MX Registrar For WHMCS
From ModulesGarden Wiki
(Difference between revisions)
|
|
| Line 78: |
Line 78: |
| | |} | | |} |
| | {| | | {| |
| − | |style="padding: 0px 0px 15px 15px;"|'''6. Save certificate by using this command:'''<br /> | + | |style="padding: 0px 0px 15px 15px;"|'''6.Send '' 'epp_complete.csr' '' file along with your host IP to Registry .MX and wait for return certificate.'''<br /> |
| − | cat epp_complete.key epp_complete.csr > epp_complete.pem
| + | As soon as you will get it, create new file '' 'epp_complete.pem' '' which content is generated earlier '' 'eep_complete.key' '' and certificate file you have recived from Registry .MX.<br /> |
| − | You have just generated your certificate and certificate signing request, which are '' 'epp_complete.pem' '' and '' 'epp_complete.csr'' ' files.<br />
| + | Content of file should be simillar:<br /> |
| − | You can find it in location marked by green line on the screen below.
| + | -----BEGIN RSA PRIVATE KEY----- |
| − | |}
| + | MIICXAIBAAKB3gwIBAgICdAIcw9F... |
| | + | -----END RSA PRIVATE KEY----- |
| | + | -----BEGIN CERTIFICATE----- |
| | + | MIID6zCCA1SgAwIBAgICAIcwDQYJ... |
| | + | -----END CERTIFICATE----- |
| | {| | | {| |
| − | |style="padding: 0px 0px 20px 25px;"|[[File:MX4_2.png]]
| + | |style="padding: 0px 0px 15px 15px;"|'''7. Copy '' 'epp_complete.pem' '' file you have just created to your MX Registrar module folder, which is located at '' 'your_whmcs/modules/registrars/mxregistrar' ''. |
| − | |}
| + | |
| − | {|
| + | |
| − | |style="padding: 0px 0px 15px 15px;"|'''7.Send '' 'epp_complete.csr' '' file along with your host IP to Registry .MX and wait for authorization.'''<br /> | + | |
| − | As soon as you will get it, copy '' 'epp_complete.pem' '' file to your MX Registrar module folder, which is located at '' 'your_whmcs/modules/registrars/mxregistrar' ''.
| + | |
| | |} | | |} |
| | {| | | {| |
Revision as of 14:28, 10 January 2014
MX Registrar For WHMCS is a registrar module that provides automation of .mx domains provisioning in your WHMCS.
Our product is both easy to set up and use which makes it a really good tool for every Accredited Registrar of .mx domains.
|
| ✔ Supports WHMCS V5 and Later
|
Installation and Configuration
This tutorial will show you how to successfully install and configure MX Registrar For WHMCS.
We will guide you step by step through the whole installation and configuration process.
|
| 1. Log in to your client area and download MX Registrar For WHMCS.
|
2. Upload and extract the module into the main WHMCS directory.
Files in your WHMCS directory should look like this.
|
3. When you install MX Registrar for the first time you have to rename 'license_RENAME.php' file.
File is located at 'modules/registrars/mxregistrar/license_RENAME.php' . Rename it from 'license_RENAME.php' to 'license.php' .
|
4. In order to configure your license key, you have to edit a previously renamed 'license.php' file.
Enter your licence key between quotation marks as presented on the following screen. You can find your license key at your client area → 'My Products' .
|
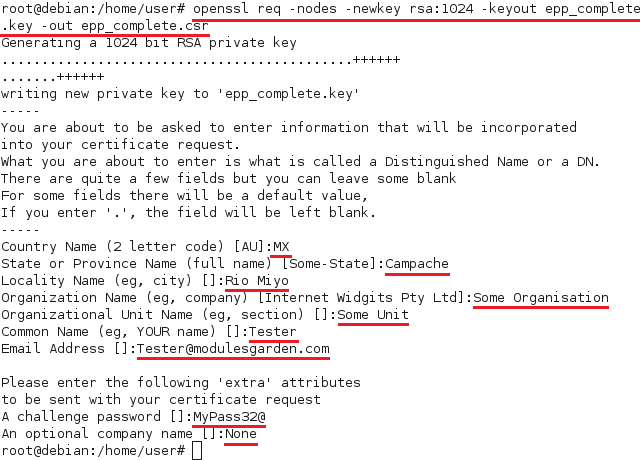
5. Now you have to generate your certificate. To do so, open your linux root console and paste this line:
openssl req -nodes -newkey rsa:1024 -keyout epp_complete.key -out epp_complete.csr
Afterwards enter details you will be asked for.
|
|
6.Send 'epp_complete.csr' file along with your host IP to Registry .MX and wait for return certificate.
As soon as you will get it, create new file 'epp_complete.pem' which content is generated earlier 'eep_complete.key' and certificate file you have recived from Registry .MX.
Content of file should be simillar:
-----BEGIN RSA PRIVATE KEY-----
MIICXAIBAAKB3gwIBAgICdAIcw9F...
-----END RSA PRIVATE KEY-----
-----BEGIN CERTIFICATE-----
MIID6zCCA1SgAwIBAgICAIcwDQYJ...
-----END CERTIFICATE-----
| 7. Copy 'epp_complete.pem' file you have just created to your MX Registrar module folder, which is located at 'your_whmcs/modules/registrars/mxregistrar' .
|
8. Now you have to activate the module in your WHMCS system.
Log in to your WHMCS admin area and go to 'Setup' → 'Products/Servers' → 'Domain Registrars' . Afterwards find 'MX Registrar' and press 'Activate' button.
|
9. In next step you need to configure test mode.
To do so, enter 'Server' , 'Certificate File Name' , 'Sandbox Username' and 'Sandbox Password' .
Afterwards tick 'Test Mode' checkbox and press 'Save Changes' .
|
Accreditation
10. In order to connect with live server you have to pass accreditation test.
To do so, enter 'your_whmcs/modules/registrars/mxregistrar/mx_accreditation.php?domain=testmx0.mx' to your web browser.
You should see something like on the screen below.
|
| 11. Now go to 'Setup' → 'Products/Servers' → 'Domain Registrars' . Afterwards find 'MX Registrar' and press 'Configure' button.
|
| 12. Enter 'Username' and 'Password' for live server and unmark 'Test Mode ' checkbox. Afterwards press 'Save Changes' .
|
| You have just successfully installed and configured MX Registrar For WHMCS.
|
Management
| MX Registrar allows you to manage your TLDs in your WHMCS system.
In this short guide we will present you the possibilities of our module.
|
Management of TLDs
Adding new TLD is quite simple. To add it, go to 'Setup' → 'Products/Services' → 'Domain Pricing' .
Enter your TLD and choose 'MX Registrar' from 'Auto Registration' dropdown menu as shown on the screen below.
Here you can also decide whether to offer your customers the features like EPP Code. Then press 'Save Changes' .
|
| As you can see 'Open Pricing' field has appeared. Click on it and set up your pricing.
|
| In newly opened window you can set your prices. Remember to save the changes!
|
Ordering
| Ordering .mx domain goes alike to ordering other domains. A typical order is presented on the screen below.
|
Management of Domain
In the admin area you can manage all the aspects of the domain. You can also lock client's domain, preventing him from making any change to it.
To do so, simply go to admin area, choose 'Domains' tab, tick 'Registrar Lock ' and press 'Save Changes' .
|
Tips
Common Problems
| 1. When you have problems with connection, check whether your SELinux or firewall is not blocking ports.
|
|


