IP Manager For WHMCS
From ModulesGarden Wiki
(Difference between revisions)
|
|
| Line 552: |
Line 552: |
| | {| | | {| |
| | |style="padding: 10px 0px 15px 15px;"|Let's say, that you want to set multiple IP assignment to specific product, it is available with our module!<br /> | | |style="padding: 10px 0px 15px 15px;"|Let's say, that you want to set multiple IP assignment to specific product, it is available with our module!<br /> |
| − | Here we will show you how to set up multiple IP addresses assignment to configurable option '' 'Extra IP Addresses' ''.<br /> | + | Here we will show you how to set up multiple IP addresses assignment to configurable option '' 'Extra IP Addresses'. ''<br /> |
| | Create a new configuration as while setting up a standard configuration.<br /> | | Create a new configuration as while setting up a standard configuration.<br /> |
| | Once it is done press '' 'Configurable Options' '' as shown on the screen below. | | Once it is done press '' 'Configurable Options' '' as shown on the screen below. |
| Line 561: |
Line 561: |
| | {| | | {| |
| | |style="padding: 0px 0px 15px 15px;"|Afterwards, mark checkboxes next to configurable options you want to assign IP addresses to.<br /> | | |style="padding: 0px 0px 15px 15px;"|Afterwards, mark checkboxes next to configurable options you want to assign IP addresses to.<br /> |
| − | Enter quantity of IP addresses which will be assigned to each configurable option and press '' 'Save Changes' ''. | + | Enter quantity of IP addresses which will be assigned to each configurable option and press '' 'Save Changes'. '' |
| | |} | | |} |
| | {| | | {| |
| | |style="padding: 0px 0px 30px 25px;"|[[File:IPM16.png]] | | |style="padding: 0px 0px 30px 25px;"|[[File:IPM16.png]] |
| | |} | | |} |
| | + | |
| | ==Usage Graph== | | ==Usage Graph== |
| | {| | | {| |
Revision as of 10:12, 4 December 2015
IP Manager For WHMCS allows you to conveniently add and manage IP pools, and automatically assign IP addresses to your servers, products, addons or configurable options.
With our module you will be also able to assign an IP pool to a specified client, integrate with 3rd party applications like cPanel, export IP pools or view clear graphs.
You will also be able to synchronize IP addresses used by products in your WHMCS system with the module's IP blocks and pools.
What is more, IP Manager For WHMCS will allow your customers to easily manage their IP addresses from the WHMCS client area.
|
| ✔ Create Multiple Configurations For Multiple Scenarios Of IP Addresses Assignment
|
| ✔ Create Multiple Relations In One Configuration For Products, Addons, Configurable Options & Servers
|
| ✔ IP Addresses Range (IPv4 Only)
|
| ✔ IP Addresses List (IPv4 Only)
|
| ✔ Add IPv6 Block In CIDR Notation
|
| ✔ Export IP Pools To XML And CSV Format
|
| ✔ Import IP Pools From XML And CSV Files
|
| ✔ Synchronize IP Addresses Used By Products In WHMCS With IP Manager
|
| ✔ Exclude Selected IP Addresses From IP Pool During Its Creation
|
| ✔ Integrate With 3rd Party Applications:
|
| ✔ Create New Integration Modules
|
| ✔ Assign/Unassign IP Addresses From IP Pool For Specified Client Service
|
| ✔ Omit Dedicated IP Address Fields For Specific Configuration
|
| ✔ Define Custom Field Usage
|
| ✔ Receive Automatic Email Reminder Sent When Specified Usage Percentage Of Any IP Pool Has Been Exceeded
|
| ✔ Define Configuration Of Integration Method (cPanel & cPanel Extended)
|
| ✔ Set Up IP Addresses Cleaner - Ensures That All Assigned IP Addresses Are In Use
|
| ✔ View IP Pool Usage Statistics And Graphs
|
| ✔ Filter Data In IP Addresses List
|
| ✔ View IP Addresses Of IP Pool
|
| ✔ Delete Single IP Address From Pool
|
| ✔ Bulk Actions - Assign/Unassign/Delete IP Addresses
|
| ✔ Create Custom Fields For IP Pool Or IP Address
|
| ✔ Generate Free IP Addresses
|
| ✔ View IP Addresses Of IP Pool
|
| ✔ Assign/Unassign/Delete Any IP Pool
|
| ✔ Create Custom Fields For IP Pools
|
| ✔ View Assigned IP Addresses
|
| ✔ Order Additional IP Addresses
|
| ✔ Supported All Types Of Configurable Options
|
| ✔ IPv6 Pools Relying On IP Addresses Range And Assigned IP Addresses (Free IPv6 Addresses Are Not Stored In Database)
|
| ✔ Block Assignment Of IP Addresses For IPv6
|
| ✔ Supports WHMCS Templates Five and Six
|
| ✔ Supports WHMCS V5 and V6
|
Installation
This tutorial will show you how to successfully install and configure IP Manager For WHMCS.
We will guide you step by step through the whole installation and configuration process.
|
| 1. Log in to your client area and download IP Manager For WHMCS.
|
2. Upload and extract the module into the main WHMCS directory.
Files in your WHMCS directory should look like this.
|
3. When you install IP Manager for the first time, you have to rename 'license_RENAME.php' file.
File is located in 'modules/addons/ipmanager2/license_RENAME.php'. Rename it from 'license_RENAME.php' to 'license.php'.
|
4. In order to configure your license key, you have to edit a previously renamed 'license.php' file.
Enter your license key between quotation marks as presented on the following screen. You can find your license key in your client area → 'My Products'.
|
| 5. Remove all files from 'tempates_c' folder located in your WHMCS root directory.
|
6. Now, you have to activate the module in your WHMCS system.
Log in to your WHMCS admin area and go to 'Setup' → 'Addon Modules'.
Afterwards, find 'IP Manager' and press 'Activate' button.
|
7. In the next step you need to permit the access to the module.
Click on 'Configure' button, tick desired admin roles and press 'Save Changes'.
|
8. The last step is setting chmod 755 to 'storage' folder.
Folder is located in 'you_whmcs/modules/addons/ipmanager2'.
|
9. You have just successfully installed IP Manager!
You can access your module in 'Addons' → 'IP Manager'.
|
Configuration and Management
IP Manager For WHMCS allows you to manage dedicated IP addresses' pools, automatically assign them to clients/products/servers/addons/configurable options.
IP Manager supports both IPv4 and IPv6.
Module enables clients to manage and order dedicated IP addresses.
In this short guide we will present you the possibilities of our module.
|
IP Pools
To manage any IP pool via IP Manager you have to add it first.
There are four ways to do that. You can use CIDR notation, enter IP addresses range, provide a full list of IP addresses or create IP blocks for subnets.
Note 1: IP addresses range and IP addresses list support IPv4 only.
Note 2: IPv6 pools rely on IP addresses range. Additionally, only assigned IP addresses are stored in the database.
Therefore free IPv6 addresses will not be visible in the IP pool overview.
Note 3: IP Block Assigned For Subnet feature is currently available for IPv6 only.
|
Create IP Pool
| In order to add a new IP addresses pool, go to 'IP Pool' → 'Create IP Pool'.
|
CIDR Notation
Select 'Classless Inter-Domain Routing (CIDR)'.
Select IP version, type the first IP address from a pool and a netmask (in prefix notation).
Note: The first IP from the pool should be compatible with CIDR notation.
|
You can exclude any number of IP addresses from the pool.
To do so, enter them into 'Excluded IP Addresses:' textbox, one IP address or IP range per line.
Additionally, you can exclude boundary IP addresses through marking 'Exclude Boundary' checkbox.
If you want to set nameservers and gateway click on 'Toggle Advanced Settings'.
|
Enter nameservers and gateway address into textboxes as shown on the screen below (This step is optional).
Afterwards, confirm the creation of an IP pool through pressing 'Add Pool' button.
|
IP Addresses Range
Select 'IP Range'.
Type the first and the last IP address of a pool you wish to add.
|
You can exclude any number of IP addresses from the pool.
To do so, enter them into 'Excluded IP Addresses:' textbox, one IP address or IP range per line.
Additionally, you can exclude boundary IP addresses through marking 'Exclude Boundary' checkbox.
You should also enter netmask which your IP pool fits in.
If you want to set nameservers and gateway click on 'Toggle Advanced Settings'.
Otherwise, press 'Add Pool' button and your IP pool will be created.
|
Fill out nameservers and gateway address as shown on the screen below (This step is optional).
Afterwards, confirm creation of an IP pool through pressing 'Add Pool' button.
|
List of IP Addresses
Select 'One or more single IP Addresses'.
Type in IP addresses you want to add, comma separated, after typing in the last IP address press 'Enter' button.
Afterwards, confirm creation of IP pool through pressing 'Add Pool' button.
Note 1: This option supports only IPv4 addresses.
Note 2: For each IP address added this way, one IP pool will be created.
|
IPv6 Block Assigned For Subnet
Provide a valid network block address, then select the number of subnets that will be created for the block.
Finally press Add Pool button.
Note 1: This option supports only IPv6 addresses.
|
Show IP Pools
To manage previously created pools and blocks, proceed to 'IP Pool' → 'Show IP Pools'.
As you can see on the following screen, you can find here a list of IP Pools and a list of IP Blocks.
|
Additional Information
You can edit IP pools additional information even after creation of the pool.
To do so, press the option you want to alter.
|
| Afterwards, enter a new value and press save button as shown on the screen below.
|
Custom Fields
IP Manager allows you to add custom fields per IP pool.
To add a new custom field, press 'Create a New Custom Field'.
Afterwards, fill out the form with custom field name and value.
|
Assign To A Client
If you wish to assign an IP pool to a client, our module makes it available to you.
You can achieve that through using auto-complete textbox to choose the client and pressing 'Save Changes' button.
Note: IP addresses will be added to all products ordered by client.
|
IP Pool Details
| To view IP pool details press on its address as shown on the following screen.
|
In IP pool view you can find information about current assignment of IP addresses in the pool and manually manage their assignment.
We also added records' filters to facilitate the management of addresses.
|
Bulk Actions
Our module supports actions on multiple IP addresses.
To issue such action, mark involved IP addresses and choose desired action from 'Action For Selected IP Addresses' dropdown menu.
Afterwards, confirm your choice through pressing 'Save Changes'.
|
- Delete From The Pool - as its name suggests, removes IP addresses from a pool.
- Unassign - removes IP addresses from products they were assigned to, IP addresses still remain in the pool.
- Unassign Using Submodules - works in the same way as Unassign does.
Additionally, it removes IP addresses from external servers.
- Assign - is the most interesting option, it allows you to:
- Choose a product which IP addresses should be assigned to.
- Define whether or not to use 3rd party integration module.
- Set them as assigned without assigning them to any product. You can also add a note to each involved IP address.
|
Custom Fields For IP Addresses
Additionally, you can assign a custom field to IP address.
Some 3rd party integration submodules may need additional information provided along with IP address (like MAC address) this it the place to add them.
To add custom field, press 'Add a New Custom Field' next to IP address you want to assign a custom field to.
|
| Afterwards, fill in 'Custom Field Name' and 'Custom Field Value' and press 'Save Changes' .
|
IP Blocks List
You will find here any information on the blocks including:
Pool details
- Maximum available subnets in the block
- Number of subnets that can be generated
- Number of already generated subnets
- Number of generated and ready to be assigned subnets
- Subnets CIDR
- Available address in the subnet
Additional Information
- Nameservers
- Gateway
- Manage the block additional information just like it was described in case of IP pools management
Usage
- Percentage graph on generated subnets
- Percentage graph on subnets assignment
Actions
|
IP Block Details
| Press any block to see details and move to the list of the bloc's subnets.
|
If you do not have any subnets yet, you can generate them here.
Press Generate Subnet button.
|
| Enter the number of Subnets that will be generated and press 'Submit'.
|
Now you can see the generated subnets for that block.
|
Block subnets management:
IP Block Details
- Block and its usage details
- Pool details
- Address range
- Services assigned
- Username
- Client Name
- Custom Fields
- Press Create a New Custom Field to generate
- Available actions:
- Assign To
- Unassign
- Delete
IP Addresses In Pool
- IP Address in the pool
- Full IP address
|
IP Assignment Mechanism
It is crucial to understand mechanism of automatic IP addresses assignment. In this section we will clarify it to you.
'IP Quantity' field defines the quantity of IP addresses added to the ordered product by triggering a specific relation.
Two and more relations from one configuration can be triggered for the same product (therefore, multiple quantity of IP addresses can be assigned).
Additionally, if you set up two configurations with the same relation, IP addresses from both configurations will be added.
Therefore, if you set up these two configurations in IP Manager:
- Configuration 1: Addon A (IP Quantity = 2), Product C (IP Quantity = 1)
- Configuration 2: Addon A (IP Quantity = 2), Addon B (IP Quantity = 2), Product D (IP Quantity = 3)
Orders listed below will trigger different relations:
- Order 1: Product C with addon A: 5 IP addresses assigned
- Order 2: Product C with addon B: 3 IP addresses assigned
- Order 3: Product D with addon A: 7 IP addresses assigned
- Order 4: Product F with addon A: 4 IP addresses assigned
|
Automatic IP Assignment
The main reason, why this module has been created, was to automate IP addresses assignment.
Here we will show you how to set up its configuration. In order to start, go to 'Configuration' → 'Create Configuration'.
Type your configuration name, press textboxes corresponding to options you wish to add and select them from dropdown menus.
Afterwards, press 'Create New Configuration' button. On the screen below you can see sample configuration with two products.
|
Now you have to assign at least one IP pool to configuration. You can do it through 'Assigned Pools' or 'Assigned Blocs' button.
Note: It is possible to assign IPs using either pools or blocks! You are not allowed to assign both to one configuration.
Let's start with Assigning pools.
|
Next, choose an IP pool from a dropdown menu and press 'Add Pool' button.
Keep in mind that you can assign multiple pools to a single configuration.
|
If you wish you can assign IP using blocks assignment. You can also assign blocks to the configuration.
To do so, press Assigned Blocks in the configuration.
|
| Select block from the list of available and press Assign A Block button.
|
Added block will appear on the list of below.
|
| Keep in mind that you can add more than one block to a single configuration.
|
Advanced Configuration
Let's say, that you want to set multiple IP assignment to specific product, it is available with our module!
Here we will show you how to set up multiple IP addresses assignment to configurable option 'Extra IP Addresses'.
Create a new configuration as while setting up a standard configuration.
Once it is done press 'Configurable Options' as shown on the screen below.
|
Afterwards, mark checkboxes next to configurable options you want to assign IP addresses to.
Enter quantity of IP addresses which will be assigned to each configurable option and press 'Save Changes'.
|
Usage Graph
| In each configuration you can find a graph, which shows the statistics of IP addresses assignment.
|
3rd Party Integration
In this tab you can set up 3rd party integration which allows you to manage IP through our module in your WHMCS and synchronize changes on 3rd party servers.
Note 1: Some of these integration submodules require free IP pools (cPanel) or IP addresses (Plesk) on servers to be set up.
Note 2: IP Manager can integrate multiple IP addresses with a single product.
|
Enabling 3rd Party Integration
Activation of all integration modules looks similar, there is only a difference in cPanel and cPanel Extended integration submodules.
Start by pressing 'Activate' button next to a module you want to activate.
|
Press 'Configure' button and assign configurations to it.
Confirm through clicking 'Save Changes' .
|
cPanel and cPanel Extended additionally allow you to choose the method of the integration.
1. Creates a DNS zone for each IP address assigned to a product.
2. The first IP address assigned to a product is set up as a site dedicated IP address.
|
| As you can see on the following screen, you can easily check the quantity of configurations assigned to each 3rd party integration.
|
Integration With Proxmox VPS/Cloud For WHMCS
Integration with Proxmox VPS For WHMCS & Proxmox Cloud For WHMCS are the only integrations which are set up on both IP Manager For WHMCS and integrated module sides.
Due to that, setting up the integration consists of 3 steps:
1. Create IP addresses pool which will be used for product.
2. Create configuration and assign a previously created pool to it. No additional action is required in this step.
Important: Assigning anything beyond the IP pool to the configuration in IP Manager For WHMCS may cause unexpected effect in your WHMCS environment.
|
Integration With SolusVM Extended VPS For WHMCS
Integration with SolusVM Extended VPS For WHMCS is tricky.
IP Manager For WHMCS cannot inject the first IP address to VPS, due to the way SolusVM API works.
After creation of VPS, IP Manager is able to add additional IP addresses.
Therefore, if you are using this integration, we advise setting up IP Manager synchronization as a cron job.
|
Test Integration Module
This module logs information about IP processing for 'Autorelease' type products.
Your order should look similar to the one on the screen below.
Note: You need to set up 'Autorelease' type server, otherwise logs will not show up.
|
Creation of Integration Submodule
You can create your own integration, all you need is knowledge of PHP programming language.
You can do it through using 'Autorelease' submodule file.
1. To begin, make copy of 'AutorelaseIntegration.php' located in 'your_whmcs/modules/addons/ipmanager2/app/modules'.
|
2. Rename copy to your new submodule name.
Note: File name has to end with 'Integration', for example 'NewSubmoduleIntegration.php'.
|
3. Edit the file, start by entering basic settings.
1. Class name should be the same as the file name.
2. Submodule name visible in IP Manager.
3. Submodule description displayed in IP Manager.
4. Place here an integrating module name ( the best way is to copy a folder name of the module ).
|
4. Now, it is time to implement integration part, you will need integrated module documentation to do that.
1. Configuration of 3rd party integration submodule.
2. Code assigning IP address to module product goes here.
3. You can add a code to unassign IP address here.
|
| 4. In order to view a submodule you have just created, log in to your WHMCS and go to 'Addons' → 'IP Manager' → '3rd Party Integration'.
|
Export
You can export your IP pools to SCV and XML files.
To export, go to 'Export' tab, choose IP pool to export and file format.
Confirm through pressing 'Save Changes' button. Download of the file will start shortly.
Note: Your 'storage' folder located in 'your_whmcs/modules/addons/ipmanager2' should have chmod set to 755.
|
Import
In 'Import' tab you can find tools to synchronize IP addresses from your WHMCS as well as import them from a file.
Synchronization
Synchronization will confirm relations in your system with relations in IP Manager pools.
- IP address is used by a product, but inside of IP Manager pool is marked as unassigned - record inside of a pool will be updated.
- IP address is used by a product, but does not exist in any IP Manager pool - a new pool will be created.
There are three available cron commands:
1. This cron command synchronizes all products (it will require confirmation).
2. This cron command synchronizes all products (it will not require any confirmation).
3. This cron command synchronizes only products which IDs have been provided as arguments separated by comma.
Import
To import IP addresses from a file, select it, choose its format and press 'Import'.
|
IP Logs
| 'Logs' page stores the history of actions ordered on each IP address.
|
Settings
Along with great power comes great responsibility.
IP Manager For WHMCS allows you to define its behavior, therefore make sure you configure settings that suit you needs.
|
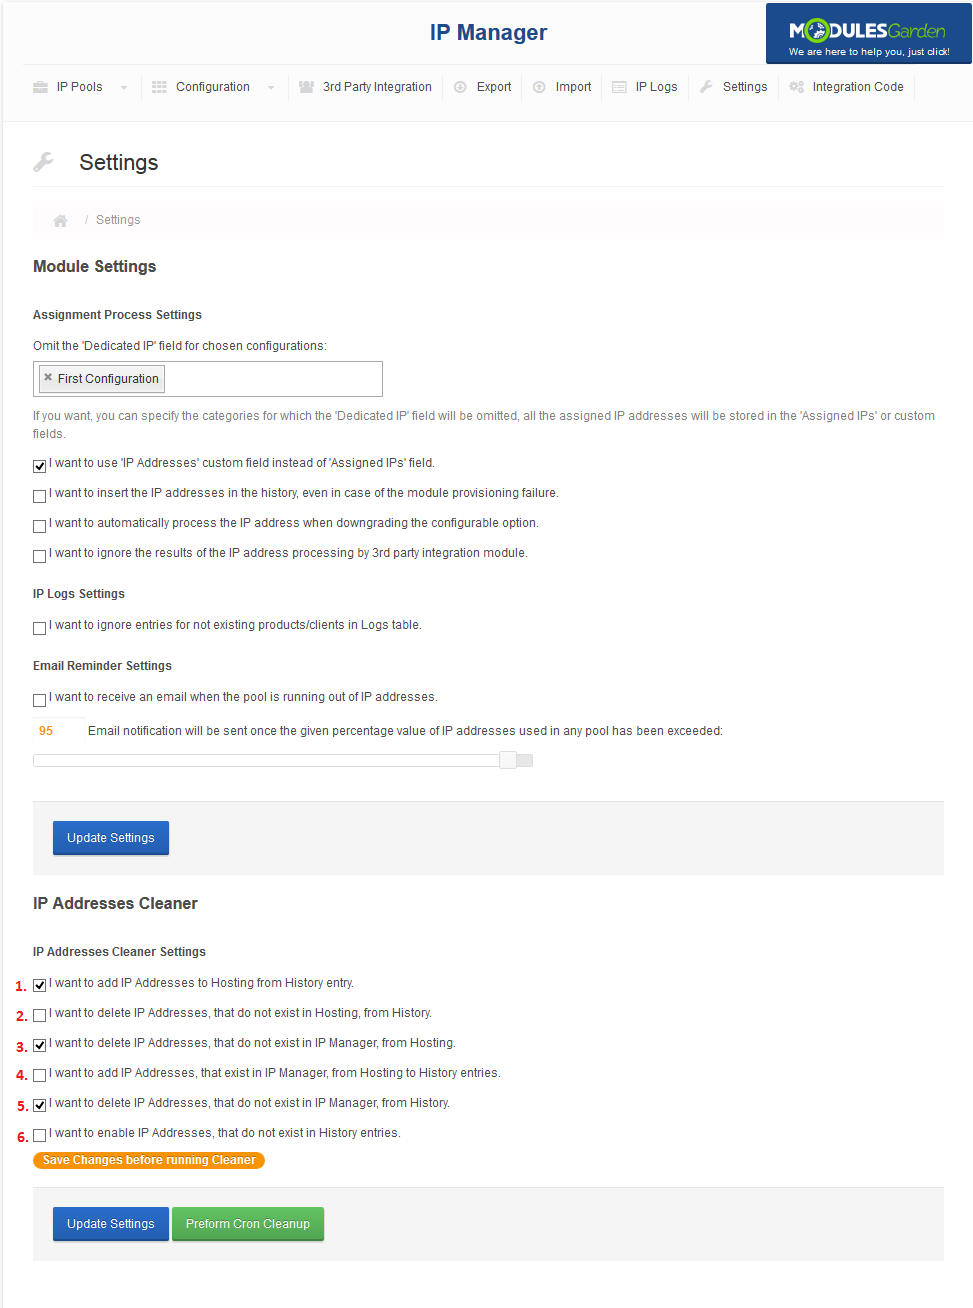
Module Settings
Below, you can find description of each option.
- Assignment Process Settings
- For any configuration you provide into this field, 'Dedicated IP' field will be omitted.
- If checked, additional IP addresses will be stored in a custom field or 'Assigned IPs' field.
- If checked, in case of a server provisioning failure, relation will be saved.
- Automatically process the IP address when downgrading the configurable option.
- Module ignores error message from an external server and continues the action.
- IP Logs Settings
- IP addresses without product or user will not be displayed in 'IP Logs' page.
- Email Reminder Settings
- If you check this checkbox, you will receive an email with notification about IP pools running out of IP addresses.
- Enables you to define percentage value which, when exceeded by any IP pool, results in a notification being sent.
|
IP Addresses Cleaner
IP Addresses Cleaner allows you to restore/remove IP addresses form WHMCS/IP Manager/both depending on chosen settings.
- IP Addresses Cleaner Settings
- IP address are added to hosting if relation exists.
- IP address' relation are removed if IP address is not assigned to any hosting.
- If IP address does not exist in any IP pool, it is removed from hosting.
- Create IP address' relation if it does not exist.
- If IP address does not exist in any IP pool, it is removed from relations.
- Set IP address as unassigned if its relation does not exist.
Important: After making any changes in those settings, press 'Update Settings'.
Otherwise, settings will not be saved and the Cleaner will run using old ones.
|
|
IP Addresses Cleaner allows you to automatically find and fix broken IP addresses assignment.
For example, when you manually remove a product with IP addresses assigned or remove an IP pool.
To start IP Addresses Cleaner, press 'Perform Cron Cleanup' .
Actions issued by the cleaner are listed in a popup as shown on the following screen.
|
Integration Code
Integration described below is not obligatory.
Module allows your customers to view IP addresses assigned to their product and order additional ones.
To enable it, follow these simple steps:
|
| Correctly placed code is presented on the following screen.
|
| In the client area it should look like on the screen below.
|
| To allow your customers to buy a new IP address you need to set up a product addon for product and assign the addon to a configuration in IP Manager.
|
The above described integration works for all products without exception.
However, in case you wish to restrict the integration to limited number of products, please insert the below codes instead of the one suggested in the addon.
{if $moduleclientarea}
  <div class="moduleoutput">;{$moduleclientarea|replace:'modulebutton':'btn'}
  {if $pid == 26 || $module ==  'proxmoxCloud' || $module == 'proxmoxVPS'}
       {$ipmanager_integration}
  {/if}
  </div>
{/if}
|
Once such code is inserted in the template, IP Manager will be displayed for product with ID that equals 26 or if the product is based on 'proxmoxCloud/proxmoxVPS' modules.
Extend the IP Manager integration according to your needs. The above code is just an example which can undergo modifications.
|
Client Area
Your clients can view and manage their IP addresses owing to IP Manager For WHMCS.
To remove an IP address from a product, press 'Unassign'.
|
Your client can also order a new IP address.
Press 'Order Additional IP Addresses' as shown below.
Your client will be moved to order form containing previously configured addons.
|
| As soon as the addon is active, new IP address is granted.
|
Add IP via Addon
Setting up an addon allows your client to add an IP address to their product using integration.
Go to 'Setup' → 'Products/Services' → 'Product Addons' and press 'Add New Addon' .
|
Afterwards, enter addon name, addon description and select applicable products.
Set pricing for addon by choosing 'Billing Cycle' and typing price.
Confirm through pressing 'Save Changes' button.
|
Now, go to 'Addons' → 'IP Manager' and use configuration created before or create a new one.
Remember to add a previously created addon as a configuration relation.
You can do it by pressing 'Addon' button as shown on the following screen.
|
Tick checkbox next to addon and enter the quantity of IP addresses to be added.
Afterwards, click 'Save Changes' button.
|
| If you enabled integration for the client area, your client should be able to order new IP addresses.
|
Management of Custom Hooks
Our module allows you to use custom hooks. All you have to do is create some functions using PHP programming language.
Here you can see possible hooks:
before_ip_assign_hook($ip, $serviceid, $relation, $configid)
after_ip_assign_hook($ip, $serviceid, $relation, $configid)
before_ip_integrating_hook($ip, $service, $server)
after_ip_integrating_hook($ip, $service, $server)
before_ip_disintegrating_hook($ip, $service, $server)
after_ip_disintegrating_hook($ip, $service, $server)
|
To find details about hooks read 'custom_hooks.php' file.
You can find there all hooks, information about their time of run, returned values and parameters.
For example, if you want to throw message to activity log after IP address assignment find hook 'after_ip_assign_hook($ip, $serviceid, $relation, $configid)' and type:
Logger::factory()->log('Custom hook was triggered');
It should look like on the screen below:
|
How To Update
Tips
| 1. If your client orders a product bonded to two configurations (e.g. by product type and configurable option), IP Manager will add IP addresses from both configurations.
|
Common Problems
| 1. When you have problems with connection, check whether your SELinux or firewall does not block ports.
|
| 2. If you see something like this when moving to 'Addon' → 'IP Manager', remove content of 'template_c' folder.
|
3. If you export file and it is empty, check your 'Storage' folder chmod, it should be set to 755. Folder is located in 'your_whmcs/modules/addons/ipmanager2' .
If you still have that problem, set chmod 777.
|


