| Multibrand For WHMCS will allow you to manage multiple brands on multiple websites while using just a single WHMCS installation.
You will be able to customize your brand through modifying factors like client area template, logo or brand language, and preview the changes with just a single click.
The module enables you to easily assign your clients to and migrate them between brands, as well as assign products and ticket departments to each brand.
Owing to Multibrand For WHMCS your customers will be able to log into specified client areas in accordance with the brand under which they purchased a product or service.
|
| ✔ User Friendly Management Of Multiple Brands
|
| ✔ Easy Modification Of Existing Brands
|
| ✔ Assign/Unassign Clients To Multiple Brands
|
| ✔ Assign Products To Brands
|
| ✔ Assign Product Bundles To Brands
|
| ✔ Assign Ticket Departments To Brands
|
| ✔ Configure Payment Gateways For Each Brand Separately:
|
| ✔ PayPal - Single Payment And Subscription
|
| ✔ 2CheckOut - Single Payment Only
|
| ✔ Display Active Clients, Invoices, Orders, Tickets And Services Associated To Brands
|
| ✔ Quick Preview Of Branded Client Area
|
| ✔ Publish/Unpublish Brands On Click
|
| ✔ Set Brand As Default - Automatic Assignment Of New Clients
|
| ✔ View Brand Reports - List Of Clients, Invoices, Orders, Tickets And Services
|
| ✔ View Dynamic Brands Comparison Reports - Various Graph Types
|
| ✔ Generate Separate Email Templates For Each Brand
|
| ✔ Verify Integration Of Templates Used By Brands
|
| ✔ Create Branded Invoices
|
| ✔ Create Branded Announcements
|
| ✔ Add Branded Knowledgebase Articles
|
| ✔ Log In As Client To Chosen Brand
|
| ✔ Displayed Client Area Template And Default Language Depend On Brand
|
| ✔ Access To Products, Invoices, Downloads, Ticket Departments and Payment Gateways Assigned To Brand
|
| ✔ View Articles And Announcements Assigned To Brand
|
| ✔ Receive Branded Emails And Invoices
|
| ✔ Branded Clients Can Only Log Into Brand They Are Assigned To
|
| ✔ Multibranded Clients Can Log Into All Existing Brands With The Same Access Details
|
| ✔ Default Brand For New Accounts
|
| ✔ Brand Terms Of Service URL
|
| ✔ Supports PHP 5.4 Up To PHP 7
|
| ✔ Supports WHMCS Templates Five and Six
|
| ✔ Supports WHMCS V6 and V7
|
Installation
This tutorial will show you how to successfully install and configure Multibrand For WHMCS.
We will guide you step by step through the whole installation and configuration process.
Note: If you are still using any of Multibrand For WHMCS previous versions prior to v2.x, read about it here.
|
Installation
| 1. Log in to your client area and download the module.
|
2. In the downloaded file you will find two packages that support different PHP versions.
As presented on the screen below, the first one is dedicated to PHP 7, while the second one is aimed at PHP 5.4 up to PHP 5.6.
It does not apply to open source versions.
Note: You can check current PHP version in your WHMCS. To do so proceed to 'Utilities' → 'System' → 'PHP Info'.
|
3. Extract the downloaded file and choose the one with the right PHP version. Upload and extract the PHP file into the main WHMCS directory.
The content of PHP version files should look like this.
|
4. When you install Multibrand For WHMCS for the first time you have to rename 'license_RENAME.php' file.
File is located in 'modules/addons/MultibrandFunctionality/license_RENAME.php'. Rename it from 'license_RENAME.php' to 'license.php'.
|
5. In order to configure your license key, you have to edit a previously renamed 'license.php' file.
Enter your license key between quotation marks as presented on the following screen. You can find your license key in your client area → 'My Products'.
|
Activating Addon Module
6. Now you have to activate the module in your WHMCS system.
Log in to your WHMCS admin area. Go to 'Setup' → 'Addon Modules'. Afterwards, find 'Multibrand' and press 'Activate' button.
|
7. In the next step you need to allow to hooks beeing enabled and permit access to this module.
To do so click on 'Configure' button, tick 'Access Control' near required admin role groups and press 'Save Changes'.
|
Additional Settings
8. Now, set up the 'storage' folder as recursively writable (with all subfolders).
This folder are located in 'your_whmcs/modules/addons/Multibrand/' location.
|
9. You will also need set up 'gateways' and 'callback' folders as writable.
This folders are located in 'your_whmcs/modules/' and 'your_whmcs/modules/gateways accordingly locations (do NOT mistake with the in the Multibrand addon location)
|
10. The next step is replacing 'invoicepdf.tpl' file with 'invoicepdf_rename.tpl' for each of the templates used.
'invoicepdf_rename.tpl' file is located in 'your_whmcs/templates/six/' folder.
Simply, remove default 'invoicepdf.tpl' file from template folder and rename 'invoicepdf_rename.tpl' file to 'invoicepdf.tpl' in that folder.
|
Integration Code
11. Now you can access your Multibrand For WHMCS module.
Simply go to the 'Addons' → 'Multibrand'. But before you start using the module you still need to do an 'Integration Code'. It is required for correct logo branding and it should be done for all templates that you want to use with brands.
So go to the 'Utilities' → 'Integration Code' and follow the instructions given there, depending on the version of WHMCS and templates you are using.
|
12. And that's all! You have now completed the installation of the module.
|
Migration
In the current beta 2.0.0 version, it is not possible to easily migrate data from 1.8.X to 2.X module version.
Such migration functionality will be added in a future stable version. We are sorry for the inconvenience.
|
Configuration and Management
| In this section we will show you how to properly set up and use Multibrand For WHMCS.
|
Brands
Under 'Brands' tab you can create and manage your brands using a single instance of WHMCS solution.
Important: Due to module beta limitations, one of the brands configuration must be manually set to your main WHMCS domain. Simplification of this process will be solved in future editions.
|
New Brand
Let's start by creating a new brand. For that purpose go to 'Brands' tab and press 'Add a new brand'  button. button.
|
| Fill out brand's 'Name' and 'Domain' with desired values, and press 'Save' button.
|
Your first brand will be created. Next press the 'Edit' '  action button. action button.
|
| You will be moved to the brand configuarion, where you can manage all brand's information and settings.
|
|
Note: Once the configuration of your brand is complete, will still need to set up a CNAME DNS record before the brand is published (status - enabled).
This record will point from branded domain towards your main domain used by WHMCS. To learn more about setting up CNAME records, proceed to the Creating CNAME Records section.
Do not forget to publish the brand as soon as the CNAME record propagates worldwide.
|
Brand Information
In the Brand Information window, you can edit the brand name, domain name and custom logo.
In addition, you can see the current month revenue, total sale and last update of the brand.
|
Settings
| In this window you will be able to configure all the most important settings of your brand, including billing, payment gateways, SMTP and email templates configuration.
|
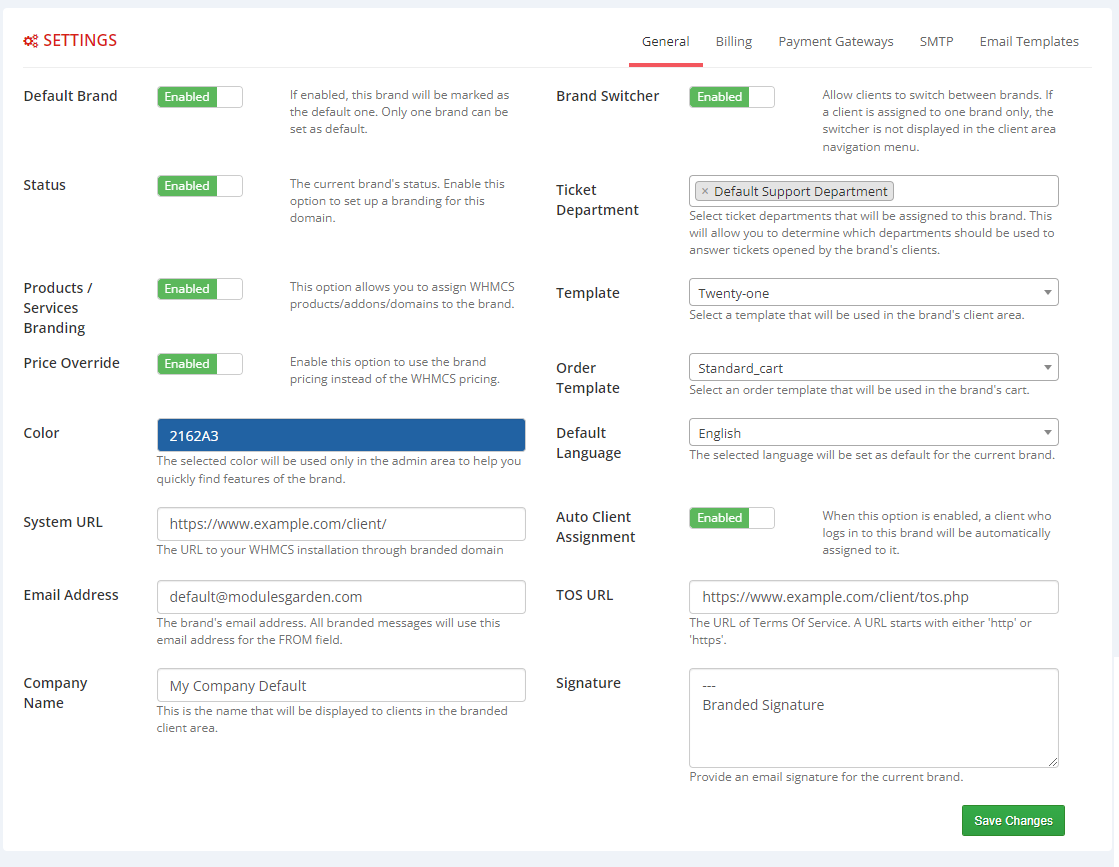
General
In general settings you will configure the main brand options.
First fill out brand's 'Email Address', 'Company Name' and 'TOS URL' . Next choose brand's 'Color', 'Ticket Departments' , 'Default Language', 'Template' and 'Order Template' .
Be sure that chosen template is integrated correctly with Multibrand (see the Integration Code section). Finally toggle 'Auto Client Assign' if you desire.
Here you can also manage brand publication 'Status' , but you should change it to 'Enable' only after you have configured the rest of the settings.
Do not forget to 'Save Configuration' .
Note: Only published brands can be set as default. New users created by admin or through API will be assigned to the default brand.
|
|
Billings
In billing settings you can configure the appearance of your invoices.
- Invoice Branding - if enabled, the invoices will be branded with the number and basic information
- Invoice Pay To Text - address that is displayed on the invoice as the 'Pay To' details.
- Sequential Invoice Number Format - if invoice branding is enabled provided sequential invoice number format will be used
- Next Sequential Number - change this option only if you want to reset the automatic sequential numbering. Otherwise leave empty
Note: Remember to do the 'Additional Settings' step during module installation to make the PDF invoices also branded.
|
Payment Gateways
This tab allows you to configure payment gateway for the brand which will work independently of that configured in WHMCS.
You can check the list of currently available gates in the Feature List.
If you would like in future releases, to see a payment gateway that is not yet available, please contact our support.
Note: You may still use any other payment gateway that is active in your WHMCS system. These gates will have a (WHMCS) mark in the dropdown list.
Multibrand For WHMCS can work with any gateway that works within your WHMCS, the only limitation is that the other payment gateways use the same settings for all brands.
To add a configuration of a payment gateway press 'Add' button.
|
| Next choose the desired gate from the list and press 'Confirm' button.
|
Finally fill the payment gateway settings, according to the details received from the provider.
Save the configuration and activate the gateway.
|
SMTP
If you would like to use for this brand a different outgoing mail configuration than the main WHMCS settings, you can do so in this tab.
In addition you can set custom CSS email styling and header and footer content.
|
Email Templates
In this window you can set up each branded email template in five available categories.
If enabled, the template configured here will be sent to the branded clients instead the one of configured in the main WHMCS template settings.
To start edit a branded template, simply press 'Edit' button.
|
Next, enter the desired subjecty and message content. You can also add them in several languages.
In addition, you can also use the available merge fields tags just like in standard email templates. Save the changes after finishing.
|
Finally toggle edited template to enabled and save configuration. Next to the edited template you will see the 'Branded' label.
If you would like to restore the default template, simply return to editing it and click the 'Delete Template' button.
|
Services Pricing
In this section you can configure separate prices for products, addons and domains .
To start, select the product, addon or domain tab and click on the 'Add' button. In the following example we will add the braning for product pricing.
|
| Select the product for which you want to set branded prices and click 'Save' .
|
| Next open the pricing editor for the choosen product.
|
Here you can configure the desired prices in selected billing cycles and currencies.
You can also automatically fill in amounts from the main product and update them refreshing the currencies rate.
Note: Availability of billing cycles, prices and currencies to be edited depends on their main configuration in WHMCS.
If one of them is not available for branding, it means that there is no corresponding configuration in the main WHMCS.
|
| From now on, the pricing for this product will be branded. In the same way, you can also configure pricing for the addons and domains.
|
Relations
In the relations section you can see which Clients, Services, Invoices, Knowledgebase, Downloads and Announcements are assigned to this brand.
In addition, you can manually manage, assign and unassign selected items to brand.
Don't forget to check the 'Branded Admin Area Functionalities' section, where you will find more brand relation management functionality outside the Multibrand addon.
Note: Currently there is no possibility of mass management, assigning and unassigning selected items to the brand. This functionality will be implemented in future releases.
|
Clients
In the clients tab you can see customers who are assigned to the brand and the date on which they were assigned.
Assignment takes place at the moment of client registration from the branded domain. You can also manually assign already existing customer to the brand or migrate to another.
Note: If the customers are already registered on one of the other brands and trie to log in to another brand, their will also be automatically assigned to it.
Therefore, one customer can be assigned to several brands at the same time.
|
To assign an exiting client to the brand, press 'Add' button.
In the open popup select the customer you want to add to the brand and press 'Save' .
|
You can also migrate the customer from this brand to another one.
Click 'Migrate'  button next to the client and then select the brand to which you want to assign it. button next to the client and then select the brand to which you want to assign it.
|
And finally, if you want to delete the customer relationship with this brand, press the 'Delete'  button and confirm the action. button and confirm the action.
|
Services
In the Services tab you can see which Products, Addons and Domains have a relation with this brand.
These services are automatically added to the brand while ordering from the branded domain.
|
You can also manually add a relation for a service that is not yet branded.
Press 'Add' button and then select the type and service you want to assign to the brand.
|
| And if you want to delete a service relation with the brand, press 'Delete' button and confirm the action.
|
Invoices
In this tab you can see which invoices have a relation with brand.
These invoices are automatically added to the brand after the order has been created from branded domain.
|
You can also manually add a relation for the invoice that is not yet branded.
Press 'Add' button and select the invoice you want to assign to the brand.
|
| And if you want to delete an invoice relation with the brand, press 'Delete' button and confirm the action.
|
Tickets
In this tab you can see which tickets have a relation with brand.
These tickets are automatically branded after ticket has been opened in one of earlier branded departments.
|
You can also manually add a relation for the ticket that is not yet branded.
Press 'Add' button and select the ticktet you want to assign to the brand.
|
| And if you want to delete a ticket relation with the brand, press 'Delete' button and confirm the action.
|
Knowledgebase
In this tab you can see which your knowledgebase articles have a relation with brand.
In addition, you can find here statistics of views, useful points, number of votes and date of assignment to the brand.
|
| To add a relation for the knowledgebase articles press 'Add' button and select the article you want to assign to the brand.
|
| And if you want to delete a knowledgebase article relation with the brand, press 'Delete' button and confirm the action.
|
Downloads
In this tab you can see which of your files available for download have a relation with brand.
In addition, you can find here download category, type, number od downloads and date of assignment to the brand.
|
| To add a relation for the download press 'Add' button and select the file you want to assign to the brand.
|
| And if you want to delete a download relation with the brand, press 'Delete' button and confirm the action.
|
Announcements
In this tab you can see which of your announcements have a relation with brand.
In addition, you can find here date of announcement creation, assignment to the brand and published status.
|
| To add a relation for the announcement press 'Add' button and select the article you want to assign to the brand.
|
| And if you want to delete a announcement relation with the brand, press 'Delete' button and confirm the action.
|
Statistics
In the statistics section you will find sales charts of selected brands.
You can filter them by date period and selected brands.
|
Logs
| Logs tab allows you to see the details of the actions that have been already performed.
|
Branded Admin Area Functionalities
Due to the beta version, not all sections available in the previous module versions provide the direct actions with the brand relations yet.
See the Branding Limitations section for more information. More admin area integrations are coming coon.
|
Order Creation
If the administrator wants to create an order for a client manually, their can directly create a relation to the selected brand (provided that the client belongs to it).
Additionally, their can also assign a payment gateway available in a given brand.
|
Invoices
| If the administrator creates a new invoice for the customer, he has the possibility to select a direct relationship with the given brand.
|
| Additionally, for previously created invoices there is also a possibility of direct changing the brand relation.
|
Branded Client Area
Multibrand For WHMCS offers multiple client areas in one solution and lets you have your clients assigned to them.
For example each brand domain can have a separate template, logo, language, services and invoices.
You can find more information about what functionality can be branded in the Features list.
|
| On the following screen you can see invoices generated for a brand.
|
Branded Email Templates
teraz jest troche inaczej
nie ma już zmian w EmailTemplates
tylko MB ma własną table gdzie zapisuje sobie brandowane templatki
w Addon → Brand Details → Settings → EmailTemplates jest możliowśc edycji
Domains & CNAME Records Configuration
In this section you will find guides on how to create CNAME record in popular control panels.
For instance, if your branded domain is 'reseller.com' and domain with your WHMCS is 'whmcs.domain.com' , your CNAME will be 'www.reseller.com. CNAME whmcs.domain.com.'.
Note 1: As you can see above, each domain has to be closed with a dot.
Note 2: To learn more about certificate requirements, visit Common Problems section.
|
Domain used by each of the brands must be parked on the main domain.
In case a domain cannot be parked or it is a subdomain, you must create CNAME records that will redirect from the brand domain to the main domain.
Only when you have parked your domains you can move to setting CNAME records on your panels. See the tips below.
|
cPanel
| 2. Press 'Simple DNS Zone Editor' under 'Domains' section.
|
3. Select the domain you wish to manage from the menu.
Note: This step is required only if you own more than one domain.
|
4. Fill in 'Name' and 'CNAME' record and press 'Add CNAME Record'.
Note: To define record's TTL, you have to use 'Advanced DNS Zone Editor'.
|
DirectAdmin
| 1. Log into your DirectAdmin.
|
| 2. Click 'DNS Administration' .
|
| 3. Afterwards, press select the desired domain.
|
4. Fill in the full domain/subdomain into the CNAME record and press 'Add' next to it.
Note: Do not forget to place a dot at the end.
|
Plesk
| 1. Log into your Plesk panel.
|
| 2. Press 'Domains' under 'Hosting Services' section.
|
3. Find the domain to be edited, and click on the corresponding Control Panel link.
Afterwards, proceed to 'Websites & Domains' tab and press 'DNS Settings' .
|
4. Find the domain to be edited, and click on the corresponding Control Panel link.
Afterwards, proceed to 'Websites & Domains' tab and press 'DNS Settings'.
|
| 5. Add a new record or edit an existing one.
|
6. Now, change the record type to 'CNAME' and fill in both 'Domain name' and 'Canonical name'.
Finish by pressing 'Ok'.
Note: The changes will take between 4 to 8 hours to update worldwide.
|
| Remember to restart your server once it is configured.
|
SSL Certificate
In this section you will find all information related to SSL certificate in WHMCS using Multibrand.
If your branded domains or WHMCS domain are using SSL connection, all of them need to have the same certificate.
Certificate type required:
- Wildcard - if all brands and main WHMCS are using the same domain.
- SAN - if your brands and main WHMCS are using different domains.
This is due the way in which WHMCS works. It is not the limitation of our module.
Additionally, in order to fix connection support for secured connections, add the integration code shown below.
Edit 'configuration.php' located in the main WHMCS V7 directory and place following code at the end of the file.
require_once dirname(__FILE__).'/includes/MultiBrandSSLFixer.php';
$SSLFixer = new MultiBrandSSLFixer();
if($SSLFixer->shouldBeInSSL() || $SSLFixer->issetSystemSSLURL($db_host, $db_username, $db_password, $db_name))
  {
      if(! $SSLFixer->isInSSL())
      {
          $SSLFixer->forceRedirect(true);
      }
  }
  else
  {
      if($SSLFixer->isInSSL())
      {
          $SSLFixer->forceRedirect(false);
      }
  }
|
cPanel
| Installing SSL certificate for domains managed from cPanel consists of the following steps:
|
| 1. Log into your cPanel and press 'SSL/TSLS Manager' under 'Security' section.
|
| 2. Click on 'Manage SSL sites' under 'Install and Manage SSL for your site (HTTPS)'.
|
| 3. (installing the certificate) Select the domain, paste certificate and private key and save the settings.
|
| 4. (using already installed certificate) Select it from 'Browse Certificates' and save the settings.
|
Branding Limitations
Beta Version 2.0.0
For better stability and support for future improvements, Multibrand For WHMCS in version 2.0.0 has been completely rewritten.
For this reason, some of the functionalities in previous versions are not yet available, or are operating in a limited way.
These features will be successively restored in future versions. Here are some of the feeatures that are not currently being supported:
- Brand Details - a column with brands in admin area, displayed in souch places like clients and orders lists. Also branded details in client's profile.
- Login as Client to a Brand - action directly accessible from the client profile in admin area
- Create Invoice/Quote/Ticket in a Brand - action directly accessible from the client profile in admin area
- Choose Brand in particulary WHMCS sections - feature enabling direct brand selection on ticket, quote, announcement, download and knowledgebase view (currently only order and invoice view is supported)
- Product Bundle - not yet available for branding
- Brand Reports - the current statistics are limited
- Configurable Options Pricing - currently there is no possibility to set different pricing per prand for configurable options options
- Brand Previews - preview the client area of the brand is not yet implemented
- WHMCS V6 - Multibrand For WHMCS V2 will no longer support WHMCS V6 and template five
|
WHMCS
In this section we will list the parts of WHMCS which cannot be branded or may be working in an odd way.
- Bridges - Multibrand For WHMCS does not support any kind of bridges (WordPress, Jomla).
- Link replacement - currently links are replaced with their branded counterparts with a visible delay.
This is the only way we could do that for the time being.
- Clients Profile → Send Email - if you try to send an email template, a branded counterpart of which exists, you will receive an error.
This is due to its branded counterpart being sent, while default email is blocked.
- Branded Quote → Duplicate - duplicating a branded quote results in receiving unbranded quote.
- Emails - not branded due to the lack of possibility to determine from which brand an email should be sent:
- Affiliate Monthly Referrals Report
- Clients Only Bounce Message
|
WHMCS Modules and Others
In this section we will list the WHMCS modules and other services which do not support multibranding or do not cooperate with Multibrand For WHMCS at all.
- WHMCS Modules
- SMS Center For WHMCS - SMS sent to customers cannot be branded. Default set of SMS templates is sent to clients from all brands.
- Resellers Center For WHMCS - this module is not yet compatible with our Multibrand For WHMCS module
- Others
- Cloudflare - it is a service that will mask your server IP address.
This is because they use their own DNS to resolve to one of their many reverse proxy servers and will cause incompatibility with Multibrand module.
You may disallow the CloudFlare network to assume NS authority and don't become the intermediary between a user and your server, but then your Cloudflare service may become useless.
|
Tips
1. The logo image is usually hard coded into the WHMCS template files.
In order to use logo file provided in the 'Multibrand For WHMCS' module, find proper line at the template file and replace it with '{$logo}' variable.
The line responsible for a displayed logo is placed at the 'header.tpl' file located in a currently used template.
|
| 2. If you want Captcha security option to be displayed in your client area for all branded domains, you need to configure each of those domains in your Google Account as well.
|
Common Problems
| 1. When you have problems with connection, check whether your SELinux or firewall does not block ports.
|
2. If your CNAME record is not working, remember that first domain name in CNAME record should be branded domain.
The second one is the domain on which you have your WHMCS. The redirection goes from the first domain to the second.
Dots after domains are also important.
Take note that there could be a delay with propagation of changes for DNS servers while using A type CNAME records.
|
3. If your branded domain or WHMCS domain are using SSL connection, both of them need to have the same certificate.
If both of them are using the same domain, you will need a wildcard certificate.
If they are using different domains, secure them with the SAN certificate.
This is due to the way WHMCS works. It is not the limitation of our module.
|
4. Please remember that Multibrand For WHMCS works flawlessly with the WHMCS V7 and officially supported template 'Six' .
In case you are using some custom template, you must be aware that unexpected errors might occur and we cannot take the responsibility for solving them.
|
|
5. Multibrand For WHMCS module is not compatible with our Resellers Center For WHMCS.
There is no integration between these modules and we do not recommend using them together.
|
|


