Hosting Quota Notifications 1.X For WHMCS
From ModulesGarden Wiki
(Difference between revisions)
|
|
| Line 204: |
Line 204: |
| | =Tips= | | =Tips= |
| | {| | | {| |
| − | |style="padding: 10px 0px 30px 15px;"|1. When you press '' 'Renew' '' button in the admin area '' ('Client Profile → Products/Services') '', a new order for selected domain will be created. | + | |style="padding: 10px 0px 30px 15px;"|1. Apart from the '' 'ServerTasticToken' '', since version 1.3.0 there is no longer directly support for '' 'Servertastic SSL' '' module type.<br/> |
| − | :The admin can place it as '' 'Renewal' '' order type but only 90 days before the expiration date.
| + | This is due to the removal of the existing API support that allowed this module to work properly. |
| | |} | | |} |
| | | | |
Revision as of 13:21, 6 April 2018
Servertastic SSL For WHMCS will allow you to offer SSL certificates to your clients. They will be able to define and order a certificate directly in the client area.
Moreover, the module will give you the access to SSL configuration details as well as enable you to terminate certificates and renew them after their expiration date.
|
| ✔ Resend Configuration Email
|
| ✔ View Certificate Status
|
| ✔ Choose Certificate Type
|
| ✔ Toggle Synchronization Of Expiration Date
|
| ✔ View Basic Certificate Details
|
| ✔ Download Generated Certificate
|
- cPanel Tokens Integration:
| ✔ Choose Certificate Type
|
| ✔ Define Management Page Link
|
| ✔ Toggle Management Page Link Visibility For Client Area
|
| ✔ Send Generated Token Via Email
|
| ✔ Renewal Support - Automatically Creates New Certificate For Recurring Products After Expiration Date
|
| ✔ Supports PHP 5.4 Up To PHP 7
|
| ✔ Supports WHMCS V6 And V7
|
Installation and Configuration
This tutorial will show you how to successfully install and configure Servertastic SSL For WHMCS.
We will guide you step by step through the whole installation and configuration process.
|
Installation
| 1. Log in to our client area and download Servertastic SSL For WHMCS.
|
2. Upload and extract the module into the main WHMCS directory.
Files in your WHMCS directory should look like this.
|
Configuration of Product
4. In order to create and configure a product, go to 'Setup' → 'Products/Services' → 'Products/Services' .
Click on 'Create a New Group' .
|
| 5. Enter product group name and press 'Save Changes' .
|
6. When you have a product group, you can create your product.
To create a product click on 'Create a New Product' .
|
| 7. Afterwards, choose your product group and type from dropdown menus, fill in your product name and press 'Continue' .
|
8. Now, go to 'Module Settings' section, choose 'ServerTasticToken' from a dropdown menu.
Next, click on 'Save Changes' .
|
9. Finish by filling in 'API Key' and selecting desired certificate type.
To obtain 'API Key' log in to your 'Reseller Panel' and click 'View your API Key' :
|

|
Confirm through pressing 'Save Changes' .
Note: You can mark 'Test Mode' to connect with the test API.
|
| Congratulations! Your module is ready for use.
|
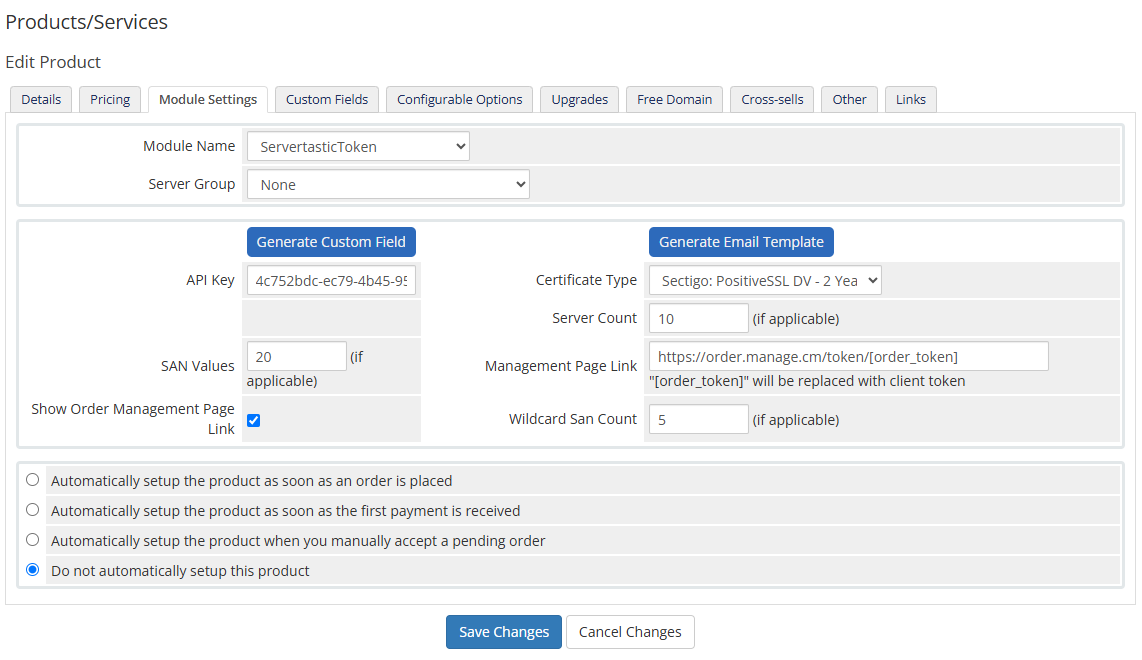
cPanel Tokens Configuration
To enable selling of certificates with Servertastic SSL For cPanel module, configure the token generator using the provisioning module for WHMCS.
Your WHMCS will now bill customers for the ordered certificates and generate tokens, which can be then used by customers to add their certificates in cPanel.
After saving the settings in the 'Certificate Type' dropdown, available certificates will appear.
Note: If you are using a test API key, first make sure that the 'Test Mode' option is enabled.
Then set the remaining options corresponding to the selected certificate:
- SAN Values - enter how many domain names can be protected with a single certificate.
- Server Count - enter how many different servers can indicate the domains protected by a given certificate.
- Management Page Link - Specify the address at which the customer will be able to see the generated certificate directly in the 'Servertastic' panel.
- Show Order Management Page link - select whether you want your customers to see a direct link to the certificate in the 'Servertastic' panel.
Note: Make sure that SAN and Server vaules are supported by the selected type of certificate. You can find more relevant information on here.
Finally, save the changes and do not forget to generate 'Custom Field' and 'Email Template' .
|
|
| After placing an order for a configured product, the customer will have access to the generated 'certificate token' , its 'status' and a direct link to the order at the 'Servertastic' panel (if that option has been enabled).
|
The client should now copy the token and complete the certificate configuration directly in the cPanel.
These steps are described on the Servertastic SSL For cPanel wiki.
|
Tips
1. Apart from the 'ServerTasticToken' , since version 1.3.0 there is no longer directly support for 'Servertastic SSL' module type.
This is due to the removal of the existing API support that allowed this module to work properly.
|
Common Problems
| 1. When you have problems with connection, check whether your SELinux or firewall does not block ports.
|
|


