Hosting Quota Notifications 1.X For WHMCS
(→Membership) |
|||
| Line 1: | Line 1: | ||
| − | <meta name="keywords" content=" | + | <meta name="keywords" content="product auto upgrade for whmcs, product auto upgrade configuration, product auto upgrade management, product auto upgrade installation, product auto upgrade guide, modulesgarden product auto upgrade, product auto upgrade wiki, product auto upgrade tutorial, product auto upgrade tips, whmcs billing module wiki, product auto upgrade common problems, about product auto upgrade, product auto upgrade documentation, product auto upgrade faq, product auto upgrade help"></meta> |
| − | <meta name="description" content="ModulesGarden Wiki Contains All The Information You Need About The | + | <meta name="description" content="ModulesGarden Wiki Contains All The Information You Need About The Product Auto Upgrade For WHMCS Module."></meta> |
| − | =About [https://www.modulesgarden.com/products/whmcs/ | + | =About [https://www.modulesgarden.com/products/whmcs/product-auto-upgrade Product Auto Upgrade For WHMCS]= |
{| | {| | ||
| − | |style="padding: 10px 0px 10px 0px;"|''' | + | |style="padding: 10px 0px 10px 0px;"|'''Product Auto Upgrade For WHMCS''' permits to automatically shift products on the basis of the server resource usage tracked with Advanced Billing For WHMCS module.<br/>It will allow you to set rules related to the server resource usage according to which the module will upgrade/downgrade products and their configurable options at the right time.<br/>You will be also able to let your clients decide if they want their products to be modified as well as enable them to set the rules on their own. |
| − | + | ||
| − | You will be able to | + | |
| − | + | ||
| − | + | ||
|} | |} | ||
| − | <!-- | + | <!--Comment--> |
| − | *''' | + | *'''Admin Area Features:''' |
{| | {| | ||
| − | |style="padding: 10px 0px 0px 30px;"|✔ | + | |style="padding: 10px 0px 0px 30px;"|✔ Define Product Auto Upgrade Groups |
|} | |} | ||
{| | {| | ||
| − | |style="padding: 0px 0px 0px 30px;"|✔ | + | |style="padding: 0px 0px 0px 30px;"|✔ Enable/Disable Product Auto Upgrade Groups |
|} | |} | ||
{| | {| | ||
| − | |style="padding: 0px 0px 0px 30px;"|✔ | + | |style="padding: 0px 0px 0px 30px;"|✔ Create Product Auto Upgrade Options |
|} | |} | ||
{| | {| | ||
| − | |style="padding: 0px 0px 0px 30px;"|✔ | + | |style="padding: 0px 0px 0px 30px;"|✔ Assign Product To An Option - Configurable Option Support |
|} | |} | ||
{| | {| | ||
| − | |style="padding: 0px 0px 0px 30px;"|✔ | + | |style="padding: 0px 0px 0px 30px;"|✔ Define Options Upgrade/Downgrade Rules |
|} | |} | ||
{| | {| | ||
| − | |style="padding: 0px 0px 0px 30px;"|✔ | + | |style="padding: 0px 0px 0px 30px;"|✔ Set Up Minimal Upgrade/Downgrade Interval |
|} | |} | ||
{| | {| | ||
| − | |style="padding: 0px 0px 0px 30px;"|✔ | + | |style="padding: 0px 0px 0px 30px;"|✔ Enable/Disable Any Product Auto Upgrade Option |
|} | |} | ||
{| | {| | ||
| − | |style="padding: 0px 0px 0px 30px;"|✔ | + | |style="padding: 0px 0px 0px 30px;"|✔ Drag & Drop To Reorder Options |
|} | |} | ||
{| | {| | ||
| − | |style="padding: 0px 0px 0px 30px;"|✔ | + | |style="padding: 0px 0px 0px 30px;"|✔ Define Client Area Features |
| − | + | ||
| − | + | ||
| − | + | ||
| − | + | ||
| − | + | ||
| − | + | ||
| − | + | ||
| − | + | ||
| − | + | ||
| − | + | ||
| − | + | ||
| − | + | ||
| − | + | ||
| − | + | ||
| − | + | ||
| − | + | ||
| − | + | ||
| − | + | ||
| − | + | ||
| − | + | ||
| − | + | ||
| − | + | ||
|} | |} | ||
{| | {| | ||
| − | |style="padding: 0px 0px 0px 30px;"|✔ | + | |style="padding: 0px 0px 0px 30px;"|✔ View List Of All Hostings Affected By Product Auto Upgrade |
|} | |} | ||
{| | {| | ||
| − | |style="padding: 0px 0px 10px 30px;"|✔ | + | |style="padding: 0px 0px 10px 30px;"|✔ Access Product Auto Upgrade History Of Any Hosting |
|} | |} | ||
*'''Client Area Features:''' | *'''Client Area Features:''' | ||
{| | {| | ||
| − | |style="padding: 10px 0px 0px 30px;"|✔ | + | |style="padding: 10px 0px 0px 30px;"|✔ Enable/Disable Product Auto Upgrade And Product Auto Upgrade Options |
|} | |} | ||
{| | {| | ||
| − | |style="padding: 0px 0px 0px 30px;"|✔ | + | |style="padding: 0px 0px 0px 30px;"|✔ Manage Rules Of Product Auto Upgrade Options |
|} | |} | ||
{| | {| | ||
| − | |style="padding: 0px 0px 0px 30px;"|✔ | + | |style="padding: 0px 0px 0px 30px;"|✔ Set Up Minimal Upgrade/Downgrade Interval |
|} | |} | ||
{| | {| | ||
| − | |style="padding: 0px 0px 0px 30px;"|✔ | + | |style="padding: 0px 0px 0px 30px;"|✔ View Products' Product Auto Upgrade History |
|} | |} | ||
{| | {| | ||
| − | |style="padding: 0px 0px 0px 30px;"|✔ | + | |style="padding: 0px 0px 0px 30px;"|✔ Set Up Rules Of Notifications |
|} | |} | ||
{| | {| | ||
| − | |style="padding: 0px 0px 10px 30px;"|✔ | + | |style="padding: 0px 0px 10px 30px;"|✔ Define Minimal Notification Interval |
|} | |} | ||
| − | *''' | + | *'''General Info:''' |
{| | {| | ||
| − | |style="padding: 10px 0px 0px 30px;"|✔ | + | |style="padding: 10px 0px 0px 30px;"|✔ Requires <u>Advanced Billing For WHMCS</u> - Server Resource Usage Billing [http://www.modulesgarden.com/products/whmcs/advanced_billing/features (read more)] |
|} | |} | ||
{| | {| | ||
| − | |style="padding: 0px | + | |style="padding: 0px 0px 0px 30px;"|✔ Multi-Language Support |
| − | + | ||
| − | + | ||
| − | + | ||
| − | + | ||
| − | + | ||
| − | + | ||
| − | + | ||
| − | + | ||
| − | + | ||
| − | + | ||
| − | + | ||
| − | + | ||
| − | + | ||
| − | + | ||
| − | + | ||
| − | + | ||
| − | + | ||
| − | + | ||
| − | + | ||
| − | + | ||
| − | + | ||
| − | + | ||
| − | + | ||
| − | + | ||
| − | + | ||
| − | + | ||
| − | + | ||
| − | + | ||
| − | + | ||
| − | + | ||
| − | + | ||
| − | + | ||
| − | + | ||
| − | + | ||
| − | + | ||
| − | + | ||
| − | + | ||
| − | + | ||
| − | + | ||
| − | + | ||
| − | + | ||
| − | + | ||
| − | + | ||
| − | + | ||
| − | + | ||
| − | + | ||
| − | + | ||
| − | + | ||
| − | + | ||
| − | + | ||
| − | + | ||
| − | + | ||
| − | + | ||
| − | + | ||
| − | + | ||
| − | + | ||
| − | + | ||
| − | + | ||
| − | + | ||
| − | + | ||
| − | + | ||
| − | + | ||
| − | + | ||
| − | + | ||
| − | + | ||
|} | |} | ||
{| | {| | ||
| − | |style="padding: 0px 0px 0px 30px;"|✔ Supports PHP 5. | + | |style="padding: 0px 0px 0px 30px;"|✔ Supports PHP 5.3 Up To PHP 7 |
|} | |} | ||
{| | {| | ||
| − | |style="padding: 0px 0px 0px 30px;"|✔ Supports WHMCS | + | |style="padding: 0px 0px 0px 30px;"|✔ Supports WHMCS Templates Five and Six |
|} | |} | ||
{| | {| | ||
| − | |style="padding: 0px 0px | + | |style="padding: 0px 0px 30px 30px;"|✔ Supports WHMCS V6 and V7 |
|} | |} | ||
| − | =Installation= | + | =Installation and Configuration= |
{| | {| | ||
| − | |style="padding: 10px 0px | + | |style="padding: 10px 0px 0px 0px;"|'''In this tutorial we will show you how to successfully install and manage Product Auto Upgrade For WHMCS.'''<br /> |
| − | We will guide you step by step through the whole installation and configuration process. | + | We will guide you step by step through the whole installation and configuration process. |
| − | + | ||
|} | |} | ||
| − | |||
{| | {| | ||
| − | |style="padding: | + | |style="padding: 20px 0px 20px 15px;"|'''1. Log in to your client area and download the module.''' |
|} | |} | ||
{| | {| | ||
| − | |style="padding: 0px 0px 20px 25px;"|[[File: | + | |style="padding: 0px 0px 20px 25px;"|[[File:AB2_AS_1.png]] |
|} | |} | ||
{| | {| | ||
| − | |style="padding: 0px 0px 10px 15px;"|'''2. In the downloaded file you will find two packages that support different PHP versions.'''<br/>As presented on the screen below, the first one is dedicated to PHP 7, while the second one is aimed at PHP 5. | + | |style="padding: 0px 0px 10px 15px;"|'''2. In the downloaded file you will find two packages that support different PHP versions.'''<br/>As presented on the screen below, the first one is dedicated to PHP 7, while the second one is aimed at PHP 5.3 up to PHP 5.6.<br/>It does not apply to open source versions.<br/> |
'' '''Note''': You can check current PHP version in your WHMCS. To do so proceed to ''' 'Utilities' → 'System' → 'PHP Info'.''' | '' '''Note''': You can check current PHP version in your WHMCS. To do so proceed to ''' 'Utilities' → 'System' → 'PHP Info'.''' | ||
|} | |} | ||
{| | {| | ||
| − | |style="padding: 0px 0px | + | |style="padding: 0px 0px 30px 25px;"|[[File:AB2_AS_2.png]] |
|} | |} | ||
{| | {| | ||
|style="padding: 0px 0px 15px 15px;"|'''3. Extract the downloaded file and choose the one with the right PHP version. Upload and extract the PHP file into the main WHMCS directory.'''<br /> | |style="padding: 0px 0px 15px 15px;"|'''3. Extract the downloaded file and choose the one with the right PHP version. Upload and extract the PHP file into the main WHMCS directory.'''<br /> | ||
| − | + | Files in your WHMCS directory should look like this. | |
|} | |} | ||
{| | {| | ||
| − | + | |style="padding: 0px 0px 30px 25px;"|[[File:drte4.png]] | |
| − | + | ||
| − | + | ||
| − | + | ||
| − | + | ||
| − | + | ||
| − | + | ||
| − | + | ||
| − | + | ||
| − | + | ||
| − | + | ||
| − | + | ||
| − | + | ||
| − | + | ||
| − | |style="padding: 0px 0px 30px 25px;"|[[File: | + | |
|} | |} | ||
| − | == | + | ==Module Configuration== |
{| | {| | ||
| − | |style="padding: 10px 0px 15px 15px;"|''' | + | |style="padding: 10px 0px 15px 15px;"|'''4. Now you have to activate the module in your WHMCS system.'''<br/> |
| − | + | Move to '' 'Setup' → 'Addon Modules', '' find '' 'Advanced Billing' '' and press '' 'Activate' '' button.<br/> | |
| + | ''Note: Skip this subsection, if you have Advanced Billing For WHMCS already installed.'' | ||
|} | |} | ||
{| | {| | ||
| − | |style="padding: 0px 0px 20px 25px;"|[[File: | + | |style="padding: 0px 0px 20px 25px;"|[[File:PAU_5.png]] |
|} | |} | ||
{| | {| | ||
| − | |style="padding: 0px 0px 15px 15px;"|''' | + | |style="padding: 0px 0px 15px 15px;"|'''5. In the next step you need to permit access to the module.'''<br/> |
| − | To do so, | + | To do so, press '' 'Configure', '' choose desired admin roles and press '' 'Save Changes'. '' |
|} | |} | ||
{| | {| | ||
| − | |style="padding: 0px 0px | + | |style="padding: 0px 0px 20px 25px;"|[[File:PAU_6.png]] |
|} | |} | ||
| − | |||
| − | |||
{| | {| | ||
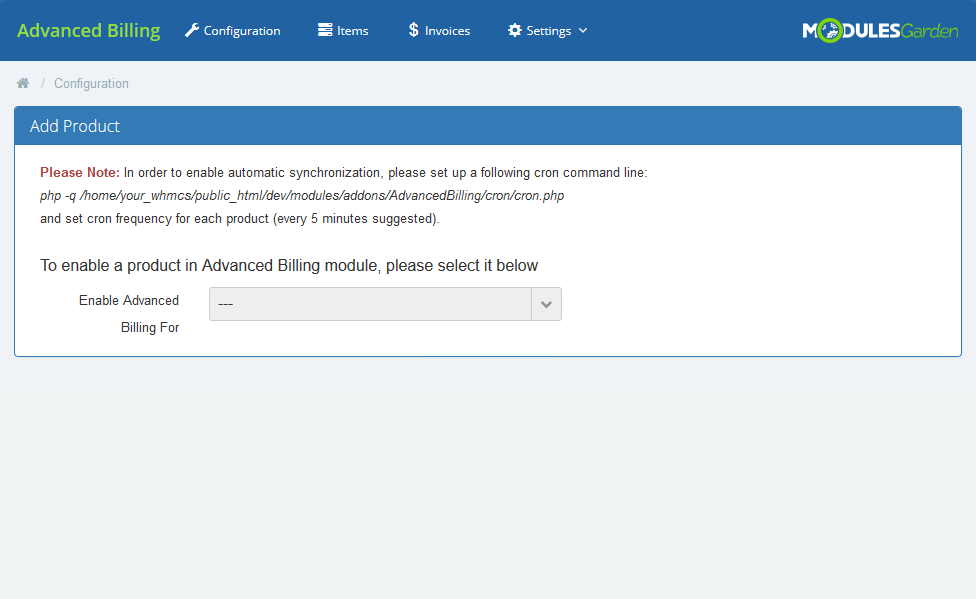
| − | |style="padding: | + | |style="padding: 0px 0px 20px 15px;"|'''6. Now, set up a cron job, you can find it in your WHMCS → '' 'Addons' → 'Advanced Billing' '' as shown on the following screen.''' |
| − | + | ||
|} | |} | ||
{| | {| | ||
| − | |style="padding: 0px 0px | + | |style="padding: 0px 0px 30px 25px;"|[[File:PAU_7.png]] |
| − | + | ||
| − | + | ||
| − | + | ||
| − | + | ||
| − | + | ||
| − | + | ||
| − | + | ||
| − | + | ||
| − | + | ||
| − | + | ||
| − | + | ||
| − | + | ||
| − | + | ||
| − | + | ||
| − | + | ||
|} | |} | ||
| − | == | + | ==Extension Configuration== |
{| | {| | ||
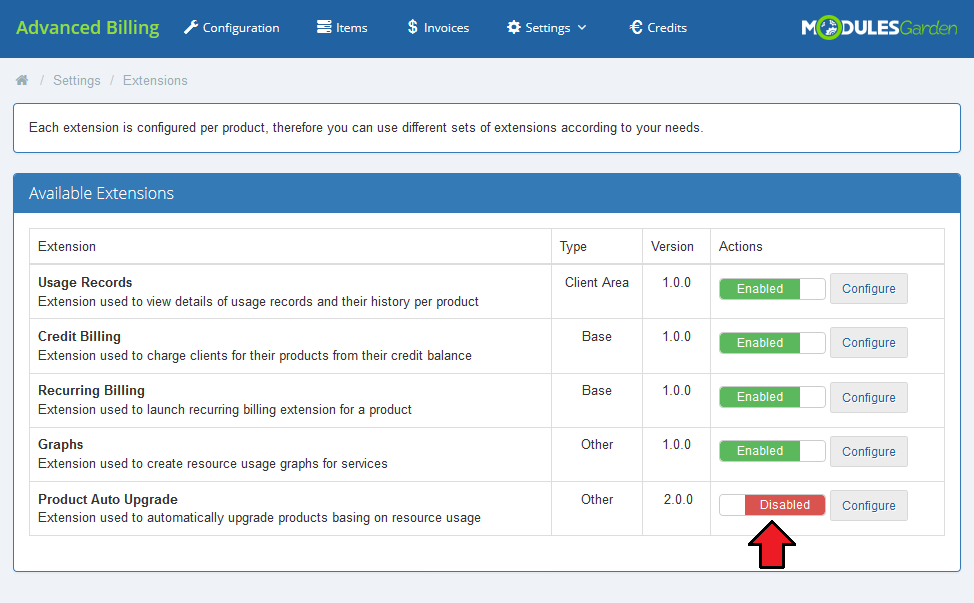
| − | |style="padding: 10px 0px 15px 15px;"|''' | + | |style="padding: 10px 0px 15px 15px;"|'''7. Now, you have to activate the extension in your Advanced Billing For WHMCS.'''<br/> |
| − | + | Log in to your WHMCS admin area and proceed to '' 'Addons' '' → '' 'Advanced Billing' '' → '' 'Settings' '' → '' 'Extensions'. ''<br/> | |
| − | + | Afterwards, find '' 'Product Auto Upgrade' '' and enable the extension. | |
|} | |} | ||
{| | {| | ||
| − | |style="padding: 0px 0px 20px 25px;"|[[File: | + | |style="padding: 0px 0px 20px 25px;"|[[File:PAU_8.png]] |
|} | |} | ||
{| | {| | ||
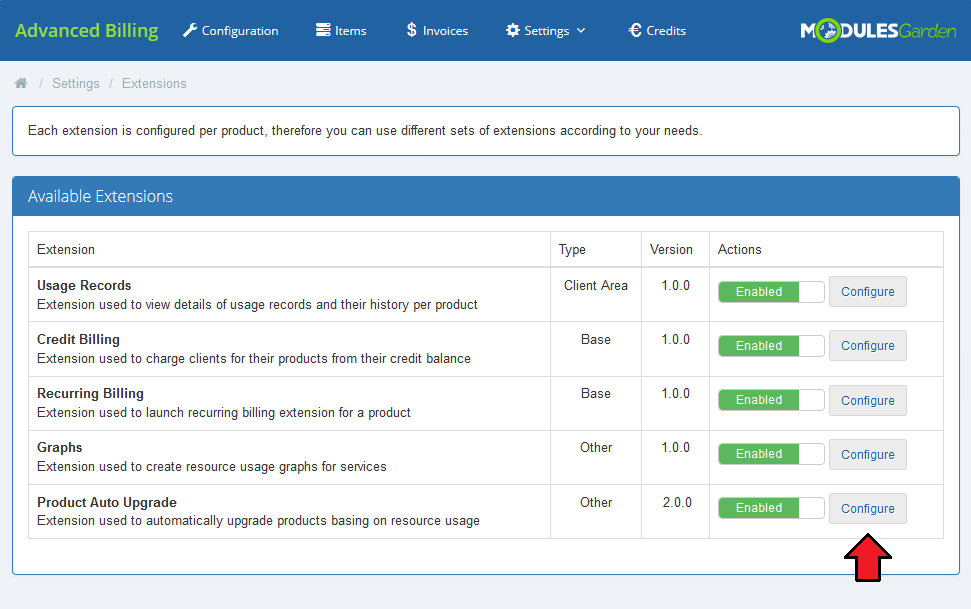
| − | |style="padding: 0px 0px | + | |style="padding: 0px 0px 15px 15px;"|'''8. Next, you have to provide your license key.'''<br/> |
| + | Press '' 'Configure' '' next to the extension. | ||
|} | |} | ||
| − | |||
| − | |||
{| | {| | ||
| − | |style="padding: | + | |style="padding: 0px 0px 20px 25px;"|[[File:PAU_8_1.png]] |
| − | + | ||
|} | |} | ||
| − | |||
| − | |||
{| | {| | ||
| − | |style="padding: | + | |style="padding: 0px 0px 20px 15px;"|'''9. Paste your license here and then confirm the changes.''' |
|} | |} | ||
| − | |||
{| | {| | ||
| − | |style="padding: | + | |style="padding: 0px 0px 20px 25px;"|[[File:PAU_9.png]] |
| − | + | ||
|} | |} | ||
| − | |||
{| | {| | ||
| − | |style="padding: | + | |style="padding: 0px 0px 30px 15px;"|'''Your Product Auto Upgrade For WHMCS is ready to use! ''' |
| − | + | ||
| − | + | ||
| − | + | ||
| − | + | ||
| − | + | ||
| − | + | ||
| − | + | ||
| − | + | ||
| − | + | ||
| − | + | ||
| − | + | ||
| − | + | ||
| − | + | ||
| − | + | ||
| − | + | ||
| − | + | ||
| − | + | ||
| − | + | ||
| − | + | ||
| − | + | ||
| − | + | ||
| − | + | ||
| − | + | ||
| − | + | ||
| − | + | ||
| − | + | ||
| − | + | ||
|} | |} | ||
| − | = | + | =Management= |
{| | {| | ||
| − | |style="padding: 10px 0px | + | |style="padding: 10px 0px 10px 15px;"|'''To combine any product with Product Auto Upgrade For WHMCS, you need to firstly enable and then configure it in Advanced Billing For WHMCS.'''<br/> |
| − | + | Advanced Billing For WHMCS is used to collect information about hosting's resource usage.<br/> | |
| + | '''Important:''' Product Auto Upgrade For WHMCS uses '' 'Change Package' '' functionality to switch the products.<br/>Therefore it is required that the products also support this feature. | ||
|} | |} | ||
| + | ==Admin Area== | ||
{| | {| | ||
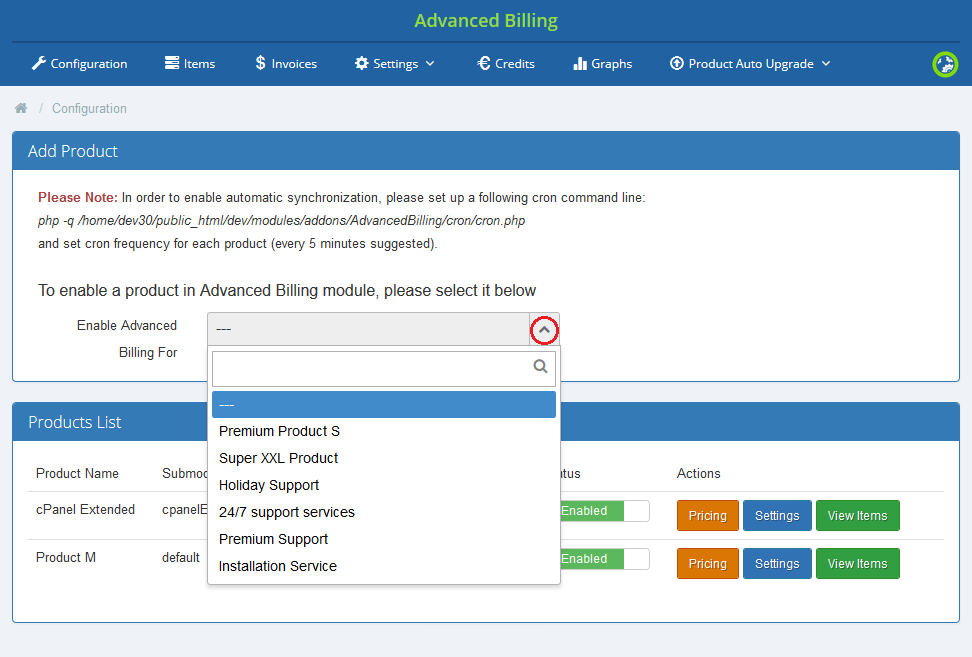
| − | |style="padding: 0px 0px | + | |style="padding: 0px 0px 20px 15px;"|Before you can do anything you must enable the products you want to work with for Advanced Billing. |
|} | |} | ||
| − | |||
| − | |||
{| | {| | ||
| − | |style="padding: | + | |style="padding: 0px 0px 20px 25px;"|[[File:PAU_10.png]] |
|} | |} | ||
| − | |||
| − | |||
{| | {| | ||
| − | |style="padding: | + | |style="padding: 0px 0px 15px 15px;"|Only then you have to enable the extension Product Auto Upgrade For WHMCS for each of the products.<br/>Move to '' 'Settings', '' find appropriate section and enable the extension. |
| − | + | ||
| − | + | ||
| − | + | ||
| − | + | ||
| − | + | ||
| − | + | ||
| − | + | ||
| − | + | ||
| − | + | ||
|} | |} | ||
{| | {| | ||
| − | |style="padding: 0px 0px 30px 25px;"|[[File: | + | |style="padding: 0px 0px 30px 25px;"|[[File:PAU_10_1.png]] |
|} | |} | ||
| + | ===Groups of Rules=== | ||
{| | {| | ||
| − | + | |style="padding: 10px 0px 15px 15px;"|As you might have already noticed, a new tab dedicated to the extension appeared on your Advanced Billing For WHMCS module main menu.<br/>Under this section there is located the whole management of the extension.<br/> | |
| − | + | Let's move to '' 'Configuration' '' firstly. | |
| − | + | ||
| − | |style="padding: 10px 0px 15px 15px;"| | + | |
| − | + | ||
| − | + | ||
| − | + | ||
| − | + | ||
| − | '' ''' | + | |
|} | |} | ||
{| | {| | ||
| − | |style="padding: 0px 0px | + | |style="padding: 0px 0px 20px 25px;"|[[File:PAU_11.png]] |
|} | |} | ||
| − | |||
| − | |||
{| | {| | ||
| − | |style="padding: 10px 0px 15px 15px;"| | + | |style="padding: 10px 0px 15px 15px;"|What you will find there is a full list of autoscaling groups displayed.<br/> |
| − | + | Here you can find information such as status of a group, its name and used submodule.<br/>What is more, you can manage groups through using buttons in '' 'Actions' '' column to prepare rules for scaling services. | |
| − | + | ||
| − | <br/> | + | |
| − | + | ||
|} | |} | ||
{| | {| | ||
| − | |style="padding: 0px 0px 20px 25px;"|[[File: | + | |style="padding: 0px 0px 20px 25px;"|[[File:PAU_11_1.png]] |
|} | |} | ||
{| | {| | ||
| − | |style="padding: 0px | + | |style="padding: 10px 0px 15px 15px;"|Let's see now how to create a new group.<br/> |
| + | Press '' 'Create New Group' '' button and a short formula will appear. | ||
|} | |} | ||
{| | {| | ||
| − | |style="padding: 0px 0px 20px 25px;"|[[File: | + | |style="padding: 0px 0px 20px 25px;"|[[File:PAU_12.png]] |
|} | |} | ||
{| | {| | ||
| − | |style="padding: 0px 0px 15px 15px;"| | + | |style="padding: 0px 0px 15px 15px;"|You can add products and define rules inside of the group which will result in upgrading/downgrading client's hosting.<br/> |
| − | Save the | + | Name your new group - this name is only for your information and convenience. Then select the product that can be automatically upgraded or downgraded according to resource usage count.<br/>Optionally, you can enable and choose configurable option group that will be used to define products options.<br/> |
| + | Save the group when it is ready. | ||
|} | |} | ||
{| | {| | ||
| − | |style="padding: 0px 0px 20px 25px;"|[[File: | + | |style="padding: 0px 0px 20px 25px;"|[[File:PAU_13.png]] |
|} | |} | ||
{| | {| | ||
| − | |style="padding: 0px 0px | + | |style="padding: 0px 0px 20px 15px;"|Your newly created group appeared on the list. Now you can configure it according to your specific needs. |
| − | + | ||
|} | |} | ||
{| | {| | ||
| − | |style="padding: 0px 0px 30px 25px;"|[[File: | + | |style="padding: 0px 0px 30px 25px;"|[[File:PAU_13_1.png]] |
|} | |} | ||
| − | + | ====Group Configuration==== | |
| − | + | ||
| − | + | ||
| − | ==== | + | |
{| | {| | ||
| − | |style="padding: 10px 0px 15px 15px;"| | + | |style="padding: 10px 0px 15px 15px;"|There are two main sections where a group can be configured. |
| − | + | #'' 'Settings' '' - a place where general and client area configuration is set up. | |
| + | #'' 'Options' '' - detailed configuration of rules to scale services automatically. | ||
|} | |} | ||
{| | {| | ||
| − | |style="padding: 0px 0px 30px 25px;"|[[File: | + | |style="padding: 0px 0px 30px 25px;"|[[File:PAU_14.png]] |
|} | |} | ||
| − | + | =====Group Settings===== | |
| − | ==== | + | |
{| | {| | ||
| − | |style="padding: 10px 0px 15px 15px;"| | + | |style="padding: 10px 0px 15px 15px;"|'''General Configuration''' |
| − | * | + | *'''Group Name''' - name of a group, can be changed at any time and is visible only to the admin. |
| − | * | + | *'''Server Type''' - module type of the product allowed in the group. |
| − | * | + | *'''Time Interval''' - minimum time period between the two products changes that can be made on a single hosting. |
| − | + | *'''Notifications Time Interval''' - defines time between notifications sent to a client. | |
|} | |} | ||
{| | {| | ||
| − | |style="padding: 0px 0px 20px 25px;"|[[File: | + | |style="padding: 0px 0px 20px 25px;"|[[File:PAU_14_1.png]] |
|} | |} | ||
{| | {| | ||
| − | |style="padding: 0px 0px 15px 15px;"| | + | |style="padding: 0px 0px 15px 15px;"|'''Client Area Configuration''' |
| − | + | *'''Display Client Rules Configuration''' - shows rules of this group for clients with products configured in the group. | |
| + | *'''Modify Rules Configuration''' - client can modify group rules, changes will affect their product only. | ||
| + | *'''Modify Time Interval''' - client can modify the minimum time between two switches on a single hosting. | ||
| + | *'''Allowed Time Interval Values''' - specifies what time interval a client can use (they will be displayed in the form of a dropdown menu or a textbox with a limited range). | ||
| + | *'''Enable Notifications''' - allows the client to enable/disable notifications. | ||
| + | *'''Modify Notifications Time Interval''' - allows the client to modify minimum time between two notifications. | ||
| + | *'''Allowed Notifications Time Interval Values''' - defines values which can be used by client.<br/> | ||
| + | Do not forget to save the configuration when it is ready. | ||
|} | |} | ||
{| | {| | ||
| − | + | |style="padding: 0px 0px 30px 25px;"|[[File:PAU_14_2.png]] | |
| − | + | ||
| − | + | ||
| − | + | ||
| − | + | ||
| − | + | ||
| − | + | ||
| − | |style="padding: 0px 0px 30px 25px;"|[[File: | + | |
|} | |} | ||
| − | === | + | =====Group Options===== |
{| | {| | ||
| − | |style="padding: 10px 0px | + | |style="padding: 10px 0px 15px 15px;"|The second place where the group rules are configured is '''Options''' section.<br/> |
| − | + | These rules will be used by the extension to determine which service should be changed.<br/>Service will be changed according to the parameters set in rules options if the condition of either downgrade rules or upgrade rules has been met. | |
|} | |} | ||
{| | {| | ||
| − | |style="padding: 0px 0px 20px 25px;"|[[File: | + | |style="padding: 0px 0px 20px 25px;"|[[File:PAU_15.png]] |
|} | |} | ||
{| | {| | ||
| − | |style="padding: 0px 0px | + | |style="padding: 0px 0px 15px 15px;"|Every group has already some predefined basic options - disabled at the start.<br/>You can base your rules configuration on them or add your own ones in case they are not sufficient.<br/>Let us show how to set the autoscaling rules on the basis of these options.<br/> |
| + | Before you can do anything, you must configure the upgrade and downgarade rules. | ||
|} | |} | ||
{| | {| | ||
| − | |style="padding: 0px 0px 20px 25px;"|[[File: | + | |style="padding: 0px 0px 20px 25px;"|[[File:PAU_16.png]] |
|} | |} | ||
{| | {| | ||
| − | |style="padding: 0px 0px | + | |style="padding: 0px 0px 15px 15px;"|'' 'Upgrade Rules'/'Downgrade Rules' '' can have multiple rules defined.<br/> |
| + | To add a new rule, select it from a dropdown menu marked on the following screen and press '' 'Add'.'' | ||
|} | |} | ||
{| | {| | ||
| − | |style="padding: 0px 0px 20px 25px;"|[[File: | + | |style="padding: 0px 0px 20px 25px;"|[[File:PAU_17.png]] |
|} | |} | ||
{| | {| | ||
| − | |style="padding: 0px 0px | + | |style="padding: 0px 0px 15px 15px;"|You can define comparison type and threshold of any added rule.<br/> |
| − | + | To add a rule which will be fulfilled when the product has more or equal than 3 FTP accounts, choose '' '≥' '' from '' 'Comparison Type' '' and type '' '3' '' into '' 'Threshold' '' field.<br/> | |
| − | + | This example can be seen on the following screen. | |
| − | '' ''' | + | |
| − | + | ||
|} | |} | ||
{| | {| | ||
| − | |style="padding: 0px 0px 20px 25px;"|[[File: | + | |style="padding: 0px 0px 20px 25px;"|[[File:PAU_18.png]] |
|} | |} | ||
{| | {| | ||
| − | |style="padding: 0px 0px | + | |style="padding: 0px 0px 15px 15px;"|You also have to define a product for each package that will be used when upgrading/downgrading.<br/>Press button marked on the screen to go on. |
|} | |} | ||
| − | |||
| − | |||
{| | {| | ||
| − | |style="padding: | + | |style="padding: 0px 0px 20px 25px;"|[[File:PAU_18_1.png]] |
| − | + | ||
| − | + | ||
| − | + | ||
| − | + | ||
|} | |} | ||
| − | |||
| − | |||
{| | {| | ||
| − | |style="padding: | + | |style="padding: 0px 0px 15px 15px;"|Select the product you need from the available in the dropdown menu.<br/> |
| − | + | Then select option you wish to be used by clients and add it. Save the changes.<br/> | |
| − | + | '''Important!''' Options selection is available only if a supported configurable options group has been enabled for the group of rules on its creation. | |
| − | '' ''' | + | |
| − | + | ||
|} | |} | ||
{| | {| | ||
| − | |style="padding: 0px 0px 20px 25px;"|[[File: | + | |style="padding: 0px 0px 20px 25px;"|[[File:PAU_18_2.png]] |
|} | |} | ||
{| | {| | ||
| − | |style="padding: 0px 0px | + | |style="padding: 0px 0px 20px 15px;"|Every selected option appears in the box above. Here you can specify available selection under '' 'Setting' '' or delete it. |
| − | + | ||
|} | |} | ||
{| | {| | ||
| − | |style="padding: 0px 0px | + | |style="padding: 0px 0px 30px 25px;"|[[File:PAU_18_3.png]] |
|} | |} | ||
{| | {| | ||
| − | |style="padding: 0px 0px 15px 15px;"| | + | |style="padding: 0px 0px 15px 15px;"|Repeat that for all packages that you want to enable.<br/> |
| − | + | Note that only packages with selected products can be enabled! | |
|} | |} | ||
{| | {| | ||
| − | |style="padding: 0px 0px 20px 25px;"|[[File: | + | |style="padding: 0px 0px 20px 25px;"|[[File:PAU_19.png]] |
|} | |} | ||
{| | {| | ||
| − | |style="padding: 0px 0px | + | |style="padding: 0px 0px 20px 15px;"|Additionally, you can change the order the rules are displayed, simply drag and drop a rule and make a previously downgrade rule an upgrade. |
|} | |} | ||
| − | |||
| − | |||
{| | {| | ||
| − | |style="padding: | + | |style="padding: 0px 0px 20px 25px;"|[[File:PAU_20.png]] |
| − | + | ||
|} | |} | ||
{| | {| | ||
| − | |style="padding: 0px 0px 20px | + | |style="padding: 0px 0px 20px 15px;"|Add new option, just type in its name, press '' 'Add New Option' '' and then configure it like the previous ones. |
|} | |} | ||
{| | {| | ||
| − | |style="padding: 0px 0px | + | |style="padding: 0px 0px 20px 25px;"|[[File:PAU_21.png]] |
| − | + | ||
|} | |} | ||
{| | {| | ||
| − | |style="padding: 0px 0px | + | |style="padding: 0px 0px 15px 15px;"|Finally, you can describe shortly each option. Press ' ''Description' '' and a text area will appear.<br/>Type in your description there. As you can see you can prepare a few language versions of the description. |
|} | |} | ||
{| | {| | ||
| − | |style="padding: 0px 0px 30px | + | |style="padding: 0px 0px 30px 25px;"|[[File:PAU_22.png]] |
|} | |} | ||
| − | === | + | ===Accounts=== |
{| | {| | ||
| − | |style="padding: 10px 0px 15px 15px;"| | + | |style="padding: 10px 0px 15px 15px;"|To access the list of hostings affected by the autoscaling groups proceed to '' 'Product Auto Upgrade' '' → '' 'Accounts'. ''<br/> |
| − | + | Information about each hosting can be found here along with access to the hosting history.<br/> | |
| + | Press '' 'View History' '' near desired hosting to view its history of changes. | ||
|} | |} | ||
{| | {| | ||
| − | |style="padding: 0px 0px 20px 25px;"|[[File: | + | |style="padding: 0px 0px 20px 25px;"|[[File:PAU_23.png]] |
|} | |} | ||
{| | {| | ||
| − | |style="padding: 0px 0px | + | |style="padding: 0px 0px 20px 15px;"|Hosting history contains the list of changes ever made for the hosting. |
| − | + | ||
|} | |} | ||
{| | {| | ||
| − | |style="padding: 0px 0px | + | |style="padding: 0px 0px 30px 25px;"|[[File:PAU_24.png]] |
| − | + | ||
| − | + | ||
| − | + | ||
|} | |} | ||
| − | == | + | ==Client Area== |
{| | {| | ||
| − | |style="padding: 10px 0px 15px 15px;"|In | + | |style="padding: 10px 0px 15px 15px;"|In the following section we will show you client area with all autoscaling features enabled.<br/> |
| − | + | As you can see, autoscaling is displayed on the main page of a product right below the Advanced Billing For WHMCS usage records.<br/> | |
| + | Press '' 'Show' '' to view details. | ||
|} | |} | ||
{| | {| | ||
| − | |style="padding: 0px 0px 20px 25px;"|[[File: | + | |style="padding: 0px 0px 20px 25px;"|[[File:PAU_25.png]] |
|} | |} | ||
{| | {| | ||
| − | |style="padding: 0px 0px 15px 15px;"|You can | + | |style="padding: 0px 0px 15px 15px;"|You can easily enable/disable autoscaling (red) or a selected option (blue) through pressing '' 'Enabled'/'Disabled' '' button and saving the changes.<br/> |
| − | + | To browse other options, use their names marked on the following screen. | |
|} | |} | ||
{| | {| | ||
| − | |style="padding: 0px 0px 20px 25px;"|[[File: | + | |style="padding: 0px 0px 20px 25px;"|[[File:PAU_26.png]] |
|} | |} | ||
{| | {| | ||
| − | |style="padding: 0px 0px | + | |style="padding: 0px 0px 15px 15px;"|Through pressing '' 'Show Rules' '' you can manage switching rules of currently displayed option.<br/> |
| + | Additionally, you can change the minimum interval between the changes through using marked field. | ||
|} | |} | ||
| − | |||
| − | |||
{| | {| | ||
| − | |style="padding: | + | |style="padding: 0px 0px 20px 25px;"|[[File:PAU_27.png]] |
| − | + | ||
|} | |} | ||
{| | {| | ||
| − | |style="padding: 0px 0px | + | |style="padding: 0px 0px 15px 15px;"|Rules are displayed in a table, press pencil icon next to the rule you wish to change.<br/> |
| + | Do not forget to save changes when you finish. | ||
|} | |} | ||
{| | {| | ||
| − | |style="padding: 0px 0px 20px | + | |style="padding: 0px 0px 20px 25px;"|[[File:PAU_28.png]] |
|} | |} | ||
{| | {| | ||
| − | |style="padding: 0px 0px 20px | + | |style="padding: 0px 0px 20px 15px;"|Besides the management of autoscaling, you can view the history of switches made on a hosting through pressing '' 'History'. '' |
|} | |} | ||
{| | {| | ||
| − | |style="padding: 0px 0px 30px | + | |style="padding: 0px 0px 30px 25px;"|[[File:PAU_29.png]] |
|} | |} | ||
| − | + | ===Notifications=== | |
| − | === | + | |
{| | {| | ||
| − | |style="padding: 10px 0px 15px 15px;"| | + | |style="padding: 10px 0px 15px 15px;"|Client can also set up notifications, they will be sent when requirements defined by a client are met.<br/> |
| − | + | For the settings shown on the following screen, notification will be sent once in ten minutes if the following rules are met.<br/> | |
| + | The product number of Installed applications is equal or higher than 10. | ||
|} | |} | ||
{| | {| | ||
| − | |style="padding: 0px 0px | + | |style="padding: 0px 0px 30px 25px;"|[[File:PAU_30.png]] |
| − | + | ||
| − | + | ||
| − | + | ||
| − | + | ||
| − | + | ||
| − | + | ||
| − | + | ||
| − | + | ||
| − | + | ||
|} | |} | ||
| − | == | + | ==Sample Usage== |
{| | {| | ||
| − | |style="padding: 10px 0px | + | |style="padding: 10px 0px 5px 15px;"|In this section we will show you a sample situation when Product Auto Upgrade For WHMCS is used simultaneously with another built-in extension to Advanced Billing - [[Advanced_Billing_For_WHMCS#Recurring_Billing|Recurring Billing]]. |
| − | + | ||
|} | |} | ||
{| | {| | ||
| − | |style="padding: 0px 0px 20px | + | |style="padding: 0px 0px 20px 15px;"|Let's say you have configured 3 cPanel Extended products enabled for Advanced Billing. |
|} | |} | ||
{| | {| | ||
| − | |style="padding: 0px 0px 20px | + | |style="padding: 0px 0px 20px 25px;"|[[File:PAU_31.png]] |
|} | |} | ||
{| | {| | ||
| − | |style="padding: 0px 0px | + | |style="padding: 0px 0px 15px 15px;"|Each of the products has different limits set:<br /> |
| + | *'''Product A''': Max 4 FTP accounts and 500 MB storage. | ||
| + | *'''Product B''': Max 10 FTP accounts and 1 GB storage. | ||
| + | *'''Product C''': Max 20 FTP accounts and 5 GB storage.<br/> | ||
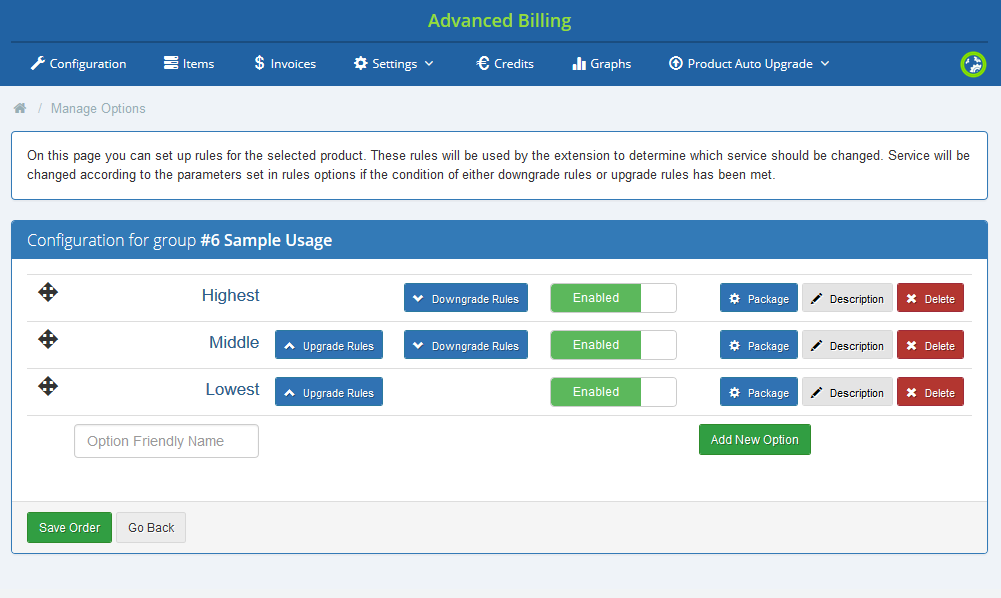
| + | Afterwards, you have created an autoscaling group, added products listed above to it and defined them with following rules. | ||
|} | |} | ||
{| | {| | ||
| − | |style="padding: 0px 0px | + | |style="padding: 0px 0px 20px 25px;"|[[File:PAU_32.png]] |
|} | |} | ||
| − | |||
| − | |||
{| | {| | ||
| − | |style="padding: | + | |style="padding: 0px 0px 15px 15px;"| |
| − | + | *'''Product A - Lowest''' | |
| + | **Upgrade Rule: ≥ 3 FTP accounts & ≥ 400 MB storage | ||
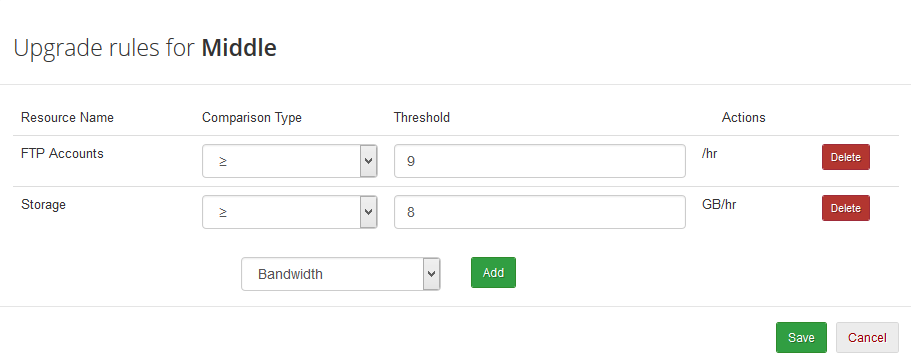
| + | *'''Product B - Middle''' | ||
| + | **Upgrade Rule: ≥ 9 FTP accounts & ≥ 8 GB storage | ||
| + | **Downgrade Rule: ≤ 3 FTP accounts & ≤ 300 MB storage | ||
| + | *'''Product C - Highest''' | ||
| + | **Downgrade Rule: ≤ 8 FTP accounts & ≤ 7 GB storage | ||
|} | |} | ||
{| | {| | ||
| − | |style="padding: 0px 0px | + | |style="padding: 0px 0px 20px 25px;"|[[File:PAU_33.png]] |
|} | |} | ||
| − | |||
| − | |||
{| | {| | ||
| − | |style="padding: | + | |style="padding: 0px 0px 10px 15px;"|Now, this is which is going to happen:<br /> |
| + | 1. A client, John orders product C and creates 3 FTP accounts in it.<br /> | ||
| + | 2. Advanced Billing cron job changes product C to product B with the first run, and further to product A in the second run (if provided minimum time interval has passed).<br /> | ||
| + | 3. John uploads 450 MB of files, so now his product meets product A top rule requirement.<br /> | ||
| + | 4. Cron runs again, and changes his product to product B.<br /> | ||
| + | 5. John creates additional 7 FTP accounts and uploads files with total size of 550 MB.<br /> | ||
| + | 6. Now, his product meets product B upgrade rules only partially, therefore cron run does nothing.<br /> | ||
| + | 7. Some time passes and total amount of storage used by John reaches 8 GB.<br /> | ||
| + | 8. This time his product meets product B upgrade rules completely and is updated to product C.<br /> | ||
| + | 9. John removes 4 of his FTP accounts and 1 GB of files.<br /> | ||
| + | 10. Therefore his product meets product C bottom rules requirements and is downgraded to product B.<br /> | ||
|} | |} | ||
{| | {| | ||
| − | |style="padding: 0px 0px 30px | + | |style="padding: 0px 0px 30px 15px;"| |
| − | + | That was all about upgrading/downgrading the products, but let us now see how the payments look like.<br/> | |
| − | + | If your client orders product C and their product gets downgraded to product B, they will be billed with product C price.<br/> | |
| − | + | However, if the prices and free limits are set per resources, you will help your clients to avoid additional payments if their resource usage is low.<br/> | |
| − | + | If you do it this way, clients will pay fixed price each month, but additional payment will depend on the resource they use.<br/> | |
| − | + | In case you own only limited amount of resources, Product Auto Upgrade For WHMCS extension will allow you to use them more efficiently.<br/> Whereas the core Advanced Billing For WHMCS features will let you bill your clients adequately. | |
| − | + | ||
| − | + | ||
| − | + | ||
| − | + | ||
| − | + | ||
| − | + | ||
| − | + | ||
| − | + | ||
| − | + | ||
| − | + | ||
| − | + | ||
| − | + | ||
| − | + | ||
| − | + | ||
| − | + | ||
| − | + | ||
| − | + | ||
| − | + | ||
| − | + | ||
| − | + | ||
| − | + | ||
| − | + | ||
| − | + | ||
| − | + | ||
| − | + | ||
| − | + | ||
| − | + | ||
| − | + | ||
| − | + | ||
| − | + | ||
| − | + | ||
| − | + | ||
| − | + | ||
| − | + | ||
| − | + | ||
| − | + | ||
| − | + | ||
| − | + | ||
| − | + | ||
| − | + | ||
| − | + | ||
| − | + | ||
| − | + | ||
| − | + | ||
| − | + | ||
| − | + | ||
| − | + | ||
| − | + | ||
| − | + | ||
| − | + | ||
| − | + | ||
| − | + | ||
| − | + | ||
| − | + | ||
| − | + | ||
| − | + | ||
| − | + | ||
| − | + | ||
| − | + | ||
| − | + | ||
| − | + | ||
| − | + | ||
| − | + | ||
| − | + | ||
| − | + | ||
| − | + | ||
| − | + | ||
| − | + | ||
| − | + | ||
| − | + | ||
| − | + | ||
| − | + | ||
| − | + | ||
| − | + | ||
| − | + | ||
| − | + | ||
| − | + | ||
| − | + | ||
| − | + | ||
| − | + | ||
| − | + | ||
| − | + | ||
| − | + | ||
| − | + | ||
| − | + | ||
| − | + | ||
| − | + | ||
| − | + | ||
| − | + | ||
| − | + | ||
| − | + | ||
| − | + | ||
| − | + | ||
| − | + | ||
| − | + | ||
| − | + | ||
| − | + | ||
| − | + | ||
| − | + | ||
| − | + | ||
| − | + | ||
| − | + | ||
| − | + | ||
| − | + | ||
| − | + | ||
| − | + | ||
| − | + | ||
| − | + | ||
| − | + | ||
| − | + | ||
| − | + | ||
| − | + | ||
| − | + | ||
| − | + | ||
| − | + | ||
| − | + | ||
| − | + | ||
| − | + | ||
| − | + | ||
| − | + | ||
| − | + | ||
| − | + | ||
| − | + | ||
| − | + | ||
| − | + | ||
| − | + | ||
| − | + | ||
| − | + | ||
| − | + | ||
| − | + | ||
| − | + | ||
| − | + | ||
| − | + | ||
| − | + | ||
| − | + | ||
| − | + | ||
| − | + | ||
| − | + | ||
| − | + | ||
| − | + | ||
| − | + | ||
| − | + | ||
| − | + | ||
| − | + | ||
| − | + | ||
| − | + | ||
| − | + | ||
| − | + | ||
| − | + | ||
| − | + | ||
| − | + | ||
| − | + | ||
| − | + | ||
| − | + | ||
| − | + | ||
| − | + | ||
| − | + | ||
| − | + | ||
| − | + | ||
| − | + | ||
| − | + | ||
| − | + | ||
| − | + | ||
| − | + | ||
| − | + | ||
| − | + | ||
| − | + | ||
| − | + | ||
| − | + | ||
| − | + | ||
| − | + | ||
| − | + | ||
| − | + | ||
| − | + | ||
| − | + | ||
| − | + | ||
| − | + | ||
| − | + | ||
| − | + | ||
| − | + | ||
| − | + | ||
| − | + | ||
| − | + | ||
| − | + | ||
| − | + | ||
| − | + | ||
| − | + | ||
| − | + | ||
| − | + | ||
| − | + | ||
| − | + | ||
| − | + | ||
| − | + | ||
| − | + | ||
| − | + | ||
| − | + | ||
| − | + | ||
| − | + | ||
| − | + | ||
| − | + | ||
| − | + | ||
| − | + | ||
| − | + | ||
| − | + | ||
| − | + | ||
| − | + | ||
| − | + | ||
| − | + | ||
| − | + | ||
|} | |} | ||
=Tips= | =Tips= | ||
{| | {| | ||
| − | |style="padding: 10px 0px | + | |style="padding: 10px 0px 30px 15px;"|1. If you want to allow access to a certain product only through automatic upgrade/downgrade of another product, you may set such product as hidden.<br/>Product Auto Upgrade For WHMCS allows configuration of hidden products. |
| − | + | ||
| − | + | ||
| − | + | ||
| − | + | ||
| − | + | ||
| − | + | ||
| − | + | ||
| − | + | ||
|} | |} | ||
| Line 856: | Line 445: | ||
|} | |} | ||
{| | {| | ||
| − | |style="padding: 0px 0px | + | |style="padding: 0px 0px 30px 15px;"|2. In case you encounter any issues when enabling the extension, please make sure you are using Advanced Billing For WHMCS 3.1.3 or later.<br/> Product Auto Upgrade For WHMCS 2.0.0 is not supported by the previous versions of Advanced Billing. |
| − | + | ||
| − | + | ||
| − | + | ||
| − | + | ||
| − | + | ||
| − | + | ||
| − | + | ||
| − | + | ||
| − | + | ||
| − | + | ||
| − | + | ||
| − | + | ||
| − | + | ||
| − | + | ||
| − | + | ||
| − | + | ||
| − | + | ||
| − | + | ||
|} | |} | ||
Revision as of 11:32, 13 November 2017
Contents |
About Product Auto Upgrade For WHMCS
| Product Auto Upgrade For WHMCS permits to automatically shift products on the basis of the server resource usage tracked with Advanced Billing For WHMCS module. It will allow you to set rules related to the server resource usage according to which the module will upgrade/downgrade products and their configurable options at the right time. You will be also able to let your clients decide if they want their products to be modified as well as enable them to set the rules on their own. |
- Admin Area Features:
| ✔ Define Product Auto Upgrade Groups |
| ✔ Enable/Disable Product Auto Upgrade Groups |
| ✔ Create Product Auto Upgrade Options |
| ✔ Assign Product To An Option - Configurable Option Support |
| ✔ Define Options Upgrade/Downgrade Rules |
| ✔ Set Up Minimal Upgrade/Downgrade Interval |
| ✔ Enable/Disable Any Product Auto Upgrade Option |
| ✔ Drag & Drop To Reorder Options |
| ✔ Define Client Area Features |
| ✔ View List Of All Hostings Affected By Product Auto Upgrade |
| ✔ Access Product Auto Upgrade History Of Any Hosting |
- Client Area Features:
| ✔ Enable/Disable Product Auto Upgrade And Product Auto Upgrade Options |
| ✔ Manage Rules Of Product Auto Upgrade Options |
| ✔ Set Up Minimal Upgrade/Downgrade Interval |
| ✔ View Products' Product Auto Upgrade History |
| ✔ Set Up Rules Of Notifications |
| ✔ Define Minimal Notification Interval |
- General Info:
| ✔ Requires Advanced Billing For WHMCS - Server Resource Usage Billing (read more) |
| ✔ Multi-Language Support |
| ✔ Supports PHP 5.3 Up To PHP 7 |
| ✔ Supports WHMCS Templates Five and Six |
| ✔ Supports WHMCS V6 and V7 |
Installation and Configuration
| In this tutorial we will show you how to successfully install and manage Product Auto Upgrade For WHMCS. We will guide you step by step through the whole installation and configuration process. |
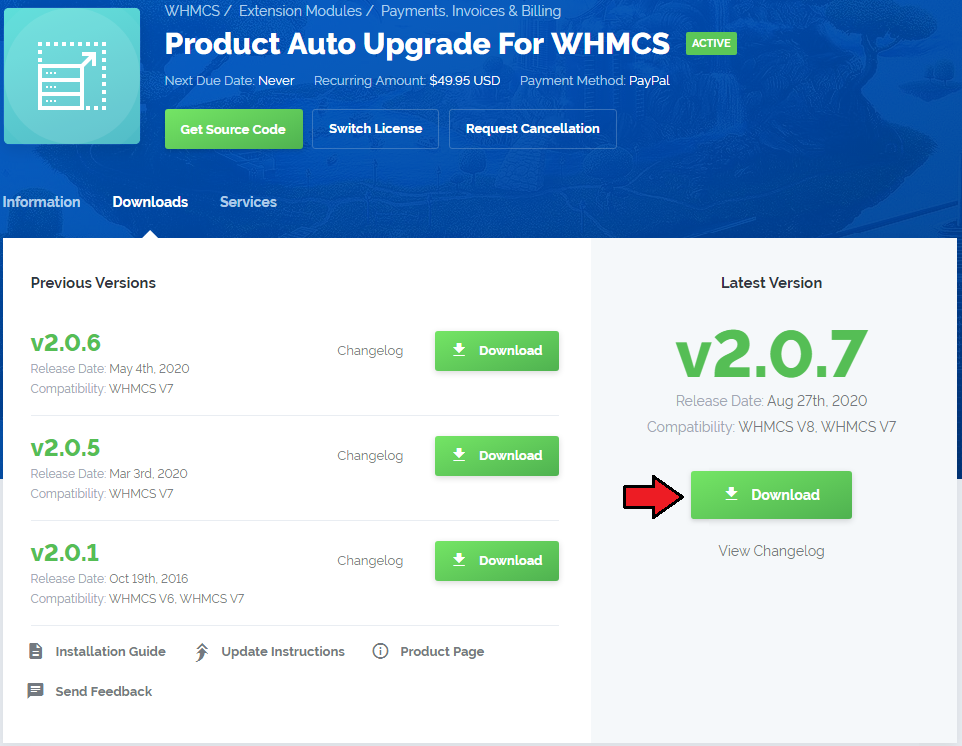
| 1. Log in to your client area and download the module. |
|
| 2. In the downloaded file you will find two packages that support different PHP versions. As presented on the screen below, the first one is dedicated to PHP 7, while the second one is aimed at PHP 5.3 up to PHP 5.6. It does not apply to open source versions. Note: You can check current PHP version in your WHMCS. To do so proceed to 'Utilities' → 'System' → 'PHP Info'. |

|
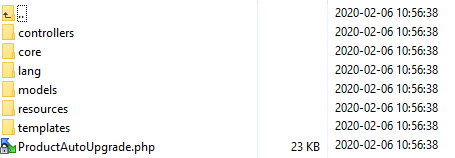
| 3. Extract the downloaded file and choose the one with the right PHP version. Upload and extract the PHP file into the main WHMCS directory. Files in your WHMCS directory should look like this. |
|
Module Configuration
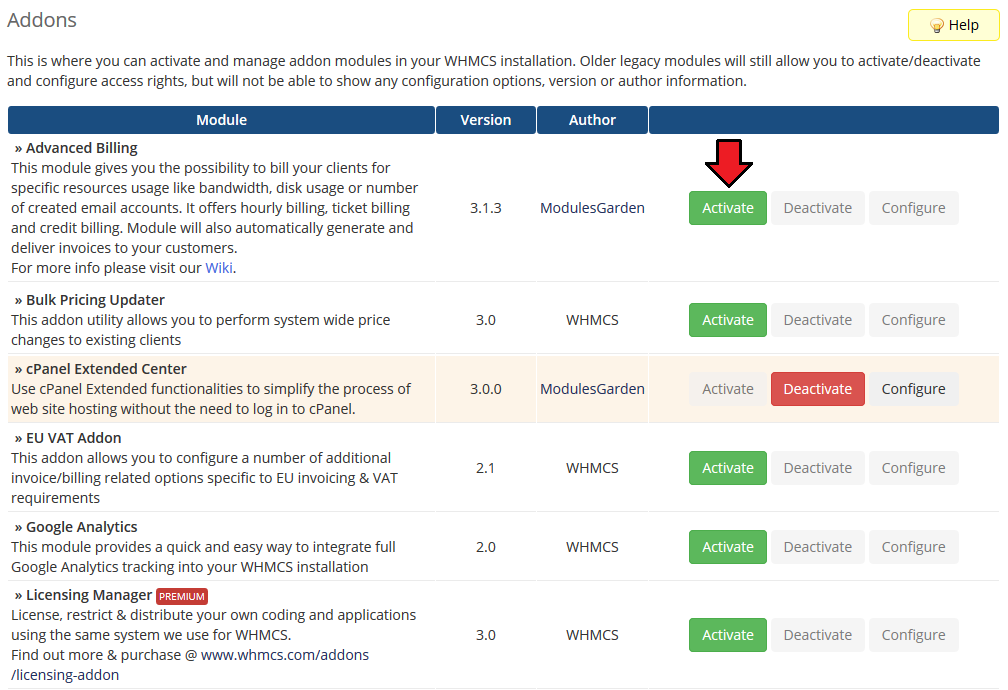
| 4. Now you have to activate the module in your WHMCS system. Move to 'Setup' → 'Addon Modules', find 'Advanced Billing' and press 'Activate' button. |
|
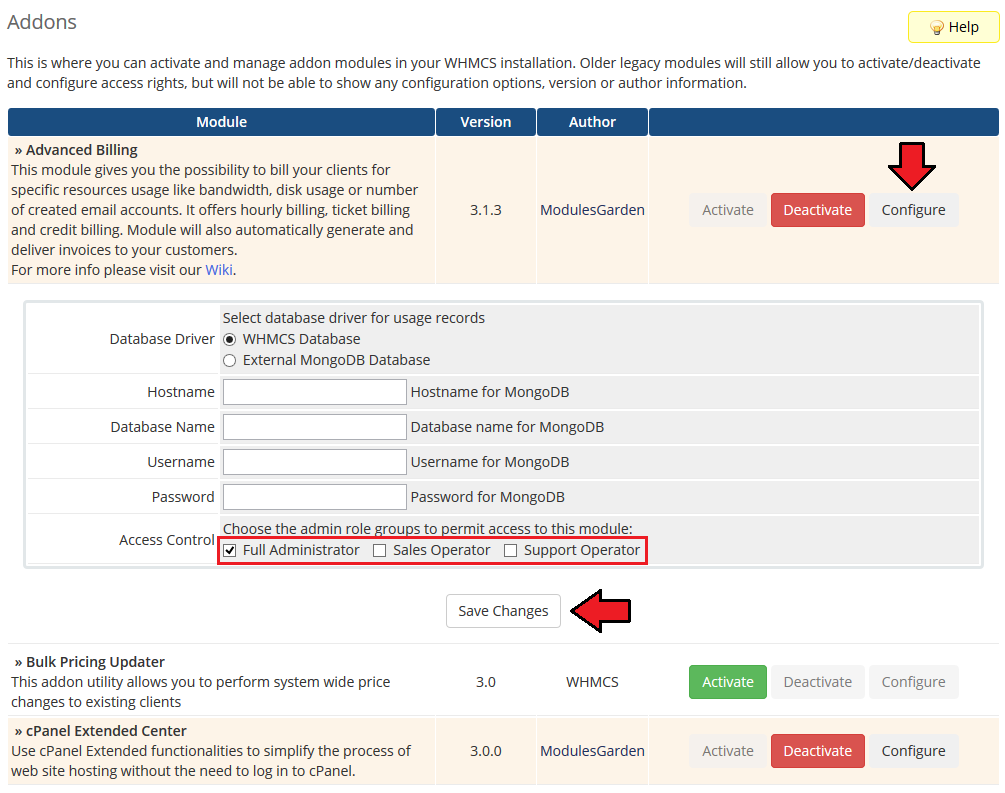
| 5. In the next step you need to permit access to the module. To do so, press 'Configure', choose desired admin roles and press 'Save Changes'. |
|
| 6. Now, set up a cron job, you can find it in your WHMCS → 'Addons' → 'Advanced Billing' as shown on the following screen. |
|
Extension Configuration
| 7. Now, you have to activate the extension in your Advanced Billing For WHMCS. Log in to your WHMCS admin area and proceed to 'Addons' → 'Advanced Billing' → 'Settings' → 'Extensions'. |
|
| 8. Next, you have to provide your license key. Press 'Configure' next to the extension. |
|
| 9. Paste your license here and then confirm the changes. |

|
| Your Product Auto Upgrade For WHMCS is ready to use! |
Management
| To combine any product with Product Auto Upgrade For WHMCS, you need to firstly enable and then configure it in Advanced Billing For WHMCS. Advanced Billing For WHMCS is used to collect information about hosting's resource usage. |
Admin Area
| Before you can do anything you must enable the products you want to work with for Advanced Billing. |
|
| Only then you have to enable the extension Product Auto Upgrade For WHMCS for each of the products. Move to 'Settings', find appropriate section and enable the extension. |

|
Groups of Rules
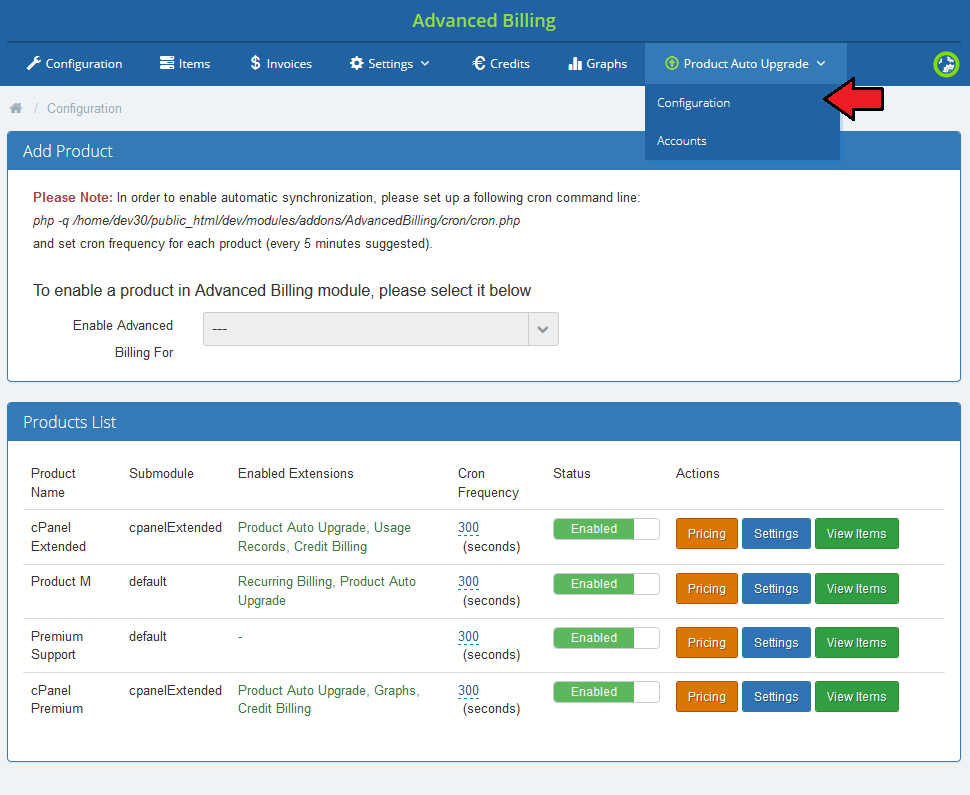
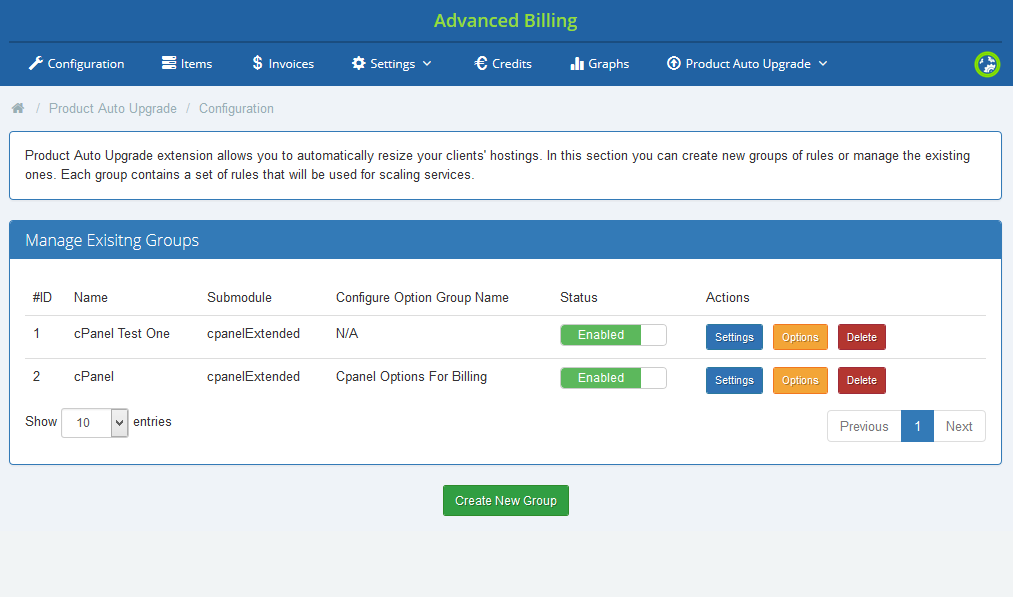
| As you might have already noticed, a new tab dedicated to the extension appeared on your Advanced Billing For WHMCS module main menu. Under this section there is located the whole management of the extension. Let's move to 'Configuration' firstly. |
|
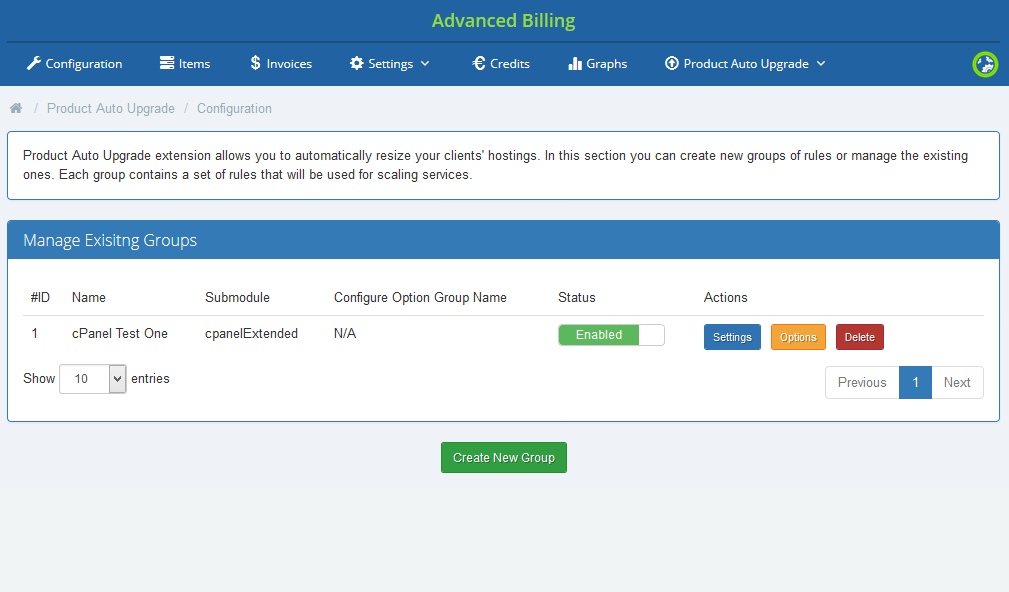
| What you will find there is a full list of autoscaling groups displayed. Here you can find information such as status of a group, its name and used submodule. |
|
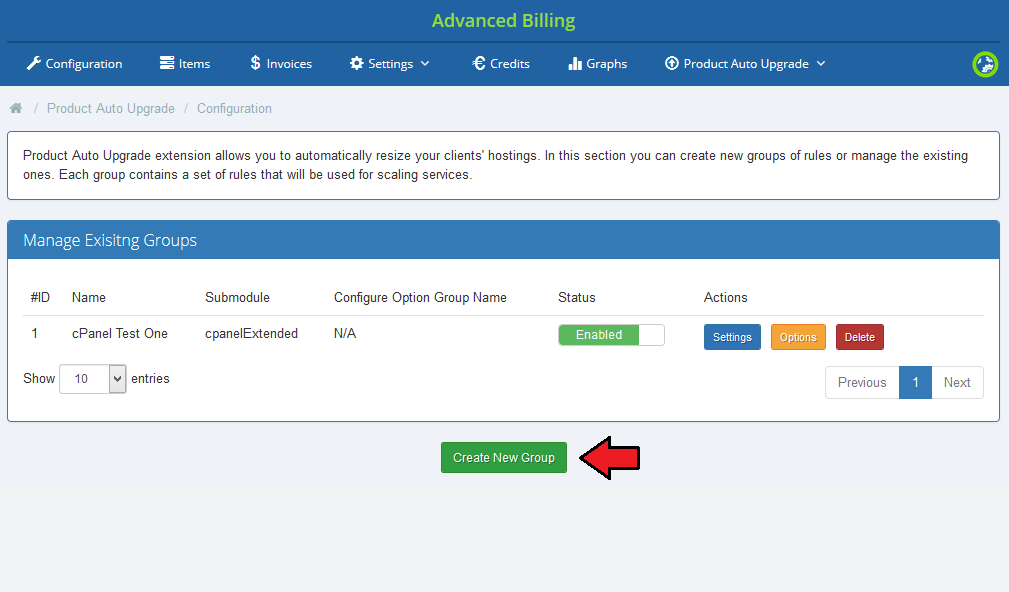
| Let's see now how to create a new group. Press 'Create New Group' button and a short formula will appear. |
|
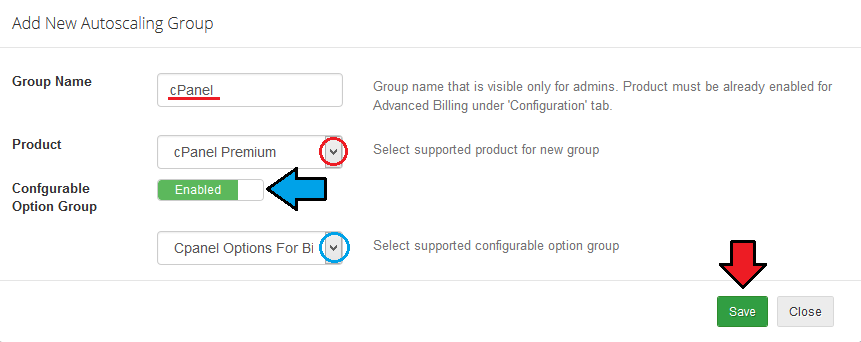
| You can add products and define rules inside of the group which will result in upgrading/downgrading client's hosting. Name your new group - this name is only for your information and convenience. Then select the product that can be automatically upgraded or downgraded according to resource usage count. |
|
| Your newly created group appeared on the list. Now you can configure it according to your specific needs. |
|
Group Configuration
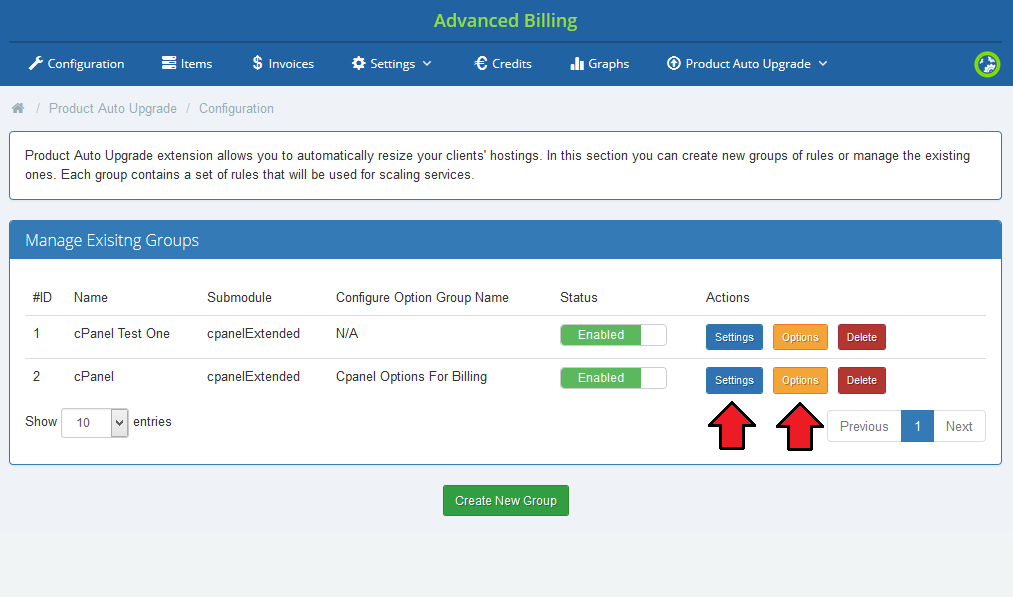
There are two main sections where a group can be configured.
|
|
Group Settings
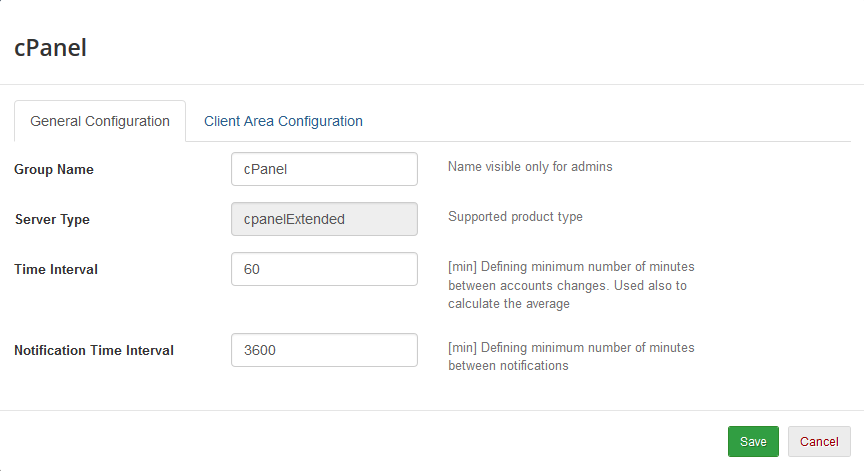
General Configuration
|
|
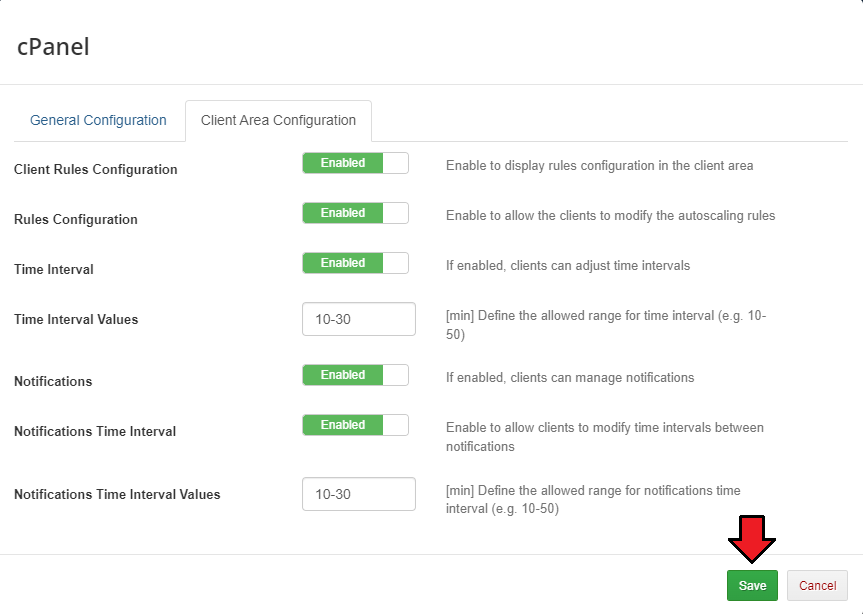
Client Area Configuration
Do not forget to save the configuration when it is ready. |
|
Group Options
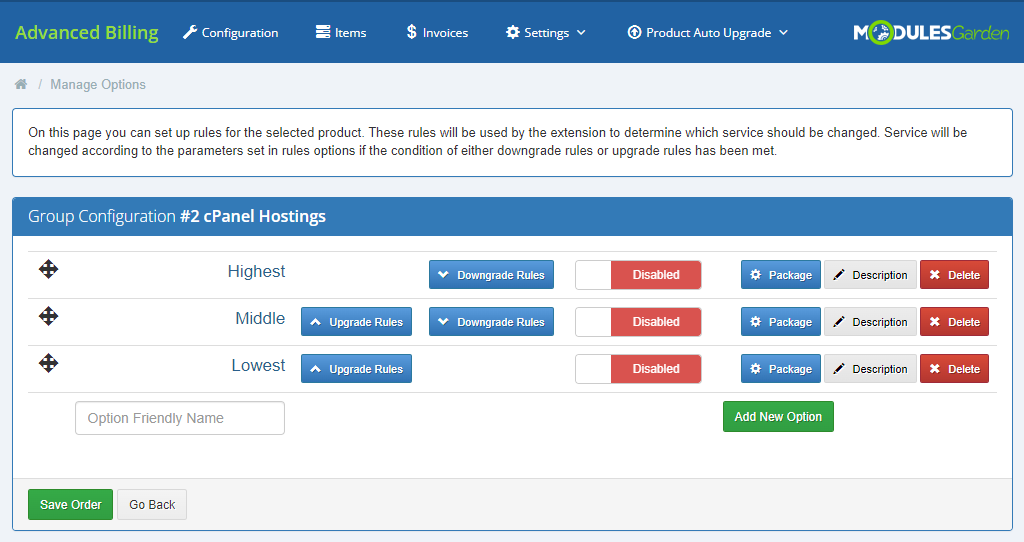
| The second place where the group rules are configured is Options section. These rules will be used by the extension to determine which service should be changed. |
|
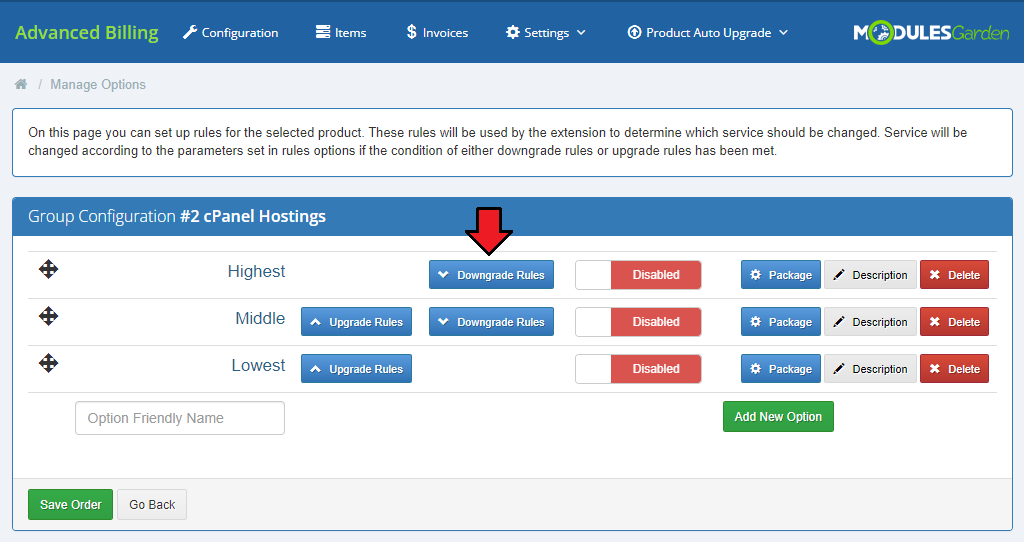
| Every group has already some predefined basic options - disabled at the start. You can base your rules configuration on them or add your own ones in case they are not sufficient. Let us show how to set the autoscaling rules on the basis of these options. Before you can do anything, you must configure the upgrade and downgarade rules. |
|
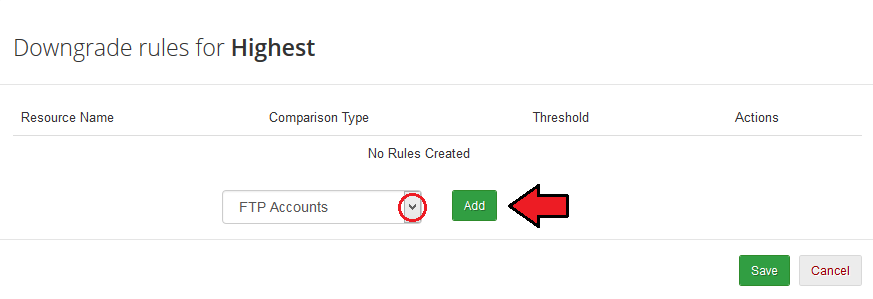
| 'Upgrade Rules'/'Downgrade Rules' can have multiple rules defined. To add a new rule, select it from a dropdown menu marked on the following screen and press 'Add'. |
|
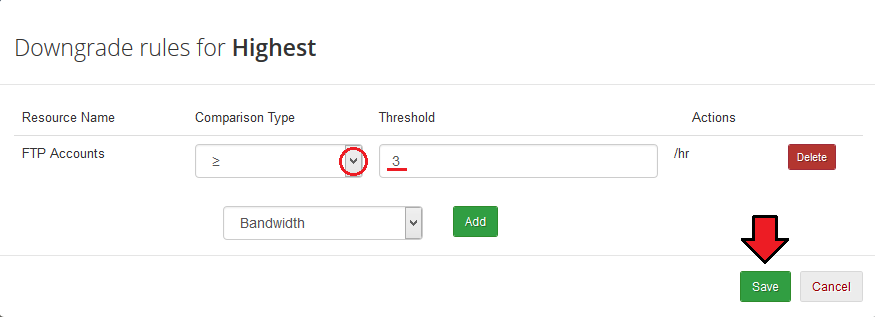
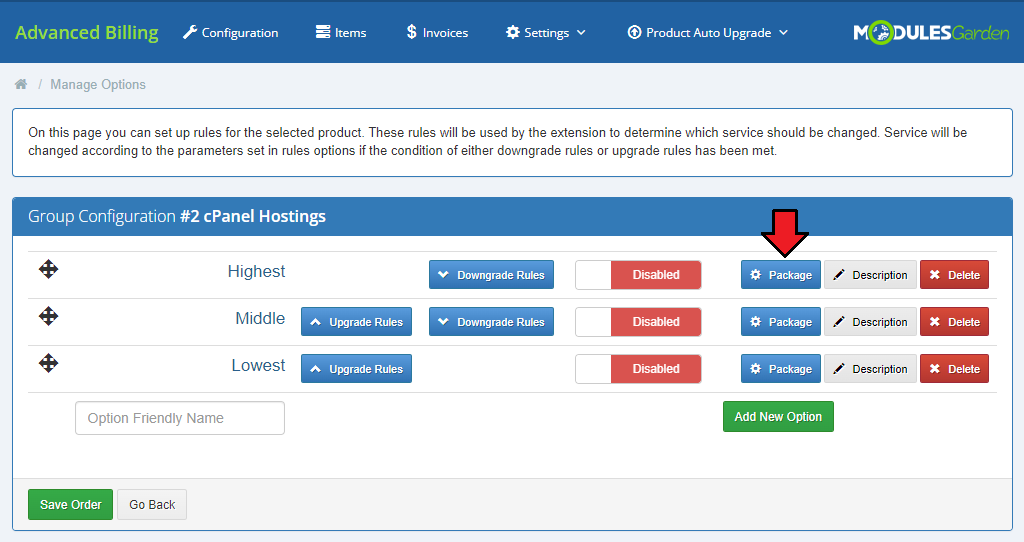
| You can define comparison type and threshold of any added rule. To add a rule which will be fulfilled when the product has more or equal than 3 FTP accounts, choose '≥' from 'Comparison Type' and type '3' into 'Threshold' field. |
|
| You also have to define a product for each package that will be used when upgrading/downgrading. Press button marked on the screen to go on. |
|
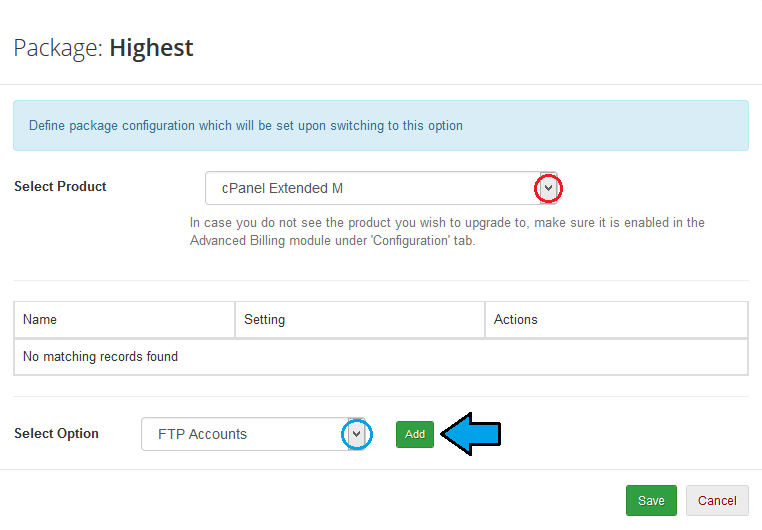
| Select the product you need from the available in the dropdown menu. Then select option you wish to be used by clients and add it. Save the changes. |
|
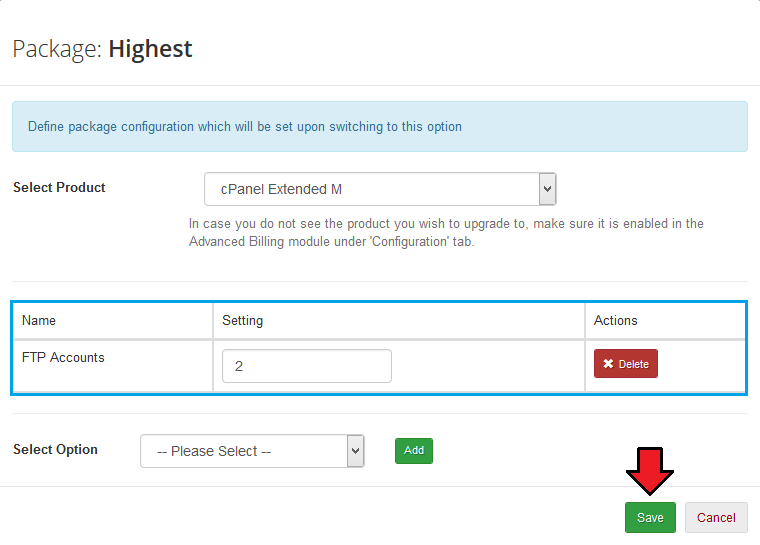
| Every selected option appears in the box above. Here you can specify available selection under 'Setting' or delete it. |
|
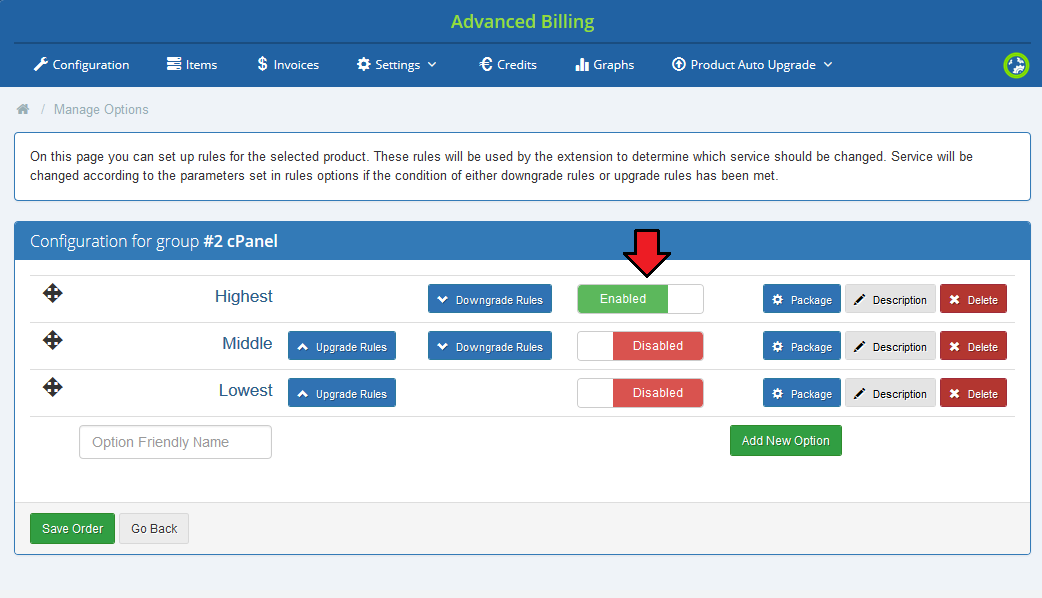
| Repeat that for all packages that you want to enable. Note that only packages with selected products can be enabled! |
|
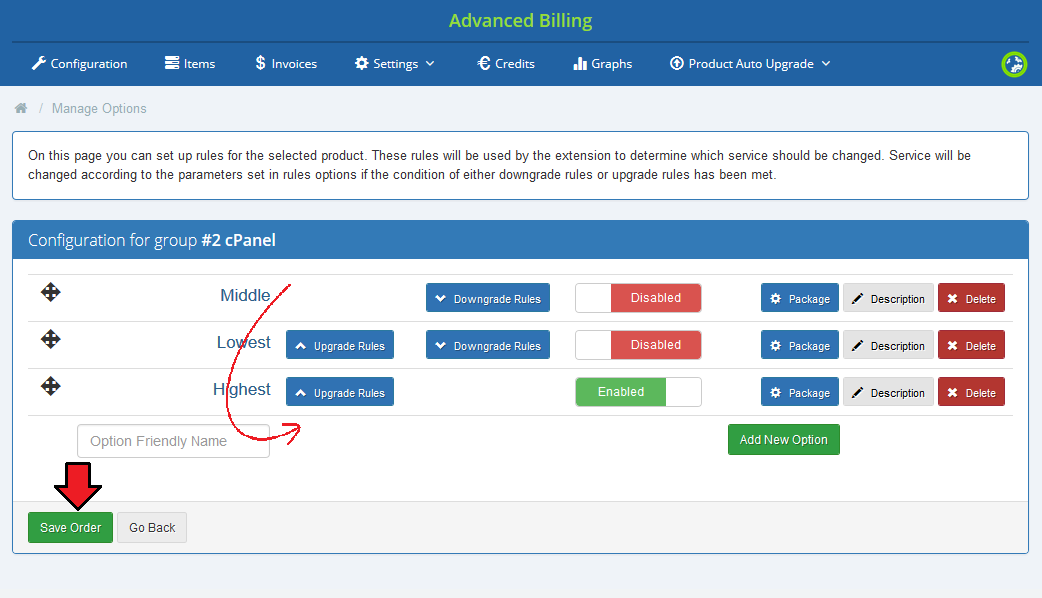
| Additionally, you can change the order the rules are displayed, simply drag and drop a rule and make a previously downgrade rule an upgrade. |
|
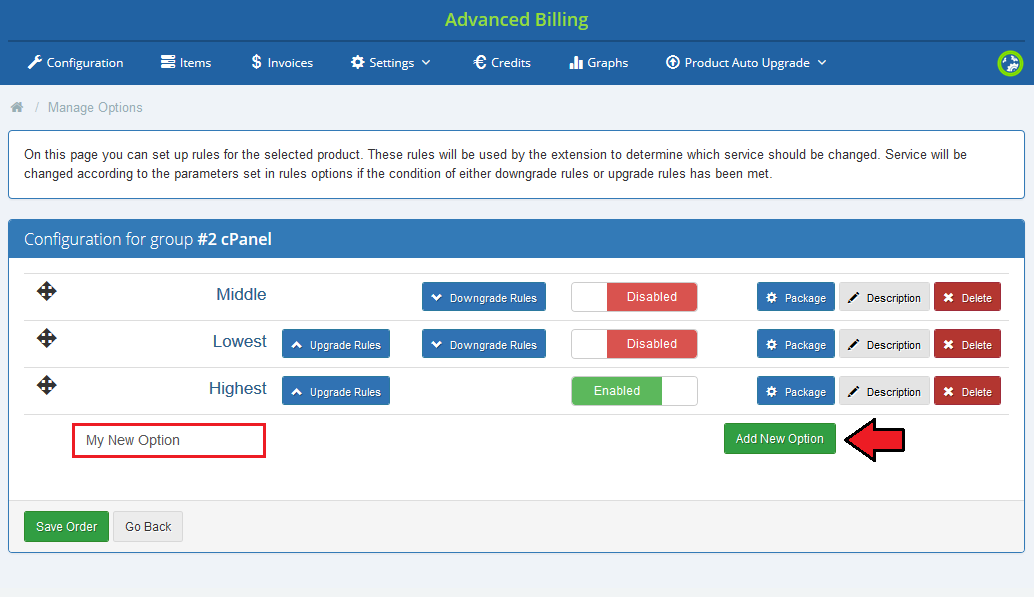
| Add new option, just type in its name, press 'Add New Option' and then configure it like the previous ones. |
|
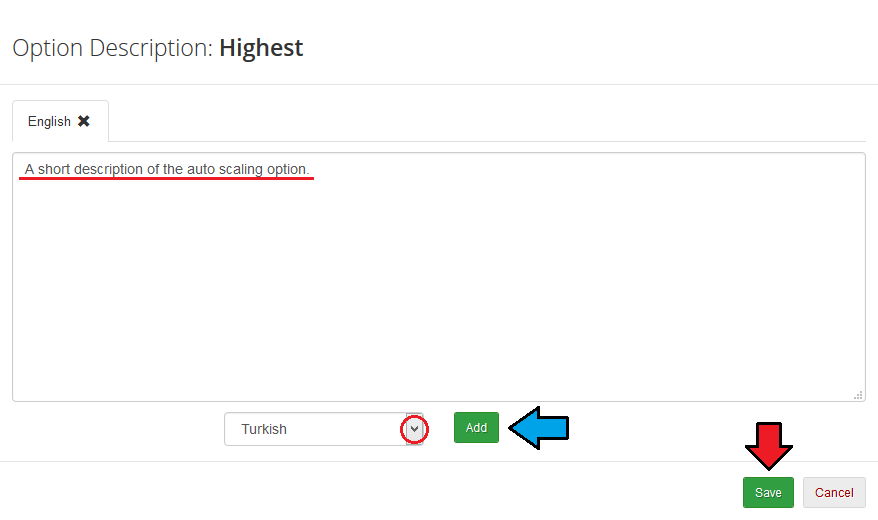
| Finally, you can describe shortly each option. Press ' Description' and a text area will appear. Type in your description there. As you can see you can prepare a few language versions of the description. |
|
Accounts
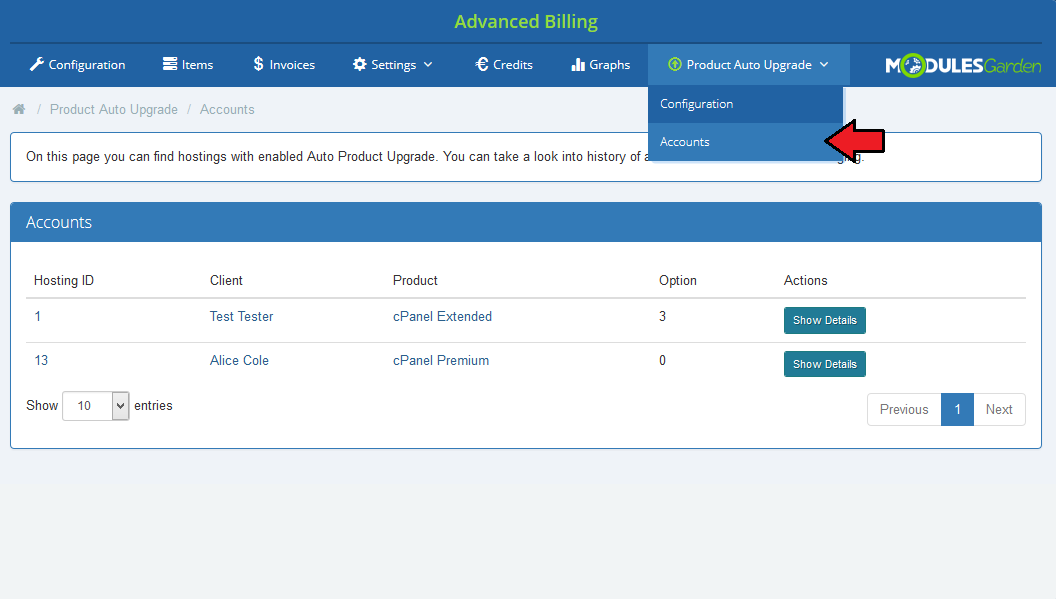
| To access the list of hostings affected by the autoscaling groups proceed to 'Product Auto Upgrade' → 'Accounts'. Information about each hosting can be found here along with access to the hosting history. |
|
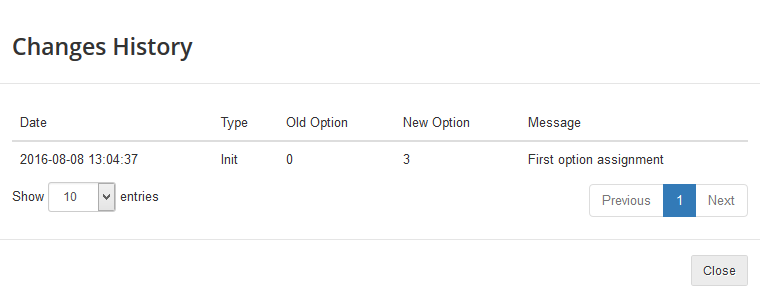
| Hosting history contains the list of changes ever made for the hosting. |
|
Client Area
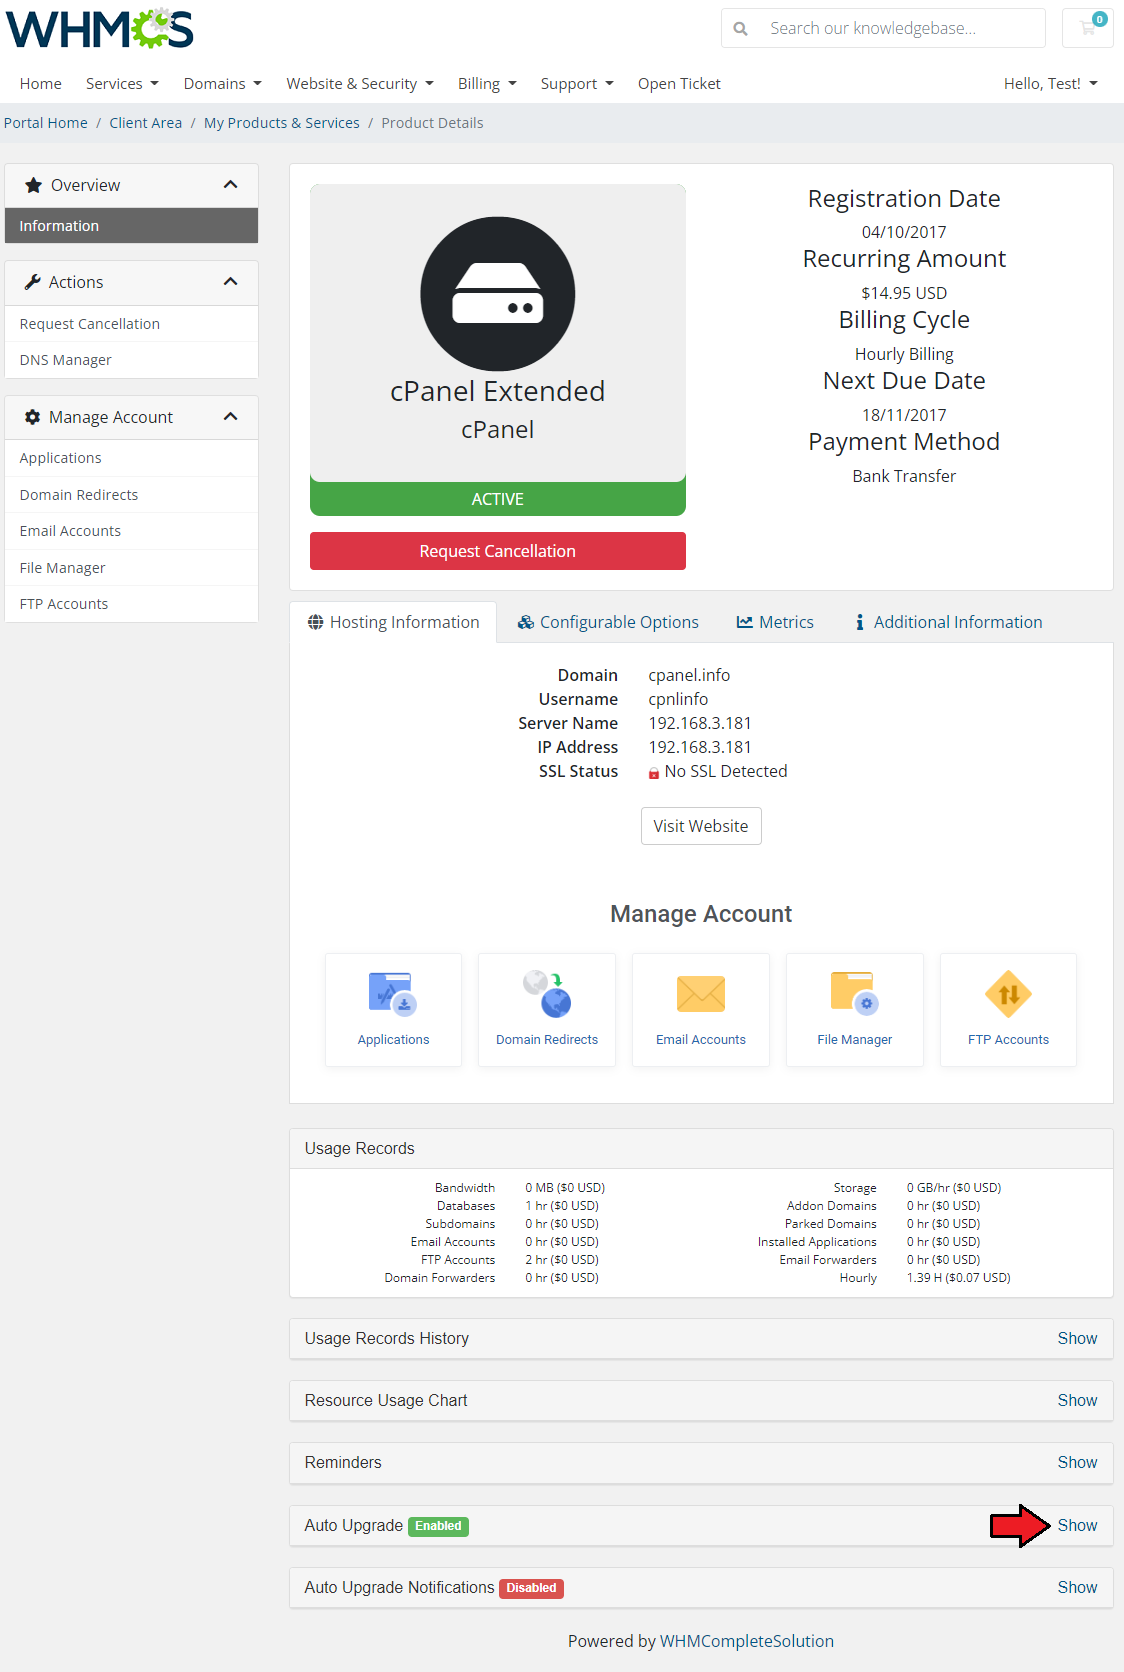
| In the following section we will show you client area with all autoscaling features enabled. As you can see, autoscaling is displayed on the main page of a product right below the Advanced Billing For WHMCS usage records. |
|
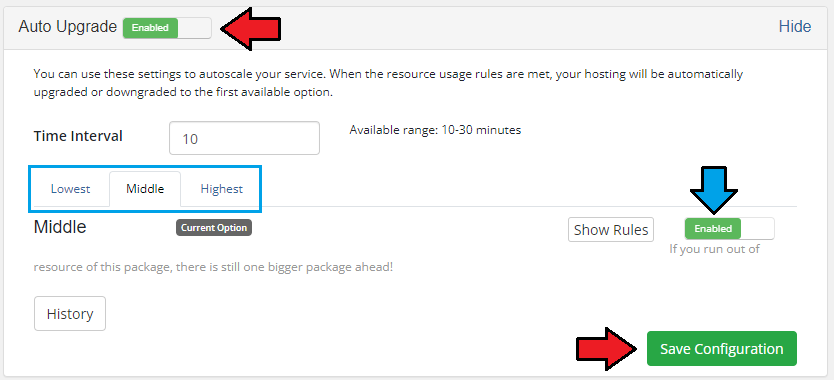
| You can easily enable/disable autoscaling (red) or a selected option (blue) through pressing 'Enabled'/'Disabled' button and saving the changes. To browse other options, use their names marked on the following screen. |
|
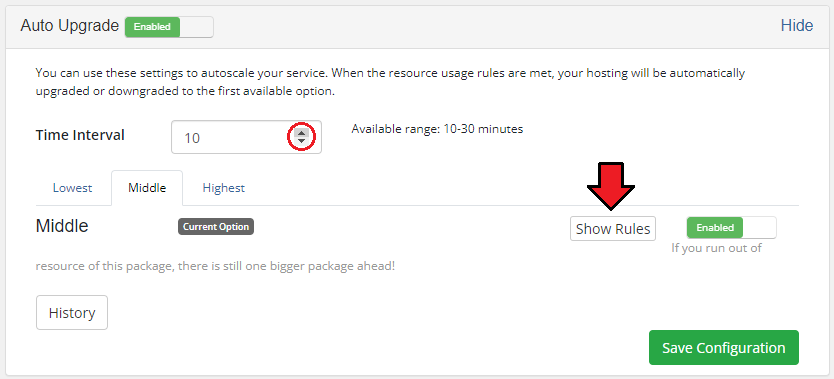
| Through pressing 'Show Rules' you can manage switching rules of currently displayed option. Additionally, you can change the minimum interval between the changes through using marked field. |
|
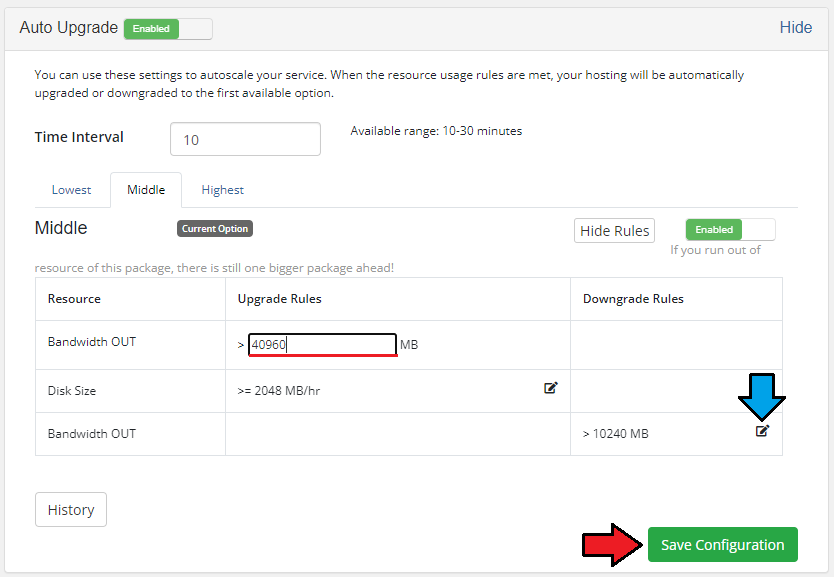
| Rules are displayed in a table, press pencil icon next to the rule you wish to change. Do not forget to save changes when you finish. |
|
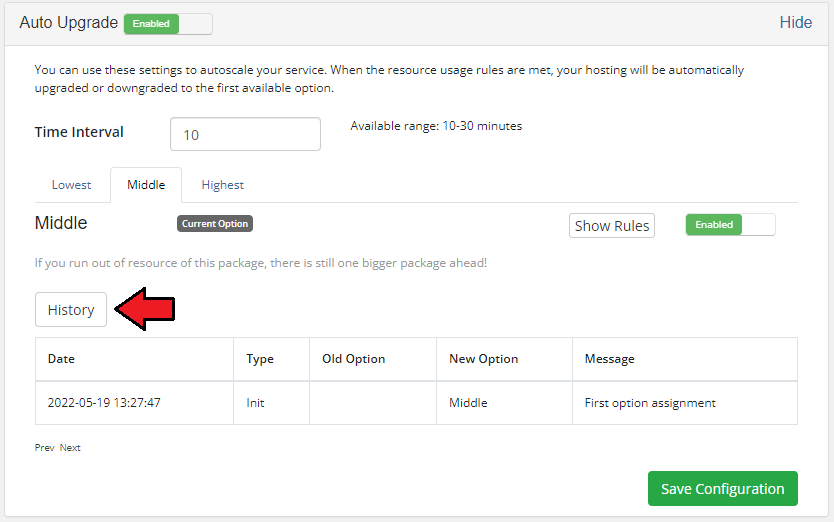
| Besides the management of autoscaling, you can view the history of switches made on a hosting through pressing 'History'. |
|
Notifications
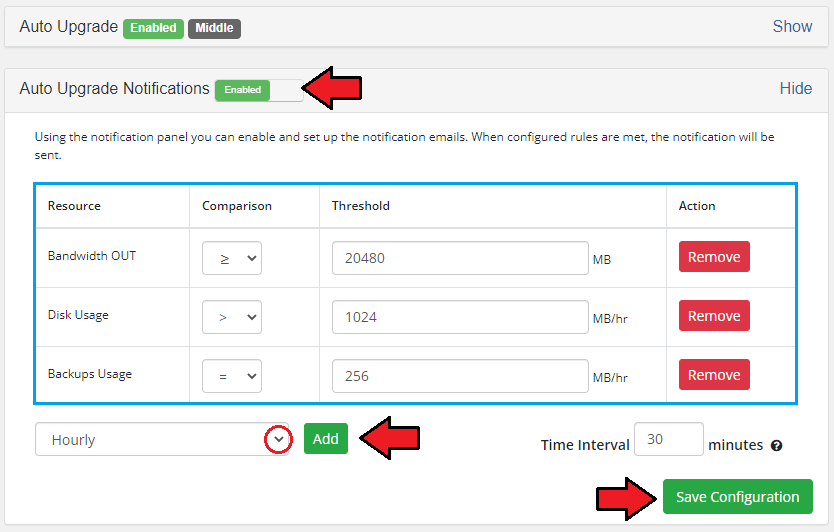
| Client can also set up notifications, they will be sent when requirements defined by a client are met. For the settings shown on the following screen, notification will be sent once in ten minutes if the following rules are met. |
|
Sample Usage
| In this section we will show you a sample situation when Product Auto Upgrade For WHMCS is used simultaneously with another built-in extension to Advanced Billing - Recurring Billing. |
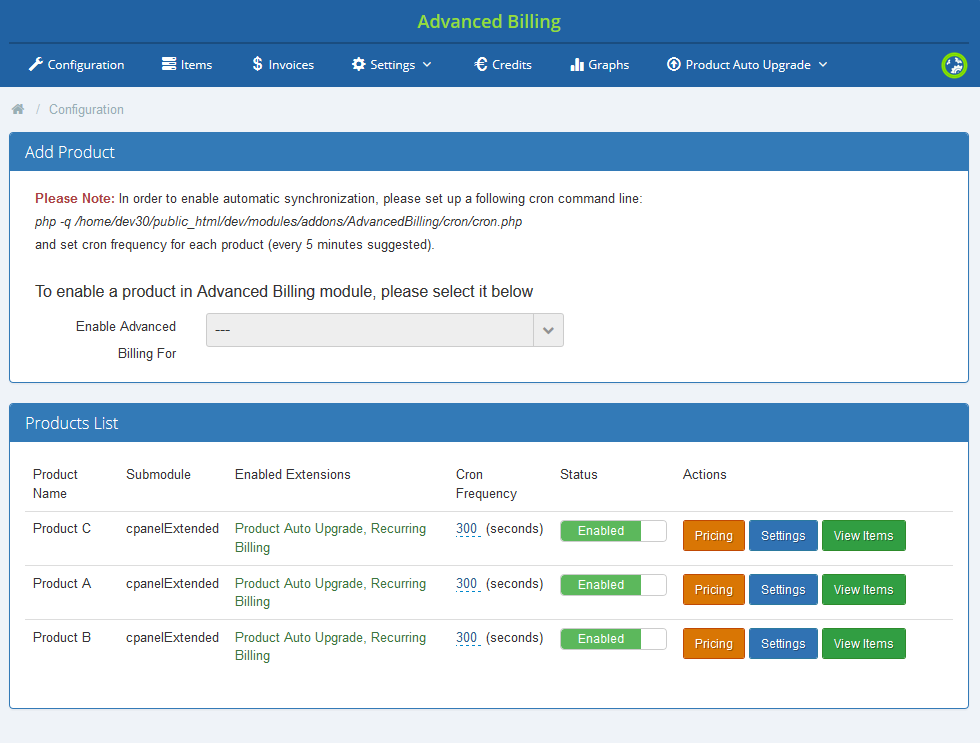
| Let's say you have configured 3 cPanel Extended products enabled for Advanced Billing. |
|
Each of the products has different limits set:
Afterwards, you have created an autoscaling group, added products listed above to it and defined them with following rules. |
|
|
|
| Now, this is which is going to happen: 1. A client, John orders product C and creates 3 FTP accounts in it. |
|
That was all about upgrading/downgrading the products, but let us now see how the payments look like. |
Tips
| 1. If you want to allow access to a certain product only through automatic upgrade/downgrade of another product, you may set such product as hidden. Product Auto Upgrade For WHMCS allows configuration of hidden products. |
Common Problems
| 1. When you have problems with connection, check whether your SELinux or firewall does not block ports. |
| 2. In case you encounter any issues when enabling the extension, please make sure you are using Advanced Billing For WHMCS 3.1.3 or later. Product Auto Upgrade For WHMCS 2.0.0 is not supported by the previous versions of Advanced Billing. |