Hosting Quota Notifications 1.X For WHMCS
From ModulesGarden Wiki
(Difference between revisions)
|
|
| Line 472: |
Line 472: |
| | ====Services==== | | ====Services==== |
| | {| | | {| |
| − | |style="padding: 10px 0px 15px 15px;"|xxxxxxxxxx | + | |style="padding: 10px 0px 15px 15px;"|In the Services tab you can see which products, additions and domains have a relationship with this brand.</br> |
| | + | These services are automatically added to the brand while ordering from the branded domain. |
| | |} | | |} |
| | {| | | {| |
| − | |style="padding: 0px 0px 20px 25px;"|[[File:MB2_XX.png]] | + | |style="padding: 0px 0px 20px 25px;"|[[File:MB2_27.png]] |
| | |} | | |} |
| | + | {| |
| | + | |style="padding: 0px 0px 15px 15px;"|You can also manually add a relation for a service that is not yet branded.<br/> |
| | + | Press '' 'Add' '' [[File:MB2_Plus.png|frameless]] button and then select the type and service you want to assign to the brand. |
| | + | |} |
| | + | {| |
| | + | |style="padding: 0px 0px 20px 25px;"|[[File:MB2_28.png]] |
| | + | |} |
| | + | {| |
| | + | |style="padding: 0px 0px 30px 15px;"|And if you want to delete a service relation with the brand, press '' 'Delete' '' [[File:MB2_Delete.png|frameless]] button and confirm the action. |
| | + | |} |
| | + | |
| | ====Invoices==== | | ====Invoices==== |
| | {| | | {| |
Revision as of 08:55, 15 September 2017
| Multibrand For WHMCS will allow you to manage multiple brands on multiple websites while using just a single WHMCS installation.
You will be able to customize your brand through modifying factors like client area template, logo or brand language, and preview the changes with just a single click.
The module enables you to easily assign your clients to and migrate them between brands, as well as assign products and ticket departments to each brand.
Owing to Multibrand For WHMCS your customers will be able to log into specified client areas in accordance with the brand under which they purchased a product or service.
|
| ✔ User Friendly Management Of Multiple Brands
|
| ✔ Easy Modification Of Existing Brands
|
| ✔ Assign/Unassign Clients To Multiple Brands
|
| ✔ Assign Products To Brands
|
| ✔ Assign Product Bundles To Brands
|
| ✔ Assign Ticket Departments To Brands
|
| ✔ Configure Payment Gateways For Each Brand Separately:
|
| ✔ PayPal - Single Payment And Subscription
|
| ✔ 2CheckOut - Single Payment Only
|
| ✔ Display Active Clients, Invoices, Orders, Tickets And Services Associated To Brands
|
| ✔ Quick Preview Of Branded Client Area
|
| ✔ Publish/Unpublish Brands On Click
|
| ✔ Set Brand As Default - Automatic Assignment Of New Clients
|
| ✔ View Brand Reports - List Of Clients, Invoices, Orders, Tickets And Services
|
| ✔ View Dynamic Brands Comparison Reports - Various Graph Types
|
| ✔ Generate Separate Email Templates For Each Brand
|
| ✔ Verify Integration Of Templates Used By Brands
|
| ✔ Create Branded Invoices
|
| ✔ Create Branded Announcements
|
| ✔ Add Branded Knowledgebase Articles
|
| ✔ Log In As Client To Chosen Brand
|
| ✔ Displayed Client Area Template And Default Language Depend On Brand
|
| ✔ Access To Products, Invoices, Downloads, Ticket Departments and Payment Gateways Assigned To Brand
|
| ✔ View Articles And Announcements Assigned To Brand
|
| ✔ Receive Branded Emails And Invoices
|
| ✔ Branded Clients Can Only Log Into Brand They Are Assigned To
|
| ✔ Multibranded Clients Can Log Into All Existing Brands With The Same Access Details
|
| ✔ Default Brand For New Accounts
|
| ✔ Brand Terms Of Service URL
|
| ✔ Supports PHP 5.4 Up To PHP 7
|
| ✔ Supports WHMCS Templates Five and Six
|
| ✔ Supports WHMCS V6 and V7
|
Installation
This tutorial will show you how to successfully install and configure Multibrand For WHMCS.
We will guide you step by step through the whole installation and configuration process.
Note: If you are still using any of Multibrand For WHMCS previous versions prior to v2.x, read about it here.
|
Installation
| 1. Log in to your client area and download the module.
|
2. In the downloaded file you will find two packages that support different PHP versions.
As presented on the screen below, the first one is dedicated to PHP 7, while the second one is aimed at PHP 5.4 up to PHP 5.6.
It does not apply to open source versions.
Note: You can check current PHP version in your WHMCS. To do so proceed to 'Utilities' → 'System' → 'PHP Info'.
|
3. Extract the downloaded file and choose the one with the right PHP version. Upload and extract the PHP file into the main WHMCS directory.
The content of PHP version files should look like this.
|
4. When you install Multibrand For WHMCS for the first time you have to rename 'license_RENAME.php' file.
File is located in 'modules/addons/MultibrandFunctionality/license_RENAME.php'. Rename it from 'license_RENAME.php' to 'license.php'.
|
5. In order to configure your license key, you have to edit a previously renamed 'license.php' file.
Enter your license key between quotation marks as presented on the following screen. You can find your license key in your client area → 'My Products'.
|
Activating Addon Module
6. Now you have to activate the module in your WHMCS system.
Log in to your WHMCS admin area. Go to 'Setup' → 'Addon Modules'. Afterwards, find 'Multibrand' and press 'Activate' button.
|
7. In the next step you need to allow to hooks beeing enabled and permit access to this module.
To do so click on 'Configure' button, tick 'Access Control' near required admin role groups and press 'Save Changes'.
|
Additional Settings
8. Now, set up the 'storage' folder as recursively writable (with all subfolders).
This folder are located in 'your_whmcs/modules/addons/Multibrand/' location.
|
9. You will also need set up 'gateways' and 'callback' folders as writable.
This folders are located in 'your_whmcs/modules/' and 'your_whmcs/modules/gateways accordingly locations (do NOT mistake with the in the Multibrand addon location)
|
10. The next step is replacing 'invoicepdf.tpl' file with 'invoicepdf_rename.tpl' for each of the templates used.
'invoicepdf_rename.tpl' file is located in 'your_whmcs/templates/six/' folder.
Simply, remove default 'invoicepdf.tpl' file from template folder and rename 'invoicepdf_rename.tpl' file to 'invoicepdf.tpl' in that folder.
|
Integration Code
11. Now you can access your Multibrand For WHMCS module.
Simply go to the 'Addons' → 'Multibrand'. But before you start using the module you still need to do an 'Integration Code'. It is required for correct branding and it should be done for all templates that you want to use with brands.
So go to the 'Utilities' → 'Integration Code' and follow the instructions given there, depending on the version of WHMCS and templates you are using.
|
12. And that's all! You have now completed the installation of the module.
|
Migration
In the current beta 2.0.0 version, it is not possible to easily migrate data from 1.8.X to 2.X module version.
Such migration functionality will be added in a future stable version. We are sorry for the inconvenience.
|
Configuration and Management
| In this section we will show you how to properly set up and use Multibrand For WHMCS.
|
Brands
| Under 'Brands' tab you can create and manage your brands using a single instance of WHMCS solution.
|
New Brand
Let's start by creating a new brand. For that purpose go to 'Brands' tab and press 'Add a new brand'  button. button.
|
| Fill out brand's 'Name' and 'Domain' with desired values, and press 'Save' button.
|
Your first brand will be created. Next press the 'Edit' '  action button. action button.
|
| You will be moved to the brand configuarion, where you can manage all brand's information and settings.
|
|
Note: Once the configuration of your brand is complete, will still need to set up a CNAME DNS record before the brand is published (status - enabled).
This record will point from branded domain towards your main domain used by WHMCS. To learn more about setting up CNAME records, proceed to the Creating CNAME Records section.
Do not forget to publish the brand as soon as the CNAME record propagates worldwide.
|
Brand Information
In the Brand Information window, you can edit the brand name, domain name and custom logo.
In addition, you can see the current month revenue, total sale and last update of the brand.
|
Settings
| In this window you will be able to configure all the most important settings of your brand, including billing, payment gateways, SMTP and email templates configuration.
|
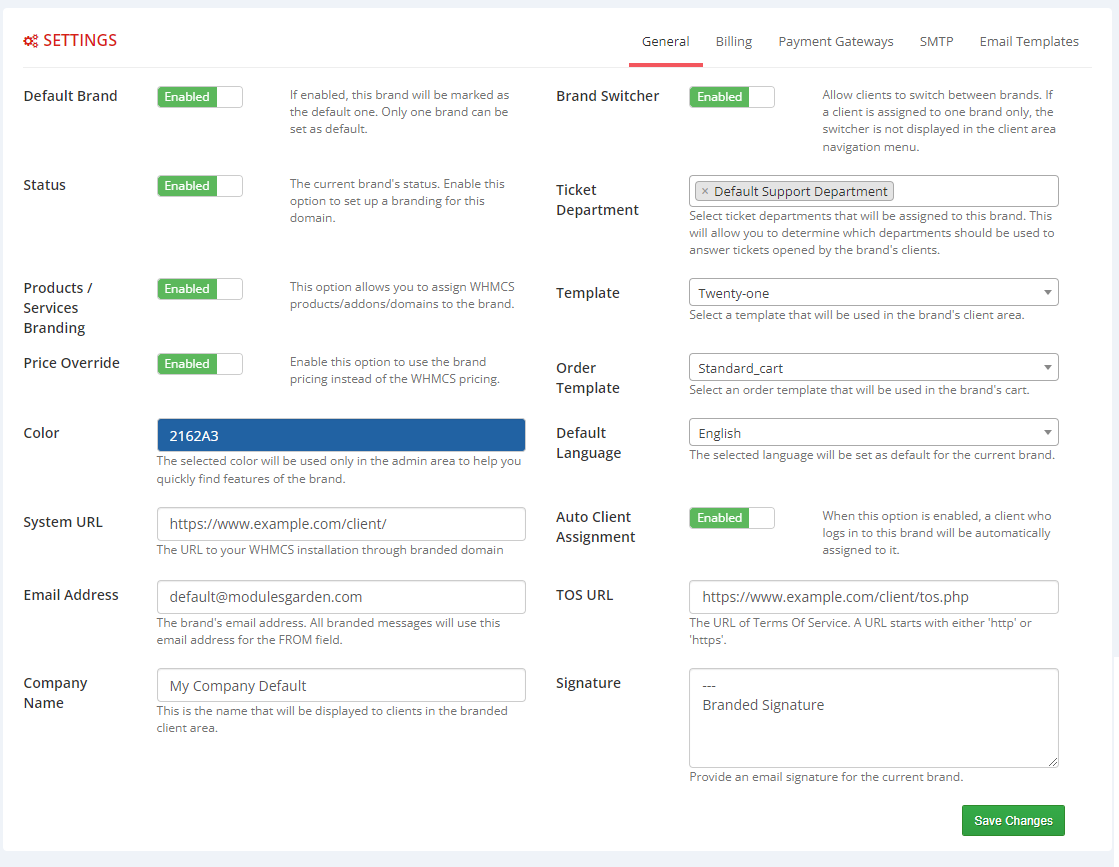
General
In general settings you will configure the main brand options.
First fill out brand's 'Email Address', 'Company Name' and 'TOS URL' . Next choose brand's 'Color', 'Ticket Departments' , 'Default Language', 'Template' and 'Order Template' .
Be sure that chosen template is integrated correctly with Multibrand (see the Integration Code section). Finally toggle 'Auto Client Assign' if you desire.
Here you can also manage brand publication 'Status' , but you should change it to 'Enable' only after you have configured the rest of the settings.
Do not forget to 'Save Configuration' .
Note: Only published brands can be set as default. New users created by admin or through API will be assigned to the default brand.
|
|
Billings
In billing settings you can configure the appearance of your invoices.
- Invoice Branding - if enabled, the invoices will be branded with the number and basic information
- Invoice Pay To Text - address that is displayed on the invoice as the 'Pay To' details.
- Sequential Invoice Number Format - if invoice branding is enabled provided sequential invoice number format will be used
- Next Sequential Number - change this option only if you want to reset the automatic sequential numbering. Otherwise leave empty
Note: Remember to do the 'Additional Settings' step during module installation to make the PDF invoices also branded.
|
Payment Gateways
This tab allows you to configure payment gateway for the brand which will work independently of that configured in WHMCS.
You can check the list of currently available gates in the Feature List.
If you would like in future releases, to see a payment gateway that is not yet available, please contact our support.
Note: You may still use any other payment gateway that is active in your WHMCS system. These gates will have a (WHMCS) mark in the dropdown list.
Multibrand For WHMCS can work with any gateway that works within your WHMCS, the only limitation is that the other payment gateways use the same settings for all brands.
To add a configuration of a payment gateway press 'Add' button.
|
| Next choose the desired gate from the list and press 'Confirm' button.
|
Finally fill the payment gateway settings, according to the details received from the provider.
Save the configuration and activate the gateway.
|
SMTP
If you would like to use for this brand a different outgoing mail configuration than the main WHMCS settings, you can do so in this tab.
In addition you can set custom CSS email styling and header and footer content.
|
Email Templates
In this window you can set up each branded email template in five available categories.
If enabled, the template configured here will be sent to the branded clients instead the one of configured in the main WHMCS template settings.
To start edit a branded template, simply press 'Edit' button.
|
Next, enter the desired subjecty and message content. You can also add them in several languages.
In addition, you can also use the available merge fields tags. Save the changes after finishing.
|
Finally toggle edited template to enabled and save configuration. Next to the edited template you will see the 'Branded' label.
If you would like to restore the default template, simply return to editing it and click the 'Delete Template' button.
|
Services Pricing
In this section you can configure separate prices for products, addons and domains .
To start, select the product, addon or domain tab and click on the 'Add' button. In the following example we will add the braning for product pricing.
|
| Select the product for which you want to set branded prices and click 'Save' .
|
| Next open the pricing editor for the choosen product.
|
Here you can configure the desired prices in selected billing cycles and currencies.
You can also automatically fill in amounts from the main product and update them refreshing the currencies rate.
Note: Availability of billing cycles, prices and currencies to be edited depends on their main configuration in WHMCS.
If one of them is not available for branding, it means that there is no corresponding configuration in the main WHMCS.
|
| From now on, the pricing for this product will be branded. In the same way, you can also configure pricing for the addons and domains.
|
Relations
In the relations section you can see which Clients, Services, Invoices, Knowledgebase, Downloads and Announcements are assigned to this brand.
In addition, you can manually manage, assign and unassign selected items to brand.
Note: Currently there is no possibility of mass management, assigning and unassigning selected items to the brand. This functionality will be implemented in future releases.
|
Clients
In the clients tab you can see customers who are assigned to the brand and the date on which they were assigned.
Assignment takes place at the moment of client registration from the branded domain. You can also manually assign already existing customer to the brand or migrate to another.
Note: If the customers are already registered on one of the other brands and trie to log in to another brand, their will also be automatically assigned to it.
Therefore, one customer can be assigned to several brands at the same time.
|
To assign an exiting client to the brand, press 'Add' button.
In the open popup select the customer you want to add to the brand and press 'Save' .
|
You can also migrate the customer from this brand to another one.
Click 'Migrate'  button next to the client and then select the brand to which you want to assign it. button next to the client and then select the brand to which you want to assign it.
|
And finally, if you want to delete the customer relationship with this brand, press the 'Delete'  button and confirm the action. button and confirm the action.
|
Services
| In the Services tab you can see which products, additions and domains have a relationship with this brand.</br>
These services are automatically added to the brand while ordering from the branded domain.
|
You can also manually add a relation for a service that is not yet branded.
Press 'Add' button and then select the type and service you want to assign to the brand.
|
| And if you want to delete a service relation with the brand, press 'Delete' button and confirm the action.
|
Invoices
Tickets
Knowledgebase
Downloads
Announcements
Statistics
Logs
Branded Admin Area Functionalities
Membership In The Admin Area
Invoices/Tickets/Quotes Creation From Admin Area
Announcements
Downloads
Knowledgebase
Branded Client Area Functionalities
Domains & CNAME Records Configuration
cPanel
DirectAdmin
Plesk
SSL Certificates
cPanel
Branding Limitations & Requirements
Limitations
Requirements
Tips
Common Problems
|


