General
(→How To Use Language Overrides) |
|||
| (94 intermediate revisions by 5 users not shown) | |||
| Line 1: | Line 1: | ||
| − | <meta name="keywords" content="modulesgarden how to change module language, modulesgarden change language, modulesgarden module language, module language wiki, modulesgarden general wiki, modulesgarden general problems, debug mode, debug module, modulesgarden general issues"></meta> | + | <meta name="keywords" content="modulesgarden 7-day free access, modulesgarden common problems, whmcs widget for zendesk, modulesgarden faq, modulesgarden how to change whmcs module language, modulesgarden change language, modulesgarden whmcs module language, whmcs module language wiki, modulesgarden how to change magento module language, modulesgarden how to change magento admin theme, modulesgarden magento module language, magento module language wiki, modulesgarden general wiki, modulesgarden general problems, debug mode, debug module, modulesgarden general issues, modulesgarden module license, modulesgarden license problems, whmcs configurable options, configurable options whmcs"></meta> |
| − | <meta name="description" content="ModulesGarden Wiki | + | <meta name="description" content="In General Section Of ModulesGarden Wiki You Will Find Miscellaneous Information And How-To's About Our Products."></meta> |
| − | ==How To | + | |
| − | '''< | + | <!-- |
| + | ==How To Use Language Overrides== | ||
| + | {| | ||
| + | |style="padding: 10px 0px 15px 15px;"|'''Incorporating language customizations - the modules readily accommodate language overrides, allowing you to tailor the language files to your preferences.'''<br/> The language file english.php remains unencoded and can be modified to suit your needs. However, it's recommended to avoid altering the core file itself, and instead, leverage the capability of using overrides.<br/> | ||
| + | |} | ||
| + | {| | ||
| + | |style="padding: 0px 0px 15px 15px;"|Here's how to apply language overrides: | ||
| + | * Navigate to the ''~/langs/'' directory located within the following ''yourWHMCS/modules/servers/moduleName/langs/'' path. | ||
| + | * Within this directory, create a new file or duplicate the language file you intend to modify. For instance, if you wish to create an override for the English language, establish the following directory structure: | ||
| + | ''~/langs/overrides/english.php''. | ||
| + | * Open the newly created override file to edit its contents. | ||
| + | * At the beginning of the file, indicate the used code, for instance, you can use: '''<?php''' for PHP code. | ||
| + | * Adapt the file content according to your requirements. You can either selectively modify specific variables or opt to revise the entire content of the language file. | ||
| + | |||
| + | For example: | ||
| + | |||
| + | '''Original ''yourWHMCS/modules/servers/moduleName/langs/english.php:''''' | ||
| + | |||
| + | $_LANG['Search'] = 'Search'; | ||
| + | |||
| + | '''Override ''yourWHMCS/modules/servers/moduleName/langs/overrides/english.php:''''' | ||
| + | |||
| + | $_LANG['Search'] = 'Look for'; | ||
| + | |} | ||
| + | {| | ||
| + | |style="padding: 0px 0px 15px 15px;"|By following these steps, you can seamlessly implement language customizations without altering the core language file, ensuring your changes will not be lost after every module update.<br/> | ||
| + | |||
| + | Remember that some of the modules have more than one language file, located under ''/addons'' and ''/servers'' paths. You may create the override files for both of them.<br/> Note that you do not need to paste all the original content of the lang file into the override file. Enter there only the lines that you wish to change, every other line will be fetched from the original module lang file.<br/> Consequently, the override lang file might include only one or just a few lines. | ||
| + | |} | ||
| + | {| | ||
| + | |style="padding: 0px 0px 30px 15px;"|'''''Important: Please review the module features list to assure the language overrides are supported by the module you are using.'' | ||
| + | |} | ||
| + | --> | ||
| + | |||
| + | ==How To Change WHMCS Module Language== | ||
{| | {| | ||
| − | |style="padding: 10px 0px | + | |style="padding: 10px 0px 15px 15px;"|'''1. Changing WHMCS module language is very simple. First of all, go to '' 'lang' '' folder located in your module or templates directory.'''<br/><br/> |
| − | + | '''Important:'''<br/> 1. Depending on the module the directory may vary.<br/> 2. There might be two language files located in different directories, separately for Admin Area and Client Area.<br/> You may decide whether you wish to translate both of them or only one.<br/><br/> | |
| + | Copy '' 'english.php' '' file and rename the newly copied directory with your desired language, for example '' 'italian.php'.'' | ||
|} | |} | ||
{| | {| | ||
| Line 12: | Line 47: | ||
|} | |} | ||
{| | {| | ||
| − | |style="padding: 0px 0px | + | |style="padding: 0px 0px 15px 15px;"|'''2. Open your personalized file now and replace particular sentences with ease.'''<br /> |
| − | For presentation purposes we changed ''['manage header']'' from '' 'Manage' '' to '' ' | + | For presentation purposes we changed ''['manage header']'' from '' 'Manage Account' '' to '' 'Gestisci Il Tuo Account'. '' Do not forget to save the changes! |
|} | |} | ||
{| | {| | ||
| Line 19: | Line 54: | ||
|} | |} | ||
{| | {| | ||
| − | |style="padding: 0px 0px | + | |style="padding: 0px 0px 15px 15px;"|'''3. There are two ways you can alter the language:<br /> |
| − | * | + | *Change the client's language in your WHMCS system: |
|} | |} | ||
{| | {| | ||
| Line 27: | Line 62: | ||
{| | {| | ||
|style="padding: 0px 0px 20px 15px;"| | |style="padding: 0px 0px 20px 15px;"| | ||
| − | * | + | *Change the language directly in the client area (keep in mind that customers can change their language anytime they want): |
|} | |} | ||
{| | {| | ||
| Line 33: | Line 68: | ||
|} | |} | ||
{| | {| | ||
| − | |style="padding: 0px 0px 20px 15px;"|'''4. | + | |style="padding: 0px 0px 20px 15px;"|'''4. Take a look at the screen and you will see that the header has changed from '' 'Manage Account' '' to '' 'Gestisci Il Tuo Account','' which is a direct consequence of our modifications.''' |
|} | |} | ||
{| | {| | ||
| Line 39: | Line 74: | ||
|} | |} | ||
{| | {| | ||
| − | |style="padding: 0px 0px 30px 15px;"| | + | |style="padding: 0px 0px 30px 15px;"|Act accordingly to the above instructions to implement any changes in the language files of our modules. <br/>In case you have any doubts or encounter any problems we will do our best to provide you with adequate assistance. |
| + | '''<span style="color: #ff0000;">Please note that not all of our modules are provided with Multi-Language Support.</span>''' | ||
|} | |} | ||
| − | + | =How To Debug Module= | |
| − | '''<span style="color: #ff0000;">If the procedure described below doesn't work for you, please report | + | '''<span style="color: #ff0000;">If the procedure described below doesn't work for you, please report it to our Support Team.</span>''' |
{| | {| | ||
|style="padding: 10px 0px 20px 15px;"|'''When you are experiencing white page or the module is not working as it should, you can enable debug mode that prints all the PHP errors on the screen.''' | |style="padding: 10px 0px 20px 15px;"|'''When you are experiencing white page or the module is not working as it should, you can enable debug mode that prints all the PHP errors on the screen.''' | ||
|} | |} | ||
{| | {| | ||
| − | |style="padding: 0px 0px 15px 15px;"|To do so, enter the URL you are experiencing the issue with and add | + | |style="padding: 0px 0px 15px 15px;"|To do so, enter the URL you are experiencing the issue with and add an additional parameter''''' '_debug=turnon'. ''''' For example:<br /> |
yourdomain.com/clientarea.php?action=productdetails&id=81'''&_debug=turnon'''<br /> | yourdomain.com/clientarea.php?action=productdetails&id=81'''&_debug=turnon'''<br /> | ||
yourdomain.com/clientarea.php?'''_debug=turnon''' | yourdomain.com/clientarea.php?'''_debug=turnon''' | ||
|} | |} | ||
{| | {| | ||
| − | |style="padding: 0px 0px 10px 15px;"|To disable debug mode, simply call the same parameter but with | + | |style="padding: 0px 0px 10px 15px;"|To disable debug mode, simply call the same parameter but with value '''''turnoff.''''' For example:<br /> |
yourdomain.com/clientarea.php?'''_debug=turnoff''' | yourdomain.com/clientarea.php?'''_debug=turnoff''' | ||
|} | |} | ||
{| | {| | ||
| − | |style="padding: 0px 0px 20px 15px;"|'''If you | + | |style="padding: 0px 0px 20px 15px;"|'''If you get the error as shown on the screen below, please make sure that you are using the correct parameter and you have sufficient privileges. |
|} | |} | ||
{| | {| | ||
|style="padding: 0px 0px 30px 25px;"|[[File:DM1.png]] | |style="padding: 0px 0px 30px 25px;"|[[File:DM1.png]] | ||
| + | |} | ||
| + | |||
| + | =How To Solve Problems With Module License= | ||
| + | {| | ||
| + | |style="padding: 10px 0px 20px 15px;"|'''In case you encounter any problems with the license, please read through the below points to find a solution.''' | ||
| + | |} | ||
| + | {| | ||
| + | |style="padding: 0px 0px 15px 15px;"|1. Make sure your license key applies to the used license. For example:<br/> | ||
| + | *If you had a trial version and then bought a full version (separately), then the license key must be changed. | ||
| + | *If you own a trial version and then upgrade it to a full version, then a trial license key should be used.<br/> | ||
| + | If you want to learn more about upgrades, please follow [https://www.docs.modulesgarden.com/7-Day_Free_Access here]. | ||
| + | |} | ||
| + | {| | ||
| + | |style="padding: 0px 0px 15px 15px;"|2. Check if ''License_RENAME.php'' file has been removed ''(or renamed)''.<br/> | ||
| + | |} | ||
| + | {| | ||
| + | |style="padding: 0px 0px 15px 15px;"|3. Make sure your license file content format is correct.<br/> | ||
| + | Former license format '''(no longer supported)''': | ||
| + | |||
| + | <?php | ||
| + | /* | ||
| + | * LICENSE: | ||
| + | * Please provide your DNS Manager Module For WHMCS license below | ||
| + | */ | ||
| + | $dns_manager_licensekey="ModulesGarden_DNSManager_xxxxxxxxxxxx"; | ||
| + | ?> | ||
| + | |||
| + | '''Current and correct''' license file format: | ||
| + | |||
| + | <?php | ||
| + | /* | ||
| + | * LICENSE: | ||
| + | * Please provide your DNS Manager Module For WHMCS license below | ||
| + | */ | ||
| + | $dns_manager_licensekey="ModulesGarden_DNSManager_xxxxxxxxxxxx"; | ||
| + | |||
| + | Please note that the below symbol is no longer used: <pre style="color: red; font-weight:bold;">?></pre> | ||
| + | |} | ||
| + | {| | ||
| + | |style="padding: 0px 0px 20px 15px;"|4. Check if your firewall does not block our domain: ''modulesgarden.com.'' | ||
| + | |} | ||
| + | {| | ||
| + | |style="padding: 0px 0px 20px 15px;"|5. If you notice the following error message in your client area: <br/> | ||
| + | '''"A problem with module occurred. Please contact the administration."'''<br/> | ||
| + | |||
| + | Then we recommend reissuing your license in the ModulesGarden client area. | ||
| + | |||
| + | |} | ||
| + | {| | ||
| + | |style="padding: 0px 0px 15px 15px;"|6. In case you see an error: <br/> | ||
| + | |||
| + | '''Order Accept Encountered Problems'''<br/> | ||
| + | '''License Invalid: MD5 Checksum Verification Failed'''<br/> | ||
| + | |||
| + | Make sure all module files are correctly downloaded and installed. | ||
| + | |} | ||
| + | {| | ||
| + | |style="padding: 0px 0px 20px 15px;"|7. If, despite following all of the above pieces of advice, problems with you license persist, try to reissue your license. <br/> | ||
| + | To to so, log in to our client area, choose a product, and click the 'Reissue License' button located next to your license key. '' | ||
| + | |} | ||
| + | {| | ||
| + | |style="padding: 0px 0px 20px 25px;"|[[File:G1.png]] | ||
| + | |} | ||
| + | {| | ||
| + | |style="padding: 0px 0px 30px 15px;"|'''In case of further issues, please [https://www.modulesgarden.com/support/ticket/general-support contact our Support Team.]''' | ||
| + | |} | ||
| + | |||
| + | =How To Use Configurable Options= | ||
| + | {| | ||
| + | |style="padding: 10px 0px 10px 0px;"|'''Configurable options on products allow you to give your clients variables which alter the resource available at that product as well as its price.''' | ||
| + | In this tutorial we will show you how to manage configurable options generated by our modules. | ||
| + | |} | ||
| + | |||
| + | ==Editing Configurable Options== | ||
| + | {| | ||
| + | |style="padding: 10px 0px 20px 15px;"|When you successfully set up a product, your client can order it by choosing its resource and settings from default configurable options. | ||
| + | |} | ||
| + | {| | ||
| + | |style="padding: 0px 0px 20px 25px;"|[[File:HCO1.png]] | ||
| + | |} | ||
| + | {| | ||
| + | |style="padding: 0px 0px 15px 15px;"|In case those options do not suit your needs, you can edit them.<br /> | ||
| + | To do so, go to '' 'Setup' '' → '' 'Products/Services' '' → '' 'Configurable Options' '' and press edit button next to configurable option used by your product.<br /> | ||
| + | Its name is '' 'Configurable options for your_product_name' ''. | ||
| + | |} | ||
| + | {| | ||
| + | |style="padding: 0px 0px 20px 25px;"|[[File:HCO2.png]] | ||
| + | |} | ||
| + | {| | ||
| + | |style="padding: 0px 0px 15px 15px;"|Here you can view all products this configurable option group is assigned to.<br /> | ||
| + | Now we will show you how to edit options. Let's say you want to add an option to order a product with up to 5 snapshots.<br /> | ||
| + | To do so, edit '' 'Snapshots Limit' '' by pressing edit button as shown on the screen below. | ||
| + | |} | ||
| + | {| | ||
| + | |style="padding: 0px 0px 20px 25px;"|[[File:HCO3.png]] | ||
| + | |} | ||
| + | {| | ||
| + | |style="padding: 0px 0px 15px 15px;"|You will see a popup window, so make sure your browser will not block it.<br /> | ||
| + | Enter the maximum allowed number of options and save the changes. | ||
| + | |} | ||
| + | {| | ||
| + | |style="padding: 0px 0px 30px 25px;"|[[File:HCO4.png]] | ||
| + | |} | ||
| + | |||
| + | ==Hiding Configurable Options== | ||
| + | {| | ||
| + | |style="padding: 10px 0px 15px 15px;"|If you decide to hide configurable options from a client order form and manage them only from the admin area, follow the steps below.<br /> | ||
| + | Firstly, go to '' 'Setup' '' → '' 'Products/Services' '' → '' 'Configurable Options'.'' | ||
| + | |} | ||
| + | {| | ||
| + | |style="padding: 0px 0px 20px 25px;"|[[File:HCO5.png]] | ||
| + | |} | ||
| + | {| | ||
| + | |style="padding: 0px 0px 20px 15px;"|Afterwards, tick '' 'Hidden' '' checkboxes next to configurable options you want to hide and confirm the action through pressing '' 'Save Changes'.'' | ||
| + | |||
| + | |} | ||
| + | {| | ||
| + | |style="padding: 0px 0px 30px 25px;"|[[File:HCO6.png]] | ||
| + | |} | ||
| + | |||
| + | ==Setting Up Pricing For Configurable Options== | ||
| + | {| | ||
| + | |style="padding: 10px 0px 20px 15px;"|If you decide to set up pricing for configurable options, follow the steps described below. | ||
| + | |} | ||
| + | {| | ||
| + | |style="padding: 0px 0px 20px 25px;"|[[File:HCO7.png]] | ||
| + | |} | ||
| + | {| | ||
| + | |style="padding: 0px 0px 20px 15px;"|Press the edit icon next to configurable options you want to set the pricing for. | ||
| + | |} | ||
| + | {| | ||
| + | |style="padding: 0px 0px 20px 25px;"|[[File:HCO8.png]] | ||
| + | |} | ||
| + | {| | ||
| + | |style="padding: 0px 0px 10px 15px;"|Afterwards, you will see a popup window, so make sure your browser does not block it.<br /> | ||
| + | Now, price you entered for resource should be in a column responsible for the same type of payment as your product uses.<br /> | ||
| + | For example, if we have product with monthly and quarterly payments allowed, you will have to enter product pricing in the first and second columns.<br /> | ||
| + | Confirm through clicking on '' 'Save Changes' '' button as soon as you finish. | ||
| + | |} | ||
| + | {| | ||
| + | |style="padding: 0px 0px 15px 15px;"|Depending on '' 'Option Type' '', pricing you entered may be counted in various ways.<br /> | ||
| + | '' 'Dropdown' '' - You have to set price for each option.<br /> | ||
| + | '' 'Radio' '' - Same as above, only difference is the display manner.<br /> | ||
| + | '' 'Yes/No' '' - Your price will be applied if client checkes this option.<br /> | ||
| + | '' 'Quantity' '' - Price you set will be multiplied by amount of configurable options your client chooses. | ||
| + | |} | ||
| + | {| | ||
| + | |style="padding: 0px 0px 30px 25px;"|[[File:HCO9.png]] | ||
| + | |} | ||
| + | {| | ||
| + | |style="padding: 0px 0px 20px 15px;"|On the screen below you can see all configurable options types available on the order form. | ||
| + | |} | ||
| + | {| | ||
| + | |style="padding: 0px 0px 20px 25px;"|[[File:HCO10.png]] | ||
| + | |} | ||
| + | {| | ||
| + | |style="padding: 0px 0px 30px 15px;"|Now you should have no problems with understanding and using the configurable options in your WHMCS. | ||
|} | |} | ||
Revision as of 15:39, 2 August 2023
Contents |
How To Change WHMCS Module Language
| 1. Changing WHMCS module language is very simple. First of all, go to 'lang' folder located in your module or templates directory. Important: |
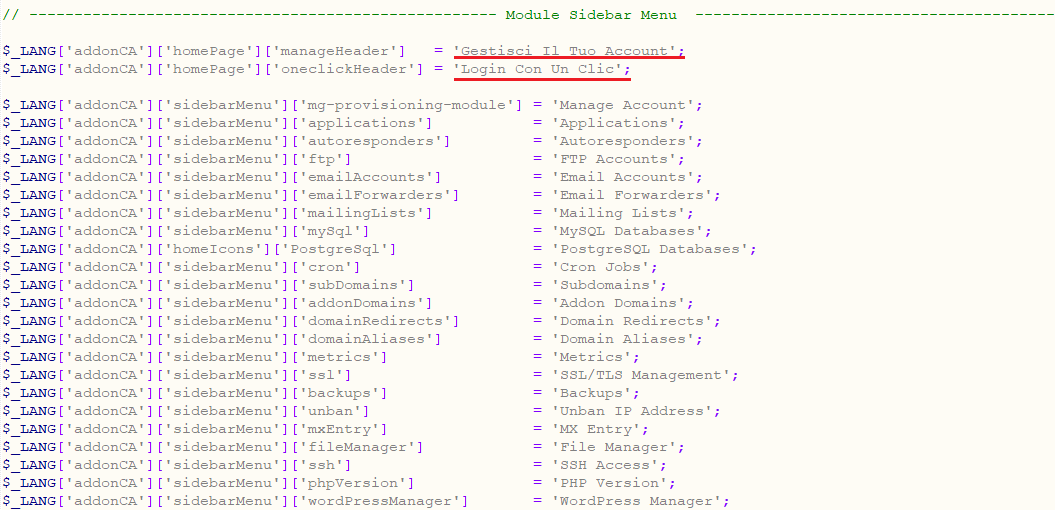
| 2. Open your personalized file now and replace particular sentences with ease. For presentation purposes we changed ['manage header'] from 'Manage Account' to 'Gestisci Il Tuo Account'. Do not forget to save the changes! |
|
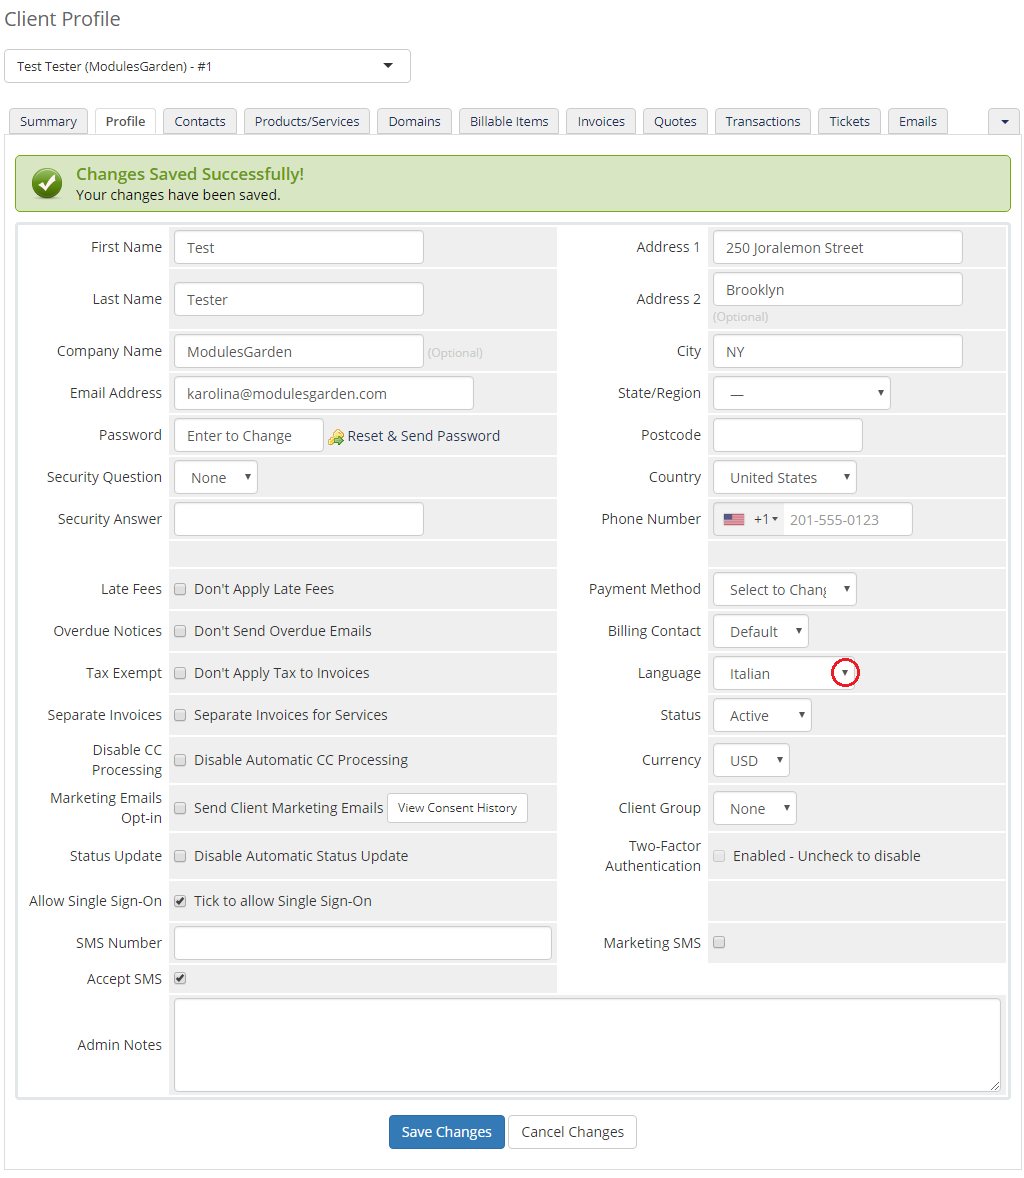
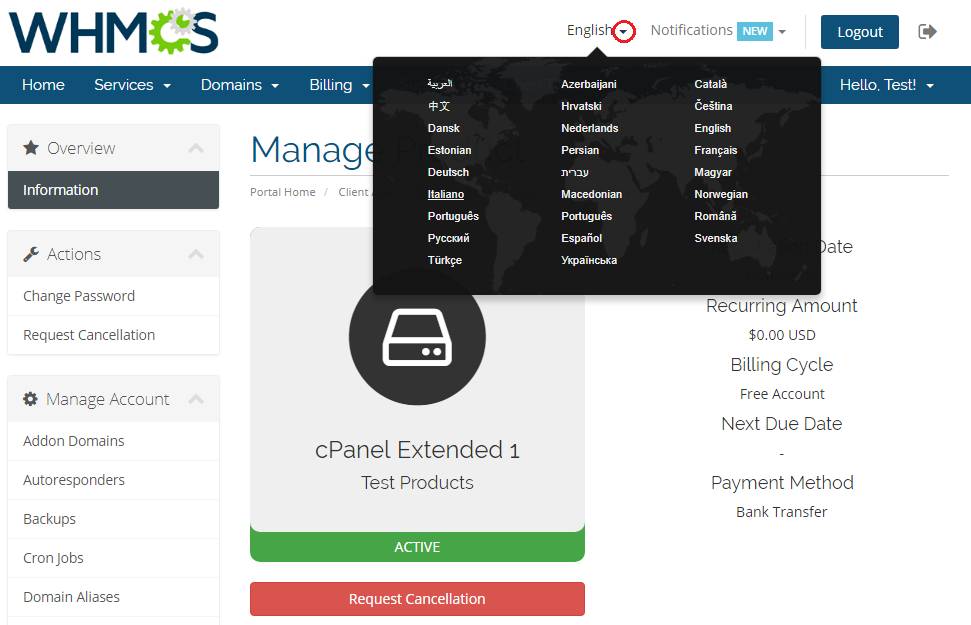
3. There are two ways you can alter the language:
|
|
|
|
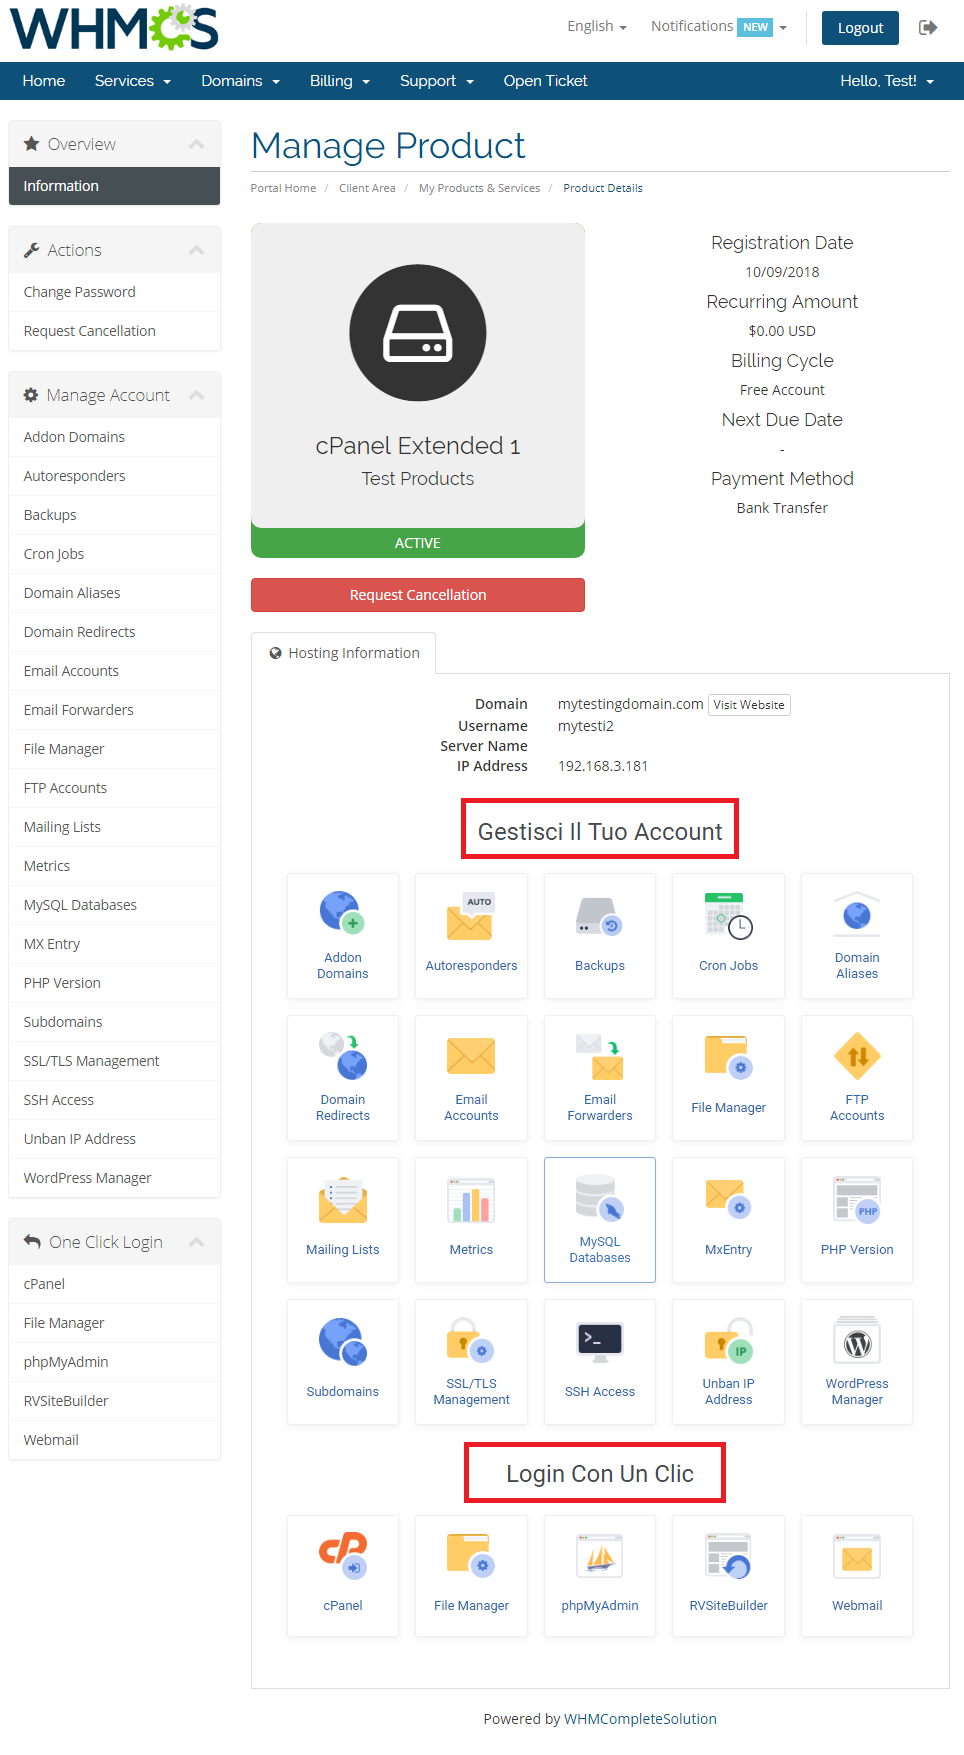
| 4. Take a look at the screen and you will see that the header has changed from 'Manage Account' to 'Gestisci Il Tuo Account', which is a direct consequence of our modifications. |
|
| Act accordingly to the above instructions to implement any changes in the language files of our modules. In case you have any doubts or encounter any problems we will do our best to provide you with adequate assistance. Please note that not all of our modules are provided with Multi-Language Support. |
How To Debug Module
If the procedure described below doesn't work for you, please report it to our Support Team.
| When you are experiencing white page or the module is not working as it should, you can enable debug mode that prints all the PHP errors on the screen. |
| To do so, enter the URL you are experiencing the issue with and add an additional parameter '_debug=turnon'. For example: yourdomain.com/clientarea.php?action=productdetails&id=81&_debug=turnon |
| To disable debug mode, simply call the same parameter but with value turnoff. For example: yourdomain.com/clientarea.php?_debug=turnoff |
| If you get the error as shown on the screen below, please make sure that you are using the correct parameter and you have sufficient privileges. |

|
How To Solve Problems With Module License
| In case you encounter any problems with the license, please read through the below points to find a solution. |
1. Make sure your license key applies to the used license. For example:
If you want to learn more about upgrades, please follow here. |
| 2. Check if License_RENAME.php file has been removed (or renamed). |
| 3. Make sure your license file content format is correct. Former license format (no longer supported): <?php /* * LICENSE: * Please provide your DNS Manager Module For WHMCS license below */ $dns_manager_licensekey="ModulesGarden_DNSManager_xxxxxxxxxxxx"; ?> Current and correct license file format: <?php /* * LICENSE: * Please provide your DNS Manager Module For WHMCS license below */ $dns_manager_licensekey="ModulesGarden_DNSManager_xxxxxxxxxxxx";Please note that the below symbol is no longer used: ?> |
| 4. Check if your firewall does not block our domain: modulesgarden.com. |
| 5. If you notice the following error message in your client area: "A problem with module occurred. Please contact the administration." Then we recommend reissuing your license in the ModulesGarden client area. |
| 6. In case you see an error: Order Accept Encountered Problems Make sure all module files are correctly downloaded and installed. |
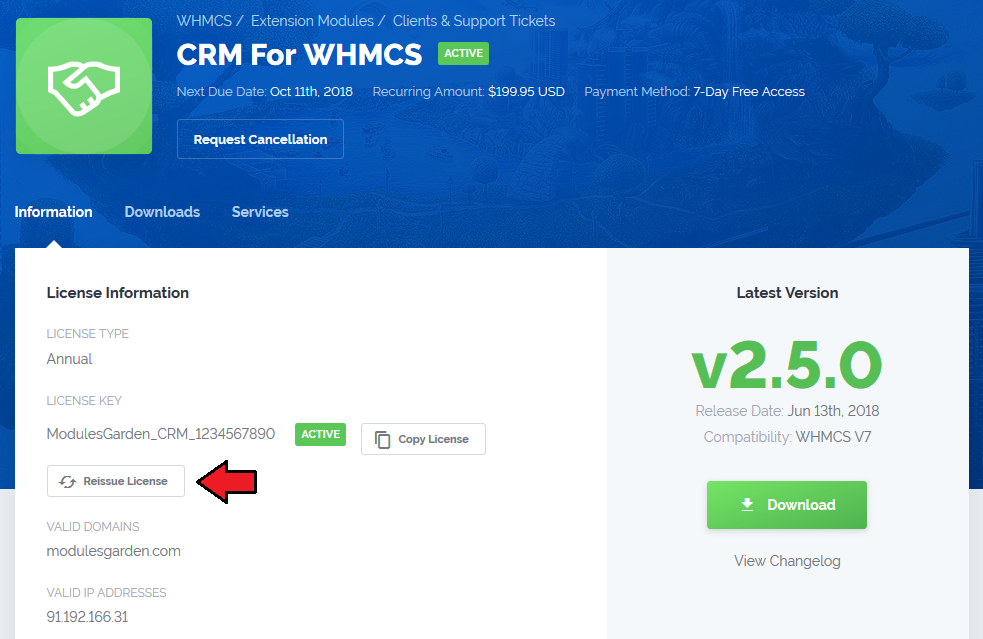
| 7. If, despite following all of the above pieces of advice, problems with you license persist, try to reissue your license. To to so, log in to our client area, choose a product, and click the 'Reissue License' button located next to your license key. |
|
| In case of further issues, please contact our Support Team. |
How To Use Configurable Options
| Configurable options on products allow you to give your clients variables which alter the resource available at that product as well as its price.
In this tutorial we will show you how to manage configurable options generated by our modules. |
Editing Configurable Options
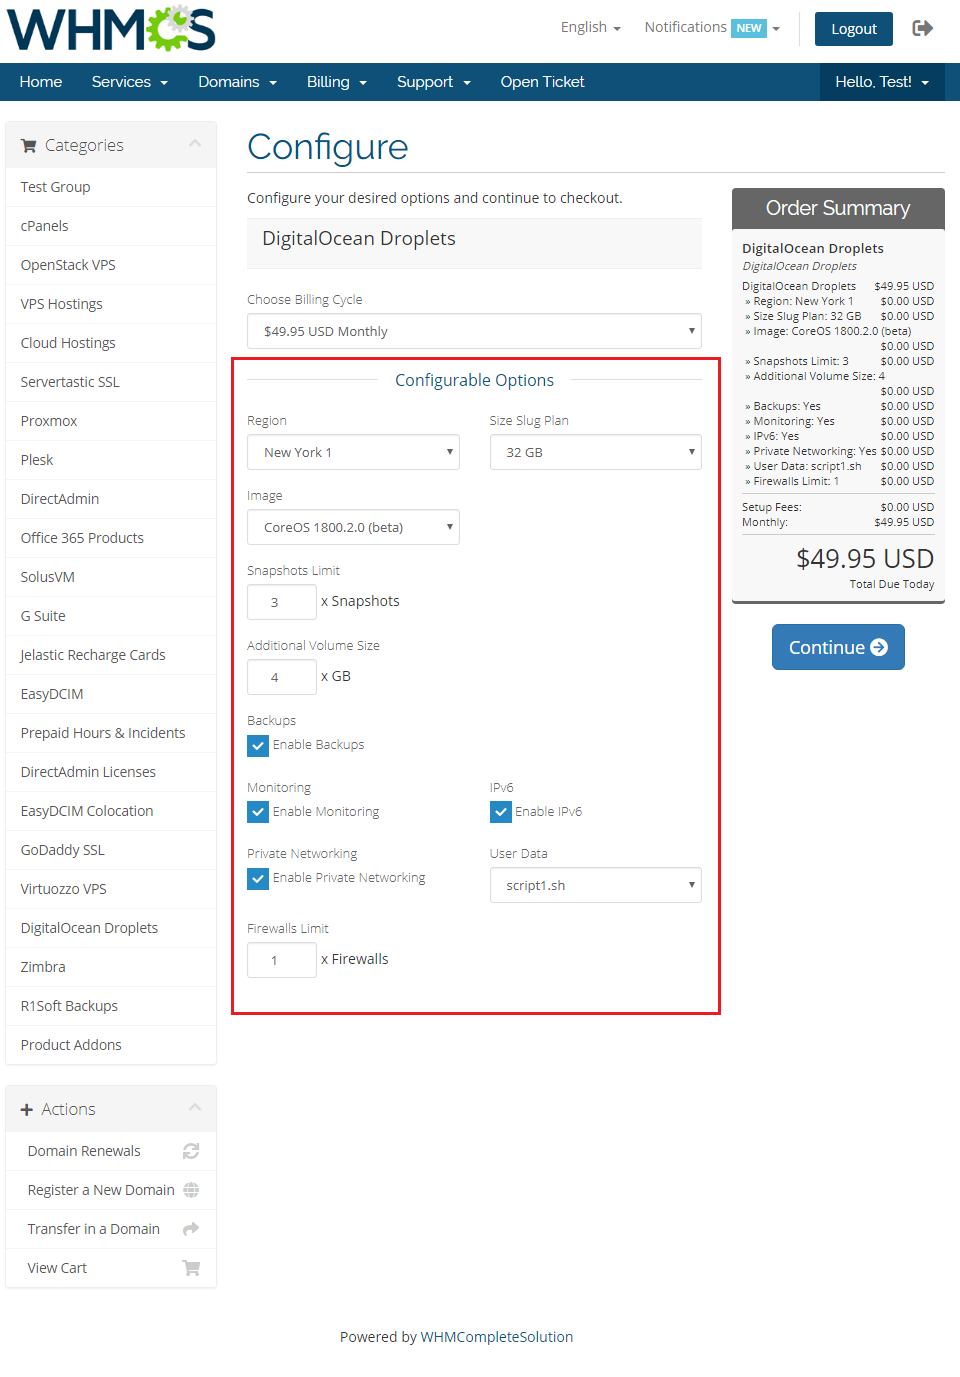
| When you successfully set up a product, your client can order it by choosing its resource and settings from default configurable options. |
|
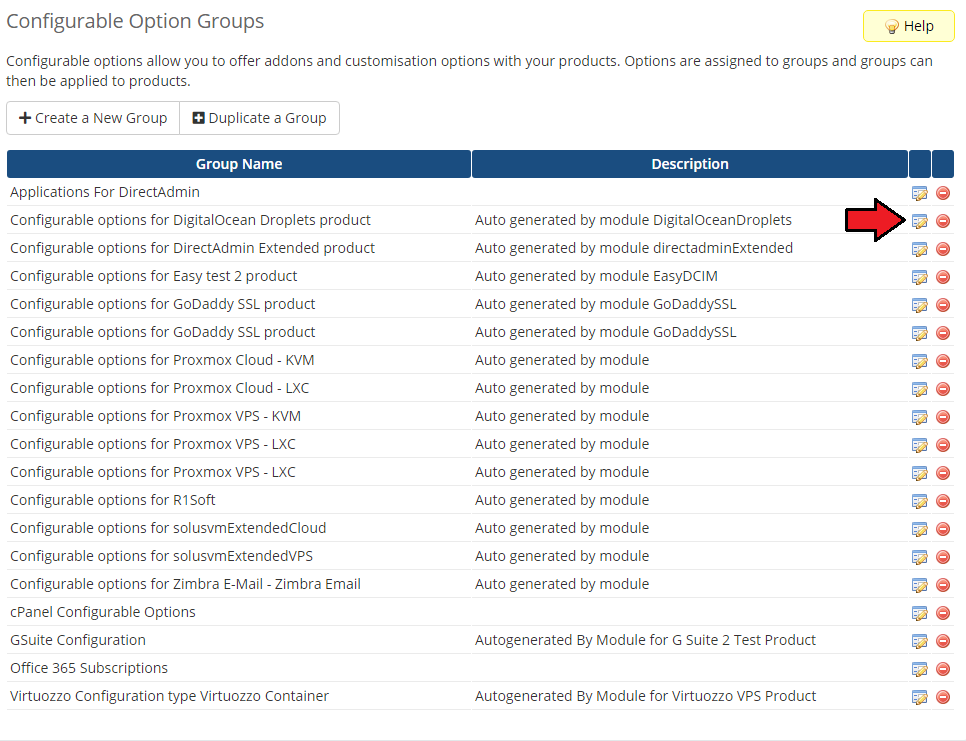
| In case those options do not suit your needs, you can edit them. To do so, go to 'Setup' → 'Products/Services' → 'Configurable Options' and press edit button next to configurable option used by your product. |
|
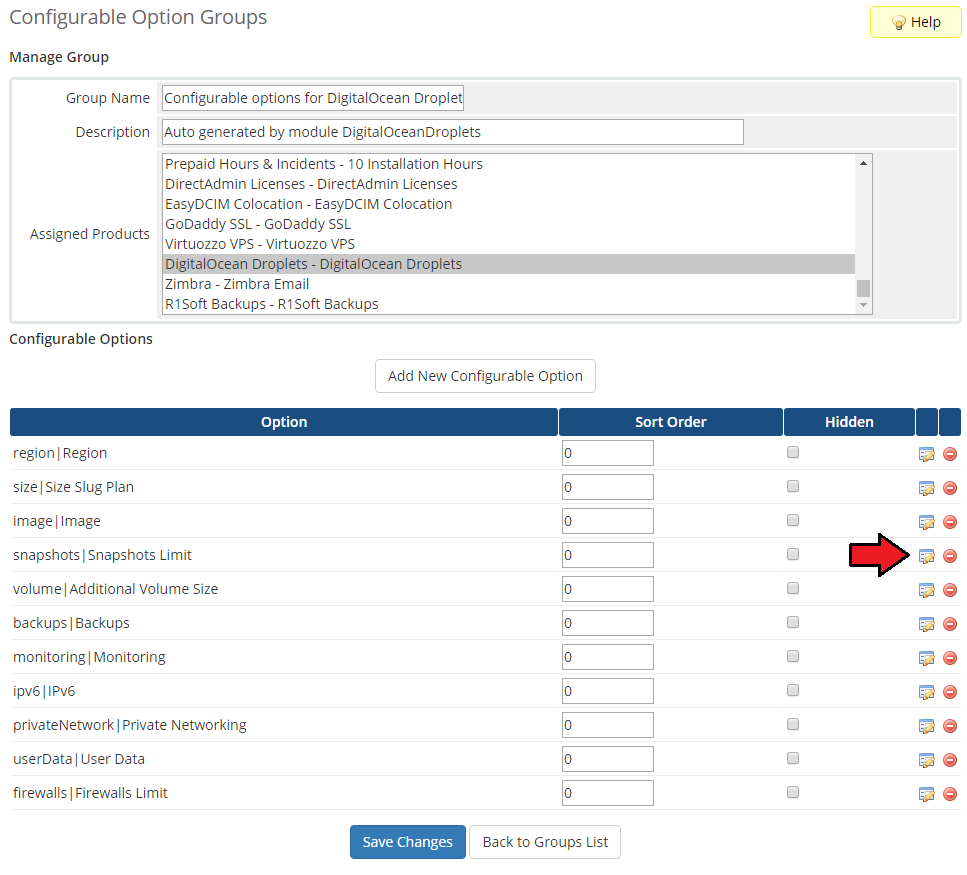
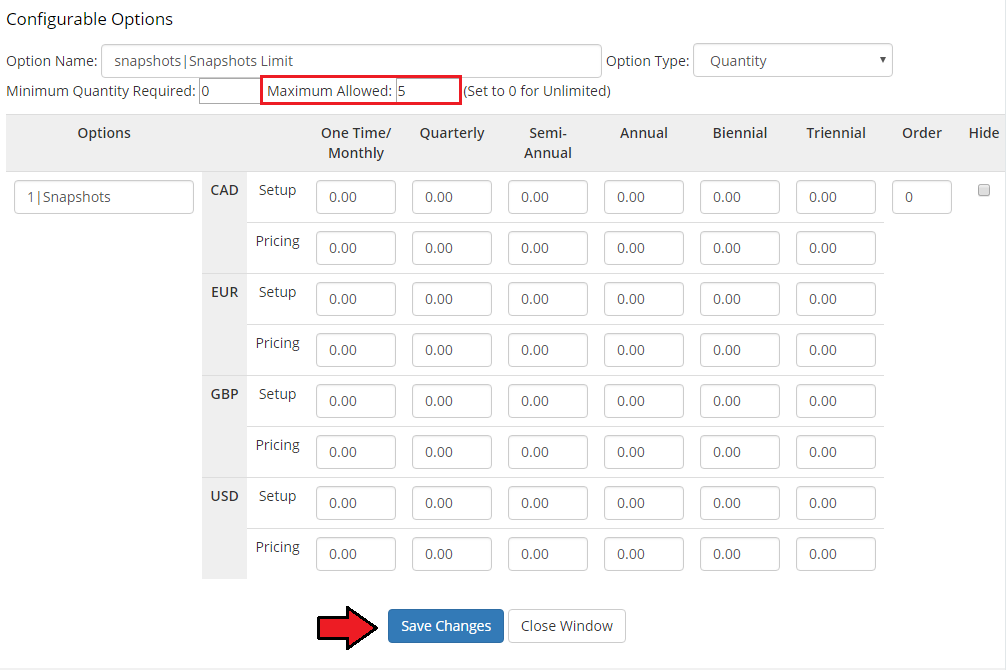
| Here you can view all products this configurable option group is assigned to. Now we will show you how to edit options. Let's say you want to add an option to order a product with up to 5 snapshots. |
|
| You will see a popup window, so make sure your browser will not block it. Enter the maximum allowed number of options and save the changes. |
|
Hiding Configurable Options
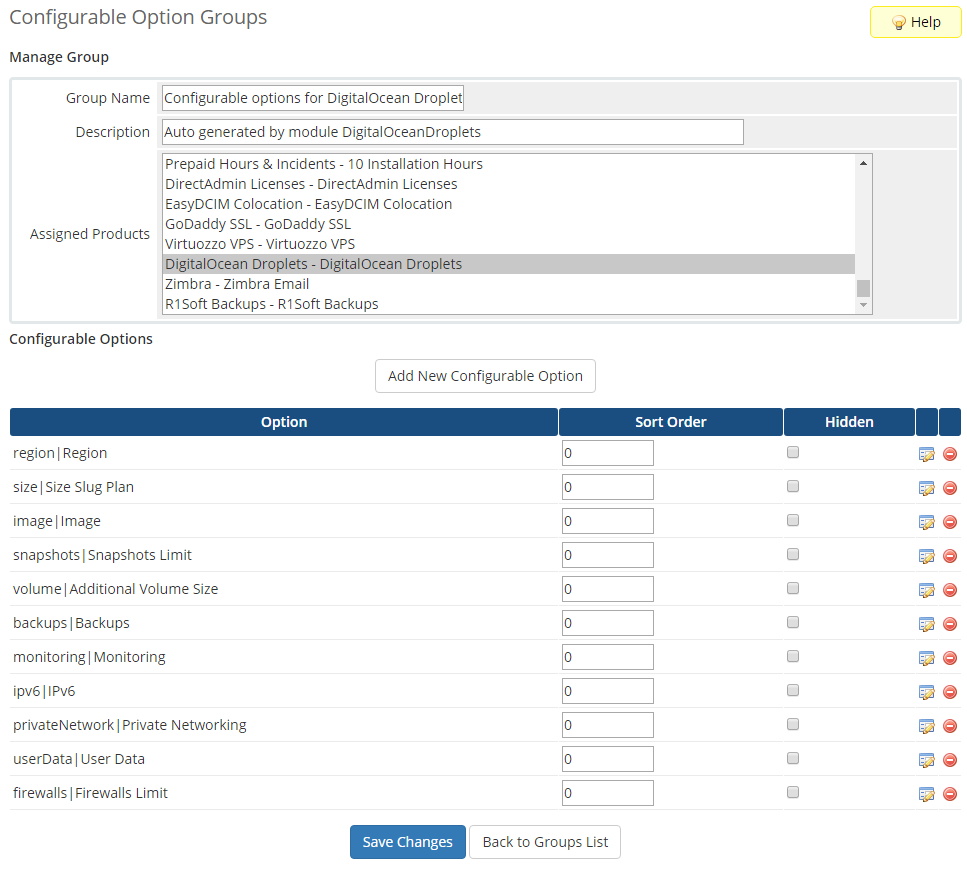
| If you decide to hide configurable options from a client order form and manage them only from the admin area, follow the steps below. Firstly, go to 'Setup' → 'Products/Services' → 'Configurable Options'. |
|
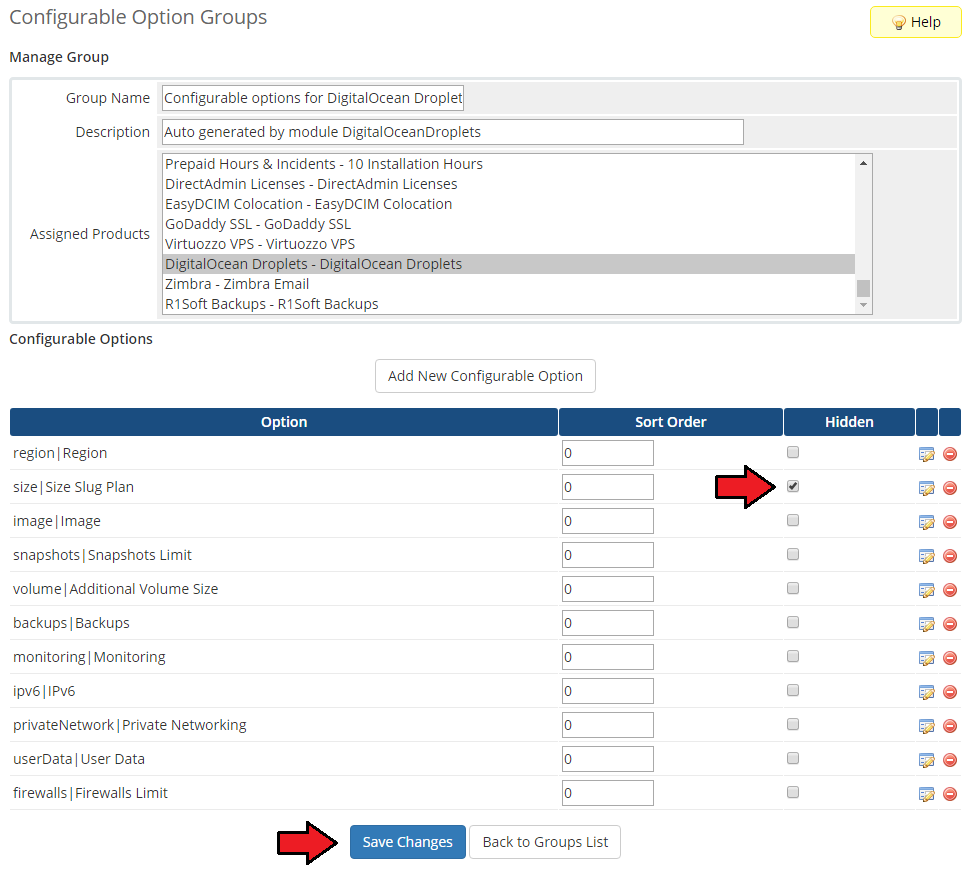
| Afterwards, tick 'Hidden' checkboxes next to configurable options you want to hide and confirm the action through pressing 'Save Changes'. |
|
Setting Up Pricing For Configurable Options
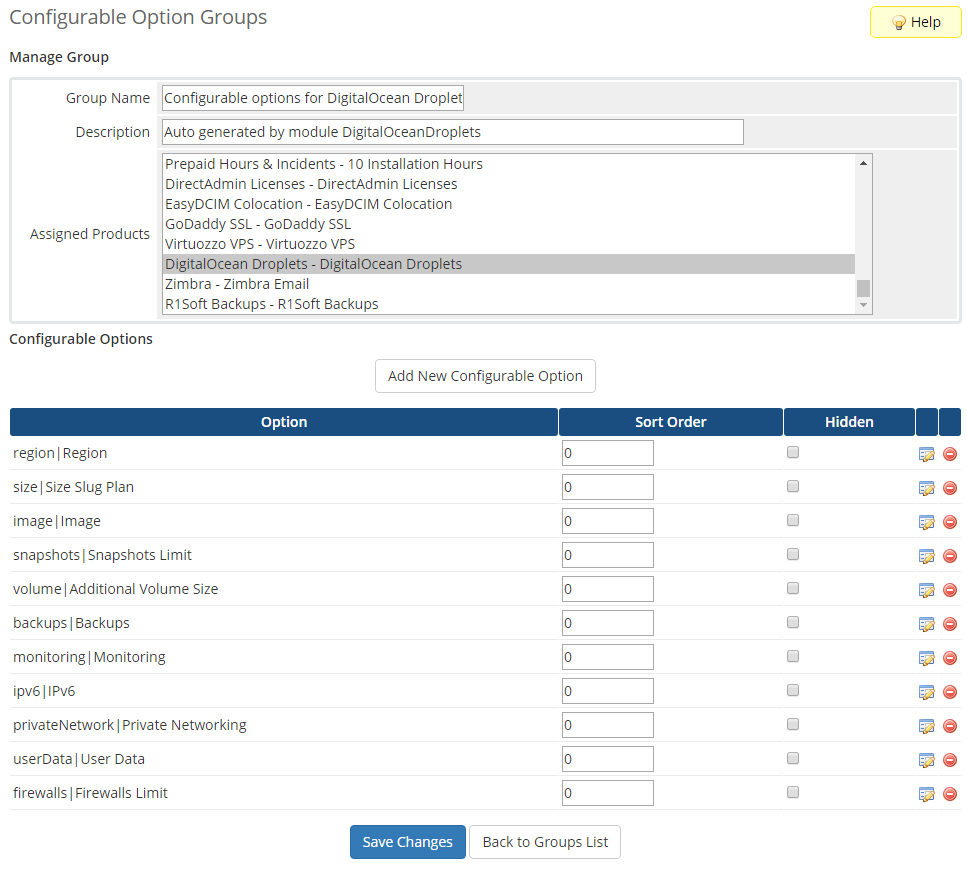
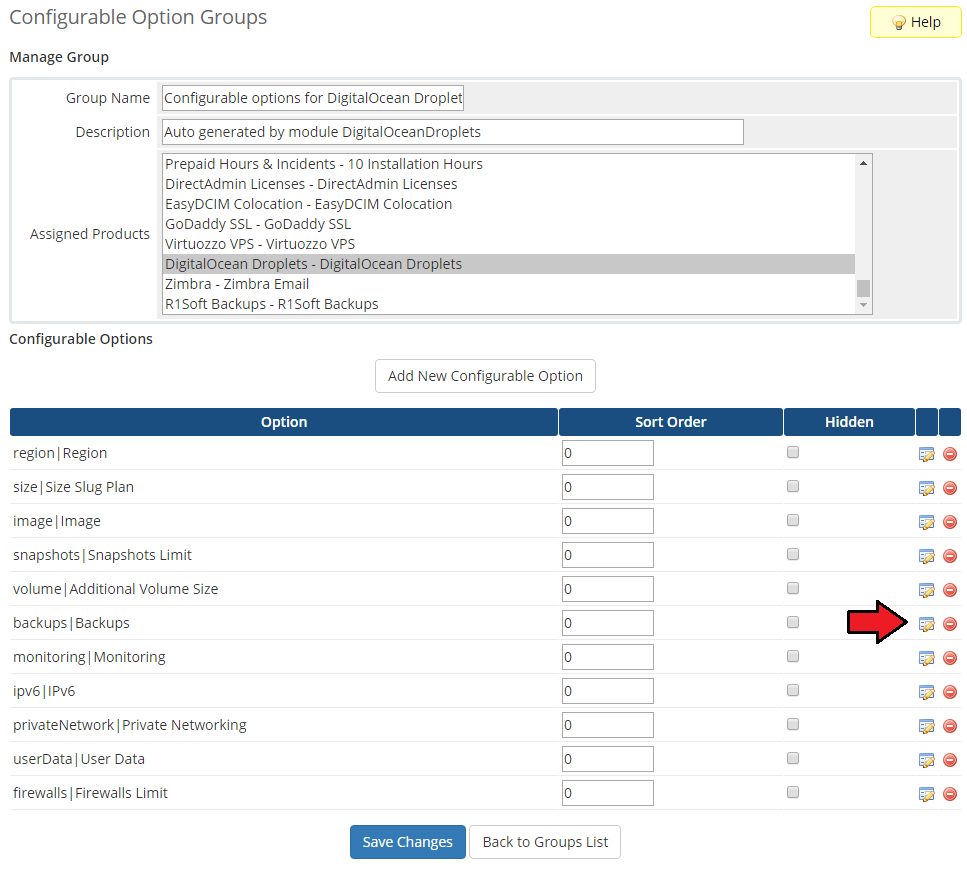
| If you decide to set up pricing for configurable options, follow the steps described below. |
|
| Press the edit icon next to configurable options you want to set the pricing for. |
|
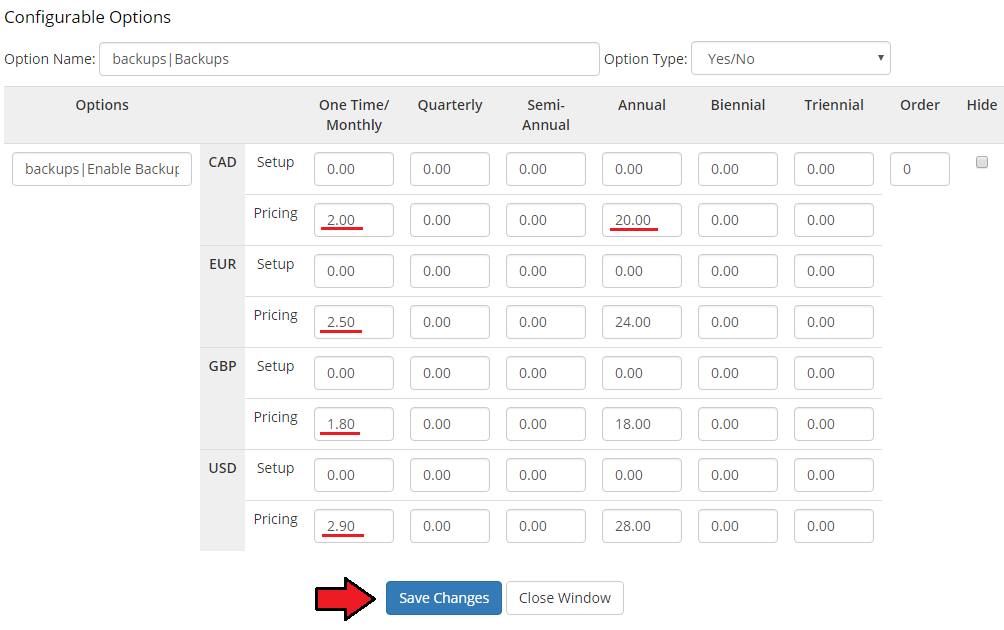
| Afterwards, you will see a popup window, so make sure your browser does not block it. Now, price you entered for resource should be in a column responsible for the same type of payment as your product uses. |
| Depending on 'Option Type' , pricing you entered may be counted in various ways. 'Dropdown' - You have to set price for each option. |
|
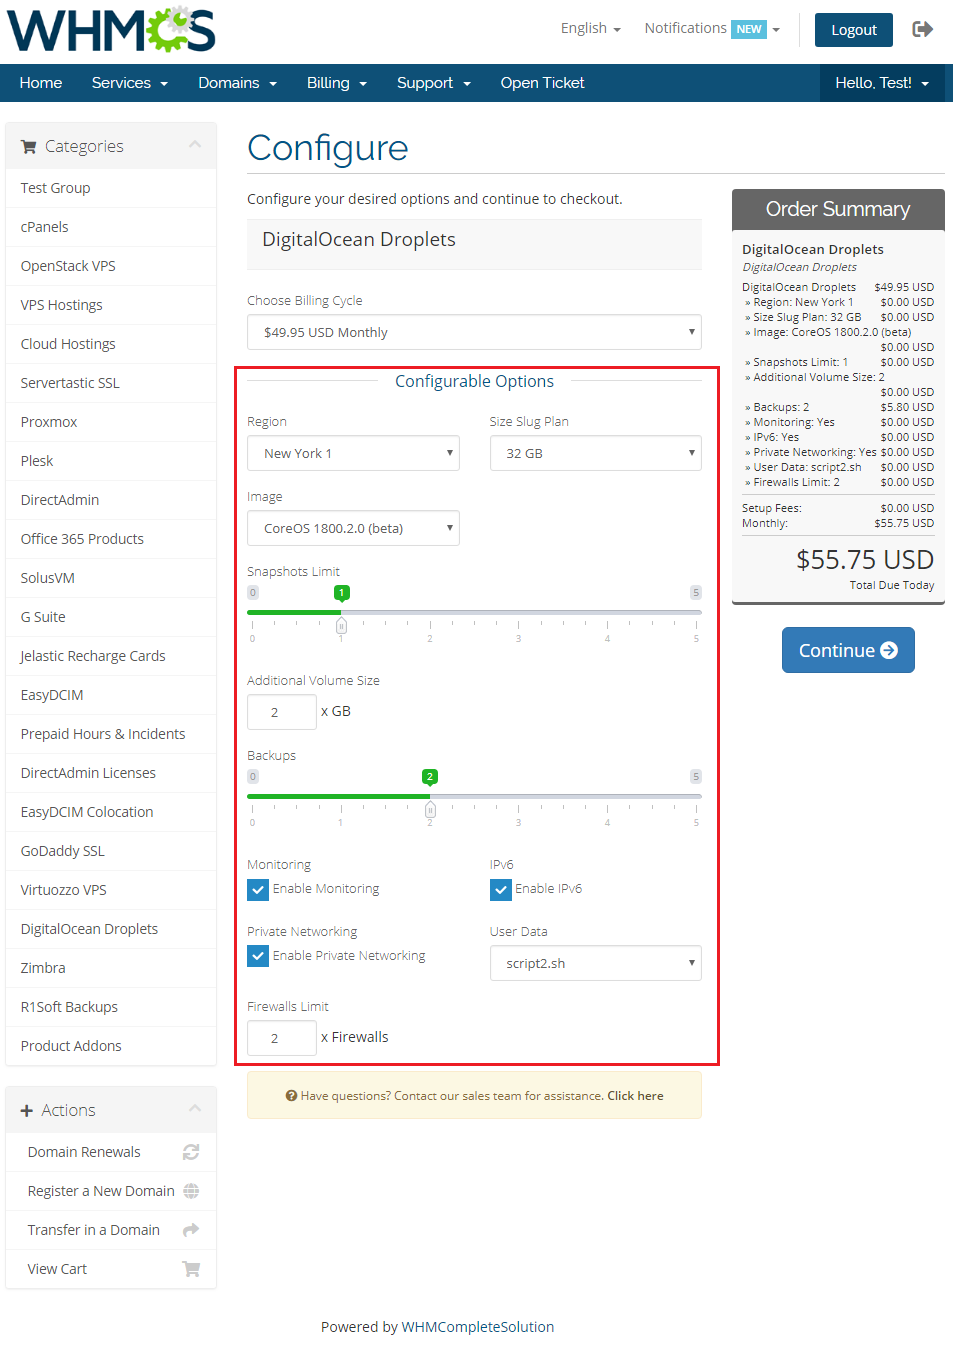
| On the screen below you can see all configurable options types available on the order form. |
|
| Now you should have no problems with understanding and using the configurable options in your WHMCS. |