Domains Reseller For WHMCS
(→API) |
|||
| Line 4: | Line 4: | ||
=About [http://www.modulesgarden.com/products/whmcs/domains_reseller/features Domains Reseller For WHMCS]= | =About [http://www.modulesgarden.com/products/whmcs/domains_reseller/features Domains Reseller For WHMCS]= | ||
{| | {| | ||
| − | |style="padding: 10px 0px 5px 0px;"|'''Domains Reseller For WHMCS''' | + | |style="padding: 10px 0px 5px 0px;"|'''Domains Reseller For WHMCS''' allows you to resell your TLDs with ease.<br /> |
With our module's help you will be able to easily manage your resellers and allow them to instantly start reselling domains directly to their own clients.<br /> | With our module's help you will be able to easily manage your resellers and allow them to instantly start reselling domains directly to their own clients.<br /> | ||
Our product offers you your own API which can be used by your resellers to resell your domains in other systems and platforms! | Our product offers you your own API which can be used by your resellers to resell your domains in other systems and platforms! | ||
| Line 23: | Line 23: | ||
|} | |} | ||
{| | {| | ||
| − | |style="padding: 0px 0px 0px 30px;"|✔ Restrict IP | + | |style="padding: 0px 0px 0px 30px;"|✔ Restrict IP Addresses |
|} | |} | ||
{| | {| | ||
|style="padding: 0px 0px 0px 30px;"|✔ Reseller White List | |style="padding: 0px 0px 0px 30px;"|✔ Reseller White List | ||
| + | |} | ||
| + | {| | ||
| + | |style="padding: 0px 0px 0px 30px;"|✔ Restrict IP Address Per Client | ||
|} | |} | ||
{| | {| | ||
| Line 42: | Line 45: | ||
{| | {| | ||
|style="padding: 0px 0px 0px 30px;"|✔ Choose TLDs Enabled For API | |style="padding: 0px 0px 0px 30px;"|✔ Choose TLDs Enabled For API | ||
| + | |} | ||
| + | {| | ||
| + | |style="padding: 0px 0px 0px 30px;"|✔ Allow Reselling And Activating Domains For Chosen Clients Without Credits | ||
| + | |} | ||
| + | {| | ||
| + | |style="padding: 0px 0px 0px 30px;"|✔ Define Type Of Refund Upon Unsuccessful Domain Registration | ||
|} | |} | ||
{| | {| | ||
| Line 63: | Line 72: | ||
*'''API Functionality:''' | *'''API Functionality:''' | ||
{| | {| | ||
| − | |style="padding: 10px 0px 0px 30px;"|✔ Register | + | |style="padding: 10px 0px 0px 30px;"|✔ Register/Transfer/Renew Domain |
| − | + | ||
| − | + | ||
| − | + | ||
| − | + | ||
| − | + | ||
| − | + | ||
| − | + | ||
| − | + | ||
| − | + | ||
|} | |} | ||
{| | {| | ||
| − | |style="padding: 0px 0px 0px 30px;"|✔ Delete Domain | + | |style="padding: 0px 0px 0px 30px;"|✔ Release/Delete Domain |
|} | |} | ||
{| | {| | ||
| Line 90: | Line 90: | ||
|} | |} | ||
{| | {| | ||
| − | |style="padding: 0px 0px 0px 30px;"|✔ Register | + | |style="padding: 0px 0px 0px 30px;"|✔ Register/Modify/Delete Nameserver |
| − | + | ||
| − | + | ||
| − | + | ||
| − | + | ||
| − | + | ||
| − | + | ||
|} | |} | ||
{| | {| | ||
| Line 103: | Line 97: | ||
{| | {| | ||
|style="padding: 0px 0px 0px 30px;"|✔ Get/Save Email Forwarding | |style="padding: 0px 0px 0px 30px;"|✔ Get/Save Email Forwarding | ||
| + | |} | ||
| + | {| | ||
| + | |style="padding: 0px 0px 0px 30px;"|✔ ID Protection | ||
|} | |} | ||
{| | {| | ||
| Line 118: | Line 115: | ||
|} | |} | ||
{| | {| | ||
| − | |style="padding: 0px 0px | + | |style="padding: 0px 0px 0px 30px;"|✔ Register/Manage Private Nameservers |
| + | |} | ||
| + | {| | ||
| + | |style="padding: 0px 0px 10px 30px;"|✔ Enable/Disable ID Protection | ||
|} | |} | ||
*'''General Info:''' | *'''General Info:''' | ||
| Line 126: | Line 126: | ||
{| | {| | ||
|style="padding: 0px 0px 0px 30px;"|✔ Reseller Can Manage API From The WHMCS Client Area | |style="padding: 0px 0px 0px 30px;"|✔ Reseller Can Manage API From The WHMCS Client Area | ||
| + | |} | ||
| + | {| | ||
| + | |style="padding: 0px 0px 0px 30px;"|✔ Integrated With <u>Domain Orders Extended For WHMCS</u> - Easy Management Of TLDs [http://www.modulesgarden.com/products/whmcs/domain_orders_extended/features (read more)] | ||
|} | |} | ||
{| | {| | ||
| Line 137: | Line 140: | ||
{| | {| | ||
|style="padding: 10px 0px 30px 0px;"|'''This tutorial will show you how to successfully install and configure Domains Reseller For WHMCS.''' <br /> | |style="padding: 10px 0px 30px 0px;"|'''This tutorial will show you how to successfully install and configure Domains Reseller For WHMCS.''' <br /> | ||
| − | We will guide you step by step through the whole installation and configuration process. | + | We will guide you step by step through the whole installation and configuration process. |
|} | |} | ||
==Provider WHMCS Module Installation== | ==Provider WHMCS Module Installation== | ||
| Line 144: | Line 147: | ||
|} | |} | ||
{| | {| | ||
| − | |style="padding: 0px 0px 20px 25px;"|[[File: | + | |style="padding: 0px 0px 20px 25px;"|[[File:DR_1.png]] |
|} | |} | ||
{| | {| | ||
| Line 151: | Line 154: | ||
|} | |} | ||
{| | {| | ||
| − | |style="padding: 0px 0px 20px 25px;"|[[File: | + | |style="padding: 0px 0px 20px 25px;"|[[File:DR_2.png]] |
|} | |} | ||
{| | {| | ||
| Line 158: | Line 161: | ||
|} | |} | ||
{| | {| | ||
| − | |style="padding: 0px 0px 20px 25px;"|[[File: | + | |style="padding: 0px 0px 20px 25px;"|[[File:DR_3.png]] |
|} | |} | ||
{| | {| | ||
| Line 165: | Line 168: | ||
|} | |} | ||
{| | {| | ||
| − | |style="padding: 0px 0px 20px 25px;"|[[File: | + | |style="padding: 0px 0px 20px 25px;"|[[File:DR_4.png]] |
|} | |} | ||
{| | {| | ||
| − | |style="padding: 0px 0px | + | |style="padding: 0px 0px 15px 15px;"|'''5. Edit '' 'header.tpl' '' file located at '' 'your_whmcs/templates/default/header.tpl' ''.<br /> |
| − | Add this code: | + | Add this code: |
| − | <nowiki><li><a href="index.php?m=domainsReseller">Reseller Registrar Credentials</a></li | + | <nowiki><li><a href="index.php?m=domainsReseller">Reseller Registrar Credentials</a></li></nowiki> |
| − | After: | + | After: |
| − | <nowiki><li><a href="domainchecker.php">{$LANG.navwhoislookup}</a></li></nowiki> | + | <nowiki><li><a id="Menu-Domains-Whois_Lookup" href="domainchecker.php">{$LANG.navwhoislookup}</a></li></nowiki> |
Take a look at the screenshot below and verify your changes: | Take a look at the screenshot below and verify your changes: | ||
|} | |} | ||
{| | {| | ||
| − | |style="padding: 0px 0px 20px 25px;"|[[File: | + | |style="padding: 0px 0px 20px 25px;"|[[File:DR_5.png]] |
|} | |} | ||
{| | {| | ||
| Line 183: | Line 186: | ||
|} | |} | ||
{| | {| | ||
| − | |style="padding: 0px 0px 20px 25px;"|[[File: | + | |style="padding: 0px 0px 20px 25px;"|[[File:DR_6.png]] |
|} | |} | ||
{| | {| | ||
| Line 190: | Line 193: | ||
|} | |} | ||
{| | {| | ||
| − | |style="padding: 0px 0px 20px 25px;"|[[File: | + | |style="padding: 0px 0px 20px 25px;"|[[File:DR_7.png]] |
|} | |} | ||
{| | {| | ||
| Line 198: | Line 201: | ||
|} | |} | ||
{| | {| | ||
| − | |style="padding: 0px 0px 20px 25px;"|[[File: | + | |style="padding: 0px 0px 20px 25px;"|[[File:DR_8.png]] |
|} | |} | ||
{| | {| | ||
| Line 204: | Line 207: | ||
|} | |} | ||
{| | {| | ||
| − | |style="padding: 0px 0px 20px 25px;"|[[File: | + | |style="padding: 0px 0px 20px 25px;"|[[File:DR_9.png]] |
|} | |} | ||
{| | {| | ||
| − | |style="padding: 0px 0px | + | |style="padding: 0px 0px 15px 15px;"|'''10. Go to '' 'Setup' '' → '' 'Products/Services' '' → '' 'Domains Pricing' ''.'''<br /> |
Add TLD, set pricing for it and choose automatic registrar you have just configured. | Add TLD, set pricing for it and choose automatic registrar you have just configured. | ||
|} | |} | ||
{| | {| | ||
| − | |style="padding: 0px 0px 20px 25px;"|[[File: | + | |style="padding: 0px 0px 20px 25px;"|[[File:DR_10.png]] |
|} | |} | ||
{| | {| | ||
| − | |style="padding: 0px 0px 15px 15px;"|'''11. To generate registrar for your resellers, make sure that '' 'module_generator' '' folder | + | |style="padding: 0px 0px 15px 15px;"|'''11. To generate registrar for your resellers, make sure that '' 'module_generator' '' folder has chmod set to '755' or '777'.'''<br /> |
Folder is located in '' 'your_whmcs/modules/addons/domainsReseller/pages/ ' ''. | Folder is located in '' 'your_whmcs/modules/addons/domainsReseller/pages/ ' ''. | ||
|} | |} | ||
{| | {| | ||
| − | |style="padding: 0px 0px 20px 25px;"|[[File: | + | |style="padding: 0px 0px 20px 25px;"|[[File:DR_11.png]] |
|} | |} | ||
{| | {| | ||
| Line 225: | Line 228: | ||
|} | |} | ||
{| | {| | ||
| − | |style="padding: 0px 0px 20px 25px;"|[[File: | + | |style="padding: 0px 0px 20px 25px;"|[[File:DR_12.png]] |
|} | |} | ||
| Line 232: | Line 235: | ||
|} | |} | ||
{| | {| | ||
| − | |style="padding: 0px 0px 20px 25px;"|[[File: | + | |style="padding: 0px 0px 20px 25px;"|[[File:DR_13.png]] |
|} | |} | ||
{| | {| | ||
| − | |style="padding: 0px 0px 15px 15px;"|'''14. Downloading of module you have just generated will start shortly.'''<br /> | + | |style="padding: 0px 0px 15px 15px;"|'''14. Downloading of the module you have just generated will start shortly.'''<br /> |
| − | You can provide | + | You can provide registrar module for your resellers in two ways, by sending them a file or a link to it.<br /> |
| − | '''Save link and installation instruction marked on the screen below, it will not appear again.'''<br /> | + | The link should appear right after the module has been generated.<br /> |
| − | Note | + | '''Important:''' Save the link and the installation instruction marked on the screen below, it will not appear again.'''<br /> |
| + | ''Note: You have to provide integration code (step 5. of installation instructions) to your resellers.'' | ||
|} | |} | ||
{| | {| | ||
| − | |style="padding: 0px 0px 20px 25px;"|[[File: | + | |style="padding: 0px 0px 20px 25px;"|[[File:DR_14.png]] |
|} | |} | ||
{| | {| | ||
| − | |style="padding: 0px 0px 15px 15px;"|'''15. Now you have to generate API key for your client. | + | |style="padding: 0px 0px 15px 15px;"|'''15. Now you have to generate API key for your client. Go to '' 'API Users' '' tab.<br /> |
| − | Afterwards, press '' 'Generate API Key' '' next to user you want to generate API key for.<br /> | + | Afterwards, press '' 'Generate API Key' '' next to the user you want to generate API key for.<br /> |
| − | Note that API key and user email are needed as credentials | + | Note that API key and the user's email are needed as credentials at the registrar module you have just generated. |
|} | |} | ||
{| | {| | ||
| − | |style="padding: 0px 0px 20px 25px;"|[[File: | + | |style="padding: 0px 0px 20px 25px;"|[[File:DR_15.png]] |
|} | |} | ||
{| | {| | ||
|style="padding: 0px 0px 30px 15px;"|'''Your Domains Reseller module is ready to use!'''<br /> | |style="padding: 0px 0px 30px 15px;"|'''Your Domains Reseller module is ready to use!'''<br /> | ||
| − | Your clients can use their registrars as soon as they install them on their WHMCS and '''add credits''' | + | Your clients can use their registrars as soon as they install them on their WHMCS and '''add credits''' to their accounts in your WHMCS. |
|} | |} | ||
==Reseller WHMCS Module Installation== | ==Reseller WHMCS Module Installation== | ||
{| | {| | ||
| − | |style="padding: 10px 0px 20px | + | |style="padding: 10px 0px 20px 15px;"|'''Below you can find instructions for installation of the registrar module on reseller WHMCS.''' |
|} | |} | ||
{| | {| | ||
| − | |style="padding: 0px 0px 20px 15px;"|'''1. Upload and extract registrar module into your WHMCS.''' | + | |style="padding: 0px 0px 20px 15px;"|'''1. Upload and extract the registrar module into your WHMCS.''' |
|} | |} | ||
{| | {| | ||
| − | |style="padding: 0px 0px 20px 25px;"|[[File: | + | |style="padding: 0px 0px 20px 25px;"|[[File:DR_16.png]] |
|} | |} | ||
{| | {| | ||
| − | |style="padding: 0px 0px 15px 15px;"|'''2. | + | |style="padding: 0px 0px 15px 15px;"|'''2. Enter integration code that you got from your provider.<br /> |
Open '' 'additionaldomainfields.php' '' file located at '' 'includes/additionaldomainfields.php' ''.<br /> | Open '' 'additionaldomainfields.php' '' file located at '' 'includes/additionaldomainfields.php' ''.<br /> | ||
| − | Paste | + | Paste the code you received at the end of the file, right before '' '?>' '', as shown on the following screen. |
|} | |} | ||
{| | {| | ||
| − | |style="padding: 0px 0px 20px 25px;"|[[File: | + | |style="padding: 0px 0px 20px 25px;"|[[File:DR_17.png]] |
|} | |} | ||
{| | {| | ||
| − | |style="padding: 0px 0px 20px 15px;"|'''3. Go to '' 'Setup' '' → '' 'Products/Services' '' → '' 'Domains Registrar' '', find module you have just uploaded and press '' 'Activate' '' next to it.''' | + | |style="padding: 0px 0px 20px 15px;"|'''3. Go to '' 'Setup' '' → '' 'Products/Services' '' → '' 'Domains Registrar' '', find the module you have just uploaded and press '' 'Activate' '' next to it.''' |
|} | |} | ||
{| | {| | ||
| − | |style="padding: 0px 0px 20px 25px;"|[[File: | + | |style="padding: 0px 0px 20px 25px;"|[[File:DR_18.png]] |
|} | |} | ||
{| | {| | ||
| Line 285: | Line 289: | ||
|} | |} | ||
{| | {| | ||
| − | |style="padding: 0px 0px 20px 25px;"|[[File: | + | |style="padding: 0px 0px 20px 25px;"|[[File:DR_19.png]] |
|} | |} | ||
{| | {| | ||
|style="padding: 0px 0px 15px 15px;"|'''5. To continue, go to '' 'Setup' '' → '' 'Products/Services' '' → '' 'Domains Pricing' ''.'''<br /> | |style="padding: 0px 0px 15px 15px;"|'''5. To continue, go to '' 'Setup' '' → '' 'Products/Services' '' → '' 'Domains Pricing' ''.'''<br /> | ||
| − | Set up TLD your provider allows you to resell, choose registrar you have just installed from a dropdown menu and save it through pressing '' 'Save Changes' ''. | + | Set up TLD your provider allows you to resell, select additional features, choose registrar you have just installed from a dropdown menu and save it through pressing '' 'Save Changes' ''. |
|} | |} | ||
{| | {| | ||
| − | |style="padding: 0px 0px 20px 25px;"|[[File: | + | |style="padding: 0px 0px 20px 25px;"|[[File:DR_20.png]] |
|} | |} | ||
{| | {| | ||
|style="padding: 0px 0px 15px 15px;"|'''6. Afterwards, set pricing for your TLD. To do so, press '' 'Open Pricing' '' text.'''<br /> | |style="padding: 0px 0px 15px 15px;"|'''6. Afterwards, set pricing for your TLD. To do so, press '' 'Open Pricing' '' text.'''<br /> | ||
| − | It will open in new window, so make sure your browser will not block it. | + | It will open in a new window, so make sure your browser will not block it. |
|} | |} | ||
{| | {| | ||
| − | |style="padding: 0px 0px 20px 25px;"|[[File: | + | |style="padding: 0px 0px 20px 25px;"|[[File:DR_21.png]] |
|} | |} | ||
{| | {| | ||
| − | |style="padding: 0px 0px 20px 15px;"|'''7. Next, enter prices for specific actions. | + | |style="padding: 0px 0px 20px 15px;"|'''7. Next, enter prices for specific actions. Press '' 'Save Changes' '' to confirm.''' |
|} | |} | ||
{| | {| | ||
| − | |style="padding: 0px 0px 20px 25px;"|[[File: | + | |style="padding: 0px 0px 20px 25px;"|[[File:DR_22.png]] |
|} | |} | ||
{| | {| | ||
| − | |style="padding: 0px 0px | + | |style="padding: 0px 0px 15px 15px;"|'''8. Congratulations, you have just successfully installed your registrar!'''<br /> |
You can start using registrar as soon as you add credits to your account on provider WHMCS.<br /> | You can start using registrar as soon as you add credits to your account on provider WHMCS.<br /> | ||
| − | If you order domain using this registrar, you should see in your admin area something similar to the screen below. | + | If you order a domain using this registrar, you should see in your admin area something similar to the screen below. |
|} | |} | ||
{| | {| | ||
| − | |style="padding: 0px 0px 30px 25px;"|[[File: | + | |style="padding: 0px 0px 30px 25px;"|[[File:DR_23.png]] |
|} | |} | ||
| Line 320: | Line 324: | ||
|style="padding: 10px 0px 30px 15px;"|'''Domains Reseller For WHMCS allows your customers to resell domains on their own WHMCS.''' | |style="padding: 10px 0px 30px 15px;"|'''Domains Reseller For WHMCS allows your customers to resell domains on their own WHMCS.''' | ||
|} | |} | ||
| − | |||
==Configuration== | ==Configuration== | ||
{| | {| | ||
| Line 326: | Line 329: | ||
|} | |} | ||
{| | {| | ||
| − | |style="padding: 0px 0px 20px 25px;"|[[File: | + | |style="padding: 0px 0px 20px 25px;"|[[File:DR_24.png]] |
|} | |} | ||
{| | {| | ||
|style="padding: 0px 0px 15px 15px;"|We will describe these options below.<br /> | |style="padding: 0px 0px 15px 15px;"|We will describe these options below.<br /> | ||
1. '' 'API Status'' ' - Enable/Disable Domains Reseller API.<br /> | 1. '' 'API Status'' ' - Enable/Disable Domains Reseller API.<br /> | ||
| − | 2. '' 'Reseller | + | 2. '' 'Restricted By IP Addresses' '' - Enable/Disable restricting connection to Domains Reseller API only for IP addresses specified in the '' 'Allowed IP Addresses' '' field.<br /> |
| − | + | 3. '' 'Allowed IP Addresses' '' - The list of IP addresses allowed to connect with Domains Reseller when '' 'Restrict IP Address' '' option is enabled.<br /> | |
| − | + | ''Note: This option shows up only when '''' 'Restrict IP Address' '' is enabled.<br /> | |
| − | + | 4. '' 'Pay After Registration' '' - The list of resellers who are able to pay for a domain after its registration.<br /> | |
| − | + | 5. '' 'Pay After Order' '' - The list of resellers who are able to pay for a domain after ordering it.<br /> | |
| + | 6. '' 'Auto Disable API For New Users' '' - API will be disabled for newly created clients.<br /> | ||
| + | 7. '' 'Auto Generate API Key For New Users' '' - API Key will be generated automatically when client's account is created.<br /> | ||
| + | 8. '' 'SSL Connection' '' - You can define here, if connection with your API will use SSL or not. When you change it, you will need to generate a new registrars for your resellers.<br /> | ||
| + | 9. '' 'Refund' '' - Defines behaviour of the module upon unsuccessful domain registration.<br /> | ||
| + | 10. '' 'Low Credit Notification' '' - Notification to your client will be sent when credit balance on client's account falls below entered value.<br /> | ||
''Note 1: All changes should be saved, you can do it through pressing 'Save Changes' button.''<br /> | ''Note 1: All changes should be saved, you can do it through pressing 'Save Changes' button.''<br /> | ||
| − | ''Note 2: To | + | ''Note 2: To sent an email notification about low credit balance, create a template 'Low Credit Notification' of 'General' type.'' |
|} | |} | ||
{| | {| | ||
| − | |style="padding: 0px 0px 20px 25px;"|[[File: | + | |style="padding: 0px 0px 20px 25px;"|[[File:DR_25.png]] |
|} | |} | ||
{| | {| | ||
| − | |style="padding: 0px 0px 15px 15px;"|To restrict access to Domains Reseller API by IP address, simply choose '' 'Enable' '' from '' 'Restrict IP' '' dropdown menu.<br /> | + | |style="padding: 0px 0px 15px 15px;"|To restrict access to the Domains Reseller API by IP address, simply choose '' 'Enable' '' from '' 'Restrict IP Addresses' '' dropdown menu.<br /> |
New text field should appear, enter IP addresses you want to whitelist, one IP address per line.<br /> | New text field should appear, enter IP addresses you want to whitelist, one IP address per line.<br /> | ||
At the end, press '' 'Save Changes' '' button. | At the end, press '' 'Save Changes' '' button. | ||
|} | |} | ||
{| | {| | ||
| − | |style="padding: 0px 0px 20px 25px;"|[[File: | + | |style="padding: 0px 0px 20px 25px;"|[[File:DR_26.png]] |
|} | |} | ||
{| | {| | ||
| − | |style="padding: 0px 0px 15px 15px;"|Last, but not | + | |style="padding: 0px 0px 15px 15px;"|Last, but not least important thing you can do here is enabling TLD for resell.<br /> |
It can be done simply by ticking TLD and pressing '' 'Save Changes' ''. | It can be done simply by ticking TLD and pressing '' 'Save Changes' ''. | ||
|} | |} | ||
{| | {| | ||
| − | |style="padding: 0px 0px 30px 25px;"|[[File: | + | |style="padding: 0px 0px 30px 25px;"|[[File:DR_27.png]] |
|} | |} | ||
| − | |||
==API== | ==API== | ||
{| | {| | ||
| − | |style="padding: 10px 0px 30px 15px;"| | + | |style="padding: 10px 0px 30px 15px;"|At the '' 'API' '' tab you can find a lot of information about Domains Reseller API, as well as generate and share API knowledgebase. |
|} | |} | ||
===Introduction=== | ===Introduction=== | ||
| Line 367: | Line 374: | ||
|} | |} | ||
{| | {| | ||
| − | |style="padding: 0px 0px 30px 25px;"|[[File: | + | |style="padding: 0px 0px 30px 25px;"|[[File:DR_28.png]] |
|} | |} | ||
| − | |||
===Connection=== | ===Connection=== | ||
{| | {| | ||
|style="padding: 10px 0px 15px 15px;"|In this subtab you can read about request and response data format as well as authentication.<br /> | |style="padding: 10px 0px 15px 15px;"|In this subtab you can read about request and response data format as well as authentication.<br /> | ||
| − | You can also find | + | You can also find URL to the API here. |
|} | |} | ||
{| | {| | ||
| − | |style="padding: 0px 0px 30px 25px;"|[[File: | + | |style="padding: 0px 0px 30px 25px;"|[[File:DR_29.png]] |
|} | |} | ||
| + | |||
===Examples=== | ===Examples=== | ||
{| | {| | ||
| − | |style="padding: 10px 0px 20px 15px;"|Here you can find | + | |style="padding: 10px 0px 20px 15px;"|Here you can find sample API request and response. |
|} | |} | ||
{| | {| | ||
| − | |style="padding: 0px 0px 30px 25px;"|[[File: | + | |style="padding: 0px 0px 30px 25px;"|[[File:DR_30.png]] |
|} | |} | ||
===Knowledgebase=== | ===Knowledgebase=== | ||
| Line 390: | Line 397: | ||
|} | |} | ||
{| | {| | ||
| − | |style="padding: 0px 0px 20px 25px;"|[[File: | + | |style="padding: 0px 0px 20px 25px;"|[[File:DR_31.png]] |
|} | |} | ||
{| | {| | ||
| − | |style="padding: 0px 0px 20px 15px;"|When your | + | |style="padding: 0px 0px 20px 15px;"|When your clients follow a link to the knowledgebase they should see something similar to the screen below. |
|} | |} | ||
{| | {| | ||
| − | |style="padding: 0px 0px 30px 25px;"|[[File: | + | |style="padding: 0px 0px 30px 25px;"|[[File:DR_32.png]] |
|} | |} | ||
| − | |||
==API Users== | ==API Users== | ||
{| | {| | ||
| − | |style="padding: 10px 0px 15px 15px;"|At '' 'API Users' '' tab you can manage all aspects related to your resellers.<br /> | + | |style="padding: 10px 0px 15px 15px;"|At the '' 'API Users' '' tab you can manage all aspects related to your resellers.<br /> |
| − | For your convenience we also implemented filters, you can use them to find specific user or group of users.<br /> | + | For your convenience we also implemented filters, you can use them to find a specific user or a group of users.<br /> |
| − | ''Note: Remember to set default payment method for every reseller. It can be set up at client profile in 'Payment Method' | + | ''Note: Remember to set default payment method for every reseller. It can be set up at client profile in 'Payment Method' dropdown menu.'' |
|} | |} | ||
{| | {| | ||
| − | |style="padding: 0px 0px 20px 25px;"|[[File: | + | |style="padding: 0px 0px 20px 25px;"|[[File:DR_33.png]] |
|} | |} | ||
{| | {| | ||
| − | |style="padding: | + | |style="padding: 0px 0px 20px 15px;"|You can set up IP restriction per client (1), assign a promotion code to a single user (2), generate a new key for them(3) or disable API for them (4). |
|} | |} | ||
{| | {| | ||
| − | |style="padding: 0px 0px 20px 25px;"|[[File: | + | |style="padding: 0px 0px 20px 25px;"|[[File:DR_34.png]] |
|} | |} | ||
{| | {| | ||
| Line 418: | Line 424: | ||
|} | |} | ||
{| | {| | ||
| − | |style="padding: 0px 0px 30px 25px;"|[[File: | + | |style="padding: 0px 0px 30px 25px;"|[[File:DR_35.png]] |
|} | |} | ||
| + | ===IP Restriction=== | ||
| + | {| | ||
| + | |style="padding: 10px 0px 15px 15px;"|Let's ensure, that specific clients are able to connect with Domains Reseller API only from defined IP addresses.<br /> | ||
| + | Press '' 'IP Restriction' '', fill in IP address and press '' 'Save' ''.<br /> | ||
| + | ''Note: To add multiple IP addresses, press '' 'Add Field' ''.'' | ||
| + | |} | ||
| + | {| | ||
| + | |style="padding: 0px 0px 30px 25px;"|[[File:DR_36.png]] | ||
| + | |} | ||
| + | |||
===Assigning Promotion Codes=== | ===Assigning Promotion Codes=== | ||
{| | {| | ||
| Line 426: | Line 442: | ||
|} | |} | ||
{| | {| | ||
| − | |style="padding: 0px 0px 20px 25px;"|[[File: | + | |style="padding: 0px 0px 20px 25px;"|[[File:DR_37.png]] |
|} | |} | ||
{| | {| | ||
| Line 432: | Line 448: | ||
|} | |} | ||
{| | {| | ||
| − | |style="padding: 0px 0px 20px 25px;"|[[File: | + | |style="padding: 0px 0px 20px 25px;"|[[File:DR_38.png]] |
|} | |} | ||
{| | {| | ||
| − | |style="padding: 0px 0px 15px 15px;"|Your promotion is ready to use, | + | |style="padding: 0px 0px 15px 15px;"|Your promotion is ready to use, let's assign it to some user.<br /> |
| − | + | Go to '' 'Addon' '' → '' 'Domains Reseller' '' → '' 'API User' '' and press '' 'Assign Promocode' '' next to the user you want to assign the promotion for. | |
|} | |} | ||
{| | {| | ||
| − | |style="padding: 0px 0px 20px 25px;"|[[File: | + | |style="padding: 0px 0px 20px 25px;"|[[File:DR_39.png]] |
|} | |} | ||
{| | {| | ||
| − | |style="padding: 0px 0px 20px 15px;"|Now select | + | |style="padding: 0px 0px 20px 15px;"|Now select the previously created promotion and press '' 'Save Changes' ''. |
|} | |} | ||
{| | {| | ||
| − | |style="padding: 0px 0px 20px 25px;"|[[File: | + | |style="padding: 0px 0px 20px 25px;"|[[File:DR_40.png]] |
|} | |} | ||
{| | {| | ||
| − | |style="padding: 0px 0px 20px 15px;"|You should see, that promotion code appeared next to the client, as shown on the following screen. | + | |style="padding: 0px 0px 20px 15px;"|You should see, that the promotion code appeared next to the client, as shown on the following screen. |
|} | |} | ||
{| | {| | ||
| − | |style="padding: 0px 0px 30px 25px;"|[[File: | + | |style="padding: 0px 0px 30px 25px;"|[[File:DR_41.png]] |
|} | |} | ||
==API Logs== | ==API Logs== | ||
{| | {| | ||
| − | |style="padding: 10px 0px 15px 15px;"|You can display logs of | + | |style="padding: 10px 0px 15px 15px;"|You can display the logs of requests to the API. As well as responses to these requests and information about who sent the request to the API.<br /> |
| − | You can find desired log using filters. Fields left empty will not be considered during search. | + | You can find the desired log using filters. Fields left empty will not be considered during the search. |
|} | |} | ||
{| | {| | ||
| − | |style="padding: 0px 0px 30px 25px;"|[[File: | + | |style="padding: 0px 0px 30px 25px;"|[[File:DR_42.png]] |
|} | |} | ||
==Module Generator== | ==Module Generator== | ||
{| | {| | ||
| − | |style="padding: 10px 0px | + | |style="padding: 10px 0px 15px 15px;"|Rebranding registrar module has never been easier. With our generator all you have to do is fill in its name and press '' 'Generate Module' ''.<br /> |
| + | ''Note: You can generate registrar module both for WHMCS and HostBill systems.'' | ||
|} | |} | ||
{| | {| | ||
| − | |style="padding: 0px 0px 20px 25px;"|[[File: | + | |style="padding: 0px 0px 20px 25px;"|[[File:DR_43.png]] |
|} | |} | ||
{| | {| | ||
| − | |style="padding: 0px 0px 15px 15px;"|As soon as you do that, module will be generated. Save link to it and copy installation instructions.<br /> | + | |style="padding: 0px 0px 15px 15px;"|As soon as you do that, the module will be generated. Save the link to it and copy installation instructions.<br /> |
| − | '''As soon as new module is generated, integration code for it will appear as | + | '''Important:''' As soon as the new module is generated, integration code for it will appear as the 5th step of installation instruction<br /> |
| − | + | It is crucial to save the code and deliver it to resellers in installation instructions along with the link to the module. | |
|} | |} | ||
{| | {| | ||
| − | |style="padding: 0px 0px 30px 25px;"|[[File: | + | |style="padding: 0px 0px 30px 25px;"|[[File:DR_44.png]] |
|} | |} | ||
==Documentation== | ==Documentation== | ||
{| | {| | ||
| − | |style="padding: 10px 0px | + | |style="padding: 10px 0px 20px 15px;"|This tab is a hyperlink. It leads to Domains Reseller For WHMCS Wiki article you are currently reading. |
|} | |} | ||
{| | {| | ||
| − | |style="padding: 0px 0px 30px 25px;"|[[File: | + | |style="padding: 0px 0px 30px 25px;"|[[File:DR_45.png]] |
|} | |} | ||
| − | |||
==Email To Reseller== | ==Email To Reseller== | ||
{| | {| | ||
|style="padding: 10px 0px 30px 15px;"|Email to your reseller should consist of:<br /> | |style="padding: 10px 0px 30px 15px;"|Email to your reseller should consist of:<br /> | ||
| − | 1. Registrar module you generated or link to download | + | 1. Registrar module you generated or link to its download.<br /> |
2. Installation instructions (with integration code).<br /> | 2. Installation instructions (with integration code).<br /> | ||
| − | 3. Connection credentials ( | + | 3. Connection credentials (user API key and email). |
|} | |} | ||
| − | |||
==Provider WHMCS Client Area== | ==Provider WHMCS Client Area== | ||
{| | {| | ||
| − | |style="padding: 10px 0px 15px 15px;"|Resellers can manage API connection credentials directly from the provider WHMCS client area. | + | |style="padding: 10px 0px 15px 15px;"|Resellers can manage API connection credentials directly from the provider WHMCS client area.<br /> |
| − | + | Go to '' 'Domains' '' → '' 'Reseller Registrar Credentials' '' to access them. | |
|} | |} | ||
{| | {| | ||
| − | |style="padding: 0px 0px 20px 25px;"|[[File: | + | |style="padding: 0px 0px 20px 25px;"|[[File:DR_46.png]] |
|} | |} | ||
{| | {| | ||
| − | |style="padding: 0px 0px 15px 15px;"|As you can see, you can find all the information linked with your registrar. | + | |style="padding: 0px 0px 15px 15px;"|As you can see, you can find all the information linked with your registrar.<br /> |
To view your API key, press '' 'Show' '' button. | To view your API key, press '' 'Show' '' button. | ||
|} | |} | ||
{| | {| | ||
| − | |style="padding: 0px 0px 20px 25px;"|[[File: | + | |style="padding: 0px 0px 20px 25px;"|[[File:DR_47.png]] |
|} | |} | ||
{| | {| | ||
| − | |style="padding: 0px 0px 20px 15px;"|If your API key was exposed, generate new one through pressing '' 'Generate Key' ''. | + | |style="padding: 0px 0px 20px 15px;"|If your API key was exposed, generate a new one through pressing '' 'Generate Key' ''. |
|} | |} | ||
{| | {| | ||
| − | |style="padding: 0px 0px 30px 25px;"|[[File: | + | |style="padding: 0px 0px 30px 25px;"|[[File:DR_48.png]] |
|} | |} | ||
| + | |||
==End User Client Area== | ==End User Client Area== | ||
{| | {| | ||
| − | |style="padding: 10px 0px 15px 15px;"|Domains Reseller allows end user to register | + | |style="padding: 10px 0px 15px 15px;"|Domains Reseller registrar module allows an end user to register, transfer and renew domain.<br /> |
| − | Client can also manage | + | Client can also manage private nameservers (1), enable/disable ID protection (2), modify contact information (3), manage DNS records (4) and set up email forwarding (5). |
| + | |} | ||
| + | {| | ||
| + | |style="padding: 0px 0px 20px 25px;"|[[File:DR_49.png]] | ||
| + | |} | ||
| + | {| | ||
| + | |style="padding: 0px 0px 20px 15px;"|At the '' 'Register Nameservers' '' (1) you can manage your custom nameservers. | ||
| + | |} | ||
| + | {| | ||
| + | |style="padding: 0px 0px 20px 25px;"|[[File:DR_50.png]] | ||
| + | |} | ||
| + | {| | ||
| + | |style="padding: 0px 0px 20px 15px;"|To enable/disable ID protection (2), proceed to the '' 'Addons' '' subtab. | ||
| + | |} | ||
| + | {| | ||
| + | |style="padding: 0px 0px 20px 25px;"|[[File:DR_51.png]] | ||
| + | |} | ||
| + | {| | ||
| + | |style="padding: 0px 0px 20px 15px;"|At '' 'Contact Information' '' (3) you can decide which contact information use: yours, your contact or custom information. | ||
| + | |} | ||
| + | {| | ||
| + | |style="padding: 0px 0px 20px 25px;"|[[File:DR_52.png]] | ||
| + | |} | ||
| + | {| | ||
| + | |style="padding: 0px 0px 15px 15px;"|'' 'Manage DNS' '' (4) allows you to manage your DNS records.<br /> | ||
| + | On the following screen you can find information '' 'Function Not Supported by Registrar Module' '', it informs you that the registrar module used at the Provider WHMCS does not support this feature. | ||
| + | |} | ||
| + | {| | ||
| + | |style="padding: 0px 0px 20px 25px;"|[[File:DR_53.png]] | ||
| + | |} | ||
| + | {| | ||
| + | |style="padding: 0px 0px 20px 15px;"|At the '' 'Manage Email Forwards' '' (5) you can redirect your emails to another domain. | ||
| + | |} | ||
| + | {| | ||
| + | |style="padding: 0px 0px 30px 25px;"|[[File:DR_54.png]] | ||
| + | |} | ||
| + | ==Extended TLDs Management - Integration With [http://www.docs.modulesgarden.com/Domain_Orders_Extended_For_WHMCS Domain Orders Extended For WHMCS]== | ||
| + | {| | ||
| + | |style="padding: 10px 0px 15px 15px;"|Owing to the integration with Domain Orders Extended For WHMCS, the management of multiple TLDs and offering them to your resellers is even easier!<br /> | ||
| + | We will show the exemplary workflow of such a integration.<br /> | ||
| + | Install one of gTLDs groups at the Domain Orders Extended For WHMCS. | ||
| + | |} | ||
| + | {| | ||
| + | |style="padding: 0px 0px 20px 25px;"|[[File:DR_54_1.png]] | ||
| + | |} | ||
| + | {| | ||
| + | |style="padding: 0px 0px 20px 15px;"|Use grouping by categories to select all TLDs from a previously created '' 'Business' '' group and press '' 'Bulk Set Pricing' ''. | ||
| + | |} | ||
| + | {| | ||
| + | |style="padding: 0px 0px 20px 25px;"|[[File:DR_54_2.png]] | ||
| + | |} | ||
| + | {| | ||
| + | |style="padding: 0px 0px 15px 15px;"|Next step is setting up pricing. We are still using Domain Orders Extended For WHMCS.<br /> | ||
| + | On the following screen we are copying pricing from a previously created TLD.<br /> | ||
| + | You can find more information about the pricing in Domain Orders Extended For WHMCS [http://www.docs.modulesgarden.com/Domain_Orders_Extended_For_WHMCS#Pricing here]. | ||
| + | |} | ||
| + | {| | ||
| + | |style="padding: 0px 0px 20px 25px;"|[[File:DR_54_3.png]] | ||
| + | |} | ||
| + | {| | ||
| + | |style="padding: 0px 0px 15px 15px;"|Select all TLDs the same way you did earlier and press '' 'Bulk Registrar Change' ''.<br /> | ||
| + | Afterwards, select a registrar which can provision gTLDs domains and press '' 'Update Registrars' ''. | ||
| + | |} | ||
| + | {| | ||
| + | |style="padding: 0px 0px 20px 25px;"|[[File:DR_54_4.png]] | ||
|} | |} | ||
{| | {| | ||
| − | |style="padding: 0px 0px 20px | + | |style="padding: 0px 0px 20px 15px;"|Now, enable previously configured TLDs at your Domains Reseller → '' 'Configuration' '' tab. |
| + | TLDs are ready to be offered by your resellers. | ||
|} | |} | ||
{| | {| | ||
| − | |style="padding: | + | |style="padding: 0px 0px 20px 25px;"|[[File:DR_54_5.png]] |
|} | |} | ||
{| | {| | ||
| − | |style="padding: 0px 0px | + | |style="padding: 0px 0px 15px 15px;"|One of your reseller also own Domain Orders Extended For WHMCS, he can quickly update his offer by installing the same gTLD category.<br /> |
| + | Afterwards, he can set up pricing and assign them to use Domains Reseller For WHMCS registrar module generated by you in the same way you did. | ||
|} | |} | ||
{| | {| | ||
| − | |style="padding: | + | |style="padding: 0px 0px 20px 25px;"|[[File:DR_54_6.png]] |
|} | |} | ||
{| | {| | ||
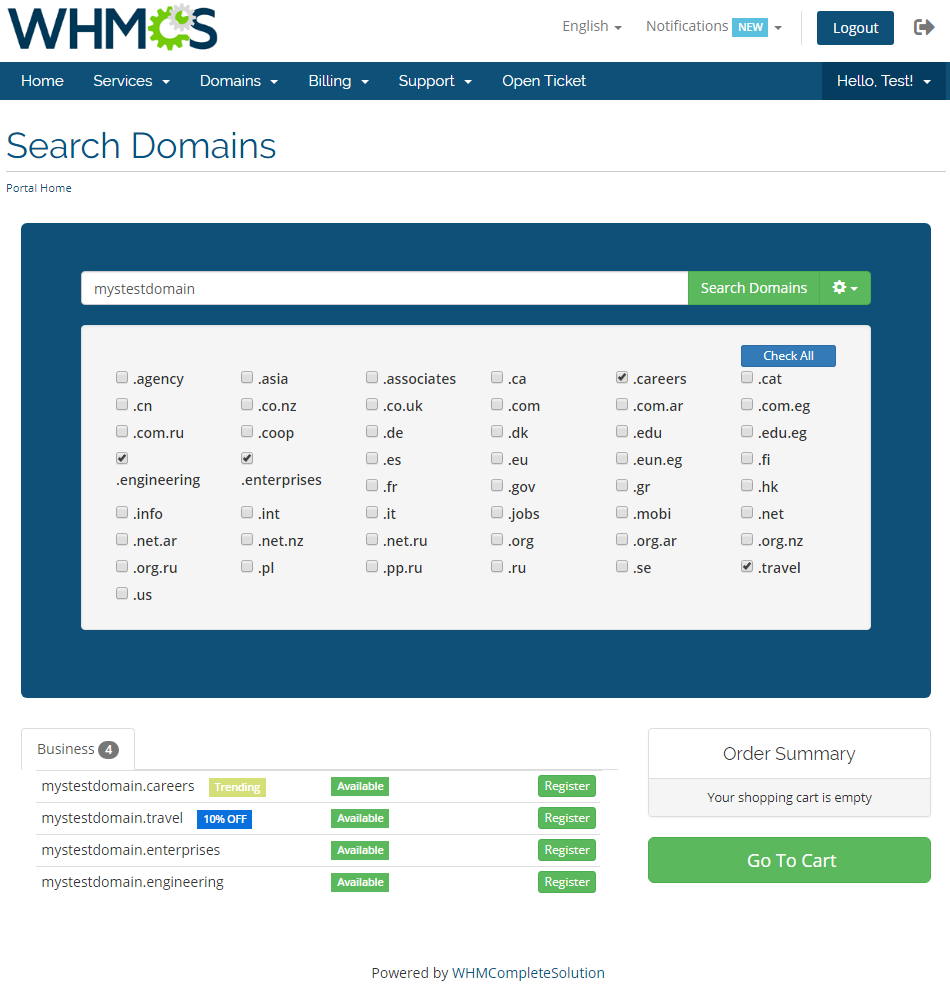
| − | |style="padding: 0px 0px | + | |style="padding: 0px 0px 20px 15px;"|Additionally, his offer is more client-friendly due to the custom Domain Orders Extended domain registration form. |
|} | |} | ||
{| | {| | ||
| − | |style="padding: | + | |style="padding: 0px 0px 20px 25px;"|[[File:DR_54_7.png]] |
|} | |} | ||
{| | {| | ||
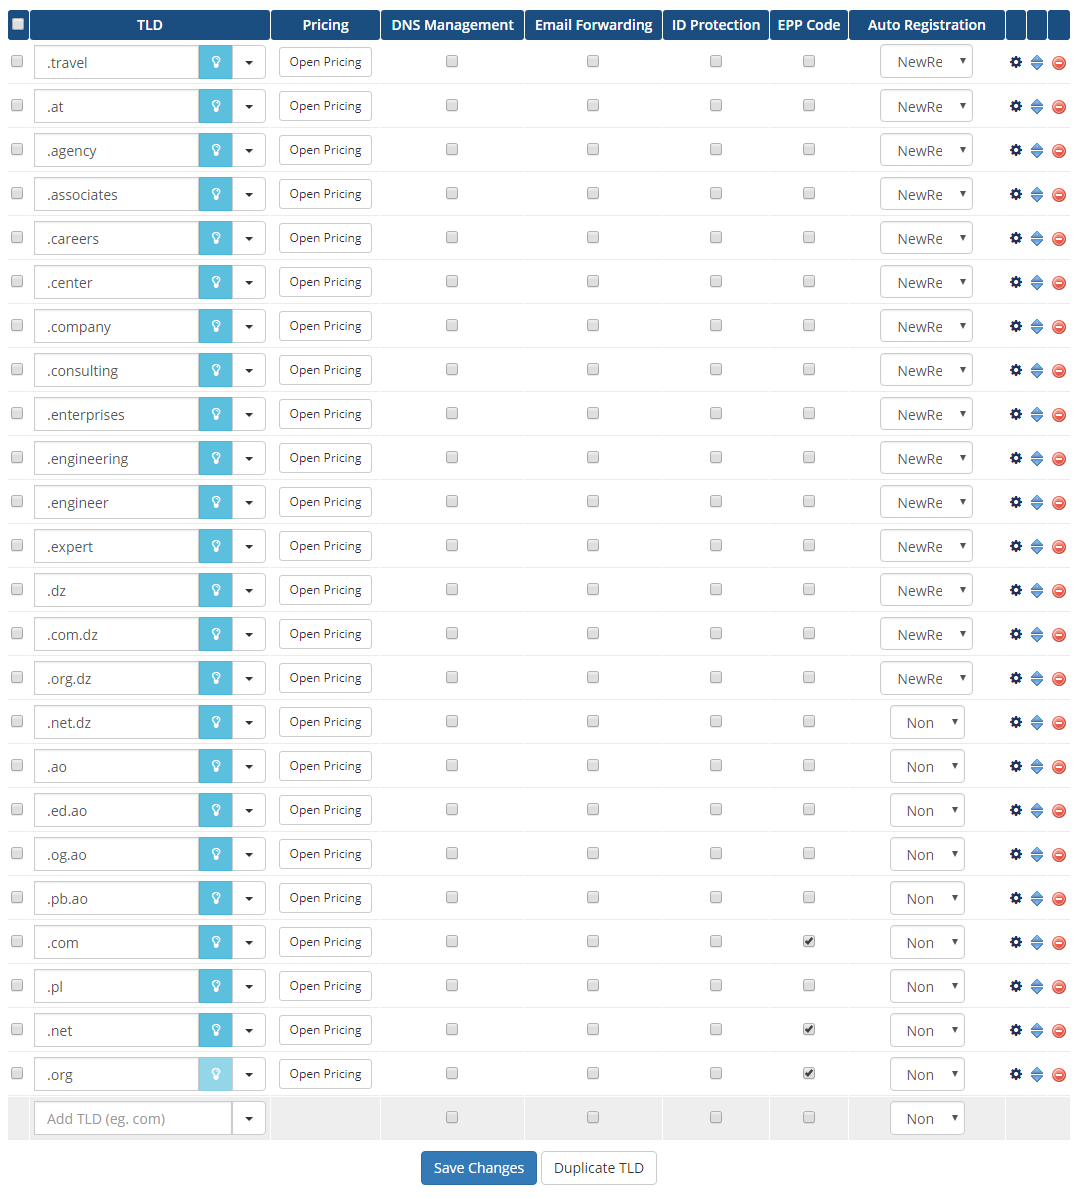
| − | |style="padding: 0px 0px | + | |style="padding: 0px 0px 15px 15px;"|There is also no problem for resellers who do not own Domain Orders Extended.<br /> |
| + | However they have to add and set up each TLD separately at the '' 'Setup' '' → '' 'Products/Services' '' → '' 'Domain Pricing' '', which may be time consuming. | ||
|} | |} | ||
{| | {| | ||
| − | |style="padding: | + | |style="padding: 0px 0px 30px 25px;"|[[File:DR_54_8.png]] |
|} | |} | ||
{| | {| | ||
| − | |style="padding: 0px 0px | + | |style="padding: 0px 0px 15px 15px;"|As you saw, an integrating of Domains Resellers For WHMCS and Domain Orders Extended For WHMCS allows you to offer vast array of TLDs with ease.<br /> |
| + | Your resellers can also benefit from such an integration, beside management of the TLDs, they end clients can benefit from user-friendly domain order form as well as domain spinner.<br /> | ||
| + | All of this breed yours and your resellers' income to increase even more! | ||
|} | |} | ||
=Tips= | =Tips= | ||
{| | {| | ||
| − | |style="padding: 10px 0px 0px 15px;"|1. If you forget to save link to registrar module you generated or integration code for it, | + | |style="padding: 10px 0px 0px 15px;"|1. If you forget to save the link to the registrar module you generated or integration code for it, do not worry, there is a way!<br /> |
| − | Simply generate module with the same name and save what you forgot to save last time. | + | Simply generate the module with the same name and save what you forgot to save the last time. |
|} | |} | ||
{| | {| | ||
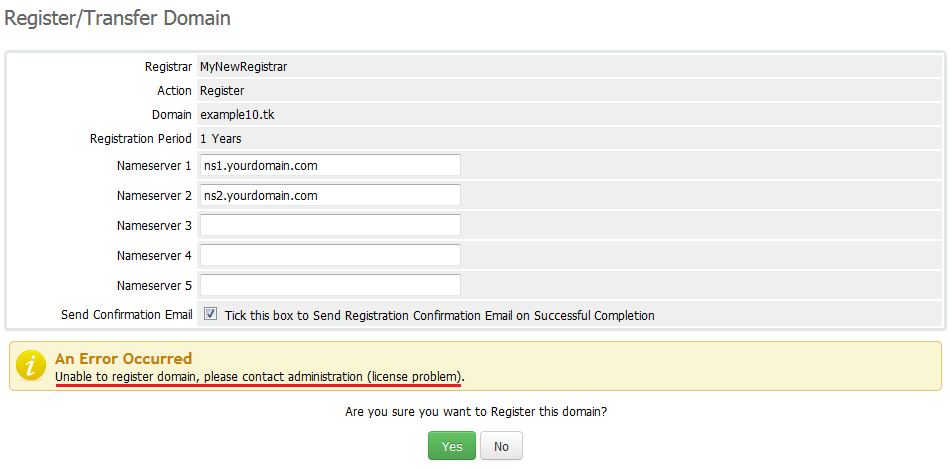
| − | |style="padding: 10px 0px 20px 15px;"|2. If your reseller | + | |style="padding: 10px 0px 20px 15px;"|2. If your reseller gets an error '' 'Unable to register domain, please contact administration (license problem).' '', that means your license is invalid or expired. |
|} | |} | ||
{| | {| | ||
| − | |style="padding: 0px 0px 20px 25px;"|[[File: | + | |style="padding: 0px 0px 20px 25px;"|[[File:DR_55.png]] |
|} | |} | ||
{| | {| | ||
| − | |style="padding: 0px 0px 30px 15px;"|3. | + | |style="padding: 0px 0px 30px 15px;"|3. Make sure that you are not blocking access to the '' 'domainsResellerAPI' '' catalog by your '' '.htaccess' '' file. |
|} | |} | ||
=Common Problems= | =Common Problems= | ||
{| | {| | ||
| − | |style="padding: 10px 0px 10px 15px;"|1. When you have problems with connection, check whether your SELinux or firewall | + | |style="padding: 10px 0px 10px 15px;"|1. When you have problems with connection, check whether your SELinux or firewall does not block ports. |
|} | |} | ||
{| | {| | ||
| − | |style="padding: 0px 0px 30px 15px;"|2. Error '' 'Function Not Supported by Registrar Module' '' means that registrar on main WHMCS | + | |style="padding: 0px 0px 30px 15px;"|2. Error '' 'Function Not Supported by Registrar Module' '' means that registrar on main WHMCS does not support the operation you were trying to do. |
|} | |} | ||
Revision as of 13:51, 4 September 2014
Contents
|
About Domains Reseller For WHMCS
| Domains Reseller For WHMCS allows you to resell your TLDs with ease. With our module's help you will be able to easily manage your resellers and allow them to instantly start reselling domains directly to their own clients. |
- Domains Reseller - Provider Features:
| ✔ Your Own API For Domains Reselling |
| ✔ Domain Registrar Module Generator For WHMCS |
| ✔ Enable/Disable API |
| ✔ API Status |
| ✔ Restrict IP Addresses |
| ✔ Reseller White List |
| ✔ Restrict IP Address Per Client |
| ✔ Auto Disable API For New Users |
| ✔ Auto Generate API Key For New Users |
| ✔ SSL Connection |
| ✔ Low Credit Notification |
| ✔ Choose TLDs Enabled For API |
| ✔ Allow Reselling And Activating Domains For Chosen Clients Without Credits |
| ✔ Define Type Of Refund Upon Unsuccessful Domain Registration |
| ✔ List Of Clients With Possibility To Generate/Remove/Enable/Disable The API Key |
| ✔ Generate/Enable/Disable API Keys For All Users |
| ✔ Filtering API Users Per Firstname, Lastname And E-mail |
| ✔ Assign Promocode To Users |
| ✔ API Knowledgbase Generator |
| ✔ API Logs With Filtering |
- API Functionality:
| ✔ Register/Transfer/Renew Domain |
| ✔ Release/Delete Domain |
| ✔ Modify Contact Details |
| ✔ Get EPP Code |
| ✔ Get/Save DNS Records |
| ✔ Get/Modify Nameservers |
| ✔ Register/Modify/Delete Nameserver |
| ✔ Registrar Lock |
| ✔ Get/Save Email Forwarding |
| ✔ ID Protection |
| ✔ Domain Cron Synchronization |
- End User Features:
| ✔ Contact Information |
| ✔ Management of Email Forwarders |
| ✔ DNS Records Management |
| ✔ Register/Manage Private Nameservers |
| ✔ Enable/Disable ID Protection |
- General Info:
| ✔ Orders Paid By Resellers' Credit |
| ✔ Reseller Can Manage API From The WHMCS Client Area |
| ✔ Integrated With Domain Orders Extended For WHMCS - Easy Management Of TLDs (read more) |
| ✔ Multi-Language Support |
| ✔ Supports WHMCS V5 and Later |
Installation
| This tutorial will show you how to successfully install and configure Domains Reseller For WHMCS. We will guide you step by step through the whole installation and configuration process. |
Provider WHMCS Module Installation
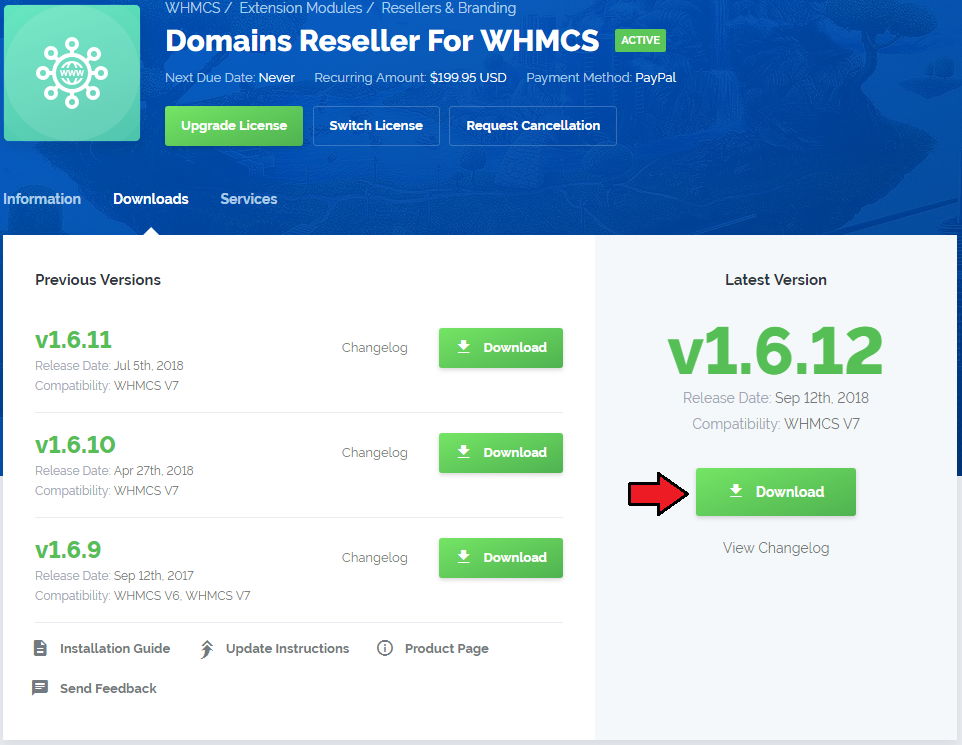
| 1. Log in to your client area and download Domains Reseller For WHMCS. |
|
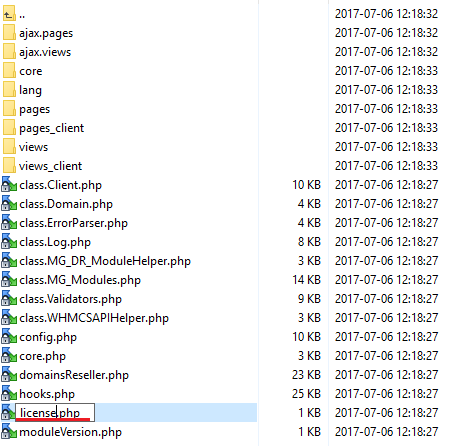
| 2. Upload and extract the module into the main WHMCS directory. Files in your WHMCS directory should look like this. |
| 3. When you install Domains Reseller for the first time you have to rename 'license_RENAME.php' file. File is located at 'modules/addons/domainsReseller/license_RENAME.php' . Rename it from 'license_RENAME.php' to 'license.php' . |
|
| 4. In order to configure your license key, you have to edit a previously renamed 'license.php' file.' Enter your license key between quotation marks as presented on the following screen. You can find your license key at your client area → 'My Products' . |

|
| 5. Edit 'header.tpl' file located at 'your_whmcs/templates/default/header.tpl' . Add this code: <li><a href="index.php?m=domainsReseller">Reseller Registrar Credentials</a></li> After: <li><a id="Menu-Domains-Whois_Lookup" href="domainchecker.php">{$LANG.navwhoislookup}</a></li>
Take a look at the screenshot below and verify your changes: |

|
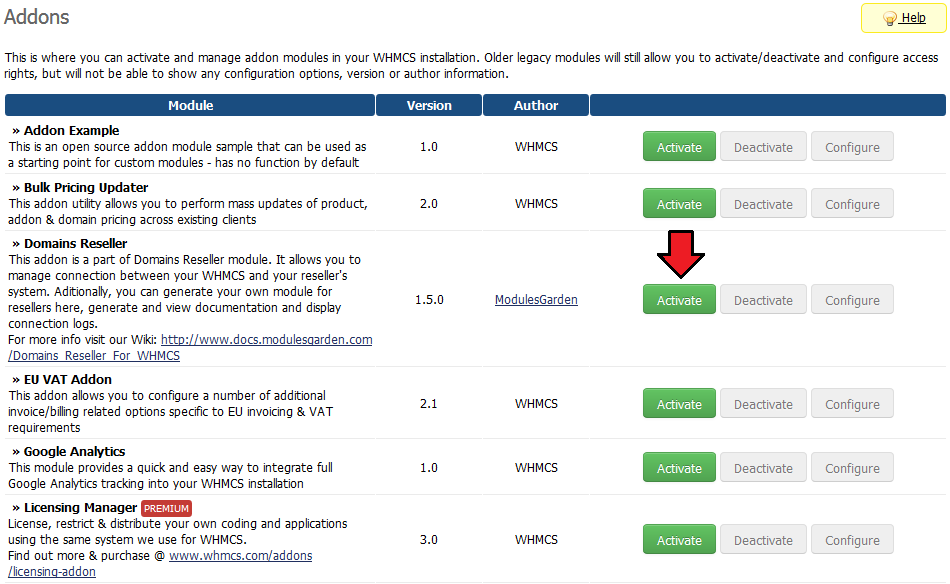
| 6. Now you have to activate the module in your WHMCS system. Log in to your WHMCS admin area. Go to 'Setup' → 'Addon Modules' . Afterwards find 'Domains Reseller' and press 'Activate' button. |
|
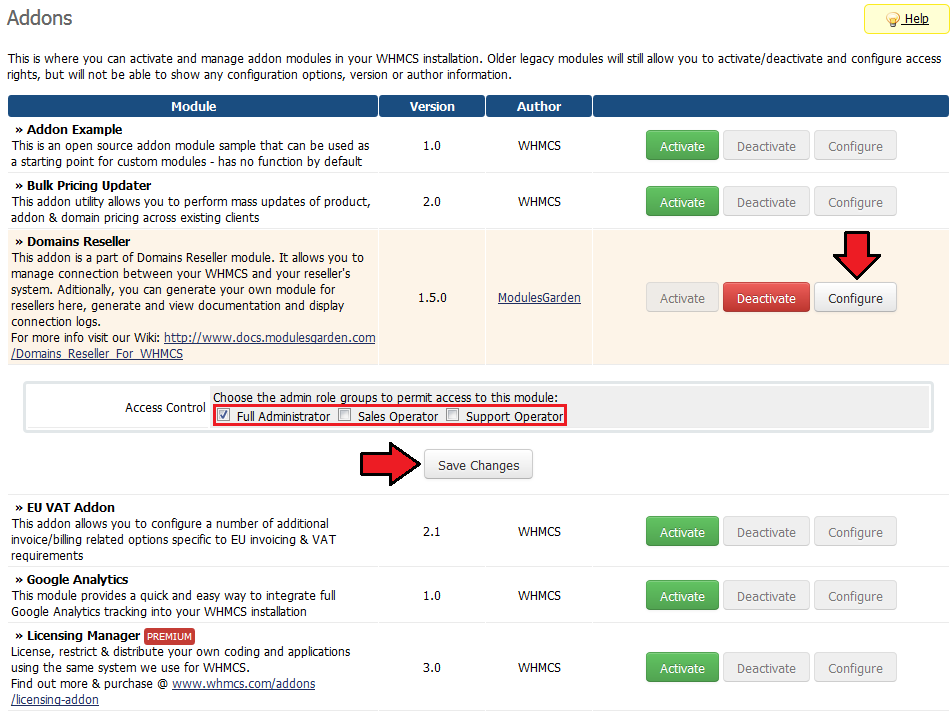
| 7. In the next step you need to permit access to this module. To do so click on 'Configure' button, tick 'Full Administrator' and press 'Save Changes' . |
|
| 8. You have just successfully installed Domains Reseller! You can access your module at 'Addons' → 'Domains Reseller' . |
|
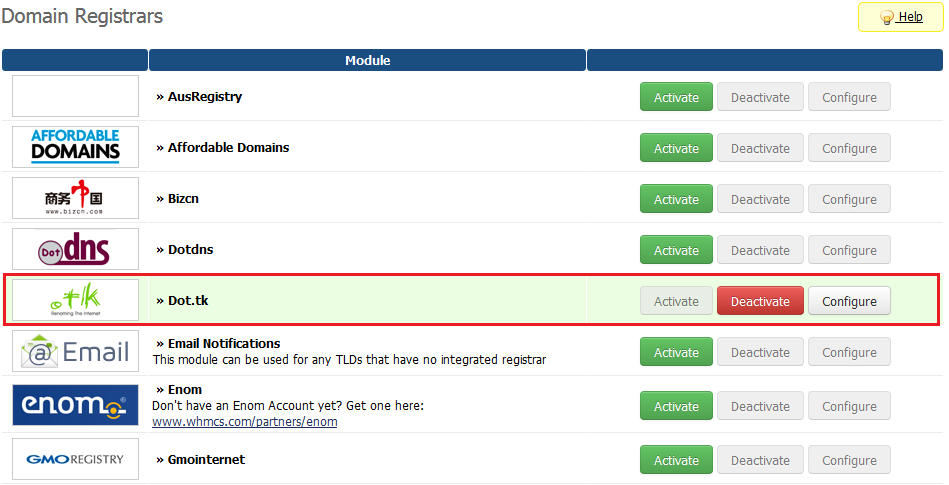
| 9. Activate and configure registrar at 'Setup' → 'Products/Services' → 'Domains Registrar' . |
|
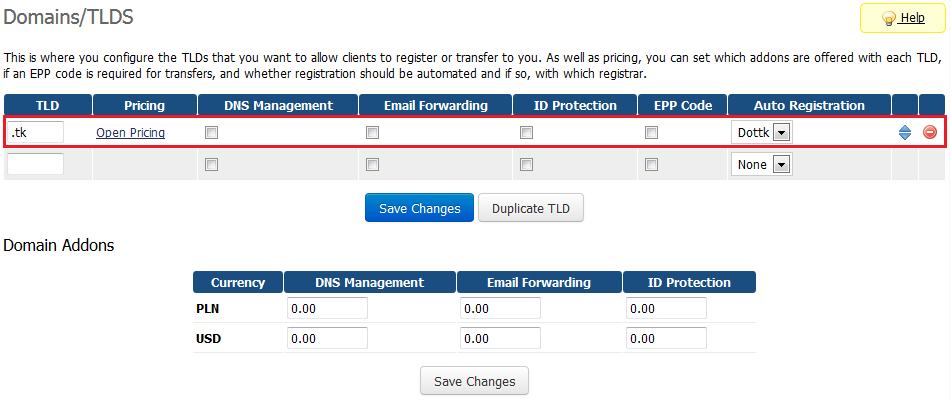
| 10. Go to 'Setup' → 'Products/Services' → 'Domains Pricing' . Add TLD, set pricing for it and choose automatic registrar you have just configured. |
|
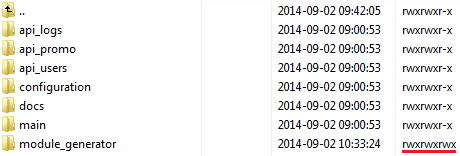
| 11. To generate registrar for your resellers, make sure that 'module_generator' folder has chmod set to '755' or '777'. Folder is located in 'your_whmcs/modules/addons/domainsReseller/pages/ ' . |
|
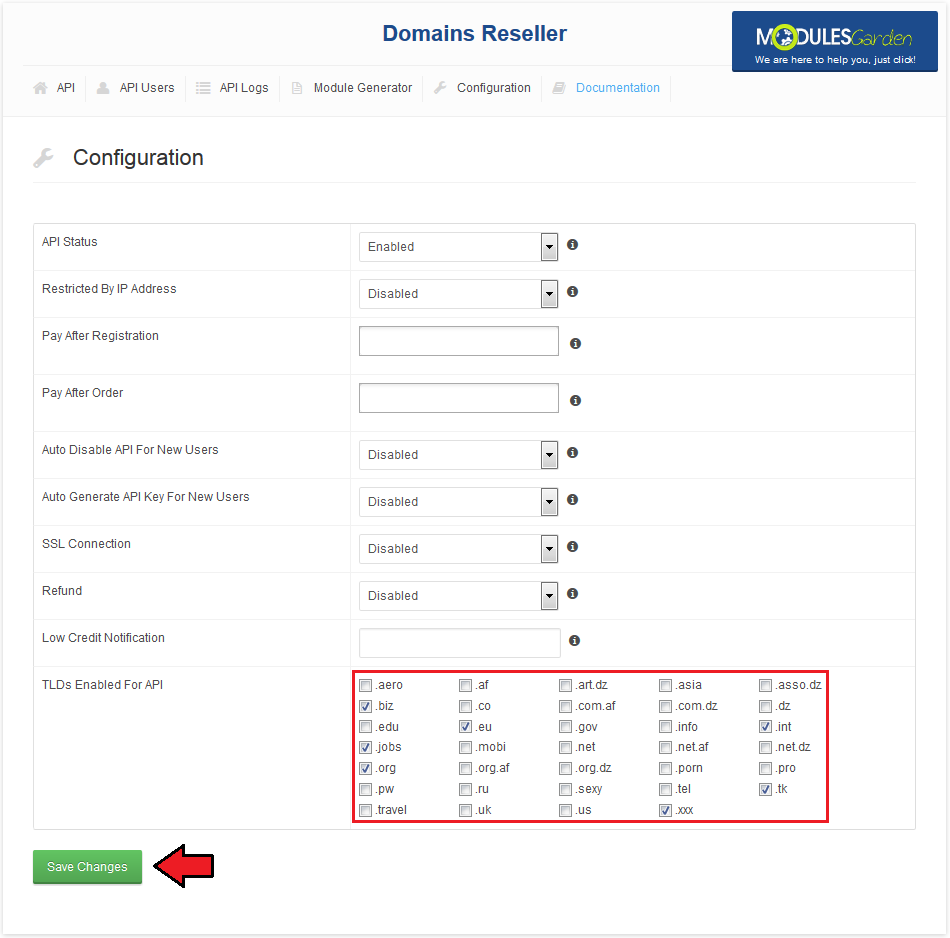
| 12. Go to Domains Reseller addon and switch to 'Configuration' tab. Mark checkbox next to TLD you want to resell and press 'Save Changes' button. |
|
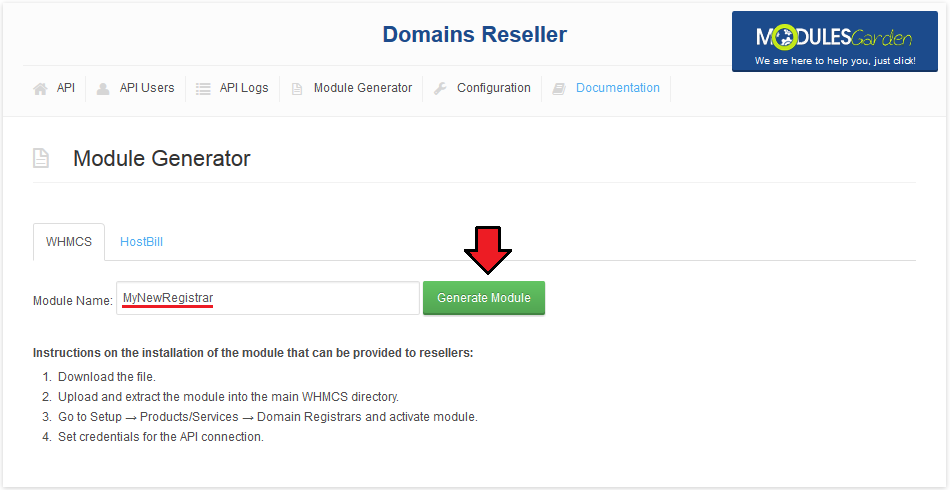
| 13. In 'Module Generator' tab enter module name into textbox and press 'Generate Module' button. |
|
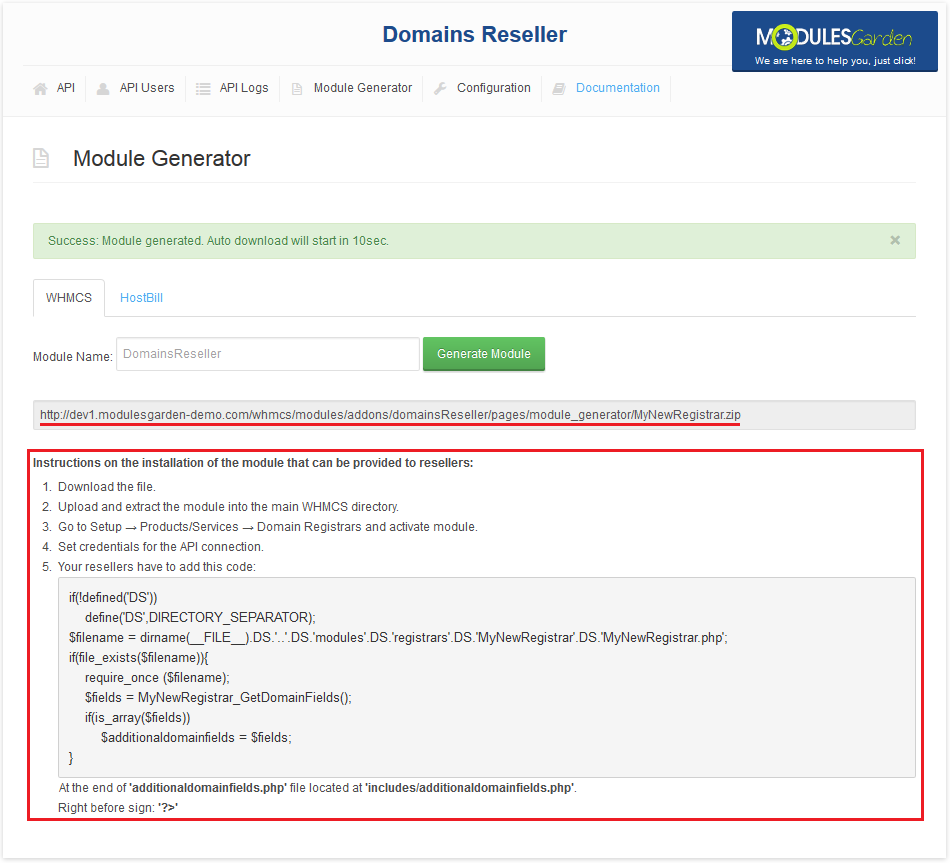
| 14. Downloading of the module you have just generated will start shortly. You can provide registrar module for your resellers in two ways, by sending them a file or a link to it. |
|
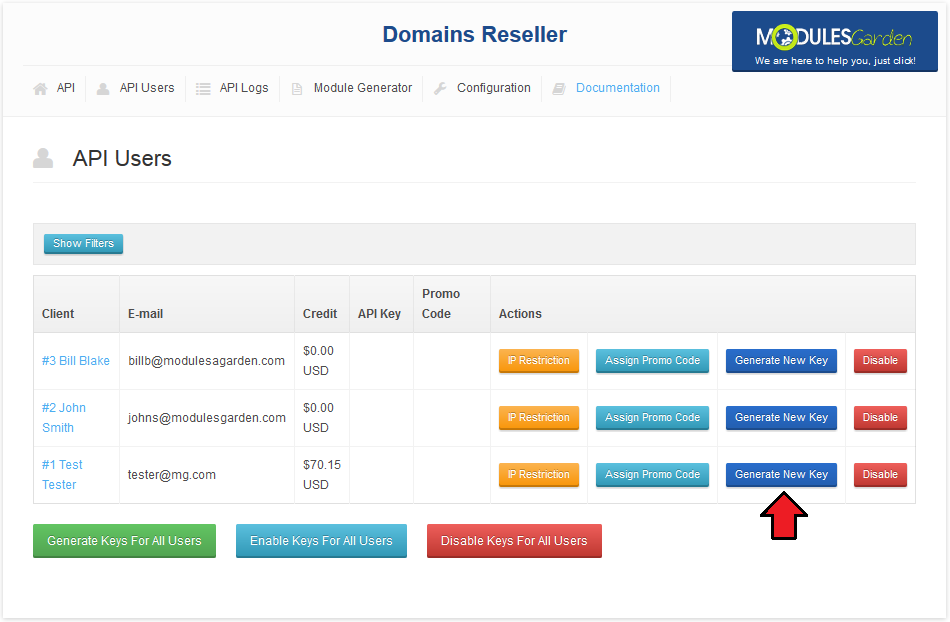
| 15. Now you have to generate API key for your client. Go to 'API Users' tab. Afterwards, press 'Generate API Key' next to the user you want to generate API key for. |
|
| Your Domains Reseller module is ready to use! Your clients can use their registrars as soon as they install them on their WHMCS and add credits to their accounts in your WHMCS. |
Reseller WHMCS Module Installation
| Below you can find instructions for installation of the registrar module on reseller WHMCS. |
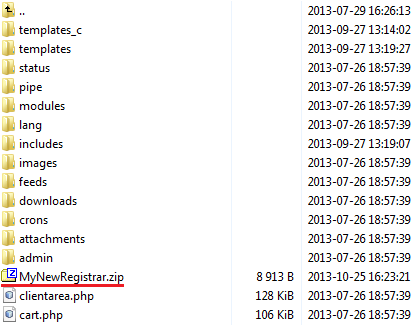
| 1. Upload and extract the registrar module into your WHMCS. |
|
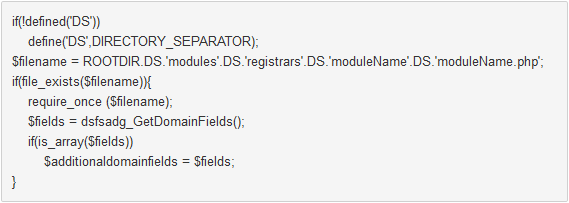
| 2. Enter integration code that you got from your provider. Open 'additionaldomainfields.php' file located at 'includes/additionaldomainfields.php' . |
|
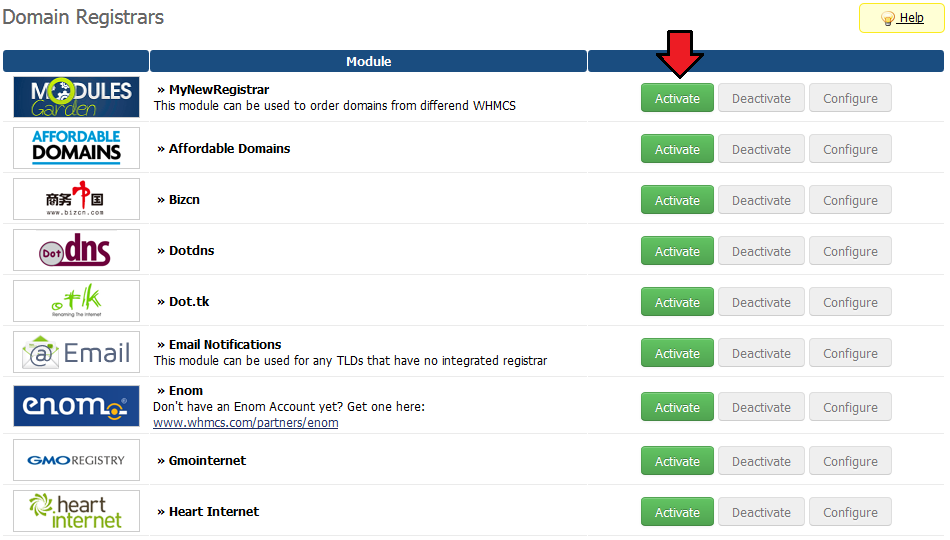
| 3. Go to 'Setup' → 'Products/Services' → 'Domains Registrar' , find the module you have just uploaded and press 'Activate' next to it. |
|
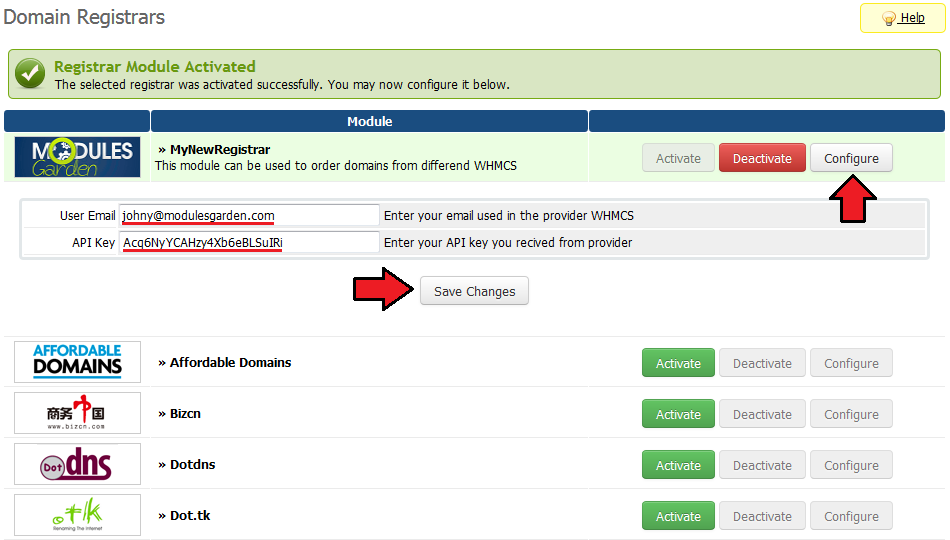
| 4. Now, press 'Configure' button, enter 'User Email' and 'API Key' provided along with module. Afterwards, press 'Save Changes' . |
|
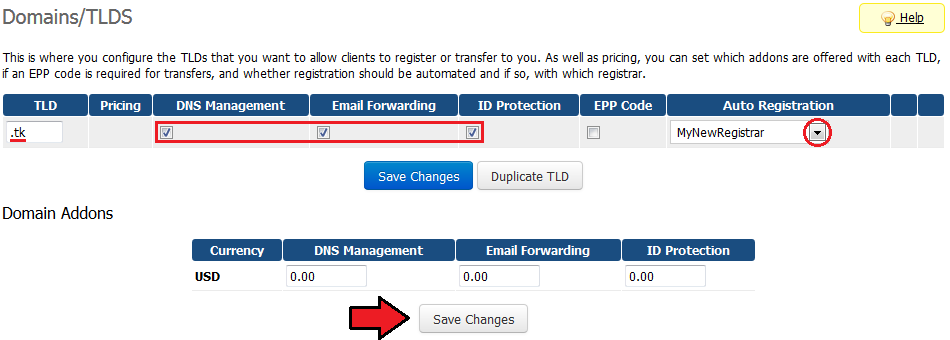
| 5. To continue, go to 'Setup' → 'Products/Services' → 'Domains Pricing' . Set up TLD your provider allows you to resell, select additional features, choose registrar you have just installed from a dropdown menu and save it through pressing 'Save Changes' . |
|
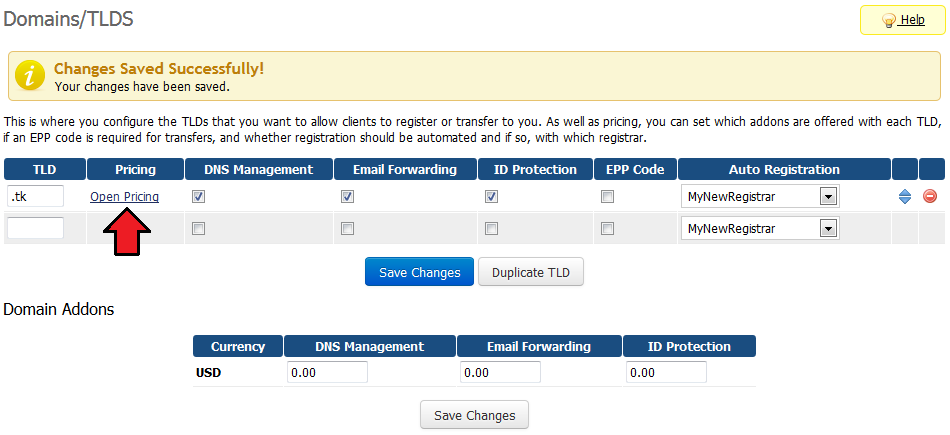
| 6. Afterwards, set pricing for your TLD. To do so, press 'Open Pricing' text. It will open in a new window, so make sure your browser will not block it. |
|
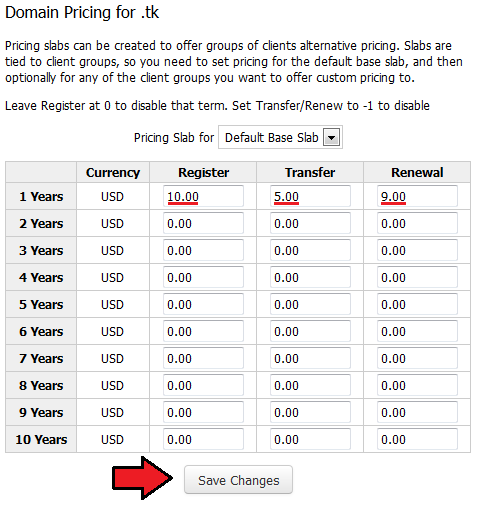
| 7. Next, enter prices for specific actions. Press 'Save Changes' to confirm. |
|
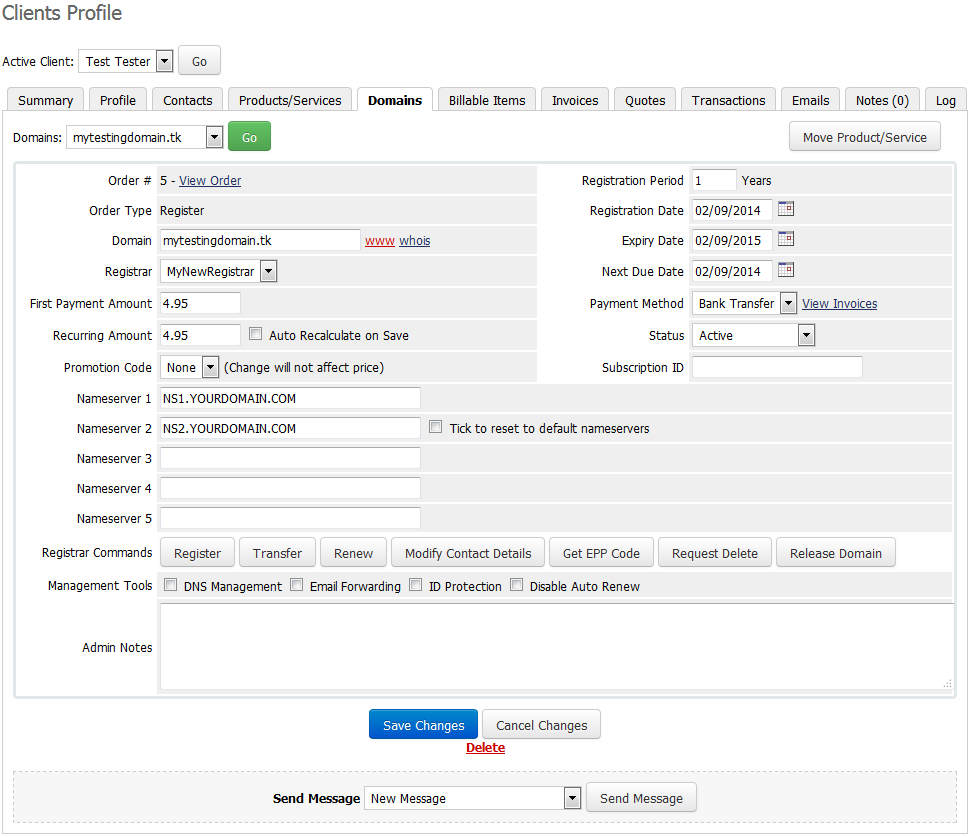
| 8. Congratulations, you have just successfully installed your registrar! You can start using registrar as soon as you add credits to your account on provider WHMCS. |
|
Configuration and Management
| Domains Reseller For WHMCS allows your customers to resell domains on their own WHMCS. |
Configuration
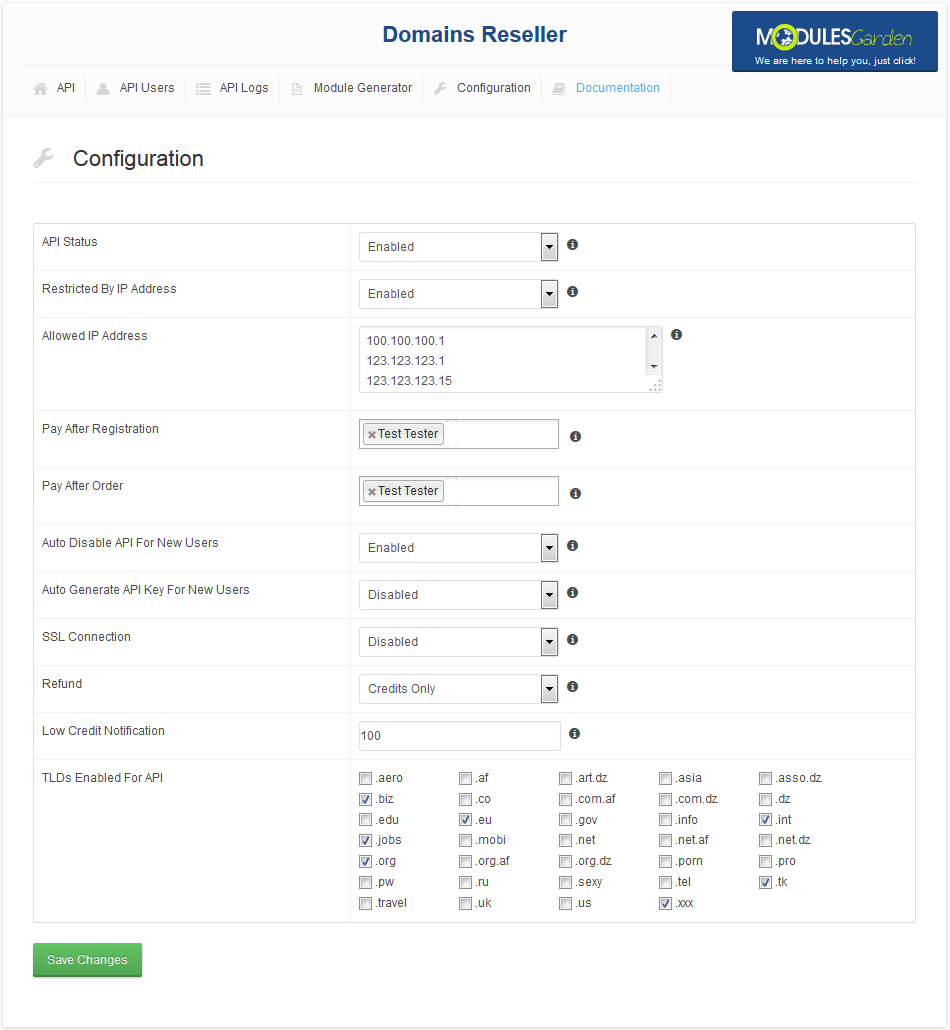
| 'Configuration' tab allows you to access general settings of your Domain Reseller API. |
|
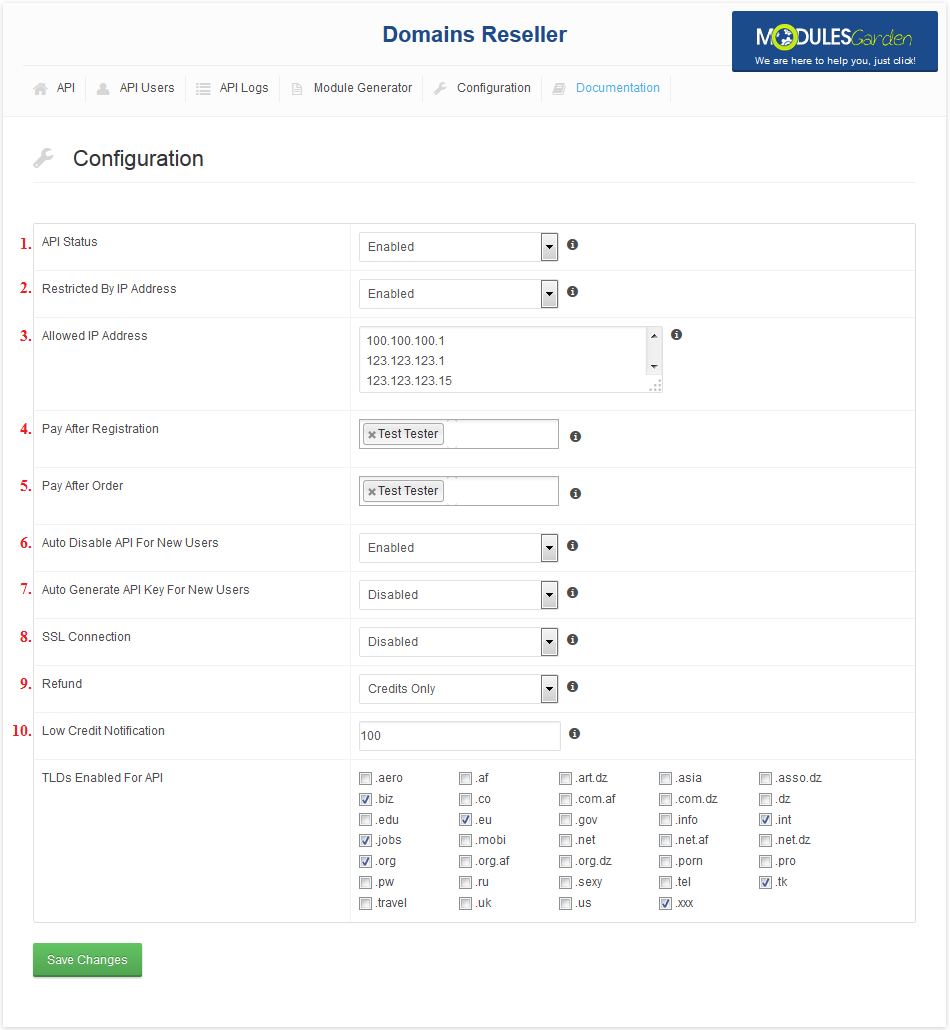
| We will describe these options below. 1. 'API Status ' - Enable/Disable Domains Reseller API. |
|
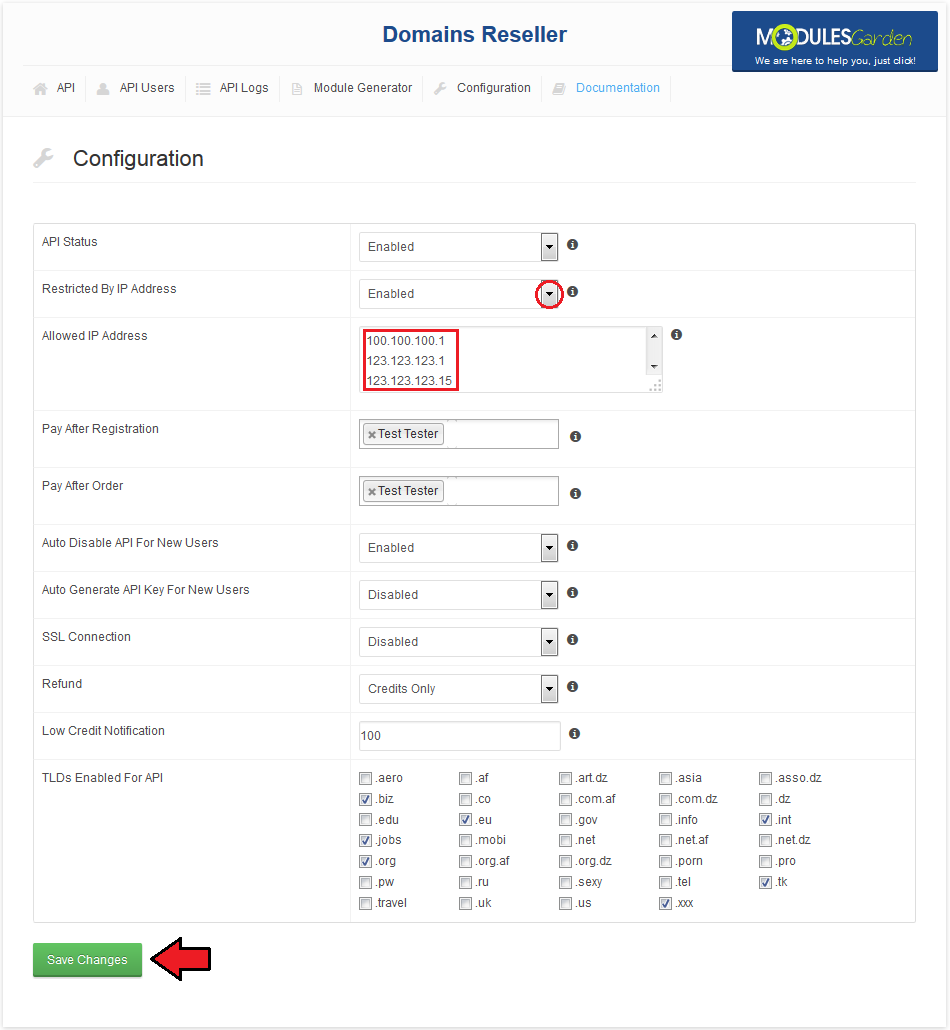
| To restrict access to the Domains Reseller API by IP address, simply choose 'Enable' from 'Restrict IP Addresses' dropdown menu. New text field should appear, enter IP addresses you want to whitelist, one IP address per line. |
|
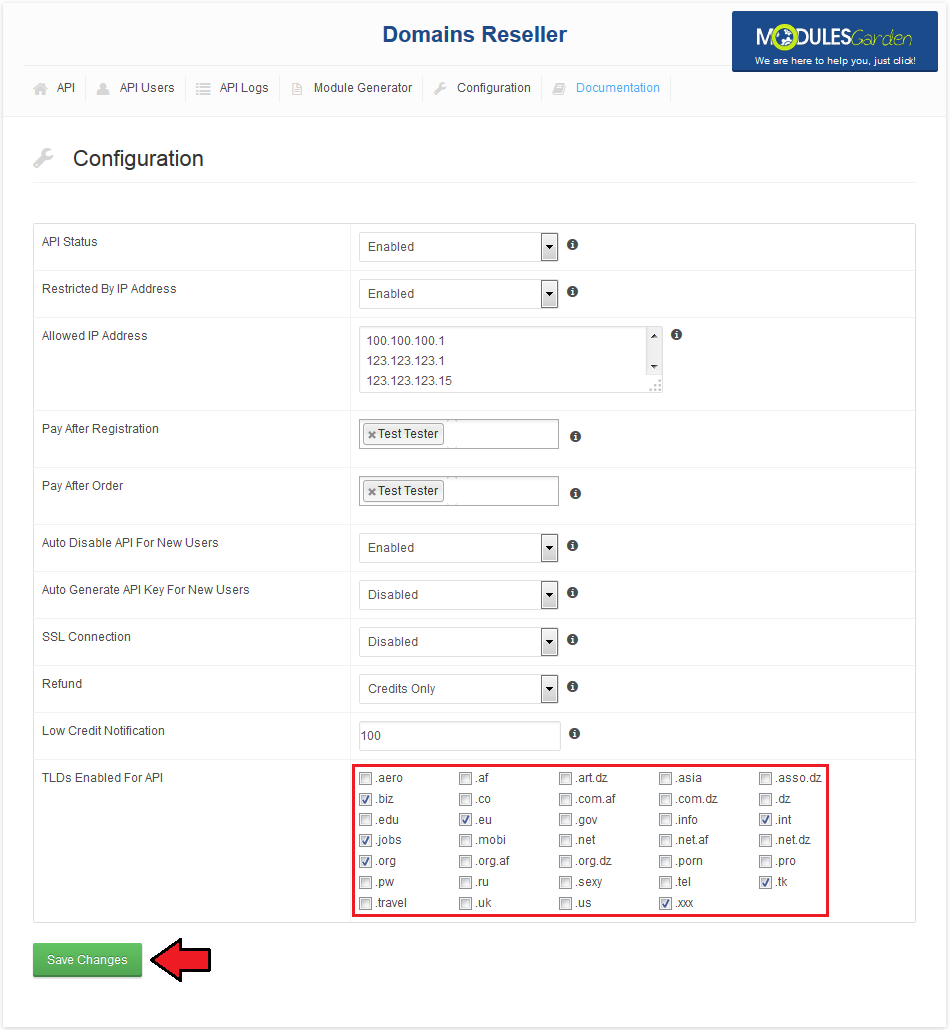
| Last, but not least important thing you can do here is enabling TLD for resell. It can be done simply by ticking TLD and pressing 'Save Changes' . |
|
API
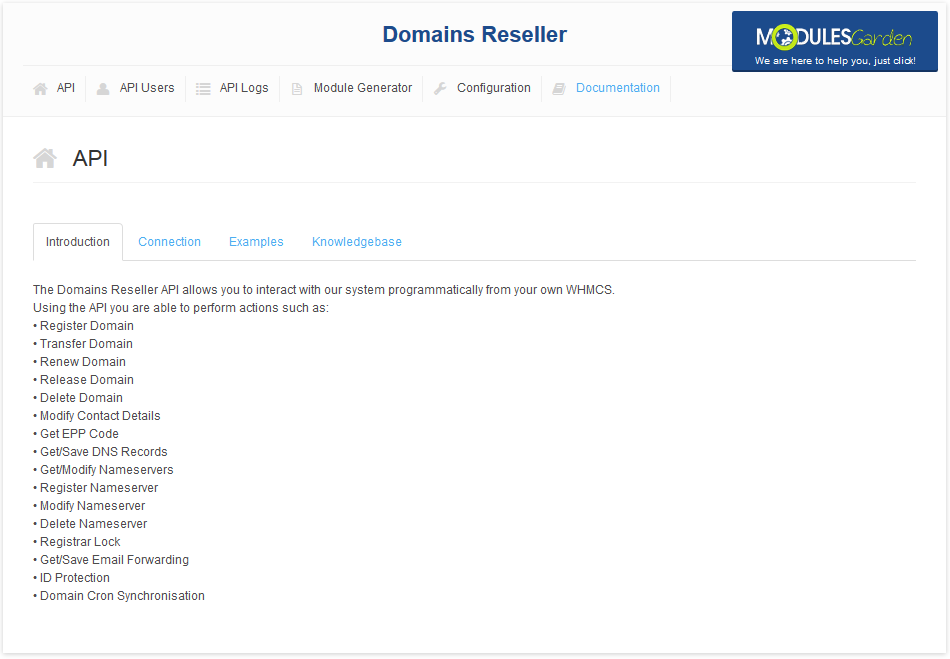
| At the 'API' tab you can find a lot of information about Domains Reseller API, as well as generate and share API knowledgebase. |
Introduction
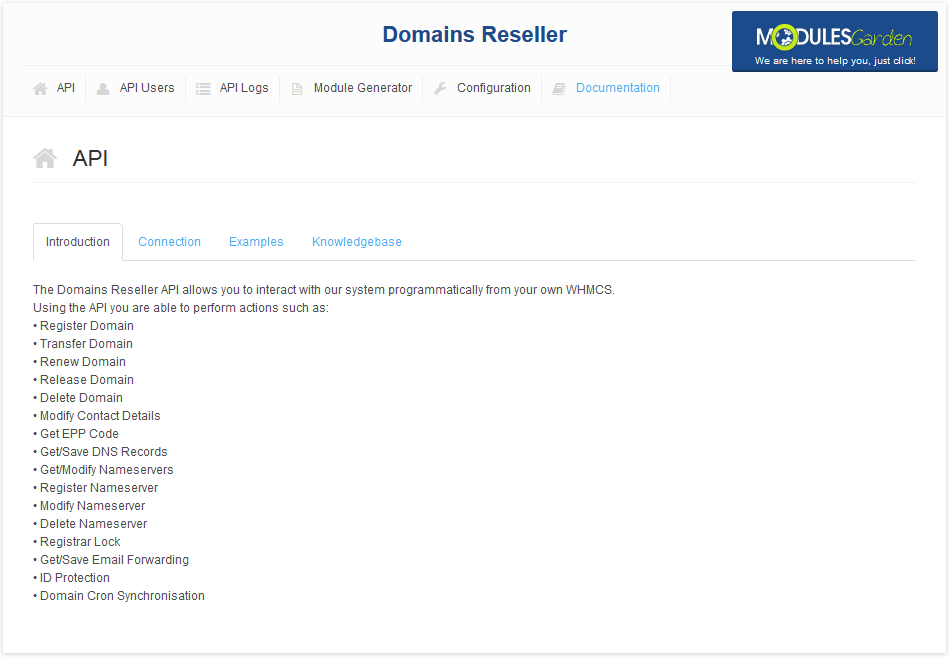
| 'Introduction' subtab contains information about actions supported by the API. |
|
Connection
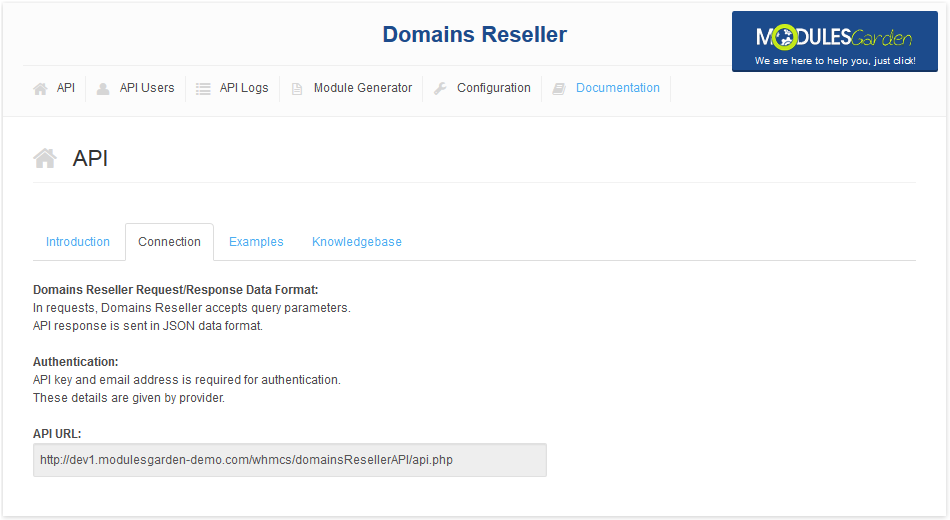
| In this subtab you can read about request and response data format as well as authentication. You can also find URL to the API here. |
|
Examples
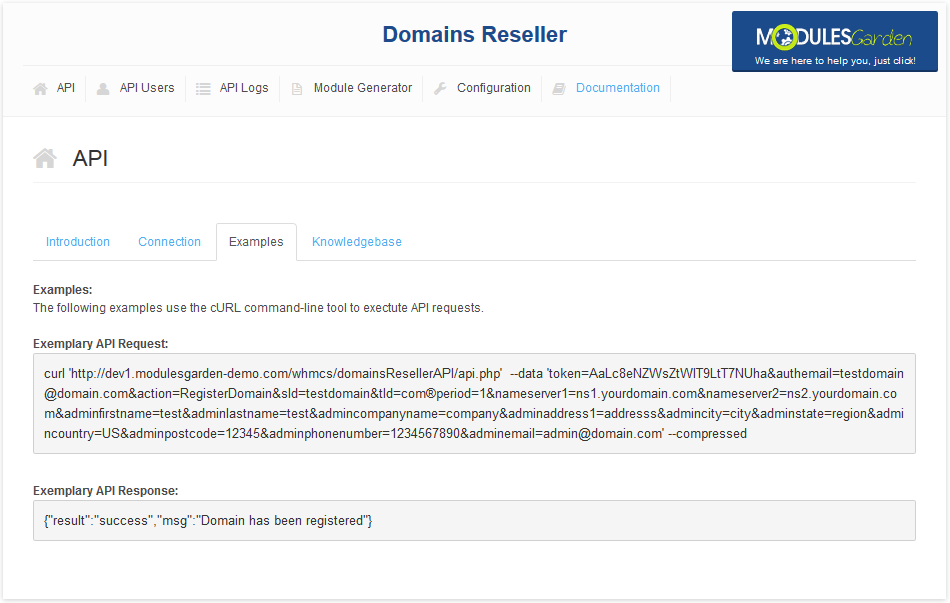
| Here you can find sample API request and response. |
|
Knowledgebase
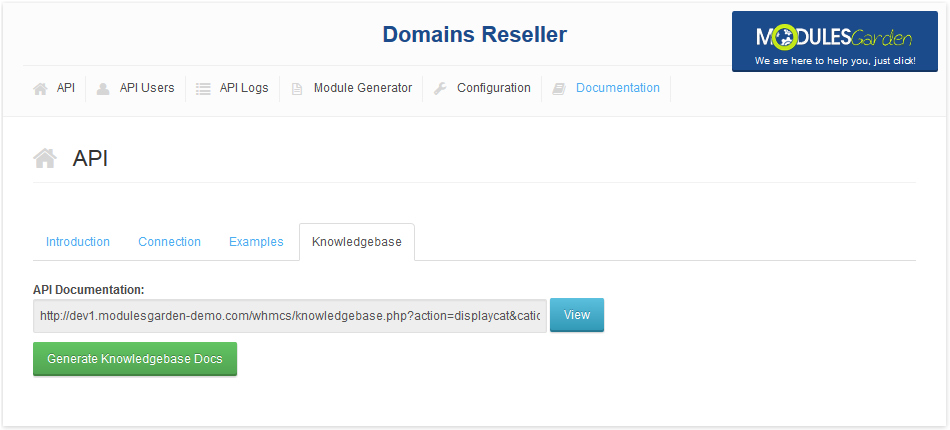
| 'Knowledgebase' subtab allows you to generate API knowledgebase for your resellers in your WHMCS client area and locate link to it (if already generated). |
|
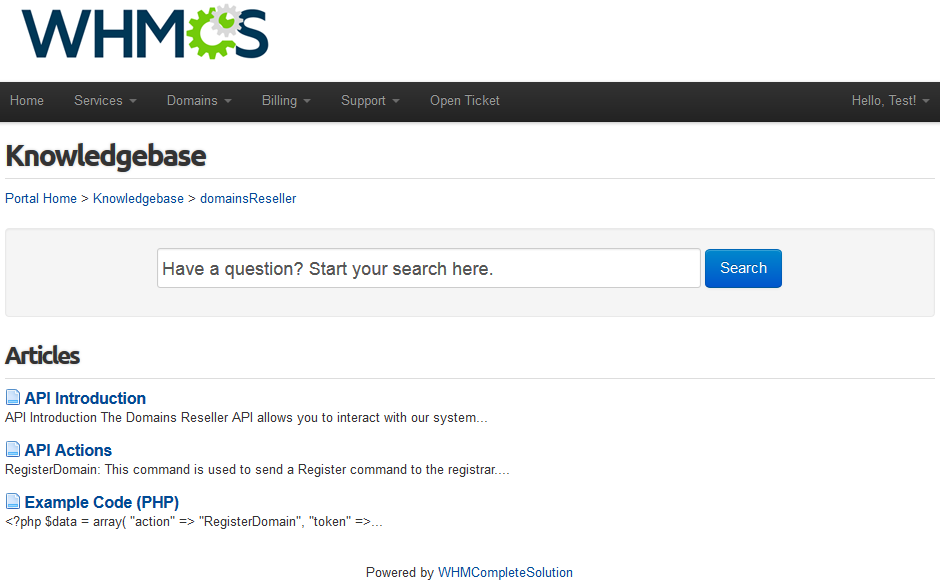
| When your clients follow a link to the knowledgebase they should see something similar to the screen below. |
|
API Users
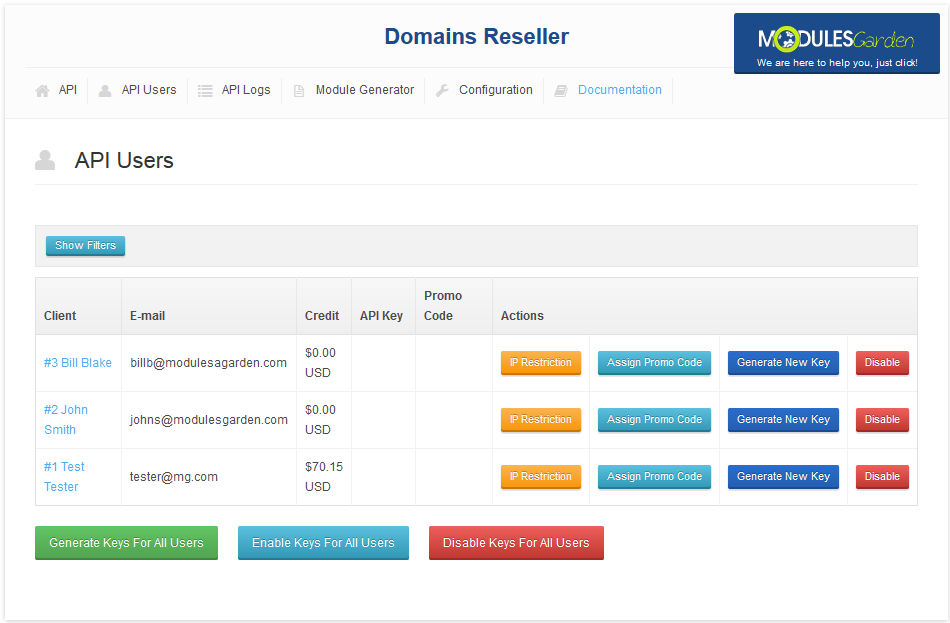
| At the 'API Users' tab you can manage all aspects related to your resellers. For your convenience we also implemented filters, you can use them to find a specific user or a group of users. |
|
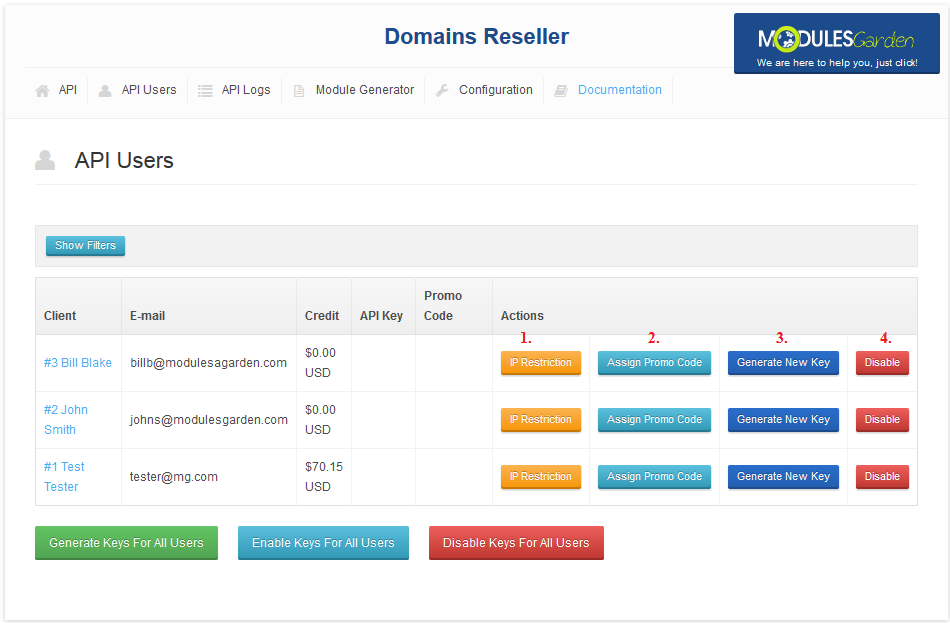
| You can set up IP restriction per client (1), assign a promotion code to a single user (2), generate a new key for them(3) or disable API for them (4). |
|
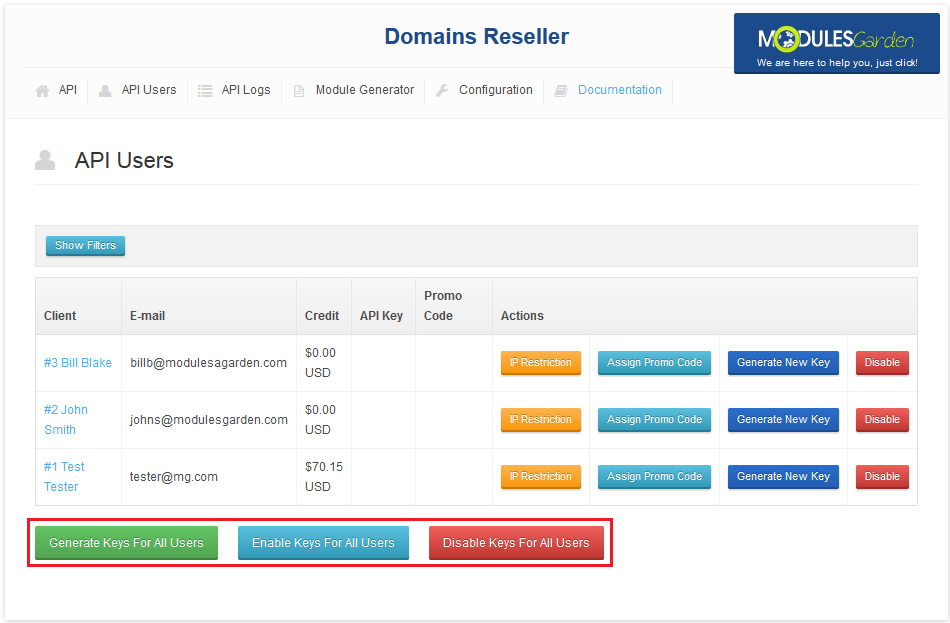
| Our module also allows performing these actions for all clients at once. |
|
IP Restriction
| Let's ensure, that specific clients are able to connect with Domains Reseller API only from defined IP addresses. Press 'IP Restriction' , fill in IP address and press 'Save' . |
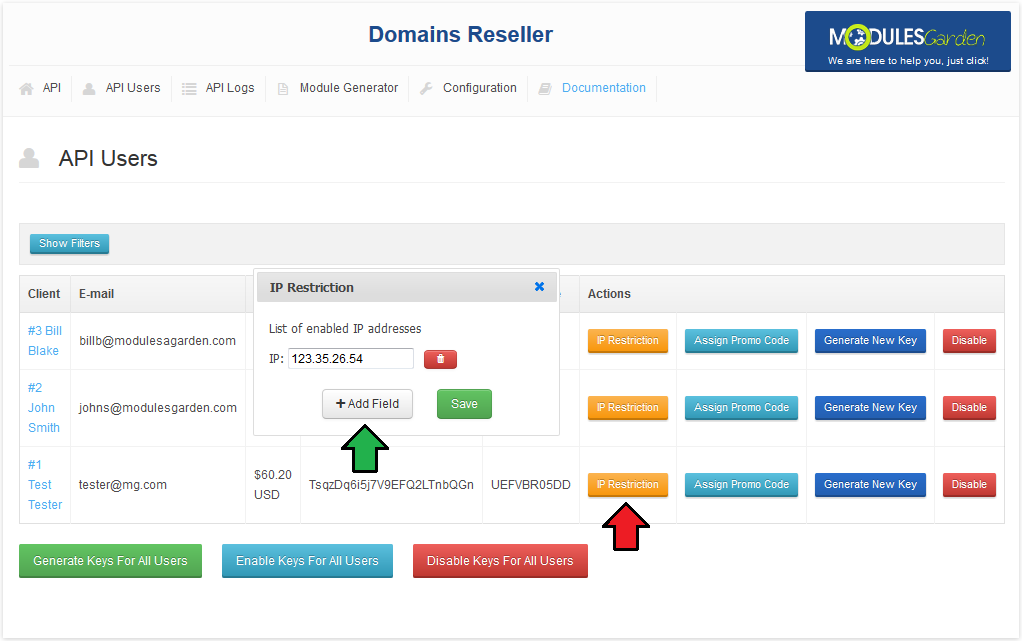
|
Assigning Promotion Codes
| You can create and assign promotion codes to your users. Firstly, go to 'Setup' → 'Payments' → 'Promotions' and press 'Create New Promotion' . |

|
| Afterwards, press 'Auto Generate Code' , select type from a dropdown menu, enter value and save through pressing 'Save Changes' . |
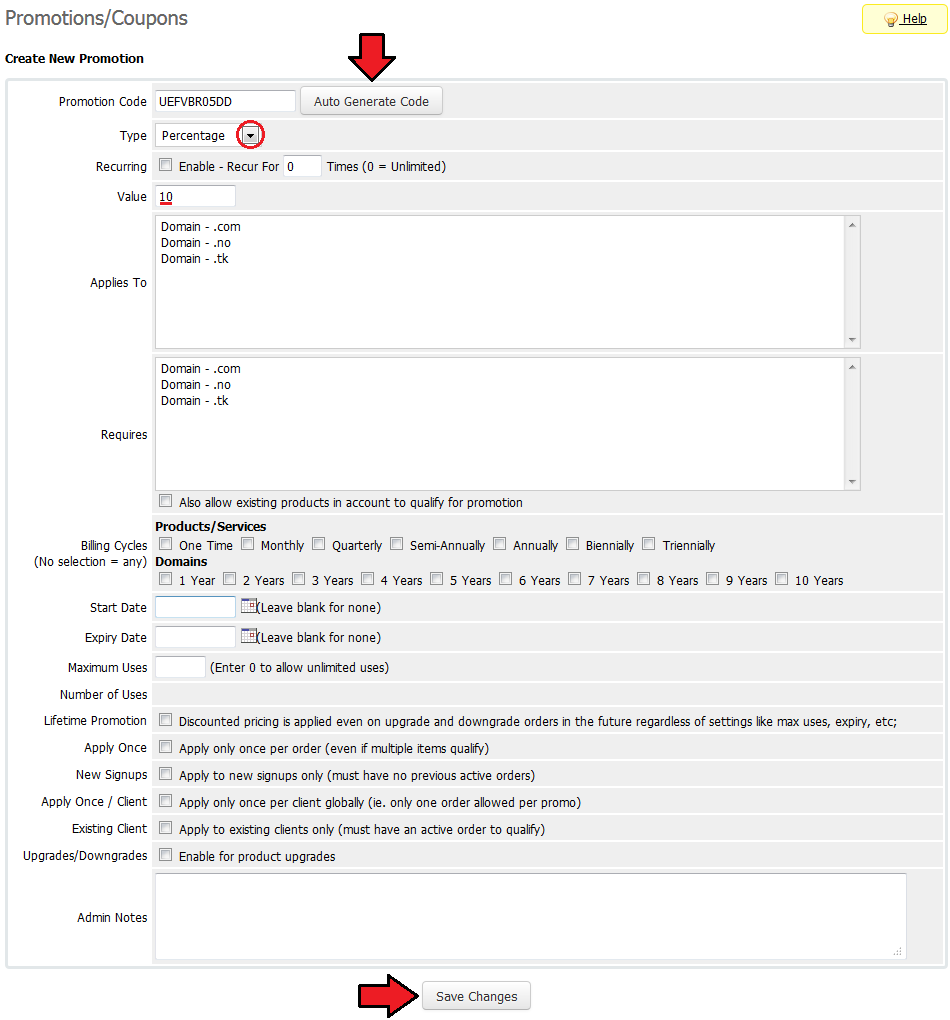
|
| Your promotion is ready to use, let's assign it to some user. Go to 'Addon' → 'Domains Reseller' → 'API User' and press 'Assign Promocode' next to the user you want to assign the promotion for. |
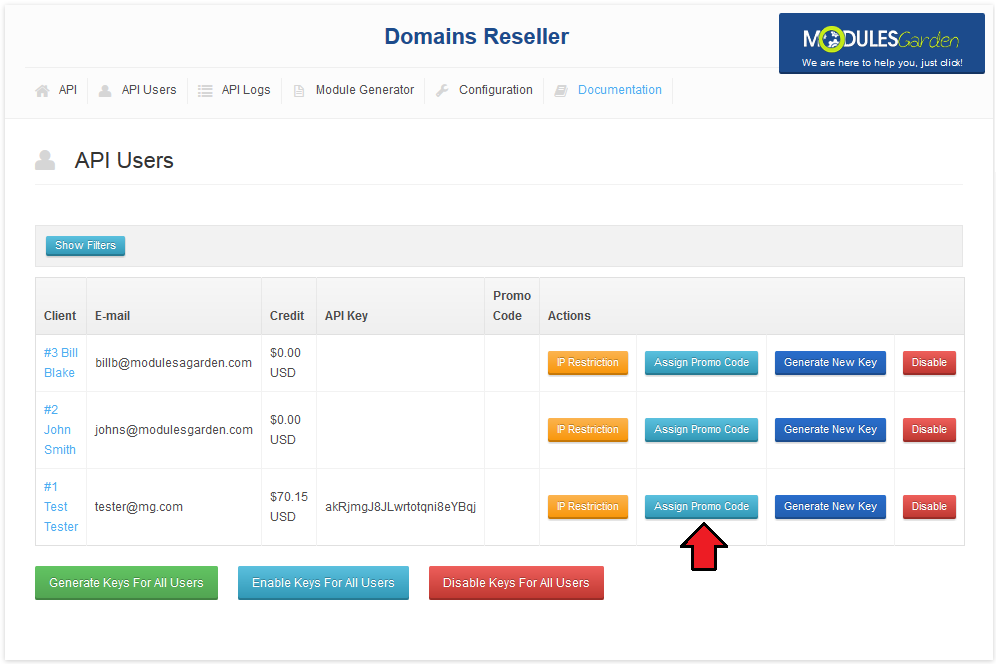
|
| Now select the previously created promotion and press 'Save Changes' . |
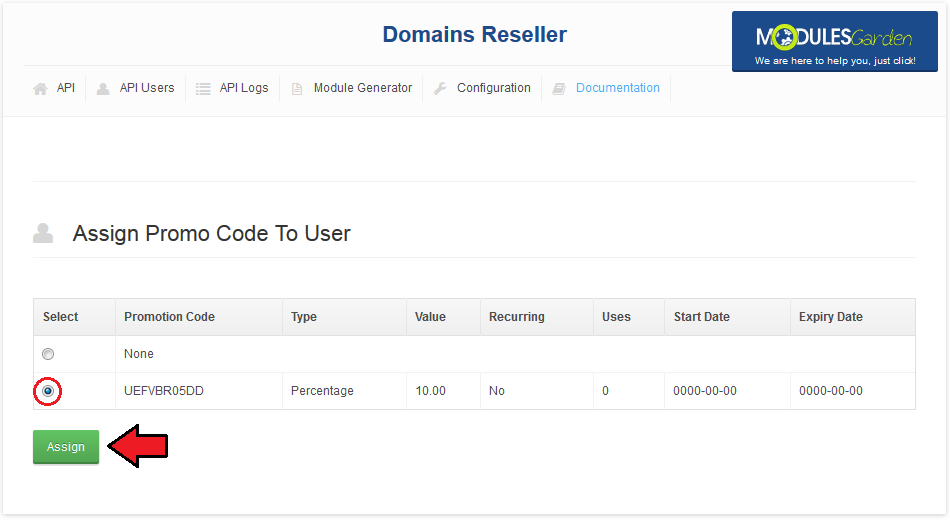
|
| You should see, that the promotion code appeared next to the client, as shown on the following screen. |
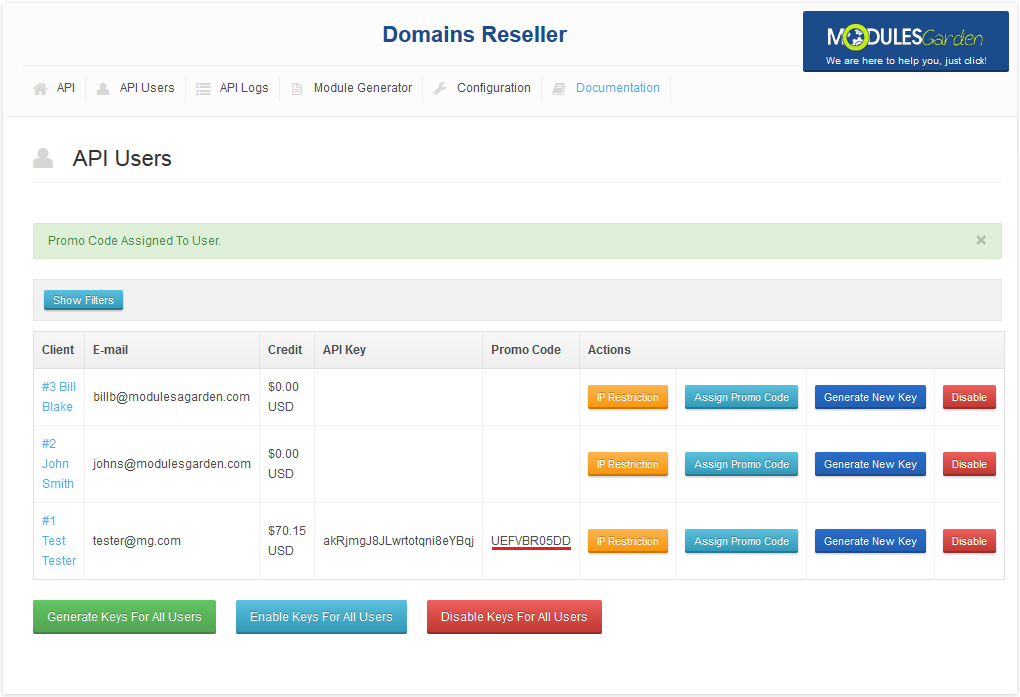
|
API Logs
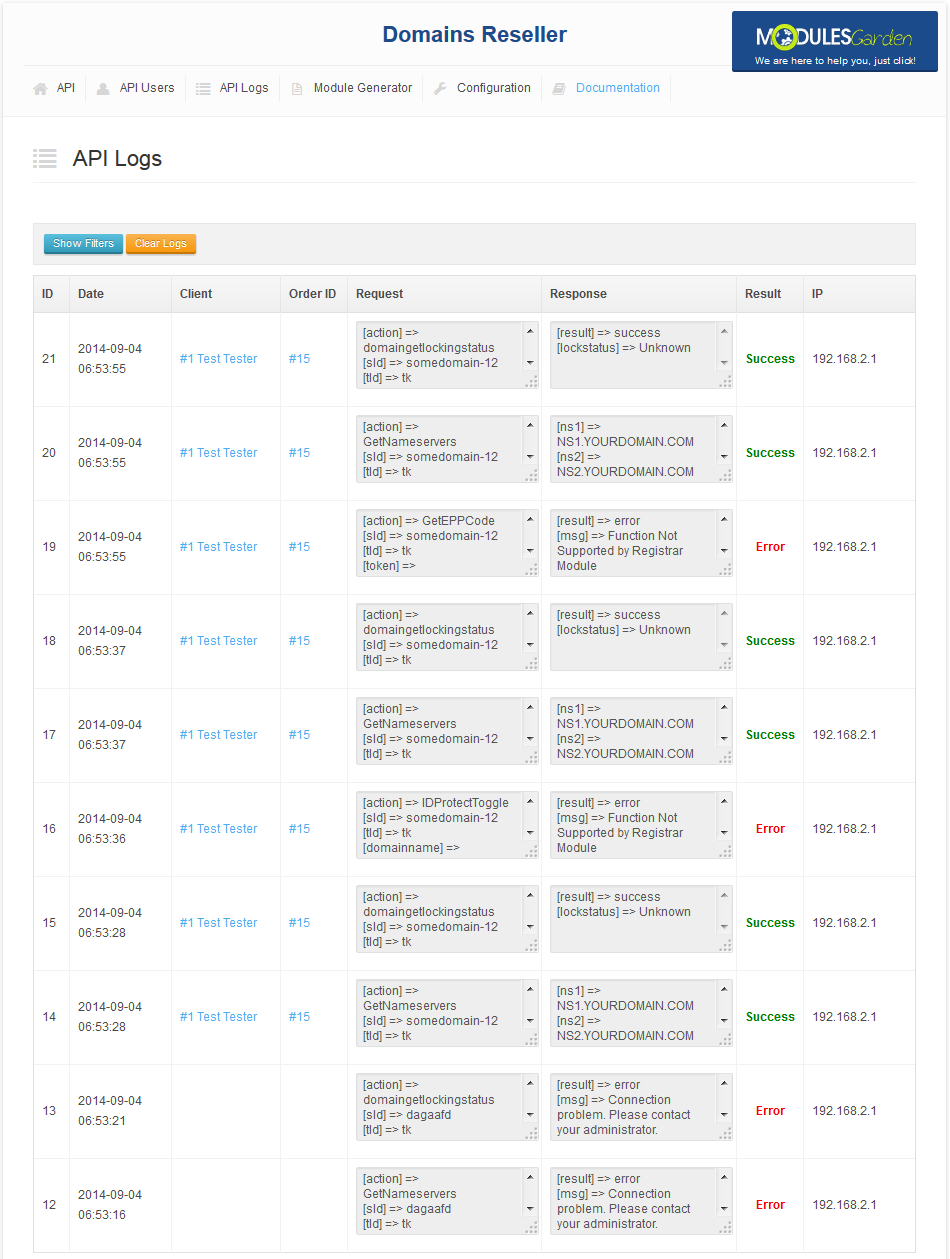
| You can display the logs of requests to the API. As well as responses to these requests and information about who sent the request to the API. You can find the desired log using filters. Fields left empty will not be considered during the search. |
|
Module Generator
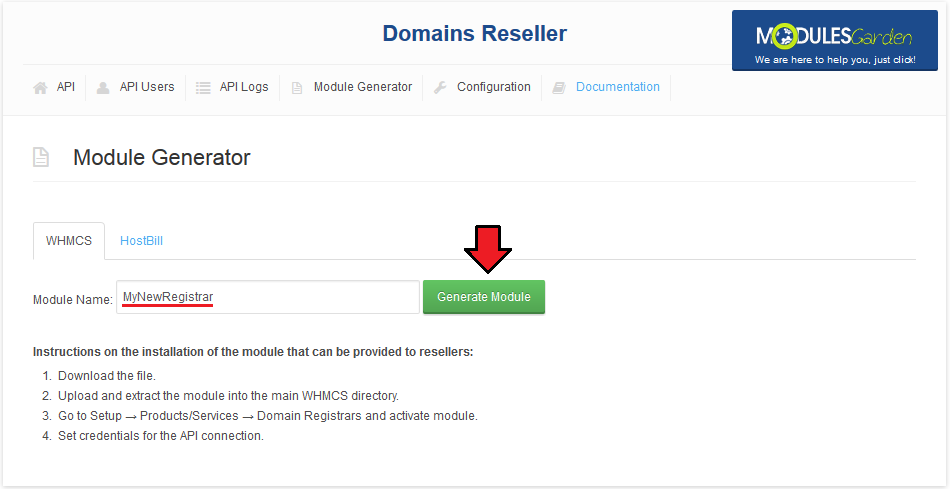
| Rebranding registrar module has never been easier. With our generator all you have to do is fill in its name and press 'Generate Module' . Note: You can generate registrar module both for WHMCS and HostBill systems. |
|
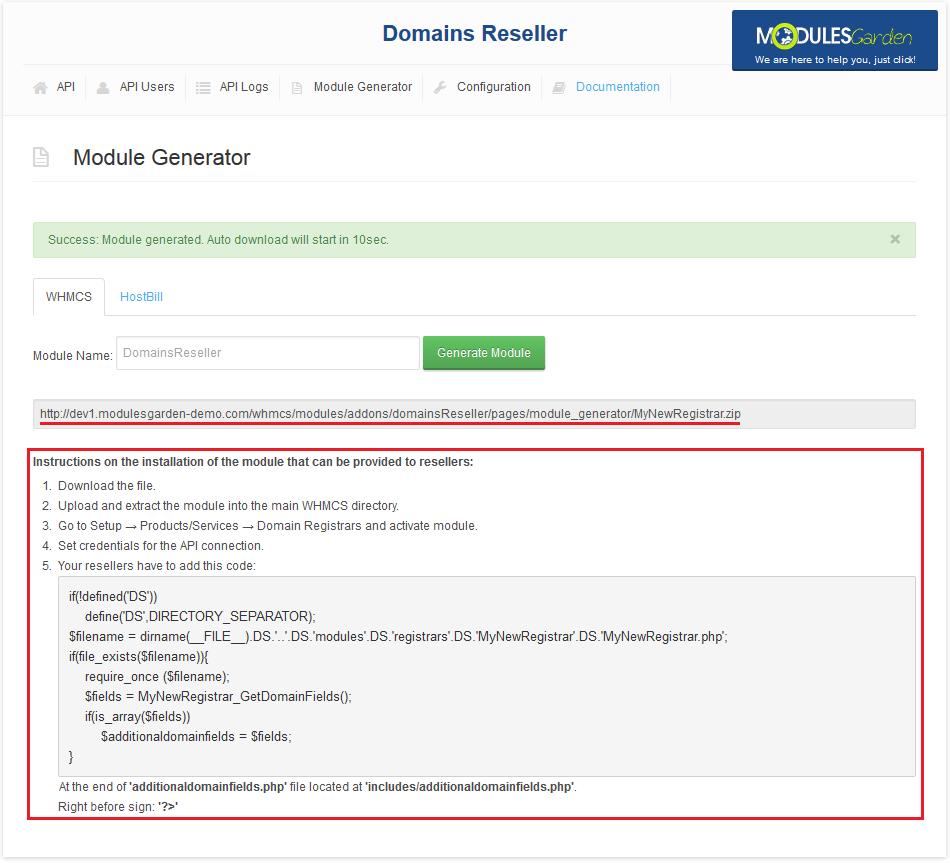
| As soon as you do that, the module will be generated. Save the link to it and copy installation instructions. Important: As soon as the new module is generated, integration code for it will appear as the 5th step of installation instruction |
|
Documentation
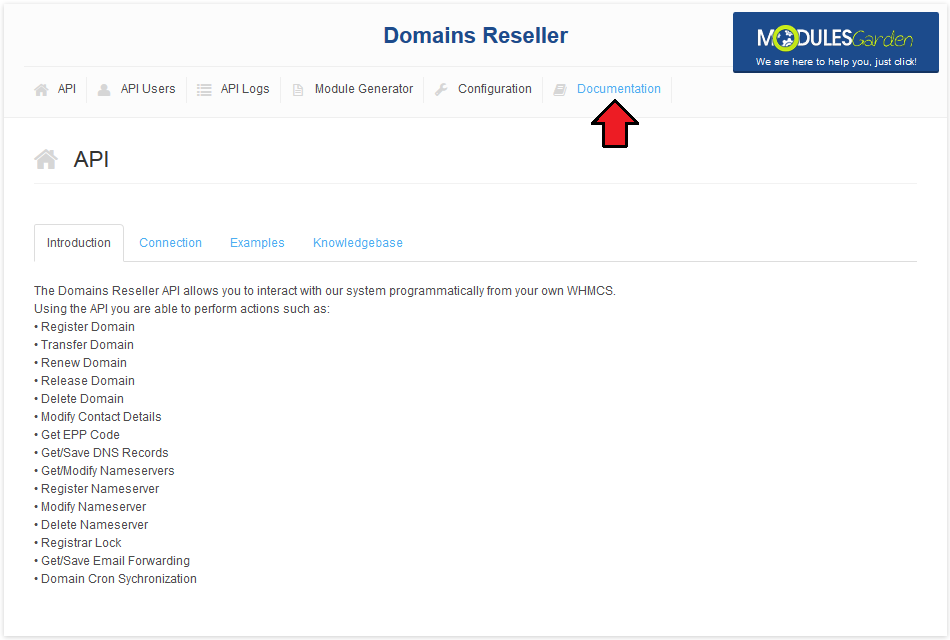
| This tab is a hyperlink. It leads to Domains Reseller For WHMCS Wiki article you are currently reading. |
|
Email To Reseller
| Email to your reseller should consist of: 1. Registrar module you generated or link to its download. |
Provider WHMCS Client Area
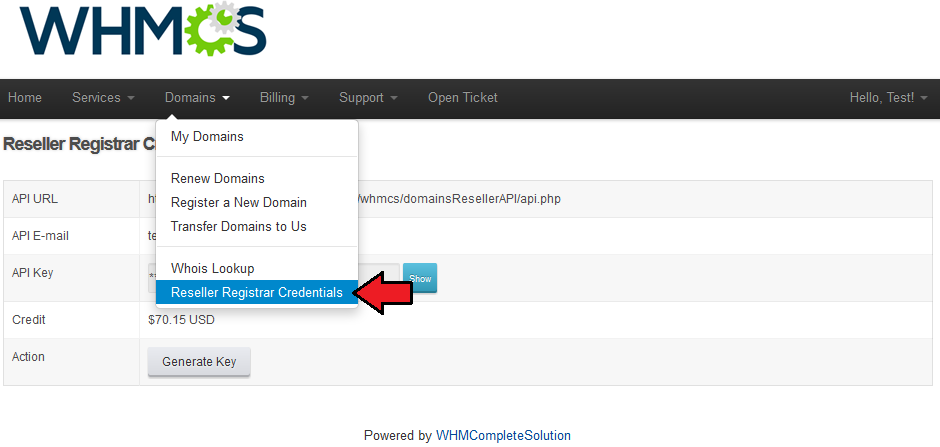
| Resellers can manage API connection credentials directly from the provider WHMCS client area. Go to 'Domains' → 'Reseller Registrar Credentials' to access them. |
|
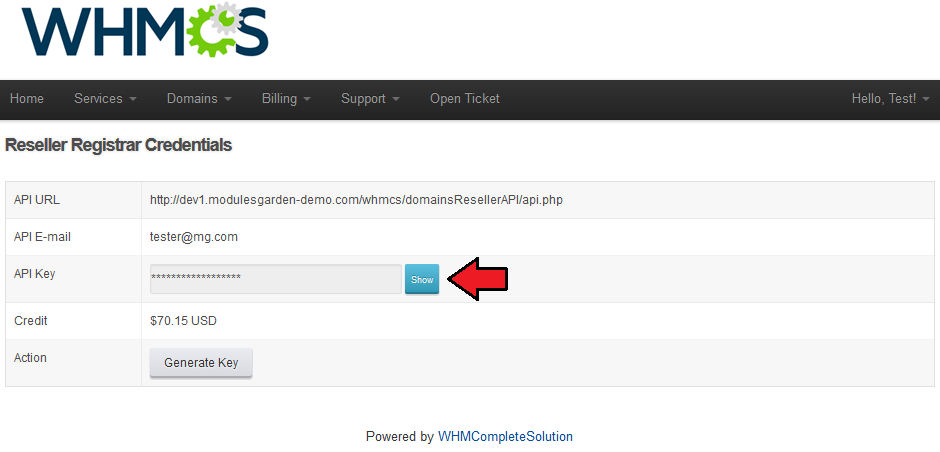
| As you can see, you can find all the information linked with your registrar. To view your API key, press 'Show' button. |
|
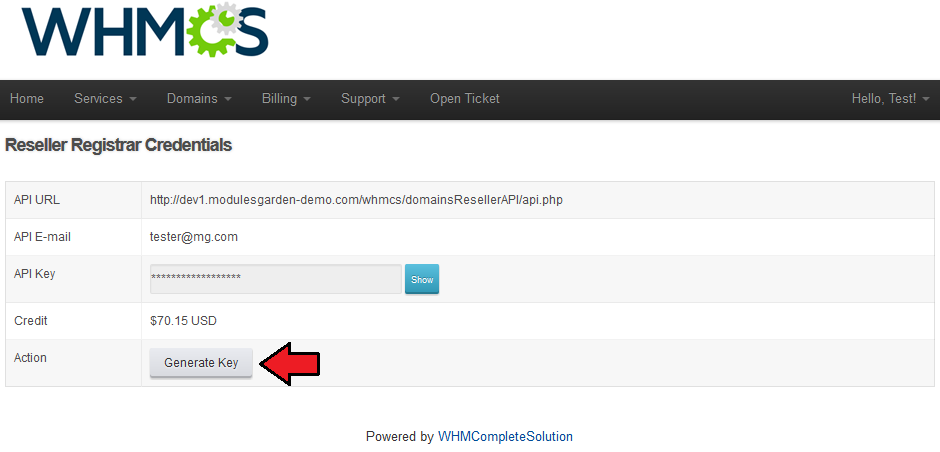
| If your API key was exposed, generate a new one through pressing 'Generate Key' . |
|
End User Client Area
| Domains Reseller registrar module allows an end user to register, transfer and renew domain. Client can also manage private nameservers (1), enable/disable ID protection (2), modify contact information (3), manage DNS records (4) and set up email forwarding (5). |
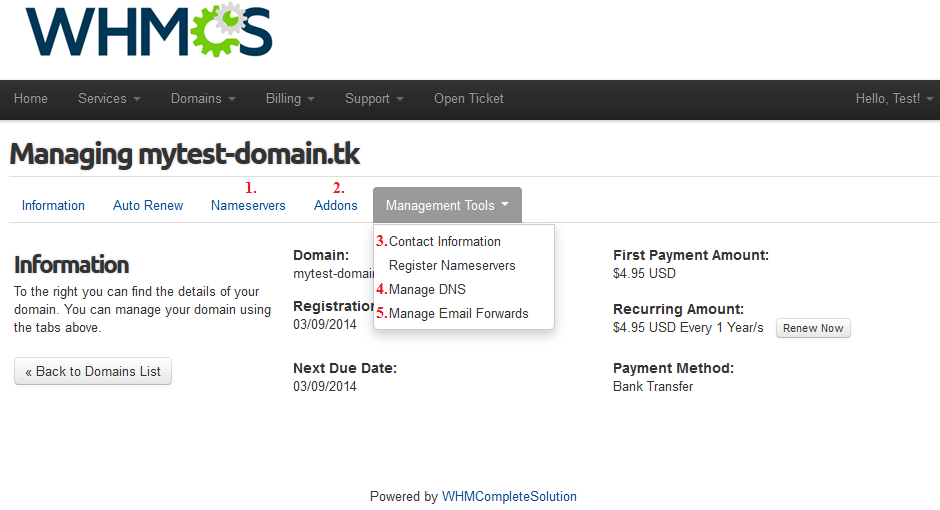
|
| At the 'Register Nameservers' (1) you can manage your custom nameservers. |
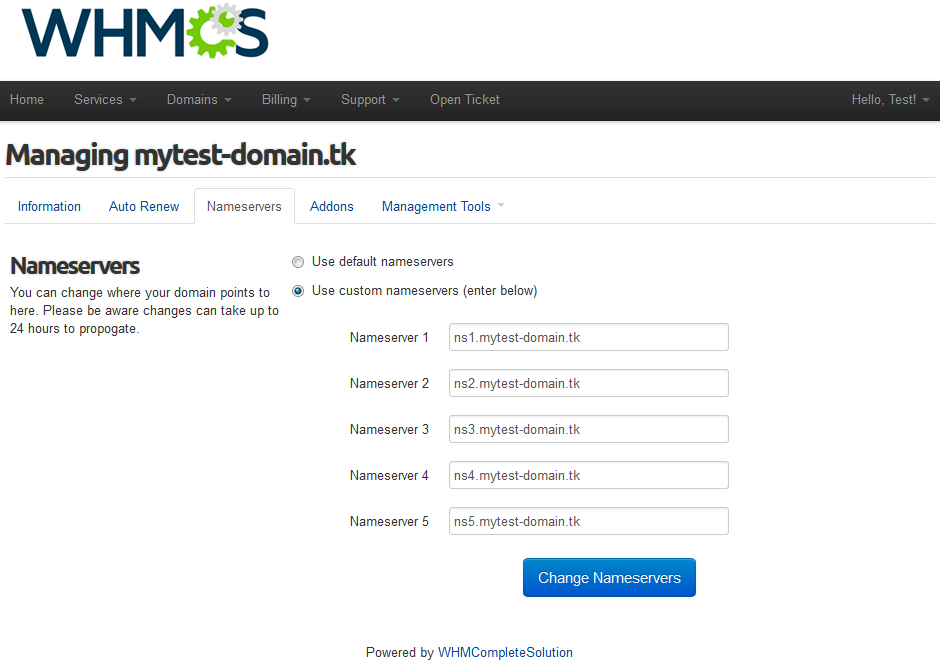
|
| To enable/disable ID protection (2), proceed to the 'Addons' subtab. |
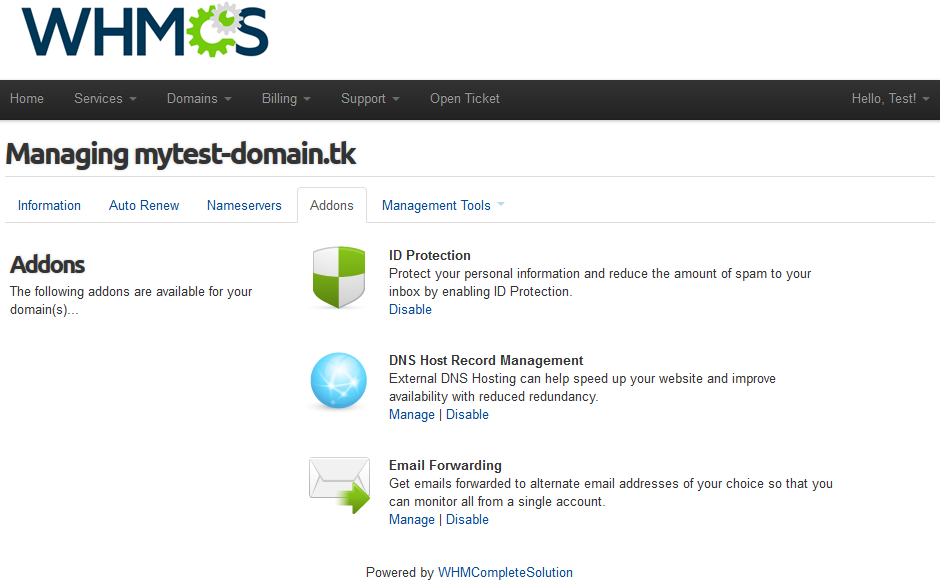
|
| At 'Contact Information' (3) you can decide which contact information use: yours, your contact or custom information. |
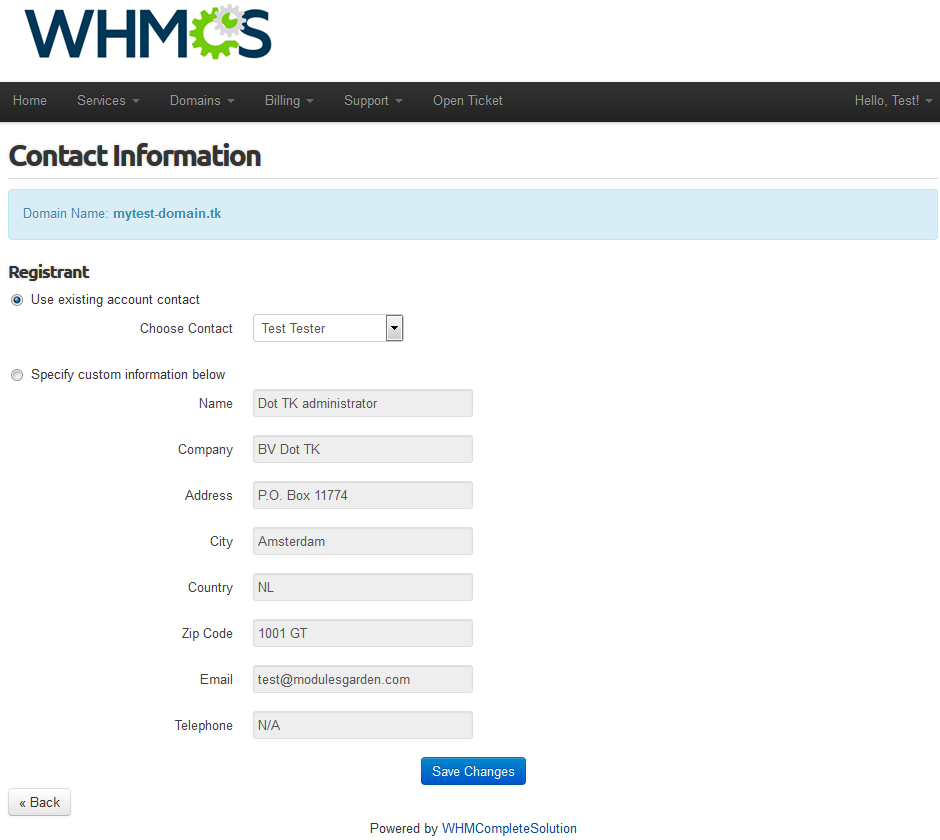
|
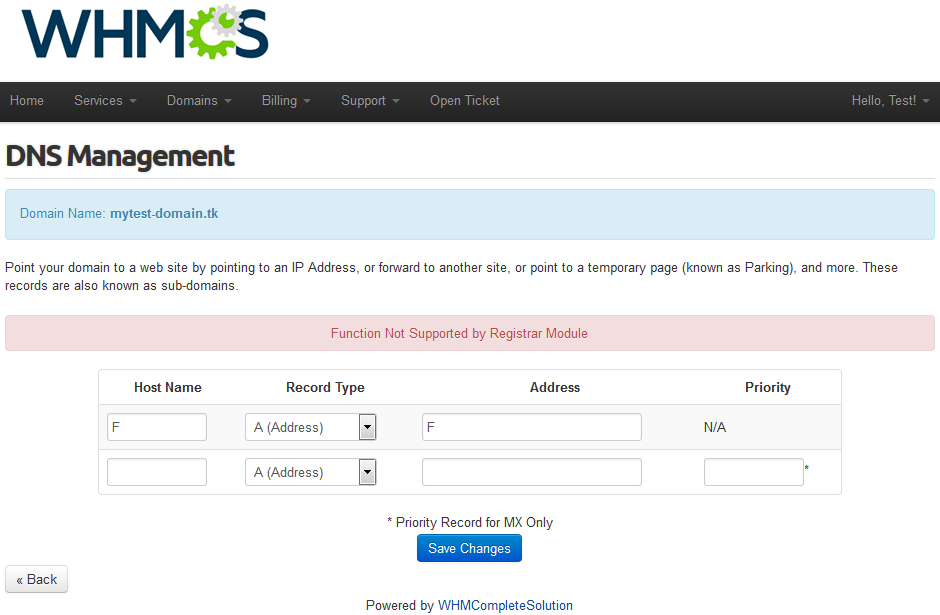
| 'Manage DNS' (4) allows you to manage your DNS records. On the following screen you can find information 'Function Not Supported by Registrar Module' , it informs you that the registrar module used at the Provider WHMCS does not support this feature. |
|
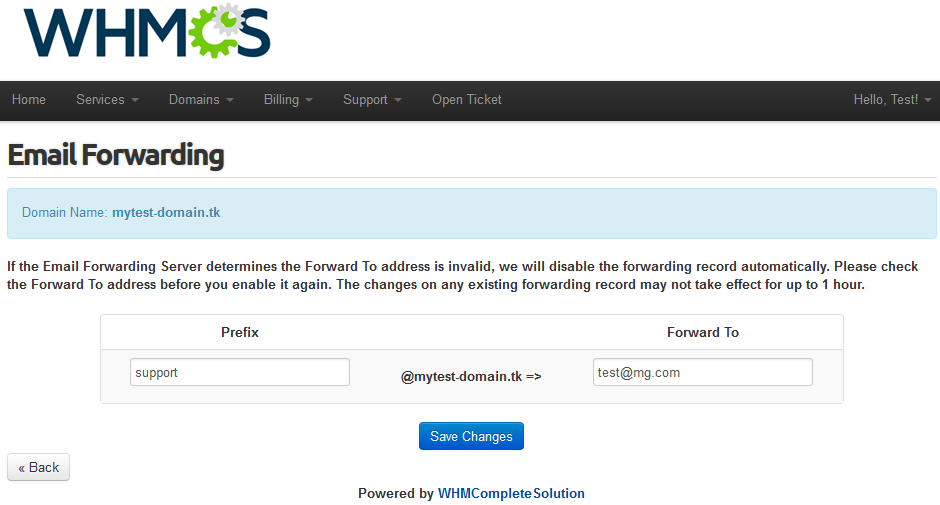
| At the 'Manage Email Forwards' (5) you can redirect your emails to another domain. |
|
Extended TLDs Management - Integration With Domain Orders Extended For WHMCS
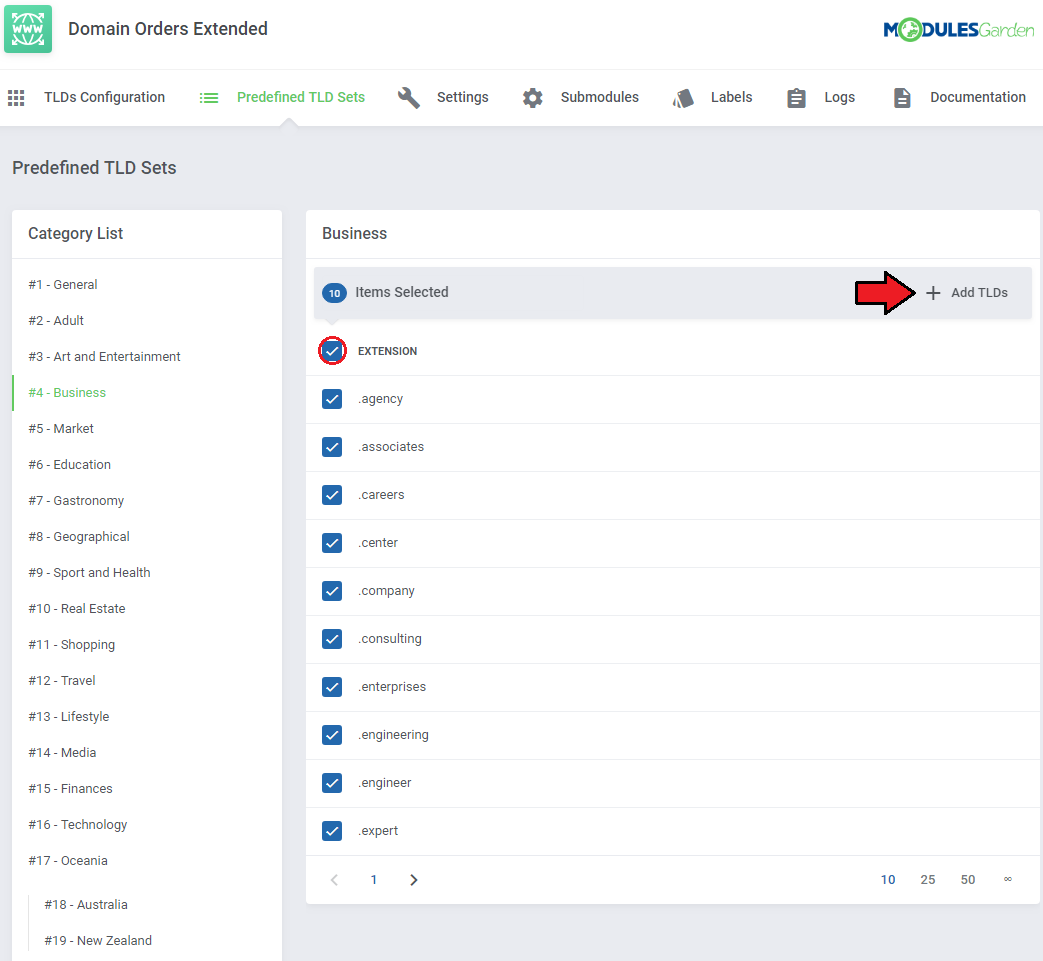
| Owing to the integration with Domain Orders Extended For WHMCS, the management of multiple TLDs and offering them to your resellers is even easier! We will show the exemplary workflow of such a integration. |
|
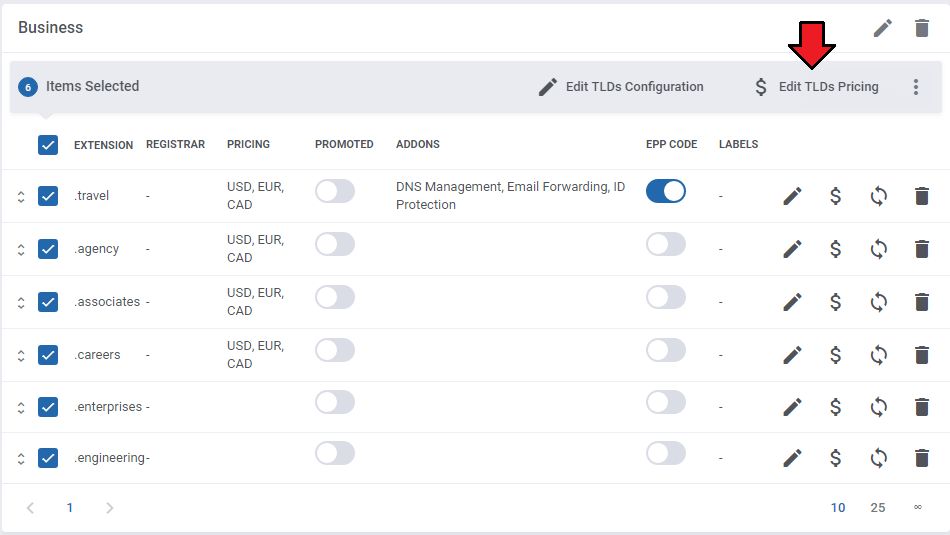
| Use grouping by categories to select all TLDs from a previously created 'Business' group and press 'Bulk Set Pricing' . |
|
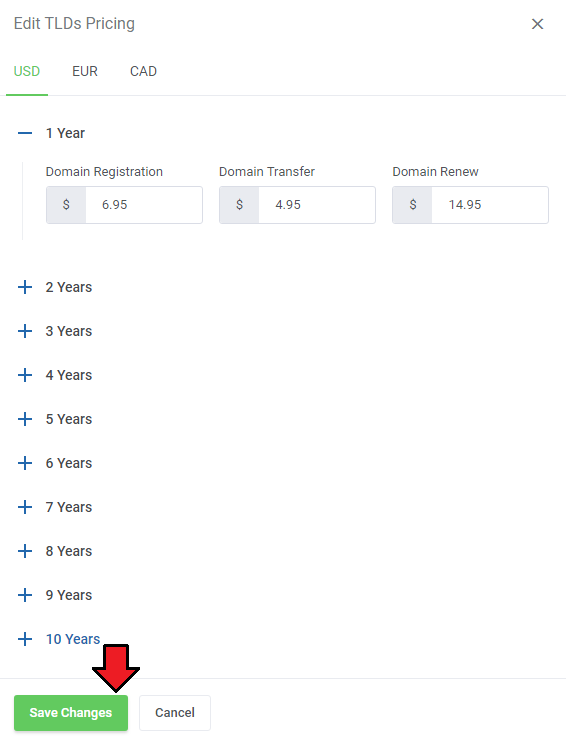
| Next step is setting up pricing. We are still using Domain Orders Extended For WHMCS. On the following screen we are copying pricing from a previously created TLD. |
|
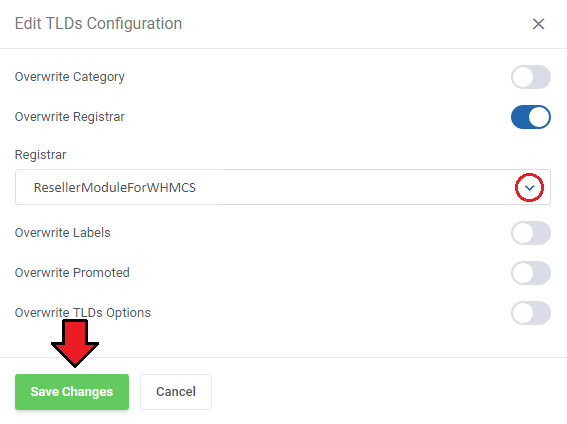
| Select all TLDs the same way you did earlier and press 'Bulk Registrar Change' . Afterwards, select a registrar which can provision gTLDs domains and press 'Update Registrars' . |
|
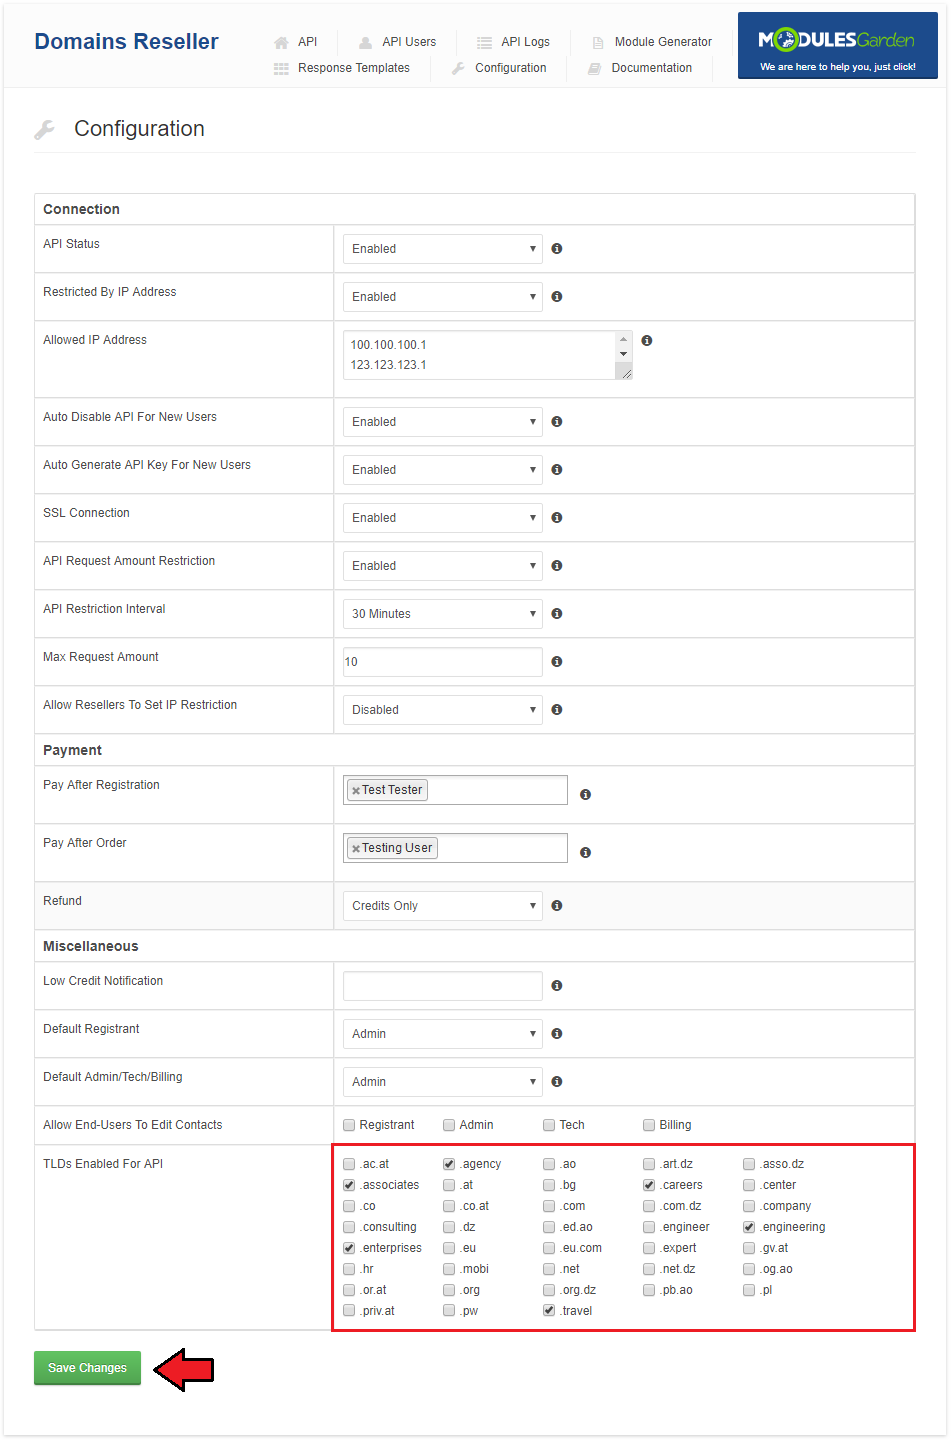
| Now, enable previously configured TLDs at your Domains Reseller → 'Configuration' tab.
TLDs are ready to be offered by your resellers. |
|
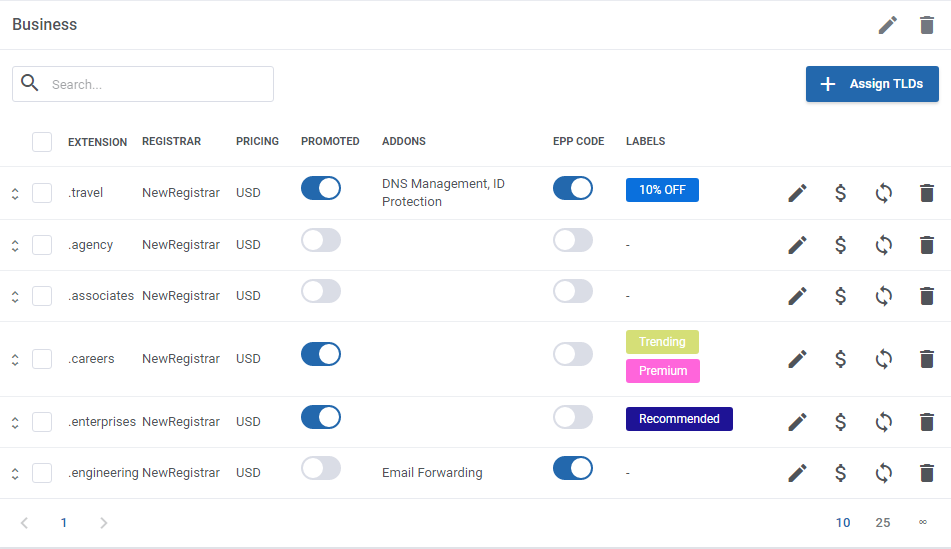
| One of your reseller also own Domain Orders Extended For WHMCS, he can quickly update his offer by installing the same gTLD category. Afterwards, he can set up pricing and assign them to use Domains Reseller For WHMCS registrar module generated by you in the same way you did. |
|
| Additionally, his offer is more client-friendly due to the custom Domain Orders Extended domain registration form. |
|
| There is also no problem for resellers who do not own Domain Orders Extended. However they have to add and set up each TLD separately at the 'Setup' → 'Products/Services' → 'Domain Pricing' , which may be time consuming. |
|
| As you saw, an integrating of Domains Resellers For WHMCS and Domain Orders Extended For WHMCS allows you to offer vast array of TLDs with ease. Your resellers can also benefit from such an integration, beside management of the TLDs, they end clients can benefit from user-friendly domain order form as well as domain spinner. |
Tips
| 1. If you forget to save the link to the registrar module you generated or integration code for it, do not worry, there is a way! Simply generate the module with the same name and save what you forgot to save the last time. |
| 2. If your reseller gets an error 'Unable to register domain, please contact administration (license problem).' , that means your license is invalid or expired. |
|
| 3. Make sure that you are not blocking access to the 'domainsResellerAPI' catalog by your '.htaccess' file. |
Common Problems
| 1. When you have problems with connection, check whether your SELinux or firewall does not block ports. |
| 2. Error 'Function Not Supported by Registrar Module' means that registrar on main WHMCS does not support the operation you were trying to do. |