DirectAdmin Licenses For WHMCS
| Line 1: | Line 1: | ||
| − | |||
| − | |||
| − | |||
<meta name="keywords" content="directadmin licenses for whmcs, directadmin licenses guide, cpanel partner noc, modulesgarden directadmin licenses, directadmin licenses wiki, directadmin licenses tutorial, directadmin licenses tips, cpanel module wiki, directadmin licenses common problems, about directadmin licenses, directadmin licenses documentation, directadmin licenses faq, directadmin licenses help, directadmin licenses configuration, directadmin licenses management, directadmin licenses installation"></meta> | <meta name="keywords" content="directadmin licenses for whmcs, directadmin licenses guide, cpanel partner noc, modulesgarden directadmin licenses, directadmin licenses wiki, directadmin licenses tutorial, directadmin licenses tips, cpanel module wiki, directadmin licenses common problems, about directadmin licenses, directadmin licenses documentation, directadmin licenses faq, directadmin licenses help, directadmin licenses configuration, directadmin licenses management, directadmin licenses installation"></meta> | ||
<meta name="description" content="ModulesGarden Wiki Contains All The Information You Need About The DirectAdmin Licenses For WHMCS Module."></meta> | <meta name="description" content="ModulesGarden Wiki Contains All The Information You Need About The DirectAdmin Licenses For WHMCS Module."></meta> | ||
| Line 7: | Line 4: | ||
=About [https://www.modulesgarden.com/products/whmcs/directadmin-licenses DirectAdmin Licenses For WHMCS]= | =About [https://www.modulesgarden.com/products/whmcs/directadmin-licenses DirectAdmin Licenses For WHMCS]= | ||
{| | {| | ||
| − | |style="padding: 10px 0px 10px 0px;"|'''DirectAdmin Licenses For WHMCS''' will | + | |style="padding: 10px 0px 10px 0px;"|'''DirectAdmin Licenses For WHMCS''' will authorize you to offer DirectAdmin licenses as available products in your WHMCS.<br /> |
| − | The module will automatically provide, verify and activate DirectAdmin licenses for your customers, who then | + | The module will automatically provide, verify and activate DirectAdmin licenses for your customers, who will then have a chance to control them from their client area. |
|} | |} | ||
<!--a comment maybe? --> | <!--a comment maybe? --> | ||
| Line 38: | Line 35: | ||
|} | |} | ||
{| | {| | ||
| − | |style="padding: 0px 0px | + | |style="padding: 0px 0px 0px 30px;"|✔ Change IP Address Assigned To License |
| + | |} | ||
| + | {| | ||
| + | |style="padding: 0px 0px 0px 30px;"|✔ Change License OS | ||
| + | |} | ||
| + | {| | ||
| + | |style="padding: 0px 0px 10px 30px;"|✔ Change License Name | ||
|} | |} | ||
*'''General Info:''' | *'''General Info:''' | ||
| Line 51: | Line 54: | ||
|} | |} | ||
{| | {| | ||
| − | |style="padding: 0px 0px 0px 30px;"|✔ Supports WHMCS | + | |style="padding: 0px 0px 0px 30px;"|✔ Supports WHMCS Product Addons |
|} | |} | ||
{| | {| | ||
| − | |style="padding: 0px 0px 30px 30px;"|✔ Supports WHMCS | + | |style="padding: 0px 0px 0px 30px;"|✔ Supports WHMCS Template Six |
| + | |} | ||
| + | {| | ||
| + | |style="padding: 0px 0px 30px 30px;"|✔ Supports WHMCS V7 | ||
|} | |} | ||
| Line 70: | Line 76: | ||
{| | {| | ||
|style="padding: 0px 0px 10px 15px;"|'''2. In the downloaded file you will find two packages that support different PHP versions.'''<br/>As presented on the screen below, the first one is dedicated to PHP 7, while the second one is aimed at PHP 5.4 up to PHP 5.6.<br/>It does not apply to open source versions.<br/> | |style="padding: 0px 0px 10px 15px;"|'''2. In the downloaded file you will find two packages that support different PHP versions.'''<br/>As presented on the screen below, the first one is dedicated to PHP 7, while the second one is aimed at PHP 5.4 up to PHP 5.6.<br/>It does not apply to open source versions.<br/> | ||
| − | '' '''Note''': You can check current PHP version in your WHMCS. To do so proceed to ''' 'Utilities' → 'System' → 'PHP Info'.''' | + | '' '''Note''': You can check the current PHP version in your WHMCS. To do so proceed to ''' 'Utilities' → 'System' → 'PHP Info'.''' |
|} | |} | ||
{| | {| | ||
| Line 83: | Line 89: | ||
|} | |} | ||
{| | {| | ||
| − | |style="padding: 0px 0px 15px 15px;"|'''4. When you install DirectAdmin Licenses For WHMCS for the first time you have to rename '' 'license_RENAME.php' '' file.'''<br /> | + | |style="padding: 0px 0px 15px 15px;"|'''4. When you install DirectAdmin Licenses For WHMCS for the first time you have to rename the '' 'license_RENAME.php' '' file.'''<br /> |
File is located in '' 'modules/servers/dalicenses/license_RENAME.php'. '' Rename it from '' 'license_RENAME.php' '' to '' 'license.php'. '' | File is located in '' 'modules/servers/dalicenses/license_RENAME.php'. '' Rename it from '' 'license_RENAME.php' '' to '' 'license.php'. '' | ||
|} | |} | ||
| Line 90: | Line 96: | ||
|} | |} | ||
{| | {| | ||
| − | |style="padding: 0px 0px 15px 15px;"|'''5. In order to configure your license key, you have to edit | + | |style="padding: 0px 0px 15px 15px;"|'''5. In order to configure your license key, you have to edit the previously renamed '' 'license.php' '' file.'''<br /> |
Enter your license key between quotation marks as presented on the following screen. You can find your license key in your client area → '' 'My Products'. '' | Enter your license key between quotation marks as presented on the following screen. You can find your license key in your client area → '' 'My Products'. '' | ||
|} | |} | ||
| Line 104: | Line 110: | ||
|} | |} | ||
{| | {| | ||
| − | |style="padding: 0px 0px 15px 15px;"|'''7. Next, enter your server name and enter '' 'https://www.directadmin.com/clients ' '' into '' 'Hostname' '' field.'''<br /> | + | |style="padding: 0px 0px 15px 15px;"|'''7. Next, enter your server name and enter '' 'https://www.directadmin.com/clients ' '' into the '' 'Hostname' '' field.'''<br /> |
| − | + | Afterward, fill out username and password fields and choose '' 'Dalicenses' '' from the dropdown menu.<br /> | |
Select '' 'Secure' '' checkbox, remember to '' 'Save Changes'. '' | Select '' 'Secure' '' checkbox, remember to '' 'Save Changes'. '' | ||
|} | |} | ||
| Line 112: | Line 118: | ||
|} | |} | ||
{| | {| | ||
| − | |style="padding: 0px 0px 15px 15px;"|'''8. After you have configured your server correctly, you should see | + | |style="padding: 0px 0px 15px 15px;"|'''8. After you have configured your server correctly, you should see the following screen.'''<br /> |
Create a new group for your server now. Press '' 'Create New Group' '' to do so. | Create a new group for your server now. Press '' 'Create New Group' '' to do so. | ||
|} | |} | ||
| Line 119: | Line 125: | ||
|} | |} | ||
{| | {| | ||
| − | |style="padding: 0px 0px 20px 15px;"|'''9. Enter name, click on your previously created server, press '' 'Add' '' then | + | |style="padding: 0px 0px 20px 15px;"|'''9. Enter a name, click on your previously created server, press '' 'Add' '' then click '' 'Save Changes'. ''''' |
|} | |} | ||
{| | {| | ||
| − | |style="padding: 0px 0px | + | |style="padding: 0px 0px 30px 25px;"|[[File:DAL8.png]] |
|} | |} | ||
| + | ==Configuration Of Product== | ||
{| | {| | ||
| − | |style="padding: | + | |style="padding: 10px 0px 15px 15px;"|'''10. In order to create and configure product, click on '' 'Setup' '' → '' 'Products/Services' '' → '' 'Products/Services'. '''''<br /> |
If you do not have a product group, click on '' 'Create a New Group'. '' If you do, simply go to step 11. | If you do not have a product group, click on '' 'Create a New Group'. '' If you do, simply go to step 11. | ||
|} | |} | ||
| Line 132: | Line 139: | ||
|} | |} | ||
{| | {| | ||
| − | |style="padding: 0px 0px 20px 15px;"|'''11. Enter product group name and press '' 'Create Group'. ''''' | + | |style="padding: 0px 0px 20px 15px;"|'''11. Enter a product group name and press '' 'Create Group'. ''''' |
|} | |} | ||
{| | {| | ||
| Line 145: | Line 152: | ||
|} | |} | ||
{| | {| | ||
| − | |style="padding: 0px 0px 20px 15px;"|'''13. | + | |style="padding: 0px 0px 20px 15px;"|'''13. Afterward, choose your product type and product group from dropdown menus, enter your product name and press '' 'Continue'. ''''' |
|} | |} | ||
{| | {| | ||
| Line 151: | Line 158: | ||
|} | |} | ||
{| | {| | ||
| − | |style="padding: 0px 0px 20px 15px;"|'''14. Now, go to '' 'Module Settings' '' section, choose both '' 'Dalicenses' '' and your previously created server group from dropdown menu.''' | + | |style="padding: 0px 0px 20px 15px;"|'''14. Now, go to the '' 'Module Settings' '' section, choose both '' 'Dalicenses' '' and your previously created server group from the dropdown menu.''' |
|} | |} | ||
{| | {| | ||
| Line 165: | Line 172: | ||
{| | {| | ||
|style="padding: 0px 0px 15px 15px;"|'''16. After modifying the module settings move to '' 'Custom Fields'. '' '''<br /> | |style="padding: 0px 0px 15px 15px;"|'''16. After modifying the module settings move to '' 'Custom Fields'. '' '''<br /> | ||
| − | In '' 'Field Name' '' enter '' 'IP' '', choose '' 'Text Box' '' from | + | In '' 'Field Name' '' enter '' 'IP' '', choose '' 'Text Box' '' from the '' 'Field Type' '' dropdown menu, enter a description and set up the hereby validation:<br /> |
<nowiki>/\b(25[0-5]|2[0-4][0-9]|[01]?[0-9][0-9]?)\.(25[0-5]|2[0-4][0-9]|[01]?[0-9][0-9]?)\.(25[0-5]|2[0-4][0-9]|[01]?[0-9][0-9]?)\.(25[0-5]|2[0-4][0-9]|[01]?[0-9][0-9]?)\b/</nowiki> | <nowiki>/\b(25[0-5]|2[0-4][0-9]|[01]?[0-9][0-9]?)\.(25[0-5]|2[0-4][0-9]|[01]?[0-9][0-9]?)\.(25[0-5]|2[0-4][0-9]|[01]?[0-9][0-9]?)\.(25[0-5]|2[0-4][0-9]|[01]?[0-9][0-9]?)\b/</nowiki> | ||
<br /> | <br /> | ||
| − | Important! It is a | + | Important! It is a single line command, do not split it into two lines.<br /> |
| − | Mark '' 'Show on Order Form' '' checkbox and press '' 'Save Changes' '' button. | + | Mark the '' 'Show on Order Form' '' checkbox and press the '' 'Save Changes' '' button. |
|} | |} | ||
{| | {| | ||
| Line 182: | Line 189: | ||
{| | {| | ||
|style="padding: 0px 0px 30px 25px;"|[[File:DAL15.png]] | |style="padding: 0px 0px 30px 25px;"|[[File:DAL15.png]] | ||
| + | |} | ||
| + | |||
| + | ==Configuration Of Addon== | ||
| + | {| | ||
| + | |style="padding: 10px 0px 0px 0px;"|'''This module can be also alternatively configured so to become a 'Product Addon' that can be bought additionally next to a given product.'''<br /> | ||
| + | More information concerning 'Product Addons' in WHMCS can be found [https://docs.whmcs.com/Product_Addons here]. | ||
| + | In order to configure your addon follow the steps explained below. | ||
| + | |} | ||
| + | {| | ||
| + | |style="padding: 10px 0px 15px 15px;"|'''1. Proceed to '' 'Setup' '' → '' 'Products/Services' '' → '' 'Product Addons' '' → '' 'Add New' '' . '''''<br /> | ||
| + | Enter a name and desired description. Then move to the '' 'Module Settings' '' tab. | ||
| + | |} | ||
| + | {| | ||
| + | |style="padding: 0px 0px 20px 25px;"|[[File:NDAL.png]] | ||
| + | |} | ||
| + | {| | ||
| + | |style="padding: 0px 0px 25px 15px;"|'''2. Now, as your '' 'Module Name' ''choose '' 'Dalicenses' '' and select your previously created server group from the '' 'Server Group' '' dropdown menu. '''<br /> | ||
| + | Note that the checkboxes presented on the screen are only optional. | ||
| + | |} | ||
| + | {| | ||
| + | |style="padding: 0px 0px 20px 25px;"|[[File:NDAL1.png]] | ||
| + | |} | ||
| + | {| | ||
| + | |style="padding: 0px 0px 15px 15px;"|'''3. In the next step settings move to '' 'Custom Fields'. '' '''<br /> | ||
| + | In '' 'Field Name' '' enter '' 'IP' '', choose '' 'Text Box' '' from the '' 'Field Type' '' dropdown menu, enter a description and set up the hereby validation:<br /> | ||
| + | |||
| + | <nowiki>/\b(25[0-5]|2[0-4][0-9]|[01]?[0-9][0-9]?)\.(25[0-5]|2[0-4][0-9]|[01]?[0-9][0-9]?)\.(25[0-5]|2[0-4][0-9]|[01]?[0-9][0-9]?)\.(25[0-5]|2[0-4][0-9]|[01]?[0-9][0-9]?)\b/</nowiki> | ||
| + | |||
| + | <br /> | ||
| + | Important! It is a single line command, do not split it into two lines.<br /> | ||
| + | Mark the '' 'Show on Order Form' '' checkbox and press the '' 'Save Changes' '' button. | ||
| + | |} | ||
| + | {| | ||
| + | |style="padding: 0px 0px 20px 25px;"|[[File:DALN14.png]] | ||
| + | |} | ||
| + | {| | ||
| + | |style="padding: 10px 0px 15px 15px;"|'''You have just successfully configured a new DirectAdmin Licenses For WHMCS addon. It can be assigned to other products of your choice.''' | ||
| + | |} | ||
| + | {| | ||
| + | |style="padding: 0px 0px 30px 25px;"|[[File:NDAL8.png]] | ||
|} | |} | ||
| Line 199: | Line 246: | ||
==Client Area== | ==Client Area== | ||
{| | {| | ||
| − | |style="padding: 10px 0px 15px 15px;"|Our module allows you and your clients to quickly change license IP address.<br /> | + | |style="padding: 10px 0px 15px 15px;"|Our module, among others allows you and your clients to quickly change license IP address.<br /> |
As you know from the previous section it can be done in the admin area. We will show you now how to change IP address from the client area.<br /> | As you know from the previous section it can be done in the admin area. We will show you now how to change IP address from the client area.<br /> | ||
Start by pressing '' 'Change IP Address' '' marked on the below screen. | Start by pressing '' 'Change IP Address' '' marked on the below screen. | ||
| Line 207: | Line 254: | ||
|} | |} | ||
{| | {| | ||
| − | |style="padding: 0px 0px 15px 15px;"| | + | |style="padding: 0px 0px 15px 15px;"|Afterward, enter a new IP address and press '' 'Submit'. ''<br /> |
You have just successfully changed the license IP address. | You have just successfully changed the license IP address. | ||
|} | |} | ||
{| | {| | ||
| − | |style="padding: 0px 0px | + | |style="padding: 0px 0px 20px 25px;"|[[File:DAL17.png]] |
| + | |} | ||
| + | {| | ||
| + | |style="padding: 0px 0px 15px 15px;"|You can also change the license OS. Simply press the '' 'Change License OS' '', choose a new OS and save the changes by clicking on '' 'Submit' ''. | ||
| + | |} | ||
| + | {| | ||
| + | |style="padding: 0px 0px 20px 25px;"|[[File:DAL18.png]] | ||
| + | |} | ||
| + | {| | ||
| + | |style="padding: 0px 0px 15px 15px;"|At last, the license name can be also modified. To do so, simply press the '' 'Change License Name' '' button, then provide a new one and press '' 'Submit' '' to finish. | ||
| + | |} | ||
| + | {| | ||
| + | |style="padding: 0px 0px 20px 25px;"|[[File:DAL19.png]] | ||
|} | |} | ||
| Line 227: | Line 286: | ||
=Common Problems= | =Common Problems= | ||
{| | {| | ||
| − | |style="padding: 10px 0px | + | |style="padding: 10px 0px 20px 15px;"|'''1. When you have problems with connection, check whether your SELinux or firewall does not block ports.''' |
|} | |} | ||
{| | {| | ||
| − | |style="padding: 0px 0px | + | |style="padding: 0px 0px 20px 15px;"|2. Make sure that your custom field name is '' 'IP'. '' Otherwise, the module will not work properly. |
|} | |} | ||
{| | {| | ||
| − | |style="padding: 0px 0px 30px 15px;"|3. If after installation you get an ionCube encoder problem (wrong version), please open a support ticket.<br /> | + | |style="padding: 0px 0px 30px 15px;"|3. If after the installation you get an ionCube encoder problem (wrong version), please open a support ticket.<br /> |
You will be provided with a different version of the module encrypted with the older version of ionCube. | You will be provided with a different version of the module encrypted with the older version of ionCube. | ||
|} | |} | ||
Revision as of 13:31, 25 January 2018
Contents |
About DirectAdmin Licenses For WHMCS
| DirectAdmin Licenses For WHMCS will authorize you to offer DirectAdmin licenses as available products in your WHMCS. The module will automatically provide, verify and activate DirectAdmin licenses for your customers, who will then have a chance to control them from their client area. |
- Admin Area Features:
| ✔ Create/Suspend/Unsuspend/Terminate License |
| ✔ Change IP Address Assigned To License |
| ✔ View License Details |
| ✔ Choose Product ID And Operating System |
| ✔ Terminate License On Its Suspension |
| ✔ Toggle Automatic Payment For Provisioned License |
- Client Area Features:
| ✔ Order License |
| ✔ View License Details |
| ✔ Change IP Address Assigned To License |
| ✔ Change License OS |
| ✔ Change License Name |
- General Info:
| ✔ Integrated With Product Linker For WHMCS - Resell Licenses In Product Bundles (read more) |
| ✔ Multi-Language Support |
| ✔ Supports PHP 5.4 Up To PHP 7 |
| ✔ Supports WHMCS Product Addons |
| ✔ Supports WHMCS Template Six |
| ✔ Supports WHMCS V7 |
Installation and Configuration
| In this tutorial we will show you how to quickly install and configure DirectAdmin Licenses For WHMCS. We will guide you step by step through the whole installation process. |
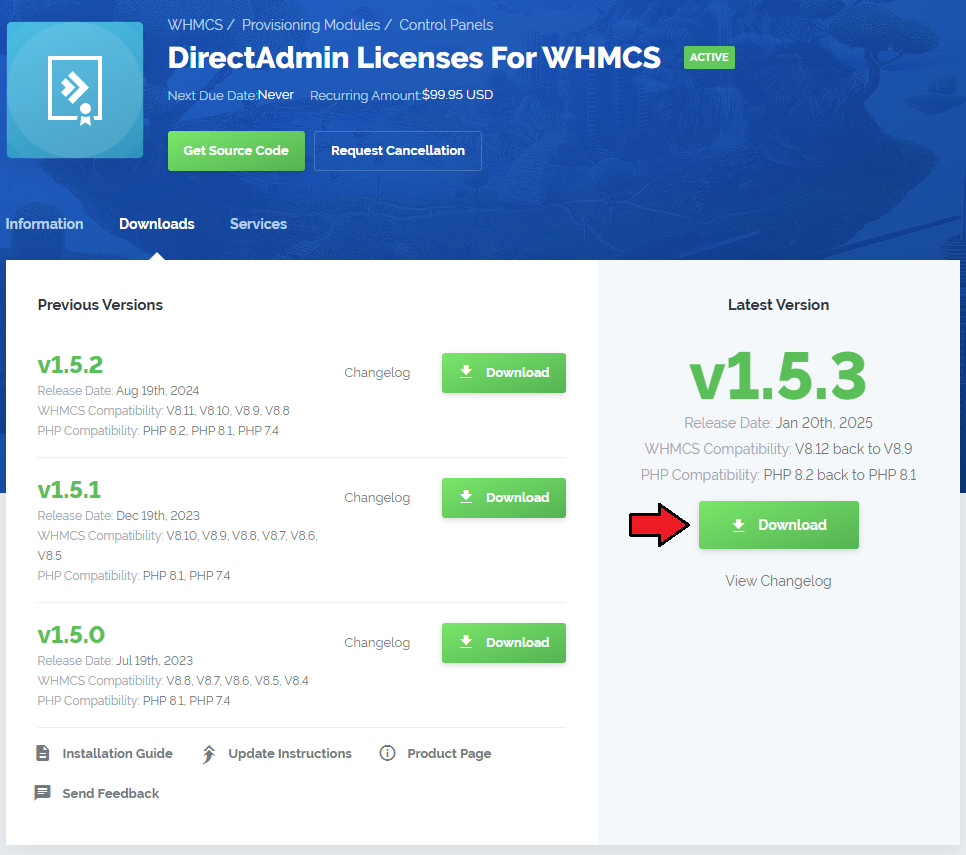
| 1. Log in to your client area and download the module. |
|
| 2. In the downloaded file you will find two packages that support different PHP versions. As presented on the screen below, the first one is dedicated to PHP 7, while the second one is aimed at PHP 5.4 up to PHP 5.6. It does not apply to open source versions. Note: You can check the current PHP version in your WHMCS. To do so proceed to 'Utilities' → 'System' → 'PHP Info'. |

|
| 3. Extract the downloaded file and choose the one with the right PHP version. Upload and extract the PHP file into the main WHMCS directory. The content of PHP version files should look like this. |
| 4. When you install DirectAdmin Licenses For WHMCS for the first time you have to rename the 'license_RENAME.php' file. File is located in 'modules/servers/dalicenses/license_RENAME.php'. Rename it from 'license_RENAME.php' to 'license.php'. |

|
| 5. In order to configure your license key, you have to edit the previously renamed 'license.php' file. Enter your license key between quotation marks as presented on the following screen. You can find your license key in your client area → 'My Products'. |

|
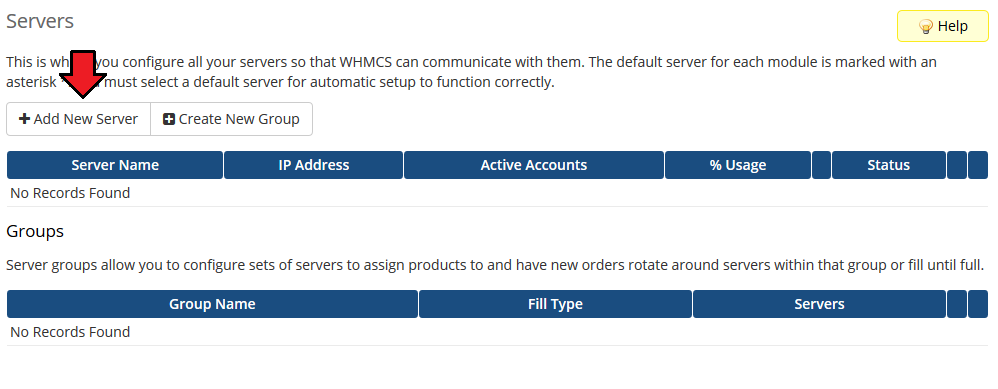
| 6. Now we will show you how to configure a new product. Go to 'Setup' → 'Products/Services' → 'Servers' and press 'Add New Server'. |
|
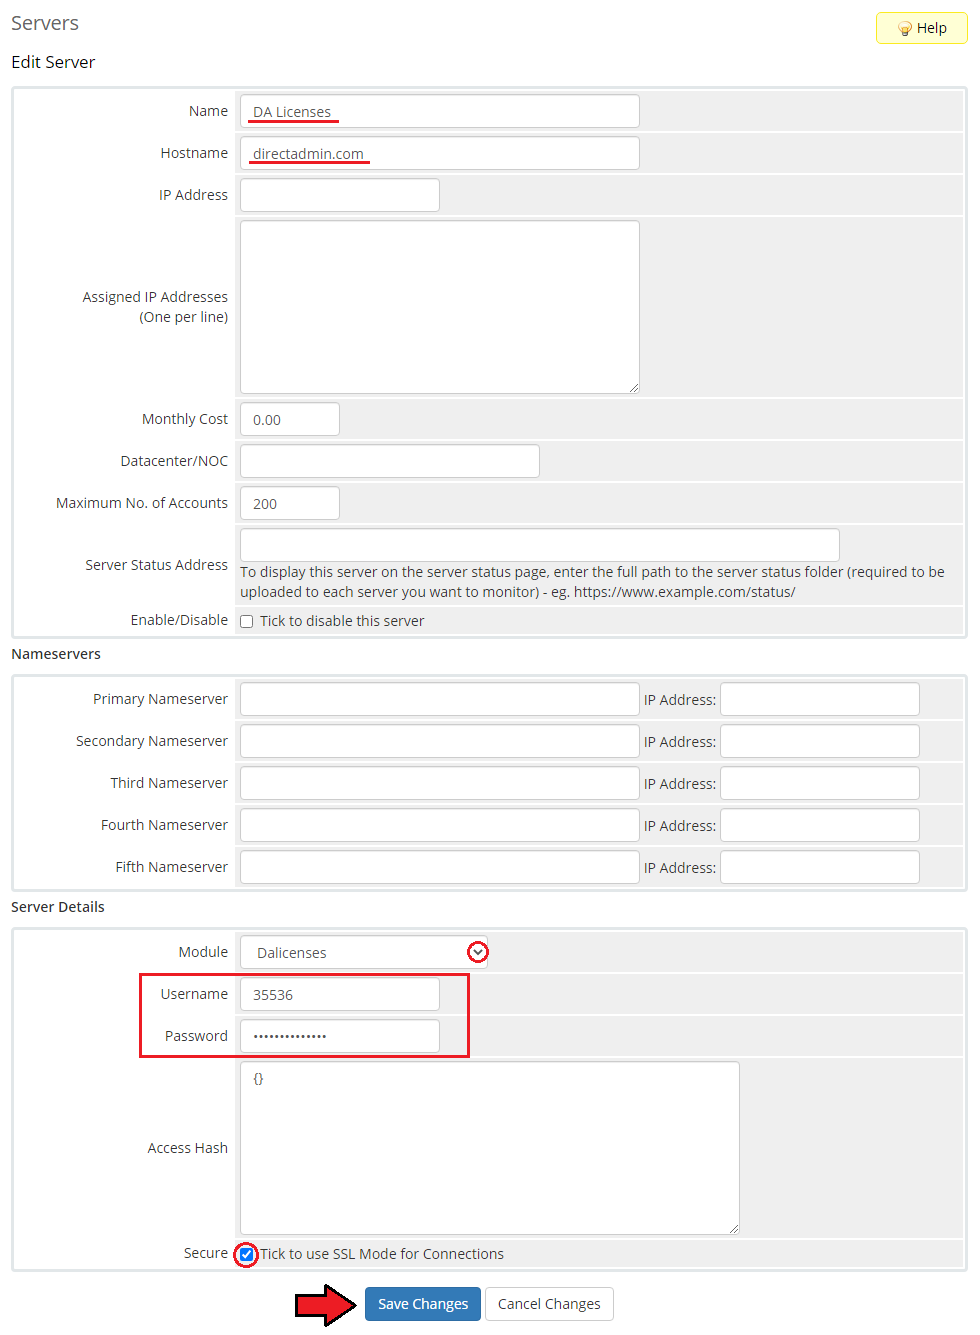
| 7. Next, enter your server name and enter 'https://www.directadmin.com/clients ' into the 'Hostname' field. Afterward, fill out username and password fields and choose 'Dalicenses' from the dropdown menu. |
|
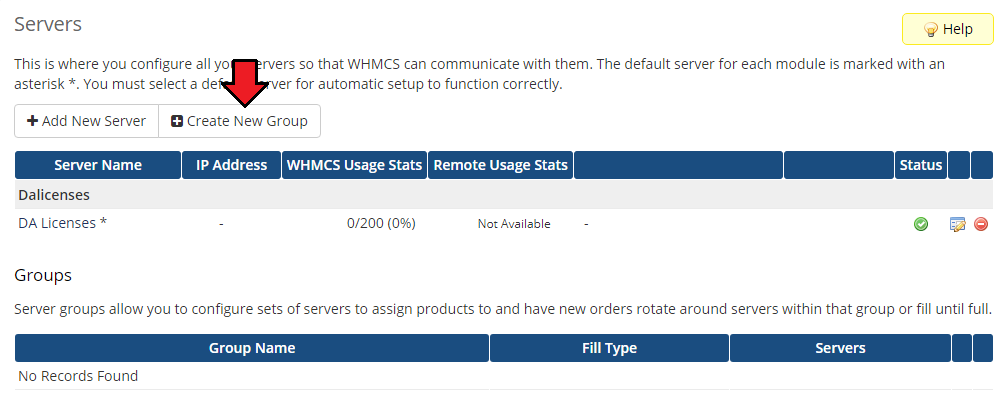
| 8. After you have configured your server correctly, you should see the following screen. Create a new group for your server now. Press 'Create New Group' to do so. |
|
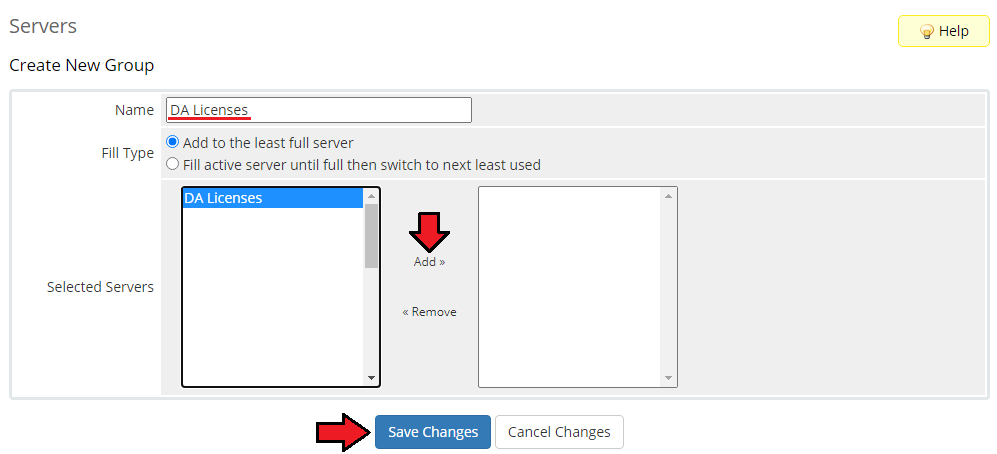
| 9. Enter a name, click on your previously created server, press 'Add' then click 'Save Changes'. |
|
Configuration Of Product
| 10. In order to create and configure product, click on 'Setup' → 'Products/Services' → 'Products/Services'. If you do not have a product group, click on 'Create a New Group'. If you do, simply go to step 11. |

|
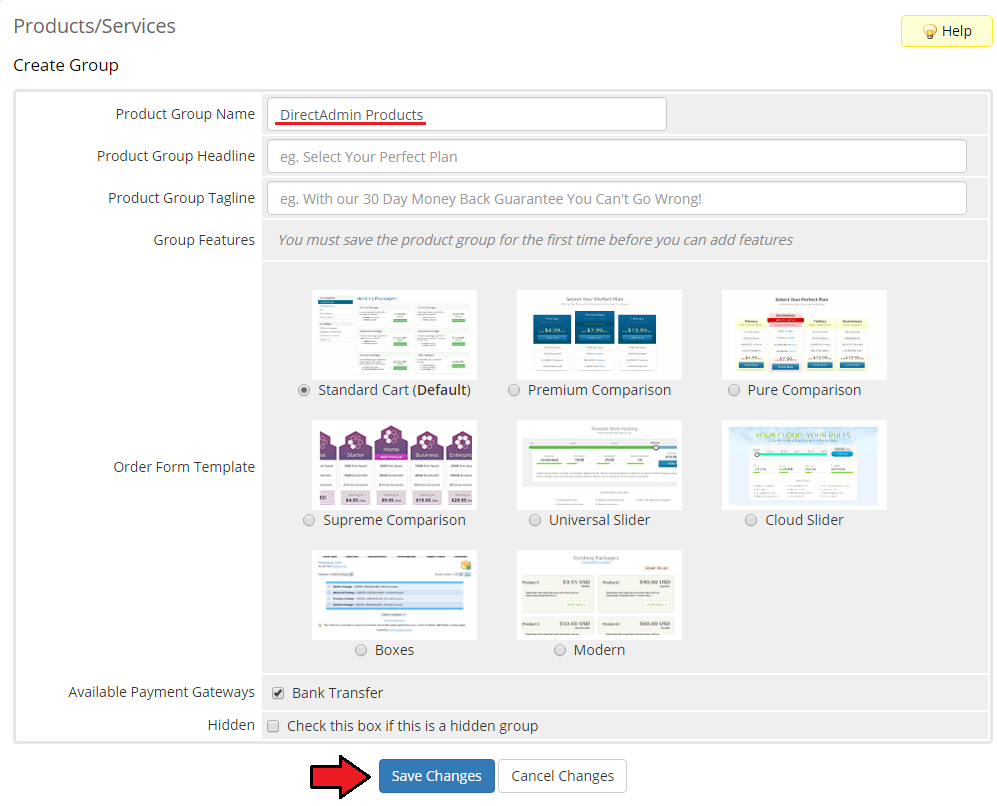
| 11. Enter a product group name and press 'Create Group'. |
|
| 12. When you have a product group, create your product. To create a product click on 'Create a New Product'. |

|
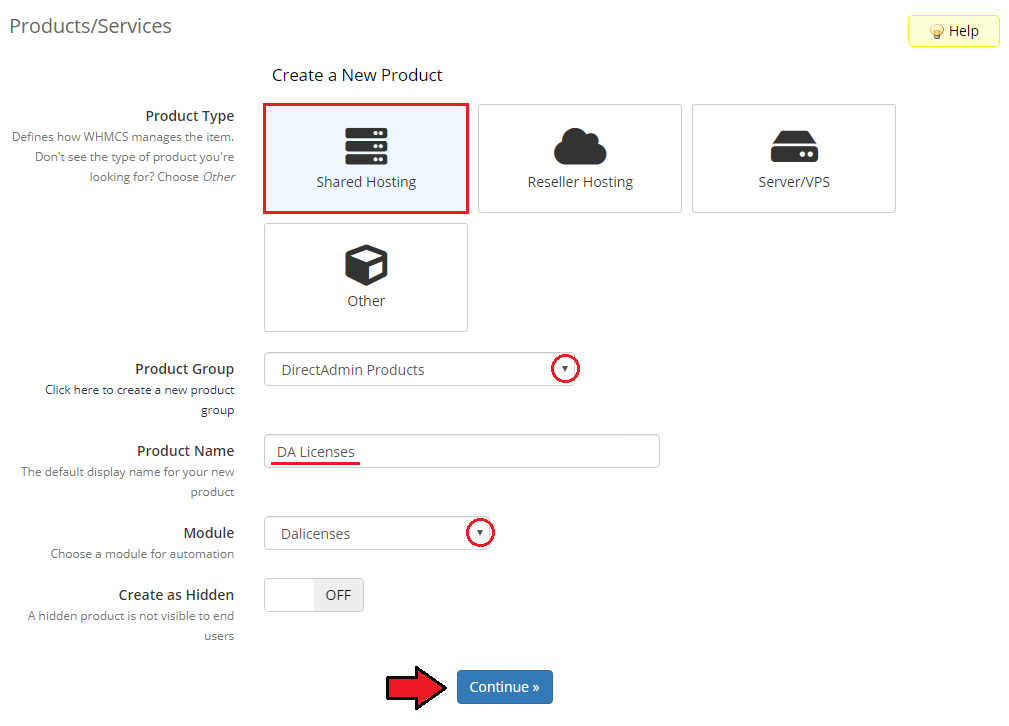
| 13. Afterward, choose your product type and product group from dropdown menus, enter your product name and press 'Continue'. |
|
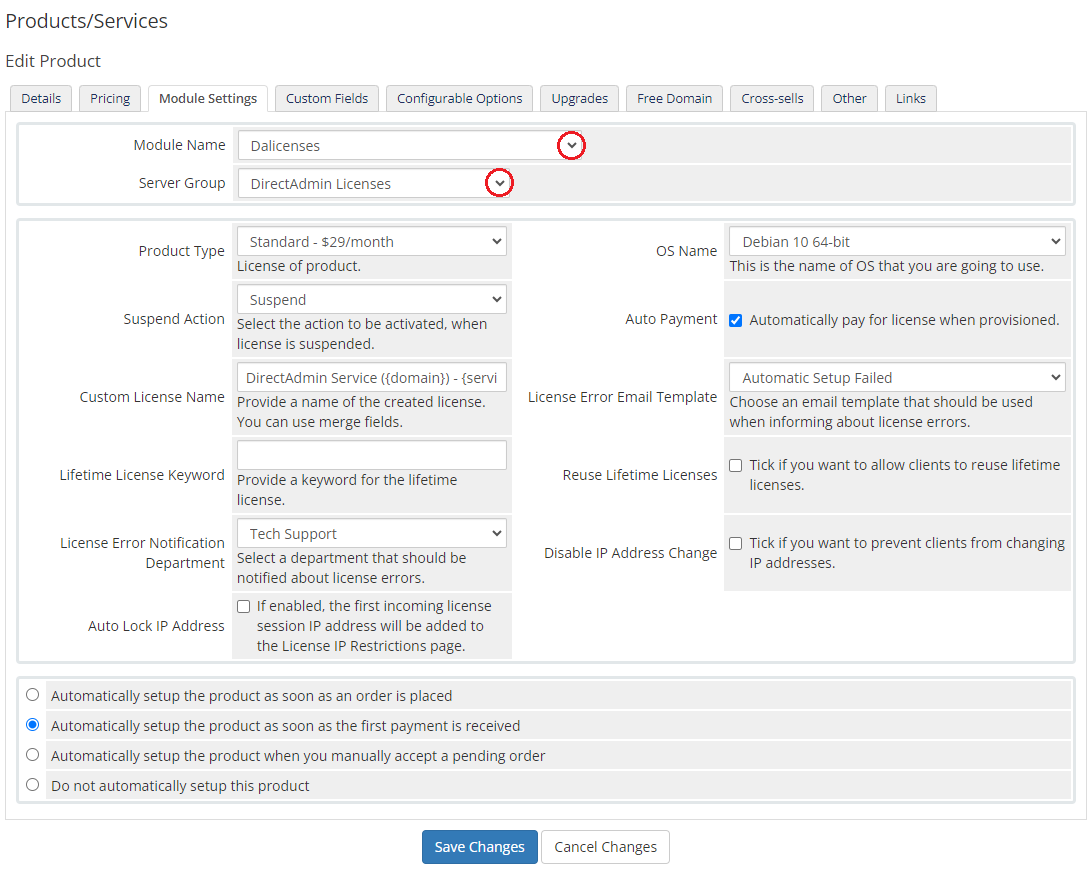
| 14. Now, go to the 'Module Settings' section, choose both 'Dalicenses' and your previously created server group from the dropdown menu. |
|
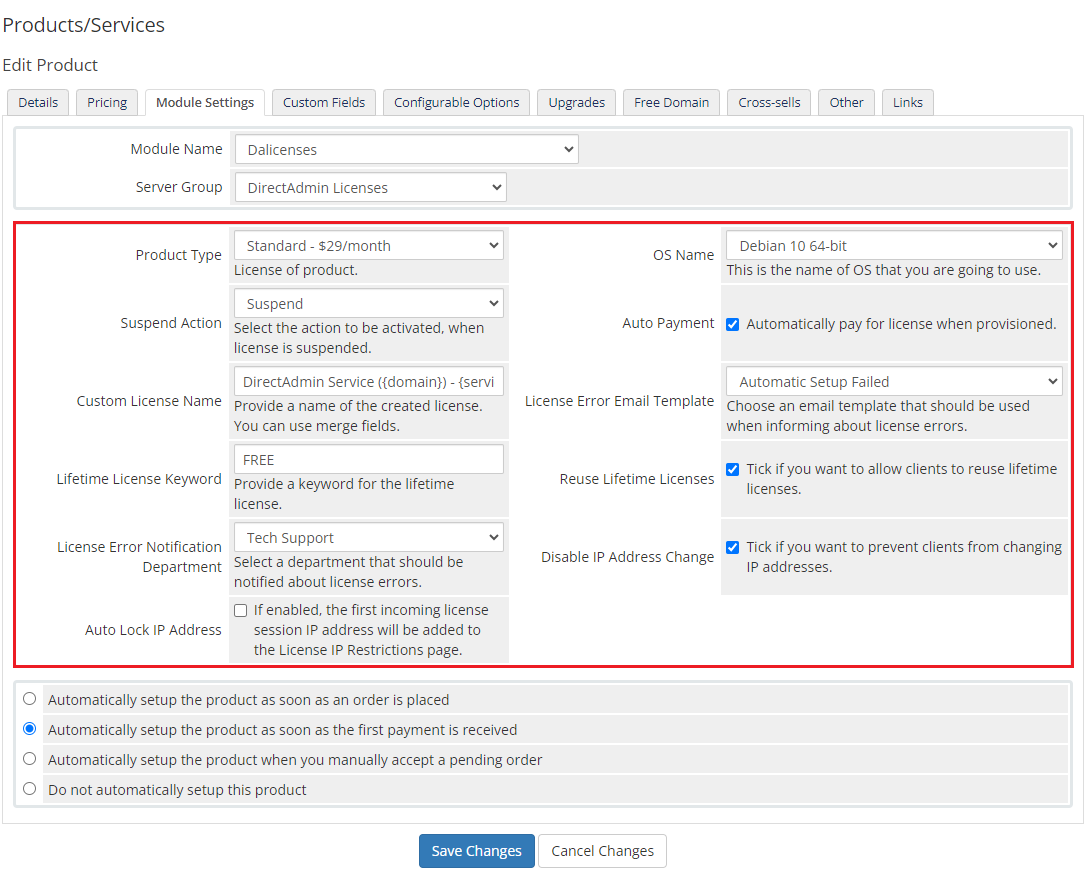
| 15. Next, tick 'Suspend Action' and 'Auto Payment'. Choose 'Product ID' and 'OS Name' , then press 'Save Changes'. |
|
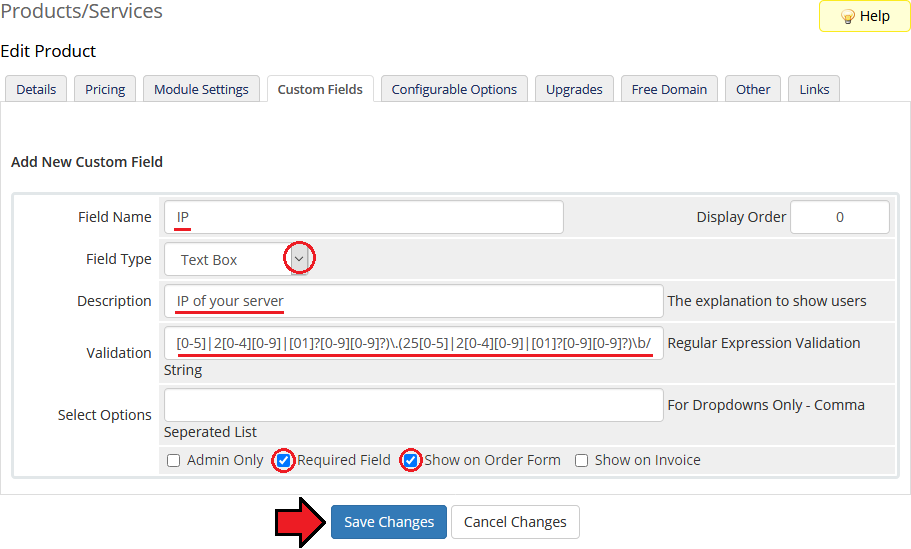
| 16. After modifying the module settings move to 'Custom Fields'. In 'Field Name' enter 'IP' , choose 'Text Box' from the 'Field Type' dropdown menu, enter a description and set up the hereby validation: /\b(25[0-5]|2[0-4][0-9]|[01]?[0-9][0-9]?)\.(25[0-5]|2[0-4][0-9]|[01]?[0-9][0-9]?)\.(25[0-5]|2[0-4][0-9]|[01]?[0-9][0-9]?)\.(25[0-5]|2[0-4][0-9]|[01]?[0-9][0-9]?)\b/
|
|
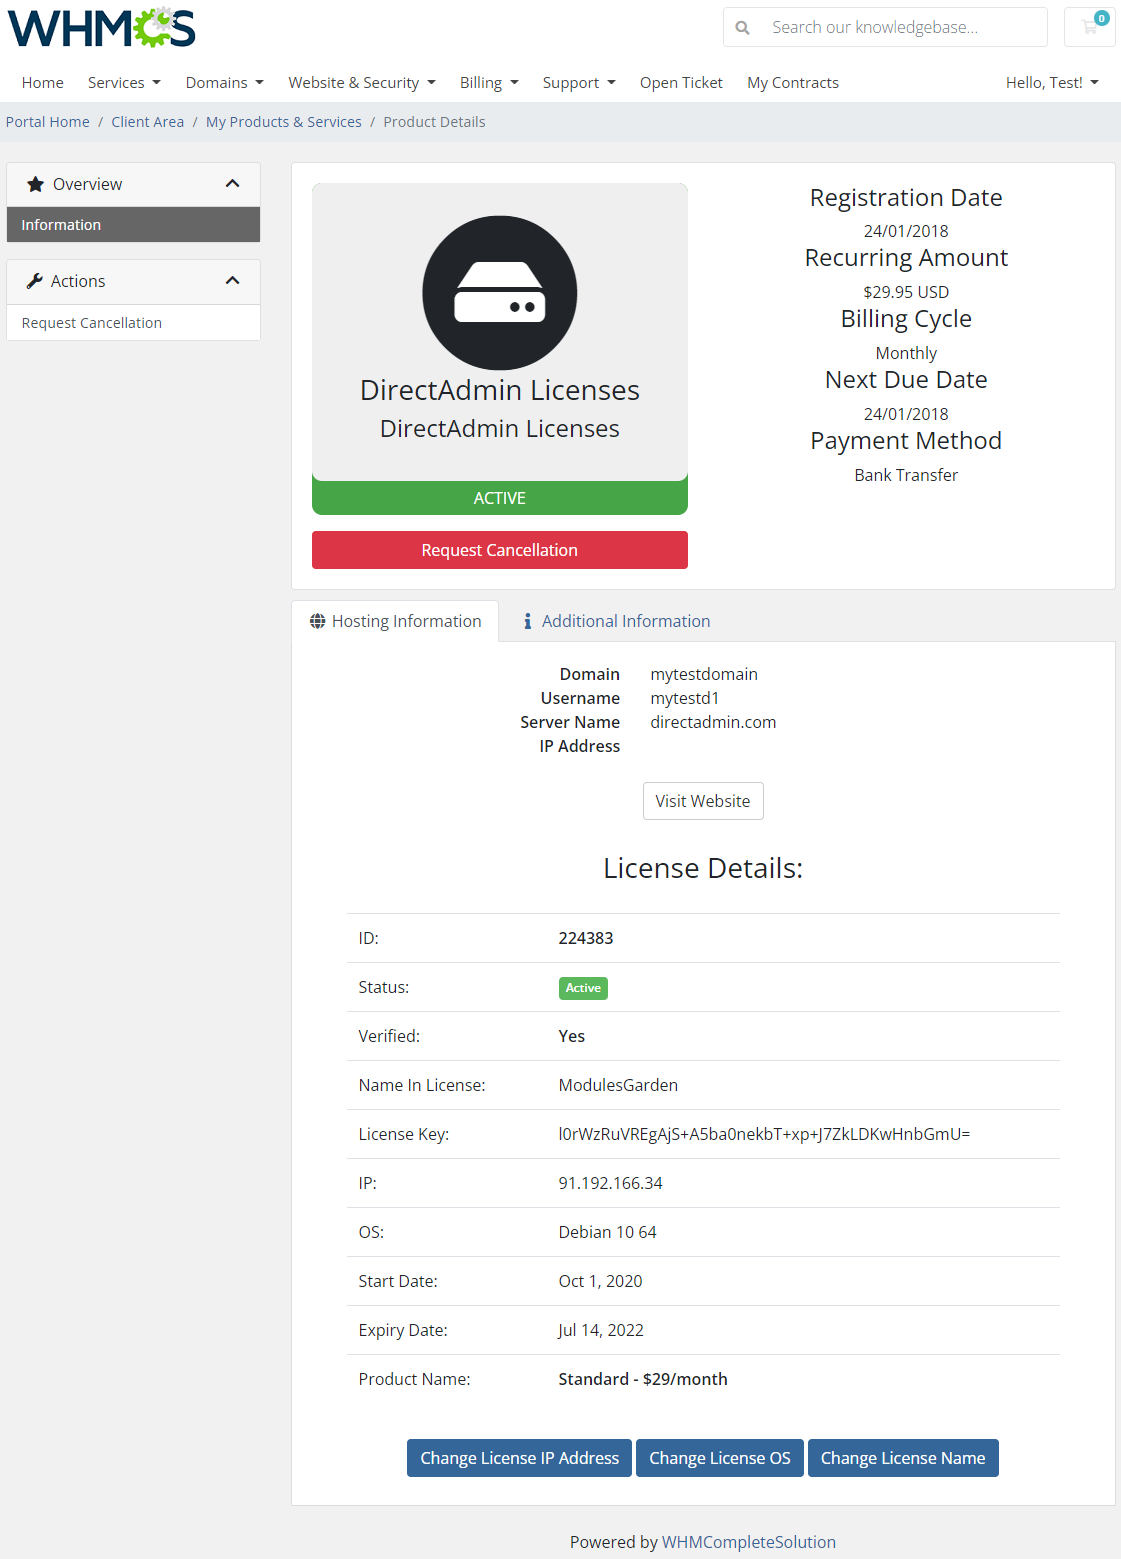
| That's it. You have just successfully installed and configured DirectAdmin Licenses For WHMCS! This is how a properly configured product looks like. |
|
Configuration Of Addon
| This module can be also alternatively configured so to become a 'Product Addon' that can be bought additionally next to a given product. More information concerning 'Product Addons' in WHMCS can be found here. In order to configure your addon follow the steps explained below. |
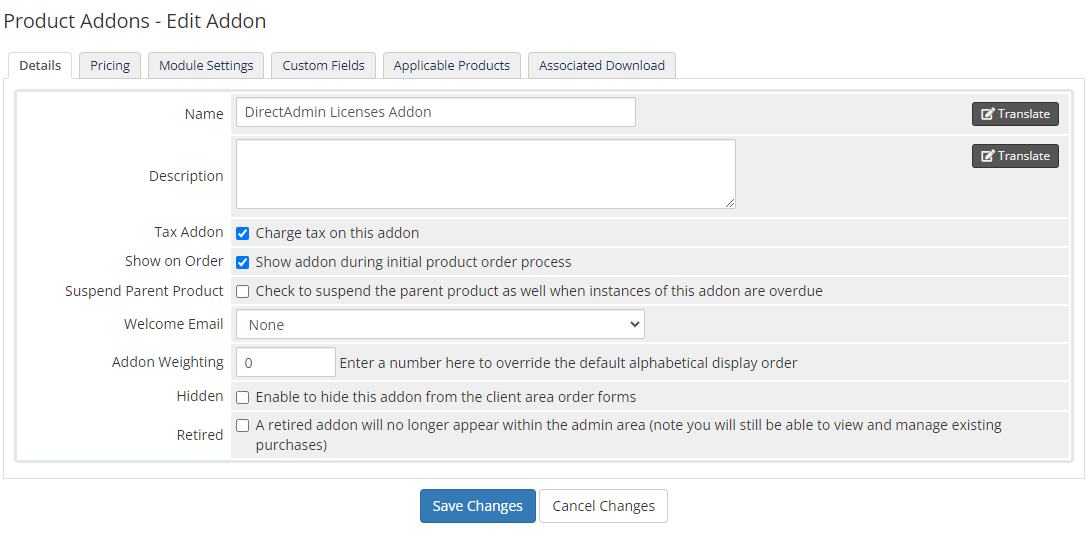
| 1. Proceed to 'Setup' → 'Products/Services' → 'Product Addons' → 'Add New' . Enter a name and desired description. Then move to the 'Module Settings' tab. |
|
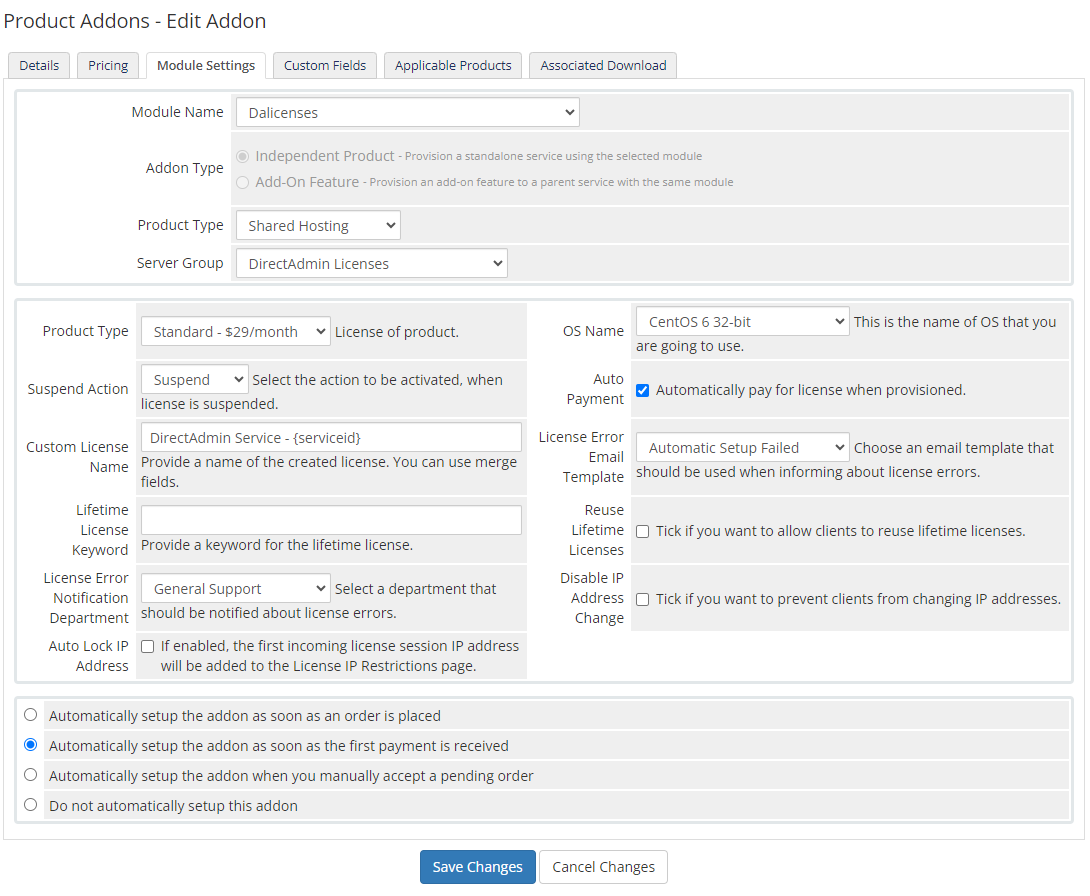
| 2. Now, as your 'Module Name' choose 'Dalicenses' and select your previously created server group from the 'Server Group' dropdown menu. Note that the checkboxes presented on the screen are only optional. |
|
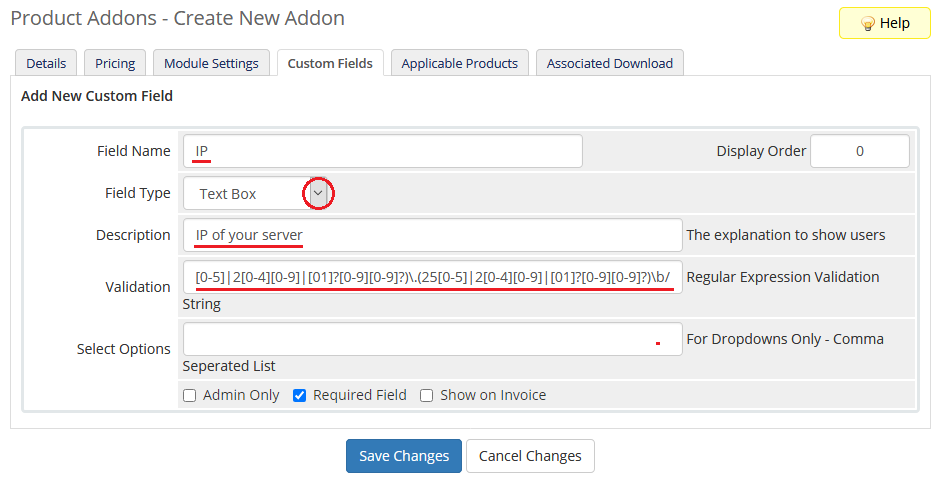
| 3. In the next step settings move to 'Custom Fields'. In 'Field Name' enter 'IP' , choose 'Text Box' from the 'Field Type' dropdown menu, enter a description and set up the hereby validation: /\b(25[0-5]|2[0-4][0-9]|[01]?[0-9][0-9]?)\.(25[0-5]|2[0-4][0-9]|[01]?[0-9][0-9]?)\.(25[0-5]|2[0-4][0-9]|[01]?[0-9][0-9]?)\.(25[0-5]|2[0-4][0-9]|[01]?[0-9][0-9]?)\b/
|
|
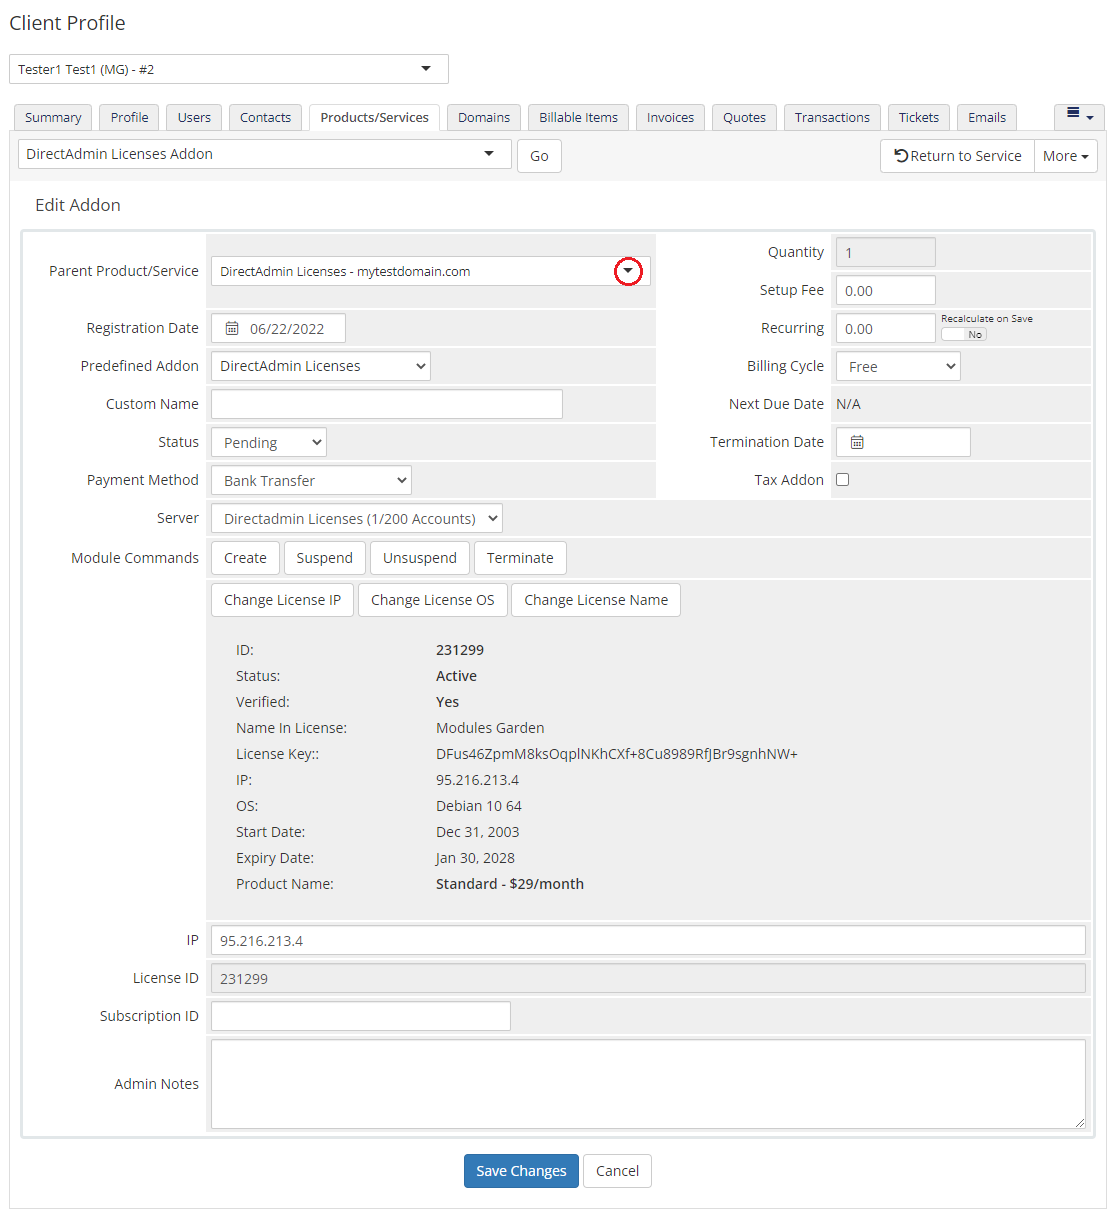
| You have just successfully configured a new DirectAdmin Licenses For WHMCS addon. It can be assigned to other products of your choice. |
|
Management
| Our module allows you to provide DirectAdmin licenses through WHMCS. Read through the below sections to learn how to use its functionalities efficiently. |
Admin Area
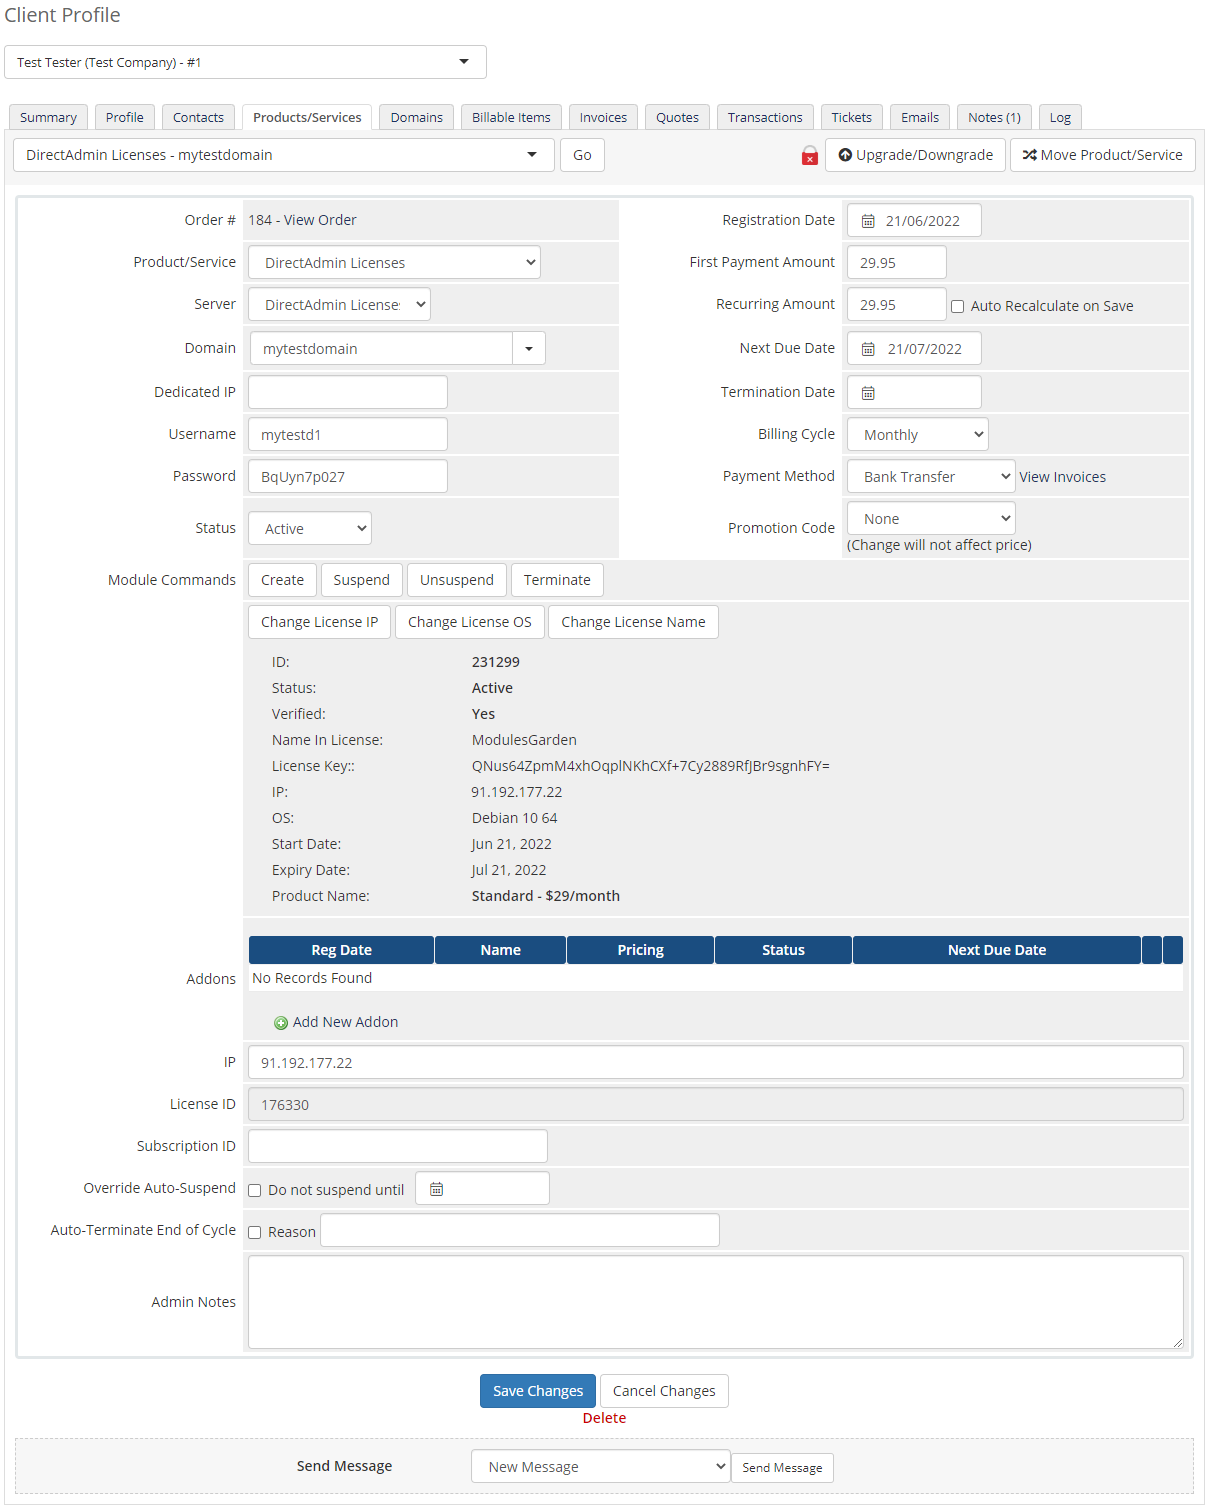
| You can view all important details of DirectAdmin Licenses For WHMCS products ordered by your clients in the admin area. Additionally, our module allows you to manage your clients licenses and change licenses' IP addresses. |
|
Client Area
| Our module, among others allows you and your clients to quickly change license IP address. As you know from the previous section it can be done in the admin area. We will show you now how to change IP address from the client area. |
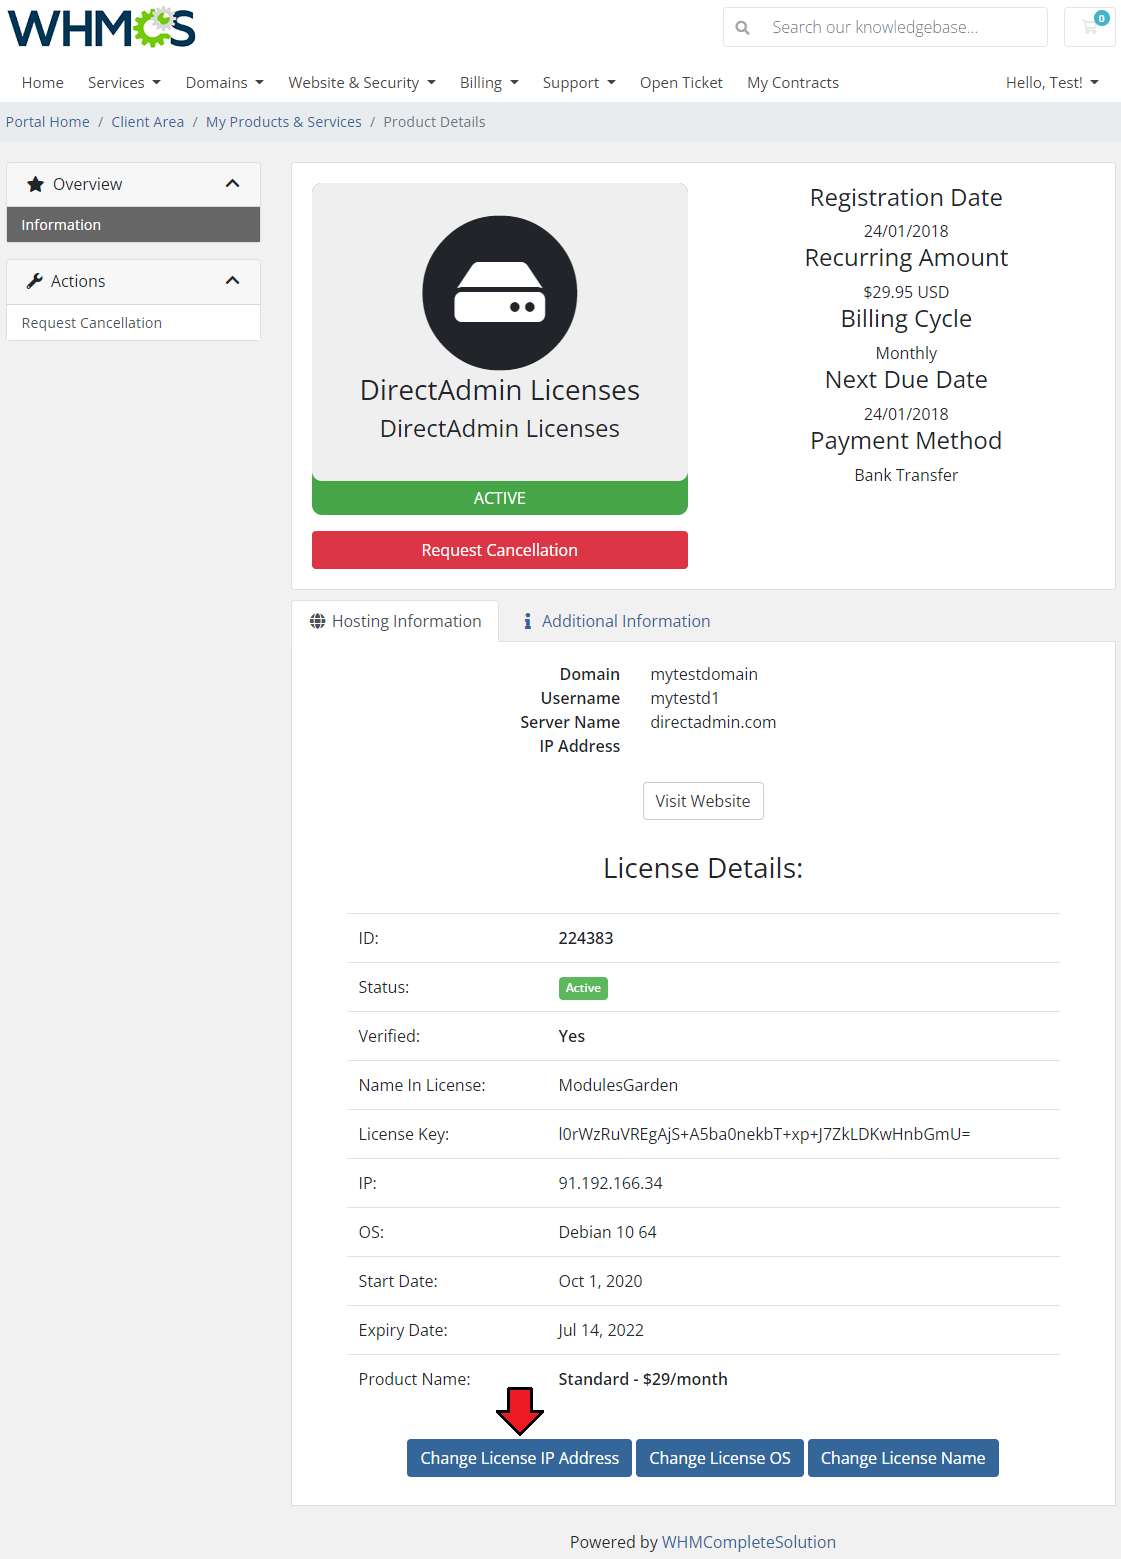
|
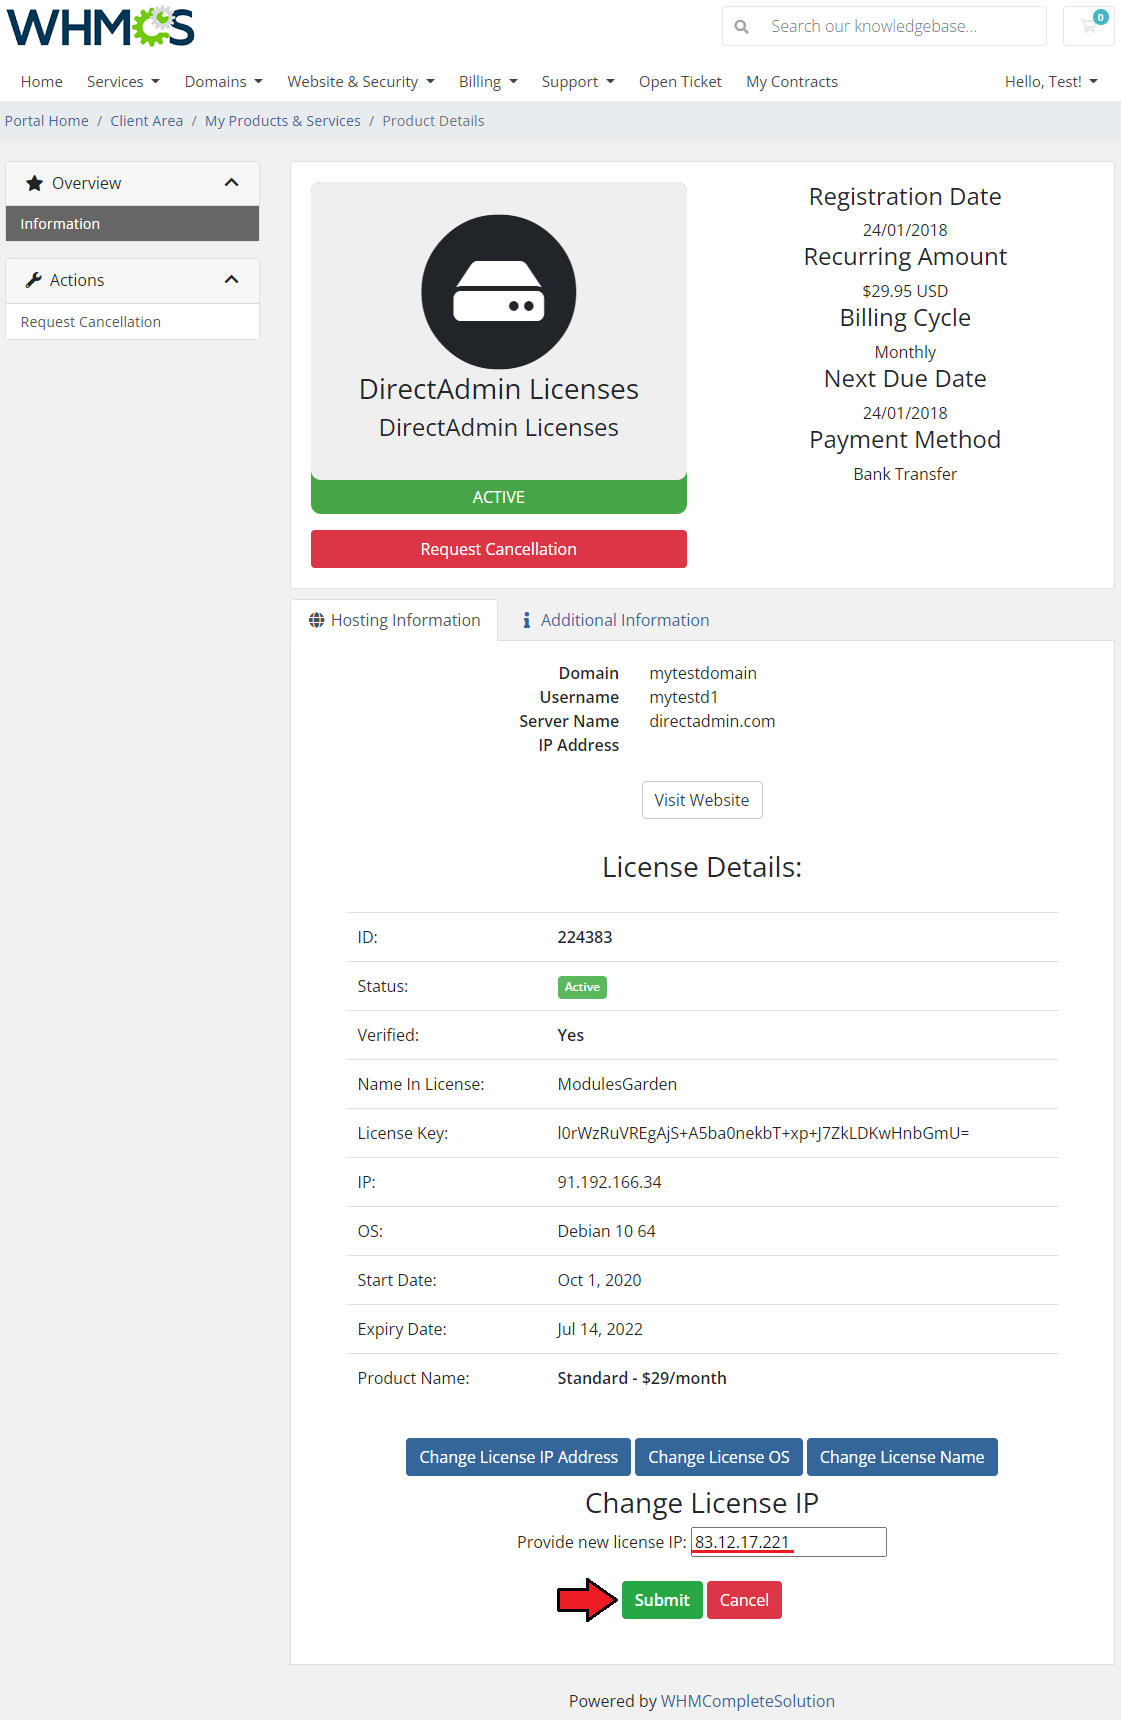
| Afterward, enter a new IP address and press 'Submit'. You have just successfully changed the license IP address. |
|
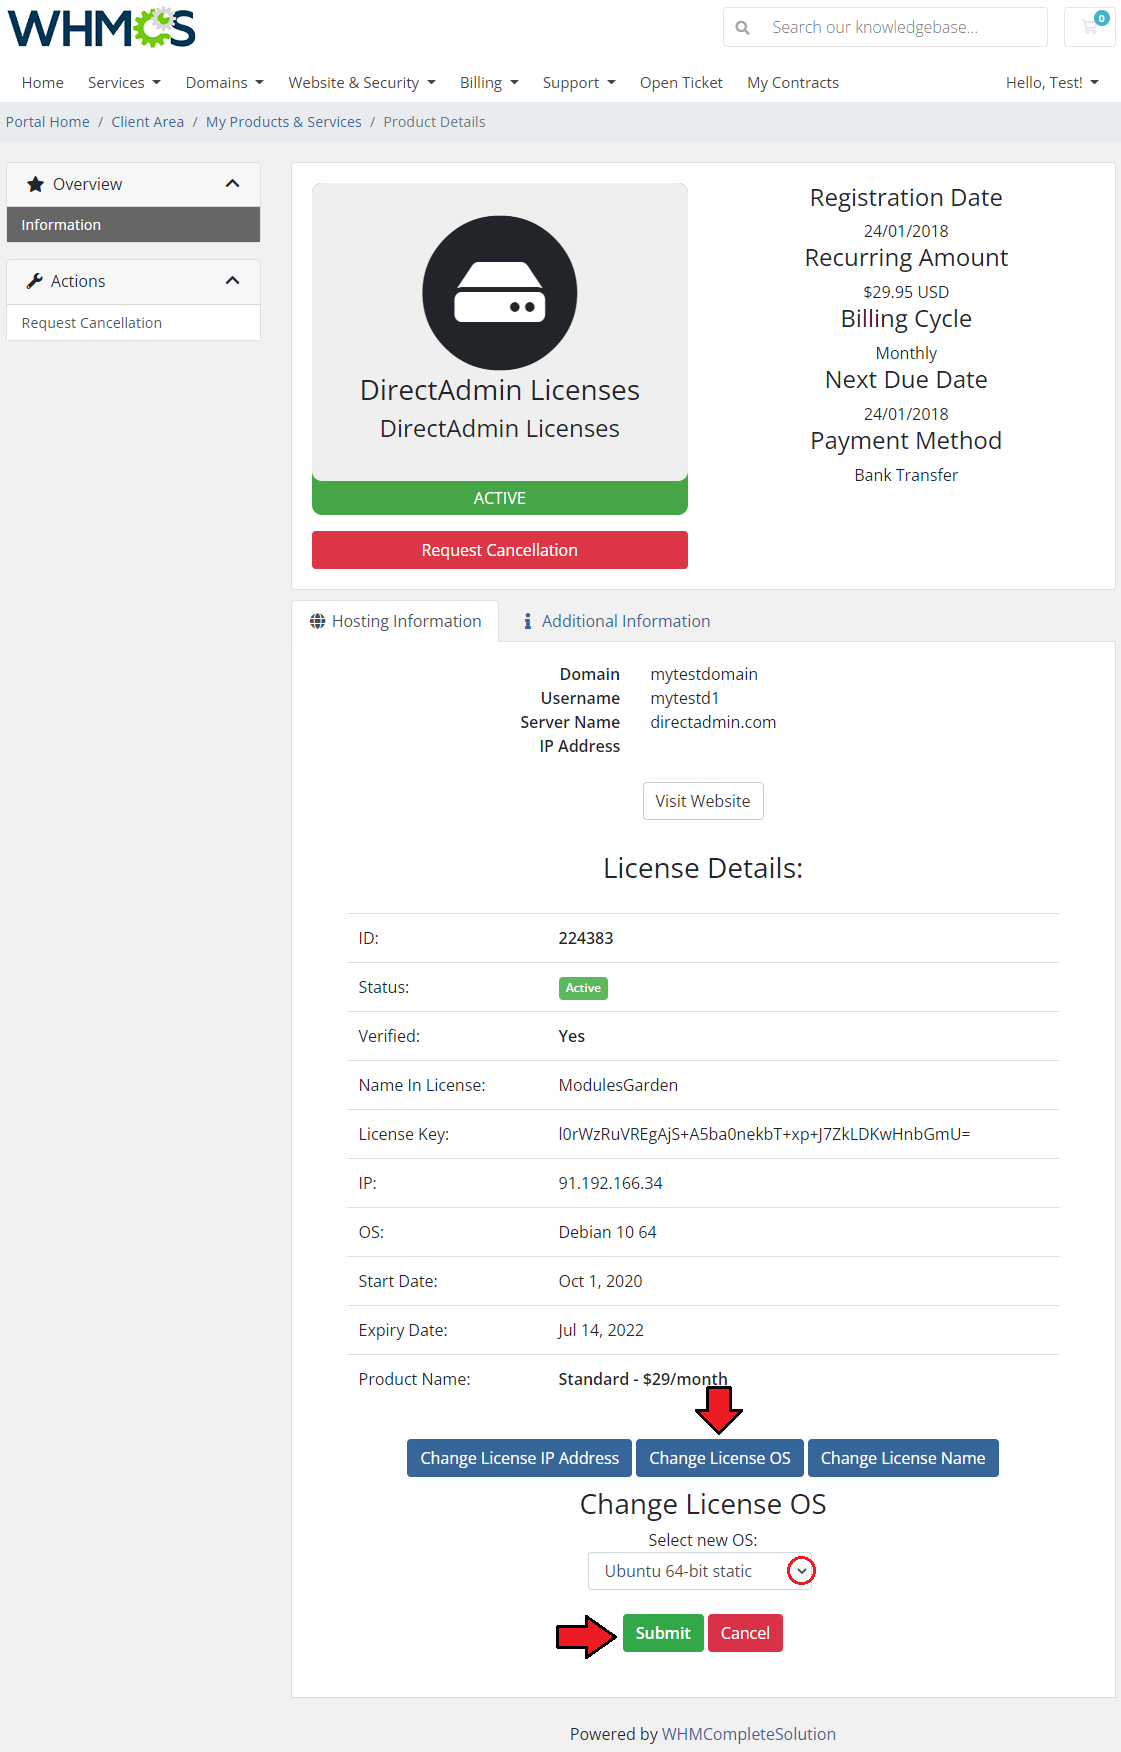
| You can also change the license OS. Simply press the 'Change License OS' , choose a new OS and save the changes by clicking on 'Submit' . |
|
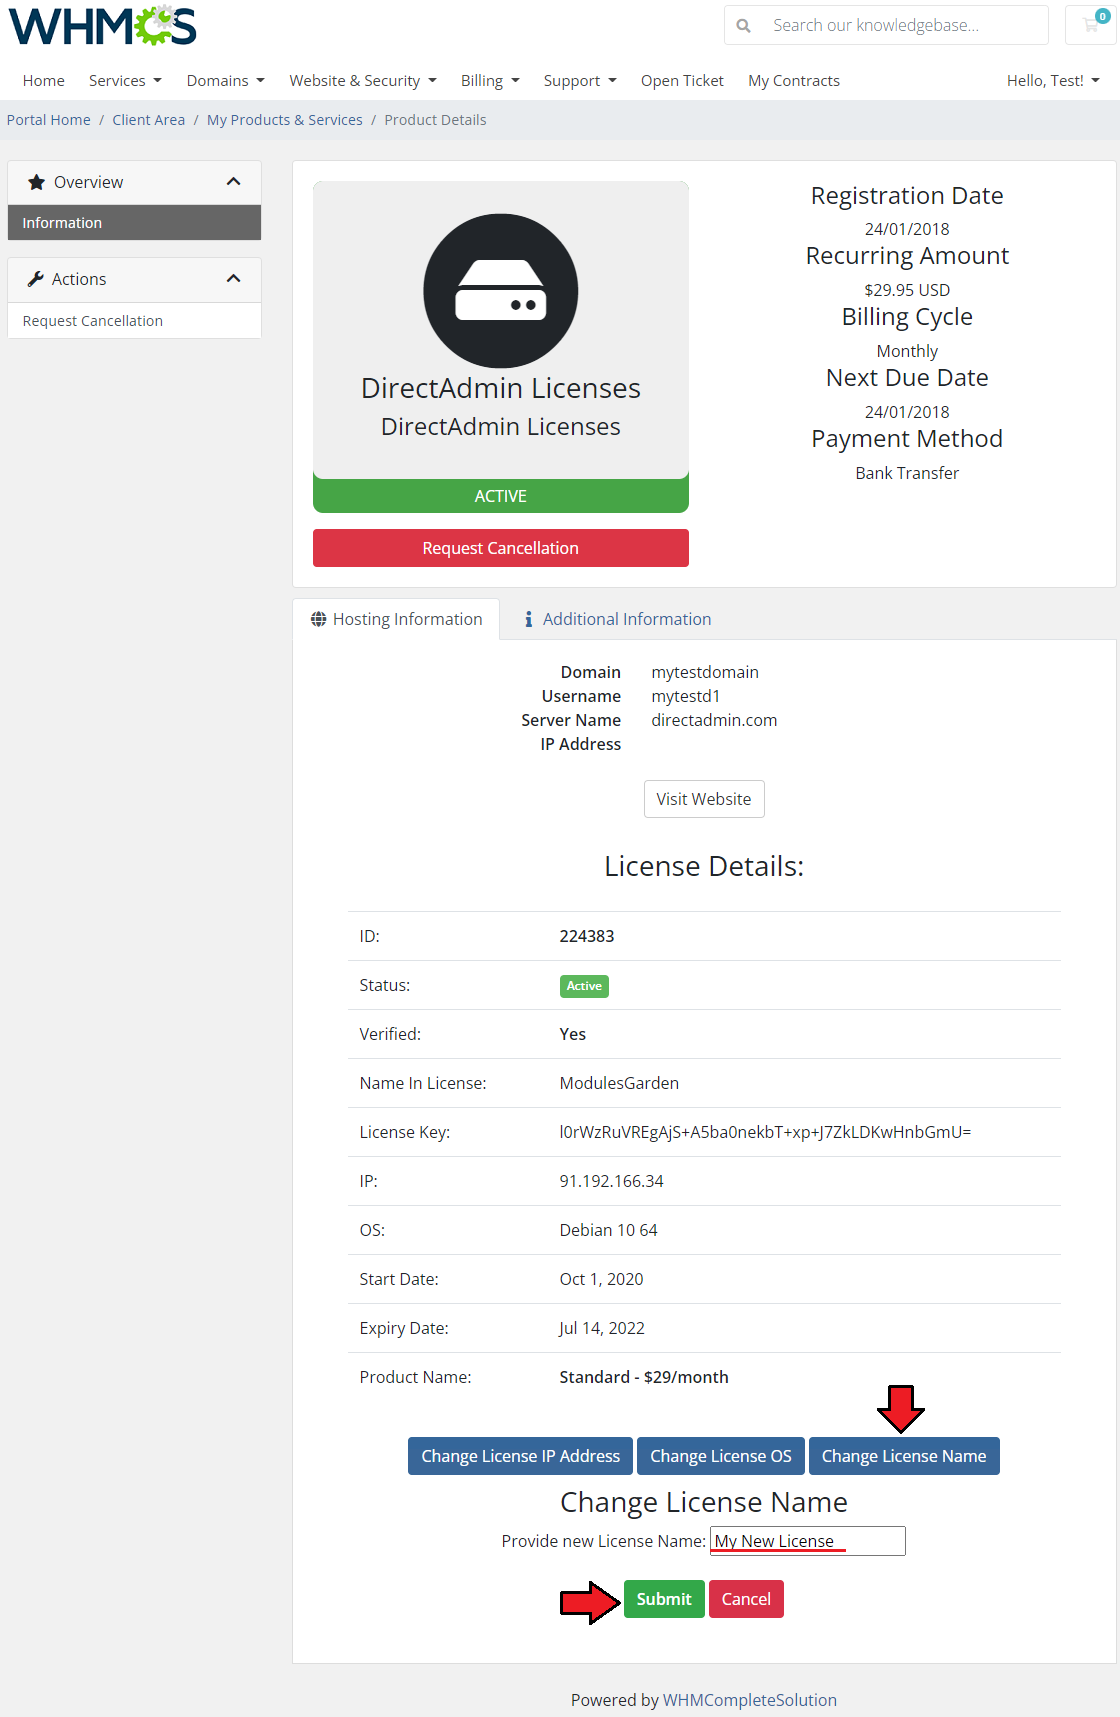
| At last, the license name can be also modified. To do so, simply press the 'Change License Name' button, then provide a new one and press 'Submit' to finish. |
|
Tips
| 1. Combine DirectAdmin Licenses For WHCMS with Product Linker For WHMCS to prepare product bundles like a VPS server with an active DirectAdmin license. |
Update Instructions
| Essential guidance through the process of updating the module is offered here. Keep in mind there is a quick and easy option in our client area that will let you upgrade the license of your module to an open source version at any time - and at a lower price! |
Common Problems
| 1. When you have problems with connection, check whether your SELinux or firewall does not block ports. |
| 2. Make sure that your custom field name is 'IP'. Otherwise, the module will not work properly. |
| 3. If after the installation you get an ionCube encoder problem (wrong version), please open a support ticket. You will be provided with a different version of the module encrypted with the older version of ionCube. |