Client Area Popup For WHMCS
| Line 1: | Line 1: | ||
| − | |||
| − | |||
<meta name="keywords" content="client area popup for whmcs, client area popup configuration, whmcs client area popup management, whmcs client area popup installation, whmcs client area popup common problems, about whmcs client area popup, whmcs client client area popup documentation, whmcs client area popup faq, whmcs client area popup help, whmcs client area popup guide, whmcs client area popup wiki, whmcs client area popup tutorial, whmcs client area popup tips, whmcs client area popup wiki"></meta> | <meta name="keywords" content="client area popup for whmcs, client area popup configuration, whmcs client area popup management, whmcs client area popup installation, whmcs client area popup common problems, about whmcs client area popup, whmcs client client area popup documentation, whmcs client area popup faq, whmcs client area popup help, whmcs client area popup guide, whmcs client area popup wiki, whmcs client area popup tutorial, whmcs client area popup tips, whmcs client area popup wiki"></meta> | ||
<meta name="description" content="ModulesGarden Wiki Contains All The Information You Need About The Client Area Popup For WHMCS Module."></meta> | <meta name="description" content="ModulesGarden Wiki Contains All The Information You Need About The Client Area Popup For WHMCS Module."></meta> | ||
| Line 8: | Line 6: | ||
=About [https://www.modulesgarden.com/products/whmcs/client-area-popup Client Area Popup For WHMCS]= | =About [https://www.modulesgarden.com/products/whmcs/client-area-popup Client Area Popup For WHMCS]= | ||
{| | {| | ||
| − | |style="padding: 10px 0px 10px 0px;"|'''Client Area Popup For WHMCS''' is a module that lets you create fully customized pop-ups that will be visible to your clients in their panel.<br/>Prepare a ready pop-up in a form of an image, raw or HTML text to pass a message directly to your clients.<br/>Design it using predefined styles, which can be always altered and upgraded to implement your idea perfectly. | + | |style="padding: 10px 0px 10px 0px;"|'''Client Area Popup For WHMCS''' is a module that lets you create fully customized pop-ups that will be visible to your clients in their panel.<br />Prepare a ready pop-up in a form of an image, raw or HTML text to pass a message directly to your clients.<br />Design it using predefined styles, which can be always altered and upgraded to implement your idea perfectly. |
|} | |} | ||
<!-- fixed --> | <!-- fixed --> | ||
| Line 19: | Line 17: | ||
|} | |} | ||
{| | {| | ||
| − | |style="padding: 0px 0px 0px 30px;"|✔ Archive Pop-ups For | + | |style="padding: 0px 0px 0px 30px;"|✔ Archive Pop-ups For Later Use |
|} | |} | ||
{| | {| | ||
| Line 28: | Line 26: | ||
|} | |} | ||
{| | {| | ||
| − | |style="padding: 0px 0px | + | |style="padding: 0px 0px 0px 30px;"|✔ Create Styles To Be Used By Pop-up |
| + | |} | ||
| + | {| | ||
| + | |style="padding: 0px 0px 10px 30px;"|✔ Preview Style With Single Click | ||
|} | |} | ||
*'''Client Area Features:''' | *'''Client Area Features:''' | ||
| Line 64: | Line 65: | ||
{| | {| | ||
|style="padding: 0px 0px 0px 45px;"|✔ Required Active Products With Servers | |style="padding: 0px 0px 0px 45px;"|✔ Required Active Products With Servers | ||
| + | |} | ||
| + | {| | ||
| + | |style="padding: 0px 0px 0px 45px;"|✔ Required Active Addons | ||
|} | |} | ||
{| | {| | ||
|style="padding: 0px 0px 0px 45px;"|✔ Required Active Domains Using TLDs | |style="padding: 0px 0px 0px 45px;"|✔ Required Active Domains Using TLDs | ||
| + | |} | ||
| + | {| | ||
| + | |style="padding: 0px 0px 0px 45px;"|✔ Lack Of Chosen Products | ||
| + | |} | ||
| + | {| | ||
| + | |style="padding: 0px 0px 0px 45px;"|✔ Lack Of Chosen Addons | ||
| + | |} | ||
| + | {| | ||
| + | |style="padding: 0px 0px 0px 45px;"|✔ Lack Of Domains Using TLDs | ||
|} | |} | ||
{| | {| | ||
| Line 97: | Line 110: | ||
|} | |} | ||
{| | {| | ||
| − | |style="padding: 0px 0px 0px 30px;"|✔ Supports PHP 5. | + | |style="padding: 0px 0px 0px 30px;"|✔ Supports PHP 5.4 Up To PHP 7 |
|} | |} | ||
{| | {| | ||
| Line 115: | Line 128: | ||
|} | |} | ||
{| | {| | ||
| − | |style="padding: 0px 0px 10px 15px;"|'''2. In the downloaded file you will find two packages that support different PHP versions.'''<br/>As presented on the screen below, the first one is dedicated to PHP 7, while the second one is aimed at PHP 5. | + | |style="padding: 0px 0px 10px 15px;"|'''2. In the downloaded file you will find two packages that support different PHP versions.'''<br />As presented on the screen below, the first one is dedicated to PHP 7, while the second one is aimed at PHP 5.4 up to PHP 5.6.<br />It does not apply to open source versions.<br /> |
'' '''Note''': You can check current PHP version in your WHMCS. To do so proceed to ''' 'Utilities' → 'System' → 'PHP Info'.''' | '' '''Note''': You can check current PHP version in your WHMCS. To do so proceed to ''' 'Utilities' → 'System' → 'PHP Info'.''' | ||
|} | |} | ||
| Line 170: | Line 183: | ||
=Configuration and Management= | =Configuration and Management= | ||
{| | {| | ||
| − | |style="padding: 10px 0px 30px 15px;"|'''Client Area Popup For WHMCS is a module which allows you to notify your clients by showing them customized pop-ups directly in their panel.'''<br/> | + | |style="padding: 10px 0px 30px 15px;"|'''Client Area Popup For WHMCS is a module which allows you to notify your clients by showing them customized pop-ups directly in their panel.'''<br /> |
Below, you will find instructions on how to draft and customize such pop-ups. | Below, you will find instructions on how to draft and customize such pop-ups. | ||
|} | |} | ||
==Configuration== | ==Configuration== | ||
{| | {| | ||
| − | |style="padding: 10px 0px 30px 15px;"|The module does not require advanced configuration.<br/> That is why, we will immediately move to the most crucial | + | |style="padding: 10px 0px 30px 15px;"|The module does not require advanced configuration.<br /> That is why, we will immediately move to the most crucial part, which is creating a pop-up. |
|} | |} | ||
===Create Pop-up=== | ===Create Pop-up=== | ||
| Line 186: | Line 199: | ||
====General==== | ====General==== | ||
{| | {| | ||
| − | |style="padding: 10px 0px 20px 15px;"|Start with naming the pop-up.<br/>''Note: the title will not be displayed in any way on the final pop-up.''<br/> | + | |style="padding: 10px 0px 20px 15px;"|Start with naming the pop-up.<br />''Note: the title will not be displayed in any way on the final pop-up.''<br /> |
|} | |} | ||
{| | {| | ||
| Line 192: | Line 205: | ||
|} | |} | ||
{| | {| | ||
| − | |style="padding: 0px 0px 15px 15px;"|If you | + | |style="padding: 0px 0px 15px 15px;"|If you added any pop-ups in the past, you may copy their settings to the newly created one to save time.<br /> |
Finally, select the initial status:<br> | Finally, select the initial status:<br> | ||
*''Active'' - for enabled pop-ups. | *''Active'' - for enabled pop-ups. | ||
| − | *''Archived'' - for pop-ups awaiting activation | + | *''Archived'' - for pop-ups awaiting activation. |
|} | |} | ||
{| | {| | ||
| Line 203: | Line 216: | ||
====Look And Feel==== | ====Look And Feel==== | ||
{| | {| | ||
| − | |style="padding: 10px 0px 15px 15px;"|The next part of creating a pop-up process concerns its interface, layout and general design.<br/> | + | |style="padding: 10px 0px 15px 15px;"|The next part of creating a pop-up process concerns its interface, layout and general design.<br /> |
| − | *'''Size'''<br/> | + | *'''Size'''<br /> |
| − | Auto - it automatically adjusts to the content.<br/> | + | Auto - it automatically adjusts to the content.<br /> |
| − | Custom - if you want a customized size, then simply enter appropriate width and height.<br/> | + | Custom - if you want a customized size, then simply enter appropriate width and height.<br /> |
| − | *'''Style'''<br/> | + | *'''Style'''<br /> |
| − | Select style from the list of available and previously defined styles. <br/> | + | Select style from the list of available and previously defined styles. <br /> |
| − | ''More about styles can be found [http://www.docs.modulesgarden.com/Client_Area_Popup_For_WHMCS#Styles here.]''<br/> | + | ''More about styles can be found [http://www.docs.modulesgarden.com/Client_Area_Popup_For_WHMCS#Styles here.]''<br /> |
|} | |} | ||
{| | {| | ||
| Line 217: | Line 230: | ||
|style="padding: 0px 0px 15px 15px;"| | |style="padding: 0px 0px 15px 15px;"| | ||
*'''Type''' | *'''Type''' | ||
| − | The pop-up may have a simple text form - select '' 'Text' '' and then format the text.<br/> | + | The pop-up may have a simple text form - select '' 'Text' '' and then format the text.<br /> |
See the visualization [[media:CAP_29.png|'''here''']]. | See the visualization [[media:CAP_29.png|'''here''']]. | ||
|} | |} | ||
| Line 224: | Line 237: | ||
|} | |} | ||
{| | {| | ||
| − | |style="padding: 0px 0px 15px 15px;"|Provide ready code snippet that you want to insert into the pop-up content.<br/> | + | |style="padding: 0px 0px 15px 15px;"|Provide ready code snippet that you want to insert into the pop-up content.<br /> |
See the visualization [[media:CAP_28.png|'''here''']]. | See the visualization [[media:CAP_28.png|'''here''']]. | ||
|} | |} | ||
| Line 231: | Line 244: | ||
|} | |} | ||
{| | {| | ||
| − | |style="padding: 0px 0px 15px 15px;"|Upload an '' 'Image'. ''<br/> | + | |style="padding: 0px 0px 15px 15px;"|Upload an '' 'Image'. ''<br /> |
See the visualization [[media:CAP_31.png|'''here''']]. | See the visualization [[media:CAP_31.png|'''here''']]. | ||
|} | |} | ||
| Line 240: | Line 253: | ||
====Restrictions==== | ====Restrictions==== | ||
{| | {| | ||
| − | |style="padding: 0px 0px | + | |style="padding: 0px 0px 15px 15px;"|Restrictions - this is the place where a pop-up is conditioned. Please set up the rules according to which the pop-up will be displayed to clients.<br />Only one restriction rule per group is required to show pop-up. If you choose restrictions from multiple conditions then at least one rule in each group must be fulfilled to show pup-up. |
| + | |} | ||
| + | {| | ||
| + | |style="padding: 0px 0px 15px 15px;"| | ||
| + | For example: If you choose three products under '' 'Has Active Product' '' rule then client needs to have only one of active products to see the pop-up. <br /> | ||
| + | But if you choose three products under '' 'Has Active Product' '' rule and three addons under '' 'Has Active Addon' '' rule then client will have to have at least one active product and at least one active addon from selected conditions to see the pop-up. | ||
|} | |} | ||
{| | {| | ||
| Line 247: | Line 265: | ||
*'''Hide''' - if selected, clients will be allowed to close the pop-up permanently, even if it was configured to appear repeatedly. | *'''Hide''' - if selected, clients will be allowed to close the pop-up permanently, even if it was configured to appear repeatedly. | ||
*'''Non-logged In Users''' - if selected, the pop-up will be displayed to all guests and unlogged visitors. | *'''Non-logged In Users''' - if selected, the pop-up will be displayed to all guests and unlogged visitors. | ||
| − | *'''Pages''' - provide here specific wildcards URL of sites where the pop-up should be available from. Use comma to separate them if you plan to add more than one page.<br />''e.g.: '*action=invoices, *action=quotes' etc.''<br/><br/> | + | *'''Pages''' - provide here specific wildcards URL of sites where the pop-up should be available from. Use comma to separate them if you plan to add more than one page.<br />''e.g.: '*action=invoices, *action=quotes' etc.''<br /><br /> |
| − | Conditions:<br/> | + | Conditions:<br /> |
| − | ''Press required text area and available options will appear.''<br/> | + | ''Press required text area and available options will appear.''<br /> |
| − | *'''Languages''' - select languages, the pop-up will be displayed only to clients who use | + | *'''Languages''' - select languages, the pop-up will be displayed only to clients who use one of the chosen languages. |
*'''User Groups''' - point groups, only clients in these groups will see the pop-up. | *'''User Groups''' - point groups, only clients in these groups will see the pop-up. | ||
| − | *'''Has Active Product''' - select products that | + | *'''Has Active Product''' - select any products that have to be active. |
| − | *'''Has Active Product In Group''' - select groups of products that a client has active products in. | + | *'''Has Active Addon''' - select any addons that have to be active. |
| − | *'''Has Active TLDs''' - point TLDs that | + | *'''Has Active Product In Group''' - select any groups of products that a client has active products in. ''Note: At least one product in group is required.'' |
| − | *'''Has Active Product With Server''' - select servers | + | *'''Has Active TLDs''' - point any TLDs that have to be active for client. |
| + | *'''Has No Products''' - select which products client should not have to show pop-up | ||
| + | *'''Has No Addons''' - select which addons client should not have to show pop-up | ||
| + | *'''Has No TLDs''' - select which domains TLD user should not have to show pop-up | ||
| + | *'''Has Active Product With Server''' - select any servers assigned to active products owned by a client. | ||
If any of the above options is left blank, it will not be taken into consideration when creating a final list of clients to see the pop-up. | If any of the above options is left blank, it will not be taken into consideration when creating a final list of clients to see the pop-up. | ||
|} | |} | ||
| Line 271: | Line 293: | ||
====Timing==== | ====Timing==== | ||
{| | {| | ||
| − | |style="padding: 10px 0px 15px 15px;"|In the last section define time period within which the pop-up shall be active - when it will be displayed with the set up previously frequency.<br/> | + | |style="padding: 10px 0px 15px 15px;"|In the last section define time period within which the pop-up shall be active - when it will be displayed with the set up previously frequency.<br /> |
| − | Choose a specific day and | + | Choose a specific day and time to schedule the pop-up activation or select option '' 'Immediately' '' - then the pop-up will be active once you have saved the changes.<br /><br /> |
| − | + | Set up ending date in the same way. Provide specific date when the pop-up will be marked as '' 'Inactive'.''<br /> You may also select '' 'Never' '' option, if you do not want it to be deactivated. | |
|} | |} | ||
{| | {| | ||
| Line 287: | Line 309: | ||
===Pop-ups=== | ===Pop-ups=== | ||
{| | {| | ||
| − | |style="padding: 10px 0px 15px 15px;"|The first and main section of the module is called '' 'Pop-ups'. ''<br/> | + | |style="padding: 10px 0px 15px 15px;"|The first and main section of the module is called '' 'Pop-ups'. ''<br /> |
| − | You will find there all the most important information on existing pop-ups together with any possible action that can be taken on them.<br/>Go through the following section to learn more. | + | You will find there all the most important information on existing pop-ups together with any possible action that can be taken on them.<br />Go through the following section to learn more. |
|} | |} | ||
{| | {| | ||
| Line 297: | Line 319: | ||
{| | {| | ||
|style="padding: 10px 0px 15px 15px;"| | |style="padding: 10px 0px 15px 15px;"| | ||
| − | 1. Preview the pop-up - a sample page with a visible pop-up will appear. This is the final look a client will receive.<br/> | + | 1. Preview the pop-up - a sample page with a visible pop-up will appear. This is the final look a client will receive.<br /> |
| − | 2. Edit the pop-up - change the restrictions, timing or style.<br/> | + | 2. Edit the pop-up - change the restrictions, timing or style.<br /> |
| − | 3. Move the pop-up to archive, you will be able to restore it at any time in the future.<br/> | + | 3. Set the pop-up as inactive, it will be moved to '' 'Inactive' '' tab.<br /> |
| − | + | 4. Move the pop-up to archive, you will be able to restore it at any time in the future.<br /> | |
| + | 5. Delete the pop-up. You must be completely sure, you will not be able to have it back in any way.<br /> | ||
| + | 6. You may also perform bulk actions on multiple selected entries simultaneously. | ||
|} | |} | ||
{| | {| | ||
| Line 317: | Line 341: | ||
|} | |} | ||
{| | {| | ||
| − | |style="padding: 0px 0px 15px 15px;"|Inactive pop-ups are those for which the end date has been | + | |style="padding: 0px 0px 15px 15px;"|Inactive pop-ups are those for which the end date has been exceeded and they are no longer displayed to clients.<br /> |
Just like in case of active pop-ups all actions are available. You may edit it to change the end date and at the same time activate it again. | Just like in case of active pop-ups all actions are available. You may edit it to change the end date and at the same time activate it again. | ||
|} | |} | ||
| Line 333: | Line 357: | ||
==Styles== | ==Styles== | ||
{| | {| | ||
| − | |style="padding: 10px 0px 15px 15px;"|'' 'Styles' '' section contains a list of all predefined styles, that position your pop-ups.<br/>There are | + | |style="padding: 10px 0px 15px 15px;"|'' 'Styles' '' section contains a list of all predefined styles, that position your pop-ups.<br />There are 26 types of different styles, that vary from one another with up or down position, right/left/center, overlay option etc. |
|} | |} | ||
{| | {| | ||
| Line 339: | Line 363: | ||
|} | |} | ||
{| | {| | ||
| − | |style="padding: 0px 0px 15px 15px;"|If | + | |style="padding: 0px 0px 15px 15px;"|Before you start using any of the styles you can see their preview in the client area.<br /> |
| + | See the visualization [[media:CAP_24_1.png|'''here''']]. | ||
| + | |} | ||
| + | {| | ||
| + | |style="padding: 0px 0px 20px 25px;"|[[File:CAP_24_2.png]] | ||
| + | |} | ||
| + | {| | ||
| + | |style="padding: 0px 0px 15px 15px;"|If none of the predefined styles perfectly matches your needs, you may edit the styles..<br /> | ||
Press the icon as marked on the screen. | Press the icon as marked on the screen. | ||
|} | |} | ||
| Line 346: | Line 377: | ||
|} | |} | ||
{| | {| | ||
| − | |style="padding: 0px 0px 20px 15px;"|You are moved to the style edition page with CSS and HTML details. You may edit them | + | |style="padding: 0px 0px 20px 15px;"|You are moved to the style edition page with CSS and HTML details. You may edit them if you need to adjust the style to your preferences. |
|} | |} | ||
{| | {| | ||
| Line 353: | Line 384: | ||
===New Style=== | ===New Style=== | ||
{| | {| | ||
| − | |style="padding: 10px 0px 15px 15px;"|In case the predefined styles are not sufficient and you do not want to lose any by editing its content, you may always add a new style.<br/>Press the button as on the screen to do so. | + | |style="padding: 10px 0px 15px 15px;"|In case the predefined styles are not sufficient and you do not want to lose any by editing its content, you may always add a new style.<br />Press the button as on the screen to do so. |
|} | |} | ||
{| | {| | ||
| Line 359: | Line 390: | ||
|} | |} | ||
{| | {| | ||
| − | |style="padding: 0px 0px 15px 15px;"|Provide your customized content or copy and modify a predefined style content.<br/> | + | |style="padding: 0px 0px 15px 15px;"|Provide your customized content or copy and modify a predefined style content.<br /> |
| − | + | Subsequently save the changes. | |
|} | |} | ||
{| | {| | ||
| Line 376: | Line 407: | ||
==Visualizations== | ==Visualizations== | ||
{| | {| | ||
| − | |style="padding: 10px 0px 5px 15px;"|Now, let's take a look what Client Area Popup For WHMCS may give you in practice.<br/> Underneath, you will find several examples of pup-ups, each in a different style and of a different type. | + | |style="padding: 10px 0px 5px 15px;"|Now, let's take a look what Client Area Popup For WHMCS may give you in practice.<br /> Underneath, you will find several examples of pup-ups, each in a different style and of a different type. |
|} | |} | ||
{| | {| | ||
| − | |style="padding: 0px 0px 15px 15px;"|Type: '' 'Text' ''<br/> Style: '' 'left_up' '' | + | |style="padding: 0px 0px 15px 15px;"|Type: '' 'Text' ''<br /> Style: '' 'left_up' '' |
|} | |} | ||
{| | {| | ||
| Line 385: | Line 416: | ||
|} | |} | ||
{| | {| | ||
| − | |style="padding: 0px 0px 15px 15px;"|Type: '' 'Text' ''<br/> Style: '' 'center_overlay' ''<br/> | + | |style="padding: 0px 0px 15px 15px;"|Type: '' 'Text' ''<br /> Style: '' 'center_overlay' ''<br /> |
'' 'Overlay' means there is a gray background behind the pop-up text or image.'' | '' 'Overlay' means there is a gray background behind the pop-up text or image.'' | ||
|} | |} | ||
| Line 392: | Line 423: | ||
|} | |} | ||
{| | {| | ||
| − | |style="padding: 0px 0px 15px 15px;"|Type: '' 'Image',''<br/> Style: '' 'center' '' | + | |style="padding: 0px 0px 15px 15px;"|Type: '' 'Image',''<br /> Style: '' 'center' '' |
|} | |} | ||
{| | {| | ||
| Line 398: | Line 429: | ||
|} | |} | ||
{| | {| | ||
| − | |style="padding: 0px 0px 15px 15px;"|Type: '' 'Image',''<br/> Style: '' 'right_overlay_up' '' | + | |style="padding: 0px 0px 15px 15px;"|Type: '' 'Image',''<br /> Style: '' 'right_overlay_up' '' |
|} | |} | ||
{| | {| | ||
| Line 409: | Line 440: | ||
|} | |} | ||
{| | {| | ||
| − | |style="padding: 0px 0px 30px 15px;"|2. The module is ad blocker resistant unless | + | |style="padding: 0px 0px 30px 15px;"|2. The module is ad blocker resistant unless your clients block the popup class deliberately in the tool. |
|} | |} | ||
| Line 417: | Line 448: | ||
|} | |} | ||
{| | {| | ||
| − | |style="padding: 0px 0px 10px 15px;"|2. If you encounter an error like on the below screen, please make sure you have successfully completed [http://www.docs.modulesgarden.com/Client_Area_Popup_For_WHMCS#Installation step | + | |style="padding: 0px 0px 10px 15px;"|2. If you encounter an error like on the below screen, please make sure you have successfully completed [http://www.docs.modulesgarden.com/Client_Area_Popup_For_WHMCS#Installation step 6] of the installation instructions. |
|} | |} | ||
{| | {| | ||
| Line 423: | Line 454: | ||
|} | |} | ||
{| | {| | ||
| − | |style="padding: 0px 0px 30px 15px;"|3. If you have problems with your license, please make sure that the content of the file is correct.<br/> | + | |style="padding: 0px 0px 30px 15px;"|3. If you have problems with your license, please make sure that the content of the file is correct.<br /> |
Please note that for '''Client Area Popup For WHMCS V1.0.1''' and later the license key begins with: | Please note that for '''Client Area Popup For WHMCS V1.0.1''' and later the license key begins with: | ||
$client_area_popup_licensekey="ModulesGarden_ClientAreaPopup_W_XXXXXXXXXXXX"; | $client_area_popup_licensekey="ModulesGarden_ClientAreaPopup_W_XXXXXXXXXXXX"; | ||
Revision as of 16:39, 5 July 2017
Contents |
About Client Area Popup For WHMCS
| Client Area Popup For WHMCS is a module that lets you create fully customized pop-ups that will be visible to your clients in their panel. Prepare a ready pop-up in a form of an image, raw or HTML text to pass a message directly to your clients. Design it using predefined styles, which can be always altered and upgraded to implement your idea perfectly. |
- Admin Area Features:
| ✔ Create Pop-ups Using Predefined Styles |
| ✔ Preview Pop-up With Single Click |
| ✔ Archive Pop-ups For Later Use |
| ✔ View Pop-up Restrictions |
| ✔ View Number of Pop-up Displays |
| ✔ Create Styles To Be Used By Pop-up |
| ✔ Preview Style With Single Click |
- Client Area Features:
| ✔ View Pop-up If Restrictions Are Met |
| ✔ Close Pop-up Permanently |
- Pop-up Features:
| ✔ Define Pop-up Restrictions: |
| ✔ Display Frequency - How Often Pop-up Should Be Displayed |
| ✔ Hide - Client Can Close Pop-up Permanently |
| ✔ Pages - Define Pages Where Pop-up Is Displayed |
| ✔ Required Languages |
| ✔ Required User Groups |
| ✔ Required Active Products |
| ✔ Required Active Products In Groups |
| ✔ Required Active Products With Servers |
| ✔ Required Active Addons |
| ✔ Required Active Domains Using TLDs |
| ✔ Lack Of Chosen Products |
| ✔ Lack Of Chosen Addons |
| ✔ Lack Of Domains Using TLDs |
| ✔ Define Time Frames For Pop-up To Be Shown |
| ✔ Define Pop-up Size |
| ✔ Assign Style To Pop-up |
| ✔ Choose Type And Provide Pop-up Content: |
| ✔ Raw Text |
| ✔ HTML |
| ✔ Image |
- General Info:
| ✔ Supports Default And Custom WHMCS Templates |
| ✔ Multi-Language Support |
| ✔ Supports PHP 5.4 Up To PHP 7 |
| ✔ Supports WHMCS V6 and V7 |
Installation
| This tutorial will show you how to successfully install and configure Client Area Popup For WHMCS. We will guide you step by step through the whole installation and configuration process. |
| 1. Log in to your client area and download the module. |

|
| 2. In the downloaded file you will find two packages that support different PHP versions. As presented on the screen below, the first one is dedicated to PHP 7, while the second one is aimed at PHP 5.4 up to PHP 5.6. It does not apply to open source versions. Note: You can check current PHP version in your WHMCS. To do so proceed to 'Utilities' → 'System' → 'PHP Info'. |

|
| 3. Extract the downloaded file and choose the one with the right PHP version. Upload and extract the PHP file into the main WHMCS directory. The content of PHP version files should look like this. |
| 4. When you install Client Area Popup For WHMCS for the first time you have to rename 'license_RENAME.php' file. File is located in 'modules/addons/PopupModule/license_RENAME.php'. Rename it from 'license_RENAME.php' to 'license.php'. |

|
| 5. In order to configure your license key, you have to edit the previously renamed 'license.php' file. Enter your license key between quotation marks as presented on the following screen. You can find your license key in your client area → 'My Products'. |

|
| 6. Set permissions to file: 'modules/addons/PopupModule/templates/clientarea/assets/popup' to '0777'. |
| 7. Now you have to activate the module in your WHMCS system. Log in to your WHMCS admin area. Go to 'Setup' → 'Addon Modules'. Afterwards, find 'Client Area Popup' and press 'Activate' button. |

|
| 8. In the next step you need to permit access to this module. To do so, click on 'Configure' button, tick 'Full Administrator' and press 'Save Changes'. |

|
| 9. You have just successfully installed Client Area Popup For WHMCS! You can access your module under 'Addons' → 'Client Area Popup'. |

|
Configuration and Management
| Client Area Popup For WHMCS is a module which allows you to notify your clients by showing them customized pop-ups directly in their panel. Below, you will find instructions on how to draft and customize such pop-ups. |
Configuration
| The module does not require advanced configuration. That is why, we will immediately move to the most crucial part, which is creating a pop-up. |
Create Pop-up
| To add a new pop-up simply press an appropriate button. |

|
General
| Start with naming the pop-up. Note: the title will not be displayed in any way on the final pop-up. |

|
| If you added any pop-ups in the past, you may copy their settings to the newly created one to save time. Finally, select the initial status:
|

|
Look And Feel
The next part of creating a pop-up process concerns its interface, layout and general design.
Auto - it automatically adjusts to the content.
Select style from the list of available and previously defined styles. |

|
The pop-up may have a simple text form - select 'Text' and then format the text. |

|
| Provide ready code snippet that you want to insert into the pop-up content. See the visualization here. |

|
| Upload an 'Image'. See the visualization here. |

|
Restrictions
| Restrictions - this is the place where a pop-up is conditioned. Please set up the rules according to which the pop-up will be displayed to clients. Only one restriction rule per group is required to show pop-up. If you choose restrictions from multiple conditions then at least one rule in each group must be fulfilled to show pup-up. |
|
For example: If you choose three products under 'Has Active Product' rule then client needs to have only one of active products to see the pop-up. |
General options:
Conditions:
If any of the above options is left blank, it will not be taken into consideration when creating a final list of clients to see the pop-up. |

|
| You will also find there an explanation of the checking process: |

|
Timing
| In the last section define time period within which the pop-up shall be active - when it will be displayed with the set up previously frequency. Choose a specific day and time to schedule the pop-up activation or select option 'Immediately' - then the pop-up will be active once you have saved the changes. |

|
| Press 'Save' button once you have finished the configuration. |

|
Pop-ups
| The first and main section of the module is called 'Pop-ups'. You will find there all the most important information on existing pop-ups together with any possible action that can be taken on them. |

|
Actions
|
1. Preview the pop-up - a sample page with a visible pop-up will appear. This is the final look a client will receive. |

|
Types
There are three types of pop-ups in the system:
|

|
| Inactive pop-ups are those for which the end date has been exceeded and they are no longer displayed to clients. Just like in case of active pop-ups all actions are available. You may edit it to change the end date and at the same time activate it again. |

|
| Pop-ups in archive are moved there manually, these can be the previously active or inactive pop-ups (use action button to move entry to 'Archive').
You may restore archived pop-ups any time and, depending on the end date of the resorted pop-up, it will be moved either to 'Active' or 'Inactive' group. |

|
Styles
| 'Styles' section contains a list of all predefined styles, that position your pop-ups. There are 26 types of different styles, that vary from one another with up or down position, right/left/center, overlay option etc. |

|
| Before you start using any of the styles you can see their preview in the client area. See the visualization here. |

|
| If none of the predefined styles perfectly matches your needs, you may edit the styles.. Press the icon as marked on the screen. |

|
| You are moved to the style edition page with CSS and HTML details. You may edit them if you need to adjust the style to your preferences. |

|
New Style
| In case the predefined styles are not sufficient and you do not want to lose any by editing its content, you may always add a new style. Press the button as on the screen to do so. |

|
| Provide your customized content or copy and modify a predefined style content. Subsequently save the changes. |

|
Documentation
| The last position in your navigation menu, when pressed, redirects to the article you are currently reading. |

|
Visualizations
| Now, let's take a look what Client Area Popup For WHMCS may give you in practice. Underneath, you will find several examples of pup-ups, each in a different style and of a different type. |
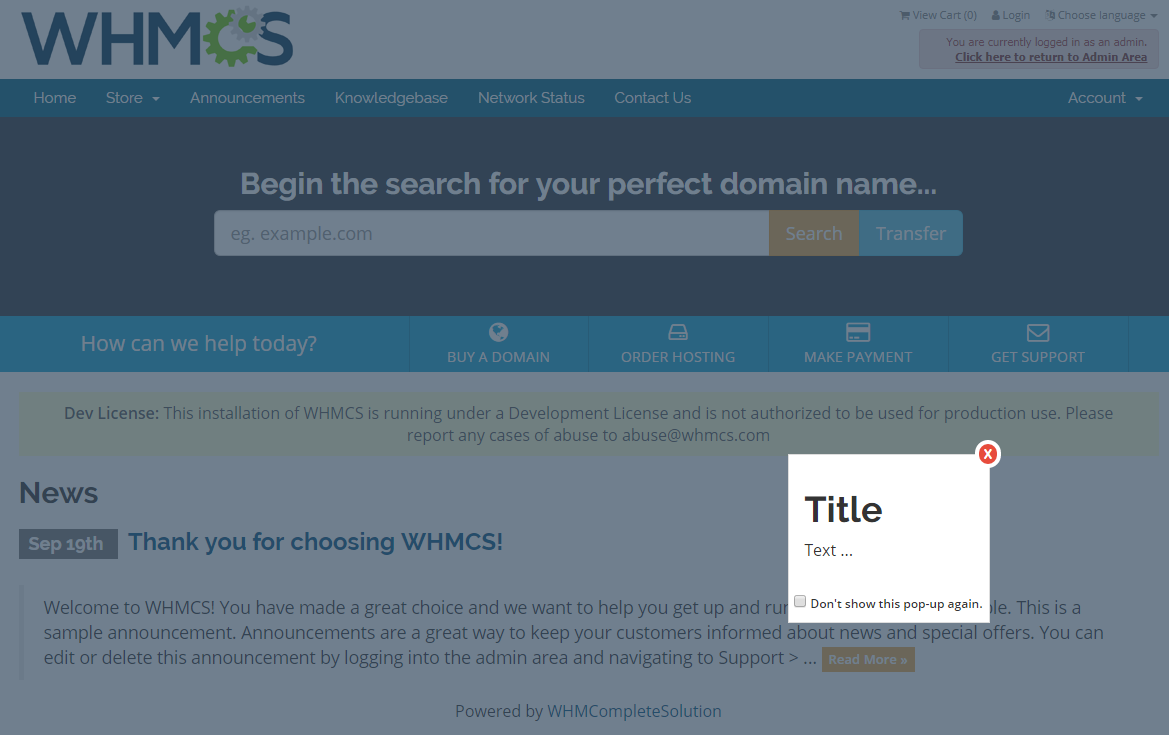
| Type: 'Text' Style: 'left_up' |

|
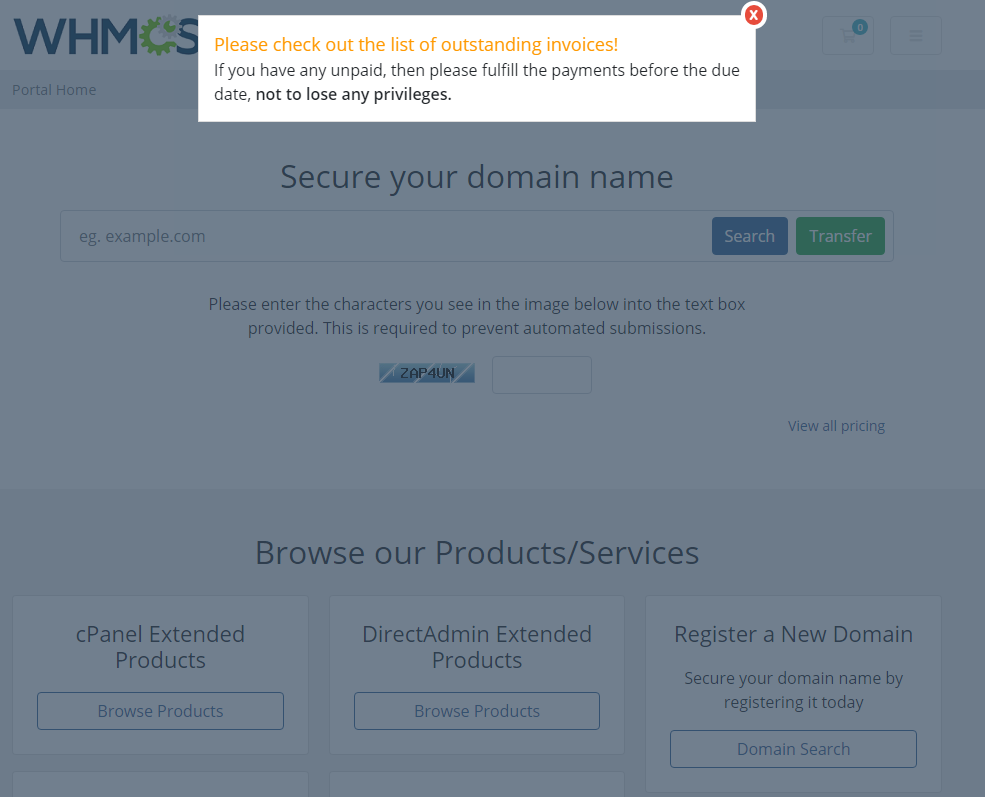
| Type: 'Text' Style: 'center_overlay' 'Overlay' means there is a gray background behind the pop-up text or image. |

|
| Type: 'Image', Style: 'center' |

|
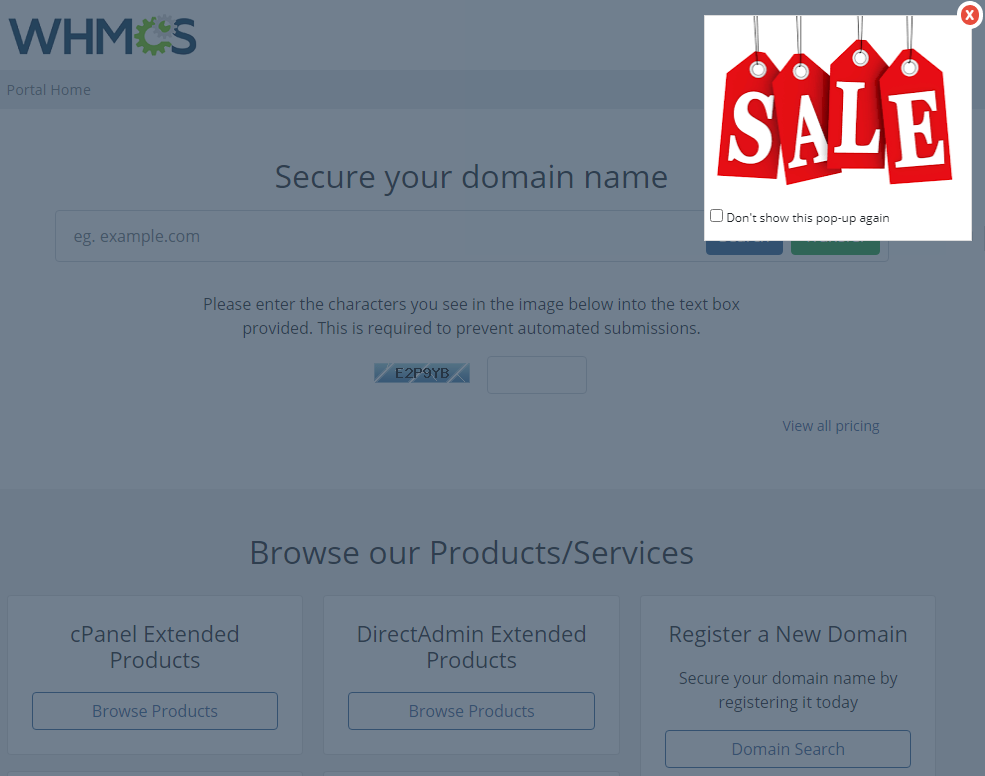
| Type: 'Image', Style: 'right_overlay_up' |

|
Tips
| 1. For your comfort, 'HTML' type of pop-up content supports also 'JavaScript' to let you provide your preferable content. |
| 2. The module is ad blocker resistant unless your clients block the popup class deliberately in the tool. |
Common Problems
| 1. When you have problems with connection, check whether your SELinux or firewall does not block ports. |
| 2. If you encounter an error like on the below screen, please make sure you have successfully completed step 6 of the installation instructions. |

|
| 3. If you have problems with your license, please make sure that the content of the file is correct. Please note that for Client Area Popup For WHMCS V1.0.1 and later the license key begins with: $client_area_popup_licensekey="ModulesGarden_ClientAreaPopup_W_XXXXXXXXXXXX"; Not as it was for the previous version: $popup_module_licensekey="ModulesGarden_ClientAreaPopup_W_XXXXXXXXXXXX"; |