Client Area Designer For WHMCS
(→Panels) |
|||
| Line 188: | Line 188: | ||
===Panels=== | ===Panels=== | ||
{| | {| | ||
| − | |style="padding: 10px 0px | + | |style="padding: 10px 0px 30px 15px;"|Under '' 'Panels' '' tab you will find three sections dedicated to the visibility of different types of panels in your client area. |
*Navbars - Manage positions available on the navigation bar in your client area. Additionally, define requirements for element to be shown. | *Navbars - Manage positions available on the navigation bar in your client area. Additionally, define requirements for element to be shown. | ||
*Sidebars - Manage panels available on the left sidebar in your client area. Additionally, define requirements for panels to be shown or modify output of the default panels. | *Sidebars - Manage panels available on the left sidebar in your client area. Additionally, define requirements for panels to be shown or modify output of the default panels. | ||
| − | *Homepage Widgets - Homepage Widgets can be viewed and modified here. | + | *Homepage Widgets - Homepage Widgets can be viewed and modified here. |
| − | + | ||
| − | + | ||
| − | + | ||
|} | |} | ||
====Navbars==== | ====Navbars==== | ||
| Line 202: | Line 199: | ||
|} | |} | ||
{| | {| | ||
| − | |style="padding: 0px 0px 20px 25px;"|[[File: | + | |style="padding: 0px 0px 20px 25px;"|[[File:CAD_8.png]] |
|} | |} | ||
{| | {| | ||
| − | |style="padding: 0px 0px 20px 15px;"|Those are the below navbar panels visible in client area. | + | |style="padding: 0px 0px 20px 15px;"|Those are the below navbar panels visible in the client area. |
|} | |} | ||
{| | {| | ||
| − | |style="padding: 0px 0px 20px 25px;"|[[File: | + | |style="padding: 0px 0px 20px 25px;"|[[File:CAD_9.png]] |
|} | |} | ||
{| | {| | ||
|style="padding: 10px 0px 20px 15px;"|Use action buttons to: | |style="padding: 10px 0px 20px 15px;"|Use action buttons to: | ||
*edit the section | *edit the section | ||
| − | *delete | + | *delete '''(only custom elements)''' |
| − | *view | + | *view child elements |
|} | |} | ||
{| | {| | ||
|style="padding: 0px 0px 20px 25px;"|[[File:CAD_9.png]] | |style="padding: 0px 0px 20px 25px;"|[[File:CAD_9.png]] | ||
|} | |} | ||
| − | ===== | + | =====Edit Element===== |
{| | {| | ||
| − | |style="padding: 0px 0px 15px 15px;"|You may add a completely new parent element either on left or right side.<br/>Press '' 'Add'.'' | + | |style="padding: 10px 0px 15px 15px;"|When you are editing an existing parent element, you may: |
| + | *provide a new display name | ||
| + | *change URI - location it is placed in | ||
| + | *add icon | ||
| + | *hide the element | ||
| + | |} | ||
| + | {| | ||
| + | |style="padding: 0px 0px 30px 25px;"|[[File:CAD_10.png]] | ||
| + | |} | ||
| + | {| | ||
| + | |style="padding: 0px 0px 15px 15px;"|You may also provide some display rules, only clients who fulfill the rules will see the element.<br/> | ||
| + | If you leave this part empty, the element will be visible for all clients without limitations. | ||
| + | *select domains a client must own | ||
| + | *point product that must be owned | ||
| + | *location a client must enter<br/> | ||
| + | Do not forget to save the changes when ready. | ||
| + | |} | ||
| + | {| | ||
| + | |style="padding: 0px 0px 30px 25px;"|[[File:CAD_10.png]] | ||
| + | |} | ||
| + | =====New Parent Elements===== | ||
| + | {| | ||
| + | |style="padding: 10px 0px 15px 15px;"|You may add a completely new parent element either on left or right side.<br/>Press '' 'Add'.'' | ||
|} | |} | ||
{| | {| | ||
| Line 229: | Line 248: | ||
|style="padding: 0px 0px 15px 15px;"|Then you will have to fill out all the general info, content and display rules.<br/> | |style="padding: 0px 0px 15px 15px;"|Then you will have to fill out all the general info, content and display rules.<br/> | ||
Start with '' 'General'.'' Provide: | Start with '' 'General'.'' Provide: | ||
| − | * | + | *name visible for clients |
| − | + | *unique for the system identifier | |
*URI | *URI | ||
*select icon from available | *select icon from available | ||
| Line 238: | Line 257: | ||
|style="padding: 0px 0px 30px 25px;"|[[File:CAD_10.png]] | |style="padding: 0px 0px 30px 25px;"|[[File:CAD_10.png]] | ||
|} | |} | ||
| − | |||
{| | {| | ||
| − | |style="padding: 0px 0px 15px 15px;"| | + | |style="padding: 0px 0px 15px 15px;"|If you want only some of the clients to see the panel, then set up the '' 'Display Rules'.''<br/> |
| + | Save the changes in the end. | ||
| + | |} | ||
| + | {| | ||
| + | |style="padding: 0px 0px 20px 25px;"|[[File:CAD_10.png]] | ||
| + | |} | ||
| + | {| | ||
| + | |style="padding: 0px 0px 20px 15px;"|This is how our new panel looks like in the client area: | ||
|} | |} | ||
{| | {| | ||
| Line 246: | Line 271: | ||
|} | |} | ||
| + | =====New Child Elements===== | ||
| + | {| | ||
| + | |style="padding: 10px 0px 15px 15px;"|Let's now add one child element to the just created '' 'Test Panel'.'' | ||
| + | |} | ||
| + | {| | ||
| + | |style="padding: 0px 0px 30px 25px;"|[[File:CAD_10.png]] | ||
| + | |} | ||
| + | {| | ||
| + | |style="padding: 0px 0px 15px 15px;"|You have to fill out the same data as in case of parent element:<br/> | ||
| + | *name | ||
| + | *identifier | ||
| + | *URI | ||
| + | *icon | ||
| + | *finally select '' 'Display' '' to make the panel visible | ||
| + | |} | ||
| + | {| | ||
| + | |style="padding: 0px 0px 30px 25px;"|[[File:CAD_10.png]] | ||
| + | |} | ||
| + | {| | ||
| + | |style="padding: 0px 0px 15px 15px;"|If you want only some of the clients to see the panel, then set up the '' 'Display Rules'.''<br/> | ||
| + | Save the changes in the end. | ||
| + | |} | ||
| + | {| | ||
| + | |style="padding: 0px 0px 20px 25px;"|[[File:CAD_10.png]] | ||
| + | |} | ||
{| | {| | ||
| − | |style="padding: 0px 0px | + | |style="padding: 0px 0px 20px 15px;"|This is how our new panel looks like in the client area: |
| − | + | ||
| − | + | ||
|} | |} | ||
{| | {| | ||
Revision as of 10:38, 20 September 2016
Contents |
About Client Area Designer For WHMCS
| Client Area Designer For WHMCS is a module that allows administrators to manage their client area final view. Change the order of displayed elements, add new ones or hide them if you do not want your clients to access them. |
- Module Features:
| ✔ Customize Your Client Area By Modifying: |
| ✔ Navbar Elements |
| ✔ Sidebar Elements |
| ✔ Homepage Widgets |
| ✔ Add Your Own Elements & Widgets |
| ✔ Scan Your Client Area In Search Of Custom Elements & Widgets |
| ✔ View & Modify List Of Known Locations In Your Client Area |
- Navbar Element Features:
| ✔ Define Name |
| ✔ Define URI |
| ✔ Define Icon |
| ✔ Define Display Rules: |
| ✔ Client Owns Domain |
| ✔ Client Owns Product |
| ✔ Client Is In Location |
| ✔ Add Multiple Links To Element |
- Sidebar Element Features:
| ✔ Define Name |
| ✔ Define URI Of 2nd Level Elements Only |
| ✔ Define Icon |
| ✔ Define Display Rules: |
| ✔ Client Owns Domain |
| ✔ Client Owns Product |
| ✔ Client Is In Location |
| ✔ Choose One Feature Per Element: |
| ✔ Add Multiple Links To Element |
| ✔ Define Custom Body & Footer Content - Support HTML, CSS & JavaScript |
- Homepage Widget Features:
| ✔ Define Name |
| ✔ Define URI Of 2nd Level Elements Only |
| ✔ Define Icon |
| ✔ Define Style Color |
| ✔ Define Widget Button |
| ✔ Choose One Feature Per Widget: |
| ✔ Add Multiple Links To Element |
| ✔ Define Custom Body & Footer Content - Support HTML, CSS & JavaScript |
- General Info:
| ✔ Multi-Language Support |
| ✔ Supports WHMCS V6 |
Installation
| This tutorial will show you how to successfully install and configure Client Area Designer For WHMCS. We will guide you step by step through the whole installation and configuration process. |
| 1. Log in to your client area and download Client Area Designer For WHMCS. |

|
| 2. Upload and extract the module into the main WHMCS directory. Files in your WHMCS directory should look like on the following screen. |

|
| 3. When you install Client Area Designer for the first time you have to rename 'license_RENAME.php' file. File is located in 'modules/addons/ClientAreaDesignerModule/license_RENAME.php'. Rename it from 'license_RENAME.php' to 'license.php'. |

|
| 4. In order to configure your license key, you have to edit the previously renamed 'license.php' file. Enter your license key between quotation marks as presented on the following screen. You can find your license key in your client area → 'My Products'. |

|
| 5. Now you have to activate the module in your WHMCS system. Log in to your WHMCS admin area. Go to 'Setup' → 'Addon Modules'. Afterwards, find 'Client Area Designer' and press 'Activate' button. |

|
| 6. In the next step you need to permit access to this module. To do so, click on 'Configure' button, tick 'Full Administrator' and press 'Save Changes'. |

|
| 7. You have just successfully installed Client Area Designer For WHMCS! You can access your module under 'Addons' → 'Client Area Designer'. |

|
Configuration and Management
| Client Area Designer For WHMCS is a module which allows you to adjust the layout of any panels available on your client area as well as add new widgets sections. |
Configuration
| The module does not require highly advanced configuration. That is why, we will immediately move to the most crucial aspect, which is customizing the panels layout. |
Panels
Under 'Panels' tab you will find three sections dedicated to the visibility of different types of panels in your client area.
|
| On the first sight you will see two tables, each related to Primary Navbar Left or Right side. There are already all the predefined sections outlined with their official names and positions. |

|
| Those are the below navbar panels visible in the client area. |

|
Use action buttons to:
|
|
|
Edit Element
When you are editing an existing parent element, you may:
|

|
| You may also provide some display rules, only clients who fulfill the rules will see the element. If you leave this part empty, the element will be visible for all clients without limitations.
Do not forget to save the changes when ready. |
|
|
New Parent Elements
| You may add a completely new parent element either on left or right side. Press 'Add'. |
|
|
| Then you will have to fill out all the general info, content and display rules. Start with 'General'. Provide:
|
|
|
| If you want only some of the clients to see the panel, then set up the 'Display Rules'. Save the changes in the end. |
|
|
| This is how our new panel looks like in the client area: |
|
|
New Child Elements
| Let's now add one child element to the just created 'Test Panel'. |
|
|
You have to fill out the same data as in case of parent element:
|
|
|
| If you want only some of the clients to see the panel, then set up the 'Display Rules'. Save the changes in the end. |
|
|
| This is how our new panel looks like in the client area: |
|
|
Sidebars
The next part of creating a pop-up process concerns its interface, layout and general design.
Auto - it automatically adjusts to the content.
Select style from the list of available and previously defined styles. |

|
The pop-up may have a simple text form - select 'Text' and then format the text. |

|
| Provide ready code snippet that you want to insert into the pop-up content. See the visualization here. |

|
| Upload an 'Image'. See the visualization here. |

|
Homepage Widgets
| Restrictions - this is the place where a pop-up is conditioned. Please set up the rules according to which the pop-up will be displayed to clients. Only clients who meet all the restriction rules will see the pop-up. |
General options:
Conditions:
If any of the above options is left blank, it will not be taken into consideration when creating a final list of clients to see the pop-up. |

|
| You will also find there an explanation of the checking process: |

|
Locations
| Any known location found in your client area is listed here, these are used to define display rules of navbar and sidebar elements as well as homepage widgets. |

|
| Press button with pencil icon next to location you are interested in to edit it. |

|
| There you can edit the name of existing location and its URI. |
|
|
New Location
| You may also add new locations, press 'Add New' button to begin. |
|
|
| Provide location name and URI. |
|
|
Scanner
| The first and main section of the module is called 'Pop-ups'. You will find there all the most important information on existing pop-ups together with any possible action that can be taken on them. |

|
Documentation
| The last position in your navigation menu, when pressed, redirects to the article you are currently reading. |

|
Visualizations
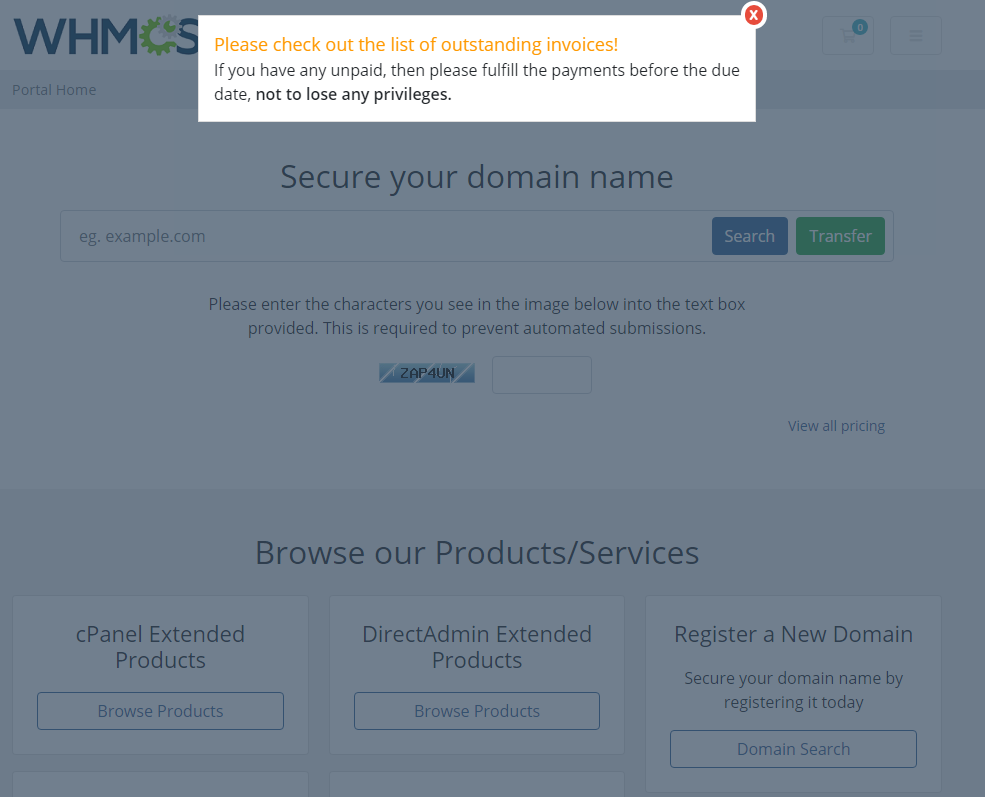
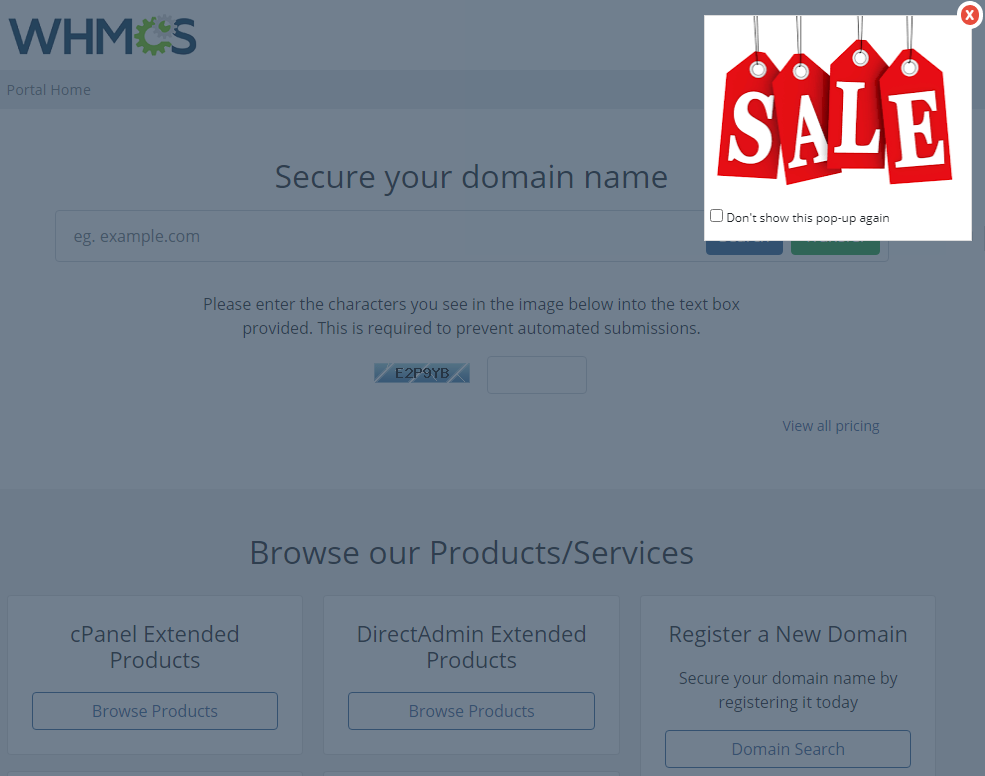
| Now, let's take a look what Client Area Designer For WHMCS may give you in practice. Underneath, you will find several examples of pup-ups, each in a different style and of a different type. |
| Type: 'Text' Style: 'left_up' |

|
| Type: 'Text' Style: 'center_overlay' 'Overlay' means there is a gray background behind the pop-up text or image. |

|
| Type: 'Image', Style: 'center' |

|
| Type: 'Image', Style: 'right_overlay_up' |

|
Tips
| 1. For your comfort, 'HTML' type of pop-up content supports also 'JavaScript' to let you provide your preferable content. |
Common Problems
| 1. When you have problems with connection, check whether your SELinux or firewall does not block ports. |