CPanel Extended For WHMCS
(→About cPanel Extended For WHMCS) |
(→Update Instructions) |
||
| Line 1,671: | Line 1,671: | ||
# your_whmcs/modules/addons/CpanelExtended/ | # your_whmcs/modules/addons/CpanelExtended/ | ||
# your_whmcs/modules/servers/cpanelExtended/ | # your_whmcs/modules/servers/cpanelExtended/ | ||
| − | |||
| − | |||
| − | |||
| − | |||
|} | |} | ||
{| | {| | ||
| − | |style="padding: 0px 0px 30px 15px;"|2. When | + | |style="padding: 0px 0px 30px 15px;"|2. When updating from version '''3.14 to 3.15,''' you have to manually delete the following files from the '''Templates''' folder at: <br/> |
''yourWHMCS/modules/servers/cpanelExtended/app/UI/WordPressToolkit/Templates/pages'' | ''yourWHMCS/modules/servers/cpanelExtended/app/UI/WordPressToolkit/Templates/pages'' | ||
| Line 1,689: | Line 1,685: | ||
* '''wordPressMaintenanceMain.tpl''' | * '''wordPressMaintenanceMain.tpl''' | ||
* '''wordPressSubEdit.tpl''' | * '''wordPressSubEdit.tpl''' | ||
| + | |} | ||
| + | ==Upgrade Guide== | ||
| + | {| | ||
| + | |style="padding: 10px 0px 30px 15px;"|Seeking a solution that offers greater flexibility, customization tailored to your precise needs, and unrestricted availability?<br/> There is an option that not only proves to be cost-effective in the long run but also includes prioritized support services, making it a truly valuable investment.<br/> | ||
| + | |||
| + | Opt for the [https://www.modulesgarden.com/products/whmcs/cpanel-extended#open-source-version Open Source version] of your CPanel Extended For WHMCS module to unlock these benefits.<br/> Simply click on either the '''Get Source Code''' or '''Upgrade To Lifetime''' button found on the product's page in our client area to complete the one-step upgrade process, with a '''dedicated discount''' already applied.<br/> | ||
| + | |||
| + | Follow a [https://www.docs.modulesgarden.com/How_To_Upgrade_WHMCS_Module comprehensive guide] covering the transition process, the advantages it brings, and step-by-step instructions on what to do next after the order has been successfully finalized. | ||
|} | |} | ||
Revision as of 09:44, 10 April 2024
About cPanel Extended For WHMCS
| cPanel Extended For WHMCS allows you to automate accounts provisioning and lets your clients manage their web hosting accounts in the WHMCS client area. The module authorizes your customers to not only manage FTP accounts, domains, databases or backups but also install and manage various web applications. |
- Admin Area Features:
| ✔ Create/Suspend/Unsuspend/Terminate Account |
| ✔ Change Package And Account Password |
| ✔ Log In To Each cPanel Account On Click |
| ✔ Log In To WHM Panel On Click |
| ✔ Automatically Unban Client IP Address Upon Logging In |
| ✔ Configure Account Initial Settings And Resource Limits |
| ✔ Configure Email Accounts Initial Settings And Resource Limits |
| ✔ Configure Client Area Features And Template Per Product |
| ✔ Enable And Configure Application Auto Installer To Use Per Product - Softaculous Or Installatron |
| ✔ View All cPanel And cPanel Extended Products And Servers In One Place |
| ✔ Define CloudLinux Configuration Per Product: |
| ✔ Operations Per Second |
| ✔ PHP Version |
| ✔ Resource Limits |
| ✔ Virtual Memory |
- Client Area Features:
| ✔ Remote Access And Management Of: |
| ✔ Addon Domains |
| ✔ Applications And Their Backups |
| ✔ Autoresponders |
| ✔ Backups - Manual And Automatic |
| ✔ Cron Jobs |
| ✔ Disk Usage |
| ✔ DNS Zone Editor |
| ✔ Domain Aliases |
| ✔ Domain Redirects |
| ✔ Email Accounts |
| ✔ Email Deliverability |
| ✔ Email Forwarders |
| ✔ Files Manager |
| ✔ FTP Accounts |
| ✔ Git Version Control |
| ✔ IP Blocker |
| ✔ JetBackup 4 |
| ✔ Mailing Lists |
| ✔ Metrics: Latest Visitors, Webalizer, Analog Stats, AWStats |
| ✔ ModSecurity |
| ✔ MX Entries |
| ✔ MySQL Databases |
| ✔ PHP Version |
| ✔ PostgreSQL Databases |
| ✔ Remote MySQL |
| ✔ Subdomains |
| ✔ SSL/TLS Management |
| ✔ SSH Access |
| ✔ Unban IP Addresses |
| ✔ User Manager |
| ✔ WordPress Manager - Separate Module Required |
| ✔ WordPress Toolkit |
| ✔ One Click Login To: |
| ✔ cPanel |
| ✔ File Manager |
| ✔ phpMyAdmin |
| ✔ RVSiteBuilder |
| ✔ Webmail |
| ✔ WP Toolkit |
| ✔ Change Account Password |
| ✔ Perform Bulk Actions |
- Application Auto Installer Features:
| ✔ Ordering Process: |
| ✔ Auto Install Chosen Application After Account Creation |
| ✔ Auto Install Application Chosen By Client During Order - With Configurable Options |
| ✔ Allow Custom Settings Of Auto Installed Application - With Custom Fields |
| ✔ Client Area: |
| ✔ Install New Applications With Softaculous Or Installatron |
| ✔ View And Manage Installed Applications |
| ✔ Create Clones Of Installed Applications - Softaculous Auto Installer |
| ✔ Create And Push To Live Staging Instances Of Installed Applications - Softaculous Auto Installer |
| ✔ Backup Installed Applications |
| ✔ Perform Auto Backups On Application Updates By Softaculous Or Installatron |
| ✔ View And Manage Created Backups |
| ✔ Restore Applications From Backups |
| ✔ Delete Applications Along With Their Backups |
- General Info:
| ✔ Supports CloudLinux on WHM |
| ✔ Works With Root And Reseller Account (Single Features Require Root Access) |
| ✔ Utilizes Ajax Loaded Pages - Similar To Those From cPanel |
| ✔ Integrated With Advanced Billing For WHMCS - Actual Server Resource Usage Billing |
| ✔ Integrated With DNS Manager For WHMCS - Supports cPanel & cPanel DNSOnly |
| ✔ Integrated With IP Manager For WHMCS - Complete Control And Easy Assignment Of IP Subnets |
| ✔ Integrated With Server Allocator For WHMCS - Automatic Assignment Of Most Suitable Servers To Products |
| ✔ Integrated With WordPress Manager For WHMCS - Remote Installation And Management Of WordPress Instances |
| ✔ Fully Integrated With Lagom WHMCS Client Theme |
| ✔ Multi-Language Support |
| ✔ Supports PHP 8.1 Back To PHP 7.4 |
| ✔ Supports WHMCS Server Sync Tool |
| ✔ Supports WHMCS Themes "Six" And "Twenty-One" |
| ✔ Supports WHMCS V8.8 Back To WHMCS V8.6 |
| ✔ Requires ionCube Loader V12 Or Later |
| ✔ Easy Module Upgrade To Open Source Version |
Installation and Configuration
| Read the below instructions to learn how to install and then configure cPanel Extended For WHMCS properly. We will guide you step by step through all installation procedures. |
Installation
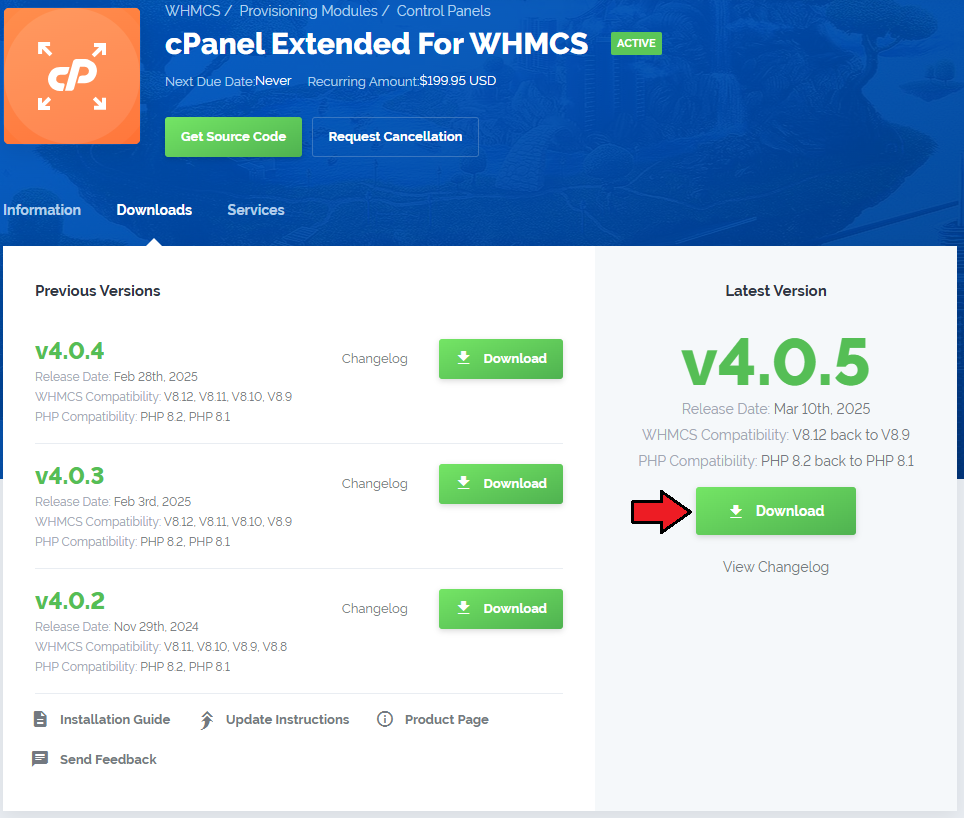
| 1. Log in to our client area and download the module. |
|
| 2. In the downloaded file you might find one or two packages that support different PHP versions. In the most recent versions of the module, you will find only one package that supports PHP 7.2 and later. |
| Previous updates of the module may contain two packages dedicated to various PHP versions. The first one that supports PHP 5.6 up to PHP 7.1, and the second one addressed to PHP 7.2 up to PHP 7.4. |

|
| Note: You can check the current PHP version in your WHMCS. To do so, proceed to 'Utilities' → 'System' → 'PHP Info'. |
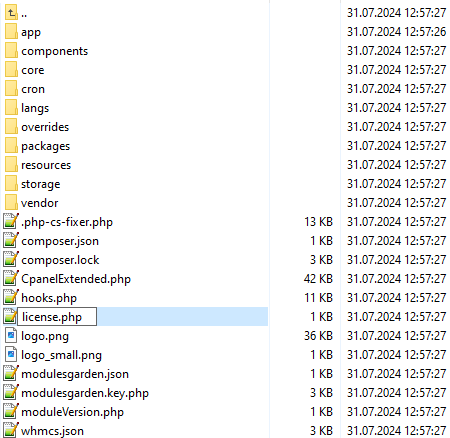
| 3. Extract the package and upload its content into the main WHMCS directory.
The content of the package to upload should look like this. |
| 4. When you install cPanel Extended For WHMCS for the first time, you have to rename the 'license_RENAME.php' file. The file is located in 'modules/servers/cpanelExtended/license_RENAME.php' . Rename it from 'license_RENAME.php' to 'license.php' . |
|
| 5. In order to configure your license key, you have to edit the previously renamed 'license.php' file. Enter your license key between the quotation marks as presented on the following screen. You can find your license key in our client area → 'My Products' . |

|
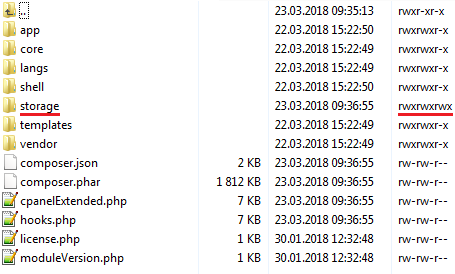
| 6. In the next step, set up the 'storage' folder as recursively writable. This folder is available at two locations:
|
|
| If you are updating your module from version 3.14 to 3.15, you have to perform additional steps described in the Update Instructions. |
Activation of Addon
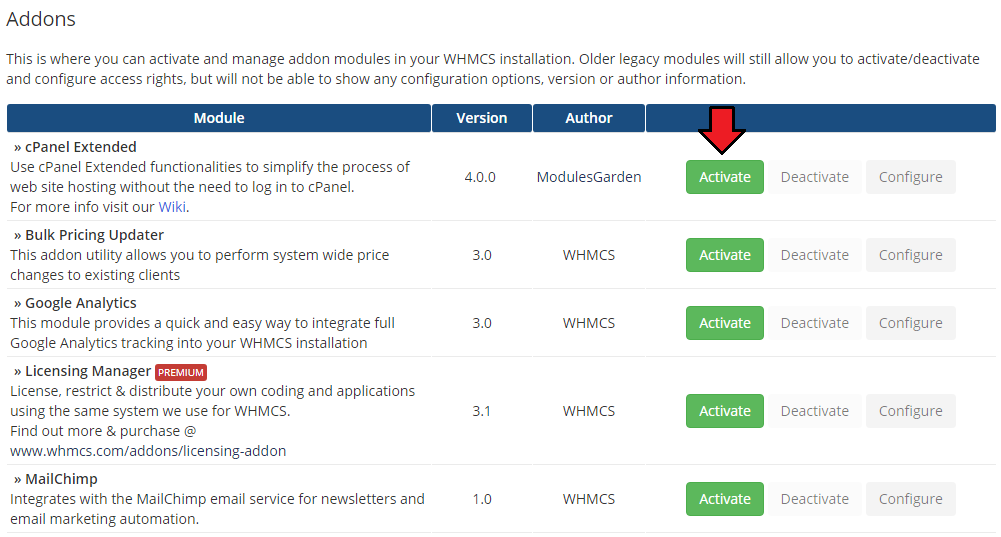
| 7. Now you have to activate the module in your WHMCS system. Log in to your WHMCS admin area. Click 'Setup' and find 'Addon Modules'. |
|
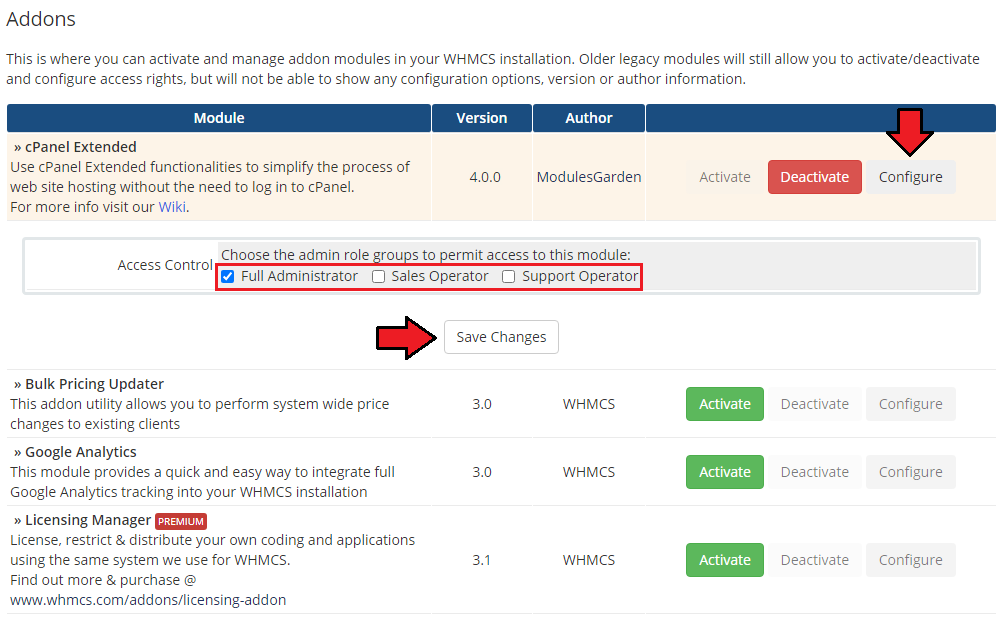
| 8. In the next step you need to permit access to this module. To do so, click on the 'Configure' button, tick the desired admin roles and press 'Save Changes'. |
|
| 9. cPanel Extended For WHMCS has been successfully installed! Access the addon under 'Addons' → 'cPanel Extended Center'. |
Configuration of Server
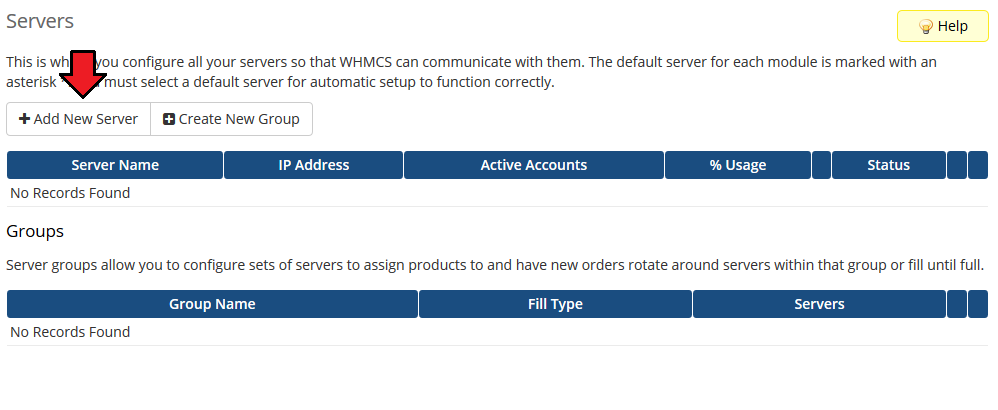
| 10 To begin, you must add a new server. Go to 'Setup' → 'Products/Services' → 'Servers' and press 'Add New Server'. |
|
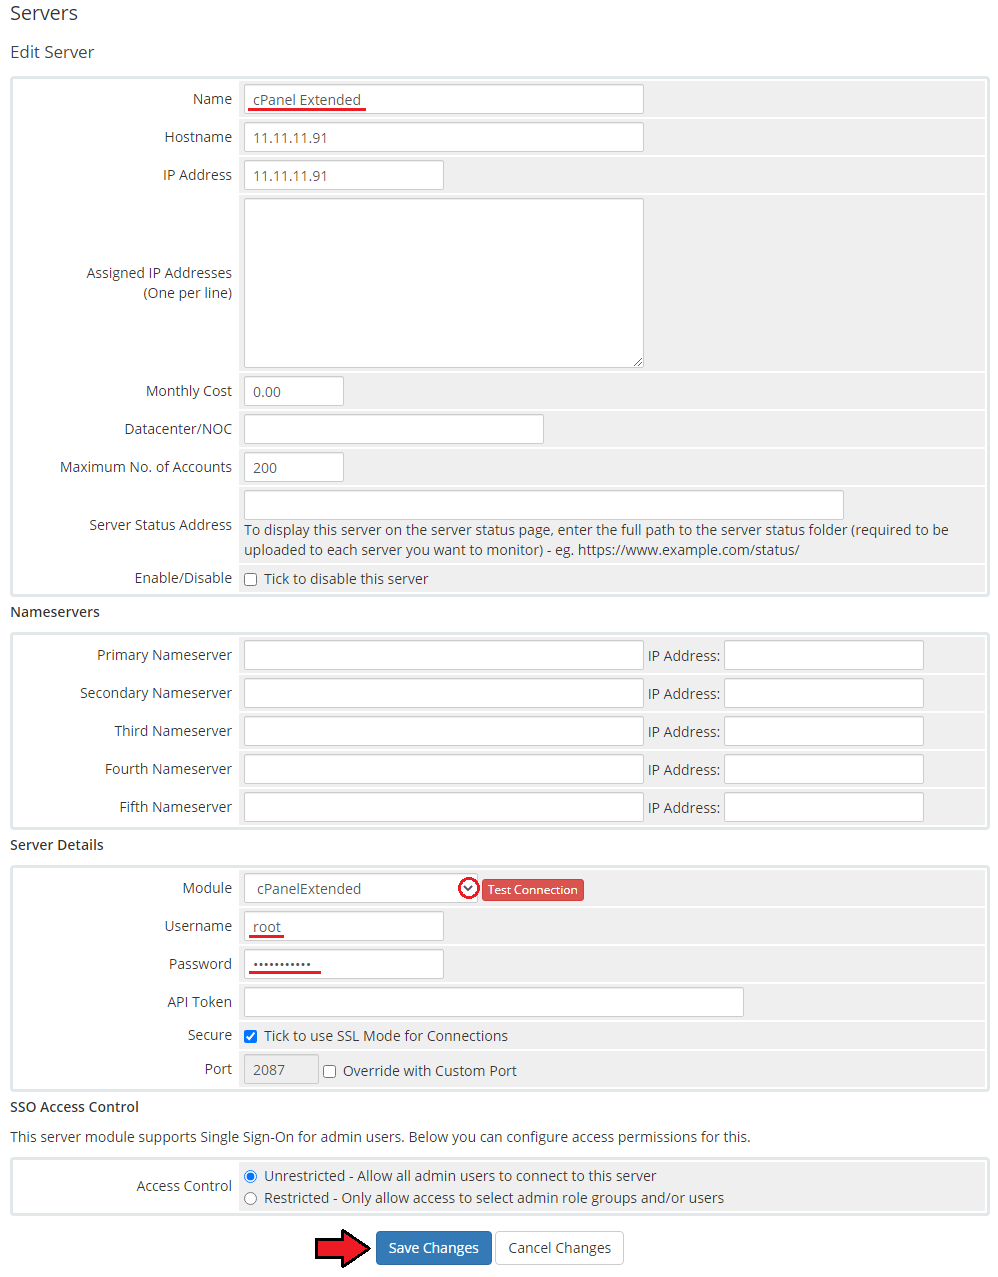
| 11. Enter your server name, IP address, username and a password. Choose 'cPanelExtended' from the dropdown menu and press 'Save Changes'. If you connect with your cPanel server via SSL, then make sure that you checked the 'Secure' field located at the bottom of the page. |
|
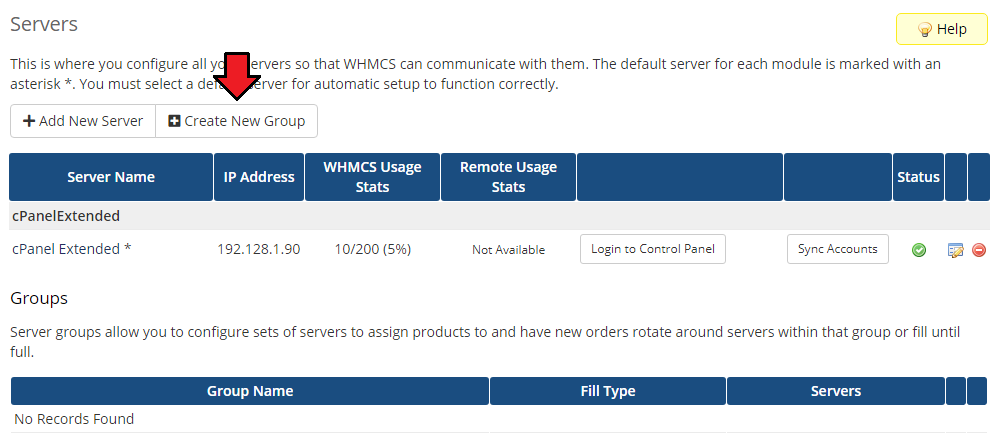
| 12. Once your server has been configured correctly, you will see the following screen. Create a new group for your server. Press 'Create New Group' to proceed. |
|
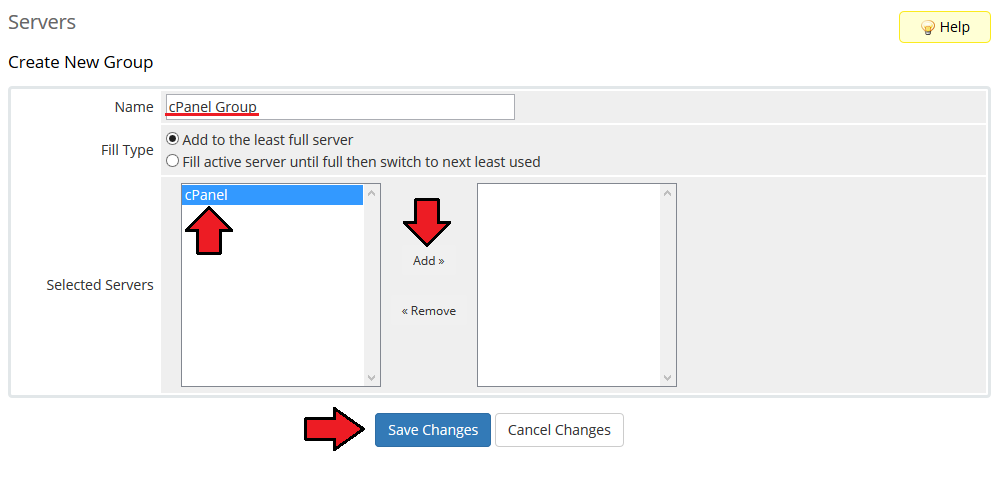
| 13. Enter the group name, select your previously created server, press 'Add', and then 'Save Changes'. |
|
Configuration of Product
| 14. In order to create a product, go to 'Setup' → 'Products/Services' → 'Products/Services' . If you do not have a product group, click on 'Create a New Group' . If you do, simply skip step 13. |

|
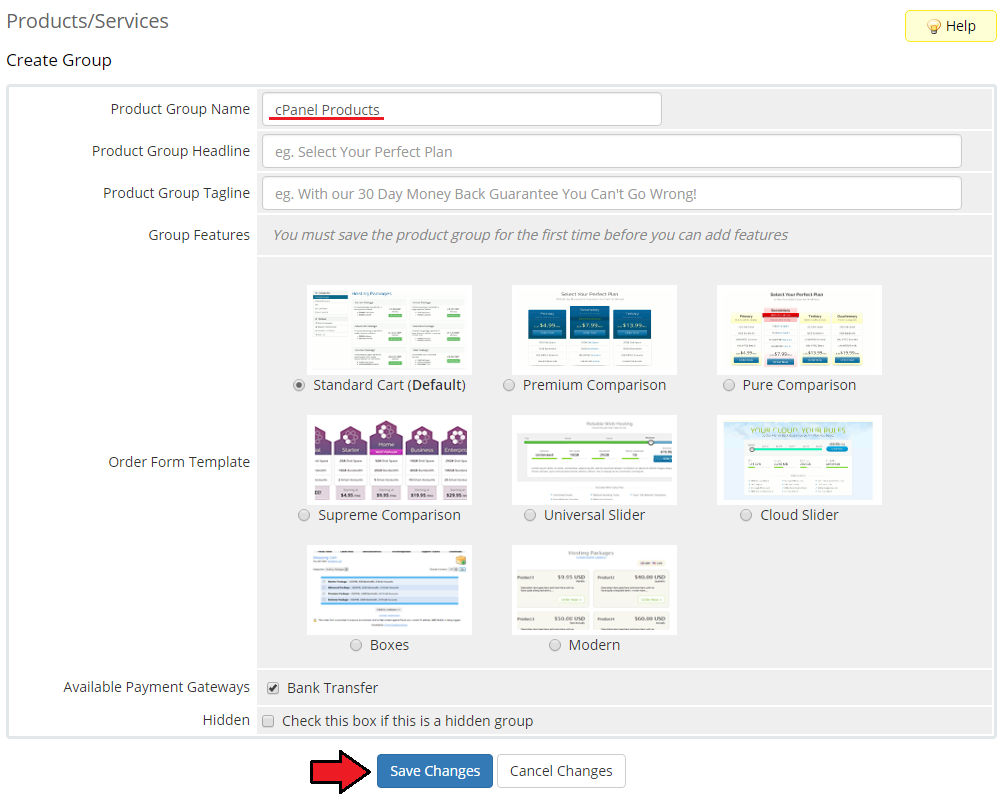
| 15. Fill in a product group name and press 'Save Changes'. |
|
| 16. When you have a product group added, you can create your product and assign it to the cPanel Extended module. |

|
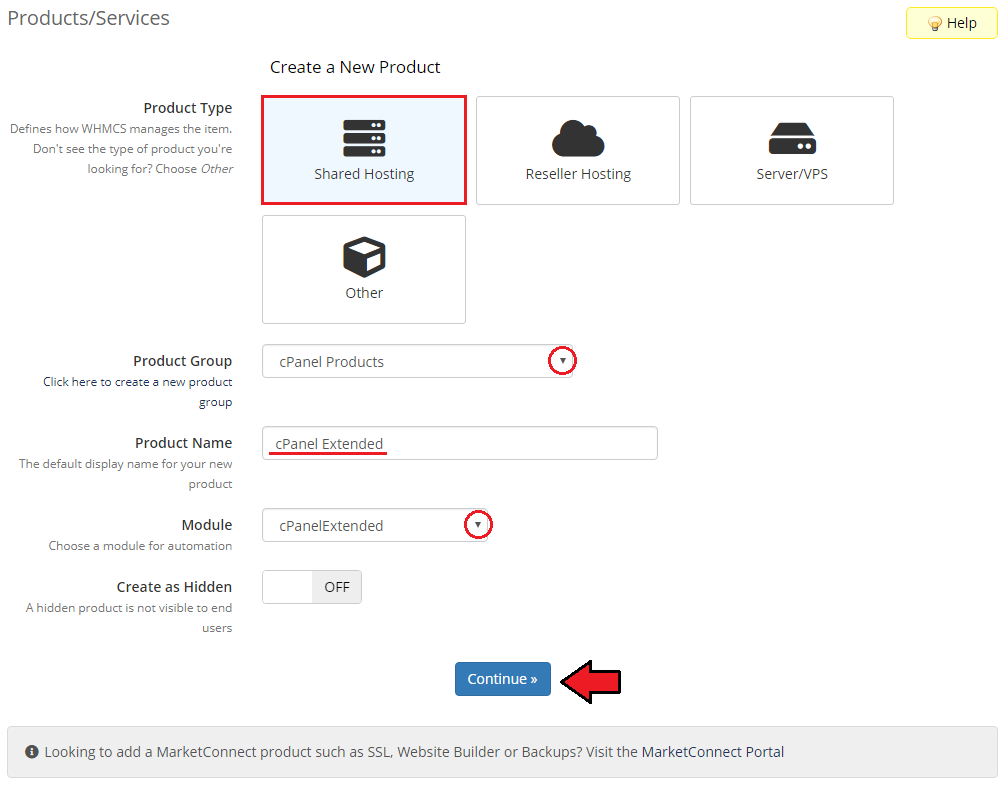
| 17. Afterwards, choose your product type and product group from dropdown menus, then enter your product name select the used module: 'cPanel Extended'. Press 'Continue' to go on. |
|
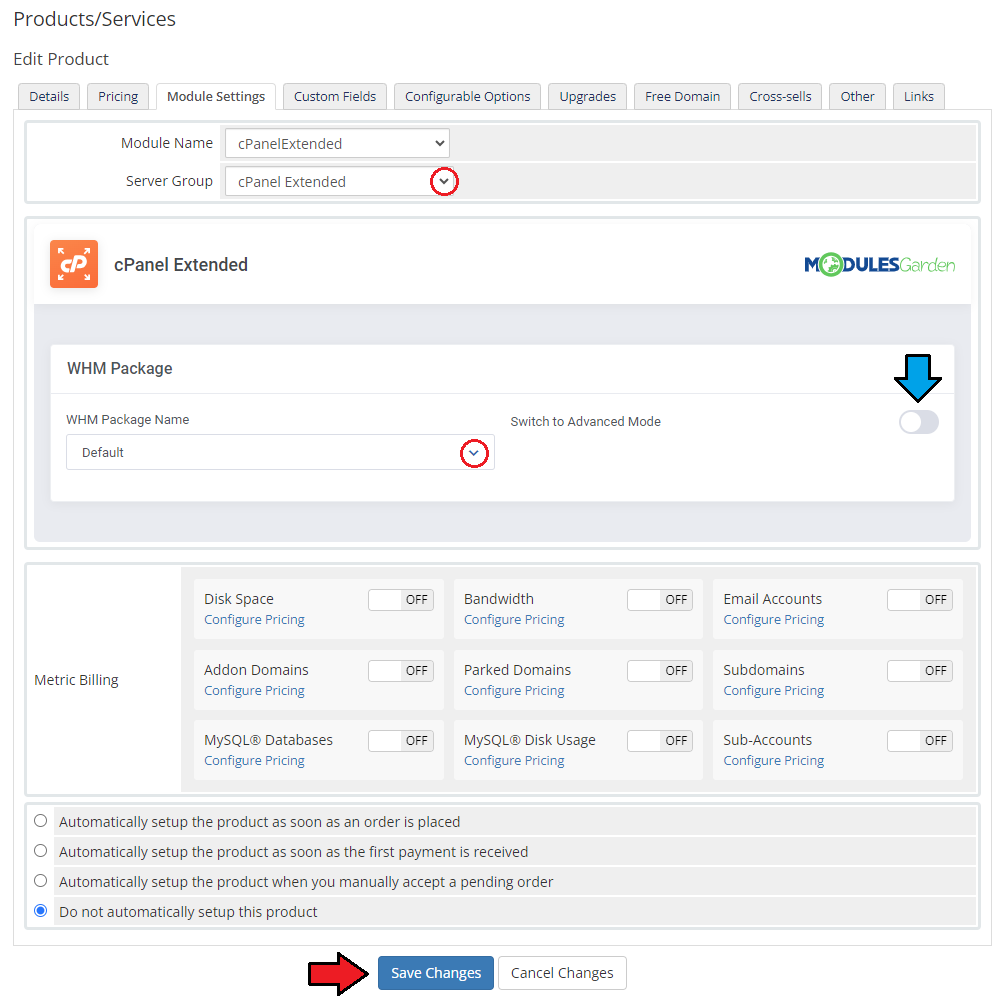
| 18. Now, go to the 'Module Settings' section, choose the previously created server group from dropdown menu and press 'Save Changes' . Important: Setting cPanel theme is required for some features to work properly. |
|
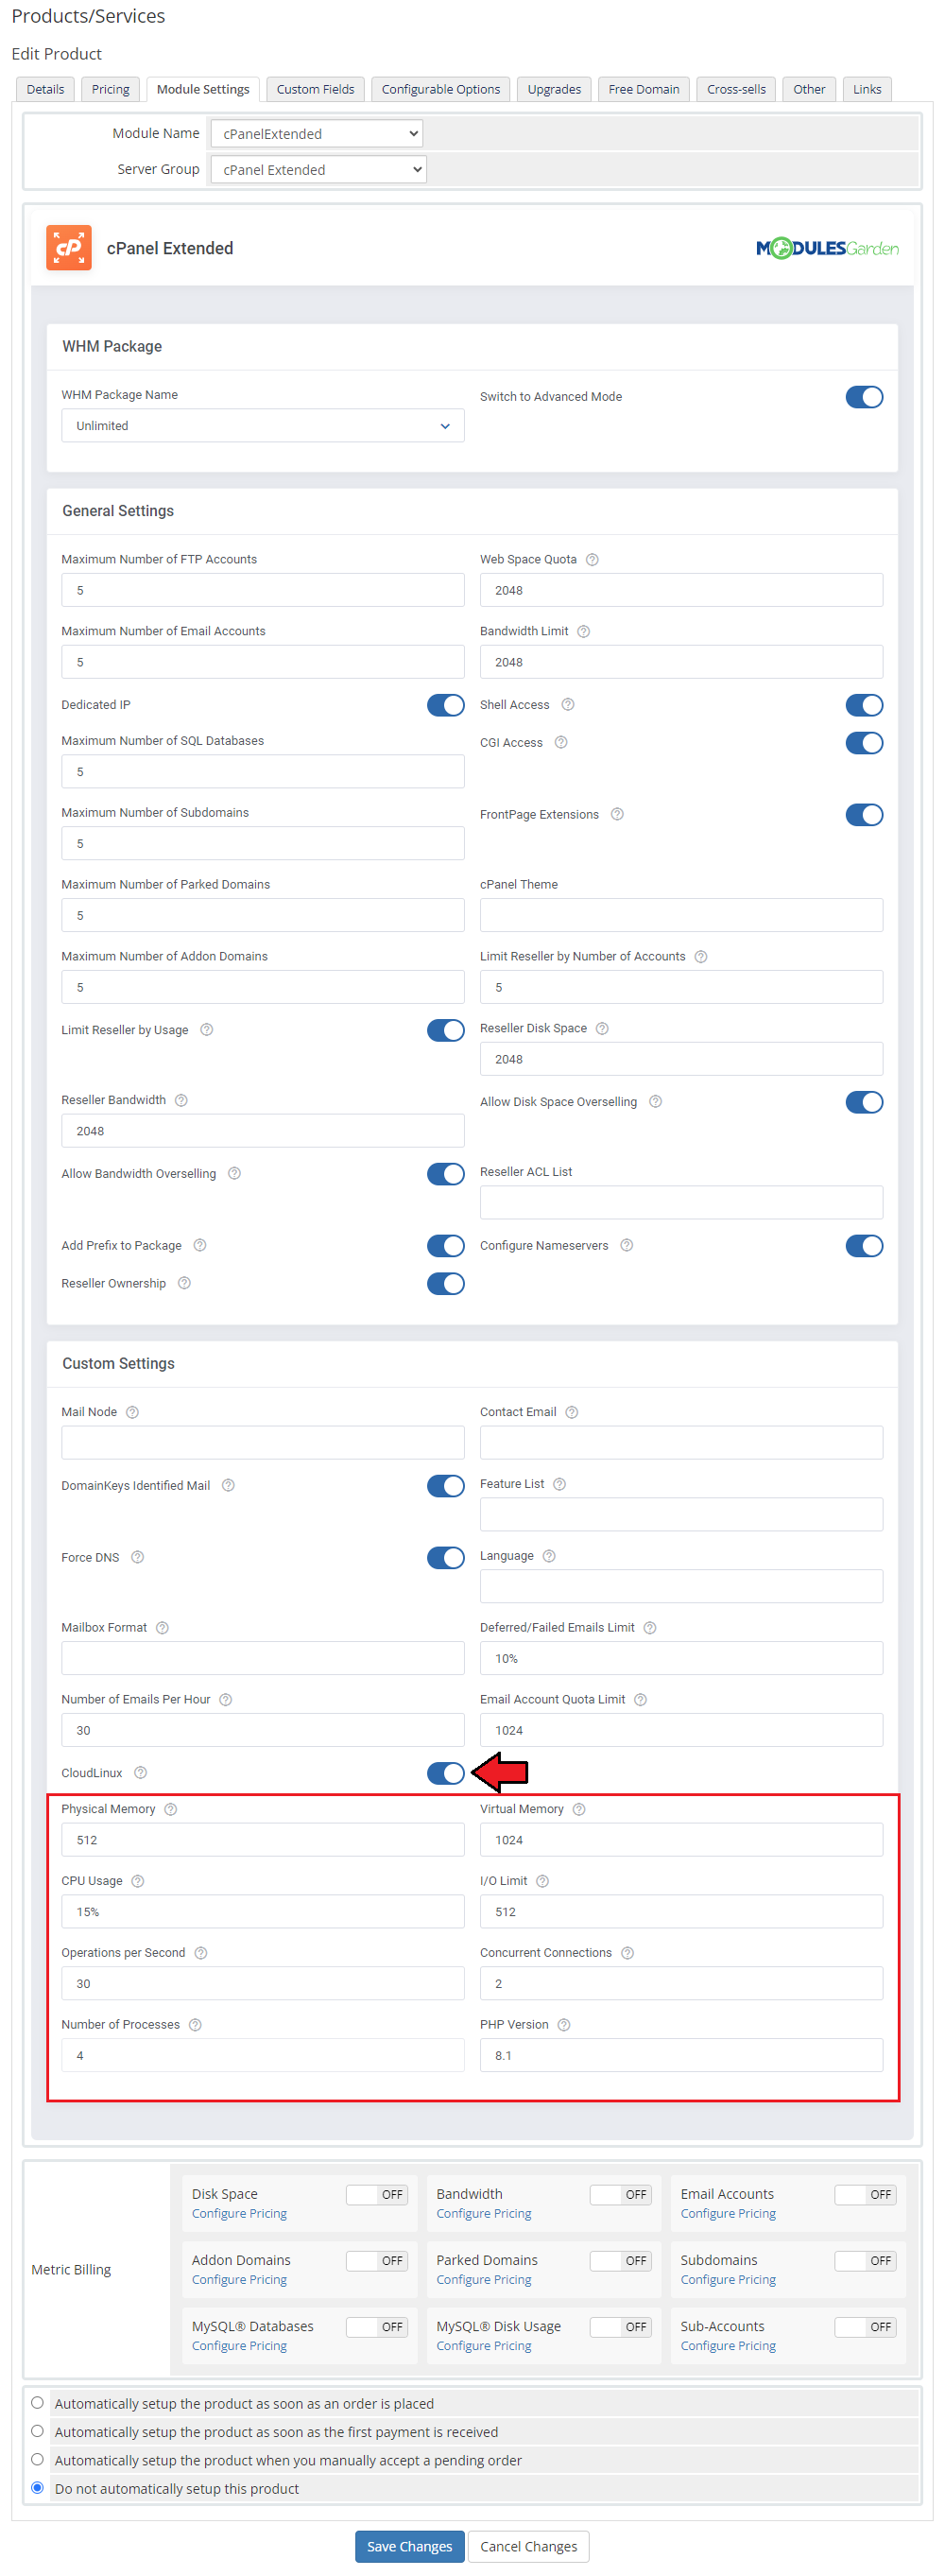
| 19. If you want to enable CloudLinux features for your product, simply select this option. Now, you can put limits for your clients' resources regarding:
|
|
| If you want to use the above cPanel entries as configurable options, please follow the guide available at this article. Additionally, you can use the records for CloudLinux from the list below: speed|CPU Speed pmem|Physical Memory io|I/O Limit maxentryprocs|Concurrent Connections nproc|Number of Processes vmem|Virtual Memory iops|Operations Per Second |
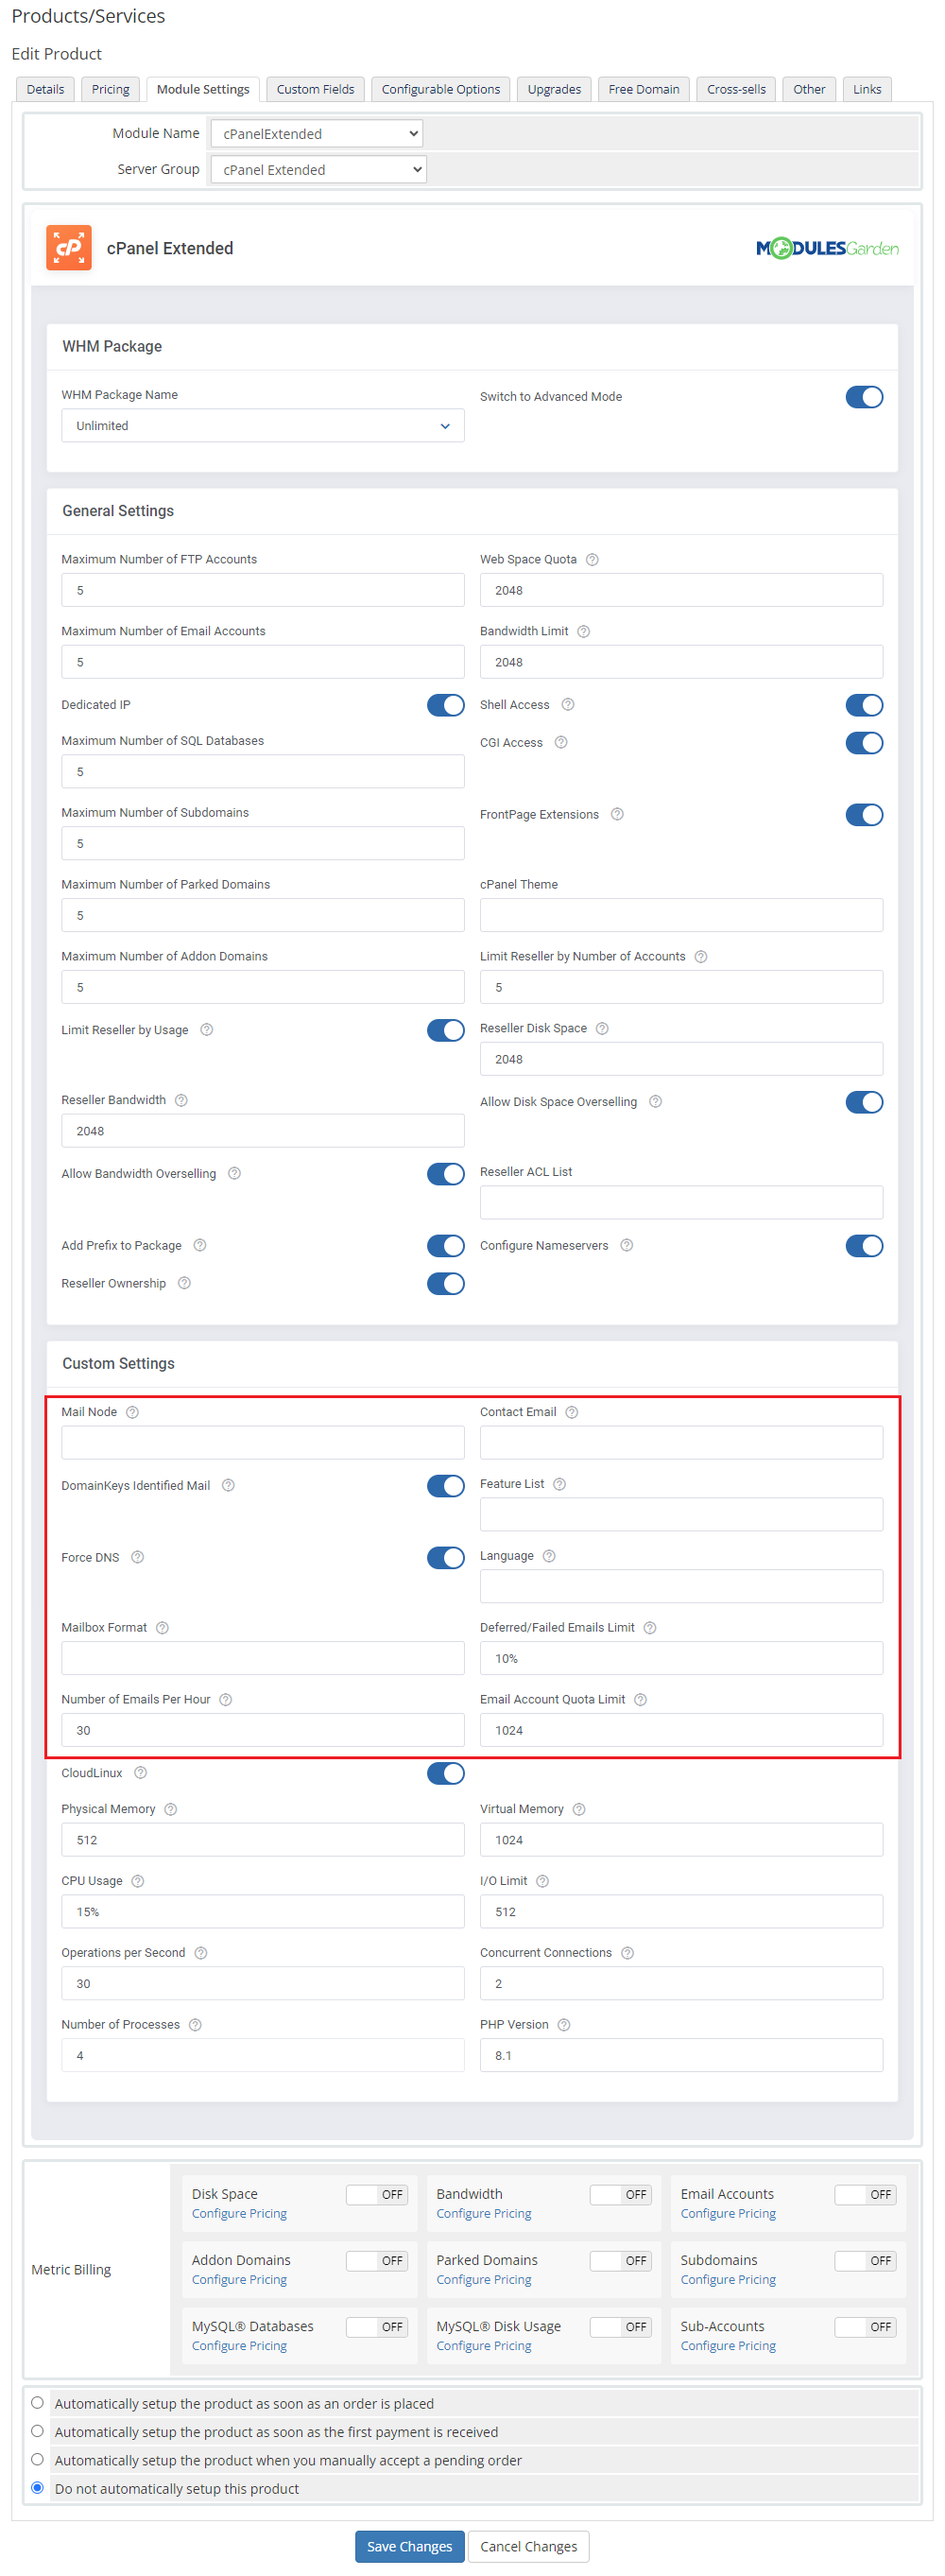
20. You may set up several options that will be applied to the product when creating one:
|
|
Configuration of Addon
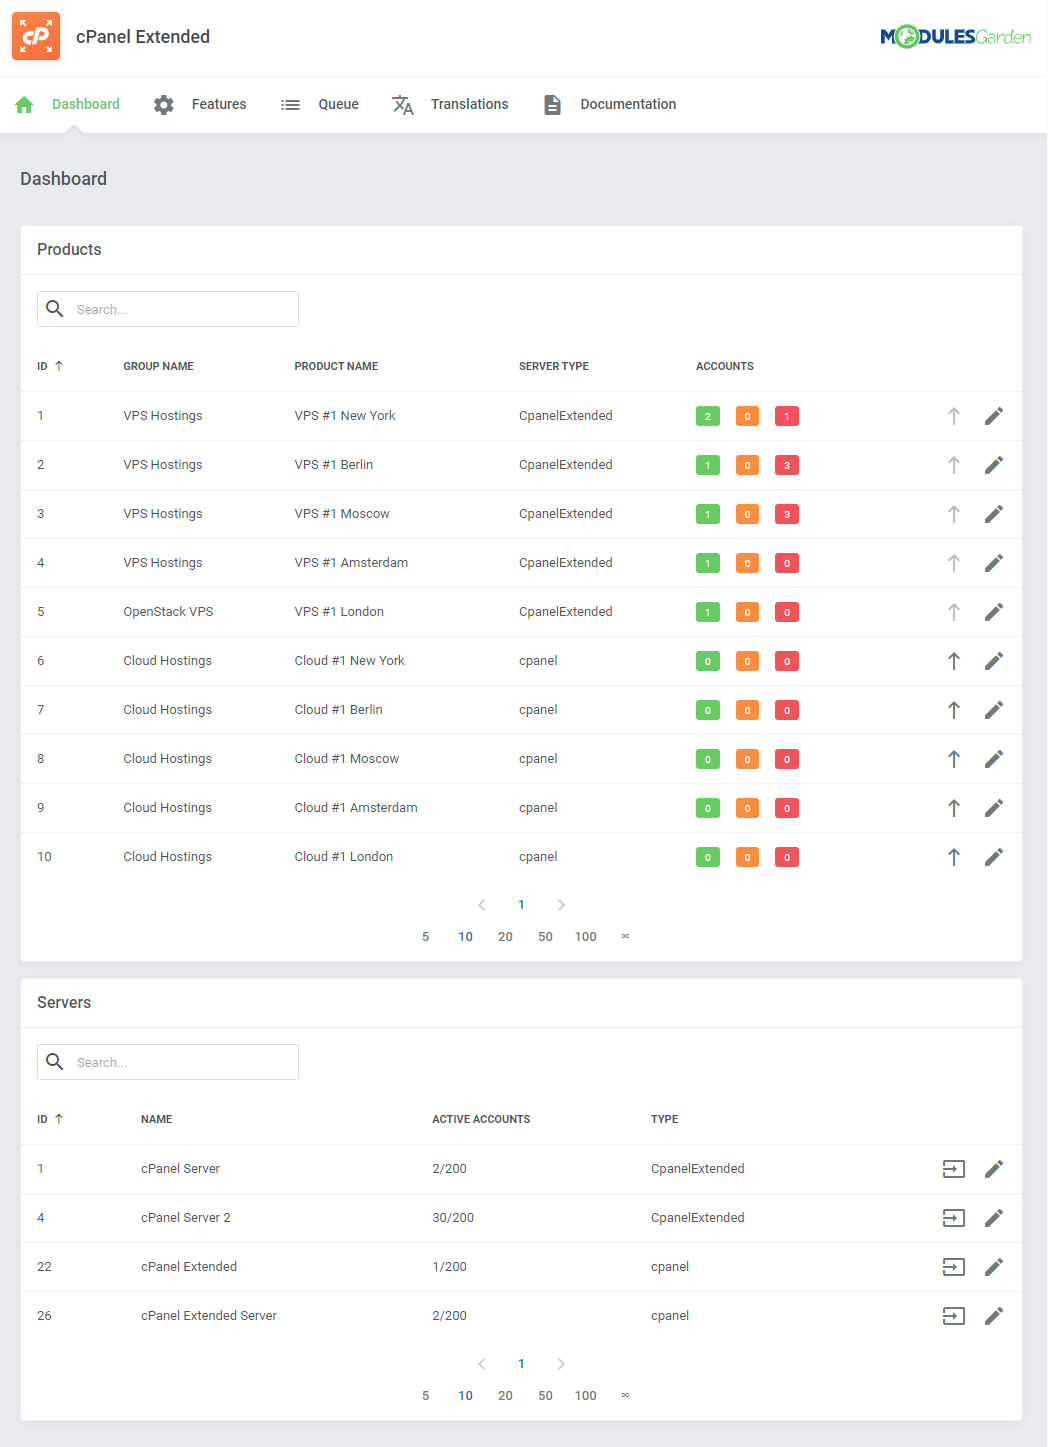
| 20. You have just correctly created and customized a new product. Go to 'Addons' → 'cPanel Extended' in your WHMCS. You will find there a dashboard with the possibility to:
|
|
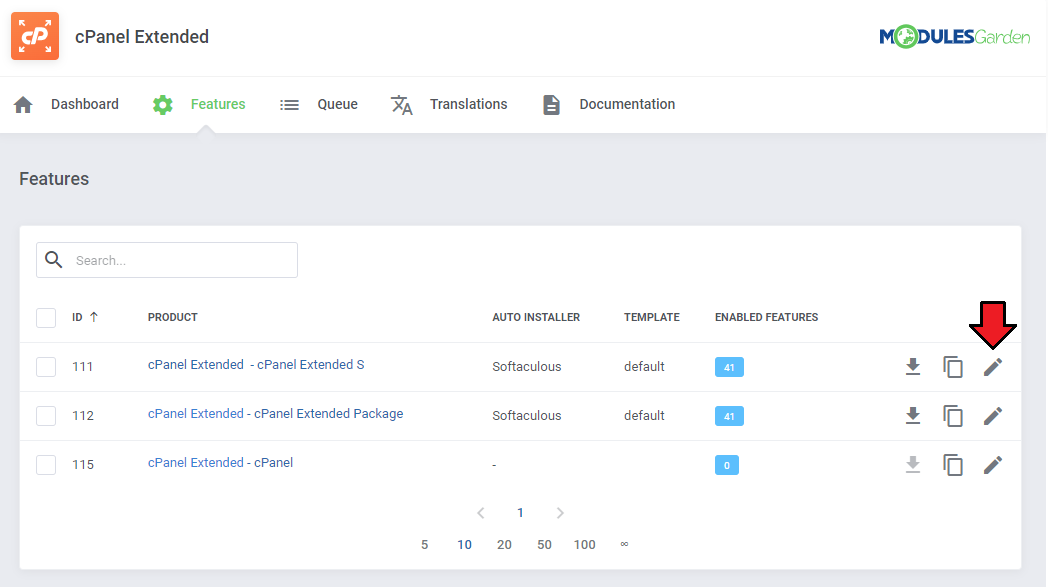
| 21. Proceed to the 'Features' section and find the product you are interested in and press the 'Configuration' button next to it. |
|
| 22. You should find here boxes dedicated to 'Features', 'Applications', 'Client Area Template'. To show you an example, we will set the configuration from the beginning, without using other configuration options of the product. |
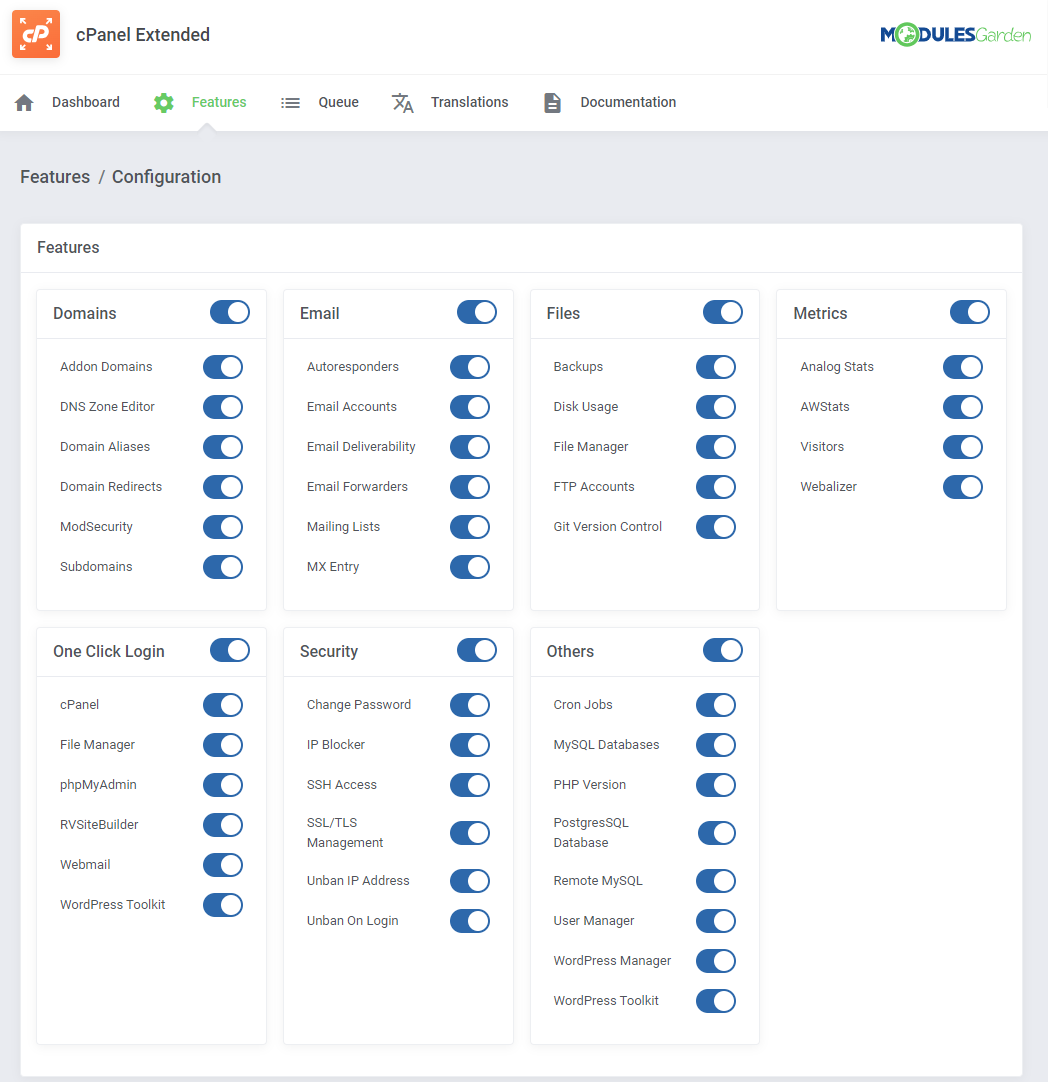
|
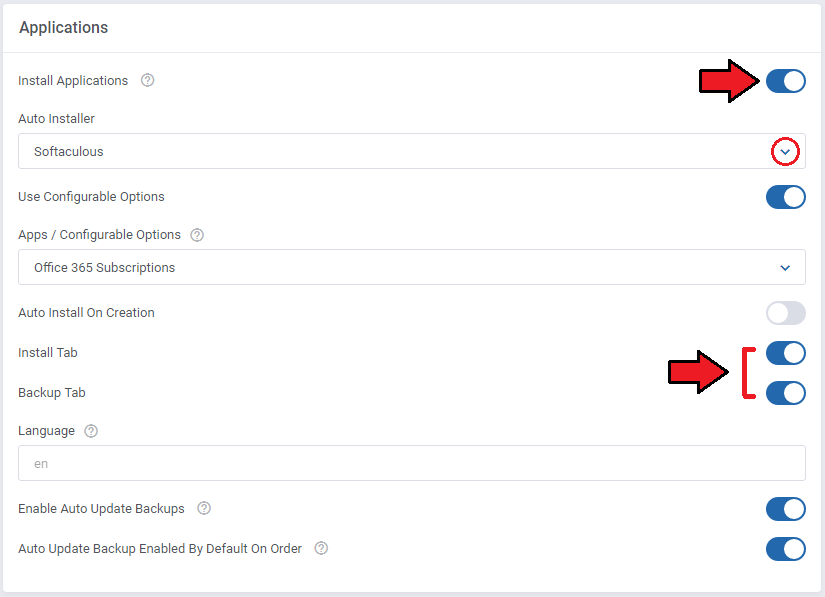
| 23. Choose whether to activate the 'Install Applications' option. In case you wish to activate this option, you will have to select 'Auto Installer' from the dropdown menu. Afterwards, enable 'Install Tab' and 'Backup Tab'. |
|
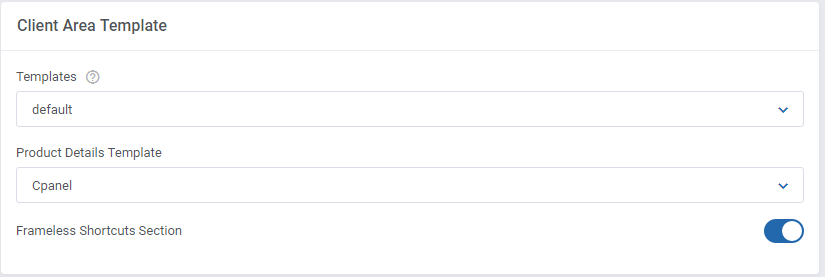
| 24. Select from the dropdown menu which client area template should be used for this product. Note: By default only one template is available. If you have more templates prepared, you will be able to choose one from here. |
|
| 25. Finally, decide whether to allow your clients to create email accounts with an unlimited quota. If you disable this option here, you may then set the quota limit per created account. |

|
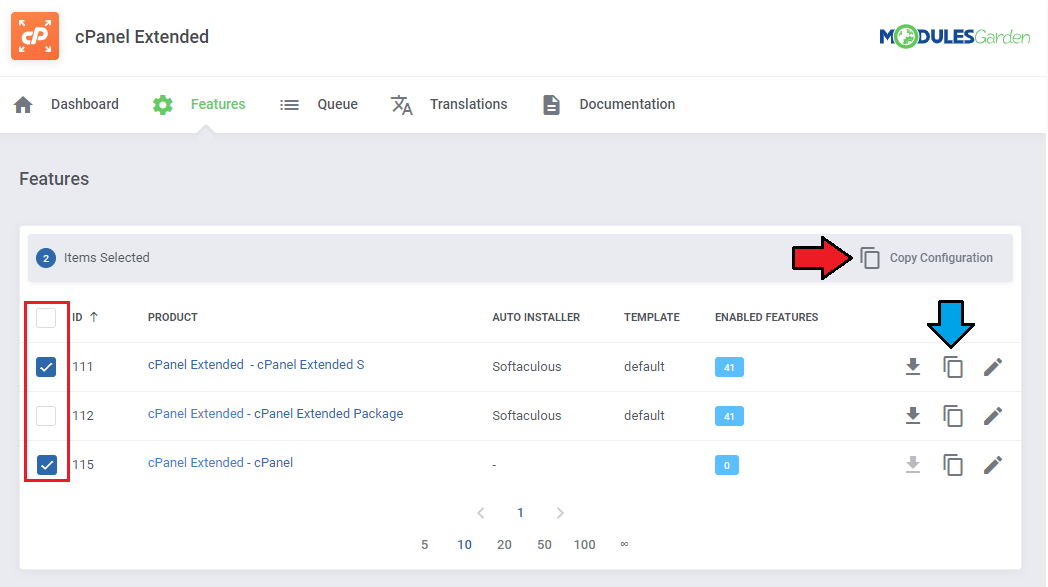
| 26. If you already have another product configured, you may copy its configuration. Find the 'Copy' button on the list with products or select multiple item at once. |
|
| 27. From now on, all your clients who ordered a previously created product will be able to manage their cPanel accounts via your WHMCS system. The screen below presents a summary view of the ordered product in admin area. Among the available actions you will find:
|
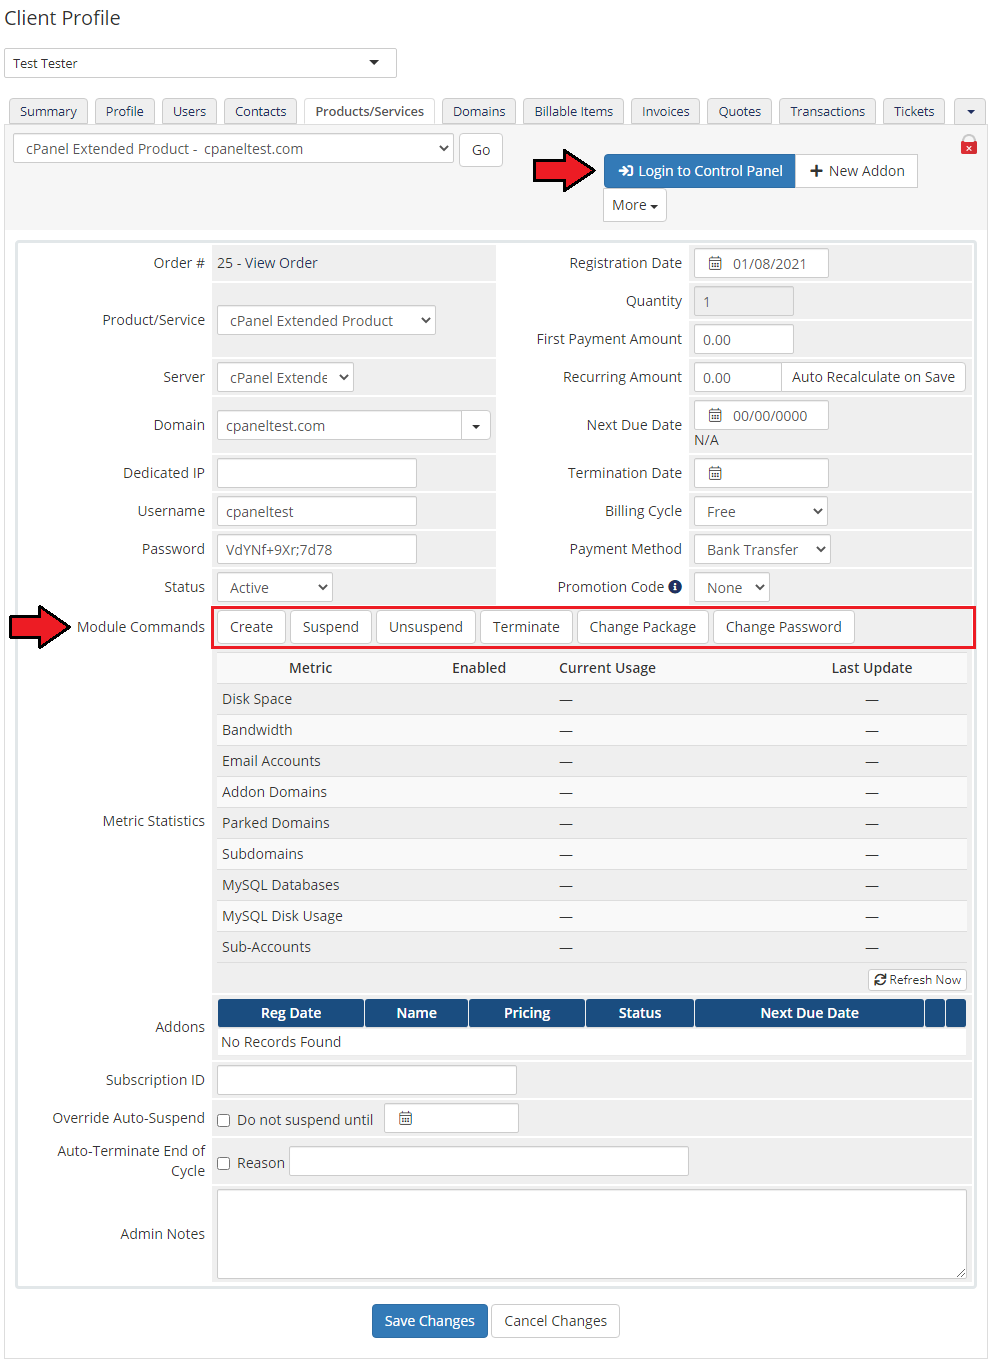
|
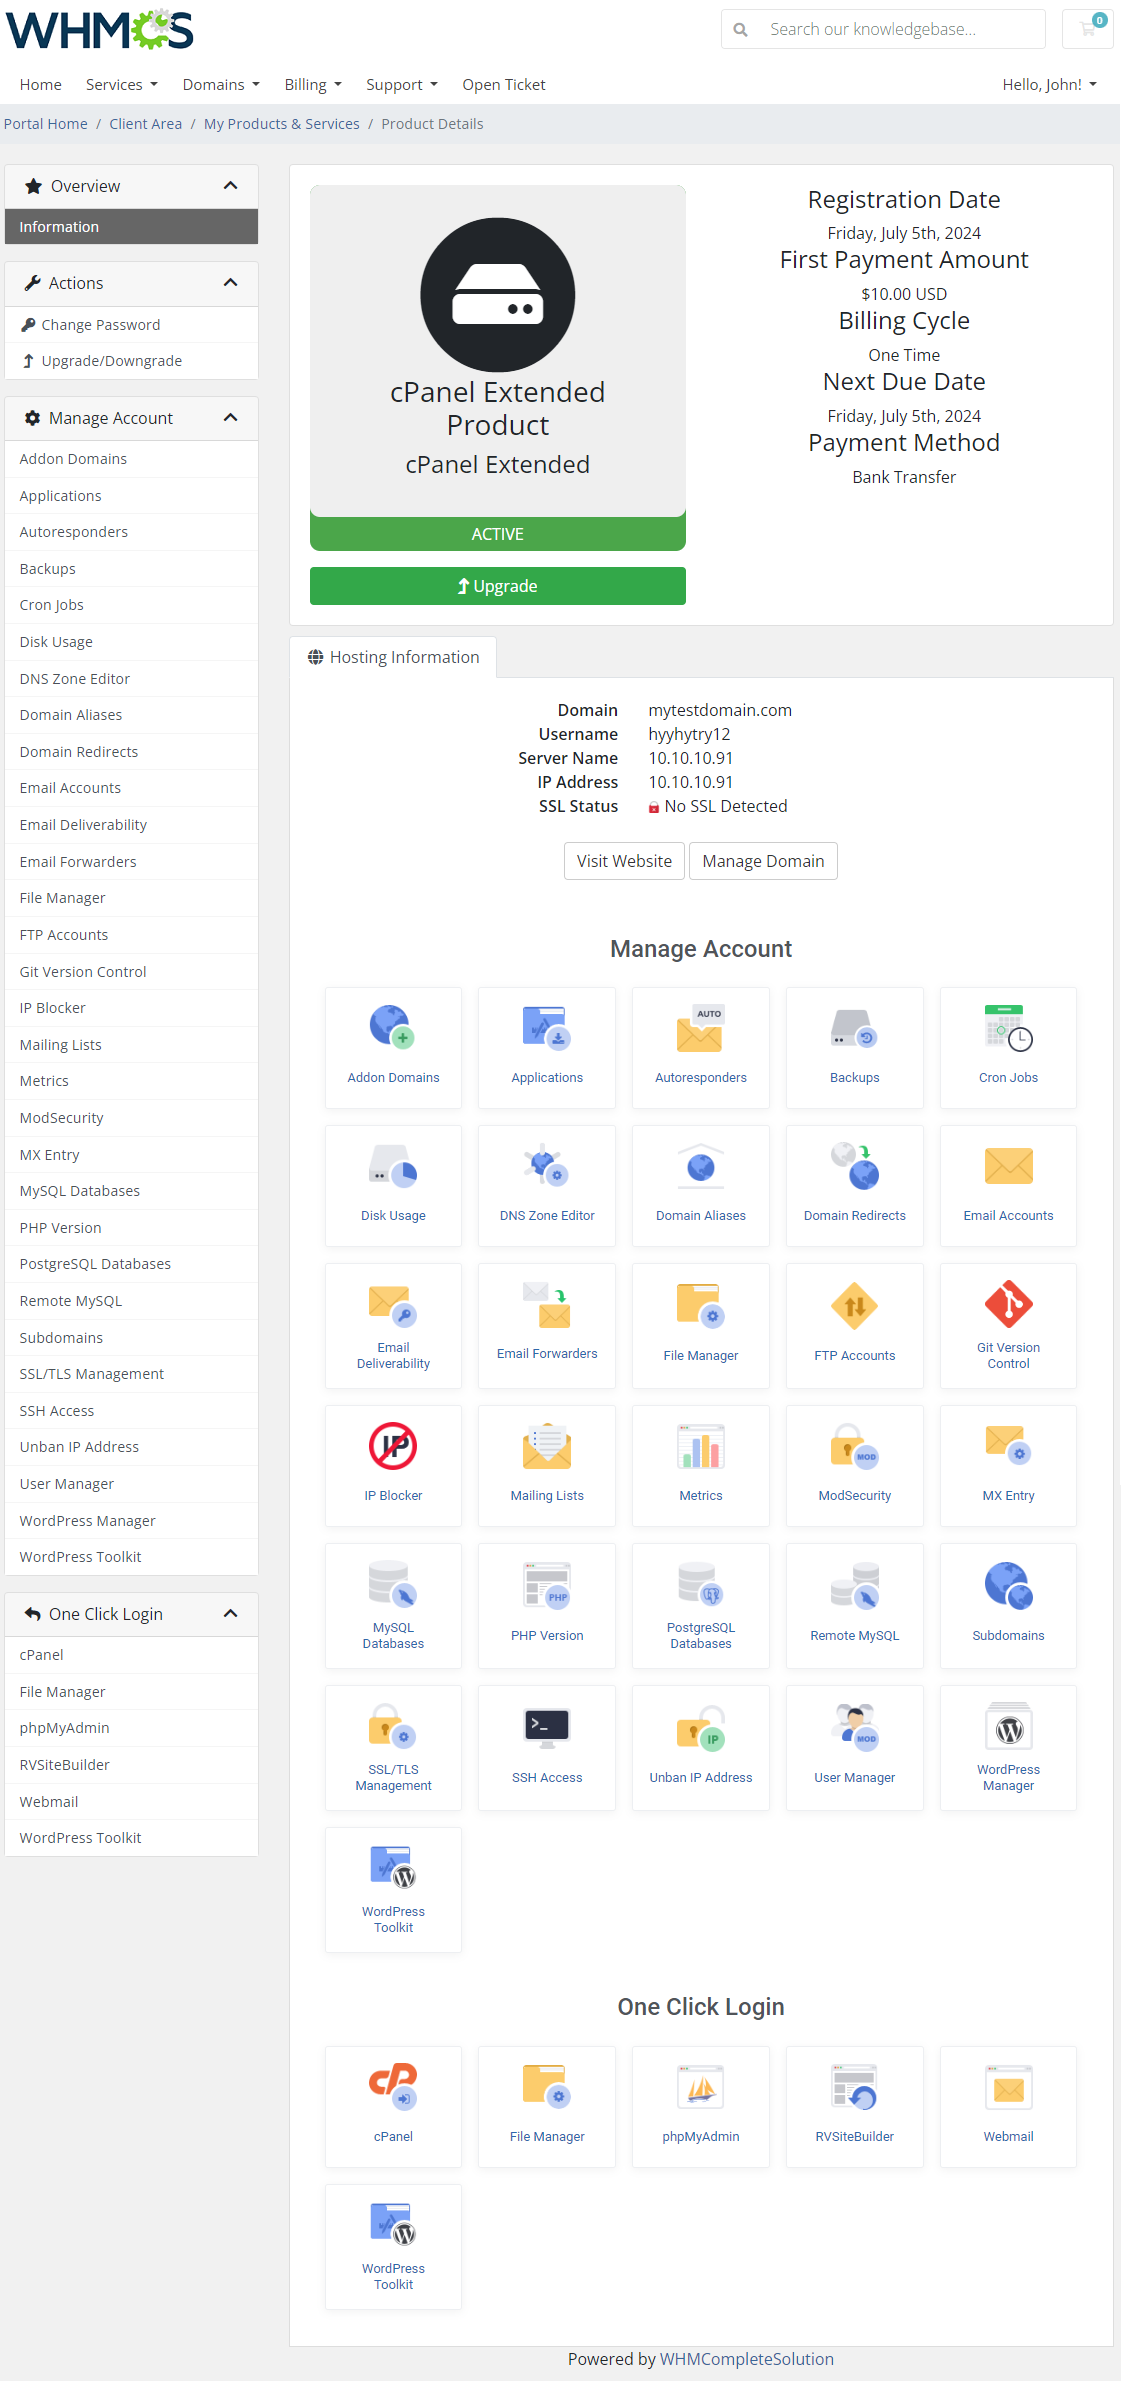
| This is what your customers should see in their client area: |
|
| Please note that the 'WordPress Manager' icon only appears if you have WordPress Manager For WHMCS module installed. |
Upgrade cPanel to cPanel Extended Product
| Once you have already configured the standard cPanel products, you can easily upgrade them to the cPanel Extended products. Note: Before you start, make sure that you have already configured the cPanel Extended server. |
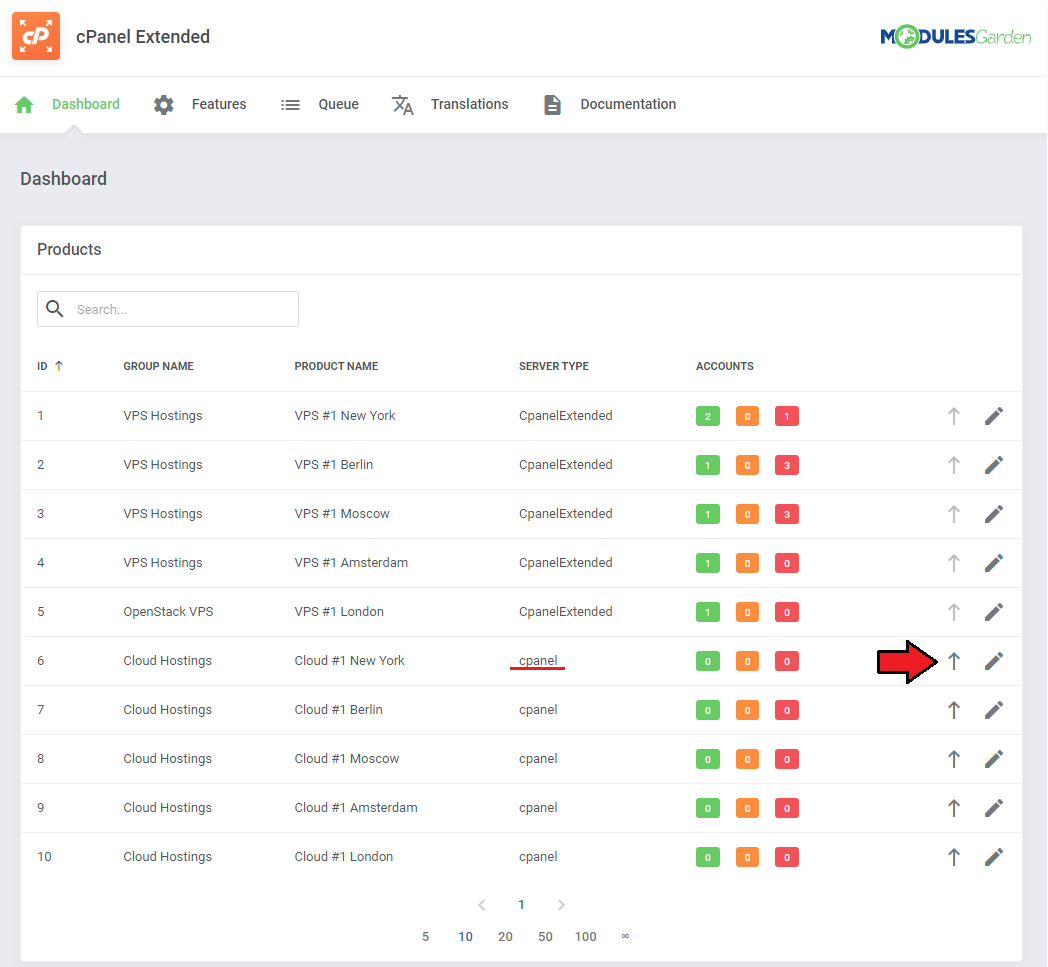
|
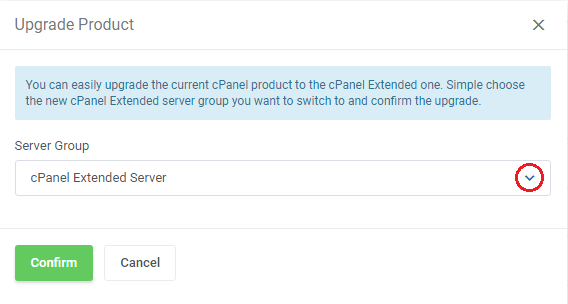
| Now, select the new server group configured for the cPanel Extended module.
Note: Make sure that this server configuration is exactly the same as the standard cPanel server configuration. |
|
Management
| cPanel Extended For WHMCS allows your customers to manage their cPanel accounts without being logged into the cPanel server. Read the below descriptions to get familiar with all of the cPanel Extended For WHMCS functionalities. |
Configurable Options For Application Auto Install
| Let your clients decide which application they would like to install on their new cPanel account. While placing an order, your customer can choose an application which will be installed upon account creation. |
|
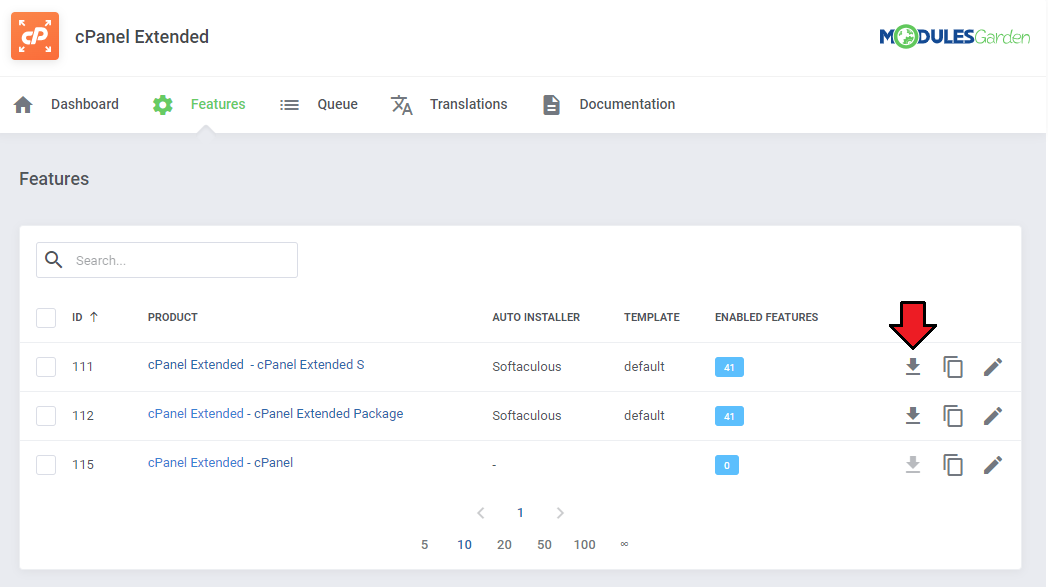
| Go back to the list of products and click on a download icon to view the applications list. |
|
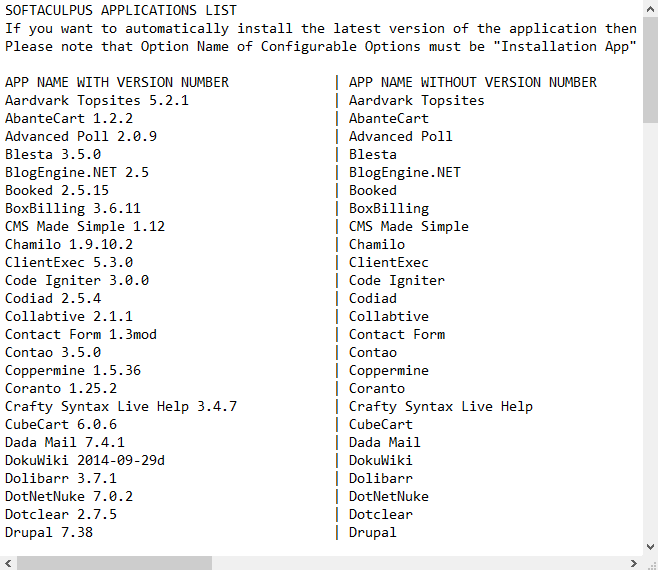
| These are the names of values that you can enter in the fields of configurable options. We will configure them in the next step. For example, if you would like to set up 'Drupal' in your applications list, you will need to enter the 'Drupal 8.6.2' or 'Drupal' value. |
|
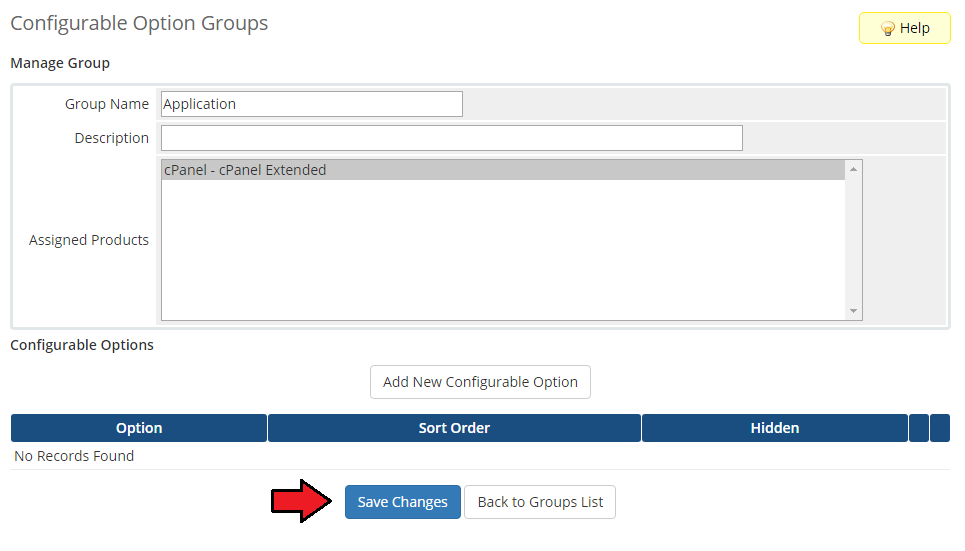
| Go to your 'WHMCS' → 'Setup' → 'Products/Services' → 'Configurable Options' and press 'Create a New Group' . |

|
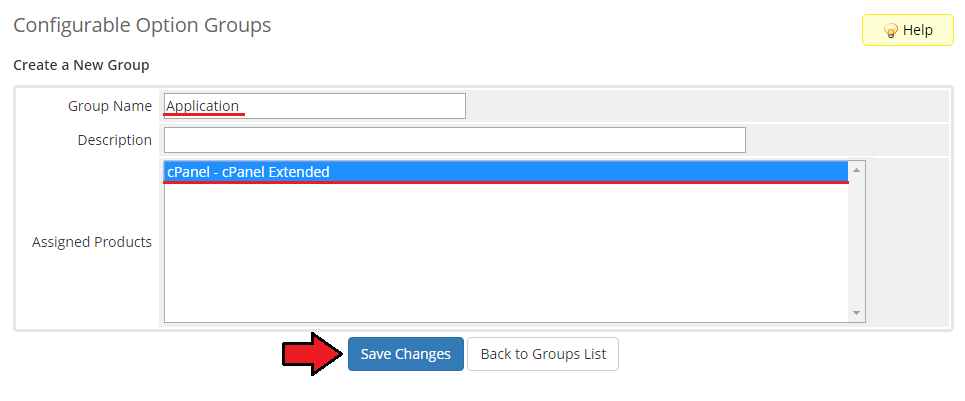
| Enter the group name of your choice, select the product to which you want to assign configurable, then press 'Save Changes' . |
|
| Now click on 'Add New Configurable Option' . |
|
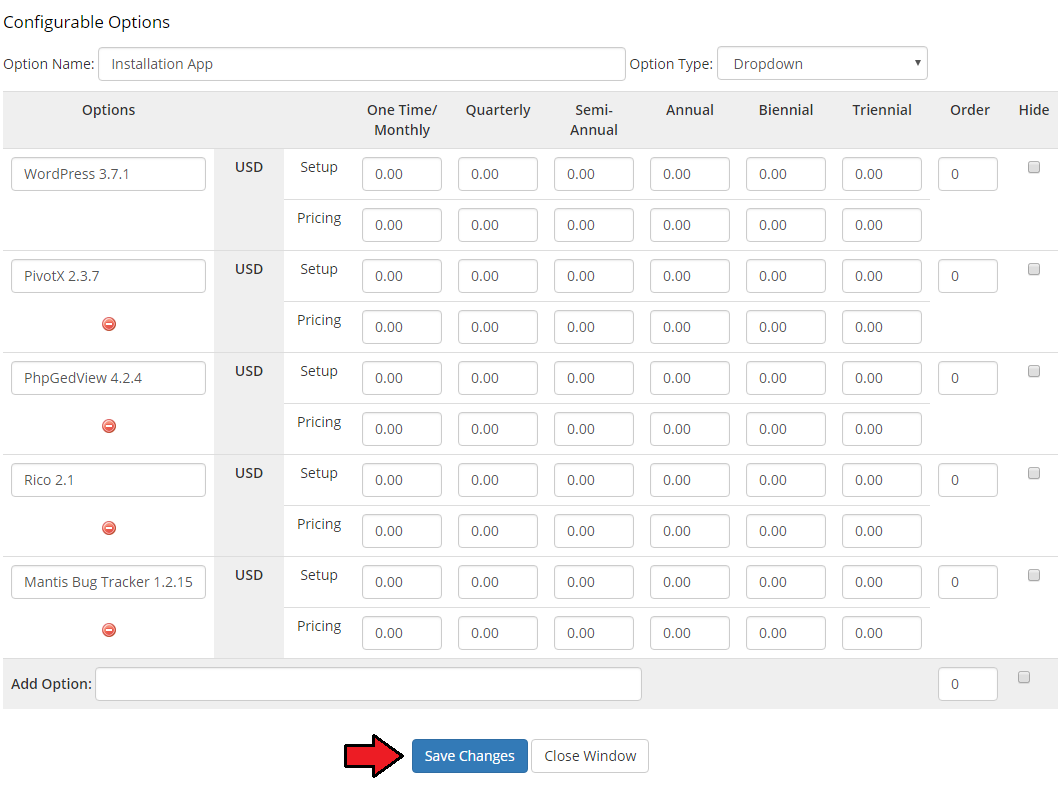
| This moment is very important. As 'Option Name' , you have to enter 'Installation App' . Otherwise the entire functionality will not work. Here you can set up as many applications as you want. To do so, enter a value name, e.g. 'WordPress 3.7.1' and press 'Save Changes' . |

|
| As you can see on the following screen, we decided to offer our customers five applications. When you finish adding applications, press 'Save Changes' and 'Close Window'. |
|
| Using the module's version above 3.1.0, you can also create a new configurable option - Auto Backup On Update with the 'Yes/No' type. This option is used to enable the creation of auto update backups for the first chosen application after the initial order in WHMCS. |

|
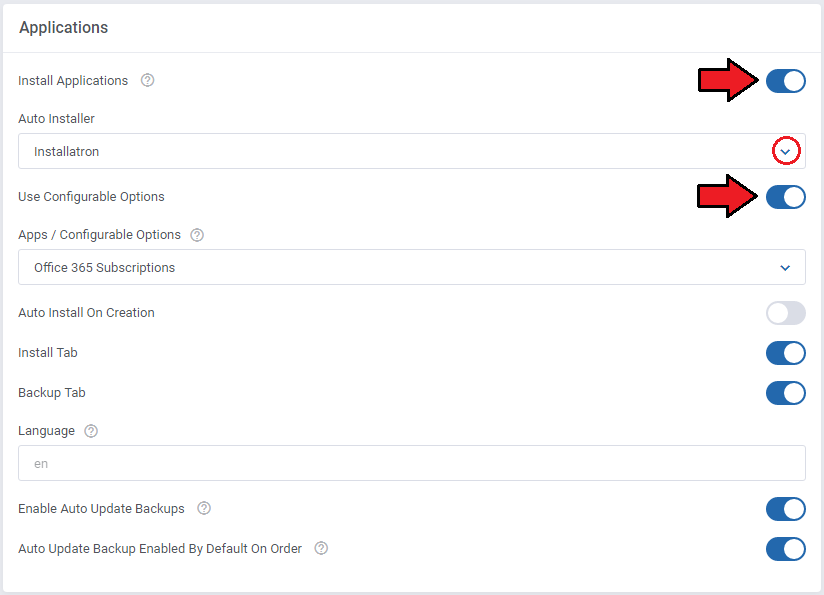
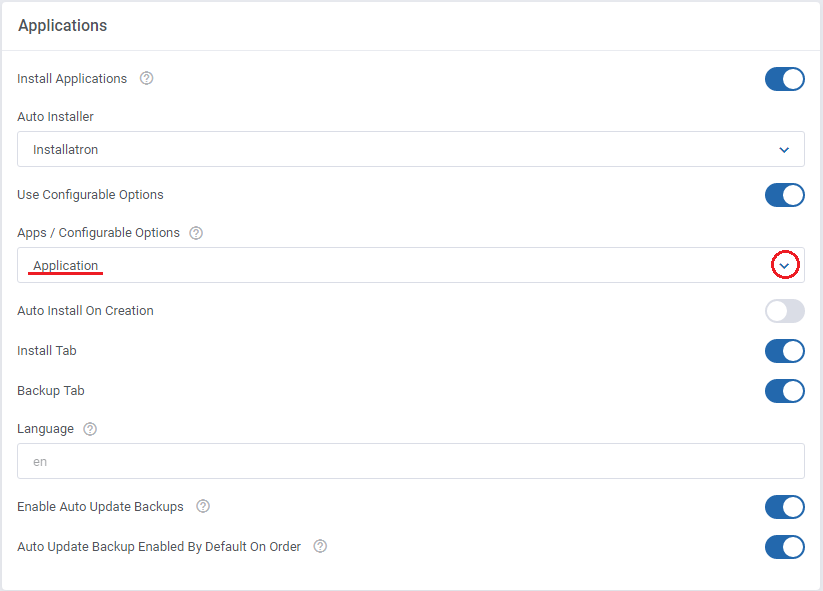
| Afterwards, come back to 'cPanel Extended Features' → 'Configuration' → 'Applications' , activate 'Use Configurable Options' and choose 'Apps/Configurable Options' from a dropdown menu. Please note that you can have more configurable options groups at your disposal. Press 'Save' . You have just successfully assigned configurable options to the application autoinstall. |
|
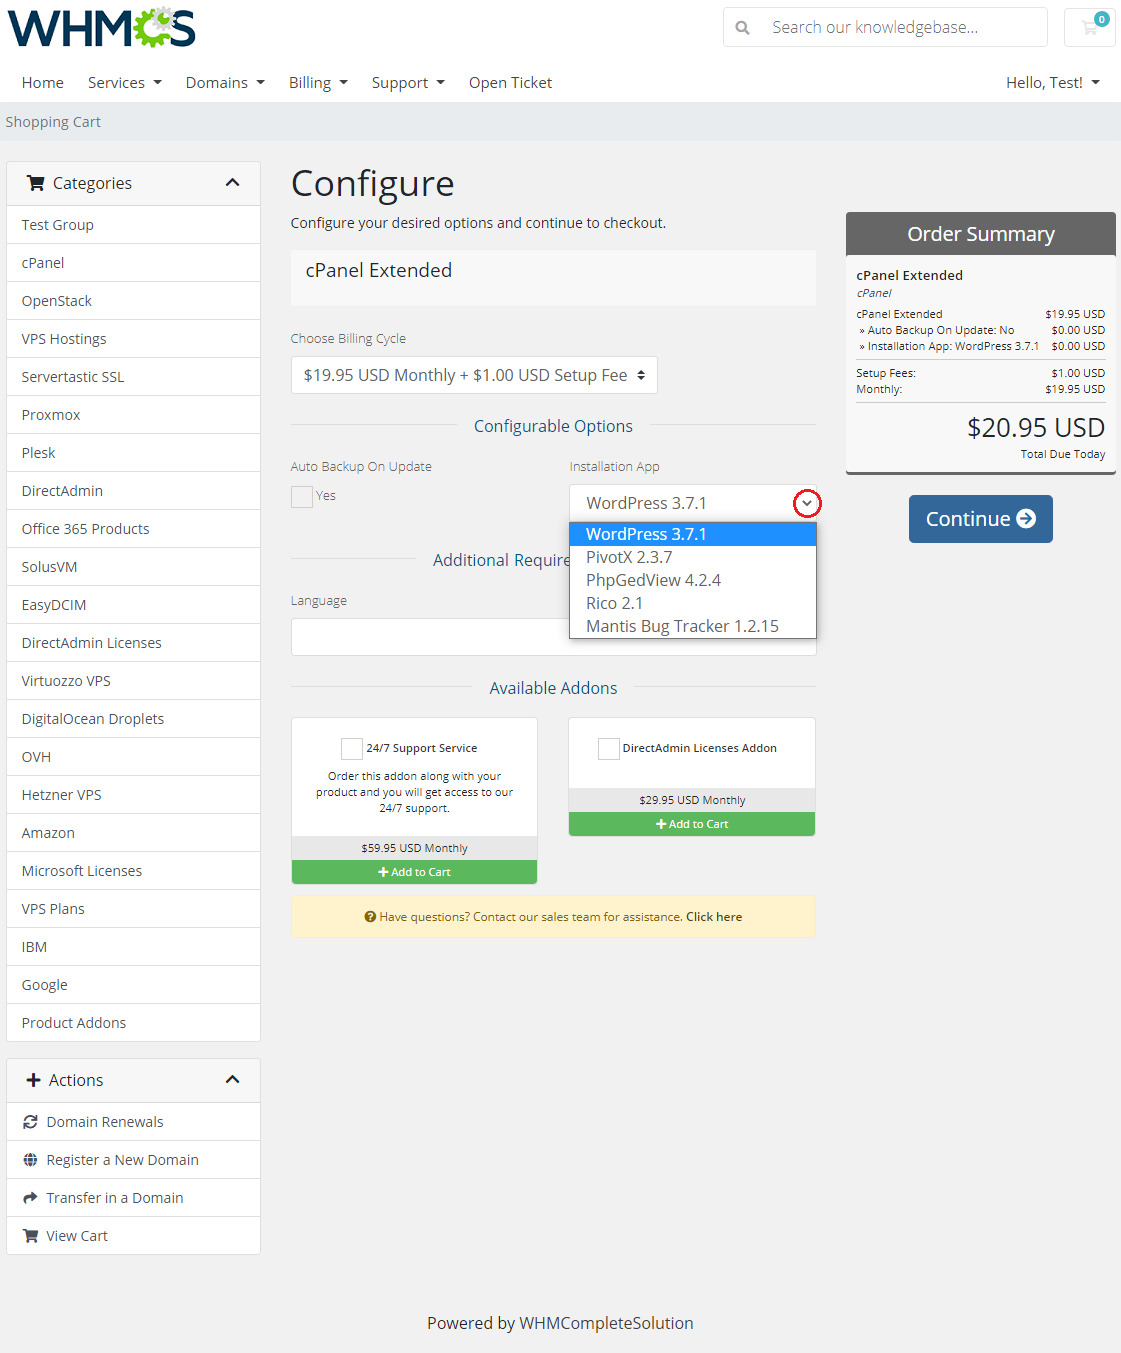
| Let us find out what your customers are going to see in your client area while placing an order. As you can see, a dropdown menu with the previously configured applications has shown up. |
|
Assignment of Custom Fields To Application Autoinstall
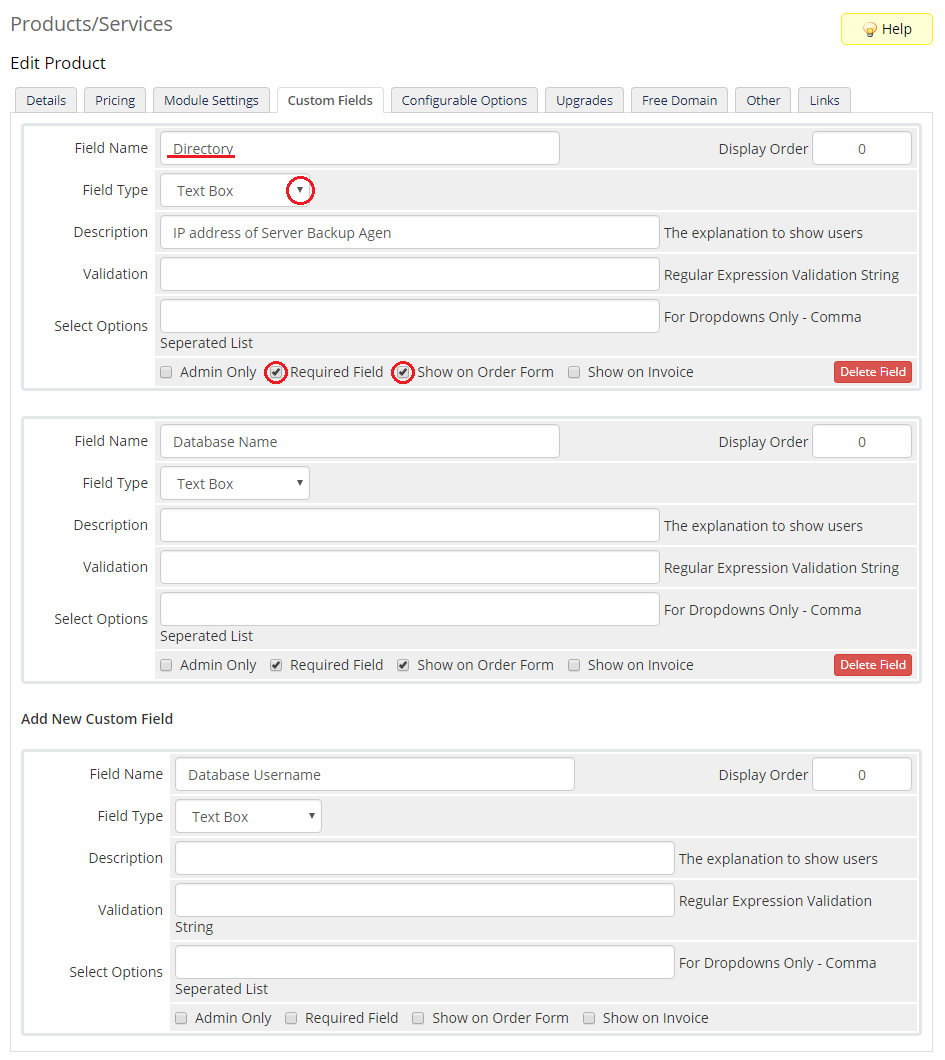
| Now that you know how to allow your customers to choose which application they would like to install on their account, we can proceed one step further. Until now all applications have been installed with the use of default details like e.g. directory names or a database name.
Remember to set each field type as 'Text Box', tick 'Required Field ' and 'Show on Order Form'. |
|
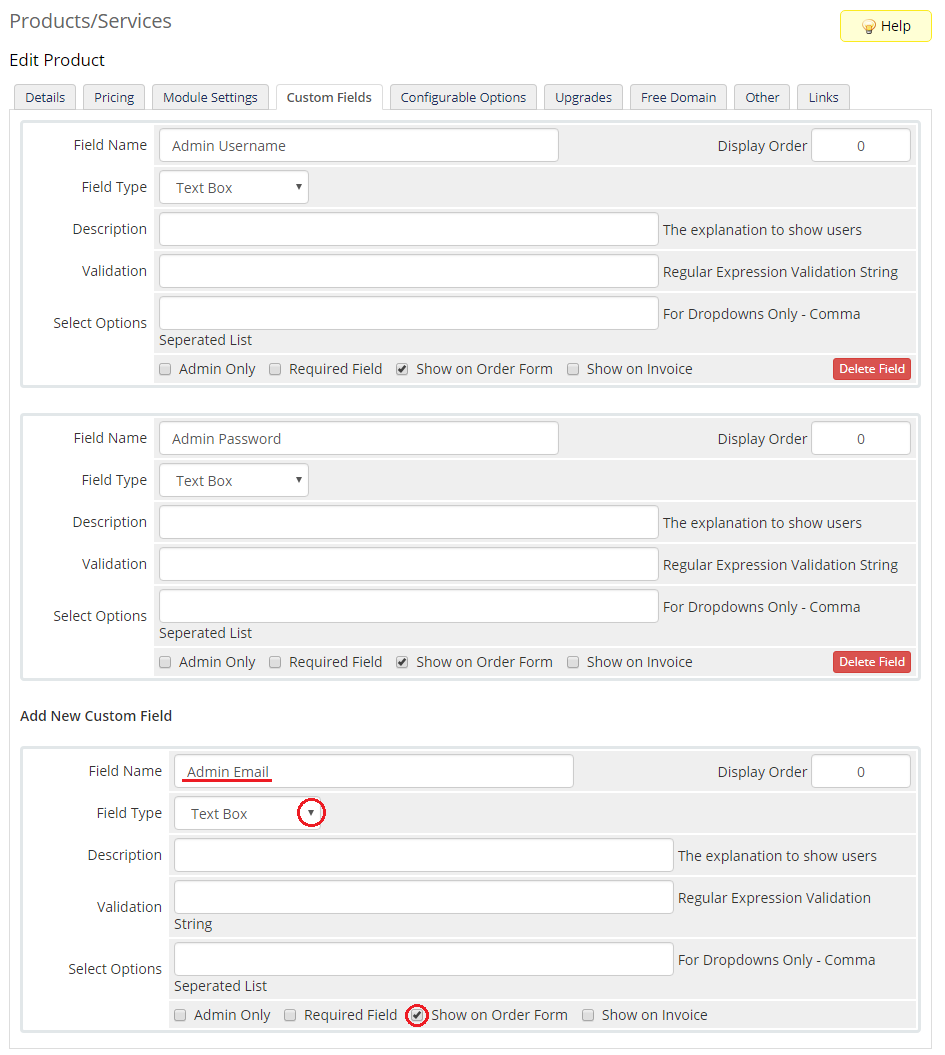
The next 3 fields are:
Set them as 'Text Box' and tick 'Show on Order Form'. |
|
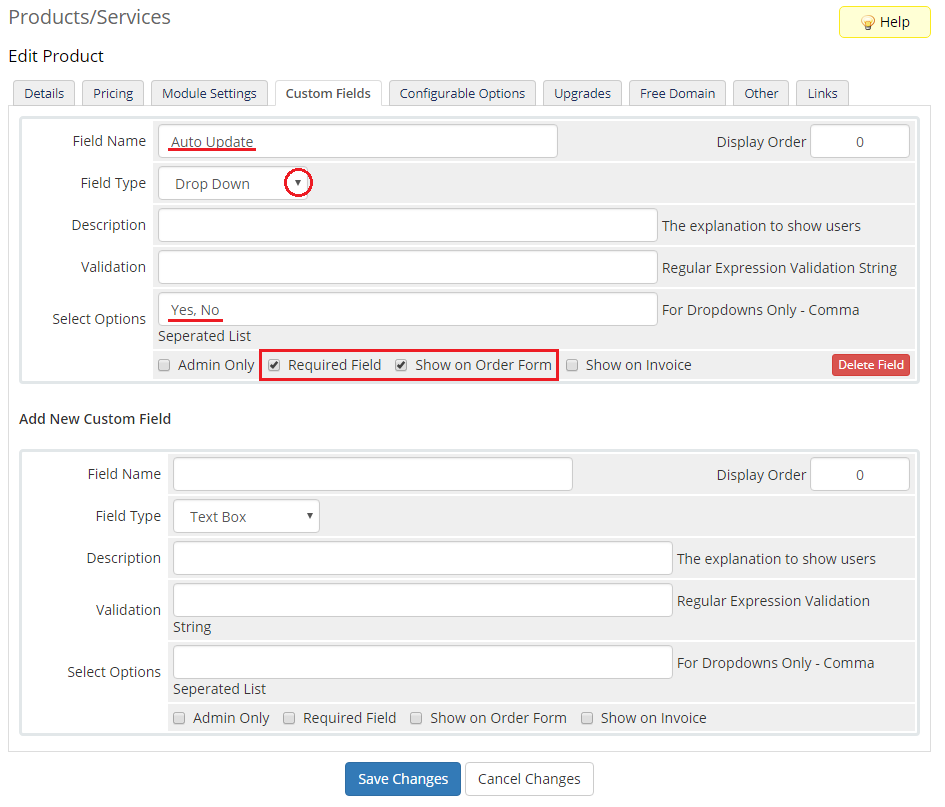
The last field is:
Set it as 'Drop Down', enter 'Yes, No' into 'Select Options', tick 'Required Field ' and 'Show on Order Form'. |
|
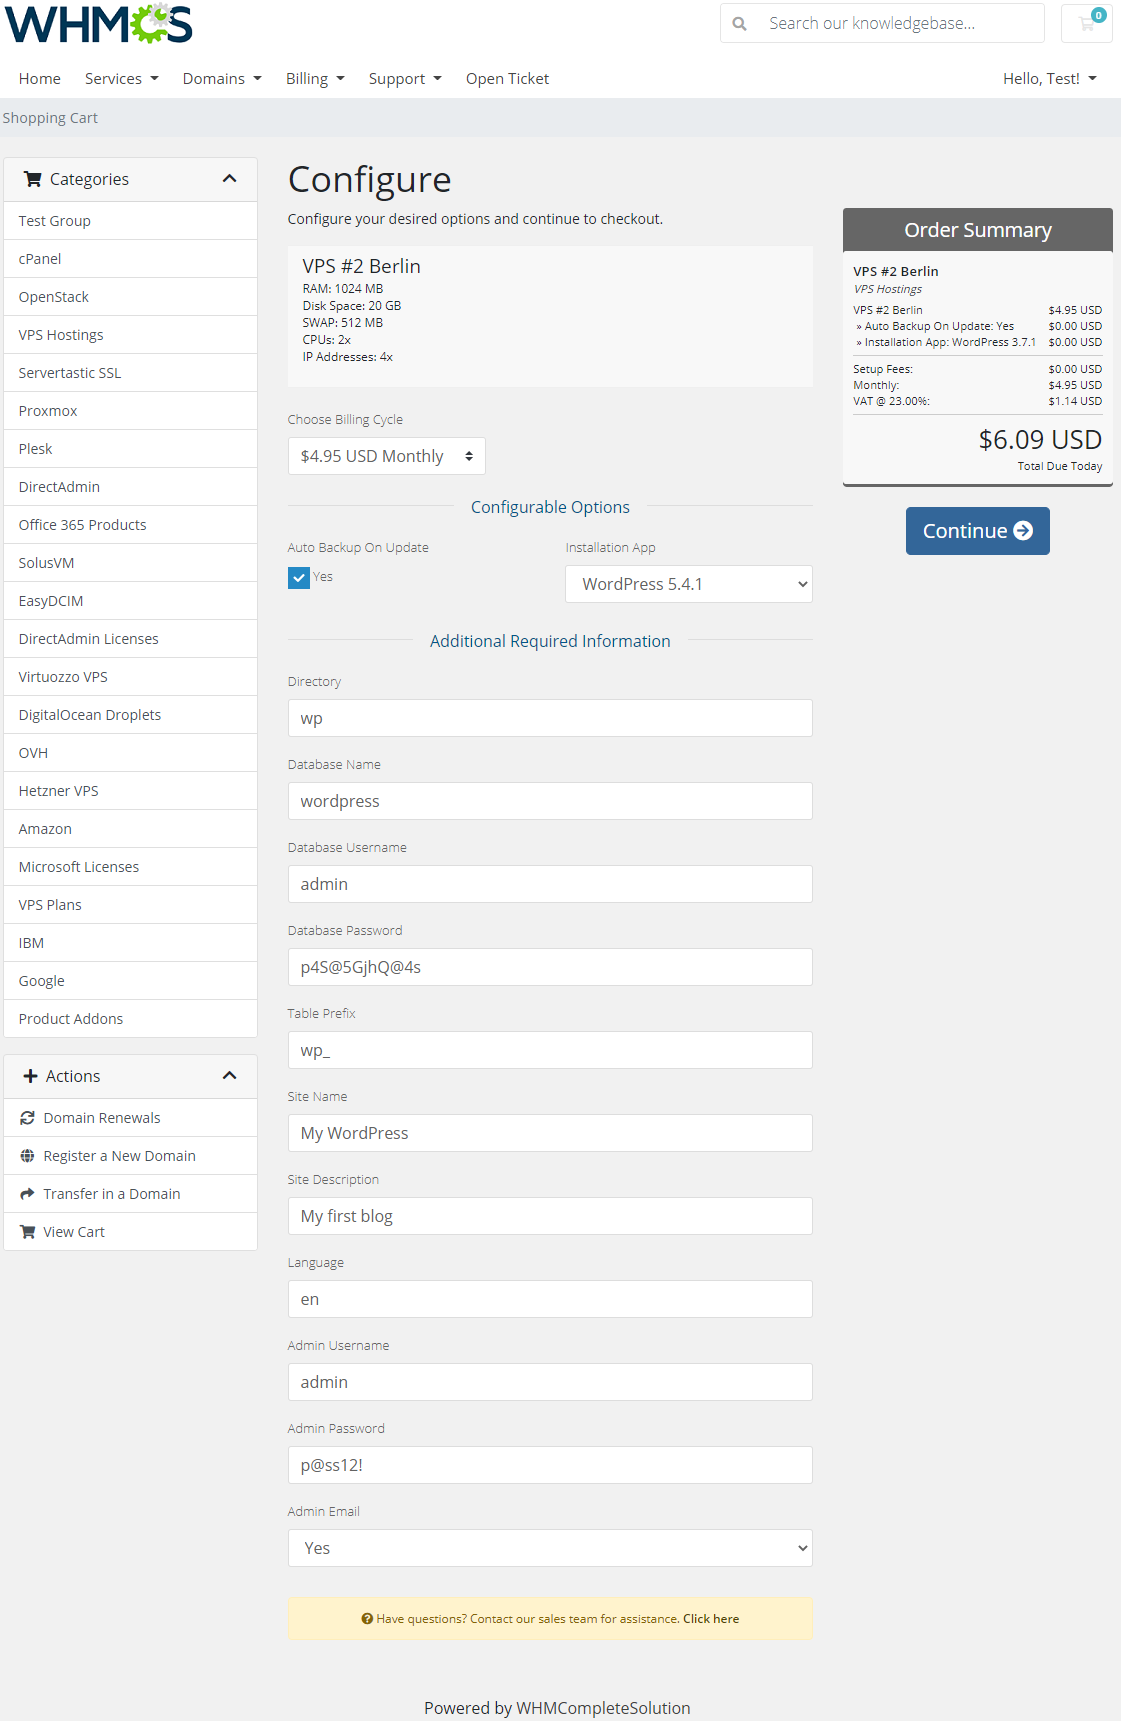
| Once you add all custom fields, they will appear while placing an order. Voila! Now your customers can personalize each application without the necessity of installing it later. |
|
Custom Softaculous Application Language
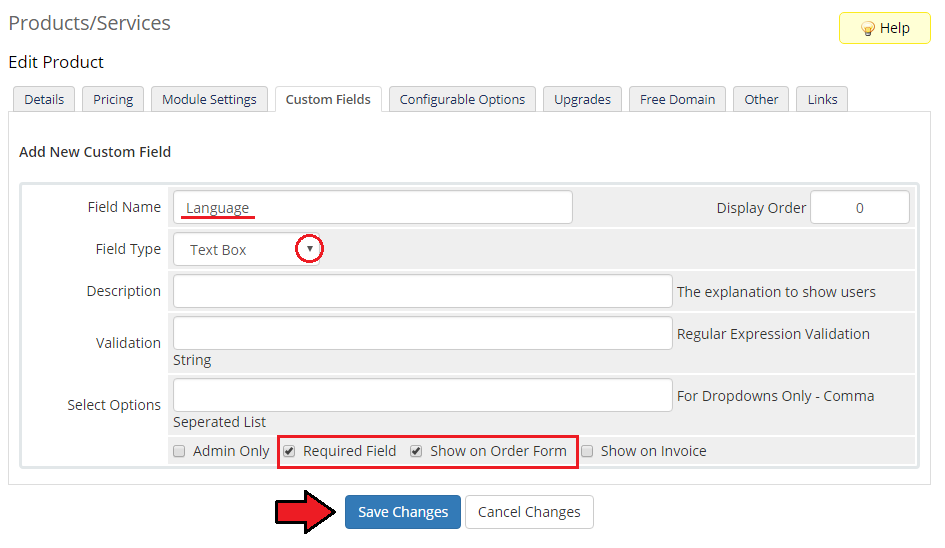
| We will show you how to quickly set custom language for Softaculous web applications. For this purpose you need to add a new custom field for your product. The field should be called 'Language' . |
|
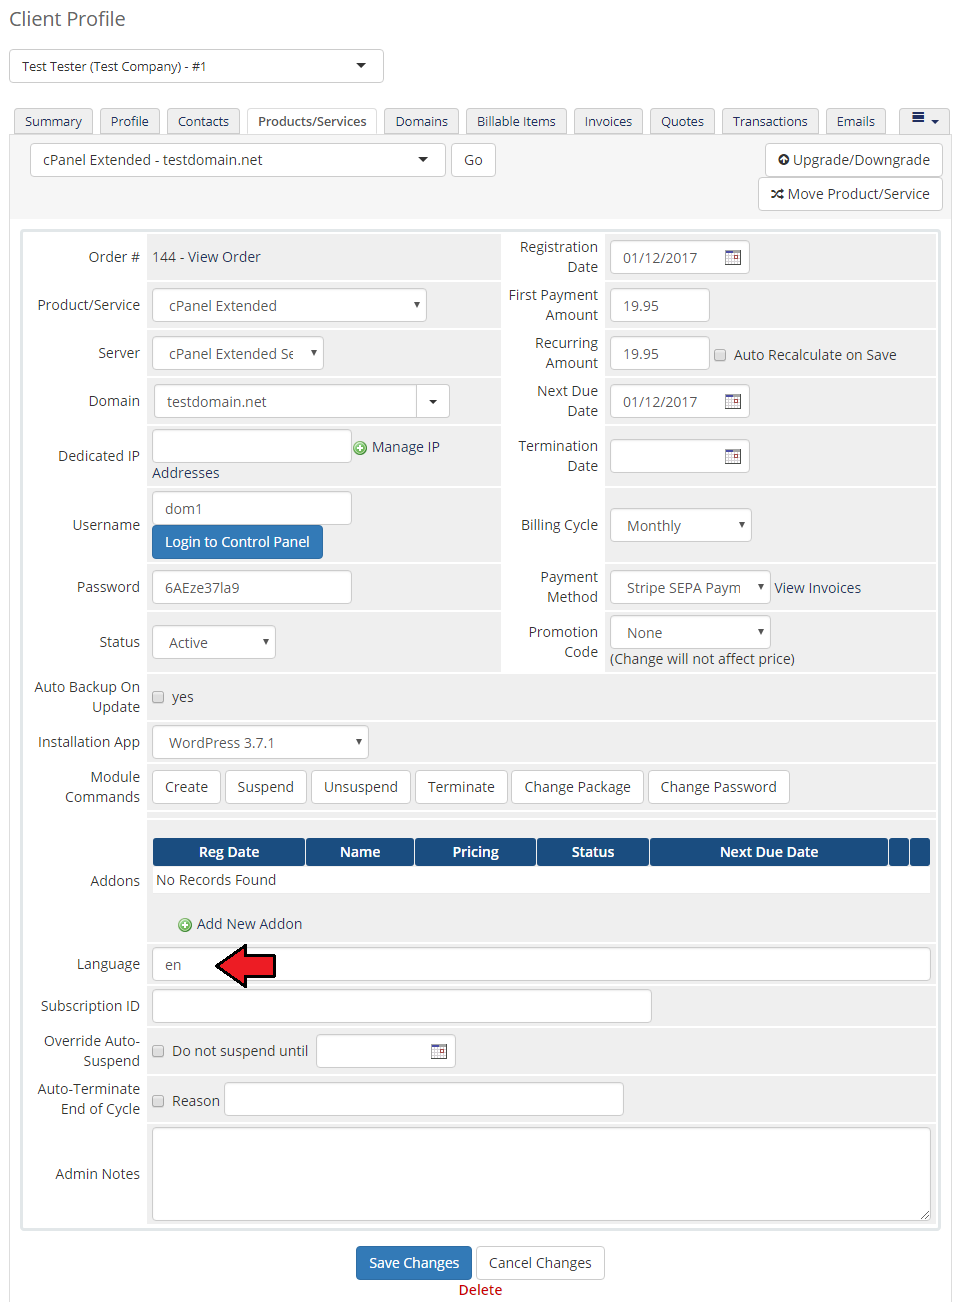
| Afterwards, go to your 'Products/Services' and check whether the 'Language' field has appeared. In order to change the default language of the application for an account, enter here an appropriate value. |
|
| From now on the just added language field will be visible to your customers as well. While installing a new application, they will be enabled to set a desired language by entering the appropriate value into the field. Here you will find a complete list of all language codes. |
Client Area
| In the following section, features available in the client area will be thoroughly discussed. |
Addon Domains
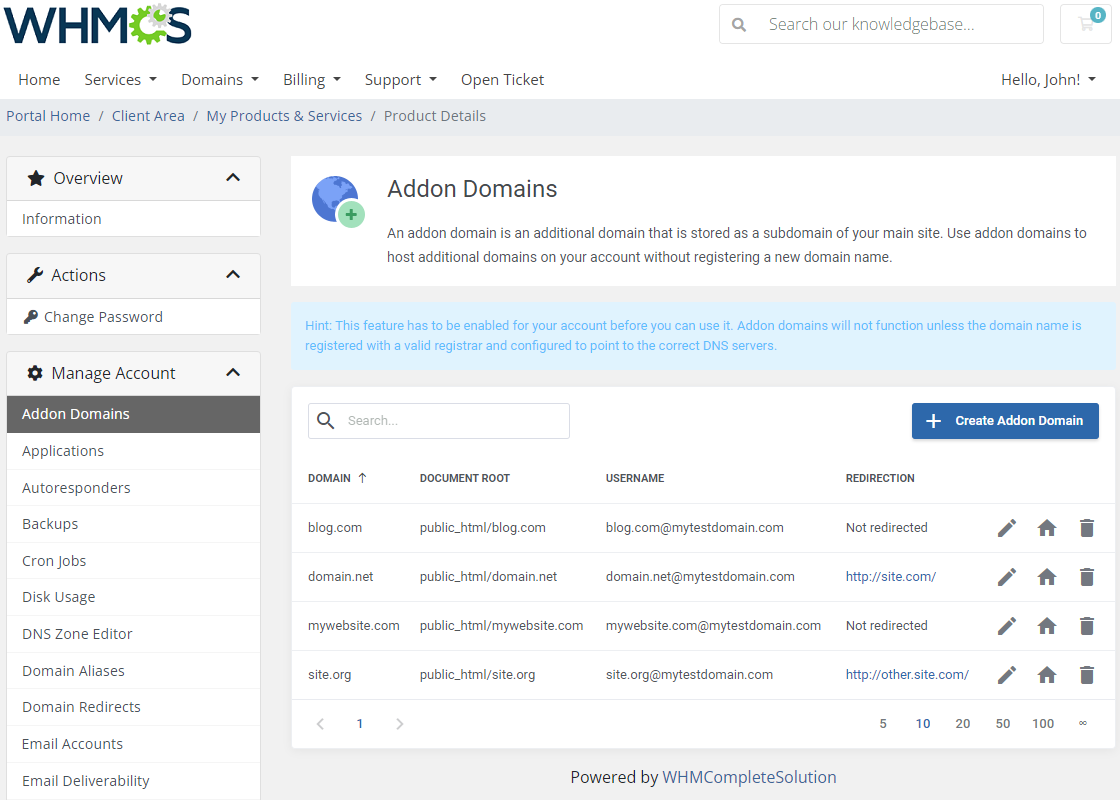
| Addon domains allow you to link the domain to a subdirectory of your account. You can view and manage addon domains, edit document root and make redirections. |
|
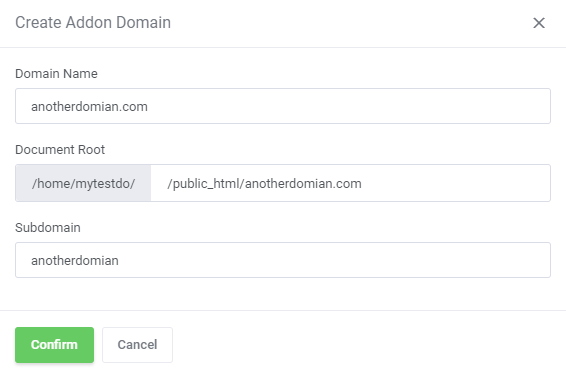
| Press the 'Create Addon Domain' button and enter the desired details. Please note that an FTP account will not be automatically created with the domain. |
|
Applications Configuration
Applications
| Install your favorite applications in a few seconds without even accessing cPanel. Use cPanel Extended For WHMCS to:
To start, simply proceed to 'Applications' , and then find the 'Install New' section. |
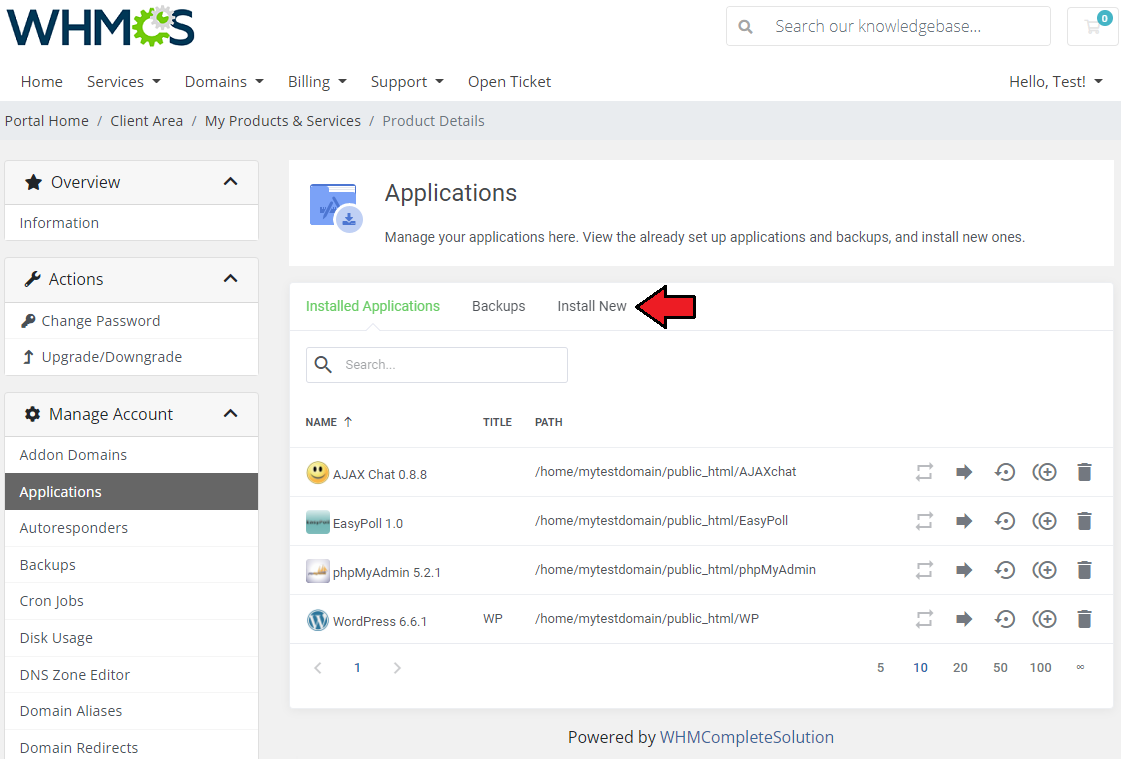
|
| Afterwards, you will see an extensive menu with application categories. |
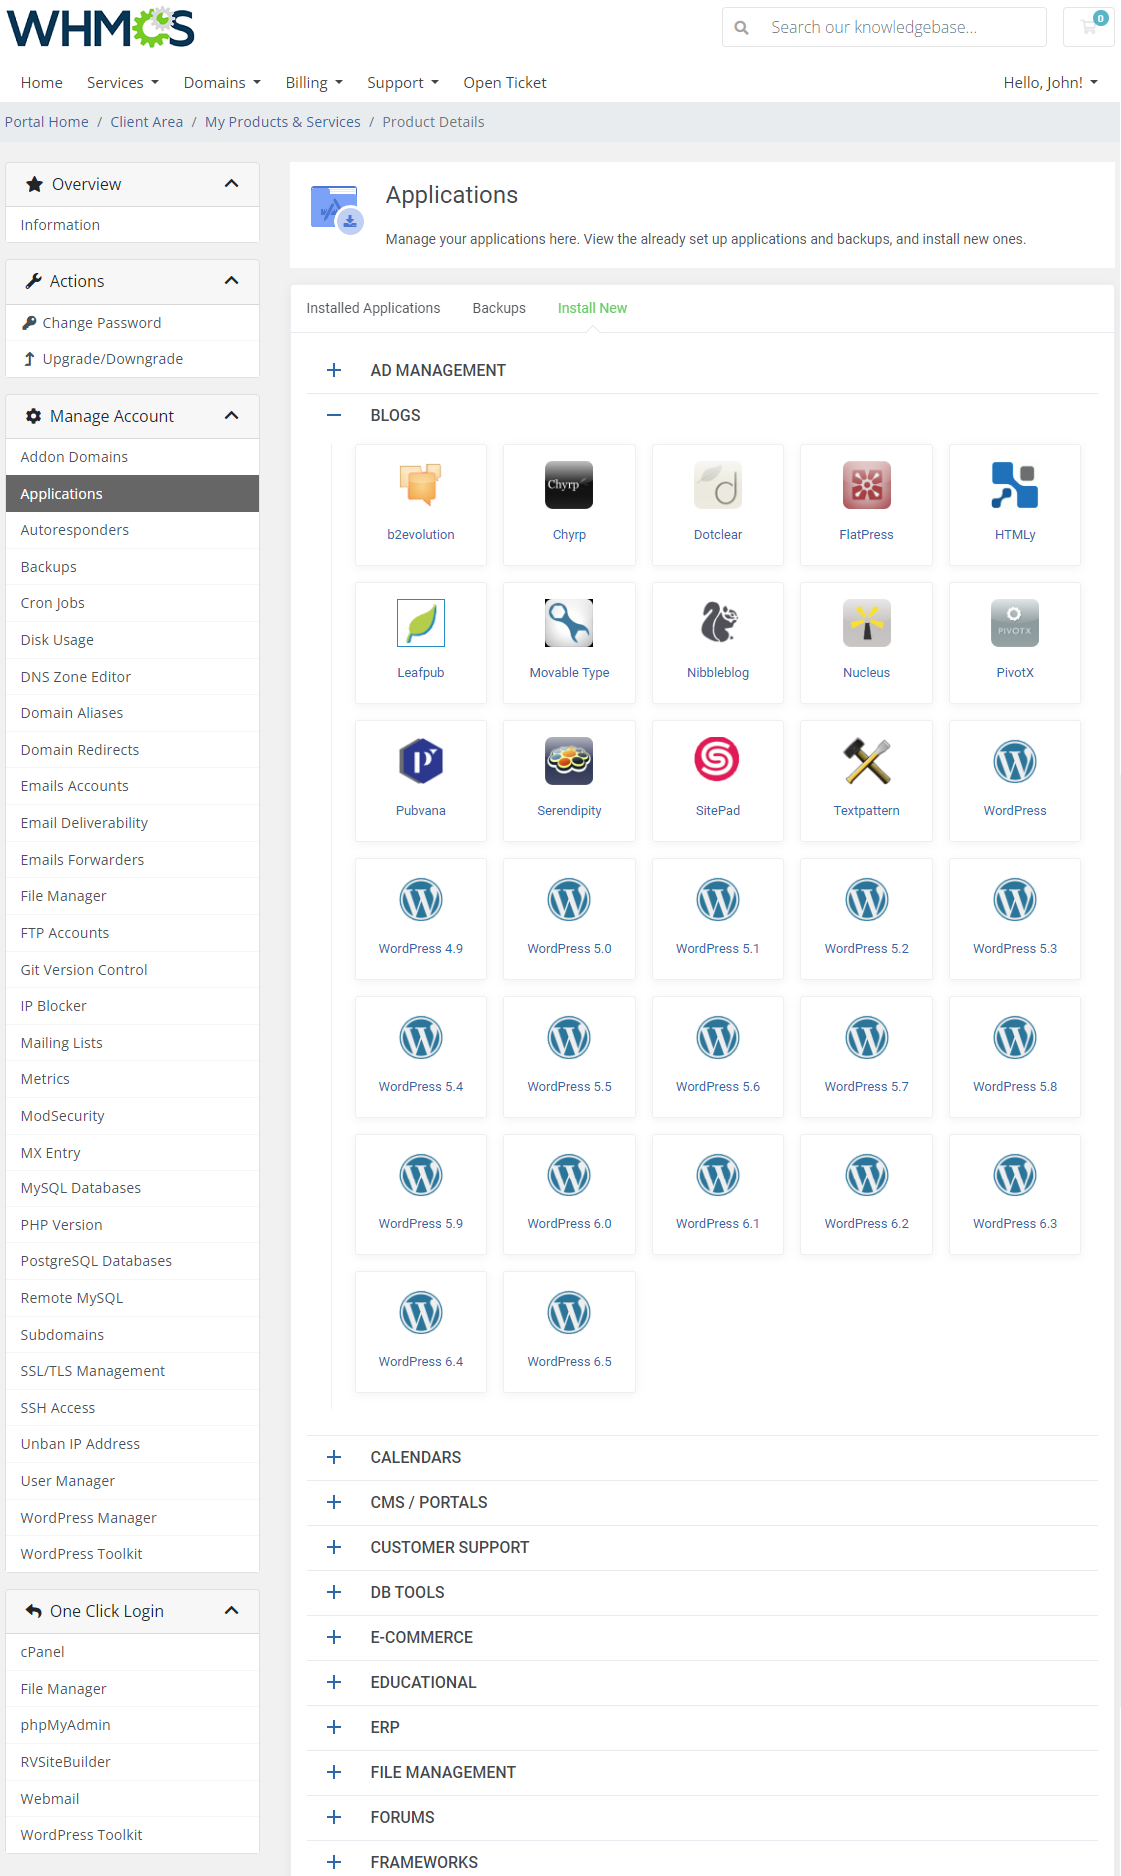
|
| Use the 'Search' box to find the application you need and install it. For presentation purposes we will install 'PrestaShop' located in the 'eCommerce' category. |
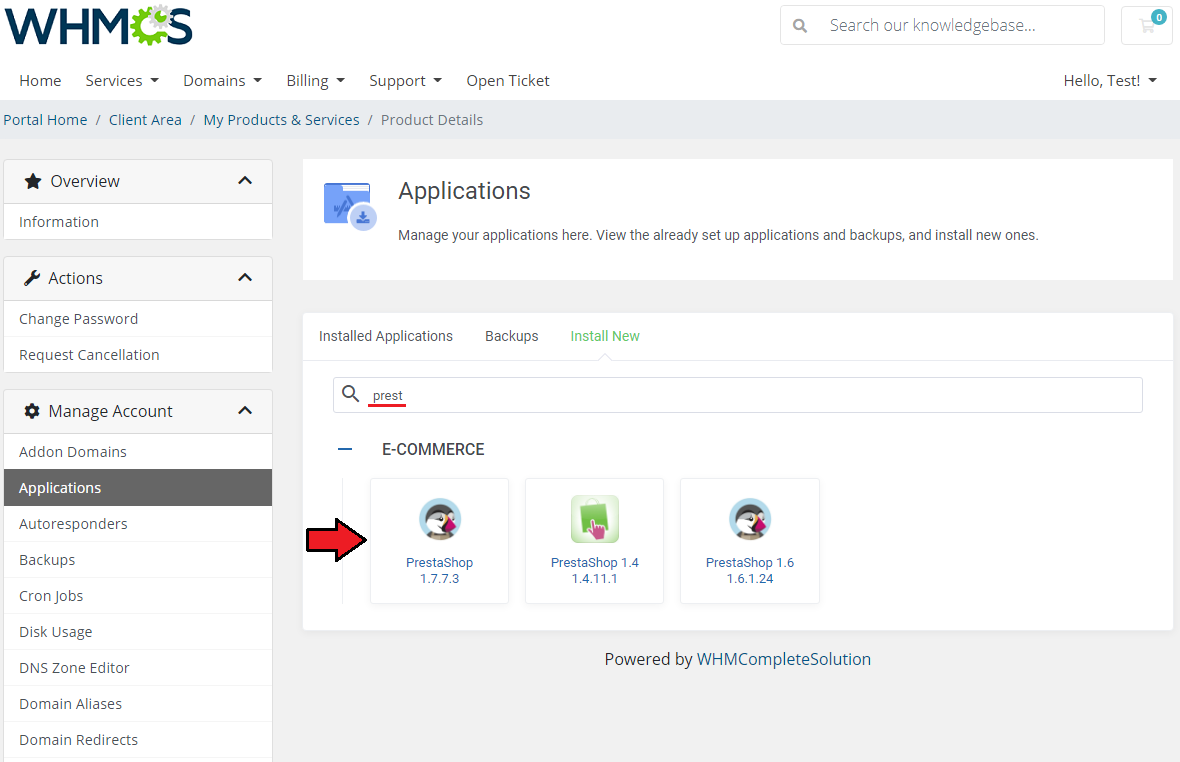
|
| Now, you have to enter necessary installation details, login details and other required data. Then press 'Create' button to follow. Wait for the 'Success' notification. |
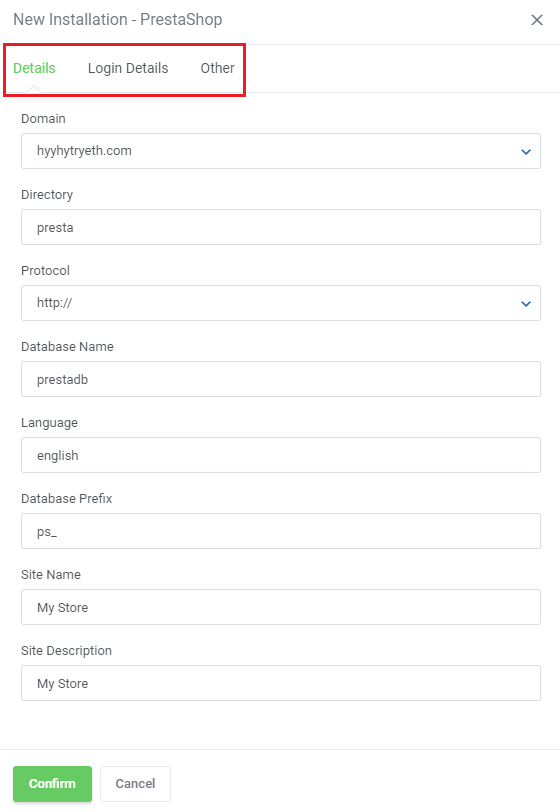
|
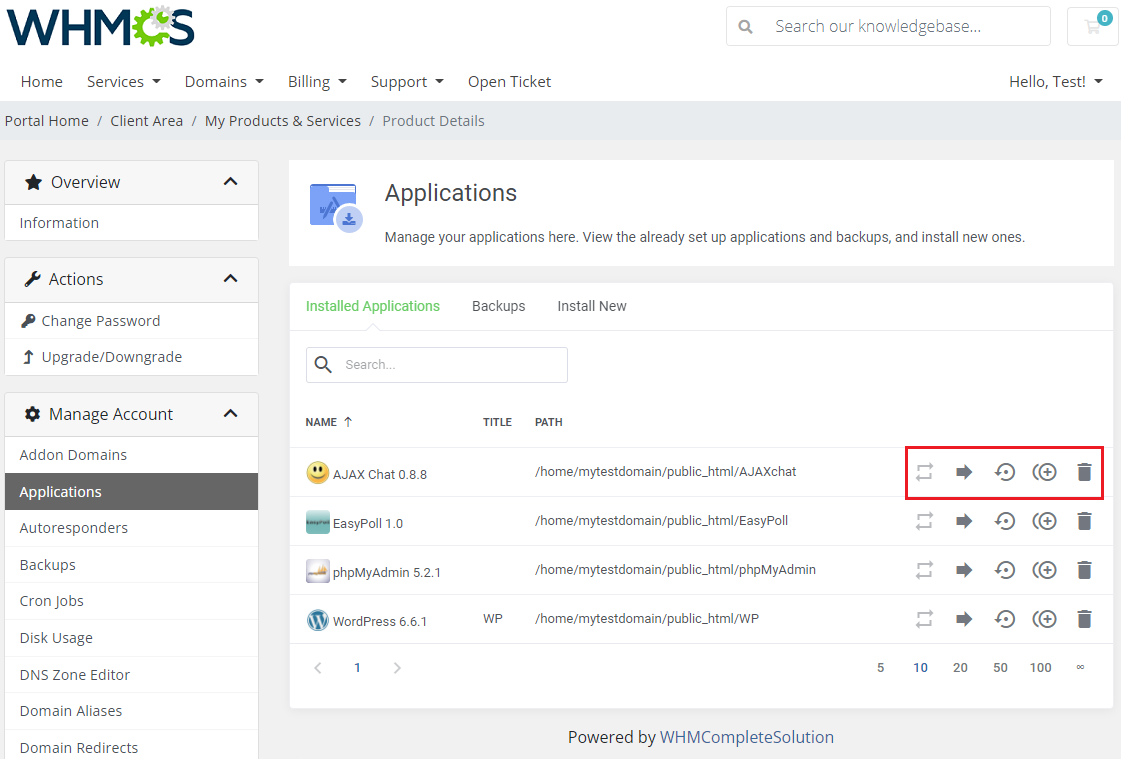
| View the list of your installed applications by clicking on the 'Installed Applications' tab and manage the application. Here you will find the name of the application, its path, size and available actions:
Note 1: Please be aware that creating staging applications, generating backups and cloning may take even up to a few minutes and the results are not visible instantly. Note 2: There are few applications available in Softaculous, which cannot be cloned nor staging instances created. These two options are not available on the list in case of such apps. |
|
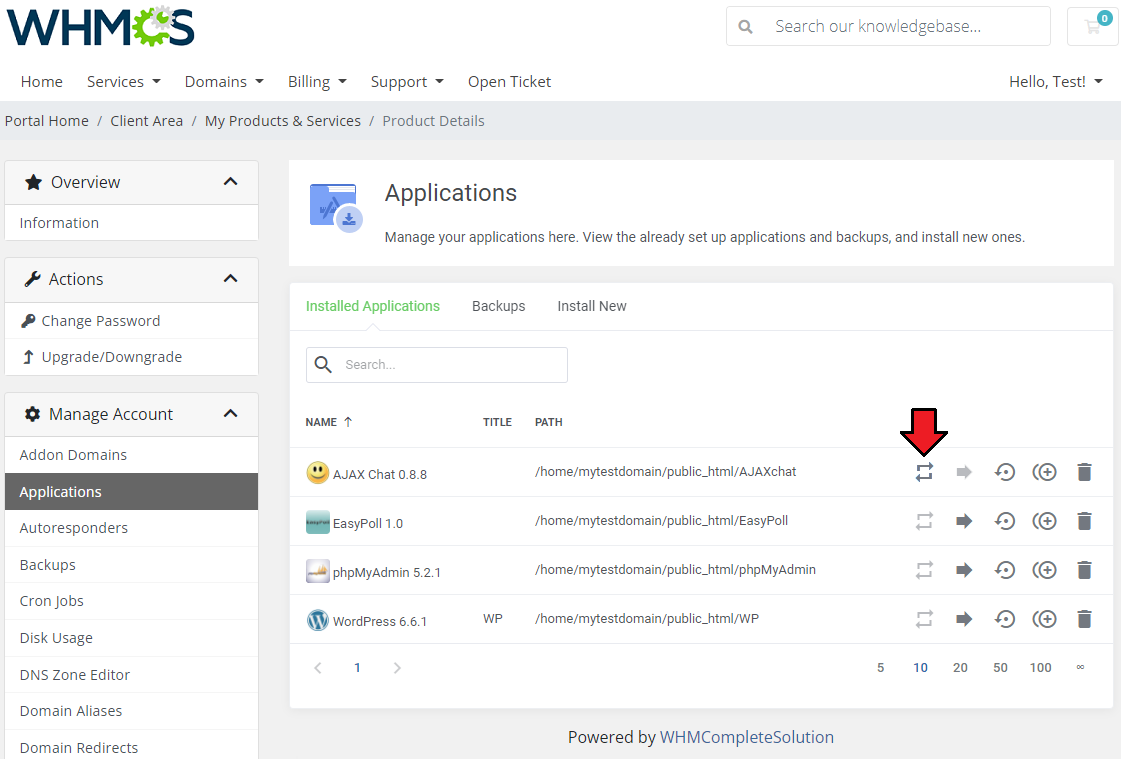
| For staging applications, there is an extra option available to push such application instance to the live environment. Simply press the marked button. Please keep in mind that it might last a short while before the application appears on the list. |
|
Application Backups
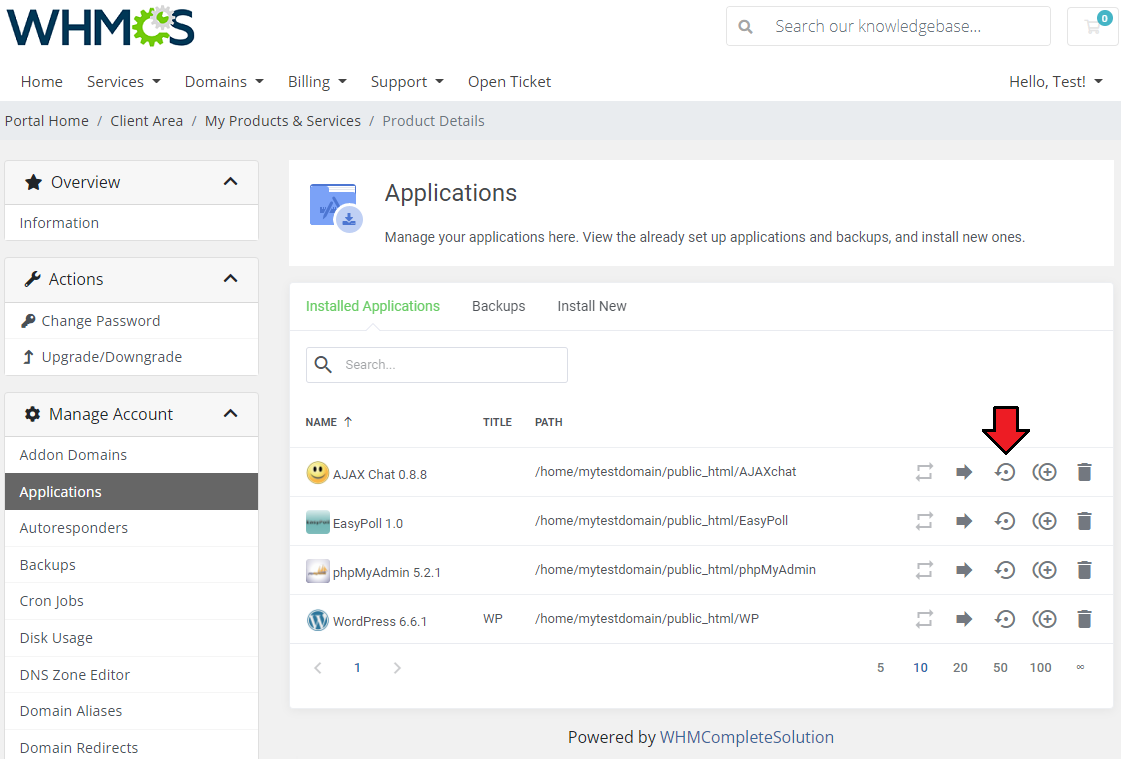
| You can also create a backup of your installation. To do so, simply press the 'Create Backup' button next to the installed application. |
|
| Confirm the action and backup generation will start immediately. |

|
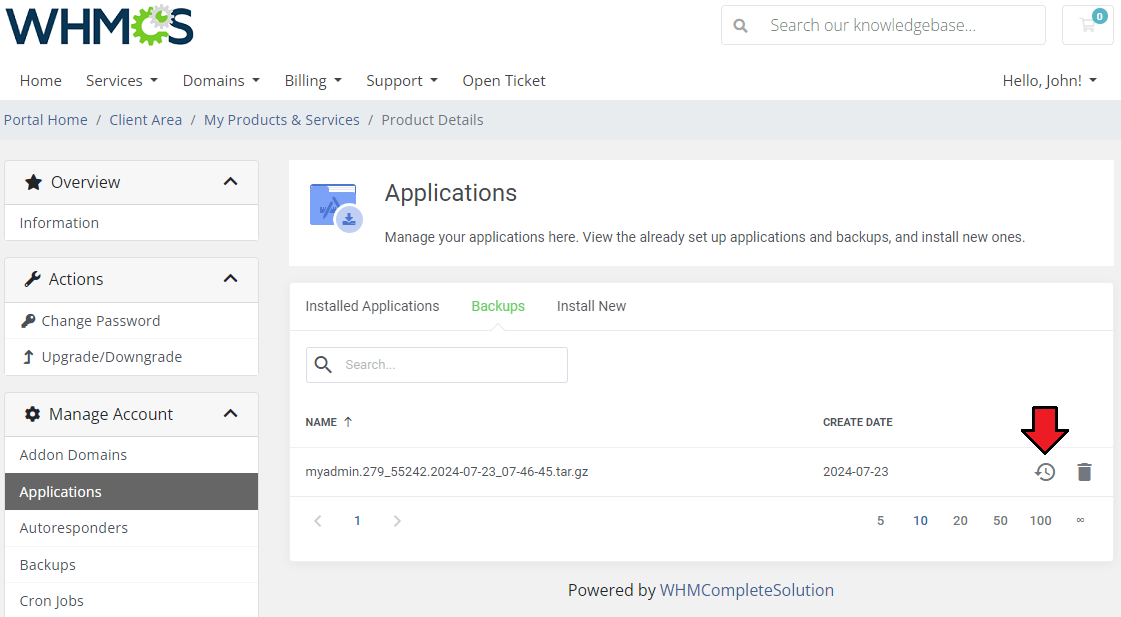
| After a moment you should receive a message confirming that the operation has just started and will be completed in a short while. Once you have created a backup of your application, proceed to the 'Backups' tab. |
|
| You can also let your customers create automatic backups for application updates. To do this, go to 'Addons' → 'cPanel Extended Center' → 'Features' → 'Configuration' and enable Auto Update Backups. |
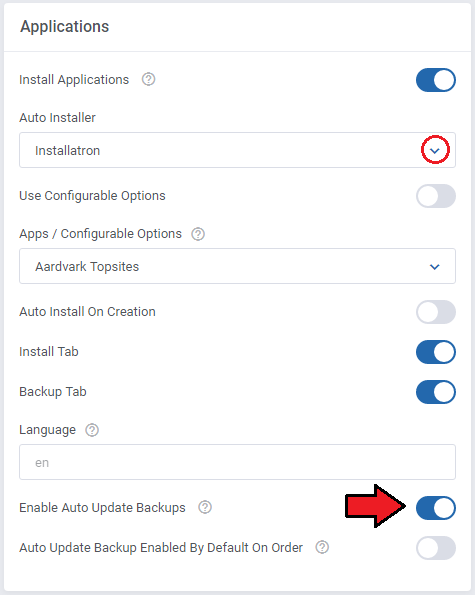
|
| Then, when a client installs a new application, it will be possible to toggle the option for automatic update backups and restore them if the application update fails. |
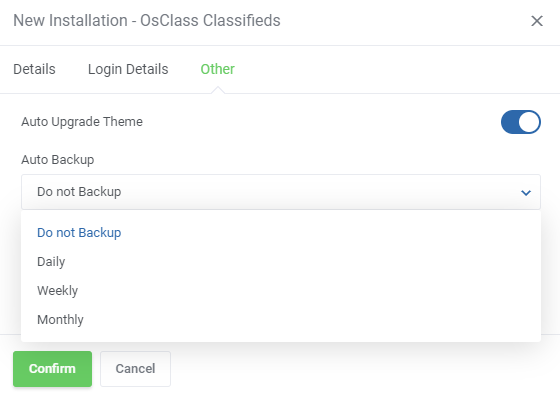
|
Autoresponders
| In this section you may compose and add extremely useful default messages. They will be automatically sent as a response message when you have no access to your mailbox. |
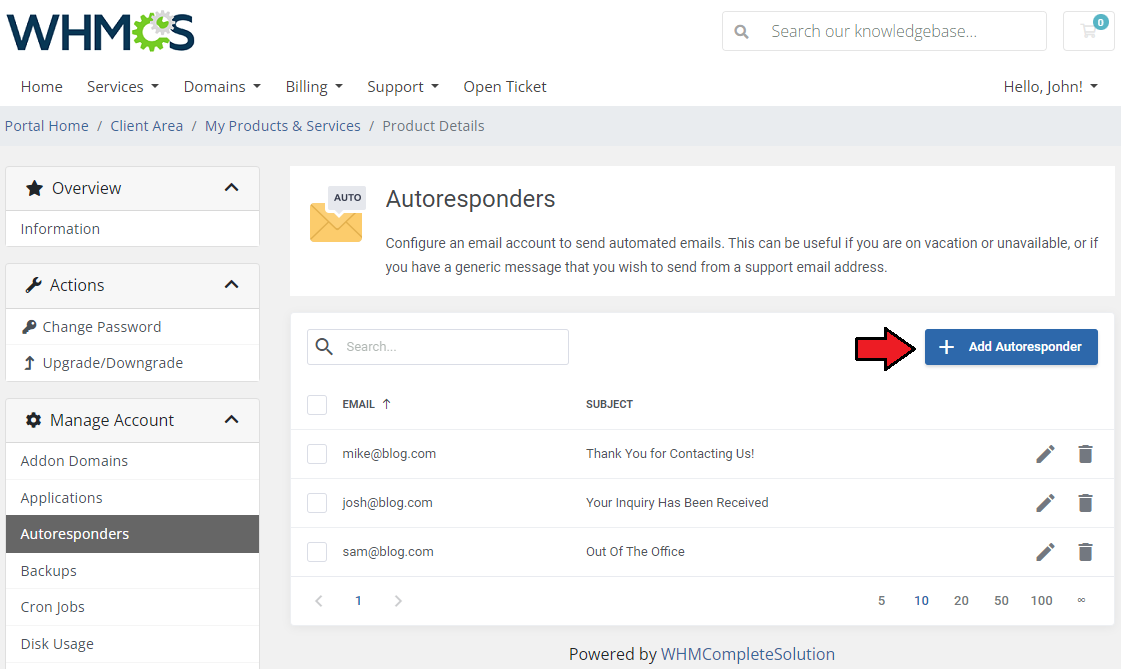
|
| Fill out all the required information. Define whether to start the autoresponder immediately or introduce custom starting time. In the same way, define when to stop using this particular autoresponder. |
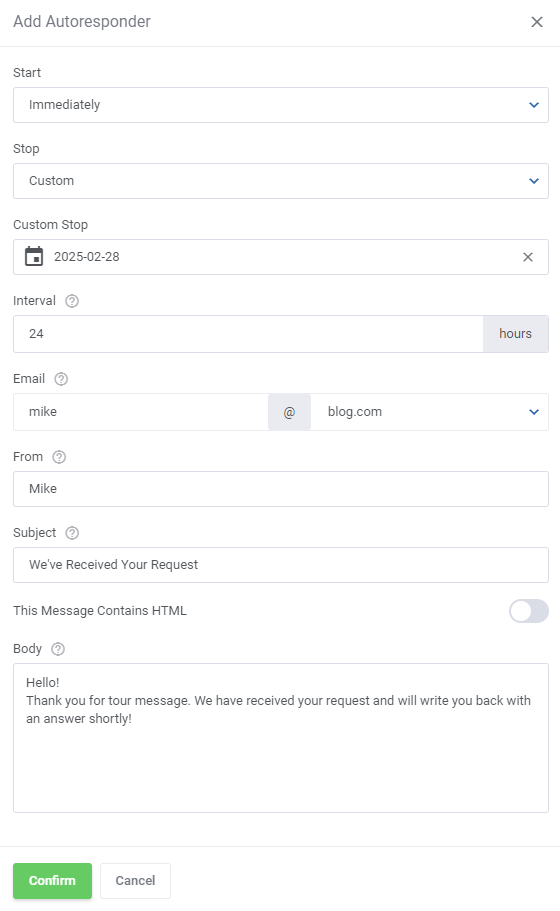
|
Backups
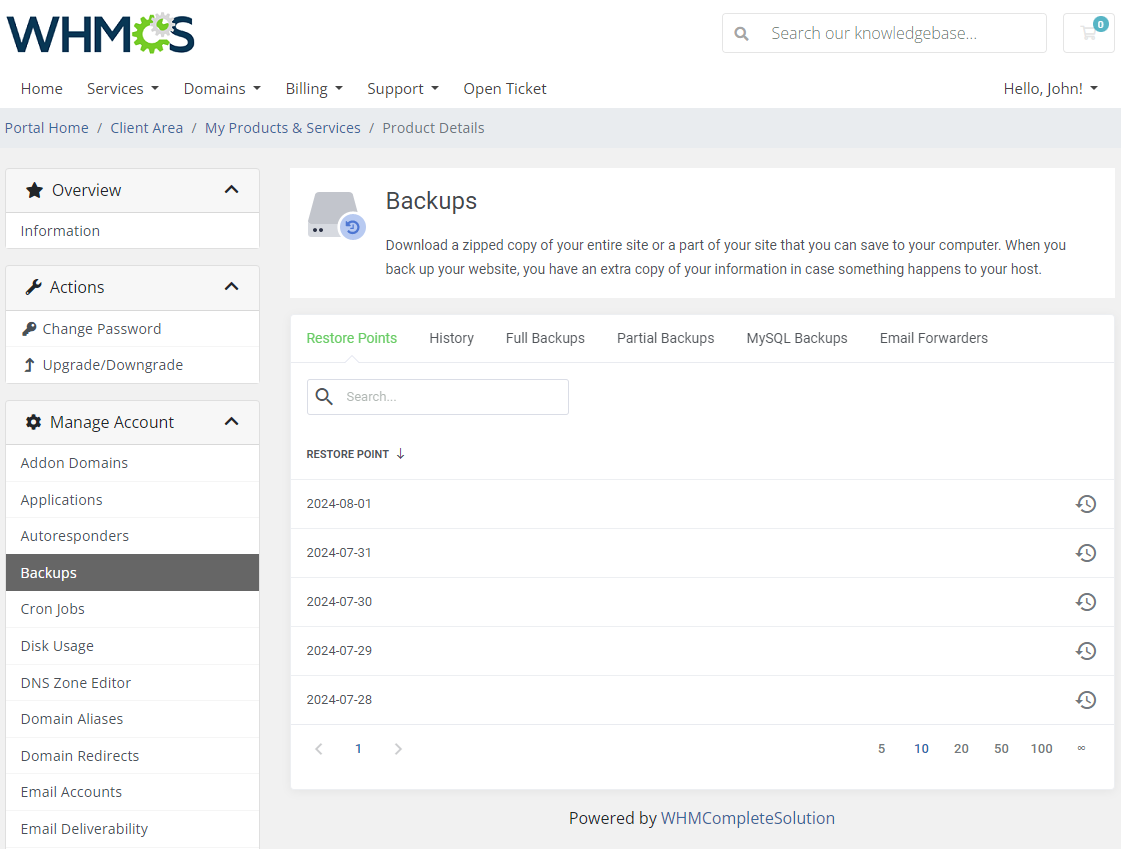
| All backups generated automatically are displayed in the page under 'Restore Points' and 'History' tabs. To restore a backup, choose the desired elements and press 'Restore' . |
|
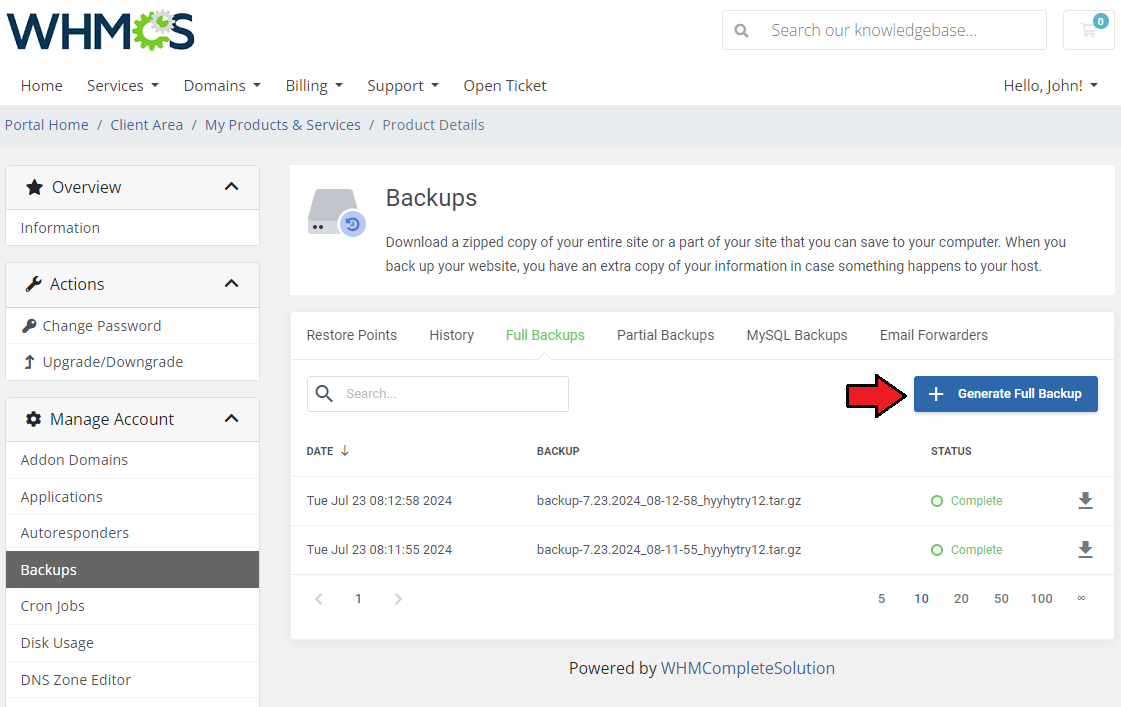
| You can make backups and download your entire cPanel settings or only a part of them. To generate a full backup, press 'Generate Full Backup' . |
|
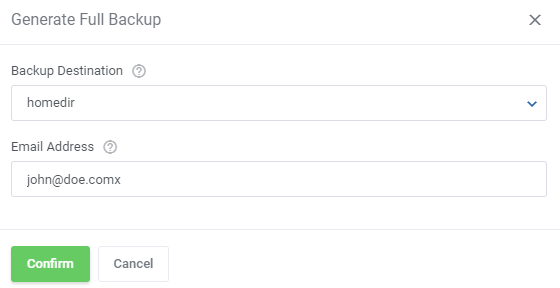
| Afterwards, choose 'Backup Destination' from a dropdown menu. Optionally, you can also fill in an email address to which a notification about the backup will be sent. |
|
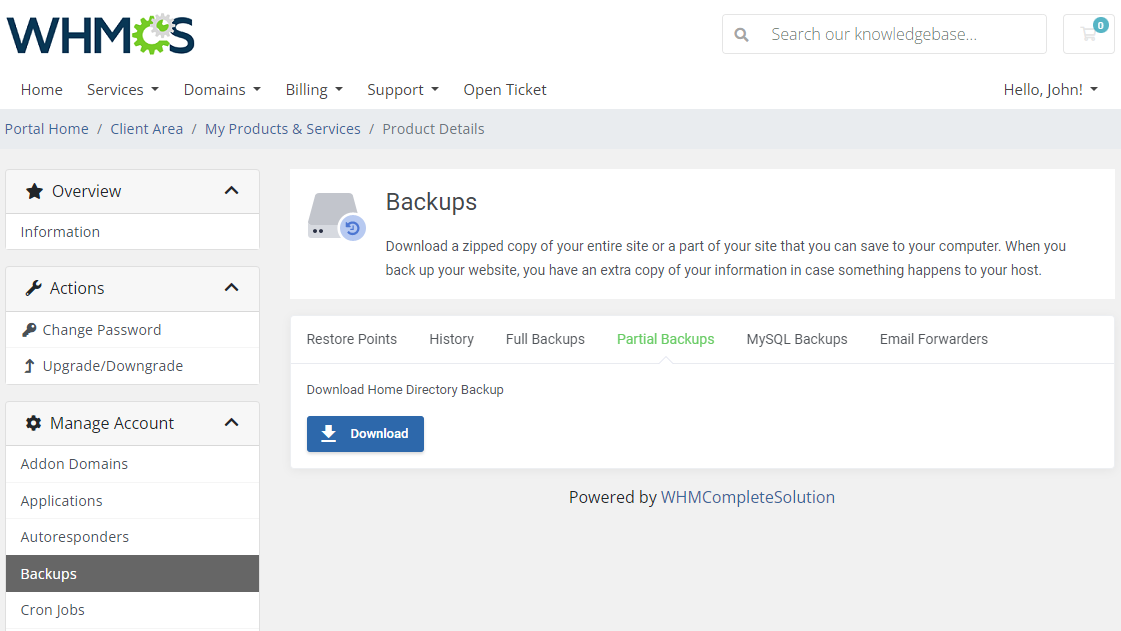
| To download a backup, simply press the 'Download' button. The process should start immediately. Partial backups are generated during the download process. |
|
| Note that if you have created any MySQL databases or email forwarders, you can also download their backups from the corresponding tabs. |
Cron Jobs
| Configure cron jobs settings to fully automate commands and scripts on your site. Press 'Add Cron Job' to create a command. |
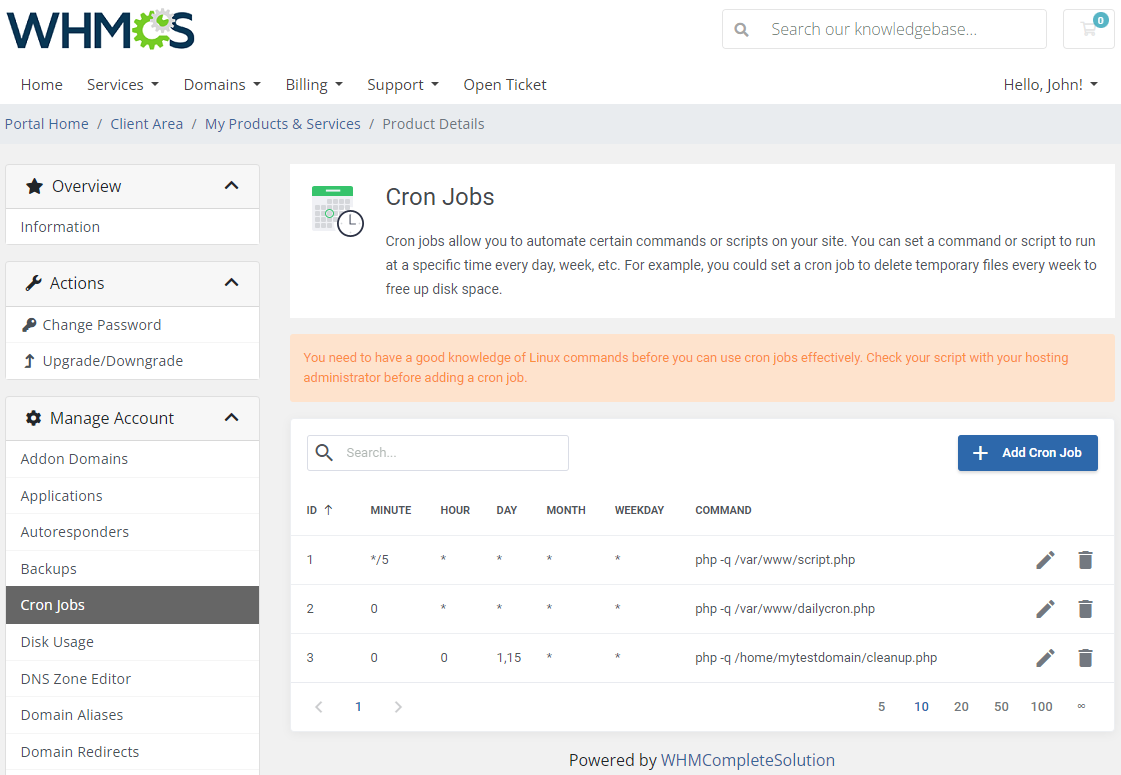
|
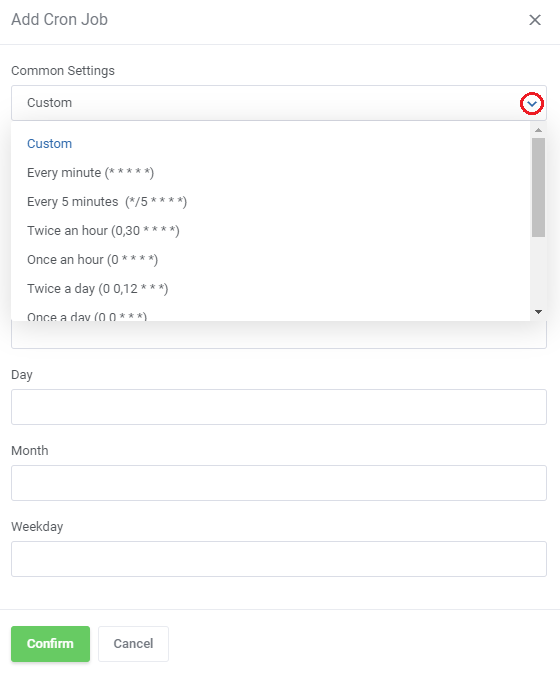
| You may create a custom command, yet make sure it is correct, or slecet one of the defined settings. In the second case, simply select need time configuration and type in the command. |
|
Disk Usage
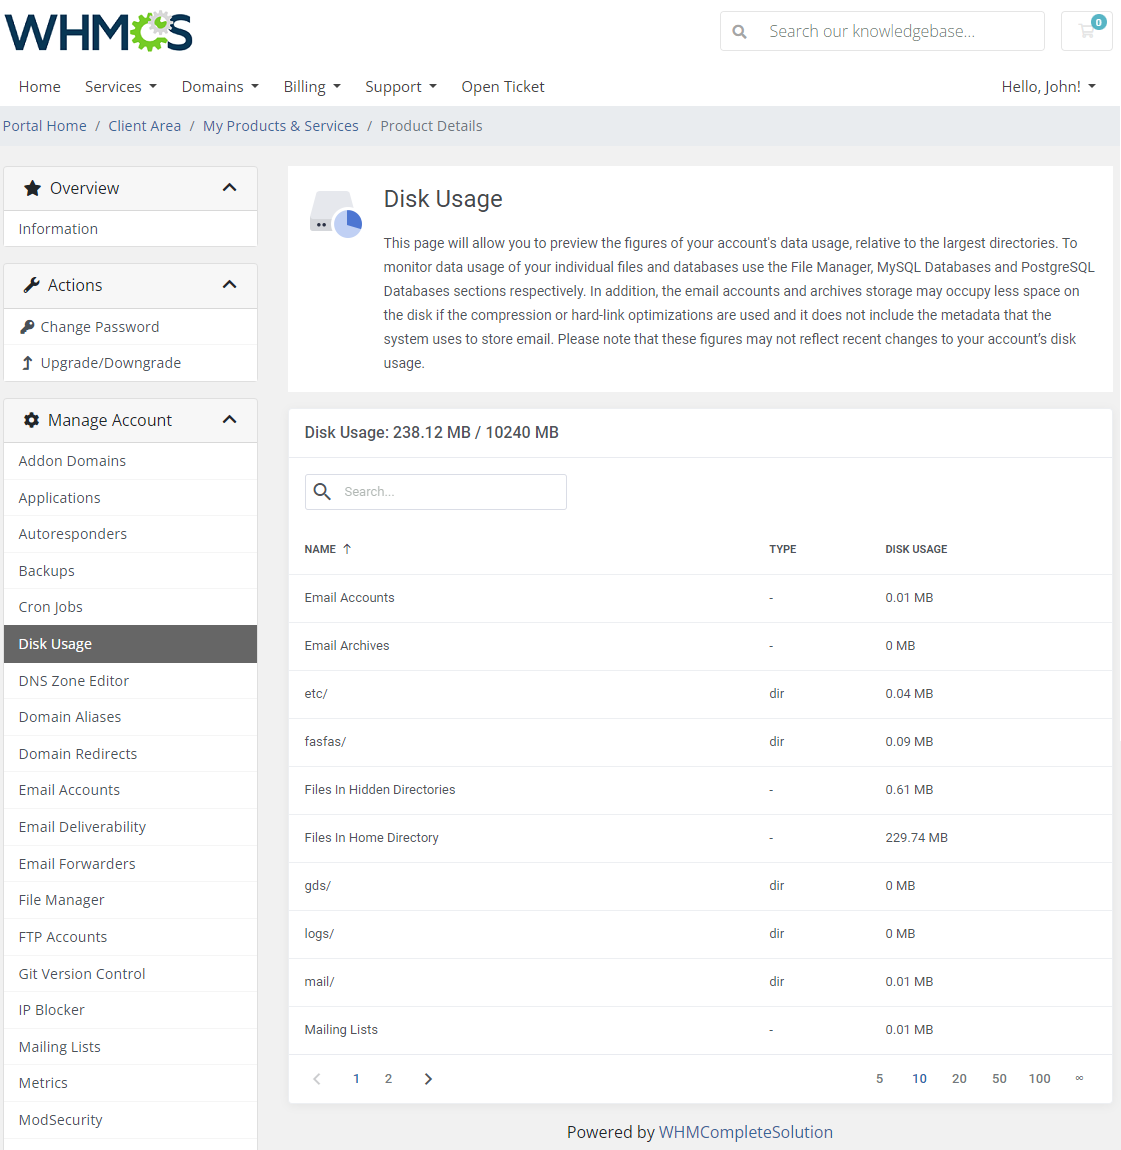
| Disk Usage section allows clients to monitor their account's available space. Please note that all presented figures are relative to the largest directory and may not reflect recent changes to the client account’s disk usage. Moreover, email account storage may occupy less space on the disk if compression or hard-link optimizations are used to save space. If you need to see usage data for individual files use File Manager tool. |
|
DNS Zone Editor
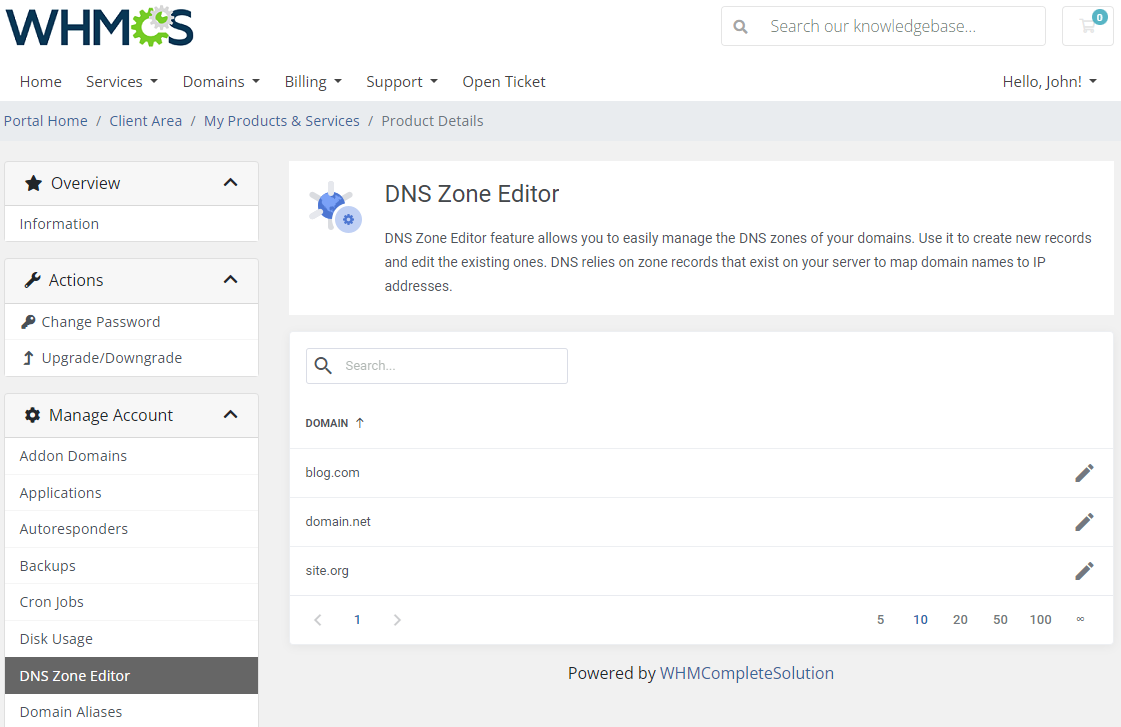
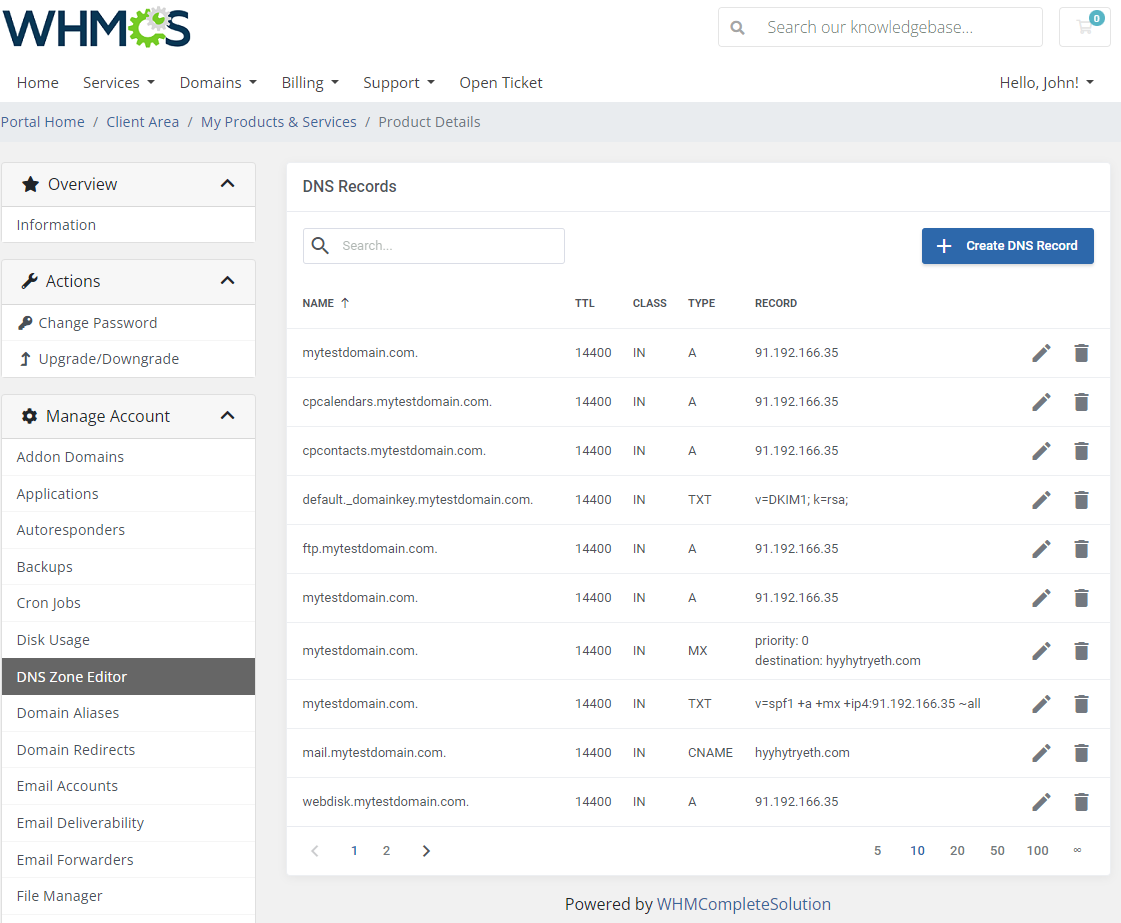
| This section gives you the possibility to manage the 'DNS Zones' of your domain easily. Press ' Edit' icon next to a single domain and you will be moved to DNS records section. |
|
| As presented below, there is a list of your existing 'DNS Zones' . You can edit them or delete if they are no longer needed. If you wish to add a new 'DNS Zone' , simply click on the appropriate button. |
|
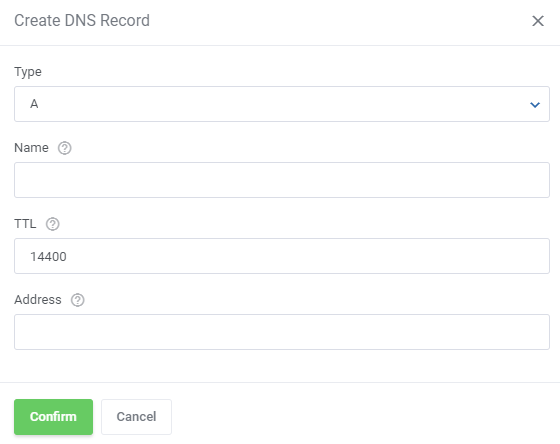
| Now, choose the type of your 'DNS Zone' and provide its name and any other required values depending on the zone type. |
|
Domain Aliases
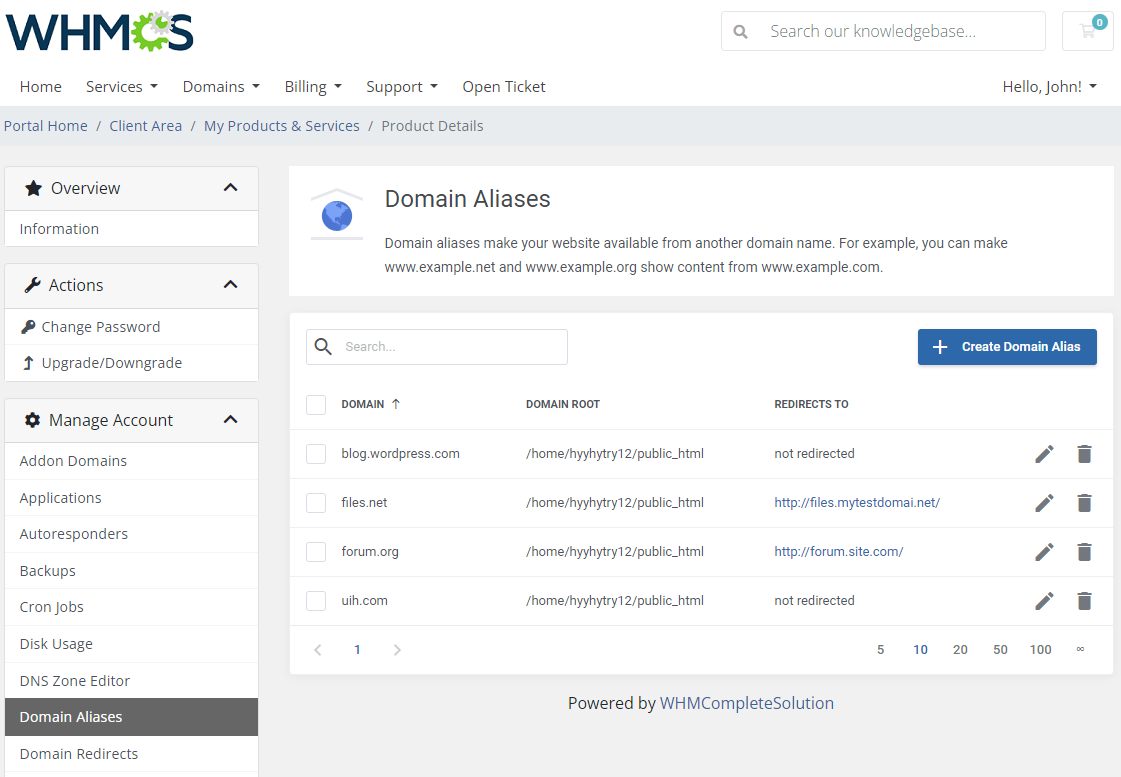
| You can add and manage your domain aliases. This option allows you to read content of one domain from another domain name. |
|
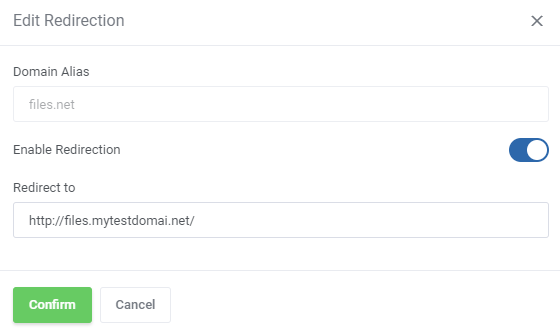
| After alias creation, you can edit it to enable and add redirection. |
|
Domain Redirects
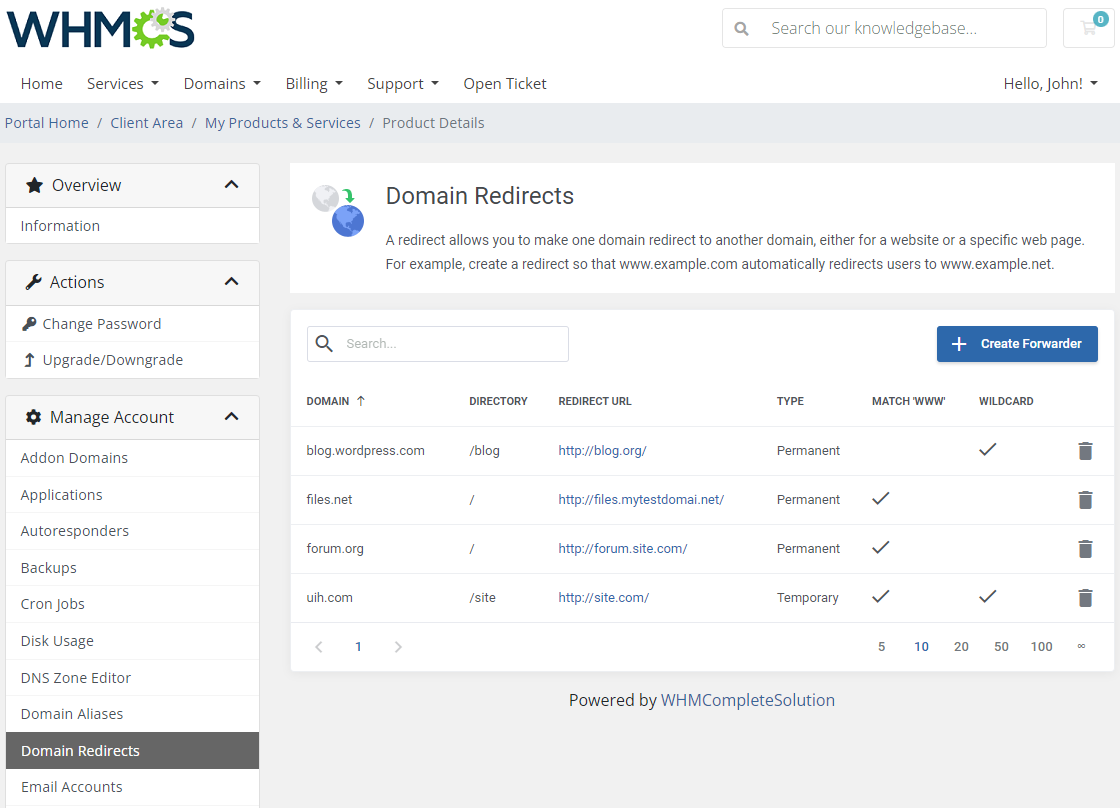
| Easy access to domain redirection options is very useful. This option allows you to redirect a specific web page to another one and display the contents of that page. |
|
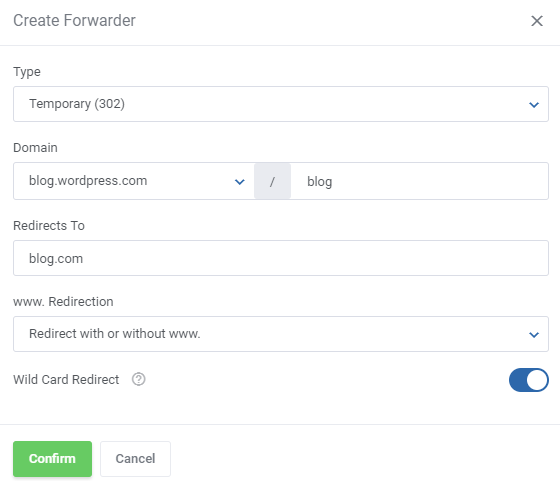
| For example, if your main domain is mytestdomain.com, you can make such the following forward: mytestdomain.com/redirect → adomainwithlongname-averylongname.com Choose the type: Permanent or Temporary; decide whether to use 'www' redirection or not; select 'Wild Card Redirect' if you need. |
|
Email Accounts
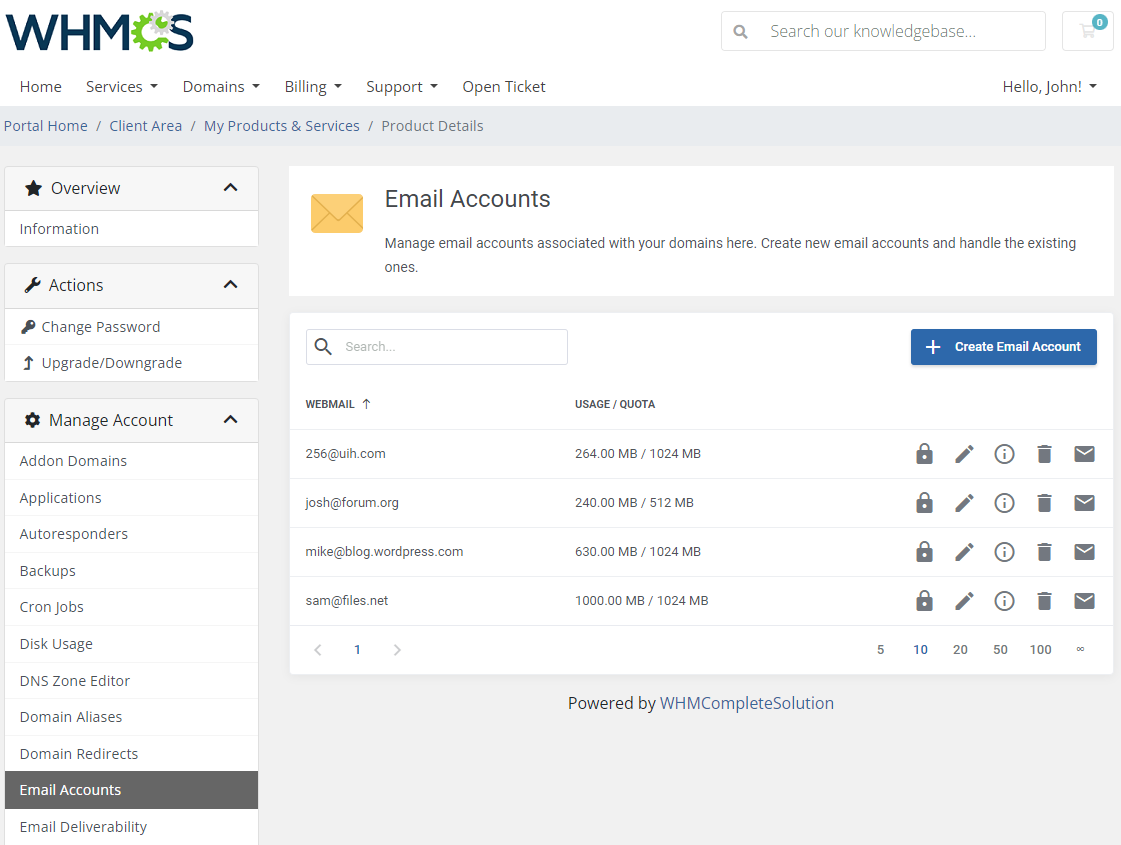
| View and edit email accounts that are associated with your domains. Use filter to find required email addresses, preview its selected quota and manage the account. |
|
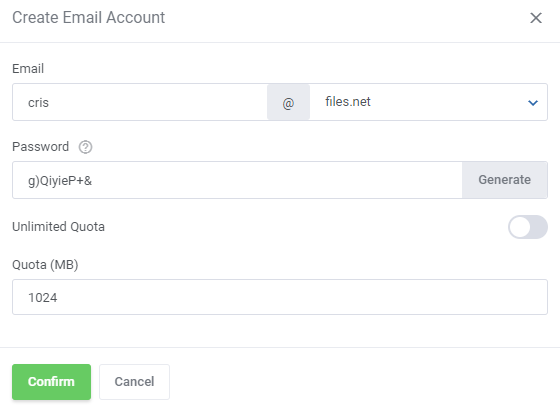
| Press 'Create Email Account' and select to which domain it should be added, type or generate password and define limited or unlimited quota. In case 'Unlimited Quota' has been disabled for the product by the administrator the visible on the screen below option will not be available here. |
|
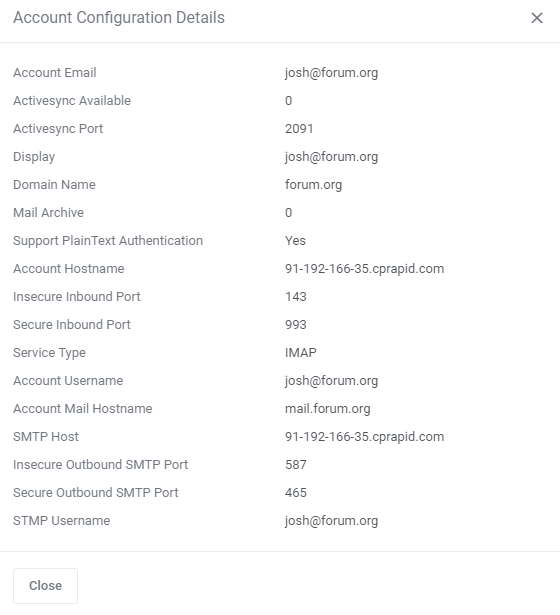
| You may also preview the email account settings on pressing the information icon. Any details on the email account, necessary to configure an external email client, are included in that place. |
|
Email Deliverability
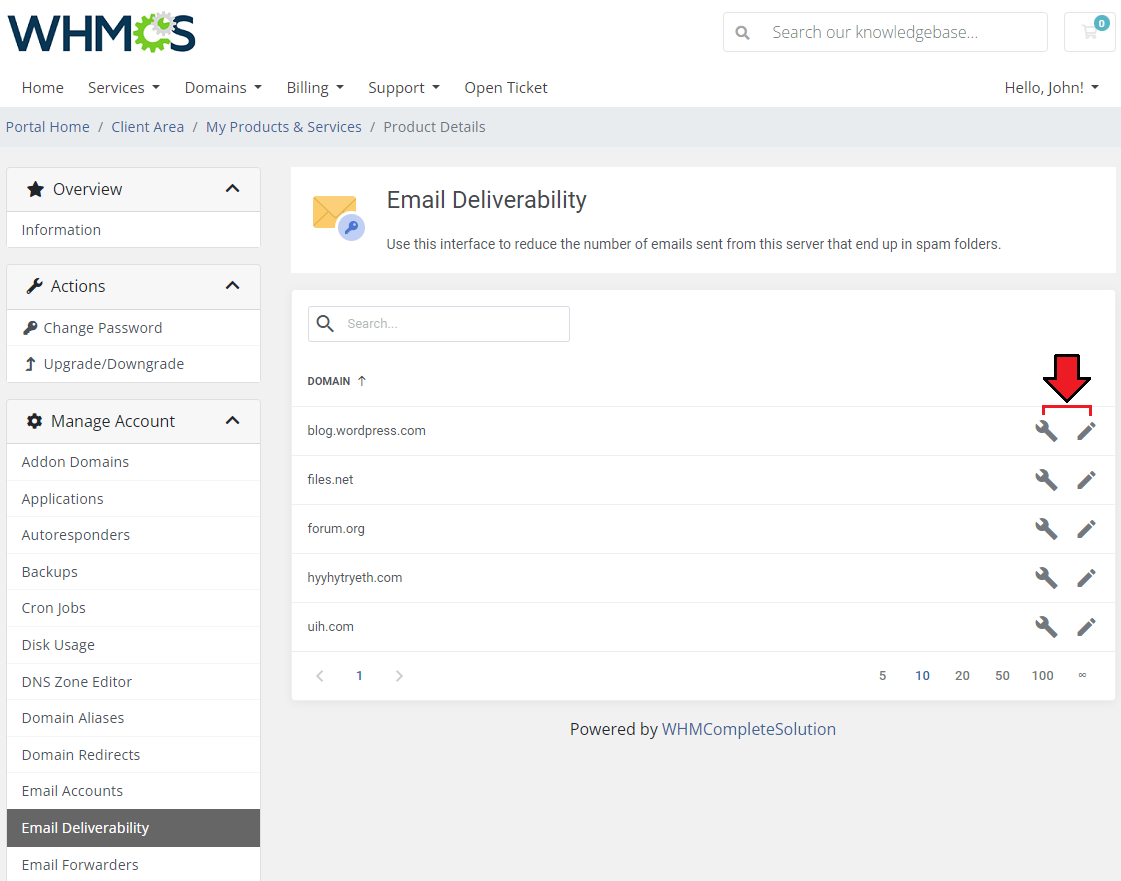
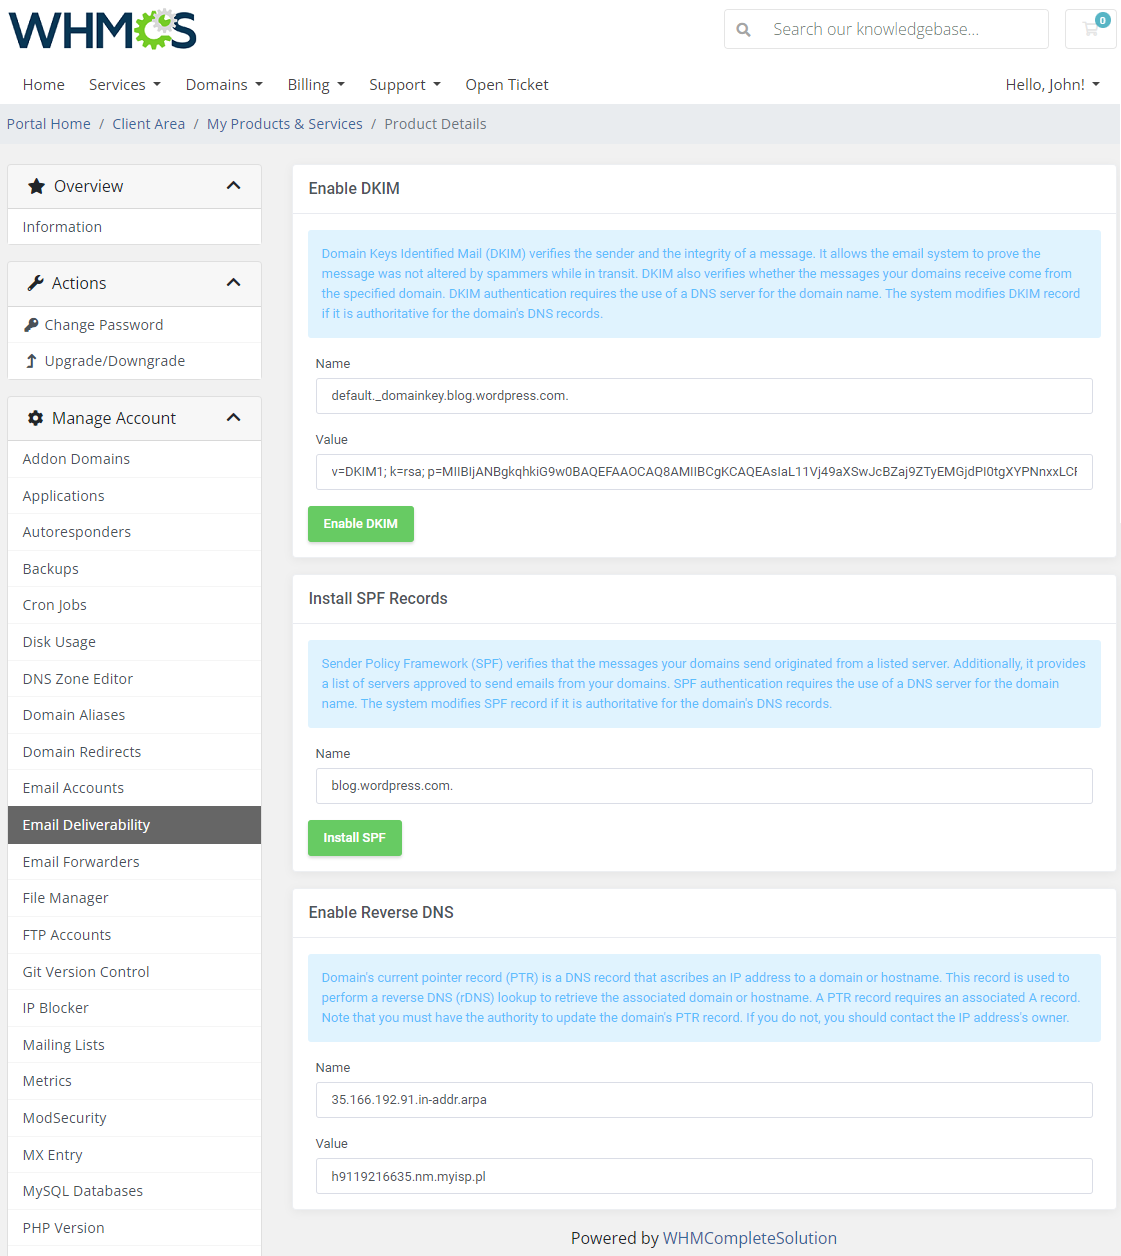
| Email Deliverability interface allows clients to reduce the number of emails sent from their server that end up in spam folders by installing recommended DKIM, SPF and PTR DNS records. There are two options available:
|
|
| After choosing the domain, the client can preview and install the suggested names and values of the records. Please note that it is recommended to evaluate beforehand whether your system is properly configured. |
|
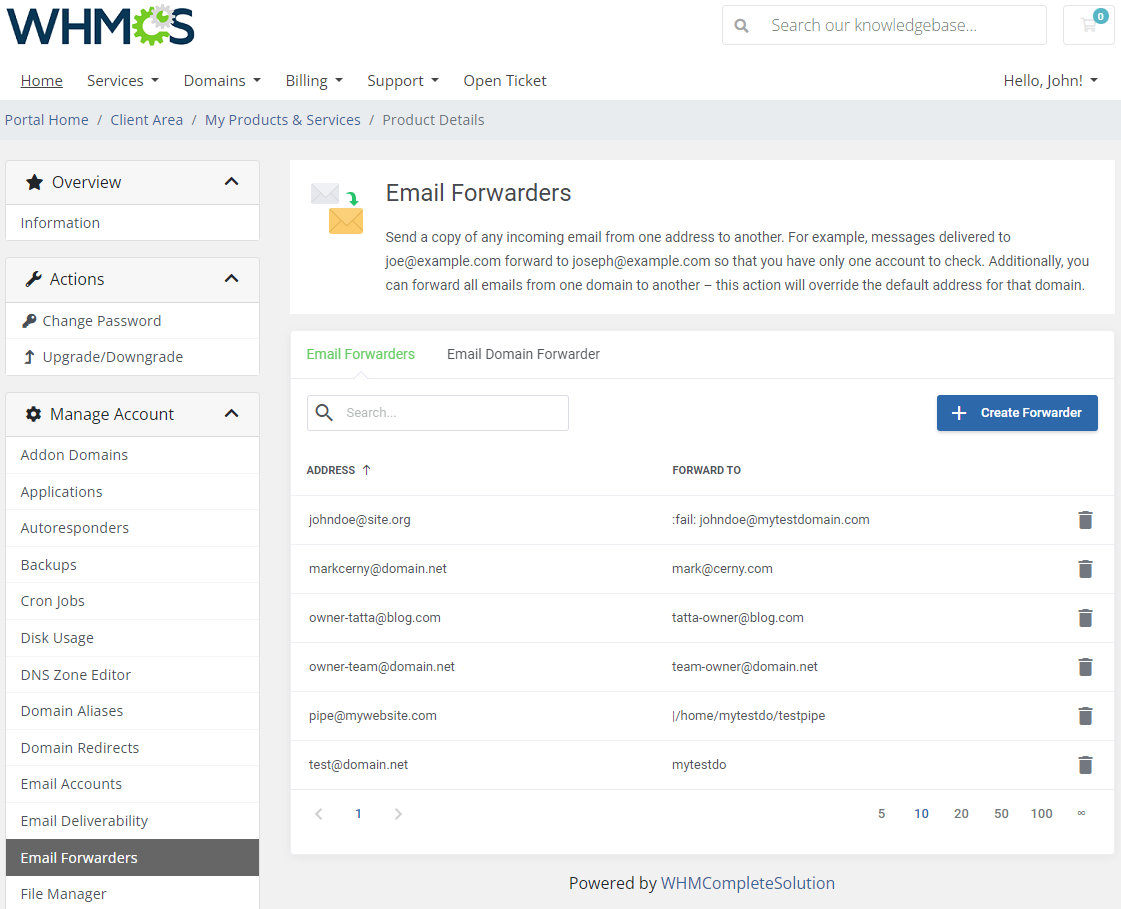
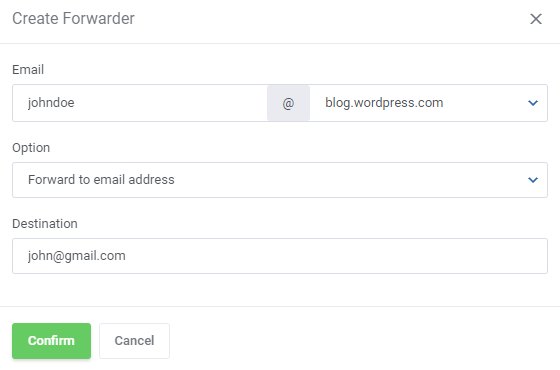
| In this section you can set up email forwarders and choose from several destination options to adjust mail forwarding perfectly to your needs. |
|
| Press the 'Create Forwarder' button, specify the forwarded email, select forward option type and define the destination |
|
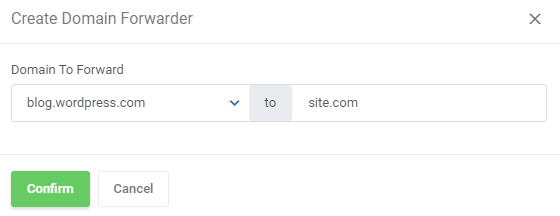
| In the next tab you can also add email domain forwarders to forward email from one domain to another. Note: Forwarding a domain's email will override the default address for that domain! |
|
File Manager
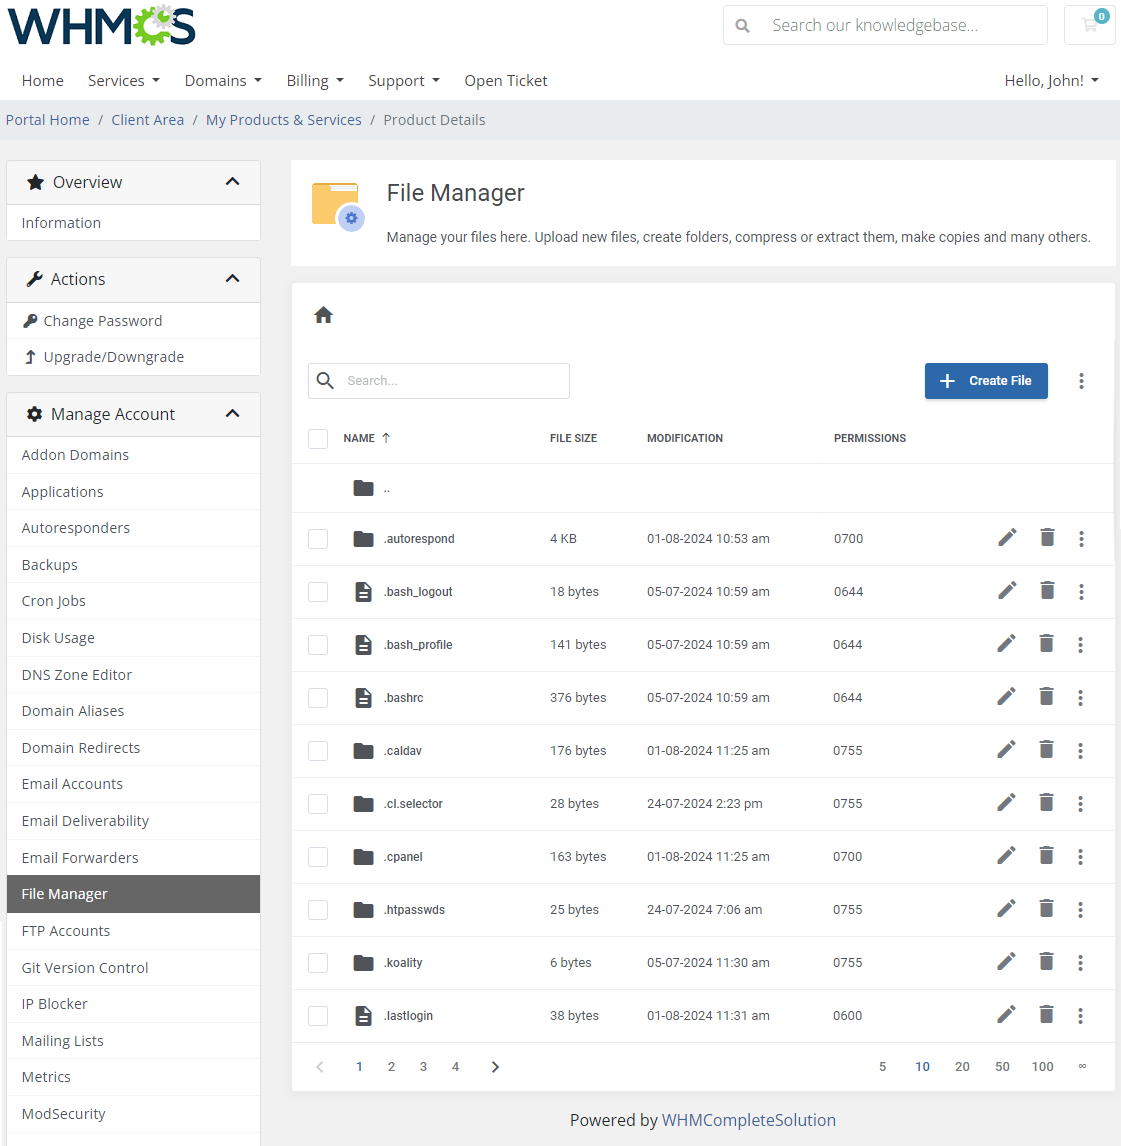
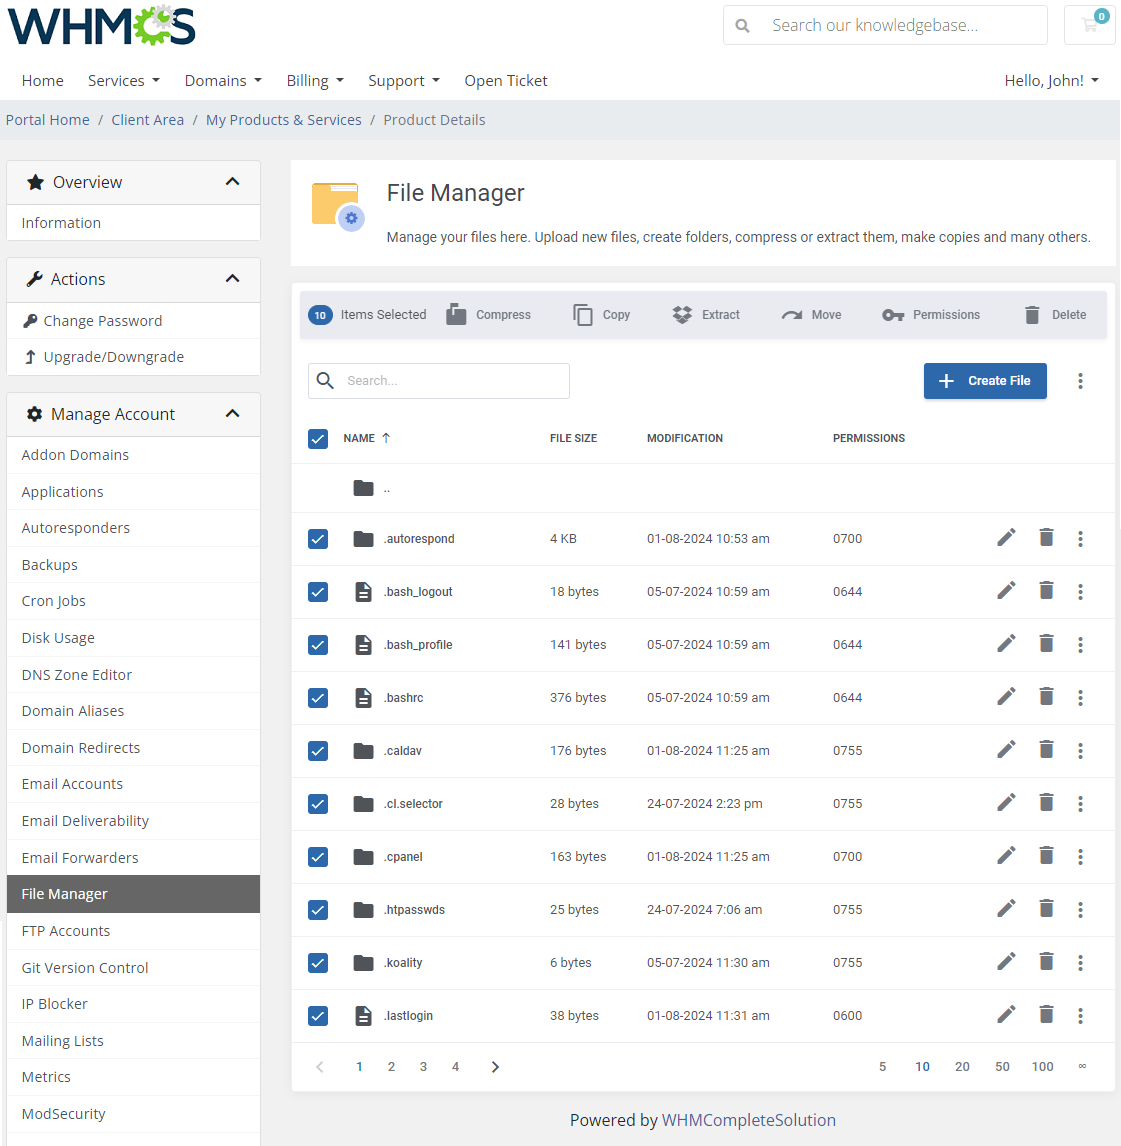
| File manager allows you to manage files and folders on your cPanel account. View the list of files with their specific data: name, size, date of last modification and established permissions. |
|
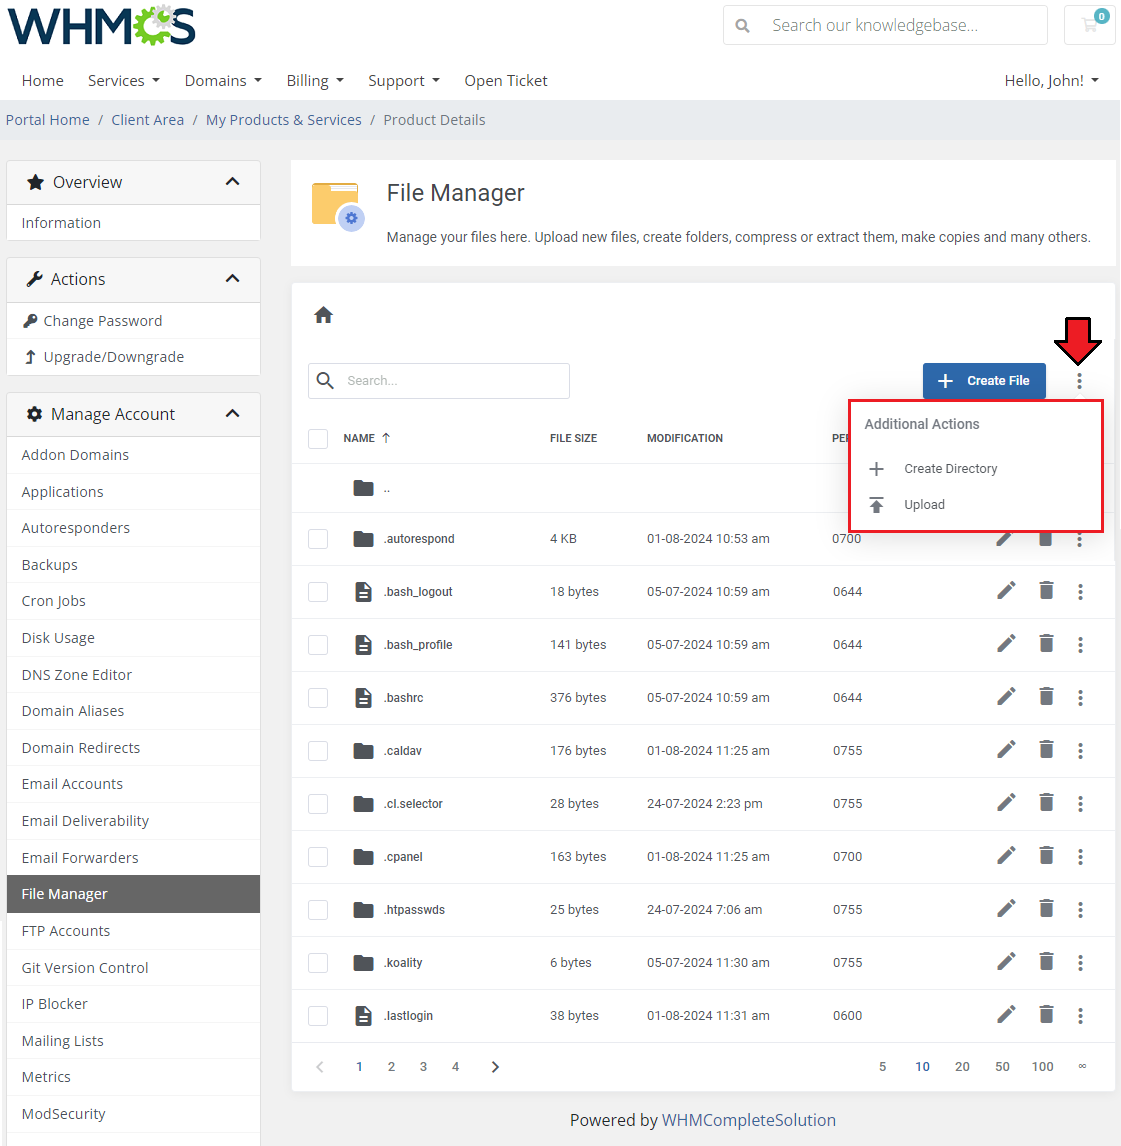
| You can create a new file by pressing a corresponding button as well as upload new files and create directory by pressing additional actions. |
|
| You can also perform such actions as compression, extraction, moving or coping to other location, permission change and removal on single or multiple files or directories. |
|
FTP Accounts
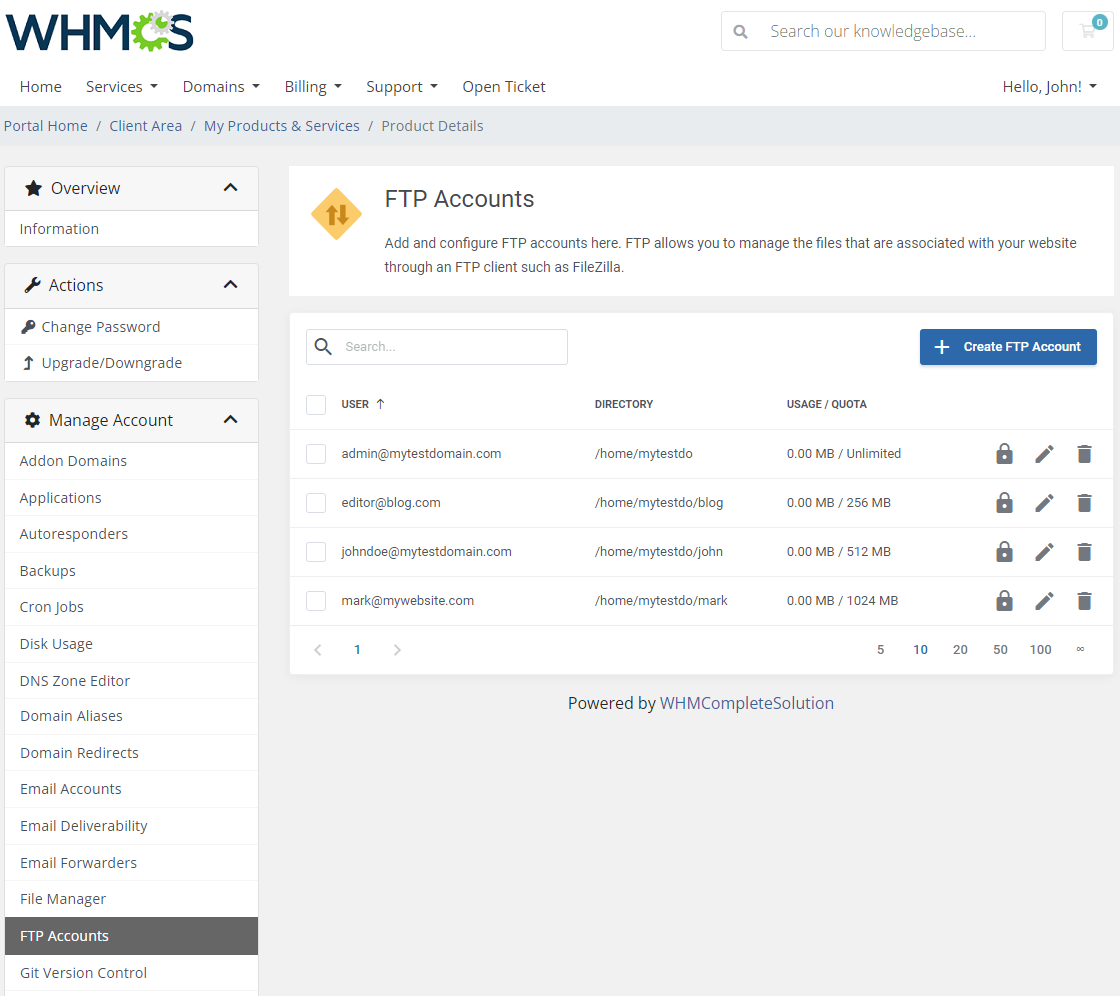
| Manage the accounts to be able to access your website files through an FTP protocol. |
|
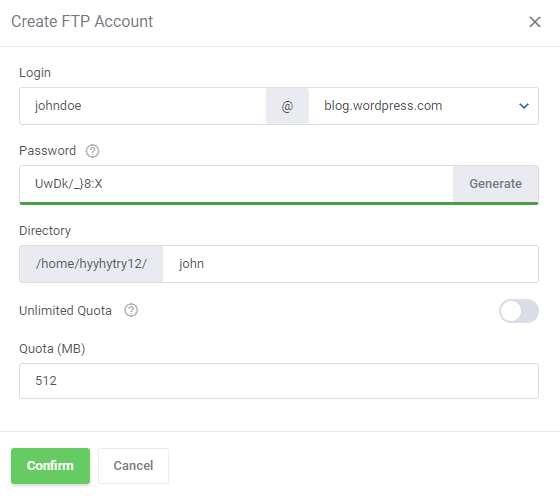
| Add and configure FTP Accounts in the easiest possible way. Just type in your login on a selected domain, provide or generate a secure password, define directory and declare available quota. |
|
Git Version Control
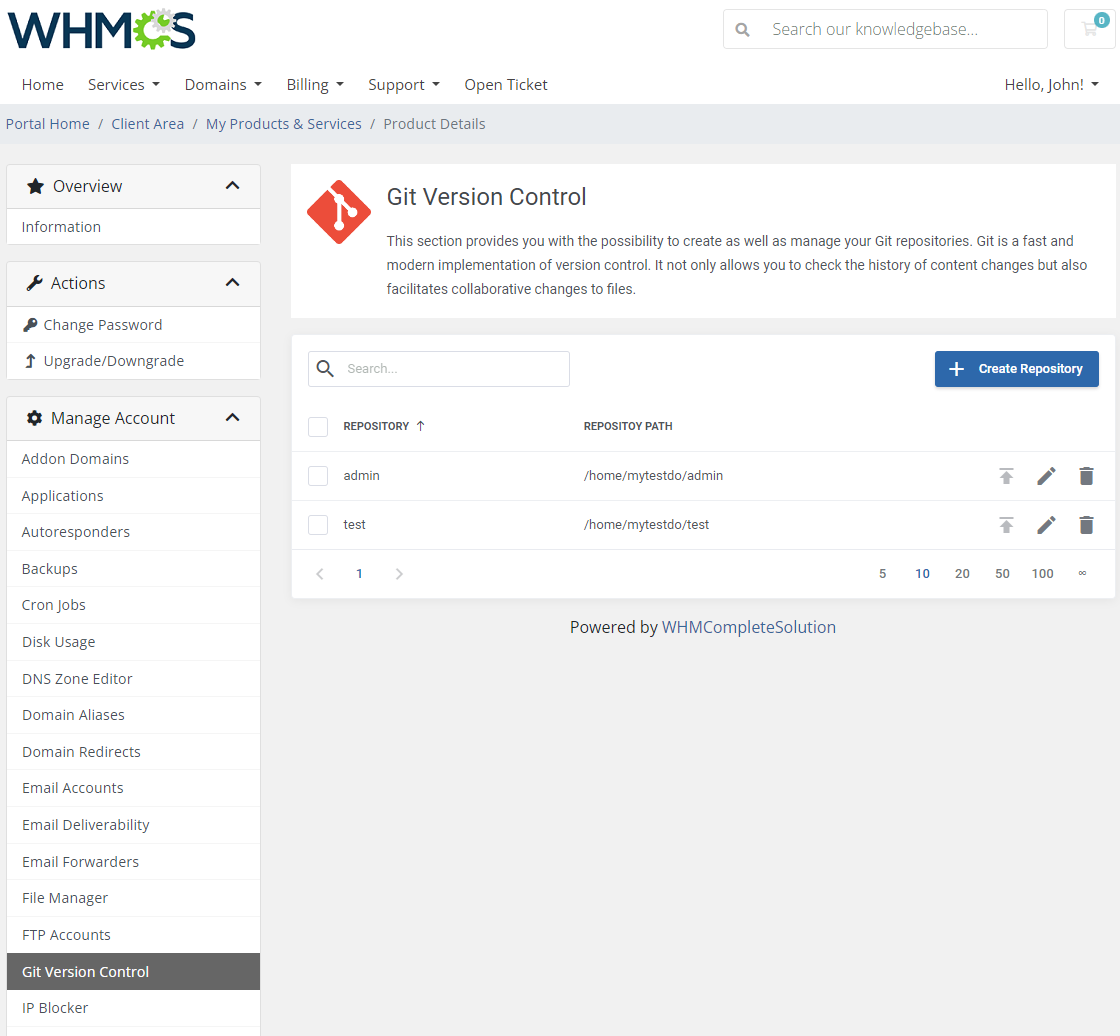
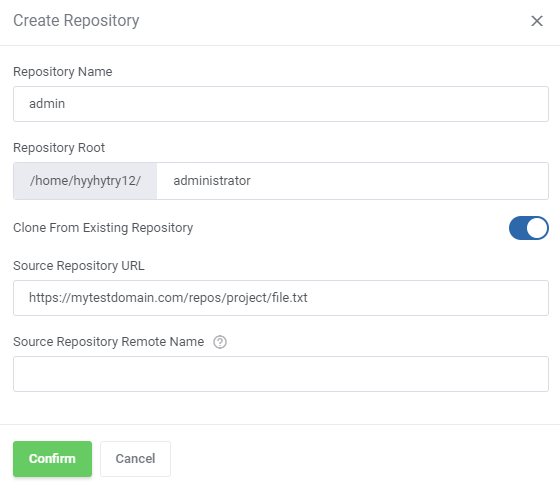
| The 'Git Version Control' section provides you with the possibility to create as well as manage your Git repositories. Git is a fast and modern implementation of version control. It not only allows you to check the history of content changes but also facilitates collaborative changes to files. To do so, simply click on the 'Create Repository' button. |
|
| Complete the 'Repository Root' and 'Repository Name' fields. If you wish to clone from your already existing repository, you need to enable 'Clone From Existing Repository' and provide the source of the repository. |
|
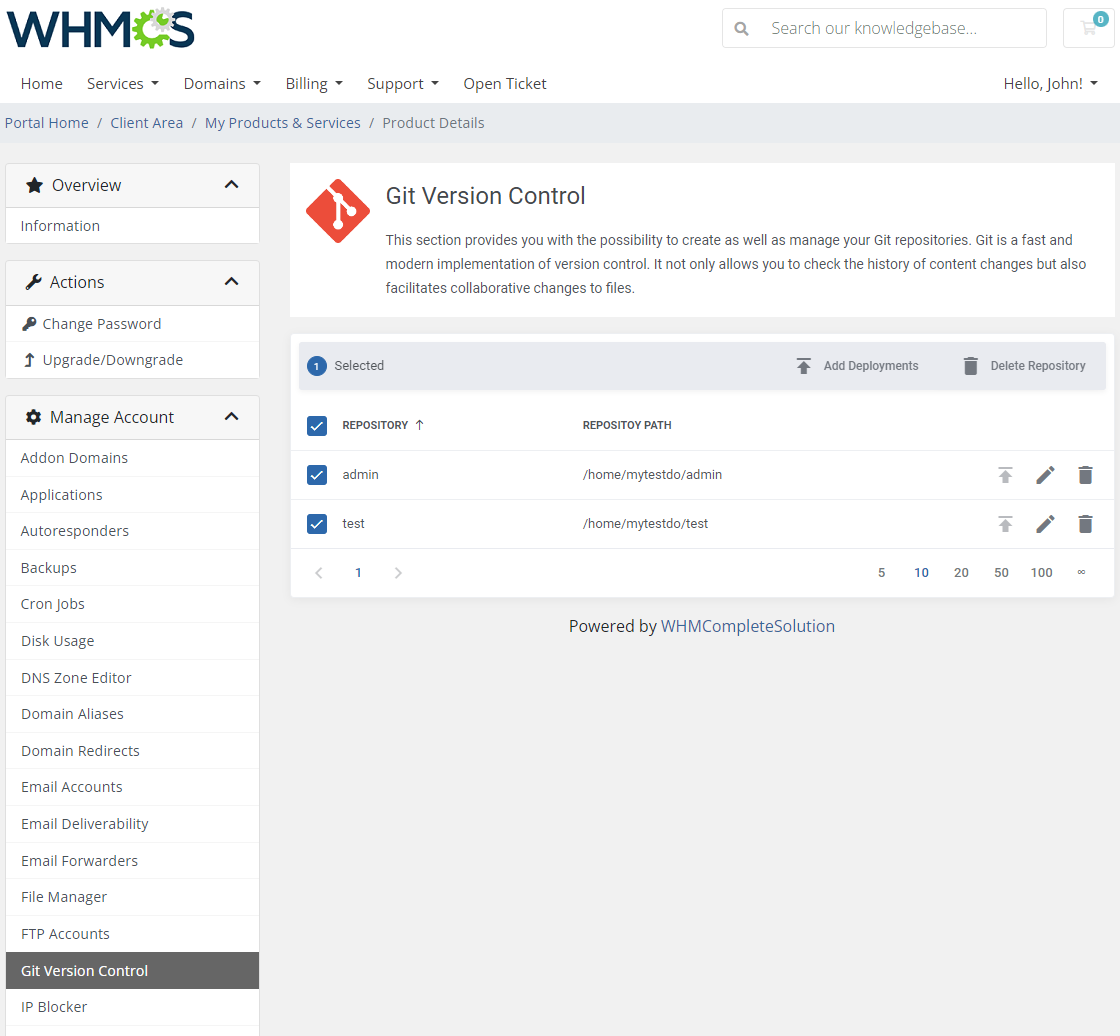
| You may 'Add Deployment' , 'Modify' , or 'Delete' a single repository. There are also the mass action buttons as presented below. |
|
IP Blocker
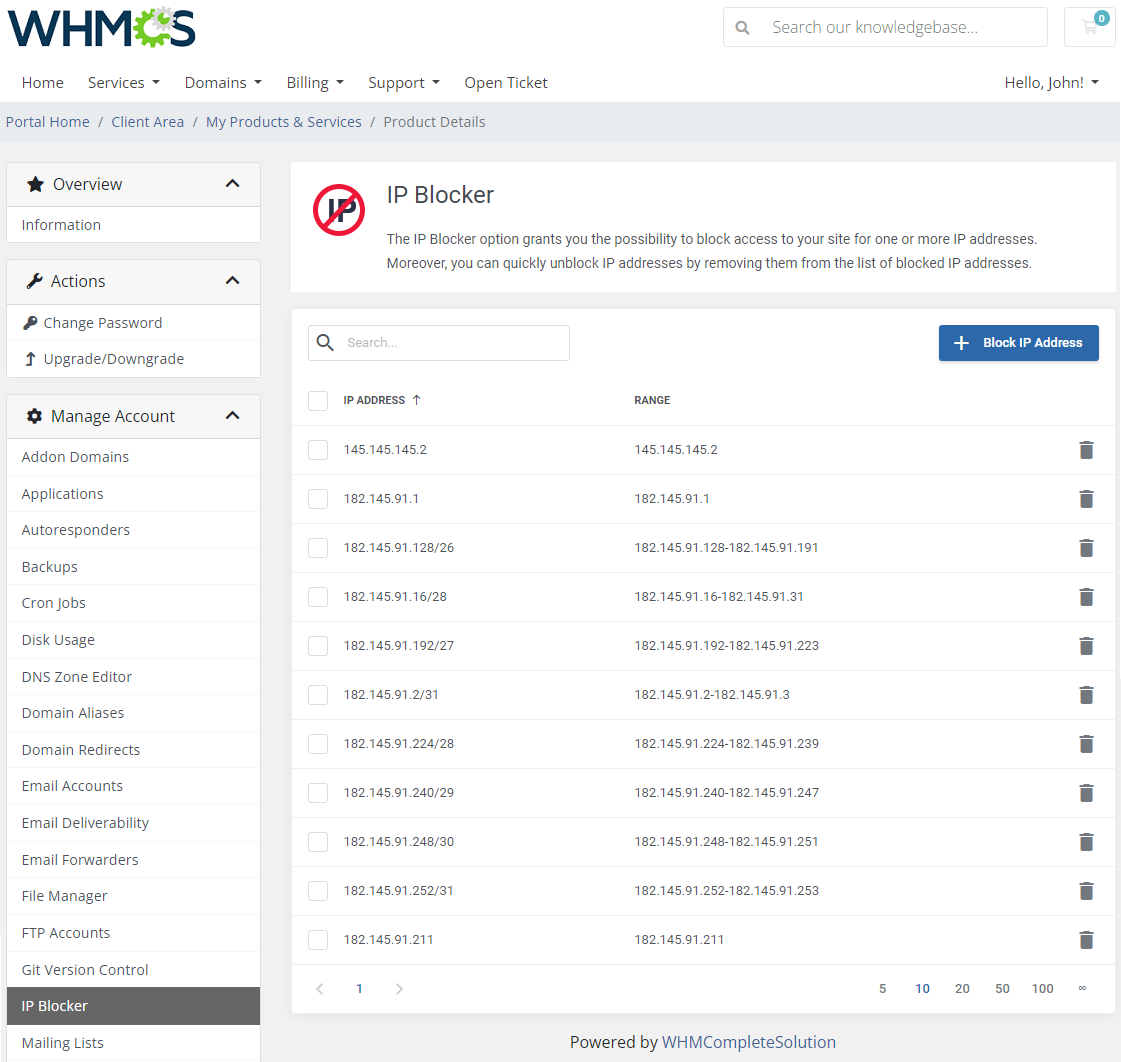
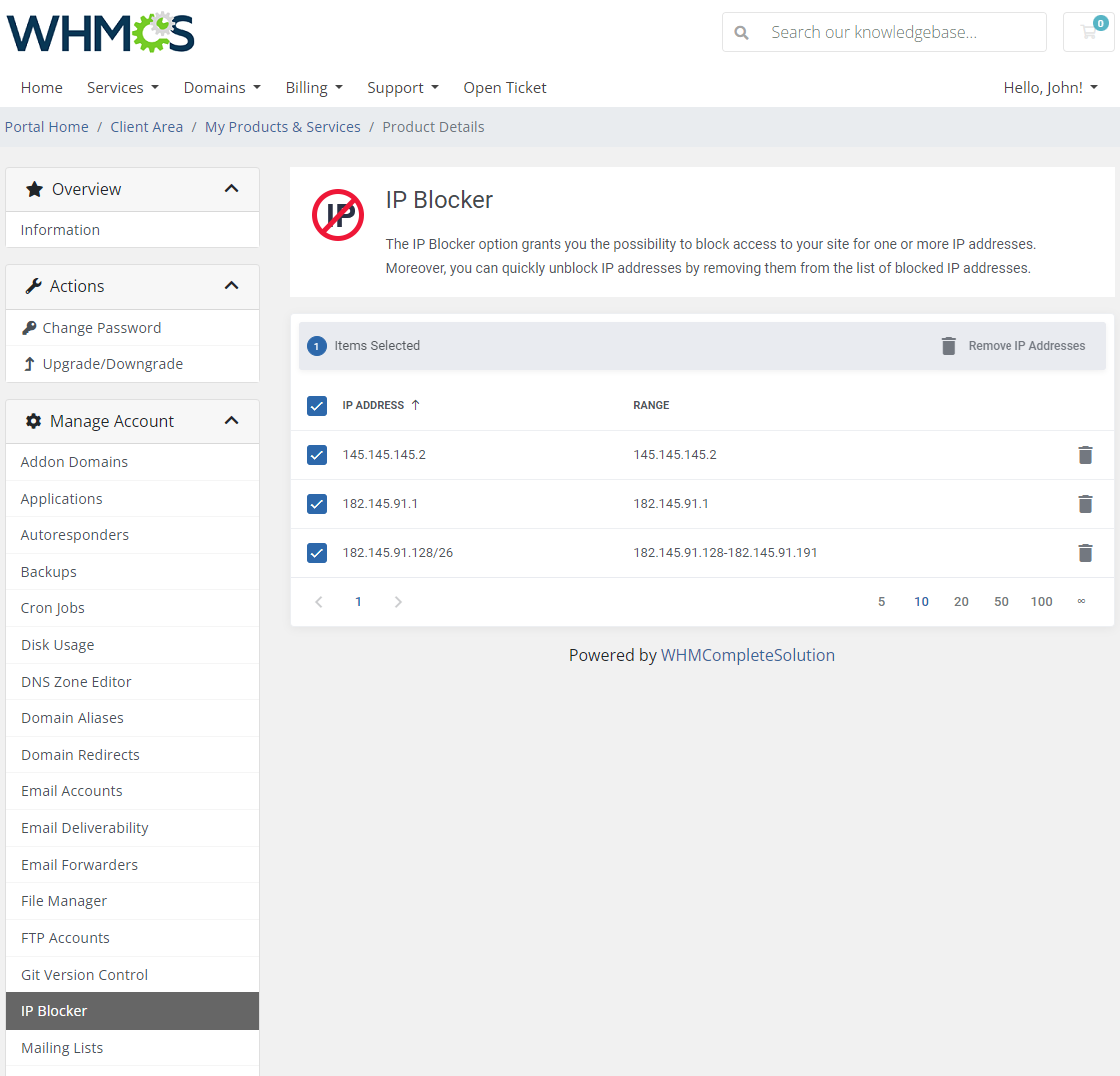
| The 'IP Blocker' option grants you the possibility to block access to your site for one or more IP addresses. What is more, you can quickly unblock IP addresses by removing them from the list of blocked IP addresses. Click on the 'Block IP Address' button. |
|
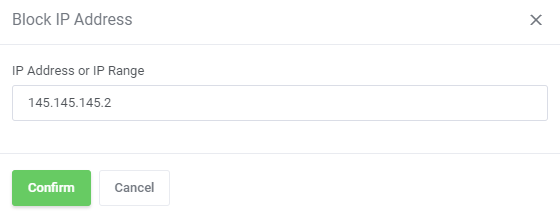
| All you need to do is provide the IP address or IP range. |
|
| If you wish to remove all blocked IP addresses, you can simply do it by clicking on the 'Remove IP Addresses' button. |
|
JetBackup
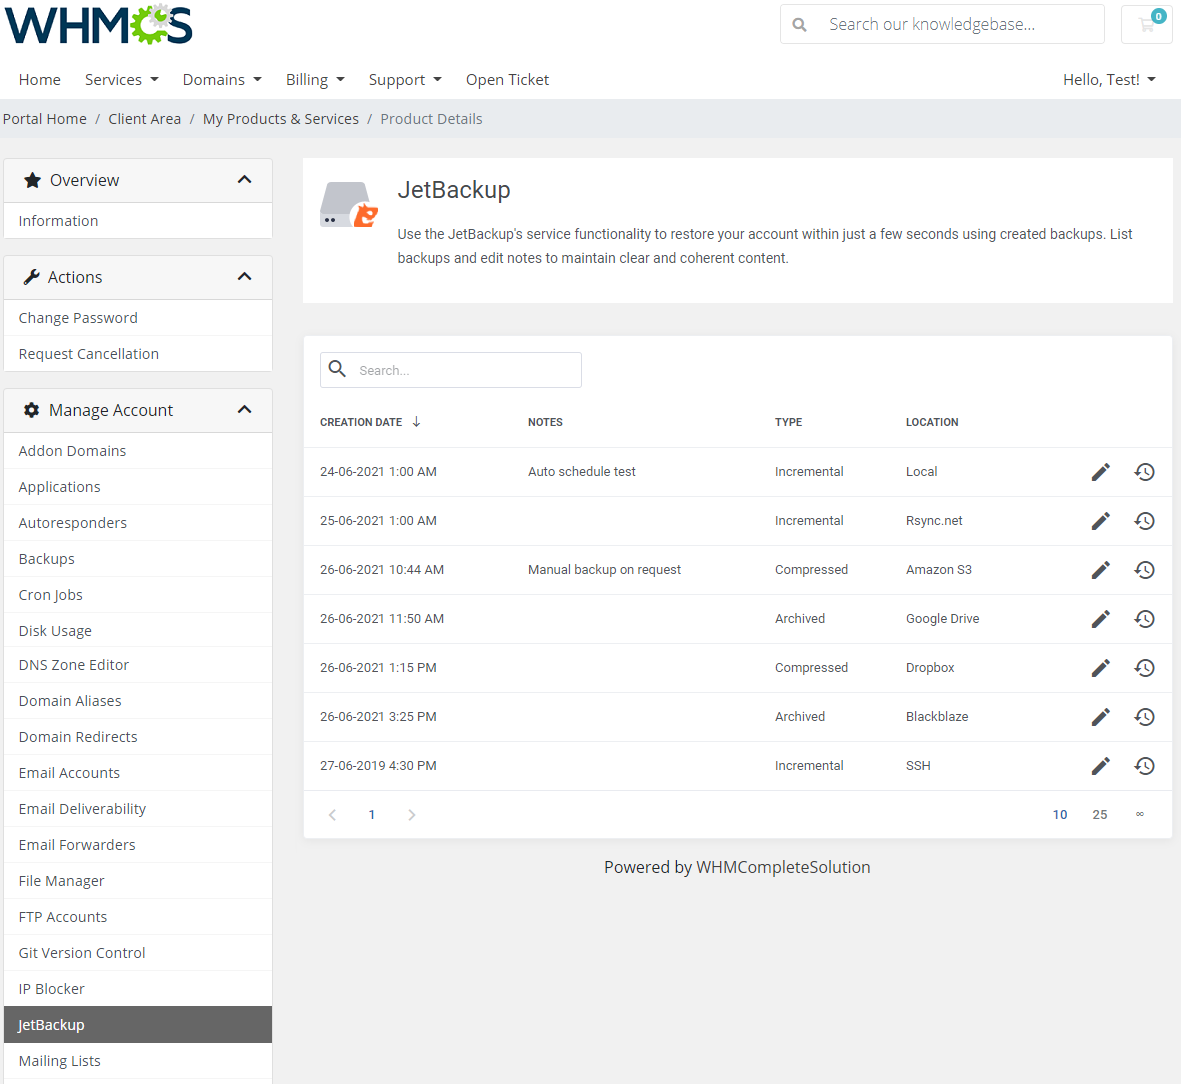
| JetBackup section ensures full support of backups created with this external service. In order to assure correct work of this service you need to set up the below cPanel Permissions in your JetBackup plugin. These are:
|
|
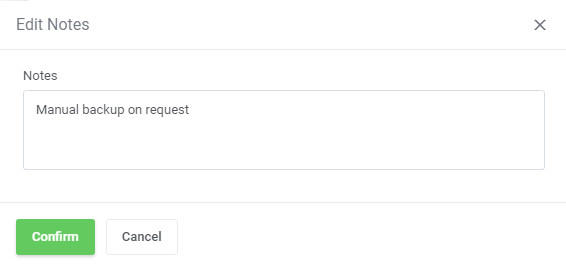
| Press the 'Pencil' icon in action buttons to edit the notes added to the existing backup. Make any changes in the notes. |
|
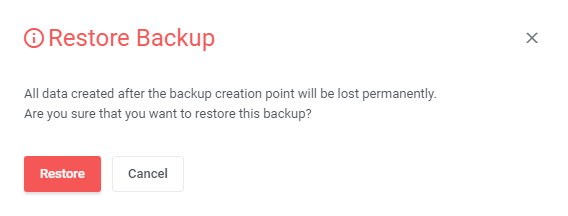
| Most importantly, use the 'Restore Backup' button to bring back your account within just a moment. Confirm the action. |
|
Mailing Lists
| Mailing lists allow you to use a single address to send message to multiple email addresses. This feature is very useful when you need to send a newsletter or another update to a group of people. Allowed actions on a mailing list:
|
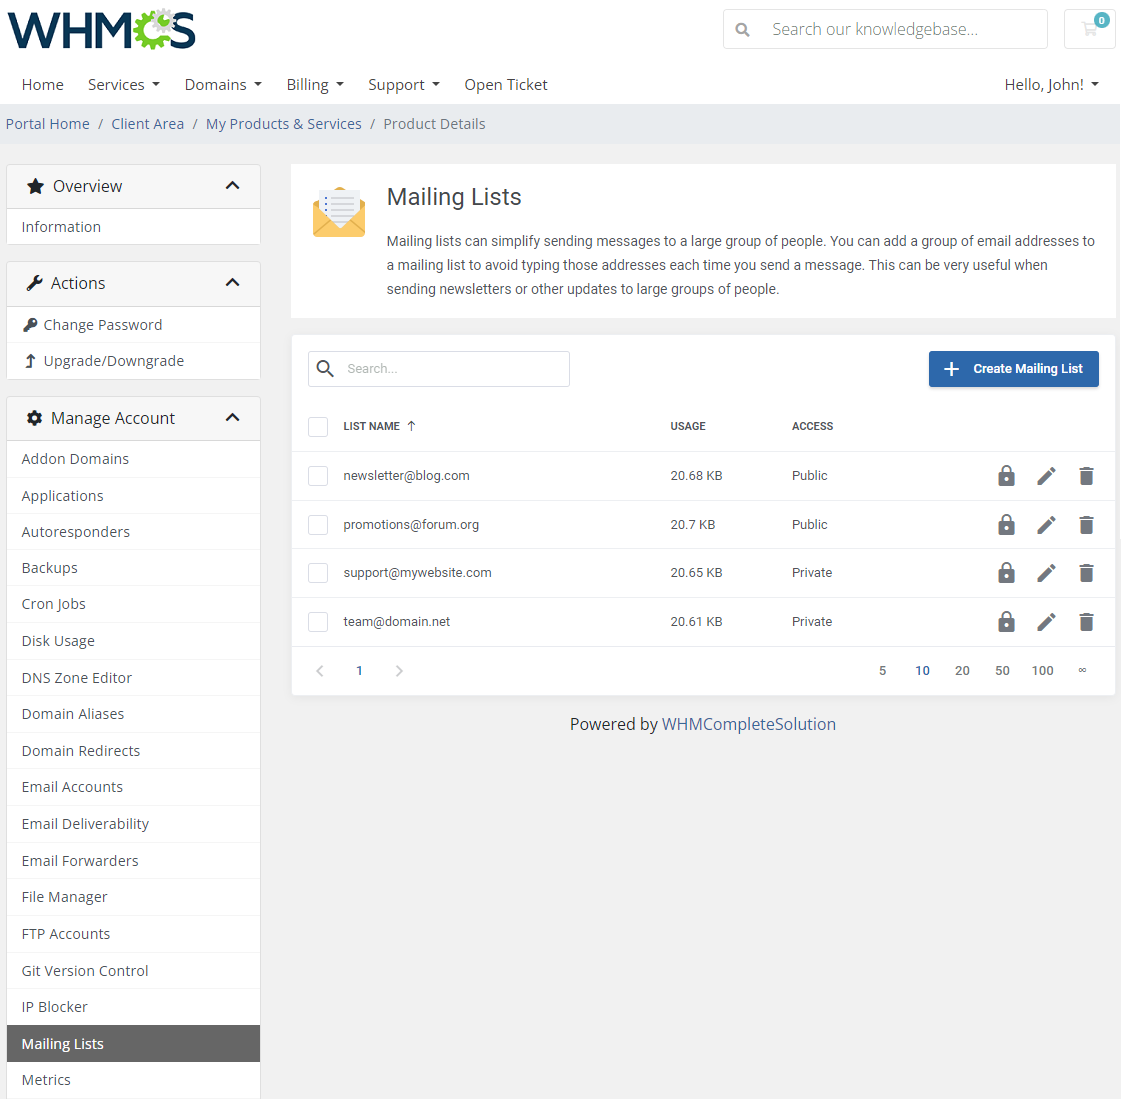
|
Press the 'Create Mailing List' button and then define a name, password, and a domain name. Next, choose the access type:
|
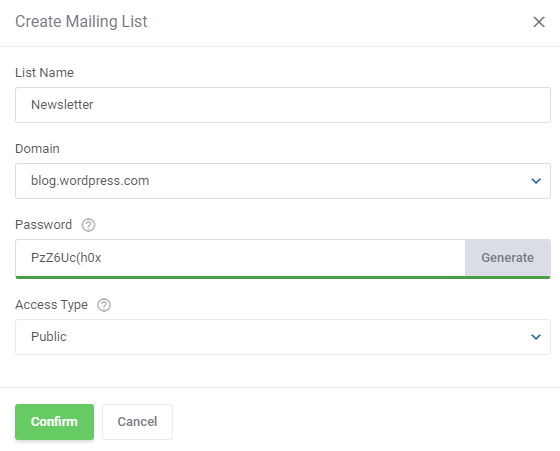
|
| After creating a list, you can delegate its administrative privileges to the users of your choice. Press the 'Edit' button and 'Create Delegate' in the next section. |
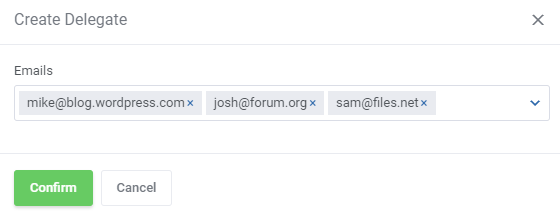
|
| Once you have delegated administrative privileges to an email user from a list, this user will be able to log in to administrative console of the list from webmail. |
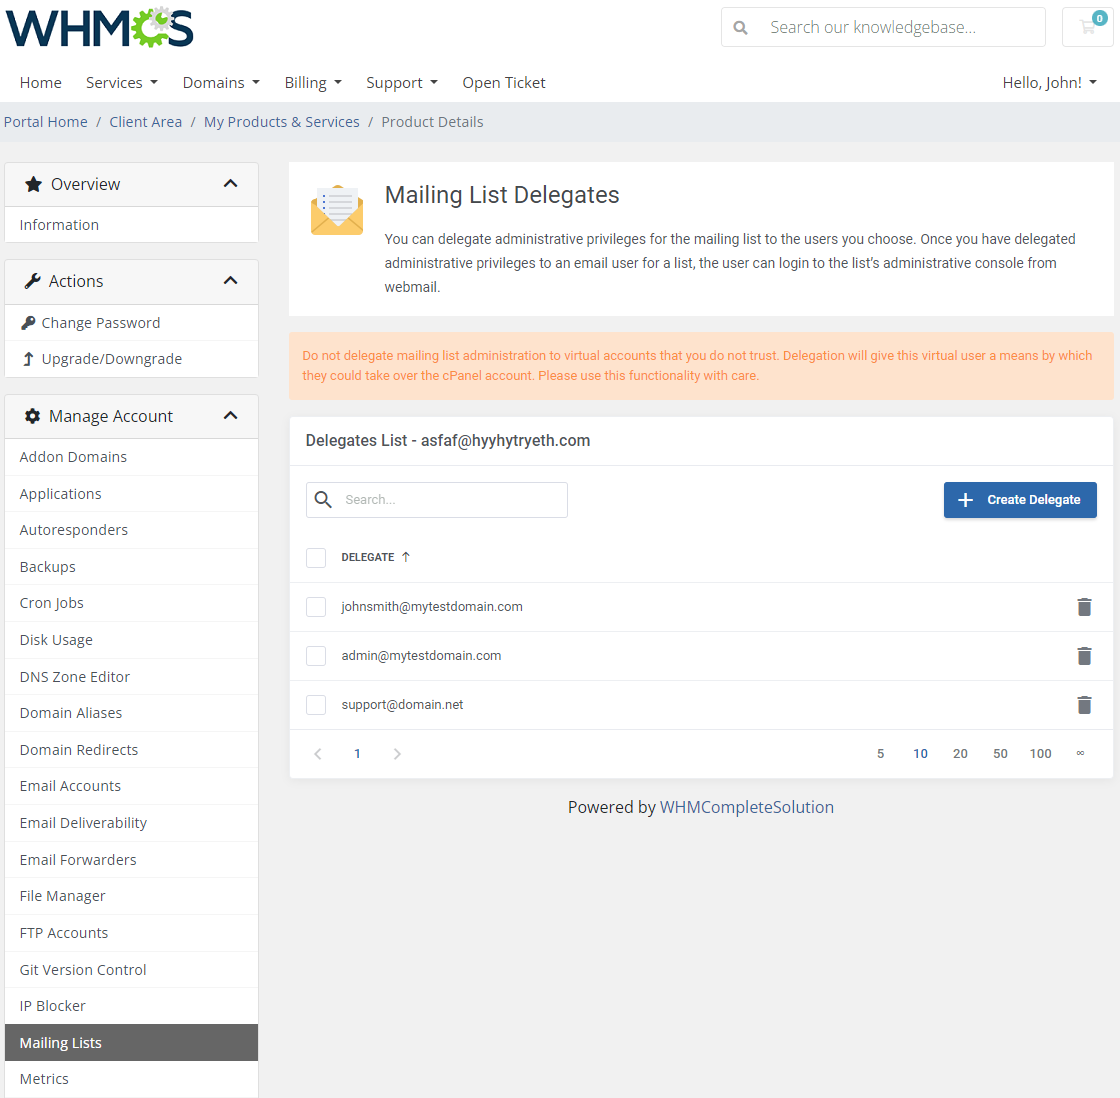
|
Metrics
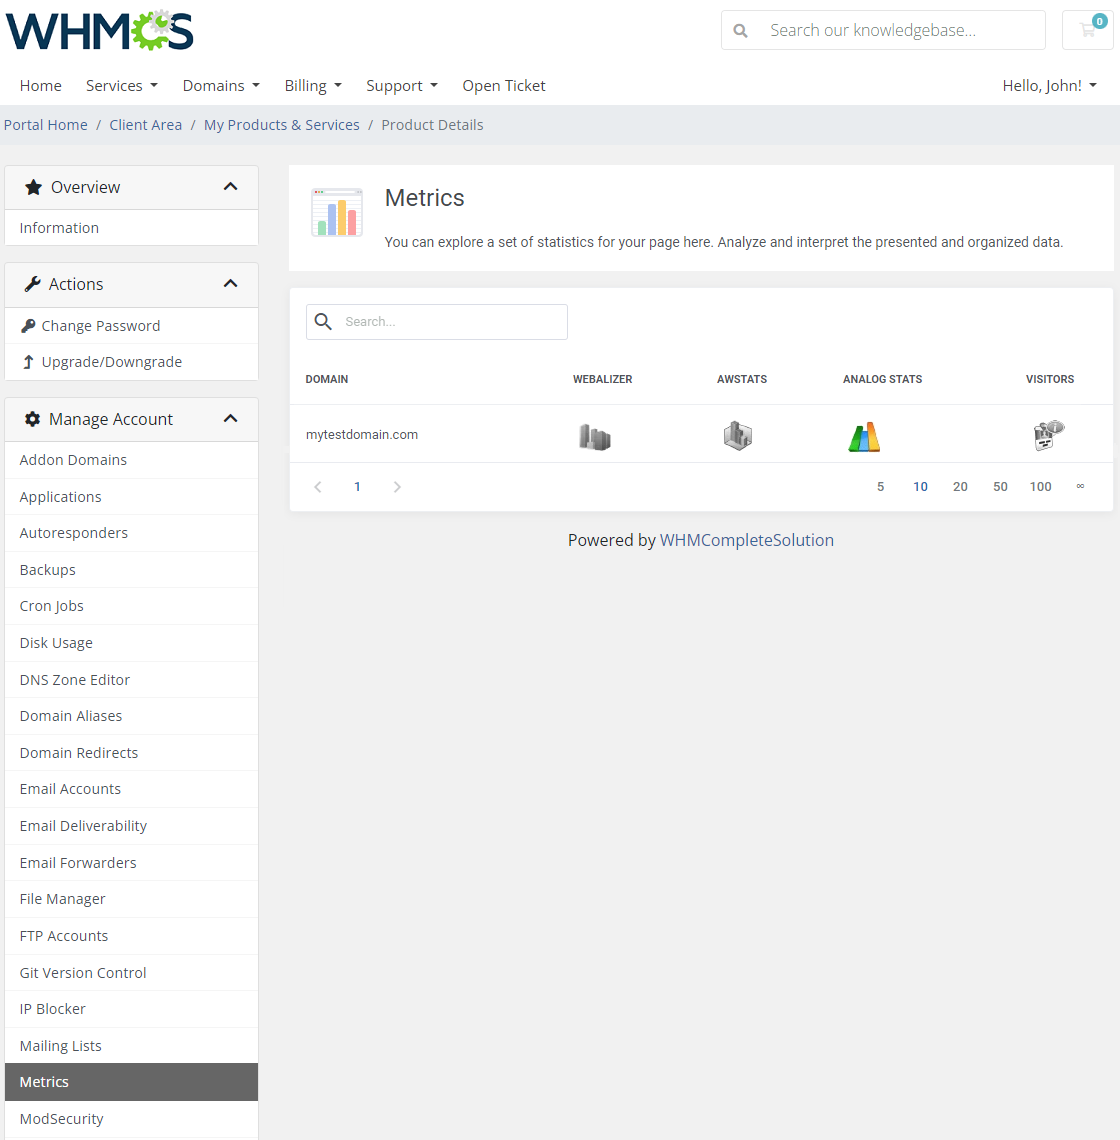
| Be always up to date with information about your websites. Use 'Webalizer', 'AWstats', 'Analog Stats' and 'Visitors' to analyze and interpret the presented data on each domain. |
|
ModSecurity
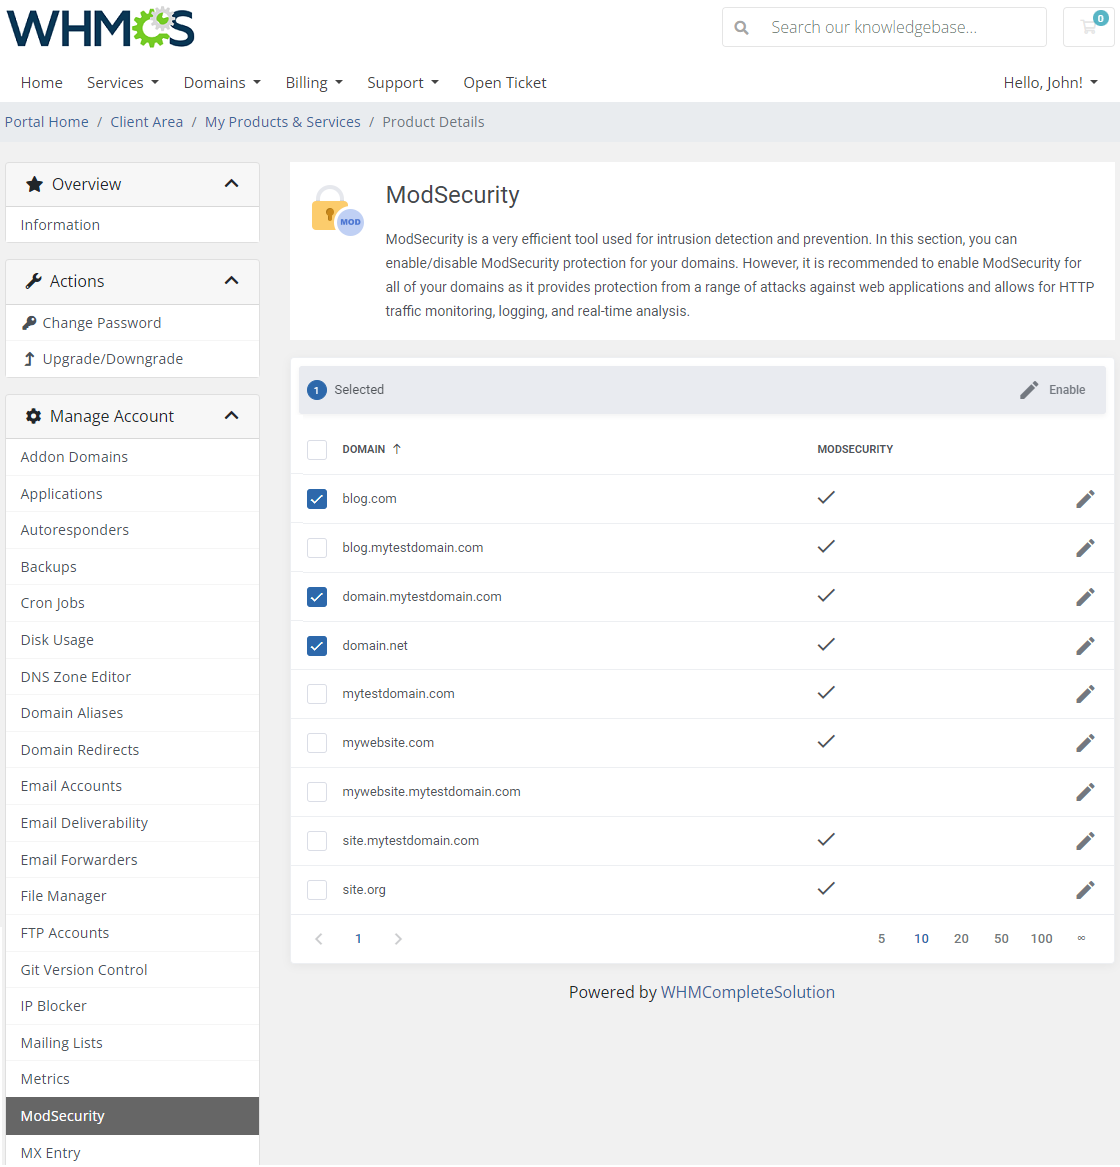
| In this section, you can enable and disable the ModSecurity protection for your domains. Please remember that we recommend to enable ModSecurity for all of your domains as it is used for intrusion detection and prevention. Disable ModSecurity only while you troubleshoot ModSecurity-related problems. |
|
MySQL Databases
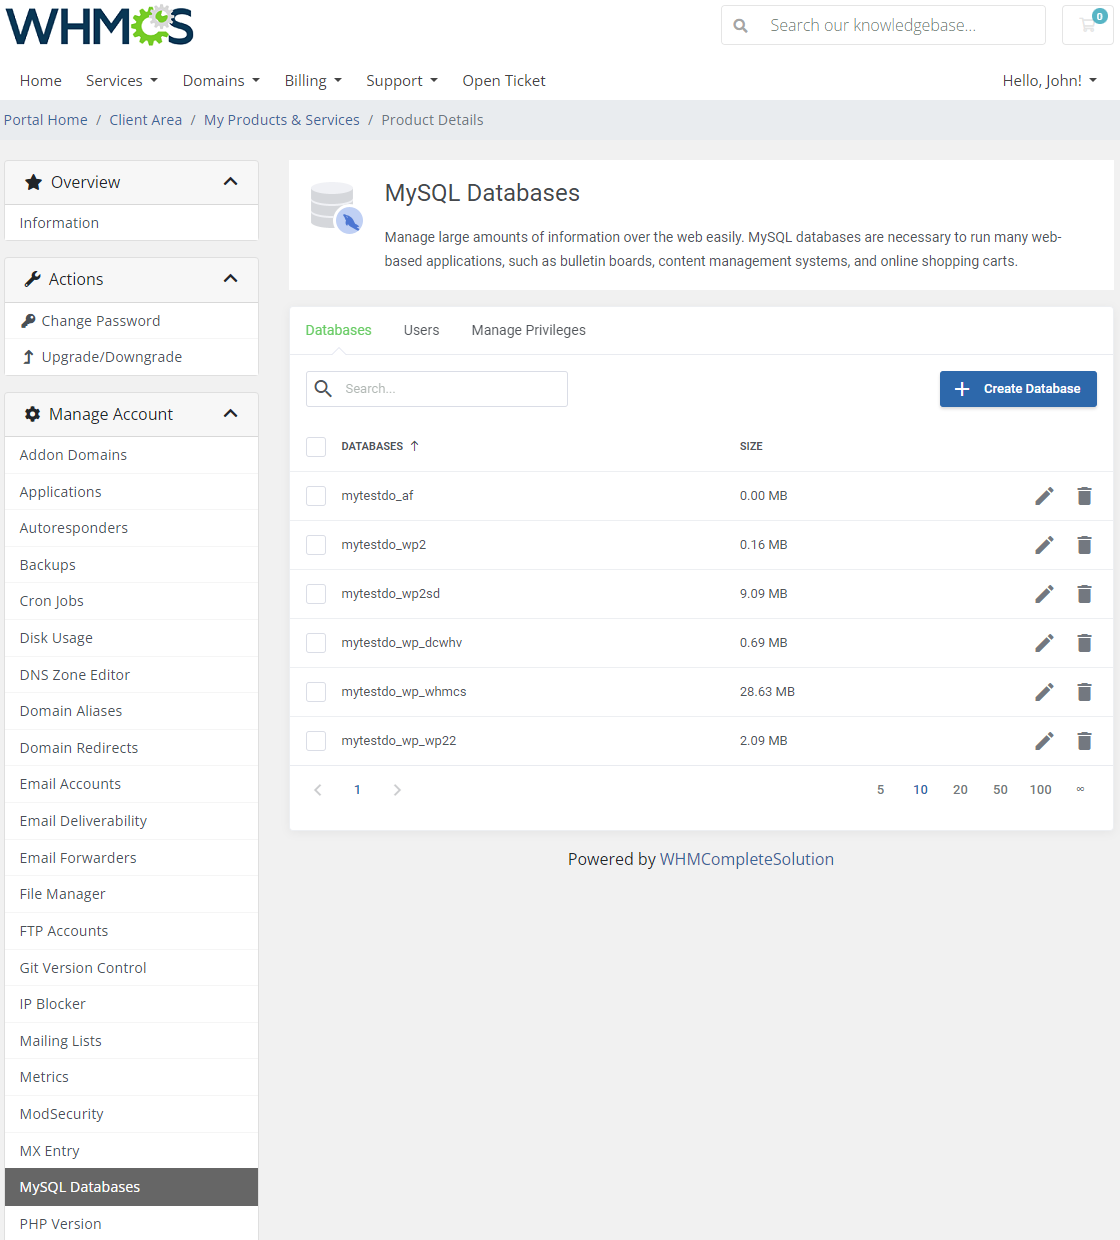
MySQL databases are required to run web-based applications such us CMS systems, bulletin boards, online stores etc. There are three subsections available:
|
|
MX Entry
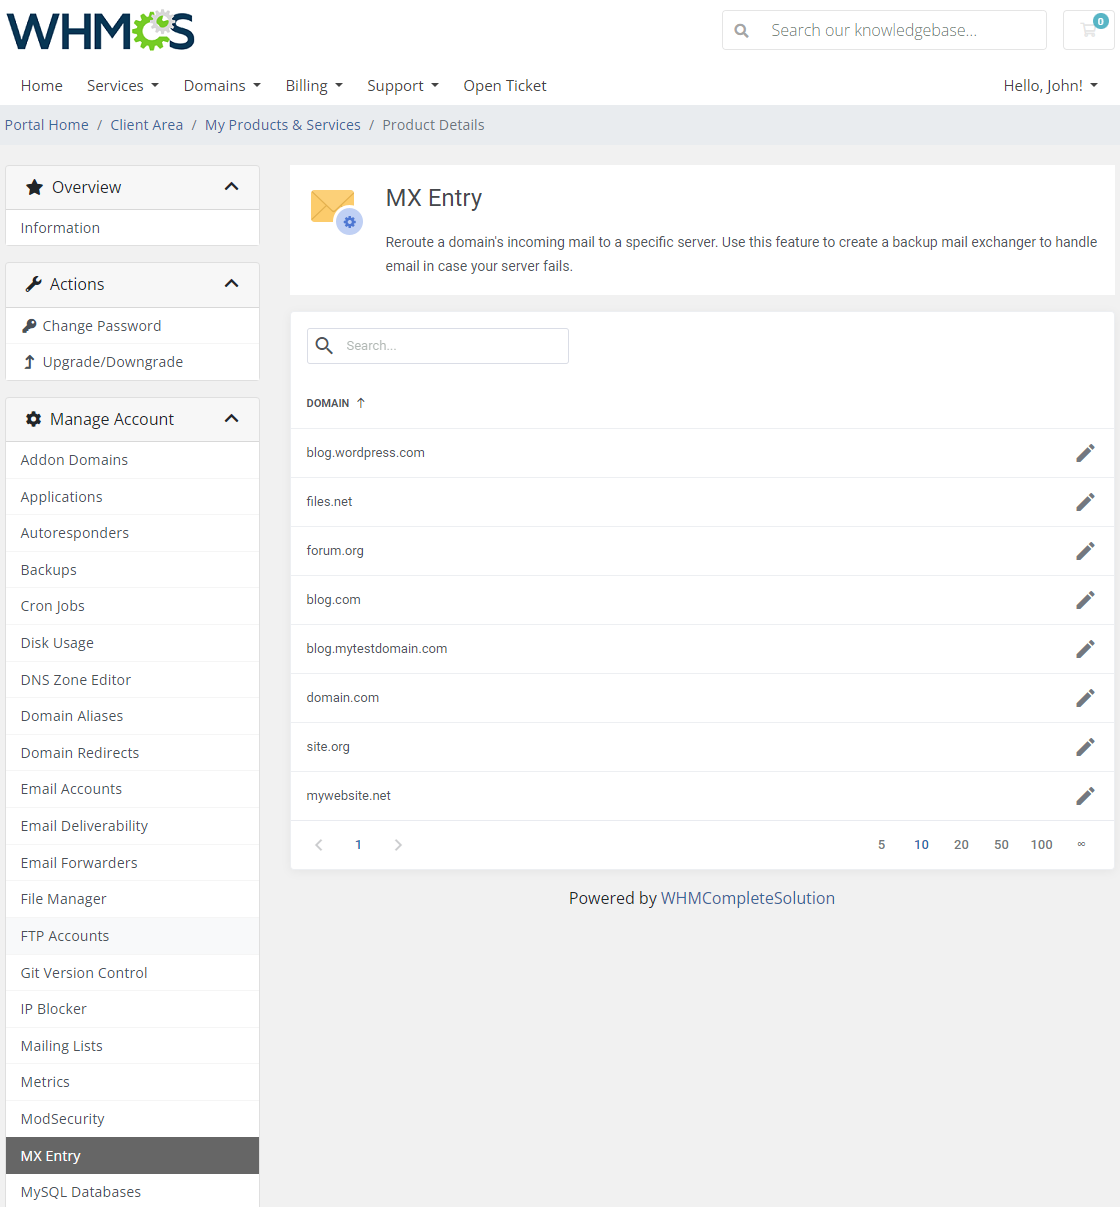
| This page enables you to manage your MX records for each of your domains. First, you need to choose the desired domain. |
|
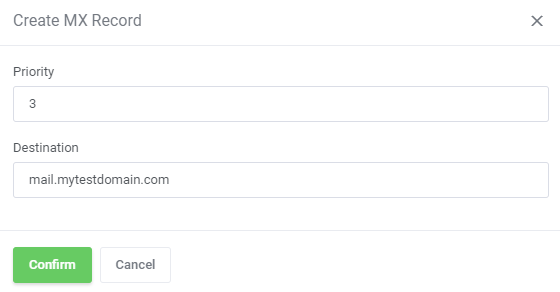
| Then, press 'Create MX Record' and define its priority and destination. After creating an MX record, you can add more records or edit and remove the existing ones. |
|
PHP Version
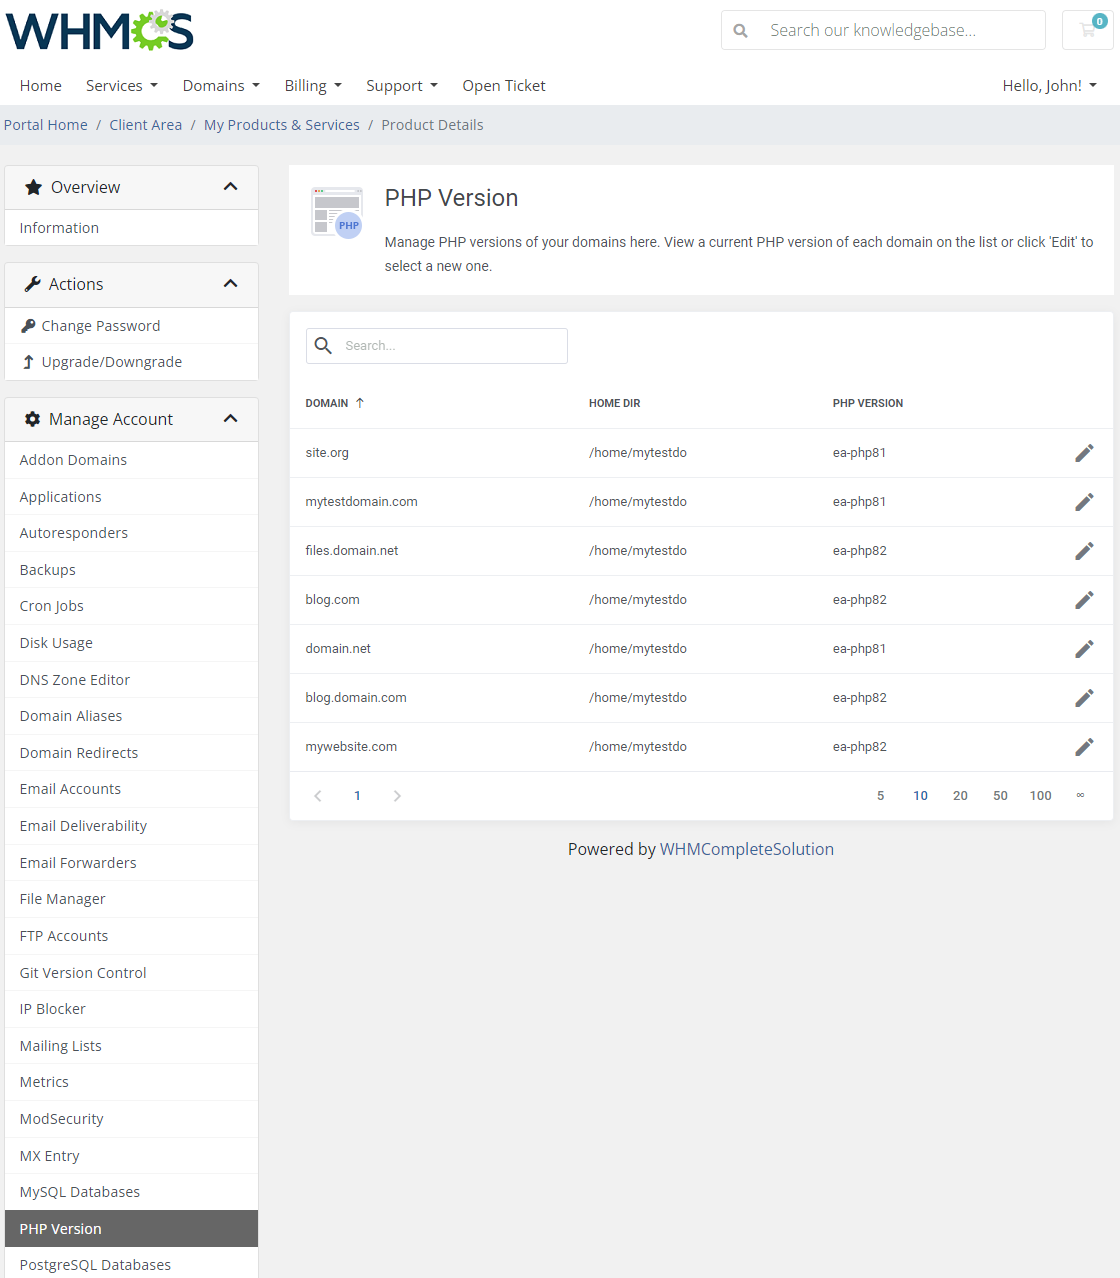
| In this section your clients can manage PHP versions of their domains. They are allowed to view a current PHP version of each domain as well as select a new one by clicking the 'Edit' button. Please note that EasyApache 4 is required to permit your clients to handle PHP versions. |
|
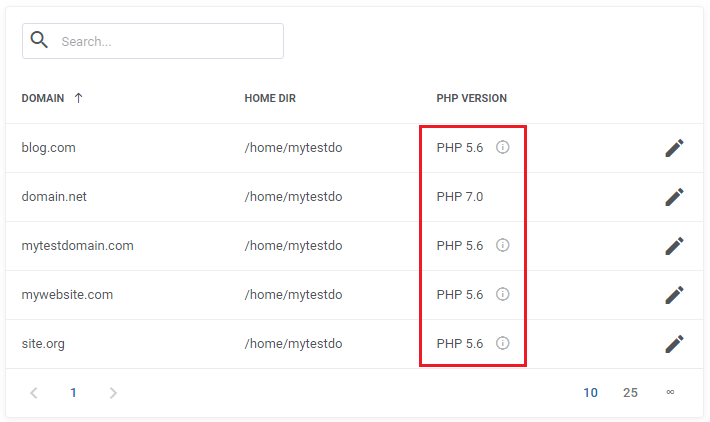
If you would like to change the display of the default PHP names in the system to a more user-friendly variant, please locate the language file in:
{yourWHMCS}/modules/servers/cpanelExtended/lang/english.php
An add records according to the system names of PHP versions you want to change. E.g.: $_LANG['phpVersion']['ea-php54'] = 'PHP 5.4'; $_LANG['phpVersion']['ea-php55'] = 'PHP 5.5'; $_LANG['phpVersion']['ea-php56'] = 'PHP 5.6'; $_LANG['phpVersion']['ea-php70'] = 'PHP 7.0'; $_LANG['phpVersion']['ea-php71'] = 'PHP 7.1'; $_LANG['phpVersion']['ea-php72'] = 'PHP 7.2'; |
| The result of those changes will be as following: |
|
PostgreSQL Databases
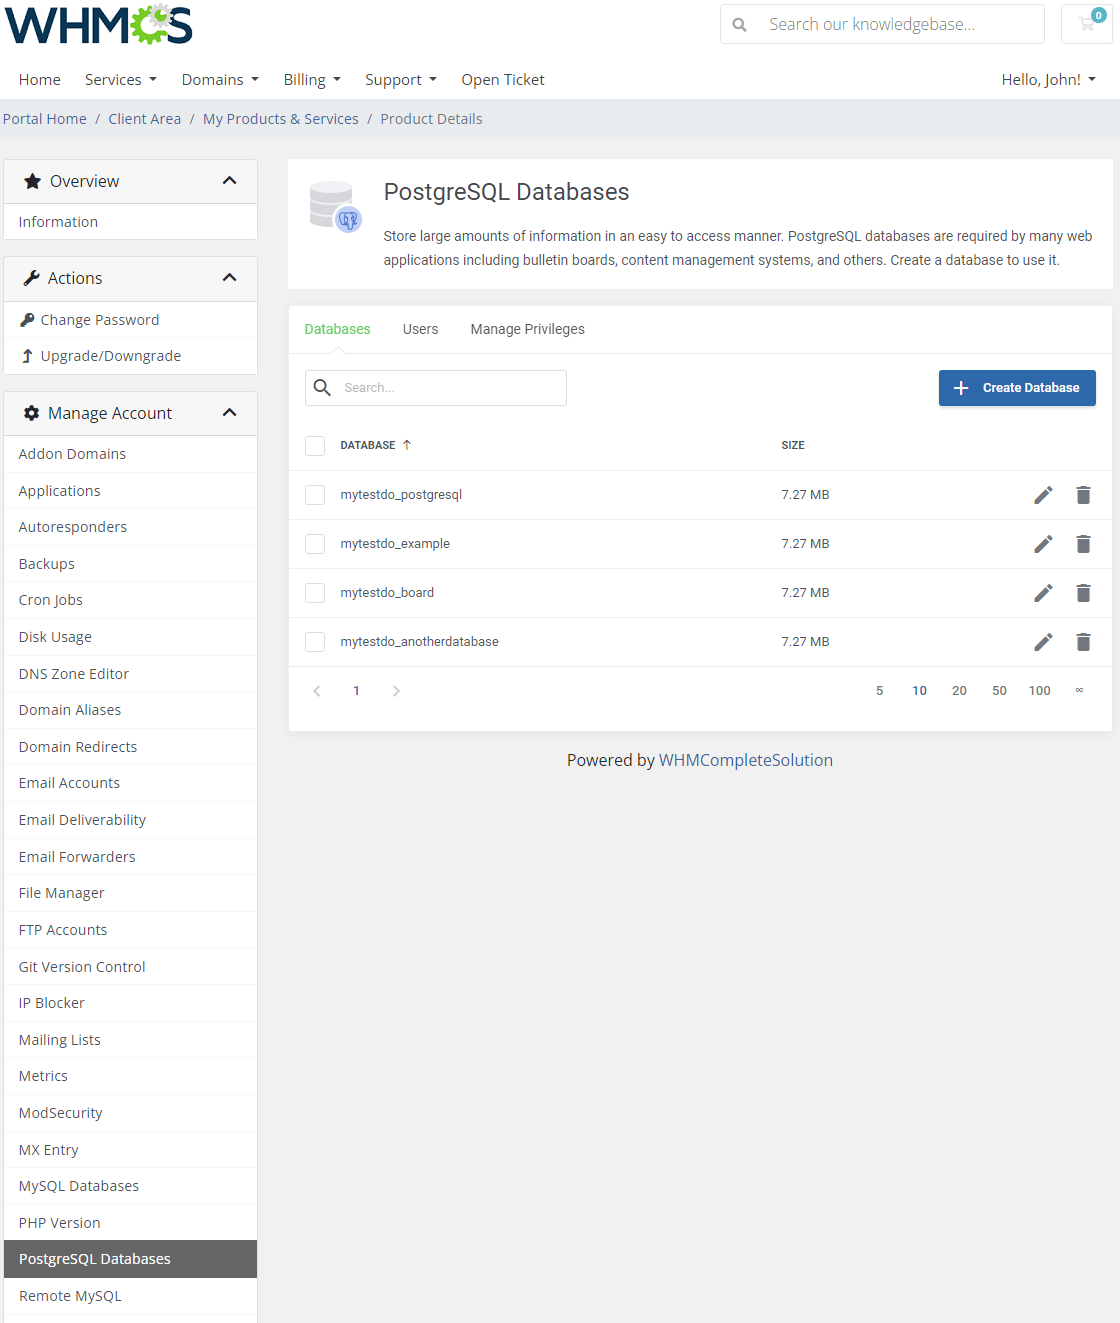
| PostgreSQL databases are required to run web-based applications such as CMS systems, bulletin boards, online stores etc. Here you can create and rename databases, add new users as well as connect them with particular databases. |
|
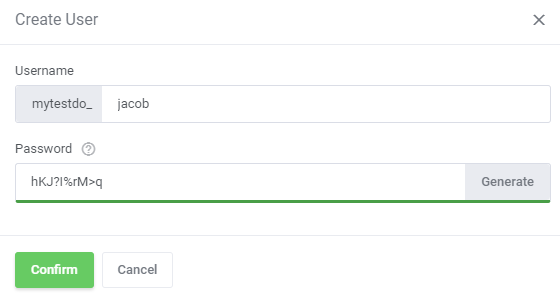
| When you create a new user, please be aware that currently there is NO possibility to remove such a user due to cPanel API limitations. You can only change their passwords or modify their usernames. |
|
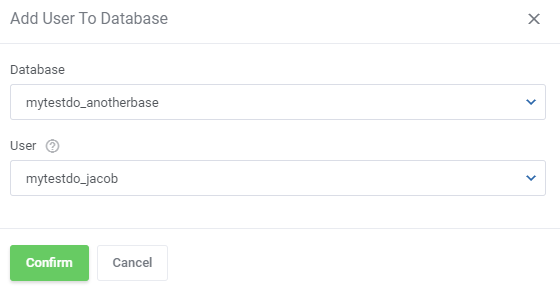
| Add the user to the database, the same moment all the privileges will be granted. You can revoke the privileges by removing the user from the database. |
|
Remote MySQL
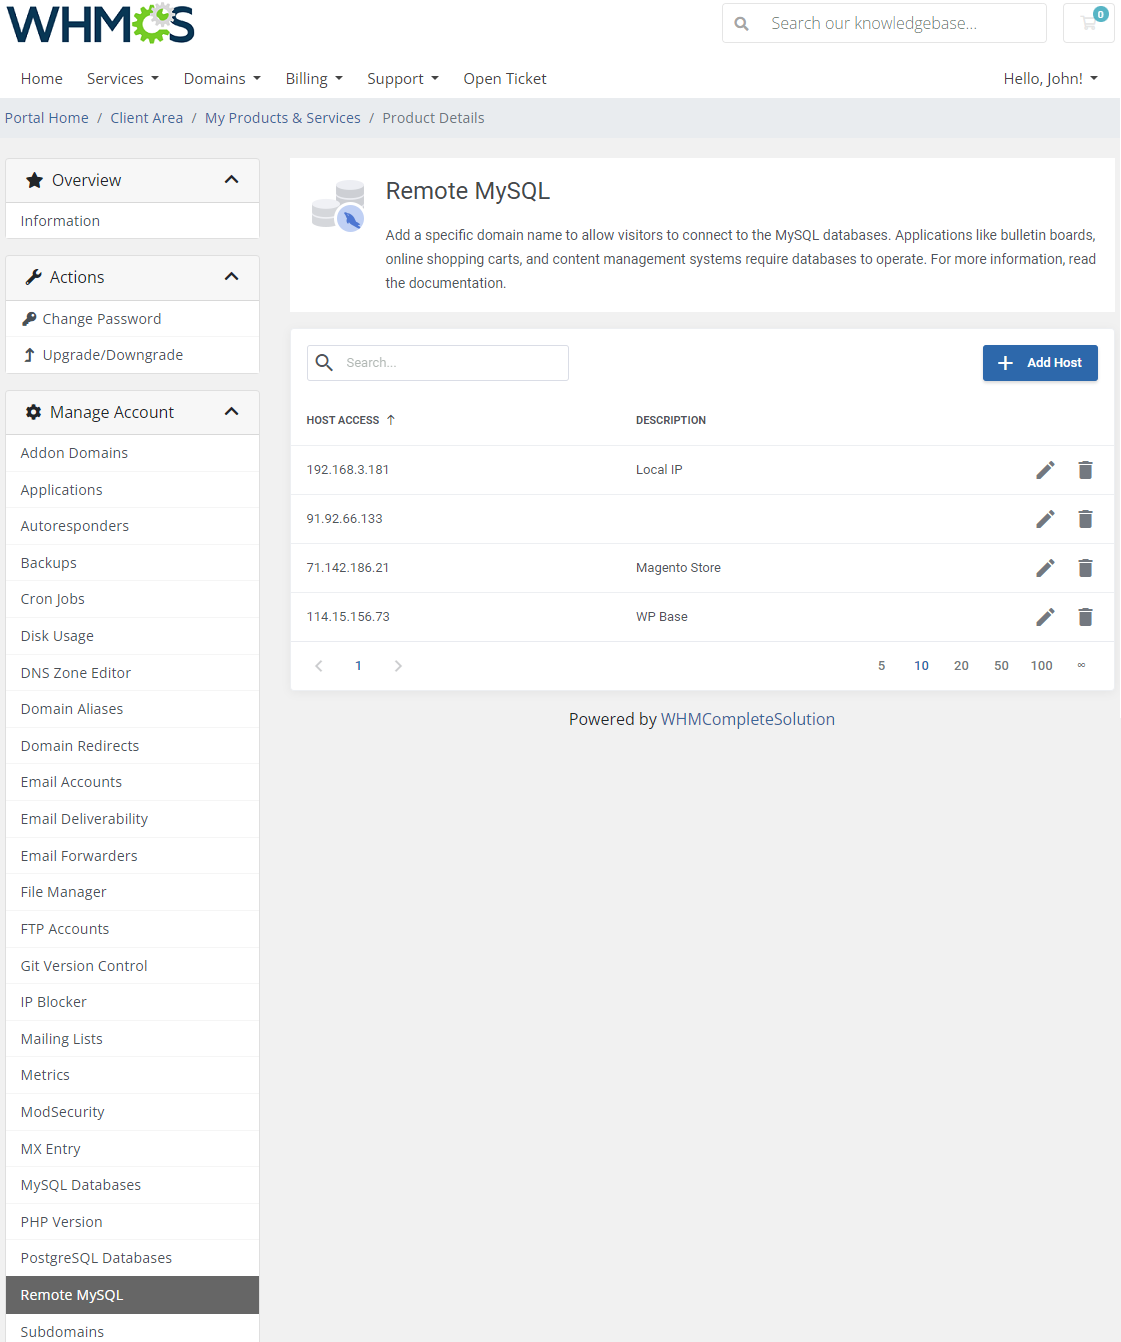
| The 'Remote MySQL' section allows you to add specific domain names to allow visitors to connect to the MySQL databases. It may be used, for example, when you want to enable shopping cart or guestbook apps on other servers to access your databases. |
|
Subdomains
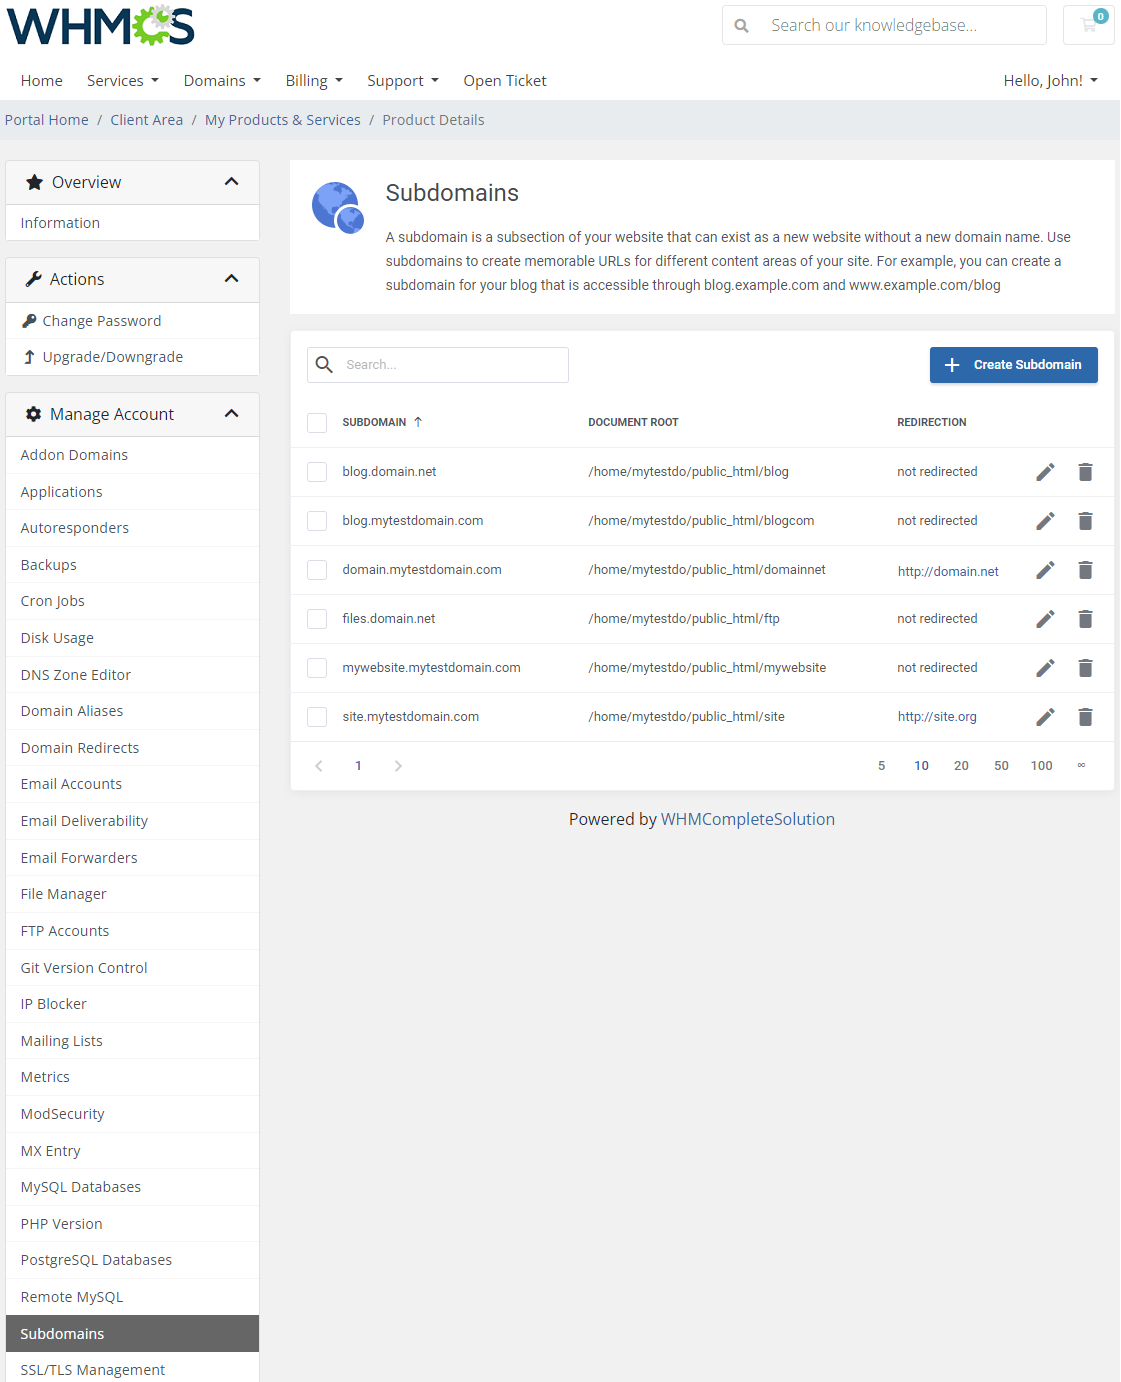
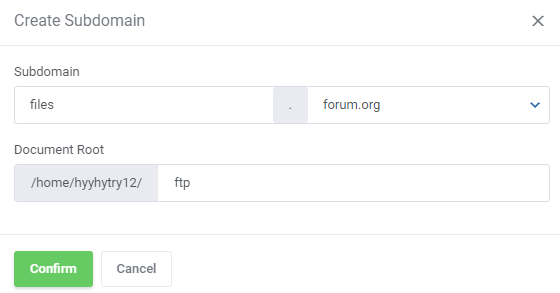
| Create subdomains for different parts of your website by pressing the 'Create Subdomain' button. |
|
| Choose the domain for your available subdomain from the list and provide document root. |
|
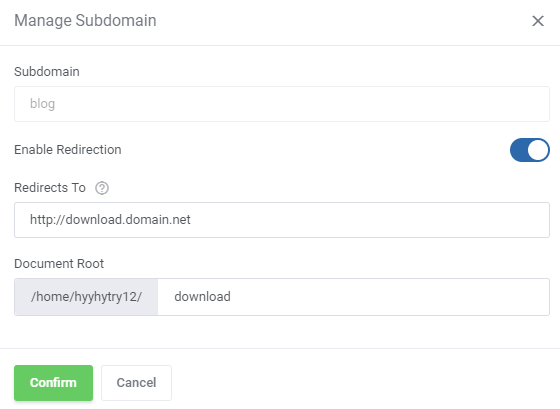
| You can redirect or delete the once created subdomains if you wish so. |
|
SSL/TLS Management
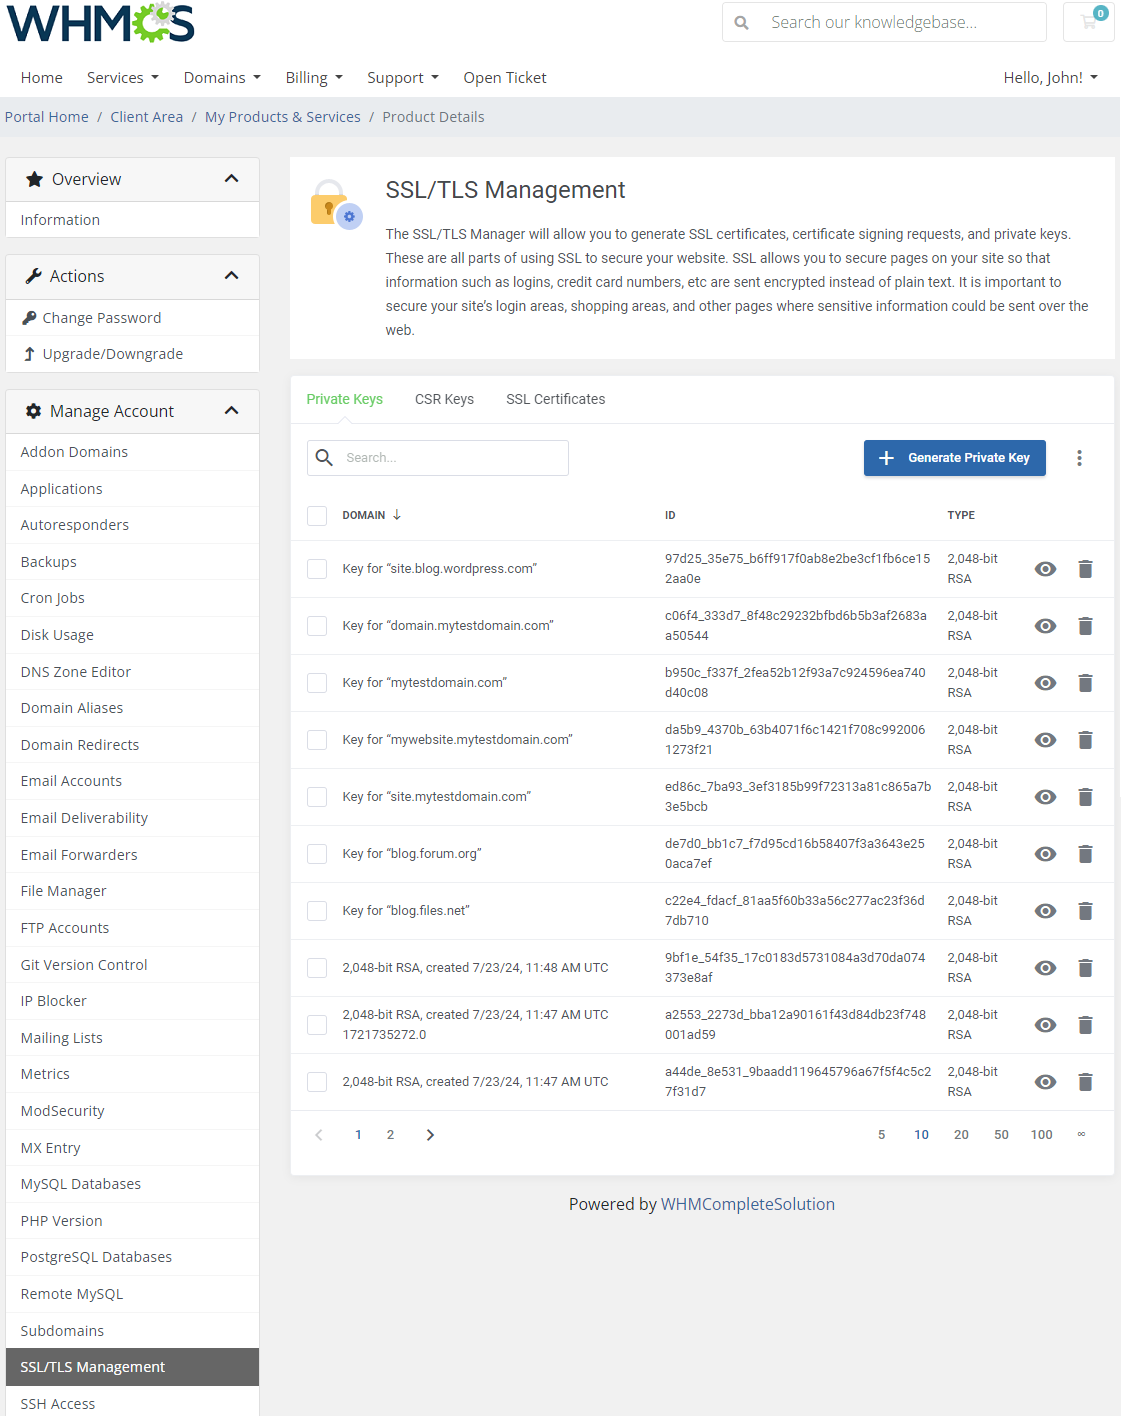
| This feature moves the management of your Private Keys, CSR Keys and SSL Certificates into your WHMCS client area. Generate, upload and install certificates and keys without the necessity of logging in to your cPanel. |
|
SSH Access
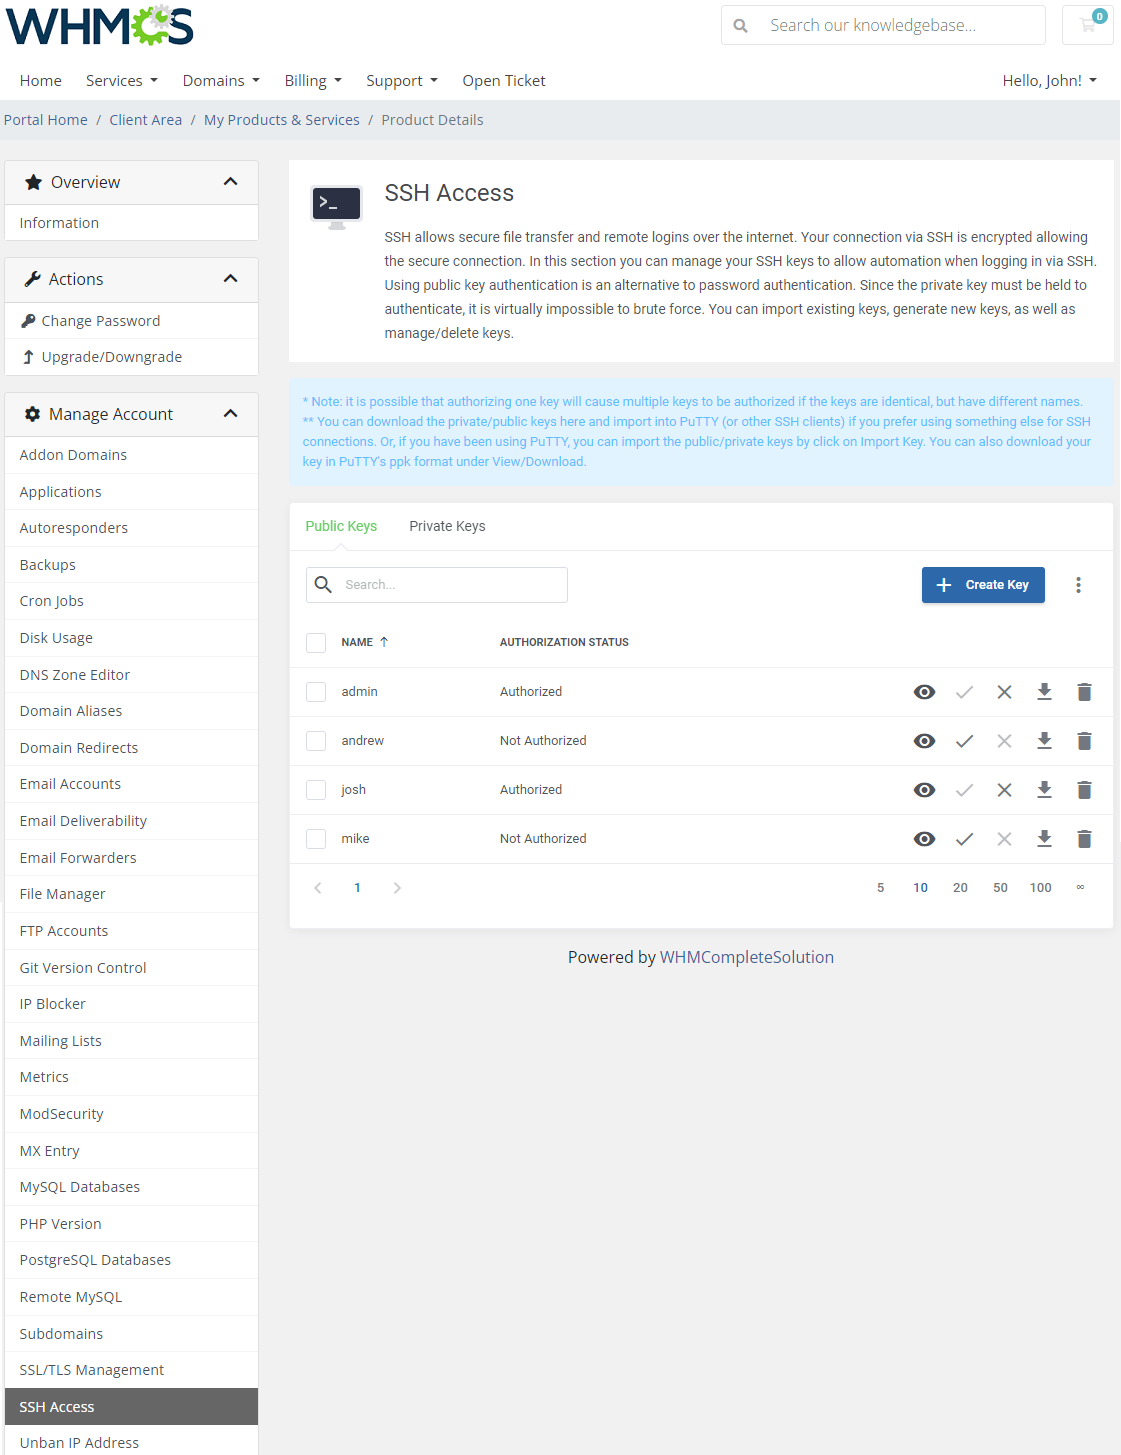
| Configure your SSH keys. Create new keys or import your existing keys. Available actions: view, authorize, download or delete key. |
|
Unban IP Address
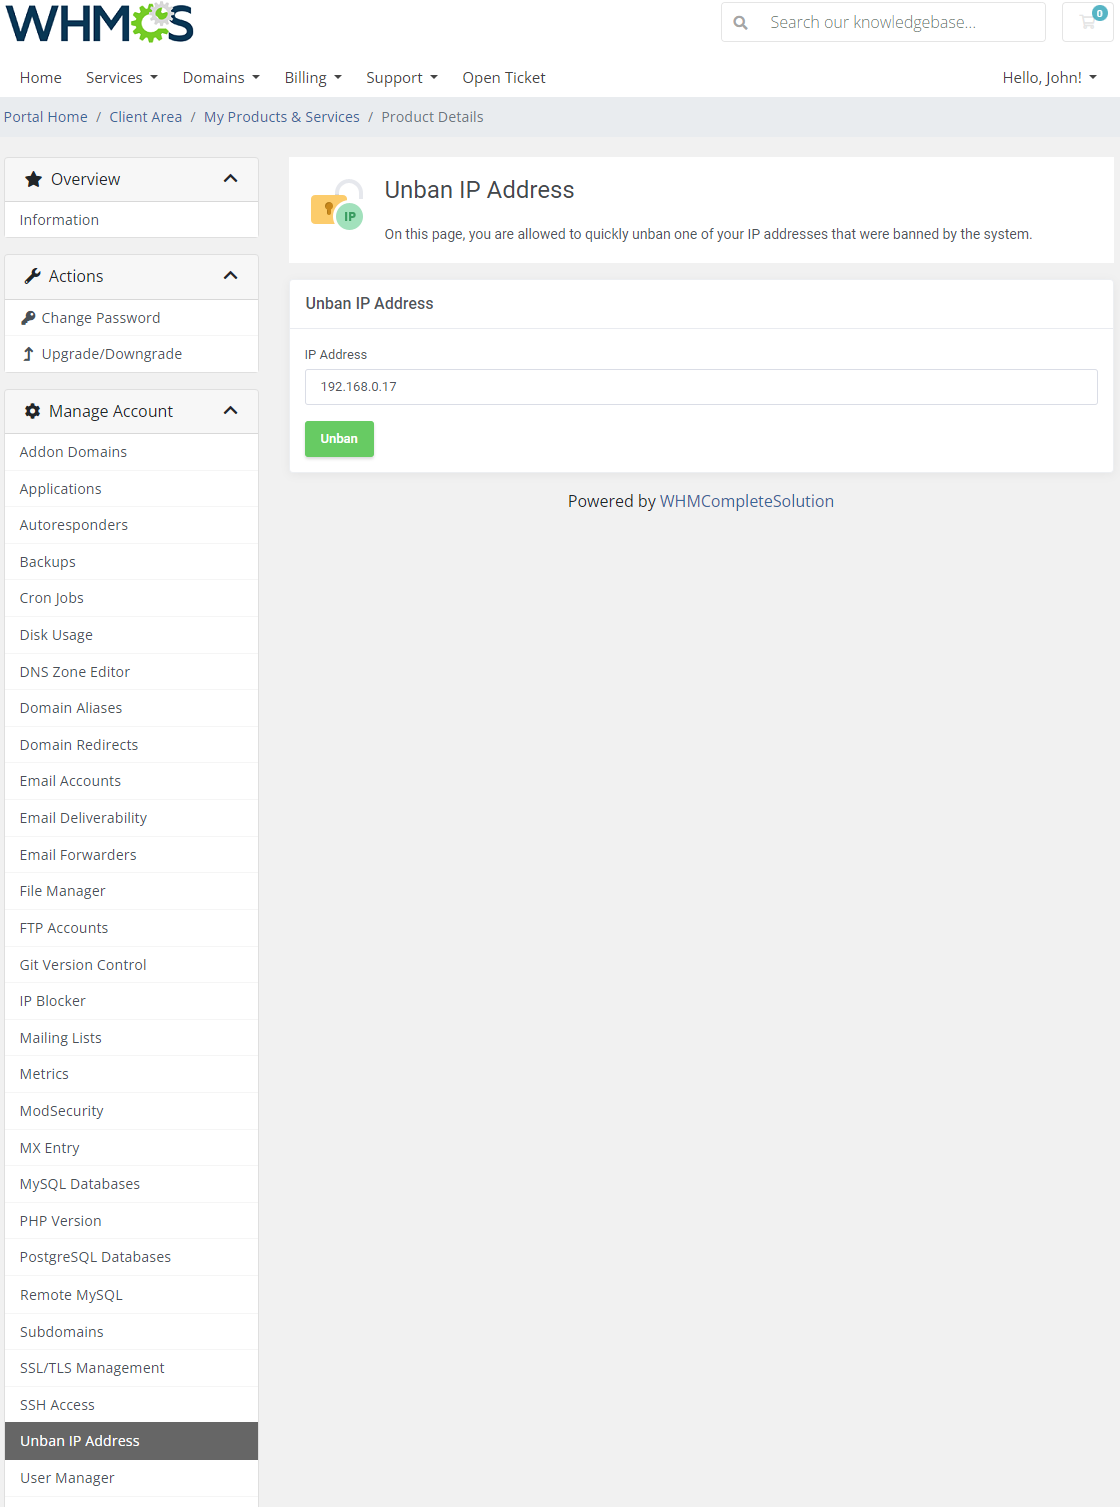
| Unban IP addresses banned by the system. In order for the process of unbanning IP addresses to work properly, you need to run the following cron command (1-minute interval suggested). php -q {whmcs_path}/modules/servers/cpanelExtended/cron/cron.php queue
Please do not forget to replace {whmcs_path} with your WHMCS root location. |
|
User Manager
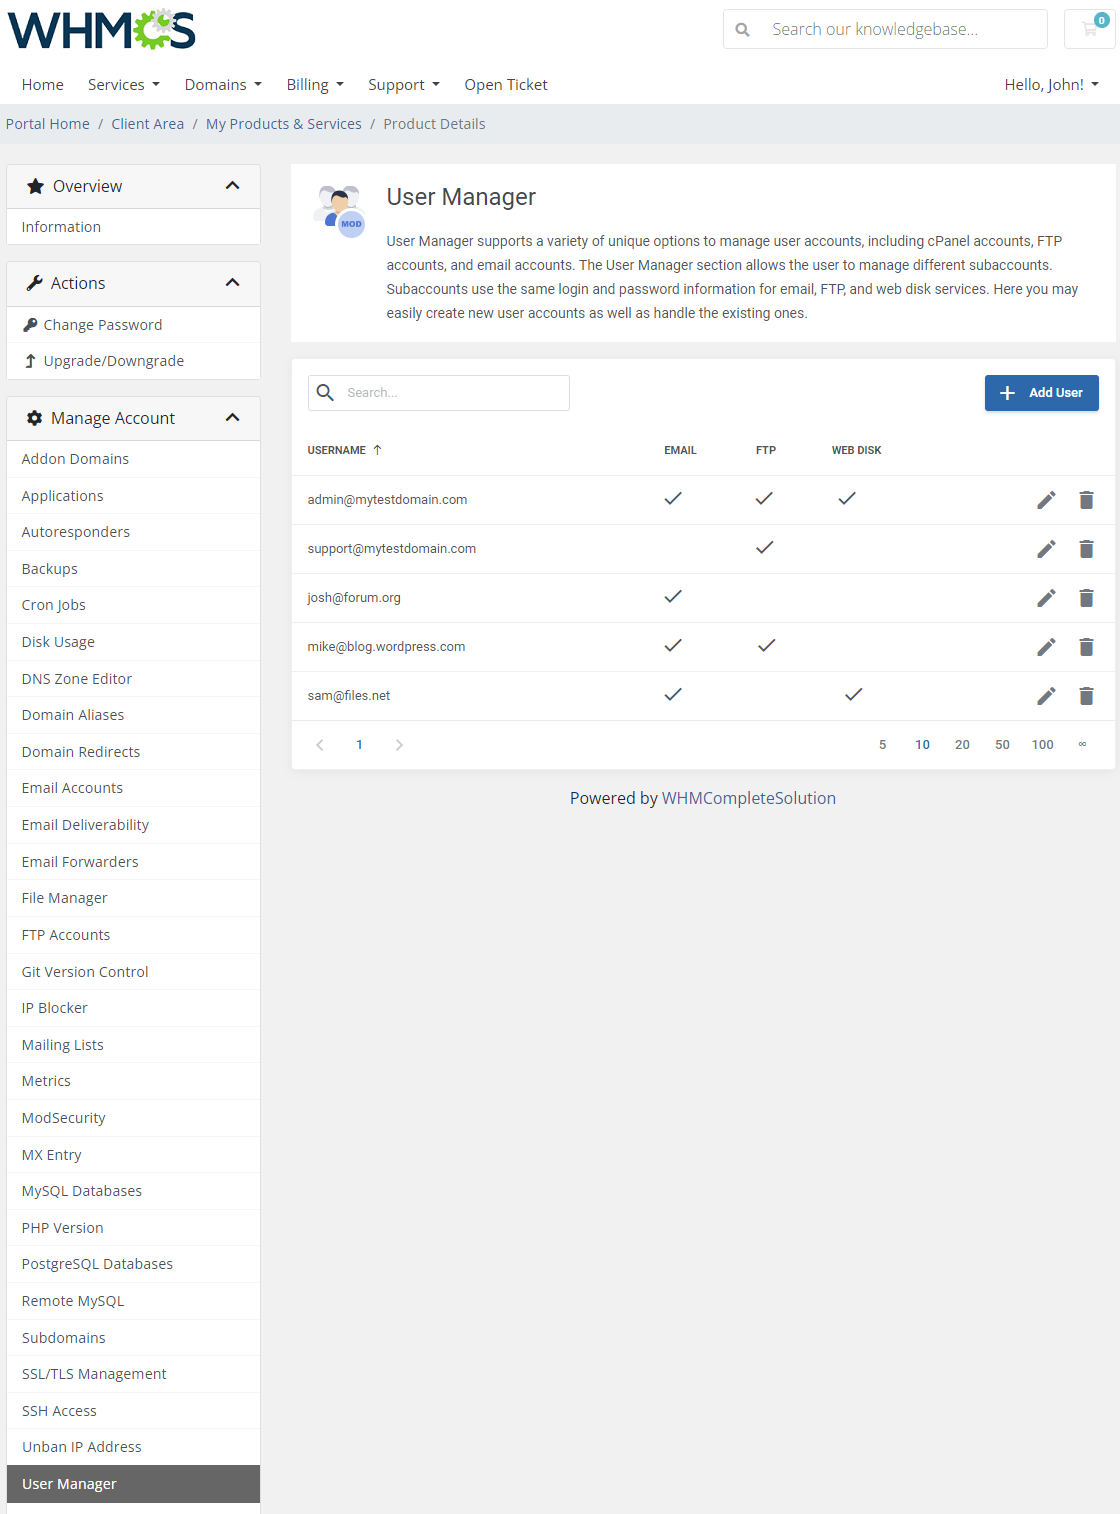
| The 'User Manager' section grants you the possibility to manage your subaccounts that use the same login and password details for email, FTP, and Web Disk services. |
|
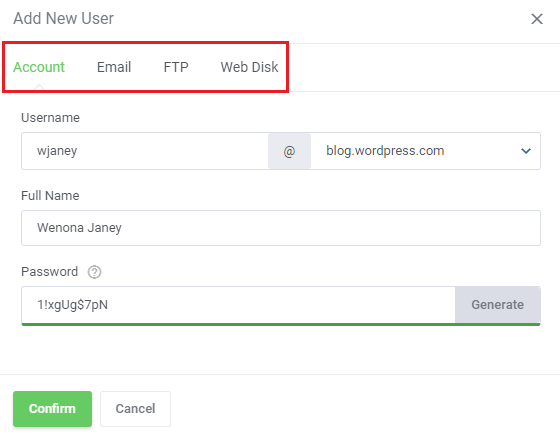
| Add a new user by clicking 'Add User' and complete the details. Note: Please keep in mind that the 'Unlimited Quota' is set for 'FTP Subaccount' by default. If you wish to modify it, please proceed to your panel and change it manually in the 'User Manager' section. |
|
WordPress Manager
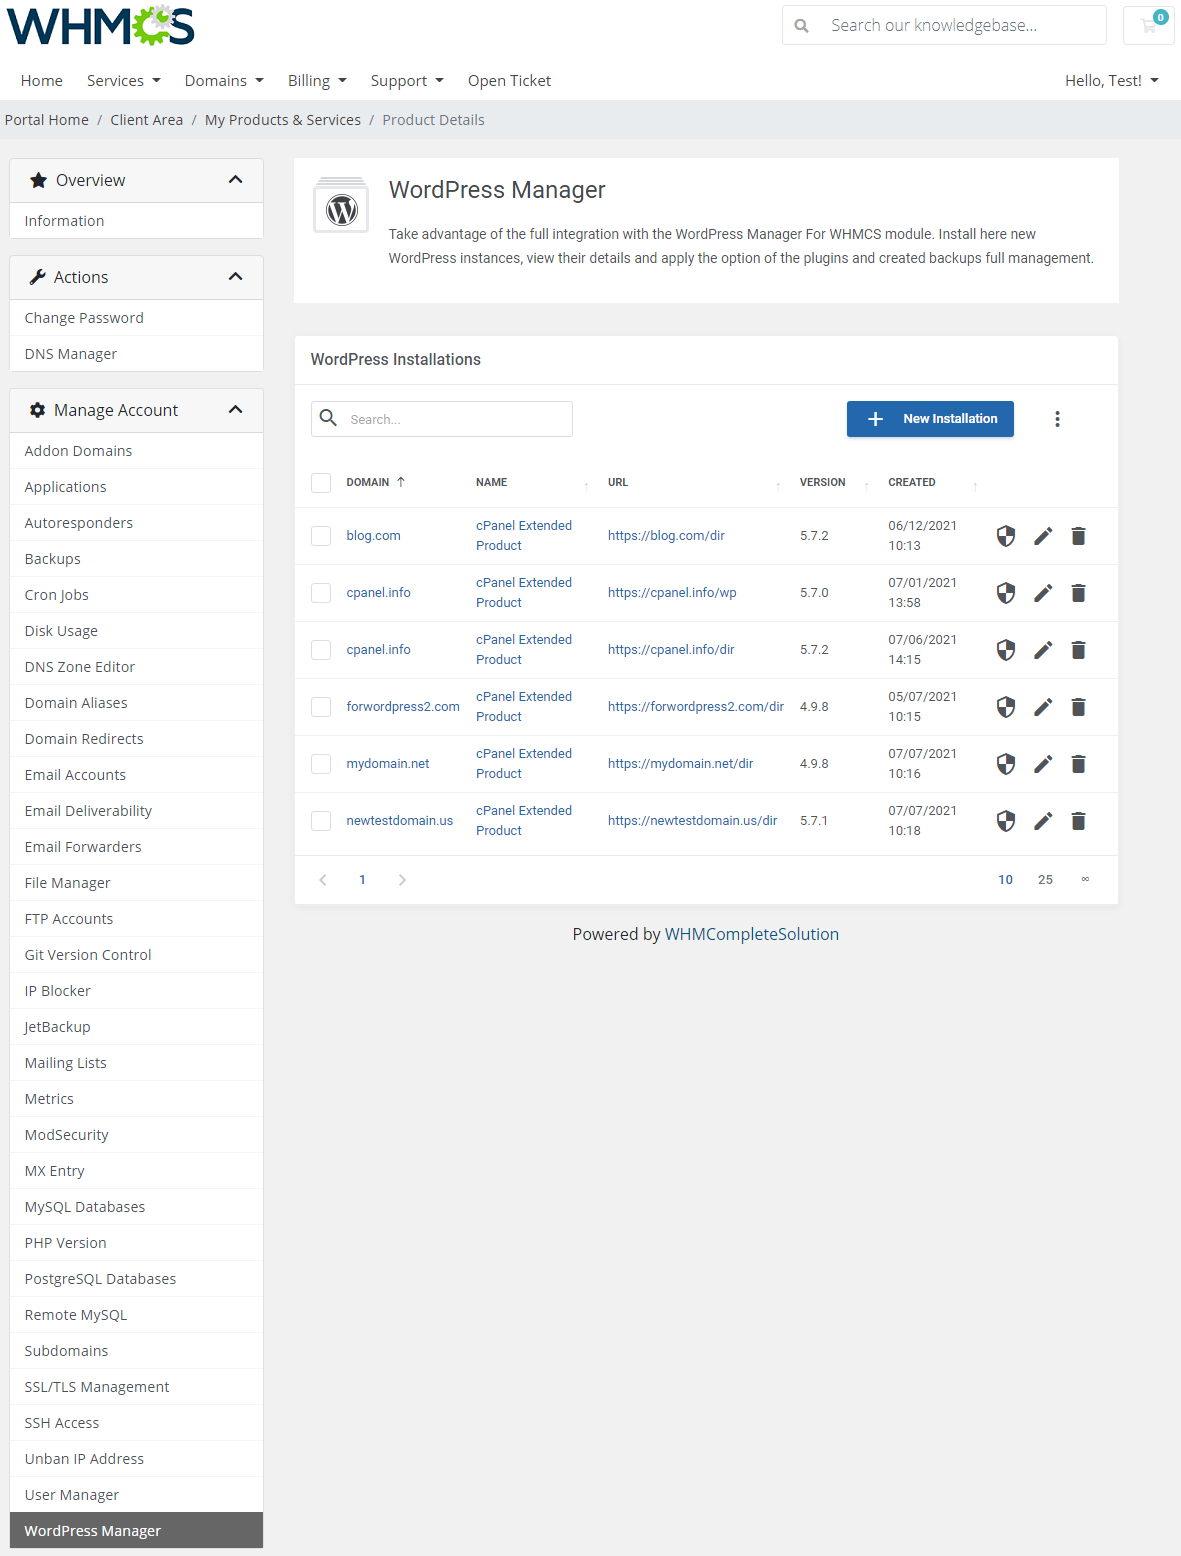
| If you have WordPress Manager For WHMCS module installed, your customers will fully benefit from its seamless integration with the cPanel Extended For WHMCS module. |
|
| Thanks to this integration, your customers will have the capability to install and manage WordPress instances in detail without the bother of leaving the cPanel Extended panel in your WHMCS client area.
Full and detailed instructions on the 'WordPress Manager' itself is located here. Important: cPanel integration with WordPress Manager does not offer support for reseller's accounts. Such accounts will not be visible nor managed in the cPanel view. |
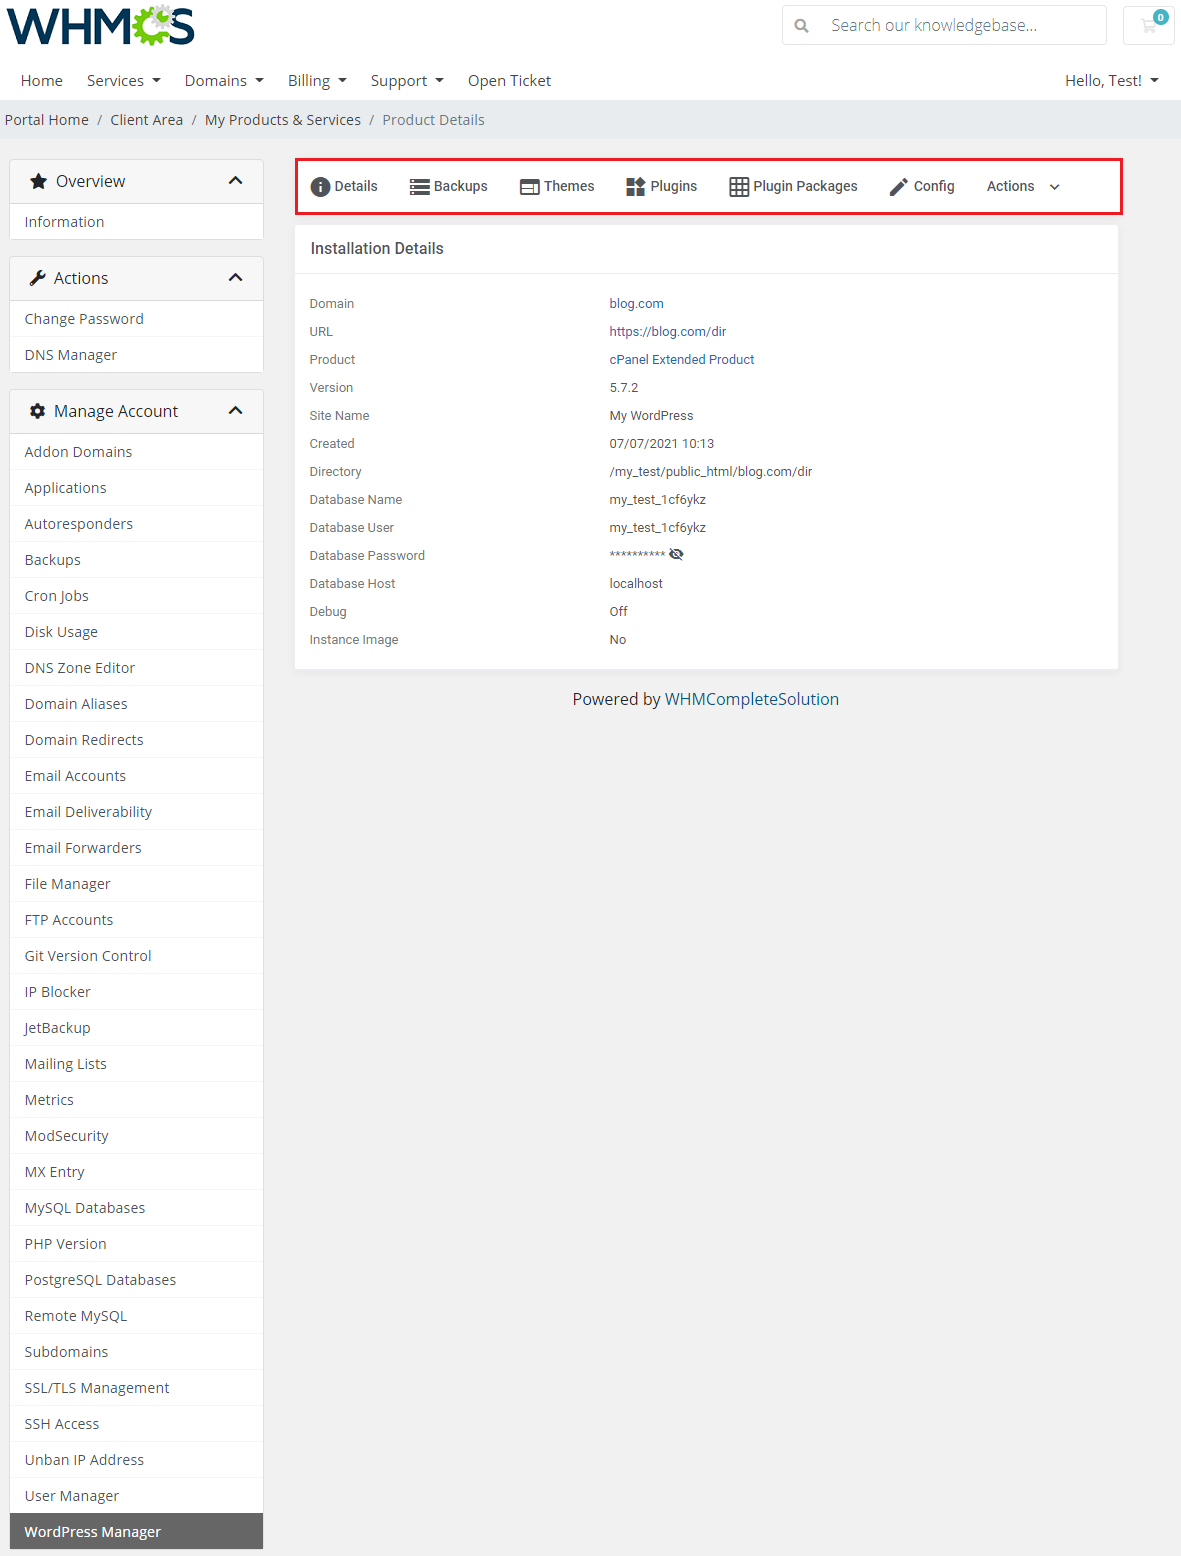
|
| Please note that this entire section can only be available if you have purchased and installed the WordPress Manager For WHMCS module. |
WordPress Toolkit
| WordPress Toolkit is an independent tool used to manage WordPress instances. You may add, configure and freely manage your WordPress installations directly from the level of the WHMCS client area. Note: Please bear in mind that WordPress Toolkit and WordPress Manager are two separate applications. |
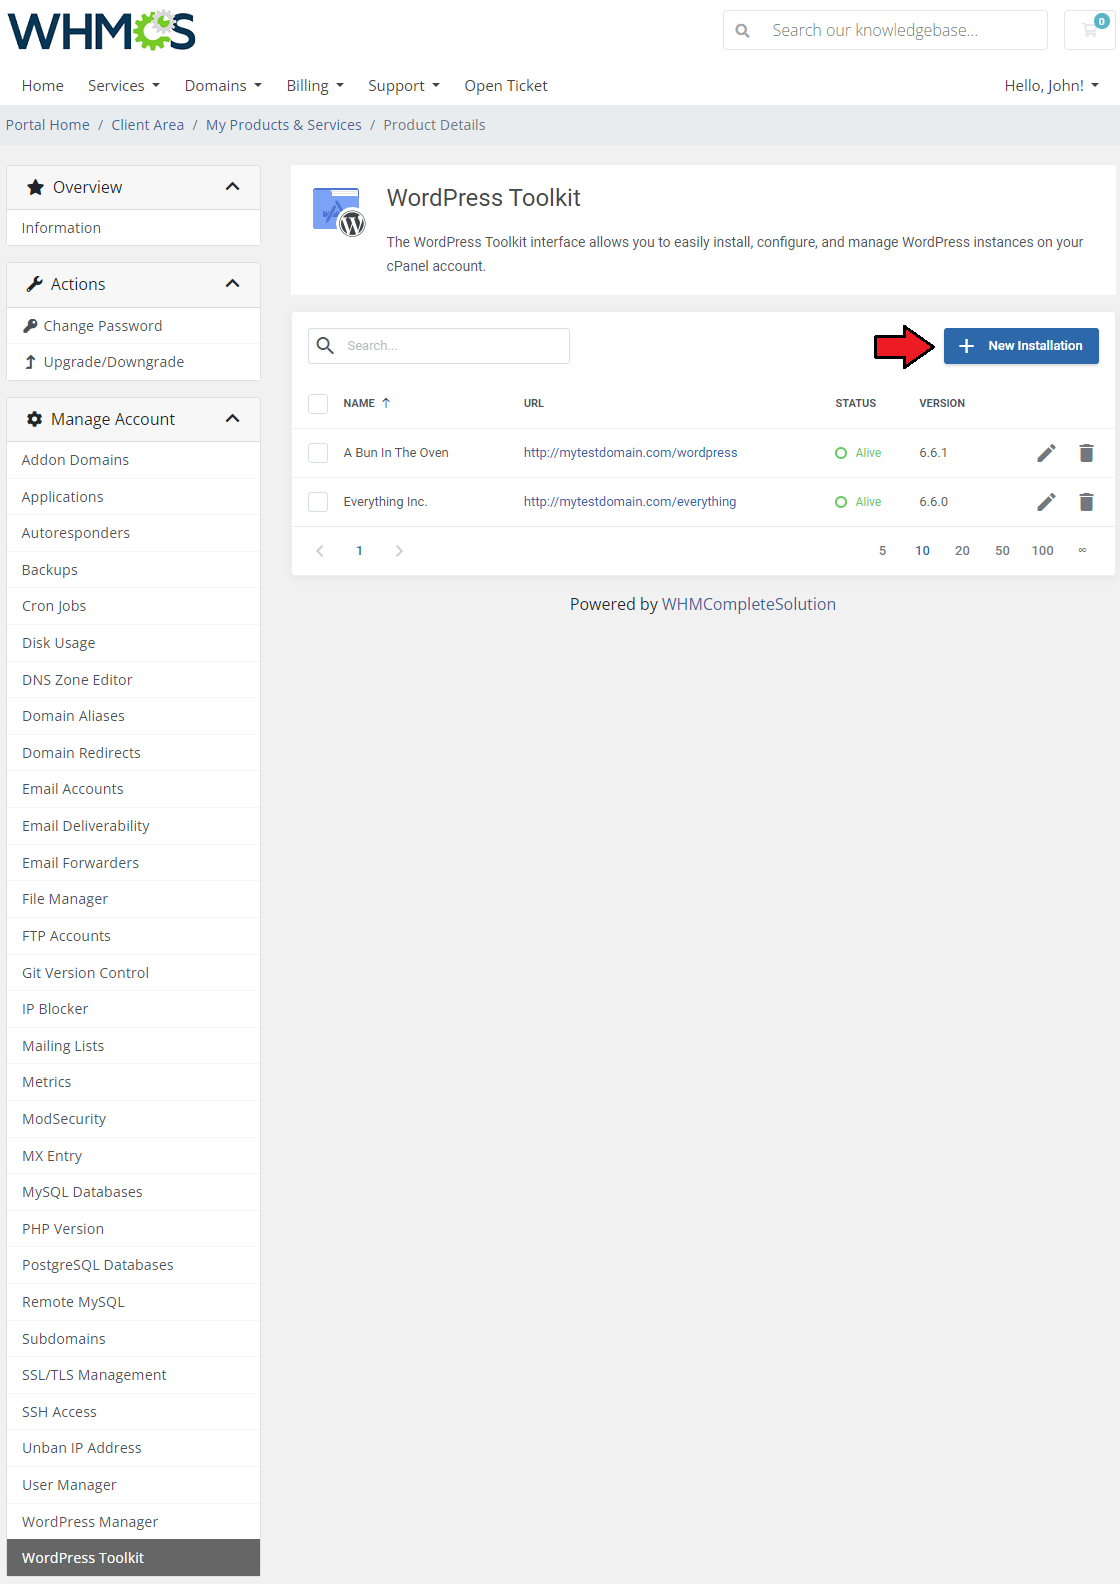
|
| Start your journey by adding the first installation of WordPress. Press the button 'New Installation' marked on the screen below and read the instruction to see how to install a pure new instance. |
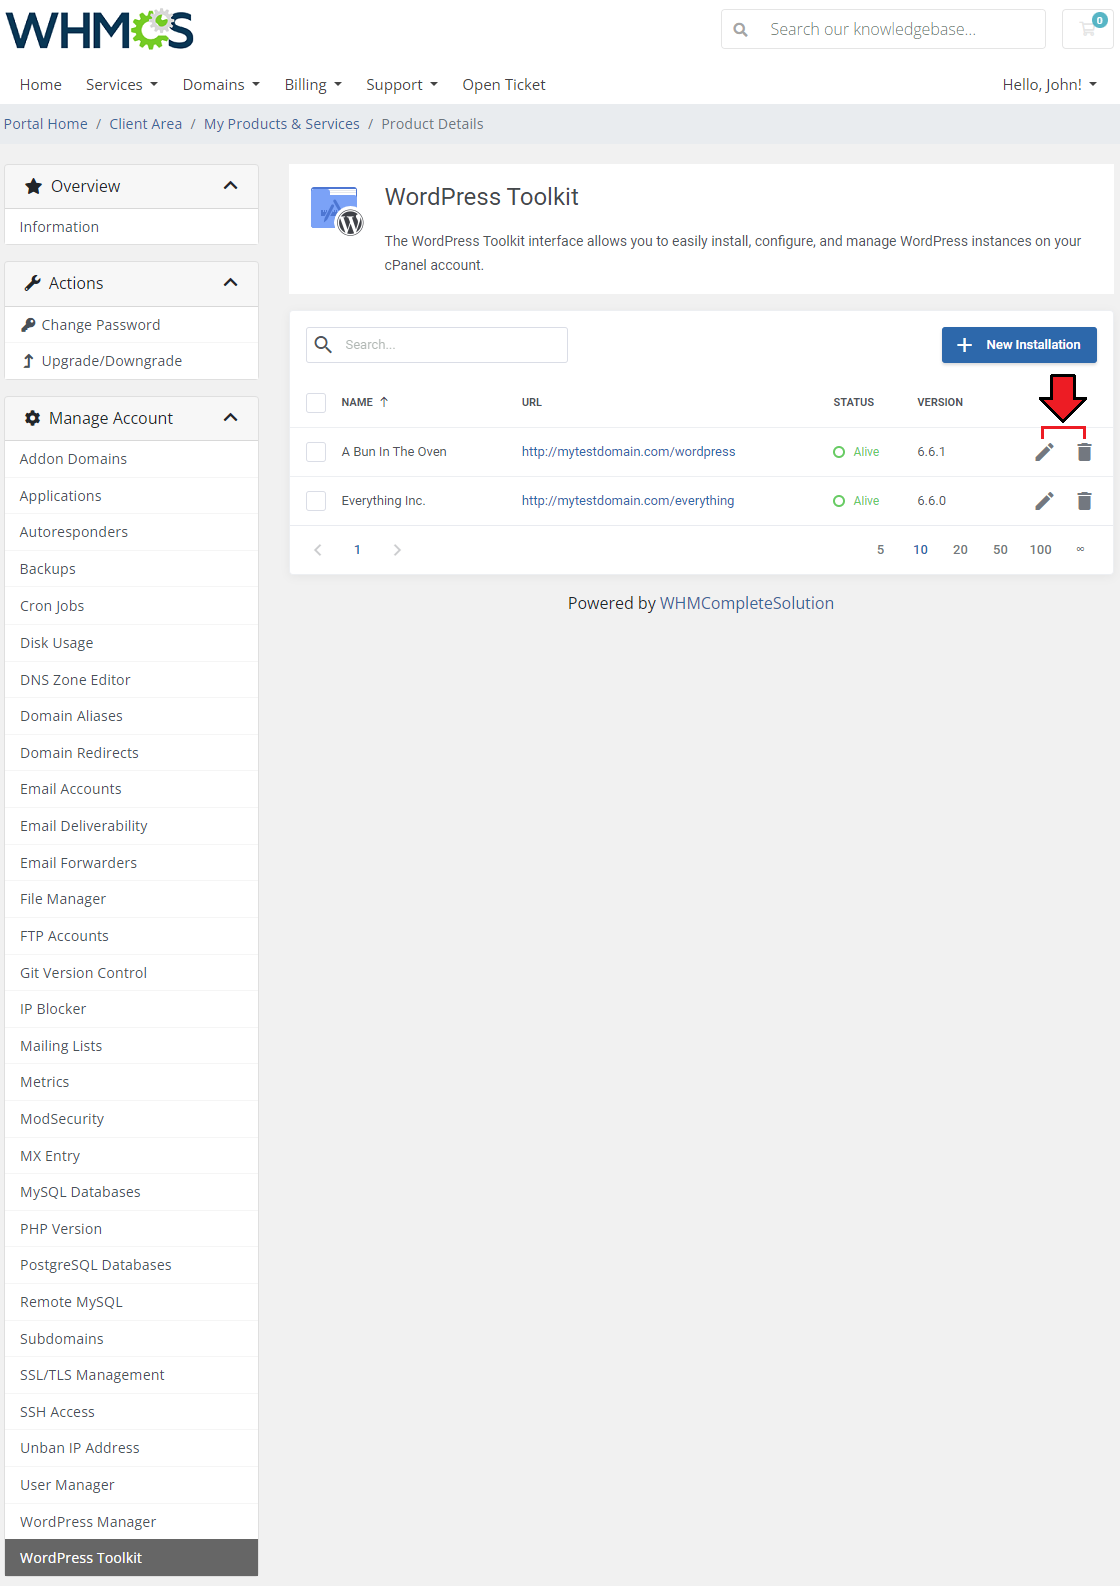
|
A new window with four tabs will open. In the first Details tab, fill in the following fields:
|
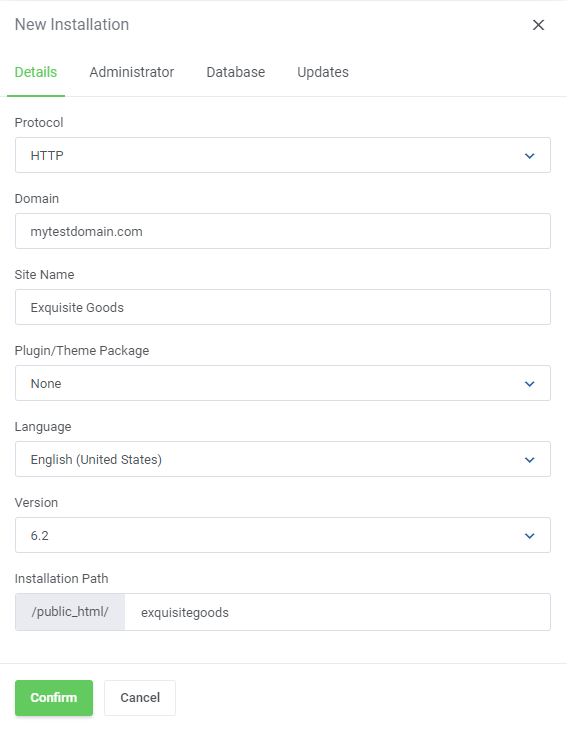
|
|
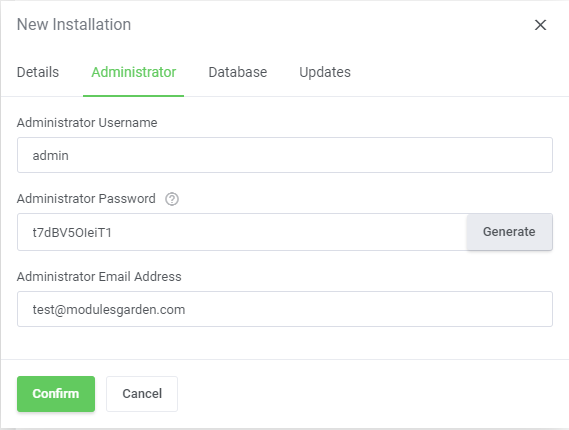
|
|
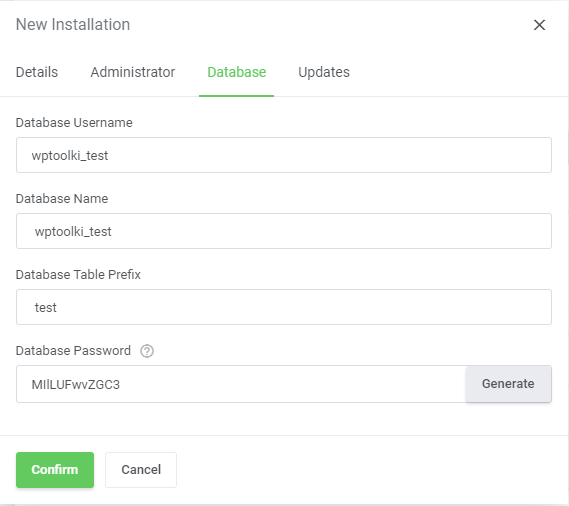
|
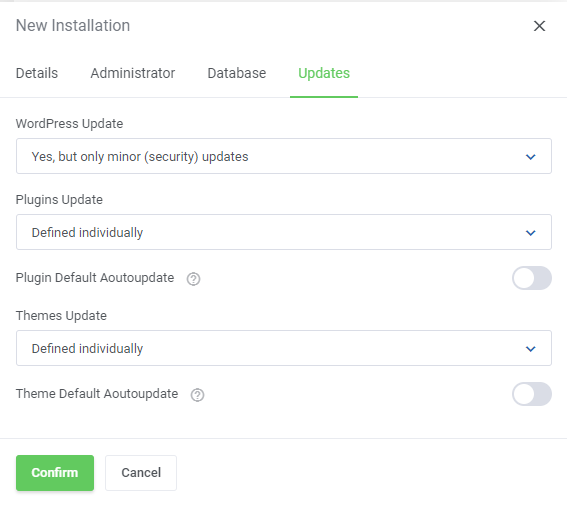
| WP Toolkit can automatically install WordPress core, plugin, and theme updates as soon as they become available. Updates related data:
WordPress Update - Update WordPress automatically:
Plugins Update - Update plugins automatically
Themes Update - Update themes automatically
|
|
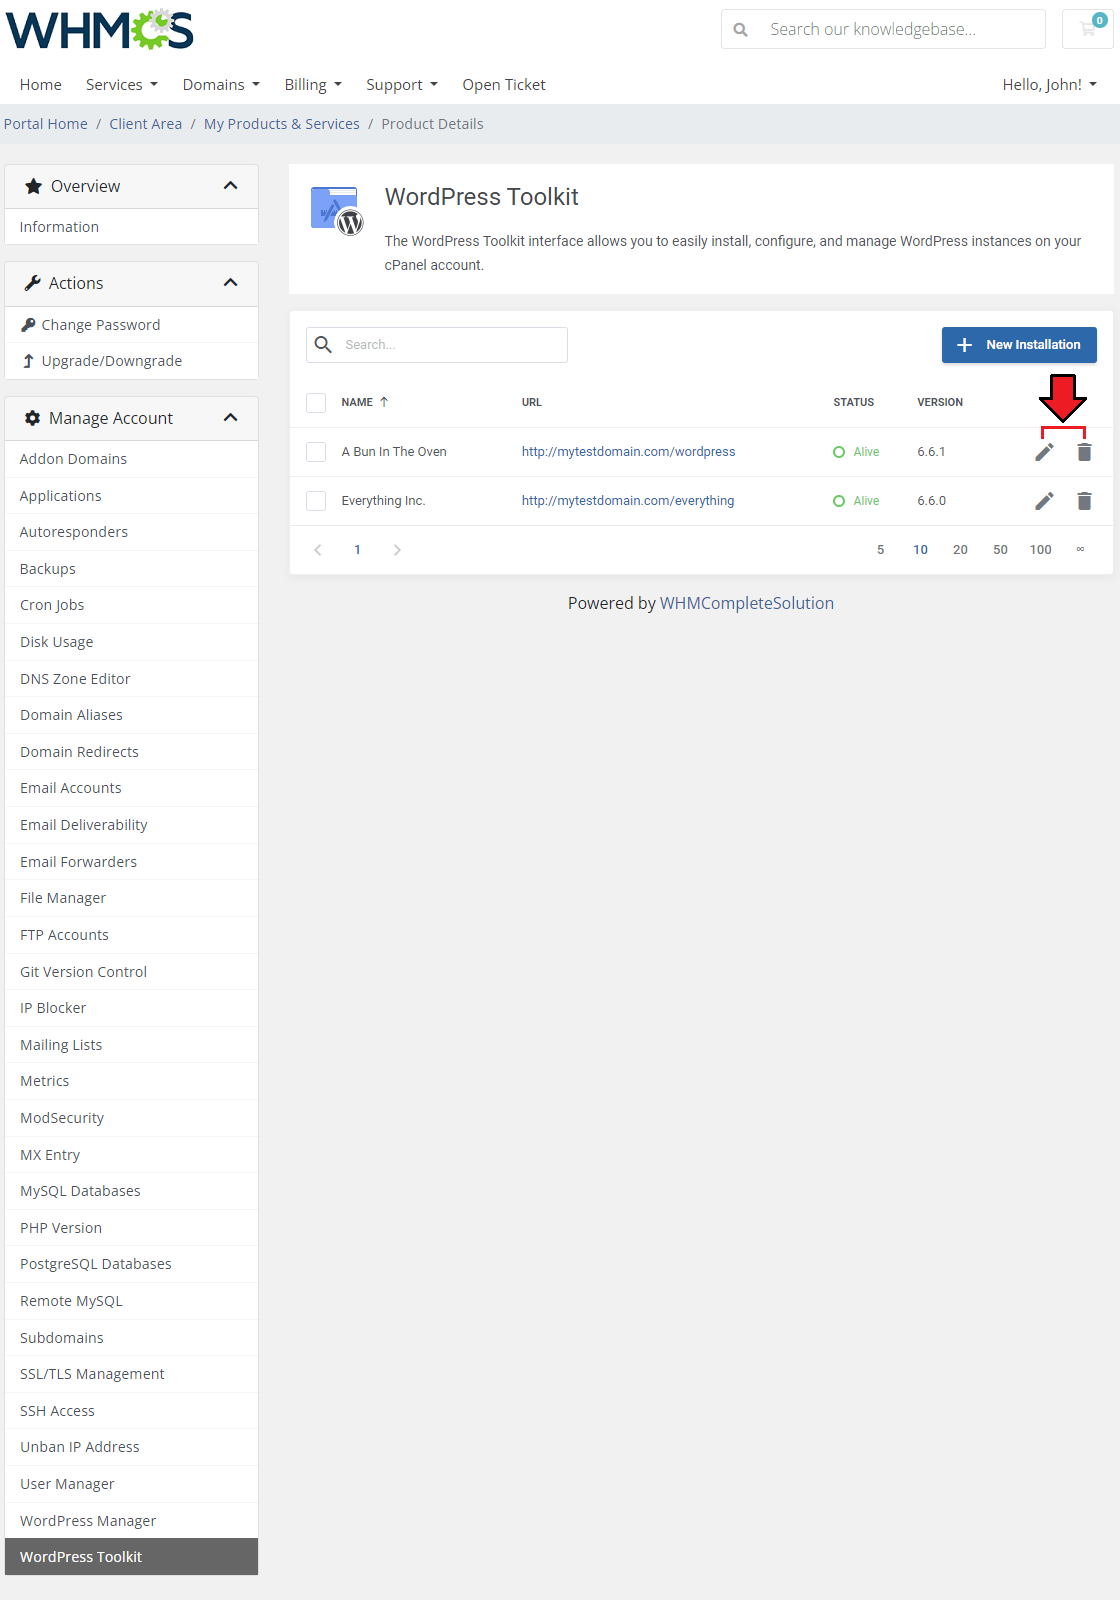
| Now wait a moment until a ready WordPress installation is complete and appears on the list on the main page of the WP Toolkit app.
You will find there a list with basic information regarding every installation, including the URL, site name, and version. From this point, you may also manage the installation (1) and delete (2) it at any time. |
|
Instance Management
Details
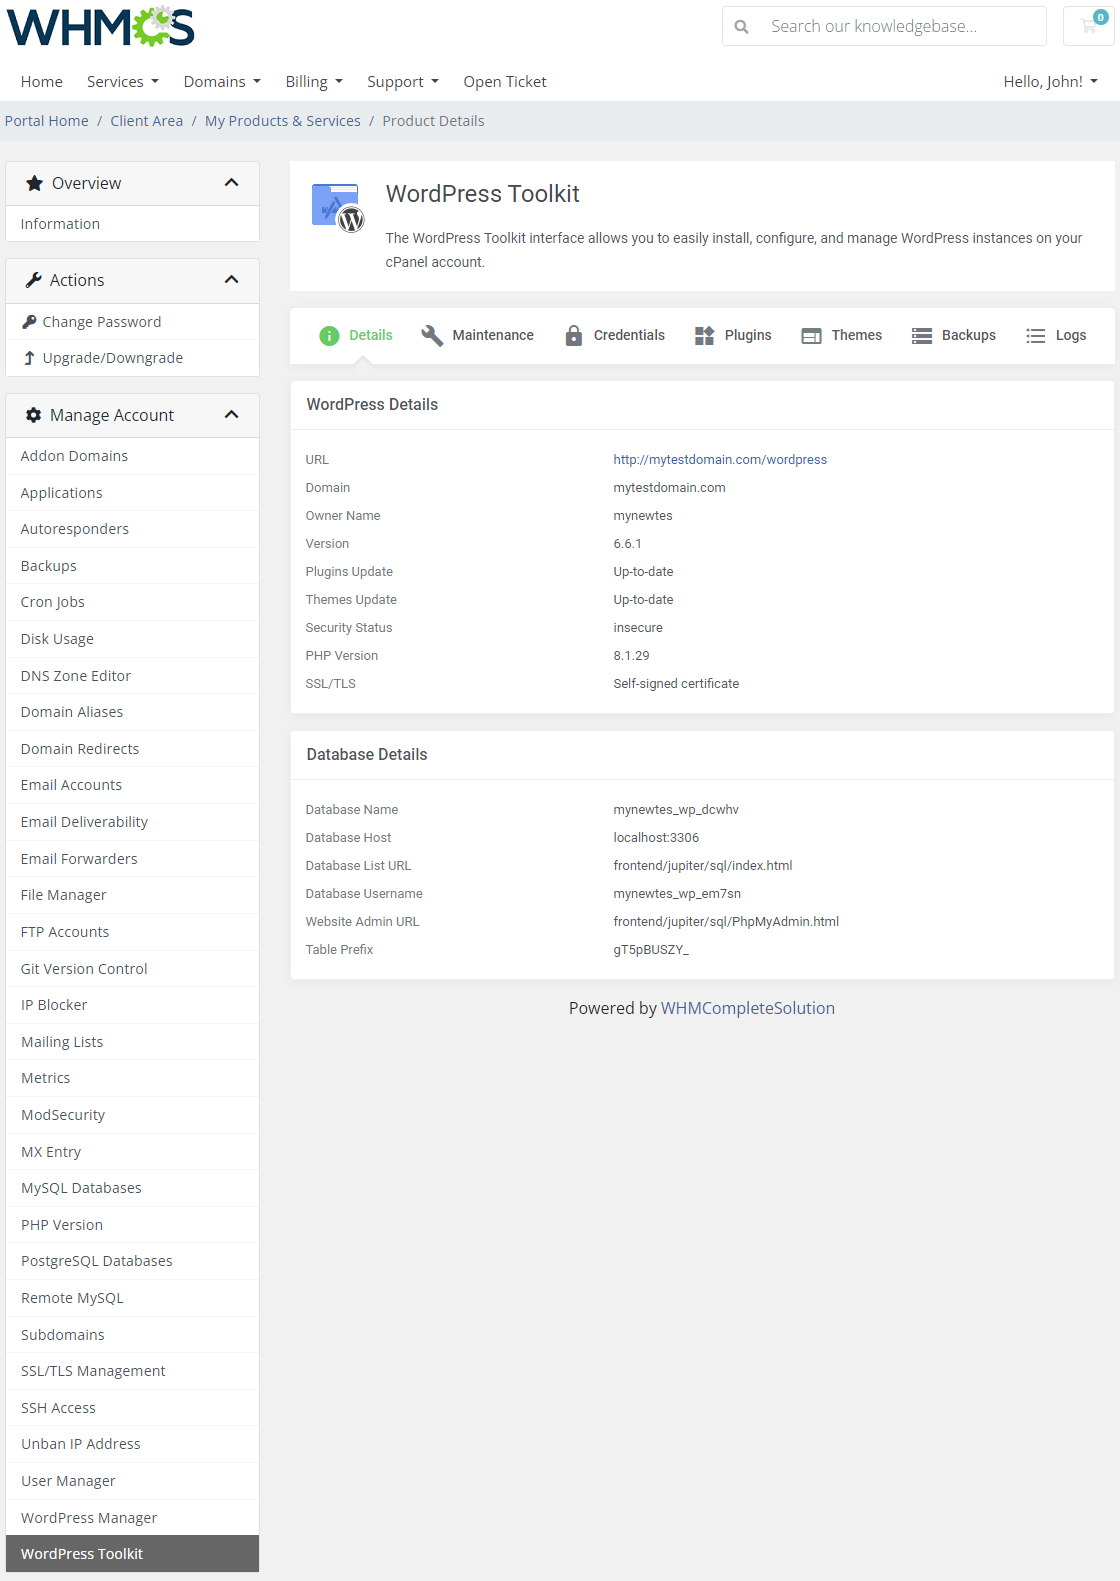
| Instance details is the first section that you will be directed to once you move to single installation management.</br>
You will find there gathered details on WordPress and database, such as:
|
|
Maintenance Mode
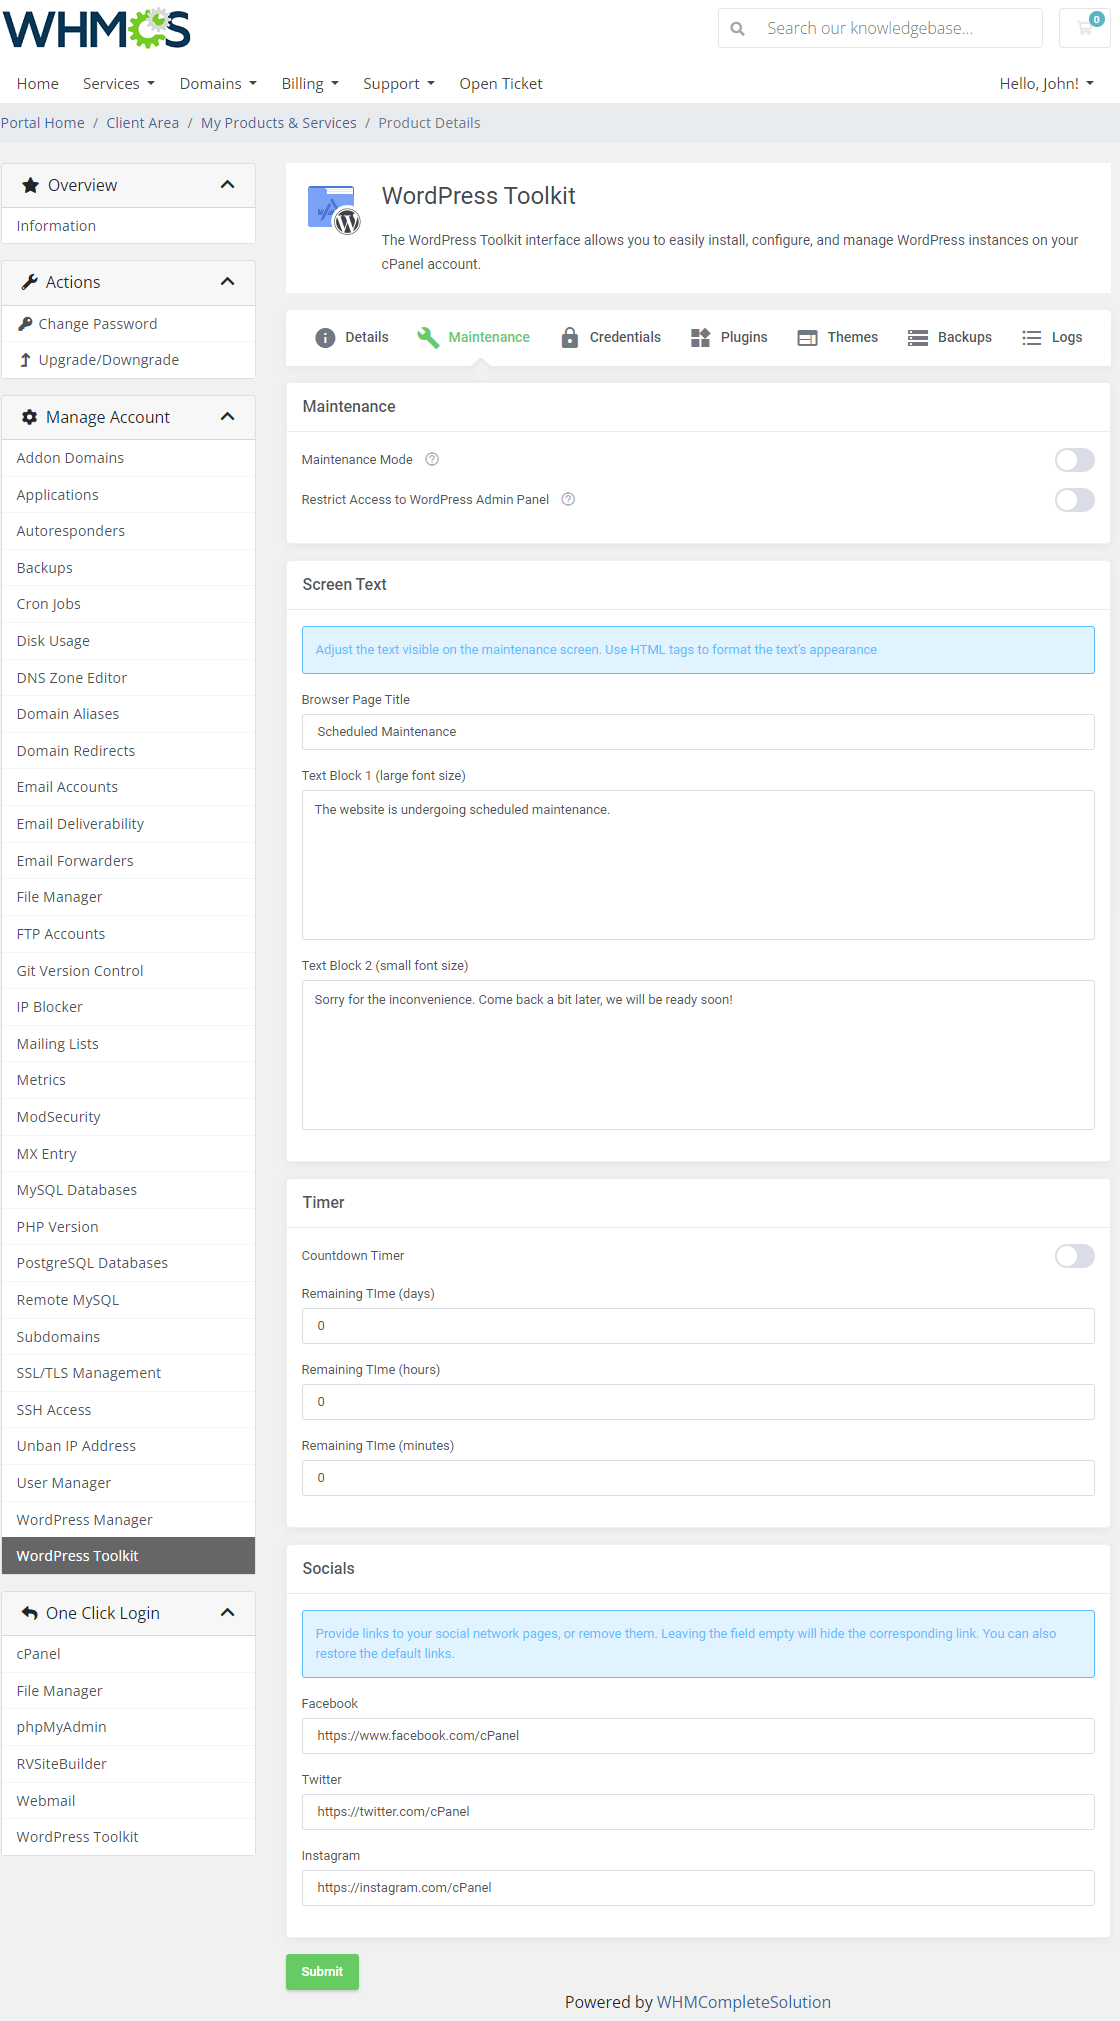
This section allows setting up the options of website maintenance time. Start by enabling/disabling the mode and then move to more specific features:
Screen Text section allows changing the text displayed on the maintenance screen. You can use HTML tags to format the text's appearance. You may adjust the texts of:
Timer - enable the timer to count down the remaining time
Social Network Links - Type in links to your social network pages. If left empty, the corresponding link will be hidden. |
|
Credentials
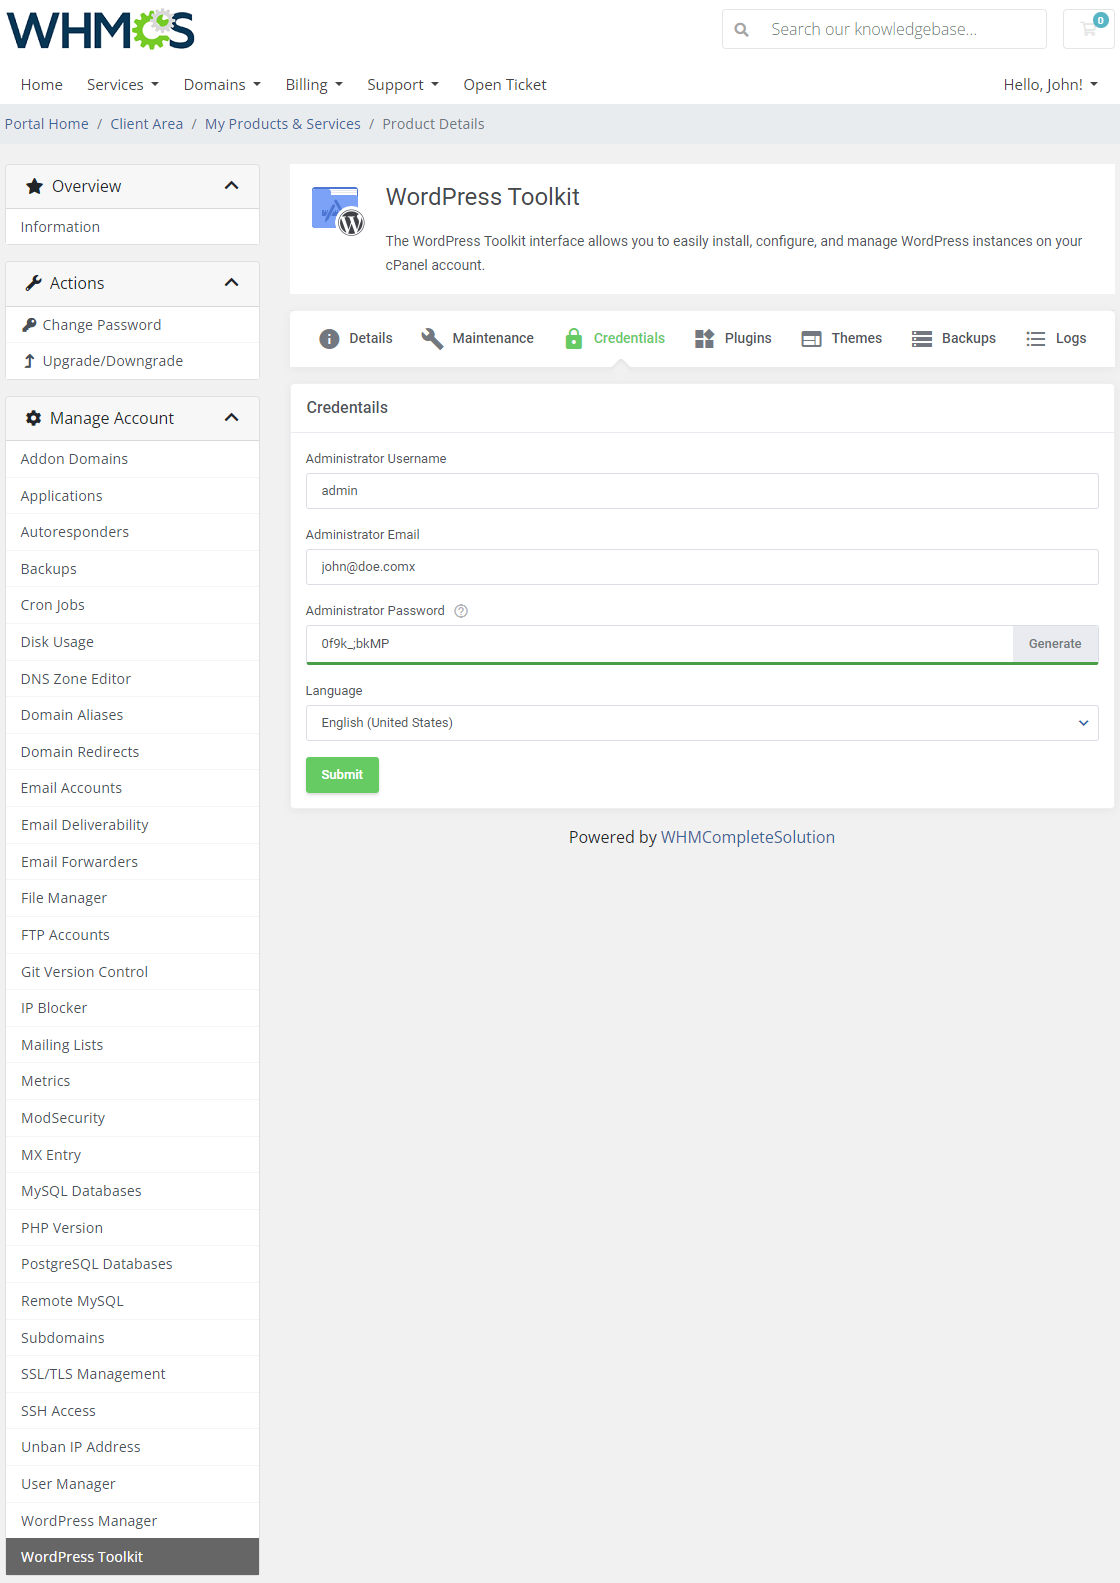
Instance settings
|
|
Plugins
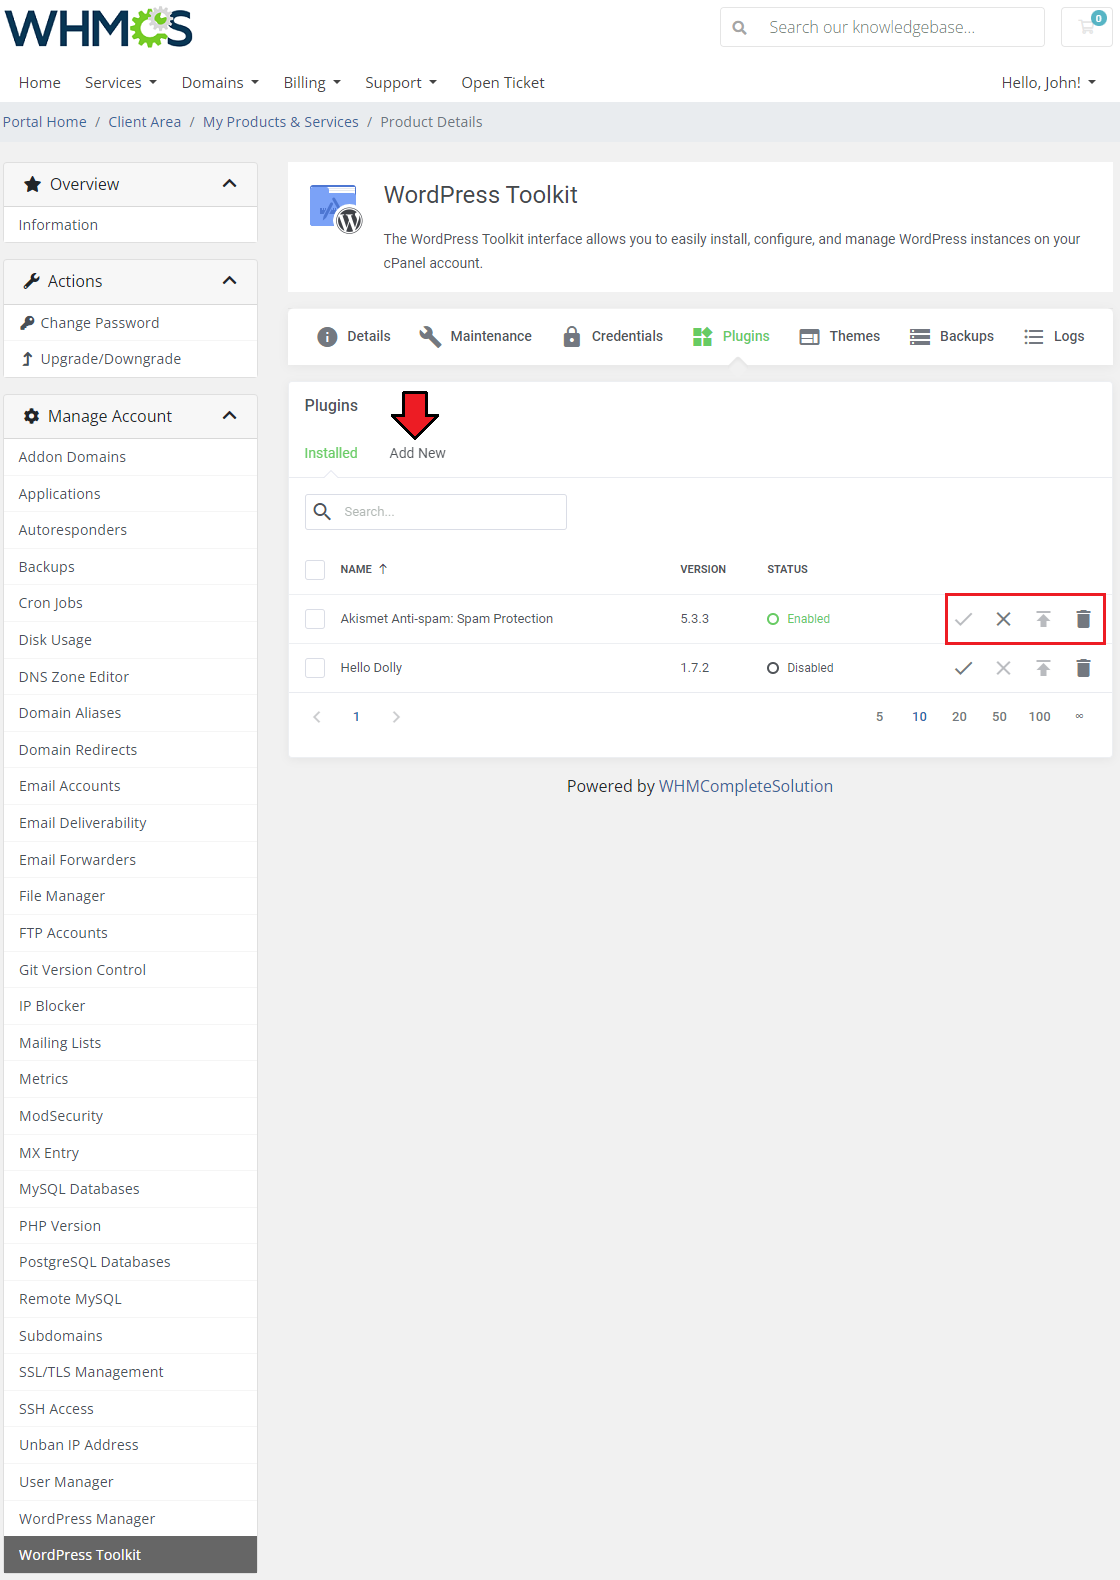
| Here you are enabled to activate, deactivate, delete, and update the already installed plugins. You can also add new plugins to your WordPress installation in the 'Add New' tab. |
|
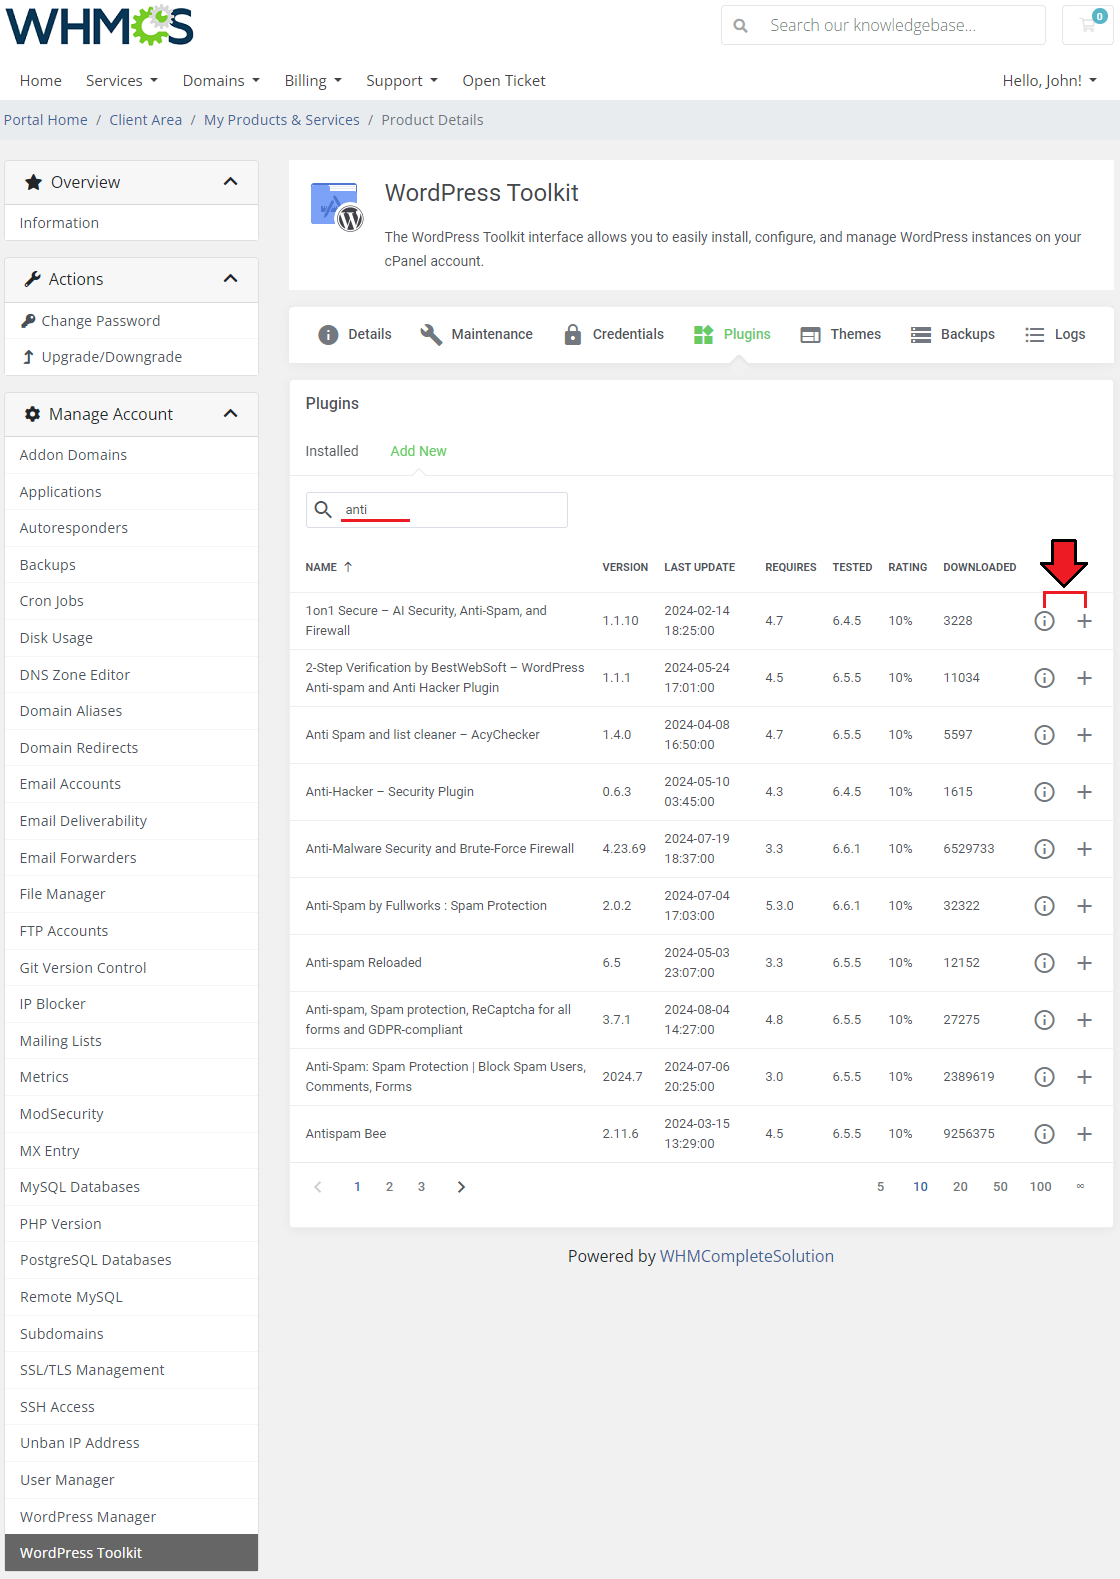
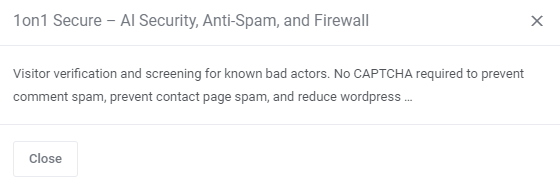
| To add a new plugin, you are required to type in at least three of the initial letters of the desired plugin's name into the search field to see the actual results. A list of related plugins will appear. You may now learn more about each plugin by pressing the 'Show Details' button. If the plugin meets your requirements, simply press the corresponding button to begin the installation process (which might take a short while). |
|
|
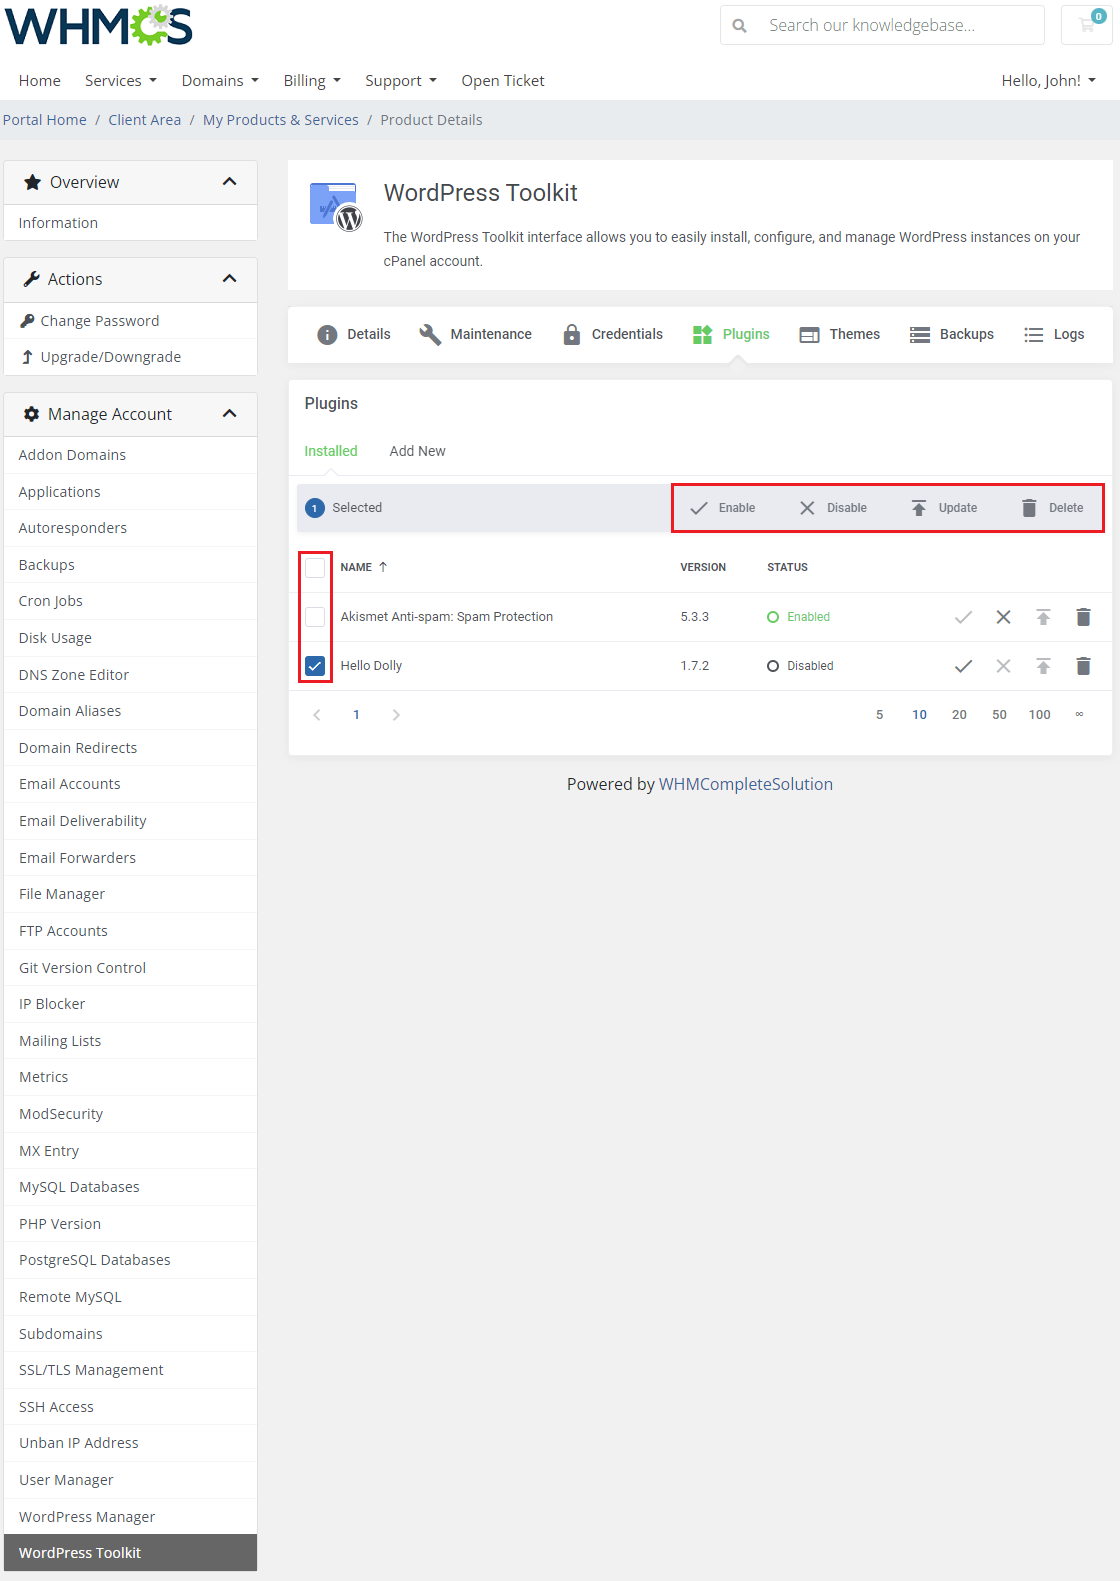
| The 'Mass Action' feature is also present in this section, so you will be able to handle multiple plugins more efficiently and at the same time. |
|
Themes
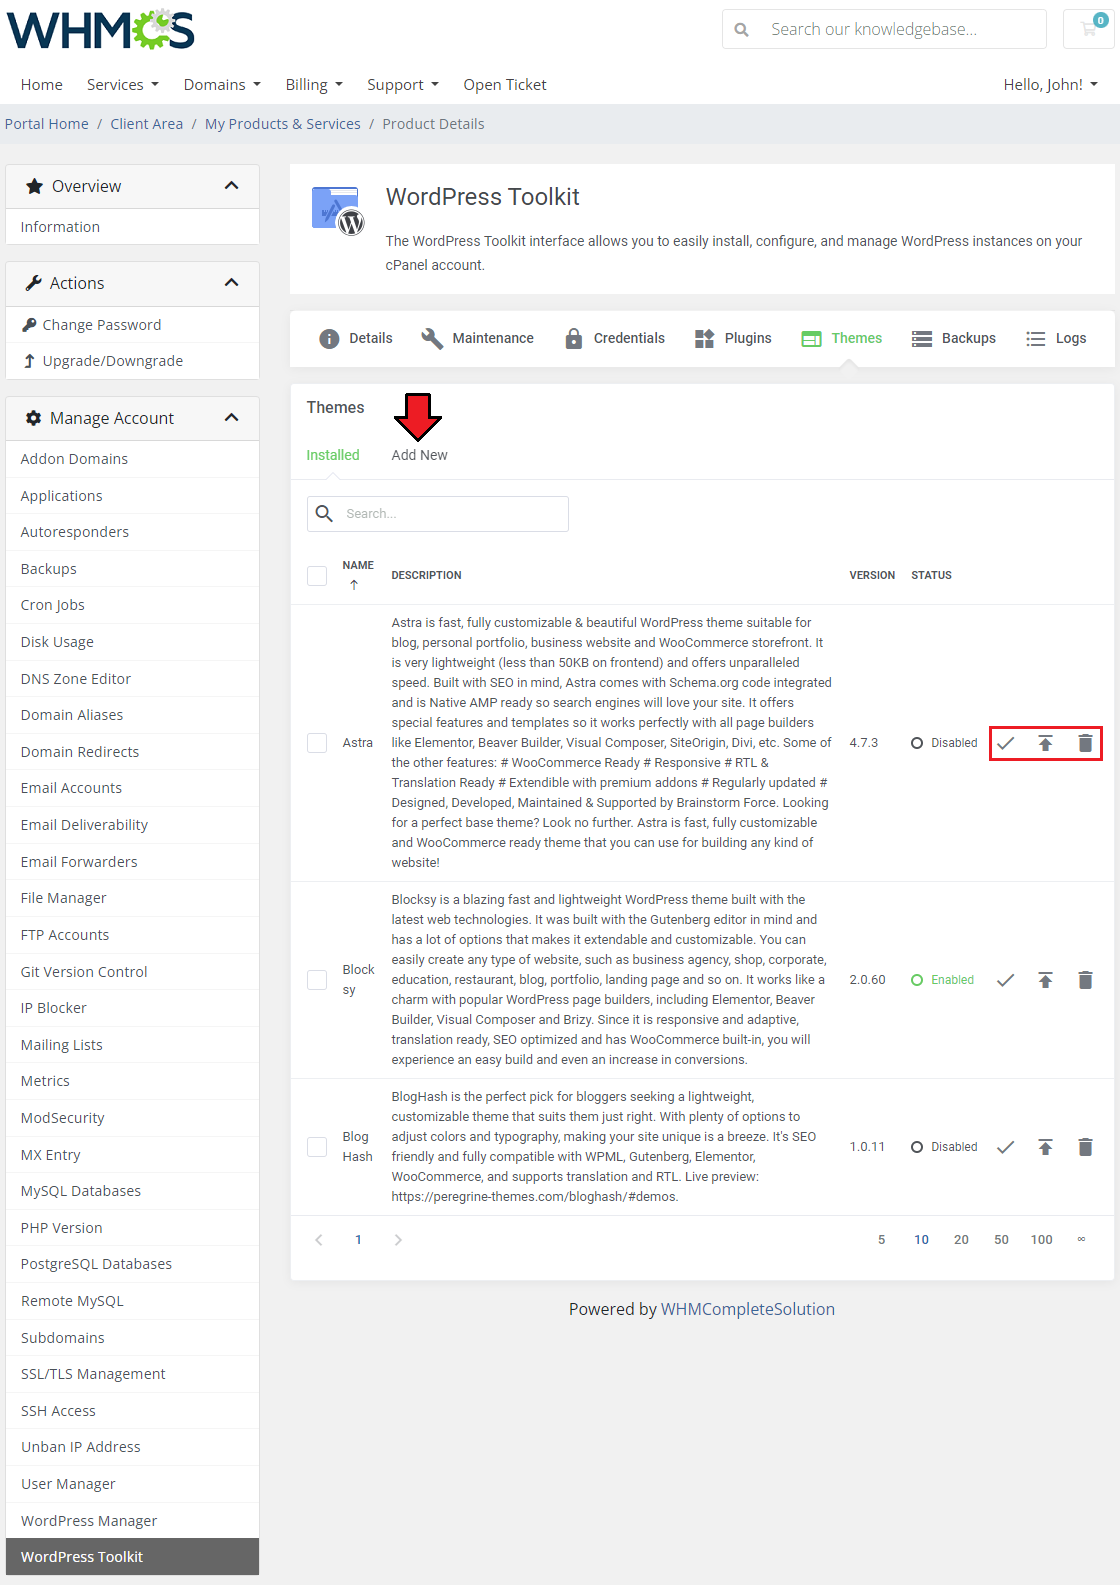
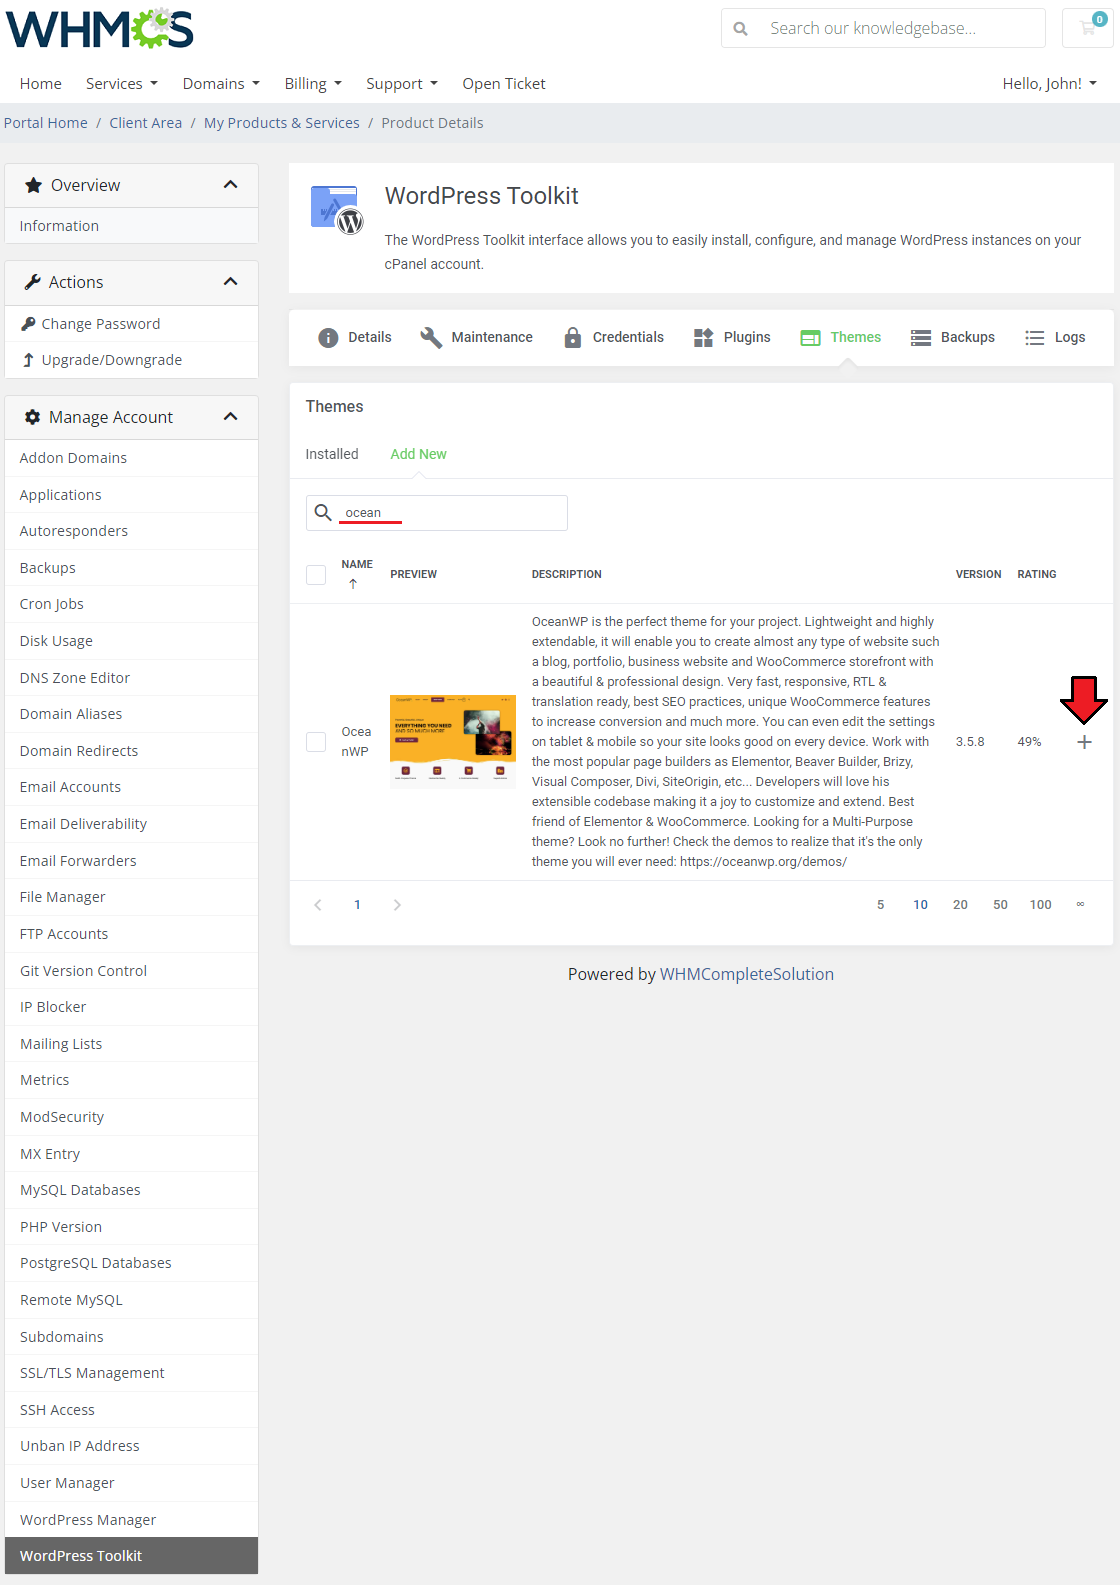
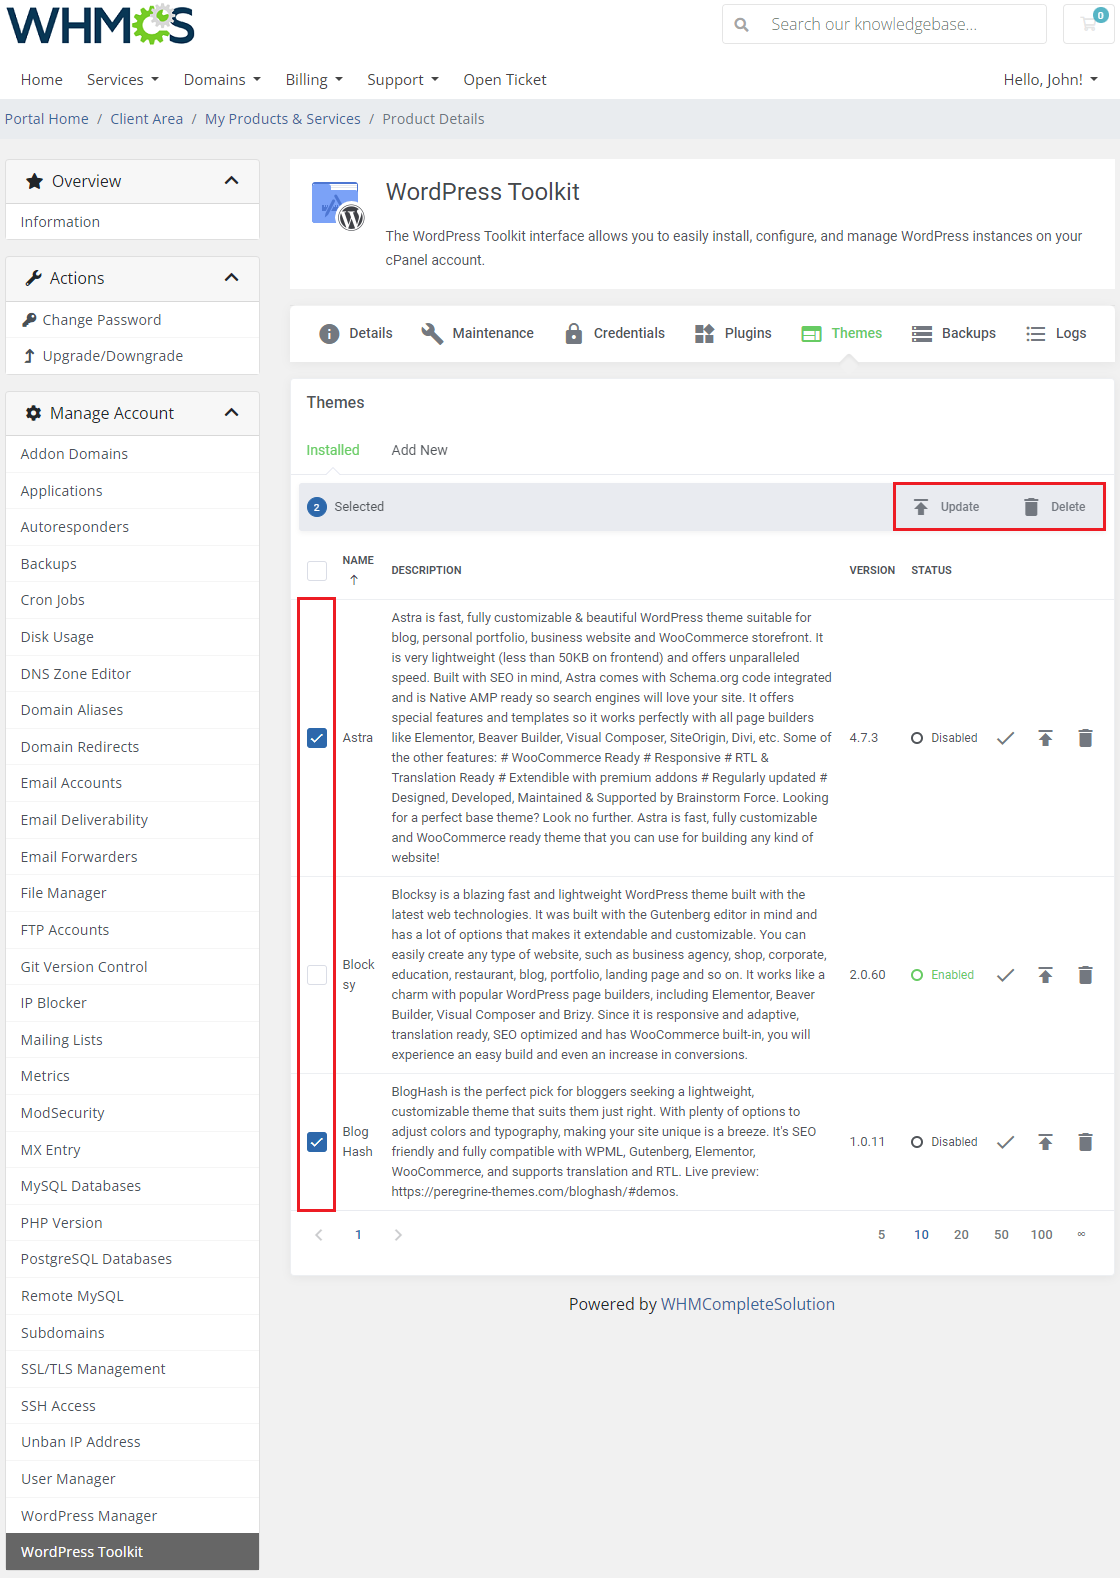
| This section allows quick and easy management of themes installed on your WordPress instance. Enable/disable the theme, update the already installed theme, and delete useless ones. You can also add new themes to your WordPress installation in the 'Add New' tab. |
|
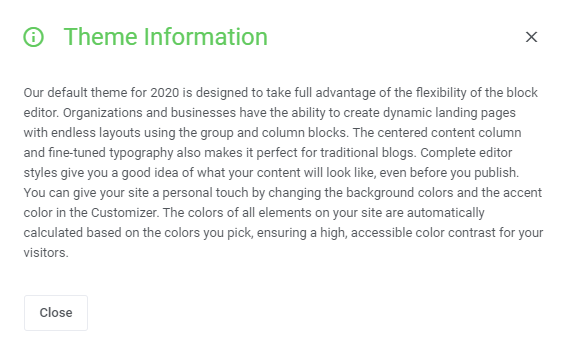
| Please start typing in the search field to see the available themes. Once a list of related themes appears, you will be allowed to first check their preview and details - pressing the 'Information' button to learn more. If the theme satisfies your needs, simply press the corresponding button to begin the installation process (which might take a short while). |
|
|
| Thanks to the 'Mass Action' functionality, you will be able to handle multiple themes more efficiently at the same time. |
|
Backups
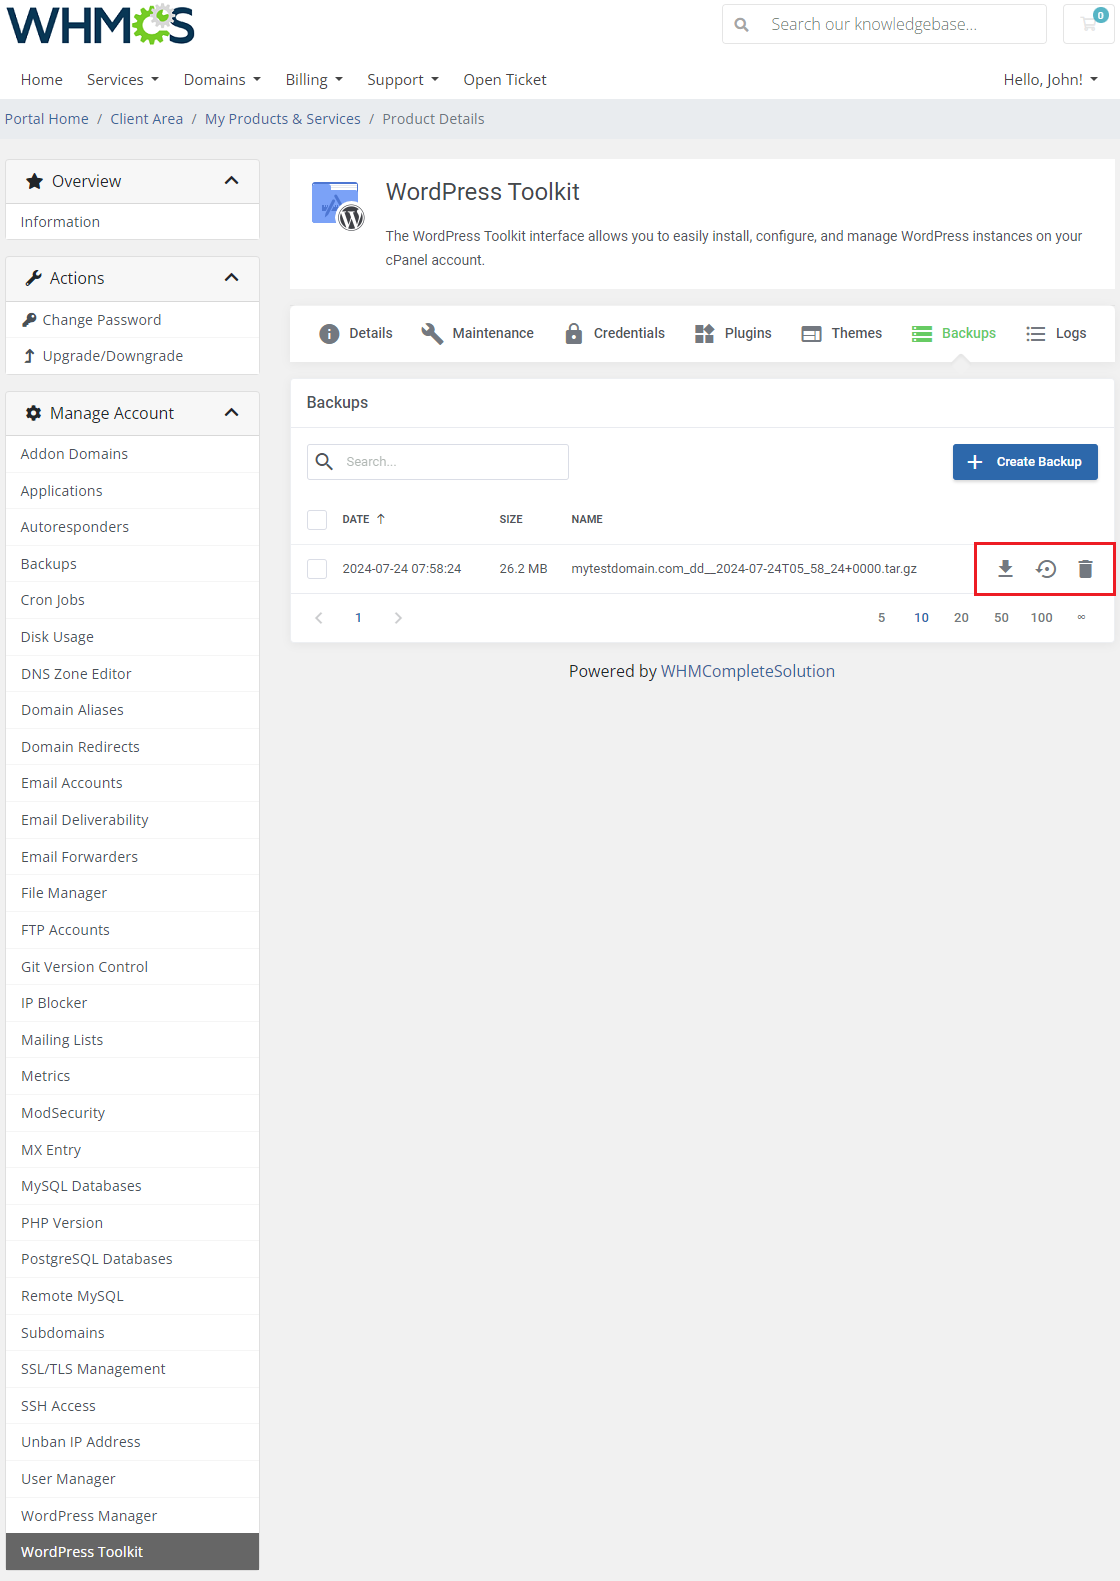
| As the name suggests, this section provides you with the ability to create backups. You are allowed to download, restore and delete a particular backup. |
|
Logs
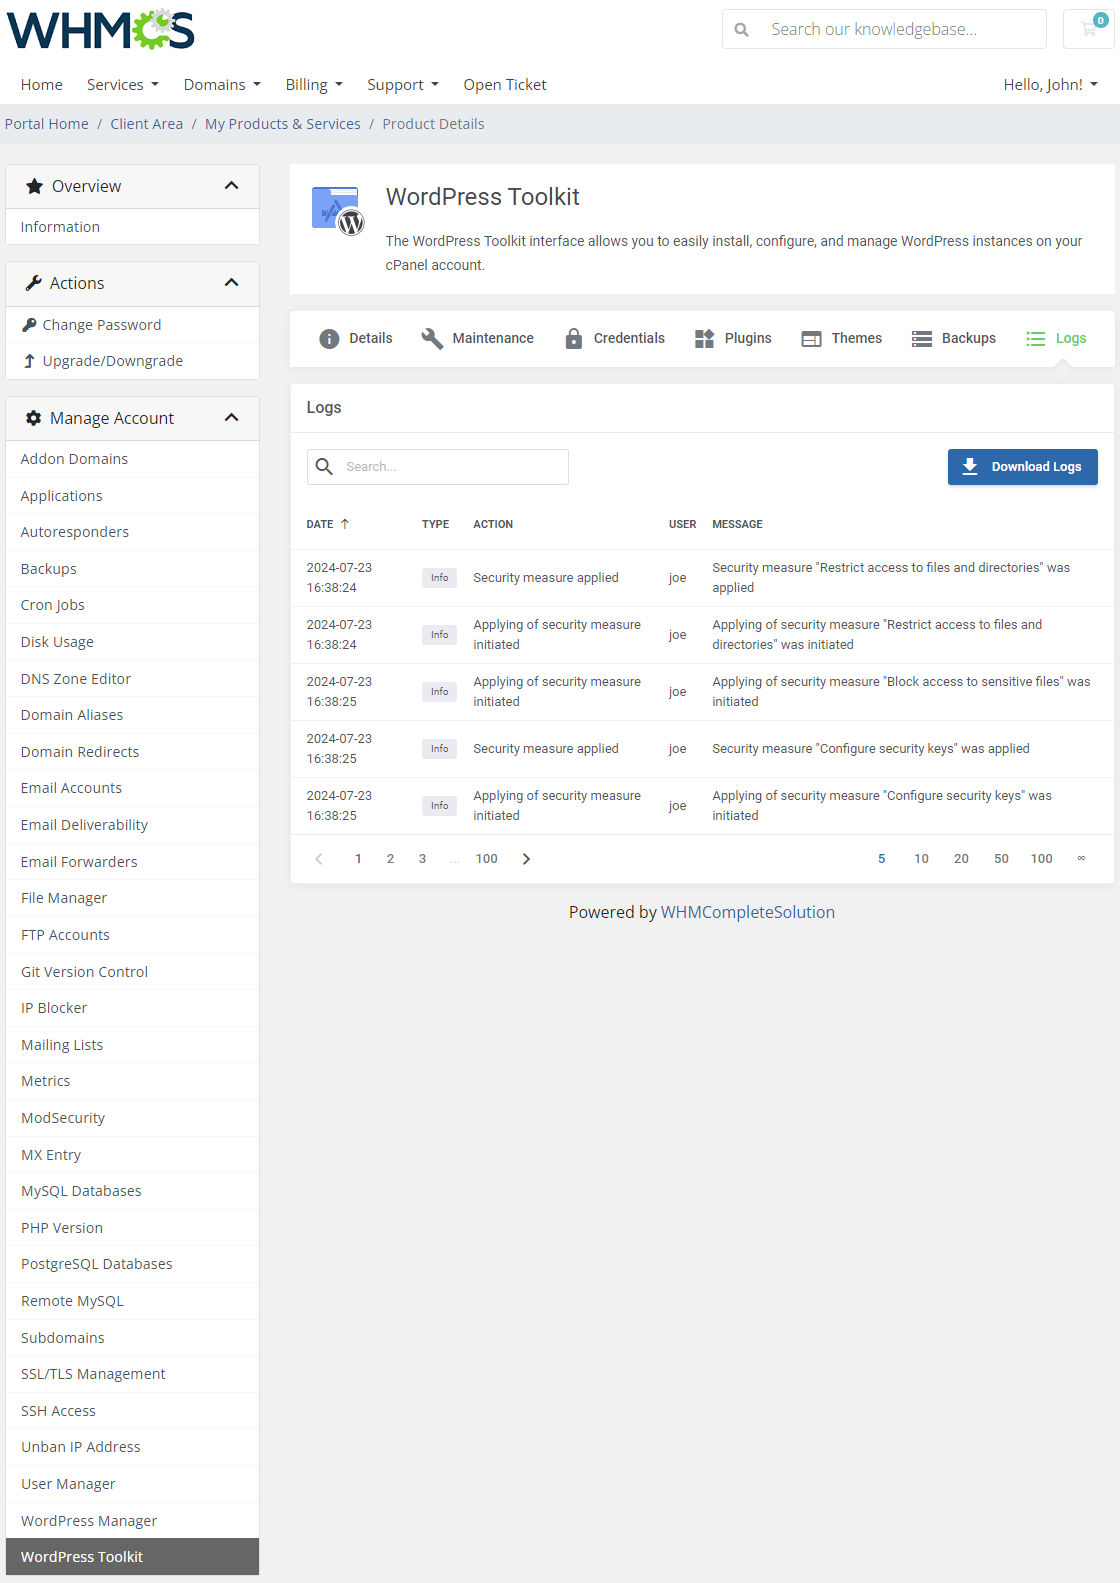
| The 'Logs' section contains a list of recorded events. Check the list of actions, which can also be downloaded as a .txt file. |
|
Log In To cPanel
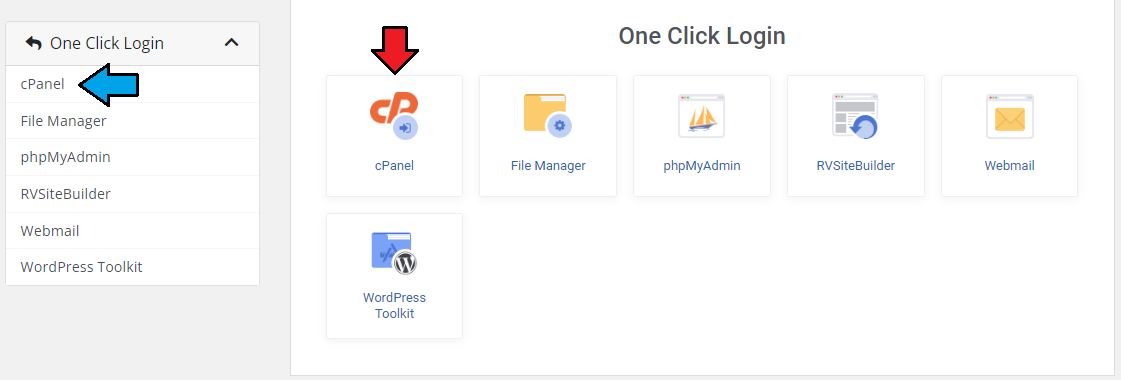
| You can easily log in to your cPanel by clicking 'Log In To cPanel'. You do not even need to fill in your username and password! |
|
Log In To File Manager
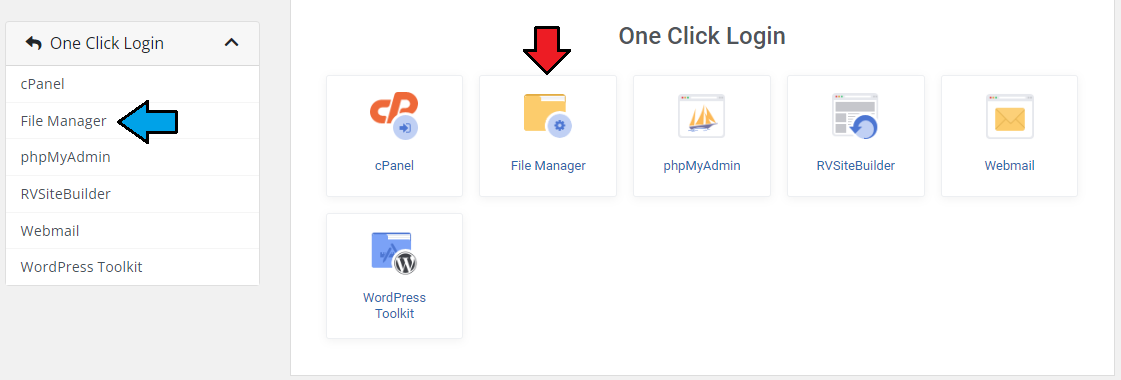
| Takes you to File Manager in your cPanel account instantly. |
|
Log In To phpMyAdmin
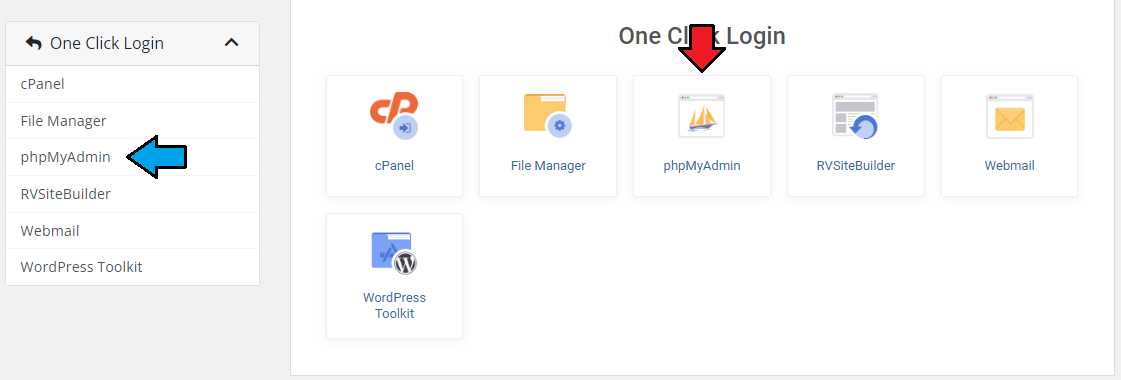
| Get quick access to your phpMyAdmin with just one click. Here, similarly to cPanel login, you do not even need to enter your access details! |
|
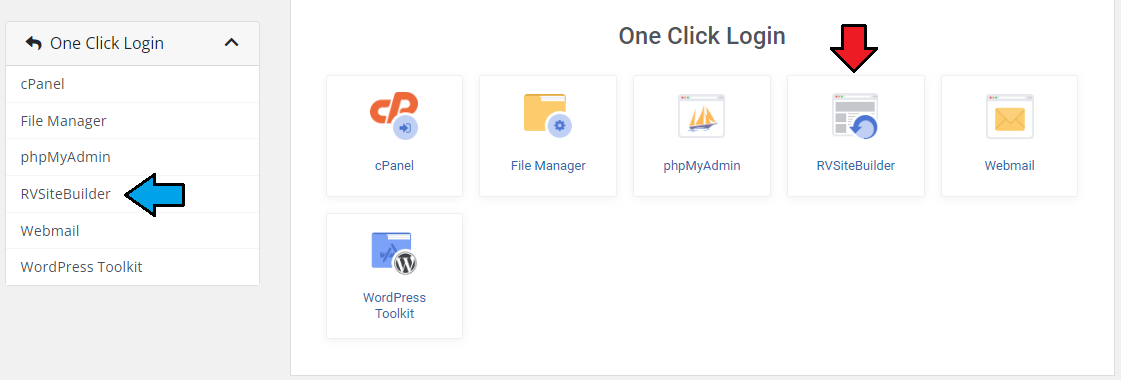
Log In To RVSiteBuilder
| One click of the button will also move you immediately to RVSiteBuilder. |
|
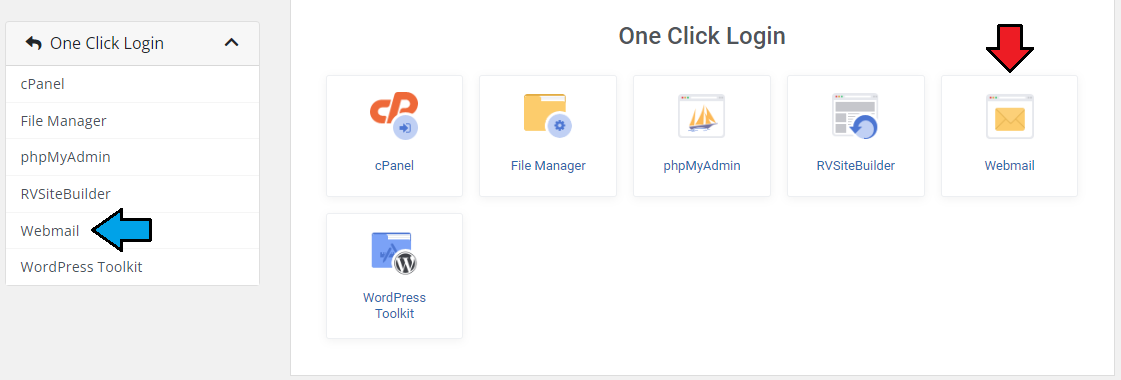
Log In To Webmail
| With a single click of 'Log In To Webmail' you can access your Webmail. Please note that Webmail redirection does not automatically log in to the panel. You will have to provide your credentials manually. |
|
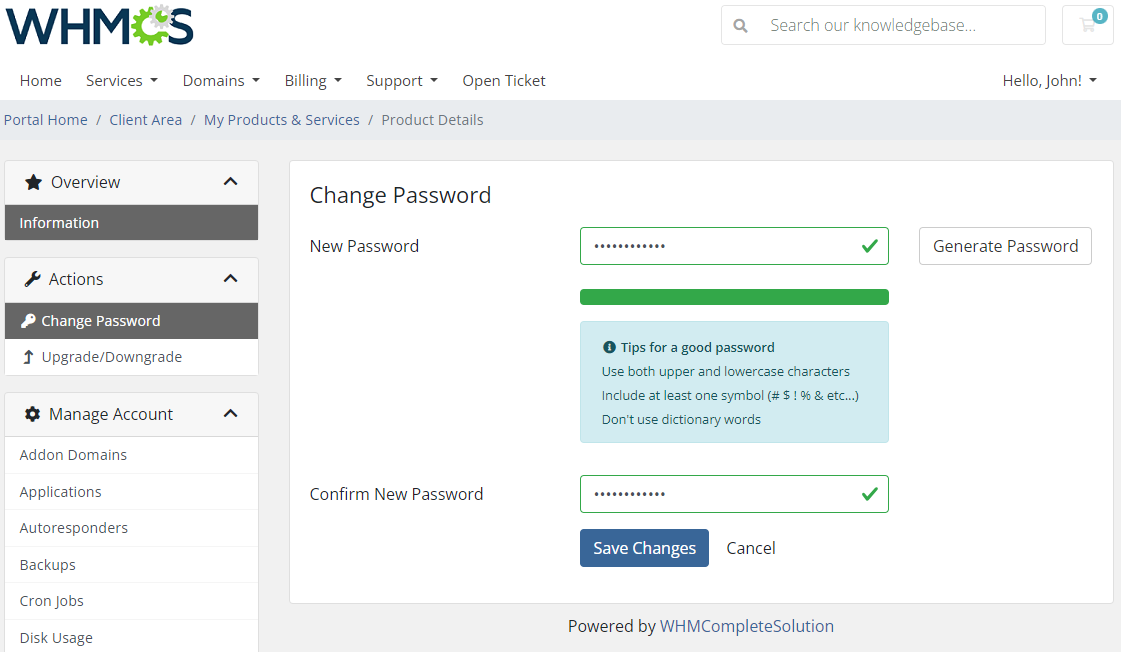
Change Password
| You can change the password to both your cPanel and FTP account at the same time. |
|
Management of Existing Products
| You can easily use cPanel Extended For WHMCS module with your already configured cPanel products. To do so, change the type of servers and module names of products from 'cPanel' to 'cPanelExtended' . |
Management of Billing
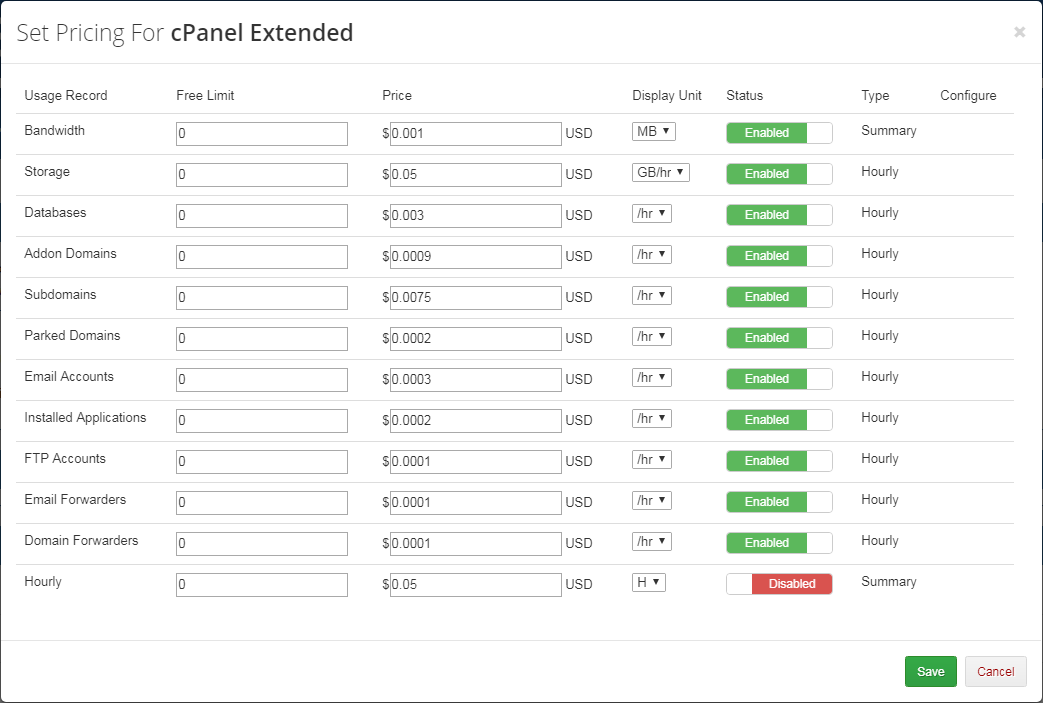
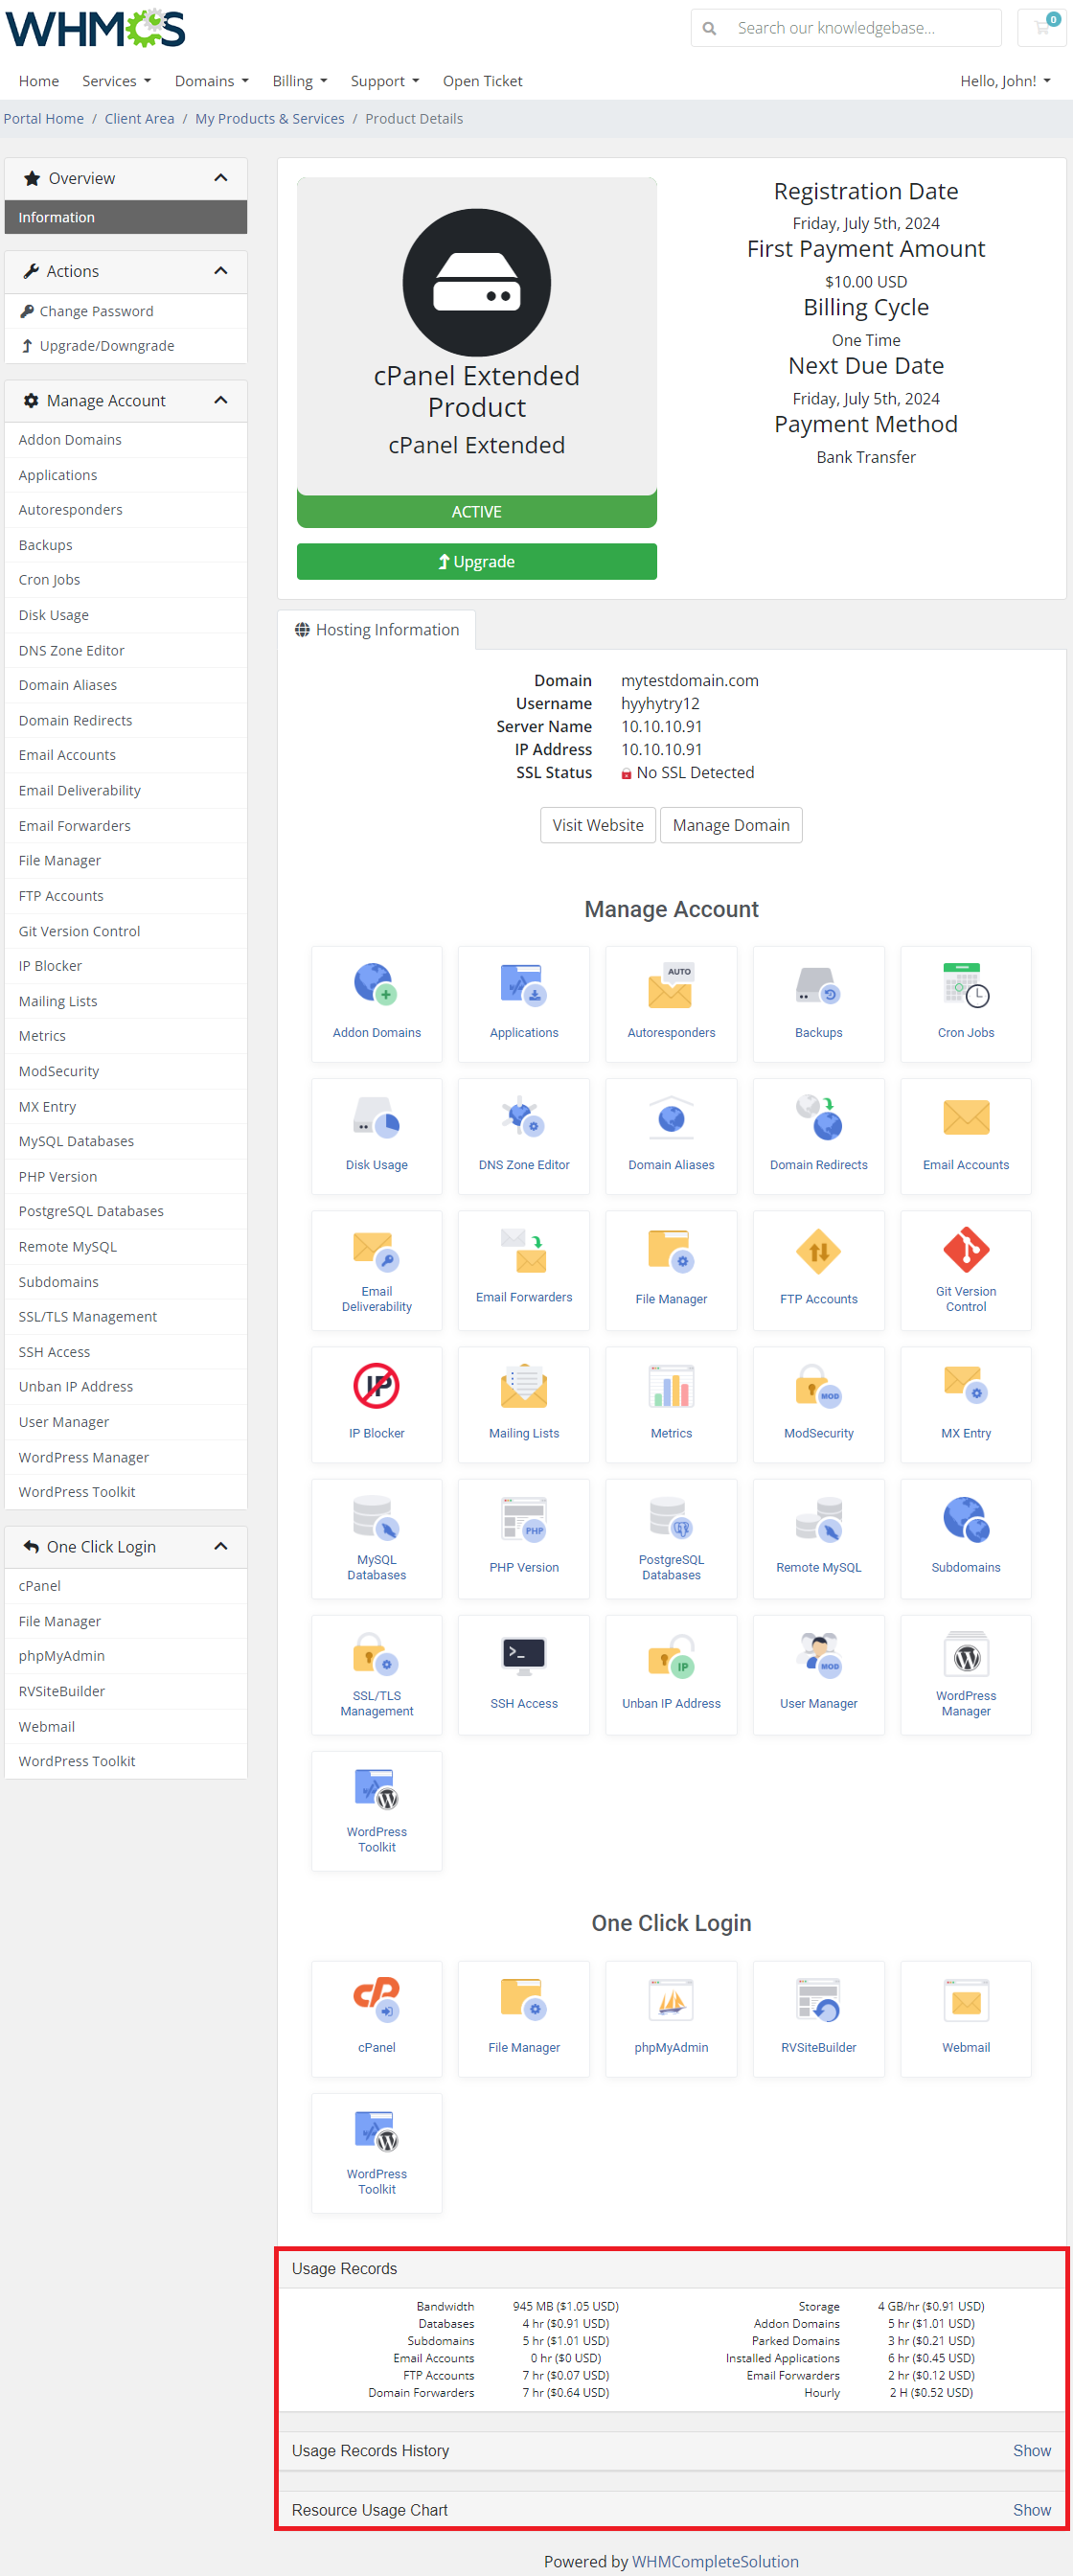
| When you combine cPanel Extended For WHMCS with Advanced Billing For WHMCS, you will be able to set up additional billing options. The module allows you to charge your customers basing on the located server resources. More information concerning the usage can be found in the Advanced Billing documentation. |
|
| With Advanced Billing module you can also display the current server resource usage, its total cost, and usage records history, as well as set resource reminders. |
|
Importing Existing Account
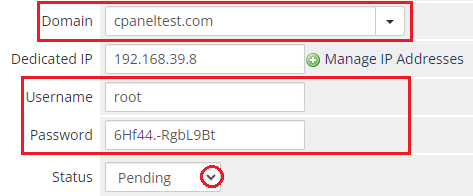
| In this section, you can find short instruction on how to connect one of your clients to your already existing account in cPanel. Take the following steps to make sure that the process will be carried out properly. 1. Firstly, manually create an order for your customer in WHMCS. Choose a client and in the summary, view click on the ' Add New Order' button. Next, select a 'Product/Service' and press 'Submit Order' .
The above-mentioned information has to be consistent with the data from your cPanel account. Now, complete these fields as presented below. |
|
| 3. If the completed data is correct, you can log in to the account by pressing the 'Login to Control Panel' button. Moreover, to make sure that everything works as expected, you can check if the newly-created account can be managed in the client area. Important! Remember to manually add other missing parameters of the product in configurable options, custom fields, billing cycle, etc. so they match the parameters of the connected account from your cPanel. 4. If you have Account Synchronization For WHMCS installed, you can use it to quickly and automatically import and synchronize your cPanel account with WHMCS. |
Tips
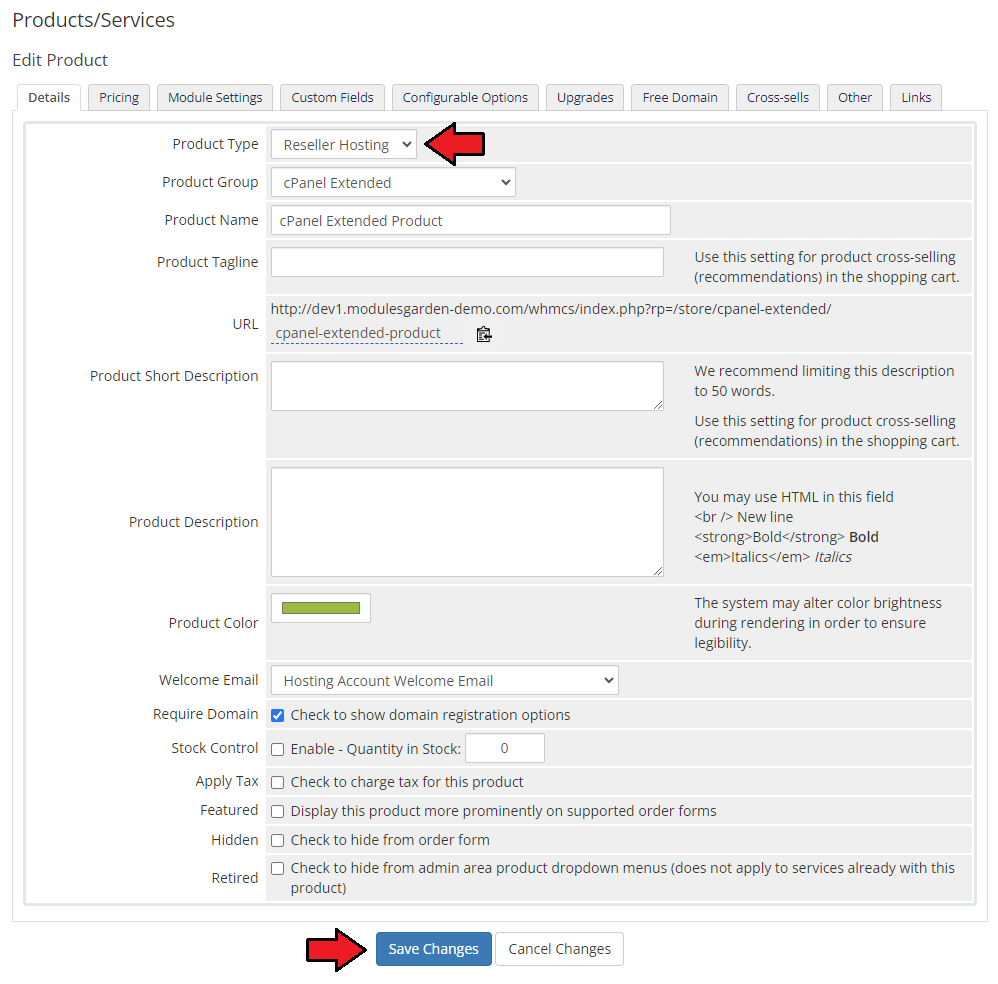
| 1. cPanel Extended For WHMCS shall be used with a root account on regular basics, however, it is also possible to use a reseller account. Bear in mind that you might encounter some issues while using the reseller account. If you need to switch accounts, simply go to your cPanel Extended product → 'Details' and choose 'Reseller Hosting' from a dropdown menu as shown on the following screen. |
|
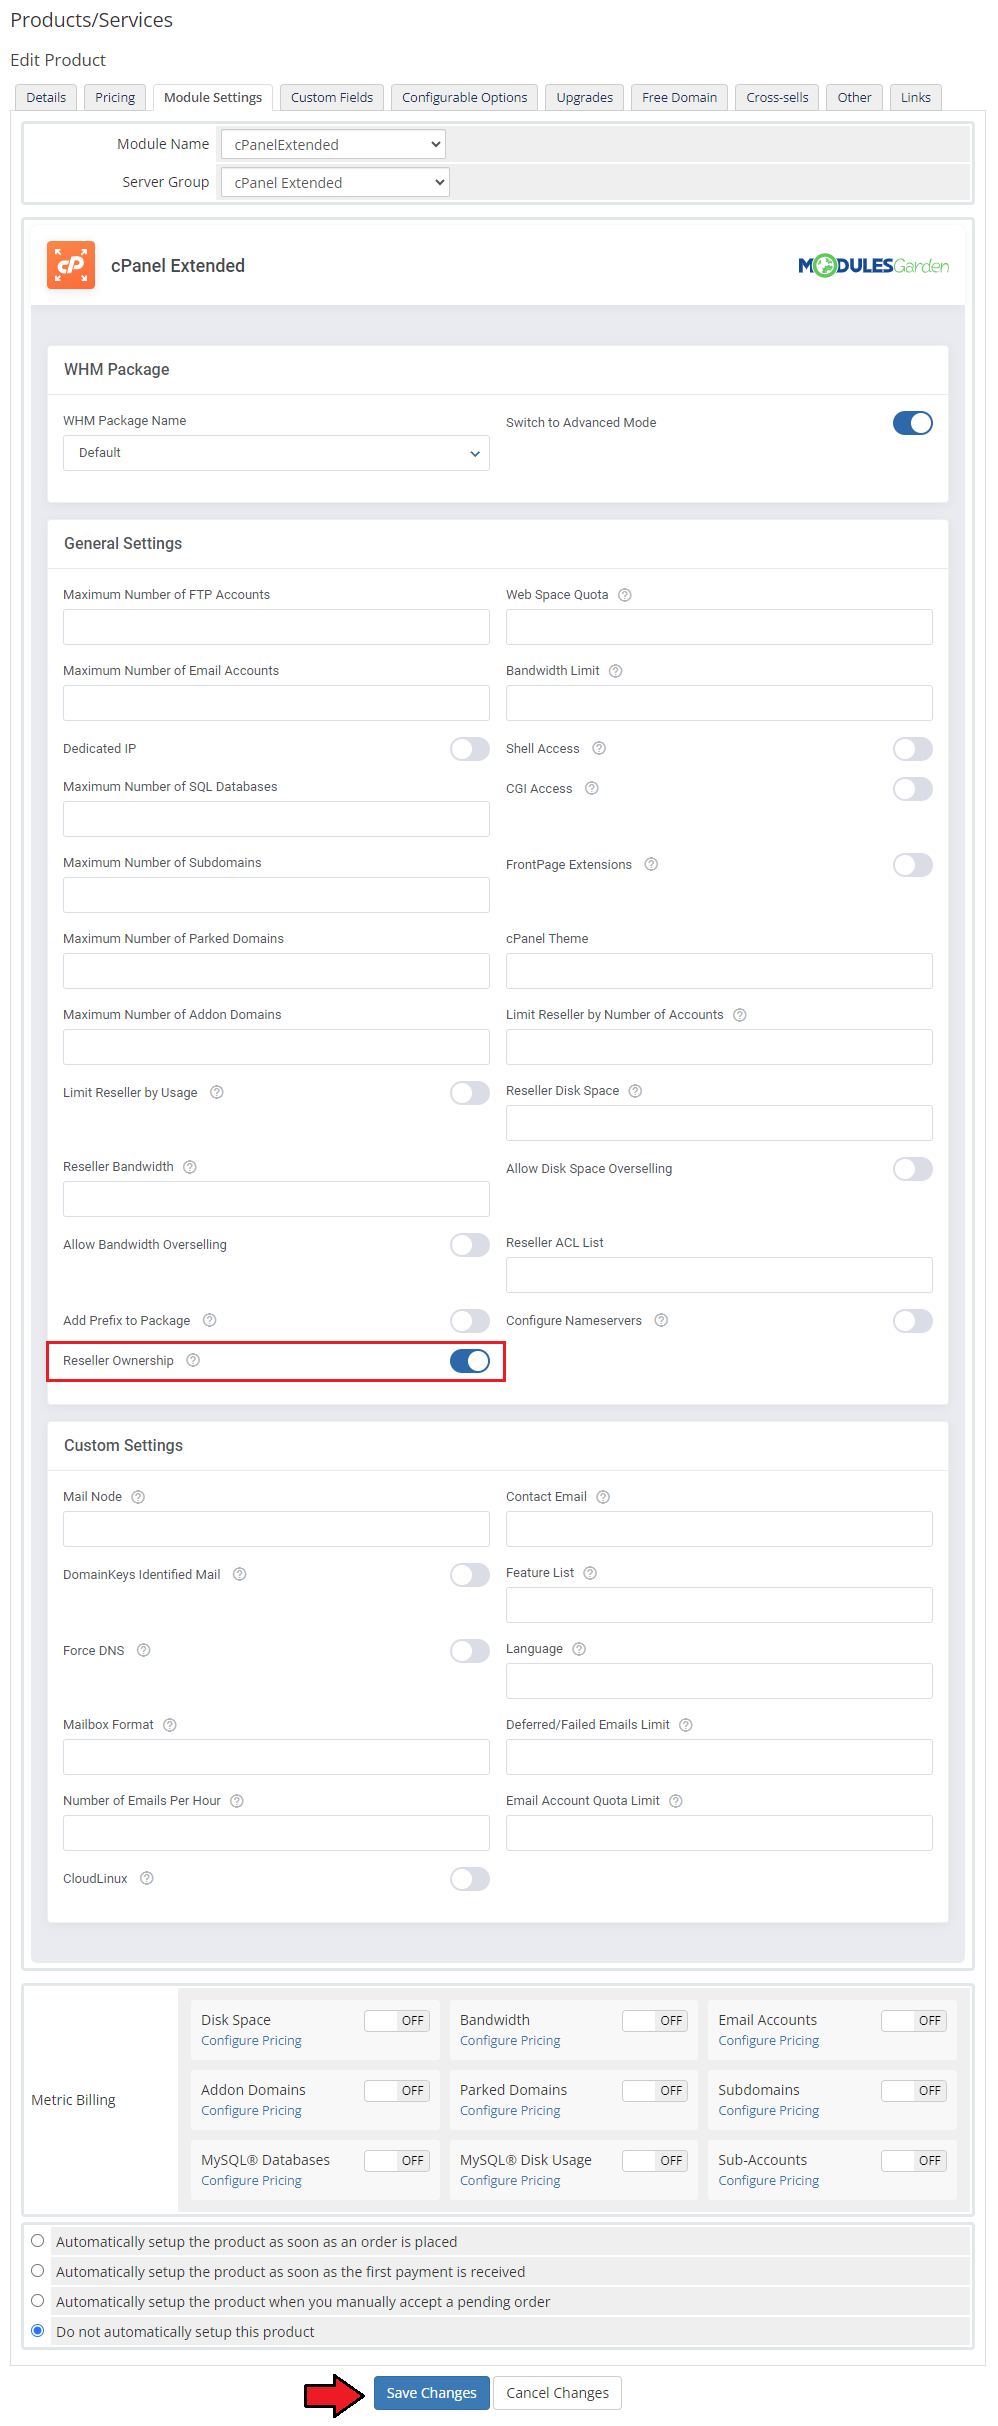
| 2. In order to make the reseller own their account, you need to check 'Set the reseller to own their own account' field located in 'Module Settings'. |
|
| 3. If you would like to use cPanel/WHM Import Utility with cPanel Extended products, you will need to switch the products type to 'cPanel'. Afterwards, you can successfully use the import script. After finishing the import, simply switch back the product type to 'cPanelExtended'. |
| 4. If your users have problems with seeing applications available for installation, you need to log in to WHM and proceed to Softaculous general settings. Choose: Top Scripts (Default) for Default page for End user Panel. |
| 5. As this module supports templates system, any changes made to the module's templates files will be saved after the upgrade process. |
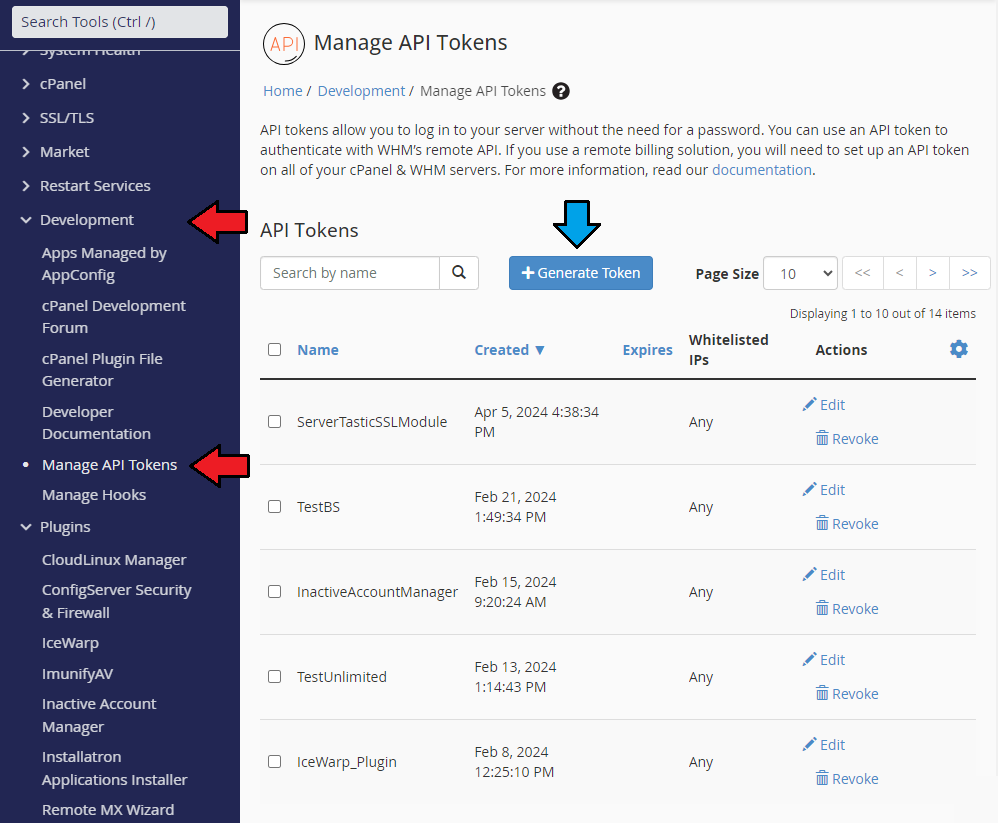
| 6. Alternatve method of server connection. You can connect with your cPanel server by providing 'API Token' and your username. Firstly, you need to generate 'API Token' in your WHM panel. To do so, log in to your panel and choose 'Development' from the side menu. Then, navigate to the 'Manage API Tokens' section. To add a new 'API Token' , you need to click 'Generate Token' . Enter the name of your new token as well as set the preferred privileges. Once ready, press 'Save' at the bottom of the page. |
|
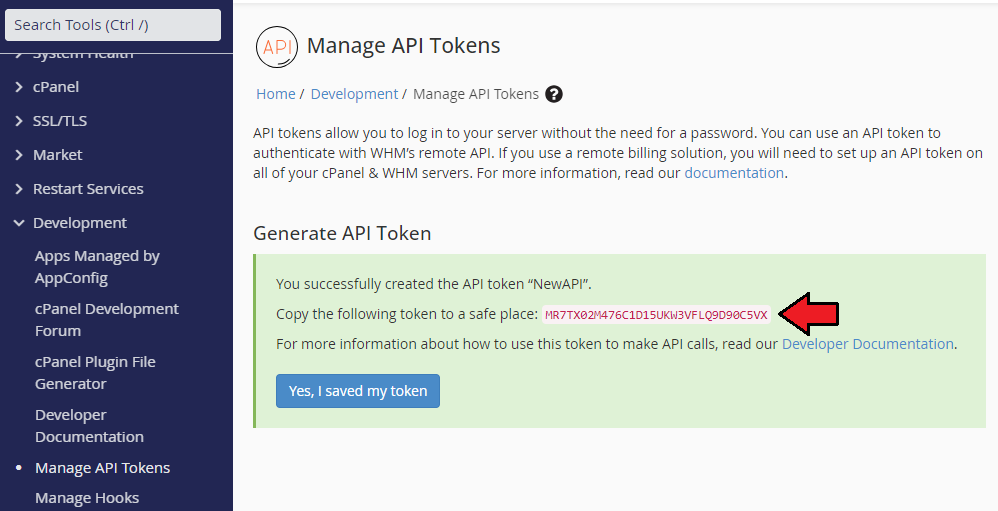
| Copy your API Token to a safe place. |
|
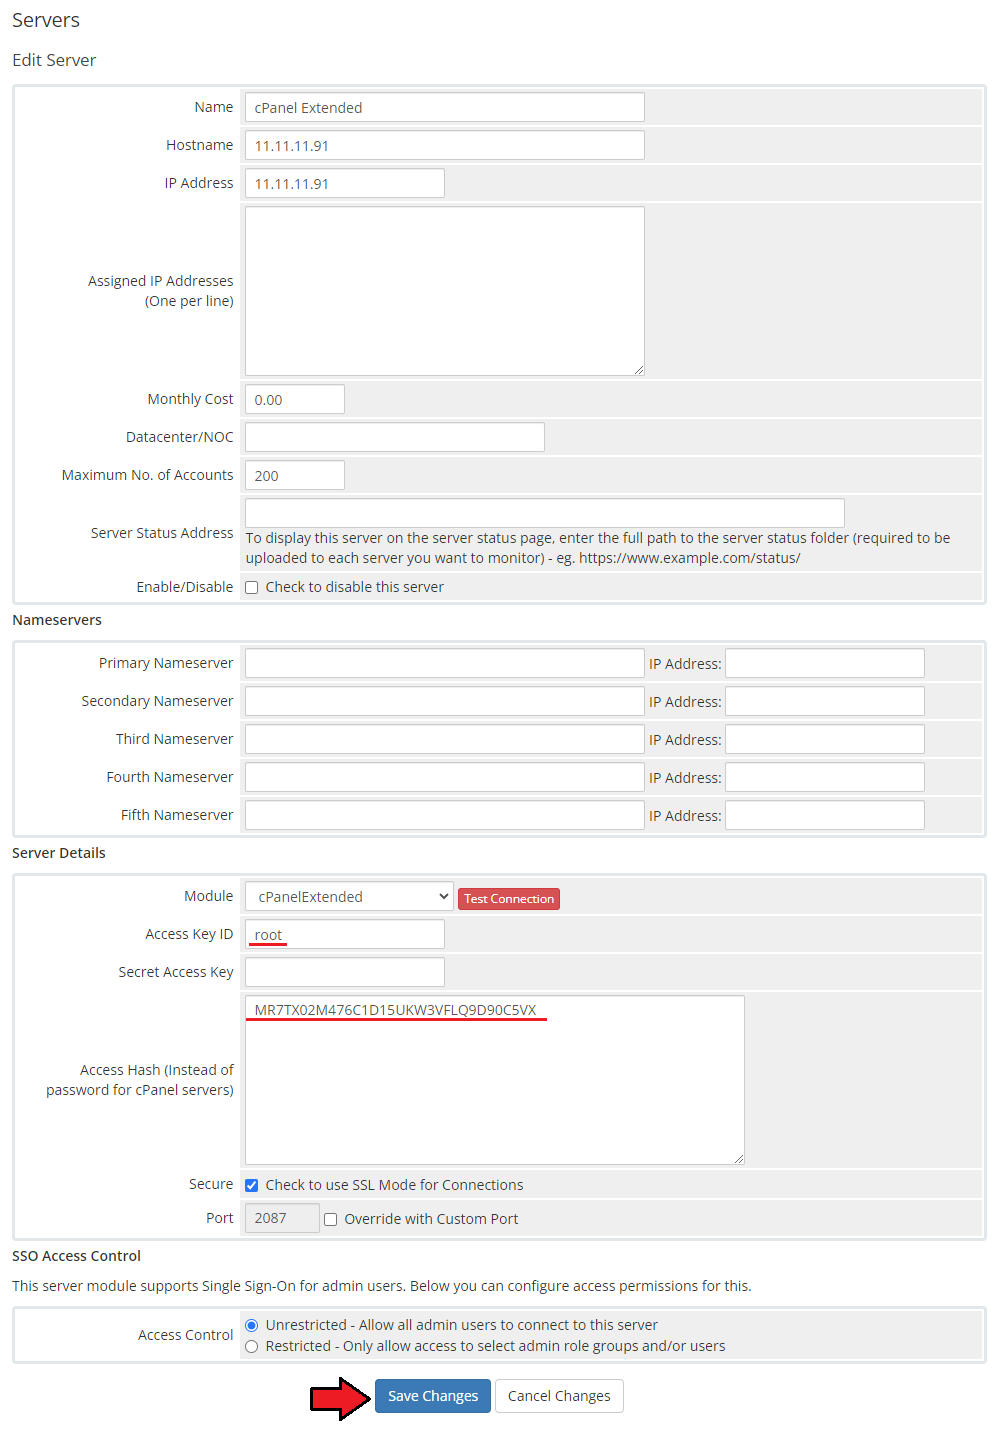
| Finally, you can provide it during the server configuration as presented below. |
|
Update Instructions
| 1. The essential guidance through the process of updating the module is offered here. Important: If you update the module from any version prior to 3.2.0, you have to activate a new addon and then deactivate the old one.
|
| 2. When updating from version 3.14 to 3.15, you have to manually delete the following files from the Templates folder at: yourWHMCS/modules/servers/cpanelExtended/app/UI/WordPressToolkit/Templates/pages List of files to delete:
|
Upgrade Guide
| Seeking a solution that offers greater flexibility, customization tailored to your precise needs, and unrestricted availability? There is an option that not only proves to be cost-effective in the long run but also includes prioritized support services, making it a truly valuable investment. Opt for the Open Source version of your CPanel Extended For WHMCS module to unlock these benefits. Follow a comprehensive guide covering the transition process, the advantages it brings, and step-by-step instructions on what to do next after the order has been successfully finalized. |
Common Problems
| 1. In case of connection problems, please check whether your SELinux or firewall does not block ports. |
| 2. If you get an ionCube encoder problem (wrong version) after installation, please open a support ticket. We will provide you with a different version of the module encrypted with the older version of ionCube. |
| 3. SQL Issue: When you move your WHMCS system to another domain and you import your SQL database, you may get an error with missing tables or fields. An example of such an error can be: "Unknown column 's.change_password' in 'field list' ". |
| 4. If you have problems with connection, make sure that both ports 2082 and 2083 are open. |
| 5. After you change the language of the module, your Ajax notifications may work incorrectly. Encode language file in UTF-8 (without BOM) to solve this issue. |
| 6. No results to display: Connection problem: This problem occurs when connection to the cPanel server is not configured properly. |
| Reason: Values inside the field/s 'Hostname' , 'IP Address' , 'Username' , 'Password' , 'Type' and/or 'Access Hash' is/are incorrect. Solution: Verify provided details and test connection through pressing the 'WHM' button. |
| 7. No results to display: Wrong hostname or IP value: This problem occurs when connection to the cPanel server is not configured properly. |
| Reason: Values inside the field/s 'Hostname' or 'IP Address' is/are are in the wrong format. Solution: Verify provided details and test connection through pressing the 'WHM' button. |
| 8. No results to display: User or domain not found. |
| Reason: Account with the specified domain name does not exist on the server. Solution: Make sure that customer's details in your WHMCS system contain specified domain name or create a new account. |
| 9. No results to display: Wrong username value |
| Reason: Account with the specified username does not exist on the server. Solution: Make sure that customer's details in your WHMCS system contain specified username or create a new account. |
| 10. No results to display: Access denied |
| Reason: Account already exists on the server but access to the server has been lost due to changed server group, changed server details or is blocked by e.g firewall. Solution 1: Make sure that connection to your server is working properly and it is not being blocked. Additionally, make sure that your server group is set up correctly. |
| 11. User parameter is invalid or was not supplied |
| Reason: Account exists on the server but the username is incorrect. Solution: Make sure that customer's account username is the same in both your WHMCS system and your WHM. |
| 12. When you get 'cURL Error : Maximum (20) redirects followed' while trying to install a new application, this indicates the problem with your cPanel theme. To solve the problem, log in to your WHMCS, go to 'Module Settings' of your product, find the 'cPanel Theme' field and make sure that the entered name is correct. |
| 13. Blank page while logging into phpMyAdmin or any functionality in the 'Stats' page. |
| Reason: Logging in requires SSL connection. Solution: Check 'Secure' in your server settings for cPanel (step 11th of Installation and Configuration). |
| 14. Running 'Create' on cPanel Extended product does not create application ordered along with product. Reason: Some applications require additional fields during installation (other than those available in the product custom fields). |
| 15. In case you encounter a problem with notification: 'Something goes wrong, check logs, contact admin.' please clear your cache first before taking any other steps as it might solve the problem. |
| 16. cPanel Extended For WHMCS does not support Application Links. |
| 17. If you see any missing language entries e.g. for applications installer, you can add them manually in the language file. Simply open the '{yourWHMCS}/modules/servers/cpanelExtended/lang/english.php' file, insert the missing entry to it and add your own translation, following the example of the other records. |
| 18. 'Domain is invalid' - displayed while trying to create a new addon domain. |
| Reason: Used TLD is not supported. Solution: Please check whether the used TLD is present on the list of supported TLDs in the file: '/modules/servers/cpanelExtended/core/Config/tldList/tld.list' |
| 19. 'Unexpected Module Error(Token 'f80e57b1be9752d7d4344672d55aafa2'). Please Contact Administrator.' - error displayed in the client area. |
| Solution: Reissue your license in our client area, if that does not help, please contact our support department. |
| 20. Failure Reason: 'Permission Denied' encountered in the module queue. |
| Solution: Review your server configuration, and make sure you used a correct token with sufficient (full) privileges. More about API tokens can be found here. |