Resellers Center For WHMCS
| Line 82: | Line 82: | ||
{| | {| | ||
|style="padding: 0px 0px 0px 30px;"|✔ Choose Whether To Show Products Marked As "Hidden" To End Clients | |style="padding: 0px 0px 0px 30px;"|✔ Choose Whether To Show Products Marked As "Hidden" To End Clients | ||
| + | |} | ||
| + | {| | ||
| + | |style="padding: 0px 0px 0px 30px;"|✔ Choose Whether To Allow Resellers To Delete End Clients | ||
|} | |} | ||
{| | {| | ||
| Line 106: | Line 109: | ||
{| | {| | ||
|style="padding: 0px 0px 0px 30px;"|✔ Allow Resellers To Alter Their Email Templates CSS Styling, Header And Footer | |style="padding: 0px 0px 0px 30px;"|✔ Allow Resellers To Alter Their Email Templates CSS Styling, Header And Footer | ||
| + | |} | ||
| + | {| | ||
| + | |style="padding: 0px 0px 0px 30px;"|✔ Allow Resellers To Use Their Own SMTP Email Settings | ||
| + | |} | ||
| + | {| | ||
| + | |style="padding: 0px 0px 0px 30px;"|✔ Allow Resellers To Change Date Format | ||
| + | |} | ||
| + | {| | ||
| + | |style="padding: 0px 0px 0px 30px;"|✔ Allow Resellers To Suspend End Client Services | ||
|} | |} | ||
{| | {| | ||
| Line 112: | Line 124: | ||
{| | {| | ||
|style="padding: 0px 0px 0px 30px;"|✔ Prevent Resellers From Viewing End Clients Details | |style="padding: 0px 0px 0px 30px;"|✔ Prevent Resellers From Viewing End Clients Details | ||
| + | |} | ||
| + | {| | ||
| + | |style="padding: 0px 0px 0px 30px;"|✔ Prevent Resellers From Placing Orders On Behalf Of End Clients | ||
|} | |} | ||
{| | {| | ||
| Line 133: | Line 148: | ||
{| | {| | ||
|style="padding: 0px 0px 0px 30px;"|✔ Hide Services Ordered Through Reseller Store In Admin Store View | |style="padding: 0px 0px 0px 30px;"|✔ Hide Services Ordered Through Reseller Store In Admin Store View | ||
| + | |} | ||
| + | {| | ||
| + | |style="padding: 0px 0px 0px 30px;"|✔ Hide Single Sign-on Buttons From Reseller Store | ||
|} | |} | ||
{| | {| | ||
| Line 141: | Line 159: | ||
|} | |} | ||
{| | {| | ||
| − | |style="padding: 0px 0px | + | |style="padding: 0px 0px 0px 30px;"|✔ Access To Module Logs |
|} | |} | ||
| + | {| | ||
| + | |style="padding: 0px 0px 0px 30px;"|✔ Export Resellers Data To CSV File: | ||
| + | |} | ||
| + | {| | ||
| + | |style="padding: 0px 0px 0px 45px;"|✔ Customer Details | ||
| + | |} | ||
| + | {| | ||
| + | |style="padding: 0px 0px 0px 45px;"|✔ Products | ||
| + | |} | ||
| + | {| | ||
| + | |style="padding: 0px 0px 0px 45px;"|✔ Product Addons | ||
| + | |} | ||
| + | {| | ||
| + | |style="padding: 0px 0px 0px 45px;"|✔ Domains | ||
| + | |} | ||
| + | {| | ||
| + | |style="padding: 0px 0px 0px 45px;"|✔ Invoices | ||
| + | |} | ||
| + | {| | ||
| + | |style="padding: 0px 0px 0px 45px;"|✔ Resellers And WHMCS Invoices | ||
| + | |} | ||
| + | {| | ||
| + | |style="padding: 0px 0px 0px 45px;"|✔ Resellers And WHMCS Transactions | ||
| + | |} | ||
| + | {| | ||
| + | |style="padding: 0px 0px 10px 30px;"|✔ View Resellers Affiliations On WHMCS Clients List | ||
| + | |} | ||
| + | |||
*'''Resellers Features:''' | *'''Resellers Features:''' | ||
{| | {| | ||
| Line 154: | Line 200: | ||
|} | |} | ||
{| | {| | ||
| − | |style="padding: 0px 0px 0px 45px;"|✔ Store Logo | + | |style="padding: 0px 0px 0px 45px;"|✔ Store And Invoice Logo |
|} | |} | ||
{| | {| | ||
| − | |style="padding: 0px 0px 0px 45px;"|✔ | + | |style="padding: 0px 0px 0px 45px;"|✔ Store And Order Template |
| + | |} | ||
| + | {| | ||
| + | |style="padding: 0px 0px 0px 45px;"|✔ Store Email Address | ||
| + | |} | ||
| + | {| | ||
| + | |style="padding: 0px 0px 0px 45px;"|✔ Terms Of Service URL | ||
|} | |} | ||
{| | {| | ||
|style="padding: 0px 0px 0px 45px;"|✔ Sequential Invoice Number Format | |style="padding: 0px 0px 0px 45px;"|✔ Sequential Invoice Number Format | ||
| + | |} | ||
| + | {| | ||
| + | |style="padding: 0px 0px 0px 45px;"|✔ Next Sequential Number | ||
| + | |} | ||
| + | {| | ||
| + | |style="padding: 0px 0px 0px 45px;"|✔ Invoice Pay To Text | ||
| + | |} | ||
| + | {| | ||
| + | |style="padding: 0px 0px 0px 45px;"|✔ Auto WHMCS Invoice Payment | ||
|} | |} | ||
{| | {| | ||
| Line 208: | Line 269: | ||
|} | |} | ||
{| | {| | ||
| − | |style="padding: 0px 0px 0px 30px;"|✔ | + | |style="padding: 0px 0px 0px 30px;"|✔ Generate Direct URLs To Products And Product Groups |
|} | |} | ||
{| | {| | ||
| − | |style="padding: 0px 0px 0px 30px;"|✔ Define Individual | + | |style="padding: 0px 0px 0px 30px;"|✔ Define Individual Promotions For End Clients |
|} | |} | ||
{| | {| | ||
| Line 217: | Line 278: | ||
|} | |} | ||
{| | {| | ||
| − | |style="padding: 0px 0px 0px 30px;"|✔ View End Clients Orders, Invoices, Products, Addons And Domains | + | |style="padding: 0px 0px 0px 30px;"|✔ View And Manage End Clients Orders, Invoices, Products, Addons And Domains |
| − | + | ||
| − | + | ||
| − | + | ||
|} | |} | ||
{| | {| | ||
| Line 259: | Line 317: | ||
|} | |} | ||
{| | {| | ||
| − | |style="padding: 0px 0px | + | |style="padding: 0px 0px 0px 30px;"|✔ Access Store By CNAME Domain Or Default Store URL |
| + | |} | ||
| + | {| | ||
| + | |style="padding: 0px 0px 0px 30px;"|✔ Export End Clients Data To CSV File And Via API: | ||
| + | |} | ||
| + | {| | ||
| + | |style="padding: 0px 0px 0px 45px;"|✔ Customer Details | ||
| + | |} | ||
| + | {| | ||
| + | |style="padding: 0px 0px 0px 45px;"|✔ Customer Details | ||
| + | |} | ||
| + | {| | ||
| + | |style="padding: 0px 0px 0px 45px;"|✔ Product Addons | ||
| + | |} | ||
| + | {| | ||
| + | |style="padding: 0px 0px 0px 45px;"|✔ Domains | ||
| + | |} | ||
| + | {| | ||
| + | |style="padding: 0px 0px 0px 45px;"|✔ Invoices | ||
| + | |} | ||
| + | {| | ||
| + | |style="padding: 0px 0px 10px 45px;"|✔ Transactions | ||
|} | |} | ||
*'''End Clients Features:''' | *'''End Clients Features:''' | ||
| Line 300: | Line 379: | ||
|} | |} | ||
{| | {| | ||
| − | |style="padding: 0px 0px 0px 30px;"|✔ Supports PHP 7. | + | |style="padding: 0px 0px 0px 30px;"|✔ Supports PHP 7.3 Up To PHP 8.1 |
|} | |} | ||
{| | {| | ||
| Line 306: | Line 385: | ||
|} | |} | ||
{| | {| | ||
| − | |style="padding: 0px 0px 0px 30px;"|✔ Supports WHMCS V8. | + | |style="padding: 0px 0px 0px 30px;"|✔ Supports WHMCS V8.3 And Later |
| + | |} | ||
| + | {| | ||
| + | |style="padding: 0px 0px 0px 30px;"|✔ Requires ionCube Loader V12 Or Later | ||
|} | |} | ||
{| | {| | ||
| Line 451: | Line 533: | ||
*'''Allow Domains''' - Gives resellers possibility to sell domains in their own stores. | *'''Allow Domains''' - Gives resellers possibility to sell domains in their own stores. | ||
*'''Allow CNAME''' - It enables the support for CNAME record pointing from the customer's domain. A new field named '' '[https://www.docs.modulesgarden.com/images/4/42/RCnpng.png Domain]' '' should appear in the '' 'Configuration' '' section of the 'Reseller Area' | *'''Allow CNAME''' - It enables the support for CNAME record pointing from the customer's domain. A new field named '' '[https://www.docs.modulesgarden.com/images/4/42/RCnpng.png Domain]' '' should appear in the '' 'Configuration' '' section of the 'Reseller Area' | ||
| + | *'''Log In As Client''' - If this option is enabled, the resellers can log in as the client. | ||
| + | *'''Place Orders''' - If this option is enabled, the resellers can place orders on behalf of the client. | ||
| + | *'''Suspend Services''' - If this option is enabled, the resellers can suspend client's services. | ||
*'''Allow Promotions''' - If enabled, the reseller's end-clients will be able to the use promo codes in the reseller's store configured by the resellers in the [https://www.docs.modulesgarden.com/Resellers_Center_For_WHMCS#Promotions 'Promotions'] section. | *'''Allow Promotions''' - If enabled, the reseller's end-clients will be able to the use promo codes in the reseller's store configured by the resellers in the [https://www.docs.modulesgarden.com/Resellers_Center_For_WHMCS#Promotions 'Promotions'] section. | ||
*'''Show Hidden''' - If enabled, the hidden products and groups will be visible to resellers' clients. <br/> Thanks to that functionality, there is a chance to configure special products destined for resellers exclusively. These will not be accessible in the main Administrator's store.<br/> | *'''Show Hidden''' - If enabled, the hidden products and groups will be visible to resellers' clients. <br/> Thanks to that functionality, there is a chance to configure special products destined for resellers exclusively. These will not be accessible in the main Administrator's store.<br/> | ||
| + | *'''Hide Delete Client Option''' - If enabled, the reseller will not be allowed to delete a client from the reseller area. | ||
*'''Configurable Options Commissions''' - If enabled, resellers will receive commissions from configurable options. This feature can be used with the following '' 'Calculation Methods' '': | *'''Configurable Options Commissions''' - If enabled, resellers will receive commissions from configurable options. This feature can be used with the following '' 'Calculation Methods' '': | ||
**Percent Rate, | **Percent Rate, | ||
**Administrator Percent With Fixed Rate, | **Administrator Percent With Fixed Rate, | ||
**Reseller Percent With Fixed Rate.<br/> '''''Important:''' 'Configurable Options Commissions' feature is not available if 'Reseller Invoice' option is enabled in 'Billing Settings'.'' | **Reseller Percent With Fixed Rate.<br/> '''''Important:''' 'Configurable Options Commissions' feature is not available if 'Reseller Invoice' option is enabled in 'Billing Settings'.'' | ||
| + | *'''Redirect Emails''' - If enabled, all emails received by client will be also sent to the reseller. | ||
| + | *'''Change Mail Settings''' - If enabled, the reseller can set custom email settings. | ||
| + | *'''Change Date Format''' - If enabled, the reseller can set custom date format which will be displayed on their clients pages. | ||
| + | *'''Hide Single Sign-on''' - If enabled, Single Sign-on featured is hidden in the reseller's store. | ||
*'''Default Reseller Documentation''' - Select the default documentation to show for new resellers. | *'''Default Reseller Documentation''' - Select the default documentation to show for new resellers. | ||
*'''Ticket Departments''' - Allows you to choose ticket departments available for end clients as they will contact resellers. | *'''Ticket Departments''' - Allows you to choose ticket departments available for end clients as they will contact resellers. | ||
*'''Templates''' - Allows you to select client area templates of the reseller store. | *'''Templates''' - Allows you to select client area templates of the reseller store. | ||
*'''Order Templates''' - Allows you to select order templates set for a cart view in the reseller store. | *'''Order Templates''' - Allows you to select order templates set for a cart view in the reseller store. | ||
| + | *'''API Token''' - Provide an API Token that will be used to authenticate API calls, use at least 32 characters or leave this field empty. | ||
|} | |} | ||
{| | {| | ||
| Line 526: | Line 617: | ||
*'''Allow Mail Wrappers Change''' - If this option is enabled your resellers will be able to change a global mail header, footer and CSS for their email messages.<br/>'''''Important:''' If enabled, please inform the reseller that the fields are obligatory. If left empty or filled in incorrectly issues with email templates formatting are bound to occur.<br/> Exemplary settings can be found in 'WHMCS System Settings' → 'General Settings' → 'Mail'.''<br/> | *'''Allow Mail Wrappers Change''' - If this option is enabled your resellers will be able to change a global mail header, footer and CSS for their email messages.<br/>'''''Important:''' If enabled, please inform the reseller that the fields are obligatory. If left empty or filled in incorrectly issues with email templates formatting are bound to occur.<br/> Exemplary settings can be found in 'WHMCS System Settings' → 'General Settings' → 'Mail'.''<br/> | ||
*'''Hide Delete Client Option''' - If this option is enabled, the reseller has no access to the Delete Client feature in the Reseller Area. | *'''Hide Delete Client Option''' - If this option is enabled, the reseller has no access to the Delete Client feature in the Reseller Area. | ||
| − | *'''Hide | + | *'''Hide Log In As Client Quick Action''' - If enabled, the reseller has no access to the '' 'Client Details' '' page in the Reseller Area. |
| − | *'''Hide Client Details | + | *'''Hide Client Details Action''' - If enabled, the reseller has no access to the '' 'Login As Client' '' feature in the Reseller Area. |
*'''Send Default Emails''' - If enabled and the email template is disabled in the '' 'Emails Templates' '' tab, the standard WHMCS email is sent for it. Otherwise, the email is not sent at all. | *'''Send Default Emails''' - If enabled and the email template is disabled in the '' 'Emails Templates' '' tab, the standard WHMCS email is sent for it. Otherwise, the email is not sent at all. | ||
| − | *''' | + | *'''Change Mail Settings''' - If enabled, the reseller will be allowed to manage the custom e-mail settings. |
| − | *''' | + | *'''Change Date Format''' - If enabled, the reseller will be allowed to configure the date format, display on their clients pages, individually. |
*'''Hide Single Sign-on''' - Enable to hide the Single Sign-on featured from the reseller's store. | *'''Hide Single Sign-on''' - Enable to hide the Single Sign-on featured from the reseller's store. | ||
|} | |} | ||
| Line 636: | Line 727: | ||
|} | |} | ||
{| | {| | ||
| − | |style="padding: 0px 0px 20px 15px;"|In order to add a new domain, click the right button, as shown below. | + | |style="padding: 0px 0px 20px 15px;"|In order to add a new domain, click the right button, as shown below. You may also add all TLDs from WHMCS, just press the button marked with the blue arrow. |
|} | |} | ||
{| | {| | ||
| Line 642: | Line 733: | ||
|} | |} | ||
{| | {| | ||
| − | |style="padding: 0px 0px 20px 15px;"|From the dropdown menu choose the one that will be added to the group. | + | |style="padding: 0px 0px 20px 15px;"|From the dropdown menu choose the one that will be added to the group (in case of adding TLDs one by one). |
|} | |} | ||
{| | {| | ||
| Line 648: | Line 739: | ||
|} | |} | ||
{| | {| | ||
| − | |style="padding: 0px 0px 20px 15px;"|Now, you can set '' 'Pricing' | + | |style="padding: 0px 0px 20px 15px;"|Now, you can set '' 'Pricing', 'Calculation Method','' delete this domain and '' 'Show Details'.'' |
|} | |} | ||
{| | {| | ||
| Line 694: | Line 785: | ||
|} | |} | ||
{| | {| | ||
| − | |style="padding: 0px 0px | + | |style="padding: 0px 0px 20px 25px;"|[[File:R3_11_7.png]] |
|} | |} | ||
| + | {| | ||
| + | |style="padding: 0px 0px 20px 15px;"|In your WHMCS admin area, you may now quickly check if a client is assigned to a reseller, and to which one exactly, without the need of opening the Resellers Center addon. | ||
| + | |} | ||
| + | {| | ||
| + | |style="padding: 0px 0px 20px 25px;"|[[File:R3_11_9.png]] | ||
| + | |} | ||
| + | {| | ||
| + | |style="padding: 0px 0px 30px 25px;"|[[File:R3_11_10.png]] | ||
| + | |} | ||
| + | |||
<!-- | <!-- | ||
{| | {| | ||
| Line 888: | Line 989: | ||
--> | --> | ||
| − | ==== | + | ====Pricing Configuration==== |
{| | {| | ||
| − | |style="padding: 10px 0px 15px 15px;"|The '' ' | + | |style="padding: 10px 0px 15px 15px;"|The '' 'Pricing Configuration' '' tab enables you to define prices for products, addons and domains you wish to offer to your clients.<br /> |
Remember, you can define prices only within limits shown as placeholders.<br /> | Remember, you can define prices only within limits shown as placeholders.<br /> | ||
If pricing is not provided, product, addon or domain will not be available for your clients.<br /> | If pricing is not provided, product, addon or domain will not be available for your clients.<br /> | ||
| − | + | You can also get here a direct cart URL to products group that you can share directly with your customers. | |
|} | |} | ||
{| | {| | ||
| − | |style="padding: 0px 0px | + | |style="padding: 0px 0px 20px 25px;"|[[File:R3_29.png]] |
| + | |} | ||
| + | {| | ||
| + | |style="padding: 0px 0px 30px 25px;"|[[File:R3_29_0.png]] | ||
|} | |} | ||
====Configuration==== | ====Configuration==== | ||
| + | =====General Configuration===== | ||
{| | {| | ||
| − | |style="padding: 10px 0px 0px 15px;"|In the '' 'Configuration' '' tab you are allowed to define '' 'General Settings' '' such as your own company name, email signature and | + | |style="padding: 10px 0px 0px 15px;"|In the '' 'Configuration' '' tab you are allowed to define '' 'General Settings' '' such as your own company name, email signature, invoice and store logos used across client's client area, emails, invoices and date format.<br /> |
Please notice, that the available reseller configuration options may vary depending on the options you selected in the addon configuration and whether the '' 'Reseller Invoice' '' option was enabled for the reseller.<br/><br/> | Please notice, that the available reseller configuration options may vary depending on the options you selected in the addon configuration and whether the '' 'Reseller Invoice' '' option was enabled for the reseller.<br/><br/> | ||
| Line 926: | Line 1,031: | ||
|} | |} | ||
{| | {| | ||
| − | |style="padding: 0px 0px | + | |style="padding: 0px 0px 30px 25px;"|[[File:R3_30_10.png]] |
|} | |} | ||
| + | |||
| + | =====Email Templates===== | ||
{| | {| | ||
| − | |style="padding: | + | |style="padding: 10px 0px 15px 15px;"|'' 'Email Templates' '' is a place where you can view and edit email templates sent to your clients.<br /> |
Provided the option '' 'Allow Mail Wrappers Change' '' has been enabled for the reseller, empty fields to edit the CSS Styling, Header and Footer will appear.<br/>'''''Important:''' If this option is available, you must fill in these three fields correctly or otherwise issues with email formatting are sure to occur.<br/.> You may use and alter general WHMCS settings available under: 'WHMCS System Settings' → 'General Settings' → 'Mail'.''<br/> | Provided the option '' 'Allow Mail Wrappers Change' '' has been enabled for the reseller, empty fields to edit the CSS Styling, Header and Footer will appear.<br/>'''''Important:''' If this option is available, you must fill in these three fields correctly or otherwise issues with email formatting are sure to occur.<br/.> You may use and alter general WHMCS settings available under: 'WHMCS System Settings' → 'General Settings' → 'Mail'.''<br/> | ||
To edit an email template, press the '' 'Edit' '' button next to the template you wish to alter. | To edit an email template, press the '' 'Edit' '' button next to the template you wish to alter. | ||
| Line 941: | Line 1,048: | ||
|} | |} | ||
{| | {| | ||
| − | |style="padding: 0px 0px | + | |style="padding: 0px 0px 30px 25px;"|[[File:R3_30_2.png]] |
|} | |} | ||
| + | =====Payment Gateways===== | ||
{| | {| | ||
| − | |style="padding: | + | |style="padding: 10px 0px 15px 15px;"|'' 'Payment Gateways' '' - this tab is only available if the '' 'Reseller Invoice' '' option in the admin area is set to '' 'Enabled' ''.<br/> |
In this section, the reseller can set up their own payment gateway ('PayPal', 'Stripe', 'Bank Transfer', '2Checkout, Authorize.Net Aim', 'Checkout.com', 'Payflow Pro', 'Billplz'<br/>and 'WePay' gateways are currently available).<br/> | In this section, the reseller can set up their own payment gateway ('PayPal', 'Stripe', 'Bank Transfer', '2Checkout, Authorize.Net Aim', 'Checkout.com', 'Payflow Pro', 'Billplz'<br/>and 'WePay' gateways are currently available).<br/> | ||
Thanks to this, all payments made by end clients are transferred directly to the reseller's PayPal account or bank institution.<br/> | Thanks to this, all payments made by end clients are transferred directly to the reseller's PayPal account or bank institution.<br/> | ||
| Line 951: | Line 1,059: | ||
{| | {| | ||
|style="padding: 0px 0px 30px 25px;"|[[File:R3_30_3.png]] | |style="padding: 0px 0px 30px 25px;"|[[File:R3_30_3.png]] | ||
| + | |} | ||
| + | =====Email Settings===== | ||
| + | {| | ||
| + | |style="padding: 10px 0px 15px 15px;"|The Email Settings section allows the configuration of your own email mailbox. Enter the SMTP details to send messages.<br/> Remember to test the connection and send testing email messaged to ensure everything works correctly before saving the whole configuration.<br/> | ||
| + | '''''Important:''' Please bear in mind that "gmail" mail provided is not supported for reasons that are currently beyond our control.'' | ||
| + | |} | ||
| + | {| | ||
| + | |style="padding: 0px 0px 30px 25px;"|[[File:R3_32.png]] | ||
| + | |} | ||
| + | |||
| + | =====Data Export===== | ||
| + | {| | ||
| + | |style="padding: 10px 0px 15px 15px;"|Export data to CSV files and via API: | ||
| + | *Customer Details | ||
| + | *Products | ||
| + | *Product Addons | ||
| + | *Domains | ||
| + | *Invoices | ||
| + | *Transactions | ||
| + | |} | ||
| + | {| | ||
| + | |style="padding: 0px 0px 30px 25px;"|[[File:R3_32_1.png]] | ||
|} | |} | ||
| Line 963: | Line 1,093: | ||
|} | |} | ||
{| | {| | ||
| − | |style="padding: 0px 0px 20px 15px;"|Using the '' 'Action' '' button on invoices list resellers can also view and manage the invoice details, similarly to how it is done in the admin area. | + | |style="padding: 0px 0px 20px 15px;"|Using the '' 'Action' '' button on invoices list resellers can also view and manage the invoice details, similarly to how it is done in the admin area.<br/> |
| + | Press the marked button to download the invoice in a PDF format. | ||
|} | |} | ||
{| | {| | ||
Revision as of 15:26, 17 November 2022
Article update is ongoing on this page, watch out for broken links, unclear descriptions and images!
We are sorry for the inconvenience caused.
Contents
|
About Resellers Center For WHMCS
| Resellers Center For WHMCS empowers your resellers with tools to control end clients and their orders through single WHMCS! Thanks to Resellers Center For WHMCS, your resellers will be allowed to collect dedicated customers and select for them specific products, services and domains. |
- Provider Features:
| ✔ Define Global Configuration And Reseller Permissions |
| ✔ Manage Assignment Of Clients And Services To Resellers |
| ✔ Create And Manage Pricing Groups |
| ✔ Assign Clients to Pricing Groups To Set Them As Resellers |
| ✔ Assign Products, Addons And Domains To Pricing Groups |
| ✔ Define Pricing Range Per Products, Addons And Domains For Each Billing Cycle |
| ✔ Select Payouts Calculation Method Per Products, Addons, Domains And Configurable Options: |
| ✔ Fixed Rate |
| ✔ Difference |
| ✔ Percent Rate |
| ✔ Percent From Difference Between Admin And Reseller Price |
| ✔ Admin Percent With Fixed Rate |
| ✔ Admin Percent Plus Reseller Margin |
| ✔ Reseller Percent With Fixed Rate |
| ✔ Write Own Class To Calculate Reseller Profit |
| ✔ View Statistics On Resellers Sales, Income And End Clients |
| ✔ View Reseller Profits |
| ✔ Enable Reseller Own CNAME Domain Support |
| ✔ Select Available Store And Order Templates |
| ✔ Choose Email Templates Available For Branding |
| ✔ Choose Payment Gateways Available For End Clients |
| ✔ Choose Ticket Departments Available For End Clients |
| ✔ Choose Whether To Show Products Marked As "Hidden" To End Clients |
| ✔ Choose Whether To Allow Resellers To Delete End Clients |
| ✔ Determine Invoicing Method For Billing End Clients: |
| ✔ Provider As Issuer Of Invoices |
| ✔ Reseller As Issuer Of Invoices |
| ✔ Allow Invoice Branding |
| ✔ Define Default Sequential Invoice Number Format |
| ✔ Allow Resellers To Receive Commissions From Configurable Options |
| ✔ Allow Resellers To Access And Define Their Own Promotions |
| ✔ Allow Resellers To Alter Their Email Templates CSS Styling, Header And Footer |
| ✔ Allow Resellers To Use Their Own SMTP Email Settings |
| ✔ Allow Resellers To Change Date Format |
| ✔ Allow Resellers To Suspend End Client Services |
| ✔ Prevent Resellers From Logging In As Their End Clients |
| ✔ Prevent Resellers From Viewing End Clients Details |
| ✔ Prevent Resellers From Placing Orders On Behalf Of End Clients |
| ✔ Choose Whether To Send Default WHMCS Email If Reseller Template Is Disabled |
| ✔ Make Payouts To PayPal Account Or Credit Balance |
| ✔ Enable Automatic PayPal Payout Transfers |
| ✔ Prepare Documentation For Each Reseller |
| ✔ Disable Access To Knowledgebase For End Clients Of Certain Reseller |
| ✔ Disable Access To Your Main Store For End Clients Of All Or Certain Resellers |
| ✔ Hide Services Ordered Through Reseller Store In Admin Store View |
| ✔ Hide Single Sign-on Buttons From Reseller Store |
| ✔ Redirect All Email Received By End Clients To Their Resellers |
| ✔ Set Up API Token And Connection Settings |
| ✔ Access To Module Logs |
| ✔ Export Resellers Data To CSV File: |
| ✔ Customer Details |
| ✔ Products |
| ✔ Product Addons |
| ✔ Domains |
| ✔ Invoices |
| ✔ Resellers And WHMCS Invoices |
| ✔ Resellers And WHMCS Transactions |
| ✔ View Resellers Affiliations On WHMCS Clients List |
- Resellers Features:
| ✔ Configure Reseller Brand: |
| ✔ Domain |
| ✔ Company Name |
| ✔ Store And Invoice Logo |
| ✔ Store And Order Template |
| ✔ Store Email Address |
| ✔ Terms Of Service URL |
| ✔ Sequential Invoice Number Format |
| ✔ Next Sequential Number |
| ✔ Invoice Pay To Text |
| ✔ Auto WHMCS Invoice Payment |
| ✔ Tickets Email Signature |
| ✔ Store And Order Template |
| ✔ Available Ticket Departments |
| ✔ Set Up Independent Payment Gateways Available For End Clients: |
| ✔ 2Checkout |
| ✔ Authorize.Net AIM |
| ✔ Bank Transfer |
| ✔ Billplz |
| ✔ Checkout.com |
| ✔ Paypal |
| ✔ Payflow Pro |
| ✔ Stripe |
| ✔ WePay |
| ✔ Define Order Of Payment Gateways |
| ✔ Define Prices Of Products, Addons And Domains Within Defined Limits |
| ✔ Generate Direct URLs To Products And Product Groups |
| ✔ Define Individual Promotions For End Clients |
| ✔ Add And Manage End Clients |
| ✔ View And Manage End Clients Orders, Invoices, Products, Addons And Domains |
| ✔ Create Custom Invoice Drafts And Issue Them To End Clients |
| ✔ Place Orders For End Clients Manually |
| ✔ Manually Accept Order Of End Client Before Payment Receipt |
| ✔ Login As End Client |
| ✔ View Statistics On Sales, Income And End Clients |
| ✔ View Generated Profits |
| ✔ Access Documentation |
| ✔ Receive Payouts To PayPal Account Or Credit Balance |
| ✔ Receive Email Notifications On End Clients Orders |
| ✔ Reply To Tickets Submitted By End Clients |
| ✔ View Email Templates And Use Editor To Modify Their Content |
| ✔ Modify Email Templates CSS Styling, Header And Footer |
| ✔ Access Store By CNAME Domain Or Default Store URL |
| ✔ Export End Clients Data To CSV File And Via API: |
| ✔ Customer Details |
| ✔ Customer Details |
| ✔ Product Addons |
| ✔ Domains |
| ✔ Invoices |
| ✔ Transactions |
- End Clients Features:
| ✔ Order Products, Addons And Domains |
| ✔ Use End Client Details For Registered Domains |
| ✔ View And Pay Invoices |
| ✔ Pay Using Credit Card And Store Payment Data |
| ✔ Apply Credits To Invoices |
| ✔ Apply Resellers Promo Codes To Orders |
| ✔ View And Manage Products |
| ✔ Receive Branded Email Notifications |
| ✔ Submit Tickets To Reseller |
- General Info:
| ✔ Migration Tool |
| ✔ Fully Integrated With Lagom WHMCS Client Theme |
| ✔ Multi-Language Support |
| ✔ Supports PHP 7.3 Up To PHP 8.1 |
| ✔ Supports WHMCS Themes "Six" And "Twenty-One" |
| ✔ Supports WHMCS V8.3 And Later |
| ✔ Requires ionCube Loader V12 Or Later |
| ✔ Easy Module Upgrade To Open Source Version |
Installation
| Installation of Resellers Center For WHMCS requires a few simple modifications of the template files. No worries, we will guide you step by step through the entire installation process. Important: If you are updating Resellers Center For WHMCS from the 3.8.0 version (or prior to 3.8.0) to the 3.9.0 version and later, you need to reconfigure your API settings. |
Installation
| 1. Log in to our client area and download the module. |

|
| 2. In the downloaded file you might find one or two packages that support different PHP versions. In the most recent versions of the module, you will find only one package that supports PHP 7.2 and later. |
| Previous updates of the module may contain two packages dedicated to various PHP versions. The first one that supports PHP 5.6 up to PHP 7.1, and the second one addressed to PHP 7.2 up to PHP 7.4. |

|
| Note: You can check the current PHP version in your WHMCS. To do so, proceed to 'Utilities' → 'System' → 'PHP Info'. |
| 3. Extract the package and upload its content into the main WHMCS directory. The content of the package to upload should look like this. |

|
| 4. When you install Resellers Center For WHMCS for the first time you have to rename the 'license_RENAME.php' file. The file is located in 'modules/addons/ResellersCenter/license_RENAME.php'. Rename it from 'license_RENAME.php' to 'license.php'. |

|
| 5. In order to configure your license key you have to edit the previously renamed 'license.php' file. Enter your license key between quotation marks as presented on the following screen. |

|
| 6. The next step is setting up the 'storage' and 'config' folders as writable. They are located in: 'your_whmcs/modules/addons/ResellersCenter/'. |

|
Activation of Addon
| 7. Now, you have to activate the module in your WHMCS system. Log in to your WHMCS admin area. Click 'System Settings' then choose 'Addon Modules'. |

|
| 8. In the next step, you need to permit access to the module. To do so, select the admin roles which should have access to the module. Press 'Save Changes' when ready. |

|
| 9. Afterward, go to 'Addons' → 'Resellers Center' → 'Integration Code' and follow the instructions.
Note: Please keep in mind that WHMCS versions prior to V7.7 are no longer officially supported by the module. |

|
| 10. You have just successfully installed Resellers Center For WHMCS! |
Management and Configuration
| Management of Resellers Center For WHMCS is very convenient. You can supervise everything from the addon. What is more, the module extends possibilities of both your resellers and their customers. |
Settings
| In this section you can find more information about a global configuration. Additionally, here you can also read about the details of migration. |
Global Configuration
| In the 'Configuration' tab you can set up global settings of the module. You can define 'General', 'Billing' and 'Email Templates' settings. Please note that these settings are default for all resellers. Read this section through to find the details of configuration per each reseller. |
General Settings
|

|
Billing Settings
|

|
Email Templates Settings
| Here you can enable/disable numerous options that a reseller can customize later on. These templates are related to emails regarding issues like:
|

|
Single Reseller Configuration
| Global configuration settings, enumerated and explained above, can be also defined for particular resellers. You may alter them for a single reseller, the global settings will be overwritten by these ones. Go to the 'Resellers' tab and press the marked button to continue. |

|
| Here you will find the details related to the chosen reseller. In the 'Configuration' section you can select preferred 'General', 'Billing', 'Miscellaneous' and 'Email Template' settings. Under the first tab, you will find exactly the same options to configure as in the global settings. |

|
The 'Billing Settings' section includes global and some additional configuration details per reseller:
|

|
Under the 'Miscellaneous' tab you will find these options available per reseller:
|

|
| The last 'Email Templates' section contains the same list of email templates to enable/disable as the global configuration. |

|
Addon Management
| In this section you can find more details about the management possibilities. We will show you how to set up key options to ease the module's handling processes. |
Pricing Groups
| In order to grant any of your clients resellers' rights, you need to configure a group first. To do so, proceed to the 'Pricing Groups' tab and click the button as shown below. |

|
| A popup window appears. Just fill in a group name and press 'Create'. |

|
| As you can see, a new group is visible on the list. It does not have any product configured. To add a new product press the button as presented below. |

|
| Choose a new product from the 'Add Product To Group' dropdown menu and press 'Save'. |

|
The product needs to be configured. Then, Resellers Center For WHMCS enables you to:
|

|
Product Pricing
| It is possible to set pricing (1) for different billing cycles and currencies.
You can define pricing using the below options:
To confirm settings, press 'Save' . |

|
Calculation Method
Several methods for the calculation (2) are available. Choose the one you want to use from the dropdown menu.
To confirm settings press 'Save' next to the product you have configured. |

|
| The procedure is quite similar when it comes to adding addons and domains. Click the right button to add a new addon. |

|
| From the dropdown menu choose the one that will be added to the group. |

|
| Now, you can set 'Pricing' and 'Calculation Method' or delete this addon. |

|
| In order to add a new domain, click the right button, as shown below. You may also add all TLDs from WHMCS, just press the button marked with the blue arrow. |

|
| From the dropdown menu choose the one that will be added to the group (in case of adding TLDs one by one). |

|
| Now, you can set 'Pricing', 'Calculation Method', delete this domain and 'Show Details'. |

|
Resellers
| The 'Resellers' tab displays all clients from your WHMCS system. You can use it to assign any client to a reseller's group, that will activate them as resellers. |

|
| Assign a new reseller to the chosen group. |

|
Clients
| To see resellers' clients go to the 'Resellers' tab and click the button next to a selected reseller. |
|
|
| Here you can obtain more details about your customers and their clients. Apart from clients, you can manage also invoices, transactions and services. |

|
| You can also assign a new client to this reseller. |

|
| Move to 'Services' to obtain more details about the clients' services and add any other products/addons/domains that are not yet assigned to this reseller's store. |

|
| In your WHMCS admin area, you may now quickly check if a client is assigned to a reseller, and to which one exactly, without the need of opening the Resellers Center addon. |

|

|
Payouts
| In the 'Payouts' tab, you can view the list of all resellers' transactions and make profit payouts to them. Moreover, you can accept 'Mass Payments' for selected resellers here. Please note - this tab is only used if the 'Reseller Invoice' configuration is set to 'Disabled'. In the 'Payouts' section, apart from looking at the details it is also possible to perform the following actions: pay by PayPal (1) or WHMCS Credits (2) and mark the transaction as completed (3). |

|
Statistics
| The 'Statistics' tab allows you to see the amount of sales and income, and the number of clients assigned to resellers. |

|
| Information about sale is also visible in the 'Reseller' tab. |

|
Logs
| The 'Logs' tab allows you to see the details of the actions that have been already performed. |

|
Integration Code
| In the 'Integration Code' tab you will find the instructions on how to allow your resellers to modify the client area and invoice logo. Note: Please keep in mind that WHMCS versions prior to V7.6 are no longer officially supported by the module. |

|
Reseller Documentation
|
The 'Reseller Documentation' tab enables you to create and modify the documentation visible to specified resellers. The documentation provides guidelines to help resellers handle their panels with ease. |

|
|
Choose the resellers to whom the documentation will be visible, enter the name of the documentation and its content. |

|
|
From now on, our resellers will be encouraged to read the documentation from the welcome page, when they enter the 'Reseller Area' for the first time. |

|
Client Area - Reseller
| In the client area, your clients can add new subclients and access the 'Reseller Area' . Access to the 'Reseller Area' is granted only to those clients, to whom reseller's groups are assigned in the Resellers Center For WHMCS module. |

|
Reseller Area
| In the 'Reseller Area' you can manage clients, define products prices, set up branding, customize email templates and open tickets. |
Clients
| Under this tab, you can see a list of reseller's clients and perform various actions. It is possible to log in as a client (1), make an order for a client (2), view client's details (3) and delete a client (4). |

|
| To add a new client, press the button as presented below. |

|
| Fill in all the necessary details in both 'General' and 'Address' sections. Remember to save changes. |

|
| When you enter client's details view (3), you will find here not only his personal details but also information about orders, invoices, services, addons and domains. |

|
Pricing Configuration
| The 'Pricing Configuration' tab enables you to define prices for products, addons and domains you wish to offer to your clients. Remember, you can define prices only within limits shown as placeholders. |

|

|
Configuration
General Configuration
| In the 'Configuration' tab you are allowed to define 'General Settings' such as your own company name, email signature, invoice and store logos used across client's client area, emails, invoices and date format. Please notice, that the available reseller configuration options may vary depending on the options you selected in the addon configuration and whether the 'Reseller Invoice' option was enabled for the reseller. Note: Once the configuration of your brand is complete, your reseller will still need to set up a CNAME DNS record if domain is used. |
|

|
|

|
|

|
Email Templates
| 'Email Templates' is a place where you can view and edit email templates sent to your clients. Provided the option 'Allow Mail Wrappers Change' has been enabled for the reseller, empty fields to edit the CSS Styling, Header and Footer will appear. |

|
| Finally, edit the email template to suit your needs and press the 'Save Changes' button. Note: During this step you can easily add merge fields using dropdown menus marked on the following screen. |

|
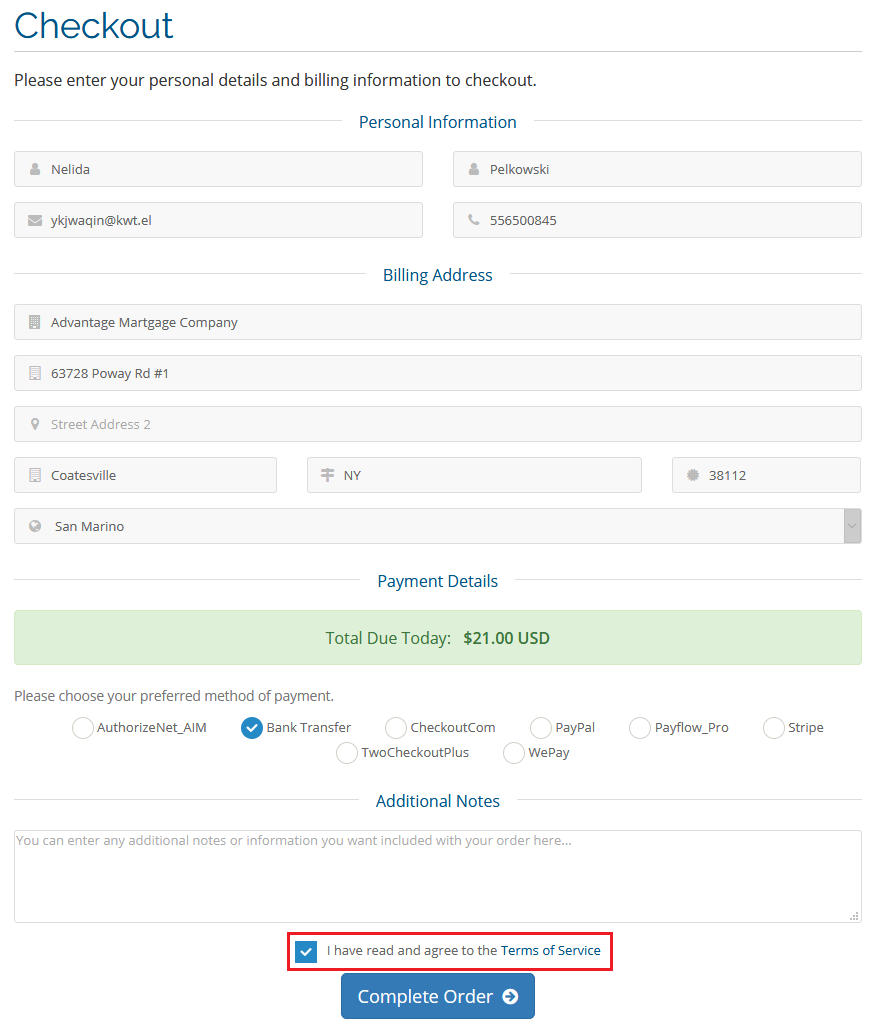
Payment Gateways
| 'Payment Gateways' - this tab is only available if the 'Reseller Invoice' option in the admin area is set to 'Enabled' . In this section, the reseller can set up their own payment gateway ('PayPal', 'Stripe', 'Bank Transfer', '2Checkout, Authorize.Net Aim', 'Checkout.com', 'Payflow Pro', 'Billplz' |

|
Email Settings
| The Email Settings section allows the configuration of your own email mailbox. Enter the SMTP details to send messages. Remember to test the connection and send testing email messaged to ensure everything works correctly before saving the whole configuration. Important: Please bear in mind that "gmail" mail provided is not supported for reasons that are currently beyond our control. |

|
Data Export
Export data to CSV files and via API:
|

|
Invoices
Here is the detailed list of end clients' all invoices together with their status.
|

|
| Using the 'Action' button on invoices list resellers can also view and manage the invoice details, similarly to how it is done in the admin area. Press the marked button to download the invoice in a PDF format. |

|
Add a custom invoice. This option is available only for branded invoices between the reseller and the client.
|

|
Orders
| This section allows you to view all of the orders with their chosen payment method and status. |

|
| Apart from the general section with all orderes listed, you may view a list of ordered products, addons and domains separately. Use visible filters to seach for specific orders only. |

|
Promotions
| In the 'Promotions' section resellers can generate fully customizable promo codes in order to apply a promotion for products, addons or domains of your choice. Note: You must first enable them in your 'Configuration' section of a specific reseller. |

|
| Click on the symbol, marked on the screen below to create one. |

|
Now you should see all fields required to properly configure a promotion.
|

|
By toggling the 'Upgrades / Downgrades' section, you will have a few extra fields to configure.
|

|
Ordering
| There are two ways to add a product to an end client account, we will show you both of them below. |
Assign Product by Reseller
| Your resellers can place orders for their own customers as if the orders were for themselves. |

|
| Both your reseller and the end client will receive an order confirmation email. Afterward, when an end client logs in to the WHMCS client area, he/she will be able to view and manage previously ordered products. |

|
Access Order From The Client Area
| Your reseller's clients can view order form with the list of products configured by their resellers. Therefore, your reseller's clients can place orders on their own, using order forms in the client area. |

|
Tickets Management
| If you have not disabled tickets in your addon, your resellers will be able to reply and forward tickets created by their clients. It is only available for tickets department set in the Resellers Center For WHMCS configuration. |

|
| On the screen below you can see a list of all the tickets created by a reseller's clients from the client area. |

|
| You can easily reply to them. |

|
Client Area - End Client
| An end client sees a branded client area. Since the version 3.x of the module end clients are treated as regular WHMCS clients. |

|
General Relations
| Relations between Provider, Reseller and Client |
| Payment system: In general, Reseller receives a product from the Provider and then provides it further to the End Client. |
Invoicing system:
|
Domains & CNAME Records Configuration
| In this section you will find guides on how to create a CNAME record in popular control panels. For instance, if a reseller's branded domain is 'reseller.com' and the domain with your WHMCS is 'whmcs.domain.com' , the CNAME needs to be 'www.reseller.com. CNAME whmcs.domain.com.'. |
| The domain used by each of brands must be parked on the main domain. In case when a domain cannot be parked or it is a subdomain, you must create the CNAME records that will redirect from the brand domain to the main domain. Only when you have parked your domains can you move to setting the CNAME records on your panels. See the tips below. |
cPanel
| 1. Log in to your cPanel. |
| 2. Press 'Simple DNS Zone Editor' under the 'Domains' section. |
| 3. Select the domain you wish to manage from the menu. Note: This step is required only if you own more than one domain. |
| 4. Fill in the 'Name' field and the 'CNAME' record and press 'Add CNAME Record'. Note: To define the record's TTL, you have to use 'Advanced DNS Zone Editor' . |
DirectAdmin
| 1. Log in to your DirectAdmin. |
| 2. Click 'DNS Administration' . |
| 3. Afterward, select the desired domain. |
| 4. Fill in the full domain/subdomain into the CNAME record and press 'Add' next to it. Note: Do not forget to place a full stop at the end. |
Plesk
| 1. Log in to your Plesk panel. |
| 2. Press 'Domains' under the 'Hosting Services' section. |
| 3. Find the domain to be edited, and click on the corresponding Control Panel link. Afterward, proceed to the 'Websites & Domains' tab and press 'DNS Settings' . |
| 4. Add a new record or edit the existing one. |
| 5. Now, change the record type to 'CNAME' and fill in both the 'Domain name' and the 'Canonical name'. Finish by pressing 'OK'. |
| Remember to restart your server once it is configured. |
SSL Certificate
| If reseller branded domains or your WHMCS main domain use the SSL connection, they should also support selected certificates. The supported types of certificates:
This is the way WHMCS works. It is not the limitation of our module which uses the 'WHMCS System URL' scheme. |
cPanel
| Installing the SSL certificate for domains managed from cPanel consists of the following steps: |
| 1. Log in to your cPanel and press 'SSL/TSLS Manager' under the 'Security' section. |
| 2. Click on 'Manage SSL sites' under 'Install and Manage SSL for your site (HTTPS)'. |
| 3. (installing the certificate) Select the domain, paste certificate and the private key, and save settings. |
| 4. (using the already installed certificate) Select it from 'Browse Certificates' , and save settings. |
| You can also consider enabling the AutoSSL solution, which should automatically installs domain-validated SSL certificates. Go here for more information. Note: AutoSSL function will rather not work for CNAME entries so you should use virtual hosts (vhosts) instead. |
Tips
| 1. If your WHMCS is installed in a subdirectory, your resellers using CNAME record must provide their links with it. For example, reseller.com/main-whmcs-directory instead of reseller.com.. RewriteEngine on
RewriteCond %{HTTP_HOST} !^main-whmcs-domain.com$ [NC]
RewriteCond %{REQUEST_URI} !^/whmcs-directory/
RewriteRule ^(.*)$ /whmcs-directory/$1 [R=301,L]
Result: If hostname is not main-whmcs-domain.com and path is not whmcs-directory', then redirect to resellers domain with /whmcs-directory. |
| 2. When it comes to our Resellers Center For WHMCS and Social Media Login For WHMCS modules, they are compatible and work faultlessly unless your reseller uses a branded domain. |
| 3. If you enable the 'Reseller Invoice' option and any invoice is created in the meantime, you will no longer be able to disable this option. |
| 4. If you would like to use Google reCAPTCHA for brand storefronts, you need to add domain addresses of those brands to the reCAPTCHA configuration. To do so, please proceed here. |

|
Update Instructions
| An essential manual through the process of updating the module is offered here. When you upgrade the module from the version older than 3.5.0 to 3.5.0 or newer, please remember to set writable permissions to the 'config' directory, as described in step 6. of the installation guide. Please keep in mind that there is a quick and easy option in our client area to upgrade the license of your module to an open source version at any time - and at a lower price! |
Migration
| Migration tool allows you to upgrade Resellers Center For WHMCS module to the latest version. Note: Version 3.x currently supports migration from the version 2.5.x of the module and it will only transfer data on resellers, resellers' clients and resellers' groups. |
External API Configuration
| From the 3.9.0 version of Resellers Center For WHMCS, the module uses External API instead of Local API. To begin with the configuration, please navigate to 'Configuration → WHMCS API Connection Settings' . Now, click on the link as presented below. |

|
| Once you are in the 'Manage API Credentials' section, go to 'API Roles' and press 'Create API Role' . |

|
| Enter your 'Role Name' and decide which API actions will be allowed. Do not forget to save changes. |

|
| Next, navigate to the 'API Credentials' section and click the 'Generate New API Credential' button. Provide a description and choose the previously created API role. Finally, press the Generate button. |

|
| You will find your new 'Identifier' as well as 'Secret' . Copy them and paste to a safe place because you will not see them again. |

|
| Now, come back to the configuration section of the module. Provide your 'Identifier' and 'Secret' . You also need to complete 'Base Auth Login' and 'Base Auth Password' if your site uses them. |

|
| The final step is to navigate to 'General Settings' of your WHMCS admin area. Find the 'Security' section there and scroll down to the 'API IP Access Restriction' feature. Enter your IP address here to make sure that the configuration will work properly. |

|
Common Problems
| 1. When you have problems with connection, check whether your SELinux or firewall does not block ports. |
| 2. If you use HTTPS, remember to implement a redirect from HTTP to HTTPS on the reseller's domain. Otherwise, WHMCS will route visitors to the main WHMCS and not the reseller store. Keep in mind that when WHMCS creates the redirection, the domain is changed as well. |
3. We do not recommend using Resellers Center For WHMCS with:
Integration between these modules is hampered due to specific features of each one of them and their individual work flow. |
| 4. Please remember that Resellers Center For WHMCS is guaranteed to work smoothly with 'Six', 'Twenty-One' And 'Lagom' templates. If you are using some custom template, please be mindful that the module may not combine well with it out of the box, which may result in unexpected errors. |
| 5. If you are using other language than English in the client area, note that some strings might be still in English, e.g. billing cycles or invoice status. Note that this issue is not related to our module, but to WHMCS itself and we have no influence on these occurrences. |