EURid Registrar For WHMCS
(Created page with "<span style="color:red">Page coming soon to a browser near you!</span>") |
|||
| Line 1: | Line 1: | ||
| − | < | + | <meta name="keywords" content="eurid registrar for whmcs, eurid registrar configuration, whmcs eurid registrar management, whmcs eurid registrar installation, whmcs eurid registrar common problems, about whmcs eurid registrar, whmcs eurid registrar documentation, whmcs eurid registrar faq, whmcs eurid registrar help, whmcs eurid registrar guide, whmcs eurid registrar wiki, whmcs eurid registrar tutorial, whmcs eurid registrar tips, whmcs eurid registrar wiki"></meta> |
| + | <meta name="description" content="ModulesGarden Wiki Contains All The Information You Need About The EURid Registrar For WHMCS Module."></meta> | ||
| + | |||
| + | =About [http://www.modulesgarden.com/products/whmcs/eurid_registrar/features EURid Registrar For WHMCS]= | ||
| + | {| | ||
| + | |style="padding: 10px 0px 5px 0px;"|'''EURid Registrar For WHMCS''' allows you to sell your products in bundles.<br /> | ||
| + | Product bundles content is defined by clients through chosen addons or configurable options.<br /> | ||
| + | Module will also allow you to view, filter and delete existing connections used by your customers. | ||
| + | |} | ||
| + | *'''Features:''' | ||
| + | {| | ||
| + | |style="padding: 10px 0px 0px 30px;"|✔ Create A Single Or Multiple Relations Between Your WHMCS Products, Addons And Configurable Options | ||
| + | |} | ||
| + | {| | ||
| + | |style="padding: 0px 0px 0px 30px;"|✔ Allow Your Clients To Purchase Multiple Products, Addons And Configurable Options Through Ordering Just One Of Them | ||
| + | |} | ||
| + | {| | ||
| + | |style="padding: 0px 0px 0px 30px;"|✔ Dependencies Between Module Actions - Every Action: Create, Terminate, Suspend Or Unsuspend Called On The Main Product Will Result With The Same Action Performed On The Child Products | ||
| + | |} | ||
| + | {| | ||
| + | |style="padding: 0px 0px 0px 30px;"|✔ Product Updates With Automatic Email Notifications To Admin | ||
| + | |} | ||
| + | {| | ||
| + | |style="padding: 0px 0px 0px 30px;"|✔ View And Delete Existing Connections | ||
| + | |} | ||
| + | {| | ||
| + | |style="padding: 0px 0px 0px 30px;"|✔ Flexible Filtering Of Existing Connections | ||
| + | |} | ||
| + | {| | ||
| + | |style="padding: 0px 0px 10px 30px;"|✔ Advanced Module Logs | ||
| + | |} | ||
| + | *'''Additionally:''' | ||
| + | {| | ||
| + | |style="padding: 10px 0px 0px 30px;"|✔ Integrated With <u>cPanel Manage2 For WHMCS</u> - Easy Reselling Of cPanel Licenses [http://www.modulesgarden.com/products/whmcs/cpanel_manage2/features (read more)] | ||
| + | |} | ||
| + | {| | ||
| + | |style="padding: 0px 0px 0px 30px;"|✔ Integrated With <u>DirectAdmin Licenses For WHMCS</u> - Easy DirectAdmin Licenses Reselling [http://www.modulesgarden.com/products/whmcs/directadmin_licenses/features (read more)] | ||
| + | |} | ||
| + | {| | ||
| + | |style="padding: 0px 0px 0px 30px;"|✔ Integrated With <u>Parallels Key Administrator For WHMCS</u> - Easy Parallels Licenses Reselling [http://www.modulesgarden.com/products/whmcs/parallels_key_administrator/features (read more)] | ||
| + | |} | ||
| + | {| | ||
| + | |style="padding: 0px 0px 0px 30px;"|✔ Improved Update Of Products | ||
| + | |} | ||
| + | {| | ||
| + | |style="padding: 0px 0px 0px 30px;"|✔ Multi-Language Support | ||
| + | |} | ||
| + | {| | ||
| + | |style="padding: 0px 0px 30px 30px;"|✔ Supports WHMCS V5 and Later | ||
| + | |} | ||
| + | |||
| + | =Installation= | ||
| + | {| | ||
| + | |style="padding: 10px 0px 0px 0px;"|'''This tutorial will show you how to successfully install EURid Registrar For WHMCS.''' <br /> | ||
| + | We will guide you step by step through the whole installation and configuration process. <br /> | ||
| + | |} | ||
| + | {| | ||
| + | |style="padding: 20px 0px 20px 15px;"|'''1. Log in to your client area and download EURid Registrar For WHMCS.''' | ||
| + | |} | ||
| + | {| | ||
| + | |style="padding: 0px 0px 20px 25px;"|[[File:EU1.png]] | ||
| + | |} | ||
| + | {| | ||
| + | |style="padding: 0px 0px 15px 15px;"|'''2. Upload and extract the module into the main WHMCS directory.'''<br /> | ||
| + | Files in your WHMCS directory should look like this. | ||
| + | |} | ||
| + | {| | ||
| + | |style="padding: 0px 0px 20px 25px;"|[[File:EU2.png]] | ||
| + | |} | ||
| + | {| | ||
| + | |style="padding: 0px 0px 15px 15px;"|'''3. When you install EURid Registrar For WHMCS for the first time you have to rename '' 'license_RENAME.php' '' file.'''<br /> | ||
| + | File is located at '' 'modules/registrars/eurid/license_RENAME.php' '' . Rename it from '' 'license_RENAME.php' '' to '' 'license.php' '' . | ||
| + | |} | ||
| + | {| | ||
| + | |style="padding: 0px 0px 20px 25px;"|[[File:EU3.png]] | ||
| + | |} | ||
| + | {| | ||
| + | |style="padding: 0px 0px 15px 15px;"|'''4. In order to configure your license key, you have to edit a previously renamed '' 'license.php' '' file.'''<br /> | ||
| + | Enter your license key between quotation marks as presented on the following screen. You can find your license key at your client area → '' 'My Products' ''. | ||
| + | |} | ||
| + | {| | ||
| + | |style="padding: 0px 0px 20px 25px;"|[[File:EU4.png]] | ||
| + | |} | ||
| + | {| | ||
| + | |style="padding: 0px 0px 15px 15px;"|'''5. Now you have to activate the module in your WHMCS system.'''<br /> | ||
| + | Log in to your WHMCS admin area. Go to '' 'Setup' '' → '' 'Products/Services' '' → '' 'Domain Registrars' ''.<br /> | ||
| + | Afterwards, find '' 'EURid' '' and press '' 'Activate' '' button. | ||
| + | |} | ||
| + | {| | ||
| + | |style="padding: 0px 0px 20px 25px;"|[[File:EU5.png]] | ||
| + | |} | ||
| + | {| | ||
| + | |style="padding: 0px 0px 15px 15px;"|'''6. In the next step you need to set up access to EURid API.'''<br /> | ||
| + | To do so, fill '' 'Username' '' and '' 'EPP Password' '' fields with your EURid username and EEP password.<br /> | ||
| + | Additionally, you have to fill '' 'Server' '', '' 'Billing Contact ID' '' and '' 'Tech Contact ID' ''.<br /> | ||
| + | Next, confirm through pressing '' 'Save' '' button. | ||
| + | |} | ||
| + | {| | ||
| + | |style="padding: 0px 0px 20px 25px;"|[[File:EU6.png]] | ||
| + | |} | ||
| + | {| | ||
| + | |style="padding: 0px 0px 15px 15px;"|'''6.1. You can find '' 'Billing Contact ID' '' and '' 'Tech Contact ID' '' at your EURid account → '' 'Contact' '' → '' 'Search' ''.<br /> | ||
| + | Simply press '' 'Search' '' button and copy values from '' 'Alias' '' column next to '' 'Billing' '' and '' 'Technical' '' types. | ||
| + | |} | ||
| + | {| | ||
| + | |style="padding: 0px 0px 20px 25px;"|[[File:EU6_1.png]] | ||
| + | |} | ||
| + | {| | ||
| + | |style="padding: 0px 0px 30px 15px;"|'''7. You have just successfully installed EURid Registrar For WHMCS!''' | ||
| + | |} | ||
| + | |||
| + | =Configuration and Management= | ||
| + | {| | ||
| + | |style="padding: 10px 0px 30px 15px;"|'''EURid Registrar For WHMCS allows you to sell TLDs from EURid via WHMCS system.'''<br /> | ||
| + | Additionally, EURid Registrar For WHMCS allows your customers to manage their domains from the WHMCS client area. | ||
| + | |} | ||
| + | ==Management of TLDs== | ||
| + | {| | ||
| + | |style="padding: 10px 0px 15px 15px;"|Adding new TLD is quite simple. To add it, go to '' 'Setup' '' → '' 'Products/Services' '' → '' 'Domain Pricing' ''.<br /> | ||
| + | Enter your TLD and choose '' 'Eurid' '' from an '' 'Auto Registration' '' dropdown menu as shown on the screen below.<br /> | ||
| + | Here you can also decide whether to offer your customers features like DNS Management or ID Protection. Then press '' 'Save Changes' '' button. | ||
| + | |} | ||
| + | {| | ||
| + | |style="padding: 0px 0px 20px 25px;"|[[File:EU8.png]] | ||
| + | |} | ||
| + | {| | ||
| + | |style="padding: 0px 0px 20px 15px;"|As you can see '' 'Open Pricing' '' field has appeared. Click on it and set up your pricing. | ||
| + | |} | ||
| + | {| | ||
| + | |style="padding: 0px 0px 20px 25px;"|[[File:EU9.png]] | ||
| + | |} | ||
| + | {| | ||
| + | |style="padding: 0px 0px 20px 15px;"|In newly opened window you can set your prices. Remember to save the changes! | ||
| + | |} | ||
| + | {| | ||
| + | |style="padding: 0px 0px 20px 25px;"|[[File:EU10.png]] | ||
| + | |} | ||
| + | {| | ||
| + | |style="padding: 0px 0px 30px 15px;"|This it it! From now your customers can start ordering .eu domains directly from your WHMCS. | ||
| + | |} | ||
| + | |||
| + | ==Ordering== | ||
| + | {| | ||
| + | |style="padding: 10px 0px 20px 15px;"|Ordering EURid domain goes alike to ordering other domains. | ||
| + | |} | ||
| + | {| | ||
| + | |style="padding: 0px 0px 30px 25px;"|[[File:EU11.png]] | ||
| + | |} | ||
| + | |||
| + | ==Domain Management== | ||
| + | {| | ||
| + | |style="padding: 10px 0px 15px 15px;"|In the admin area client overview → '' 'Domains' '' tab you can manage all the aspects of the domain.<br /> | ||
| + | Along with basic actions like '' 'Register' '', '' 'Renew' '' and '' 'Transfer' '' you can make use of features '' 'Modify Contact Details' '' and '' 'Get EEP Code' ''. | ||
| + | |} | ||
| + | {| | ||
| + | |style="padding: 0px 0px 20px 25px;"|[[File:EU12.png]] | ||
| + | |} | ||
| + | {| | ||
| + | |style="padding: 0px 0px 15px 15px;"|You can also disable/enable auto renewal through marking/unmarking '' 'Disable Auto Renewal' '' checkbox.<br /> | ||
| + | Confirm changes through clicking on '' 'Save Changes' '' button. | ||
| + | |} | ||
| + | {| | ||
| + | |style="padding: 0px 0px 30px 25px;"|[[File:EU13.png]] | ||
| + | |} | ||
| + | |||
| + | ==Client Area== | ||
| + | {| | ||
| + | |style="padding: 10px 0px 15px 15px;"|Your customers can order various actions on his EURid Registrar domain from the client area.<br /> | ||
| + | Clients can view basic information related to domain and renew domain through pressing '' 'Renew Now' '' button. | ||
| + | |} | ||
| + | {| | ||
| + | |style="padding: 0px 0px 20px 25px;"|[[File:EU14.png]] | ||
| + | |} | ||
| + | {| | ||
| + | |style="padding: 0px 0px 20px 15px;"|At '' 'Auto Renew' '' tab clients can enable/disable auto renewal by pressing '' 'Enable Auto Renew' ''/'' 'Disable Auto Renew' '' button. | ||
| + | |} | ||
| + | {| | ||
| + | |style="padding: 0px 0px 20px 25px;"|[[File:EU15.png]] | ||
| + | |} | ||
| + | {| | ||
| + | |style="padding: 0px 0px 20px 15px;"|'' 'Nameservers' '' tab allows clients to change nameservers used by his domain. | ||
| + | |} | ||
| + | {| | ||
| + | |style="padding: 0px 0px 20px 25px;"|[[File:EU16.png]] | ||
| + | |} | ||
| + | {| | ||
| + | |style="padding: 0px 0px 20px 15px;"|Under '' 'Management Tools' '' → '' 'Contact Information' '' your clients can also view and modify contact information. | ||
| + | |} | ||
| + | {| | ||
| + | |style="padding: 0px 0px 20px 25px;"|[[File:EU17.png]] | ||
| + | |} | ||
| + | {| | ||
| + | |style="padding: 0px 0px 20px 15px;"|In order to get domain EEP Code settings your clients have to go to '' 'Management Tools' '' → '' 'Get EEP Code' '' | ||
| + | |} | ||
| + | {| | ||
| + | |style="padding: 0px 0px 30px 25px;"|[[File:EU18.png]] | ||
| + | |} | ||
| + | |||
| + | =Tips= | ||
| + | {| | ||
| + | |style="padding: 10px 0px 30px 15px;"|1. If lookup of any .eu domain returns '' 'Sorry, your_domain.eu is already taken' '', you need to modify '' 'whoisservers.php' '' file located at '' 'your_whmcs/include/' '' folder.<br /> | ||
| + | Find line '' '.eu|whois.eu|Status: AVAILABLE' '' and replace it with '' '.eu|whois.eu|AVAILABLE' ''. | ||
| + | |||
| + | |} | ||
| + | |||
| + | =Common Problems= | ||
| + | {| | ||
| + | |style="padding: 10px 0px 30px 15px;"|1. When you have problems with connection, check whether your SELinux or firewall is not blocking ports. | ||
| + | |} | ||
Revision as of 11:13, 25 February 2014
Contents |
About EURid Registrar For WHMCS
| EURid Registrar For WHMCS allows you to sell your products in bundles. Product bundles content is defined by clients through chosen addons or configurable options. |
- Features:
| ✔ Create A Single Or Multiple Relations Between Your WHMCS Products, Addons And Configurable Options |
| ✔ Allow Your Clients To Purchase Multiple Products, Addons And Configurable Options Through Ordering Just One Of Them |
| ✔ Dependencies Between Module Actions - Every Action: Create, Terminate, Suspend Or Unsuspend Called On The Main Product Will Result With The Same Action Performed On The Child Products |
| ✔ Product Updates With Automatic Email Notifications To Admin |
| ✔ View And Delete Existing Connections |
| ✔ Flexible Filtering Of Existing Connections |
| ✔ Advanced Module Logs |
- Additionally:
| ✔ Integrated With cPanel Manage2 For WHMCS - Easy Reselling Of cPanel Licenses (read more) |
| ✔ Integrated With DirectAdmin Licenses For WHMCS - Easy DirectAdmin Licenses Reselling (read more) |
| ✔ Integrated With Parallels Key Administrator For WHMCS - Easy Parallels Licenses Reselling (read more) |
| ✔ Improved Update Of Products |
| ✔ Multi-Language Support |
| ✔ Supports WHMCS V5 and Later |
Installation
| This tutorial will show you how to successfully install EURid Registrar For WHMCS. We will guide you step by step through the whole installation and configuration process. |
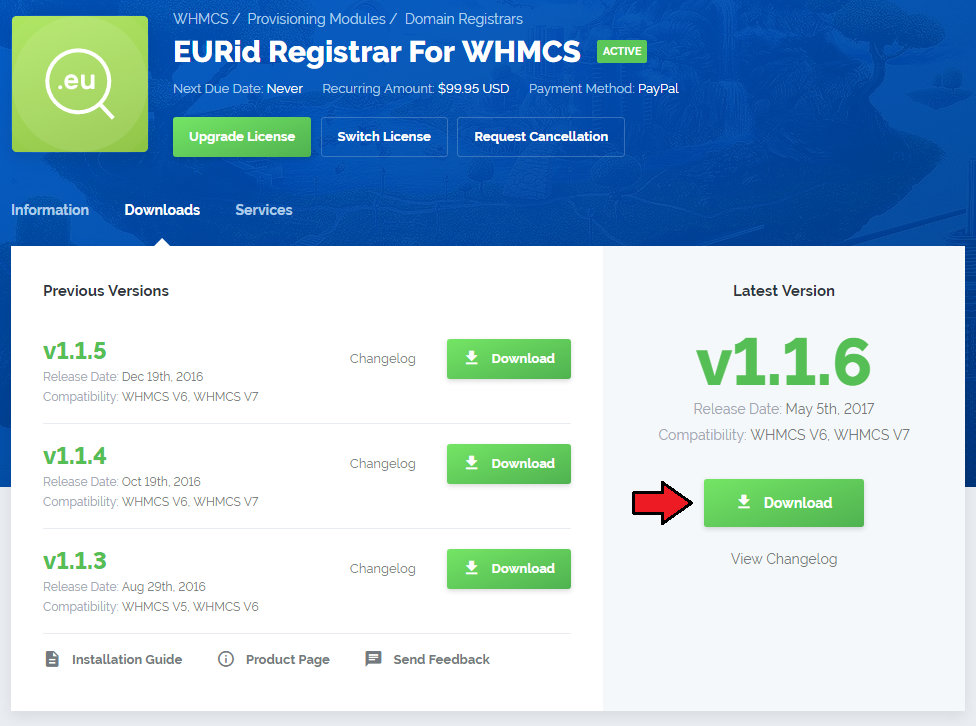
| 1. Log in to your client area and download EURid Registrar For WHMCS. |
|
| 2. Upload and extract the module into the main WHMCS directory. Files in your WHMCS directory should look like this. |

|
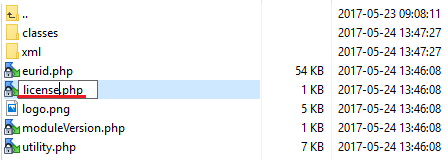
| 3. When you install EURid Registrar For WHMCS for the first time you have to rename 'license_RENAME.php' file. File is located at 'modules/registrars/eurid/license_RENAME.php' . Rename it from 'license_RENAME.php' to 'license.php' . |
|
| 4. In order to configure your license key, you have to edit a previously renamed 'license.php' file. Enter your license key between quotation marks as presented on the following screen. You can find your license key at your client area → 'My Products' . |

|
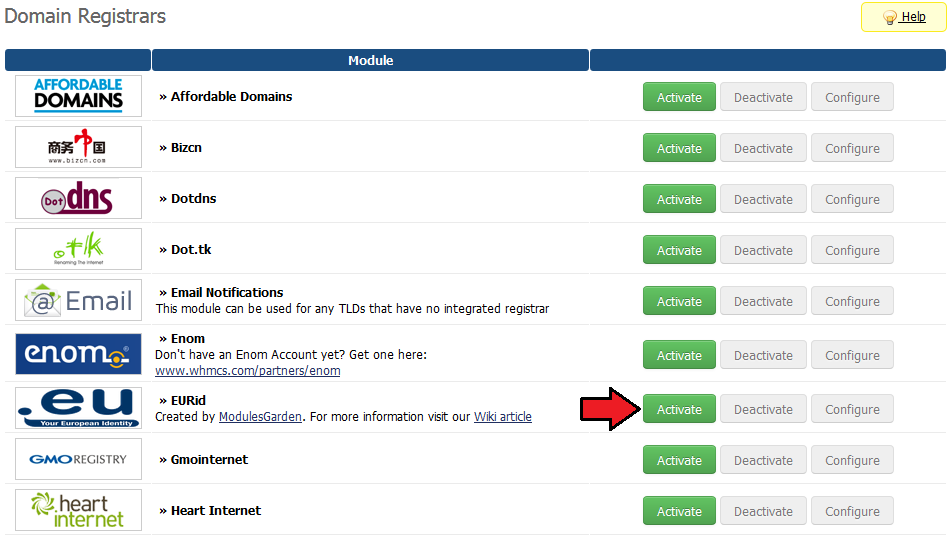
| 5. Now you have to activate the module in your WHMCS system. Log in to your WHMCS admin area. Go to 'Setup' → 'Products/Services' → 'Domain Registrars' . |
|
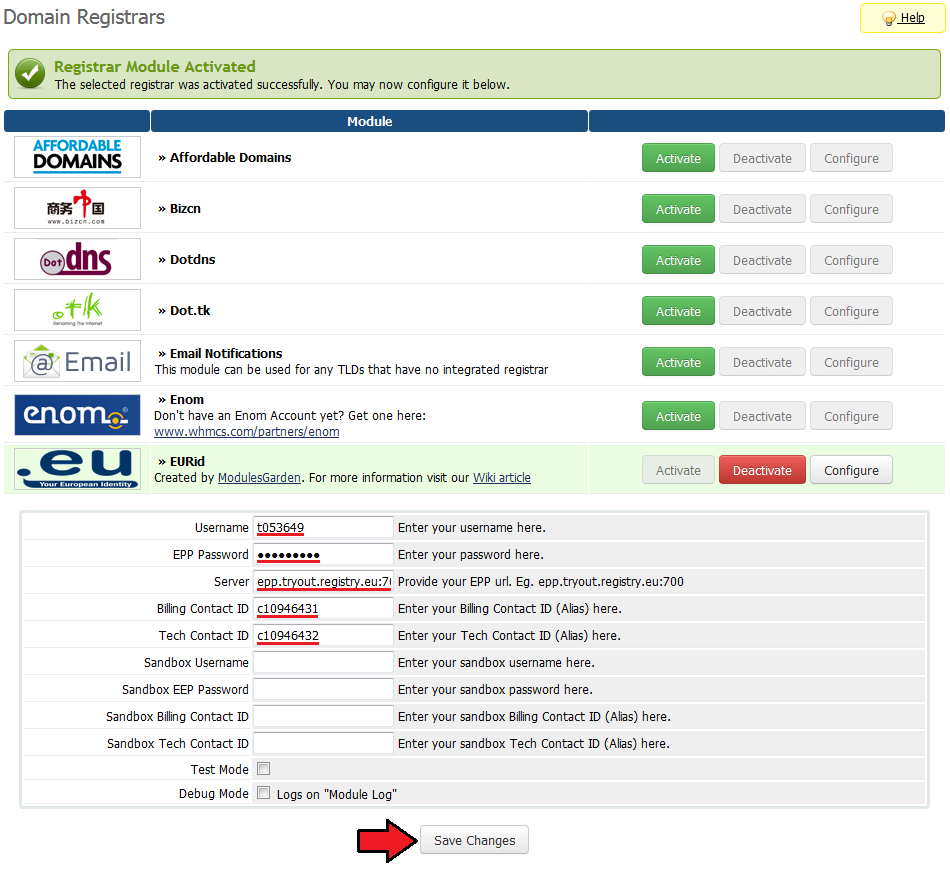
| 6. In the next step you need to set up access to EURid API. To do so, fill 'Username' and 'EPP Password' fields with your EURid username and EEP password. |
|
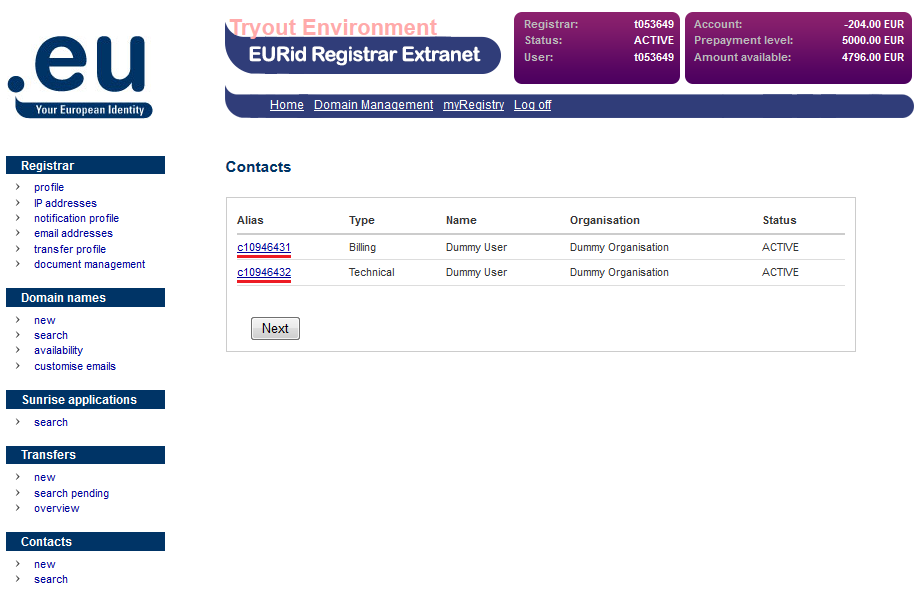
| 6.1. You can find 'Billing Contact ID' and 'Tech Contact ID' at your EURid account → 'Contact' → 'Search' . Simply press 'Search' button and copy values from 'Alias' column next to 'Billing' and 'Technical' types. |
|
| 7. You have just successfully installed EURid Registrar For WHMCS! |
Configuration and Management
| EURid Registrar For WHMCS allows you to sell TLDs from EURid via WHMCS system. Additionally, EURid Registrar For WHMCS allows your customers to manage their domains from the WHMCS client area. |
Management of TLDs
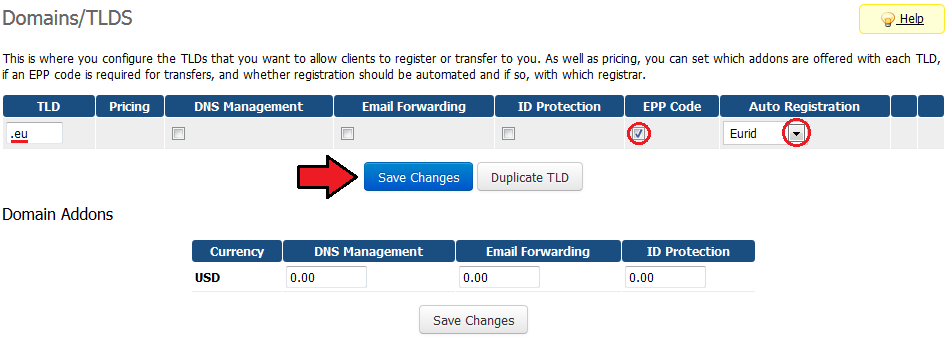
| Adding new TLD is quite simple. To add it, go to 'Setup' → 'Products/Services' → 'Domain Pricing' . Enter your TLD and choose 'Eurid' from an 'Auto Registration' dropdown menu as shown on the screen below. |
|
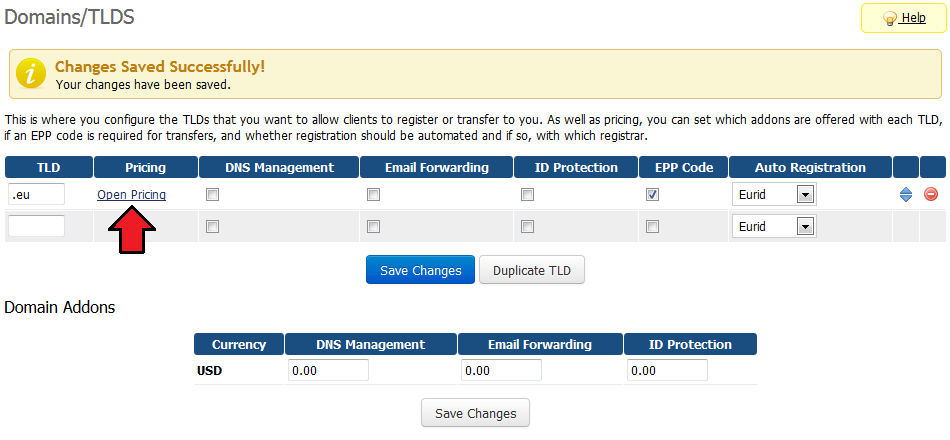
| As you can see 'Open Pricing' field has appeared. Click on it and set up your pricing. |
|
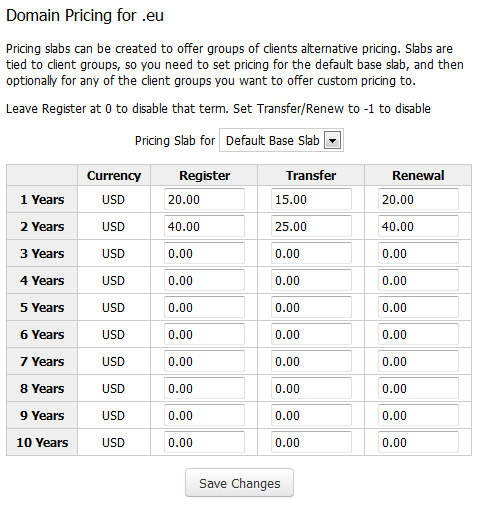
| In newly opened window you can set your prices. Remember to save the changes! |
|
| This it it! From now your customers can start ordering .eu domains directly from your WHMCS. |
Ordering
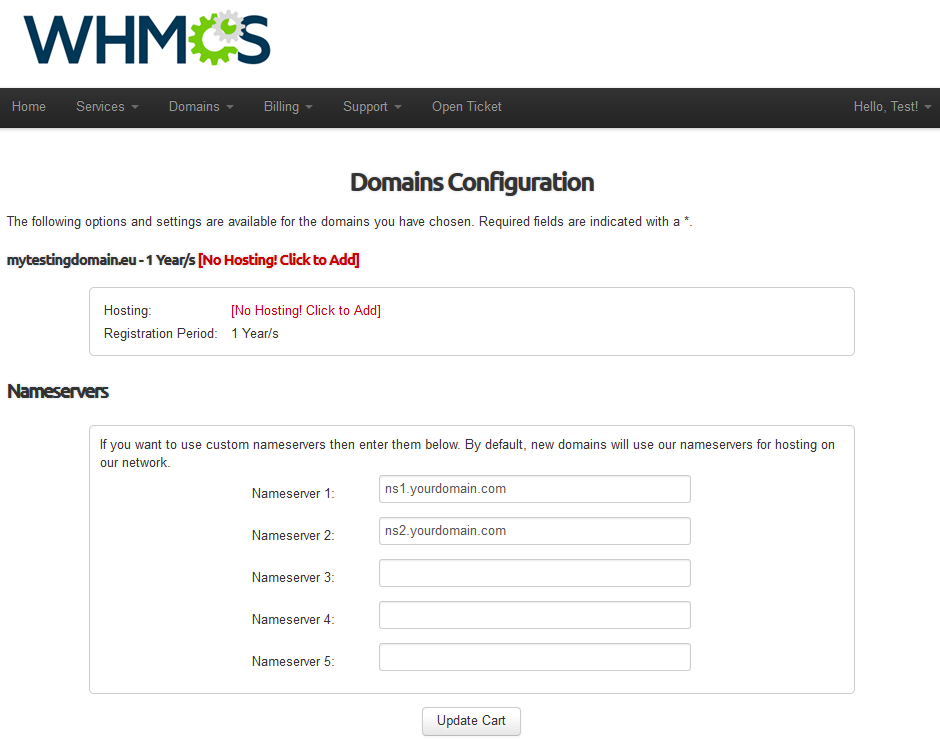
| Ordering EURid domain goes alike to ordering other domains. |
|
Domain Management
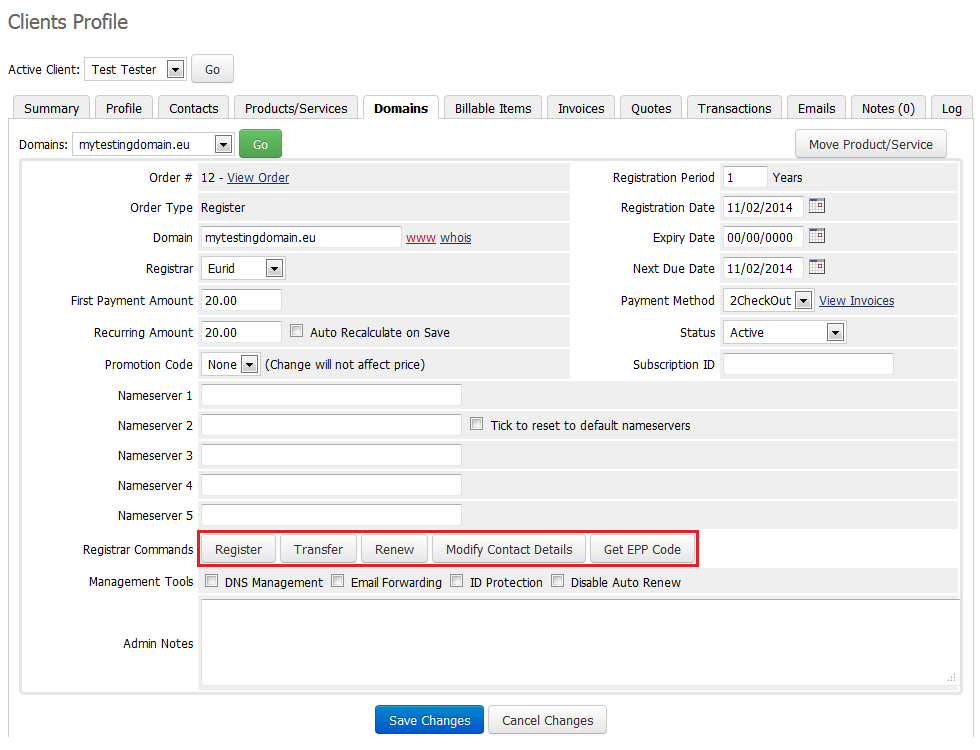
| In the admin area client overview → 'Domains' tab you can manage all the aspects of the domain. Along with basic actions like 'Register' , 'Renew' and 'Transfer' you can make use of features 'Modify Contact Details' and 'Get EEP Code' . |
|
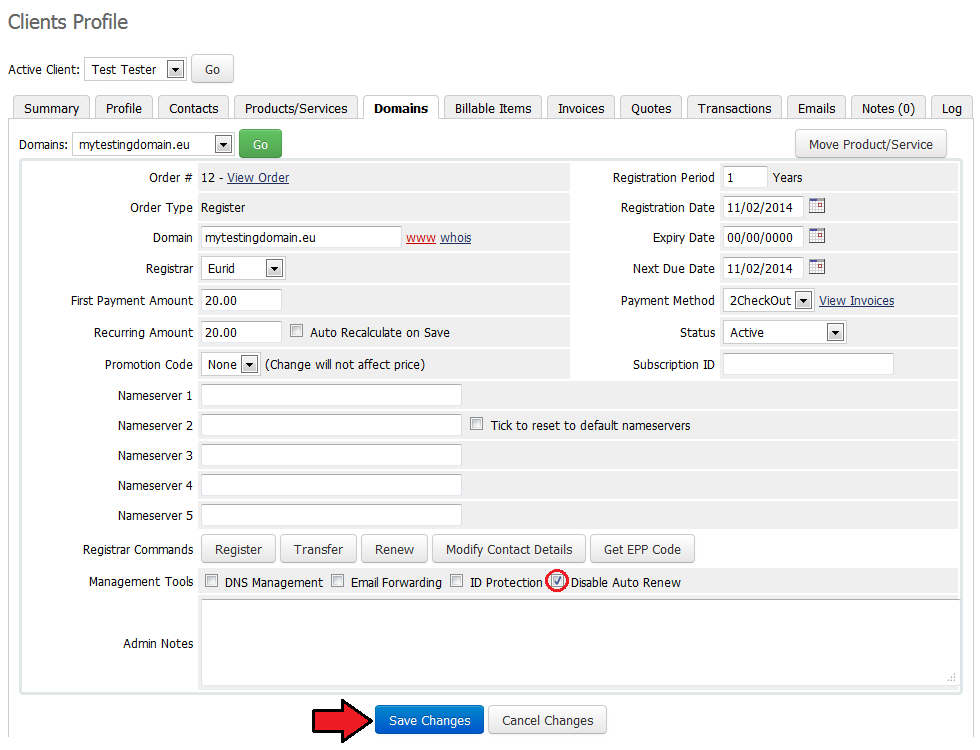
| You can also disable/enable auto renewal through marking/unmarking 'Disable Auto Renewal' checkbox. Confirm changes through clicking on 'Save Changes' button. |
|
Client Area
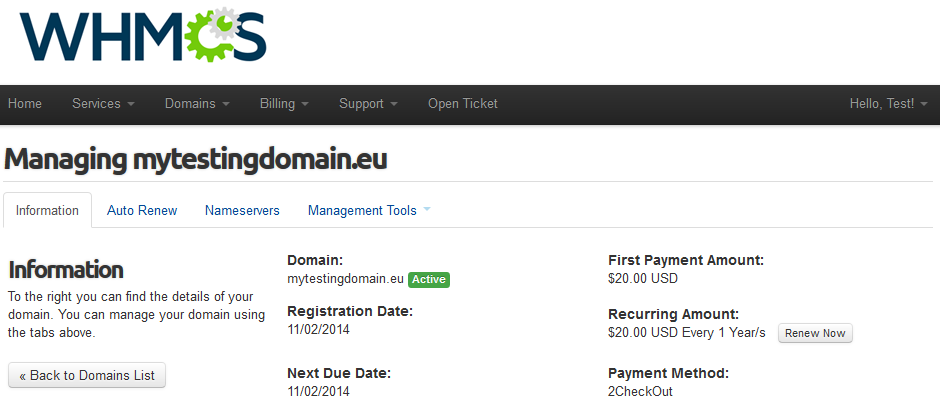
| Your customers can order various actions on his EURid Registrar domain from the client area. Clients can view basic information related to domain and renew domain through pressing 'Renew Now' button. |
|
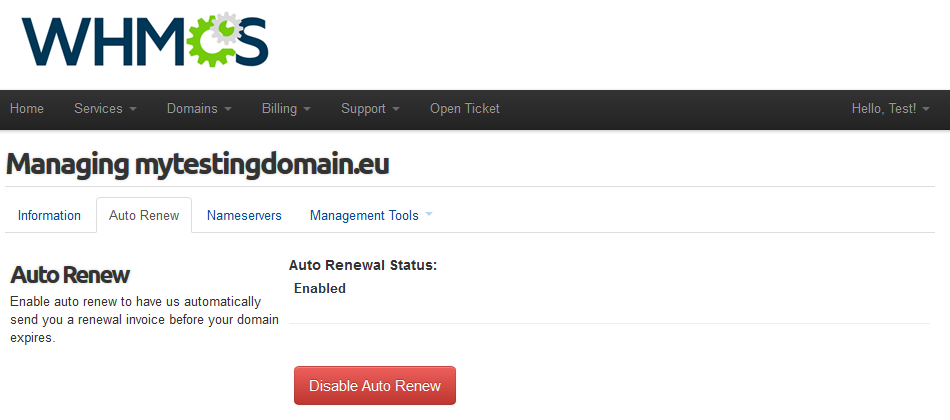
| At 'Auto Renew' tab clients can enable/disable auto renewal by pressing 'Enable Auto Renew' / 'Disable Auto Renew' button. |
|
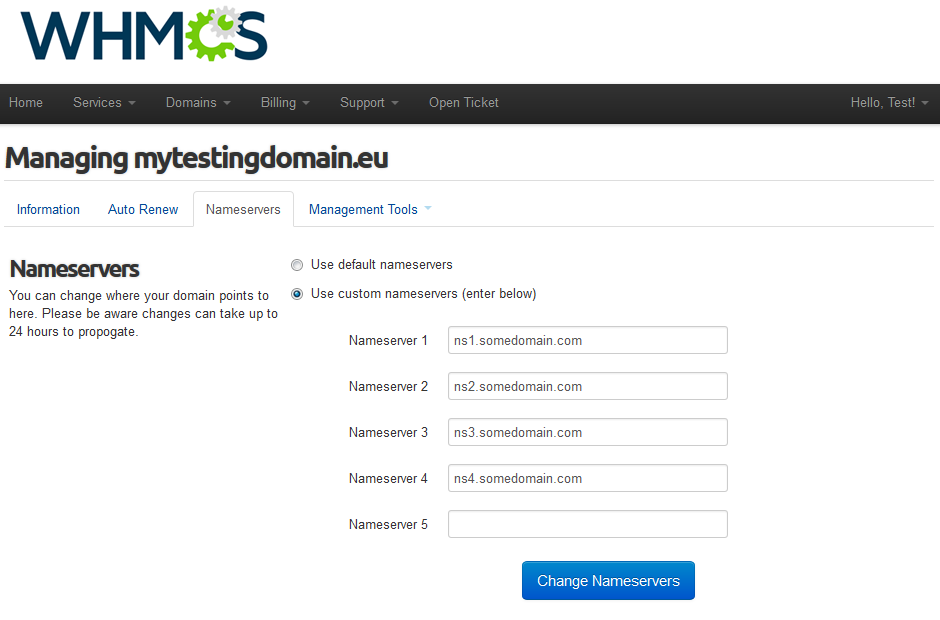
| 'Nameservers' tab allows clients to change nameservers used by his domain. |
|
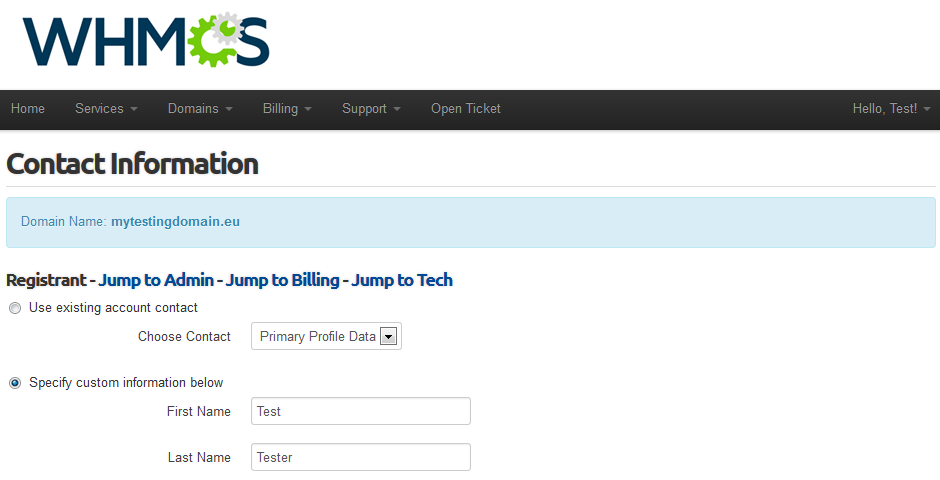
| Under 'Management Tools' → 'Contact Information' your clients can also view and modify contact information. |
|
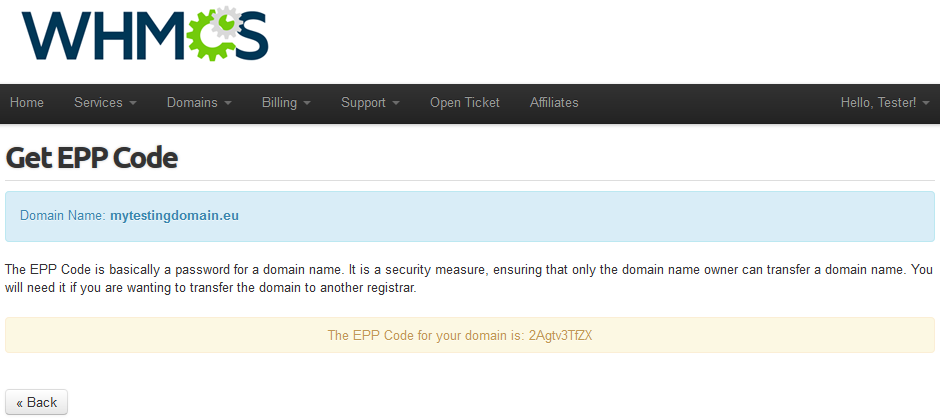
| In order to get domain EEP Code settings your clients have to go to 'Management Tools' → 'Get EEP Code' |
|
Tips
| 1. If lookup of any .eu domain returns 'Sorry, your_domain.eu is already taken' , you need to modify 'whoisservers.php' file located at 'your_whmcs/include/' folder. Find line '.eu|whois.eu|Status: AVAILABLE' and replace it with '.eu|whois.eu|AVAILABLE' . |
Common Problems
| 1. When you have problems with connection, check whether your SELinux or firewall is not blocking ports. |