SolusVM 2 VPS And Cloud For WHMCS
From ModulesGarden Wiki
(Difference between revisions)
|
|
| Line 440: |
Line 440: |
| | |} | | |} |
| | {| | | {| |
| − | |style="padding: 0px 0px 30px 25px;"|[[File:HR3_12_0.png]] | + | |style="padding: 0px 0px 30px 25px;"|[[File:SVM2_22.png |
| | + | ]] |
| | |} | | |} |
| | | | |
| | ===Logs=== | | ===Logs=== |
| − |
| |
| | | | |
| | ==Admin Area== | | ==Admin Area== |
Revision as of 14:38, 27 May 2024
SolusVM 2 VPS & Cloud For WHMCS is a module created to automate the provisioning of VPS services.
Your customers will be allowed to access the console, add, resize, and upgrade their virtual server, and view resource usage graphs, all within the defined resource limits.
Empower your customers with comprehensive control over their virtual servers.
|
| ✔ Create/Suspend/Unsuspend/Terminate Server
|
| ✔ Change Package - Supports Configurable Options
|
| ✔ Change Password Of Account
|
| ✔ Boot/Reboot/Shutdown Server
|
| ✔ Change Password: Root, Client, SSH Console, VNC Console
|
| ✔ View Graphs: Traffic, Load, Memory
|
| ✔ Define Product Resource:
|
| ✔ Dynamically - Using Configurable Options
|
| ✔ Statically - Using 'Module Settings' Fields
|
| ✔ Configure Client Area Features Per Product
|
| ✔ Define OS Templates Available For Rebuild
|
| ✔ Allow To Rebuild Server On Purchased OS Only
|
| ✔ Select Kernels For Rescue Mode
|
| ✔ Configure Friendly Names For OS Templates And Nodes
|
| ✔ Create New SolusVM User For Each VPS Ordered By Client
|
| ✔ Toggle Root Password Storing In System Database
|
| ✔ Toggle Root Password Change After Server Creation
|
| ✔ View Decoded Server Password
|
| ✔ Run API Connection Test
|
| ✔ View Server Details And Status
|
| ✔ Boot/Reboot/Shutdown/Rebuild/Delete Server
|
| ✔ Access SSH Console - OpenVZ And Xen Only
|
| ✔ Access VNC Console - KVM And Xen HVM Only
|
| ✔ Access NoVNC HTML5 Console - KVM And Xen HVM Only
|
| ✔ Access HTML5 Serial Console - OpenVZ And Xen Only
|
| ✔ Log In To Control Panel
|
| ✔ Toggle PXE (Preboot Execution Environment)
|
| ✔ Toggle Rescue Mode With Chosen Kernel
|
| ✔ Change Passwords: Root, Client, SSH Console And VNC Console
|
| ✔ View Graphs: Traffic, Load, Memory
|
| ✔ Send Email Templates After Creation Of Server Based On Its Type
|
| ✔ Choose Server Resources While Ordering And Upgrade/Downgrade Them Freely
|
| ✔ Choose SolusVM Username When Ordering New Product
|
| ✔ Supports OpenVZ, Xen And KVM Virtualization
|
| ✔ Supports SolusVM 1.0 (Compatibility With SolusVM 2 Coming Soon)
|
| ✔ Supports PHP 8.1 Back To PHP 7.4
|
| ✔ Supports WHMCS Themes "Six" And "Twenty-One"
|
| ✔ Supports WHMCS V8.8 Back To WHMCS V8.8
|
| ✔ Requires ionCube Loader V12 Or Later
|
Installation and Configuration
In this tutorial we will show you how to successfully install SolusVM 2 VPS & Cloud For WHMCS.
We will guide you step by step through the whole installation and configuration process.
|
| 1. Log in to our client area and download the module.
|
3. Extract the package and upload its content into the main WHMCS directory.
The content of the package to upload should look like this.
|
4. When you install SolusVM 2 VPS & Cloud For WHMCS for the first time you have to rename 'license_RENAME.php' file.
File is located in '/modules/servers/SolusVM2VpsCloud/license_RENAME.php'. Rename it from 'license_RENAME.php' to 'license.php'.
|
5. In order to configure your license key, you have to edit a previously renamed 'license.php' file.
Enter your license key between quotation marks as presented on the following screen. You can find your license key in our client area → 'My Products'.
|
Activation of SolusVM 2 VPS & Cloud Addon
6. Firstly, activate the SolusVM 2 VPS & Cloud Addon.
To do so, log in to your WHMCS and navigate to 'System Settings' → 'Addon Modules'. Find 'SolusVM 2 VPS & Cloud' and press 'Activate'.
|
7. In the next step, you need to permit access to this module.
To do so, click on the 'Configure' button, tick 'Full Administrator' and press 'Save Changes'.
|
Configuration of Server
8. Now, log in to your WHMCS admin area and proceed to 'System Settings' → 'Servers'.
Afterwards, press 'Add New Server'.
|
9. Enter your server name and IP address.
Choose 'SolusVM 2 VPS & Cloud For WHMCS' from a dropdown menu and provide:
- Access Key ID
- Secret Access Key - fill in with API User Key
Important: Make sure the token is created for a user with the 'Admin' role. Some functions of the module might not work properly otherwise.
Check if your server uses SSL connection.
Press 'Save Changes' when ready.
|
| 10. Now, you need to create a new group for your server. For that purpose press 'Create New Group'.
|
11. Fill in name, choose a previously created server and press 'Add'.
Confirm by clicking on 'Save Changes'.
|
Configuration of Product
12. In order to create and configure product, go to 'System Settings' → 'Products/Services'.
Afterwards, click on 'Create a New Group'.
|
| 13. Fill in a product group name and press 'Save Changes'.
|
14. When you have a product group, you can create your product and assign it to SolusVM 2 Vps & Cloud.
To create a product click on 'Create a New Product'.
|
| 15. Afterward, choose your product type and product group from dropdown menus, fill in your product name and press 'Continue'.
|
16. Now, go to 'Module Settings' section, choose both 'SolusVM 2 Vps & Cloud' and a previously created server group from dropdown menus.
|
17. Start configuration of a product with the 'General' section.
- First of all, choose the Product Type: 'VPS' or 'Cloud'.
- Next, select the desired Virtualization Type: 'KVM' or 'VZ'
Press 'Save Changes' to load the virtualization.
|
18. Now, choose 'Image format', 'Compute Resource', 'Default User Role', 'Storage Type' and 'Location'.
|
| 19. Set up the limits on the virtual machine.
|
| 20. As well as the Default Configuration.
|
| 21. Define features available in the client area by marking them in the 'Client Area Features' section.
Available actions:
- Backups
- Graphs
- Network
- Reinstall
- Snapshots
- Tasks
- Available Operating Systems
- Available Applications
|
22. The final step is generating default configurable options.
To do so, press 'Generate Configurable Options' as shown on the screen below.
|
| You have just finished the installation and configuration of the module!
|
Managemnt
You have just correctly created and customized a new product.
Go to 'Addons' → 'SolusVM 2 Vps & Cloud' in your WHMCS.
|
Addon Configuration
Servers
| 'Servers' section contains a list of your configured servers, you may quickly edit them directly from this tab, simply press the edit icon.
|
| Click on the 'Details' icon to...
|
Library
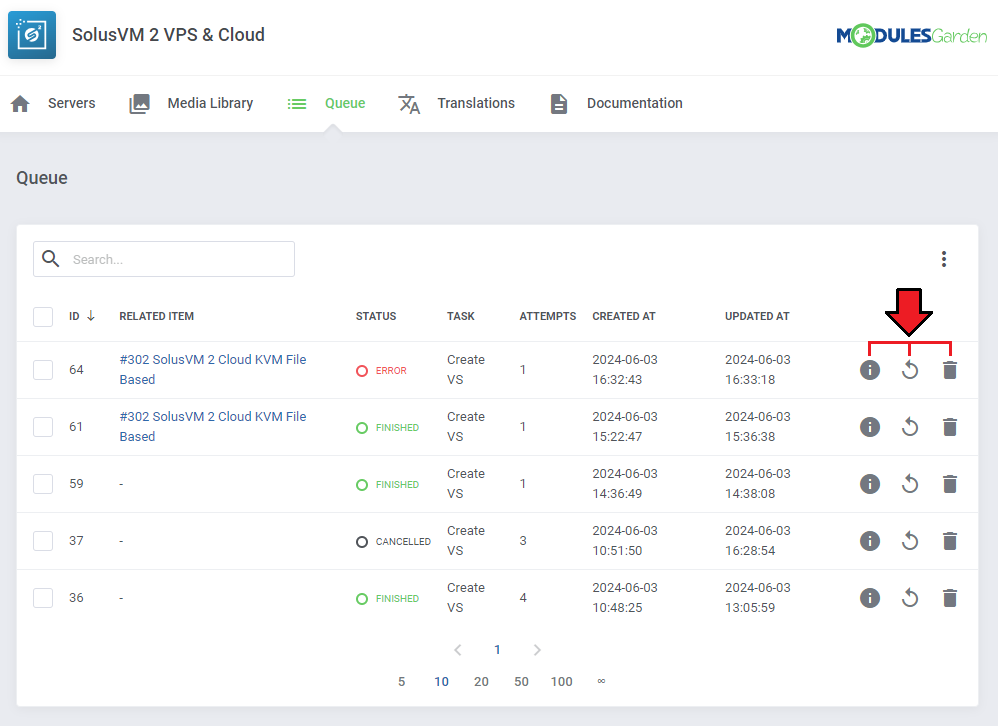
Queue
Customizing language files is now extremely easy with the "Translations" tool that is now available directly in the addon.
Its user-friendly design makes managing various language file tweaks a smooth and efficient process.
Prepare translations for the original English files with this handy built-in tool. For specific instructions on how to use this tool please refer to its dedicated article, you will find it here.
|
Logs
Admin Area
Client Area - Ordering Proccess
Importing Existing VPS
In this section, you can find short instruction on how to connect one of your clients to your already existing VPS in Solus panel.
Take the following steps to make sure that the process will be carried out properly.
1. Firstly, manually create an order for your customer in WHMCS. Choose a client and in the summary, view click on the ' Add New Order' button. Next, select a 'Product/Service' and press 'Submit Order' .
What is important, do not perform the 'Create' action. The status has to remain as 'Pending' .
More info about placing orders can be found here
2. Proceed to the newly created product's card in your admin area. Find the following custom fields:
The above-mentioned information has to be consistent with the data from your Solus panel. Now, complete these fields as presented below.
Important! Remember to make sure that the format of the provided data is compatible with the format supported by the module. You can preview it for another product of the module you have already created and enter it in a similar way.
If you completed the required data, now change the status from 'Pending' to 'Active' and 'Save Changes' .
|
|
3. If the completed data is correct, after refreshing the page, you will see the attached VPS from Solus.
Important! Remember to manually add other missing parameters of the VPS such as domains, credentials, IP Addresses, configurable options, SSH Key, billing cycle, etc. so they match the parameters of the attached VPS from Solus.
|
Client Area - VPS
Console
Backups
Rebuild feature allows you to change OS template from available OS templates list.
To rebuild your server click on 'Rebuild' button, choose template and confirm by pressing 'Rebuild' button.
|
Graphs
Move to 'Graphs' section. You will find there visualizations of your current 'Network Traffic', 'Load Average' and 'Memory Usage'.
Tracking your VPS usage you avoid sudden and unexpected overload.
|
Network
One of the options available is Rescue Mode that may be turned on/off by the client. It allows to boot the server directly into the rescue mode.
Press to enable this functionality.
|
Client Area - Cloud Type
New Virtual Server
|
Now, let's check the interface of the module in the client area where your customers can create and manage virtual servers.
Note: The screen below presents the module right after the product creation. More features will be displayed after creating a server.
Press 'Create Virtual Server' to start
|
| Provide the details for the new virtual server, set server resources - you can preview the currently available resources at the top and click on the 'Add New Virtual Server' button to confirm.
|
| As you can see on the screen below, the virtual server has been created successfully.
Now let's see how we can manage our new server. To proceed, click on the 'Manage' button.
|
Reinstall
Snapshots
Tasks
Tips
| 1. Do wymyślenia jeden tip
|
Update Instructions
An essential guidance through the process of updating the module is offered here.
Ensure successful completion of the module update by carefully following each step, thereby preventing data loss or any unforeseen issues.
Additionally, you will find a current list of supplementary actions necessary for a smooth update process there.
|
Upgrade Guide
Seeking a solution that offers greater flexibility, customization tailored to your precise needs, and unrestricted availability?
There is an option that not only proves to be cost-effective in the long run but also includes prioritized support services, making it a truly valuable investment.
Opt for the Open Source version of your SolusVM Extended VPS For WHMCS module to unlock these benefits.
Simply click on either the Get Source Code or Upgrade To Lifetime button found on the product's page in our client area to complete the one-step upgrade process, with a dedicated discount already applied.
Follow a comprehensive guide covering the transition process, the advantages it brings, and step-by-step instructions on what to do next after the order has been successfully finalized.
|
Common Problems
| 1. When you have problems with connection, check whether your SELinux or firewall does not block ports.
|


