Hosting Quota Notifications 1.X For WHMCS
From ModulesGarden Wiki
(Difference between revisions)
|
|
| Line 134: |
Line 134: |
| | |} | | |} |
| | {| | | {| |
| − | |style="padding: 0px 0px 10px 15px;"|'''2. In the downloaded file you will find two packages that support different PHP versions.'''<br/>As presented on the screen below, the first one is dedicated to PHP 7, while the second one is aimed at PHP 5.4 up to PHP 5.6.<br/>It does not apply to open source versions.<br/> | + | |style="padding: 0px 0px 10px 15px;"|'''2. In the downloaded file you will find two packages that support different PHP versions.'''<br/>As presented on the screen below, the first one is dedicated to PHP 7, while the second one is aimed at PHP 5.3 up to PHP 5.6.<br/>It does not apply to open source versions.<br/> |
| | '' '''Note''': You can check current PHP version in your WHMCS. To do so proceed to ''' 'Utilities' → 'System' → 'PHP Info'.''' | | '' '''Note''': You can check current PHP version in your WHMCS. To do so proceed to ''' 'Utilities' → 'System' → 'PHP Info'.''' |
| | |} | | |} |
Revision as of 10:54, 6 June 2017
InterWorx Extended For WHMCS will allow you to automate the process of web hosting accounts provisioning and management in your WHMCS.
All relevant hosting features will be gathered in your client area: FTP accounts, emails, domains and more. Your clients will be also able to choose from numerous applications.
The module will allow you to configure each product handily and define which features should be available for your clients' use.
|
| ✔ Create/Suspend/Unsuspend/Terminate Account
|
| ✔ Change Package And Password Of Account
|
| ✔ Automatically Unban Client IP Address Upon Logging In
|
| ✔ Configure Client Area Features And Template Per Product
|
| ✔ Choose And Configure Application Auto Installer To Use Per Product - Softaculous
|
| ✔ View All InterWorx And InterWorx Extended Products And Servers In One Place
|
| ✔ Remote Access And Management Of:
|
| ✔ Applications And Their Backups
|
| ✔ Backups - Manual And Automatic
|
| ✔ One Click Login To InterWorx
|
| ✔ Change Account Password
|
- Application Auto Installer Features:
| ✔ Auto Install Chosen Application After Account Creation
|
| ✔ Auto Install Application Chosen By Client During Order - Owing To Configurable Options
|
| ✔ Allow Custom Settings Of Auto Installed Application - Owing To Custom Fields
|
| ✔ Install New Applications With Softaculous
|
| ✔ View And Manage Installed Applications
|
| ✔ Backup Installed Applications
|
| ✔ View And Manage Created Backups
|
| ✔ Restore Applications From Backups
|
| ✔ Delete Applications Along With Their Backups
|
| ✔ Utilizes Ajax Loaded Pages
|
| ✔ Supports PHP 5.3 Up To PHP 7
|
| ✔ Supports WHMCS Templates Five and Six
|
| ✔ Supports WHMCS V6 and V7
|
Installation and Configuration
Read the below instructions to learn how to install and then configure InterWorx Extended For WHMCS properly.
We will guide you step by step through the installation procedures.
|
Installation
| 1. Log in to your client area and download the module.
|
2. In the downloaded file you will find two packages that support different PHP versions.
As presented on the screen below, the first one is dedicated to PHP 7, while the second one is aimed at PHP 5.3 up to PHP 5.6.
It does not apply to open source versions.
Note: You can check current PHP version in your WHMCS. To do so proceed to 'Utilities' → 'System' → 'PHP Info'.
|
3. Extract the downloaded file and choose the one with the right PHP version. Upload and extract the PHP file into the main WHMCS directory.
The content of PHP version files should look like this.
|
3. When you install InterWorx Extended for the first time you have to rename 'license_RENAME.php' file.
File is located in 'modules/servers/interworxExtended/license_RENAME.php'. Rename it from 'license_RENAME.php' to 'license.php'.
|
4. In order to configure your license key you have to edit a previously renamed 'license.php' file.
Enter your license key between quotation marks as presented on the following screen. You can find your license key in your client area → 'My Products'.
|
| 5. Set file softaculous_scripts.txt located in 'whmcs_root/modules/addons/interworx_extended_center' as writable.
|
Activation of Addon
6. Now you have to activate the module in your WHMCS system.
Log in to your WHMCS admin area. Click 'Setup' and find 'Addon Modules'.
Afterwards, find 'InterWorx Extended Center' and press 'Activate' button.
|
7. In the next step, you need to permit access to this module.
To do so, click on 'Configure' button, tick desired admin roles and press 'Save Changes'.
Note: Here you can also define which client area template are you using, based on Six or Five.
|
8. InterWorx Extended For WHMCS is now successfully installed!
Access the addon under 'Addons' → 'InterWorx Extended Center'.
|
Configuration of Server
9. First of all, you must configure a new product.
Go to 'Setup' → 'Products/Services' → 'Servers' and press 'Add New Server'.
|
10. Enter your server name, IP address, username and a password. Choose 'interworxExtended' from a dropdown menu and press 'Save Changes'.
If you connect with your InterWorx server via SSL, then make sure that you checked 'Secure' located at the bottom of the page.
Note: Keep in mind that 'Login to InterWorx' button URL, located in the client area, derive from 'Hostname' or 'IP Address' fields input.
|
11. Once your server has been configured correctly, you will see a following screen.
Create a new group for your server. Press 'Create New Group' to follow.
|
| 12. Enter name, click on your previously created server, press 'Add' then 'Save Changes'.
|
Configuration of Product
13. In order to create a product, go to 'Setup' → 'Products/Services' → 'Products/Services' .
If you do not have a product group, click on 'Create a New Group' . If you do, simply skip step 13.
|
| 14. Fill in a product group name and press 'Create Group'.
|
| 15. When you have a product group added, you can create your product and assign it to InterWorx Extended module.
|
| 16. Afterwards, choose your product type and product group from dropdown menus, enter your product name and press 'Continue'.
|
17. Now, go to 'Module Settings' section, choose both 'InterWorxExtended' and a previously created server group from dropdown menus and press 'Save Changes'.
Additionally, choose InterWorx package and theme.
|
Configuration of Addon
18. You have just correctly created and customized a new product.
Go to 'Addons' → 'InterWorx Extended Center' in your WHMCS.
You will find there InterWorx Extended dashboard with precise data on products and servers:
- see the number of active/suspended/terminated products
- check the number of active accounts
- connect with WHM here (if configured in 'Module Settings')
- press 'Documentation' tab to be moved to this very site!
|
| 19. Proceed to 'Features' section and find the product you are interested in and press 'Configuration' button next to it.
|
20. You should find there boxes dedicated to 'Features', 'Applications', 'Client Area Template'.
If you have already another product configured, you may copy its configuration now. Find one more box 'Copy Configuration' and choose product from dropdown menu.
To show you an example, we will set the configuration from the beginning, we will not use other product's configuration.
Select the features you would like to activate for your customers.
|
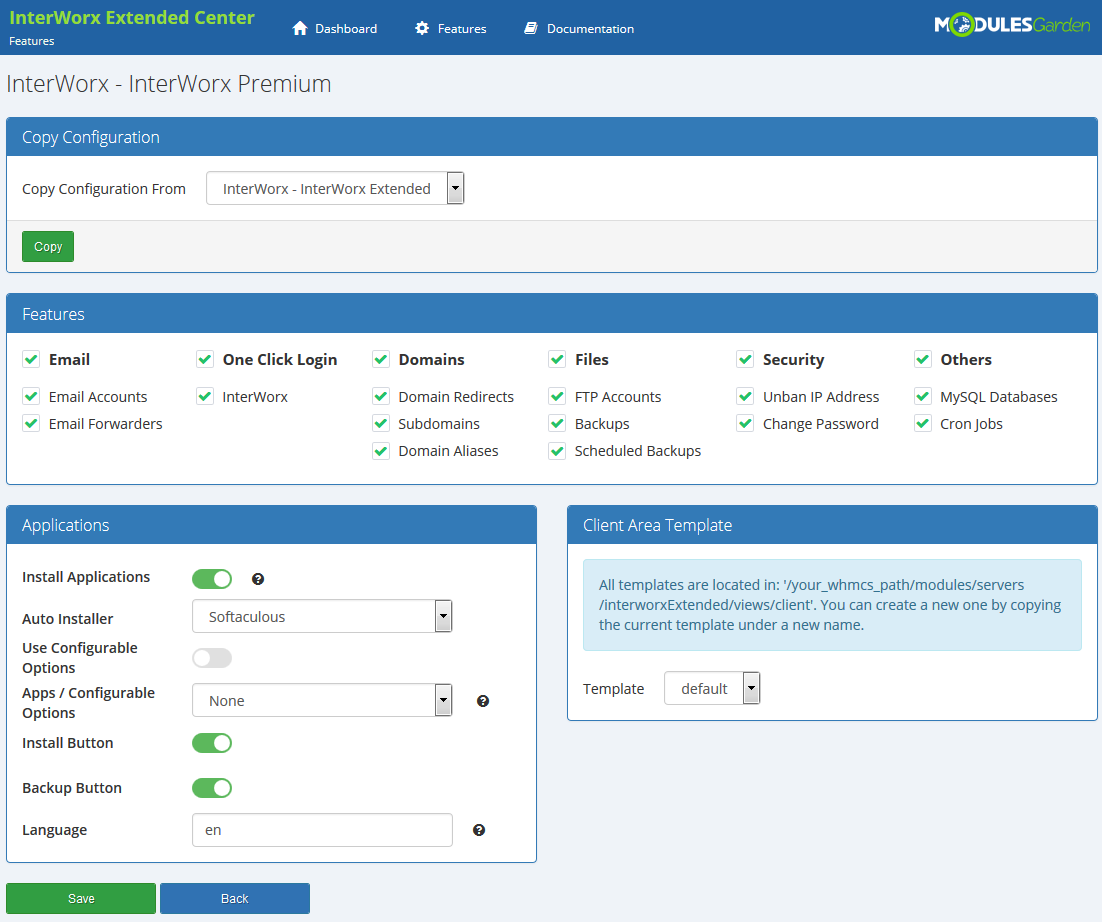
|
21. Choose whether to activate 'Install Applications' option.
In case you wish to activate this option, you will have to select 'Auto Installer' from a dropdown menu. Afterwards activate 'Install Button' and 'Backup Button'.
You can also choose desired language of the applications by typing in its two letter code into the 'Language' field. A complete list of language codes can be found here.
If the field is left blank, a default value, which is 'en' (english) will be used.
Note: You can also create a configurable option with app to be installed, you can find the instruction to do that here.
|
22. Finally, select from the available which client area template shall be used for this product.
Note that by default only one template is available. If you have more templates prepared, they will also appear here to choose from.
Do not forget to 'Save' changes once product configuration is ready!
|
23. From now on, all your clients who ordered a previously created product will be able to manage their InterWorx accounts via your WHMCS system.
Here a view of the ordered product summary in admin area. Available actions:
- Log In To SiteWorx
- Use Module Commands: 'Create', 'Suspend', 'Unsuspend', 'Terminate' the product; 'Change Package' and 'Change Password'
|
| This is what your customers should see in their client area.
|
Management
InterWorx Extended allows your customers to manage their InterWorx accounts without being logged into the server.
Read the below descriptions to become familiarized with all of the InterWorx Extended functionalities.
|
Client Area
| In the following section, features available in the client area will be thoroughly discussed.
|
Applications
Install your favorite applications in a few seconds without even accessing InterWorx!
Use InterWorx Extended Fro WHMCS to:
- Install applications
- Edit/delete applications
- Create and restore Backups
To start, simply proceed to 'Applications' then find 'Install New' section.
|
Afterwards, you will see an extensive menu of application categories. For presentation purposes we will install 'Piwigo' located in 'Galleries'.
Find 'Piwigo' and press it.
|
| Now, you have to enter necessary installation details and then press 'Install Application' to follow. Wait for 'Success' message.
|
View the list of your installed applications by clicking 'Installed Applications' tab and manage the application.
You will find there the name of the application, its path, size and available actions:
- create backup
- delete application
|
Backups
| You can also create a backup of your installation. It's very easy! To do so, press 'Create Backup' button next to an installed application.
|
| Confirm the action and backup creation will start immediately.
|
| After a moment you should see 'Backup created successfully' message as a confirmation of the operation performed.
|
When you have created a backup of your application, proceed to 'Backups' tab.
There is a lit of created application backups along with the date when they were created.
Use action buttons marked on the screen to restore and delete a chosen backup.
|
FTP Accounts
Add and configure FTP Accounts in the easiest way possible. Just type in login, generate a totally secure password, provide directory and declare Quota.
Manage the accounts to be able to access your website files through an FTP protocol.
|
Email Accounts
| Create and edit email accounts that are associated with your domains. Use filter to find required email address, preview its selected quota and manage the account.
|
Email Forwarders
Set up email forwarders, choose from several destination options to adjust mail forwarding perfectly to your needs.
Add email domain forwarders to forward email form one domain to another.
|
MySQL Databases
MySQL Databases and Users allow easy and fast management of online applications, systems, shopping carts etc.
Create database, add new users and then combine the users with particular databases.
|
Cron Jobs
Select cron jobs settings to fully automate commands and scripts on your site.
Choose its specific timing and type in the command to be executed.
|
Subdomains
Create subdomains for different parts of your website. Choose domain from your list of available, provide document root.
Once created, redirect or delete the subdomain if needed.
|
Domain Redirects
Easy access to domain redirection options is very useful.
This option allows you to redirect a specific web page to another one and display the contents of that page.
For example, if your main domain is mytestingdomain.com, you can make such forward:
mytestingdomain.com/redirect → adomainwithlongname-averylongname.com
Choose type: permanent or temporary; decide whether to use 'www' redirection or not; select 'Wild Card Redirect' if you need.
|
Domain Aliases
You can add and manage your domains' aliases.
This option allows you to read content of one domain from another domain name.
Note: domains must be registered with a valid registrar and point to your DNS server.
|
Backups
All backups made are displayed on this page under 'Available Restore Points' section.
All backup jobs are displayed under 'Scheduled Backups' .
|
You can make backups of your whole InterWorx settings or only a part of them.
To generate a full backup, choose 'Full' backup, specify e-mail for notification and press 'Create' .
|
You can also define recurring backups. Simply choose when to run backup.
Additionally, define backup type and email for notifications.
Confirm by pressing 'Create' .
|
Unban IP Address
Unban IP addresses banned by the system.
Your IP is automatically filled in in the field to unban.
|
Log In To InterWorx
You can easily log in to your InterWorx by clicking 'Log In To InterWorx'.
You don't need to enter your access details!
|
Change Password
| Through changing the password you can change both, your InterWorx account and FTP account passwords at the same time.
|
Applications Configuration
Configurable Options For Application Auto Install
Let your clients decide which application they would like to install on their new InterWorx account.
While placing an order your customer chooses an application and along with account creation this very application will be installed on the account.
There is nothing else you need to do. Application will be instantly ready to use!
To set up this feature, come back to your product's configuration, find 'Applications' section, activate 'Install Applications' , choose 'Auto Installer' and activate 'Use Configurable Options'.
Click on a download icon to view the list of applications.
|

|
These are the names of values that you can enter in configurable options' fields, we will configure them in the next step.
For example, if you would like to set up '4images' in your applications list, you will need to enter value '4images 1.7.11' or '4images'.
1. If you have made a mistake with the application name, the auto installer will not work.
2. If you do not enter version number, the auto installer will install the latest version of the application.
Now, when you know what values should be entered in configurable options for particular applications, we can proceed further.
|
| Go to your 'WHMCS' → 'Setup' → 'Products/Services' → 'Configurable Options' and press 'Create a New Group'.
|
| Enter 'Group Name' of your choice, select product you want to assign configurable options to, then press 'Save Changes'.
|
| Now click on 'Add New Configurable Option'.
|
This moment is very important. As 'Option Name' , you have to enter 'Installation App' . In other case the entire functionality will not work.
Here you can set up as many applications as you want. To do so, enter a value name e.g. 'Wordpress 3.7.1' and press 'Save Changes' .
Repeat this as many times as you need and do not forget to set 'Option Type' to 'Dropdown' .
Remember that you are not obliged to type in the application version number! If not provided, the latest version will be installed.
|
As you can see on the following screen we decided to offer our customers 5 applications.
When you finish adding applications, press 'Save Changes' and 'Close Window'.
|
Afterwards, come back to 'InterWorx Extended Features' → 'Configuration' → 'Applications' , activate 'Use Configurable Options' and choose 'Apps/Configurable Options' from a dropdown menu.
Please note that you can have more configurable options groups. Press 'Save' and that's it. You have just successfully assigned configurable options to application autoinstall.
|
Let's check out what your customers are going to see in their client area while placing the order.
As you can see, a dropdown menu with previously configured applications has shown up.
|
Assignment of Custom Fields To Application Autoinstall
Now, when you know how to allow your customers to choose which application they would like to install on their account, we can proceed one step further.
Until that moment applications had been installed with use of default details like e.g. directory names or database name.
Those details are sent to each customer's email.
Allowing your customers to choose their own installation paths, usernames and others is a safer and recommended solution. Let's see how to do that.
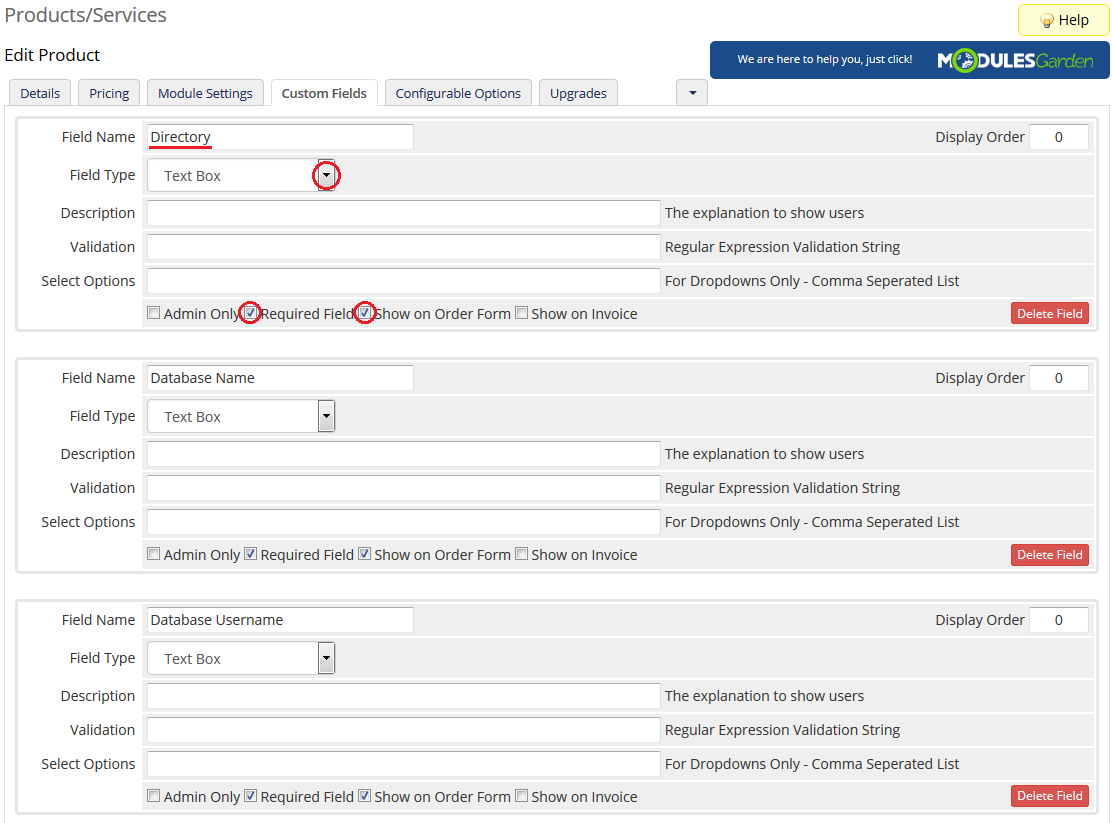
In the beginning, go to 'Product/Services', find your product using 'InterWorx Extended' module and enter 'Custom Fields' category.
You will need to add 12 custom fields, the first 8 are:
- Directory
- Database Name
- Database Username
- Database Password
- Table Prefix
- Site Name
- Site Description
- Language
Remember to set each field type as 'Text Box', tick 'Required Field ' and 'Show on Order Form'.
Everything is shown on the screen below.
|
|
The next 3 fields are:
- Admin Username
- Admin Password
- Admin Email
Set them as 'Text Box' and tick 'Show on Order Form'.
|
| The last field is:
Set it as 'Drop Down', enter 'Yes, No' into 'Select Options', tick 'Required Field ' and 'Show on Order Form'.
|
Once you add all the custom fields, they will appear while placing an order.
Voila! Now your customers can personalize each application without the necessity of installing it later.
Client can place one of the following language codes.
|
Management of Existing Products
You can easily use InterWorx Extended module with your already configured InterWorx products.
To do so, change the type of servers and module names of products from 'InterWorx' to 'InterWorxExtended' .
Additional information about how to correctly configure your servers and products can be found in points 9-17 in 'Installation and Configuration' section.
|
How To Update
| 1. Updating InterWorx Extended goes alike updating any other MG product, for more information visit Modules Update page.
|
Tips
| 1. As this module supports templates system, any changes made in the module's templates files will be saved after the upgrade process.
|
Common Problems
| 1. When you have problems with connection, check whether your SELinux or firewall does not block ports.
|


