Plesk Extended For WHMCS
(→About Plesk Extended For WHMCS) |
(→Tips) |
||
| (48 intermediate revisions by 4 users not shown) | |||
| Line 42: | Line 42: | ||
{| | {| | ||
|style="padding: 0px 0px 0px 45px;"|✔ Define Default PHP Version | |style="padding: 0px 0px 0px 45px;"|✔ Define Default PHP Version | ||
| + | |} | ||
| + | {| | ||
| + | |style="padding: 0px 0px 0px 45px;"|✔ Enable Plesk Addon Ordering via Configurable Options | ||
|} | |} | ||
{| | {| | ||
| Line 80: | Line 83: | ||
|} | |} | ||
{| | {| | ||
| − | |style="padding: 0px 0px | + | |style="padding: 0px 0px 0px 30px;"|✔ Log In To Plesk Administrator Panel On Click |
| + | |} | ||
| + | {| | ||
| + | |style="padding: 0px 0px 0px 30px;"|✔ Customize Module Language Files With "Translations" Tool | ||
| + | |} | ||
| + | {| | ||
| + | |style="padding: 0px 0px 0px 30px;"|✔ Control Staff Access Level To Specific Resources With ACL | ||
| + | |} | ||
| + | {| | ||
| + | |style="padding: 0px 0px 10px 30px;"|✔ View And Manage Logs | ||
|} | |} | ||
| Line 92: | Line 104: | ||
{| | {| | ||
|style="padding: 0px 0px 0px 45px;"|✔ Applications | |style="padding: 0px 0px 0px 45px;"|✔ Applications | ||
| − | |||
| − | |||
| − | |||
|} | |} | ||
{| | {| | ||
| Line 125: | Line 134: | ||
{| | {| | ||
|style="padding: 0px 0px 0px 45px;"|✔ PHP Settings | |style="padding: 0px 0px 0px 45px;"|✔ PHP Settings | ||
| − | |||
| − | |||
| − | |||
|} | |} | ||
{| | {| | ||
| Line 136: | Line 142: | ||
|} | |} | ||
{| | {| | ||
| − | |style="padding: 0px 0px 0px 45px;"|✔ | + | |style="padding: 0px 0px 0px 45px;"|✔ [https://www.modulesgarden.com/products/whmcs/wordpress-manager WordPress Manager] - Separate Module Required ''(Native Integration Will Be Restored Soon)'' |
|} | |} | ||
{| | {| | ||
| − | |style="padding: 0px 0px 0px 45px;"|✔ WordPress | + | |style="padding: 0px 0px 0px 45px;"|✔ WordPress Toolkit |
|} | |} | ||
{| | {| | ||
|style="padding: 0px 0px 0px 30px;"|✔ One Click Login To: | |style="padding: 0px 0px 0px 30px;"|✔ One Click Login To: | ||
| + | |} | ||
| + | {| | ||
| + | |style="padding: 0px 0px 0px 45px;"|✔ Backup Manager | ||
|} | |} | ||
{| | {| | ||
| Line 151: | Line 160: | ||
|} | |} | ||
{| | {| | ||
| − | |style="padding: 0px 0px 0px | + | |style="padding: 0px 0px 0px 45px;"|✔ WP Toolkit |
|} | |} | ||
{| | {| | ||
| Line 202: | Line 211: | ||
|} | |} | ||
{| | {| | ||
| − | |style="padding: 0px 0px 0px 30px;"|✔ | + | |style="padding: 0px 0px 0px 30px;"|✔ Requires Plesk Administrator Account |
|} | |} | ||
{| | {| | ||
| − | |style="padding: 0px 0px 0px 30px;"|✔ Integrated With | + | |style="padding: 0px 0px 0px 30px;"|✔ Integrated With [https://www.modulesgarden.com/products/whmcs/advanced-billing Advanced Billing For WHMCS] - Actual Server Resource Usage Billing |
|} | |} | ||
{| | {| | ||
| − | |style="padding: 0px 0px 0px 30px;"|✔ Integrated With | + | |style="padding: 0px 0px 0px 30px;"|✔ Integrated With [https://www.modulesgarden.com/products/whmcs/ip-manager IP Manager For WHMCS] - Complete Control And Easy Assignment Of IP Subnets |
|} | |} | ||
{| | {| | ||
| − | |style="padding: 0px 0px 0px 30px;"|✔ Integrated With | + | |style="padding: 0px 0px 0px 30px;"|✔ Integrated With [https://www.modulesgarden.com/products/whmcs/server-allocator Server Allocator For WHMCS] - Automatic Assignment Of Most Suitable Servers To Products |
|} | |} | ||
{| | {| | ||
| − | |style="padding: 0px 0px 0px 30px;"|✔ | + | |style="padding: 0px 0px 0px 30px;"|✔ Integrated With [https://www.modulesgarden.com/products/whmcs/wordpress-manager WordPress Manager For WHMCS] - Remote Installation And Management Of WordPress Instances |
|} | |} | ||
{| | {| | ||
| − | |style="padding: 0px 0px 0px 30px;"|✔ Multi-Language Support | + | |style="padding: 0px 0px 0px 30px;"|✔ Fully Integrated With [https://lagom.rsstudio.net/extensions/whmcs-modules-integration/plesk-extended-by-modulesgarden/ Lagom WHMCS Client Theme] |
| + | |} | ||
| + | {| | ||
| + | |style="padding: 0px 0px 0px 30px;"|✔ Multi-Language Support With Custom Translations Tool | ||
|} | |} | ||
{| | {| | ||
| Line 226: | Line 238: | ||
|} | |} | ||
{| | {| | ||
| − | |style="padding: 0px 0px 0px 30px;"|✔ Supports PHP | + | |style="padding: 0px 0px 0px 30px;"|✔ Supports PHP 8.3 Back To PHP 8.2 |
|} | |} | ||
{| | {| | ||
| Line 238: | Line 250: | ||
|} | |} | ||
{| | {| | ||
| − | |style="padding: 0px 0px 0px 30px;"|✔ Supports WHMCS V8. | + | |style="padding: 0px 0px 0px 30px;"|✔ Supports WHMCS V9.0 Back To WHMCS V8.10 |
|} | |} | ||
{| | {| | ||
| − | |style="padding: 0px 0px 30px 30px;"|✔ Easy Module Upgrade To [https://www.modulesgarden.com/products/whmcs/plesk-extended#open-source-version Open Source Version] | + | |style="padding: 0px 0px 0px 30px;"|✔ Requires ionCube Loader V14 Or Later |
| + | |} | ||
| + | {| | ||
| + | |style="padding: 0px 0px 30px 30px;"|✔ Easy [https://www.docs.modulesgarden.com/How_To_Upgrade_WHMCS_Module Module Upgrade] To [https://www.modulesgarden.com/products/whmcs/plesk-extended#open-source-version Open Source Version] | ||
|} | |} | ||
| Line 256: | Line 271: | ||
|style="padding: 0px 0px 20px 25px;"|[[File:PE3_1.png]] | |style="padding: 0px 0px 20px 25px;"|[[File:PE3_1.png]] | ||
|} | |} | ||
| + | |||
{| | {| | ||
| − | |style="padding: 0px 0px 15px 15px;"|'''2 | + | |style="padding: 0px 0px 15px 15px;"|'''2. Extract the package and upload its content into the main WHMCS directory. <br/> |
| − | + | ||
| − | + | ||
| − | + | ||
| − | + | ||
| − | + | ||
| − | + | ||
| − | + | ||
| − | + | ||
| − | + | ||
| − | + | ||
| − | + | ||
| − | + | ||
| − | + | ||
| − | + | ||
| − | + | ||
| − | + | ||
| − | + | ||
| − | + | ||
The content of the package to upload should look like this. | The content of the package to upload should look like this. | ||
|} | |} | ||
| Line 282: | Line 280: | ||
|} | |} | ||
{| | {| | ||
| − | |style="padding: 0px 0px 15px 15px;"|''' | + | |style="padding: 0px 0px 15px 15px;"|'''3. When you install Plesk Extended For WHMCS for the first time you have to rename the '' 'license_RENAME.php' '' file.'''<br /> |
The file is located in '' 'modules/servers/pleskExtended/license_RENAME.php'. '' Rename it from '' 'license_RENAME.php' '' to '' 'license.php'. '' | The file is located in '' 'modules/servers/pleskExtended/license_RENAME.php'. '' Rename it from '' 'license_RENAME.php' '' to '' 'license.php'. '' | ||
|} | |} | ||
| Line 289: | Line 287: | ||
|} | |} | ||
{| | {| | ||
| − | |style="padding: 0px 0px 15px 15px;"|''' | + | |style="padding: 0px 0px 15px 15px;"|'''4. In order to configure your license key, you have to edit the previously renamed '' 'license.php' '' file.'''<br /> |
Enter your license key between the quotation marks as presented on the following screen. You can find your license key in our client area → '' 'My Products'. '' | Enter your license key between the quotation marks as presented on the following screen. You can find your license key in our client area → '' 'My Products'. '' | ||
|} | |} | ||
| Line 296: | Line 294: | ||
|} | |} | ||
{| | {| | ||
| − | |style="padding: 0px 0px 15px 15px;"|''' | + | |style="padding: 0px 0px 15px 15px;"|'''5. In the next step, set up the '' 'storage' '' folder as recursively writable.'''<br /> |
| − | This folder is available at | + | This folder is available at ''your_whmcs/modules/servers/PleskExtended/.'' |
| − | + | ||
| − | + | ||
|} | |} | ||
{| | {| | ||
| Line 307: | Line 303: | ||
==Activation of Addon== | ==Activation of Addon== | ||
{| | {| | ||
| − | |style="padding: 10px 0px 15px 15px;"|''' | + | |style="padding: 10px 0px 15px 15px;"|'''6. Now, you have to activate the module in your WHMCS system.'''<br /> |
Log in to your WHMCS admin area. Move to '' 'System Settings' '' and then choose '' 'Addon Modules'. ''<br /> | Log in to your WHMCS admin area. Move to '' 'System Settings' '' and then choose '' 'Addon Modules'. ''<br /> | ||
Afterward, find '' 'Plesk Extended' '' and press the '' 'Activate' '' button. | Afterward, find '' 'Plesk Extended' '' and press the '' 'Activate' '' button. | ||
| Line 315: | Line 311: | ||
|} | |} | ||
{| | {| | ||
| − | |style="padding: 0px 0px 15px 15px;"|''' | + | |style="padding: 0px 0px 15px 15px;"|'''7. In the next step you need to permit access to this module.'''<br /> |
To do so, press '' 'Configure'. '' Next, select the required administrator roles and press '' 'Save Changes' ''. | To do so, press '' 'Configure'. '' Next, select the required administrator roles and press '' 'Save Changes' ''. | ||
|} | |} | ||
| Line 322: | Line 318: | ||
|} | |} | ||
{| | {| | ||
| − | |style="padding: 0px 0px 30px 15px;"|''' | + | |style="padding: 0px 0px 30px 15px;"|'''8. Congratulations, you have just successfully installed Plesk Extended For WHMCS!<br/> |
|} | |} | ||
==Configuration of Server== | ==Configuration of Server== | ||
{| | {| | ||
| − | |style="padding: 10px 0px 15px 15px;"|''' | + | |style="padding: 10px 0px 15px 15px;"|'''9. Now, we will show you how to configure a new server.'''<br /> |
To do so, log in to your WHMCS. Go to '' 'System Settings' → 'Servers'.'' Afterward, press '' 'Add New Server'. '' | To do so, log in to your WHMCS. Go to '' 'System Settings' → 'Servers'.'' Afterward, press '' 'Add New Server'. '' | ||
|} | |} | ||
| Line 334: | Line 330: | ||
|} | |} | ||
{| | {| | ||
| − | |style="padding: 0px 0px 15px 15px;"|''' | + | |style="padding: 0px 0px 15px 15px;"|'''10. Next, enter your server name, hostname/IP address, username and password. Choose '' 'PleskExtended' '' from the dropdown menu and press '' 'Save Changes'. '''''<br /> |
Here you can also provide other server details like nameservers or maximum number of accounts. Finally, click '' 'Test Connection' '' to check if the provided credentials are valid.<br/> | Here you can also provide other server details like nameservers or maximum number of accounts. Finally, click '' 'Test Connection' '' to check if the provided credentials are valid.<br/> | ||
'' '''Note:''' According to the [https://docs.plesk.com/en-US/onyx/partner-api-3.0/introduction-to-key-administrator-partner-api-30.77827 Plesk documentation], you '''cannot''' use the same account and password that you use to log in to the '''ka.plesk.com''' panel. Please use your special account with '''Partner API''' access.''<br/> | '' '''Note:''' According to the [https://docs.plesk.com/en-US/onyx/partner-api-3.0/introduction-to-key-administrator-partner-api-30.77827 Plesk documentation], you '''cannot''' use the same account and password that you use to log in to the '''ka.plesk.com''' panel. Please use your special account with '''Partner API''' access.''<br/> | ||
| − | '' '''Important:''' Due to changes in the original WHMCS Plesk module, it may be required to additionally enter the IP address into the '''Hostname''' field even if you have already provided it in the '''IP Address''' field below.<br/>Otherwise, the "Could not resolve host" error may occur.'' | + | '' '''Important:''' Due to changes in the original WHMCS Plesk module, it may be required to additionally enter the IP address into the '''Hostname''' field even if you have already provided it in the '''IP Address''' field below.<br/>Otherwise, the "Could not resolve host" error may occur.''<br/> |
| + | |||
| + | '''''Important:''' Pesk Extended For WHMCS module '''functions only on the administrator account'''; reseller accounts are not supported.'' | ||
| + | |||
|} | |} | ||
{| | {| | ||
| Line 345: | Line 344: | ||
|} | |} | ||
{| | {| | ||
| − | |style="padding: 0px 0px 15px 15px;"|''' | + | |style="padding: 0px 0px 15px 15px;"|'''11. After you have configured your server correctly, you will see the following screen.'''<br /> |
Now, you need to create a new group for your server. For that purpose, press '' 'Create New Group'. '' | Now, you need to create a new group for your server. For that purpose, press '' 'Create New Group'. '' | ||
|} | |} | ||
| Line 352: | Line 351: | ||
|} | |} | ||
{| | {| | ||
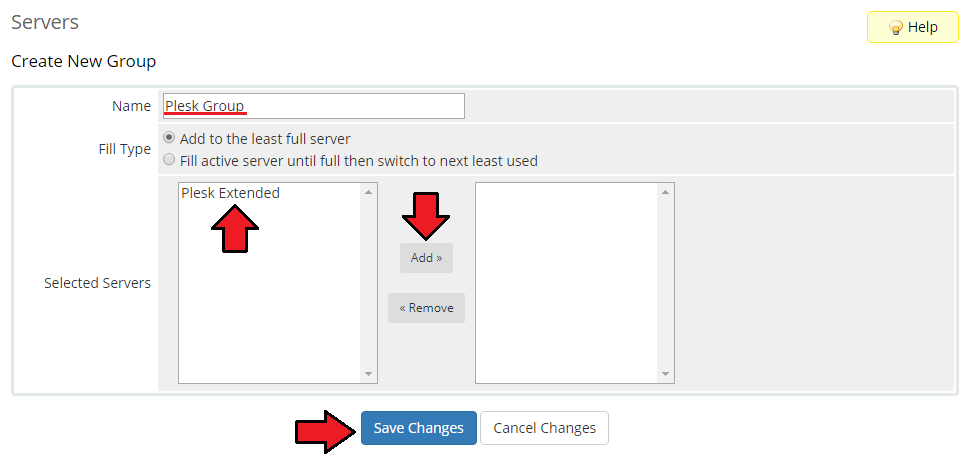
| − | |style="padding: 0px 0px 20px 15px;"|''' | + | |style="padding: 0px 0px 20px 15px;"|'''12. Enter a name, click on your previously created server, press '' 'Add' '', then '' 'Save Changes'. ''''' |
|} | |} | ||
{| | {| | ||
| Line 360: | Line 359: | ||
==Configuration of Product== | ==Configuration of Product== | ||
{| | {| | ||
| − | |style="padding: 10px 0px 15px 15px;"|''' | + | |style="padding: 10px 0px 15px 15px;"|'''13. In order to create and configure the product, move to '' 'System Settings' → 'Products/Services'. '''''<br /> |
If you do not have a product group, choose '' 'Create a New Group'. '' | If you do not have a product group, choose '' 'Create a New Group'. '' | ||
|} | |} | ||
| Line 367: | Line 366: | ||
|} | |} | ||
{| | {| | ||
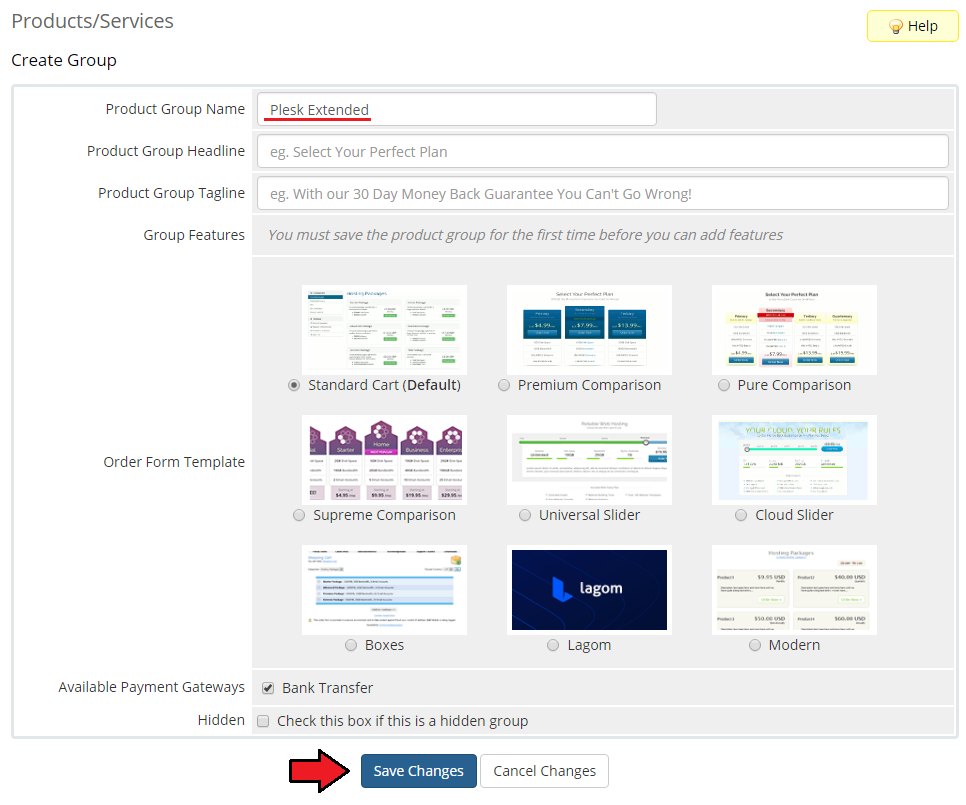
| − | |style="padding: 0px 0px 20px 15px;"|''' | + | |style="padding: 0px 0px 20px 15px;"|'''14. Enter a product group name and press '' 'Save Changes'. ''''' |
|} | |} | ||
{| | {| | ||
| Line 373: | Line 372: | ||
|} | |} | ||
{| | {| | ||
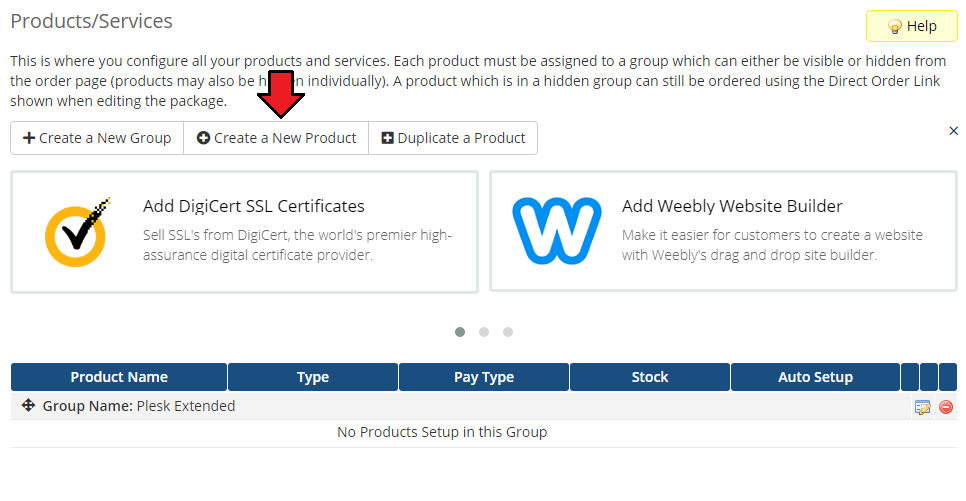
| − | |style="padding: 0px 0px 15px 15px;"|''' | + | |style="padding: 0px 0px 15px 15px;"|'''15. Once you have a product group, you can create your product and assign it to Plesk Extended.'''<br /> |
To create a product, press '' 'Create a New Product'. '' | To create a product, press '' 'Create a New Product'. '' | ||
|} | |} | ||
| Line 380: | Line 379: | ||
|} | |} | ||
{| | {| | ||
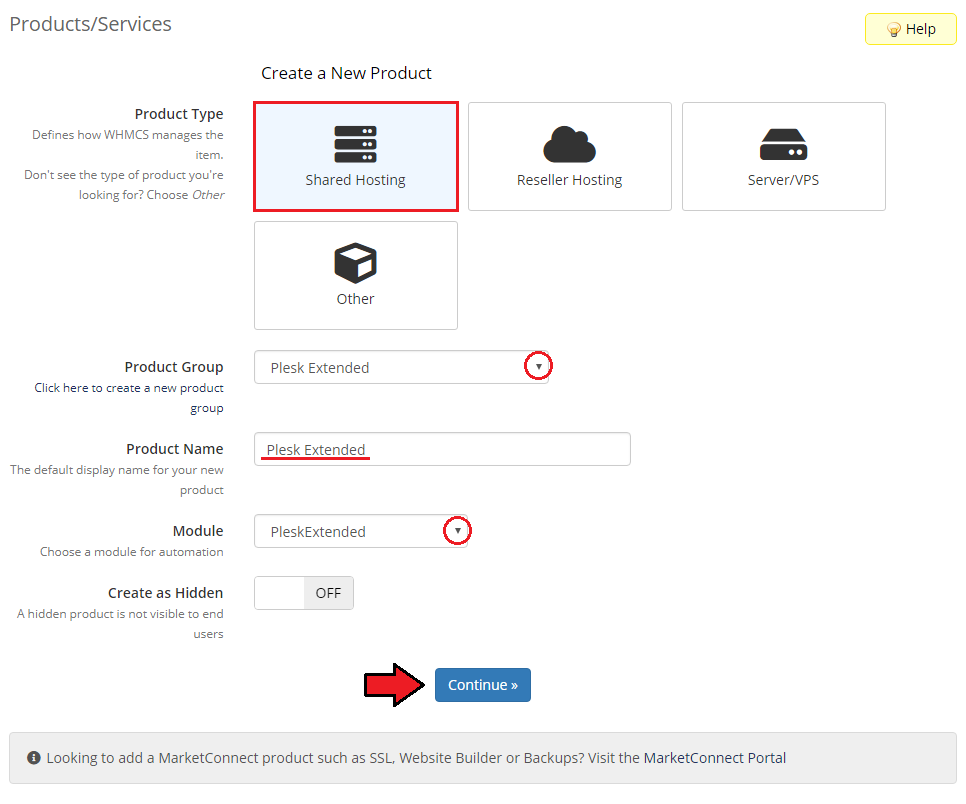
| − | |style="padding: 0px 0px 15px 15px;"|''' | + | |style="padding: 0px 0px 15px 15px;"|'''16. Afterward, choose your product type, product group, and module, enter your product name, and press "Save Changes".'''<br/> |
| − | Please note that | + | Please note that only the following product types are supported by the Plesk module: '''Shared Hosting''' and '''Reseller Account'''.<br/> |
| + | The product types '''Other''' and '''Server/VPS''' are not supported. | ||
|} | |} | ||
{| | {| | ||
| Line 387: | Line 387: | ||
|} | |} | ||
{| | {| | ||
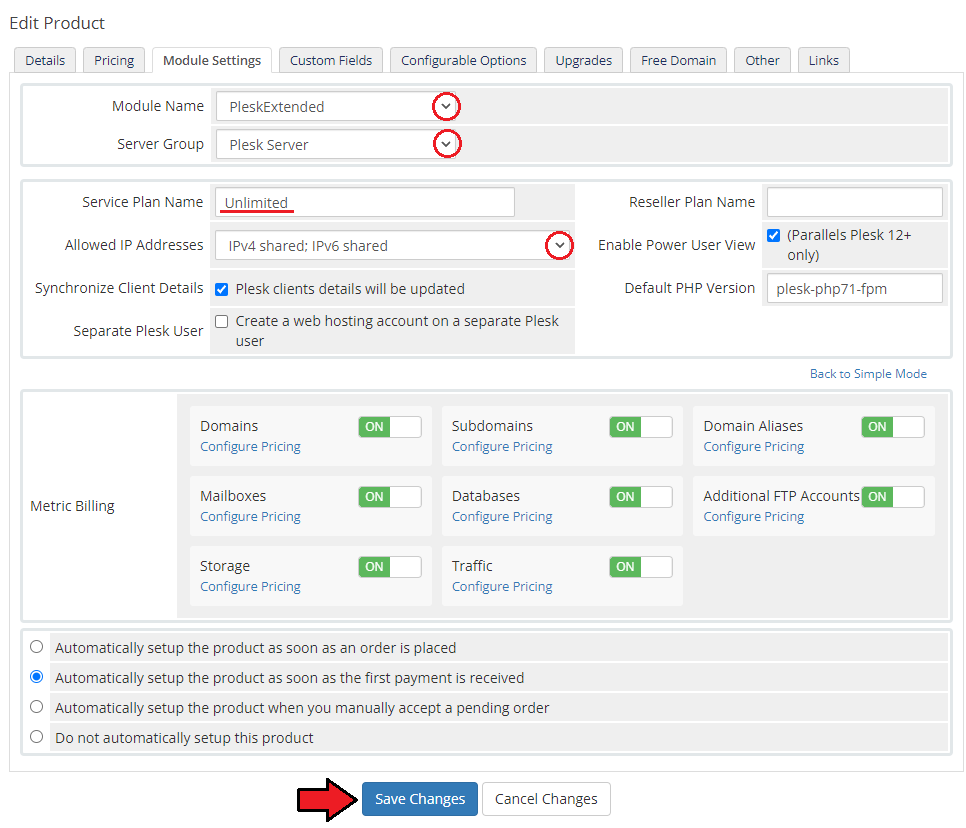
| − | |style="padding: 0px 0px 15px 15px;"|''' | + | |style="padding: 0px 0px 15px 15px;"|'''17. Now, move to the '' 'Module Settings' '' section, choose your previously created server group from the dropdown menu.'''<br /> |
| − | + | In the Configuration box you can adjust how the product will behave in Plesk: | |
| − | + | * '''Service Plan Name''' - Select the Plesk service plan to assign to new accounts. This is required. | |
| − | + | ||
| + | * '''Reseller Plan Name''' - Select the reseller plan if the product is intended for reseller accounts. | ||
| + | |||
| + | * '''Allowed IP Addresses''' - Decide how IP addresses will be assigned to new accounts (e.g. shared IPv4/IPv6, dedicated). | ||
| + | |||
| + | * '''Power User View''' - Switch to the simplified Plesk Power User interface. | ||
| + | |||
| + | * '''Synchronize Client Details''' - If enabled, client details updated in WHMCS will also be synchronized to Plesk. | ||
| + | |||
| + | * '''Default PHP Version''' - Select the PHP version that will be applied by default to accounts created with this product. | ||
| + | |||
| + | * '''Plesk Addon Ordering via Configurable Options''' - If enabled, WHMCS configurable options can automatically provision matching Plesk addons. | ||
| + | ** The configurable option name must start with <code>addon_</code>. | ||
| + | ** The remaining part of the name must match the addon name in Plesk. | ||
| + | ** Example: <code>addon_Antivirus</code> → provisions the "Antivirus" addon in Plesk. | ||
| + | |||
|} | |} | ||
{| | {| | ||
|style="padding: 0px 0px 20px 25px;"|[[File:PE2_16.png]] | |style="padding: 0px 0px 20px 25px;"|[[File:PE2_16.png]] | ||
|} | |} | ||
| + | |||
<!-- CRON OD WERSJI 3.0.0 wyleciał | <!-- CRON OD WERSJI 3.0.0 wyleciał | ||
{| | {| | ||
| − | |style="padding: 0px 0px 20px 15px;"|''' | + | |style="padding: 0px 0px 20px 15px;"|'''18. At the end of the product configuration process, make sure you add a cron job as presented below (10 minutes intervals are suggested).<br /> |
Its purpose is to download requested backups from Plesk to your WHMCS server which can be subsequently downloaded by clients. | Its purpose is to download requested backups from Plesk to your WHMCS server which can be subsequently downloaded by clients. | ||
php -q /your_whmcs/modules/addons/PleskExtended/cron/cron.php | php -q /your_whmcs/modules/addons/PleskExtended/cron/cron.php | ||
| Line 405: | Line 421: | ||
--> | --> | ||
{| | {| | ||
| − | |style="padding: 0px 0px 30px 15px;"|''' | + | |style="padding: 0px 0px 30px 15px;"|'''18. Good job! You have just correctly created and customized your new product. It will now appear in Plesk Extended Center admin area.''' |
|} | |} | ||
==Configuration of Addon== | ==Configuration of Addon== | ||
{| | {| | ||
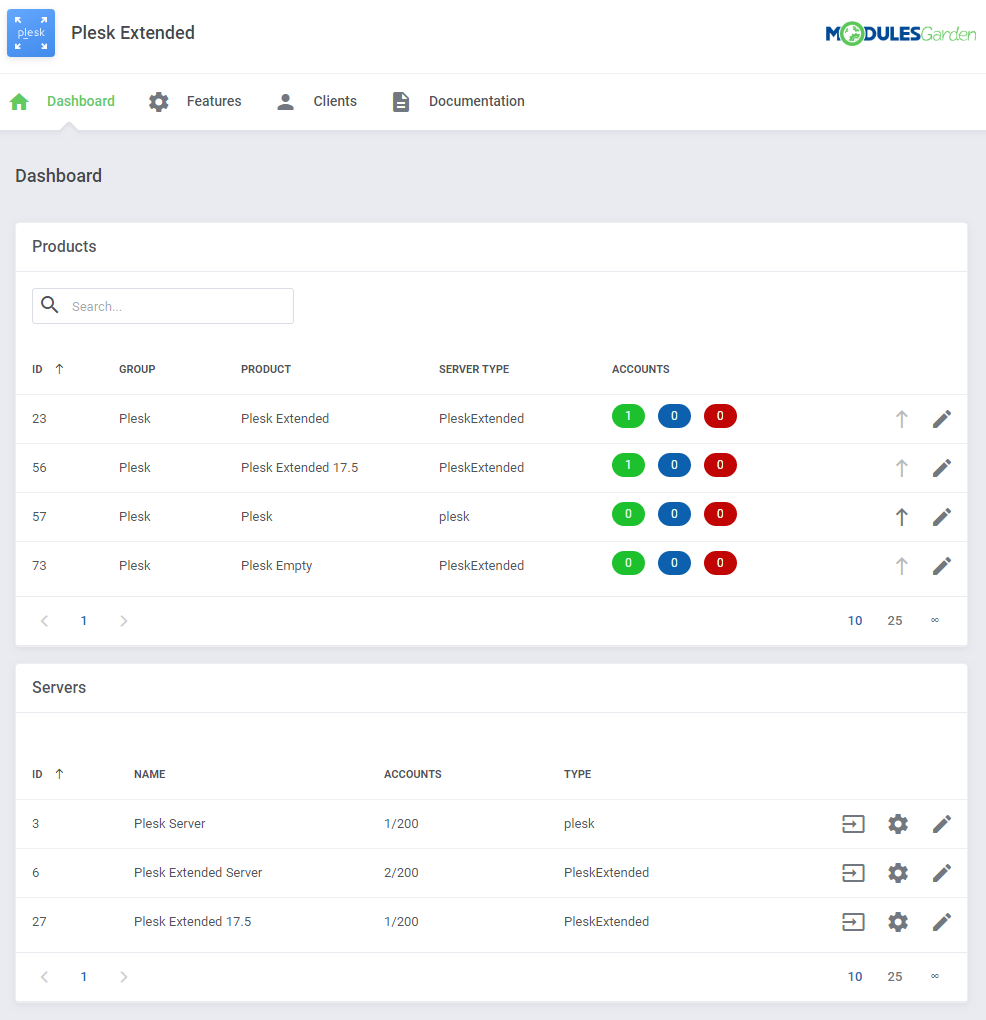
| − | |style="padding: 10px 0px 15px 15px;"|''' | + | |style="padding: 10px 0px 15px 15px;"|'''19. After you have correctly created and customized a new product, it is time to configure it in the addon.'''<br /> |
Go to '' 'Addons' '' → '' 'Plesk Extended' '' in your WHMCS.<br /> | Go to '' 'Addons' '' → '' 'Plesk Extended' '' in your WHMCS.<br /> | ||
| Line 424: | Line 440: | ||
|} | |} | ||
{| | {| | ||
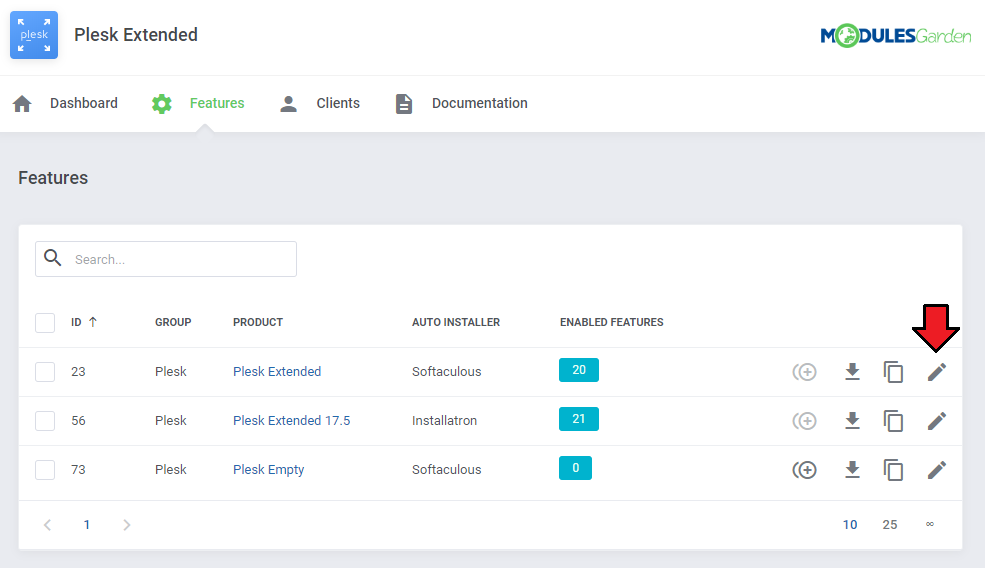
| − | |style="padding: 0px 0px 15px 15px;"|''' | + | |style="padding: 0px 0px 15px 15px;"|'''20. Proceed to the 'Features' section and find the product you are interested in. Press the 'Configuration' button next to the product. |
|} | |} | ||
{| | {| | ||
| Line 430: | Line 446: | ||
|} | |} | ||
{| | {| | ||
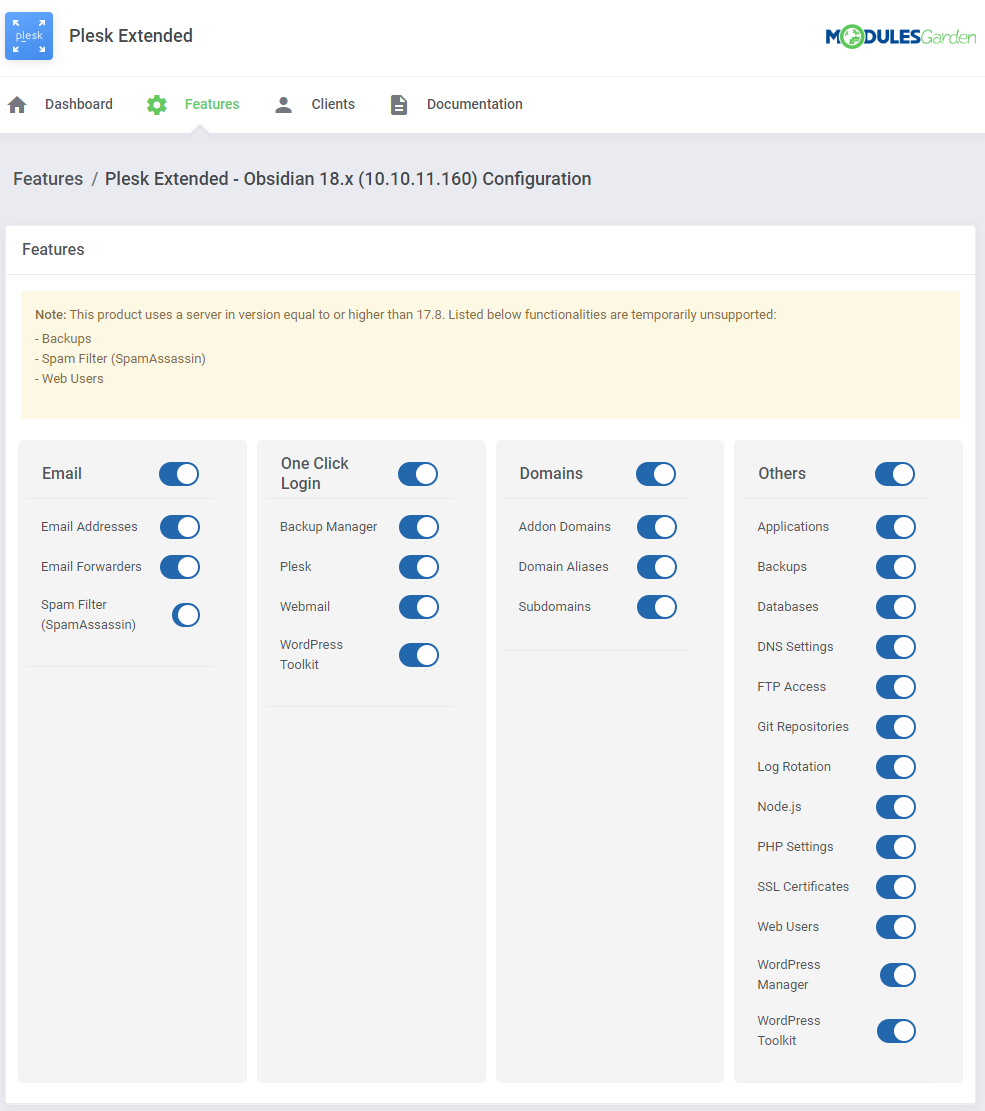
| − | |style="padding: 0px 0px 15px 15px;"|''' | + | |style="padding: 0px 0px 15px 15px;"|'''21. You will find here boxes dedicated to '' 'Features' and 'Applications'. ''<br /> |
To show you an example, we will set the configuration from the very beginning, without using other configuration options of the product.<br/> | To show you an example, we will set the configuration from the very beginning, without using other configuration options of the product.<br/> | ||
| Line 439: | Line 455: | ||
|} | |} | ||
{| | {| | ||
| − | |style="padding: 0px 0px 15px 15px;"|''' | + | |style="padding: 0px 0px 15px 15px;"|'''22. Next, toggle '' 'Install Application' '' that will be used to install applications by your clients.<br /> |
In the '' 'Auto Installer Type' '' field you will be free to choose between '' 'Installatron' '', '' 'Softaculous' '' and '' 'Default' '' auto installers. <br/> | In the '' 'Auto Installer Type' '' field you will be free to choose between '' 'Installatron' '', '' 'Softaculous' '' and '' 'Default' '' auto installers. <br/> | ||
|} | |} | ||
| Line 446: | Line 462: | ||
|} | |} | ||
{| | {| | ||
| − | |style="padding: 0px 0px 15px 15px;"|''' | + | |style="padding: 0px 0px 15px 15px;"|'''23. You may also enable the option for automatic installation of selected applications once an order is created.<br /> |
| − | + | * '''Auto Install On Creation''' If enabled, the selected application will be installed right after the order is created. | |
| − | + | * '''Use Configurable Options''' – Enable to let clients choose which application to install through WHMCS configurable options. | |
| − | You can | + | ** '''Apps / Configurable Options''' - Select the list of applications or configurable options that will be available.<br/> '' '''Note:''' You can create a configurable option with an app to be installed. You can find the instruction on how to do that [[#Applications Configuration|here]].'' |
| − | + | * '''Language''' - Enter the two-letter code of the desired application language (e.g., en, pl). If left blank, English (en) will be used. A complete list of language codes can be found [http://softaculous.com/docs/Scripts_Language_Codes here]. | |
| − | + | <br/> | |
| − | + | '''Automatic Update Backups''' | |
| − | '' ''' | + | * '''Allow Automatic Update Backups''' - Lets clients enable or disable automatic update backups. Clients can also restore their application from a backup if an update fails. |
| + | *'''Default Automatic Update Backups''' - Automatically turns on update backups by default as soon as the service is provisioned in WHMCS. | ||
|} | |} | ||
{| | {| | ||
| Line 459: | Line 476: | ||
|} | |} | ||
{| | {| | ||
| − | |style="padding: 0px 0px 20px 15px;"|''' | + | |style="padding: 0px 0px 20px 15px;"|'''24. You can let your clients decide about the automatic application installation during ordering process by using the '' 'Use Configurable Options' '' switch and choosing the appropriate option from the list. |
|} | |} | ||
{| | {| | ||
| Line 474: | Line 491: | ||
|} | |} | ||
{| | {| | ||
| − | |style="padding: 0px 0px 15px 15px;"|''' | + | |style="padding: 0px 0px 15px 15px;"|'''25. If you have selected the Auto Installer for the product, and that product does not have any configurable options assigned yet, a button to '' 'Generate Configurable Options' '' becomes active.'''<br/> |
Press it to quickly generate the configurable options for the product to allow selecting and installing application at the moment of ordering the product.<br/> Read more about generating configurable options [[#Applications Configuration|here]]. | Press it to quickly generate the configurable options for the product to allow selecting and installing application at the moment of ordering the product.<br/> Read more about generating configurable options [[#Applications Configuration|here]]. | ||
|} | |} | ||
| Line 481: | Line 498: | ||
|} | |} | ||
{| | {| | ||
| − | |style="padding: 0px 0px 15px 15px;"|''' | + | |style="padding: 0px 0px 15px 15px;"|'''26. If you already have another product configured, you may copy its configuration. <br/> |
Find the '' 'Copy' '' button on the list with products or select multiple item at once. <br/> | Find the '' 'Copy' '' button on the list with products or select multiple item at once. <br/> | ||
Then, choose the product configuration whose settings you wish to copy into the selected products.<br/> | Then, choose the product configuration whose settings you wish to copy into the selected products.<br/> | ||
| Line 489: | Line 506: | ||
|} | |} | ||
{| | {| | ||
| − | |style="padding: 0px 0px 20px 15px;"|''' | + | |style="padding: 0px 0px 20px 15px;"|'''27. In situation you wish to edit the features of more than one product at once, simply mark the required products and use the mass action button.''' |
|} | |} | ||
{| | {| | ||
| Line 495: | Line 512: | ||
|} | |} | ||
{| | {| | ||
| − | |style="padding: 0px 0px 15px 15px;"|''' | + | |style="padding: 0px 0px 15px 15px;"|'''28. In the next step, move to '' 'Server Configuration' '' to set up a connection.'''<br /> |
Press the '' ' Configuration' '' button next to a desired server. | Press the '' ' Configuration' '' button next to a desired server. | ||
|} | |} | ||
| Line 510: | Line 527: | ||
|} | |} | ||
{| | {| | ||
| − | |style="padding: 0px 0px 15px 15px;"|'' 'Clients' '' section includes a list of your clients who own any Plesk type product. Apart from the client name you may find there the client's Plesk customer ID and server.<br/> | + | |style="padding: 0px 0px 15px 15px;"|'' 'Clients' '' section includes a list of your clients who own any Plesk type product. Apart from the client name, you may find there the client's Plesk customer ID and server.<br/> |
Press '' 'More Information' '' icon to get more details. | Press '' 'More Information' '' icon to get more details. | ||
|} | |} | ||
| Line 521: | Line 538: | ||
{| | {| | ||
|style="padding: 0px 0px 30px 25px;"|[[File:PE3_21_2.png]] | |style="padding: 0px 0px 30px 25px;"|[[File:PE3_21_2.png]] | ||
| + | |} | ||
| + | |||
| + | ===Additional Tools=== | ||
| + | {| | ||
| + | |style="padding: 10px 0px 15px 15px;"|'''[https://www.docs.modulesgarden.com/Translations_Tool Translations Tool]'''<br/> | ||
| + | Customizing language files is now extremely easy with the ''Translations'' tool that is now available directly in the addon.<br.> Its user-friendly design makes managing various language file tweaks a smooth and efficient process. Prepare translations for the original English files with this handy built-in tool.<br/> | ||
| + | For specific instructions on how to use this tool please refer to its dedicated article, you will find it [https://www.docs.modulesgarden.com/Translations_Tool here]. | ||
| + | |} | ||
| + | {| | ||
| + | |style="padding: 0px 0px 20px 25px;"|[[File:PE3_21_4.png]] | ||
| + | |} | ||
| + | {| | ||
| + | |style="padding: 0px 0px 15px 15px;"|'''[https://www.docs.modulesgarden.com/Access_Control_Tool Access Control]'''<br/> | ||
| + | Ensure secure and tailored access to your module with the "Access Control" tool available in ModulesGarden addons.<br/> | ||
| + | This feature allows you to assign permissions, define resource access for administrators, and track activities with detailed logs.<br/> | ||
| + | Customize access settings to fit your team’s structure and maintain transparency with ease. For comprehensive guidance, refer to the tool's [https://www.docs.modulesgarden.com/Access_Control_Tool dedicated article]. | ||
| + | |} | ||
| + | {| | ||
| + | |style="padding: 0px 0px 20px 25px;"|[[File:PE3_21_5.png]] | ||
| + | |} | ||
| + | {| | ||
| + | |style="padding: 0px 0px 15px 15px;"|'''[https://www.docs.modulesgarden.com/Logs Logs]'''<br/> | ||
| + | The '' "Logs" '' tool makes monitoring and managing module activity records simple and efficient. It provides options to categorize, filter, and view detailed entries, giving you control over the logs.<br/ > Features like bulk deletion, rule-based deletion, and export options make it easy to organize and maintain your logs.<br/> | ||
| + | For detailed guidance on using this tool, check its dedicated article, which is available [https://www.docs.modulesgarden.com/Logs here]. | ||
| + | |} | ||
| + | {| | ||
| + | |style="padding: 0px 0px 30px 25px;"|[[File:PE3_21_6.png]] | ||
|} | |} | ||
| Line 538: | Line 582: | ||
|} | |} | ||
{| | {| | ||
| − | |style="padding: 0px 0px | + | |style="padding: 0px 0px 30px 25px;"|[[File:PE3_24_1.png]] |
|} | |} | ||
| + | |||
{| | {| | ||
| − | |style="padding: 0px 0px 15px 15px;"|''' | + | |style="padding: 0px 0px 15px 15px;"|'''From now on, all your clients who ordered a previously created product will be able to manage their Plesk accounts via your WHMCS system.'''<br /> |
Here is the summary of the ordered product in admin area. The available actions include: | Here is the summary of the ordered product in admin area. The available actions include: | ||
*Log In To Control Panel | *Log In To Control Panel | ||
| Line 584: | Line 629: | ||
Use Plesk Extended For WHMCS to: | Use Plesk Extended For WHMCS to: | ||
*Install applications | *Install applications | ||
| − | * | + | *Delete applications |
*Create and restore backups<br/> | *Create and restore backups<br/> | ||
To start, simply proceed to '' 'Applications' '', and then find the '' 'Install New' '' section. | To start, simply proceed to '' 'Applications' '', and then find the '' 'Install New' '' section. | ||
| Line 592: | Line 637: | ||
|} | |} | ||
{| | {| | ||
| − | |style="padding: 0px 0px 20px 15px;"|Afterwards, you will see an extensive menu with application categories. <br/>For presentation purposes we will install '' ' | + | |style="padding: 0px 0px 20px 15px;"|Afterwards, you will see an extensive menu with application categories. <br/>For presentation purposes we will install '' 'WordPress' '' located in the '' 'Blogs' ''category. Find '' 'WordPress' '' and click on it. |
|} | |} | ||
{| | {| | ||
| Line 598: | Line 643: | ||
|} | |} | ||
{| | {| | ||
| − | |style="padding: 0px 0px 20px 15px;"|Now, you have to enter necessary installation details and then press '' 'Install Application' '' to follow. Wait for the '' 'Success' '' notification. | + | |style="padding: 0px 0px 20px 15px;"|Now, you have to enter the necessary installation details and then press '' 'Install Application' '' to follow. Wait for the '' 'Success' '' notification. |
|} | |} | ||
{| | {| | ||
| Line 605: | Line 650: | ||
{| | {| | ||
|style="padding: 0px 0px 20px 15px;"|View the list of your installed applications by clicking on the '' 'Installed Applications' '' tab and manage the application.<br/> | |style="padding: 0px 0px 20px 15px;"|View the list of your installed applications by clicking on the '' 'Installed Applications' '' tab and manage the application.<br/> | ||
| − | Here you will find the name of the application, its path, size and available actions: | + | Here you will find the name of the application, its path, size and available actions ''(available only for Softaculous & Installatron)'': |
*Create backup | *Create backup | ||
*Delete application | *Delete application | ||
| Line 650: | Line 695: | ||
|} | |} | ||
| + | <!-- | ||
===Backups=== | ===Backups=== | ||
{| | {| | ||
| Line 683: | Line 729: | ||
|style="padding: 0px 0px 30px 25px;"|[[File:PE3_24_7.png]] | |style="padding: 0px 0px 30px 25px;"|[[File:PE3_24_7.png]] | ||
|} | |} | ||
| + | --> | ||
===Databases=== | ===Databases=== | ||
| Line 758: | Line 805: | ||
===Email Forwarders=== | ===Email Forwarders=== | ||
{| | {| | ||
| − | |style="padding: 10px 0px 20px 15px;"|In this section you can set up email forwarders and choose from several destination options to adjust mail forwarding perfectly to your needs. | + | |style="padding: 10px 0px 20px 15px;"|In this section, you can set up email forwarders and choose from several destination options to adjust mail forwarding perfectly to your needs. |
|} | |} | ||
{| | {| | ||
| Line 767: | Line 814: | ||
|} | |} | ||
{| | {| | ||
| − | |style="padding: 0px 0px | + | |style="padding: 0px 0px 20px 25px;"|[[File:PE3_26_4.png]] |
| + | |} | ||
| + | {| | ||
| + | |style="padding: 0px 0px 20px 15px;"|Use the mass action button to delete numerous email forwarders at once, or remove single items one by one. | ||
| + | |} | ||
| + | {| | ||
| + | |style="padding: 0px 0px 30px 25px;"|[[File:PE3_26_5.png]] | ||
|} | |} | ||
| Line 897: | Line 950: | ||
|} | |} | ||
| + | <!-- | ||
===Spam Filter=== | ===Spam Filter=== | ||
{| | {| | ||
| Line 915: | Line 969: | ||
|style="padding: 0px 0px 30px 25px;"|[[File:PE3_26_0.png]] | |style="padding: 0px 0px 30px 25px;"|[[File:PE3_26_0.png]] | ||
|} | |} | ||
| + | --> | ||
===SSL Certificates=== | ===SSL Certificates=== | ||
| Line 951: | Line 1,006: | ||
|} | |} | ||
| + | <!-- | ||
===Web Users=== | ===Web Users=== | ||
{| | {| | ||
| Line 965: | Line 1,021: | ||
|style="padding: 0px 0px 30px 25px;"|[[File:PE3_34_2.png]] | |style="padding: 0px 0px 30px 25px;"|[[File:PE3_34_2.png]] | ||
|} | |} | ||
| − | ===WordPress Manager=== | + | --> |
| + | |||
| + | ===WordPress Manager Integration (Temporarily Suspended)=== | ||
| + | {| | ||
| + | |style="padding: 10px 0px 30px 15px;"|Integration with [https://www.modulesgarden.com/products/whmcs/wordpress-manager WordPress Manager For WHMCS] is currently unavailable, and will be re-added with the nearest WordPress Manager For WHMCS module update.<br/> | ||
| + | '''''Important:''' This section is only available with [https://www.modulesgarden.com/products/whmcs/wordpress-manager WordPress Manager For WHMCS] module active.'' | ||
| + | |} | ||
| + | <!-- | ||
{| | {| | ||
|style="padding: 10px 0px 20px 15px;"|If you are an owner of the '''[https://www.modulesgarden.com/products/whmcs/wordpress-manager WordPress Manager For WHMCS]''' module and you have it installed in your WHMCS, your customers can now fully benefit from its seamless integration with the Plesk Extended For WHMCS module. | |style="padding: 10px 0px 20px 15px;"|If you are an owner of the '''[https://www.modulesgarden.com/products/whmcs/wordpress-manager WordPress Manager For WHMCS]''' module and you have it installed in your WHMCS, your customers can now fully benefit from its seamless integration with the Plesk Extended For WHMCS module. | ||
| Line 981: | Line 1,044: | ||
{| | {| | ||
|style="padding: 0px 0px 30px 15px;"|Keep in mind that the entire section can '''only''' be available if you have purchased and installed the [https://www.modulesgarden.com/products/whmcs/wordpress-manager WordPress Manager For WHMCS] module. | |style="padding: 0px 0px 30px 15px;"|Keep in mind that the entire section can '''only''' be available if you have purchased and installed the [https://www.modulesgarden.com/products/whmcs/wordpress-manager WordPress Manager For WHMCS] module. | ||
| + | |} | ||
| + | --> | ||
| + | |||
| + | ===WordPress Toolkit=== | ||
| + | {| | ||
| + | |style="padding: 10px 0px 15px 15px;"|WordPress Toolkit is an independent tool used to manage WordPress instances. You may add, configure and freely manage your WordPress installations directly from the level of the WHMCS client area.<br/> | ||
| + | '''''Important:''' Kindly note that the option to delete instances is currently exclusively accessible through the control panel. Removing an installation from the WHMCS client area is not supported.''<br/> | ||
| + | |||
| + | '''''Note:''' Please bear in mind that WordPress Toolkit and WordPress Manager are two separate applications.<br/> A single instance cannot be managed from either app, an instance created via the WP Toolkit can be managed in this app only, it cannot be fetched by the WordPress Manager module and the other way around.'' | ||
| + | |} | ||
| + | {| | ||
| + | |style="padding: 0px 0px 20px 25px;"|[[File:PE_40.png]] | ||
| + | |} | ||
| + | {| | ||
| + | |style="padding: 0px 0px 15px 15px;"|Start your journey by adding the first installation of WordPress.<br/> | ||
| + | Press the button 'New Installation' marked on the screen below and read the instruction to see how to install a pure new instance. | ||
| + | |} | ||
| + | {| | ||
| + | |style="padding: 0px 0px 20px 25px;"|[[File:PE_41.png]] | ||
| + | |} | ||
| + | {| | ||
| + | |style="padding: 0px 0px 15px 15px;"|A new window with four tabs will open. In the first '''Details''' tab, fill in the following fields: | ||
| + | |||
| + | *'''Protocol''' - select protocol between 'https://' and 'http://' | ||
| + | *'''Domain''' - provide a domain the software will be installed on (your domain is entered by default) | ||
| + | *'''Site Name''' - your custom name of the installation | ||
| + | *'''Plugin/Theme Package''' - you may optionally select a ready plugin or theme set to install on WordPress | ||
| + | *'''Language''' - choose a language for the installation | ||
| + | *'''Version''' - select the version from the list of available | ||
| + | *'''Installation Path''' - here you can select any custom installation script that you want to install ''(this field is required)''. | ||
| + | <!--Note that this field will be displayed only for domains whose products have installation scripts configured in the Products Settings. | ||
| + | If it is not displayed then the clean WordPress installation will be applied.--> | ||
| + | |} | ||
| + | {| | ||
| + | |style="padding: 0px 0px 20px 25px;"|[[File:PE_42.png]] | ||
| + | |} | ||
| + | {| | ||
| + | |style="padding: 0px 0px 15px 15px;"| | ||
| + | *'''Administrator Username''' - enter the administrator account username for this installation. | ||
| + | *'''Administrator Password''' - generate an administrator password for this new installation of WordPress. | ||
| + | *'''Administrator Email Address''' - enter the administrator account email address for this installation. | ||
| + | |} | ||
| + | {| | ||
| + | |style="padding: 0px 0px 20px 25px;"|[[File:PE_43.png]] | ||
| + | |} | ||
| + | {| | ||
| + | |style="padding: 0px 0px 15px 15px;"| | ||
| + | *'''Database Username''' | ||
| + | *'''Database Name''' | ||
| + | *'''Database Table Prefix''' | ||
| + | *'''Database Password''' | ||
| + | |} | ||
| + | {| | ||
| + | |style="padding: 0px 0px 20px 25px;"|[[File:PE_44.png]] | ||
| + | |} | ||
| + | {| | ||
| + | |style="padding: 0px 0px 20px 15px;"|WP Toolkit can automatically install WordPress core, plugin, and theme updates as soon as they become available. Updates related data: | ||
| + | '''WordPress Update''' - Update WordPress automatically: | ||
| + | * No | ||
| + | * Yes, but only minor (security) updates | ||
| + | * Yes, all (minor and major) updates | ||
| + | |||
| + | '''Plugins Update''' - Update plugins automatically | ||
| + | *Defined individually | ||
| + | **Enable autoupdates by default for new plugins installed via WP Toolkit | ||
| + | *Defined individually, but security updates are autoinstalled | ||
| + | **Enable autoupdates by default for new plugins installed via WP Toolkit | ||
| + | **Deactivate vulnerable plugins instead of updating them | ||
| + | *Forced | ||
| + | **Deactivate vulnerable plugins instead of updating them | ||
| + | |||
| + | '''Themes Update''' - Update themes automatically | ||
| + | *Defined individually | ||
| + | **Enable autoupdates by default for new plugins installed via WP Toolkit | ||
| + | *Defined individually, but security updates are autoinstalled | ||
| + | **Enable autoupdates by default for new plugins installed via WP Toolkit | ||
| + | *Forced - All themes will be forcefully autoupdated regardless of their individual autoupdate settings | ||
| + | |} | ||
| + | {| | ||
| + | |style="padding: 0px 0px 20px 25px;"|[[File:PE_45.png]] | ||
| + | |} | ||
| + | {| | ||
| + | |style="padding: 0px 0px 15px 15px;"|Now wait a moment until a ready WordPress installation is complete and appears on the list on the main page of the WP Toolkit app. | ||
| + | You will find there a list with basic information regarding every installation, including the URL, site name, and version. From this point, you may also manage the installation ''(1)'' and delete ''(2)'' it at any time. | ||
| + | |} | ||
| + | {| | ||
| + | |style="padding: 0px 0px 30px 25px;"|[[File:PE_46.png]] | ||
| + | |} | ||
| + | |||
| + | ====Instance Management==== | ||
| + | =====Details===== | ||
| + | {| | ||
| + | |style="padding: 10px 0px 20px 15px;"|Instance details is the first section that you will be directed to once you move to single installation management.<br/> | ||
| + | You will find there gathered details on WordPress, such as: | ||
| + | *URL, Domain, Owner Name, Version, Plugins & Themes Updates, Security Status, PHP version, SSL/TLS | ||
| + | |} | ||
| + | {| | ||
| + | |style="padding: 0px 0px 20px 25px;"|[[File:PE_47.png]] | ||
| + | |} | ||
| + | =====Maintenance Mode===== | ||
| + | {| | ||
| + | |style="padding: 10px 0px 20px 15px;"|This section allows setting up the options of website maintenance time. Start by enabling/disabling the mode and then move to more specific features: | ||
| + | *''Restrict Access to WordPress Admin Panel'' - Restricting access to the WordPress admin dashboard will prevent the site admin from logging in to WordPress when maintenance mode is enabled<br/> | ||
| + | |||
| + | '''Screen Text''' section allows changing the text displayed on the maintenance screen. You can use HTML tags to format the text's appearance. You may adjust the texts of: | ||
| + | *''Browser Page Title'' | ||
| + | *''Text Block 1 (large font size)'' | ||
| + | *''Text Block 2 (small font size)''<br/> | ||
| + | |||
| + | '''Timer''' - enable the timer to count down the remaining time | ||
| + | *''Countdown Timer'' | ||
| + | *''Remaining time (days, hours, minutes)''<br/> | ||
| + | |||
| + | '''Social Network Links''' - Type in links to your social network pages. If left empty, the corresponding link will be hidden. | ||
| + | *''Facebook'' | ||
| + | *''Twitter'' | ||
| + | *''Instagram'' | ||
| + | |} | ||
| + | {| | ||
| + | |style="padding: 0px 0px 20px 25px;"|[[File:PE_48.png]] | ||
| + | |} | ||
| + | |||
| + | =====Credentials===== | ||
| + | {| | ||
| + | |style="padding: 10px 0px 20px 15px;"|Instance settings <br/> | ||
| + | *Administrator Login Name | ||
| + | *Administrator Password | ||
| + | *Email Address | ||
| + | *Language | ||
| + | |} | ||
| + | {| | ||
| + | |style="padding: 0px 0px 20px 25px;"|[[File:PE_49.png]] | ||
| + | |} | ||
| + | =====Plugins===== | ||
| + | {| | ||
| + | |style="padding: 10px 0px 20px 15px;"|Here you are enabled to activate, deactivate, delete, and update the already installed plugins. You can also add new plugins to your WordPress installation in the '' 'Add New' '' tab. | ||
| + | |||
| + | |} | ||
| + | {| | ||
| + | |style="padding: 0px 0px 20px 25px;"|[[File:PE_50.png]] | ||
| + | |} | ||
| + | {| | ||
| + | |style="padding: 0px 0px 15px 15px;"|To add a new plugin, you are required to type in at least three of the initial letters of the desired plugin's name into the search field to see the actual results.<br/> A list of related plugins will appear. You may now learn more about each plugin by pressing the '' 'Show Details' '' button. <br/> If the plugin meets your requirements, simply press the corresponding button to begin the installation process (which might take a short while). | ||
| + | |} | ||
| + | {| | ||
| + | |style="padding: 0px 0px 20px 25px;"|[[File:PE_51.png]] | ||
| + | |} | ||
| + | {| | ||
| + | |style="padding: 0px 0px 20px 25px;"|[[File:PE_52.png]] | ||
| + | |} | ||
| + | {| | ||
| + | |style="padding: 0px 0px 20px 15px;"|The '' 'Mass Action' '' feature is also present in this section, so you will be able to handle multiple plugins more efficiently and at the same time. | ||
| + | |} | ||
| + | {| | ||
| + | |style="padding: 0px 0px 30px 25px;"|[[File:PE_53.png]] | ||
| + | |} | ||
| + | |||
| + | =====Themes===== | ||
| + | {| | ||
| + | |style="padding: 10px 0px 20px 15px;"|This section allows quick and easy management of themes installed on your WordPress instance. Enable/disable the theme, update the already installed theme, and delete useless ones. <br/> You can also add new themes to your WordPress installation in the 'Add New' tab. | ||
| + | |} | ||
| + | {| | ||
| + | |style="padding: 0px 0px 20px 25px;"|[[File:PE_54.png]] | ||
| + | |} | ||
| + | {| | ||
| + | |style="padding: 0px 0px 15px 15px;"|Please start typing in the search field to see the available themes.<br/> Once a list of related themes appears, you will be allowed to first check their preview and details. <br/> If the theme satisfies your needs, simply press the corresponding button to begin the installation process (which might take a short while). | ||
| + | |} | ||
| + | {| | ||
| + | |style="padding: 0px 0px 20px 25px;"|[[File:PE_55.png]] | ||
| + | |} | ||
| + | {| | ||
| + | |style="padding: 0px 0px 20px 15px;"|Thanks to the '' 'Mass Action' '' functionality, you will be able to handle multiple themes more efficiently at the same time. | ||
| + | |} | ||
| + | {| | ||
| + | |style="padding: 0px 0px 30px 25px;"|[[File:PE_56.png]] | ||
|} | |} | ||
==One Click Login== | ==One Click Login== | ||
| − | ===Log In To | + | ===Log In To Backup Manager=== |
{| | {| | ||
| − | |style="padding: 10px 0px 15px 15px;"|With a single click on the '' 'Log In To | + | |style="padding: 10px 0px 15px 15px;"|Just one click on the '' 'Backup Manager' '' button and you will be immediately redirected to the dedicated page.<br/> |
| + | ''Note that you must have a proper IP address or domain entered in the admin area panel to use this button.'' | ||
| + | |} | ||
| + | {| | ||
| + | |style="padding: 0px 0px 30px 25px;"|[[File:PE3_36_0.png]] | ||
| + | |} | ||
| + | |||
| + | ===Log In To Plesk=== | ||
| + | {| | ||
| + | |style="padding: 10px 0px 15px 15px;"|With a single click on the '' 'Log In To Plesk' '' button you can be redirected to your Plesk Panel account.<br/> | ||
''Note that you must have a proper IP address or domain entered in the admin area panel to use this button.'' | ''Note that you must have a proper IP address or domain entered in the admin area panel to use this button.'' | ||
|} | |} | ||
| Line 1,000: | Line 1,247: | ||
{| | {| | ||
|style="padding: 0px 0px 30px 25px;"|[[File:PE3_36.png]] | |style="padding: 0px 0px 30px 25px;"|[[File:PE3_36.png]] | ||
| + | |} | ||
| + | |||
| + | ===Log In To WP Toolkit=== | ||
| + | {| | ||
| + | |style="padding: 10px 0px 15px 15px;"|You can easily be redirected to the WP Toolkit section in your Plek panel by clicking the '' 'Log In To WordPress Toolkit' '' button.<br/> | ||
| + | ''Note that you must have a proper IP address or domain entered in the admin area panel to use this button.'' | ||
| + | |} | ||
| + | {| | ||
| + | |style="padding: 0px 0px 30px 25px;"|[[File:PE3_36_1.png]] | ||
|} | |} | ||
| Line 1,232: | Line 1,488: | ||
After performing this action, do not forget to run the following cron command: <br/> | After performing this action, do not forget to run the following cron command: <br/> | ||
<pre> php -q yourModulePath/modules/servers/PleskExtended/cron/cron.php account:synchronize </pre> | <pre> php -q yourModulePath/modules/servers/PleskExtended/cron/cron.php account:synchronize </pre> | ||
| + | |} | ||
| + | |||
| + | =Use Cases= | ||
| + | {| | ||
| + | |style="padding: 10px 0px 30px 15px;"|'''This section provides sample scenarios showcasing common use cases and how the module's features can be applied in practice.<br/> | ||
| + | Explore the examples below for real-world applications of the module. | ||
| + | |} | ||
| + | ==Automatic App Installation With Service Order== | ||
| + | {| | ||
| + | |style="padding: 10px 0px 15px 15px;"|With Plesk Extended For WHMCS products, you can make it easy for users to install applications.<br/> To get started, open the '' 'Plesk Extended' '' addon, navigate to '' 'Features' '' → '' 'Settings' '' and find the '' 'Applications' '' section. | ||
| + | |} | ||
| + | {| | ||
| + | |style="padding: 0px 0px 20px 25px;"|[[File:PE3_55.png]] | ||
| + | |} | ||
| + | {| | ||
| + | |style="padding: 0px 0px 15px 15px;"|Begin by activating the '' 'Install Applications' '' option.<br/> One way to achieve this is by selecting an application that will automatically be installed for new Plesk accounts.<br/> Choose the '' 'Auto Installer Type' '' first, then pick your desired application.<br/> Don’t forget to enable the '' 'Auto Install On Creation' '' feature to automate the installation process. | ||
| + | |} | ||
| + | {| | ||
| + | |style="padding: 0px 0px 20px 25px;"|[[File:PE3_56.png]] | ||
| + | |} | ||
| + | {| | ||
| + | |style="padding: 0px 0px 15px 15px;"|Another option is to allow customers to select their application during the ordering process.<br/> To do this, activate the '' 'Use Configurable Options' '' switch and select the desired options from the dropdown list.<br/>For further assistance in preparing these Configurable Options, consult the '' '[[#Applications_Configuration|Applications Configuration]]' '' section. | ||
| + | |} | ||
| + | {| | ||
| + | |style="padding: 0px 0px 20px 25px;"|[[File:PE3_57.png]] | ||
| + | |} | ||
| + | {| | ||
| + | |style="padding: 0px 0px 20px 15px;"|After the client completes their order and the '' 'Create' '' action is taken, the new Plesk account will come pre-installed with the chosen application (such as a WordPress installation). | ||
| + | |} | ||
| + | {| | ||
| + | |style="padding: 0px 0px 30px 25px;"|[[File:PE3_58.png]] | ||
|} | |} | ||
| Line 1,251: | Line 1,538: | ||
|} | |} | ||
{| | {| | ||
| − | |style="padding: 0px 0px | + | |style="padding: 0px 0px 5px 15px;"|5. We recommend assigning only one server to '' 'Server Group' '' as servers may have different service plans. <br/> Otherwise, API may return the following message '' 'There is no such a service plan' '' if WHMCS chooses a server from ' ''Server Group' '' that has no existing service plan. |
| + | |} | ||
| + | {| | ||
| + | |style="padding: 0px 0px 15px 15px;"|6. '''Repairing Plesk account relations:'''<br/> | ||
| + | The module provides a maintenance tool that detects and fixes incorrect relations between WHMCS services and Plesk customer accounts.<br/> | ||
| + | It compares data stored in the <code>PleskExtended_Accounts</code> table with current information retrieved from the Plesk API based on the service domain.<br/> Then corrects missing or invalid <code>customer_id</code>, <code>username</code>, duplicate entries, orphaned records (<code>customer_id = 0</code>), and the <code>hostingId</code> field depending on whether the "Separate Plesk User" option is enabled.<br/><br/> | ||
| + | '''Before running the repair command, make sure to create a backup of the <code>PleskExtended_Accounts</code> table.''' | ||
| + | *'''Preview invalid relations:''' | ||
| + | php -q modules/servers/PleskExtended/cron/cron.php relationsFixer:print | ||
| + | |||
| + | *'''Fix detected issues:''' | ||
| + | php -q modules/servers/PleskExtended/cron/cron.php relationsFixer:run | ||
|} | |} | ||
| Line 1,265: | Line 1,563: | ||
'' '''Note:''' from 3.0.0 version of the module the cron execution is also no longer required. | '' '''Note:''' from 3.0.0 version of the module the cron execution is also no longer required. | ||
| − | <br/><br/> | + | |} |
| − | + | ==Migration To Version 4.x== | |
| − | + | {| | |
| + | |style="padding: 10px 0px 30px 15px;"|The migration process to version 4.x is fully automated. You only need to follow the steps described in the following article: ''[https://www.docs.modulesgarden.com/How_To_Update_WHMCS_Module Update Guide]''.<br/> | ||
| + | All your existing settings, products, and client data will be preserved during the update. No additional manual actions are normally required.<br/> | ||
| + | |||
| + | 1. '''Delete all files''' from the previous version of the module.<br/> | ||
| + | 2. Upload the '''new module files'''.<br/> | ||
| + | 3. '''Migration tool should run automatically and transfer all your existing data'''; however, if that is not the case, please manually initiate the version upgrade with the '''cron command''': | ||
| + | php -q /YOUR_WHMCS/modules/servers/PleskExtended/cron/cron.php module:upgrade run 4.0.0 | ||
| + | |} | ||
| + | |||
| + | =Upgrade Guide= | ||
| + | {| | ||
| + | |style="padding: 10px 0px 30px 15px;"|Seeking a solution that offers greater flexibility, customization tailored to your precise needs, and unrestricted availability?<br/> There is an option that not only proves to be cost-effective in the long run but also includes prioritized support services, making it a truly valuable investment.<br/> | ||
| + | |||
| + | Opt for the [https://www.modulesgarden.com/products/whmcs/plesk-extended#open-source-version Open Source version] of your Plesk Extended For WHMCS module to unlock these benefits.<br/> Simply click on either the '''Get Source Code''' or '''Upgrade To Lifetime''' button found on the product's page in our client area to complete the one-step upgrade process, with a '''dedicated discount''' already applied.<br/> | ||
| + | |||
| + | Follow a [https://www.docs.modulesgarden.com/How_To_Upgrade_WHMCS_Module comprehensive guide] covering the transition process, the advantages it brings, and step-by-step instructions on what to do next after the order has been successfully finalized. | ||
|} | |} | ||
| Line 1,275: | Line 1,589: | ||
|} | |} | ||
{| | {| | ||
| − | |style="padding: 0px 0px | + | |style="padding: 0px 0px 5px 15px;"|2. If you see an error as shown on the screen below, it means that you haven't provided your service plan name or reseller plan name in the product's 'Module Settings'.<br /> |
Once you enter the name, the problem will disappear. | Once you enter the name, the problem will disappear. | ||
|} | |} | ||
| Line 1,282: | Line 1,596: | ||
|} | |} | ||
{| | {| | ||
| − | |style="padding: 0px 0px | + | |style="padding: 0px 0px 5px 15px;"|3. If you are unable to connect with your Plesk server or client area functionalities do not work properly, then make sure that you are connecting with your server on port 8443.<br /> |
Here you can find more information on how to change the default port in [https://kb.parallels.com/en/138 Linux] and [https://kb.parallels.com/en/115712 Windows] | Here you can find more information on how to change the default port in [https://kb.parallels.com/en/138 Linux] and [https://kb.parallels.com/en/115712 Windows] | ||
|} | |} | ||
{| | {| | ||
| − | |style="padding: 0px 0px | + | |style="padding: 0px 0px 5px 15px;"|4. ''CURL Error: [6] Could not resolve host.''<br /> |
Try entering your Plesk IP address into the ''Hostname'' field in the server configuration. | Try entering your Plesk IP address into the ''Hostname'' field in the server configuration. | ||
|} | |} | ||
{| | {| | ||
| − | |style="padding: 0px 0px | + | |style="padding: 0px 0px 5px 15px;"|5. ''Unable to get the version number from the server. CURL Error: 7 - couldn't connect to host. Check server connection details.''<br /> |
Check connection details and the connection itself between WHMCS and server. | Check connection details and the connection itself between WHMCS and server. | ||
|} | |} | ||
{| | {| | ||
| − | |style="padding: 0px 0px | + | |style="padding: 0px 0px 5px 15px;"|6. ''Unable to get the version number from the server. Permission denied. You have to set admin account access details.''<br /> |
You need admin account access to use PPPE module. Reseller account API is not supported. | You need admin account access to use PPPE module. Reseller account API is not supported. | ||
|} | |} | ||
{| | {| | ||
| − | |style="padding: 0px 0px | + | |style="padding: 0px 0px 5px 15px;"|7. '''Blank page at '' 'Applications'. '''''<br /> |
''Reason'': Some libraries may be missing.<br /> | ''Reason'': Some libraries may be missing.<br /> | ||
''Solution'': Make sure you have installed php-xml library. | ''Solution'': Make sure you have installed php-xml library. | ||
|} | |} | ||
{| | {| | ||
| − | |style="padding: 0px 0px | + | |style="padding: 0px 0px 5px 15px;"|8. If you have problems with your license, please make sure that the content of the file is correct.<br/> |
Please note that for '''Plesk Extended For WHMCS V2.0.0''' and later, the license key begins with: | Please note that for '''Plesk Extended For WHMCS V2.0.0''' and later, the license key begins with: | ||
$plesk_extended_licensekey="ModulesGarden_PleskEX_LicenseKey"; | $plesk_extended_licensekey="ModulesGarden_PleskEX_LicenseKey"; | ||
| Line 1,312: | Line 1,626: | ||
|} | |} | ||
{| | {| | ||
| − | |style="padding: 0px 0px | + | |style="padding: 0px 0px 5px 15px;"|9. In case you see an error: '' 'Request Is Invalid: Error In Line 5: Element 'owner-id' is not a valid value of the atomic type 'int'.' '' while creating a product, please verify your product type.<br/> Most probably it is set to '' 'Dedicated/VPS Server' '' or '' 'Other' '' which are not supported. See point 17 of the installation for more info. |
|} | |} | ||
{| | {| | ||
| − | |style="padding: 0px 0px | + | |style="padding: 0px 0px 5px 15px;"|10. If you see an error similar to: '' 'Unable to find appropriate manager for this version of Panel. Plesk should be at least 8.0 version.' '' while creating a product, please verify your server configuration.<br/> Make sure that you have SSL 'Secure' ticked in your server configuration, depending on your Plesk settings. |
|} | |} | ||
{| | {| | ||
| − | |style="padding: 0px 0px | + | |style="padding: 0px 0px 5px 15px;"|11. Plesk Extended For WHMCS functions only on the administrator account. |
|} | |} | ||
{| | {| | ||
| − | |style="padding: 0px 0px | + | |style="padding: 0px 0px 5px 15px;"|12. For a large backup files we recommend to increase the '' 'max_execution_time' '' setting in your server's '' 'php.ini' '' configuration.<br/>Otherwise, fatal errors like '' 'Allowed memory size of 134217728 bytes exhausted (tried to allocate 100401152 bytes)' may occur when trying to download local backups. |
|} | |} | ||
{| | {| | ||
| − | |style="padding: 0px 0px | + | |style="padding: 0px 0px 5px 15px;"|13. Getting the '' 'SQLSTATE[23000]: Integrity constraint violation: 1062 Duplicate entry (...)' '' error when creating a new Plesk account?<br/> |
This might occur when a client has both ''normal'' and ''reseller'' hosting accounts. In this case, we recommended to try the '' 'Separate Plesk User' '' option for the product's configuration. | This might occur when a client has both ''normal'' and ''reseller'' hosting accounts. In this case, we recommended to try the '' 'Separate Plesk User' '' option for the product's configuration. | ||
|} | |} | ||
{| | {| | ||
| − | |style="padding: 0px 0px | + | |style="padding: 0px 0px 5px 15px;"|14. Due to [https://docs.plesk.com/en-US/onyx/api-rpc/about-xml-api.28709/ removed support for '' 'XML API'] '' by Plesk, Plesk Onyx from version ''' ''17.8'' ''' is only '''partly''' supported.<br/> |
This means the following functionalities: | This means the following functionalities: | ||
*Backups | *Backups | ||
| Line 1,337: | Line 1,651: | ||
|} | |} | ||
{| | {| | ||
| − | |style="padding: 0px 0px | + | |style="padding: 0px 0px 5px 15px;"|15. If your clients encounter problems with auto-login to Plesk control panel, please check if you provided the proper '' 'Log In To Panel' '' URL in the addon's '' 'Server Settings' ''.<br/> |
You can set it up as described in [[#Configuration_of_Addon|Configuration of Addon]] section in '''step 29'''. | You can set it up as described in [[#Configuration_of_Addon|Configuration of Addon]] section in '''step 29'''. | ||
|} | |} | ||
{| | {| | ||
| − | |style="padding: 0px 0px | + | |style="padding: 0px 0px 5px 15px;"|16. If you come across the ''' ''PleskAPIInvalidSecretKeyException : Invalid secret key usage. Please check logs for details.'' ''' error after migrating the system to another server, <br/> then use the following cron command. It will delete all keys from the Plesk panel as well as 'PleskExtended_Accounts' database table to allow each account to create a new key.<br/> |
<pre> php yourModulePath/modules/servers/PleskExtended/cron/cron.php secretKeys:delete </pre> | <pre> php yourModulePath/modules/servers/PleskExtended/cron/cron.php secretKeys:delete </pre> | ||
| + | |} | ||
| + | {| | ||
| + | |style="padding: 0px 0px 10px 15px;"|17. Plesk Extended For WHMCS does not support the WHMCS '' 'Move Product/Service to Another Client' '' function. | ||
| + | |} | ||
| + | {| | ||
| + | |style="padding: 0px 0px 30px 15px;"|18. The account types "Other" and "Server/VPS" are not supported. When creating a product, make sure to assign it to one of the supported types: Shared Hosting or Reseller Hosting.<br/> | ||
| + | Otherwise, attempting to run the create command will result in an error. | ||
|} | |} | ||
Latest revision as of 10:43, 29 January 2026
[edit] About Plesk Extended For WHMCS
| Plesk Extended For WHMCS is a module which empowers your customers to manage their web hosting accounts directly from the WHMCS client area. They will be able to manage their FTP accounts, backups, databases, mailboxes, spam filters, DNS settings and other key aspects in a fully remote manner. |
- Admin Area Features:
| ✔ Create/Suspend/Unsuspend/Terminate Account |
| ✔ Change Package And Password Of Account |
| ✔ Log In To Plesk User Panel On Click |
| ✔ Define Products Configuration: |
| ✔ Service Plan Name |
| ✔ Reseller Plan Name |
| ✔ IP Address Types To Use |
| ✔ Toggle "Power User" Plesk Panel View |
| ✔ Toggle Client Details Synchronization |
| ✔ Create Subscriptions On Single Or Separate Plesk User Accounts |
| ✔ Define Default PHP Version |
| ✔ Enable Plesk Addon Ordering via Configurable Options |
| ✔ Enable Metric Billing |
| ✔ Configure Client Area Features Per Product |
| ✔ Enable And Configure Application Auto Installer To Use Per Product: |
| ✔ Default Plesk App Installer |
| ✔ Installatron |
| ✔ Softaculous |
| ✔ Generate Auto Installer's Applications Configurable Options |
| ✔ Configure Multiple Product Features And Settings At Once |
| ✔ View All Plesk And Plesk Extended Products And Servers In One Place |
| ✔ View All Plesk Extended Server Configurations In One Place |
| ✔ View All WHMCS Clients Linked With Plesk Customer Accounts In One Place |
| ✔ Define Server Custom URL Of Panel And Webmail |
| ✔ Log In To Plesk Administrator Panel On Click |
| ✔ Customize Module Language Files With "Translations" Tool |
| ✔ Control Staff Access Level To Specific Resources With ACL |
| ✔ View And Manage Logs |
- Client Area Features:
| ✔ Remote Access And Management Of: |
| ✔ Addon Domains |
| ✔ Applications |
| ✔ Databases - MySQL And PostgreSQL Support |
| ✔ Domain Aliases |
| ✔ DNS Settings |
| ✔ Email Addresses |
| ✔ Email Forwarders |
| ✔ FTP Access |
| ✔ Git Repositories |
| ✔ Log Rotation |
| ✔ Node.js |
| ✔ PHP Settings |
| ✔ SSL Certificates |
| ✔ Subdomains |
| ✔ WordPress Manager - Separate Module Required (Native Integration Will Be Restored Soon) |
| ✔ WordPress Toolkit |
| ✔ One Click Login To: |
| ✔ Backup Manager |
| ✔ Plesk |
| ✔ Webmail |
| ✔ WP Toolkit |
| ✔ Change Account Password |
- Application Auto Installer Features:
| ✔ Ordering Process: |
| ✔ Auto Install Chosen Application After Account Creation |
| ✔ Auto Install Application Chosen By Client During Order - With Configurable Options |
| ✔ Allow Custom Settings Of Auto Installed Application - With Custom Fields |
| ✔ Client Area: |
| ✔ Install New Applications With Installatron, Softaculous Or Default Plesk App Installer |
| ✔ View And Manage Installed Applications |
| ✔ Backup Installed Applications |
| ✔ Perform Auto Backups Upon Application Updates By Installatron |
| ✔ View And Manage Created Backups |
| ✔ Restore Applications From Backups |
| ✔ Delete Applications Along With Their Backups |
- General Info:
| ✔ Utilizes Ajax Loaded Pages |
| ✔ Supports SSO Into Panel And Webmail |
| ✔ Requires Plesk Administrator Account |
| ✔ Integrated With Advanced Billing For WHMCS - Actual Server Resource Usage Billing |
| ✔ Integrated With IP Manager For WHMCS - Complete Control And Easy Assignment Of IP Subnets |
| ✔ Integrated With Server Allocator For WHMCS - Automatic Assignment Of Most Suitable Servers To Products |
| ✔ Integrated With WordPress Manager For WHMCS - Remote Installation And Management Of WordPress Instances |
| ✔ Fully Integrated With Lagom WHMCS Client Theme |
| ✔ Multi-Language Support With Custom Translations Tool |
| ✔ Supports Windows And Linux |
| ✔ Supports Plesk Onyx And Plesk Obsidian |
| ✔ Supports PHP 8.3 Back To PHP 8.2 |
| ✔ Supports WHMCS Metric Billing - Integration: Domains, Subdomains, Domain Aliases, Mailboxes, Databases, Additional FTP Accounts, Storage, Traffic |
| ✔ Supports WHMCS Server Sync Tool |
| ✔ Supports WHMCS Themes "Six" And "Twenty-One" |
| ✔ Supports WHMCS V9.0 Back To WHMCS V8.10 |
| ✔ Requires ionCube Loader V14 Or Later |
| ✔ Easy Module Upgrade To Open Source Version |
[edit] Installation and Configuration
[edit] Installation
| This tutorial will show you how to successfully install and configure Plesk Extended For WHMCS. We will guide you step by step through the whole installation and configuration process. |
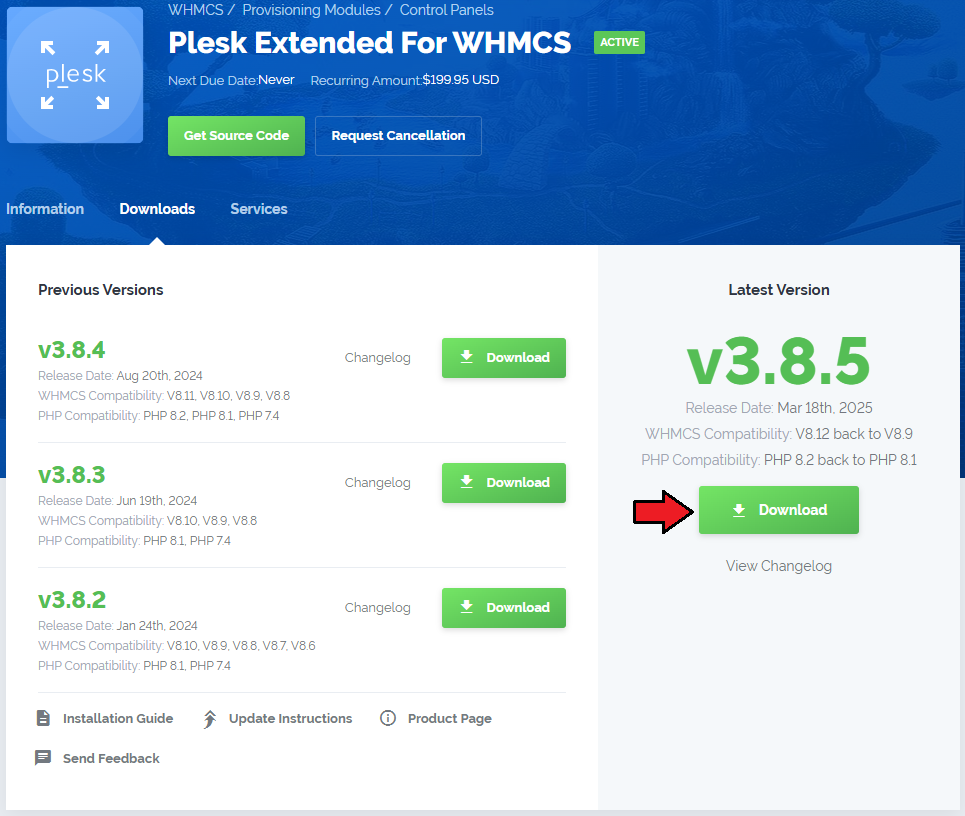
| 1. Log in to our client area and download the module. |
|
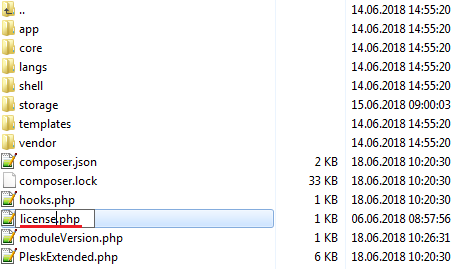
| 2. Extract the package and upload its content into the main WHMCS directory. The content of the package to upload should look like this. |
| 3. When you install Plesk Extended For WHMCS for the first time you have to rename the 'license_RENAME.php' file. The file is located in 'modules/servers/pleskExtended/license_RENAME.php'. Rename it from 'license_RENAME.php' to 'license.php'. |
|
| 4. In order to configure your license key, you have to edit the previously renamed 'license.php' file. Enter your license key between the quotation marks as presented on the following screen. You can find your license key in our client area → 'My Products'. |

|
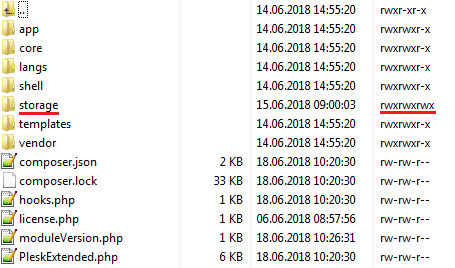
| 5. In the next step, set up the 'storage' folder as recursively writable. This folder is available at your_whmcs/modules/servers/PleskExtended/. |
|
[edit] Activation of Addon
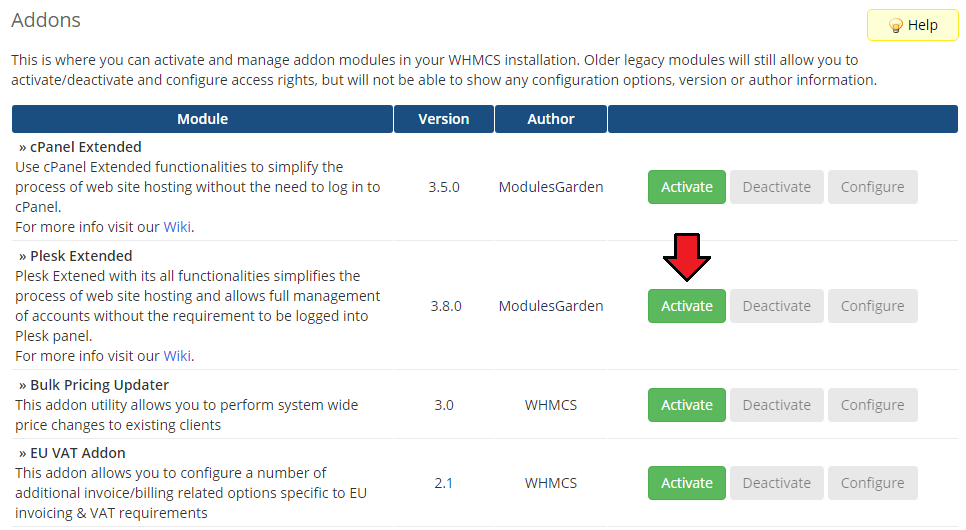
| 6. Now, you have to activate the module in your WHMCS system. Log in to your WHMCS admin area. Move to 'System Settings' and then choose 'Addon Modules'. |
|
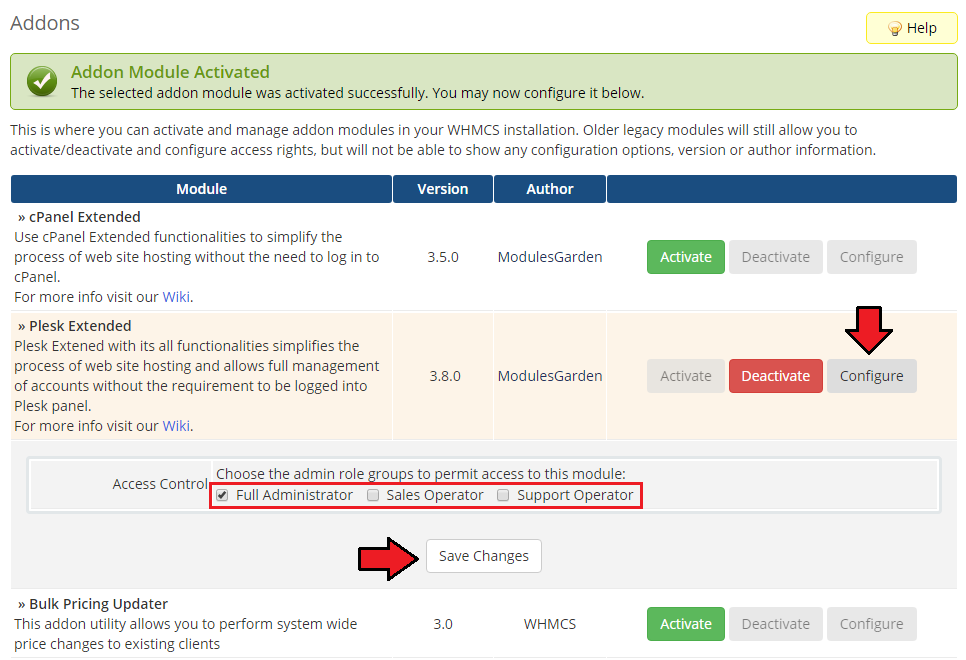
| 7. In the next step you need to permit access to this module. To do so, press 'Configure'. Next, select the required administrator roles and press 'Save Changes' . |
|
| 8. Congratulations, you have just successfully installed Plesk Extended For WHMCS! |
[edit] Configuration of Server
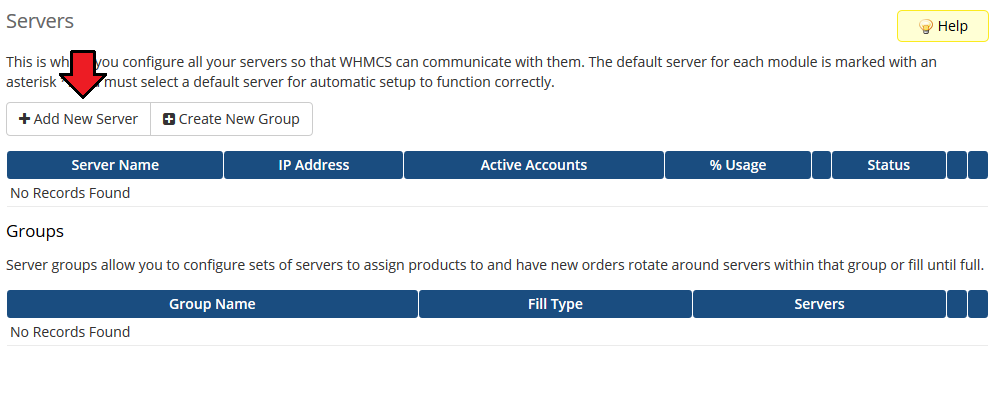
| 9. Now, we will show you how to configure a new server. To do so, log in to your WHMCS. Go to 'System Settings' → 'Servers'. Afterward, press 'Add New Server'. |
|
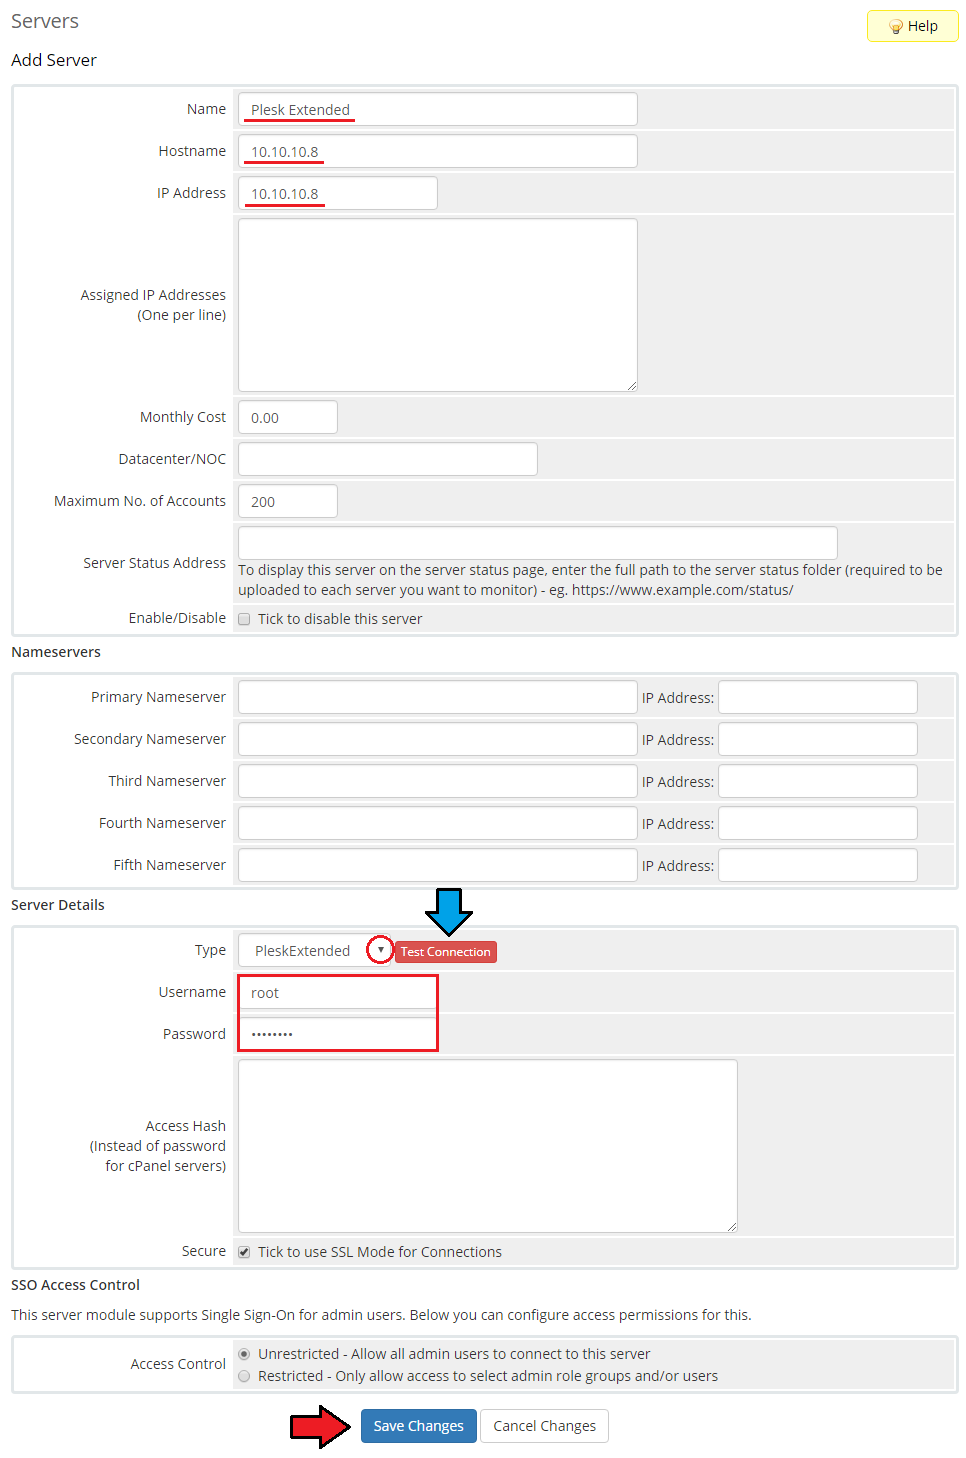
| 10. Next, enter your server name, hostname/IP address, username and password. Choose 'PleskExtended' from the dropdown menu and press 'Save Changes'. Here you can also provide other server details like nameservers or maximum number of accounts. Finally, click 'Test Connection' to check if the provided credentials are valid. Note: According to the Plesk documentation, you cannot use the same account and password that you use to log in to the ka.plesk.com panel. Please use your special account with Partner API access. Important: Due to changes in the original WHMCS Plesk module, it may be required to additionally enter the IP address into the Hostname field even if you have already provided it in the IP Address field below. Important: Pesk Extended For WHMCS module functions only on the administrator account; reseller accounts are not supported. |
|
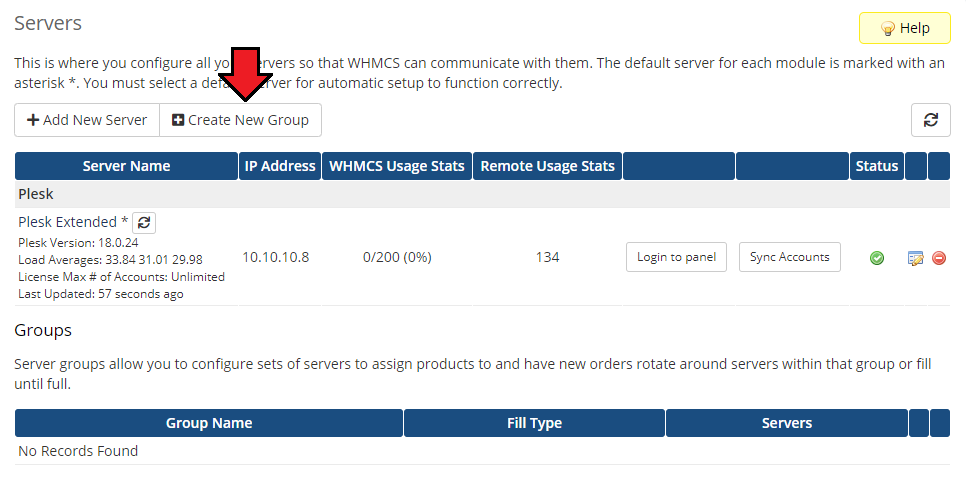
| 11. After you have configured your server correctly, you will see the following screen. Now, you need to create a new group for your server. For that purpose, press 'Create New Group'. |
|
| 12. Enter a name, click on your previously created server, press 'Add' , then 'Save Changes'. |
|
[edit] Configuration of Product
| 13. In order to create and configure the product, move to 'System Settings' → 'Products/Services'. If you do not have a product group, choose 'Create a New Group'. |

|
| 14. Enter a product group name and press 'Save Changes'. |
|
| 15. Once you have a product group, you can create your product and assign it to Plesk Extended. To create a product, press 'Create a New Product'. |
|
| 16. Afterward, choose your product type, product group, and module, enter your product name, and press "Save Changes". Please note that only the following product types are supported by the Plesk module: Shared Hosting and Reseller Account. |
|
| 17. Now, move to the 'Module Settings' section, choose your previously created server group from the dropdown menu. In the Configuration box you can adjust how the product will behave in Plesk:
|
|
| 18. Good job! You have just correctly created and customized your new product. It will now appear in Plesk Extended Center admin area. |
[edit] Configuration of Addon
| 19. After you have correctly created and customized a new product, it is time to configure it in the addon. Go to 'Addons' → 'Plesk Extended' in your WHMCS. This section offers precise data on available products and servers:
|
|
| 20. Proceed to the 'Features' section and find the product you are interested in. Press the 'Configuration' button next to the product. |
|
| 21. You will find here boxes dedicated to 'Features' and 'Applications'. To show you an example, we will set the configuration from the very beginning, without using other configuration options of the product. Select the features you would like to activate for your customers. |
|
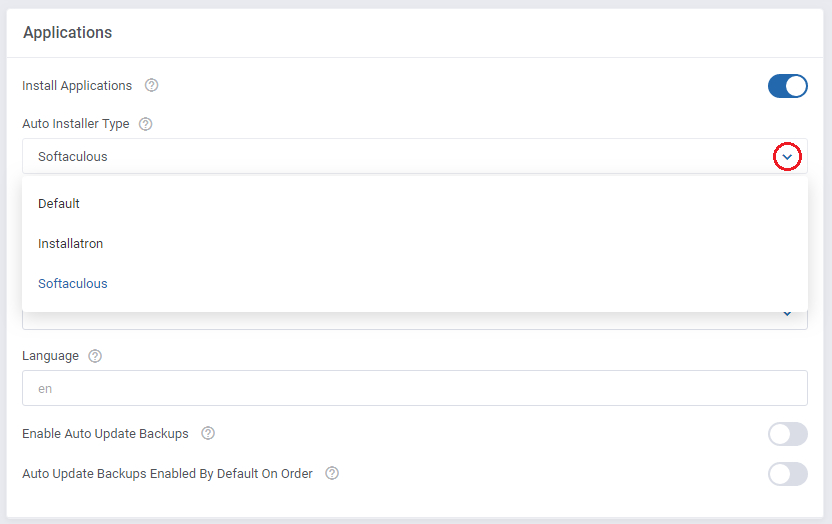
| 22. Next, toggle 'Install Application' that will be used to install applications by your clients. In the 'Auto Installer Type' field you will be free to choose between 'Installatron' , 'Softaculous' and 'Default' auto installers. |
|
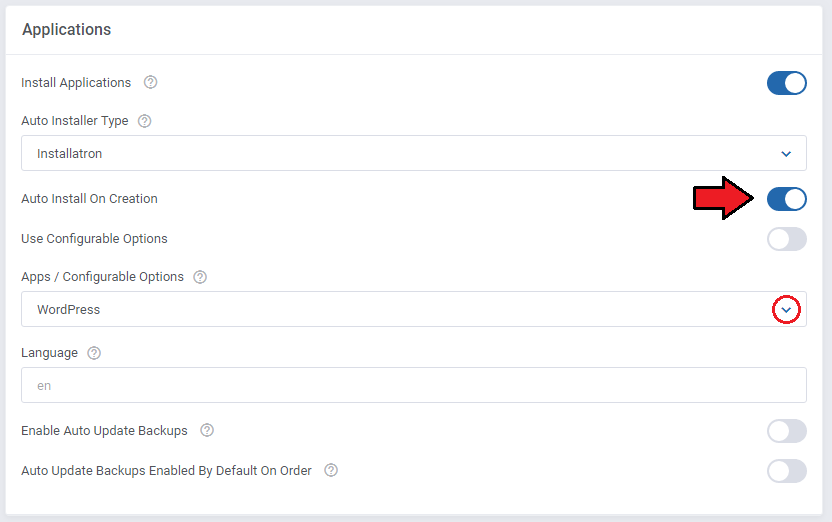
23. You may also enable the option for automatic installation of selected applications once an order is created.
|
|
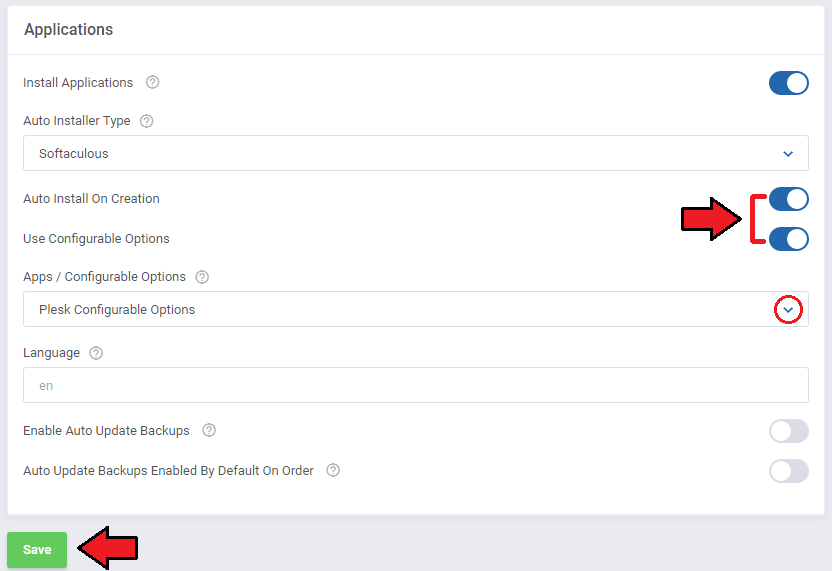
| 24. You can let your clients decide about the automatic application installation during ordering process by using the 'Use Configurable Options' switch and choosing the appropriate option from the list. |
|
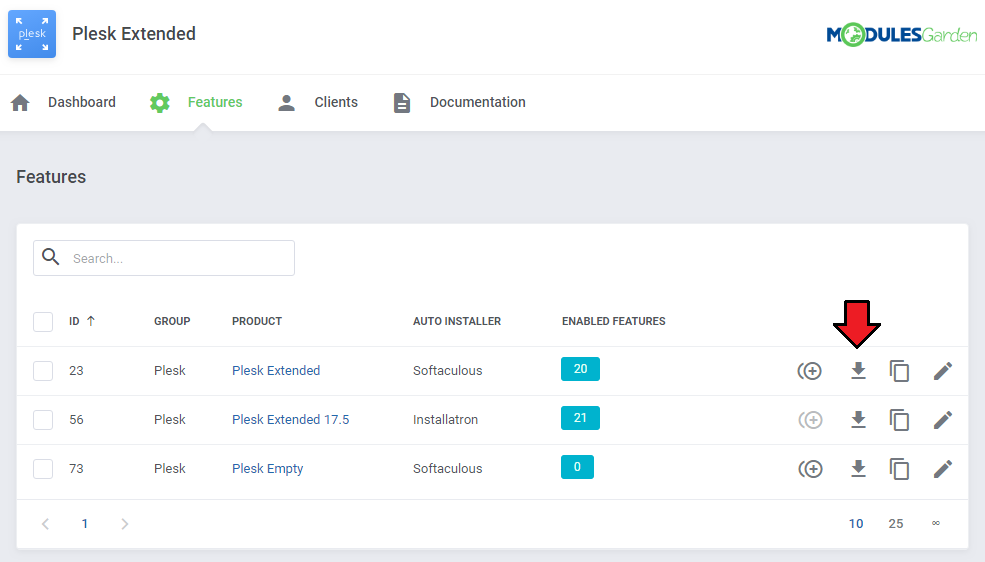
| By selecting this option, you will notice a download button next to the dropdown list on the product's features list. Its purpose is to download the available application list in the text format that can be then used for configurable options. More information about the available configurable options and custom fields can be found here. |
|
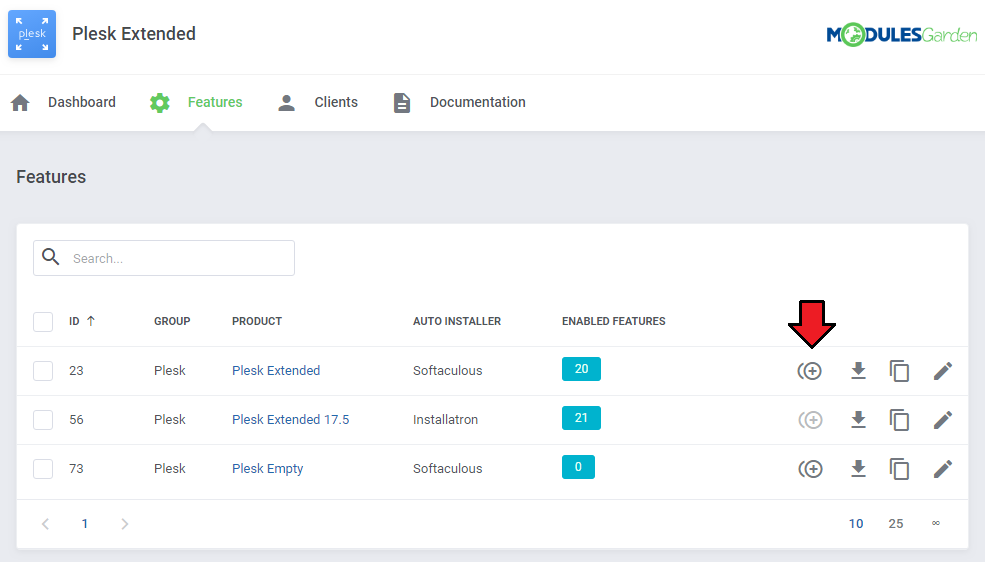
| 25. If you have selected the Auto Installer for the product, and that product does not have any configurable options assigned yet, a button to 'Generate Configurable Options' becomes active. Press it to quickly generate the configurable options for the product to allow selecting and installing application at the moment of ordering the product. |
|
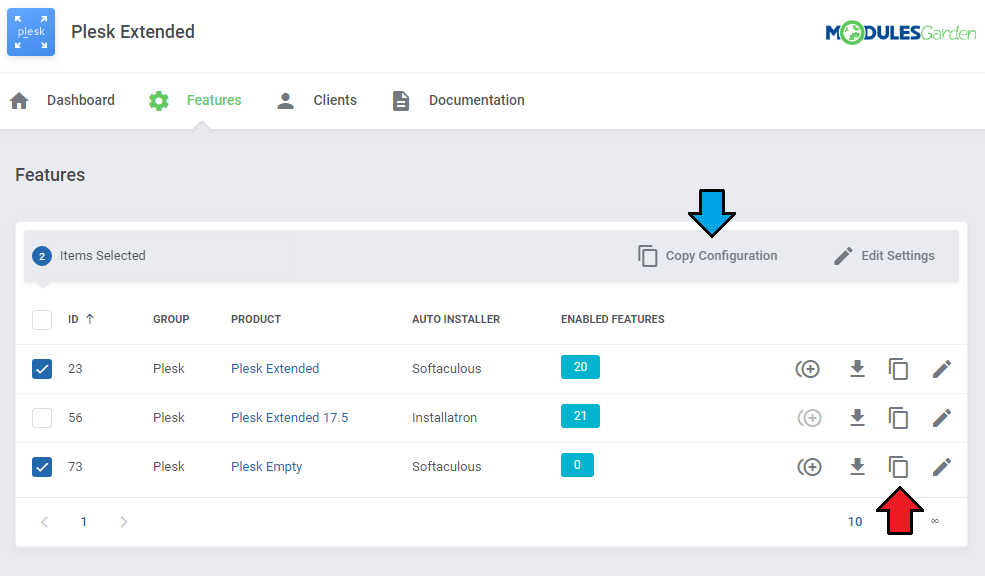
| 26. If you already have another product configured, you may copy its configuration. Find the 'Copy' button on the list with products or select multiple item at once. |
|
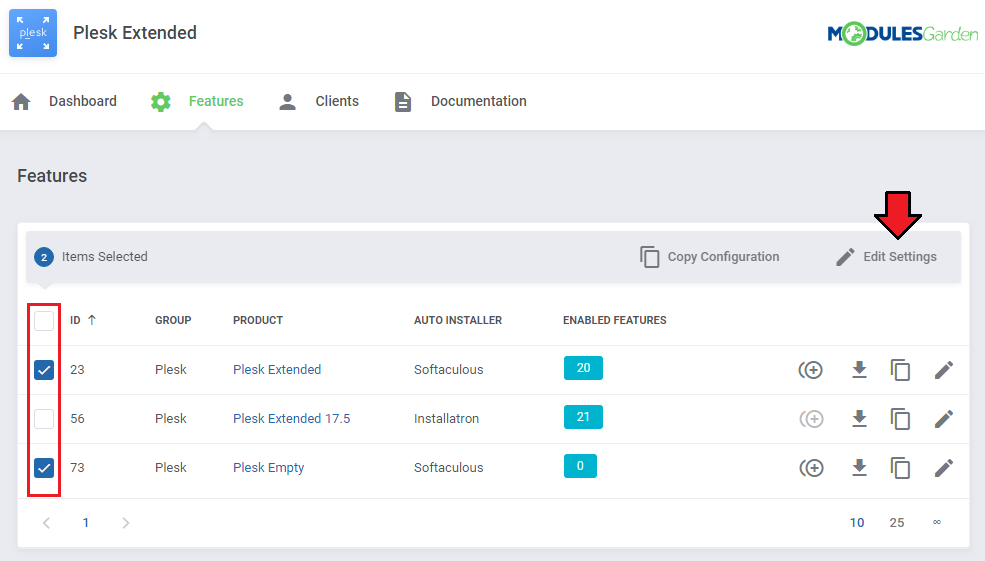
| 27. In situation you wish to edit the features of more than one product at once, simply mark the required products and use the mass action button. |
|
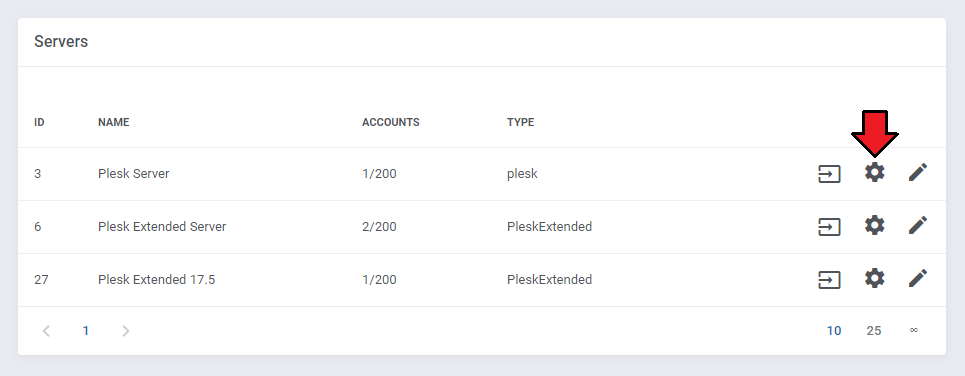
| 28. In the next step, move to 'Server Configuration' to set up a connection. Press the ' Configuration' button next to a desired server. |
|
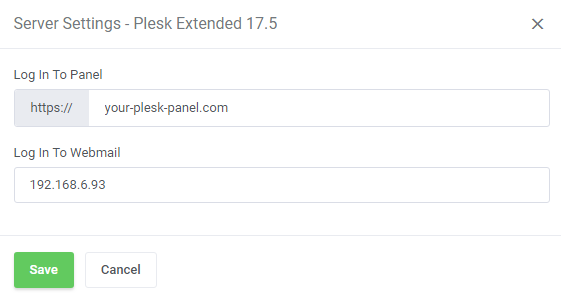
| Enter the proper domain to allow a connection with Plesk panel. In order to connect to Webmail you may either type in an adequate IP address or provide a webmail URL with a {$domain} variable which will be replaced with a client's domain. |
|
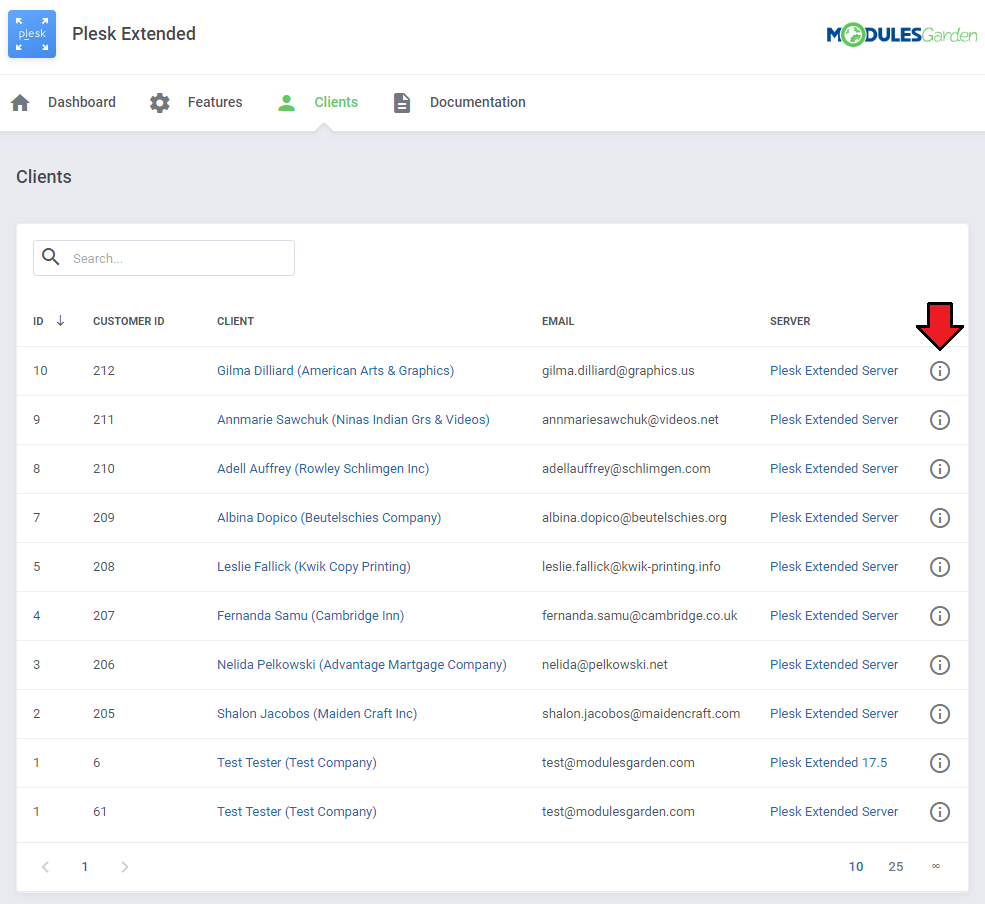
| 'Clients' section includes a list of your clients who own any Plesk type product. Apart from the client name, you may find there the client's Plesk customer ID and server. Press 'More Information' icon to get more details. |
|
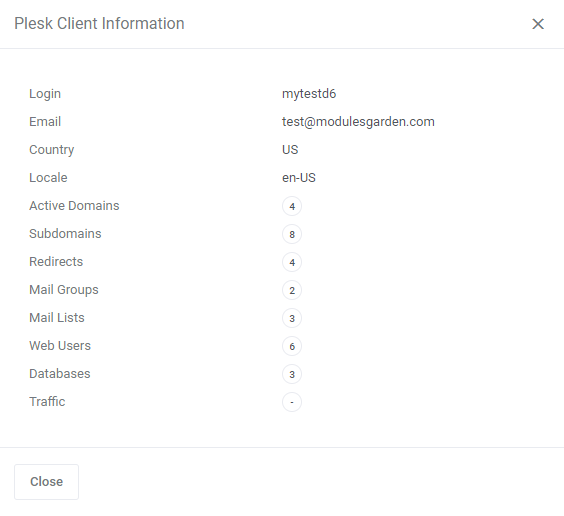
| Plesk client detailed information: |
|
[edit] Additional Tools
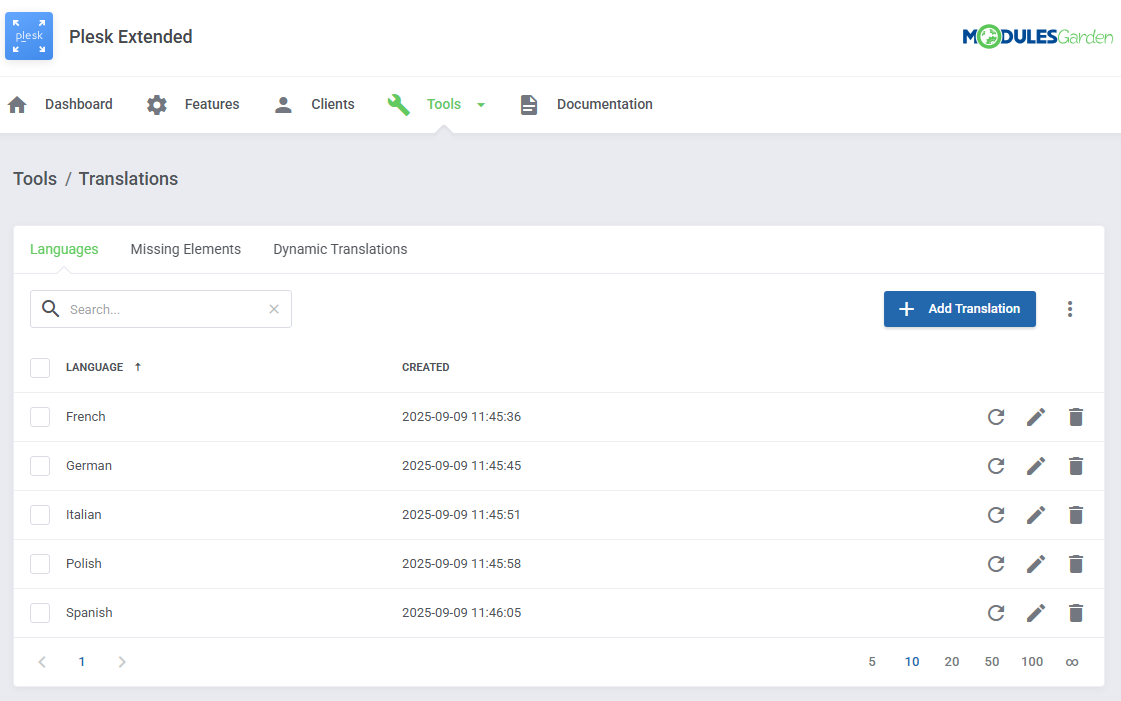
| Translations Tool Customizing language files is now extremely easy with the Translations tool that is now available directly in the addon. |
|
| Access Control Ensure secure and tailored access to your module with the "Access Control" tool available in ModulesGarden addons. |
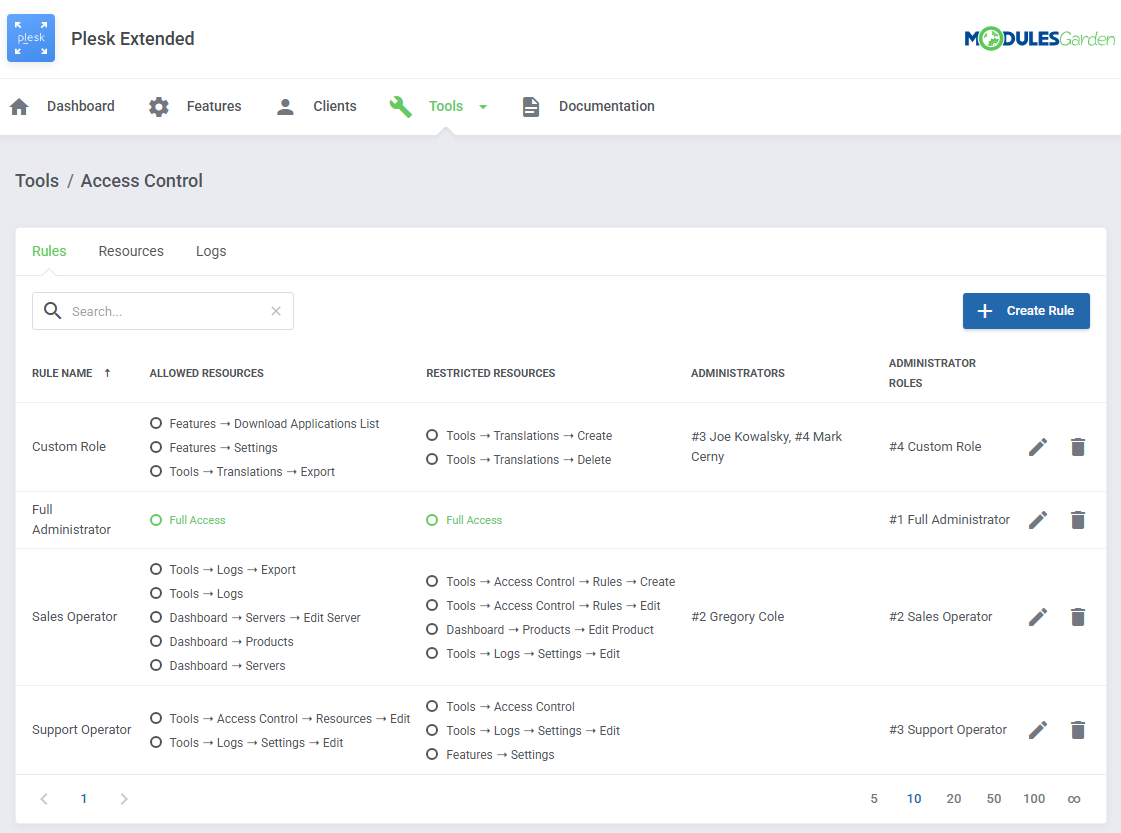
|
| Logs The "Logs" tool makes monitoring and managing module activity records simple and efficient. It provides options to categorize, filter, and view detailed entries, giving you control over the logs. |
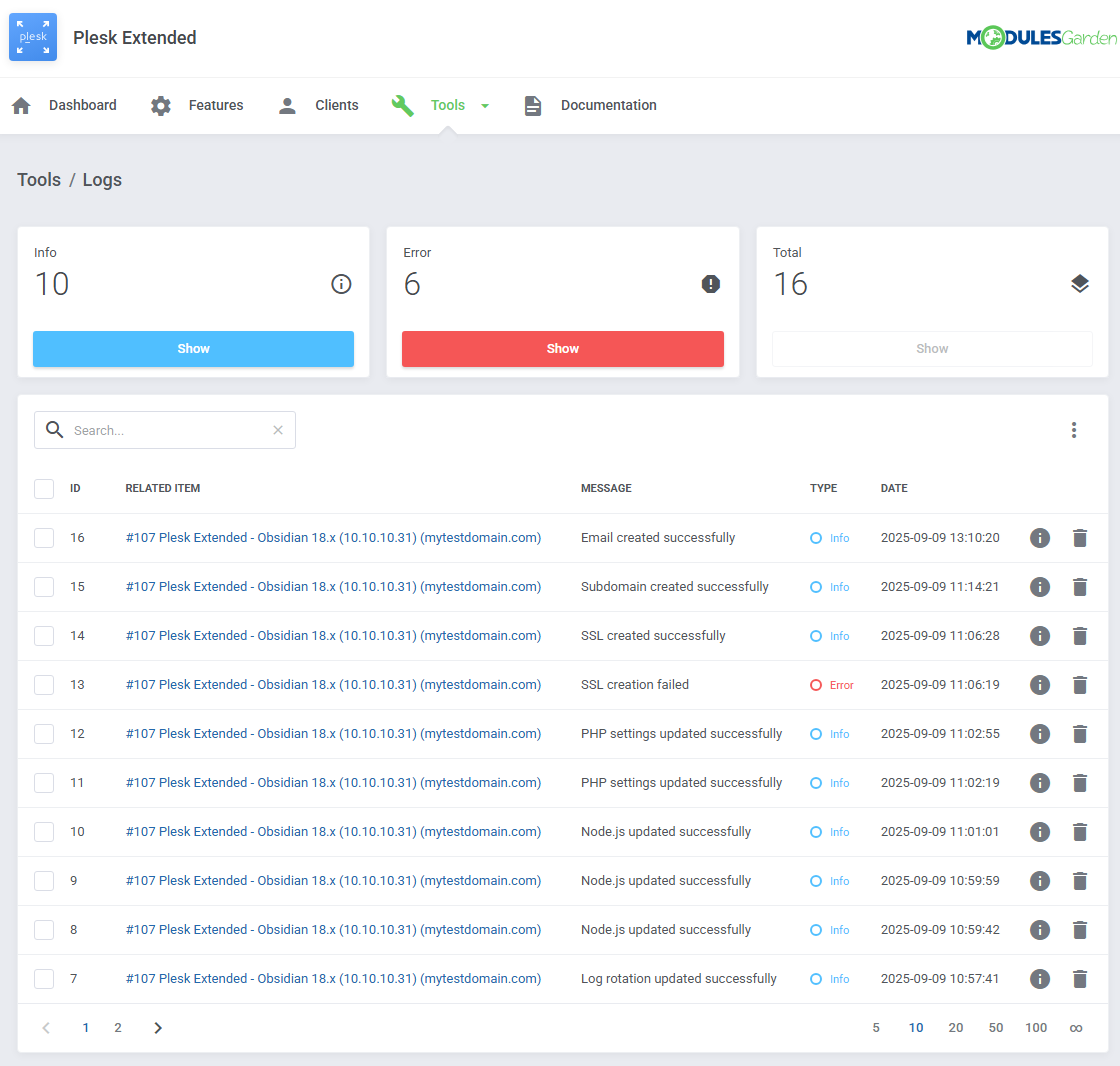
|
[edit] Upgrade Plesk to Plesk Extended Product
| Once you have already configured the standard Plesk products, you can easily upgrade them to the Plesk Extended products. Note: Before you start, make sure that you have already configured the Plesk Extended server. |
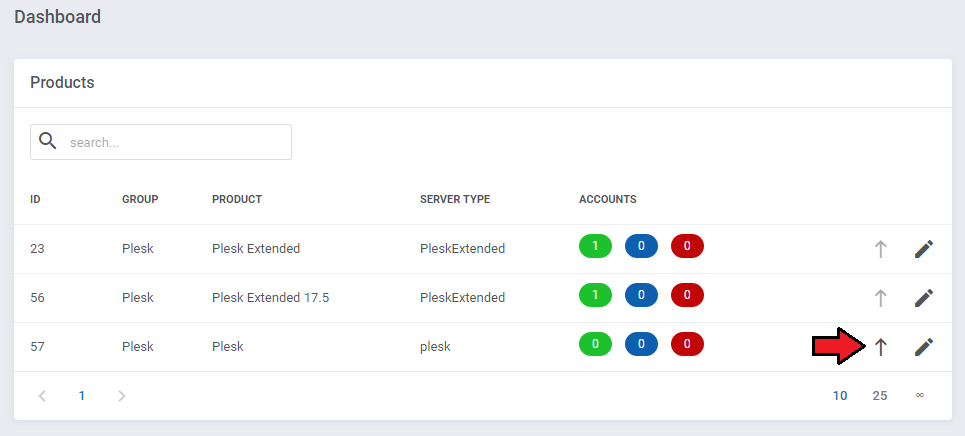
|
| Now, select the new server group configured for the Plesk Extended module.
Note: Make sure that this server configuration is exactly the same as the standard cPanel server configuration. |
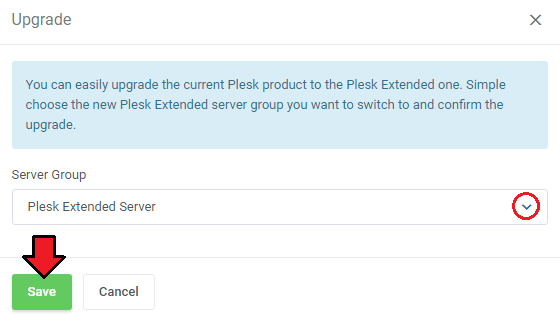
|
| From now on, all your clients who ordered a previously created product will be able to manage their Plesk accounts via your WHMCS system. Here is the summary of the ordered product in admin area. The available actions include:
|
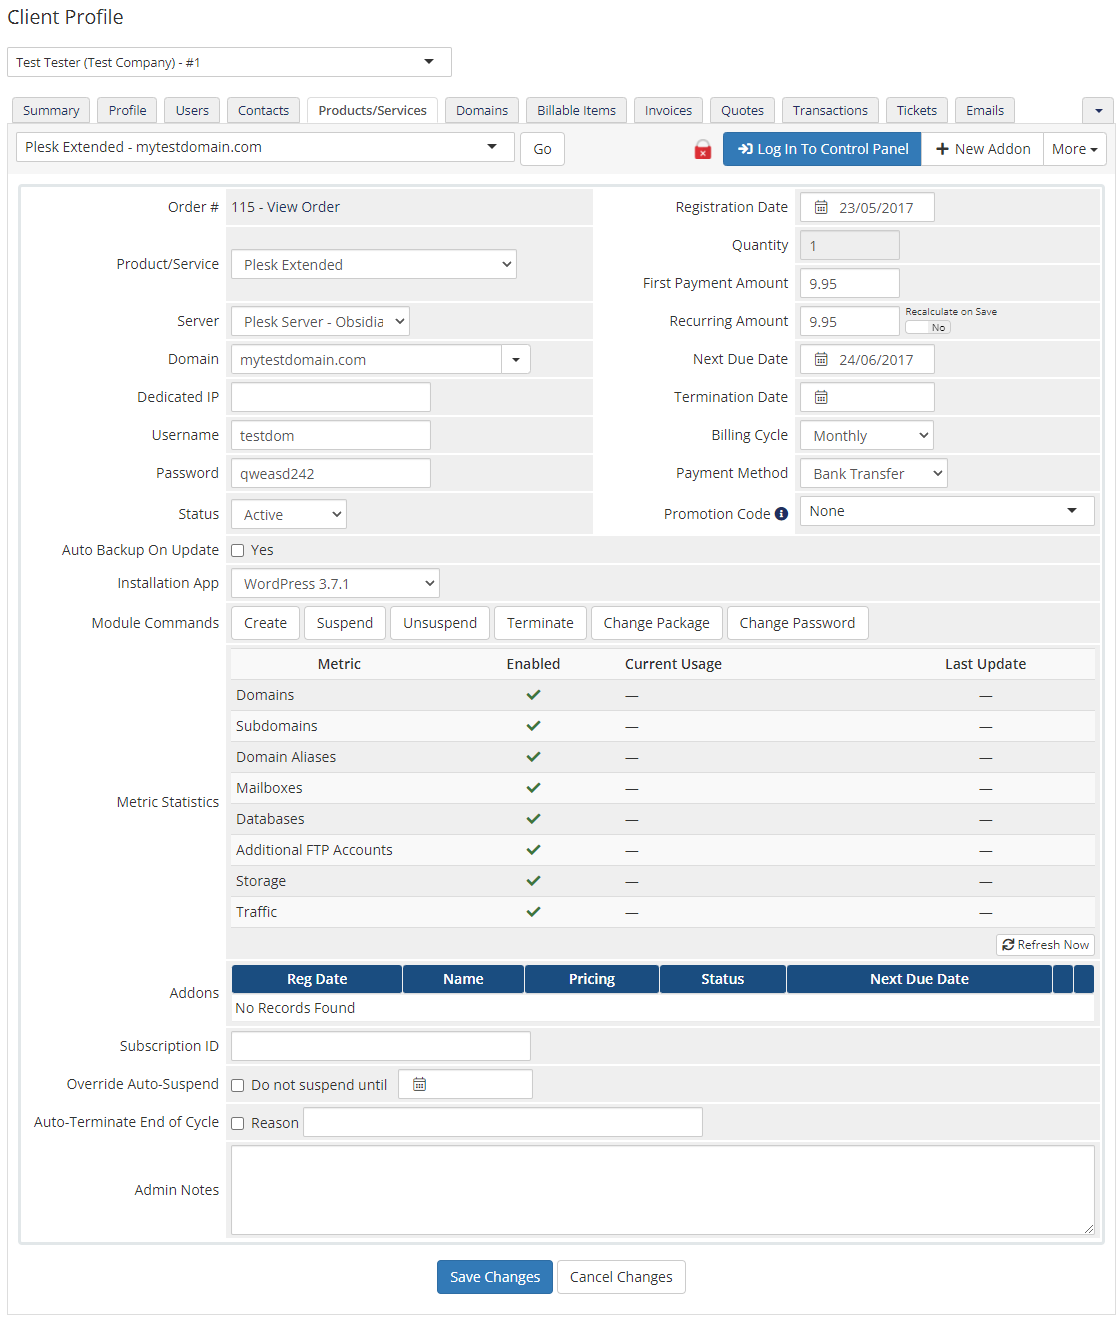
|
| Client area view: |
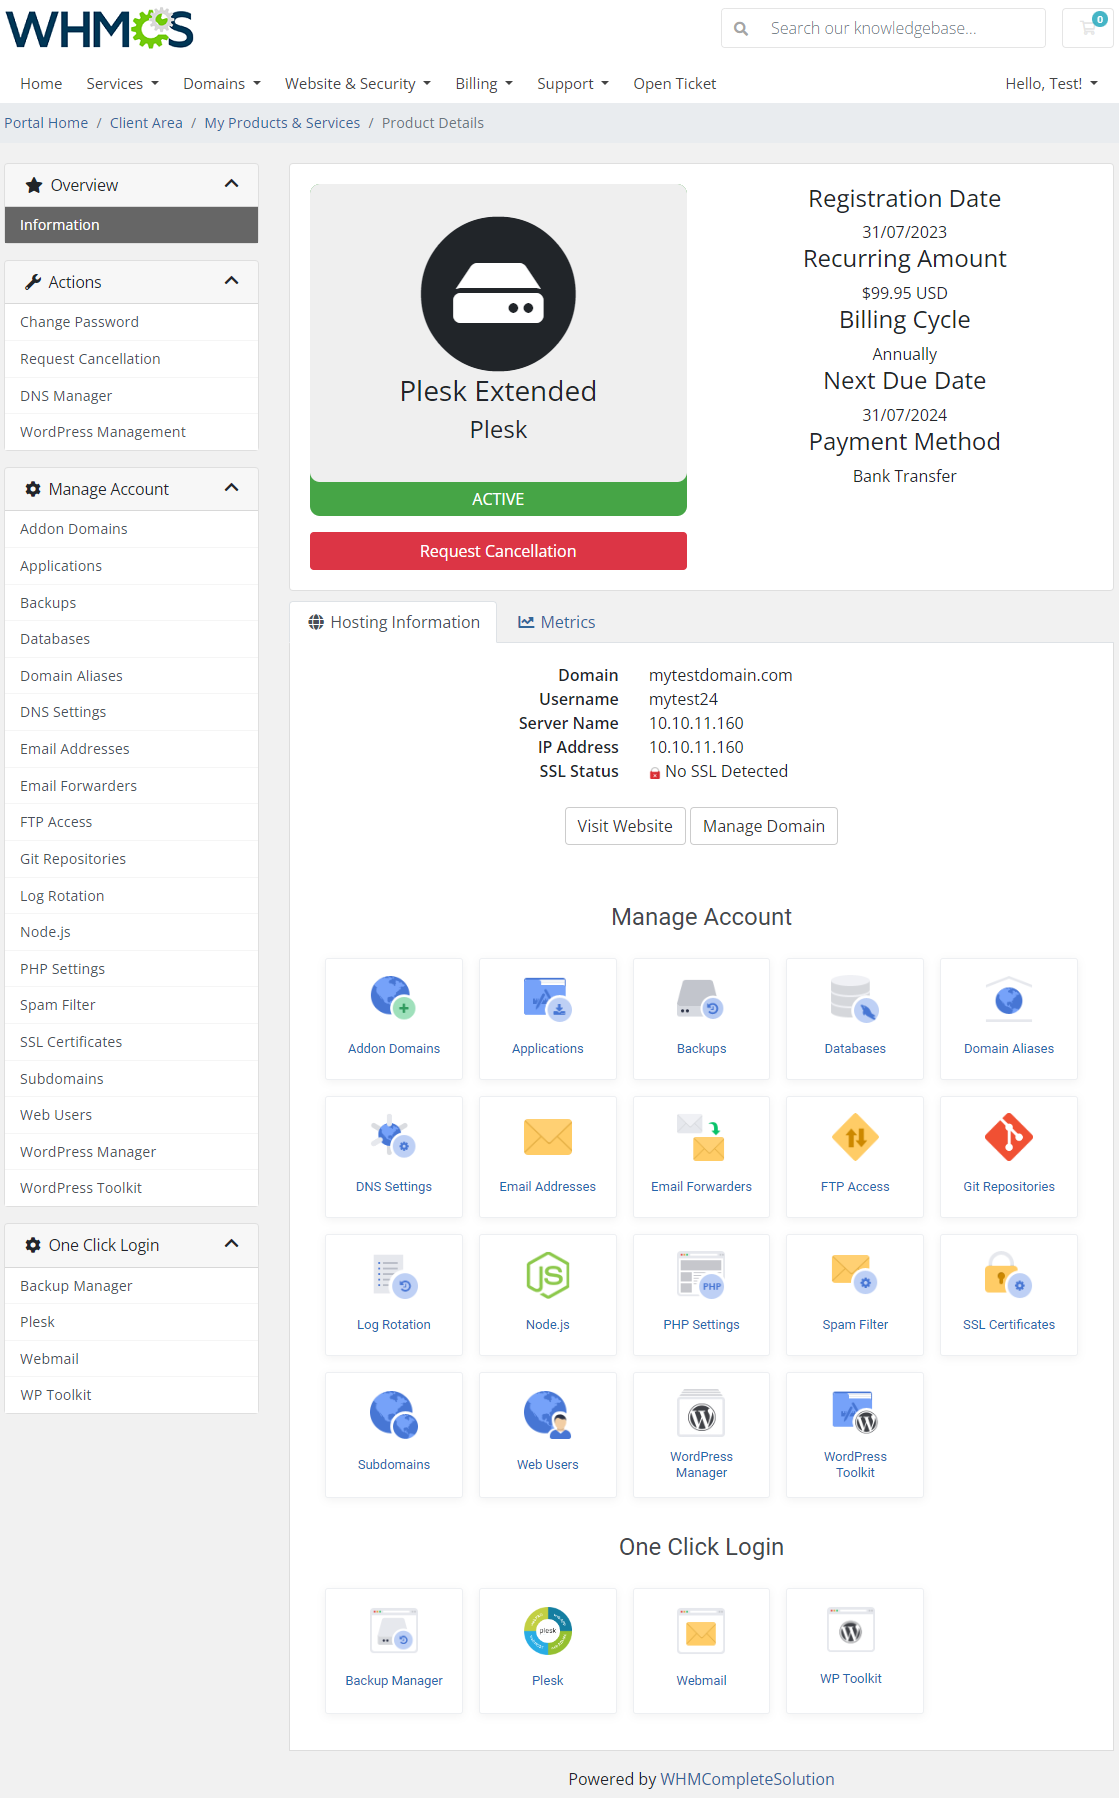
|
[edit] Management
| Plesk Extended allows your customers to manage their accounts via client area in your WHMCS system. In this short guide we will present you with the management possibilities of our module. |
[edit] Client Area
[edit] Addon Domains
| Addon domains section allows you to link the domain to a subdirectory of your account. You can view and manage addon domains, edit document root and make redirections. Note: Make sure this feature is enabled for your account before using |
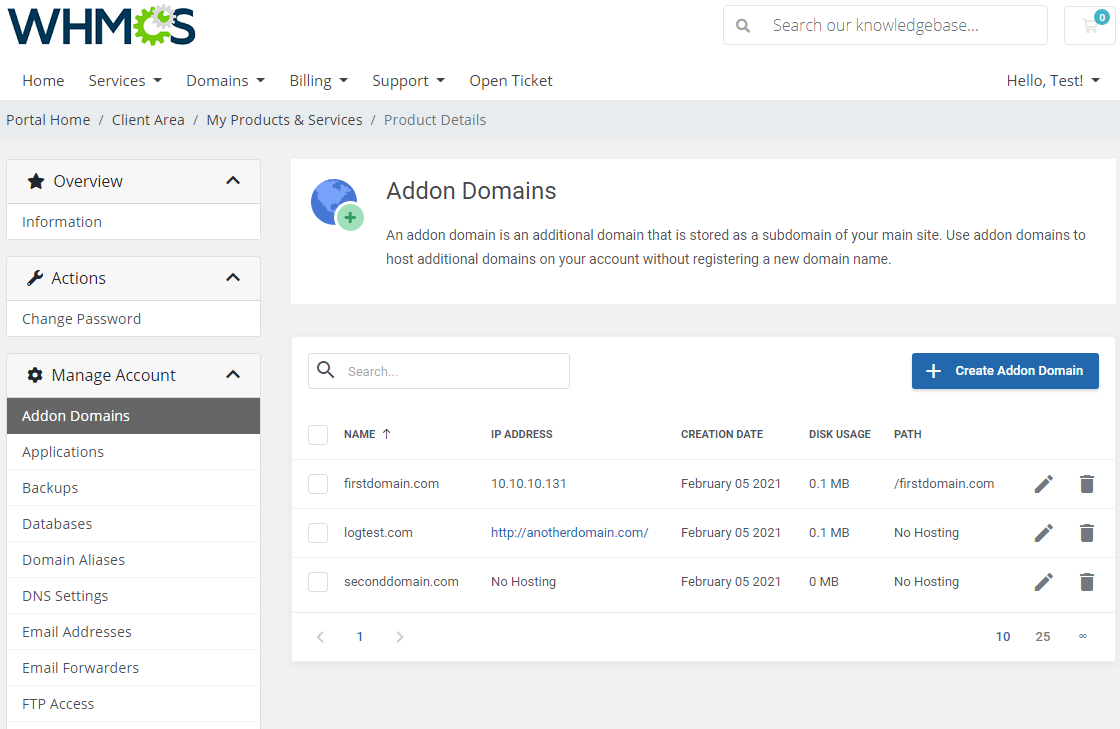
|
| Press the 'Create Addon Domain' button and enter the desired details. Please note that an FTP account will not be automatically created with the domain. |
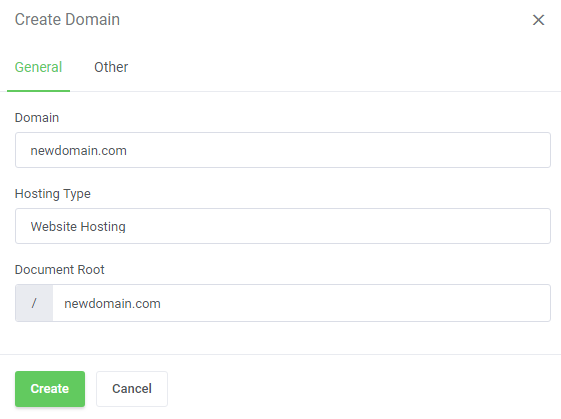
|
[edit] Applications
| Install your favorite applications in a few seconds without even accessing Plesk. Use Plesk Extended For WHMCS to:
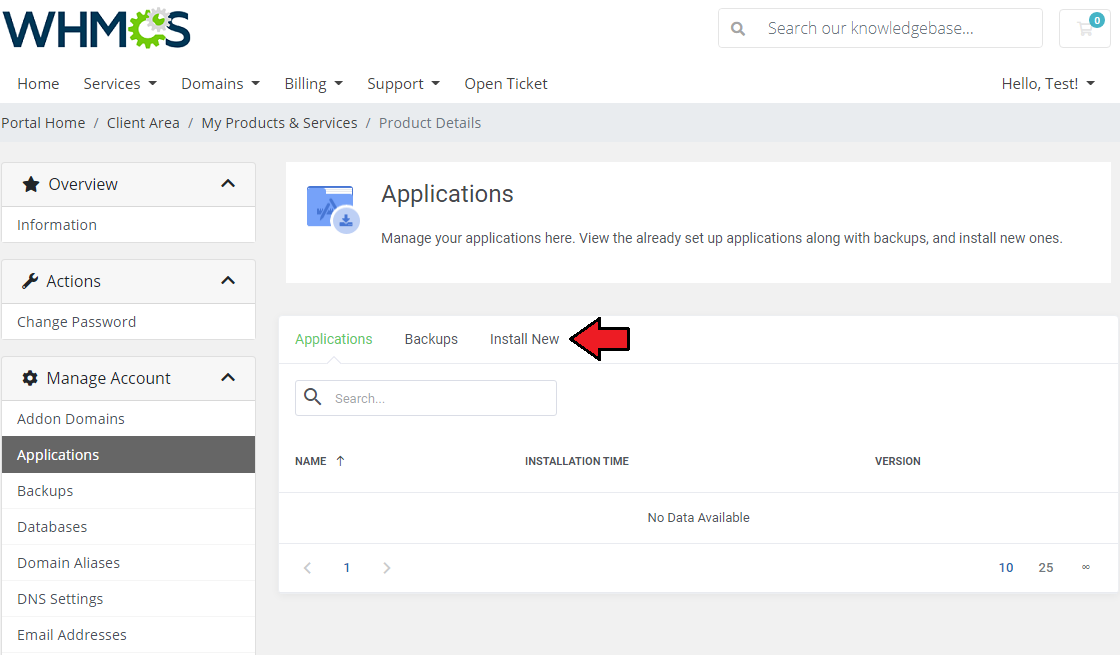
To start, simply proceed to 'Applications' , and then find the 'Install New' section. |
|
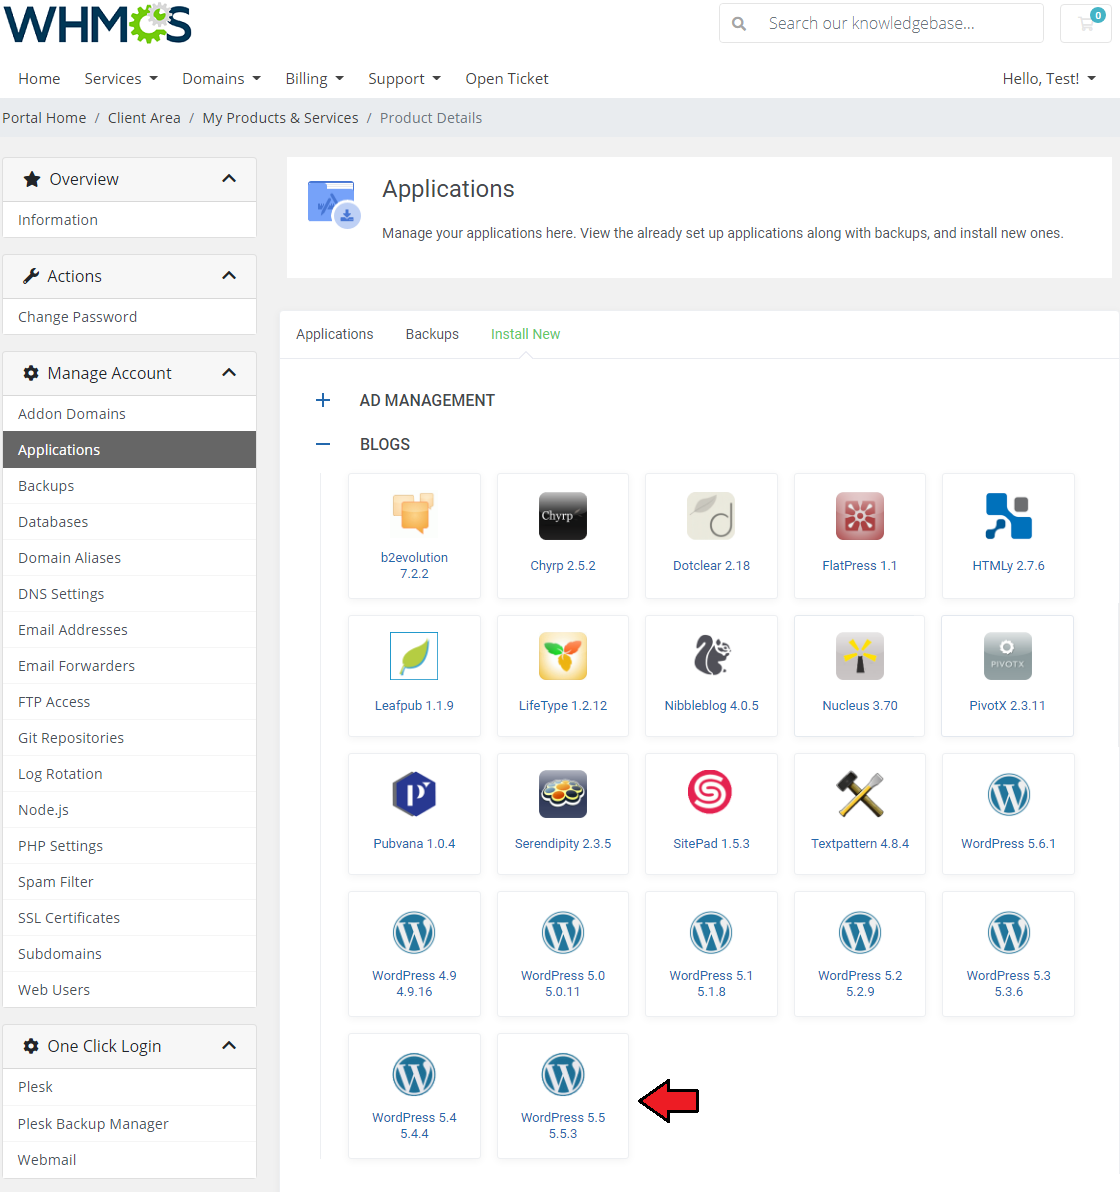
| Afterwards, you will see an extensive menu with application categories. For presentation purposes we will install 'WordPress' located in the 'Blogs' category. Find 'WordPress' and click on it. |
|
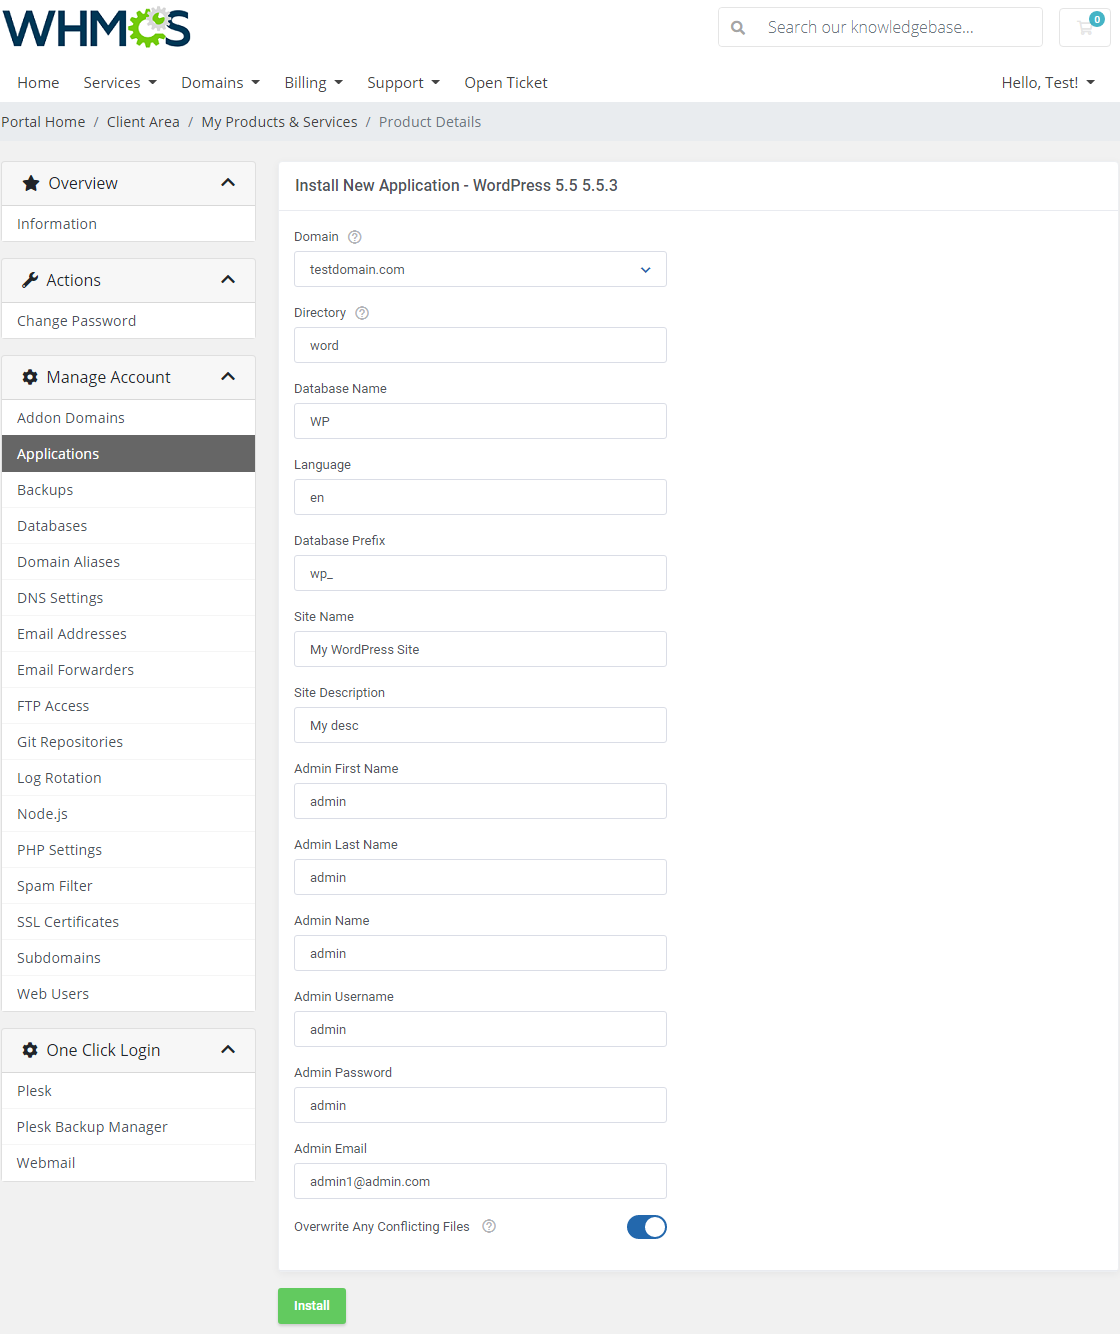
| Now, you have to enter the necessary installation details and then press 'Install Application' to follow. Wait for the 'Success' notification. |
|
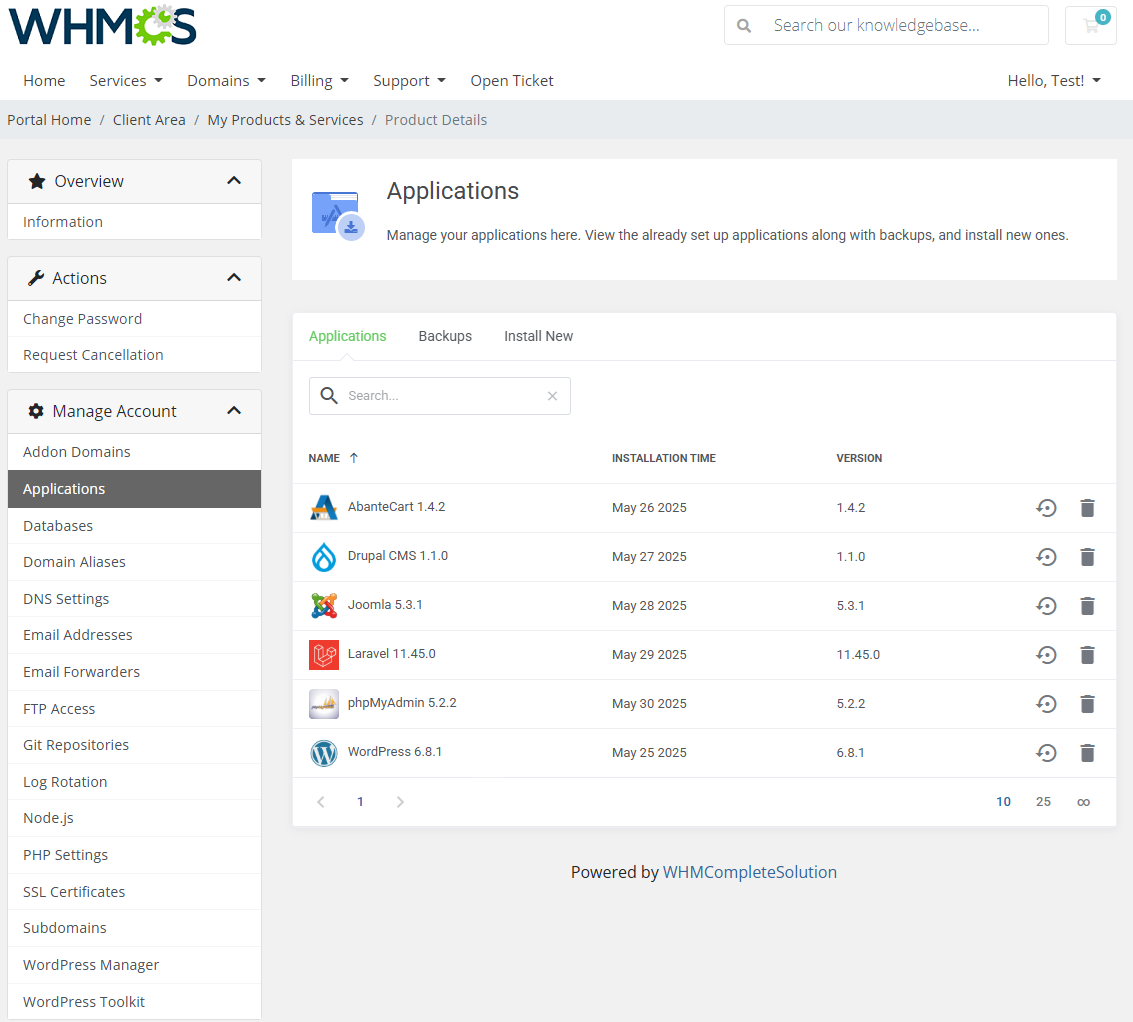
| View the list of your installed applications by clicking on the 'Installed Applications' tab and manage the application. Here you will find the name of the application, its path, size and available actions (available only for Softaculous & Installatron):
|
|
[edit] Application Backups
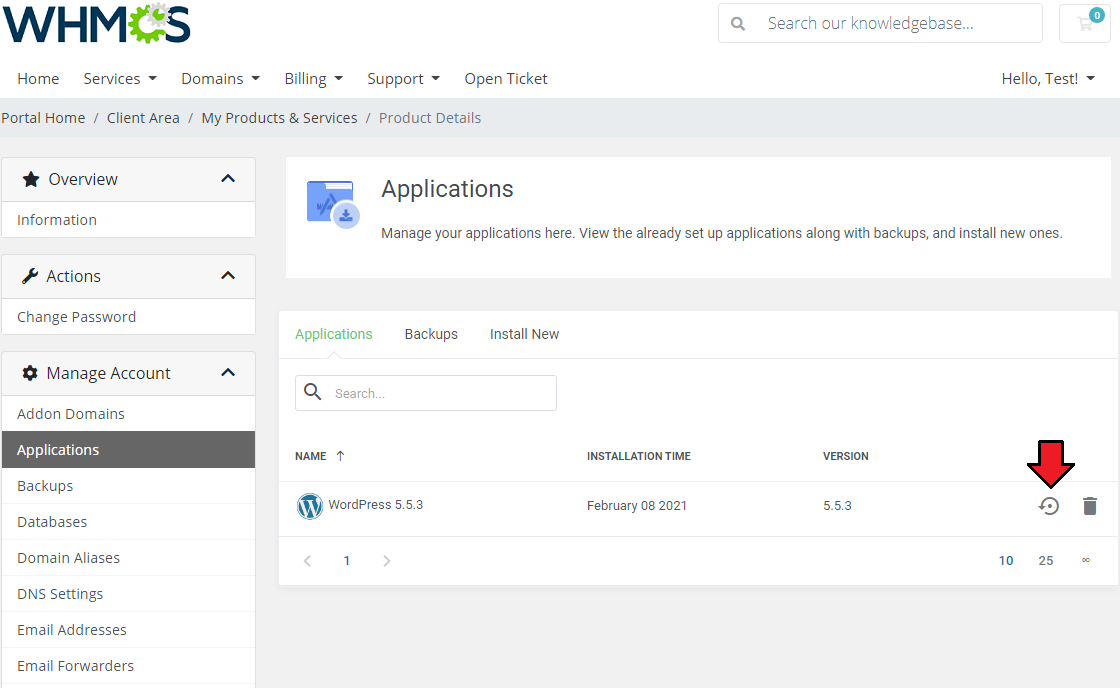
| You can also create a backup of your installation. To do so, simply press the 'Create Backup' button next to the installed application. |
|
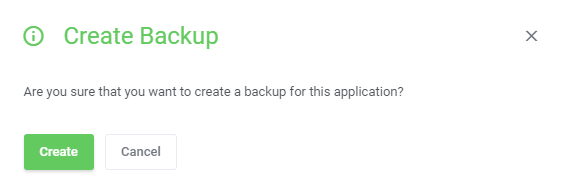
| Confirm the action and backup generation will start immediately. |
|
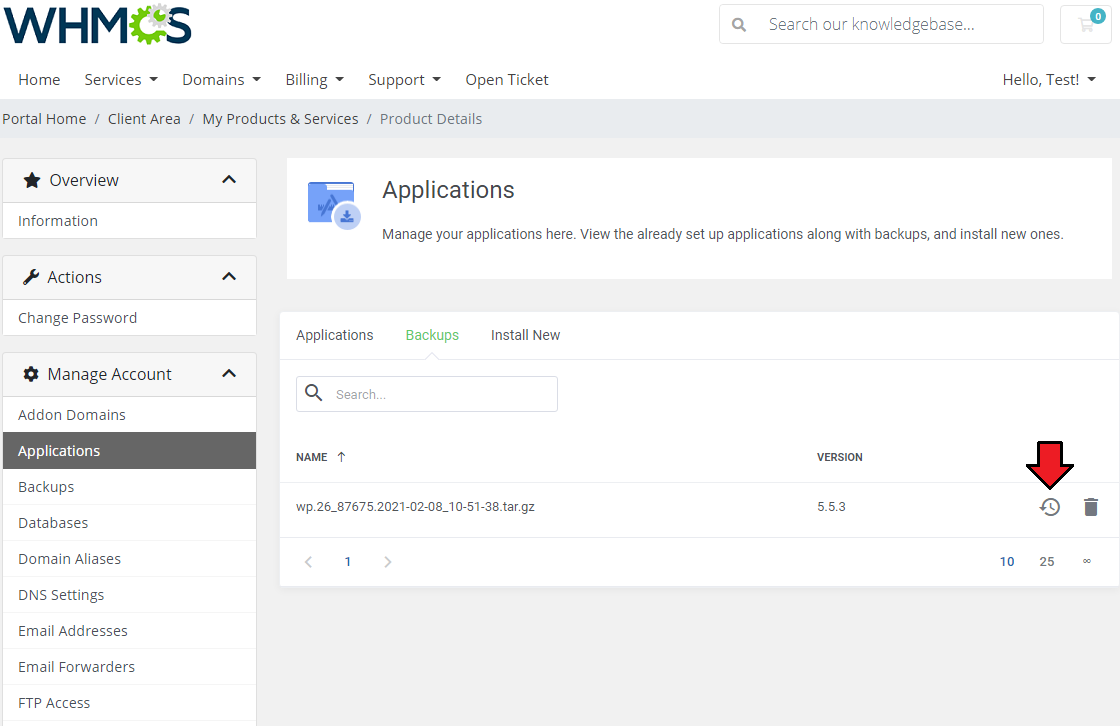
| After a moment you should receive the 'The backup has been created successfully' message confirming that the operation has been performed successfully. Once you have created a backup of your application, proceed to the 'Backups' tab. |
|
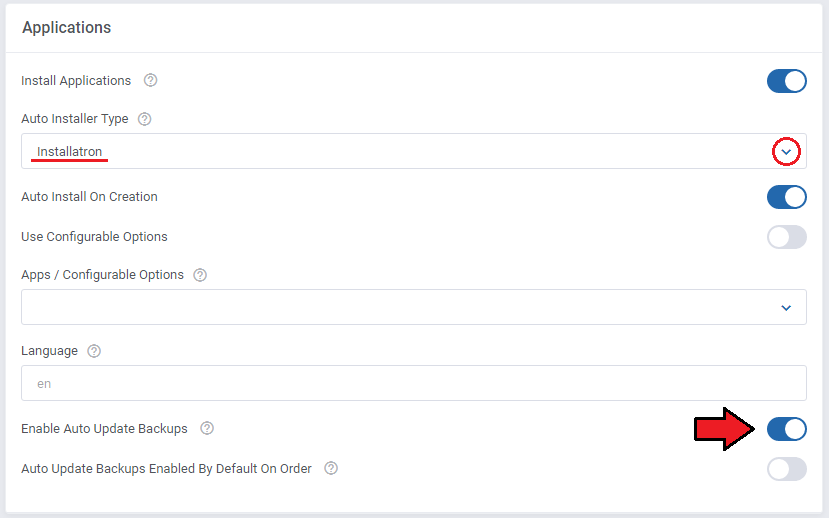
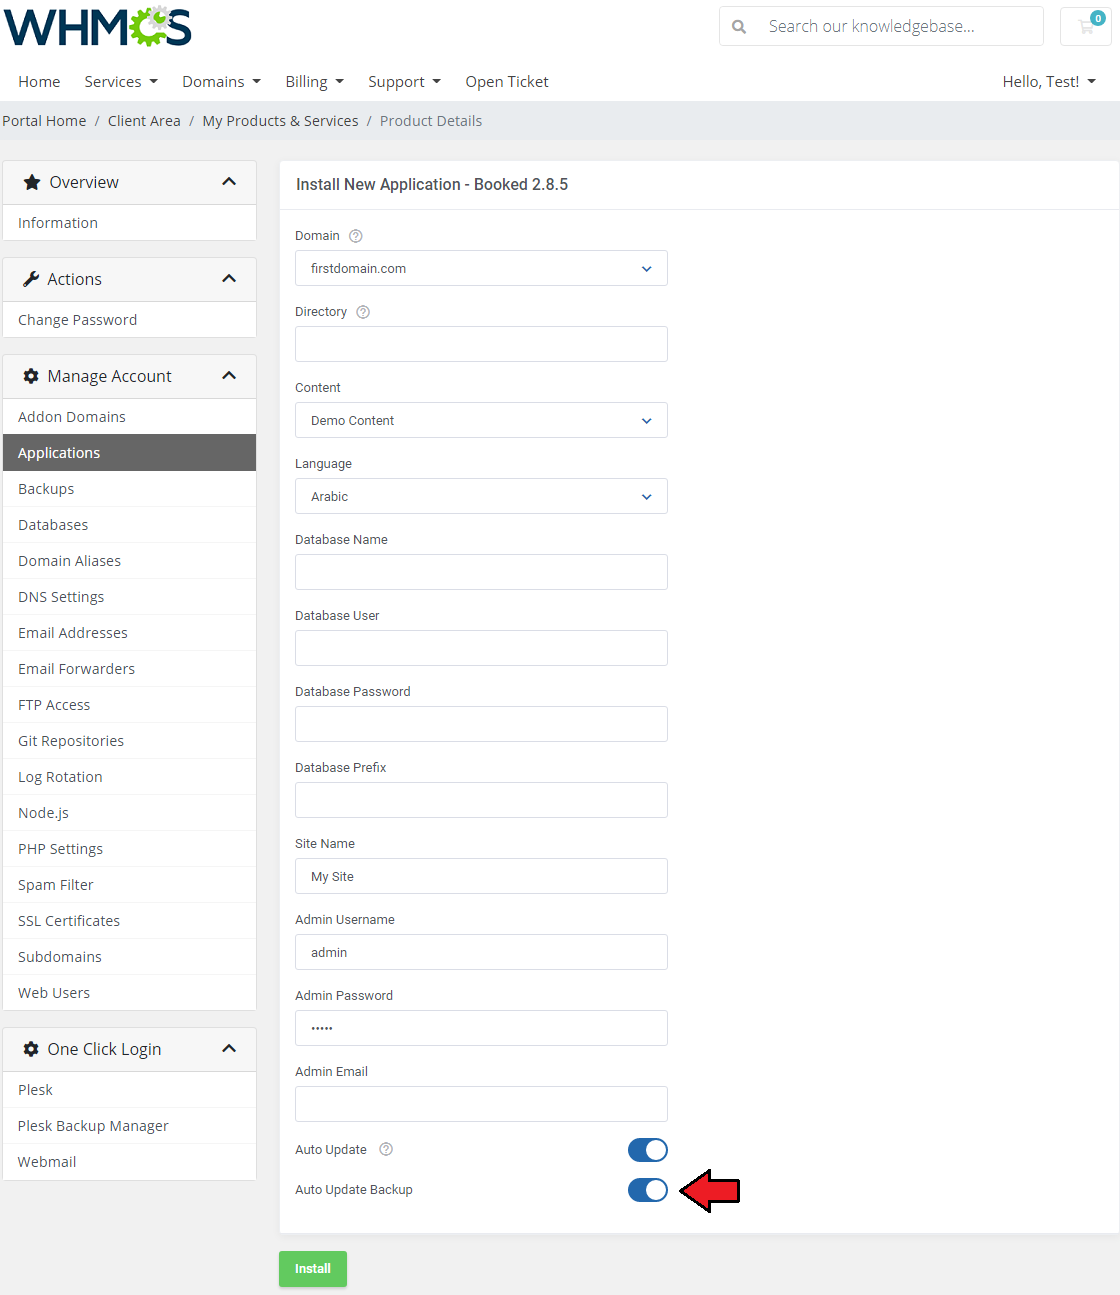
| If you use the Installatron plugin, you can also let your customers create automatic backups for application updates. To do this, go to 'Addons' → 'Plesk Extended' → 'Features' → 'Configuration' and enable Auto Update Backups. |
|
| Then, when a client installs a new application, it will be possible to toggle the option for automatic update backups and restore them if the application update fails. |
|
[edit] Databases
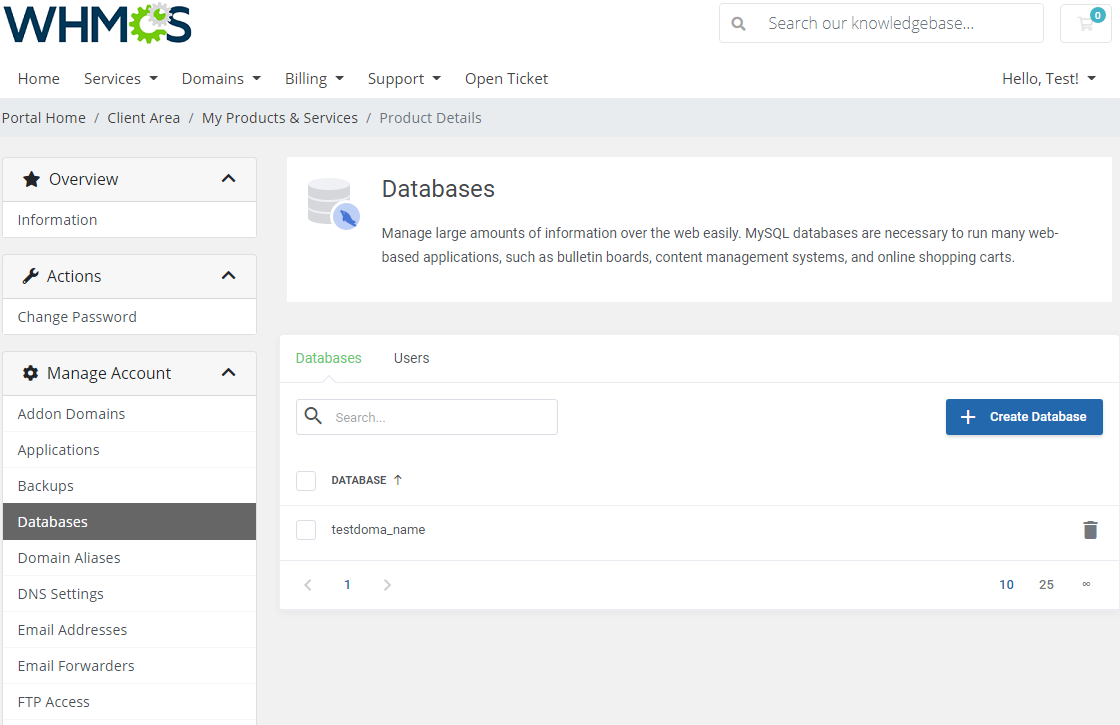
| Owing to 'Databases' management you can create/delete new databases and users. Press 'Create Database' to add a new database. |
|
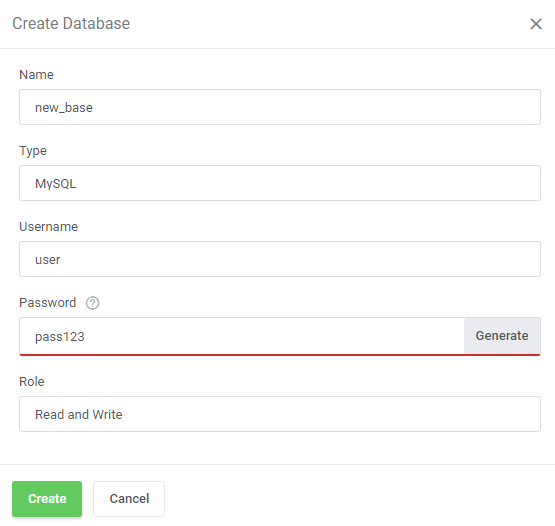
| To create a new database, type in its name into the appropriate field and select its type. Optionally, you can also create a user directly assigned to the database. Note: Only 'MySQL' and 'PostgreSQL' databases are currently supported and must be enabled in your Plesk panel first. |
|
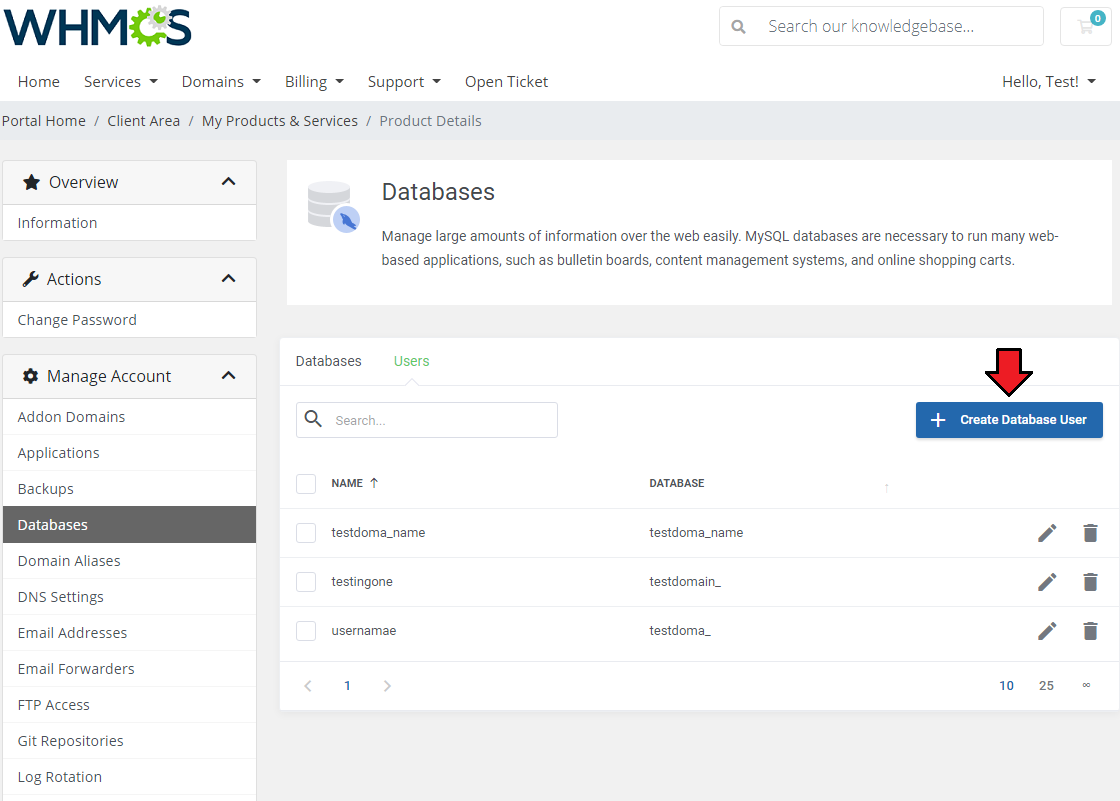
| You can also delete already assigned users as well as add new ones to particular databases by choosing 'Create Database User' in the 'Users' tab. |
|
[edit] Domain Aliases
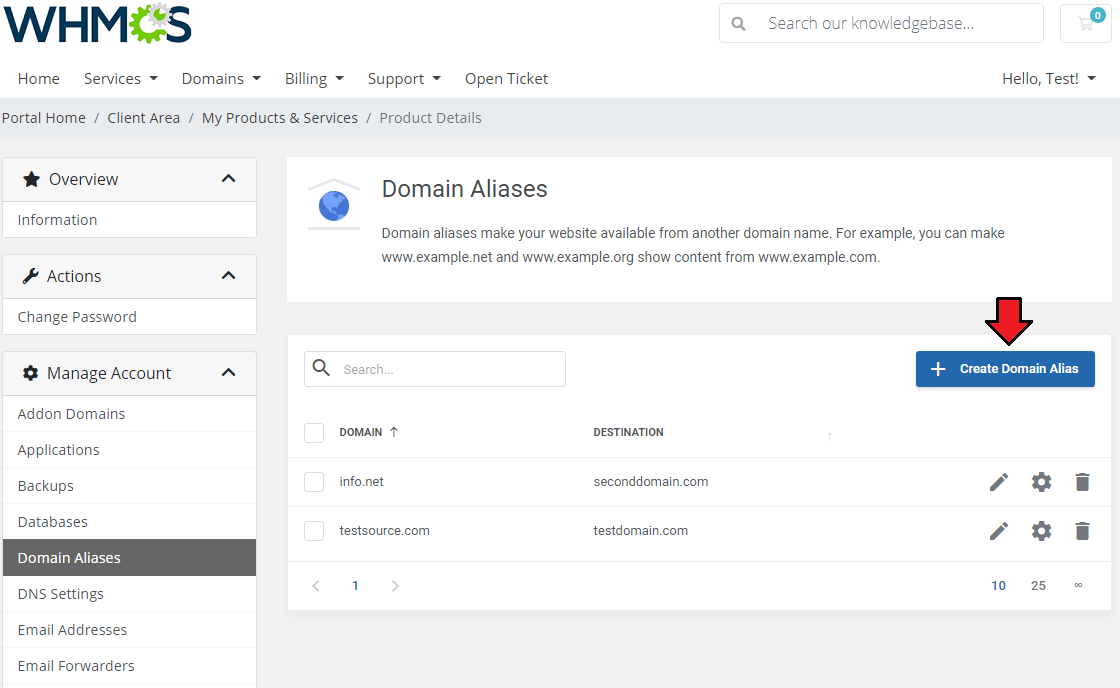
| Here you can add and manage your domain aliases. This allows you to read content of one domain from another domain name. |
|
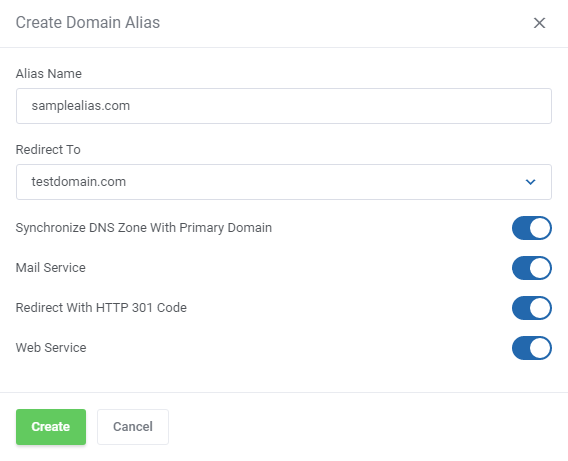
| Next, provide your alias domain, chose domain redirections as well as toggle the remaining options. |
|
| After alias creation, you can also rename it, change its settings or delete it. |
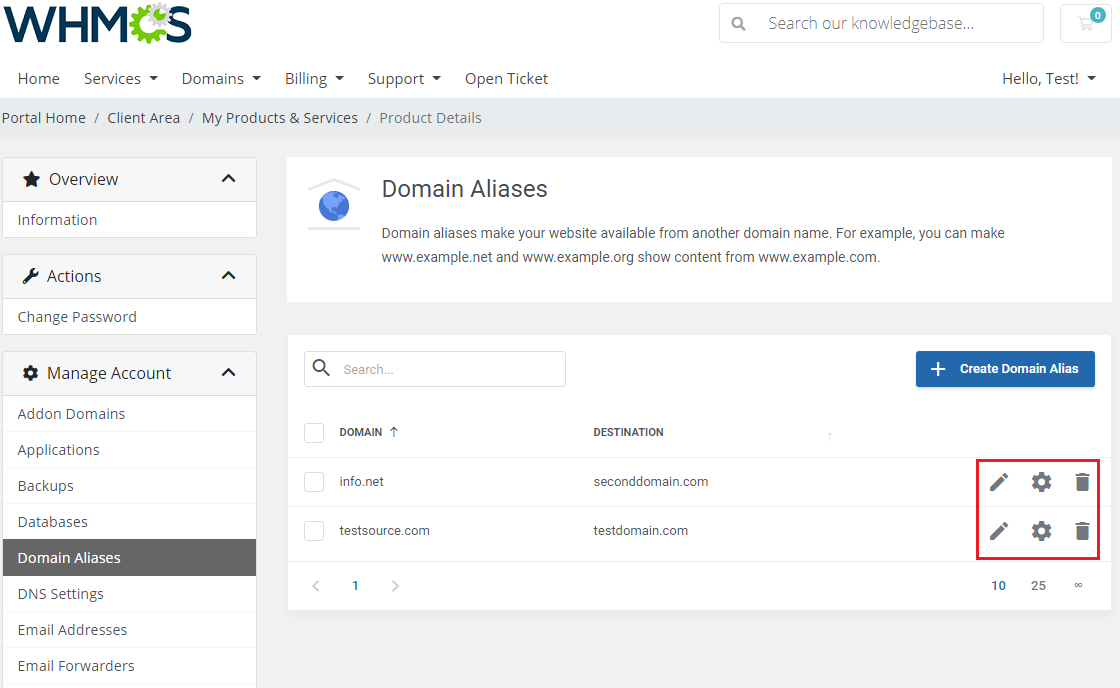
|
[edit] DNS Settings
| Here you can add and manage DNS records to define the structure and content of the chosen domain name space. |
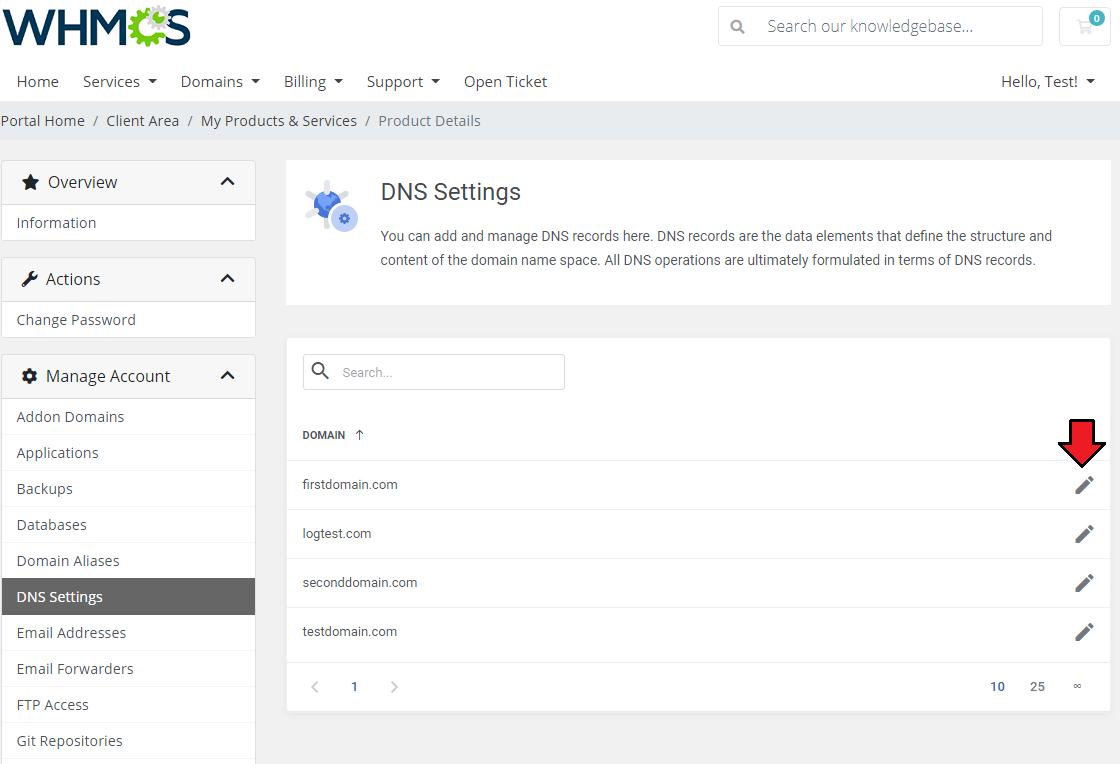
|
| Add records by selecting the type and providing their hostname and value. |
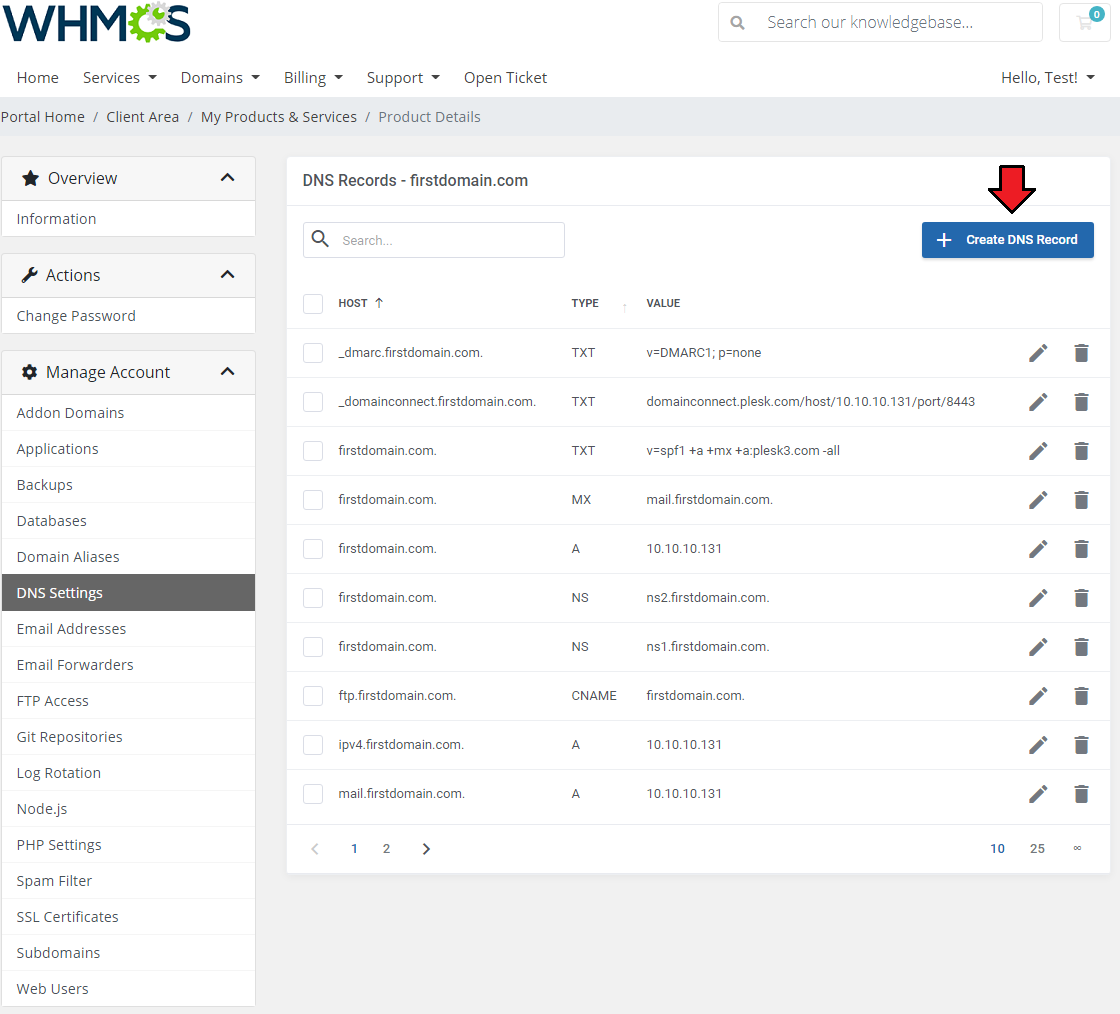
|
[edit] Email Addresses
| View and edit email accounts that are associated with your domains. Use filter to find required email addresses, preview its selected quota or delete manage the account. |
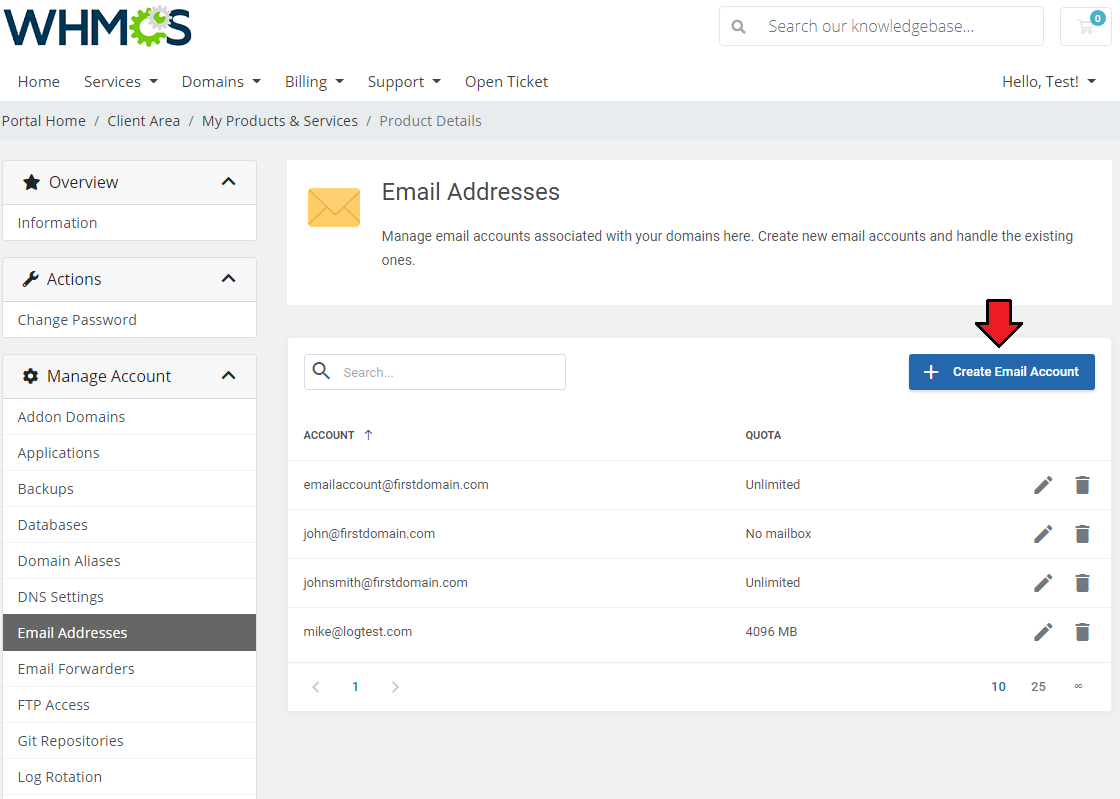
|
| Press 'Add Email Account' and select to which domain it shall be added, type or generate password and define limited or unlimited quota. |
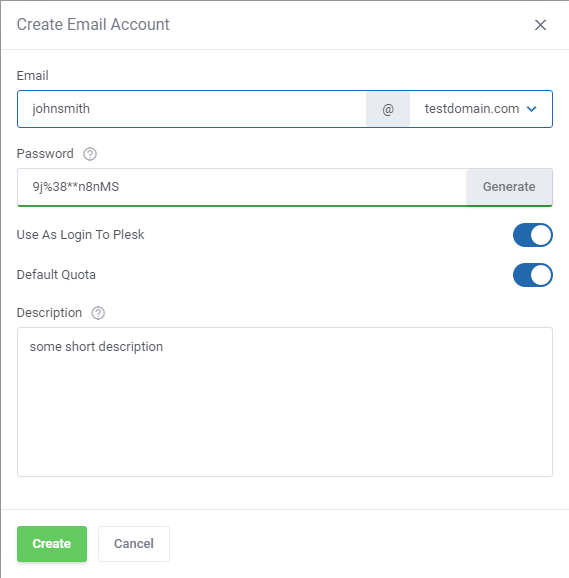
|
[edit] Email Forwarders
| In this section, you can set up email forwarders and choose from several destination options to adjust mail forwarding perfectly to your needs. |
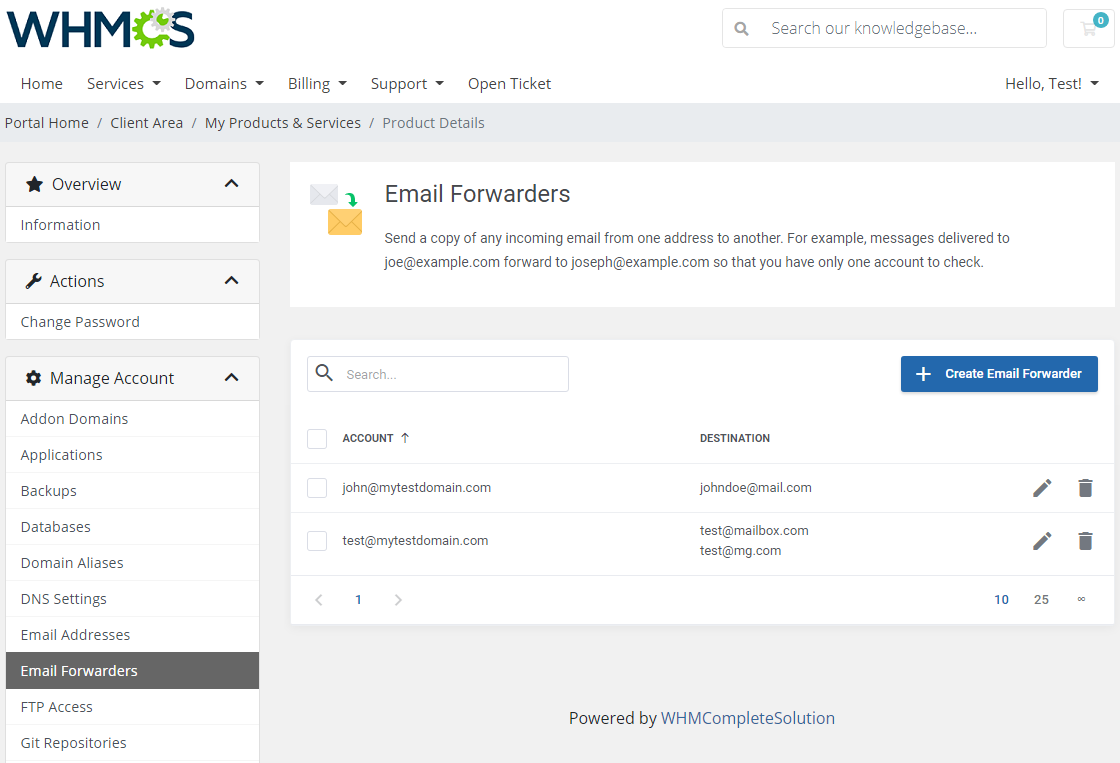
|
| Press the 'Create Email Forwarder' button, specify the forwarded email and define the destination addresses. |
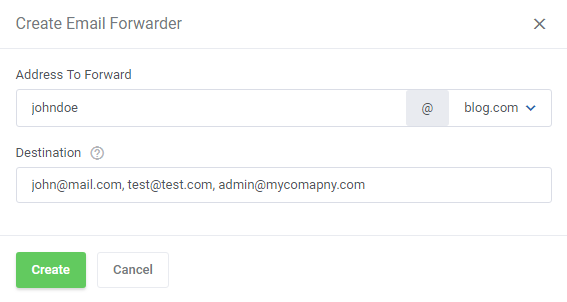
|
| Use the mass action button to delete numerous email forwarders at once, or remove single items one by one. |
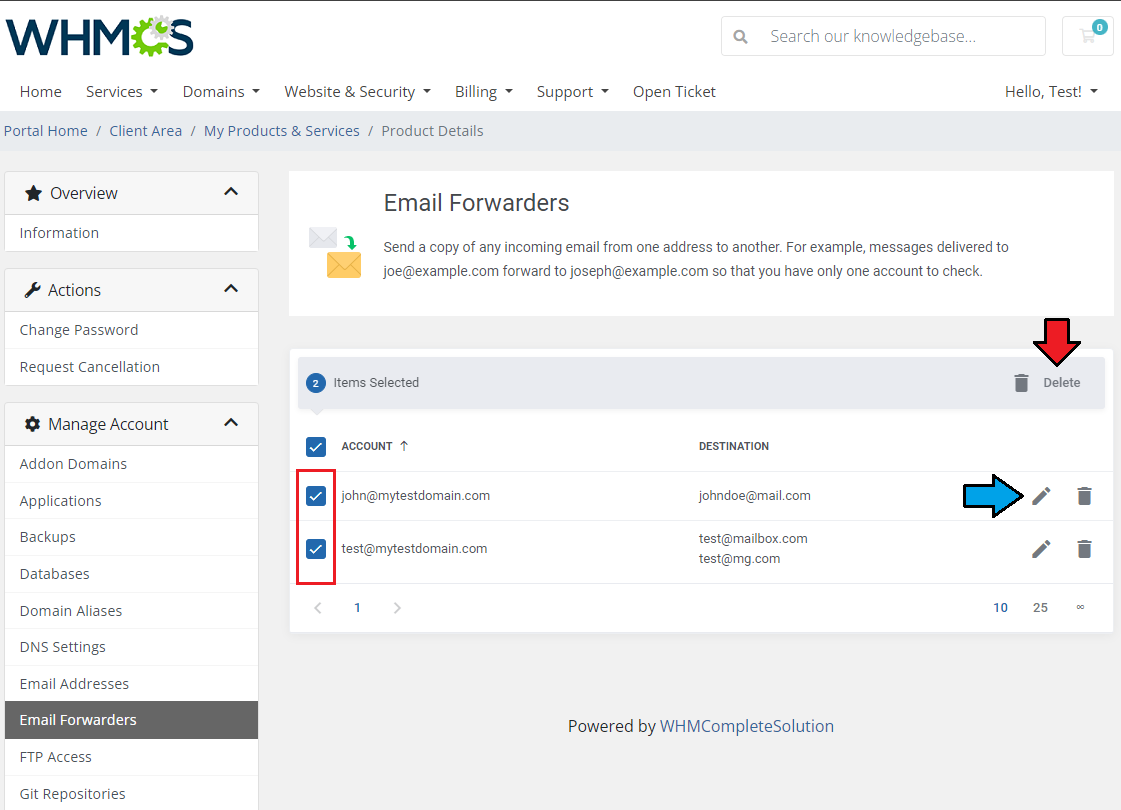
|
[edit] FTP Access
| In the very first section you are given the possibility to manage your FTP access or create new FTP accounts. FTP access management is dependent on the system your Plesk panel is set up on. |
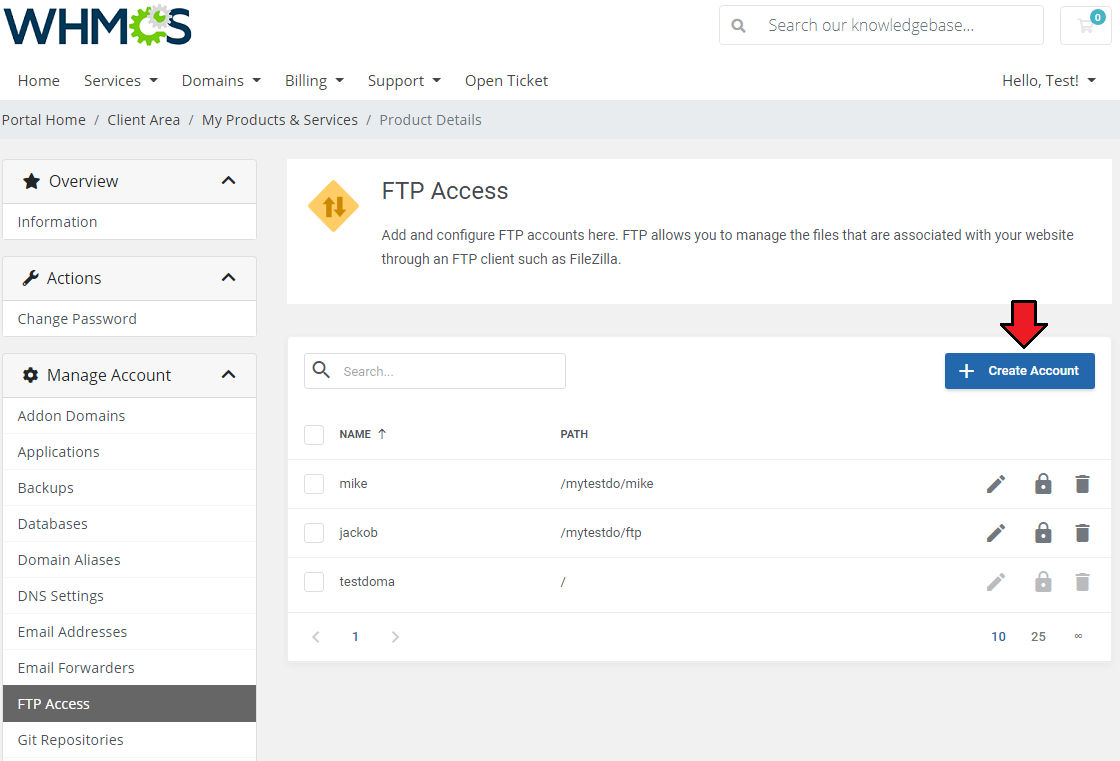
|
| Add and configure FTP Accounts in the easiest way possible. Just type in your login on a domain, provide or generate a secure password, define directory access and declare available quota. Note: If you have some other addon domains, creating an FTP account on the main domain will also add it to these domains. |
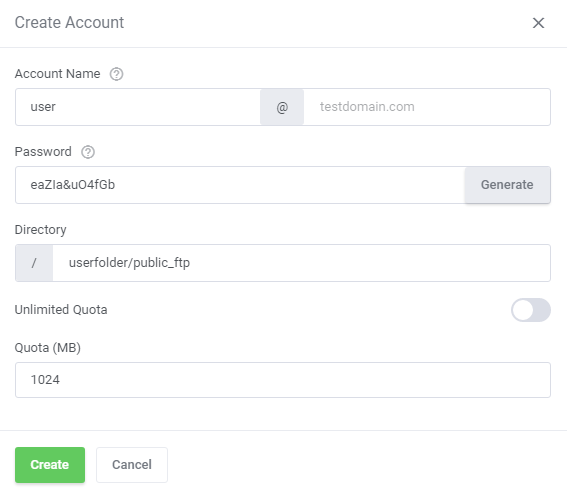
|
[edit] Git Repositories
| The 'Git Repositories' section allows you to create and manage your local Git Repositories and automatically or manualy deploy web sites from such repositories to a target public directory. Note: Curently, adding only local repositories is supported. Remote Git Repositories like GitHub or BitBucket are not supported yet. Start by pressing the 'Create Repository' button. |
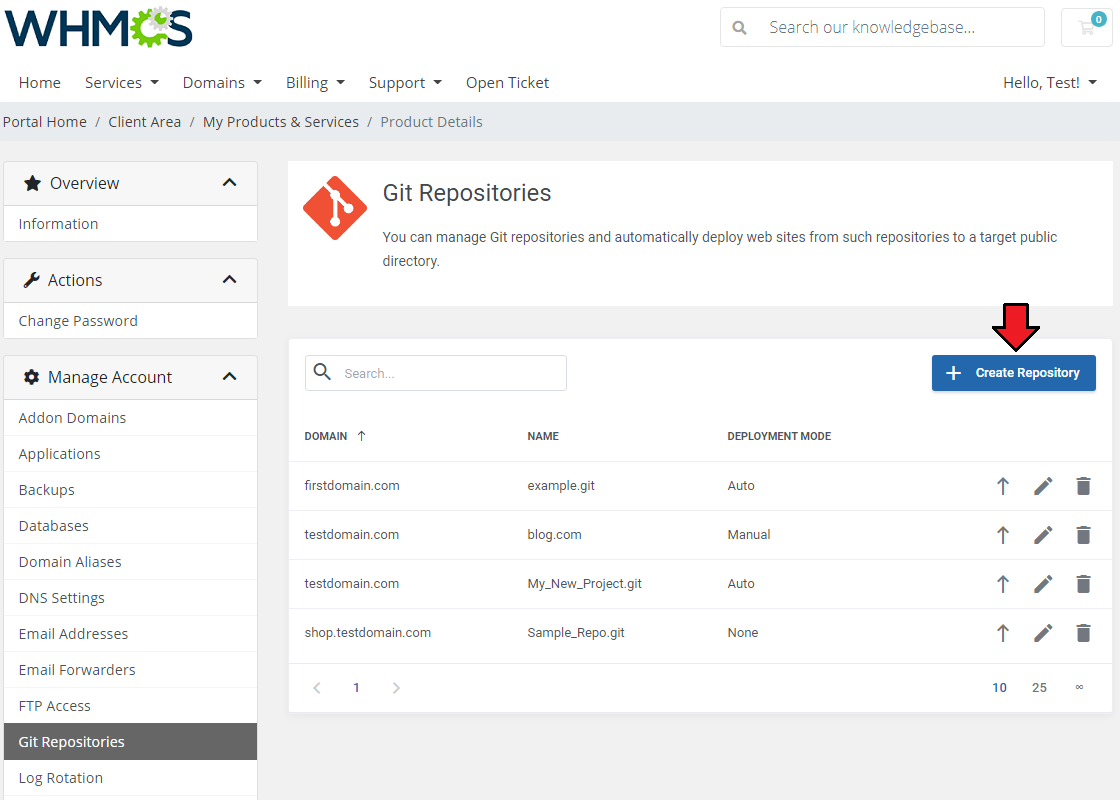
|
| In the opened window, chose which 'Domain' you want to use, provide 'Repository Name' (only latin characters, numbers, dashes, underscores, and dots are allowed) and 'Deployment Path' (by default is set to 'httpdocs' ). Next, also choose the 'Deployment Mode' ( 'Auto' , 'Manual' or 'None' ). Optionally, specify a list of additional actions which can be carried out each time the files are deployed to the website - use shell commands delimited by “;” symbol that should be applied with an escape character: “>”. |
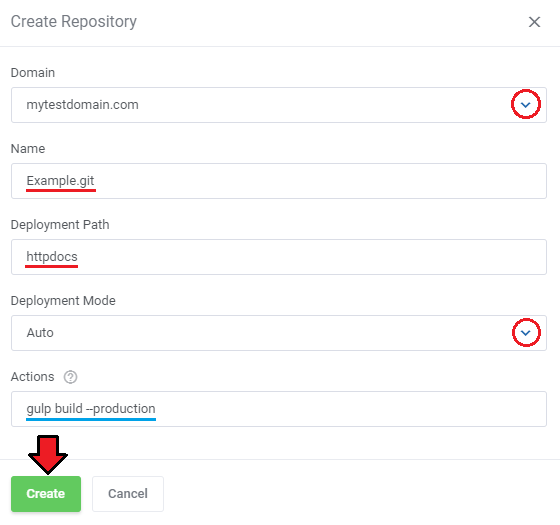
|
| Once the repository is created you can also manually deploy it by pressing arrow up button. |
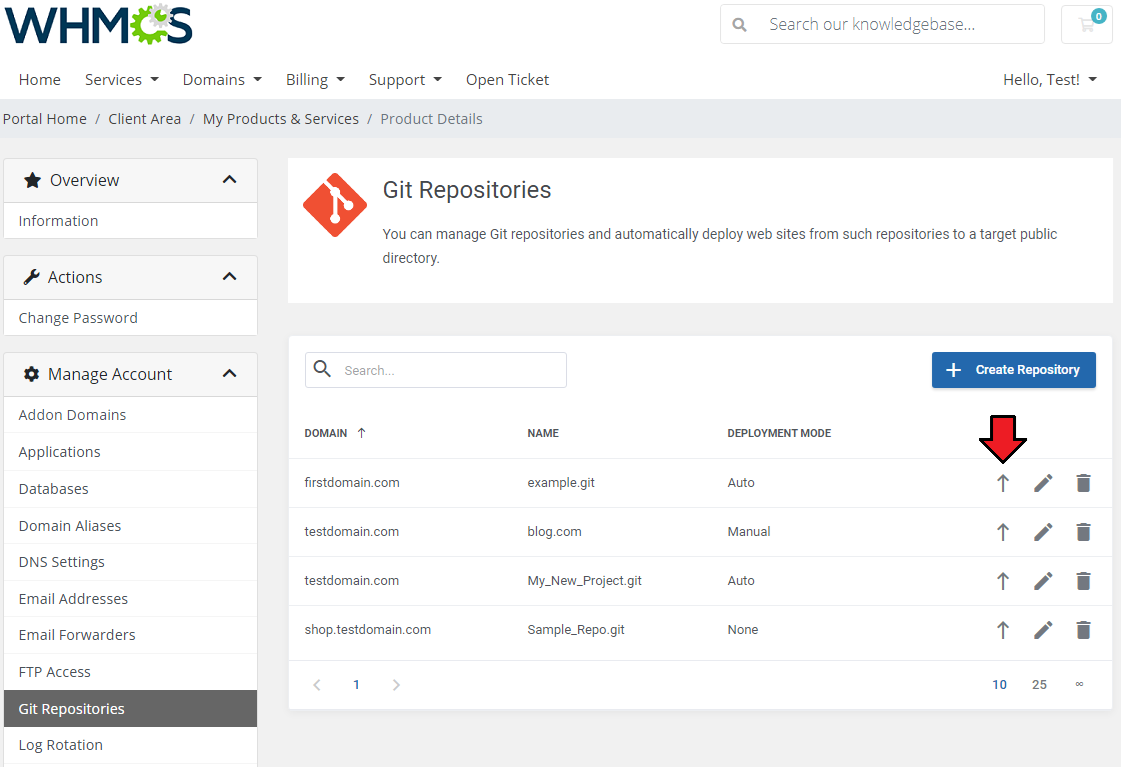
|
| Additionally, when pressing the 'Edit' button, besides the ability to change certain attributes, you can also preview the direct URL of the created repository. |
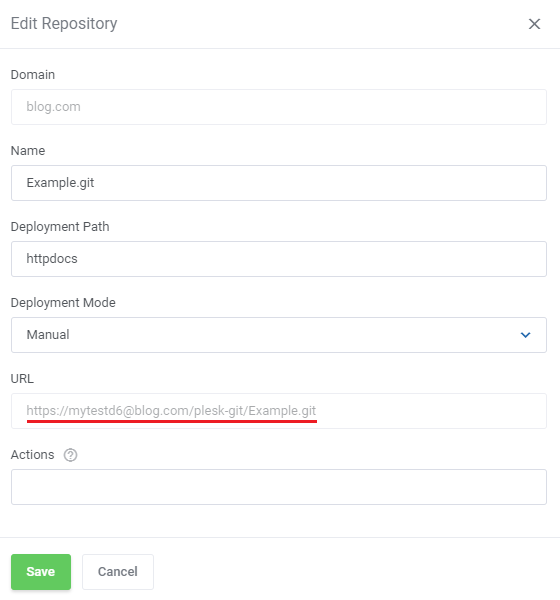
|
[edit] Log Rotation
| The Log Rotation section allows managemnt of logs, turn on log rotation for a domain and configure its conditions. Note: Please keep in mind that custom logs cannot be rotated. |
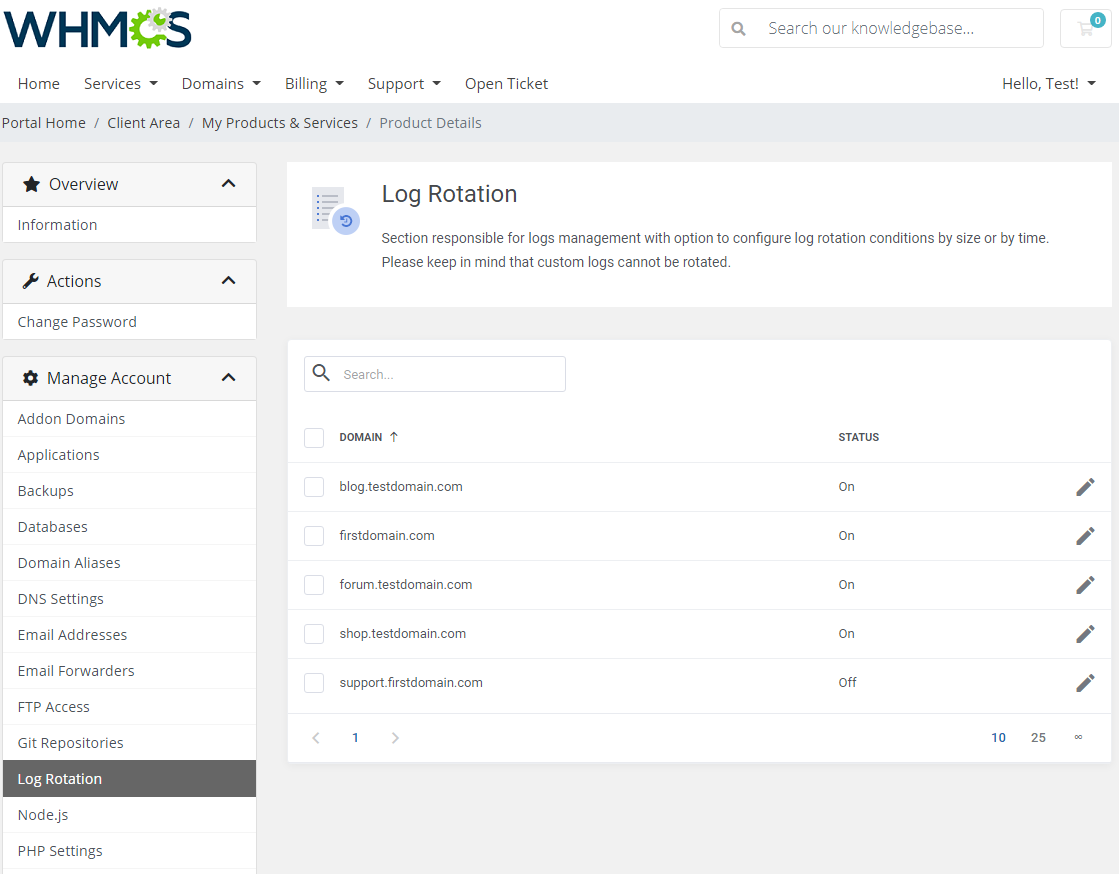
|
| Preess the 'Edit' button next to a single domain, and you will be moved to log rotation settings. Enable log rotaion and define its conditions. |
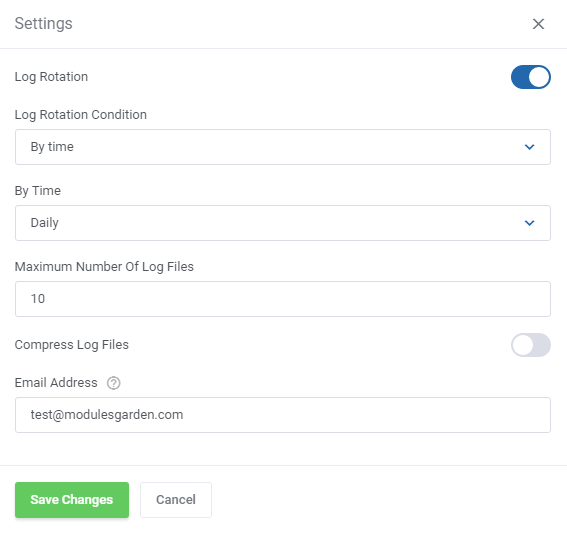
|
| Select numerous domains and define log rotaion settings in bulk. |
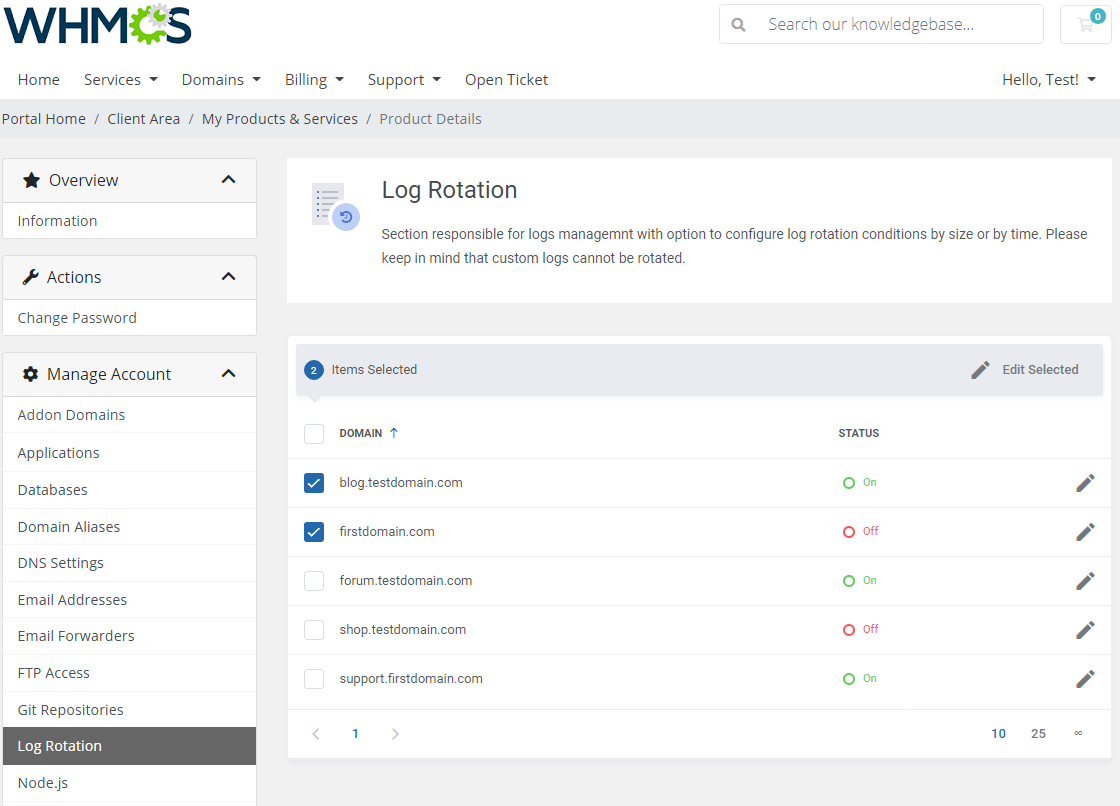
|
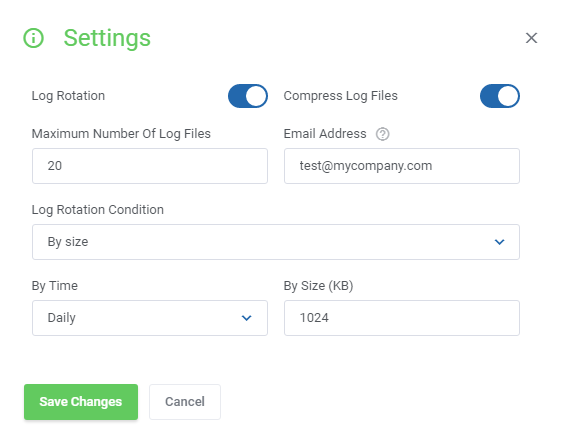
|
[edit] Node.js
| To use Node.js with our module you have to first get that extension from the Plesk catalog.
Please, log in to you Plesk administrator panel and go to the 'Extensions' section. |
|
| Once you have installed Node.js extension and enabled it in the features configuration you can enable and adjust the Node.js version to your domains, by pressing the 'Edit' button in the 'Node.js' section of the client area. |
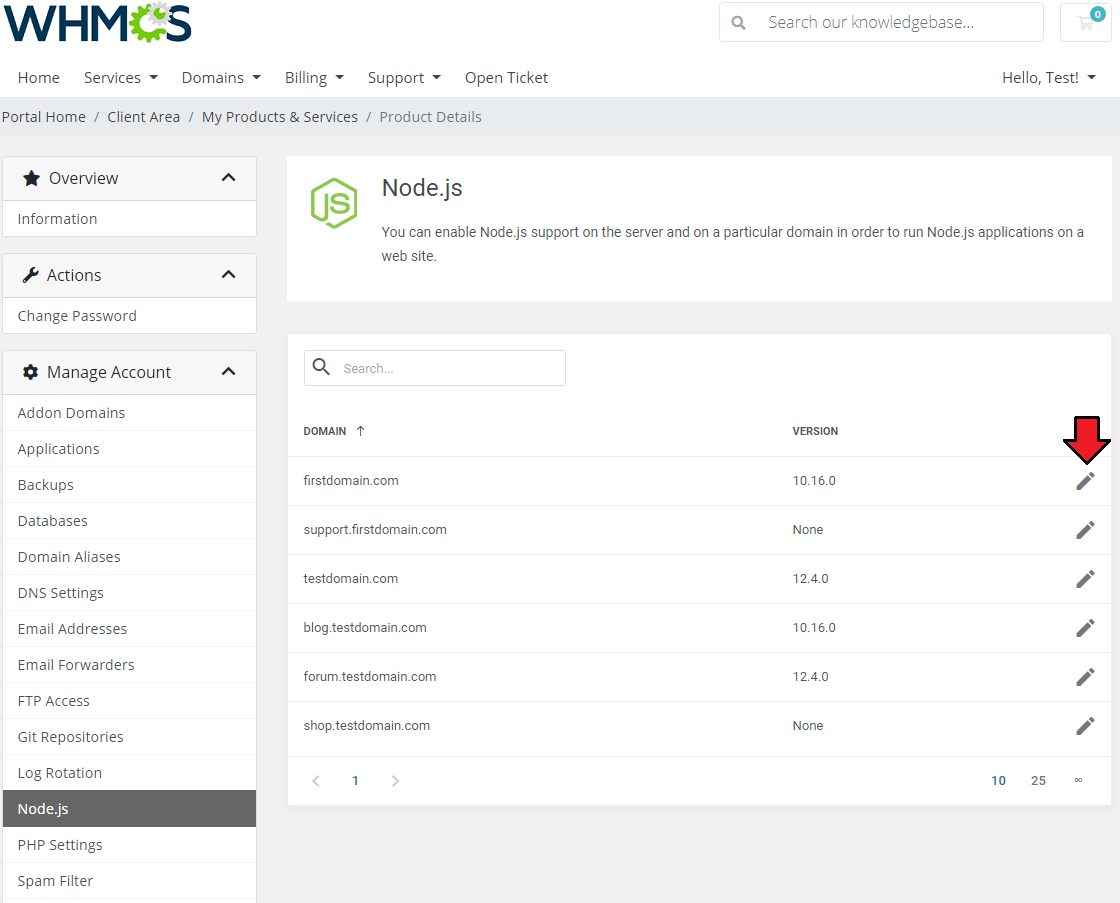
|
| Now, simply enable Node.js for the chosen domain and select which version you would like to use. You will also be able to switch version or disable Node.js any time by pressing the 'Edit' button again. |
|
[edit] PHP Settings
| This section allows your clients to configure PHP settings of their domains. They are allowed to view and alter PHP version of each domain as well as select new settings by clicking the 'Edit' button. |
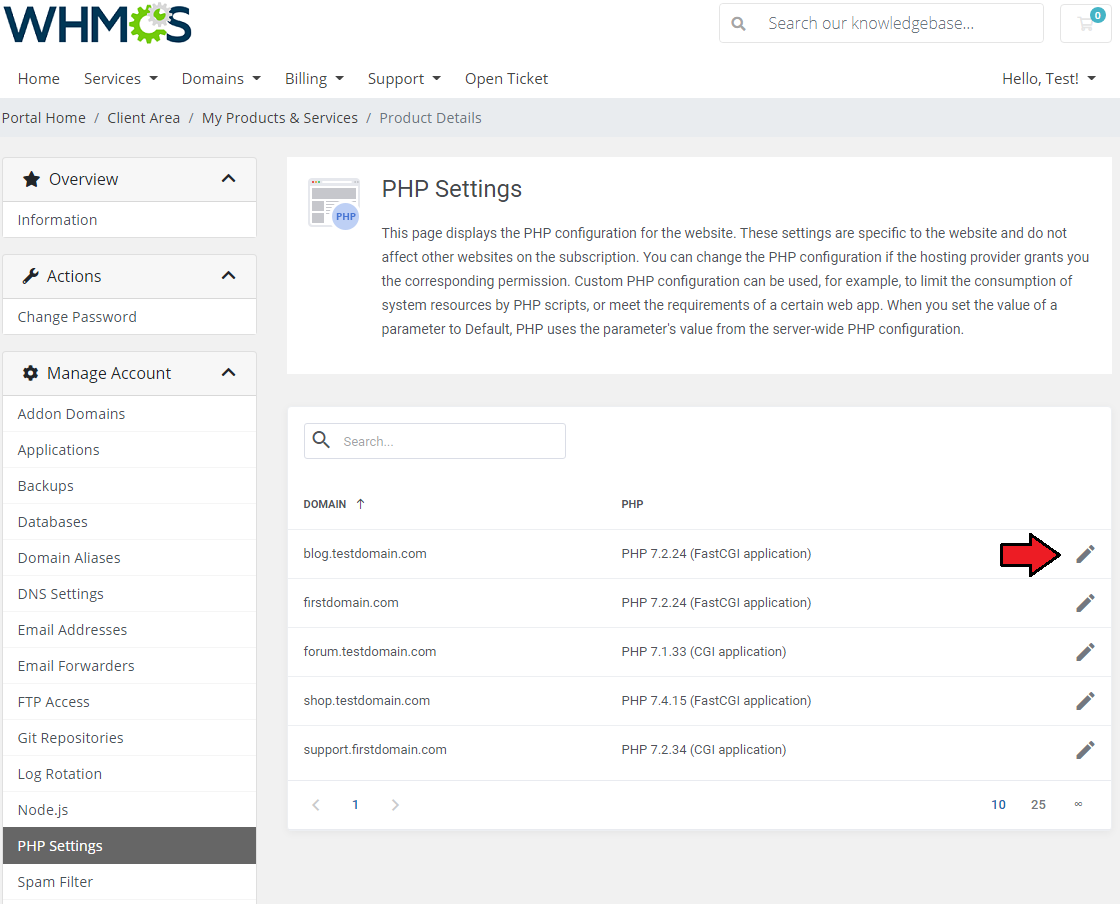
|
| Edit the PHP settings according to your needs. Note: Settings may vary depending on the currently selected PHP version. |
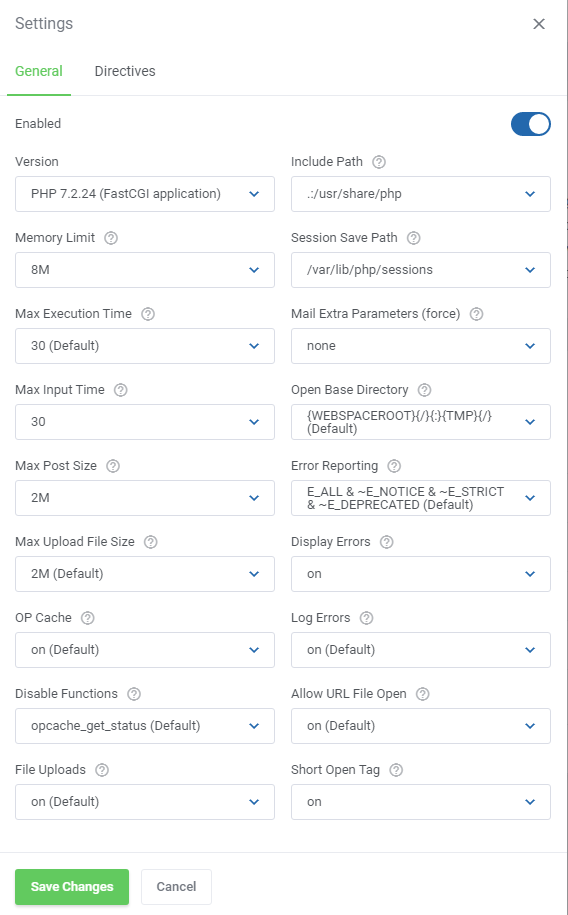
|
If you would like to change the display of the default PHP names in the system to a more user-friendly variant, you may esily edit the language file that is located in:
{yourWHMCS}/modules/servers/pleskExtended/lang/english.php
Add records into the file according to the system names of PHP versions that you want to change, e.g.: $_LANG['addonCA']['phpSettings'][PHP]['PHP 7.2.34 (CGI application)'] = 'PHP 7.2'; $_LANG['addonCA']['phpSettings'][PHP]['PHP 7.1.33 (CGI application)'] = 'PHP 7.1'; $_LANG['addonCA']['phpSettings'][PHP]['PHP 7.4.15 (FastCGI application)'] = 'PHP 7.4'; $_LANG['addonCA']['phpSettings'][PHP]['PHP 7.2.34 (CGI application)'] = 'Some Custom Name'; |
| The result of these changes will be as following: |
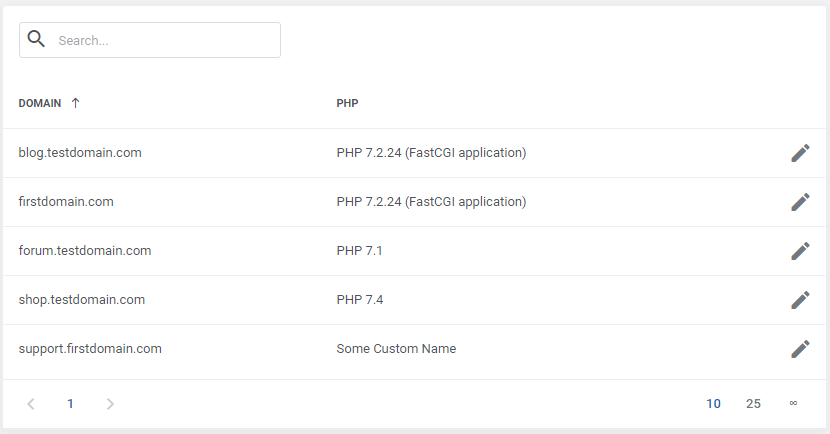
|
[edit] SSL Certificates
| This section will allow you to generate or paste ready SSL certificates and private keys. |
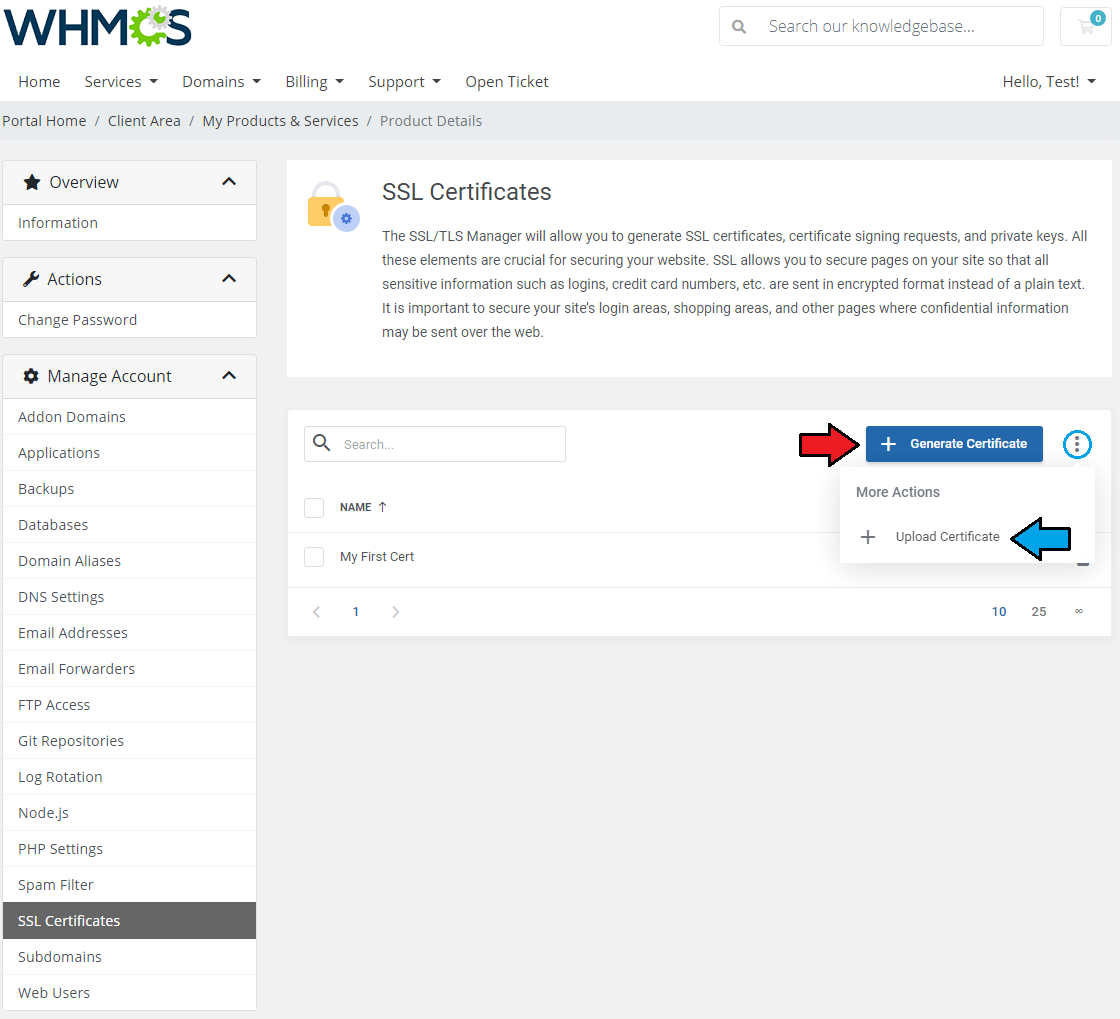
|
| Choose 'Generate Certificate' and fill out the required fields. You can also decide whether you want the private key to be automatically generated or provide your own key. Once ready, you will see it on the list of ready certificates. Note: Current Plesk API does not give the possibility to preview the automatically generated private key. To do this, you need to log directly into the Plesk panel. |
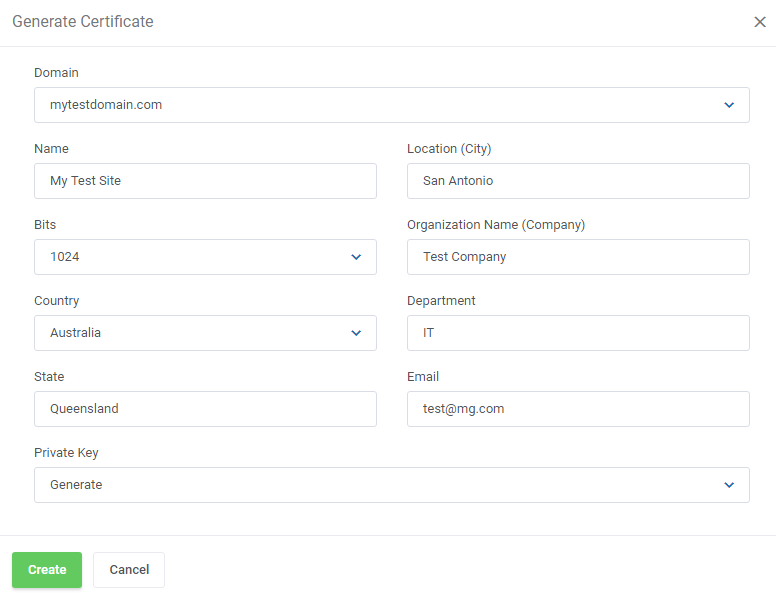
|
| If you already have a certificate, you can provide it by choosing 'Upload Certificate' . Next, provide the certificate and domain name, and paste the content of yours 'Private Key (*.key)' , 'Certificate (*.crt)' and 'CA Certificate (*-ca.crt)' files. Once ready, you should see the provided certificate on the list. |
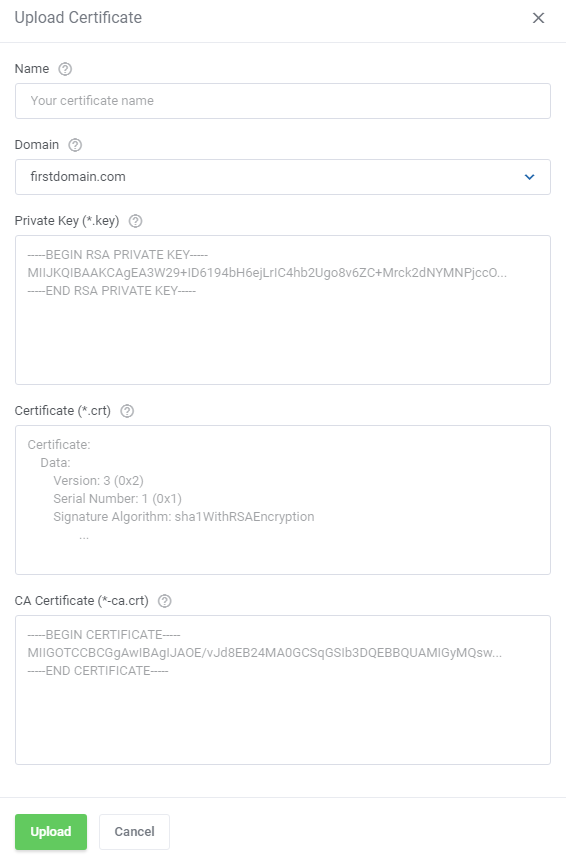
|
[edit] Subdomains
| Create subdomains for different parts of your website by pressing the 'Create Subdomain' button. |
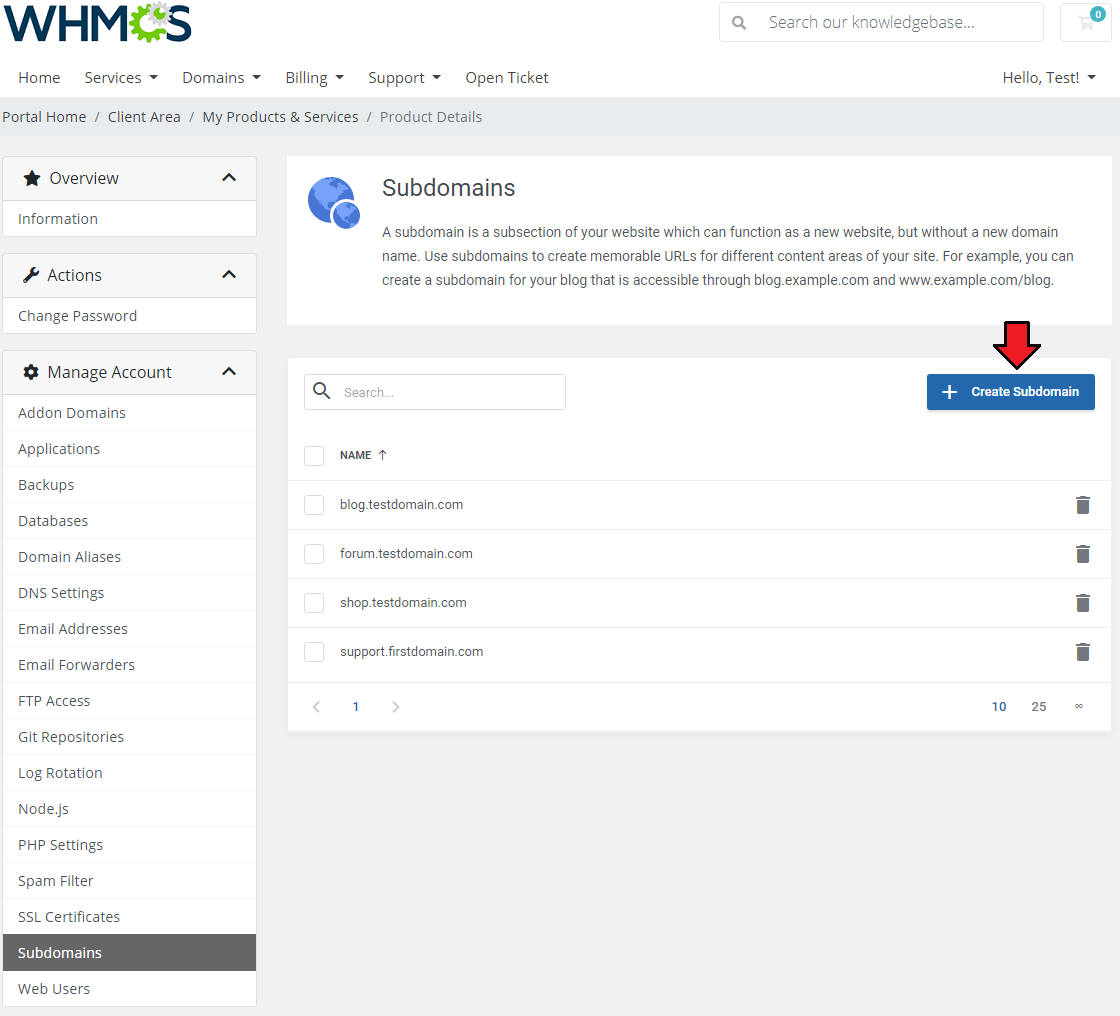
|
| Choose a domain for your available subdomain from the list and provide a document root. |
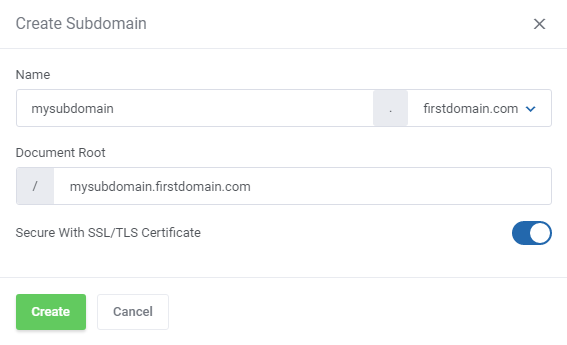
|
[edit] WordPress Manager Integration (Temporarily Suspended)
| Integration with WordPress Manager For WHMCS is currently unavailable, and will be re-added with the nearest WordPress Manager For WHMCS module update. Important: This section is only available with WordPress Manager For WHMCS module active. |
[edit] WordPress Toolkit
| WordPress Toolkit is an independent tool used to manage WordPress instances. You may add, configure and freely manage your WordPress installations directly from the level of the WHMCS client area. Important: Kindly note that the option to delete instances is currently exclusively accessible through the control panel. Removing an installation from the WHMCS client area is not supported. Note: Please bear in mind that WordPress Toolkit and WordPress Manager are two separate applications. |
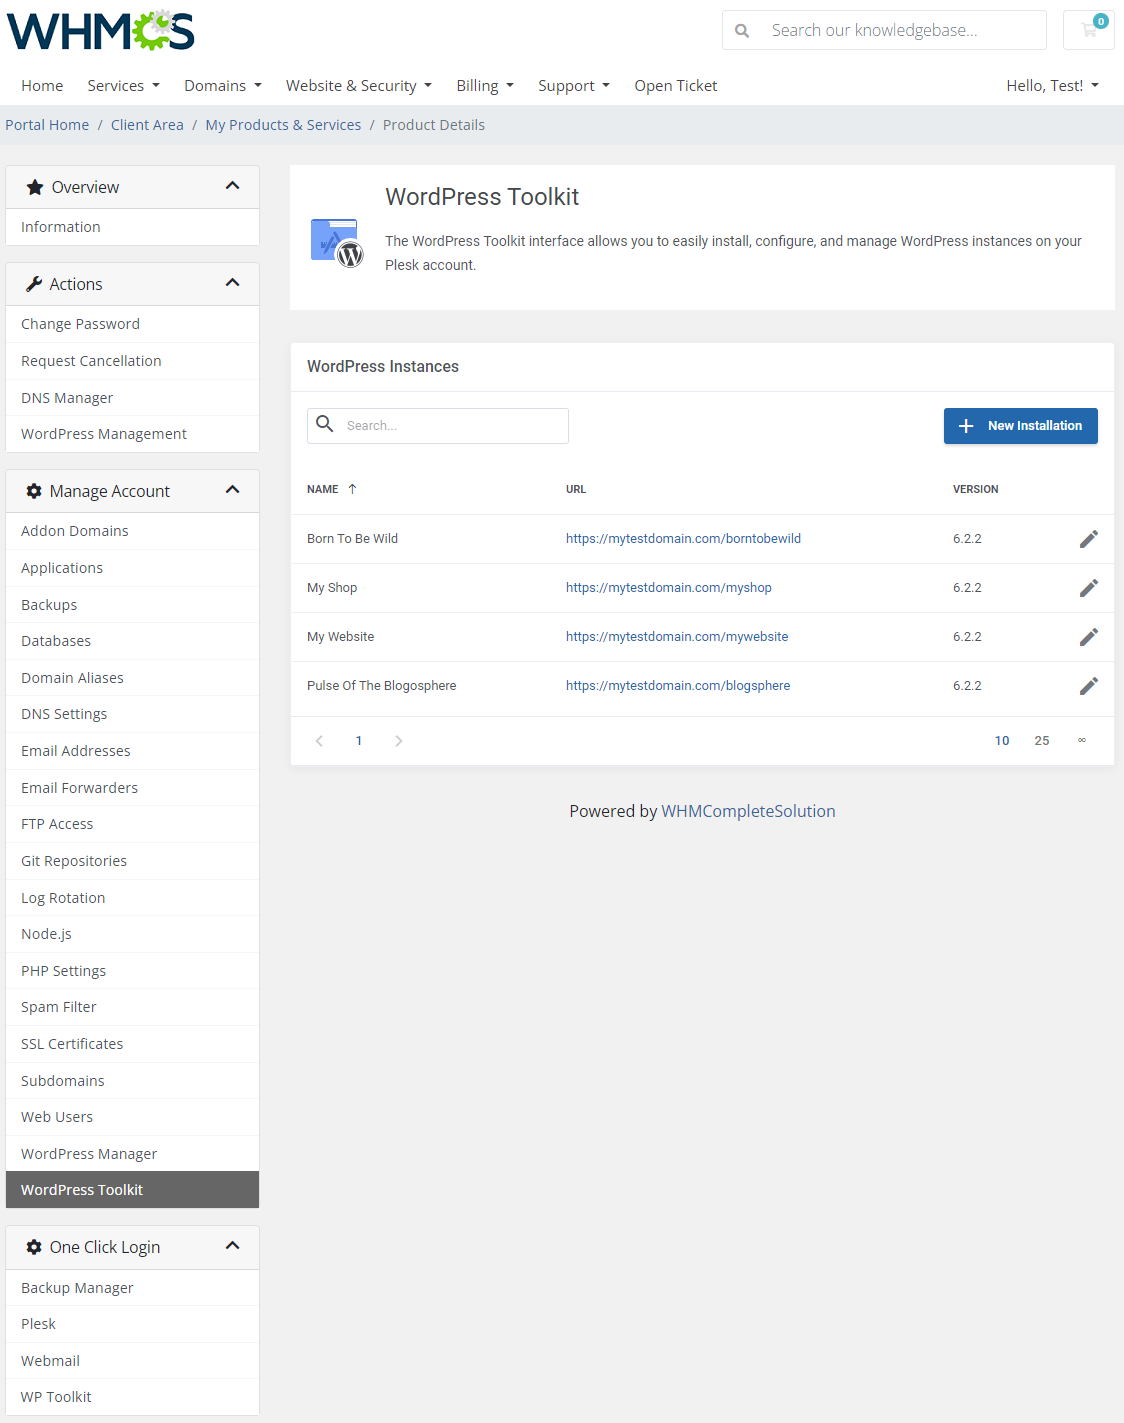
|
| Start your journey by adding the first installation of WordPress. Press the button 'New Installation' marked on the screen below and read the instruction to see how to install a pure new instance. |
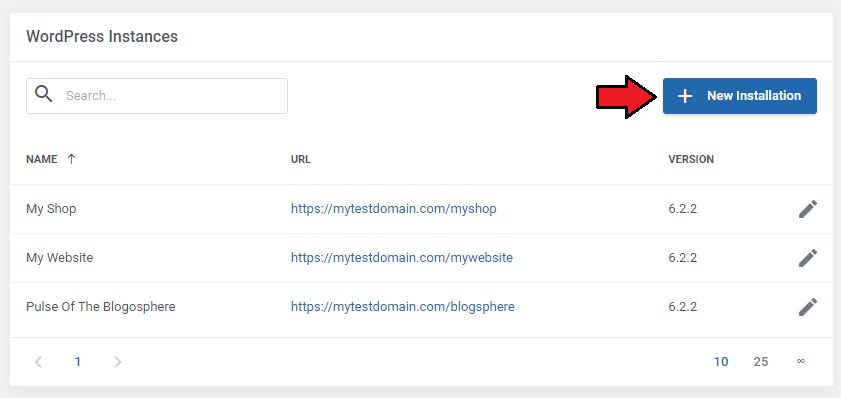
|
A new window with four tabs will open. In the first Details tab, fill in the following fields:
|
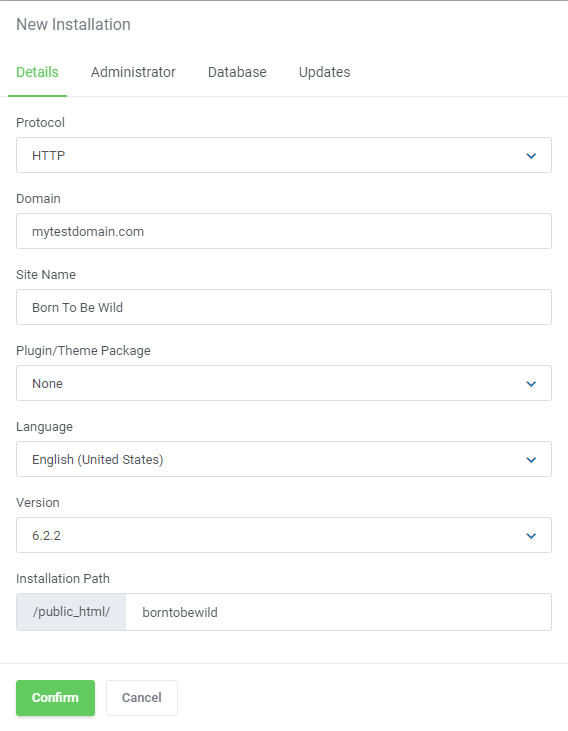
|
|
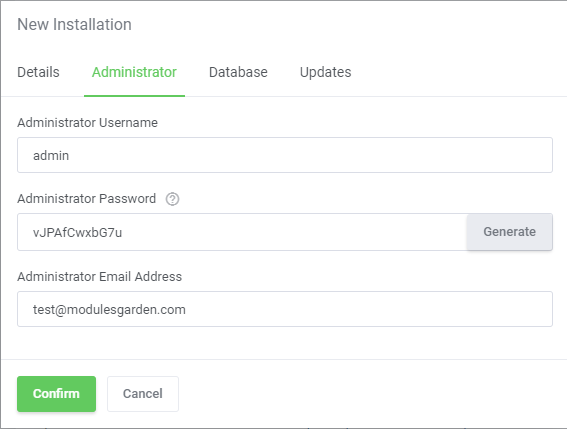
|
|
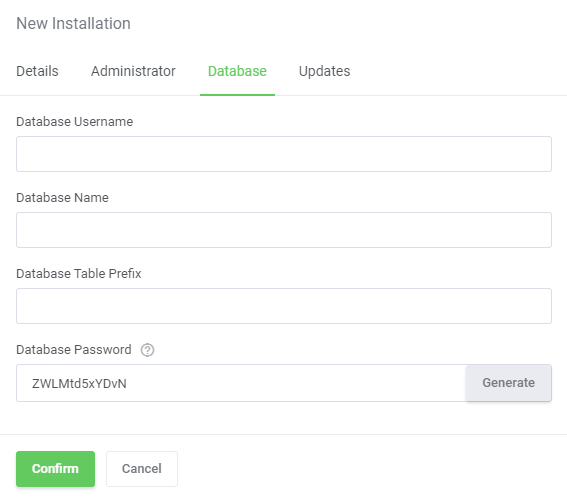
|
| WP Toolkit can automatically install WordPress core, plugin, and theme updates as soon as they become available. Updates related data:
WordPress Update - Update WordPress automatically:
Plugins Update - Update plugins automatically
Themes Update - Update themes automatically
|
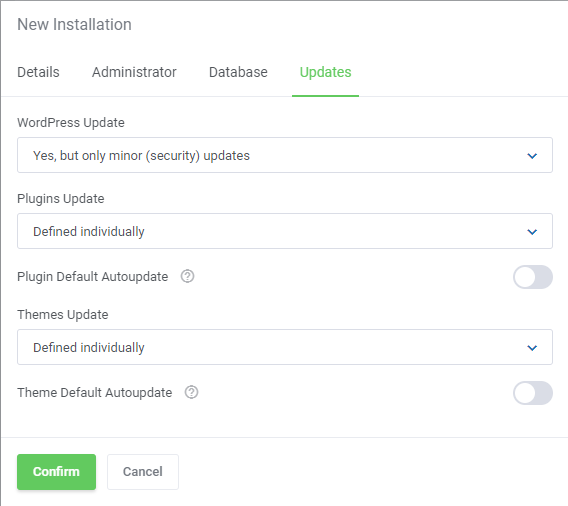
|
| Now wait a moment until a ready WordPress installation is complete and appears on the list on the main page of the WP Toolkit app.
You will find there a list with basic information regarding every installation, including the URL, site name, and version. From this point, you may also manage the installation (1) and delete (2) it at any time. |
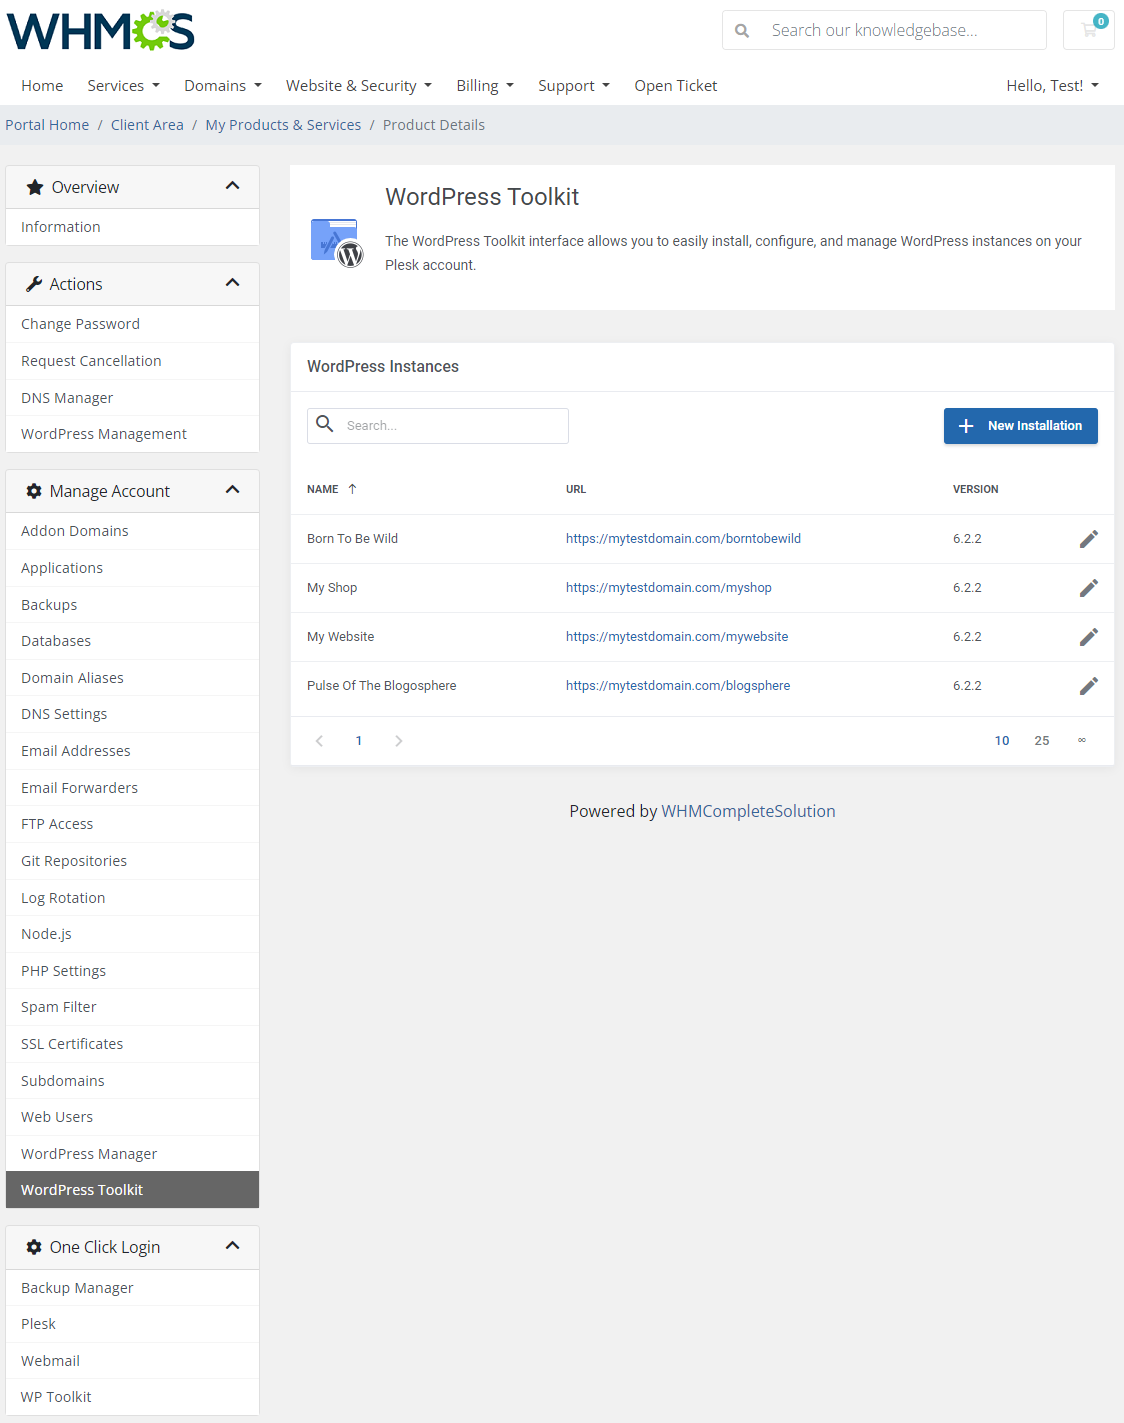
|
[edit] Instance Management
[edit] Details
| Instance details is the first section that you will be directed to once you move to single installation management. You will find there gathered details on WordPress, such as:
|
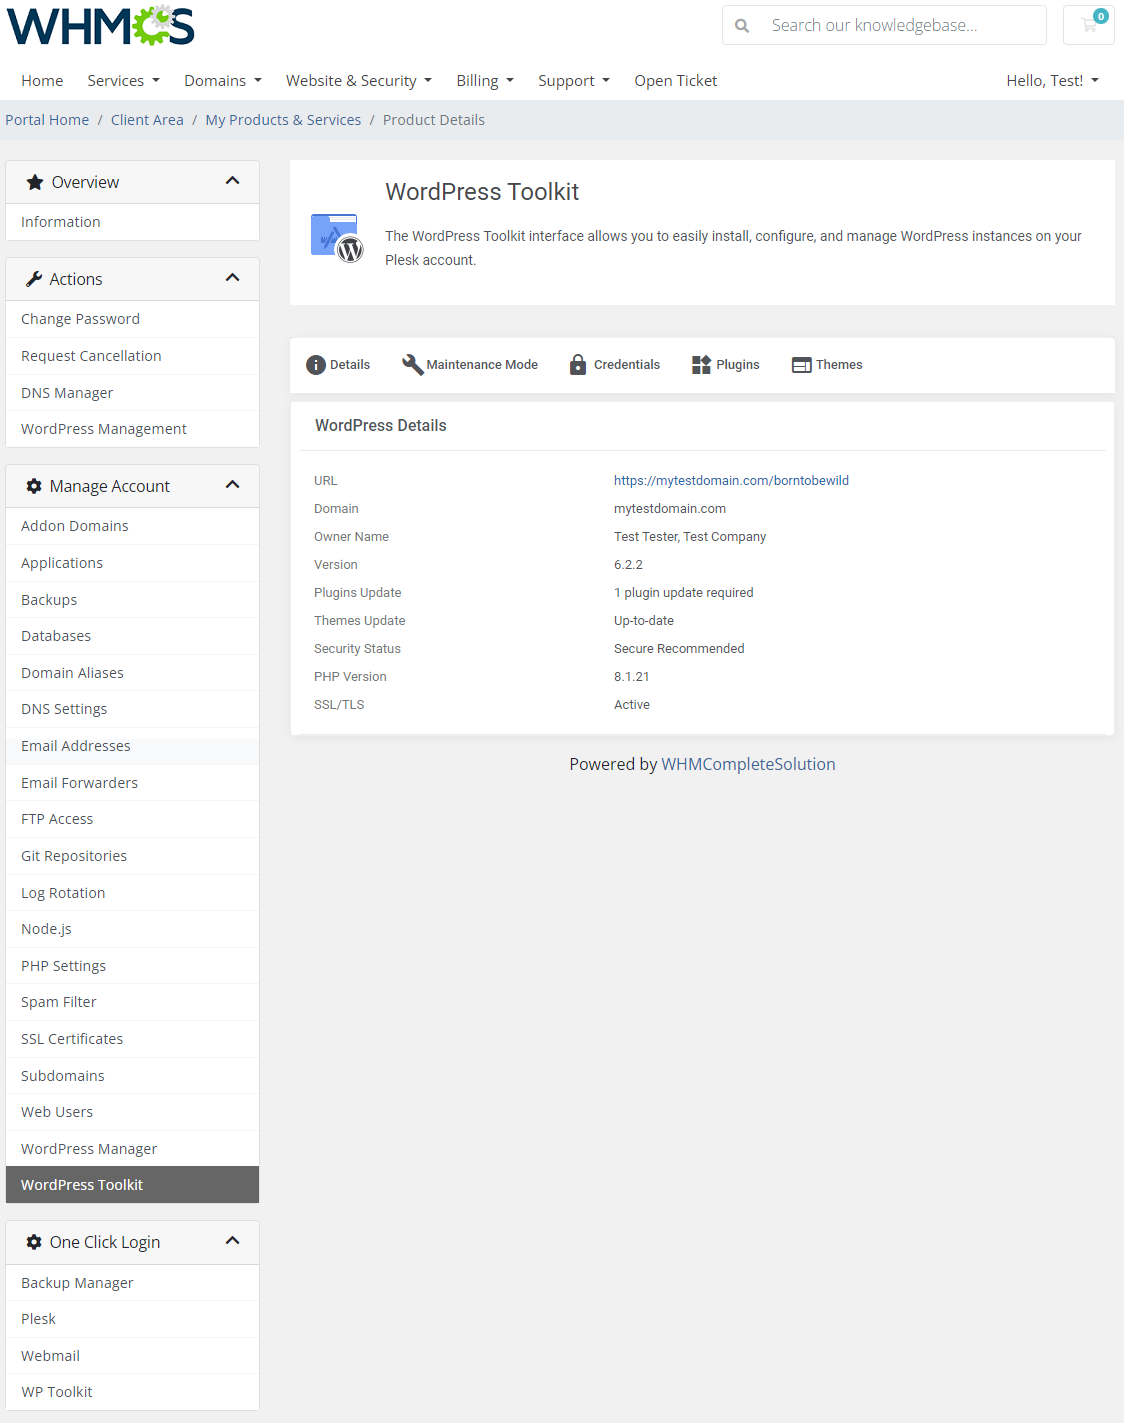
|
[edit] Maintenance Mode
This section allows setting up the options of website maintenance time. Start by enabling/disabling the mode and then move to more specific features:
Screen Text section allows changing the text displayed on the maintenance screen. You can use HTML tags to format the text's appearance. You may adjust the texts of:
Timer - enable the timer to count down the remaining time
Social Network Links - Type in links to your social network pages. If left empty, the corresponding link will be hidden. |
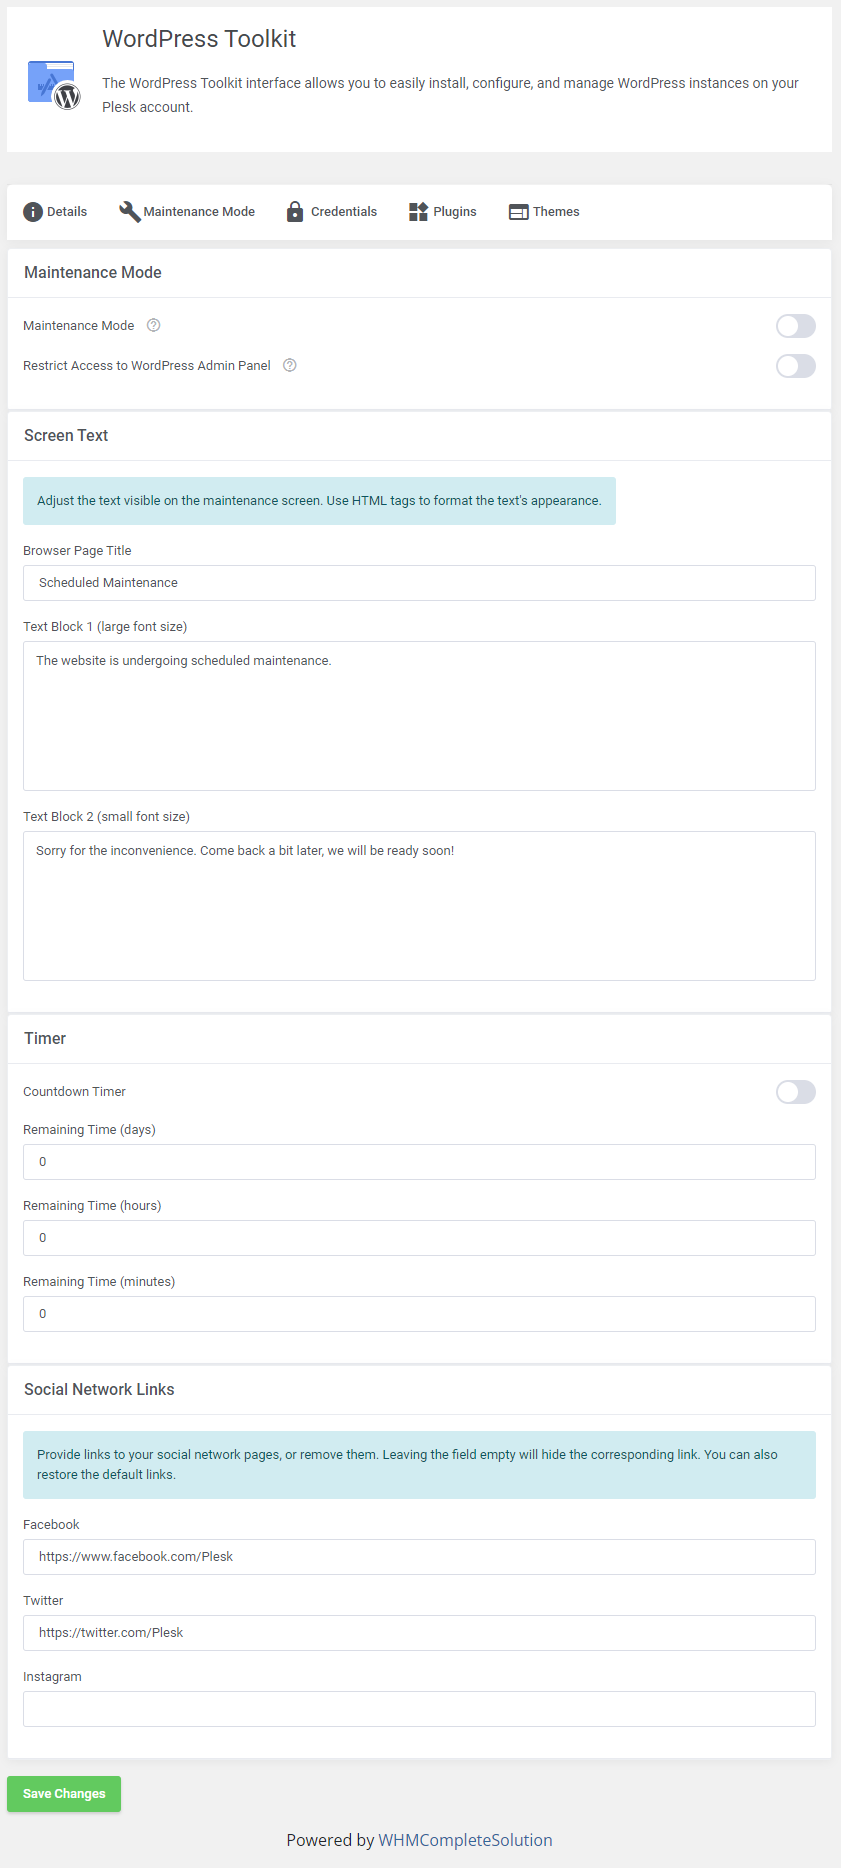
|
[edit] Credentials
Instance settings
|
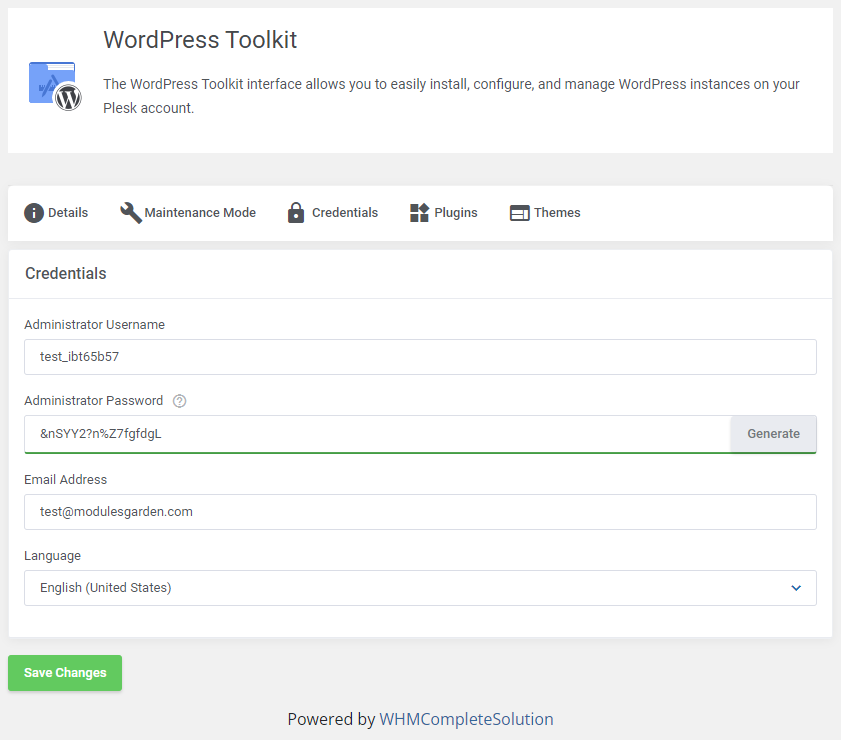
|
[edit] Plugins
| Here you are enabled to activate, deactivate, delete, and update the already installed plugins. You can also add new plugins to your WordPress installation in the 'Add New' tab. |
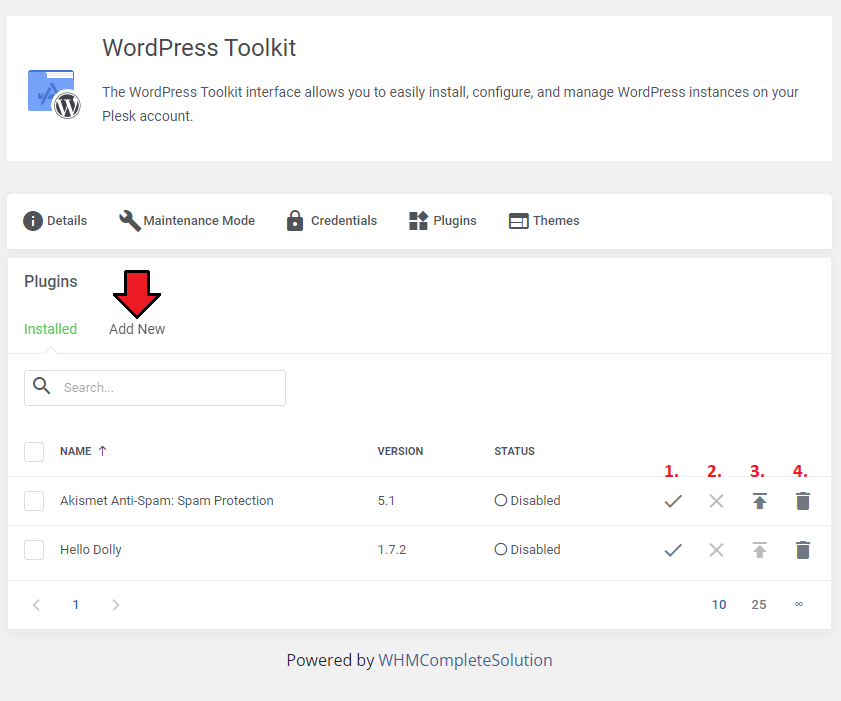
|
| To add a new plugin, you are required to type in at least three of the initial letters of the desired plugin's name into the search field to see the actual results. A list of related plugins will appear. You may now learn more about each plugin by pressing the 'Show Details' button. If the plugin meets your requirements, simply press the corresponding button to begin the installation process (which might take a short while). |
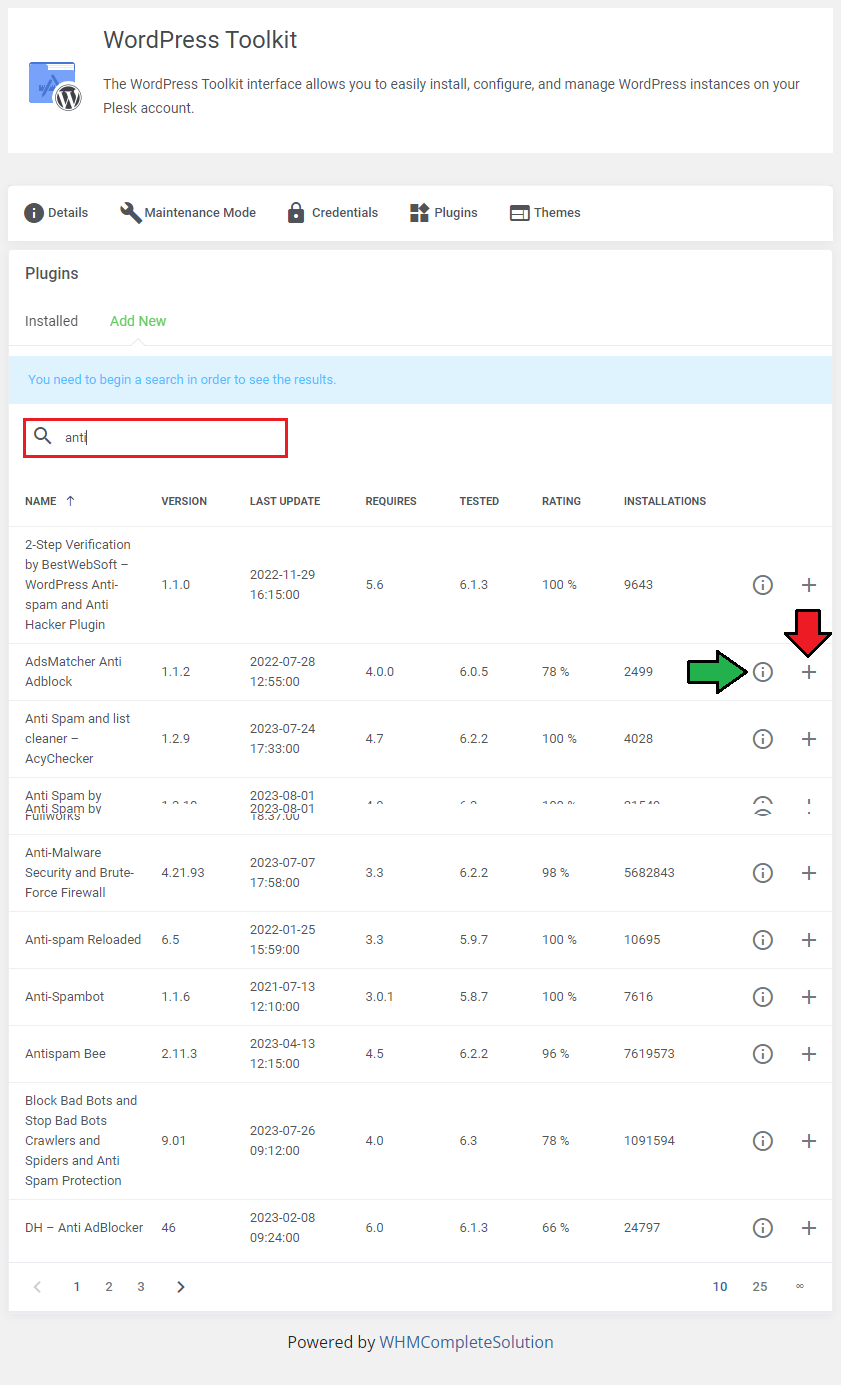
|
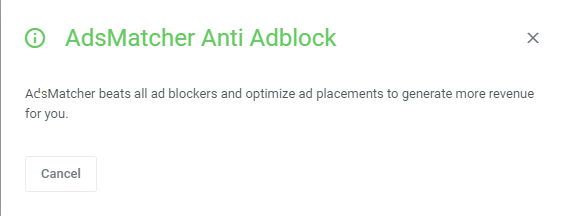
|
| The 'Mass Action' feature is also present in this section, so you will be able to handle multiple plugins more efficiently and at the same time. |
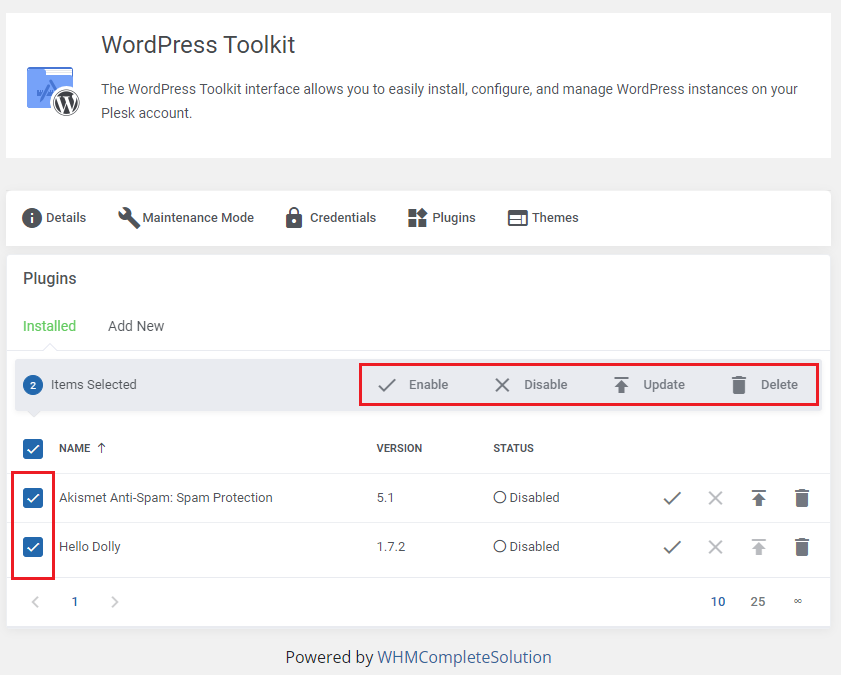
|
[edit] Themes
| This section allows quick and easy management of themes installed on your WordPress instance. Enable/disable the theme, update the already installed theme, and delete useless ones. You can also add new themes to your WordPress installation in the 'Add New' tab. |
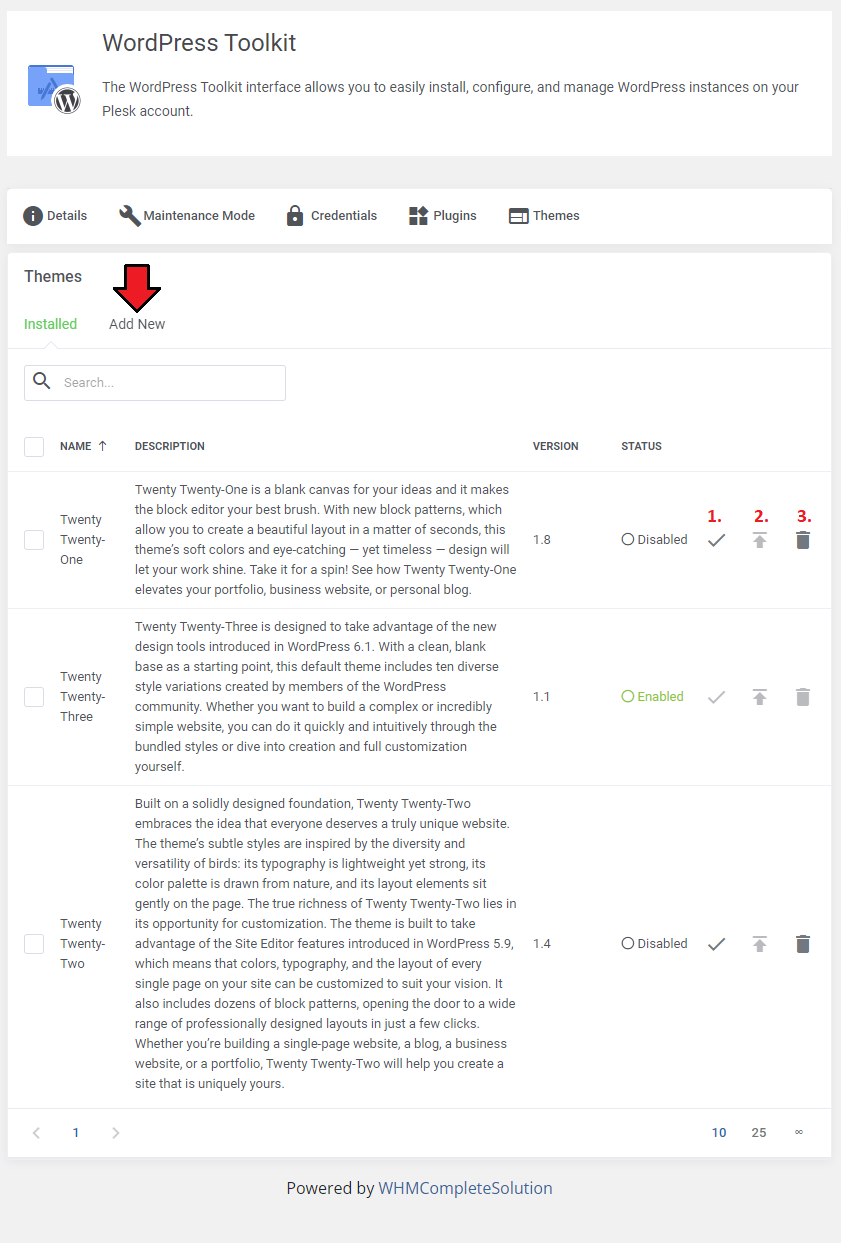
|
| Please start typing in the search field to see the available themes. Once a list of related themes appears, you will be allowed to first check their preview and details. If the theme satisfies your needs, simply press the corresponding button to begin the installation process (which might take a short while). |

|
| Thanks to the 'Mass Action' functionality, you will be able to handle multiple themes more efficiently at the same time. |
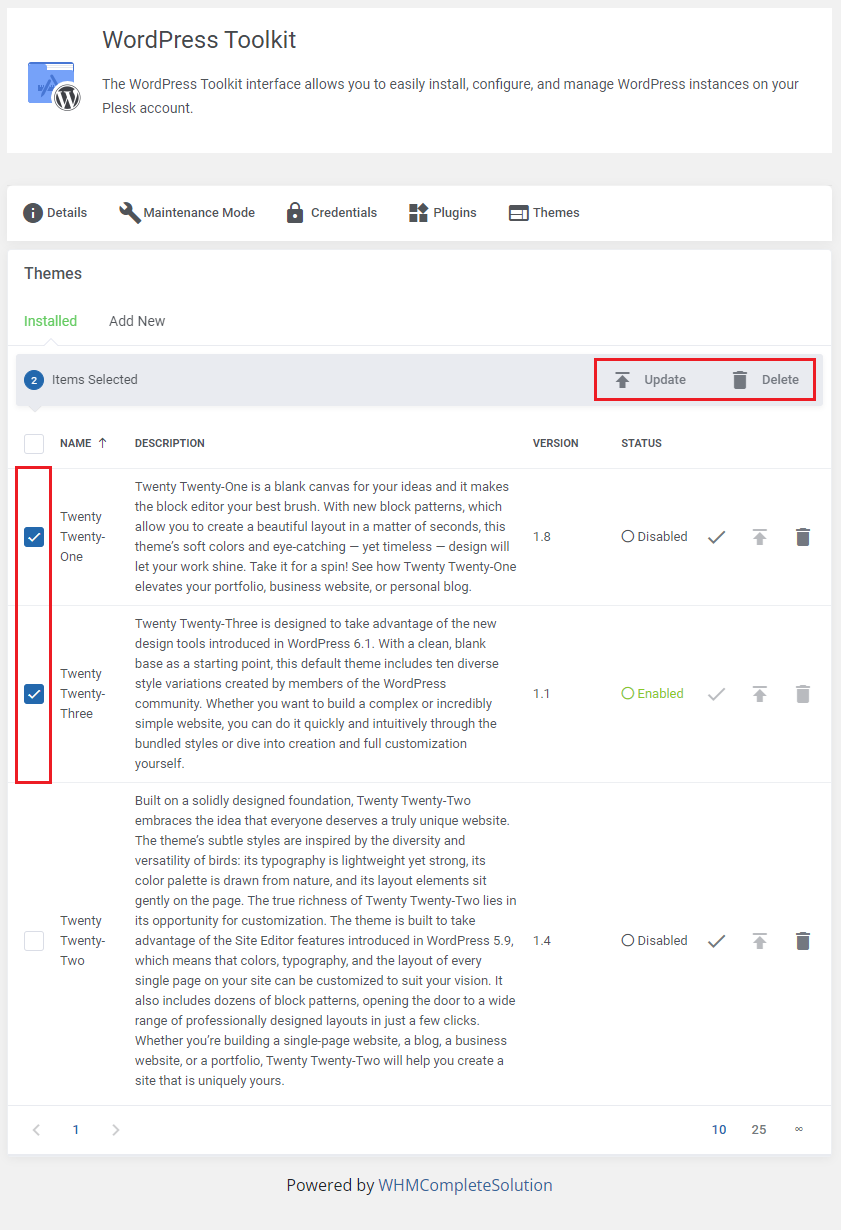
|
[edit] One Click Login
[edit] Log In To Backup Manager
| Just one click on the 'Backup Manager' button and you will be immediately redirected to the dedicated page. Note that you must have a proper IP address or domain entered in the admin area panel to use this button. |

|
[edit] Log In To Plesk
| With a single click on the 'Log In To Plesk' button you can be redirected to your Plesk Panel account. Note that you must have a proper IP address or domain entered in the admin area panel to use this button. |

|
[edit] Log In To Webmail
| You can quickly access your webmail through pressing the 'Log In To Webmail' button. Note that you must have a proper IP address or domain entered in the admin area panel to use this button. |

|
[edit] Log In To WP Toolkit
| You can easily be redirected to the WP Toolkit section in your Plek panel by clicking the 'Log In To WordPress Toolkit' button. Note that you must have a proper IP address or domain entered in the admin area panel to use this button. |

|
[edit] Applications Configuration
[edit] Configurable Options For Application Auto Installation
| Let your clients decide which application they would like to install on their new Plesk account. While placing an order, your customer will choose an application and along with the account creation, this very application will be installed on the account. |
[edit] Automatic Generation
| Move to your product's configuration 'Addon' → 'Features' → 'Settings', find the 'Applications' section and make sure you have selected the Auto Installer for the product. |
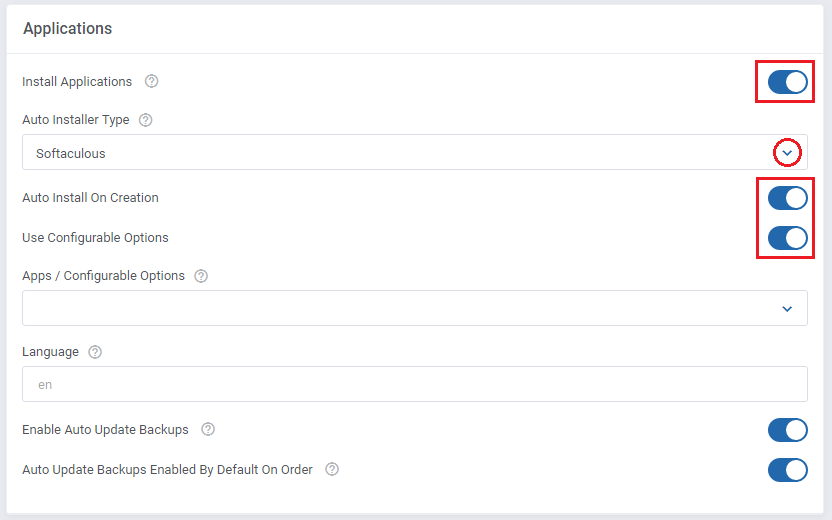
|
| Next, go back to the products list and press the ' 'Generate Auto Installer's Applications Configurable Options' icon. Note that the button will remain inactive if the product already has the options generated and assigned or the Auto Installer is not selected. |
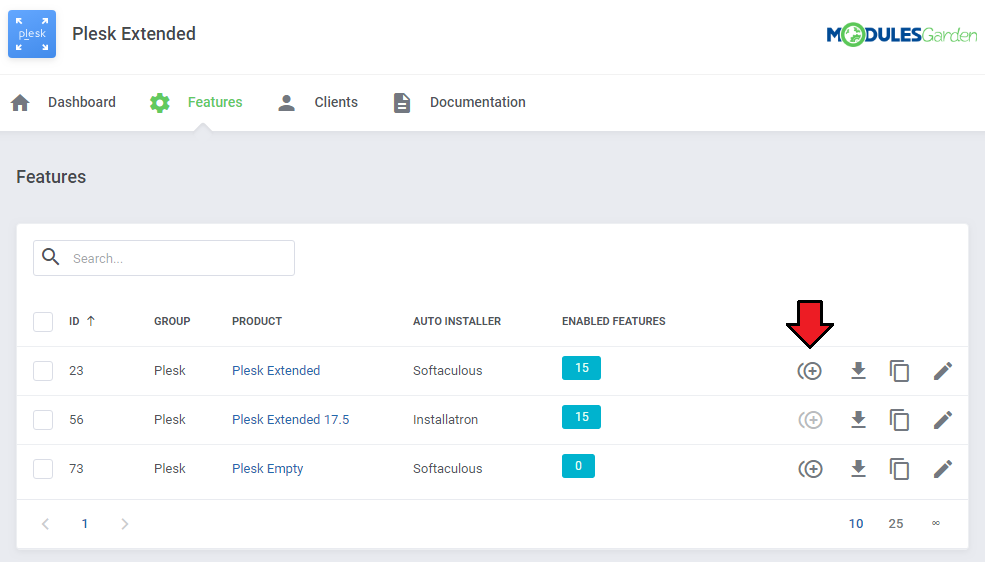
|
| A list of available applications will appear. Keep in mind that it will differ depending on the selected Auto Installer. Decide which of the applications you wish to offer to your clients, to select all at once, use the 'Toggle All' option. |
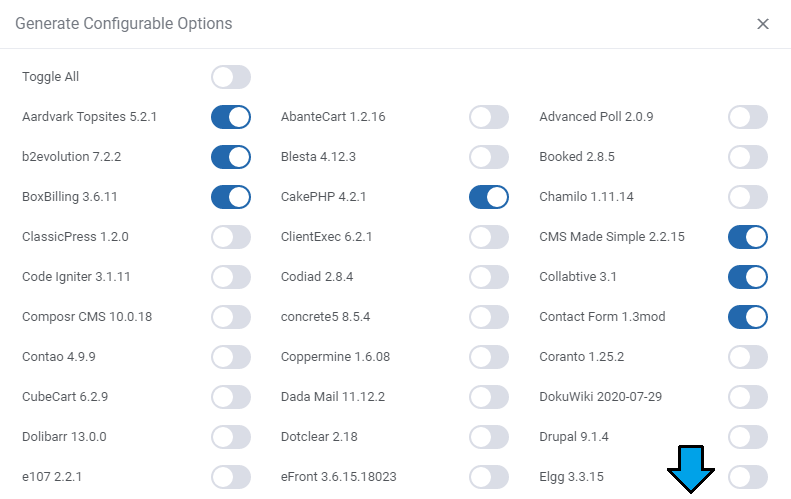
|
| Once the options have been generated, they are visible at 'WHMCS' → 'System Settings' → 'Products/Services' → 'Configurable Options' and assigned to the product. In case you wish to generate the options again for that product, you must previuosy unassign those already generated or delete them. |
[edit] Manual Generation
|
As an alternative, you may generate the configurable options in a traditional way. |
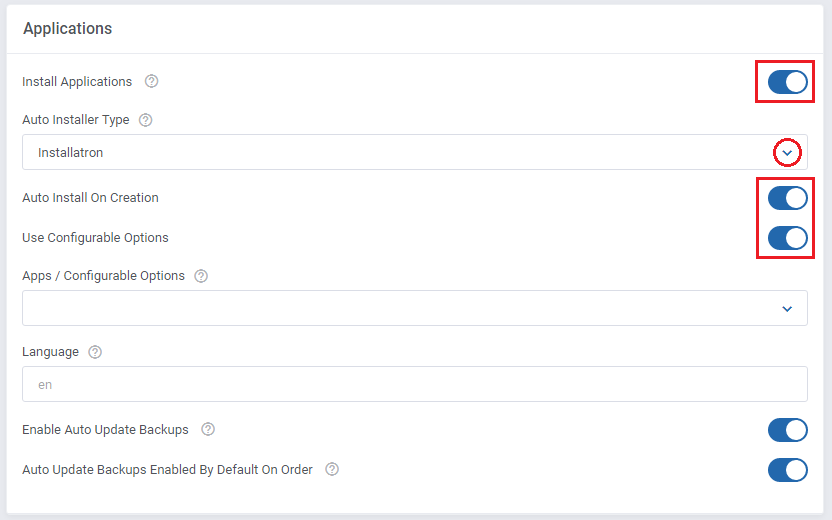
|
| Next, go back to the features list and click on the download icon to view the list of applications. |
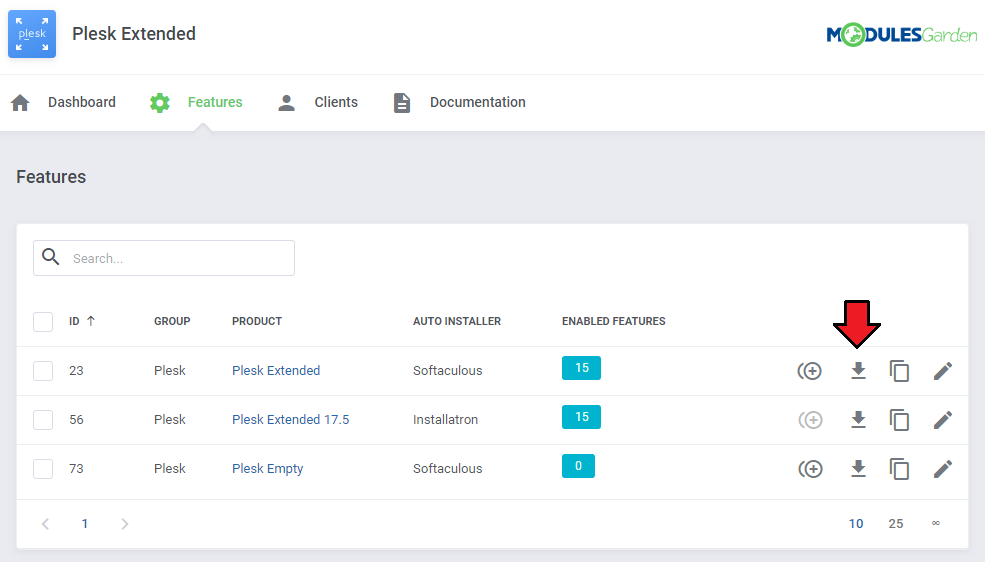
|
| These are the names of values that you can enter in configurable option fields. We will configure them in the next step. For example, if you would like to set up 'Drupal 8.3.2' in your applications list, you will need to enter 'Drupal' or 'Drupal|Drupal 8.3.2' into the value field. |
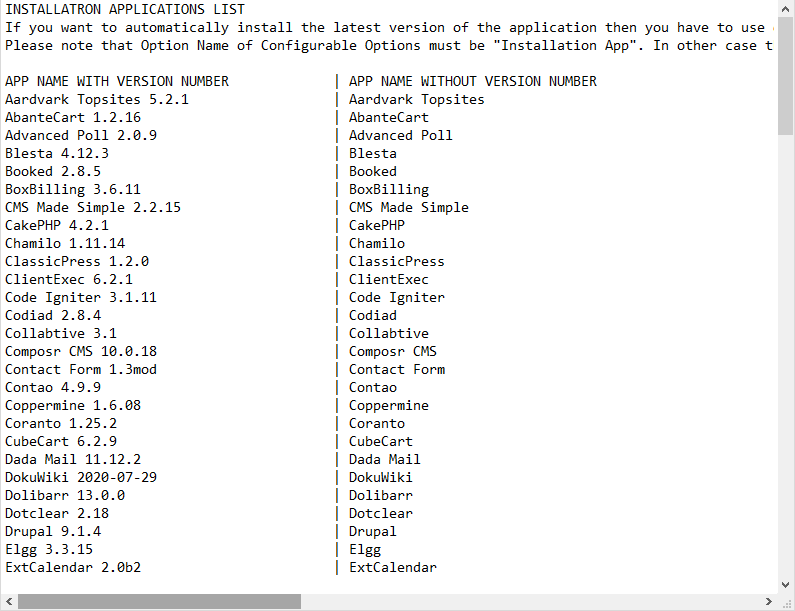
|
| Go to your 'WHMCS' → 'System Settings' → 'Products/Services' → 'Configurable Options' and press 'Create a New Group' . |

|
| Enter 'Group Name' of your choice, select product you want to assign configurable options to, then press 'Save Changes' . |
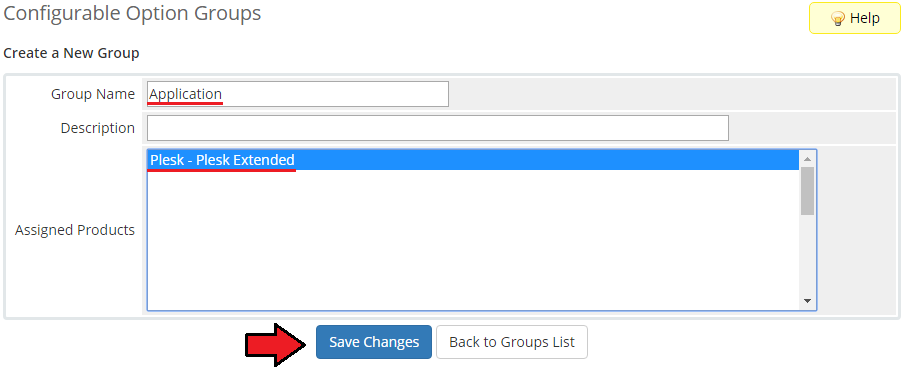
|
| Now, click on 'Add New Configurable Option' . |
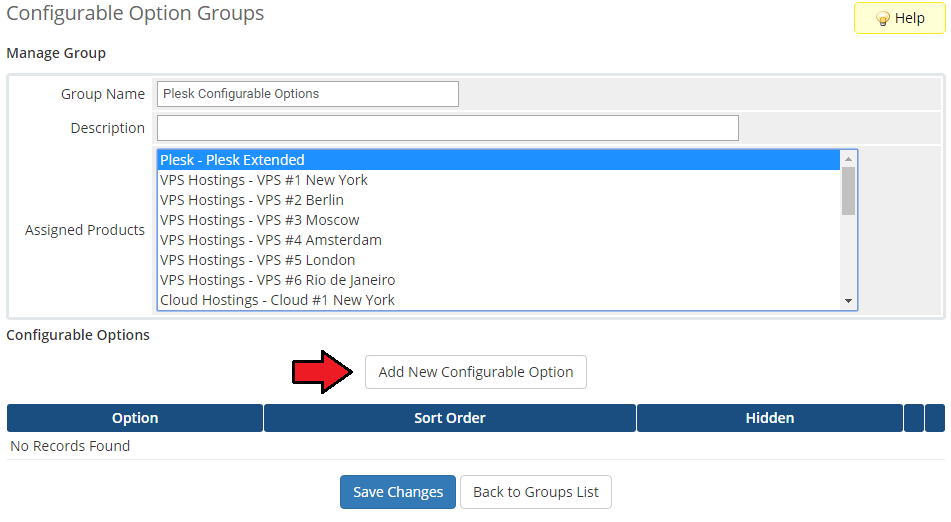
|
| This moment is very important. As 'Option Name' , you have to enter 'Installation App' . Otherwise, the entire functionality will not work. Here you can set up as many applications as you want. To do so, enter a value name, e.g. 'WordPress |WordPress 4.7.5' and press 'Save Changes' . |
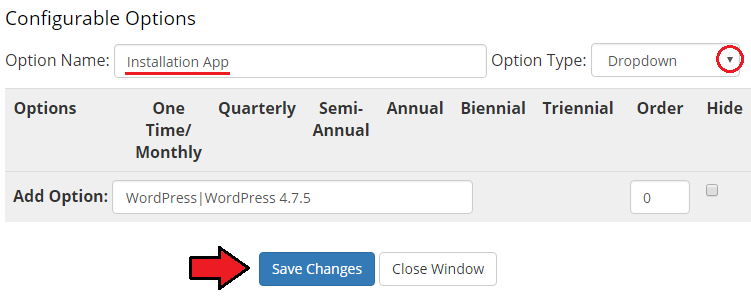
|
| As you can see on the following screen, we decided to offer our customers 5 applications. When you finish adding the applications, press 'Save Changes' and 'Close Window'. |
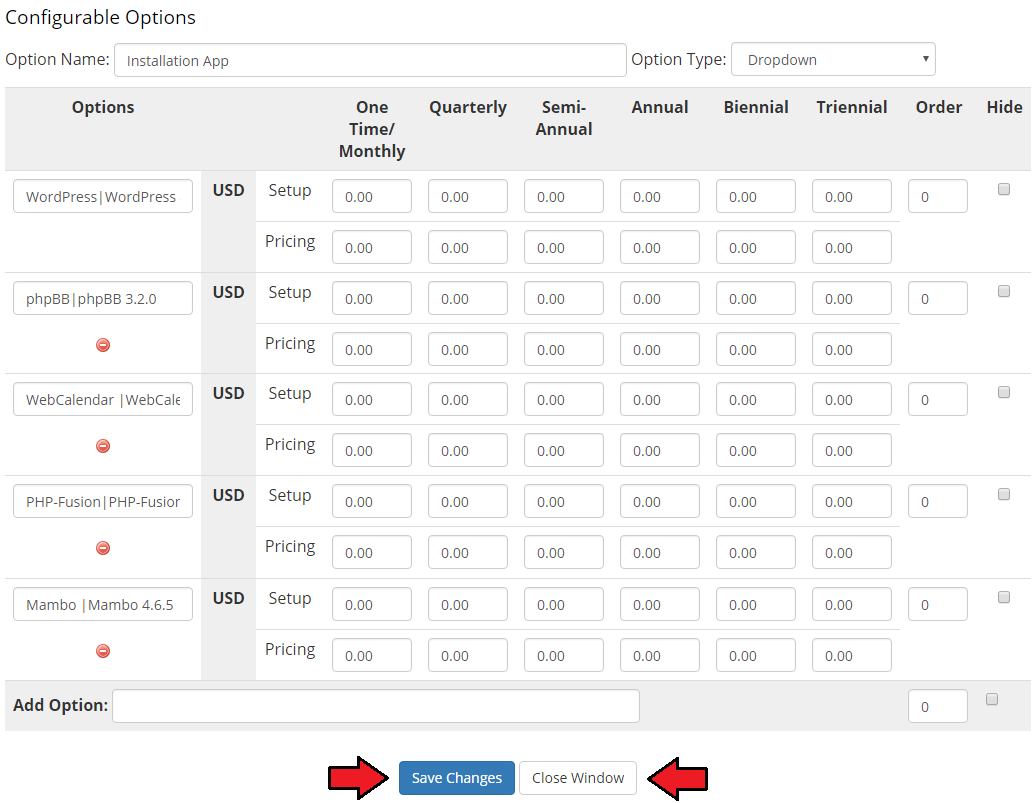
|
| From the module's 3.1.0 version you can also create a new configurable option - Auto Backup On Update with the 'Yes/No' option type. This option is used to enable the creation of auto update backups for a first chosen application after the initial order in WHMCS. |
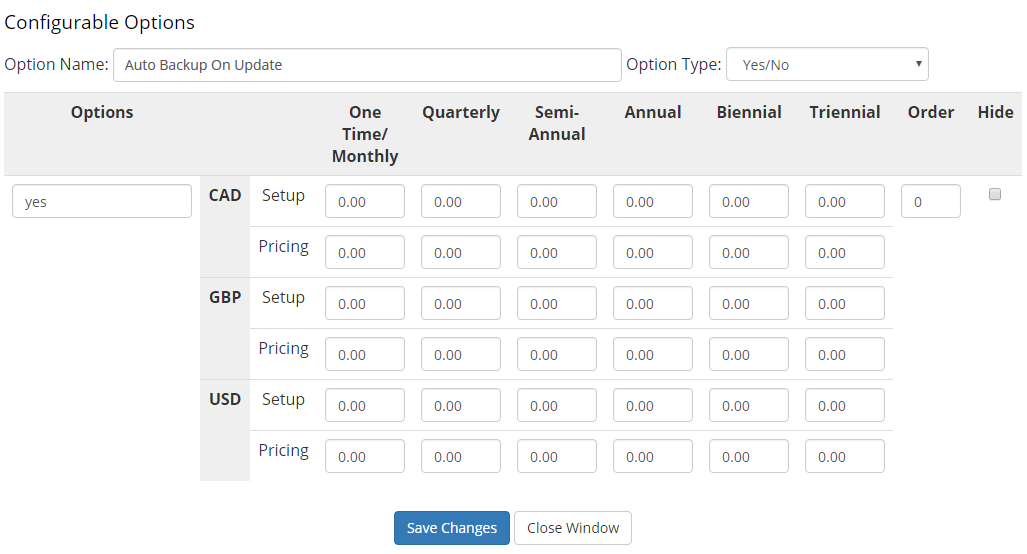
|
| Afterward, come back to 'Plesk Extended Features' → 'Configuration' → 'Applications' , activate 'Use Configurable Options' and choose 'Apps / Configurable Options' from the dropdown menu. Please note that you can have more configurable options groups. Press 'Save' . You have just successfully assigned configurable options to the application auto installation. |
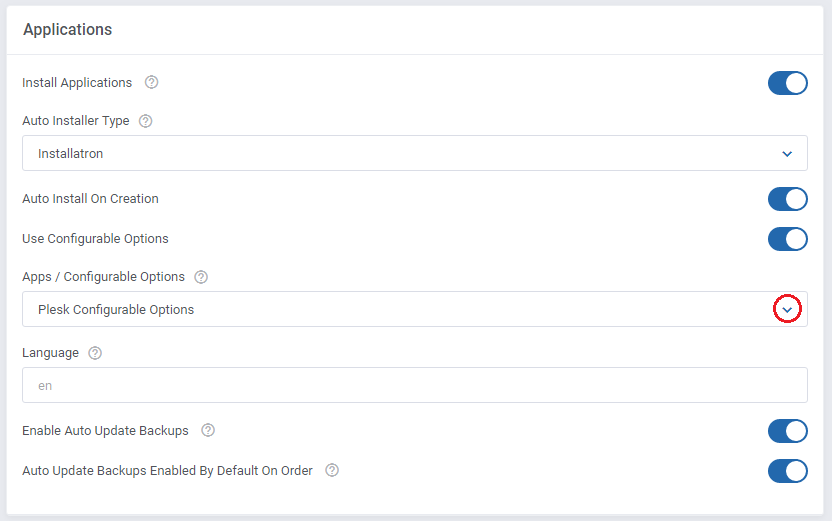
|
| Let us find out what your customers are going to see in your client area while placing the order. As you can notice, a dropdown menu with the previously configured applications has appeared. |
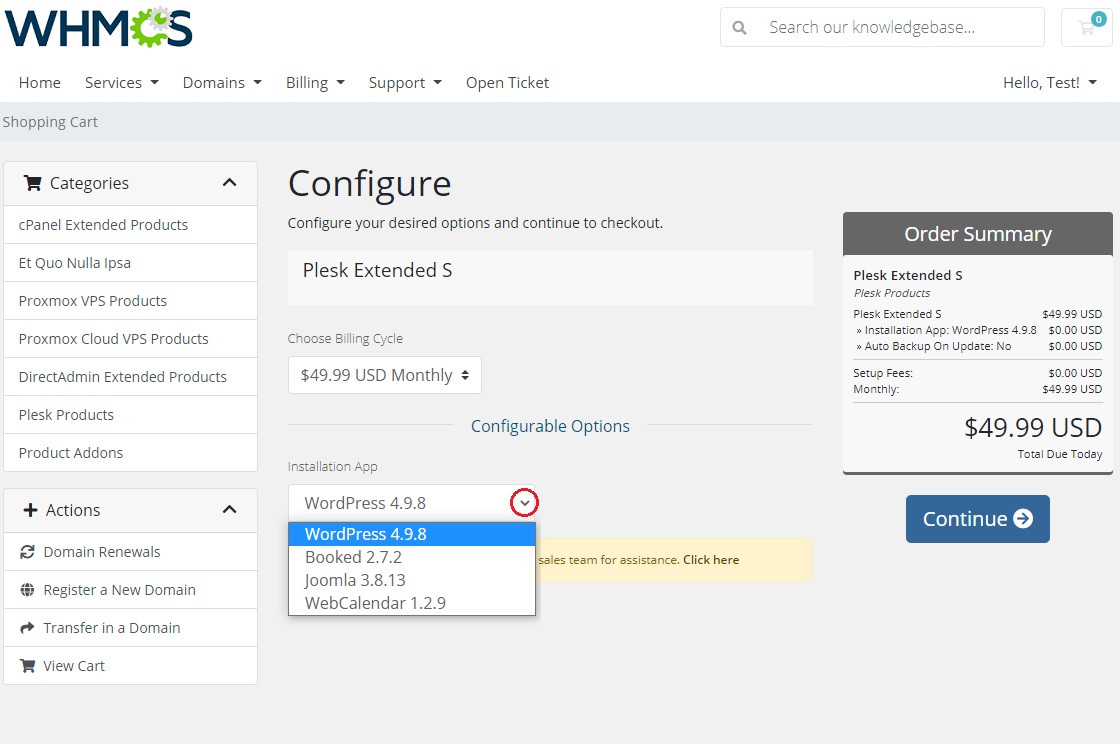
|
[edit] Assignment of Custom Fields To Application Auto Installation
| Now that you know how to allow your customers to choose which application they would like to install on their account, we can proceed one step further. Until this moment applications have been installed with the use of default details like e.g. directory names or database name.
Remember to set each field type as 'Text Box' , tick 'Required Field ' and 'Show on Order Form'. |
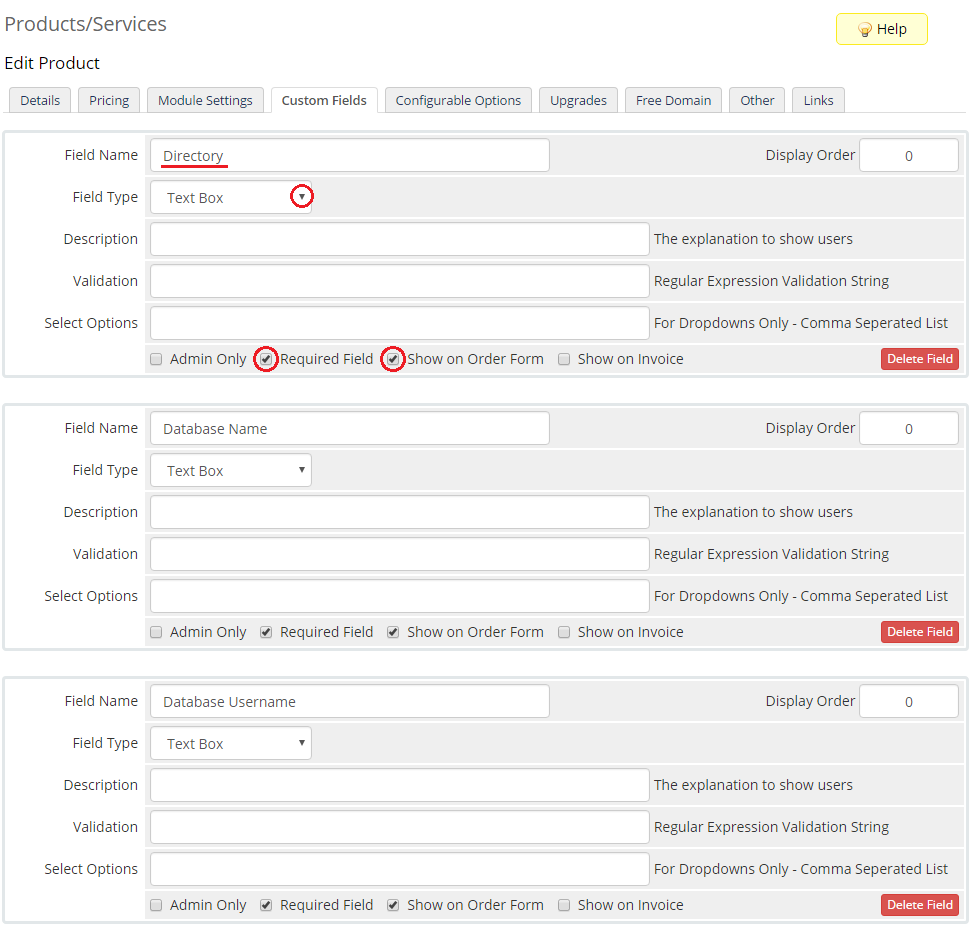
|
The next 3 fields are:
Set them as 'Text Box' and tick 'Show on Order Form'. |
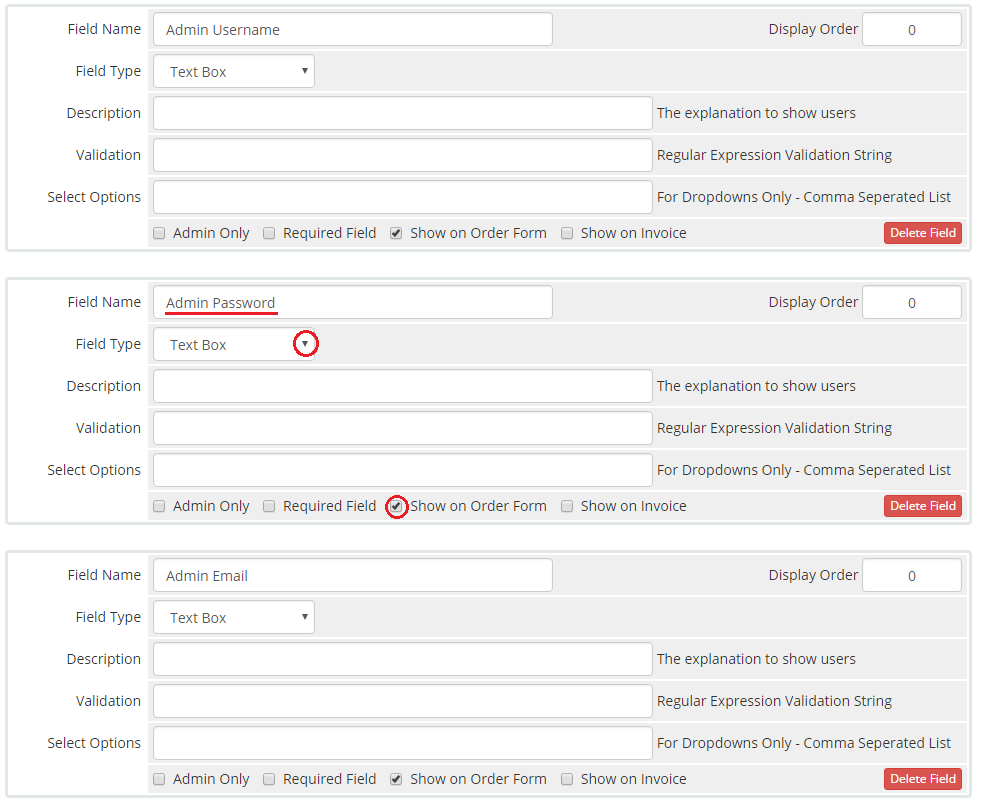
|
The last field is:
Set it as 'Drop Down' , enter 'Yes, No' into 'Select Options' , tick 'Required Field ' and 'Show on Order Form'. |
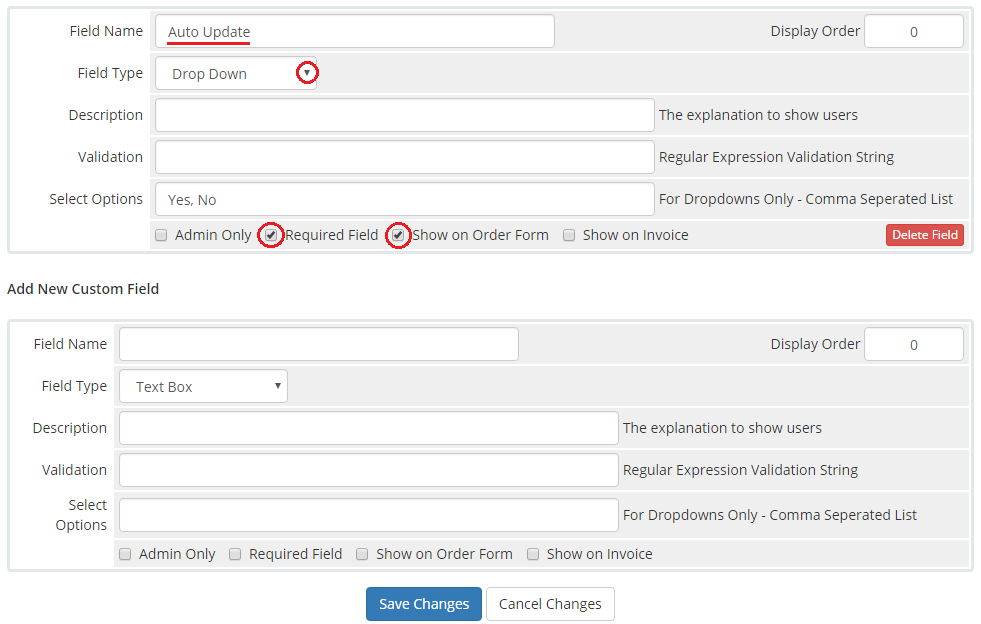
|
| Once you add all the custom fields, they will appear while placing an order. Voila! Now your customers can personalize each application without the necessity of installing it later. |
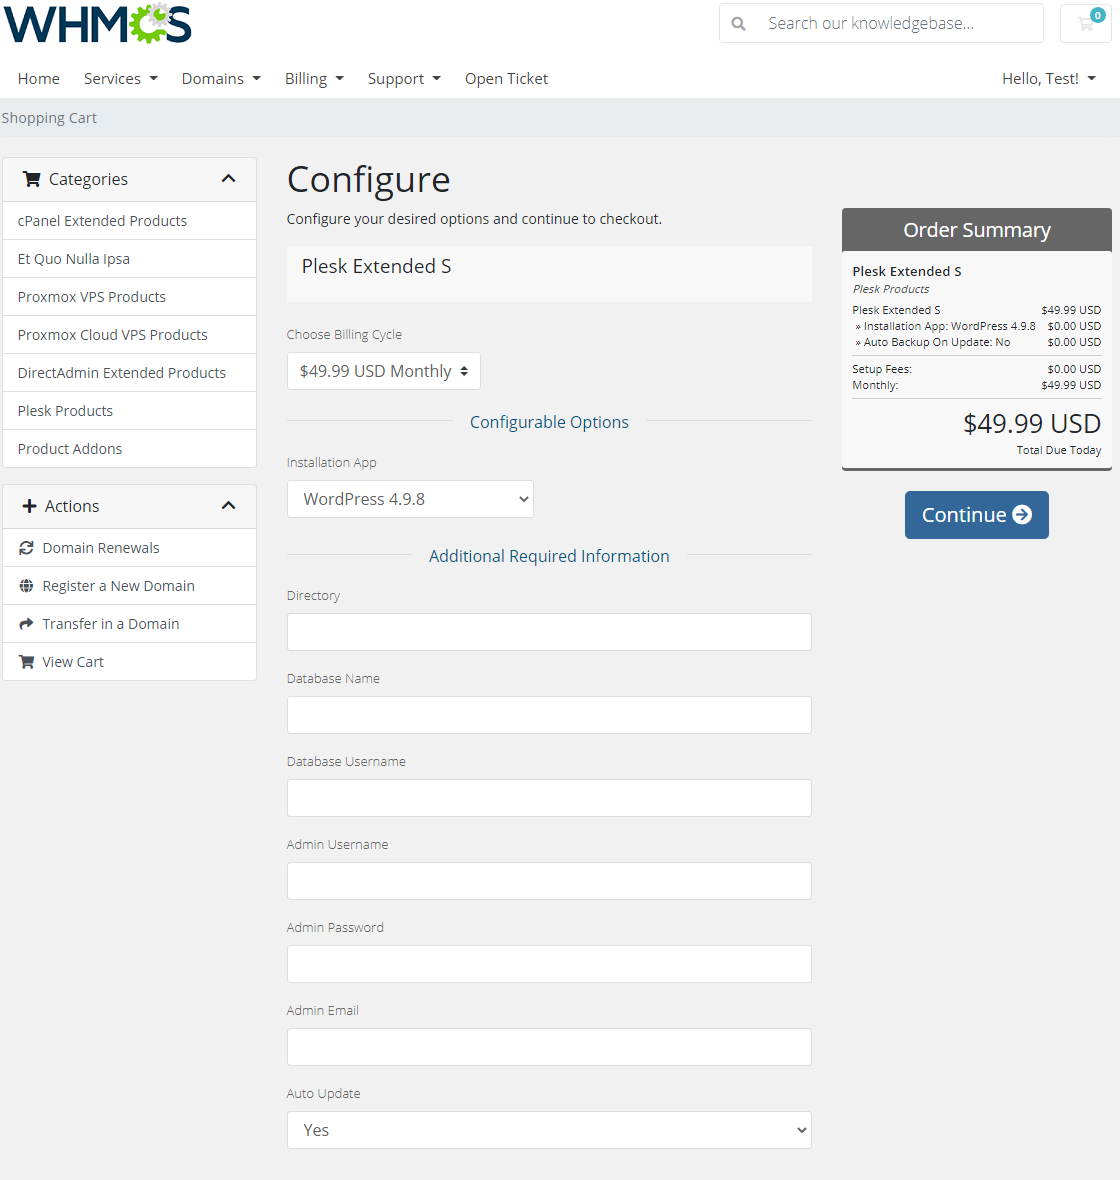
|
[edit] Custom Installatron Application Language
| We will show you how to quickly set a custom language for Installatron web applications. For this purpose, you need to add a new custom field for your product. The field should be called 'Language' . |
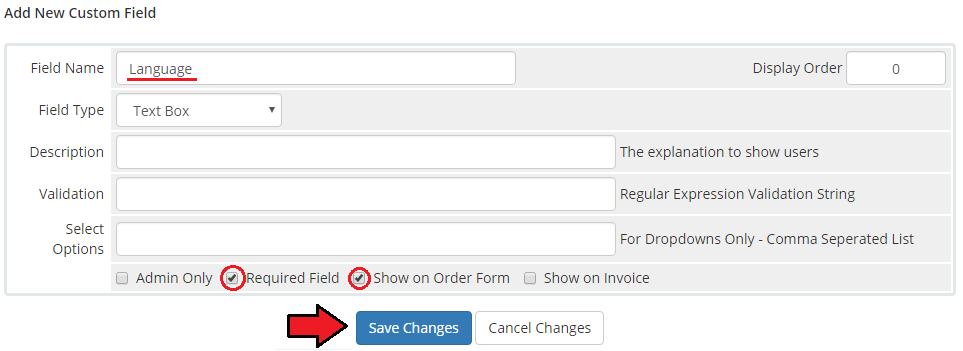
|
| Afterward, go to your 'Products/Services' and check whether the 'Language' field has appeared. In order to change the default application language for a certain account, enter the appropriate value here. |
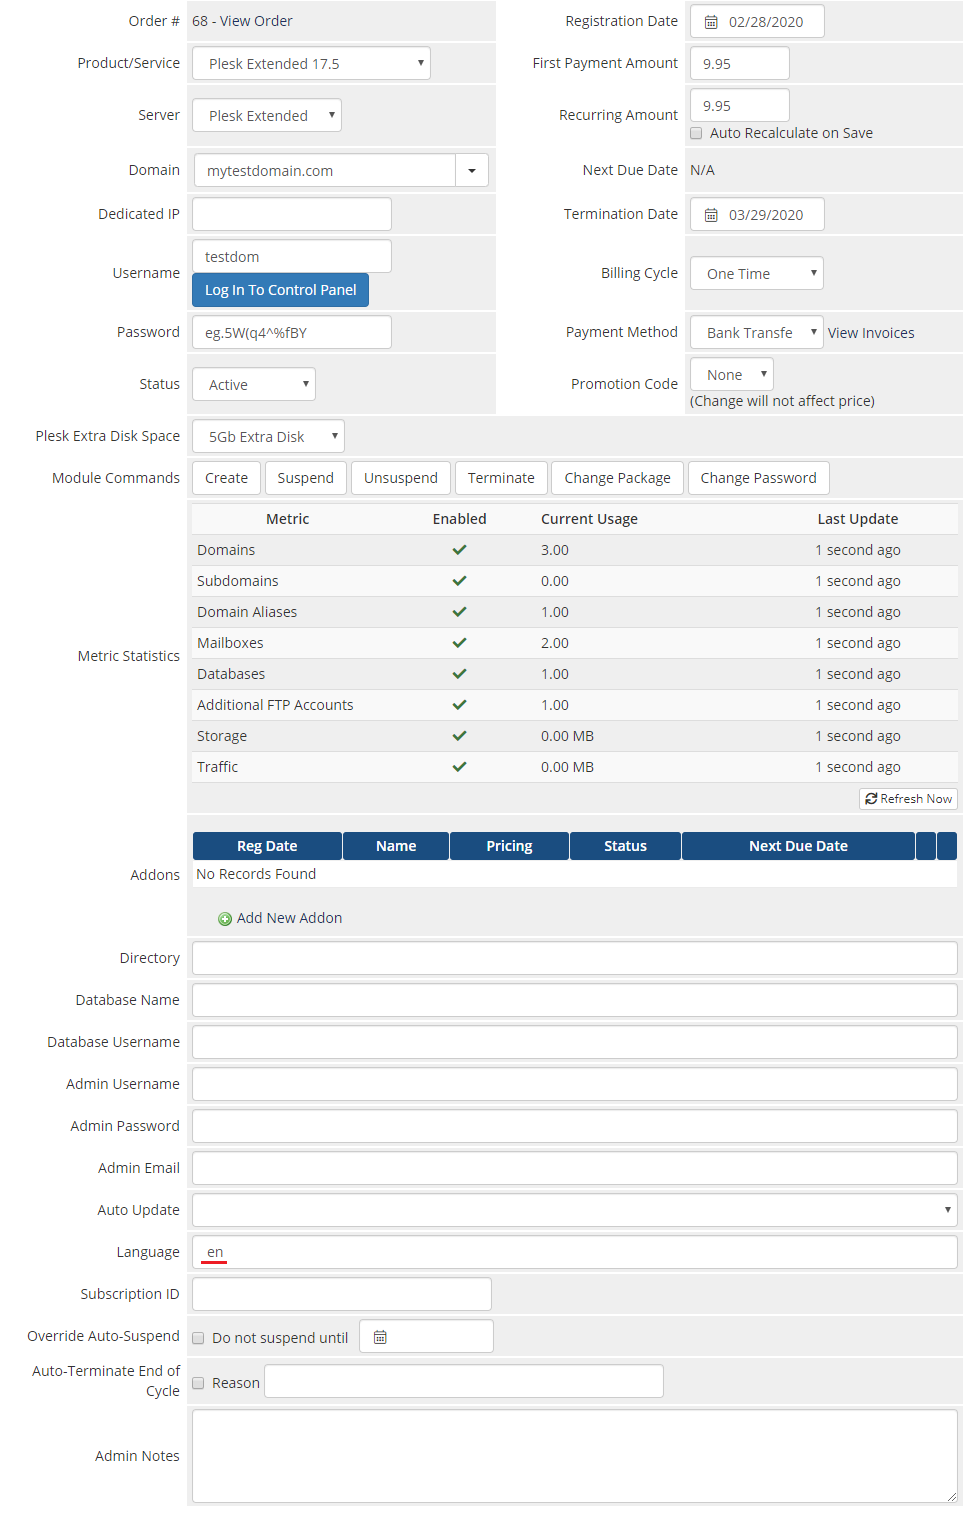
|
| From now on the new field will be visible to your customers as well. While installing a new application, they will be able to choose a desired language by entering its value into the field. Here you will find a complete list of language codes. |
[edit] Management of Existing Products
| You can easily use Plesk Extended module with your already configured Plesk products. To do so, change the type of servers and module names of products from 'Plesk' to 'PleskExtended'. |
[edit] Billing Management
| When you combine Plesk Extended For WHMCS with Advanced Billing For WHMCS, you will be able to set up additional billing options. |
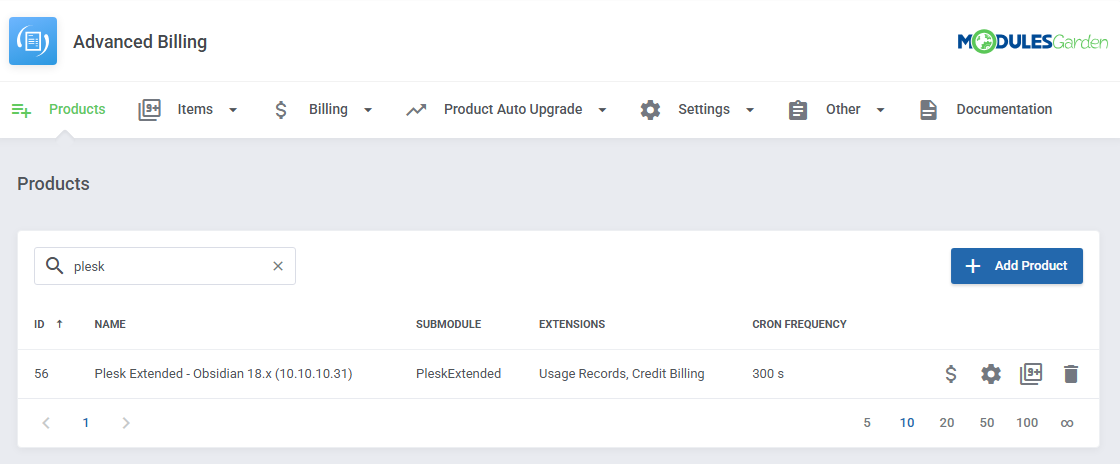
|
| The module allows you to charge your customers basing on the server resources used by them. |
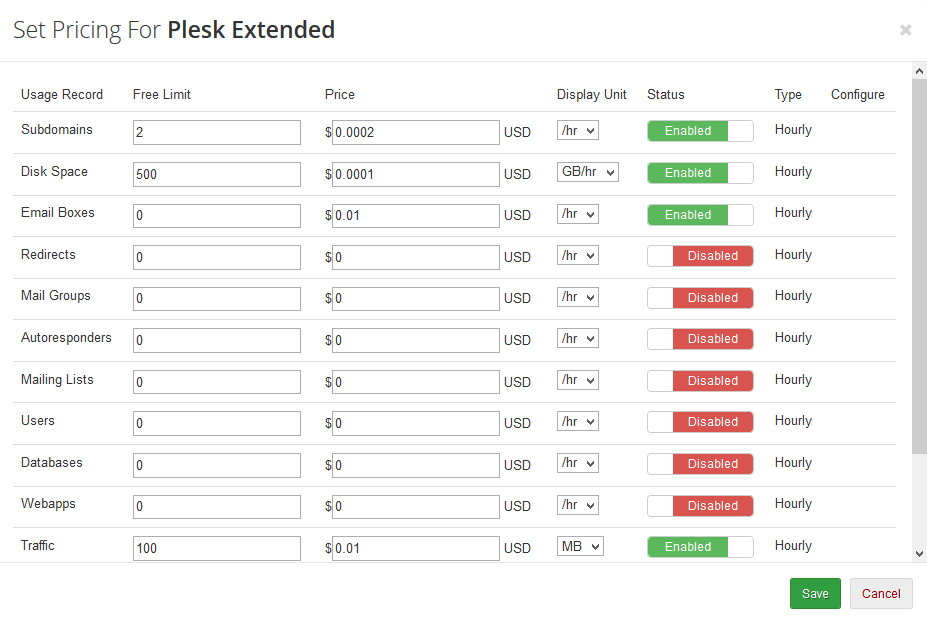
|
| With Advanced Billing module, you can also display to your customers the current server resource usage and their cost. |
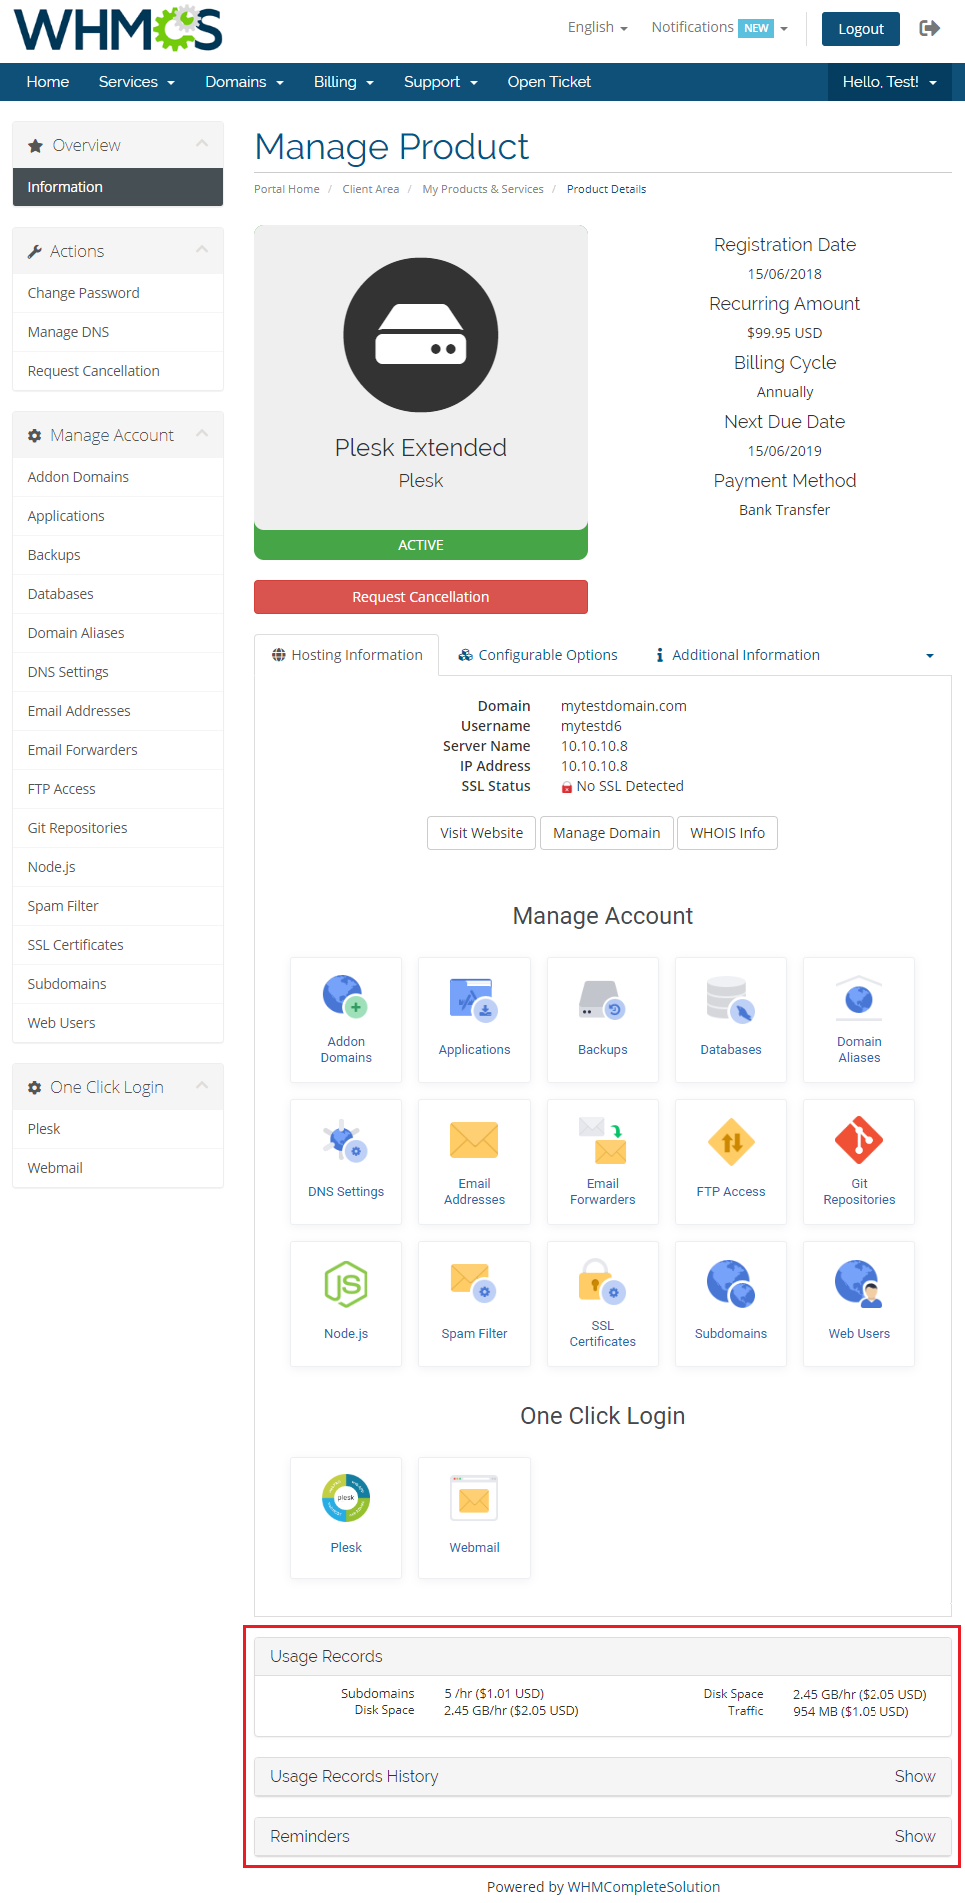
|
[edit] Importing Existing Account
| In this section, you can find short instruction on how to connect one of your clients to your already existing account in Plesk. Take the following steps to make sure that the process will be carried out properly. 1. Firstly, manually create an order for your customer in WHMCS. Choose a client and in the summary view, click on the ' Add New Order' button. Next, select a 'Product/Service' and press 'Submit Order' .
The above-mentioned information has to be consistent with the data from your cPanel account. Now, complete these fields as presented below. |
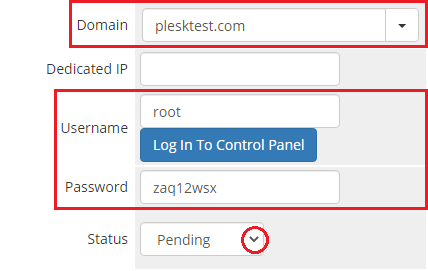
|
| 3. If the completed data is correct, you can log in to the account by pressing the 'Go To Webmail' button. Moreover, to make sure that everything works as expected, you can check if the newly-created account can be managed in the client area. Important! Remember to manually add other missing parameters of the product in configurable options, custom fields, billing cycle, etc. so they match the parameters of the connected account from your Plesk panel. |
| Another possibility to import already existing accounts in Plesk with your WHMCS is to use the 'Server Sync Tool' WHMCS tool. More info can be found here. After performing this action, do not forget to run the following cron command: php -q yourModulePath/modules/servers/PleskExtended/cron/cron.php account:synchronize |
[edit] Use Cases
| This section provides sample scenarios showcasing common use cases and how the module's features can be applied in practice. Explore the examples below for real-world applications of the module. |
[edit] Automatic App Installation With Service Order
| With Plesk Extended For WHMCS products, you can make it easy for users to install applications. To get started, open the 'Plesk Extended' addon, navigate to 'Features' → 'Settings' and find the 'Applications' section. |
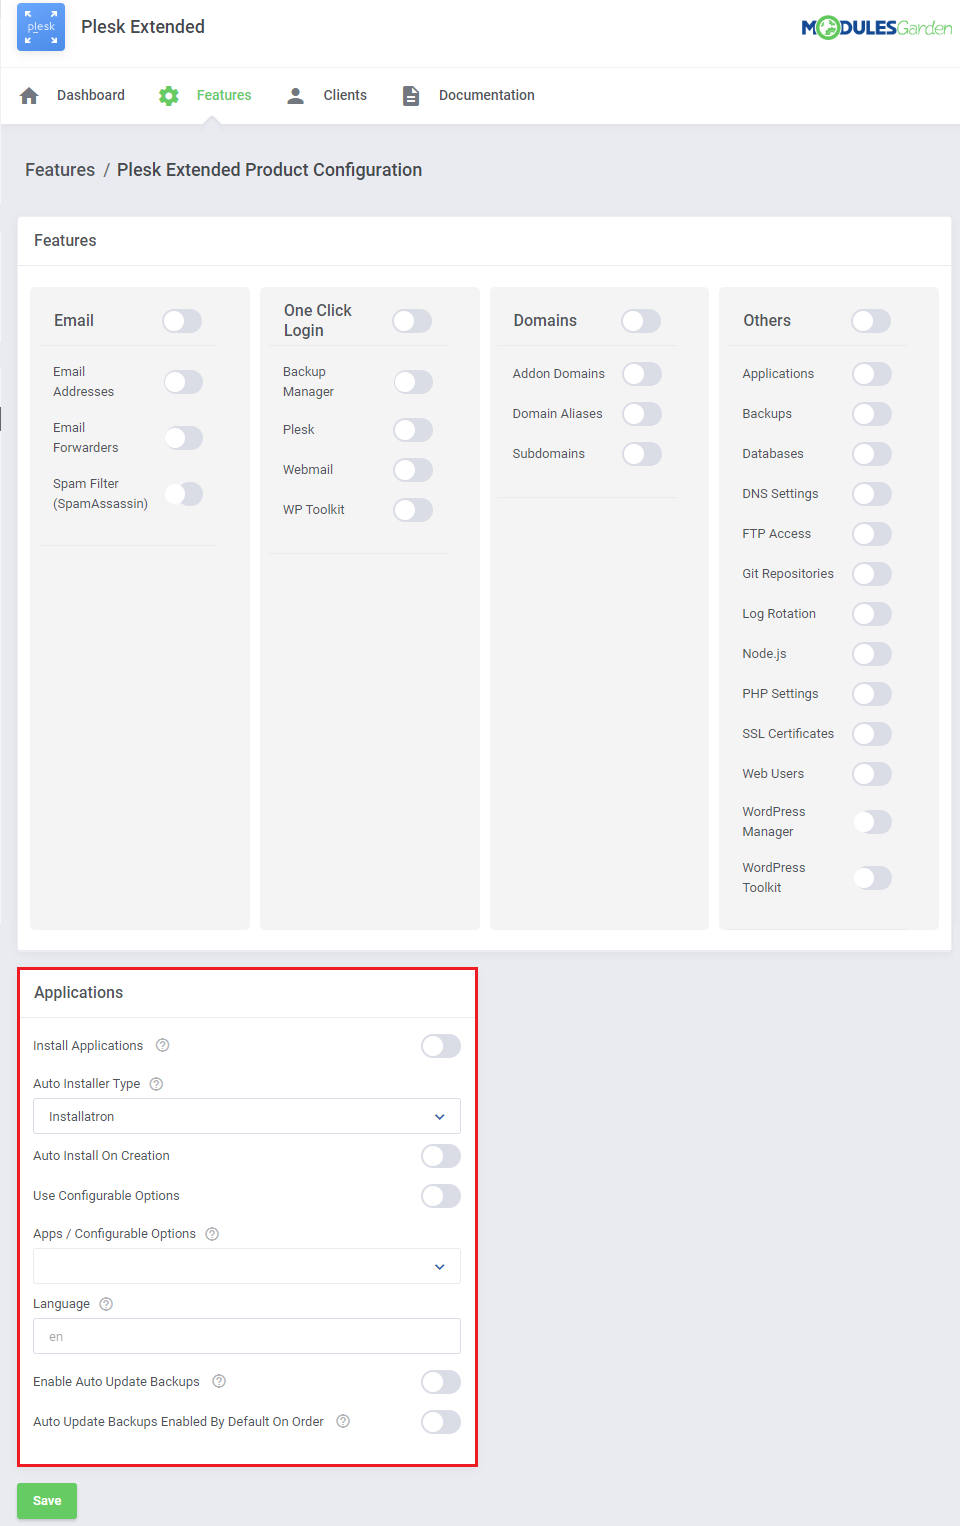
|
| Begin by activating the 'Install Applications' option. One way to achieve this is by selecting an application that will automatically be installed for new Plesk accounts. Choose the 'Auto Installer Type' first, then pick your desired application. Don’t forget to enable the 'Auto Install On Creation' feature to automate the installation process. |
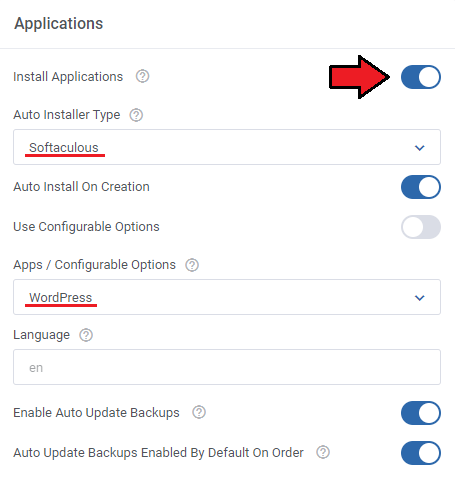
|
| Another option is to allow customers to select their application during the ordering process. To do this, activate the 'Use Configurable Options' switch and select the desired options from the dropdown list. For further assistance in preparing these Configurable Options, consult the 'Applications Configuration' section. |
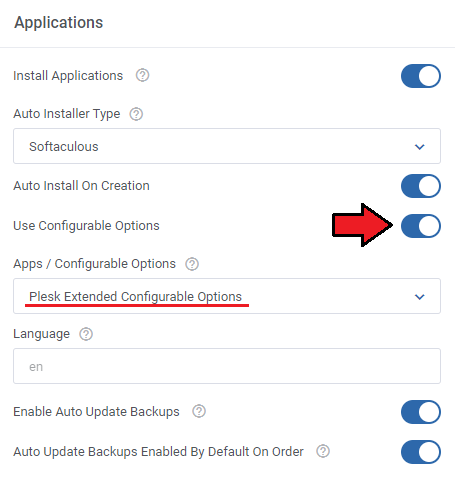
|
| After the client completes their order and the 'Create' action is taken, the new Plesk account will come pre-installed with the chosen application (such as a WordPress installation). |
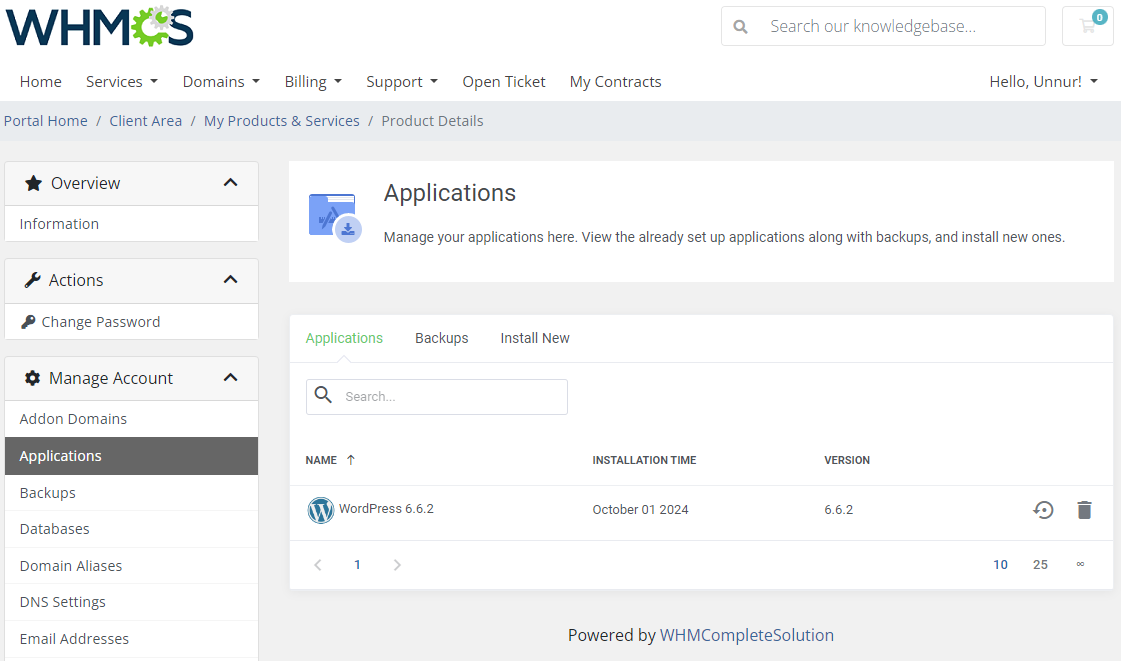
|
[edit] Tips
| 1. To set up an account for an existing customer in your Plesk Extended, create a new WHMCS order with the exact same username, password and email address. Then, set the account status to active. |
| 2. As this module supports templates system, any changes made in the module's templates files will be saved after the upgrade process. |
| 3. If you want the already deleted accounts on the server to be removed from the WHMCS addon module list, proceed to yourWHMCS/modules/addons/PleskExtended/commands and use the following cron command. > php -q run.php client:plesk:delete |
| 4. If the "Invalid secret key usage. Please check logs for details." error occurs, then you need to use the following cron command that will delete all keys from the Plesk panel as well as 'PleskExtended_Accounts' database table to allow each account to create a new key. yourModulePath/modules/servers/PleskExtended/cron/cron.php secretKeys:delete |
| 5. We recommend assigning only one server to 'Server Group' as servers may have different service plans. Otherwise, API may return the following message 'There is no such a service plan' if WHMCS chooses a server from ' Server Group' that has no existing service plan. |
| 6. Repairing Plesk account relations: The module provides a maintenance tool that detects and fixes incorrect relations between WHMCS services and Plesk customer accounts.
php -q modules/servers/PleskExtended/cron/cron.php relationsFixer:print
php -q modules/servers/PleskExtended/cron/cron.php relationsFixer:run |
[edit] Update Instructions
| Essential guidance through the process of updating the module is offered here. Important: If you are upgrading from Plesk Extended 2.X to 3.X version of the module, you have to delete the old /modules/servers/pleskExtended/ folder (started with a lower case letter) before you start using a new version.
Then, after activation of the new addon version, all data from the old version of the addon and the product configurations will be automatically migrated to the new version. Note: from 3.0.0 version of the module the cron execution is also no longer required. |
[edit] Migration To Version 4.x
| The migration process to version 4.x is fully automated. You only need to follow the steps described in the following article: Update Guide. All your existing settings, products, and client data will be preserved during the update. No additional manual actions are normally required. 1. Delete all files from the previous version of the module. php -q /YOUR_WHMCS/modules/servers/PleskExtended/cron/cron.php module:upgrade run 4.0.0 |
[edit] Upgrade Guide
| Seeking a solution that offers greater flexibility, customization tailored to your precise needs, and unrestricted availability? There is an option that not only proves to be cost-effective in the long run but also includes prioritized support services, making it a truly valuable investment. Opt for the Open Source version of your Plesk Extended For WHMCS module to unlock these benefits. Follow a comprehensive guide covering the transition process, the advantages it brings, and step-by-step instructions on what to do next after the order has been successfully finalized. |
[edit] Common Problems
| 1. When you have problems with connection, check whether your SELinux or firewall does not block ports. |
| 2. If you see an error as shown on the screen below, it means that you haven't provided your service plan name or reseller plan name in the product's 'Module Settings'. Once you enter the name, the problem will disappear. |
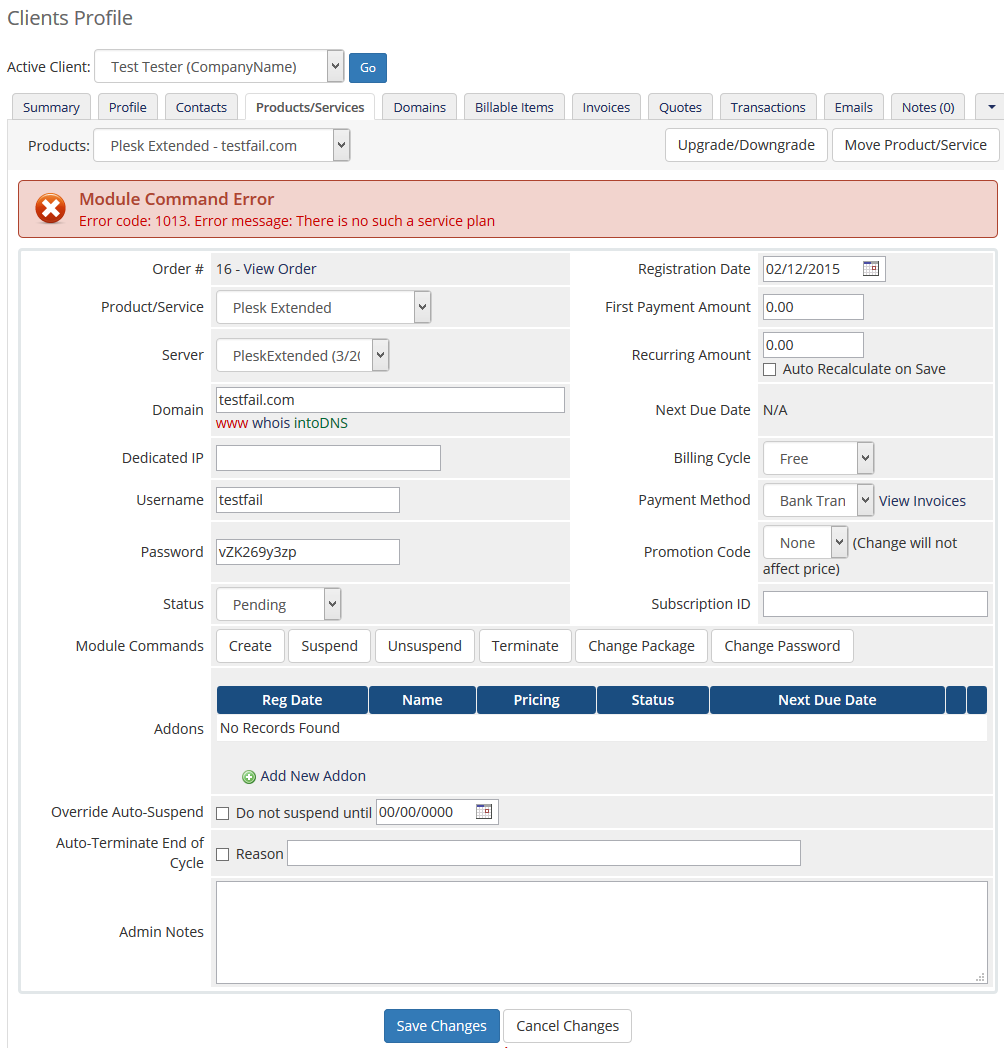
|
| 3. If you are unable to connect with your Plesk server or client area functionalities do not work properly, then make sure that you are connecting with your server on port 8443. Here you can find more information on how to change the default port in Linux and Windows |
| 4. CURL Error: [6] Could not resolve host. Try entering your Plesk IP address into the Hostname field in the server configuration. |
| 5. Unable to get the version number from the server. CURL Error: 7 - couldn't connect to host. Check server connection details. Check connection details and the connection itself between WHMCS and server. |
| 6. Unable to get the version number from the server. Permission denied. You have to set admin account access details. You need admin account access to use PPPE module. Reseller account API is not supported. |
| 7. Blank page at 'Applications'. Reason: Some libraries may be missing. |
| 8. If you have problems with your license, please make sure that the content of the file is correct. Please note that for Plesk Extended For WHMCS V2.0.0 and later, the license key begins with: $plesk_extended_licensekey="ModulesGarden_PleskEX_LicenseKey"; Not as it was for the previous versions: $parallels_plesk_panel_extended_licensekey="ModulesGarden_PleskEX_LicenseKey"; |
| 9. In case you see an error: 'Request Is Invalid: Error In Line 5: Element 'owner-id' is not a valid value of the atomic type 'int'.' while creating a product, please verify your product type. Most probably it is set to 'Dedicated/VPS Server' or 'Other' which are not supported. See point 17 of the installation for more info. |
| 10. If you see an error similar to: 'Unable to find appropriate manager for this version of Panel. Plesk should be at least 8.0 version.' while creating a product, please verify your server configuration. Make sure that you have SSL 'Secure' ticked in your server configuration, depending on your Plesk settings. |
| 11. Plesk Extended For WHMCS functions only on the administrator account. |
| 12. For a large backup files we recommend to increase the 'max_execution_time' setting in your server's 'php.ini' configuration. Otherwise, fatal errors like 'Allowed memory size of 134217728 bytes exhausted (tried to allocate 100401152 bytes)' may occur when trying to download local backups. |
| 13. Getting the 'SQLSTATE[23000]: Integrity constraint violation: 1062 Duplicate entry (...)' error when creating a new Plesk account? This might occur when a client has both normal and reseller hosting accounts. In this case, we recommended to try the 'Separate Plesk User' option for the product's configuration. |
| 14. Due to removed support for 'XML API' by Plesk, Plesk Onyx from version 17.8 is only partly supported. This means the following functionalities:
will not work anymore and even more features may become incompatible with further versions of Plesk. If you need full compatibility, please use the last compatible Plesk 17.5 version. |
| 15. If your clients encounter problems with auto-login to Plesk control panel, please check if you provided the proper 'Log In To Panel' URL in the addon's 'Server Settings' . You can set it up as described in Configuration of Addon section in step 29. |
| 16. If you come across the PleskAPIInvalidSecretKeyException : Invalid secret key usage. Please check logs for details. error after migrating the system to another server, then use the following cron command. It will delete all keys from the Plesk panel as well as 'PleskExtended_Accounts' database table to allow each account to create a new key. php yourModulePath/modules/servers/PleskExtended/cron/cron.php secretKeys:delete |
| 17. Plesk Extended For WHMCS does not support the WHMCS 'Move Product/Service to Another Client' function. |
| 18. The account types "Other" and "Server/VPS" are not supported. When creating a product, make sure to assign it to one of the supported types: Shared Hosting or Reseller Hosting. Otherwise, attempting to run the create command will result in an error. |