Zendesk For WHMCS
(→API Connection) |
(→About Zendesk For WHMCS) |
||
| (80 intermediate revisions by 4 users not shown) | |||
| Line 5: | Line 5: | ||
{| | {| | ||
|style="padding: 10px 0px 10px 0px;"|'''Zendesk For WHMCS''' replaces the standard WHMCS support system with the complex choice of Zendesk tools.<br /> | |style="padding: 10px 0px 10px 0px;"|'''Zendesk For WHMCS''' replaces the standard WHMCS support system with the complex choice of Zendesk tools.<br /> | ||
| − | The module will enrich your client area with various extra features, allowing customers to | + | The module will enrich your client area with various extra features, allowing customers to fill in Zendesk ticket fields and use emojis.<br /> |
At the same time, you and your staff members will be free to monitor and manage every ticket created in WHMCS straight from within the Zendesk admin area. | At the same time, you and your staff members will be free to monitor and manage every ticket created in WHMCS straight from within the Zendesk admin area. | ||
|} | |} | ||
| Line 40: | Line 40: | ||
{| | {| | ||
|style="padding: 0px 0px 0px 30px;"|✔ Toggle SSL Connection | |style="padding: 0px 0px 0px 30px;"|✔ Toggle SSL Connection | ||
| + | |} | ||
| + | {| | ||
| + | |style="padding: 0px 0px 0px 30px;"|✔ Toggle SSO For Only Verified Users | ||
|} | |} | ||
{| | {| | ||
| Line 46: | Line 49: | ||
{| | {| | ||
|style="padding: 0px 0px 0px 30px;"|✔ Choose Available Support Departments | |style="padding: 0px 0px 0px 30px;"|✔ Choose Available Support Departments | ||
| + | |} | ||
| + | {| | ||
| + | |style="padding: 0px 0px 0px 30px;"|✔ Choose Available Ticket Fields | ||
|} | |} | ||
{| | {| | ||
| Line 60: | Line 66: | ||
|} | |} | ||
{| | {| | ||
| − | |style="padding: 0px 0px 0px 45px;"|✔ WHMCS | + | |style="padding: 0px 0px 0px 45px;"|✔ WHMCS Users |
|} | |} | ||
{| | {| | ||
| Line 66: | Line 72: | ||
|} | |} | ||
{| | {| | ||
| − | |style="padding: 0px 0px 0px 30px;"|✔ Check Status Of Exported | + | |style="padding: 0px 0px 0px 30px;"|✔ Check Status Of Exported Users |
|} | |} | ||
{| | {| | ||
| Line 82: | Line 88: | ||
{| | {| | ||
|style="padding: 0px 0px 0px 45px;"|✔ Update Client Credentials | |style="padding: 0px 0px 0px 45px;"|✔ Update Client Credentials | ||
| + | |} | ||
| + | {| | ||
| + | |style="padding: 0px 0px 0px 30px;"|✔ Define Default Column And Sorting Direction For Tickets | ||
|} | |} | ||
{| | {| | ||
| Line 100: | Line 109: | ||
|} | |} | ||
{| | {| | ||
| − | |style="padding: 0px 0px 0px 45px;"|✔ | + | |style="padding: 0px 0px 0px 45px;"|✔ Users On Tickets Creation |
|} | |} | ||
{| | {| | ||
| Line 112: | Line 121: | ||
|} | |} | ||
{| | {| | ||
| − | |style="padding: 0px 0px | + | |style="padding: 0px 0px 0px 30px;"|✔ Convert Markdowns To HTML And Emojis |
| + | |} | ||
| + | {| | ||
| + | |style="padding: 0px 0px 0px 30px;"|✔ Use [https://www.modulesgarden.com/products/whmcs/multibrand Multibrand For WHMCS] Integration To: | ||
| + | |} | ||
| + | {| | ||
| + | |style="padding: 0px 0px 0px 45px;"|✔ Export Branded Tickets To Selected Departments | ||
| + | |} | ||
| + | {| | ||
| + | |style="padding: 0px 0px 0px 45px;"|✔ Define Per Brand: | ||
| + | |} | ||
| + | {| | ||
| + | |style="padding: 0px 0px 0px 60px;"|✔ Default Department | ||
| + | |} | ||
| + | {| | ||
| + | |style="padding: 0px 0px 0px 60px;"|✔ Contact Us Department | ||
| + | |} | ||
| + | {| | ||
| + | |style="padding: 0px 0px 0px 60px;"|✔ Available Departments | ||
| + | |} | ||
| + | {| | ||
| + | |style="padding: 0px 0px 10px 60px;"|✔ Available Ticket Fields | ||
|} | |} | ||
*'''General Info:''' | *'''General Info:''' | ||
{| | {| | ||
| − | |style="padding: 10px 0px 0px 30px;"|✔ | + | |style="padding: 10px 0px 0px 30px;"|✔ Integrated With [https://www.modulesgarden.com/products/whmcs/multibrand Multibrand For WHMCS] - Export And Create Tickets From Each Brand To Chosen Departments |
|} | |} | ||
{| | {| | ||
| − | |style="padding: 0px 0px 0px 30px;"|✔ Supports Zendesk Emoji - Artworks Provided By [https://www. | + | |style="padding: 0px 0px 0px 30px;"|✔ Supports Zendesk Multibrand Feature |
| + | |} | ||
| + | {| | ||
| + | |style="padding: 0px 0px 0px 30px;"|✔ Supports Zendesk Emoji - Artworks Provided By [https://www.joypixels.com// JoyPixels] | ||
|} | |} | ||
{| | {| | ||
|style="padding: 0px 0px 0px 30px;"|✔ Custom Templates Support | |style="padding: 0px 0px 0px 30px;"|✔ Custom Templates Support | ||
| + | |} | ||
| + | {| | ||
| + | |style="padding: 0px 0px 0px 30px;"|✔ Fully Integrated With [https://lagom.rsstudio.net/extensions/whmcs-modules-integration/zendesk-by-modulesgarden/ Lagom WHMCS Client Theme] | ||
|} | |} | ||
{| | {| | ||
| Line 128: | Line 164: | ||
|} | |} | ||
{| | {| | ||
| − | |style="padding: 0px 0px 0px 30px;"|✔ Supports PHP | + | |style="padding: 0px 0px 0px 30px;"|✔ Supports PHP 8.3 Back To PHP 8.1 |
|} | |} | ||
{| | {| | ||
| − | |style="padding: 0px 0px 0px 30px;"|✔ Supports WHMCS | + | |style="padding: 0px 0px 0px 30px;"|✔ Supports WHMCS Themes "Six" And "Twenty-One" |
|} | |} | ||
{| | {| | ||
| − | |style="padding: 0px 0px 0px 30px;"|✔ Supports WHMCS | + | |style="padding: 0px 0px 0px 30px;"|✔ Supports WHMCS V8.13 Back To WHMCS V8.10 |
|} | |} | ||
{| | {| | ||
| − | |style="padding: 0px 0px 30px 30px;"|✔ Easy Module Upgrade To [https://www.modulesgarden.com/products/whmcs/zendesk#open-source-version Open Source Version] | + | |style="padding: 0px 0px 0px 30px;"|✔ Requires ionCube Loader V14 Or Later |
| + | |} | ||
| + | {| | ||
| + | |style="padding: 0px 0px 30px 30px;"|✔ Easy [https://www.docs.modulesgarden.com/How_To_Upgrade_WHMCS_Module Module Upgrade] To [https://www.modulesgarden.com/products/whmcs/zendesk#open-source-version Open Source Version] | ||
|} | |} | ||
| Line 154: | Line 193: | ||
{| | {| | ||
|style="padding: 0px 0px 15px 15px;"|'''2. In the downloaded file you might find one or two packages that support different PHP versions.'''<br/> | |style="padding: 0px 0px 15px 15px;"|'''2. In the downloaded file you might find one or two packages that support different PHP versions.'''<br/> | ||
| − | In the most recent versions of the module, you will find only one package that supports PHP 7. | + | In the most recent versions of the module, you will find only one package that supports PHP 7.4 and later.<br/> <!-- If you need a package for the previous versions of PHP, please [https://www.modulesgarden.com/support/ticket/general-support contact our support]. --> |
|} | |} | ||
{| | {| | ||
| − | |style="padding: 0px 0px 20px 25px;"|[[File: | + | |style="padding: 0px 0px 20px 25px;"|[[File:PHP74_78.png]] |
|} | |} | ||
| + | <!-- | ||
{| | {| | ||
|style="padding: 0px 0px 15px 15px;"|'''Previous updates of the module may contain two packages dedicated to various PHP versions.'''<br/> | |style="padding: 0px 0px 15px 15px;"|'''Previous updates of the module may contain two packages dedicated to various PHP versions.'''<br/> | ||
| − | The first one | + | The first one supports PHP 5.6 up to PHP 7.1, and the second one is addressed to PHP 7.2 up to PHP 7.4.<br/> |
| − | '''''Note:''' Keep in mind that PHP versions 5.6 up to 7. | + | '''''Note:''' Keep in mind that PHP versions 5.6 up to 7.1 are no longer officially supported and their security issues are not fixed or released anymore. Find more info [http://php.net/supported-versions.php here].'' |
|} | |} | ||
{| | {| | ||
| − | |style="padding: 0px 0px 20px 25px;"|[[File: | + | |style="padding: 0px 0px 20px 25px;"|[[File:PHP56_74.png]] |
|} | |} | ||
| + | --> | ||
{| | {| | ||
| − | |style="padding: 0px 0px 10px 15px;"|'' '''Important''': This situation does not affect [https://www.modulesgarden.com/products/whmcs/zendesk#open-source-version '''the open source version'''] of this module which can be applied to any PHP from version 5.6 and later.''<br/>'' '''Note''': You can check the current PHP version in your WHMCS. To do so, proceed to ''' 'Utilities' → 'System' → 'PHP Info'.''' | + | |style="padding: 0px 0px 10px 15px;"| <!-- '' '''Important''': This situation does not affect [https://www.modulesgarden.com/products/whmcs/zendesk#open-source-version '''the open source version'''] of this module which can be applied to any PHP from version 5.6 and later.''<br/>'' --> '''Note''': You can check the current PHP version in your WHMCS. To do so, proceed to ''' 'Utilities' → 'System' → 'PHP Info'.''' |
|} | |} | ||
{| | {| | ||
| − | |style="padding: 0px 0px 15px 15px;"|'''3. | + | |style="padding: 0px 0px 15px 15px;"|'''3. Extract the package and upload its content into the main WHMCS directory. <br/> |
| − | The content of the | + | The content of the package to upload should look like this. |
|} | |} | ||
{| | {| | ||
| Line 179: | Line 220: | ||
{| | {| | ||
|style="padding: 0px 0px 15px 15px;"|'''4. When you install Zendesk For WHMCS for the first time you have to rename '' 'license_RENAME.php' '' file.'''<br /> | |style="padding: 0px 0px 15px 15px;"|'''4. When you install Zendesk For WHMCS for the first time you have to rename '' 'license_RENAME.php' '' file.'''<br /> | ||
| − | + | The file is located in '' 'modules/addons/Zendesk/license_RENAME.php'.'' Rename it from '' 'license_RENAME.php' '' to '' 'license.php'. '' | |
|} | |} | ||
{| | {| | ||
| Line 203: | Line 244: | ||
|style="padding: 10px 0px 15px 15px;"|'''7. Now, you have to activate the module in your WHMCS system.'''<br /> | |style="padding: 10px 0px 15px 15px;"|'''7. Now, you have to activate the module in your WHMCS system.'''<br /> | ||
Log in to your WHMCS admin area and proceed to '' 'Setup' '' → '' 'Addon Modules'. ''<br /> | Log in to your WHMCS admin area and proceed to '' 'Setup' '' → '' 'Addon Modules'. ''<br /> | ||
| − | + | Afterward, find '' 'Zendesk' '' and press the '' 'Activate' '' button. | |
|} | |} | ||
{| | {| | ||
| Line 209: | Line 250: | ||
|} | |} | ||
{| | {| | ||
| − | |style="padding: 0px 0px 15px 15px;"|'''8. In the next step you need to permit access to this module.'''<br /> | + | |style="padding: 0px 0px 15px 15px;"|'''8. In the next step, you need to permit access to this module.'''<br /> |
| − | To do so, click on '' 'Configure' '' button, tick checkboxes to assign desired admin roles. | + | To do so, click on the '' 'Configure' '' button, tick checkboxes to assign desired admin roles. |
|} | |} | ||
{| | {| | ||
| Line 232: | Line 273: | ||
|} | |} | ||
{| | {| | ||
| − | |style="padding: 0px 0px 15px 15px;"|Go to '' 'Admin' '' → '' ' | + | |style="padding: 0px 0px 15px 15px;"|Go to '' 'Admin Center' '' → '' 'Apps and integrations' '' → '' 'APIs' '' → '' 'Zendesk API'.'' There, in the '' 'Settings' '' section find '' 'Token access' '' and enable it.<br /> |
Add a new token or use an existing one if you already created it.<br/> | Add a new token or use an existing one if you already created it.<br/> | ||
| Line 241: | Line 282: | ||
|} | |} | ||
{| | {| | ||
| − | |style="padding: 0px 0px 15px 15px;"|Now go to '' ' | + | |style="padding: 0px 0px 15px 15px;"|Now go to '' 'Account' '' → '' 'Security' '' → '' 'End users authentication' '' section where you can enable '' 'External authentication'.'' The action is '''optional'''.<br /> Once this option is enabled, now press the '' 'Edit' '' button as shown below. <br /> |
'' '''Note:''' Thanks to this feature, when clients go to the ticket URL that leads directly to the Zendesk panel (e.g. from the Zendesk email notification), they will be redirected first to your WHMCS,<br/>and after logging in, they will be again redirected and automatically logged into the Zendesk panel to view the ticket.''<br /> | '' '''Note:''' Thanks to this feature, when clients go to the ticket URL that leads directly to the Zendesk panel (e.g. from the Zendesk email notification), they will be redirected first to your WHMCS,<br/>and after logging in, they will be again redirected and automatically logged into the Zendesk panel to view the ticket.''<br /> | ||
|} | |} | ||
| Line 248: | Line 289: | ||
|} | |} | ||
{| | {| | ||
| − | |style="padding: 0px 0px 15px 15px;"| Once clicked, you will be redirected to the '' 'Single-Sign On' section where you will be able to add your remote login URL and remote logout URL. <br />They should lead to '' 'loginshare_jsonwt.php' '' file located in '' 'yourWHMCS/modules/support/Zendesk/' '' directory. For example:<br/> | + | |style="padding: 0px 0px 15px 15px;"| Once clicked, you will be redirected to the '' 'Single-Sign On' '' section where you will be able to add your remote login URL and remote logout URL. <br />They should lead to '' 'loginshare_jsonwt.php' '' file located in '' 'yourWHMCS/modules/support/Zendesk/' '' directory. For example:<br/> |
<pre> | <pre> | ||
https://yourWHMCS.com/modules/support/Zendesk/loginshare_jsonwt.php | https://yourWHMCS.com/modules/support/Zendesk/loginshare_jsonwt.php | ||
| Line 257: | Line 298: | ||
|} | |} | ||
{| | {| | ||
| − | |style="padding: 0px 0px 20px 15px;"|Next, scroll down to the bottom of the page and find '' 'Shared Secret' '' section. Copy and keep your '' 'Shared Secret' '' in a safe place. It will be needed later.<br /> Do not forget to press '' 'Save' '' button, you will find it at the bottom of the page.<br /> | + | |style="padding: 0px 0px 20px 15px;"|Next, scroll down to the bottom of the page and find '' 'Shared Secret' '' section. Copy and keep your '' 'Shared Secret' '' in a safe place. It will be needed later.<br /> Do not forget to press the'' 'Save' '' button, you will find it at the bottom of the page.<br /> |
'' '''Note:''' The 'Shared Secret' is '''not required''' for Zendesk module to work itself. It is needed for SSO only.'' | '' '''Note:''' The 'Shared Secret' is '''not required''' for Zendesk module to work itself. It is needed for SSO only.'' | ||
| − | |||
| − | |||
| − | |||
|} | |} | ||
| Line 279: | Line 317: | ||
*'''Shared Secret Token''' - the key generated in the previous steps used for SSO | *'''Shared Secret Token''' - the key generated in the previous steps used for SSO | ||
*'''SSL Connection''' - enable this option to use the secured connection with the Zendesk API | *'''SSL Connection''' - enable this option to use the secured connection with the Zendesk API | ||
| + | *'''Login For A Verified User''' - allows to perform the '' 'Single Sign On' '' action only for verified users | ||
Test the connection, to ensure that all credentials are correct, save the changes if the test ends with success. | Test the connection, to ensure that all credentials are correct, save the changes if the test ends with success. | ||
|} | |} | ||
| Line 286: | Line 325: | ||
{| | {| | ||
|style="padding: 0px 0px 15px 15px;"|Next, move to '' 'Setup' → 'General Settings' → 'Support'.<br/> | |style="padding: 0px 0px 15px 15px;"|Next, move to '' 'Setup' → 'General Settings' → 'Support'.<br/> | ||
| − | Choose '' 'Zendesk' '' support module | + | Choose '' 'Zendesk' '' support module from a dropdown menu and save changes afterward.<br/> |
'' '''Note:''' From now on, your clients will see Zendesk tickets and departments (not the ones of WHMCS).'' | '' '''Note:''' From now on, your clients will see Zendesk tickets and departments (not the ones of WHMCS).'' | ||
|} | |} | ||
| Line 305: | Line 344: | ||
{| | {| | ||
|style="padding: 10px 0px 15px 15px;"|Before you start your actual work on support tickets with Zendesk For WHMCS, move again to '' 'Addons' → 'Zendesk' → 'Ticket Settings'. ''<br/> | |style="padding: 10px 0px 15px 15px;"|Before you start your actual work on support tickets with Zendesk For WHMCS, move again to '' 'Addons' → 'Zendesk' → 'Ticket Settings'. ''<br/> | ||
| − | This section of the addon allows the easy and comfortable management of the form in which tickets are displayed in your client area, their visibility, sorting properties, etc. | + | This section of the addon allows the easy and comfortable management of the form in which tickets are displayed in your client area, their visibility, sorting properties, etc.<br/> |
|} | |} | ||
{| | {| | ||
| Line 311: | Line 350: | ||
|} | |} | ||
{| | {| | ||
| − | |style="padding: 0px 0px 15px 15px;"|In the first box ''''' 'Options', ''''' you can enable several basic settings that will be applied to the tickets view in the client area.<br/> Let's now discuss their functionality in | + | |style="padding: 0px 0px 15px 15px;"|In the first box ''''' 'Options', ''''' you can enable several basic settings that will be applied to the tickets view in the client area.<br/> Let's now discuss their functionality in detail: |
*'''Default Department''' - choose the Zendesk department that will be selected by default for exported tickets | *'''Default Department''' - choose the Zendesk department that will be selected by default for exported tickets | ||
*'''Allowed Departments''' - select which of your Zendesk departments shall be available for your WHMCS clients | *'''Allowed Departments''' - select which of your Zendesk departments shall be available for your WHMCS clients | ||
| + | *'''Ticket Fields''' - choose which ticket fields from the Zendesk panel should be displayed in the client area. <br/>Ticket fields marked as required in the Zendesk panel are not visible here and will show up in the client area automatically. | ||
*'''Show Solved Tickets''' - if you enable this option, all tickets, no matter what status they have, will be displayed on the list of the latest tickets (e.g. open/new/solved/closed tickets, etc.); | *'''Show Solved Tickets''' - if you enable this option, all tickets, no matter what status they have, will be displayed on the list of the latest tickets (e.g. open/new/solved/closed tickets, etc.); | ||
| − | *'''Replies | + | *'''Replies Descending Order''' - enable this option to make ticket replies sorted by date in descending order when viewing a ticket |
| − | *'''Shared Login Redirection''' - if enabled, the user is redirected to the Zendesk panel after successfully shared login | + | *'''Shared Login Redirection''' - if enabled, the user is redirected to the Zendesk panel after successfully shared login (please refer to point 8 [https://www.docs.modulesgarden.com/Zendesk_For_WHMCS#Tips here] for more information) |
*'''Contact Us Integration''' - if enabled, tickets from visitors will be sent to Zendesk | *'''Contact Us Integration''' - if enabled, tickets from visitors will be sent to Zendesk | ||
| − | *'''Contact Us Department''' - select a default department for tickets sent from visitors via the "Contact Us" page.<br/> In case the '' "Contact Us Integration" '' option is disabled, a WHMCS department, selected at ''WHMCS → Setup | + | *'''Contact Us Department''' - select a default department for tickets sent from visitors via the "Contact Us" page.<br/> In case the '' "Contact Us Integration" '' option is disabled, a WHMCS department, selected at ''WHMCS → Setup → Mail → Presales Form Destination/Presales Contact Form Email,'' will be applied to such tickets. |
| − | *'''Brand''' - if you have [https://support.zendesk.com/hc/en-us/articles/204108983 Zendesk Multibrand] feature enabled on your account you can choose a brand here | + | *'''Zendesk Brand''' - if you have [https://support.zendesk.com/hc/en-us/articles/204108983 Zendesk Multibrand] feature enabled on your account you can choose a brand here |
*'''Template Name''' - Change only if you want to use a custom template.<br/>Custom template files should be placed in the '' '/modules/addons/Zendesk/templates/client/default/pages/submodule/yourCustomTemplateName' '' directory | *'''Template Name''' - Change only if you want to use a custom template.<br/>Custom template files should be placed in the '' '/modules/addons/Zendesk/templates/client/default/pages/submodule/yourCustomTemplateName' '' directory | ||
*'''Client Services''' - choose the field (created in Zendesk) responsible for displaying all customer products and domains (click [https://www.docs.modulesgarden.com/Zendesk_For_WHMCS#Service_Field here] for more information) | *'''Client Services''' - choose the field (created in Zendesk) responsible for displaying all customer products and domains (click [https://www.docs.modulesgarden.com/Zendesk_For_WHMCS#Service_Field here] for more information) | ||
| − | *'''Update Client Credentials''' - if the client's email is updated in WHMCS, it is updated in Zendesk accordingly '' | + | *'''Update Client Credentials''' - if enabled, each time the ID of a client's email, name or phone number is updated in WHMCS, it is updated in Zendesk accordingly. |
| + | *'''Default Sort Column''' - the tickets table in the client area will be by default sorted by the selected column. (Department/Subject/Status/Updated At) | ||
| + | *'''Default Sort Direction''' - pick the default sorting direction. (Ascending/Descending) | ||
|} | |} | ||
{| | {| | ||
| Line 329: | Line 371: | ||
{| | {| | ||
|style="padding: 0px 0px 15px 15px;"|Below the '' 'Options' '' box you will find a box where you can assign colors to a specific ticket status.<br/> | |style="padding: 0px 0px 15px 15px;"|Below the '' 'Options' '' box you will find a box where you can assign colors to a specific ticket status.<br/> | ||
| − | Click on the field to choose a color from the palette or type in the | + | Click on the field to choose a color from the palette or type in the code of the color you like.<br/><br/> |
Remember to save the changes if you modify the ticket settings in any way. | Remember to save the changes if you modify the ticket settings in any way. | ||
|} | |} | ||
{| | {| | ||
|style="padding: 0px 0px 20px 25px;"|[[File:ZD18.png]] | |style="padding: 0px 0px 20px 25px;"|[[File:ZD18.png]] | ||
| + | |} | ||
| + | {| | ||
| + | |style="padding: 0px 0px 15px 15px;"|If you use [https://www.modulesgarden.com/products/whmcs/multibrand Multibrand For WHMCS], you can also define various settings for separate brands.<br/> Simply, choose the preferred brand from the dropdown menu and complete the following fields. Do not forget to save changes. | ||
| + | |} | ||
| + | {| | ||
| + | |style="padding: 0px 0px 20px 25px;"|[[File:ZD18_1.png]] | ||
|} | |} | ||
{| | {| | ||
| Line 351: | Line 399: | ||
{| | {| | ||
|style="padding: 10px 0px 15px 15px;"|You can also manage ticket fields that are available in WHMCS on a new ticket form, directly in Zendesk.<br /> | |style="padding: 10px 0px 15px 15px;"|You can also manage ticket fields that are available in WHMCS on a new ticket form, directly in Zendesk.<br /> | ||
| − | Move to '' 'Zendesk' → 'Admin' → 'Manage' → 'Ticket Fields'. '' On this site, you can activate, deactivate or edit any system and custom fields or add new ones. <br /> | + | Move to '' 'Zendesk' → 'Admin' → 'Manage' → 'Ticket Fields'. '' On this site, you can activate, deactivate, or edit any system and custom fields or add new ones. <br /> |
For test purposes, we activated and adjusted the '' 'Priority' '' field according to our needs. | For test purposes, we activated and adjusted the '' 'Priority' '' field according to our needs. | ||
|} | |} | ||
| Line 366: | Line 414: | ||
===Service Field=== | ===Service Field=== | ||
{| | {| | ||
| − | |style="padding: 10px 0px 15px 15px;"|The '' 'Client Service' field allows your customers to specify the service they refer to when creating a ticket.<br /> | + | |style="padding: 10px 0px 15px 15px;"|The '' 'Client Service' '' field allows your customers to specify the service they refer to when creating a ticket.<br /> |
This can help your support teams more easily identify the problem with the service used by the client.<br/> | This can help your support teams more easily identify the problem with the service used by the client.<br/> | ||
| − | Move to '' 'Zendesk' → 'Admin' → 'Manage' → 'Ticket Fields'. '' and press '' 'add | + | Move to '' 'Zendesk' → 'Admin' → 'Manage' → 'Ticket Fields'. '' and press '' 'add field'. '' |
|} | |} | ||
{| | {| | ||
| Line 374: | Line 422: | ||
|} | |} | ||
{| | {| | ||
| − | |style="padding: 0px 0px 20px 15px;"| | + | |style="padding: 0px 0px 20px 15px;"|There are a few types of fields to choose from. Click on the ''Text'' type to add your new ticket field. |
|} | |} | ||
{| | {| | ||
| Line 380: | Line 428: | ||
|} | |} | ||
{| | {| | ||
| − | |style="padding: 0px 0px 15px 15px;"|We will now adjust the '' 'Client Service' '' field according to our needs. | + | |style="padding: 0px 0px 15px 15px;"|We will now adjust the '' 'Client Service' '' field according to our needs. Firstly, you can complete an optional description.<br/> |
| − | Then, select | + | Then, select '' 'Editable for end users' '' permissions and make sure to leave the '' 'Required' '' box unchecked to keep this field optional for the clients when they open a new ticket. |
|} | |} | ||
{| | {| | ||
| Line 400: | Line 448: | ||
|} | |} | ||
{| | {| | ||
| − | |style="padding: 0px 0px 20px 15px;"|Next, when the agent | + | |style="padding: 0px 0px 20px 15px;"|Next, when the agent accesses the ticket in the Zendesk panel, there will be information about the service selected by the client. |
|} | |} | ||
{| | {| | ||
| Line 427: | Line 475: | ||
|} | |} | ||
{| | {| | ||
| − | |style="padding: 0px 0px 15px 15px;"|After confirming your choice, the selected users should be exported from WHMCS to Zendesk, their '' 'Status' '' field will become modified as well.<br/> All users newly added to WHMCS will be automatically synchronized with Zendesk.''<br/><br/> | + | |style="padding: 0px 0px 15px 15px;"|After confirming your choice, the selected users should be exported from WHMCS to Zendesk, and their '' 'Status' '' field will become modified as well.<br/> All users newly added to WHMCS will be automatically synchronized with Zendesk.''<br/><br/> |
|} | |} | ||
{| | {| | ||
| Line 435: | Line 483: | ||
===Tickets=== | ===Tickets=== | ||
{| | {| | ||
| − | |style="padding: 10px 0px 15px 15px;"|The next option offered by our module is the export of tickets from WHMCS to Zendesk, | + | |style="padding: 10px 0px 15px 15px;"|The next option offered by our module is the export of tickets from WHMCS to Zendesk, proceeding to '' 'Tickets Export'. ''<br/>You will see here a list of all tickets which exist in your WHMCS and have not been synchronized with Zendesk yet. |
| + | Thanks to the integration with [https://www.modulesgarden.com/products/whmcs/multibrand Multibrand For WHMCS], you can also export tickets that are assigned to a particular brand. <br/> To do that, choose the proper brand from the dropdown menu. | ||
|} | |} | ||
{| | {| | ||
| Line 453: | Line 502: | ||
|} | |} | ||
{| | {| | ||
| − | |style="padding: 0px 0px 15px 15px;"|Since 2.1.0 version of the module, all exported to Zendesk tickets will have a corresponding | + | |style="padding: 0px 0px 15px 15px;"|Since the 2.1.0 version of the module, all exported to Zendesk tickets will have a corresponding status. These are: |
*Open → Open | *Open → Open | ||
*Closed → Closed | *Closed → Closed | ||
| Line 501: | Line 550: | ||
|} | |} | ||
{| | {| | ||
| − | |style="padding: 0px 0px 15px 15px;"|Now, we will submit a ticket to show you the complete creation flow. Just like in case of a standard WHMCS support ticket, choose the department.<br/> | + | |style="padding: 0px 0px 15px 15px;"|Now, we will submit a ticket to show you the complete creation flow. Just like in the case of a standard WHMCS support ticket, choose the department.<br/> |
'' '''Note:''' For convenience, if you have only one department configured, you will be moved immediately to the ticket creation view.'' | '' '''Note:''' For convenience, if you have only one department configured, you will be moved immediately to the ticket creation view.'' | ||
|} | |} | ||
| Line 532: | Line 581: | ||
|} | |} | ||
{| | {| | ||
| − | |style="padding: 0px 0px 20px 15px;"|The module allows also the unlogged users to send tickets via the '' 'Contact Us' '' form.<br/> Such ticket will be delivered to a department previously defined by the admin. Please refer to the '' 'Ticket Settings' '' section [[#WHMCS|here]] to see how to configure the 'Contact Us' integration and department. | + | |style="padding: 0px 0px 20px 15px;"|The module allows also the unlogged users to send tickets via the '' 'Contact Us' '' form.<br/> Such a ticket will be delivered to a department previously defined by the admin. Please refer to the '' 'Ticket Settings' '' section [[#WHMCS|here]] to see how to configure the 'Contact Us' integration and department. |
|} | |} | ||
{| | {| | ||
| Line 539: | Line 588: | ||
===Emoji Support=== | ===Emoji Support=== | ||
{| | {| | ||
| − | |style="padding: 10px 0px 15px 15px;"|Since 2.0.0 version of the module, agents can use emojis (emoticons) without worrying that these will not be displayed to the clients in WHMCS.<br/> | + | |style="padding: 10px 0px 15px 15px;"|Since the 2.0.0 version of the module, agents can use emojis (emoticons) without worrying that these will not be displayed to the clients in WHMCS.<br/> |
First, you need to enable support for them in your Zendesk Panel. <br/> | First, you need to enable support for them in your Zendesk Panel. <br/> | ||
| − | Go to the '' 'Admin' → ' | + | Go to the '' 'Admin Center' → 'Objects and rules' → 'Tickets' → 'Settings' '' and tick the '' 'Turn on emoji text replacement' '' option.<br/> |
Remember to save the settings. | Remember to save the settings. | ||
|} | |} | ||
| Line 554: | Line 603: | ||
|} | |} | ||
{| | {| | ||
| − | |style="padding: 0px 0px 20px 15px;"|You can use a lot of different emojis. Press the '' 'Preview' '' button to see | + | |style="padding: 0px 0px 20px 15px;"|You can use a lot of different emojis. Press the '' 'Preview' '' button to see how they will look in the ticket. |
|} | |} | ||
{| | {| | ||
| Line 561: | Line 610: | ||
{| | {| | ||
|style="padding: 0px 0px 15px 15px;"|After sending the reply, the emojis will be displayed in WHMCS to your client.<br/> | |style="padding: 0px 0px 15px 15px;"|After sending the reply, the emojis will be displayed in WHMCS to your client.<br/> | ||
| − | '' '''Note:''' Due to the licensing issues, the appearance of emoticons used in the module is slightly different from those used by Zendesk itself.<br/>Moreover, a very small part of the emojis supported by Zendesk may not be yet included in the set used in the module. <br/>Click [https:// | + | '' '''Note:''' Due to the licensing issues, the appearance of emoticons used in the module is slightly different from those used by Zendesk itself.<br/>Moreover, a very small part of the emojis supported by Zendesk may not be yet included in the set used in the module. <br/>Click [https://joypixels.com/emoji/v3 here] to see the list of emojis supported by the module.'' |
| − | + | ||
| − | + | ||
| − | + | ||
|} | |} | ||
{| | {| | ||
| Line 573: | Line 619: | ||
=Tips= | =Tips= | ||
{| | {| | ||
| − | |style="padding: 10px 0px 10px 15px;"|1. If you create a custom field in Zendesk, it will also be visible in WHMCS. Custom fields need to be enabled, visible and editable by client. | + | |style="padding: 10px 0px 10px 15px;"|1. If you create a custom field in Zendesk, it will also be visible in WHMCS. Custom fields need to be enabled, visible, and editable by the client. |
|} | |} | ||
{| | {| | ||
| Line 615: | Line 661: | ||
|} | |} | ||
{| | {| | ||
| − | |style="padding: 0px 0px | + | |style="padding: 0px 0px 15px 15px;"|5. If you use SSO, you can still access your Zendesk panel in a normal way.<br/> |
Simply go to: ''[https://yoursubdomain.zendesk.com/access/normal https://'''YourZendeskSubdomain'''.zendesk.com/access/normal]'' and enter your access details. | Simply go to: ''[https://yoursubdomain.zendesk.com/access/normal https://'''YourZendeskSubdomain'''.zendesk.com/access/normal]'' and enter your access details. | ||
| + | |} | ||
| + | {| | ||
| + | |style="padding: 0px 0px 15px 15px;"|6. It is possible to change the name of a particular Zendesk department which is displayed while opening a ticket in the client area.<br/> All you need to do is to add the following lines to the language file. <br/> | ||
| + | <pre> $_LANG['addonCA']['submitTicket']['ZendeskDepartmentName'] = 'NewDepartmentName'; </pre> | ||
| + | <pre> $_LANG['ZendeskDepartmentName'] = 'NewDepartmentName'; </pre> | ||
| + | As for example, we will change the name of the 'Feedback' department to 'General Feedback'. | ||
| + | |} | ||
| + | {| | ||
| + | |style="padding: 0px 0px 20px 15px;"|[[File:ZD40_1.png]] | ||
| + | |} | ||
| + | {| | ||
| + | |style="padding: 0px 0px 15px 15px;"| We added these lines to the language file:<br/> | ||
| + | <pre> $_LANG['addonCA']['submitTicket']['Feedback'] = 'General Feedback'; </pre> | ||
| + | <pre> $_LANG['Feedback'] = 'General Feedback'; </pre> | ||
| + | As a result, the name has been modified successfully. | ||
| + | |} | ||
| + | {| | ||
| + | |style="padding: 0px 0px 20px 15px;"|[[File:ZD40_2.png]] | ||
| + | |} | ||
| + | {| | ||
| + | |style="padding: 0px 0px 20px 15px;"|[[File:ZD40_3.png]] | ||
| + | |} | ||
| + | {| | ||
| + | |style="padding: 0px 0px 15px 15px;"|7. There is the possibility to add translations for the '' 'Ticket Fields' '' created in Zendesk. <br/> | ||
| + | Simply, complete the below pattern by providing the field name and its translation. <br/> | ||
| + | <pre> $_LANG['fieldName'] = "Your Translation" </pre> <br/>Here are a few ready examples: <br/> | ||
| + | <pre> $_LANG['Related Services'] = "Saistītais pakalpojums"; </pre> | ||
| + | <pre>$_LANG['Priority'] = "Prioritāte"; </pre> | ||
| + | <pre>$_LANG['Request priority'] = "Pieprasījuma prioritāte"; </pre> | ||
| + | Once ready, add them to the language file and save the changes. <br/> | ||
| + | |} | ||
| + | {| | ||
| + | |style="padding: 0px 0px 15px 15px;"|8. '' 'Shared Login Redirection' '' allows you to log in to the Zendesk panel using the URL redirection that is provided in the Zendesk panel. <br/> To find the '' 'Remote login URL' '' option, proceed to the ''Zendesk panel → Security → Single sign-on → JSON Web Token''.<br/> With this option, we can use authorization from another website to access the Zendesk panel. | ||
| + | |} | ||
| + | {| | ||
| + | |style="padding: 0px 0px 20px 15px;"|[[File:ZD40_4.png]] | ||
| + | |} | ||
| + | {| | ||
| + | |style="padding: 0px 0px 15px 15px;"|9. Cache time of the module can be adjusted to seconds directly in the "configuration.yml" file. Open the file at: ''modules/addons/Zendesk/app/Config/configuration.yml''.<br/> The entered values are measured in seconds, if no value is entered in "cacheTime:", by default 5 minutes (300 seconds) is used. | ||
| + | |} | ||
| + | {| | ||
| + | |style="padding: 0px 0px 30px 15px;"|[[File:ZD49_1.png]] | ||
|} | |} | ||
=Update Instructions= | =Update Instructions= | ||
{| | {| | ||
| − | |style="padding: 10px 0px 30px 15px;"| | + | |style="padding: 10px 0px 30px 15px;"|An essential guidance through the process of updating the module is offered '''[https://www.docs.modulesgarden.com/How_To_Update_WHMCS_Module here]'''.<br/> |
| − | + | Ensure successful completion of the module update by carefully following each step, thereby preventing data loss or any unforeseen issues.<br/> Additionally, you will find a current list of supplementary actions necessary for a smooth update process there. | |
| − | + | |} | |
| + | =Upgrade Guide= | ||
| + | {| | ||
| + | |style="padding: 10px 0px 30px 15px;"|Seeking a solution that offers greater flexibility, customization tailored to your precise needs, and unrestricted availability?<br/> There is an option that not only proves to be cost-effective in the long run but also includes prioritized support services, making it a truly valuable investment.<br/> | ||
| + | |||
| + | Opt for the [https://www.modulesgarden.com/products/whmcs/zendesk#open-source-version Open Source version] of your Zendesk For WHMCS module to unlock these benefits.<br/> Simply click on either the '''Get Source Code''' or '''Upgrade To Lifetime''' button found on the product's page in our client area to complete the one-step upgrade process, with a '''dedicated discount''' already applied.<br/> | ||
| + | |||
| + | Follow a [https://www.docs.modulesgarden.com/How_To_Upgrade_WHMCS_Module comprehensive guide] covering the transition process, the advantages it brings, and step-by-step instructions on what to do next after the order has been successfully finalized. | ||
|} | |} | ||
| Line 645: | Line 740: | ||
This is due to the use of cache to limit the number of queries to APIs.<br/> | This is due to the use of cache to limit the number of queries to APIs.<br/> | ||
E.g. the cache refreshing time for the ticket list and replies is 30 seconds. <br/> | E.g. the cache refreshing time for the ticket list and replies is 30 seconds. <br/> | ||
| − | The update of brands, ticket fields and departments can take up to 18 minutes and clients even 54 minutes.<br/> | + | The update of brands, ticket fields, and departments can take up to 18 minutes and clients even 54 minutes.<br/> |
| − | If you need the immediate cache refreshment, go to the '' 'Ticket Settings' '' or save '' ' | + | If you need the immediate cache refreshment, go to the '' 'Ticket Settings' '' or save '' 'Server Settings' '' again. |
|} | |} | ||
{| | {| | ||
| Line 652: | Line 747: | ||
|} | |} | ||
{| | {| | ||
| − | |style="padding: 0px 0px | + | |style="padding: 0px 0px 5px 15px;"|6. We do not recommend using Zendesk For WHMCS module with Resellers Center For WHMCS.<br/> |
| − | Integration between | + | Integration between the two modules is hampered due to specific features of Resellers Center For WHMCS and its individual workflow. |
| + | |} | ||
| + | {| | ||
| + | |style="padding: 0px 0px 30px 15px;"|7. The SSO only works for end users, it cannot be enabled for the staff login attempts. | ||
|} | |} | ||
Latest revision as of 12:52, 15 May 2025
Contents |
[edit] About Zendesk For WHMCS
| Zendesk For WHMCS replaces the standard WHMCS support system with the complex choice of Zendesk tools. The module will enrich your client area with various extra features, allowing customers to fill in Zendesk ticket fields and use emojis. |
- Client Area Features:
| ✔ View Zendesk Departments |
| ✔ Open New Ticket In Chosen Department |
| ✔ Open New Ticket From "Contact Us" Form |
| ✔ Manage Existing Tickets |
| ✔ Fill In Zendesk Ticket Fields |
| ✔ Select Related Service |
| ✔ Attach Files To Ticket |
| ✔ List Recent Tickets |
- Admin Area Features:
| ✔ Configure And Test Server Connection |
| ✔ Toggle SSL Connection |
| ✔ Toggle SSO For Only Verified Users |
| ✔ Select Zendesk Brand |
| ✔ Choose Available Support Departments |
| ✔ Choose Available Ticket Fields |
| ✔ Choose Default Department For Exported Tickets |
| ✔ Choose Department For "Contact Us" Tickets Opened By Visitors |
| ✔ Define Client Service Field |
| ✔ Manually Export To Zendesk: |
| ✔ WHMCS Users |
| ✔ WHMCS Tickets |
| ✔ Check Status Of Exported Users |
| ✔ Define Module Behavior: |
| ✔ Show Solved Tickets |
| ✔ Define Order Of Replies |
| ✔ Allow Shared Login Redirection |
| ✔ Update Client Credentials |
| ✔ Define Default Column And Sorting Direction For Tickets |
| ✔ Define Ticket Status Colors |
| ✔ View Logs |
- Integration Features:
| ✔ Single Sign On (SSO) Integration |
| ✔ Automatically Export To Zendesk: |
| ✔ New Tickets |
| ✔ Users On Tickets Creation |
| ✔ Synchronize Ticket Responses Between WHMCS And Zendesk |
| ✔ Transfer Ticket Fields Settings |
| ✔ Transfer Attachments Settings |
| ✔ Convert Markdowns To HTML And Emojis |
| ✔ Use Multibrand For WHMCS Integration To: |
| ✔ Export Branded Tickets To Selected Departments |
| ✔ Define Per Brand: |
| ✔ Default Department |
| ✔ Contact Us Department |
| ✔ Available Departments |
| ✔ Available Ticket Fields |
- General Info:
| ✔ Integrated With Multibrand For WHMCS - Export And Create Tickets From Each Brand To Chosen Departments |
| ✔ Supports Zendesk Multibrand Feature |
| ✔ Supports Zendesk Emoji - Artworks Provided By JoyPixels |
| ✔ Custom Templates Support |
| ✔ Fully Integrated With Lagom WHMCS Client Theme |
| ✔ Multi-Language Support |
| ✔ Supports PHP 8.3 Back To PHP 8.1 |
| ✔ Supports WHMCS Themes "Six" And "Twenty-One" |
| ✔ Supports WHMCS V8.13 Back To WHMCS V8.10 |
| ✔ Requires ionCube Loader V14 Or Later |
| ✔ Easy Module Upgrade To Open Source Version |
[edit] Installation and Configuration
| This tutorial will show you how to successfully install and configure Zendesk For WHMCS. We will guide you step by step through the whole installation and configuration process. |
[edit] Installation
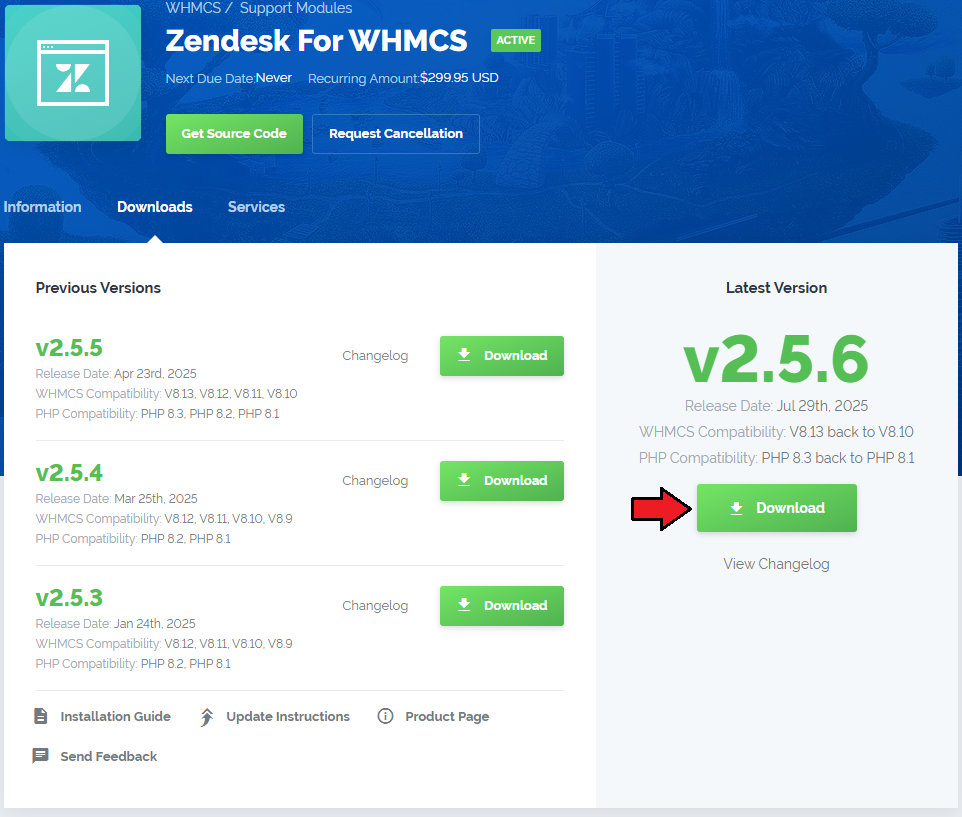
| 1. Log in to our client area and download Zendesk For WHMCS. |
|
| 2. In the downloaded file you might find one or two packages that support different PHP versions. In the most recent versions of the module, you will find only one package that supports PHP 7.4 and later. |
| Note: You can check the current PHP version in your WHMCS. To do so, proceed to 'Utilities' → 'System' → 'PHP Info'. |
| 3. Extract the package and upload its content into the main WHMCS directory. The content of the package to upload should look like this. |

|
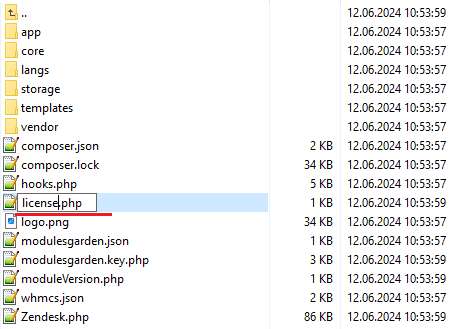
| 4. When you install Zendesk For WHMCS for the first time you have to rename 'license_RENAME.php' file. The file is located in 'modules/addons/Zendesk/license_RENAME.php'. Rename it from 'license_RENAME.php' to 'license.php'. |
|
| 5. In order to configure your license key, you have to edit the previously renamed 'license.php' file. Enter your license key between quotation marks as presented on the following screen. You can find your license key in our client area → 'My Products'. |

|
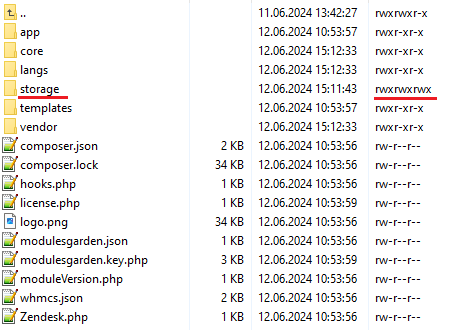
| 6. Now, set up the 'storage' folder as recursively writable. This folder is available at 'your_whmcs/modules/addons/Zendesk/'. |
|
[edit] Activation
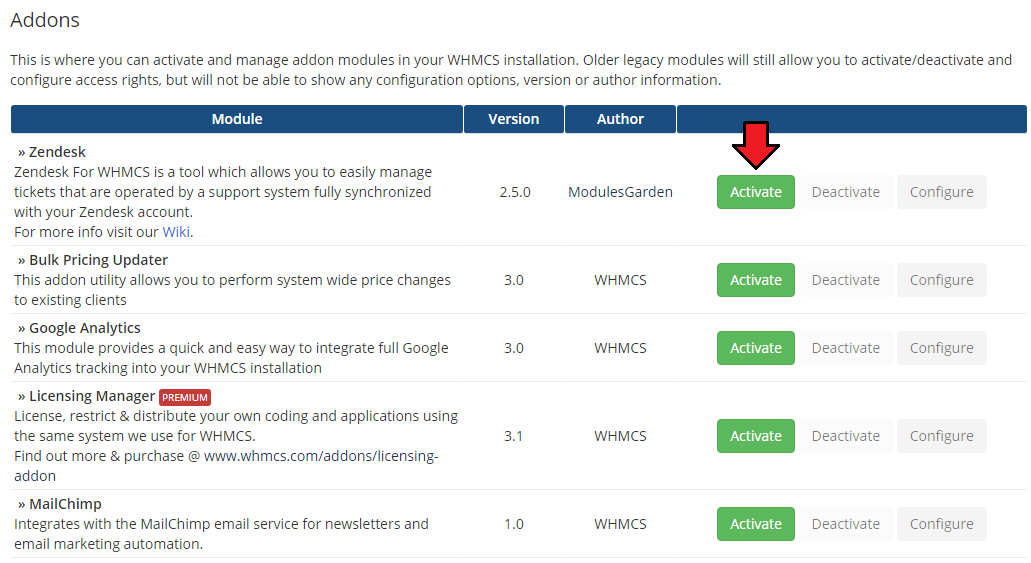
| 7. Now, you have to activate the module in your WHMCS system. Log in to your WHMCS admin area and proceed to 'Setup' → 'Addon Modules'. |
|
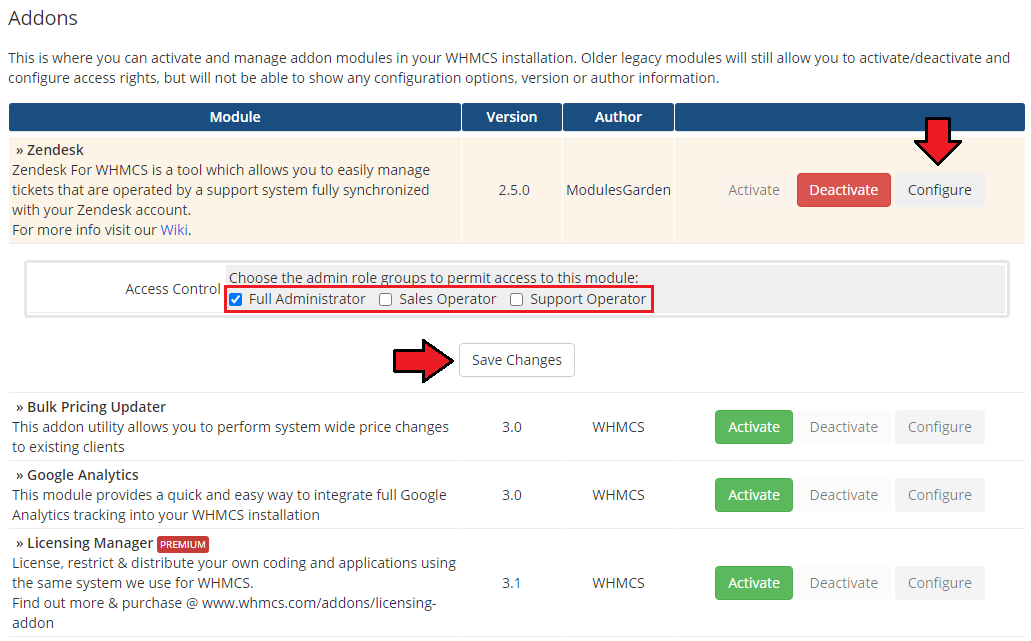
| 8. In the next step, you need to permit access to this module. To do so, click on the 'Configure' button, tick checkboxes to assign desired admin roles. |
|
| 9. You have just successfully installed Zendesk For WHMCS! |
[edit] Configuration
| Now you have to configure your newly installed module. Before we proceed to the configuration itself, you have to generate your API details to connect with your Zendesk account. |
[edit] API Connection
| Firstly, log in to your Zendesk admin area in order to enable API access. |
|
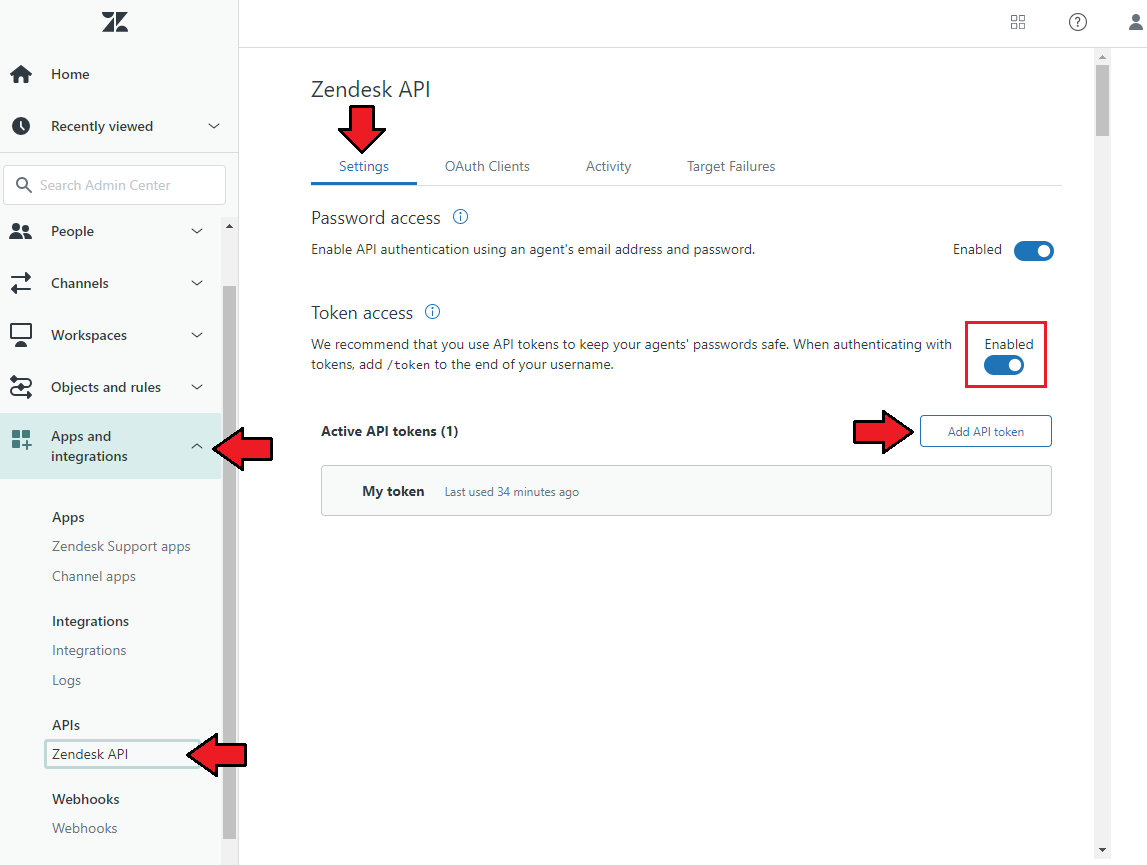
| Go to 'Admin Center' → 'Apps and integrations' → 'APIs' → 'Zendesk API'. There, in the 'Settings' section find 'Token access' and enable it. Add a new token or use an existing one if you already created it. Important: Make sure to copy and store this token. It won't be shown again after you click 'Save' or leave this page. |
|
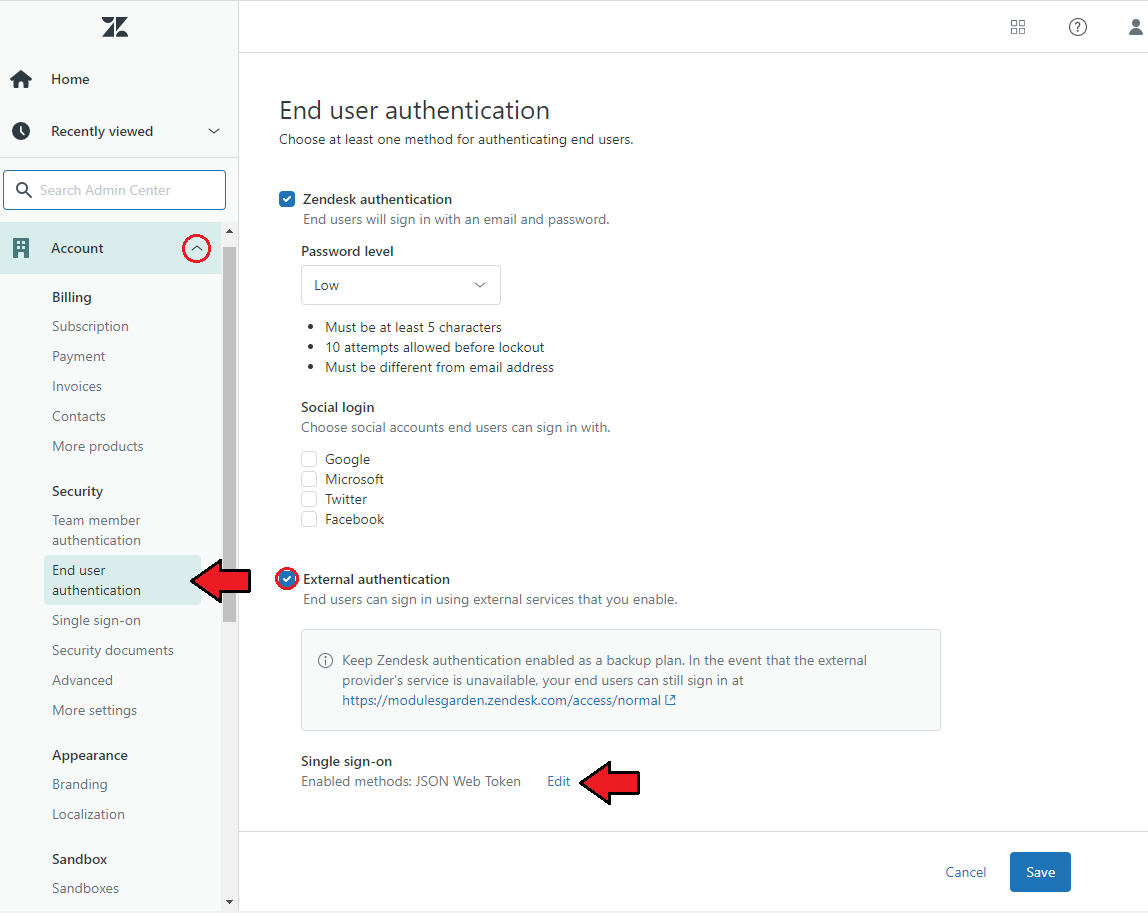
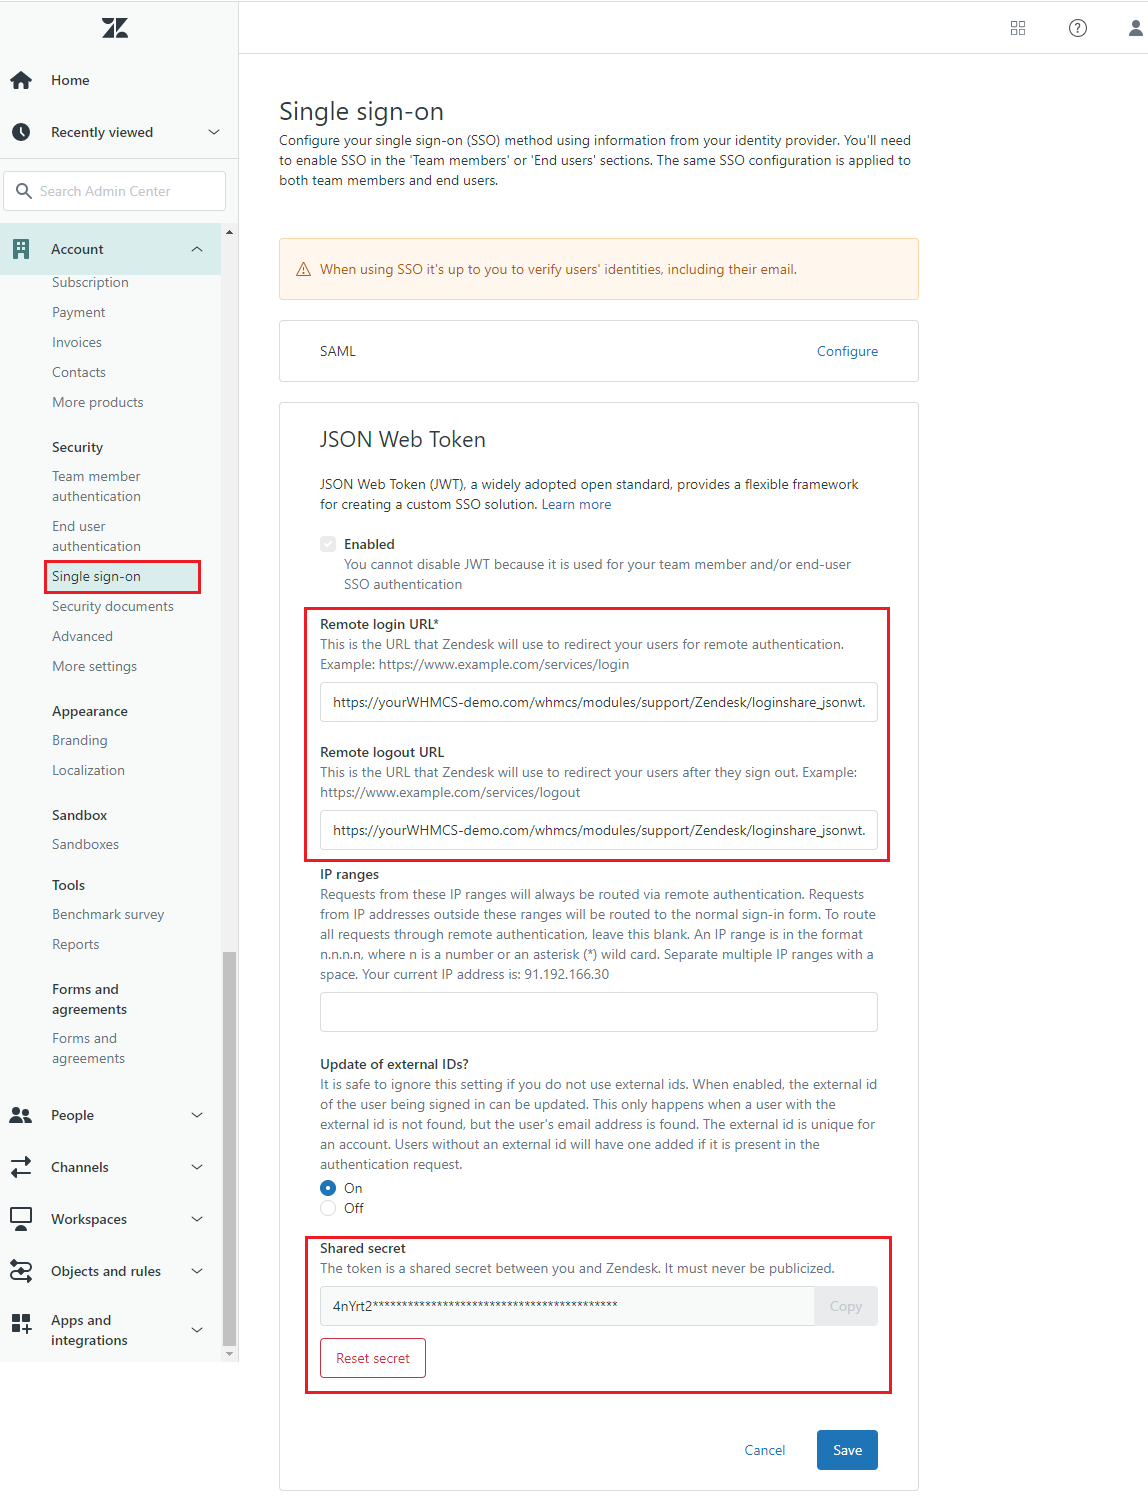
| Now go to 'Account' → 'Security' → 'End users authentication' section where you can enable 'External authentication'. The action is optional. Once this option is enabled, now press the 'Edit' button as shown below. Note: Thanks to this feature, when clients go to the ticket URL that leads directly to the Zendesk panel (e.g. from the Zendesk email notification), they will be redirected first to your WHMCS, |
|
| Once clicked, you will be redirected to the 'Single-Sign On' section where you will be able to add your remote login URL and remote logout URL. They should lead to 'loginshare_jsonwt.php' file located in 'yourWHMCS/modules/support/Zendesk/' directory. For example: https://yourWHMCS.com/modules/support/Zendesk/loginshare_jsonwt.php |
|
| Next, scroll down to the bottom of the page and find 'Shared Secret' section. Copy and keep your 'Shared Secret' in a safe place. It will be needed later. Do not forget to press the 'Save' button, you will find it at the bottom of the page. Note: The 'Shared Secret' is not required for Zendesk module to work itself. It is needed for SSO only. |
[edit] Server Settings
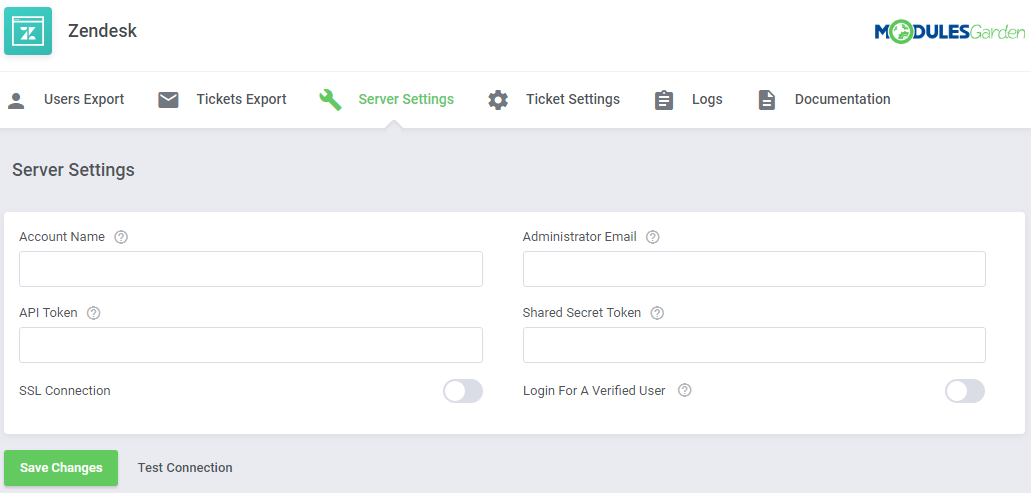
| Now, that you have safely stored API and Shared Secret tokens, you may move to the second part of the configuration process. Proceed to 'Addons' → 'Zendesk' → 'Server Settings', this is where you have to enter any data required to connect your WHMCS with the Zendesk server. |
|
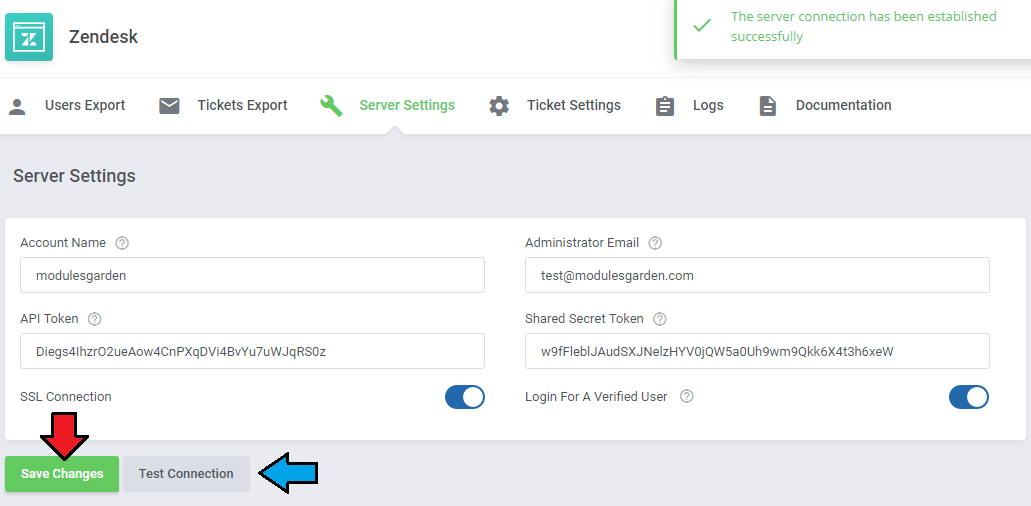
Enter your Zendesk details:
Test the connection, to ensure that all credentials are correct, save the changes if the test ends with success. |
|
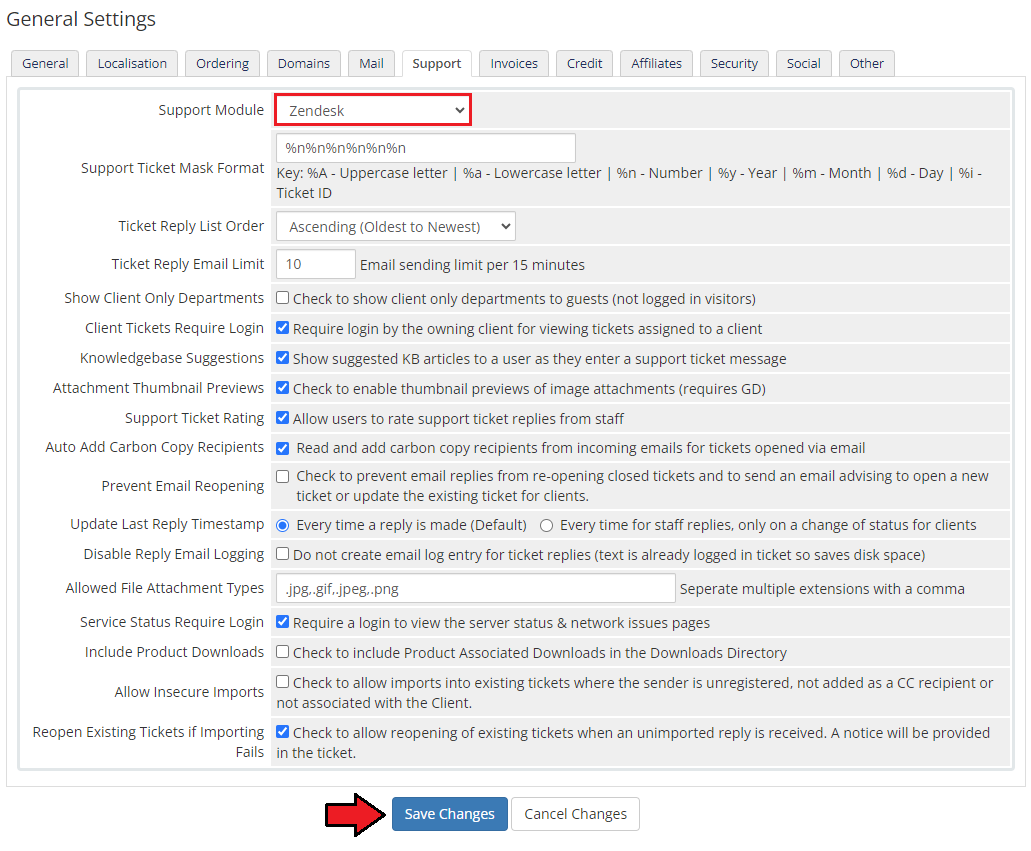
| Next, move to 'Setup' → 'General Settings' → 'Support'. Choose 'Zendesk' support module from a dropdown menu and save changes afterward. |
|
| Good job! Now your WHMCS is connected with the Zendesk support system. |
[edit] Management
| Once Zendesk For WHMCS is installed and the connection configured, you can either create or update your ticket departments and start using them. Each ticket department you create in Zendesk will be available to your customers in the WHMCS client area. |
[edit] Settings
[edit] WHMCS
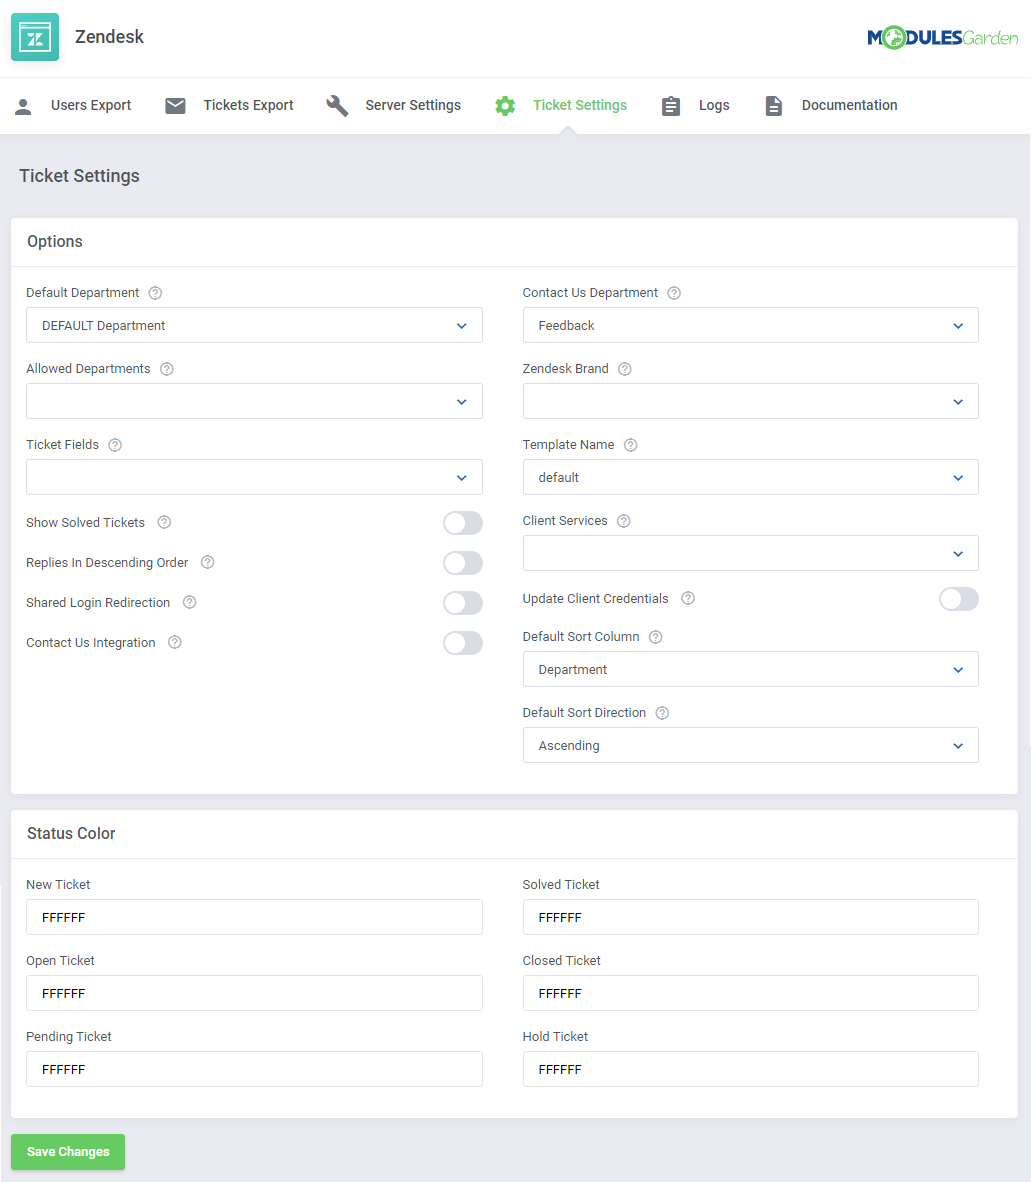
| Before you start your actual work on support tickets with Zendesk For WHMCS, move again to 'Addons' → 'Zendesk' → 'Ticket Settings'. This section of the addon allows the easy and comfortable management of the form in which tickets are displayed in your client area, their visibility, sorting properties, etc. |
|
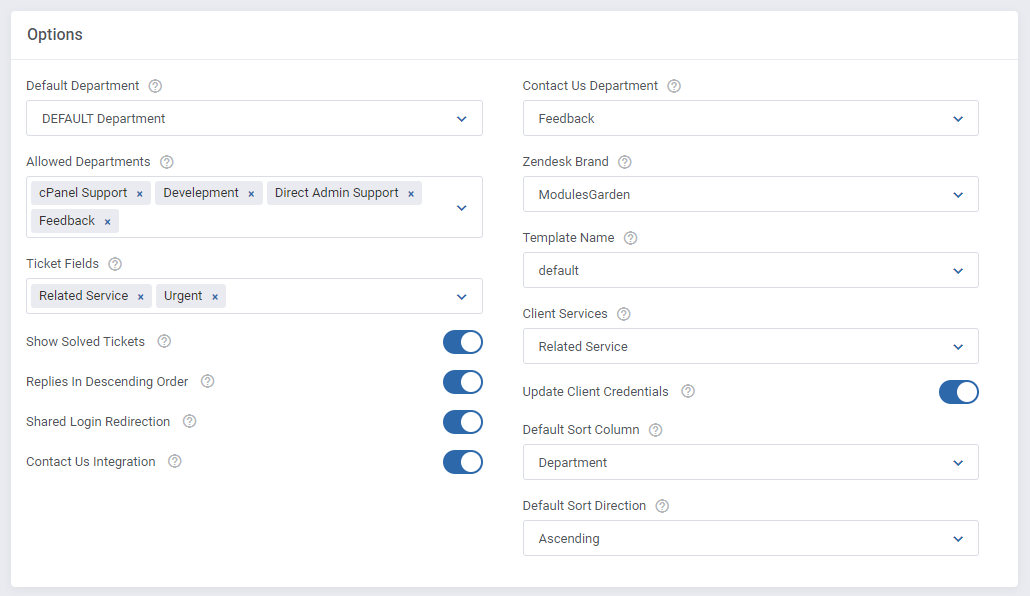
| In the first box 'Options', you can enable several basic settings that will be applied to the tickets view in the client area. Let's now discuss their functionality in detail:
|
|
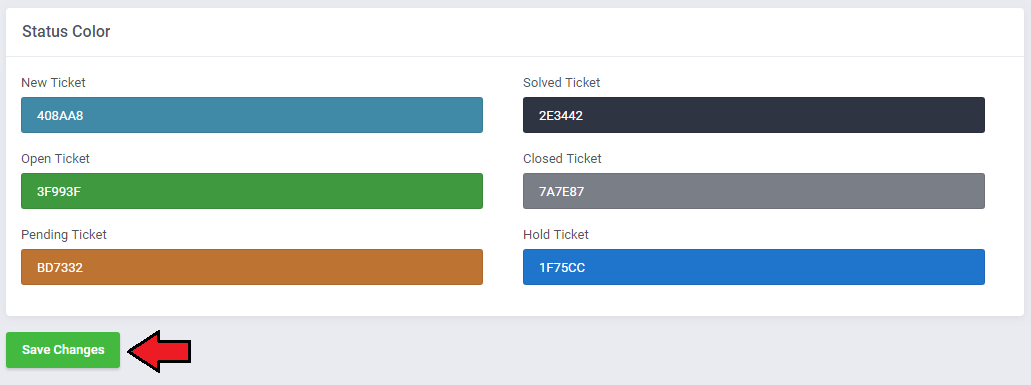
| Below the 'Options' box you will find a box where you can assign colors to a specific ticket status. Click on the field to choose a color from the palette or type in the code of the color you like. |
|
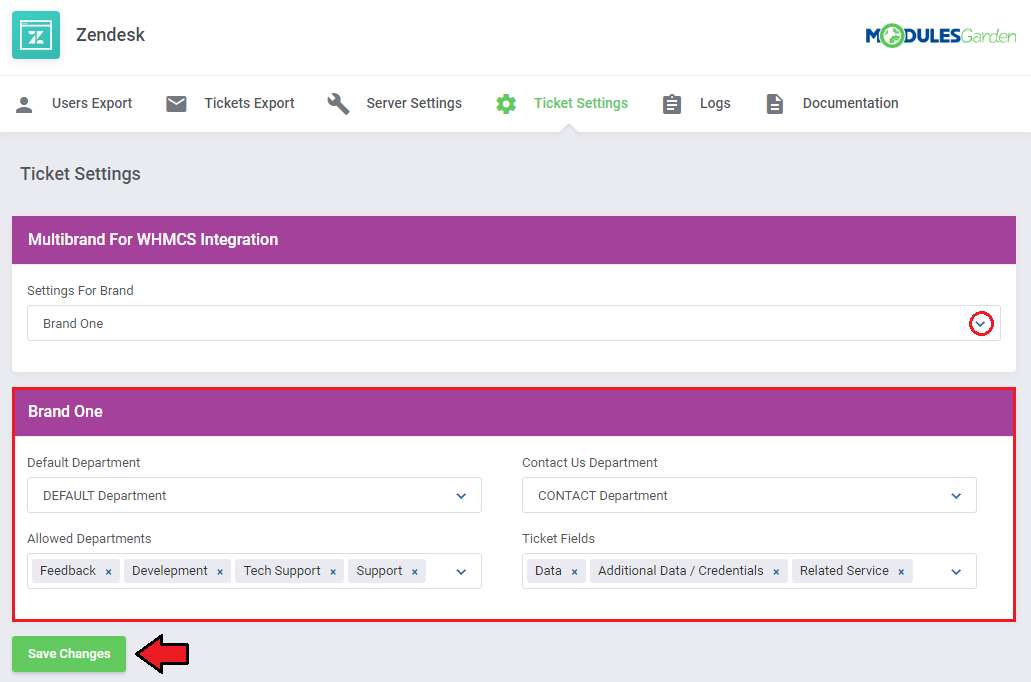
| If you use Multibrand For WHMCS, you can also define various settings for separate brands. Simply, choose the preferred brand from the dropdown menu and complete the following fields. Do not forget to save changes. |
|
| Tickets will be now marked with selected colors on the homepage according to the status they have. |
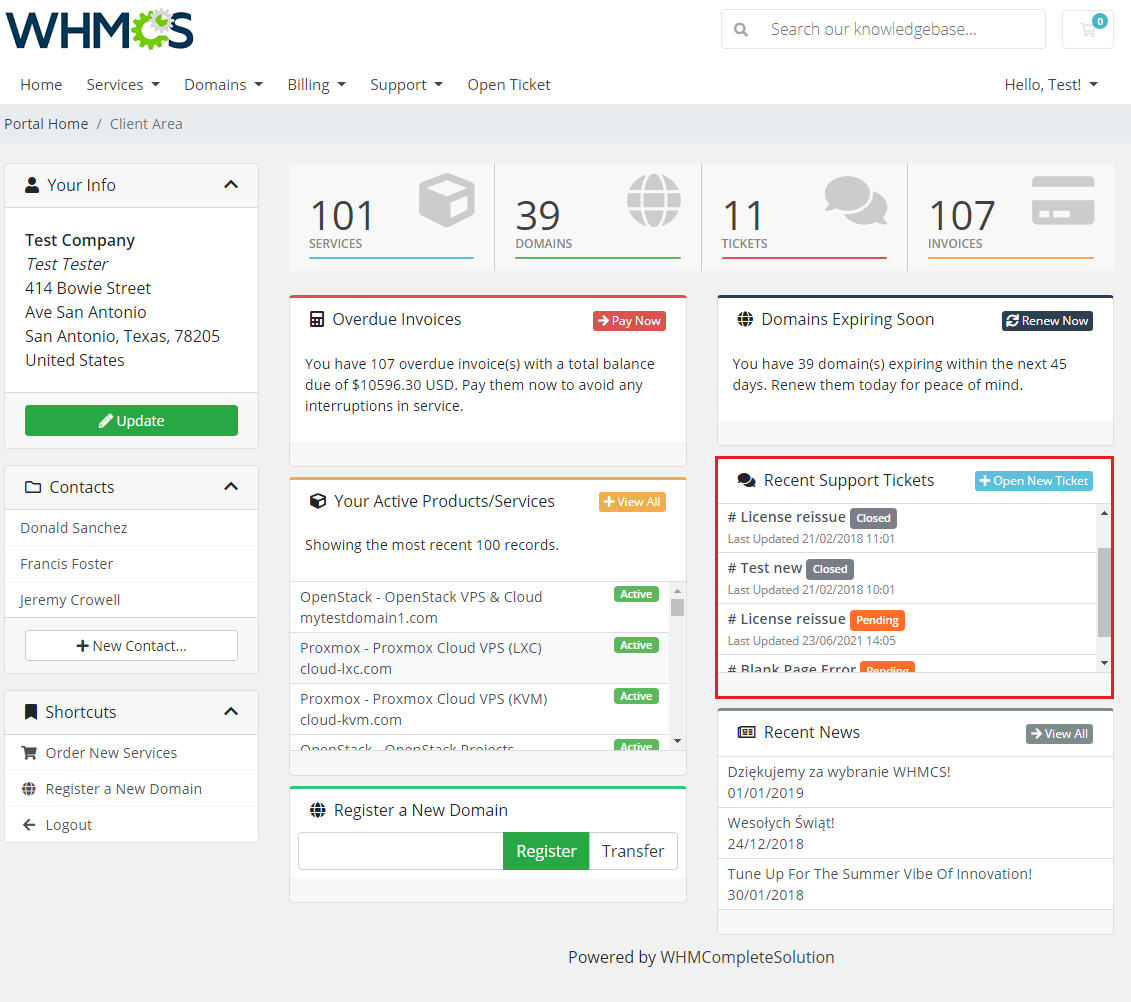
|
| The color settings will be also viewable on your main tickets list. |
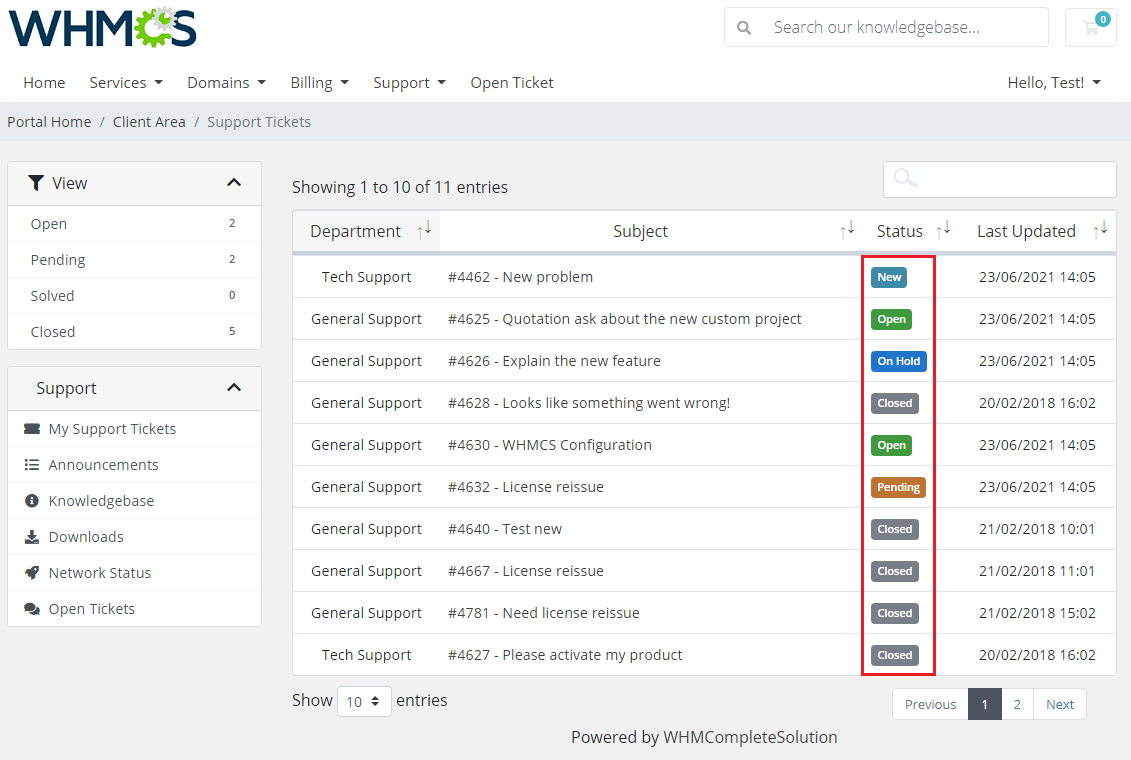
|
[edit] Ticket Fields
| You can also manage ticket fields that are available in WHMCS on a new ticket form, directly in Zendesk. Move to 'Zendesk' → 'Admin' → 'Manage' → 'Ticket Fields'. On this site, you can activate, deactivate, or edit any system and custom fields or add new ones. |
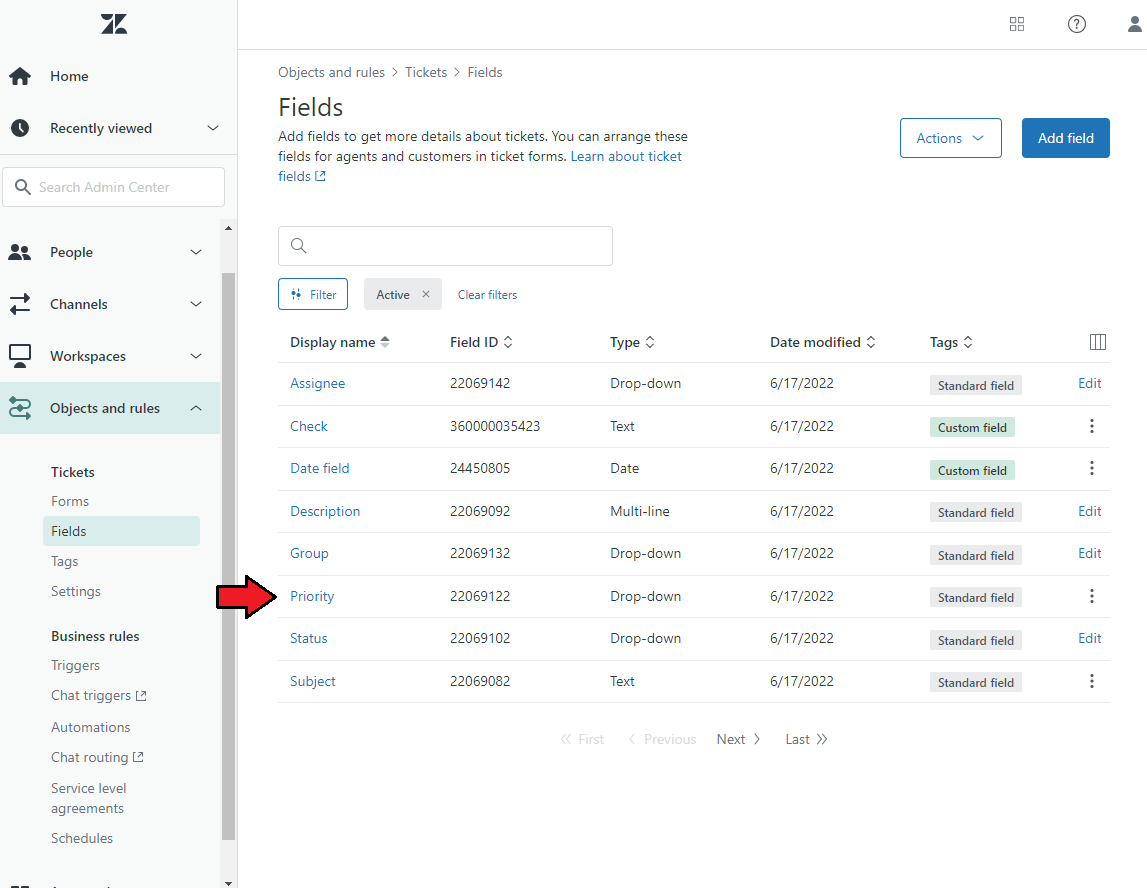
|
| As you can see on the screen below, a new field appeared in the WHMCS client area. Edit or add ticket fields to adjust the ticket form to fit your needs perfectly. |
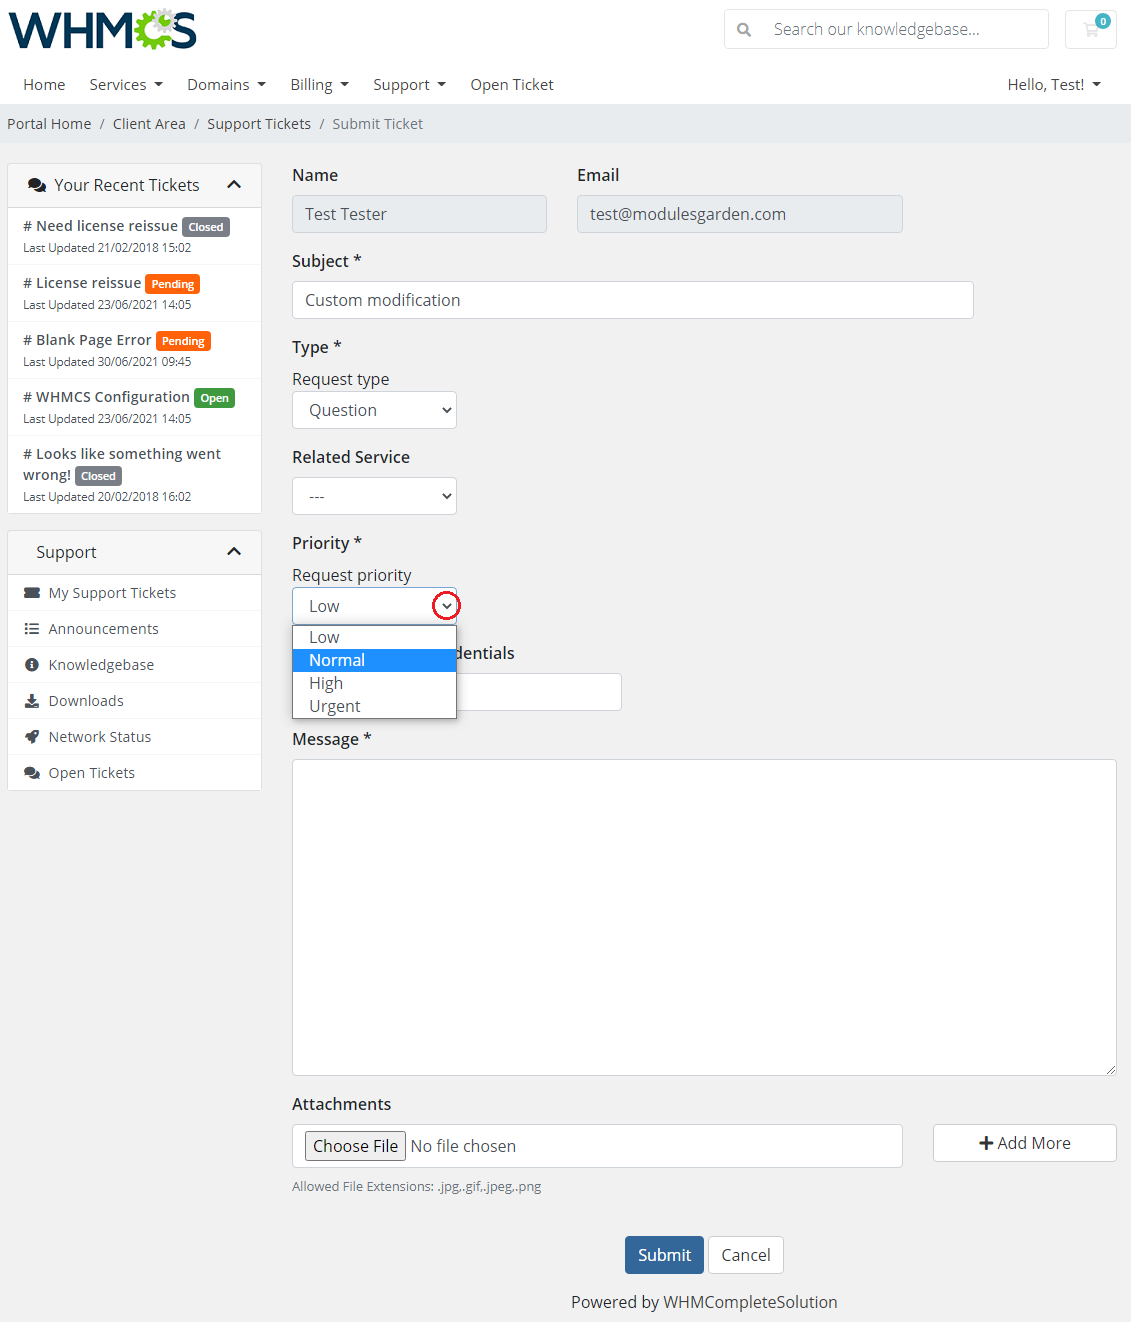
|
[edit] Service Field
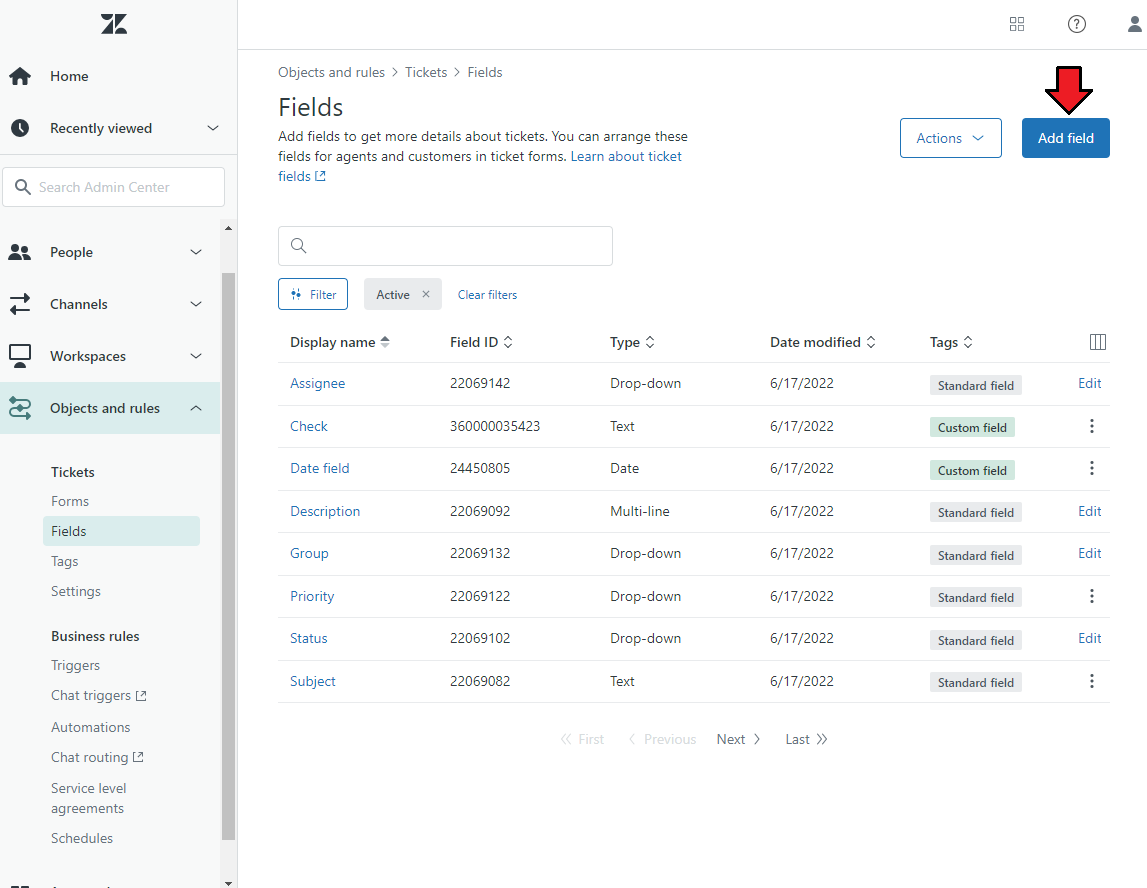
| The 'Client Service' field allows your customers to specify the service they refer to when creating a ticket. This can help your support teams more easily identify the problem with the service used by the client. |
|
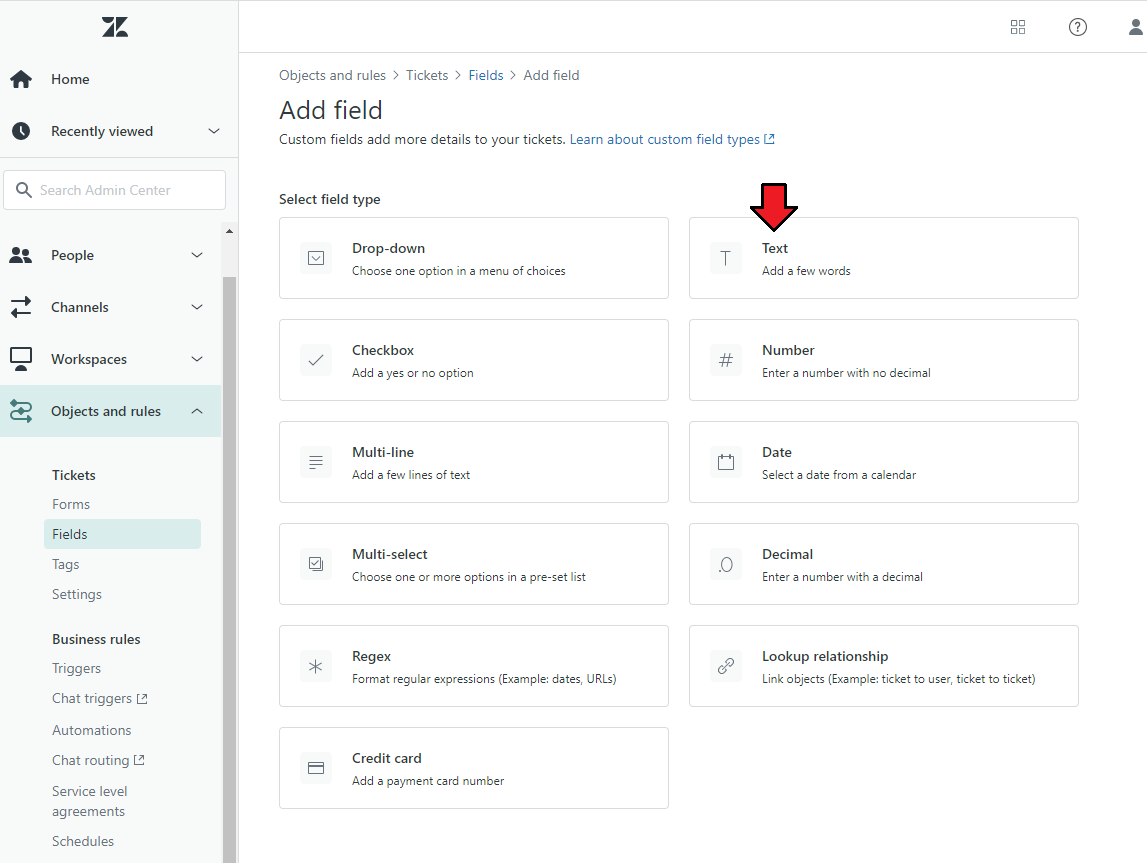
| There are a few types of fields to choose from. Click on the Text type to add your new ticket field. |
|
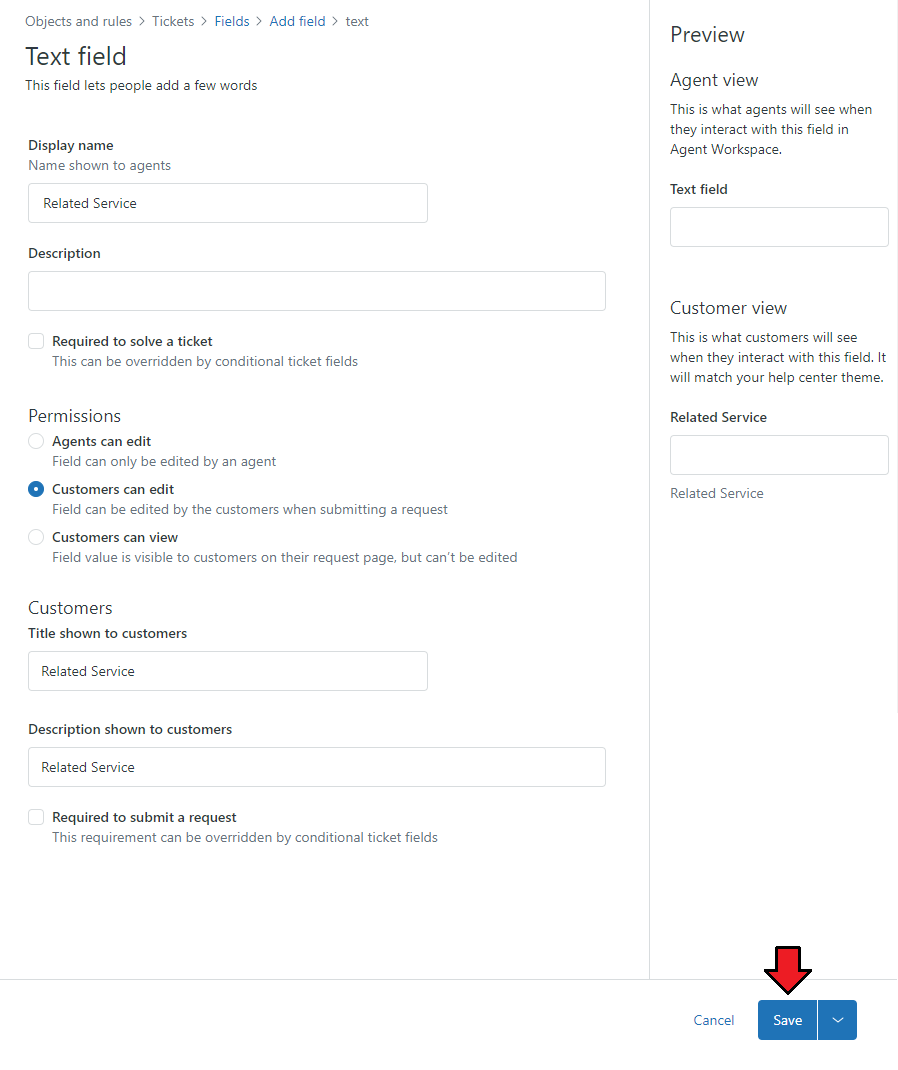
| We will now adjust the 'Client Service' field according to our needs. Firstly, you can complete an optional description. Then, select 'Editable for end users' permissions and make sure to leave the 'Required' box unchecked to keep this field optional for the clients when they open a new ticket. |
|
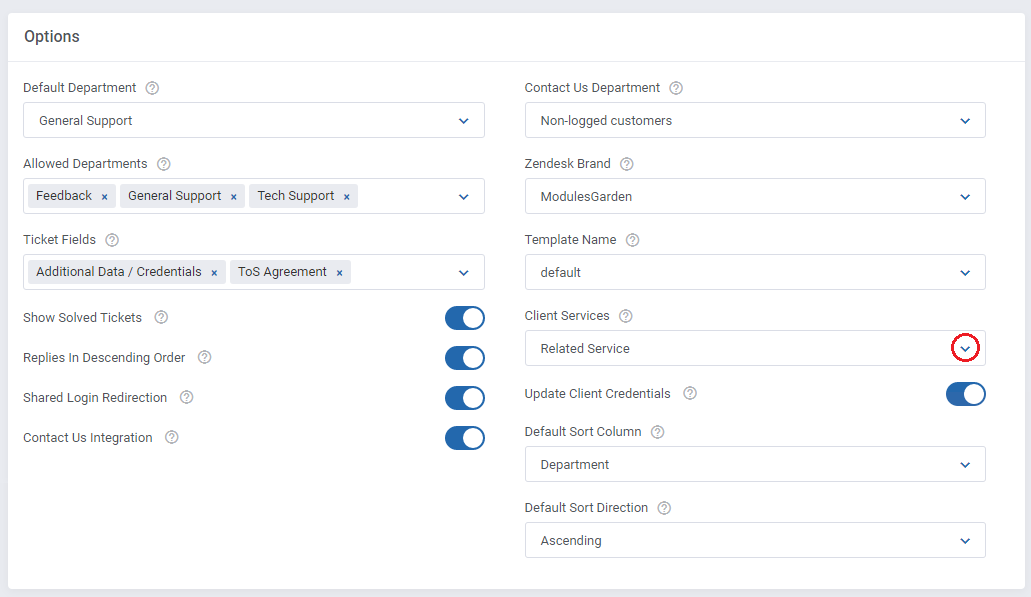
| Once you have created your new field, you can select it as 'Client Service' in the 'Ticket Settings' section of Zendesk. Do not forget to save settings. |
|
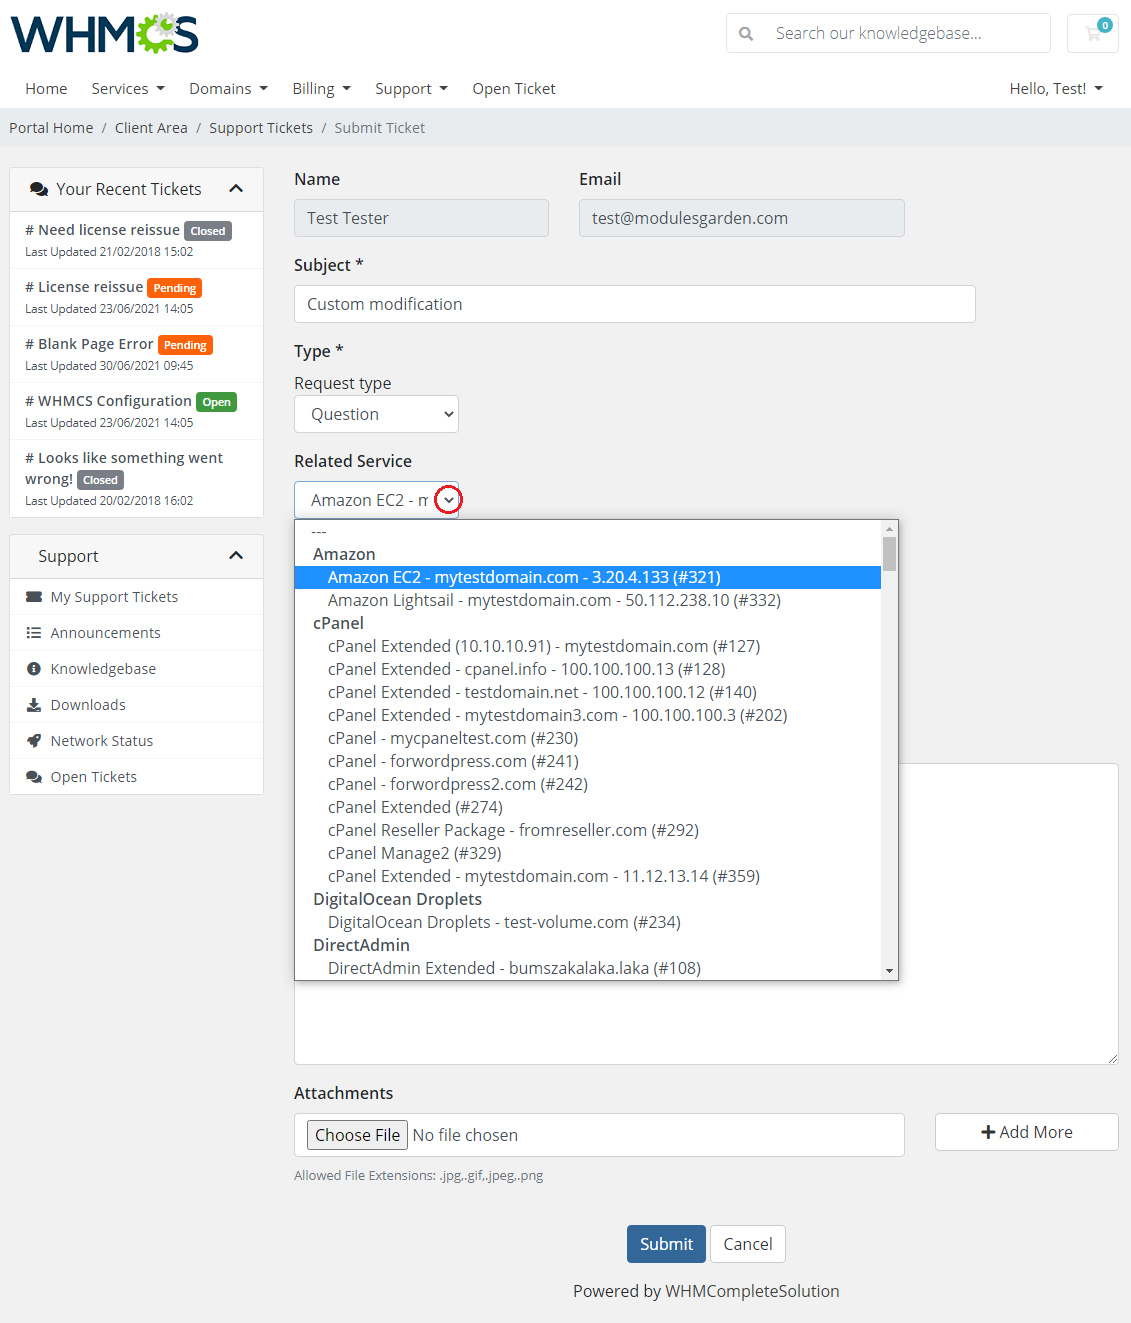
| As you can see on the screen below, a new field, which may help to draw the agent's attention to a specific client's service appeared in the WHMCS client area. |
|
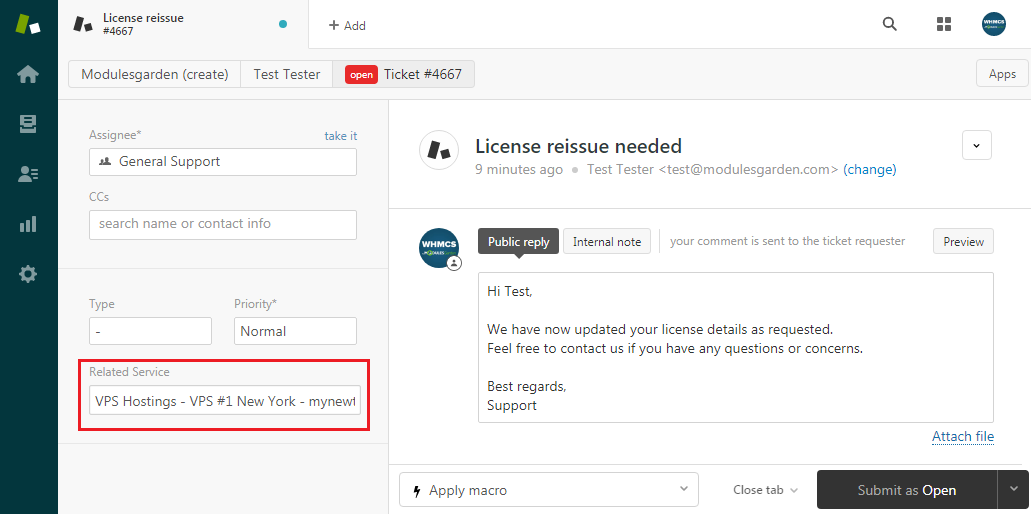
| Next, when the agent accesses the ticket in the Zendesk panel, there will be information about the service selected by the client. |
|
[edit] Export
| Our module allows you to export data gathered in WHMCS, more specifically, all the users and tickets generated before the installation of the product. Read the below points to learn what data can be synchronized with Zendesk and what are the possible means of such synchronization. |
[edit] Users
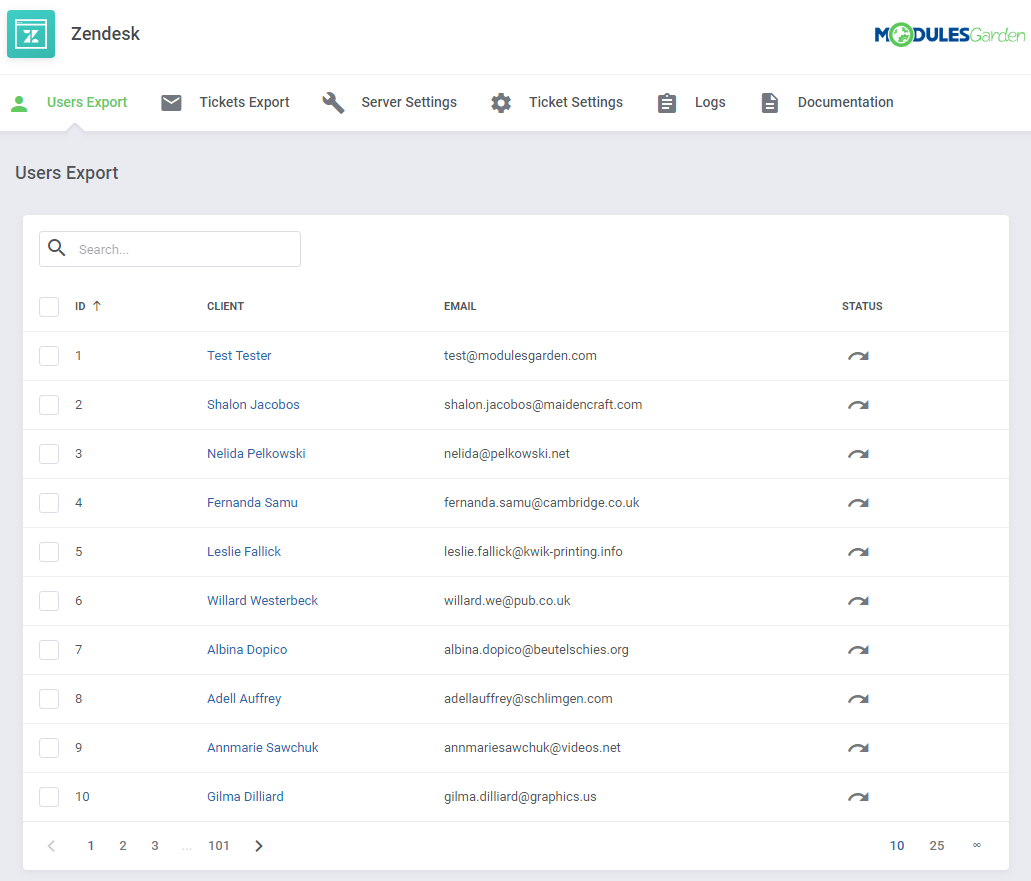
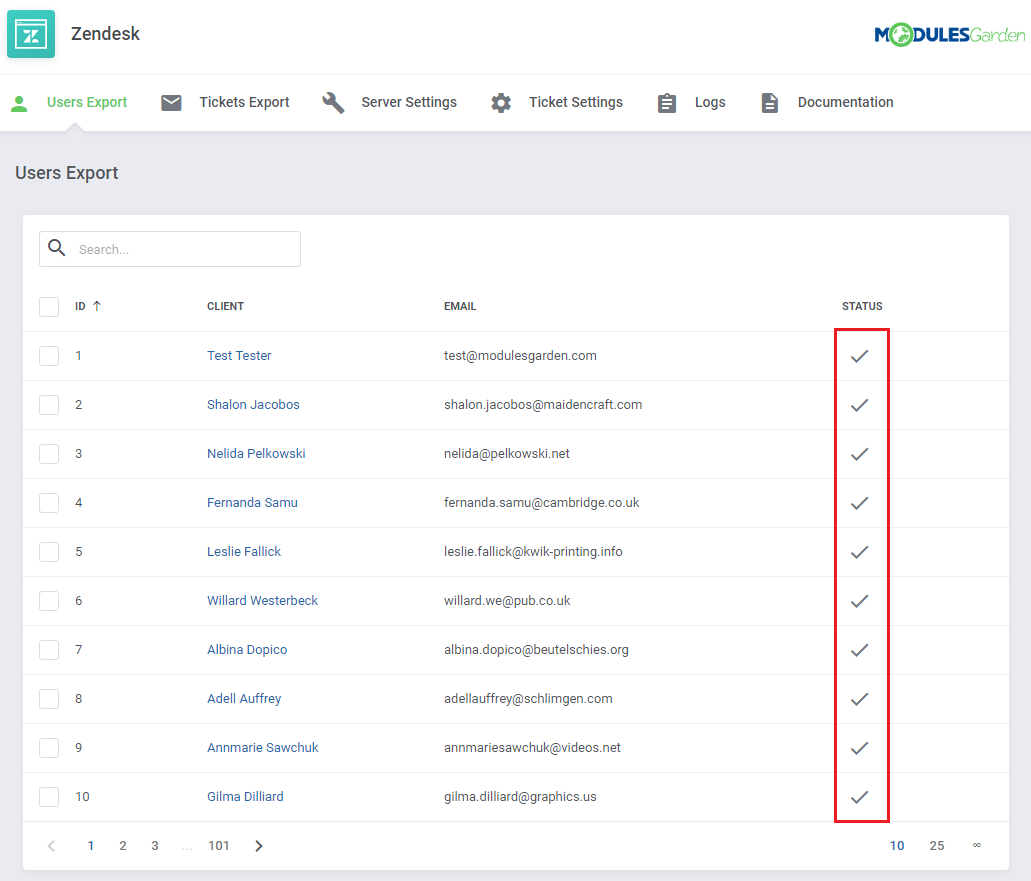
| The first option offered by our module is the export of users from WHMCS to Zendesk, proceed to 'Users Export' . If you are using Zendesk For WHMCS for the first time, you will see here a list of all users who exist in your WHMCS and have not been synchronized with Zendesk yet. |
|
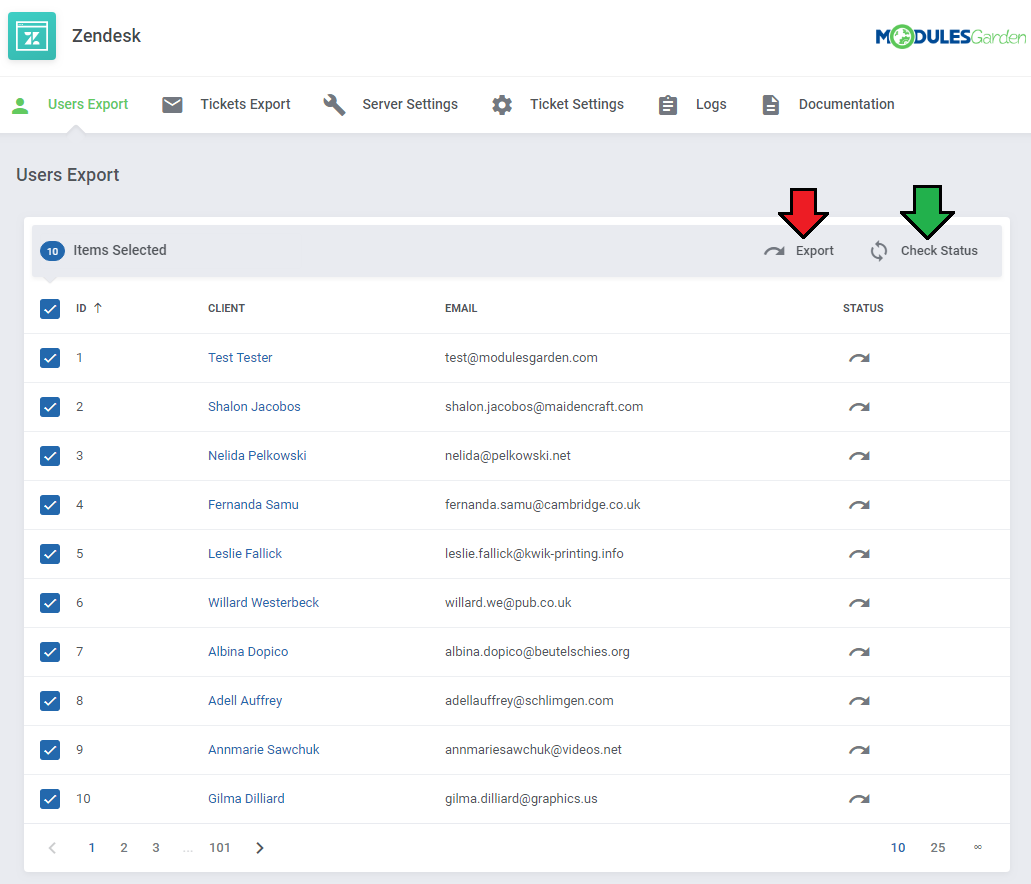
| Now, you can manually export all of the users available on the list or choose only some of them. Check boxes next to the users you are going to export and press the 'Export' button, marked with the red arrow on the screen. You can always check the status of the exported clients. |
|
| After confirming your choice, the selected users should be exported from WHMCS to Zendesk, and their 'Status' field will become modified as well. All users newly added to WHMCS will be automatically synchronized with Zendesk. |
|
[edit] Tickets
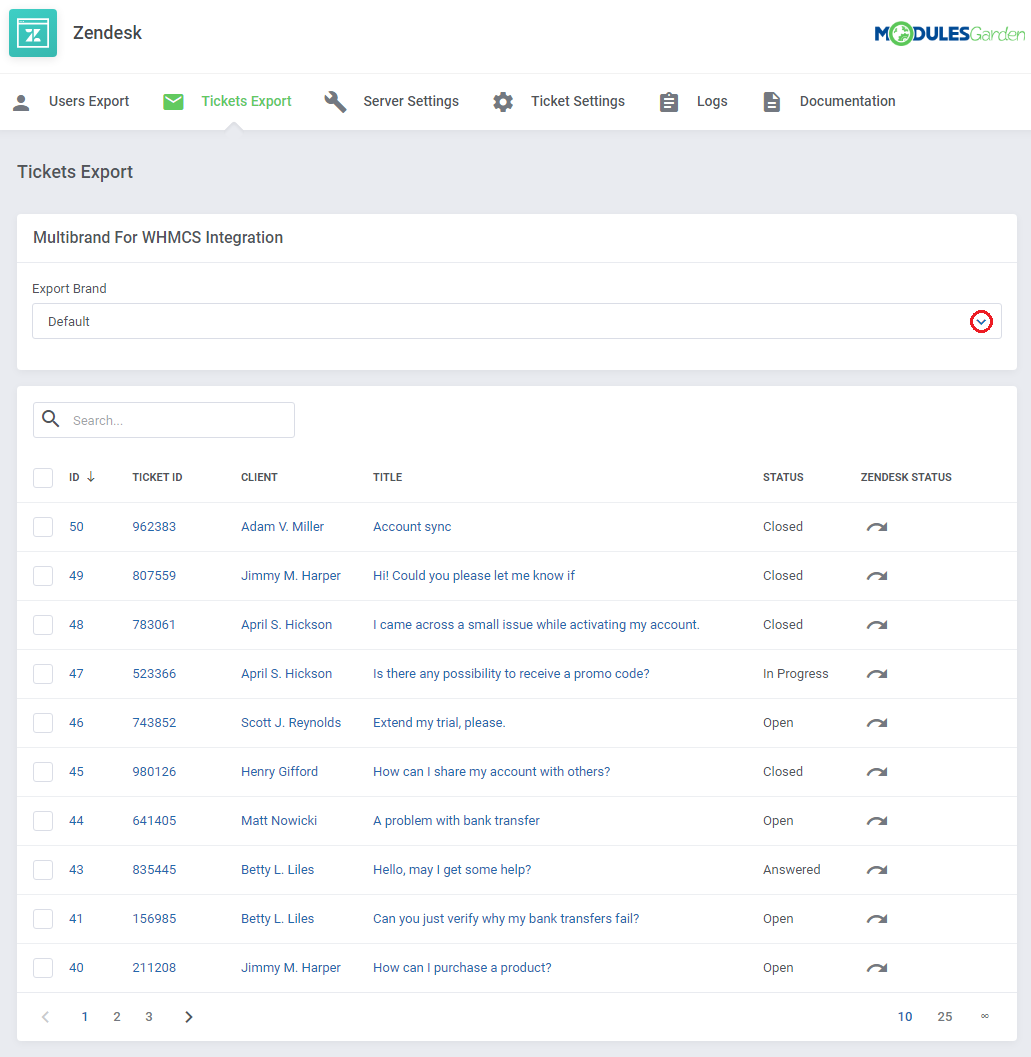
| The next option offered by our module is the export of tickets from WHMCS to Zendesk, proceeding to 'Tickets Export'. You will see here a list of all tickets which exist in your WHMCS and have not been synchronized with Zendesk yet. Thanks to the integration with Multibrand For WHMCS, you can also export tickets that are assigned to a particular brand. |
|
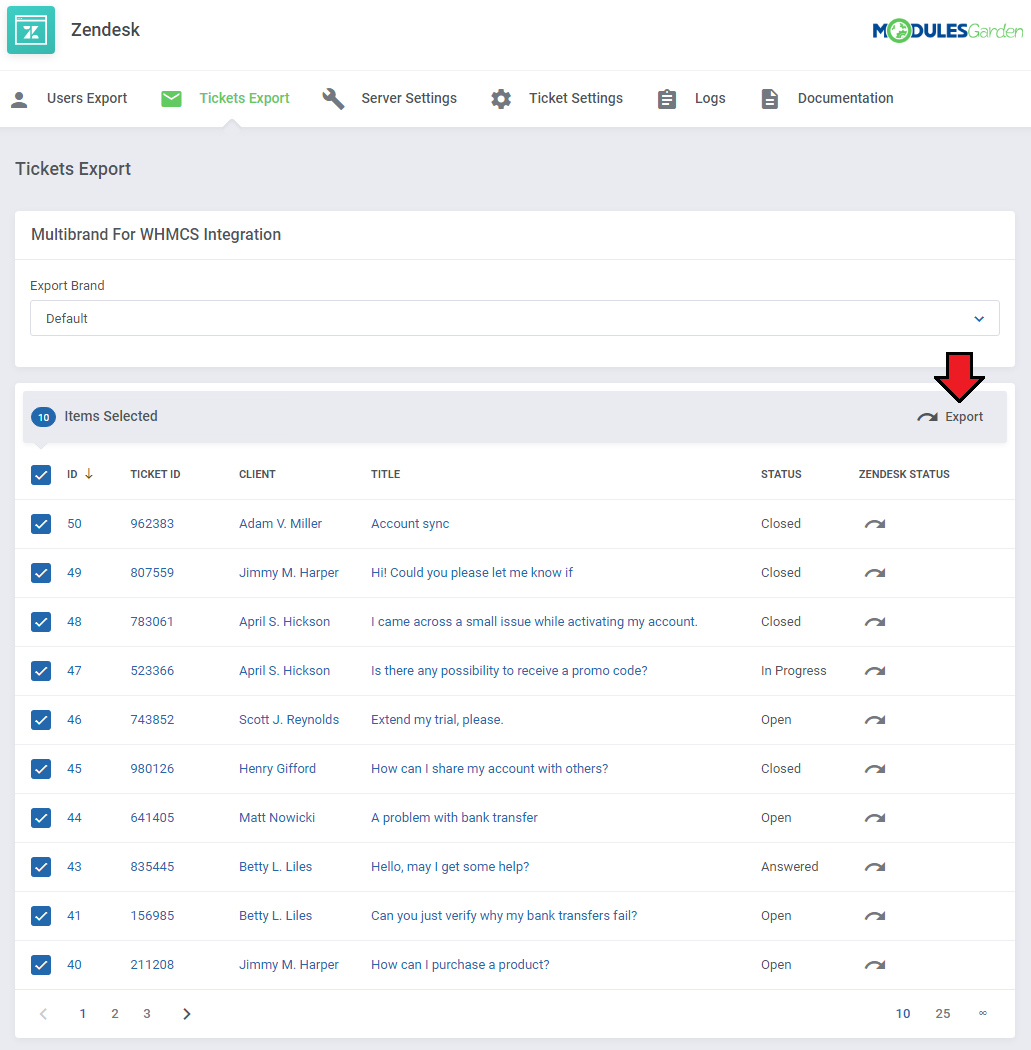
| Now, you can manually export all of the tickets available on the list or choose only some of them. Check boxes next to the tickets you are going to export and press 'Export' button as marked on the screen. |
|
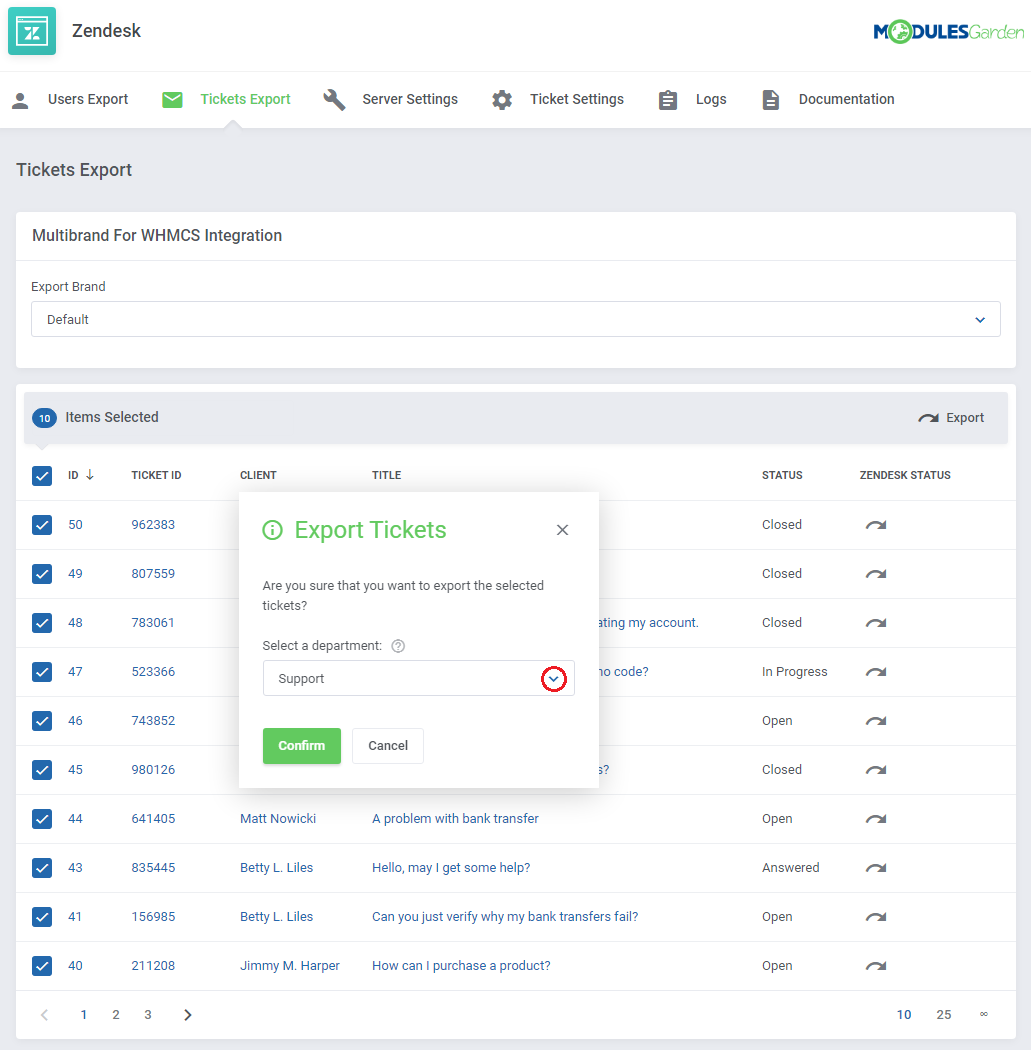
| Next, confirm the default department you have chosen in the 'Ticket Settings' , or select one of the other available departments. |
|
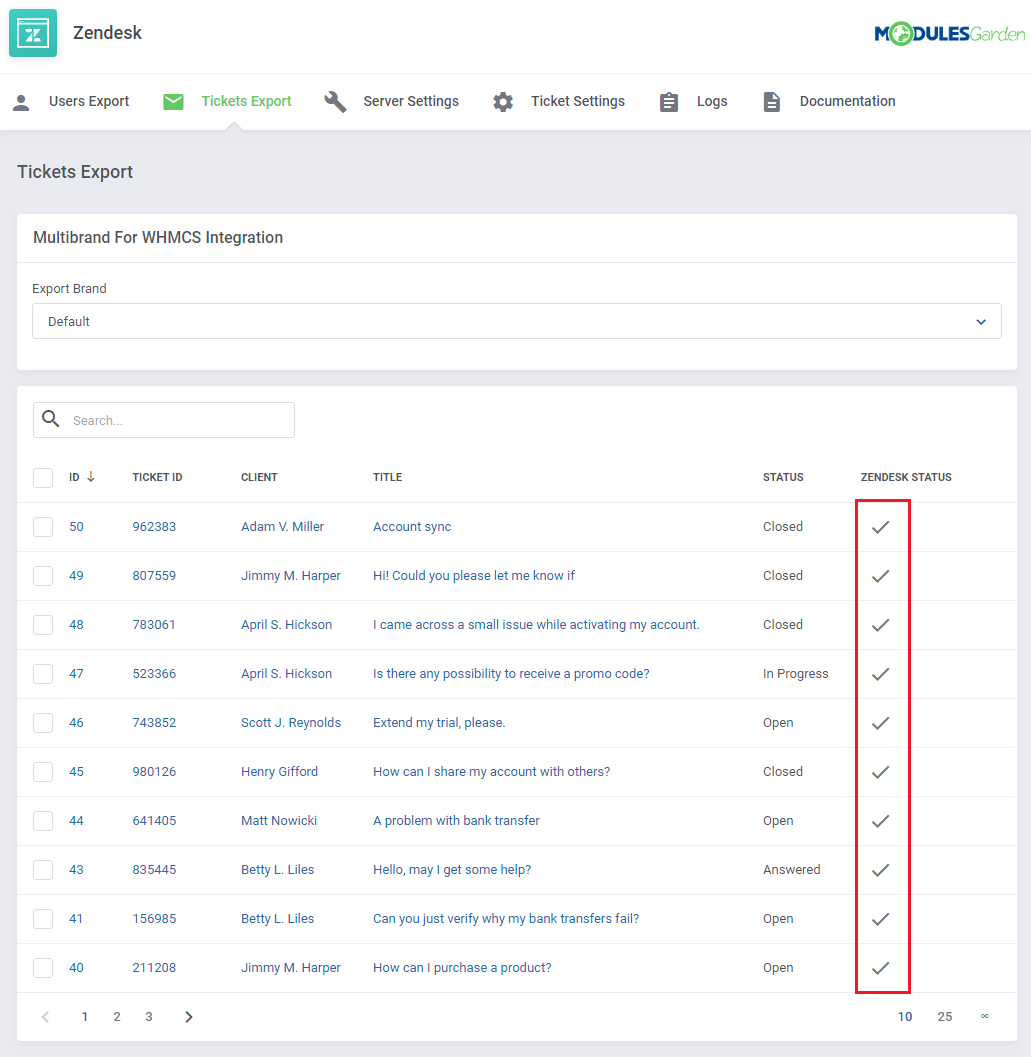
Since the 2.1.0 version of the module, all exported to Zendesk tickets will have a corresponding status. These are:
Prior to V2.1.0: |
|
[edit] Logs
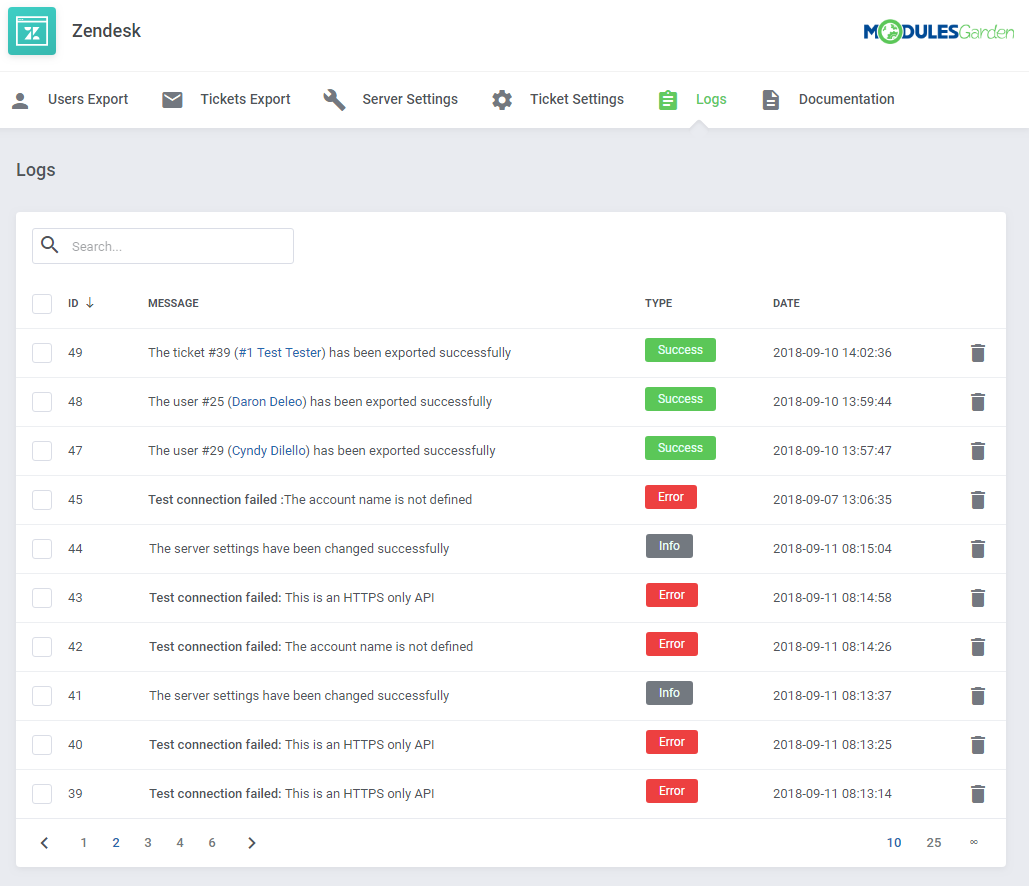
| All module activities are recorded in 'Logs' . Note: You might have no logs visible here if there are no logged actions yet. |
|
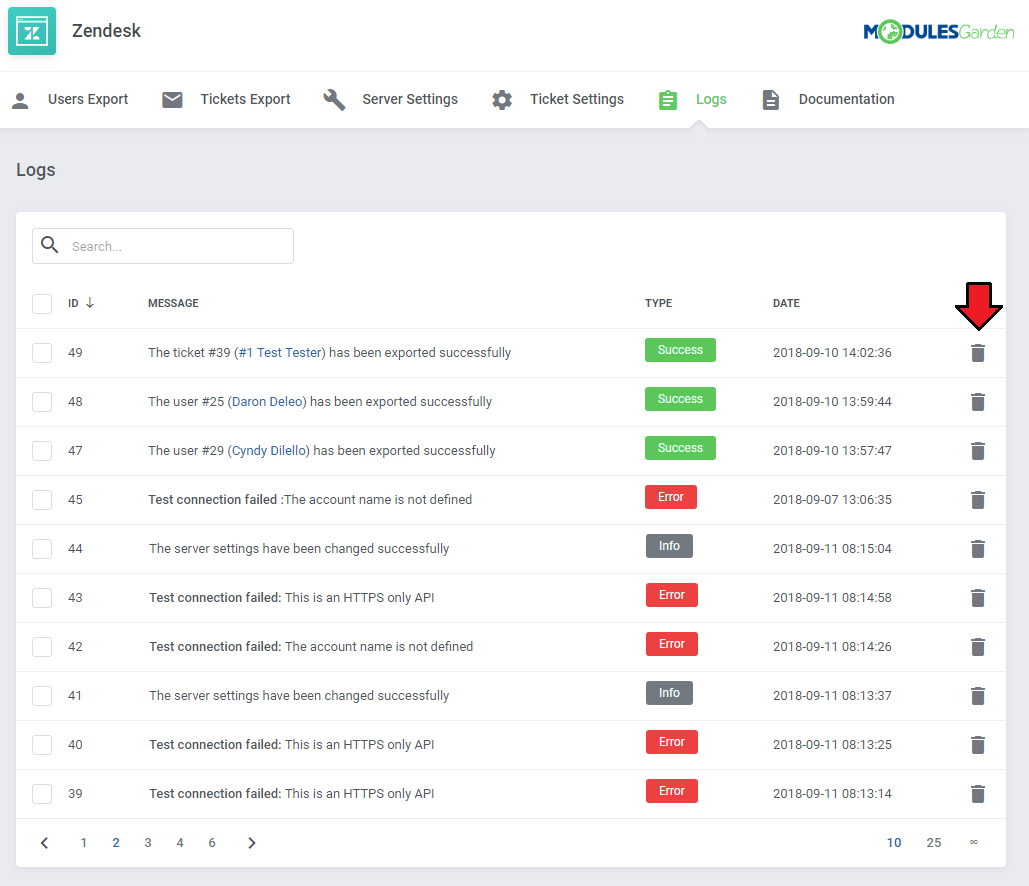
| In case you no longer wish to see a particular log you can easily remove it. Select a particular entry and click on the bin icon as presented on the screen below. |
|
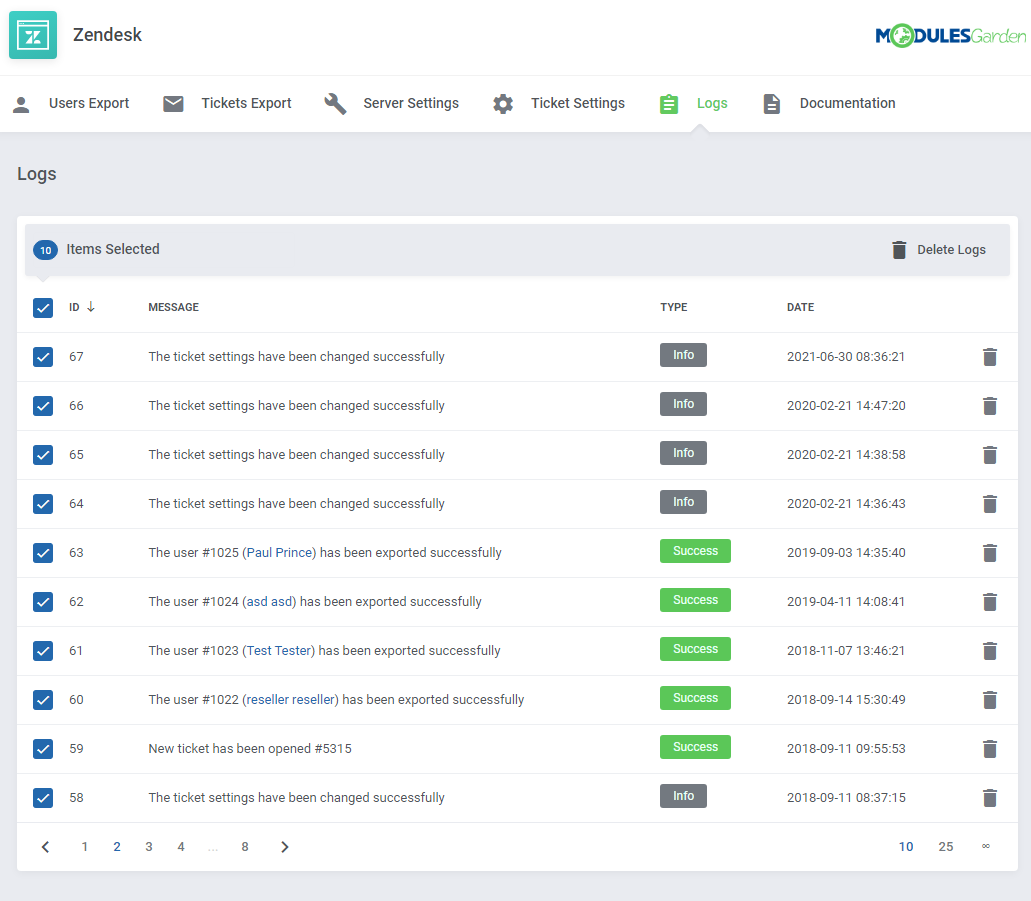
| In order to delete multiple logs at the same time you can simply take advantage of the 'Mass Remove Action'. |
|
[edit] Support Tickets
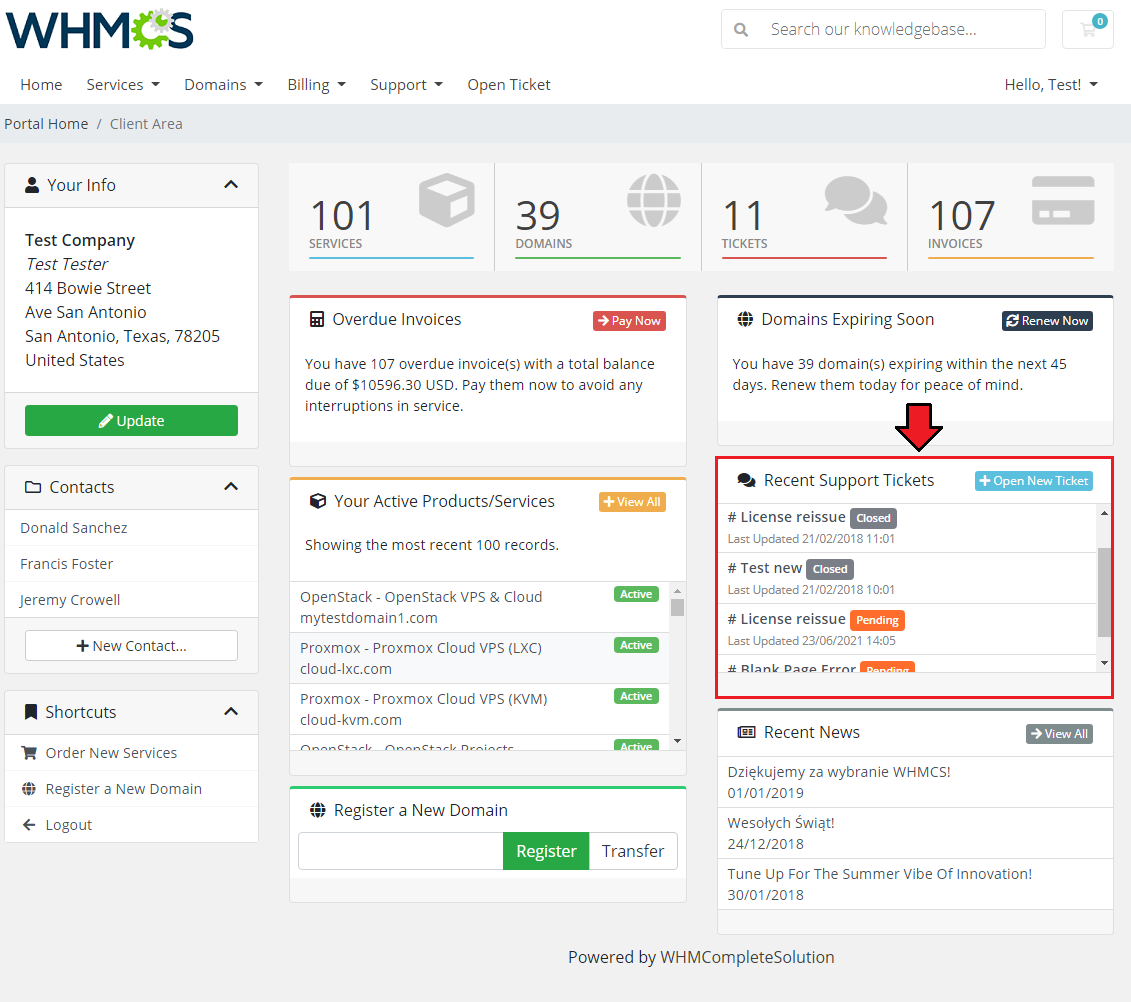
| Move to your client area. There, on the homepage, a 'Recent Support Tickets' box can be found. It presents the latest tickets available in your system. The visible tickets are marked with colors related to their current status. |
|
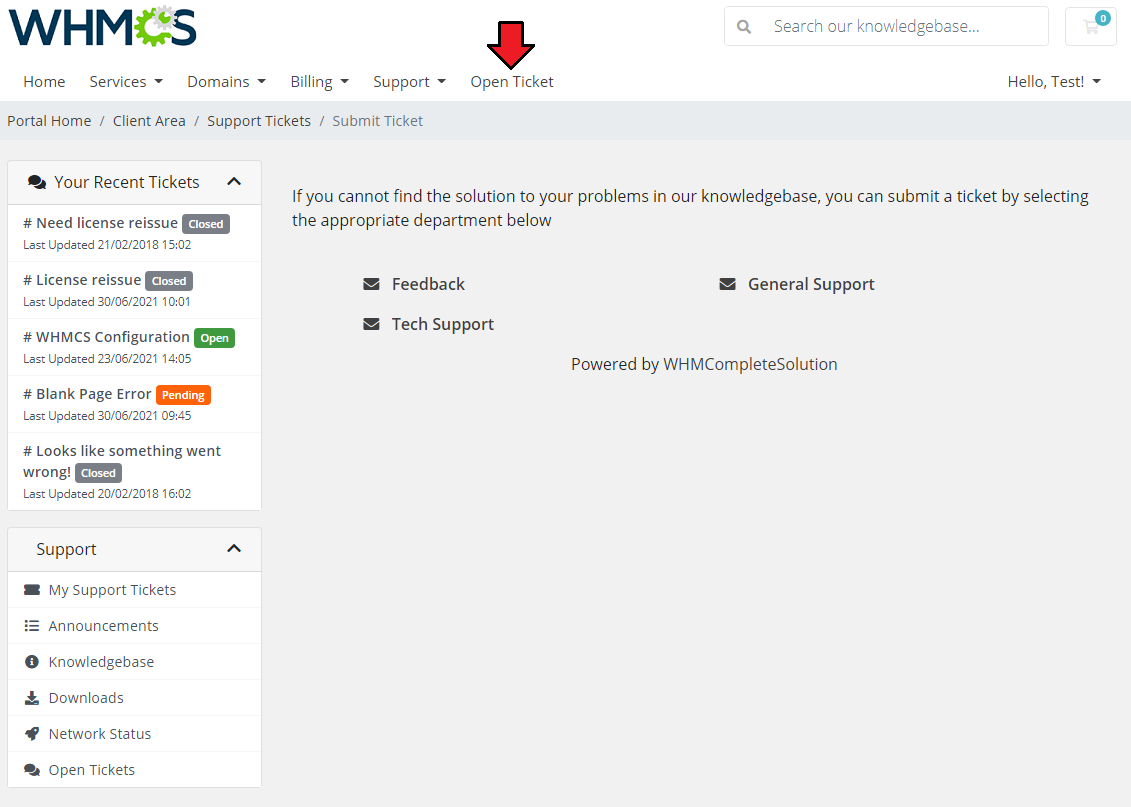
| Now, we will submit a ticket to show you the complete creation flow. Just like in the case of a standard WHMCS support ticket, choose the department. Note: For convenience, if you have only one department configured, you will be moved immediately to the ticket creation view. |
|
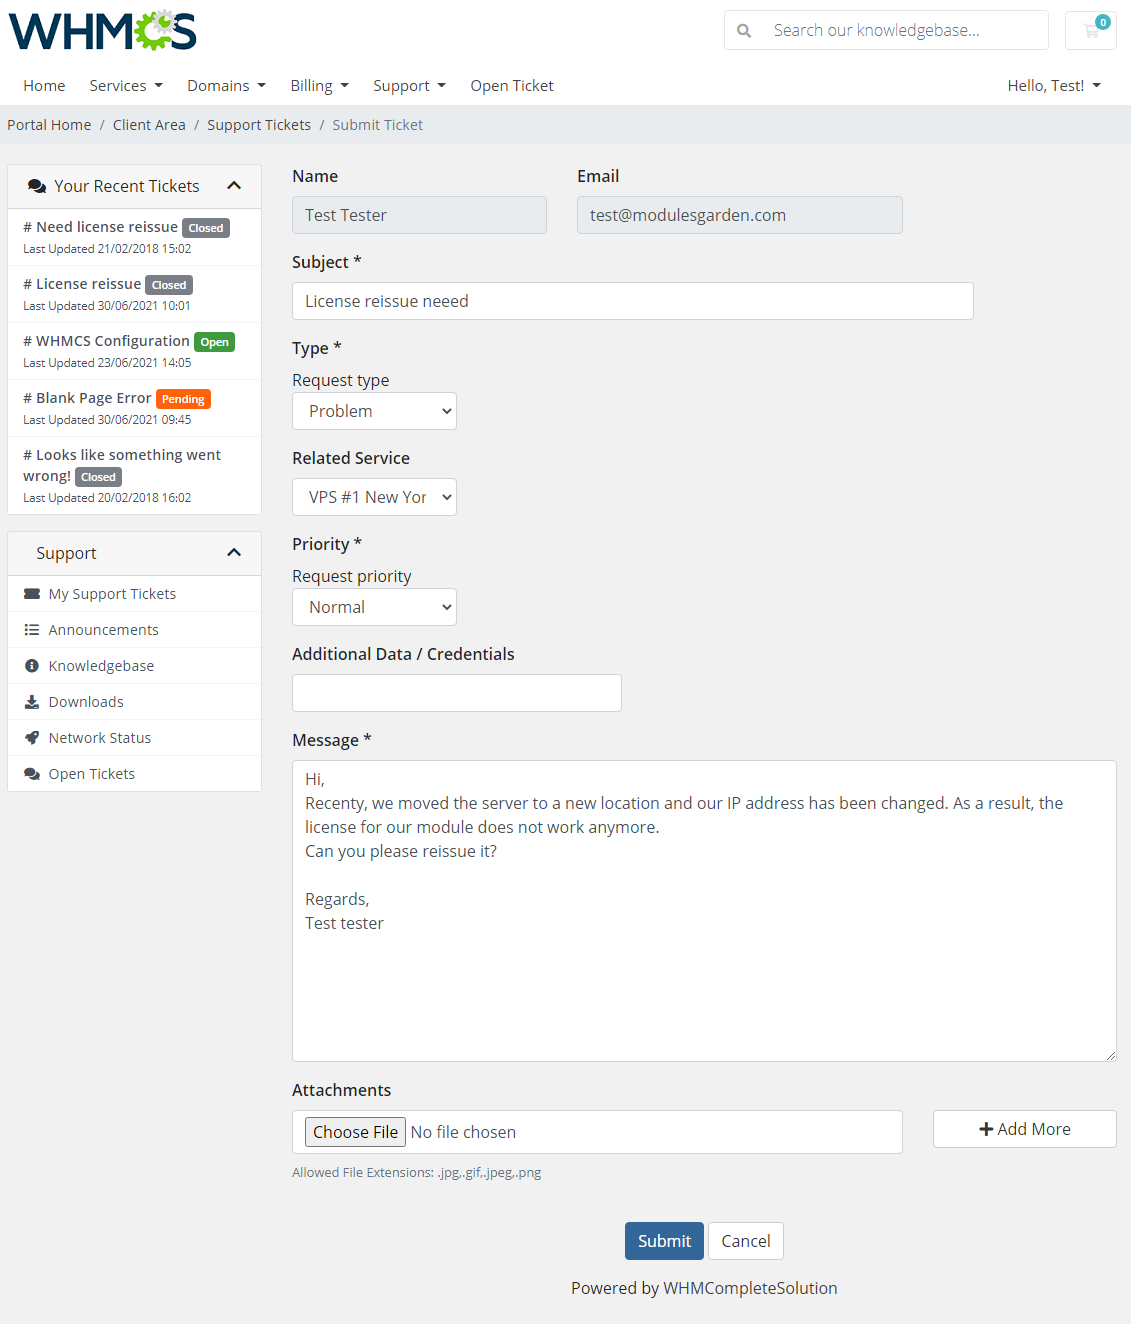
| Next, enter the subject, type in the ticket message and fill in any additional ticket fields that you feel are useful and will help you quickly receive a satisfactory answer. Submit the ticket. |
|
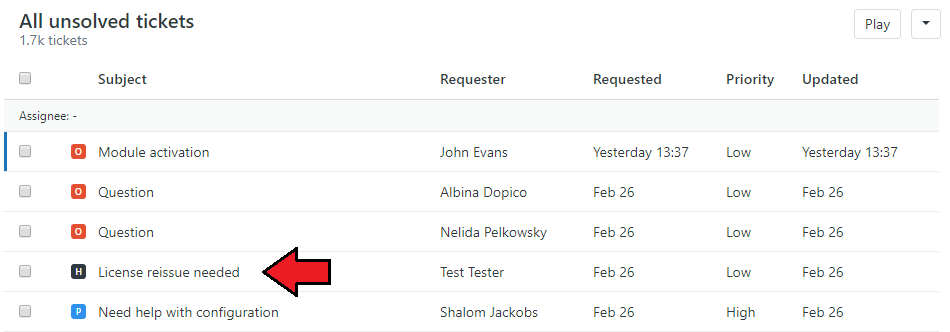
| A new ticket, sent with Zendesk For WHMCS module, is immediately visible in the Zendesk admin area. |
|
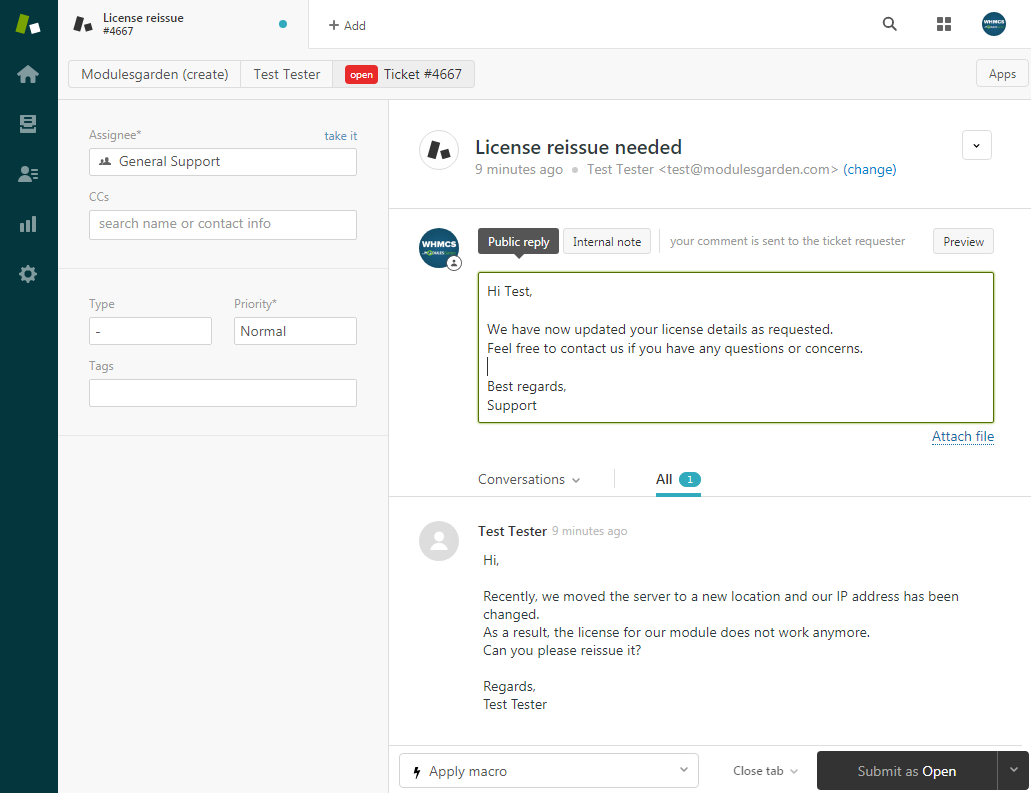
| Do not hesitate and send a reply to this ticket. |
|
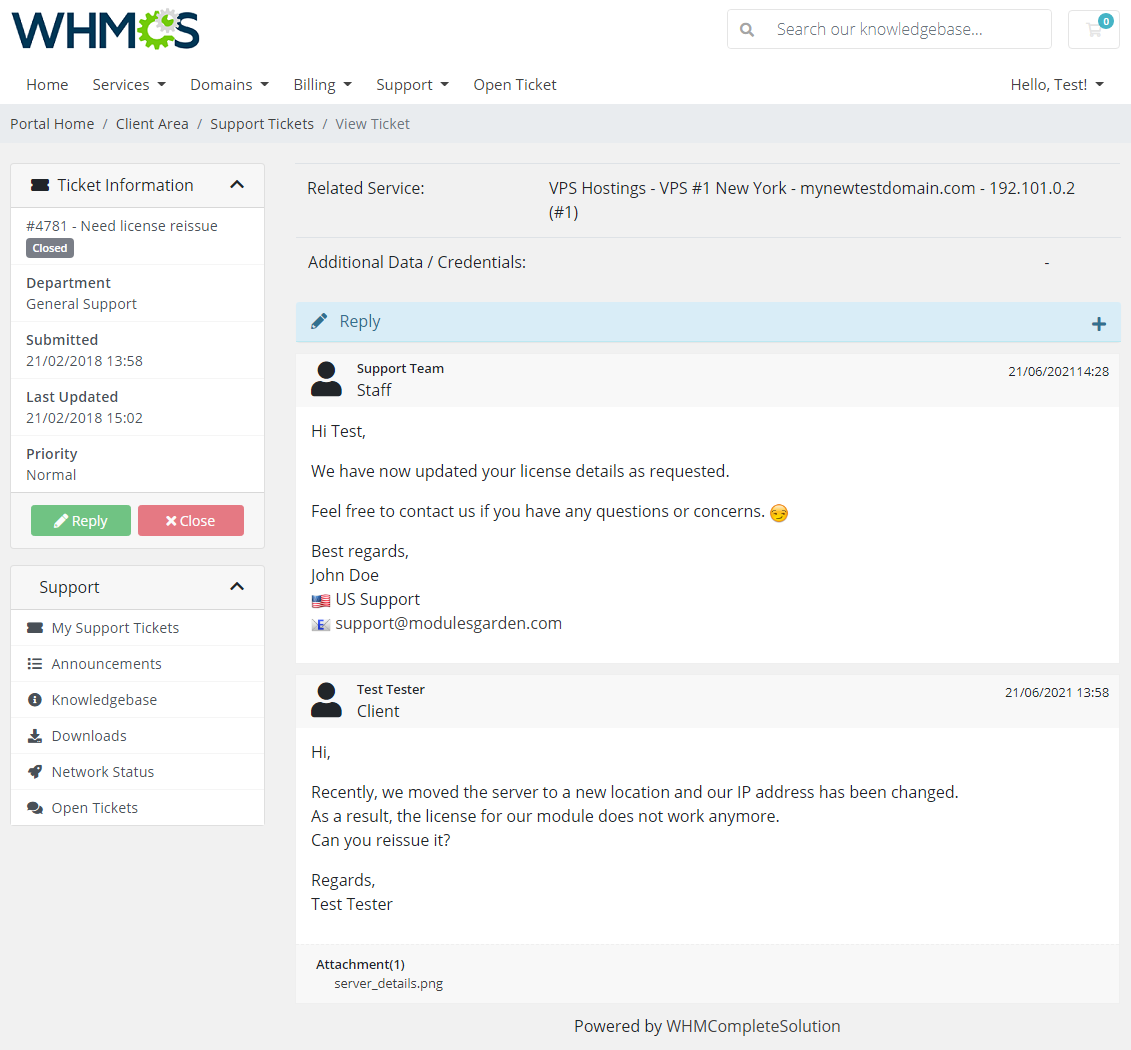
| The client has received an answer. Note that the ticket status has been updated as well. |
|
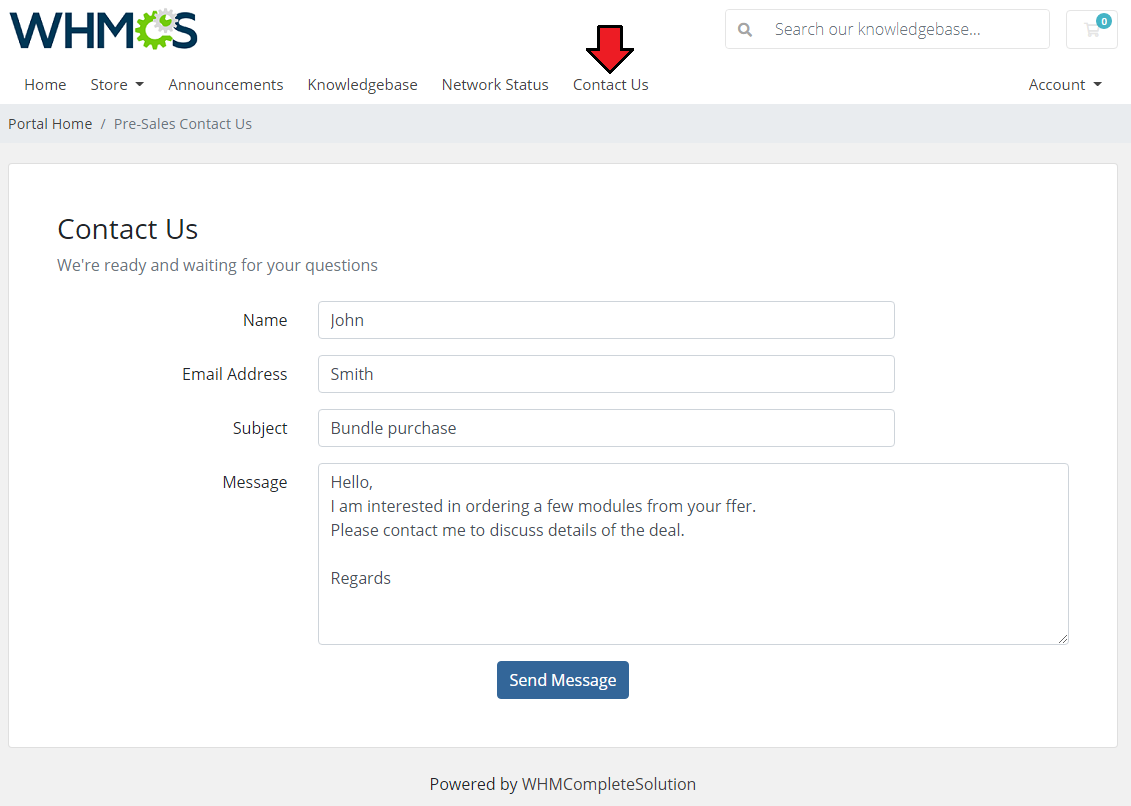
| The module allows also the unlogged users to send tickets via the 'Contact Us' form. Such a ticket will be delivered to a department previously defined by the admin. Please refer to the 'Ticket Settings' section here to see how to configure the 'Contact Us' integration and department. |
|
[edit] Emoji Support
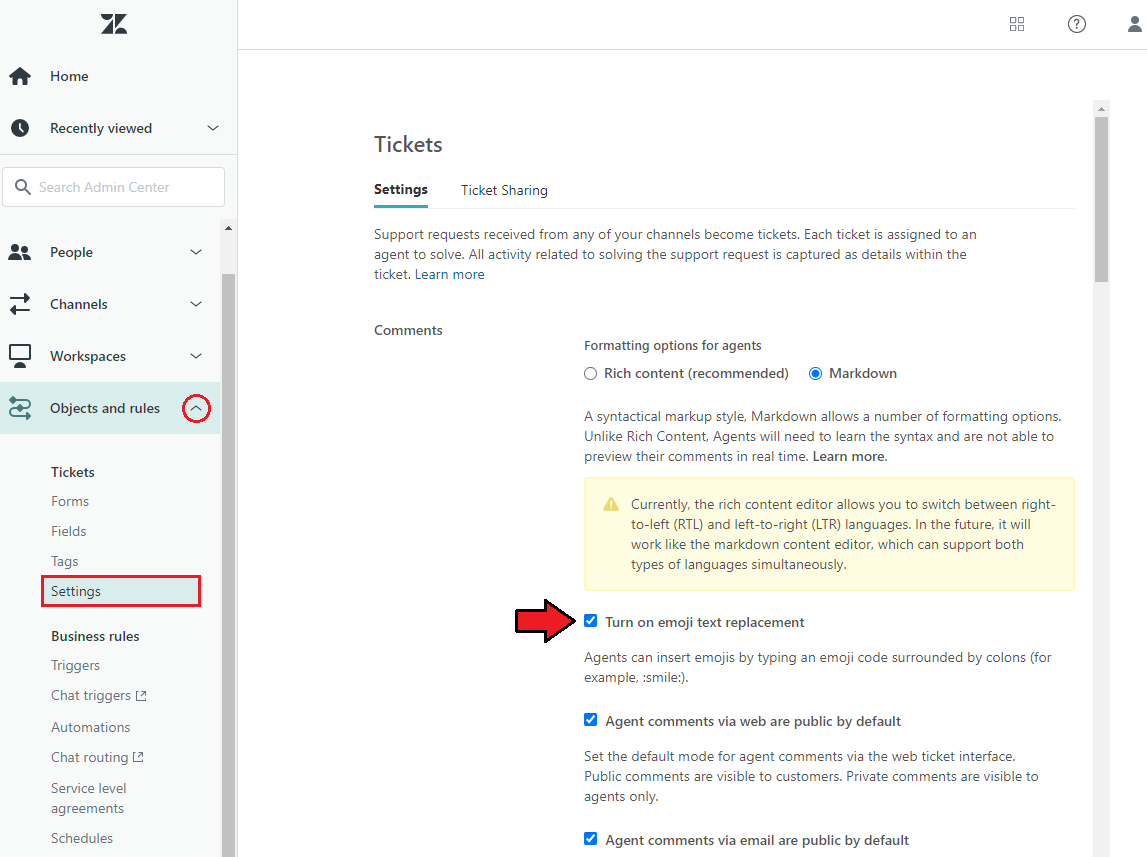
| Since the 2.0.0 version of the module, agents can use emojis (emoticons) without worrying that these will not be displayed to the clients in WHMCS. First, you need to enable support for them in your Zendesk Panel. |
|
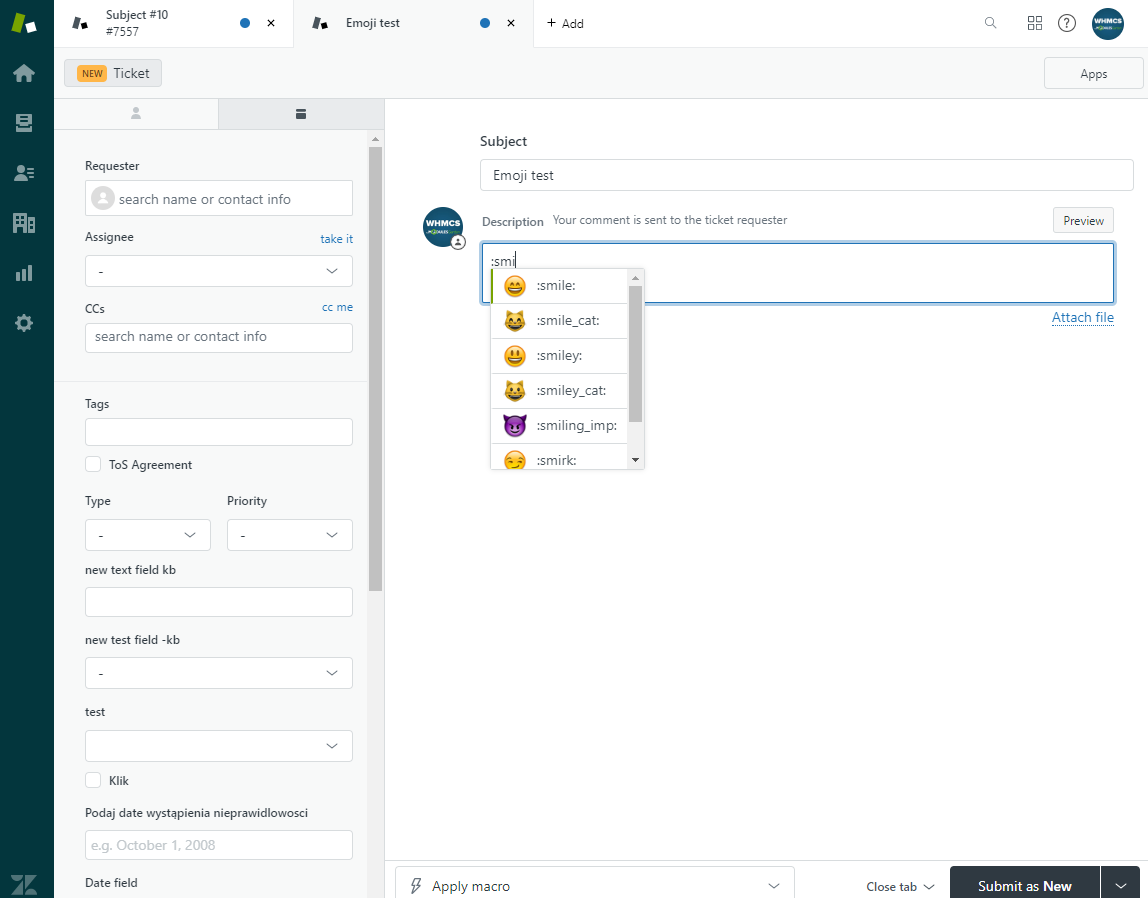
| Now, your agent can insert emojis by typing an emoji code surrounded by colons (e.g. :smile:). |
|
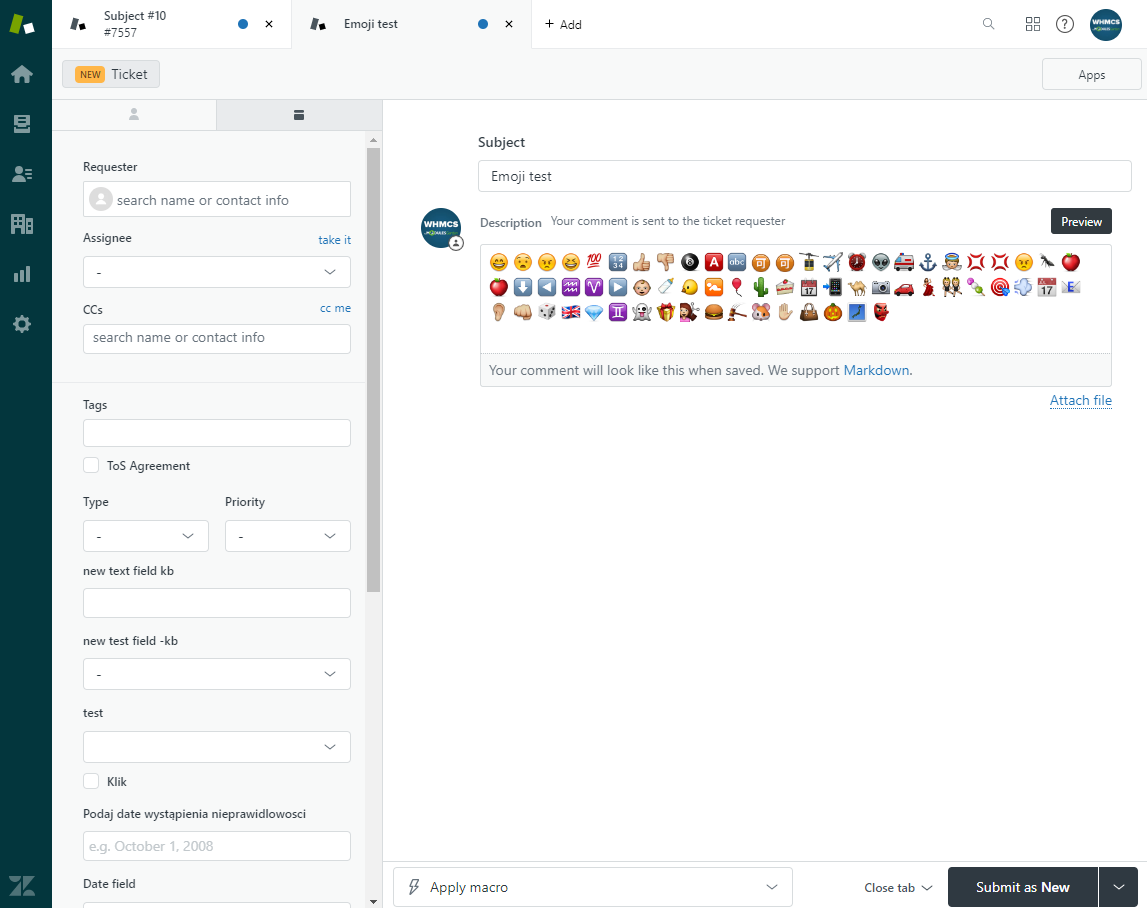
| You can use a lot of different emojis. Press the 'Preview' button to see how they will look in the ticket. |
|
| After sending the reply, the emojis will be displayed in WHMCS to your client. Note: Due to the licensing issues, the appearance of emoticons used in the module is slightly different from those used by Zendesk itself. |
| Your customers can also use emoji codes in WHMCS, but it is not possible to preview them before sending a ticket. The workaround for this inconvenience will be presented in the near future. |
[edit] Tips
| 1. If you create a custom field in Zendesk, it will also be visible in WHMCS. Custom fields need to be enabled, visible, and editable by the client. |
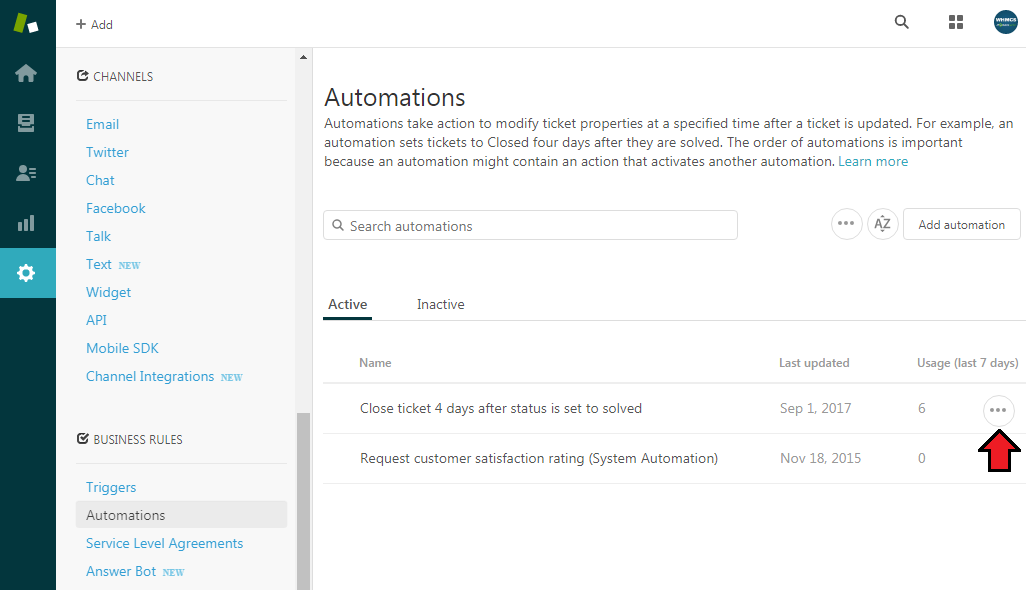
| 2. Since Zendesk does not fully support the WHMCS option to reopen closed tickets, 'Close ticket 4 days after status is set to solved' option is currently the only available one. To enable this option, proceed to Zendesk → Business Rules → Automations. |
|
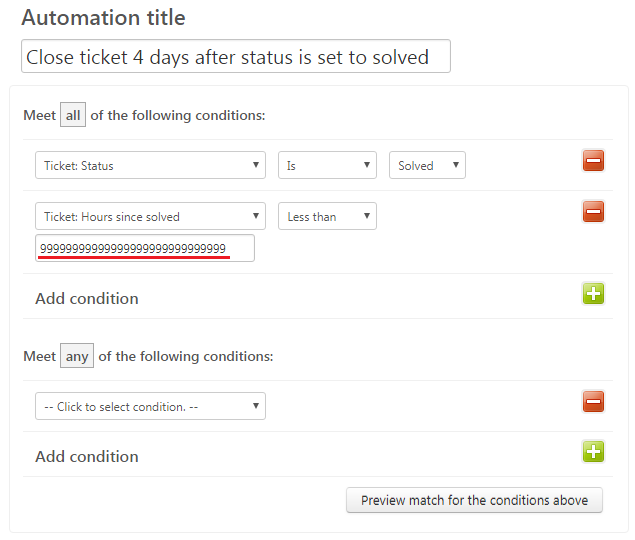
| Here you can configure the time period within which the tickets can be reopened by an answer from the client. Extend the maximum time to your needs. |
|
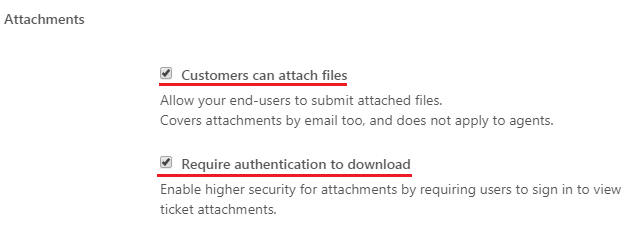
| 3. Attachments are managed in Zendesk, therefore if you do not enable them in Zendesk, your clients will not be allowed to add them in the tickets. To enable attachments in Zendesk, please move to 'Zendesk' → 'Settings' → 'Tickets' → 'Attachments'. Then, enable both options:
|
|
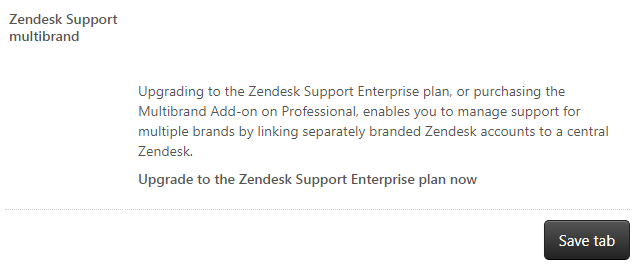
| 4. If you would like to use multiple brands, first make sure you have 'Zendesk Support Multibrand' ' option enabled in your Zendesk account. Go to 'Zendesk' → 'Settings' → 'Account' → 'Branding'. |
|
| 5. If you use SSO, you can still access your Zendesk panel in a normal way. Simply go to: https://YourZendeskSubdomain.zendesk.com/access/normal and enter your access details. |
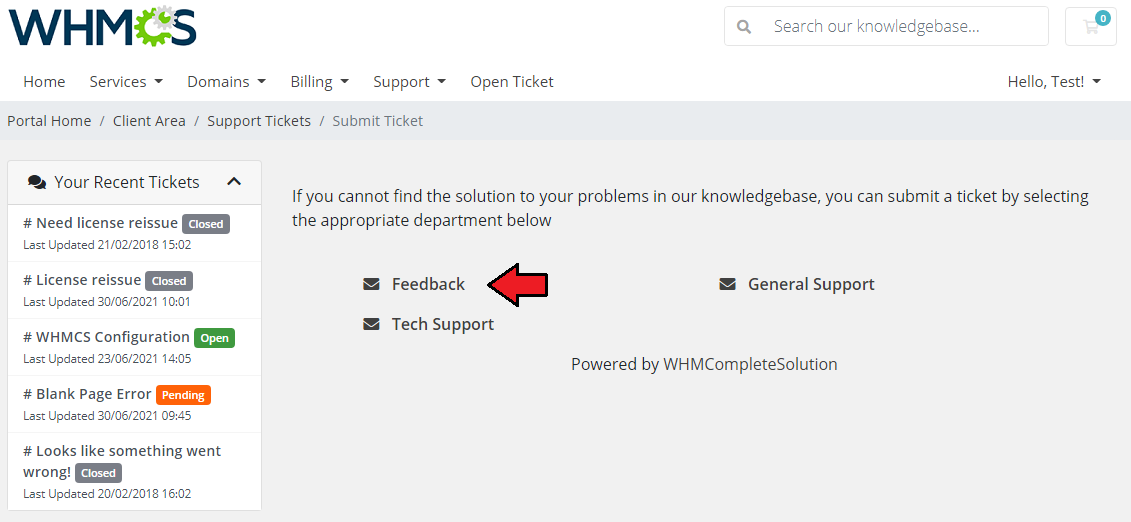
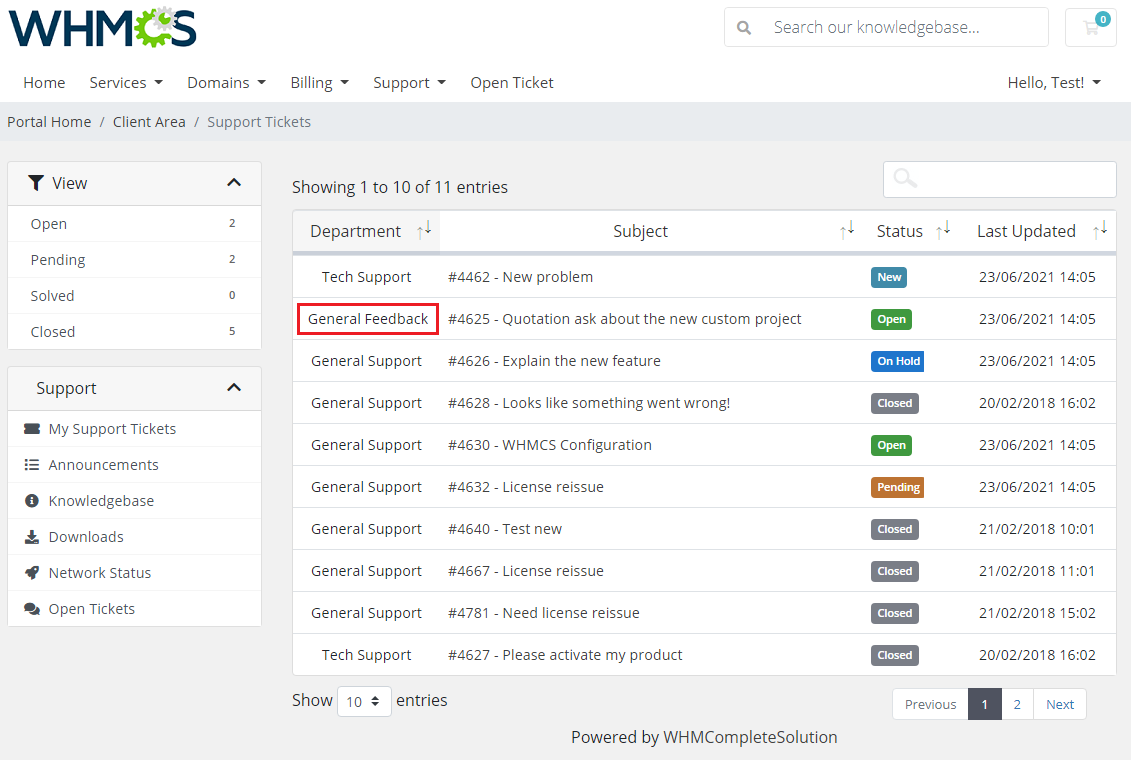
| 6. It is possible to change the name of a particular Zendesk department which is displayed while opening a ticket in the client area. All you need to do is to add the following lines to the language file. $_LANG['addonCA']['submitTicket']['ZendeskDepartmentName'] = 'NewDepartmentName'; $_LANG['ZendeskDepartmentName'] = 'NewDepartmentName'; As for example, we will change the name of the 'Feedback' department to 'General Feedback'. |
|
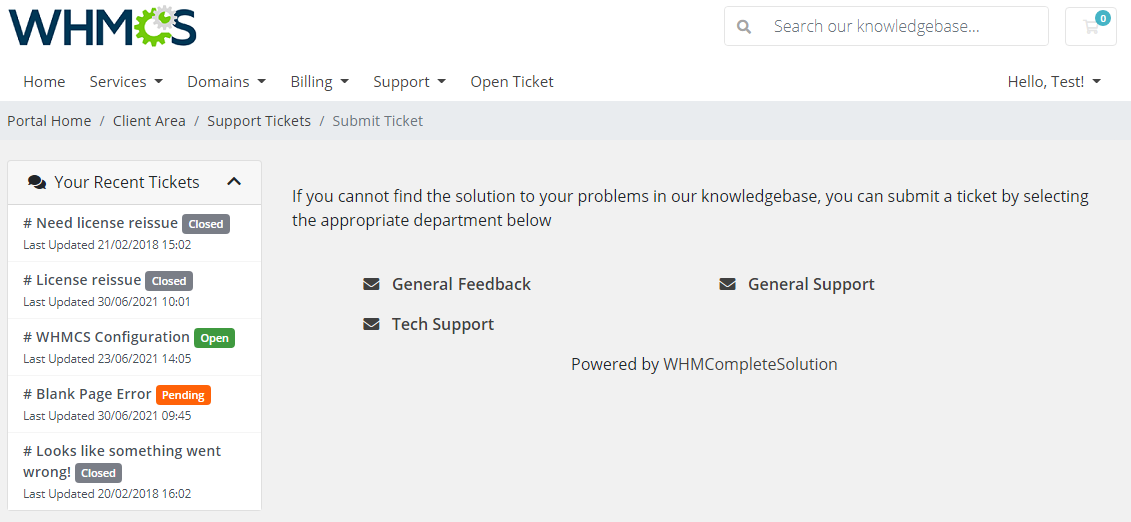
We added these lines to the language file:$_LANG['addonCA']['submitTicket']['Feedback'] = 'General Feedback'; $_LANG['Feedback'] = 'General Feedback'; As a result, the name has been modified successfully. |
|
|
| 7. There is the possibility to add translations for the 'Ticket Fields' created in Zendesk. Simply, complete the below pattern by providing the field name and its translation. $_LANG['fieldName'] = "Your Translation" Here are a few ready examples: $_LANG['Related Services'] = "Saistītais pakalpojums"; $_LANG['Priority'] = "Prioritāte"; $_LANG['Request priority'] = "Pieprasījuma prioritāte"; Once ready, add them to the language file and save the changes. |
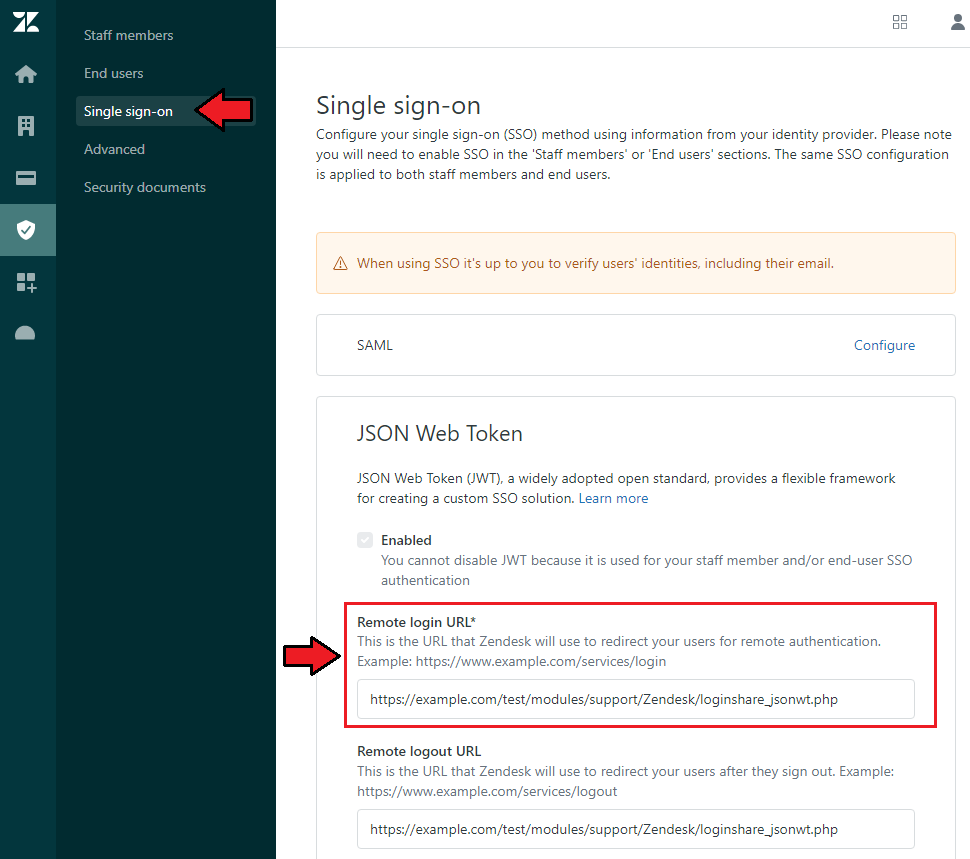
| 8. 'Shared Login Redirection' allows you to log in to the Zendesk panel using the URL redirection that is provided in the Zendesk panel. To find the 'Remote login URL' option, proceed to the Zendesk panel → Security → Single sign-on → JSON Web Token. With this option, we can use authorization from another website to access the Zendesk panel. |
|
| 9. Cache time of the module can be adjusted to seconds directly in the "configuration.yml" file. Open the file at: modules/addons/Zendesk/app/Config/configuration.yml. The entered values are measured in seconds, if no value is entered in "cacheTime:", by default 5 minutes (300 seconds) is used. |

|
[edit] Update Instructions
| An essential guidance through the process of updating the module is offered here. Ensure successful completion of the module update by carefully following each step, thereby preventing data loss or any unforeseen issues. |
[edit] Upgrade Guide
| Seeking a solution that offers greater flexibility, customization tailored to your precise needs, and unrestricted availability? There is an option that not only proves to be cost-effective in the long run but also includes prioritized support services, making it a truly valuable investment. Opt for the Open Source version of your Zendesk For WHMCS module to unlock these benefits. Follow a comprehensive guide covering the transition process, the advantages it brings, and step-by-step instructions on what to do next after the order has been successfully finalized. |
[edit] Common Problems
| 1. When you have problems with connection, check whether your SELinux or firewall does not block ports. |
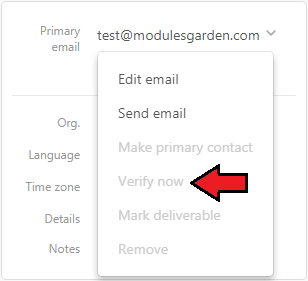
| 2. When you try to open a new ticket and you get the 'Unable to authenticate' error, this means that the user's email is already registered in Zendesk, but it has not been verified yet. To solve the problem, log in to your Zendesk admin area and verify the email by clicking 'Verify now' as presented on the screen below. |
|
| 3. If you encounter a problem when performing the export of a lot of users, make sure you are not using the Zendesk trial account. This is due to Zendesk trial account limitations, where you cannot use the API endpoint to bulk import users or organizations. A '403 Forbidden' error is returned. |
| 4. Some of the module elements may not reflect immediate changes made in the Zednesk panel. This is due to the use of cache to limit the number of queries to APIs. |
| 5. If you are using the 'Contact Us Integration' option with Zendesk, you must remember to previously remove the standard WHMCS settings for this option. Move to WHMCS → Setup → General Settings → Mail and remove the 'Presales Form Destination' and 'Presales Contact Form Email' input. Otherwise, the visitor will be redirected to a login page. |
| 6. We do not recommend using Zendesk For WHMCS module with Resellers Center For WHMCS. Integration between the two modules is hampered due to specific features of Resellers Center For WHMCS and its individual workflow. |
| 7. The SSO only works for end users, it cannot be enabled for the staff login attempts. |