DirectAdmin Extended For WHMCS
(→About DirectAdmin Extended For WHMCS) |
(→About DirectAdmin Extended For WHMCS) |
||
| (213 intermediate revisions by 10 users not shown) | |||
| Line 2: | Line 2: | ||
<meta name="description" content="ModulesGarden Wiki Contains All The Information You Need About The DirectAdmin Extended For WHMCS Module."></meta> | <meta name="description" content="ModulesGarden Wiki Contains All The Information You Need About The DirectAdmin Extended For WHMCS Module."></meta> | ||
| − | =About [ | + | <h4 class="no-toc" style="color: #ff0000; font-weight:bold; text-align:center;"> |
| + | DirectAdmin version 1.671 introduces changes that are not yet supported by the module.<br/> | ||
| + | See [[#Common_Problems|Common Problems]] for more information and a workaround. | ||
| + | </h4> | ||
| + | |||
| + | =About [https://www.modulesgarden.com/products/whmcs/directadmin-extended DirectAdmin Extended For WHMCS]= | ||
{| | {| | ||
| − | |style="padding: 10px 0px 10px 0px;"|'''DirectAdmin Extended For WHMCS''' | + | |style="padding: 10px 0px 10px 0px;"|'''DirectAdmin Extended For WHMCS''' will bring the automation into the provisioning and management of web hosting accounts in your WHMCS.<br /> |
| − | The module will | + | The module will allow your clients to remotely handle FTP accounts, create backups, install SSL certificates as well as set up various applications with the inbuilt installers. |
|} | |} | ||
<!--a comment maybe? --> | <!--a comment maybe? --> | ||
| Line 13: | Line 18: | ||
|} | |} | ||
{| | {| | ||
| − | |style="padding: 0px 0px 0px 30px;"|✔ Change Package And | + | |style="padding: 0px 0px 0px 30px;"|✔ Change Package And Account Password |
|} | |} | ||
{| | {| | ||
| Line 19: | Line 24: | ||
|} | |} | ||
{| | {| | ||
| − | |style="padding: 0px 0px 0px 30px;"|✔ | + | |style="padding: 0px 0px 0px 30px;"|✔ Log In As Admin To DirectAdmin Panel On Click |
|} | |} | ||
{| | {| | ||
| − | |style="padding: 0px 0px 0px 30px;"|✔ | + | |style="padding: 0px 0px 0px 30px;"|✔ Automatically Suspend Client Account Upon Reaching Bandwidth Limit |
|} | |} | ||
{| | {| | ||
| − | |style="padding: 0px 0px 0px 30px;"|✔ Define FTP Backups | + | |style="padding: 0px 0px 0px 30px;"|✔ Configure Client Area Features Per Product |
| + | |} | ||
| + | {| | ||
| + | |style="padding: 0px 0px 0px 30px;"|✔ Configure Resource Limits Per Product | ||
| + | |} | ||
| + | {| | ||
| + | |style="padding: 0px 0px 0px 30px;"|✔ Define FTP Backups Endpoints Per Product | ||
|} | |} | ||
{| | {| | ||
| Line 31: | Line 42: | ||
|} | |} | ||
{| | {| | ||
| − | |style="padding: 0px 0px 0px 30px;"|✔ | + | |style="padding: 0px 0px 0px 30px;"|✔ Enable And Configure Application Auto Installer To Use Per Product - Softaculous Or Installatron |
|} | |} | ||
{| | {| | ||
| − | |style="padding: 0px 0px 10px 30px;"|✔ View All DirectAdmin Extended Products In One Place | + | |style="padding: 0px 0px 10px 30px;"|✔ View All DirectAdmin Extended Products And Servers In One Place |
|} | |} | ||
*'''Client Area Features:''' | *'''Client Area Features:''' | ||
{| | {| | ||
|style="padding: 10px 0px 0px 30px;"|✔ Remote Access And Management Of: | |style="padding: 10px 0px 0px 30px;"|✔ Remote Access And Management Of: | ||
| + | |} | ||
| + | {| | ||
| + | |style="padding: 0px 0px 0px 45px;"|✔ Addon Domains, Their Details, PHP Version And Logs | ||
| + | |} | ||
| + | {| | ||
| + | |style="padding: 0px 0px 0px 45px;"|✔ Apache Handlers | ||
|} | |} | ||
{| | {| | ||
| Line 44: | Line 61: | ||
|} | |} | ||
{| | {| | ||
| − | |style="padding: 0px 0px 0px 45px;"|✔ | + | |style="padding: 0px 0px 0px 45px;"|✔ Autoresponders |
|} | |} | ||
{| | {| | ||
| − | |style="padding: 0px 0px 0px 45px;"|✔ | + | |style="padding: 0px 0px 0px 45px;"|✔ Backups, Remote FTP Backups And Admin Backups |
|} | |} | ||
{| | {| | ||
| − | |style="padding: 0px 0px 0px 45px;"|✔ | + | |style="padding: 0px 0px 0px 45px;"|✔ Catch All Email |
|} | |} | ||
{| | {| | ||
| − | |style="padding: 0px 0px 0px 45px;"|✔ | + | |style="padding: 0px 0px 0px 45px;"|✔ Cron Jobs |
|} | |} | ||
{| | {| | ||
| − | |style="padding: 0px 0px 0px 45px;"|✔ | + | |style="padding: 0px 0px 0px 45px;"|✔ Custom Error Pages |
|} | |} | ||
{| | {| | ||
| − | |style="padding: 0px 0px 0px 45px;"|✔ | + | |style="padding: 0px 0px 0px 45px;"|✔ Databases And Their Backups |
| + | |} | ||
| + | {| | ||
| + | |style="padding: 0px 0px 0px 45px;"|✔ DNS Records | ||
|} | |} | ||
{| | {| | ||
| − | |style="padding: 0px 0px 0px 45px;"|✔ | + | |style="padding: 0px 0px 0px 45px;"|✔ Domain Pointers And Their DNS Records |
|} | |} | ||
{| | {| | ||
| − | |style="padding: 0px 0px 0px 45px;"|✔ | + | |style="padding: 0px 0px 0px 45px;"|✔ Email Accounts |
|} | |} | ||
{| | {| | ||
| Line 71: | Line 91: | ||
|} | |} | ||
{| | {| | ||
| − | |style="padding: 0px 0px 0px 45px;"|✔ | + | |style="padding: 0px 0px 0px 45px;"|✔ File Manager |
|} | |} | ||
{| | {| | ||
| − | |style="padding: 0px 0px 0px 45px;"|✔ | + | |style="padding: 0px 0px 0px 45px;"|✔ FTP Accounts |
| + | |} | ||
| + | {| | ||
| + | |style="padding: 0px 0px 0px 45px;"|✔ Git Repositories | ||
| + | |} | ||
| + | {| | ||
| + | |style="padding: 0px 0px 0px 45px;"|✔ Hotlinks Protection | ||
|} | |} | ||
{| | {| | ||
| Line 80: | Line 106: | ||
|} | |} | ||
{| | {| | ||
| − | |style="padding: 0px 0px 0px 45px;"|✔ | + | |style="padding: 0px 0px 0px 45px;"|✔ MX Records |
|} | |} | ||
{| | {| | ||
| − | |style="padding: 0px 0px 0px 45px;"|✔ | + | |style="padding: 0px 0px 0px 45px;"|✔ Perl Modules |
|} | |} | ||
{| | {| | ||
| − | |style="padding: 0px 0px 0px 45px;"|✔ | + | |style="padding: 0px 0px 0px 45px;"|✔ Protected Directories |
|} | |} | ||
{| | {| | ||
| − | |style="padding: 0px 0px 0px 45px;"|✔ | + | |style="padding: 0px 0px 0px 45px;"|✔ SPAM Filters |
|} | |} | ||
{| | {| | ||
| − | |style="padding: 0px 0px 0px 45px;"|✔ | + | |style="padding: 0px 0px 0px 45px;"|✔ SSH Keys |
|} | |} | ||
{| | {| | ||
| Line 98: | Line 124: | ||
|} | |} | ||
{| | {| | ||
| − | |style="padding: 0px 0px 0px 45px;"|✔ | + | |style="padding: 0px 0px 0px 45px;"|✔ Site Redirections |
|} | |} | ||
{| | {| | ||
| − | |style="padding: 0px 0px 0px 45px;"|✔ Site | + | |style="padding: 0px 0px 0px 45px;"|✔ Site Summary |
|} | |} | ||
{| | {| | ||
| − | |style="padding: 0px 0px 0px 45px;"|✔ | + | |style="padding: 0px 0px 0px 45px;"|✔ SpamAssassin Setup |
| + | |} | ||
| + | {| | ||
| + | |style="padding: 0px 0px 0px 45px;"|✔ Subdomains | ||
| + | |} | ||
| + | {| | ||
| + | |style="padding: 0px 0px 0px 45px;"|✔ Unban IP Address | ||
| + | |} | ||
| + | {| | ||
| + | |style="padding: 0px 0px 0px 45px;"|✔ Vacation Messages | ||
| + | |} | ||
| + | {| | ||
| + | |style="padding: 0px 0px 0px 45px;"|✔ [https://www.modulesgarden.com/products/whmcs/wordpress-manager WordPress Manager] - Separate Module Required | ||
|} | |} | ||
{| | {| | ||
| Line 113: | Line 151: | ||
|} | |} | ||
{| | {| | ||
| − | |style="padding: 0px 0px 0px 45px;"|✔ | + | |style="padding: 0px 0px 0px 45px;"|✔ phpMyAdmin |
|} | |} | ||
{| | {| | ||
| − | |style="padding: 0px 0px 0px 45px;"|✔ | + | |style="padding: 0px 0px 0px 45px;"|✔ SitePad |
| + | |} | ||
| + | {| | ||
| + | |style="padding: 0px 0px 0px 45px;"|✔ Webmail | ||
|} | |} | ||
{| | {| | ||
| Line 132: | Line 173: | ||
|} | |} | ||
{| | {| | ||
| − | |style="padding: 0px 0px 0px 45px;"|✔ Auto Install Application Chosen By Client During Order - | + | |style="padding: 0px 0px 0px 45px;"|✔ Auto Install Application Chosen By Client During Order - With Configurable Options |
|} | |} | ||
{| | {| | ||
| − | |style="padding: 0px 0px 0px 45px;"|✔ Allow Custom Settings Of Auto Installed Application - | + | |style="padding: 0px 0px 0px 45px;"|✔ Allow Custom Settings Of Auto Installed Application - With Custom Fields |
|} | |} | ||
{| | {| | ||
| Line 157: | Line 198: | ||
{| | {| | ||
|style="padding: 0px 0px 10px 45px;"|✔ Delete Applications Along With Their Backups | |style="padding: 0px 0px 10px 45px;"|✔ Delete Applications Along With Their Backups | ||
| + | |} | ||
| + | *'''Configurable Options:''' | ||
| + | {| | ||
| + | |style="padding: 10px 0px 0px 30px;"|✔ Addon Domains | ||
| + | |} | ||
| + | {| | ||
| + | |style="padding: 0px 0px 0px 30px;"|✔ Anonymous FTP Accounts | ||
| + | |} | ||
| + | {| | ||
| + | |style="padding: 0px 0px 0px 30px;"|✔ Autoresponders | ||
| + | |} | ||
| + | {| | ||
| + | |style="padding: 0px 0px 0px 30px;"|✔ Bandwidth | ||
| + | |} | ||
| + | {| | ||
| + | |style="padding: 0px 0px 0px 30px;"|✔ CGI Access | ||
| + | |} | ||
| + | {| | ||
| + | |style="padding: 0px 0px 0px 30px;"|✔ Catch All Email | ||
| + | |} | ||
| + | {| | ||
| + | |style="padding: 0px 0px 0px 30px;"|✔ Cron Jobs | ||
| + | |} | ||
| + | {| | ||
| + | |style="padding: 0px 0px 0px 30px;"|✔ DNS Control | ||
| + | |} | ||
| + | {| | ||
| + | |style="padding: 0px 0px 0px 30px;"|✔ Dedicated IPv4 Address | ||
| + | |} | ||
| + | {| | ||
| + | |style="padding: 0px 0px 0px 30px;"|✔ Dedicated IPv6 Address | ||
| + | |} | ||
| + | {| | ||
| + | |style="padding: 0px 0px 0px 30px;"|✔ Disk Space | ||
| + | |} | ||
| + | {| | ||
| + | |style="padding: 0px 0px 0px 30px;"|✔ Email Accounts | ||
| + | |} | ||
| + | {| | ||
| + | |style="padding: 0px 0px 0px 30px;"|✔ Email Forwarders | ||
| + | |} | ||
| + | {| | ||
| + | |style="padding: 0px 0px 0px 30px;"|✔ FTP Accounts | ||
| + | |} | ||
| + | {| | ||
| + | |style="padding: 0px 0px 0px 30px;"|✔ Inode Limit | ||
| + | |} | ||
| + | {| | ||
| + | |style="padding: 0px 0px 0px 30px;"|✔ Mailing Lists | ||
| + | |} | ||
| + | {| | ||
| + | |style="padding: 0px 0px 0px 30px;"|✔ MySQL Databases | ||
| + | |} | ||
| + | {| | ||
| + | |style="padding: 0px 0px 0px 30px;"|✔ PHP Access | ||
| + | |} | ||
| + | {| | ||
| + | |style="padding: 0px 0px 0px 30px;"|✔ Parked Domains | ||
| + | |} | ||
| + | {| | ||
| + | |style="padding: 0px 0px 0px 30px;"|✔ Server IPv4 Address | ||
| + | |} | ||
| + | {| | ||
| + | |style="padding: 0px 0px 0px 30px;"|✔ SSH Access | ||
| + | |} | ||
| + | {| | ||
| + | |style="padding: 0px 0px 0px 30px;"|✔ SSL Access | ||
| + | |} | ||
| + | {| | ||
| + | |style="padding: 0px 0px 0px 30px;"|✔ SpamAssassin | ||
| + | |} | ||
| + | {| | ||
| + | |style="padding: 0px 0px 0px 30px;"|✔ Subdomains | ||
| + | |} | ||
| + | {| | ||
| + | |style="padding: 0px 0px 0px 30px;"|✔ Suspend At Limit | ||
| + | |} | ||
| + | {| | ||
| + | |style="padding: 0px 0px 10px 30px;"|✔ System Information | ||
|} | |} | ||
*'''General Info:''' | *'''General Info:''' | ||
{| | {| | ||
| − | |style="padding: 10px 0px 0px 30px;"|✔ | + | |style="padding: 10px 0px 0px 30px;"|✔ Integrated With [https://www.modulesgarden.com/products/whmcs/advanced-billing Advanced Billing For WHMCS] - Actual Server Resource Usage Billing |
| + | |} | ||
| + | {| | ||
| + | |style="padding: 0px 0px 0px 30px;"|✔ Integrated With [https://www.modulesgarden.com/products/whmcs/ip-manager IP Manager For WHMCS] - Complete Control And Easy Assignment Of IP Subnets | ||
| + | |} | ||
| + | {| | ||
| + | |style="padding: 0px 0px 0px 30px;"|✔ Integrated With [https://www.modulesgarden.com/products/whmcs/server-allocator Server Allocator For WHMCS] - Automatic Assignment Of Most Suitable Servers To Products | ||
| + | |} | ||
| + | {| | ||
| + | |style="padding: 0px 0px 0px 30px;"|✔ Integrated With [https://www.modulesgarden.com/products/whmcs/wordpress-manager WordPress Manager For WHMCS] - Remote Installation And Management Of WordPress Instances | ||
|} | |} | ||
{| | {| | ||
| − | |style="padding: 0px 0px 0px 30px;"|✔ Integrated With | + | |style="padding: 0px 0px 0px 30px;"|✔ Fully Integrated With [https://lagom.rsstudio.net/extensions/whmcs-modules-integration/directadmin-extended-by-modulesgarden Lagom WHMCS Client Theme] |
|} | |} | ||
{| | {| | ||
| Line 169: | Line 298: | ||
|} | |} | ||
{| | {| | ||
| − | |style="padding: 0px 0px 0px 30px;"|✔ Supports | + | |style="padding: 0px 0px 0px 30px;"|✔ Supports WHMCS Server Sync Tool |
|} | |} | ||
{| | {| | ||
| − | |style="padding: 0px 0px 0px 30px;"|✔ Supports WHMCS | + | |style="padding: 0px 0px 0px 30px;"|✔ Supports WHMCS Metric Billing - Integration: Disk Space, Bandwidth, Email Accounts, Addon Domains, Parked Domains, Subdomains, MySQL Databases, MySQL Disk Usage, Sub-Accounts |
|} | |} | ||
{| | {| | ||
| − | |style="padding: 0px 0px 30px 30px;"|✔ Supports WHMCS | + | |style="padding: 0px 0px 0px 30px;"|✔ Supports PHP 8.3 Back To PHP 8.1 |
| + | |} | ||
| + | {| | ||
| + | |style="padding: 0px 0px 0px 30px;"|✔ Supports WHMCS Themes "Six" And "Twenty-One" | ||
| + | |} | ||
| + | {| | ||
| + | |style="padding: 0px 0px 0px 30px;"|✔ Supports WHMCS V8.13 Back To WHMCS V8.10 | ||
| + | |} | ||
| + | {| | ||
| + | |style="padding: 0px 0px 0px 30px;"|✔ Requires DirectAdmin Administrator Account | ||
| + | |} | ||
| + | {| | ||
| + | |style="padding: 0px 0px 0px 30px;"|✔ Requires ionCube Loader V14 Or Later | ||
| + | |} | ||
| + | {| | ||
| + | |style="padding: 0px 0px 30px 30px;"|✔ Easy [https://www.docs.modulesgarden.com/How_To_Upgrade_WHMCS_Module Module Upgrade] To [https://www.modulesgarden.com/products/whmcs/directadmin-extended#open-source-version Open Source Version] | ||
|} | |} | ||
=Installation and Configuration= | =Installation and Configuration= | ||
{| | {| | ||
| − | |style="padding: 10px 0px 20px 0px;"|'''This tutorial will focus on how to successfully install and manage DirectAdmin Extended For WHMCS.'''<br /> | + | |style="padding: 10px 0px 20px 0px;"|'''This tutorial will focus on how to successfully install and manage [https://www.modulesgarden.com/products/whmcs/directadmin-extended DirectAdmin Extended For WHMCS.]'''<br /> |
We will guide you step by step through the whole installation process. | We will guide you step by step through the whole installation process. | ||
|} | |} | ||
==Installation== | ==Installation== | ||
{| | {| | ||
| − | |style="padding: 10px 0px 20px 15px;"|'''1. Log in to | + | |style="padding: 10px 0px 20px 15px;"|'''1. Log in to our client area and download the module.''' |
|} | |} | ||
{| | {| | ||
| Line 191: | Line 335: | ||
|} | |} | ||
{| | {| | ||
| − | |style="padding: 0px 0px 15px 15px;"|'''2. | + | |style="padding: 0px 0px 15px 15px;"|'''2. In the downloaded file you might find one or two packages that support different PHP versions.'''<br/> |
| − | + | In the most recent versions of the module, you will find only one package that supports PHP 7.2 and later.<br/> <!-- If you need a package for the previous versions of PHP, please [https://www.modulesgarden.com/support/ticket/general-support contact our support]. --> | |
|} | |} | ||
{| | {| | ||
| − | |style="padding: 0px 0px 20px 25px;"|[[File: | + | |style="padding: 0px 0px 20px 25px;"|[[File:PHP72_74.png]] |
|} | |} | ||
{| | {| | ||
| − | |style="padding: 0px 0px 15px 15px;"|'''3. When you install DirectAdmin Extended for the first time you have to rename '' 'license_RENAME.php' '' file.'''<br /> | + | |style="padding: 0px 0px 15px 15px;"|'''Previous updates of the module may contain two packages dedicated to various PHP versions.'''<br/> |
| − | + | The first one that supports PHP 5.6 up to PHP 7.1, and the second one addressed to PHP 7.2 up to PHP 7.4.<br/> | |
| + | '''''Note:''' Keep in mind that PHP versions 5.6 up to 7.1 are no longer officially supported and their security issues are not fixed or released any more. Find more info [http://php.net/supported-versions.php here].'' | ||
| + | |} | ||
| + | {| | ||
| + | |style="padding: 0px 0px 20px 25px;"|[[File:PHP56_74.png]] | ||
| + | |} | ||
| + | {| | ||
| + | |style="padding: 0px 0px 10px 15px;"| <!-- '' '''Important''': This situation does not affect [https://www.modulesgarden.com/products/whmcs/directadmin-extended#open-source-version '''the open source version'''] of this module which can be applied to any PHP from version 5.6 and later.''<br/>'' -->'' '''Note''': You can check the current PHP version in your WHMCS. To do so, proceed to ''' 'Utilities' → 'System' → 'PHP Info'.''' '' | ||
| + | |} | ||
| + | {| | ||
| + | |style="padding: 0px 0px 15px 15px;"|'''3. Extract the package and upload its content into the main WHMCS directory. <br/> | ||
| + | The content of the package to upload should look like this. | ||
| + | |} | ||
| + | {| | ||
| + | |style="padding: 0px 0px 20px 25px;"|[[File:DA_2_1.png]] | ||
| + | |} | ||
| + | {| | ||
| + | |style="padding: 0px 0px 15px 15px;"|'''4. When you install DirectAdmin Extended For WHMCS for the first time you have to rename the '' 'license_RENAME.php' '' file.'''<br /> | ||
| + | The file is located in '' 'modules/servers/directadminExtended/license_RENAME.php'. '' Rename it from '' 'license_RENAME.php' '' to '' 'license.php'. '' | ||
|} | |} | ||
{| | {| | ||
| Line 205: | Line 367: | ||
|} | |} | ||
{| | {| | ||
| − | |style="padding: 0px 0px 15px 15px;"|''' | + | |style="padding: 0px 0px 15px 15px;"|'''5. In order to configure your license key you have to edit the previously renamed '' 'license.php' '' file.'''<br /> |
| − | Enter your license key between quotation marks as presented on the following screen. You can find your license key in | + | Enter your license key between quotation marks as presented on the following screen. You can find your license key in our client area → '' 'My Products'. '' |
|} | |} | ||
{| | {| | ||
|style="padding: 0px 0px 30px 25px;"|[[File:DA_4.png]] | |style="padding: 0px 0px 30px 25px;"|[[File:DA_4.png]] | ||
|} | |} | ||
| − | |||
| − | |||
{| | {| | ||
| − | |style="padding: | + | |style="padding: 0px 0px 15px 15px;"|'''6. In the next step, set up the two '' 'storage' '' folders as recursively writable.'''<br /> |
| − | + | Both folders are available at '' 'yourWHMCS/modules/addons/DirectAdminExtended/storage' '' and '' 'yourWHMCS/modules/servers/directadminExtended/storage' ''. | |
| − | + | ||
|} | |} | ||
{| | {| | ||
| − | |style="padding: 0px 0px | + | |style="padding: 0px 0px 30px 25px;"|[[File:DA_4_1.png]] |
| + | |} | ||
| + | |||
| + | ==Addon Activation== | ||
| + | {| | ||
| + | |style="padding: 10px 0px 15px 15px;"|'''7. Now, you have to activate the module in your WHMCS system.'''<br /> | ||
| + | Log in to your WHMCS admin area. Move to '' 'System Settings' '' then choose '' 'Addon Modules'.''<br /> | ||
| + | Afterwards, find '' 'DirectAdmin Extended' '' and press the '' 'Activate' '' button. | ||
|} | |} | ||
{| | {| | ||
| − | |style="padding: 0px 0px | + | |style="padding: 0px 0px 20px 25px;"|[[File:DA3_5.png]] |
| − | + | ||
|} | |} | ||
{| | {| | ||
| − | |style="padding: 0px 0px | + | |style="padding: 0px 0px 15px 15px;"|'''8. In the next step you need to permit access to this module.'''<br /> |
| + | To do so, click on the '' 'Configure' '' button, select required administrator groups and press '' 'Save Changes'. '' | ||
|} | |} | ||
{| | {| | ||
| − | |style="padding: 0px 0px | + | |style="padding: 0px 0px 20px 25px;"|[[File:DA3_6.png]] |
| − | + | ||
| − | + | ||
|} | |} | ||
{| | {| | ||
| − | |style="padding: 0px 0px 30px | + | |style="padding: 0px 0px 30px 15px;"|'''9. Well done! You have just successfully installed DirectAdmin Extended For WHMCS!'''<br /> |
| + | You may access your addon under '' 'Addons' '' → '' 'DirectAdmin Extended'.'' | ||
|} | |} | ||
==Server Configuration== | ==Server Configuration== | ||
{| | {| | ||
| − | |style="padding: 10px 0px 15px 15px;"|''' | + | |style="padding: 10px 0px 15px 15px;"|'''10. Now, we will show you how to configure a new server.'''<br /> |
| − | To do so log | + | To do so, log into your WHMCS and go to '' 'System Settings' '' → '' 'Servers'.''<br /> |
| − | + | Once you are there, press '' 'Add New Server'. '' | |
|} | |} | ||
{| | {| | ||
| − | |style="padding: 0px 0px 20px 25px;"|[[File: | + | |style="padding: 0px 0px 20px 25px;"|[[File:DA3_8.png]] |
|} | |} | ||
{| | {| | ||
| − | |style="padding: 0px 0px 15px 15px;"|''' | + | |style="padding: 0px 0px 15px 15px;"|'''11. Next, enter your server name, IP address, username and password. Choose '' 'DirectadminExtended' '' from a dropdown menu and press '' 'Save Changes'. '''''<br /> |
| − | + | In this section, you can also provide other server details like nameservers or the maximum number of accounts.<br /> | |
| + | '' '''Note:''' Please remember that you can use login credentials of administrator or reseller account (reseller's login credentials can be used from the 3.3.0 version of the module). '' | ||
|} | |} | ||
{| | {| | ||
| − | |style="padding: 0px 0px 20px 25px;"|[[File: | + | |style="padding: 0px 0px 20px 25px;"|[[File:DA3_9.png]] |
|} | |} | ||
{| | {| | ||
| − | |style="padding: 0px 0px 15px 15px;"|''' | + | |style="padding: 0px 0px 15px 15px;"|'''12. After you configure your server correctly, you will see the following screen.'''<br /> |
| − | + | At this point, you need to create a new group for your server. For that purpose, press '' 'Create New Group'. '' | |
|} | |} | ||
{| | {| | ||
| − | |style="padding: 0px 0px 20px 25px;"|[[File: | + | |style="padding: 0px 0px 20px 25px;"|[[File:DA3_10.png]] |
|} | |} | ||
{| | {| | ||
| − | |style="padding: 0px 0px 20px 15px;"|''' | + | |style="padding: 0px 0px 20px 15px;"|'''13. Enter the name, click on your previously created server, press '' 'Add' '' and then '' 'Save Changes'. ''''' |
|} | |} | ||
{| | {| | ||
| − | |style="padding: 0px 0px 30px 25px;"|[[File: | + | |style="padding: 0px 0px 30px 25px;"|[[File:DA3_11.png]] |
|} | |} | ||
==Product Configuration== | ==Product Configuration== | ||
{| | {| | ||
| − | |style="padding: 10px 0px 15px 15px;"|''' | + | |style="padding: 10px 0px 15px 15px;"|'''14. In order to create and configure the product, click on '' 'System Settings' '' → '' 'Products/Services'. '''''<br /> |
| − | If you do not have a product group, click on '' 'Create a New Group'. '' If you do, simply move to step | + | If you do not have a product group, click on '' 'Create a New Group'. '' If you do, simply move to the step 15. |
|} | |} | ||
{| | {| | ||
| − | |style="padding: 0px 0px 20px 25px;"|[[File: | + | |style="padding: 0px 0px 20px 25px;"|[[File:DA3_12.png]] |
|} | |} | ||
{| | {| | ||
| − | |style="padding: 0px 0px 20px 15px;"|''' | + | |style="padding: 0px 0px 20px 15px;"|'''15. Enter the product group name and press '' 'Save Changes'. ''''' |
|} | |} | ||
{| | {| | ||
| − | |style="padding: 0px 0px 20px 25px;"|[[File: | + | |style="padding: 0px 0px 20px 25px;"|[[File:DA3_13.png]] |
|} | |} | ||
{| | {| | ||
| − | |style="padding: 0px 0px 15px 15px;"|''' | + | |style="padding: 0px 0px 15px 15px;"|'''16. When you have a product group, you can create your product and assign it to DirectAdmin Extended. If you already have a product, jump to the step 17.'''<br /> |
| − | To create a product click on '' 'Create a New Product'. '' | + | To create a product, click on '' 'Create a New Product'. '' |
|} | |} | ||
{| | {| | ||
| − | |style="padding: 0px 0px 20px 25px;"|[[File: | + | |style="padding: 0px 0px 20px 25px;"|[[File:DA3_14.png]] |
|} | |} | ||
{| | {| | ||
| − | |style="padding: 0px 0px | + | |style="padding: 0px 0px 15px 15px;"|'''17. Afterwards, choose your product type and product group from dropdown menus, then enter your product name and select the used module: 'DirectAdmin Extended'. '''''<br/> |
| + | Press '' 'Continue'. '' | ||
|} | |} | ||
{| | {| | ||
| − | |style="padding: 0px 0px 20px 25px;"|[[File: | + | |style="padding: 0px 0px 20px 25px;"|[[File:DA3_15.png]] |
|} | |} | ||
{| | {| | ||
| − | |style="padding: 0px 0px 15px 15px;"|''' | + | |style="padding: 0px 0px 15px 15px;"|'''18. Then, you need to move to the '' 'Module Settings' '' section and choose your previously created server group from dropdown menu.'''<br /> |
| − | + | * Choose a preconfigured '' 'Package' '' you want to use | |
| − | You can also activate the | + | * Select'' 'Reseller IP Address' '' if required: |
| + | ** '' 'Shared' '' - the domain will use the server's main IP | ||
| + | ** '' 'Shared - Reseller's IP' '' - the domain will set the resellers IP to shared and assign the reseller to it | ||
| + | ** '' 'Assigned' '' - the domain will use one of the reseller's IPs | ||
| + | |||
| + | *'' 'Share Server IP Address with Reseller' '' - allow resellers to create sites with the server IP address ''(resellers only)'' | ||
| + | *'' 'IP Addresses Assigned to Reseller' '' - define the number of IP addresses assigned to a reseller for product configuration ''(resellers only)'' | ||
| + | |||
| + | You can also activate the feature to automatically suspend accounts when the bandwidth limit is reached. Simply tick '' 'Suspend at Limit'. '' <br/> Don't forget to press '' 'Save Changes' '' in the end. | ||
| + | |} | ||
| + | {| | ||
| + | |style="padding: 0px 0px 20px 25px;"|[[File:DA3_16.png]] | ||
| + | |} | ||
| + | {| | ||
| + | |style="padding: 0px 0px 15px 15px;"|'''19. If you would like to set up your own configuration, choose '' 'Custom' '' from the 'Package' '' dropdown.'''<br /> | ||
| + | A list of customizable options will appear. Configure them at your own discretion or generate [https://docs.whmcs.com/Configurable_Package_Addon#DirectAdmin_Options Configurable Options] instead. <br /> | ||
| + | Also, you can generate custom fields if you wish to use the product with [[#Management of Auto Installed Applications|Auto Installed Applications]]. | ||
|} | |} | ||
{| | {| | ||
| − | |style="padding: 0px 0px | + | |style="padding: 0px 0px 20px 25px;"|[[File:DA3_16_1.png]] |
|} | |} | ||
==Addon Configuration== | ==Addon Configuration== | ||
{| | {| | ||
| − | |style="padding: 10px 0px | + | |style="padding: 10px 0px 15px 15px;"|'''20. Go to '' 'Addons' '' → '' 'DirectAdmin Extended'. '' '''<br/> |
| − | + | The dashboard located there contains the precise data on available products and servers: | |
*see the number of ''active/suspended/terminated'' products | *see the number of ''active/suspended/terminated'' products | ||
*check the number of active accounts | *check the number of active accounts | ||
*log into panel | *log into panel | ||
*upgrade your DirectAdmin products | *upgrade your DirectAdmin products | ||
| − | *press '' 'Documentation' '' tab to be moved to this very site! | + | *press the '' 'Documentation' '' tab to be moved to this very site! |
|} | |} | ||
{| | {| | ||
| − | |style="padding: 0px 0px 20px 25px;"|[[File: | + | |style="padding: 0px 0px 20px 25px;"|[[File:DA3_17_0.png]] |
|} | |} | ||
{| | {| | ||
| − | |style="padding: 0px 0px 20px 15px;"|''' | + | |style="padding: 0px 0px 20px 15px;"|'''21. Proceed to the '' 'Features' '' section, find the product you are interested in and press the '' 'Configuration' '' button next to it.''' |
|} | |} | ||
{| | {| | ||
| − | |style="padding: 0px 0px 20px 25px;"|[[File: | + | |style="padding: 0px 0px 20px 25px;"|[[File:DA3_17.png]] |
|} | |} | ||
{| | {| | ||
| − | |style="padding: 0px 0px 15px 15px;"|''' | + | |style="padding: 0px 0px 15px 15px;"|'''22. You should see boxes dedicated to '' 'Features', 'Applications' and 'Other' '''<br/> |
| − | + | Begin by selecting the features you would like to activate for your customers. | |
| − | + | ||
|} | |} | ||
{| | {| | ||
| − | |style="padding: 0px 0px 20px 25px;"|[[File: | + | |style="padding: 0px 0px 20px 25px;"|[[File:DA3_18.png]] |
|} | |} | ||
{| | {| | ||
| − | |style="padding: 0px 0px 15px 15px;"|''' | + | |style="padding: 0px 0px 15px 15px;"|'''23. Choose whether to activate the '' 'Install Applications' '' option.'''<br /> |
| − | In case you wish to | + | In case you wish to enable this feature, you will have to select '' 'Auto Installer' '' from a dropdown menu. After, activate '' 'Install Button' '' and '' 'Backup Button'. ''<br /> |
| − | You can also choose desired language of the applications by typing in its two letter code into the '' 'Language' '' field. A complete list of language codes can be found [http://softaculous.com/docs/Scripts_Language_Codes here].<br /> | + | You can also choose a desired language of the applications by typing in its two-letter code into the '' 'Language' '' field. A complete list of language codes can be found [http://softaculous.com/docs/Scripts_Language_Codes here].<br /> |
| − | If the field is left blank, a default value, which is '' 'en' '' ( | + | If the field is left blank, a default value, which is '' 'en' '' (English) will be used.<br /> |
| − | ''Note: You can also create a configurable option with app to be installed, you can find the instruction | + | '' '''Note:''' You can also create a configurable option with app to be installed, you can find the relevant instruction [[#Configurable Options For Application Auto Install|here]].'' |
|} | |} | ||
{| | {| | ||
| − | |style="padding: 0px 0px 20px 25px;"|[[File: | + | |style="padding: 0px 0px 20px 25px;"|[[File:DA3_19.png]] |
|} | |} | ||
{| | {| | ||
| − | |style="padding: 0px 0px 15px 15px;"|''' | + | |style="padding: 0px 0px 15px 15px;"|'''24. Finally, select the '' 'Webmail' '' button redirection from the '' 'Other' '' and choose '' 'Show Server IP' '' address.'''<br/> |
| − | + | Do not forget to '' 'Save' '' changes once the product configuration is ready! | |
|} | |} | ||
{| | {| | ||
| − | |style="padding: 0px 0px 20px 25px;"|[[File: | + | |style="padding: 0px 0px 20px 25px;"|[[File:DA3_20.png]] |
|} | |} | ||
{| | {| | ||
| − | |style="padding: 0px 0px | + | |style="padding: 0px 0px 20px 15px;"|If the '' 'Show Server IP' '' address option is on, it will be visible in the client area for customers. |
| − | + | ||
| − | + | ||
|} | |} | ||
{| | {| | ||
| − | |style="padding: 0px 0px 20px 25px;"|[[File: | + | |style="padding: 0px 0px 20px 25px;"|[[File:DA3_20_1.png]] |
|} | |} | ||
{| | {| | ||
| − | |style="padding: 0px 0px 20px 15px;"|''' | + | |style="padding: 0px 0px 20px 15px;"|If the '' 'Let's Encrypt' '' button is toggled on, your customers will see it under the '' '[[#SSL Certificates|SSL Certificates]]' '' menu. |
|} | |} | ||
{| | {| | ||
| − | |style="padding: 0px 0px 20px 25px;"|[[File: | + | |style="padding: 0px 0px 20px 25px;"|[[File:DA3_20_2.png]] |
|} | |} | ||
{| | {| | ||
| − | |style="padding: 0px 0px 15px 15px;"|''' | + | |style="padding: 0px 0px 15px 15px;"|'''25. (Optional) Move to the '' 'Backups' '' tab where you can define the FTP backup path under '' 'FTP Backups Endpoints' '' and '' 'Backup Directory Path'. ''<br/> |
| − | This | + | This will allow creating backups on external servers defined by their admin, which then will be available for the clients to choose. Find more about Backups [[#Backups|here]]. |
|} | |} | ||
{| | {| | ||
| − | |style="padding: 0px 0px 20px 25px;"|[[File: | + | |style="padding: 0px 0px 20px 25px;"|[[File:DA3_21.png]] |
|} | |} | ||
{| | {| | ||
| − | |style="padding: 0px 0px 15px 15px;"|''' | + | |style="padding: 0px 0px 15px 15px;"|'''Define the FTP backup path under '' 'FTP Backups End Points'. '''''<br /> |
| − | + | Simply fill out the form with '' 'Backup Name', 'Host', 'Port', 'User', 'Password' '' and '' 'Path to Files'.''<br /> | |
| + | Afterwards, save it by pressing the '' 'Save' '' button. | ||
| + | |} | ||
| + | {| | ||
| + | |style="padding: 0px 0px 20px 25px;"|[[File:DA3_21_1.png]] | ||
| + | |} | ||
| + | {| | ||
| + | |style="padding: 0px 0px 20px 15px;"|'''Under the Backup Directory Path, enter the backup path which can be found in your DirectAdmin server → '' 'Admin Backup/Transfer' '' →'' 'Local' '' textbox.''' | ||
| + | |} | ||
| + | {| | ||
| + | |style="padding: 0px 0px 20px 25px;"|[[File:DA3_22.png]] | ||
| + | |} | ||
| + | {| | ||
| + | |style="padding: 0px 0px 15px 15px;"|'''26. If you already have another product configured, you may copy its configuration.'''<br/> | ||
| + | Find the '' 'Copy Configuration' '' button on the list with products or select multiple items at once. | ||
| + | Then choose the product configuration which settings you wish to copy into the selected products. | ||
| + | |} | ||
| + | {| | ||
| + | |style="padding: 0px 0px 20px 25px;"|[[File:DA3_22_1.png]] | ||
| + | |} | ||
| + | {| | ||
| + | |style="padding: 0px 0px 15px 15px;"|'''27. That's all, you have just correctly created and customized a new product, now you can check the results.'''<br /> | ||
| + | This is what your customers should see in your client area. | ||
| + | |} | ||
| + | {| | ||
| + | |style="padding: 0px 0px 20px 25px;"|[[File:DA3_23.png]] | ||
| + | |} | ||
| + | {| | ||
| + | |style="padding: 0px 0px 15px 15px;"|'''28. From now on, all your clients who will order the previously created product, will be able to manage their DirectAdmin accounts via your WHMCS system.'''<br /> | ||
| + | Below you can see the view of the ordered product summary in the admin area. Available actions: | ||
*Log In To Control Panel | *Log In To Control Panel | ||
| − | *Use | + | *Use the module commands: '' 'Create', 'Suspend', 'Unsuspend', 'Terminate' '' the product; '' 'Change Package' and 'Change Password' '' |
|} | |} | ||
{| | {| | ||
| − | |style="padding: 0px 0px 30px 25px;"|[[File: | + | |style="padding: 0px 0px 30px 25px;"|[[File:DA3_23_0.png]] |
|} | |} | ||
=Management= | =Management= | ||
{| | {| | ||
| − | |style="padding: 10px 0px 30px 15px;"|'''DirectAdmin Extended allows your customers to manage their DirectAdmin accounts | + | |style="padding: 10px 0px 30px 15px;"|'''DirectAdmin Extended allows your customers to manage their DirectAdmin accounts directly in your WHMCS client area.''' <br /> |
| − | + | This short guide will present you the possibilities of our addon module. | |
|} | |} | ||
==Your Account== | ==Your Account== | ||
{| | {| | ||
| − | |style="padding: 10px 0px 30px 15px;"|In the below sections you will find basic tools used to manage your DirectAdmin account shown and described.<br> | + | |style="padding: 10px 0px 30px 15px;"|In the below sections, you will find basic tools used to manage your DirectAdmin account shown and described.<br> |
Analyze them carefully to enjoy full and easy management. | Analyze them carefully to enjoy full and easy management. | ||
|} | |} | ||
| − | === | + | ===Addon Domains=== |
{| | {| | ||
| − | |style="padding: 10px 0px | + | |style="padding: 10px 0px 15px 15px;"|Addon domains allow you add and manage your addon domains.<br/> Take a look at the domain details, view error and usage logs, change the PHP version if applicable and suspend or unsuspend domains. |
| − | + | ||
|} | |} | ||
{| | {| | ||
| − | |style="padding: 0px 0px 30px 25px;"|[[File: | + | |style="padding: 0px 0px 20px 25px;"|[[File:DA3_24.png]] |
| + | |} | ||
| + | {| | ||
| + | |style="padding: 0px 0px 15px 15px;"|Press the '' 'Create Addon Domain' '' button and enter a new domain name, specify bandwidth and disc space, select options you may need: | ||
| + | *'Secure SSL' | ||
| + | **'Force SSL With HTTPS Redirect' | ||
| + | *'CGI Access' | ||
| + | *'PHP Access' | ||
| + | *'Local Mail Server' | ||
| + | |} | ||
| + | {| | ||
| + | |style="padding: 0px 0px 20px 25px;"|[[File:DA3_24_1.png]] | ||
| + | |} | ||
| + | {| | ||
| + | |style="padding: 0px 0px 20px 15px;"|Press the '' 'Information' '' icon to see the domain details. | ||
| + | |} | ||
| + | {| | ||
| + | |style="padding: 0px 0px 20px 25px;"|[[File:DA3_24_3.png]] | ||
| + | |} | ||
| + | {| | ||
| + | |style="padding: 0px 0px 20px 15px;"|You may also check the list of '' 'Error' '' and '' 'Usage Logs' '' of each addon domain. | ||
| + | |} | ||
| + | {| | ||
| + | |style="padding: 0px 0px 20px 25px;"|[[File:DA3_24_4.png]] | ||
| + | |} | ||
| + | {| | ||
| + | |style="padding: 0px 0px 15px 15px;"|Select a '' 'PHP Version' '' and enable/disable the '' 'Local Mail Server' '' of the addon domain.<br/> Keep in mind that this option is available only if it is enabled and managed on the product's DirectAdmin server.<br/> Otherwise, the '' 'There is no PHP Selector Enabled' ''information will be displayed and the option disabled. | ||
| + | |} | ||
| + | {| | ||
| + | |style="padding: 0px 0px 30px 25px;"|[[File:DA3_24_2.png]] | ||
|} | |} | ||
| − | === | + | ===Applications=== |
| + | {| | ||
| + | |style="padding: 10px 0px 20px 15px;"| Manage your applications straight from your WHMCS client area. Install new applications, create backups if needed and delete unused apps.<br/> | ||
| + | ''A separate section has been dedicated to applications, please move to section [[#Install Applications|Install Applications]] to learn how to manage applications and their backups. | ||
| + | |} | ||
| + | {| | ||
| + | |style="padding: 0px 0px 30px 25px;"|[[File:DA3_23_1.png]] | ||
| + | |} | ||
| + | |||
| + | ===Backups=== | ||
| + | {| | ||
| + | |style="padding: 10px 0px 15px 15px;"| This tab, '' 'User Backups', '' allows you to back up your DirectAdmin user account.<br /> | ||
| + | |||
| + | To delete backup, simply press an adequate icon. | ||
| + | |} | ||
| + | {| | ||
| + | |style="padding: 0px 0px 20px 25px;"|[[File:DA3_25.png]] | ||
| + | |} | ||
| + | {| | ||
| + | |style="padding: 0px 0px 15px 15px;"| You can select what exactly you want to backup. Mark checkboxes next to the setting you would like to make the backup of.<br /> | ||
| + | Afterwards, press the '' 'Create' '' button to order it. | ||
| + | |} | ||
| + | {| | ||
| + | |style="padding: 0px 0px 20px 25px;"|[[File:DA3_26.png]] | ||
| + | |} | ||
| + | {| | ||
| + | |style="padding: 0px 0px 15px 15px;"|You may restore your backups at any time, you can do it by pressing the '' 'Restore' ''button next to the backup.<br /> | ||
| + | Then, toggle options that you want to restore with this action. <br/> | ||
| + | '''''Note:''' Only backed up features are available here to choose, all the others are hidden.'' | ||
| + | |} | ||
| + | {| | ||
| + | |style="padding: 0px 0px 20px 25px;"|[[File:DA3_26_1.png]] | ||
| + | |} | ||
{| | {| | ||
| − | |style="padding: | + | |style="padding: 0px 0px 15px 15px;"| At '' 'Admin Backups' '' and '' 'FTP Backups' '' sections you will get a list of backups created by your administrator and FTP Backups, you may view a list of backups of a given server.<br/> |
| − | + | '''''Note:''' Please refer to '''[[#Tips|Tips]] section, point 4''', to learn how to manage FTP and Admin backups.'' | |
|} | |} | ||
{| | {| | ||
| − | |style="padding: 0px 0px | + | |style="padding: 0px 0px 20px 25px;"|[[File:DA3_26_2.png]] |
|} | |} | ||
===Databases=== | ===Databases=== | ||
{| | {| | ||
| − | |style="padding: 10px 0px 20px 15px;"| Owing to MySQL | + | |style="padding: 10px 0px 20px 15px;"| Owing to the MySQL databases management, you can create and delete databases. |
|} | |} | ||
{| | {| | ||
| − | |style="padding: 0px 0px | + | |style="padding: 0px 0px 20px 25px;"|[[File:DA3_27.png]] |
|} | |} | ||
{| | {| | ||
| − | |style="padding: 0px 0px 20px 15px;"| | + | |style="padding: 0px 0px 20px 15px;"|Type in the required information and generate a secure password. |
| − | + | ||
|} | |} | ||
{| | {| | ||
| − | |style="padding: 0px 0px 30px 25px;"|[[File: | + | |style="padding: 0px 0px 20px 25px;"|[[File:DA3_27_1.png]] |
| + | |} | ||
| + | {| | ||
| + | |style="padding: 0px 0px 20px 15px;"|You can also add users to particular databases, use action buttons to delete needless users or change their password. | ||
| + | |} | ||
| + | {| | ||
| + | |style="padding: 0px 0px 20px 25px;"|[[File:DA3_27_2.png]] | ||
| + | |} | ||
| + | {| | ||
| + | |style="padding: 0px 0px 20px 15px;"|Remember that you should always use the secure password generator while creating a user. | ||
| + | |} | ||
| + | {| | ||
| + | |style="padding: 0px 0px 20px 25px;"|[[File:DA3_27_3.png]] | ||
| + | |} | ||
| + | {| | ||
| + | |style="padding: 0px 0px 15px 15px;"|Once the user has been created, you can edit it to set appropriate privileges then. <br/> | ||
| + | Toggle privileges you wish to assign to the user and confirm the changes. | ||
| + | |} | ||
| + | {| | ||
| + | |style="padding: 0px 0px 20px 25px;"|[[File:DA3_27_4.png]] | ||
| + | |} | ||
| + | {| | ||
| + | |style="padding: 0px 0px 20px 15px;"|It is also possible to change the user's password in case of any need. | ||
| + | |} | ||
| + | {| | ||
| + | |style="padding: 0px 0px 30px 25px;"|[[File:DA3_27_5.png]] | ||
| + | |} | ||
| + | |||
| + | ===DNS Management=== | ||
| + | {| | ||
| + | |style="padding: 10px 0px 15px 15px;"|This section gives you the possibility to manage the '' 'DNS Records' '' of your domain easily. You can create new records as well as edit the existing ones. | ||
| + | |} | ||
| + | {| | ||
| + | |style="padding: 0px 0px 20px 25px;"|[[File:DA3_27_6.png]] | ||
| + | |} | ||
| + | {| | ||
| + | |style="padding: 0px 0px 20px 15px;"|As presented below, there is a list of your existing '' 'DNS Records' ''. <br/>You can edit them or delete if they are no longer needed. If you wish to add a new '' 'DNS Record' '', simply click on the appropriate button. | ||
| + | |} | ||
| + | {| | ||
| + | |style="padding: 0px 0px 20px 25px;"|[[File:DA3_27_7.png]] | ||
| + | |} | ||
| + | {| | ||
| + | |style="padding: 0px 0px 20px 15px;"|Now, choose the type of your '' 'DNS Record' '' and provide its name and value. | ||
| + | |} | ||
| + | {| | ||
| + | |style="padding: 0px 0px 30px 25px;"|[[File:DA3_27_8.png]] | ||
| + | |} | ||
| + | {| | ||
| + | |style="padding: 0px 0px 20px 15px;"|Press the button to restore the DNS configuration to default. | ||
| + | |} | ||
| + | {| | ||
| + | |style="padding: 0px 0px 20px 25px;"|[[File:DA3_27_9.png]] | ||
| + | |} | ||
| + | {| | ||
| + | |style="padding: 0px 0px 20px 15px;"|You must be aware that after restoring the default configuration, all the custom entries you have made will be erased. </br>If you are sure, just press '' 'Confrirm' '' button to restore default DNS configuration. | ||
| + | |} | ||
| + | {| | ||
| + | |style="padding: 0px 0px 30px 25px;"|[[File:DA3_27_10.png]] | ||
|} | |} | ||
===File Manager=== | ===File Manager=== | ||
{| | {| | ||
| − | |style="padding: 10px 0px | + | |style="padding: 10px 0px 15px 15px;"|Manage files and folders of your DirectAdmin account. Upload files and create directories.<br/> |
View the list of files with specific data on them: name, file size, last modification date and given permissions. | View the list of files with specific data on them: name, file size, last modification date and given permissions. | ||
|} | |} | ||
{| | {| | ||
| − | |style="padding: 0px 0px | + | |style="padding: 0px 0px 20px 25px;"|[[File:DA3_29.png]] |
|} | |} | ||
| − | |||
| − | |||
{| | {| | ||
| − | |style="padding: | + | |style="padding: 0px 0px 20px 15px;"|You can create a new directory by pressing a corresponding button as well as upload new files by pressing additional actions. |
|} | |} | ||
{| | {| | ||
| − | |style="padding: 0px 0px 30px 25px;"|[[File: | + | |style="padding: 0px 0px 20px 25px;"|[[File:DA3_29_1.png]] |
| + | |} | ||
| + | {| | ||
| + | |style="padding: 0px 0px 15px 15px;"|Rename, change permissions, copy, protect and delete a single file or directory.<br/><div id="File_Manager_Protect"></div> | ||
| + | '''''Note:''' Only folders placed in the public_html directory can be protected, no other files have this option.<br/> All files with this opton enalbed will be listed in the [[#Protected_Directories|Protected Directoiries]] section.'' | ||
| + | |} | ||
| + | {| | ||
| + | |style="padding: 0px 0px 20px 25px;"|[[File:DA3_29_3.png]] | ||
| + | |} | ||
| + | {| | ||
| + | |style="padding: 0px 0px 20px 15px;"|You can also change permissions and remove single or multiple files or directories. | ||
| + | |} | ||
| + | {| | ||
| + | |style="padding: 0px 0px 30px 25px;"|[[File:DA3_29_2.png]] | ||
|} | |} | ||
| − | === | + | ===FTP Accounts=== |
{| | {| | ||
| − | |style="padding: 10px 0px | + | |style="padding: 10px 0px 15px 15px;"| Manage FTP accounts in the easiest possible way. Type in your login, generate a new password and select the directory.<br/> |
| − | + | Handle the accounts to be able to access your website files through an FTP protocol. You can also suspend or unsuspend created accounts. | |
| − | + | ||
| − | + | ||
| − | + | ||
|} | |} | ||
{| | {| | ||
| − | |style="padding: 0px 0px 30px 25px;"|[[File: | + | |style="padding: 0px 0px 20px 25px;"|[[File:DA3_30.png]] |
| + | |} | ||
| + | {| | ||
| + | |style="padding: 0px 0px 20px 15px;"|Add and configure FTP Accounts, just type in your login on a selected domain, provide or generate a secure password, select directory: '' 'Domain', 'FTP', 'User''' ' or a custom one. | ||
| + | |} | ||
| + | {| | ||
| + | |style="padding: 0px 0px 30px 25px;"|[[File:DA3_30_1.png]] | ||
|} | |} | ||
| − | === | + | ===Hotlinks Protection=== |
{| | {| | ||
| − | |style="padding: 10px 0px 15px 15px;"| | + | |style="padding: 10px 0px 15px 15px;"|'' 'Hotlinks Protection' '' section is a place where you may enable and disable protection of single links to the content of your website.<br/> This way you mayt avoid your content, for example images, from being stolen or badwidth abused.<br/> |
| − | + | Press the icon next to every of your domains to see existings, currently protected URLs. | |
| − | + | ||
|} | |} | ||
{| | {| | ||
| − | |style="padding: 0px 0px 20px 25px;"|[[File: | + | |style="padding: 0px 0px 20px 25px;"|[[File:DA3_33_1.png]] |
|} | |} | ||
{| | {| | ||
| − | |style="padding: 0px 0px 15px 15px;"| | + | |style="padding: 0px 0px 15px 15px;"|In this section you may add new URLs to protected or remove existing ones from the list of hotlinks.<br/> |
| − | + | Press '' 'Add new URL' '' to protect another link. | |
|} | |} | ||
{| | {| | ||
| − | |style="padding: 0px 0px | + | |style="padding: 0px 0px 20px 25px;"|[[File:DA3_33_2.png]] |
|} | |} | ||
| + | {| | ||
| + | |style="padding: 0px 0px 20px 15px;"|Type in your URL, you may use '' '*' '' sign to hide part of the URL and confirm the action. | ||
| + | |} | ||
| + | {| | ||
| + | |style="padding: 0px 0px 20px 25px;"|[[File:DA3_33_3.png]] | ||
| + | |} | ||
| + | {| | ||
| + | |style="padding: 0px 0px 20px 15px;"|Define protection settings for all the URLs | ||
| + | |} | ||
| + | {| | ||
| + | |style="padding: 0px 0px 20px 25px;"|[[File:DA3_33_4.png]] | ||
| + | |} | ||
| + | {| | ||
| + | |style="padding: 0px 0px 15px 15px;"| | ||
| + | * Enable/disable protection | ||
| + | * Type in the protected file types, use commas to separate, and do not use spaces in between | ||
| + | * Allow blank referrer | ||
| + | * Allow redirection | ||
| + | ** Provide redirection URL if enabled | ||
| + | |} | ||
| + | {| | ||
| + | |style="padding: 0px 0px 30px 25px;"|[[File:DA3_33_5.png]] | ||
| + | |} | ||
| + | ===MX Records=== | ||
| + | {| | ||
| + | |style="padding: 10px 0px 15px 15px;"|The '' 'MX Records' '' section provides a convenient way to handle your domain's MX records. You can both create new records and modify existing ones. <br/> Start by selecting the desired domain first. | ||
| + | |} | ||
| + | {| | ||
| + | |style="padding: 0px 0px 20px 25px;"|[[File:DA3_33_6.png]] | ||
| + | |} | ||
| + | {| | ||
| + | |style="padding: 0px 0px 20px 15px;"|Under Domain → MX Records, you can either manage existing records by editing them or create new records. To do so just press the '' 'Create MX Record'' ' button. | ||
| + | |} | ||
| + | {| | ||
| + | |style="padding: 0px 0px 20px 25px;"|[[File:DA3_33_7.png]] | ||
| + | |} | ||
| + | {| | ||
| + | |style="padding: 0px 0px 15px 15px;"|Before creating a new record, it is important to be confident in your actions. MX records are crucial for directing emails to the correct mail server for your domain.<br/> Therefore, modifying these records could disrupt your email service, impacting all email accounts associated with your domain.<br/> | ||
| − | + | If you are certain about creating a new record, please fill out the form with the following information: | |
| + | |||
| + | * '''Name''' - The hostname or domain name to which the record applies. If left empty, the domain name will be used for the created MX record. | ||
| + | * '''Priority''' - The priority value, an integer between 0 and 65535, determines the order in which mail exchangers are verified. Lower values indicate a higher priority of the record. | ||
| + | * '''Value''' - The mail exchanger (MX) server's hostname or IP address. Please ensure to add a period symbol at the end of the domain name if it should not be auto-appended. | ||
| + | |} | ||
{| | {| | ||
| − | |style="padding: | + | |style="padding: 0px 0px 20px 25px;"|[[File:DA3_33_8.png]] |
|} | |} | ||
{| | {| | ||
| − | |style="padding: 0px 0px | + | |style="padding: 0px 0px 15px 15px;"|The newly created record immediately appears on the list. <br/> |
| + | It is also possible to '' 'Set MX Tmeplate' '' from this point. You will find this option as marked on the screen below: | ||
|} | |} | ||
| + | {| | ||
| + | |style="padding: 0px 0px 20px 25px;"|[[File:DA3_33_11.png]] | ||
| + | |} | ||
| + | {| | ||
| + | |style="padding: 0px 0px 15px 15px;"|Fill out the form to easily add pre-defined MX records to your domain. Choose the MX template from the list.<br/> You can also activate the '' 'Affect Pointers' '' feature to update the pointer records that alias MX records. | ||
| + | |} | ||
| + | {| | ||
| + | |style="padding: 0px 0px 20px 25px;"|[[File:DA3_33_9.png]] | ||
| + | |} | ||
| + | {| | ||
| + | |style="padding: 0px 0px 20px 15px;"|The MX records list will be automatically updated. You can edit individual records, delete them one by one, or use the mass action button to delete multiple records at once. | ||
| + | |} | ||
| + | {| | ||
| + | |style="padding: 0px 0px 30px 25px;"|[[File:DA3_33_10.png]] | ||
| + | |} | ||
| + | |||
===Perl Modules=== | ===Perl Modules=== | ||
{| | {| | ||
| − | |style="padding: 10px 0px 20px 15px;"|Move to the next section, which is '' 'Perl Modules'. '' | + | |style="padding: 10px 0px 20px 15px;"|Move to the next section, which is '' 'Perl Modules'. '' All Perl based modules installed on your server are listed there. |
|} | |} | ||
{| | {| | ||
| − | |style="padding: 0px 0px 30px 25px;"|[[File: | + | |style="padding: 0px 0px 30px 25px;"|[[File:DA3_33.png]] |
|} | |} | ||
| − | == | + | ===Subdomains=== |
{| | {| | ||
| − | |style="padding: 10px 0px | + | |style="padding: 10px 0px 20px 15px;"| Create subdomains for your website sections. All you need to do is choosing the domain from the list of available domains and typing in the subdomain name. <br/> Once created, you can remove the subdomain if needed, see its bandwidth usage and view a list of subdomain logs. |
|} | |} | ||
| − | |||
{| | {| | ||
| − | |style="padding: | + | |style="padding: 0px 0px 20px 25px;"|[[File:DA3_31.png]] |
|} | |} | ||
{| | {| | ||
| − | |style="padding: 0px 0px 30px 25px;"|[[File: | + | |style="padding: 0px 0px 20px 15px;"|Choose the domain for your available subdomain from the list. |
| + | |} | ||
| + | {| | ||
| + | |style="padding: 0px 0px 30px 25px;"|[[File:DA3_31_1.png]] | ||
|} | |} | ||
| − | === | + | ===Site Summary=== |
{| | {| | ||
| − | |style="padding: 10px 0px 20px 15px;"| | + | |style="padding: 10px 0px 20px 15px;"|Proceed to the '' 'Site Summary' '' section in order to check and analyze precise statistics.<br/> Control usage level for each setting here. |
|} | |} | ||
{| | {| | ||
| − | |style="padding: 0px 0px 30px 25px;"|[[File: | + | |style="padding: 0px 0px 30px 25px;"|[[File:DA3_32.png]] |
|} | |} | ||
| − | == | + | ==Email Management== |
{| | {| | ||
| − | |style="padding: 10px 0px | + | |style="padding: 10px 0px 30px 15px;"|Email management section includes all tools related to emails. Go through them to learn more. |
| − | + | ||
| − | + | ||
| − | + | ||
| − | + | ||
| − | + | ||
| − | + | ||
|} | |} | ||
| + | |||
| + | ===Autoresponders=== | ||
{| | {| | ||
| − | |style="padding: 0px | + | |style="padding: 10px 0px 15px 15px;"|In this section you may compose and add extremely useful default messages.<br/> |
| + | They will be automatically sent as a response message when you have no access to your mailbox. | ||
|} | |} | ||
| − | |||
{| | {| | ||
| − | |style="padding: | + | |style="padding: 0px 0px 20px 25px;"|[[File:DA3_34.png]] |
| − | + | ||
|} | |} | ||
{| | {| | ||
| − | |style="padding: 0px 0px 30px 25px;"|[[File: | + | |style="padding: 0px 0px 15px 15px;"|Press '' 'Add Autoresponder' '' to create one. Provide the email address and compose the whole message here.<br/>You may also add a CC recipient address if you need to send a copy. |
| + | |} | ||
| + | {| | ||
| + | |style="padding: 0px 0px 30px 25px;"|[[File:DA3_34_1.png]] | ||
|} | |} | ||
| − | === | + | ===Catch All Email=== |
{| | {| | ||
| − | |style="padding: 10px 0px 15px 15px;"| | + | |style="padding: 10px 0px 15px 15px;"|'' 'Catch All Email' '' is a feature that allows you to forward emails that are sent to the non-existent email address of your domain name. <br/> Click on the '' 'Edit' '' button as shown here: |
| − | + | ||
|} | |} | ||
{| | {| | ||
| − | |style="padding: 0px 0px | + | |style="padding: 0px 0px 20px 25px;"|[[File:DA3_34_2.png]] |
|} | |} | ||
| + | {| | ||
| + | |style="padding: 0px 0px 15px 15px;"|Now, here are three options available. Choose the preferred option and save changes. | ||
| + | *'''Fail''' - the sender will be informed that the recipient does not exist | ||
| + | *'''Ignore''' - the email is dropped, no message is sent back | ||
| + | *'''Address''' - the email will be forwarded to an email address of your choice. | ||
| + | |} | ||
| + | {| | ||
| + | |style="padding: 0px 0px 30px 25px;"|[[File:DA3_34_3.png]] | ||
| + | |} | ||
| + | |||
| + | ===Email Accounts=== | ||
| + | {| | ||
| + | |style="padding: 10px 0px 15px 15px;"|View and edit email accounts that are associated with your domains. Use a filter to find required email addresses, preview its selected quota, number of sent messages and manage the account.<br/> | ||
| + | # View SMTP Logs - incoming and outgoing | ||
| + | # Change Password | ||
| + | # Edit Limits | ||
| + | # Download Outlook Configuration | ||
| + | # Delete Account | ||
| + | |} | ||
| + | {| | ||
| + | |style="padding: 0px 0px 20px 25px;"|[[File:DA3_35.png]] | ||
| + | |} | ||
| + | {| | ||
| + | |style="padding: 0px 0px 20px 15px;"|Press '' 'Create Account' '' and select to which domain it shall be added, type or generate password, define limited or unlimited quota and limit of messages. | ||
| + | |} | ||
| + | {| | ||
| + | |style="padding: 0px 0px 30px 25px;"|[[File:DA3_35_1.png]] | ||
| + | |} | ||
| + | |||
| + | ===Email Forwarders=== | ||
| + | {| | ||
| + | |style="padding: 10px 0px 20px 15px;"|In this section you can set up email forwarders and choose from several destination options to adjust mail forwarding perfectly to your needs. | ||
| + | |} | ||
| + | {| | ||
| + | |style="padding: 0px 0px 30px 25px;"|[[File:DA3_36.png]] | ||
| + | |} | ||
| + | {| | ||
| + | |style="padding: 0px 0px 20px 15px;"|Press the '' 'Create Forwarder' '' button, specify the forwarded email and define the destination emails.<br/>You may add more than one forwarder name and destination emails, use a comma to separate them. | ||
| + | |} | ||
| + | {| | ||
| + | |style="padding: 0px 0px 30px 25px;"|[[File:DA3_36_1.png]] | ||
| + | |} | ||
| + | |||
===Mailing Lists=== | ===Mailing Lists=== | ||
{| | {| | ||
| − | |style="padding: 10px 0px 15px 15px;"| | + | |style="padding: 10px 0px 15px 15px;"|Mailing lists allow you to use a single address to send message to multiple email addresses.<br/>This feature is very useful when you need to send a newsletter or another update to a group of people. <br/> Underneath, you can find a list of your mailing lists. Use action buttons to delete a list, view its details and alter settings. |
| − | Underneath, you can find a list of your mailing lists. Use action buttons to delete a list, view its details and alter settings. | + | |
|} | |} | ||
{| | {| | ||
| − | |style="padding: 0px 0px 20px 25px;"|[[File: | + | |style="padding: 0px 0px 20px 25px;"|[[File:DA3_37.png]] |
|} | |} | ||
{| | {| | ||
| − | |style="padding: 0px 0px 20px 15px;"| | + | |style="padding: 0px 0px 20px 15px;"|Create a new mailing list by providing its name. |
|} | |} | ||
{| | {| | ||
| − | |style="padding: 0px 0px 20px 25px;"|[[File: | + | |style="padding: 0px 0px 20px 25px;"|[[File:DA3_37_1.png]] |
|} | |} | ||
{| | {| | ||
| − | |style="padding: 0px 0px | + | |style="padding: 0px 0px 20px 15px;"|Modify the mailing list in the '' 'Settings' '' section. |
|} | |} | ||
{| | {| | ||
| − | |style="padding: 0px 0px 30px 25px;"|[[File: | + | |style="padding: 0px 0px 20px 25px;"|[[File:DA3_37_2.png]] |
| + | |} | ||
| + | {| | ||
| + | |style="padding: 0px 0px 20px 25px;"|[[File:DA3_37_2_1.png]] | ||
| + | |} | ||
| + | {| | ||
| + | |style="padding: 0px 0px 20px 25px;"|[[File:DA3_37_3.png]] | ||
| + | |} | ||
| + | {| | ||
| + | |style="padding: 0px 0px 20px 15px;"|When you '' 'Edit' '' the list, you will be moved to the section where a list of subscribers is available. | ||
| + | |} | ||
| + | {| | ||
| + | |style="padding: 0px 0px 20px 25px;"|[[File:DA3_37_4.png]] | ||
| + | |} | ||
| + | {| | ||
| + | |style="padding: 0px 0px 20px 15px;"|Add new email addresses to the list of '' 'Subscribers' '' or '' 'Digest Subscribers' '' from the according tab. | ||
| + | |} | ||
| + | {| | ||
| + | |style="padding: 0px 0px 30px 25px;"|[[File:DA3_37_5.png]] | ||
|} | |} | ||
| − | === | + | ===SPAM Filter=== |
{| | {| | ||
| − | |style="padding: 10px 0px 15px 15px;"|On this page you can configure your | + | |style="padding: 10px 0px 20px 15px;"|SPAM Filters give you the possibility to add numerous filters for a selected domain. |
| + | |||
| + | |} | ||
| + | {| | ||
| + | |style="padding: 0px 0px 20px 25px;"|[[File:DA3_38.png]] | ||
| + | |} | ||
| + | {| | ||
| + | |style="padding: 0px 0px 15px 15px;"|Add and configure the filter as desired for the selected mailbox.<br/> | ||
| + | *block email addresses | ||
| + | *block email domains | ||
| + | *block emails with a chosen word | ||
| + | *block emails larger than the specified number of kilobytes | ||
| + | |} | ||
| + | {| | ||
| + | |style="padding: 0px 0px 20px 25px;"|[[File:DA3_38_2.png]] | ||
| + | |} | ||
| + | {| | ||
| + | |style="padding: 0px 0px 15px 15px;"|Move to settings and define options per domain: | ||
| + | *define the action for blocked emails: '' 'Drop Email' '' or '' 'Send To SPAMbox' '' | ||
| + | *adult filter - enable/disable | ||
| + | |} | ||
| + | {| | ||
| + | |style="padding: 0px 0px 30px 25px;"|[[File:DA3_38_1.png]] | ||
| + | |} | ||
| + | |||
| + | ===SpamAssassin Setup=== | ||
| + | {| | ||
| + | |style="padding: 10px 0px 15px 15px;"|On this page, you can configure your SpamAssassin.<br /> | ||
You can set up: | You can set up: | ||
*Action performed on spam emails | *Action performed on spam emails | ||
*Threshold | *Threshold | ||
| − | *Define | + | *Define separate actions for spam emails of the above defined threshold |
| − | *Define whether to change spam email subject or leave it intact | + | *Define whether to change the spam email subject or leave it intact |
*Choose how spam should be delivered | *Choose how spam should be delivered | ||
*Specify blacklisted email addresses | *Specify blacklisted email addresses | ||
| Line 566: | Line 1,050: | ||
|} | |} | ||
{| | {| | ||
| − | |style="padding: 0px 0px 30px 25px;"|[[File: | + | |style="padding: 0px 0px 30px 25px;"|[[File:DA3_41.png]] |
| + | |} | ||
| + | |||
| + | ===Vacation Messages=== | ||
| + | {| | ||
| + | |style="padding: 10px 0px 15px 15px;"|The goal of '' 'Vacation Messages' '' is similar to the one of [[#Autoresponders|Autoresponder]] shown above.<br /> | ||
| + | The only difference is that the vacation message replies only to the first email received per email address.<br/> | ||
| + | '''''Note:''' If there is already an autoresponder set up for the account, it will be impossible to set a vacation message to that account.'' | ||
| + | |} | ||
| + | {| | ||
| + | |style="padding: 0px 0px 20px 25px;"|[[File:DA3_42.png]] | ||
| + | |} | ||
| + | {| | ||
| + | |style="padding: 0px 0px 20px 15px;"|Type in the message content, define your vacation start and end time. | ||
| + | |} | ||
| + | {| | ||
| + | |style="padding: 0px 0px 30px 25px;"|[[File:DA3_42_1.png]] | ||
|} | |} | ||
==Advanced Features== | ==Advanced Features== | ||
{| | {| | ||
| − | |style="padding: 10px 0px 30px 15px;"|Advanced tools used to configure sophisticated settings of your account. | + | |style="padding: 10px 0px 30px 15px;"|Advanced tools are used to configure sophisticated settings of your account. |
|} | |} | ||
| + | ===Apache Handlers=== | ||
| + | {| | ||
| + | |style="padding: 10px 0px 20px 15px;"|Under the '' 'Apache Handlers' '' page, you can define custom handlers for chosen file extensions or specific files. You can read more about Apache Handlers [https://httpd.apache.org/docs/2.4/handler.html here]. | ||
| + | |} | ||
| + | {| | ||
| + | |style="padding: 0px 0px 20px 25px;"|[[File:DA3_43.png]] | ||
| + | |} | ||
| + | {| | ||
| + | |style="padding: 0px 0px 20px 15px;"|To add a new handler, type its name and then extensions it will process. | ||
| + | |} | ||
| + | {| | ||
| + | |style="padding: 0px 0px 30px 25px;"|[[File:DA3_43_1.png]] | ||
| + | |} | ||
| + | |||
| + | ===Cron Jobs=== | ||
| + | {| | ||
| + | |style="padding: 10px 0px 20px 15px;"| Cron Jobs section allows you to easily add and remove your cron tasks.<br/> | ||
| + | |} | ||
| + | {| | ||
| + | |style="padding: 0px 0px 20px 25px;"|[[File:DA3_44.png]] | ||
| + | |} | ||
| + | {| | ||
| + | |style="padding: 0px 0px 20px 15px;"|Select cron job settings to fully automate commands and scripts on your site. | ||
| + | |} | ||
| + | {| | ||
| + | |style="padding: 0px 0px 30px 25px;"|[[File:DA3_44_1.png]] | ||
| + | |} | ||
| + | |||
| + | ===Custom Error Pages=== | ||
| + | {| | ||
| + | |style="padding: 10px 0px 20px 15px;"|Defining custom apache error pages is easy with '' 'Error Pages'. ''<br /> | ||
| + | |||
| + | |} | ||
| + | {| | ||
| + | |style="padding: 0px 0px 20px 25px;"|[[File:DA3_46.png]] | ||
| + | |} | ||
| + | {| | ||
| + | |style="padding: 0px 0px 20px 15px;"|You can alter or define a new HTML code of error pages displayed during 401, 403, 404 and 500 errors. | ||
| + | |} | ||
| + | {| | ||
| + | |style="padding: 0px 0px 30px 25px;"|[[File:DA3_46_1.png]] | ||
| + | |} | ||
| + | |||
===Domain Pointers=== | ===Domain Pointers=== | ||
{| | {| | ||
| − | |style="padding: 10px 0px 20px 15px;"| In '' 'Domain Pointers' '' section you | + | |style="padding: 10px 0px 20px 15px;"| In the '' 'Domain Pointers' '' section you can manage your aliases and pointers.<br/> You can have access to the content of one domain from another one! |
|} | |} | ||
{| | {| | ||
| − | |style="padding: 0px 0px 30px 25px;"|[[File: | + | |style="padding: 0px 0px 20px 25px;"|[[File:DA3_45.png]] |
| + | |} | ||
| + | {| | ||
| + | |style="padding: 0px 0px 20px 25px;"|Enter a source domain, then select type: '' 'Alias' '' or '' 'Pointer'. '' | ||
| + | |} | ||
| + | {| | ||
| + | |style="padding: 0px 0px 20px 25px;"|[[File:DA3_45_1.png]] | ||
| + | |} | ||
| + | {| | ||
| + | |style="padding: 0px 0px 20px 25px;"|Manage DNS records of the domain pointer. | ||
| + | |} | ||
| + | {| | ||
| + | |style="padding: 0px 0px 20px 25px;"|[[File:DA3_45_2.png]] | ||
| + | |} | ||
| + | {| | ||
| + | |style="padding: 0px 0px 20px 25px;"|Edit, delete and create DNS records of a single domain pointer. | ||
| + | |} | ||
| + | {| | ||
| + | |style="padding: 0px 0px 20px 25px;"|[[File:DA3_45_3.png]] | ||
| + | |} | ||
| + | {| | ||
| + | |style="padding: 0px 0px 15px 25px;"|Select record type, enter name and value. In case of '' 'MX' '' record type define priority and a hostname. <br/> Note that the lower preference number stands for the higher priority. | ||
| + | |} | ||
| + | {| | ||
| + | |style="padding: 0px 0px 30px 25px;"|[[File:DA3_45_4.png]] | ||
| + | |} | ||
| + | ===Git Repositories=== | ||
| + | {| | ||
| + | |style="padding: 10px 0px 15px 15px;"|This section provides you with the possibility to create as well as manage your Git repositories.<br/> Git is a fast and modern implementation of version control. It not only allows you to check the history of content changes but also facilitates collaborative changes to files.<br/> | ||
| + | To start tracking, simply click on the '' 'Create Repository' '' button. | ||
| + | |} | ||
| + | {| | ||
| + | |style="padding: 0px 0px 20px 25px;"|[[File:DA3_45_5.png]] | ||
| + | |} | ||
| + | {| | ||
| + | |style="padding: 0px 0px 15px 25px;"|Fill out the simple form to ad dyou repository. <br/> | ||
| + | Select the domain and provide a name. You may also provide an optional directory that will direct you to the remote repository. this field is required for synchronization only.<br/> Select your key file or choose the "Without SSH" option. It is an optional public key authorized by the remote repository, required for syncing to a private remote repository only. | ||
| + | |} | ||
| + | {| | ||
| + | |style="padding: 0px 0px 20px 25px;"|[[File:DA3_45_6.png]] | ||
| + | |} | ||
| + | {| | ||
| + | |style="padding: 0px 0px 20px 25px;"|Allowed actions on a repository: | ||
| + | * display repository details ''(1)'' | ||
| + | * deploy repository ''(2)'' | ||
| + | * fetch repository ''(3)'' | ||
| + | * access repository logs ''(4)'' | ||
| + | * modify details ''(5)'' | ||
| + | * delete repository ''(6)'' - accessible via mass actions as well to delete repos in bulk | ||
| + | |} | ||
| + | {| | ||
| + | |style="padding: 0px 0px 20px 25px;"|[[File:DA3_45_7.png]] | ||
| + | |} | ||
| + | {| | ||
| + | |style="padding: 0px 0px 20px 25px;"|'''Repository details:''' | ||
| + | |} | ||
| + | {| | ||
| + | |style="padding: 0px 0px 20px 25px;"|[[File:DA3_45_8.png]] | ||
| + | |} | ||
| + | {| | ||
| + | |style="padding: 0px 0px 20px 25px;"|'''Repository Logs:''' when accessed, you will see a list of all branches existing on its repo. Check logs for every branch separately: | ||
| + | |} | ||
| + | {| | ||
| + | |style="padding: 0px 0px 20px 25px;"|[[File:DA3_45_9.png]] | ||
| + | |} | ||
| + | {| | ||
| + | |style="padding: 0px 0px 20px 25px;"|[[File:DA3_45_10.png]] | ||
| + | |} | ||
| + | {| | ||
| + | |style="padding: 0px 0px 20px 25px;"|'''Modify details''' - select a branch to deploy the repo and ''(optionally)'' provide the new directory. | ||
| + | |} | ||
| + | {| | ||
| + | |style="padding: 0px 0px 30px 25px;"|[[File:DA3_45_11.png]] | ||
| + | |} | ||
| + | |||
| + | ===Protected Directories=== | ||
| + | {| | ||
| + | |style="padding: 10px 0px 15px 15px;"|Protected directories section includes a list of domains with any folders protected with a password.<br/> Press the icon to see an exact list of protected folders.<br/> | ||
| + | '''''Important:''' You may protect single folders directly in [[#File_Manager_Protect|'File Manager']] section, however, they must be located in the 'public_htlm' directory only.'' | ||
| + | |} | ||
| + | {| | ||
| + | |style="padding: 0px 0px 20px 25px;"|[[File:DA3_46_3.png]] | ||
| + | |} | ||
| + | {| | ||
| + | |style="padding: 0px 0px 20px 15px;"|Details section contains a direct path to the protected folder, you may also perform flowing actions on single directories: | ||
| + | # View/Add directory users | ||
| + | # Edit directory name | ||
| + | # Delete single directory protection<br/> | ||
| + | Use mass action button to remove the password protection of the selected directories. | ||
| + | |} | ||
| + | {| | ||
| + | |style="padding: 0px 0px 20px 25px;"|[[File:DA3_46_4.png]] | ||
| + | |} | ||
| + | {| | ||
| + | |style="padding: 0px 0px 20px 15px;"|1. View existing users and add new ones by pressing button. Then provide the username and a password. | ||
| + | |} | ||
| + | {| | ||
| + | |style="padding: 0px 0px 20px 25px;"|[[File:DA3_46_5.png]] | ||
| + | |} | ||
| + | {| | ||
| + | |style="padding: 0px 0px 20px 25px;"|[[File:DA3_46_6.png]] | ||
| + | |} | ||
| + | {| | ||
| + | |style="padding: 0px 0px 20px 15px;"|2. Change the folder name | ||
| + | |} | ||
| + | {| | ||
| + | |style="padding: 0px 0px 30px 25px;"|[[File:DA3_46_7.png]] | ||
|} | |} | ||
===Site Redirections=== | ===Site Redirections=== | ||
{| | {| | ||
| − | |style="padding: 10px 0px 20px 15px;"| Easy access to site redirections is very | + | |style="padding: 10px 0px 20px 15px;"|Easy access to site redirections is very advantageous. Within a few seconds, you can redirect the page to another. |
|} | |} | ||
{| | {| | ||
| − | |style="padding: 0px 0px | + | |style="padding: 0px 0px 20px 25px;"|[[File:DA3_47.png]] |
|} | |} | ||
| − | |||
{| | {| | ||
| − | |style="padding: | + | |style="padding: 0px 0px 20px 15px;"|For example, if your main domain is mytestdomain.com, you can forward it like this:<br/> |
| − | Choose | + | '''mytestdomain.com/redirect → adomainwithlongname-averylongname.com'''<br/> |
| + | Choose the type: '' 'Permanent', 'Temporary' '' or '' 'Replaced'. '' | ||
|} | |} | ||
{| | {| | ||
| − | |style="padding: 0px 0px 30px 25px;"|[[File: | + | |style="padding: 0px 0px 30px 25px;"|[[File:DA3_47_1.png]] |
| + | |} | ||
| + | |||
| + | ===SSH Keys=== | ||
| + | {| | ||
| + | |style="padding: 10px 0px 20px 15px;"|SSH Keys are responsible for providing secure file transfer and remote logins to the account. This section allows you to manage your SSH Keys easily. | ||
| + | |} | ||
| + | {| | ||
| + | |style="padding: 0px 0px 20px 25px;"|[[File:DA3_47_2.png]] | ||
| + | |} | ||
| + | {| | ||
| + | |style="padding: 0px 0px 20px 15px;"|Now, provide '' 'Key ID' '' and '' 'Comment' ''. Enter a strong '' ' Password' '', optionally, you can generate it.<br/> Finally, choose the size of your SSH Key from the dropdown menu and decide if you want to authorize the Key.<br/> Afterwards, click the '' 'Create' '' button. | ||
| + | |} | ||
| + | {| | ||
| + | |style="padding: 0px 0px 20px 25px;"|[[File:DA3_47_3.png]] | ||
| + | |} | ||
| + | {| | ||
| + | |style="padding: 0px 0px 20px 15px;"|All newly created SSH Keys are visible here. You can '' 'Authorize' '' or '' 'Delete' '' your SSH Key using the buttons shown below: | ||
| + | |} | ||
| + | {| | ||
| + | |style="padding: 0px 0px 20px 25px;"|[[File:DA3_47_4.png]] | ||
| + | |} | ||
| + | {| | ||
| + | |style="padding: 0px 0px 20px 15px;"|If you wish to '' 'Authorize' '' or '' ' Delete' '' a few SSH Keys, click the appropriate mass action button. | ||
| + | |} | ||
| + | {| | ||
| + | |style="padding: 0px 0px 20px 25px;"|[[File:DA3_47_5.png]] | ||
| + | |} | ||
| + | {| | ||
| + | |style="padding: 0px 0px 20px 15px;"|All of authorized SSH Keys are listed in the '' 'Authorized Keys' ''section. Here you can edit one of the existing SSH Keys or delete any if no longer needed. | ||
| + | |} | ||
| + | {| | ||
| + | |style="padding: 0px 0px 20px 25px;"|[[File:DA3_47_6.png]] | ||
| + | |} | ||
| + | {| | ||
| + | |style="padding: 0px 0px 20px 15px;"|It is also possible to paste an existing, authorixed SSH Key. All you need to do is press the button marked on the creen and then paste your authorized key. | ||
| + | |} | ||
| + | {| | ||
| + | |style="padding: 0px 0px 30px 25px;"|[[File:DA3_47_7.png]] | ||
|} | |} | ||
===SSL Certificates=== | ===SSL Certificates=== | ||
{| | {| | ||
| − | |style="padding: 10px 0px 15px 15px;"| | + | |style="padding: 10px 0px 15px 15px;"| Your customers can benefit from generating free certificates provided by '' '[https://letsencrypt.org/ Let's Encrypt]' ''. Assuming that this option was previously enabled in the [https://www.docs.modulesgarden.com/DirectAdmin_Extended_For_WHMCS#Addon_Configuration Addon Configuration].<br/> |
| − | + | Generating a CSR or a certificate with '' 'Let's Encrypt' '' will result with automatically added private keys to the list.<br/> | |
| + | |||
| + | You may also upload a ready certificate with a private key or a CA SSL Certificate ''(Certificate Authority)''. Use '' 'More Actions' '' to find appropriate buttons. | ||
|} | |} | ||
{| | {| | ||
| − | |style="padding: 0px 0px 30px 25px;"|[[File: | + | |style="padding: 0px 0px 20px 25px;"|[[File:DA3_48.png]] |
| + | |} | ||
| + | {| | ||
| + | |style="padding: 0px 0px 20px 15px;"|If you decide to use the easiest method of generating cerificates, that is '' 'Let's Encrypt' '' option, you will only have to fill in a short form with basic information.<br/> | ||
| + | In '' 'Entries' '' tab you will find all existing subdomains for the selected domain. | ||
| + | |} | ||
| + | {| | ||
| + | |style="padding: 0px 0px 20px 25px;"|[[File:DA3_48_0.png]] | ||
| + | |} | ||
| + | {| | ||
| + | |style="padding: 0px 0px 20px 25px;"|[[File:DA3_48_01.png]] | ||
| + | |} | ||
| + | {| | ||
| + | |style="padding: 0px 0px 20px 15px;"|This feature relocates completely the management of your private keys, CSR keys and SSL certificates into your WHMCS client area.<br /> | ||
| + | Thanks to it, you can conveniently manage all the aspects of your SSL certificates without the necessity to log in to your DirectAdmin account.<br /> | ||
| + | |} | ||
| + | {| | ||
| + | |style="padding: 0px 0px 20px 25px;"|[[File:DA3_48_1.png]] | ||
| + | |} | ||
| + | {| | ||
| + | |style="padding: 0px 0px 15px 15px;"|If you want to obtain a certificate from a trusted provider, complete the Certificate Signing Request form to generate a CSR, which will then be used to generate the certificate by that provider. | ||
| + | |} | ||
| + | {| | ||
| + | |style="padding: 0px 0px 30px 25px;"|[[File:DA3_48_2.png]] | ||
|} | |} | ||
| − | === | + | ===Unban IP Address=== |
{| | {| | ||
| − | |style="padding: 10px 0px | + | |style="padding: 10px 0px 15px 15px;"|The '' 'Unban IP Address' '' section allows clients to unban their IP address if it has been blocked in the DirectAdmin panel. <br/> Both IPv4 and IPv6 addresses can be unbanned here. Simply type in the address, press the '' 'Unban' '' button and wait until the action is complete. |
|} | |} | ||
{| | {| | ||
| − | |style="padding: 0px 0px 30px 25px;"|[[File: | + | |style="padding: 0px 0px 30px 25px;"|[[File:DA3_48_5.png]] |
| + | |} | ||
| + | |||
| + | ===WordPress Manager=== | ||
| + | {| | ||
| + | |style="padding: 10px 0px 20px 15px;"|If you have '''[https://www.modulesgarden.com/products/whmcs/wordpress-manager WordPress Manager For WHMCS]''' module installed, your customers will fully benefit from its seamless integration with the DirectAdmin Extended For WHMCS module. | ||
| + | |} | ||
| + | {| | ||
| + | |style="padding: 0px 0px 20px 25px;"|[[File:DA3_48_3.png]] | ||
| + | |} | ||
| + | {| | ||
| + | |style="padding: 0px 0px 15px 15px;"|Thanks to this integration, your customers will have the capability to install and manage WordPress instances in detail without the bother of leaving the DirectAdmin Extended panel in your WHMCS client area. | ||
| + | Full and detailed instructions on the '' 'WordPress Manager' '' itself is located '''[https://www.docs.modulesgarden.com/WordPress_Manager_For_WHMCS#Client_Area here]'''.<br/> | ||
| + | <!-- | ||
| + | '''''Important:''' DirectAdmin integration with WordPress Manager does not offer support for reseller's accounts. Such accounts will not be visible nor managed in the DirectAdmin view.'' | ||
| + | --> | ||
|} | |} | ||
| − | |||
{| | {| | ||
| − | |style="padding: | + | |style="padding: 0px 0px 20px 25px;"|[[File:DA3_48_4.png]] |
| − | + | ||
|} | |} | ||
{| | {| | ||
| − | |style="padding: 0px 0px 30px | + | |style="padding: 0px 0px 30px 15px;"|Please note that this entire section can '''only''' be available if you have purchased and installed the [https://www.modulesgarden.com/products/whmcs/wordpress-manager WordPress Manager For WHMCS] module. |
|} | |} | ||
==Install Applications== | ==Install Applications== | ||
{| | {| | ||
| − | |style="padding: 10px 0px 15px 15px;"| Install Applications is a very interesting and time saving feature of DirectAdmin Extended. In seconds you can install your favorite applications without even accessing DirectAdmin! <br /> | + | |style="padding: 10px 0px 15px 15px;"|'' 'Install Applications' '' is a very interesting and time-saving feature of DirectAdmin Extended For WHMCS module. In merely seconds, you can install your favorite applications without even accessing DirectAdmin! <br /> |
| − | Firstly, you need to enable one of the two auto-installation managers. To do so, go to '' 'Addons' → 'DirectAdmin Extended | + | Firstly, you need to enable one of the two auto-installation managers. To do so, go to '' 'Addons' → 'DirectAdmin Extended' → 'Features'. ''<br /> |
| − | Press '' 'Configure' '' button next to | + | Press the '' 'Configure' '' button next to the product you are interested in. Then, find the '' 'Applications ' '' box. <br/> |
| − | Enable '' 'Install | + | Enable the '' 'Install Applications' '' checkbox, select the autoinstaller from a dropdown menu (you can choose '' 'Installatron' '' or '' 'Softaculous' '').<br /> |
| − | You can also choose desired language of the application by entering value into the '' 'Language' '' field. [http://softaculous.com/docs/Scripts_Language_Codes | + | You can also choose a desired language of the application by entering value into the '' 'Language' '' field. A complete list of language codes can be found [http://softaculous.com/docs/Scripts_Language_Codes here.]<br /> |
If the field is left blank, the default value '' 'en' '' (English) will be used.<br /> | If the field is left blank, the default value '' 'en' '' (English) will be used.<br /> | ||
| − | Finish | + | Finish the process by enabling '' 'Install Button' '' and '' 'Backup Button'. '' Do not forget to save the changes. |
|} | |} | ||
{| | {| | ||
| − | |style="padding: 0px 0px 20px 25px;"|[[File: | + | |style="padding: 0px 0px 20px 25px;"|[[File:DA3_49.png]] |
|} | |} | ||
{| | {| | ||
| − | |style="padding: 0px 0px | + | |style="padding: 0px 0px 15px 15px;"|In the client area section, move to the '' 'Applications' '' section and then find the '' 'Install New' '' tab as shown on the following screen.<br/> |
| + | You will see an extensive menu of application categories. | ||
|} | |} | ||
{| | {| | ||
| − | |style="padding: 0px 0px 20px 25px;"|[[File: | + | |style="padding: 0px 0px 20px 25px;"|[[File:DA3_50.png]] |
|} | |} | ||
{| | {| | ||
| − | |style="padding: 0px 0px 20px 15px;"| | + | |style="padding: 0px 0px 20px 15px;"|For presentation purposes we will install '' 'Claroline' '' located in the '' 'Educational' '' section. |
|} | |} | ||
{| | {| | ||
| − | |style="padding: 0px 0px 20px 25px;"|[[File: | + | |style="padding: 0px 0px 20px 25px;"|[[File:DA3_50_1.png]] |
|} | |} | ||
{| | {| | ||
| − | |style="padding: 0px 0px 20px 15px;"| | + | |style="padding: 0px 0px 20px 15px;"|Necessary installation fields should be automatically filled in. In case the '' 'Directory' '' field is left empty, the application will be installed in the main folder of the selected domain. |
|} | |} | ||
{| | {| | ||
| − | |style="padding: 0px 0px 20px 25px;"|[[File: | + | |style="padding: 0px 0px 20px 25px;"|[[File:DA3_50_2.png]] |
|} | |} | ||
{| | {| | ||
| − | |style="padding: 0px 0px 20px 15px;"| | + | |style="padding: 0px 0px 20px 15px;"|If the installation process has been successful your newly installed application will appear on the list of installed ones when you go back to that tab. |
|} | |} | ||
{| | {| | ||
| − | |style="padding: 0px 0px 20px 25px;"|[[File: | + | |style="padding: 0px 0px 20px 25px;"|[[File:DA3_51.png]] |
|} | |} | ||
{| | {| | ||
| − | |style="padding: 0px 0px | + | |style="padding: 0px 0px 15px 15px;"|Here you can find the name of the application, its domain, installation time and version.<br/> |
| + | Available actions on installed applications: | ||
| + | #'' 'One Click Login' '' - works with '' 'WordPress' '' only, press the icon and you will be automatically moved to the admin panel created while installing '' 'WordPress' '' first instance | ||
| + | #'' 'Create Staging' '' application - create staging instances from an application, e.g. for testing purposes before pushing them to the live installation ''('Softaculous' only)'' | ||
| + | #*'' 'Push To Live' '' - push a staging application to the live environment. '' 'Push To Live' '' button ''(2.1)'' is available for '' 'Staging' '' applications only ''('Softaculous' only)'' | ||
| + | #'' 'Clone' '' application - clone existing website installations to modify or use them on different domains ''('Softaculous' only)'' | ||
| + | #'' 'Generate Backup' '' | ||
| + | #'' 'Edit' '' application - a form with pre-filled values will appear, you may easily modify them now. | ||
| + | #'' 'Delete' '' application<br/> | ||
| + | |||
| + | '''''Note:''' Please keep in mind that creating staging applications, cloning, and generating backups might last up to a few minutes and the instances are not visible right away.<br/> Please wait until they appear on the list.''<br/> | ||
|} | |} | ||
{| | {| | ||
| − | |style="padding: 0px 0px 30px 25px;"|[[File: | + | |style="padding: 0px 0px 30px 25px;"|[[File:DA3_51_1.png]] |
|} | |} | ||
| − | ==Management of | + | ==Management of Auto Installed Applications== |
{| | {| | ||
| − | |style="padding: 10px 0px 15px 15px;"|To set up DirectAdmin Extended | + | |style="padding: 10px 0px 15px 15px;"|To set up DirectAdmin Extended products with the auto installed app, follow these steps:<br /> |
| − | In the beginning go to '' 'Product/Services', '' find your product connected with DirectAdmin Extended and enter '' ' | + | In the beginning, go to '' 'Product/Services', '' find your product connected with DirectAdmin Extended and enter the '' 'Module Settings' '' tab.<br /> |
| − | You will need to add 8 custom fields.<br /> | + | Press '' 'Generate Custom Fields' '' to automatically create the required fields. |
| + | |} | ||
| + | {| | ||
| + | |style="padding: 0px 0px 20px 25px;"|[[File:DA3_55_1.png]] | ||
| + | |} | ||
| + | {| | ||
| + | |style="padding: 0px 0px 20px 15px;"|Select which of the available fields you wish to generate. | ||
| + | |} | ||
| + | {| | ||
| + | |style="padding: 0px 0px 20px 25px;"|[[File:DA3_55_0.png]] | ||
| + | |} | ||
| + | {| | ||
| + | |style="padding: 0px 0px 15px 15px;"|You can also create these fields manually by going to the '' 'Custom Fields' '' tab. You will need to add 8 custom fields.<br /> | ||
These are:'' 'Directory', 'Database Name', 'Database Username', 'Database Password', 'Table Prefix', 'Site Name', 'Site Description' '' and '' 'Language'. ''<br /> | These are:'' 'Directory', 'Database Name', 'Database Username', 'Database Password', 'Table Prefix', 'Site Name', 'Site Description' '' and '' 'Language'. ''<br /> | ||
| − | Remember to set the field type as '' 'Text Box', '' tick '' 'Required Field ' '' and '' 'Show on Order Form' | + | Remember to set the field type as '' 'Text Box', '' tick '' 'Required Field ' '' and/or '' 'Show on Order Form' '' exactly as it is shown on the screen below.<br /> |
| − | ''Note 1: 'Site Description' is needed only for Softaculous autoinstaller.''<br /> | + | |
| − | ''Note 2: 'Database Name', 'Database Username' | + | '''''Note 1:''' 'Site Description' is needed only for Softaculous autoinstaller.''<br /> |
| − | ''If they are not filled, database will be automatically generated.''<br /> | + | '''''Note 2:''' 'Database Name', 'Database Username', 'Database Password' and 'Table Prefix' fields do not need to be filled upon ordering product by a client.''<br /> |
| − | ''Note 3: For Installatron | + | ''If they are not filled, the database will be automatically generated.''<br /> |
| + | '''''Note 3:''' For the Installatron auto installer use 'Site Title' in place of 'Site Name'.'' | ||
|} | |} | ||
{| | {| | ||
| − | |style="padding: 0px 0px 20px 25px;"|[[File: | + | |style="padding: 0px 0px 20px 25px;"|[[File:DA3_55.png]] |
|} | |} | ||
{| | {| | ||
| − | |style="padding: 0px 0px 15px 15px;"|Afterwards, go to '' 'Addons' '' → '' 'DirectAdmin Extended | + | |style="padding: 0px 0px 15px 15px;"|Afterwards, go to '' 'Addons' '' → '' 'DirectAdmin Extended' '' → '' 'Features' → 'Configuration'. ''<br /> |
| − | Enable'' 'Install | + | Enable'' 'Install Applications' '' in the Applications section. Select the auto installer and application to install from dropdown menus. Confirm by pressing the '' 'Save' '' button. |
|} | |} | ||
{| | {| | ||
| − | |style="padding: 0px 0px 20px 25px;"|[[File: | + | |style="padding: 0px 0px 20px 25px;"|[[File:DA3_56.png]] |
|} | |} | ||
{| | {| | ||
| − | |style="padding: 0px 0px 15px 15px;"|Once you add all the custom fields they will appear while placing an order.<br /> | + | |style="padding: 0px 0px 15px 15px;"|Once you add all the custom fields, they will appear while placing an order.<br /> |
| − | Voila! Now your customers can personalize each application without the necessity of installing it later. | + | Voila! Now your customers can personalize each application without the necessity of installing it later on. |
|} | |} | ||
{| | {| | ||
| − | |style="padding: 0px 0px 30px 25px;"|[[File: | + | |style="padding: 0px 0px 30px 25px;"|[[File:DA3_56_1.png]] |
|} | |} | ||
| − | == | + | ===Configurable Options For Application Auto Install=== |
| + | {| | ||
| + | |style="padding: 10px 0px 15px 15px;"|Let your clients decide which application they would like to install on their new DirectAdmin account.<br /> | ||
| + | While placing an order, your customer can choose an application which will be installed upon account creation.<br /> | ||
| + | There is nothing else you need to do. The application will be ready to use instantly!<br /> | ||
| + | To set up this feature, return to the configuration of your product, find the '' 'Applications' '' section, activate '' 'Install Applications', '' choose '' 'Auto Installer' '' and activate '' 'Use Configurable Options'. ''<br /> | ||
| + | |} | ||
| + | {| | ||
| + | |style="padding: 0px 0px 20px 25px;"|[[File:DA3_58.png]] | ||
| + | |} | ||
| + | {| | ||
| + | |style="padding: 0px 0px 20px 15px;"|Go back to the list of products and click on a download icon to view the applications list. | ||
| + | |} | ||
| + | {| | ||
| + | |style="padding: 0px 0px 20px 25px;"|[[File:DA3_59.png]] | ||
| + | |} | ||
{| | {| | ||
| − | |style="padding: | + | |style="padding: 0px 0px 15px 15px;"|These are the names of values that you can enter in the fields of configurable options. We will configure them in the next step.<br /> |
| − | + | For example, if you would like to set up '' 'Drupal' '' in your applications list, you will need to enter the '' 'Drupal 7.59' '' or '' 'Drupal' '' value.<br /> | |
| − | + | '''1. If you make a mistake with the application name, the auto installer will not work.'''<br /> | |
| − | + | '''2. If you do not enter the version number, the auto installer will install the latest version of the application.'''<br /> | |
| − | + | Now that you know what values should be entered in configurable options for particular applications, we can proceed further. | |
|} | |} | ||
{| | {| | ||
| − | |style="padding: 0px 0px 20px 25px;"|[[File: | + | |style="padding: 0px 0px 20px 25px;"|[[File:DA3_60.png]] |
|} | |} | ||
{| | {| | ||
| − | |style="padding: 0px 0px | + | |style="padding: 0px 0px 20px 15px;"|Go to your '' 'WHMCS' '' → '' 'Setup' '' → '' 'Products/Services' '' → '' 'Configurable Options' '' and press '' 'Create a New Group' ''. |
| − | + | ||
| − | ''' | + | |
| − | ''' | + | |
| − | + | ||
|} | |} | ||
{| | {| | ||
| − | |style="padding: 0px 0px 20px 25px;"|[[File: | + | |style="padding: 0px 0px 20px 25px;"|[[File:DA3_61.png]] |
|} | |} | ||
{| | {| | ||
| − | |style="padding: 0px 0px 20px 15px;"| | + | |style="padding: 0px 0px 20px 15px;"|Enter the group name of your choice, select the product to which you want to assign configurable, then press '' 'Save Changes' ''. |
|} | |} | ||
{| | {| | ||
| − | |style="padding: 0px 0px 20px 25px;"|[[File: | + | |style="padding: 0px 0px 20px 25px;"|[[File:DA3_62.png]] |
|} | |} | ||
{| | {| | ||
| − | |style="padding: 0px 0px 20px 15px;"| | + | |style="padding: 0px 0px 20px 15px;"|Now click on '' 'Add New Configurable Option' ''. |
|} | |} | ||
{| | {| | ||
| − | |style="padding: 0px 0px 20px 25px;"|[[File: | + | |style="padding: 0px 0px 20px 25px;"|[[File:DA3_63.png]] |
|} | |} | ||
{| | {| | ||
| − | |style="padding: 0px 0px | + | |style="padding: 0px 0px 15px 15px;"|This moment is very important. As '' 'Option Name', '' you have to enter '' 'Installation App'. '' '''Otherwise the entire functionality will not work.'''<br /> |
| + | Here you can set up as many applications as you want. To do so, enter a value name, e.g. '' 'WordPress 4.9.8' '' and press '' 'Save Changes' ''.<br /> | ||
| + | Repeat this as many times as you need and do not forget to set '' 'Option Type' '' to '' 'Dropdown' ''.<br/><br /> | ||
| + | Remember that if you do not provide the version number of the application, the latest version will be installed. | ||
|} | |} | ||
{| | {| | ||
| − | |style="padding: 0px 0px 20px 25px;"|[[File: | + | |style="padding: 0px 0px 20px 25px;"|[[File:DA3_64.png]] |
|} | |} | ||
{| | {| | ||
| − | |style="padding: 0px 0px 15px 15px;"| | + | |style="padding: 0px 0px 15px 15px;"|As you can see on the following screen, we decided to offer our customers five applications.<br /> |
| − | + | When you finish adding applications, press '' 'Save Changes' '' and '' 'Close Window'. '' | |
| − | + | ||
|} | |} | ||
{| | {| | ||
| − | |style="padding: 0px 0px 20px 25px;"|[[File: | + | |style="padding: 0px 0px 20px 25px;"|[[File:DA3_65.png]] |
|} | |} | ||
{| | {| | ||
| − | |style="padding: 0px 0px 15px 15px;"| | + | |style="padding: 0px 0px 15px 15px;"|You can also create a new configurable option - '''Auto Backup On Update''' with the 'Yes/No' type.<br /> |
| − | + | This option is used to enable the creation of auto update backups for the first chosen application after the initial order in WHMCS.<br /> | |
| + | ''Please note that this option '''works only with Installatron''' plugin and '''Auto Update Backup Enabled By Default On Order''' setting in the module features has to be '''disabled''' to make this configurable option work properly.''<br /> | ||
|} | |} | ||
{| | {| | ||
| − | |style="padding: 0px 0px 20px 25px;"|[[File: | + | |style="padding: 0px 0px 20px 25px;"|[[File:DA3_65_1.png]] |
|} | |} | ||
{| | {| | ||
| − | |style="padding: 0px 0px 15px 15px;"|Afterwards | + | |style="padding: 0px 0px 15px 15px;"|Afterwards, come back to '' 'DirectAdmin Extended Features' '' → '' 'Configuration' '' → '' 'Applications' '', activate '' 'Use Configurable Options' '' and choose '' 'Apps/Configurable Options' '' from a dropdown menu.<br /> |
| − | Please note that you can have more configurable options groups. Press '' 'Save | + | Please note that you can have more configurable options groups at your disposal. Press '' 'Save' ''. You have just successfully assigned configurable options to the application autoinstall. |
| − | + | ||
|} | |} | ||
{| | {| | ||
| − | |style="padding: 0px 0px 20px 25px;"|[[File: | + | |style="padding: 0px 0px 20px 25px;"|[[File:DA3_65_2.png]] |
|} | |} | ||
{| | {| | ||
| − | |style="padding: 0px 0px | + | |style="padding: 0px 0px 15px 15px;"|Let us find out what your customers are going to see in your client area while placing an order.<br/> |
| + | As you can see, a dropdown menu with the previously configured applications has shown up. | ||
|} | |} | ||
{| | {| | ||
| − | |style="padding: 0px 0px 30px 25px;"|[[File: | + | |style="padding: 0px 0px 30px 25px;"|[[File:DA3_65_3.png]] |
|} | |} | ||
==Backups Management For Apps== | ==Backups Management For Apps== | ||
{| | {| | ||
| − | |style="padding: 10px 0px 20px 15px;"| You can also create a backup of your application. It is very easy! To do so click '' 'Create Backup'. '' | + | |style="padding: 10px 0px 20px 15px;"| You can also create a backup of your application. It is very easy! To do so, click '' 'Create Backup'. '' |
|} | |} | ||
{| | {| | ||
| − | |style="padding: 0px 0px 20px 25px;"|[[File: | + | |style="padding: 0px 0px 20px 25px;"|[[File:DA3_66.png]] |
|} | |} | ||
{| | {| | ||
| − | |style="padding: 0px 0px 15px 15px;"| After a few seconds you should see | + | |style="padding: 0px 0px 15px 15px;"| After a few seconds, you should see the '' 'Success' '' message as a confirmation of the performed operation.<br /> |
| − | To manage your backups simply press '' 'Backups'. '' | + | To manage your backups, simply press '' 'Backups'. '' |
|} | |} | ||
{| | {| | ||
| − | |style="padding: 0px 0px 20px 25px;"|[[File: | + | |style="padding: 0px 0px 20px 25px;"|[[File:DA3_67.png]] |
|} | |} | ||
{| | {| | ||
| − | |style="padding: 0px 0px 20px 15px;"| | + | |style="padding: 0px 0px 20px 15px;"| You can quickly view, delete or restore your existing backups. |
|} | |} | ||
{| | {| | ||
| − | |style="padding: 0px 0px 30px 25px;"|[[File: | + | |style="padding: 0px 0px 30px 25px;"|[[File:DA3_68.png]] |
|} | |} | ||
==Log In To DirectAdmin== | ==Log In To DirectAdmin== | ||
{| | {| | ||
| − | |style="padding: 10px 0px 20px 15px;"| With a single click | + | |style="padding: 10px 0px 20px 15px;"| With a single click on the '' 'Log In To DirectAdmin' '' button, you can log in to your DirectAdmin without the necessity to enter login details. |
|} | |} | ||
{| | {| | ||
| − | |style="padding: 0px 0px 30px 25px;"|[[File: | + | |style="padding: 0px 0px 30px 25px;"|[[File:DA3_69.png]] |
|} | |} | ||
| − | ==Log In To | + | ==Log In To phpMyAdmin== |
{| | {| | ||
| − | |style="padding: 10px 0px 20px 15px;"| You can easily log in to your | + | |style="padding: 10px 0px 20px 15px;"| You can easily log in to your phpMyAdmin by clicking '' 'phpMyAdmin'. '' You will be redirected to that site on the run. |
|} | |} | ||
{| | {| | ||
| − | |style="padding: 0px 0px 30px 25px;"|[[File: | + | |style="padding: 0px 0px 30px 25px;"|[[File:DA3_70.png]] |
|} | |} | ||
| − | ==Log In To | + | ==Log In To SitePad== |
{| | {| | ||
| − | |style="padding: 10px 0px 20px 15px;"| | + | |style="padding: 10px 0px 20px 15px;"| To be redirected to SitePad, click on the '' 'SitePad' '' button as presented below: |
|} | |} | ||
{| | {| | ||
| − | |style="padding: 0px 0px 30px 25px;"|[[File: | + | |style="padding: 0px 0px 30px 25px;"|[[File:DA3_71.png]] |
|} | |} | ||
| + | ==Log In To Webmail== | ||
| + | {| | ||
| + | |style="padding: 10px 0px 20px 15px;"| In order to enter Webmail, press '' 'Webmail' '' button as shown on the following screen.<br/> | ||
| + | '''''Note:''' Webmail type login has been defined by the admin and can be either 'Horde', 'Roundcube' or 'Squirellmail'.'' | ||
| + | |} | ||
| + | {| | ||
| + | |style="padding: 0px 0px 30px 25px;"|[[File:DA3_71_1.png]] | ||
| + | |} | ||
| + | |||
| + | <!-- | ||
==Management of Resource Usage== | ==Management of Resource Usage== | ||
{| | {| | ||
| − | |style="padding: 10px 0px 20px 15px;"| | + | |style="padding: 10px 0px 20px 15px;"| In the product overview tab, you can find your product's current resource usage andg]] |
|} | |} | ||
{| | {| | ||
| − | |style="padding: 0px 0px | + | |style="padding: 0px 0px 20px 15px;"|'''13. Enter a name, click on your previously created server, press '' 'Add' '' and afterward '' 'Save Changes'.''''' |
|} | |} | ||
| + | {| | ||
| + | |style="padding: 0px 0px 30px 25px;"|[[File:OVH_9_1.png]] | ||
| + | |} | ||
| + | --> | ||
| − | == | + | <!-- |
| + | ==Configuration of Product== | ||
{| | {| | ||
| − | |style="padding: 10px 0px | + | |style="padding: 10px 0px 15px 15px;"|'''15. In order to create and configure a product, go to '' 'System Settings' '' → '' 'Products/Services'.'''''<br /> |
| − | + | Click on '' 'Create a New Group'.'' | |
| − | + | ||
|} | |} | ||
| + | {| | ||
| + | |style="padding: 0px 0px 20px 25px;"|[[File:OVH_10.png]] | ||
| + | |} | ||
| + | {| | ||
| + | |style="padding: 0px 0px 20px 15px;"|'''16. Enter your product group name and press '' 'Save Changes'. ''''' | ||
| + | |} | ||
| + | {| | ||
| + | |style="padding: 0px 0px 20px 25px;"|[[File:OVH_11.png]] | ||
| + | |} | ||
| + | {| | ||
| + | |style="padding: 0px 0px 15px 15px;"|'''17. Once you have a product group, you can create a new product.'''<br /> | ||
| + | To do so, first click on '' 'Create a New Product'.'' | ||
| + | |} | ||
| + | {| | ||
| + | |style="padding: 0px 0px 20px 25px;"|[[File:OVH_12.png]] | ||
| + | |} | ||
| + | {| | ||
| + | |style="padding: 0px 0px 15px 15px;"|'''18. Afterward, choose your product type, enter your product name and choose the product group from the dropdown menu. Press '' 'Continue'. '' '''<br /> | ||
| + | |} | ||
| + | {| | ||
| + | |style="padding: 0px 0px 20px 25px;"|[[File:OVH_13.png]] | ||
| + | |} | ||
| + | {| | ||
| + | |style="padding: 0px 0px 15px 15px;"|'''19. Now, go to the '' 'Module Settings' '' section, choose your previously created server group from the dropdown menu.'''<br /> | ||
| + | The module should automatically save and reload the settings. If not, click on the '' 'Save Changes' '' option manually.''' | ||
| + | |} | ||
| + | {| | ||
| + | |style="padding: 0px 0px 20px 25px;"|[[File:OVH_14.png]] | ||
| + | |} | ||
| + | {| | ||
| + | |style="padding: 0px 0px 15px 15px;"|'''20. Now, you can start configuring the settings of the Server you sell.'''<br /> Bear in mind that the settings vary, depending on the server type selected.<br/> | ||
| + | Underneath we will describe the settings configuration for '' 'OVH VPS' '' and '' 'OVH Dedicated Servers' '' in details.<br/> Note that settings for '' 'So You Start' '' and '' 'Kimsufi' '' products are very much alike the '' 'OVH Dedicated Servers' '' once, so you may surely base on them while configuring these products. | ||
| + | |||
| + | '''OVH VPS''' configuration settings: | ||
| + | |||
| + | * '''Solution Type''' - choose from the available the one that will suit your needs the most | ||
| + | |||
| + | * '''Operating System''' - choose the OS, it can still be reinstalled at any time if such an option is enabled for clients | ||
| + | **GNU/Linux | ||
| + | **Windows (Cloud/Cloud RAM only) | ||
| + | |||
| + | * ''' License''' - you can select a license from the available ones | ||
| + | |||
| + | * '''Data Center Location''' - choose where the server shall be located on the OVH data center | ||
| + | |||
| + | * '''Payment Frequency''' - define the service payment frequency to pay for renewals before their expiry date. You can set it to manual renewal or choose an automatic renewal frequency: | ||
| + | ** ''Auto'' - choose this option to correlate your payment frequency to OVH with the product billing cycle selected in WHMCS.<br/> Note that '' 'Triennially' '' billing cycle is not supported by OVH so keep it unavailable for the clients | ||
| + | ** ''Monthly, Quarterly, Semi-Annually, Annually, Biennially'' - manually define the fixed payment frequency that will be set for the ordered product regardless of the billing cycle offered for clients in WHMCS | ||
| + | |||
| + | * '''Prevent System Reinstall''' - enable if you want to block the OS reinstallation during the upgrade process | ||
| + | |||
| + | * '''Snapshot''' - decide if clients should be allowed to capture an image of the server at a given time. | ||
| + | |} | ||
| + | {| | ||
| + | |style="padding: 0px 0px 20px 25px;"|[[File:OVH_15.png]] | ||
| + | |} | ||
| + | {| | ||
| + | |style="padding: 0px 0px 15px 15px;"|'''OVH Dedicated Server''' configuration settings: | ||
| + | |||
| + | * '''Operation System Template''' - choose a template of an operation system to install | ||
| + | |||
| + | * '''Operating System Language''' - choose the language of an installed operation system | ||
| + | |||
| + | * '''Plan''' - check out the powerful line-up of dedicated servers and select the preferred solution | ||
| + | |||
| + | * '''Disks''' - customise your server by selecting one of the available disks | ||
| + | |||
| + | * '''Distribution License''' - choose the distribution license | ||
| + | |||
| + | * '''Application License''' - choose the application license | ||
| + | |||
| + | * '''Contract Duration''' - define the duration of the contract | ||
| + | |||
| + | * '''Memory''' - define the memory of your dedicated server | ||
| + | |||
| + | * '''vRack''' - choose up to 40 Gbps, on certain models, for increased speed | ||
| + | |||
| + | * '''Public Network''' - choose the preferred public network traffic | ||
| + | |||
| + | * '''Data Center Location''' - define where a server will be located on the OVH data center | ||
| + | |||
| + | * '''Payment Frequency''' - define the frequency of payments | ||
| + | |||
| + | |} | ||
| + | {| | ||
| + | |style="padding: 0px 0px 20px 25px;"|[[File:OVH_16.png]] | ||
| + | |} | ||
| + | {| | ||
| + | |style="padding: 0px 0px 15px 15px;"|'''21. Afterward, set up incoming mail configuration.'''<br/> | ||
| + | Due to API limitations, all emails with server credentials can only be sent to your OVH / Kimsufi / So You Start email address set in the panel.<br/>This applies to messages with credentials sent after creating the server as well as messages sent after reinstallation.<br/>The solution to this problem is email piping that will be used to receive messages sent to your OVH mailbox and then forwarded through the templates further to your WHMCS clients.<br/> | ||
| + | |||
| + | '' '''Note:''' Even though the module filters the received messages in your mailbox, we recommend that you use a '''separate''' mailbox for your main OVH VPS and Dedicated Servers profile account to avoid any issues with non-OVH content.''<br/> | ||
| + | |||
| + | After setting up the dedicated mailbox, provide its valid credentials below and test whether the connection has been established correctly. | ||
| + | |||
| + | '''''Note:''' There is available an option to 'Disable Certificate Validation'. Please toggle this option ONLY if you are having trouble with the connection. The certificate validation will be omitted when connecting to an email box.'' <br/> | ||
| + | '''''Note:''' The 'Mailbox Folder' option allows you to define your mailbox folder for 'Incoming Mail Configuration' which will be used if received emails are set to be automatically filtered and moved to other than the default folder in the inbox. <br/> | ||
| + | |} | ||
| + | {| | ||
| + | |style="padding: 0px 0px 20px 25px;"|[[File:OVH_17.png]] | ||
| + | |} | ||
| + | {| | ||
| + | |style="padding: 0px 0px 15px 15px;"|The cron set during the last stage of the module's installation should periodically check that mailbox for OVH messages. <br/>If any new emails are received, they will be then converted to your email template and sent to the corresponding client.<br/>The default email templates for product creation, reinstallation and reboot in rescue mode can be specified below. Take a look at the [[#Tips|Tips]] section - tip no 1, and check the templates' types. | ||
| + | |} | ||
| + | {| | ||
| + | |style="padding: 0px 0px 20px 25px;"|[[File:OVH_18.png]] | ||
| + | |} | ||
| + | {| | ||
| + | |style="padding: 0px 0px 15px 15px;"|'''22. Automation Settings section includes detailed actions that will be automatically performed by the module in several situations:''' | ||
| + | *'''Action On Service Suspension''' - decide what to do with the server in situation when the module command: ''Suspend'' has been triggered | ||
| + | **Stop (VPS) | ||
| + | **Do Nothing (VPS) | ||
| + | **Do Nothing ''(Dedicated Server)'' | ||
| + | **Reboot To Rescue ''(Dedicated Server)'' | ||
| + | **Terminate ''(Dedicated Server)'' | ||
| + | **Reinstall ''(Dedicated Server)'' | ||
| + | |||
| + | *'''Auto Pay With Preferred Method''' - toggle to make payments for orders automatically with a preferred payment method in OVH Panel | ||
| + | |||
| + | *'''Auto Assign VPS/Dedicated Server To Reusable On Termination''' - when terminated, the server will be in fact cleared and added to the queue to be selected as a reusable by other clients | ||
| + | |||
| + | *'''Waive Retractation Period''' - toggle to resign from the withdrawal period on OVH orders | ||
| + | |} | ||
| + | {| | ||
| + | |style="padding: 0px 0px 20px 25px;"|[[File:OVH_19.png]] | ||
| + | |} | ||
| + | {| | ||
| + | |style="padding: 0px 0px 15px 15px;"|'''23. The following section is dedicated to the Client Area Features.'''<br/> | ||
| + | You will find here numerous options that can be enabled and then will be available to your clients in their client area. Please note that some options are available for VPS only, Dedicated Server only and some for both of them: | ||
| + | |||
| + | *'''Disks''' ''(VPS only)'' - if enabled, clients are allowed to view disks attached to their servers with specified limits | ||
| + | |||
| + | *'''Reinstall''' - if enabled, clients are allowed to reinstall the server in the client area | ||
| + | |||
| + | *'''KVM/IPMI Console''' - if enabled, clients are allowed to manage their server using KVM console | ||
| + | |||
| + | *'''Service Information''' - decide which records will be visible in the client area. Please remember that if you do not choose anything, all records will be displayed in the client area. | ||
| + | |||
| + | *'''Rescue Mode''' - if enabled, clients are allowed to reboot the server in rescue mode | ||
| + | |||
| + | *'''IP Addresses''' - if enabled, clients are allowed to view IP addresses assigned to the server | ||
| + | |||
| + | *'''Update Reverse DNS Paths''' - if enabled, reverse DNS can be updated in the client area, '' 'IP Addresses' '' must be previously enabled to use his option | ||
| + | |||
| + | *'''Traffic Statistics Graph''' ''(Dedicated Server only)'' - if enabled, clients are allowed to view traffic graph | ||
| + | <br/> | ||
| + | '''''Important:''' Access to '''KVM/IPMI Console''' and '''Traffic Statistics Graph''' is available for OVH only. "Kimsufi" and "So You Start" brands do not support them.'' | ||
| + | |} | ||
| + | {| | ||
| + | |style="padding: 0px 0px 20px 25px;"|[[File:OVH_20.png]] | ||
| + | |} | ||
| + | {| | ||
| + | |style="padding: 0px 0px 15px 15px;"|'''24. At the end of the configuration process, you can decide whether you want to generate configurable options for the product.'''<br/> | ||
| + | Configurable options can be used by your clients to select each Server parameters individually during order placement.<br/>Otherwise, if configurable options are not defined, then the fixed parameters specified in the earlier configuration will be used instead.<br/> | ||
| + | |||
| + | Configurable options for '''OVH Dedicated Servers''': | ||
| + | *dedicatedSystemTemplate|Operating System Template | ||
| + | *dedicatedLanguage|Operating System Language | ||
| + | |||
| + | Configurable options for '''OVH VPS''' server type: | ||
| + | *product|Solution Type | ||
| + | *systemVersions|Operating System Template | ||
| + | *localisation|Data Center Location | ||
| + | *license|License | ||
| + | *snapshot|Snapshot | ||
| + | |||
| + | |} | ||
| + | {| | ||
| + | |style="padding: 0px 0px 20px 25px;"|[[File:OVH_21.png]] | ||
| + | |} | ||
| + | {| | ||
| + | |style="padding: 0px 0px 15px 15px;"|If you decide to use configurable options, press on the 'Create' button and select which options you want to generate.<br/> Note that the configuration for disabled options will still be taken from the configuration of the main product.<br/>More information about how to use configurable options can be found [https://www.docs.modulesgarden.com/General#How_To_Use_Configurable_Options here] or in the official WHMCS [https://docs.whmcs.com/Addons_and_Configurable_Options documentation]. | ||
| + | |} | ||
| + | {| | ||
| + | |style="padding: 0px 0px 30px 25px;"|[[File:OVH_22.png]] | ||
| + | |} | ||
| + | |||
| + | ===Generating Additional Configurable Option=== | ||
| + | {| | ||
| + | |style="padding: 10px 0px 15px 15px;"|This section presents how you can manually add '' 'Solution Type & Operating System & Application' '' as additional configurable option in order to provide the diversity of your products. <br/> ''' Proceed to '' 'System Settings' '' → '' 'Configurable Options' '' '''. <br/> Click on the '' 'Configurable Options' '' that were generated previously. | ||
| + | |} | ||
| + | {| | ||
| + | |style="padding: 0px 0px 20px 25px;"|[[File:OVH_CO1.png]] | ||
| + | |} | ||
| + | {| | ||
| + | |style="padding: 0px 0px 15px 15px;"|Click '' 'Add New Configurable Option' '' as presented below. | ||
| + | |} | ||
| + | {| | ||
| + | |style="padding: 0px 0px 20px 25px;"|[[File:OVH_CO2.png]] | ||
| + | |} | ||
| + | {| | ||
| + | |style="padding: 0px 0px 15px 15px;"|Now, you need to provide ''' '' 'planCodeVpsOsAddon|Solution Type & Operating System & Application' '' ''' as '' 'Option Name' '' and choose ''' '' 'Dropdown' '' ''' as '' 'Option Type' ''. <br/> The first option has to be ''' '0|None' '''. <br/> | ||
| + | |} | ||
| + | {| | ||
| + | |style="padding: 0px 0px 20px 25px;"|[[File:OVH_CO3.png]] | ||
| + | |} | ||
| + | {| | ||
| + | |style="padding: 0px 0px 15px 15px;"|You can add another '' 'Options' '' following this scheme: <br/> | ||
| + | <pre> product:OS:license|your name that is displayed to customers </pre> | ||
| + | As an example, we will provide ''' '' 'vps-value-1-2-40:Centos 7 - cPanel:option-cpanel-1|VPS Value 1 vCPU 2 GB RAM 40 GB disk - Centos 7 - cPanel (Option cPanel 1 account)' '' '''. | ||
| + | |} | ||
| + | {| | ||
| + | |style="padding: 0px 0px 20px 25px;"|[[File:OVH_CO4.png]] | ||
| + | |} | ||
| + | {| | ||
| + | |style="padding: 0px 0px 15px 15px;"|If you wish to diversify your products, set different prices to make your products more competitive on the market. <br/> You can create another options using the following values. <br/> | ||
| + | |} | ||
| + | {| class="wikitable" style="margin-left: 25px; margin-bottom: 20px; margin-top: 0px;" | ||
| + | ! Product | ||
| + | ! OS | ||
| + | ! License | ||
| + | |- | ||
| + | | vps-comfort-4-16-160 | ||
| + | | Archlinux | ||
| + | | option-cpanel-100 | ||
| + | |- | ||
| + | | vps-comfort-4-16-320 | ||
| + | | Centos 7 | ||
| + | | option-cpanel-200 | ||
| + | |- | ||
| + | | vps-comfort-4-16-80 | ||
| + | | Centos 7 - cPanel | ||
| + | | option-cpanel-30 | ||
| + | |- | ||
| + | | vps-comfort-4-4-80 | ||
| + | | Centos 8 | ||
| + | | option-cpanel-5 | ||
| + | |- | ||
| + | | vps-comfort-4-8-160 | ||
| + | | Centos 8 - Plesk | ||
| + | | option-cpanel-1 | ||
| + | |- | ||
| + | | vps-comfort-4-8-320 | ||
| + | | CoreOS Stable | ||
| + | | option-plesk-webadmin | ||
| + | |- | ||
| + | | vps-comfort-4-8-80 | ||
| + | | Debian 10 | ||
| + | | option-plesk-webhost | ||
| + | |- | ||
| + | | vps-elite-8-16-160 | ||
| + | | Debian 10 - Plesk | ||
| + | | option-plesk-webpro | ||
| + | |- | ||
| + | | vps-elite-8-16-320 | ||
| + | | Debian 8 - Docker | ||
| + | | option-windows | ||
| + | |- | ||
| + | | vps-elite-8-16-640 | ||
| + | | Debian 8 - OpenVPN | ||
| + | | | ||
| + | |- | ||
| + | | vps-elite-8-32-160 | ||
| + | | Debian 8 - Plesk | ||
| + | | | ||
| + | |- | ||
| + | | vps-elite-8-32-320 | ||
| + | | Debian 8 - Vestacp | ||
| + | | | ||
| + | |- | ||
| + | | vps-elite-8-32-640 | ||
| + | | Debian 8 - Virtualmin | ||
| + | | | ||
| + | |- | ||
| + | | vps-elite-8-8-160 | ||
| + | | Debian 8 - WordPress | ||
| + | | | ||
| + | |- | ||
| + | | vps-elite-8-8-320 | ||
| + | | Debian 9 | ||
| + | | | ||
| + | |- | ||
| + | | vps-elite-8-8-640 | ||
| + | | Fedora 31 | ||
| + | | | ||
| + | |- | ||
| + | | vps-essential-2-4-160 | ||
| + | | Ubuntu 16.04 | ||
| + | | | ||
| + | |- | ||
| + | | vps-essential-2-4-40 | ||
| + | | Ubuntu 18.04 | ||
| + | | | ||
| + | |- | ||
| + | | vps-essential-2-4-80 | ||
| + | | Ubuntu 19.10 | ||
| + | | | ||
| + | |- | ||
| + | | vps-essential-2-8-160 | ||
| + | | Ubuntu 20.04 | ||
| + | | | ||
| + | |- | ||
| + | | vps-essential-2-8-80 | ||
| + | | Windows Server 2016 Standard (Desktop) | ||
| + | | | ||
| + | |- | ||
| + | | vps-value-1-2-40 | ||
| + | | Windows Server 2019 Standard (Desktop) | ||
| + | | | ||
| + | |- | ||
| + | | vps-value-1-2-80 | ||
| + | | | ||
| + | | | ||
| + | |- | ||
| + | | vps-value-1-4-40 | ||
| + | | | ||
| + | | | ||
| + | |- | ||
| + | | vps-value-1-4-80 | ||
| + | | | ||
| + | | | ||
| + | |} | ||
| + | {| | ||
| + | |style="padding: 0px 0px 15px 15px;"| '''Note:''' ''Please remember that the above options can be changed as plans are updated.'' <br/> You can easily check the currently available options by generating the default configurable options in the '' 'Module Settings' '' section. | ||
| + | |} | ||
| + | --> | ||
| + | |||
| + | <!-- | ||
| + | ==Configuration of Addon== | ||
| + | {| | ||
| + | |style="padding: 10px 0px 15px 15px;"|'''You have just correctly created and customized a new product.'''<br /> | ||
| + | Go to '' 'Addons' '' → '' 'OVH VPS And Dedicated' '' in your WHMCS. | ||
| + | |} | ||
| + | {| | ||
| + | |style="padding: 0px 0px 30px 25px;"|[[File:OVH_23.png]] | ||
| + | |} | ||
| + | ===Servers=== | ||
| + | {| | ||
| + | |style="padding: 10px 0px 20px 15px;"|'' 'Servers' '' section contains a list of your configured servers, you may quickly edit them directly from this site, simply press the edit icon. | ||
| + | |} | ||
| + | {| | ||
| + | |style="padding: 0px 0px 20px 25px;"|[[File:OVH_24.png]] | ||
| + | |} | ||
| + | {| | ||
| + | |style="padding: 0px 0px 20px 15px;"|In the next step, press the marked icon to see a list of deployed machines. | ||
| + | |} | ||
| + | {| | ||
| + | |style="padding: 0px 0px 20px 25px;"|[[File:OVH_25.png]] | ||
| + | |} | ||
| + | {| | ||
| + | |style="padding: 0px 0px 15px 15px;"|There you will see all existing machines on this very server. Whether they are used by any client already or not.<br/> | ||
| + | Next to the machine name, there are details such as: | ||
| + | *its state | ||
| + | *displayed name | ||
| + | *assigned client (if there is any already) | ||
| + | *service assigned | ||
| + | *reusable toggle - for machines that can be used again by other clients without the necessity to terminate it first. If disabled, the machine can be simply terminated when not used.<br/> If enabled, when the product is created for the next time by the client, this machine will be automatically reinstalled and assigned to this client. | ||
| + | |||
| + | In order to manually assign the machine to a client, simply press the marked on the screen button. | ||
| + | |} | ||
| + | {| | ||
| + | |style="padding: 0px 0px 20px 25px;"|[[File:OVH_26.png]] | ||
| + | |} | ||
| + | {| | ||
| + | |style="padding: 0px 0px 20px 15px;"|Start typing to see a list of clients, then select existing service to assign. | ||
| + | |} | ||
| + | {| | ||
| + | |style="padding: 0px 0px 20px 25px;"|[[File:OVH_26_1.png]] | ||
| + | |} | ||
| + | {| | ||
| + | |style="padding: 0px 0px 20px 15px;"|There is also a possibility to assign reusable products to the machine. These products will be permitted to use this machine. | ||
| + | |} | ||
| + | {| | ||
| + | |style="padding: 0px 0px 30px 25px;"|[[File:OVH_28.png]] | ||
| + | |} | ||
| + | |||
| + | ===Logs=== | ||
| + | {| | ||
| + | |style="padding: 10px 0px 20px 15px;"|Go back to '' 'Logs' '' section, there you will see a list of all module actions, including errors, notifications etc. | ||
| + | |} | ||
| + | {| | ||
| + | |style="padding: 0px 0px 30px 25px;"|[[File:OVH_29.png]] | ||
| + | |} | ||
| + | --> | ||
| + | |||
| + | <!-- | ||
| + | =Management= | ||
| + | ==Admin Area== | ||
| + | {| | ||
| + | |style="padding: 10px 0px 15px 15px;"|''' ''OVH VPS & Dedicated Servers For WHMCS'' allows you to monitor and manage your customer servers from the admin area of your WHMCS system.'''<br /> | ||
| + | This includes supervision of such features like: | ||
| + | # Module commands and service actions that enable you to manage server status and features | ||
| + | # Service information which provides you with the current status, resources and options set for the server | ||
| + | |} | ||
| + | {| | ||
| + | |style="padding: 0px 0px 20px 25px;"|[[File:OVH_30.png]] | ||
| + | |} | ||
| + | {| | ||
| + | |style="padding: 0px 0px 15px 15px;"|'''OVH VPS type''' | ||
| + | <ol start="3"> | ||
| + | <li>Service Monitoring section with current statuses</li> | ||
| + | <li>Created snapshot with a direct option to edit, restore and delete it</li> | ||
| + | <li>List of IP addresses with option to update the reverse DNS path</li> | ||
| + | <li>List of disks with any important details</li> | ||
| + | </ol> | ||
| + | |} | ||
| + | {| | ||
| + | |style="padding: 0px 0px 20px 25px;"|[[File:OVH_31.png]] | ||
| + | |} | ||
| + | {| | ||
| + | |style="padding: 0px 0px 15px 15px;"|'''OVH Dedicated Servers type:''' | ||
| + | <ol start="3"> | ||
| + | <li>List of IP Addresses with option to update the reverse DNS path</li> | ||
| + | <li>Traffic statistics graph</li> | ||
| + | </ol> | ||
| + | |} | ||
| + | {| | ||
| + | |style="padding: 0px 0px 30px 25px;"|[[File:OVH_32.png]] | ||
| + | |} | ||
| + | |||
| + | ==Ordering== | ||
| + | {| | ||
| + | |style="padding: 10px 0px 15px 15px;"|Owing to configurable options, you are able to offer a product which your clients can tailor according to their needs.<br />Additionally, you are able to set up pricing for each configurable option, which makes your offer even more competitive.<br/> | ||
| + | |||
| + | After the order placement and successful VM creation, the server credentials will be sent to the client's email address according to the set cron execution intervals. | ||
| + | |} | ||
| + | {| | ||
| + | |style="padding: 0px 0px 30px 25px;"|[[File:OVH_33.png]] | ||
| + | |} | ||
| + | ===Importing Existing VPS=== | ||
| + | {| | ||
| + | |style="padding: 10px 0px 15px 15px;"|In this section, you can find short instruction on how to connect one of your clients to your already existing VPS in the OVH panel. <br/> Take the following steps to make sure that the process will be carried out properly. <br/> | ||
| + | 1. Firstly, manually create an order for your customer in WHMCS. Choose a client and in the summary, view click on the '' ' Add New Order' '' button. Next, select a '' 'Product/Service' '' and press '' 'Submit Order' ''. <br/> '''What is important, do not perform the '' 'Create' '' action.''' The status has to remain as '' 'Pending' ''. <br/> More info about placing orders can be found [https://docs.whmcs.com/Order_Management#Placing_an_Order here]<br/> | ||
| + | 2. Proceed to the newly created product's card in your admin area. Find the following empty field: | ||
| + | *'''Server Name''' | ||
| + | The above-mentioned information has to be consistent with the data from your OVH panel. Now, complete this field as presented below. <br/> '''Important!''' Remember to make sure that the format of the provided data is compatible with the format supported by the module. You can preview it for another product of the module you have already created and enter it in a similar way. <br/> If you completed the required data, now change the status from '' 'Pending' '' to '' 'Active' '' and '' 'Save Changes' ''. | ||
| + | |} | ||
| + | {| | ||
| + | |style="padding: 0px 0px 20px 25px;"|[[File:OVH_import.png]] | ||
| + | |} | ||
| + | {| | ||
| + | |style="padding: 0px 0px 15px 15px;"|3. If the completed data is correct, after refreshing the page, you will see the attached VPS from OVH. <br/> '''Important!''' Remember to manually add other missing parameters of the VPS such as domains, IP Addresses, configurable options, etc. so they match the parameters of the attached VPS from the OVH panel. | ||
| + | |} | ||
| + | |||
| + | ==Client Area== | ||
| + | {| | ||
| + | |style="padding: 10px 0px 15px 15px;"|Client area interface of '' 'OVH VPS & Dedicated Servers' '' should look like the one on the screen below.<br/>As you can see, the control panel contains useful options required for managing a server.<br /> | ||
| + | The module allows your customers to easily power on/off, reboot and reboot in rescue mode, reinstall and access console through pressing the corresponding buttons.<br /> | ||
| + | Clients can also view disks, create and restore snapshots, see IP addresses and view current traffic graphs.<br/> | ||
| + | Additionally, clients may view the current server parameters, resources as well as the assigned IP addresses. <br/> | ||
| + | |||
| + | '''OVH VPS''' client area view: | ||
| + | |} | ||
| + | {| | ||
| + | |style="padding: 0px 0px 20px 25px;"|[[File:OVH_34.png]] | ||
| + | |} | ||
| + | {| | ||
| + | |style="padding: 0px 0px 20px 15px;"|'''OVH Dedicated Server''' client area view: | ||
| + | |} | ||
| + | {| | ||
| + | |style="padding: 0px 0px 30px 25px;"|[[File:OVH_35.png]] | ||
| + | |} | ||
| + | ===Service Actions=== | ||
| + | ====Access Console==== | ||
| + | {| | ||
| + | |style="padding: 10px 0px 15px 15px;"|In case of OVH VPS, clients might be granted access to KVM console.<br/> | ||
| + | Simply press its icon to open the console window. | ||
| + | |} | ||
| + | {| | ||
| + | |style="padding: 0px 0px 20px 25px;"|[[File:OVH_36_1.png]] | ||
| + | |} | ||
| + | {| | ||
| + | |style="padding: 0px 0px 15px 15px;"|For OVH Dedicate Servers, there is supported IPMI console.<br/> | ||
| + | Press the IPMI Access icon and then select type and TTL of the IPMI access to continue to the console. | ||
| + | |} | ||
| + | {| | ||
| + | |style="padding: 0px 0px 30px 25px;"|[[File:OVH_36_2.png]] | ||
| + | |} | ||
| + | |||
| + | ====Rescue Reboot==== | ||
| + | {| | ||
| + | |style="padding: 10px 0px 15px 15px;"|This action reboots the server in the rescue mode. <br/> | ||
| + | The moment you press the confirm button, new login details are sent in an email template selected in the product configuration ''(see point [[#Configuration_of_Product|21]])'', with accordance to the cron settings. <br/> | ||
| + | '''''Note:''' The action might last up to a few minutes, please be patient.'' | ||
| + | |} | ||
| + | {| | ||
| + | |style="padding: 0px 0px 30px 25px;"|[[File:OVH_36_3.png]] | ||
| + | |} | ||
| + | |||
| + | ====Reinstall==== | ||
| + | {| | ||
| + | |style="padding: 10px 0px 15px 15px;"|The action when triggered, causes the new login details to be sent in an email template selected in the product configuration ''(see point [[#Configuration_of_Product|21]])'' and with accordance to the cron settings. <br/> | ||
| + | '''''Note:''' Please be patient as reinstallation process is quite time consuming.'' | ||
| + | |} | ||
| + | {| | ||
| + | |style="padding: 0px 0px 30px 25px;"|[[File:OVH_36_4.png]] | ||
| + | |} | ||
| + | |||
| + | ===Service Management=== | ||
| + | ====Snapshot (VPS)==== | ||
| + | {| | ||
| + | |style="padding: 10px 0px 15px 15px;"|Use snapshots to save the current contents of the virtual machine memory.<br/>You may use them later to restore the VM's settings. | ||
| + | |||
| + | '''''Note:''' Creating a snapshot may take a while, so it will not appear on the list right away. '' | ||
| + | |} | ||
| + | {| | ||
| + | |style="padding: 0px 0px 20px 25px;"|[[File:OVH_37_1.png]] | ||
| + | |} | ||
| + | {| | ||
| + | |style="padding: 0px 0px 15px 15px;"|Allowed actions on the created snapshot: | ||
| + | # Edit the snapshot (description) | ||
| + | # Restore the snapshot to reverse the saved contents of the VM settings | ||
| + | # Delete the snapshot | ||
| + | # Create another snapshot. <br/> '''''Note:''' Keep in mind that you must have previously deleted the existing snapshot, as only one snapshot may exist at the time. ''<br/> | ||
| + | |} | ||
| + | {| | ||
| + | |style="padding: 0px 0px 30px 25px;"|[[File:OVH_37.png]] | ||
| + | |} | ||
| + | |||
| + | ====Disks (VPS)==== | ||
| + | {| | ||
| + | |style="padding: 10px 0px 15px 15px;"|When you enter this section, you will see a list of assigned disks with any details on them, such as: | ||
| + | *Type | ||
| + | *Size | ||
| + | *Bandwidth limit | ||
| + | *Free space threshold | ||
| + | *Status | ||
| + | |} | ||
| + | {| | ||
| + | |style="padding: 0px 0px 30px 25px;"|[[File:OVH_36.png]] | ||
| + | |} | ||
| + | |||
| + | ====IP Addresses==== | ||
| + | {| | ||
| + | |style="padding: 10px 0px 15px 15px;"|Under '' 'IP Addresses' '' you may see any assigned IP addresses, their version, type, location, MAC address and reverse DNS if specified.<br/> | ||
| + | '''(1)''' Update the reverse DNS path of an IP address by pressing the marked button. <br/> | ||
| + | '''(2)''' Manage the firewall rules. <br/> | ||
| + | '''(3)''' Turn on the firewall. | ||
| + | |} | ||
| + | {| | ||
| + | |style="padding: 0px 0px 20px 25px;"|[[File:OVH_39.png]] | ||
| + | |} | ||
| + | {| | ||
| + | |style="padding: 0px 0px 20px 15px;"|'''(1)''' - Provide a new reverse DNS for the selected IP address. Press '' 'Confirm' '' when ready. | ||
| + | |} | ||
| + | {| | ||
| + | |style="padding: 0px 0px 20px 25px;"|[[File:OVH_40.png]] | ||
| + | |} | ||
| + | {| | ||
| + | |style="padding: 0px 0px 20px 15px;"|'''(2)''' - Manage existing firewall rules, preview their priority and other details, delete if necessary. | ||
| + | |} | ||
| + | {| | ||
| + | |style="padding: 0px 0px 20px 25px;"|[[File:OVH_40_2.png]] | ||
| + | |} | ||
| + | {| | ||
| + | |style="padding: 0px 0px 20px 15px;"|Add a new firewall rule by pressing appropriate button. A new window with rule details to be filled out will appear. | ||
| + | |} | ||
| + | {| | ||
| + | |style="padding: 0px 0px 30px 25px;"|[[File:OVH_40_3.png]] | ||
| + | |} | ||
| + | |||
| + | ====Traffic Statistics Graph (Dedicated Servers)==== | ||
| + | {| | ||
| + | |style="padding: 10px 0px 15px 15px;"|Open this section to see the graph with traffic statistics. You will find there outlined data on errors, packets and traffic downloads as well as uploads.<br/> | ||
| + | You may easily adjust the graph's view by changing the time scope of the displayed stats.<br/> | ||
| + | |||
| + | '''''Note 1:''' Some of the mentioned option may not be visible on the graph until soma data are generated. This is applicable to the graph itself as well.''<br/> | ||
| + | '''''Note 2:''' "So You Start" and "Kimsufi" brands may not support graphs.'' | ||
| + | |} | ||
| + | {| | ||
| + | |style="padding: 0px 0px 20px 25px;"|[[File:OVH_41.png]] | ||
| + | |} | ||
| + | {| | ||
| + | |style="padding: 0px 0px 20px 15px;"|Select the time scope: | ||
| + | |} | ||
| + | {| | ||
| + | |style="padding: 0px 0px 30px 25px;"|[[File:OVH_41_1.png]] | ||
| + | |} | ||
| + | --> | ||
| + | |||
==Management of Billing== | ==Management of Billing== | ||
{| | {| | ||
| − | |style="padding: 10px 0px 15px 15px;"|When you combine DirectAdmin Extended For WHMCS with [ | + | |style="padding: 10px 0px 15px 15px;"|When you combine DirectAdmin Extended For WHMCS with [https://www.docs.modulesgarden.com/Advanced_Billing_For_WHMCS Advanced Billing For WHMCS], you will be able to set up additional billing options.<br /> |
| − | + | The module allows you to charge your customers basing on the actual server resource usage. | |
|} | |} | ||
{| | {| | ||
| Line 835: | Line 2,182: | ||
|} | |} | ||
{| | {| | ||
| − | |style="padding: 0px 0px 20px 15px;"|With Advanced Billing module, you can also | + | |style="padding: 0px 0px 20px 15px;"|With Advanced Billing module, you can also show your customers the current usage of server resources and their cost. |
|} | |} | ||
{| | {| | ||
| − | |style="padding: 0px 0px 30px 25px;"|[[File: | + | |style="padding: 0px 0px 30px 25px;"|[[File:DA3_74.png]] |
| + | |} | ||
| + | |||
| + | ==Importing Existing Account== | ||
| + | {| | ||
| + | |style="padding: 10px 0px 15px 15px;"|In this section, you can find short instruction on how to connect one of your clients to your already existing account in DirectAdmin. <br/> Take the following steps to make sure that the process will be carried out properly. <br/> | ||
| + | 1. Firstly, manually create an order for your customer in WHMCS. Choose a client and in the summary, view click on the '' ' Add New Order' '' button. Next, select a '' 'Product/Service' '' and press '' 'Submit Order' ''. <br/> '''What is important, do not perform the '' 'Create' '' action.''' The status has to remain as '' 'Pending' ''. <br/> More info about placing orders can be found [https://docs.whmcs.com/Order_Management#Placing_an_Order here]<br/> | ||
| + | 2. Proceed to the newly created product's card in your admin area. Find the following empty fields: | ||
| + | *'''Domain''' | ||
| + | *'''Username''' | ||
| + | *'''Password''' | ||
| + | The above-mentioned information has to be consistent with the data from your DirectAdmin account. Now, complete these fields as presented below. <br/> '''Important!''' Remember to make sure that the format of the provided data is compatible with the format supported by the module. You can preview it for another product of the module you have already created and enter it in a similar way. <br/> '''Note:''' You need to enter a password to your DirectAdmin account. If for some reason, you do not remember your password, there has to be the possibility to reset your password and create a new one in your panel. <br/> | ||
| + | If you completed the required data, now change the status from '' 'Pending' '' to '' 'Active' '' and '' 'Save Changes' ''. | ||
| + | |} | ||
| + | {| | ||
| + | |style="padding: 0px 0px 20px 25px;"|[[File:Import_DA.png]] | ||
| + | |} | ||
| + | {| | ||
| + | |style="padding: 0px 0px 15px 15px;"|3. If the completed data is correct, you can log in to the account by pressing the '' 'Login to Control Panel' '' button. <br/> Moreover, to make sure that everything works as expected, you can check if the newly-created account can be managed in the client area. <br/> '''Important!''' Remember to manually add other missing parameters of the product in configurable options, custom fields, billing cycle, etc. so they match the parameters of the connected account from DirectAdmin. <br/> | ||
| + | 4. If you have [https://www.modulesgarden.com/products/whmcs/account-synchronization Account Synchronization For WHMCS] installed, you can use it to quickly and automatically import and synchronize your DirectAdmin account with WHMCS. <br/>The detailed instruction can be found [https://www.docs.modulesgarden.com/Account_Synchronization_For_WHMCS here]. | ||
| + | |} | ||
| + | |||
| + | =Use Cases= | ||
| + | {| | ||
| + | |style="padding: 10px 0px 30px 15px;"|'''This section presents example scenarios that demonstrate typical use cases and practical applications of the module's features.<br/> | ||
| + | Review the examples below to see how the module can be used in real-world situations. | ||
| + | |} | ||
| + | ==Automatic App Installation With Service Order== | ||
| + | {| | ||
| + | |style="padding: 10px 0px 15px 15px;"|You can set up applications to be installed automatically in DirectAdmin Extended For WHMCS products.<br/> Start by opening the '' 'DirectAdmin Extended' '' addon, then navigate to '' 'Features' '' → '' 'Settings' '' and find the '' 'Applications' '' section. | ||
| + | |} | ||
| + | {| | ||
| + | |style="padding: 0px 0px 20px 25px;"|[[File:DA3_75.png]] | ||
| + | |} | ||
| + | {| | ||
| + | |style="padding: 0px 0px 15px 15px;"|To initiate, enable the '' 'Install Applications' '' feature.<br/> You can select an application for automatic installation in new DirectAdmin accounts by choosing the '' 'Auto Installer Type' '' and then selecting your preferred application. | ||
| + | |} | ||
| + | {| | ||
| + | |style="padding: 0px 0px 20px 25px;"|[[File:DA3_76.png]] | ||
| + | |} | ||
| + | {| | ||
| + | |style="padding: 0px 0px 15px 15px;"|Alternatively, you can enable customers to select an application during their order process.<br/> To do this, toggle on the '' 'Use Configurable Options' '' feature and choose from the options available in the dropdown menu.<br/>For a comprehensive guide on how to set up these Configurable Options, refer to the '' '[[#Management_of_Auto_Installed_Applications|Management]]' '' section. | ||
| + | |} | ||
| + | {| | ||
| + | |style="padding: 0px 0px 20px 25px;"|[[File:DA3_77.png]] | ||
| + | |} | ||
| + | {| | ||
| + | |style="padding: 0px 0px 20px 15px;"|Once the client submits an order and the '' 'Create' '' action is completed, the new DirectAdmin account will be set up with the chosen application (for example, a WordPress installation). | ||
| + | |} | ||
| + | {| | ||
| + | |style="padding: 0px 0px 30px 25px;"|[[File:DA3_78.png]] | ||
|} | |} | ||
| Line 847: | Line 2,244: | ||
|} | |} | ||
{| | {| | ||
| − | |style="padding: 0px 0px 5px 15px;"|2. To manage SSL certificates, your customers require | + | |style="padding: 0px 0px 5px 15px;"|2. To manage SSL certificates, your customers require the owned IP address.<br /> |
| − | + | Otherwise, the module will return the following error: '' 'You can manage SSL certificates when you own the IP you are using. Info for admins: Assign an owned IP'. '' | |
|} | |} | ||
| + | <!-- | ||
{| | {| | ||
|style="padding: 0px 0px 10px 25px;"|[[File:DA_75.png]] | |style="padding: 0px 0px 10px 25px;"|[[File:DA_75.png]] | ||
|} | |} | ||
| + | --> | ||
{| | {| | ||
| − | |style="padding: 0px 0px 10px 15px;"|To add owned IP, log in to your DirectAdmin admin area, go to '' 'IP Management' '' section, add the IP and assign it to the admin. | + | |style="padding: 0px 0px 10px 15px;"|To add the owned IP address, log in to your DirectAdmin admin area, go to the '' 'IP Management' '' section, add the IP and assign it to the admin. |
|} | |} | ||
{| | {| | ||
| Line 860: | Line 2,259: | ||
|} | |} | ||
{| | {| | ||
| − | |style="padding: 0px 0px 5px 15px;"|Afterwards manage the user for whom you want to add the IP.<br /> | + | |style="padding: 0px 0px 10px 25px;"|[[File:DA_76_1.png]] |
| − | Set IP to your previously created IP, save changes and make sure that this IP will be current IP of your customer. | + | |} |
| + | {| | ||
| + | |style="padding: 0px 0px 5px 15px;"|Afterwards, manage the user for whom you want to add the IP address.<br /> | ||
| + | Set IP to your previously created IP address, save changes and make sure that this IP will be the current IP address of your customer. | ||
|} | |} | ||
{| | {| | ||
| Line 868: | Line 2,270: | ||
{| | {| | ||
|style="padding: 0px 0px 5px 15px;"|If you add more IP addresses with free status in your DirectAdmin, you can quickly assign those IP addresses to your customers in WHMCS.<br /> | |style="padding: 0px 0px 5px 15px;"|If you add more IP addresses with free status in your DirectAdmin, you can quickly assign those IP addresses to your customers in WHMCS.<br /> | ||
| − | For this purpose, simply type the IP in the '' 'Dedicated IP' '' field, press '' 'Enter' '' on your keyboard and update the product package | + | For this purpose, simply type the IP in the '' 'Dedicated IP' '' field, press '' 'Enter' '' on your keyboard and update the product package by clicking on the '' 'Change Package' '' button. |
|} | |} | ||
{| | {| | ||
| − | |style="padding: 0px 0px | + | |style="padding: 0px 0px 20px 25px;"|[[File:DA_78.png]] |
| + | |} | ||
| + | {| | ||
| + | |style="padding: 0px 0px 10px 15px;"|3. As this module supports templates system, any changes made in the module's template files will be saved after the upgrade process. | ||
| + | |} | ||
| + | {| | ||
| + | |style="padding: 0px 0px 5px 15px;"|4. Backups management in DirectAdmin panel:<br/> | ||
| + | '''Admin Backups:''' | ||
| + | *Log into Your DirectAdmin Panel and find Admin Backup/Transfer and create a new one. | ||
| + | *Select your user and define '' 'When', 'Where' - set to '''Local''' '' and '' 'What' '' to backup. | ||
| + | *Go back to WHMCS → Addons → DirectAdmin Extended → Features (of the backed up product) → Backups. Fill out the '' 'Backup Directory Paths' '' with the very same data as in the panel. | ||
| + | <br/> | ||
| + | '''FTP Backups:''' | ||
| + | *Log into Your DirectAdmin Panel and find Admin Backup/Transfer and create a new one. | ||
| + | *Select your user ('Who') and define '' 'When', 'Where' - set to '''FTP''' '' and '' 'What' '' to backup. | ||
| + | *Go back to WHMCS → Addons → DirectAdmin Extended → Features (of the backed up product) → Backups. Fill out the ''' 'FTP Backup Endpoints' '' with the very same data as in the panel. | ||
| + | |} | ||
| + | {| | ||
| + | |style="padding: 0px 0px 30px 15px;"|5. Please remember that if you want to use Configurable Options then set ' '''-- Custom --''' ' in the '' 'Package' '' field of the WHMCS product configuration. | ||
| + | |} | ||
| + | |||
| + | =Update Instructions= | ||
| + | {| | ||
| + | |style="padding: 10px 0px 5px 15px;"|The essential guidance through the process of updating the module is offered '''[https://www.docs.modulesgarden.com/How_To_Update_WHMCS_Module here]'''.<br/> | ||
| + | |} | ||
| + | {| | ||
| + | |style="padding: 0px 0px 30px 15px;"|When migrating your product from version 2.x to 3.x, you must deactivate your old addon (version prior to 3.x.x) and then activate the new one (v3.x.x) to successfully migrate your current settings. ''(Please ignore point 8 of our modules [https://www.docs.modulesgarden.com/How_To_Update_WHMCS_Module update instruction])''.<br/> | ||
| + | |||
| + | No other additional steps are required to keep your addon's configuration and products' settings. | ||
| + | |} | ||
| + | =Upgrade Guide= | ||
| + | {| | ||
| + | |style="padding: 10px 0px 30px 15px;"|Seeking a solution that offers greater flexibility, customization tailored to your precise needs, and unrestricted availability?<br/> There is an option that not only proves to be cost-effective in the long run but also includes prioritized support services, making it a truly valuable investment.<br/> | ||
| + | |||
| + | Opt for the [https://www.modulesgarden.com/products/whmcs/directadmin-extended#open-source-version Open Source version] of your DirectAdmin Extended For WHMCS module to unlock these benefits.<br/> Simply click on either the '''Get Source Code''' or '''Upgrade To Lifetime''' button found on the product's page in our client area to complete the one-step upgrade process, with a '''dedicated discount''' already applied.<br/> | ||
| + | |||
| + | Follow a [https://www.docs.modulesgarden.com/How_To_Upgrade_WHMCS_Module comprehensive guide] covering the transition process, the advantages it brings, and step-by-step instructions on what to do next after the order has been successfully finalized. | ||
|} | |} | ||
| Line 877: | Line 2,315: | ||
{| | {| | ||
|style="padding: 10px 0px 10px 15px;"|'''1. When you have problems with connection, check whether your SELinux or firewall does not block ports.''' | |style="padding: 10px 0px 10px 15px;"|'''1. When you have problems with connection, check whether your SELinux or firewall does not block ports.''' | ||
| − | |||
|} | |} | ||
{| | {| | ||
| − | |style="padding: 0px 0px 10px 15px;"|2. If you have problems with connection make sure that port '''2222''' is open. | + | |style="padding: 0px 0px 10px 15px;"|2. If you have problems with connection, we recommend that you make sure that the default DirectAdmin port '''2222''' is open.<br/> |
| + | You can also change the DirectAdmin port to '''other than 2222''' by using the '' 'Override with Custom Port' '' option while configuring the server. | ||
| + | |} | ||
| + | {| | ||
| + | |style="padding: 0px 0px 5px 15px;"|3. If you run into an ionCube encoder problem (wrong version) after the installation, please open a support ticket.<br /> | ||
| + | We will provide you with a different version of the module encrypted with the older version of ionCube. | ||
| + | |} | ||
| + | {| | ||
| + | |style="padding: 0px 0px 10px 15px;"|4. DirectAdmin Extended For WHMCS module functions only on the administrator account. | ||
| + | |} | ||
| + | {| | ||
| + | |style="padding: 0px 0px 10px 15px;"|5. Change Package option currently does not support the Configurable Options. | ||
| + | |} | ||
| + | {| | ||
| + | |style="padding: 0px 0px 10px 15px;"|6. If you encounter error: '' 'Unexpected Module Error(Token 'f80e57b1be9752d7d4658434bd55aafa2'). Please Contact Administrator.' '' displayed in the client area, | ||
| + | reissue your license in our client area, if that does not help, please contact our support department. | ||
|} | |} | ||
{| | {| | ||
| − | |style="padding: 0px 0px 5px 15px;"| | + | |style="padding: 0px 0px 5px 15px;"|7. '''Warning: Compatibility Issue with DirectAdmin Version 1.671'''<br/> |
| − | + | DirectAdmin introduced changes to their API in version 1.671 that are currently incompatible with our module. We are actively working on an update to address this.<br/> | |
| + | To continue using the module without issues, you must revert to DirectAdmin version 1.670.<br/> We recommend postponing any updates to 1.671 until compatibility is restored. | ||
|} | |} | ||
{| | {| | ||
| − | |style="padding: 0px 0px 30px 15px;"| | + | |style="padding: 0px 0px 30px 15px;"|8. ''' "Applications" and "SSO" functionality issues in DirectAdmin Version 1.671.'''<br/> |
| − | DirectAdmin Extended For WHMCS | + | The API returns an '' 'Access Denied' '' error for "Applications" and "SSO" functionalities when the '''Login Keys''' option is disabled in the DirectAdmin account.<br/> |
| + | To resolve this issue and ensure the proper functionality of the "Applications" and "SSO" options in the DirectAdmin Extended For WHMCS module, make sure the ''' "Login Keys" option is enabled''' in your DirectAdmin account. | ||
|} | |} | ||
Latest revision as of 09:36, 8 May 2025
DirectAdmin version 1.671 introduces changes that are not yet supported by the module.
See Common Problems for more information and a workaround.
[edit] About DirectAdmin Extended For WHMCS
| DirectAdmin Extended For WHMCS will bring the automation into the provisioning and management of web hosting accounts in your WHMCS. The module will allow your clients to remotely handle FTP accounts, create backups, install SSL certificates as well as set up various applications with the inbuilt installers. |
- Admin Area Features:
| ✔ Create/Suspend/Unsuspend/Terminate Account |
| ✔ Change Package And Account Password |
| ✔ Log In To Each DirectAdmin Account On Click |
| ✔ Log In As Admin To DirectAdmin Panel On Click |
| ✔ Automatically Suspend Client Account Upon Reaching Bandwidth Limit |
| ✔ Configure Client Area Features Per Product |
| ✔ Configure Resource Limits Per Product |
| ✔ Define FTP Backups Endpoints Per Product |
| ✔ Define Backup Directory Paths Per Product |
| ✔ Enable And Configure Application Auto Installer To Use Per Product - Softaculous Or Installatron |
| ✔ View All DirectAdmin Extended Products And Servers In One Place |
- Client Area Features:
| ✔ Remote Access And Management Of: |
| ✔ Addon Domains, Their Details, PHP Version And Logs |
| ✔ Apache Handlers |
| ✔ Applications And Their Backups |
| ✔ Autoresponders |
| ✔ Backups, Remote FTP Backups And Admin Backups |
| ✔ Catch All Email |
| ✔ Cron Jobs |
| ✔ Custom Error Pages |
| ✔ Databases And Their Backups |
| ✔ DNS Records |
| ✔ Domain Pointers And Their DNS Records |
| ✔ Email Accounts |
| ✔ Email Forwarders |
| ✔ File Manager |
| ✔ FTP Accounts |
| ✔ Git Repositories |
| ✔ Hotlinks Protection |
| ✔ Mailing Lists |
| ✔ MX Records |
| ✔ Perl Modules |
| ✔ Protected Directories |
| ✔ SPAM Filters |
| ✔ SSH Keys |
| ✔ SSL Certificates |
| ✔ Site Redirections |
| ✔ Site Summary |
| ✔ SpamAssassin Setup |
| ✔ Subdomains |
| ✔ Unban IP Address |
| ✔ Vacation Messages |
| ✔ WordPress Manager - Separate Module Required |
| ✔ One Click Login To: |
| ✔ DirectAdmin |
| ✔ phpMyAdmin |
| ✔ SitePad |
| ✔ Webmail |
| ✔ View Account Resource Usage |
| ✔ Change Account Password |
- Application Auto Installer Features:
| ✔ Ordering Process: |
| ✔ Auto Install Chosen Application After Account Creation |
| ✔ Auto Install Application Chosen By Client During Order - With Configurable Options |
| ✔ Allow Custom Settings Of Auto Installed Application - With Custom Fields |
| ✔ Client Area: |
| ✔ Install New Applications With Softaculous And Installatron |
| ✔ View And Manage Installed Applications |
| ✔ Backup Installed Applications |
| ✔ View And Manage Created Backups |
| ✔ Restore Applications From Backups |
| ✔ Delete Applications Along With Their Backups |
- Configurable Options:
| ✔ Addon Domains |
| ✔ Anonymous FTP Accounts |
| ✔ Autoresponders |
| ✔ Bandwidth |
| ✔ CGI Access |
| ✔ Catch All Email |
| ✔ Cron Jobs |
| ✔ DNS Control |
| ✔ Dedicated IPv4 Address |
| ✔ Dedicated IPv6 Address |
| ✔ Disk Space |
| ✔ Email Accounts |
| ✔ Email Forwarders |
| ✔ FTP Accounts |
| ✔ Inode Limit |
| ✔ Mailing Lists |
| ✔ MySQL Databases |
| ✔ PHP Access |
| ✔ Parked Domains |
| ✔ Server IPv4 Address |
| ✔ SSH Access |
| ✔ SSL Access |
| ✔ SpamAssassin |
| ✔ Subdomains |
| ✔ Suspend At Limit |
| ✔ System Information |
- General Info:
| ✔ Integrated With Advanced Billing For WHMCS - Actual Server Resource Usage Billing |
| ✔ Integrated With IP Manager For WHMCS - Complete Control And Easy Assignment Of IP Subnets |
| ✔ Integrated With Server Allocator For WHMCS - Automatic Assignment Of Most Suitable Servers To Products |
| ✔ Integrated With WordPress Manager For WHMCS - Remote Installation And Management Of WordPress Instances |
| ✔ Fully Integrated With Lagom WHMCS Client Theme |
| ✔ Multi-Language Support |
| ✔ Supports WHMCS Server Sync Tool |
| ✔ Supports WHMCS Metric Billing - Integration: Disk Space, Bandwidth, Email Accounts, Addon Domains, Parked Domains, Subdomains, MySQL Databases, MySQL Disk Usage, Sub-Accounts |
| ✔ Supports PHP 8.3 Back To PHP 8.1 |
| ✔ Supports WHMCS Themes "Six" And "Twenty-One" |
| ✔ Supports WHMCS V8.13 Back To WHMCS V8.10 |
| ✔ Requires DirectAdmin Administrator Account |
| ✔ Requires ionCube Loader V14 Or Later |
| ✔ Easy Module Upgrade To Open Source Version |
[edit] Installation and Configuration
| This tutorial will focus on how to successfully install and manage DirectAdmin Extended For WHMCS. We will guide you step by step through the whole installation process. |
[edit] Installation
| 1. Log in to our client area and download the module. |
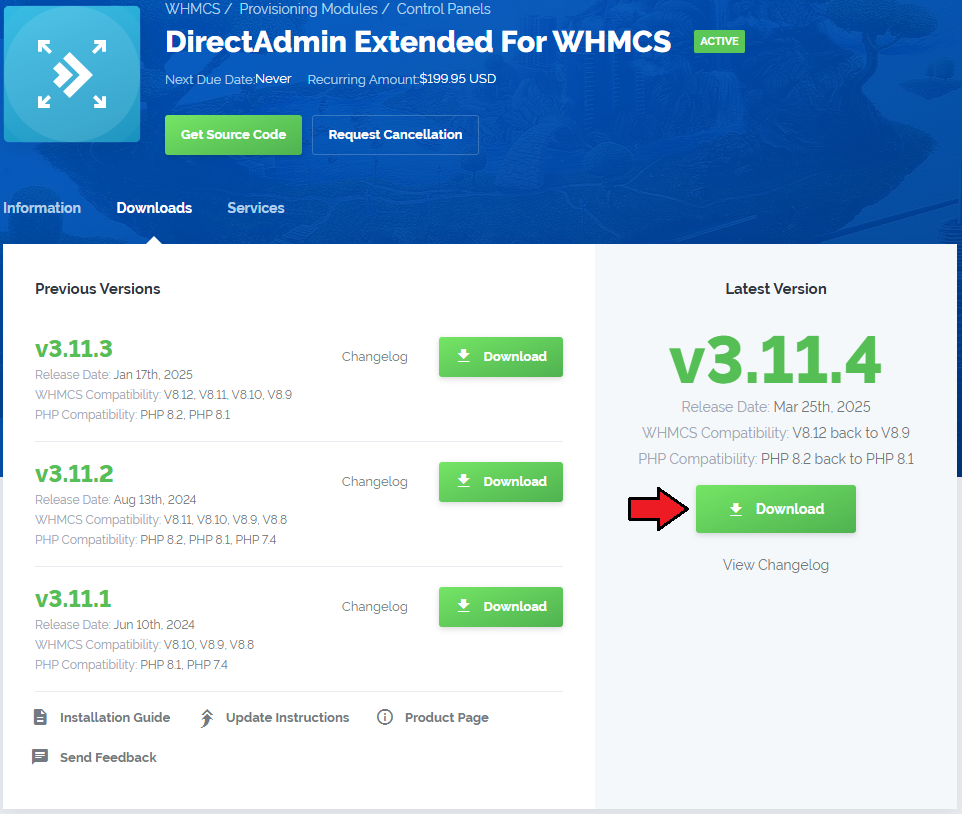
|
| 2. In the downloaded file you might find one or two packages that support different PHP versions. In the most recent versions of the module, you will find only one package that supports PHP 7.2 and later. |
| Previous updates of the module may contain two packages dedicated to various PHP versions. The first one that supports PHP 5.6 up to PHP 7.1, and the second one addressed to PHP 7.2 up to PHP 7.4. |

|
| Note: You can check the current PHP version in your WHMCS. To do so, proceed to 'Utilities' → 'System' → 'PHP Info'. |
| 3. Extract the package and upload its content into the main WHMCS directory. The content of the package to upload should look like this. |
| 4. When you install DirectAdmin Extended For WHMCS for the first time you have to rename the 'license_RENAME.php' file. The file is located in 'modules/servers/directadminExtended/license_RENAME.php'. Rename it from 'license_RENAME.php' to 'license.php'. |
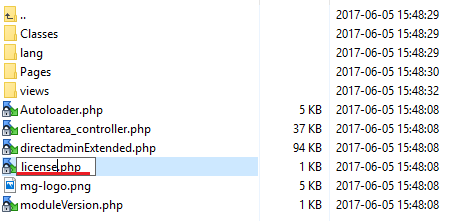
|
| 5. In order to configure your license key you have to edit the previously renamed 'license.php' file. Enter your license key between quotation marks as presented on the following screen. You can find your license key in our client area → 'My Products'. |

|
| 6. In the next step, set up the two 'storage' folders as recursively writable. Both folders are available at 'yourWHMCS/modules/addons/DirectAdminExtended/storage' and 'yourWHMCS/modules/servers/directadminExtended/storage' . |
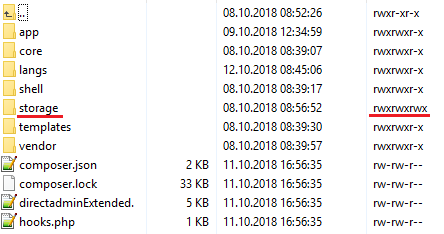
|
[edit] Addon Activation
| 7. Now, you have to activate the module in your WHMCS system. Log in to your WHMCS admin area. Move to 'System Settings' then choose 'Addon Modules'. |
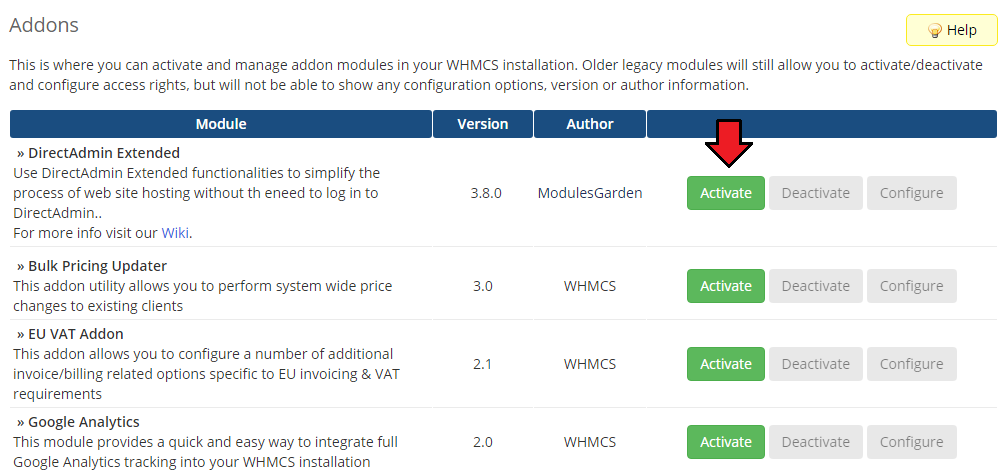
|
| 8. In the next step you need to permit access to this module. To do so, click on the 'Configure' button, select required administrator groups and press 'Save Changes'. |
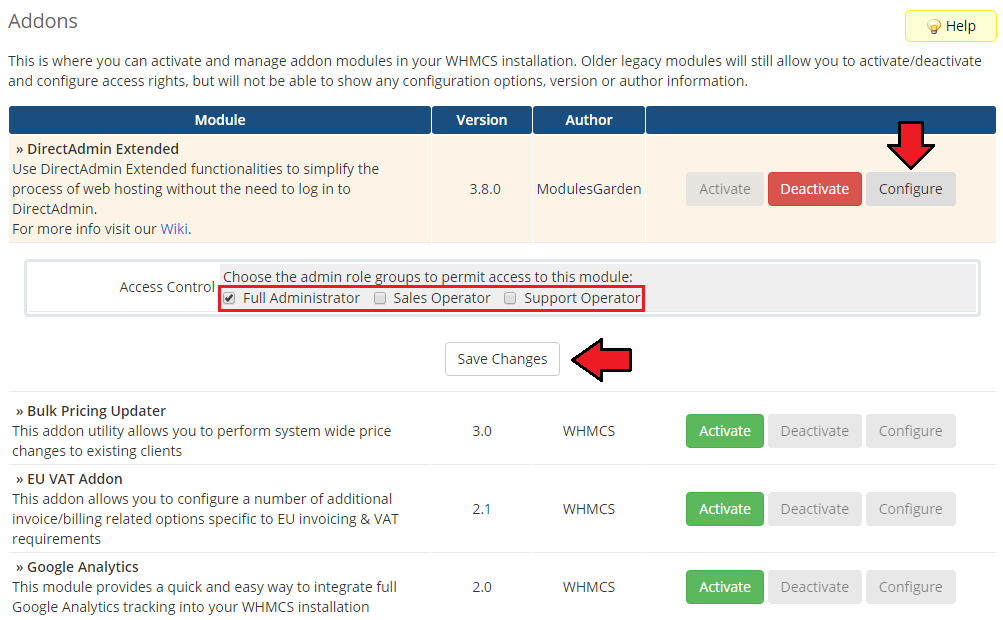
|
| 9. Well done! You have just successfully installed DirectAdmin Extended For WHMCS! You may access your addon under 'Addons' → 'DirectAdmin Extended'. |
[edit] Server Configuration
| 10. Now, we will show you how to configure a new server. To do so, log into your WHMCS and go to 'System Settings' → 'Servers'. |
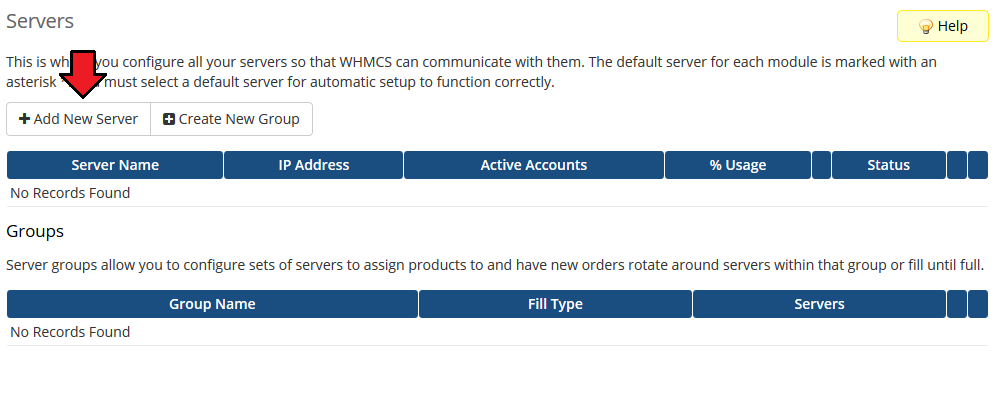
|
| 11. Next, enter your server name, IP address, username and password. Choose 'DirectadminExtended' from a dropdown menu and press 'Save Changes'. In this section, you can also provide other server details like nameservers or the maximum number of accounts. |
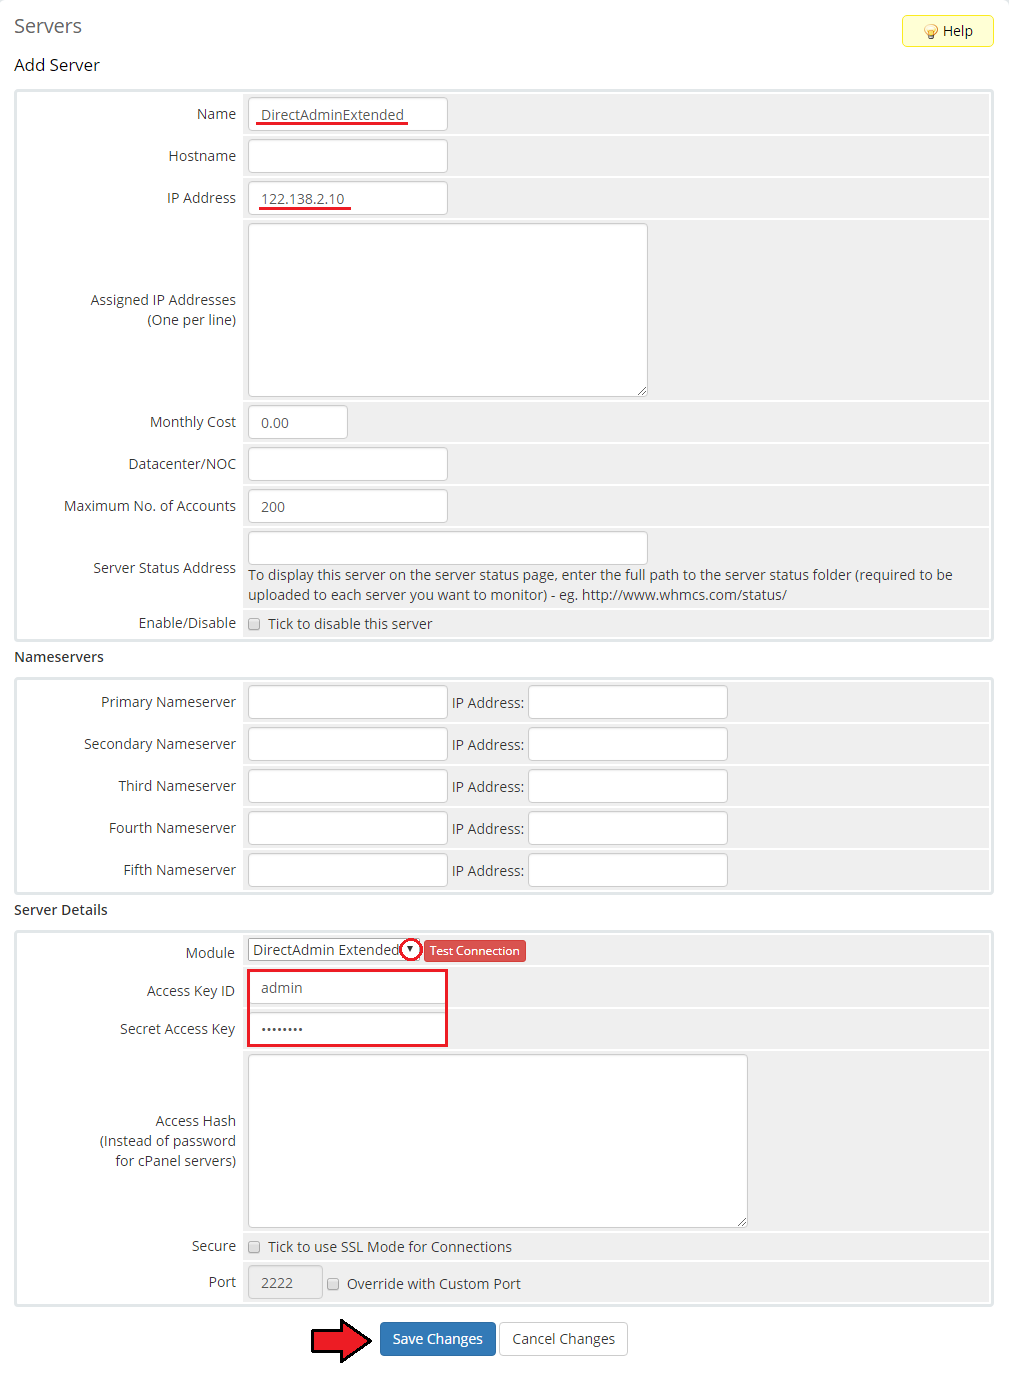
|
| 12. After you configure your server correctly, you will see the following screen. At this point, you need to create a new group for your server. For that purpose, press 'Create New Group'. |
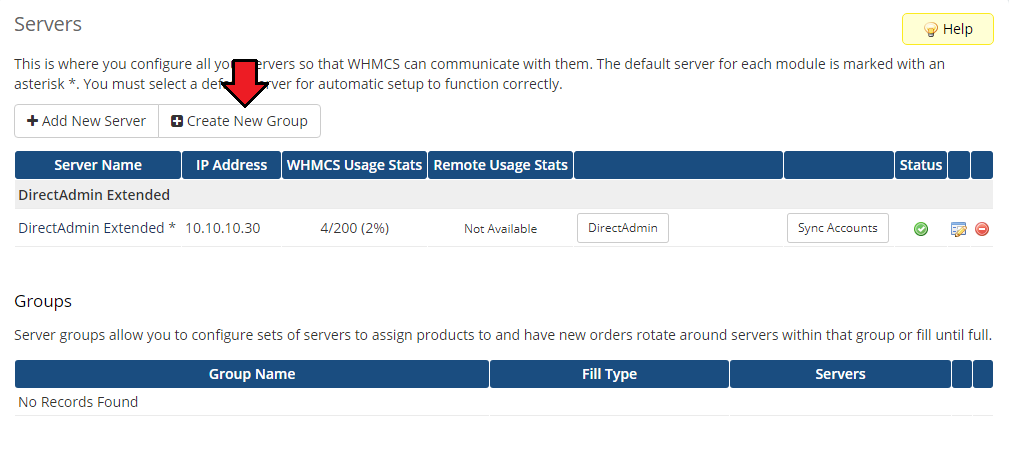
|
| 13. Enter the name, click on your previously created server, press 'Add' and then 'Save Changes'. |
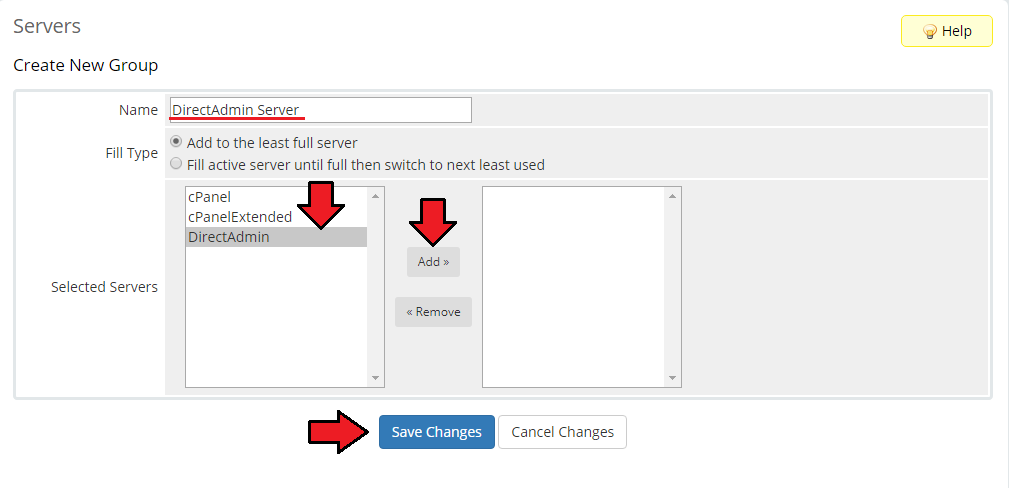
|
[edit] Product Configuration
| 14. In order to create and configure the product, click on 'System Settings' → 'Products/Services'. If you do not have a product group, click on 'Create a New Group'. If you do, simply move to the step 15. |

|
| 15. Enter the product group name and press 'Save Changes'. |
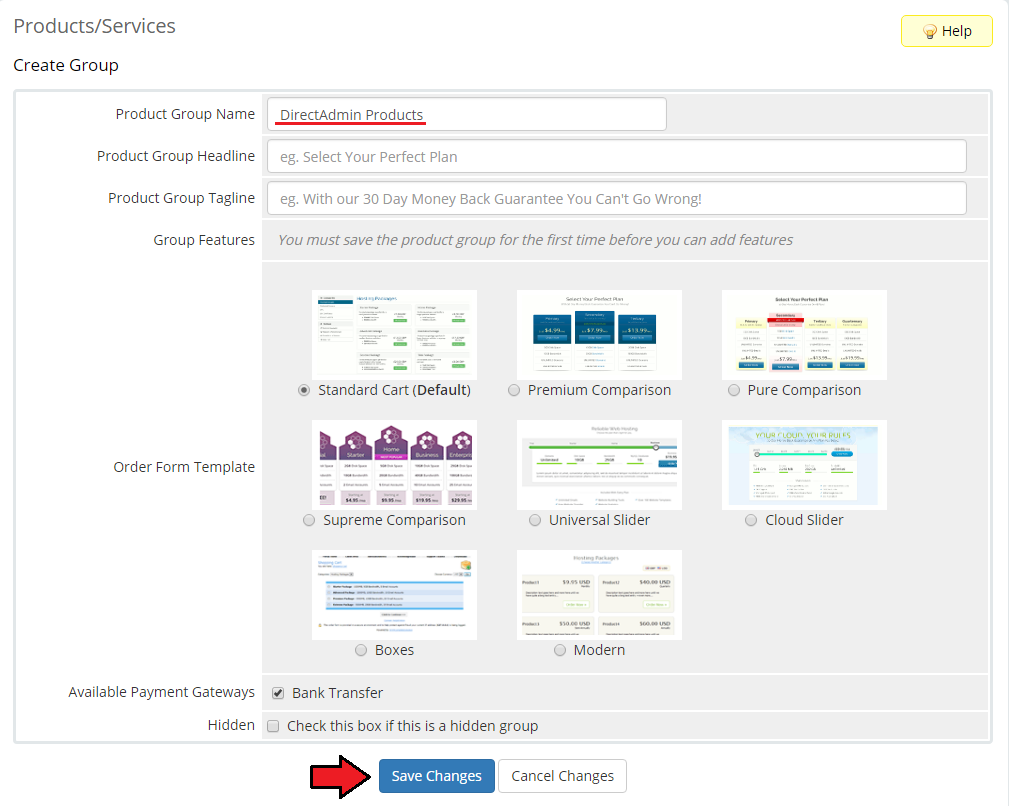
|
| 16. When you have a product group, you can create your product and assign it to DirectAdmin Extended. If you already have a product, jump to the step 17. To create a product, click on 'Create a New Product'. |
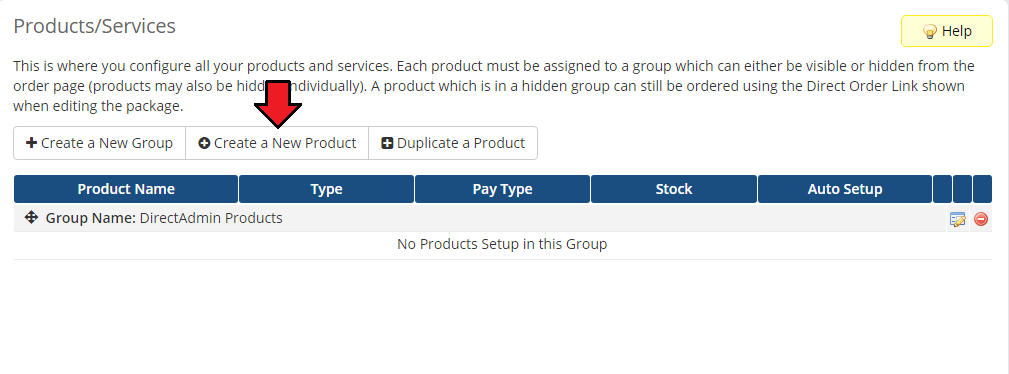
|
| 17. Afterwards, choose your product type and product group from dropdown menus, then enter your product name and select the used module: 'DirectAdmin Extended'. Press 'Continue'. |
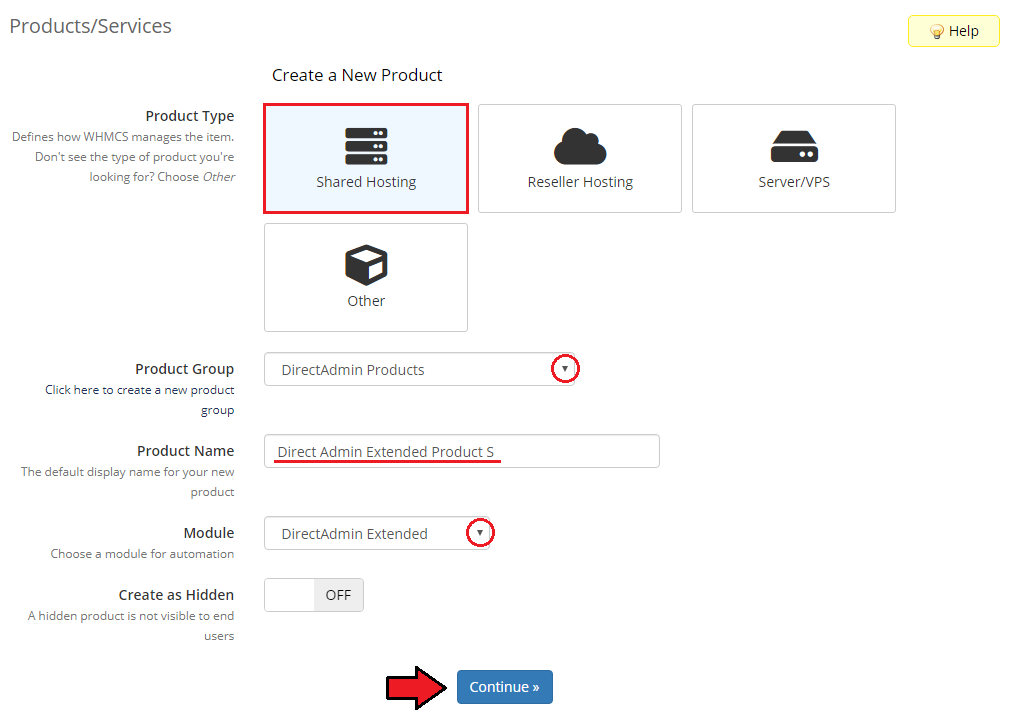
|
18. Then, you need to move to the 'Module Settings' section and choose your previously created server group from dropdown menu.
You can also activate the feature to automatically suspend accounts when the bandwidth limit is reached. Simply tick 'Suspend at Limit'. |
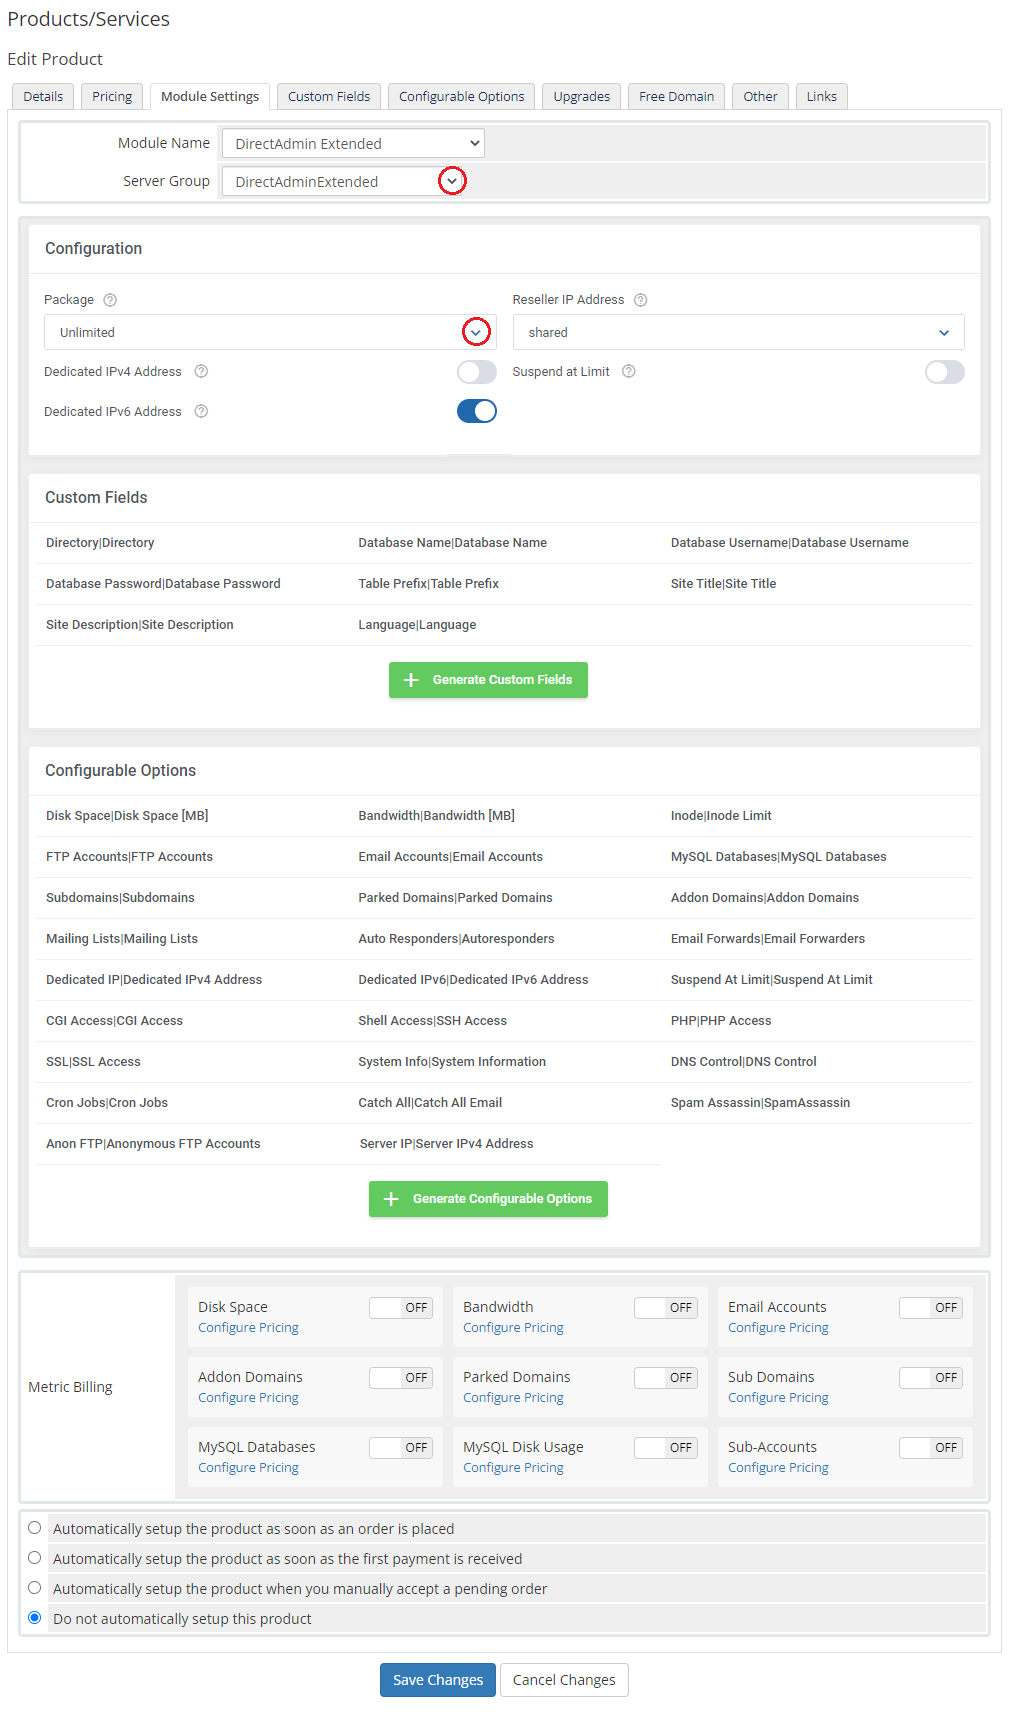
|
| 19. If you would like to set up your own configuration, choose 'Custom' from the 'Package' dropdown. A list of customizable options will appear. Configure them at your own discretion or generate Configurable Options instead. |
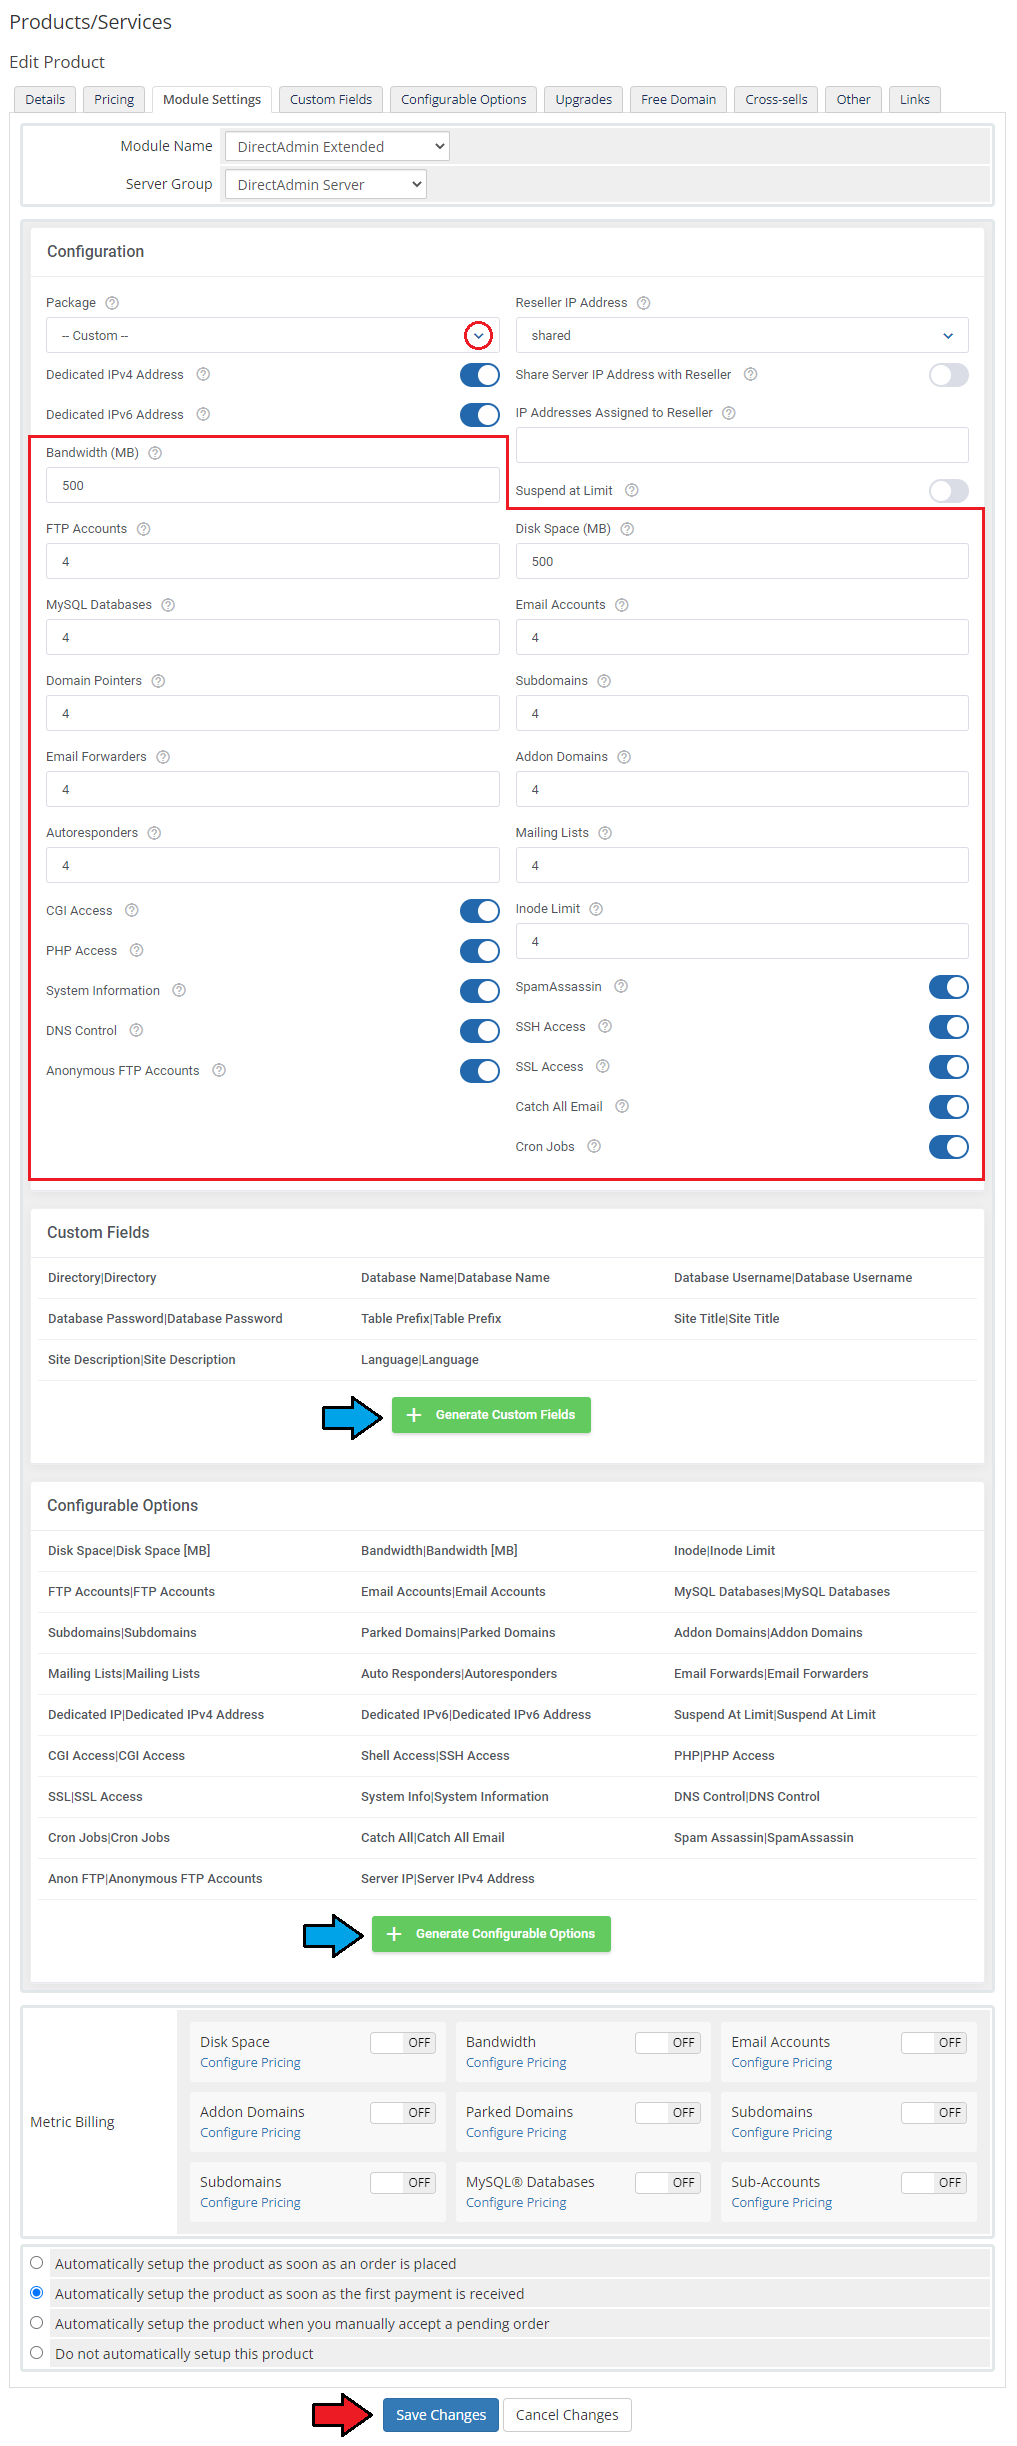
|
[edit] Addon Configuration
| 20. Go to 'Addons' → 'DirectAdmin Extended'. The dashboard located there contains the precise data on available products and servers:
|
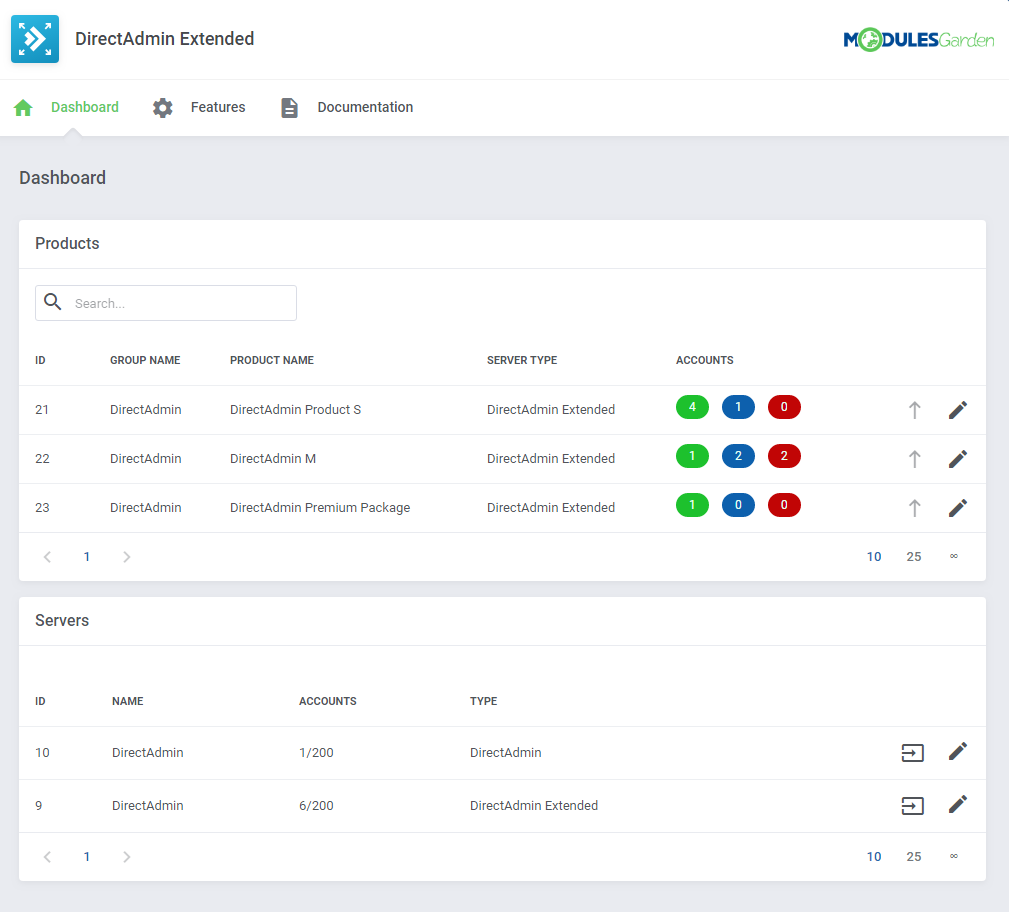
|
| 21. Proceed to the 'Features' section, find the product you are interested in and press the 'Configuration' button next to it. |
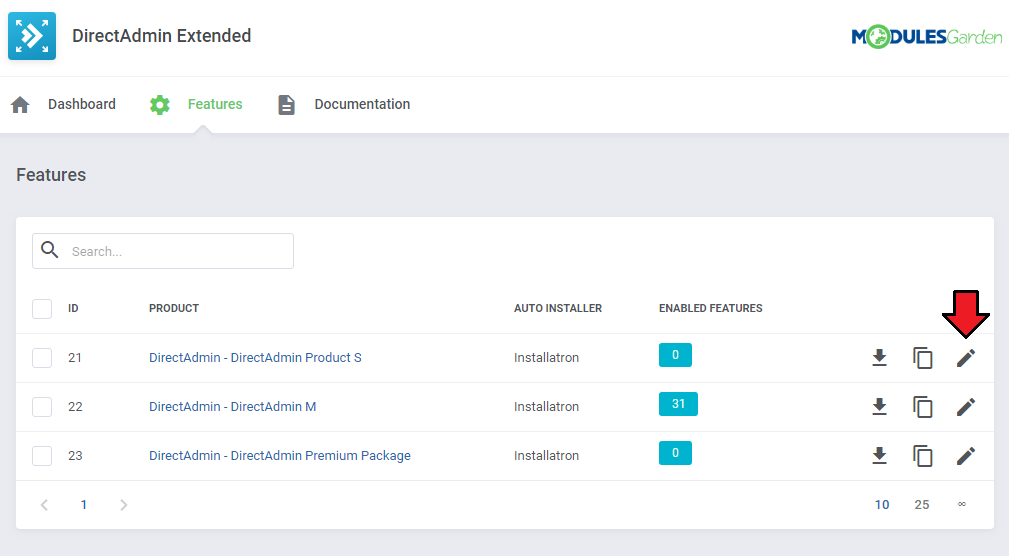
|
| 22. You should see boxes dedicated to 'Features', 'Applications' and 'Other' Begin by selecting the features you would like to activate for your customers. |
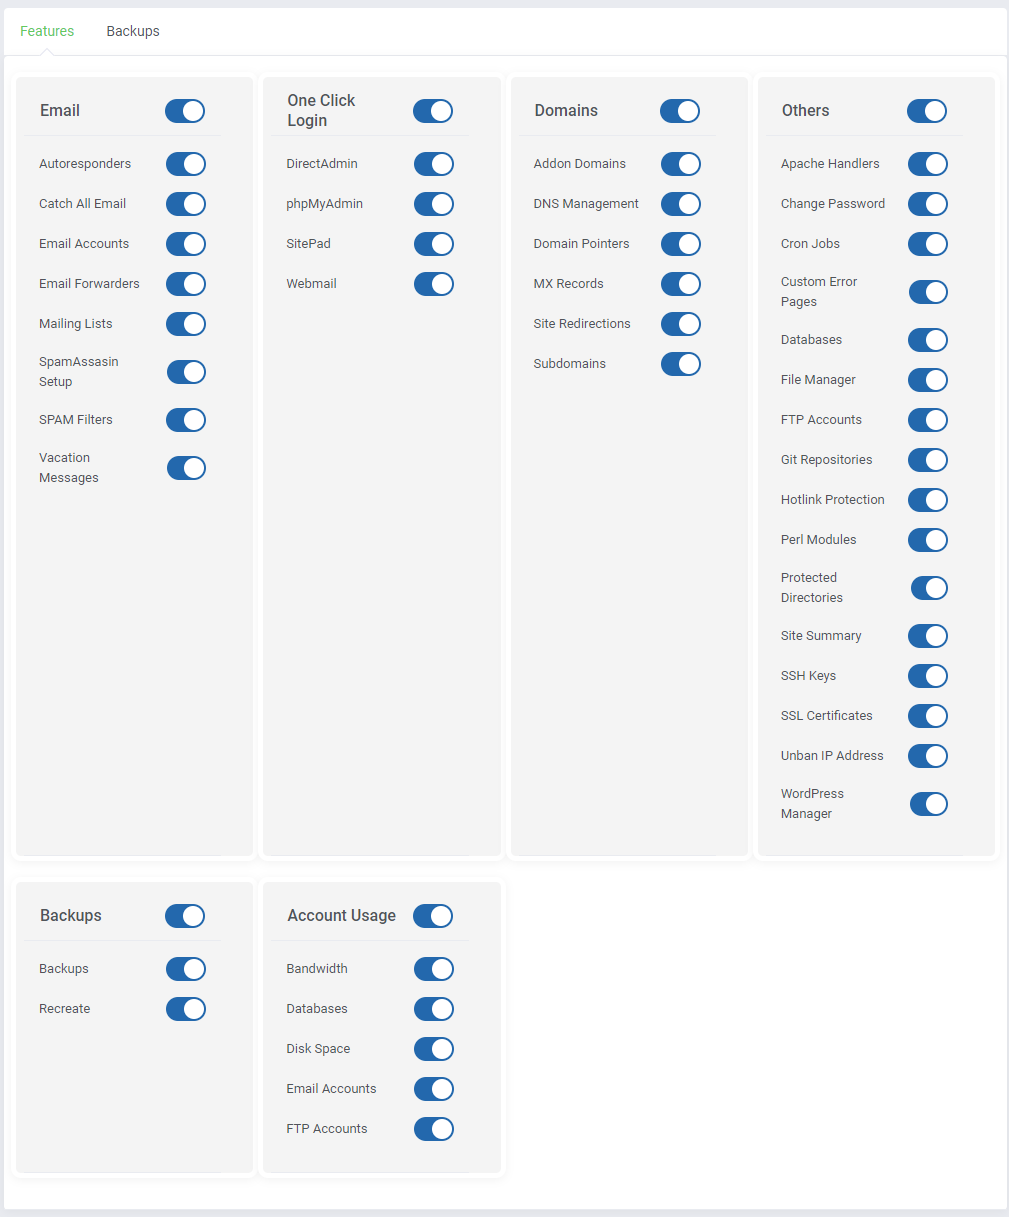
|
| 23. Choose whether to activate the 'Install Applications' option. In case you wish to enable this feature, you will have to select 'Auto Installer' from a dropdown menu. After, activate 'Install Button' and 'Backup Button'. |
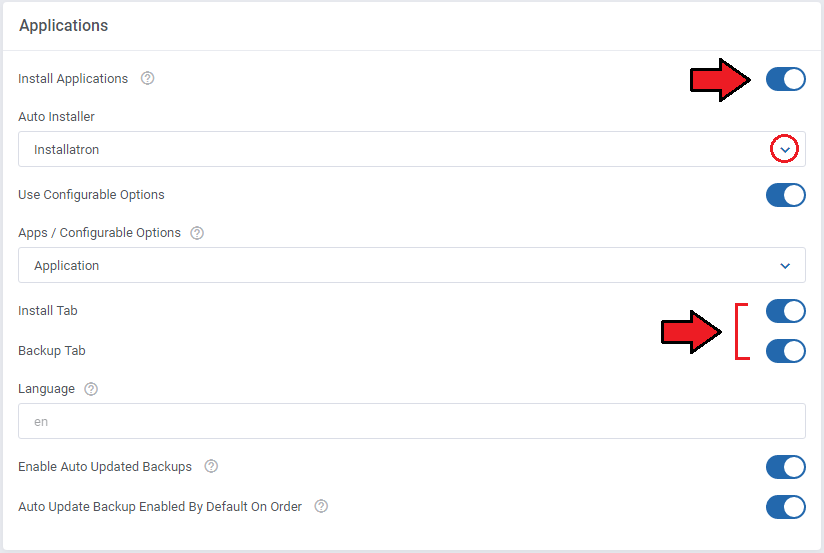
|
| 24. Finally, select the 'Webmail' button redirection from the 'Other' and choose 'Show Server IP' address. Do not forget to 'Save' changes once the product configuration is ready! |

|
| If the 'Show Server IP' address option is on, it will be visible in the client area for customers. |
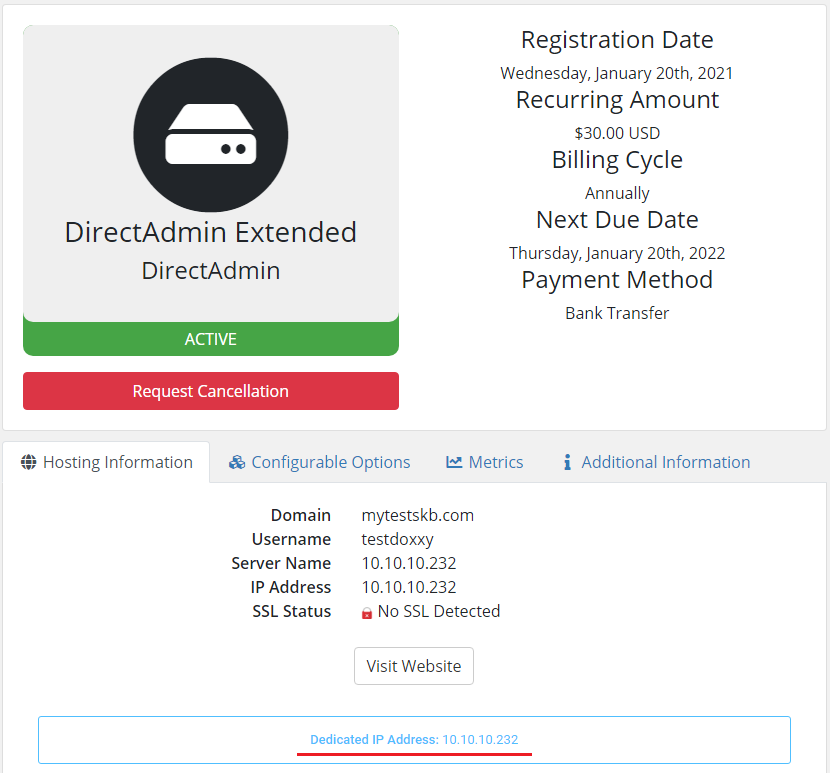
|
| If the 'Let's Encrypt' button is toggled on, your customers will see it under the 'SSL Certificates' menu. |
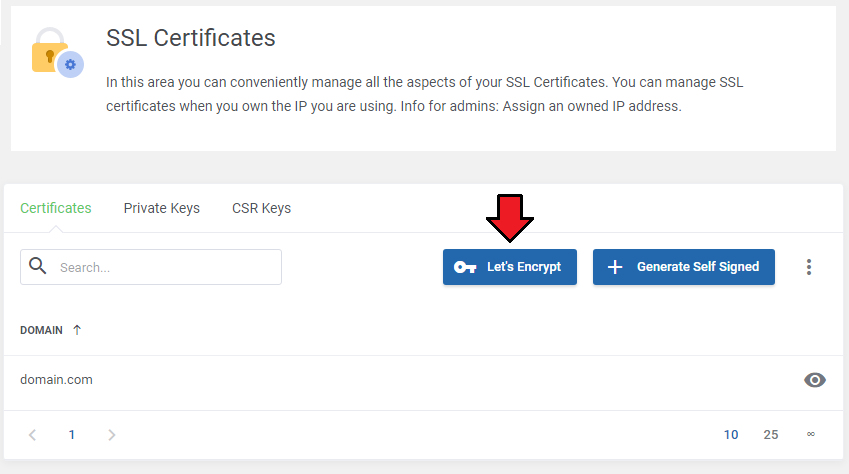
|
| 25. (Optional) Move to the 'Backups' tab where you can define the FTP backup path under 'FTP Backups Endpoints' and 'Backup Directory Path'. This will allow creating backups on external servers defined by their admin, which then will be available for the clients to choose. Find more about Backups here. |
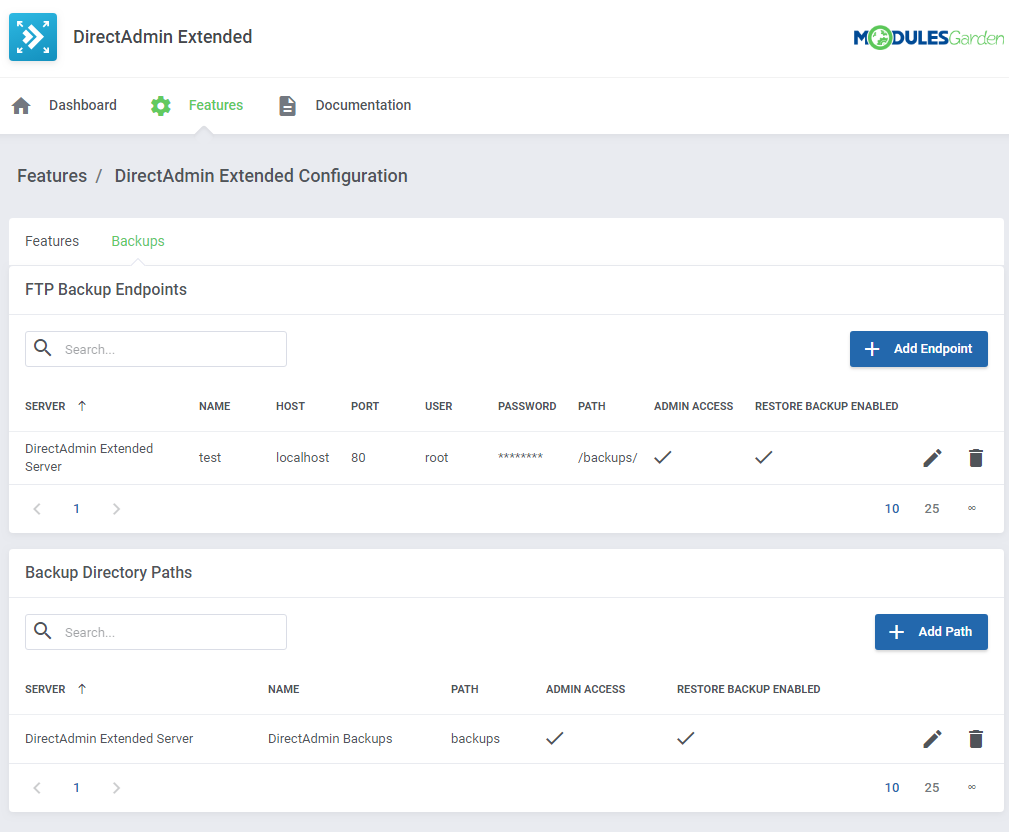
|
| Define the FTP backup path under 'FTP Backups End Points'. Simply fill out the form with 'Backup Name', 'Host', 'Port', 'User', 'Password' and 'Path to Files'. |
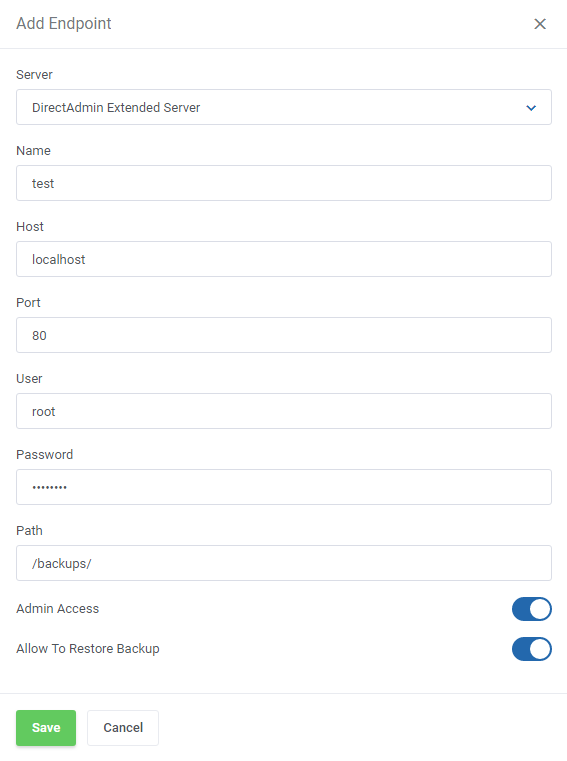
|
| Under the Backup Directory Path, enter the backup path which can be found in your DirectAdmin server → 'Admin Backup/Transfer' → 'Local' textbox. |
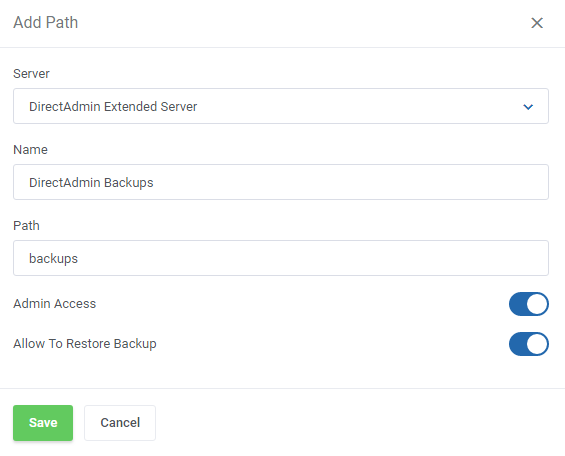
|
| 26. If you already have another product configured, you may copy its configuration. Find the 'Copy Configuration' button on the list with products or select multiple items at once. Then choose the product configuration which settings you wish to copy into the selected products. |
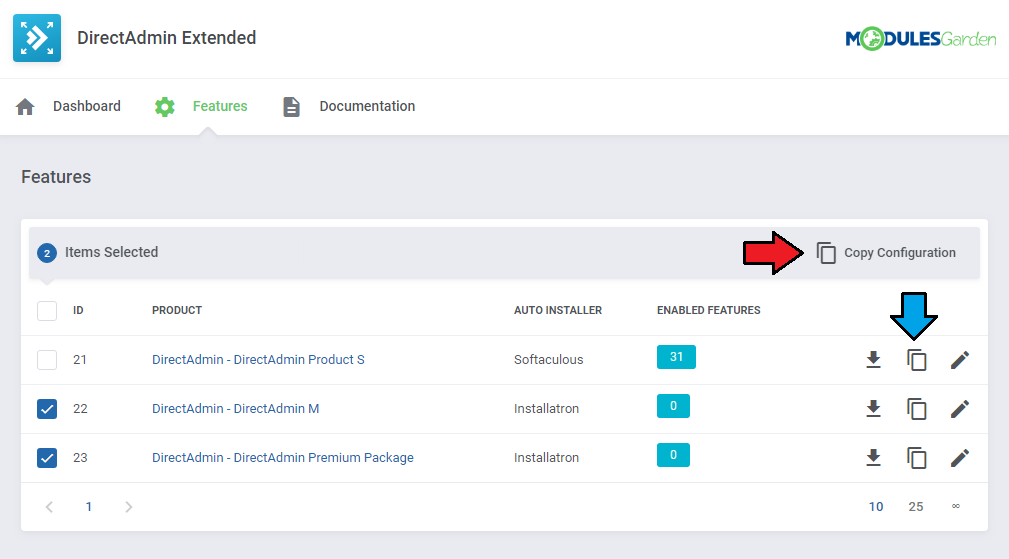
|
| 27. That's all, you have just correctly created and customized a new product, now you can check the results. This is what your customers should see in your client area. |
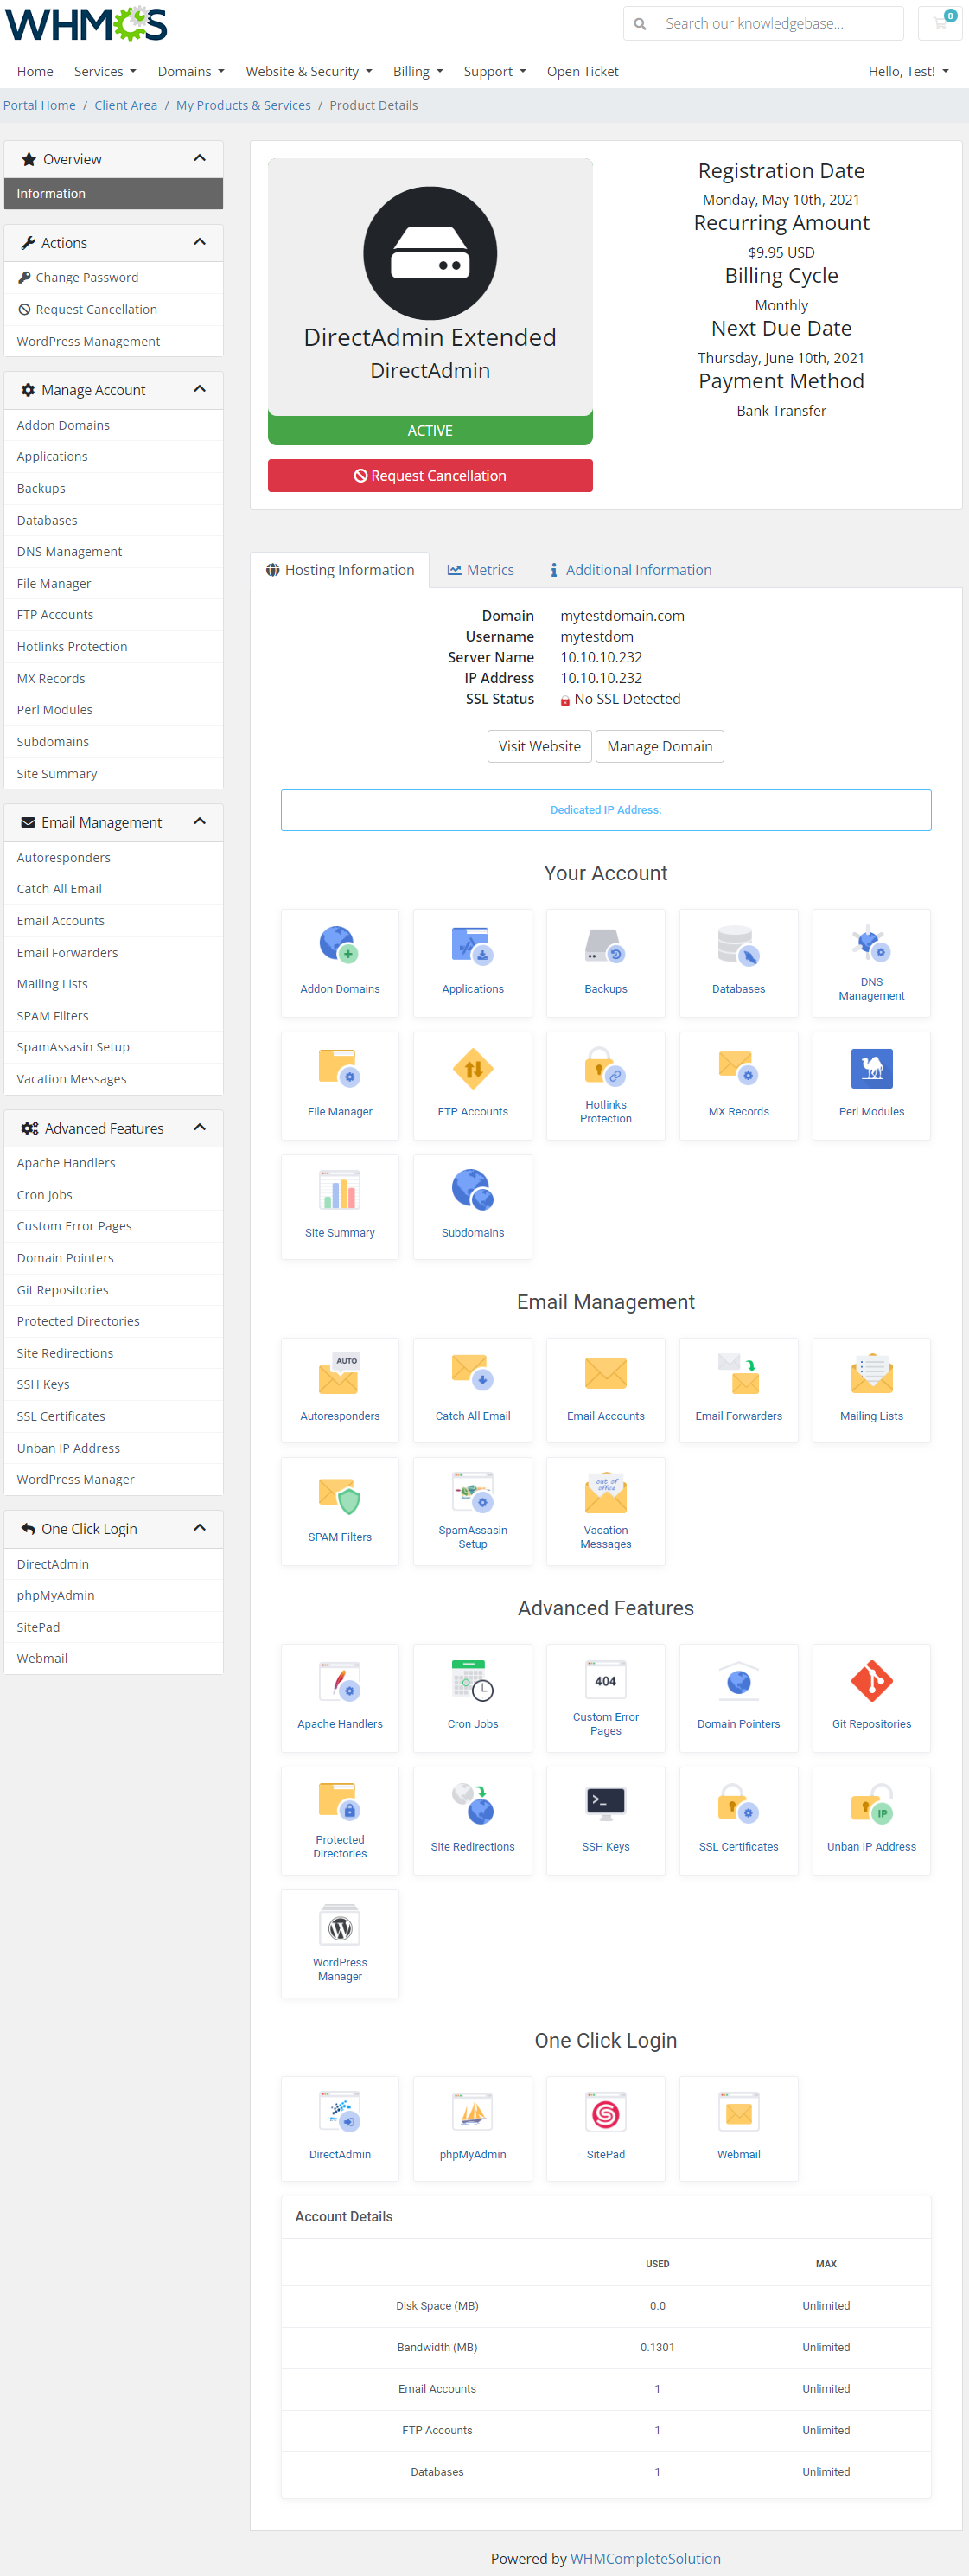
|
| 28. From now on, all your clients who will order the previously created product, will be able to manage their DirectAdmin accounts via your WHMCS system. Below you can see the view of the ordered product summary in the admin area. Available actions:
|
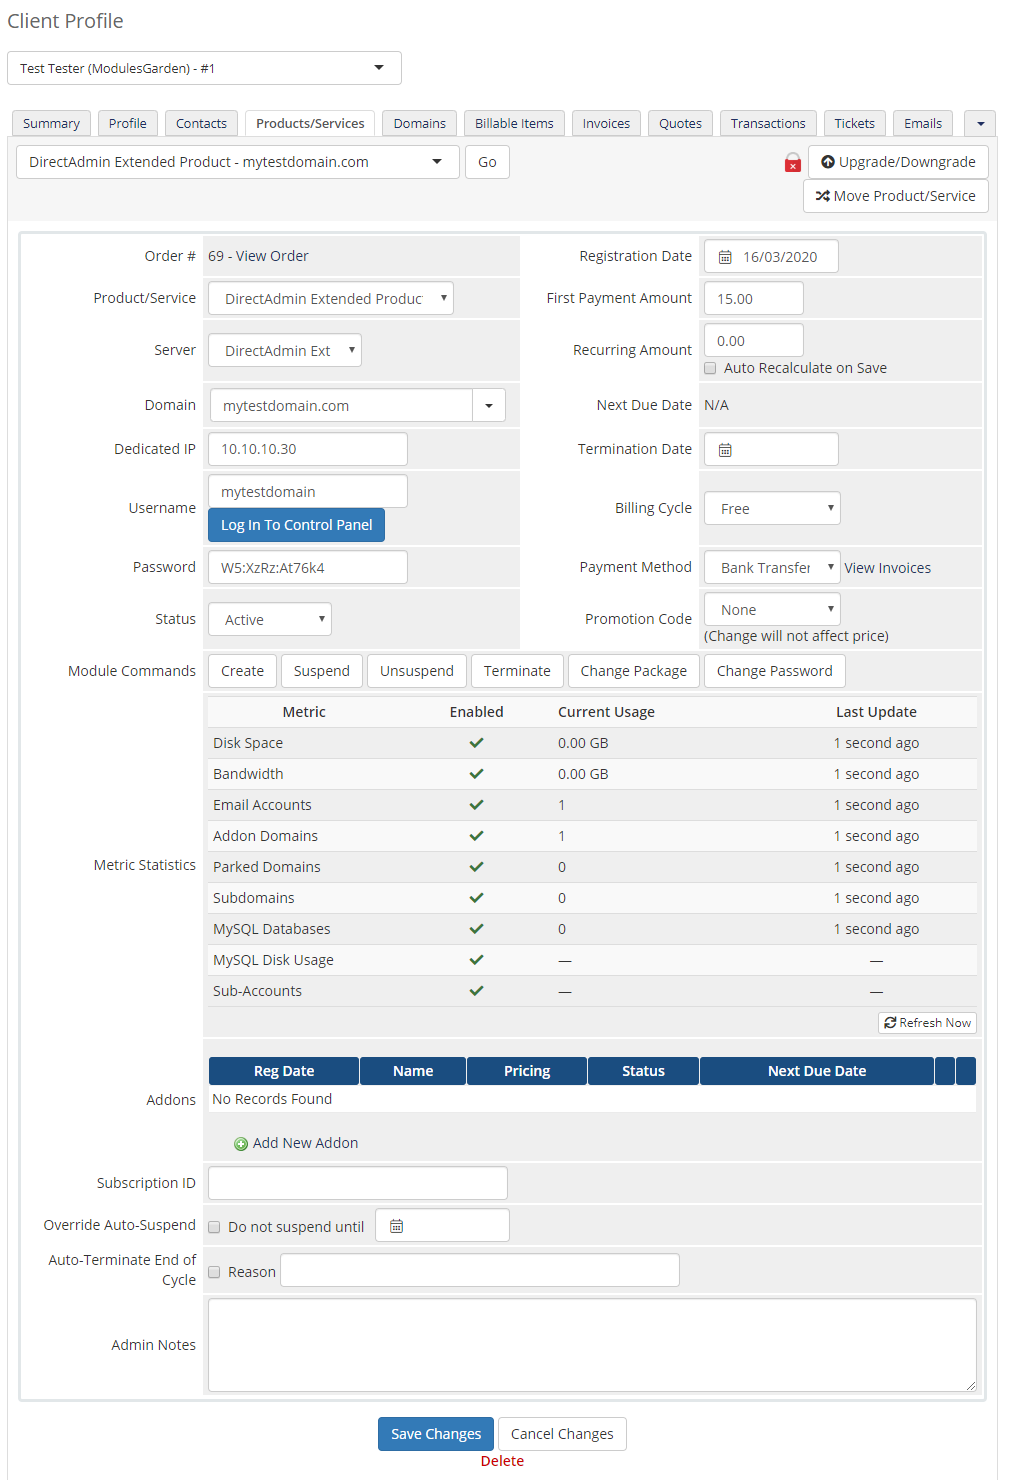
|
[edit] Management
| DirectAdmin Extended allows your customers to manage their DirectAdmin accounts directly in your WHMCS client area. This short guide will present you the possibilities of our addon module. |
[edit] Your Account
| In the below sections, you will find basic tools used to manage your DirectAdmin account shown and described. Analyze them carefully to enjoy full and easy management. |
[edit] Addon Domains
| Addon domains allow you add and manage your addon domains. Take a look at the domain details, view error and usage logs, change the PHP version if applicable and suspend or unsuspend domains. |
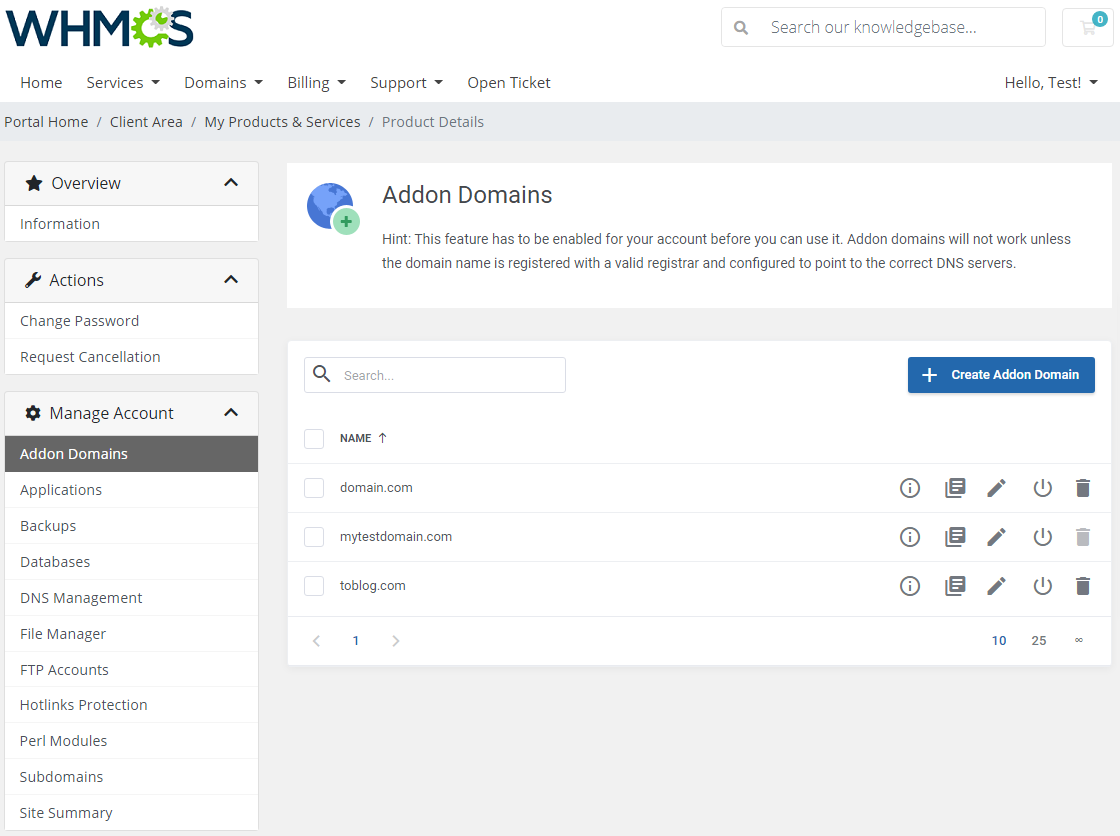
|
Press the 'Create Addon Domain' button and enter a new domain name, specify bandwidth and disc space, select options you may need:
|
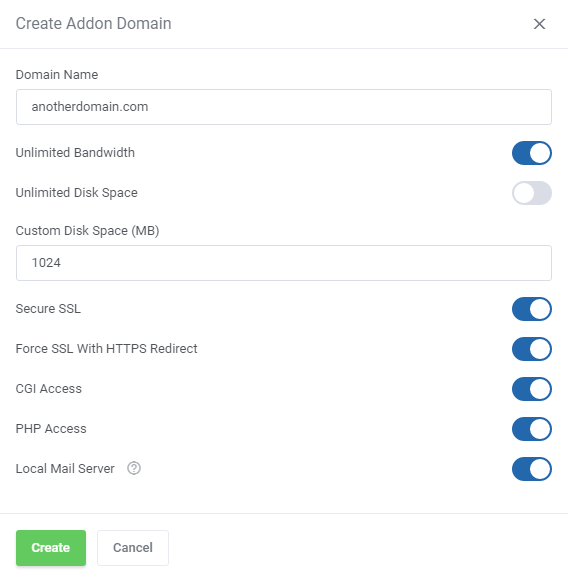
|
| Press the 'Information' icon to see the domain details. |
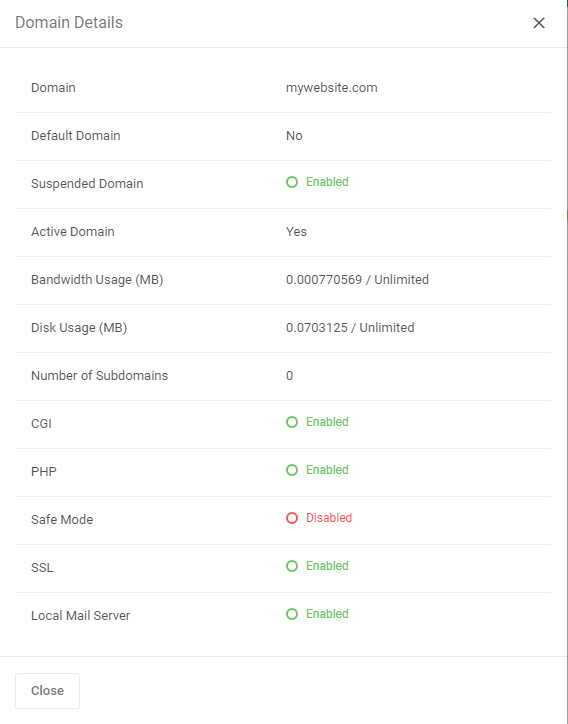
|
| You may also check the list of 'Error' and 'Usage Logs' of each addon domain. |
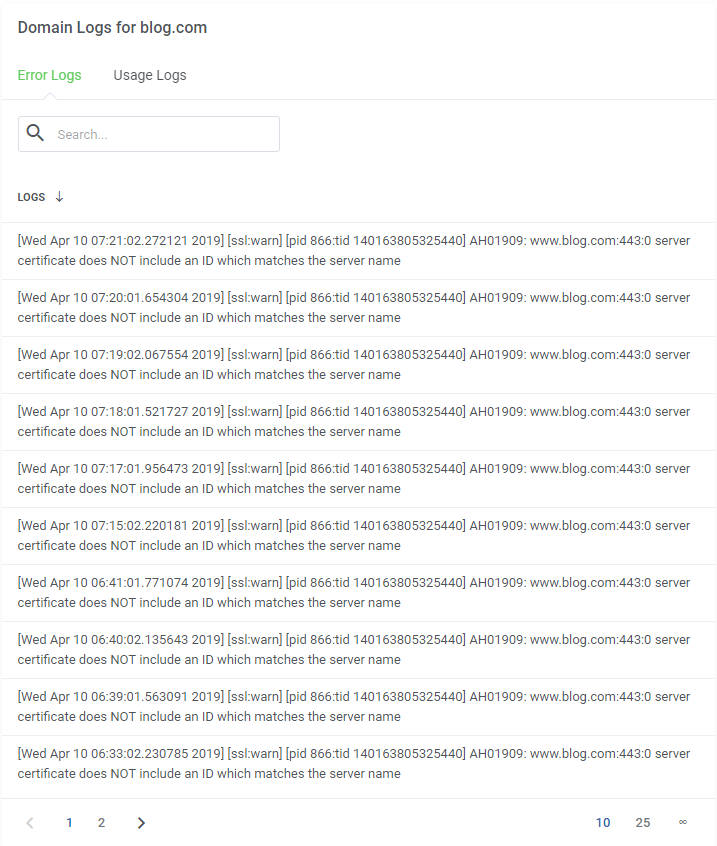
|
| Select a 'PHP Version' and enable/disable the 'Local Mail Server' of the addon domain. Keep in mind that this option is available only if it is enabled and managed on the product's DirectAdmin server. Otherwise, the 'There is no PHP Selector Enabled' information will be displayed and the option disabled. |
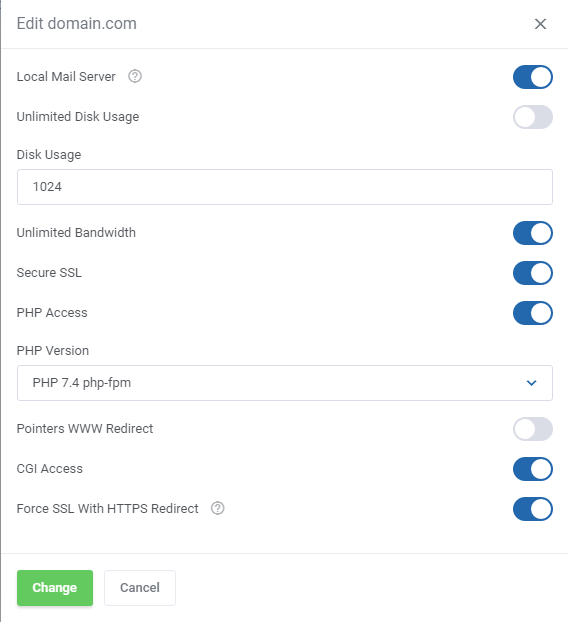
|
[edit] Applications
| Manage your applications straight from your WHMCS client area. Install new applications, create backups if needed and delete unused apps. A separate section has been dedicated to applications, please move to section Install Applications to learn how to manage applications and their backups. |
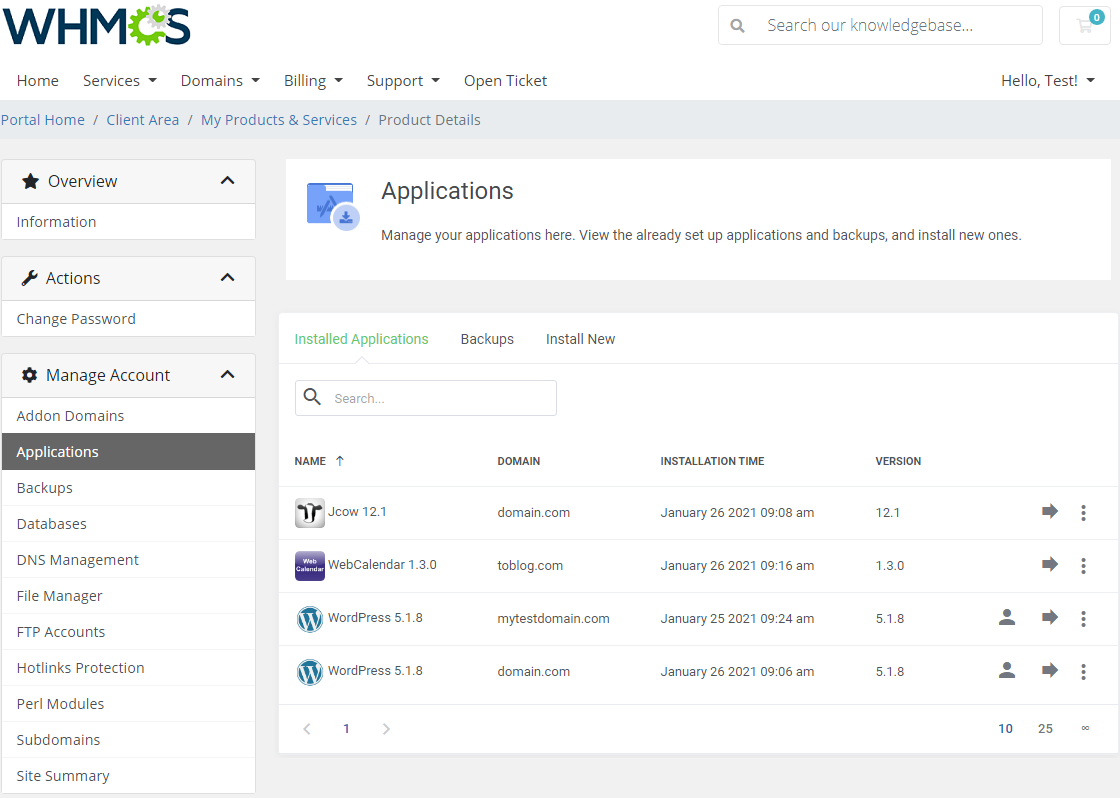
|
[edit] Backups
| This tab, 'User Backups', allows you to back up your DirectAdmin user account. To delete backup, simply press an adequate icon. |
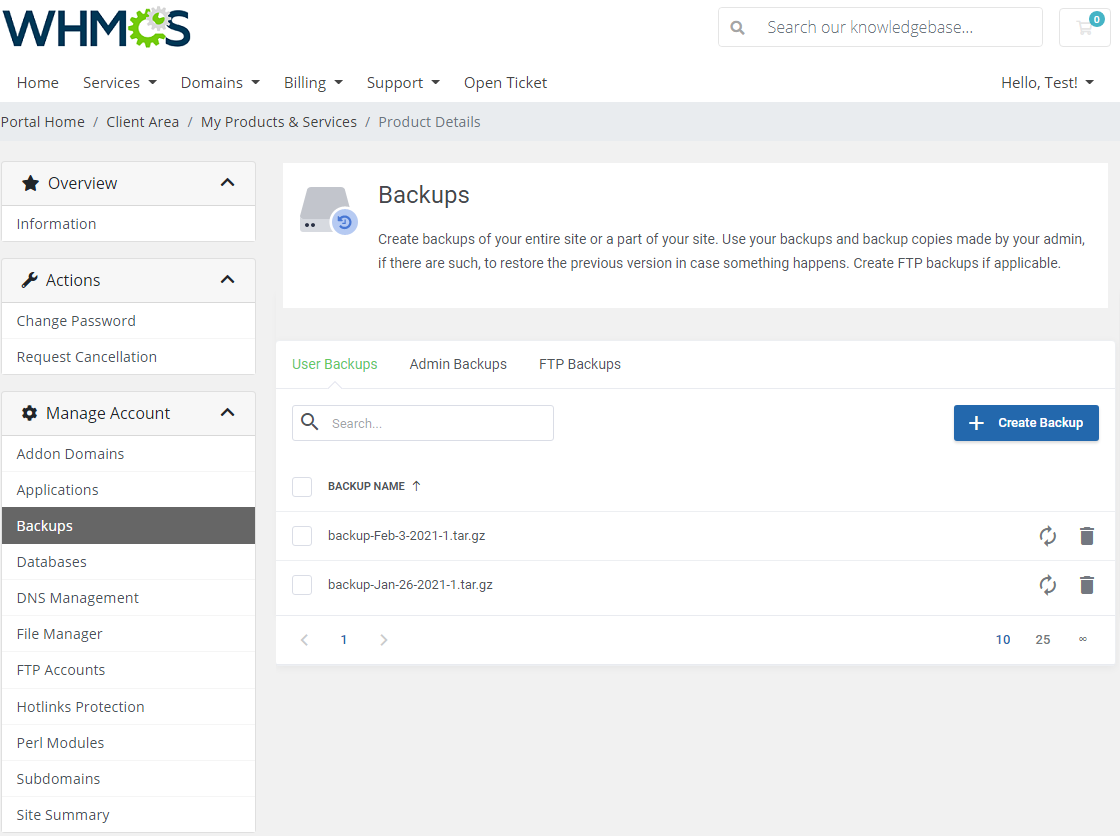
|
| You can select what exactly you want to backup. Mark checkboxes next to the setting you would like to make the backup of. Afterwards, press the 'Create' button to order it. |
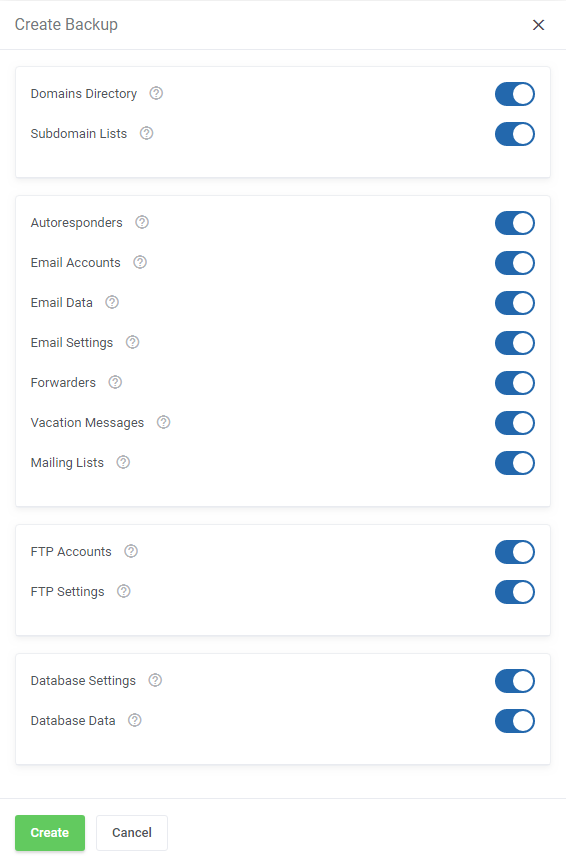
|
| You may restore your backups at any time, you can do it by pressing the 'Restore' button next to the backup. Then, toggle options that you want to restore with this action. |
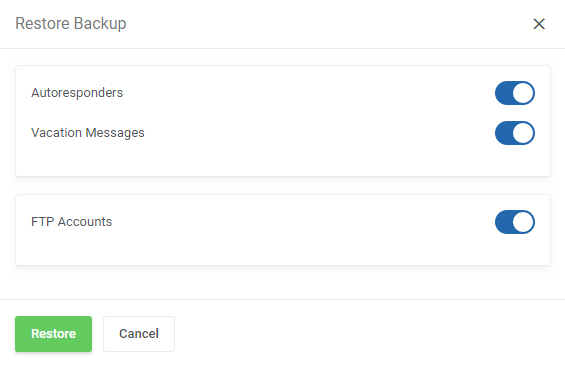
|
| At 'Admin Backups' and 'FTP Backups' sections you will get a list of backups created by your administrator and FTP Backups, you may view a list of backups of a given server. Note: Please refer to Tips section, point 4, to learn how to manage FTP and Admin backups. |
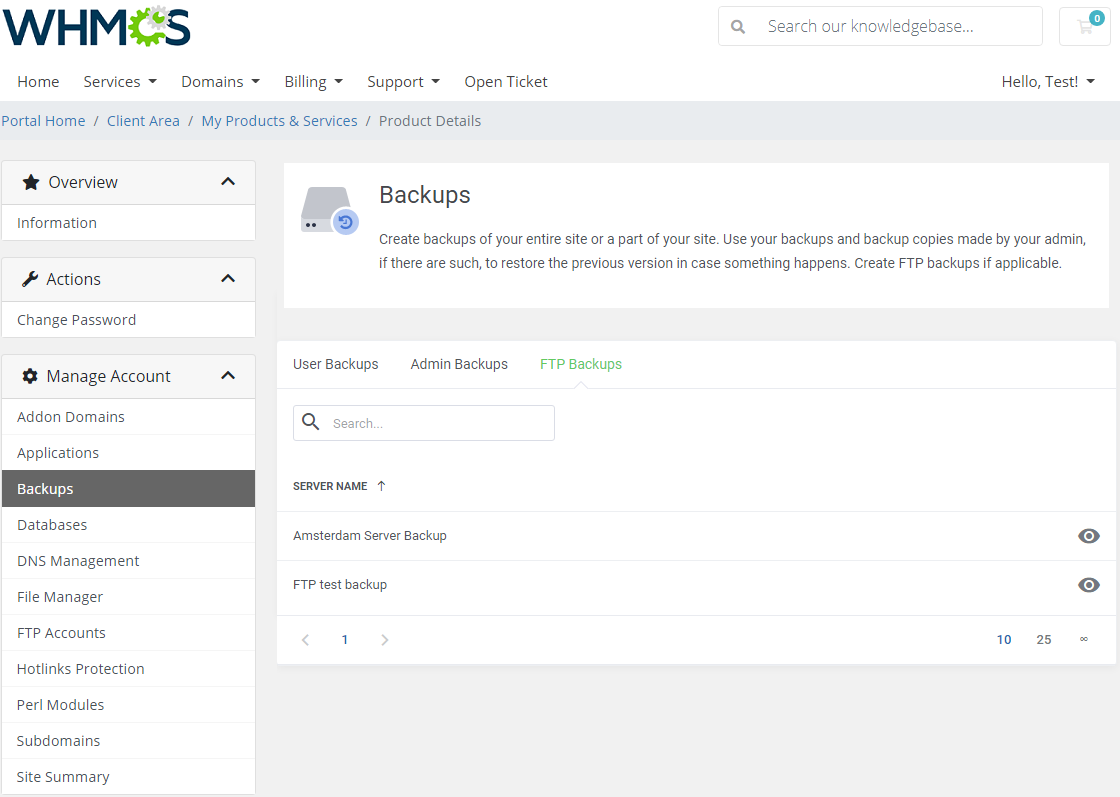
|
[edit] Databases
| Owing to the MySQL databases management, you can create and delete databases. |
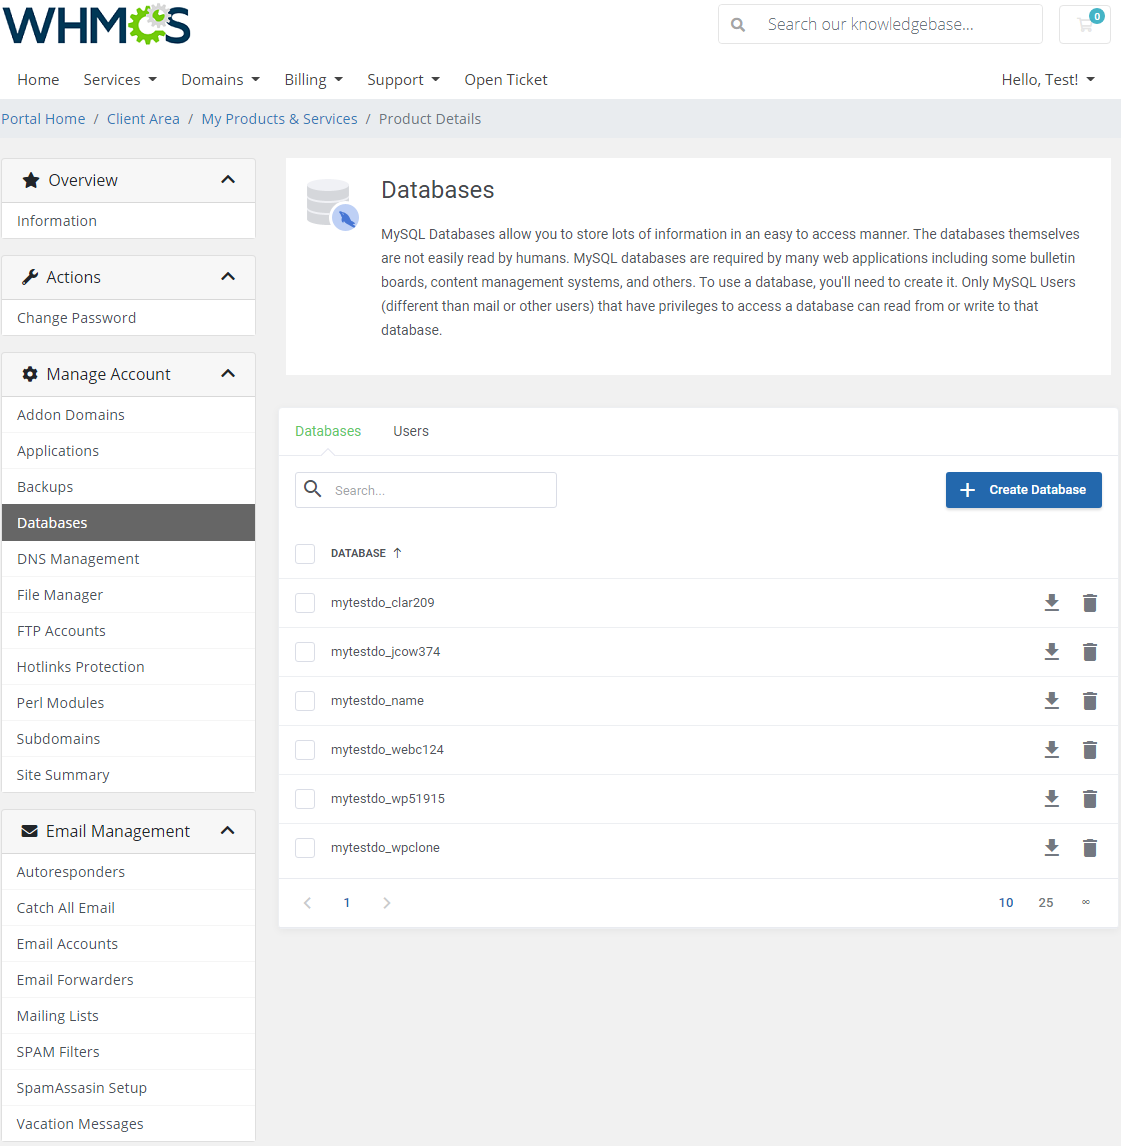
|
| Type in the required information and generate a secure password. |
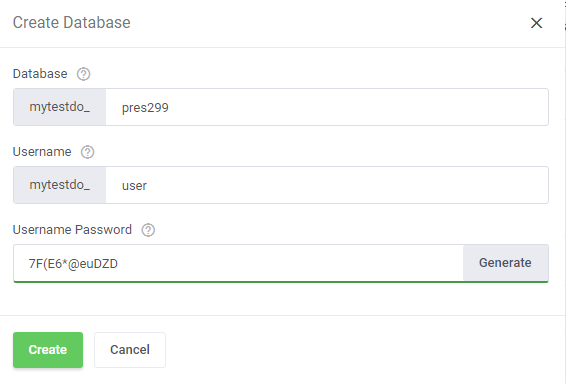
|
| You can also add users to particular databases, use action buttons to delete needless users or change their password. |
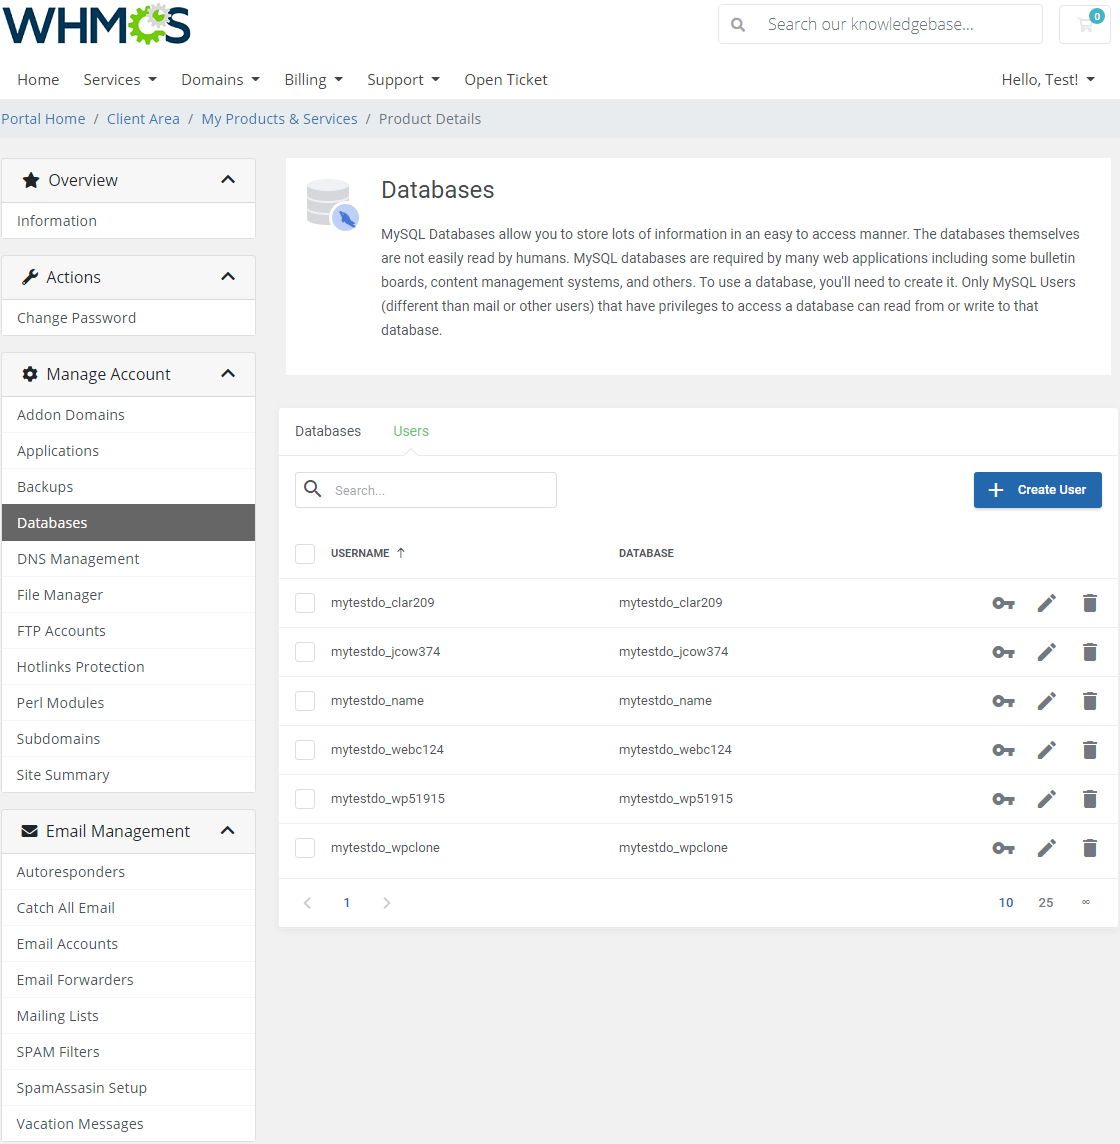
|
| Remember that you should always use the secure password generator while creating a user. |
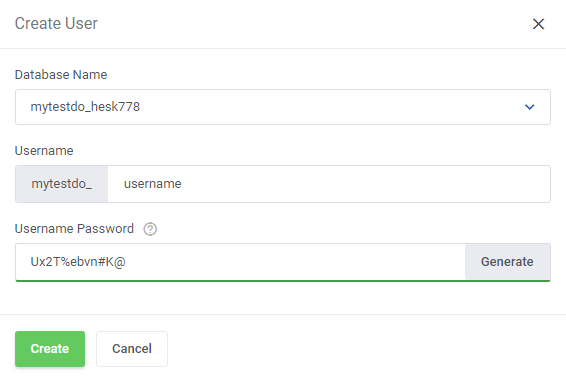
|
| Once the user has been created, you can edit it to set appropriate privileges then. Toggle privileges you wish to assign to the user and confirm the changes. |
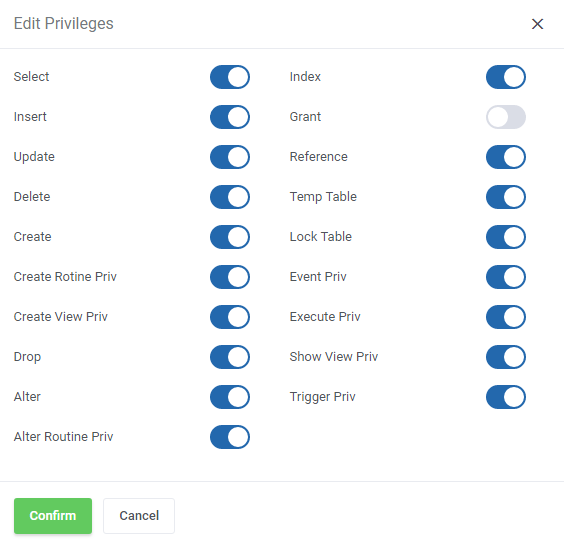
|
| It is also possible to change the user's password in case of any need. |
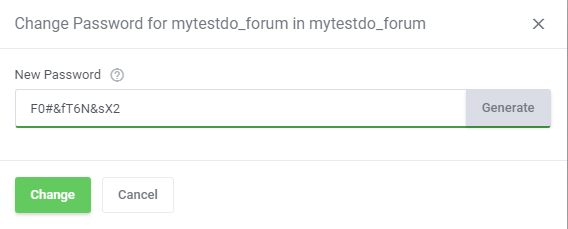
|
[edit] DNS Management
| This section gives you the possibility to manage the 'DNS Records' of your domain easily. You can create new records as well as edit the existing ones. |
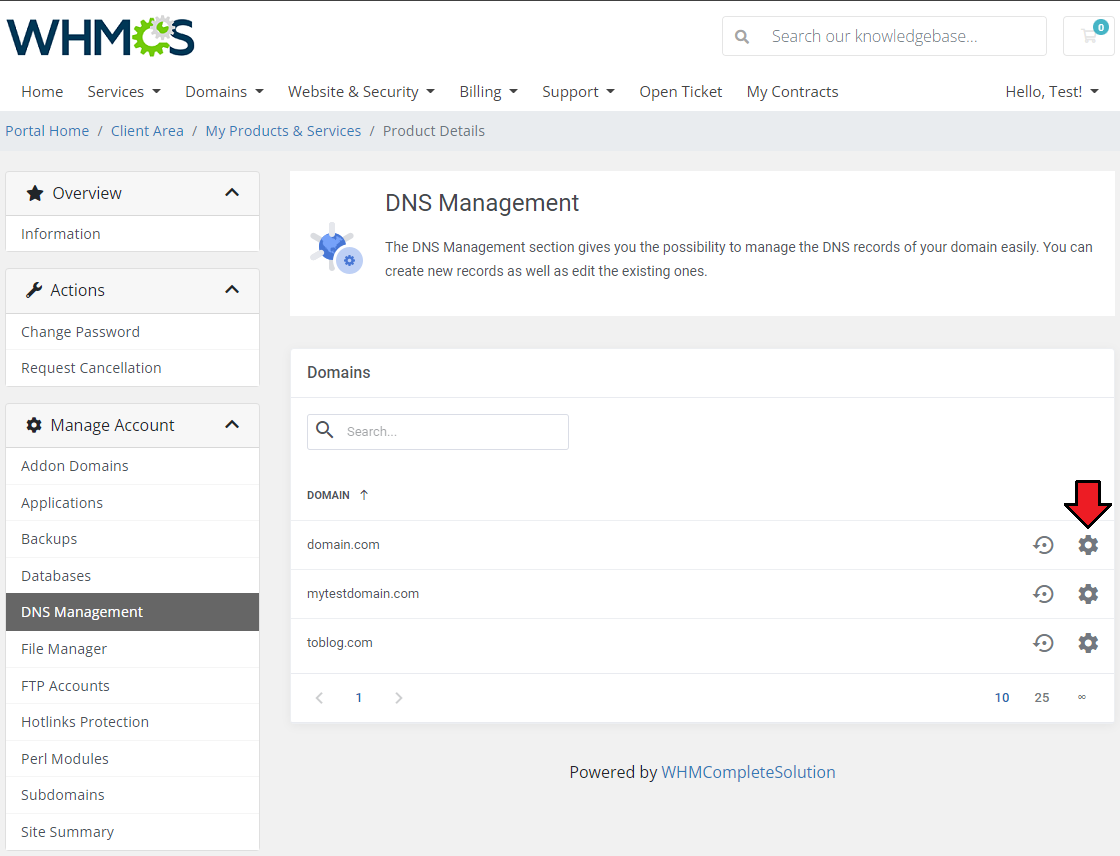
|
| As presented below, there is a list of your existing 'DNS Records' . You can edit them or delete if they are no longer needed. If you wish to add a new 'DNS Record' , simply click on the appropriate button. |
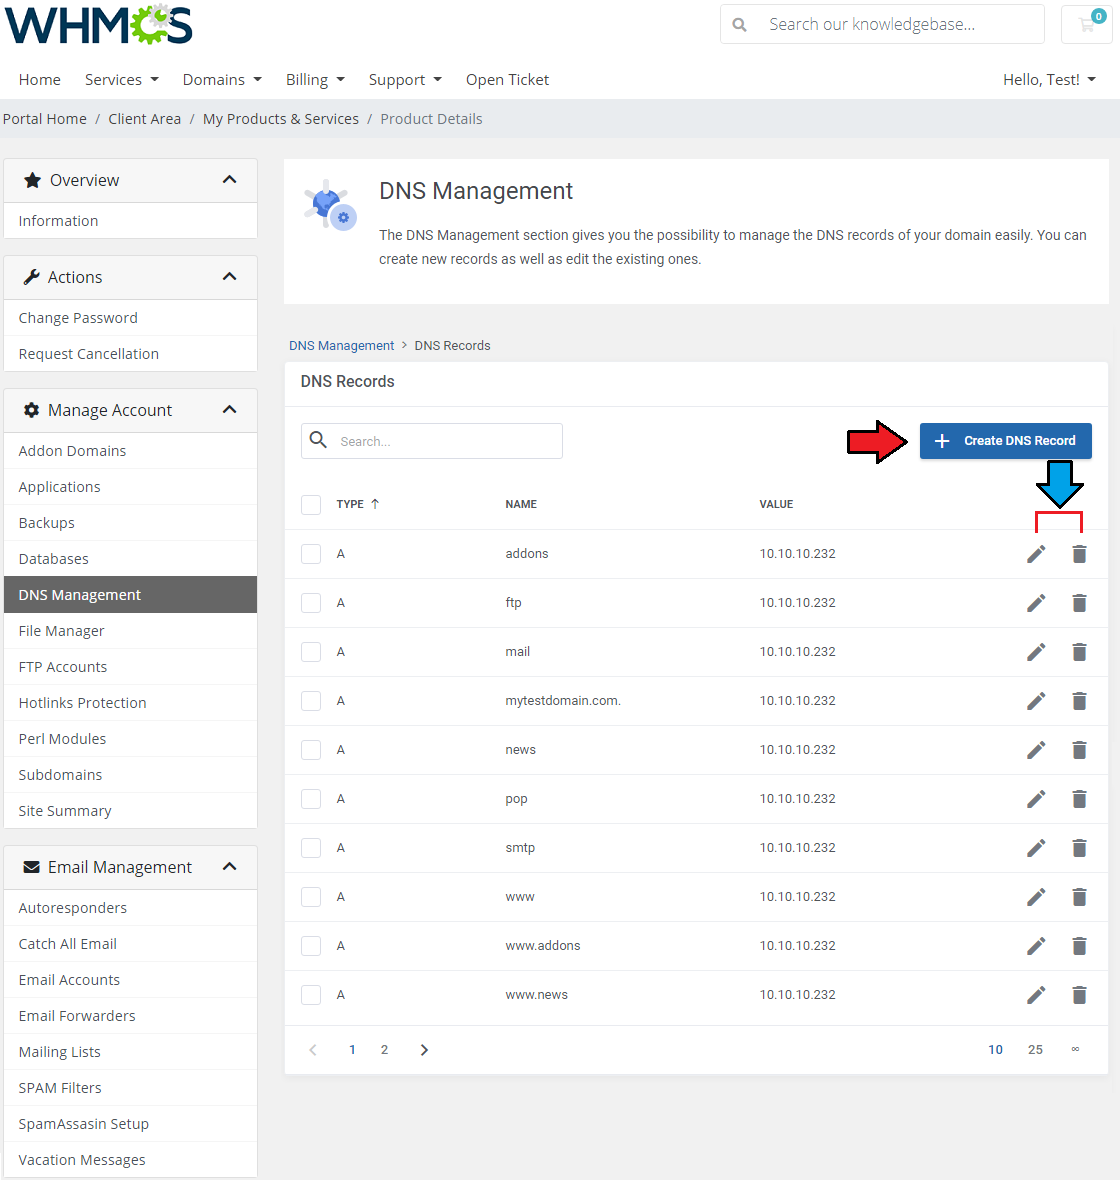
|
| Now, choose the type of your 'DNS Record' and provide its name and value. |
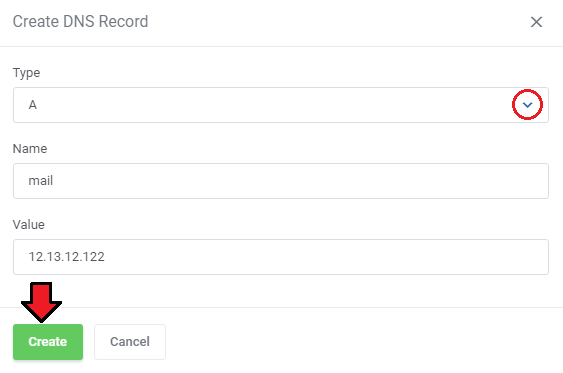
|
| Press the button to restore the DNS configuration to default. |
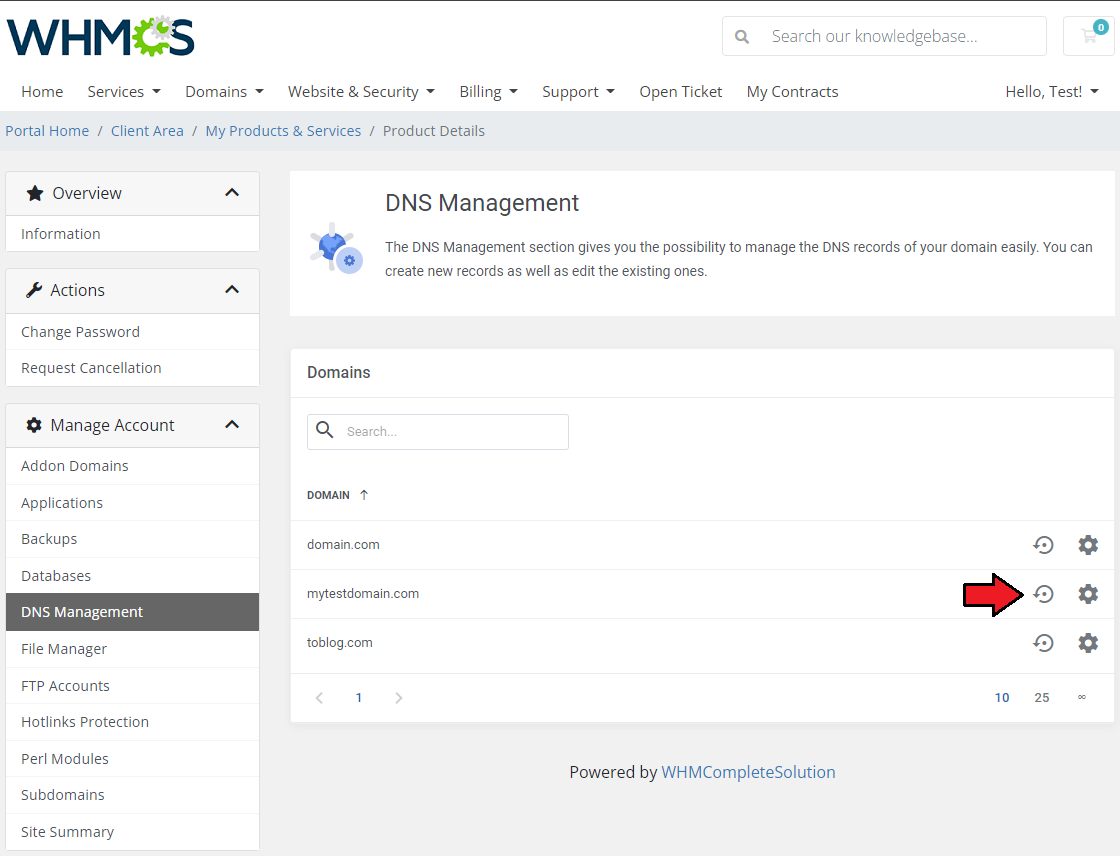
|
| You must be aware that after restoring the default configuration, all the custom entries you have made will be erased. </br>If you are sure, just press 'Confrirm' button to restore default DNS configuration. |
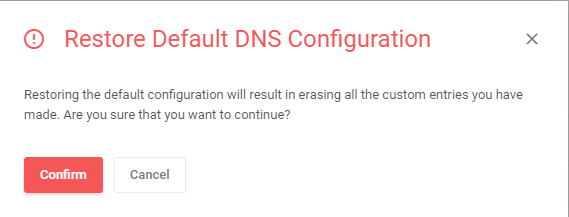
|
[edit] File Manager
| Manage files and folders of your DirectAdmin account. Upload files and create directories. View the list of files with specific data on them: name, file size, last modification date and given permissions. |
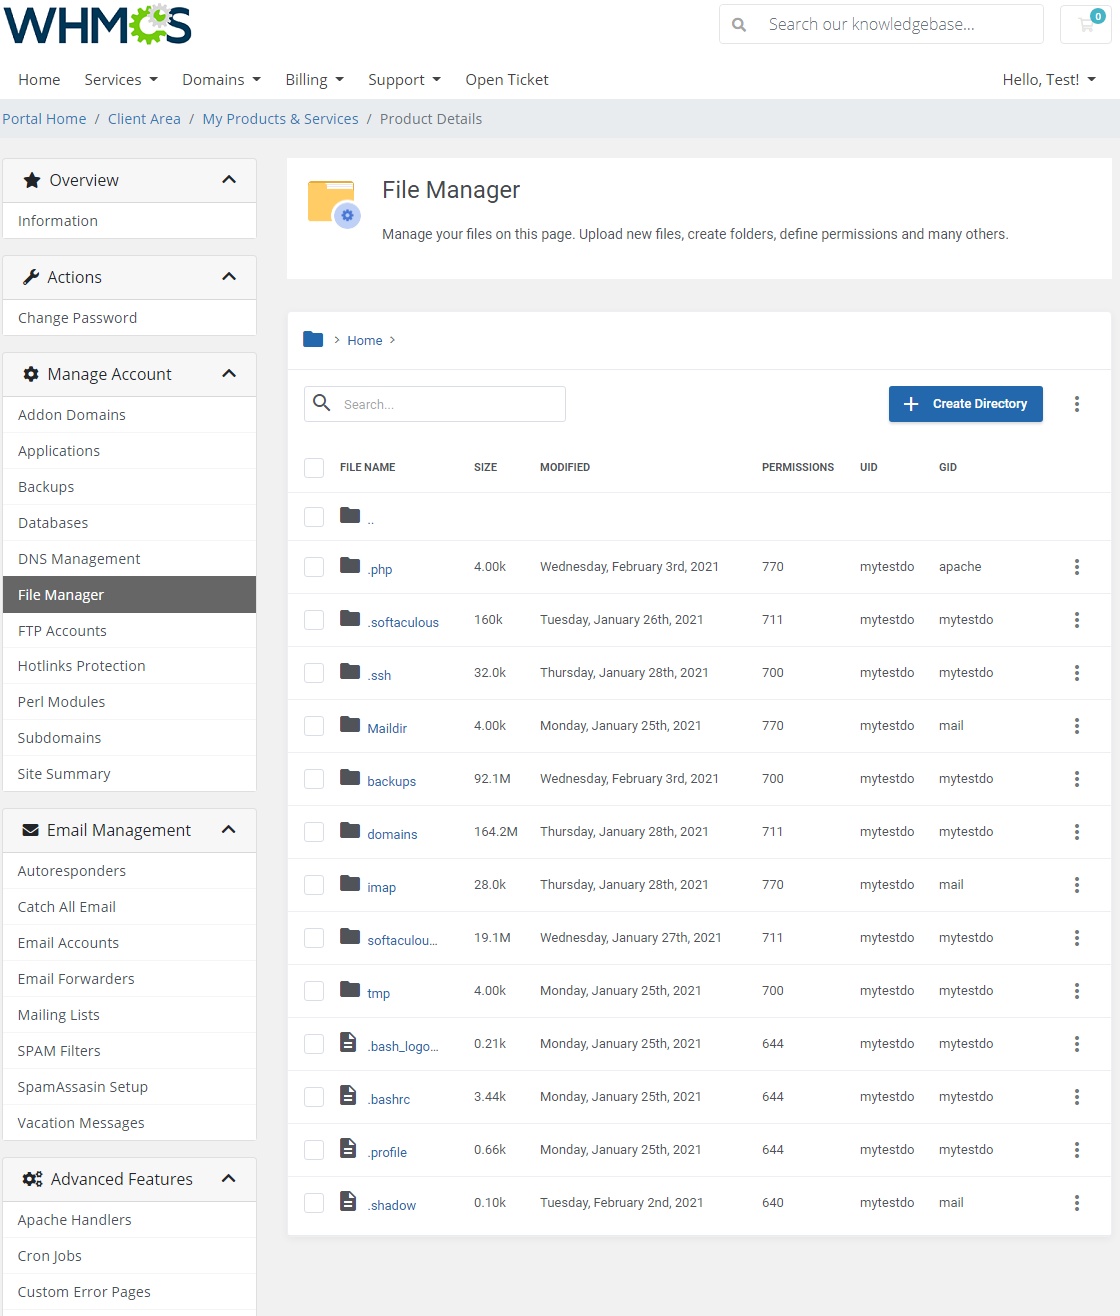
|
| You can create a new directory by pressing a corresponding button as well as upload new files by pressing additional actions. |
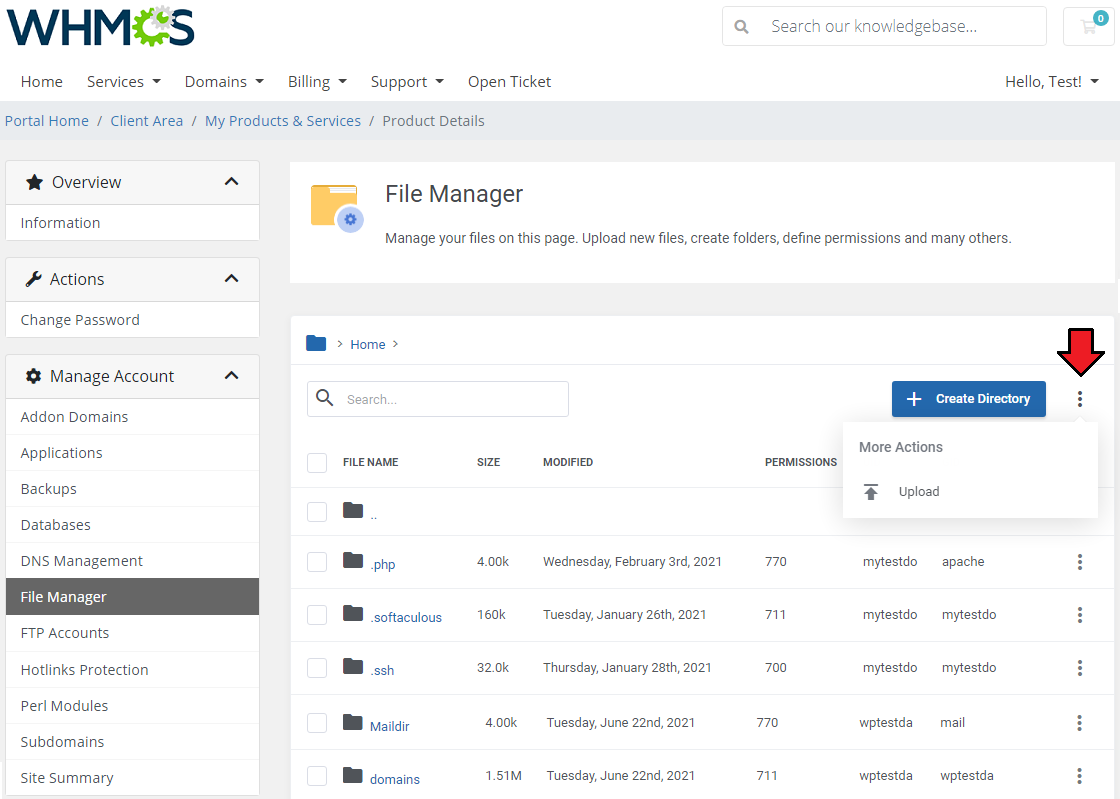
|
| Rename, change permissions, copy, protect and delete a single file or directory. Note: Only folders placed in the public_html directory can be protected, no other files have this option. |
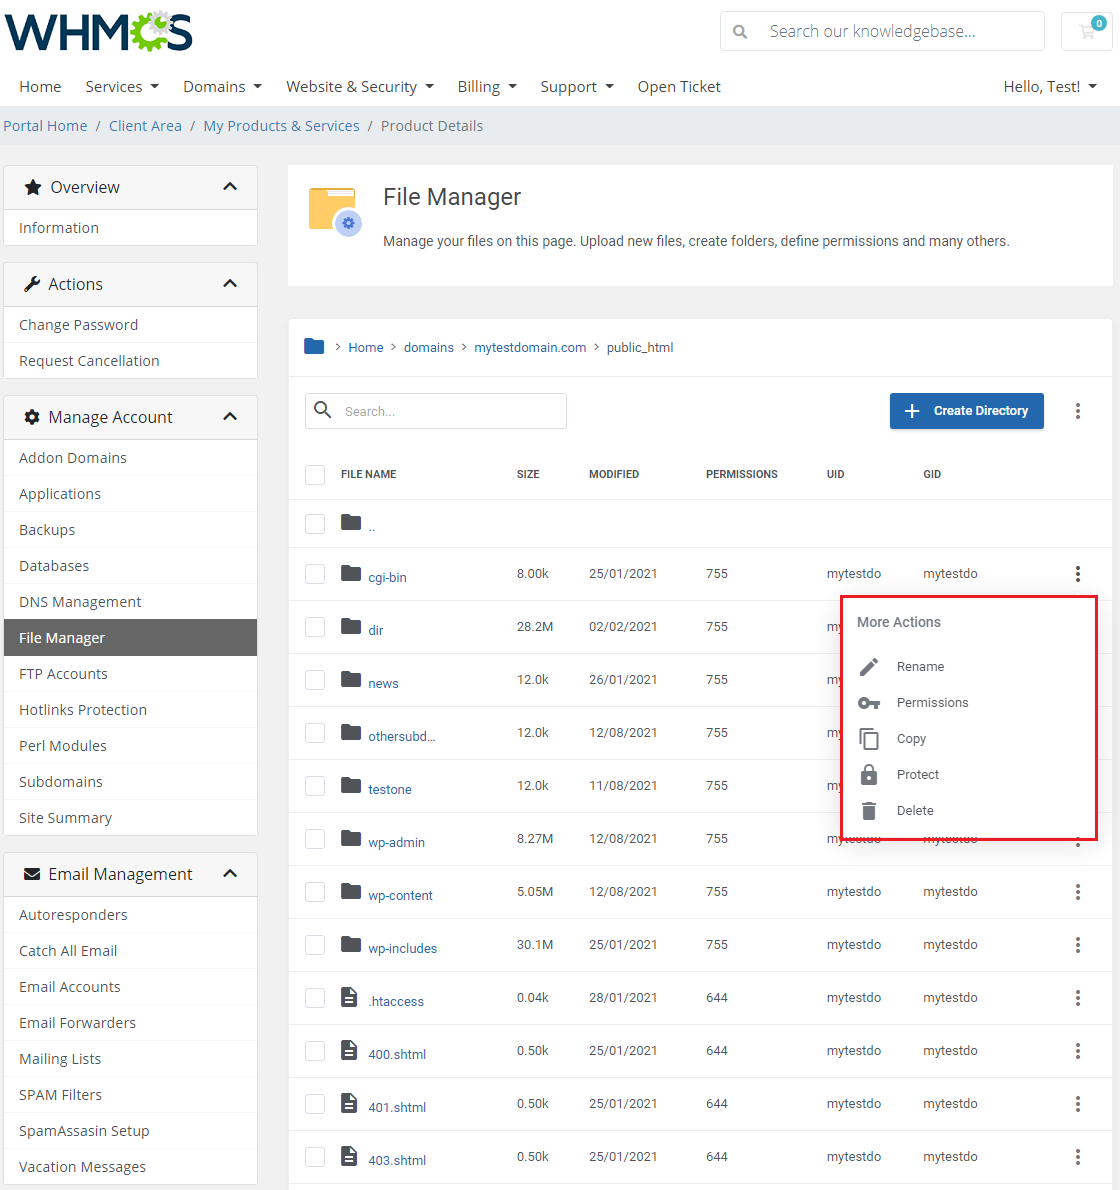
|
| You can also change permissions and remove single or multiple files or directories. |
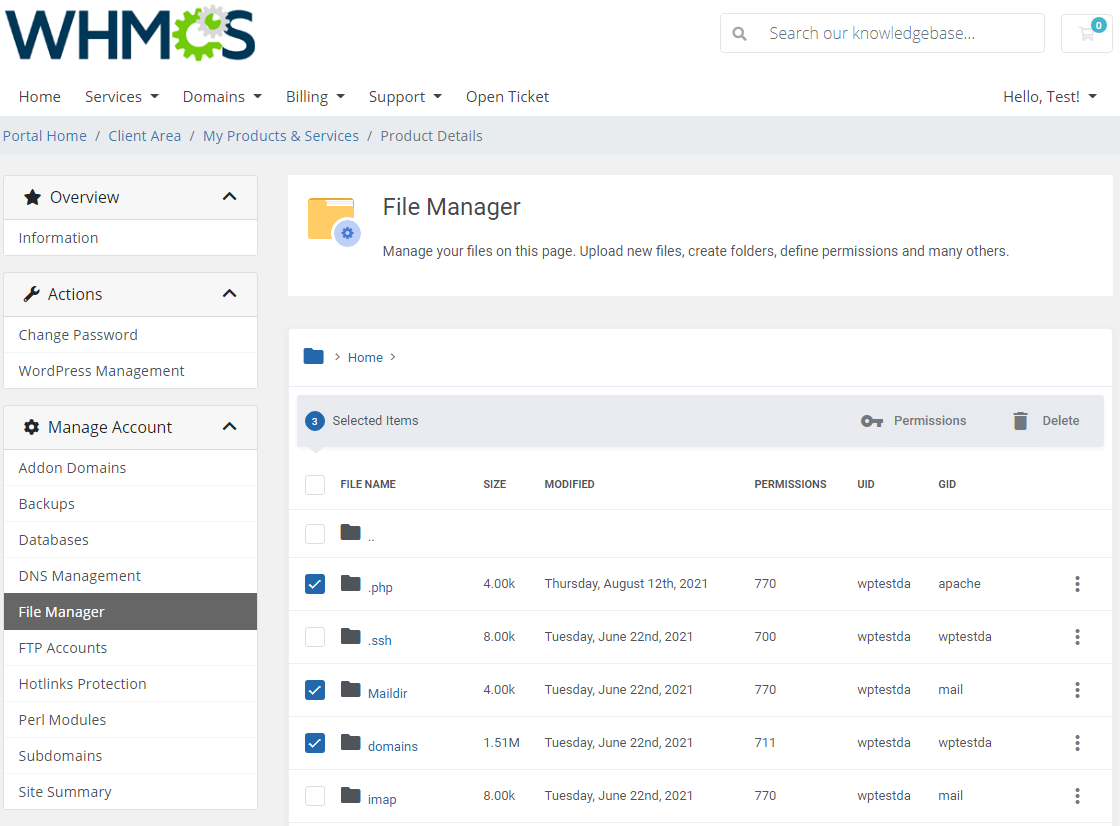
|
[edit] FTP Accounts
| Manage FTP accounts in the easiest possible way. Type in your login, generate a new password and select the directory. Handle the accounts to be able to access your website files through an FTP protocol. You can also suspend or unsuspend created accounts. |
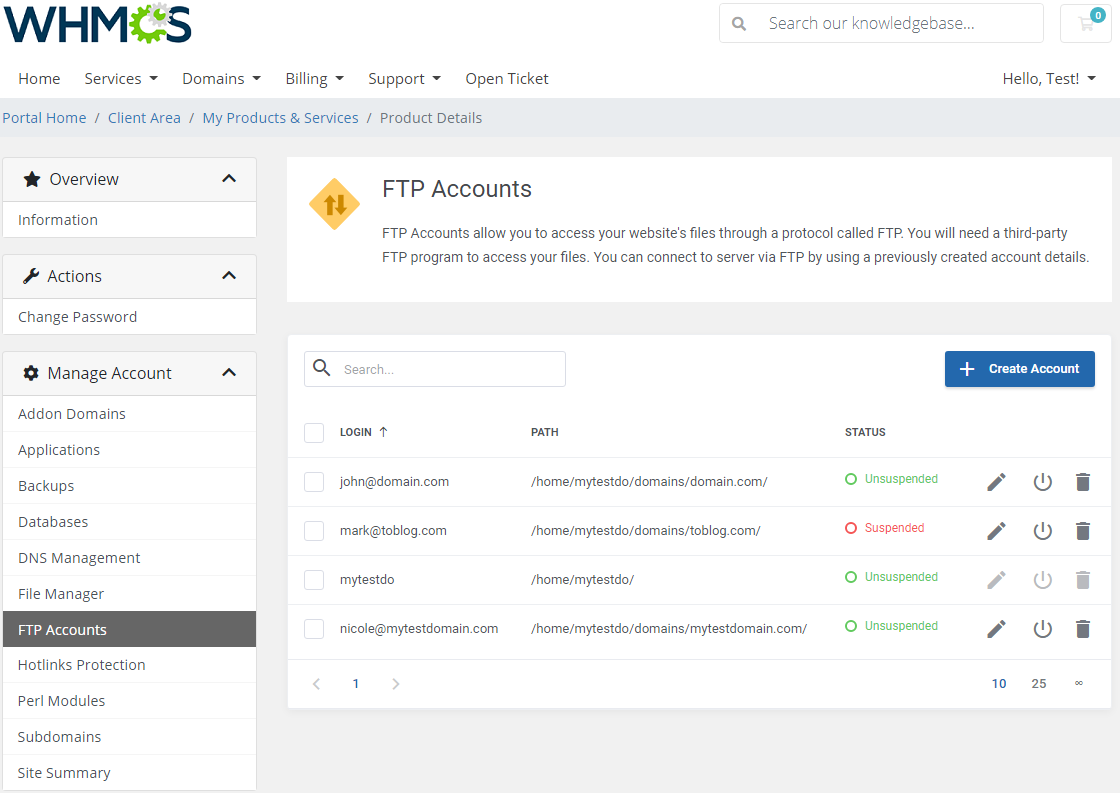
|
| Add and configure FTP Accounts, just type in your login on a selected domain, provide or generate a secure password, select directory: 'Domain', 'FTP', 'User' ' or a custom one. |
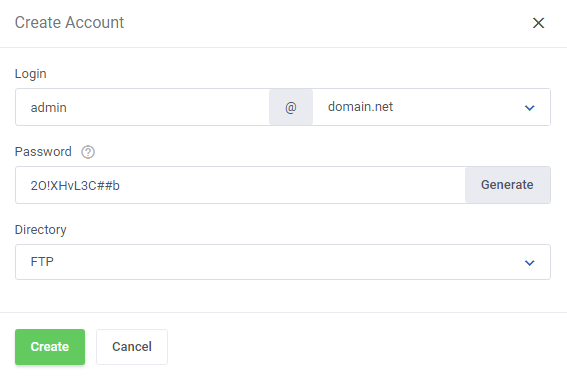
|
[edit] Hotlinks Protection
| 'Hotlinks Protection' section is a place where you may enable and disable protection of single links to the content of your website. This way you mayt avoid your content, for example images, from being stolen or badwidth abused. Press the icon next to every of your domains to see existings, currently protected URLs. |
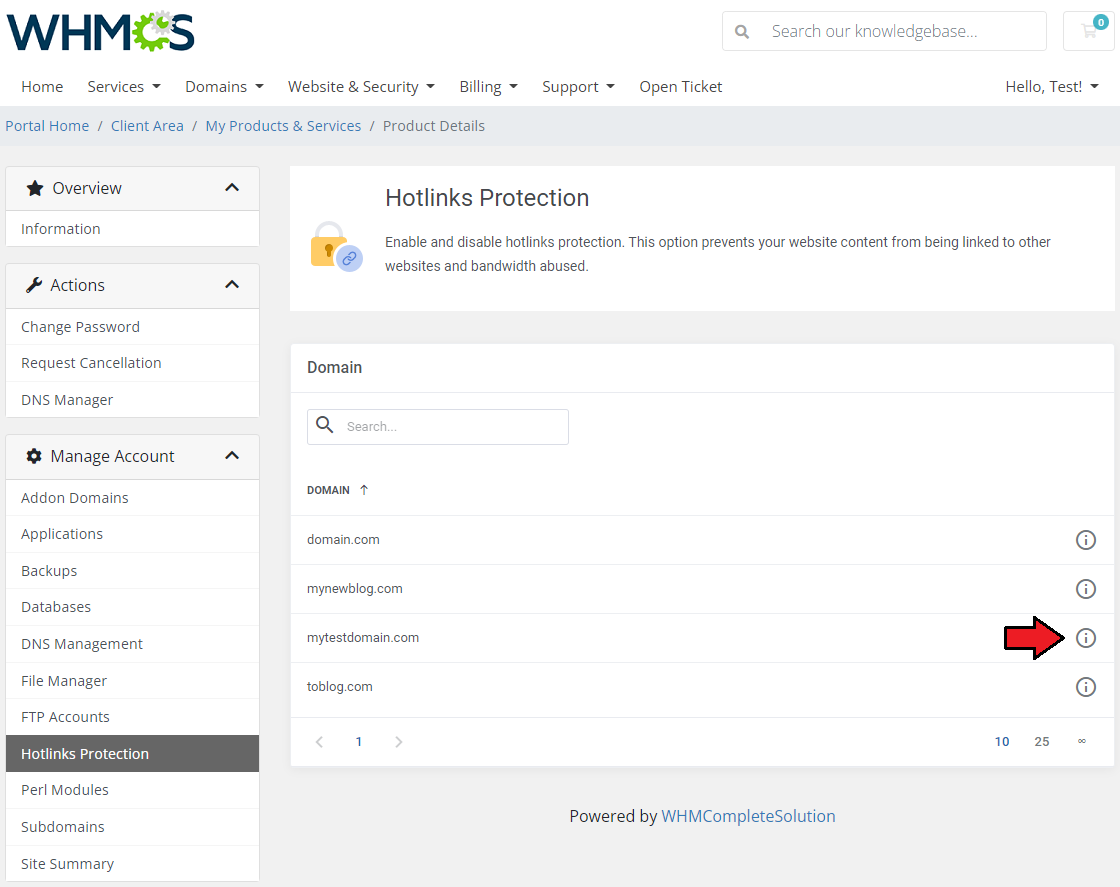
|
| In this section you may add new URLs to protected or remove existing ones from the list of hotlinks. Press 'Add new URL' to protect another link. |
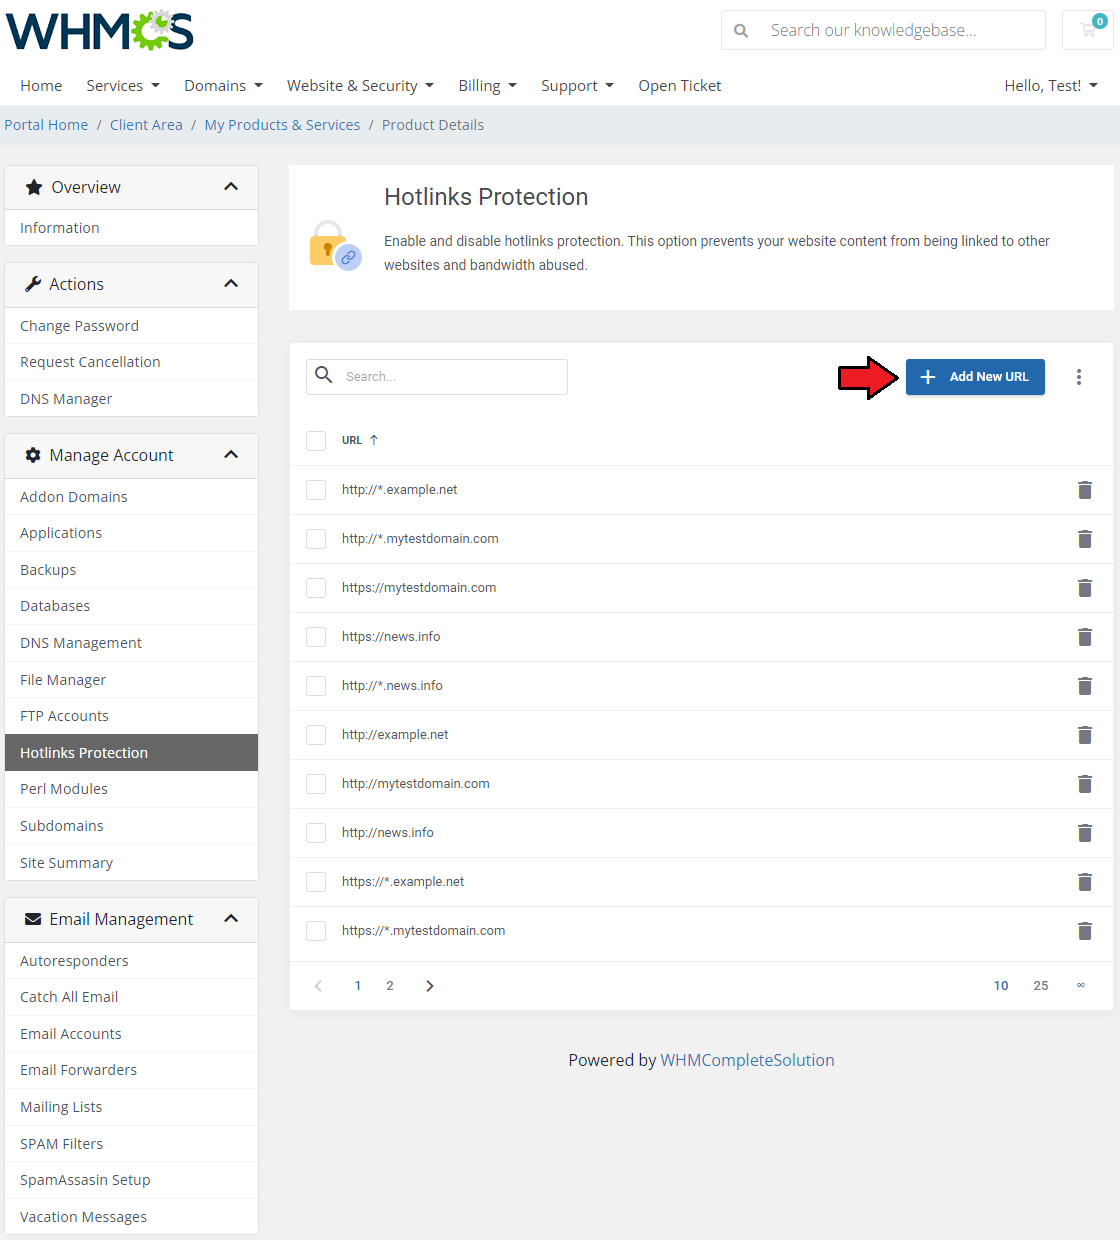
|
| Type in your URL, you may use '*' sign to hide part of the URL and confirm the action. |
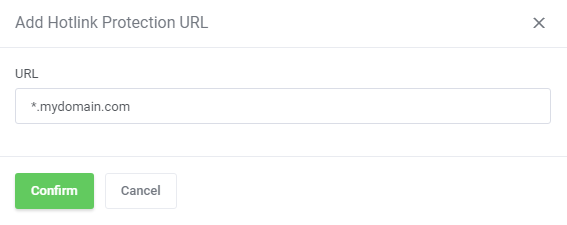
|
| Define protection settings for all the URLs |
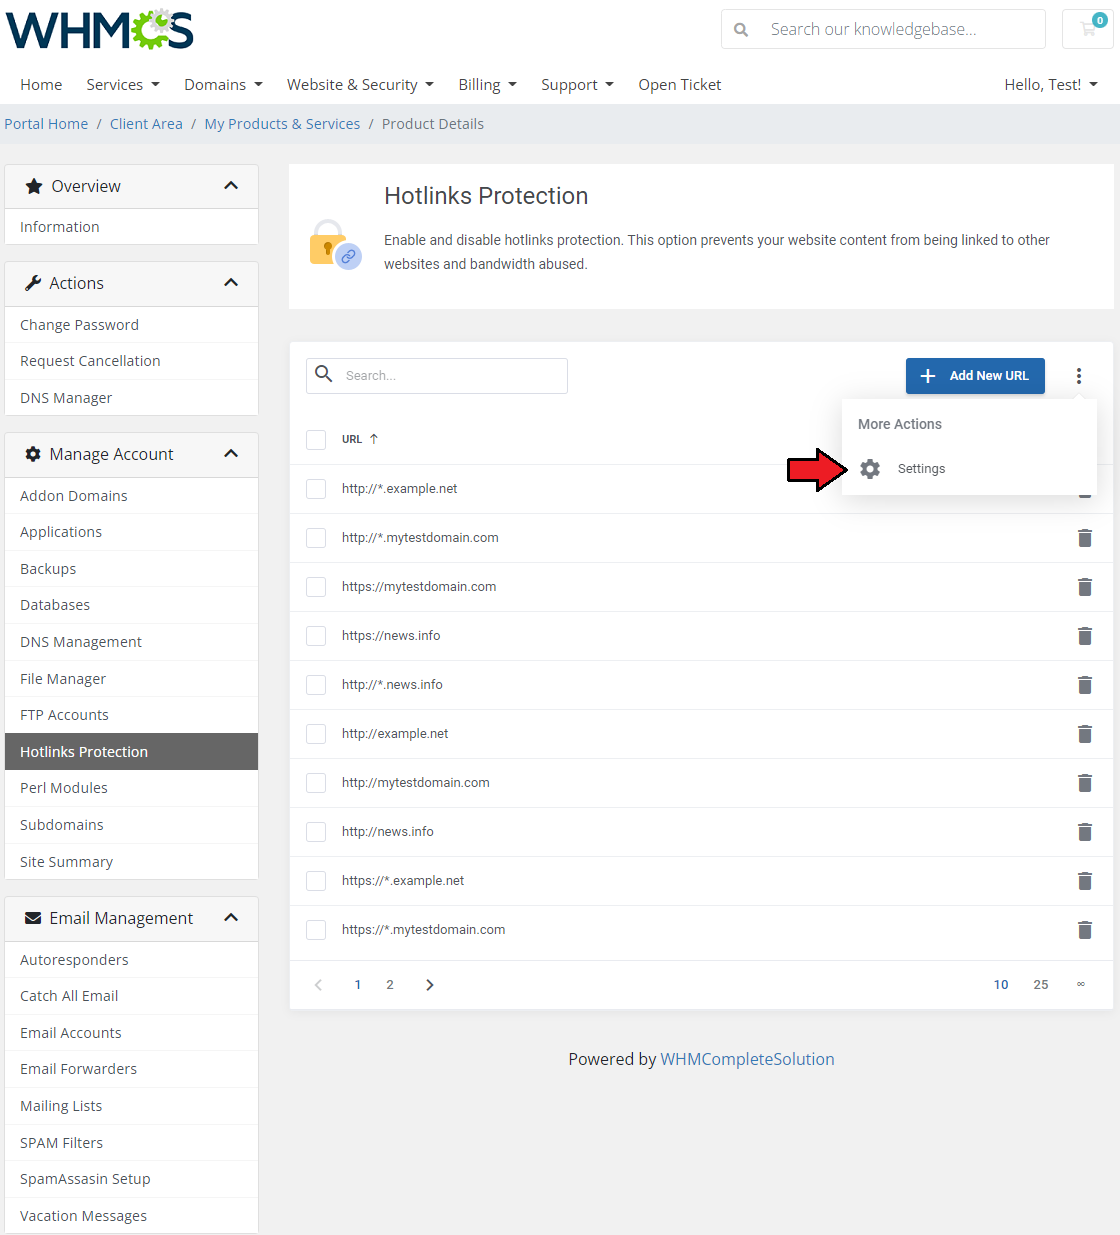
|
|
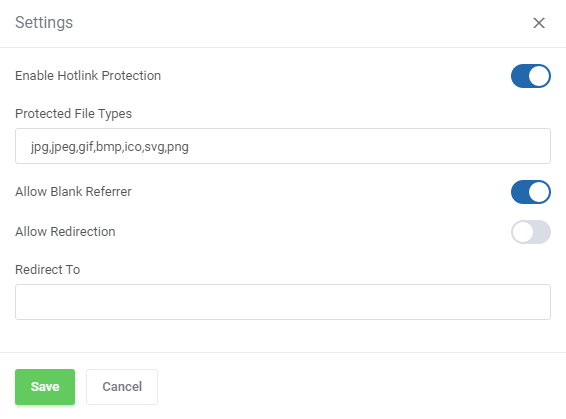
|
[edit] MX Records
| The 'MX Records' section provides a convenient way to handle your domain's MX records. You can both create new records and modify existing ones. Start by selecting the desired domain first. |
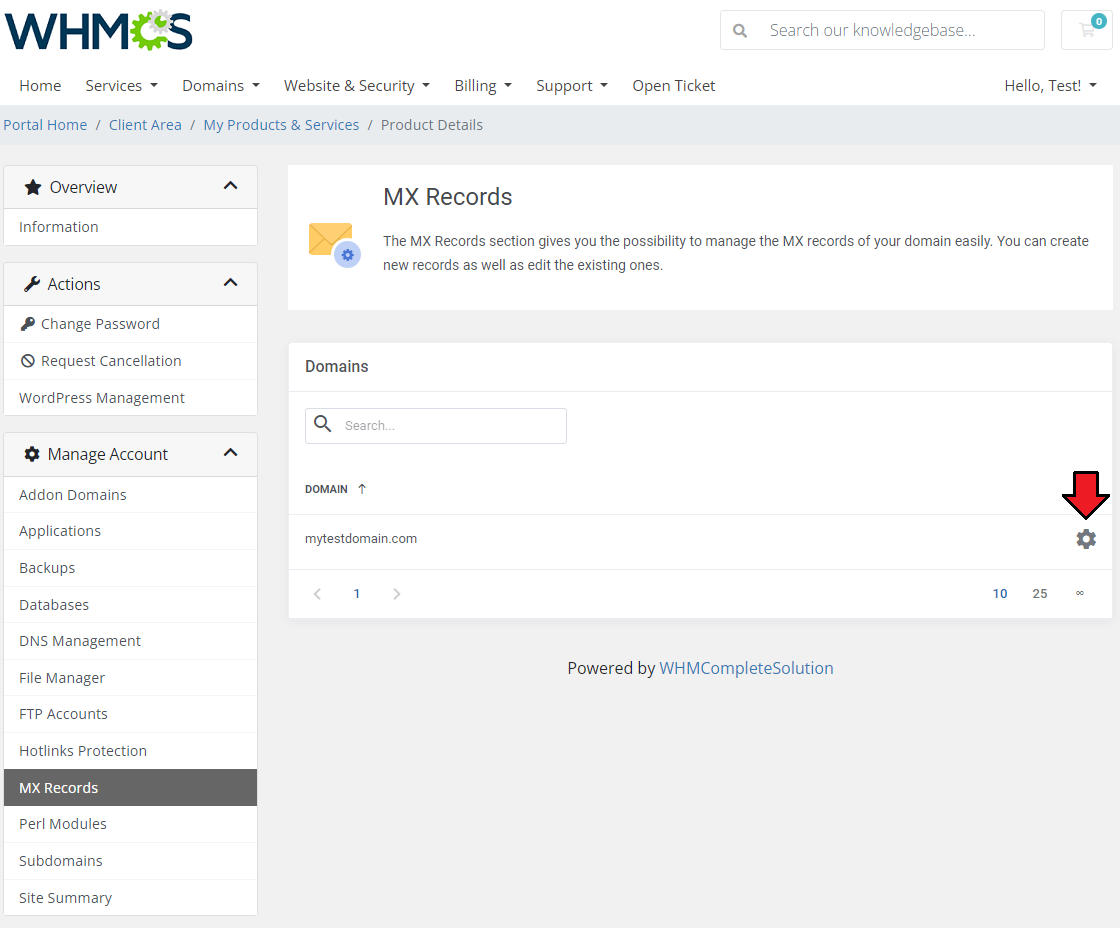
|
| Under Domain → MX Records, you can either manage existing records by editing them or create new records. To do so just press the 'Create MX Record ' button. |
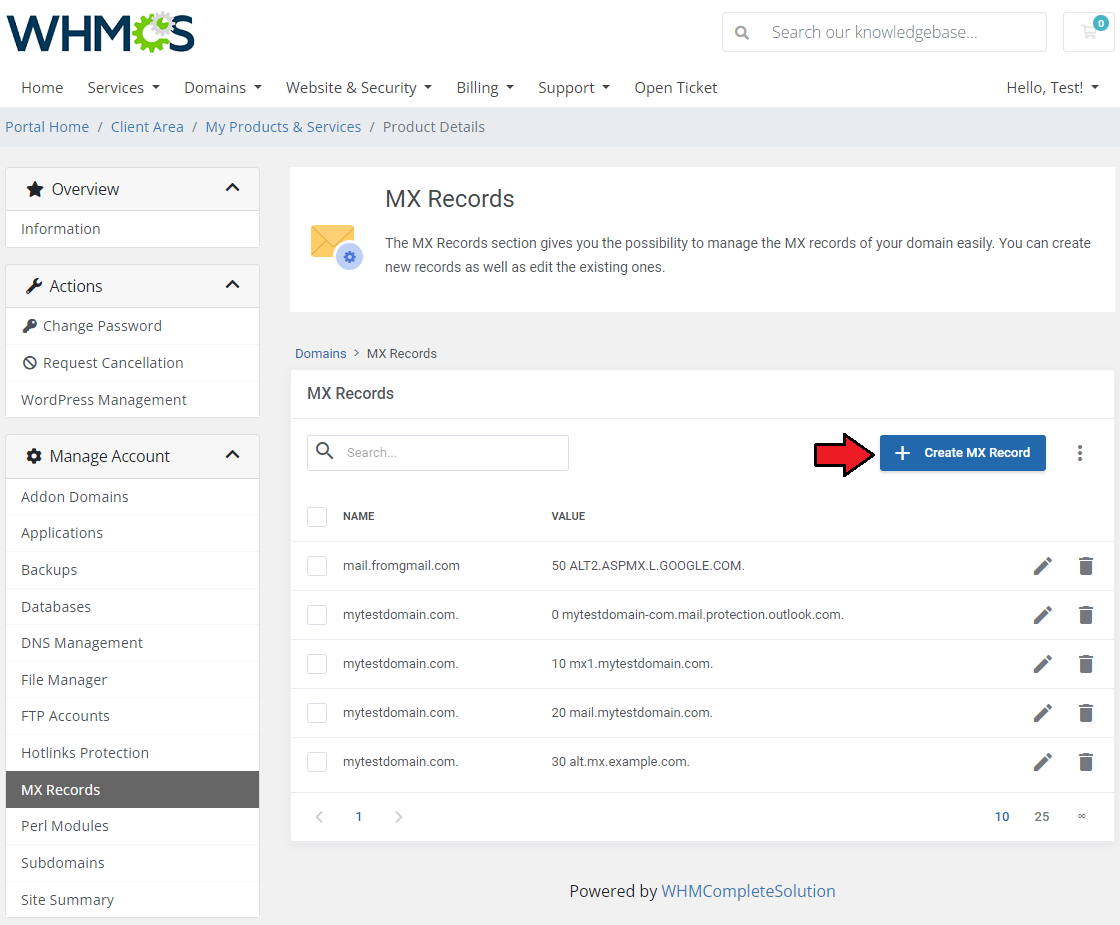
|
| Before creating a new record, it is important to be confident in your actions. MX records are crucial for directing emails to the correct mail server for your domain. Therefore, modifying these records could disrupt your email service, impacting all email accounts associated with your domain. If you are certain about creating a new record, please fill out the form with the following information:
|
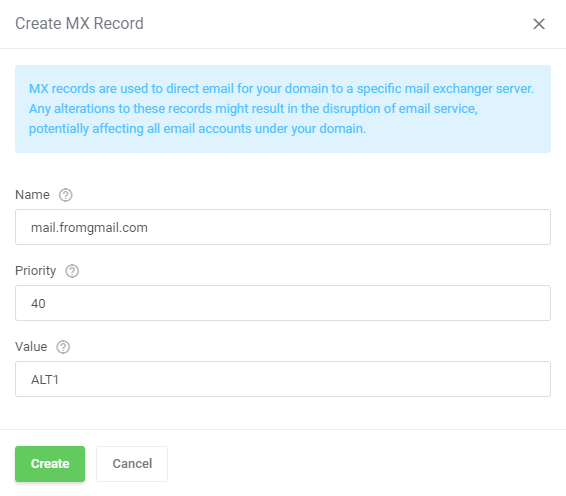
|
| The newly created record immediately appears on the list. It is also possible to 'Set MX Tmeplate' from this point. You will find this option as marked on the screen below: |
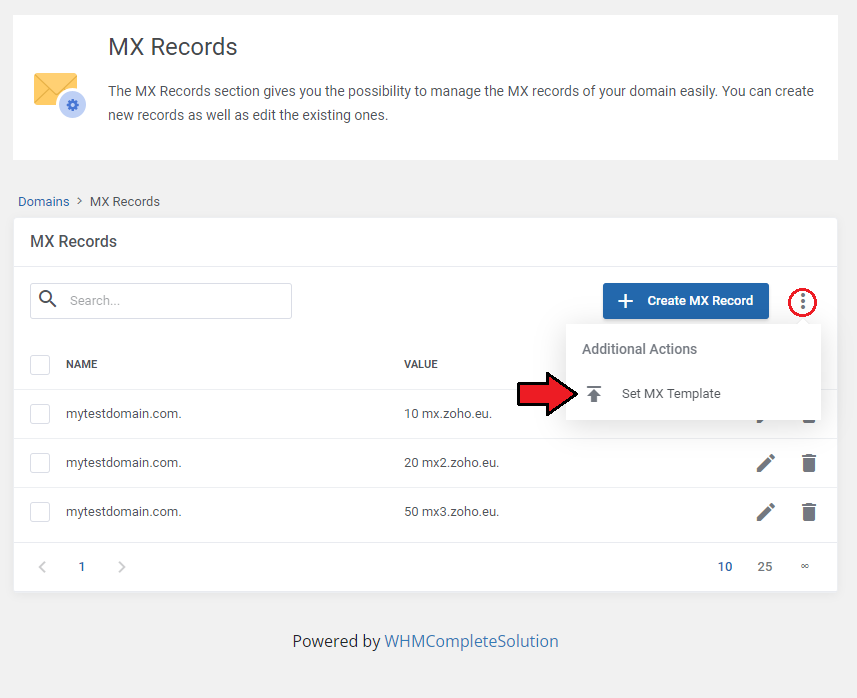
|
| Fill out the form to easily add pre-defined MX records to your domain. Choose the MX template from the list. You can also activate the 'Affect Pointers' feature to update the pointer records that alias MX records. |
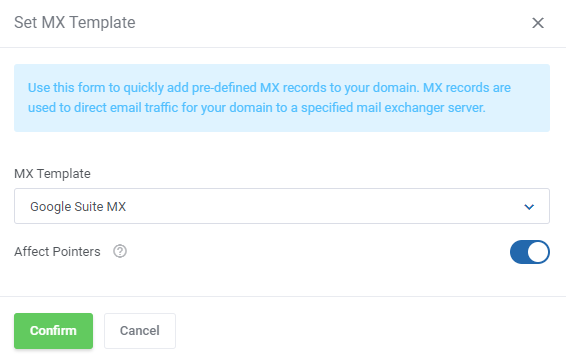
|
| The MX records list will be automatically updated. You can edit individual records, delete them one by one, or use the mass action button to delete multiple records at once. |
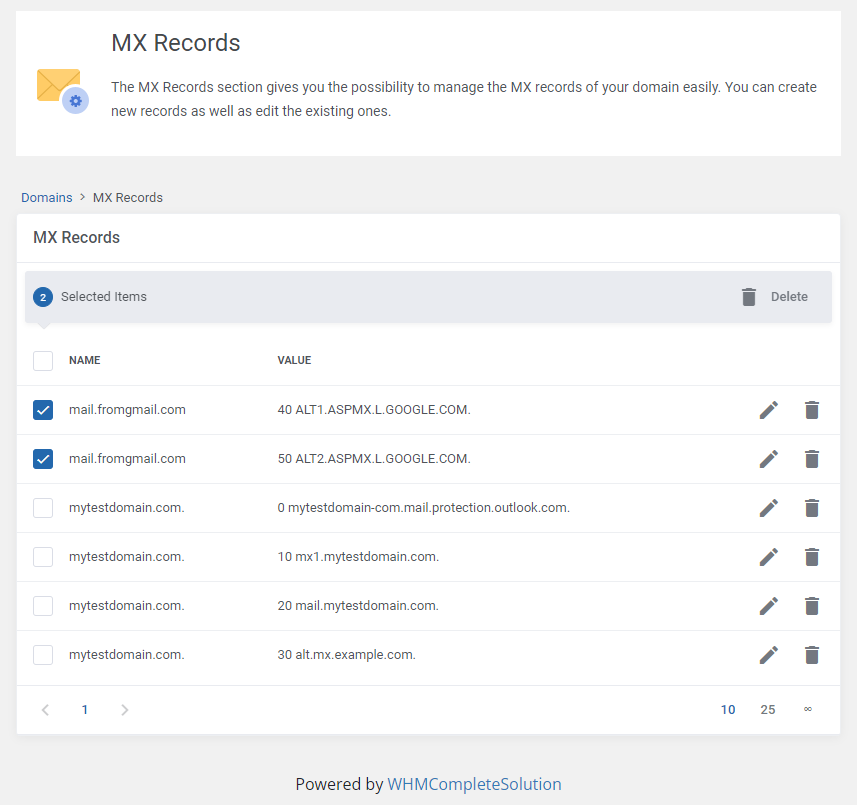
|
[edit] Perl Modules
| Move to the next section, which is 'Perl Modules'. All Perl based modules installed on your server are listed there. |
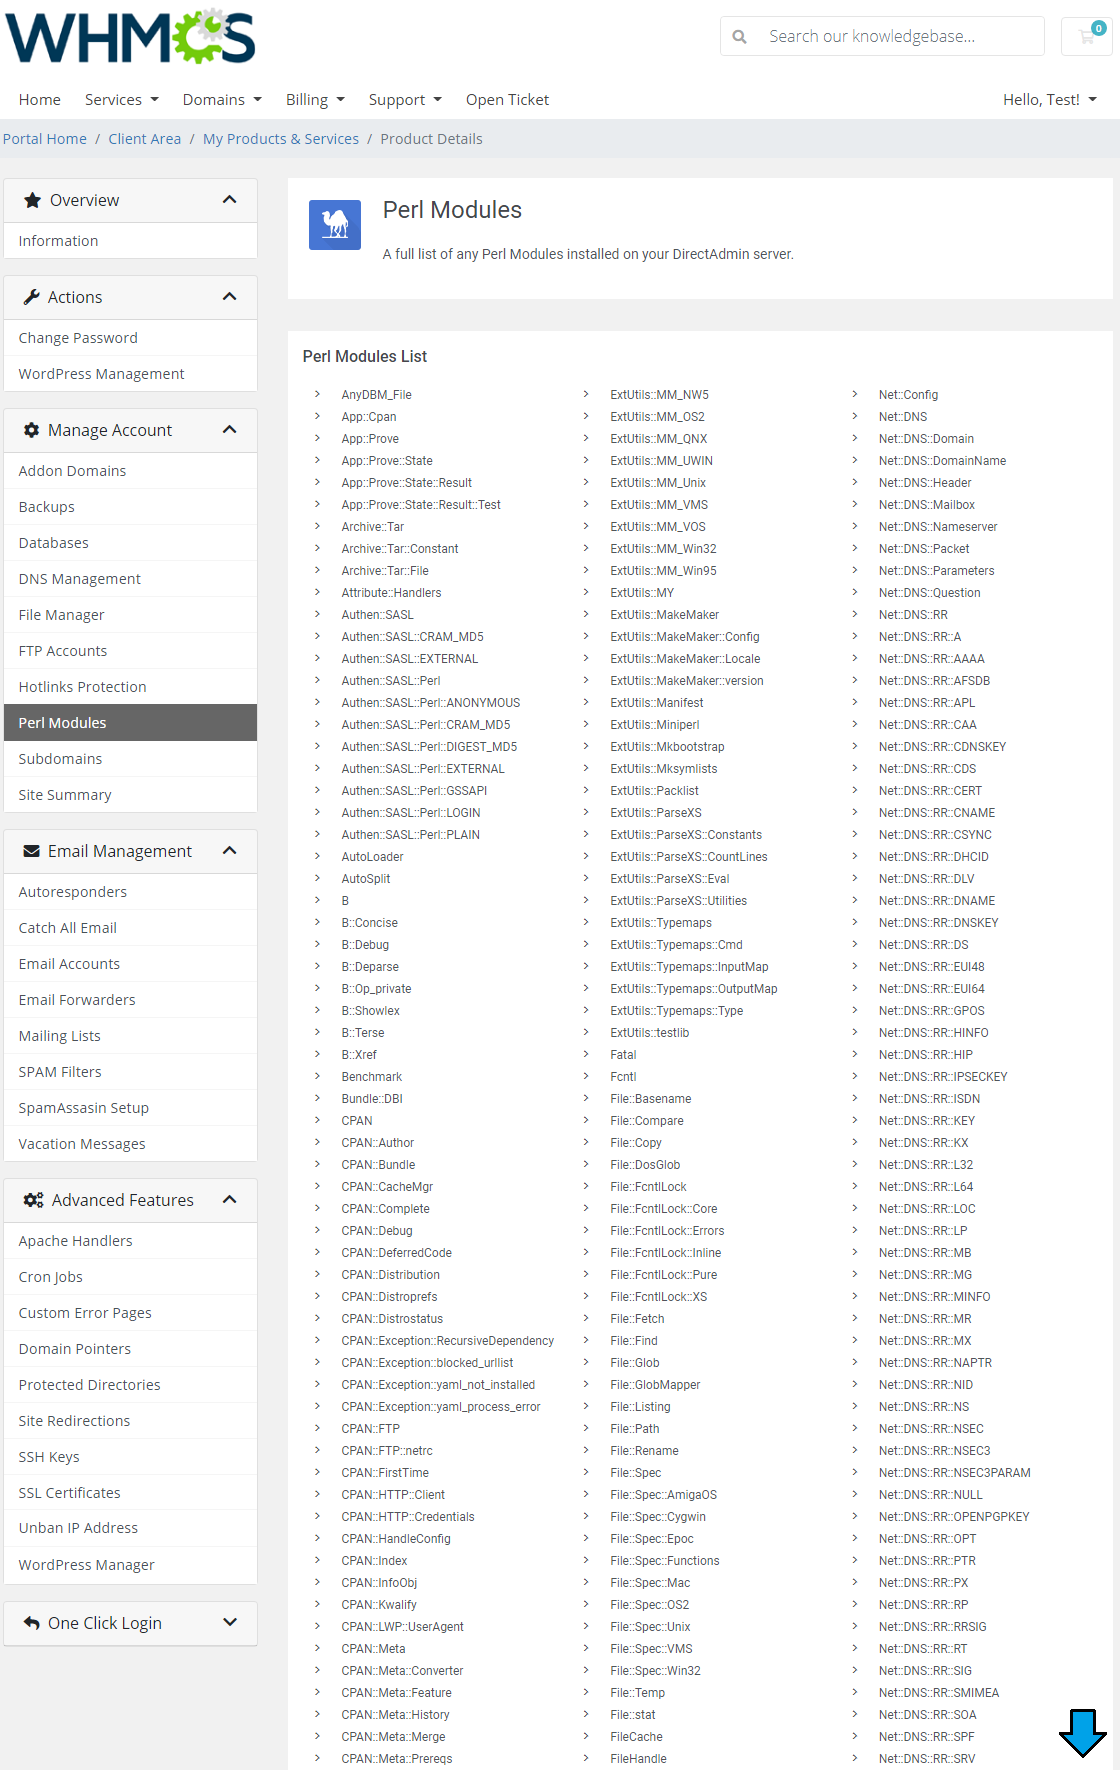
|
[edit] Subdomains
| Create subdomains for your website sections. All you need to do is choosing the domain from the list of available domains and typing in the subdomain name. Once created, you can remove the subdomain if needed, see its bandwidth usage and view a list of subdomain logs. |
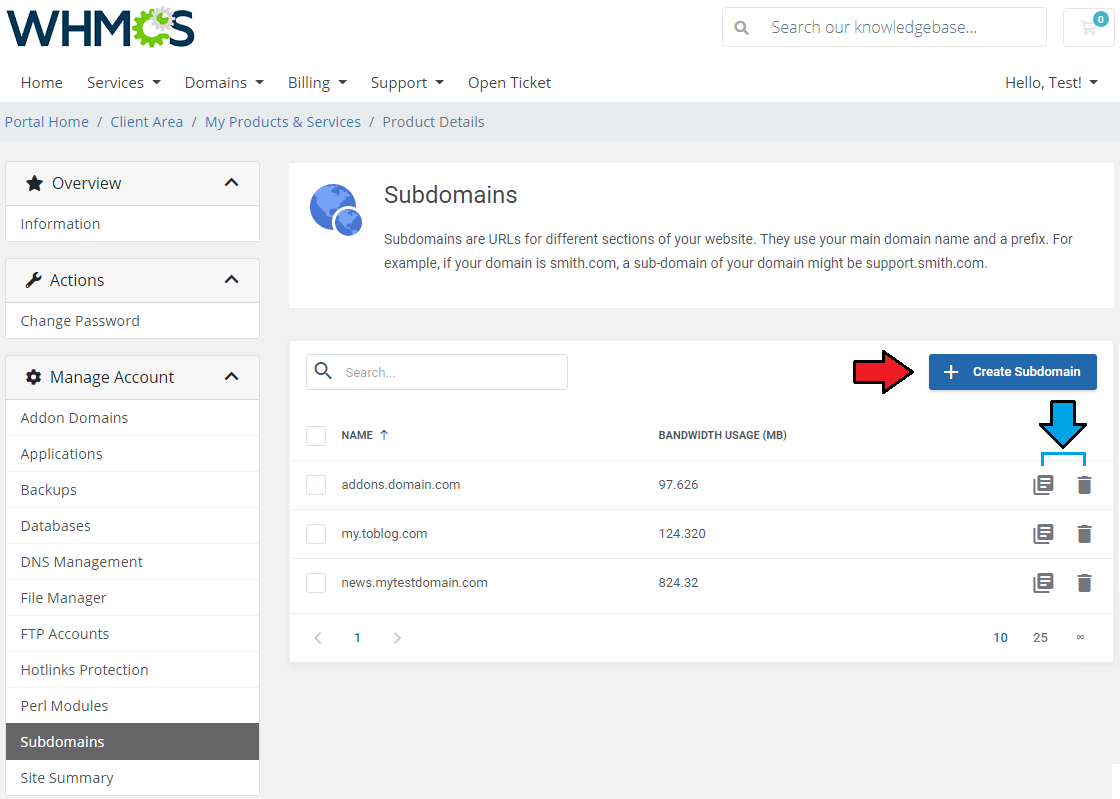
|
| Choose the domain for your available subdomain from the list. |
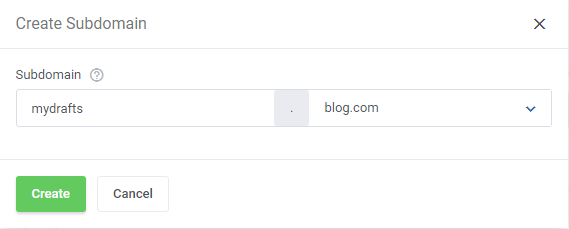
|
[edit] Site Summary
| Proceed to the 'Site Summary' section in order to check and analyze precise statistics. Control usage level for each setting here. |
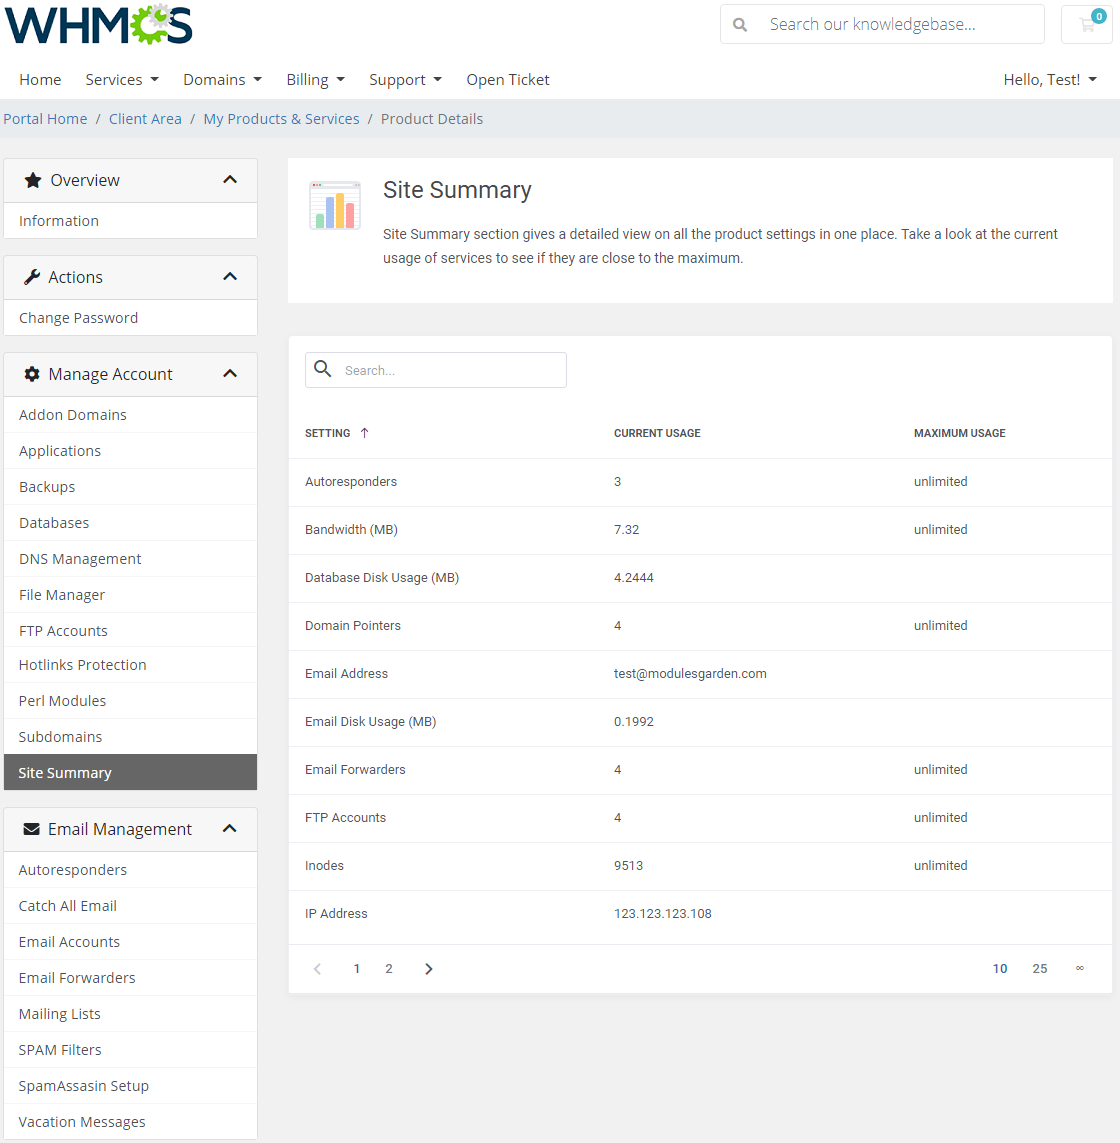
|
[edit] Email Management
| Email management section includes all tools related to emails. Go through them to learn more. |
[edit] Autoresponders
| In this section you may compose and add extremely useful default messages. They will be automatically sent as a response message when you have no access to your mailbox. |
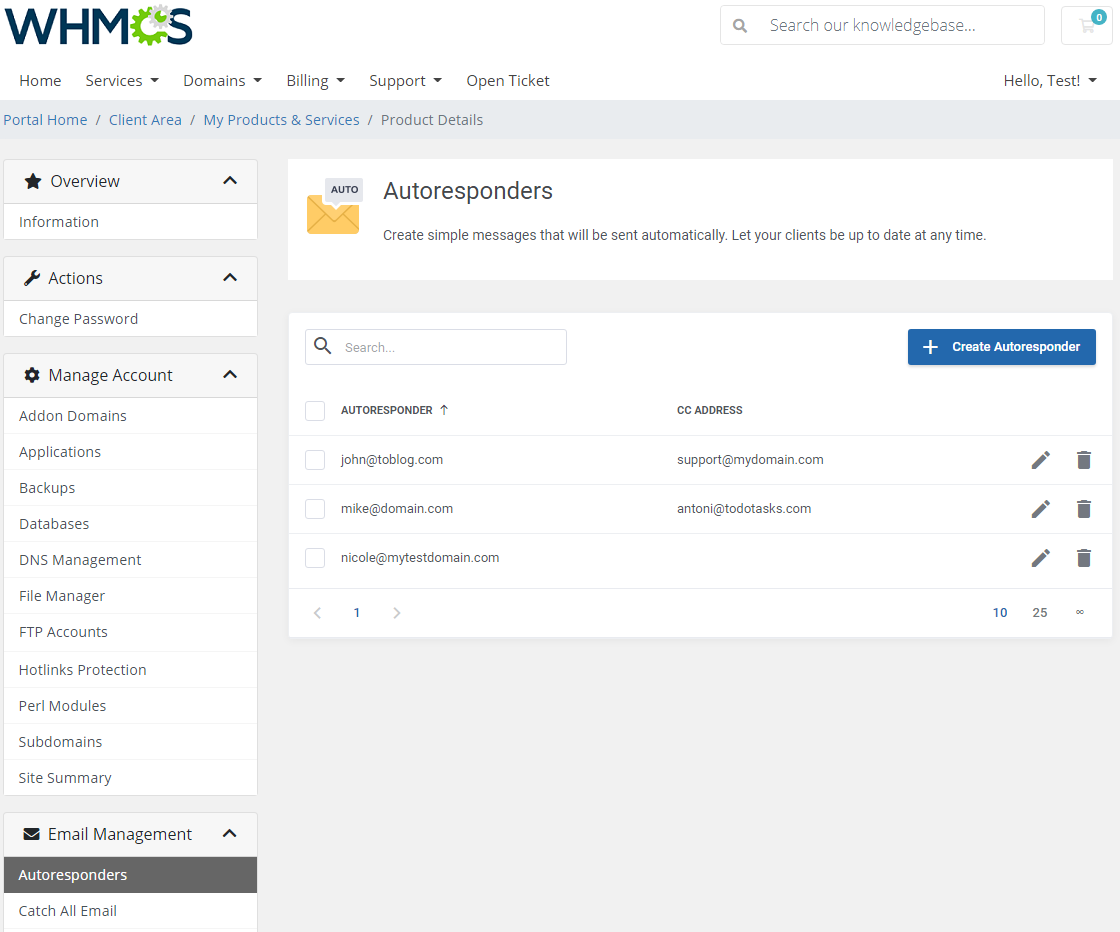
|
| Press 'Add Autoresponder' to create one. Provide the email address and compose the whole message here. You may also add a CC recipient address if you need to send a copy. |
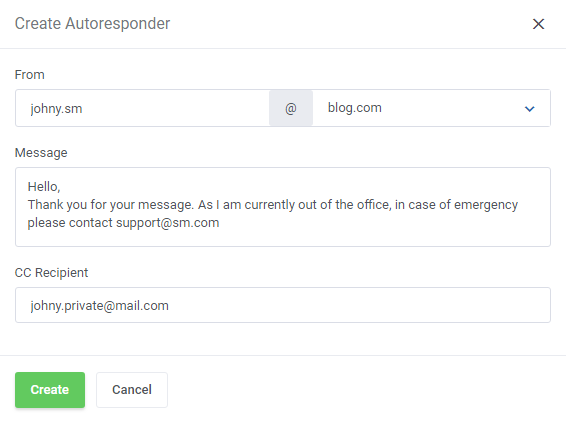
|
[edit] Catch All Email
| 'Catch All Email' is a feature that allows you to forward emails that are sent to the non-existent email address of your domain name. Click on the 'Edit' button as shown here: |
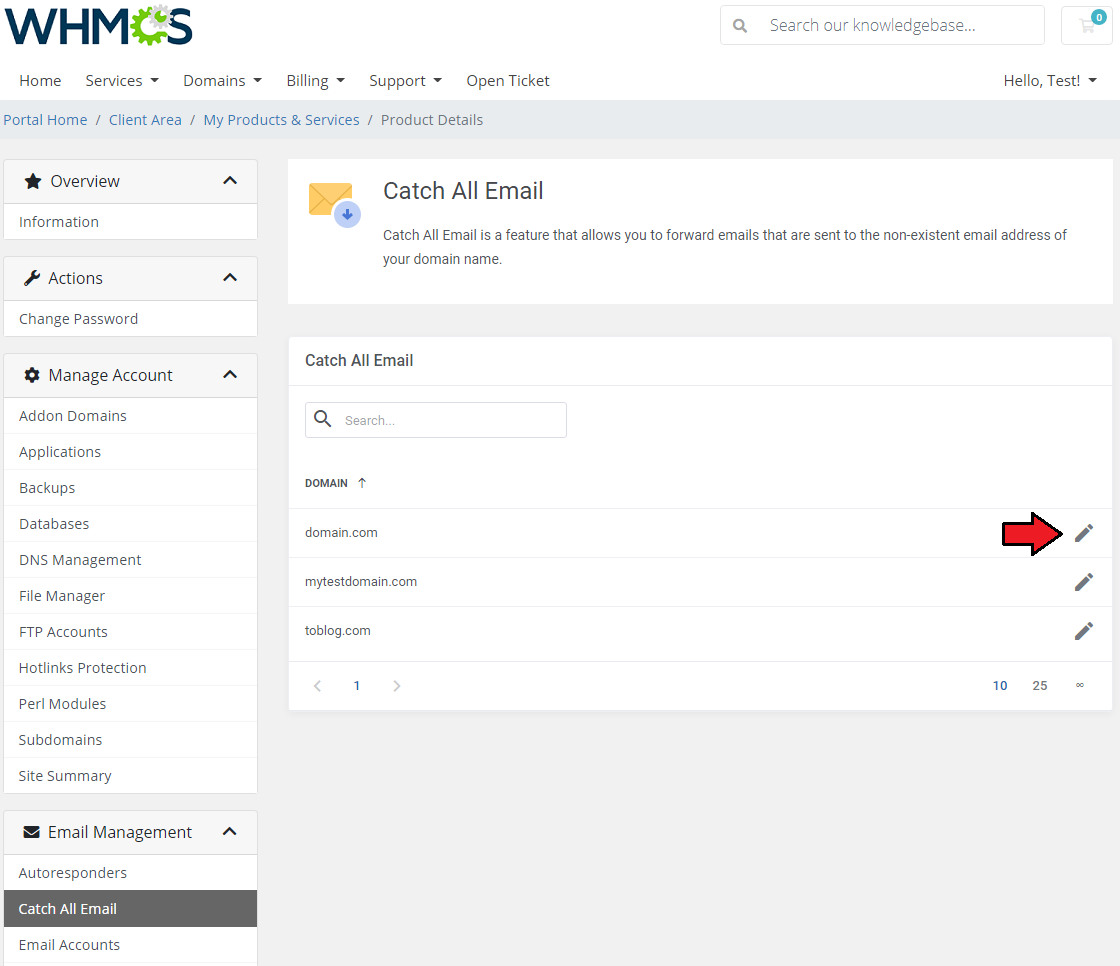
|
Now, here are three options available. Choose the preferred option and save changes.
|
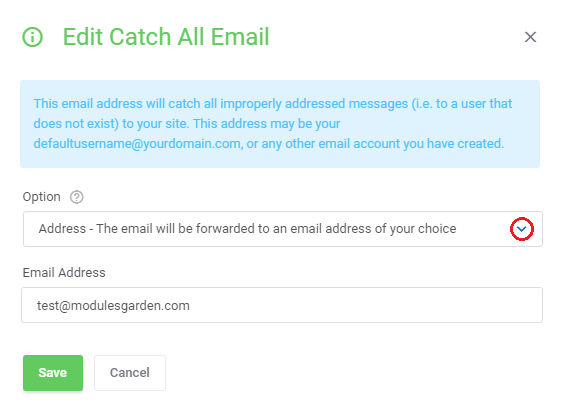
|
[edit] Email Accounts
View and edit email accounts that are associated with your domains. Use a filter to find required email addresses, preview its selected quota, number of sent messages and manage the account.
|
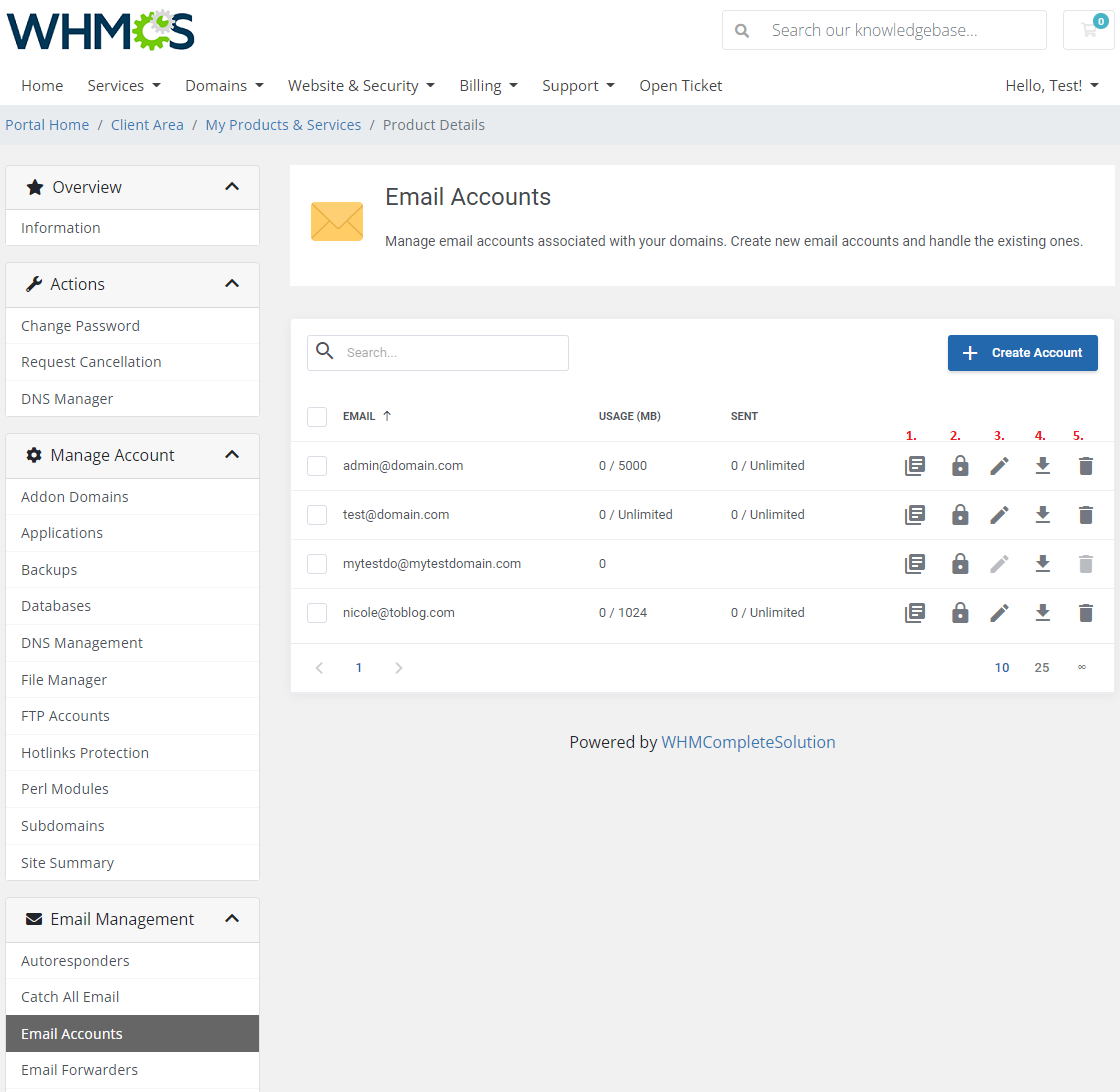
|
| Press 'Create Account' and select to which domain it shall be added, type or generate password, define limited or unlimited quota and limit of messages. |
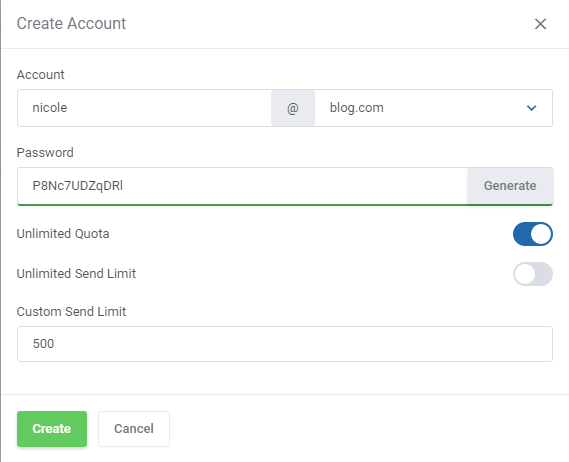
|
[edit] Email Forwarders
| In this section you can set up email forwarders and choose from several destination options to adjust mail forwarding perfectly to your needs. |
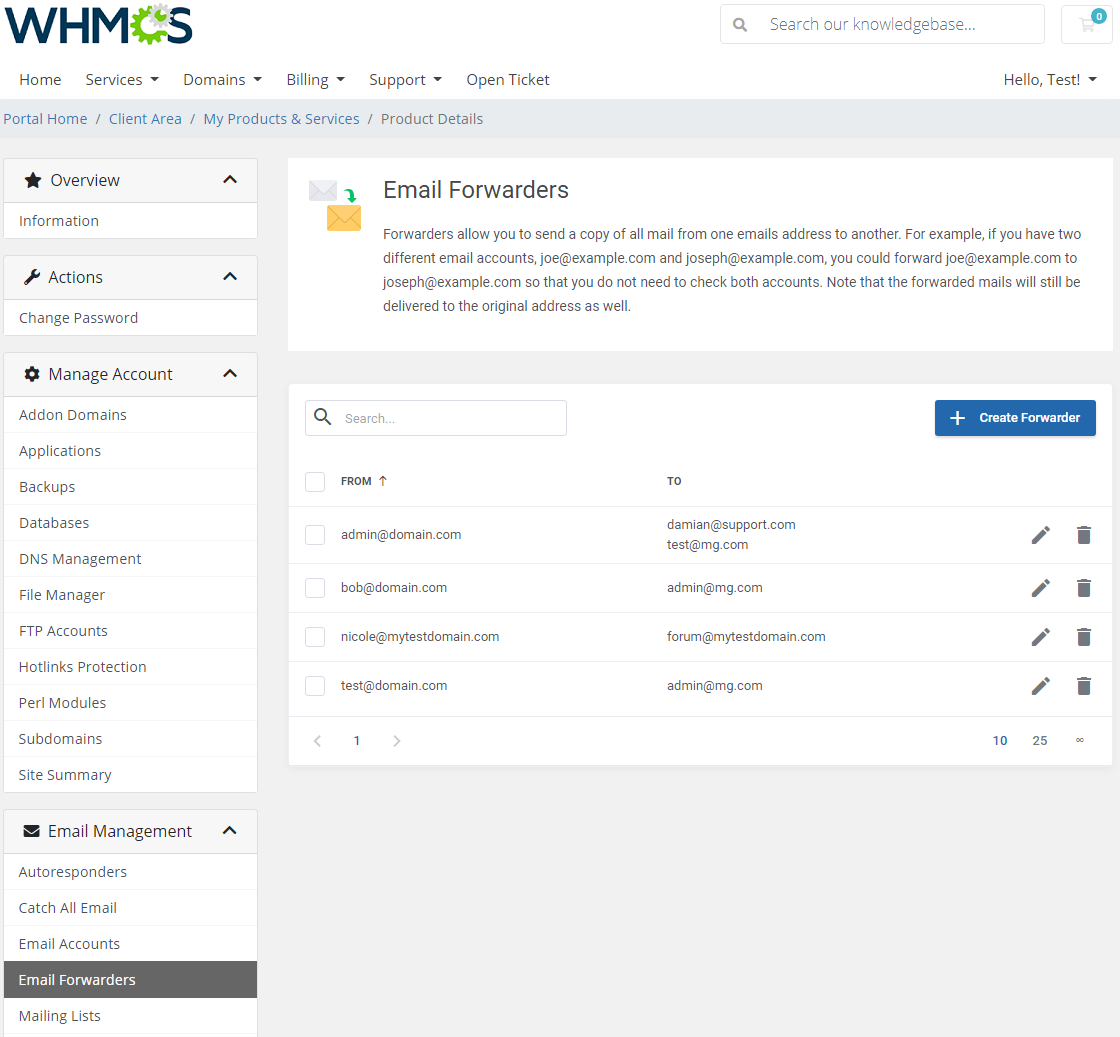
|
| Press the 'Create Forwarder' button, specify the forwarded email and define the destination emails. You may add more than one forwarder name and destination emails, use a comma to separate them. |
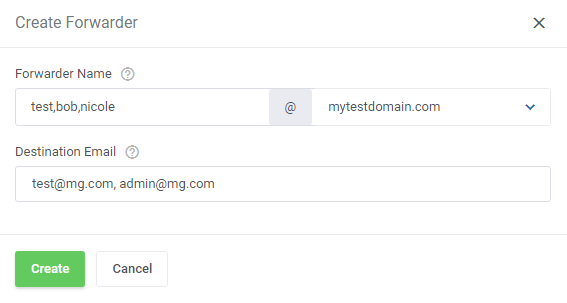
|
[edit] Mailing Lists
| Mailing lists allow you to use a single address to send message to multiple email addresses. This feature is very useful when you need to send a newsletter or another update to a group of people. Underneath, you can find a list of your mailing lists. Use action buttons to delete a list, view its details and alter settings. |
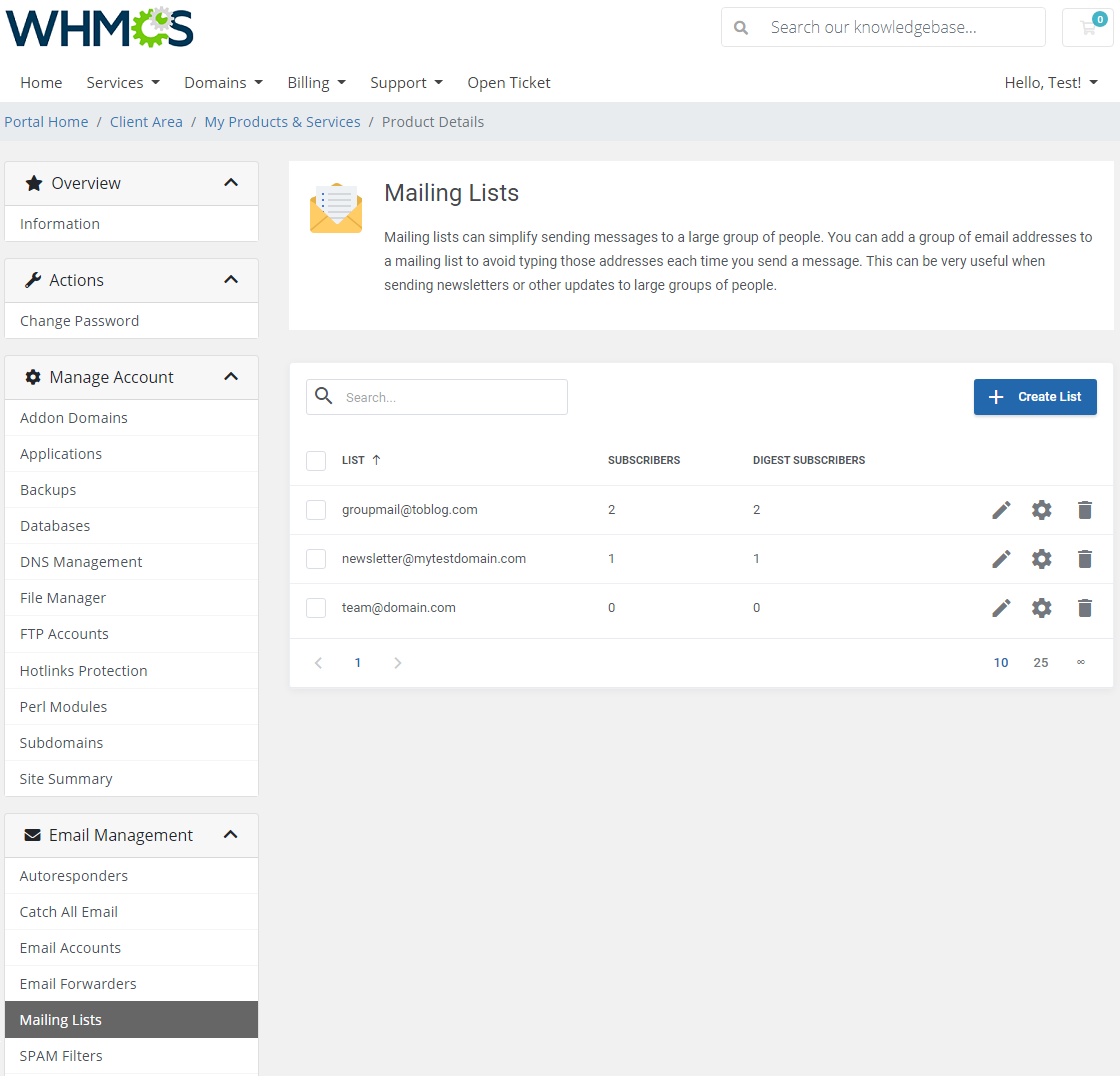
|
| Create a new mailing list by providing its name. |
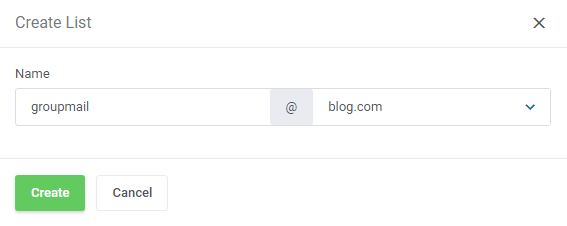
|
| Modify the mailing list in the 'Settings' section. |
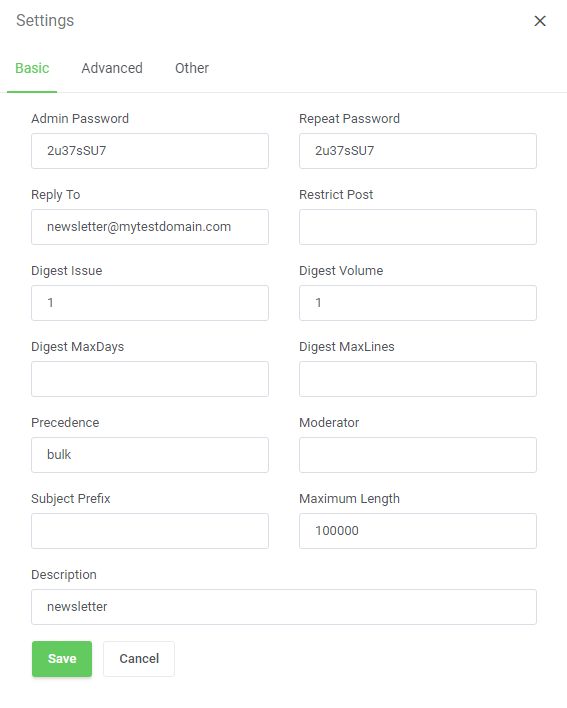
|
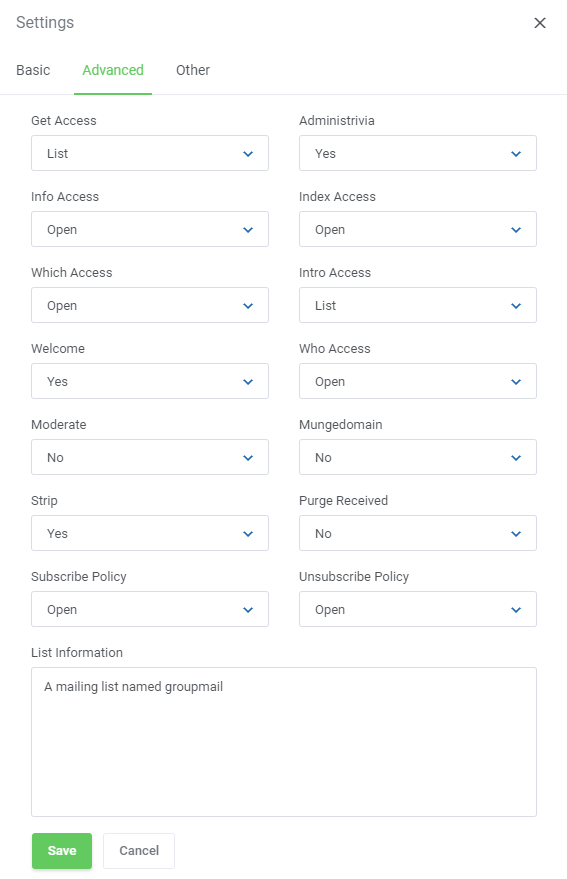
|
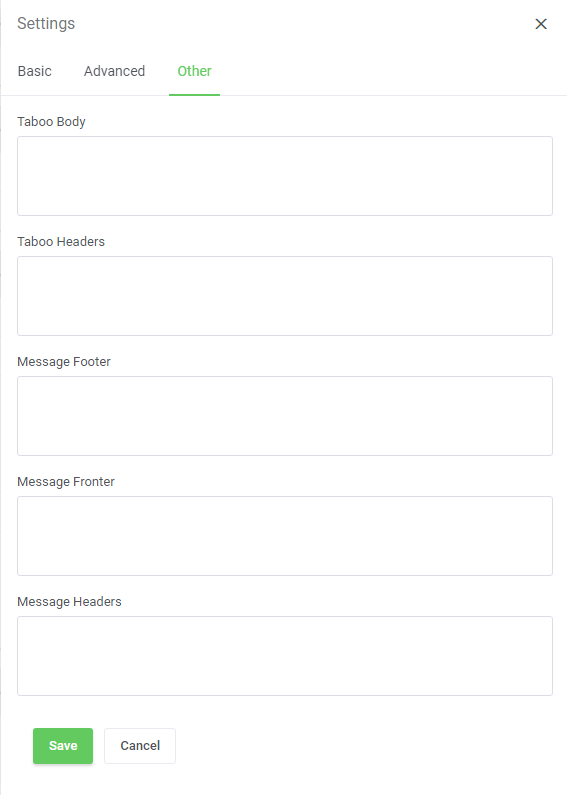
|
| When you 'Edit' the list, you will be moved to the section where a list of subscribers is available. |
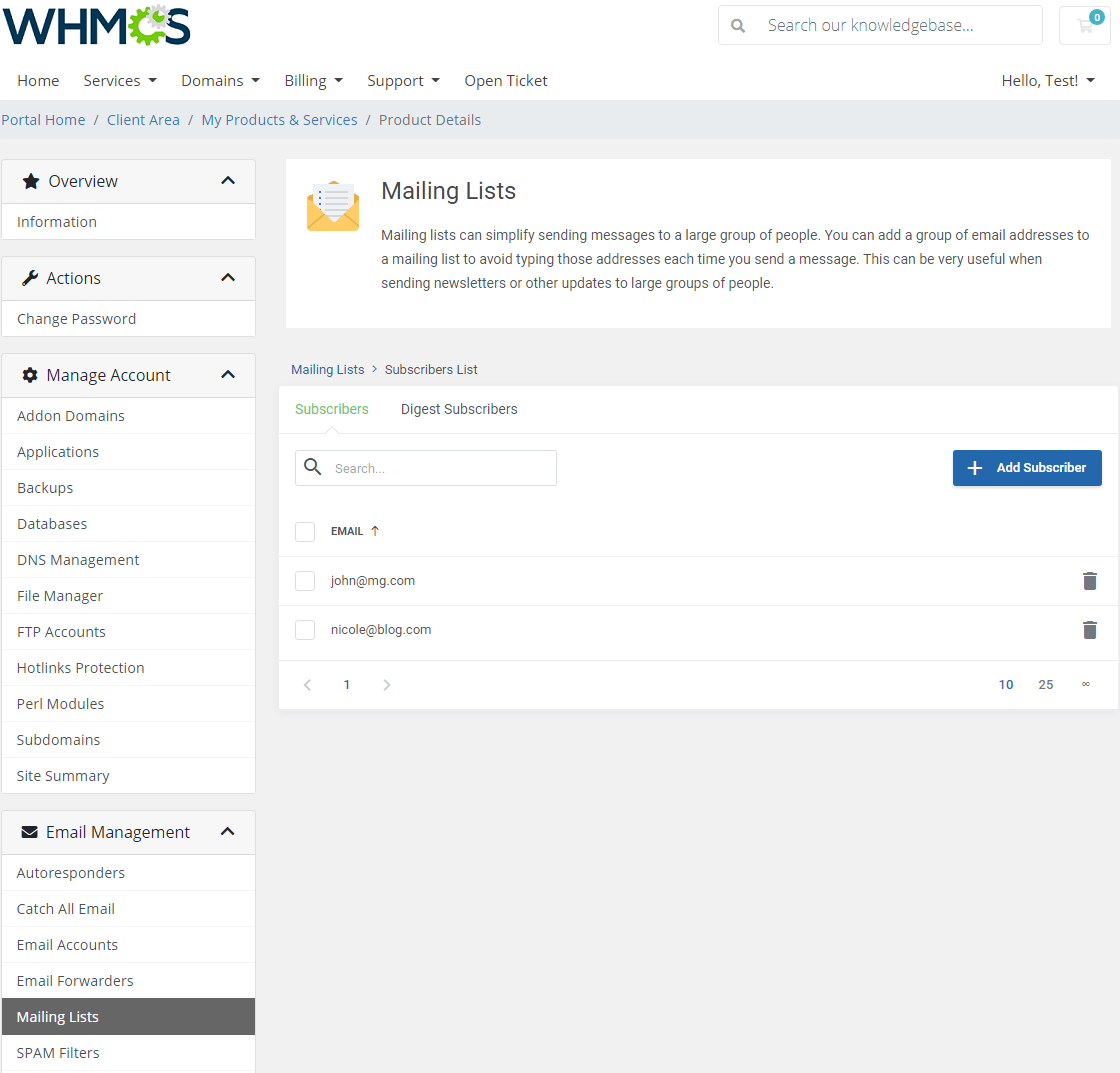
|
| Add new email addresses to the list of 'Subscribers' or 'Digest Subscribers' from the according tab. |
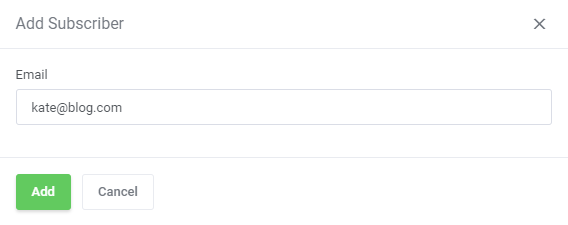
|
[edit] SPAM Filter
| SPAM Filters give you the possibility to add numerous filters for a selected domain. |
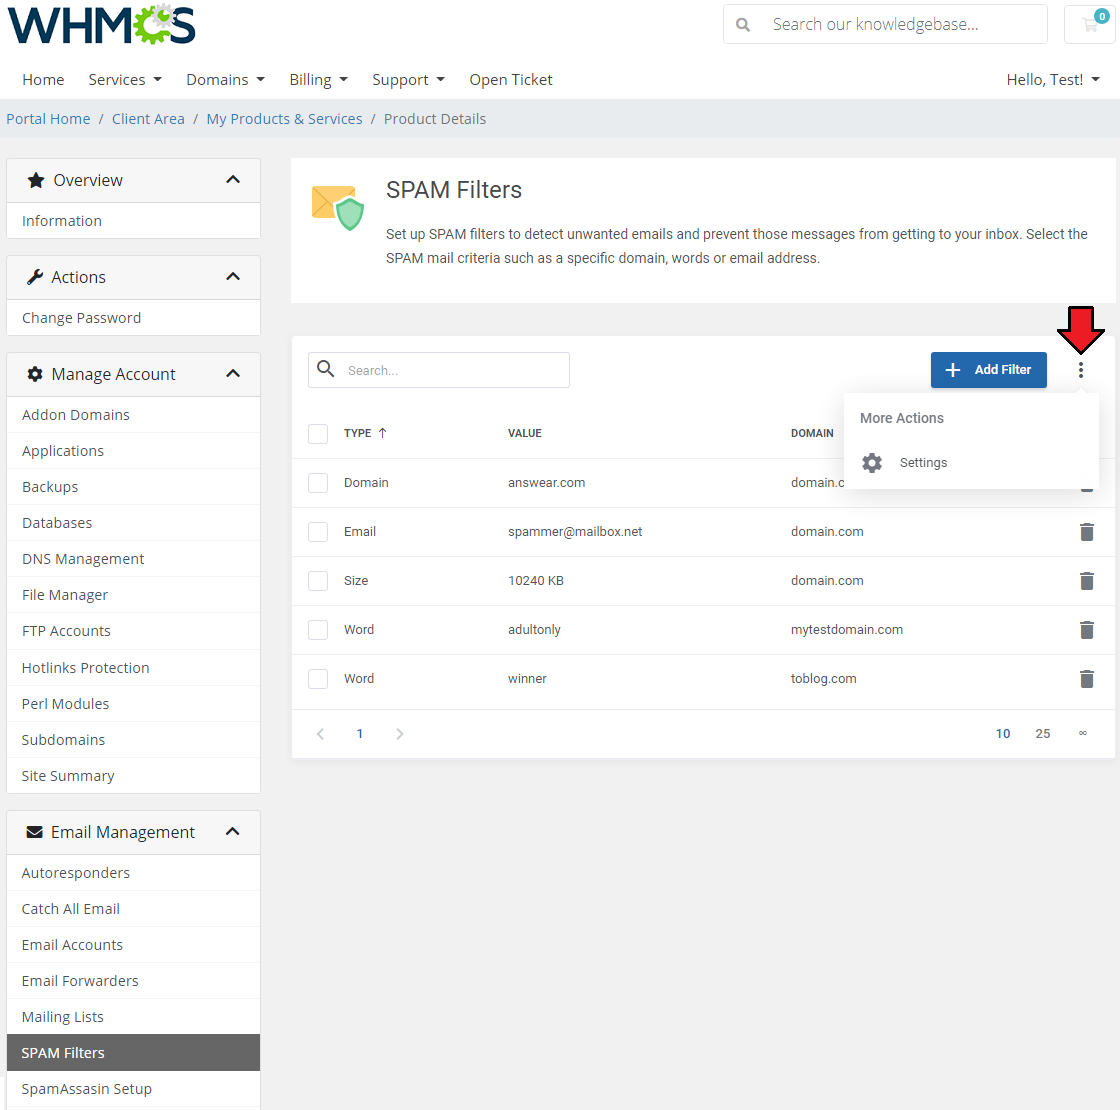
|
Add and configure the filter as desired for the selected mailbox.
|
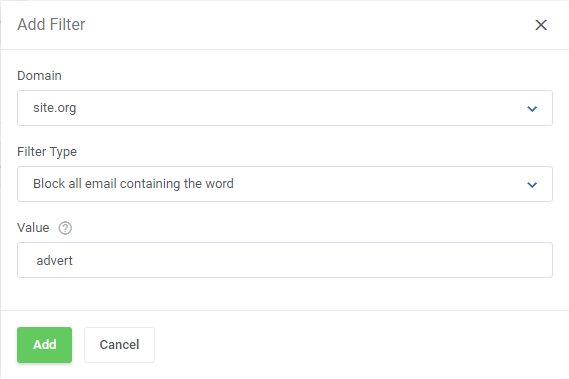
|
Move to settings and define options per domain:
|
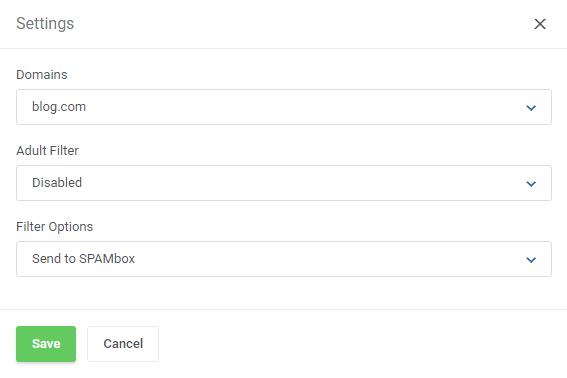
|
[edit] SpamAssassin Setup
| On this page, you can configure your SpamAssassin. You can set up:
|
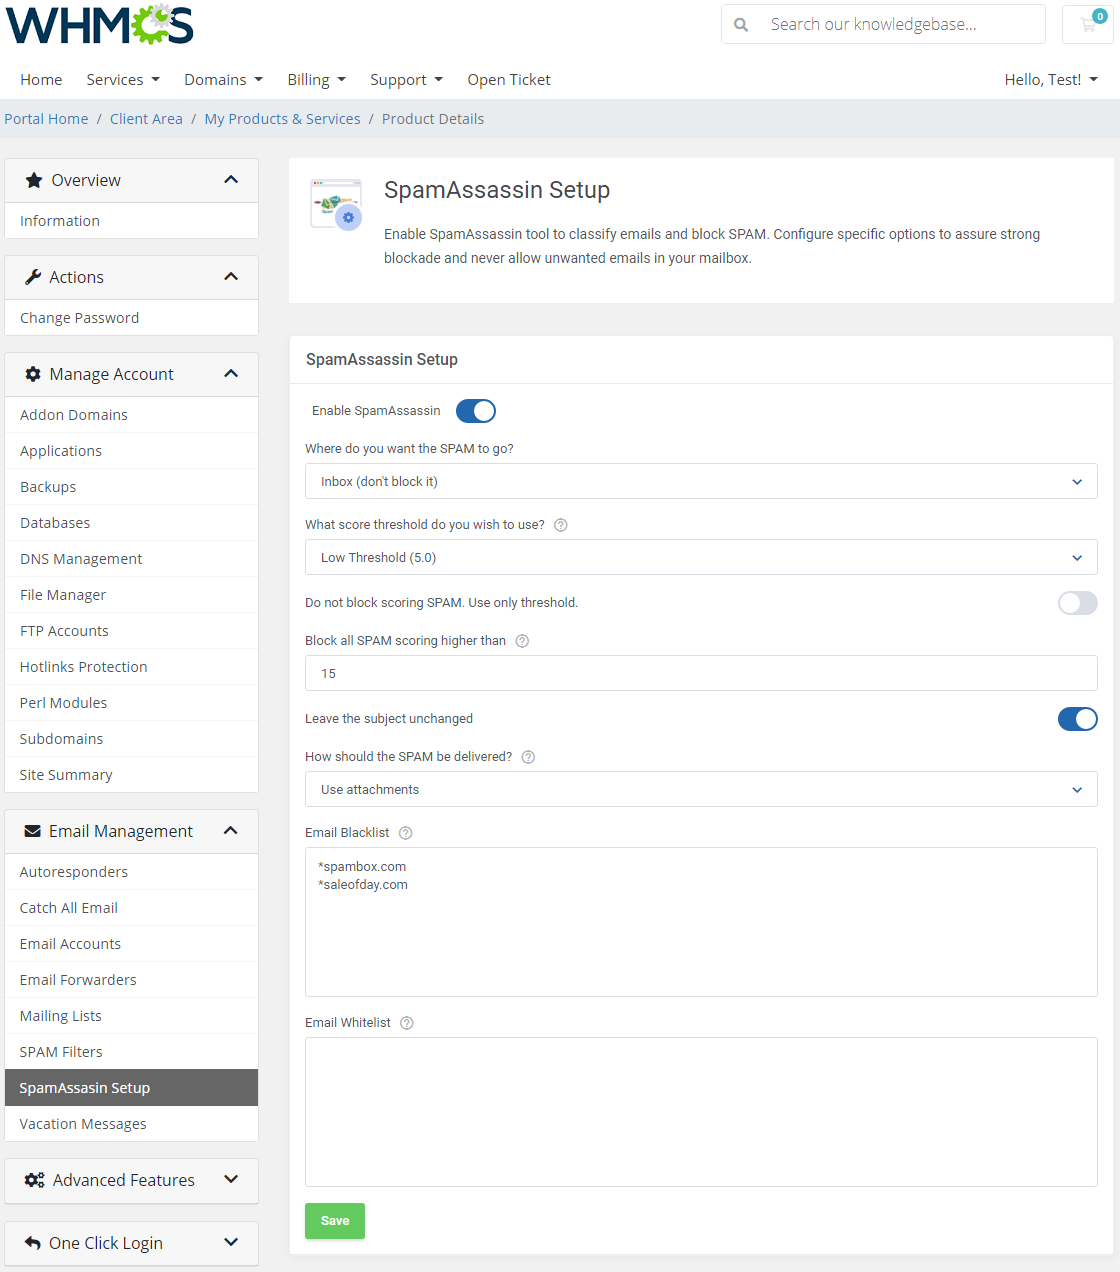
|
[edit] Vacation Messages
| The goal of 'Vacation Messages' is similar to the one of Autoresponder shown above. The only difference is that the vacation message replies only to the first email received per email address. |
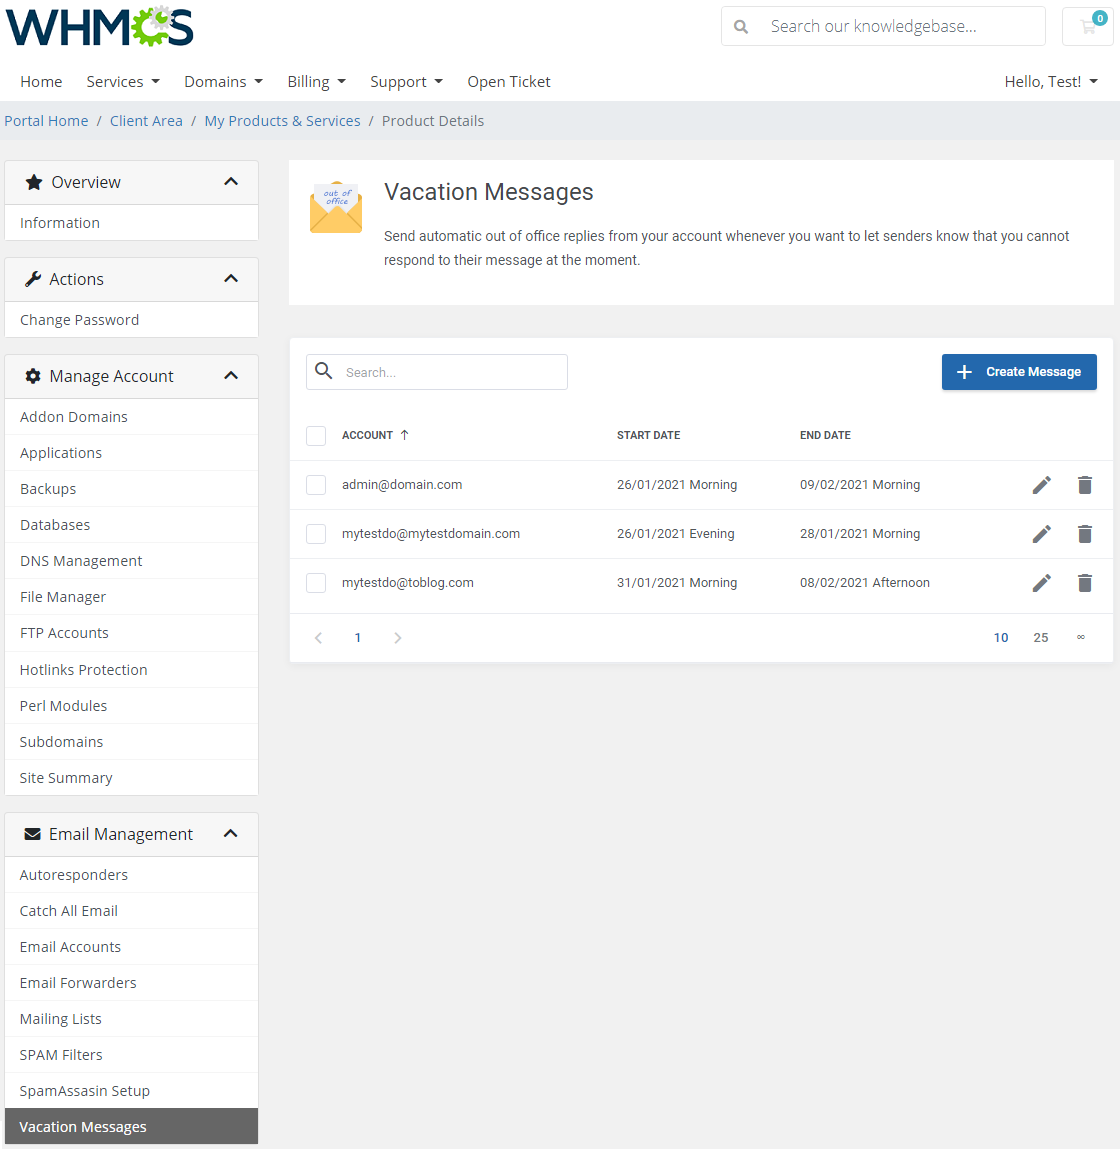
|
| Type in the message content, define your vacation start and end time. |
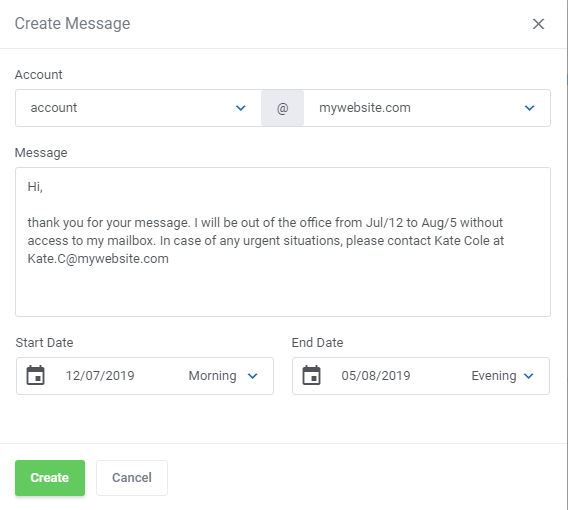
|
[edit] Advanced Features
| Advanced tools are used to configure sophisticated settings of your account. |
[edit] Apache Handlers
| Under the 'Apache Handlers' page, you can define custom handlers for chosen file extensions or specific files. You can read more about Apache Handlers here. |
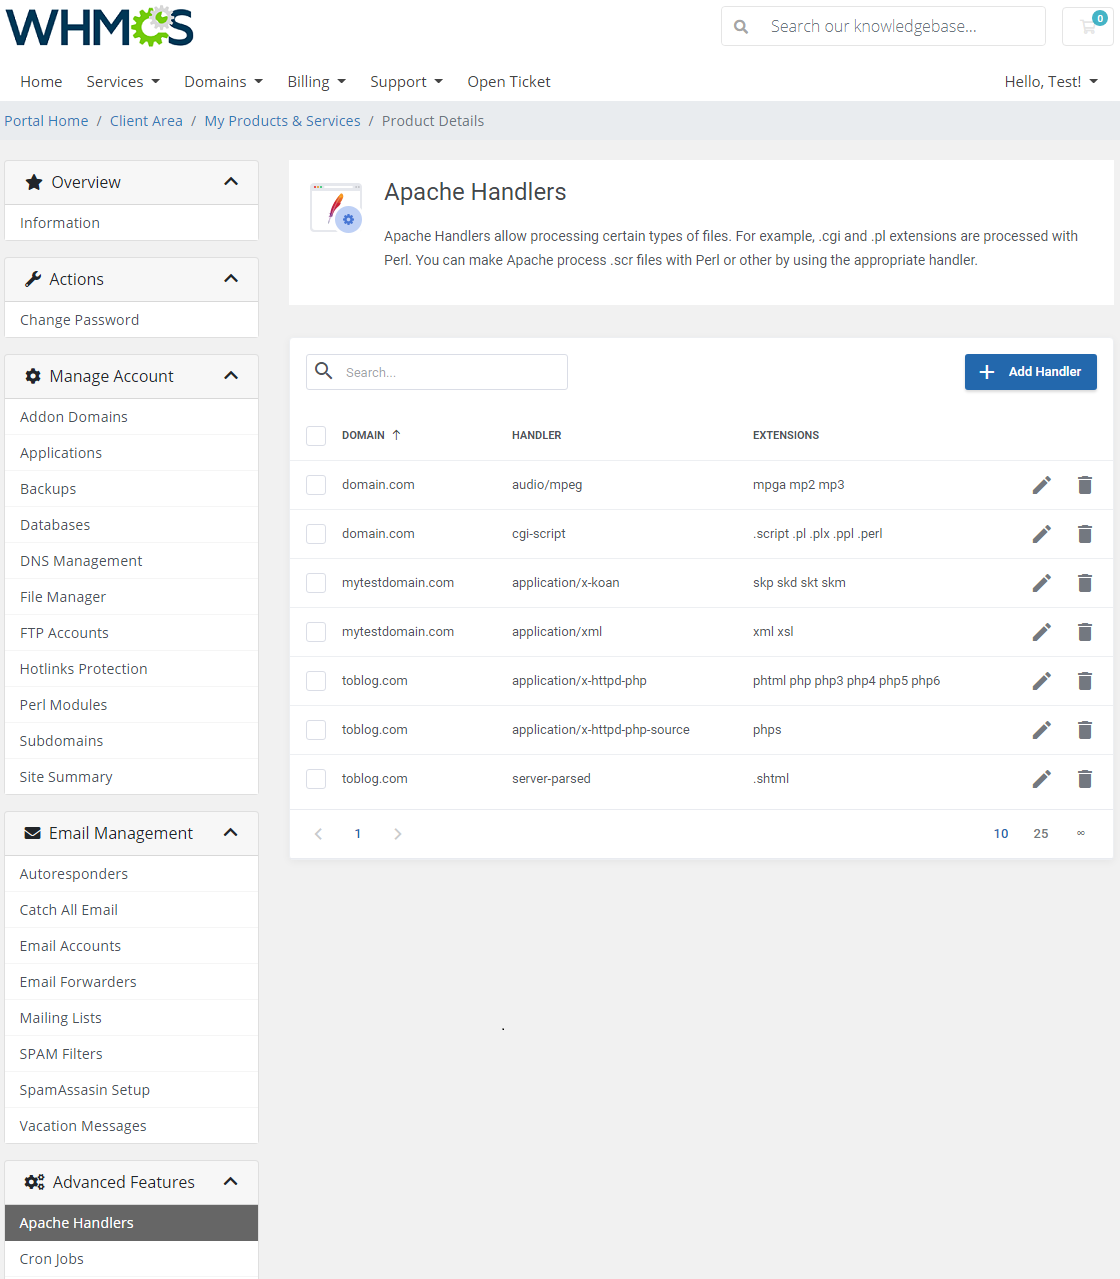
|
| To add a new handler, type its name and then extensions it will process. |
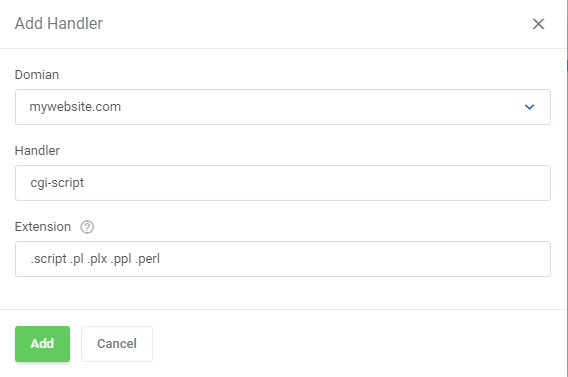
|
[edit] Cron Jobs
| Cron Jobs section allows you to easily add and remove your cron tasks. |
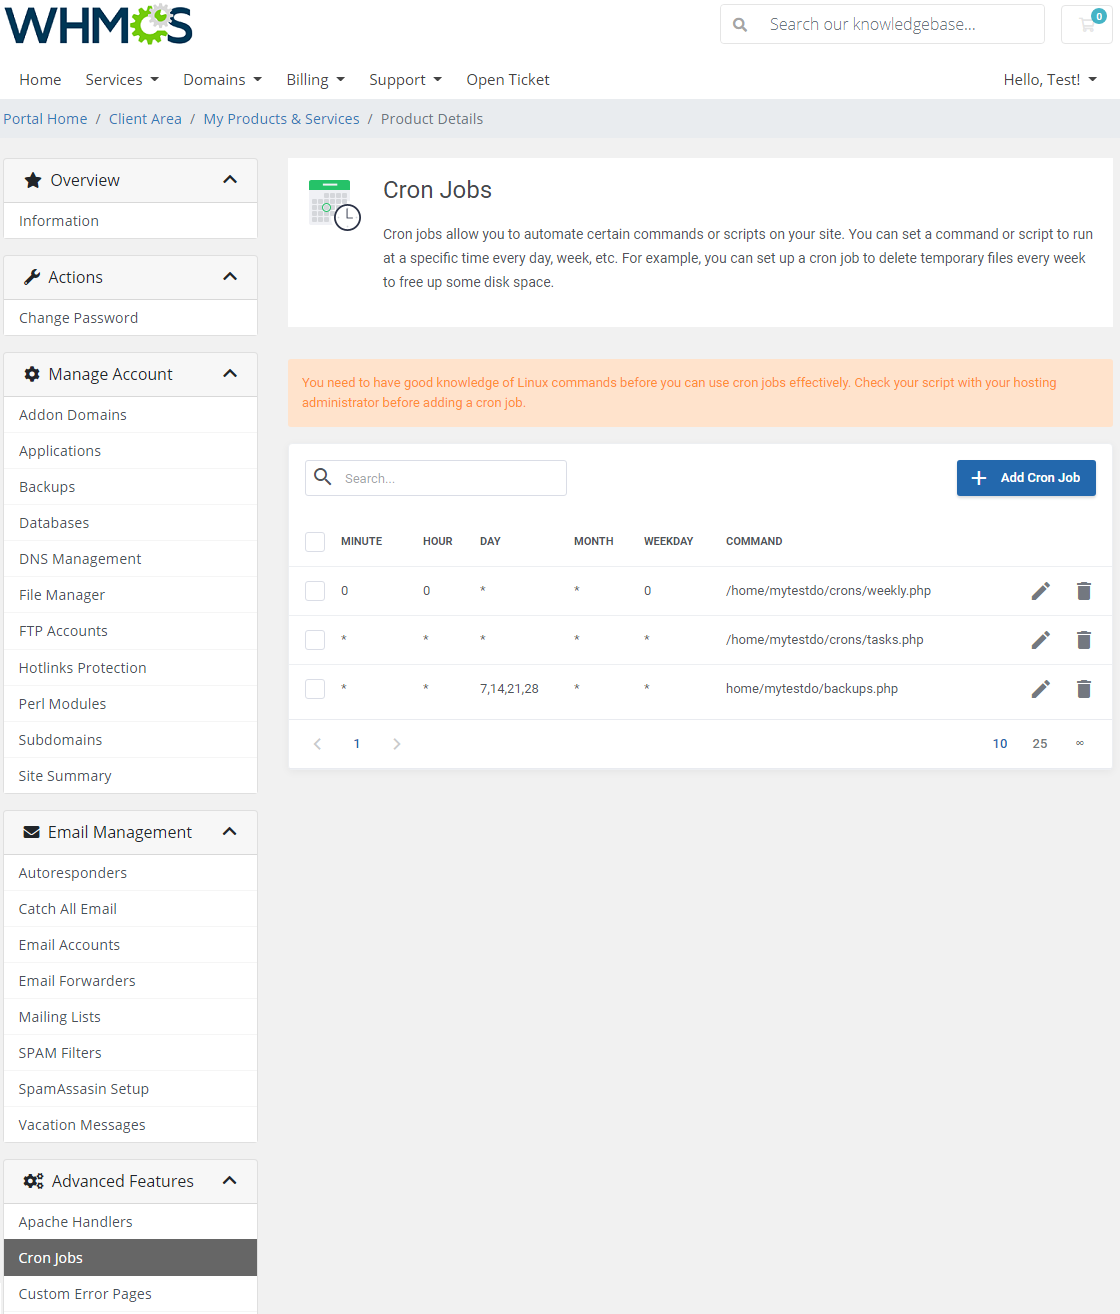
|
| Select cron job settings to fully automate commands and scripts on your site. |
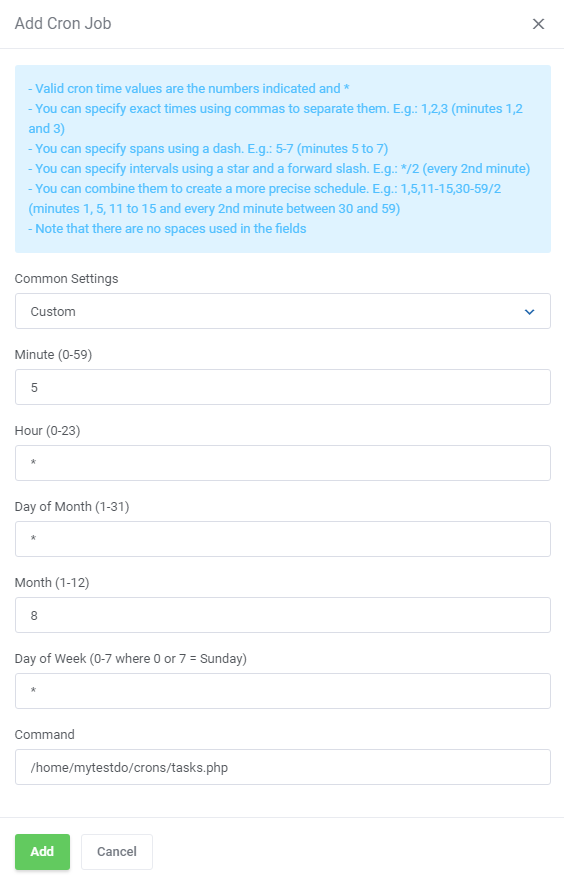
|
[edit] Custom Error Pages
| Defining custom apache error pages is easy with 'Error Pages'. |
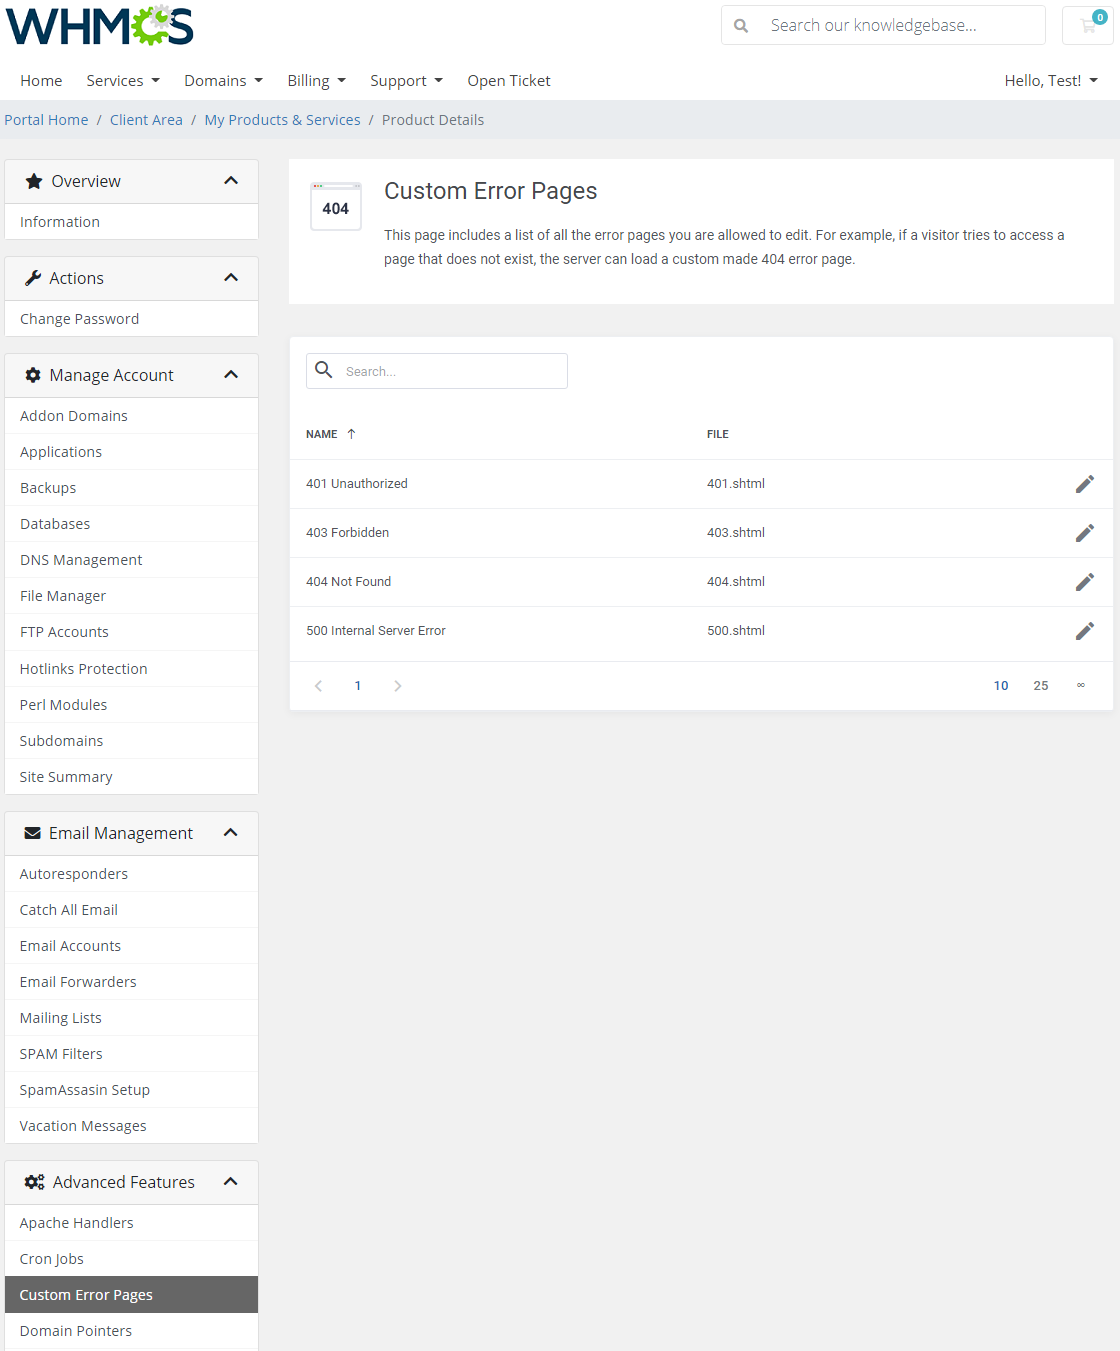
|
| You can alter or define a new HTML code of error pages displayed during 401, 403, 404 and 500 errors. |
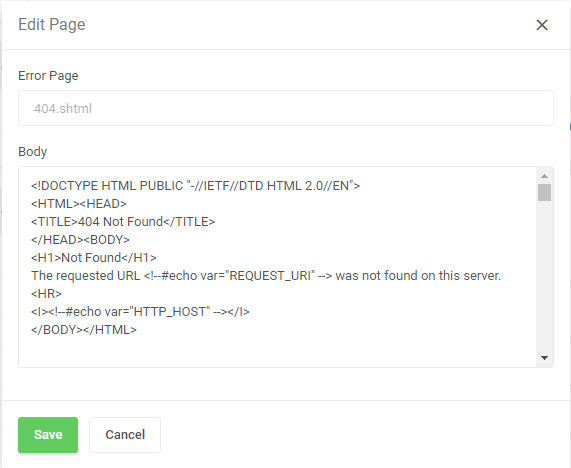
|
[edit] Domain Pointers
| In the 'Domain Pointers' section you can manage your aliases and pointers. You can have access to the content of one domain from another one! |
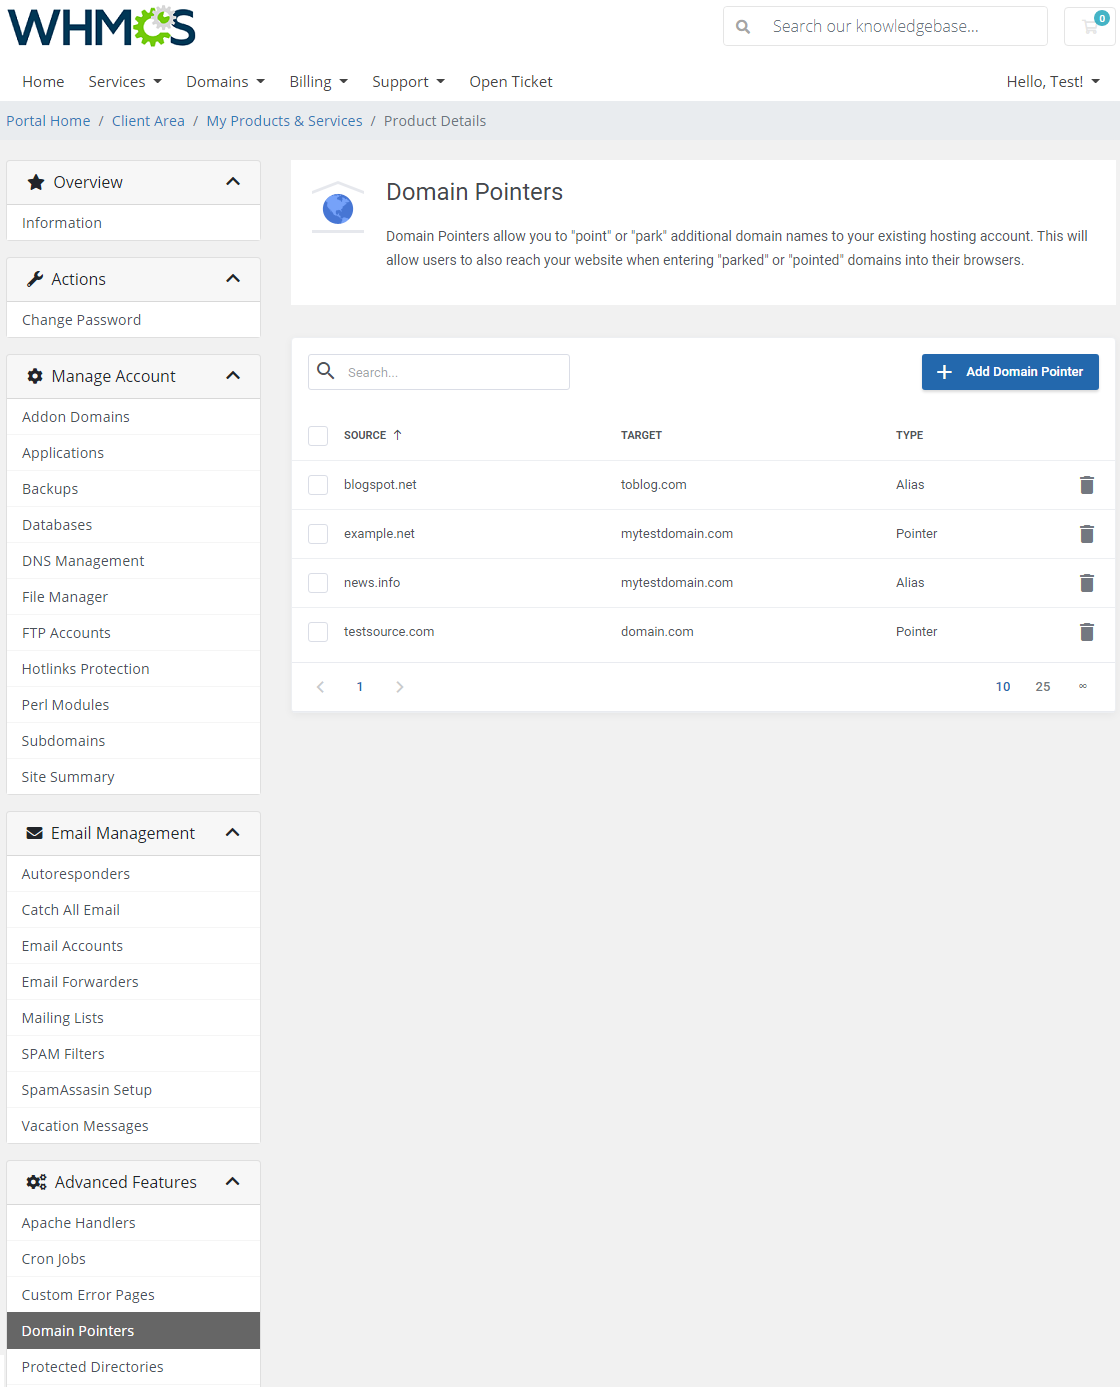
|
| Enter a source domain, then select type: 'Alias' or 'Pointer'. |
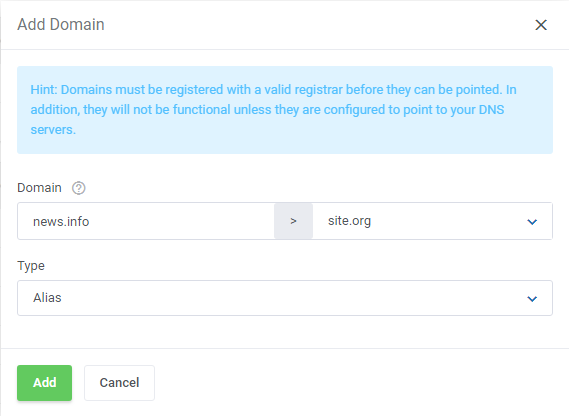
|
| Manage DNS records of the domain pointer. |
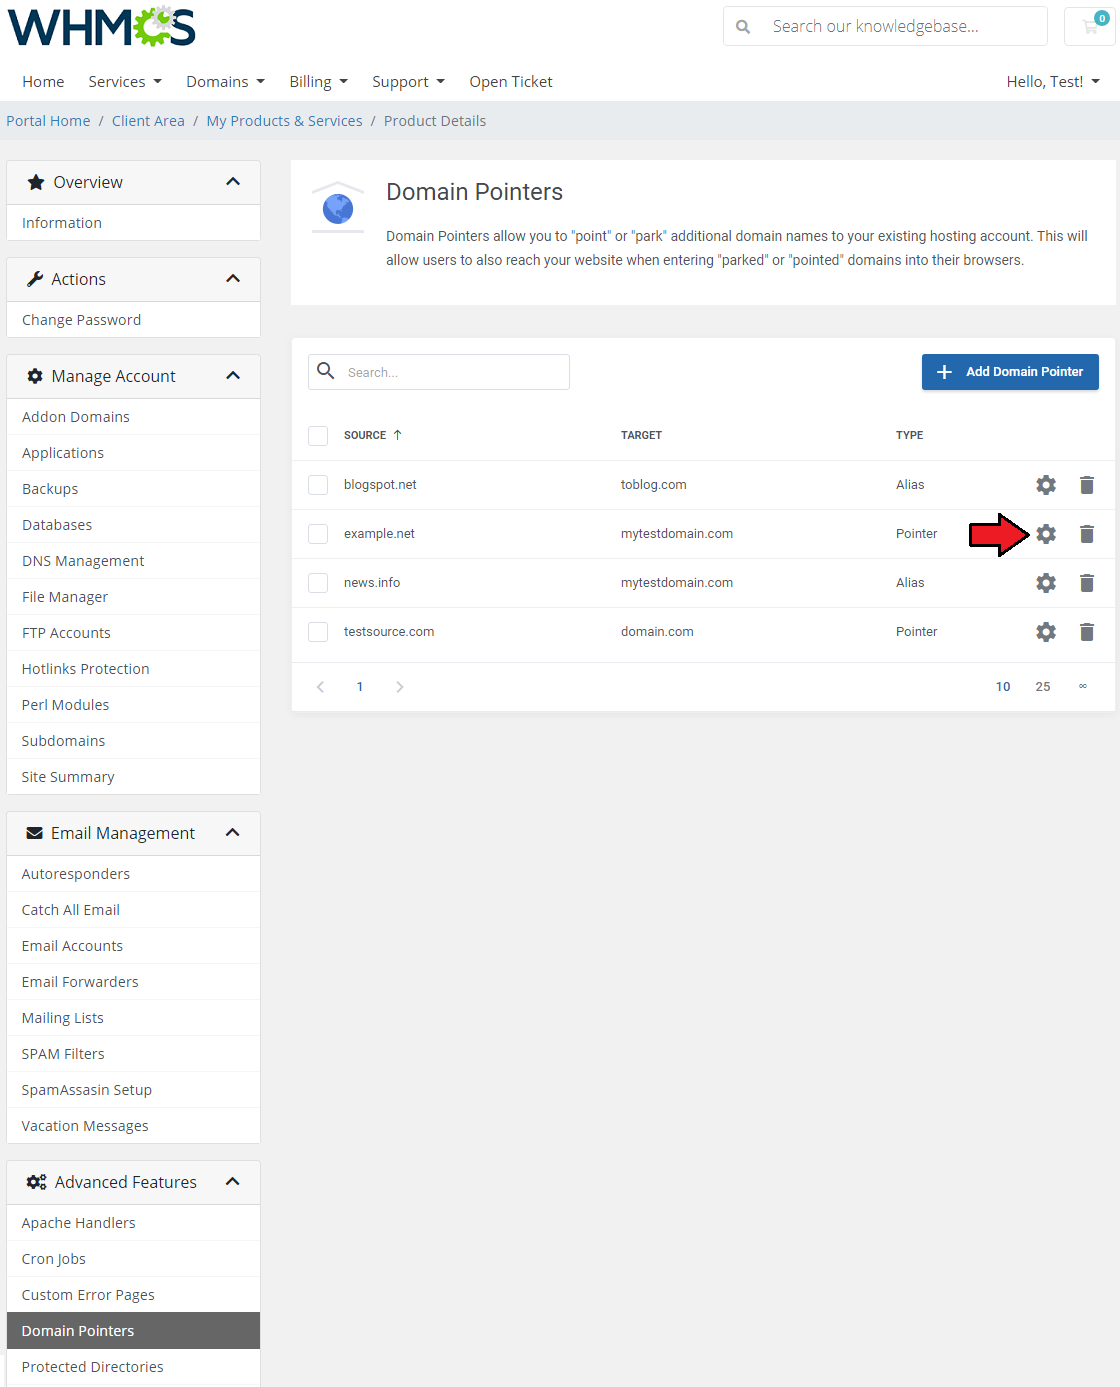
|
| Edit, delete and create DNS records of a single domain pointer. |
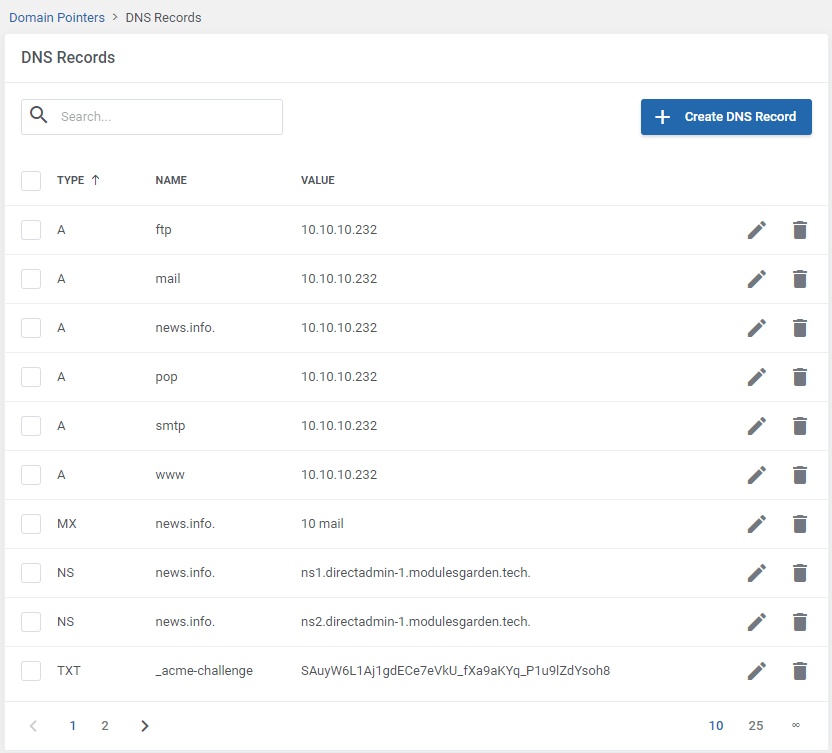
|
| Select record type, enter name and value. In case of 'MX' record type define priority and a hostname. Note that the lower preference number stands for the higher priority. |
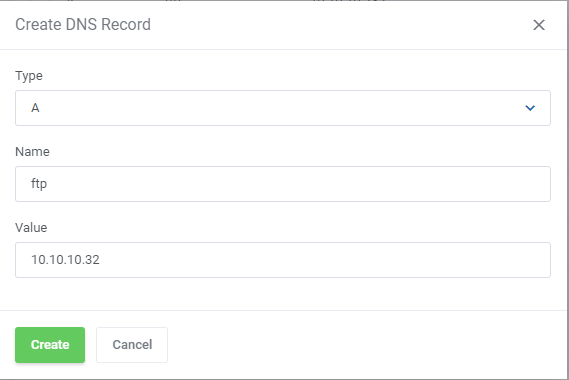
|
[edit] Git Repositories
| This section provides you with the possibility to create as well as manage your Git repositories. Git is a fast and modern implementation of version control. It not only allows you to check the history of content changes but also facilitates collaborative changes to files. To start tracking, simply click on the 'Create Repository' button. |
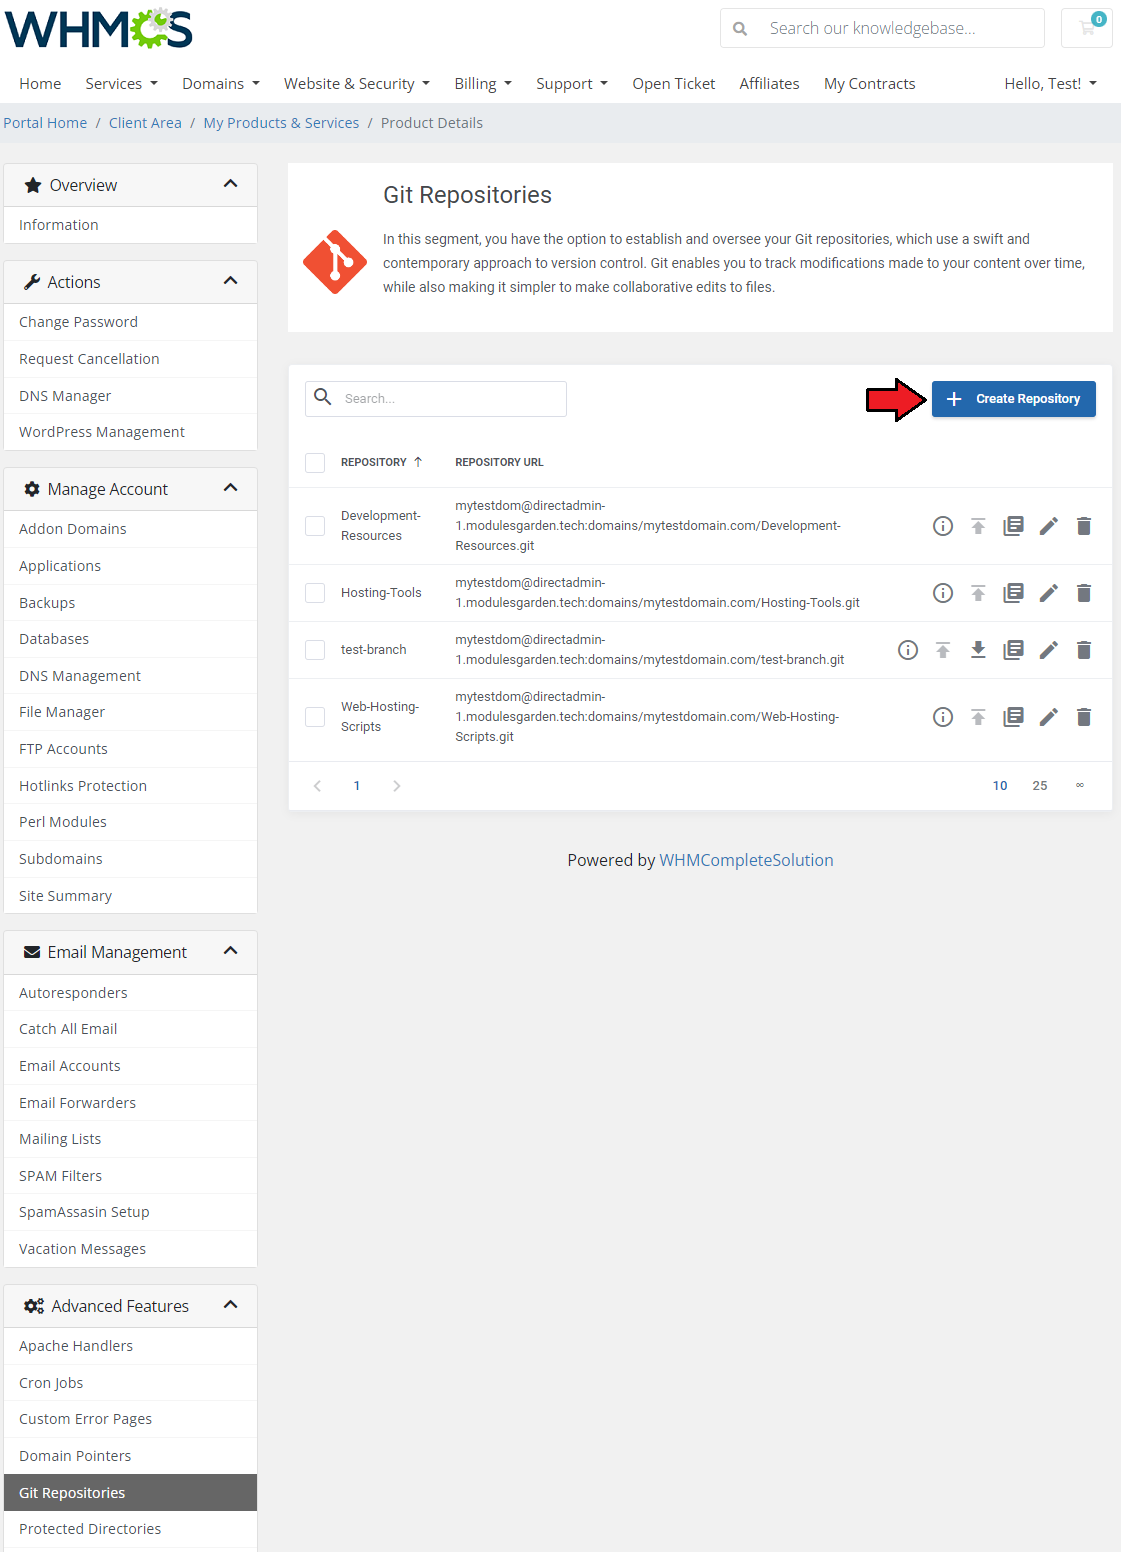
|
| Fill out the simple form to ad dyou repository. Select the domain and provide a name. You may also provide an optional directory that will direct you to the remote repository. this field is required for synchronization only. |
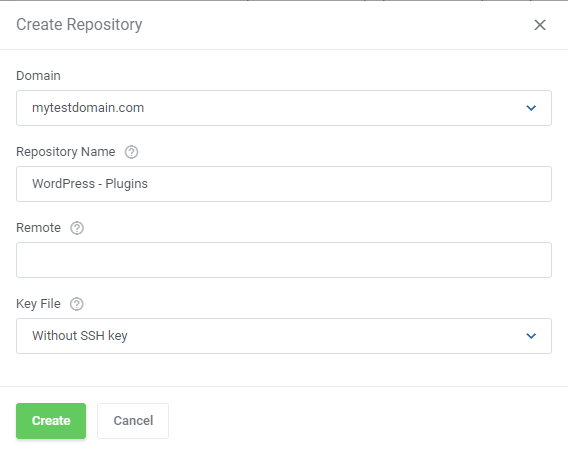
|
Allowed actions on a repository:
|
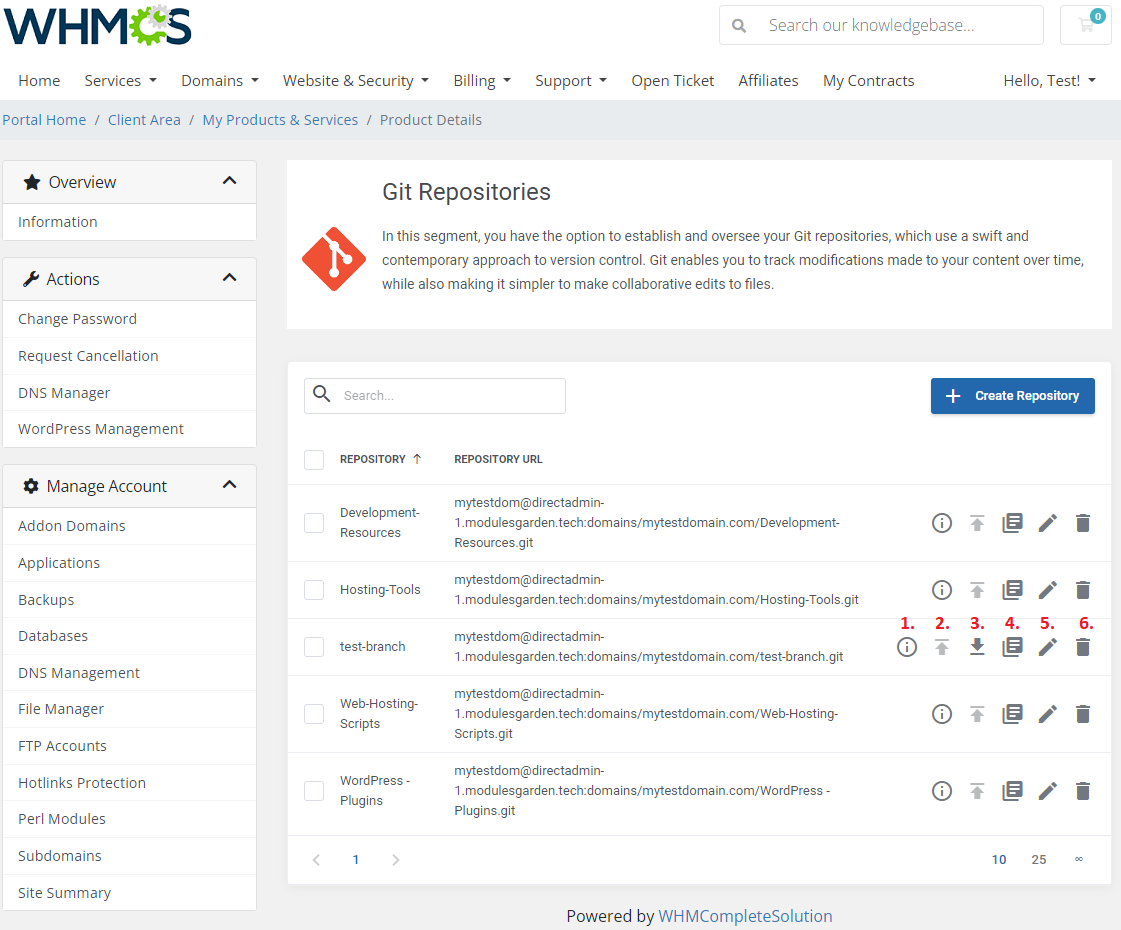
|
| Repository details: |
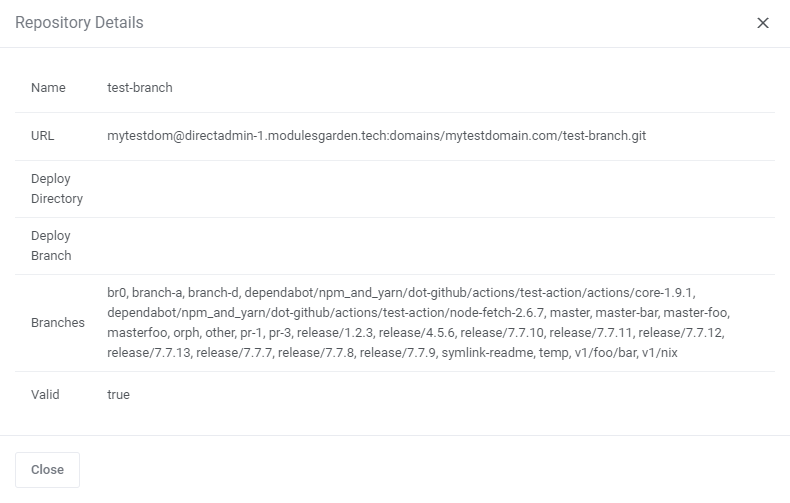
|
| Repository Logs: when accessed, you will see a list of all branches existing on its repo. Check logs for every branch separately: |
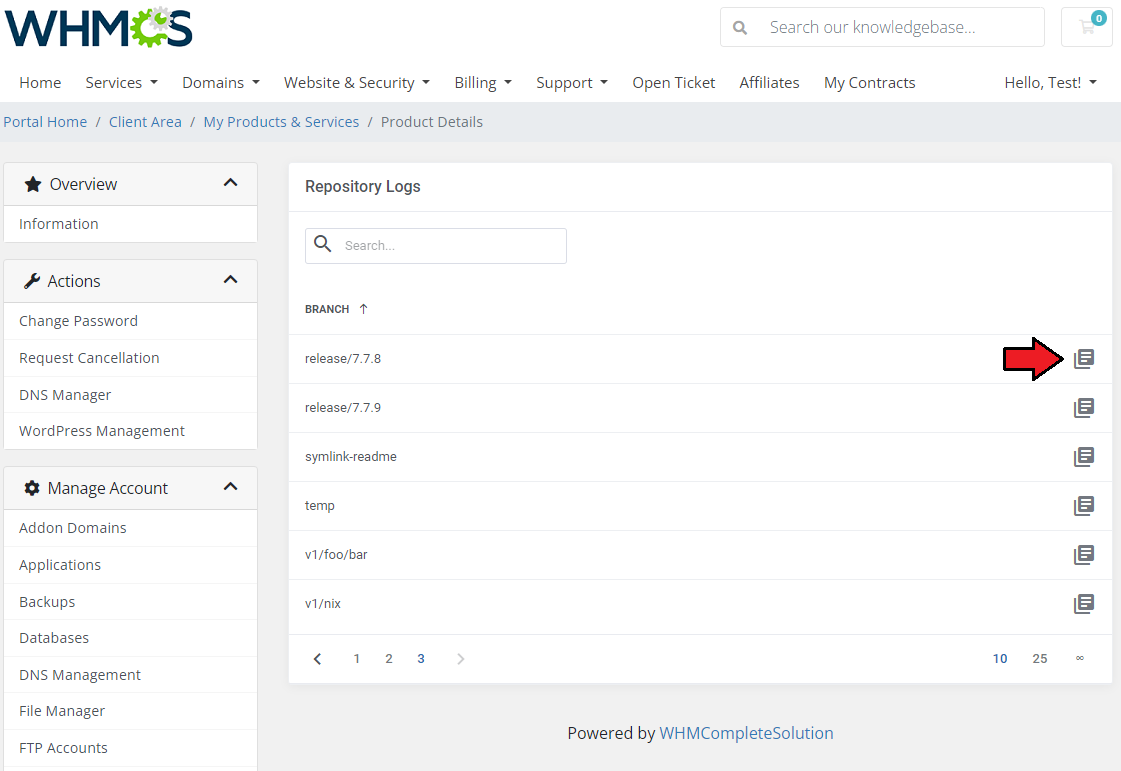
|
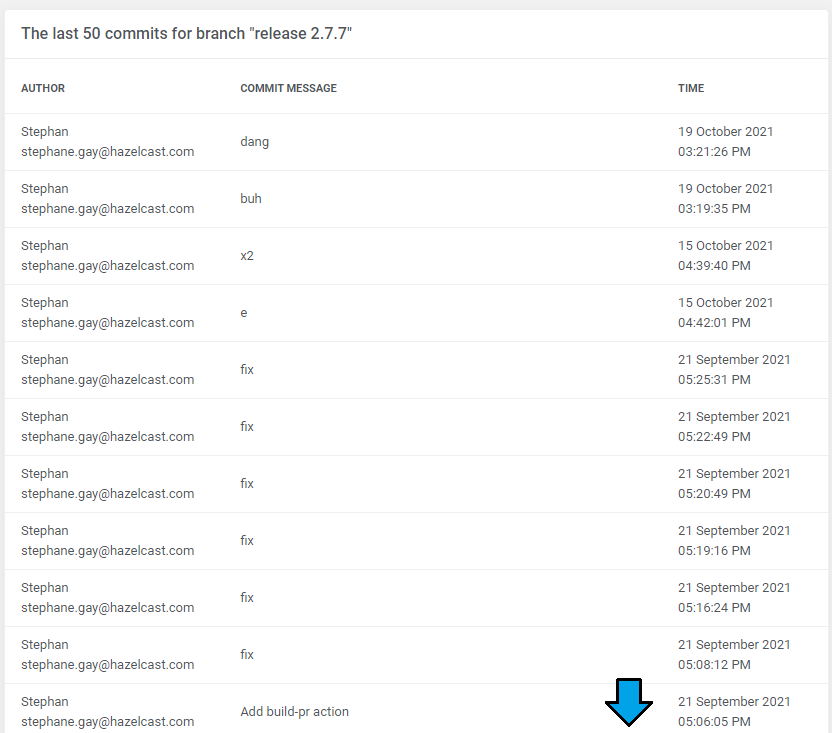
|
| Modify details - select a branch to deploy the repo and (optionally) provide the new directory. |
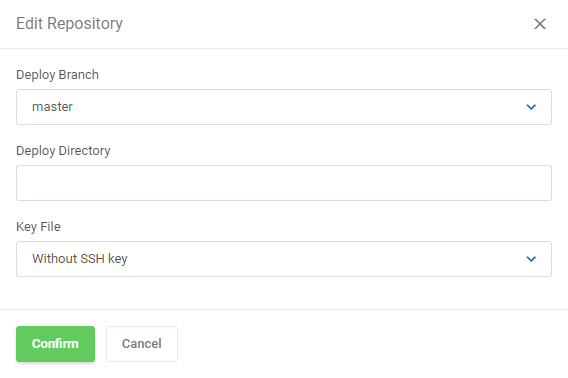
|
[edit] Protected Directories
| Protected directories section includes a list of domains with any folders protected with a password. Press the icon to see an exact list of protected folders. Important: You may protect single folders directly in 'File Manager' section, however, they must be located in the 'public_htlm' directory only. |
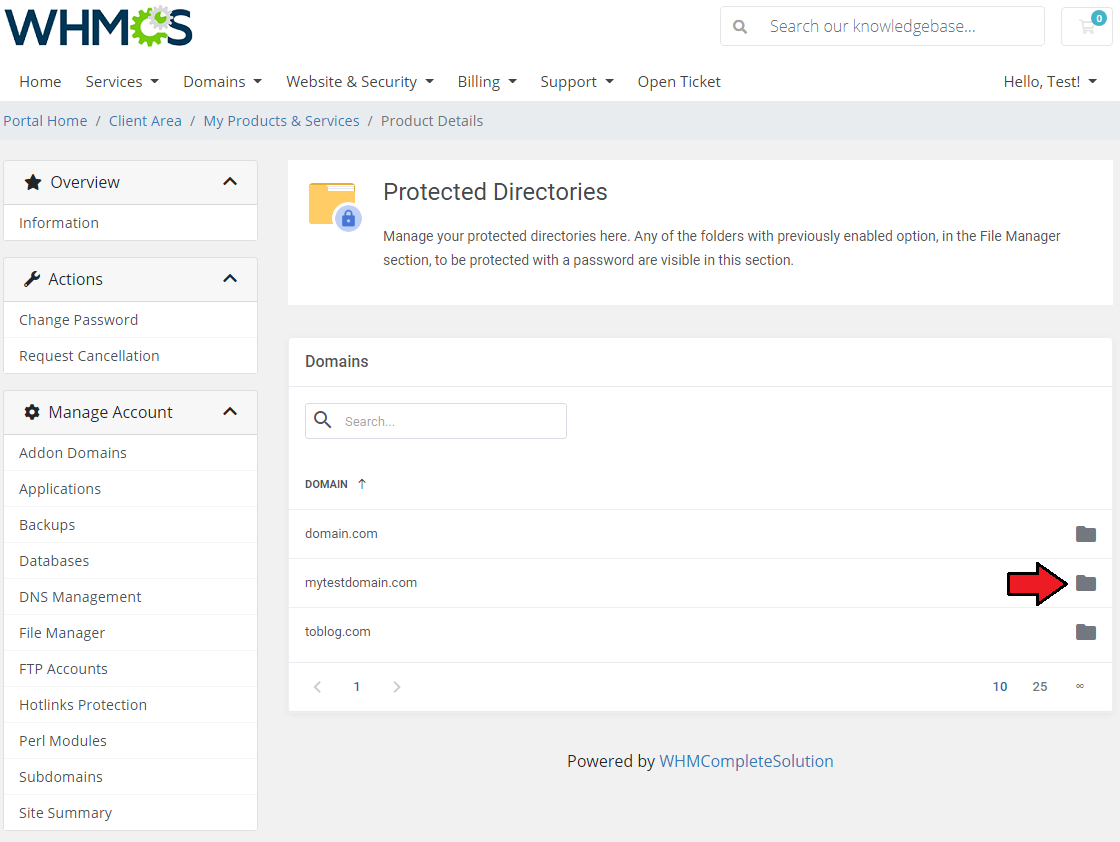
|
Details section contains a direct path to the protected folder, you may also perform flowing actions on single directories:
Use mass action button to remove the password protection of the selected directories. |
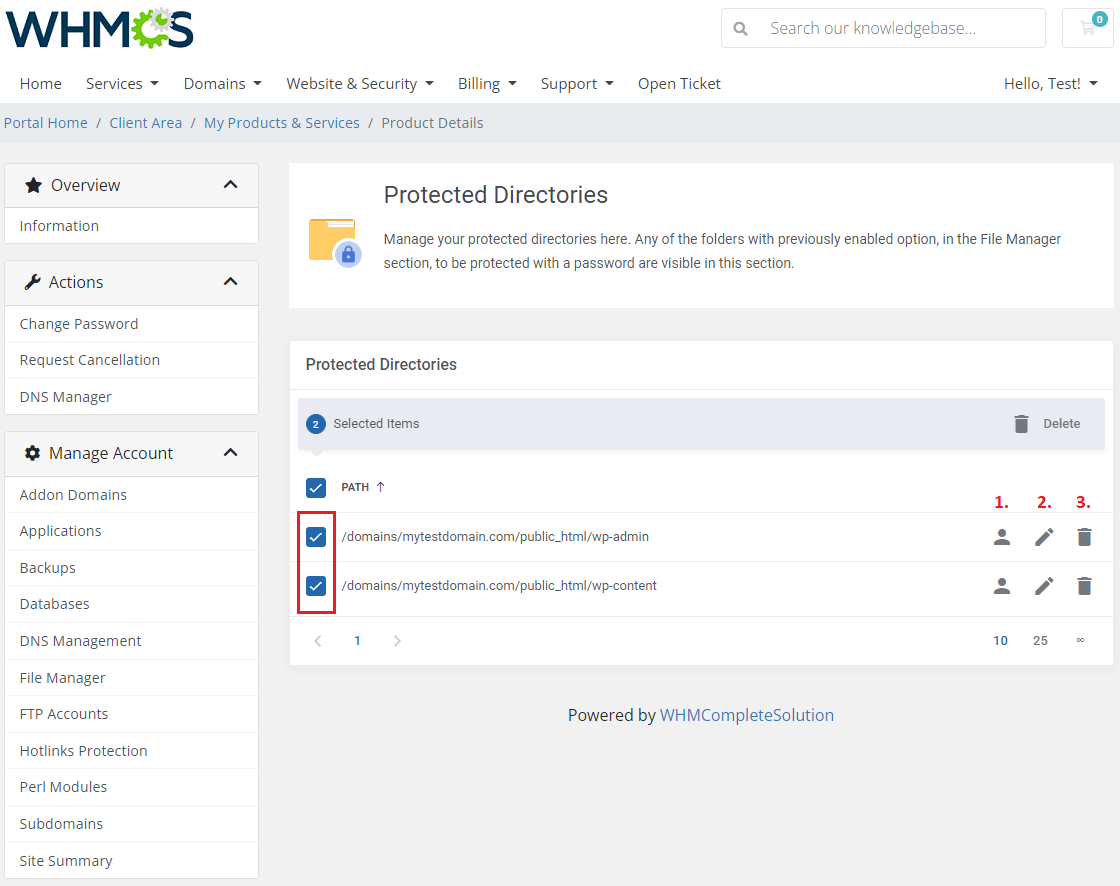
|
| 1. View existing users and add new ones by pressing button. Then provide the username and a password. |
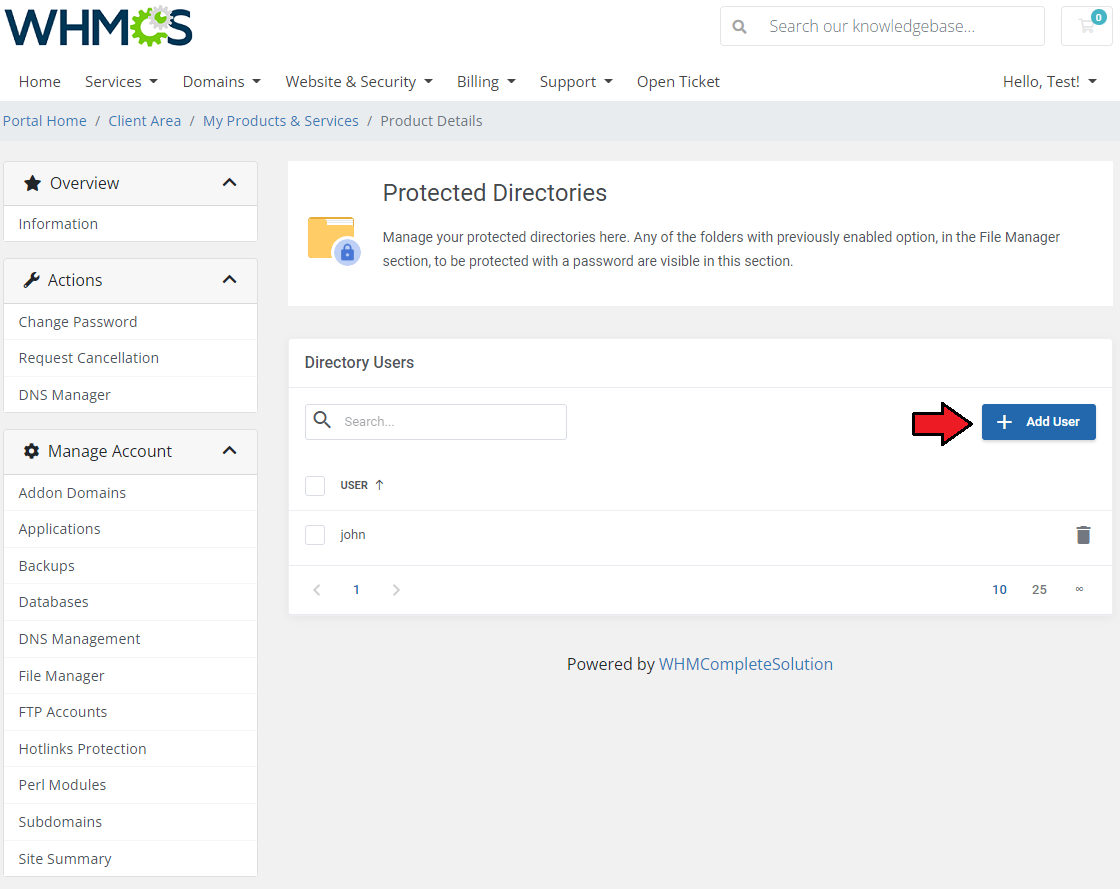
|
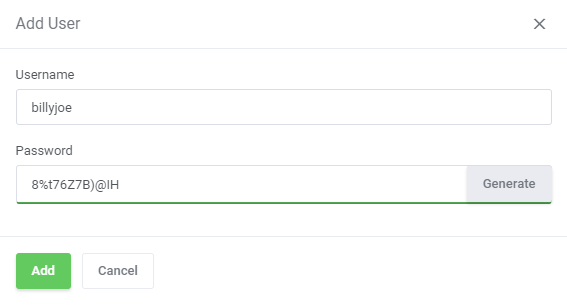
|
| 2. Change the folder name |
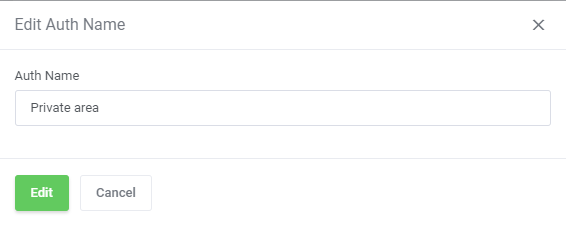
|
[edit] Site Redirections
| Easy access to site redirections is very advantageous. Within a few seconds, you can redirect the page to another. |
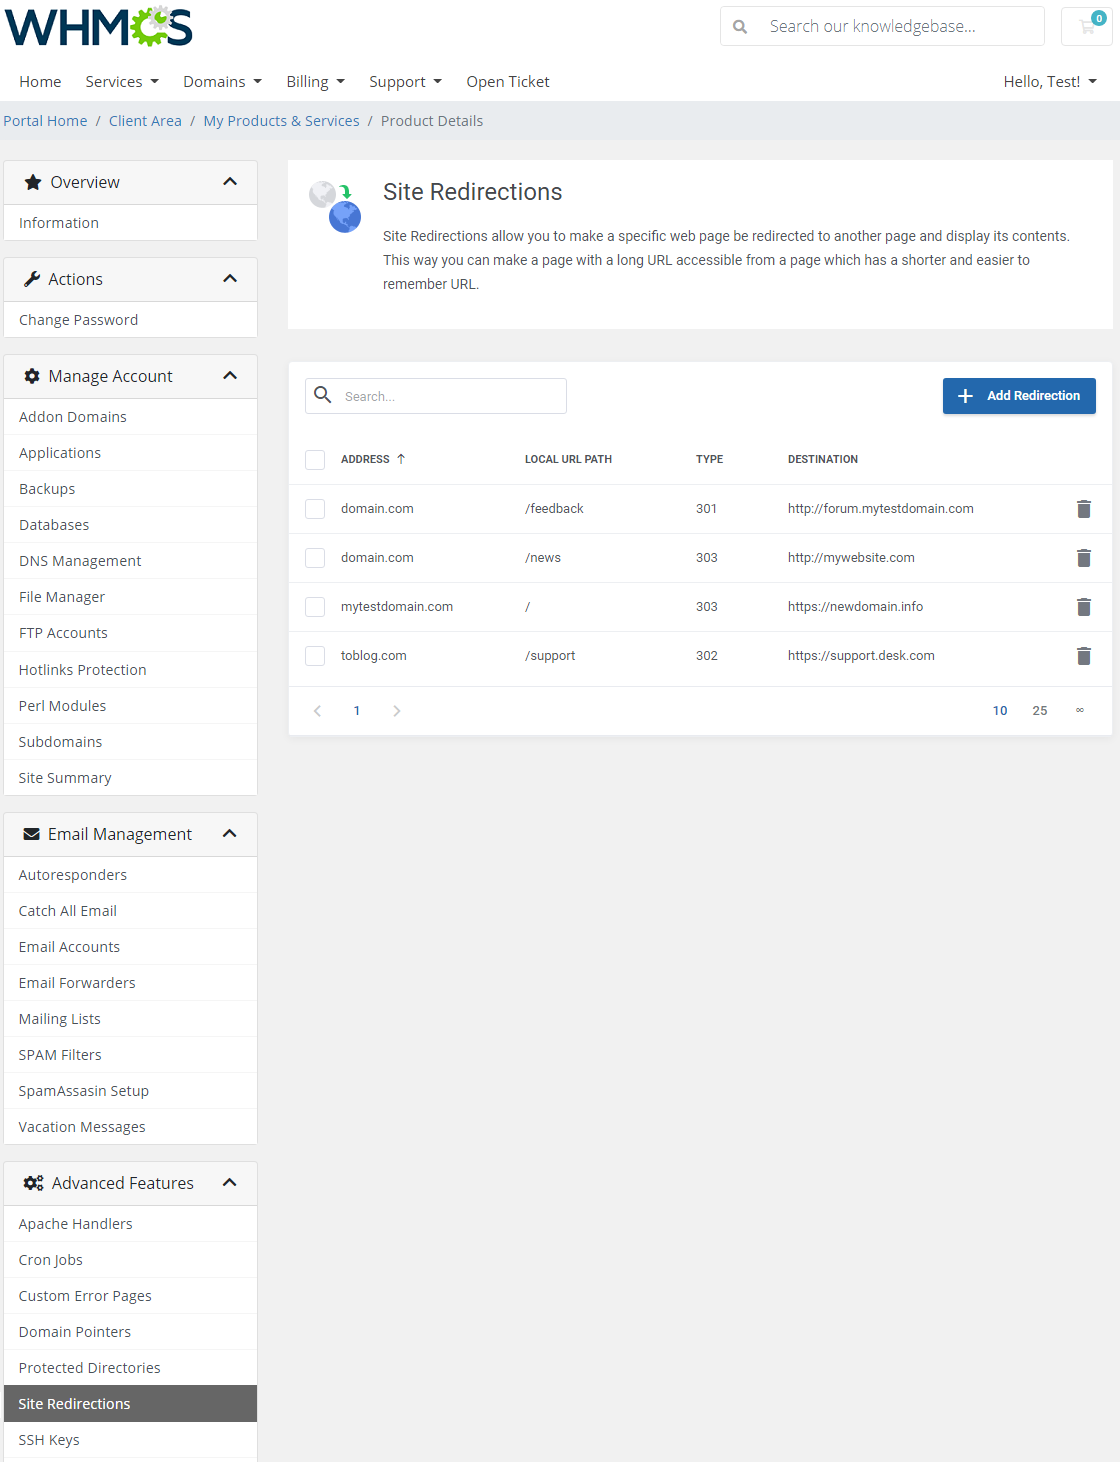
|
| For example, if your main domain is mytestdomain.com, you can forward it like this: mytestdomain.com/redirect → adomainwithlongname-averylongname.com |
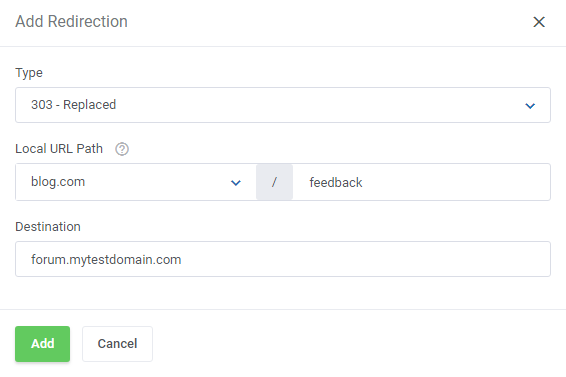
|
[edit] SSH Keys
| SSH Keys are responsible for providing secure file transfer and remote logins to the account. This section allows you to manage your SSH Keys easily. |
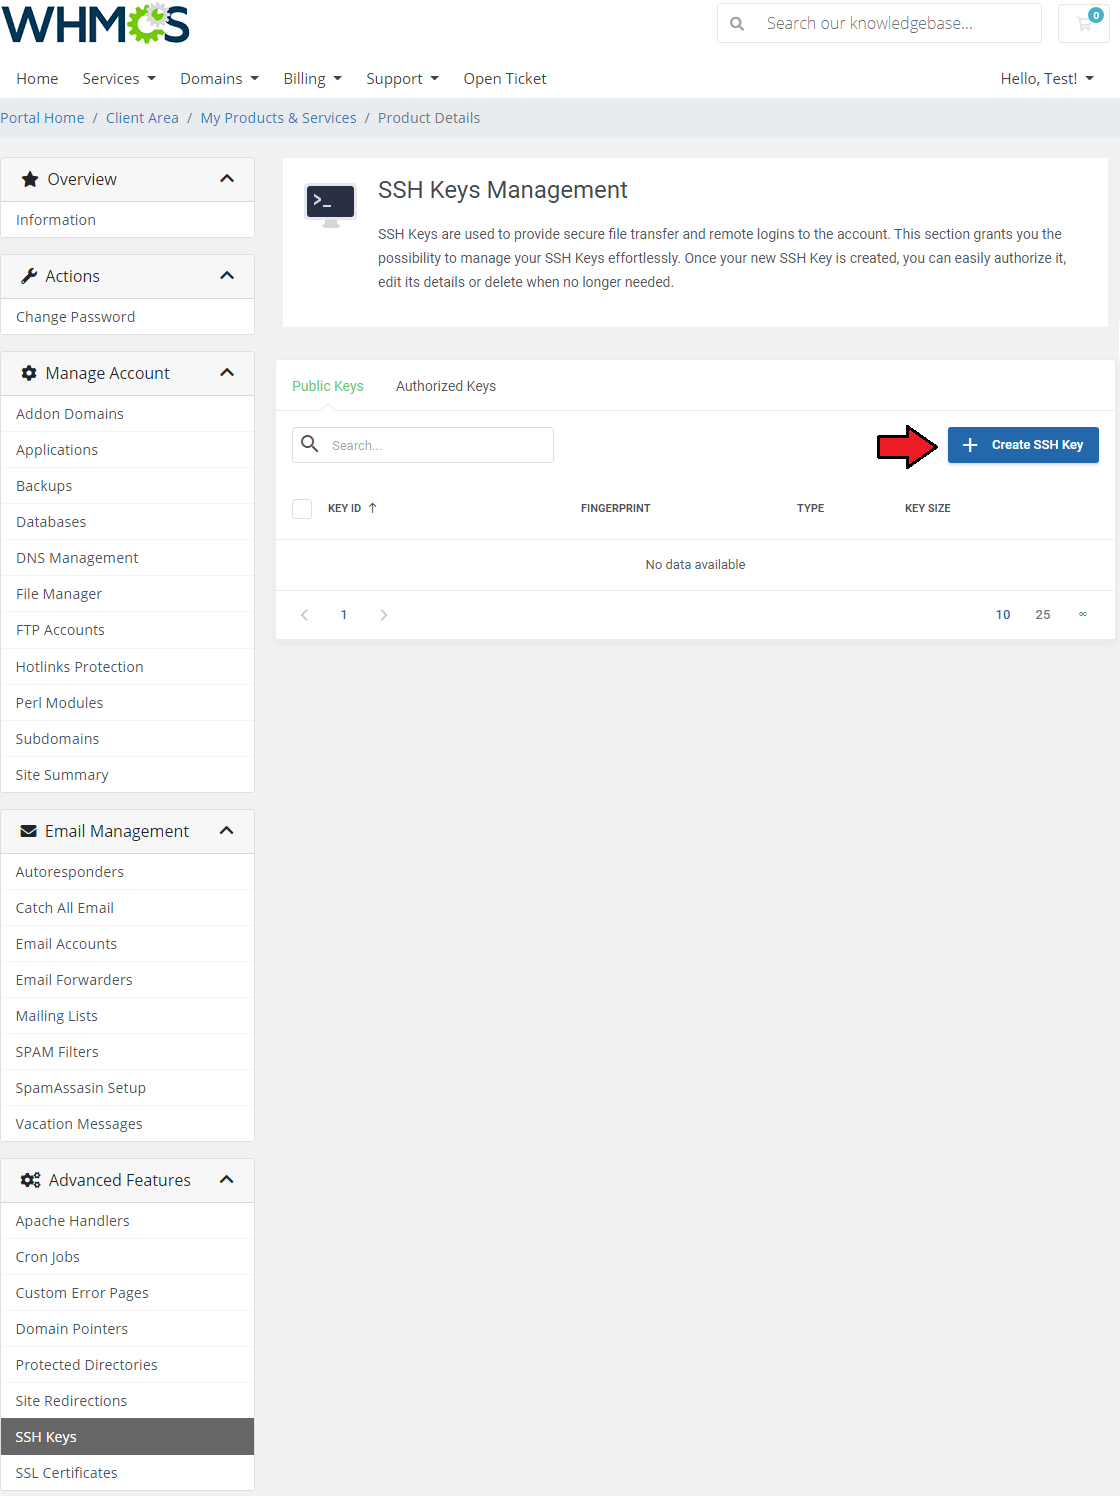
|
| Now, provide 'Key ID' and 'Comment' . Enter a strong ' Password' , optionally, you can generate it. Finally, choose the size of your SSH Key from the dropdown menu and decide if you want to authorize the Key. Afterwards, click the 'Create' button. |
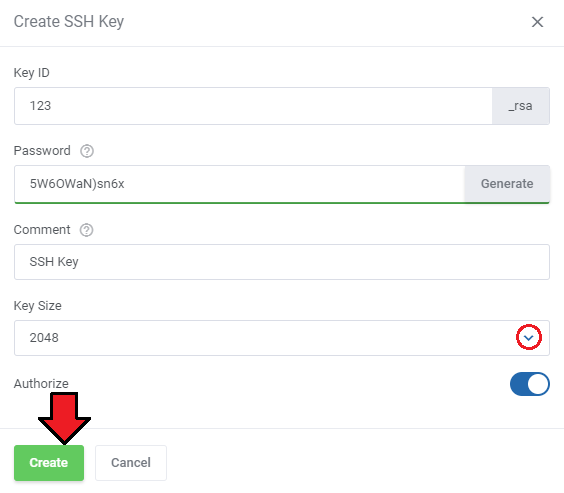
|
| All newly created SSH Keys are visible here. You can 'Authorize' or 'Delete' your SSH Key using the buttons shown below: |
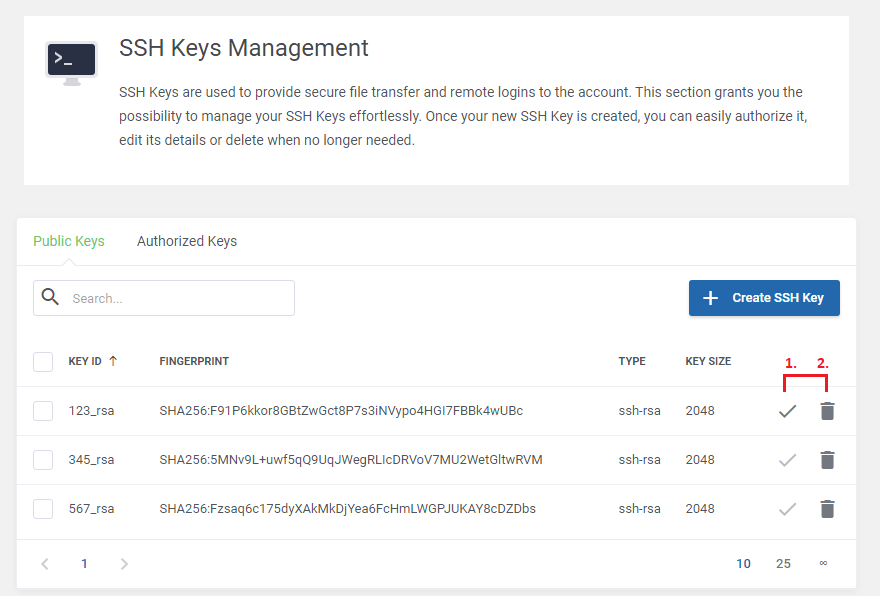
|
| If you wish to 'Authorize' or ' Delete' a few SSH Keys, click the appropriate mass action button. |
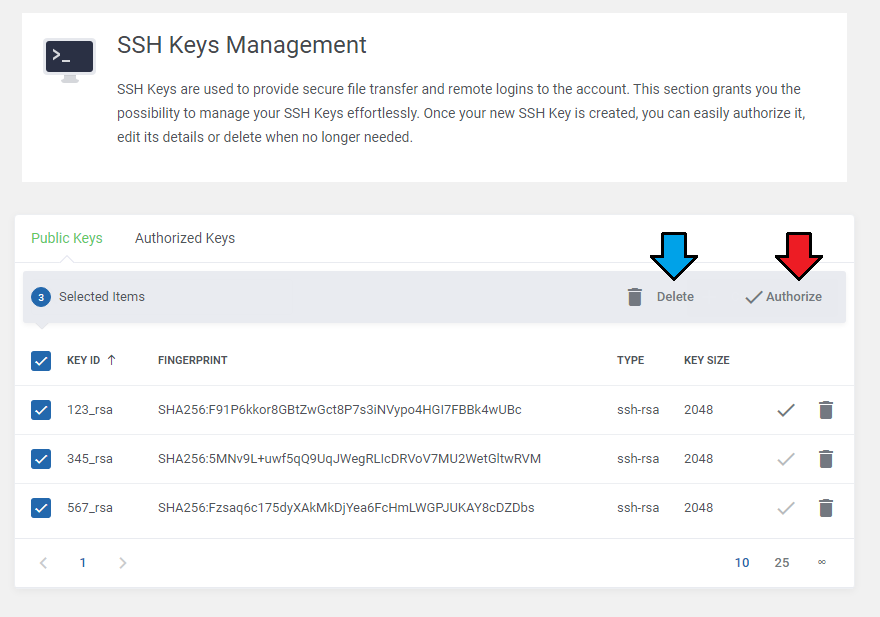
|
| All of authorized SSH Keys are listed in the 'Authorized Keys' section. Here you can edit one of the existing SSH Keys or delete any if no longer needed. |
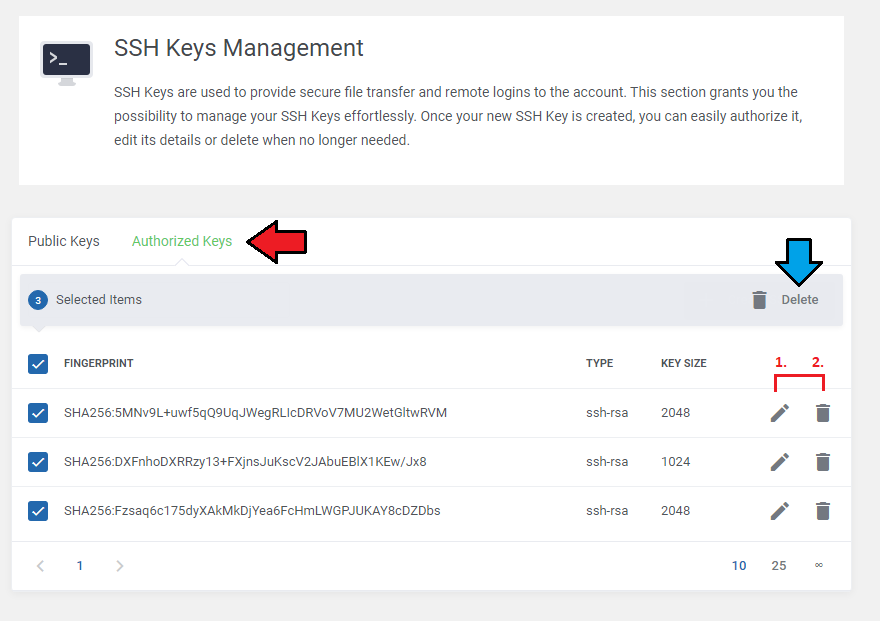
|
| It is also possible to paste an existing, authorixed SSH Key. All you need to do is press the button marked on the creen and then paste your authorized key. |
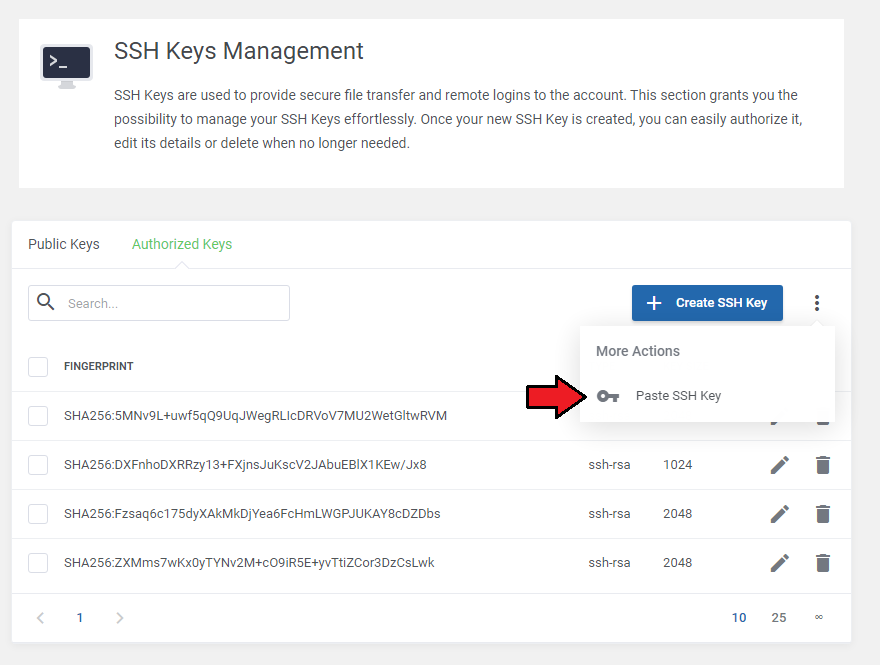
|
[edit] SSL Certificates
| Your customers can benefit from generating free certificates provided by 'Let's Encrypt' . Assuming that this option was previously enabled in the Addon Configuration. Generating a CSR or a certificate with 'Let's Encrypt' will result with automatically added private keys to the list. You may also upload a ready certificate with a private key or a CA SSL Certificate (Certificate Authority). Use 'More Actions' to find appropriate buttons. |
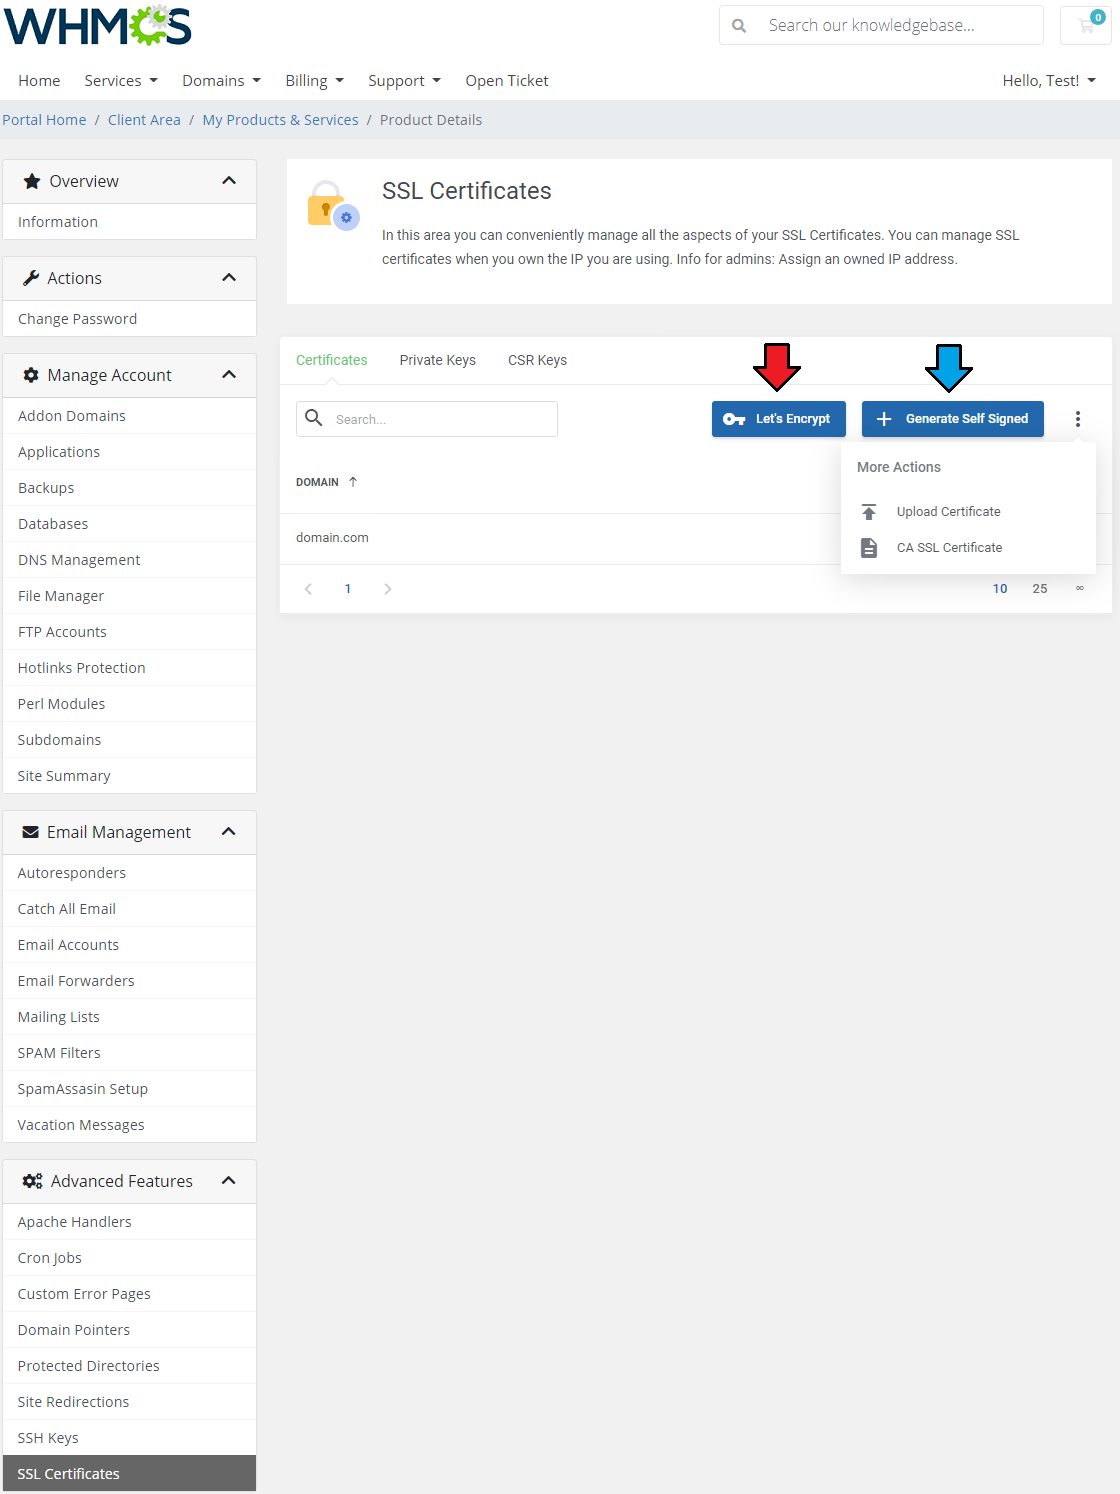
|
| If you decide to use the easiest method of generating cerificates, that is 'Let's Encrypt' option, you will only have to fill in a short form with basic information. In 'Entries' tab you will find all existing subdomains for the selected domain. |
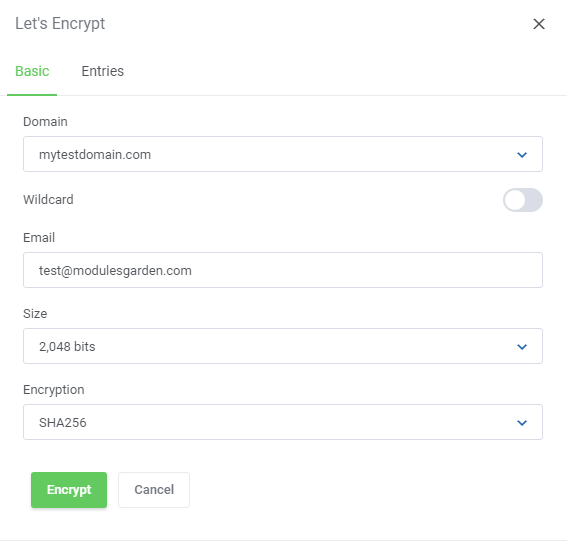
|
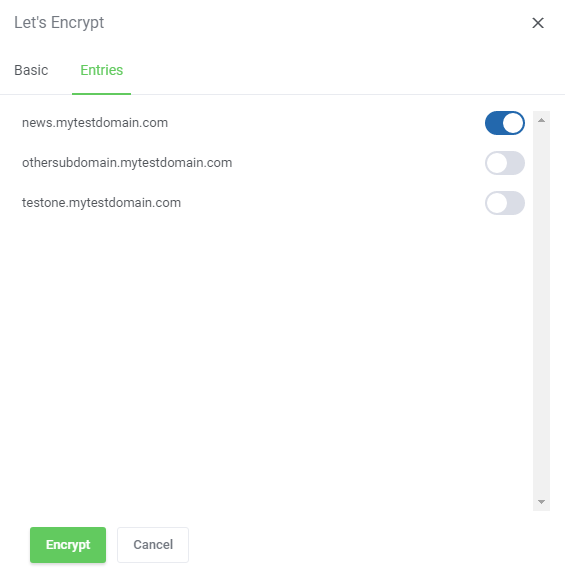
|
| This feature relocates completely the management of your private keys, CSR keys and SSL certificates into your WHMCS client area. Thanks to it, you can conveniently manage all the aspects of your SSL certificates without the necessity to log in to your DirectAdmin account. |
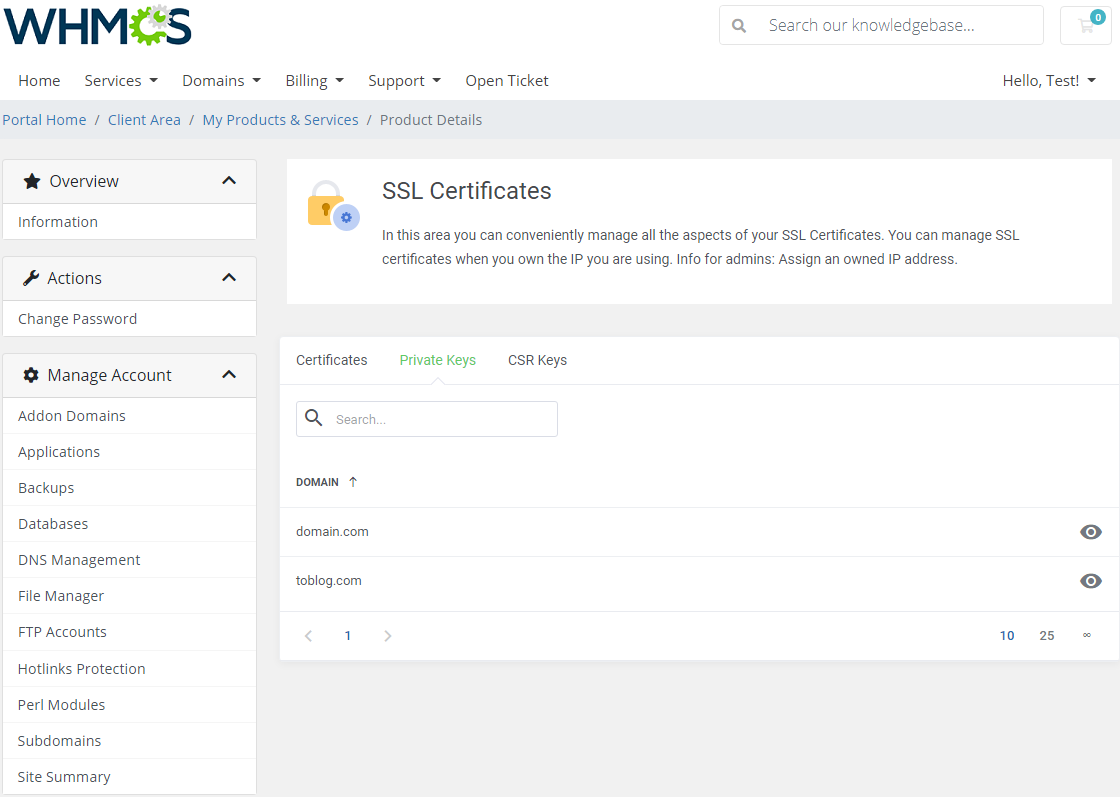
|
| If you want to obtain a certificate from a trusted provider, complete the Certificate Signing Request form to generate a CSR, which will then be used to generate the certificate by that provider. |
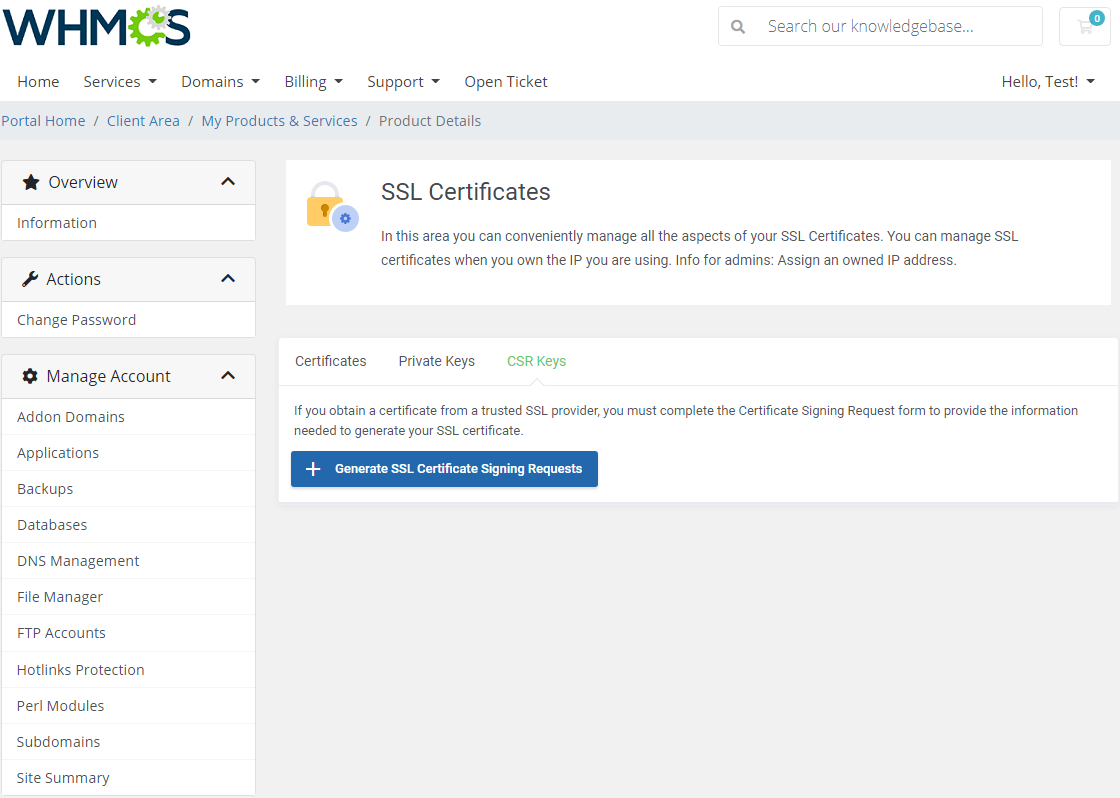
|
[edit] Unban IP Address
| The 'Unban IP Address' section allows clients to unban their IP address if it has been blocked in the DirectAdmin panel. Both IPv4 and IPv6 addresses can be unbanned here. Simply type in the address, press the 'Unban' button and wait until the action is complete. |
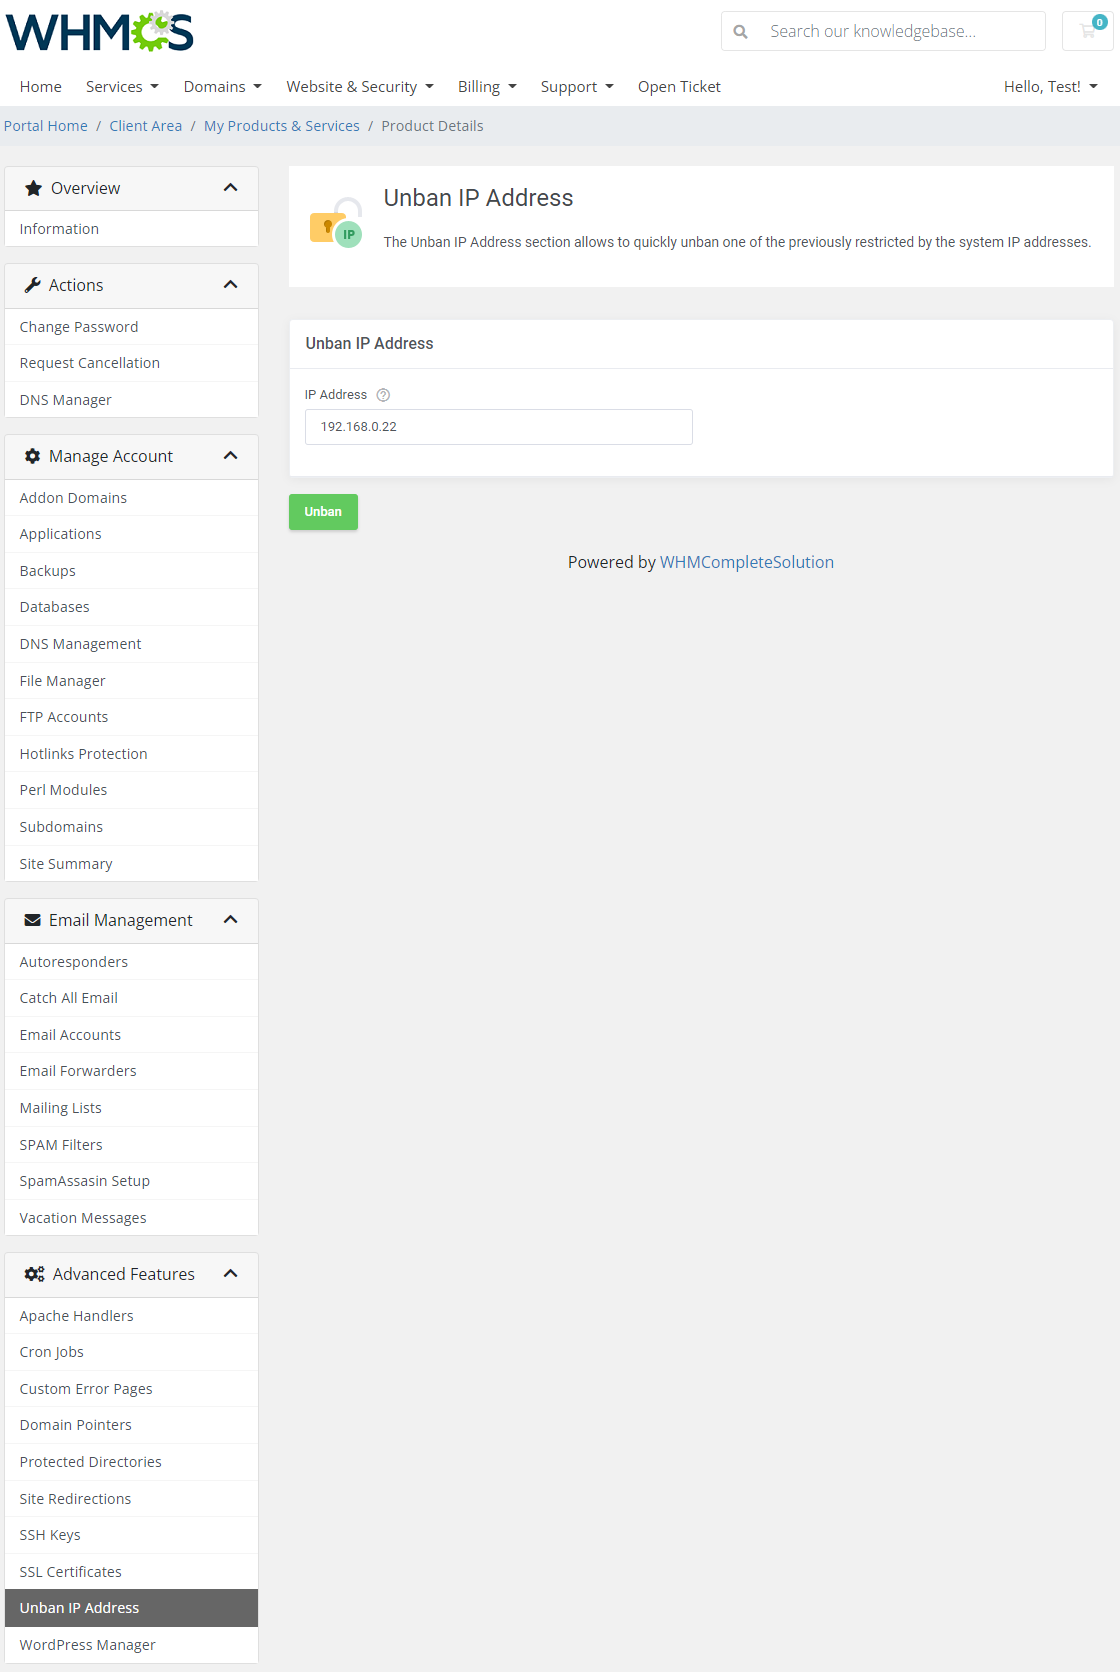
|
[edit] WordPress Manager
| If you have WordPress Manager For WHMCS module installed, your customers will fully benefit from its seamless integration with the DirectAdmin Extended For WHMCS module. |
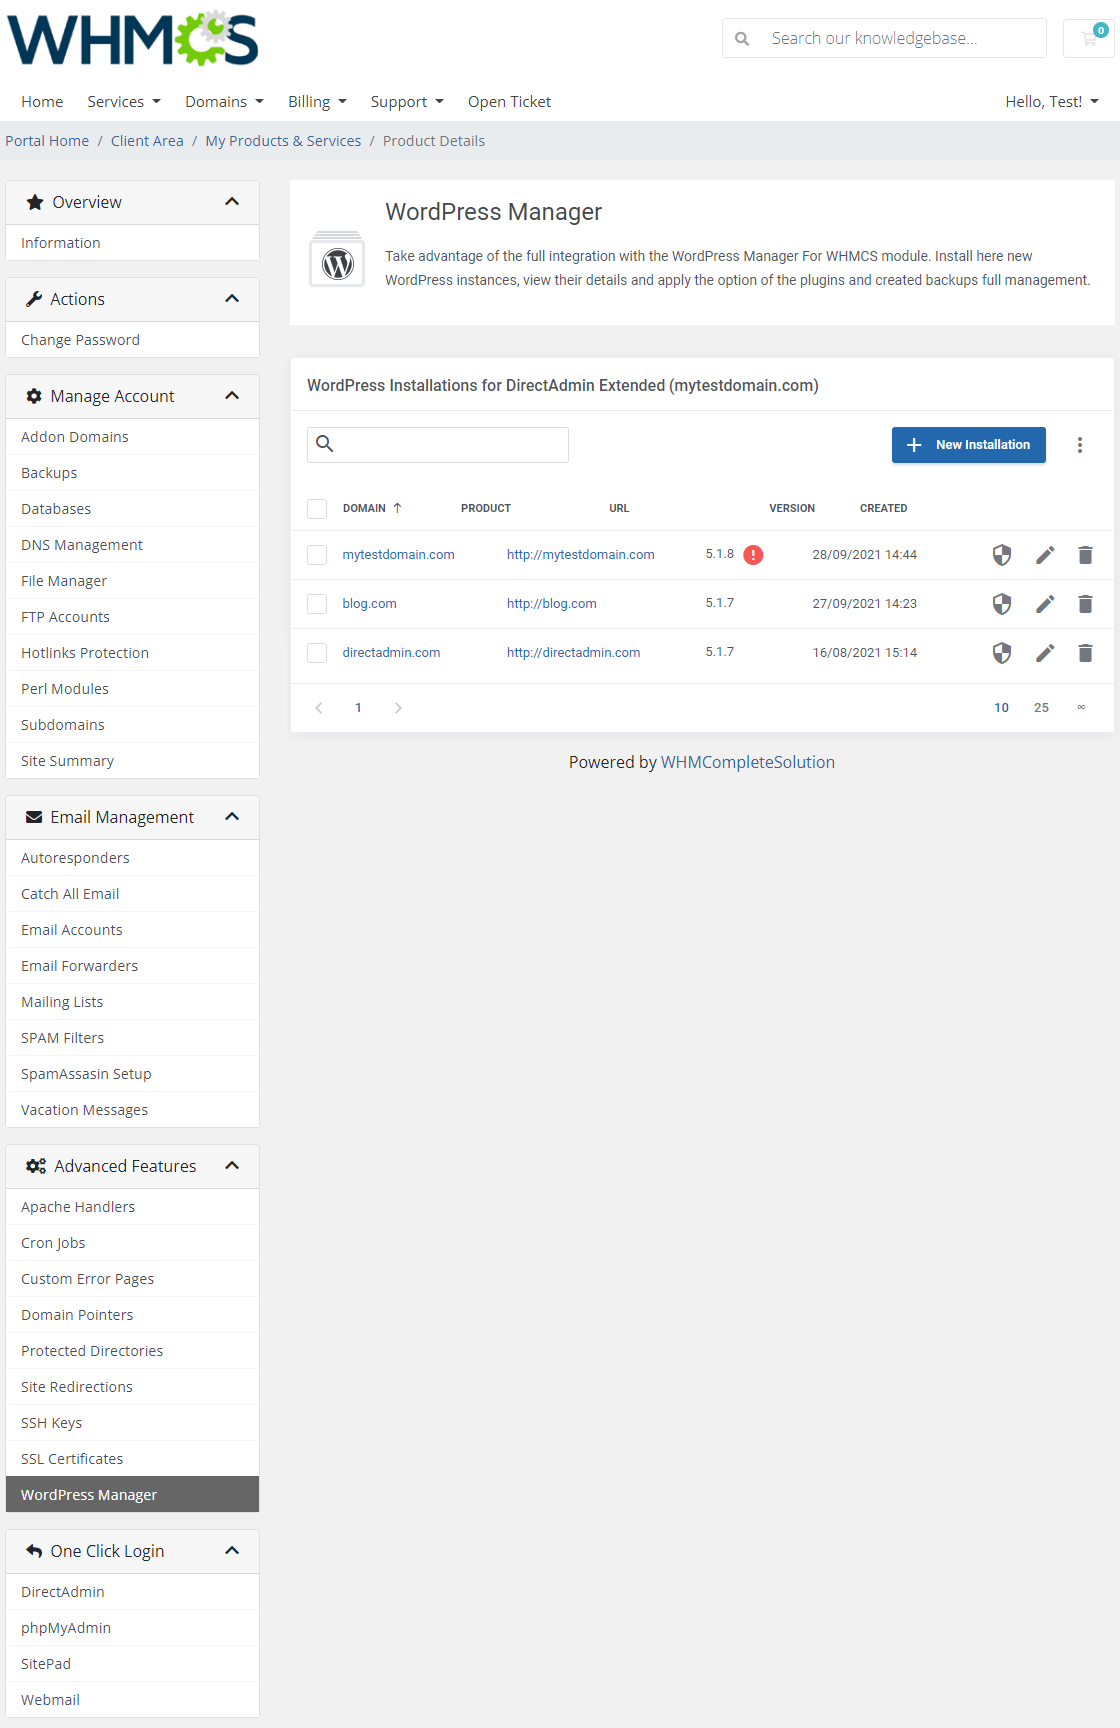
|
| Thanks to this integration, your customers will have the capability to install and manage WordPress instances in detail without the bother of leaving the DirectAdmin Extended panel in your WHMCS client area.
Full and detailed instructions on the 'WordPress Manager' itself is located here. |
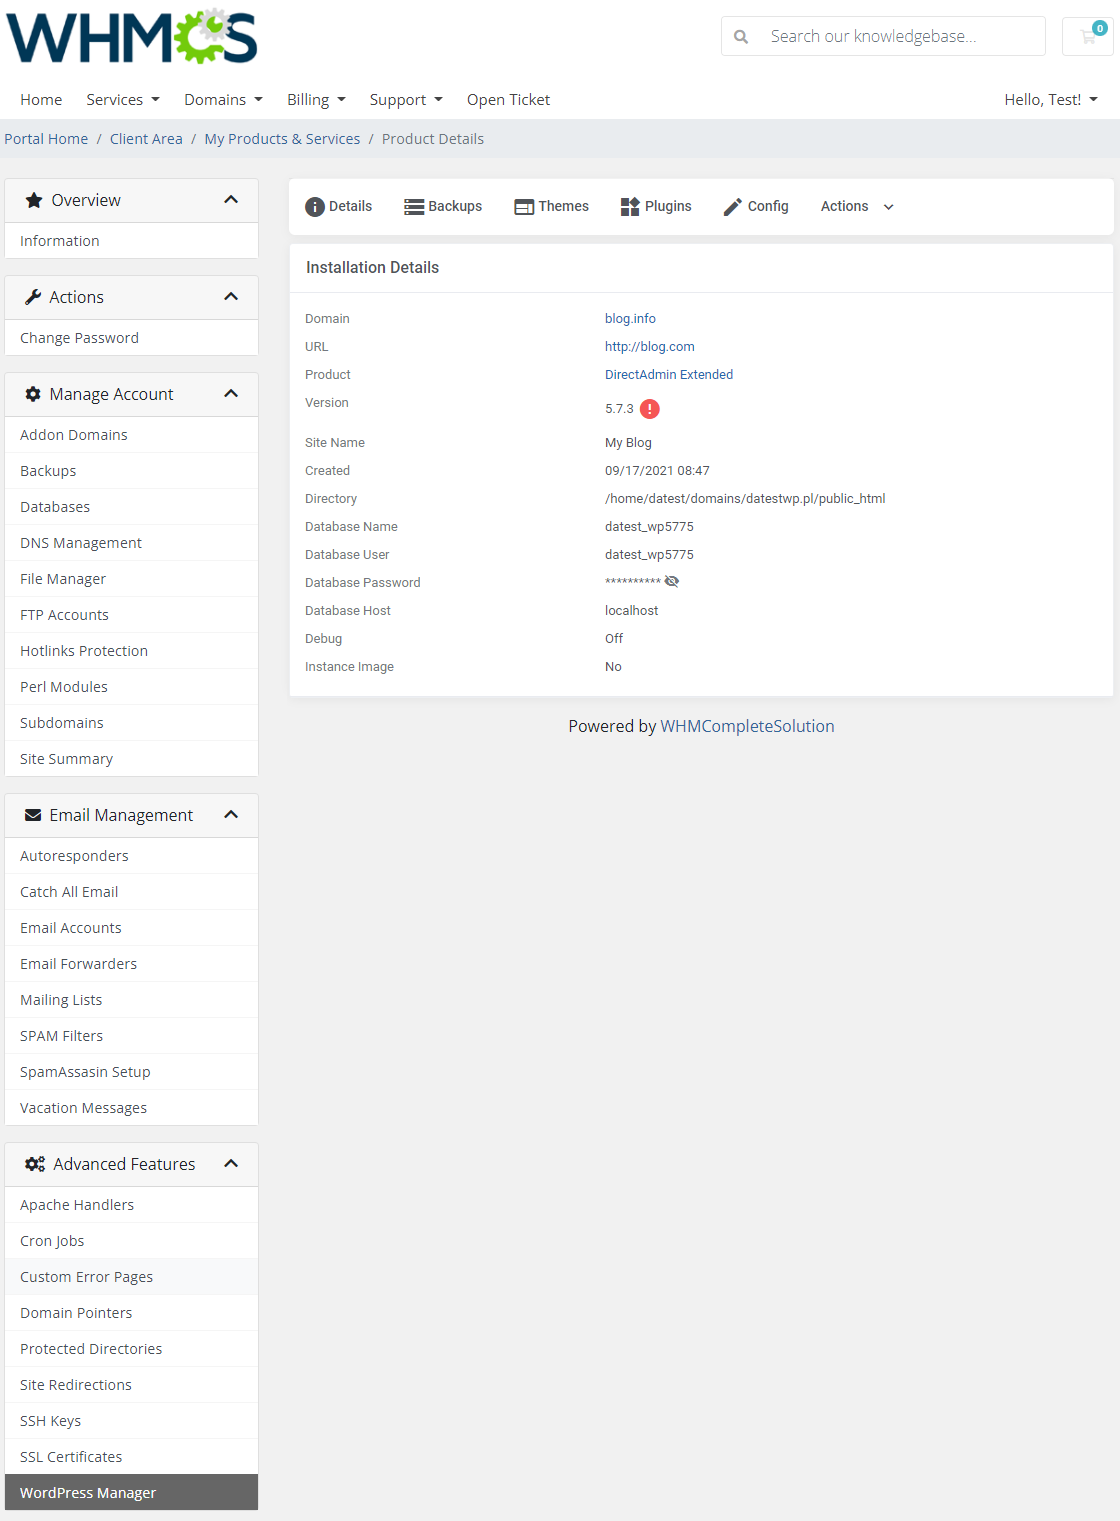
|
| Please note that this entire section can only be available if you have purchased and installed the WordPress Manager For WHMCS module. |
[edit] Install Applications
| 'Install Applications' is a very interesting and time-saving feature of DirectAdmin Extended For WHMCS module. In merely seconds, you can install your favorite applications without even accessing DirectAdmin! Firstly, you need to enable one of the two auto-installation managers. To do so, go to 'Addons' → 'DirectAdmin Extended' → 'Features'. |
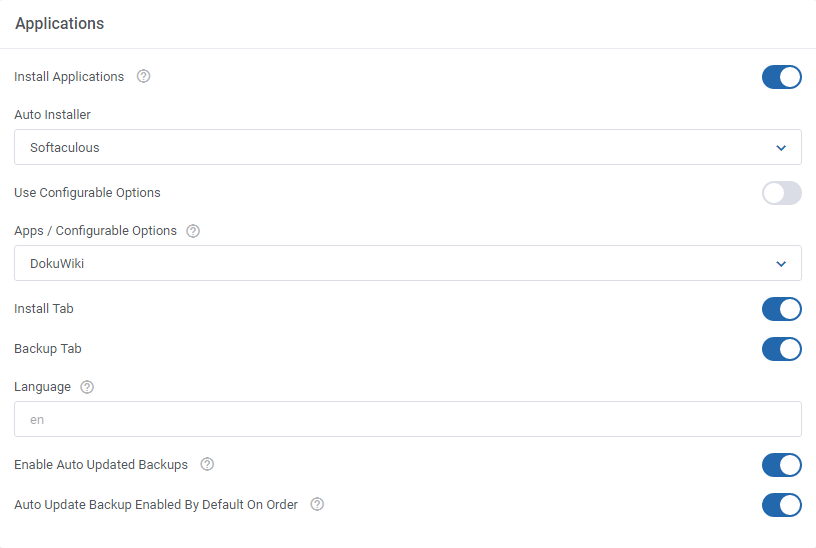
|
| In the client area section, move to the 'Applications' section and then find the 'Install New' tab as shown on the following screen. You will see an extensive menu of application categories. |
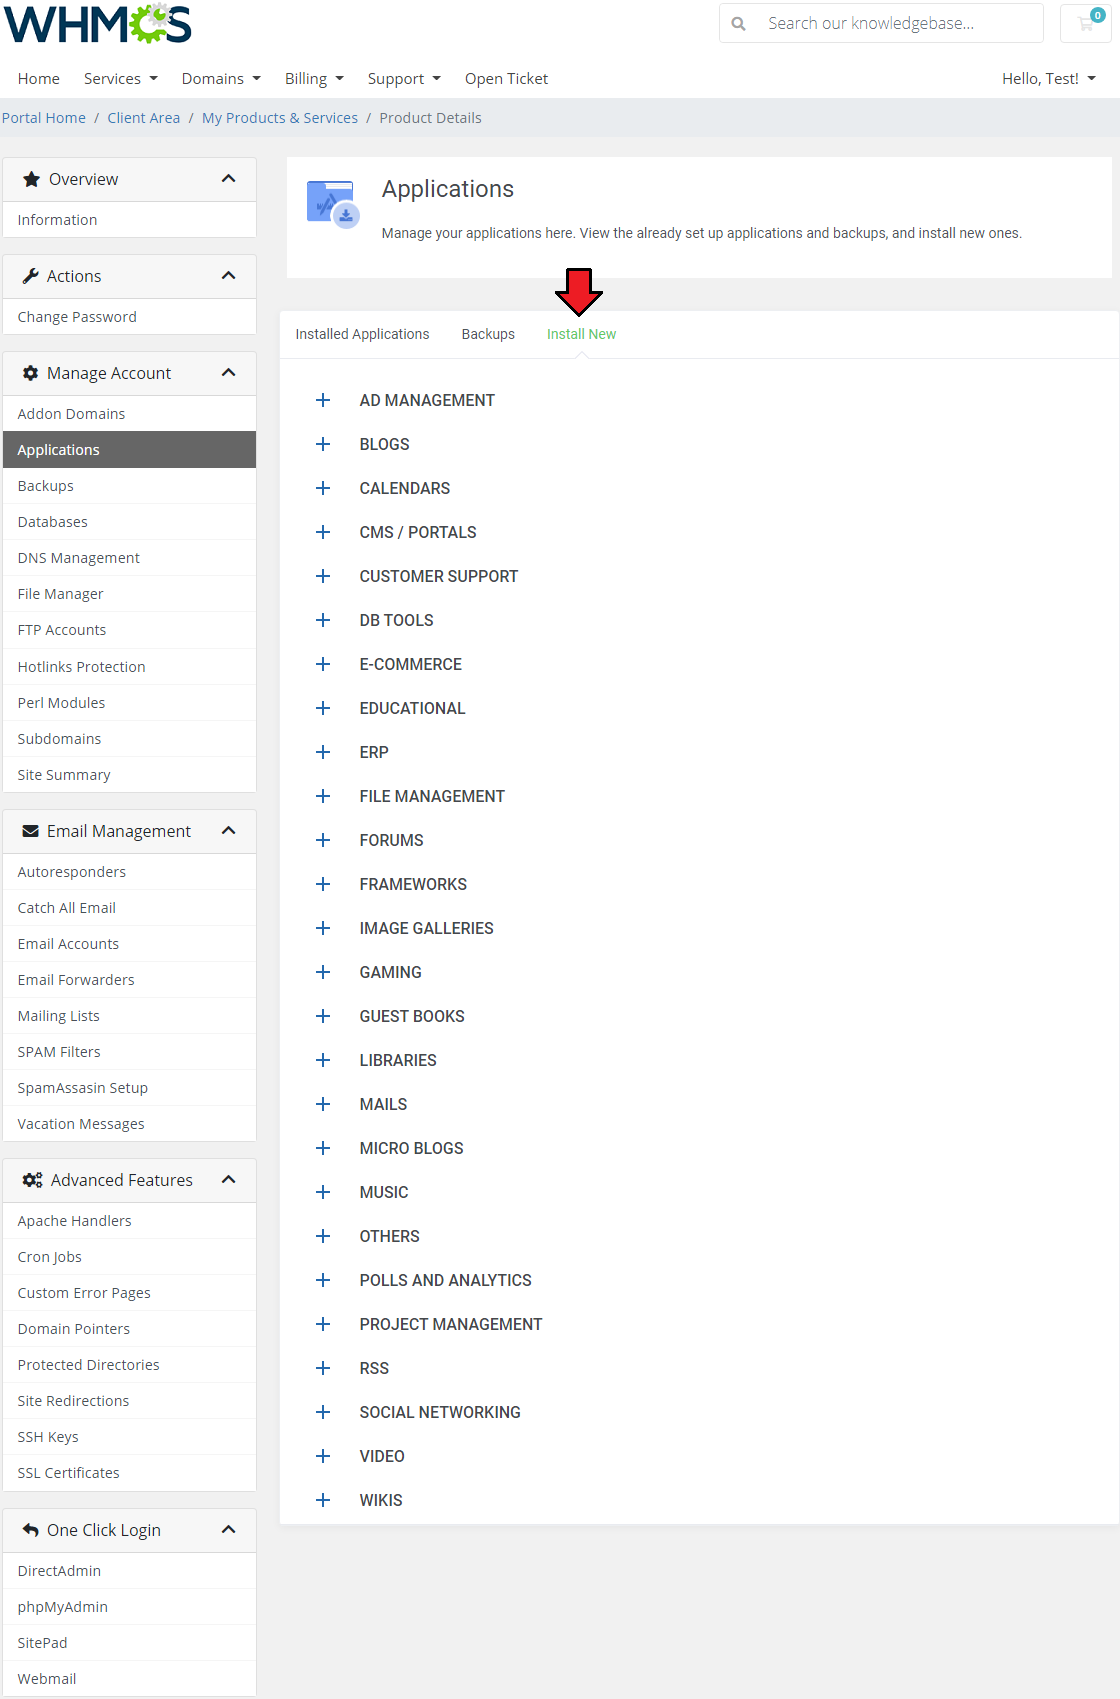
|
| For presentation purposes we will install 'Claroline' located in the 'Educational' section. |
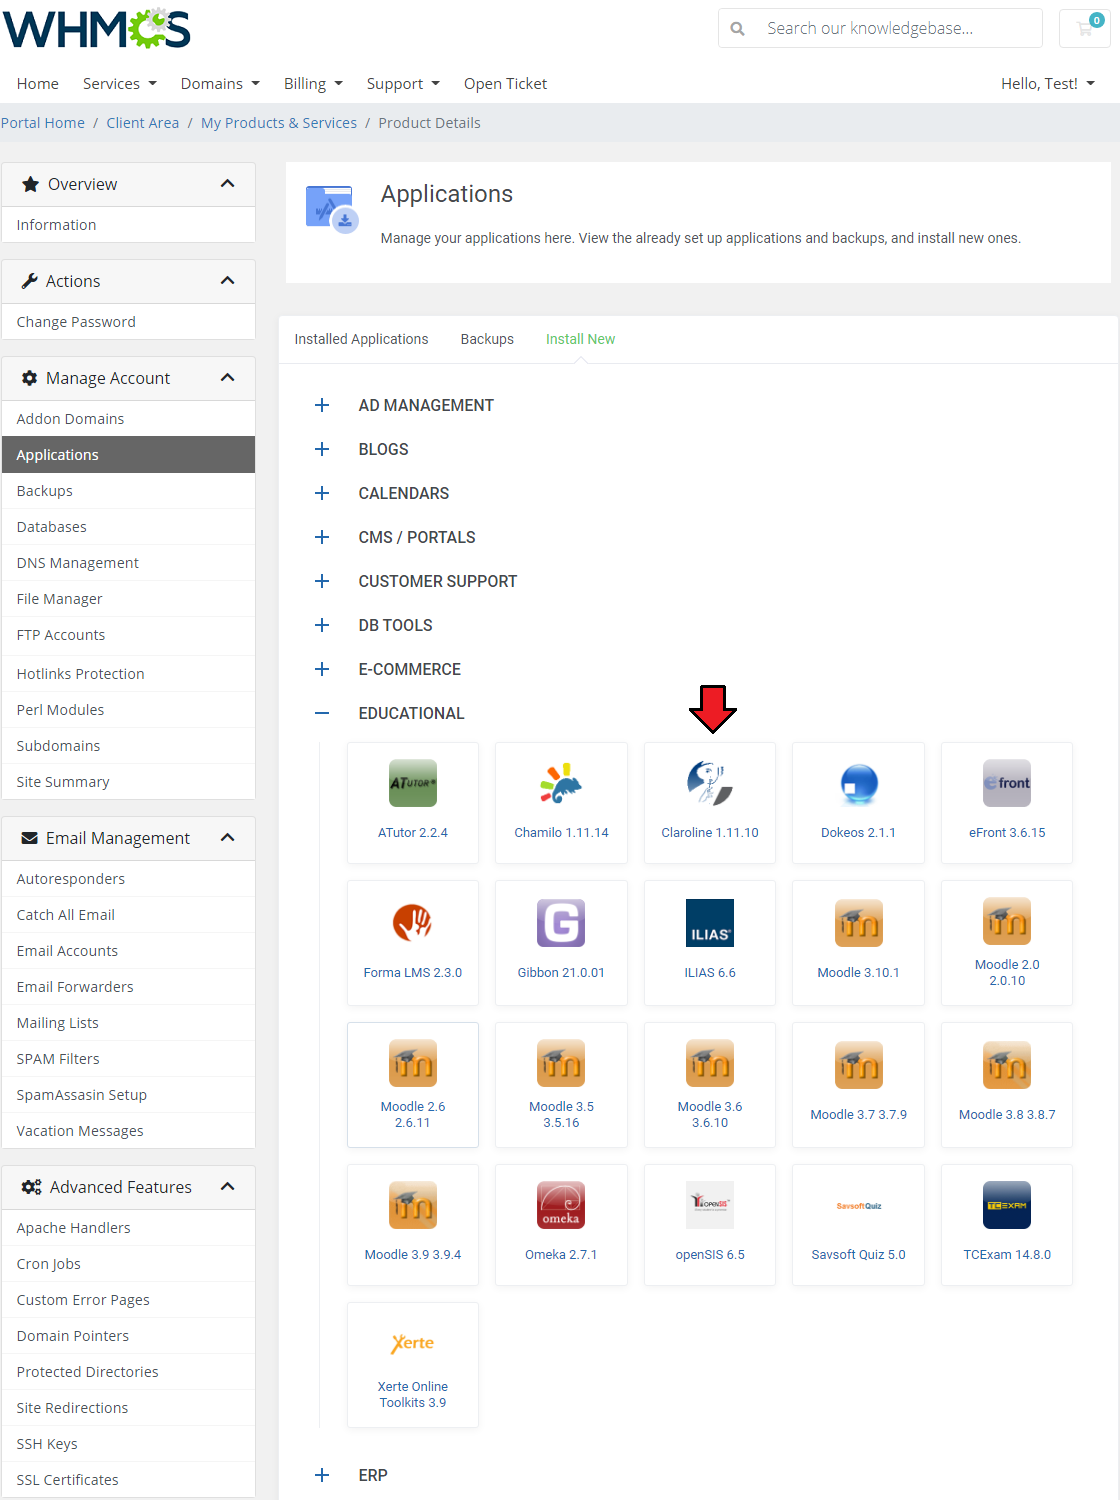
|
| Necessary installation fields should be automatically filled in. In case the 'Directory' field is left empty, the application will be installed in the main folder of the selected domain. |
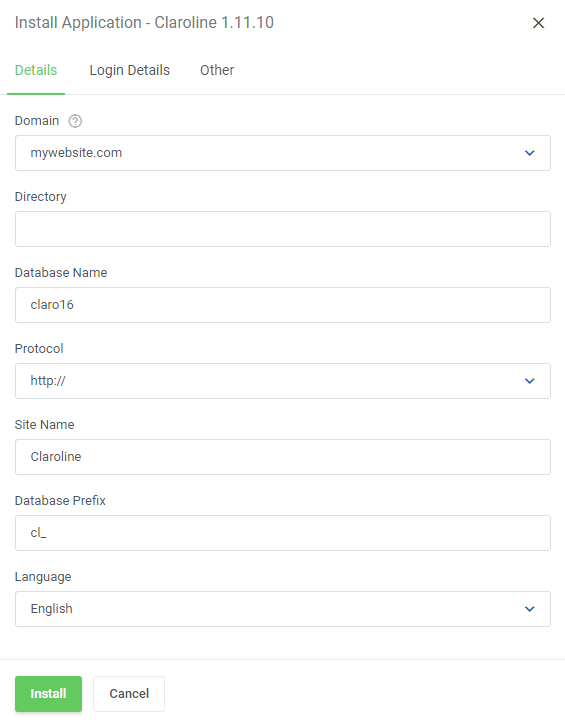
|
| If the installation process has been successful your newly installed application will appear on the list of installed ones when you go back to that tab. |
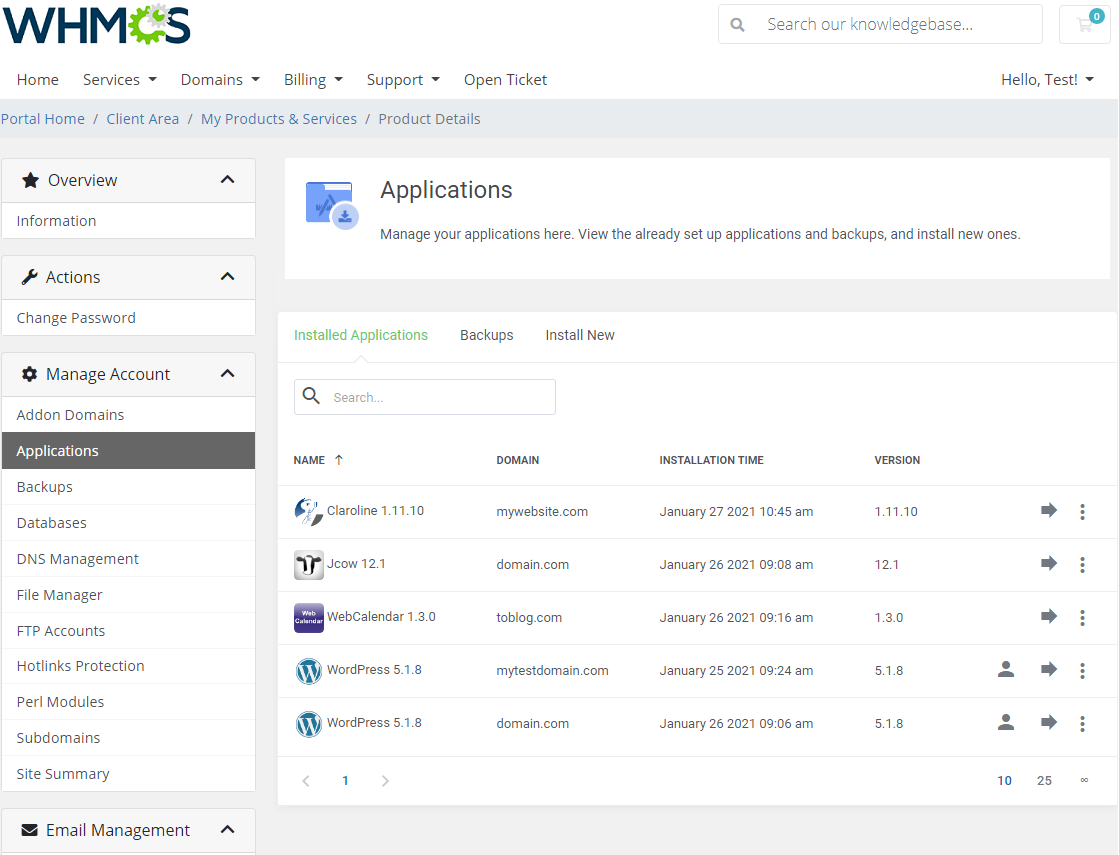
|
| Here you can find the name of the application, its domain, installation time and version. Available actions on installed applications:
Note: Please keep in mind that creating staging applications, cloning, and generating backups might last up to a few minutes and the instances are not visible right away. |
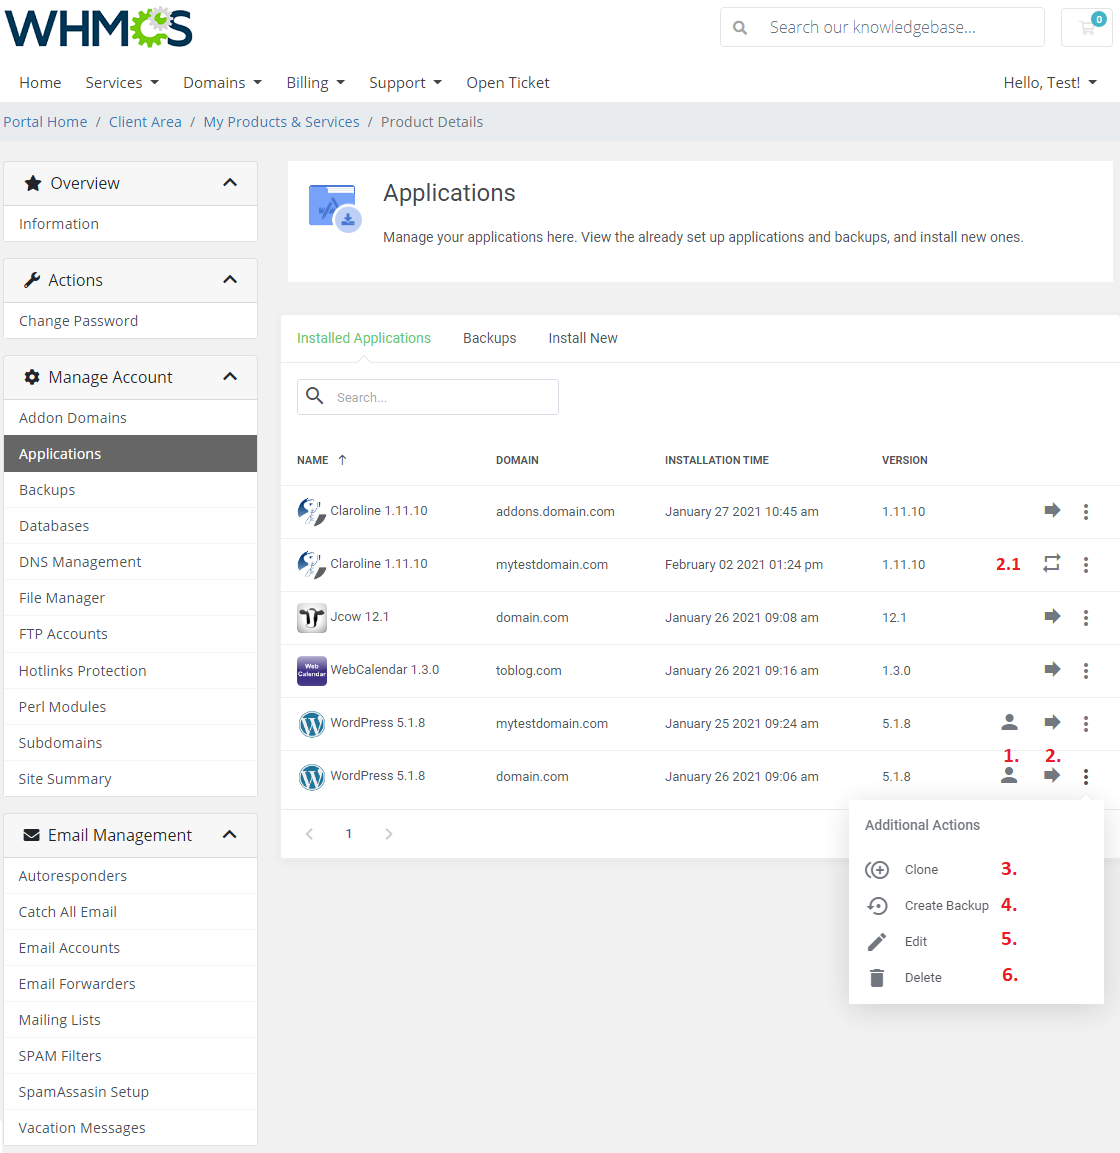
|
[edit] Management of Auto Installed Applications
| To set up DirectAdmin Extended products with the auto installed app, follow these steps: In the beginning, go to 'Product/Services', find your product connected with DirectAdmin Extended and enter the 'Module Settings' tab. |

|
| Select which of the available fields you wish to generate. |
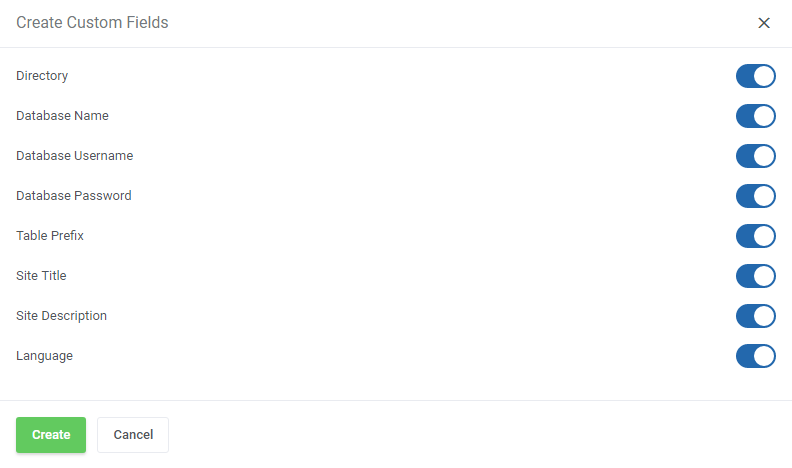
|
| You can also create these fields manually by going to the 'Custom Fields' tab. You will need to add 8 custom fields. These are: 'Directory', 'Database Name', 'Database Username', 'Database Password', 'Table Prefix', 'Site Name', 'Site Description' and 'Language'. Note 1: 'Site Description' is needed only for Softaculous autoinstaller. |
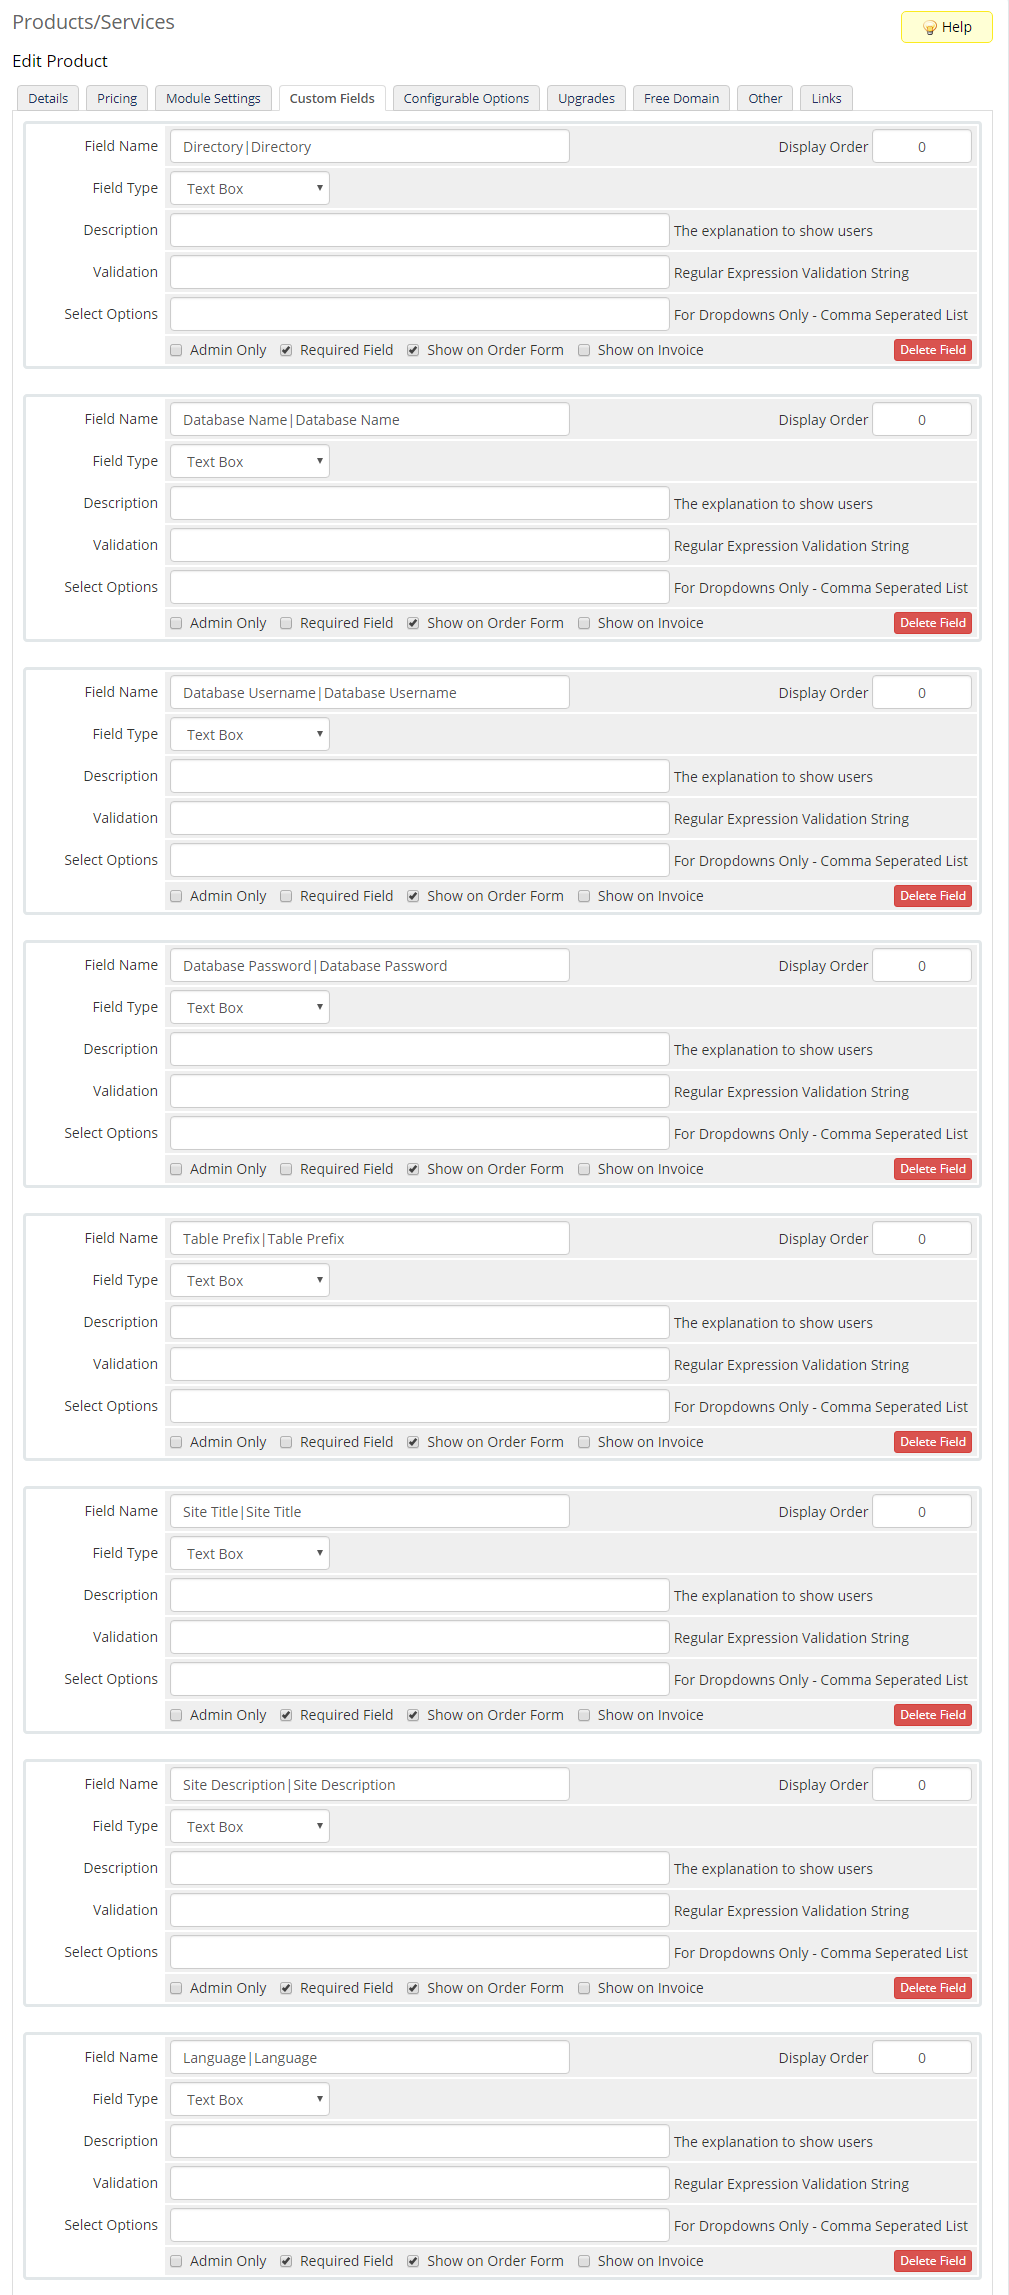
|
| Afterwards, go to 'Addons' → 'DirectAdmin Extended' → 'Features' → 'Configuration'. Enable 'Install Applications' in the Applications section. Select the auto installer and application to install from dropdown menus. Confirm by pressing the 'Save' button. |
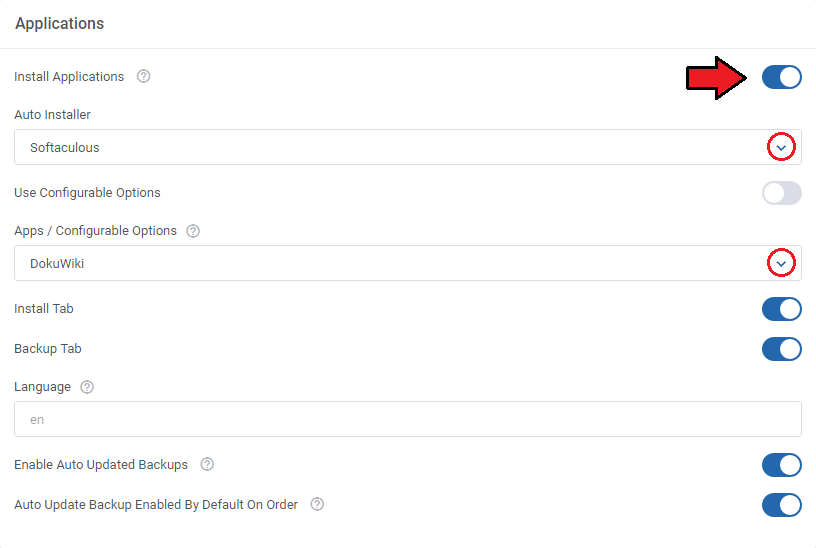
|
| Once you add all the custom fields, they will appear while placing an order. Voila! Now your customers can personalize each application without the necessity of installing it later on. |
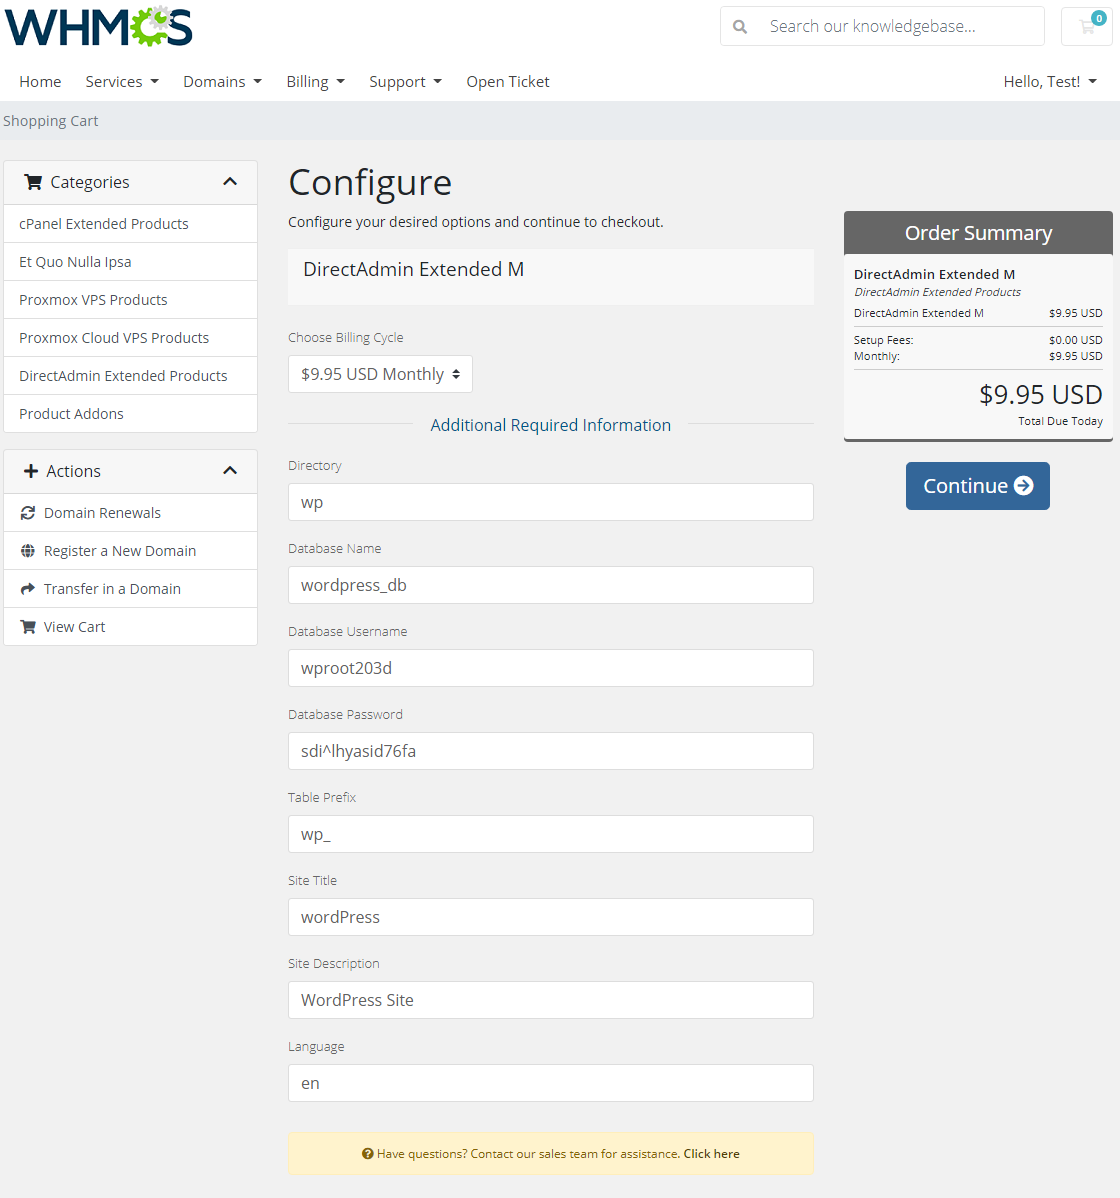
|
[edit] Configurable Options For Application Auto Install
| Let your clients decide which application they would like to install on their new DirectAdmin account. While placing an order, your customer can choose an application which will be installed upon account creation. |
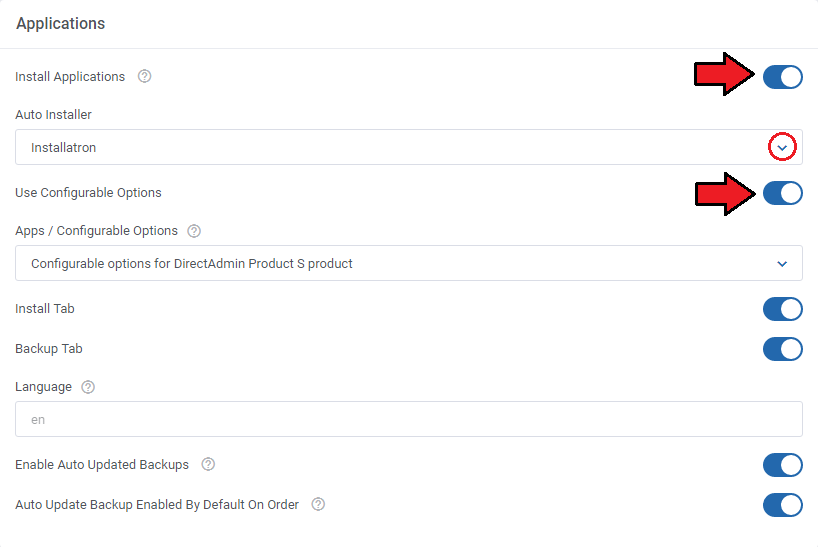
|
| Go back to the list of products and click on a download icon to view the applications list. |
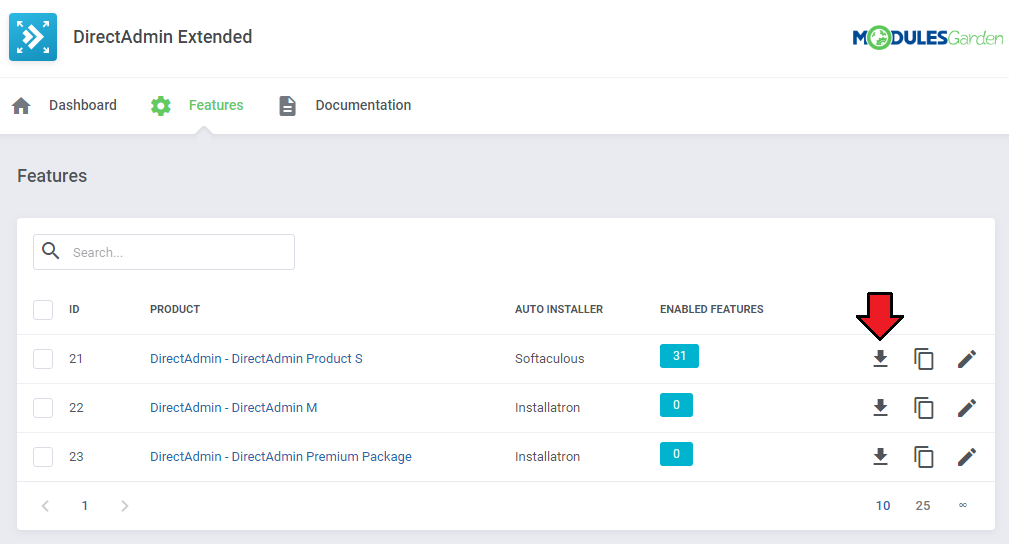
|
| These are the names of values that you can enter in the fields of configurable options. We will configure them in the next step. For example, if you would like to set up 'Drupal' in your applications list, you will need to enter the 'Drupal 7.59' or 'Drupal' value. |
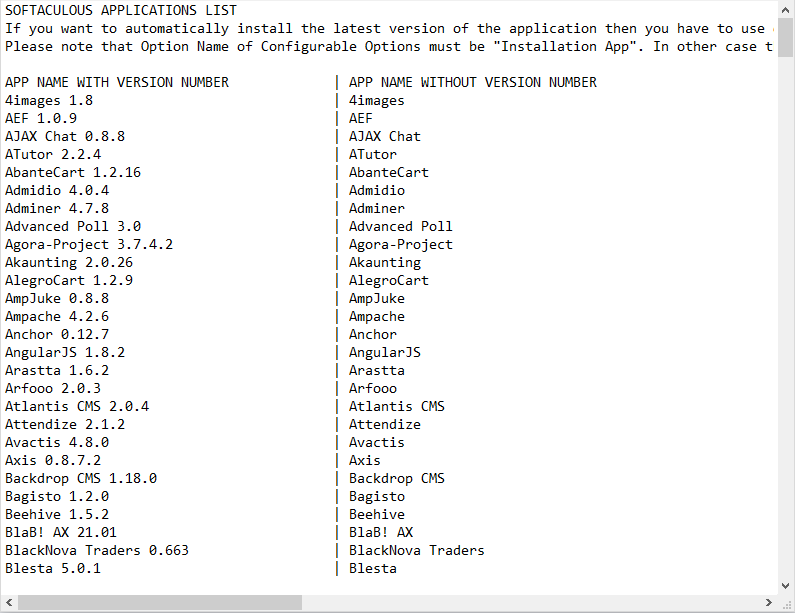
|
| Go to your 'WHMCS' → 'Setup' → 'Products/Services' → 'Configurable Options' and press 'Create a New Group' . |

|
| Enter the group name of your choice, select the product to which you want to assign configurable, then press 'Save Changes' . |
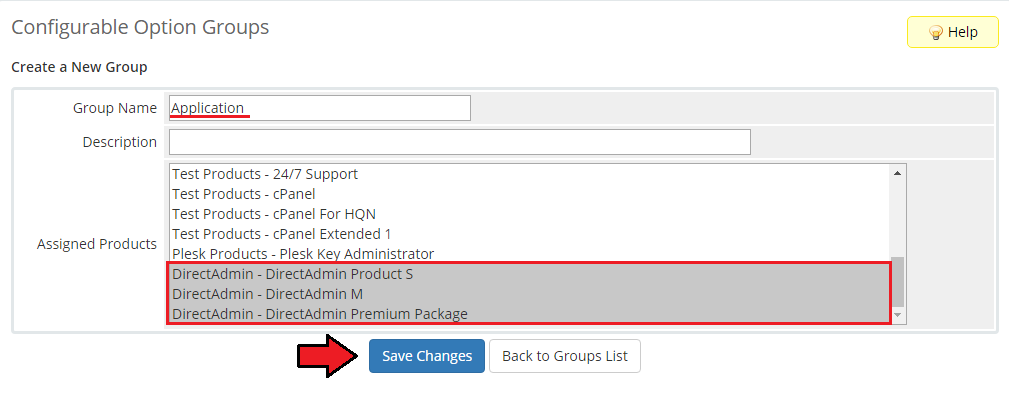
|
| Now click on 'Add New Configurable Option' . |
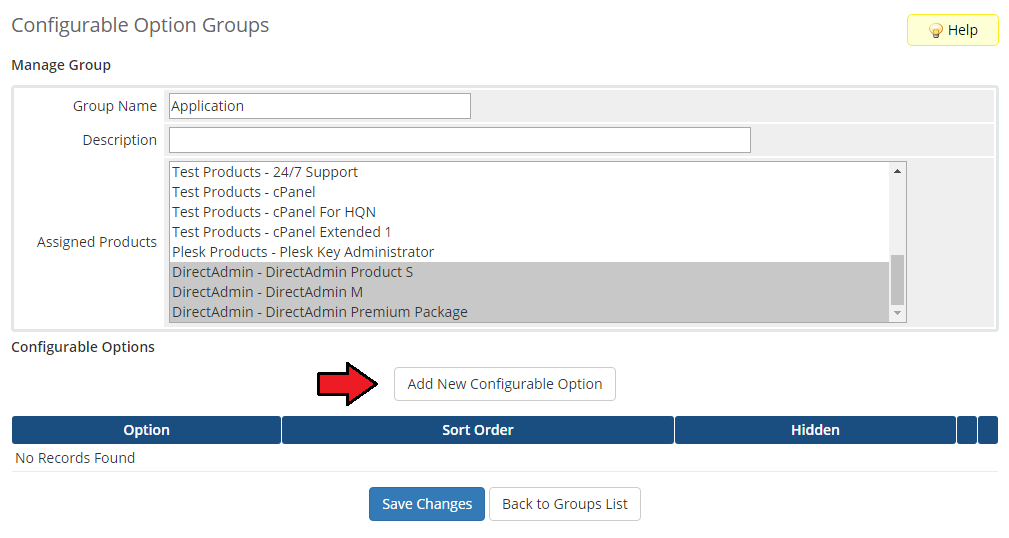
|
| This moment is very important. As 'Option Name', you have to enter 'Installation App'. Otherwise the entire functionality will not work. Here you can set up as many applications as you want. To do so, enter a value name, e.g. 'WordPress 4.9.8' and press 'Save Changes' . |

|
| As you can see on the following screen, we decided to offer our customers five applications. When you finish adding applications, press 'Save Changes' and 'Close Window'. |
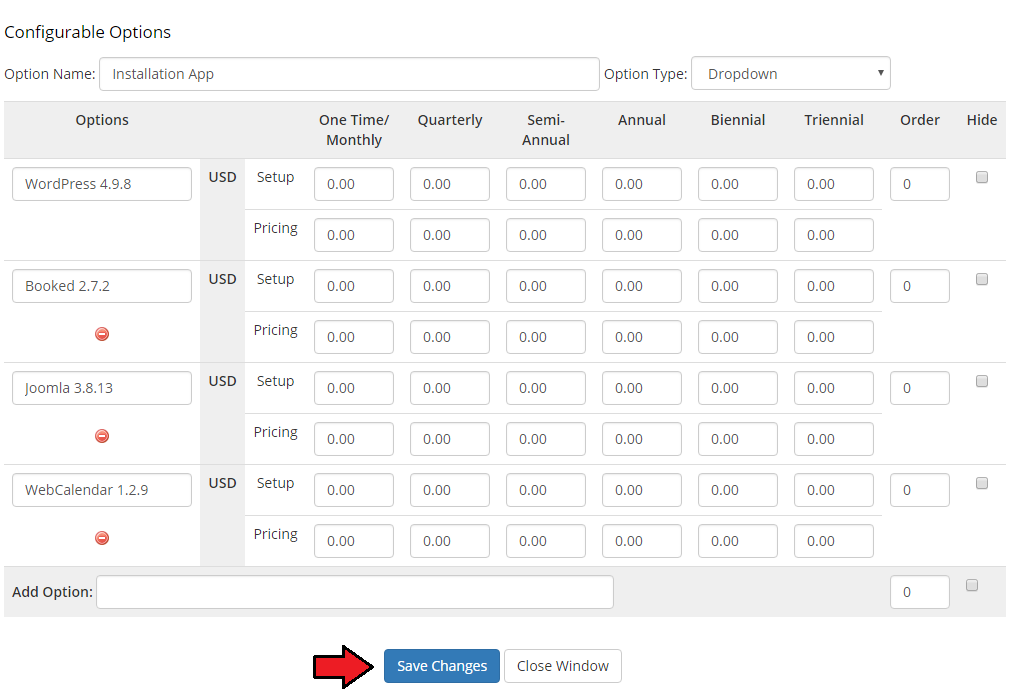
|
| You can also create a new configurable option - Auto Backup On Update with the 'Yes/No' type. This option is used to enable the creation of auto update backups for the first chosen application after the initial order in WHMCS. |

|
| Afterwards, come back to 'DirectAdmin Extended Features' → 'Configuration' → 'Applications' , activate 'Use Configurable Options' and choose 'Apps/Configurable Options' from a dropdown menu. Please note that you can have more configurable options groups at your disposal. Press 'Save' . You have just successfully assigned configurable options to the application autoinstall. |
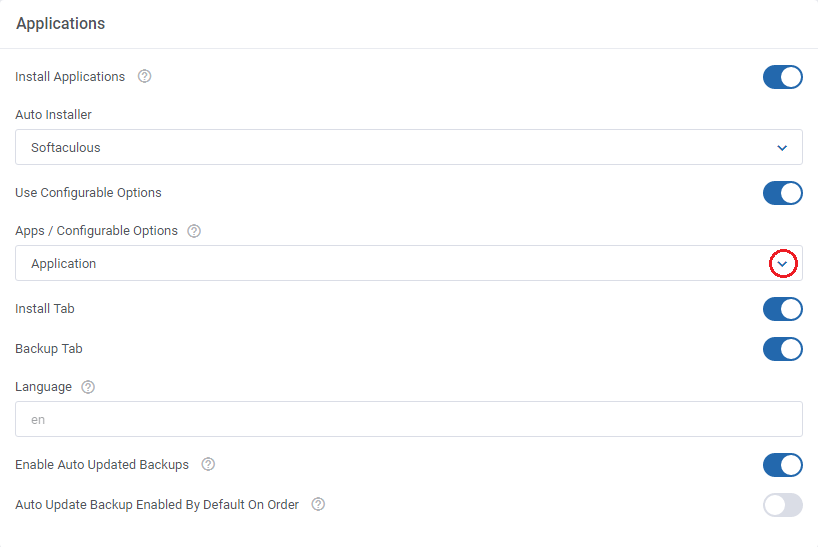
|
| Let us find out what your customers are going to see in your client area while placing an order. As you can see, a dropdown menu with the previously configured applications has shown up. |
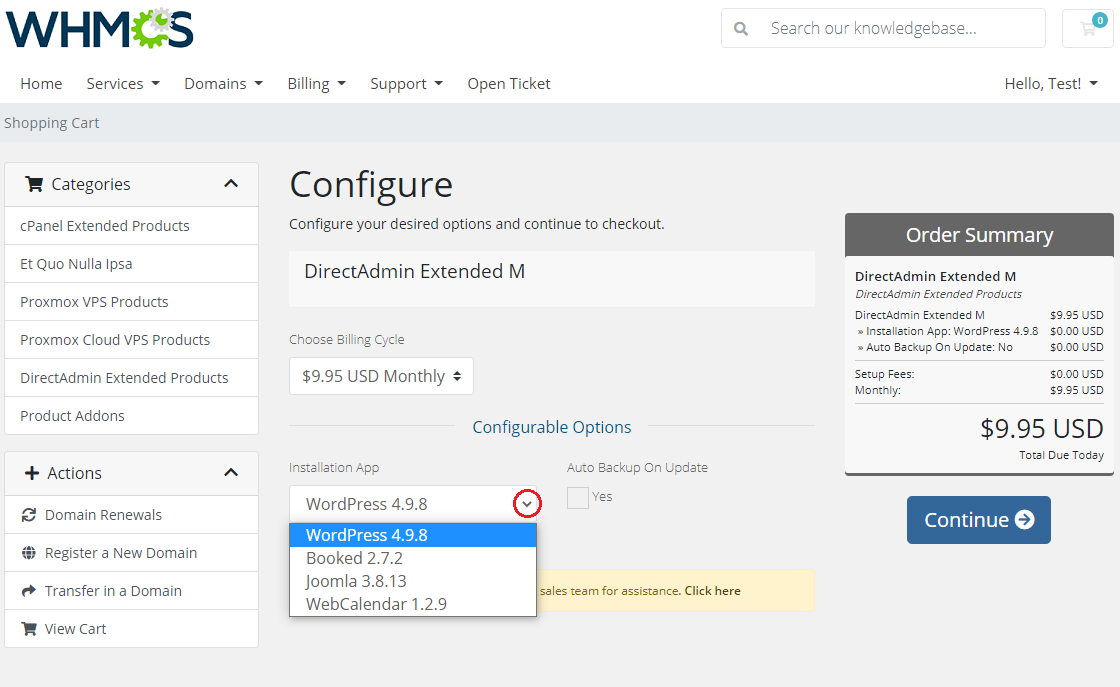
|
[edit] Backups Management For Apps
| You can also create a backup of your application. It is very easy! To do so, click 'Create Backup'. |
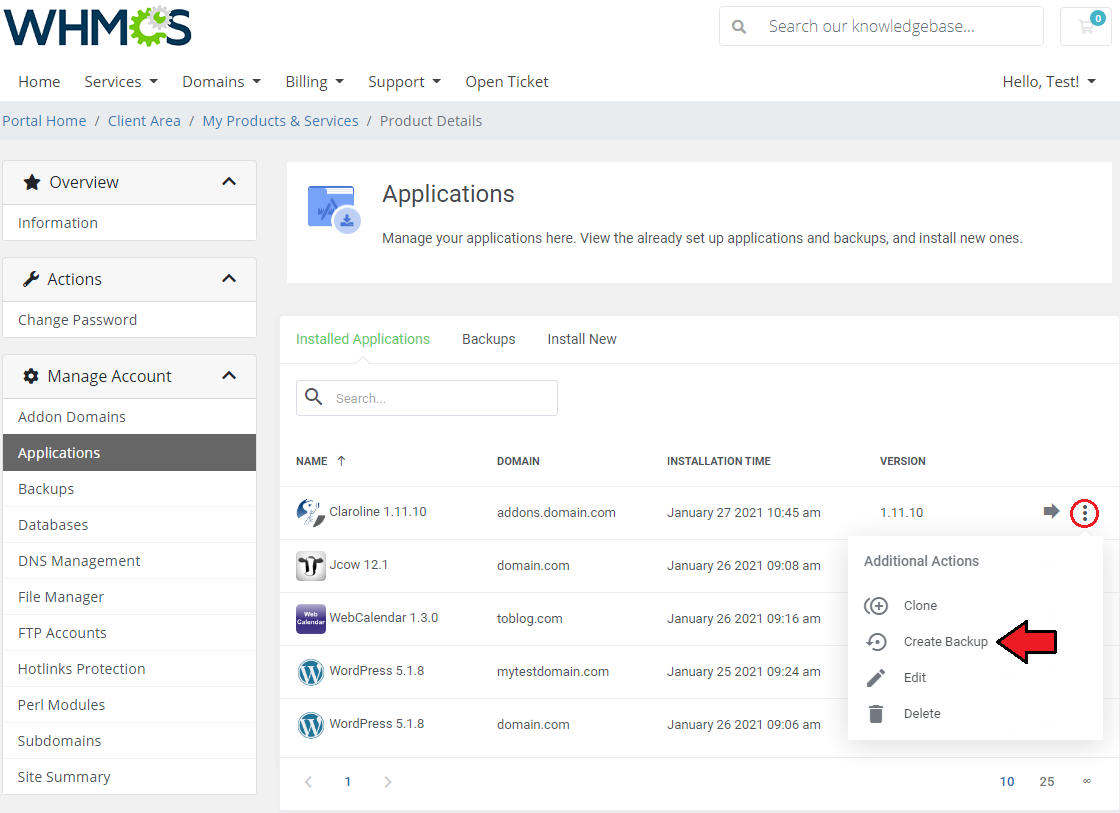
|
| After a few seconds, you should see the 'Success' message as a confirmation of the performed operation. To manage your backups, simply press 'Backups'. |
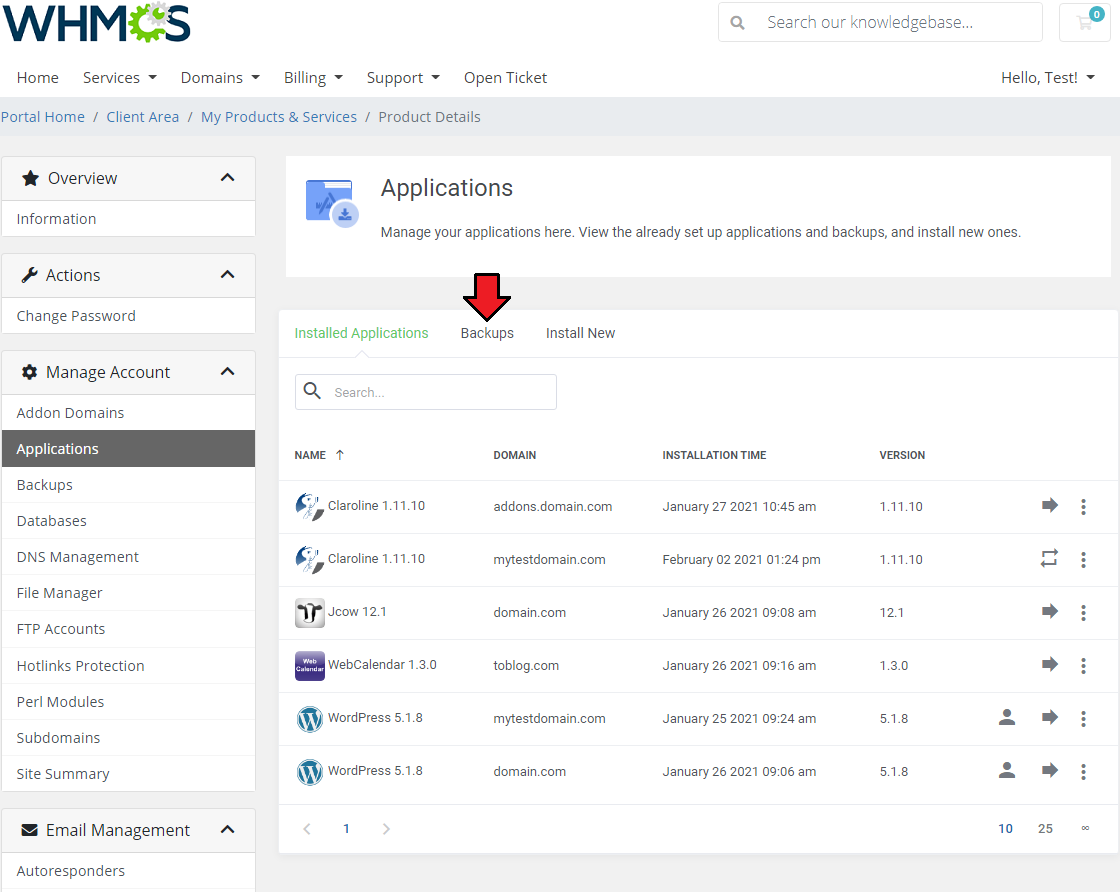
|
| You can quickly view, delete or restore your existing backups. |
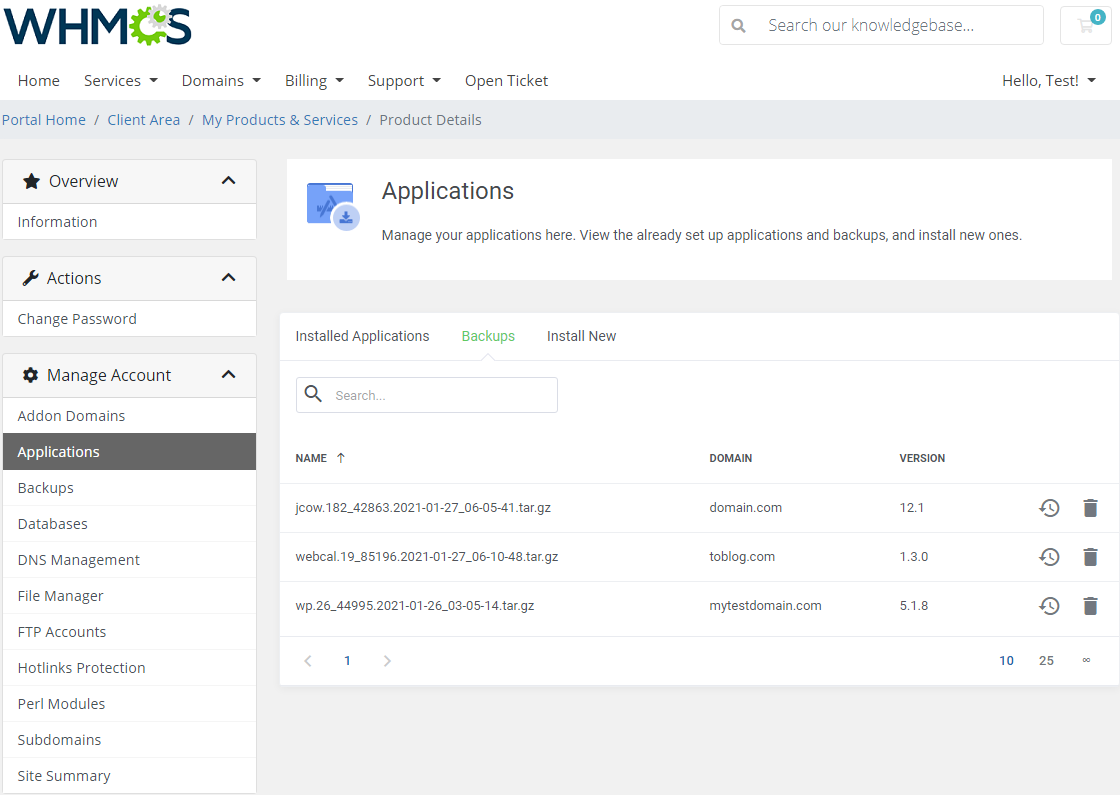
|
[edit] Log In To DirectAdmin
| With a single click on the 'Log In To DirectAdmin' button, you can log in to your DirectAdmin without the necessity to enter login details. |

|
[edit] Log In To phpMyAdmin
| You can easily log in to your phpMyAdmin by clicking 'phpMyAdmin'. You will be redirected to that site on the run. |

|
[edit] Log In To SitePad
| To be redirected to SitePad, click on the 'SitePad' button as presented below: |

|
[edit] Log In To Webmail
| In order to enter Webmail, press 'Webmail' button as shown on the following screen. Note: Webmail type login has been defined by the admin and can be either 'Horde', 'Roundcube' or 'Squirellmail'. |

|
[edit] Management of Billing
| When you combine DirectAdmin Extended For WHMCS with Advanced Billing For WHMCS, you will be able to set up additional billing options. The module allows you to charge your customers basing on the actual server resource usage. |
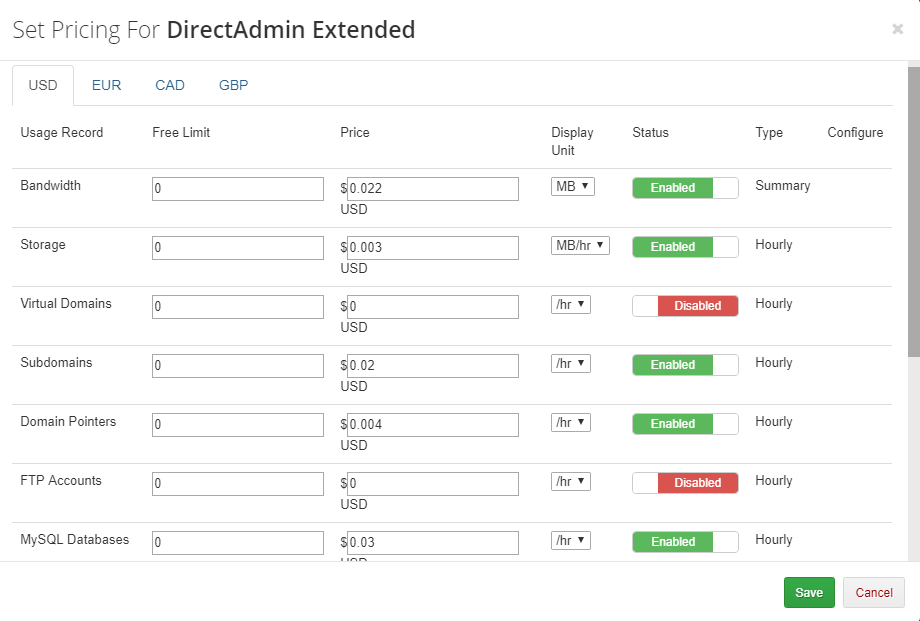
|
| With Advanced Billing module, you can also show your customers the current usage of server resources and their cost. |

|
[edit] Importing Existing Account
| In this section, you can find short instruction on how to connect one of your clients to your already existing account in DirectAdmin. Take the following steps to make sure that the process will be carried out properly. 1. Firstly, manually create an order for your customer in WHMCS. Choose a client and in the summary, view click on the ' Add New Order' button. Next, select a 'Product/Service' and press 'Submit Order' .
The above-mentioned information has to be consistent with the data from your DirectAdmin account. Now, complete these fields as presented below. |
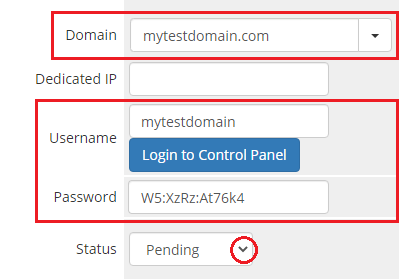
|
| 3. If the completed data is correct, you can log in to the account by pressing the 'Login to Control Panel' button. Moreover, to make sure that everything works as expected, you can check if the newly-created account can be managed in the client area. Important! Remember to manually add other missing parameters of the product in configurable options, custom fields, billing cycle, etc. so they match the parameters of the connected account from DirectAdmin. 4. If you have Account Synchronization For WHMCS installed, you can use it to quickly and automatically import and synchronize your DirectAdmin account with WHMCS. |
[edit] Use Cases
| This section presents example scenarios that demonstrate typical use cases and practical applications of the module's features. Review the examples below to see how the module can be used in real-world situations. |
[edit] Automatic App Installation With Service Order
| You can set up applications to be installed automatically in DirectAdmin Extended For WHMCS products. Start by opening the 'DirectAdmin Extended' addon, then navigate to 'Features' → 'Settings' and find the 'Applications' section. |
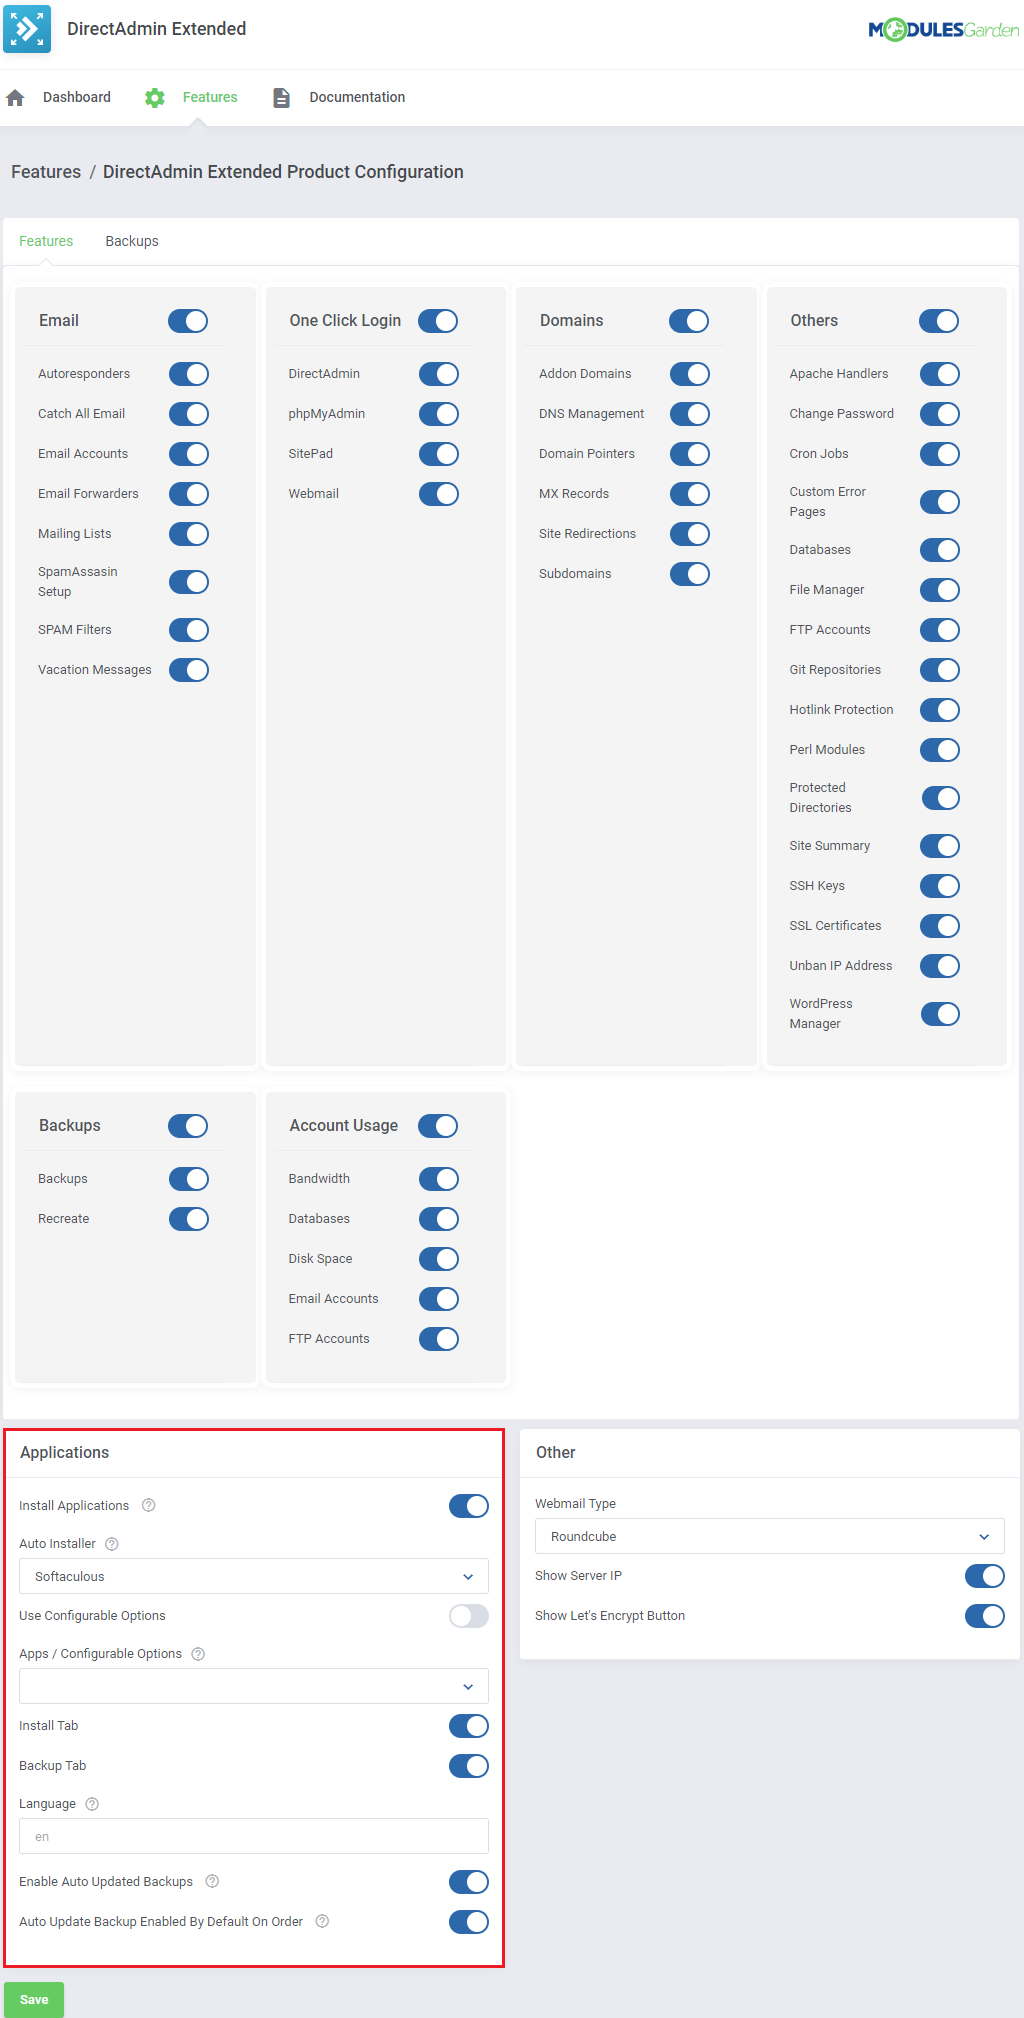
|
| To initiate, enable the 'Install Applications' feature. You can select an application for automatic installation in new DirectAdmin accounts by choosing the 'Auto Installer Type' and then selecting your preferred application. |
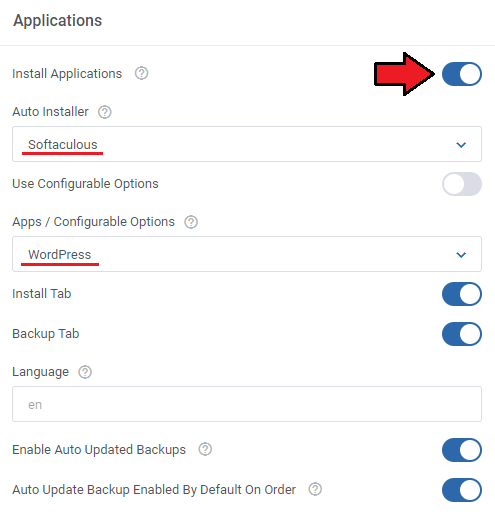
|
| Alternatively, you can enable customers to select an application during their order process. To do this, toggle on the 'Use Configurable Options' feature and choose from the options available in the dropdown menu. For a comprehensive guide on how to set up these Configurable Options, refer to the 'Management' section. |
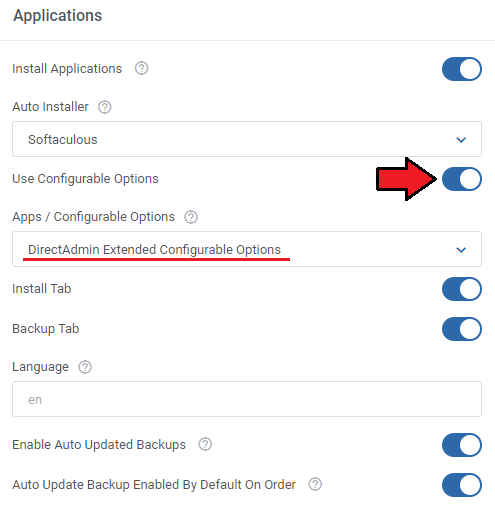
|
| Once the client submits an order and the 'Create' action is completed, the new DirectAdmin account will be set up with the chosen application (for example, a WordPress installation). |
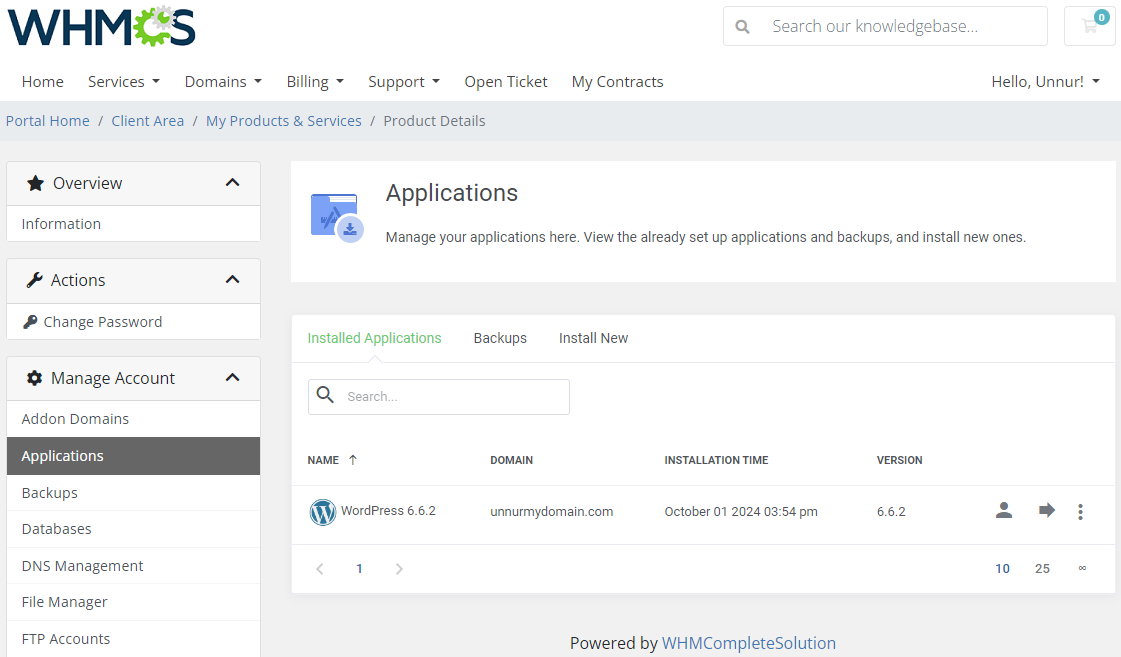
|
[edit] Tips
| 1. Keep in mind that user packages and reseller packages are two different things. When you configure a typical product for your customers in the WHMCS, you would usually need to enter one of your user packages, not the reseller packages. |
| 2. To manage SSL certificates, your customers require the owned IP address. Otherwise, the module will return the following error: 'You can manage SSL certificates when you own the IP you are using. Info for admins: Assign an owned IP'. |
| To add the owned IP address, log in to your DirectAdmin admin area, go to the 'IP Management' section, add the IP and assign it to the admin. |
|
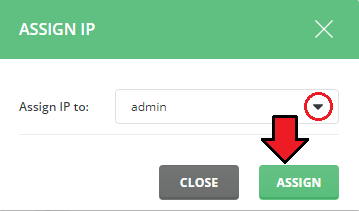
|
| Afterwards, manage the user for whom you want to add the IP address. Set IP to your previously created IP address, save changes and make sure that this IP will be the current IP address of your customer. |
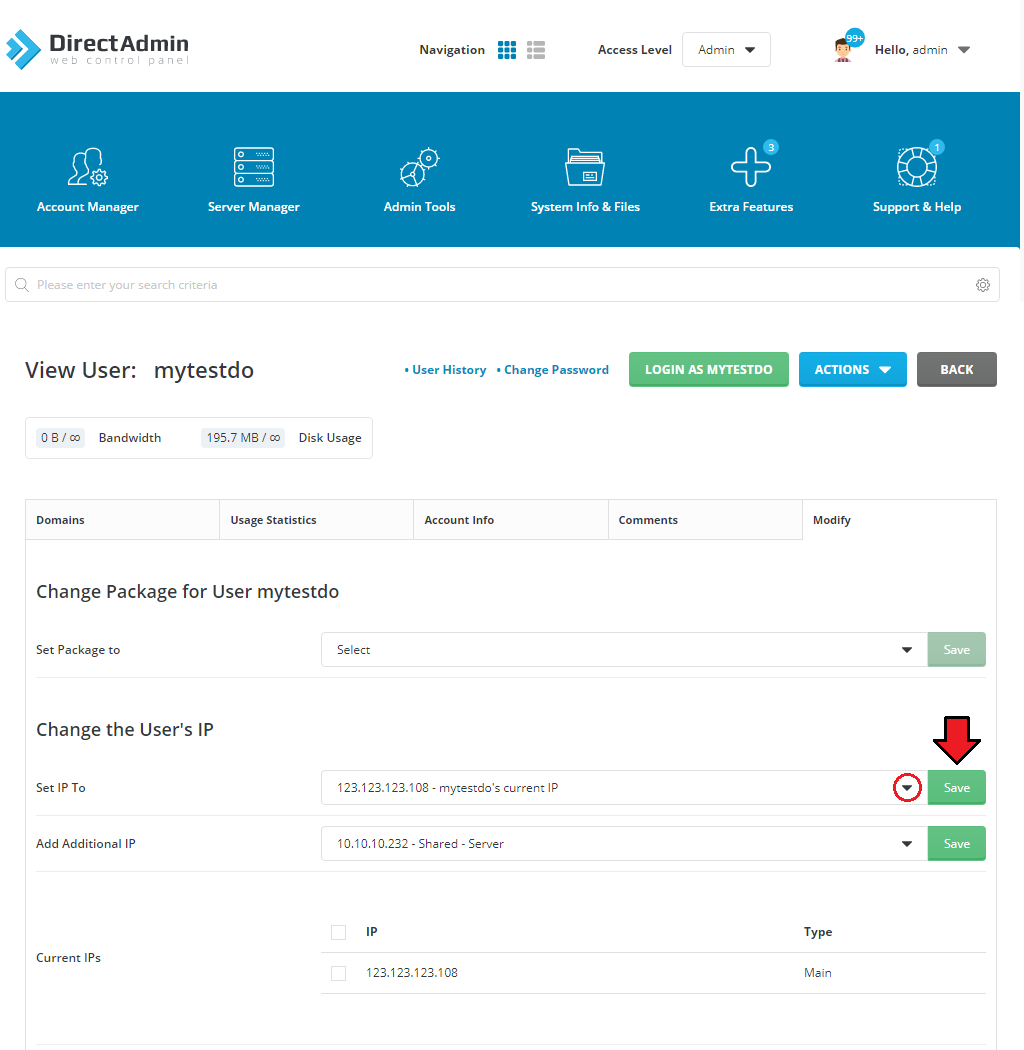
|
| If you add more IP addresses with free status in your DirectAdmin, you can quickly assign those IP addresses to your customers in WHMCS. For this purpose, simply type the IP in the 'Dedicated IP' field, press 'Enter' on your keyboard and update the product package by clicking on the 'Change Package' button. |
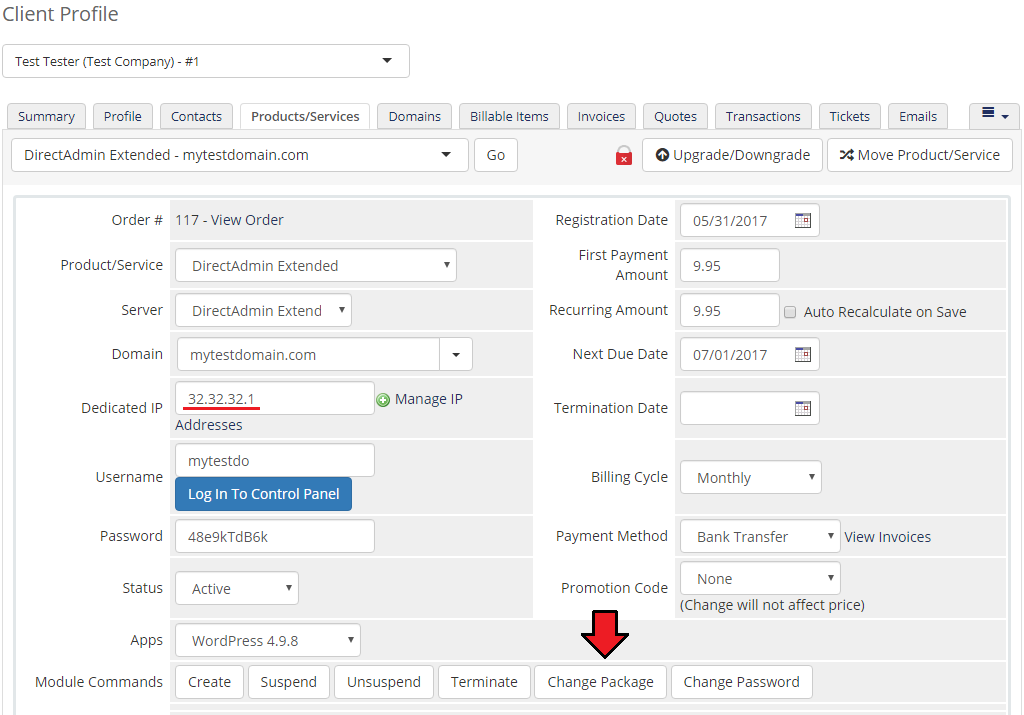
|
| 3. As this module supports templates system, any changes made in the module's template files will be saved after the upgrade process. |
| 4. Backups management in DirectAdmin panel: Admin Backups:
|
| 5. Please remember that if you want to use Configurable Options then set ' -- Custom -- ' in the 'Package' field of the WHMCS product configuration. |
[edit] Update Instructions
| The essential guidance through the process of updating the module is offered here. |
| When migrating your product from version 2.x to 3.x, you must deactivate your old addon (version prior to 3.x.x) and then activate the new one (v3.x.x) to successfully migrate your current settings. (Please ignore point 8 of our modules update instruction). No other additional steps are required to keep your addon's configuration and products' settings. |
[edit] Upgrade Guide
| Seeking a solution that offers greater flexibility, customization tailored to your precise needs, and unrestricted availability? There is an option that not only proves to be cost-effective in the long run but also includes prioritized support services, making it a truly valuable investment. Opt for the Open Source version of your DirectAdmin Extended For WHMCS module to unlock these benefits. Follow a comprehensive guide covering the transition process, the advantages it brings, and step-by-step instructions on what to do next after the order has been successfully finalized. |
[edit] Common Problems
| 1. When you have problems with connection, check whether your SELinux or firewall does not block ports. |
| 2. If you have problems with connection, we recommend that you make sure that the default DirectAdmin port 2222 is open. You can also change the DirectAdmin port to other than 2222 by using the 'Override with Custom Port' option while configuring the server. |
| 3. If you run into an ionCube encoder problem (wrong version) after the installation, please open a support ticket. We will provide you with a different version of the module encrypted with the older version of ionCube. |
| 4. DirectAdmin Extended For WHMCS module functions only on the administrator account. |
| 5. Change Package option currently does not support the Configurable Options. |
| 6. If you encounter error: 'Unexpected Module Error(Token 'f80e57b1be9752d7d4658434bd55aafa2'). Please Contact Administrator.' displayed in the client area,
reissue your license in our client area, if that does not help, please contact our support department. |
| 7. Warning: Compatibility Issue with DirectAdmin Version 1.671 DirectAdmin introduced changes to their API in version 1.671 that are currently incompatible with our module. We are actively working on an update to address this. |
| 8. "Applications" and "SSO" functionality issues in DirectAdmin Version 1.671. The API returns an 'Access Denied' error for "Applications" and "SSO" functionalities when the Login Keys option is disabled in the DirectAdmin account. |