Client Area Designer For WHMCS
(→New Child Element) |
(→Upgrade Guide) |
||
| (104 intermediate revisions by 8 users not shown) | |||
| Line 2: | Line 2: | ||
<meta name="description" content="ModulesGarden Wiki Contains All The Information You Need About The Client Area Designer For WHMCS Module."></meta> | <meta name="description" content="ModulesGarden Wiki Contains All The Information You Need About The Client Area Designer For WHMCS Module."></meta> | ||
| − | + | =About [https://www.modulesgarden.com/products/whmcs/client-area-designer Client Area Designer For WHMCS]= | |
| − | + | ||
| − | =About [ | + | |
{| | {| | ||
| − | |style="padding: 10px 0px 10px 0px;"|'''Client Area Designer For WHMCS''' | + | |style="padding: 10px 0px 10px 0px;"|'''Client Area Designer For WHMCS''' will allow you to tailor the view of your entire WHMCS client area.<br/> |
| − | + | The module will let you alter the order and visibility of displayed elements, adjust existing widgets and add new ones, or even create customizable slideshows.<br/> | |
| − | Additionally, you may | + | Additionally, you may set up restrictions rules to show the particular components to selected clients only. |
|} | |} | ||
<!-- fixed --> | <!-- fixed --> | ||
| Line 25: | Line 23: | ||
|} | |} | ||
{| | {| | ||
| − | |style="padding: 0px 0px 0px 30px;"|✔ Add Your Own Elements | + | |style="padding: 0px 0px 0px 30px;"|✔ Add Your Own Elements And Widgets |
|} | |} | ||
{| | {| | ||
| − | |style="padding: 0px 0px 0px 30px;"|✔ Scan Your Client Area In Search Of Custom Elements | + | |style="padding: 0px 0px 0px 30px;"|✔ Scan Your Client Area In Search Of Custom Elements And Widgets |
|} | |} | ||
{| | {| | ||
| − | |style="padding: 0px 0px 10px 30px;"|✔ View | + | |style="padding: 0px 0px 10px 30px;"|✔ View And Modify List Of Known Locations In Your Client Area |
|} | |} | ||
*'''Navbar Element Features:''' | *'''Navbar Element Features:''' | ||
| Line 42: | Line 40: | ||
{| | {| | ||
|style="padding: 0px 0px 0px 30px;"|✔ Define Icon | |style="padding: 0px 0px 0px 30px;"|✔ Define Icon | ||
| + | |} | ||
| + | {| | ||
| + | |style="padding: 0px 0px 0px 30px;"|✔ Toggle Elements Display | ||
| + | |} | ||
| + | {| | ||
| + | |style="padding: 0px 0px 0px 30px;"|✔ Define Visibility For: | ||
| + | |} | ||
| + | {| | ||
| + | |style="padding: 0px 0px 0px 45px;"|✔ Logged In Clients | ||
| + | |} | ||
| + | {| | ||
| + | |style="padding: 0px 0px 0px 45px;"|✔ Non-Logged In Clients | ||
| + | |} | ||
| + | {| | ||
| + | |style="padding: 0px 0px 0px 45px;"|✔ All Clients | ||
|} | |} | ||
{| | {| | ||
| − | |style="padding: 0px 0px 0px 30px;"|✔ | + | |style="padding: 0px 0px 0px 30px;"|✔ Define Display Rules: |
|} | |} | ||
{| | {| | ||
| Line 54: | Line 67: | ||
{| | {| | ||
|style="padding: 0px 0px 0px 45px;"|✔ Client Is In Location | |style="padding: 0px 0px 0px 45px;"|✔ Client Is In Location | ||
| + | |} | ||
| + | {| | ||
| + | |style="padding: 0px 0px 0px 30px;"|✔ Additional Conditions: | ||
| + | |} | ||
| + | {| | ||
| + | |style="padding: 0px 0px 0px 45px;"|✔ Active Products/Domains/Addons | ||
| + | |} | ||
| + | {| | ||
| + | |style="padding: 0px 0px 0px 45px;"|✔ Inactive Products/Domains/Addons | ||
| + | |} | ||
| + | {| | ||
| + | |style="padding: 0px 0px 0px 45px;"|✔ Minimum And Maximum Customer Revenue | ||
|} | |} | ||
{| | {| | ||
| Line 62: | Line 87: | ||
{| | {| | ||
|style="padding: 10px 0px 0px 30px;"|✔ Define Name | |style="padding: 10px 0px 0px 30px;"|✔ Define Name | ||
| − | |||
| − | |||
| − | |||
|} | |} | ||
{| | {| | ||
|style="padding: 0px 0px 0px 30px;"|✔ Define Icon | |style="padding: 0px 0px 0px 30px;"|✔ Define Icon | ||
| + | |} | ||
| + | {| | ||
| + | |style="padding: 0px 0px 0px 30px;"|✔ Toggle Elements Display | ||
| + | |} | ||
| + | {| | ||
| + | |style="padding: 0px 0px 0px 30px;"|✔ Define Visibility For: | ||
| + | |} | ||
| + | {| | ||
| + | |style="padding: 0px 0px 0px 45px;"|✔ Logged In Clients | ||
| + | |} | ||
| + | {| | ||
| + | |style="padding: 0px 0px 0px 45px;"|✔ Non-Logged In Clients | ||
| + | |} | ||
| + | {| | ||
| + | |style="padding: 0px 0px 0px 45px;"|✔ All Clients | ||
|} | |} | ||
{| | {| | ||
| Line 82: | Line 119: | ||
|} | |} | ||
{| | {| | ||
| − | |style="padding: 0px 0px 0px 45px;"|✔ | + | |style="padding: 0px 0px 0px 30px;"|✔ Additional Conditions: |
| + | |} | ||
| + | {| | ||
| + | |style="padding: 0px 0px 0px 45px;"|✔ Active Products/Domains/Addons | ||
| + | |} | ||
| + | {| | ||
| + | |style="padding: 0px 0px 0px 45px;"|✔ Inactive Products/Domains/Addons | ||
| + | |} | ||
| + | {| | ||
| + | |style="padding: 0px 0px 0px 45px;"|✔ Minimum And Maximum Customer Revenue | ||
|} | |} | ||
{| | {| | ||
| Line 88: | Line 134: | ||
|} | |} | ||
{| | {| | ||
| − | |style="padding: 0px 0px | + | |style="padding: 0px 0px 0px 30px;"|✔ Customize Body And Footer Content - Supports HTML, CSS, JavaScript And Smarty |
| + | |} | ||
| + | {| | ||
| + | |style="padding: 0px 0px 0px 30px;"|✔ Add Content Rotator: | ||
| + | |} | ||
| + | {| | ||
| + | |style="padding: 0px 0px 0px 45px;"|✔ Include Multiple Body Contents And Image Items | ||
| + | |} | ||
| + | {| | ||
| + | |style="padding: 0px 0px 0px 45px;"|✔ Toggle Autoplay | ||
| + | |} | ||
| + | {| | ||
| + | |style="padding: 0px 0px 0px 45px;"|✔ Define Autoplay Speed | ||
| + | |} | ||
| + | {| | ||
| + | |style="padding: 0px 0px 0px 45px;"|✔ Toggle Dots Display | ||
| + | |} | ||
| + | {| | ||
| + | |style="padding: 0px 0px 0px 45px;"|✔ Toggle Arrows Display | ||
| + | |} | ||
| + | {| | ||
| + | |style="padding: 0px 0px 0px 45px;"|✔ Toggle Infinite Rotation | ||
| + | |} | ||
| + | {| | ||
| + | |style="padding: 0px 0px 10px 45px;"|✔ Customize HTML Footer | ||
|} | |} | ||
| Line 96: | Line 166: | ||
|} | |} | ||
{| | {| | ||
| − | |style="padding: 0px 0px 0px 30px;"|✔ Define | + | |style="padding: 0px 0px 0px 30px;"|✔ Define Icon |
|} | |} | ||
{| | {| | ||
| − | |style="padding: 0px 0px 0px 30px;"|✔ | + | |style="padding: 0px 0px 0px 30px;"|✔ Toggle Elements Display |
| − | |} | + | |} |
{| | {| | ||
|style="padding: 0px 0px 0px 30px;"|✔ Define Style Color | |style="padding: 0px 0px 0px 30px;"|✔ Define Style Color | ||
| Line 108: | Line 178: | ||
|} | |} | ||
{| | {| | ||
| − | |style="padding: 0px 0px 0px 30px;"|✔ | + | |style="padding: 0px 0px 0px 30px;"|✔ Add Multiple Links To Element |
|} | |} | ||
{| | {| | ||
| − | |style="padding: 0px 0px 0px | + | |style="padding: 0px 0px 0px 30px;"|✔ Customize Body And Footer Content - Supports HTML, CSS, JavaScript And Smarty |
|} | |} | ||
{| | {| | ||
| − | |style="padding: 0px 0px | + | |style="padding: 0px 0px 0px 30px;"|✔ Add Content Rotator: |
| + | |} | ||
| + | {| | ||
| + | |style="padding: 0px 0px 0px 45px;"|✔ Include Multiple Body Contents And Image Items | ||
| + | |} | ||
| + | {| | ||
| + | |style="padding: 0px 0px 0px 45px;"|✔ Toggle Autoplay | ||
| + | |} | ||
| + | {| | ||
| + | |style="padding: 0px 0px 0px 45px;"|✔ Define Autoplay Speed | ||
| + | |} | ||
| + | {| | ||
| + | |style="padding: 0px 0px 0px 45px;"|✔ Toggle Dots Display | ||
| + | |} | ||
| + | {| | ||
| + | |style="padding: 0px 0px 0px 45px;"|✔ Toggle Arrows Display | ||
| + | |} | ||
| + | {| | ||
| + | |style="padding: 0px 0px 0px 45px;"|✔ Toggle Infinite Rotation | ||
| + | |} | ||
| + | {| | ||
| + | |style="padding: 0px 0px 10px 45px;"|✔ Customize HTML Footer | ||
|} | |} | ||
*'''General Info:''' | *'''General Info:''' | ||
{| | {| | ||
| − | |style="padding: 10px 0px 0px 30px;"|✔ Multi-Language Support | + | |style="padding: 10px 0px 0px 30px;"|✔ Supports Smarty Template Engine |
| + | |} | ||
| + | {| | ||
| + | |style="padding: 0px 0px 0px 30px;"|✔ Supports WHMCS Themes "Six" And "Twenty-One" | ||
| + | |} | ||
| + | {| | ||
| + | |style="padding: 0px 0px 0px 30px;"|✔ Multi-Language Support | ||
| + | |} | ||
| + | {| | ||
| + | |style="padding: 0px 0px 0px 30px;"|✔ Supports PHP 8.1 Back To PHP 7.4 | ||
| + | |} | ||
| + | {| | ||
| + | |style="padding: 0px 0px 0px 30px;"|✔ Supports WHMCS V8.7 Back To WHMCS V8.4 | ||
| + | |} | ||
| + | {| | ||
| + | |style="padding: 0px 0px 0px 30px;"|✔ Requires ionCube Loader V12 Or Later | ||
|} | |} | ||
{| | {| | ||
| − | |style="padding: 0px 0px 30px 30px;"|✔ | + | |style="padding: 0px 0px 30px 30px;"|✔ Easy [https://www.docs.modulesgarden.com/How_To_Upgrade_WHMCS_Module Module Upgrade] To [https://www.modulesgarden.com/products/whmcs/client-area-designer#open-source-version Open Source Version] |
|} | |} | ||
=Installation= | =Installation= | ||
{| | {| | ||
| − | |style="padding: 10px 0px 0px 0px;"|'''This tutorial will show you how to successfully install and configure Client Area Designer For WHMCS.''' <br/> | + | |style="padding: 10px 0px 0px 0px;"|'''This tutorial will show you how to successfully install and configure [https://www.modulesgarden.com/products/whmcs/client-area-designer Client Area Designer For WHMCS.]''' <br/> |
We will guide you step by step through the whole installation and configuration process. | We will guide you step by step through the whole installation and configuration process. | ||
|} | |} | ||
{| | {| | ||
| − | |style="padding: 20px 0px 20px 15px;"|'''1. Log in to | + | |style="padding: 20px 0px 20px 15px;"|'''1. Log in to our client area and download the module.''' |
|} | |} | ||
{| | {| | ||
| Line 136: | Line 242: | ||
|} | |} | ||
{| | {| | ||
| − | |style="padding: 0px 0px | + | |style="padding: 0px 0px 10px 15px;"|'''2. In the downloaded file you might find one or two packages that support different PHP versions.'''<br/> |
| − | + | In the most recent versions of the module, you will find only one package that supports PHP 7.2 and later.<br/> <!-- If you need a package for the previous versions of PHP, please [https://www.modulesgarden.com/support/ticket/general-support contact our support]. --> | |
|} | |} | ||
{| | {| | ||
| − | |style="padding: 0px 0px 20px 25px;"|[[File: | + | |style="padding: 0px 0px 20px 25px;"|[[File:PHP72_74.png]] |
|} | |} | ||
{| | {| | ||
| − | |style="padding: 0px 0px 15px 15px;"|'''3. When you install Client Area Designer for the first time you have to rename '' 'license_RENAME.php' '' file.'''<br/> | + | |style="padding: 0px 0px 15px 15px;"|'''Previous updates of the module may contain two packages dedicated to various PHP versions.'''<br/> |
| − | File is located in '' 'modules/addons/ | + | The first one that supports PHP 5.6 up to PHP 7.1, and the second one addressed to PHP 7.2 up to PHP 7.4.<br/> |
| + | '''''Note:''' Keep in mind that PHP versions 5.6 up to 7.1 are no longer officially supported and their security issues are not fixed or released any more. Find more info [http://php.net/supported-versions.php here].'' | ||
| + | |} | ||
| + | {| | ||
| + | |style="padding: 0px 0px 20px 25px;"|[[File:PHP56_74.png]] | ||
| + | |} | ||
| + | {| | ||
| + | |style="padding: 0px 0px 10px 15px;"|<!-- '' '''Important''': This situation does not affect [https://www.modulesgarden.com/products/whmcs/client-area-designer#open-source-version '''the open source version'''] of this module which can be applied to any PHP from version 5.6 and later.''<br/>'' -->'''Note''': You can check the current PHP version in your WHMCS. To do so, proceed to ''' 'Utilities' → 'System' → 'PHP Info'.''' | ||
| + | |} | ||
| + | {| | ||
| + | |style="padding: 0px 0px 15px 15px;"|'''3. Extract the package and upload its content into the main WHMCS directory.<br/> | ||
| + | The content of the package to upload should look like this. | ||
| + | |} | ||
| + | {| | ||
| + | |style="padding: 0px 0px 20px 25px;"|[[File:etrer.png]] | ||
| + | |} | ||
| + | {| | ||
| + | |style="padding: 0px 0px 15px 15px;"|'''4. When you install Client Area Designer For WHMCS for the first time you have to rename '' 'license_RENAME.php' '' file.'''<br/> | ||
| + | File is located in '' 'modules/addons/ClientAreaDesigner/license_RENAME.php'. '' Rename it from '' 'license_RENAME.php' '' to '' 'license.php'. '' | ||
|} | |} | ||
{| | {| | ||
| Line 150: | Line 274: | ||
|} | |} | ||
{| | {| | ||
| − | |style="padding: 0px 0px 15px 15px;"|''' | + | |style="padding: 0px 0px 15px 15px;"|'''5. In order to configure your license key, you have to edit the previously renamed '' 'license.php' file.'''''<br/> |
| − | Enter your license key between quotation marks as presented on the following screen. You can find your license key in | + | Enter your license key between quotation marks as presented on the following screen. You can find your license key in our client area → '' 'My Products'.'' |
|} | |} | ||
{| | {| | ||
| Line 157: | Line 281: | ||
|} | |} | ||
{| | {| | ||
| − | |style="padding: 0px 0px 15px 15px;"|''' | + | |style="padding: 0px 0px 15px 15px;"|'''6. Now you have to activate the module in your WHMCS system. '''<br/> |
| − | Log in to your WHMCS admin area. Go to '' ' | + | Log in to your WHMCS admin area. Go to '' 'System Settings' '' → '' 'Addon Modules'. '' Afterwards, find '' 'Client Area Designer' '' and press '' 'Activate' '' button. |
|} | |} | ||
{| | {| | ||
| Line 164: | Line 288: | ||
|} | |} | ||
{| | {| | ||
| − | |style="padding: 0px 0px 15px 15px;"|''' | + | |style="padding: 0px 0px 15px 15px;"|'''7. In the next step you need to permit access to this module.'''<br/> |
To do so, click on '' 'Configure' '' button, tick '' 'Full Administrator' '' and press '' 'Save Changes'. '' | To do so, click on '' 'Configure' '' button, tick '' 'Full Administrator' '' and press '' 'Save Changes'. '' | ||
|} | |} | ||
| Line 171: | Line 295: | ||
|} | |} | ||
{| | {| | ||
| − | |style="padding: 0px 0px 15px 15px;"|''' | + | |style="padding: 0px 0px 15px 15px;"|'''8. You have just successfully installed Client Area Designer For WHMCS!'''<br/> |
You can access your module under '' 'Addons' '' → '' 'Client Area Designer'.'' | You can access your module under '' 'Addons' '' → '' 'Client Area Designer'.'' | ||
|} | |} | ||
| Line 180: | Line 304: | ||
=Configuration and Management= | =Configuration and Management= | ||
{| | {| | ||
| − | |style="padding: 10px 0px 30px 15px;"|'''Client Area Designer For WHMCS is a module which allows you to adjust the layout of any panels available on your client area as well as add new widgets | + | |style="padding: 10px 0px 30px 15px;"|'''Client Area Designer For WHMCS is a module which allows you to adjust the layout of any panels available on your client area as well as add new widgets.'''<br/> |
| − | The module does not require highly advanced configuration.<br/>That is why | + | The module does not require highly advanced configuration.<br/>That is why we will immediately move to the most crucial aspect, which is customizing the panels layout. |
|} | |} | ||
| Line 187: | Line 311: | ||
{| | {| | ||
|style="padding: 10px 0px 30px 15px;"|Under '' 'Panels' '' tab you will find three sections dedicated to the visibility of different types of panels in your client area. | |style="padding: 10px 0px 30px 15px;"|Under '' 'Panels' '' tab you will find three sections dedicated to the visibility of different types of panels in your client area. | ||
| − | *Navbars - | + | *Navbars - Management of positions available on the navigation bar in your client area |
| − | *Sidebars - | + | *Sidebars - Management of panels available on the left sidebar in your client area |
| − | *Homepage Widgets - | + | *Homepage Widgets - Modify and create new widgets available on your home page |
|} | |} | ||
===Navbars=== | ===Navbars=== | ||
{| | {| | ||
|style="padding: 10px 0px 15px 15px;"|On the first sight you will see two tables, each related to Primary Navbar Left or Right side.<br/> | |style="padding: 10px 0px 15px 15px;"|On the first sight you will see two tables, each related to Primary Navbar Left or Right side.<br/> | ||
| − | There are already all the predefined sections outlined with their official names and positions. | + | There are already all the predefined sections outlined with their official names and positions.<br/> |
| + | ''Info: | ||
| + | If you already see that you have more elements than it is visible in the addon, then use '' 'Scanner' '' to search for them.<br/> Read more about scanning option [[#Scanner|here]].'' | ||
|} | |} | ||
{| | {| | ||
| Line 206: | Line 332: | ||
|} | |} | ||
{| | {| | ||
| − | |style="padding: | + | |style="padding: 0px 0px 15px 15px;"|First of all, you may change the position of the elements.<br/> |
Drag one panel and drop it in the required place. | Drag one panel and drop it in the required place. | ||
|} | |} | ||
{| | {| | ||
| − | |style="padding: 0px 0px 20px 25px;"|[[File: | + | |style="padding: 0px 0px 20px 25px;"|[[File:CAD_10.png]] |
|} | |} | ||
{| | {| | ||
| − | |style="padding: | + | |style="padding: 0px 0px 15px 15px;"|Use action buttons to: |
*edit the section | *edit the section | ||
*delete '''(only custom elements)''' | *delete '''(only custom elements)''' | ||
| Line 219: | Line 345: | ||
|} | |} | ||
{| | {| | ||
| − | |style="padding: 0px 0px | + | |style="padding: 0px 0px 30px 25px;"|[[File:CAD_11.png]] |
|} | |} | ||
====Edit Element==== | ====Edit Element==== | ||
{| | {| | ||
|style="padding: 10px 0px 15px 15px;"|When you are editing an existing parent element, you may: | |style="padding: 10px 0px 15px 15px;"|When you are editing an existing parent element, you may: | ||
| − | *provide a new | + | *Name - change existing or provide a new element name.<br/>'' '''Note''' that displayed name in the client area of a '''default''' WHMCS element will still be taken from the chosen client's language file, so you need also to modify it accordingly.'' |
| − | * | + | *URI - provide a URI |
| − | *add icon | + | *Icon - add an icon |
| − | *hide | + | *Display - hide an element |
| + | *Visible - select who it will be visible for: logged in clients, not logged or all clients | ||
|} | |} | ||
{| | {| | ||
| − | |style="padding: 0px 0px | + | |style="padding: 0px 0px 20px 25px;"|[[File:CAD_12.png]] |
|} | |} | ||
{| | {| | ||
| − | |style="padding: 0px 0px 15px 15px;"|You may also provide some display rules | + | |style="padding: 0px 0px 15px 15px;"|You may also provide some display rules. Only the clients who fulfill the rules will see the element.<br/> |
| − | If you leave this part empty, the element will be visible | + | If you leave this part empty, the element will be visible to all clients without limitations. |
| − | *select domains | + | *Domains - select the domains which clients must own |
| − | *point | + | *Products - point the products which clients must own |
| − | *location | + | *Locations - choose the location which clients must enter<br/> |
| − | + | ||
|} | |} | ||
{| | {| | ||
| − | |style="padding: 0px 0px 30px 25px;"|[[File: | + | |style="padding: 0px 0px 30px 25px;"|[[File:CAD_13.png]] |
|} | |} | ||
| − | |||
{| | {| | ||
| − | |style="padding: | + | |style="padding: 0px 0px 15px 15px;"|In the last tab, you can specify what conditions have to be met to display an element.<br/> |
| + | If you leave this part empty, the element will be visible to all clients without limitations. | ||
| + | *Active - choose which services from at least one of each types customers should have active | ||
| + | *Inactive - choose which services from at least one of each types customers should have inactive (terminated, cancelled, suspended or expired) | ||
| + | *Revenue - define the minimum and maximum revenue earned from the customer to display an element<br/> | ||
| + | Do not forget to save changes after specifying the conditions. | ||
|} | |} | ||
{| | {| | ||
| − | |style="padding: 0px 0px 30px 25px;"|[[File: | + | |style="padding: 0px 0px 30px 25px;"|[[File:CAD_13_2.png]] |
| + | |} | ||
| + | |||
| + | ====New Parent Element==== | ||
| + | {| | ||
| + | |style="padding: 10px 0px 15px 15px;"|It is possible add a completely new parent element either on left or right side.<br/> To do so, press '' 'Add'.'' | ||
| + | |} | ||
| + | {| | ||
| + | |style="padding: 0px 0px 20px 25px;"|[[File:CAD_14.png]] | ||
|} | |} | ||
{| | {| | ||
| Line 257: | Line 395: | ||
*URI | *URI | ||
*select icon from available | *select icon from available | ||
| − | * | + | *select '' 'Display' '' to make the panel visible |
| + | *finally decide who it will be visible for: logged in clients, not logged in or all clients | ||
|} | |} | ||
{| | {| | ||
| − | |style="padding: 0px 0px | + | |style="padding: 0px 0px 20px 25px;"|[[File:CAD_15.png]] |
|} | |} | ||
{| | {| | ||
|style="padding: 0px 0px 15px 15px;"|If you want only some of the clients to see the panel, then set up the '' 'Display Rules'.''<br/> | |style="padding: 0px 0px 15px 15px;"|If you want only some of the clients to see the panel, then set up the '' 'Display Rules'.''<br/> | ||
| − | Save | + | In our case, we decided to select products a client must own to get access to '' 'Support Chat'.''<br/> |
| + | Save changes. | ||
|} | |} | ||
{| | {| | ||
| − | |style="padding: 0px 0px 20px 25px;"|[[File: | + | |style="padding: 0px 0px 20px 25px;"|[[File:CAD_16.png]] |
|} | |} | ||
{| | {| | ||
| − | |style="padding: 0px 0px 20px 15px;"|This is | + | |style="padding: 0px 0px 20px 15px;"|This is what our new panel looks like in the client area: |
|} | |} | ||
{| | {| | ||
| − | |style="padding: 0px 0px 30px 25px;"|[[File: | + | |style="padding: 0px 0px 30px 25px;"|[[File:CAD_17.png]] |
|} | |} | ||
====New Child Element==== | ====New Child Element==== | ||
{| | {| | ||
| − | |style="padding: 10px 0px | + | |style="padding: 10px 0px 20px 15px;"|Let's now add one more element to the already existing '' 'Support' '' panel. |
|} | |} | ||
{| | {| | ||
| − | |style="padding: 0px 0px | + | |style="padding: 0px 0px 20px 25px;"|[[File:CAD_18.png]] |
|} | |} | ||
{| | {| | ||
| Line 287: | Line 427: | ||
*name | *name | ||
*identifier | *identifier | ||
| + | *URI | ||
*icon | *icon | ||
| − | * | + | *select '' 'Display' '' to make it visible |
| + | *finally select who it will be visible for: logged in clients, not logged or all clients | ||
| + | <br/> | ||
| + | This time we want all the clients to have access to our FAQ site, so we do no set any '' 'Display Rules'. '' | ||
|} | |} | ||
{| | {| | ||
| − | |style="padding: 0px 0px | + | |style="padding: 0px 0px 20px 25px;"|[[File:CAD_19.png]] |
|} | |} | ||
{| | {| | ||
| − | |style="padding: 0px 0px | + | |style="padding: 0px 0px 20px 15px;"|As a custom element, you may delete it completely or edit. |
| − | + | ||
|} | |} | ||
{| | {| | ||
| − | |style="padding: 0px 0px 20px 25px;"|[[File: | + | |style="padding: 0px 0px 20px 25px;"|[[File:CAD_20.png]] |
|} | |} | ||
{| | {| | ||
| − | |style="padding: 0px 0px 20px 15px;"| | + | |style="padding: 0px 0px 20px 15px;"|Let's take a look at the new position in the client area: |
|} | |} | ||
{| | {| | ||
| − | |style="padding: 0px 0px 30px 25px;"|[[File: | + | |style="padding: 0px 0px 30px 25px;"|[[File:CAD_21.png]] |
| − | + | ||
| − | + | ||
| − | + | ||
| − | + | ||
| − | + | ||
| − | + | ||
|} | |} | ||
===Sidebar Panels=== | ===Sidebar Panels=== | ||
{| | {| | ||
| − | |style="padding: 10px 0px 15px 15px;"|Sidebar panels section | + | |style="padding: 10px 0px 15px 15px;"|Sidebar panels section refers to the elements located on the left side of your client area.<br/> |
| − | Generally, management of sidebars is very similar to Navbar panels described in the previous section | + | Generally, management of sidebars is very similar to the Navbar panels described in the previous section. |
| − | + | ||
|} | |} | ||
{| | {| | ||
| − | |style="padding: 0px 0px 20px 25px;"|[[File: | + | |style="padding: 0px 0px 20px 25px;"|[[File:CAD_24.png]] |
|} | |} | ||
{| | {| | ||
| − | |style="padding: | + | |style="padding: 0px 0px 15px 15px;"|Available actions: |
| − | *change positioning by dragging and dropping | + | *change positioning by dragging and dropping elements in the selected place |
| − | *edit the section - change name, icon | + | *edit the section - change name, icon, content (if possible), display rules and conditions |
| − | *delete elements - | + | *delete elements - this option is available for custom entries only |
*view child elements | *view child elements | ||
|} | |} | ||
{| | {| | ||
| − | |style="padding: 0px 0px 20px 25px;"|[[File: | + | |style="padding: 0px 0px 20px 25px;"|[[File:CAD_23.png]] |
|} | |} | ||
====Edit Element==== | ====Edit Element==== | ||
{| | {| | ||
| − | |style="padding: 10px 0px 15px 15px;"|'''General''' | + | |style="padding: 10px 0px 15px 15px;"|'''General''' section: |
*provide a new display name | *provide a new display name | ||
| − | |||
*add icon | *add icon | ||
| − | *hide the element | + | *hide/show the element |
| + | *change visibility | ||
|} | |} | ||
{| | {| | ||
| − | |style="padding: 0px 0px | + | |style="padding: 0px 0px 20px 25px;"|[[File:CAD_25.png]] |
|} | |} | ||
{| | {| | ||
| − | |style="padding: 0px 0px 15px 15px;"|'''Content''' | + | |style="padding: 0px 0px 15px 15px;"|'''Content:''' |
| − | + | You can add two types of content - ''HTML'' and ''Content Rotator''.<br/> | |
| − | Note that it is possible only if the element has no child elements. | + | '' Note that it is possible only if the element has no child elements.'' |
| + | *''HTML'' - simply change the ''Body'' or ''Footer'' content.<br/> | ||
|} | |} | ||
{| | {| | ||
| − | |style="padding: 0px 0px | + | |style="padding: 0px 0px 20px 25px;"|[[File:CAD_26.png]] |
|} | |} | ||
{| | {| | ||
| − | |style="padding: 0px 0px 15px 15px;"|'''Display | + | |style="padding: 0px 0px 15px 15px;"| |
| + | *''Content Rotator'' - define how many elements can rotate within specified time intervals and choose the panel navigation elements.<br/> | ||
| + | |} | ||
| + | {| | ||
| + | |style="padding: 0px 0px 20px 25px;"|[[File:CAD_26_2.png]] | ||
| + | |} | ||
| + | {| | ||
| + | |style="padding: 0px 0px 15px 15px;"|Here is an example of a simple effect that you can achieve with the content rotator. | ||
| + | |} | ||
| + | {| | ||
| + | |style="padding: 0px 0px 20px 25px;"|[[File:CAD_26_3.gif]] | ||
| + | |} | ||
| + | {| | ||
| + | |style="padding: 0px 0px 15px 15px;"|'''Display Rules''' - only clients who fulfill the rules will see the element.<br/> | ||
If you leave this part empty, the element will be visible for all clients without limitations. | If you leave this part empty, the element will be visible for all clients without limitations. | ||
| − | |||
|} | |} | ||
{| | {| | ||
| − | |style="padding: 0px 0px 30px 25px;"|[[File: | + | |style="padding: 0px 0px 20px 25px;"|[[File:CAD_27.png]] |
| + | |} | ||
| + | {| | ||
| + | |style="padding: 0px 0px 15px 15px;"|'''Conditions''' - specify what conditions have be met to display an element.<br/> | ||
| + | If you leave this part empty, the element will be visible to all clients without limitations. | ||
| + | *Active - choose which services from at least one of each types customers should have active | ||
| + | *Inactive - choose which services from at least one of each types customers should have inactive (terminated, cancelled, suspended or expired) | ||
| + | *Revenue - define the minimum and maximum revenue earned from the customers to display an element<br/> | ||
| + | Do not forget to save changes after specifying the conditions. | ||
| + | |} | ||
| + | {| | ||
| + | |style="padding: 0px 0px 30px 25px;"|[[File:CAD_27_2.png]] | ||
|} | |} | ||
| − | ====New Parent | + | ====New Parent Element==== |
{| | {| | ||
|style="padding: 10px 0px 15px 15px;"|You may add a completely new parent element either on left or right side.<br/>Press '' 'Add'.'' | |style="padding: 10px 0px 15px 15px;"|You may add a completely new parent element either on left or right side.<br/>Press '' 'Add'.'' | ||
|} | |} | ||
{| | {| | ||
| − | |style="padding: 0px 0px | + | |style="padding: 0px 0px 20px 25px;"|[[File:CAD_28.png]] |
|} | |} | ||
{| | {| | ||
| Line 374: | Line 534: | ||
*unique for the system identifier | *unique for the system identifier | ||
*select icon from available | *select icon from available | ||
| − | * | + | *select '' 'Display' '' to make the panel visible |
| + | *finally decide who it should be visible for: logged in clients, not logged in or all | ||
|} | |} | ||
{| | {| | ||
| − | |style="padding: 0px 0px | + | |style="padding: 0px 0px 20px 25px;"|[[File:CAD_29.png]] |
|} | |} | ||
{| | {| | ||
| − | |style="padding: 0px 0px 15px 15px;"| | + | |style="padding: 0px 0px 15px 15px;"|Select content ''Type'' and define ''Body'' and ''Footer'' content.<br/> |
| − | Note | + | ''Note: If you provide the content here, you will not be able to add child elements to this item.'' |
|} | |} | ||
{| | {| | ||
| − | |style="padding: 0px 0px 20px 25px;"|[[File: | + | |style="padding: 0px 0px 20px 25px;"|[[File:CAD_30.png]] |
|} | |} | ||
{| | {| | ||
| − | |style="padding: 0px 0px 15px 15px;"|If you want only | + | |style="padding: 0px 0px 15px 15px;"|If you want only the specified clients to see the panel, set up the '' 'Display Rules' '' or '' 'Conditions' ''.<br/> |
| − | Save | + | Save changes. |
|} | |} | ||
{| | {| | ||
| − | |style="padding: 0px 0px 20px 25px;"|[[File: | + | |style="padding: 0px 0px 20px 25px;"|[[File:CAD_31.png]] |
|} | |} | ||
{| | {| | ||
| − | |style="padding: 0px 0px 20px 15px;"|This is | + | |style="padding: 0px 0px 20px 15px;"|This is what our new panel looks like in the client area: |
|} | |} | ||
{| | {| | ||
| − | |style="padding: 0px 0px 30px 25px;"|[[File: | + | |style="padding: 0px 0px 30px 25px;"|[[File:CAD_32.png]] |
|} | |} | ||
====New Child Element==== | ====New Child Element==== | ||
{| | {| | ||
| − | |style="padding: 10px 0px | + | |style="padding: 10px 0px 20px 15px;"|Let's now add one child element to client's '' 'Shortcuts'.'' |
|} | |} | ||
{| | {| | ||
| − | |style="padding: 0px 0px | + | |style="padding: 0px 0px 20px 25px;"|[[File:CAD_33.png]] |
|} | |} | ||
{| | {| | ||
| − | |style="padding: 0px 0px 15px 15px;"| | + | |style="padding: 0px 0px 15px 15px;"|Fill out all the required data to crate a correct link:<br/> |
*name | *name | ||
*identifier | *identifier | ||
*URI | *URI | ||
*icon | *icon | ||
| − | * | + | *select '' 'Display' '' |
| + | *define visibility | ||
|} | |} | ||
{| | {| | ||
| − | |style="padding: 0px 0px | + | |style="padding: 0px 0px 20px 25px;"|[[File:CAD_34.png]] |
|} | |} | ||
{| | {| | ||
| − | |style="padding: 0px 0px | + | |style="padding: 0px 0px 20px 15px;"|Any custom element can be deleted. In contrast to the default ones which may be only edited and hidden. |
| − | + | ||
|} | |} | ||
{| | {| | ||
| − | |style="padding: 0px 0px 20px 25px;"|[[File: | + | |style="padding: 0px 0px 20px 25px;"|[[File:CAD_35.png]] |
|} | |} | ||
{| | {| | ||
| − | |style="padding: 0px 0px 20px 15px;"| | + | |style="padding: 0px 0px 20px 15px;"|Now, you see an additional link under '' 'Shortcuts'.'' |
|} | |} | ||
{| | {| | ||
| − | |style="padding: 0px 0px 30px 25px;"|[[File: | + | |style="padding: 0px 0px 30px 25px;"|[[File:CAD_36.png]] |
|} | |} | ||
| + | |||
| + | ===Homepage Widgets=== | ||
{| | {| | ||
| − | |style="padding: 0px | + | |style="padding: 10px 0px 15px 15px;"|The last type of panels are homepage widgets.<br/> |
| + | Available actions: | ||
| + | *change positioning by dragging and dropping elements in the selected place | ||
| + | *edit the widget | ||
| + | *view child elements if there are any | ||
| + | *delete custom widgets | ||
|} | |} | ||
{| | {| | ||
| − | |style="padding: 0px 0px 30px 25px;"|[[File: | + | |style="padding: 0px 0px 20px 25px;"|[[File:CAD_37.png]] |
| + | |} | ||
| + | {| | ||
| + | |style="padding: 0px 0px 20px 15px;"|To visualize, these are the client area widgets we are going to alter in a moment: | ||
| + | |} | ||
| + | {| | ||
| + | |style="padding: 0px 0px 30px 25px;"|[[File:CAD_38.png]] | ||
|} | |} | ||
| − | === | + | ====Edit widget==== |
{| | {| | ||
| − | |style="padding: 0px | + | |style="padding: 10px 0px 15px 15px;"|'''General:''' |
| + | *provide a new display name | ||
| + | *change icon | ||
| + | *hide the element | ||
|} | |} | ||
{| | {| | ||
| − | |style="padding: 0px 0px | + | |style="padding: 0px 0px 20px 25px;"|[[File:CAD_39.png]] |
| − | + | |} | |
| − | + | {| | |
| − | + | |style="padding: 0px 0px 15px 15px;"|Under '' 'Content' '' section you can overwrite the default text.<br/> | |
| − | + | We will leave it empty as we do not want to change the content, just the look and feel of the widget. | |
| + | |} | ||
| + | {| | ||
| + | |style="padding: 0px 0px 20px 25px;"|[[File:CAD_39_1.png]] | ||
| + | |} | ||
| + | {| | ||
| + | |style="padding: 0px 0px 15px 15px;"|'''Extras''' - here you can change the visual parts: | ||
| + | *widget color | ||
| + | *button name, URI and icon | ||
| + | |} | ||
| + | {| | ||
| + | |style="padding: 0px 0px 20px 25px;"|[[File:CAD_40.png]] | ||
| + | |} | ||
| + | {| | ||
| + | |style="padding: 0px 0px 20px 15px;"|That is what our adjusted widget looks like now: | ||
| + | |} | ||
| + | {| | ||
| + | |style="padding: 0px 0px 30px 25px;"|[[File:CAD_41.png]] | ||
| + | |} | ||
| − | + | ====Add New Widget==== | |
| − | + | {| | |
| − | + | |style="padding: 10px 0px 15px 15px;"|For presentation purposes, we will create now a completely new widget.<br/>It will include a button redirection to our Knowledgebase and two links to FAQ and Upload Files form.<br/> | |
| − | + | To start, simply press '' 'Add' '' button. | |
| − | + | ||
| − | + | ||
| − | + | ||
| − | + | ||
| − | + | ||
|} | |} | ||
{| | {| | ||
| − | |style="padding: 0px 0px 20px 25px;"|[[File: | + | |style="padding: 0px 0px 20px 25px;"|[[File:CAD_42.png]] |
|} | |} | ||
{| | {| | ||
| − | |style="padding: 0px 0px | + | |style="padding: 0px 0px 15px 15px;"|Then fill out all the general info, content and extras.<br/> |
| + | Start with '' 'General','' provide: | ||
| + | *widget name | ||
| + | *unique for the system identifier | ||
| + | *select icon from available | ||
| + | *finally select '' 'Display' '' to make the panel visible | ||
|} | |} | ||
{| | {| | ||
| − | |style="padding: 0px 0px 30px 25px;"|[[File: | + | |style="padding: 0px 0px 20px 25px;"|[[File:CAD_43.png]] |
| + | |} | ||
| + | {| | ||
| + | |style="padding: 0px 0px 15px 15px;"|As we are going to add two links inside the widget, so we have to skip this section. | ||
| + | |} | ||
| + | {| | ||
| + | |style="padding: 0px 0px 20px 25px;"|[[File:CAD_44.png]] | ||
| + | |} | ||
| + | {| | ||
| + | |style="padding: 0px 0px 15px 15px;"|Finally, customize your widget by defining color and button details. | ||
| + | Save changes. | ||
| + | |} | ||
| + | {| | ||
| + | |style="padding: 0px 0px 30px 25px;"|[[File:CAD_45.png]] | ||
| + | |} | ||
| + | |||
| + | ====New Child Widget==== | ||
| + | {| | ||
| + | |style="padding: 10px 0px 15px 15px;"|Let's now add a child element to the just created '' 'Knowledgebase'.'' | ||
| + | |} | ||
| + | {| | ||
| + | |style="padding: 0px 0px 20px 25px;"|[[File:CAD_46.png]] | ||
| + | |} | ||
| + | {| | ||
| + | |style="padding: 0px 0px 15px 15px;"|Fill out the required data:<br/> | ||
| + | *name | ||
| + | *identifier | ||
| + | *URI | ||
| + | *icon | ||
| + | *select '' 'Display' '' | ||
| + | |} | ||
| + | {| | ||
| + | |style="padding: 0px 0px 20px 25px;"|[[File:CAD_47.png]] | ||
| + | |} | ||
| + | {| | ||
| + | |style="padding: 0px 0px 15px 15px;"|As you can see, we added two new entries under the '' 'Knowledgebase' '' widget.<br/> | ||
| + | Surely, you can edit each one of them or delete. | ||
| + | |} | ||
| + | {| | ||
| + | |style="padding: 0px 0px 20px 25px;"|[[File:CAD_48.png]] | ||
| + | |} | ||
| + | {| | ||
| + | |style="padding: 0px 0px 20px 15px;"|Here is a final view of our customized client area with new elements: | ||
| + | |} | ||
| + | {| | ||
| + | |style="padding: 0px 0px 30px 25px;"|[[File:CAD_49.png]] | ||
|} | |} | ||
| Line 472: | Line 712: | ||
{| | {| | ||
|style="padding: 10px 0px 15px 15px;"|In this you will find an extended list of all standard locations in your client area with its common name and URI.<br/> | |style="padding: 10px 0px 15px 15px;"|In this you will find an extended list of all standard locations in your client area with its common name and URI.<br/> | ||
| − | These locations are searched through by the module scanner in search of custom panels and are available in '' 'Locations' '' field when setting up '' 'Display Rules'. '' | + | These locations are searched through by the module scanner in search of custom panels and are available in the '' 'Locations' '' field when setting up '' 'Display Rules'. '' |
|} | |} | ||
{| | {| | ||
| − | |style="padding: 0px 0px 20px 25px;"|[[File: | + | |style="padding: 0px 0px 20px 25px;"|[[File:CAD_50.png]] |
|} | |} | ||
{| | {| | ||
| − | |style="padding: 0px 0px 20px 15px;"|Press button with pencil icon next to location you are interested in | + | |style="padding: 0px 0px 20px 15px;"|Press the button with pencil icon next to the location you are interested in editing. |
|} | |} | ||
{| | {| | ||
| − | |style="padding: 0px 0px 20px 25px;"|[[File: | + | |style="padding: 0px 0px 20px 25px;"|[[File:CAD_51.png]] |
|} | |} | ||
{| | {| | ||
| Line 487: | Line 727: | ||
|} | |} | ||
{| | {| | ||
| − | |style="padding: 0px 0px 30px 25px;"|[[File: | + | |style="padding: 0px 0px 30px 25px;"|[[File:CAD_52.png]] |
|} | |} | ||
===New Location=== | ===New Location=== | ||
{| | {| | ||
| − | |style="padding: 10px 0px | + | |style="padding: 10px 0px 15px 15px;"|You may also add new if you have some custom locations and you wish to use them in our module.<br/> |
| − | Please note that your locations | + | Please note that your locations have to be manageable by WHMCS. |
|} | |} | ||
{| | {| | ||
| − | |style="padding: 0px 0px 20px 25px;"|[[File: | + | |style="padding: 0px 0px 20px 25px;"|[[File:CAD_53.png]] |
|} | |} | ||
{| | {| | ||
| − | |style="padding: 0px 0px | + | |style="padding: 0px 0px 15px 15px;"|Provide a location name and URI.<br/> |
When ready, your new location will be from now on used by Client Area Designer module. | When ready, your new location will be from now on used by Client Area Designer module. | ||
|} | |} | ||
{| | {| | ||
| − | |style="padding: 0px 0px 30px 25px;"|[[File: | + | |style="padding: 0px 0px 30px 25px;"|[[File:CAD_54.png]] |
|} | |} | ||
==Scanner== | ==Scanner== | ||
{| | {| | ||
| − | |style="padding: 10px 0px 15px 15px;"|Scanner is a tool that allows our module to carefully browse through a chosen client's client area in search of any | + | |style="padding: 10px 0px 15px 15px;"|Scanner is a tool that allows our module to carefully browse through a chosen client's client area in search of any elements in known locations.<br/> |
Select a client to log in as one and run the scanner. | Select a client to log in as one and run the scanner. | ||
|} | |} | ||
{| | {| | ||
| − | |style="padding: 0px 0px | + | |style="padding: 0px 0px 20px 25px;"|[[File:CAD_59.png]] |
|} | |} | ||
{| | {| | ||
| − | |style="padding: | + | |style="padding: 0px 0px 15px 15px;"|You will see a preview of all locations. When the scan is finished, you will see a summary with the number of found panels.<br/> All newly found elements will be automatically added to proper positions in the addon. |
|} | |} | ||
{| | {| | ||
| − | |style="padding: 0px 0px 30px 25px;"|[[File: | + | |style="padding: 0px 0px 30px 25px;"|[[File:CAD_60.png]] |
|} | |} | ||
==Documentation== | ==Documentation== | ||
{| | {| | ||
| − | |style="padding: 10px 0px | + | |style="padding: 10px 0px 20px 15px;"|The last position in your navigation menu, when pressed, redirects to the article you are currently reading. |
|} | |} | ||
{| | {| | ||
| − | |style="padding: 0px 0px 30px 25px;"|[[File: | + | |style="padding: 0px 0px 30px 25px;"|[[File:CAD_55.png]] |
|} | |} | ||
| − | + | ==Smarty Tags== | |
| − | == | + | |
{| | {| | ||
| − | |style="padding: 10px 0px | + | |style="padding: 10px 0px 15px 15px;"|Starting with the 1.1.0 version, the module allows you to use ''[https://www.smarty.net/ Smarty]'' tags in HTML content.<br/> |
| + | For example, if you use ''{$client.firstname}'', ''{$client.lastname}'' and ''{$client.credit}'' in the following code: | ||
| + | <pre>Hello <b>{$client.firstname} {$client.lastname}!</b><br/><br/> | ||
| + | You still have <b>${$client.credit}</b> funds on your account.<br/> | ||
| + | Find out what you can do with them! | ||
| + | <br/></pre> | ||
|} | |} | ||
{| | {| | ||
| − | |style="padding: 0px 0px | + | |style="padding: 0px 0px 20px 25px;"|[[File:CAD_57.png]] |
|} | |} | ||
{| | {| | ||
| − | |style="padding: 0px 0px 20px | + | |style="padding: 0px 0px 20px 15px;"|The result will be as follows: |
|} | |} | ||
{| | {| | ||
| − | |style="padding: 0px 0px | + | |style="padding: 0px 0px 20px 25px;"|[[File:CAD_58.png]] |
| − | + | ||
|} | |} | ||
{| | {| | ||
| − | |style="padding: 0px 0px | + | |style="padding: 0px 0px 15px 15px;"|You can, of course, use the full scope of ''Smarty'' tags, such as [https://www.smarty.net/docsv2/en/language.function.if.tpl conditional instructions]: |
| + | <pre> | ||
| + | Hello <b>{$client.firstname} {$client.lastname}!</b><br/><br/> | ||
| + | {if $client.credit gt 0} | ||
| + | You still have <b>${$client.credit}</b> funds on your account. <br/> | ||
| + | Find out what you can do with them!<br/> | ||
| + | {else}Sorry you have no funds!<br/> | ||
| + | {/if} | ||
| + | </pre> | ||
| + | In this example, if the customer does not have any credit, he will see something like this: | ||
|} | |} | ||
{| | {| | ||
| − | |style="padding: 0px 0px | + | |style="padding: 0px 0px 20px 25px;"|[[File:CAD_58_2.png]] |
|} | |} | ||
{| | {| | ||
| − | |style="padding: 0px 0px | + | |style="padding: 0px 0px 15px 15px;"|Of course, this is just a very simple example that will only work for the clients who are logged in. In order to build more advanced elements, please check out the [https://www.smarty.net/documentation Smarty documentation].<br/> |
| + | '' '''Note:''' Remember that the incorrect use of ''Smarty'' tags may lead to a website not operating properly.''<br/> | ||
| + | If you need to use a more advanced code using ''{php}'' tags, make sure that you have enabled the relevant option in the '' 'General Settings' '' → '' 'Security' ''. | ||
|} | |} | ||
{| | {| | ||
| − | |style="padding: 0px 0px | + | |style="padding: 0px 0px 20px 25px;"|[[File:CAD_56.png]] |
|} | |} | ||
{| | {| | ||
| − | |style="padding: 0px 0px 30px | + | |style="padding: 0px 0px 30px 15px;"|For example, you can list all of the template variables using: |
| + | <pre><pre>{php}print_r($template->getTemplateVars());{/php}</pre> | ||
|} | |} | ||
=Tips= | =Tips= | ||
{| | {| | ||
| − | |style="padding: 10px 0px | + | |style="padding: 10px 0px 5px 15px;"|1. When you are adding a new element into your client area, you may add the langs used in the lang file to enable translations and changes.<br/> |
| + | To do so:<br/> | ||
| + | *open your english.php file | ||
| + | *type in a new line in format: | ||
| + | $_LANG['element name'] = 'Element Name'; | ||
| + | *to change/translate it, simply change the content after the '' '=' '' sign. | ||
| + | |} | ||
| + | {| | ||
| + | |style="padding: 0px 0px 30px 15px;"|2. Client Area Designer module supports only WHMCS template Six and any custom modification that is based on this template and has been customized according to this [https://developers.whmcs.com/themes/ documentation]. | ||
|} | |} | ||
| − | = | + | =Update Instructions= |
{| | {| | ||
| − | |style="padding: 10px 0px 30px 15px;"|''' | + | |style="padding: 10px 0px 30px 15px;"|Essential guidance through the process of updating the module is offered '''[https://www.docs.modulesgarden.com/How_To_Update_WHMCS_Module here]'''.<br/> |
| + | Ensure successful completion of the module update by carefully following each step, thereby preventing data loss or any unforeseen issues.<br/> Additionally, you will find a current list of supplementary actions necessary for a smooth update process there. | ||
|} | |} | ||
| − | + | =Upgrade Guide= | |
{| | {| | ||
| − | |style="padding: 0px | + | |style="padding: 10px 0px 30px 15px;"|Seeking a solution that offers greater flexibility, customization tailored to your precise needs, and unrestricted availability?<br/> There is an option that not only proves to be cost-effective in the long run but also includes prioritized support services, making it a truly valuable investment.<br/> |
| + | |||
| + | Opt for the [https://www.modulesgarden.com/products/whmcs/client-area-designer#open-source-version Open Source version] of your Client Area Designer For WHMCS module to unlock these benefits.<br/> Simply click on either the '''Get Source Code''' or '''Upgrade To Lifetime''' button found on the product's page in our client area to complete the one-step upgrade process, with a '''dedicated discount''' already applied.<br/> | ||
| + | |||
| + | Follow a [https://www.docs.modulesgarden.com/How_To_Upgrade_WHMCS_Module comprehensive guide] covering the transition process, the advantages it brings, and step-by-step instructions on what to do next after the order has been successfully finalized. | ||
|} | |} | ||
| − | + | =Common Problems= | |
| + | {| | ||
| + | |style="padding: 10px 0px 10px 15px;"|'''1. In case of connection problems, please check whether your SELinux or firewall does not block ports.''' | ||
| + | |} | ||
| + | {| | ||
| + | |style="padding: 0px 0px 30px 15px;"|2. The module is not compatible with Lagom One Step Order For WHMCS, and the integration between them is not planned as such due to their individuality and exclusive features. | ||
| + | |} | ||
Revision as of 11:49, 19 April 2024
Contents |
About Client Area Designer For WHMCS
| Client Area Designer For WHMCS will allow you to tailor the view of your entire WHMCS client area. The module will let you alter the order and visibility of displayed elements, adjust existing widgets and add new ones, or even create customizable slideshows. |
- Module Features:
| ✔ Customize Your Client Area By Modifying: |
| ✔ Navbar Elements |
| ✔ Sidebar Elements |
| ✔ Homepage Widgets |
| ✔ Add Your Own Elements And Widgets |
| ✔ Scan Your Client Area In Search Of Custom Elements And Widgets |
| ✔ View And Modify List Of Known Locations In Your Client Area |
- Navbar Element Features:
| ✔ Define Name |
| ✔ Define URI |
| ✔ Define Icon |
| ✔ Toggle Elements Display |
| ✔ Define Visibility For: |
| ✔ Logged In Clients |
| ✔ Non-Logged In Clients |
| ✔ All Clients |
| ✔ Define Display Rules: |
| ✔ Client Owns Domain |
| ✔ Client Owns Product |
| ✔ Client Is In Location |
| ✔ Additional Conditions: |
| ✔ Active Products/Domains/Addons |
| ✔ Inactive Products/Domains/Addons |
| ✔ Minimum And Maximum Customer Revenue |
| ✔ Add Multiple Links To Element |
- Sidebar Element Features:
| ✔ Define Name |
| ✔ Define Icon |
| ✔ Toggle Elements Display |
| ✔ Define Visibility For: |
| ✔ Logged In Clients |
| ✔ Non-Logged In Clients |
| ✔ All Clients |
| ✔ Define Display Rules: |
| ✔ Client Owns Domain |
| ✔ Client Owns Product |
| ✔ Client Is In Location |
| ✔ Additional Conditions: |
| ✔ Active Products/Domains/Addons |
| ✔ Inactive Products/Domains/Addons |
| ✔ Minimum And Maximum Customer Revenue |
| ✔ Add Multiple Links To Element |
| ✔ Customize Body And Footer Content - Supports HTML, CSS, JavaScript And Smarty |
| ✔ Add Content Rotator: |
| ✔ Include Multiple Body Contents And Image Items |
| ✔ Toggle Autoplay |
| ✔ Define Autoplay Speed |
| ✔ Toggle Dots Display |
| ✔ Toggle Arrows Display |
| ✔ Toggle Infinite Rotation |
| ✔ Customize HTML Footer |
- Homepage Widget Features:
| ✔ Define Name |
| ✔ Define Icon |
| ✔ Toggle Elements Display |
| ✔ Define Style Color |
| ✔ Define Widget Button |
| ✔ Add Multiple Links To Element |
| ✔ Customize Body And Footer Content - Supports HTML, CSS, JavaScript And Smarty |
| ✔ Add Content Rotator: |
| ✔ Include Multiple Body Contents And Image Items |
| ✔ Toggle Autoplay |
| ✔ Define Autoplay Speed |
| ✔ Toggle Dots Display |
| ✔ Toggle Arrows Display |
| ✔ Toggle Infinite Rotation |
| ✔ Customize HTML Footer |
- General Info:
| ✔ Supports Smarty Template Engine |
| ✔ Supports WHMCS Themes "Six" And "Twenty-One" |
| ✔ Multi-Language Support |
| ✔ Supports PHP 8.1 Back To PHP 7.4 |
| ✔ Supports WHMCS V8.7 Back To WHMCS V8.4 |
| ✔ Requires ionCube Loader V12 Or Later |
| ✔ Easy Module Upgrade To Open Source Version |
Installation
| This tutorial will show you how to successfully install and configure Client Area Designer For WHMCS. We will guide you step by step through the whole installation and configuration process. |
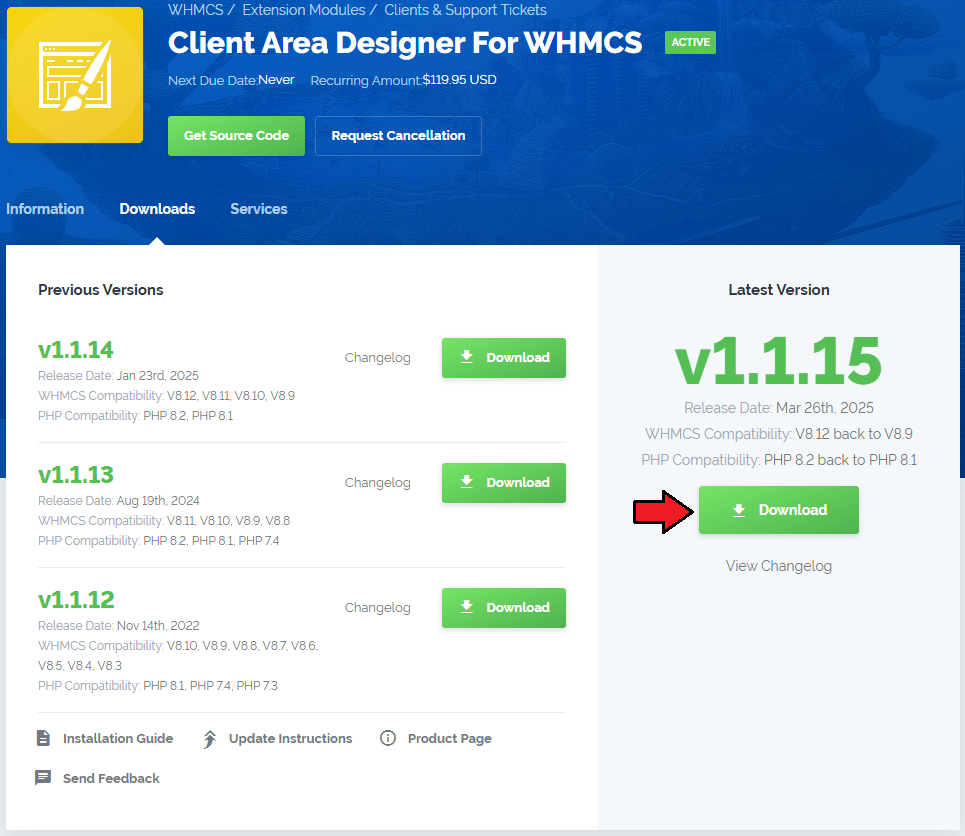
| 1. Log in to our client area and download the module. |
|
| 2. In the downloaded file you might find one or two packages that support different PHP versions. In the most recent versions of the module, you will find only one package that supports PHP 7.2 and later. |
| Previous updates of the module may contain two packages dedicated to various PHP versions. The first one that supports PHP 5.6 up to PHP 7.1, and the second one addressed to PHP 7.2 up to PHP 7.4. |

|
| Note: You can check the current PHP version in your WHMCS. To do so, proceed to 'Utilities' → 'System' → 'PHP Info'. |
| 3. Extract the package and upload its content into the main WHMCS directory. The content of the package to upload should look like this. |

|
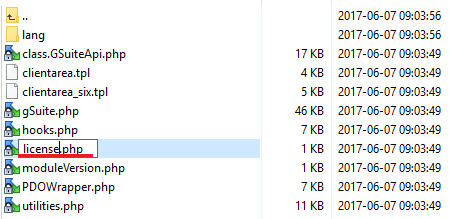
| 4. When you install Client Area Designer For WHMCS for the first time you have to rename 'license_RENAME.php' file. File is located in 'modules/addons/ClientAreaDesigner/license_RENAME.php'. Rename it from 'license_RENAME.php' to 'license.php'. |
|
| 5. In order to configure your license key, you have to edit the previously renamed 'license.php' file. Enter your license key between quotation marks as presented on the following screen. You can find your license key in our client area → 'My Products'. |

|
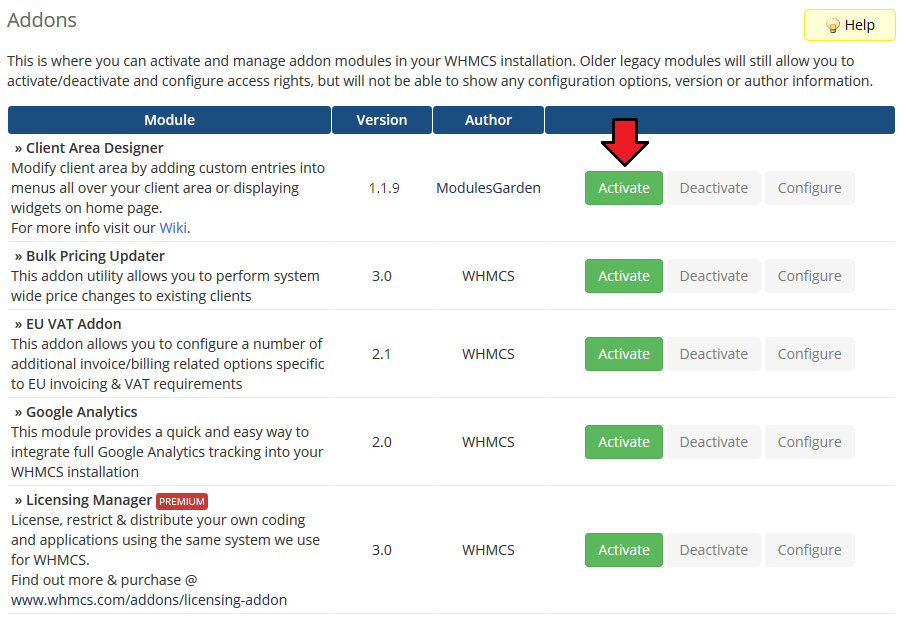
| 6. Now you have to activate the module in your WHMCS system. Log in to your WHMCS admin area. Go to 'System Settings' → 'Addon Modules'. Afterwards, find 'Client Area Designer' and press 'Activate' button. |
|
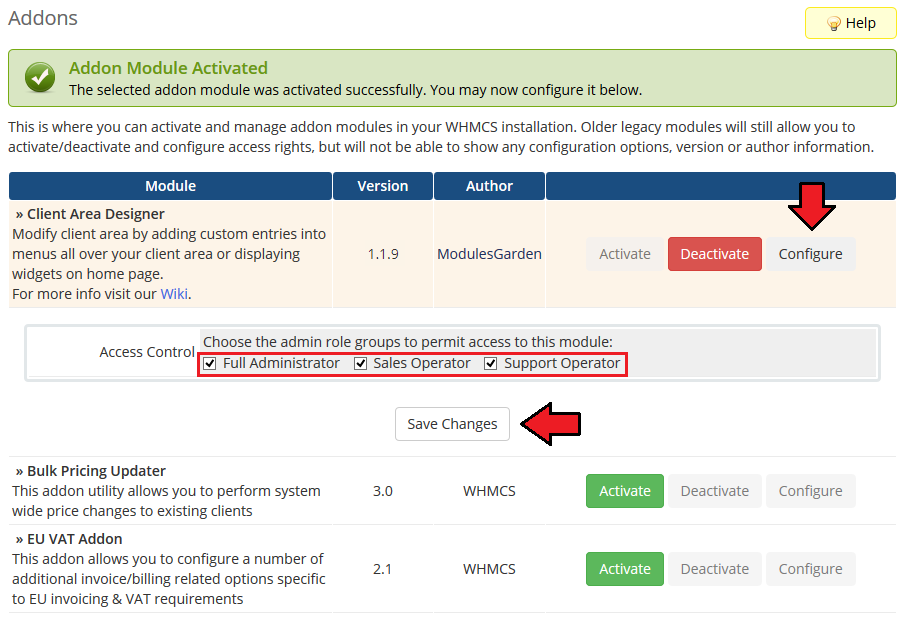
| 7. In the next step you need to permit access to this module. To do so, click on 'Configure' button, tick 'Full Administrator' and press 'Save Changes'. |
|
| 8. You have just successfully installed Client Area Designer For WHMCS! You can access your module under 'Addons' → 'Client Area Designer'. |
|
Configuration and Management
| Client Area Designer For WHMCS is a module which allows you to adjust the layout of any panels available on your client area as well as add new widgets. The module does not require highly advanced configuration. |
Panels
Under 'Panels' tab you will find three sections dedicated to the visibility of different types of panels in your client area.
|
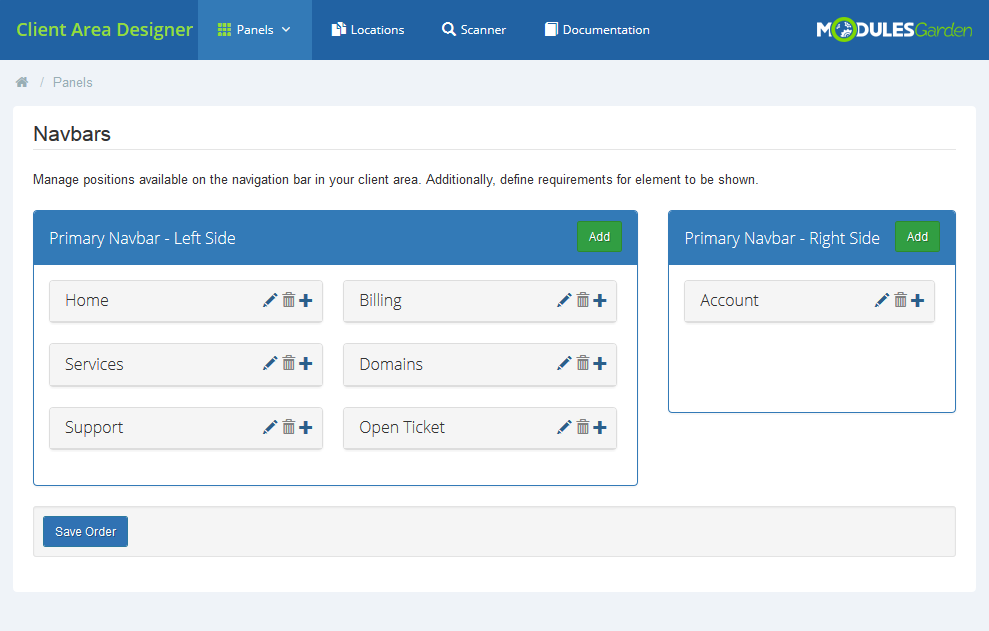
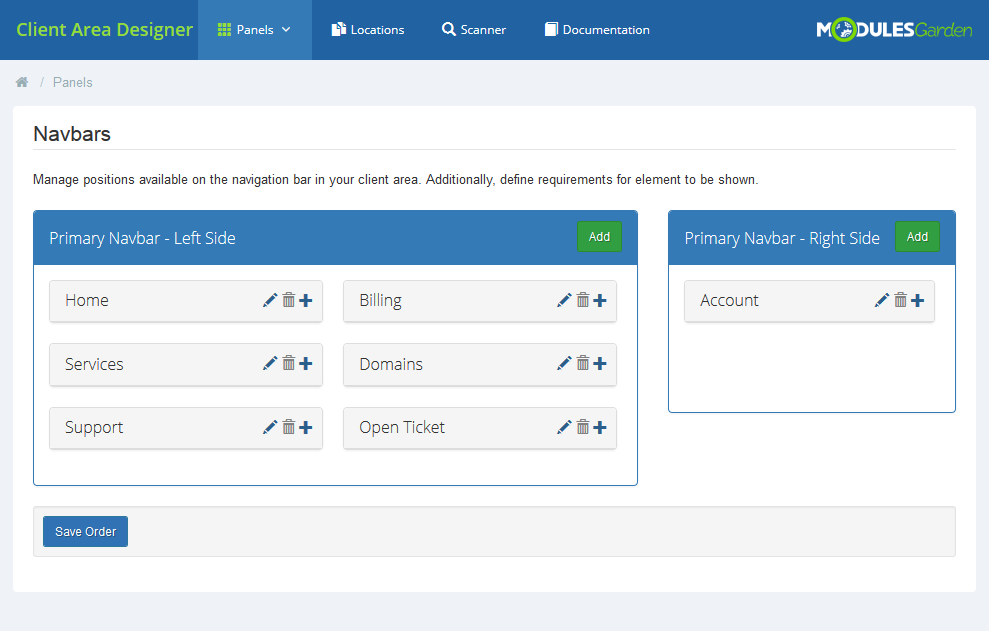
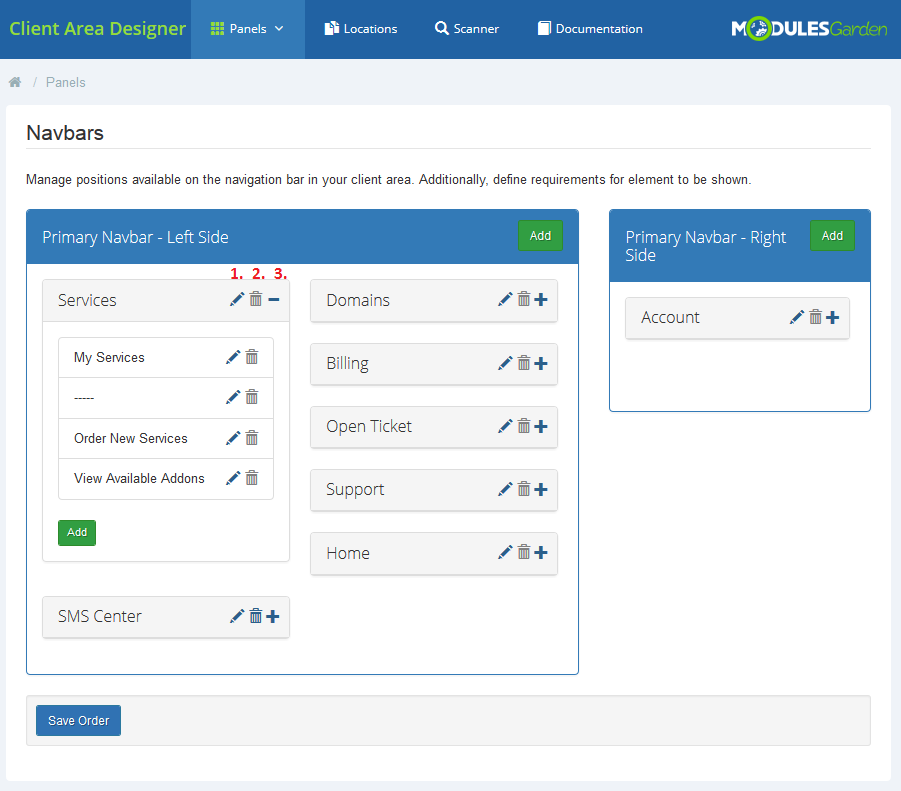
| On the first sight you will see two tables, each related to Primary Navbar Left or Right side. There are already all the predefined sections outlined with their official names and positions. |
|
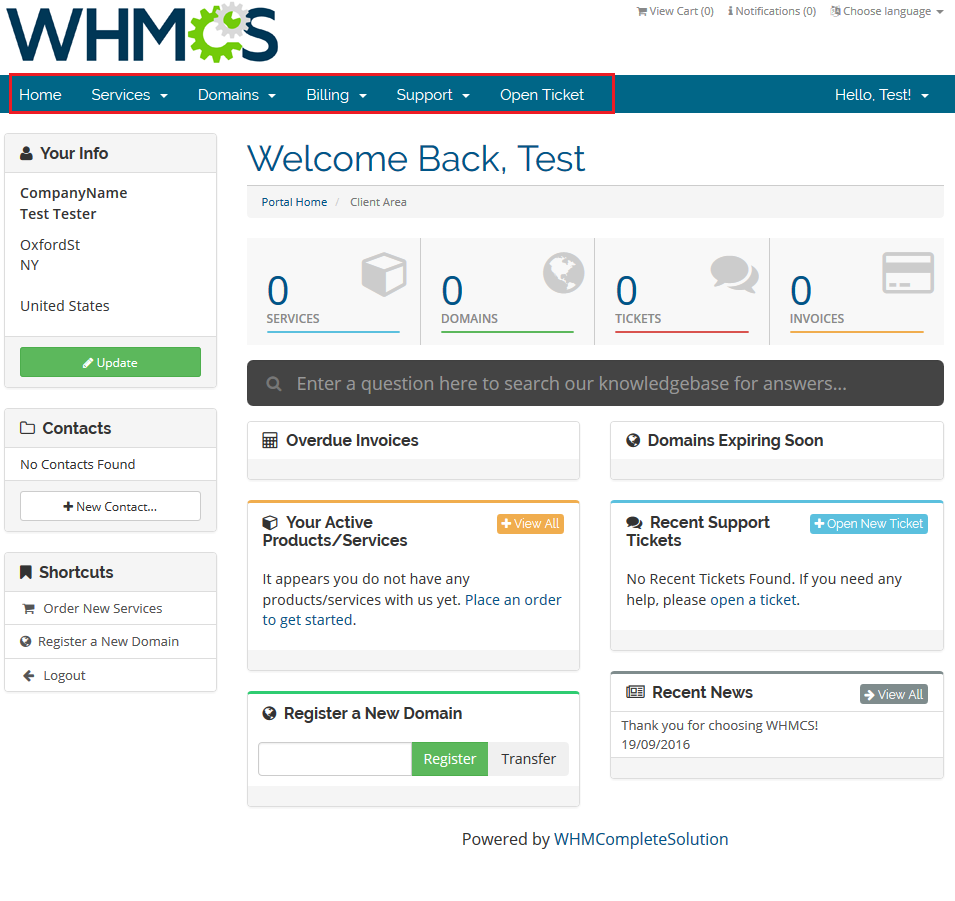
| Those are the below navbar panels visible in the client area. |
|
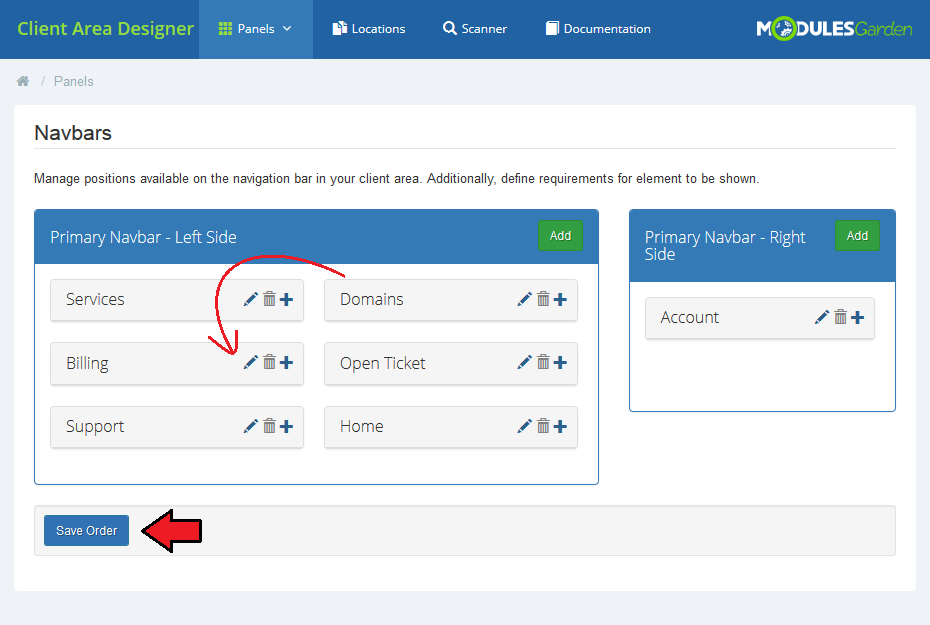
| First of all, you may change the position of the elements. Drag one panel and drop it in the required place. |
|
Use action buttons to:
|
|
Edit Element
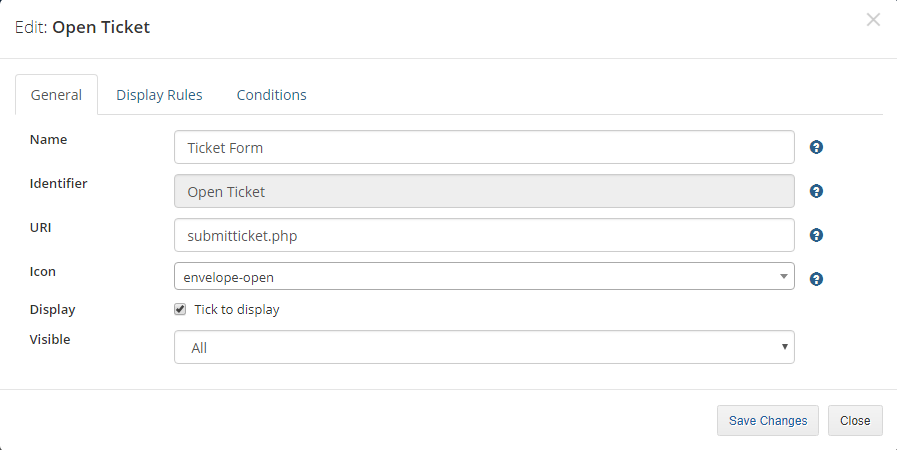
When you are editing an existing parent element, you may:
|
|
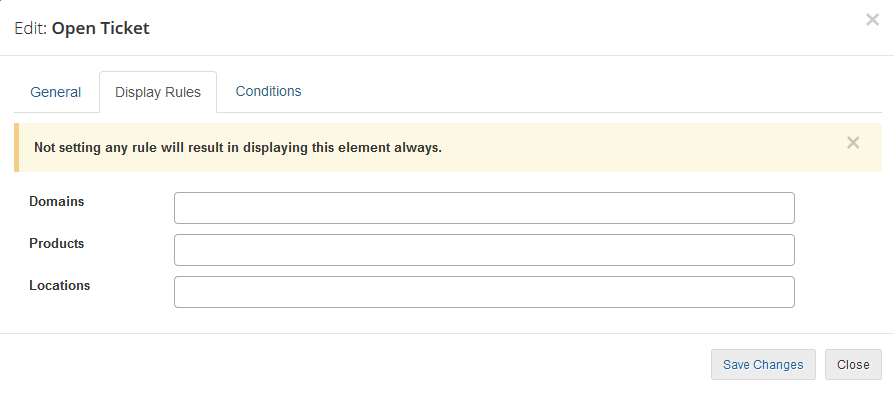
| You may also provide some display rules. Only the clients who fulfill the rules will see the element. If you leave this part empty, the element will be visible to all clients without limitations.
|
|
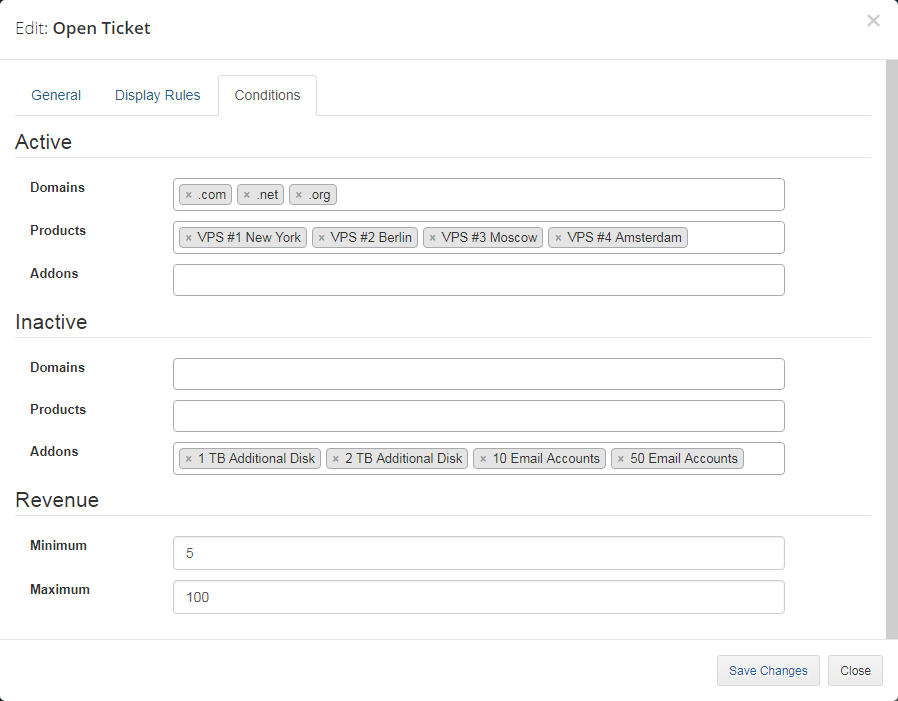
| In the last tab, you can specify what conditions have to be met to display an element. If you leave this part empty, the element will be visible to all clients without limitations.
Do not forget to save changes after specifying the conditions. |
|
New Parent Element
| It is possible add a completely new parent element either on left or right side. To do so, press 'Add'. |
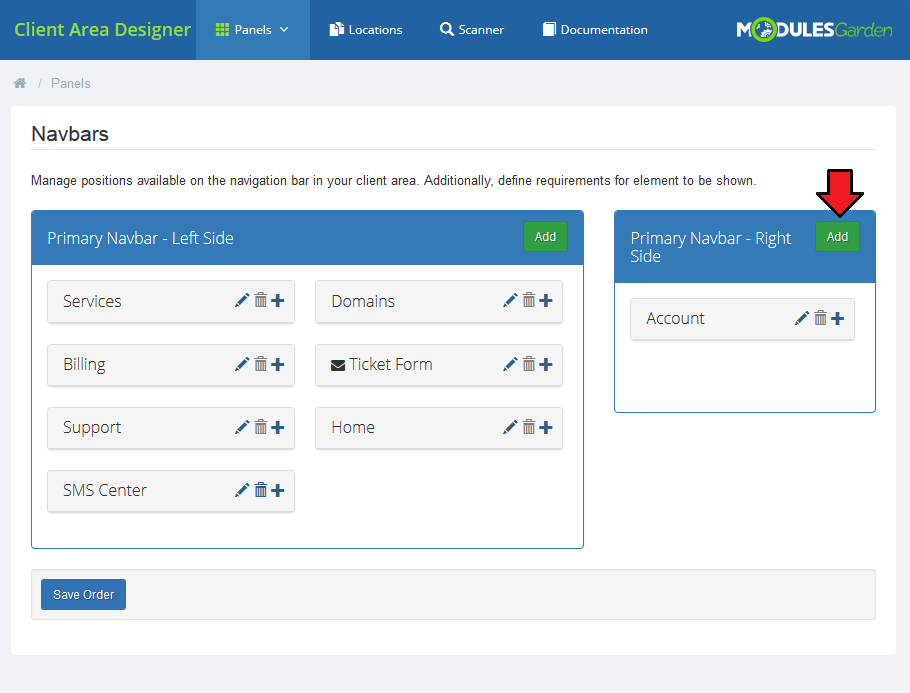
|
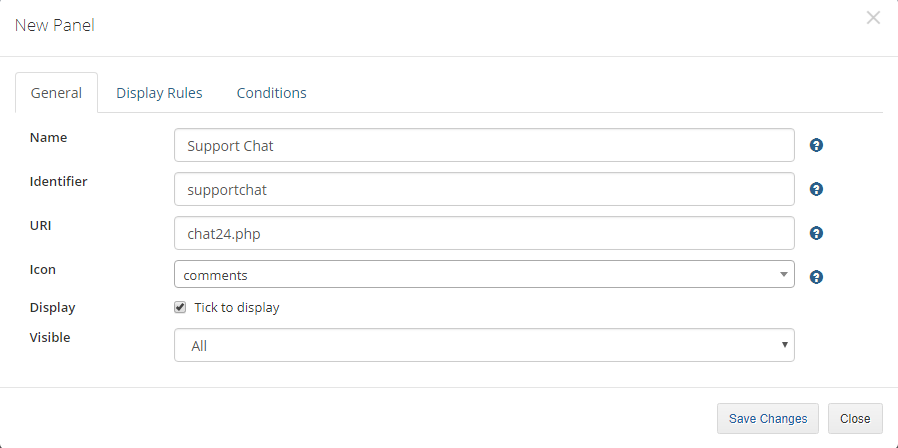
| Then you will have to fill out all the general info, content and display rules. Start with 'General'. Provide:
|
|
| If you want only some of the clients to see the panel, then set up the 'Display Rules'. In our case, we decided to select products a client must own to get access to 'Support Chat'. |
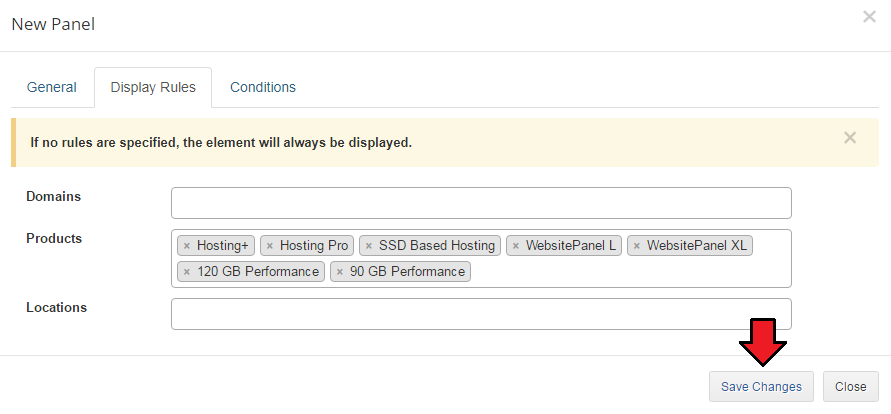
|
| This is what our new panel looks like in the client area: |
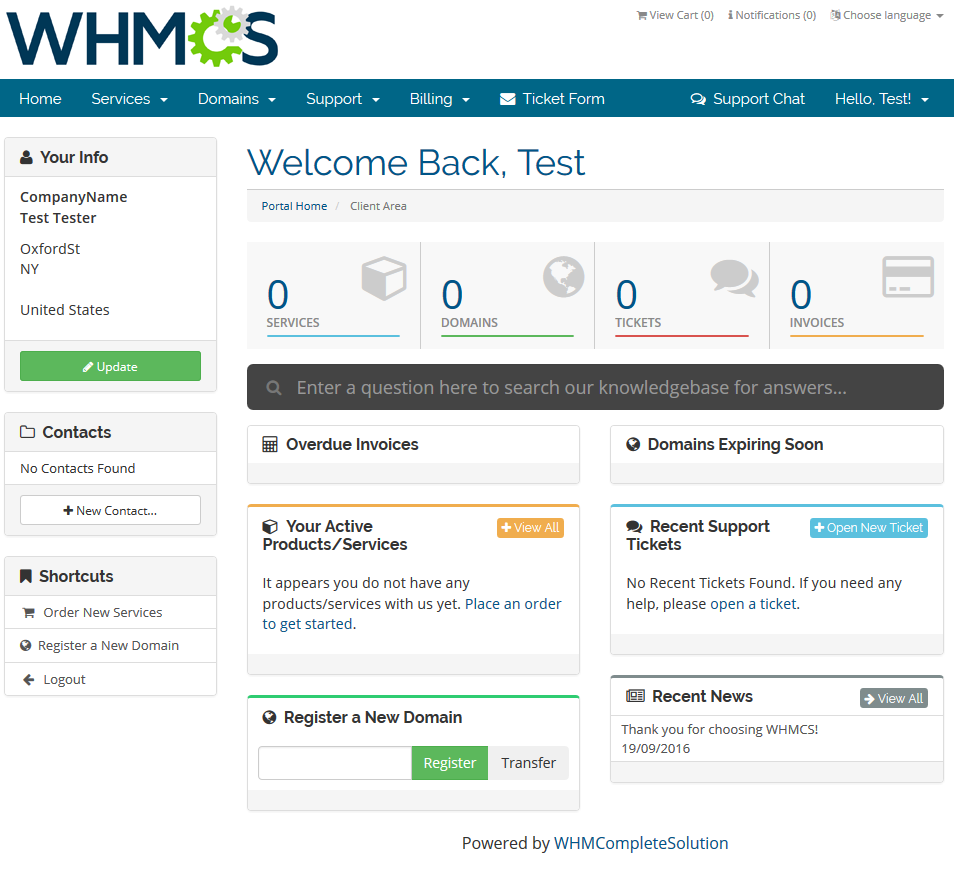
|
New Child Element
| Let's now add one more element to the already existing 'Support' panel. |
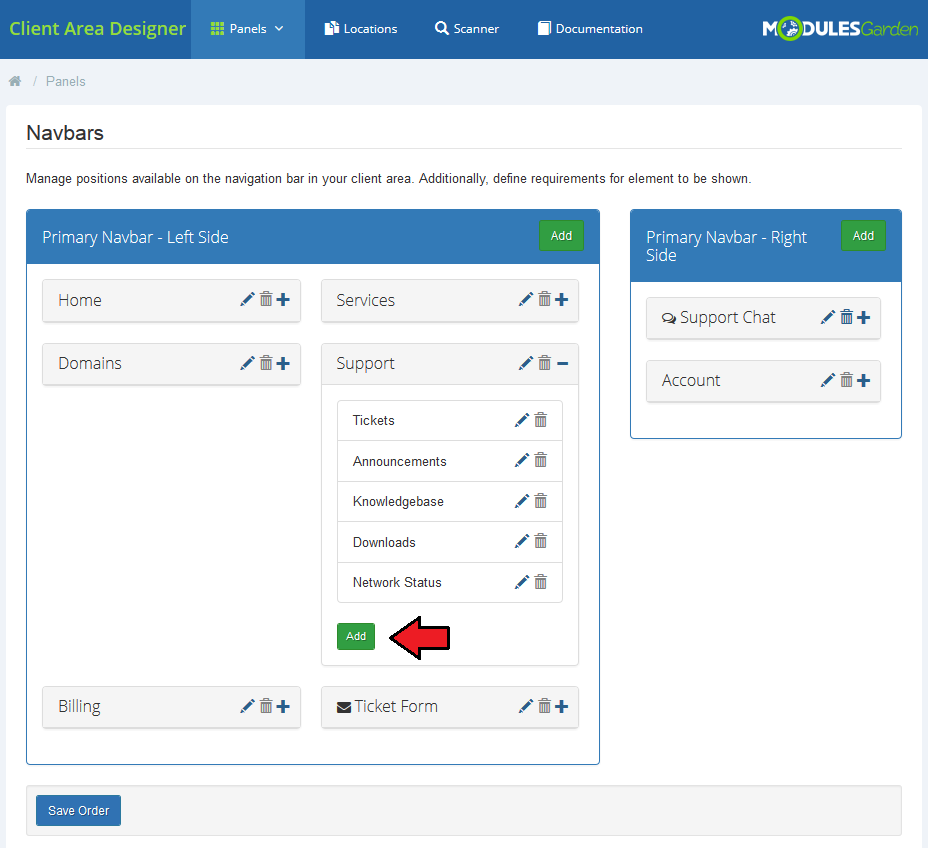
|
You have to fill out the same data as in case of parent element:
|
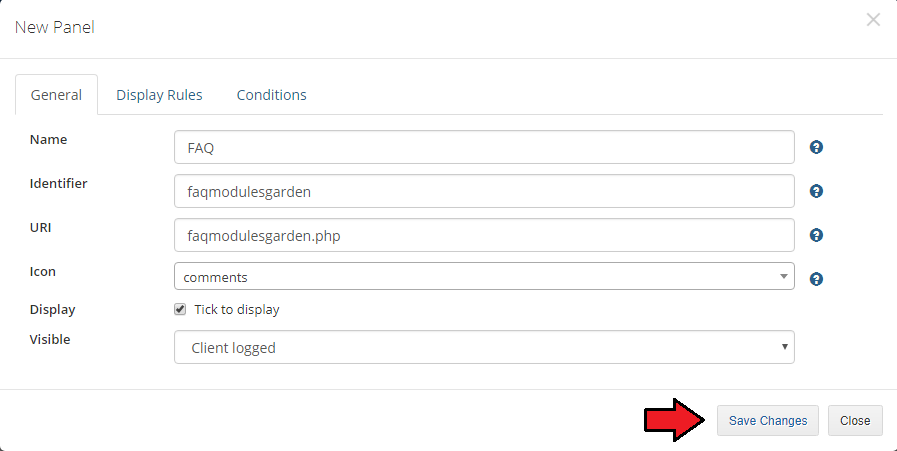
|
| As a custom element, you may delete it completely or edit. |
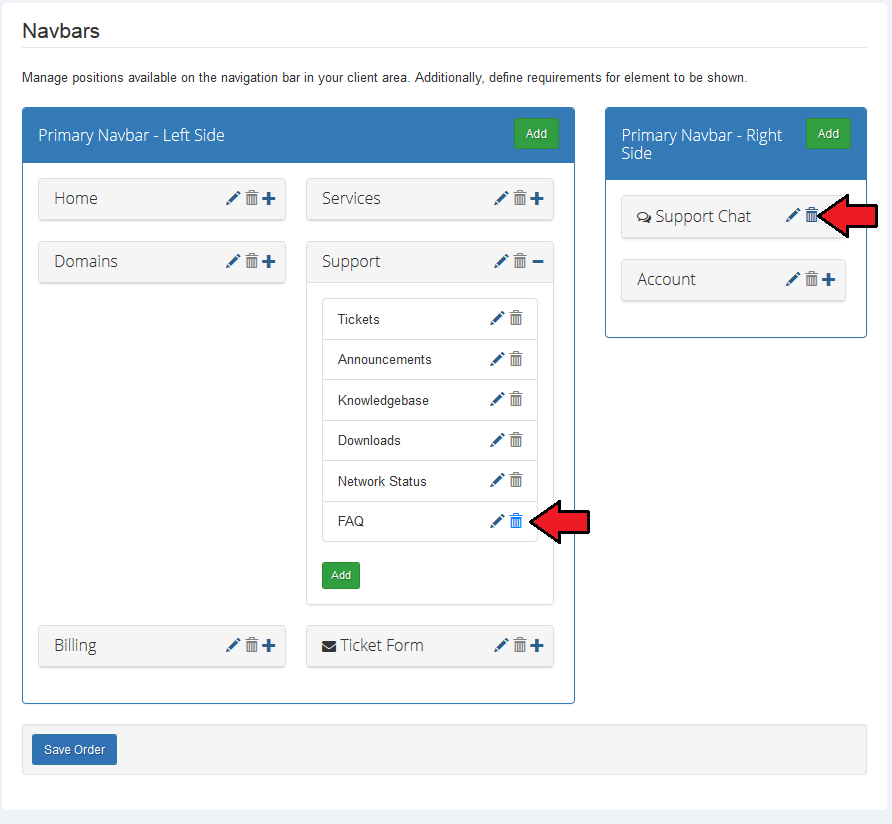
|
| Let's take a look at the new position in the client area: |
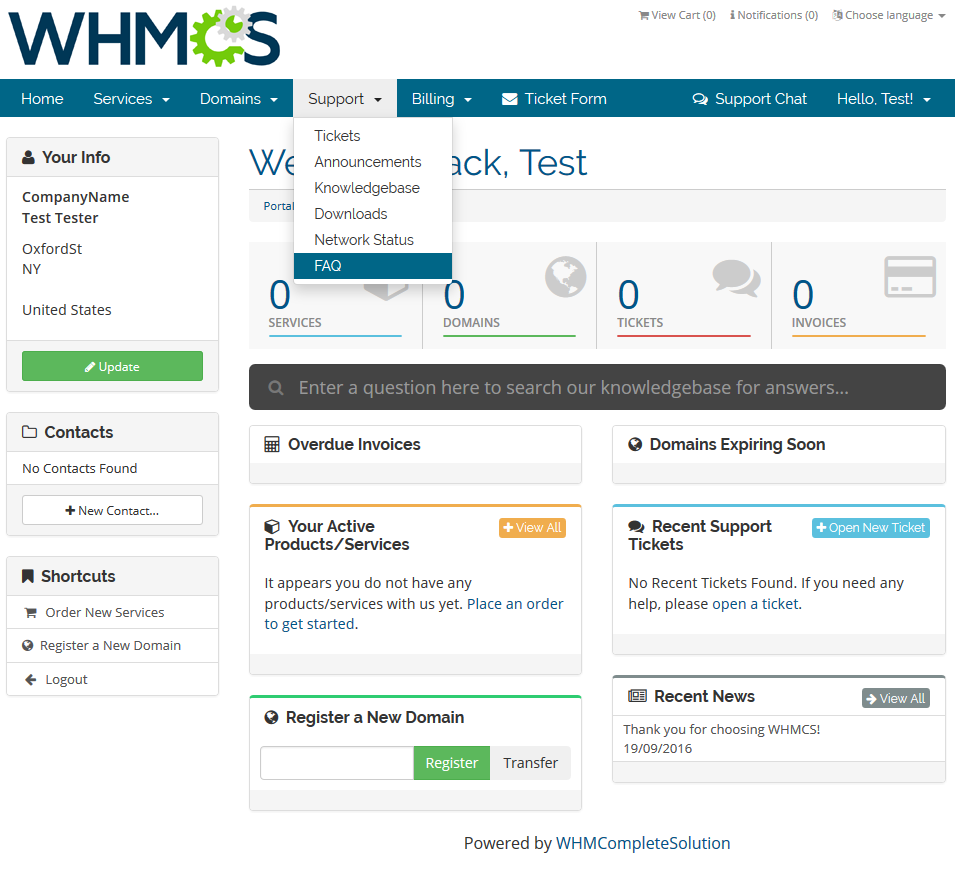
|
Sidebar Panels
| Sidebar panels section refers to the elements located on the left side of your client area. Generally, management of sidebars is very similar to the Navbar panels described in the previous section. |
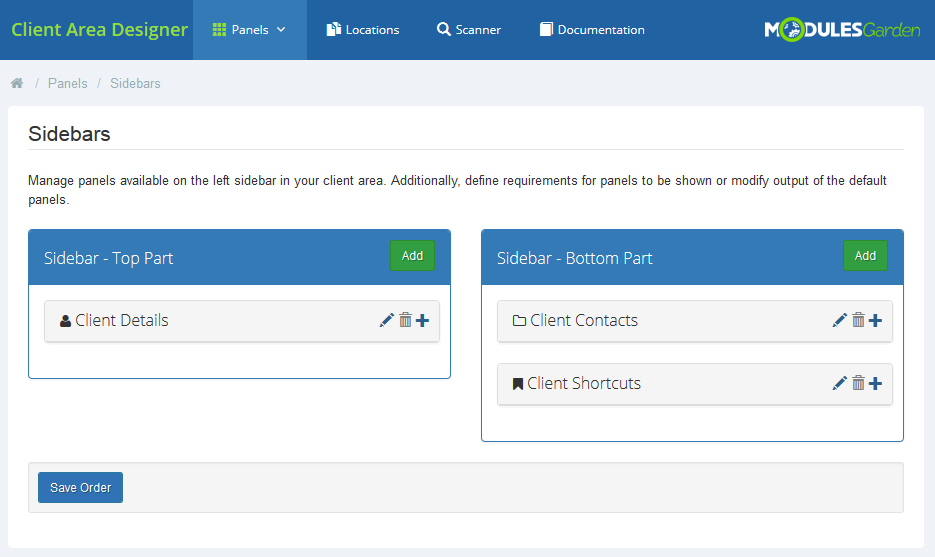
|
Available actions:
|
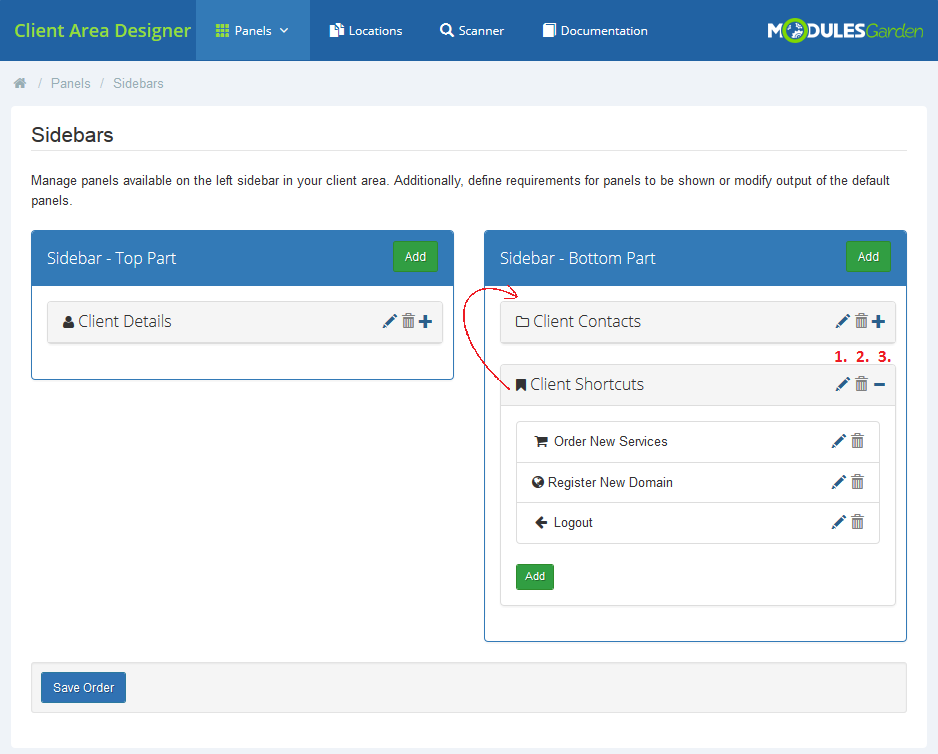
|
Edit Element
General section:
|
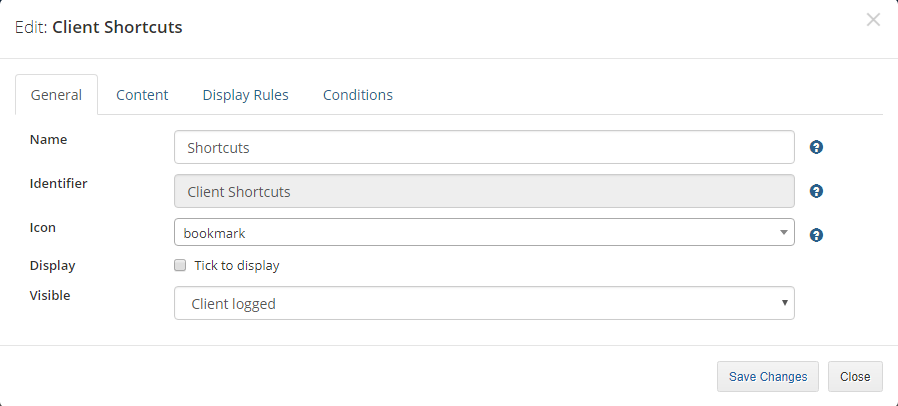
|
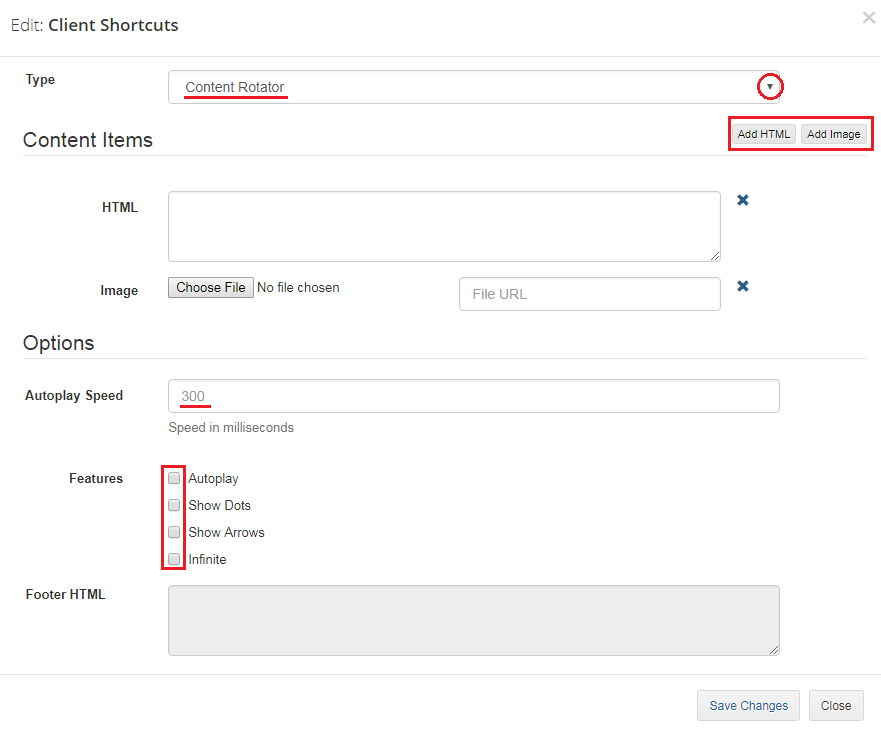
| Content:
You can add two types of content - HTML and Content Rotator.
|
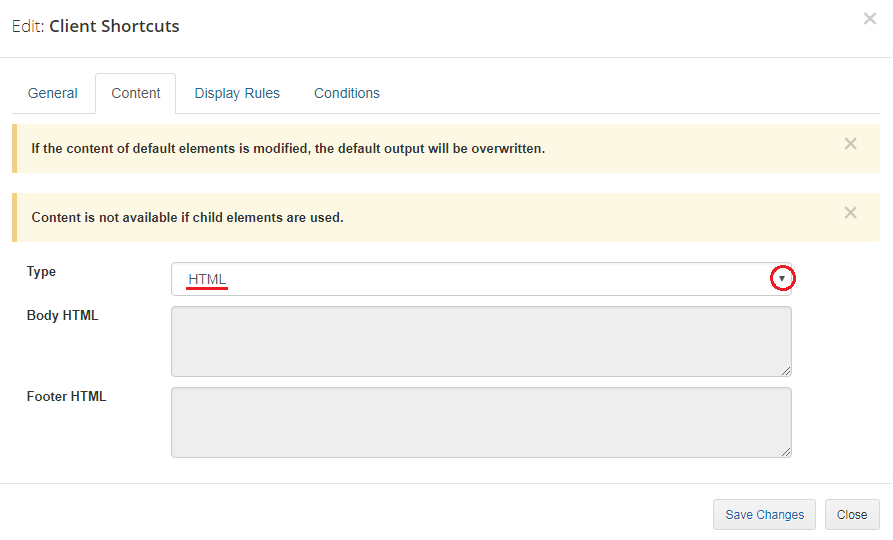
|
|
|
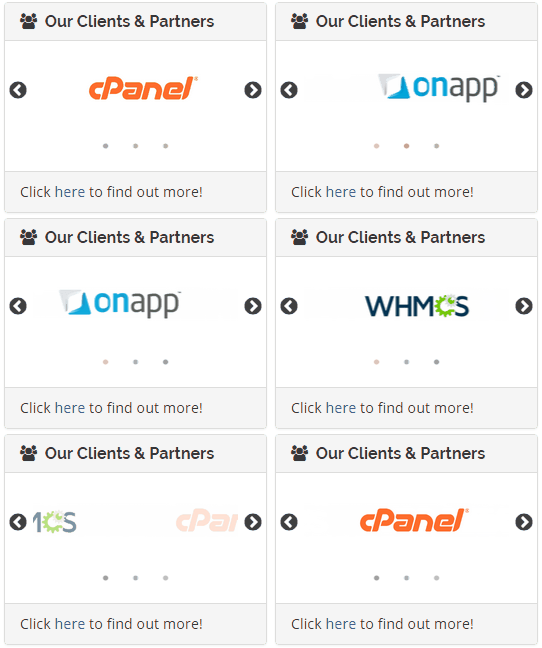
| Here is an example of a simple effect that you can achieve with the content rotator. |
|
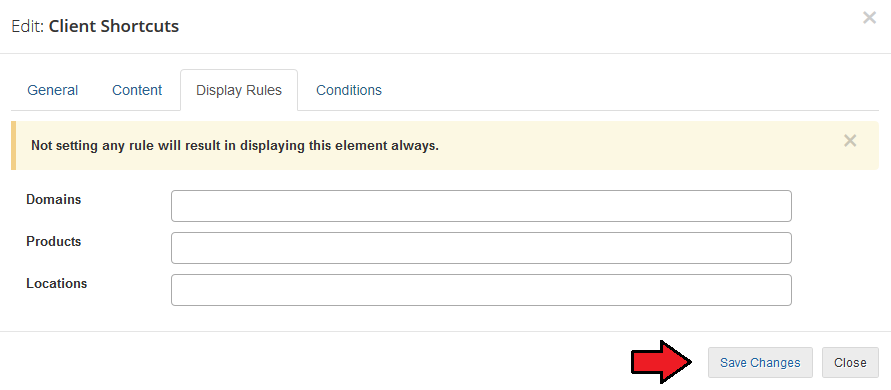
| Display Rules - only clients who fulfill the rules will see the element. If you leave this part empty, the element will be visible for all clients without limitations. |
|
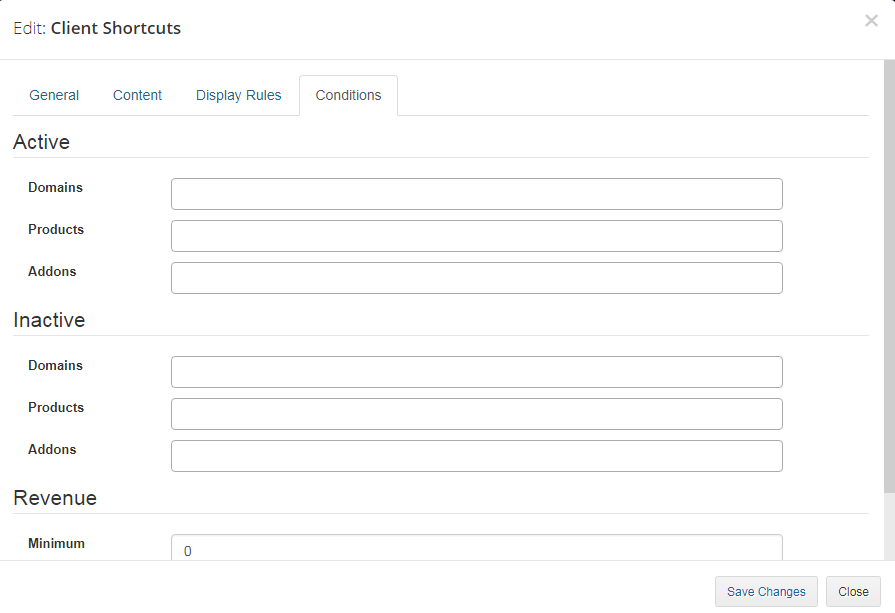
| Conditions - specify what conditions have be met to display an element. If you leave this part empty, the element will be visible to all clients without limitations.
Do not forget to save changes after specifying the conditions. |
|
New Parent Element
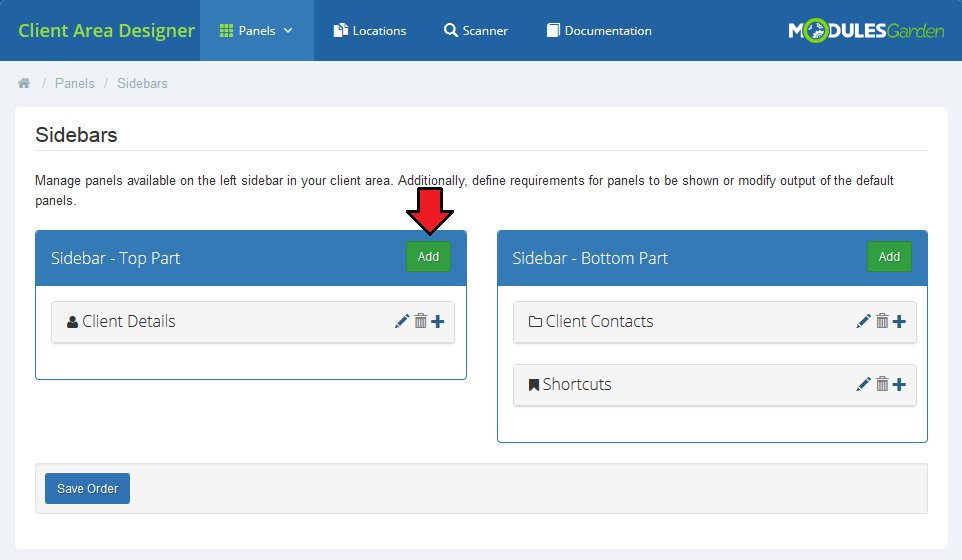
| You may add a completely new parent element either on left or right side. Press 'Add'. |
|
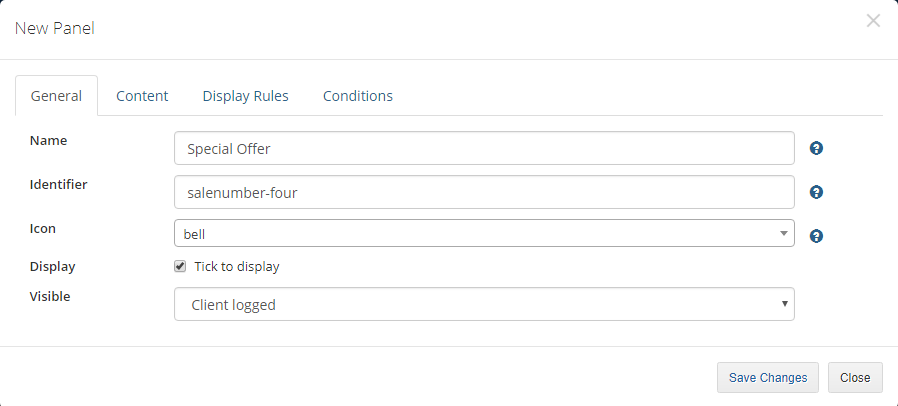
| Then you will have to fill out all the general info, content and display rules. Start with 'General'. Provide:
|
|
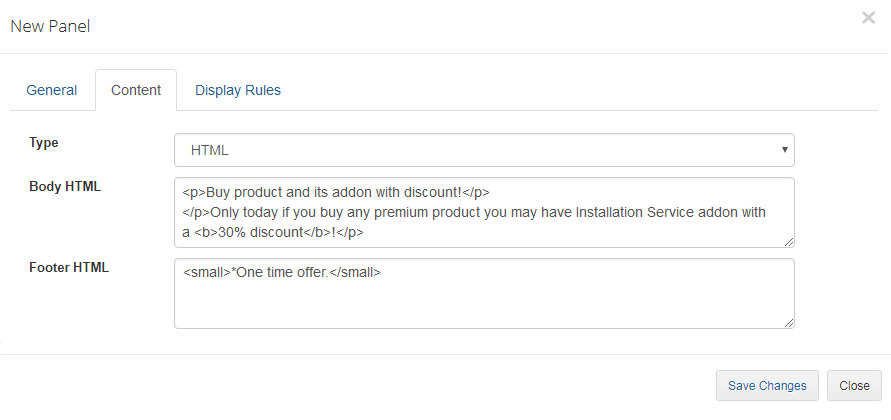
| Select content Type and define Body and Footer content. Note: If you provide the content here, you will not be able to add child elements to this item. |
|
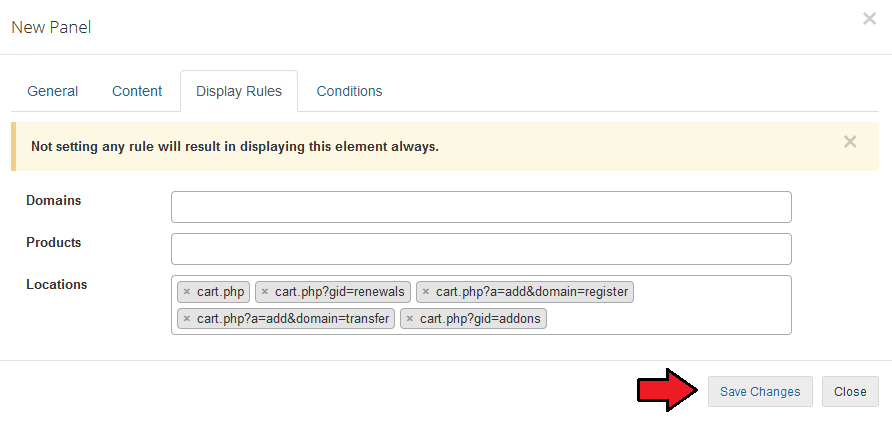
| If you want only the specified clients to see the panel, set up the 'Display Rules' or 'Conditions' . Save changes. |
|
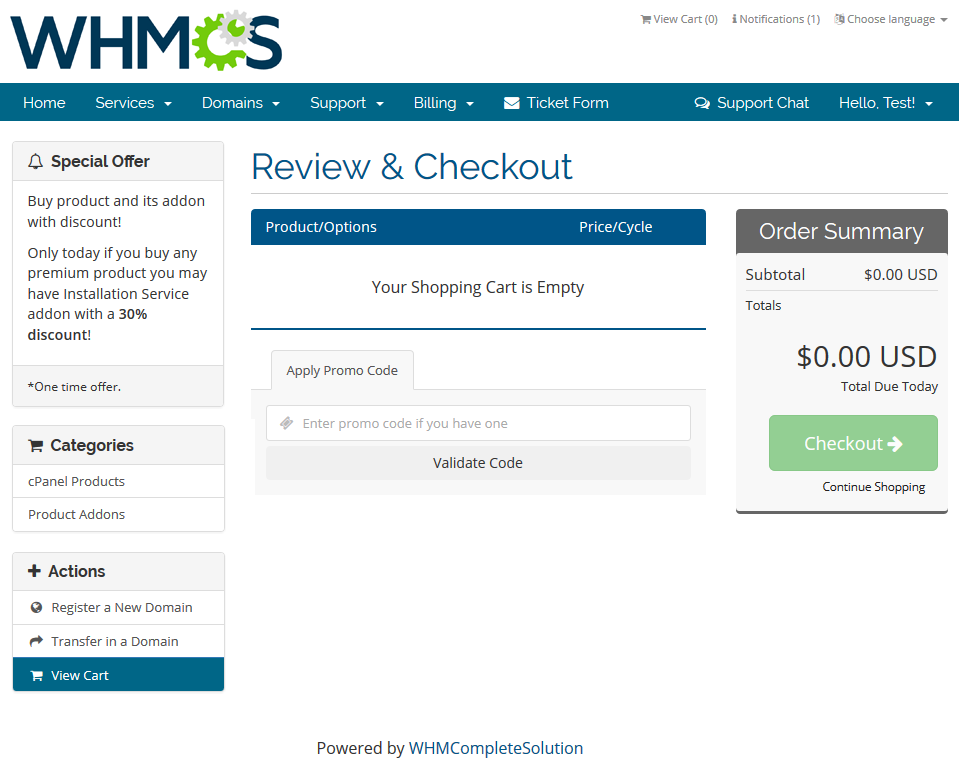
| This is what our new panel looks like in the client area: |
|
New Child Element
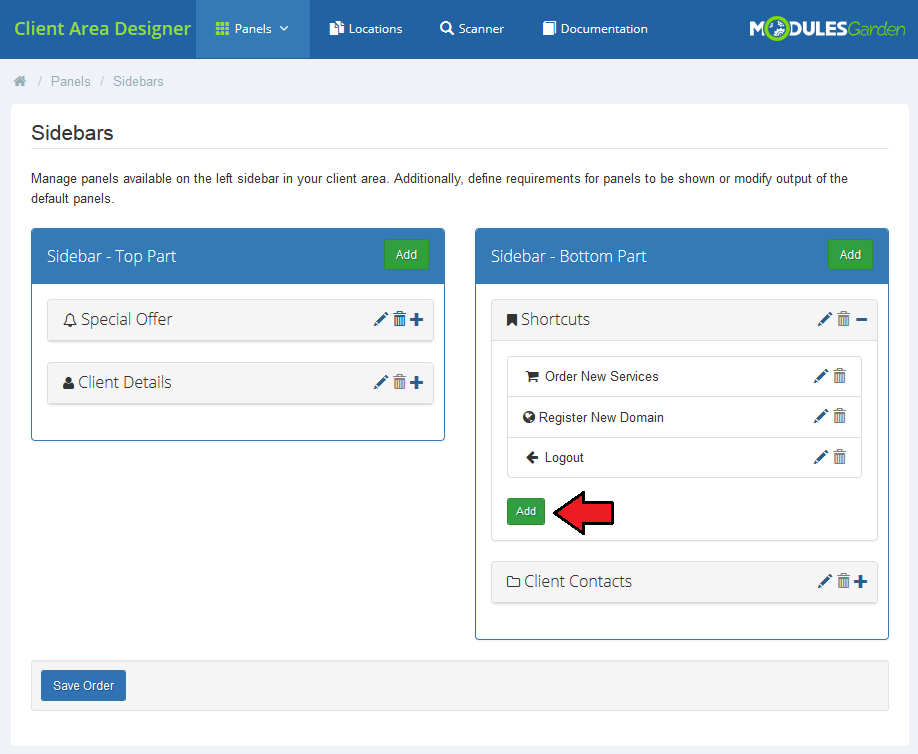
| Let's now add one child element to client's 'Shortcuts'. |
|
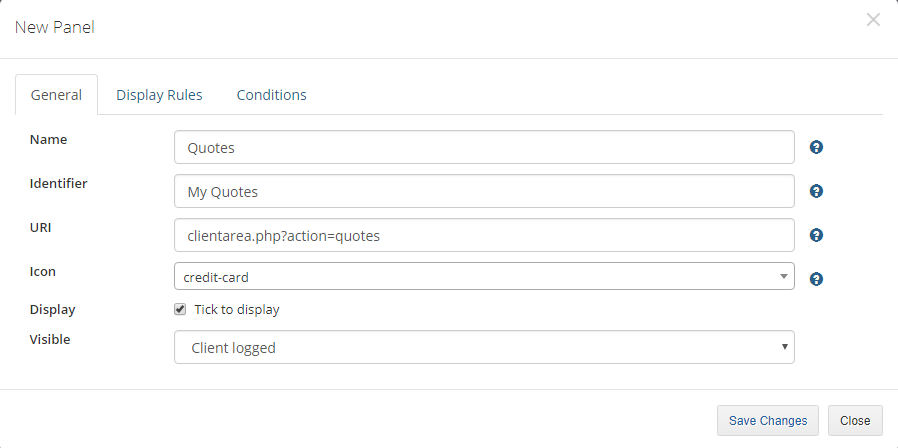
Fill out all the required data to crate a correct link:
|
|
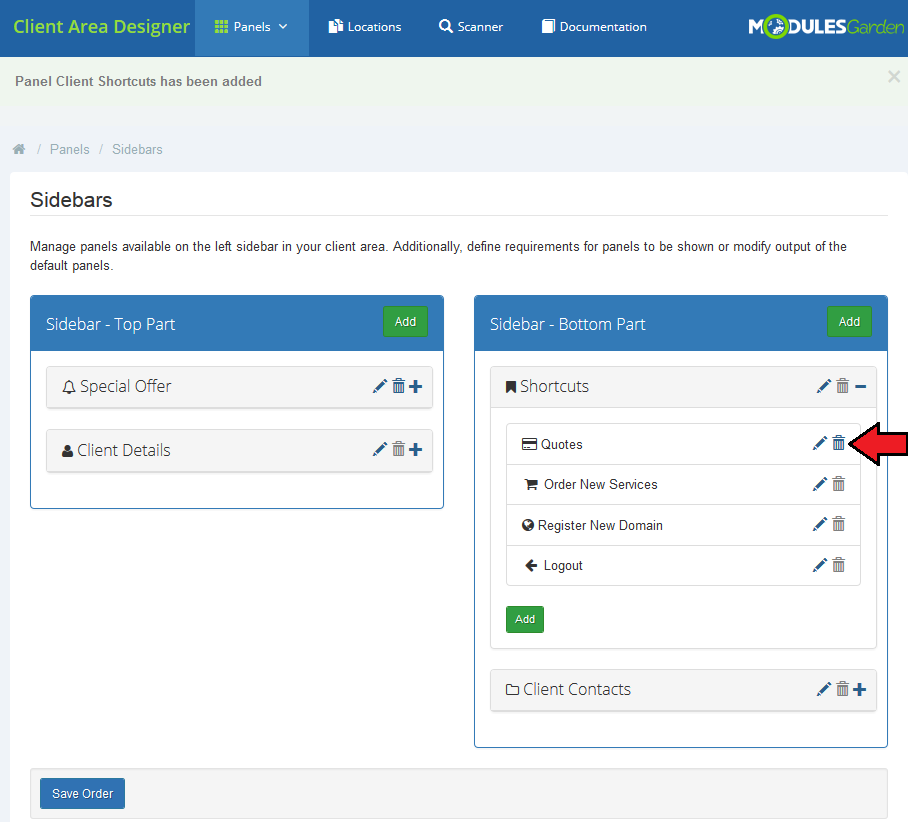
| Any custom element can be deleted. In contrast to the default ones which may be only edited and hidden. |
|
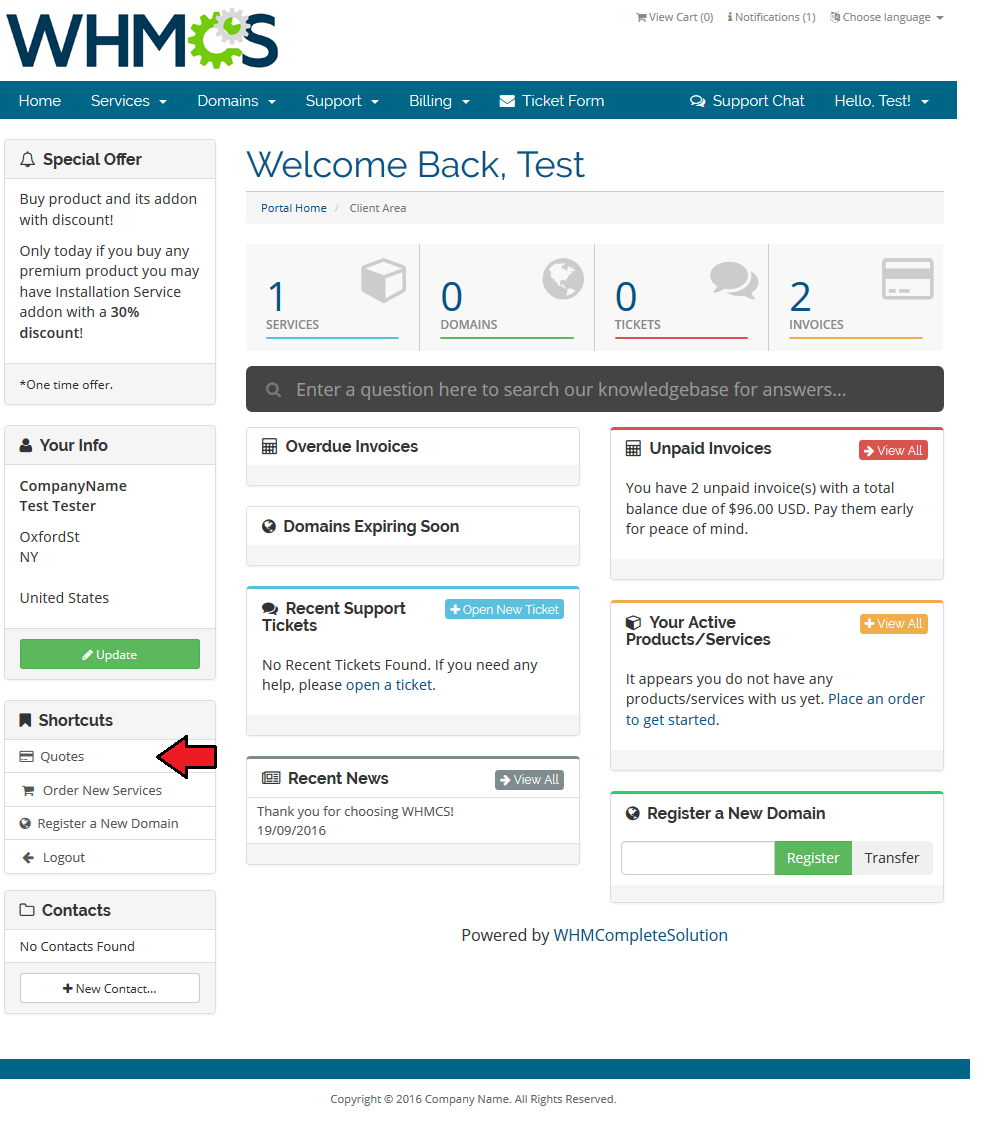
| Now, you see an additional link under 'Shortcuts'. |
|
Homepage Widgets
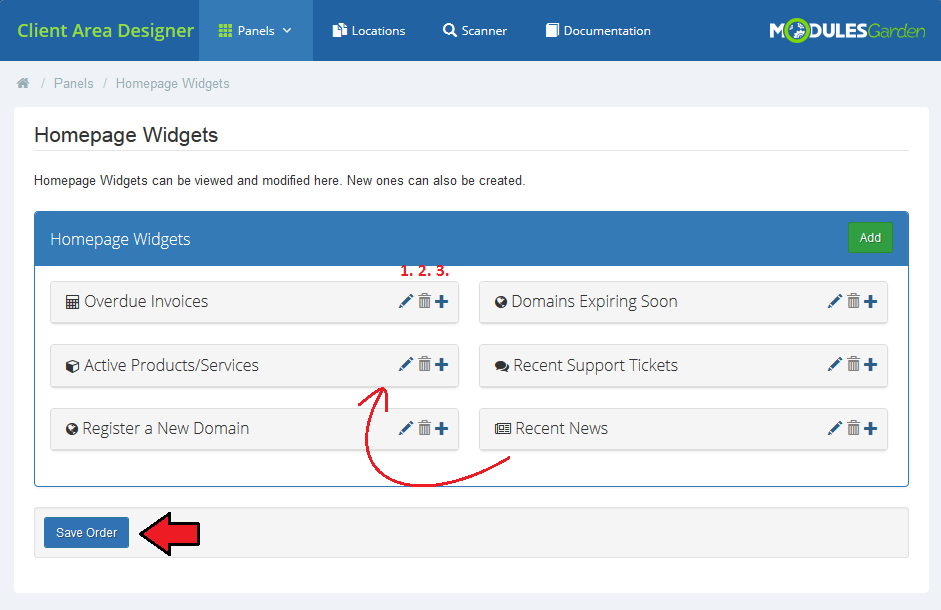
| The last type of panels are homepage widgets. Available actions:
|
|
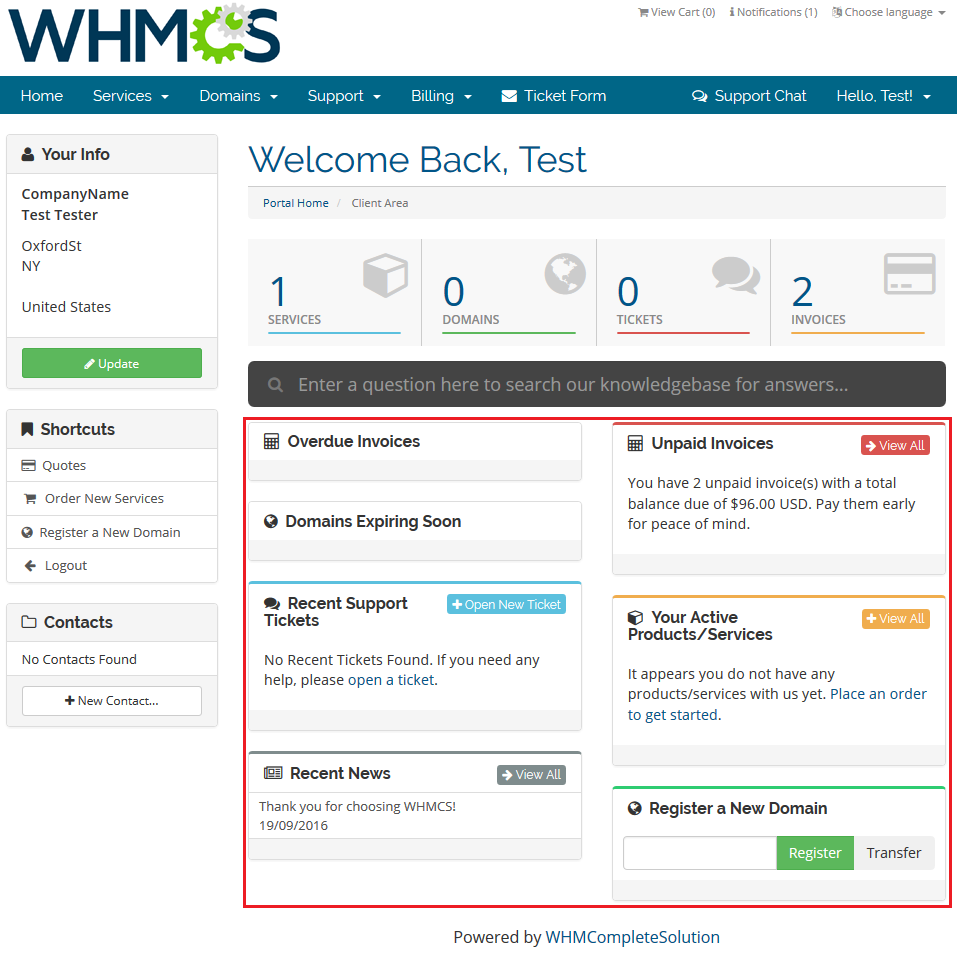
| To visualize, these are the client area widgets we are going to alter in a moment: |
|
Edit widget
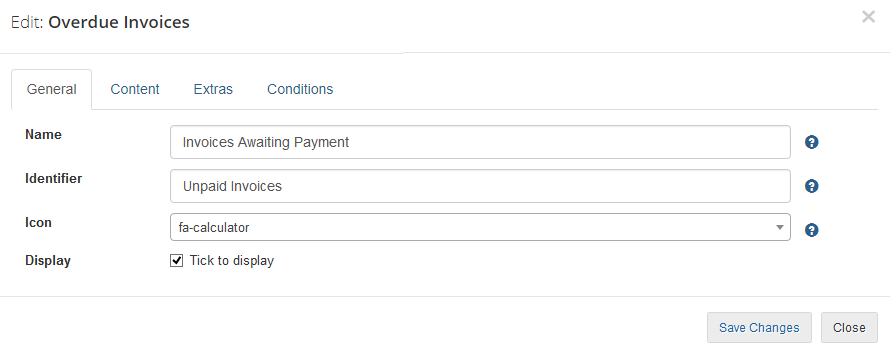
General:
|
|
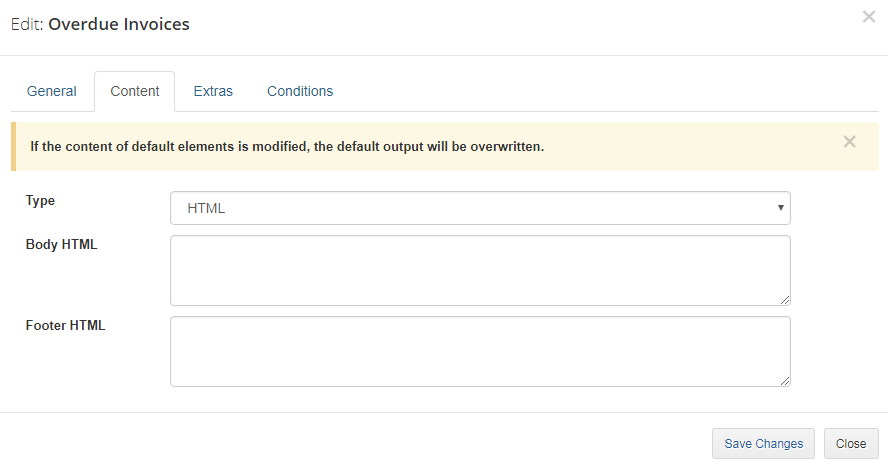
| Under 'Content' section you can overwrite the default text. We will leave it empty as we do not want to change the content, just the look and feel of the widget. |
|
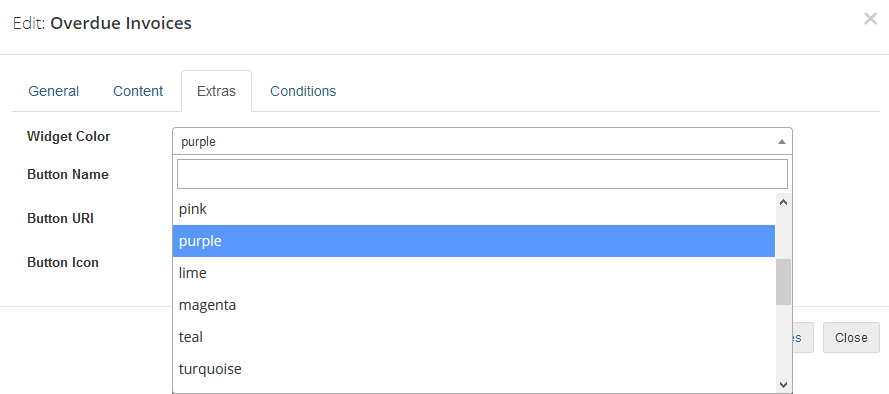
Extras - here you can change the visual parts:
|
|
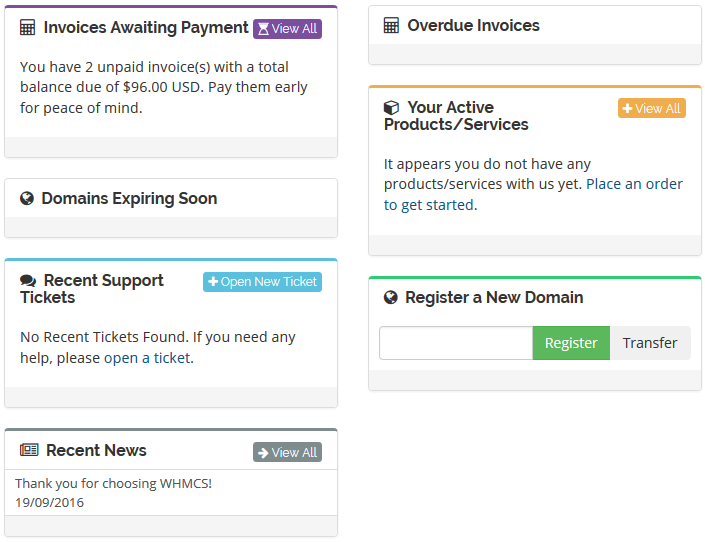
| That is what our adjusted widget looks like now: |
|
Add New Widget
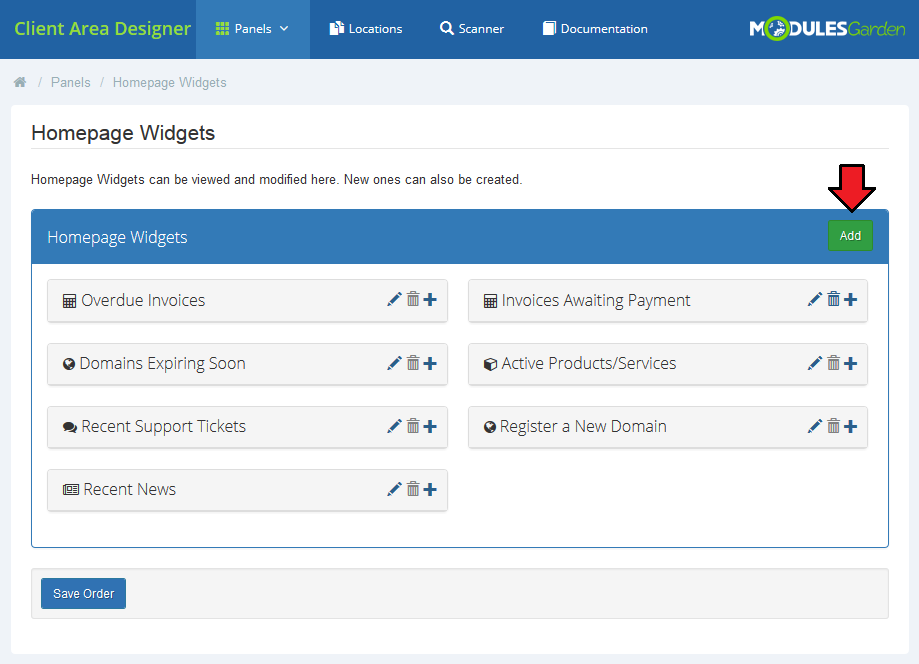
| For presentation purposes, we will create now a completely new widget. It will include a button redirection to our Knowledgebase and two links to FAQ and Upload Files form. To start, simply press 'Add' button. |
|
| Then fill out all the general info, content and extras. Start with 'General', provide:
|
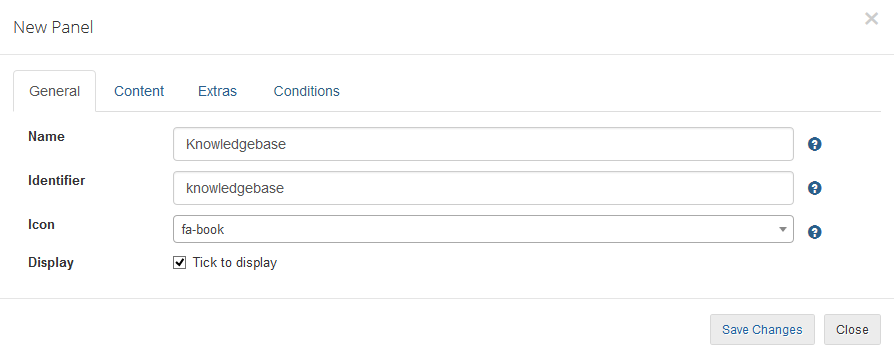
|
| As we are going to add two links inside the widget, so we have to skip this section. |
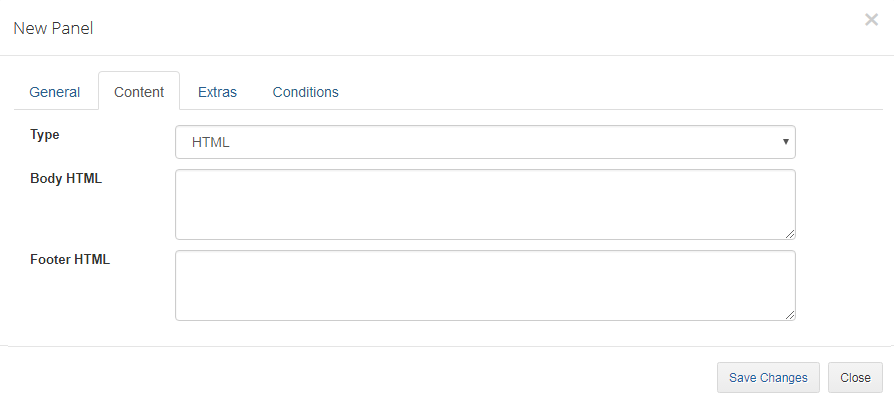
|
| Finally, customize your widget by defining color and button details.
Save changes. |
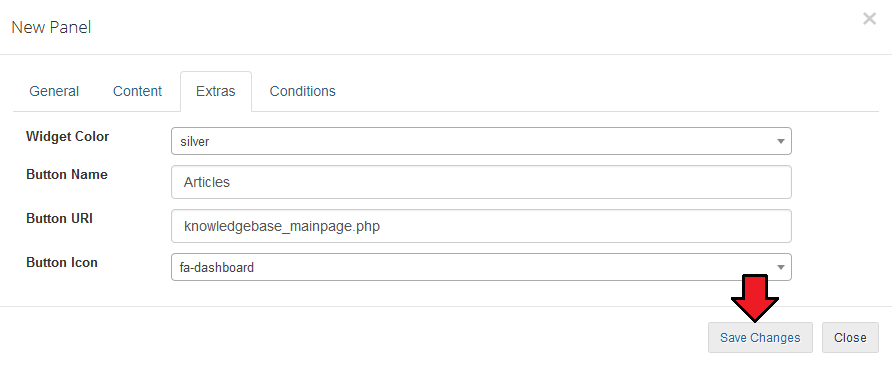
|
New Child Widget
| Let's now add a child element to the just created 'Knowledgebase'. |
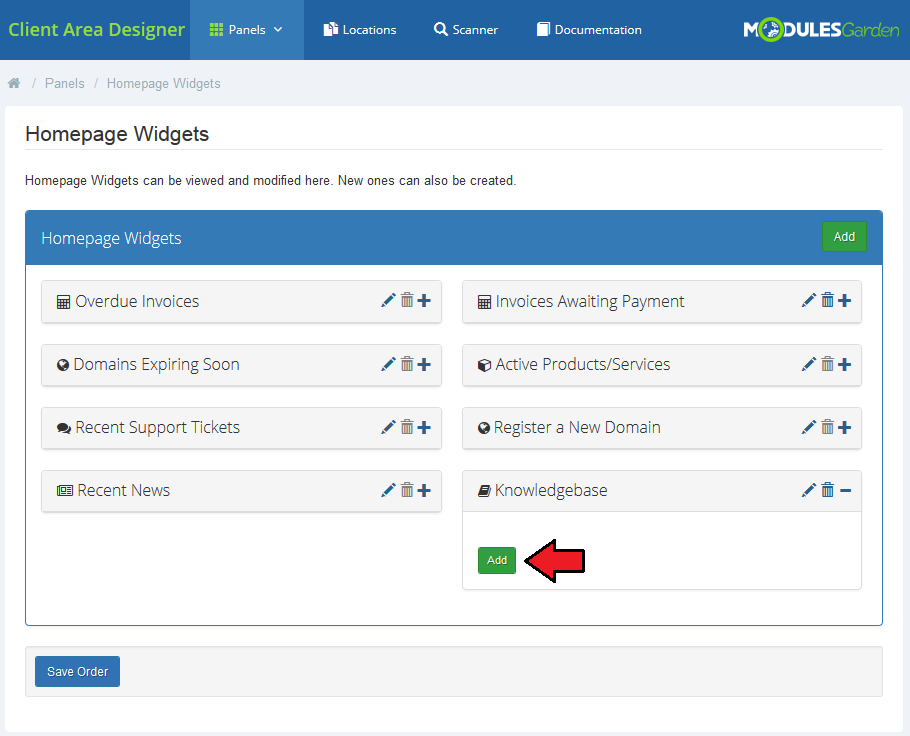
|
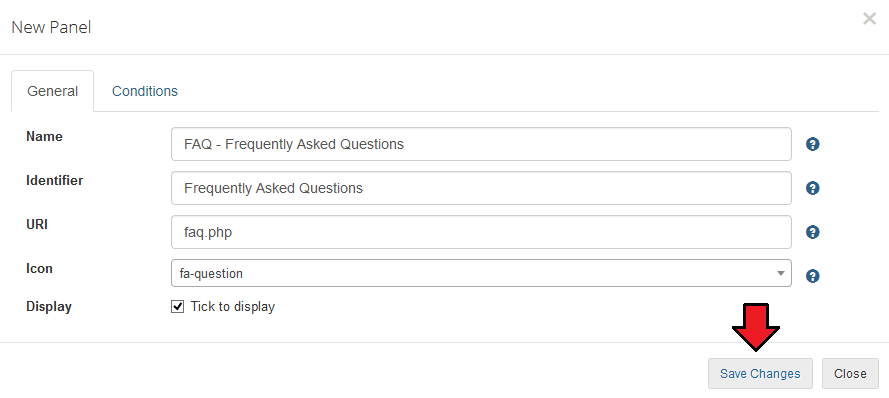
Fill out the required data:
|
|
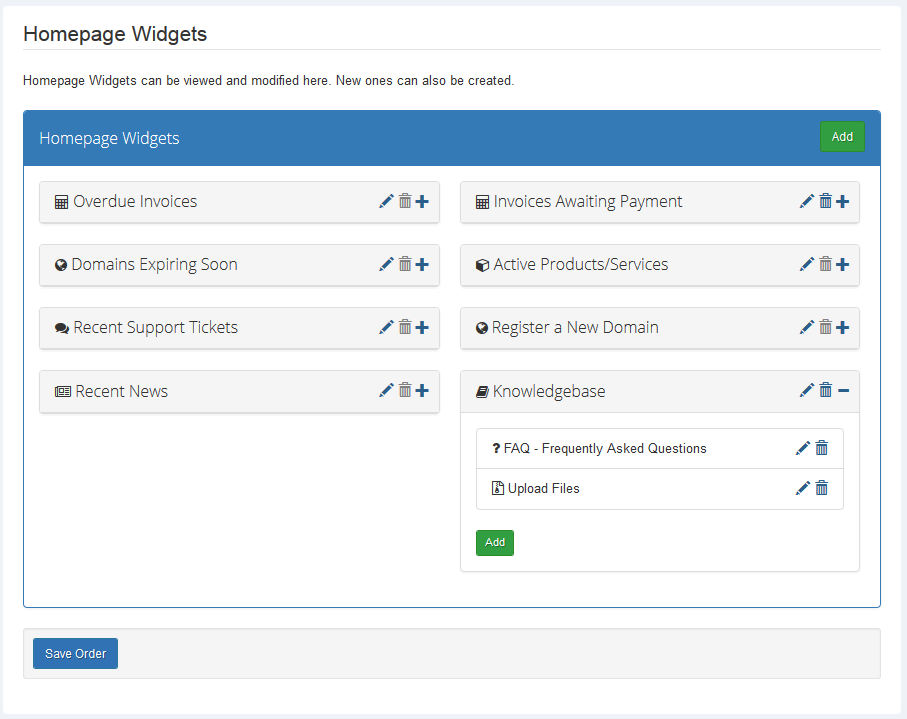
| As you can see, we added two new entries under the 'Knowledgebase' widget. Surely, you can edit each one of them or delete. |
|
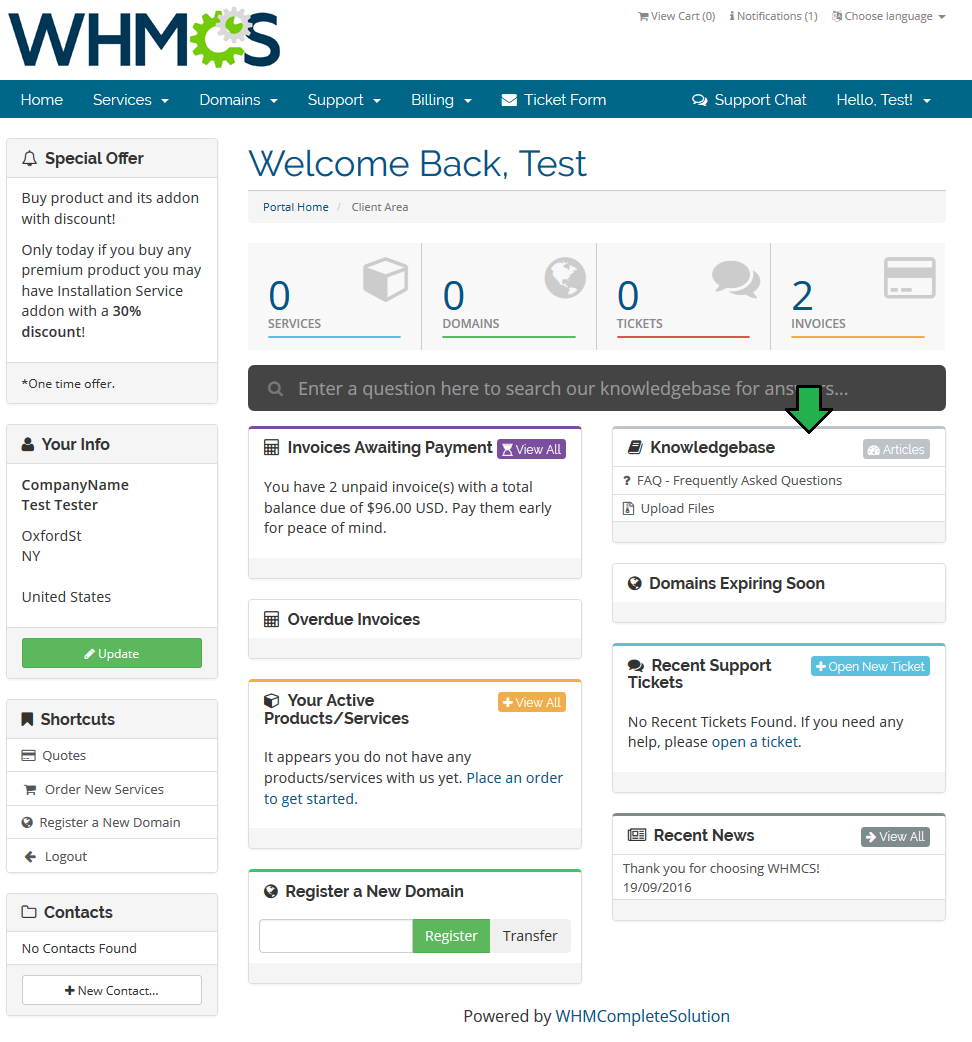
| Here is a final view of our customized client area with new elements: |
|
Locations
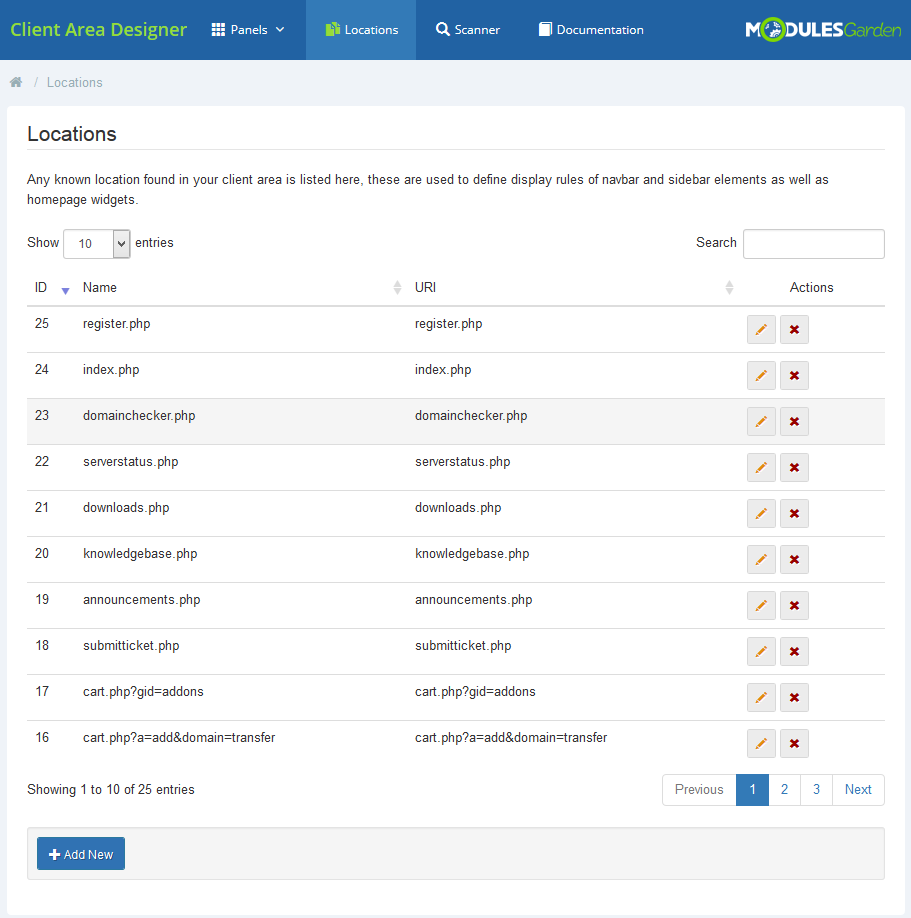
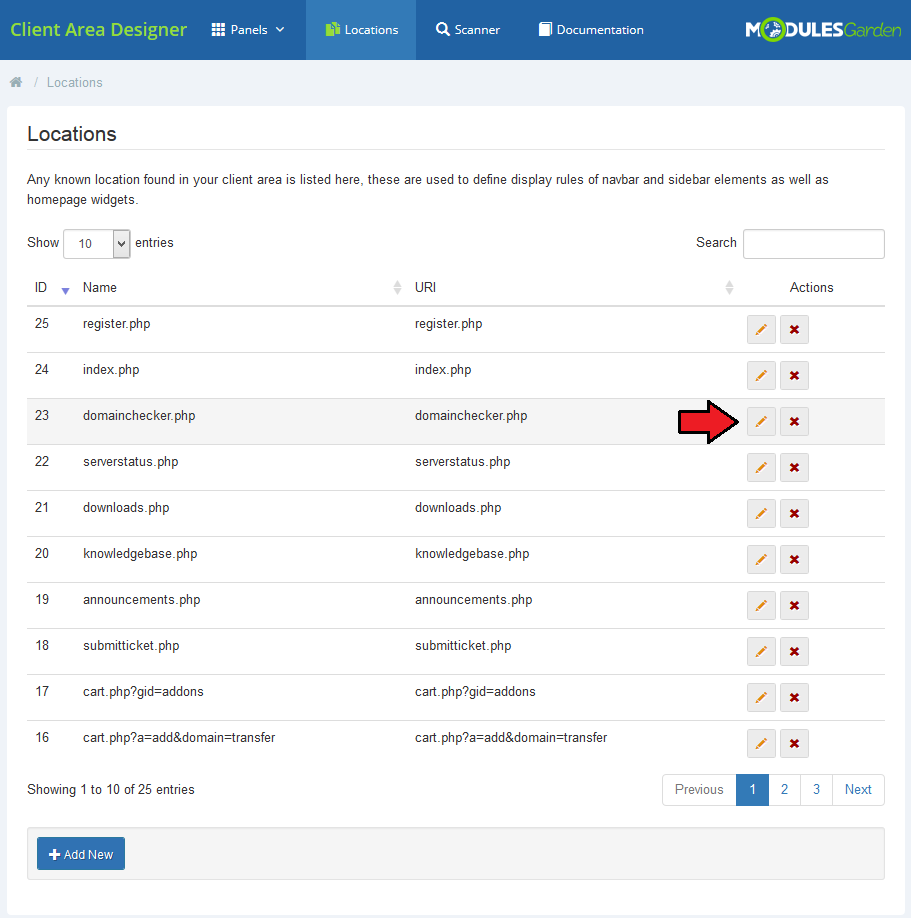
| In this you will find an extended list of all standard locations in your client area with its common name and URI. These locations are searched through by the module scanner in search of custom panels and are available in the 'Locations' field when setting up 'Display Rules'. |
|
| Press the button with pencil icon next to the location you are interested in editing. |
|
| There you can edit the name of existing location and its URI. |

|
New Location
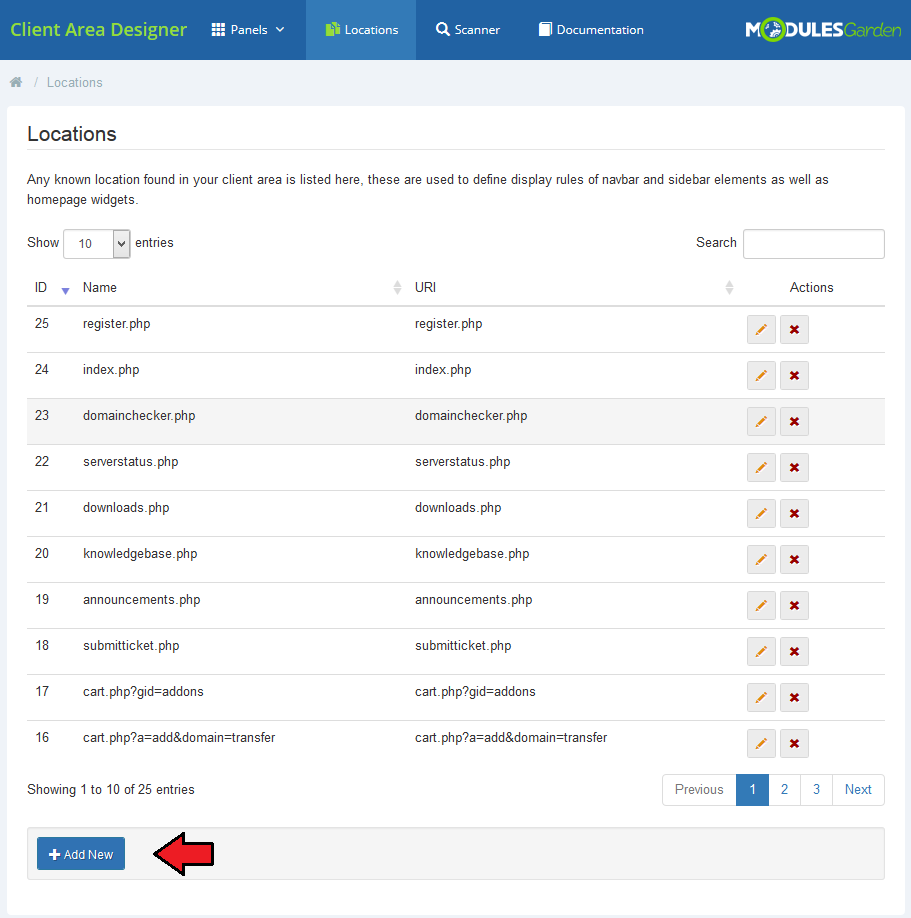
| You may also add new if you have some custom locations and you wish to use them in our module. Please note that your locations have to be manageable by WHMCS. |
|
| Provide a location name and URI. When ready, your new location will be from now on used by Client Area Designer module. |

|
Scanner
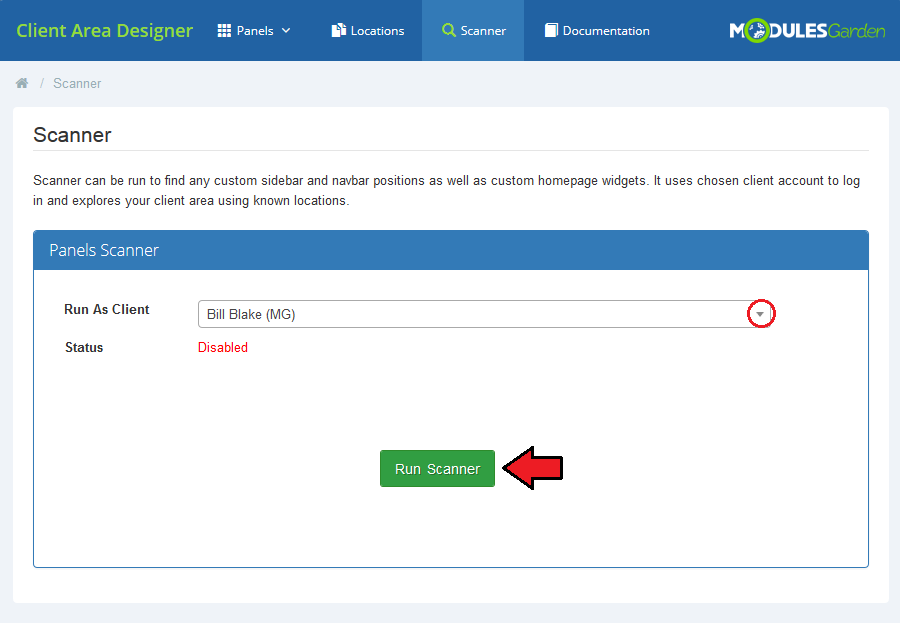
| Scanner is a tool that allows our module to carefully browse through a chosen client's client area in search of any elements in known locations. Select a client to log in as one and run the scanner. |
|
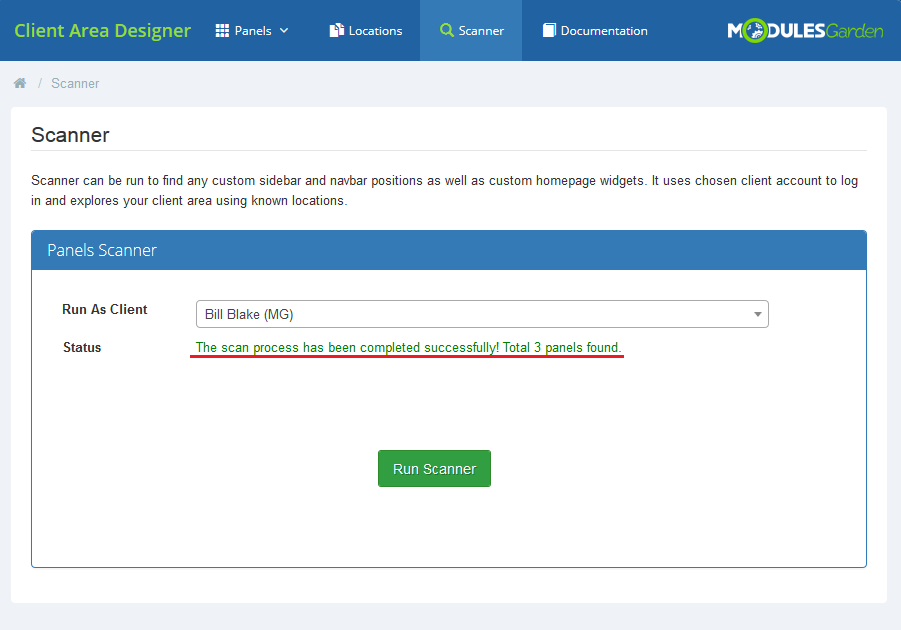
| You will see a preview of all locations. When the scan is finished, you will see a summary with the number of found panels. All newly found elements will be automatically added to proper positions in the addon. |
|
Documentation
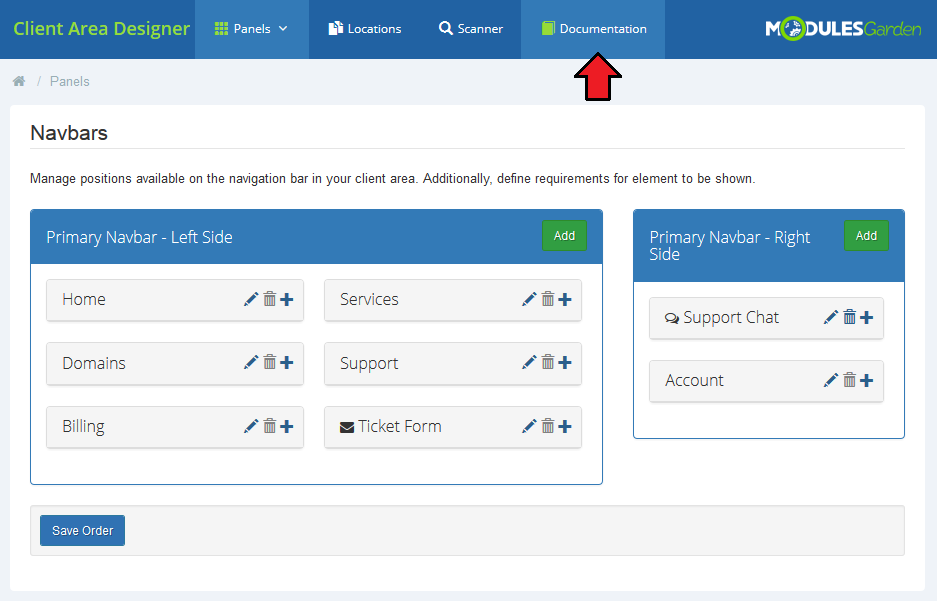
| The last position in your navigation menu, when pressed, redirects to the article you are currently reading. |
|
Smarty Tags
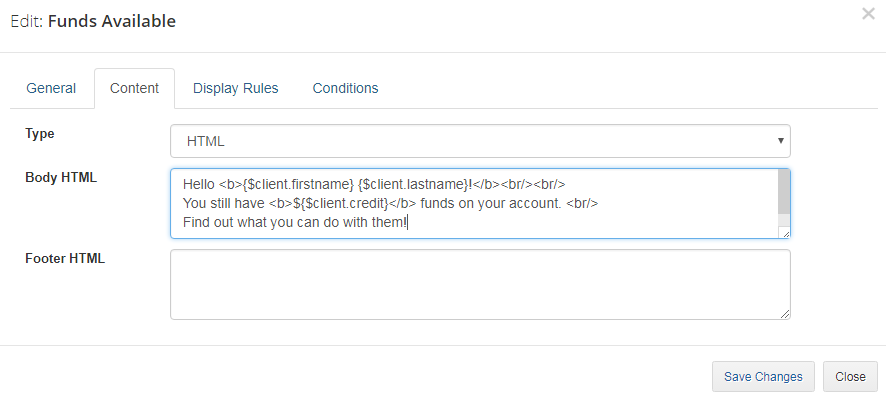
| Starting with the 1.1.0 version, the module allows you to use Smarty tags in HTML content. For example, if you use {$client.firstname}, {$client.lastname} and {$client.credit} in the following code: Hello <b>{$client.firstname} {$client.lastname}!</b><br/><br/>
You still have <b>${$client.credit}</b> funds on your account.<br/>
Find out what you can do with them!
<br/>
|
|
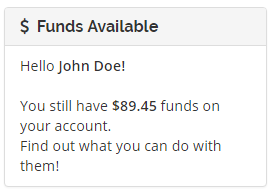
| The result will be as follows: |
|
You can, of course, use the full scope of Smarty tags, such as conditional instructions:
Hello <b>{$client.firstname} {$client.lastname}!</b><br/><br/>
{if $client.credit gt 0}
You still have <b>${$client.credit}</b> funds on your account. <br/>
Find out what you can do with them!<br/>
{else}Sorry you have no funds!<br/>
{/if}
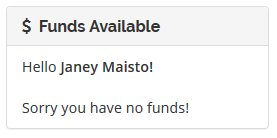
In this example, if the customer does not have any credit, he will see something like this: |
|
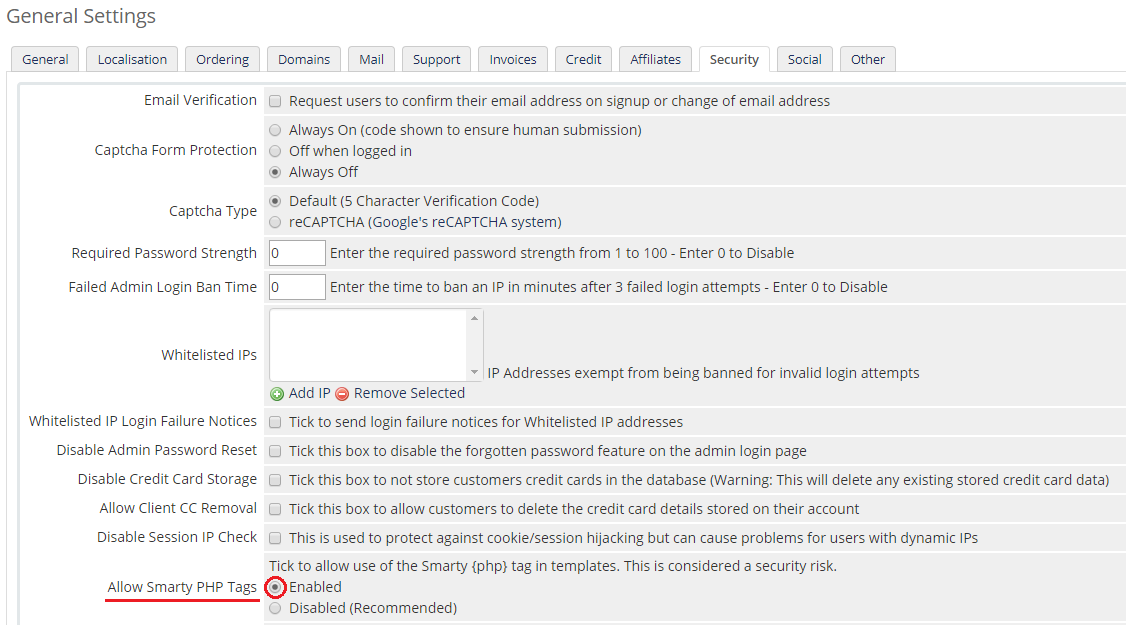
| Of course, this is just a very simple example that will only work for the clients who are logged in. In order to build more advanced elements, please check out the Smarty documentation. Note: Remember that the incorrect use of Smarty tags may lead to a website not operating properly. |
|
For example, you can list all of the template variables using:
<pre>{php}print_r($template->getTemplateVars());{/php}
|
Tips
| 1. When you are adding a new element into your client area, you may add the langs used in the lang file to enable translations and changes. To do so:
$_LANG['element name'] = 'Element Name';
|
| 2. Client Area Designer module supports only WHMCS template Six and any custom modification that is based on this template and has been customized according to this documentation. |
Update Instructions
| Essential guidance through the process of updating the module is offered here. Ensure successful completion of the module update by carefully following each step, thereby preventing data loss or any unforeseen issues. |
Upgrade Guide
| Seeking a solution that offers greater flexibility, customization tailored to your precise needs, and unrestricted availability? There is an option that not only proves to be cost-effective in the long run but also includes prioritized support services, making it a truly valuable investment. Opt for the Open Source version of your Client Area Designer For WHMCS module to unlock these benefits. Follow a comprehensive guide covering the transition process, the advantages it brings, and step-by-step instructions on what to do next after the order has been successfully finalized. |
Common Problems
| 1. In case of connection problems, please check whether your SELinux or firewall does not block ports. |
| 2. The module is not compatible with Lagom One Step Order For WHMCS, and the integration between them is not planned as such due to their individuality and exclusive features. |