Resellers Center 2.X For WHMCS
(→Common Problems) |
(→Tips) |
||
| (62 intermediate revisions by 5 users not shown) | |||
| Line 1: | Line 1: | ||
| − | <meta name="keywords" content="resellers for whmcs, whmcs resellers configuration, whmcs resellers management, whmcs resellers installation, whmcs resellers common problems, about whmcs resellers, whmcs resellers documentation, whmcs resellers faq, whmcs resellers help, whmcs resellers guide, whmcs resellers wiki, whmcs resellers tutorial, whmcs resellers tips, whmcs resellers wiki"></meta> | + | <meta name="keywords" content="resellers center for whmcs, whmcs resellers center configuration, whmcs resellers center management, whmcs resellers center installation, whmcs resellers center common problems, about whmcs resellers center, whmcs resellers center documentation, whmcs resellers center faq, whmcs resellers center help, whmcs resellers center guide, whmcs resellers center wiki, whmcs resellers center tutorial, whmcs resellers center tips, whmcs resellers center wiki"></meta> |
<meta name="description" content="ModulesGarden Wiki Contains All The Information You Need About The Resellers Center For WHMCS Module."></meta> | <meta name="description" content="ModulesGarden Wiki Contains All The Information You Need About The Resellers Center For WHMCS Module."></meta> | ||
| − | =About [http://www.modulesgarden.com/products/whmcs/resellers_center/features Resellers For WHMCS]= | + | =About [http://www.modulesgarden.com/products/whmcs/resellers_center/features Resellers Center For WHMCS]= |
{| | {| | ||
| − | |style="padding: 10px 0px 10px 0px;"|'''Resellers Center For WHMCS | + | |style="padding: 10px 0px 10px 0px;"|'''Resellers Center For WHMCS''' gives your resellers the possibility to manage end-clients and their orders through WHMCS!<br /> |
| − | + | With this module, your resellers will be allowed to acquire their own customers and assign products, services and domains to them. <br /> | |
| − | With this module, your customers | + | Thanks to that, end-clients will be able to easily order services directly from your WHMCS. <br /> |
| − | + | Moreover, they will be able to log in to their own WHMCS account in order to manage their services, pay invoices or even create tickets. | |
| − | + | ||
|} | |} | ||
| − | *'''Features:''' | + | <!-- fixed --> |
| + | *'''General Features:''' | ||
{| | {| | ||
| − | |style="padding: 10px 0px 0px 30px;"|✔ Reseller | + | |style="padding: 10px 0px 0px 30px;"|✔ Define Global Configuration And Reseller Permissions |
|} | |} | ||
{| | {| | ||
| − | |style="padding: 0px 0px 0px 30px;"|✔ | + | |style="padding: 0px 0px 0px 30px;"|✔ Define Email Templates Available For Rebranding |
|} | |} | ||
{| | {| | ||
| − | |style="padding: 0px 0px 0px 30px;"|✔ | + | |style="padding: 0px 0px 0px 30px;"|✔ Define Ticket Department Available For End-Clients |
|} | |} | ||
{| | {| | ||
| − | |style="padding: 0px 0px 0px 30px;"|✔ | + | |style="padding: 0px 0px 0px 30px;"|✔ Create & Manage Reseller Groups |
|} | |} | ||
{| | {| | ||
| − | |style="padding: 0px 0px 0px 30px;"|✔ Assign | + | |style="padding: 0px 0px 0px 30px;"|✔ Assign Products To Reseller Groups |
|} | |} | ||
{| | {| | ||
| − | |style="padding: 0px 0px 0px 30px;"|✔ | + | |style="padding: 0px 0px 0px 30px;"|✔ Define Price Limits And Profit Counting Per Product |
|} | |} | ||
{| | {| | ||
| − | |style="padding: 0px 0px 0px 30px;"|✔ | + | |style="padding: 0px 0px 0px 30px;"|✔ Allow Clients To Start Reselling Through Assigning Them To Reseller Groups |
|} | |} | ||
{| | {| | ||
| − | |style="padding: 0px 0px 0px 30px;"|✔ | + | |style="padding: 0px 0px 0px 30px;"|✔ Define Domains Discount Per Reseller |
|} | |} | ||
{| | {| | ||
| − | |style="padding: 0px 0px 0px 30px;"|✔ | + | |style="padding: 0px 0px 0px 30px;"|✔ View End-Clients As Contacts And Manage Assignment Of Their Products And Domains |
|} | |} | ||
{| | {| | ||
| − | |style="padding: 0px 0px 0px 30px;"|✔ | + | |style="padding: 0px 0px 0px 30px;"|✔ View Reseller Profit Earned From Each End-Client Order |
|} | |} | ||
{| | {| | ||
| − | |style="padding: 0px 0px 0px 30px;"|✔ | + | |style="padding: 0px 0px 0px 30px;"|✔ VIES Based EU VAT Removal For End-Clients |
|} | |} | ||
{| | {| | ||
| − | |style="padding: 0px 0px | + | |style="padding: 0px 0px 10px 30px;"|✔ Define Resellers Branding Permissions |
|} | |} | ||
| + | *'''Resellers Features:''' | ||
{| | {| | ||
| − | |style="padding: | + | |style="padding: 10px 0px 0px 30px;"|✔ Create And Manage End-Clients As Contacts |
|} | |} | ||
{| | {| | ||
| − | |style="padding: 0px 0px 0px 30px;"|✔ | + | |style="padding: 0px 0px 0px 30px;"|✔ Define Permissions Of End-Clients |
|} | |} | ||
{| | {| | ||
| − | |style="padding: 0px 0px 0px 30px;"|✔ | + | |style="padding: 0px 0px 0px 30px;"|✔ Create End-Client Account During Order Creation |
|} | |} | ||
{| | {| | ||
| − | |style="padding: 0px 0px 0px 30px;"|✔ | + | |style="padding: 0px 0px 0px 30px;"|✔ Order Products On Behalf Of End-Clients |
|} | |} | ||
{| | {| | ||
| − | |style="padding: 0px 0px 0px 30px;"|✔ View | + | |style="padding: 0px 0px 0px 30px;"|✔ View Current Balance, Total Profit Made And Credit Balance |
|} | |} | ||
{| | {| | ||
| − | |style="padding: 0px 0px 0px 30px;"|✔ | + | |style="padding: 0px 0px 0px 30px;"|✔ Redeem Credit Balance From Current Balance |
|} | |} | ||
{| | {| | ||
| − | |style="padding: 0px 0px | + | |style="padding: 0px 0px 0px 30px;"|✔ View Profit Generated By Each Transaction Made By End-Clients |
|} | |} | ||
| − | |||
{| | {| | ||
| − | |style="padding: | + | |style="padding: 0px 0px 0px 30px;"|✔ Define Prices Per Product Within Defined Limits |
|} | |} | ||
{| | {| | ||
| − | |style="padding: 0px 0px 30px 30px;"|✔ Supports WHMCS | + | |style="padding: 0px 0px 0px 30px;"|✔ Configure Reseller Brand - Domain, Company Name, Email Signature And Logo |
| + | |} | ||
| + | {| | ||
| + | |style="padding: 0px 0px 0px 40px;"|✔ Domain | ||
| + | |} | ||
| + | {| | ||
| + | |style="padding: 0px 0px 0px 40px;"|✔ Company Name | ||
| + | |} | ||
| + | {| | ||
| + | |style="padding: 0px 0px 0px 40px;"|✔ Email Address | ||
| + | |} | ||
| + | {| | ||
| + | |style="padding: 0px 0px 0px 40px;"|✔ Email Signature | ||
| + | |} | ||
| + | {| | ||
| + | |style="padding: 0px 0px 0px 40px;"|✔ Email CSS Schema | ||
| + | |} | ||
| + | {| | ||
| + | |style="padding: 0px 0px 0px 40px;"|✔ Logo | ||
| + | |} | ||
| + | {| | ||
| + | |style="padding: 0px 0px 0px 30px;"|✔ Access Branded Order Links - CNAME Record Is Required | ||
| + | |} | ||
| + | {| | ||
| + | |style="padding: 0px 0px 0px 30px;"|✔ View Email Templates And Modify Them Using Improved Email Templates Editor | ||
| + | |} | ||
| + | {| | ||
| + | |style="padding: 0px 0px 10px 30px;"|✔ Reply To Tickets Of End-Clients | ||
| + | |} | ||
| + | *'''End-Client (Contact) Features:''' | ||
| + | {| | ||
| + | |style="padding: 10px 0px 0px 30px;"|✔ Order Products/Domains | ||
| + | |} | ||
| + | {| | ||
| + | |style="padding: 0px 0px 0px 30px;"|✔ View And Pay Invoices | ||
| + | |} | ||
| + | {| | ||
| + | |style="padding: 0px 0px 0px 30px;"|✔ View And Manage Products | ||
| + | |} | ||
| + | {| | ||
| + | |style="padding: 0px 0px 0px 30px;"|✔ Receive Branded Email Templates | ||
| + | |} | ||
| + | {| | ||
| + | |style="padding: 0px 0px 0px 30px;"|✔ Open And Manage Tickets | ||
| + | |} | ||
| + | {| | ||
| + | |style="padding: 0px 0px 10px 30px;"|✔ Use End-Client Details For Registered Domains | ||
| + | |} | ||
| + | *'''General Info:''' | ||
| + | {| | ||
| + | |style="padding: 10px 0px 0px 30px;"|✔ Migration Tool | ||
| + | |} | ||
| + | {| | ||
| + | |style="padding: 0px 0px 0px 30px;"|✔ Multi-Language Support | ||
| + | |} | ||
| + | {| | ||
| + | |style="padding: 0px 0px 0px 30px;"|✔ Supports PHP 5.3 Up To PHP 7 | ||
| + | |} | ||
| + | {| | ||
| + | |style="padding: 0px 0px 0px 30px;"|✔ Supports WHMCS Templates Five and Six | ||
| + | |} | ||
| + | {| | ||
| + | |style="padding: 0px 0px 30px 30px;"|✔ Supports WHMCS V6 and V7 | ||
|} | |} | ||
=Installation= | =Installation= | ||
{| | {| | ||
| − | |style="padding: 10px 0px 30px 0px;"|Installation of Resellers Center For WHMCS requires a few simple modifications of template files. <br /> | + | |style="padding: 10px 0px 30px 0px;"|Installation of Resellers Center For WHMCS requires a few simple modifications of the template files.<br /> |
No worries, we will guide you step by step through the entire installation process. | No worries, we will guide you step by step through the entire installation process. | ||
|} | |} | ||
| Line 86: | Line 148: | ||
|} | |} | ||
{| | {| | ||
| − | |style="padding: 0px 0px 20px 25px;"|[[File: | + | |style="padding: 0px 0px 20px 25px;"|[[File:R_1.png]] |
|} | |} | ||
{| | {| | ||
|style="padding: 0px 0px 15px 15px;"|'''2. Upload and extract the module into the main WHMCS directory.'''<br /> | |style="padding: 0px 0px 15px 15px;"|'''2. Upload and extract the module into the main WHMCS directory.'''<br /> | ||
| − | Files in your WHMCS directory should look like | + | Files in your WHMCS directory should look like these. |
|} | |} | ||
{| | {| | ||
| − | |style="padding: 0px 0px 20px 25px;"|[[File: | + | |style="padding: 0px 0px 20px 25px;"|[[File:R_2.png]] |
|} | |} | ||
{| | {| | ||
|style="padding: 0px 0px 15px 15px;"|'''3. When you install Resellers Center module for the first time you have to rename '' 'license_RENAME.php' '' file.'''<br /> | |style="padding: 0px 0px 15px 15px;"|'''3. When you install Resellers Center module for the first time you have to rename '' 'license_RENAME.php' '' file.'''<br /> | ||
| − | File is located | + | File is located in '' 'modules/addons/ResellersCenter/license_RENAME.php'. '' Rename it from '' 'license_RENAME.php' '' to '' 'license.php'. '' |
|} | |} | ||
{| | {| | ||
| − | |style="padding: 0px 0px 20px 25px;"|[[File: | + | |style="padding: 0px 0px 20px 25px;"|[[File:R_3.png]] |
|} | |} | ||
{| | {| | ||
|style="padding: 0px 0px 15px 15px;"|'''4. In order to configure your license key you have to edit a previously renamed '' 'license.php' '' file.'''<br /> | |style="padding: 0px 0px 15px 15px;"|'''4. In order to configure your license key you have to edit a previously renamed '' 'license.php' '' file.'''<br /> | ||
| − | Enter your | + | Enter your license key between quotation marks as presented on the following screen.<br /> |
| + | You can find your license key in your client area → '' 'My Products'. '' | ||
|} | |} | ||
{| | {| | ||
| − | |style="padding: 0px 0px 20px 25px;"|[[File: | + | |style="padding: 0px 0px 20px 25px;"|[[File:R_4.png]] |
|} | |} | ||
{| | {| | ||
| − | |style="padding: 0px 0px 15px 15px;"|'''5. | + | |style="padding: 0px 0px 15px 15px;"|'''5. The next step is setting up '' 'storage' '' folder as writable.'''<br /> |
| − | + | It is located in '' 'your_whmcs/modules/addons/ResellersCenter/'.'' | |
| − | + | ||
|} | |} | ||
{| | {| | ||
| − | |style="padding: 0px 0px 30px 25px;"|[[File: | + | |style="padding: 0px 0px 30px 25px;"|[[File:R_5.png]] |
|} | |} | ||
| − | ==Activation | + | ==Activation Of Addon== |
{| | {| | ||
| − | |style="padding: 10px 0px 15px 15px;"|'''6. Now you have to activate the module in your WHMCS system.'''<br /> | + | |style="padding: 10px 0px 15px 15px;"|'''6. Now, you have to activate the module in your WHMCS system.'''<br /> |
| − | + | Log in to your WHMCS admin area. Click '' 'Setup' '' then choose '' 'Addon Modules'.''<br /> | |
| − | Afterwards find '' 'Resellers Center' '' and press Activate button. | + | Afterwards, find '' 'Resellers Center' '' and press '' 'Activate' '' button. |
|} | |} | ||
{| | {| | ||
| − | |style="padding: 0px 0px 20px 25px;"|[[File: | + | |style="padding: 0px 0px 20px 25px;"|[[File:R_6.png]] |
|} | |} | ||
{| | {| | ||
| − | |style="padding: 0px 0px 15px 15px;"|'''7. In next step you need to permit access to | + | |style="padding: 0px 0px 15px 15px;"|'''7. In the next step, you need to permit access to the module.'''<br /> |
| − | To do so | + | To do so, select admin roles which should have access to the module and press '' 'Save Changes'.'' |
|} | |} | ||
{| | {| | ||
| − | |style="padding: 0px 0px 20px 25px;"|[[File: | + | |style="padding: 0px 0px 20px 25px;"|[[File:R_7.png]] |
|} | |} | ||
{| | {| | ||
| − | |style="padding: 0px 0px 15px 15px;"|'''8. It is | + | |style="padding: 0px 0px 15px 15px;"|'''8. It is required to disable auto applying credits.'''<br /> |
| − | Otherwise, | + | Otherwise, orders made by resellers' clients will be automatically paid using credits from the reseller's account.<br /> |
| − | Go to '' 'Setup' '' → '' 'General | + | Go to '' 'Setup' '' → '' 'General Settings' '' → '' 'Invoices' '' and mark '' 'Disable Auto Credit Applying' '' checkbox.<br /> |
| − | + | Afterwards, press '' 'Save Changes'.'' | |
|} | |} | ||
{| | {| | ||
| − | |style="padding: 0px 0px 20px 25px;"|[[File: | + | |style="padding: 0px 0px 20px 25px;"|[[File:R_8.png]] |
|} | |} | ||
{| | {| | ||
| − | |style="padding: 0px 0px | + | |style="padding: 0px 0px 15px 15px;"|'''9. It is required to disable credit card storage. (optional)'''<br /> |
| − | + | Otherwise, credit card details provided by one contact can be accessed by other contact of the same reseller.<br /> | |
| + | Go to '' 'Setup' '' → '' 'General settings' '' → '' 'Security' '' and mark '' 'Disable Credit Card Storage' '' checkbox.<br /> | ||
| + | Next, press '' 'Save Changes'. '' | ||
|} | |} | ||
{| | {| | ||
| − | |style="padding: 0px 0px 20px 25px;"|[[File: | + | |style="padding: 0px 0px 20px 25px;"|[[File:R_9.png]] |
|} | |} | ||
{| | {| | ||
| − | |style="padding: 0px 0px 20px 15px;"|'''10. | + | |style="padding: 0px 0px 20px 15px;"|'''10. Afterwards, go to '' 'Addons' '' → '' 'Resellers Center' '' → '' 'Settings' '' → '' 'Integration Code' '' and follow the instructions.''' |
|} | |} | ||
{| | {| | ||
| − | |style="padding: 0px 0px 20px 25px;"|[[File: | + | |style="padding: 0px 0px 20px 25px;"|[[File:R_10.png]] |
|} | |} | ||
{| | {| | ||
| − | |style="padding: 0px 0px | + | |style="padding: 0px 0px 30px 15px;"|'''11. You have just successfully installed Resellers Center For WHMCS!''' |
|} | |} | ||
| + | |||
| + | =Management and Configuration= | ||
{| | {| | ||
| − | |style="padding: 0px | + | |style="padding: 10px 0px 30px 15px;"|Management of Resellers Center For WHMCS is very convenient. You can supervise everything from the addon.<br /> |
| + | What is more, the module extends possibilities of both your resellers and their customers.<br /> | ||
| + | Let us find out what our product can do. | ||
|} | |} | ||
| + | ==Settings== | ||
{| | {| | ||
| − | |style="padding: 0px | + | |style="padding: 10px 0px 30px 15px;"|In this section you can find more information about global configuration.<br /> |
| − | + | Additionally, here you can find a direct link to module documentation as well as migration tool. | |
|} | |} | ||
| + | ===Module Settings=== | ||
{| | {| | ||
| − | |style="padding: 0px | + | |style="padding: 10px 0px 15px 15px;"|In '' 'Module Settings' '' tab you can set up global settings of the module.<br /> |
| + | *'''Disable Resellers Center Branding''' - Allowing resellers to set up custom logo, company name and domain. | ||
| + | *'''Disable Products''' - if checked, end-contacts will be able to view and manage all products related to their resellers. | ||
| + | *'''Disable Domains''' - if checked, end-contacts will be able to view and manage all domains related to their resellers. | ||
| + | *'''Disable Tickets''' - if checked, end-contacts will be able to open ticket in any of existing support departments. | ||
| + | *'''Disable Invoices''' - if checked, end-contacts will be able to view all invoices related to their resellers. | ||
| + | *'''Enable Resellers CNAME''' - enables support for CNAME record pointing from customer domain.<br /> | ||
| + | Enables them to offer your products from within their domain.<br /> | ||
| + | *'''Allow Custom 'Email From' Address''' - if checked, resellers will be able to set up custom 'Email From' address. | ||
| + | *'''Allow Modify Email CSS''' - if checked, resellers will be able to set up custom email CSS sheme. | ||
| + | *'''Resellers Area Button''' - if checked, '' 'Reseller Area' '' button shows up in resellers' client area home page. | ||
| + | *'''Select Ticket Department For Reseller's Contacts''' - Allows you to define ticket department available for end-customers. | ||
| + | *'''Select Template For Reseller's Contacts''' - Allows you to define client area template of end-customers. | ||
|} | |} | ||
| − | |||
| − | |||
{| | {| | ||
| − | |style="padding: | + | |style="padding: 0px 0px 30px 25px;"|[[File:R_11.png]] |
| − | + | ||
| − | + | ||
|} | |} | ||
| − | == | + | |
| + | ===Migration Tool=== | ||
{| | {| | ||
| − | |style="padding: 10px 0px 20px 15px;"| | + | |style="padding: 10px 0px 20px 15px;"|Migration tool allows you to upgrade Resellers Center For WHMCS module to the latest version.<br /> |
| + | It's required due to completely new logic and as a result new database tables.<br /> | ||
| + | More information can be found [[#Migration_From_2.0.5_And_Earlier_To_2.5.0|here]]. | ||
|} | |} | ||
{| | {| | ||
| − | |style="padding: 0px 0px 30px 25px;"|[[File: | + | |style="padding: 0px 0px 30px 25px;"|[[File:R_13.png]] |
|} | |} | ||
| − | === | + | |
| + | ===Documentation=== | ||
{| | {| | ||
| − | |style="padding: 10px 0px | + | |style="padding: 10px 0px 20px 15px;"|By pressing '' 'Documentation', '' you will be redirected to Wiki article of Resellers Center For WHMCS. |
| − | + | ||
| − | + | ||
| − | + | ||
| − | + | ||
| − | + | ||
| − | + | ||
| − | + | ||
| − | + | ||
|} | |} | ||
{| | {| | ||
| − | |style="padding: 0px 0px 30px 25px;"|[[File: | + | |style="padding: 0px 0px 30px 25px;"|[[File:R_13_1.png]] |
|} | |} | ||
| − | == | + | ==Addon Management== |
{| | {| | ||
| − | |style="padding: 10px 0px 15px 15px;"| | + | |style="padding: 10px 0px 15px 15px;"|In order to grant any of your clients resellers' rights, you need to configure a group first.<br /> |
| − | To | + | To do so, proceed to '' 'Groups' '' tab, fill in a group name and press '' 'Save'.'' |
| − | + | ||
| − | + | ||
|} | |} | ||
{| | {| | ||
| − | |style="padding: 0px 0px 20px 25px;"|[[File: | + | |style="padding: 0px 0px 20px 25px;"|[[File:R_14.png]] |
|} | |} | ||
{| | {| | ||
| − | |style="padding: 0px 0px 15px 15px;"| | + | |style="padding: 0px 0px 15px 15px;"|As you can see, a new group appears on the list.<br /> |
| − | As you can see, | + | Press '' 'Manage' '' next to it in order to access its configuration. |
| − | + | ||
|} | |} | ||
{| | {| | ||
| − | |style="padding: 0px 0px 20px 25px;"|[[File: | + | |style="padding: 0px 0px 20px 25px;"|[[File:R_15.png]] |
|} | |} | ||
{| | {| | ||
| − | |style="padding: 0px 0px 15px 15px;"| | + | |style="padding: 0px 0px 15px 15px;"|A new group does not have any product configured.<br /> |
| − | + | Choose a new product from '' 'Add Product To Group' '' dropdown menu and press '' 'Save'.'' | |
| − | + | ||
|} | |} | ||
{| | {| | ||
| − | |style="padding: 0px 0px | + | |style="padding: 0px 0px 20px 25px;"|[[File:R_16.png]] |
|} | |} | ||
| − | |||
| − | |||
{| | {| | ||
| − | |style="padding: | + | |style="padding: 0px 0px 15px 15px;"|The product needs to be configured, Resellers Center For WHMCS enables you to define: |
| + | *'''The lowest price''' - minimum price which can be set for product | ||
| + | *'''The highest price''' - maximum price which can be set for product | ||
| + | *'''Admin price''' - suggested price for a product | ||
| + | *'''Counting type''' - defines a way of counting reseller earnings | ||
| + | *'''Profit percent''' - (if counting type uses it) percentage value granted to reseller for selling this product | ||
| + | *'''Profit value''' - (if counting type uses it) fixed value granted to reseller for selling this product | ||
| + | To confirm settings press '' 'Save' '' next to the product you have configured | ||
|} | |} | ||
{| | {| | ||
| − | |style="padding: 0px 0px 30px 25px;"|[[File: | + | |style="padding: 0px 0px 30px 25px;"|[[File:R_17.png]] |
|} | |} | ||
| − | === | + | ===Sales=== |
{| | {| | ||
| − | |style="padding: 10px 0px | + | |style="padding: 10px 0px 20px 15px;"|In '' 'Sales' '' tab, you can view all orders made by your resellers' contacts as well as all orders made by your resellers for their contacts. |
| − | + | ||
|} | |} | ||
{| | {| | ||
| − | |style="padding: 0px 0px 30px 25px;"|[[File: | + | |style="padding: 0px 0px 30px 25px;"|[[File:R_18.png]] |
|} | |} | ||
| − | === | + | ===Resellers=== |
{| | {| | ||
| − | |style="padding: 10px 0px 15px 15px;"| | + | |style="padding: 10px 0px 15px 15px;"|'' 'Resellers' '' tab displays all clients from your WHMCS system.<br /> |
| − | + | From here you can assign any of them to a reseller's group, which activates them as resellers.<br /> | |
| + | Additionally, this is the place to define discount for domains' prices. | ||
|} | |} | ||
{| | {| | ||
| − | |style="padding: 0px 0px | + | |style="padding: 0px 0px 30px 25px;"|[[File:R_19.png]] |
|} | |} | ||
| + | ===Contacts=== | ||
{| | {| | ||
| − | |style="padding: 0px | + | |style="padding: 10px 0px 15px 15px;"|In '' 'Contacts' '' tab you can manage your resellers' contacts.<br /> |
| + | Here you can enable/disable contacts as well as obtain more details about your customers and their contacts. | ||
|} | |} | ||
{| | {| | ||
| − | |style="padding: 0px 0px 20px 25px;"|[[File: | + | |style="padding: 0px 0px 20px 25px;"|[[File:R_20.png]] |
|} | |} | ||
{| | {| | ||
| − | |style="padding: 0px 0px | + | |style="padding: 0px 0px 20px 15px;"|Click on '' 'Manage' '' to view more information about contact's products and domains. |
| − | + | ||
|} | |} | ||
{| | {| | ||
| − | |style="padding: 0px 0px 20px 25px;"|[[File: | + | |style="padding: 0px 0px 20px 25px;"|[[File:R_21.png]] |
|} | |} | ||
{| | {| | ||
| − | |style="padding: 0px 0px 15px 15px;"| | + | |style="padding: 0px 0px 15px 15px;"|As you can see, all products, services and domains assigned to the reseller account are visible here.<br /> |
| − | + | Items assigned to chosen resellers' contact are highlighted in blue, items assigned to other contacts of the reseller are gray, products assigned to the reseller are black.<br /> | |
| + | This is the place to manage items assigned to end-client. | ||
|} | |} | ||
{| | {| | ||
| − | |style="padding: 0px 0px 20px 25px;"|[[File: | + | |style="padding: 0px 0px 20px 25px;"|[[File:R_22.png]] |
|} | |} | ||
{| | {| | ||
| − | |style="padding: 0px 0px 20px 15px;"| | + | |style="padding: 0px 0px 20px 15px;"|To obtain more information about contacts, simply click on '' 'Contact Name'.'' |
|} | |} | ||
{| | {| | ||
| − | |style="padding: 0px 0px 30px 25px;"|[[File: | + | |style="padding: 0px 0px 20px 25px;"|[[File:R_23.png]] |
| + | |} | ||
| + | {| | ||
| + | |style="padding: 0px 0px 20px 15px;"|From here you can manage the contacts and modify their permission. | ||
| + | |} | ||
| + | {| | ||
| + | |style="padding: 0px 0px 30px 25px;"|[[File:R_24.png]] | ||
|} | |} | ||
===Email Templates=== | ===Email Templates=== | ||
{| | {| | ||
| − | |style="padding: 10px 0px 15px 15px;"| | + | |style="padding: 10px 0px 15px 15px;"|This section allows you to define which email templates can be edited by your resellers.<br /> |
| − | Simply mark | + | Simply, mark checkboxes next to desired email templates to allow their branding and press '' 'Save Changes'.''<br /> |
| + | '' 'Note: Email templates modified by resellers are stored separately and do no harm to your email templates'.'' | ||
|} | |} | ||
{| | {| | ||
| − | |style="padding: 0px 0px 30px 25px;"|[[File: | + | |style="padding: 0px 0px 30px 25px;"|[[File:R_24_1.png]] |
|} | |} | ||
| − | == | + | |
| + | ==Client Area - Reseller== | ||
{| | {| | ||
| − | |style="padding: 10px 0px 15px 15px;"| | + | |style="padding: 10px 0px 15px 15px;"|In the client area your can add new subclients and access Reseller Area.<br /> |
| − | Access to | + | Access to the Reseller Area is granted only to those clients, whom reseller's groups are assigned to in Resellers Center For WHMCS module. |
| − | + | ||
| − | + | ||
| − | + | ||
|} | |} | ||
{| | {| | ||
| − | |style="padding: 0px 0px 30px 25px;"|[[File: | + | |style="padding: 0px 0px 30px 25px;"|[[File:R_25.png]] |
|} | |} | ||
| − | === | + | ===Adding a Contact=== |
{| | {| | ||
| − | |style="padding: 10px 0px | + | |style="padding: 10px 0px 20px 15px;"|In order to add a new contact, proceed to '' 'Contacts/Sub-Accounts' '' and choose '' 'Add New Contact'. '' |
|} | |} | ||
{| | {| | ||
| − | |style="padding: 0px 0px 20px 25px;"|[[File: | + | |style="padding: 0px 0px 20px 25px;"|[[File:R_26.png]] |
|} | |} | ||
{| | {| | ||
| − | |style="padding: 0px 0px | + | |style="padding: 0px 0px 15px 15px;"|Fill out contact details and tick '' 'Activate Sub-Account'. ''<br /> |
| + | Afterwards, fill in a password field for your contact, define account permission and email preferences.<br /> | ||
| + | Additionally, this is the place to provide end customer VIES/EU VAT ID (EU Companies Only). | ||
|} | |} | ||
{| | {| | ||
| − | |style="padding: 0px 0px | + | |style="padding: 0px 0px 30px 25px;"|[[File:R_27.png]] |
|} | |} | ||
| + | |||
| + | ===Reseller Area=== | ||
{| | {| | ||
| − | |style="padding: 0px | + | |style="padding: 10px 0px 30px 15px;"|In Reseller Area you can define products prices, set up branding, customize email templates and find branded links to order forms. |
|} | |} | ||
| + | |||
| + | ====Balance==== | ||
{| | {| | ||
| − | |style="padding: 0px | + | |style="padding: 10px 0px 15px 15px;"|Under this tab, you can view your balance, profit made, credit balance and redeem your profit into credit balance.<br /> |
| + | Besides that, it is the place to view the list of profits made by reselling to your contacts. | ||
|} | |} | ||
| − | |||
{| | {| | ||
| − | |style="padding: | + | |style="padding: 0px 0px 30px 25px;"|[[File:R_28.png]] |
| − | + | ||
|} | |} | ||
| + | |||
| + | ====Product Pricing==== | ||
{| | {| | ||
| − | |style="padding: 0px | + | |style="padding: 10px 0px 15px 15px;"|'' 'Product Pricing' '' tab enables you to define prices for products you wish to offer to your contacts.<br /> |
| + | Remember, you can define prices only within limits shown as placeholders.<br /> | ||
| + | If pricing is not provided, product will not be available for your contacts. | ||
|} | |} | ||
| − | |||
| − | |||
{| | {| | ||
| − | |style="padding: | + | |style="padding: 0px 0px 30px 25px;"|[[File:R_29.png]] |
|} | |} | ||
| + | ====Configuration==== | ||
{| | {| | ||
| − | |style="padding: 0px | + | |style="padding: 10px 0px 15px 15px;"|In '' 'Configuration' '' tab you are allowed to define your own company name, email signature and logo used across contact's client area, emails and invoices.<br /> |
| + | Additionally, this is the place to fill in the domain (or subdomain, depending on where you wish to point from), which you can resell products from. | ||
|} | |} | ||
{| | {| | ||
| − | |style="padding: 0px 0px | + | |style="padding: 0px 0px 20px 25px;"|[[File:R_30.png]] |
| − | + | ||
| − | + | ||
|} | |} | ||
{| | {| | ||
| − | |style="padding: 0px 0px | + | |style="padding: 0px 0px 30px 15px;"|To use your own domain, besides filling it into the '' 'Domain' '' field in your reseller area, you have to create a CNAME record to point from your domain.<br /> |
| + | It is the best solution to point from your subdomain, this way your main domain can be still edited by you.<br /> | ||
| + | For example, your subdomain is '''clients.reseller.com''' and WHMCS which you wish to resell products from is '''whmcs.domain.com'''.<br /> | ||
| + | In such a situation, your CNAME would be ''' 'clients.reseller.com. CNAME whmcs.domain.com.'.'''<br /> | ||
| + | '''Important:''' Don't skip any dot at the end of each domain name in your CNAME record. | ||
|} | |} | ||
| + | |||
| + | ====Order Links==== | ||
{| | {| | ||
| − | |style="padding: 0px | + | |style="padding: 10px 0px 15px 15px;"|As soon as you fill in a domain name and point from your domain to WHMCS client area, you can use links listed on this page on your own website.<br /> |
| + | Your clients will be able to use those links to order products. | ||
|} | |} | ||
{| | {| | ||
| − | |style="padding: 0px 0px | + | |style="padding: 0px 0px 30px 25px;"|[[File:R_31.png]] |
|} | |} | ||
| + | |||
| + | ====Email Templates==== | ||
{| | {| | ||
| − | |style="padding: 0px | + | |style="padding: 10px 0px 15px 15px;"|This is the place where you can view and edit email templates sent to your contacts.<br /> |
| + | To edit an email template, press '' 'Edit' '' button next to the template you wish to alter. | ||
|} | |} | ||
{| | {| | ||
| − | |style="padding: 0px 0px 30px 25px;"|[[File: | + | |style="padding: 0px 0px 20px 25px;"|[[File:R_32.png]] |
| + | |} | ||
| + | {| | ||
| + | |style="padding: 0px 0px 15px 15px;"|Finally, edit the email template to suit your needs and press '' 'Save' '' button.<br /> | ||
| + | ''Note: During this step you can easily add merge fields using dropdown menus marked on the following screen. | ||
| + | |} | ||
| + | {| | ||
| + | |style="padding: 0px 0px 30px 25px;"|[[File:R_33.png]] | ||
|} | |} | ||
| − | ==Ordering== | + | ===Ordering=== |
{| | {| | ||
| − | |style="padding: 10px 0px 30px 15px;"|There are three ways to add product to | + | |style="padding: 10px 0px 30px 15px;"|There are three ways to add a product to an end client account, we will show you all of them below. |
|} | |} | ||
| − | ===Assign Product by Reseller=== | + | ====Assign Product by Reseller==== |
{| | {| | ||
|style="padding: 10px 0px 15px 15px;"|Your resellers can place orders for their own customers as if the orders were for themselves.<br /> | |style="padding: 10px 0px 15px 15px;"|Your resellers can place orders for their own customers as if the orders were for themselves.<br /> | ||
| − | The only difference is that they need to choose a contact from | + | The only difference is that they need to choose a contact from '' 'Subclient' '' dropdown menu. And that is all! |
|} | |} | ||
{| | {| | ||
| − | |style="padding: 0px 0px 20px 25px;"|[[File: | + | |style="padding: 0px 0px 20px 25px;"|[[File:R_34.png]] |
|} | |} | ||
{| | {| | ||
| − | |style="padding: 0px 0px 15px 15px;"| | + | |style="padding: 0px 0px 15px 15px;"|Both your reseller and the end client will receive an order confirmation email.<br /> |
| − | Afterwards, when | + | Afterwards, when end client logs in to the WHMCS client area, he/she will be able to view and manage previously ordered products.<br /> |
| − | + | End clients can also list and pay invoices or create tickets (if these options are checked in the addon module). | |
|} | |} | ||
{| | {| | ||
| − | |style="padding: 0px 0px 30px 25px;"|[[File: | + | |style="padding: 0px 0px 30px 25px;"|[[File:R_35.png]] |
|} | |} | ||
| − | ===Access Order Through Link=== | + | |
| + | ====Access Order Through Link==== | ||
{| | {| | ||
| − | |style="padding: 10px 0px 15px 15px;"|Your resellers can | + | |style="padding: 10px 0px 15px 15px;"|Your resellers can use branded links to the product on their websites.<br /> |
| − | + | By using them, end-clients are forwarded directly to a product order form.<br /> | |
| + | ''Note: CNAME record is required in order to allow this step. You can find instruction [[#Configuration|here]].'' | ||
|} | |} | ||
{| | {| | ||
| − | |style="padding: 0px 0px 30px 25px;"|[[File: | + | |style="padding: 0px 0px 30px 25px;"|[[File:R_36.png]] |
|} | |} | ||
| − | ===Access Order From Client Area=== | + | ====Access Order From The Client Area==== |
{| | {| | ||
| − | |style="padding: 10px 0px 15px 15px;"|Your reseller's contacts can view order form with | + | |style="padding: 10px 0px 15px 15px;"|Your reseller's contacts can view order form with the list of products configured by their resellers.<br /> |
| − | Therefore your reseller's | + | Therefore your reseller's contacts can make orders on their own through using order forms in the client area. |
|} | |} | ||
{| | {| | ||
| − | |style="padding: 0px 0px 30px 25px;"|[[File: | + | |style="padding: 0px 0px 30px 25px;"|[[File:R_37.png]] |
|} | |} | ||
| − | ==Tickets Management == | + | ===Tickets Management=== |
{| | {| | ||
| − | |style="padding: 10px 0px 15px 15px;"|If you | + | |style="padding: 10px 0px 15px 15px;"|If you have not disabled tickets in your addon, your resellers will be able to reply and forward tickets created by their contacts.<br /> |
| − | It is only available for tickets department set in Resellers Center | + | It is only available for tickets department set in Resellers Center For WHMCS configuration. |
|} | |} | ||
{| | {| | ||
| − | |style="padding: 0px 0px 20px 25px;"|[[File: | + | |style="padding: 0px 0px 20px 25px;"|[[File:R_38.png]] |
|} | |} | ||
{| | {| | ||
| − | |style="padding: 0px 0px 20px 15px;"|On the screen below you can see ticket created by reseller's contact | + | |style="padding: 0px 0px 20px 15px;"|On the screen below you can see a ticket created by a reseller's contact from the client area. |
|} | |} | ||
{| | {| | ||
| − | |style="padding: 0px 0px 30px 25px;"|[[File: | + | |style="padding: 0px 0px 30px 25px;"|[[File:R_39.png]] |
| + | |} | ||
| + | |||
| + | ==Client Area - End Client== | ||
| + | {| | ||
| + | |style="padding: 10px 0px 15px 15px;"|End client sees branded client area, email templates and invoices. | ||
| + | |} | ||
| + | {| | ||
| + | |style="padding: 0px 0px 20px 25px;"|[[File:R_40.png]] | ||
| + | |} | ||
| + | {| | ||
| + | |style="padding: 10px 0px 15px 15px;"|Besides that, he can view his profile in order to edit his information.<br /> | ||
| + | Additionally, this is the place to fill in their VIES/EU VAT. | ||
| + | |} | ||
| + | {| | ||
| + | |style="padding: 0px 0px 20px 25px;"|[[File:R_41.png]] | ||
| + | |} | ||
| + | |||
| + | ==General Relations== | ||
| + | {| | ||
| + | |style="padding: 10px 0px 20px 15px;"|'''Relations between Provider, Reseller and Client''' | ||
| + | |} | ||
| + | {| | ||
| + | |style="padding: 0px 0px 15px 15px;"|'''Payment system:'''<br/> | ||
| + | In general Reseller receives a product from the Provider and then provides it further to the End Client.<br/> | ||
| + | The payment is regulated between the Reseller and Provider and Reseller and End Client exclusively. | ||
| + | |} | ||
| + | {| | ||
| + | |style="padding: 0px 0px 15px 15px;"|'''Invoicing system:'''<br/> | ||
| + | A standard WHMCS mechanism can be used and '' 'Disable Invoices' '' option turned on in the module settings (read more [http://www.docs.modulesgarden.com/Resellers_Center_For_WHMCS#Module_Settings here]).<br/> | ||
| + | Since End Clients are in practice Reseller's Contacts, they are able to view Reseller's invoices.<br/> | ||
| + | This will allow them to regulate the payments directly to a Provider. | ||
| + | |} | ||
| + | |||
| + | ==Migration From 2.0.5 And Earlier To 2.5.0== | ||
| + | {| | ||
| + | |style="padding: 10px 0px 30px 15px;"|Resellers Center For WHMCS 2.5.0 introduces completely rewritten logic and code.<br /> | ||
| + | We tore the module down, thought it over, and put it back together as a completely new module adding a lot of new ideas and solutions.<br /> | ||
| + | Consequently, additional steps are required in order to upgrade Resellers Center For WHMCS to version 2.5.0.<br /> | ||
| + | #Both old and new versions have to be activated in the same time. Deactivating the old module will result in losing all information about previous configuration. | ||
| + | #Use migration tool to squeeze as much information from configuration of a previous version as possible. Additionally, it will deactivate the old module. | ||
| + | #Copy '' 'license.php' '' file from '' 'your_whmcs\modules\addons\mg_resellers' '' to '' 'your_whmcs\modules\addons\ResellersCenter'. '' | ||
| + | #Configure products prices inside of resellers groups under '' 'Addons' '' → '' 'Resellers Center' '' → '' 'Groups'.'' | ||
| + | #Ensure all resellers are correctly assigned to groups under '' 'Addons' '' → '' 'Resellers Center' '' → '' 'Resellers'.'' | ||
| + | #Ask resellers to upload their logos once more. | ||
| + | |} | ||
| + | ===Removing Old Files (Optional)=== | ||
| + | {| | ||
| + | |style="padding: 10px 0px 30px 15px;"|Here, the list of old files used by a previous version of Resellers Center For WHMCS is shown.<br /> | ||
| + | You may restore/remove them, because the latest version of Resellers Center For WHMCS will not use them.<br /> | ||
| + | *Restore following template files to its form from before the integration with the first version of Resellers Center Fro WHMCS (optional): | ||
| + | **index.php | ||
| + | **clientareaaddcontact.tpl | ||
| + | **clientareacontacts.tpl | ||
| + | *Remove following template files: | ||
| + | **mg_resellers_invoicepdf.php | ||
| + | **mg_resellers_viewinvoice.php | ||
| + | **edit_ticket.tpl | ||
| + | *Remove folder '' 'mg_resellers' '' located under '' 'your_whmcs\modules\addons\'. '' | ||
| + | *Remove file '' 'class.ModulesGarden.php' '' located under '' 'your_whmcs\includes\'. '' '''Caution: This file may be used by other ModulesGarden products.''' | ||
|} | |} | ||
=Tips= | =Tips= | ||
{| | {| | ||
| − | |style="padding: 10px 0px | + | |style="padding: 10px 0px 10px 15px;"|'''1. You can create a hidden product group visible only for your resellers and their clients.'''<br /> |
| − | To do so, create hidden product groups | + | To do so, create hidden product groups containing products available for resellers.<br /> |
| − | Afterwards, just assign | + | Afterwards, just assign the product group to the client group in your Resellers Center addon → '' 'Configuration' '' tab (assignment is shown on the 3nd screen of [http://www.docs.modulesgarden.com/Resellers_Center_For_WHMCS#Addon_Management this section]). |
|} | |} | ||
{| | {| | ||
| − | |style="padding: 0px 0px 30px 15px;"|2. '' ' | + | |style="padding: 0px 0px 30px 15px;"|'''2. If your WHMCS is installed in a subdirectory, your resellers using CNAME record must provide their links with it.'''<br /> |
| − | + | For example, '''reseller.com/main-whmcs-directory''' instead of '''reseller.com.'''.<br /> | |
| − | + | You can change that behaviour through adding the below code to ''.htaccess'' file: | |
| + | RewriteEngine on | ||
| + | RewriteCond %{HTTP_HOST} !^'''main-whmcs-domain.com'''$ [NC] | ||
| + | RewriteCond %{REQUEST_URI} !^/'''whmcs-directory'''/ | ||
| + | RewriteRule ^(.*)$ /'''whmcs-directory'''/$1 [R=301,L] | ||
| + | ''Result: If hostname is not '''main-whmcs-domain.com'' and path is not '''whmcs-directory''', then redirect to resellers domain with '''/whmcs-directory'''.'' | ||
|} | |} | ||
=Common Problems= | =Common Problems= | ||
{| | {| | ||
| − | |style="padding: 10px 0px 10px 15px;"|1. When you have problems with connection, check whether your SELinux or firewall | + | |style="padding: 10px 0px 10px 15px;"|'''1. When you have problems with connection, check whether your SELinux or firewall does not block ports.''' |
| + | |} | ||
| + | {| | ||
| + | |style="padding: 0px 0px 10px 15px;"|2. When you use https on main WHMCS and your reseller passes non-https domain, the end client will see a warning message from browser that the certificates do not match. | ||
| + | |} | ||
| + | {| | ||
| + | |style="padding: 0px 0px 10px 15px;"|3. If your contact's invoices are paid from reseller's credit balance, ensure you have marked '' 'Disable Auto Credit Applying'. ''<br /> | ||
| + | This option can be found under '' 'Setup' '' → '' 'General Settings' '' → '' 'Invoices' ''. | ||
| + | |} | ||
| + | {| | ||
| + | |style="padding: 0px 0px 10px 15px;"|4. '''Resellers Center For WHMCS is not fully compatible with our Multibrand For WHMCS module.'''<br/> | ||
| + | If you have Multibrand installed on you system as well, you may encounter some issues connected with configuring domains. <br/> | ||
| + | ''Note! Reseller may use brands' domains assigned to a client, but cannot [http://www.docs.modulesgarden.com/Resellers_Center_For_WHMCS#Configuration configure] their own domain due to Multibrand module's functionality.'' | ||
|} | |} | ||
{| | {| | ||
| − | |style="padding: 0px 0px 30px 15px;"| | + | |style="padding: 0px 0px 30px 15px;"|'''5. Please remember that Resellers Center For WHMCS works flawlessly with the officially supported and pointed in features list templates.<br/> |
| + | These are: ''Template 'Six' '' and '' 'Five'.''<br/> In case you are using some custom template, you must be aware that unexpected errors might occur and we cannot take the responsibility for solving them. | ||
|} | |} | ||
Latest revision as of 15:06, 28 June 2017
Contents |
[edit] About Resellers Center For WHMCS
| Resellers Center For WHMCS gives your resellers the possibility to manage end-clients and their orders through WHMCS! With this module, your resellers will be allowed to acquire their own customers and assign products, services and domains to them. |
- General Features:
| ✔ Define Global Configuration And Reseller Permissions |
| ✔ Define Email Templates Available For Rebranding |
| ✔ Define Ticket Department Available For End-Clients |
| ✔ Create & Manage Reseller Groups |
| ✔ Assign Products To Reseller Groups |
| ✔ Define Price Limits And Profit Counting Per Product |
| ✔ Allow Clients To Start Reselling Through Assigning Them To Reseller Groups |
| ✔ Define Domains Discount Per Reseller |
| ✔ View End-Clients As Contacts And Manage Assignment Of Their Products And Domains |
| ✔ View Reseller Profit Earned From Each End-Client Order |
| ✔ VIES Based EU VAT Removal For End-Clients |
| ✔ Define Resellers Branding Permissions |
- Resellers Features:
| ✔ Create And Manage End-Clients As Contacts |
| ✔ Define Permissions Of End-Clients |
| ✔ Create End-Client Account During Order Creation |
| ✔ Order Products On Behalf Of End-Clients |
| ✔ View Current Balance, Total Profit Made And Credit Balance |
| ✔ Redeem Credit Balance From Current Balance |
| ✔ View Profit Generated By Each Transaction Made By End-Clients |
| ✔ Define Prices Per Product Within Defined Limits |
| ✔ Configure Reseller Brand - Domain, Company Name, Email Signature And Logo |
| ✔ Domain |
| ✔ Company Name |
| ✔ Email Address |
| ✔ Email Signature |
| ✔ Email CSS Schema |
| ✔ Logo |
| ✔ Access Branded Order Links - CNAME Record Is Required |
| ✔ View Email Templates And Modify Them Using Improved Email Templates Editor |
| ✔ Reply To Tickets Of End-Clients |
- End-Client (Contact) Features:
| ✔ Order Products/Domains |
| ✔ View And Pay Invoices |
| ✔ View And Manage Products |
| ✔ Receive Branded Email Templates |
| ✔ Open And Manage Tickets |
| ✔ Use End-Client Details For Registered Domains |
- General Info:
| ✔ Migration Tool |
| ✔ Multi-Language Support |
| ✔ Supports PHP 5.3 Up To PHP 7 |
| ✔ Supports WHMCS Templates Five and Six |
| ✔ Supports WHMCS V6 and V7 |
[edit] Installation
| Installation of Resellers Center For WHMCS requires a few simple modifications of the template files. No worries, we will guide you step by step through the entire installation process. |
[edit] Installation
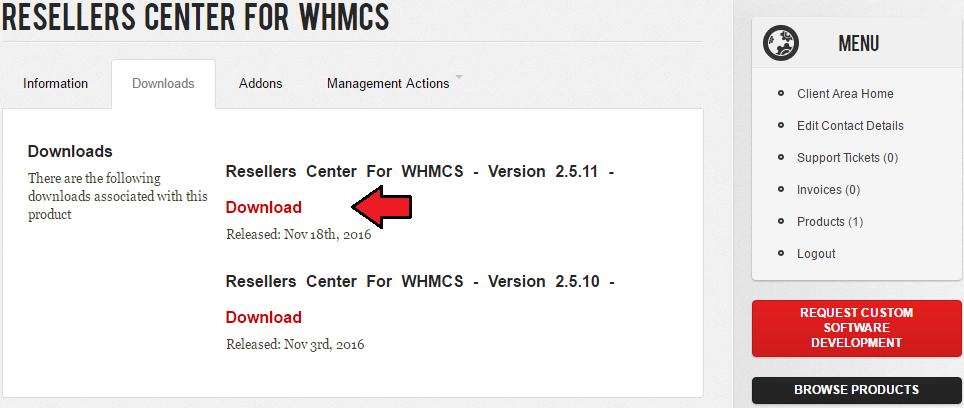
| 1. Log in to your client area and download Resellers Center For WHMCS Module. |
|
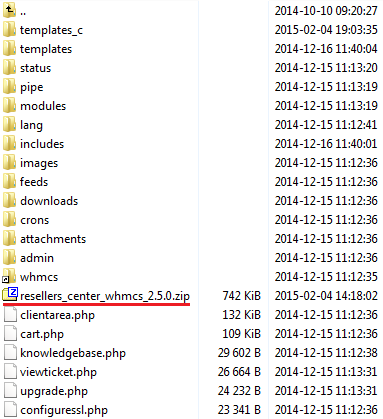
| 2. Upload and extract the module into the main WHMCS directory. Files in your WHMCS directory should look like these. |
|
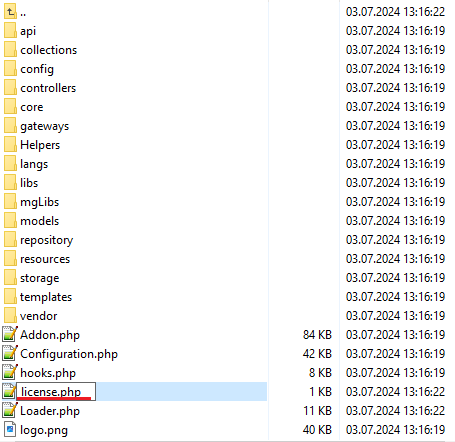
| 3. When you install Resellers Center module for the first time you have to rename 'license_RENAME.php' file. File is located in 'modules/addons/ResellersCenter/license_RENAME.php'. Rename it from 'license_RENAME.php' to 'license.php'. |
|
| 4. In order to configure your license key you have to edit a previously renamed 'license.php' file. Enter your license key between quotation marks as presented on the following screen. |

|
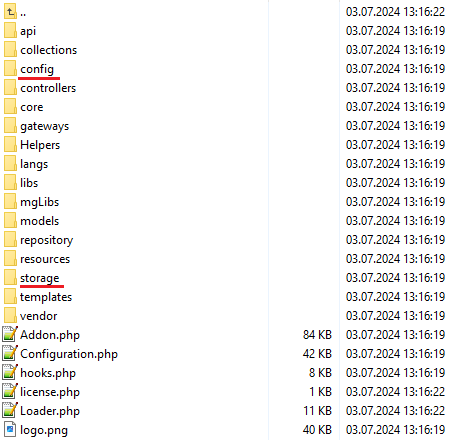
| 5. The next step is setting up 'storage' folder as writable. It is located in 'your_whmcs/modules/addons/ResellersCenter/'. |
|
[edit] Activation Of Addon
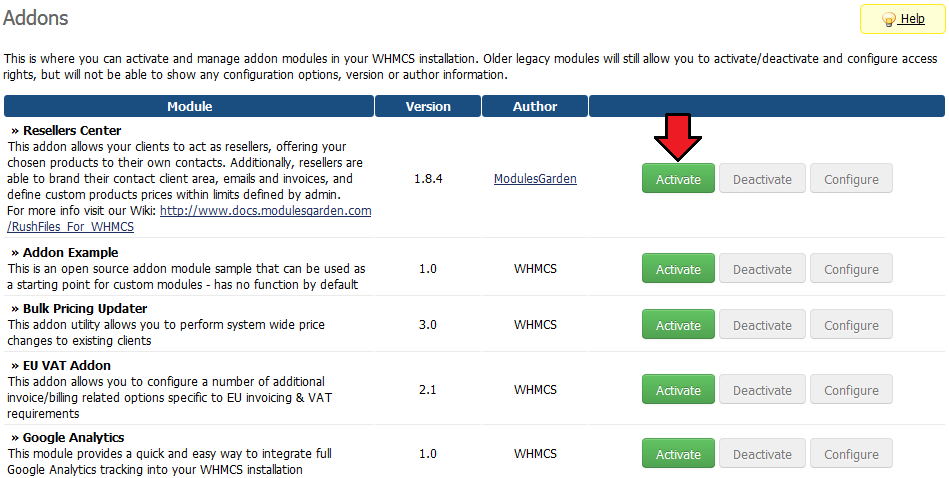
| 6. Now, you have to activate the module in your WHMCS system. Log in to your WHMCS admin area. Click 'Setup' then choose 'Addon Modules'. |
|
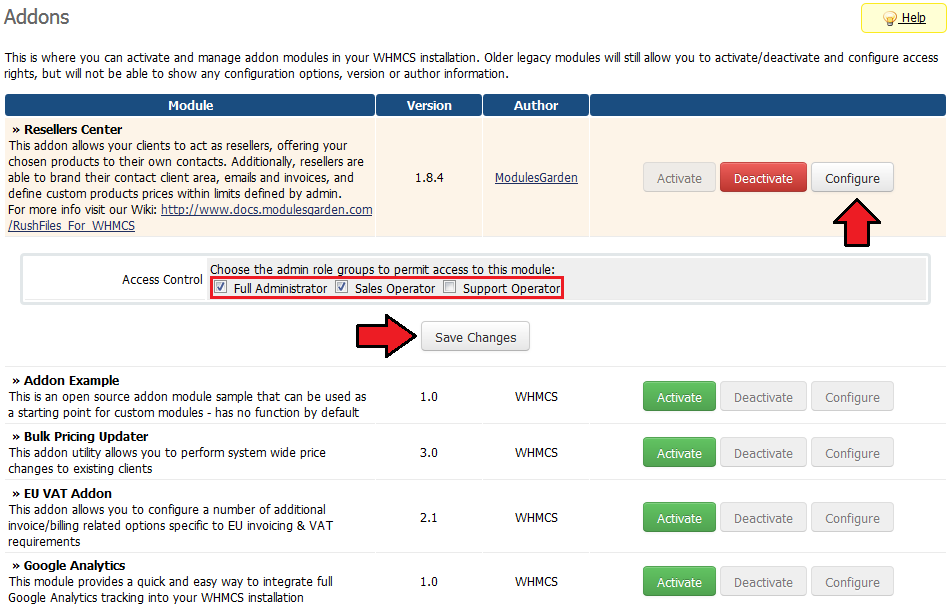
| 7. In the next step, you need to permit access to the module. To do so, select admin roles which should have access to the module and press 'Save Changes'. |
|
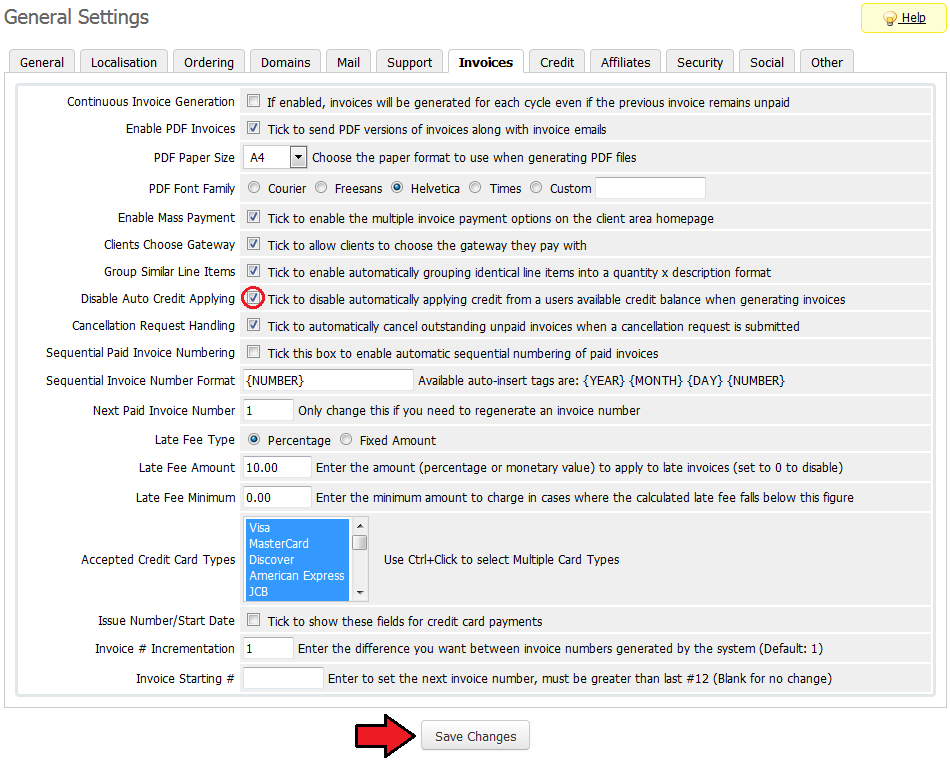
| 8. It is required to disable auto applying credits. Otherwise, orders made by resellers' clients will be automatically paid using credits from the reseller's account. |
|
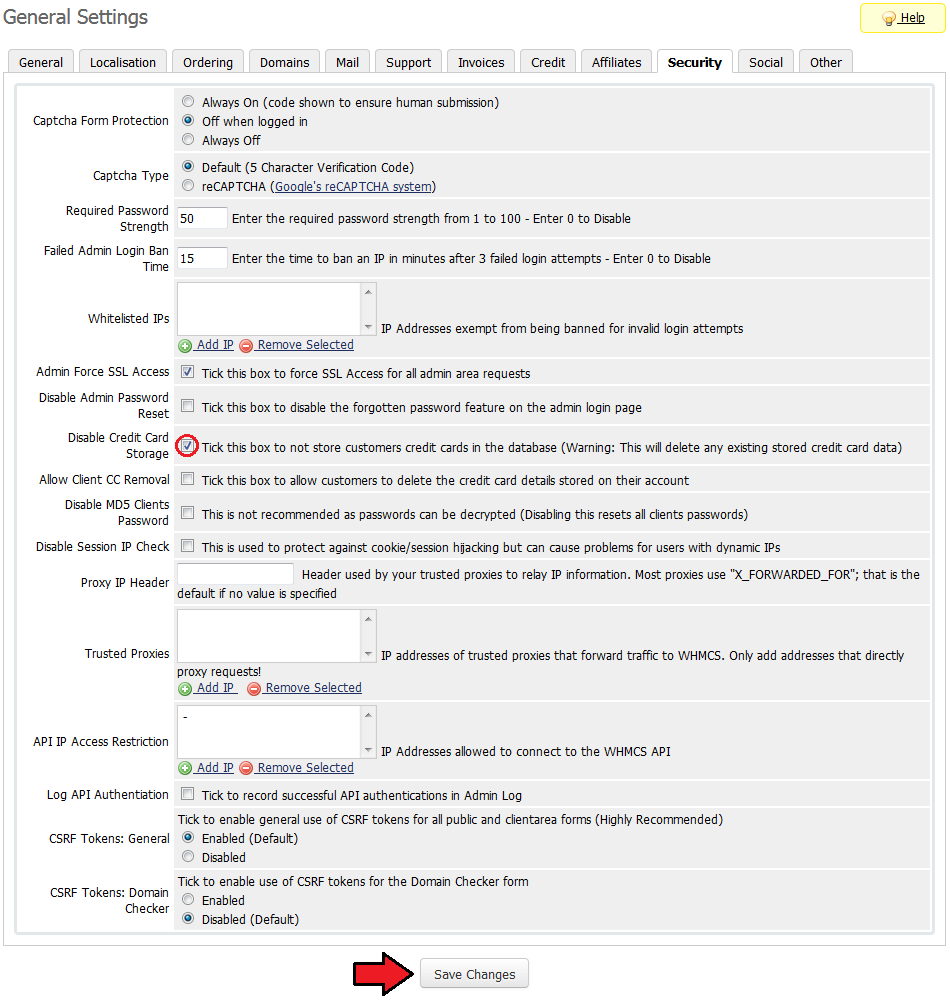
| 9. It is required to disable credit card storage. (optional) Otherwise, credit card details provided by one contact can be accessed by other contact of the same reseller. |
|
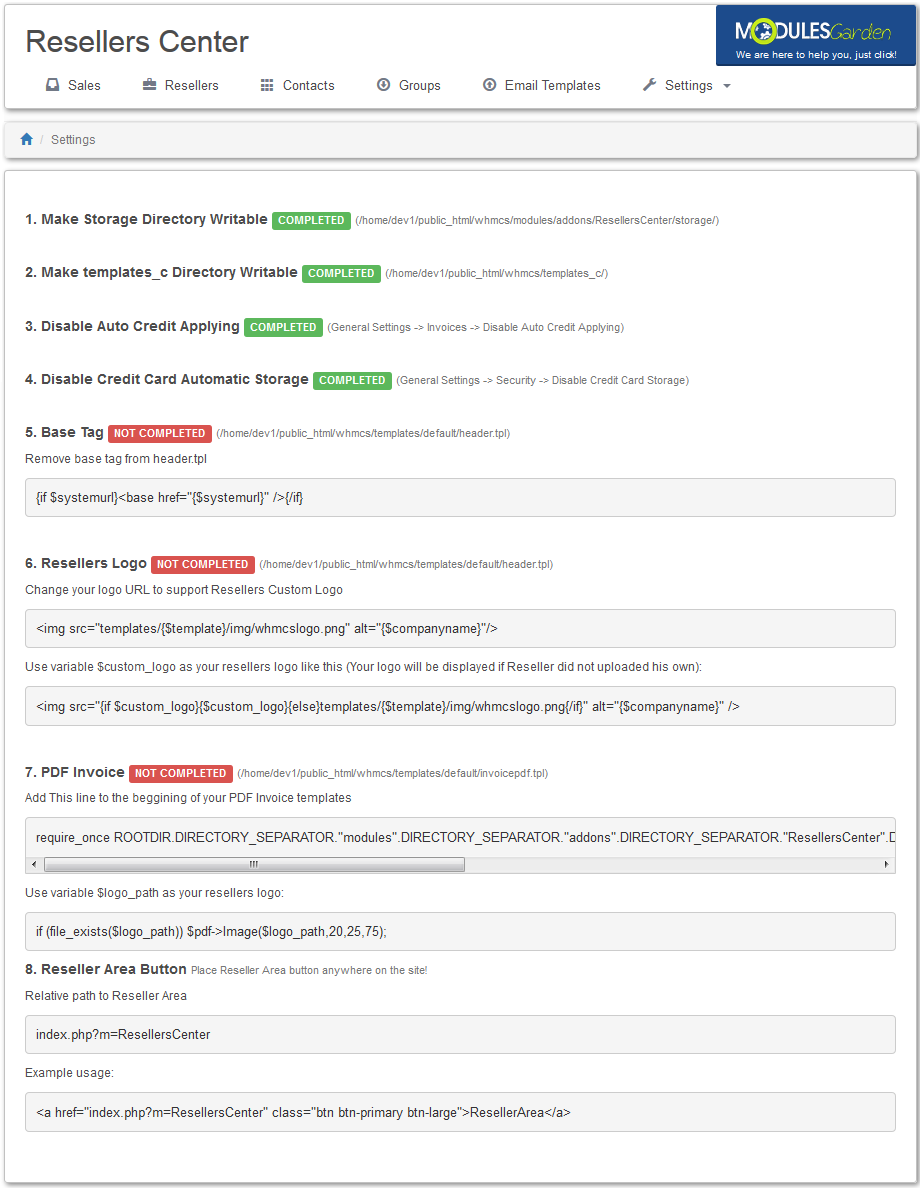
| 10. Afterwards, go to 'Addons' → 'Resellers Center' → 'Settings' → 'Integration Code' and follow the instructions. |
|
| 11. You have just successfully installed Resellers Center For WHMCS! |
[edit] Management and Configuration
| Management of Resellers Center For WHMCS is very convenient. You can supervise everything from the addon. What is more, the module extends possibilities of both your resellers and their customers. |
[edit] Settings
| In this section you can find more information about global configuration. Additionally, here you can find a direct link to module documentation as well as migration tool. |
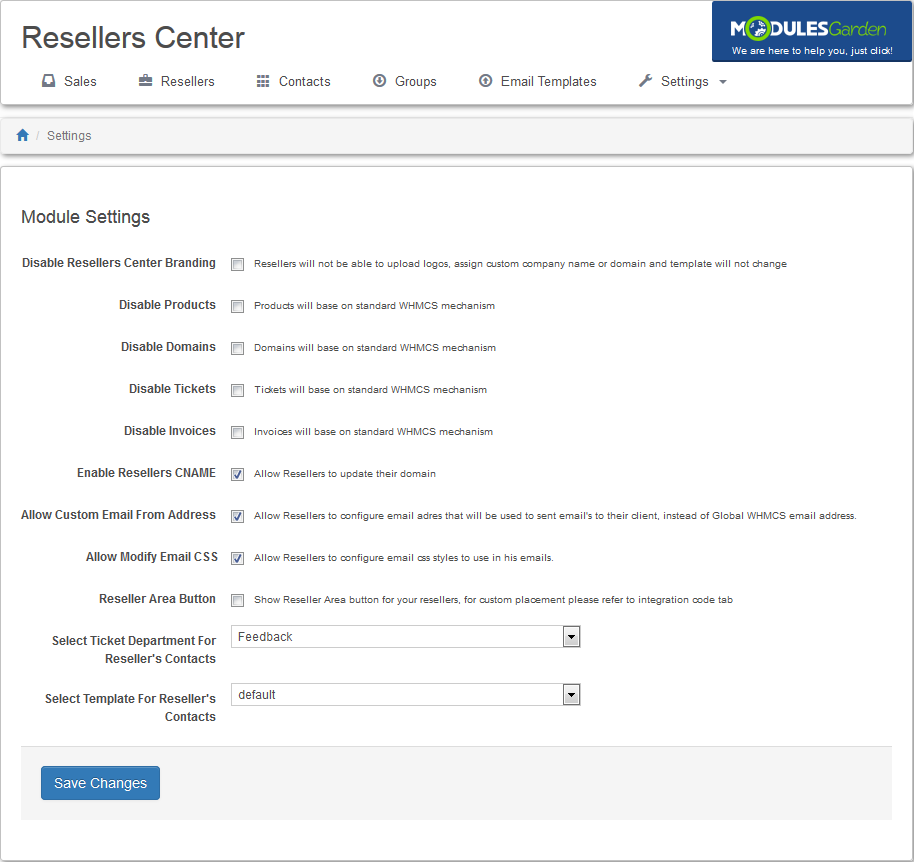
[edit] Module Settings
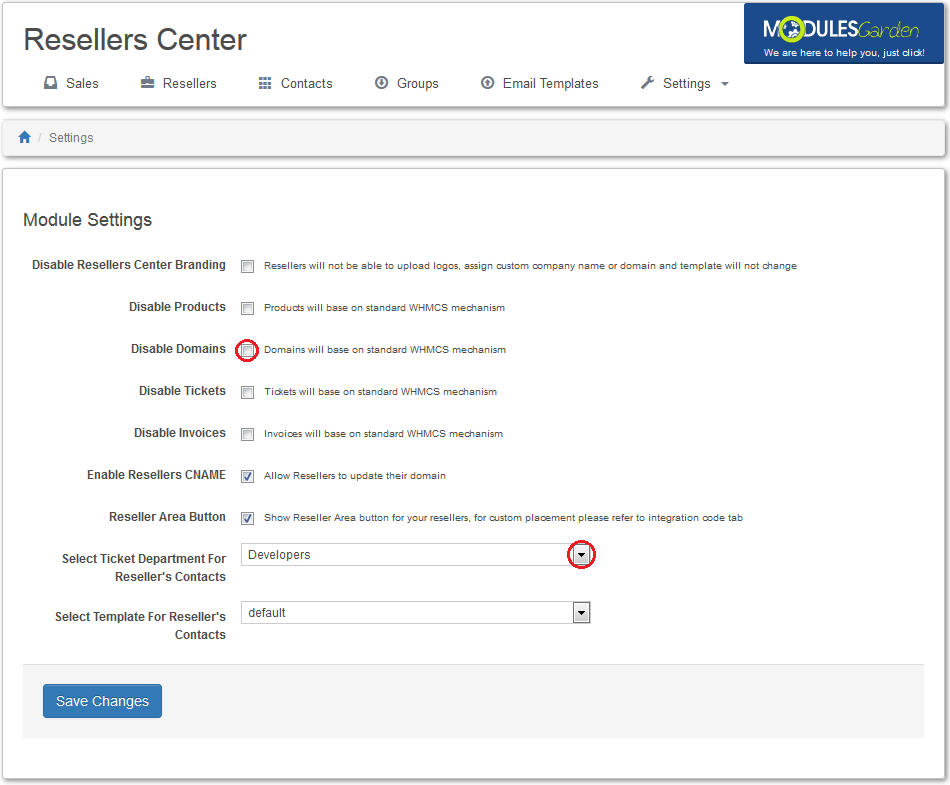
In 'Module Settings' tab you can set up global settings of the module.
Enables them to offer your products from within their domain.
|
|
[edit] Migration Tool
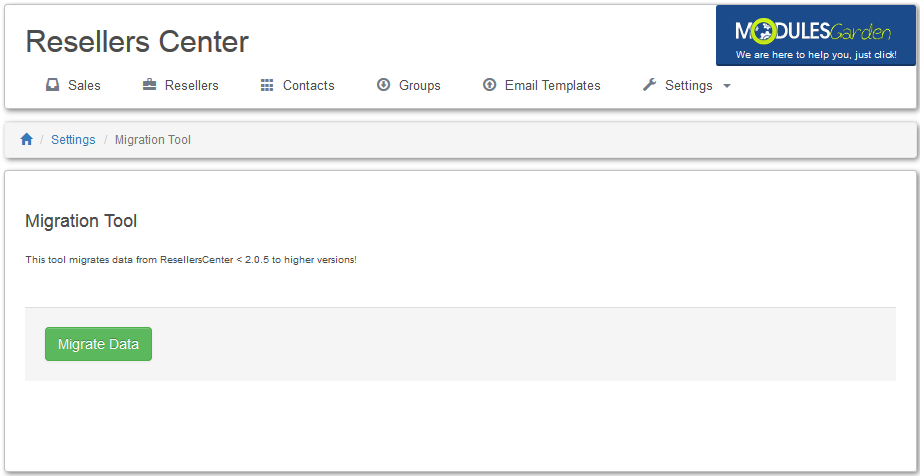
| Migration tool allows you to upgrade Resellers Center For WHMCS module to the latest version. It's required due to completely new logic and as a result new database tables. |
|
[edit] Documentation
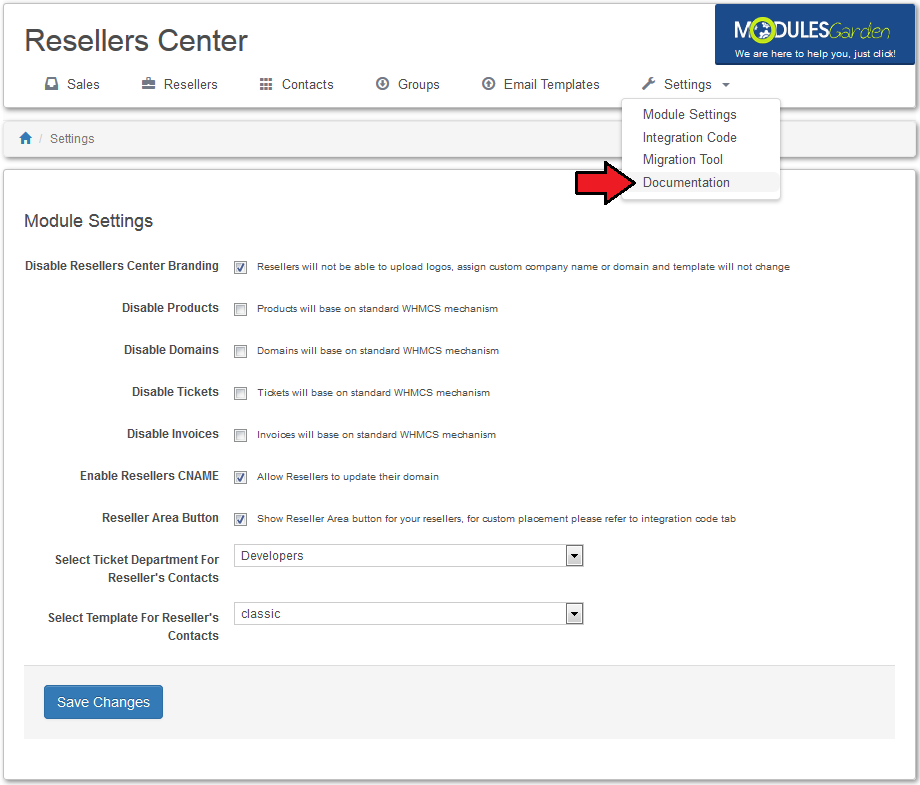
| By pressing 'Documentation', you will be redirected to Wiki article of Resellers Center For WHMCS. |
|
[edit] Addon Management
| In order to grant any of your clients resellers' rights, you need to configure a group first. To do so, proceed to 'Groups' tab, fill in a group name and press 'Save'. |
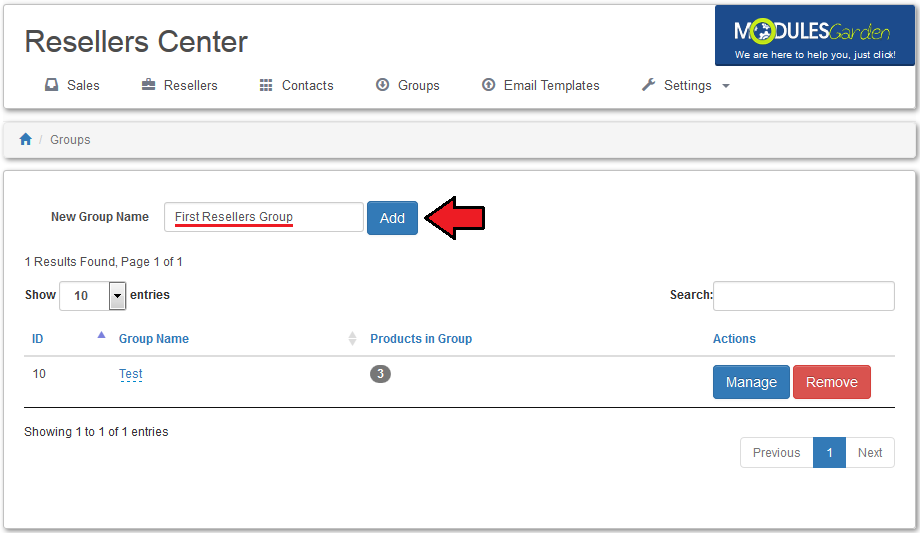
|
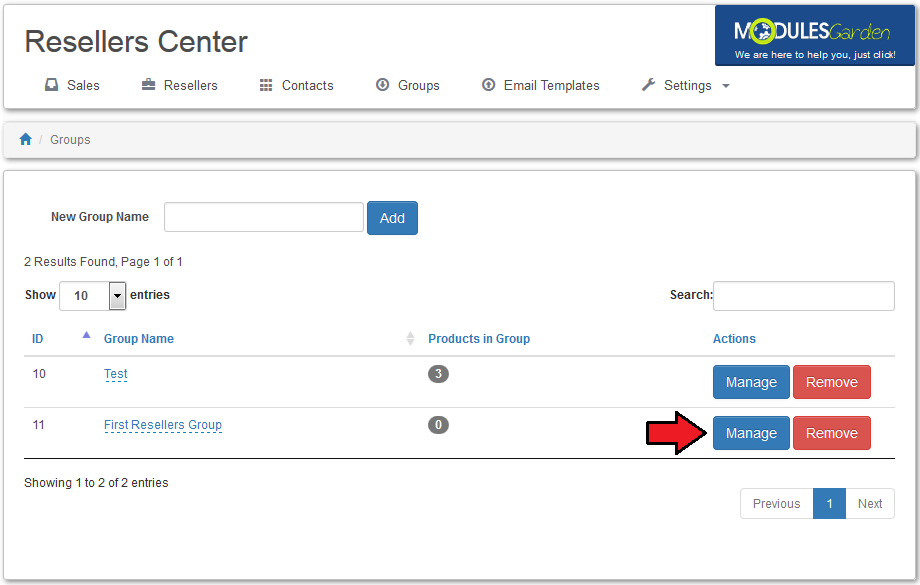
| As you can see, a new group appears on the list. Press 'Manage' next to it in order to access its configuration. |
|
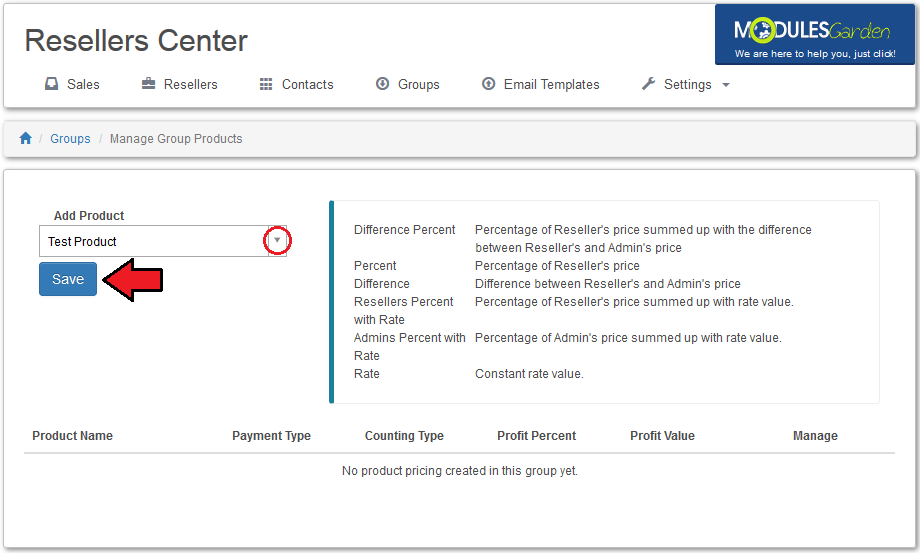
| A new group does not have any product configured. Choose a new product from 'Add Product To Group' dropdown menu and press 'Save'. |
|
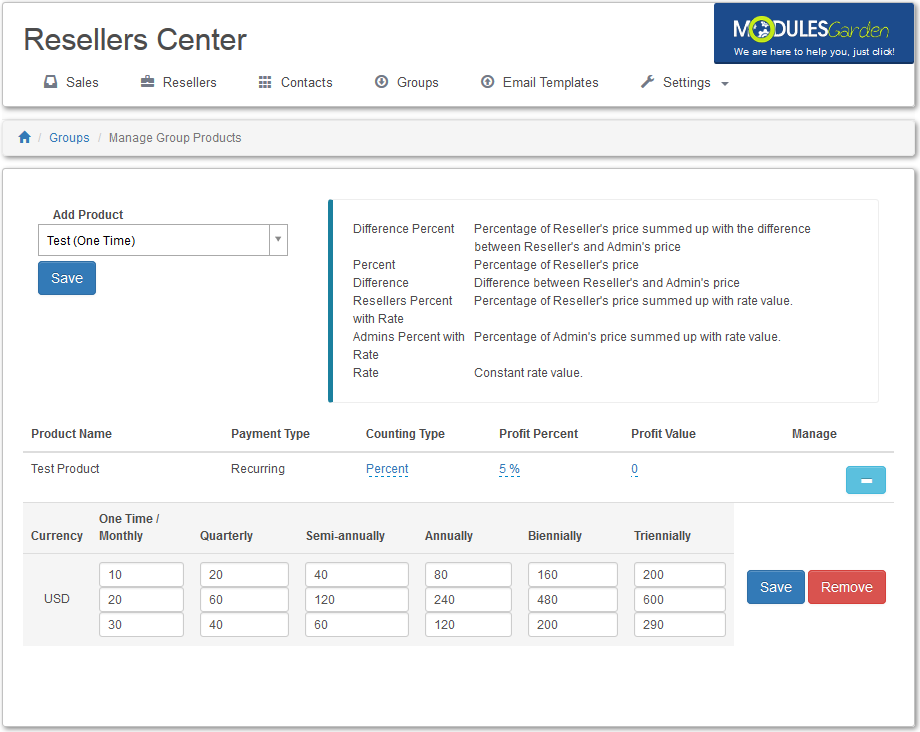
The product needs to be configured, Resellers Center For WHMCS enables you to define:
To confirm settings press 'Save' next to the product you have configured |
|
[edit] Sales
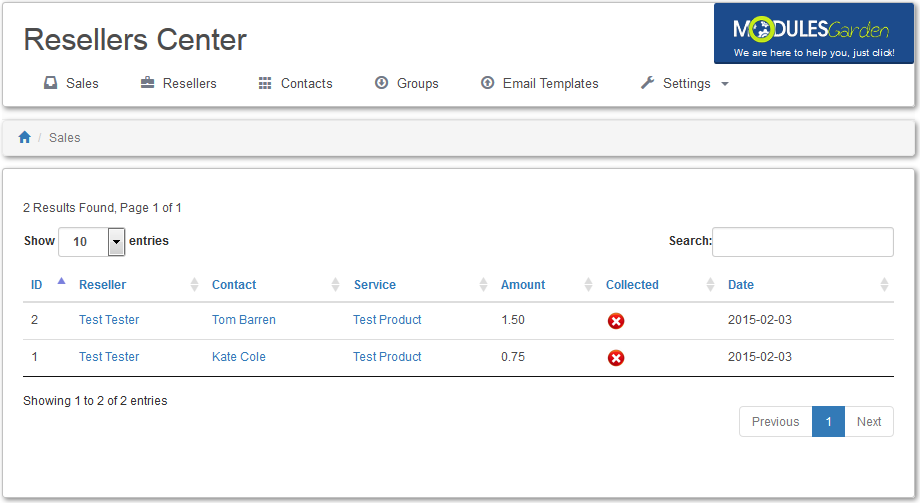
| In 'Sales' tab, you can view all orders made by your resellers' contacts as well as all orders made by your resellers for their contacts. |
|
[edit] Resellers
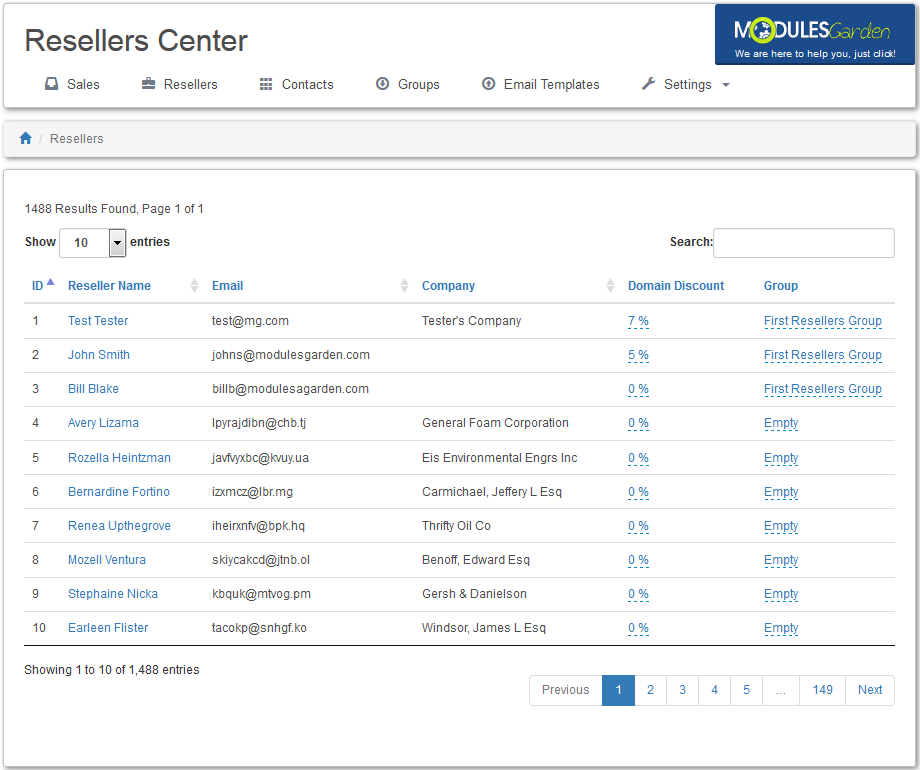
| 'Resellers' tab displays all clients from your WHMCS system. From here you can assign any of them to a reseller's group, which activates them as resellers. |
|
[edit] Contacts
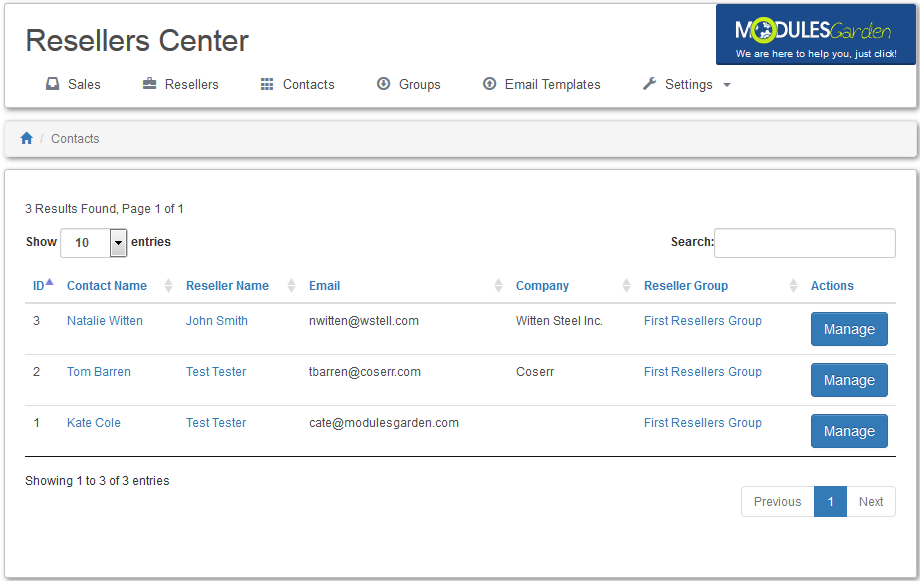
| In 'Contacts' tab you can manage your resellers' contacts. Here you can enable/disable contacts as well as obtain more details about your customers and their contacts. |
|
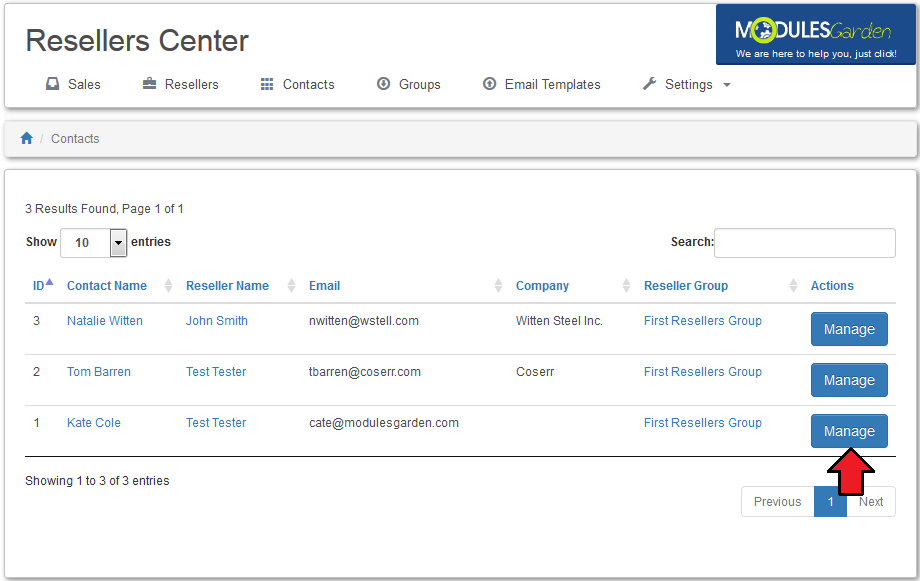
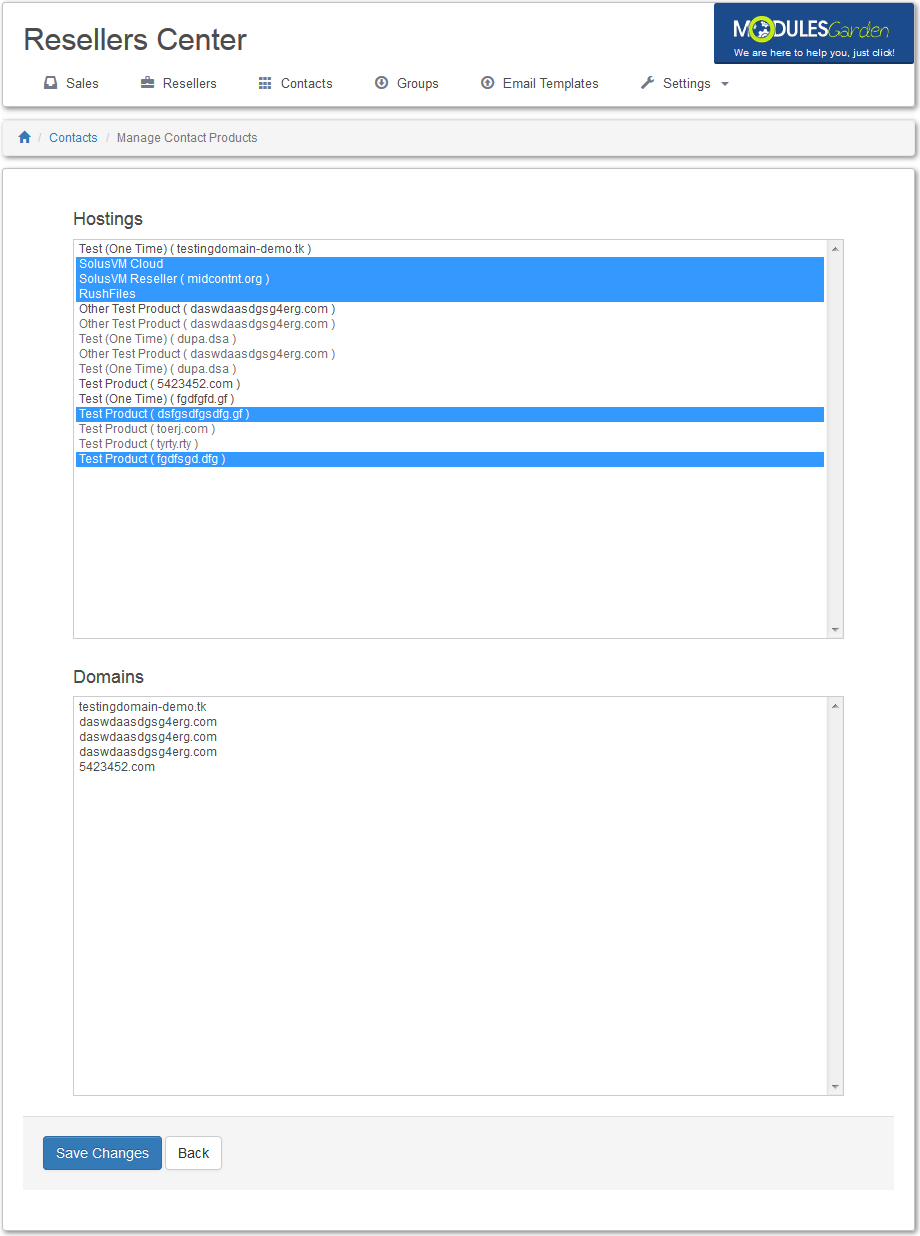
| Click on 'Manage' to view more information about contact's products and domains. |
|
| As you can see, all products, services and domains assigned to the reseller account are visible here. Items assigned to chosen resellers' contact are highlighted in blue, items assigned to other contacts of the reseller are gray, products assigned to the reseller are black. |
|
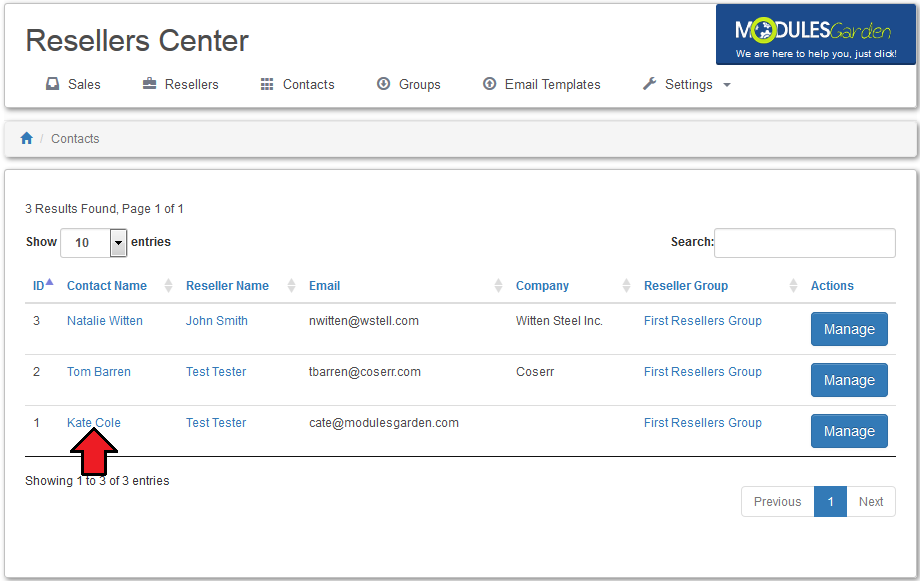
| To obtain more information about contacts, simply click on 'Contact Name'. |
|
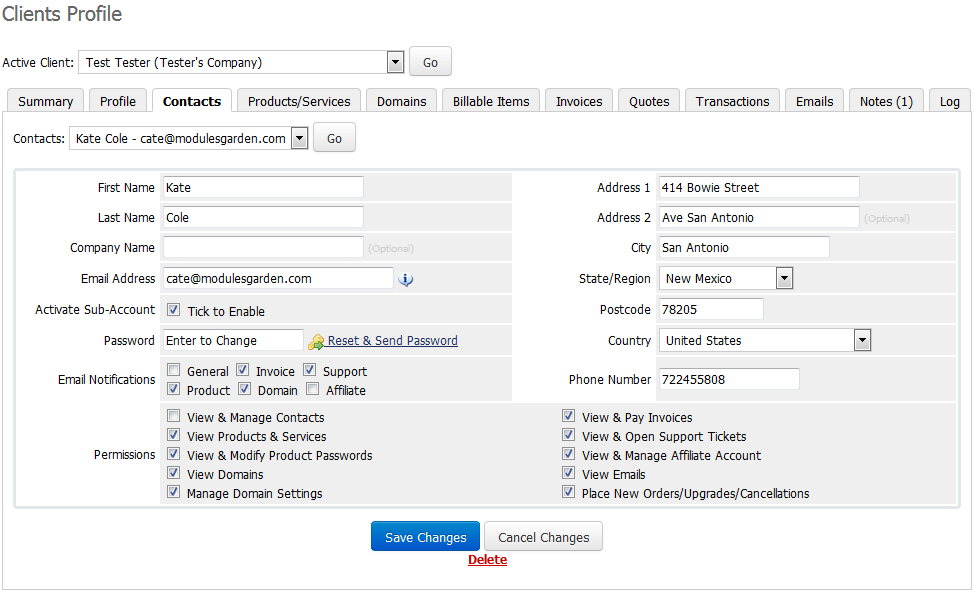
| From here you can manage the contacts and modify their permission. |
|
[edit] Email Templates
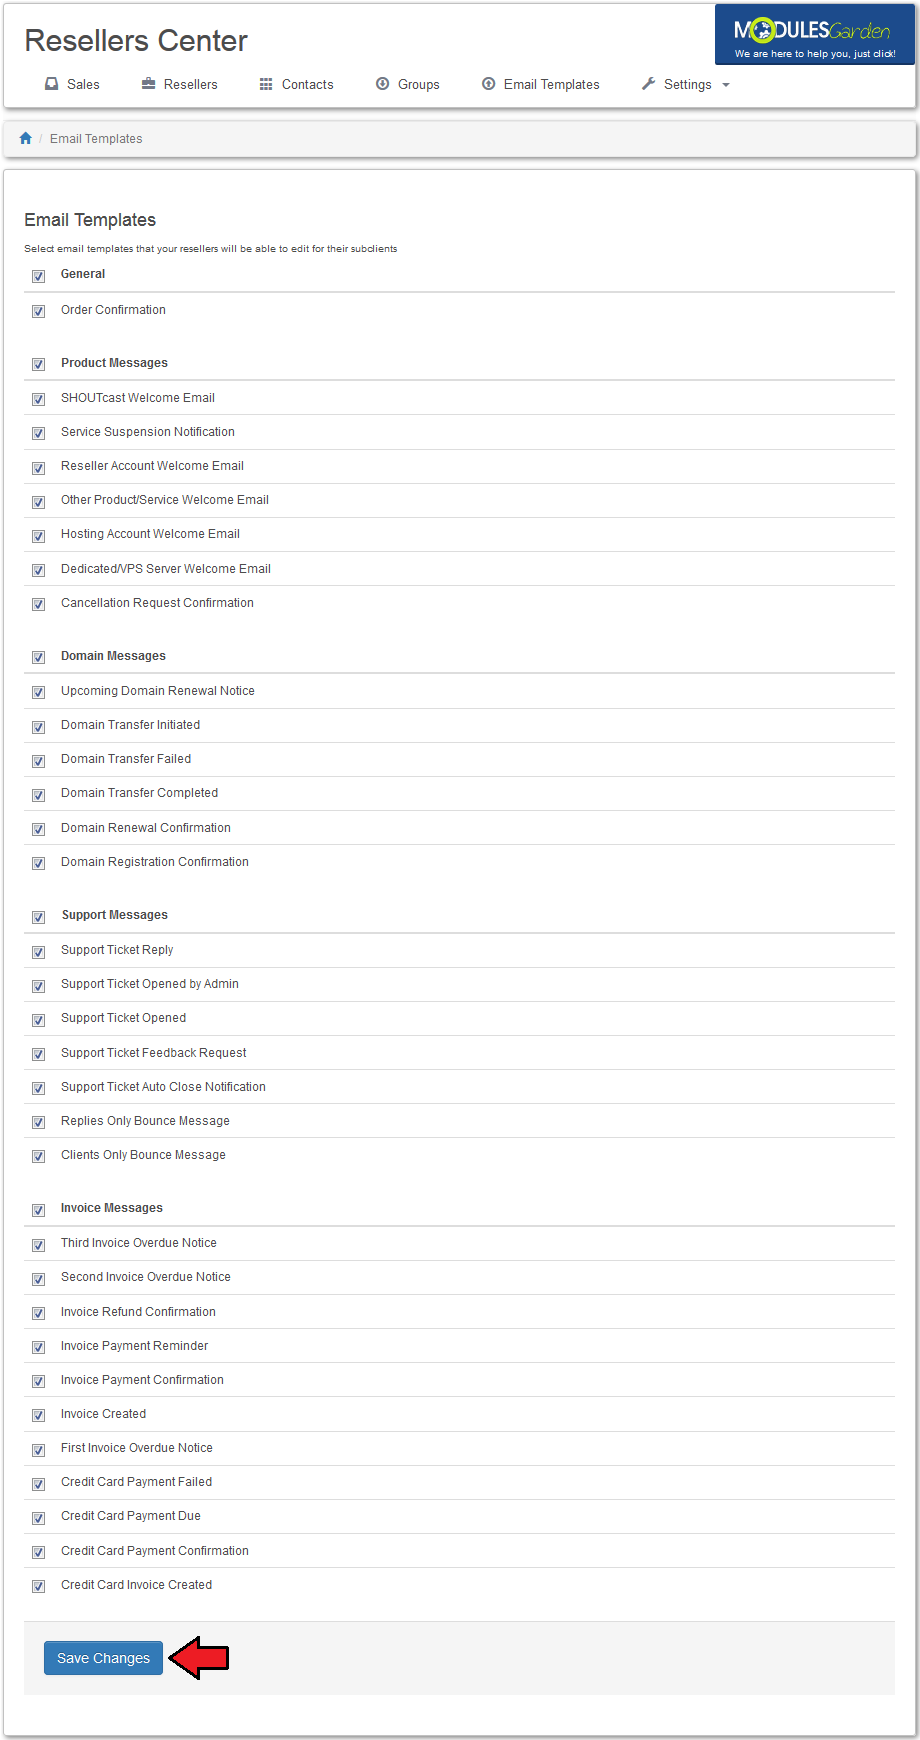
| This section allows you to define which email templates can be edited by your resellers. Simply, mark checkboxes next to desired email templates to allow their branding and press 'Save Changes'. |
|
[edit] Client Area - Reseller
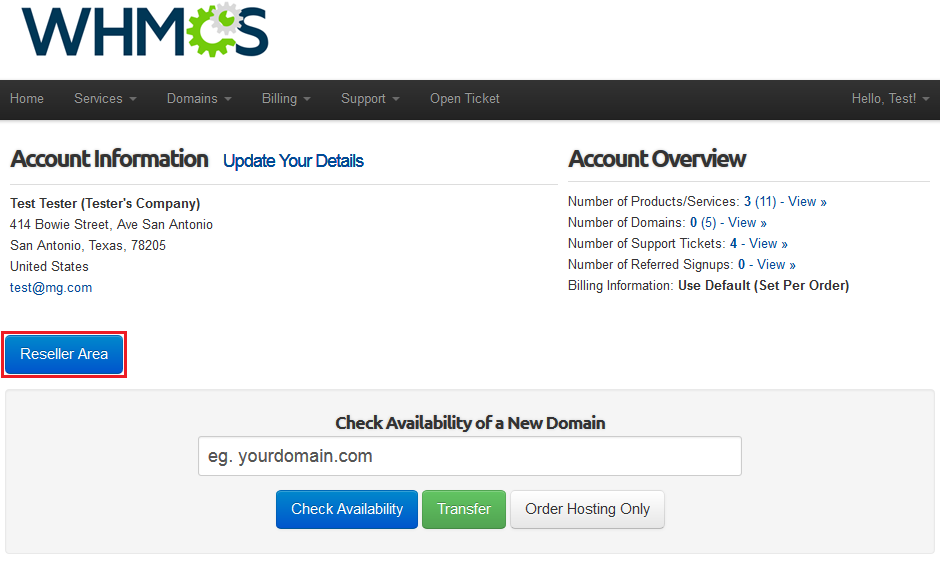
| In the client area your can add new subclients and access Reseller Area. Access to the Reseller Area is granted only to those clients, whom reseller's groups are assigned to in Resellers Center For WHMCS module. |
|
[edit] Adding a Contact
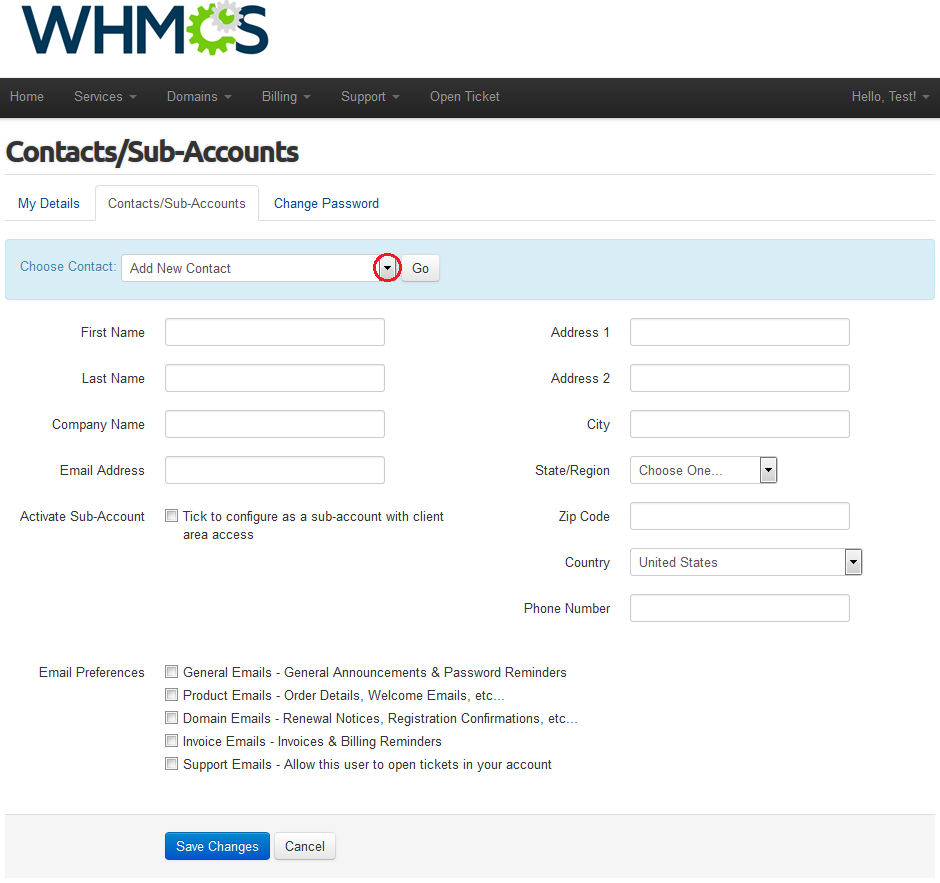
| In order to add a new contact, proceed to 'Contacts/Sub-Accounts' and choose 'Add New Contact'. |
|
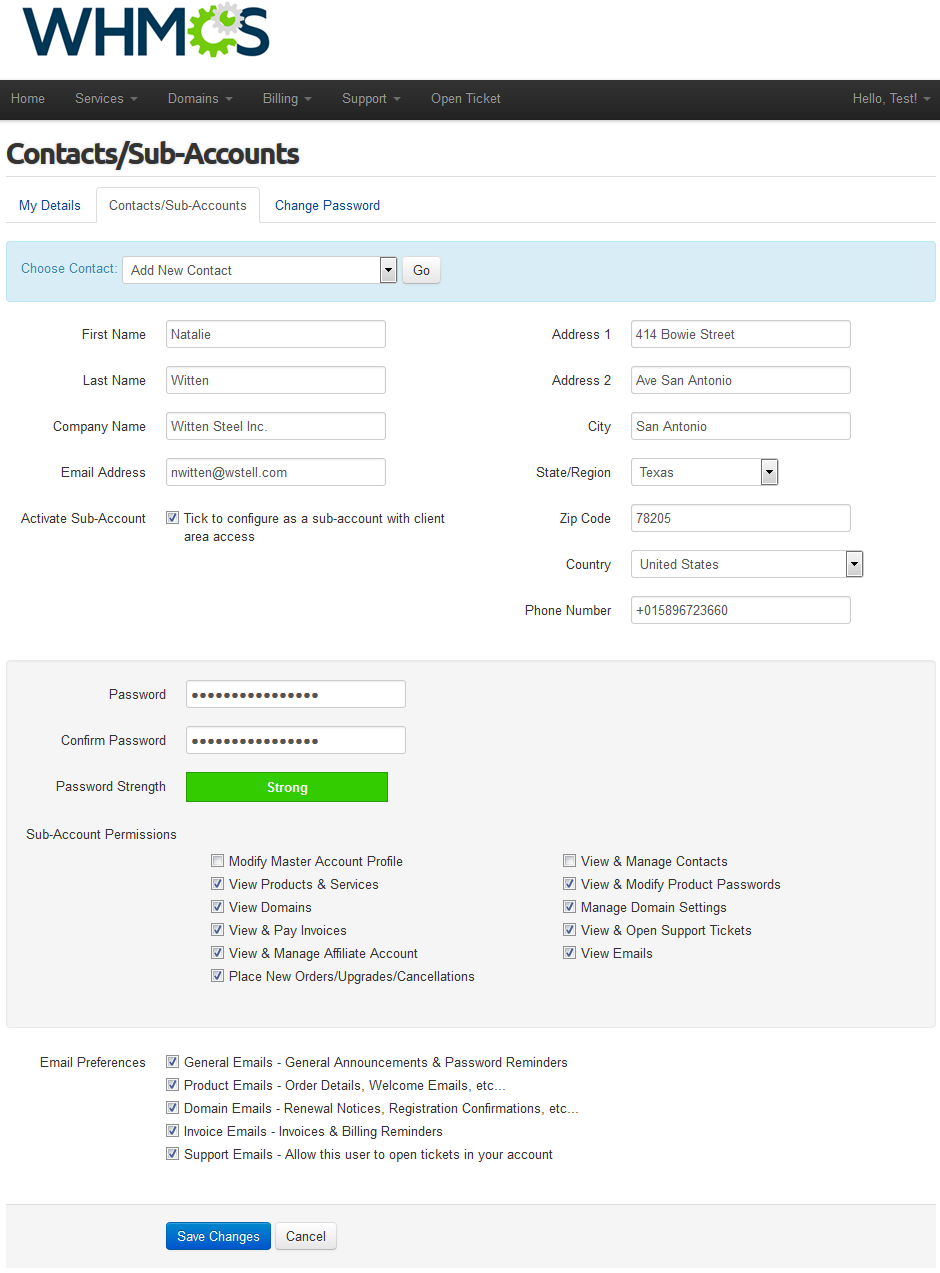
| Fill out contact details and tick 'Activate Sub-Account'. Afterwards, fill in a password field for your contact, define account permission and email preferences. |
|
[edit] Reseller Area
| In Reseller Area you can define products prices, set up branding, customize email templates and find branded links to order forms. |
[edit] Balance
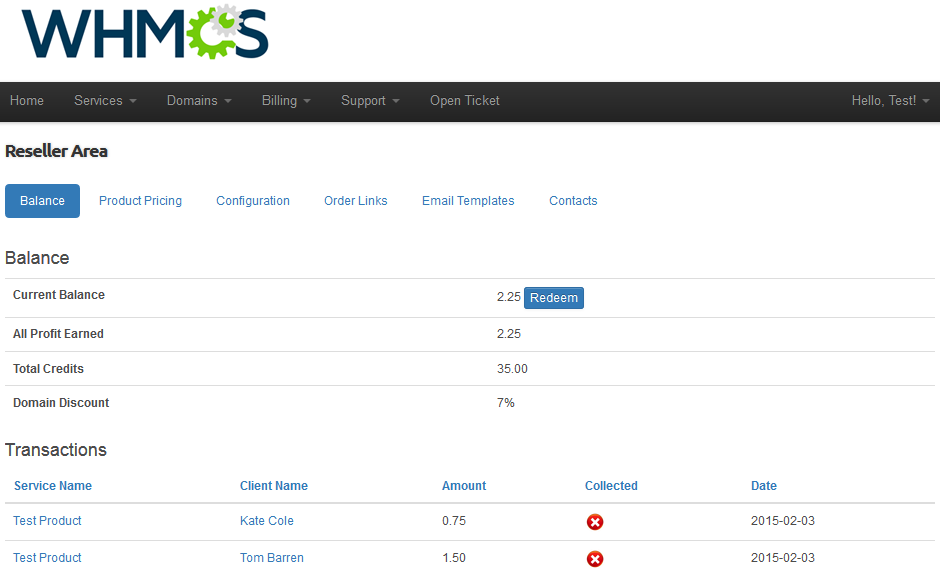
| Under this tab, you can view your balance, profit made, credit balance and redeem your profit into credit balance. Besides that, it is the place to view the list of profits made by reselling to your contacts. |
|
[edit] Product Pricing
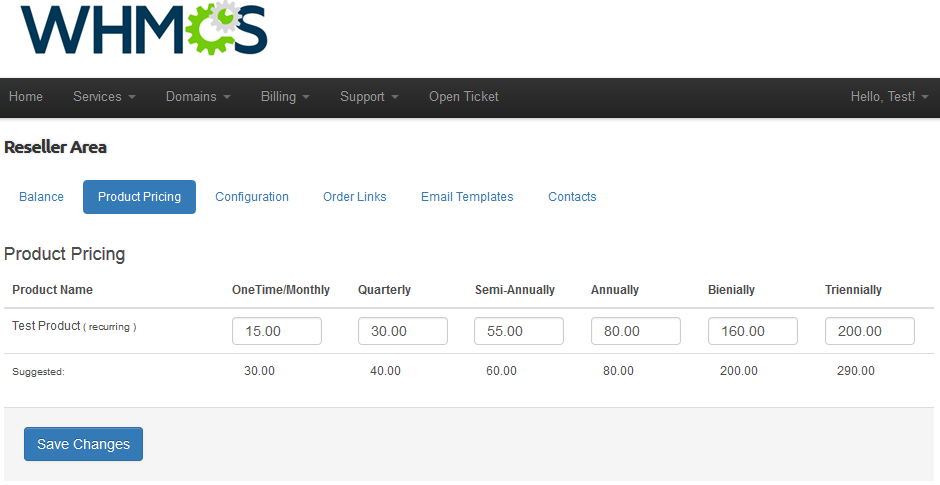
| 'Product Pricing' tab enables you to define prices for products you wish to offer to your contacts. Remember, you can define prices only within limits shown as placeholders. |
|
[edit] Configuration
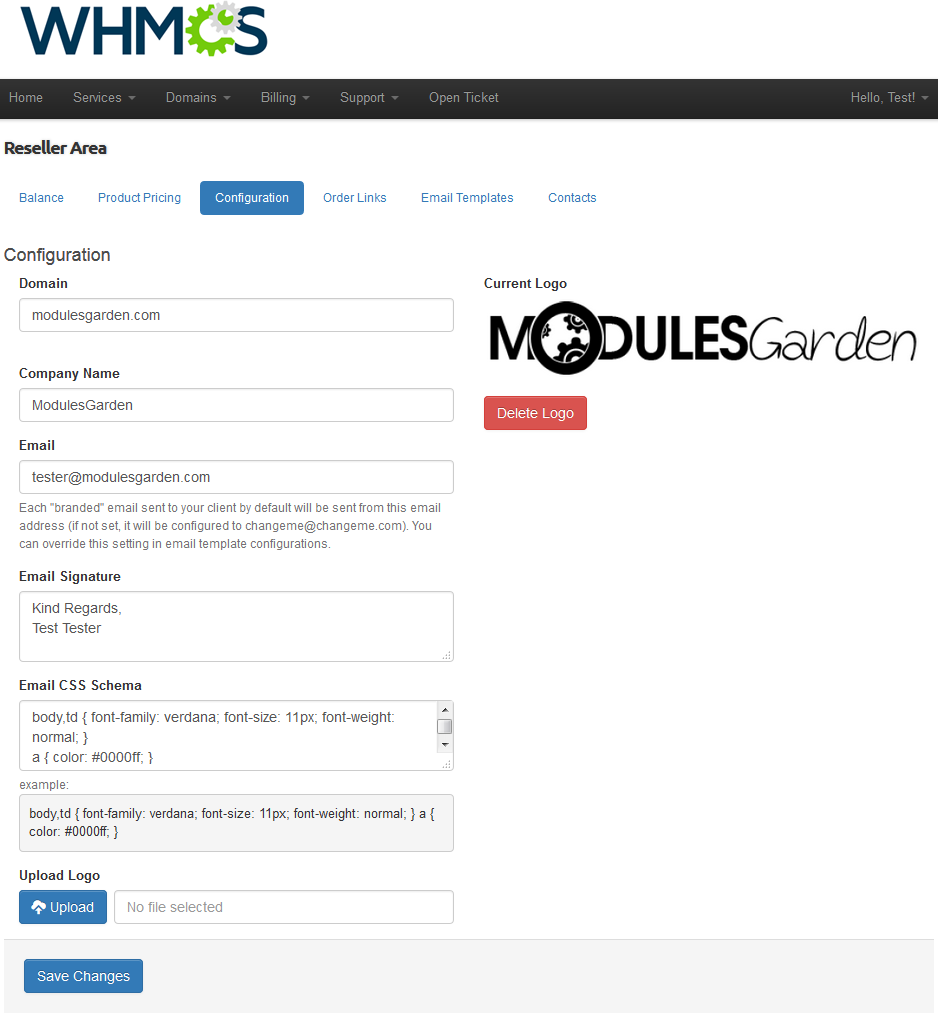
| In 'Configuration' tab you are allowed to define your own company name, email signature and logo used across contact's client area, emails and invoices. Additionally, this is the place to fill in the domain (or subdomain, depending on where you wish to point from), which you can resell products from. |
|
| To use your own domain, besides filling it into the 'Domain' field in your reseller area, you have to create a CNAME record to point from your domain. It is the best solution to point from your subdomain, this way your main domain can be still edited by you. |
[edit] Order Links
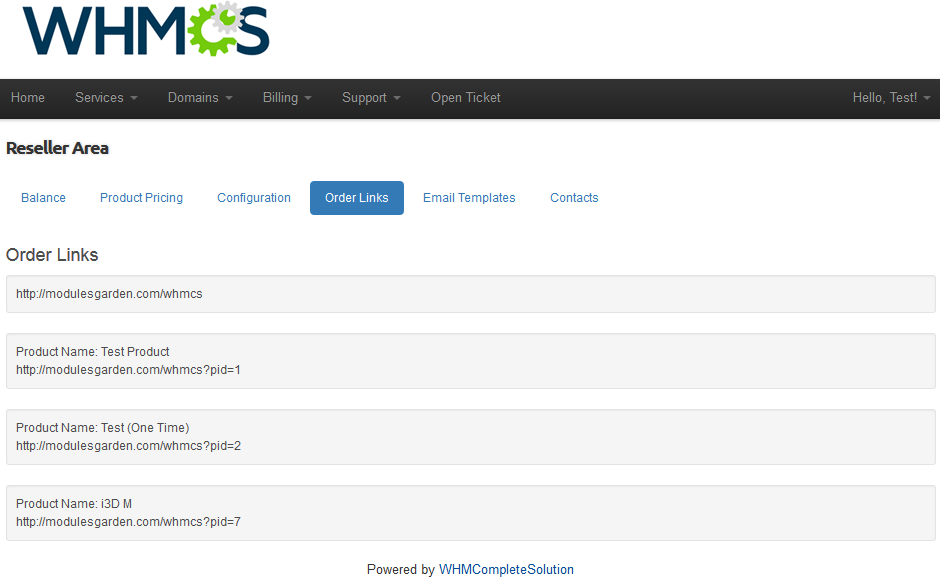
| As soon as you fill in a domain name and point from your domain to WHMCS client area, you can use links listed on this page on your own website. Your clients will be able to use those links to order products. |
|
[edit] Email Templates
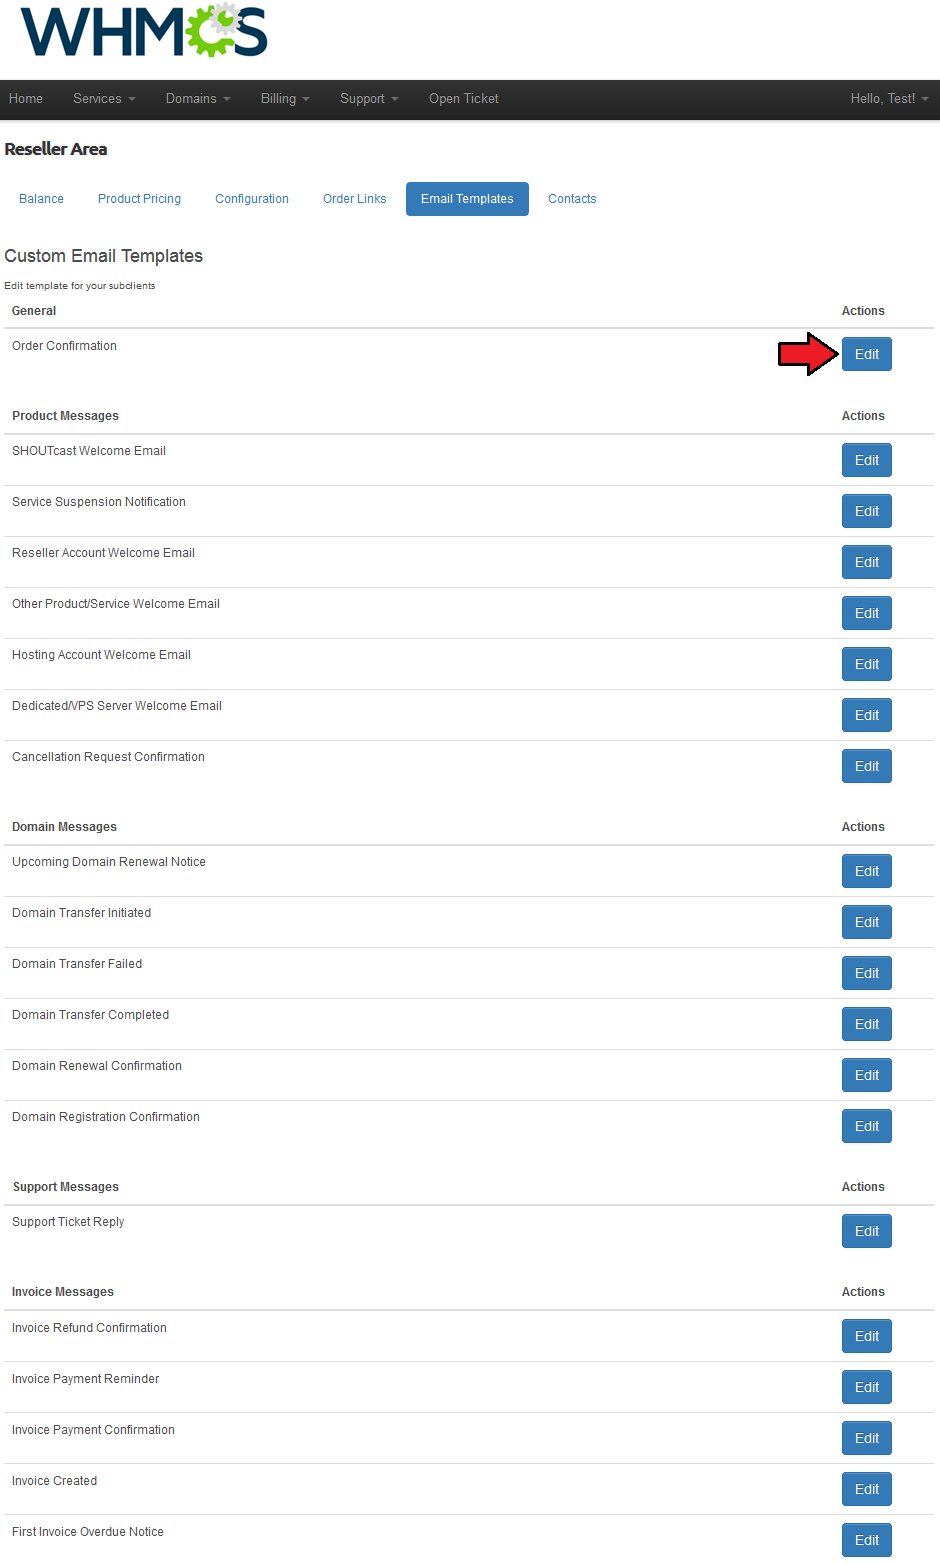
| This is the place where you can view and edit email templates sent to your contacts. To edit an email template, press 'Edit' button next to the template you wish to alter. |
|
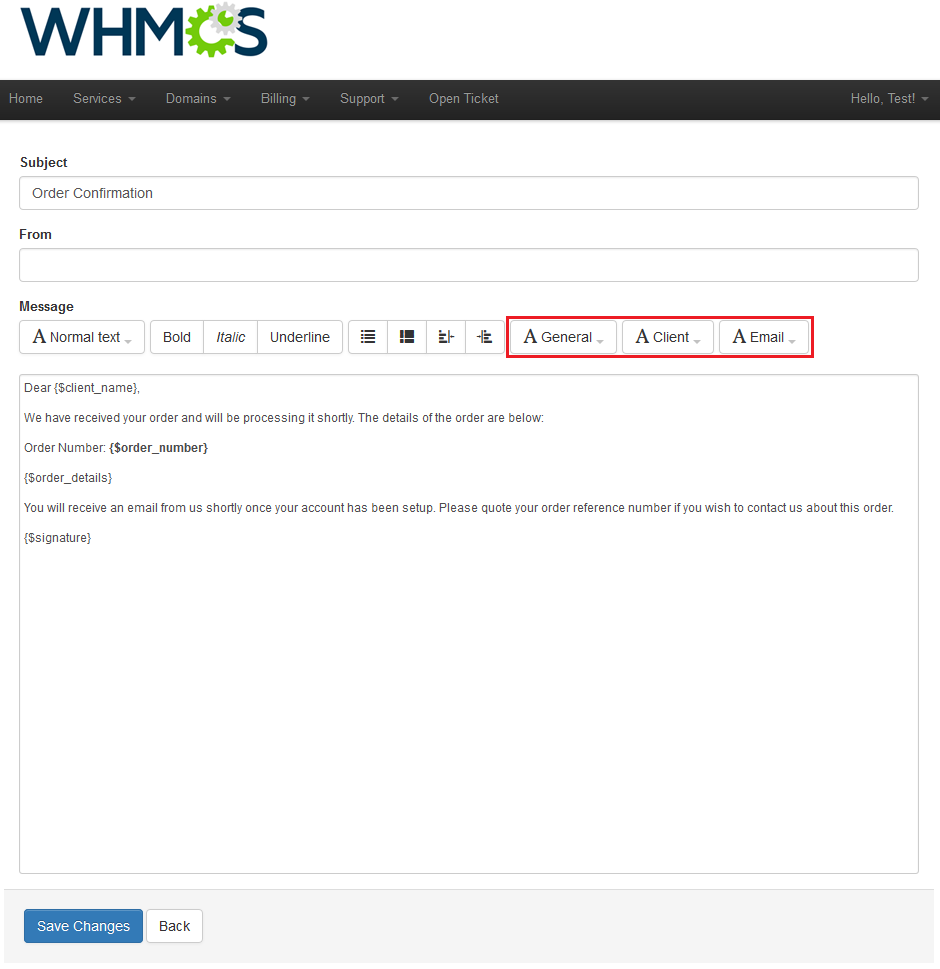
| Finally, edit the email template to suit your needs and press 'Save' button. Note: During this step you can easily add merge fields using dropdown menus marked on the following screen. |
|
[edit] Ordering
| There are three ways to add a product to an end client account, we will show you all of them below. |
[edit] Assign Product by Reseller
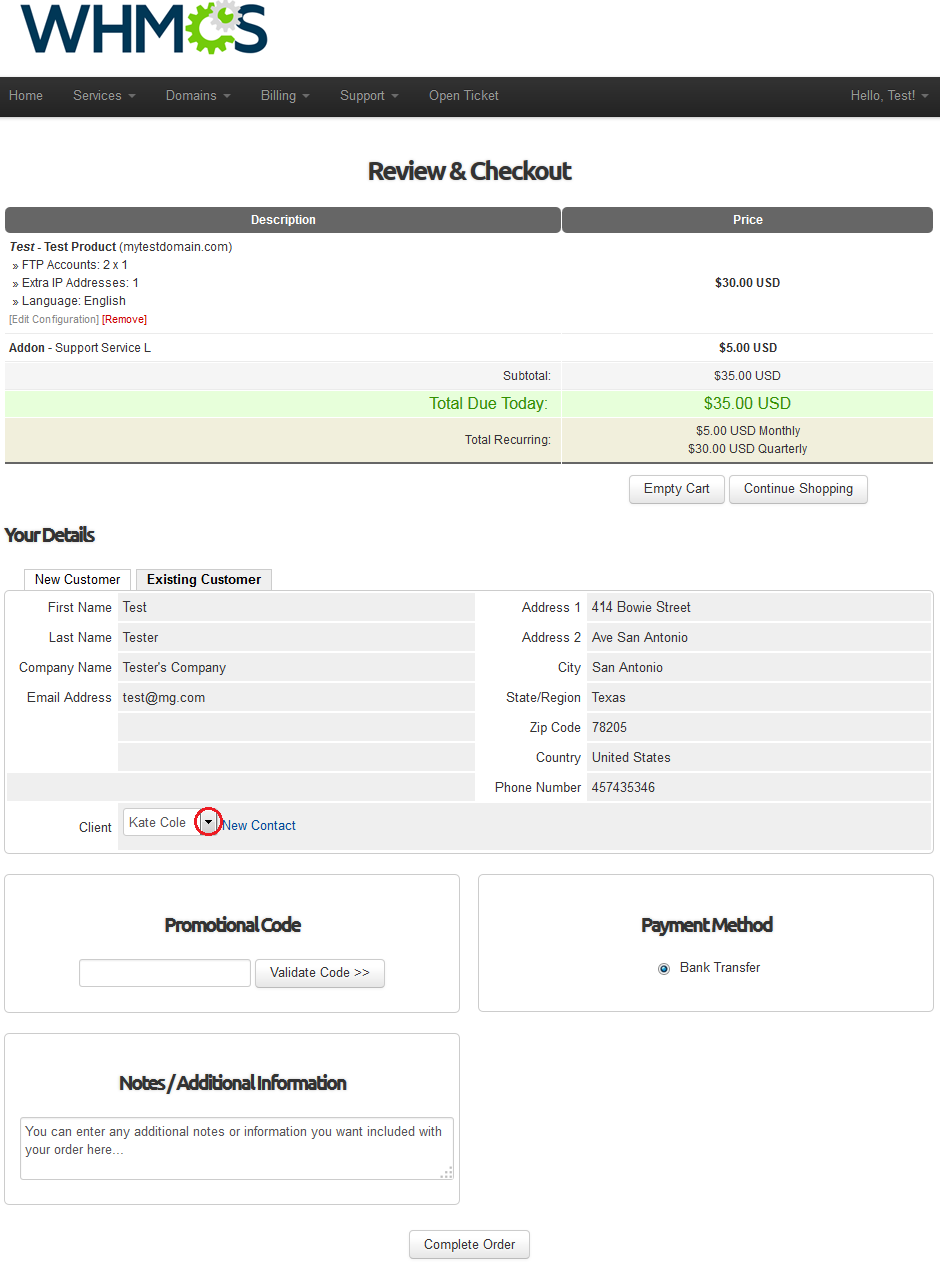
| Your resellers can place orders for their own customers as if the orders were for themselves. The only difference is that they need to choose a contact from 'Subclient' dropdown menu. And that is all! |
|
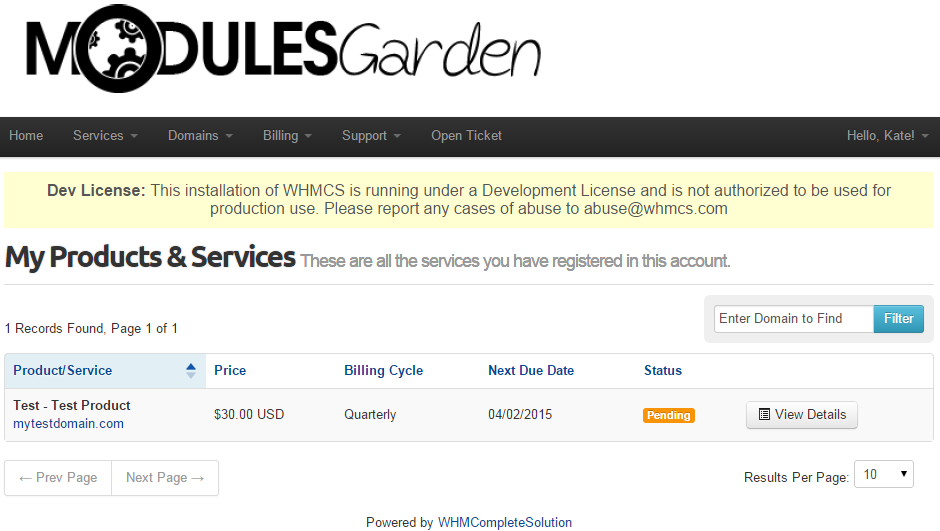
| Both your reseller and the end client will receive an order confirmation email. Afterwards, when end client logs in to the WHMCS client area, he/she will be able to view and manage previously ordered products. |
|
[edit] Access Order Through Link
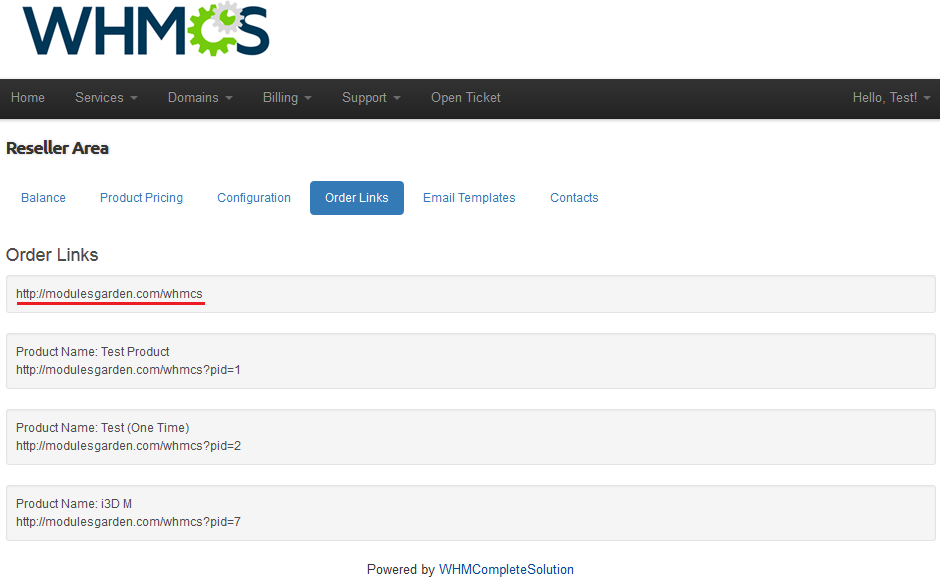
| Your resellers can use branded links to the product on their websites. By using them, end-clients are forwarded directly to a product order form. |
|
[edit] Access Order From The Client Area
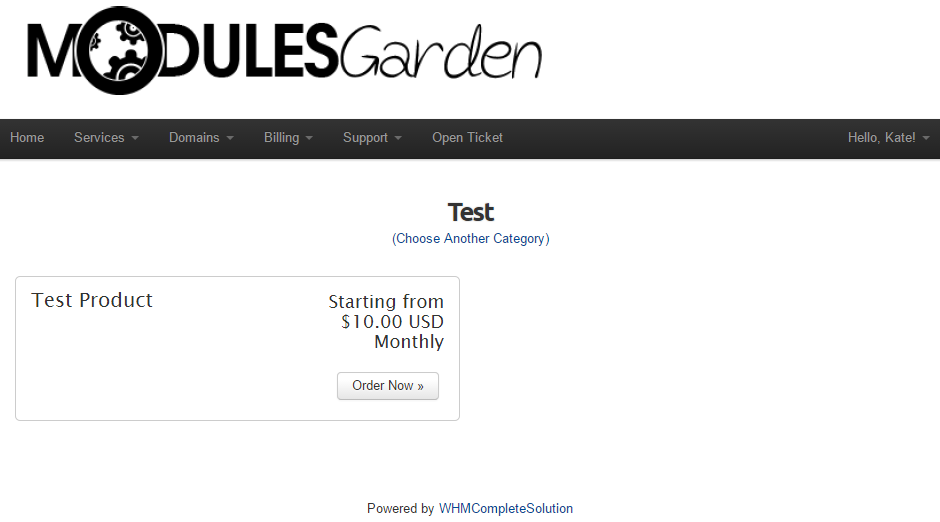
| Your reseller's contacts can view order form with the list of products configured by their resellers. Therefore your reseller's contacts can make orders on their own through using order forms in the client area. |
|
[edit] Tickets Management
| If you have not disabled tickets in your addon, your resellers will be able to reply and forward tickets created by their contacts. It is only available for tickets department set in Resellers Center For WHMCS configuration. |
|
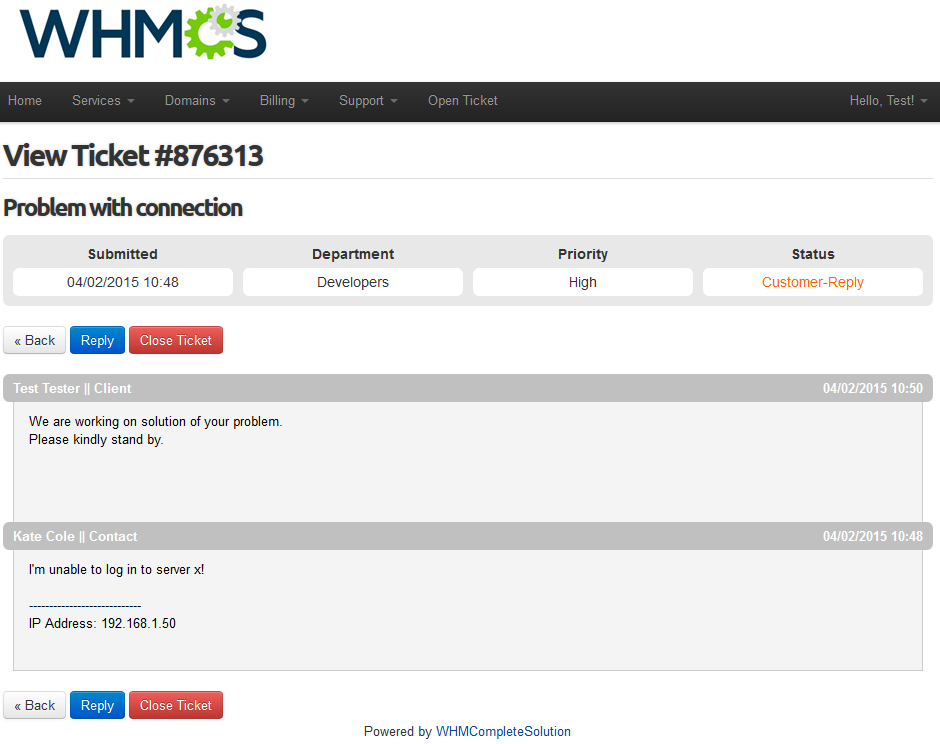
| On the screen below you can see a ticket created by a reseller's contact from the client area. |
|
[edit] Client Area - End Client
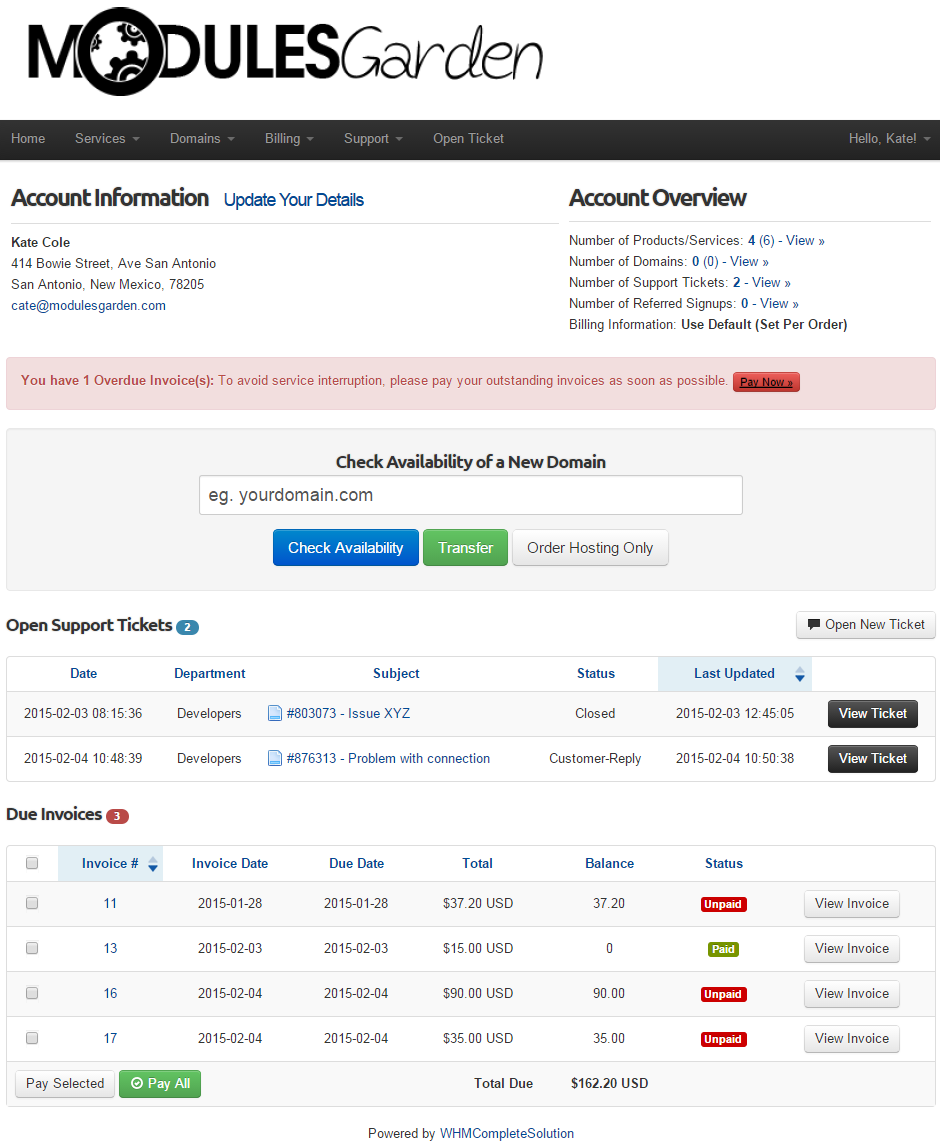
| End client sees branded client area, email templates and invoices. |
|
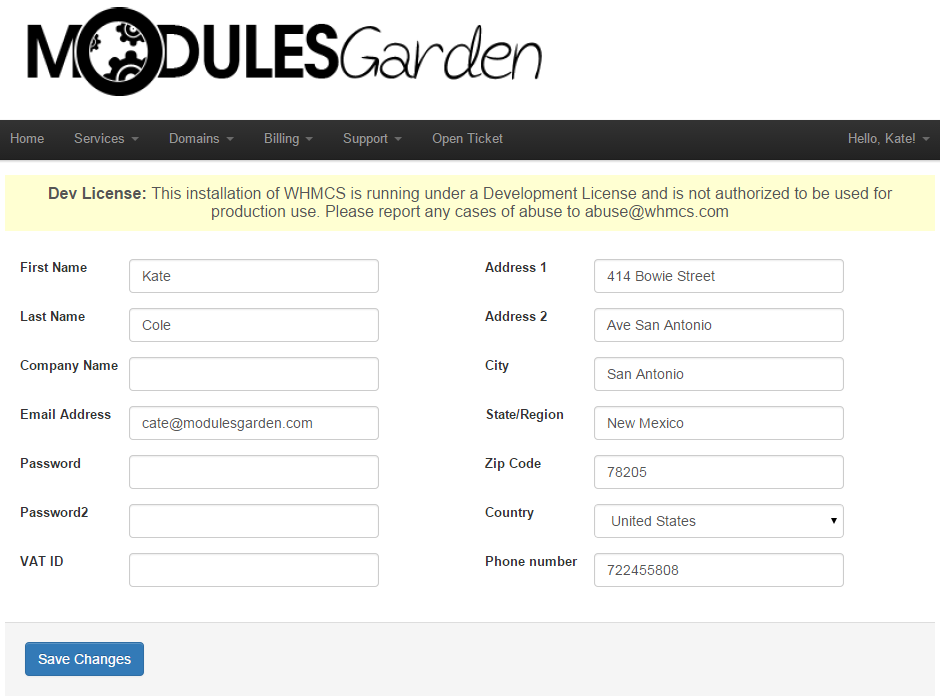
| Besides that, he can view his profile in order to edit his information. Additionally, this is the place to fill in their VIES/EU VAT. |
|
[edit] General Relations
| Relations between Provider, Reseller and Client |
| Payment system: In general Reseller receives a product from the Provider and then provides it further to the End Client. |
| Invoicing system: A standard WHMCS mechanism can be used and 'Disable Invoices' option turned on in the module settings (read more here). |
[edit] Migration From 2.0.5 And Earlier To 2.5.0
| Resellers Center For WHMCS 2.5.0 introduces completely rewritten logic and code. We tore the module down, thought it over, and put it back together as a completely new module adding a lot of new ideas and solutions.
|
[edit] Removing Old Files (Optional)
| Here, the list of old files used by a previous version of Resellers Center For WHMCS is shown. You may restore/remove them, because the latest version of Resellers Center For WHMCS will not use them.
|
[edit] Tips
| 1. You can create a hidden product group visible only for your resellers and their clients. To do so, create hidden product groups containing products available for resellers. |
| 2. If your WHMCS is installed in a subdirectory, your resellers using CNAME record must provide their links with it. For example, reseller.com/main-whmcs-directory instead of reseller.com.. RewriteEngine on
RewriteCond %{HTTP_HOST} !^main-whmcs-domain.com$ [NC]
RewriteCond %{REQUEST_URI} !^/whmcs-directory/
RewriteRule ^(.*)$ /whmcs-directory/$1 [R=301,L]
Result: If hostname is not main-whmcs-domain.com and path is not whmcs-directory', then redirect to resellers domain with /whmcs-directory. |
[edit] Common Problems
| 1. When you have problems with connection, check whether your SELinux or firewall does not block ports. |
| 2. When you use https on main WHMCS and your reseller passes non-https domain, the end client will see a warning message from browser that the certificates do not match. |
| 3. If your contact's invoices are paid from reseller's credit balance, ensure you have marked 'Disable Auto Credit Applying'. This option can be found under 'Setup' → 'General Settings' → 'Invoices' . |
| 4. Resellers Center For WHMCS is not fully compatible with our Multibrand For WHMCS module. If you have Multibrand installed on you system as well, you may encounter some issues connected with configuring domains. |
| 5. Please remember that Resellers Center For WHMCS works flawlessly with the officially supported and pointed in features list templates. These are: Template 'Six' and 'Five'. |