CPanel Extended For WHMCS
From ModulesGarden Wiki
(Difference between revisions)
|
|
| Line 117: |
Line 117: |
| | |} | | |} |
| | {| | | {| |
| − | |style="padding: 0px 0px 0px 30px;"|✔ Change Password | + | |style="padding: 0px 0px 10px 30px;"|✔ Change Password |
| | |} | | |} |
| | *'''General Info:''' | | *'''General Info:''' |
Revision as of 16:21, 26 January 2015
cPanel Extended For WHMCS allows to automate accounts provisioning and lets your clients manage their web hosting accounts in the WHMCS client area.
The module permits your customers to not only manage aspects like FTP accounts, domains, databases or backups but also install and manage various web applications.
Inbuilt admin panel will let you adjust each product and decide which functionalities are available to your clients. It will definitely prove to be a convenient and time saving solution!
|
| ✔ Configure Client Area Features Per Product
|
| ✔ Automatically Unban Client IP Address Upon Logging In
|
| ✔ Configure Resource Limits Per Product
|
| ✔ Choose Application Auto Installer To Use Per Product - Softaculous And Installatron
|
| ✔ Assign Configurable Options To Application Auto Install
|
| ✔ Assign Custom Fields To Application Auto Install
|
| ✔ Issue Module Commands Create/Suspend/Unsuspend/Terminate
|
| ✔ Change Password And Package Of Products
|
| ✔ Log In To Each cPanel Account On Click
|
| ✔ Install And Manage Applications With:
|
| ✔ Backups Management For Installed Apps
|
| ✔ Stats: Latest Visitors, Webalizer, Analog Stats, AWStats
|
| ✔ Backups - Manual And Automatic
|
| ✔ Log In To RVSiteBuilder
|
| ✔ Log In To Files Manager
|
| ✔ Ajax Loaded Pages - Similar To These From cPanel!
|
| ✔ Integrated With DNS Manager For WHMCS - Supports cPanel & cPanel DNSOnly (read more)
|
| ✔ Integrated With Advanced Billing For WHMCS - Server Resource Usage Billing (read more)
|
| ✔ Supports WHMCS V5 and Later
|
Installation and Configuration
In this tutorial we will show you how to successfully install cPanel Extended For WHMCS.
We will guide you step by step through the whole installation process.
|
Installation
| 1. Log in to your client area and download cPanel Extended For WHMCS.
|
2. Upload and extract the module into the main WHMCS directory.
Files in your WHMCS directory should look like this.
|
3. When you install cPanel Extended for the first time you have to rename 'license_RENAME.php' file.
File is located in 'modules/servers/cpanelExtended/license_RENAME.php' . Rename it from 'license_RENAME.php' to 'license.php' .
|
4. In order to configure your license key you have to edit a previously renamed 'license.php' file.
Enter your license key between quotation marks as presented on the following screen. You can find your license key in your client area → 'My Products' .
|
Activation of Addon
5. Now you have to activate the module in your WHMCS system.
Log in to your WHMCS admin area. Click 'Setup' then choose 'Addon Modules' .
|
| Afterwards, find 'cPanel Extended Functions' and press 'Activate' button.
|
6. In the next step you need to permit access to this module.
To do so, click on 'Configure' button, tick desired admin roles and press 'Save Changes' .
|
7. Well done! You have just successfully installed cPanel Extended For WHMCS!
You can access the addon under 'Addons' → 'cPanel Extended Functions' .
Let's proceed to the configuration of your freshly installed module.
|
Configuration of Server
8. Now, we will show you how to configure a new product.
Go to 'Setup' → 'Products/Services' → 'Servers' .
Afterwards press 'Add New Server' .
|
9. Next, enter your server name, IP address, username and password. Choose 'cpanelExtended' from a dropdown menu and press 'Save Changes' .
If you connect with your cPanel server via SSL then make sure that you checked 'Secure' located at the bottom of the page.
Note: Keep in mind that the URLs of client area buttons 'Login to Webmail' and 'Login to cPanel' are taken from 'Hostname' or 'IP Address' field.
|
10. After configuring your server correctly, you will see a following screen.
Now you need to create a new group for your server. For that purpose press 'Create New Group' .
|
| 11. Enter name, click on your previously created server, press 'Add' then 'Save Changes' .
|
Configuration of Product
12. In order to create a product, go to 'Setup' → 'Products/Services' → 'Products/Services' .
If you don't have a product group, click on 'Create a New Group' . If you do, simply go to step 14.
|
| 13. Fill in a product group name and press 'Create Group' .
|
| 14. When you have a product group, you can create your product and assign it with cPanel Extended module.
|
| 15. Afterwards, choose your product type and product group from dropdown menus, enter your product name and press 'Continue' .
|
16. Now, go to 'Module Settings' section, choose both 'CpanelExtended' and a previously created server group from dropdown menus and press 'Save Changes' .
You can also configure your WHM Package here.
|
Configuration of Addon
17. You have just correctly created and customized a new product.
Now, you can define features available in the client area per cPanel Extended product.
Go to 'Addons' → 'cPanel Extended Functions' in your WHMCS.
Afterwards click on 'Features' button next to a previously configured product.
|
| 18. Now, tick the features you would like to activate for your customers and press 'Save Changes' button.
|
| 19. Now, press 'Install Apps' button.
|
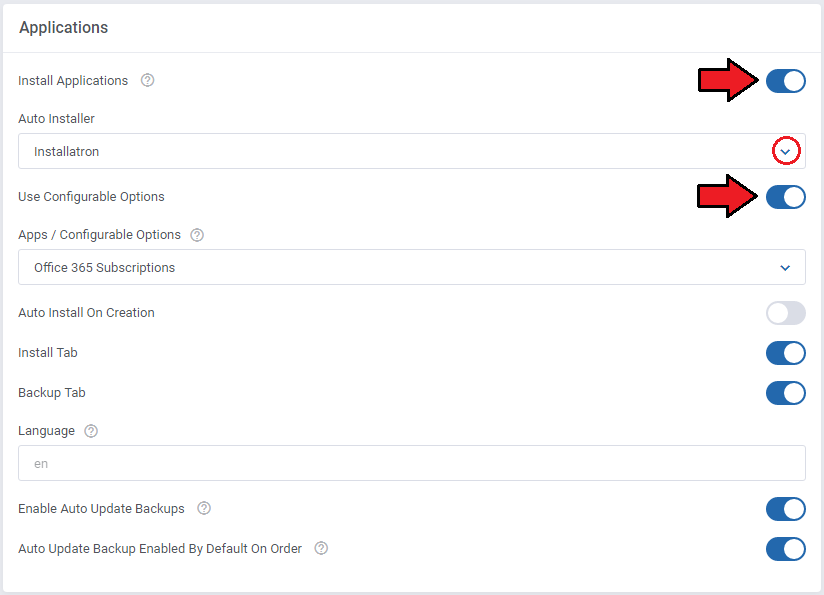
20. Tick 'Install App' , choose your Auto Installer from a dropdown menu. Afterwards tick 'Install Button' and 'Backup Button' .
You can also choose desired language of the applications by entering value into the 'Language' field. Complete list of language codes can be found here.
If the field is left blank, a default value, which is 'en' (english) will be used.
Note: You can also create a configurable option with app to install, you can find the instruction to do that here.
|
21. From now on, all your clients who ordered a previously created product will be able to manage their cPanel accounts via your WHMCS system.
This is what your customers should see in their client area:
|
Management
cPanel Extended allows your customers to manage their cPanel account via the client area of your WHMCS system.
In this short guide we will present you the possibilities of our module.
|
Client Area
| This section shows features available in the client area.
|
FTP Accounts
| You can manage your FTP accounts through creating, modifying and deleting them.
|
Emails
| In this page you can manage all aspects related to email accounts.
|
Email Forwarders
| Here you can set up email forwarders and email domain forwarders.
|
Databases
Owing to MySQL Databases Management you can create/delete databases and users.
You can also assign users to particular databases and set up their privileges.
|
Cron
| Management of cron allows you to add and monitor your cron jobs.
|
Subdomains
| You can create and manage subdomains of your domain.
|
Addon Domains
Addon domains management is available on this page.
Addon domains allow you to link the domain to a subdirectory of your account.
|
Parked Domains
You can add and manage your parked domains.
Parked domains allow you to point to another domain of your account.
|
Domain Forwarders
Easy access to domain forwarders is very useful. Within a few seconds, you can redirect the page to point to another.
Redirect option allows you to make a specific web page redirect to another page and display the contents of that page.
For example, if your main domain is mytestingdomain.com, you can make such forward:
mytestingdomain.com/redirect → 'adomainwithlongname-averylongname.com
|
Stats
| Owing to Webalizer, AWstats, Analog Stats and Latest Visitors, you can always be up to date with information about your websites.
|
Backups
All backups made automatically are displayed on this page under 'Available Restore Points' section.
To restore from a backup, choose elements to backup and press 'Restore' .
Note: Automatic backup has to be enabled from your WHM panel.'
|
You can make backups and download your whole cPanel settings or only a part of them.
To generate a full backup, press 'Download or Generate Full Website Backup' .
|
Afterwards, choose 'Backup Destination' from a dropdown menu.
Optionally, you can fill in an email address, where a notification about the backup will be sent.
If 'Home Directory' is not a backup destination, fill in additional field.
Confirm backup creation through pressing 'Generate Backup' .
|
To download a backup, simply press its name. Download should start immediately.
Partial backups are generated during the download process.
|
SSL Certificates
This feature moves completely the management of your Private Keys, CSR Keys and SSL Certificates into your WHMCS client area.
Here you can conveniently manage all the aspects of your SSL Certificates without the necessity of logging in to your cPanel.
|
Unban IP
In 'Unban IP' page you can unban IP addresses banned by your system.
To unban IP address, simply enter it into 'IP Address' textbox and press 'Unban' button.
|
MX Management
| This page enables you to manage your MX records for each of your domains.
|
Files Manager
| Files page, as its name suggests, allows you to view and manage files and folders of your cPanel account.
|
SSH/Shell Access
Here, you can configure your SSH keys pair.
Afterwards, you can connect to your cPanel, for example via PuTTY, with your private SSH key.
|
Log In To phpMyAdmin
| Get quick access to your phpMyAdmin with just one click. You don't even need to fill in your username and password!
|
Log In To cPanel
You can easily log in to your cPanel by clicking 'Log In To cPanel' .
Here, similarly to phpMyAdmin, you don't need to enter your access details!
|
Log In To Webmail
| With a single click of 'Log In To Webmail' you can access your Webmail.
|
Log In To RVSiteBuilder
| One click of the button moves you immediately to RVSiteBuilder.
|
Log In To File Manager
| Forwards you to File Manager in your cPanel account instantly.
|
Install Applications
Very interesting and time saving feature of cPanel Extended. In seconds you can install your favourite applications without even accessing cPanel!
To do so, simply click on 'Install Applications!' then click on 'Install New' button.
|
Afterwards, you will see an extensive menu of application categories. For presentation purposes we will install 'Wordpress' located in 'Content Management' .
Please note that the following screen doesn't contain all available applications.
|
| Let's enter 'Content Management' category and press 'Install Now!' button next to 'Wordpress' .
|
| Now, you can enter necessary installation details and press 'Install Application' when ready.
|
| If the installation process has been successful, you will see a message similar to the one shown on the screen below.
|
| From now on you can check the status of your applications by clicking 'Install Applications!' on the left side menu.
|
Backups Management For Apps
| You can also create a backup of your installation. It's very easy! To do so, click 'Manage' button.
|
| Afterwards, go to 'Backup' tab. Backup creation will be started immediately.
|
After a few seconds a progress bar will be fully filled.
You should see 'Creating Backup: Completed' message as a confirmation of the operation performed.
To manage your backups, go to 'Install Applications!' → 'Backups' .
|
| Here you can quickly view, delete or restore existing backups.
|
Change Password
| Through changing the password you can change both, your cPanel account and FTP account passwords at the same time.
|
Applications Configuration
Configurable Options For Application Autoinstall
Your customers will definitely love this functionality! With its help you can let them decide which application they would like to install on their new cPanel account.
And that's very easy. While placing an order your customer chooses an application and along with account creation this very application will be installed on the account.
There is nothing else you need to do. Application will be instantly ready to use!
To set up this feature, go to 'cPanel Extended Functions' , press 'Install Apps' , tick 'Install App' , 'Assign To Configurable Options' and choose 'Auto Installer' .
Click on a floppy disk icon to download the list of apps.
|
|
These are the names of values that you can enter in configurable options' fields, we will configure them in the next step.
For example, if you would like to set up '4images' in your applications list, you will need to enter value '4images 1.7.11' .
1. If you have made a mistake with the application name, the autoinstall will not work.
2. If you have not entered version number, the autoinstall will install the latest version of the application.
Now, when you know what values should be entered in configurable options for particular applications, we can proceed further.
|
| Go to your WHMCS → 'Setup' → 'Products/Services' → 'Configurable Options' and press 'Create a New Group' .
|
| Enter 'Group Name' of your choice, select product you want to assign configurable options to, then press 'Save Changes' .
|
| Now click on 'Add New Configurable Option' .
|
This moment is very important. As 'Option Name' , you have to enter 'Installation App' . In other case the entire functionality will not work.
Here you can set up as many applications as you want. To do so, enter a value name e.g. 'Wordpress 3.7.1' and press 'Save Changes' .
Repeat this as many times as you need and do not forget to set 'Option Type' to 'Dropdown' .
|
As you can see on the following screen we decided to offer our customers 5 applications.
When you finish adding applications, press 'Save Changes' and 'Close Window' .
|
Afterwards, go to 'cPanel Extended Functions' , tick 'Assign To Configurable Options' and choose 'Applications' from a dropdown menu.
Please note that you can have more configurable options groups. Press 'Save Changes' and that's it. You have just successfully assigned configurable options to application autoinstall.
Let's check out what your customers are going to see in their client area while placing the order.
|
| As you can see, a dropdown menu with previously configured applications has shown up.
|
Assignment of Custom Fields To Application Autoinstall
Now, when you know how to allow your customers to choose which application they would like to install on their account, we can proceed one step further.
Until that moment applications had been installed with use of default details like e.g. directory names or database name.
Those details are sent to each customer's email.
Allowing your customers to choose their own installation paths, usernames and others is a safer and recommended solution.. Let's see how can we do that.
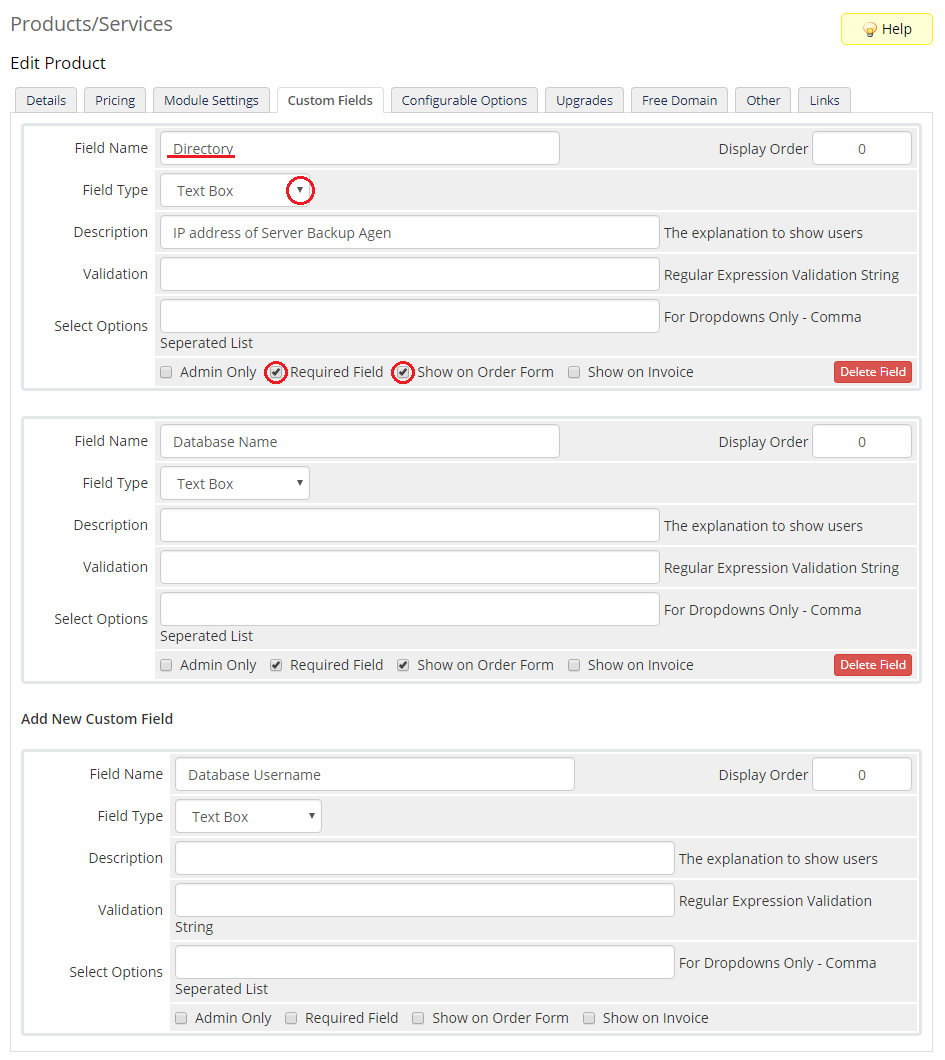
In the beginning, go to 'Product/Services' , find your product using 'cPanel Extended' module and enter 'Custom Fields' category.
You will need to add 12 custom fields, the first 8 are:
- Directory
- Database Name
- Database Username
- Database Password
- Table Prefix
- Site Name
- Site Description
- Language
Remember to set each field type as 'Text Box' , tick 'Required Field ' and 'Show on Order Form' .
Everything is shown on the screen below.
|
|
The next 3 fields are:
- Admin Username
- Admin Password
- Admin Email.
Set them as 'Text Box' and tick 'Show on Order Form' .
|
| The last field is:
Set it as 'Drop Down' , enter 'Yes, No' into 'Select Options' , tick 'Required Field ' and 'Show on Order Form' .
|
Once you add all the custom fields they will appear while placing an order.
Voila! Now your customers can personalize each application without the necessity of installing it later.
|
Custom Softaculous Application Language
We will show you how to quickly set custom language for Softaculous web applications.
For this purpose you need to add a new custom field for your product. The field should be called 'Language' .
|
Afterwards go to your 'Products/Services' and check whether 'Language' field has appeared.
In order to change default applications language for certain account enter here an appropriate value.
|
From now on the new field will be visible for your customers as well. While installing a new application they can choose desired language by entering value into the field.
Here you will find a complete list of language codes.
|
Management of Existing Products
You can easily use cPanel Extended module with your already configured cPanel products.
To do so, change the type of servers and module names of products from 'Cpanel' to 'CpanelExtended' .
Additional information about how to correctly configure your servers and products can be found in points 8-16 in 'Installation and Configuration' section.
|
Management of Billing
When you combine cPanel Extended For WHMCS with Advanced Billing For WHMCS, you will be able to set up additional billing options.
The module allows you to charge your customers basing on the server resources used by them.
|
| With Advanced Billing module, you can also display the current server resource usage and their cost for your customers.
|
How To Update
| 1. Updating cPanel Extended goes alike updating any other MG product, for more information visit Modules Update page.
|
Tips
1. You can use cPanel Extended with reseller accounts. It gives you new opportunities!
To do so, simply go to your cPanel Extended product → 'Details' and choose 'Reseller Account' from a dropdown menu as shown on the following screen.
|
| 2. In order to make the reseller account own itself you need to check 'Set the reseller to own their own account' field located in 'Module Settings' .
|
3. If you would like to use cPanel/WHM Import Utility with cPanel Extended products, you will need to switch products' type to 'Cpanel' .
Afterwards you can successfully use the import script. After finishing the import, simply switch back the products' type to 'CpanelExtended' .
|
Common Problems
| 1. When you have problems with connection, check whether your SELinux or firewall does not block ports.
|
2. If after installation, you get an ionCube encoder problem (wrong version), please open a support ticket.
We will provide you with different version of the module encrypted with the older version of ionCube.
|
3. SQL Issue: When you move your WHMCS system to another domain and you import your SQL database you may get an error with missing tables or fields.
An example of such an error can be: "Unknown column 's.change_password' in 'field list' ".
If so please deactivate and activate your module and try once again. If it still doesn't solve your problem, please download your addon module from your client area and re install it.
|
| 4. If you have problems with connection make sure that both ports 2082 and 2083 are open.
|
| 5. After you change language of the module, your Ajax notifications might not work correctly. Encode language file in UTF-8 (without BOM) to solve this issue.
|
| 6. No results to display: Connection problem: This problem occurs when connection to the cPanel server is not configured properly.
|
Reason: Values inside the field/s 'Hostname' , 'IP Address' , 'Username' , 'Password' , 'Type' and/or 'Access Hash' is/are incorrect.
Solution: Verify provided details and test connection through pressing 'WHM' button.
|
| 7. No results to display: Wrong hostname or ip value: This problem occurs when connection to the cPanel server is not configured properly.
|
Reason: Values inside the field/s 'Hostname' or 'IP Address' is/are are in the wrong format.
Solution: Verify provided details and test connection through pressing 'WHM' button.
|
| 8. No results to display: User or domain not found.
|
Reason: Account with the specified domain name doesn't exist on the server.
Solution: Make sure that customer's details in your WHMCS system contain specified domain name or create a new account.
|
| 9. No results to display: Wrong username value
|
Reason: Account with the specified username doesn't exist on the server.
Solution: Make sure that customer's details in your WHMCS system contain specified username or create a new account.
|
| 10. No results to display: Access denied
|
Reason: Account already exists on the server but access to the server has been lost due to changed server group, changed server details or block by e.g firewall.
Solution: Make sure that connection to your server is working properly and it's not being blocked. Additionally make sure that your server group is set up correctly.
|
| 11. User parameter is invalid or was not supplied
|
Reason: Account exists on the server but username is incorrect.
Solution: Make sure that customer's account username is the same in both your WHMCS system and your WHM.
|
12. When you get 'cURL Error : Maximum (20) redirects followed' while trying to install new application, this indicates the problem with your cPanel theme.
To solve the problem log in to your WHMCS, go to 'Module Settings' of your product, find the field 'cPanel Theme' and make sure that the entered name is correct.
|
| 13. Blank page while logging into phpMyAdmin or any functionality in 'Stats' page.
|
14. Running 'Create' on cPanel Extended product does not create application ordered along with product.
Reason: Some applications require additional fields during installation (other than those available in the product custom fields).
Due to limitations in the Softaculous API these applications will not be installed when a new product is created.
Solution: Application has to be installed manually via cPanel Extended For WHMCS. Walk around will be added in a further version.
|


