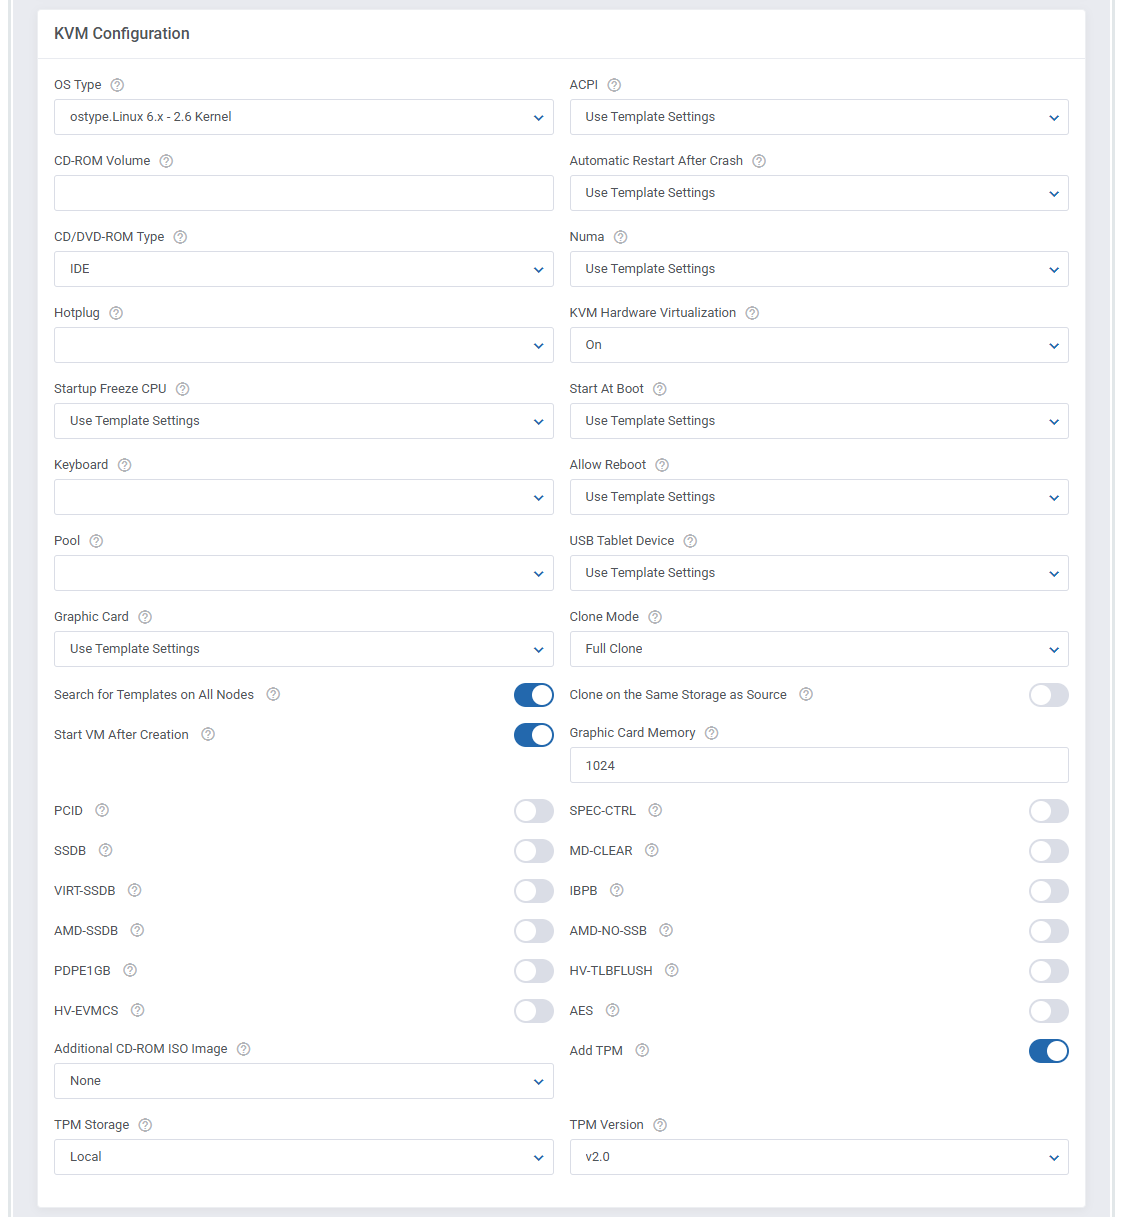
21. Setting the KVM virtualization type.
Before you start configuring the KVM virtualization, we highly recommend that you familiarize yourself with the following 'Qemu/KVM Virtual Machines' Proxmox Virtual Environment wiki article.
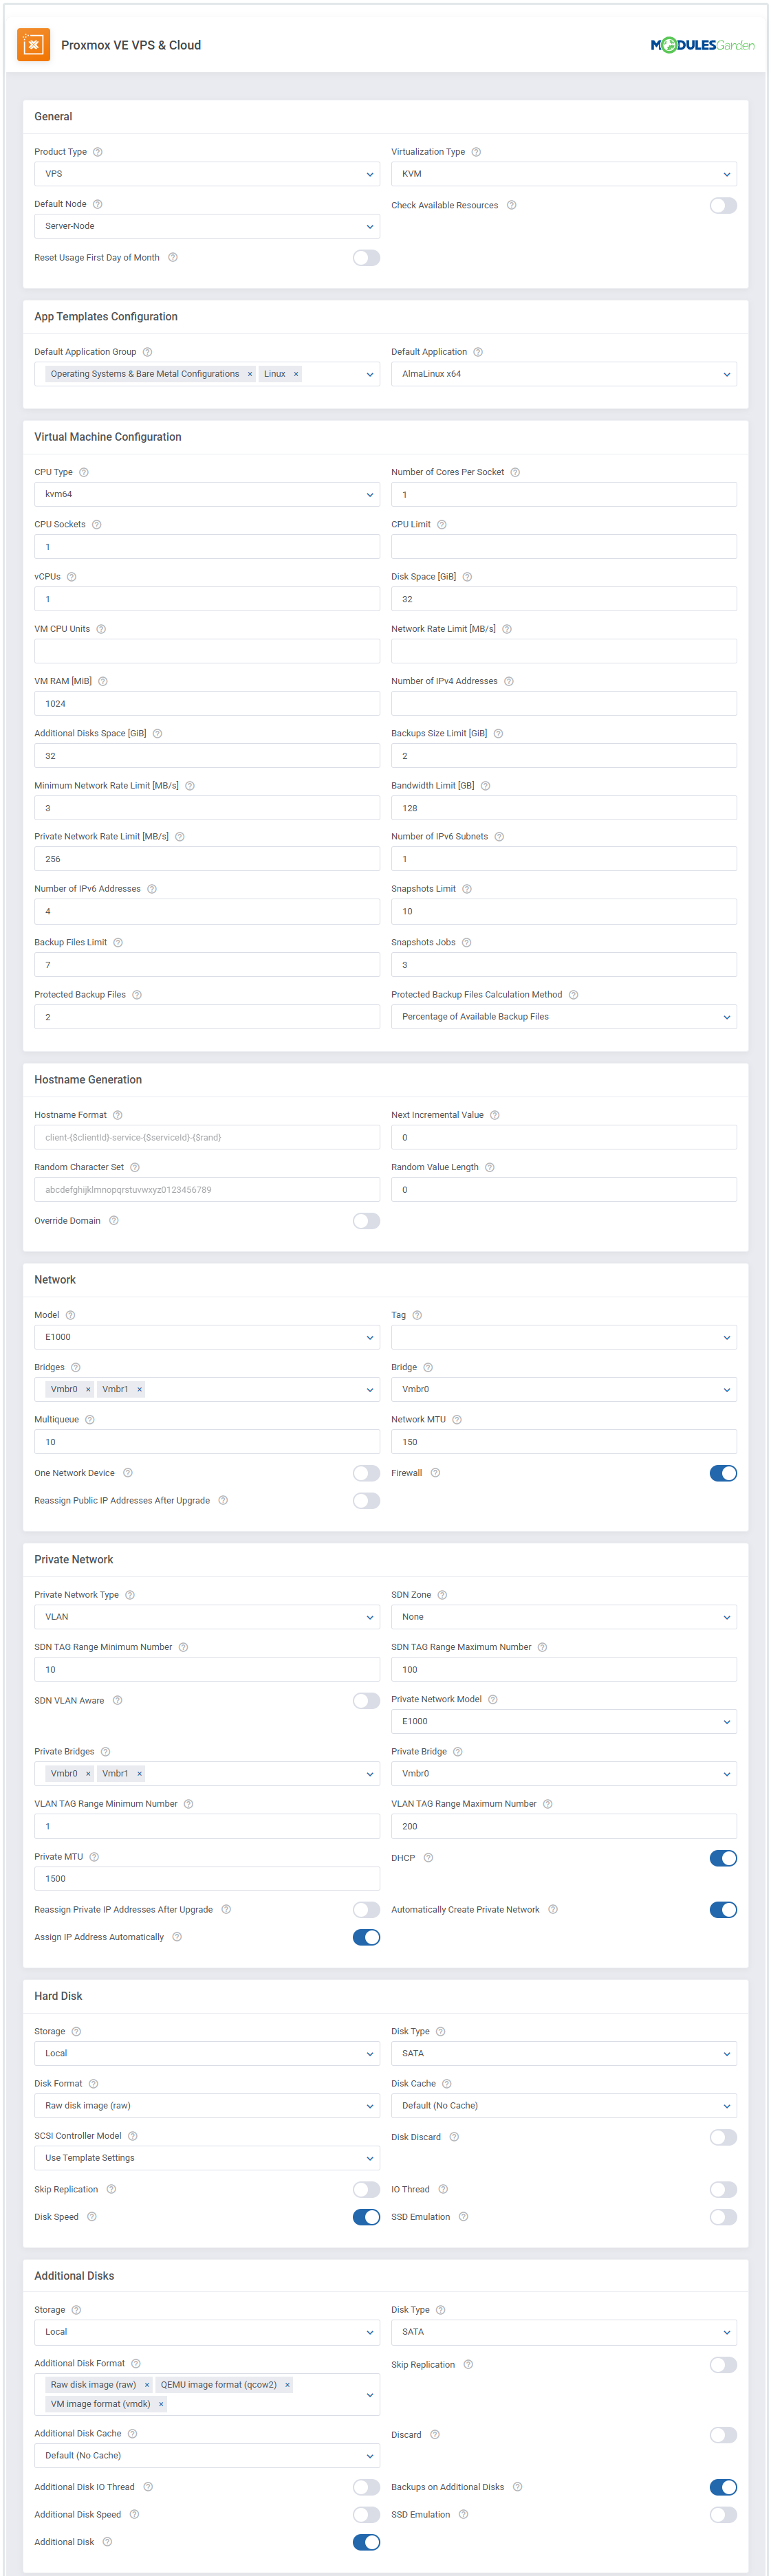
The basic fields required to create a virtual machine are filled in by default to make the initial setup simpler for you.
Start your product configuration in the 'Virtual Machine Configuration' panel, where you can set up machine resources and limits or assigned IP addresses.
Note that some fields can be left empty if you want to disable them or set as unlimited - read the tooltips for further guidance.
App Templates - If you want to create your VM based on a template, archive, or ISO image, you must first configure the App Templates in the module's addon.
Once your applications and groups are set up there, you can select the desired template or archive in the product's Module Settings tab to be used during VM creation.
Please refer to the App Templates section of the documentation for detailed setup instructions.
|
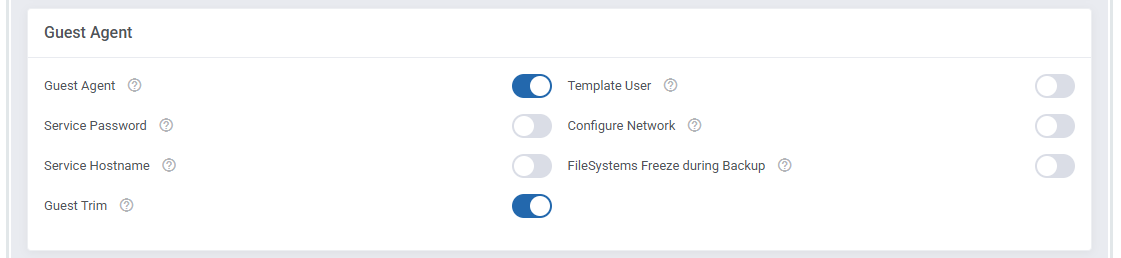
Next, configure 'Network', 'Hard Disk', 'Backup' and so on. For KVM virtualization type, there is also the 'Guest Agent' section available.
Guest Agent is used to exchange information between the virtualization server and the operating system of your virtual machine.
Thanks to this, additional commands such as setting IP addresses and the user’s password can be executed in the guest system.
The 'Service Password', 'Service Hostname' and 'Configure Network' options work with Windows OS only.
If enabled, while creating a VM, the Guest Agent will set up the user’s hostname and password and configure the network automatically.
- 'Guest Trim ' - enable and the guest-trim will be run after moving the disk or migrating the VM
- 'FileSystems Freeze during Backup' - enable to allow freezing/thawing of guest filesystems during backup for consistency
Remember that you need to install the Guest Agent on your KVM template in order for the function to work properly. For more info, click here
|
|
VPS - LXC Virtualization Type
22. Setting the LXC virtualization type is very similar to KVM.
Before you start configuring the LXC virtualization, we highly recommend that you familiarize yourself with the following 'Linux Container' Proxmox wiki article.
Just as with KVM, the basic fields required to create a virtual machine are filled in by default to make the initial setup simpler for you.
Start your product configuration in the 'Virtual Machine Configuration' panel, where you can set up such features as 'Default Storage', container resources and limits or the number of assigned IP addresses.
Note that some fields can be left empty if you want to disable them or set as unlimited - read the tooltips for more information.
|
| Next, configure 'Mount Point', 'Backup', 'Network' and so on.
|
Cloud - KVM Virtualization Type
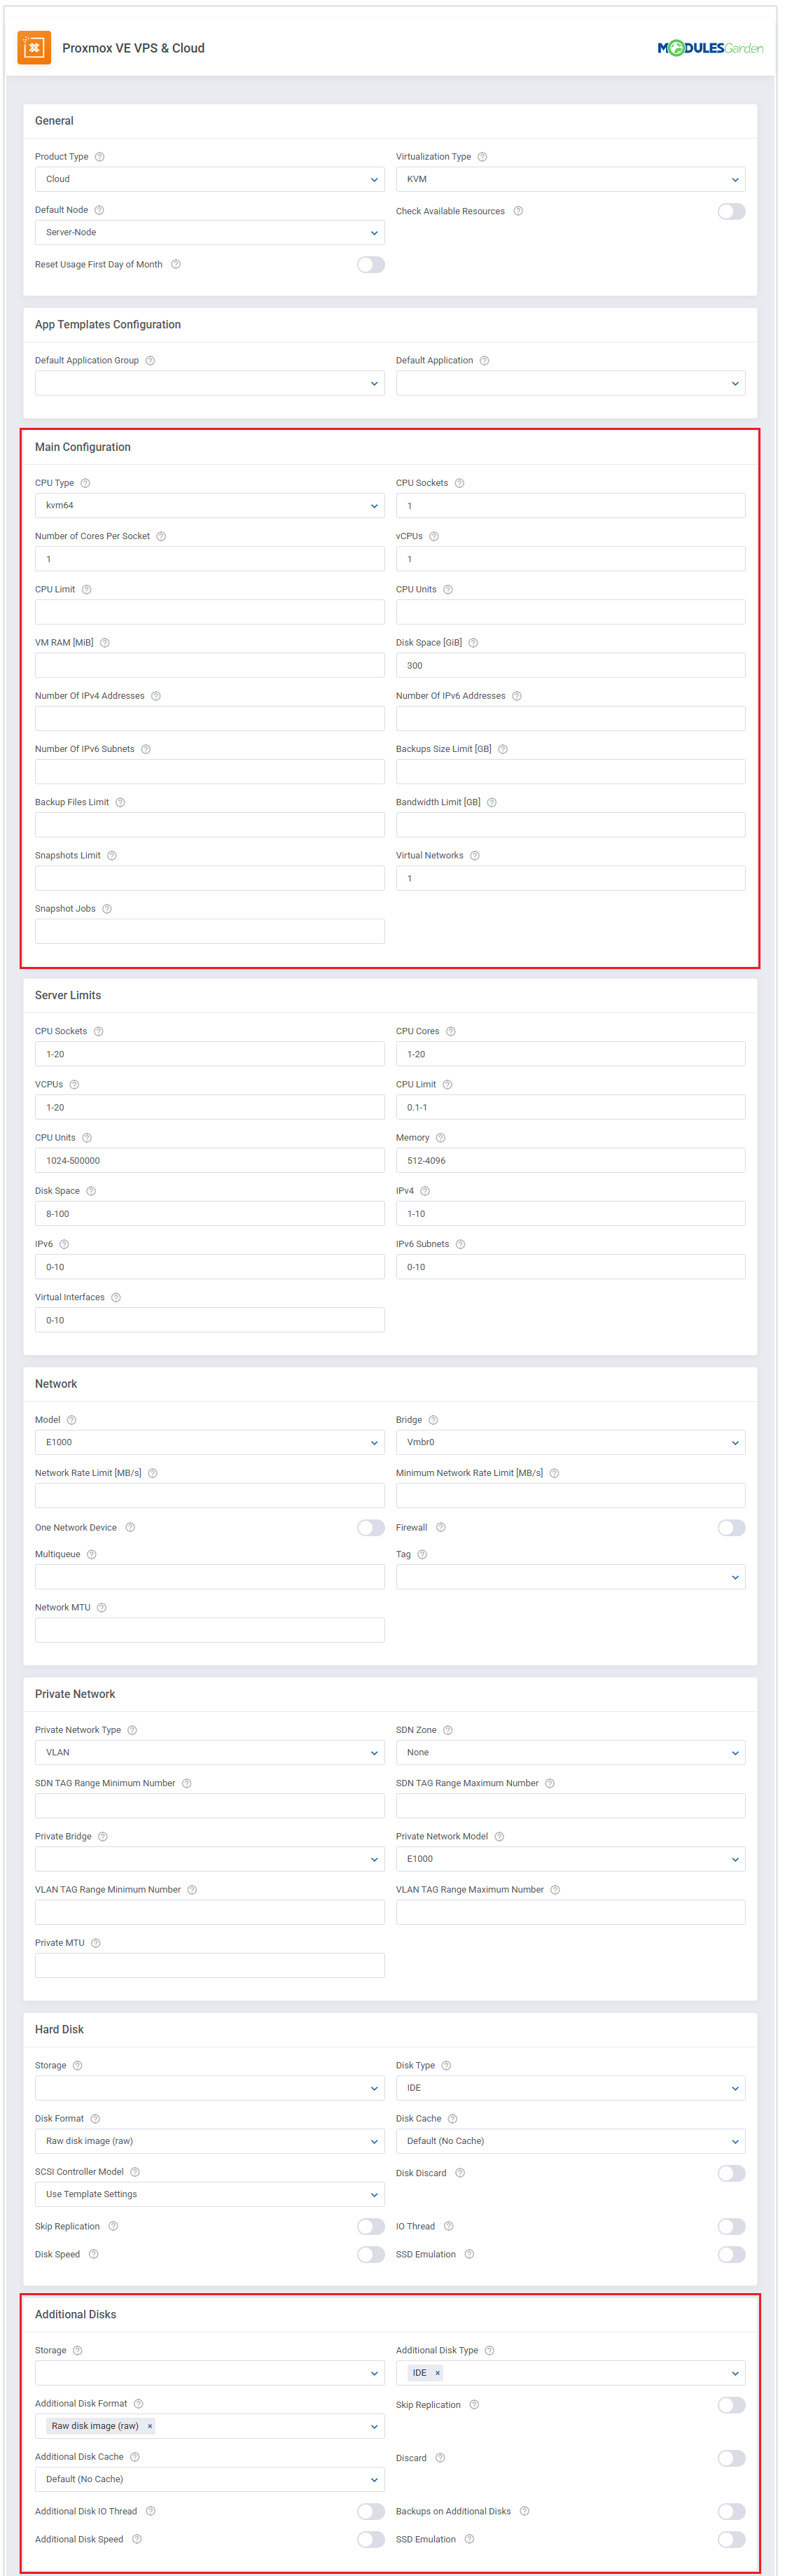
21. The setting of the KVM virtualization type (skip this step if you have chosen the LXC virtualization type).
There are a few sections underlined that need your attention. Please, complete carefully the 'KVM Configuration' , 'Additional Disks' , 'Client Area Features' sections.
As you can see, there are more options available. Look through them and decide which ones you want to modify and adjust to your and your clients' needs.
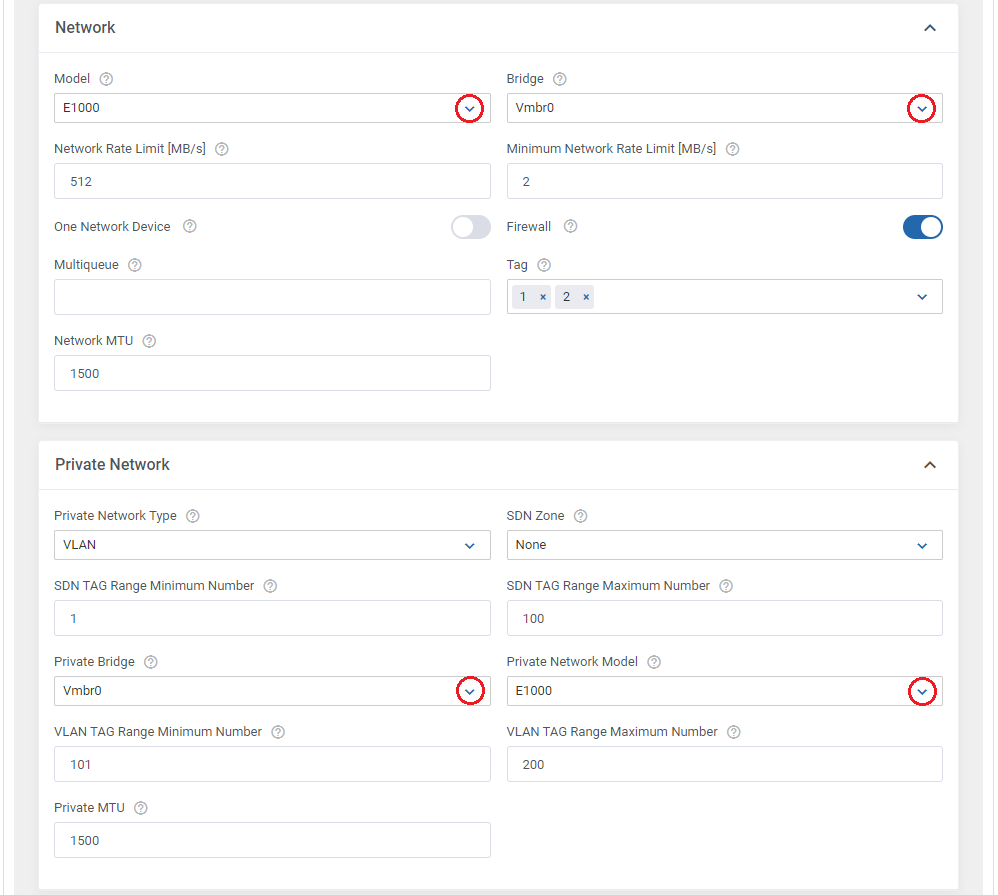
Do not forget about the 'Network' section where you can determine a model, bridge, and rate limits of the network.
If you are going to allow your clients to manage their private networks, you have to select 'Private Bridge' and set up VLAN TAG Range.
Once you make sure that the configuration is completed, click 'Save Changes'.
Important: Keep in mind that the root password is generated automatically for KVM virtualization upon its creation and reset.
'If you want to set your own password on KVM virtualization, use the Cloud-Init option.
Note: If you want to allow creating VMs based on 'Installation From Archive' remember to enable and select 'Archives' for the clients to choose from.
List of 'Archives' to select from can be found under 'Client Area Features'.
|
|
|
Cloud - LXC Virtualization Type
22. Setting of the LXC virtualization type.
Firstly, complete the 'General' configuration and then proceed to the 'Main Configuration' , 'LXC Configuration' and 'Network' sections.
There are more options available so you may easily modify the configuration of your products. Once you complete everything, click on the 'Save Changes' button.
|
Client Area Features
Finally, choose which client area features shall be available in the client area.
Enable the "Managed View" feature to make all virtual machine management options and actions visible to the administrator and hidden from the client.
|
Finalizing The Configuration
23. Private Network Management - in order to allow clients to manage their private networks, set up the 'Network' and 'Private Network' sections properly.
- Define 'Private Network Model'
- Select 'Bridge' as well as 'Private Bridge' from the dropdown menus.
- Enter ranges for VLAN TAG
Note: Configure these three options for the KVM and LXC virtualization.
If you skip this step, clients will not be allowed to add private networks.
Note2: For SDN Private Network type please refer to Tips section, point 12.
|
|
24. The next step is setting up the configuration of backups.
Define backup settings in the 'Backup' section through defining 'Storage' and enabling 'Backups Routing' .
Backups routing automatically removes the oldest backup when a new backup is created and the established backup limit is reached.
Additionally, you can limit the time period for storing backups by providing the number of days into the 'Backups Storing Period' field.
Furthermore, you can define the limit of firewall rules and the interface to apply the rules to.
Finish the configuration in the 'Module Settings' tab through pressing 'Save Changes'.
|
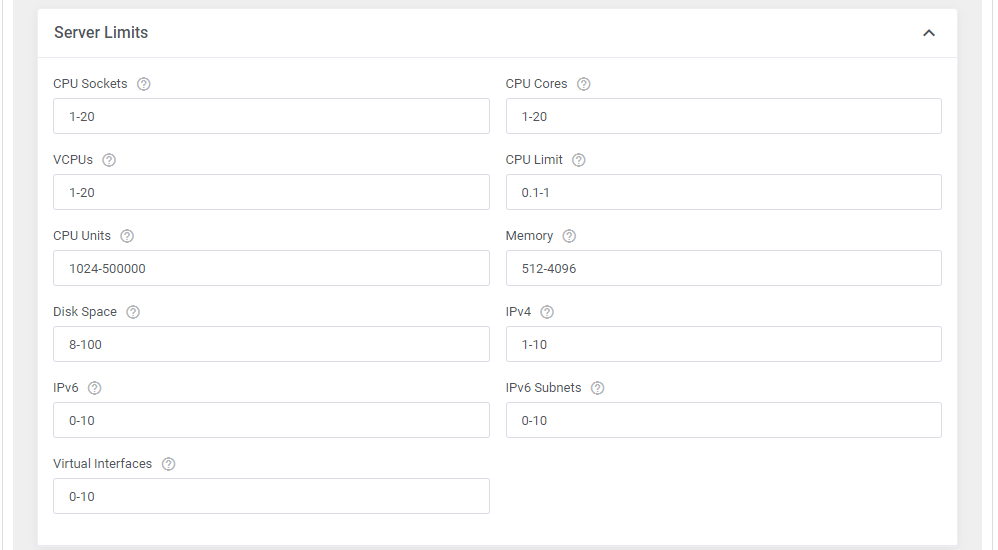
25. Set up server limits to control the size of created servers.
|
|
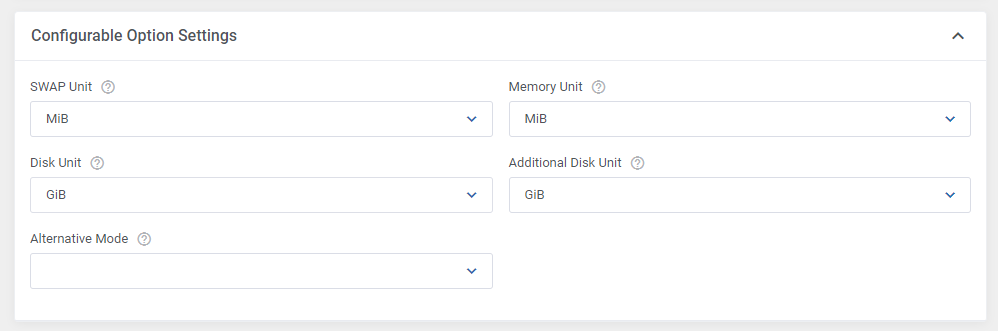
26. Afterward, you can create configurable options.
This step is optional - if you want to take it, start by selecting which of the configurable options listed in this table you want to generate.
Note: It is advisable not to generate options that you do not plan to use, or in case you want their fixed values to be taken from the module settings, rather than being flexible.
Moreover, the configurable options differ between the KVM and LXC virtualization types, so create them separately if needed.
Note 2: There is also an Alternative Mode available (VPS product type only), which changes the way the configurable options values are verified and calculated.
Select single configurable options and their values will be summed with the default product configuration values instead of overwriting them.
More information about configurable options and their edition can be found here.
A clear division of configurable opinions available per product and virtualization type, please see the comparison table.
|
|
27. At the end of the product configuration, you have to add a cron job as shown below (5-minute intervals are recommended).
php -q /your_whmcs/modules/addons/ProxmoxVeVpsCloud/cron/cron.php queue
Do not forget to replace 'your_whmcs' with your WHMCS root location. The cron can be also executed every single minute in order to perform the action more often.
In the Configuration of Addon settings, you will find a personalized command for the cron on your server as well as more possible crons to set up for execution.
Note: The queue command is also available in the addon’s Cron Scheduler.
This means you can automate its execution by simply setting up the central schedule cron task, which handles all recurring jobs configured within the scheduler.
For more details, see the Cron Scheduler section of this documentation.
|
| You have just finished the installation and configuration of the product, congratulations! Be sure to follow the below addon configuration as well to learn how to set up additional features.
|
Configuration of Addon
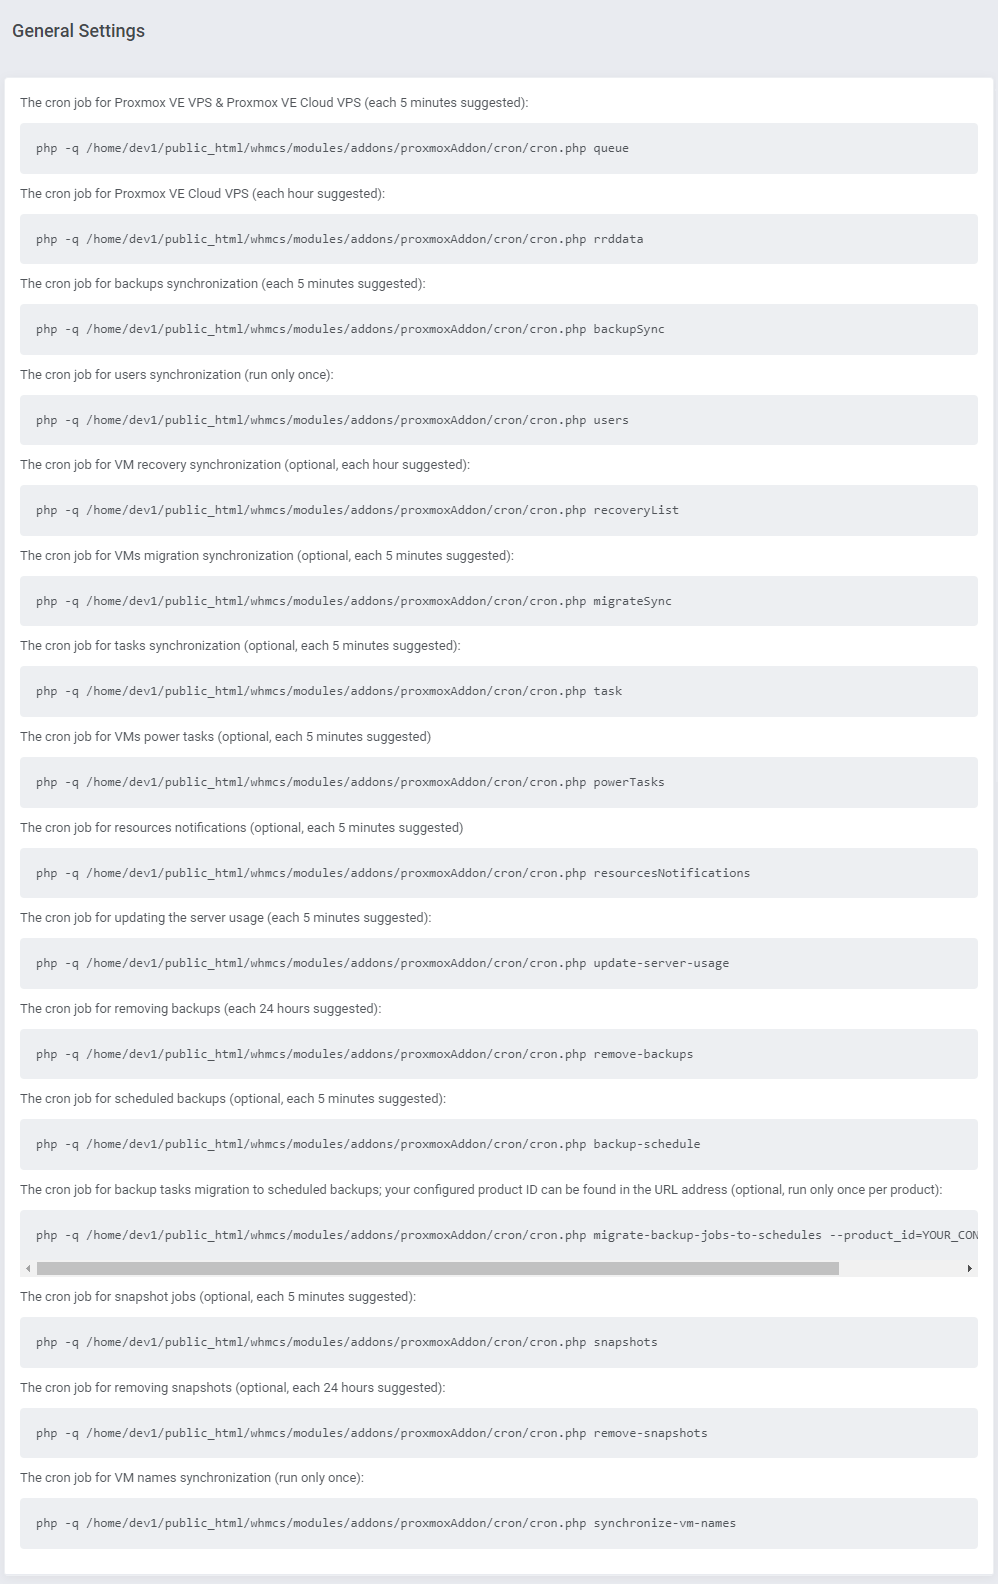
25. Proceed to Addons → Proxmox Addon → Settings → General Settings and set up the cron jobs listed under the Cron section.
Remember, there is a convenient tool called Cron Scheduler that allows you to automate recurring jobs.
Simply configure the execution frequency for each regularly run cron job, then activate the main schedule job, it will handle the regular execution of all defined tasks.
For details, please refer to the Cron Scheduler section of this documentation.
- Backups synchronization (every 5 minutes suggested)
- Users synchronization (run once only)
- VM recovery synchronization (every 5 minutes suggested)
- VM migration synchronization (every 5 minutes suggested)
- Tasks synchronization (every 5 minutes suggested)
- VM power tasks (optional, each 5 minutes suggested)
- Resource notifications (optional, each 5 minutes suggested)
- Updating the server usage (each 5 minutes suggested)
- Removing backups (each 24 hours suggested)
- Scheduled backups (optional, each 5 minutes suggested)
- Backup tasks migration to scheduled backups (optional, run only once per product)
You can find information on how to run this cron in the Backup Schedules section.
- Snapshot jobs (optional, each 5 minutes suggested)
- Removing snapshots (optional, each 24 hours suggested)
- VM names synchronization (run only once)
|
|
26. Next, find the 'Minimum VMID' field under the 'Cron' settings.
Fill it in with a number that will be used as an ID of the first VM, the second VM will be assigned the next ID number.
Define the limit of tasks that will be executed with a single cron run, just type in the required number into the 'Tasks Limit' field.
Here, you may also turn on the 'Debug Mode' if you need to register module logs.
|
27. Adding a new IP address.
In order to create a new product with an IP address assigned, you have to add 'Dedicated IP ' to the 'IP Addresses' list in 'Proxmox' addon module.
To do so, go to 'IP Management' and press 'New IP Addresses'.
Note: You can add IPv4, IPv6 addresses and IPv6 subnets. The process is the same for all types.
|
28. Start with defining the IP address type, choose among: 'IPv4', IPv6' and 'IPv6 subnet'.
Then, depending on the selected type, provide:
For IPv4 and IPv6 addresses types
- "Network Address" (eg: 192.168.1.0/24)
- "Gateway"
- "First IP Address" and "Last IP Address" - define the border from which and up to which of the IP address the generation (including the provided addresses)
|
|
For "IPv6 Subnet" address type
- "Network Address" (eg: 2a00:1911:5::/64)
- "Gateway"
- 'Number of Subnets"
- "CIDR"
- "First IP Address" and "Last IP Address" - define the border from which and up to which of the IP address the generation (including the provided addresses)
Decide whether the created addresses will be private or not.
|
Move to the 'Details' tab. Choose a server from the 'Server' dropdown menu and define which virtualization it should be applied to through selecting it from the 'Virtualization' dropdown menu.
Remember to press the 'Confirm' button when ready.
|
29. You are now able to create a new product using the previously added IP address.
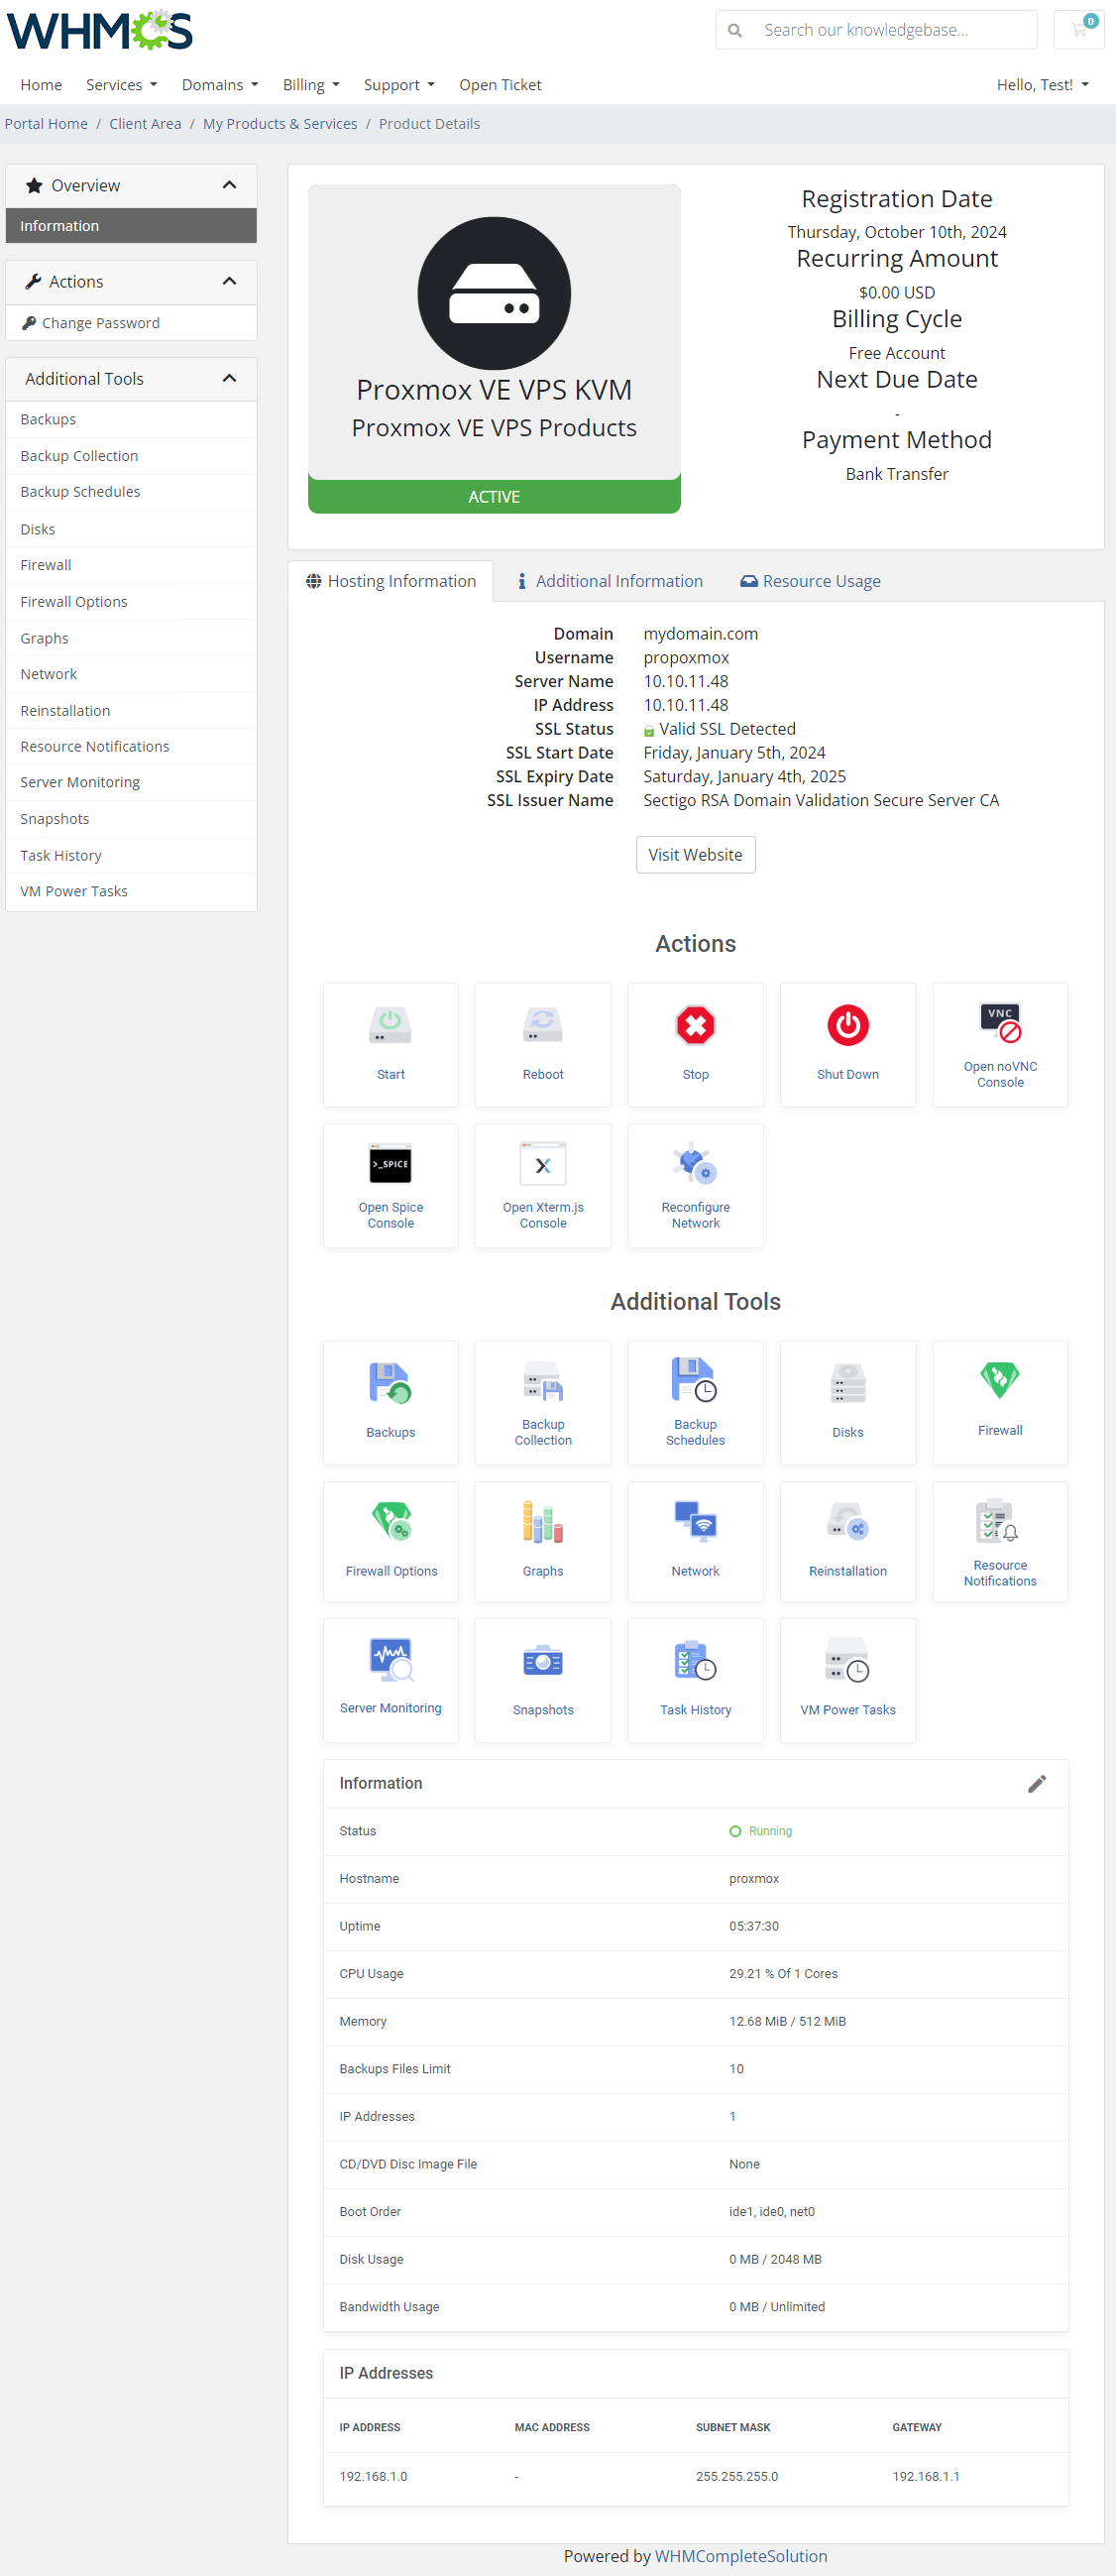
If you are using the KVM virtualization type, the client area with a successfully created product should look similar to the one on the screen below.
The assigned IP addresses should be displayed on the bottom panel according to the way you configured the IP pools. It looks quite similar in the case of the LXC virtualization type product.
|
Proxy Installation For Console Connection
A comprehensive guide detailing the installation, update instructions, and operational flow for the Proxmox Proxy application can be found in a dedicated article accessible through the following link.
We encourage you to refer to it for further insight into the Proxmox Proxy application.
|
The proxy feature can be looked on as an added security boost for your infrastructure.
It hides your Proxmox server so that your clients will not get to know its actual address when connecting to the server via the console in your system.
To work properly, the proxy must be accessible from both the public and private net as clients connect with the proxy from the public net, without the need to connect directly to proxmox.
|
Proxy must be connected with Proxomx server. To verify if the connection between these two is successful, you may run the following command:
curl -v https://10.10.11.48:8006
where 10.10.11.48:8006 is the node IP address.
|
Before you begin the process of connecting the console to the server through a proxy, you need to download the proxy application file.
The file can be found under the following link after you have logged in to your ModulesGarden account.
|
1. Create a new VPS server, which you may run on a Proxmox server.
It is advised to use the KVM virtualization type.
Warning! The used VPS may NOT have any services running, such as: PHP, WebServer (e.g. apache, nginx) or MySQL server.
|
2. Configure the network on the virtual machine, make sure the network works correctly, to do so you may use the below command:
ping modulesgarden.com
If everything is fine, assure that basic server security settings have been established.
You may turn off login with a password and turn on login with a key, change the SSH port, set up firewalls etc.
|
| 3. Log into the machine on which you are going to set up proxy.
|
5. Upload the application files into a proper directory, eg: /root/proxmox-proxy (create if needed).
Then unzip the files.
|
6. Move to the following catalog:
cd /root/proxmox-proxy
Note that the exact directory depends on the previous step where you uploaded the files.
|
| 7. Purchase or generate your own SSL certificate, and then use the certificate to overwrite the following files: 'nginx/localhost.crt' and 'nginx/localhost.key' .
|
8. Find the 'example.env' file and rename it to '.env'.
Then open the just renamed '.env' file and provide a random set of signs to create the database and root passwords: DB_PASSWORD and MYSQL_ROOT_PASSWORD
These data will be automatically used when creating the database.
|
9. Run the below command:
docker-compose up --build -d
|
10. Move to docker container:
docker exec -it proxyphp bash
and run the installation script:
php -q /var/www/html/installer.php install
When ready, find the API Key and keep it safe, you will need it later on when pasting the data into the Proxmox Addon, see point 12 for details.
|
11. Next, copy your machine IP address to WHMCS. You may check the IP address using the below command:
ip a
Note: Remember to check the IP address in your virtual machine, not in the proxyphp container.
|
12. Configure all the required data in the Proxomox addon in your WHMCS.
Move to 'Addons' → 'Proxmox Addon' → 'Settings'. At the bottom you will find section 'Console Proxy' with 'Host' and 'API Key' fields.
Note that the Host field may include either an IP address or a domain. It is extremely important that you paste here the same data as the ones used in the SSL certificate.
The below screen shows an example with an IP address which is not the only correct possible option here.
Provide the necessary data and confirm the changes.
|
13. Make sure the server works. In order to do so, please open the address: https://{vmip}:8443.
Remember to replace {vmip} with a valid virtual machine IP address, for example: https://192.168.8.113:8443/
When you see {"errors":["Invalid API Endpoint"]} it means that the server correctly responds.
|
| 14. Finally, try to open the noVNC console on your WHMCS Proxmox product to check if the proxy configuration is working properly.
|
Important: If your certificate expires in the meantime, you will need to buy/generate a new one and follow the below steps:
- move to the '/root/proxmox-proxy catalog (the directory may differ depending on your setup)
- replace the nginx/localhost.crt and nginx/localhost.key files
- run the following command:
docker-compose up --build -d
|
Note: If you ever encounter an iconcube error while rerunning the 'docker-compose up' command, delete all local docker images related to your docker file using the following command and try again.
$ docker rmi -f $(docker images -a -q)
|
| For instruction on how to react in case an update is required, please refer to the dedicated article including all details on the Proxmox Proxy application.
|
Configuring Servers Using Cloud-Init
If you are having trouble setting up DNS servers using Cloud-Init, this guide will help you resolve this issue quickly.
1. Enable the "Service Nameservers" option in your product configuration.
This option ensures that the IP addresses entered in the Nameserver fields in the service are correctly applied in Cloud-Init.
|
| Note: The "Service Nameservers" option is only available for Server/VPS product types.
|
| 2. Use the "Use Server Nameservers" option.
This feature automatically populates the Nameserver fields with values from your server configuration. Only the first two fields from the server will be used.
|
Additional Storage Configuration
This is an extra option that allows for specifying additional parameters for additional disk drives.
Check how to set the product to allow clients to add disks with desired space, storage type and speed within configured limits.
Remember that the Additional Disks options in the module settings must be enabled.
|
1. Start with creating new selections for the "Additional Disk Space" configurable option (additionalDisksSpace|Additional Disk Space), note that you have to do that manually.
To create the configurable options, please remember to follow the below-presented pattern:
local-lvm:3 | Disk Local-LVM Storage: 3GB
Where local-lvm:3 cannot be modified, the name on the right can be freely adjusted and the unit changed.
2. Next, add an appropriate entry in the language file to display the configurable option in a user-friendly manner. Open the english.php file located in modules/servers/ProxmoxVPS/langs/english.php and find an empty string:
$_LANG['storage']['local'] = 'Local';
$_LANG['storage']['local-lvm'] = 'Local-lvm';
Modify the configurable option name that is on the right from the '=' sign.
3. Consequently, clients are now given the option to add hard disk with the custom storage type.
|
Management
Proxmox VPS allows your customers to manage their PVE accounts via the client area in your WHMCS system.
At the same time, you can monitor and manage each product from your WHMCS admin area.
|
Management of Addon
Servers Management
Server List
In 'Addons' → 'Proxmox Addon' → 'Servers' → 'Servers List' you can find the configured Proxmox servers.
RAM details:
- Assigned - the RAM assigned to the server (hosting services only)
- Total - the full server RAM
- Free - the difference between the Total and Assigned values
Suspended - the number of suspended accounts per size in MB E.g.: (1/500 MB) in case there is only one suspended account that takes up 500MB assigned to the Proxmox VPS server.
|
Through pressing the 'Edit' icon, you will be moved to the server edit page - see point 10 of the Server Configuration.
Press the 'More Details' icon, and you will obtain extended information on the selected server. Look below for more details.
|
VMs
The 'VMs' tab includes the list of virtual machines created on this server. Take a quick look at information on the domain, status, bandwidth, and IP addresses.
To view information about the VM, simply press the "More Info" icon located on the right side of the page.
|
Clusters
The next tab contains the list of clusters with information on uptime, VMS and resource limits, as well as CPU, SWAP, memory and disk usage data.
Important: Limits defined in this section are taken into account by the Load Balancer function. The Check Available Resources toggle is not affected by them.
|
Press the "Edit" icon to manage the node and its limits.
- Allow To Create VM - if enabled, a VM can be created on this node
- Virtual Machines Number - define the maximum number of VM that can be created on this node
- Maximum Number of CPUs - set the top limit of CPUs on this single node
- Maximum Disk Size - set the top storage size allowed on this node
- Maximum RAM Size - set the maximum amount of RAM allowed on this node
- Default Storage - select the default storage for the VM created on this node
Setting node limits is crucial as creating virtual machines is largely based on them, once reached, a new virtual machine cannot be created on that node.
|
| Specify the 'Tasks Limit' here to set the maximum number of permitted backup tasks for the node you are currently modifying.
|
| Please bear in mind that limits placed in the above section overwrite the "Default Limit of Backup Tasks Per Node" value defined in the Addon → Settings → Backup Tasks Limitation section.
|
In the last tab you may define the relation between the node and backup storage and their synchronization.
- 'Backup Search Storages' - here you are allowed to define which storages will be searched through while running "backupSynch" cron job for backup creation and restoration purposes.
This setting overwrites the product settings.
- 'Alternative Backup Storage' - if you run out of space on the storage, an alternative pointed here storage will be used to create and store the backup.
You still can restore backup from the old storage, but only if that is selected in the above "Backup Search Storages" selection.
|
| Press 'Node Details' , and you will obtain all the summary and usage graphs:
|
VM Cleaner
VM Cleaner allows you to track VMs existing only on your Proxmox server, and not in your WHMCS.
Consequently, you are allowed to sort and delete only those VMs that cannot be managed in your WHMCS system.
|
Templates
You can view the list of templates on this page. You can easily convert any KVM machine on your server to a template.
In order to convert a VM, press the 'Create Template' button.
|
Next, choose a VM that shall be converted.
Fill out the 'Description' field, and press 'confirm'.
Important: The selected VM will be destroyed in the process.
|
| You may also delete unused templates here. Delete single templates or use the mass action feature to delete templates in bulk.
|
Server Settings
Here you can define the VM IDs range that will be used for newly created machines on this server. Please note that you need to enable the "Use VM Ranges" setting in the product configuration in order to use this feature.
To proceed, define the ID range and save changes.
Note: VM ID range allows you to sort created machines depending on the server they were created on.
SSH Data - fill out the SSH connection details (Host, User, Posrt, Password or Private Key) to allow to locate the IP addresses on the Proxmox server (Cloud-Init)
Snippet Storage - select the catalog where the file will be uploaded (Cloud-Init)
|
Node Groups
| Under the 'Node Groups' subsection, you can create new groups and assign nodes to them.
|
| Provide a name of your group and allot preferred nodes from the dropdown menu.
|
Now, navigate to the 'Module Settings' of your product and find the 'Miscellaneous' and 'Load Balancer' sections.
Firstly, provide the 'Minimum VMID' for a VM and then select one or more of the previously created groups.
|
Service List
In 'Addons' → 'Proxmox Addon' → 'Servers' → 'Services List' you can find details of any Proxmox product.
|
| Press the 'More Details' button to preview the node and VMID information.
|
Recovery VMs List
In 'Addons' → 'Proxmox Addon' → 'Servers' → 'Recovery VM List' you can view details of the created machine.
Run the 'VM recovery synchronization' cron job to create and store full backups of VM configuration - you can find it in the point 26 of the configuration instructions.
Use the 'Export to File' button to save information in a TXT copy file.
|
| Upon pressing the 'Details' icon, you will obtain the information on configuration, status, and DNS:
|
Task History
The "Task History" section includes the list of all module tasks with their most crucial details.
You may delete single tasks or use the mass action button to remove them in bulk.
Run the 'Tasks synchronization' cron job to synchronize the tasks, and view all tasks from the server - you can find it in the point 26 of the configuration instructions.
|
IP Management
IP Addresses
In the 'IP Management' tab, you can manage the IP addresses of Proxmox products.
You can create both single IP addresses (IPv4 and IPv6 are supported), and IP pools which then can be assigned to created VMs.
Important!: In order to create a virtual machine, you must previously add public IP addresses.
In case you do not own any public IP addresses in the database, you must previously enable the "cloud-init" option, only then it will be possible to create a VM with a private IP address.
|
When you create a new IP address or a pool, you may define:
- private/public address
- servers or nodes that will use them
- virtualization types (different VMs will use different IP pools)
Note: please go back to point 27 of the addon configuration to learn more details about adding IP addresses.
|
IP Logs
The 'IP Logs' includes the history of the IP addresses that were removed by the admin and which are again available in the proxmox addon IP Management pool.
Keep in mind that only addresses that were automatically added when creating the VM. Removed IP addresses, that were the manually assigned, are not logged here.
|
App Templates
'App Templates' allow you to manage and ultimately provide applications, ISO images, operating systems, and snapshots to your clients.
Prepare templates in the 'Applications' tab and gather them into groups in the 'Groups' tab.
For clients to be able to install templates on their VPS, their product has to include an 'Application Group' and allow 'App Templates' in the client area.
|
Applications
Read the guide carefully, as it contains crucial information on how to use 'App Templates'.
You can change the settings and have the guide collapsed by default. Clicking on the 'Additional Actions' button, select 'Options' and 'Collapse Guide'.
|
| You can switch between KVM Templates, LXC Templates, ISO Images, KVM and LXC Archives by clicking on relevant tabs.
|
| You can use the refresh button to download and later refresh templates from the server.
|
Once the items are loaded, you can use the action buttons to edit, duplicate or delete them from the list.
You can also use the mass action buttons to manage multiple templates at once.
|
Groups
With the templates ready, all that is left is to gather them into groups and include said groups into products.
Navigate to 'App Templates' → 'Groups' and click on the 'Create' button.
|
Read the information, then provide the group with:
- Name
- Description
- Items to include
|
| You can use the action button and the mass action function to edit and delete groups.
|
For the client to take advantage of the application templates, the product module settings have to include the group.
Find the 'App Templates Configuration' section and 'Default Application Group' field.
Include a chosen group for the product.
|
| Make sure 'Reinstallation' section is enabled under 'Client Area Features'.
|
Advanced Configuration
| App templates allow for even more in-depth management with the ability to create and edit custom applications.
See the examples below to learn about the most important options.
|
Adding Applications Manually
Manually add a single application, instead of loading all your applications at once.
1. Navigate to 'App Templates' → 'Applications' and click on 'Create'.
|
2. To fetch available templates or ISO images, you can use the Proxmox VE API.
List all content on storage (ISO, templates, etc.):
GET /api2/json/nodes/{node}/storage/{storage}/content
Filter results using the content parameter:
-
content=iso – ISO Images
-
content=vztmpl – LXC container templates
List all VMs, containers, and other resources across the cluster:
GET /api2/json/cluster/resources
You can filter the response by:
-
type: "qemu"
-
template: 1 (this field appears in the result if the VM is a template)
For Example:
  {
   "vmid": 100,
   "type": "qemu",
   "template": 1,
   "name": "ubuntu-template",
   "node": "pve1",
   "status": "stopped"
 },
|
| 3. In the 'Name' field, we recommend including the value of the '"name": "$name"' field.
For example 'ubuntu-template' from:
"name": "ubuntu-template",
Note: If you include a 'name' setting detail (see step 4) with the name from the request as its value, you can safely rename the application to something else here.
|
| 4. Edit your newly added application, and under 'Settings Details' edit/create application details outputted by the panel's API.
|
| Carefully look at the API output and fill out the 'Name' and 'Default Value' fields with you application details.
In our case, it is:
"vmid": 100,
|
| Add the remaining settings following the same pattern of filling the 'Name' and 'Default Value' fields.
|
| The application will be available on the list and ready to be included in a group.
|
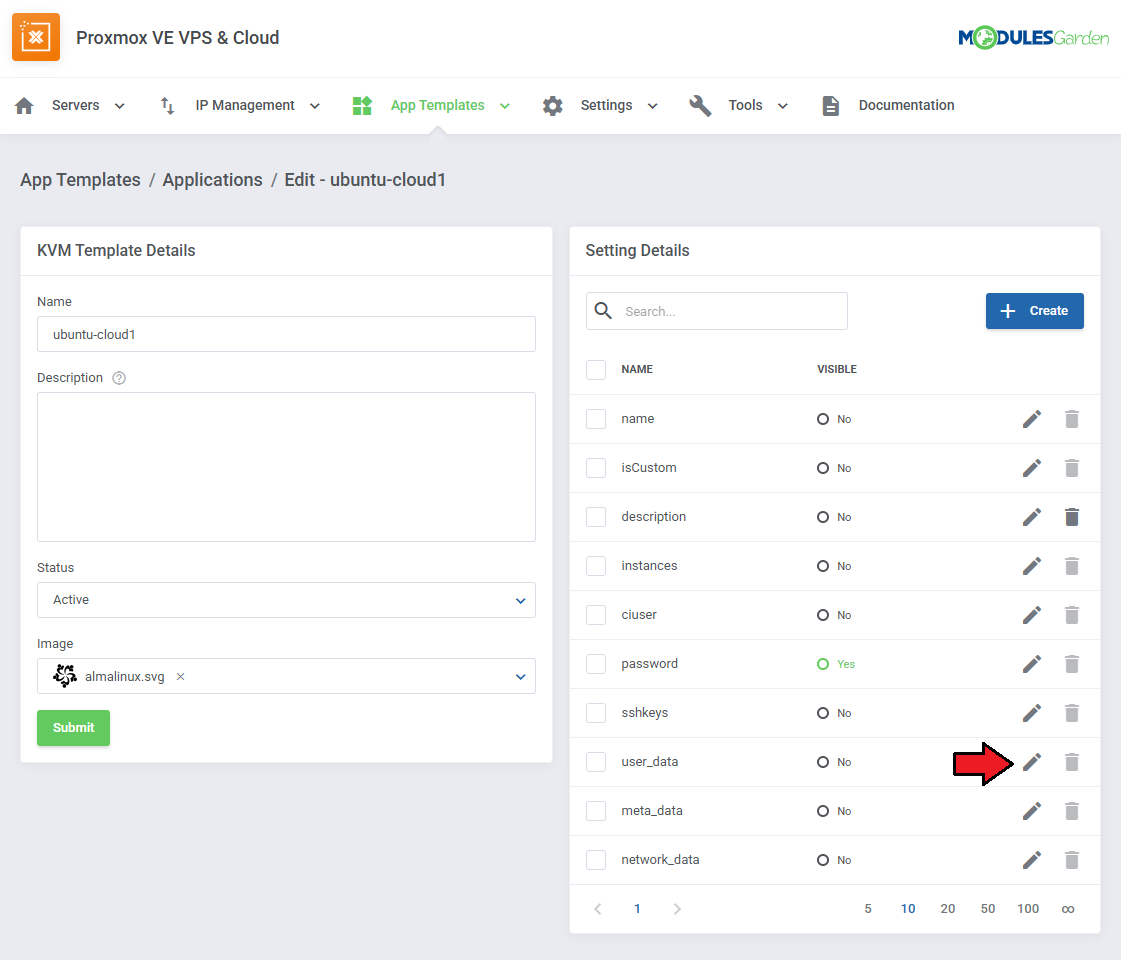
Including Cloud-Init / User-Data Scripts
Enter the user data to run common configuration tasks when the instance starts. You can run cloud-init directives or shell scripts for Linux images. You may use smarty variables, e.g. {$password}.
Note: Please refer to the following article to find a list of supported module parameters and their descriptions.
If an application supports scripts, the responsible setting will always be added automatically.
To include a script, edit the setting by clicking on the 'Edit' button next to it.
|
|
See the list below to learn how to set up the setting.
- Name - do not change this value, this is the setting identifier.
- Field Type - if the 'Visibility' setting is toggled on, this field decides the type of field, we recommend leaving it as is.
- Default Value - this is where you include your script. If 'Visibility' is toggled on, this will be the default value that clients can modify.
Note: Use the merge field list on the right for reference.
- Validation - optionally, provide Laravel validation rules like 'required'.
- Visibility - this will allow the client to modify the script before installation.
|
Settings
Load Balancer
Load Balancer is an advanced tool that allows smooth rotation between nodes so as to find the most preferable one, and create virtual machine on it.
Set the weight of the resource that will prioritize its selection when sorting the nodes according to the free resources.
Note: The lowest possible weight is 1. You cannot set, e.g. 0.5.
To learn more about nodes and their allowed limits please go back to the Clusters section of this documentation.
|
In order to use the Load Balancer, you need to enable it in the product's configuration:
Define the behavior of the tool:
- On Upgrade - select the action to perform:
- None - no action will be triggered
- Block - the upgrade process will be blocked as there are insufficient resources on the node
- Migrate - the upgrade process will be performed after the previous migration of the VM to a server with sufficient free space
- Shutdown VM on Upgrade
- Stop VM If Shutdown Fails
- Enable to allow migrating the VM with local disks
|
Node Prioritization Method
Have a look at how the sorting process works, and the rules that it goes by.
Let's take exemplary weights for each resource just like the ones presented on the screen above.
VMs Number Weight: 1,5

CPU Weight: 2

Disk Weight: 4

RAM Weight: 2,5
"Disk Weight" with the highest weight, which means it has the highest priority, and "VMs Number Weight" as the least crucial factor on a given node.
In this case, there are four nodes created, named A, B, C, and D, with current resources as shown below:
Node A (Free Ram: 60%, Free CPU: 20%, Free Disk Space: 50%, Number of VMs: 5)

Node B (Free Ram: 30%, Free CPU: 70%, Free Disk Space: 40%, Number of VMs: 10)

Node C (Free Ram: 90%, Free CPU: 50%, Free Disk Space: 20%, Number of VMs: 20)

Node D (Free Ram: 80%, Free CPU: 60%, Free Disk Space: 70%, Number of VMs: 15)
The next step is sorting the nodes according to each resource, it is done by assigning them corresponding priorities from 1 to 4.
The higher the priority, the more free resources available.
|
| Priority
|
Free Ram
|
Free CPU
|
Free Disk Space
|
Number of VMs
|
| 4
|
Node C
|
Node B
|
Node D
|
Node A
|
| 3
|
Node D
|
Node D
|
Node A
|
Node B
|
| 2
|
Node A
|
Node C
|
Node B
|
Node D
|
| 1
|
Node B
|
Node A
|
Node C
|
Node C
|
Now, the final calculation of sorting nodes according to free resources is performed, taking into account the previously defined weights.
The process of sorting nodes is based on the following calculation method:
Final Node Priority = (RAM Priority x RAM Weight) + (CPU Priority x CPU Weight) + (Free Disk Priority x Disk Weight) + (No. VMs Priority x VMs Weight)
The results for nodes A, B, C and D (with weights and sorting priority) are as follows:
Node A: (2 x 2,5) + ( 1 x 2 ) + ( 3 x 4 ) + ( 4 x 1,5 ) = 25
Node B: (1 x 2,5) + ( 4 x 2 ) + ( 2 x 4 ) + ( 3 x 1,5 ) = 23
Node C: (4 x 2,5) + ( 2 x 2 ) + ( 1 x 4 ) + ( 1 x 1,5 ) = 19,5
Node D: (3 x 2,5) + ( 3 x 2 ) + ( 4 x 4 ) + ( 2 x 1,5 ) = 32,5
As you can see, Node D has got the highest priority value with the result: 32,5.
It will be selected by Load Balancer to create a new VM on, or to migrate or upgrade an existing VM if its current node does not have sufficient resources.
The above described calculations are performed every time, 'Create' or 'Upgrade' actions are executed based on the current usage of resources on available nodes.
Important: In case a given client already has a VM existing on a node, this very node will NOT be taken into account during the prioritization of resources.
These security measures are taken to ensure that, in case of node failure, the client will still have access to the other VM server, created on another, properly working node.
At the same time, if this client has VMs on every node already, all of them will be taken into account during the prioritization process again.
If you decide to use the Load Balancer tool, define the resource weights to adjust the prioritization of nodes according to your needs.
|
Global Limitations
- 'VLANs Limit' - enter the maximum number of allowed VLANS per customer
- 'Default Limit of Backup Tasks Per Node' - put a global limit on the number of allowed tasks to create backups per node.
This general limit may be overwritten per single node in the cluster settings section at: Addon → Servers → Server Details → Edit Cluster → Tasks Limit
|
Task Settings
This setting can help you stay informed about failed tasks. When a threshold of task retries is reached a notification email message will be sent out.
You can set up a three-tier notification system with separate email contents.
|
The default email templates include:
- Task name
- Task ID
- Client ID
- Service ID
- Product/Service information
- Domain
- Error Message
You can pick different email templates from the dropdown fields in the tasks settings or edit the default templates by navigating to 'System Settings' → 'Email Templates'.
|
Admin Area Features
The 'Admin Area Features' section includes a list of all possible features that can be activated and then made available or not for the admin under the product's details:
- Virtual Machines
- Start
- Stop
- Reboot
- Shutdown
- Reinstall
- Spice Console
- noVNC console
- Xterm.js Console
- Information
- IP Set
- Graphs
- Available Resources
- IP Addresses
- Migrate
- User Details
- Reconfigure Network
|
Scheduled Backups Templates
In this section, you can create scheduled backup templates, that can be included in your products by default.
Preparing a template means there will be no need for the clients to set up their own scheduled backups and their virtual machines will be backed up on a predefined schedule from the get-go.
Start by creating and naming a scheduled backups template.
|
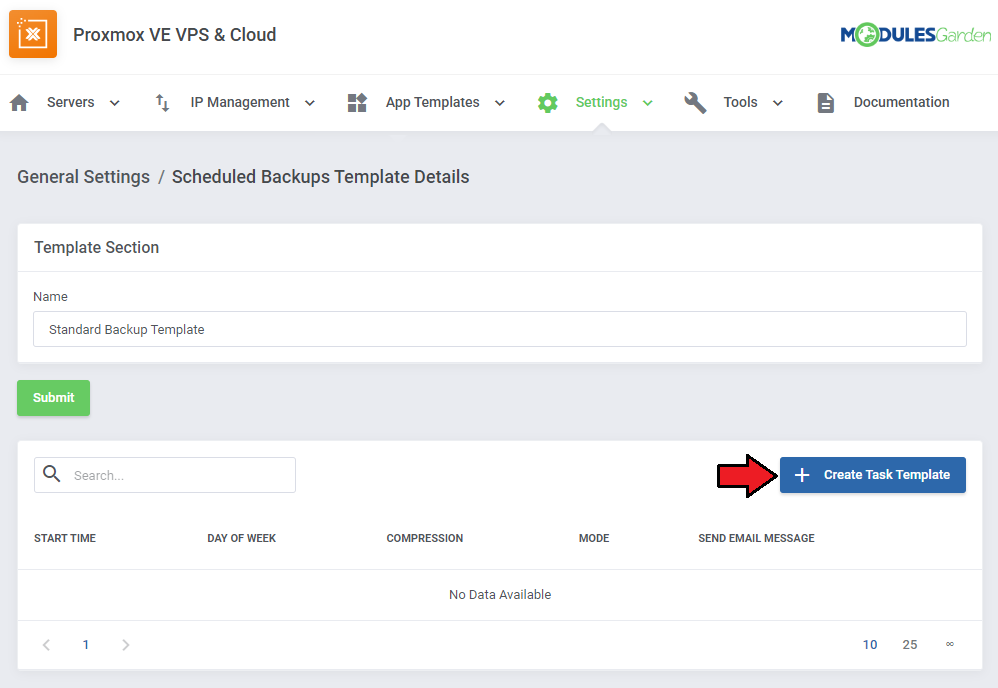
Once the template has been created, backup tasks can be included in it.
Click on the 'Create Task Template' button.
|
|
Configure the backup schedule as you see fit, you can create as many task templates in the scheduled backups template as you need.
- Start Time - The time when the task for a backup will be issued. Make sure the time you input meets the format: 24-hour time notation with the zeroes included. For example, 07:05, 20:30
- Day of the Week - The days the backups should take place each week.
- Compression type - Compression method to be used.
- Backup Mode - Decide on the backup mode.
- Send Email Message - Decide if an email notification about the backup should be sent always, never, or only on failure.
- Recipients - include the email addresses you would like the notification to be sent to. Separate each address with a comma.
You can include the {clientEmail} variable to include the client's default address in the list or leave the field empty to only send the notification to that default address.
Click on 'Confirm' when ready.
|
| You can add more task templates if you wish, edit or delete them.
|
The scheduled backup template you create can be included as the default backup schedule of your products.
The 'Scheduled Backup template' field can be found in the product's module settings under 'Backup'. You can also select the 'Scheduled Backup Email' under 'Client Notifications'.
Finally, you may allow your clients to change their scheduled backups by enabling the 'Backup Schedule' option under 'Client Area Features'.
|
Firewall Templates
Proxmox VE VPS For WHMCS allows you to prepare firewall templates for your clients. Those templates can be added to the product's configuration and will be applied in virtual machine creation.
Start by clicking on the 'Create Template' button and naming your new template.
|
| Configure the firewall options according to the needs of your clients. Make sure to click on 'Submit' to save the changes.
|
| Next, click on the 'Add Rule' button and add as many firewall rules as you need.
|
| The last step is to add the firewall template to a product. Navigate to your product's module settings and find the firewall section.
|
Tools
Logs
Cron Scheduler
Cron Scheduler allows you to define and automate the execution of module-specific commands at set intervals.
It automatically handles all recurring cron jobs, so there's no need to configure and run each one manually.
|
All cron jobs listed in 'General Settings' that are meant to run regularly (excluding one-time tasks) are automatically added to the scheduler when the module is activated.
There is no need to manually add them.
|
| Set the desired interval for each cron job (e.g., every 5 minutes, hourly).
|
| Configure and activate the main scheduler cron job, recommended to run every 1 minute.
This cron will handle the execution of all configured tasks. Scheduler cron command:
php -q /yourWHMCS/modules/addons/ProxmoxVeVpsCloud/cron/cron.php scheduler
|
If needed, you can trigger any cron job manually using the Run Command button.
The command will be queued for immediate execution with the next scheduler run, typically within one minute, ignoring its regular schedule.
|
Queue
At the top of this section, you will find information regarding the cron job.
The task cards can be used to filter the task table underneath.
|
Cron job tasks sent to the server through the module can be viewed and managed here.
The basic information includes:
- ID - identification number unique to each task.
- Related Item - the product related to the task. Clicking on it will take you to its product page.
- Status - the current status of the task (finished, running, pending, waiting or error).
- Task - specific action that the task attempts to run, these are:
- Lock Account
- Suspend Resources
- Unsuspend Resources
- Terminate Resources
- Attempts - the number of times the task was attempted.
- Created At - the date when the task was first created.
- Updated At - the date when the status of the task was last updated.
|
On the right side of the tasks list, you will find the action buttons. These are in order:
- Details - access more in-depth information about the task, including error logs.
- Run - attempt to run the task one more time.
- Delete - remove the task from the queue and the list.
|
Moreover, you can change additional settings by clicking on the three dots above the basic actions.
- Auto Prune - toggle the switch on to enable the task auto prune feature, which will delete the tasks after the specified time has passed.
- Auto Prune Older Than - specify the number of days that have to pass before a task is automatically pruned.
- Display 'Cron Job Configuration' Hint - disable to hide the cron job information.
Remember to make use of the search bar when you need to find a specific task, and the mass action feature when you need to delete multiple tasks at once.
|
Customizing language files is now extremely easy with the "Translations" tool that is now available directly in the addon.
Its user-friendly design makes managing various language file tweaks a smooth and efficient process.
Prepare translations for the original English files with this handy built-in tool. For specific instructions on how to use this tool please refer to its dedicated article, you will find it here.
|
Media Library
The media library allows you to upload images for use elsewhere in the module by admins and clients.
To upload a new picture, click on the 'Upload Image' button.
Note: The icons used in the Media Library by default are provided by Simple Icons and are licensed under the CC0 1.0 Universal (Public Domain Dedication) license.
|
You can delete images one by one by clicking on them.
To delete all images at once, use the additional action button.
|
Widget
Proxmox VE VPS & Cloud For WHMCS features a dedicated widget that displays crucial information about the module right in the WHMCS dashboard.
The information displayed includes:
- Faulty VM Deployments - a list of virtual machines that failed to be created.
- Related Domain
- Virtual Machine's ID
- Related Task
- Message
- Failed Tasks - a list of tasks that failed to complete
- Job ID
- Related Customer
- Related Task
- Message
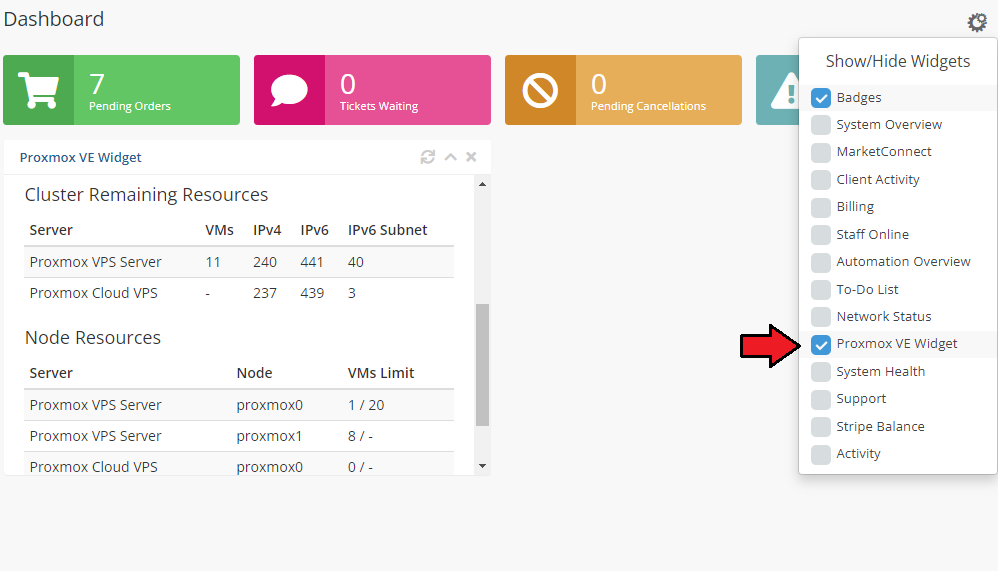
- Cluster Remaining Resources - a list of resources still available
- Server Name
- Remaining Virtual Machine slots
- Remaining IPv4 Addresses
- Remaining IPv6 Addresses
- Remaining IPv6 Subnet
- Node Resources - a list of the nodes available
- Server Name
- Node
- Virtual Machine Limit
Each list can be hidden by disabling it in the addon's general settings.
Make sure to enable the widget in the 'Show/Hide Widgets' menu.
|
|
You can change the height of the widget by editing the 'widget.tpl' file located in '/whmcs/modules/widgets/ModulesGardenProxmoxAddon/templates'.
Find this code fragment:
<style>
    #MGProxmoxVeVpsCloudWidget{
        height: 300px;
    }
</style>
and change it to include max-height: none !important;, like this:
<style>
    #MGProxmoxVeVpsCloudWidget{
        height: 300px;
        max-height: none !important;
    }
</style>
Now you will be able to adjust the widget's height by editing the height: value; from the default '300px' to any value that fits your needs.
|
To configure the widget's visible options, navigate to Settings → General Settings → Proxmox VE Widget Features section.
In this section, you can choose which data should be displayed on the WHMCS dashboard. The following features can be enabled or disabled:
- Faulty VM Deployments - Show information about unsuccessful VM provisioning attempts.
- Failed Tasks - Display a list of recent failed operations within Proxmox VE.
- Node Resources - View real-time resource usage (CPU, RAM, etc.) for each Proxmox node.
- Cluster Remaining Resources - Present the remaining available resources across the cluster.
|
Admin Area
In the admin area, you are able to view details and manage your clients' machines, access remote consoles, migrate VMs between nodes, assign IP addresses and view resource usage graphs.
All visible features can be turned on and off in the Proxmox Addon → Settings → Admin Area Features.
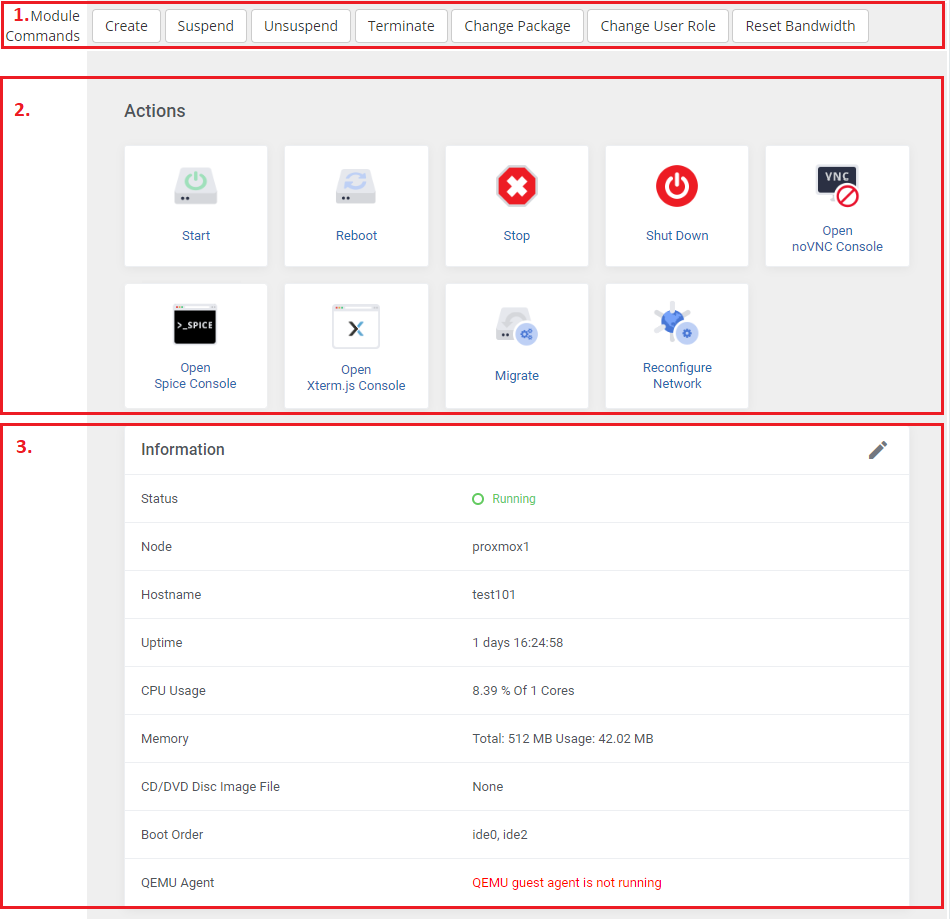
- Firstly, there are the standard module commands that you can perform on the VM.
- Among them, you will find actions to:
- Manage the status of the machine,
- Access to remote consoles
- Migrate the server between nodes.
You may enable 'Online' migration (no need to shut down the server before migration) and toggle 'Migration With Local Disks' which might take a while.
- In this panel you will also find the basic information about the VM.
- Moreover, you can change the VM hostname, ISO image, bootable devices as well as insert the SSH public key.
Note: The "Move Product/Service" action is not supported due to WHMCS limitations, and the fact that there are no hooks that would allow to catch such an event.
|
|
It is possible to fetch information of network interfaces and OS using the 'Qemu Guest Agent' tool.
This option must be previously enabled in the product configuration, and successfully installed on the VM. Afterward, it should look similar to the image below.
|
In the next panel, you can find IPv4 and IPv6 addresses assigned to the VM.
You can either delete or add an IP address to a product. To perform the latter action, press 'Add New IP' as shown on the following screen.
|
Fill in the fields to add a new IP address. At the bottom, there is a switcher 'Create Network' which, when on, forces assigning this IP address via Cloud-Init if that has been enabled and configured properly.
Important: Create Network option works for KVM configuration only.
|
Additionally, until the VM has been provisioned, you can manually assign to it the desired IP addresses from the pool by typing them in the 'Assigned IPs' field (available for the 'Dedicated/VPS Server' product type).
This will override the automatic IP address assignment, and the VM will use only the IP addresses you have entered in the mentioned field.
Note: The IP addresses you provide must already exist in the IP Management pool, and cannot be assigned to any other VM. This feature will not work if you already use the IP Manager For WHMCS module.
|
| In the next two panels, you can view IPSet information as well as reinstall the VM based either on the OS or ISO template.
|
| Graphs can be useful to monitor the usage of VM resources. You can change the interval by pressing the 'Edit' button, and simply providing a new one.
|
| In the last part of product management, you can view the user details on your Proxmox servers along with the assigned VMID, node, VLAN tag, and SSH public key provided before the VM creation.
|
Client Area - VPS
The client area interface of Proxmox VPS For WHMCS should look like the one on the screen below.
As you can see, the control panel contains assorted options that will prove highly useful in VM management.
The module allows your customers to easily 'start', 'reboot', 'stop' and 'shutdown' their servers through pressing specific buttons.
It is also possible to 'reconfigure the network' without using the "Change Package" tool to easily update the network interfaces (KVM virtualization type only).
Clients can also access the 'noVNC' , 'SPICE' and 'Xterm.js' consoles. Among 'Additional Tools' , you will find options to 'reinstall' a server, create a 'backup' or set up 'backup jobs'.
Your clients are able to access resource usage 'graphs', view the VM 'history', manage the 'network' interface device, and set up the 'firewall' rules. Additionally, clients may take 'snapshots' , and manage 'disks'.
On the main product page in the client area, under the 'Information' headline, your clients can find such details as the current usage of CPU, memory, disk (LXC only) and SWAP (LXC only).
Customers can also view 'DNS' (LXC only) as well as assigned 'IP addresses'.
Note: The bellow example image was taken from the KVM-based VM, but it looks very similar in the case of LXC.
|
|
By clicking the 'Edit' button next to the 'Information' headline, your clients can additionally change the VM hostname and ISO image, choose boot devices, as well as insert their SSH public key.
Important: If you do not see the Edit icon, it means the option to change hostname has been turned off by the admin.
Note: Information elements included in the below table are managed by the admin in the product's configuration section under Client Area Features.
|
Client Area - Cloud
Client area interface of Proxmox VE Cloud VPS For WHMCS allows your clients to create their own virtual servers.
They can also view resources used and manage existing virtual machines.
|
New Virtual Machine
| In order to add a new virtual machine, press the 'Add New Virtual Machine' button.
|
Now, provide a name of your new virtual machine and choose a proper type from the dropdown menu.
Moreover, you can add 'New Virtual Network' and 'New Additional Disk' here.
Confirm creation through pressing 'Confirm'.
Note: Data to be filled in may differ according to which type LXC or KVM you have chosen.
|
| You can now easily 'Edit' (1) or 'Delete' (2) your virtual machine.
You can find information about managing your virtual servers in next section.
|
Virtual Network Management
Move to 'Virtual Networks' section to add, delete and edit your virtual networks.
Please keep in mind that this option must be enabled by administrator in your product's 'Module Settings' previously and a private IP address must be added in the Proxmox Addon.
Otherwise you will not be able to add any virtual network successfully.
If you have reached the set by the admin limit of allowed networks, the button will not be active either.
Moreover, you can also 'Edit' (1) or 'Delete' (2) existing private networks.
|
Templates Management (KVM Only)
| Once you press 'Templates', you will be redirected to a site where you will find the list of currently created templates along with their details and access to basic actions.
|
You may edit or delete existing templates. To add a new one, simply press 'Add Template' button.
OS templates do not consume any resources such as CPU sockets, memory etc.
Important! When you convert server into a template, it is consumed in the process! There is no possibility to revert it back.
|
| Select server from dropdown menu and type in its short description. Save changes when ready.
|
Client Area - VM Management
Actions
| Start, Reboot, Stop, Shut down, Delete Virtual Machine, apart from that, three console types are available:
|
noVNC Console
| noVNC console allows your clients to connect to their server in the easiest possible way.
|
SPICE Console
SPICE console enables you to connect to the virtual machine using SPICE.
Note: Since the 2.7.0 version of the module, your clients no longer need to download and install the client side SPICE application in order to connect with a VM. The console will be now opened in the virt-viewer instead.
|
Xterm.js Console
Xterm.js console enables you to connect to the virtual machine using Xterm.js.
You have to update the scripts on Proxmox v2.6.0. To do so, open the folder: UploadOnProxmoxServer/5.2-10 and upload the content on all your Proxmox servers.
|
Client Area - Additional Tools
Backups
Important! Remember that since Proxmox VE VPS For WHMCS module version 3.7.0, a dedicated to backups synchronization cron job must be configured.
Make sure you have set up the cron task as described in the addon configuration instruction.
|
| To create a single backup, press the 'Backups' button, and click on 'Create Backup' as shown on the following screen.
|
Now, choose the compression type ( 'None' , 'LZO' or 'GZIP' ) and the backup mode ( 'Snapshot' , 'Suspend' or 'Stop' ) from dropdown menus.
Afterward, press 'Confirm'.
|
Note: Creating a backup is now added to the tasks list, wait a moment until the task is completed. Once ready, your new backup will appear on the list and will be available for future restoration.
Note 2: You may select the storage for created backups either in the module settings globally, or per node in the addon module (this setting overwrites the product settings).
|
You may mark backups as protected so they will not be unintentionally deleted.
To restore a VM from the backup, press 'Restore', and then click the 'Confirm' button in a popup window.
|
Above the backups list, there is a table with information on 'Available Resources'.
You will find data on limits put on backups:
- Backup Size: used/allowed
- Backup Files: used/allowed
- Protected Backup Files: used/allowed
Next to the statistics, there is a comfortable and easy-to-read progressive chart to illustrate the usage. If the size is set to 'Unlimited', the chart does not show any progress.
Once you have reached the limits, the option to create new backups is blocked.
|
If you would like to restore singular files instead of the whole machine, or simply download them you can do that by clicking on the 'Browse Files' button.
Important: Make sure your designated backup catalog has write permissions for file downloads and the deletion task to remove old files.
Additionally, ensure that this directory is not publicly accessible.
|
Backup Collection
Open the collection of all your backups, here you will find the backups created from all your virtual machines.
You may restore this service with any backup of your choice.
|
Backup Jobs
Important: 'Backup Jobs' and 'Backup Schedules' are mutually exclusive and should never be used together.
'Backup Schedules' are meant to replace 'Backup Jobs' as a backup solution that involves much less load on Proxmox VE resources.
By pressing 'Backup Jobs' in the client area, you will be moved to the backup jobs management page.
You can easily edit or delete, as well as preview the details of existing backup jobs there.
To add a new backup job, press 'Create Backup Job' as shown on the following screen.
|
Now, define the backup start time, choose the days when to run it, and select 'Compression Type' and 'Backup Mode' from dropdown menus.
Also, select if you want to receive the notification when the backup is ready.
Finally, press the 'Confirm' button.
|
Backup Schedules
Important: 'Backup Jobs' and 'Backup Schedules' are mutually exclusive and should never be used together.
'Backup Schedules' are meant to replace 'Backup Jobs' as a backup solution that involves much less load on Proxmox VE resources.
If you already have 'Backup Jobs' created and would like to migrate them into Backup Schedules automatically, you should use this cron job task:
php -q /your_whmcs/modules/addons/proxmoxAddon/cron/cron.php migrate-backup-jobs-to-schedules --product_id=YOUR_CONFIGURED_PRODUCT_ID
You will find the cron already personalized for you in the General Settings tab.
Replace 'YOUR_CONFIGURED_PRODUCT_ID' with the ID of the product you want to perform the migration for.
The ID can be found in the URL link after selecting the product in the Products/Services tab in the admin area. Do not confuse this ID with the ID of clients' products.
Run the task for each of the products you want to perform the migration for.
'Backup Schedules' can already be created from a template while creating the virtual machine, but can still be freely customized later.
The main difference between scheduled backups and backup jobs is that the scheduled backups are handled entirely by the module instead of the Proxmox server.
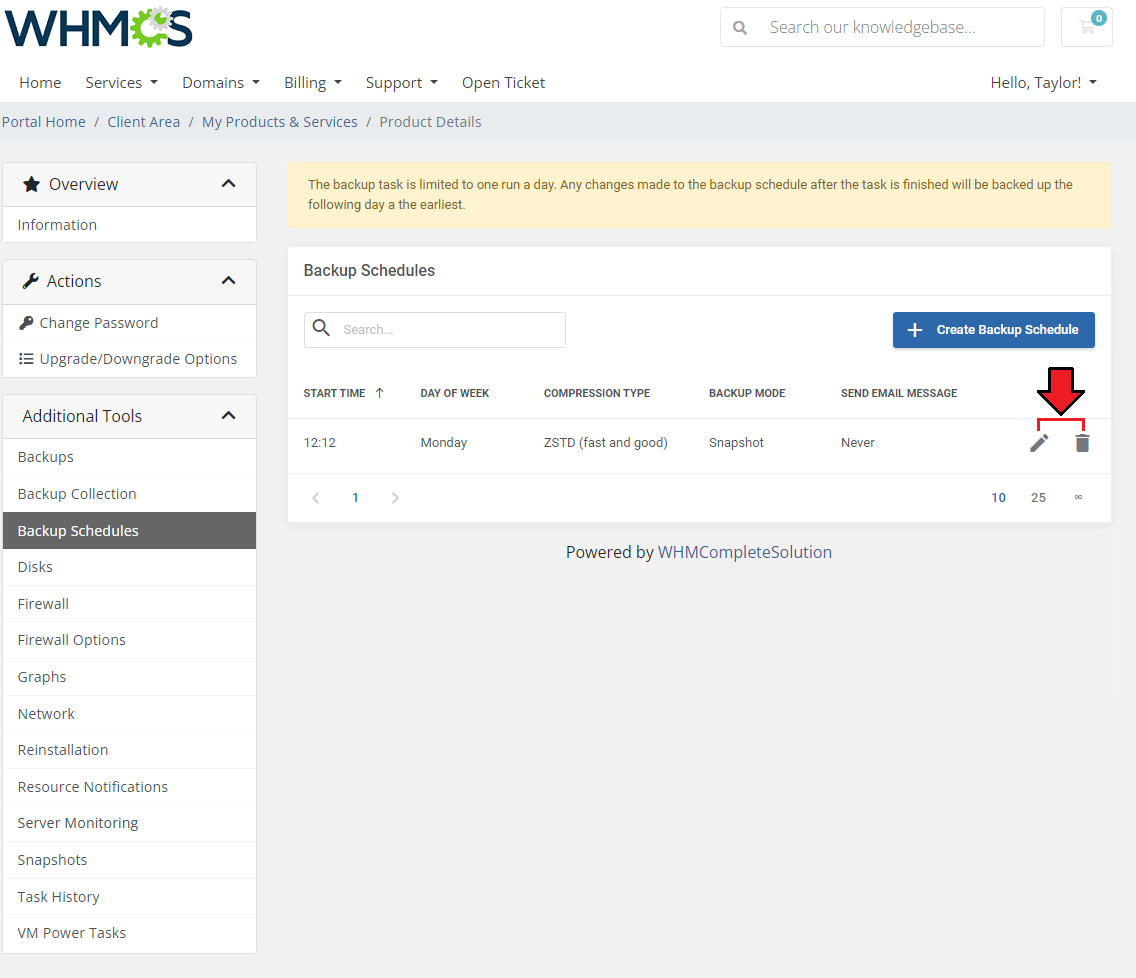
You can edit or delete existing scheduled backups by using the action buttons.
|
|
| You may also schedule new backups by clicking on the 'Create Backup Schedule' button.
|
Configure the backup schedule as you see fit, you can create as many task templates in the scheduled backups template as you need.
- Start Time - The time when the task for a backup will be issued. Make sure the time you input meets the format: 24-hour time notation with the zeroes included. For example, 07:05, 20:30
- Day of the Week - The days the backups should take place each week.
- Compression type - Compression method to be used.
- Backup Mode - Decide on the backup mode.
- Send Email Message - Decide if an email notification about the backup should be sent always, never, or only on failure.
- Recipients - include the email addresses you would like the notification to be sent to. Separate each address with a comma. Leave the field empty to only send the notification to that default address.
Click on 'Confirm' when ready.
|
Disks (KVM only)
| View available disks and add new ones.
|
| Define the additional disk size, choose its bus (the available options may be 'IDE', 'SATA', 'VIRTIO' or 'SCSI' ), as well as define a disk format - you can choose from 'Raw disk image (raw)', 'QEMU image format (qcow2)', or 'VM image format (VMDK)' .
|
Firewall
Owing to the 'Firewall' page, your clients can set up firewall rules and enable a security group for their servers from the WHMCS client area.
As you can see, you can easily modify and remove the previously added rules and security groups.
To add a new firewall rule press the 'Confirm' button.
|
You can add a firewall rule in two ways. Both of them require choosing a direction, action, interface, source, and destination.
The first way (orange) is to choose macro from the 'Macro' dropdown field.
The second way (blue) requires you to choose a protocol and fill in both the source and destination ports.
Additionally, you can enable a rule, and add a comment to it.
Press 'Confirm' to create a rule.
|
Among 'Additional Actions' you will find three options:
- Add Security group - choose a security group and an interface on which the group will be used on.
Additionally, you can enable a security group, and add a comment to it. Click 'Confirm' to use the security group.
|
- Download Rules - use this option to simply create a backup, once pressed, a file will be downloaded
- Restore Rules - restore any of the previously created backups created. Select one of the previously downloaded files with rules
|
You may manage the hierarchy of rules on the list. In front of each rule, you can find its 'Position' marker.
The higher the rule is on the list, the higher priority the rule has assigned. You may change the rule position using the 'Move up/down' arrows.
|
Firewall Options
| Here you can view the current firewall settings. To decide on its options, press the 'Edit' button, and adjust them to your needs.
|
Graphs
Through pressing the 'Graphs' button, clients will be moved to the page with the generated graphs showing the CPU and memory usage, network traffic, and disk I/O.
They can also switch the timeline of graphs by choosing a new one from a dropdown menu indicated on the following screen. Clients can pick between 'Hour', 'Day', 'Week', 'Moth' and 'Year'.
|
Network
| Your clients are allowed to add and remove only private network interface devices. Additionally, they may assign other virtual machines to the network, enabling communication between them.
|
| Upon clicking the 'Information' button, the new popup will open with more network details.
|
The 'Assign Virtual Machine' button opens another popup window, where virtual machines to be assigned to the network can be selected and optionally restarted.
A restart is necessary for the changes to be applied if the hotplug functionality is not configured for the virtual machine.
You can find an exemplary scenario illustrating a typical use case of this function in the 'Use Cases' section of this wiki.
|
Finally, the 'Delete' button will remove the network.
Keep in mind that ' Network device' options have to be set to 'Private'.
Also, after the network creation, the button to add another one or delete a newly created private network may not be longer available, depending on your Proxmox configuration.
|
Reinstallation
The "Reinstallation" feature can be used to reinstall a new OS on the VM directly by the clients.
You can allow your clients to either select a new OS from the provided KVM templates to automatically replace the system, or let them choose the ISO image for manual system installation.
Note: The ISO images can only be used for the KVM virtualization type, while VM templates can be used either for KVM or LXC.
Additionally, both KVM and LXC users can define the new OS password before a new installation.
|
| Remember to grant your clients access to the selected reinstallation types in the 'Client Area Features' , as well as choose the available 'OS Images' and 'ISO Images' .
|
Resource Notifications
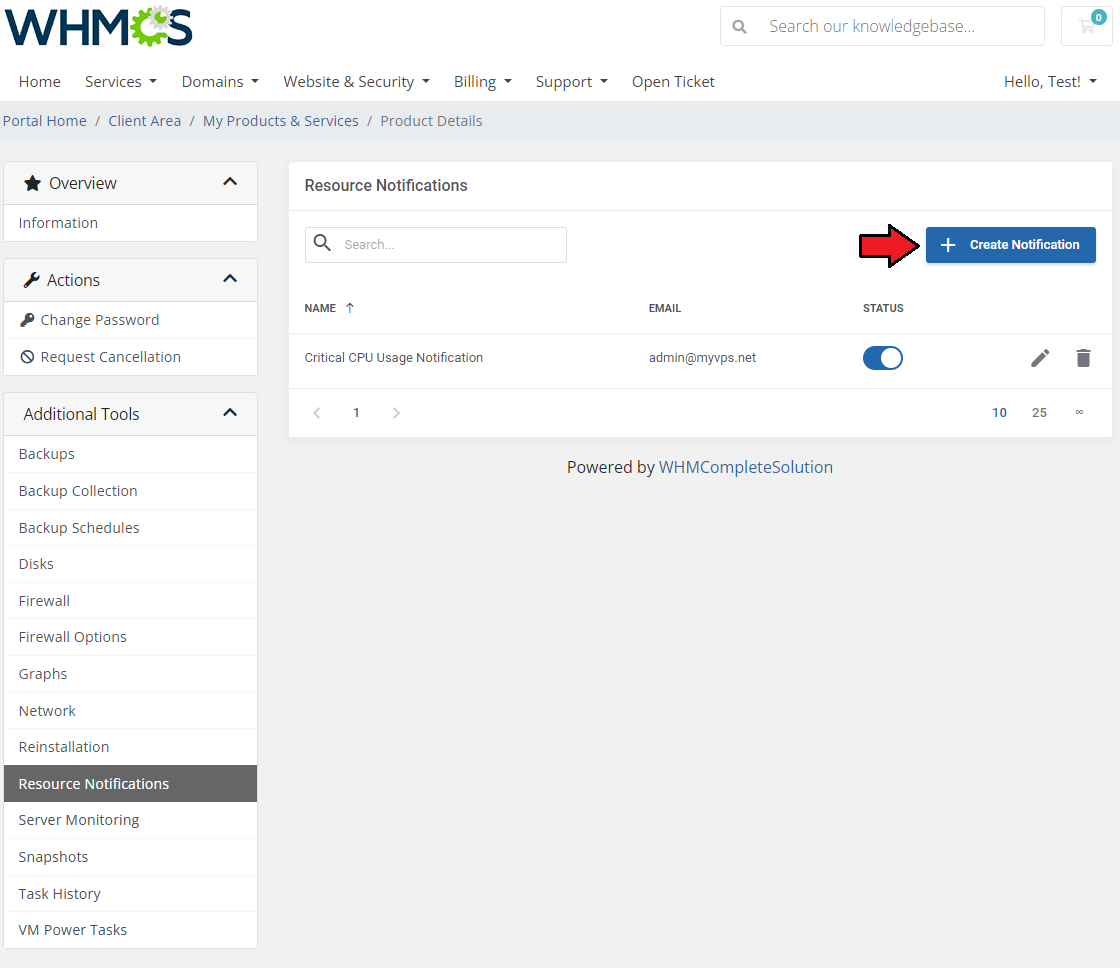
Within the "Resource Notifications" section, you can configure personalized notifications regarding your machine's utilization.
By creating "Resource Notifications", you enable the system to automatically send email alerts whenever your server exceeds predefined thresholds for network traffic, disk read and write operations, CPU utilization, and memory usage within a specified time frame.
These notifications serve as indicators, ensuring that you stay informed about any significant deviations from normal resource utilization, enabling you to take timely action and maintain optimal performance.
|
|
To create the first notification rule press the 'Create Notification' button.
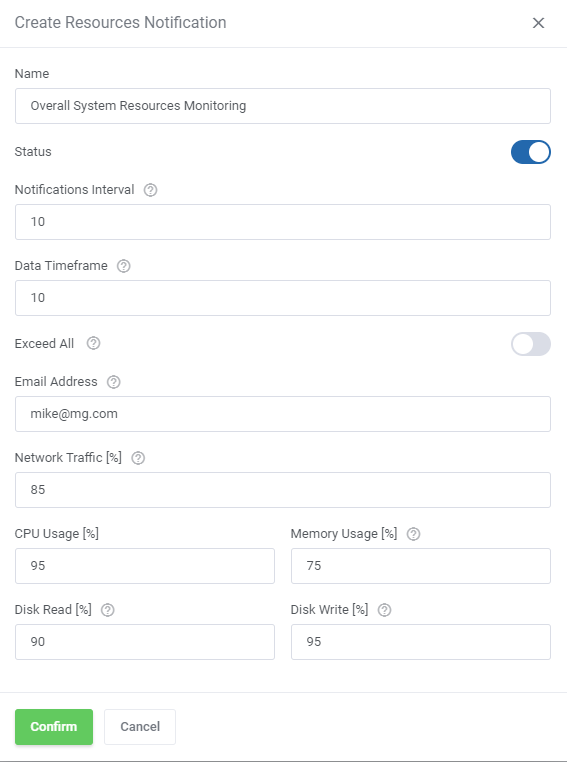
A dedicated form will appear, fill in the described below fields to compose the notification requirements:
- Name - enter the rule name
- Status - set it to enabled or disabled, can be changed later on
- Notifications Interval - define the time interval between notifications in hours. Eg. 8 - notifications will be sent in this frequency
- Data Timeframe - specify the time duration to extract and verify data usage (in minutes, eg. 30)
- Exceed All - if enabled, all the below setup conditions will have to be met to send the notification
- Email Address - if you want to send the notification to other addresses than the main customer's address, enter them here separated by a comma
- Conditions for:
- Network Traffic [%] - sum of Net In and Net Out expressed in percentage value towards Rate Limit Network
- CPU Usage [%] - a percentage that represents the overall utilization of CPU. It indicates how much of the CPU's processing capability is being utilized.
- Memory Usage [%] - percentage of memory usage towards the VM RAM
- Disk Read [%] and Disk Write [%] - disk usage percentage is calculated based on the Hard Disk Speed limits (respectively: Read Limit and Write Limit).
If there are no limits set for Hard Disk Speed, the dedicated fields in the client area ('Disk Read [%]' and 'Disk Write [%]') will not be displayed
|
|
| A ready notification rule appears on the list, here you may quickly turn it on/off (1) depending on your current needs, change (2) the rules or delete (3) the notification.
|
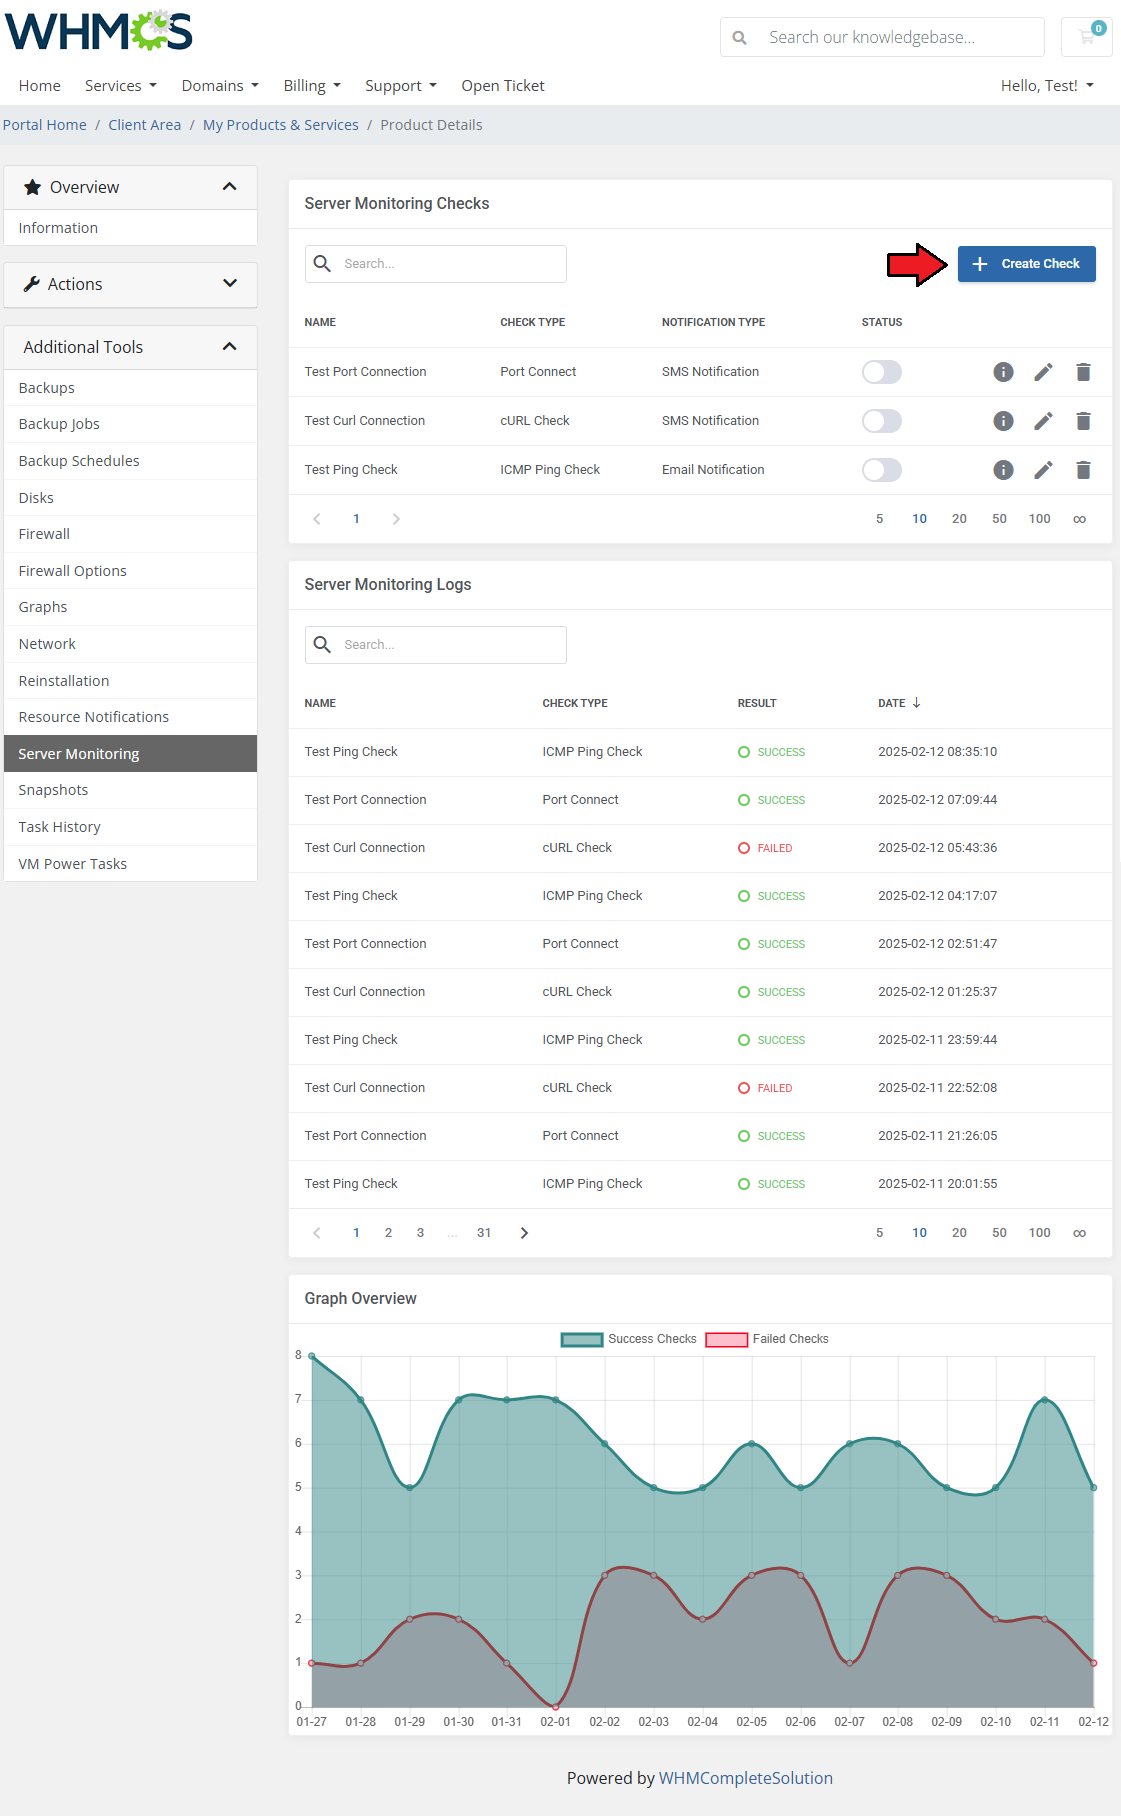
Server Monitoring Integration
| Important: This section is only available with Server Monitoring For WHMCS module active.
Clients can create their own server status checks and monitor its health.
New checks can be added by clicking on the 'Create Check' button.
|
|
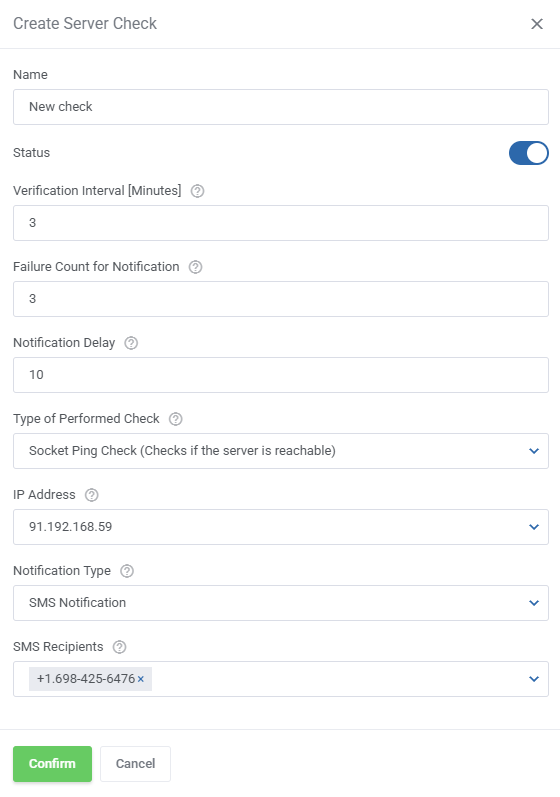
The following details have to be specified:
- Name - name the check.
- Status - select the initial status of the check.
- Verification Interval - select how often in minutes the check should be added to the queue.
- Failure Count for Notification - select how many times a check has to fail before a notification is sent.
- Notification Delay - decide how many minutes have to pass between each notification sent.
- Type of Performed Check - select the check method from options allowed by the admin.
- cURL Check - an HTTP GET request is sent to a server to retrieve data and check its availability.
- Request URL - provide a URL that will return a code upon a GET request.
- Response Code - include the expected HTTP response code.
- ICMP Ping Check - an ICMP ping is sent to a specific IP address to test if the server is reachable.
- IP Address - provide the IP address for the check.
- Socket Ping Check - a connection attempt is made to a specific IP address and port to check if the service is running and accessible.
- IP Address - provide the IP address for the check.
- Port Connect - a connection attempt is made to a specific IP address and port using the TCP protocol to verify if the service on the specified port is running and accessible.
- Allow Custom IP Address - allow the client to enter a custom IP address instead of selecting from assigned ones.
- Notification Type - select the notification method from options allowed by the admin.
- Email Notification - email messages will be sent out after the threshold for failed checks is exceeded.
- Notification Recipients - select where to send the notification.
- SMS Notification - enable SMS notifications to keep clients informed of monitoring events.
- SMS Recipients - Provide the phone numbers to which the notification will be sent.
More detailed information on specific checks and the module can be found on the Server Monitoring Wiki page.
|
|
After the first checks are performed, the logs table will include details such as:
- Check Name
- Check Type
- Check Result
- Check Date
|
| The graph displays the check logs in a visual way.
|
Snapshots
Use a snapshot to remember the current contents of the virtual machine memory. You may use them later to restore the VM's settings.
Please remember that it is necessary to run the following cron command for snapshot jobs.
You may set the cron command once a day or every hour. Do not forget to replace 'your_whmcs' with your WHMCS root location.
php -q /your_whmcs/modules/addons/proxmoxAddon/cron/cron.php snapshots
|
Press the 'Take Snapshot' button and fill out the form to take a snapshot.
Name it (use the alphabetical characters and no spaces), choose whether to include RAM, and add a description.
|
| It is also possible to set up 'Snapshot Jobs' where snapshots can be created according to your preferences (daily or hourly). Click on 'New Job' in order to add a new snapshot job.
|
| As you complete the form, remember to fill in the 'Name' field without spaces or special characters- only capital letters and numbers are allowed here.
|
Task History
To access the history of a machine, simply press the 'Task History' button. Afterward, the customer can see all the actions performed on the VM, as well as their status.
If an error has occurred during the execution of a task, the client can view the API response error by clicking on the 'Information' icon.
|
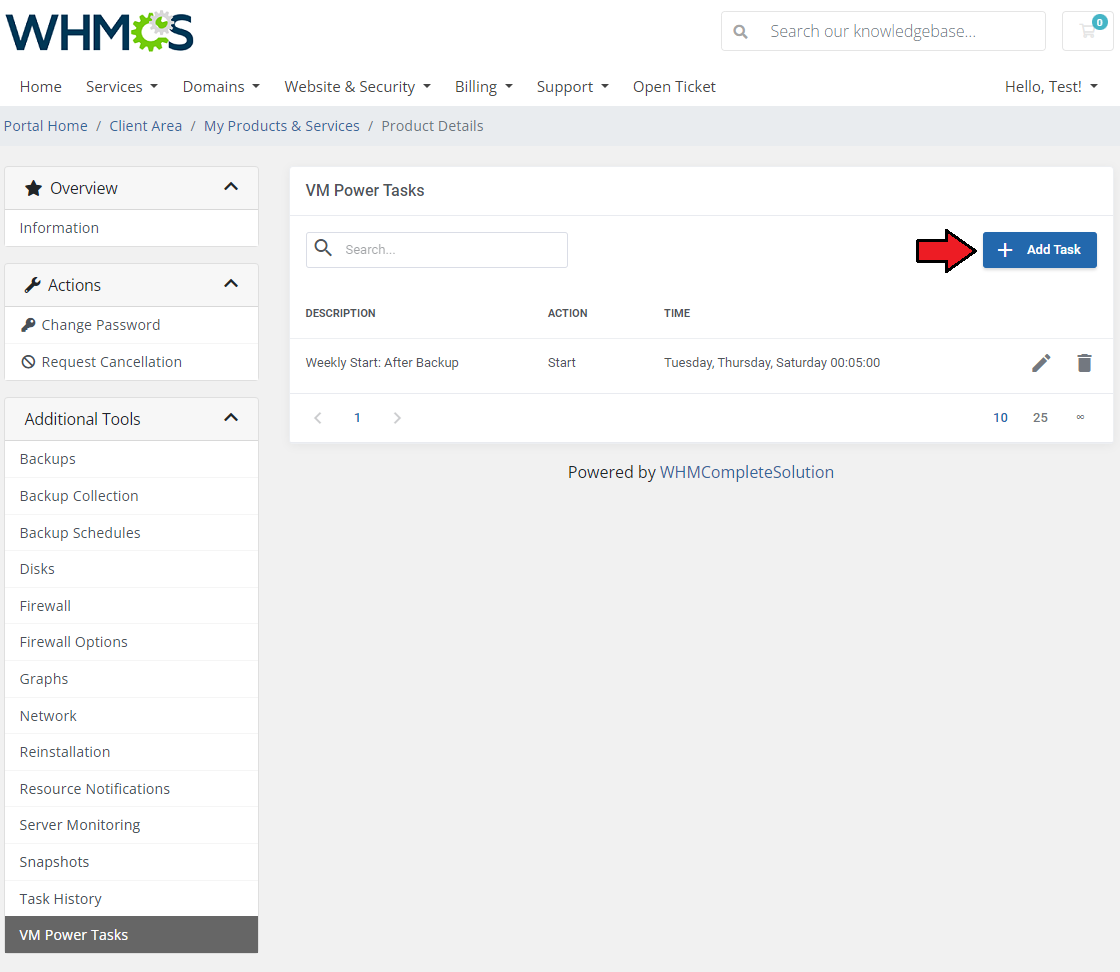
VM Power Tasks
The "VM Power Tasks" section empowers you to effortlessly create and manage automated power tasks for your virtual machine, all in one convenient location.
With the ability to define task rules, you can automate multiple actions and minimize your manual intervention in VM operations.
To begin configuring your first rule, simply click on "Add Task".
|
|
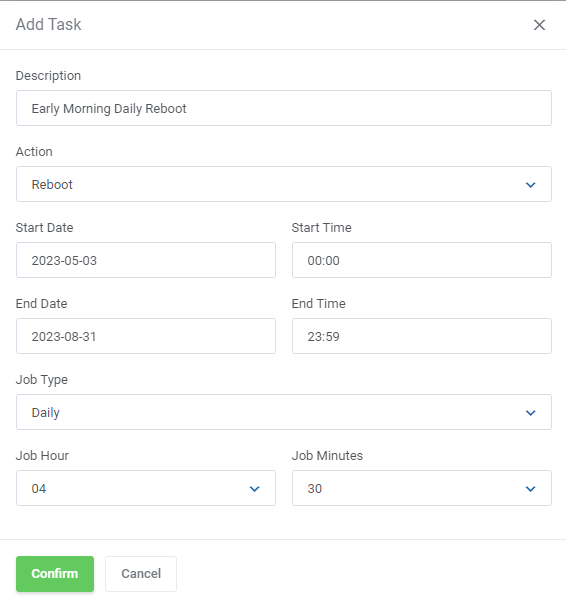
A new form will appear with the following options to provide:
- Description - task description or short name
- Action - select the action the task is to execute:
- Start the machine
- Stop the machine
- Reboot the machine
- Specify the exact time to keep the task active:
- Start Date (use the calendar to specify the task beginning date)
- Start Time - provide the exact hour to activate the task
- End Date (use the calendar to specify the task ending date)
- End Time - provide the exact hour to deactivate the task
- Job Type - choose the task type and define its execution frequency
- One Time - the job will be executed only once, specify the time to start the task:
- Job Hour
- Job Minutes (rounded to 5 minutes)
- Daily - the job will be executed every day of the week, specify the time to start the task:
- Job Hour
- Job Minutes (rounded to 5 minutes)
- Weekday - the job will be executed on selected days, specify the time to start the task:
- Job Hour
- Job Minutes (rounded to 5 minutes)
- Day of Week - select days when the task will be executed
|
|
The power tasks list provides a comprehensive overview of all the tasks associated with power management on your virtual machine.
You can easily identify active actions tasks, ensuring that your virtual machine operates according to your desired configurations.
Additionally, the flexibility to modify existing rules (1) allows you to adjust the tasks' parameters to align with your needs. If necessary, you can also remove unwanted tasks from the list (2).
|
| Important: "VM Powre Tasks" require a dedicated cron job to be set up by the administrator.
|
Configurable Options
When you successfully set up a product, your client can order it by choosing from the default configurable options.
Important: Storage Disc Space configurable option, when used by the client, overwrites the product configuration 'Disk Space ' option.
|
In case those options do not suit your needs, you can edit them.
Go to 'System Settings' → 'Products/Services' → 'Configurable Option' and press the edit button next to the configurable option used by your product.
|
Here you can view all the products this configurable option group is assigned to.
Now, we will show you how to edit options. Let's say you want to add an option to order a VPS with 4 cores per socket.
To do so, edit 'The number of cores per socket' by pressing the edit button as shown on the screen below.
|
You will see a popup window, so make sure your browser does not block it.
To add a new option, enter it in the textbox located below all other options. If you want to replace the option you currently have, simply edit the textbox.
Finish by pressing 'Save Changes'.
|
| More information about WHMCS configurable options and their editing can be found here.
|
List of Configurable Options
|
The table below lists all configurable options used by the module for the chosen virtualization type.
Note that the name on the left is a variable (which you should not edit), separated by the | from the editable custom name.
|
VPS KVM
|
VPS LXC
|
Cloud LXC
|
Cloud KVM
|
The number of CPU sockets|CPU Sockets
|
cores|CPU Cores
|
cpuLimit |CPU Limit
|
CPU Sockets
|
The number of cores per socket|CPU Cores
|
cpulimit|Limit Of CPU
|
CPU Units Limit |CPU Units Limit
|
CPU Cores
|
cpulimit|Limit Of CPU
|
CPU units for a VM|CPU Units For The VM
|
Memory Limit |Memory
|
CPU Limit
|
CPU units for a VM|CPU Units For The VM
|
Amount of RAM|Amount Of RAM
|
SWAP Limit |SWAP
|
CPU Units Limit
|
Amount of RAM|Amount Of RAM
|
Amount of SWAP|Amount Of SWAP
|
Storage Limit |Storage
|
Memory
|
Disk Space|Disk Space
|
Disk Space|Disk Space
|
IP Addresses Limit |IPv4 Addresses
|
Storage
|
additionalDisksSpace|Additional Disks Space
|
additionalDisksSpace|Additional Disks Space
|
IPv6 Addresses Limit |IPv6 Addresses
|
IPv4 Addresses
|
additionalDisksSpace_[Storage_name]|Additional Disk Space [Storage_name]
|
additionalDisksSpace_[Storage_name]|Additional Disk Space [Storage_name]
|
IPv6 Subnets Limit |IPv6 Subnets
|
IPv6 Addresses
|
IP Addresses|IPv4 Addresses
|
IP Addresses|IPv4 Addresses
|
Backups Size Limit |Backups Size
|
IPv6 Subnets
|
IPv6 Addresses|IPv6 Addresses
|
IPv6 Addresses|IPv6 Addresses
|
Backups Files Limit |Backups Files Limit
|
Backups Size
|
IPv6 Addresses|IPv6 Subnets
|
IPv6 Addresses|IPv6 Subnets
|
snapshots |Snapshots
|
Backups Files
|
privateNetwork|Private Network
|
privateNetwork|Private Network
|
Bandwidth |Bandwidth
|
Snapshots
|
Backups Limit|Backups Size
|
Backups Limit|Backups Size
|
networkRate |Network Rate
|
Bandwidth
|
Backups Files Limit|Backup Files
|
Backups Files Limit|Backup Files
|
vcpus |VCPUs
|
Network Rate
|
backupProtectedFiles|Protected Backup Files
|
backupProtectedFiles|Protected Backup Files
|
virtualNetworks |Virtual Networks
|
VCPUs
|
downloadBackupFile|Download Backup Files
|
downloadBackupFile|Download Backup Files
|
snapshotJobs |Snapshot Jobs
|
Virtual Networks
|
restoreBackupFile|Restore Backup Files
|
restoreBackupFile|Restore Backup Files
|
storageDisk |Storage Disk Space
|
Snapshot Jobs
|
snapshots|Snapshots
|
snapshots|Snapshots
|
additionalDisksSpace_local |Additional Disk Space (local)
|
Storage Disk Space
|
snapshotJobs|Snapshot Jobs
|
snapshotJobs|Snapshot Jobs
|
additionalDisksSpace_local-lvm |Additional Disk Space (local-lvm)
|
|
Bandwidth|Bandwidth
|
Bandwidth|Bandwidth
|
additionalDisksSpace_RBD |Additional Disk Space (RBD)
|
|
VM Template|VM Template
|
VM Template|VM Template
|
additionalDisksSpace_proxmox1-dir-storage |Additional Disk Space (proxmox1-dir-storage)
|
|
archive|Archive
|
archive|Archive
|
additionalDisksSpace_nfs-shared |Additional Disk Space (nfs-shared)
|
|
Network Rate|Network Rate
|
Network Rate|Network Rate
|
additionalDisksSpace_Krrecikowo |Additional Disk Space (Krrecikowo)
|
|
vcpus|VCPUs
|
tag|Tag
|
|
|
ISO Image|ISO Image
|
storage|Storage Disk Space
|
|
|
osType|OS Type
|
serverMonitoring|Server Monitoring
|
|
|
cicustom|Custom Cloud-Init Configuration
|
|
|
|
ciscript|Cloud-Init Script
|
|
|
|
tag|Tag
|
|
|
|
storage|Storage Disk Space
|
|
|
|
tpm|TPM
|
|
|
|
serverMonitoring|Server Monitoring
|
|
|
|
Differences between the cicustom and the ciscript configurable options:
cicustom - it is a more advanced alternative to the "ciscript" configurable option. Using the "cicustom" option results in sending the configuration specified by the administrator.
ciscript - using the "ciscript" option results in passing the script ID available in Proxmox Addon, which will be uploaded to the snippet storage and passed to the Proxmox VE server during the virtual machine creation.
|
Importing Existing Virtual Machines
Our module allows you to easily import VM into your product.
To do so, press 'Import Virtual Machine' as shown on the following screen.
|
Afterwards, choose the preferred virtual machine from the dropdown menu and complete the 'Password' field.
Confirm importing through pressing the 'Confirm' button.
|
Servers Location Management
Important: Server Allocator For WHMCS is required to allow location management.
In order to allow defining locations for Proxmox VPS, follow the below steps:
1. In your product's 'Module Settings' , set up 'Default Node' to 'Server-Node'.
2. Create a WHMCS server for each Proxmox node.
3. Manually create a configurable option, name it e.g.: 'Location'. Add options for each server within that configurable option.
4. Install our Server Allocator For WHMCS module and configure it properly.
- It must assign a server to a product depending on the selected option in 'Location' configurable option.
Keep in mind that all locations need to have exactly the same configuration.
|
Now, a client may order a VPS, and select 'Location'. Server Allocator For WHMCS will change the server assigned to the product.
The "Create" action is triggered on the assigned server due to the 'Server-Node' option enabled.
|
Use Cases
In this section, you will find exemplary scenarios illustrating typical use cases, along with specifics on how the module's functionalities can be applied in practice.
Review the following scenarios for practical examples of the module usage.
|
Selling Predefined Windows Virtual Machines
|
Proxmox VE VPS For WHMCS can be used to sell predefined Windows-based virtual machines. Follow the instructions below, to prepare the template for Windows Virtual Machines and configure the module.
Keep in mind that the instructions are for Kernel-based Virtual Machines (KVM) only.
|
First, a template virtual machine needs to be prepared in Proxmox:
1. Start a new virtual machine with a Windows Installer ISO file mounted.
2. Make sure the 'OS Type' in the virtual machine's options includes 'Windows.'
3. Install 'Windows Operating System' on the virtual machine.
4. Install 'Qemu Guest Agent.' The module will detect and run it if the OS Type is set to Windows.
5. Stop the virtual machine. You can delete the CD Drive (it will not be needed anymore).
6. Convert the virtual machine to a template.
7. If you are using 'Shared Storage,' upload the template to it. If you do not use 'Shared Storage,' make sure to upload the template to every node.
|
Next, the Proxmox VE VPS For WHMCS module settings need to be correctly configured:
1. Enable the 'Guest Agent' in the product's module settings.
|
Selling Predefined Linux Virtual Machines
|
Proxmox VE VPS For WHMCS can be used to sell predefined Linux-based virtual machines. Follow the instructions below, to prepare the template for Linux Virtual Machines and configure the module.
Keep in mind that the instructions are for Kernel-based Virtual Machines (KVM) only.
|
First, a template virtual machine needs to be prepared in Proxmox:
1. Create a template Cloud-Init virtual machine based on this documentation.
2. If you would like to make additional changes in the template (e.g. login with a password, root access via SSH) then:
- Create a new virtual machine with the template from step 1.
- Log in to the virtual machine.
- Introduce any changes you want the new template to have.
- Convert the virtual machine to a new template.
3. If you are using 'Shared Storage,' upload the template to it. If you are not using 'Shared Storage', you will need to upload the template to every node.
|
Next, the Proxmox VE VPS For WHMCS module settings need to be correctly configured:
1. Make sure 'Cloud-Init' is enabled in the product's module settings.
|
| 2. Define which 'OS Templates' will be available in the Reinstall section in the client area.
|
| Optionally, set prices for 'VM Template Configurable Options.' Navigate to 'System Settings' → 'Products/Services' → 'Configurable Options.' in order to do so.
|
Connecting Multiple VPS Machines Into One Private Network
Proxmox VE VPS For WHMCS allows connecting multiple VPS machines into one private network.
To do so, you will need at least 2 virtual machines. In our case, the hostname of the first virtual machine is: 'virtualmachine1.com' and the hostname of the second one is: 'virtualmachine2.com.'
First, pick one of the machines and navigate to 'Additional Tools' → 'Network' in your client area.
|
Once there, assign a new private network to the virtual machine you have selected by clicking on the 'Create Private Network' button.
If there are any private IP addresses available, a new network will be created and this virtual machine will be assigned to it.
|
| Now, you can assign other virtual machines you own to this very network. Click on the 'Assign Virtual Machine' button.
|
Select the virtual machine that you want to add to the network. You can identify it by its hostname. In our case, we want to add 'virtualmachine2.com.'
Restarting the virtual machine is optional, but recommended, as it will allow it to connect to the network as soon as possible.
Note: The reason for this is that if the virtual machine does not have the hotplug functionality configured, it has to be restarted for the change to be implemented.
|
| After clicking on 'Confirm' button, you should receive information stating that the virtual machine has been successfully assigned to the private network.
|
Selling Virtual Machine Upgrades
| Proxmox VE VPS For WHMCS integrates WHMCS 'Upgrades' and 'Configurable Options' to enable clients to change their virtual machine's specification.
See the instructions below on how those functions work with the module.
Please note that:
- When an upgrade is performed and the template of the virtual machine changes, the machine will always be reinstalled.
- Upgrades can only be performed within the same type of products, i.e. KVM to KVM; LXC to LXC.
- Disk size downgrading is not supported.
- For more information regarding the WHMCS product upgrade function, visit this guide.
|
Upgrading from one product to another.
1. Configure the first product as you normally would. For the sake of an example, in the product's module settings, we will set the limits to 4GiB of disk space, and 512MiB of RAM.
|
2. Create another product in the same way, but this time with higher limits. For the second product, we will set the limits to 6GiB of disk space, and 1024MiB of RAM.
Of course, you can change any properties of the products as you see fit.
|
3. Open the 'Upgrades' section of the first product and select the products you would like to allow the clients to upgrade it to.
In our case, we will choose the newly created 6GB product.
|
| 4. In the client area, a new option will be visible, and the client will be able to place an order to upgrade their product.
|
| 5. Once the order is accepted, the virtual machine has to be rebooted for the upgrade to take place.
|
| The changes will immediately be visible in the client area and the admin area.
|
Another way for the client to upgrade their virtual machines is to utilize the 'Configurable Options' function instead. In this way, all the changes in the specification will take place within the same product.
1. For the products that have the 'Configurable Options' assigned, you can use those as an upgrade option. Tick the 'Configurable Options' checkbox in the 'Upgrades' section.
|
| 2. In the client area, a new option to upgrade the configurable options will be displayed.
|
3. Clients will be able to pick their configuration again, all within the possible range that you have defined in configurable options.
If you prepare configurable options for, say, the number of snapshots, the client will be able to pay for an increased limit of snapshots.
|
| 4. After the order is accepted, the configuration will update once the virtual machine is rebooted.
|
| The changes will immediately be visible in the client admin areas.
|
Selling Additional Storage
Proxmox VE VPS For WHMCS can take advantage of the 'Configurable Options' function to allow admins to sell additional storage space to their clients.
Follow the instructions below, to see how to set up additional storage space options for your clients.
|
In the product's module settings, at the very bottom, you can find a list of available configurable options. The ones that we are interested in right now are:
additionalDisksSpace|Additional Disks Space
and
additionalDisksSpace_[STORAGE_NAME]|Additional Disk Space (STORAGE_NAME)
The difference between them is that 'additionalDisksSpace' can include any combination of any storage detected on your server, but only one option can be selected.
In the case of 'additionalDisksSpace_[STORAGE_NAME]' only the chosen storage will be included in the options.
Still, you can set multiple configurable options of this type, allowing the client to freely choose how much of which storage they would like to buy.
|
Click on 'Create Configurable Options' and select relevant options to generate a template that you can edit under 'System Settings' → 'Products/Services' → 'Configurable Options.'
Note: You can also create them manually if you prefer.
|
Here is an example 'additionalDisksSpace' configurable option:
- Option name - you can change the display name after the '|' symbol.
- Options - the possible options the client will be able to choose from, the left side has to be specifically '[storage_name]:[size];[another_storage_name]:[size]' while the right side is what the client will see.
Storage can be combined into one option if you put a semicolon between each storage name. An option to not buy any additional storage is represented with '-1.'
- Pricing - set an individual price for every option.
|
The option to buy additional storage space will now be displayed in the client area while ordering a new product, or upgrading configurable options.
While using the 'additionalDisksSpac' configurable option, only strict storage configurations defined by the administrator are available.
|
|
The 'additionalDisksSpace_[STORAGE_NAME]' configurable option can be used to achieve a different effect.
Set up multiple configurable options like on the screen below.
- Option name - this time the left side defines the storage type for all options.
- Options - the left side only includes the number of gigabytes.
- Pricing - make sure to set a price for each option.
|
| Once configurable options for every storage are created, the clients will be able to freely choose their own combinations.
|
| After the order for additional storage is accepted, the user may create additional disks as they see fit, within the limits specified when placing the order and the product's module settings.
|
Here is an explanation of each field:
- Size - the size of the new disk. Limited by the purchased additional storage, limits are unique to each storage type.
- Storage Type - similarly limited by the purchased additional storage.
Note: While there is an option to pick a default storage type in the product's module settings, the clients will still need to buy the storage space to create an additional disk on it.
- Bus - the type of interface the disk uses, the options can be specified in the product's module settings, under 'Additional Disks' → 'Additional Disk Type' .
- Format - the format the disk will use, the options can be specified in the product's module settings, under 'Additional Disks' → 'Additional Disk Format' .
|
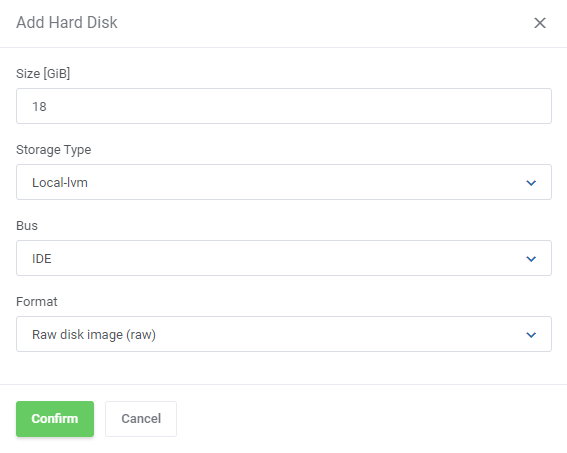
|
If you would like to change how the storage types are displayed to the client, you can do so.
1. Find and edit the english.php file located in modules/servers/ProxmoxVPS/langs/english.php.
2. Find the line responsible for the display name of your additional storage, it should look like this:
$_LANG['storage']['local-lvm'] = 'Local-lvm';
3. The text after the '=' is the display name and can be edited.
4. The string in the second bracket is the storage type. You can add more lines in the same manner, for each of your storage type configurable options, like so:
$_LANG['storage']['local-ssd'] = 'SSD Storage';
|
| The virtual machine has to be rebooted before the new disks are enabled and usable.
|
Scheduling Backups
Proxmox VE VPS For WHMCS can be used to plan and handle scheduled backups. This feature in conjunction with limiting backup tasks per node can substantially offload your Proxmox platform.
To start scheduling backups navigate to 'Additional Tools' → 'Backup Schedules' and click on 'Create Backup Schedule'.
Alternatively, you can prepare templates to automate this process.
Note: Make sure that backup schedules are enabled in the product's module settings under 'Client Area Features'.
|
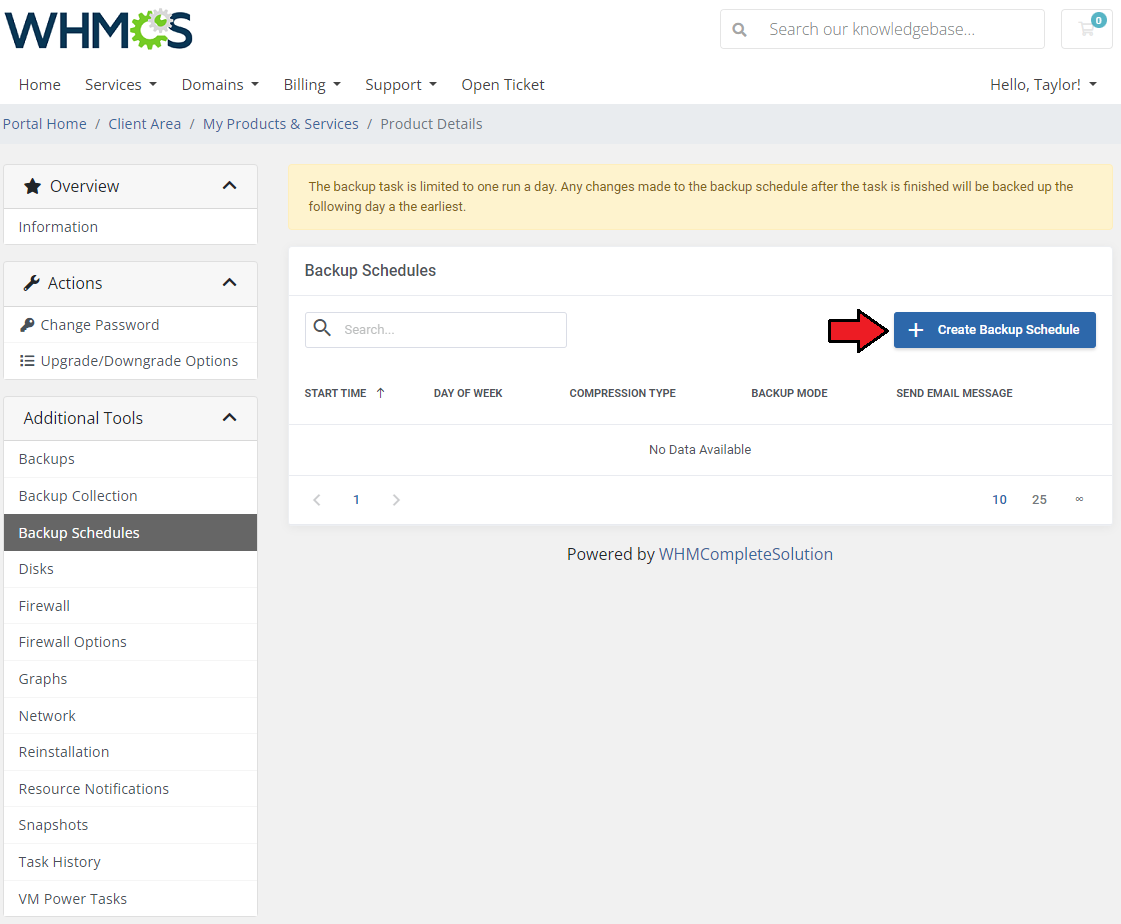
|
A configuration window for the first schedule will open. Set up as many schedules as you need.
- Start Time - The time when the task for a backup will be issued. Make sure the time you input meets the format: 24-hour time notation with the zeroes included. For example, 07:05, 20:30
- Day of the Week - The days the backups should occur each week.
- Compression type - Compression method to be used.
- Backup Mode - Decide on the backup mode.
- Send Email Message - Decide if an email notification about the backup should be sent always, never, or only on failure.
- Recipients - include the email addresses you would like the notification to be sent to. Separate each address with a comma. Leave the field empty to only send the notification to the default address.
Click on 'Confirm' when ready.
|
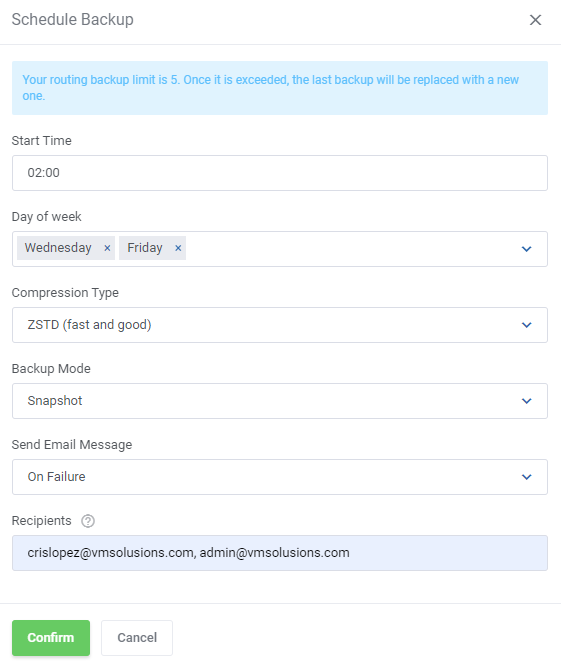
|
Now that the backups are scheduled, they will be mostly handled by the module, but you can further reduce the stress put on your Proxmox platform by limiting backup-related tasks per node.
Open the Proxmox Addon in your admin area and navigate to 'General Settings' . Find the 'Default Limit of Backup Tasks Per Node' and reduce the number, decreasing the load on your Proxmox platform.
Remember to save changes each time you change the limit.
|
Including Predefined Backup Schedules
You can include scheduled backup templates with Proxmox VE VPS For WHMCS products. This negates the need to set up backup schedules for each client.
A template only has to be prepared once and will be included with every product you choose.
To set up a template, open the Proxmox Addon and navigate to 'Settings' → 'Scheduled Backups Templates', click on 'Create Scheduled Backups Template' and name the template.
|

|
Next, click on 'Create Task Template' and define the following details. You can create multiple task templates.
- Start Time - The time when the task for a backup will be issued. Make sure the time you input meets the format: 24-hour time notation with the zeroes included. For example, 07:05, 20:30
- Day of the Week - The days the backups should occur each week.
- Compression type - Compression method to be used.
- Backup Mode - Decide on the backup mode.
- Send Email Message - Decide if an email notification about the backup should be sent always, never, or only on failure.
- Recipients - include the email addresses you would like the notification to be sent to. Separate each address with a comma.
You can include the {clientEmail} variable to include the client's default address in the list or leave the field empty to only send the notification to that default address.
Click on 'Confirm' when ready.
|
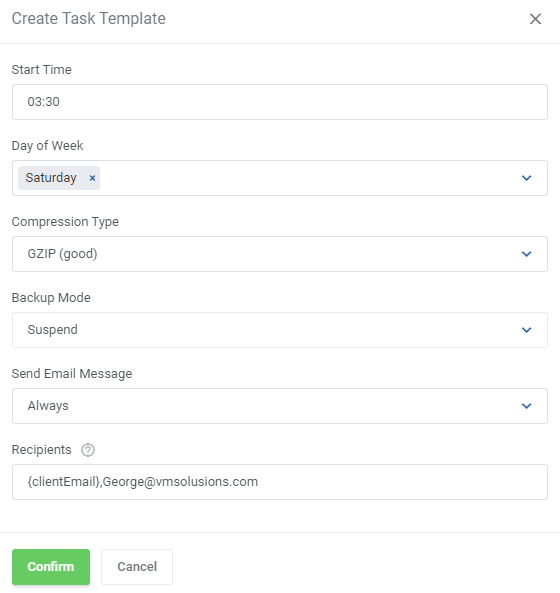
|
Once the template is created, it can be included in the product's module settings.
Each time a new virtual machine is created using this configuration, the scheduled backups will be set up according to the template.
Remember to save changes each time you change module settings.
|
Including Predefined Firewall Settings
You can include firewall templates with Proxmox VE VPS For WHMCS products, which eliminates the need to set up firewall settings for each individual client.
A template only needs to be prepared once and will be included with every product.
To set up a template, open the Proxmox Addon, navigate to 'Settings' → 'Firewall Templates', click on 'Create Template', and name the template.
|
| Configure the template's firewall settings as needed for the specific product and click on 'Submit'. You can also add firewall rules to the template, proceed to 'Add Rule'.
|
| Prepare as many rules as you need for the given template.
|
Once a template is created all that remains is to include it in a product's module settings. Remember to save changes.
Every virtual machine created with the firewall template included in the configuration will have its firewall preset, eliminating the need to manually configure the firewall for each machine.
|
Using Load Balancer
Proxmox VE VPS For WHMCS includes a load balancer feature that can help you make sure your server resources are used efficiently. Some of the possible setups include:
- Setting up an equal number of virtual machines on each node.
- Migrating virtual machines on upgrade when a node runs out of free space.
- And much more.
The general information can be found in the dedicated section of the wiki. Here are two practical examples of the load balancer working in practical scenarios.
Example 1
If we have two uneven nodes, for example, one with 64 CPU (A) and another with only 32 CPU (B), we can use the load balancer to make sure the smaller one doesn't reach its full load too fast.
Imagine you didn't set up the load balancer to favor the CPU, and the nodes were assigned an equal number of virtual machines. The load could look somewhat like this:
Node A (Number of VMs: 10, Free CPU: 80%, Free Disk Space: 40%, Free RAM: 60%)

Node B (Number of VMs: 10, Free CPU: 20%, Free Disk Space: 40%, Free RAM: 60%)
If the creation of new virtual machines continues, node B will run out of free CPU soon.
If we set up the load balancer in this way:
VMs Number Weight: 1

CPU Weight: 10

Disk Weight: 2

RAM Weight: 3
This is how the calculation will go:
Node A: (1 x 1) + ( 2 x 10 ) + ( 1 x 2 ) + ( 1 x 3 ) = 26
Node B: (1 x 1) + ( 1 x 10 ) + ( 1 x 2 ) + ( 1 x 3 ) = 16
Node A gets the higher number, so virtual machines will be created on node A until the free CPU resource priority changes in favor of node B.
In this way, node B will no longer run out of free CPU any faster than node A.
Note: You can of course use different weights, the important part is that you put emphasis on the CPU Weight, and make it significantly bigger than the rest.
Example 2
Here is another example. Let's say we have 2 nodes with the same specification, but we allow our customers to personalize their virtual machines with bigger disk space, RAM, etc.
If we only use the number of virtual machines in the calculation, the free resources on the nodes will be uneven:
Node A (Number of VMs: 10, Free CPU: 20%, Free Disk Space: 50%, Free RAM: 60%)

Node B (Number of VMs: 10, Free CPU: 50%, Free Disk Space: 12%, Free RAM: 40%)
But if we set up the load balancer to not favor the number of virtual machines, but the resources equality:
VMs Number Weight: 1

CPU Weight: 10

Disk Weight: 10

RAM Weight: 10
The calculation will look like this:
Node A: (1 x 1) + ( 1 x 10 ) + ( 2 x 10 ) + ( 2 x 10 ) = 51
Node B: (1 x 1) + ( 2 x 10 ) + ( 1 x 10 ) + ( 1 x 10 ) = 41
The virtual machines will be placed on node A, as long as it has more free resources, the number of virtual machines hardly matters anymore.
Node B will be used again when it has more free resources than node A.
|
Changing Bandwidth Usage Reset Date
By default the bandwidth usage in Proxmox VE VPS For WHMCS resets each month, on the day of the product registration.
If the product was first registered 21st of March, the bandwidth will reset on the 21st of each month.
|
There is however, an option to have the bandwidth usage reset on the first day of the month. This can be beneficial for easier billing, easier usage tracking, and reduced confusion in general.
It might also be a good idea if you want all of your customers to have their bandwidth usage reset on the exact same day.
To make this change, navigate to the product's module settings and the 'General' section, where you will find the 'Reset Usage First Day of Month' switch.
Turning the switch on will change the reset day.
|
Providing rDNS Management for Proxmox VE VPS
With DNS Manager For WHMCS, you can offer clients the ability to manage rDNS records for IP addresses allocated to their ordered servers.
Learn more about this feature and how it integrates with Proxmox VE VPS in a dedicated section of DNS Manager For WHMCS documentation page.
|
Tips
| 1. Operations performed on the virtual servers are not executed immediately. Give your Proxmox Virtual Environment some time to process the request and execute the operation.
|
2. Multiple physical Proxmox servers can be joined into one cluster.
When they are joined into one cluster, you can access all of them by connecting to just one.
- Auto-node - creates a new VM on the server (node) with the most free resources, so the administrator cannot control it
- Server-node - creates a VM on the server (node) whose IP address or node host (e.g. node1.yourproxmox.com) was provided during the WHMCS's server configuration,
allowing the administrator to control the node choice
|
3. If you set the product type to 'Hosting Account' when adding a new product, you will not need to fill out nameservers as they will be automatically set up.
But if you still want to use the 'Server/VPS' product type, this article might help you in learning how to remove nameservers from your order template.
|
4. OS Templates are not automatically downloaded while configuring a product.
For each virtualization type, templates are downloaded from the Proxmox server depending on which one they are generated on.
|
| 5. OS Templates are loaded from the storage. Make sure the module can access its content by selecting appropriate permissions for the chosen storage.
|
| 6. When the PAM authentication is used, it is necessary to create a client first in order to change the password correctly. Read more about it here.
|
| 7. As this module supports the templates system, any changes made in the module's template files will be saved after the upgrade process.
|
| 8. If you are using the module in the 2.3.2 version or any previous one, and would like to migrate to Proxmox VE V5.X, you need to update the files on your Proxmox server to the new version from the 'UploadOnProxmoxServer' folder.
|
| 9. OS Templates serve only as operating systems for the VM, while VM Templates contain complete configuration of the VM, the amount of resources included.
|
10. You can use the {$service_assigned_ips} tag in your welcome email template to display automatically assigned IP addresses for the created VM (either the KVM or LXC virtualization type).
Other available tags in the 'Client Notifications' emails:
{$user.username}
{$user.password}
{$user.realm}
If you wish you may add other information, like password, into the email, just refer to e.g. 'VPS Server Welcome Email' email template in your WHMCS to find appropriate merge fields.
Important: Remember that if the client's email address is incorrect or WHMCS is not able to correctly send it because of any reason, the module will not create the VM for that client correctly.
|
| 11. 'One User Per VPS' option allows you to either create a new username for each new client's VM, or create only one that will be then used for every new VM owned by your client.
|
12. You can use the 'IPSet IP Filter' option for firewall to prevent IP spoofing. Click here to read more about IP Sets.
Inside the admin area, in the product details view, you can preview the current IP Sets on VM:
|

|
13. You can enable 'Admin Notifications' on product configuration to be informed via email about certain actions. These are:
- Service Creation Failed - if there were any errors that prevented the VM from being successfully created, then the selected email template will be sent to the administrator
- Upgrade - select the email notification template you want to receive if the client requests the product upgrade.
This will also block the automatic sending of an upgrade request to the Proxmox API, so the administrator can review it first.
Note that, if chosen, the product will still be upgraded in the WHMCS itself, but the upgrade request will not be passed to the API.
To finalize the upgrade, use the "Change Package" module command in your admin area.
- To-Do List - if checked, in addition to sending any of the above notifications, it will also add them as tasks on the WHMCS To-Do List.
|
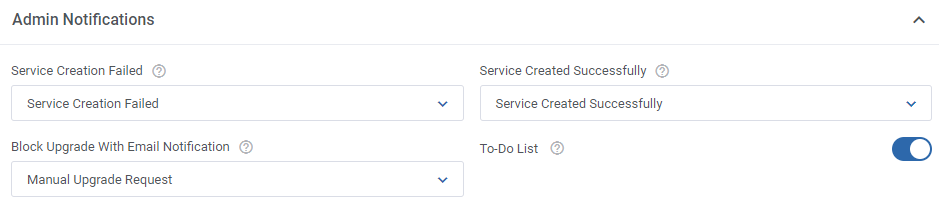
|
Default email templates include basic variables, but you can include more, such as:
- service_customfields - any custom fields defined for the service, for example:
| {$service_customfields.vmid}
|
{$service_customfields.node}
|
| {$service_customfields.userName}
|
{$service_customfields.cipassword}
|
| {$service_customfields.sshkeys}
|
{$service_customfields.baseTemplate}
|
- client- client data from WHMCS:
| {$client.userid}
|
{$client.client_id}
|
{$client.id}
|
| {$client.owner_user_id}
|
{$client.uuid}
|
{$client.firstname}
|
| {$client.lastname}
|
{$client.fullname}
|
{$client.companyname}
|
| {$client.email}
|
{$client.address1}
|
{$client.address2}
|
| {$client.city}
|
{$client.fullstate}
|
{$client.state}
|
| {$client.postcode}
|
{$client.countrycode}
|
{$client.country}
|
| {$client.phonenumber}
|
{$client.tax_id}
|
{$client.email_preferences}
|
| {$client.statecode}
|
{$client.countryname}
|
{$client.phonecc}
|
| {$client.phonenumberformatted}
|
{$client.telephoneNumber}
|
{$client.billingcid}
|
| {$client.notes}
|
{$client.currency}
|
{$client.defaultgateway}
|
| {$client.cctype}
|
{$client.cclastfour}
|
{$client.gatewayid}
|
| {$client.groupid}
|
{$client.status}
|
{$client.credit}
|
| {$client.taxexempt}
|
{$client.latefeeoveride}
|
{$client.overideduenotices}
|
| {$client.separateinvoices}
|
{$client.disableautocc}
|
{$client.emailoptout}
|
| {$client.marketing_emails_opt_in}
|
{$client.overrideautoclose}
|
{$client.allowSingleSignOn}
|
| {$client.email_verified}
|
{$client.language}
|
{$client.isOptedInToMarketingEmails}
|
| {$client.tax_state}
|
{$client.tax_countrycode}
|
{$client.lastlogin}
|
| {$client.customfields}
|
{$client.customfields1}
|
{$client.customfields2}
|
| {$client.customfields3}
|
{$client.customfields3}
|
- vm- virtual machine related data, as long as it is present:
| {$vm.digest}
|
{$vm.acpi}
|
{$vm.affinity}
|
| {$vm.agent}
|
{$vm.arch}
|
{$vm.args}
|
| {$vm.audio0}
|
{$vm.autostart}
|
{$vm.balloon}
|
| {$vm.bios}
|
{$vm.boot}
|
{$vm.bootdisk}
|
| {$vm.cdrom}
|
{$vm.cicustom}
|
{$vm.cipassword}
|
| {$vm.citype}
|
{$vm.ciupgrade}
|
{$vm.ciuser}
|
| {$vm.cores}
|
{$vm.cpu}
|
{$vm.cpulimit}
|
| {$vm.cpuunits}
|
{$vm.description}
|
{$vm.efidisk0}
|
| {$vm.freeze}
|
{$vm.hookscript}
|
{$vm.hostpci[n]}
|
| {$vm.hotplug}
|
{$vm.hugepages}
|
{$vm.ide[n]}
|
| {$vm.ipconfig[n]}
|
{$vm.ivshmem}
|
{$vm.keephugepages}
|
| {$vm.keyboard}
|
{$vm.kvm}
|
{$vm.localtime}
|
| {$vm.lock}
|
{$vm.machine}
|
{$vm.memory}
|
| {$vm.migrate_downtime}
|
{$vm.migrate_speed}
|
{$vm.name}
|
| {$vm.nameserver}
|
{$vm.net[n]}
|
{$vm.numa}
|
| {$vm.numa[n]}
|
{$vm.onboot}
|
{$vm.ostype}
|
| {$vm.parallel[n]}
|
{$vm.protection}
|
{$vm.reboot}
|
| {$vm.rng0}
|
{$vm.sata[n]}
|
{$vm.scsi[n]}
|
| {$vm.scsihw}
|
{$vm.searchdomain}
|
{$vm.serial[n]}
|
| {$vm.shares}
|
{$vm.smbios1}
|
{$vm.smp}
|
| {$vm.sockets}
|
{$vm.spice_enhancements}
|
{$vm.sshkeys}
|
| {$vm.startdate}
|
{$vm.startup}
|
{$vm.tablet}
|
| {$vm.tags}
|
{$vm.tdf}
|
{$vm.template}
|
| {$vm.tpmstate0}
|
{$vm.unused[n]}
|
{$vm.usb[n]}
|
| {$vm.vcpus}
|
{$vm.vga}
|
{$vm.virtio[n]}
|
| {$vm.vmgenid}
|
{$vm.vmstatestorage}
|
{$vm.watchdog}
|
| {$vm.ha}
|
{$vm.status}
|
{$vm.vmid}
|
| {$vm.clipboard}
|
{$vm.cpus}
|
{$vm.maxdisk}
|
| {$vm.maxmem}
|
{$vm.pid}
|
{$vm.qmpstatus}
|
| {$vm.running-machine}
|
{$vm.running-qemu}
|
{$vm.spice}
|
| {$vm.uptime}
|
|
|
- service- additional service data:
| {$service.id}
|
{$service.userid}
|
{$service.orderid}
|
| {$service.packageid}
|
{$service.server}
|
{$service.regdate}
|
| {$service.domain}
|
{$service.paymentmethod}
|
{$service.qty}
|
| {$service.firstpaymentamount}
|
{$service.amount}
|
{$service.billingcycle}
|
| {$service.nextduedate}
|
{$service.nextinvoicedate}
|
{$service.termination_date}
|
| {$service.completed_date}
|
{$service.domainstatus}
|
{$service.username}
|
| {$service.notes}
|
{$service.subscriptionid}
|
{$service.promoid}
|
| {$service.promocount}
|
{$service.suspendreason}
|
{$service.overideautosuspend}
|
| {$service.overidesuspenduntill}
|
{$service.dedicatedip}
|
{$service.assignedips}
|
| {$service.ns1}
|
{$service.ns2}
|
{$service.diskusage}
|
| {$service.disklimit}
|
{$service.bwusage}
|
{$service.bwlimit}
|
| {$service.lastupdate}
|
{$service.created_at}
|
{$service.updated_at}
|
| {$service.domainPunycode}
|
{$service.password}
|
|
|
14. The 'Minimum Network Rate Limit' option allows you to change the previously entered 'Network Rate Limit' value to a new one if the current 'Bandwidth Limit' is already reached.
Note that the 'Bandwidth Limit' can also be used for the WHMCS overage billing calculation as described here.
|
| 15. 'Default Username Prefix' - when filling in this field you may use the {$serviceid} parameter to avoid problems with creating usernames that already exist.
|
16. You can easily import and assign any already existing VM from Proxmox to your WHMCS.
First, you need order Proxmox VPS product to your client account without processing the VM creation process.
Next, in the client's 'Products/Services' management tab of your admin area, fill the 'VMID' and 'Node' custom fields with the VMID of the virtual machine you want to import from your Proxmox server
Afterward, change the product status to 'Active' , save changes and use the 'Change User Role' module command.
|
17. It is possible to display more information about your VM in Proxmox Environment.
To do so, you need to provide the preferred records in the 'Container Notes' tab under the ' KVM or LXC Configuration' section.
The following records can be used:
Client: {$client_name} (ID: {$client_id})
Email: {$client_email} Service ID: {$service_id}
Product: {$product_name} (ID: {$product_id})
Hostname: {$service_domain}
Main IP: {$service_dedicated_ip} {if $service_assigned_ips}
IP Address Allocation: {$service_assigned_ips} {/if}
You may also use markdown to modify the container notes, for example:
Client: {$client_name} (ID: {$client_id})\
Email: {$client_email}\
Service ID: {$service_id}\
Hostname: {$service_domain}\
Main IP: {$service_dedicated_ip} {if $service_assigned_ips}
The above notes will be displayed with every item starting in a new line.
|
| 18. When the interface names on the VM are Net\d+, you need to choose Eth\d+ in the 'Firewall' section of the product configuration.
|
19. If you want your clients to provide their own hostname, you need to add the following custom field in the 'Custom Fields' tab of the product configuration.
proxmoxHostname|Hostname
|
20. Create Linux VM:
- Create a VM template according to descriptions here
- Move to Module Settings → Virtual Machine Configuration → OS Template, select the previously created template (e.g. Ubuntu)
- In Module Settings → Cloud-Init: Cloud-Init: On, Service Username: On, Service Password: On
|
- Place a new order, wait until all tasks in Proxmox Addon → Tasks have 'finished' status.
|
21. Create Windows VM:
- Create a new virtual machine using an ISO image in Proxmox panel
- Install Guest Agent on the windows system, read more here
- Convert the created machine into a KVM template
- Move to the product Module Settings → Guest Agent and switch options as below:
|
- Module Settings → Virtual Machine Configuration: select the previously created Windows template under OS Template
- Place a new order, wait until all tasks in Proxmox Addon → Tasks have 'finished' status.
|
22. Configuring 'Default User' per template. Move to 'Proxmox Addon' → 'Servers' → 'Server Details' → 'Templates' → 'Create/Edit Template'.
You may assign a default user to a single template, that user will be automatically assigned to the newly created VM.
|
23. Configurable option field: 'Storage Disc Space' - this option allows to define the type and space on disc via a configurable option when placing an order.
It also allows to extend the space as well as change the disc type. This CO overwrites the ordinary 'Disc Space' field available in the product configuration section.
Important: To migrate the disc, you must previously 'Stop' your VM.
Note: Values provided in configurable option must be integers.
|
24. Usage of VLAN Tags:
VLAN Tags Range Minimum and Maximum Numbers simply play the role of network separation measures. The minimum and maximum numbers cause the module to select the next free VLAN Tag from this range for each virtual machine it creates.
VLAN Tag is actually a drop-down list, and to select anything in this section, firstly, it is necessary to configure appropriate IP addresses in your Proxmox addon → IP Management section:
|
25. SDN Support:
The module supports SDN private network type. It is possible to create virtual networks (vnets) at datacenter level thanks to the Software Defined Network (SDN).
To learn all the details on SDN in proxmox, please navigate to the official proxmox documentation.
In the module, the whole configuration of SDN is located in 'Module Settings' → 'Private Network' section. There you will find dedicated options, these are:
- Private Network Type
- SDN Zone
- SDN TAG Range Minimum Number
- SDN TAG Range Maximum Number
|
| 26. The "fetchBackupsForArchive" parameter in the "global_options.yml" file allows skipping the backups from being loaded into the "Archive" list in the product configuration.
By default the parameter is set to 'true' and backups are loaded. You may change it manually to 'false' and no backups will be loaded in the 'Archive' dropdown list as on the screens below:
|

|
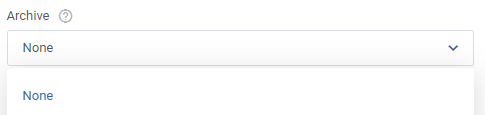
|
27. OS Templates and ISO Images' names - translate the names of available templates and images easily.
Add extra lines into the module language file (e.g. /yourWHMCS/modules/servers/proxmoxVPS/langs/english.php) with your desired translations to customize their names.
Follow the bellow pattern to add new lines:
$_LANG['template']['ISO_name'] = 'My ISO Name';
For example:
$_LANG['template']['Ubuntu'] = 'Ubuntu - preferred';
$_LANG['template']['Debian Live 9.4.0 Amd64 Cinnamon'] = 'Aktuelles Debian';
Please note that ['ISO_name'] must be replaced with the full template or image name that you are going to change.
As a result, the OS templates and ISO images names will be displayed in the language of your choice or with your custom name.
|
28. If you want to use the IP Address, CIDR and Gateway allocated from the IP Management section of the Proxmox Addon module instead of hard coding them, use the following parameter:
{$ipv4Addresses[0].gateway}
|
29. Select the storage type already while placing the order.
Create the "Storage Disk Space" configurable option with storage size and name to allow clients to set "Storage Disk Space" during the order. It will be used instead of the provided "Disk Space" value.
For VE VPS KVM and LXC:
- Resource Usage:
- Available resources
- Disc size
- Storage type
Exceptions:
- if the "Linked Clone" option is selected in "Clone Mode" of the KVM configuration, the storage disk space will not work. (In the case of a linked template the KVM must have the same storage as the machine's main disk)
|
30. Private Network management
The module allows to create private network skipping the IP Management and firewall settings. Disable the below options if you do not aim to assign the IP address to the private network device.
- 'Assign IP Address Automatically' - option toggled by default; the IP Address is automatically assigned to a private network device
- 'Firewall on Private Network' - option toggled by default; the firewall is enabled on a private network device
|
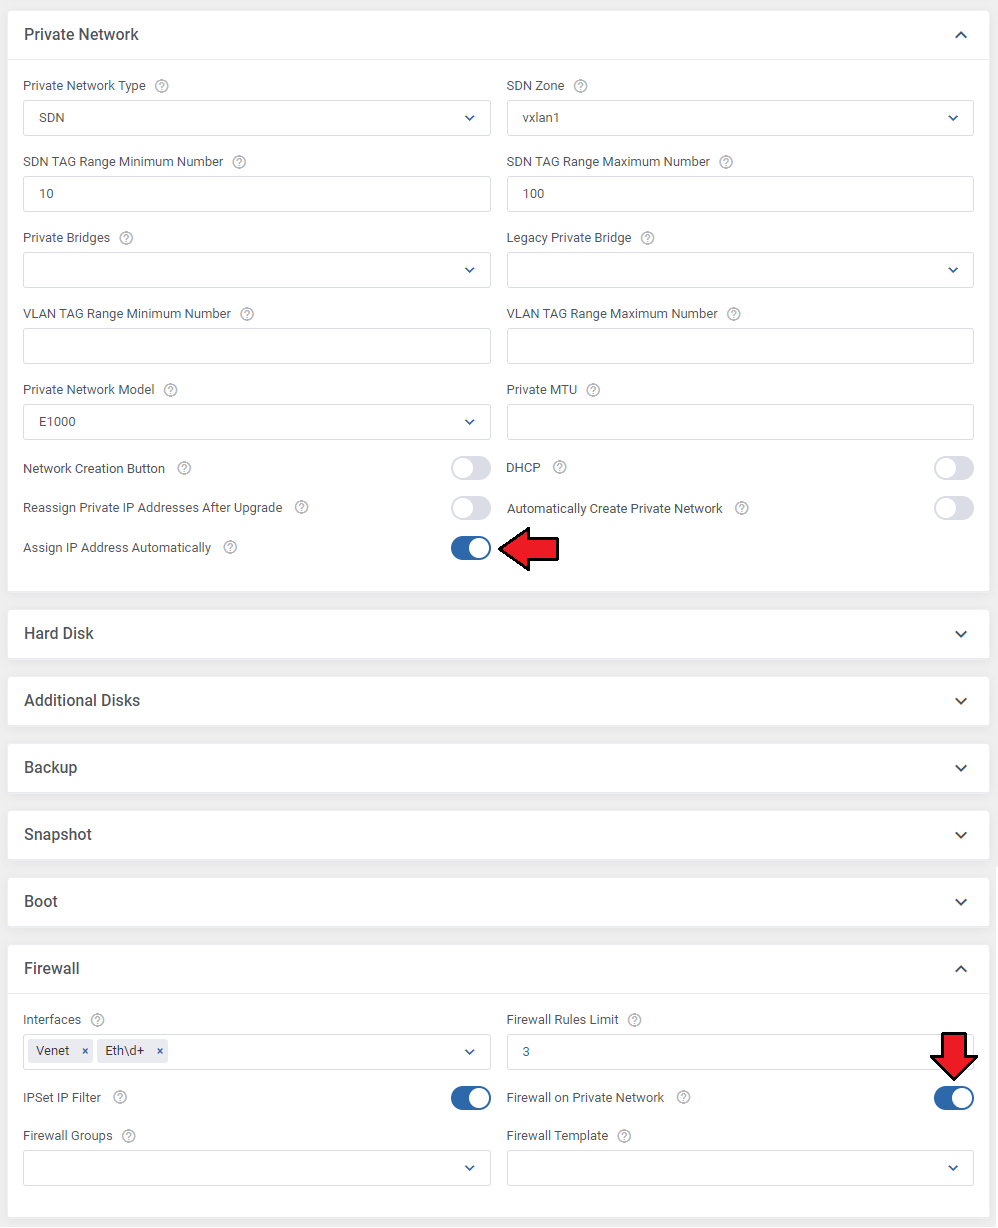
|
31. Make sure not to swap public and private network bridges during product upgrades.
Using a bridge previously used for the opposing network type, can lead to several issues. Make sure the upgrade scenario looks like this:
Product 1 (before upgrade):
Private Bridge: vmbr1
Public Bridge: vmbr0
Product 2 (after upgrade):
Private Bridge: any, except vmbr0
Public Bridge: any, except vmbr1
You can either keep it in mind when selecting bridges for upgrades or use the 'Reassign Public/Private IP Addresses After Upgrade' toggles, which will safely reassign IP addresses and bridges for you.
|
32. How to Test Cloud Init in Proxmox Panel
If a Linux machine does not have a password or network configured, but the data is correctly sent to the Proxmox panel, check if Cloud Init is properly configured on the template.
To test this, set the password and user in the Proxmox panel’s Cloud Init section and clone the template. This will confirm if the password is applied correctly in the system.
|
33. The Proxmox VE VPS For WHMCS module is fully compatible with all versions of Proxmox VE that are actively supported by Proxmox.
Ensure your Proxmox VE version is within its official support lifecycle to guarantee compatibility.
|
Update Instructions
Essential guidance through the process of updating the module is offered here.
Please note that each time you update the module, you have to also update the files on the Proxmox server described in the step 4 of the installation guide.
Important: After upgrading the module to the newest version please first enter to the Proxmox addon in your WHMCS before setting up the product or opening it from admin or client area!
Otherwise, when you try to open the product's module settings, you may get SQLSTATE" "Base table or view not found" errors.
Please also note that since 2.7.0 module version the commands for the crons execution have slighty changed - although the old ones should still work, we recommend that you update their entries.
|
Upgrade Guide
Seeking a solution that offers greater flexibility, customization tailored to your precise needs, and unrestricted availability?
There is an option that not only proves to be cost-effective in the long run but also includes prioritized support services, making it a truly valuable investment.
Opt for the Open Source version of your Proxmox VE VPS For WHMCS module to unlock these benefits.
Simply click on either the Get Source Code or Upgrade To Lifetime button found on the product's page in our client area to complete the one-step upgrade process, with a dedicated discount already applied.
Follow a comprehensive guide covering the transition process, the advantages it brings, and step-by-step instructions on what to do next after the order has been successfully finalized.
|
Common Problems
| 1. When you have problems with connection, check whether your SELinux or firewall does not block ports.
|
2. Error 'Could not create PVE2_API object' during connecting via the noVNC console.
Reason: The user account does not have permission to access the noVNC console.
Solution: Proceed to the product's 'Module Settings' tab and check whether the selected user's permission grants access to the noVNC console.
Afterward, proceed to the client's hosting and run 'Change User Role' on it.
To change the user role for all clients, please use the 'Cron job users synchronization (run only once)' cron command.
You will find it in the 'Proxmox Addon' → 'General Settings'.
|
3. Error 'This connection is untrusted' during connecting via the noVNC console.
Reason: Your certificate is not valid.
Quick Solution: Your client needs to add the Proxmox address to the certificate exception list.
Best Solution: Configure a valid certificate.
|
4. The blank page during connecting via noVNC console, '501 Error' visible in the proxmox panel.
Reason: You have not uploaded the additional files on the Proxmox server.
Solution: Open 'UploadOnProxmoxServer' and upload content of the proper version on all Proxmox servers into the '/' path.
|
5. Error 'Change password failed: user 'xxx' does not exist'
Reason: You have not created a client yet.
Solution: When the PAM authentication is used, it is necessary to create a client first in order to change the password correctly. Read more about it here.
|
6. Error 'Function "ssh2_connect" does not exist. Please Install SSH2 PECL before you start using the script.'
Reason: You have not updated the php.ini file.
Solution: After SSH2 PECL installation, make sure that you have updated the php.ini files for CLI and webserver.
|
7. Once you have updated your Proxmox VPS For WHMCS to Proxmox VPS For WHMCS V2.0.0, it is always required to save your product configuration
in the module settings again.
|
8. The current disk usage for the KVM virtualization type is not properly displayed.
This is due to API limitations that lead to returning the incorrect value, which is always set to '0' .
|
| 9. If you want to use Cloud-Init on Debian, we recommend using the Cloud-Init's version 18.2 or later to avoid assorted problems occurring in previous versions.
|
10. Error: "Only root can set 'serial0' config".
Solution: Turn off the Xterms.js console in the product configuration.
|
11. Error "Parameter verification failed. ([maxfiles] - Only root may set this option.)"
Reason: The user is other than "root" or the server authentication is set to Proxmox VE.
Solution: In the server configuration, set the root details, and select PAM as the authentication type.
|
12. Error "Node for IP Address 10.10.10.10 not found"
Reason: An interface with the IP Address 10.10.10.10 cannot be found.
Solution: You need to provide your private IP Address node in the 'Assigned IP Addresses' field in the server configuration in your WHMCS.
|
| 13. Please remember that the disk size cannot be downgraded. Such a possibility is not supported.
|
| 14. Error: "Cannot clone to non-shared storage 'local"
Reason: Option 'Search For Templates On All Nodes' is enabled in the product configuration under KVM configuration.
Solution: Keep the above option disabled as shown on the screen.
|
|
Remember that cloning from node "A" to node "B" does not work on the local storage.
We do recommend using "Shared Storage" or creating the machine on the same node on which the KVM template is located.
It is important to keep every template named the same on every node, otherwise cloning will not work either, eg.:
node1: Ubuntu, CentOS, Debian
node2: Ubuntu, CentOS, Debian
|
15. Error: "Nameserver '%' cannot be resolved"
Reason: The nameserver IP must be provided for the virtual machine of LXC configuration type.
By default, the module uses the content provided by the client during order, eg. ns1, then WHMCS completes the nameserver with a domain.
If the nameserver field is left empty or the client orders a new domain, the system is not able to process the data correctly and create a full address.
Solution: Enable the 'Use Server Nameservers' option in the product's configuration or manually correct the nameserver per the order.
|
16. Error: "SQLSTATE[42S02]: Base table or view not found: Table 'ProxmoxAddon_ServerUsage' doesn't exist"
Reason: The ProxmoxAddon_ServerUsage table has not been created properly because the tblservers table is on a different engine than "InnoDB"
Solution: Change the engine to "InnoDB", deactivate the proxmox addon and then activate it again. The missing table will be created.
|
17. The Move Product/Service action is not supported by the Proxmox VE VPS For WHMCS module.
This is due to WHMCS limitations, and the fact that there are no hooks that would allow to catch such an event.
|
18. Error: "([boot] - invalid format - format error boot.order: invalid format - invalid boot device 'c')"
Solution: Edit the boot order in any of the templates to ensure the boot order is saved in a new format (after the change you may go back to the previous order)
|
19. In case you encounter any problems with the 'Guest Agent', please first ensure that the service is active in the machine's operating system.
You may use the following command in PowerShell to check the status:
Get-Service QEMU-GA
To restart the service (stop and start again) use the following command:
Restart-Service QEMU-GA
|
20. Error: "SQLSTATE[HY000] [2002] php_network_getaddresses: getaddrinfo for proxydb failed: Temporary failure in name resolution"
Solution: Make sure there are no old volumes or duplicate .env files present.
|
|
|


