DNS Manager For WHMCS
DNS Manager V3 For WHMCS requires an active DNS Manager For WHMCS.
You must keep both addons active to be able to use the newest version of DNS Manager module in full.
Contents
|
About DNS Manager V3 For WHMCS
| DNS Manager V3 For WHMCS is an end-to-end module that enables your customers to be in charge of their DNS zones. Thanks to a wide variety of submodules, combined with options allowing you to prepare ready packages, your DNS Manager For WHMCS is there for you to surely meet your expectations. |
- Admin Area Features:
| ✔ Define DNS Servers |
| ✔ Define Packages |
| ✔ Create DNS Zones |
| ✔ View And Edit Existing Zones |
| ✔ Lock/Unlock Zones From Edition By Clients |
| ✔ Migrate Zones Between Chosen Servers |
| ✔ Import Zones From Chosen Server |
| ✔ Export Zone To TXT File In BIND Format |
| ✔ Auto-Synchronize Zones And DNS Records Between Multiple Servers |
| ✔ Manage Zones Backups |
| ✔ Define, Manage And Duplicate DNS Records Set |
| ✔ Apply DNS Record Sets To Multiple Zones At Once |
| ✔ Wipe Existing Zone Records Upon Applying DNS Records Set |
| ✔ Set Up Automated Tasks And Execution Time |
| ✔ Toggle Administrator Notifications And Choose Who Send Them To |
| ✔ Modify Notifications Email Templates |
| ✔ Allow Creation Of PTR Record Without DNS Zone |
| ✔ Protect DNS Zones On Product Termination |
| ✔ Manage Client Area Zones Features: |
| ✔ Select Default Template |
| ✔ Toggle DNS Management Link |
| ✔ Choose Scope Of Zones Management: |
| ✔ Allow DNS And rDNS Management |
| ✔ Allow Only DNS Management |
| ✔ Allow Only rDNS Management |
| ✔ Allow Domain/Products/Addon/Other Items Zones With: |
| ✔ Only That Domain |
| ✔ Only That Product Domain |
| ✔ Only Domains From Owned Domains Items |
| ✔ Only Domains From Products Items |
| ✔ Only Domains From Both Owned Domains And Product Items |
| ✔ Any Custom Domain |
| ✔ Exclude Used Domains From Zone Creation |
| ✔ Allow Zones With Related Service IP Addresses Only |
| ✔ Allow Zones With Custom Subnet IP Addresses |
| ✔ Allow rDNS With Custom IP Address |
| ✔ Allow DNS With Custom IP Address |
| ✔ Allow Management Of DNS Record Sets |
| ✔ Display Full DNS Record Names |
| ✔ Allow Management Of Zones Backups |
| ✔ Define Zones Backups Limit |
| ✔ Choose Whether To Display Zone's Product Name |
| ✔ Display Suggested Nameservers From Submodule |
| ✔ Display DNS Manager Button In Services Sidebar Menus |
| ✔ Define Zone Statutes Displayed In Client Area |
| ✔ SOA Warning |
| ✔ Available Domain |
| ✔ Active |
| ✔ Pending |
| ✔ Define Blocked DNS Strings With Regex Support |
| ✔ Define Logs And Notifications Settings |
| ✔ Define Which Zone Actions To Log: |
| ✔ Create/Terminate Zone |
| ✔ Add/Edit/Remove Record |
| ✔ View Details And Notifications Related To Zones And Servers Load |
| ✔ View Information About Automated Tasks |
| ✔ View Scheduled Tasks Progress |
| ✔ Display Usage Of DNS Servers |
| ✔ View Email Notifications Statistics |
| ✔ View Logs |
- Client Area Features:
| ✔ View List Of Owned Packages |
| ✔ View Domain Status |
| ✔ Add And Manage New Zones Within Package Limit |
| ✔ View Zones Limit Per Package |
| ✔ Add And Manage Zones Records Within Records Limits |
| ✔ Export DNS Zone To TXT File In BIND Format |
| ✔ View DNS Records Limits Per Zone |
| ✔ Toggle DNSSEC For Zone |
| ✔ View DNSSEC Details Of Zone |
| ✔ Manage In Bulk |
| ✔ Add/Modify/Delete/List DNS Records |
| ✔ Change DNS Record Sets |
| ✔ Delete Zones |
| ✔ Add And Manage rDNS PTR Records Without DNS Zone |
| ✔ Add, Manage And Duplicate DNS Records Sets |
| ✔ Create Zone From DNS Records Set |
| ✔ Manage Zones Backups: |
| ✔ Create Manual Backups |
| ✔ View Automated Backups |
| ✔ Restore Backups |
| ✔ Preview Zones List In Created Backups |
| ✔ Export To File |
| ✔ Import From File |
| ✔ View Bulk Management Tasks |
- Automation Features:
| ✔ Provision Packages |
| ✔ Migrate Zones |
| ✔ Import Zones |
| ✔ Clear Unused Zones |
| ✔ Clear Logs |
| ✔ Backup Zones |
- Server Settings:
| ✔ Allow rDNS Records |
| ✔ Enable DNSSEC |
| ✔ Allow Multiple PTR Records |
| ✔ Use Cache To Optimize Loading Time |
| ✔ Overwrite SOA Record |
| ✔ Populate Nameservers |
| ✔ Define Nameservers |
- Package Settings:
| ✔ Define Zones Limit Per Package |
| ✔ Define Items (Products/Domains/Products Addons) Purchase Of Which Results In Receiving Package |
| ✔ Define If Single Instance Of Package Should Be Assigned To Each Client |
| ✔ Define Servers Used By Package |
| ✔ Define Allowed Record Types |
| ✔ Define Total Records Limit |
| ✔ Define Record Limits Per Type |
| ✔ Define Default TTL For Records |
| ✔ Define Automation Settings For Creating First Zone |
| ✔ Assign Default DNS Records Set |
| ✔ Allow Client To Create Zone Using Chosen DNS Records Sets |
| ✔ Introduce DNS Management Functionality If Domain Registrar Does Not Support It By Default |
| ✔ Toggle Client And Administrator Notifications |
| ✔ Define Allowed/Blocked IP Addresses For Zones And DNS Records Creation |
- Supported DNS Servers:
| ✔ 4PSA |
| ✔ AtomiaDNS |
| ✔ AWS Route 53 |
| ✔ BIND 9 |
| ✔ Cloudflare (DNSSEC Support) |
| ✔ cPanel (DNSSEC Support) |
| ✔ cPanel DNSOnly |
| ✔ DigitalOcean |
| ✔ DirectAdmin (DNSSEC Support) |
| ✔ DNS Made Easy |
| ✔ DNS Pod |
| ✔ DNS.com |
| ✔ DynECT |
| ✔ EuroDNS |
| ✔ Freenom |
| ✔ Google Cloud DNS |
| ✔ InterWorx |
| ✔ Nettica |
| ✔ Openprovider |
| ✔ OpenSRS |
| ✔ OVH |
| ✔ Plesk |
| ✔ PowerDNS Hosted |
| ✔ PowerDNS V4 (DNSSEC Support) |
| ✔ Rackspace |
| ✔ Rage4 DNS |
| ✔ RRPProxy |
| ✔ Simple DNS Plus |
| ✔ Simple DNS Plus V8 And V9 (DNSSEC Support) |
| ✔ Storm On Demand |
| ✔ Zonomi |
- Supported DNS Record Types:
| ✔ A |
| ✔ AAAA |
| ✔ AFSDB |
| ✔ ALIAS |
| ✔ ANAME |
| ✔ CAA |
| ✔ CERT |
| ✔ CNAME |
| ✔ DNAME |
| ✔ DNSKEY |
| ✔ DS |
| ✔ HINFO |
| ✔ HTTPRED |
| ✔ ISDN |
| ✔ LOC |
| ✔ MB |
| ✔ MD |
| ✔ MF |
| ✔ MG |
| ✔ MINFO |
| ✔ MR |
| ✔ MX |
| ✔ NAPTR |
| ✔ NEC |
| ✔ NEC3 |
| ✔ NS |
| ✔ NSEC3PARAM |
| ✔ PTR |
| ✔ RP |
| ✔ RRSIG |
| ✔ SMIMEA |
| ✔ SOA |
| ✔ SRV |
| ✔ SSHFP |
| ✔ TLSA |
| ✔ TXT |
| ✔ URI |
| ✔ URL |
| ✔ WKS |
| ✔ X25 |
- General Info:
| ✔ Supports IDN Zones |
| ✔ AJAX Loaded Pages In Admin Area |
| ✔ Supports Template Customization |
| ✔ Connect With DNS Manager Using Its API |
| ✔ Integrated With IP Manager For WHMCS - Complete Control And Easy Assignment Of IP Subnets (read more) |
| ✔ Fully Integrated With Lagom WHMCS Client Theme |
| ✔ Multi-Language Support |
| ✔ Supports PHP 7.3 Up To PHP 8.1 |
| ✔ Supports WHMCS Themes "Six", "Twenty-One" And "Croster" |
| ✔ Supports WHMCS V8.3 And Later |
| ✔ Requires ionCube Loader V12 Or Later |
| ✔ Easy Module Upgrade To Open Source Version |
Installation
| In this short tutorial we will show you how to successfully install DNS Manager For WHMCS. We will guide you step by step through the whole installation process. |
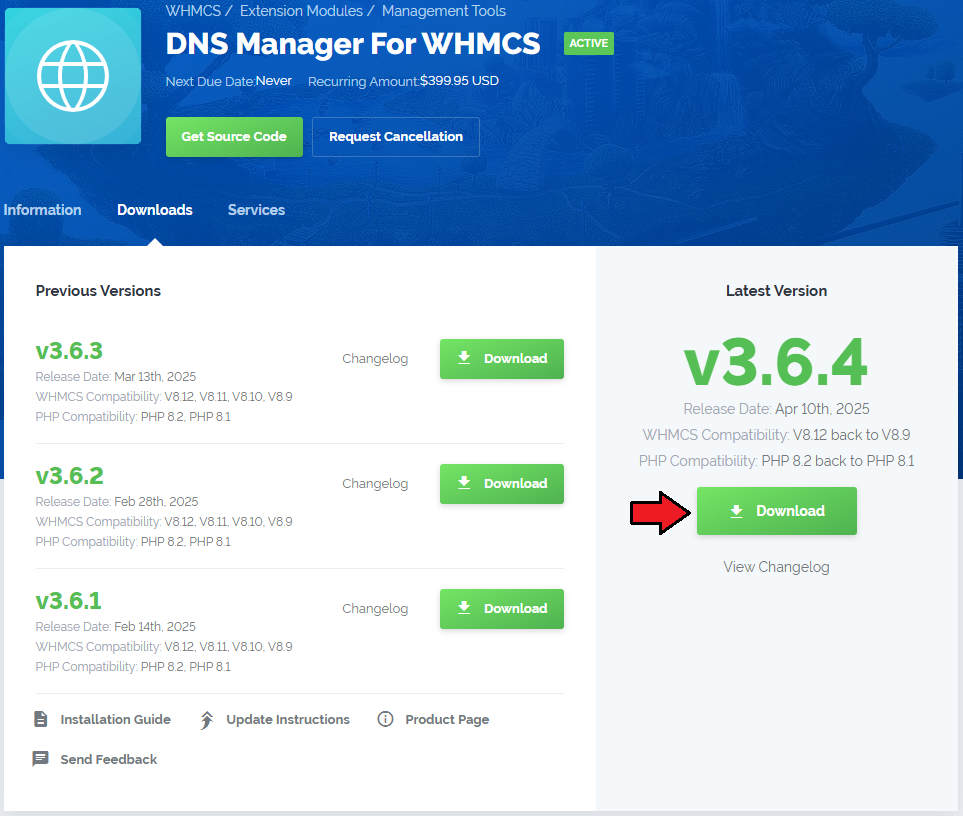
| 1. Log in to our client area and download the module. |
|
| 2. Extract the package and upload its content into the main WHMCS directory. The content of the package to upload should look like this. |

|
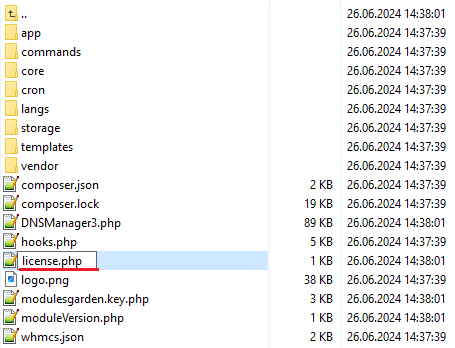
| 3. When you install DNS Manager For WHMCS for the first time you have to rename the 'license_RENAME.php' file. This file is located in 'modules/addons/dns_manager/license_RENAME.php.' Rename it from 'license_RENAME.php' to 'license.php'. |
|
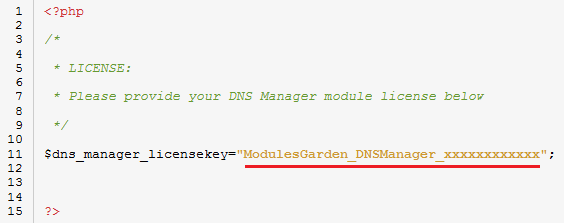
| 4. In order to configure your license key you have to edit the previously renamed 'license.php' file. Enter your license key between quotation marks as presented on the following screen. You can find your license key in our client area → 'My Products'. |
|
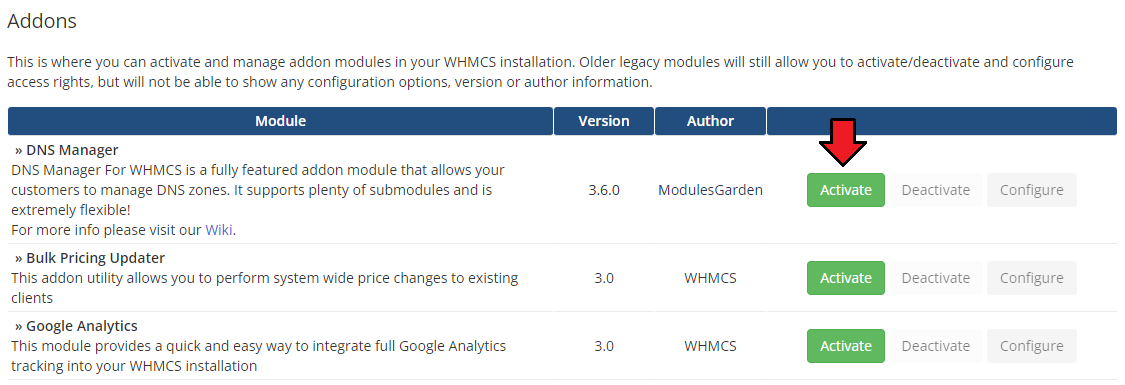
| 5. Now you have to activate the module in your WHMCS system. Go to 'WHMCS Admin Area' → 'System Settings' → 'Addon Modules' . Afterwards, find 'DNS Manager' and 'DNS Manager v3' and activate both addons. |
|
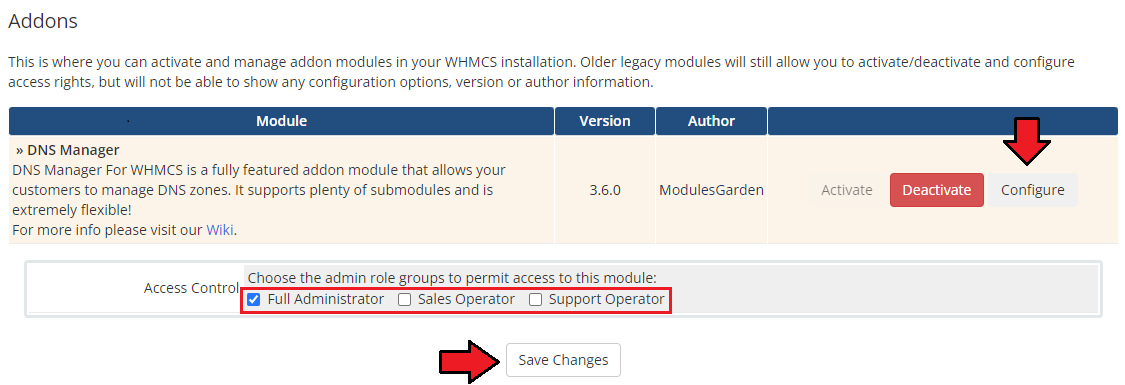
| 6. In the next step you need to permit access to this module. To do so click on the 'Configure' button, choose 'Full Administrator' and press 'Save Changes'. Remember to repeat this action for both addons. |
|
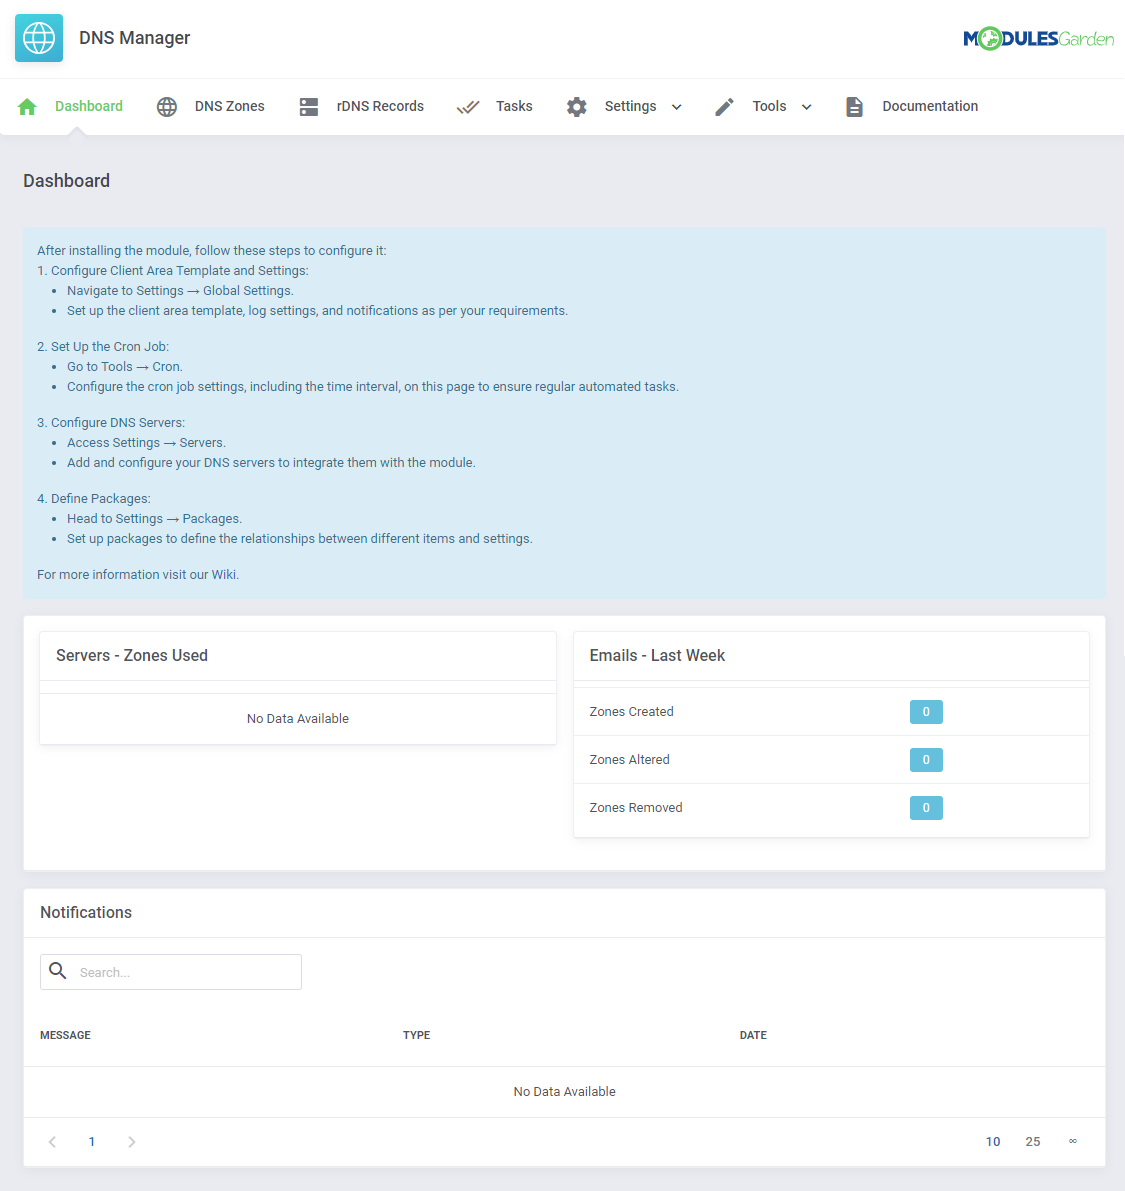
| 7. Good job! You have just successfully installed DNS Manager For WHMCS! Now in your WHMCS system press 'Addons' then press 'DNS Manager'. |
|
Configuration and Management
| If the current version of your module is 3.0 and later, you have access to both DNS Manager and DNS Manager v3 addons. Please note that most of the module management is already located under the DNS Manager V3 addon, yet some sections are still available under DNS Manager only. Please navigate to Addons → DNS Manager V3 and follow the below described steps to configure and manage your module successfully, if required, navigate to DNS Manager addon. |
| This section has been divided into two main parts to allow full and, at the same time, easy understanding of the whole module functionality. In the first part 'Basic Configuration' an exemplary flow of basic configuration of servers, through creating packages and then zones management from both the client and the administrator side has been presented. In the second part, there are described additional settings and tools that can be used while working with DNS Manager For WHMCS. |
Basic Configuration
| In the first place we would like to show you the process of configuring your DNS manager on a simple example. Follow the steps below to see how the process looks like in practice. Proceed to 'Addons' → 'DNS Manager V3'. There are several sections, but the one that you should be interested in the most in the beginning is named 'Servers'. |
Servers Configuration
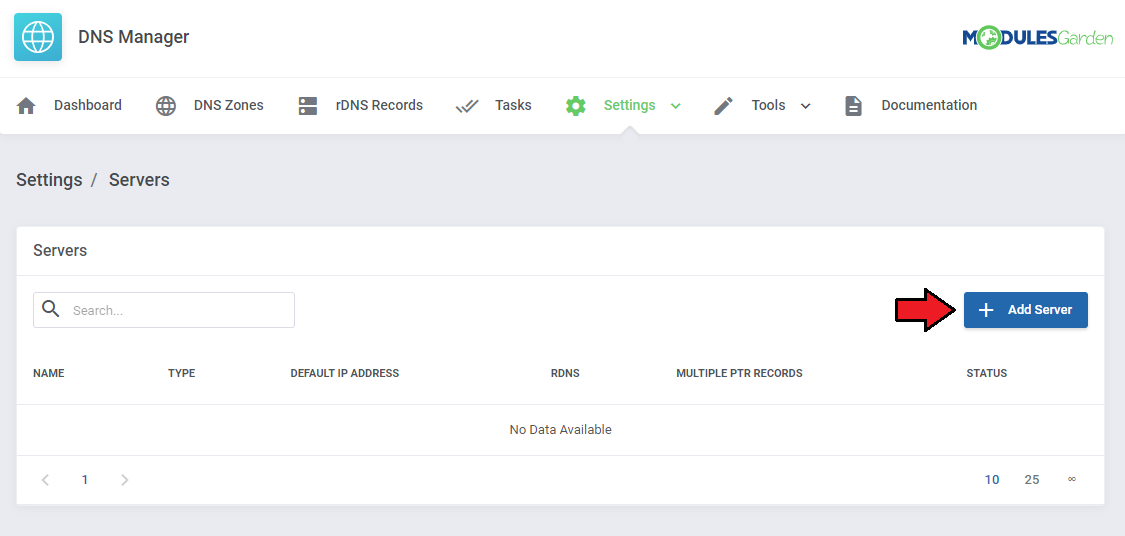
| To start your work, add a new server. |
|
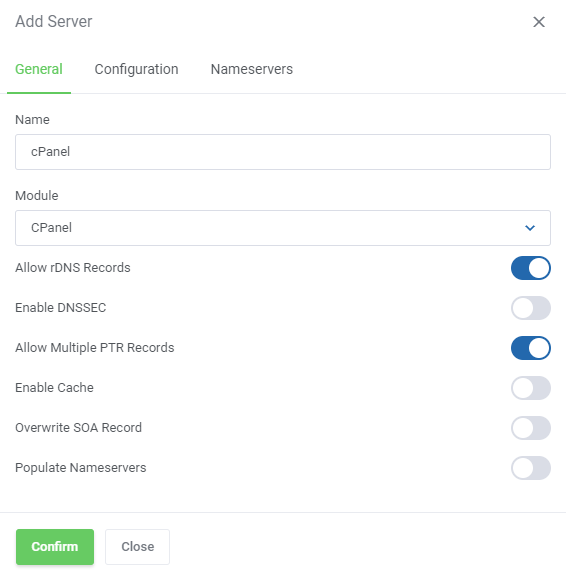
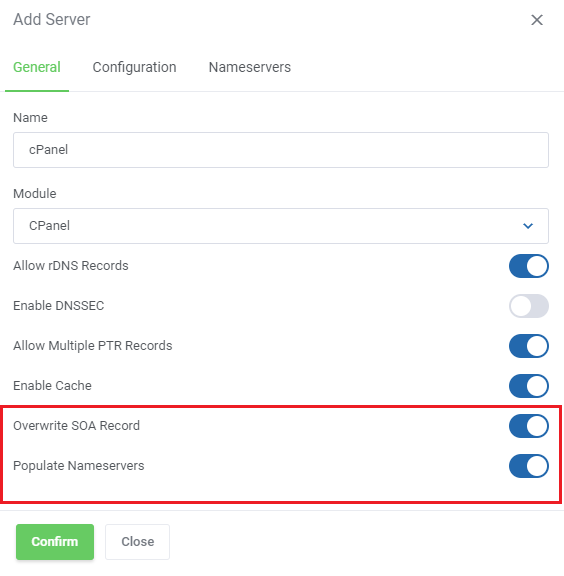
| To add a new server you must fill out some data to allow connection with it. As an example, we will try to connect with cPanel server. Additionally, you may declare here whether you need rDNS, Multiple PTR or Cache. Select the desired options. Please note, that there is also an option Enable DNSSEC available. However, it is currently compatible only with CloudFlare, cPanel, DirectAdmin, PowerDNS V4 and Simple DNS Plus V8 And V9 submodules. |
|
| If you want to have the nameserver records populated each time a new zone is created, make sure to check the Populate Nameservers option. A similar scenario applies to the Overwrite SOA Record checkbox which stands for automatically assigned nameservers in the SOA record. |
|
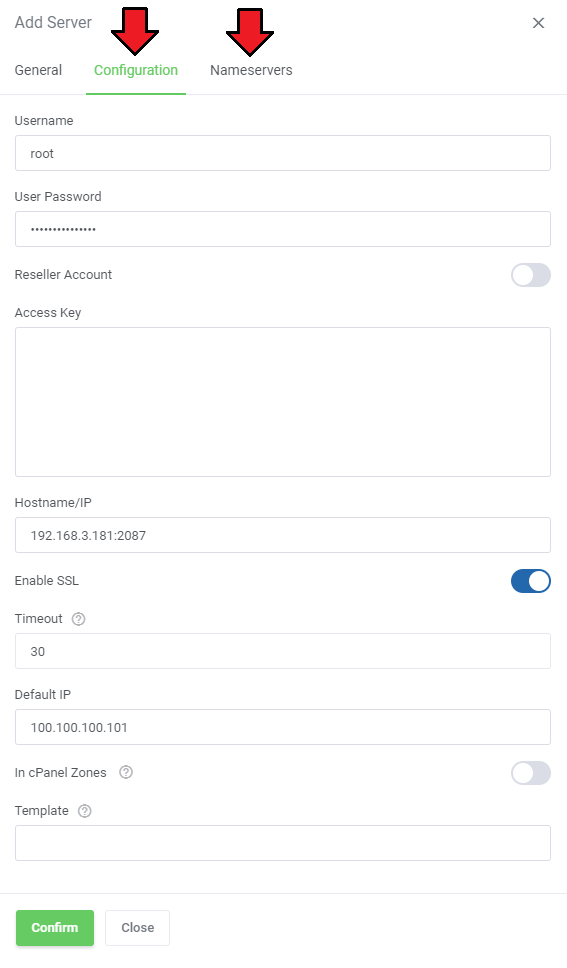
| Once you have chosen a server from the dropdown menu, 'Configuration' and 'Nameservers' tabs appear. Enter your username, password, Hostname/IP and any other details needed to connect successfully. Now, press 'Nameservers' and enter the nameservers that will be visible for your customers in their client area. Remember to save the changes when ready. |
|
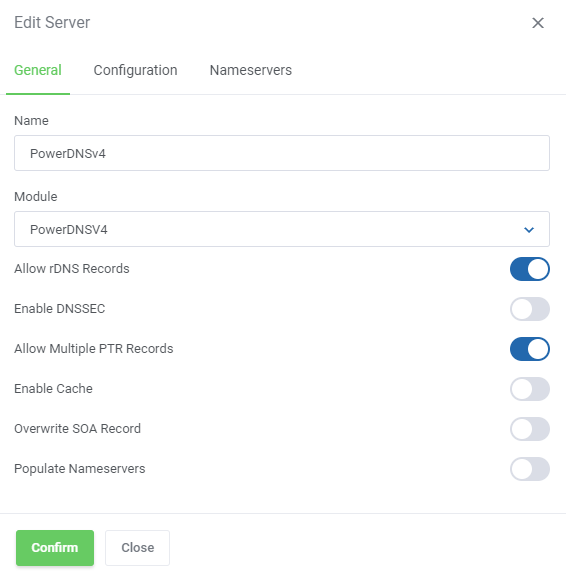
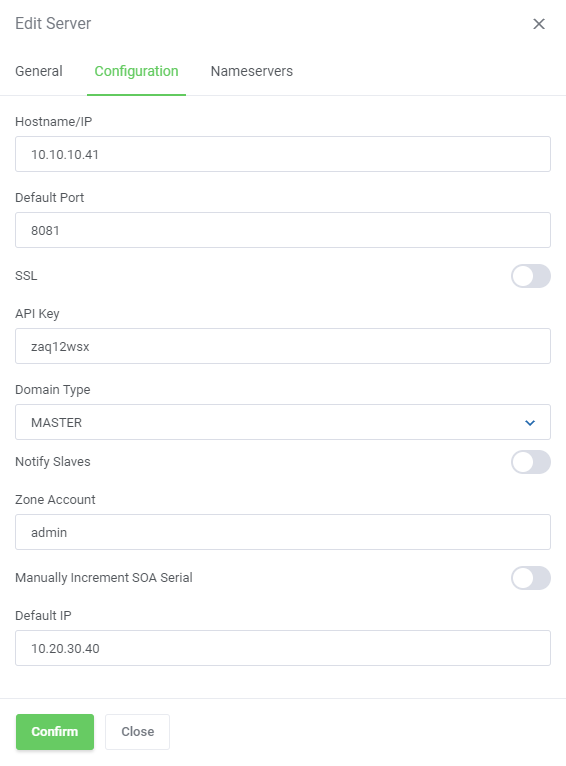
| Please also note that the configuration differs per selected submodule! |
|
|
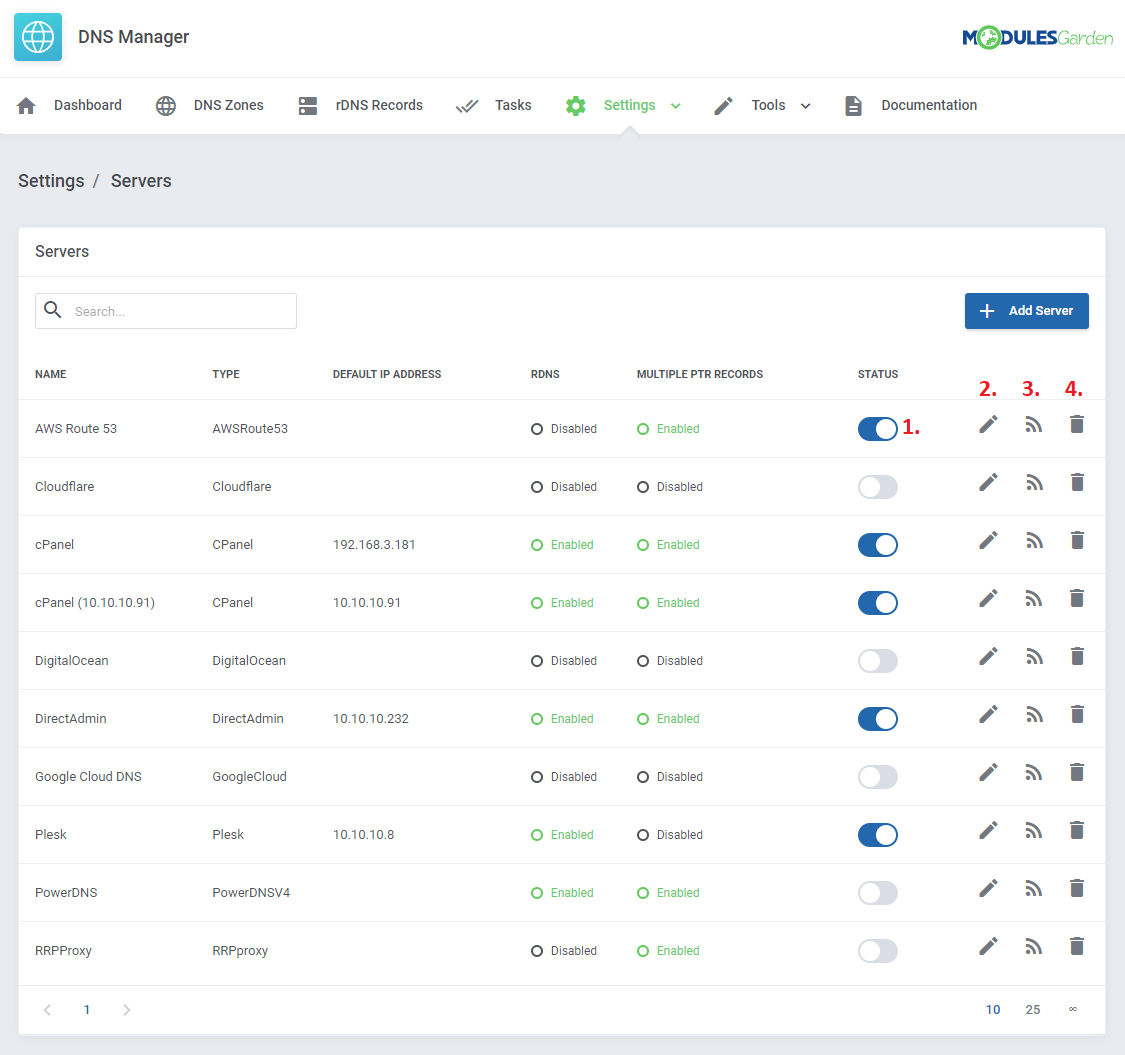
| Now, that you have a ready servers on the list, you may manage them. Turn it on/off by changing their status (1.), edit (2.), test connection (3.) and delete (4.). |
|
BIND 9 Configuration
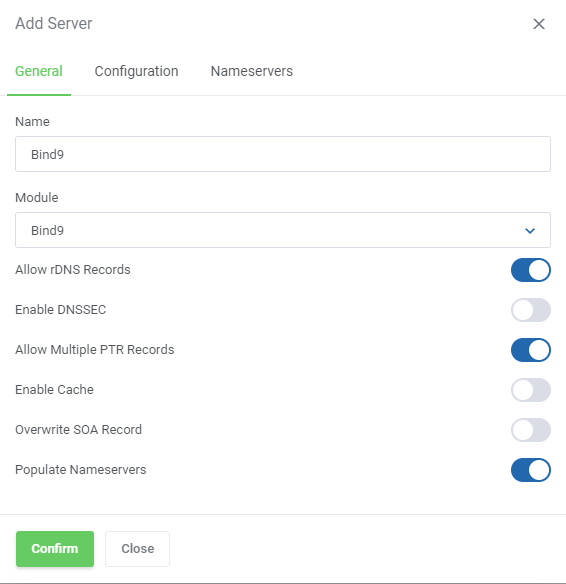
| DNS Manager For WHMCS offers solutions not only for remote DNS servers, but it can also support your own DNS server created using BIND 9. Please note that currently DNSSEC for BIND 9 is not supported yet. In this part, we will show you an exemplary BIND 9 configuration. |
|
| Now, move to the 'Configuration' tab and provide essential data to your BIND 9 server configuration. The 'Path To Bind9 Config Directory' filed is used to locate the BIND 9 'named.conf.local' configuration file. Important: Remember that paths to 'Bind9 Config Directory' and 'Backup Directory' should start with / and be absolute. |

|
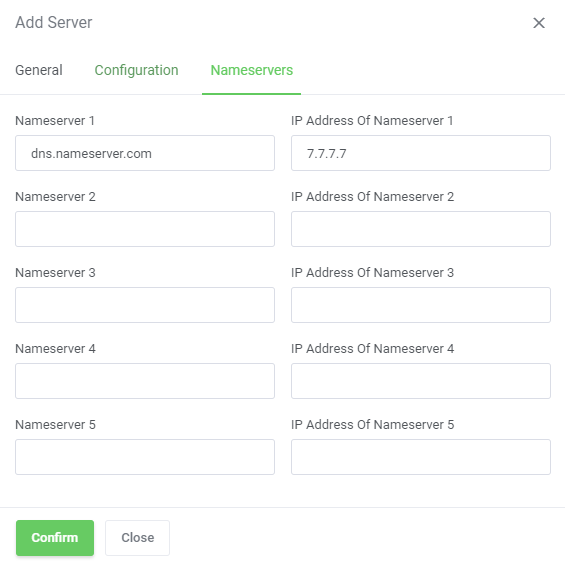
| Another obligatory step to set up is 'Nameservers' . Fill in at least one nameserver and its IP address. Do not also forget to save the changes. |
|
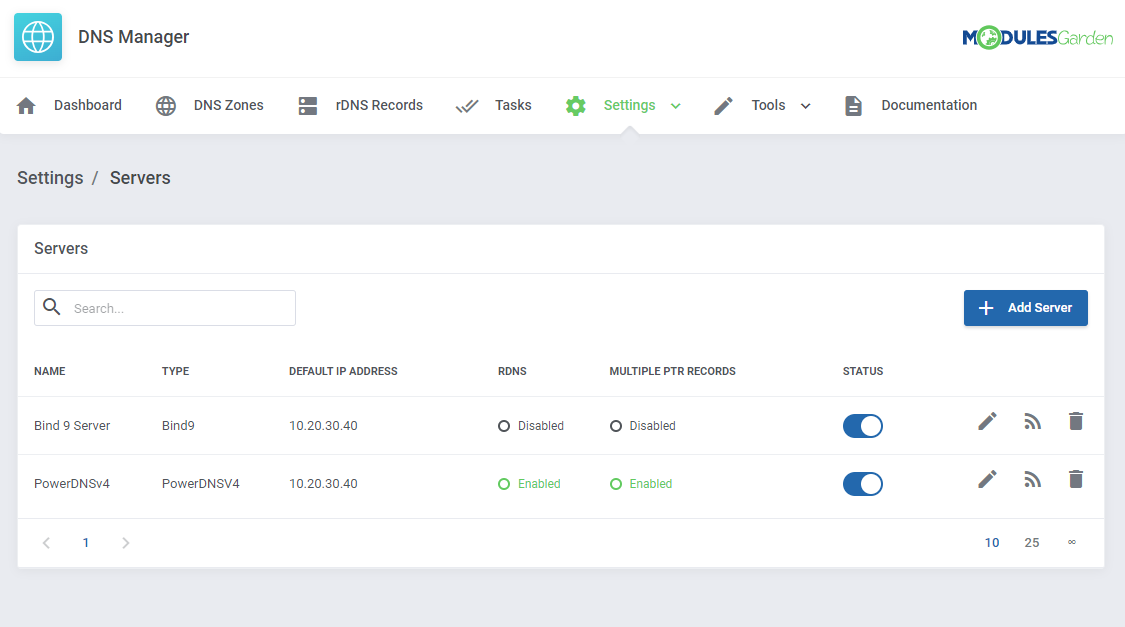
| Once the configuration has been established successfully, you can test your connection, view your ready server which can be easily managed here. |
|
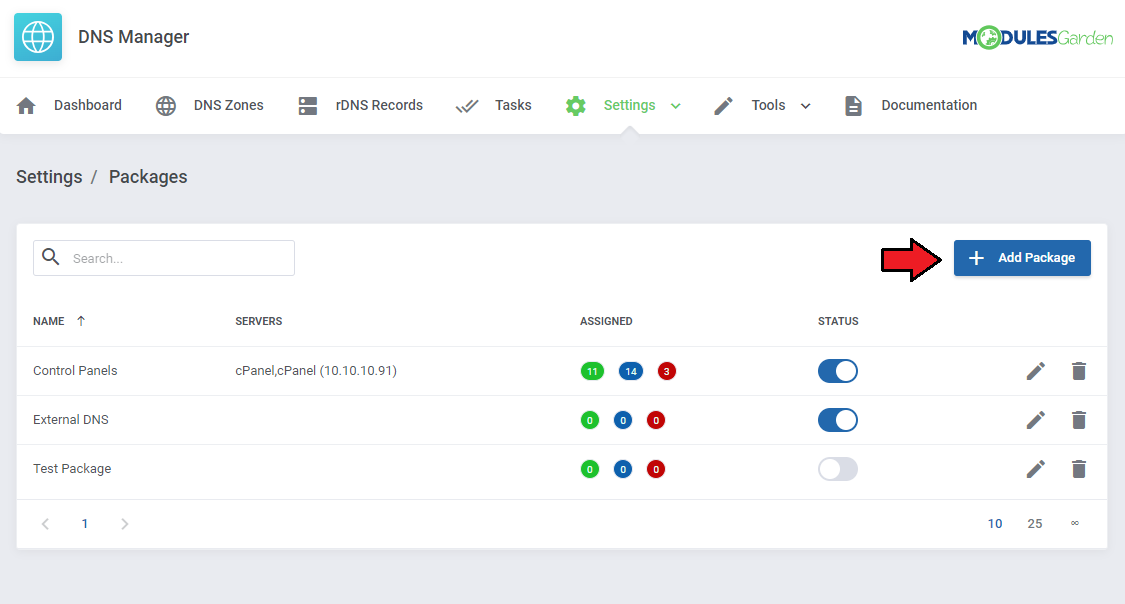
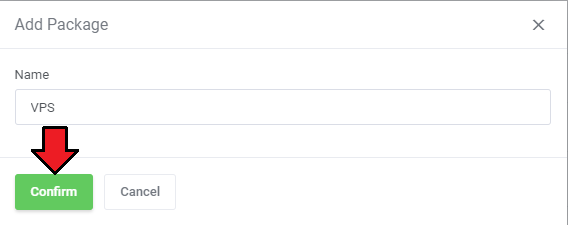
| Packages - these are collections of settings related to the products for sale. Thanks to these, the client will be allowed to create specific zones and will possess the access to DNS Management in the Client Area. Click 'Add Package' to see how to configure it and what exactly can be specified there. |
|
|
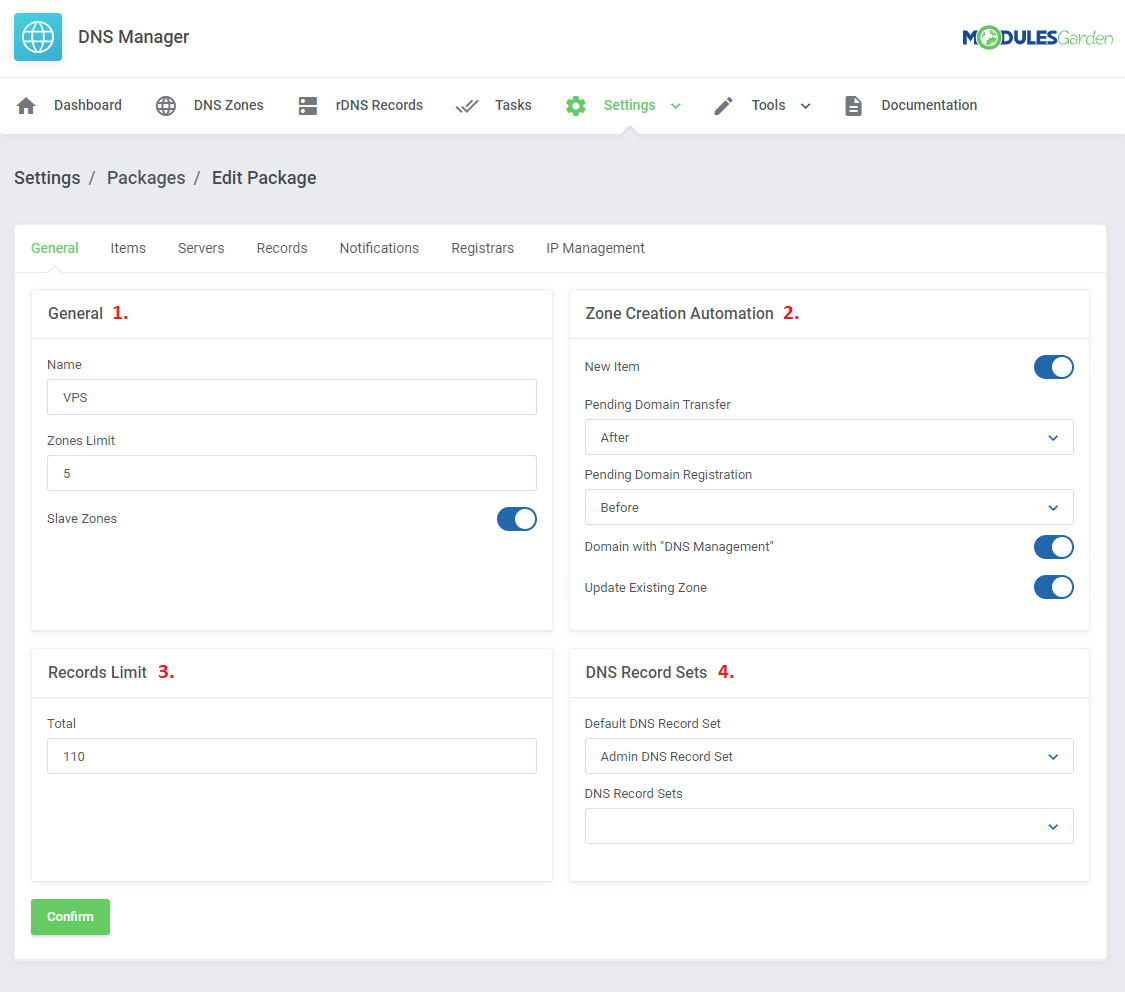
| In the 'General' section, you obviously have to name the newly created package and define the number of zones per item (limit of zones that a client may then create within this package). 1. Here, you can also decide if zones should be created automatically after defined actions.
2. Define the maximum, allowed limit of records.
|
|
Items
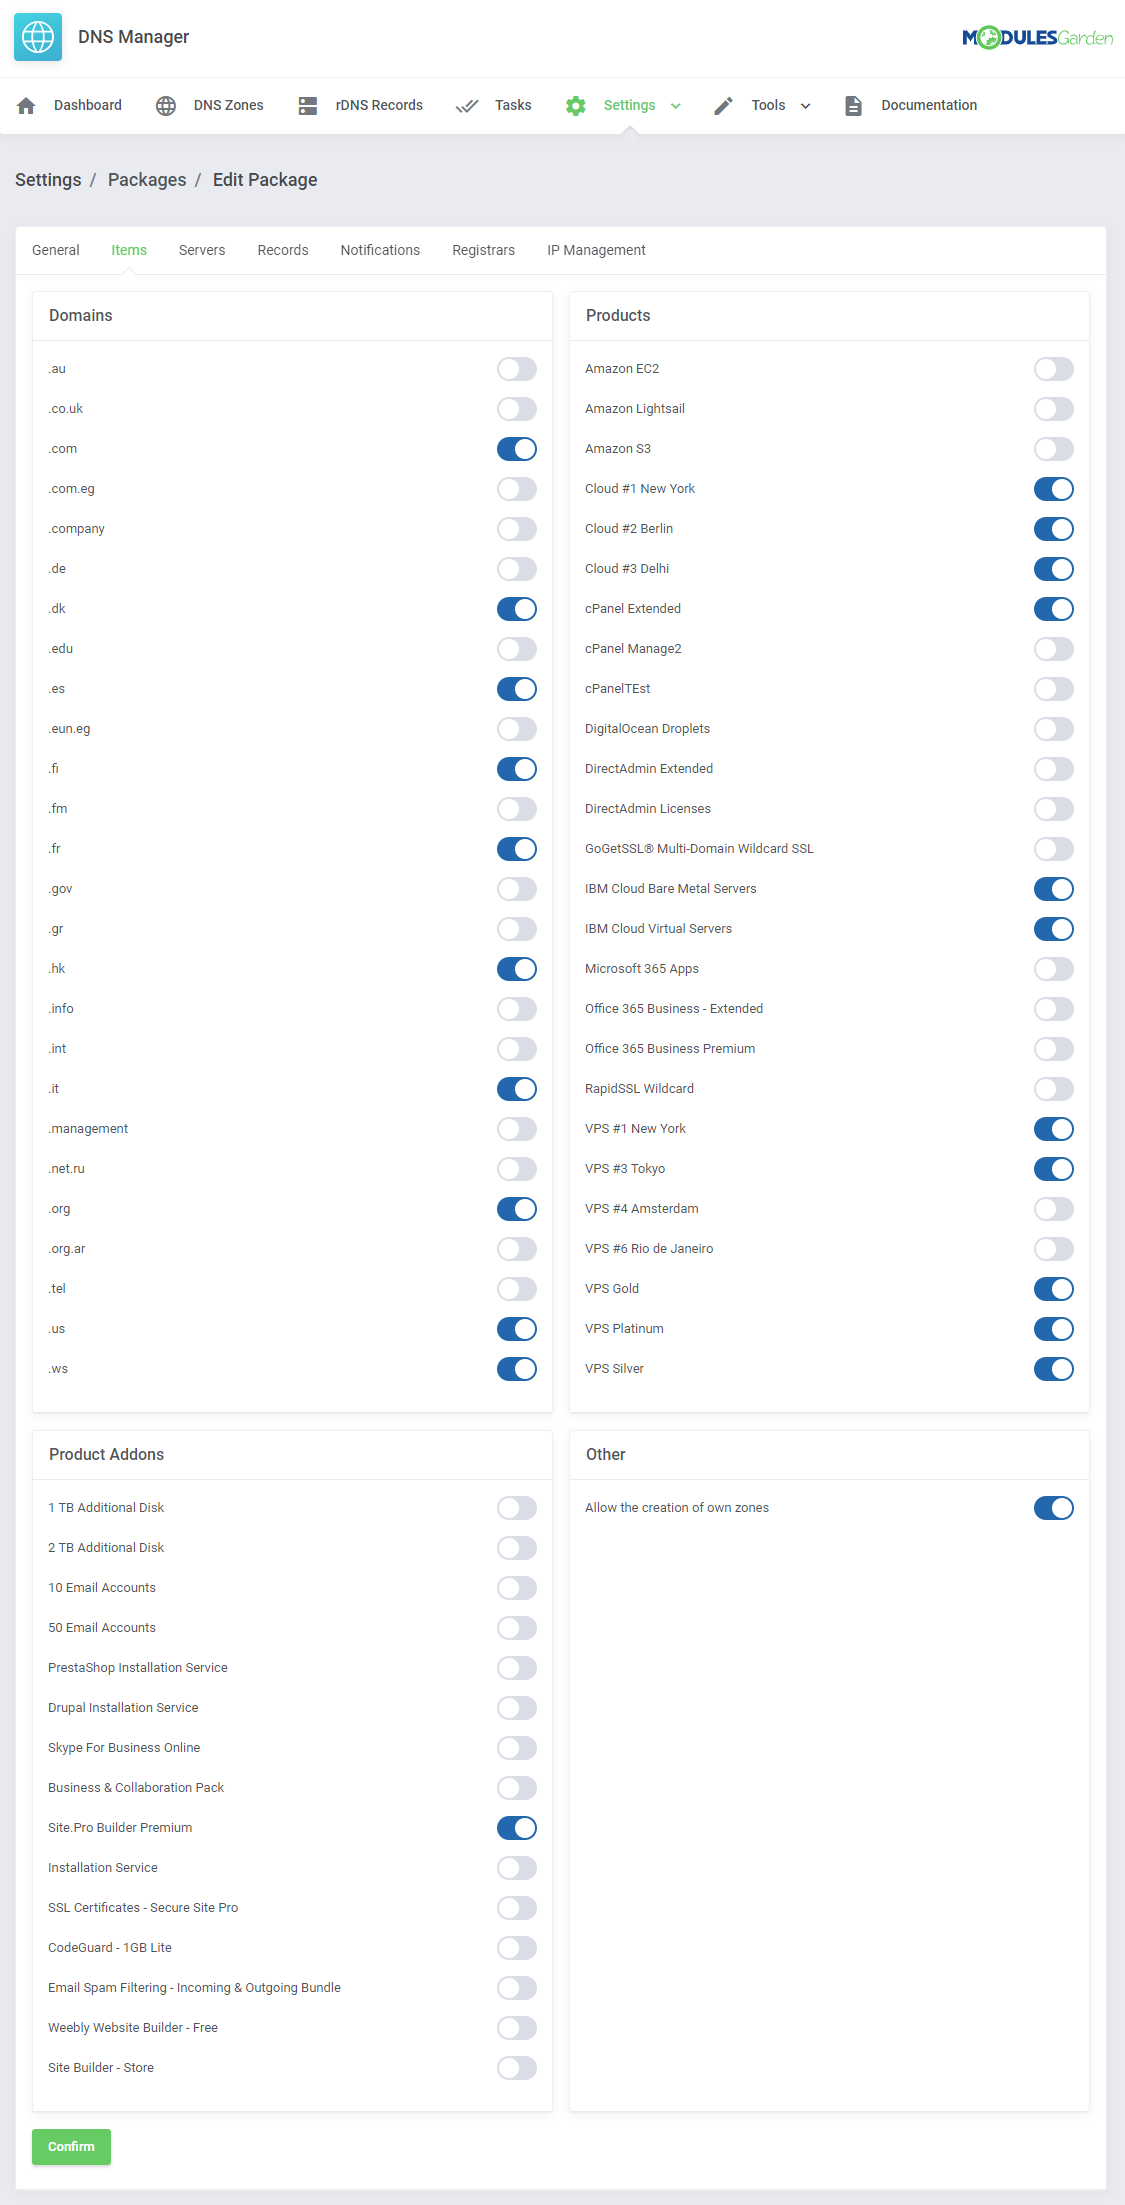
| Assign Domains, Products or/and Product Addons from available ones to the package. Here you can also allow clients to create their own free zones. Simply select option under the 'Other' section. Remember that you may use this option for one package only. |
|
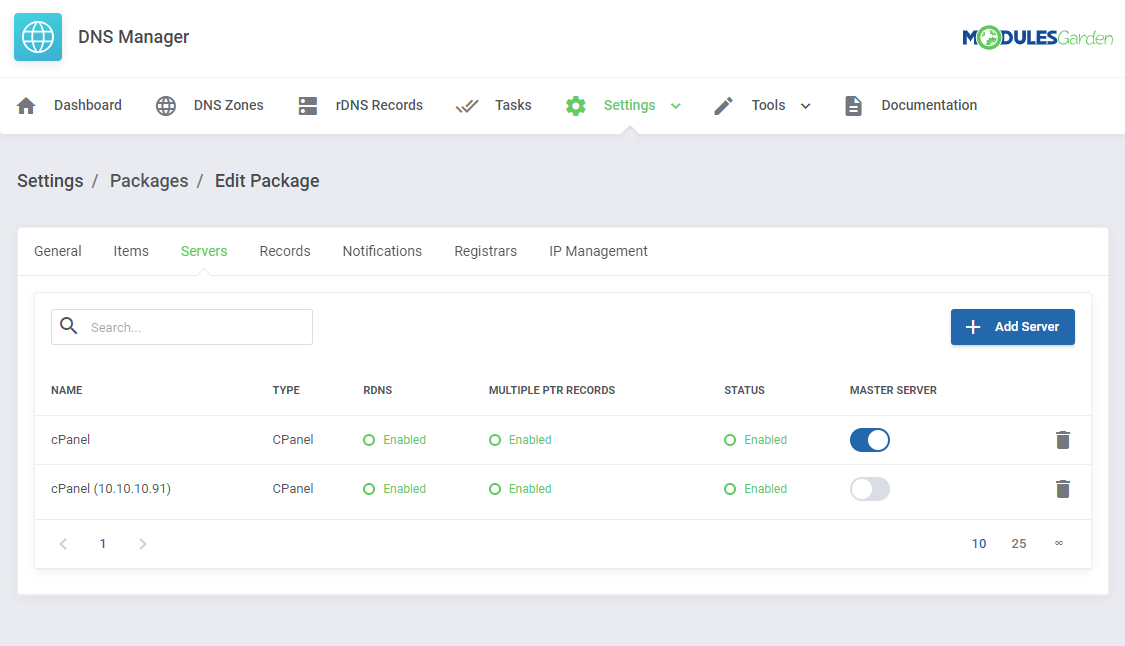
Servers
| Assign the package to the previously added server. Note: You may always assign the package to more than one server. |
|
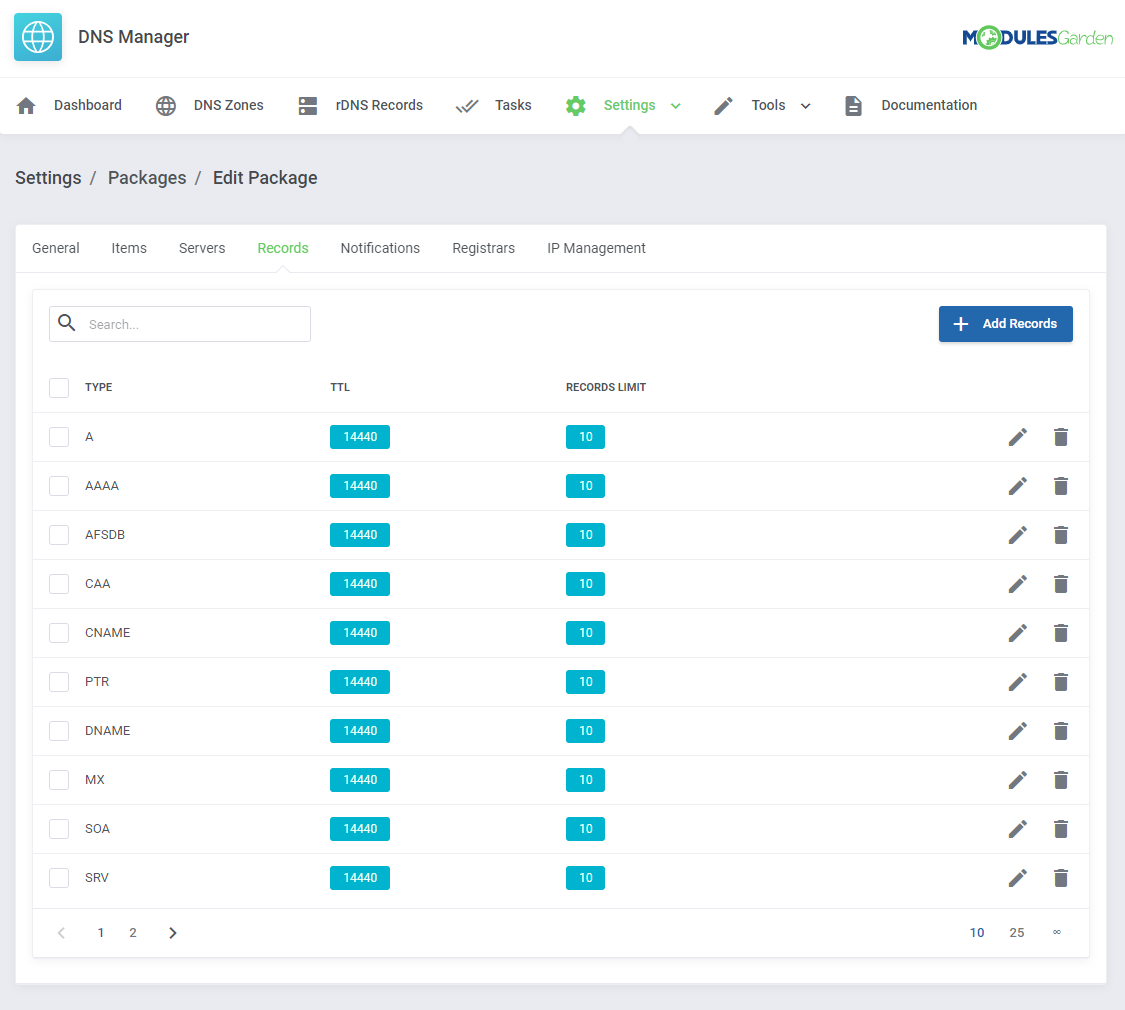
Records
| In this part, you may define the record types that you want to enable and declare their limit.
Note: The 'Total' value cannot be lower than the sum of limits set for individual records. |
|
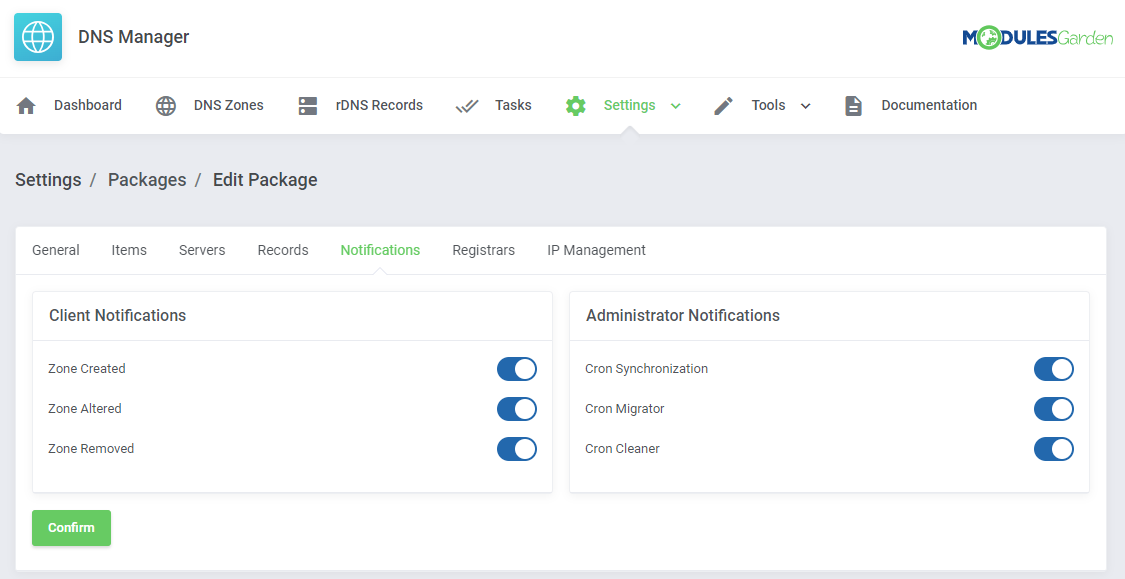
Notifications
| Here, you may configure which notification will be sent to clients and administrators. |
|
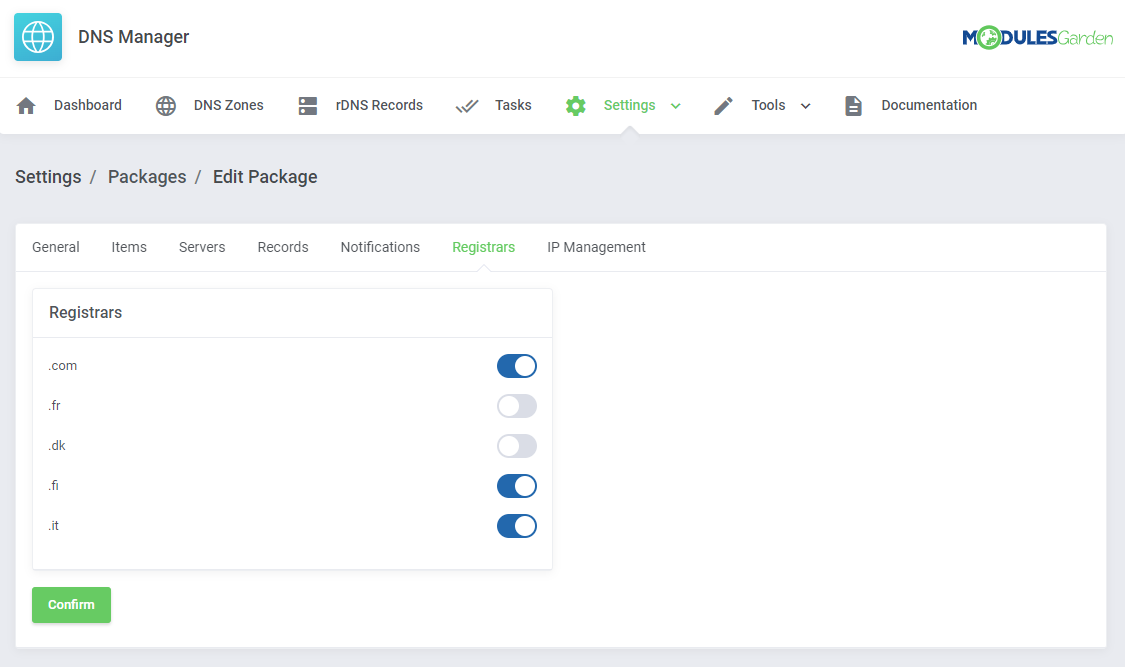
Registrars
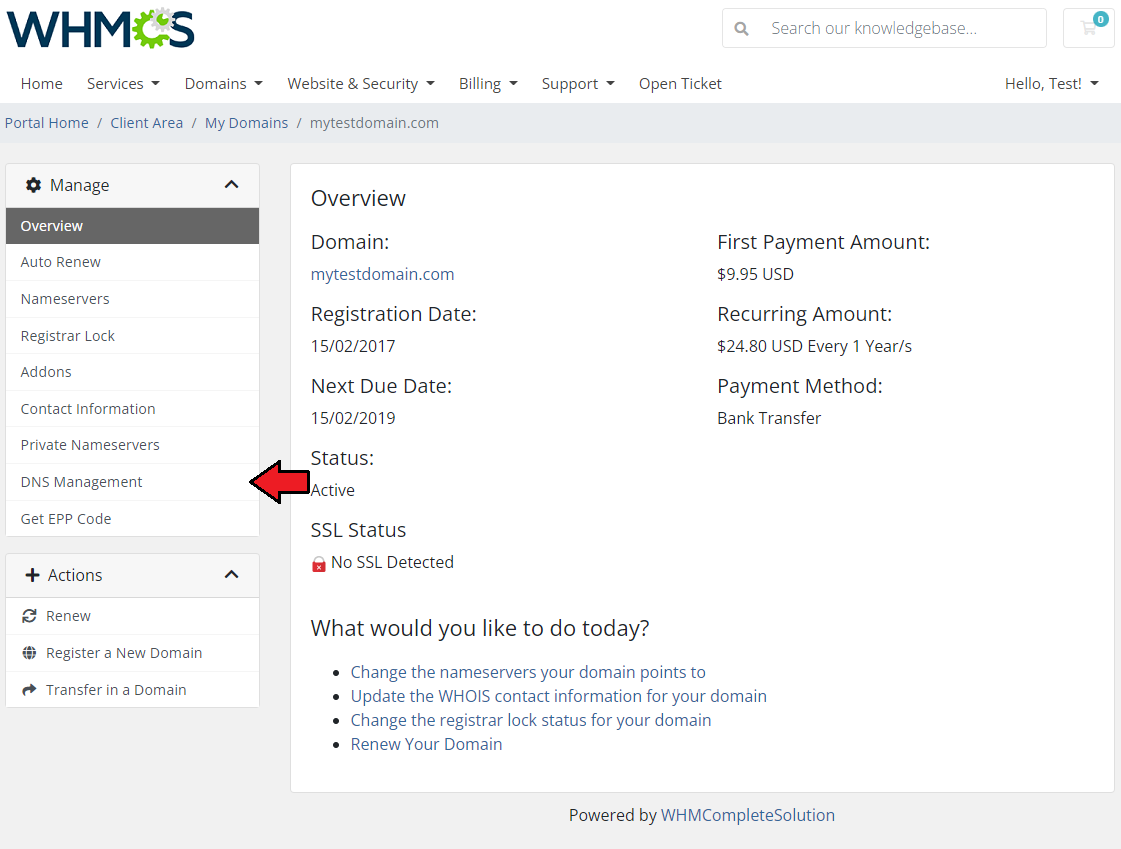
| In this part, you may allow the 'DNS Management ' option for selected here registrars that do not support DNS management by default. |
|
| Please note that the inbuilt WHMCS DNS Management will be used to handle the above functionality. |
|
IP Management
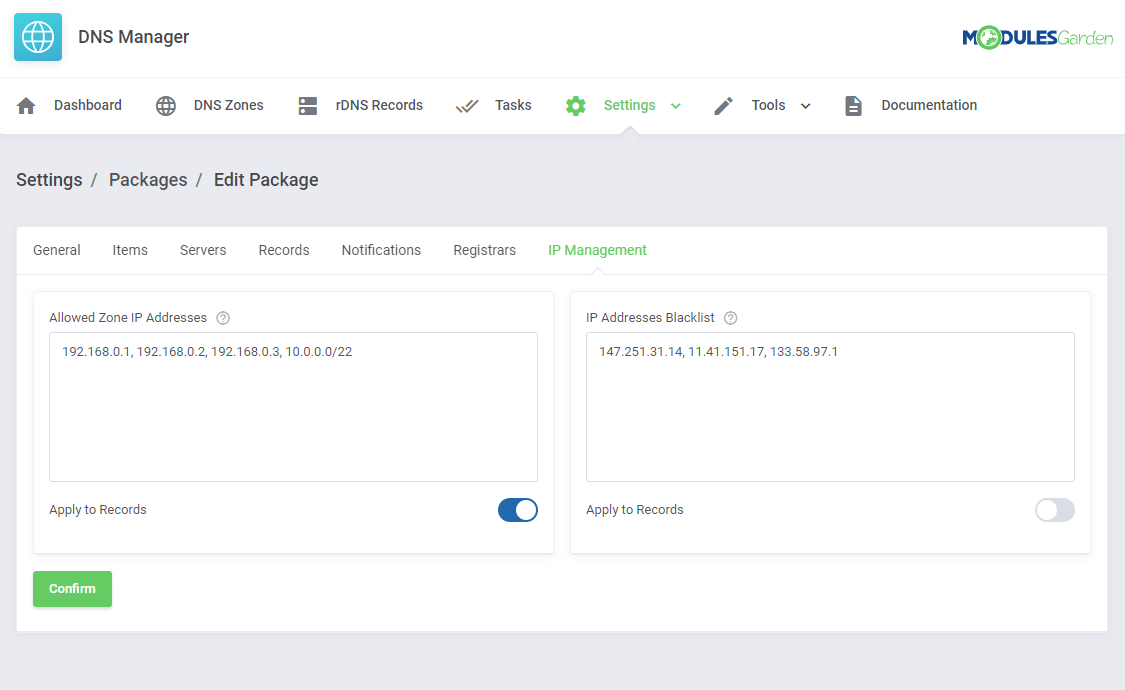
| In the last part, you can specify which IP addresses can be used by your clients while creating a package. If you do not provide anything, clients can use any IP addresses without any limitations. The 'IP Addresses Blacklist' section allows you to ban IP addresses. This will prevent users from using specified IP addresses. Rememnber to save the chcnages when th epackage configguration is ready. |
|
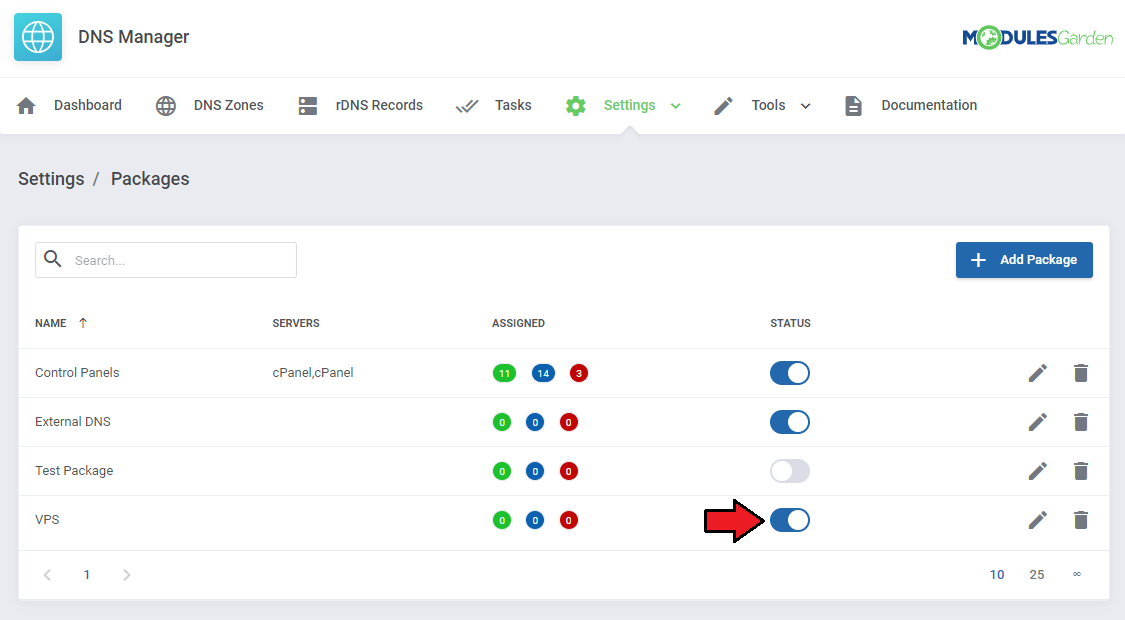
| Enable the newly created package to allow it to be used! |
|
Client Area
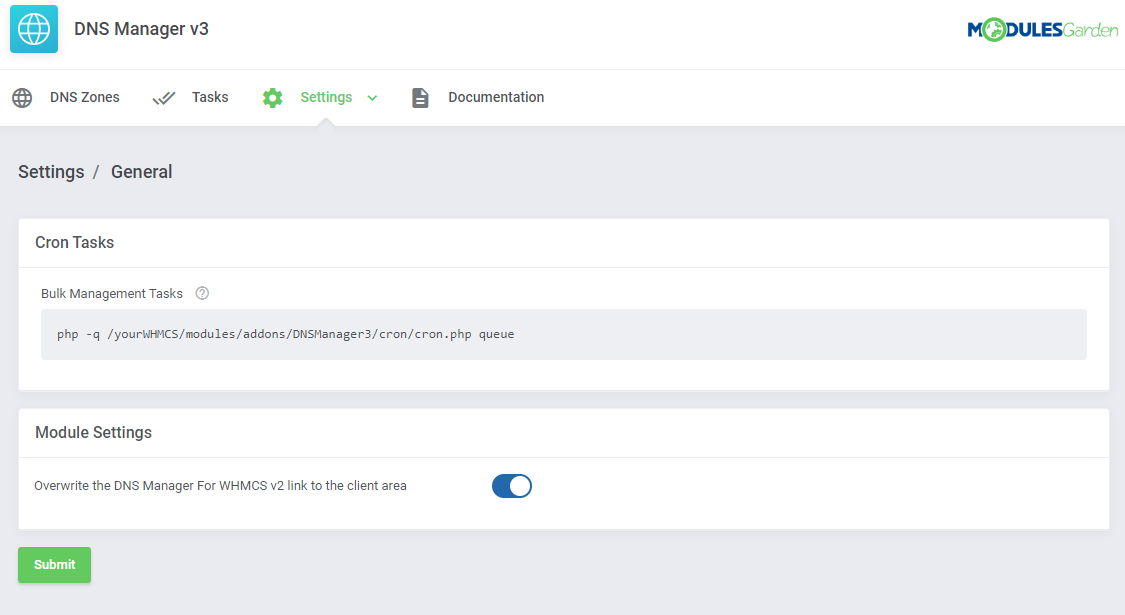
| In order to take advantage of the brand new management page in the client area, you need to allow access in the DNS Manager v3 addon. Navigate to Addons → DNS Manager v3 → Settings. There you will find two sections: 'Cron task' and 'Module Settings'.
php -q /home/your_whmcs/modules/addons/DNSManager3/cron/cron.php queue
Note: If you do not enable this option, your clients will still have access to the previous view of the 'Manage DNS' page, still available for DNS Manager v2.x.x users. |
|
DNS Management in Client Area
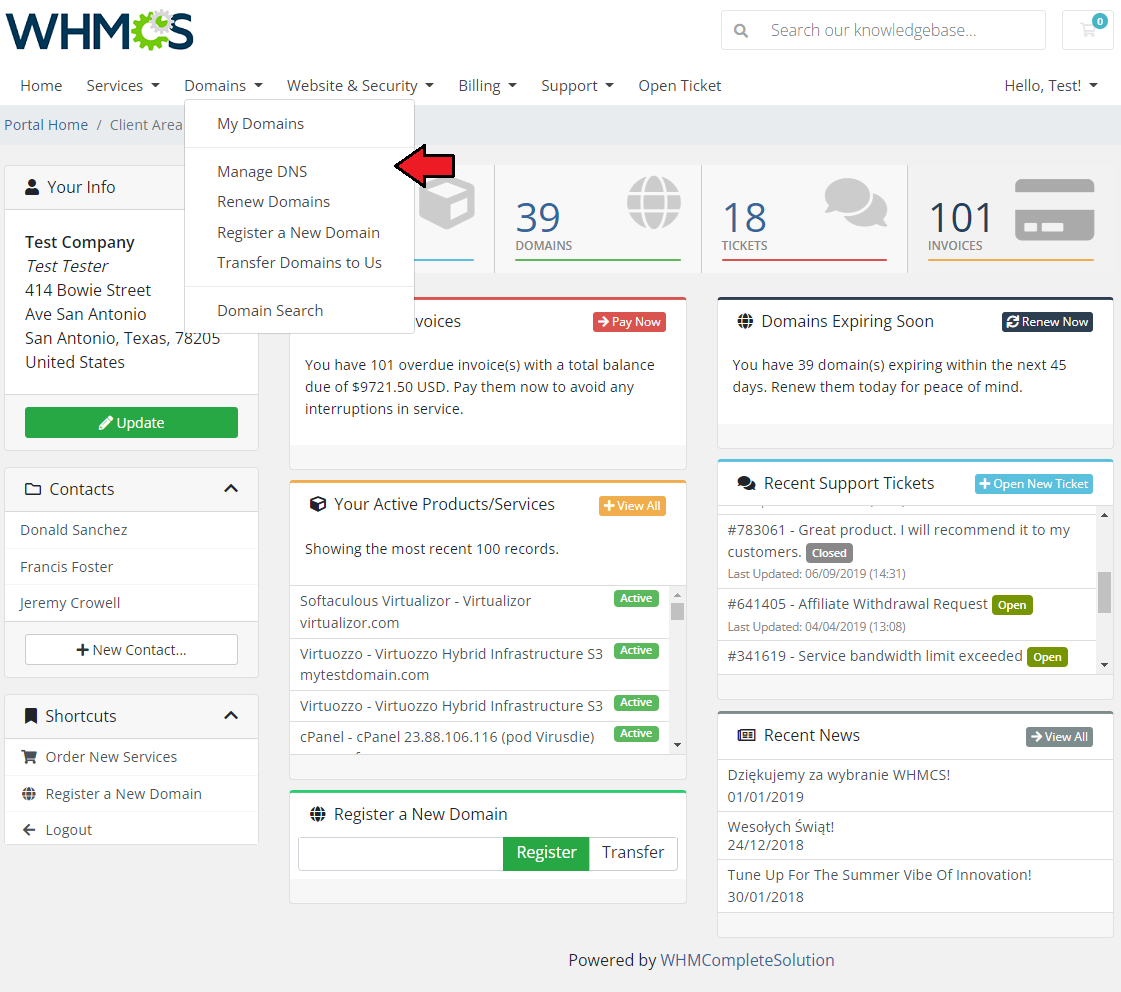
| Now, that we already have the module configured you may see how clients will add and then manage their zones. In the client area find the button 'Manage DNS', it will redirect you to the management page. |
|
Zones
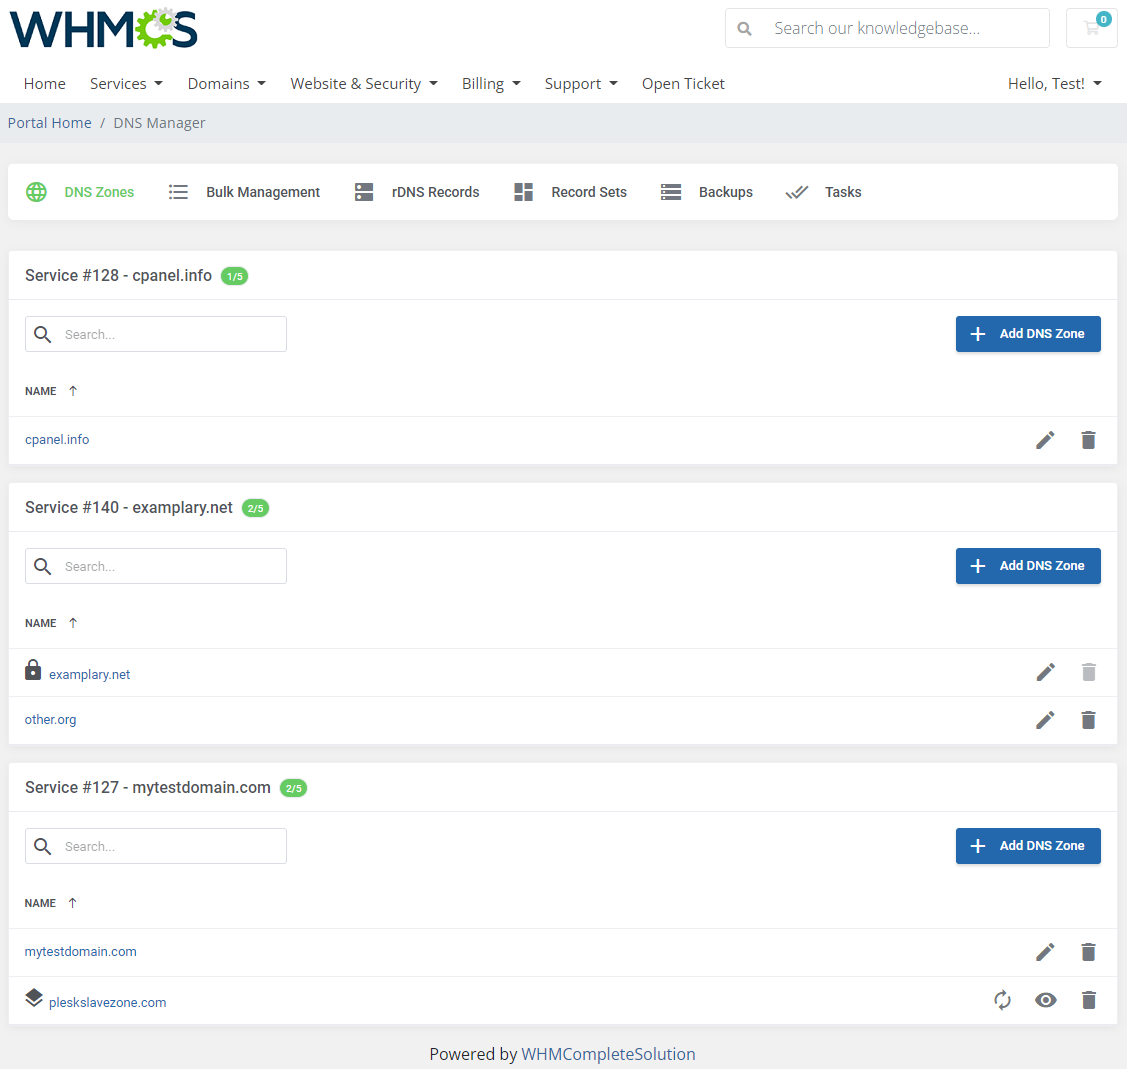
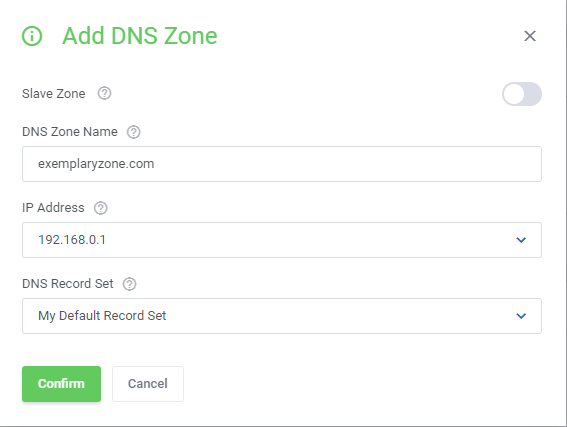
| In here, clients may add new zones. To do so, simply type in the name of the zone and choose IP address from the available or enter your custom IP. It depends on your configuration - read more about possible options here. From the dropdown menu clients can also define record sets. If they do not have any added, the default one created by the administrator in the admin area will be selected. When clients create sets by themselves, they can use the one defined by them as default, or choose other one from the list. |
|
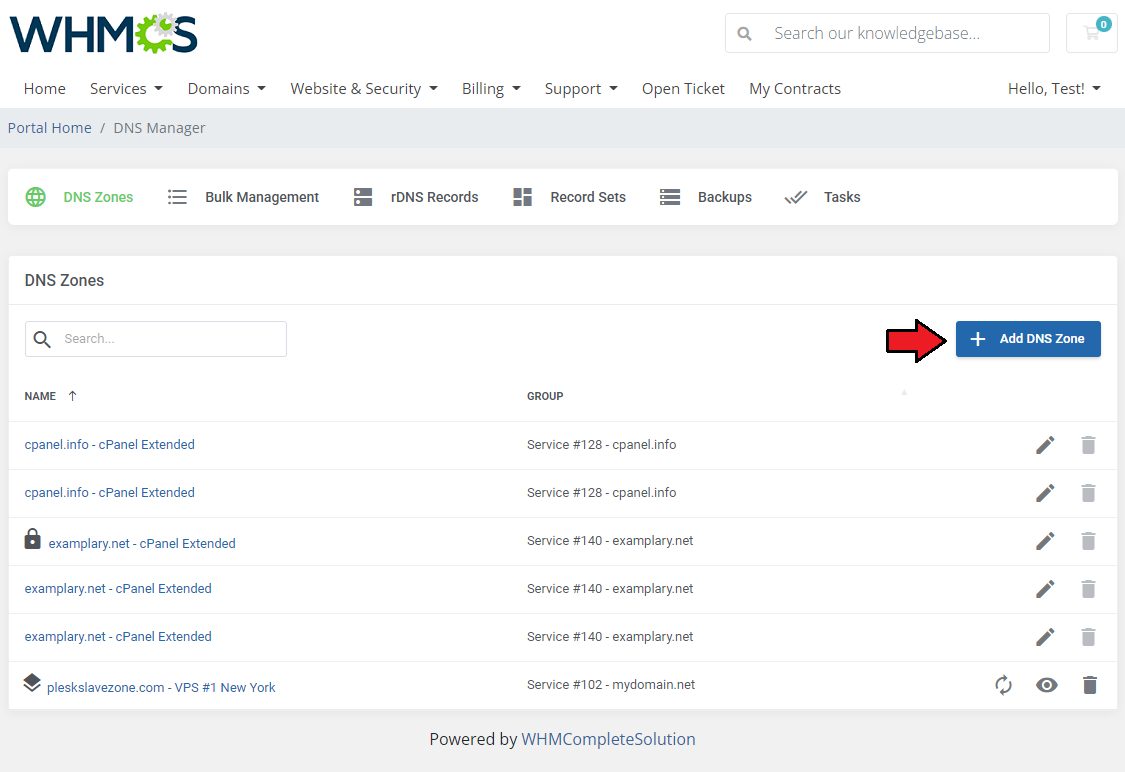
| Standard list view of DNS Zones: Note: You can turn on this mode in the 'DNS Manager v3 addon' → 'Settings' → 'Global Settings' → 'Other' → 'Zones Single Table View'. |
|
|
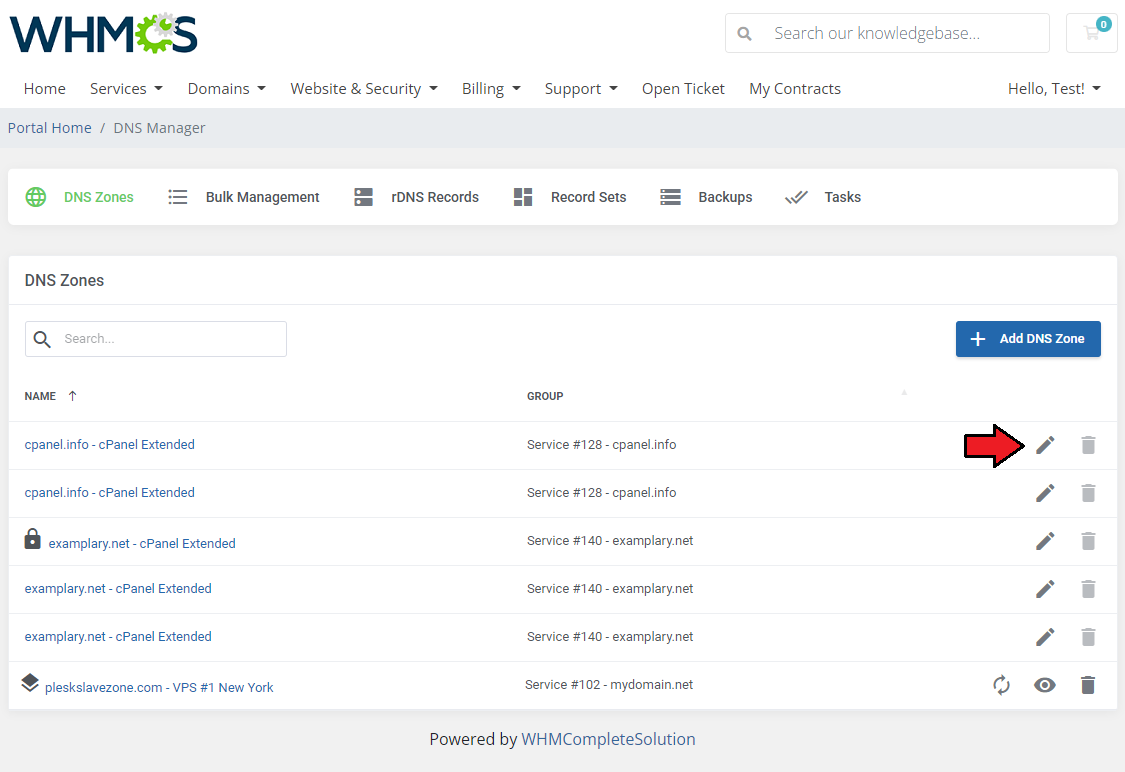
Allowed actions on a zone:
|
|
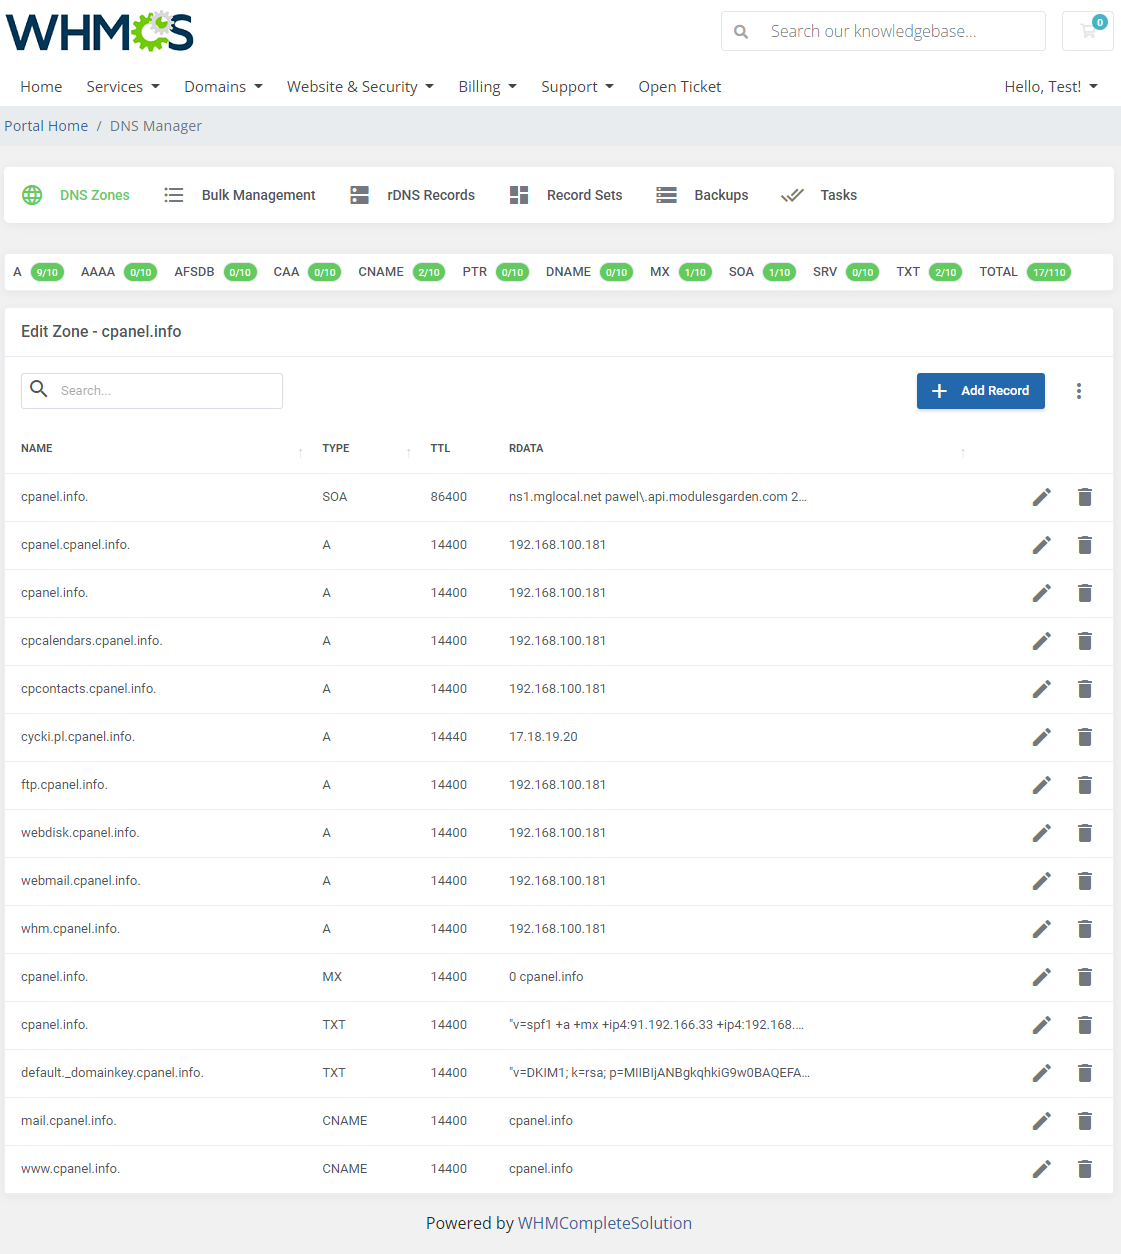
| Press 'Edit' to see details of the zone, you may edit the zone here and add new records if limits allow you. |
|
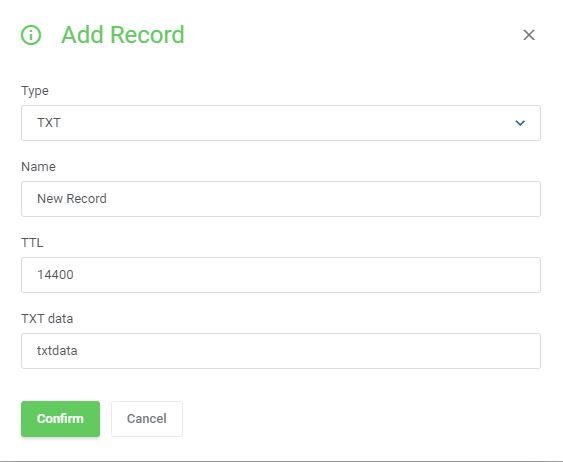
| Enter a new record's name, choose the type from available etc. |
|
DNSSEC
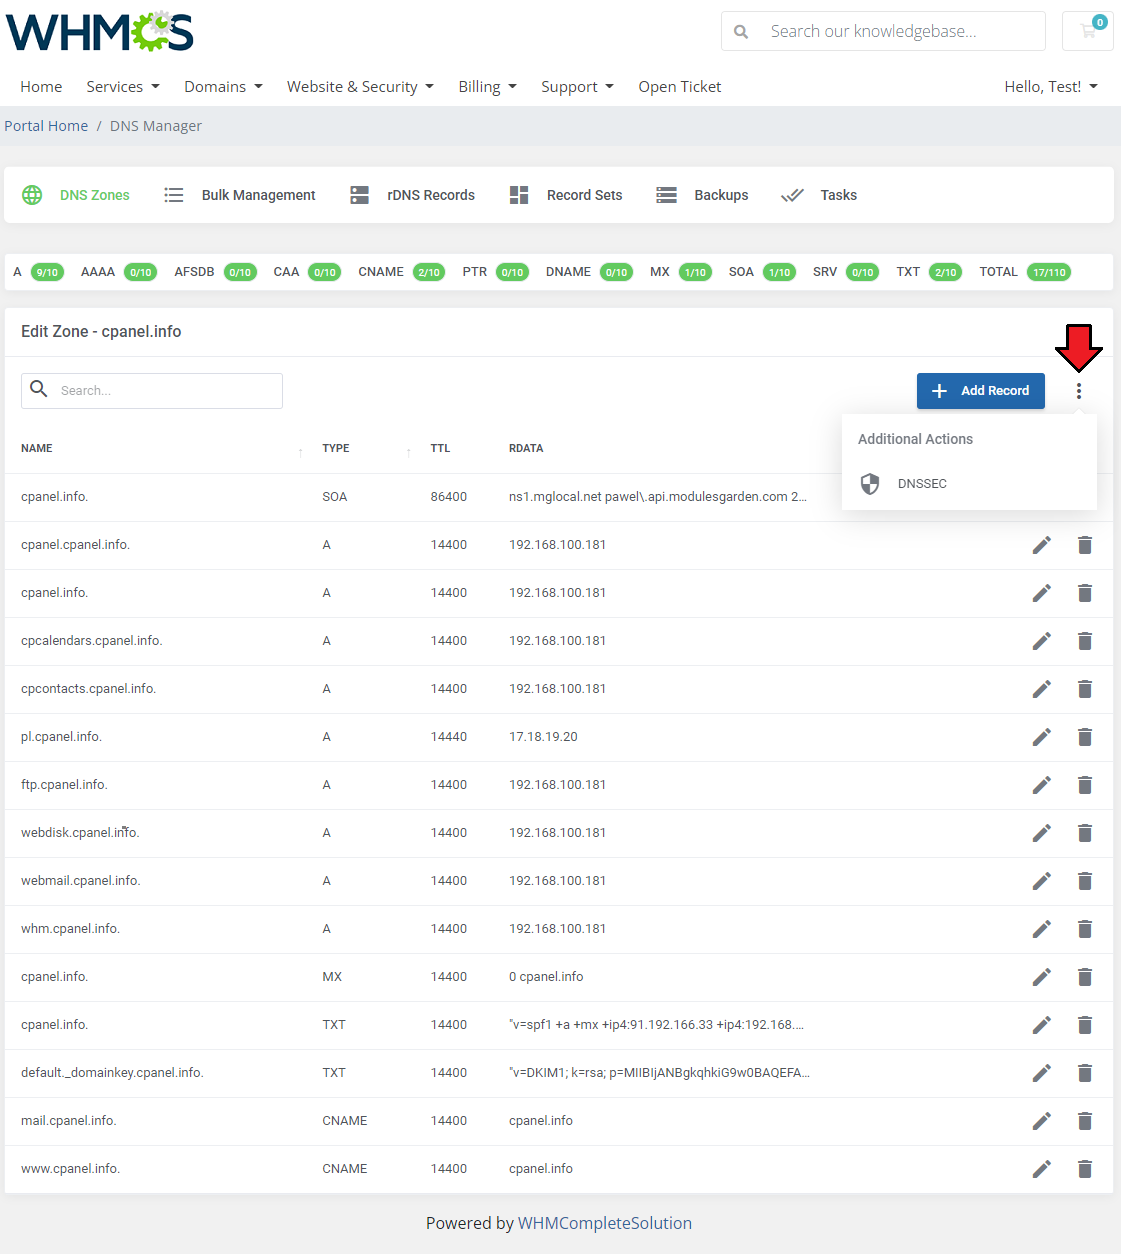
| If the 'Enable DNSSEC' option has been selected ('CloudFlare', 'cPanel', 'DirectAdmin', 'PowerDNS', 'PowerDNS V4' and 'Simple DNS Plus V8 And V9' submodules), the client may turn it on. To do so, navigate to 'Additional Actions' → 'DNSSEC'. |
|
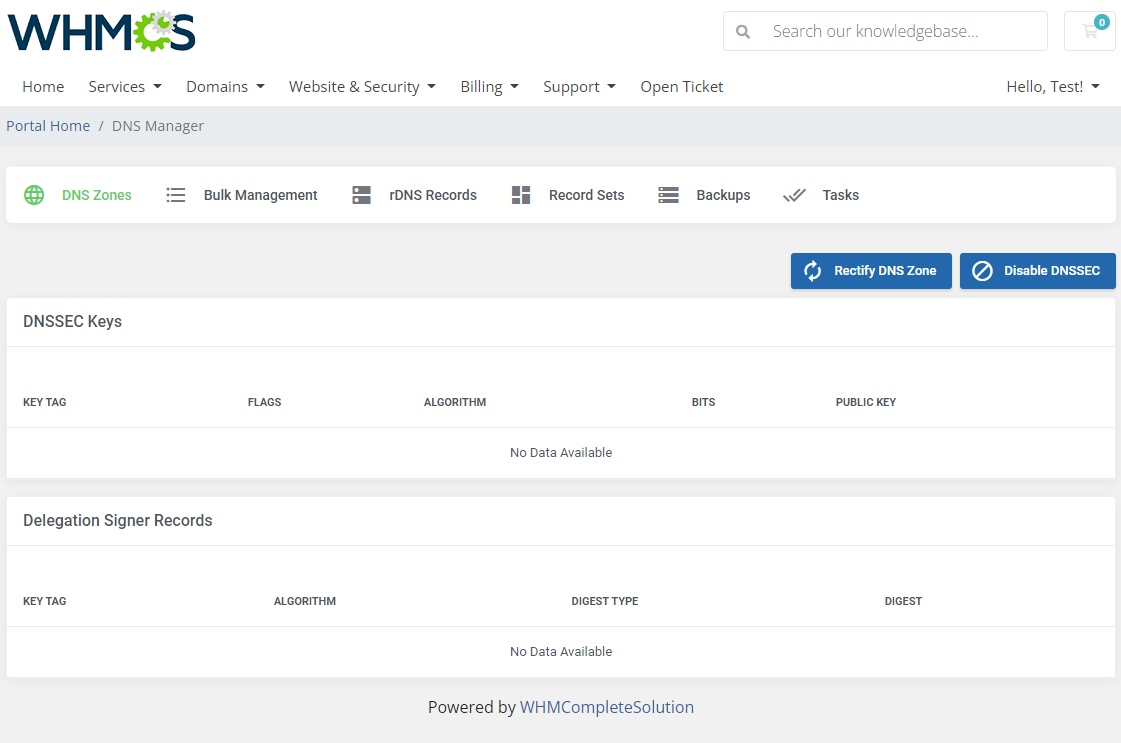
| Enable DNSSEC here, you will then get access to DNNSSEC details for the zone, including keys and delegation signer records. Press 'Rectify Zone' to comply with DNSSEC. |
|
Bulk Management
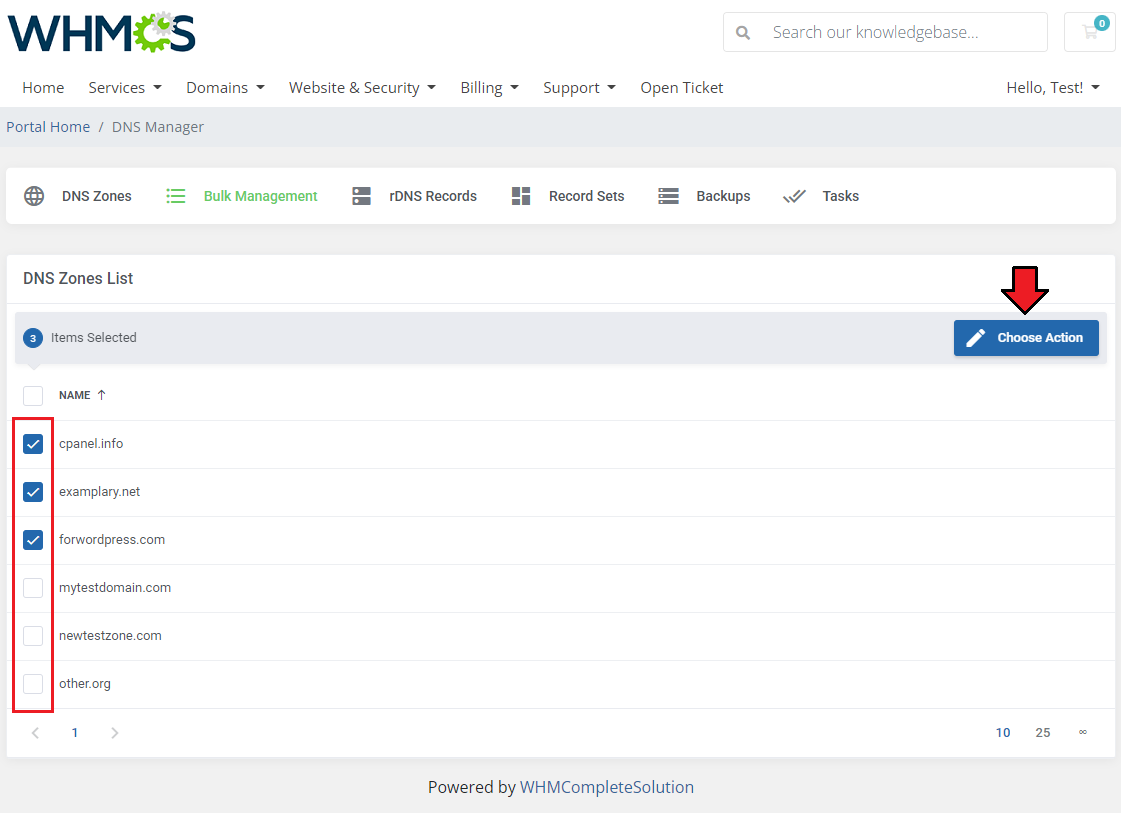
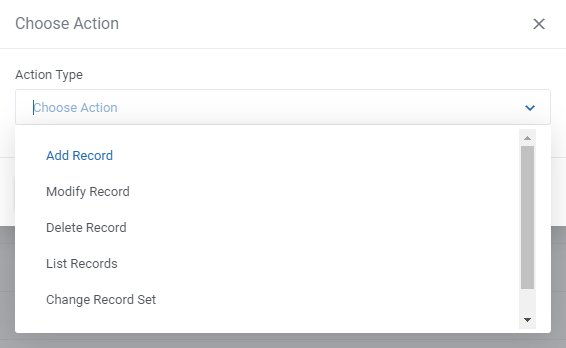
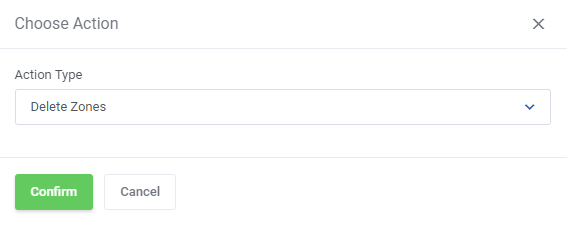
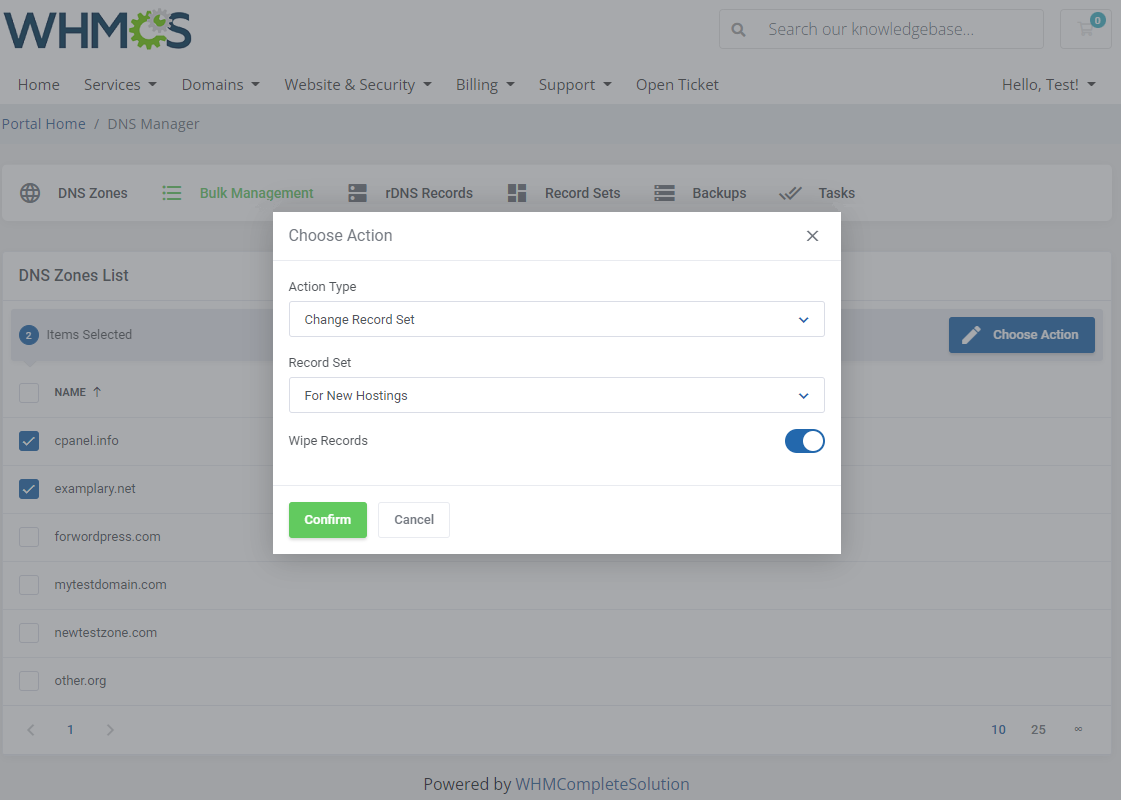
| Under this section you may manage numerous DNS zones. Select at least one zone on the list and press the 'Choose Action' button. There are six allowed actions that can be preformed on zones. Allowed actions:
|
|
|
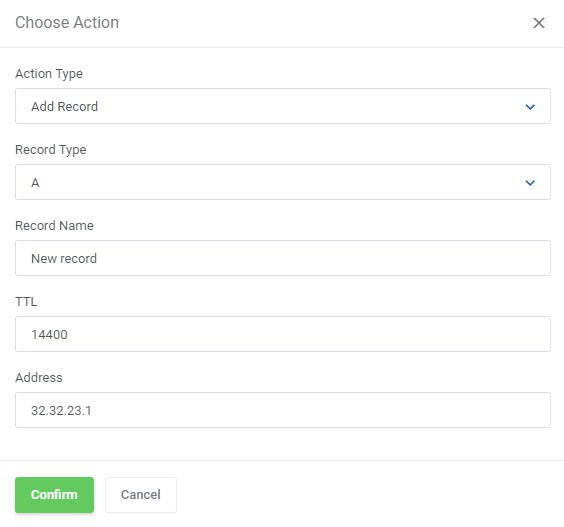
| Add Record - define the newly created record type, name, TTL and address. |
|
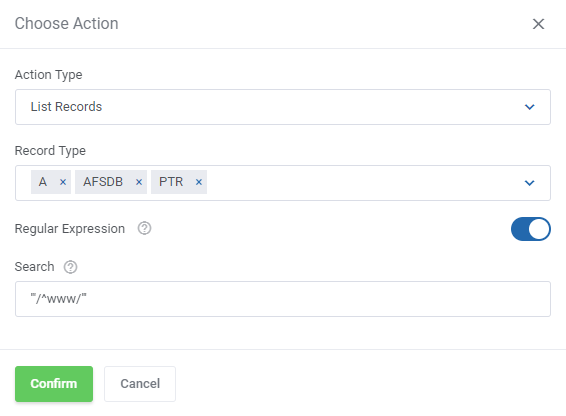
| List Records - search for records manually by typing in exactly what you need or enable 'Regular Expression' to broaden your search results. Use regex syntax, for example:
|
|
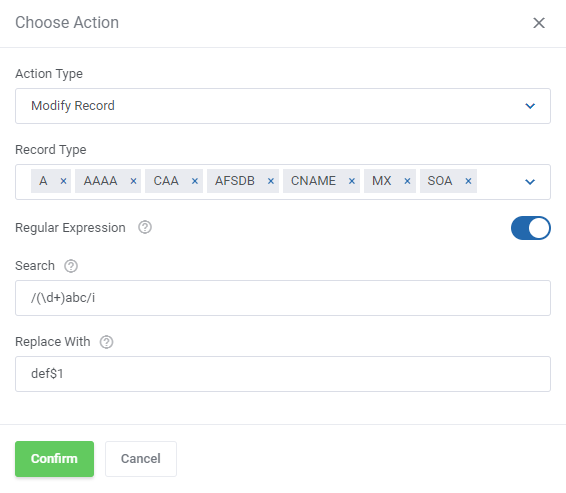
| Modify Record - you may modify existing records. Search for records manually by typing in exactly what you need or enable 'Regular Expression' to broaden your search results. Use regex syntax, for example: Search: /(\d+)abc/i The above example will result in exchanging all records that include a string of numbers followed by abc letters to a 'def' phrase with the same string of numbers: phrase2137abc → phrasedef2137 |
|
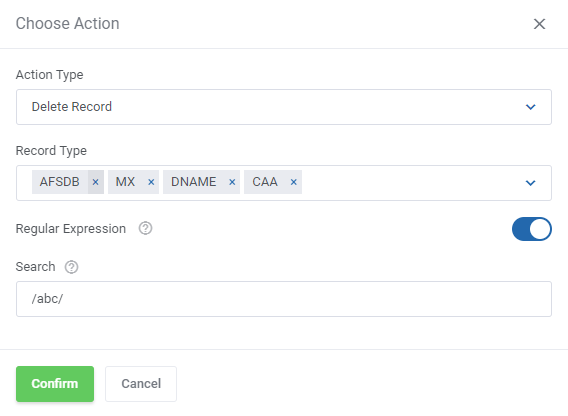
| Delete Record - select the record type and specify which records shall be deleted. Enter specific data or use regular expression. |
|
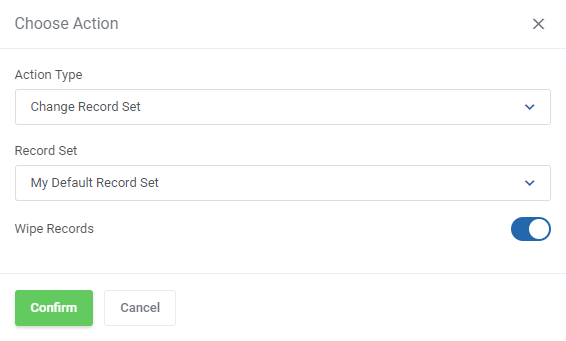
| Change Record Set - choose a new record set. You may enable the 'Wipe Records' option to clear the selected zone at the same time. |
|
| Delete Zones - remove all the selected DNS zones. |
|
rDNS
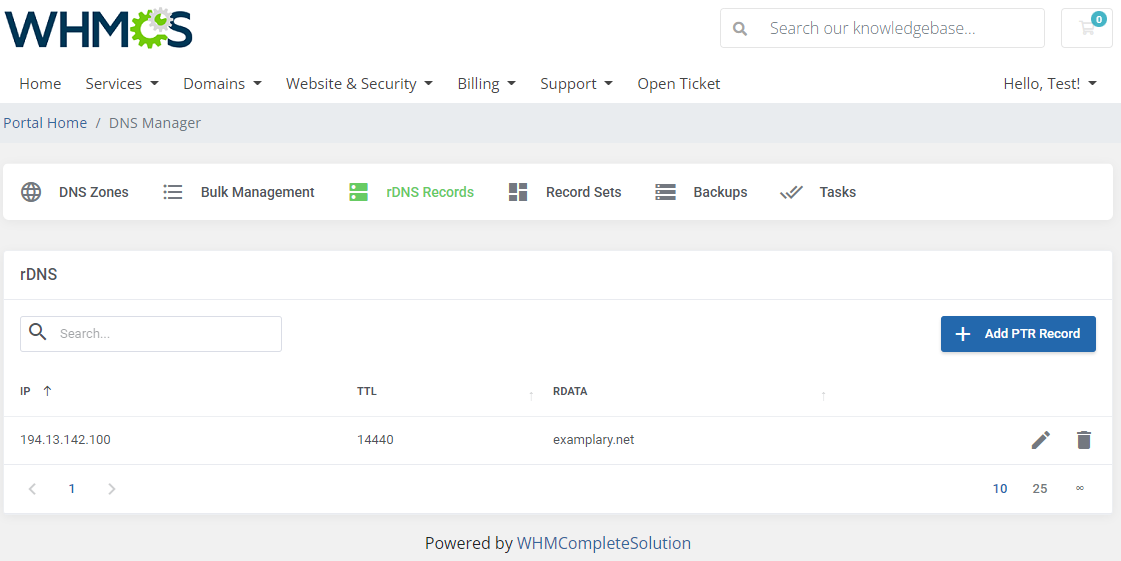
| If you have allowed the rDNS management in the client area by selecting either 'Allow DNS And rDNS Management' or 'Allow Only rDNS Management' option (read more here) in global settings, your clients can create PTR records for IPv4 and IPv6 addresses without any related zone. To do so, press 'Add PTR Record'. |
|
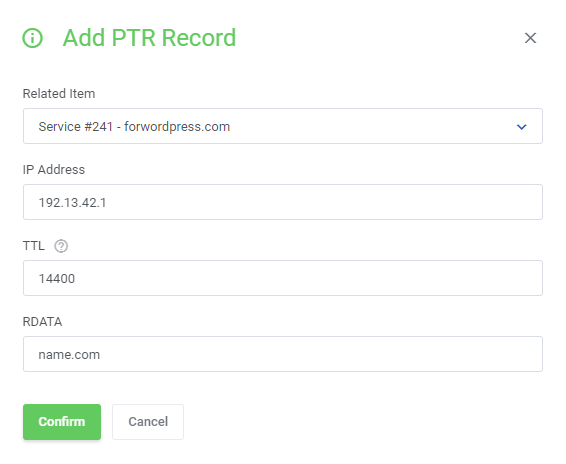
| Select related item, then depending on the configuration enter IP address or choose IP or Subnet from the available list. Note: Subnets are available only if you have integrated your DNS Manager with IP Manager For WHMCS - see below options for more details. |
|
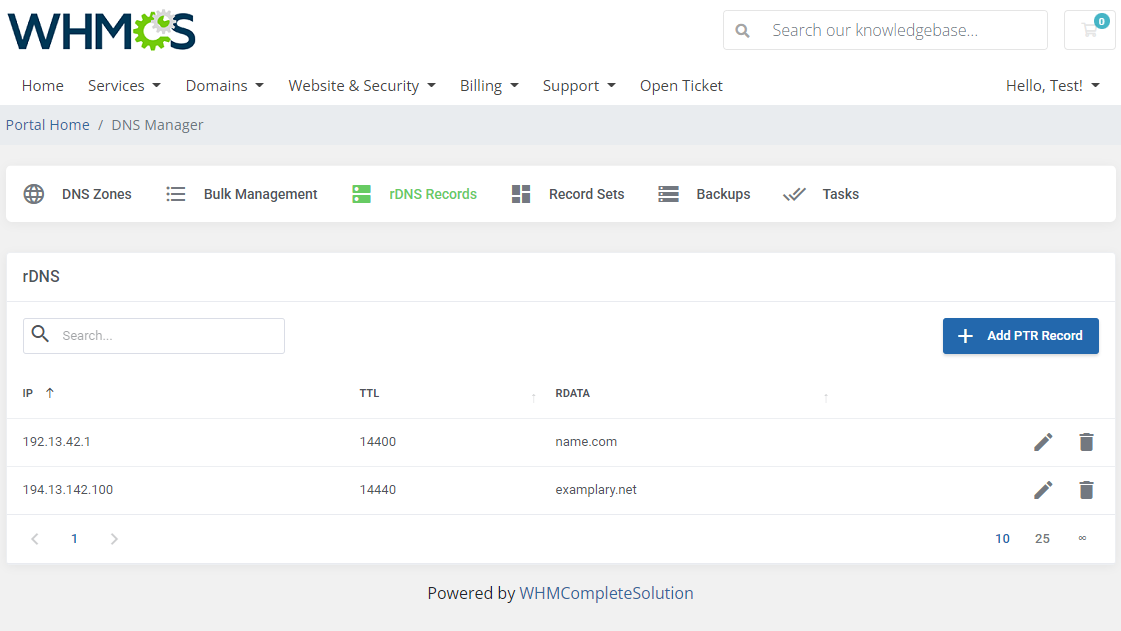
| Your newly created rDNS record should appear on the list. You may edit RDATA or delete the record completely. |
|
Record Sets
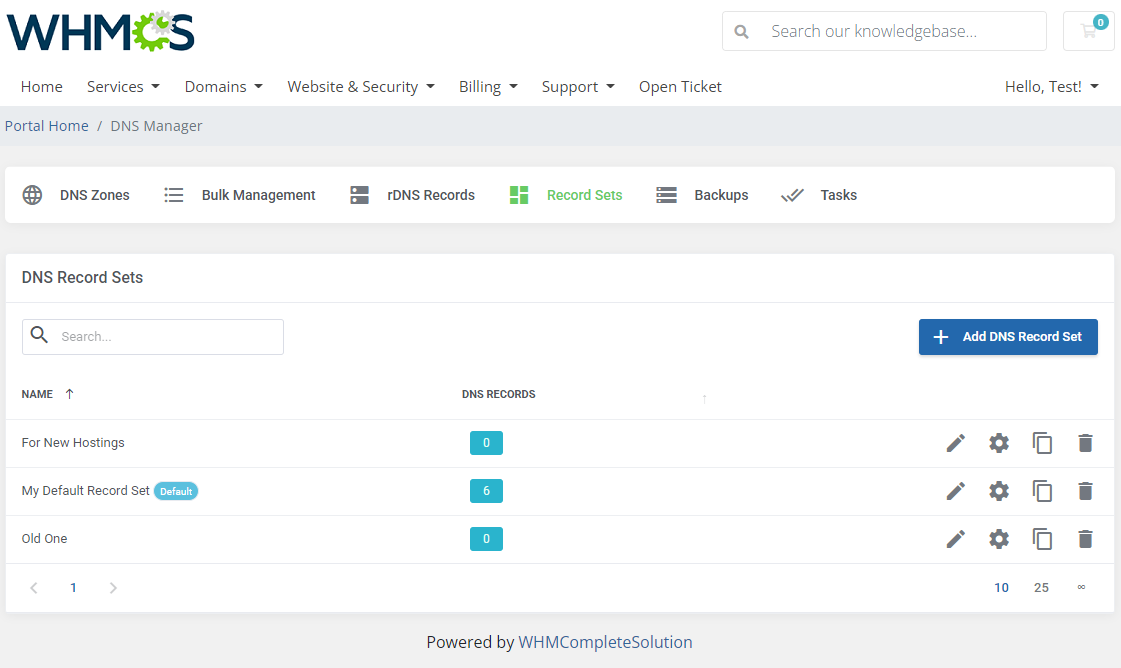
| You can add and manage records sets in the 'DNS Record Sets' section as shown below. |
|
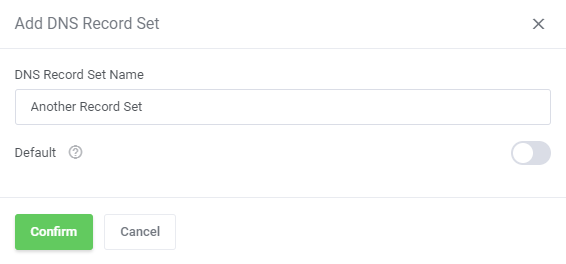
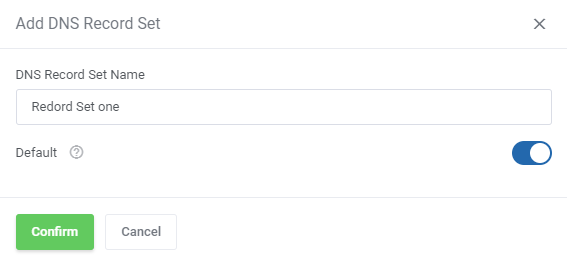
| Click the 'Add Record Set' button and provide the necessary details. It can be also set as default. |
|
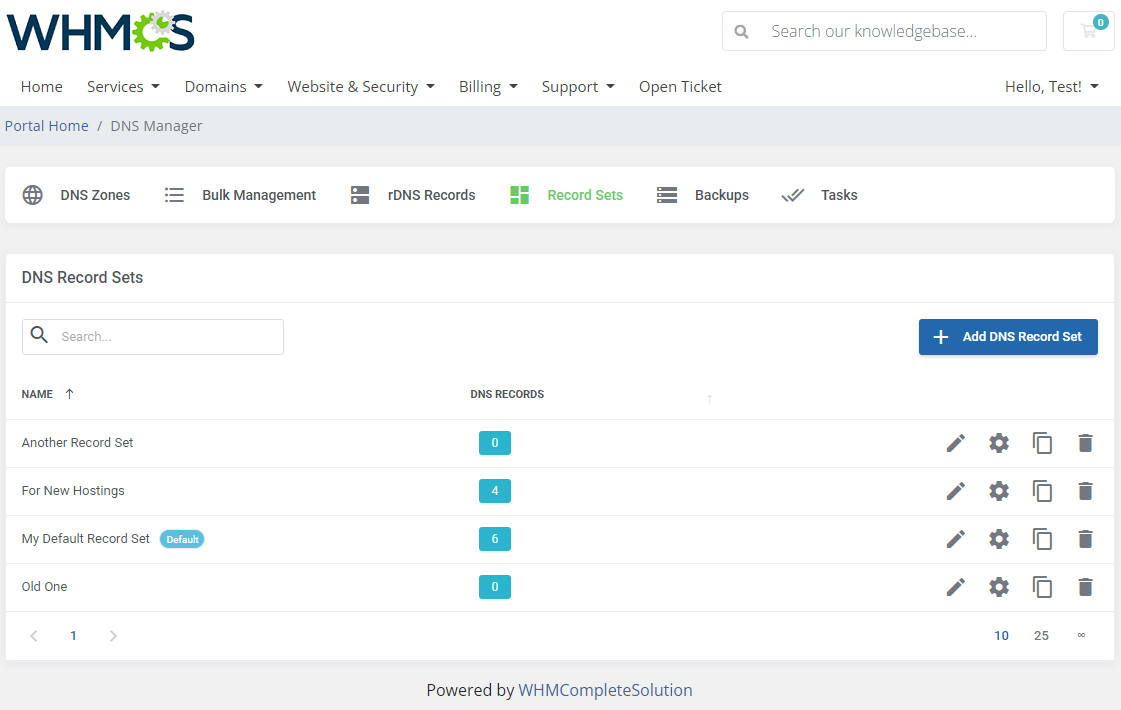
| Your newly created DNS record should appear on the list. You may edit the record set, edit general record set data, duplicate or delete it completely. |
|
Backups
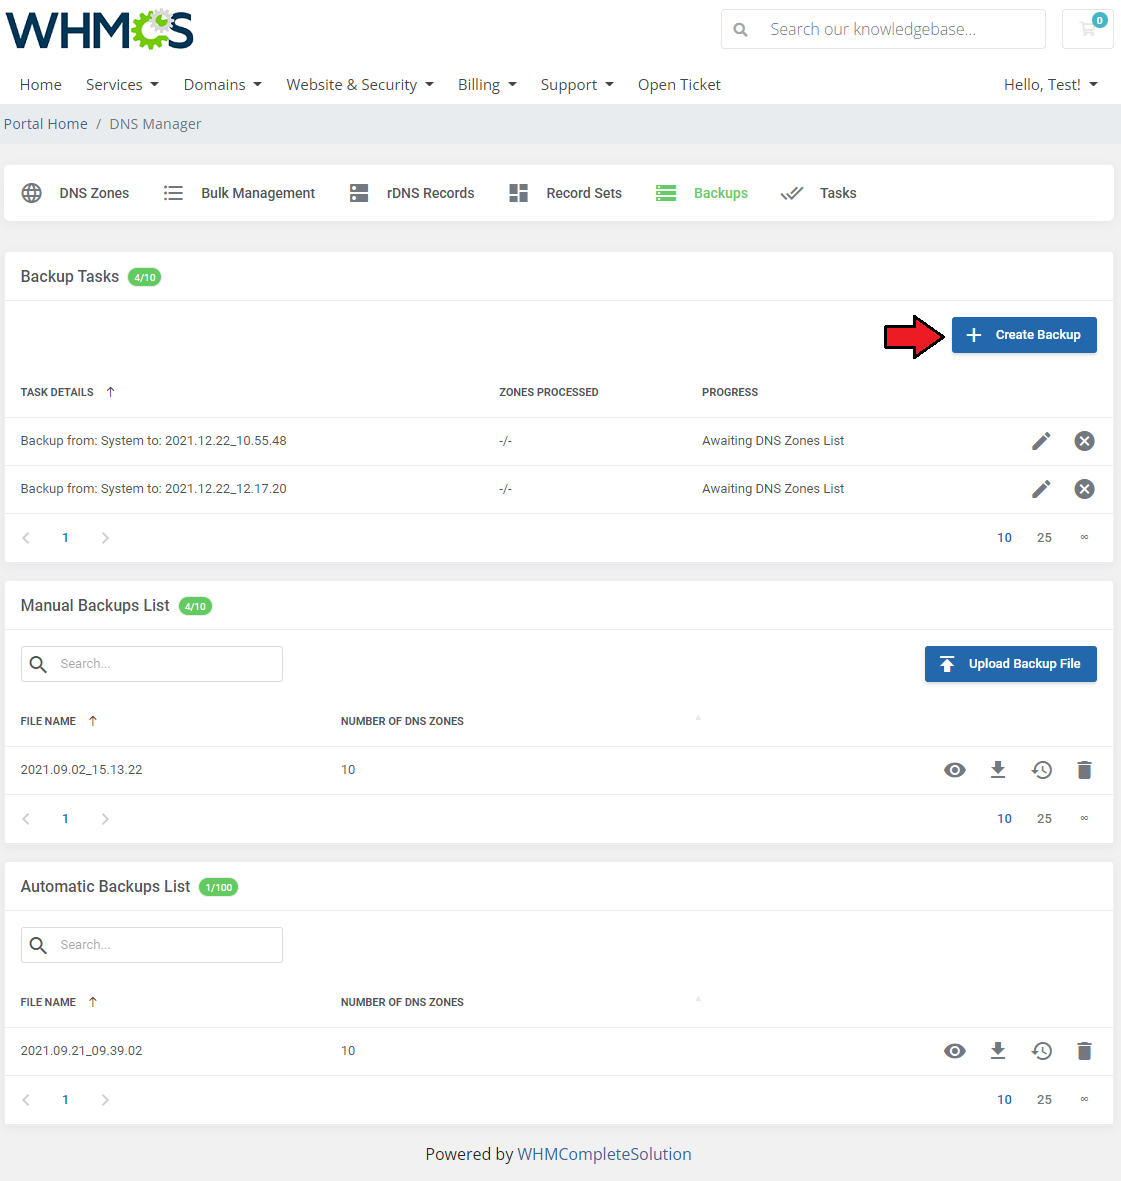
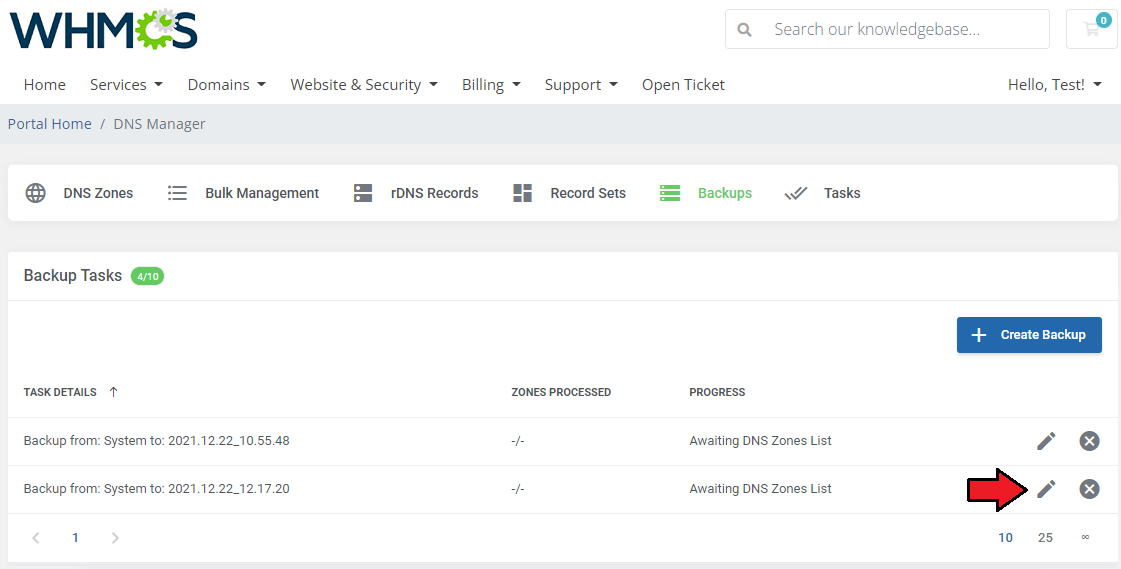
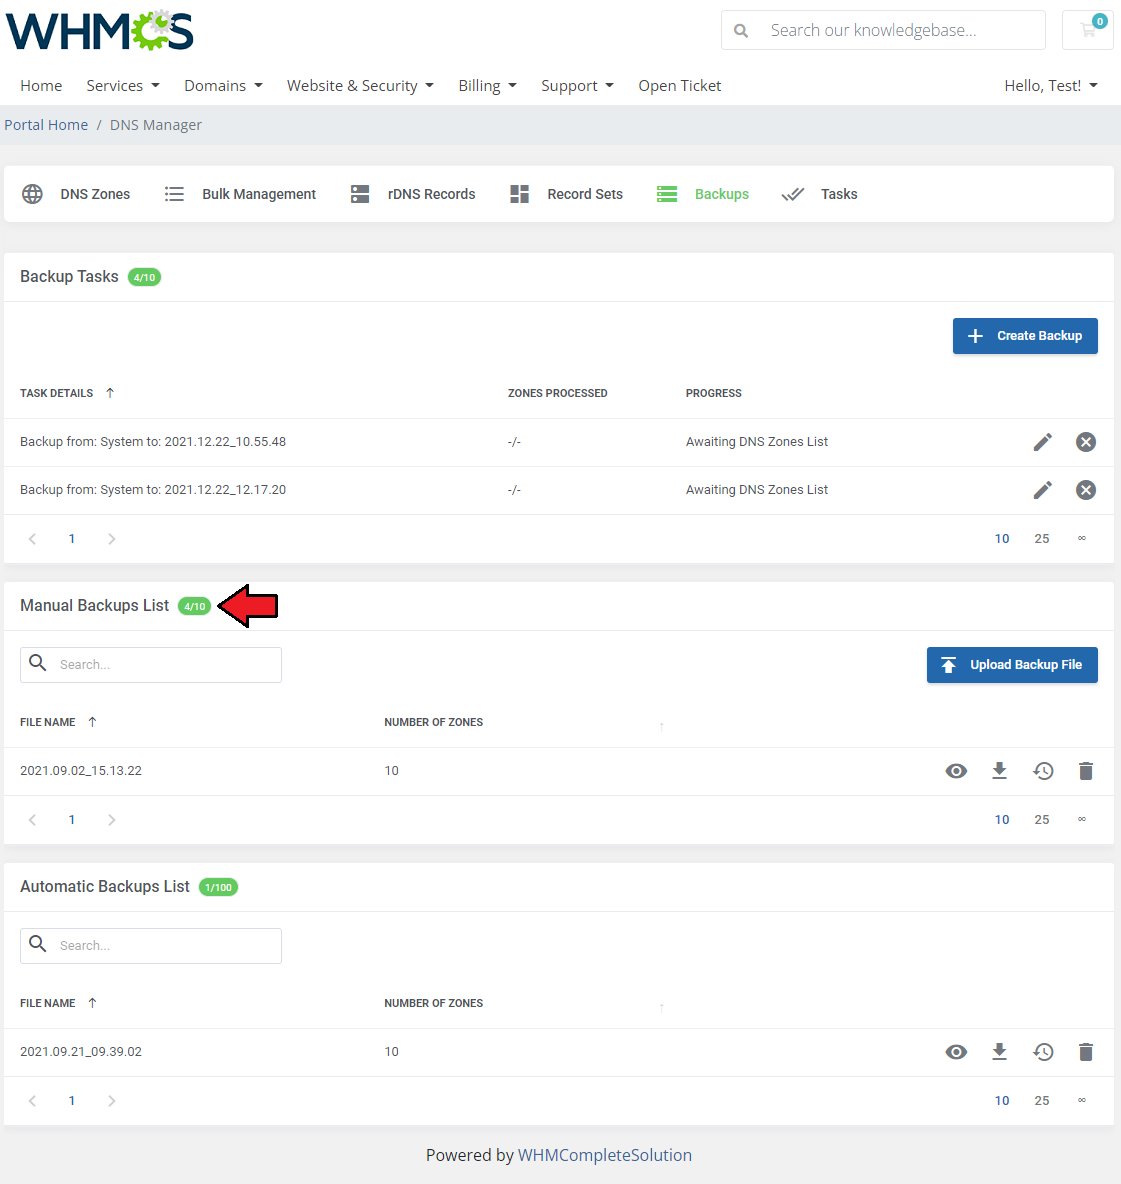
| Backup Tasks You can manage fully your zones backups. Move to the mentioned section to see any options. |
|
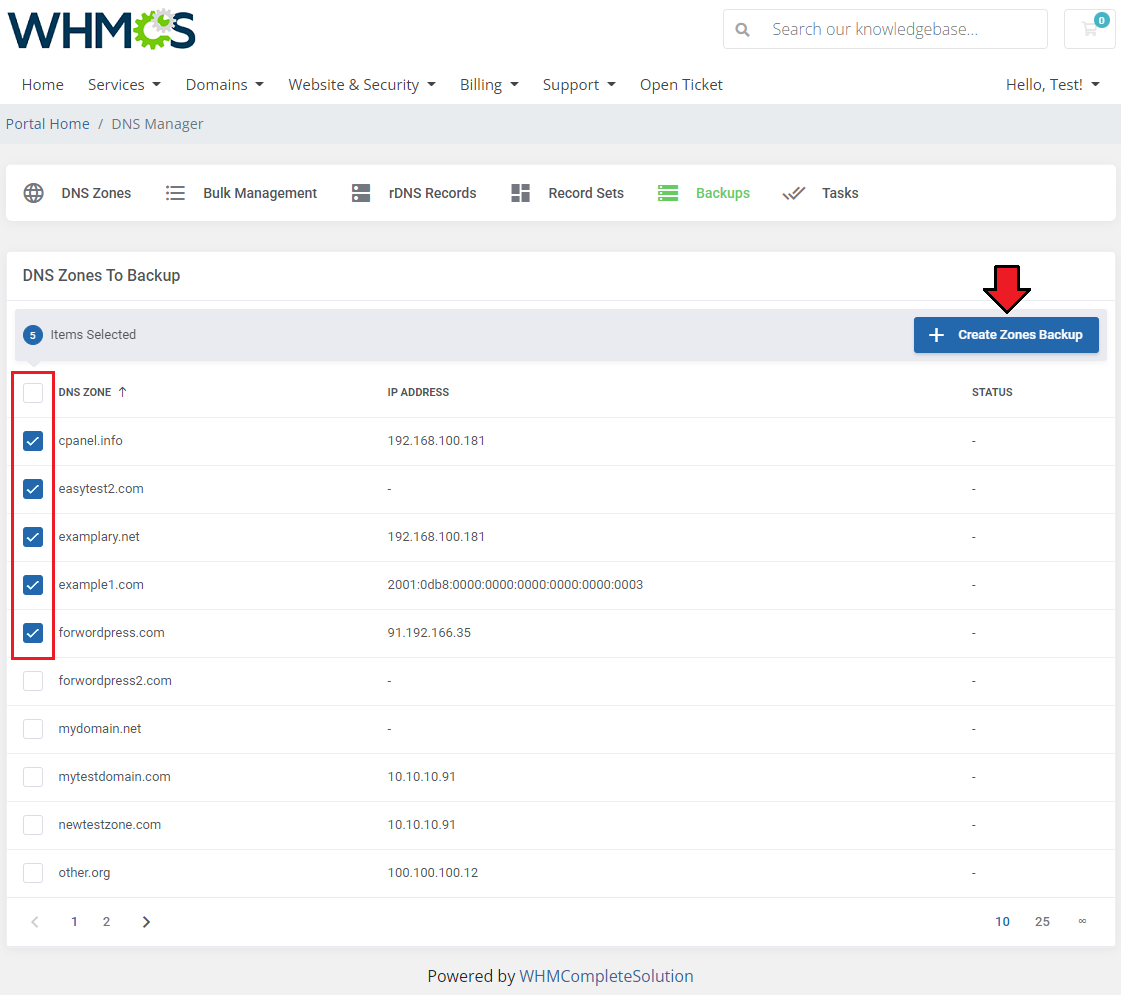
| A new task is added immediately. Now, all you need to do is edit the added backup task and there select the zones from available that will be processed and stored in a backup file. Press the 'Create Zones Backup' button when ready. |
|
|
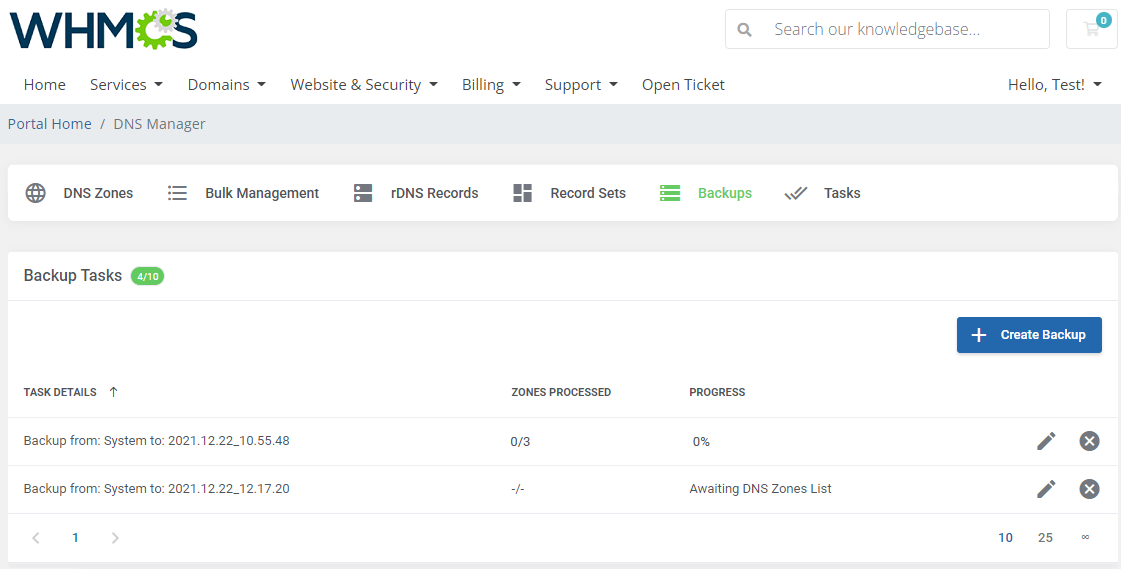
| The just added task to back up the zones is now visible on the list of all tasks. There are also information on the task progress and number of zones already processed. To see details, press 'Show List' button. |
|
| Manual Backups List Here you will find a list of all files with a number of backed up zones. In order to upload a ready backup file, simply press the 'Upload File' button. |

|
| Select the file from your store, keep in mind that only the previously downloaded backup files can be used. Surely, such file can be edited in any editor to adjust the records inside it to your needs, but you must be careful and stick to its form. |

|
| Use the action buttons to start the tasks: 1. - Show Backup File Content |

|
Tasks
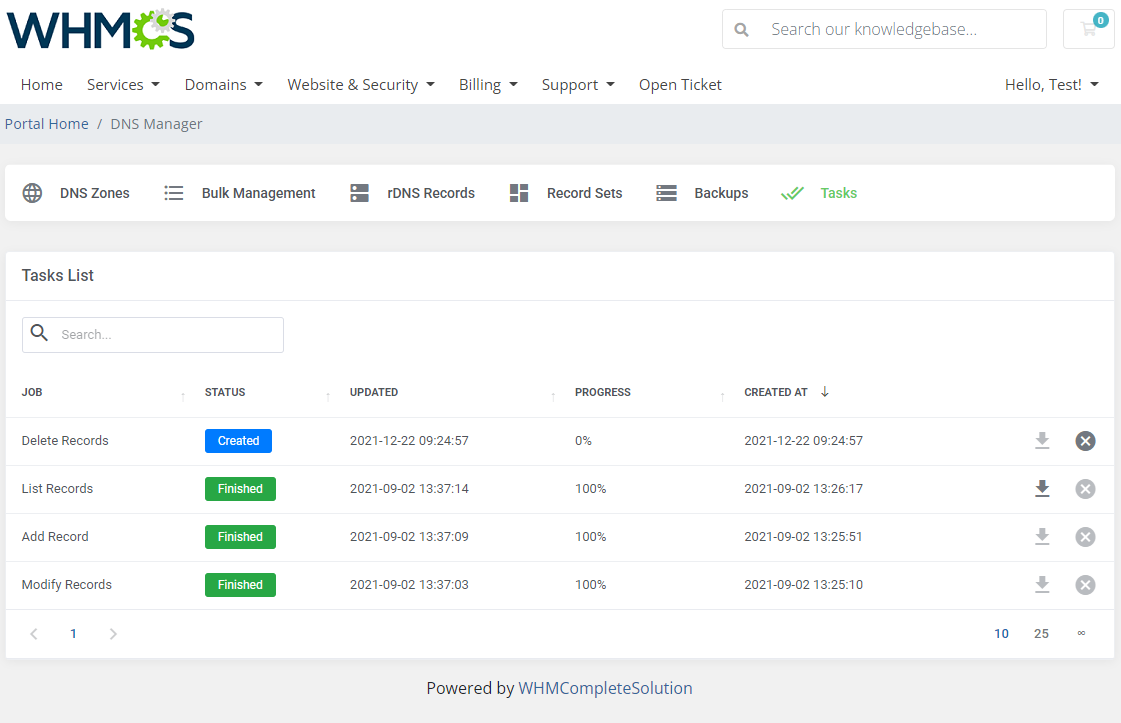
| You will find a list of current tasks in 'Tasks' section. Among all tasks there are import tasks, migration and synchronization tasks. |
|
| According to specifically set-up cron jobs all created tasks are regularly executed. Here, you can see the current status of each task. If it is queuing for the next cron run, is currently executed, aborted or complete. Check when they were executed for the last time (Last Execution) and when the task was added. Available actions: call execution manually and remove the task. |
Zones Management
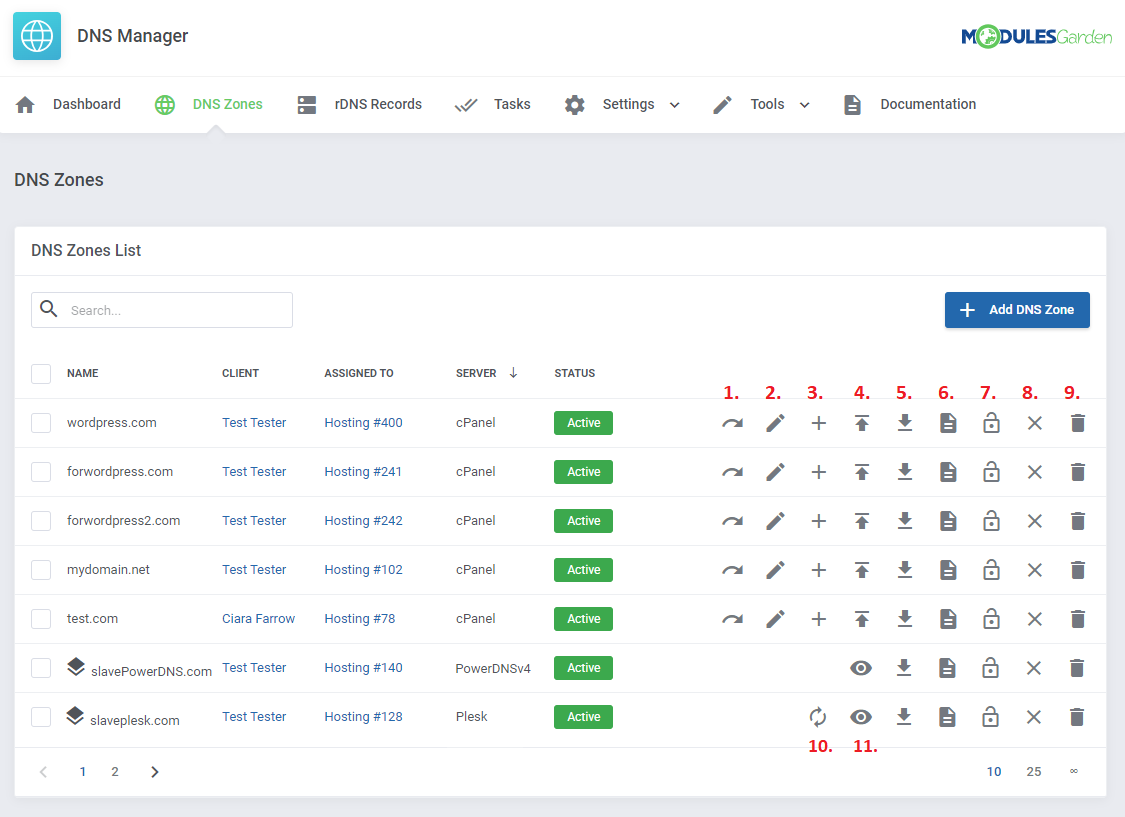
| In the administrator panel, you can spot all your client zones. You are free to preview those already existing. You will see whose zone it is, its type, on which server it is created and its status (created/deleted). |
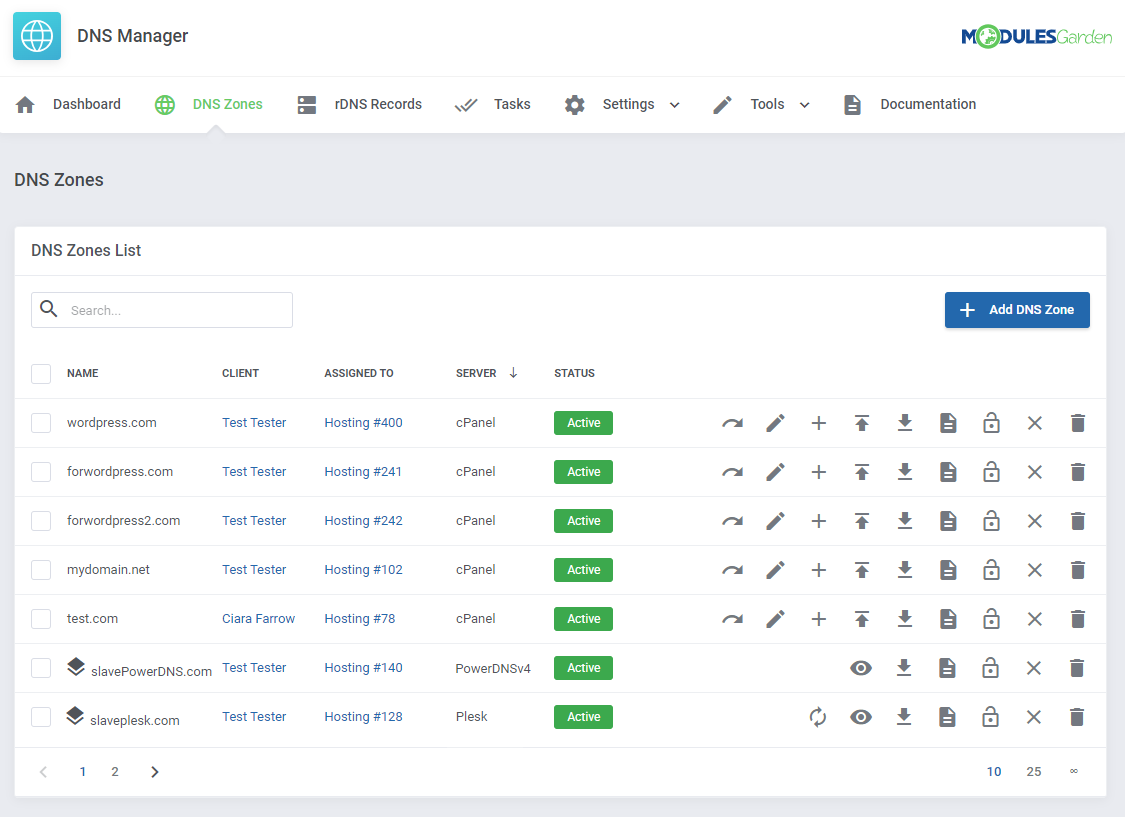
|
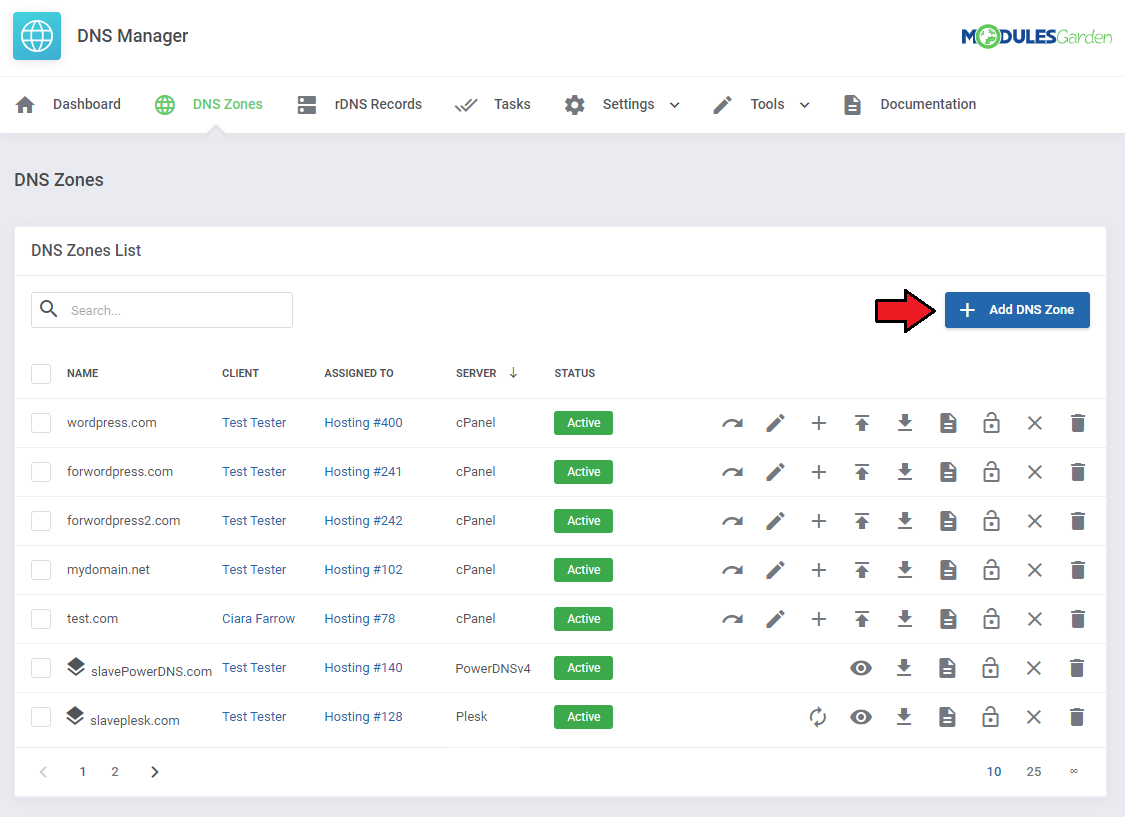
| You can always add a new custom zone directly for your client from your admin area.
To do so, press the button marked on the screen below. |
|
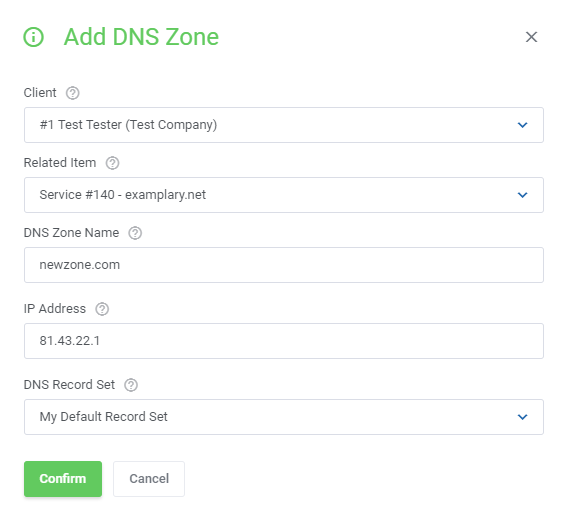
| Now, you are required to fill out the visible fields. |
|
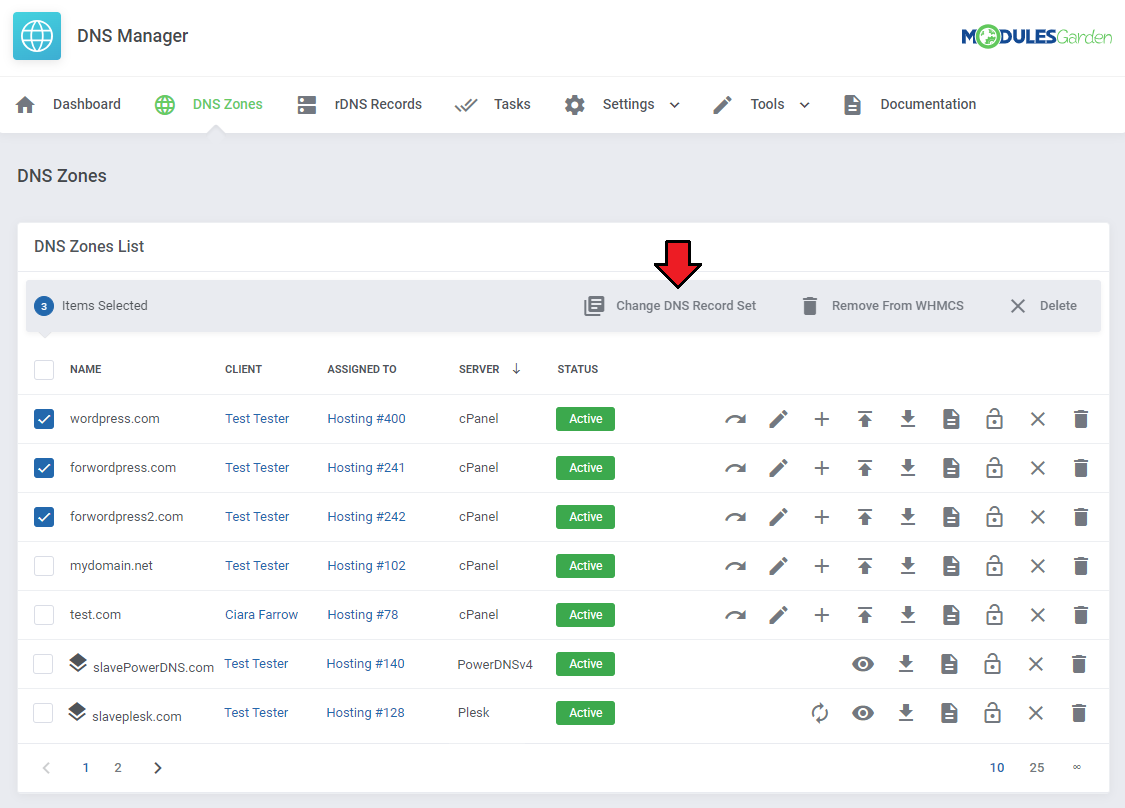
| Note that both the admin and client area allow the user to apply a record set to a single or to multiple zones. |
|
|
Actions on zones from the admin area:
|
|
Additional Tools
Settings
| Remember that if you want to redirect your clients to DNS Management page in V3.0, you must previously configure the dedicated addon settings. Move to Addons → DNS Manager v3 → Settings → General. There you will find cron task that you will need to execute in order to allow bulk actions on zones in the client area to be performed. Furthermore, in order to redirect your client to a brand new client area page of the DNS Manager v3.0, please enable the option to overwrite the client area link. |

|
Global Settings
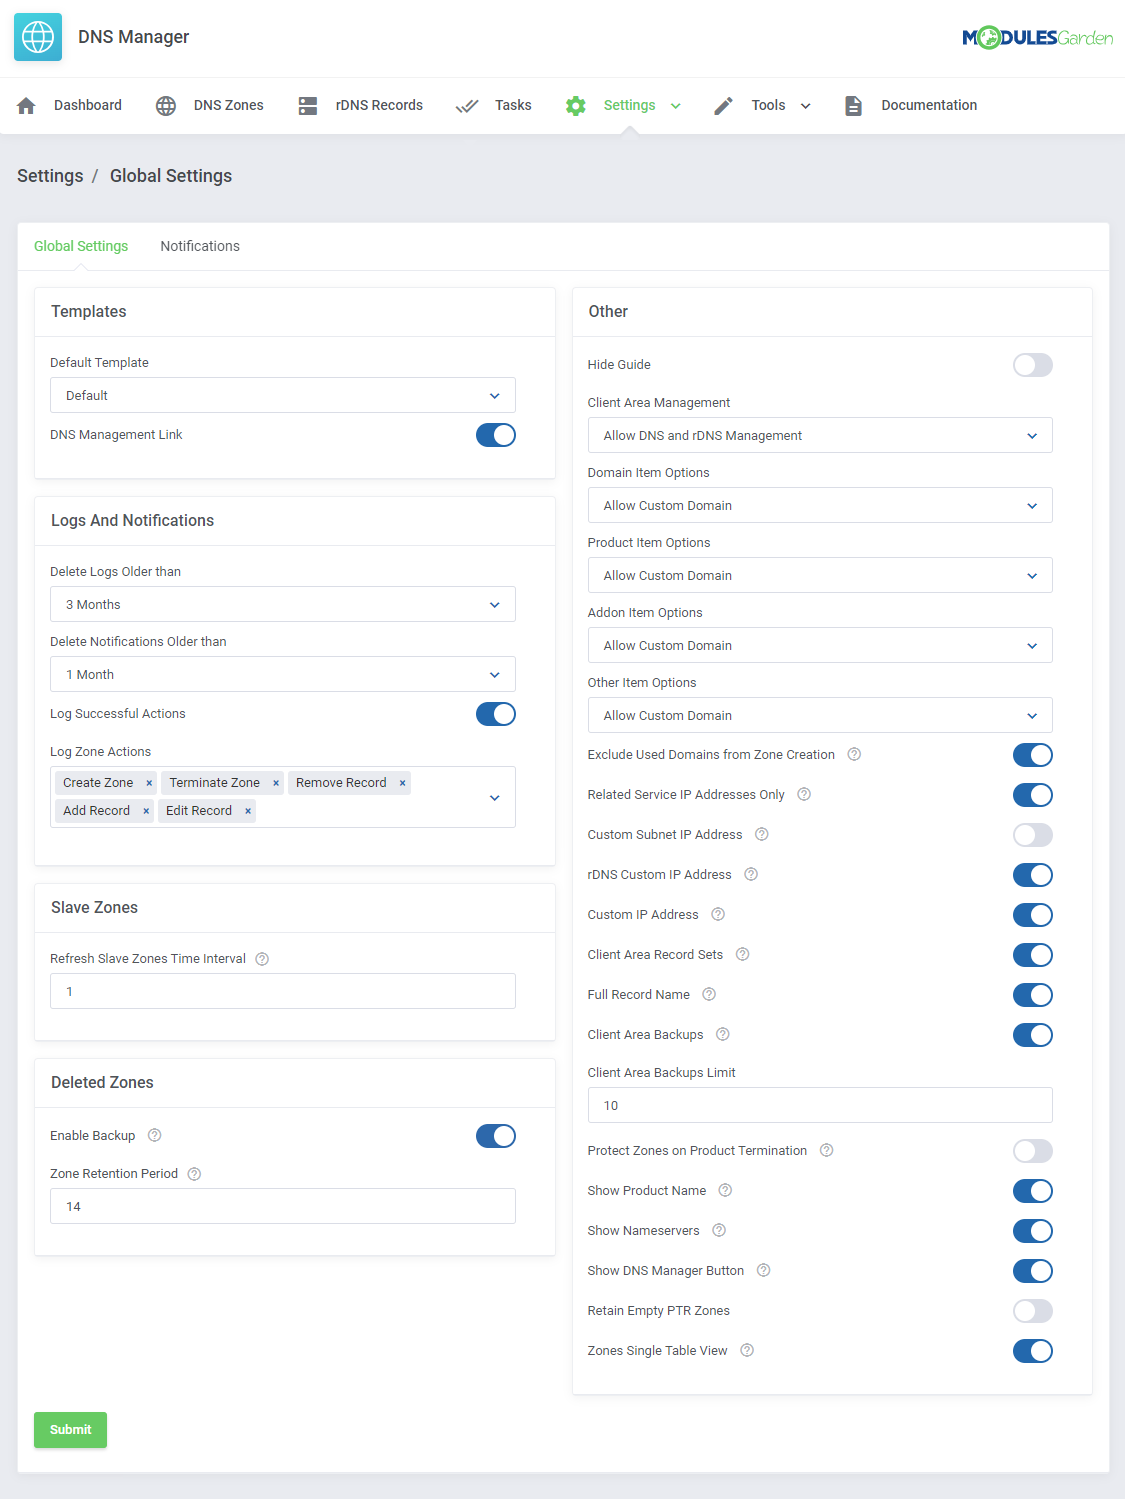
| This section has been designed to allow quick and simple configuration of global settings from one place. |
|
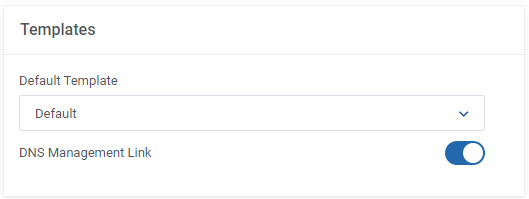
Templates
| Choose a default template that will be used in the client area. If you have more than one template then you may allow your clients switch between them. |
|
Logs And Notifications
| In this part you may impose when log entries and notifications should be removed from the system database. If you wish you may also check the 'Log Successful Actions' option to store all entries in logs (DNS Manager → Settings → Logs). 'Log Zone Actions' - select single actions on zones, logs on them will be stored in the module as well. |
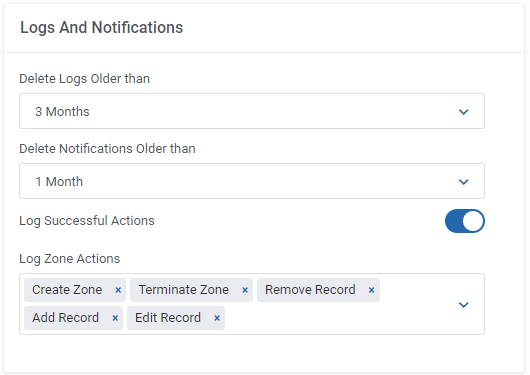
|
Other
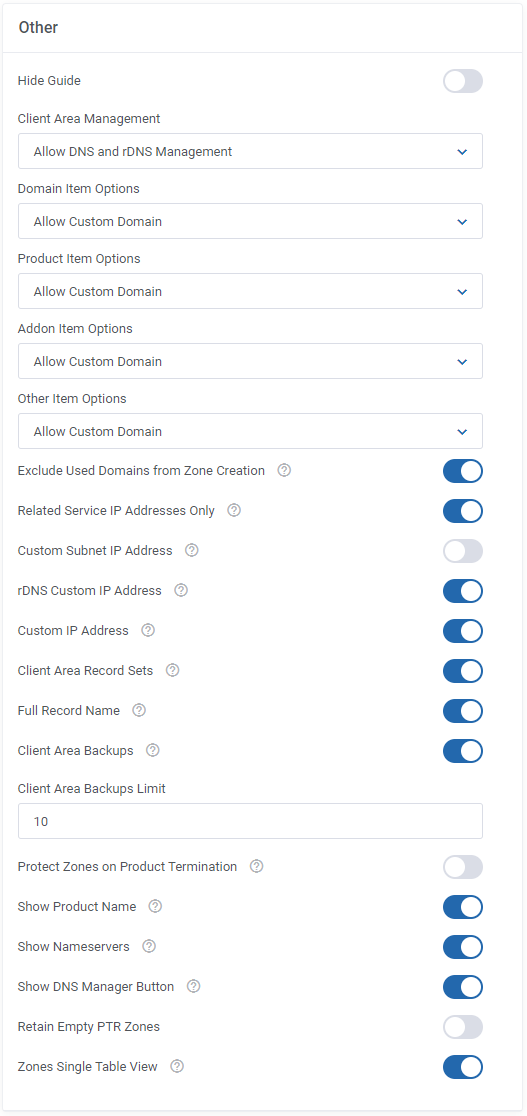
| The box with 'Other' options available is a crucial part of configuration where you can manage IP Manager For WHMCS IP Manager For WHMCS integration module and manage PTR records creation. Besides, here you can switch off the guide with simple instructions visible on dashboard. |
|
1. Client Area Management - depending on the configuration, the client has access to:
|
2. Domain/Product/Addon/Other Item Options - restrict clients to manually create zones using the indicated domains only.
|
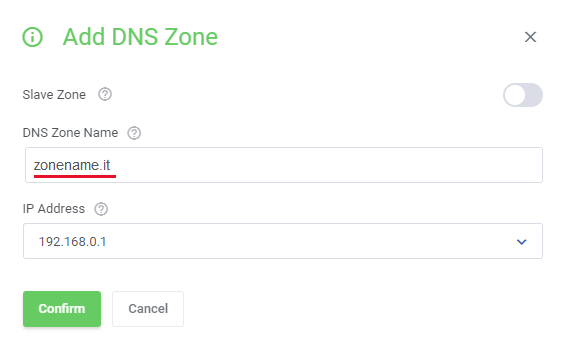
|
| 3. Exclude Used Zones From Zone Cration - select to exclude the already used domains from the possibility to be used again in a newly added zone |
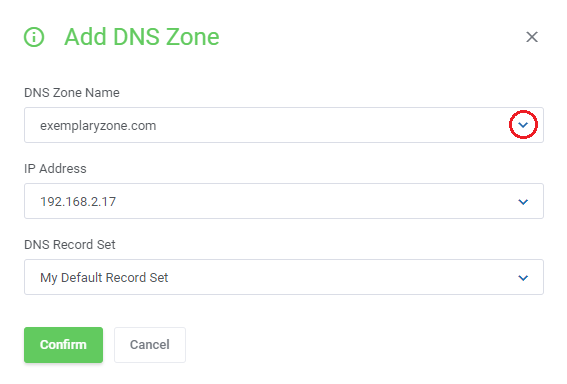
|
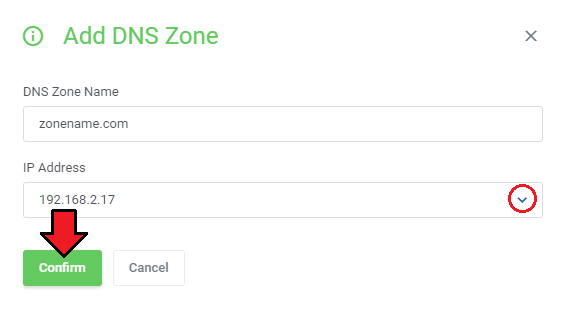
| 4. Related Service IP Addresses Only - create zones and PTR records with a related IP address only. When adding a new zone/PTR record you can choose from available hosting related IP addresses only as marked on the screen below. |
|
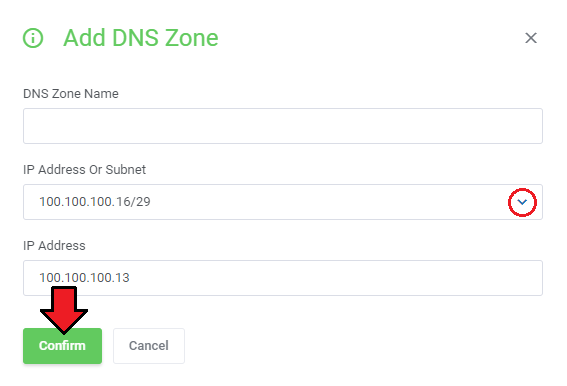
| 5. Custom Subnet IP Address - create zones and PTR records with an IP address included in a subnet related to the product. Note: This option works only if you have integrated your DNS Manager with IP Manager For WHMCS. |
|
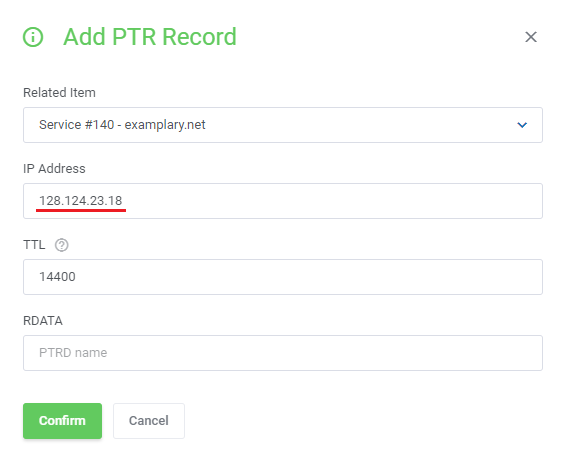
| 5. rDNS Custom IP Address - create PTR records with a custom IP, enter a new IP address to create a new PTR. Note: Both IPv4 and IPv6 are supported by DNS Manager For WHMCS. |
|
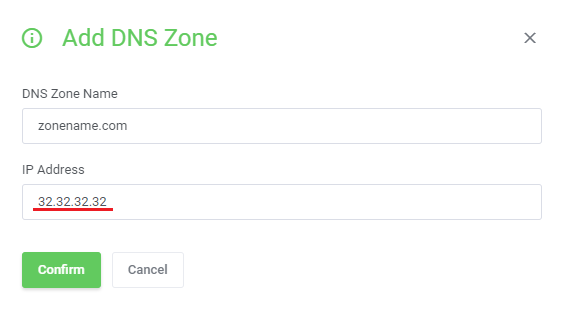
| 6. Custom IP Address - create zones with a custom IP address. If you have no IP addresses to choose from, you have to enter a new IP address. Note: Both IPv4 and IPv6 are supported by DNS Manager For WHMCS. |
|
| 7. Client Area Record Sets - clients may manage DNS records sets. |
|
| 8. Client Area Backups and Client Area Backups Limit - clients are given the option to create backups of their zones and upload backup files. It is advised to set a limit on the number of allowed backups. Default '-1' indicates unlimited |
|
| 9. Protect Zones On Product Termination - zones are not automatically deleted once the product has been terminated. |
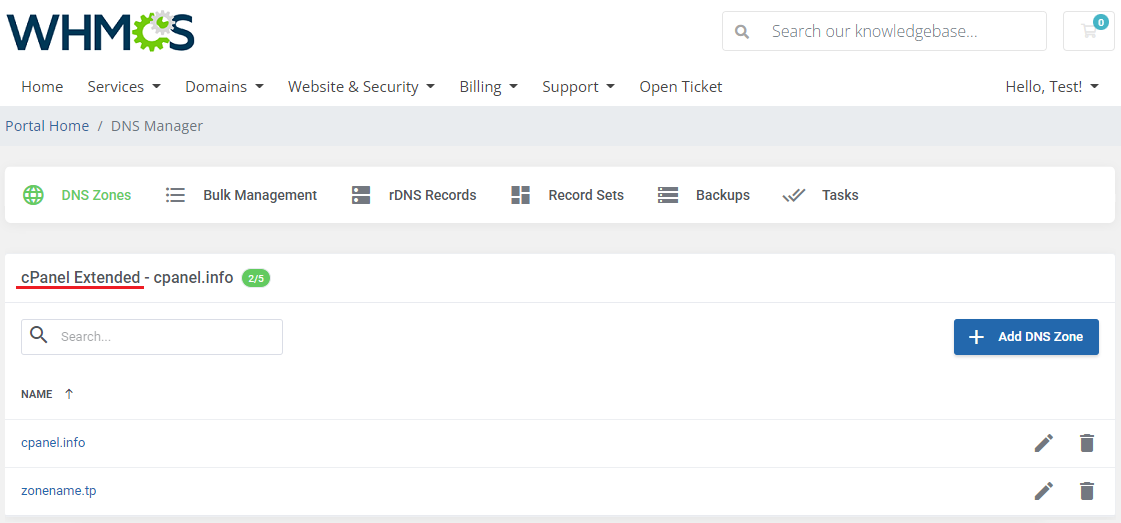
| 10. Show Product Name - a full product name is shown, instead of the general type with an order number. |
|
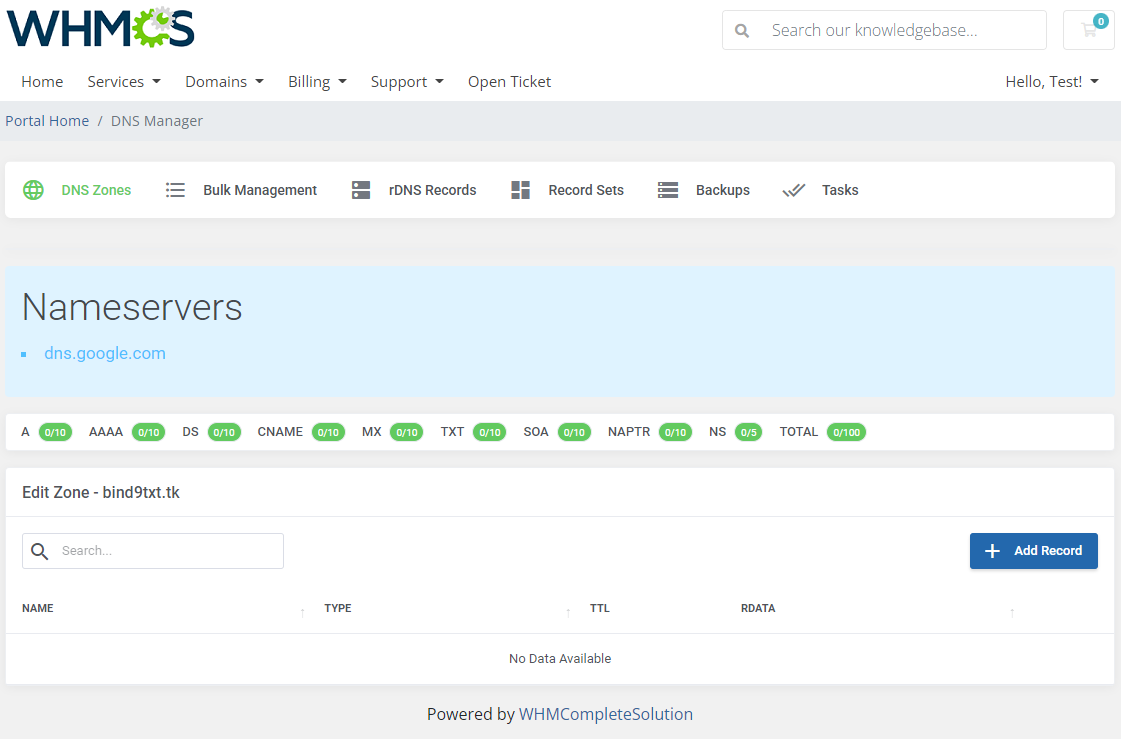
| 11. Show Nameservers - submodule nameservers will be displayed in the 'Edit Zone' section of the client area. |
|
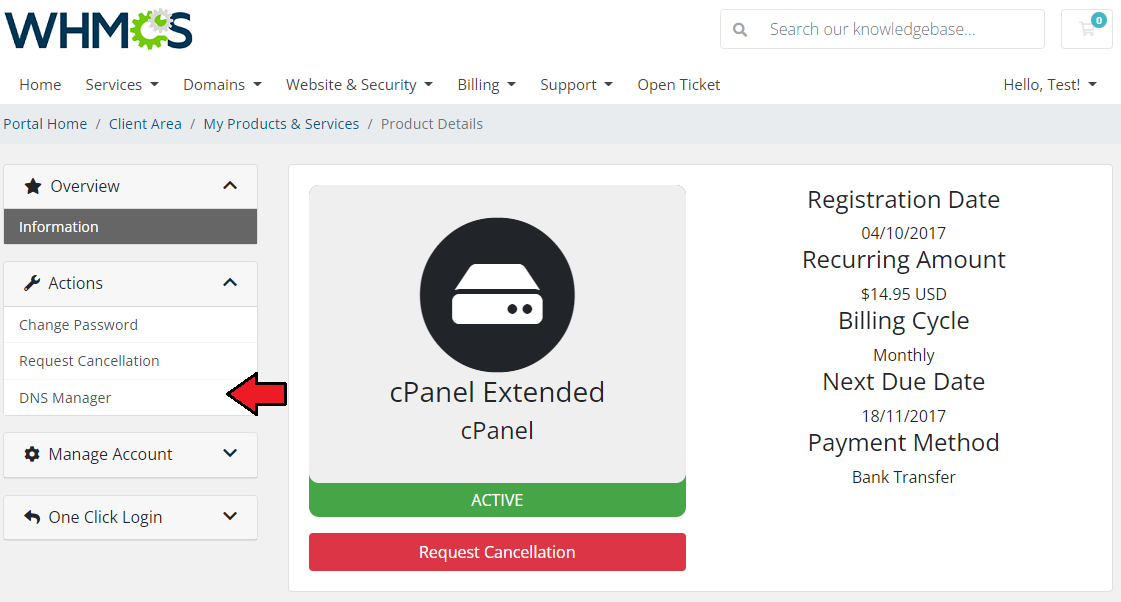
| 12. Show DNS Manager Button - the 'DNS Manager' button will show up in the sidebar section of products which have zones created. Thanks to this button you can easily move to the 'Edit Zone' section. |
|
Notifications
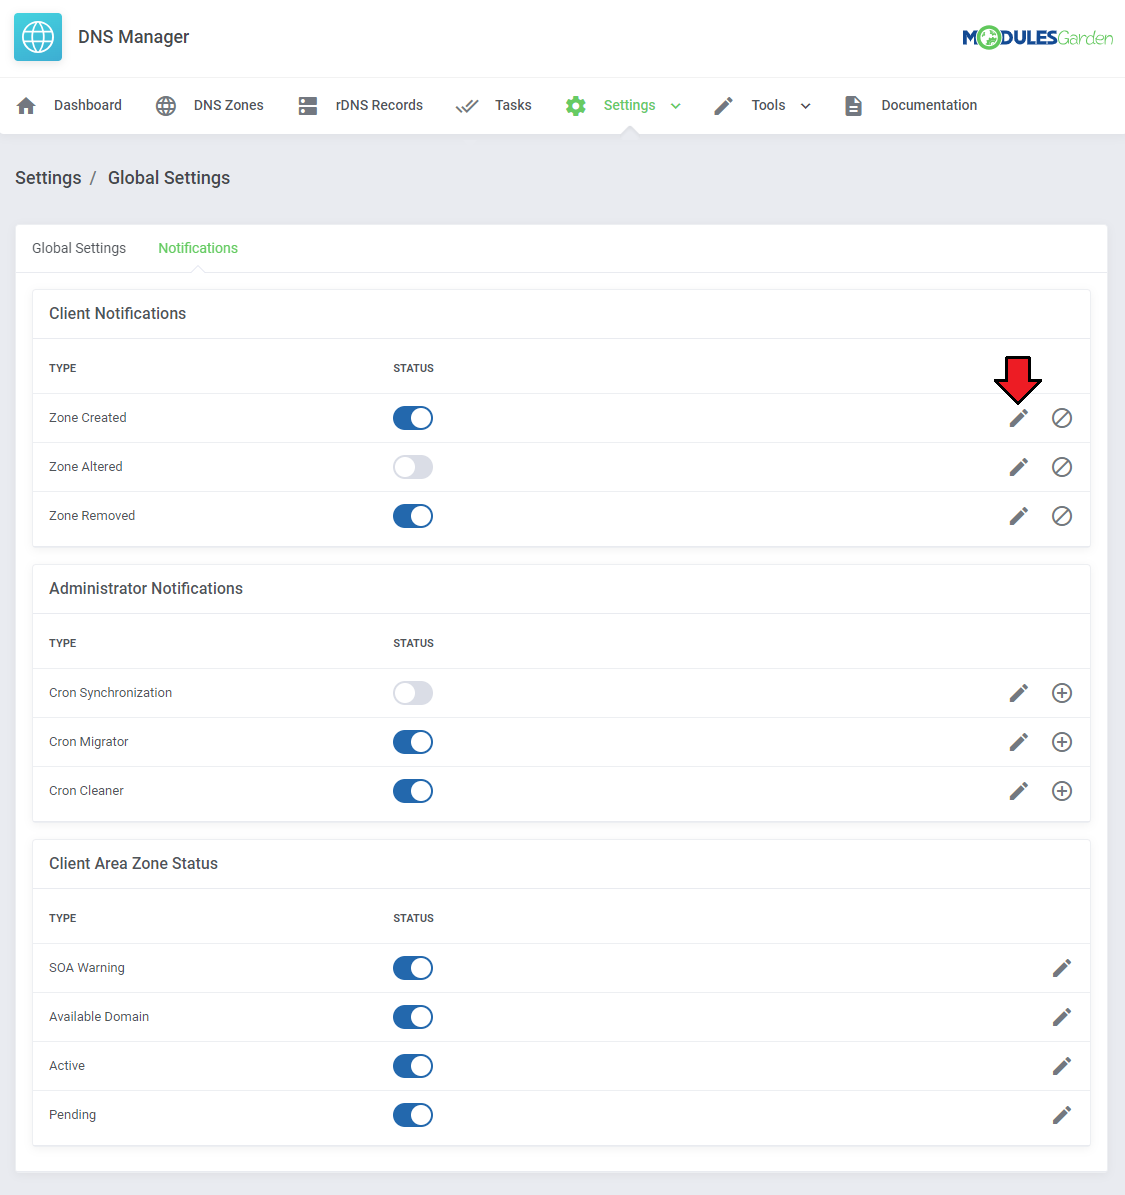
| In this part, set which notification should be sent to clients and which to the administrator. Select the ones that interest you. Press 'Modify' and you will be quickly redirected to the email template page where you can adjust it to your needs. |
|
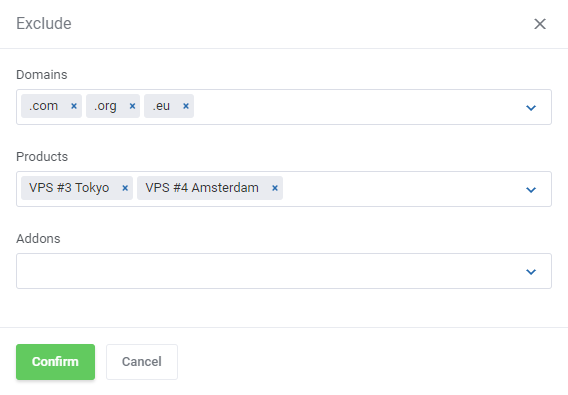
| Use the 'Exclude' button to specify domains, products and addons that the zones assigned to them will NOT be included in notifications. |
|
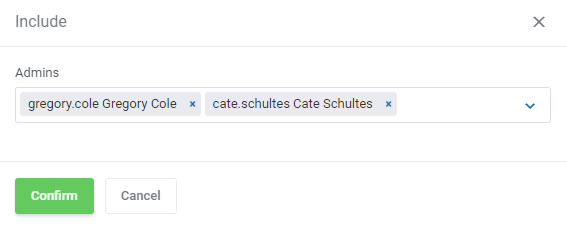
| Use the 'Include' button to specify which admin users will receive notifications. |
|
Client Area Zones Status
| Checking the selected boxes will result in an additional status concerning a given domain in the client area. |
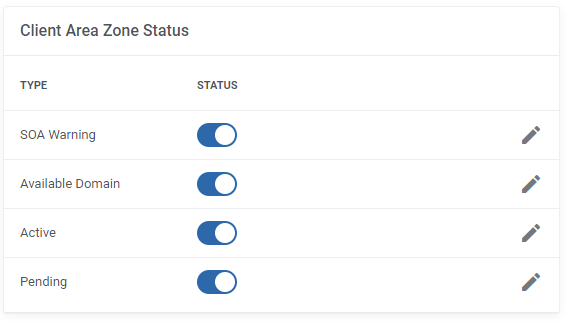
|
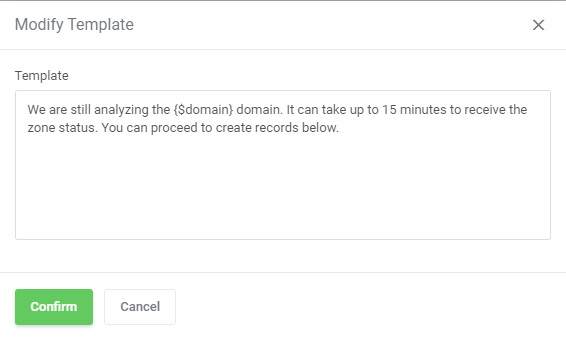
| Pressing the Modify button next to a given option will cause a new window to appear where you can set up your own custom status by means of HTML.
Your new description can include the {$domain} variable which will give the domain address back in the status message. |
|
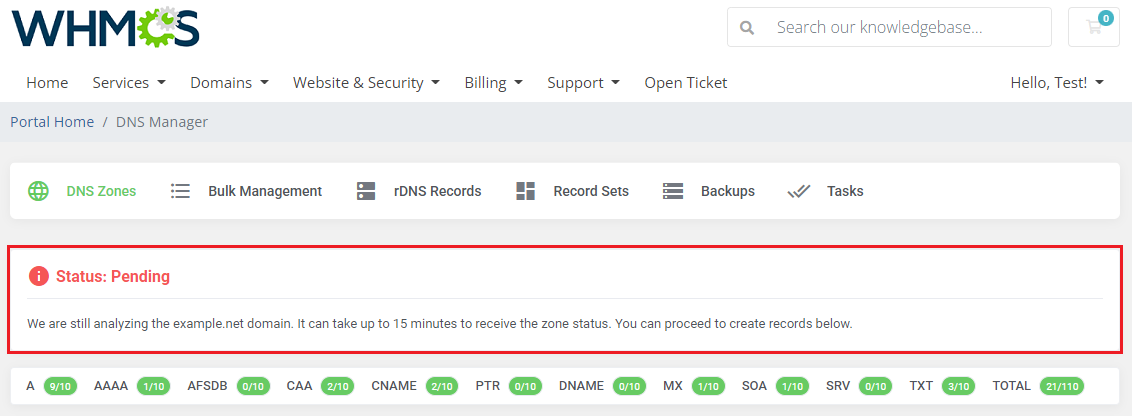
| You can see an example status on the screen below. |
|
DNS Record Sets
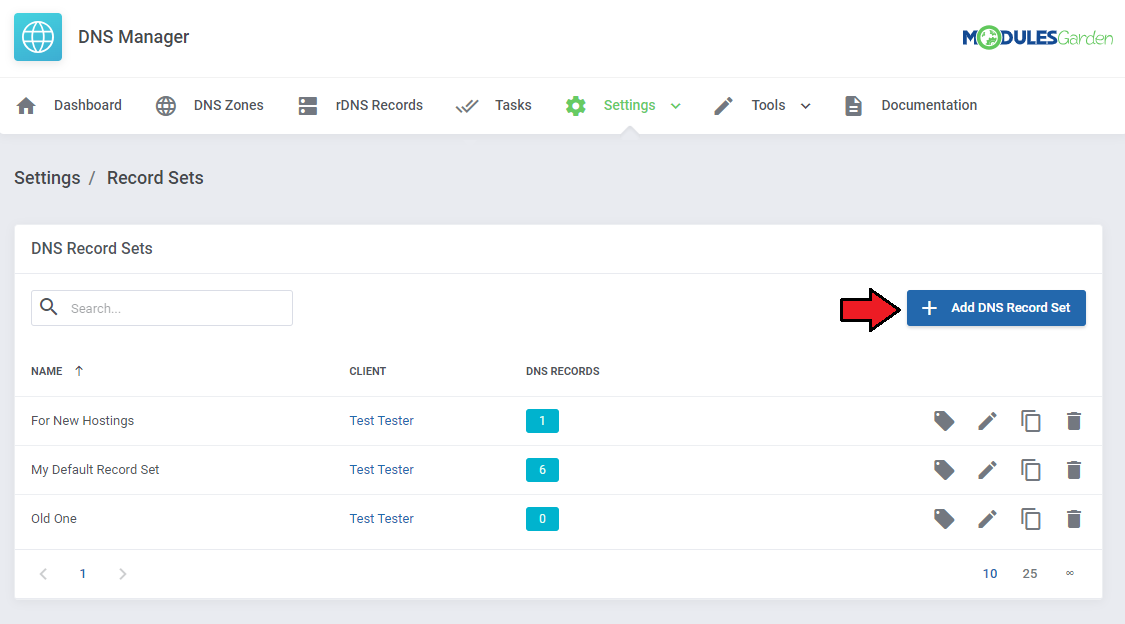
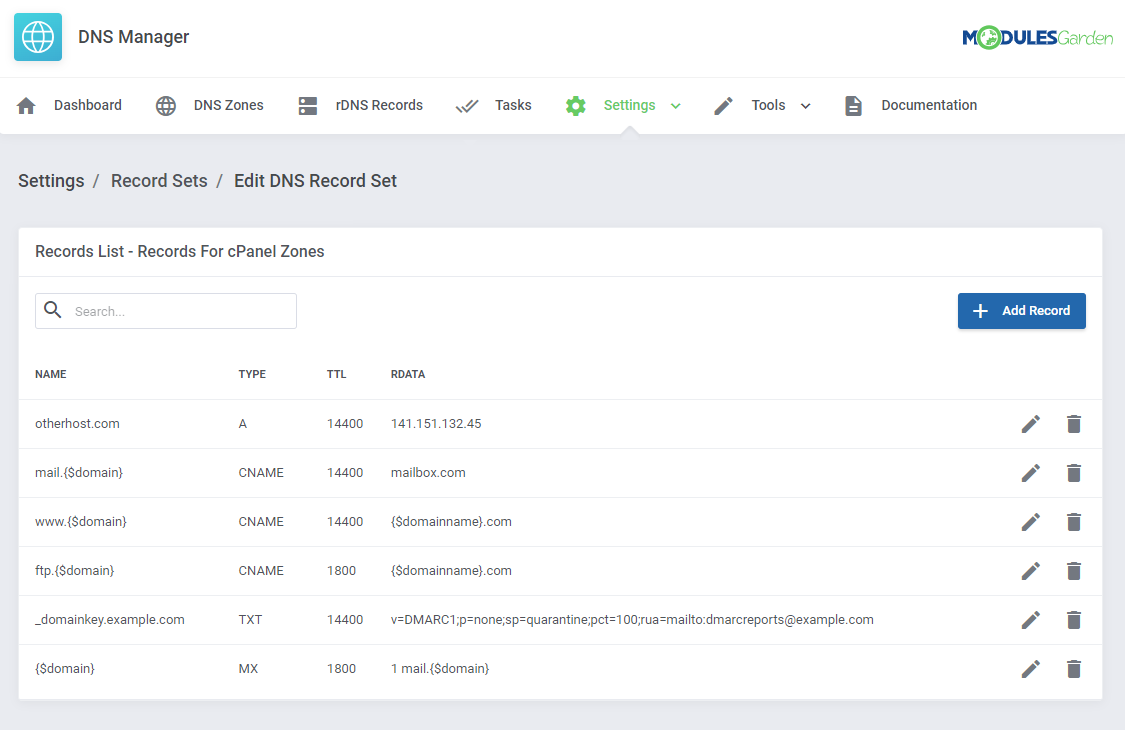
| Create ready made sets of DNS records. You will find them in 'Settings' → 'DNS Records Sets'. Press 'Add Set' to create a new one. |
|
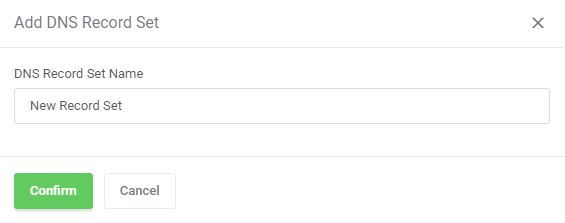
| Enter the newly created set name. |
|
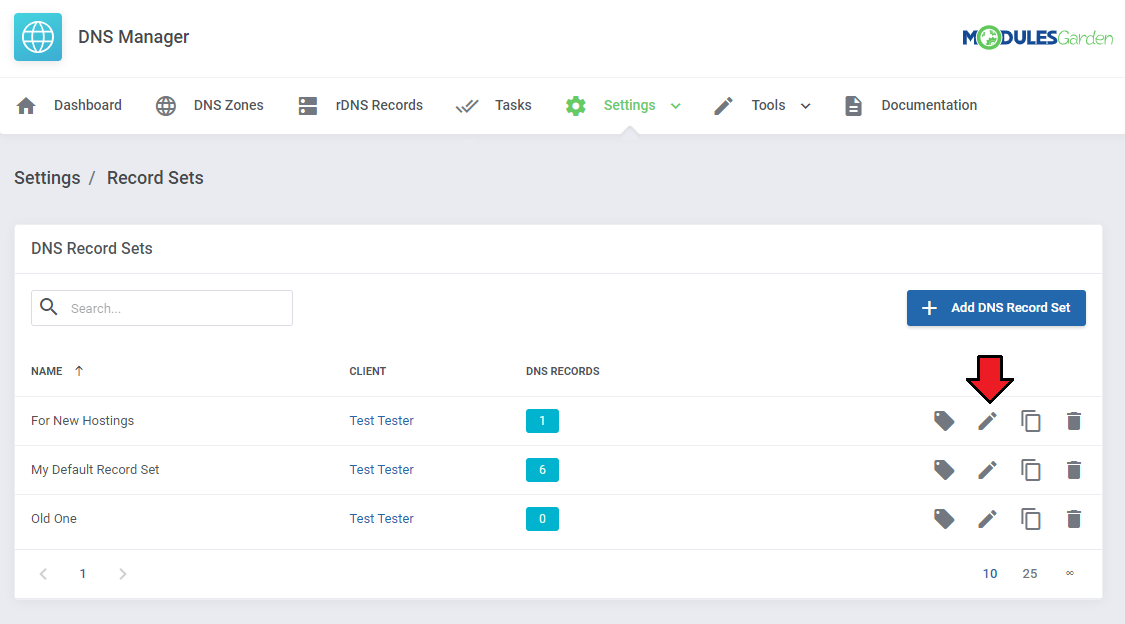
| Once your new set appears on the list, you may edit that set in order to create records. Press 'Edit Record Set' to continue. |
|
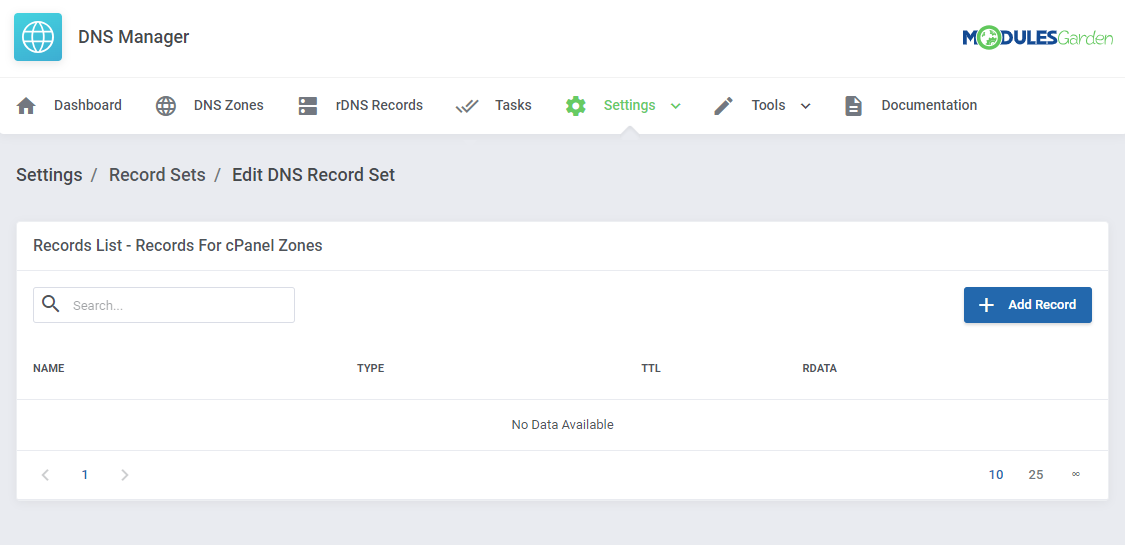
| List of records will appear. Please use the 'Add Record' button to continue. |
|
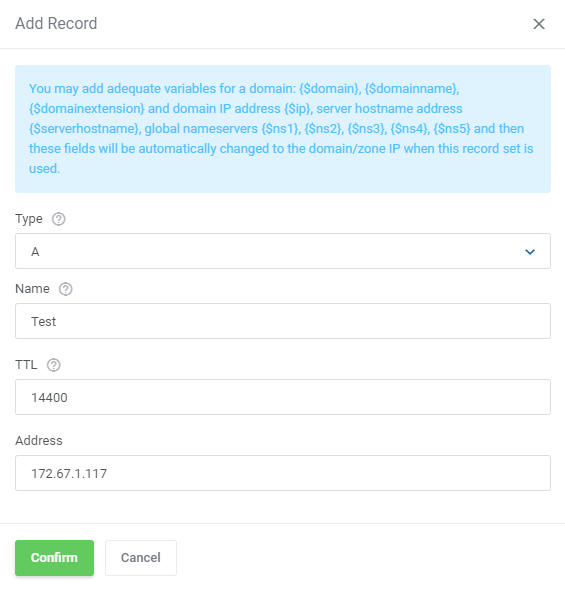
| Now, fill out the data as required. Note: You may add adequate variables for domain and IP address and then these fields will be automatically changed to domain/zone IP when this record set is used.
|
|
| Created DNS Records Sets can be then used while preparing ready packages, as it was described. Ready made sets allow much faster and more personal configuration of packages. There is also the possibility to duplicate the selected DNS Record Sets. |
|
DNS Blocked Strings
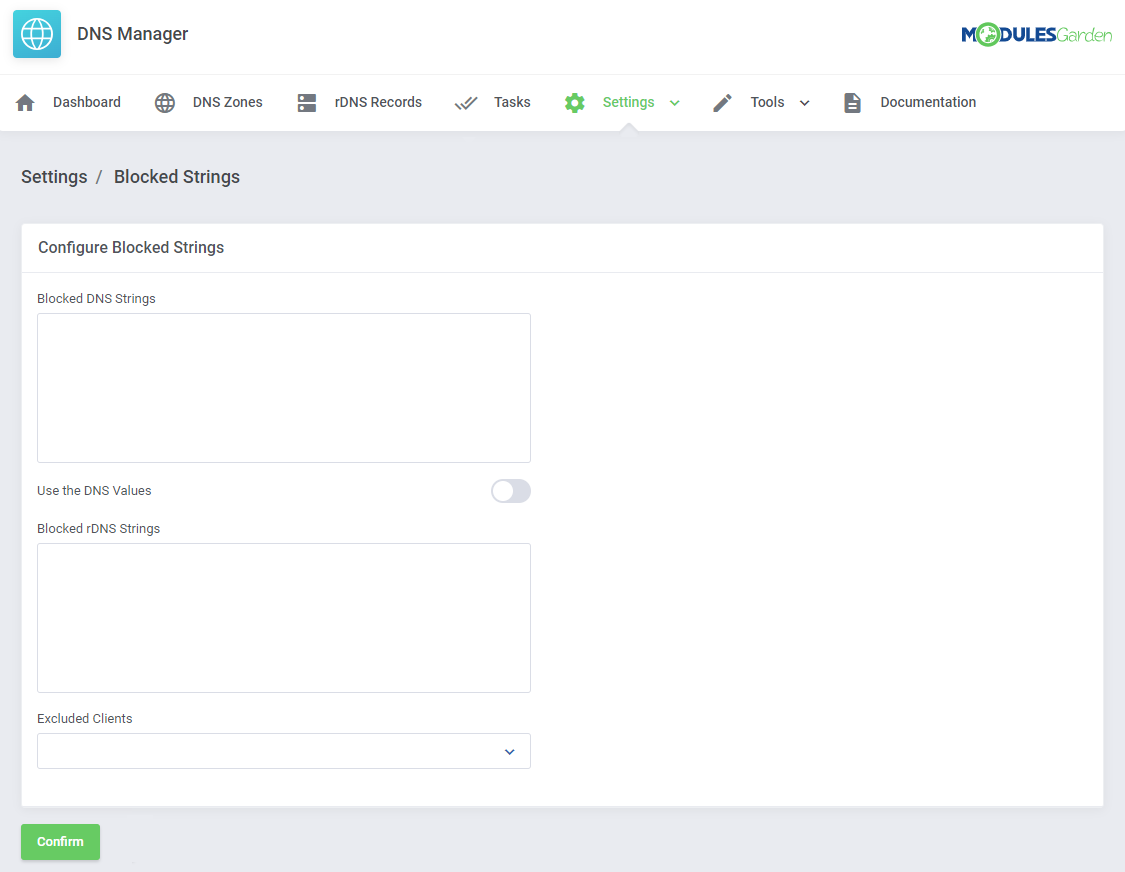
| Proceed to Settings → Blocked Strings now. In this section you may define a lists of words that will not be allowed to be used while creating DNS and rDNS records. |
|
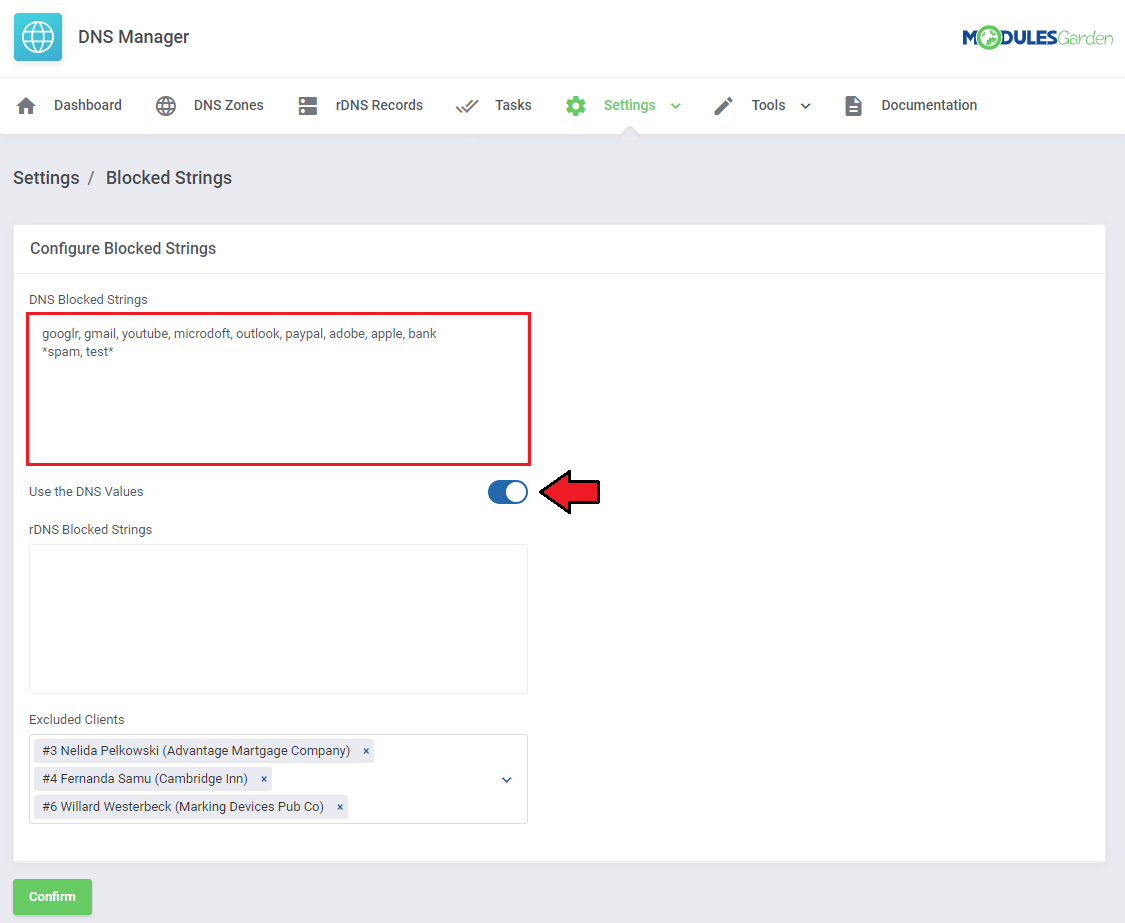
| In order to add certain words, simply type them in the adequate box. Allowed formats:
|
|
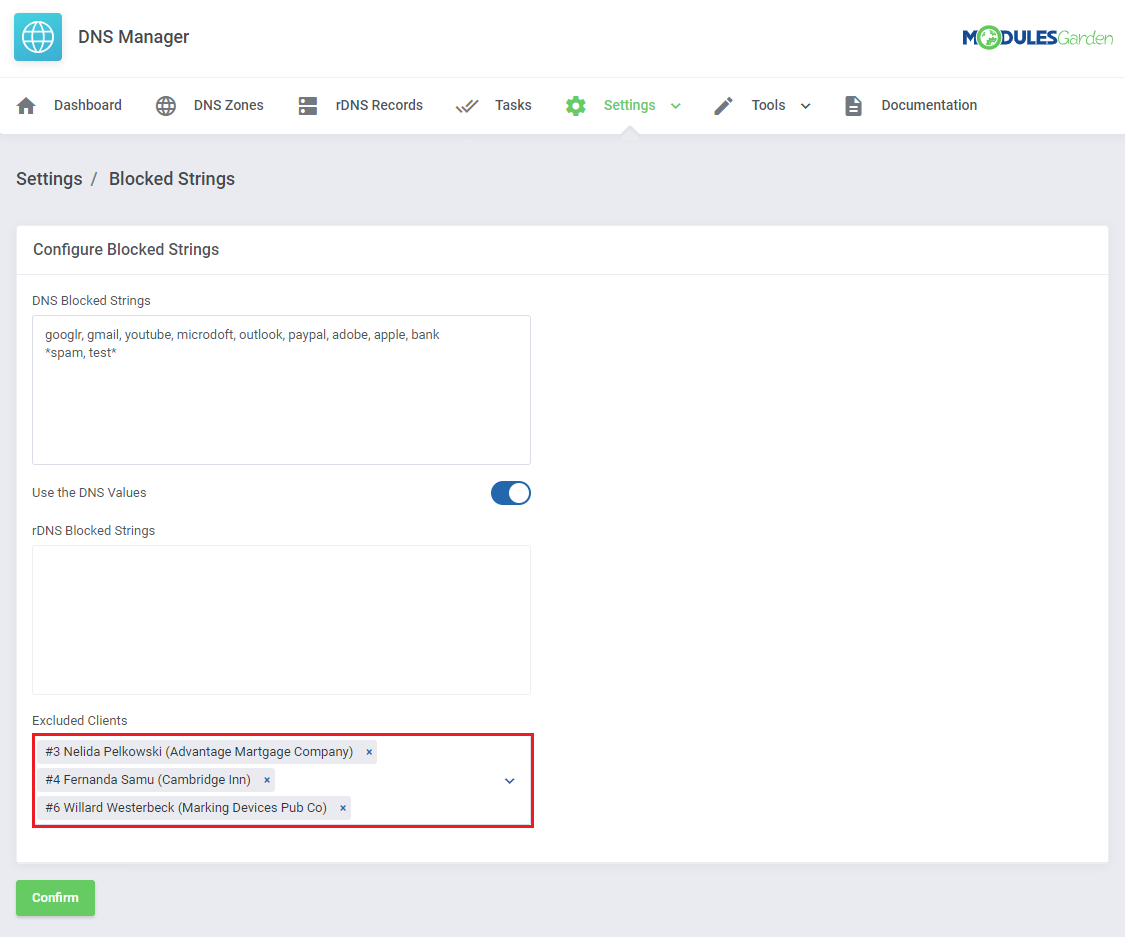
| At the very bottom, you may also create a list of clients who will be excluded from the above restrictions. All the other clients will have to follow the 'Blocked Strings' rule. Remember to save the changes in the end. |
|
| In practice, when a client will be trying to create a record using one of the forbidden words, the action will be blocked. |
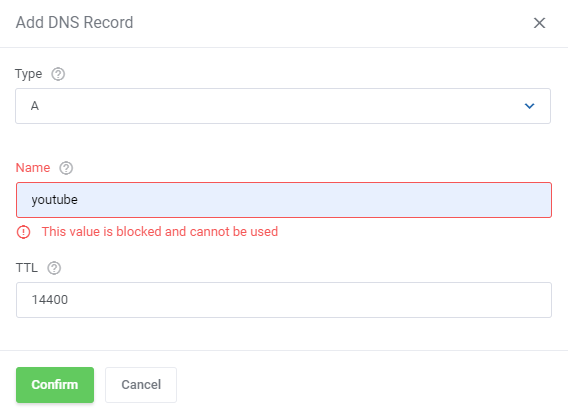
|
DNS Manager Logs
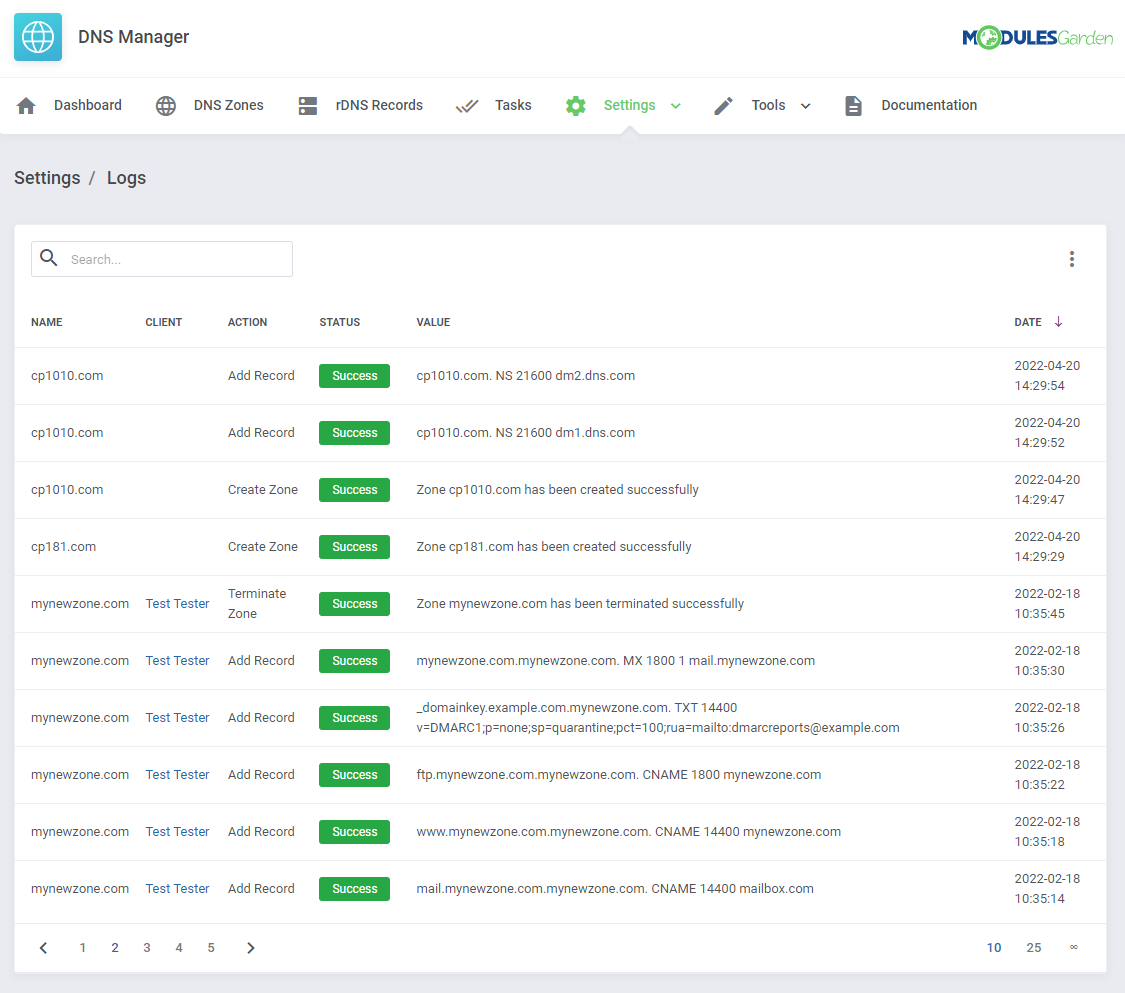
| This section helps you keep track of all the activities carried out in DNS Manager. Find them here: 'Settings' → 'Logs'. |
|
DNS Manager V2 Addon
| To manage the following setting you will have to step back to the DNS Manager v2 addon module for a moment. You will find there teh remaining section desribed below. |
Cron Jobs
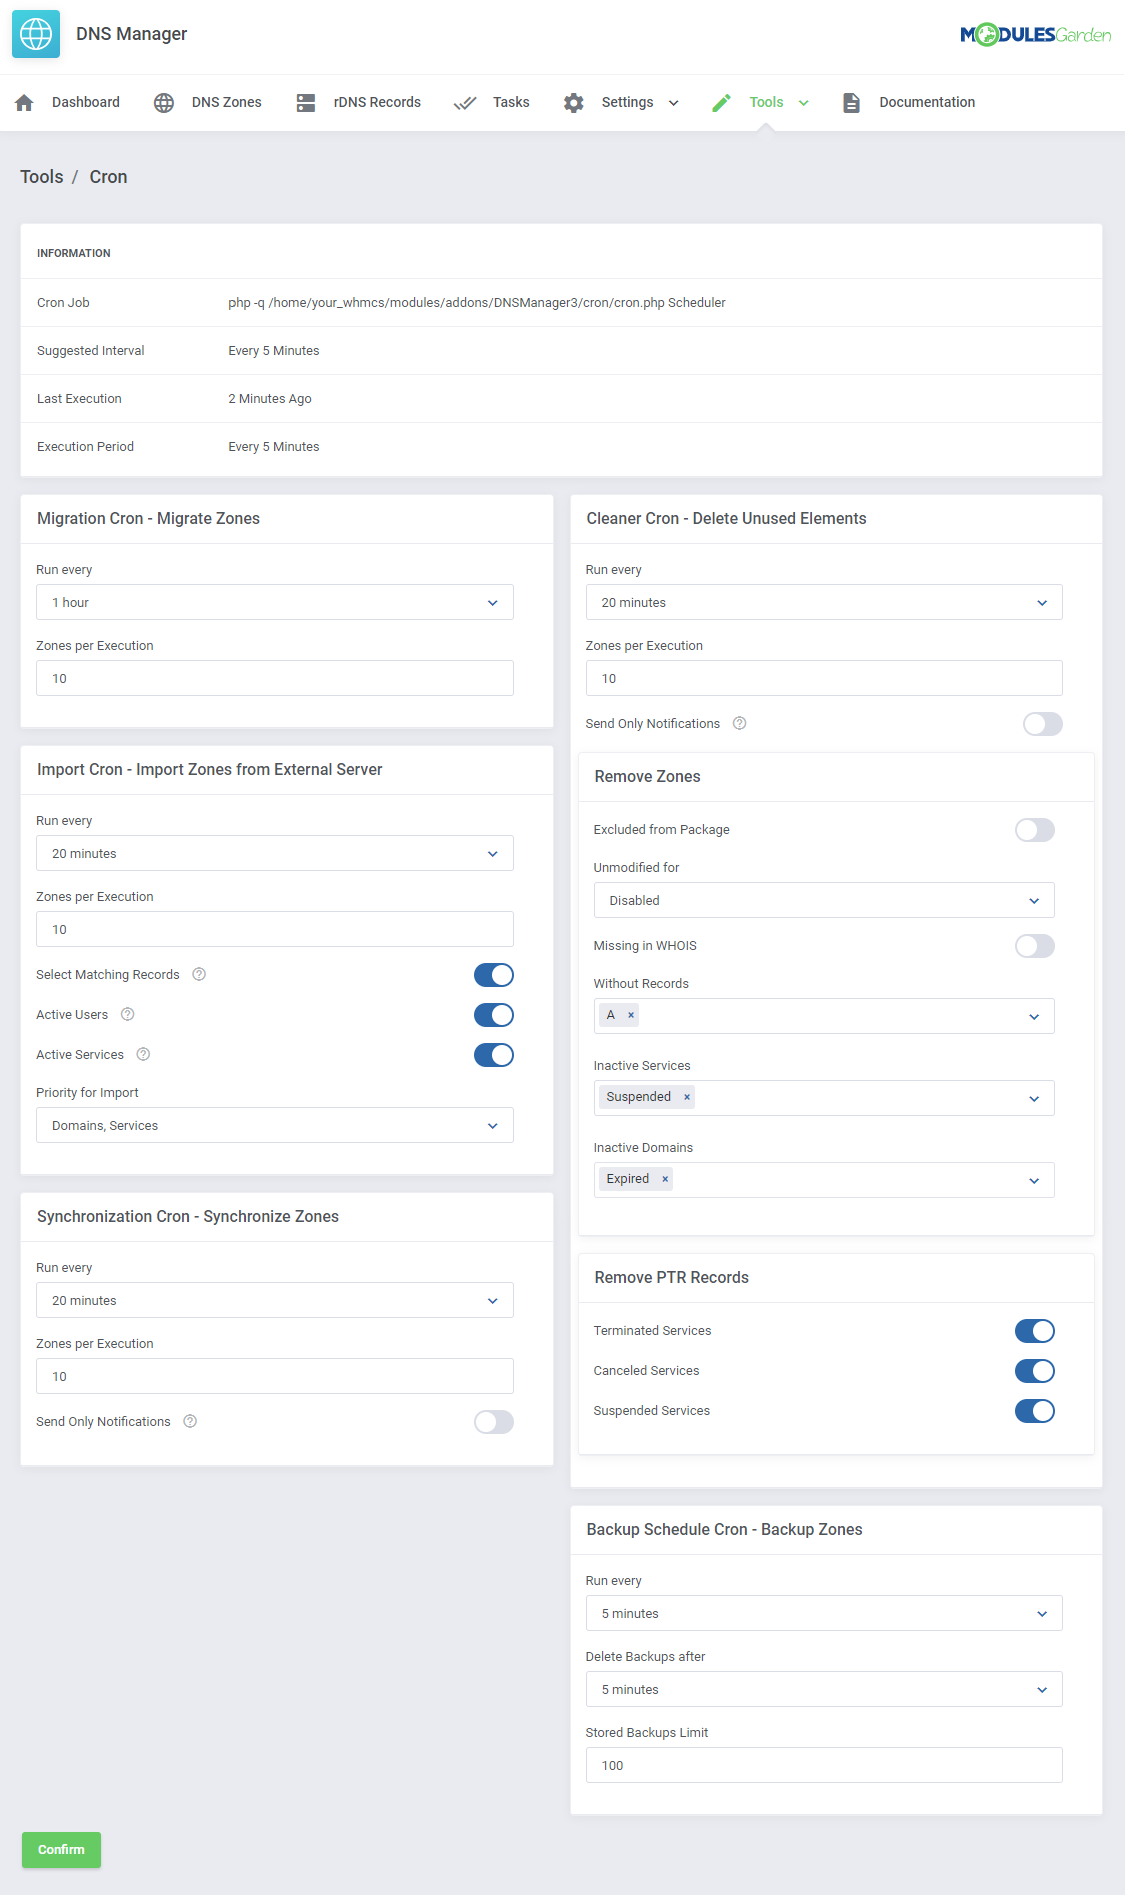
| In order to manage your cron job tasks proceed to 'Tools' → 'Cron'. Here, you will find five information boxes, each one responsible for management of a separate cron task. These are: migration, import, synchronization, cleaner and backup. |
|
| At the very top, there is an info box with general cron details, such as recommended time interval of a cron execution (5 minutes is suggested), the last execution time and run time period. (Keep it as frequent as possible!) |

|
|
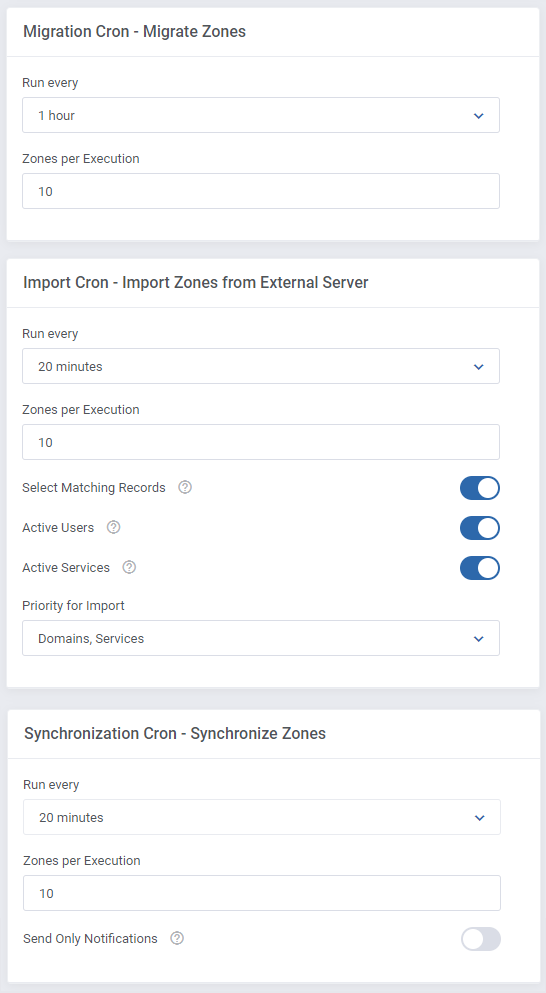
Cron Migration - responsible for calling added tasks to migrate zones between servers. |
|
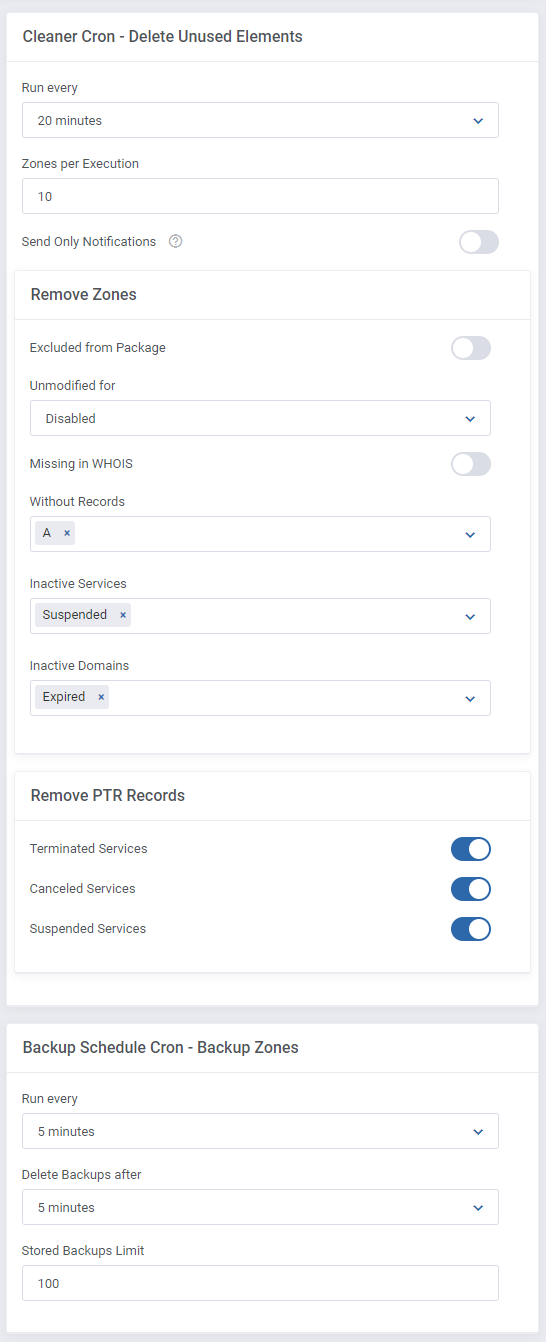
| Cron Cleaner - this option is a little bit more complex. Just like in case of other cron jobs, firstly choose an interval and declare how many zones should be cleared during a single execution. Then you may specify conditions of clearing zones and records. Warning! By default, the cron job is disabled and the 'Notify Only' option is enabled.
Decide for which of the following services, the PTR Records should be removed:
|
| Cron Backup Scheduler
In this section, you can schedule your backups. Similarly as previously, complete these fields according to your preferences.
|
|
Import
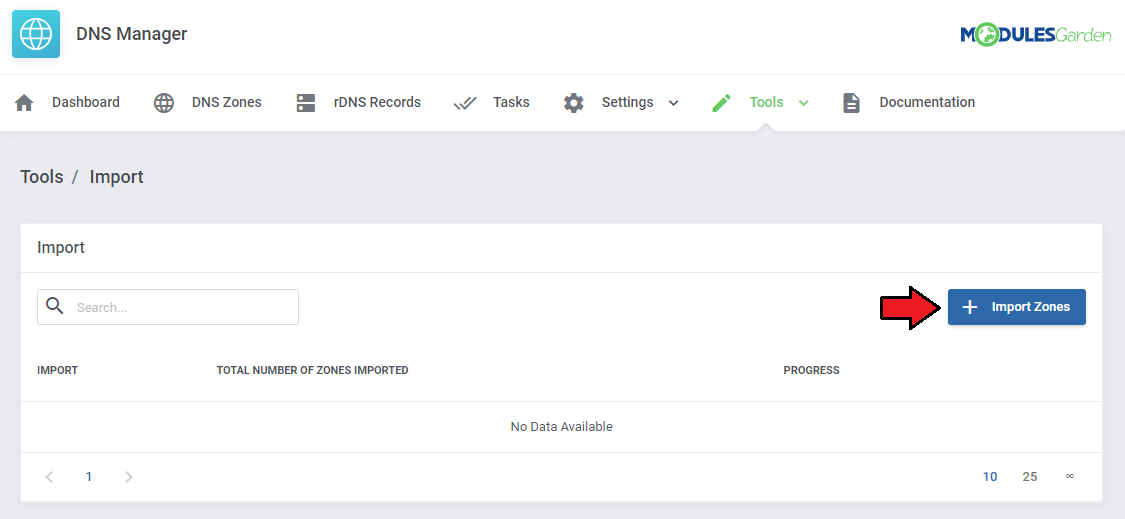
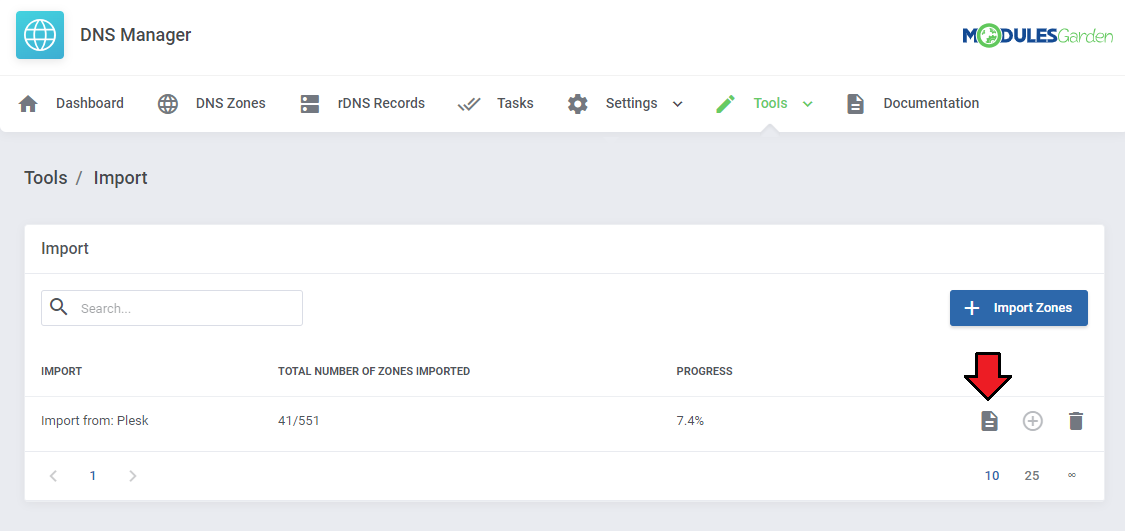
| Import - this is an additional tool that allows to import zones that exist on outside servers to WHMCS. Move to Tools' → 'Import' in your admin panel. You will find here a list of 'Import' assignments with information on which server they are imported from, total number of already imported zones and the number of all zones, progress of import task. To add a new import task press 'Add Import'. |
|
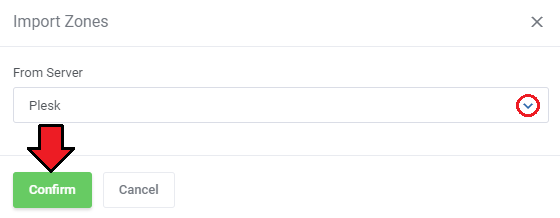
| Choose a server that you want to import zones from. |
|
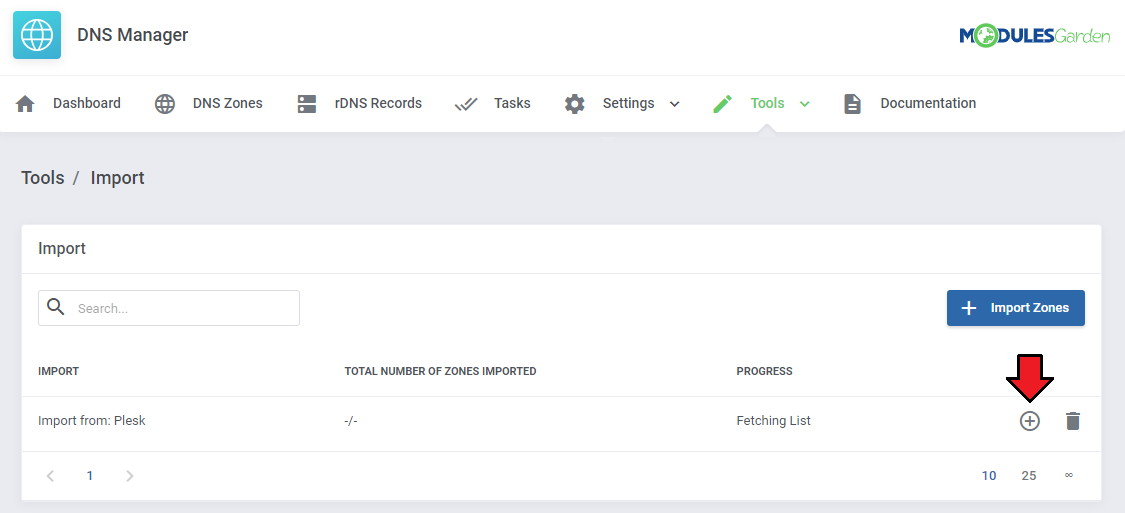
| Now, when the new import task appeared on the list of awaiting imports, schedule the action. |
|
| When schedule is confirmed, preview the list of imported zones to assign a client and a related product to the zone. To do so, press the button as marked on the screen. |
|
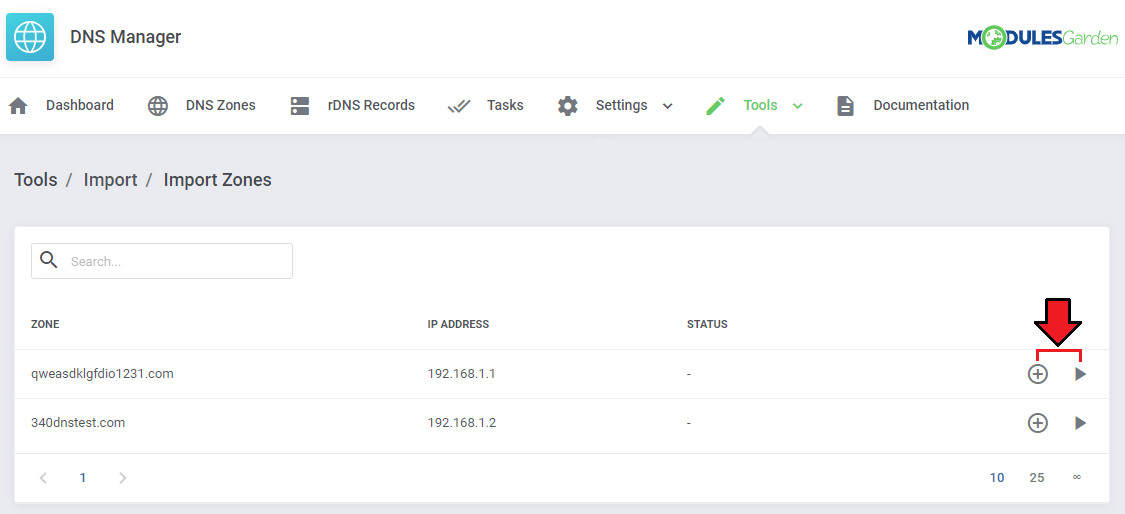
| A list of zones appears. DNS Manager Import tool detects the client and product which the domain and IP address is assigned to and automatically designates related client and product to migrate. |
|
| If you do not schedule import tasks, regular cron execution will trigger the import. However, you always have to make sure that selected zones are assigned to related clients and products. |
Zone Backups
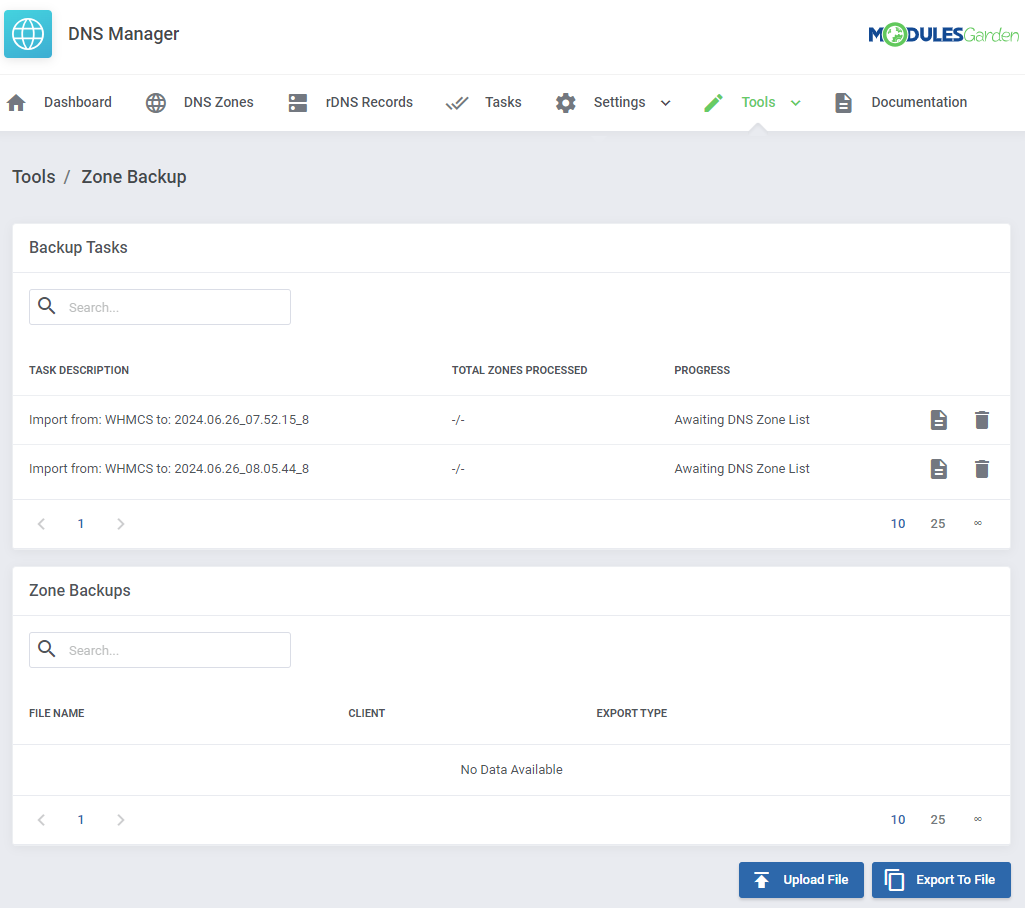
| The 'Zone Backups' section allows you to export your zones to the file and, when needed, easily import them on the server. |
|
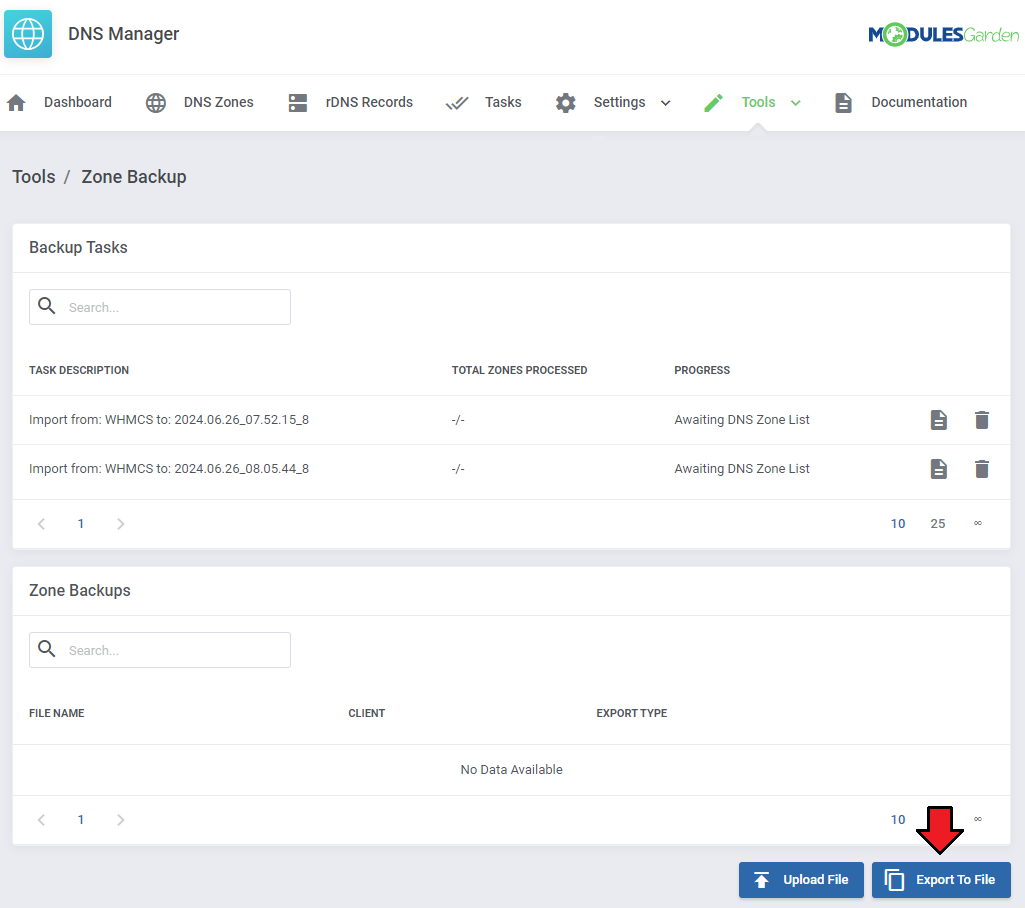
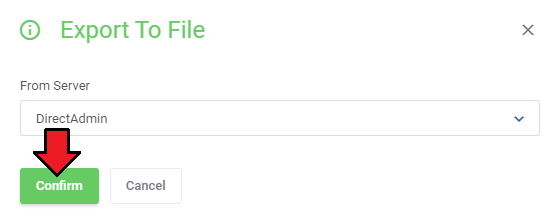
| To export zone automatically, press 'Export To File', define from which server you wish to export it and click on 'Add.' |
|
|
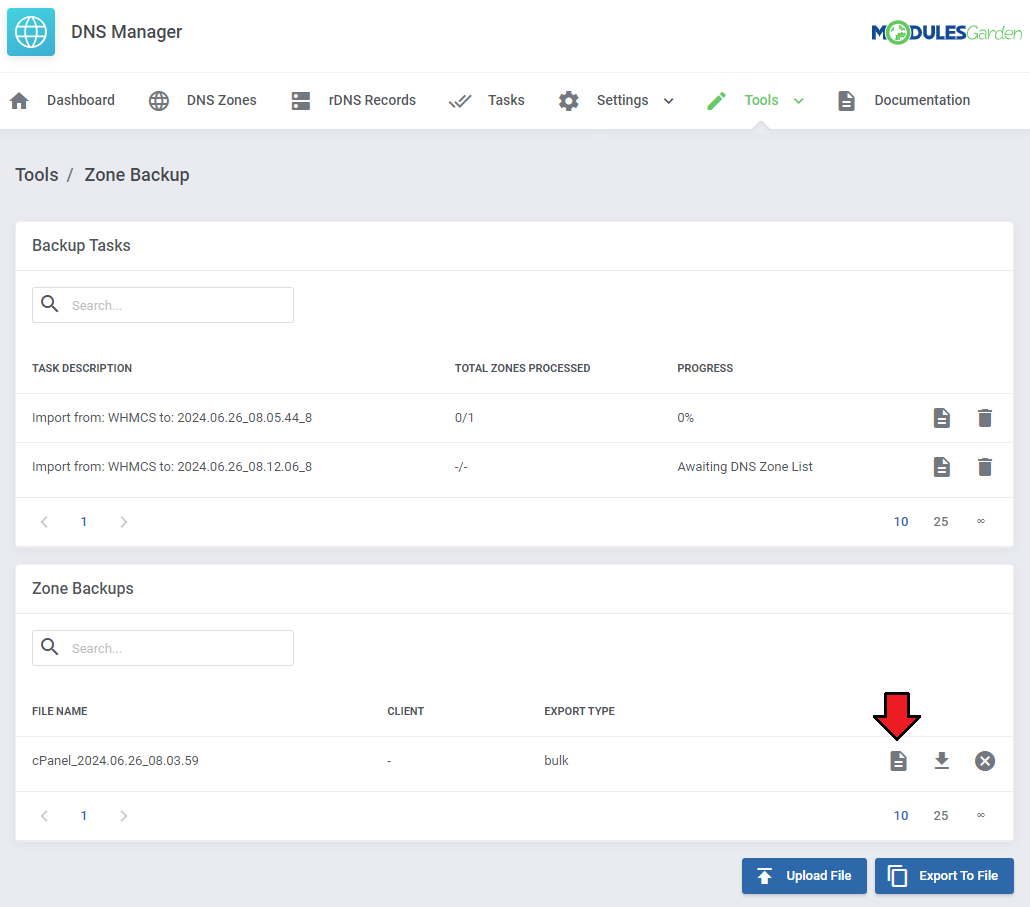
| Schedule the task. Remember to confirm the action. |
|
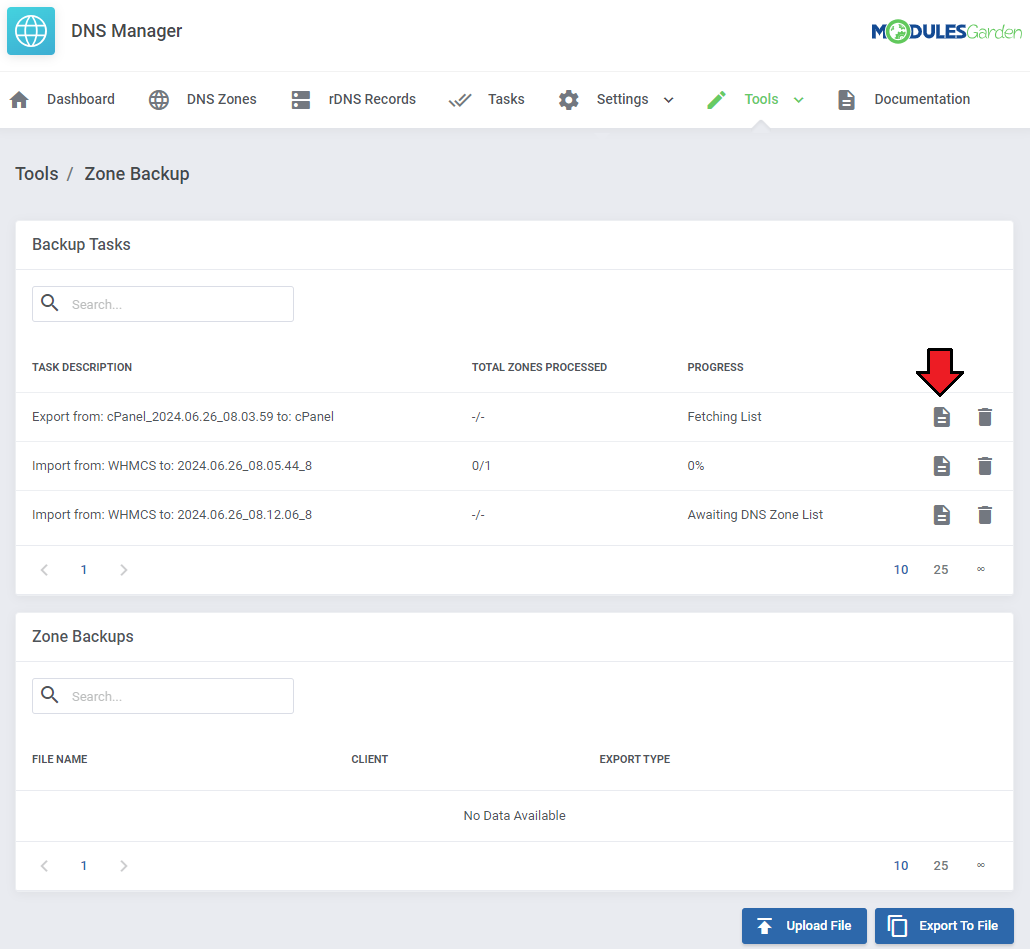
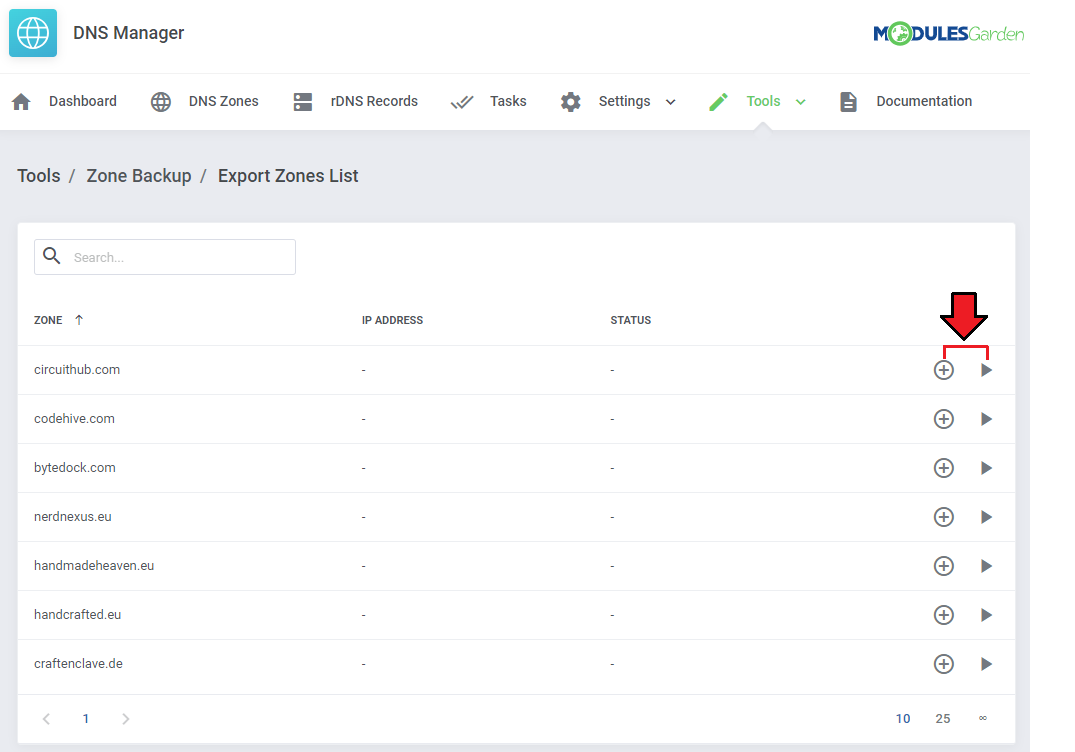
| You can now move to the list of zones to assign clients and products. Press the button marked on the screen. |
|
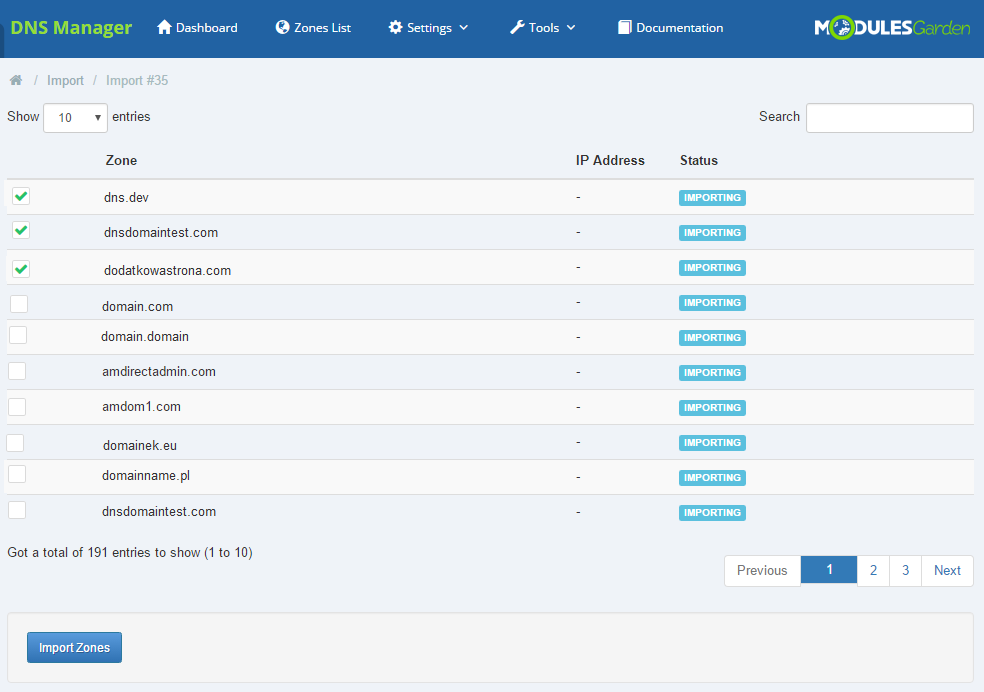
| Select zones using action buttons next to single zones and 'Import Zones' for mass import. |
|
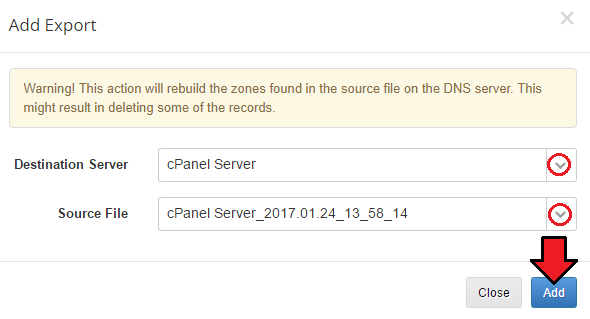
| You can also manually export zones. All you have to do is press the 'Add Export' button, then choose the appropriate server and source file. |
|
|
Tasks
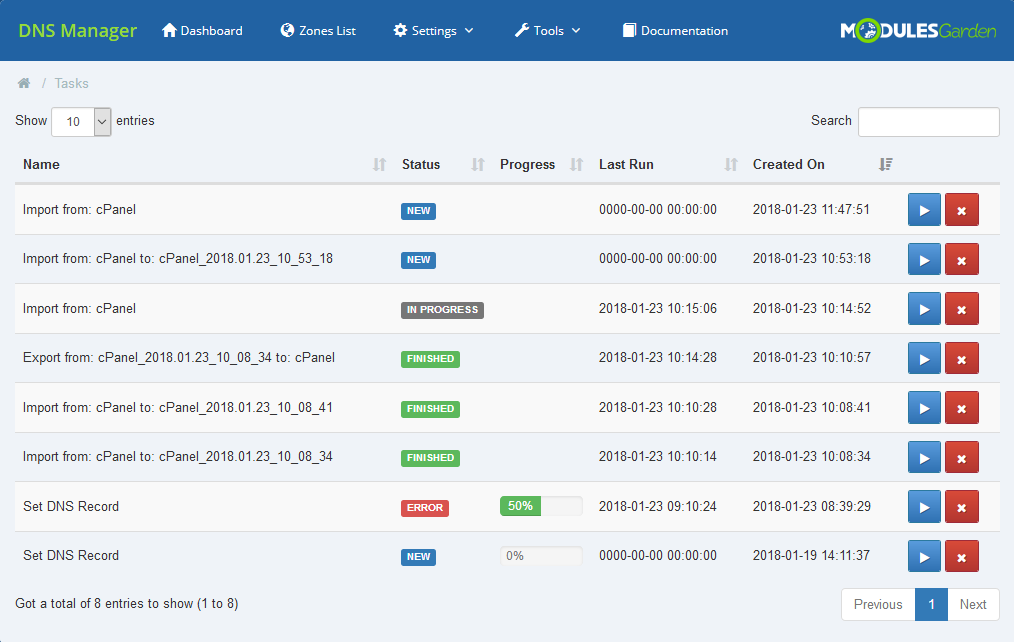
| You will find a list of current tasks in 'Tools' → 'Tasks' section. Among all tasks there are import tasks, migration and synchronization tasks. |
|
| According to specifically set-up cron jobs all created tasks are regularly executed. Here, you can see the current status of each task. If it is queuing for the next cron run, is currently executed, aborted or complete. Check when they were executed for the last time (Last Execution) and when the task was added. Available actions: call execution manually and remove the task. |
Dashboard
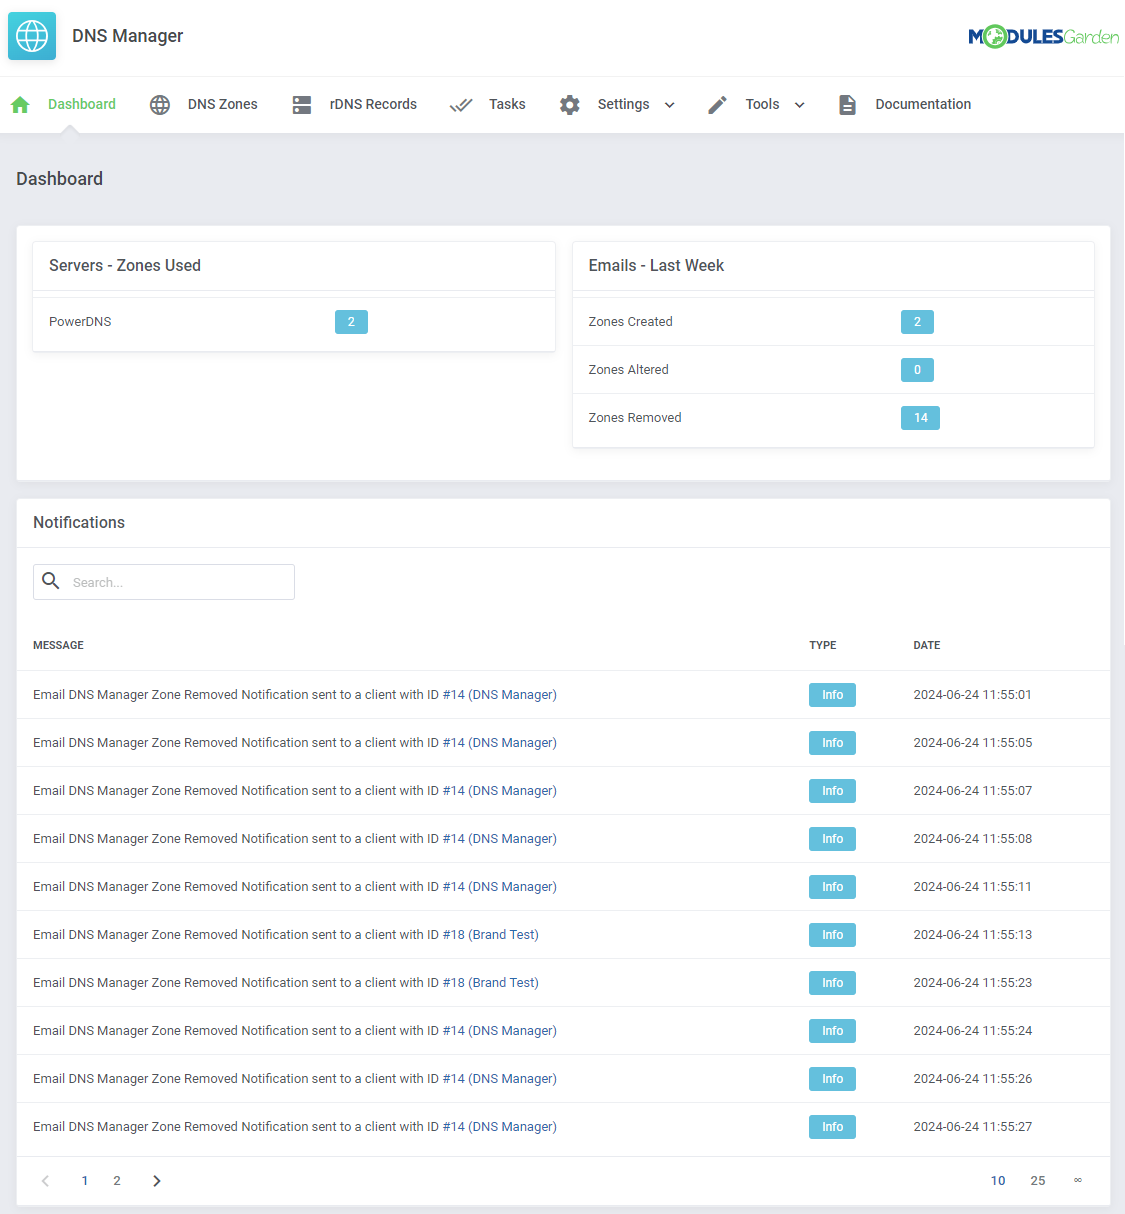
| The home page of DNS Manager which can be used to get a quick and clear preview on the crucial parts of the module: added servers with number of zones created on them, summary of email messages sent to clients and finally the most important notifications. |
|
Custom cPanel Zone Templates
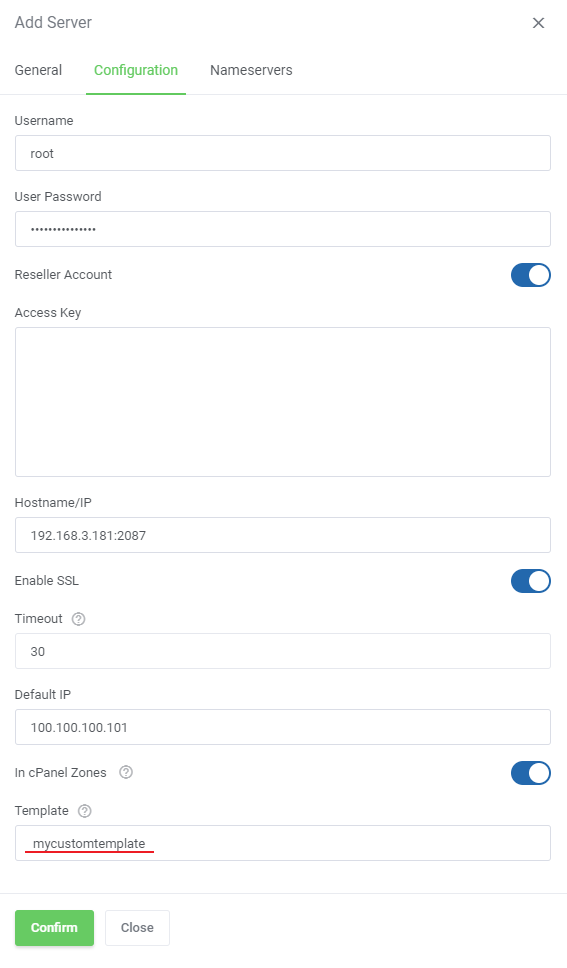
| You can allow your customers to create zones without cPanel Default Records. To do so, you need to create your own Zone Template in the WHM. If you do not know how to create your own Zone Template, you can follow this short guide made by cPanel: Edit Zone Templates Guide |
|
IP Manager For WHMCS Integration
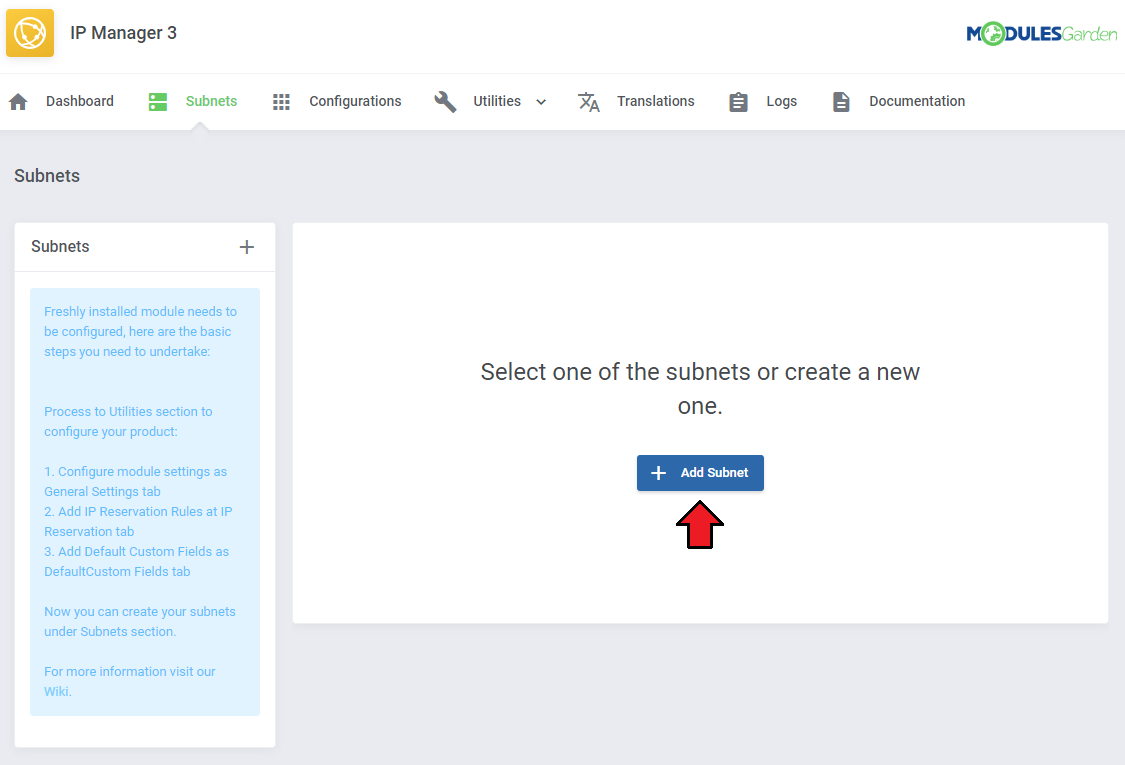
| As it has been mentioned above, some of the options in our DNS Manager For WHMCS are available if you are also using IP Manager For WHMCS simultaneously. In this section you will learn how to integrate the two products to work together. For more inforamtion on the IP manager module configuration please refer to our documentation. Let us take a look at the IP Manager module firstly. There you have to create a subnet. |
|
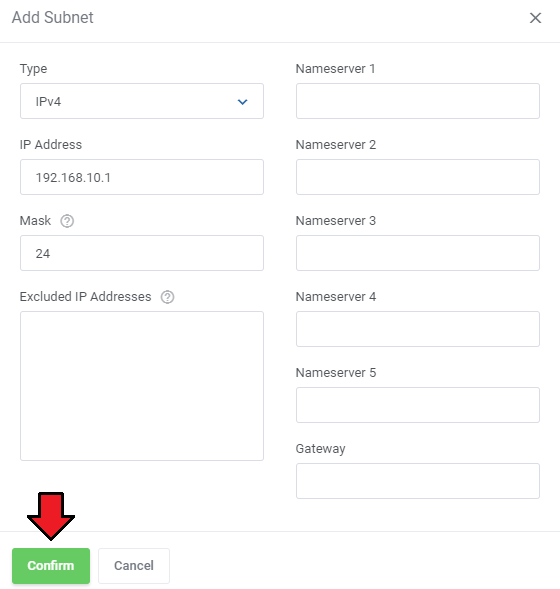
| You can do it ether for IPv4 or IPv6 type. DNS Manager For WHMCS supports both types. |
|
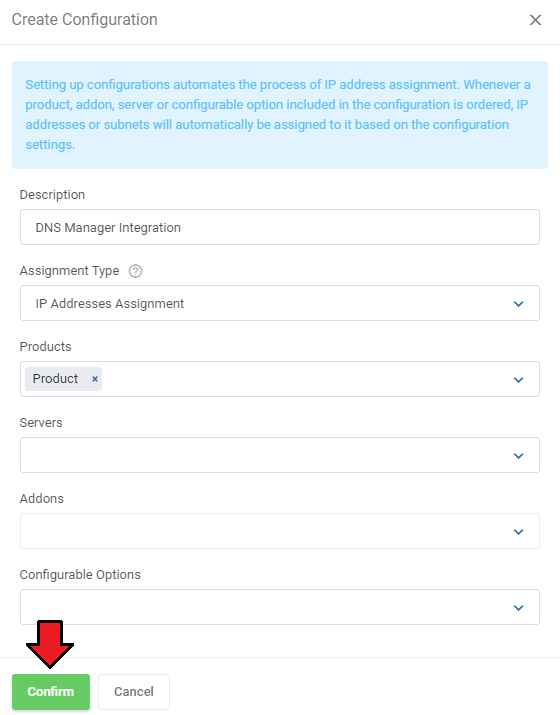
| When ready, create a proper configuration and assign required products to it. |
|
| Assign created subnet to this configuration. |
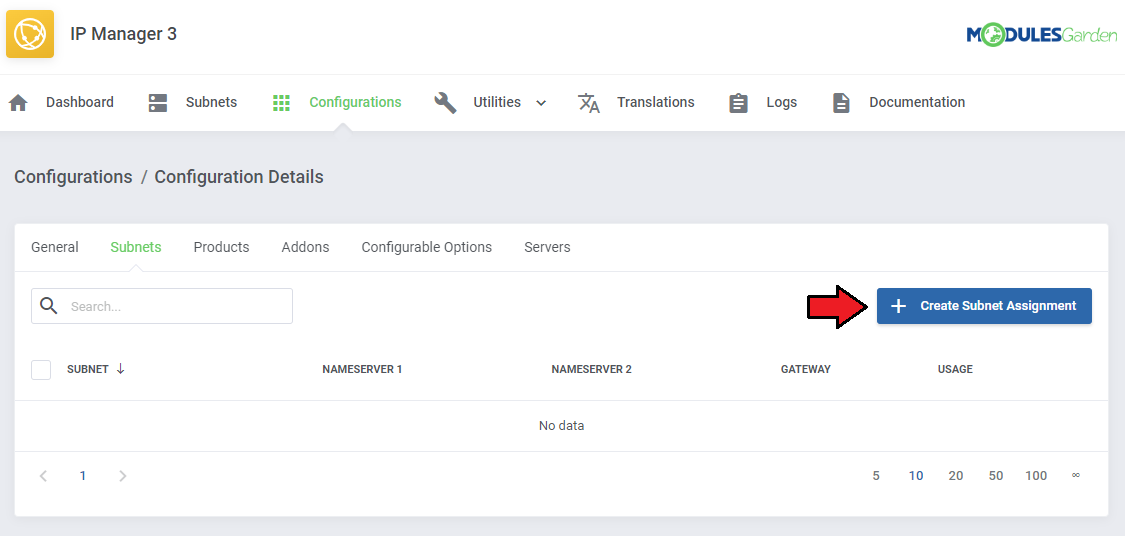
|
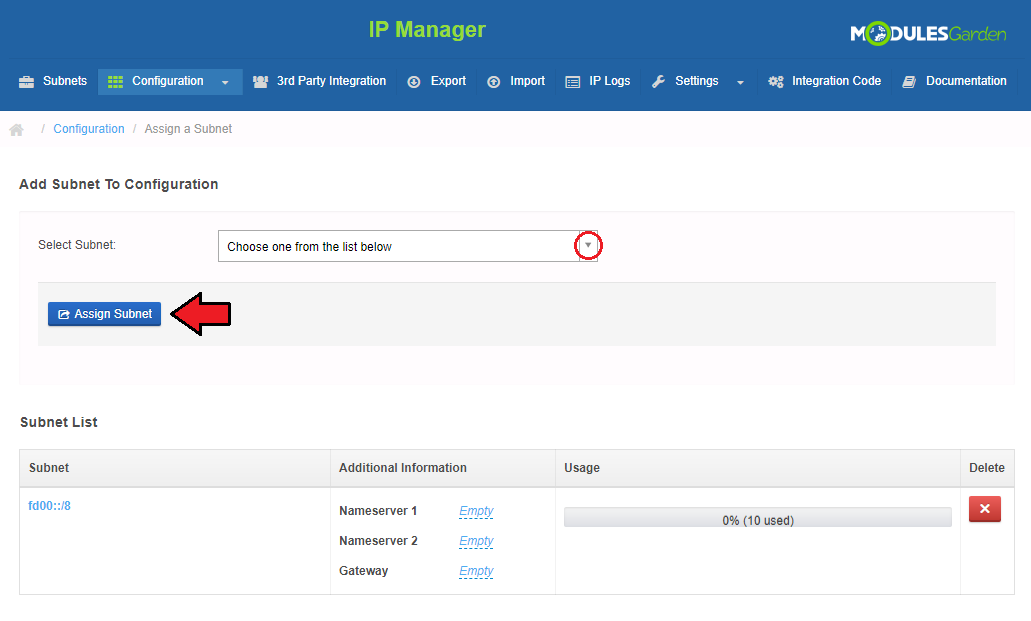
|
| Under 'Relations Configuration' → 'Products' define the number of IP addresses that will be allowed for a client. By default this is only one address. |
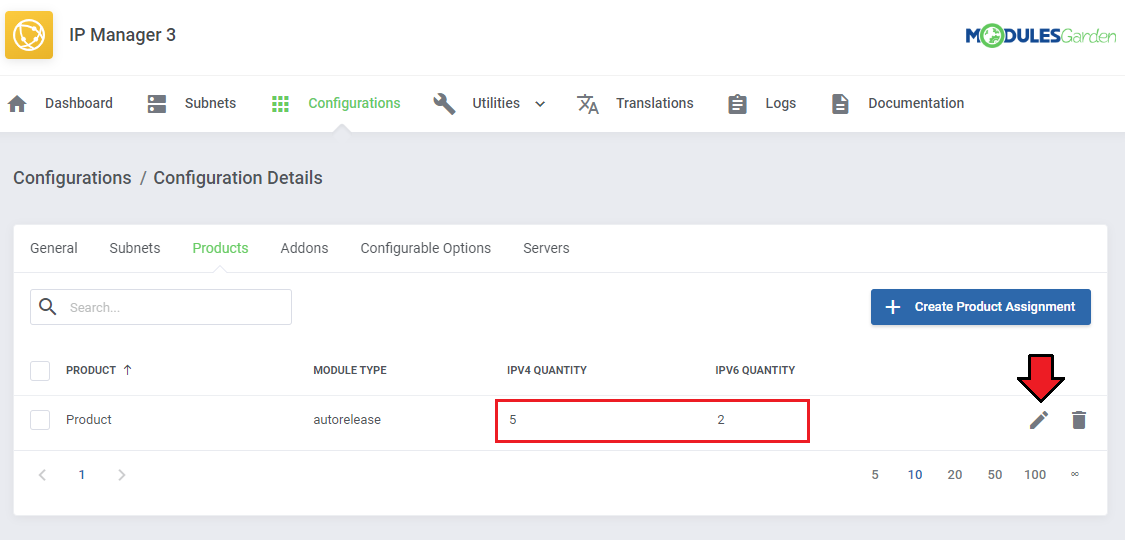
|
| Move to DNS Manager now and create an appropriate package where you declare limits for zones, select the product and allow records types and limits that will be provided within the purchased service. |
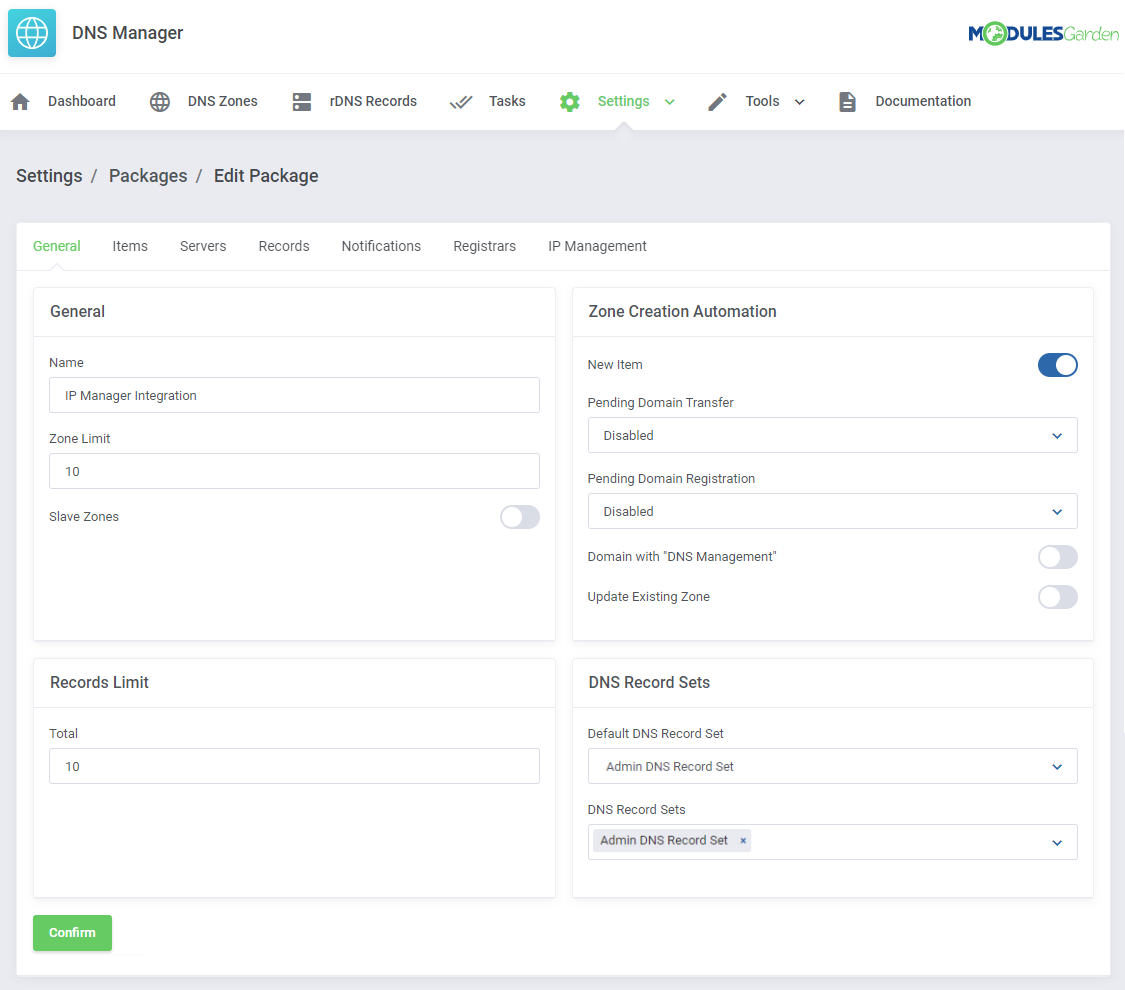
|
| Now, a client upon purchase of such service may now use assigned IP addresses from the subnet and manage the DNS zones and rDNS zones according to limits specified in the package. |
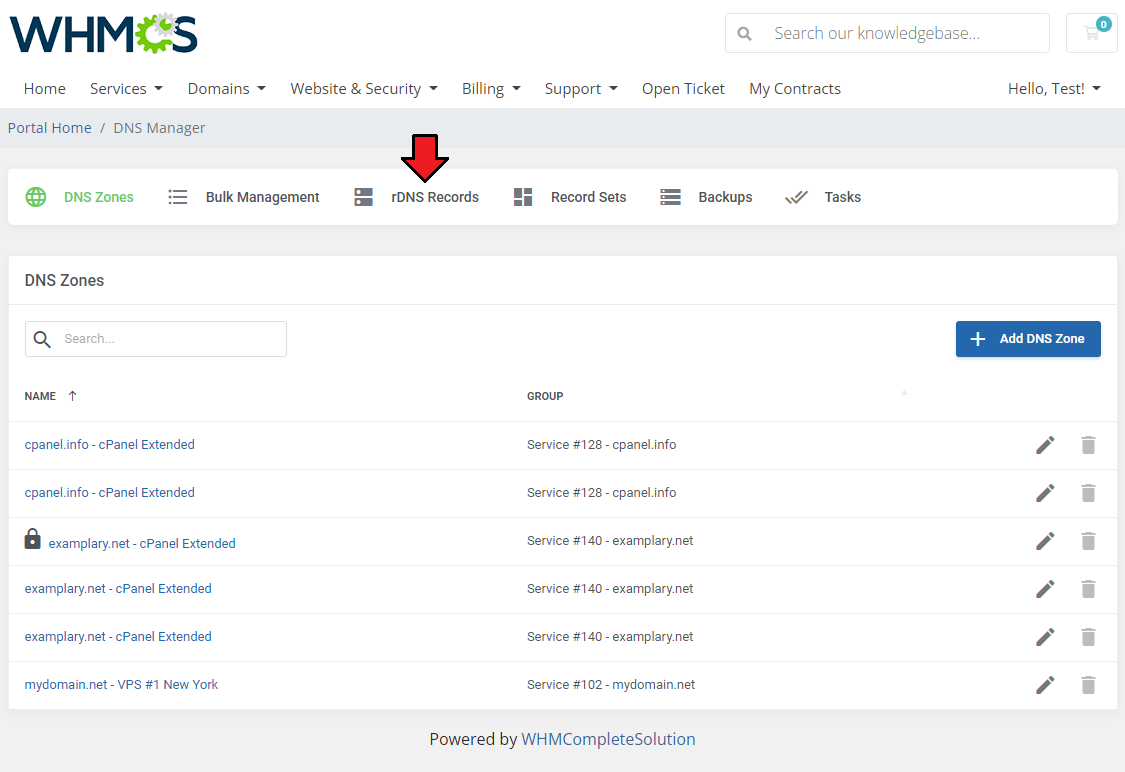
|
| The client may now add PTR records within the related service. |
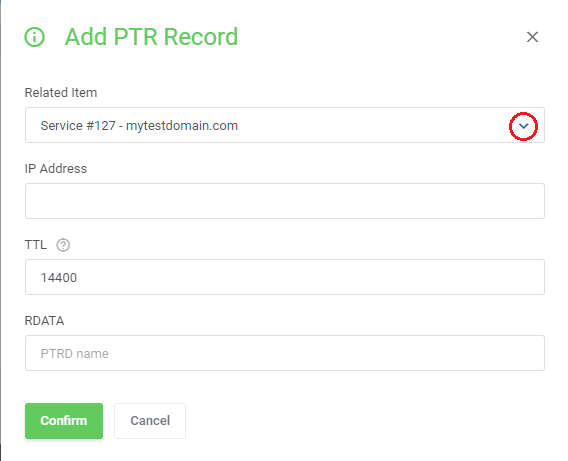
|
| Create zones with IP addresses included in a subnet related to a service in IP Manager. |
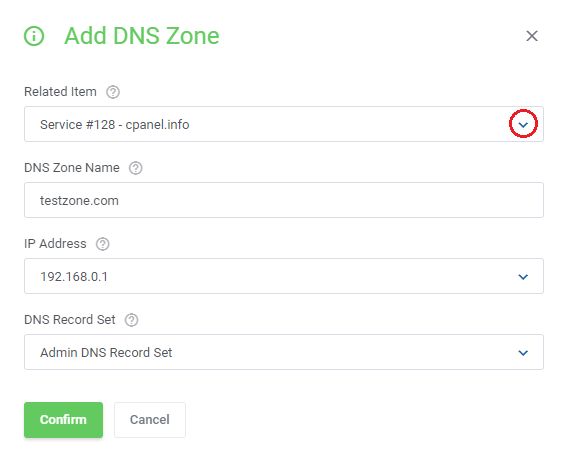
|
| You only need to remember that relevant options must be enabled in the 'Global Settings' section. |
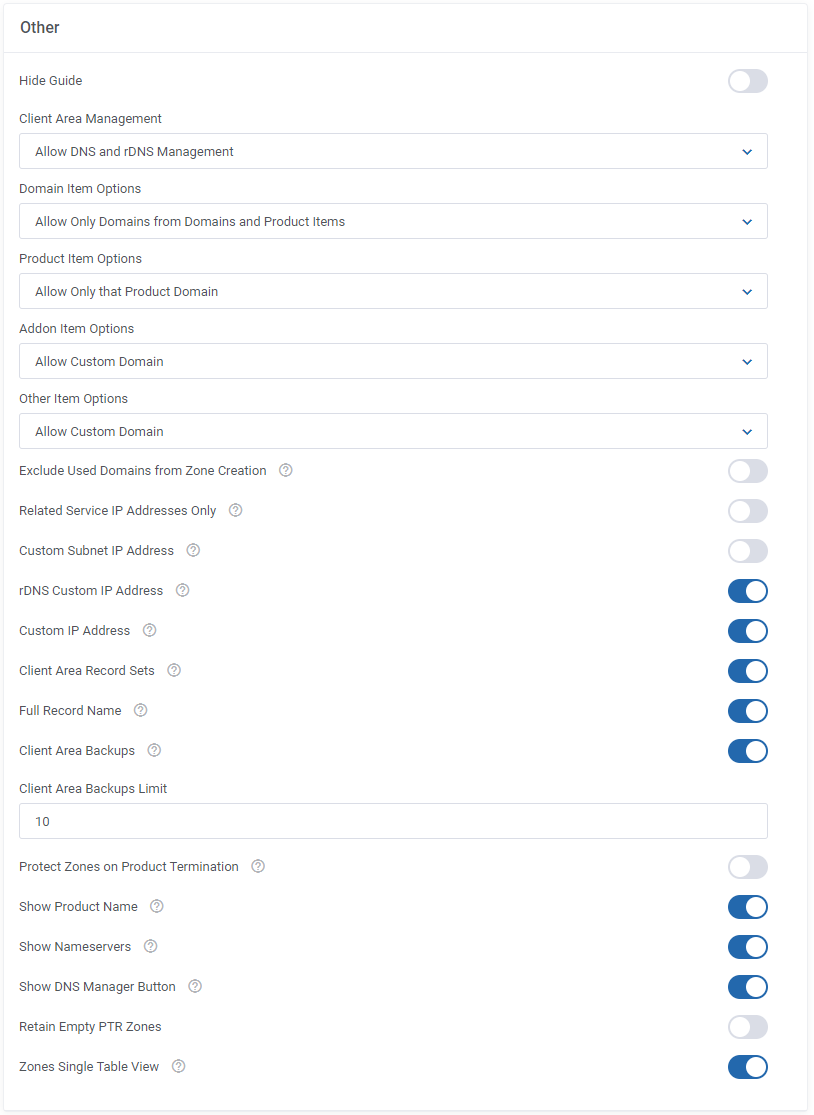
|
DNS Manager Migrator
| If you have been already using DNS Manager For WHMCS, you can migrate data from your current system to the latest version. To do so, follow the below steps: 1. Activate DNS Manager For WHMCS V2.x.x. your_whmcs_path\modules\addons\DNSManager2\cron\migration.php 3. Follow the steps that you see on your screen now! |
| Once the migration of zones is ready you can migrate rDNS records. To do so: your_whmcs_path\modules\addons\DNSManager2\cron\ptr_migration.php 2. Follow the steps that you see on your screen now. |
API Methods
| You may access your DNS Manager For WHMCS API. Here is a short instruction how to do that: The main required command that has to be used is:
Additionally, you have to define 'dnsaction' with some specific value.
Exemplary use: <?php // Set Vars $command = 'dnsmanager'; $values = array( 'dnsaction' => 'getServerList', 'params' => array() ); $adminuser = 'DemoAdmin'; // Call API $results = localAPI($command, $values, $adminuser); var_dump($results); ?> Since the 2.7.0 version, there are new methods available:
Exemplary use: $postfields = array( 'action' => 'dnsmanager', 'dnsaction' => 'createZone', 'zone_name' => 'zonename.com', 'type' => '1', 'relid' => '2', 'zone_ip' => '192.168.56.101', 'userid' => '1', 'recordSet' => '2', );
Exemplary use:
$result = localAPI('dnsmanager' ,
    array(
      'dnsaction' => 'updateZone',
      'zone_id' => 2,
      'records' => array(
        array(
          'name' => 'example.website.com',
          'type' => 'A',
          'class' => 'IN',
          'ttl' => '14440',
          'data' => '192.168.56.101',
        ),
        array(
          'name' => 'example.website.com',
          'type' => 'A',
          'class' => 'IN',
          'ttl' => '14440',
          'data' => '192.168.56.102',
        ),
      )
      ),'admin');
|
Tips
| 1. Keep track of your 'pending' and in 'progress' 'Tasks' to set an optimum interval time for the tasks execution. For example, set an interval in the way that half of the time task is set to the pending status. |
| 2. While using the OVH submodule, note that each time a client wants to remove a zone, the administrator will receive an email sent by OVH. Only after its confirmation, a given zone will be terminated successfully. |
| 3. 255 characters in TXT records is a maximum limit for the 'PowerDNS' submodule. |
| 4. As this module supports templates system, any changes made in the module's templates files will be saved after the upgrade process. |
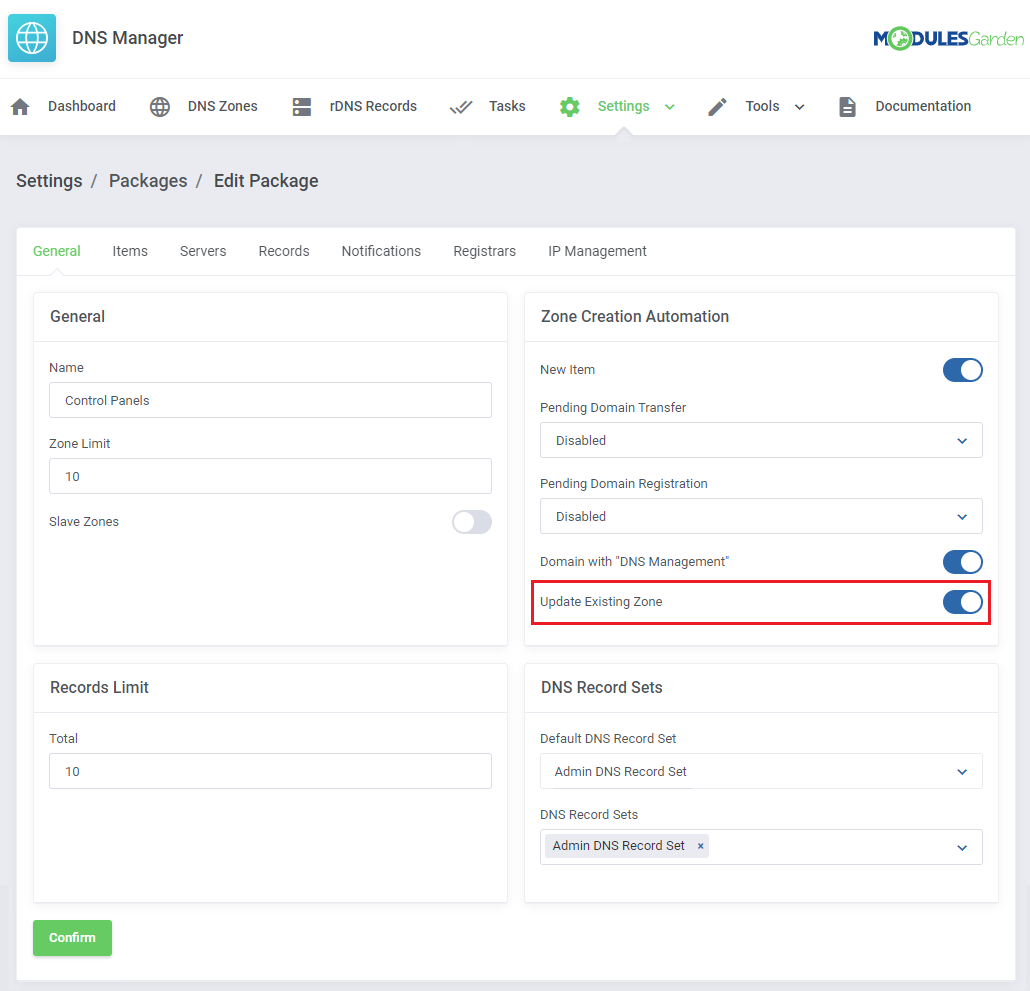
| 5. In case you are using cPanel or cPanel Extended provisioning modules with DNS Manager, it is highly advised to enable the Existing Zone Update option. Otherwise, DNS zone will be previously created by the provisioning module, not by DNS Manager where an error notification on already existing zone will appear. That will cause such zone will not be visible on the Zones List. If the mentioned option is enabled, DNS Manager will fail to check whether the zone already exists and consequently the created by the provisioning module entry will be added to the Zones List. |
|
| 6. Please note that from the 2.13.0 version of the module, it is obligatory to use a dot at the end of each domain while adding or editing 'DNS Records' and 'DNS Record Sets' . If you do not provide a dot, the module will double your domain. Take a look at the following examples, on the left side we present what is typed by a client and on the right side you can see the module’s interpretation: An exemplary zone name is example.com |
7. Now you may use 'API Token' instead of 'API Key' to configure the Cloudflare submodule. Before you generate your 'API Token' in your Cloudflare panel, please remember to set the following read/edit permissions there:
|
| 8. How to correctly add translations of the DNS server errors into the language file: Most errors include a string with a domain name, to add a custom error message, you have to replace this string with :domain_word: phrase. RRset A.testdnsipdefault.by. IN CNAME: Conflicts with pre-existing non-CNAME RRset In this case A.testdnsipdefault.by. must be replaced with :domain_word: $_LANG['addonCA']['dashboard']['errors']['RRset :domain_word: IN CNAME: Conflicts with pre-existing non-CNAME RRset'] = "Some serious problem occurred with :domain_word:"; As a result the below message will be displayed in the module: Some serious problem occurred with A.testdnsipdefault.by. Of course, you may skip the domain name in the final output or add a fully customized error message: $_LANG['addonCA']['dashboard']['errors']['RRset :domain_word: IN CNAME: Conflicts with pre-existing non-CNAME RRset'] = "Some serious problem occurred"; $_LANG['addonCA']['dashboard']['errors']['RRset :domain_word: IN CNAME: Conflicts with pre-existing non-CNAME RRset'] = 'My custom translation'; If you do not add any translation in to the lang file, an original error message will be displayed. |
Update Instructions
| The essential guidance through the process of updating the module is offered here. Keep in mind there is a quick and easy option in our client area that will let you upgrade the license of your module to an open source version at any time - and at a lower price! |
Migration from V2x.x to V3.x.x
If you want to migrate your DNS Manager For WHMCS to version 3.0, please follow the below steps:
|
Migration of Zones
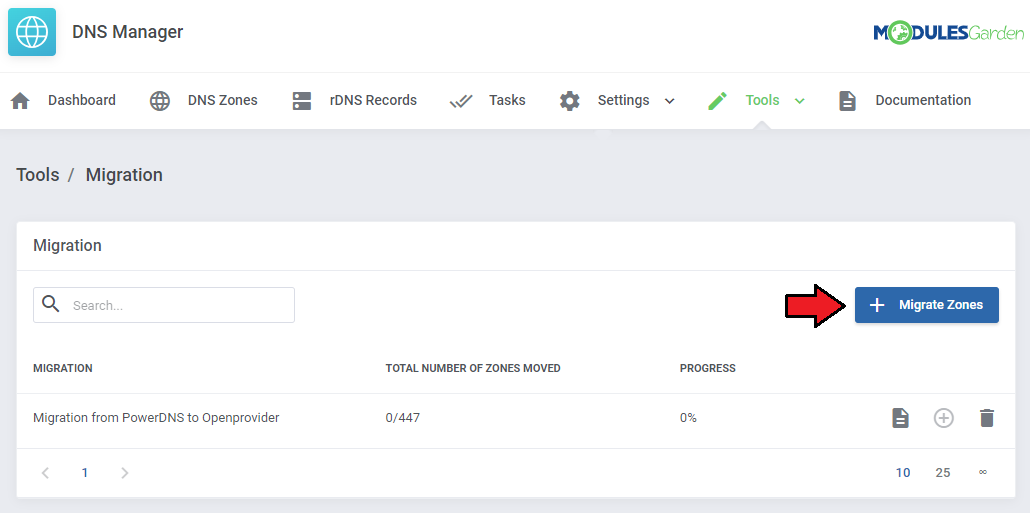
| 'Migration' is another useful tool that you may use to manage zones efficiently. With this tool you may migrate zones between servers. Keep in mind, that if you wish to transfer the relation that exists in the DNS Manager module to the target server, you must select the 'Move Management To Target Server' option. |
|
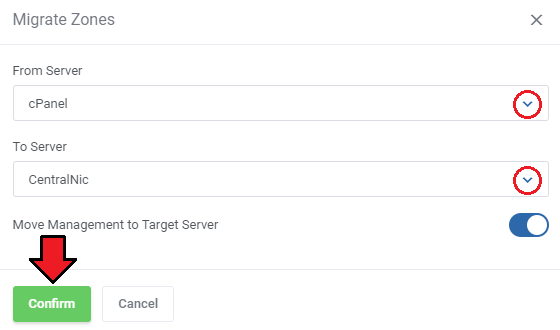
| To add a migration task, press 'Add Migration', specify from which server you wish to migrate zones, and the target server, as simple as that. Note 1: Migration does not copy DNS Manager settings, to illustrate: if you are migrating zones that exist in DNS Manager their locations for example are not updated. |
|
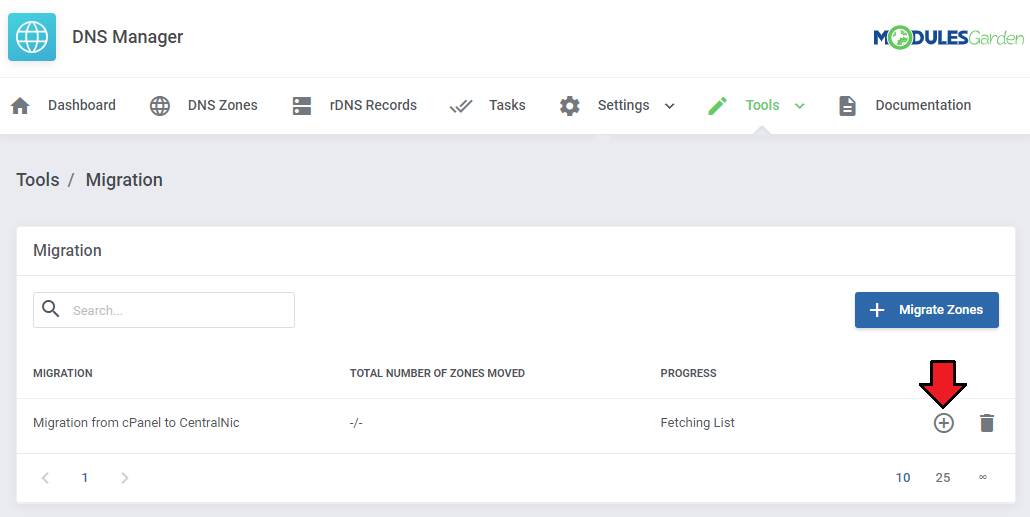
| Schedule the migration. Remember to confirm the action. |
|
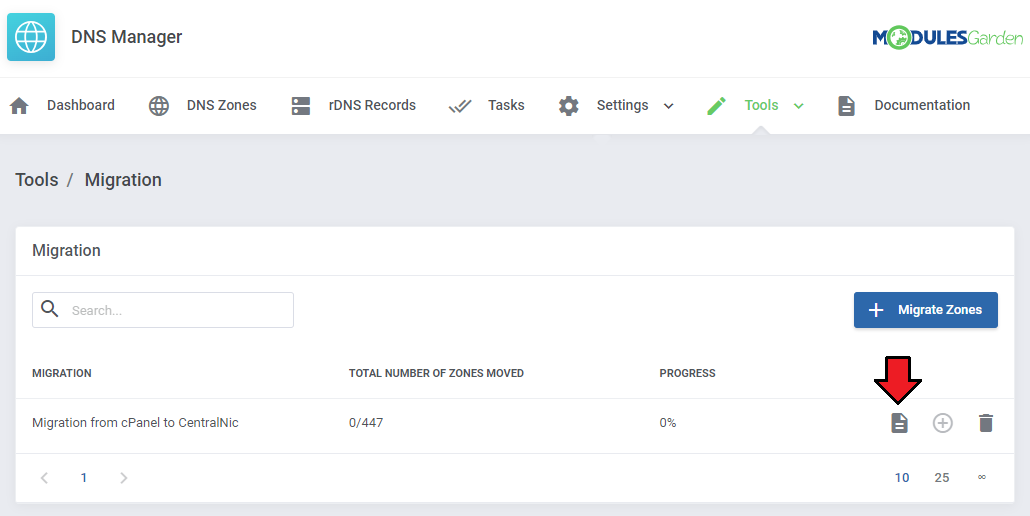
| Move to the list of zones to assign clients and products. Press the button marked on the screen. |
|
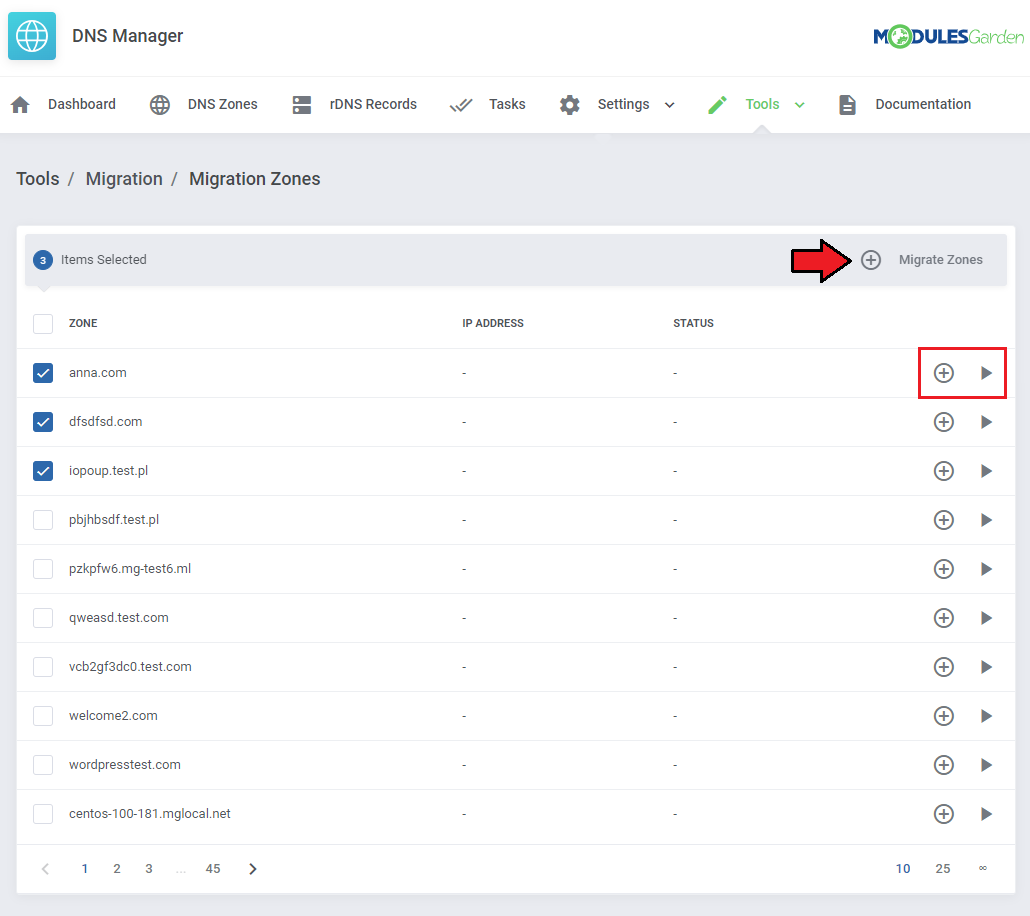
| Select zones and 'Migrate Zones' for mass migration or use action buttons next to single zones. |
|
Common Problems
| 1. When you have problems with connection, check whether your SELinux or firewall does not block ports. |
| 2. jQuery 1.9 is required to work properly. |
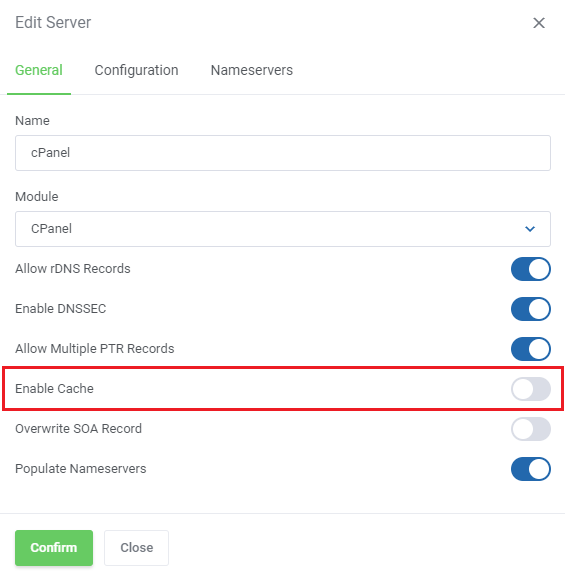
3. In case you cannot see any zone records in your client area after import or migration actions, then disable cache for the DNS server.
|
|
| 4. Once you have problems with manually created zones for specific domains, along with the 'Subdomain is not allowed' or 'Invalid zone name' error, make sure to add the .tld that you would like to use to the following file: modules\addons\DNSManager2\storage\tld.list |
| 5. In case your backup task started in your client area is not being processed, make sure that your Cron Import job is not disabled or set to a low frequency. |
| 6. Error: "The selected zone is already taken" Reason 1: A zone with the same name already exists in dns_manager2_zone table (you can also find it on the 'Zones List' in the addon)
|