DirectAdmin Extended For WHMCS
From ModulesGarden Wiki
| DirectAdmin Extended For WHMCS Wiki is going to be finished not later than on 14.12.2012. |
Contents |
About DirectAdmin Extended For WHMCS
| ModulesGarden's DirectAdmin Extended for WHMCS |
- Clientarea functionality:
| ✔ FTP |
| ✔ Databases |
| ✔ Emails |
| ✔ Subdomains |
| ✔ Emails |
| ✔ Databases |
| ✔ Subdomains |
| ✔ Addon Domains |
| ✔ Site Redirections |
| ✔ Login To DirectAdmin |
| ✔ Login To Webmail |
| ✔ Change Password Functionality |
| ✔ Password Generator Functionality |
- Additional functionality:
| ✔ Functions Manager Addon - Enable/Disable Functionality Per Each Product |
| ✔ Language Support |
| ✔ Supports WHMCS Version v4.5 and Later |
Installation & Configuration
| This tutorial will focus on how to successfully install and manage DirectAdmin Extended For WHMCS. We will guide you step by step through the whole installation process. |
| 1. Login to your clientarea and download DirectAdmin Extended For WHMCS. |
| File:DA1.png |
| 2. Upload and extract the module into the main WHMCS directory. |
| Files in your WHMCS directory should look like this. |
| File:DA2.png |
| 3. When you install DirectAdmin Extended for the first time you have to rename 'license_RENAME.php' file. |
| File is located at 'modules/servers/directadmin_extended/license_RENAME.php' . Rename it from 'license_RENAME.php' to 'license.php' . |
| File:DA3.png |
| 4. In order to configure your license key you have to edit a previously renamed 'license.php' file. |
| Enter your licence key between quotation marks as presented on the following screen. You can find your license key at your clientarea → 'My Products' . |
| File:DA4.png |
| 5. Now you have to activate the module in your WHMCS system. |
| Login to your WHMCS admin area. Click 'Setup' then choose 'Addon Modules' . |
| Afterwards find 'DirectAdmin Functions' and press Activate button. |
| File:DA5.png |
| 6. In next step you need to permit access to this module. |
| To do so choose 'Full Administrator' and press 'Save Changes' . |
| File:DA6.png |
| 7. Well done! You have just successfully installed DirectAdmin Extended For WHMCS! Now in your WHMCS system press 'Addons' then press 'DirectAdmin Extended Functions' . |
| You will see a following screen. Let's proceed to configuration of your freshly installed module. |
| File:DA7.png |
| 8. Now we will show you how to configure a new product. |
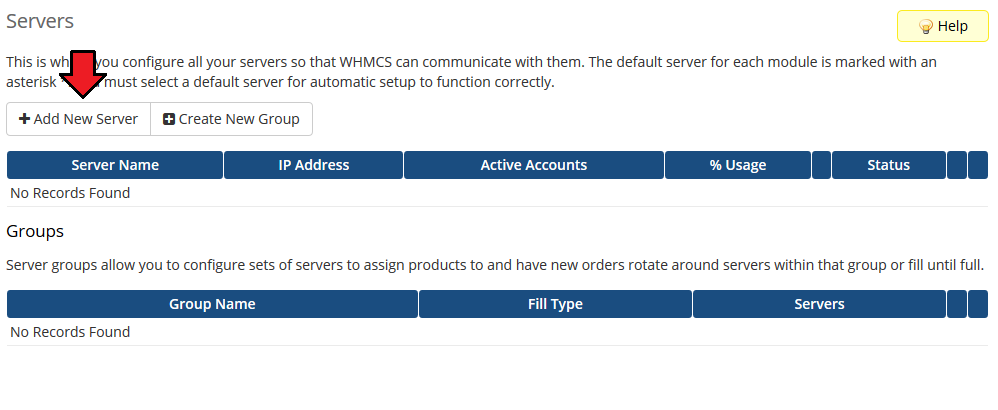
| To do so log in into your WHMCS. Now press 'Setup' → 'Products/Services' → 'Servers' (or 'Setup' → 'Servers' in WHMCS v4.x). |
| Afterwards press 'Add New Server' . |
|
| 9. Next, enter your server name, IP adress, username and password. Choose 'Directadmin_extended' from a dropdown menu and press 'Save Changes' . |
| Here you can also provide other server details like nameservers or maximum number of accounts. |
| File:DA9.png |
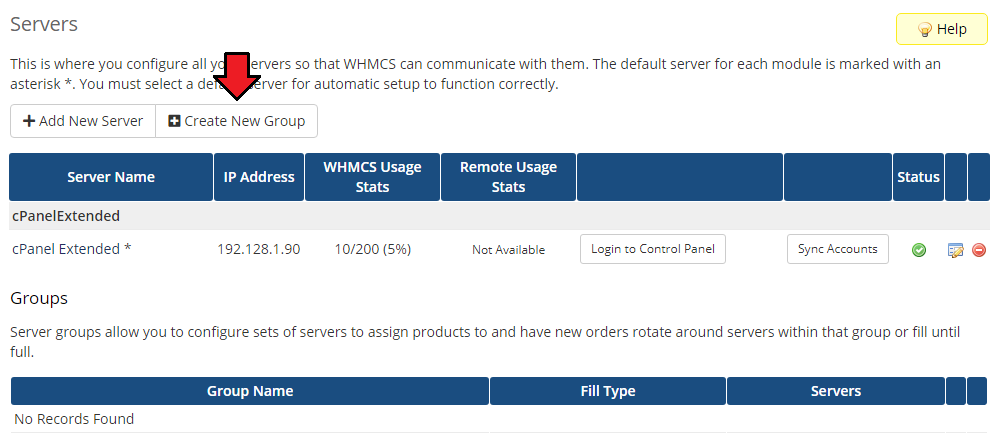
| 10. After you configure your server correctly, you will see a following screen. |
| Now you need to create a new group for your server. For that purpose press 'Create New Group' . |
|
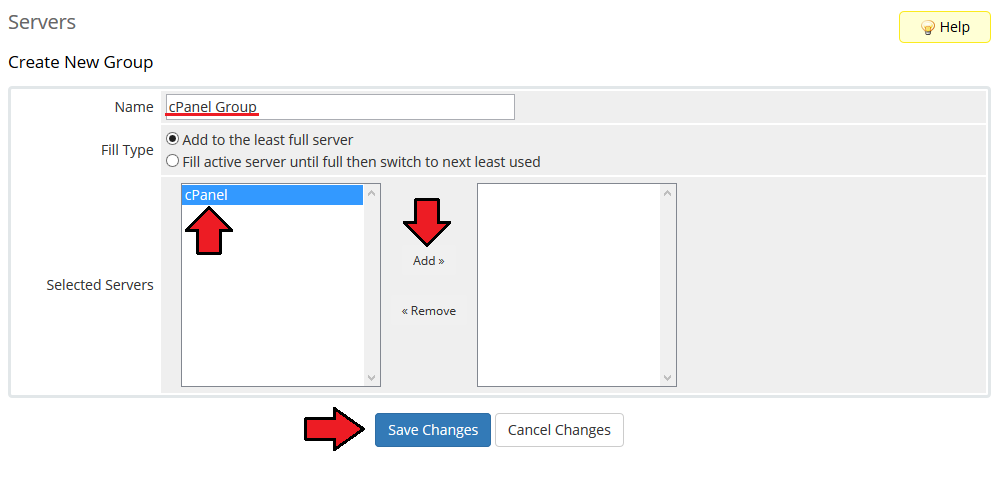
| 11. Enter name, click on your previously created server, press 'Add' then press 'Save Changes' . |
|
| 12. In order to create and configure product click on 'Setup' → 'Products/Services' → 'Products/Services' . |
| If you don't have a product group, click on 'Create a New Group' . If you do, simply go to step 14. |

|
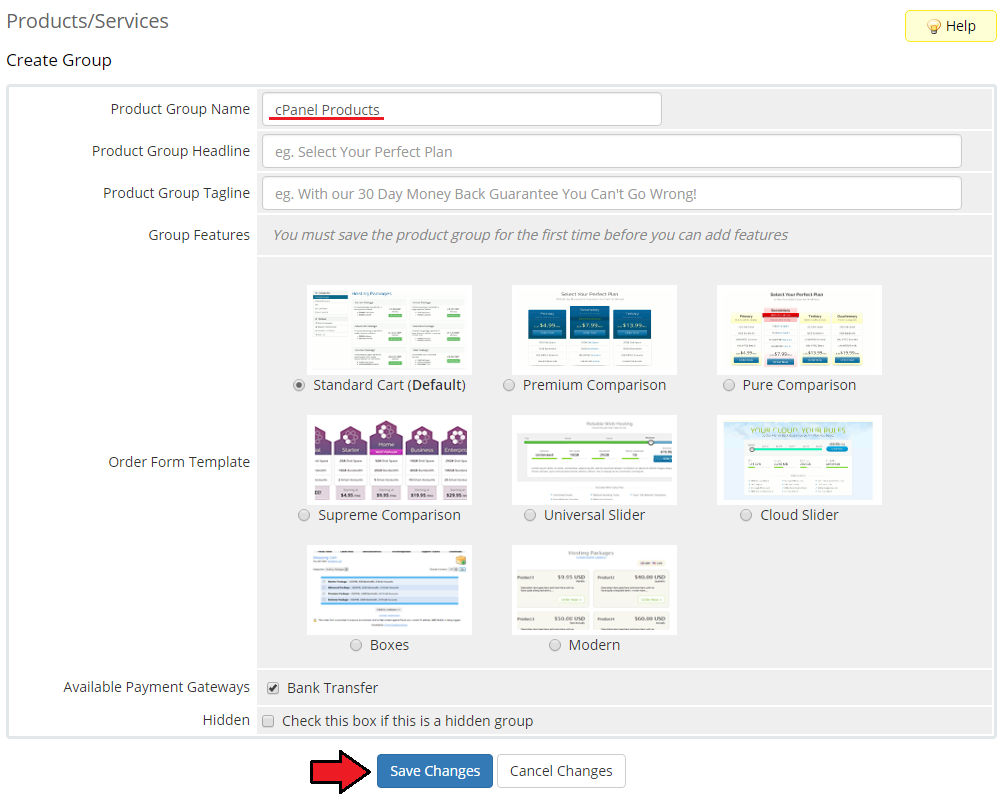
| 13. Enter product group name and press 'Create Group' . |
|
| 14. When you have a product group, you can create your product and assign it with DirectAdmin Extended. If you already have a product, go to step 16. |
| To create a product click on 'Create a New Product' . |

|
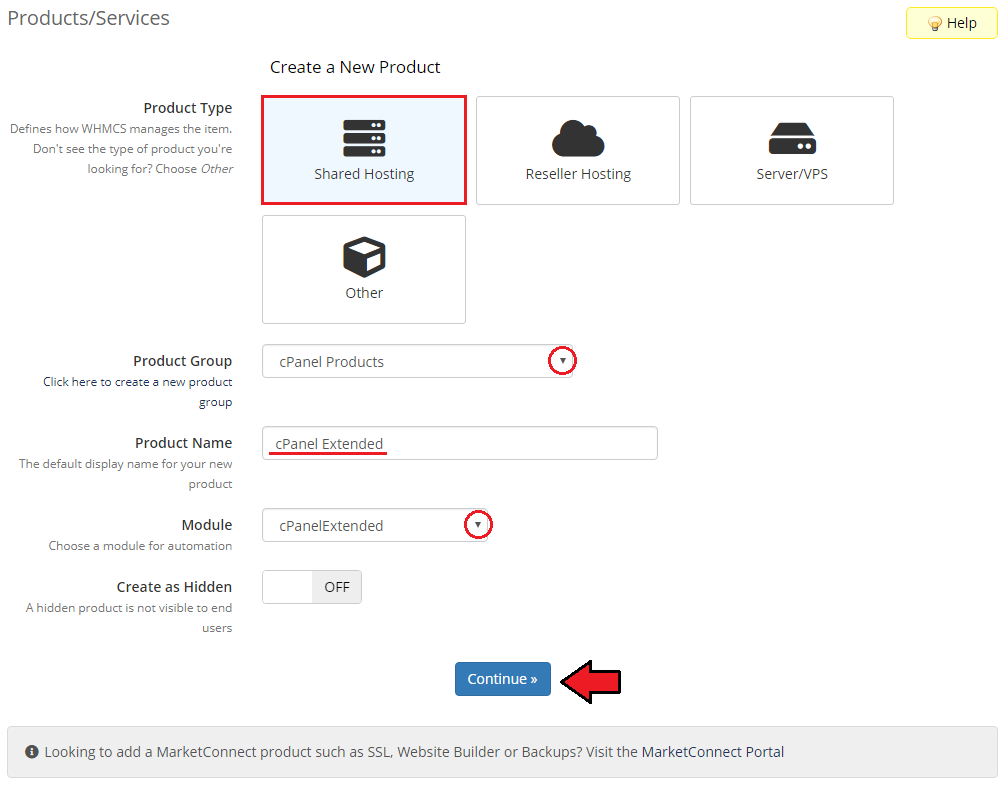
| 15. Afterwards choose your product type and product group from a dropdown menus, enter your product name and press 'Continue' . |
|
| 16. Now go to 'Module Settings' section, choose both 'Directadmin_extended' and your previously created server group from a dropdown menus and press 'Save Changes' . |
| File:DA16.png |
| That's all. You have just correctly created and customized new product which will appear in DirectAdmin Extended admin area. Let's check it out. Go to 'Addon Modules' → 'DirectAdmin Extended Functions' , tick 'Check All' and press 'Save Changes' . |
| File:DA17.png |
| Now you can check the results. This is what your customers should see in their clientarea. |
| File:DA17.1.png |
Management
| DirectAdmin Extended allows your customers to manage their DirectAdmin account via clientarea in your WHMCS system. |
| In this short guide we will present you the possibilities of our addon module. |
Management of FTP Accounts
| 1. You can manage your FTP accounts through creating, modifying and deleting. |
| File:DA18.png |
Management of Databases
| 2. Owing to MySQL Management you can create/delete new databases and users. You can also add users to particular databases and set up privileges. |
| File:DA20.png |
Management of Emails
| 3. You can manage all aspects related to e-mail accounts. |
| File:DA21.png |
Management of Subdomains
| 4. You can create and manage your subdomains. |
| File:DA22.png |
Management of Addon Domains
| 5. You can add and manage your addon domains. |
| File:DA23.png |
Management of Site Redirections
| 6. Easy access to site redirections is very useful. Within a few seconds, you can redirect the page to point to another. |
| File:DA24.png |
Log In To DirectAdmin
| 7. You can easily log in to your DirectAdmin by clicking 'Login to DirectAdmin' . |
| File:DA25.png |
Log In To Webmail
| 8. With a single click of a button 'Login to Webmail' you can log in to your Webmail. |
| File:DA26.png |
Tips
Common Problems
| 1. If after install, you get IonCube encoder problem (wrong version), please open a support ticket. We will provide you different version of the module encyrpted with the old version of IonCube. |
| 3. If you have problems with connection make sure that both ports 2082 and 2083 are open. |