Hosting Quota Notifications 1.X For WHMCS
Contents
|
About Proxmox VPS For WHMCS
| Proxmox VPS For WHMCS is a powerful module which allows you to automatically provision virtual servers to your clients. With its help, your customers can manage virtual servers, backups, firewall as well as access VNC/SPICE console and much more - all this directly in your WHMCS client area. |
- Admin Area Features:
| ✔ Create/Suspend/Unsuspend/Terminate User Account |
| ✔ Change User Role |
| ✔ Create/Suspend/Unsuspend/Terminate Server |
| ✔ Change Package - Supports Configurable Options |
| ✔ Boot/Reboot/Stop Server |
| ✔ Reinstall Server |
| ✔ View Server Status, Details And Statistics |
| ✔ View Graphs - With Ability To Change Time Scale of MRTG Graphs |
| ✔ Display Disk And Bandwidth Usage Of Each Product |
| ✔ Display CPU And Memory Usage Of Each Product |
| ✔ Access VNC/SPICE/noVNC Console |
| ✔ Migrate Server Between Nodes |
| ✔ Auto Node - Possibility To Automatically Create VM On Node With The Most Free Space |
| ✔ Configure Client Area Features Per Product |
| ✔ Import IP Address To Hosting IP Addresses Table |
| ✔ Return IP Address To IP Addresses Pool |
| ✔ Add Additional IP Address To VM |
| ✔ Enable Backups Routing |
- Proxmox Addon Features:
| ✔ Display Servers List Per VPS And Cloud |
| ✔ Manage IP Addresses Per Server |
| ✔ Display Servers Clusters |
| ✔ Display KVM Templates |
| ✔ Convert KVM VPS To KVM Template |
| ✔ Set Minimum VM ID For Product Without ID Ranges Defined |
| ✔ Synchronize Users Permissions |
| ✔ VM Cleaner - Manage VM Not Existing In Your WHMCS |
- Client Area Features:
| ✔ Boot/Reboot/Stop Server |
| ✔ Shutdown Server |
| ✔ Reinstall Server |
| ✔ Access VNC/SPICE/noVNC Console |
| ✔ Create/Restore Backups |
| ✔ Manage Backup Jobs |
| ✔ Manage Backups Within Defined Limits (Max Number Of Files & Max Size Of Files) |
| ✔ Manage Scheduled Backups Within Defined Limits (Max Number Of Files & Max Size Of Files) |
| ✔ View Graphs - With Ability To Change Time Scale of MRTG Graphs |
| ✔ View Task History |
| ✔ Manage Network Devices |
| ✔ Create Server Snapshot |
| ✔ Manage Firewall |
| ✔ View Server Status, Details And Statistics |
| ✔ Display Disk And Bandwidth Usage |
| ✔ Display CPU And Memory Usage |
| ✔ Easy Product Upgrade/Downgrade |
- General Info:
| ✔ Supports PVE And PAM Authentication |
| ✔ Server Resources Chosen During Order |
| ✔ Ability To Upgrade Server Resources |
| ✔ Integrated With Advanced Billing For WHMCS - Server Resource Usage Billing (read more) |
| ✔ Integrated With IP Manager For WHMCS - Complete Management of IP Pools (read more) |
| ✔ Multi-Language Support |
| ✔ Supports Proxmox VE 3.4 and Earlier (V4.0 Coming Soon) |
| ✔ Supports IPv4 and IPv6 |
| ✔ Supports WHMCS Templates Five and Six |
| ✔ Supports WHMCS V5 and V6 |
| ✔ Requires PHP 5.3 and Later |
- Available Configurable Options:
| ✔ KVM: |
| ✔ Number of CPU Sockets |
| ✔ Number of Cores Per Socket |
| ✔ CPU Weight For VM |
| ✔ Amount of RAM |
| ✔ Disk Space |
| ✔ Network Rate |
| ✔ IPv4 Addresses |
| ✔ IPv6 Addresses |
| ✔ Backups Limit |
| ✔ Backups Files Limit |
| ✔ Bandwidth Limit |
| ✔ VM Template |
| ✔ ISO Image |
| ✔ OpenVZ: |
| ✔ The Number of CPU Sockets |
| ✔ Amount of SWAP |
| ✔ CPU Weight For a VM |
| ✔ Amount of RAM |
| ✔ Disk Space |
| ✔ IPv4 Addresses |
| ✔ IPv6 Addresses |
| ✔ Backups Limit |
| ✔ Backups Files Limit |
| ✔ Bandwidth Limit |
| ✔ VM Templates |
Installation and Configuration
| This tutorial will show you how to successfully install and configure Proxmox VPS For WHMCS. We will guide you step by step through the whole installation and configuration process. |
Installation
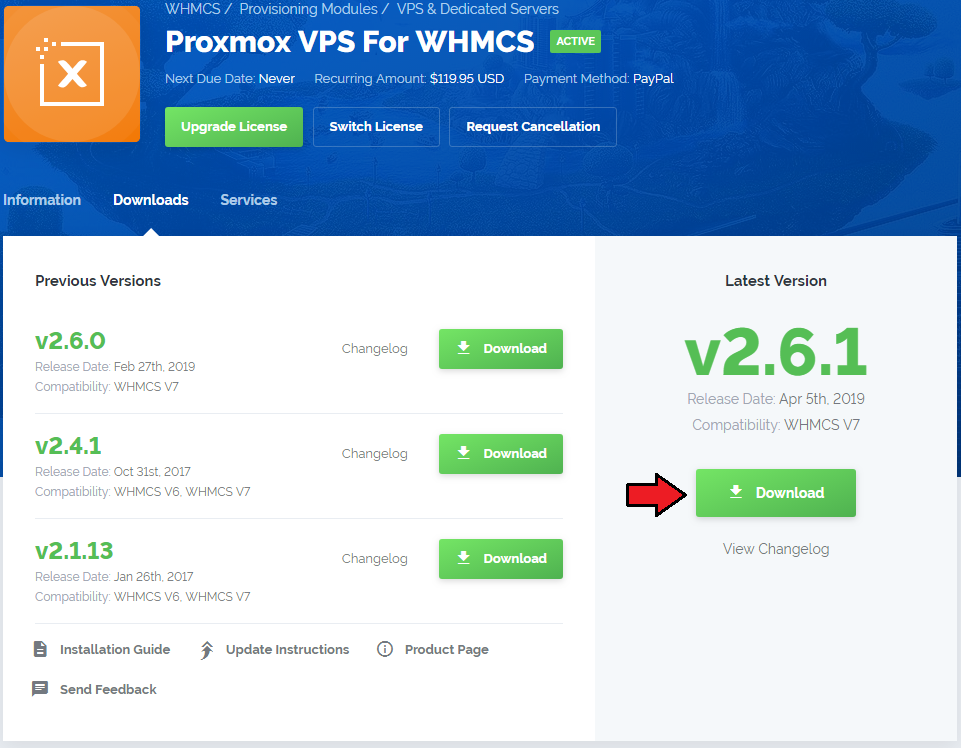
| 1. Log in to your client area and download Proxmox VPS For WHMCS. |
|
| 2. Extract the module, open 'UploadOnProxmoxServer' and upload content of proper version on all Proxmox servers into '/usr/share/novnc-pve/' folder. Note: If you wish to allow noVNC consoles, you need to configure product using PVE realm and set user permissions to 'PVEVMUser '. |
| 3. Upload and extract the module into the main WHMCS directory. |

|
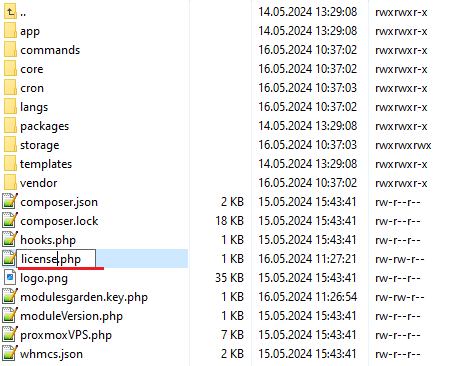
| 4. When you install Proxmox VPS for the first time you have to rename 'license_RENAME.php' file. File is located in 'modules/servers/proxmoxVPS/license_RENAME.php'. Rename it from 'license_RENAME.php' to 'license.php'. |
|
| 5. In order to configure your license key, you have to edit the previously renamed 'license.php' file. Enter your license key between quotation marks as presented on the following screen. |

|
Activation of Proxmox Addon
| 6. Firstly, activate Proxmox Addon. To do so, log in into your WHMCS and press 'Setup' → 'Addon Modules'. Find 'Proxmox Addon' and press 'Activate'. |
| File:PX2 5.png |
| 7. In the next step you need to permit access to this module. To do so, click on 'Configure' button, tick 'Full Administrator' and press 'Save Changes'. |
| File:PX2 6.png |
Configuration of Server
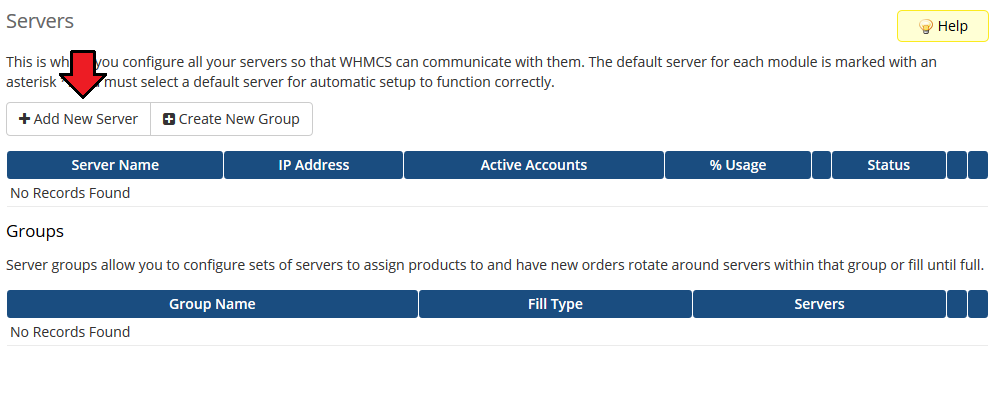
| 8. Now, we will show you how to configure a new product. Go to 'Setup' → 'Products/Services' → 'Servers' and press 'Add New Server' button. |
|
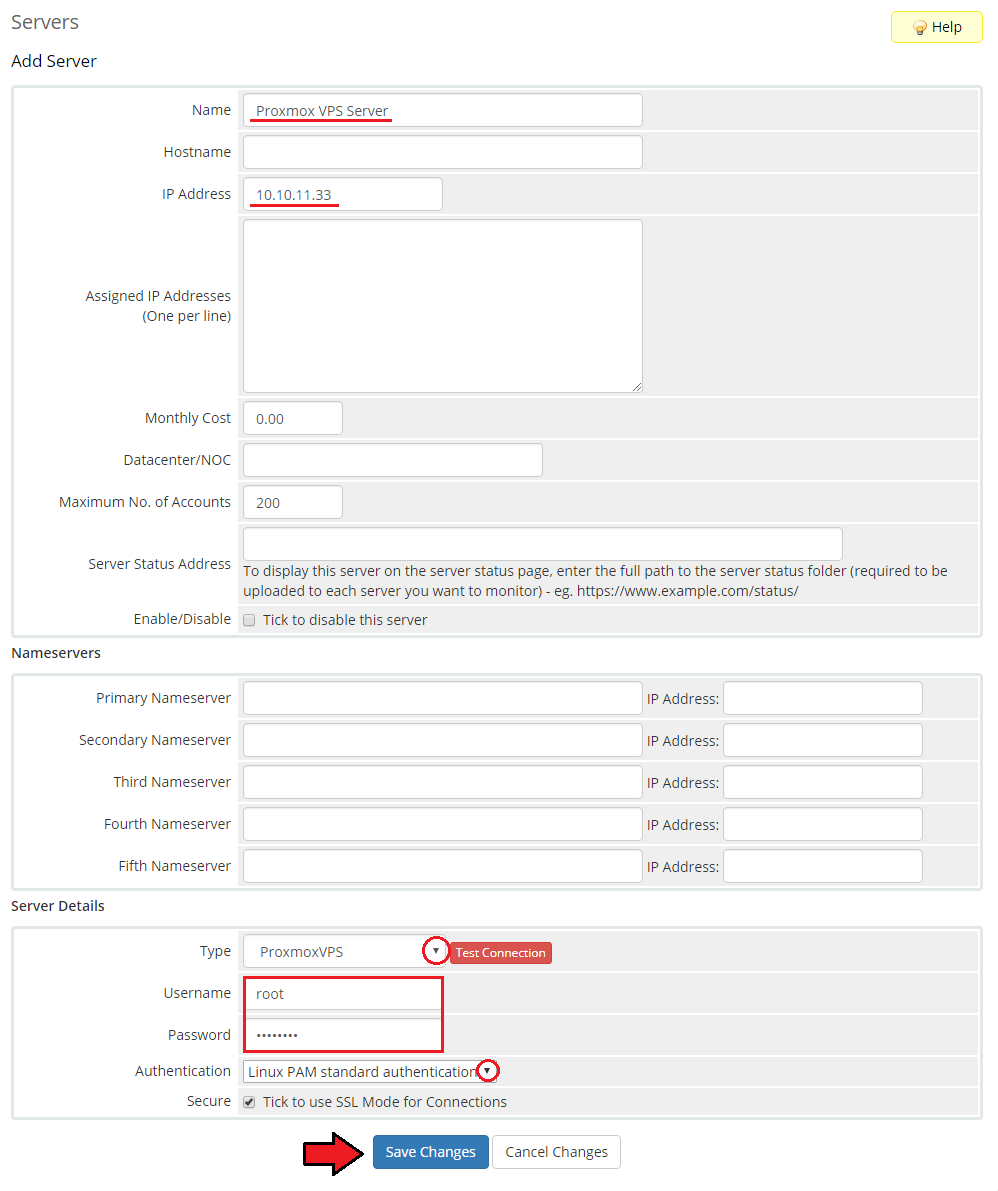
| 9. Next, enter your server name, IP address, username and password. Choose authentication type from 'Authentication' and 'Proxmox VPS' from 'Type' dropdown menus. 'Save Changes'. |
|
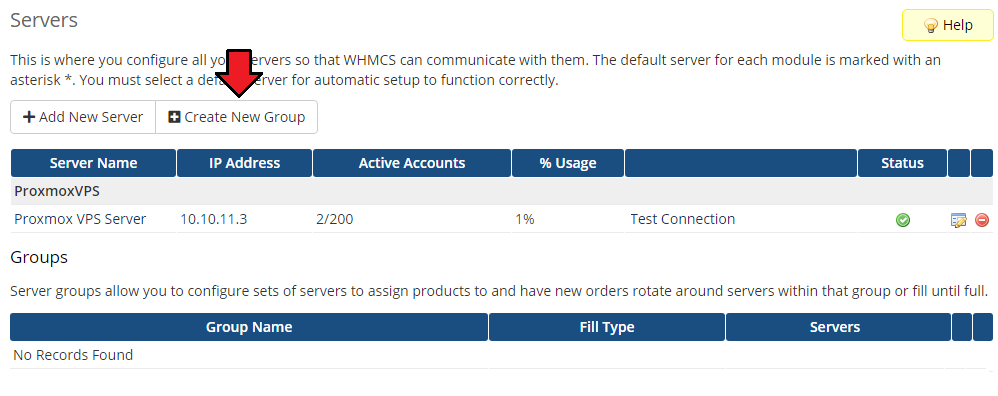
| 10. After configuring your server correctly, you will see a following screen. In order to check connection with a Proxmox server, simply press 'Test Connection' as shown on the screen below. |
|
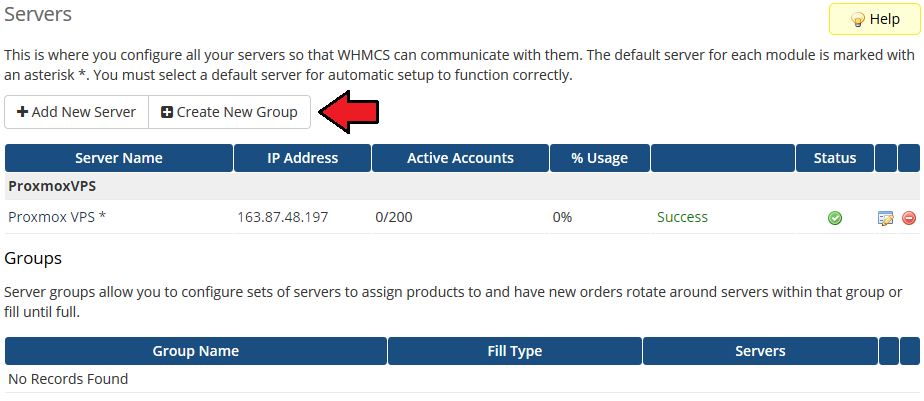
| 11. It is time to create a server group, to do so click on 'Create Server Group'. |
|
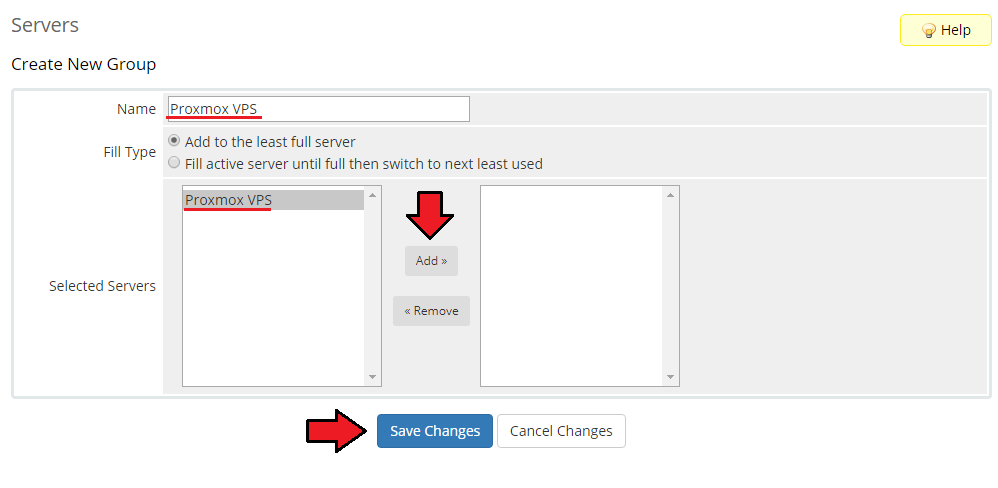
| 12. Enter name, click on your previously created server, press 'Add' and afterwards 'Save Changes'. |
|
Configuration of Product
| 13. In order to create and configure a product go to 'Setup' → 'Products/Services' → 'Products/Services'. Click on 'Create a New Group'. |
| File:PX2 12.png |
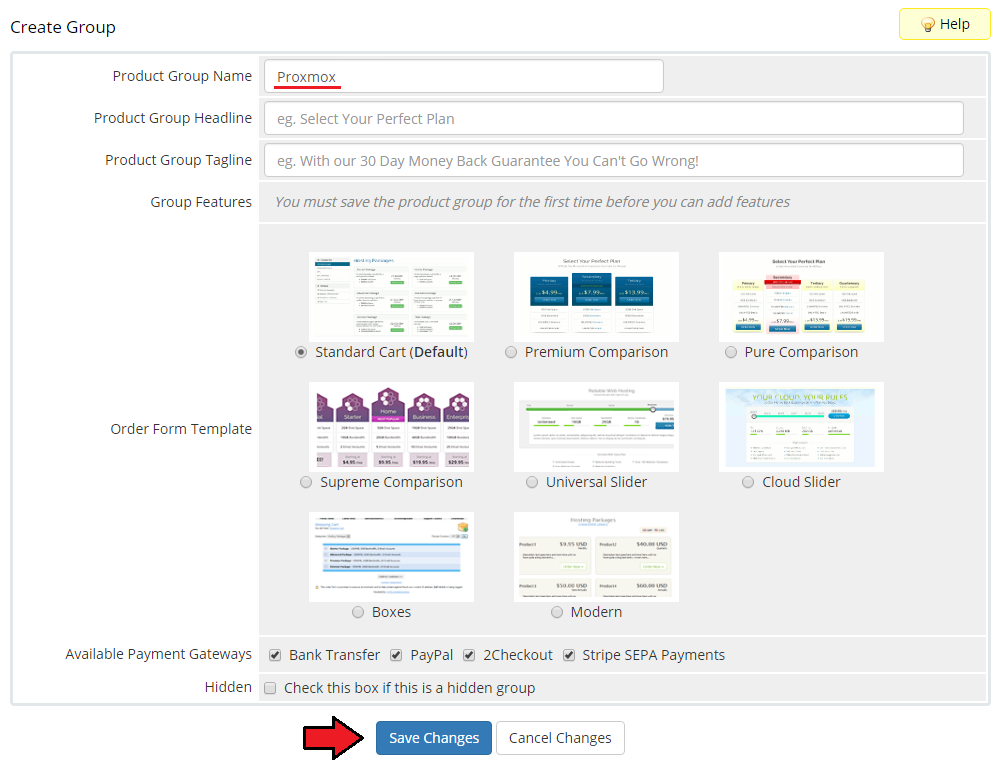
| 14. Enter product group name and press 'Save Changes'. |
|
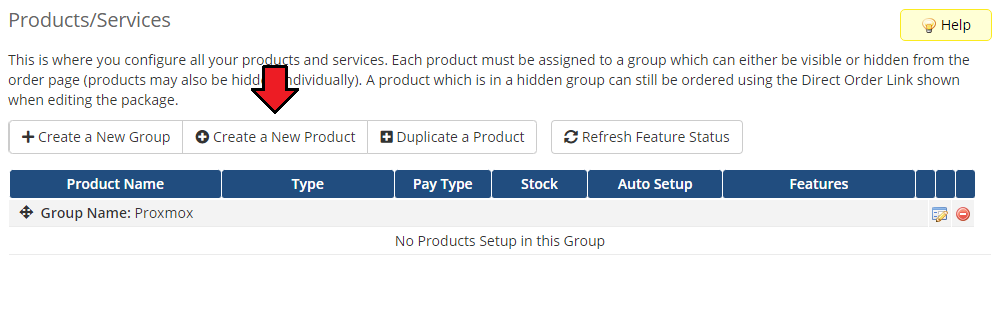
| 15. When you have a product group, you can assign your product to it. To create a product click on 'Create a New Product'. |
|
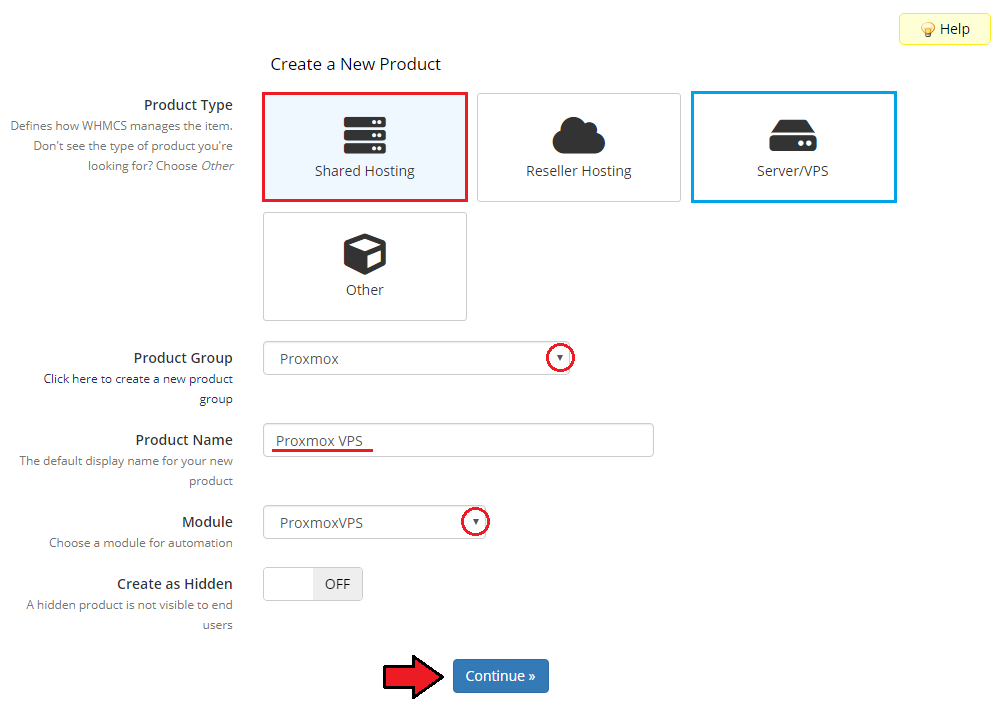
| 16. Afterwards, choose your product group and type from dropdown menus, enter your product name and press 'Continue'. 'Product Type' should be set to 'Dedicated/VPS Server' in order to add nameservers later. |
|
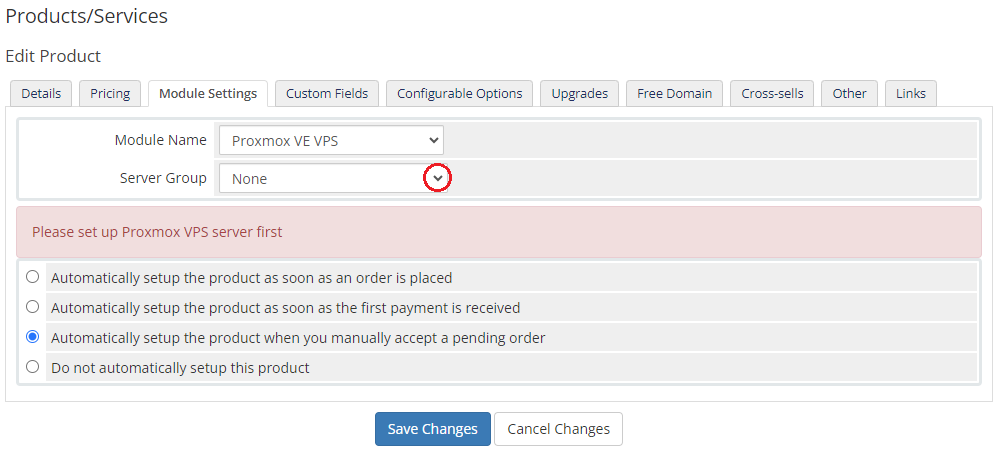
| 17. Now go to 'Module Settings' section, choose both 'Proxmox VPS' and your previously created server group from dropdown menus. Next, 'Save Changes'. |
|
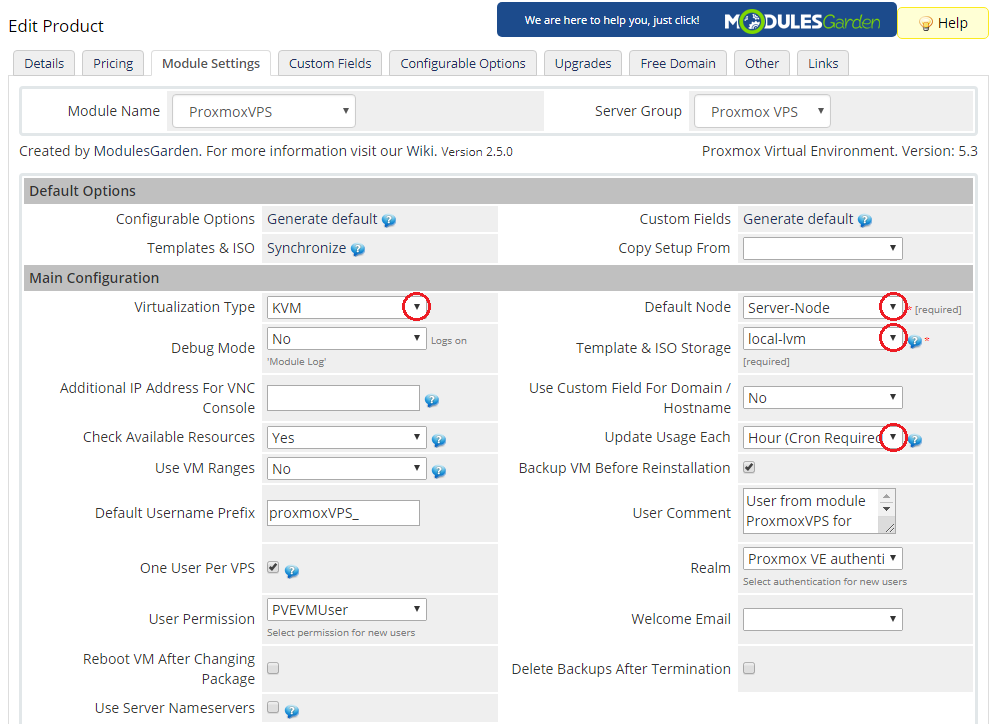
| 18. From dropdown menus choose 'Virtualization Type', 'Default Node' and 'Template & ISO Storage'. Available virtualization types: |
|
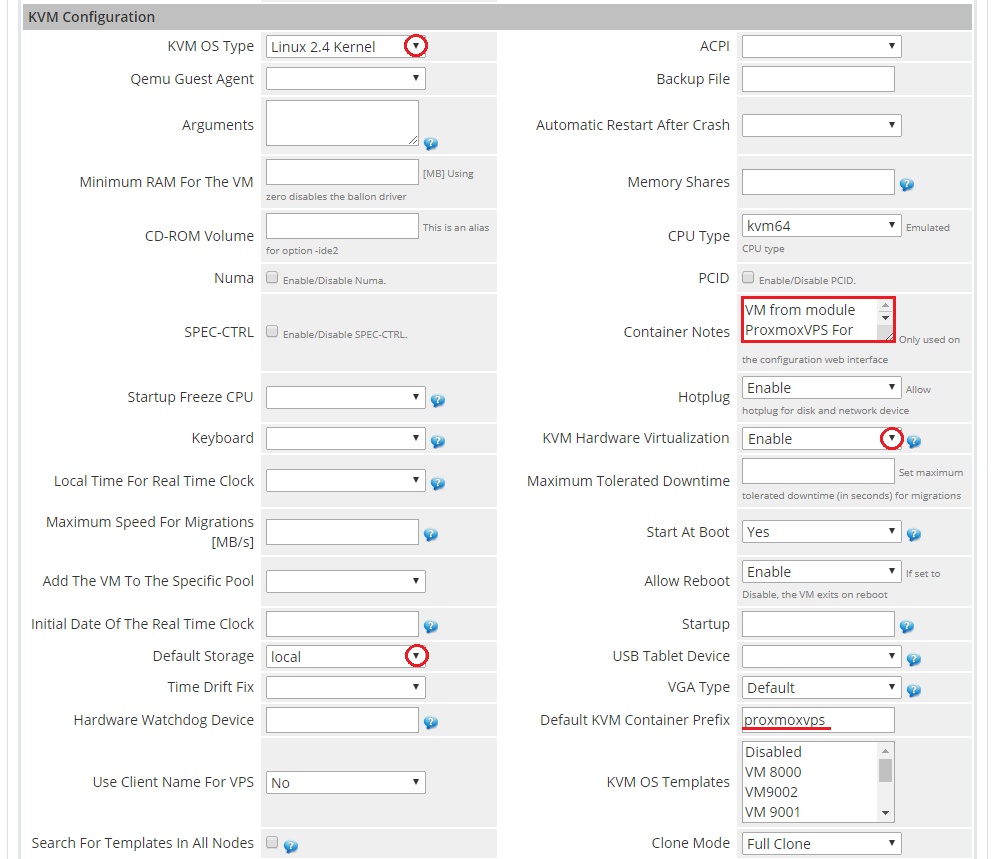
| 19. Setting KVM virtualization type (skip, if you have chosen OpenVZ or LXC virtualization type). From dropdown menus choose 'KVM OS Type' and 'Default Storage'. |
|
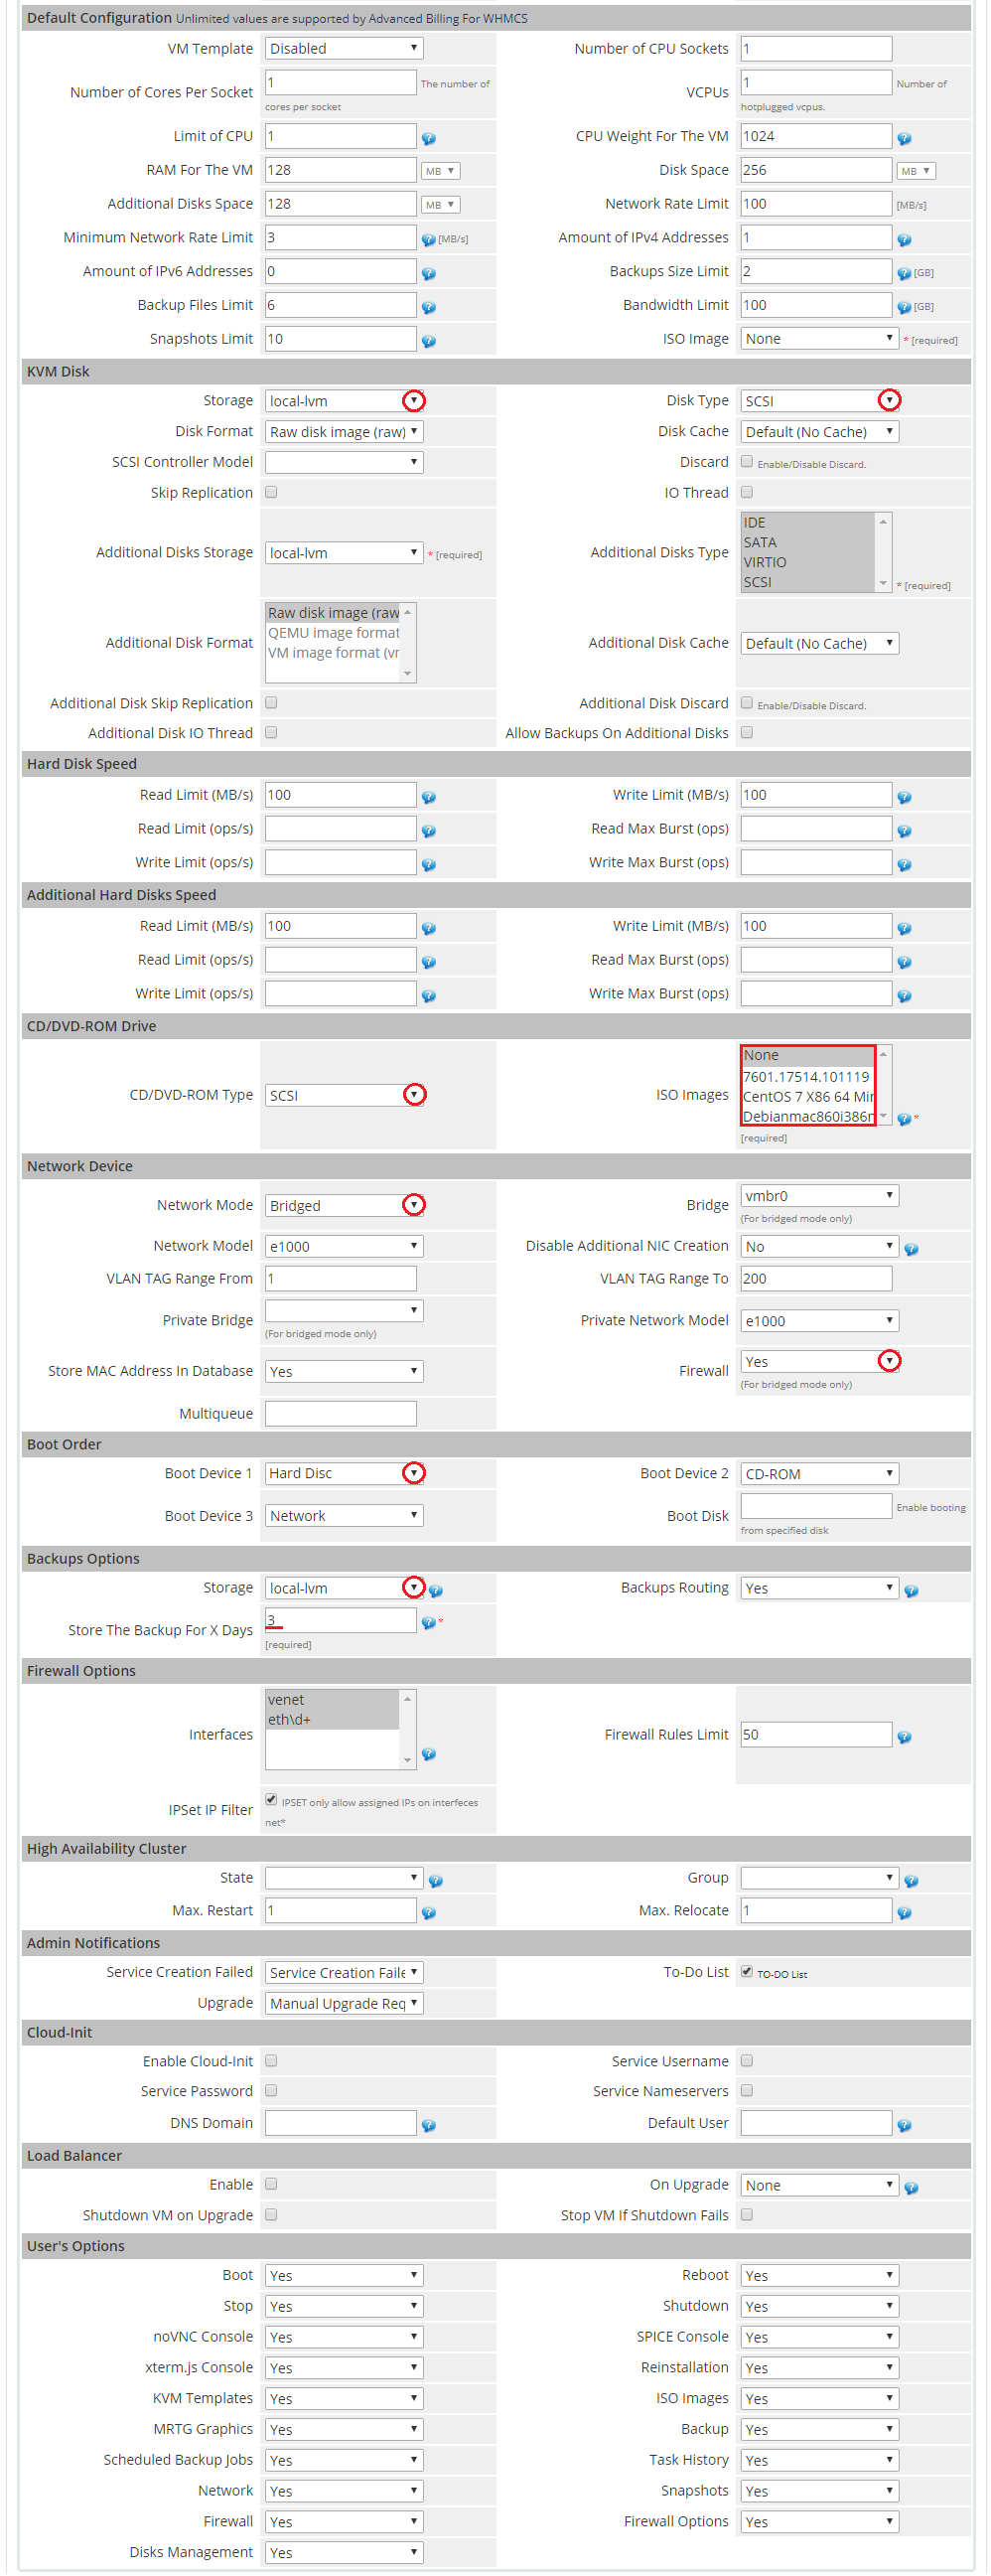
| 20. Now, select desired values from 'Storage', 'Disk Type', 'CD/DVD-ROM Type', 'ISO Image', 'Network Mode' and 'Network Model'. Additionally, set up backups in 'Backups' section through selecting values from 'Storage' and 'Backups Routing' dropdown menus. |
|
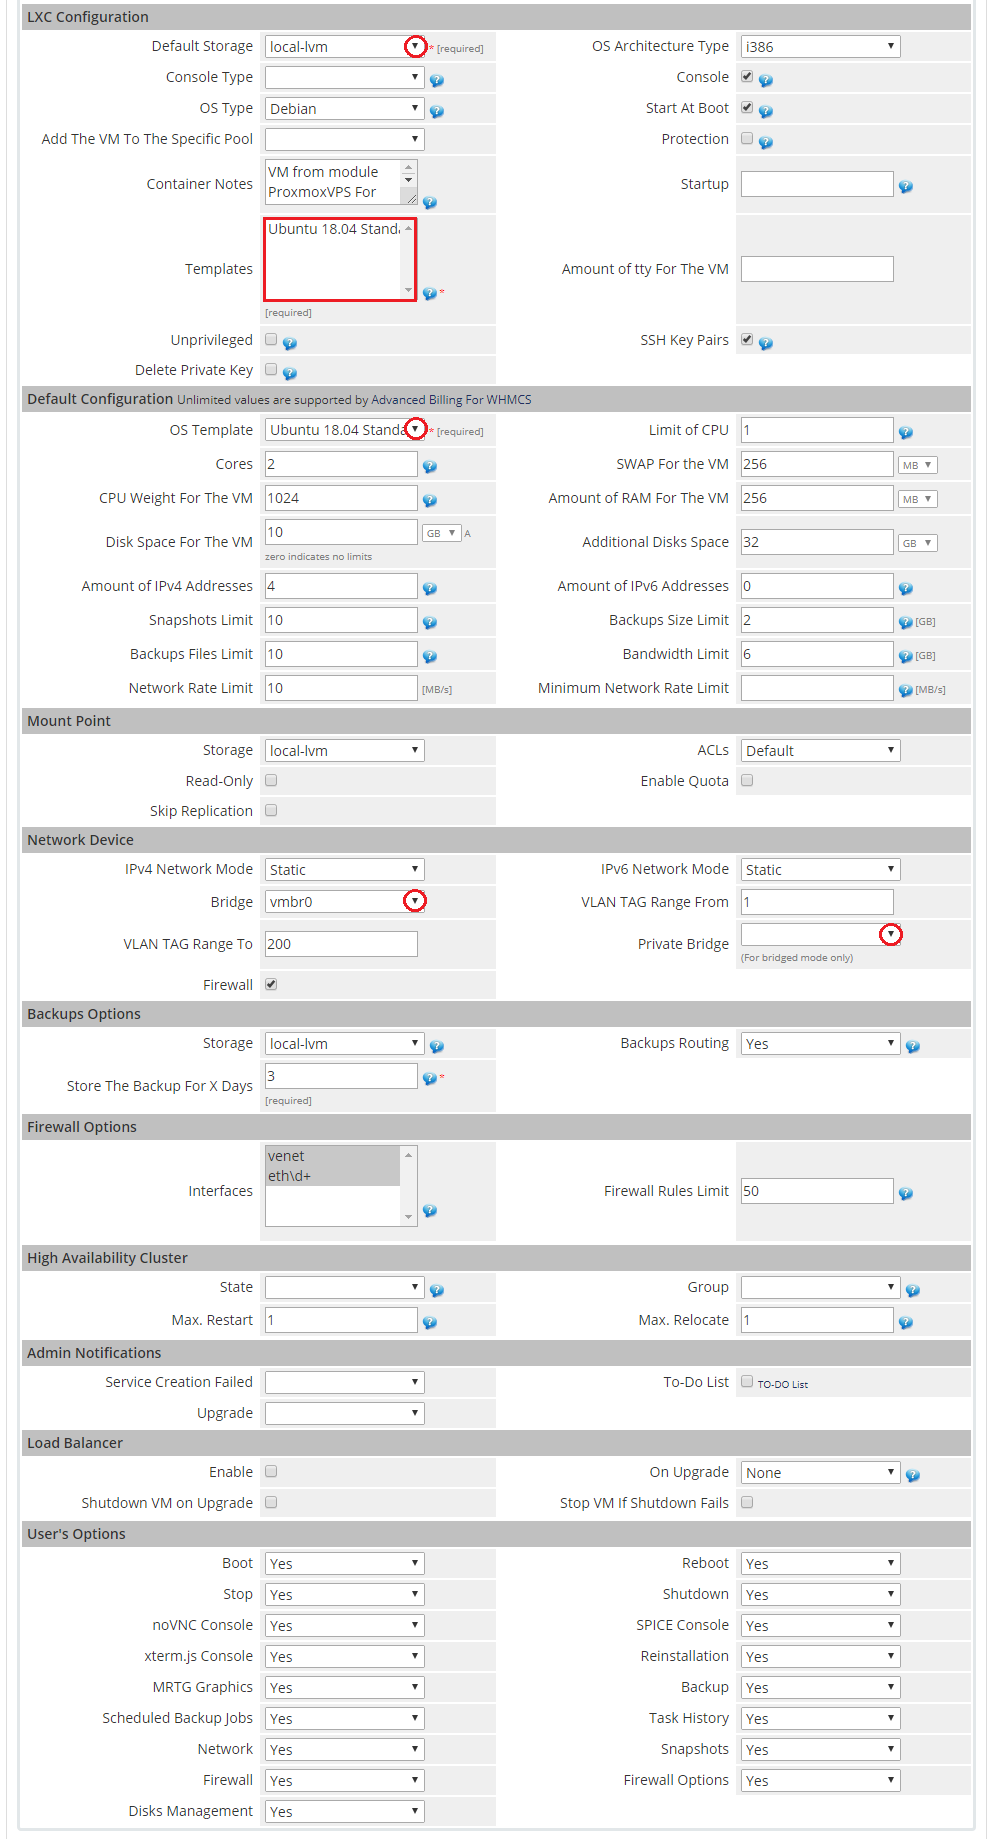
| 21. Setting of LXC virtualization type (skip, if you have chosen OpenVZ or KVM virtualization type). From dropdown menus choose 'Default Storage' , 'Template' and 'Bridge'. |
|
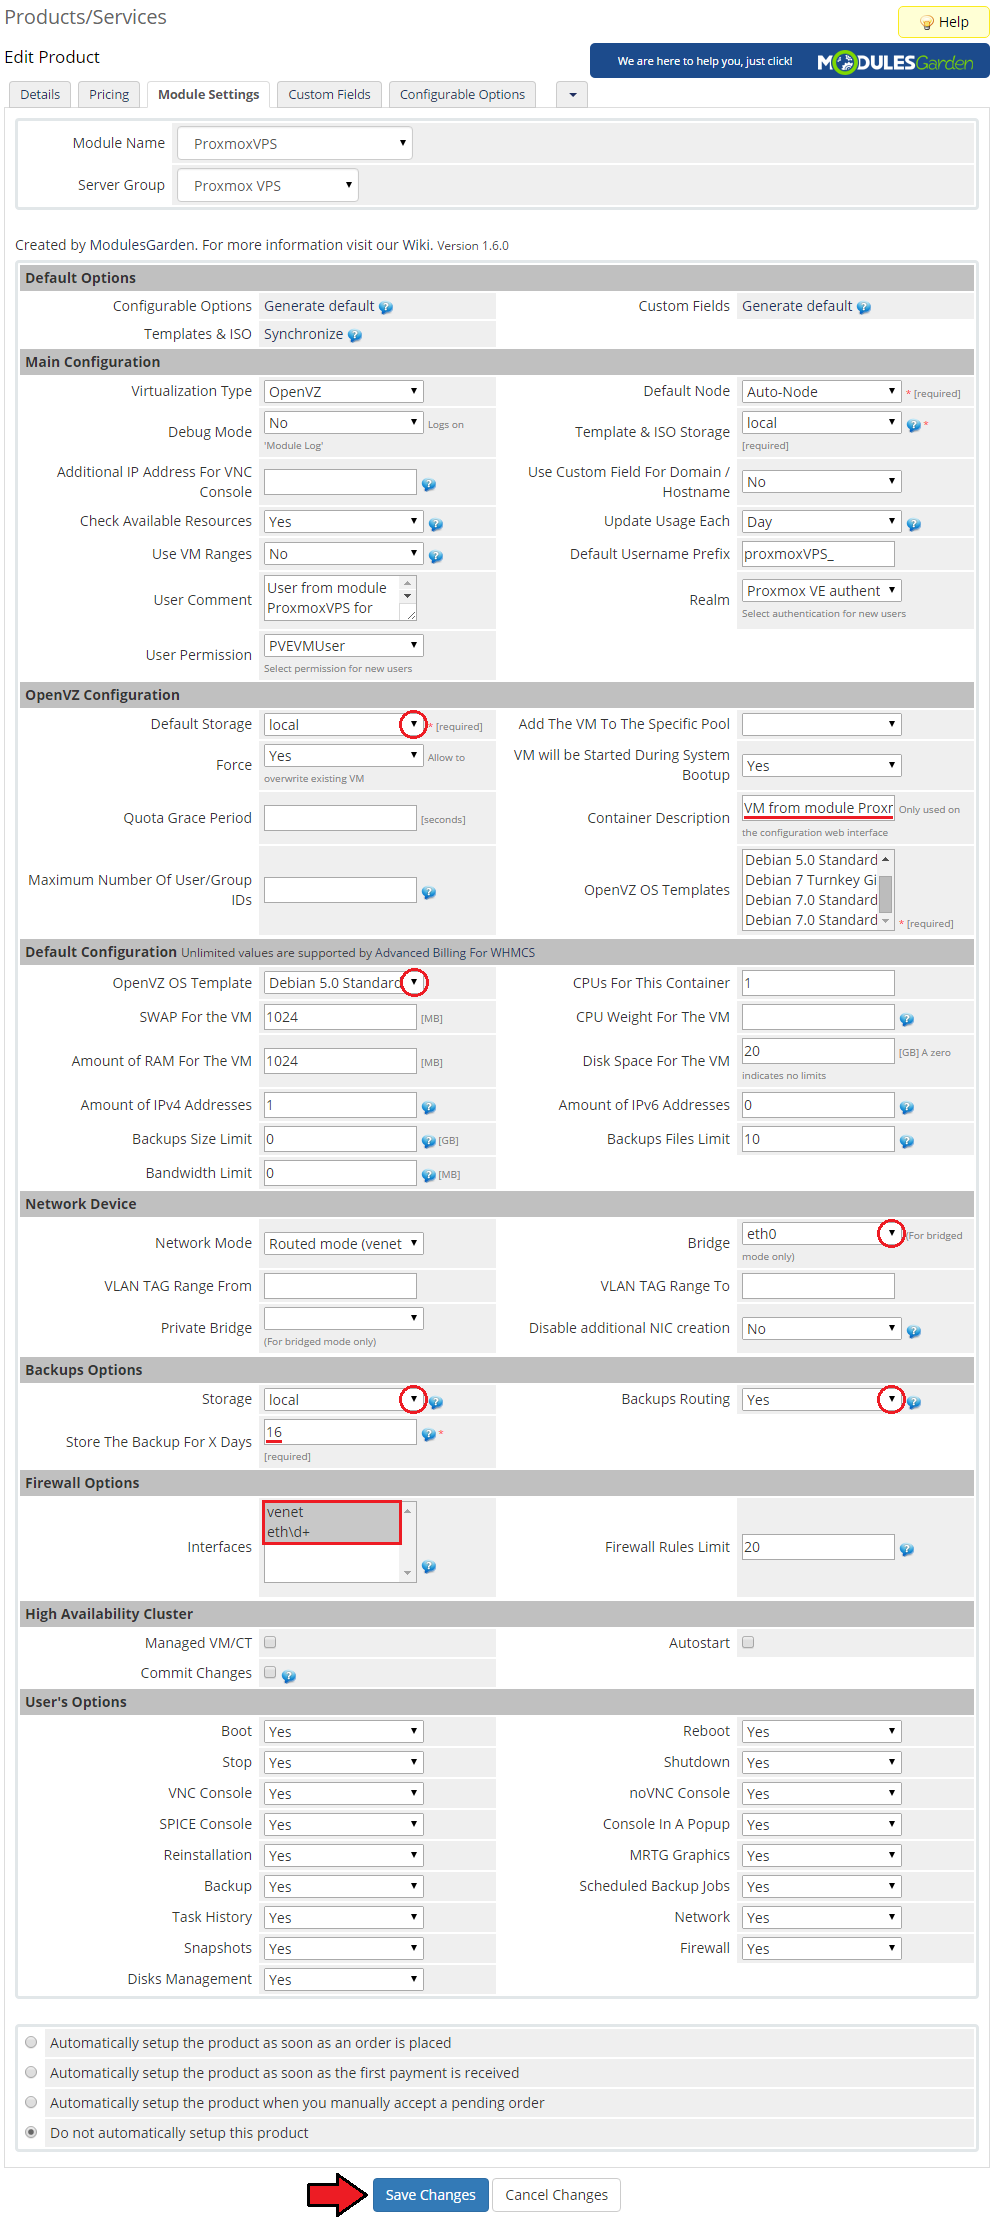
| 22. Setting of OpenVZ virtualization type (skip, if you have chosen KVM virtualization type). From dropdown menus choose 'Default Storage' and 'OpenVZ OS Template'. |
|
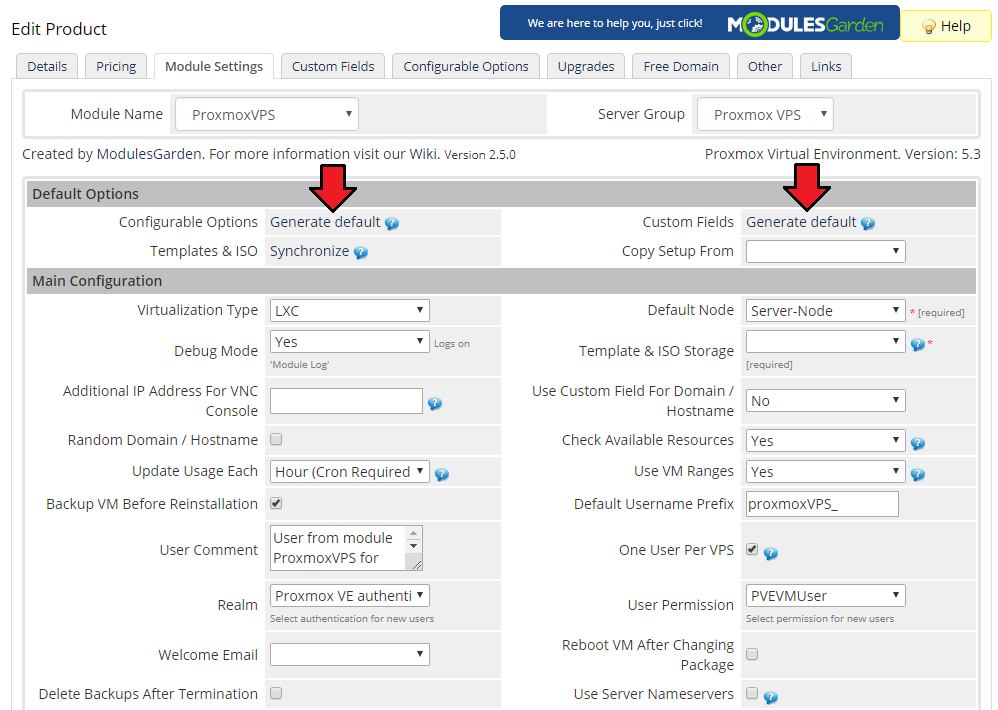
| 23.Afterwards, press 'Generate default' nearby 'Configurable Options' and 'Custom Fields'. |
|
| By doing so, you have just added required custom fields and optional configurable options listed in the table below. |
| KVM |
Open VZ |
|---|---|
| The number of CPU sockets |
The number of CPU sockets |
| The number of cores per socket |
Amount of SWAP |
| CPU weight for a VM |
CPU weight for a VM |
| Amount of RAM |
Amount of RAM |
| Disk Space |
Disk Space |
| Network Rate |
IPv4 Addresses |
| IPv4 Addresses |
IPv6 Addresses |
| IPv6 Addresses |
Backups Limit |
| Backups Limit |
Backups Files Limit |
| Backups Files Limit |
Bandwidth Limit |
| Bandwidth Limit |
VM Template |
| VM Template |
|
| ISO Image |
24. At the end of the product configuration you have to add a cron job as shown below (each 5 minutes suggested).
php -q /your_whmcs/modules/servers/proxmoxVPS/cron/cron.phpyou may Do not forget to replace 'your_whmcs' with your WHMCS root location. |
| Congratulations! You have just finished the installation and configuration of the module. |
Configuration of Addon
| 24. Proceed to 'Addons' → 'Proxmox Addon' → 'Settings' → 'General Settings' and set up cron jobs listed under 'Cron' section. |
| File:PX2 21 1.png |
| 25. Adding a new IP address (if you are not using IP Manager For WHMCS). In order to create a new product you have to add product 'Dedicated IP ' to 'IP Addresses' list in 'Proxmox' addon module. |
| File:PX2 22.png |
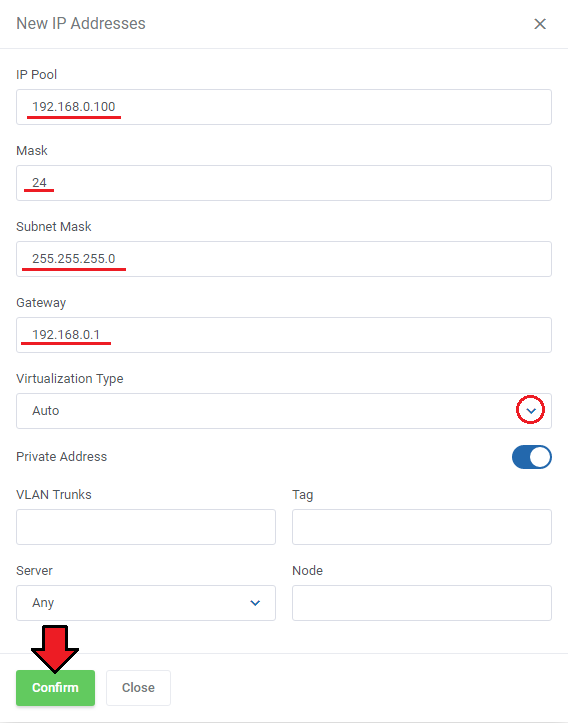
| 26. Start by typing desired IP address and mask into 'IP Pool'. Next, choose a server from 'Server' dropdown menu and define which virtualization it should be applied to through selecting it from 'Virtualization' dropdown menu. |
|
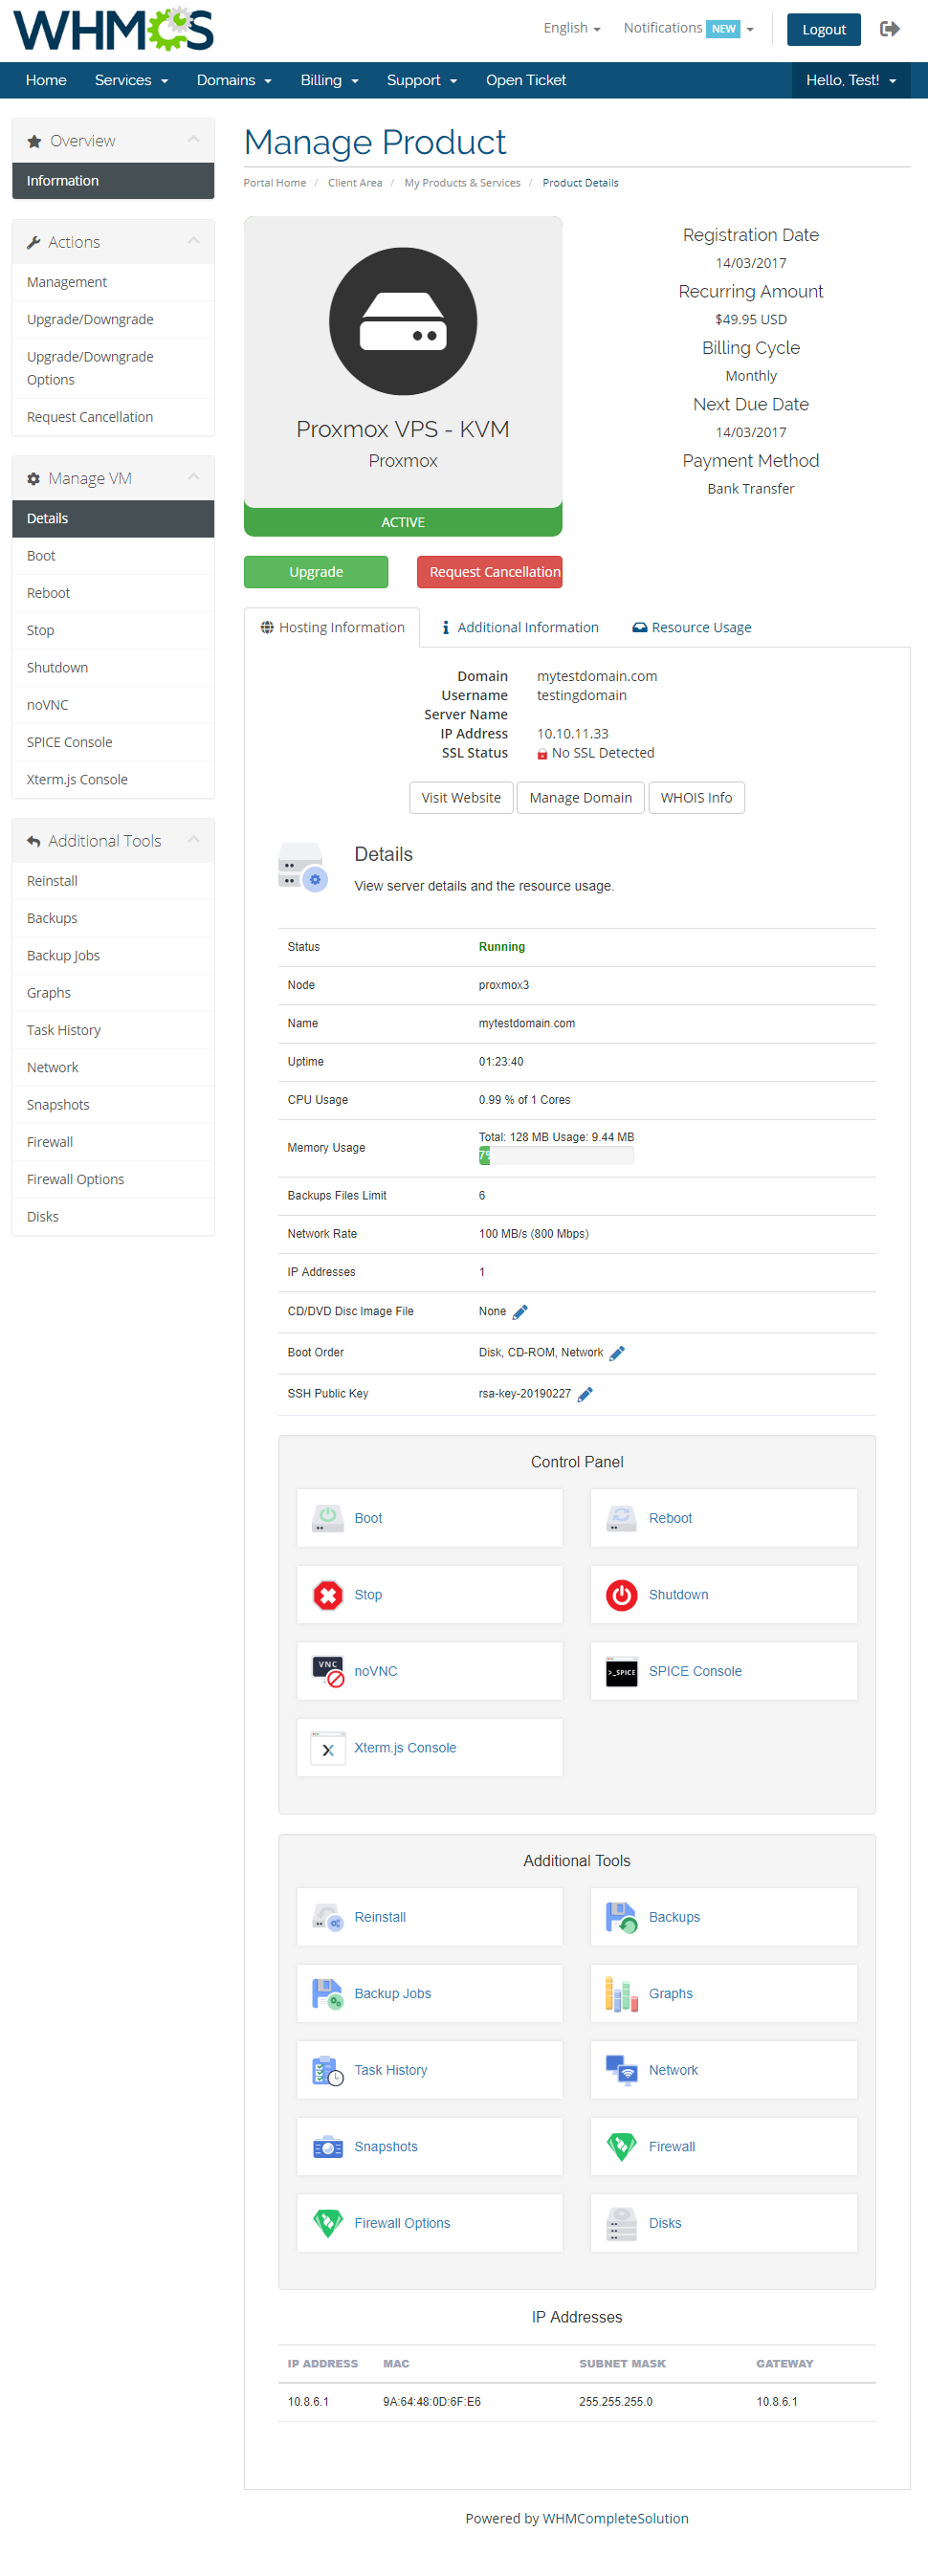
| 27. You are now able to create a new product using the previously added IP address. If you use KVM virtualization type, the client area in a successfully created product should look similar to the one on the screen below. |
|
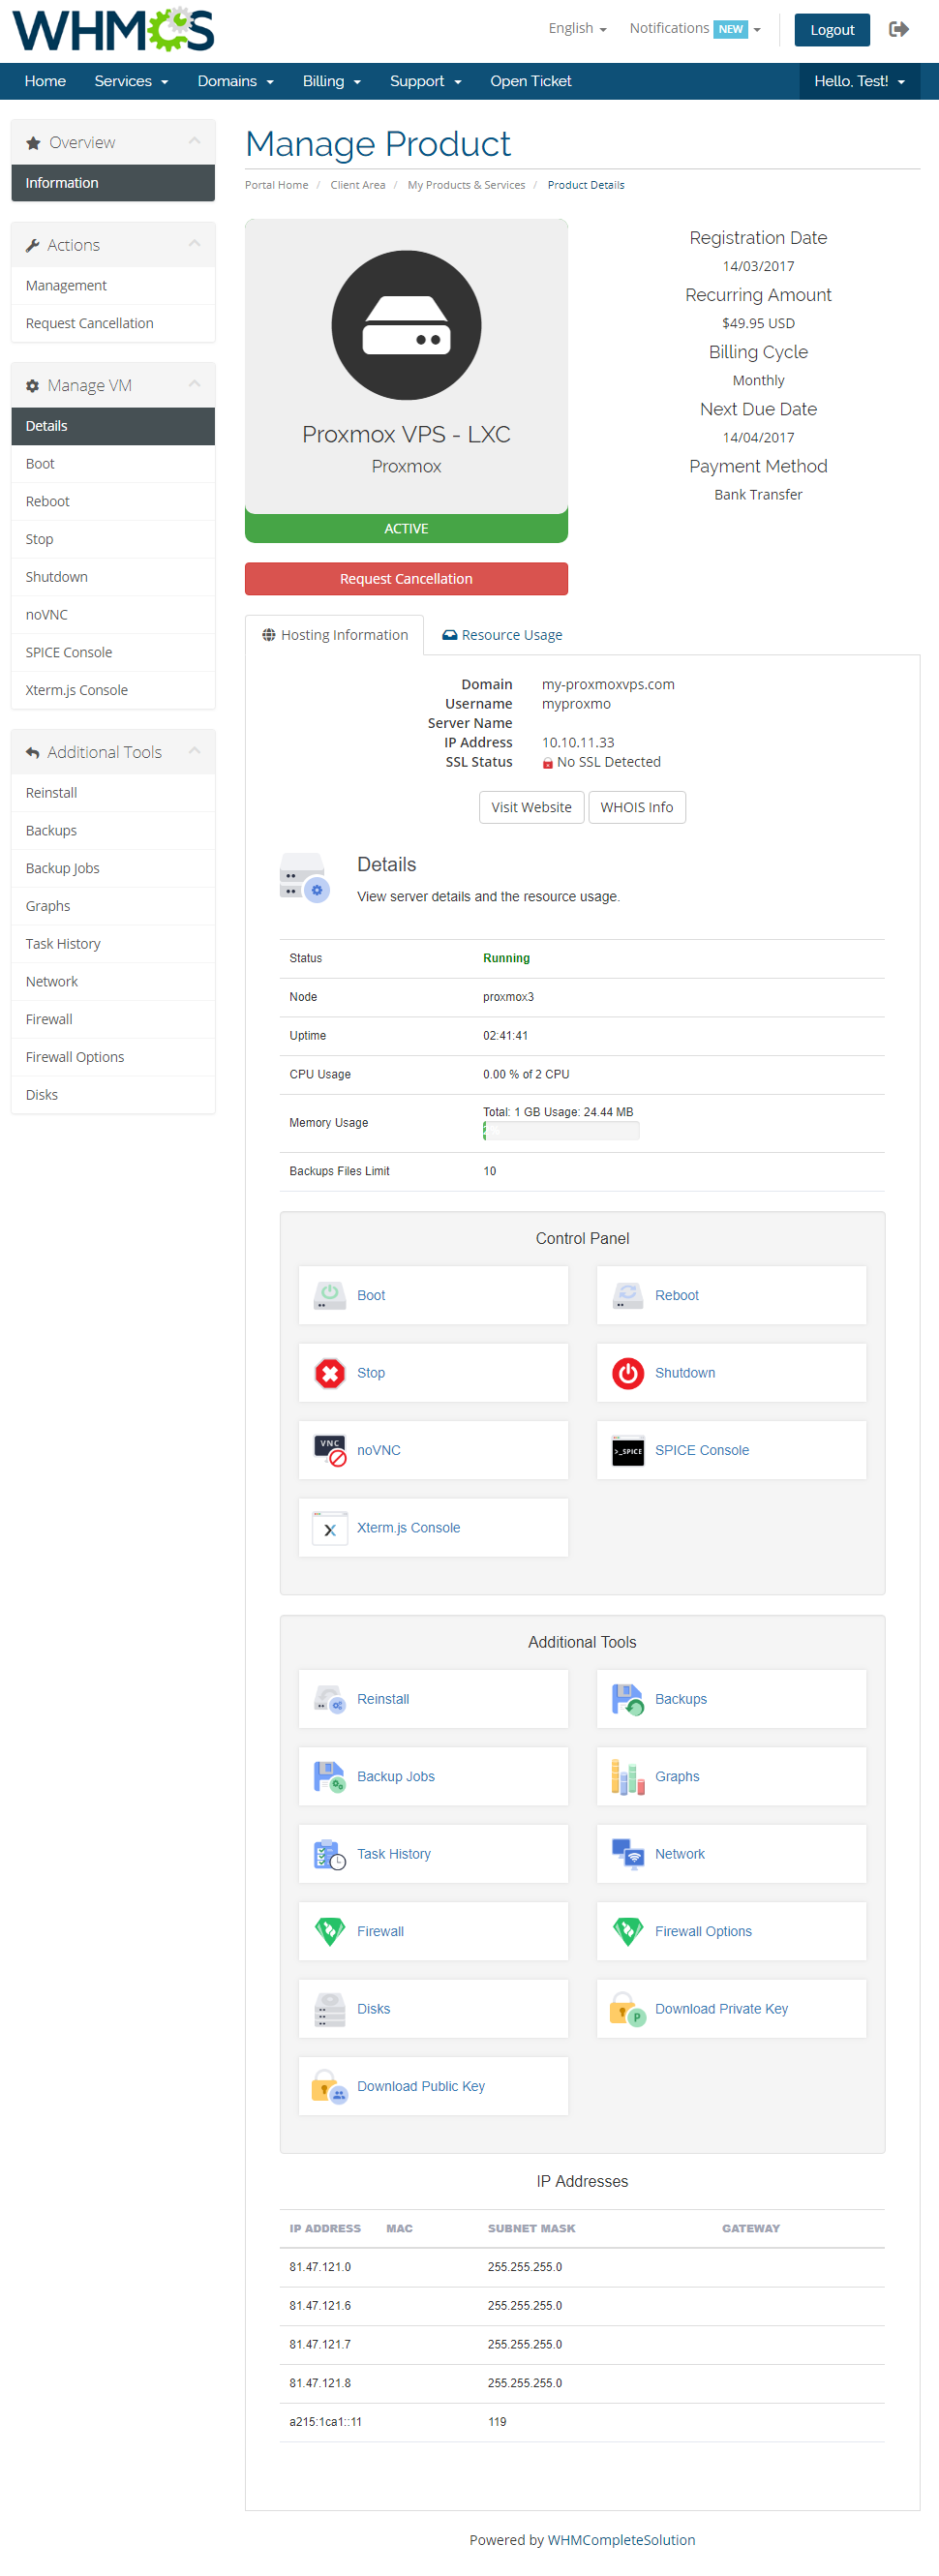
| 28.The client area with an OpenVZ virtualization type product looks quite similar. |
|
Management
| Proxmox VPS allows your customers to manage their PVE accounts via client area in your WHMCS system. You can monitor and manage each product from your WHMCS admin area. |
Admin Area
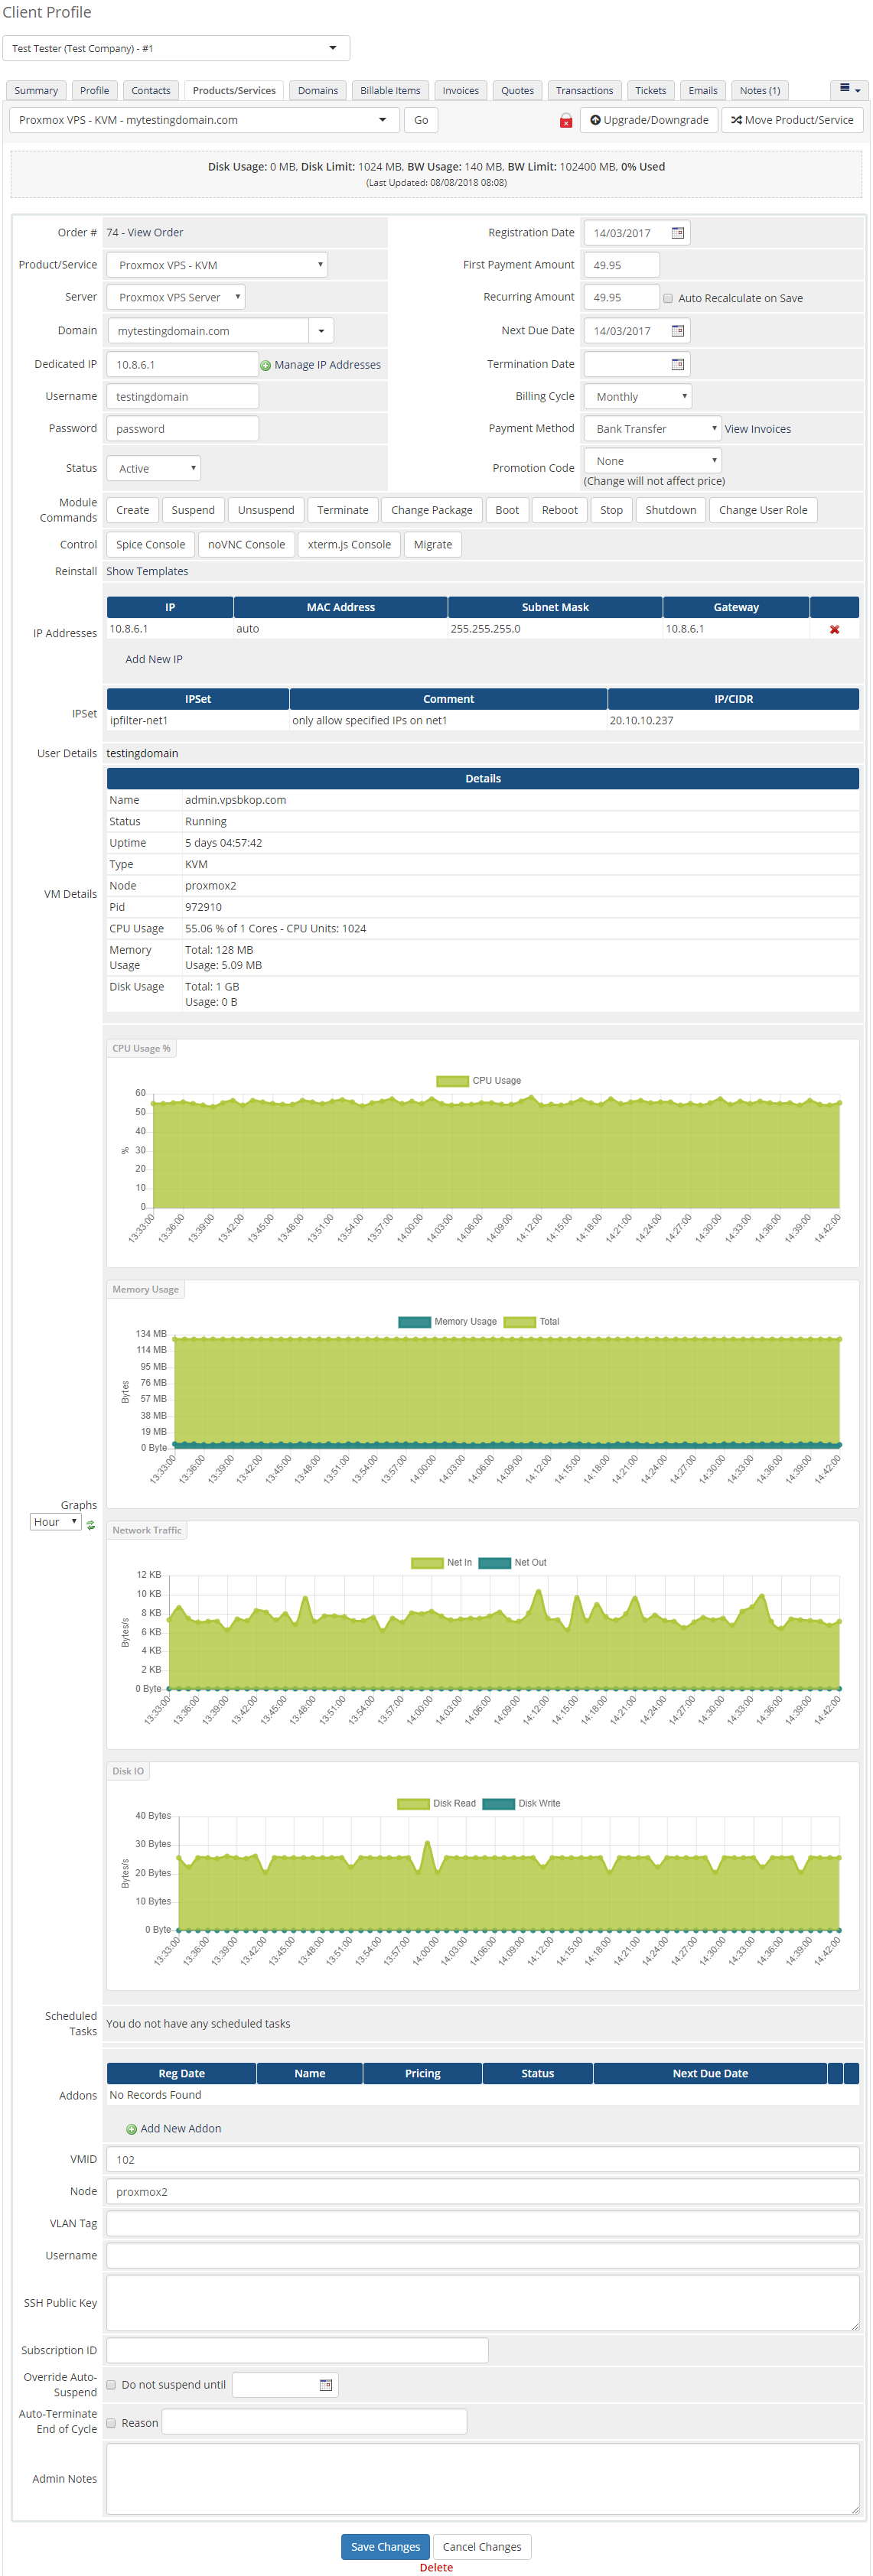
| From the admin area you are able to view details and manage your client's VMs, access VMs consoles and even migrate VMs between nodes. You are also able to add an IP address to a product. To do so, press 'Add New IP' as shown on the following screen. |
|
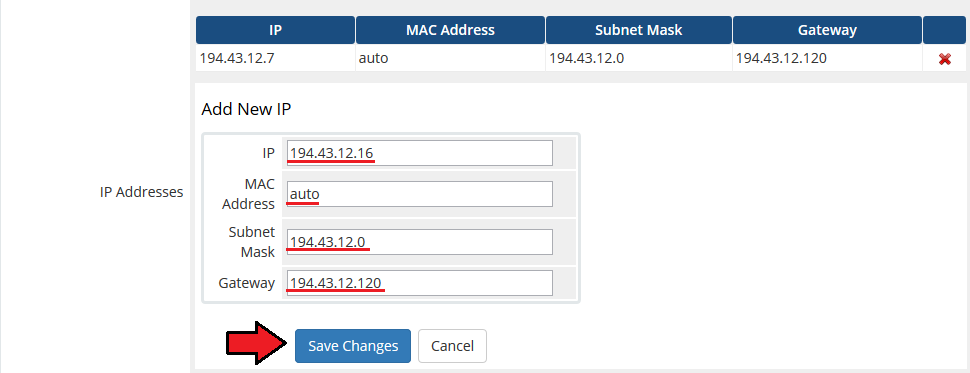
| Afterwards, enter IP address in a textbox and confirm through pressing 'Save Changes'. |
|
Management of Addon
Server List
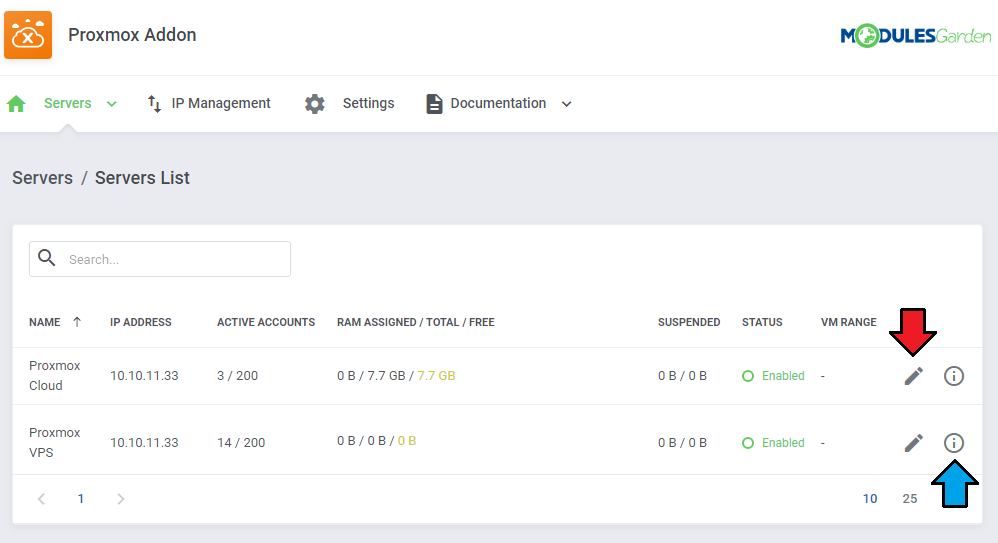
| In 'Addons' → 'Proxmox Addon' → 'Servers' → 'Servers List' you can find configured Proxmox servers with their IP address, number of active accounts, status etc. RAM details:
Suspended - number of suspended accounts per their size in MB, |
|
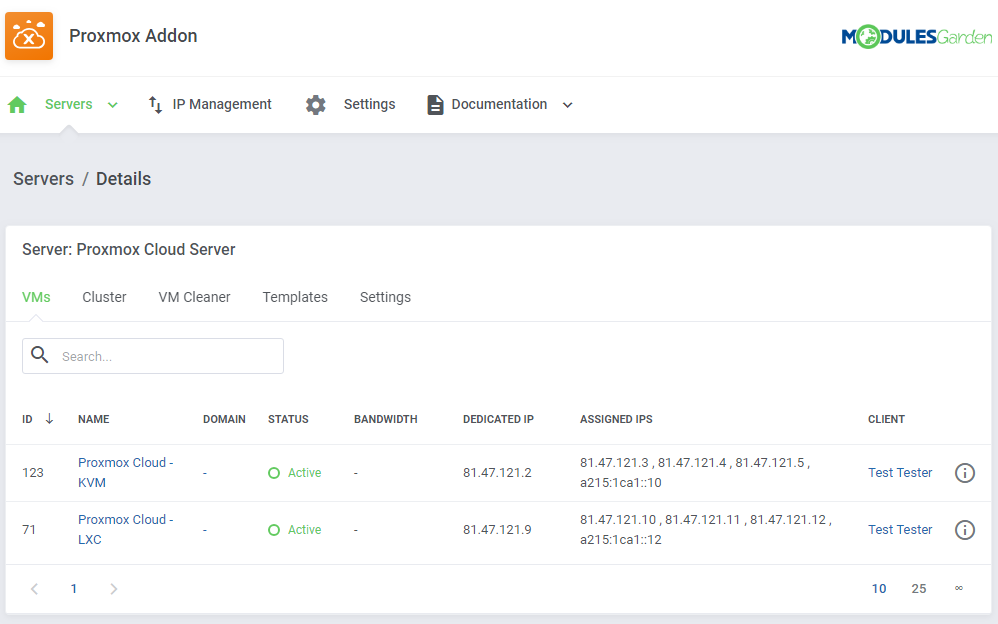
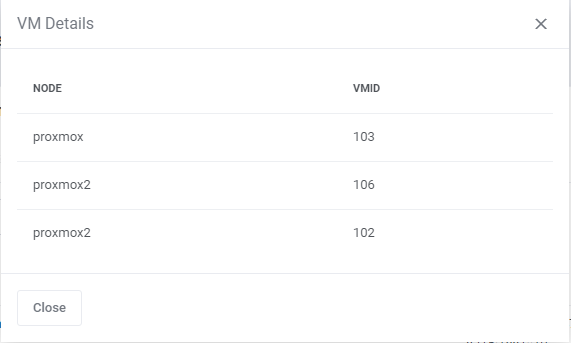
| Importat: VM ID range allows you to sort VMs depending on the server they were created on.
Define VM Range and save changes. |
|
| Through pressing 'Edit' you will be moved to a server edition page. |
|
IP Management
| Under 'IP Management' tab you can add, edit and remove IP addresses of Proxmox products. |
| File:PX2 30.png |
Clusters
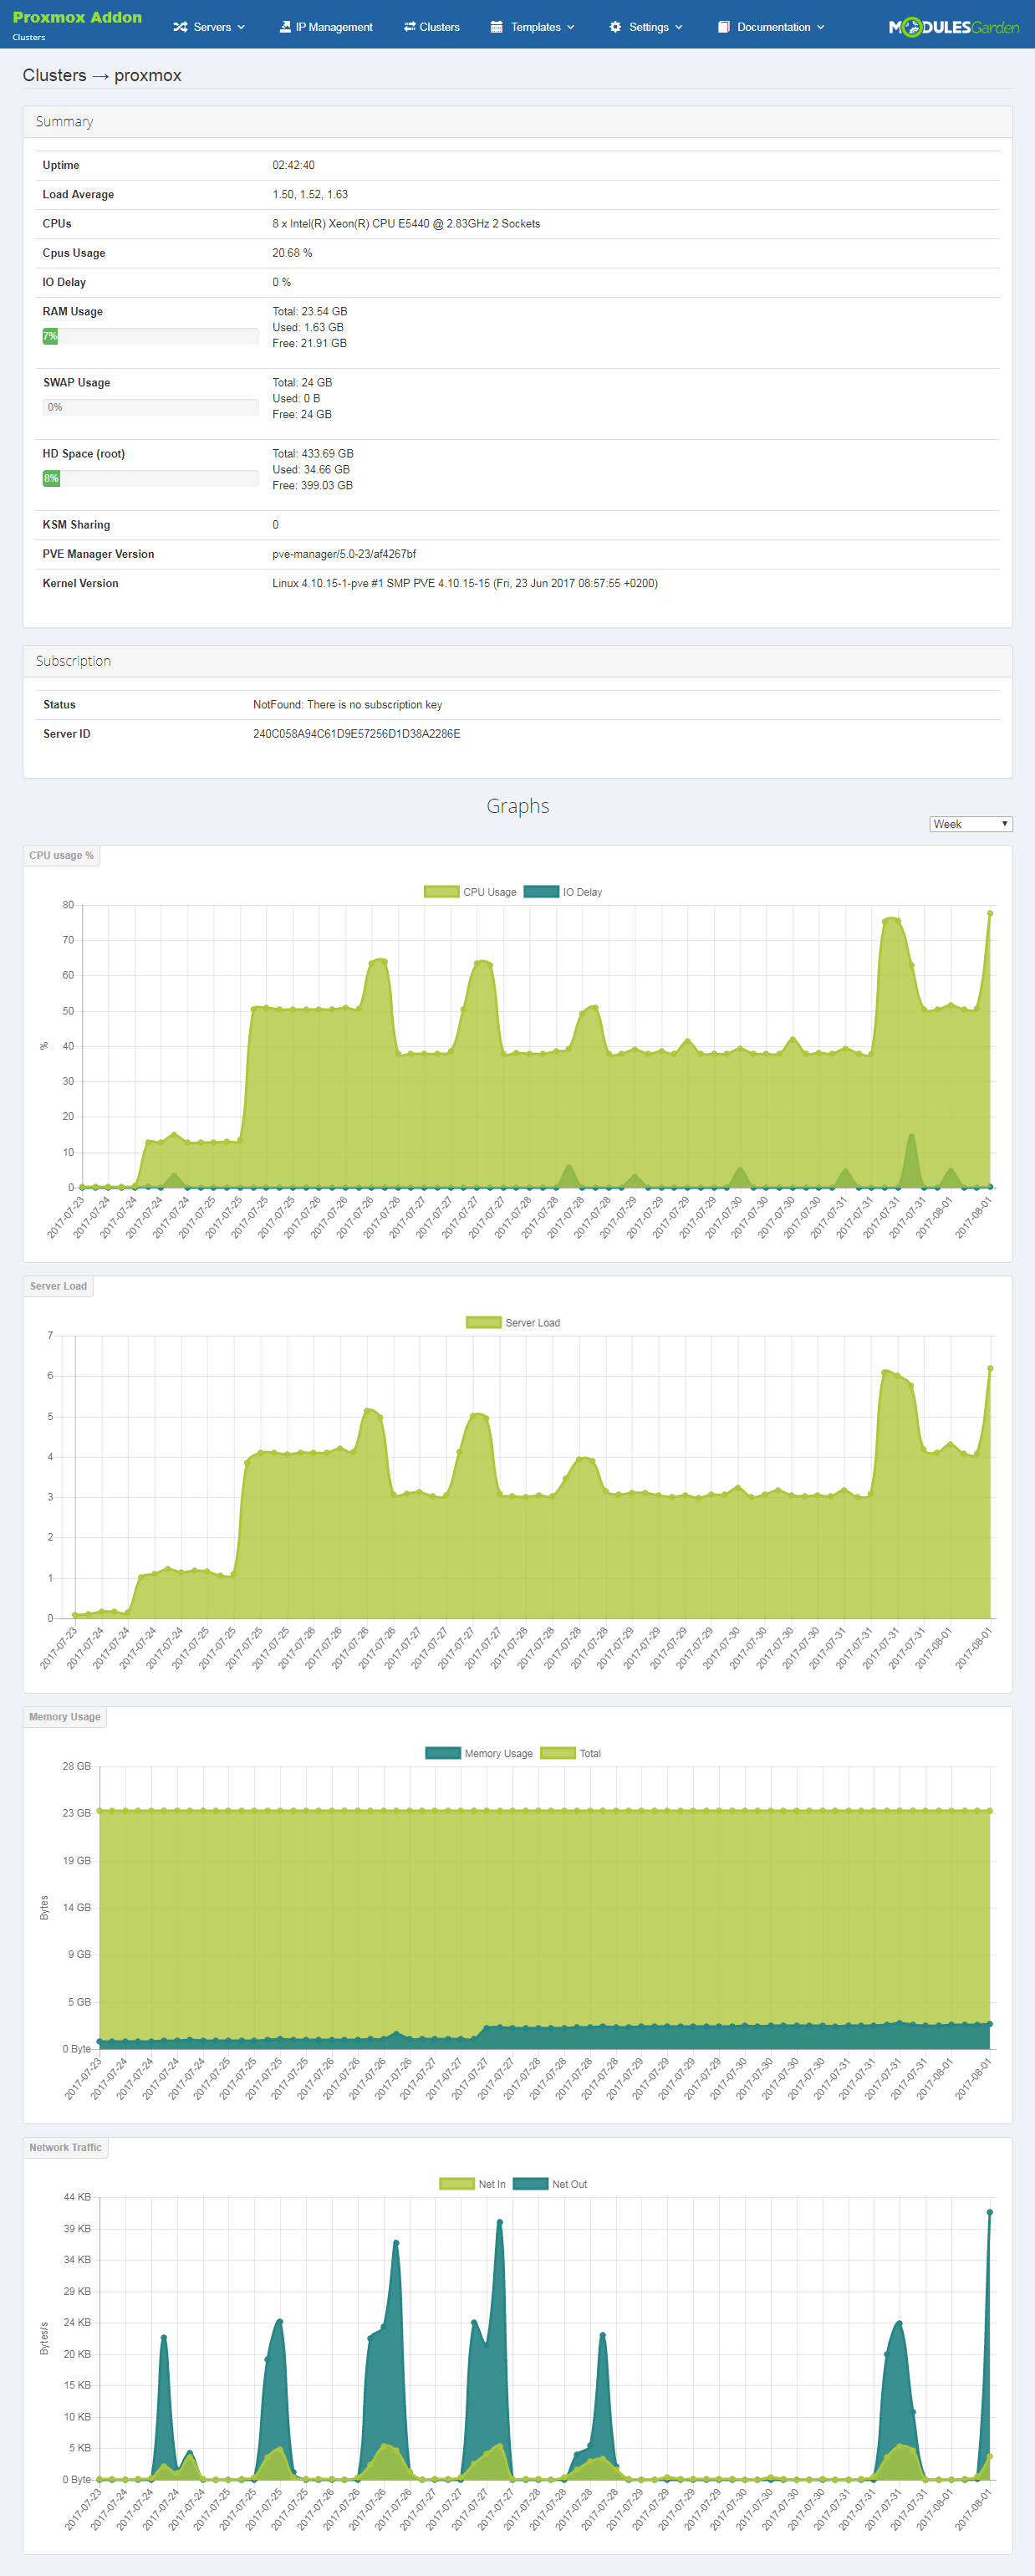
| 'Clusters' tab contains the list of clusters. To view information about a cluster simply press its name. |

|
| Here you can find various information about a cluster, from available resource to usage graphs. |
|
Templates List
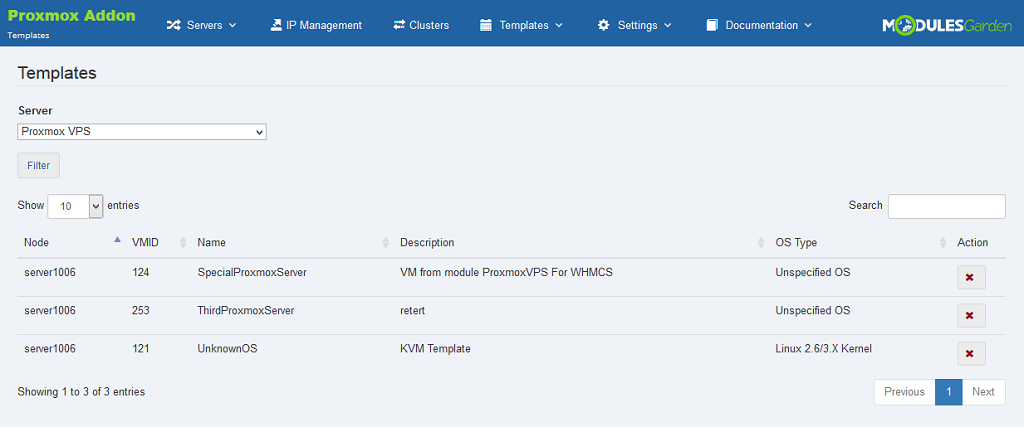
| Under this page you can view the list of templates. You may also delete unused templates here. |
|
Create Templates
| You can easily convert any VM on your server to a template. In order to convert VM, go to 'Proxmox Addon' → 'Templates' → 'Create Template'. |

|
| Next, choose node and VM to convert. Fill in 'Template Friendly Name' and press 'Save Changes'. |
|
General Settings
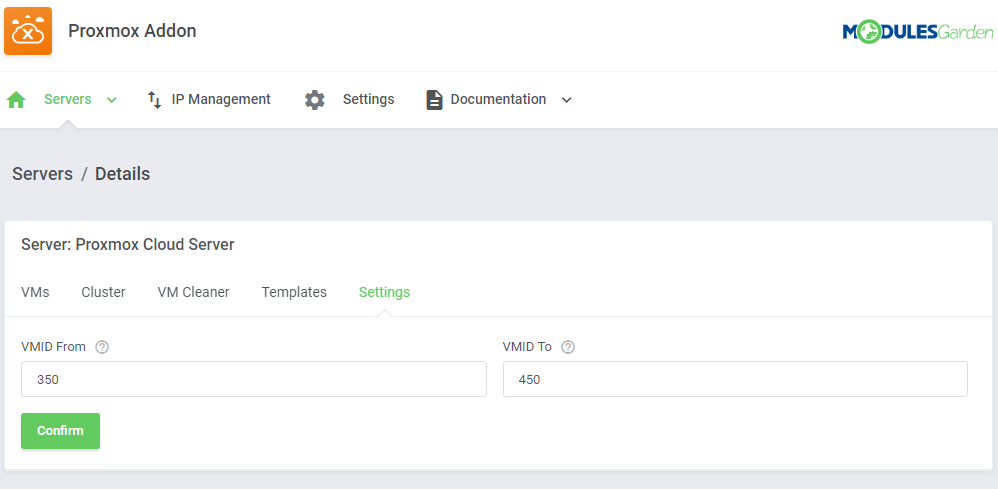
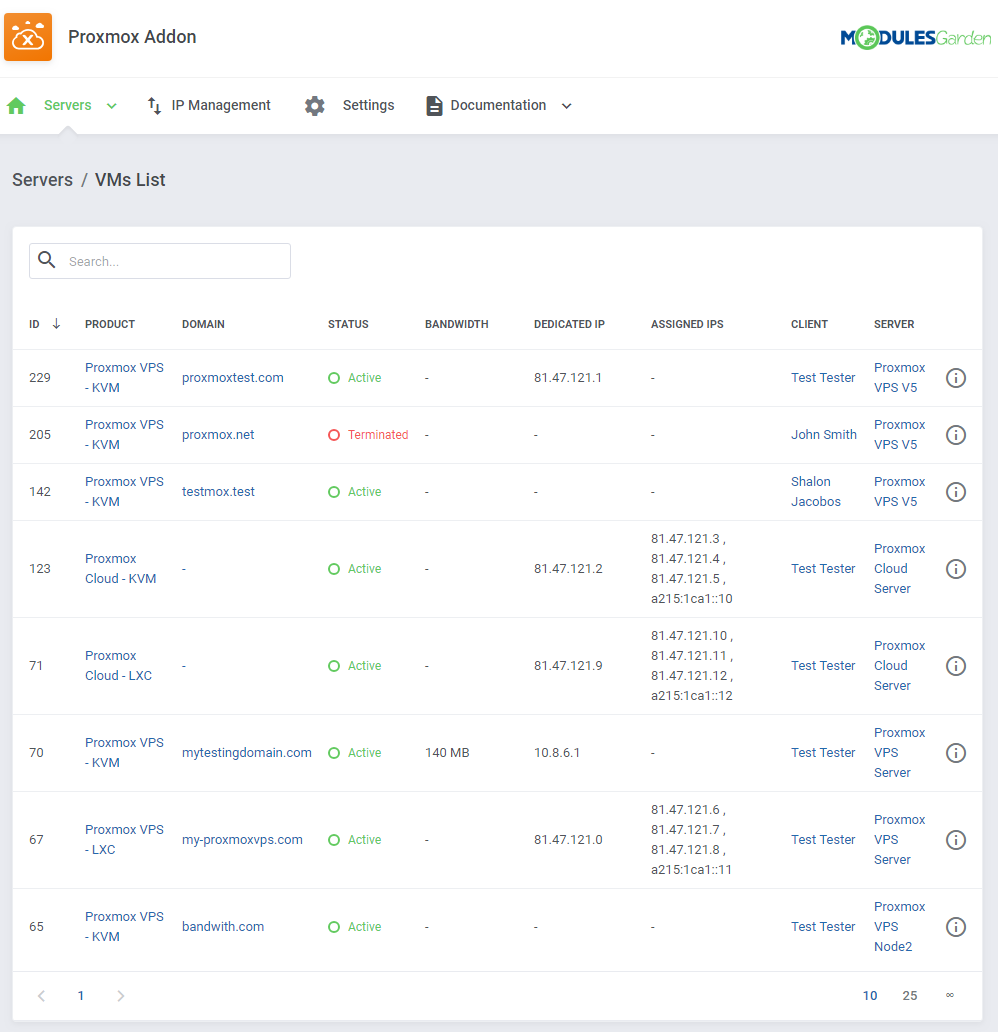
| 'Minimal VMID' allows you to define minimal ID of VM created from server, which does not have VMID range defined. Cron job user synchronization - if you change a user role in the product settings, this cron job changes the roles of existing users. |
|
VM Cleaner
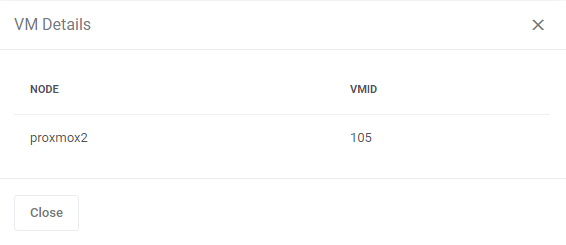
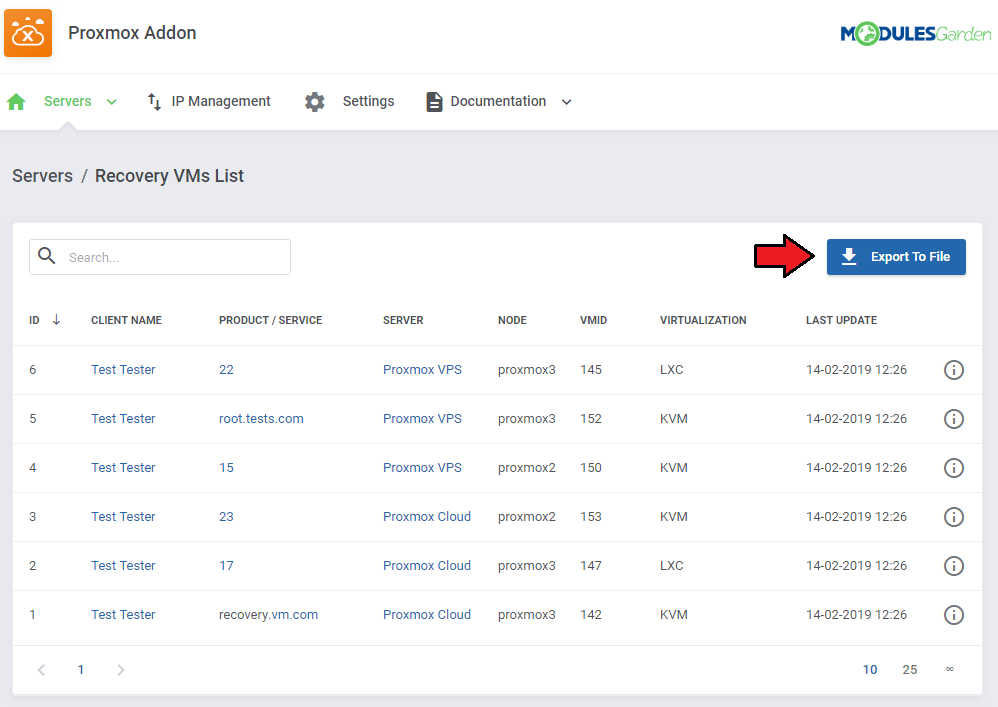
| VMVM Cleaner allows you to track VM existing only on your Proxmox server and that are not visible in your WHMCS. Consequently, you are allowed here to sort and delete only those VM that are not managed from your WHMCS. |
|
Client Area
| Client area interface of Proxmox VPS For WHMCS should look like the one on the screen below. As you can see, control panel contains options useful for managing VM. |
|
| At the main product page in the client area, under 'Details' headline your clients can find information about current usage of CPU, memory, disk (OpenVZ only) and SWAP (OpenVZ only). Customers can also view 'DNS' (OpenVZ only) and 'IP Addresses'. |
Client Area - VM Management
VNC Console
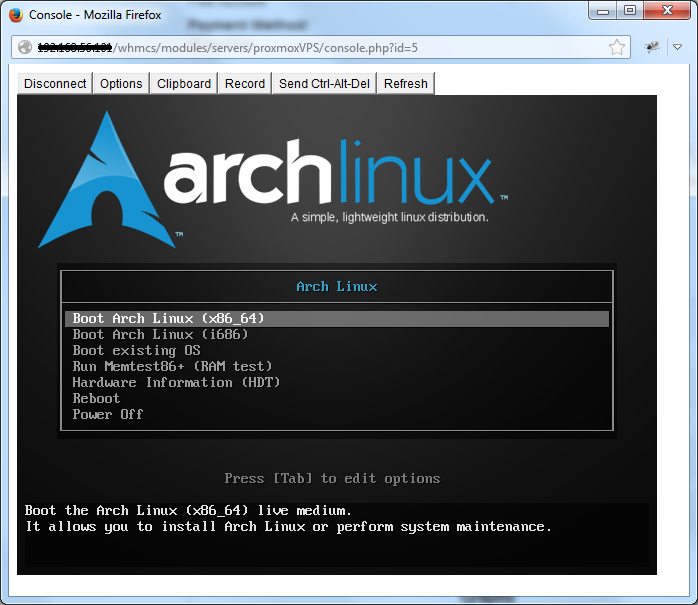
| VNC console enables your clients to remotely manage their servers. To access it, simply press the 'VNC Console' button. Console requires Java software. You need to accept security risk to run it. |
|
noVNC Console
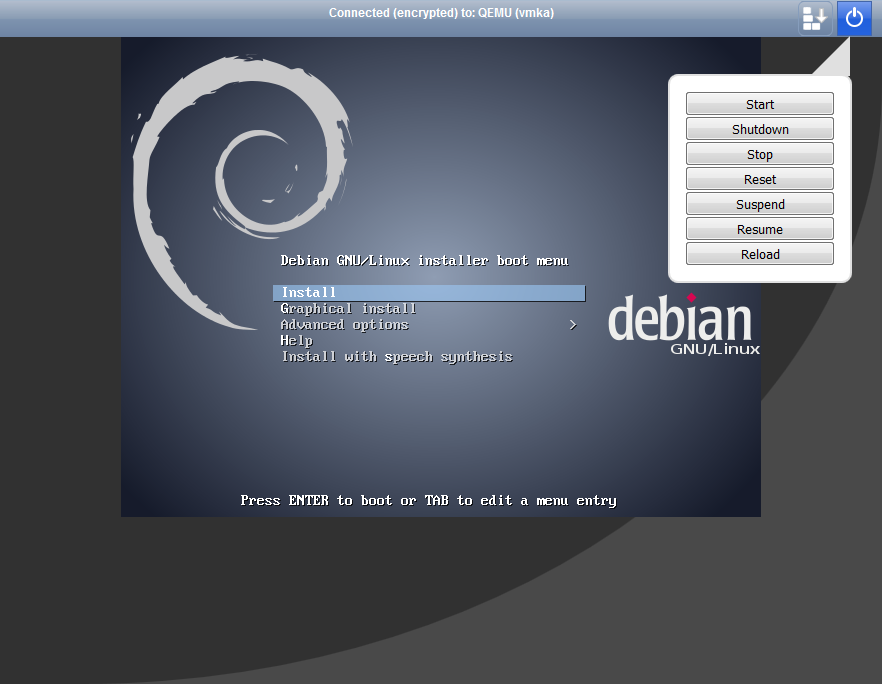
| noVNC console allows your clients to connect with their server in the easiest possible way. |
|
SPICE Console
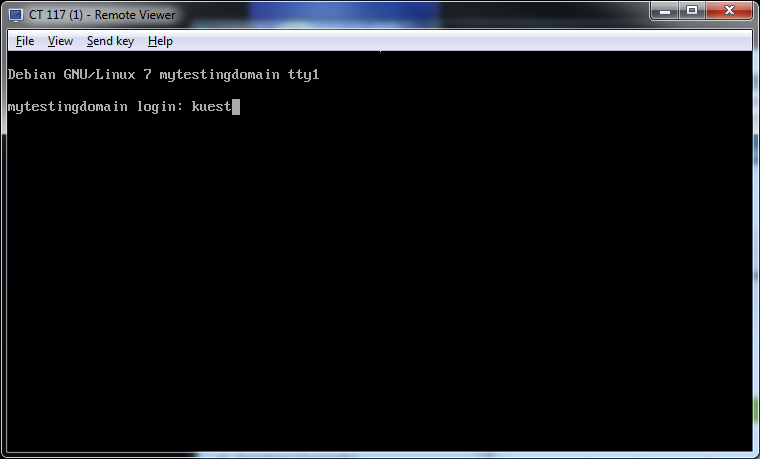
| SPICE console enables you to connect with virtual machine using SPICE. Note: Your client needs to download and install client side SPICE application in order to connect with VM. |
|
Client Area - Additional Tools
Reinstall (OpenVZ only)
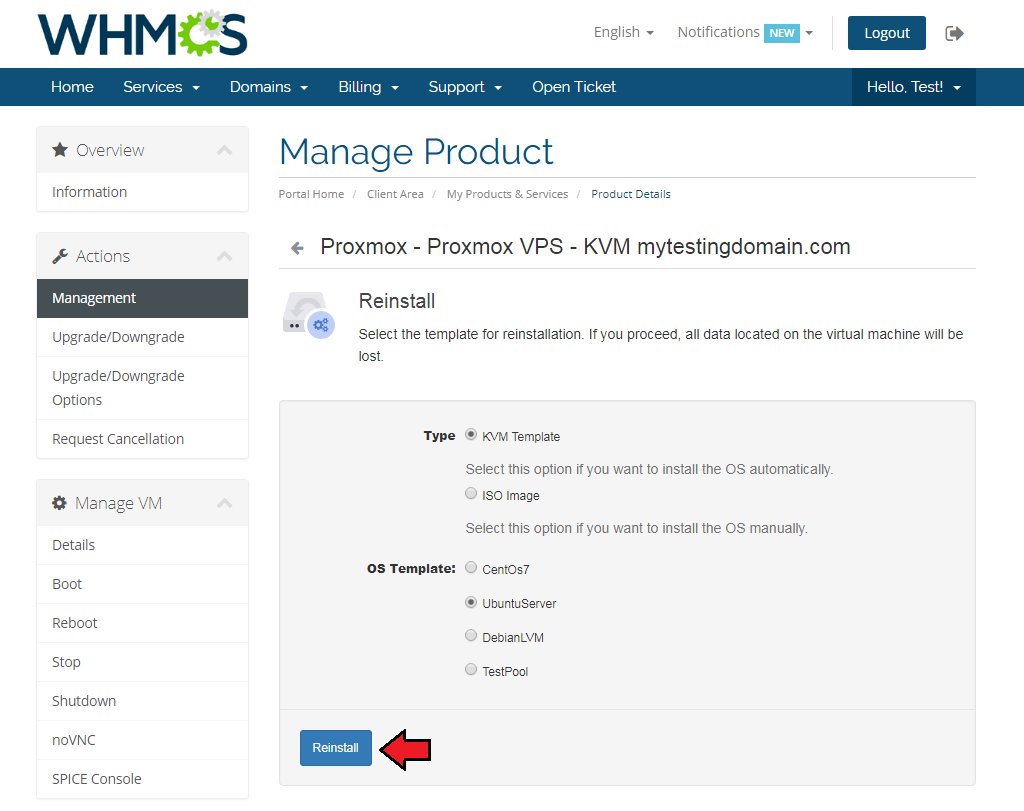
| Reinstall feature should be used to change templates. Select template from available templates list to reinstall your server, click 'Reinstall' button. |
|
Backups
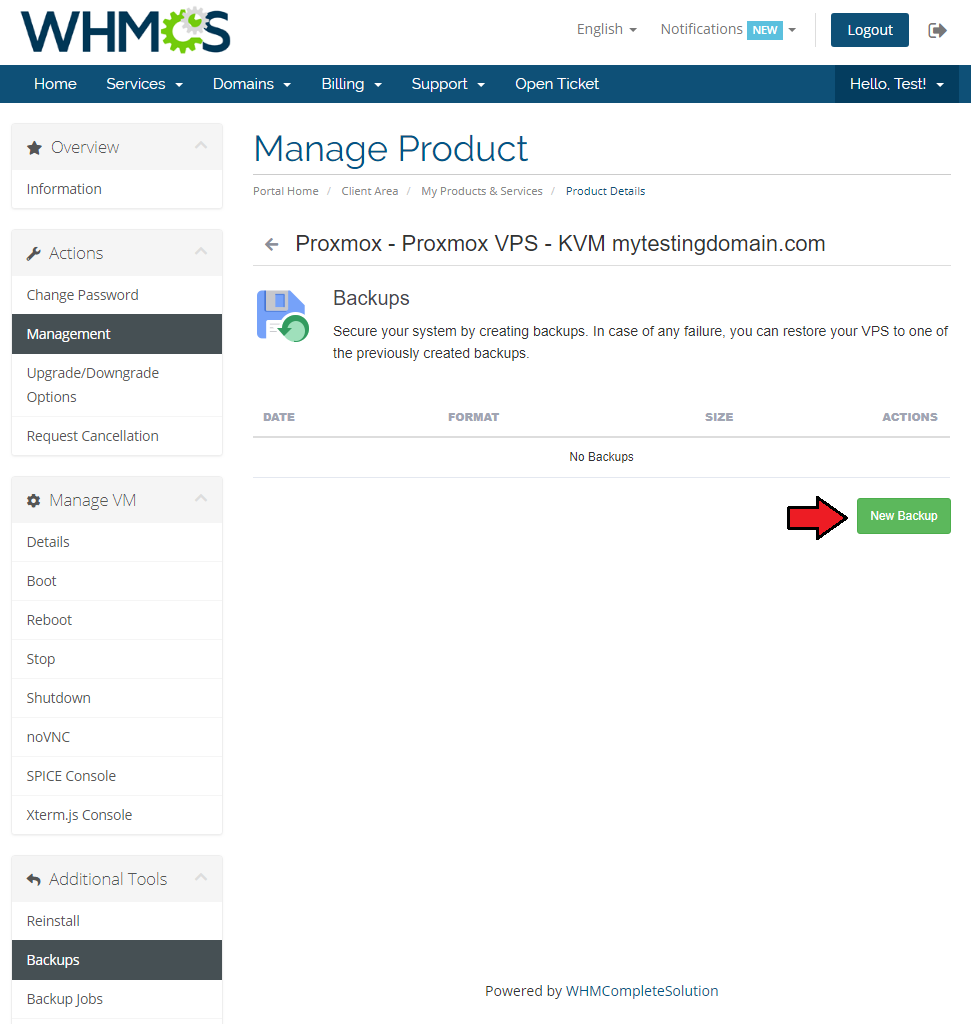
| To create a single backup, press 'Backups' button and click on 'New Backup' as shown on the following screen. |
|
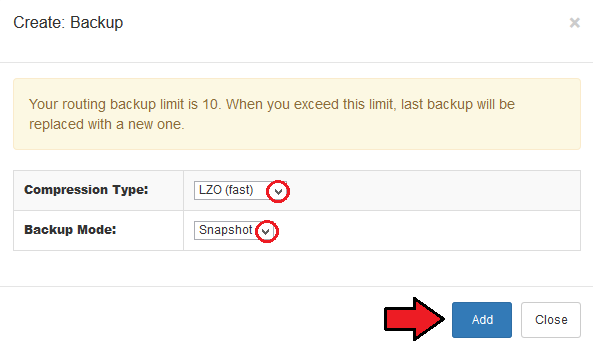
| Now, choose 'Compress Dump File' and 'Backup Mode' from dropdown menus. Afterwards, press 'Add'. |
|
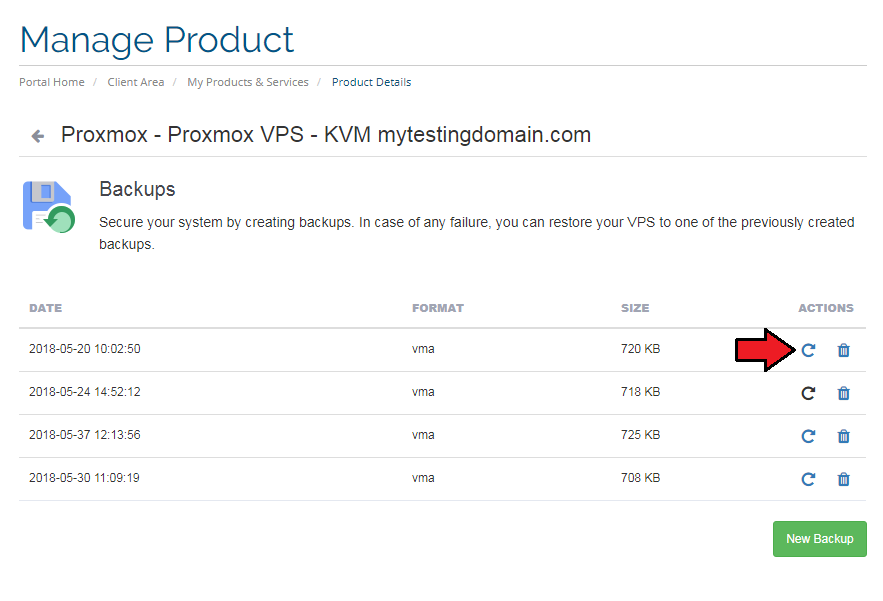
| To restore VM from backup, press 'Restore' and then click 'OK' button in a popup window to confirm. |
|
Backup Jobs
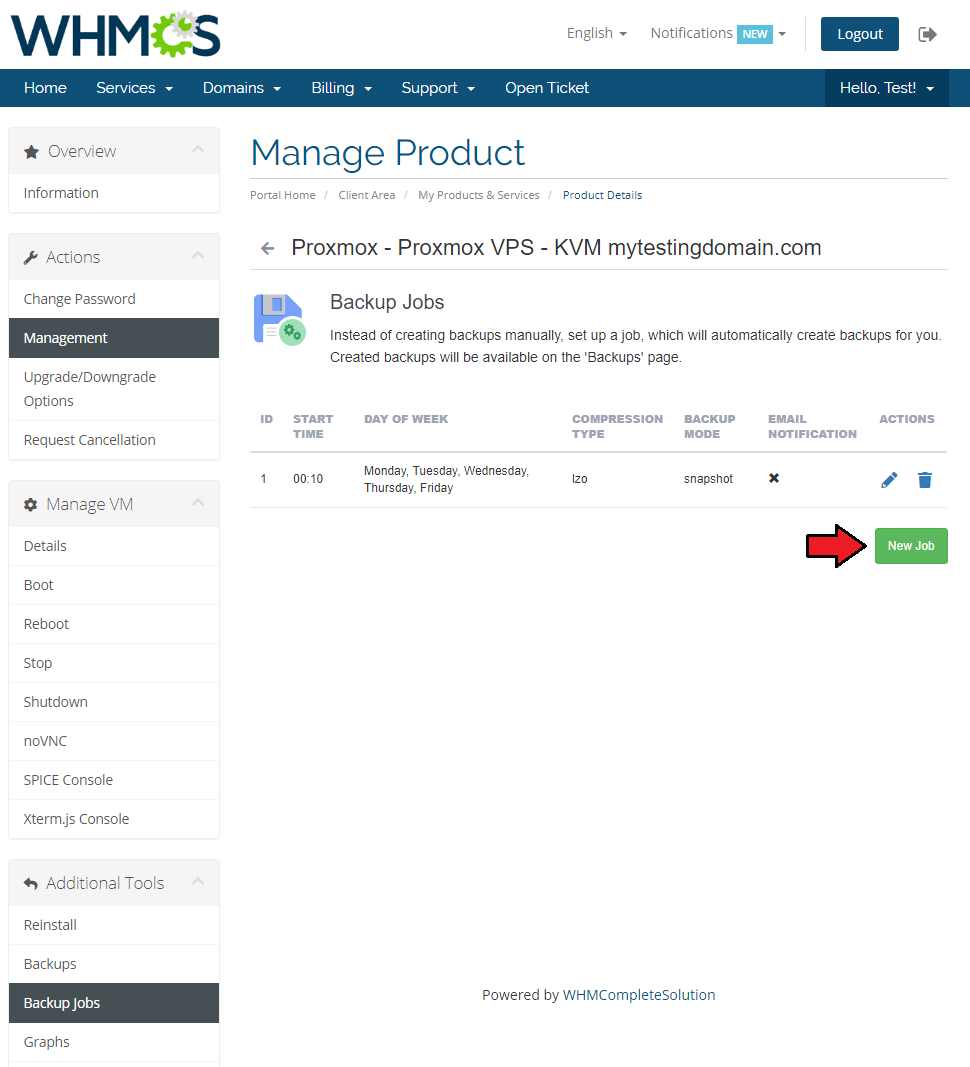
| By pressing 'Backup Jobs' in your client area, you will be carried to a backup jobs management page. There you can easily edit/delete and preview details of existing backup jobs. |
|
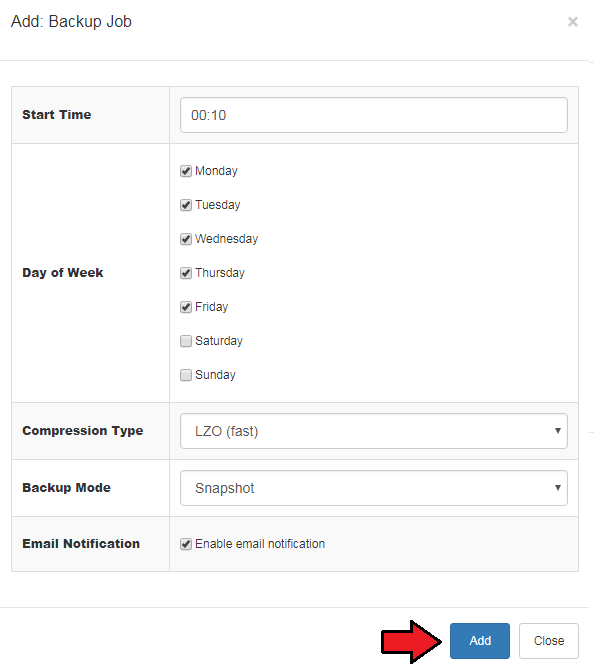
| Now, define backup time, mark days to run it and choose 'Compression Dump File' and 'Backup Mode' from dropdown menus. Next, press 'Add' button. |
|
Graphs
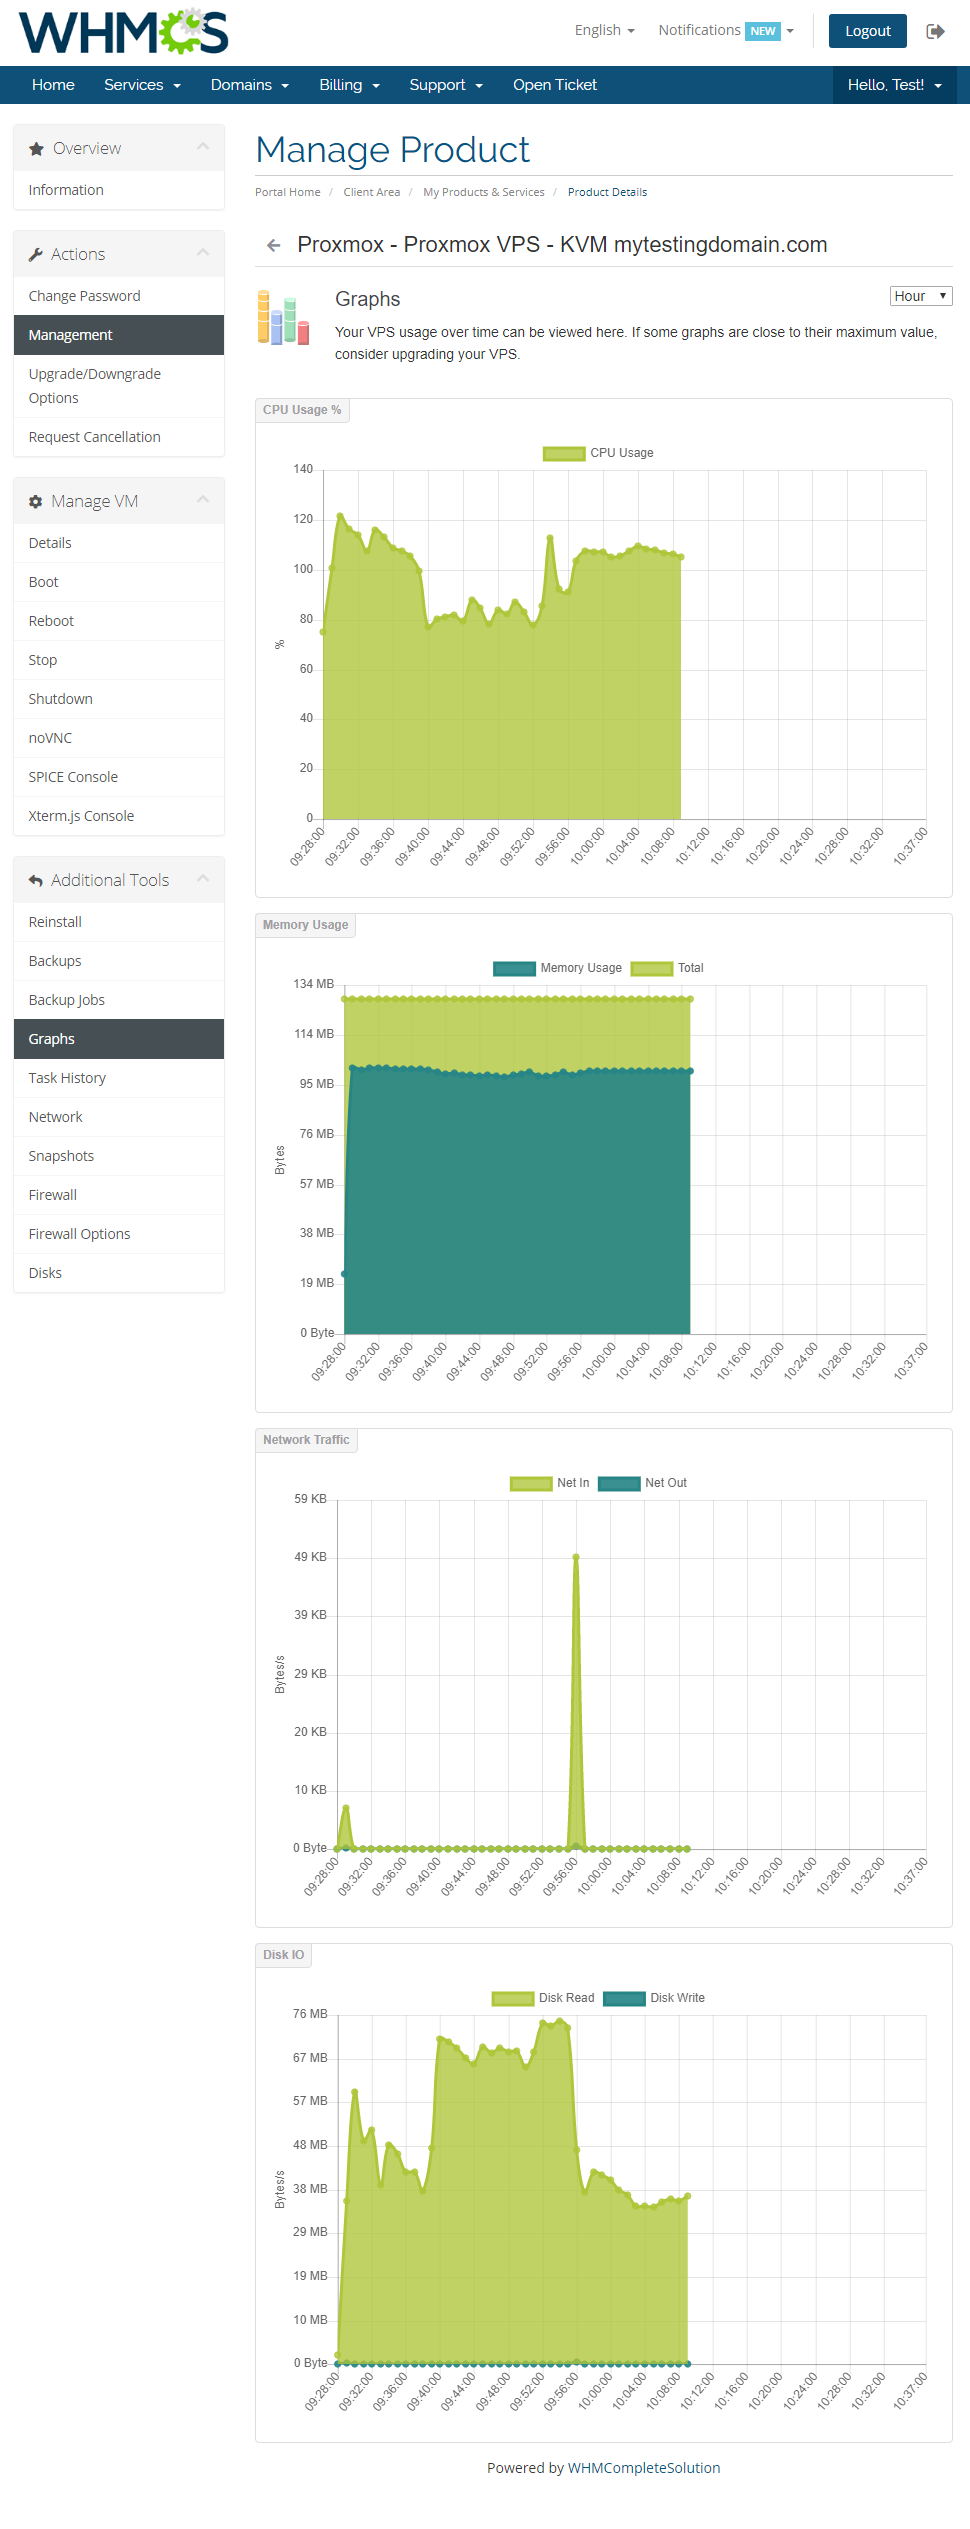
| Through pressing 'Graphs' button clients will be moved to the page with generated graphs of CPU usage, memory usage, network traffic and disc I/O. They can also switch the timeline of graphs by choosing it from a dropdown menu pointed on the following screen. Choose from 'Hour', 'Day', 'Week', 'Moth' and 'Year'. |
|
Task History
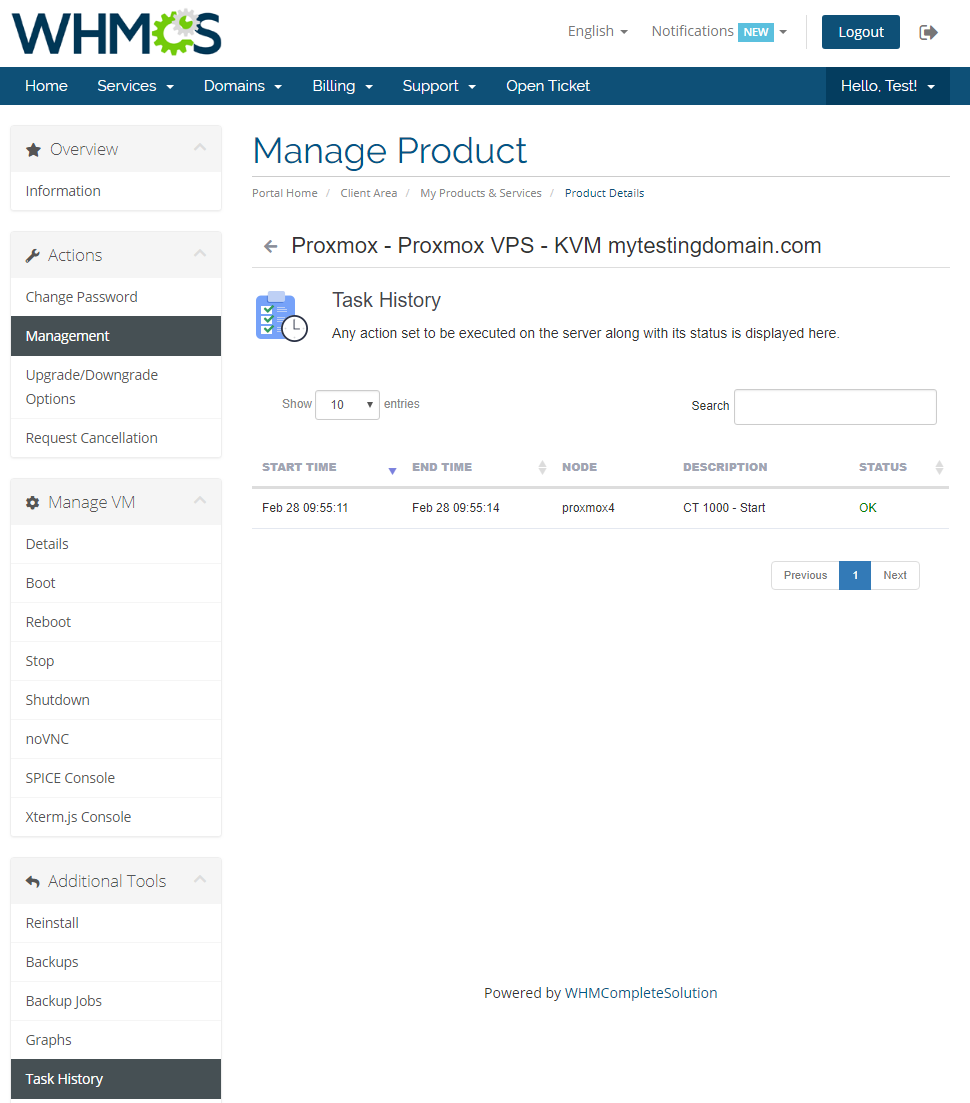
| To access history of VM, simply press 'Task History' button. |
|
Network
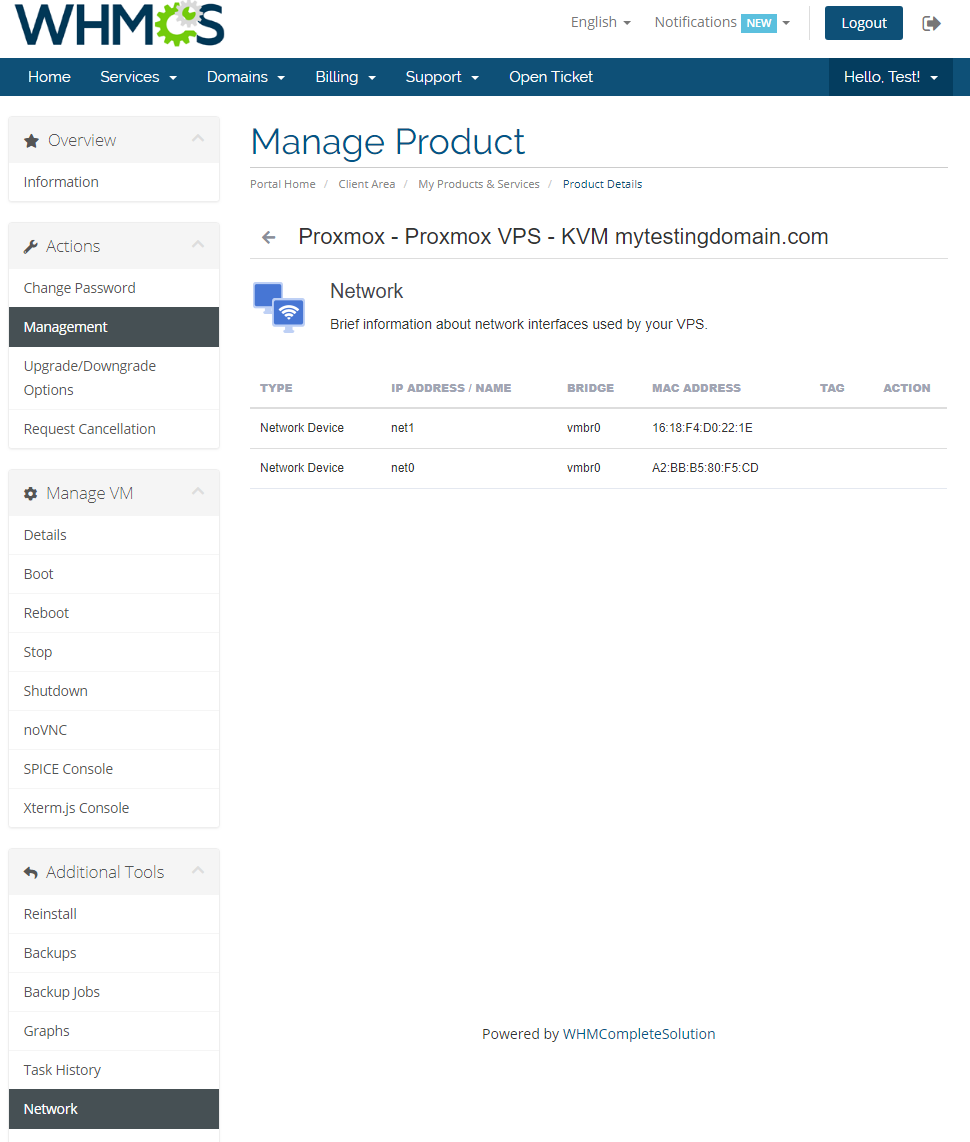
| Your clients are able to easily create and remove network interface device. Note: You are allowed to remove only private network interface devices. |
|
Snapshots (KVM only)
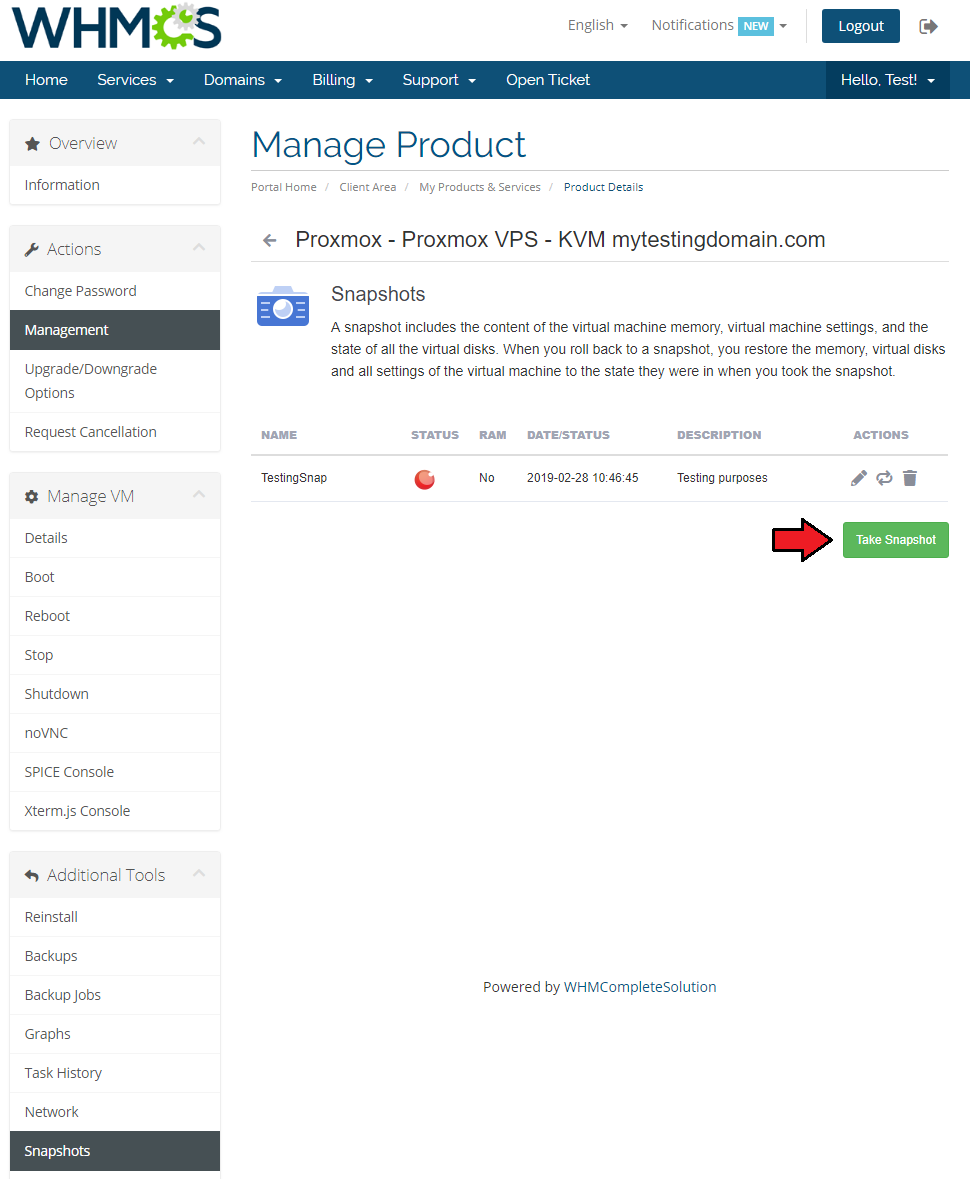
| Use snapshot to remember the contents of virtual machine memory current state. You may use them later to restore the VM settings. |
|
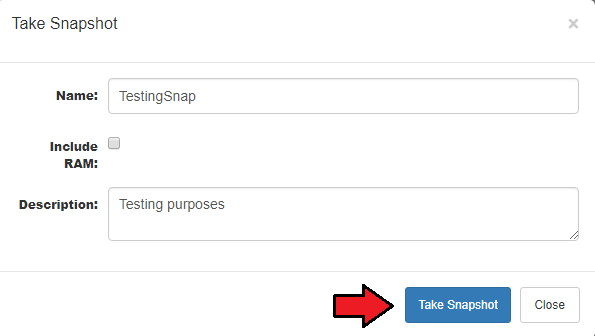
| Press 'Take Snapshot' button and fill out the form to take a snapshot. Name it (use alphabetical characters only), choose whether to include RAM and add some description. |
|
Firewall
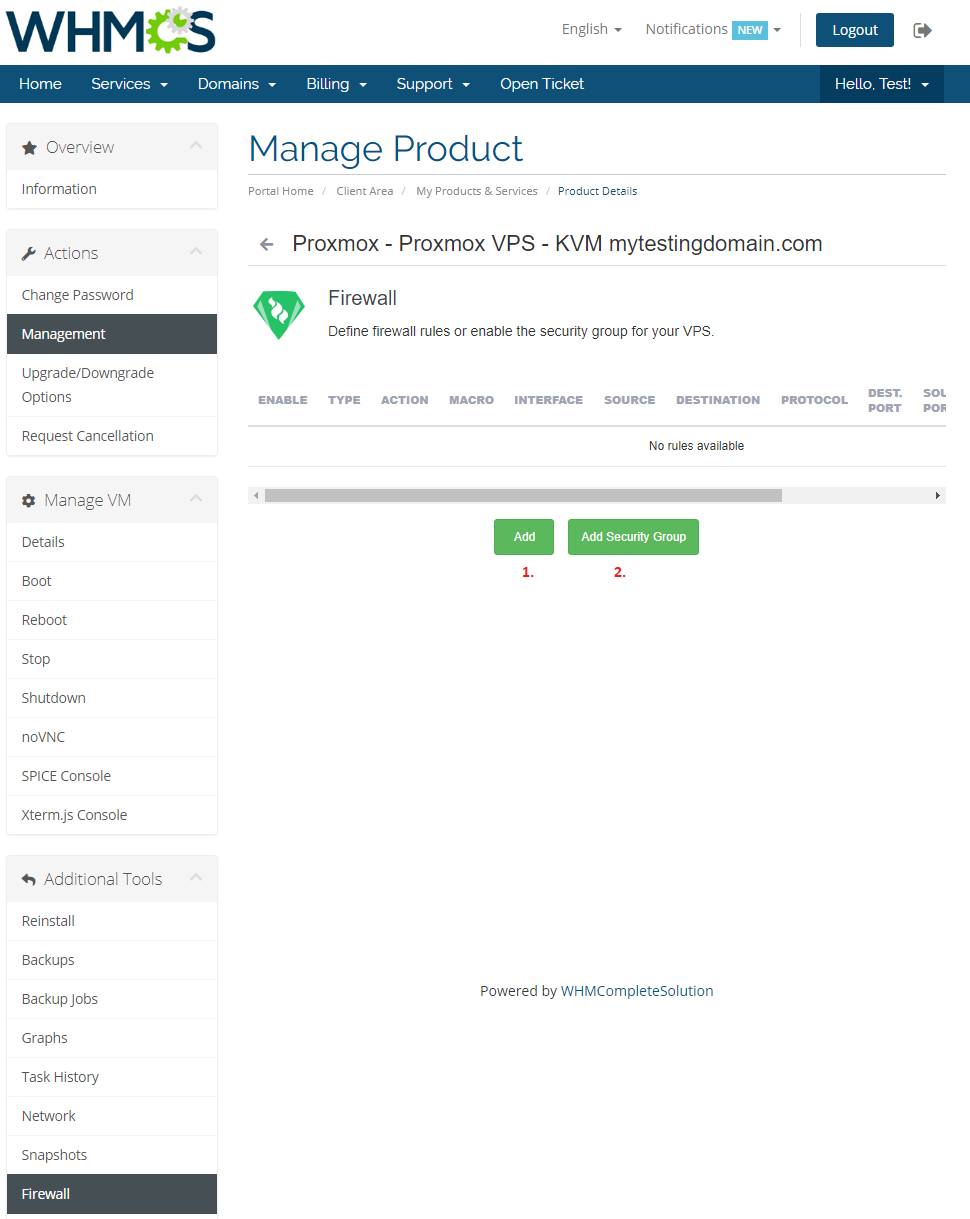
| Owing to 'Firewall' page, your clients can set up firewall rules and enable security group for theirs servers from your WHMCS client area. As you can see, you can easily modify and remove a previously added rules and security groups. |
|
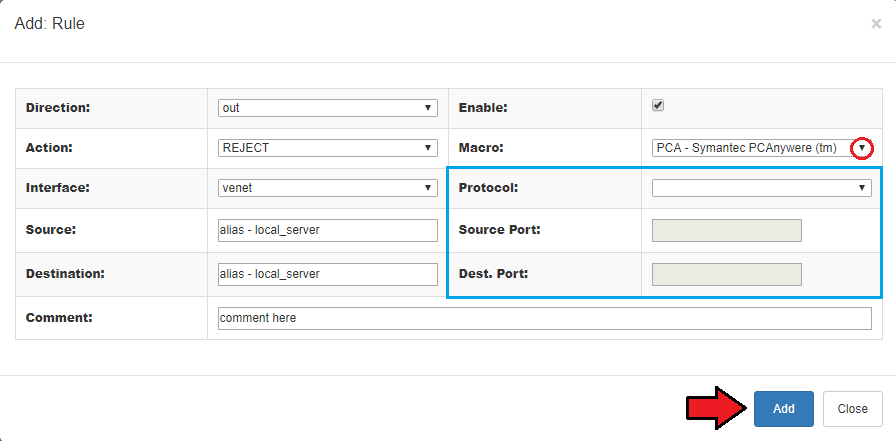
| You can add a firewall rule in two ways. Both of them require choosing direction, action, interface, source and destination. The first way (red) is by choosing macro from a 'Macro' dropdown field. |
|
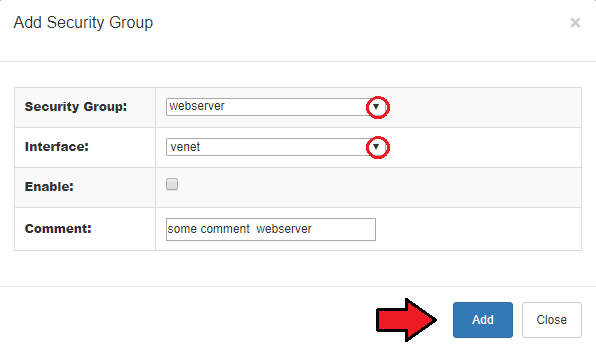
| Insert a security group by choosing security group and interface on which the group will be used. Additionally, you can enable security group and add a comment to it. |
|
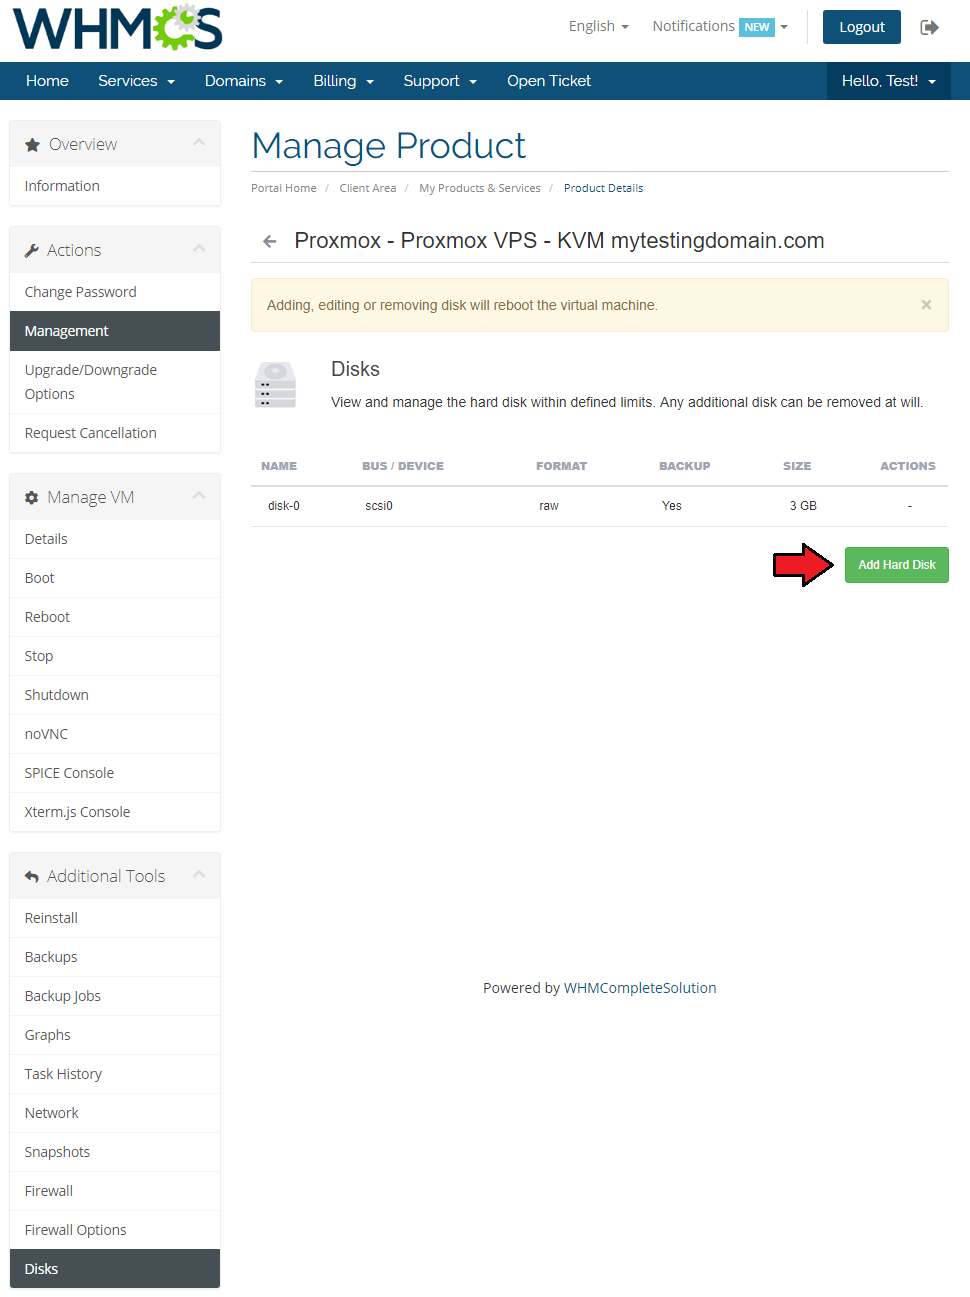
Disks (KVM only)
| View available disks and add new ones. |
|
IP Manager Integration
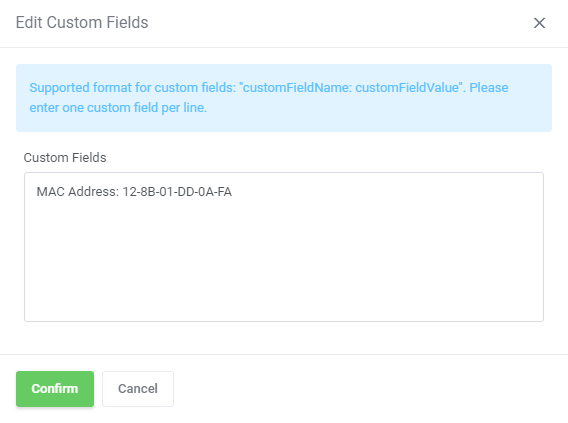
| Owing to integration with IP Manager For WHMCS you are able to easily create pools of IP addresses and assign them to desired products. 1. Proceed to IP Manager For WHMCS → IP Pools tab in order to prepare IP addresses pool for Proxmox VPS For WHMCS. |
|
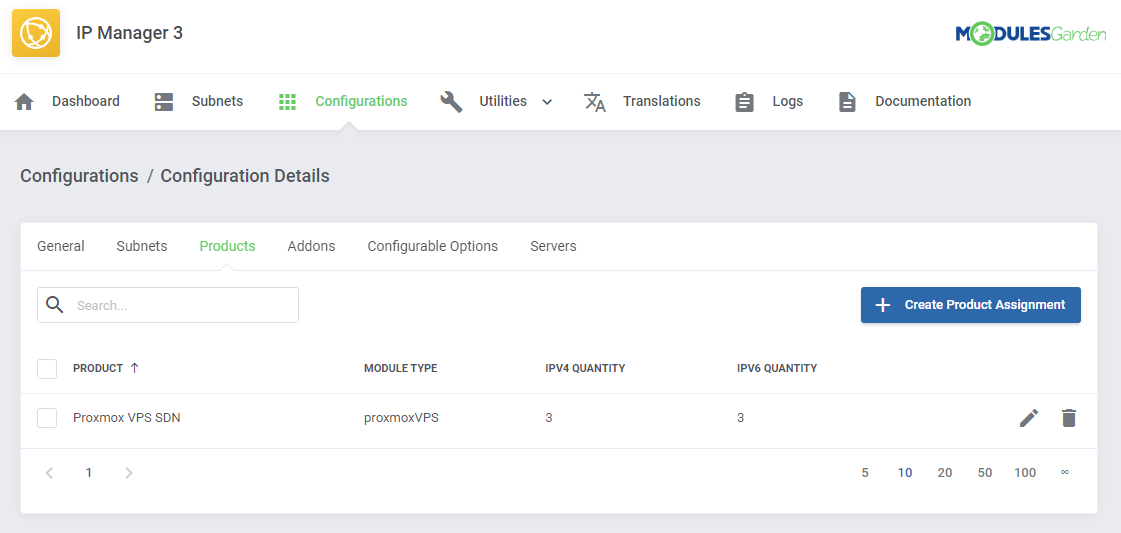
| 3. Afterwards, create a new configuration and assign a previously created pool to it. Note: Multiple IP addresses pools can be assigned to a single configuration. |
|
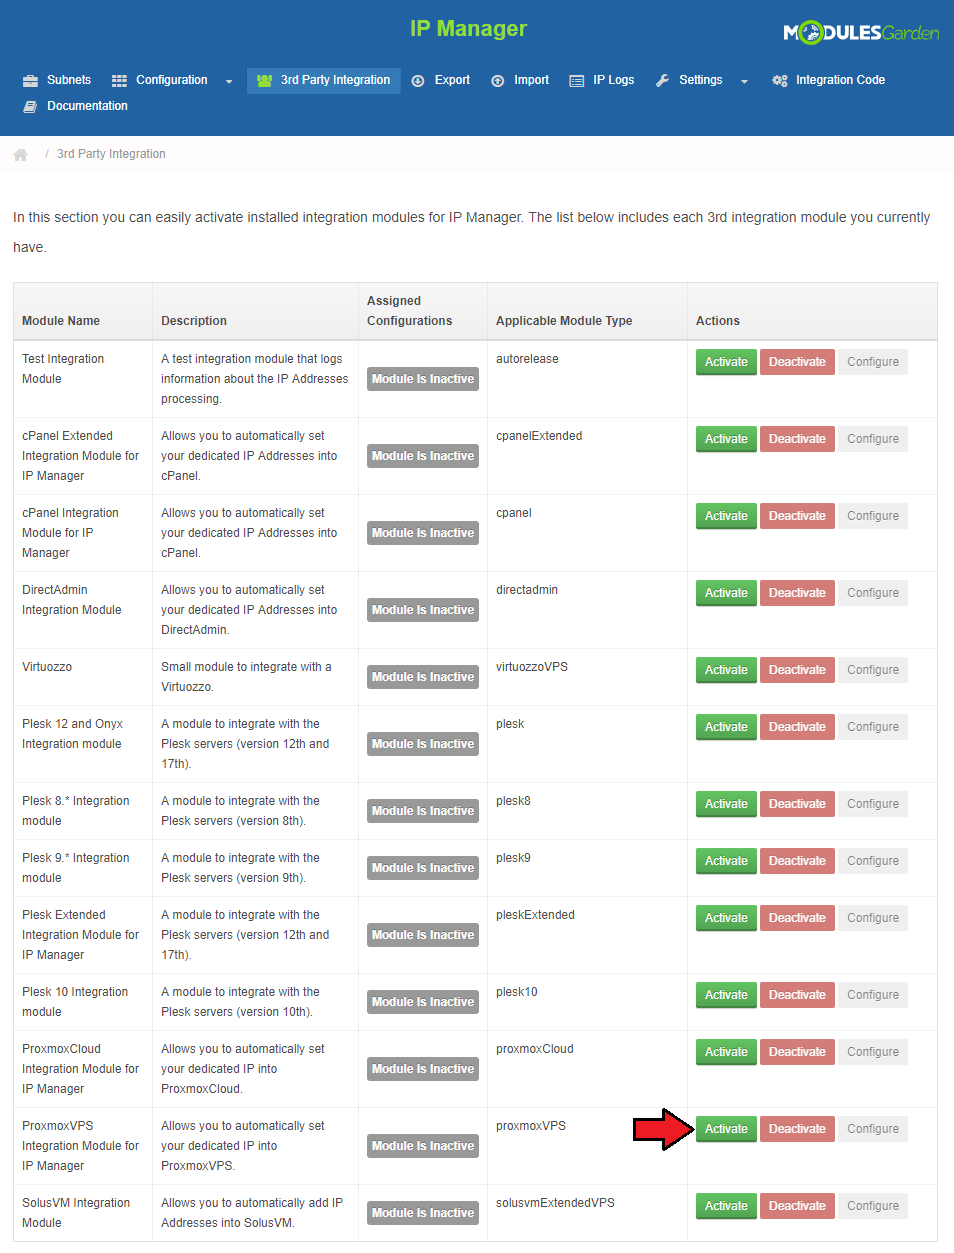
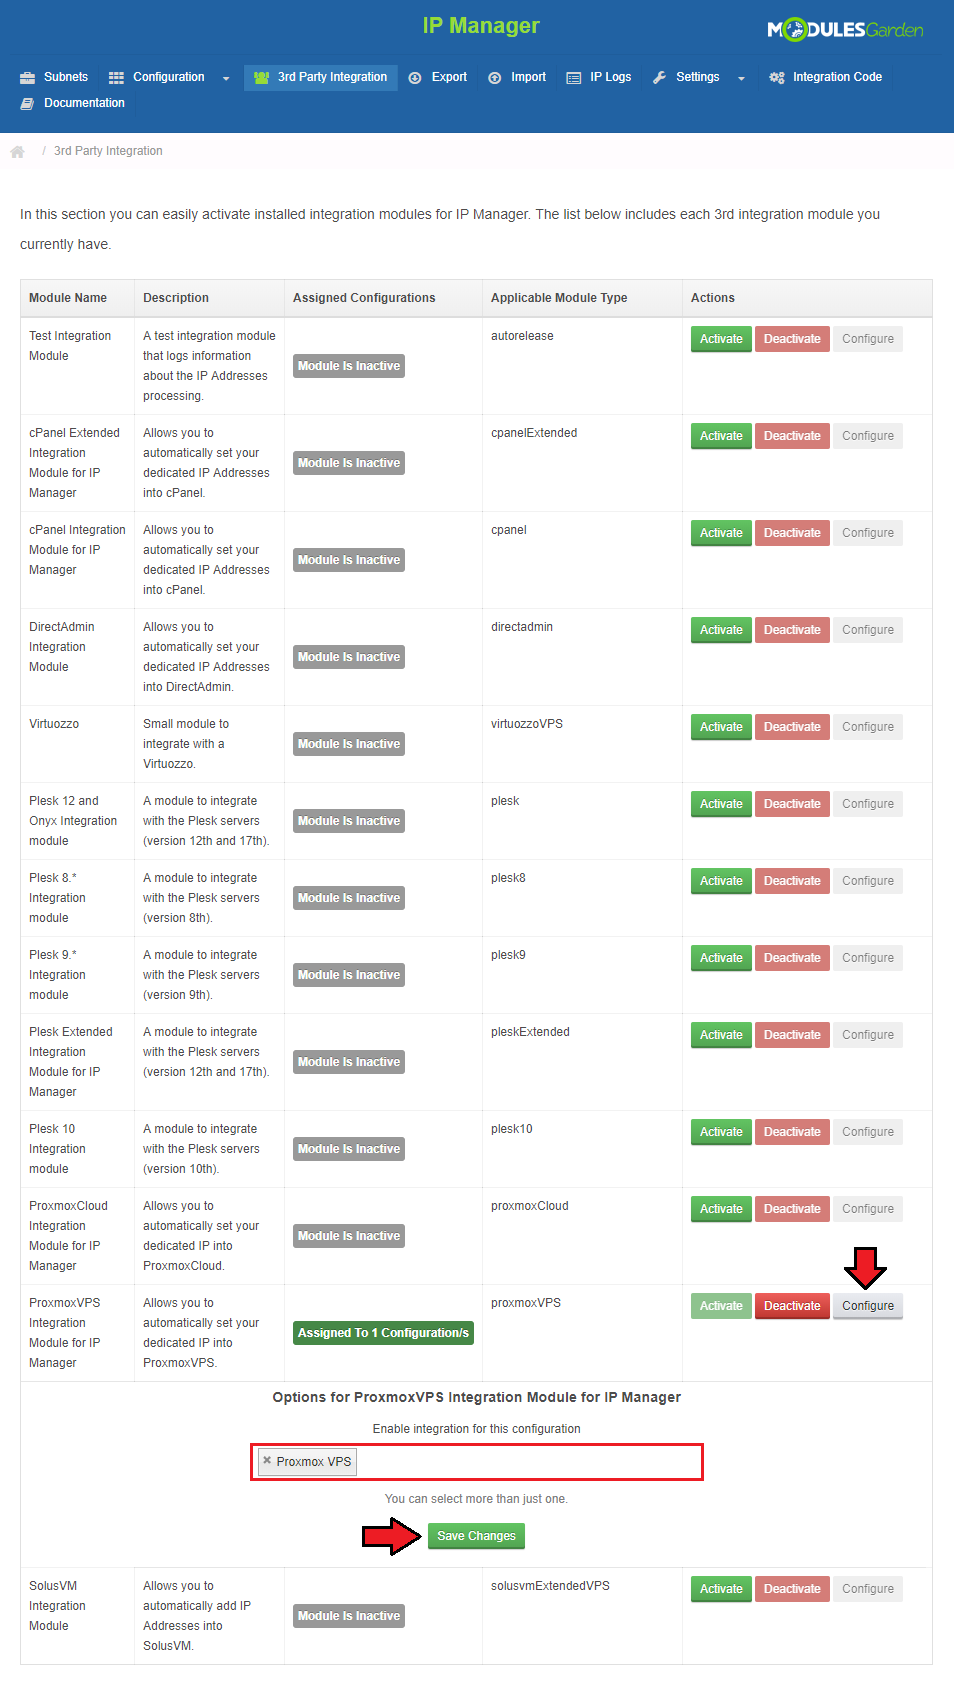
| 5. Now, enable integration by proceeding to '3rd Party Integration' tab. Press 'Activate' next to 'proxmoxVPS' module type as shown on the following screen. |
|
| 6. Next, assign a previously created configuration to the submodule. Press 'Configure' , choose the configuration and press 'Save Changes'. |
|
Configurable Options
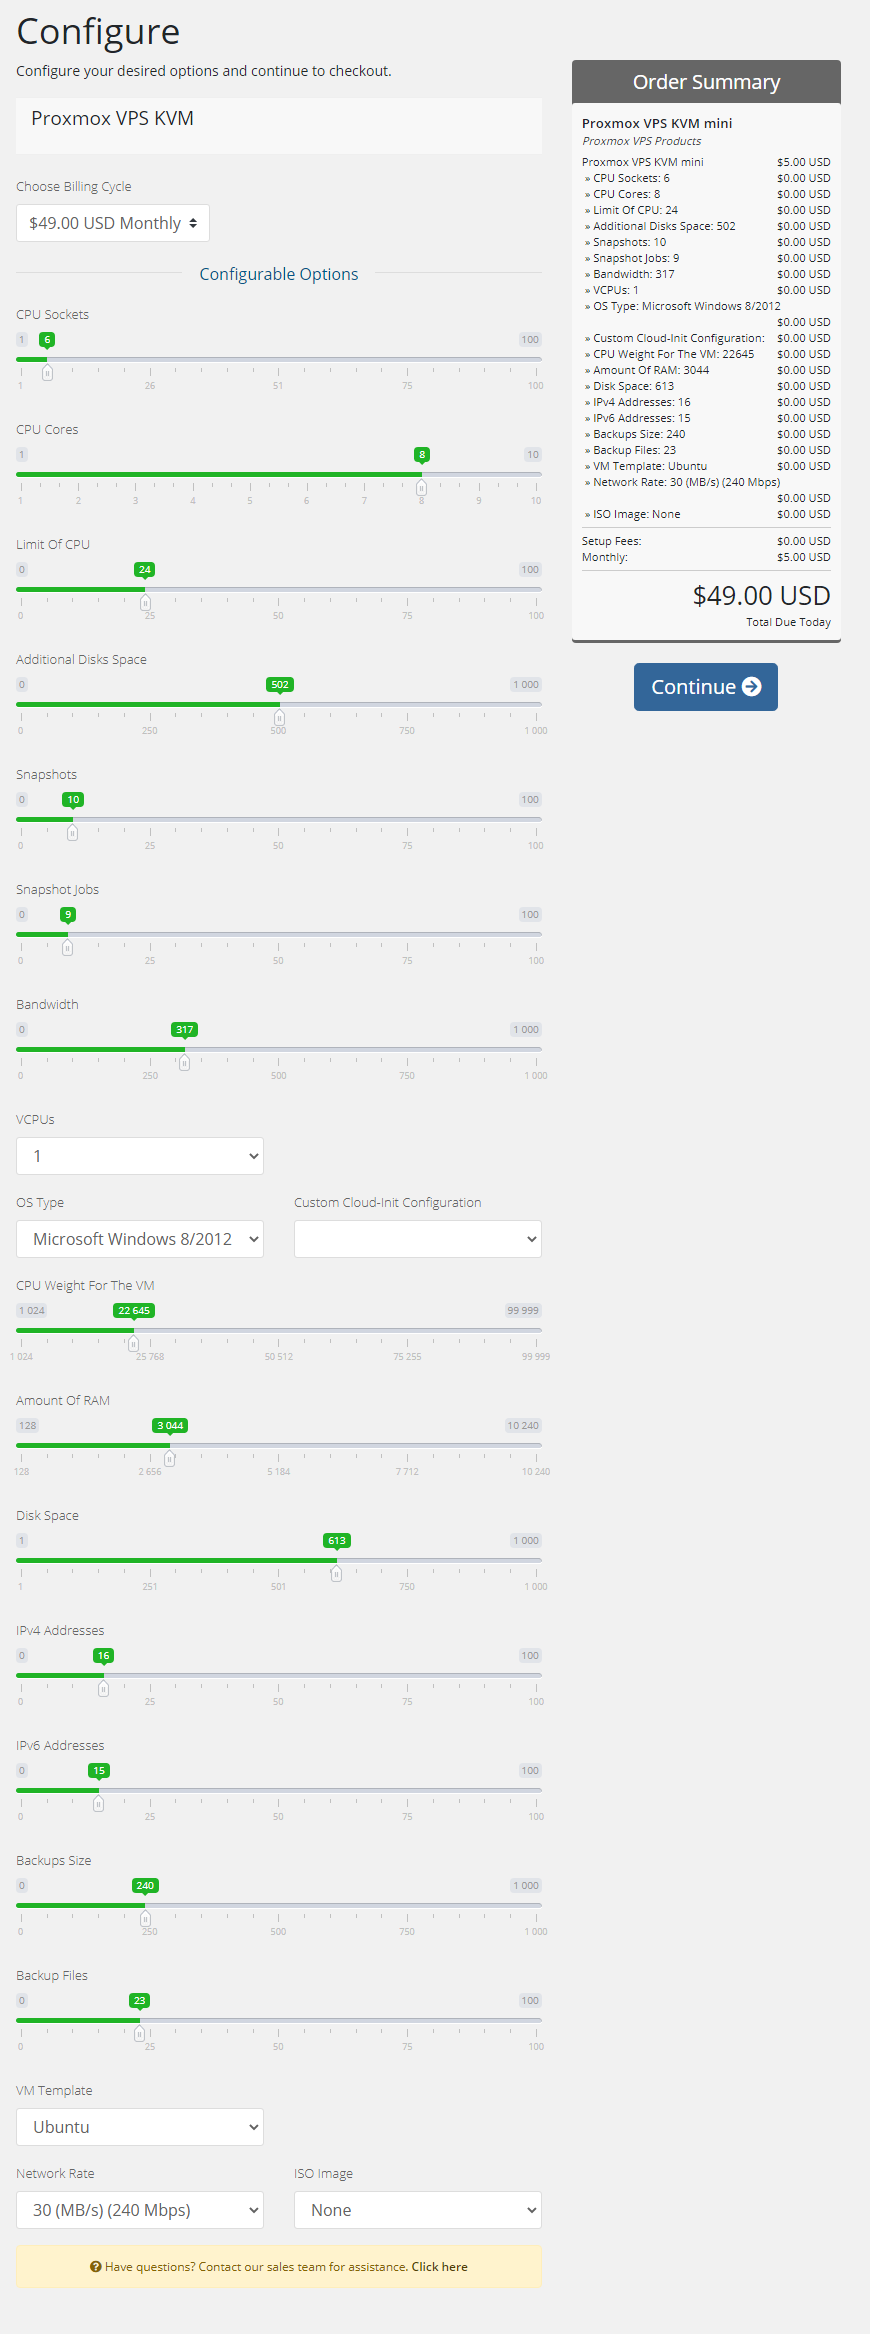
| When you successfully set up a product, your client can order it by choosing from the default configurable options. |
|
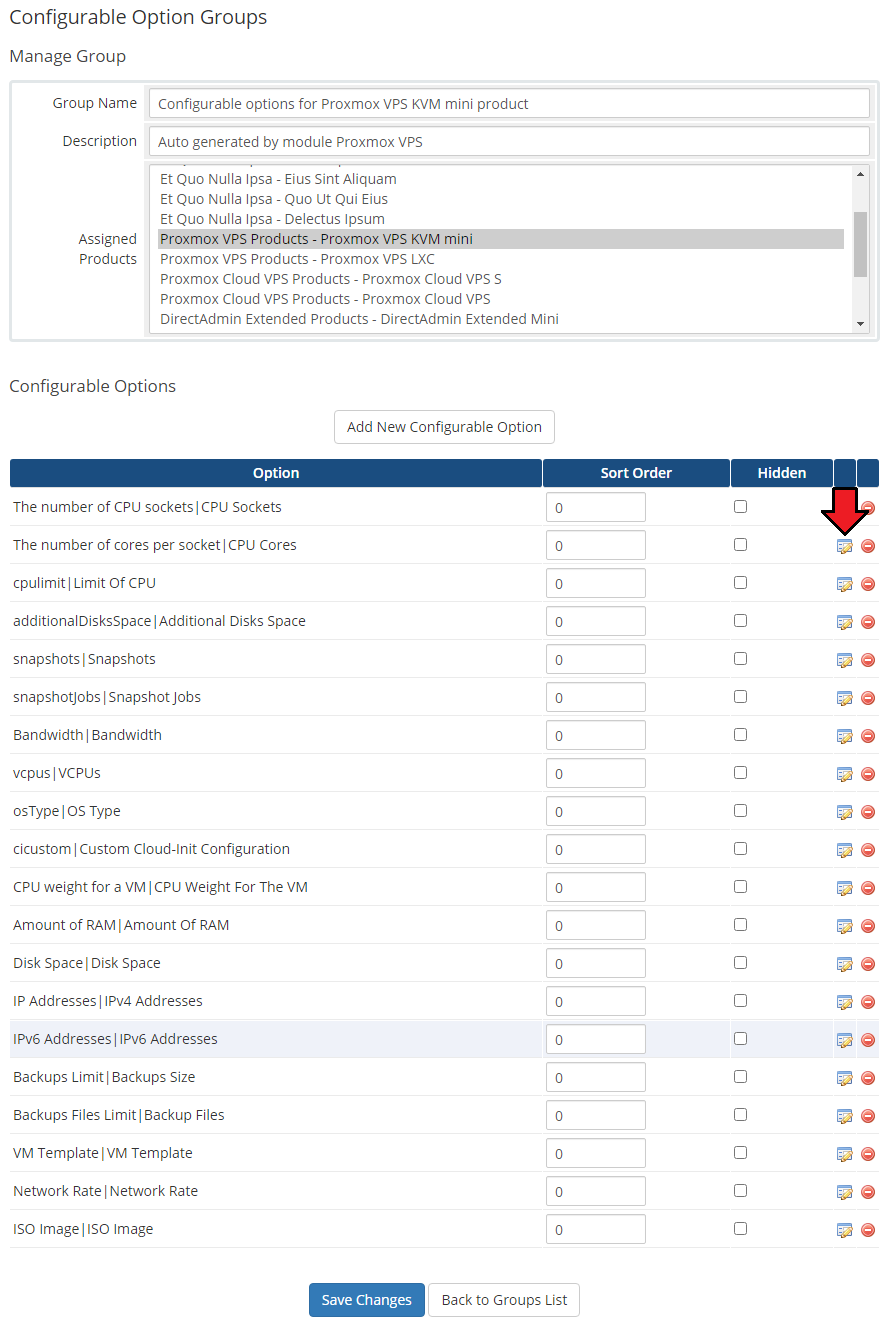
| In case those options do not suit your needs, you can edit them. Go to 'Setup' → 'Products/Services' → 'Configurable Option' and press edit button next to the configurable option used by your product. |

|
| Here you can view all the products this configurable option group is assigned to. Now, we will show you how to edit options. Let's say you want to add an option to order VPS with 4 cores per socket. |
|
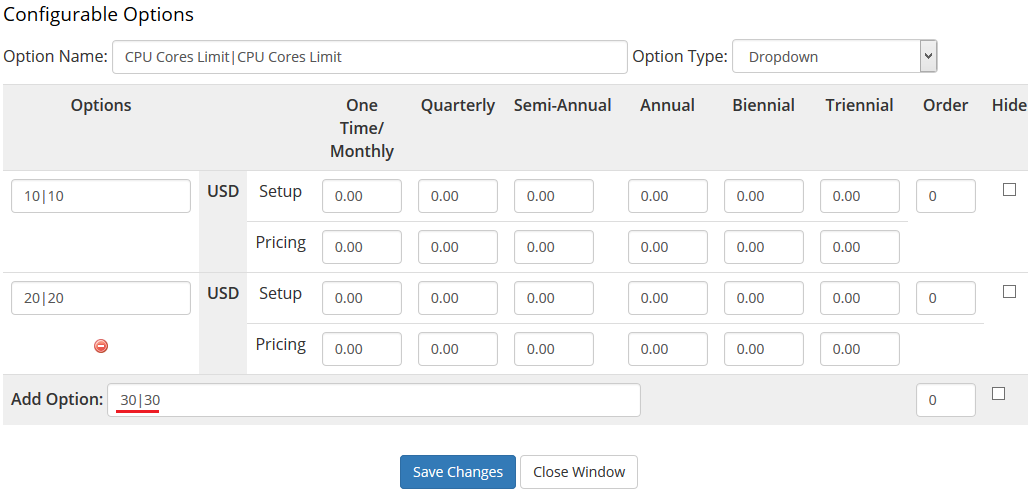
| You will see a popup window, so make sure your browser will not block it. To add a new option, enter it in a textbox under all other options, but if you want to replace it with option you currently have, simply edit its textbox. |
|
Management of Billing
| When you combine Proxmox VPS For WHMCS with Advanced Billing For WHMCS, you will be able to set up additional billing options. Module allows you to charge your customers basing on the server resources used by them. |
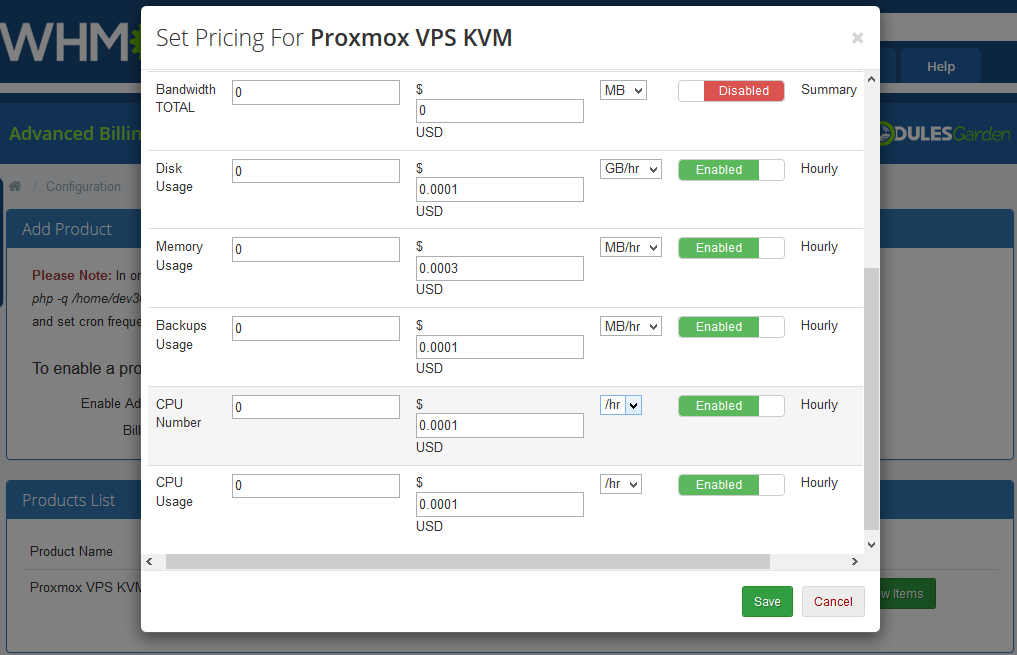
|
| With Advanced Billing For WHMCS module, you can also display your customers current server resource usage and their cost. |
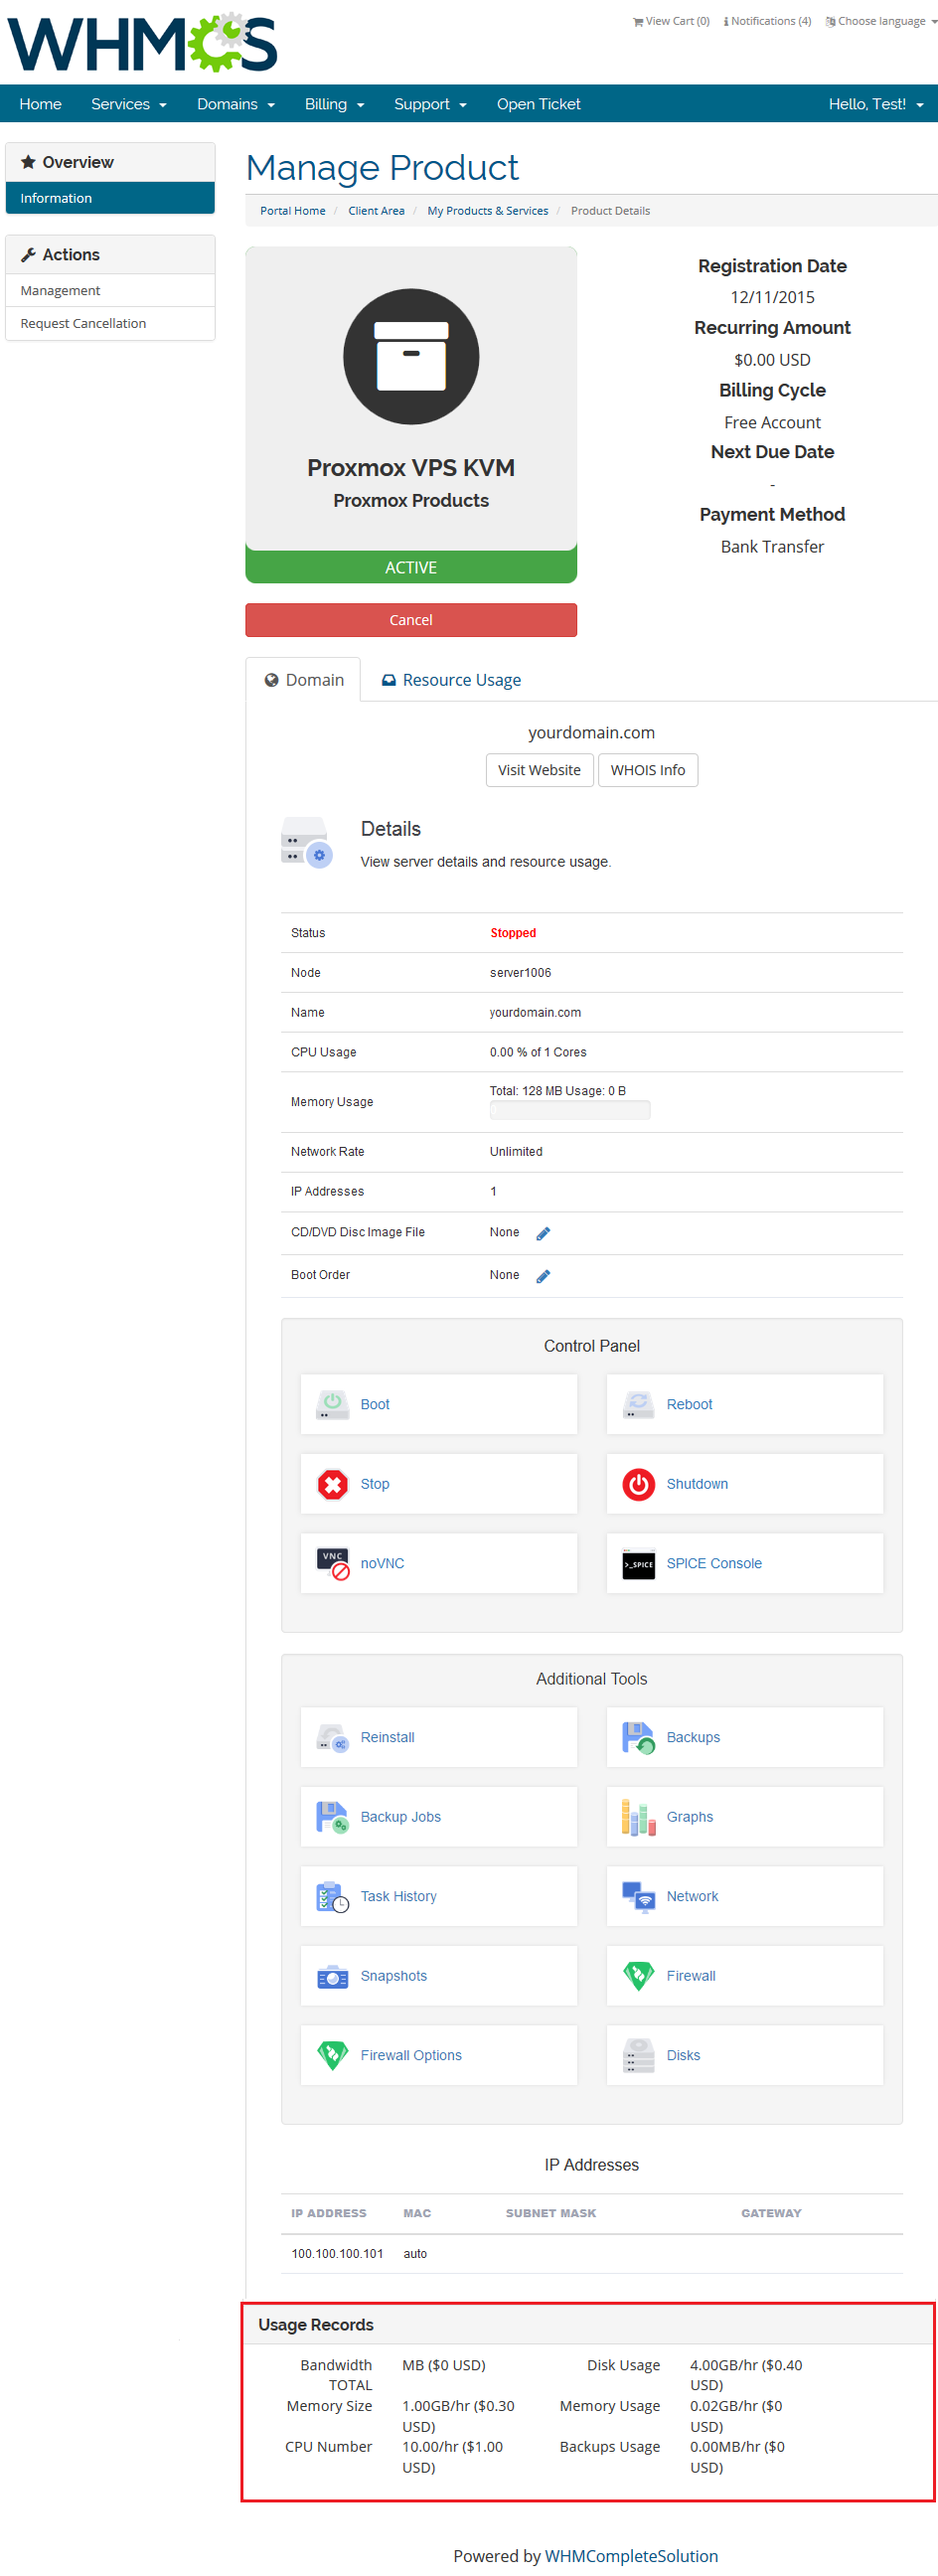
|
Management of Existing Accounts
| You can easily use Proxmox VPS module with your existing Proxmox accounts. To do so, follow the instructions below: 1. Create and configure a Proxmox VPS server and a server group. |
Tips
| 1. Operations performed on the virtual servers are not executed immediately. Give your Proxmox Virtual Environment some time for processing the request and execution of operation. |
| 2. Multiple physical Proxmox servers can be joined into one cluster. When they are joined into one cluster, you can access all of them by connecting to any. |
Common Problems
| 1. When you have problems with connection, check whether your SELinux or firewall does not block ports. |
| 2. Error 'Could not create PVE2_API object' during connecting via noVNC console. Reason: User account does not have permission to access noVNC console. |
| 3. Error 'This connection is untrusted' during connecting via noVNC console. Reason: Your certificate is not valid. |
| 4. Blank page during connecting via noVNC console. Reason: You have not uploaded 'mgnovnc.html' on to the Proxmox server. |