WithoutDNS For WHMCS
(Created page with "<meta name="keywords" content="withoutdns for whmcs, whmcs withoutdns configuration, whmcs withoutdns management, whmcs withoutdns installation, whmcs withoutdns common proble...") |
|||
| Line 16: | Line 16: | ||
|style="padding: 0px 0px 0px 45px;"|✔ | |style="padding: 0px 0px 0px 45px;"|✔ | ||
|} | |} | ||
| + | =Installation= | ||
| + | {| | ||
| + | |style="padding: 10px 0px 15px 15px;"|'''This tutorial will show you how to successfully install and configure [https://www.modulesgarden.com/products/whmcs/abandoned-cart Abandoned Cart For WHMCS.]''' <br /> | ||
| + | We will guide you step by step through the whole installation and configuration process. <br/> | ||
| + | |} | ||
| + | {| | ||
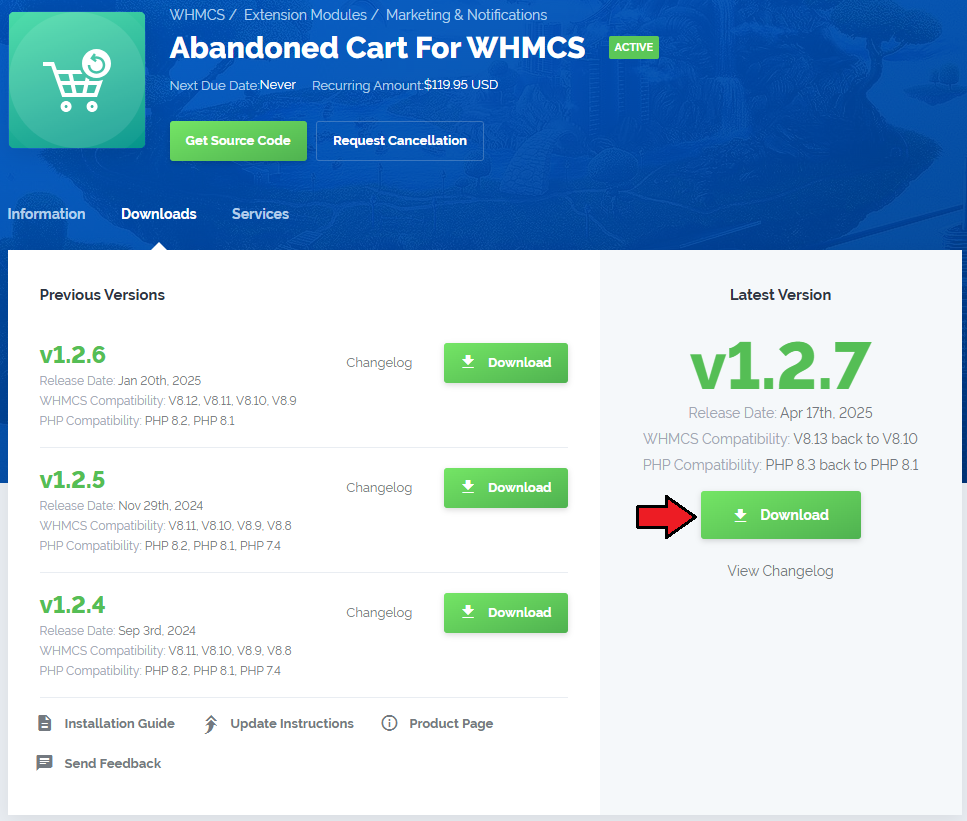
| + | |style="padding: 0px 0px 20px 15px;"|'''1. Log in to our client area and download the module.''' | ||
| + | |} | ||
| + | {| | ||
| + | |style="padding: 0px 0px 20px 25px;"|[[File:AC_1.png]] | ||
| + | |} | ||
| + | <!-- | ||
| + | {| | ||
| + | |style="padding: 0px 0px 20px 15px;"|'''2. In the downloaded file you will find a package that supports PHP 7.4 up to 8.1.''' | ||
| + | |} | ||
| + | {| | ||
| + | |style="padding: 0px 0px 20px 25px;"|[[File:PHP74_81.png]] | ||
| + | |} | ||
| + | --> | ||
| + | {| | ||
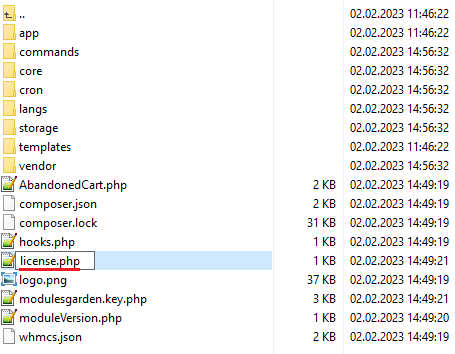
| + | |style="padding: 0px 0px 15px 15px;"|'''2. Upload and extract the extension into the main WHMCS directory.<br /> | ||
| + | Extracted files in your WHMCS directory should look like this: | ||
| + | |} | ||
| + | {| | ||
| + | |style="padding: 0px 0px 20px 25px;"|[[File:AC_2.png]] | ||
| + | |} | ||
| + | {| | ||
| + | |style="padding: 0px 0px 15px 15px;"|'''3. When you install Abandoned Cart For WHMCS for the first time, you have to rename the '' 'license_RENAME.php' '' file.<br /> | ||
| + | This file is located in '' 'modules/addons/AbandonedCart/license_RENAME.php'. '' Rename it from '' 'license_RENAME.php' '' to '' 'license.php'. '' | ||
| + | |} | ||
| + | {| | ||
| + | |style="padding: 0px 0px 20px 25px;"|[[File:AC_3.png]] | ||
| + | |} | ||
| + | {| | ||
| + | |style="padding: 0px 0px 15px 15px;"|'''4. In order to configure your license key, you have to edit the previously renamed '' 'license.php' '' file.''' <br /> | ||
| + | Enter your license key between the quotation marks as presented on the following screen. You can find your license key in our client area → '' 'My Products'. '' | ||
| + | |} | ||
| + | {| | ||
| + | |style="padding: 0px 0px 20px 25px;"|[[File:AC_4.png]] | ||
| + | |} | ||
| + | {| | ||
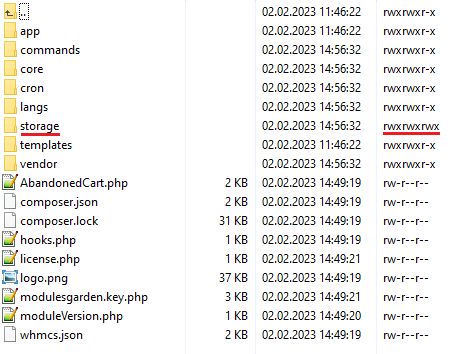
| + | |style="padding: 0px 0px 15px 15px;"|'''5. In the next step, set up the '' 'storage' '' folder as recursively writable.'''<br /> | ||
| + | This folder is available at '' 'your_whmcs/modules/addons/AbandonedCart/' ''. | ||
| + | |} | ||
| + | {| | ||
| + | |style="padding: 0px 0px 20px 25px;"|[[File:AC_5.png]] | ||
| + | |} | ||
| + | {| | ||
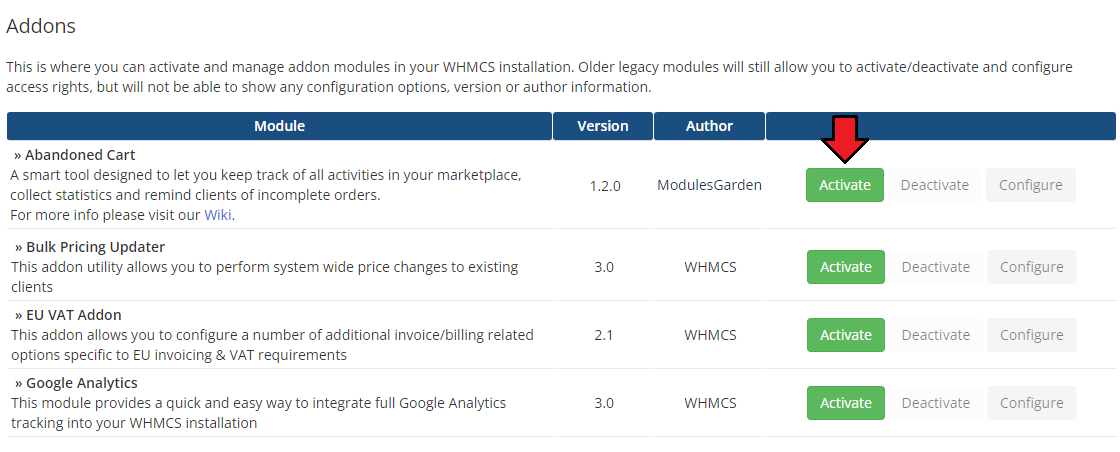
| + | |style="padding: 0px 0px 15px 15px;"|'''6. Now you have to activate the module in your WHMCS system.'''<br /> | ||
| + | Log in to your WHMCS admin area. Go to '' 'System Settings' '' → '' 'Addon Modules'. '' Afterwards, find '' 'Abandoned Cart' '' and press the '' 'Activate' '' button. | ||
| + | |} | ||
| + | {| | ||
| + | |style="padding: 0px 0px 20px 25px;"|[[File:AC_6.png]] | ||
| + | |} | ||
| + | {| | ||
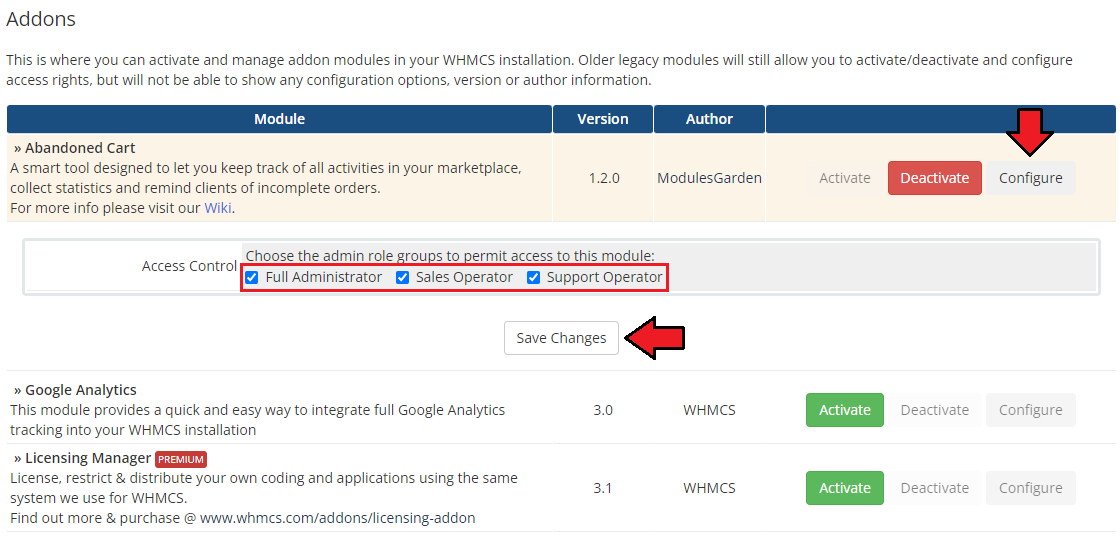
| + | |style="padding: 0px 0px 15px 15px;"|'''7. In the next step you need to permit access to this module.'''<br /> | ||
| + | To do so, click on the '' 'Configure' '' button, tick '' 'Full Administrator' '' and press '' 'Save Changes'. '' | ||
| + | |} | ||
| + | {| | ||
| + | |style="padding: 0px 0px 20px 25px;"|[[File:AC_7.png]] | ||
| + | |} | ||
| + | {| | ||
| + | |style="padding: 0px 0px 15px 15px;"|'''8. You have just successfully installed Abandoned Cart For WHMCS!'''<br /> | ||
| + | You can access your module at '' 'Addons' '' → '' 'Abandoned Cart'. '' | ||
| + | |} | ||
| + | {| | ||
| + | |style="padding: 0px 0px 30px 25px;"|[[File:AC_8.png]] | ||
| + | |} | ||
| + | |||
| + | =Configuration and Management= | ||
| + | {| | ||
| + | |style="padding: 10px 0px 30px 15px;"|'''Abandoned Cart For WHMCS''' allows you to control all the actions that take place in your marketplace. <br/> | ||
| + | Check the manual below to learn how to configure the module to take all the advantages it has to offer. | ||
| + | |} | ||
| + | ==Addon Module== | ||
| + | ===Dashboard=== | ||
| + | {| | ||
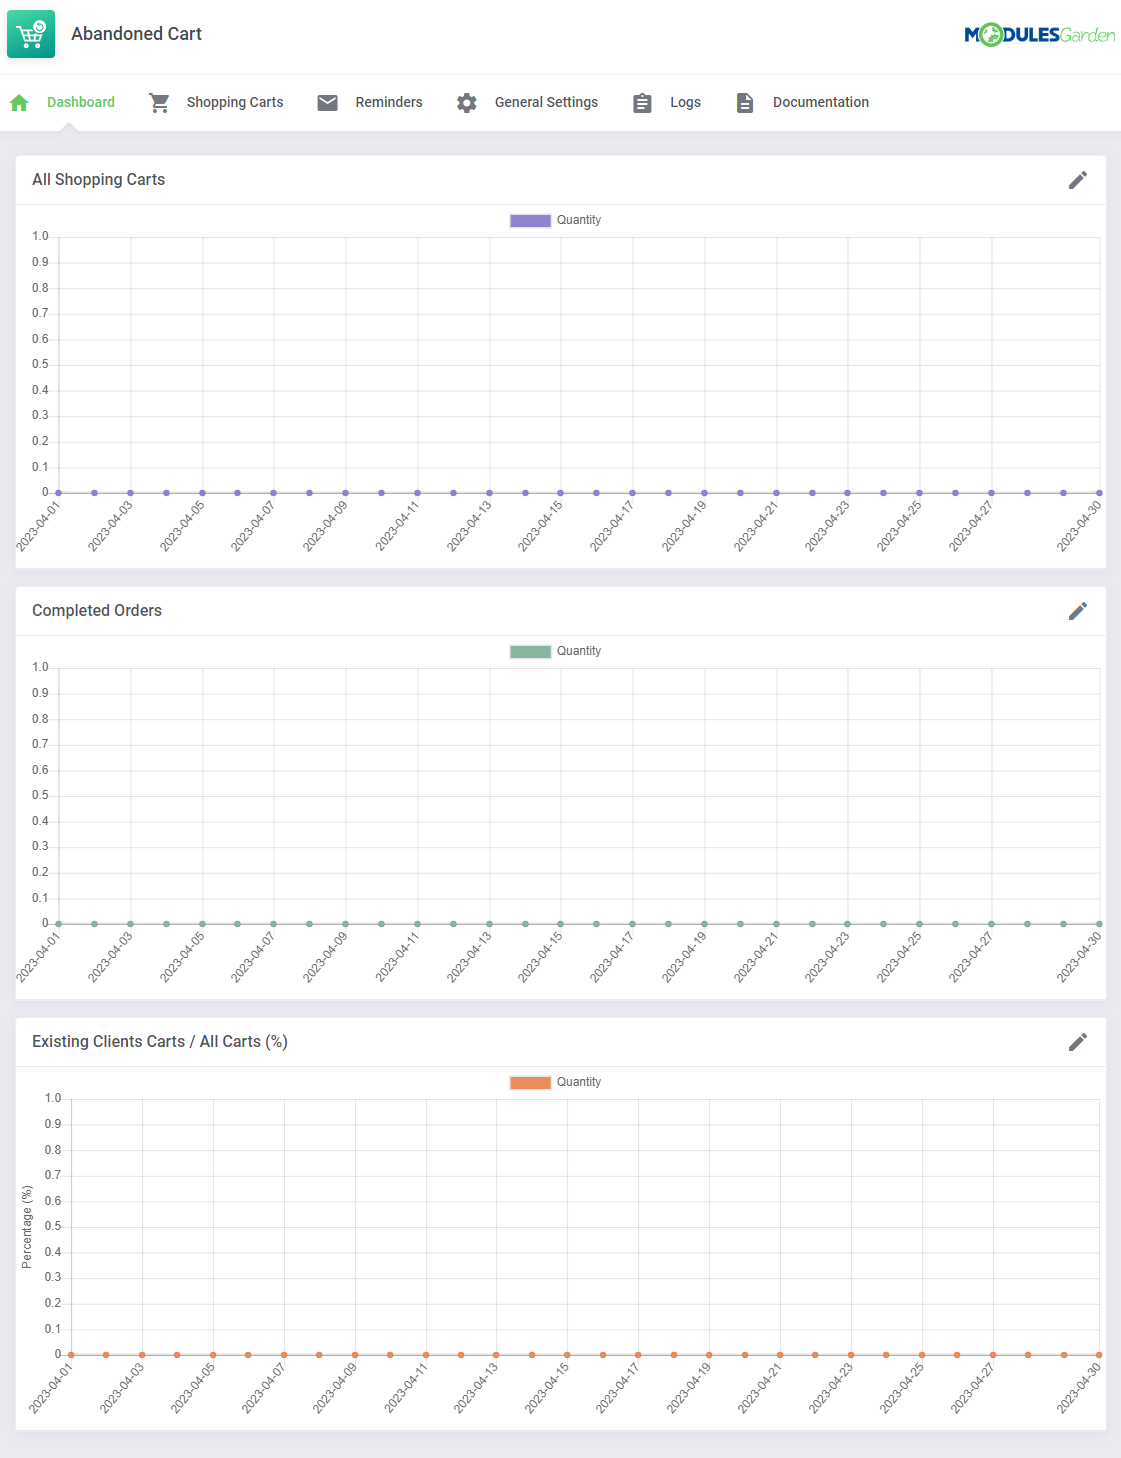
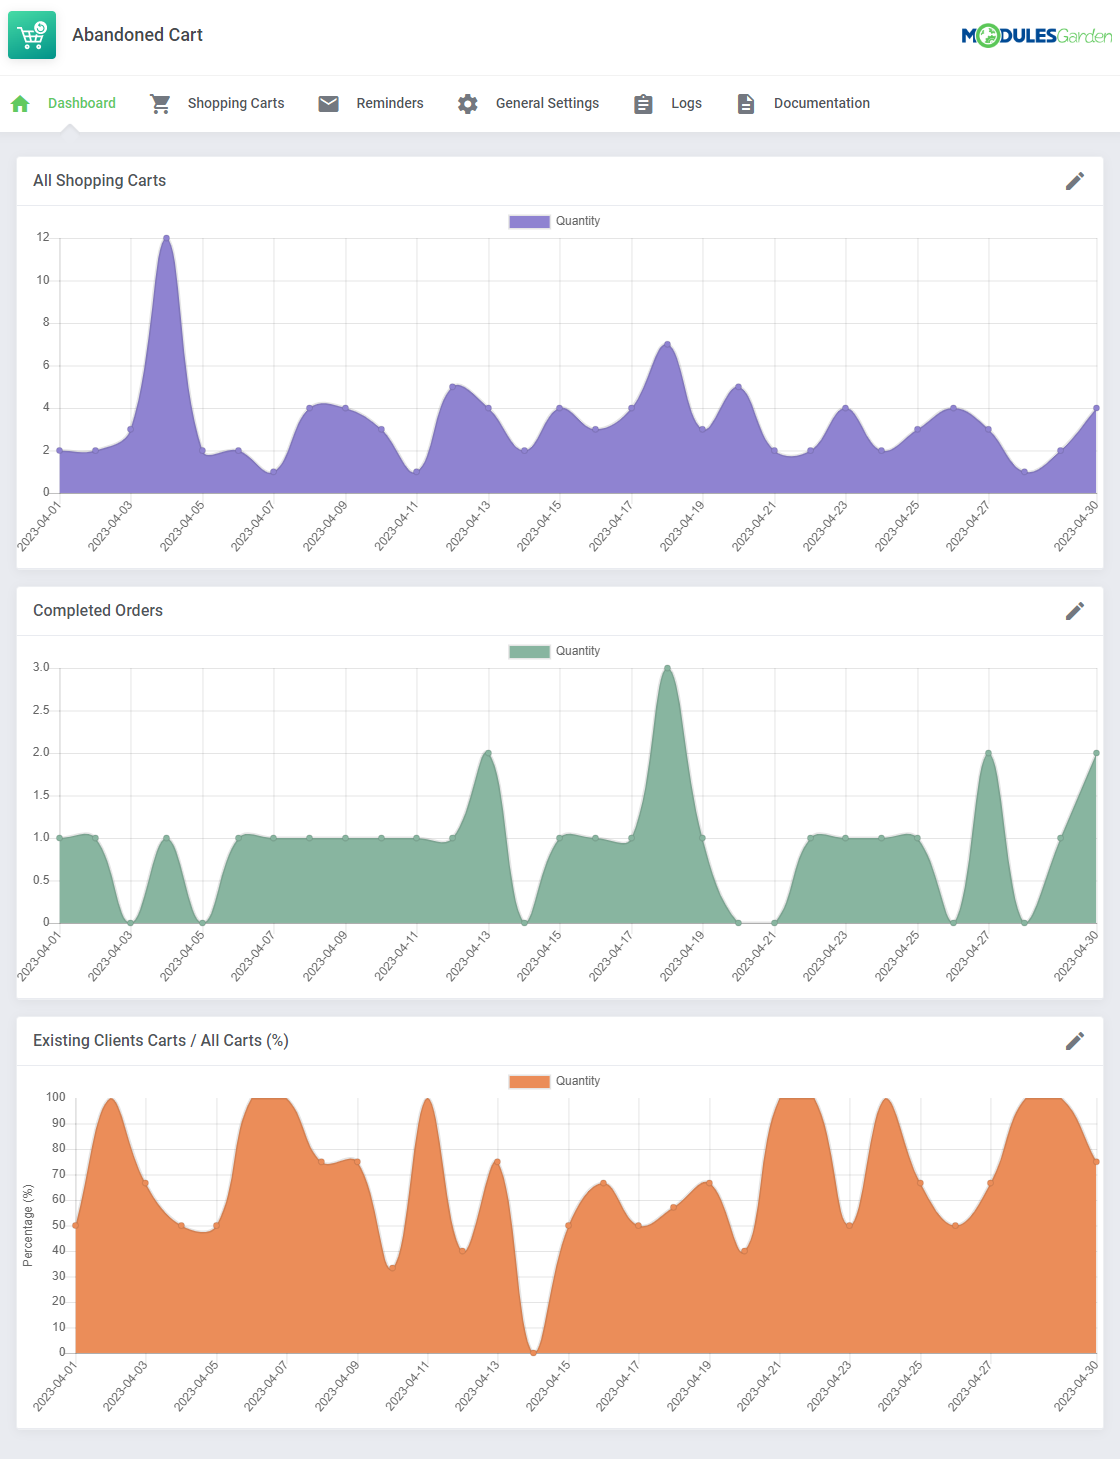
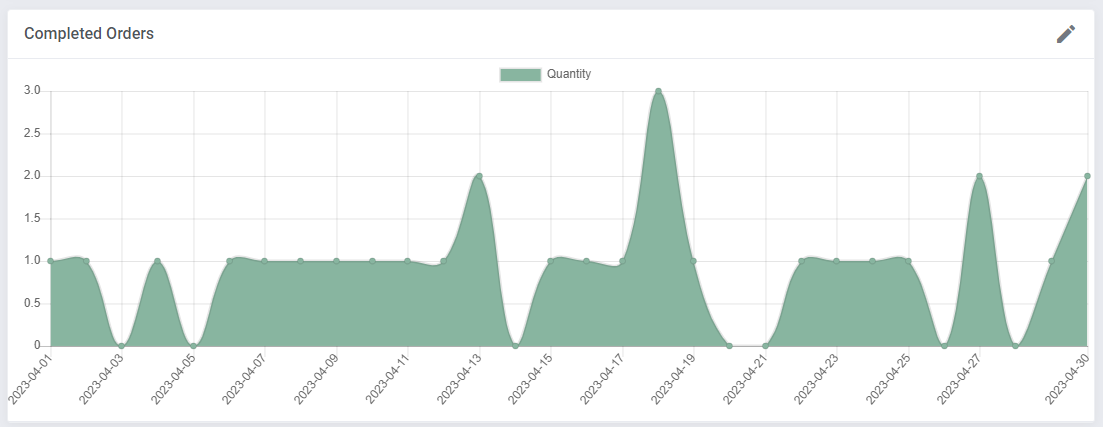
| + | |style="padding: 10px 0px 15px 15px;"|In the dashboard you can find the summary graphs of recently created shopping cart.<br/> | ||
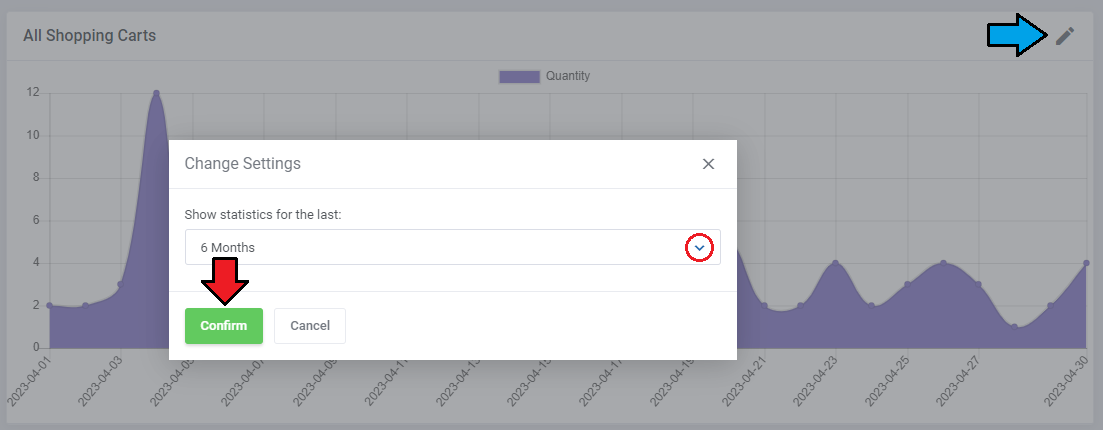
| + | The first graph illustrates the number of all shopping carts created within the selected period of time. You may choose between 1, 3, 6 and 12 months to show the statistics for. | ||
| + | |} | ||
| + | {| | ||
| + | |style="padding: 0px 0px 20px 25px;"|[[File:AC_9.png]] | ||
| + | |} | ||
| + | {| | ||
| + | |style="padding: 0px 0px 20px 25px;"|[[File:AC_10.png]] | ||
| + | |} | ||
| + | {| | ||
| + | |style="padding: 0px 0px 20px 15px;"|The second graph is dedicated to show the summary of completed orders only. | ||
| + | |} | ||
| + | {| | ||
| + | |style="padding: 0px 0px 20px 25px;"|[[File:AC_11.png]] | ||
| + | |} | ||
| + | {| | ||
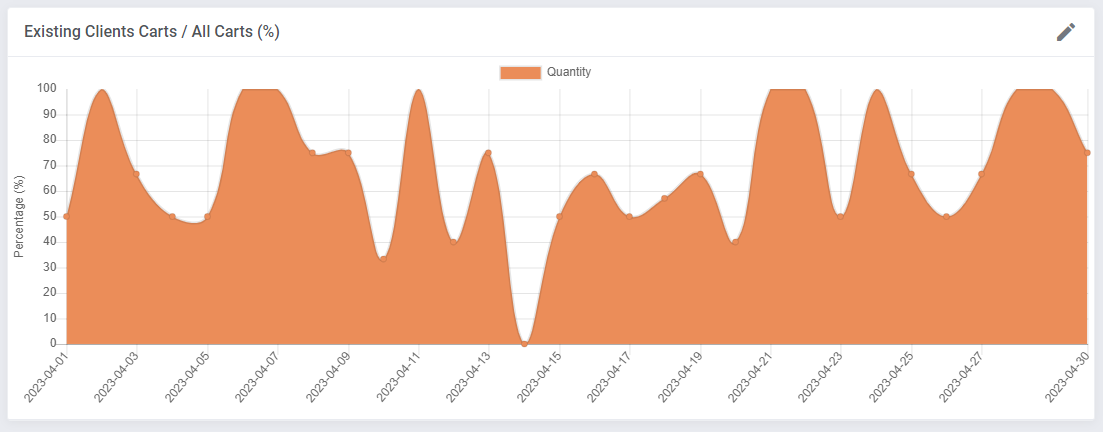
| + | |style="padding: 0px 0px 15px 15px;"|The last graph "Existing Clients Carts / All Carts (%)" represents the percentage of cars created by the existing clients ''(unlogged guests are not taken into consideration)''<br/> towards the number of all carts ''(created by existing clients and guests together)''. | ||
| + | |} | ||
| + | {| | ||
| + | |style="padding: 0px 0px 30px 25px;"|[[File:AC_12.png]] | ||
| + | |} | ||
| + | |||
| + | ===Shopping Carts=== | ||
| + | {| | ||
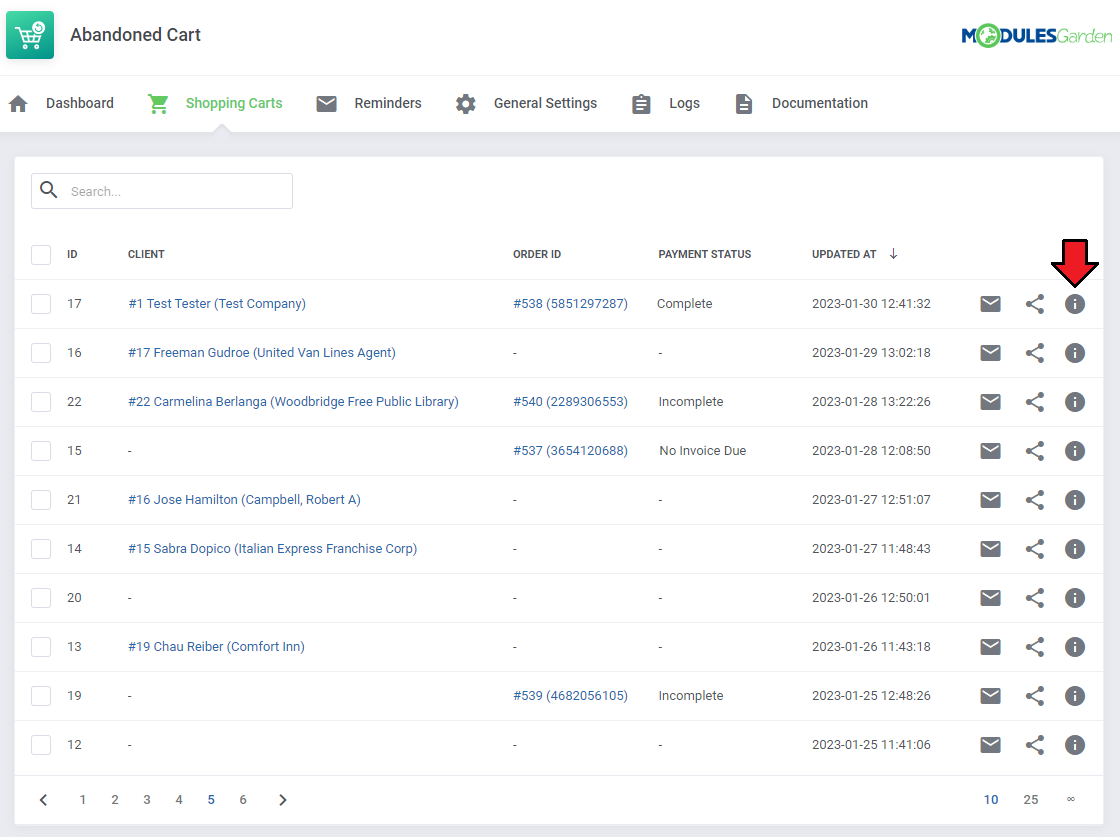
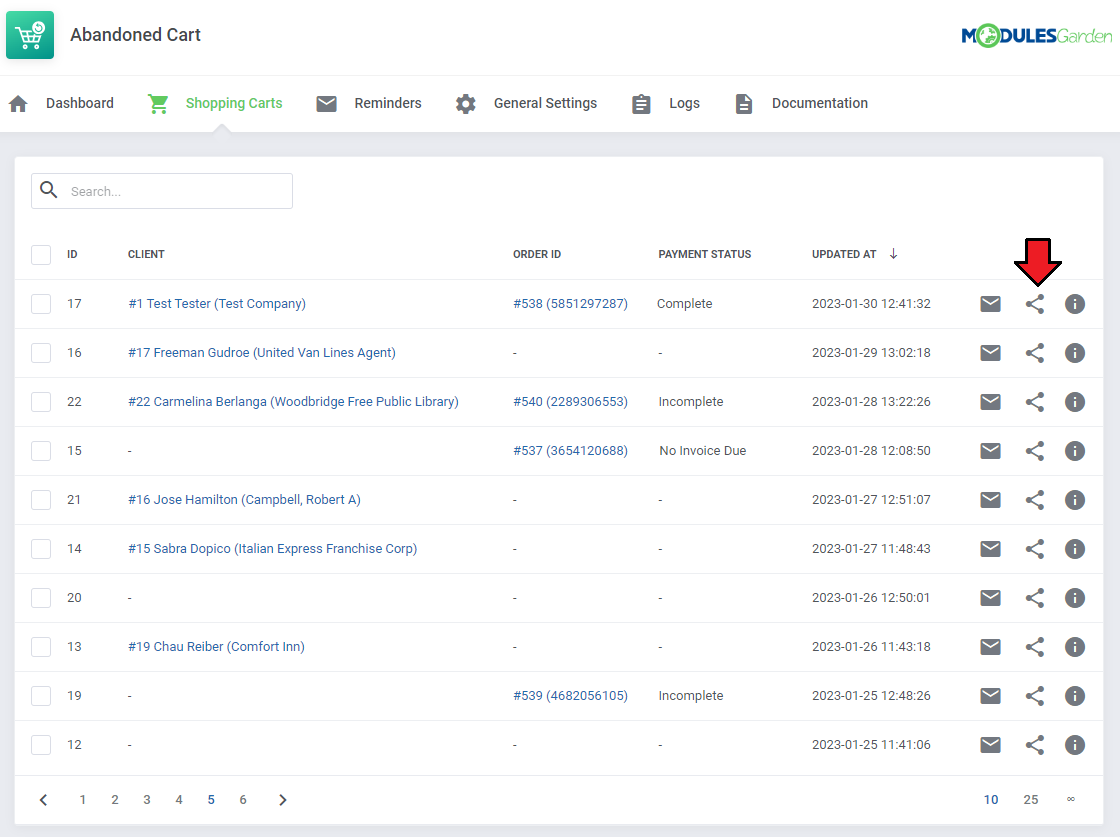
| + | |style="padding: 10px 0px 15px 15px;"|The '' 'Shopping Carts' '' section, as its name suggests, contains a list of all identified carts, with details included, as follows:<br/> | ||
| + | * client full name and its company name ''(if known)'' | ||
| + | * the URL to the order if created | ||
| + | * the cart details<br/> | ||
| + | Press the "Snapshots" button to find more specific information on the cart content and actions performed within that cart. | ||
| + | |} | ||
| + | {| | ||
| + | |style="padding: 0px 0px 20px 25px;"|[[File:AC_13.png]] | ||
| + | |} | ||
| + | {| | ||
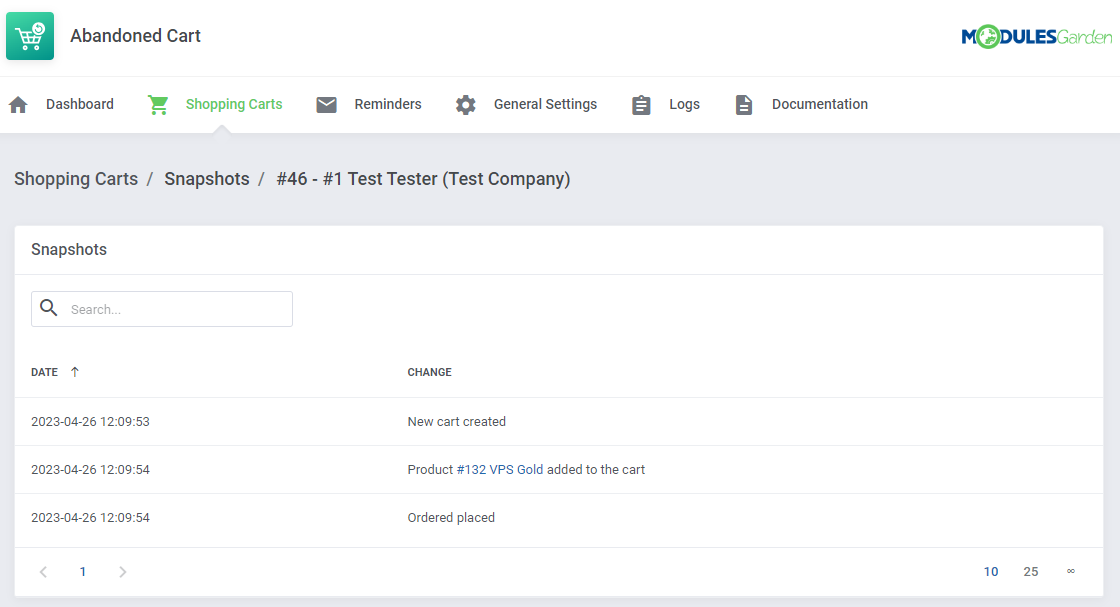
| + | |style="padding: 0px 0px 15px 15px;"|Under "Snapshots" there are details on the cart content, visible at the moment of the last snapshot being taken. <br/> You will find there also the history of changes made by the client, such as: | ||
| + | * adding a new product/addon/domain | ||
| + | * removing a product/addon/domain | ||
| + | |} | ||
| + | {| | ||
| + | |style="padding: 0px 0px 20px 25px;"|[[File:AC_14.png]] | ||
| + | |} | ||
| + | {| | ||
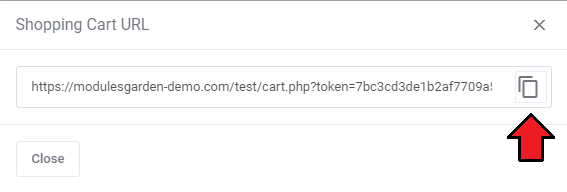
| + | |style="padding: 0px 0px 20px 15px;"|Right next to the shopping cart details you will find a button which after pressing shows a direct URL to the abandoned cart. | ||
| + | |} | ||
| + | {| | ||
| + | |style="padding: 0px 0px 20px 25px;"|[[File:AC_14_1.png]] | ||
| + | |} | ||
| + | {| | ||
| + | |style="padding: 0px 0px 20px 25px;"|[[File:AC_14_2.png]] | ||
| + | |} | ||
| + | {| | ||
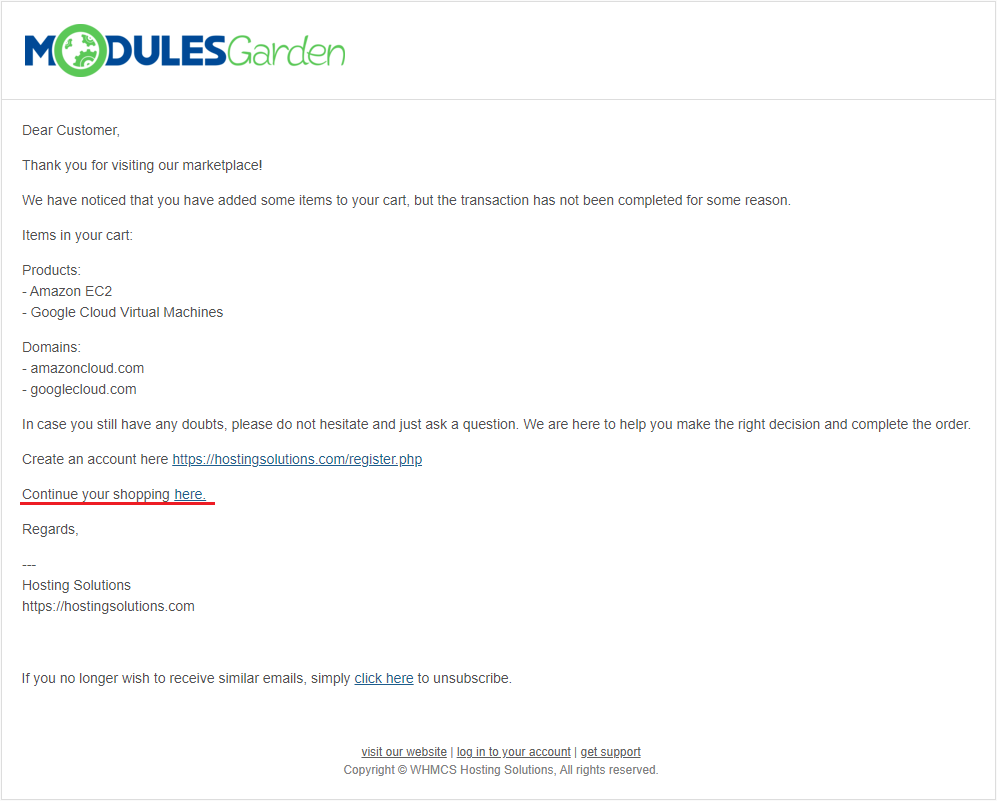
| + | |style="padding: 0px 0px 15px 15px;"|This URL can be automatically placed in the email message sent to a client provided a dedicated "Restore Abandoned Cart" option has been previously enabled [[#General_Settings|(more here)]].<br/> On pressing, the client can get his abandoned cart restored and he will be allowed to continue shopping with the already filled in cart with all the items.<br/> You may also use this URL to resend it manually. | ||
| + | |} | ||
| + | {| | ||
| + | |style="padding: 0px 0px 20px 25px;"|[[File:AC_14_3.png]] | ||
| + | |} | ||
| + | {| | ||
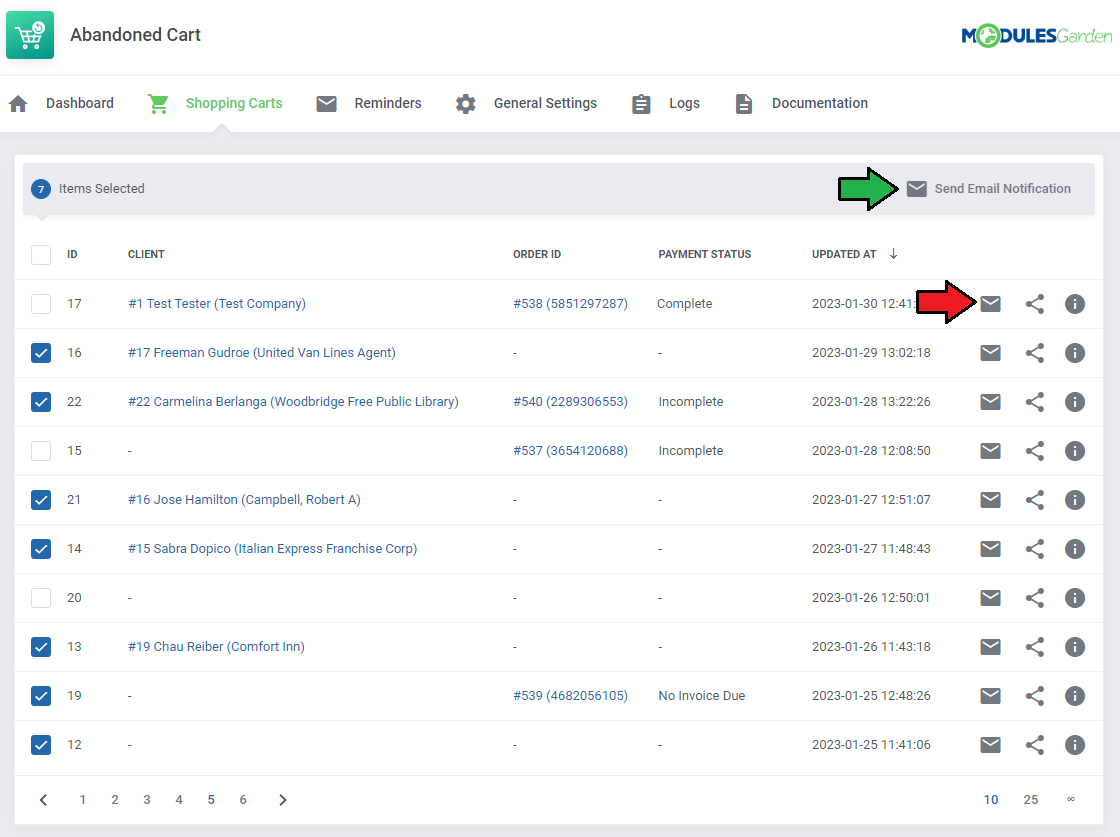
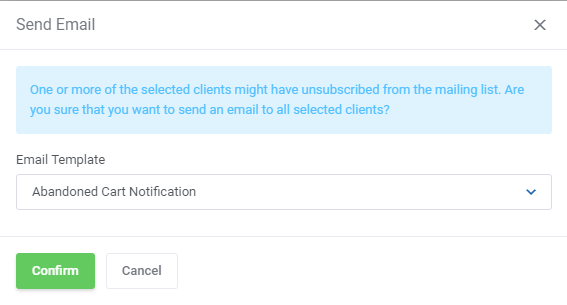
| + | |style="padding: 0px 0px 20px 15px;"|You may send email template reminders to preferred clients directly from the shopping carts list. Send emails to single clients or choose several recipients. | ||
| + | |} | ||
| + | {| | ||
| + | |style="padding: 0px 0px 20px 25px;"|[[File:AC_14_4.png]] | ||
| + | |} | ||
| + | {| | ||
| + | |style="padding: 0px 0px 30px 25px;"|[[File:AC_14_5.png]] | ||
| + | |} | ||
| + | |||
| + | ===Reminders=== | ||
| + | {| | ||
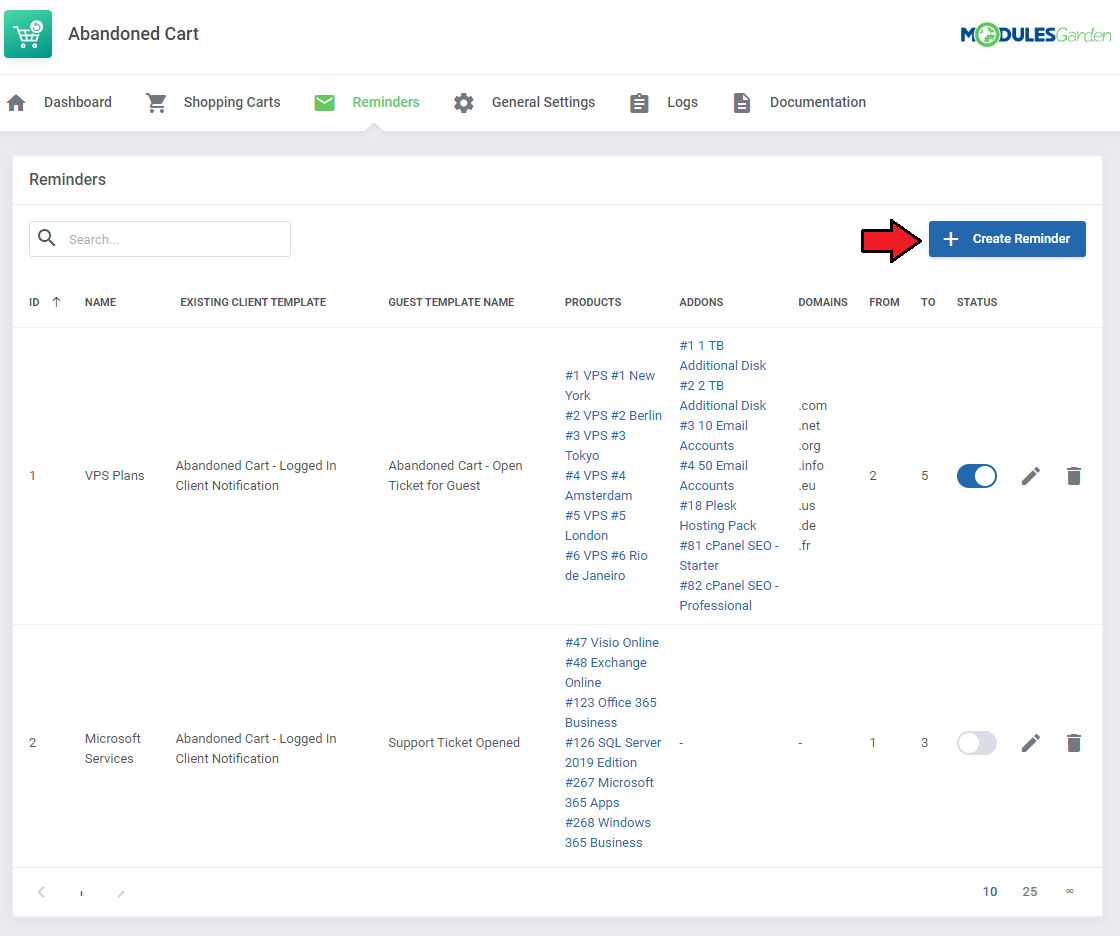
| + | |style="padding: 10px 0px 15px 15px;"|"Reminders" is the clue section of the whole module. Compose the reminders settings to deliver adjusted notifications to clients who abandoned their cart. <br/> Press '' 'Create Reminder' '' button to create your first rule. | ||
| + | |} | ||
| + | {| | ||
| + | |style="padding: 0px 0px 20px 25px;"|[[File:AC_15.png]] | ||
| + | |} | ||
| + | {| | ||
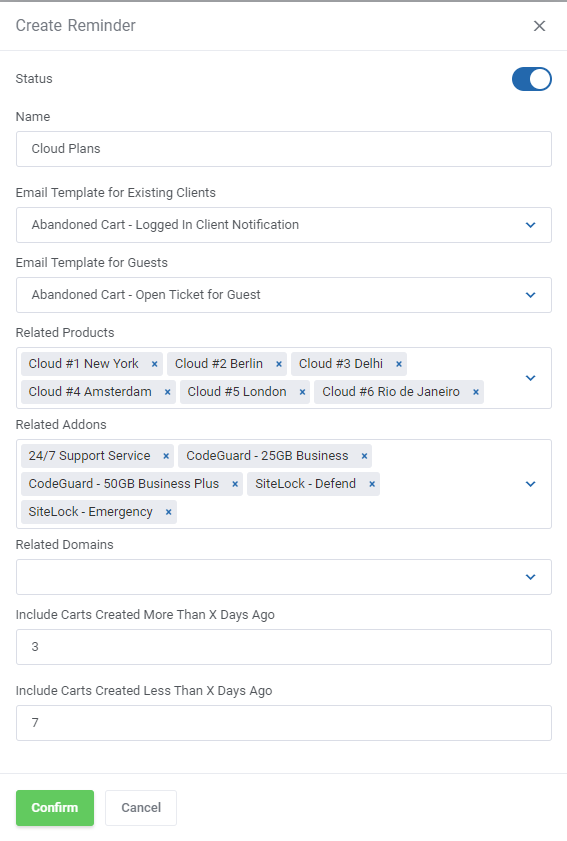
| + | |style="padding: 0px 0px 15px 15px;"|Configure the reminder by providing the details as explained below: | ||
| + | * '''Status''' - enable/disable the reminder | ||
| + | |||
| + | * '''Name''' - give the reminder a unique name | ||
| + | |||
| + | * '''Email Template for Existing Clients''' - choose the email template that will be used to send an email message notifying your already logged in/registered client; "Abandoned Cart - Logged In Client Notification" is the default module template. | ||
| + | |||
| + | * '''Email Template for Guests''' - choose the email template that will be used send an email message notifying your guest clients who visited your client area and started shopping; "Abandoned Cart - Open Ticket For Guest" is the default module template. <br/> You may preview and adjust the email templates content at ''your WHMCS → System Settings → Email Templates.''<br/> '''''Note:''' A support ticket is opened at the same time within a dedicated support department.'' | ||
| + | |||
| + | * '''Related Products/Addons/Domains''' - select items; if any has been added to the cart, a related reminder will be sent to the interested client (logged in or guest who provided the email address) | ||
| + | |||
| + | * '''Include Carts Created More Than X Days Ago''' - type in the number of days, only carts created BEFORE will be verified | ||
| + | |||
| + | * '''Include Carts Created Less Than X Days Ago''' - type in the number of days, only carts created AFTER will be verified,<br/> as illustrated: only carts created between the last 3 and 7 days will be checked | ||
| + | |||
| + | Press '' 'Confirm' '' when your reminder configuration is ready. | ||
| + | |} | ||
| + | {| | ||
| + | |style="padding: 0px 0px 20px 25px;"|[[File:AC_16.png]] | ||
| + | |} | ||
| + | {| | ||
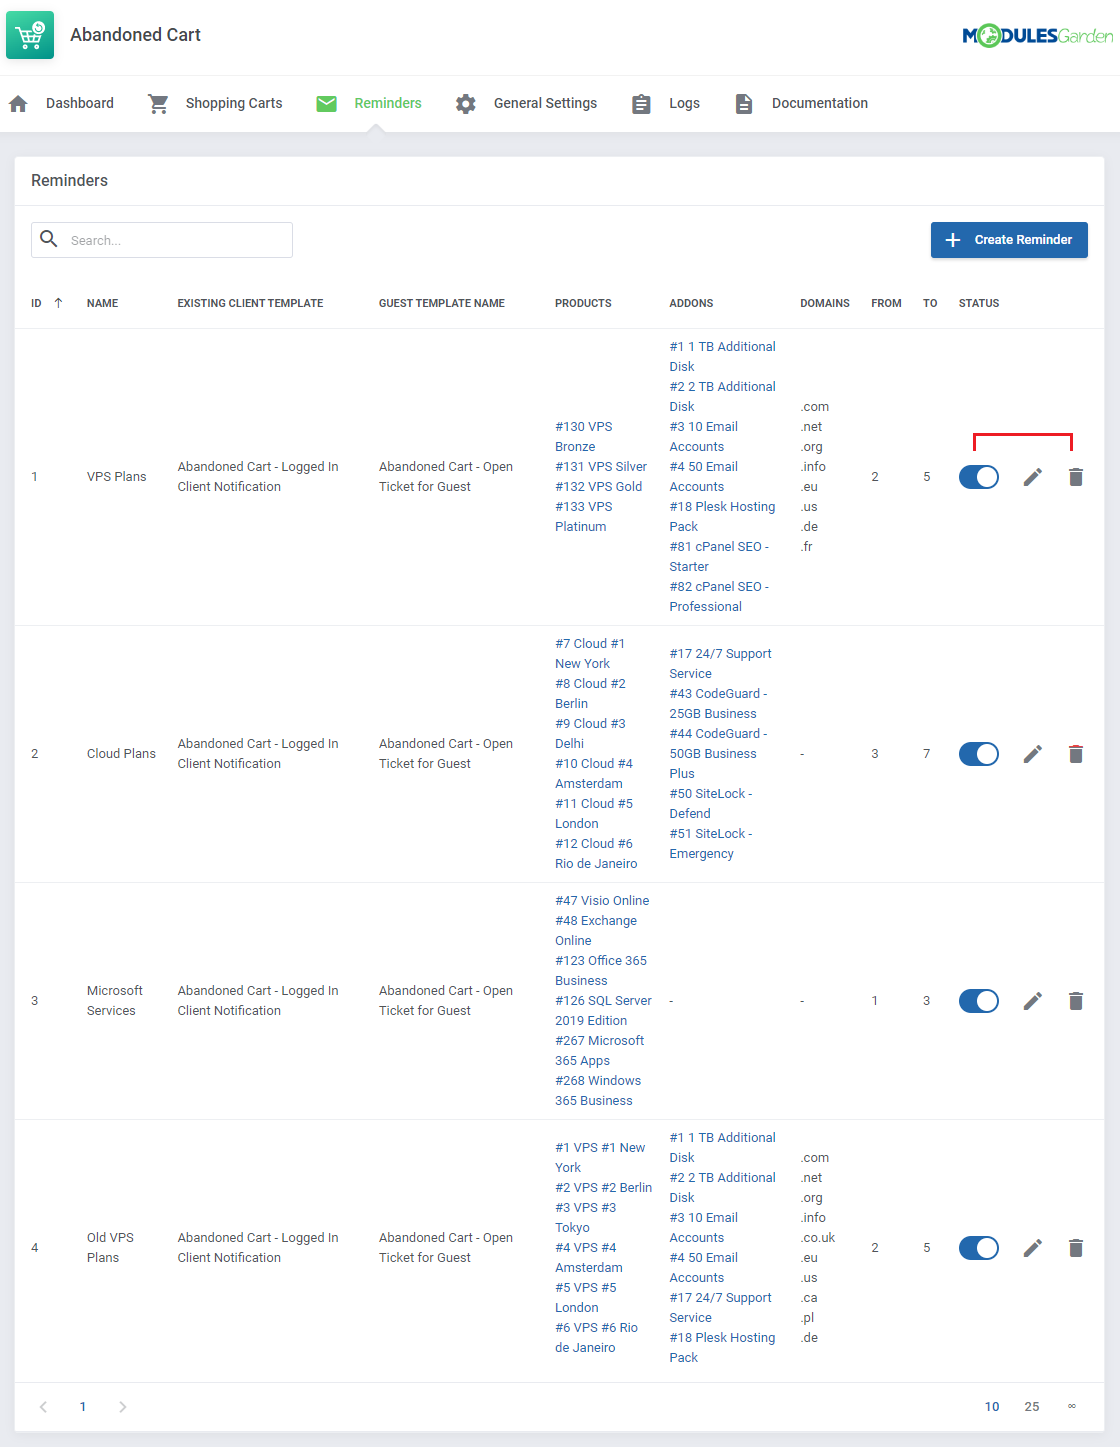
| + | |style="padding: 0px 0px 15px 15px;"|The just created reminder rule will appear on the list with crucial details visible on the front page for a quick and easy preview. <br/> | ||
| + | You may enable/disable the reminder, edit and delete it using the actions buttons. | ||
| + | |} | ||
| + | {| | ||
| + | |style="padding: 0px 0px 30px 25px;"|[[File:AC_17.png]] | ||
| + | |} | ||
| + | |||
| + | ===General Settings=== | ||
| + | {| | ||
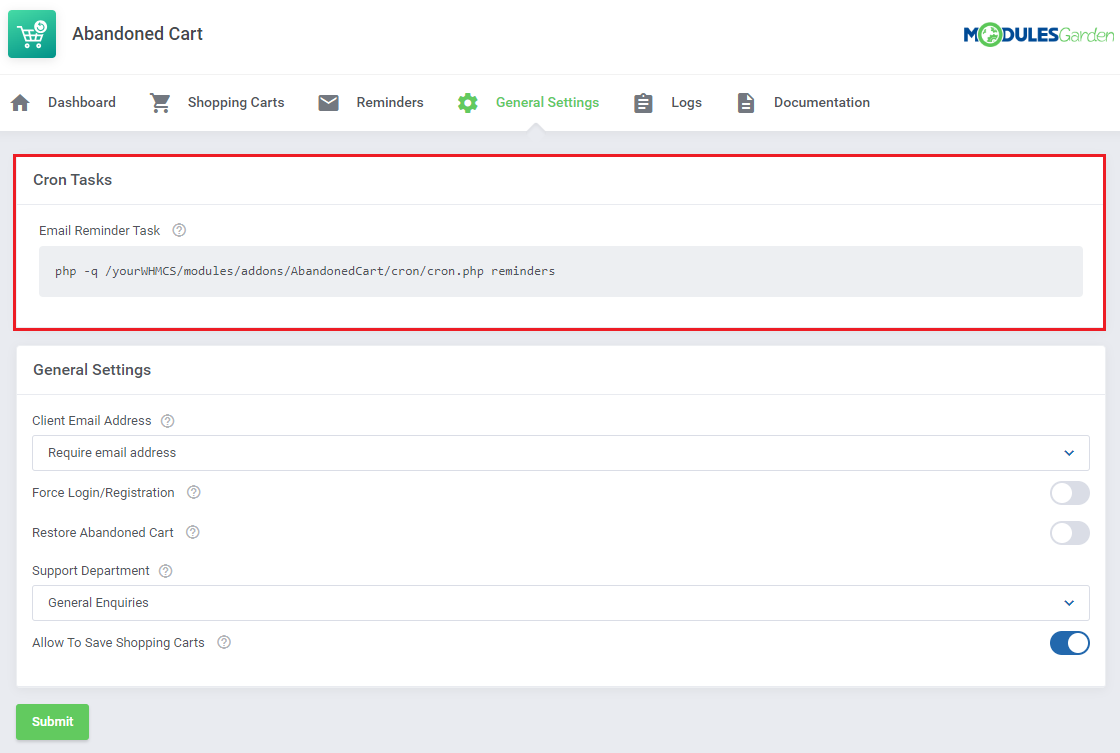
| + | |style="padding: 10px 0px 15px 15px;"|Under the '' 'General Settings' '' section you will find the cron details - setting it up is crucial for the module's correct behavior and configuration. | ||
| + | '''Cron Task'''<br/> | ||
| + | Set up the cron that is responsible for sending email messages, based on created reminders as explained in the [[#Reminders|previous step]]. Once a day is recommended to assure fluent module performance. | ||
| + | |} | ||
| + | {| | ||
| + | |style="padding: 0px 0px 20px 25px;"|[[File:AC_18.png]] | ||
| + | |} | ||
| + | {| | ||
| + | |style="padding: 0px 0px 15px 15px;"|'''General Settings:''' | ||
| + | |||
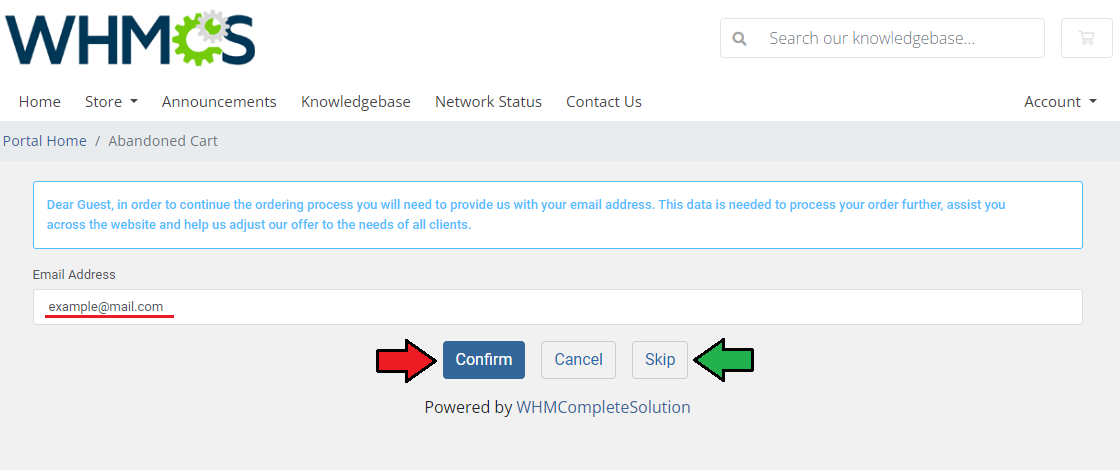
| + | * '''Client Email Address''' - related to new visitors only; when a guest client starts to browse your store, he or she will be asked to provide an email address before being allowed to continue and complete the order: | ||
| + | **Disabled | ||
| + | **Require email address - the client will be forced to enter the email address to be able to continue the shopping | ||
| + | **Allow to skip this step - the client can type in the email address or press "Skip" to continue shopping, if "Skip" is pressed, no data will be collected by the module | ||
| + | |||
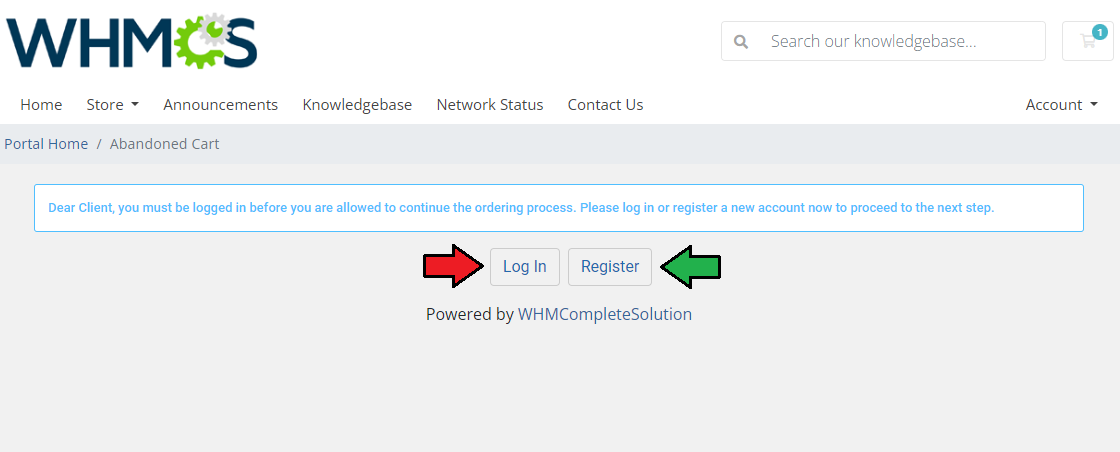
| + | * '''Force Login/Registration''' - related to new visitors and unlogged clients; when a client adds an item to the cart, he or she will be forced to either log in (if the account already exists) or register a new account (new clients).<br/> Otherwise, continuing the shopping will be impossible.<br/> '''''Important:''' Being logged in or at least providing an email address is required for the module correct behavior, without the email address no messages will be sent to remind clients about their abandoned carts.''<br/> '''''Note:''' We highly recommend enabling just one of the options, otherwise, guest clients will be forced to provide an email address in the first step and register an account in the next one.'' | ||
| + | |||
| + | * '''Restore Abandoned Cart''' - if enabled, clients will receive a direct link to their abandoned cart, in the module reminding email message, with its all contents restored to easily complete the order. | ||
| + | |||
| + | * '''Support Department''' - select one of the available support departments. A ticket to remind the guest clients about their abandoned carts will be opened within this department. <br/> | ||
| + | When your configuration is ready, do not forget to press the '' 'Submit' '' button to save your changes. | ||
| + | |||
| + | * '''Allow To Save Shopping Carts''' - when turned on, customers have the ability to save their shopping carts while placing an order.<br/> They can later access these carts from their profiles and share them with other customers using session URLs, instantly restoring the cart's contents. | ||
| + | |} | ||
| + | {| | ||
| + | |style="padding: 0px 0px 30px 25px;"|[[File:AC_19.png]] | ||
| + | |} | ||
| + | |||
| + | ===Logs=== | ||
| + | {| | ||
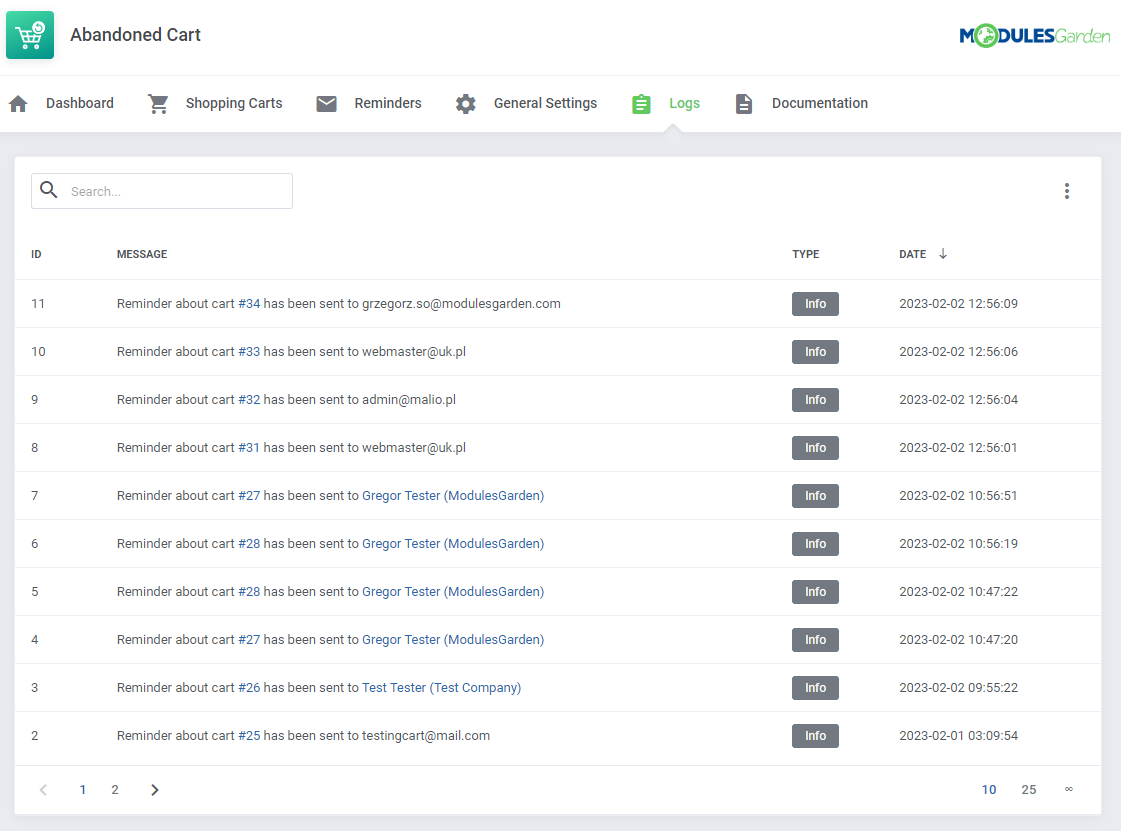
| + | |style="padding: 10px 0px 20px 15px;"|The '' 'Logs' '' section contains information an all actions taken by the module. | ||
| + | |} | ||
| + | {| | ||
| + | |style="padding: 0px 0px 20px 25px;"|[[File:AC_20.png]] | ||
| + | |} | ||
| + | {| | ||
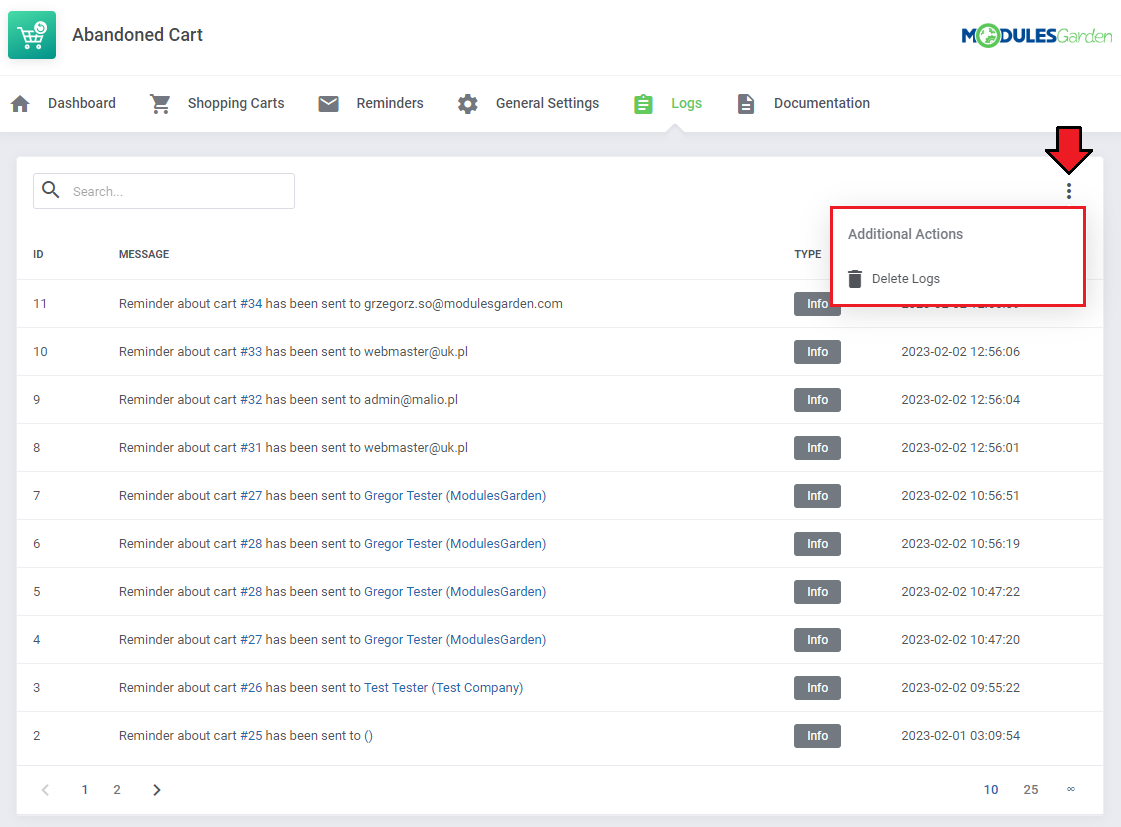
| + | |style="padding: 0px 0px 15px 15px;"|You may always delete the logs if their number is extensive.<br/> | ||
| + | Use the action button for mass removal of all existing log entries. | ||
| + | |} | ||
| + | {| | ||
| + | |style="padding: 0px 0px 30px 25px;"|[[File:AC_20_1.png]] | ||
| + | |} | ||
| + | |||
| + | ==Client Area== | ||
| + | ===Email/Login Requirement=== | ||
| + | {| | ||
| + | |style="padding: 10px 0px 10px 15px;"|Once an unlogged client visits your marketplace, they will be asked to leave some of their personal data. The extent of what exactly must be provided depends on the module [[#General_Settings|configuration]]. | ||
| + | |} | ||
| + | {| | ||
| + | |style="padding: 0px 0px 15px 15px;"|The moment the client starts browsing your store, they will be either: | ||
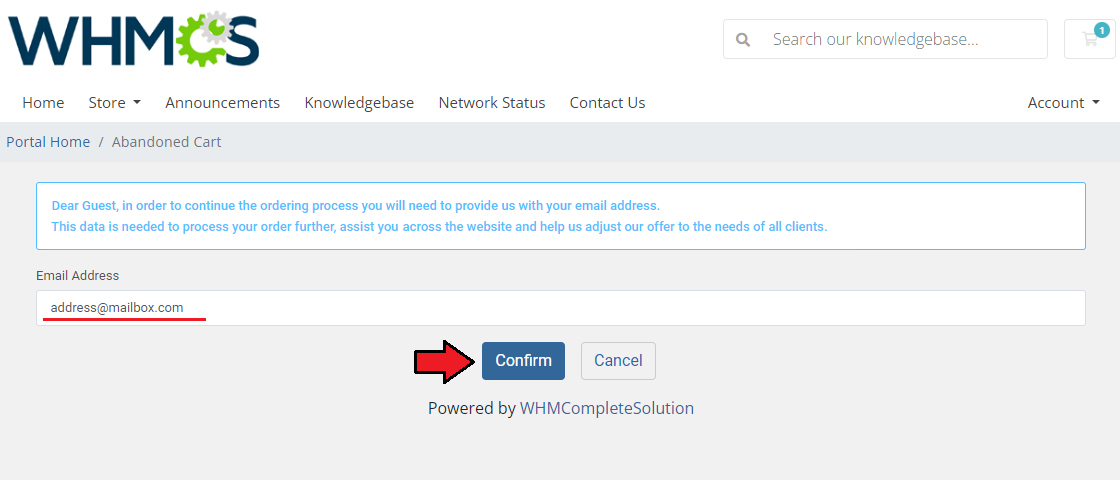
| + | *forced to provide an email address in order to be allowed to complete the shopping ''([[#General_Settings|"Client Email Address"]] option is set to "Require email address")'' | ||
| + | |} | ||
| + | {| | ||
| + | |style="padding: 0px 0px 20px 25px;"|[[File:AC_22.png]] | ||
| + | |} | ||
| + | {| | ||
| + | |style="padding: 0px 0px 20px 15px;"| | ||
| + | *asked to enter an email address in order to be allowed to complete the shopping ''([[#General_Settings|"Client Email Address"]] option is set to "Allow to skip this step")'' | ||
| + | |} | ||
| + | {| | ||
| + | |style="padding: 0px 0px 20px 25px;"|[[File:AC_22_1.png]] | ||
| + | |} | ||
| + | {| | ||
| + | |style="padding: 0px 0px 20px 15px;"| | ||
| + | *forced to log in or register a new account in order to be allowed to complete the shopping ''([[#General_Settings|"Force Login/Registration"]] option is enabled)'' | ||
| + | |} | ||
| + | {| | ||
| + | |style="padding: 0px 0px 20px 25px;"|[[File:AC_23.png]] | ||
| + | |} | ||
| + | {| | ||
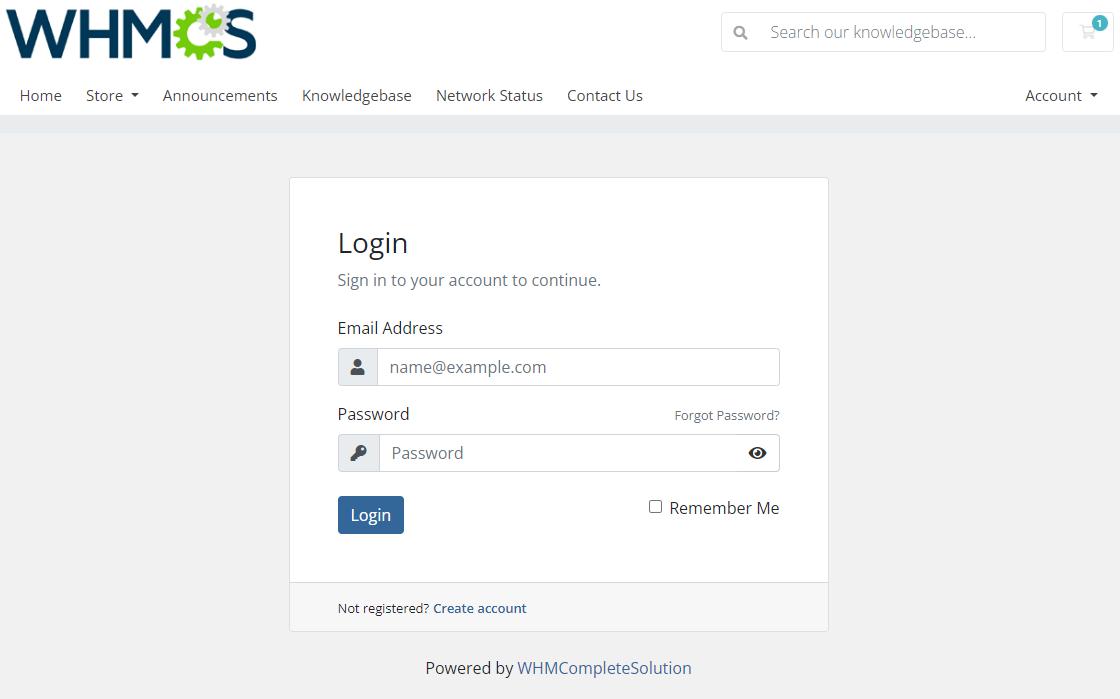
| + | |style="padding: 0px 0px 20px 15px;"|If '' 'Log in' '' is selected, the potential customer will be redirected to the standard client area login page. | ||
| + | |} | ||
| + | {| | ||
| + | |style="padding: 0px 0px 20px 25px;"|[[File:AC_23_1.png]] | ||
| + | |} | ||
| + | {| | ||
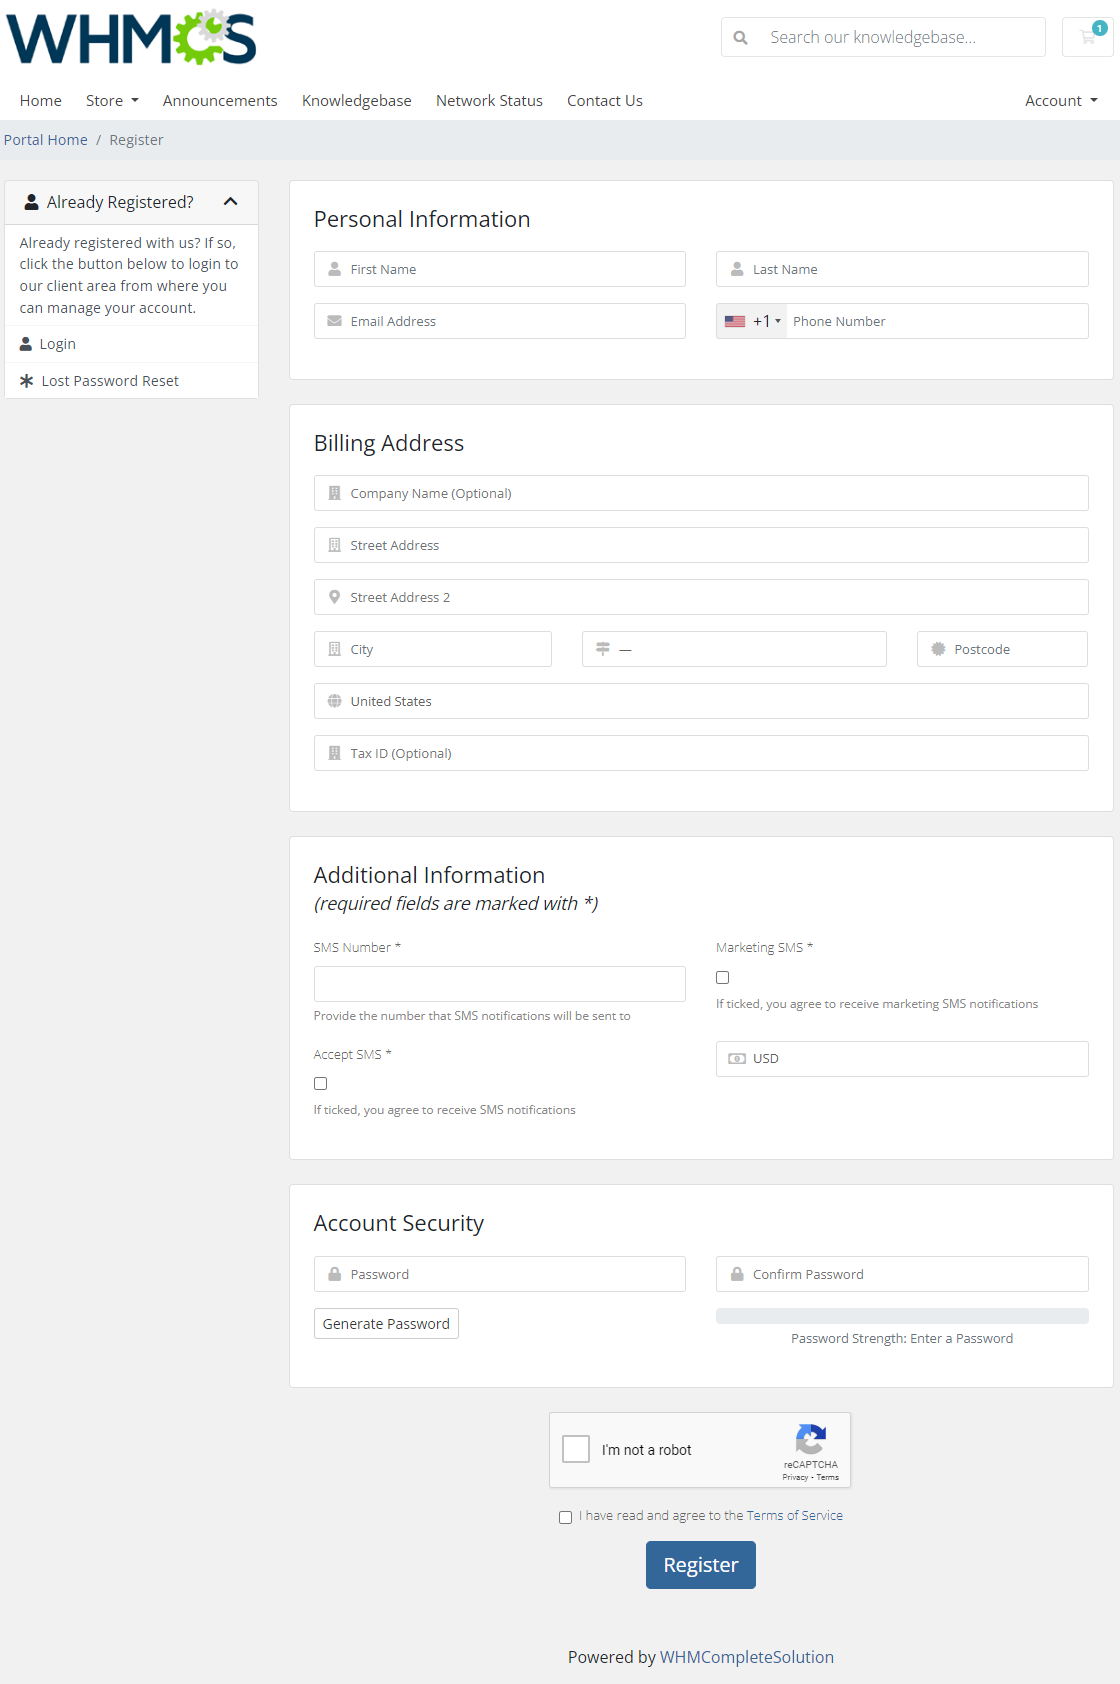
| + | |style="padding: 0px 0px 20px 15px;"|For '' 'Register' '' choice, the visitor will be asked to create a new account using a standard form. | ||
| + | |} | ||
| + | {| | ||
| + | |style="padding: 0px 0px 20px 25px;"|[[File:AC_23_2.png]] | ||
| + | |} | ||
| + | {| | ||
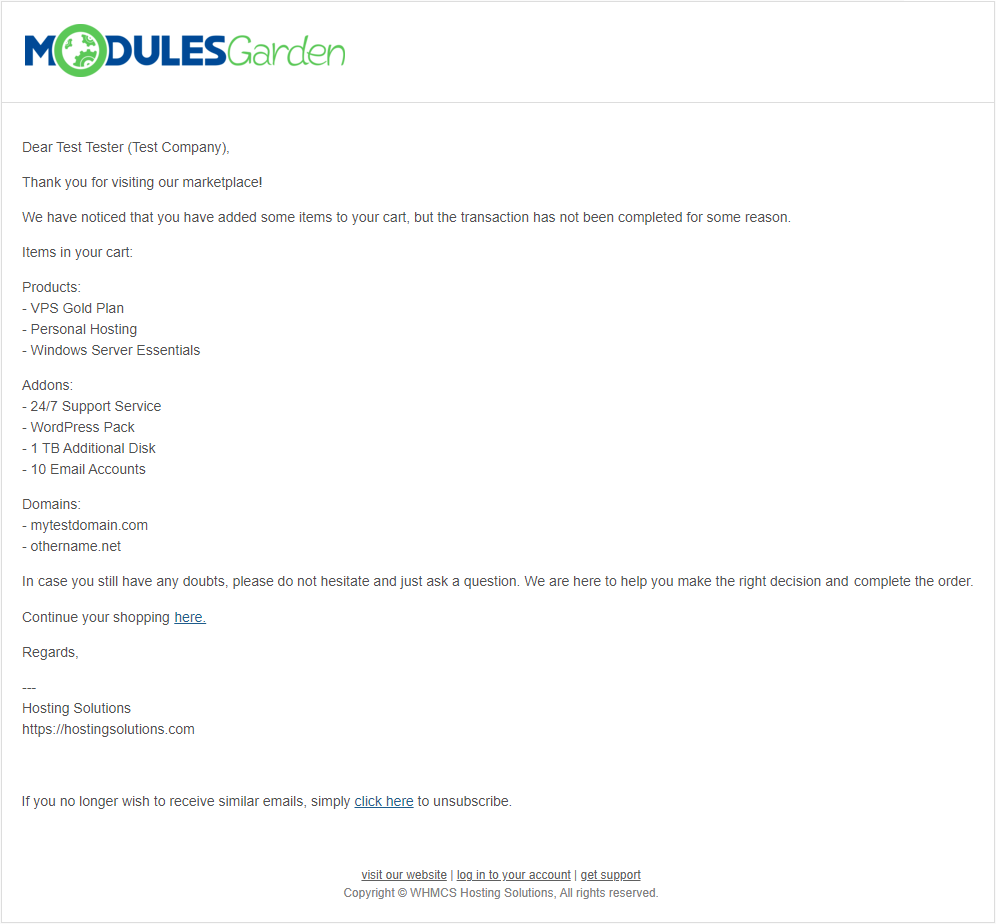
| + | |style="padding: 0px 0px 15px 15px;"|Being logged in or leaving an email address is required for the module to be able to send email messages to clients reminding them about abandoned carts and their content.<br/> | ||
| + | This is how an exemplary email notification sent to a client might look like: | ||
| + | |} | ||
| + | {| | ||
| + | |style="padding: 0px 0px 20px 25px;"|[[File:AC_24.png]] | ||
| + | |} | ||
| + | {| | ||
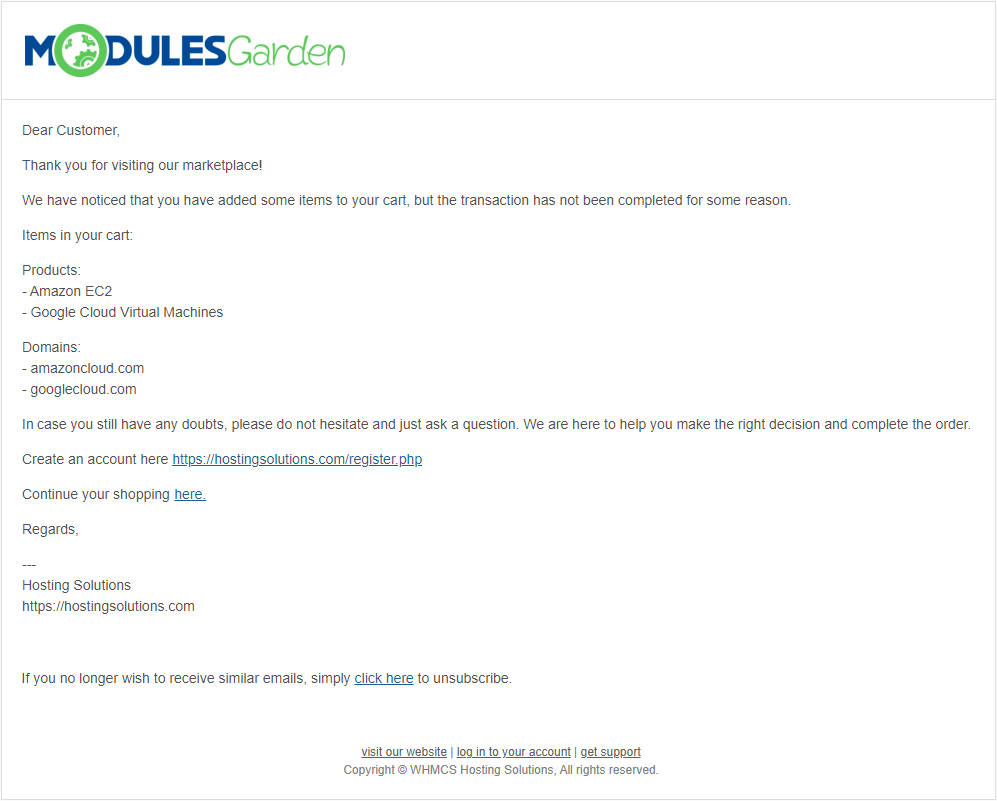
| + | |style="padding: 0px 0px 15px 15px;"|Guest clients who leave only the email address and have no account in your system will get quite a similar notification email.<br/> | ||
| + | '''''Note:''' The system will open a new support ticket in a dedicated department at the same time. Only the assigned admin will have access to this ticket.'' | ||
| + | |} | ||
| + | {| | ||
| + | |style="padding: 0px 0px 30px 25px;"|[[File:AC_25.png]] | ||
| + | |} | ||
| + | |||
| + | ===Shopping Lists=== | ||
| + | {| | ||
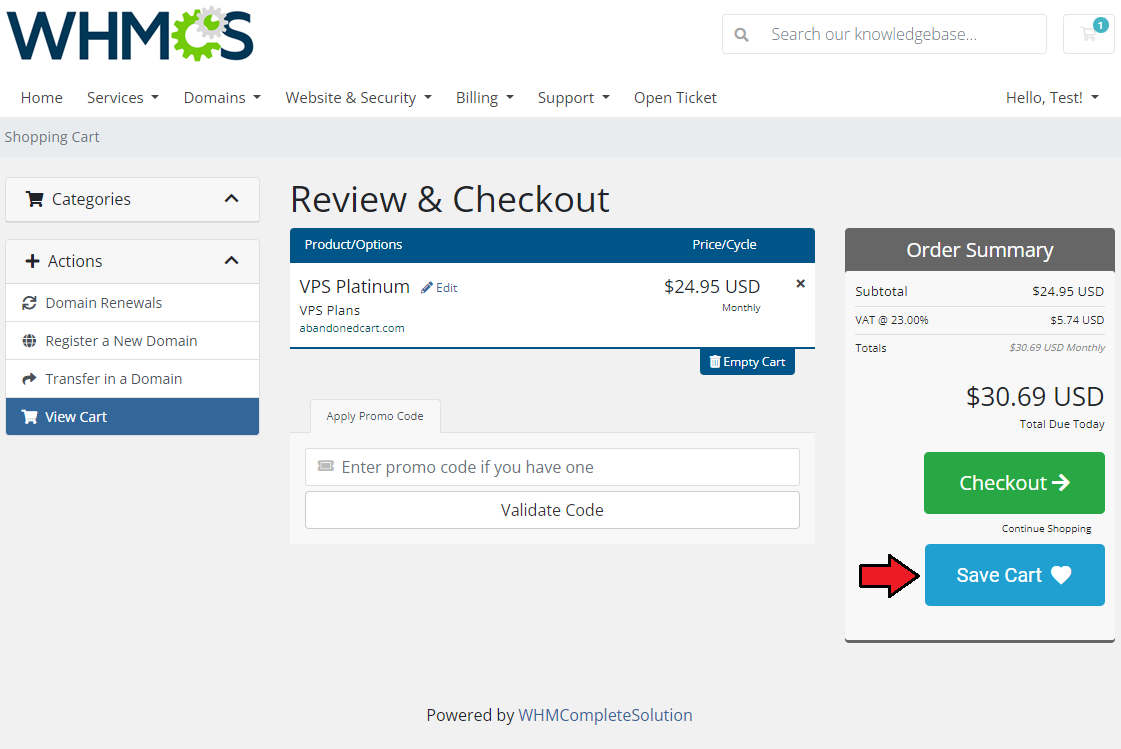
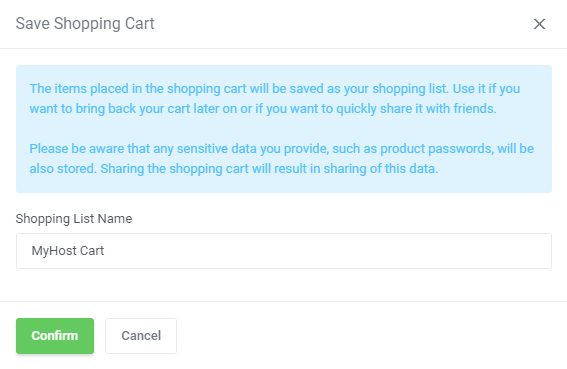
| + | |style="padding: 10px 0px 15px 15px;"|Clients have the convenience of storing their shopping carts to be viewed and finalized in the future.<br/> By clicking the "Save Cart" button while in your cart, the current contents of the cart will be promptly saved and stored in your shopping lists. | ||
| + | |} | ||
| + | {| | ||
| + | |style="padding: 0px 0px 20px 25px;"|[[File:AC_28.png]] | ||
| + | |} | ||
| + | {| | ||
| + | |style="padding: 0px 0px 20px 25px;"|[[File:AC_29.png]] | ||
| + | |} | ||
| + | {| | ||
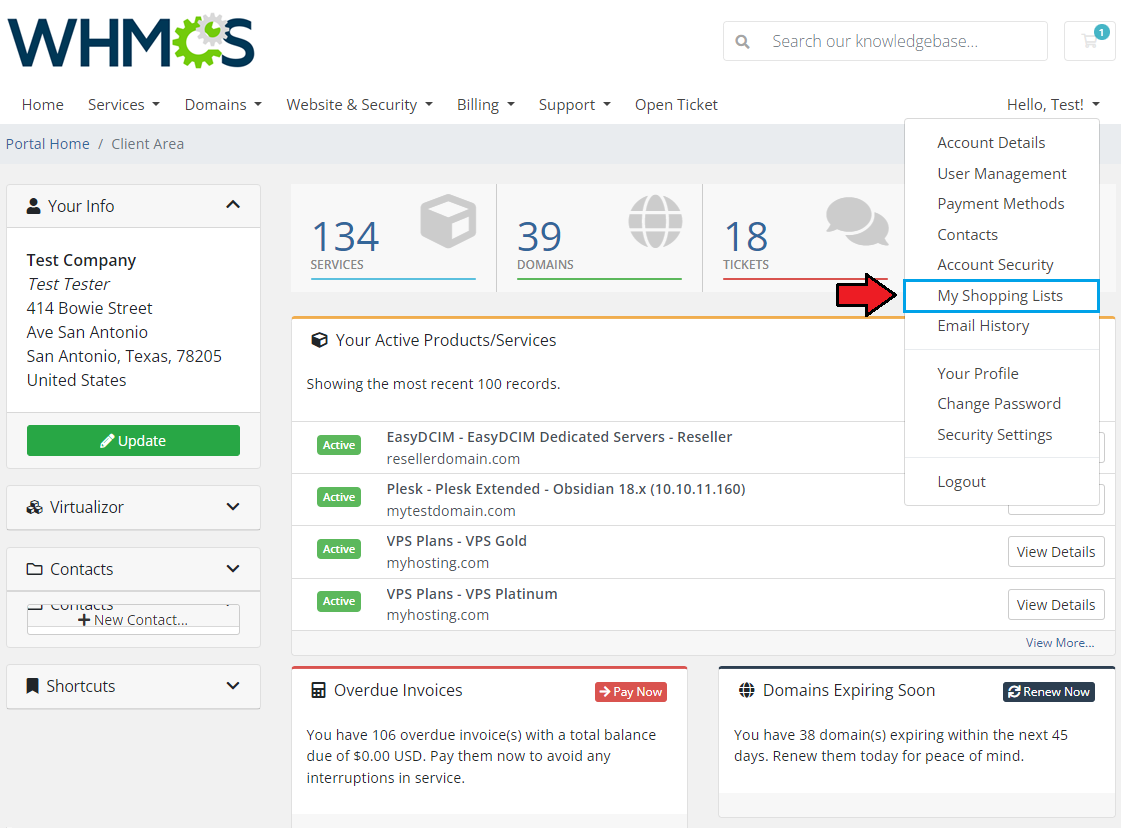
| + | |style="padding: 0px 0px 15px 15px;"|Once you have saved the cart as a shopping list, you can then access the list and manage it according to your needs.<br/> You will find the "My Shopping Lists" button in your account details dropdown menu. | ||
| + | |} | ||
| + | {| | ||
| + | |style="padding: 0px 0px 20px 25px;"|[[File:AC_30.png]] | ||
| + | |} | ||
| + | {| | ||
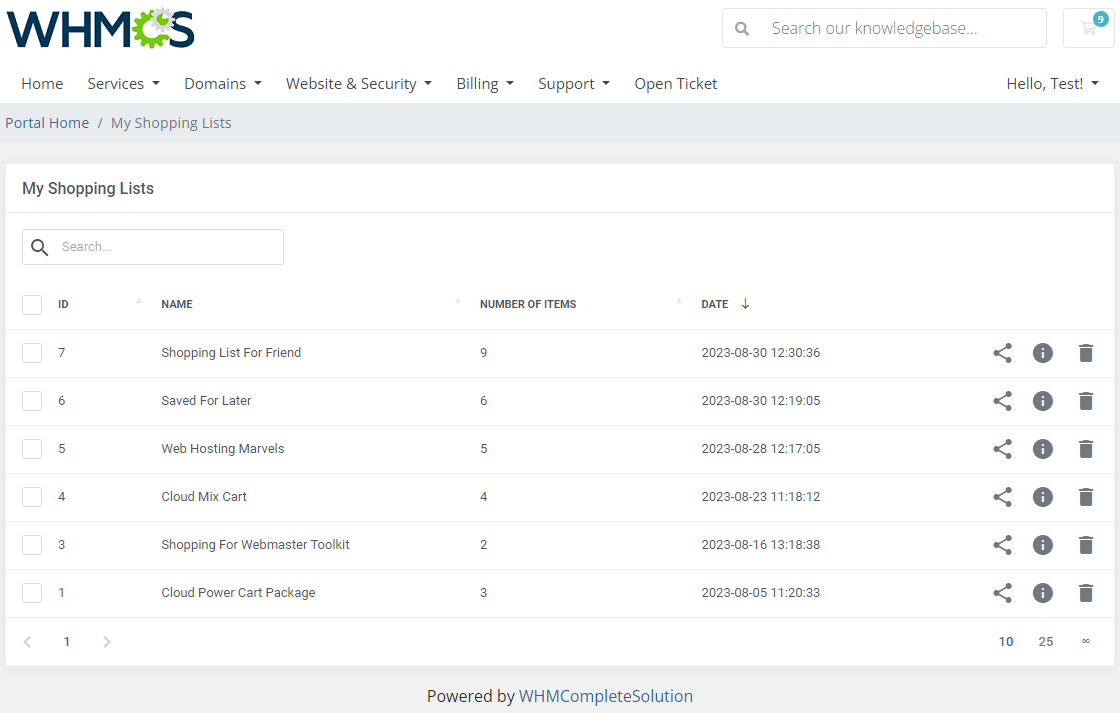
| + | |style="padding: 0px 0px 15px 15px;"|Once you navigate to the "My Shopping Lists" page, you will find all your stored carts with basic details on the dashboard. | ||
| + | Allowed actions on a : | ||
| + | - Shopping cart URL | ||
| + | - Shopping cart items | ||
| + | - Delete saved shopping cart | ||
| + | |} | ||
| + | {| | ||
| + | |style="padding: 0px 0px 20px 25px;"|[[File:AC_31.png]] | ||
| + | |} | ||
| + | {| | ||
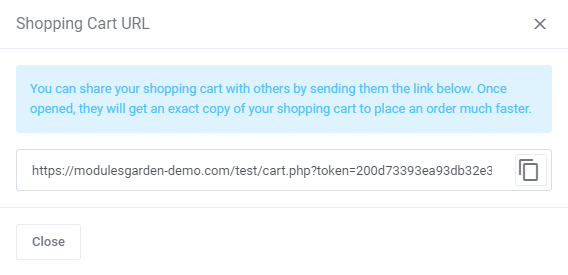
| + | |style="padding: 0px 0px 15px 15px;"|Clients may copy a direct URL to the cart and distribute it to others by providing them with the link. Upon opening the link, they will receive an identical copy of your shopping cart, allowing them to place their orders more quickly. | ||
| + | |} | ||
| + | {| | ||
| + | |style="padding: 0px 0px 20px 25px;"|[[File:AC_32.png]] | ||
| + | |} | ||
| + | {| | ||
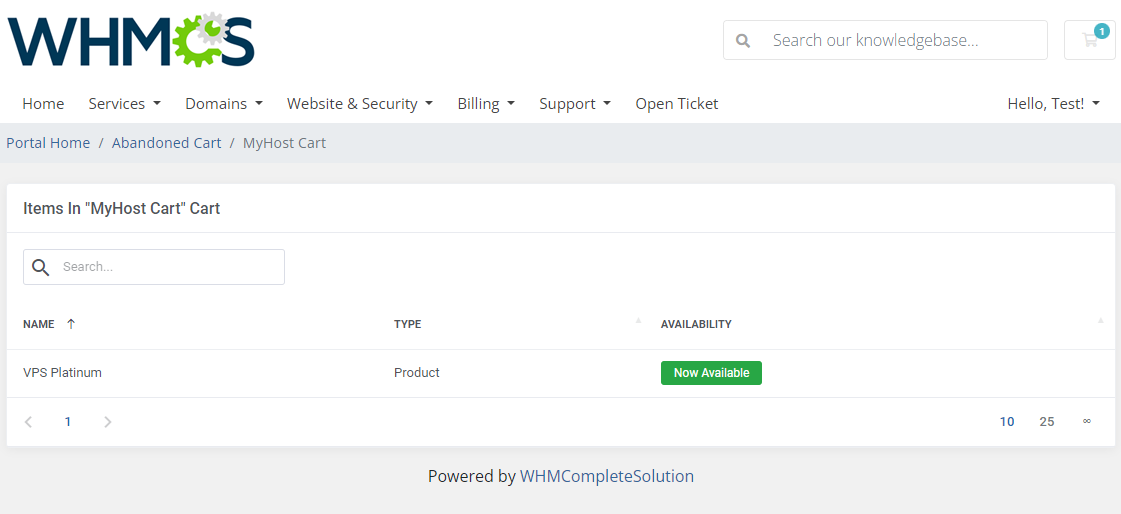
| + | |style="padding: 0px 0px 20px 15px;"|Explore the contents of this shopping list by previewing the items. Check details on the item types and their current availability in the store. | ||
| + | |} | ||
| + | {| | ||
| + | |style="padding: 0px 0px 20px 25px;"|[[File:AC_33.png]] | ||
| + | |} | ||
| + | {| | ||
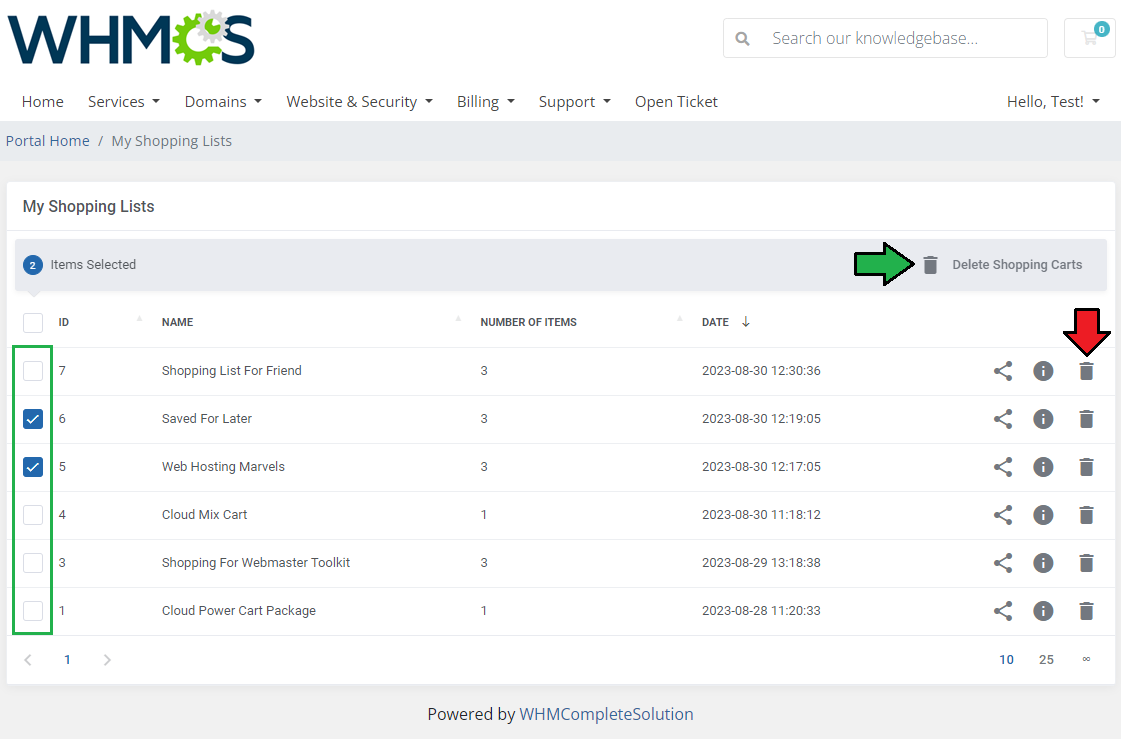
| + | |style="padding: 0px 0px 20px 15px;"|Easily remove individual carts or utilize the mass action button to eliminate multiple items at once. | ||
| + | |} | ||
| + | {| | ||
| + | |style="padding: 0px 0px 30px 25px;"|[[File:AC_34.png]] | ||
| + | |} | ||
| + | |||
| + | =Tips= | ||
| + | {| | ||
| + | |style="padding: 10px 0px 5px 15px;"| 1. The module collects information on products, addons and domains left in the cart. No data on configurable options, custom fields etc. related to products is stored. | ||
| + | |} | ||
| + | |||
| + | =Update Instructions= | ||
| + | {| | ||
| + | |style="padding: 10px 0px 30px 15px;"|An essential guidance through the process of updating the module to a higher version is offered '''[https://www.docs.modulesgarden.com/How_To_Update_WHMCS_Module here]'''.<br/> | ||
| + | Ensure successful completion of the module update by carefully following each step, thereby preventing data loss or any unforeseen issues.<br/> Additionally, you will find a current list of supplementary actions necessary for a smooth update process there. | ||
| + | |} | ||
| + | |||
| + | =Upgrade Guide= | ||
| + | {| | ||
| + | |style="padding: 10px 0px 30px 15px;"|Seeking a solution that offers greater flexibility, customization tailored to your precise needs, and unrestricted availability?<br/> There is an option that not only proves to be cost-effective in the long run but also includes prioritized support services, making it a truly valuable investment.<br/> | ||
| + | |||
| + | Opt for the [https://www.modulesgarden.com/products/whmcs/abandoned-cart#open-source-version Open Source version] of your Abandoned Cart For WHMCS module to unlock these benefits.<br/> Simply click on either the '''Get Source Code''' or '''Upgrade To Lifetime''' button found on the product's page in our client area to complete the one-step upgrade process, with a '''dedicated discount''' already applied.<br/> | ||
| + | |||
| + | Follow a [https://www.docs.modulesgarden.com/How_To_Upgrade_WHMCS_Module comprehensive guide] covering the transition process, the advantages it brings, and step-by-step instructions on what to do next after the order has been successfully finalized. | ||
| + | |} | ||
| + | =Common Problems= | ||
| + | {| | ||
| + | |style="padding: 10px 0px 10px 15px;"|'''1. In case of connection problems, please check whether your SELinux or firewall does not block ports.''' | ||
| + | |} | ||
| + | {| | ||
| + | |style="padding: 0px | ||
Revision as of 11:01, 3 April 2025
Contents |
About WithoutDNS For WHMCS
WithoutDNS is a
Installation
Configuration and Management
Addon ModuleDashboard
Shopping Carts
Reminders
General Settings
Logs
Client AreaEmail/Login Requirement
Shopping Lists
Tips
Update Instructions
Upgrade Guide
Common Problems
|
