IP Manager For WHMCS
From ModulesGarden Wiki
(Difference between revisions)
|
|
| Line 753: |
Line 753: |
| | |} | | |} |
| | {| | | {| |
| − | |style="padding: 0px 0px 15px 15px;"|Furthermore, the logs feature additional actions. Changing the logs' settings, exporting the logs to a '' '.csv' '' file, and a way to delete specific log types. | + | |style="padding: 0px 0px 20px 15px;"|Furthermore, the logs feature additional actions. Changing the logs' settings, exporting the logs to a '' '.csv' '' file, and a way to delete specific log types. |
| | |} | | |} |
| | {| | | {| |
Revision as of 10:12, 28 May 2024
IP Manager For WHMCS empowers you to effortlessly add and manage IP subnets and automatically assign IP addresses to your servers, products, add-ons, or configurable options.
With IP Manager, you can quickly assign IP addresses from a chosen IP pool to specific clients' products, effortlessly export IP subnets, and seamlessly integrate with third-party applications like cPanel.
Additionally, you can synchronize IP addresses used by products in your WHMCS with the module's IP subnets.
IP Manager also empowers your customers to manage their IP addresses directly from the WHMCS client area, providing them with greater control and convenience.
IP Manager streamlines IP address management, saving you time and effort while enhancing the customer experience.
|
| ✔ Show And Manage Multi-Level IP Subnets With IP Pools In Tree-View
|
| ✔ Assign/Unassign/Delete IP Addresses Directly From Products/Services View
|
| ✔ Create Multiple Configurations For Multiple Scenarios Of IP Addresses Assignment
|
| ✔ Create Multiple Relations In One Configuration For Products, Addons, Configurable Options & Servers
|
| ✔ Define IP Addresses Reservation Rules - Reserve IP Addresses For Network, Gateway, Broadcast And More
|
| ✔ Define Default Custom Fields For:
|
| ✔ IP Addresses In Chosen Subnets/Pools
|
| ✔ Export/Import IP Subnets/Pools - Supports XML And CSV Formats
|
| ✔ Omit Dedicated IP Address Fields For Chosen Configuration
|
| ✔ Toggle Custom Field Usage Instead Of 'Assigned IP Address' Field
|
| ✔ Synchronize IP Addresses Used By Products In WHMCS With IP Manager
|
| ✔ Receive Automatic Email Reminder Sent When Specified Usage Percentage Of Any IP Subnets Has Been Exceeded
|
| ✔ Define Configuration Of Integration Method (cPanel & cPanel Extended)
|
| ✔ Set Up IP Addresses Cleaner - Ensures That All Assigned IP Addresses Are In Use
|
| ✔ View IP Subnets Usage Statistics And Graphs
|
| ✔ Customize Module Language Files With 'Translations' Tool
|
| ✔ Add IP Subnet/Pool Using CIDR Notation
|
| ✔ Exclude Selected IP Addresses From IP Subnet During Its Creation
|
| ✔ View IP Addresses Of Subnets/Pools
|
| ✔ View And Create Child Subnets
|
| ✔ Delete Single IP Address From Subnets/Pools
|
| ✔ Assign/Unassign IP Addresses To/For Service
|
| ✔ Bulk Actions - Assign/Unassign/Delete IP Addresses
|
| ✔ Lock IP Subnet To Client Or Client Service
|
| ✔ Create Custom Fields For Subnets/Pools/IP Addresses
|
| ✔ Generate Free IP Addresses
|
| ✔ View Assigned IP Addresses And Subnets
|
| ✔ Order Additional IP Addresses
|
- 3rd Party Integration Modules:
| ✔ Supported All Types Of Configurable Options
|
| ✔ IP Subnets Rely On IP Addresses Range And Assigned IP Addresses (Free IP Addresses Are Not Stored In Database)
|
| ✔ Create New 3rd Party Integration Modules
|
| ✔ Supports WHMCS Themes "Six", "Twenty-One" And "Lagom WHMCS Client Theme"
|
| ✔ Supports WHMCS V8.10 Back To WHMCS V8.7
|
| ✔ Requires ionCube Loader V12 Or Later
|
Installation
This tutorial will show you how to successfully install and configure IP Manager For WHMCS.
We will guide you step by step through the whole installation and configuration process.
Note: If you are still using any versions of IP Manager For WHMCS prior to v3.x, read about it here.
|
| 1. Log in to our client area and download the module.
|
| 2. Extract the package and upload its content into the main WHMCS directory.
The content of the package to upload should look like this.
|
3. When you install IP Manager For WHMCS for the first time, you have to rename the 'license_RENAME.php' file.
The file is located in 'modules/addons/ipmanager2/license_RENAME.php'. Rename it from 'license_RENAME.php' to 'license.php'.
|
4. In order to configure your license key, you have to edit the previously renamed 'license.php' file.
Enter your license key between quotation marks as presented on the following screen. You can find your license key in our client area → 'My Products'.
|
| 5. Remove all files from the 'templates_c' folder located in your WHMCS root directory.
|
6. Now, you have to activate the module in your WHMCS system.
Log in to your WHMCS admin area and go to 'System Settings' → 'Addon Modules'.
Afterward, find 'IP Manager' and press the 'Activate' button.
|
7. In the next step, you need to permit access to the module.
Click on the 'Configure' button, tick desired admin roles, and press 'Save Changes'.
|
8. The last step is setting the 'storage' folder rights as recursively writable.
The catalog is located in 'you_whmcs/modules/addons/IpManager3'.
|
9. You have just successfully installed IP Manager!
You can access your module in 'Addons' → 'IP Manager'.
|
Configuration and Management
IP Manager For WHMCS empowers you to effortlessly manage dedicated IP address subnets and automatically assign them to clients, products, servers, add-ons, and configurable options.
The module enables clients to manage and order dedicated IP addresses, both IPv4 and IPv6.
In this short guide, the possibilities of the module will be briefly described.
|
Subnets
To manage subnets via IP Manager For WHMCS you have to add them first.
Remember that it is crucial to configure any IP reservation rules before you create any subnets. If you add rules later on, they may not work properly.
Read about rules reservation here.
|
Create Subnet
| To begin, add a new IP address subnet by pressing the 'Add Subnet' button.
|
First, select IP version: IPv4 or IPv6, then type in the subnet IP address and the correct bitmask.
Correct bitmask ranges:
- IPv4 - 1 to 32
- IPv6 - 1 to 128
Note: The first IP from the subnet should be compatible with CIDR notation.
|
You can exclude any number of IP addresses from the subnet.
To do so, enter them into 'Excluded IP Addresses:' text field, one IP address or IP range per line.
Note: The beginning and end of an IP range should be separated by a hyphen. For example, 192.168.0.3-192.168.0.14.
|
|
Enter nameservers and gateway address into textboxes (this step is optional).
Afterward, finalize the creation of the subnet by pressing the 'Confirm' button.
|
Available IP Subnets And Child Subnets
| Once you have added your IP subnets you can preview their details and manage the IP addresses.
You will find a list of subnets in a tree view.
If you add child subnets, you will be able to see them by clicking on the arrow sign next to the parent subnet.
|
Subnet
| Click on the parent subnet or child subnet to see its configuration. Available actions change accordingly.
|
Information about the address, mask, size, nameservers, gateway, and others can be found here.
You can change the gateway and nameservers by clicking the 'Edit' button.
|
Actions
| The most important functions of IP Manager For WHMCS include actions that can be done on subnets.
|
- Split Subnet - divide the subnet into smaller subnets according to the chosen mask. Keep in mind that the subnet may include already assigned IP addresses.
If you split such a subnet, the assigned IP addresses might be transferred to another subnet.
- Merge Subnet - use this option to join the previously split subnet. Note, that you can merge only parallel subnets.
Additionally, you must remember that merge action removes IP addresses from external servers.
- Create Child Subnet - this option allows for the creation of subnets within a 'parent' subnet.
Such child subnet may again be split/merged, and have its child subnets.
- Delete - use it to remove the subnet together with any IP address in it.
|
Excluded IP Addresses
| List of excluded IP addresses. You can remove addresses from the list or add new ones.
|
You can exclude IP addresses one by one, or exclude a range of IP addresses. Separate the range with a hyphen ("-"), for example, 192.168.0.3-192.168.0.14.
Note that range exclusion currently works for IPv4 only. Separate the addresses by a comma (",") or put each in a new line.
Important: If you have any IP reservation rules set up, do not include IP addresses here. This option should be used as a substitute for using rules.
|
Assigned Client/Service
Easily assign subnets to clients or specific services with our module.
Select clients and services using our auto-complete textbox.
Note: IP addresses will be added to all products ordered by the client and to all addons included in the products.
|
Keep in mind that a subnet that is assigned to a client is reserved for this client only.
While IP addresses are assigned to a client, the following aspects are taken into consideration (in this order):
- subnets assigned to a hosting
- subnets assigned to a client
- subnets assigned to configuration.
|
Custom Fields
IP Manager allows you to add custom fields to subnets and IP addresses.
To add a new custom field, press 'Edit'. Afterward, input the custom fields one per line in the following format: customFieldName: customFieldValue.
This option should be used if you do not specify default custom fields or want to add additional ones. Be careful not to double custom fields here.
|
Create IP Address
Creating IP addresses within the created subnet is straightforward.
Simply press the 'Add IP Address' button and select the number of IP addresses you want to create. New addresses will be generated in the subnet.
|
| You may also add an IP address manually. To do so, press the 'Add Custom IP Addresses' button.
|
Type in the IP address you wish to create. You can add a single custom IP address or a range of IP addresses.
Separate the range with a hyphen ("-"), for example, 192.168.0.3-192.168.0.14. Note that range exclusion currently works for IPv4 only.
|
Once the addresses are generated, you can proceed to their assignment.
Use action or mass actions buttons to do so.
|
Assign IP Address
You can assign the chosen IP address to a service or reserve it.
Pick a service to assign the IP address to, and decide if you want to enable third-party integration.
Alternatively, switch to 'Custom Assignment' to reserve an IP address without linking it to any service in the database.
|
Configurations and Automatic IP Assignment
The main reason this module has been created was to automate IP address assignments.
Here we will show you how to set up its configuration. In order to start, go to the 'Configurations' tab and click on the 'Create Configuration' button.
|
Type in your configuration name and choose the 'Assignment Type'.
- IP Addresses Assignment - products, servers, addons, and configurable options will receive singular IP addresses.
- Subnet Assignment - whole separate subnets will be assigned to products, servers, addons, and configurable options.
Press textboxes corresponding to the options you wish to add, and select them from dropdown menus:
- Products
- Servers
- Addons
- Configurable Options
Click on the 'Confirm' button when finished.
|
| Now you have to assign at least one subnet to the configuration. Use the 'Edit' button.
|
Open the 'Subnets' tab, click on the 'Create Subnet Assignment' button and choose a subnet from a dropdown menu.
Keep in mind that you can assign multiple subnets to a single configuration.
|
See the list of subnets assigned to your configuration, you can use the action buttons to:
- Manage additional Information: nameservers, gateway.
- Remove the subnet from the list.
|
IP Addresses Quantity
You can set the configuration in such a way, to assign more than one IP address to a given product, addon, server or configurable option.
The process is the same for each item. After creating a configuration, proceed to, for example the 'Products' tab and click on 'Edit'.
|
Change the quantity of each type of IP address as needed and 'Confirm' the change.
The new settings will be visible on the list.
|
Utilities
| IP Manager For WHMCS features numerous tools and utilities to help you manage your subnets with ease and efficiency.
|
General Settings
Settings regarding the functionality of the module can be found here.
The 'IP Addresses Cleaner' , a tool that automatically finds and fixes broken IP address assignments, can be configured here as well.
See the sections below for more details.
|
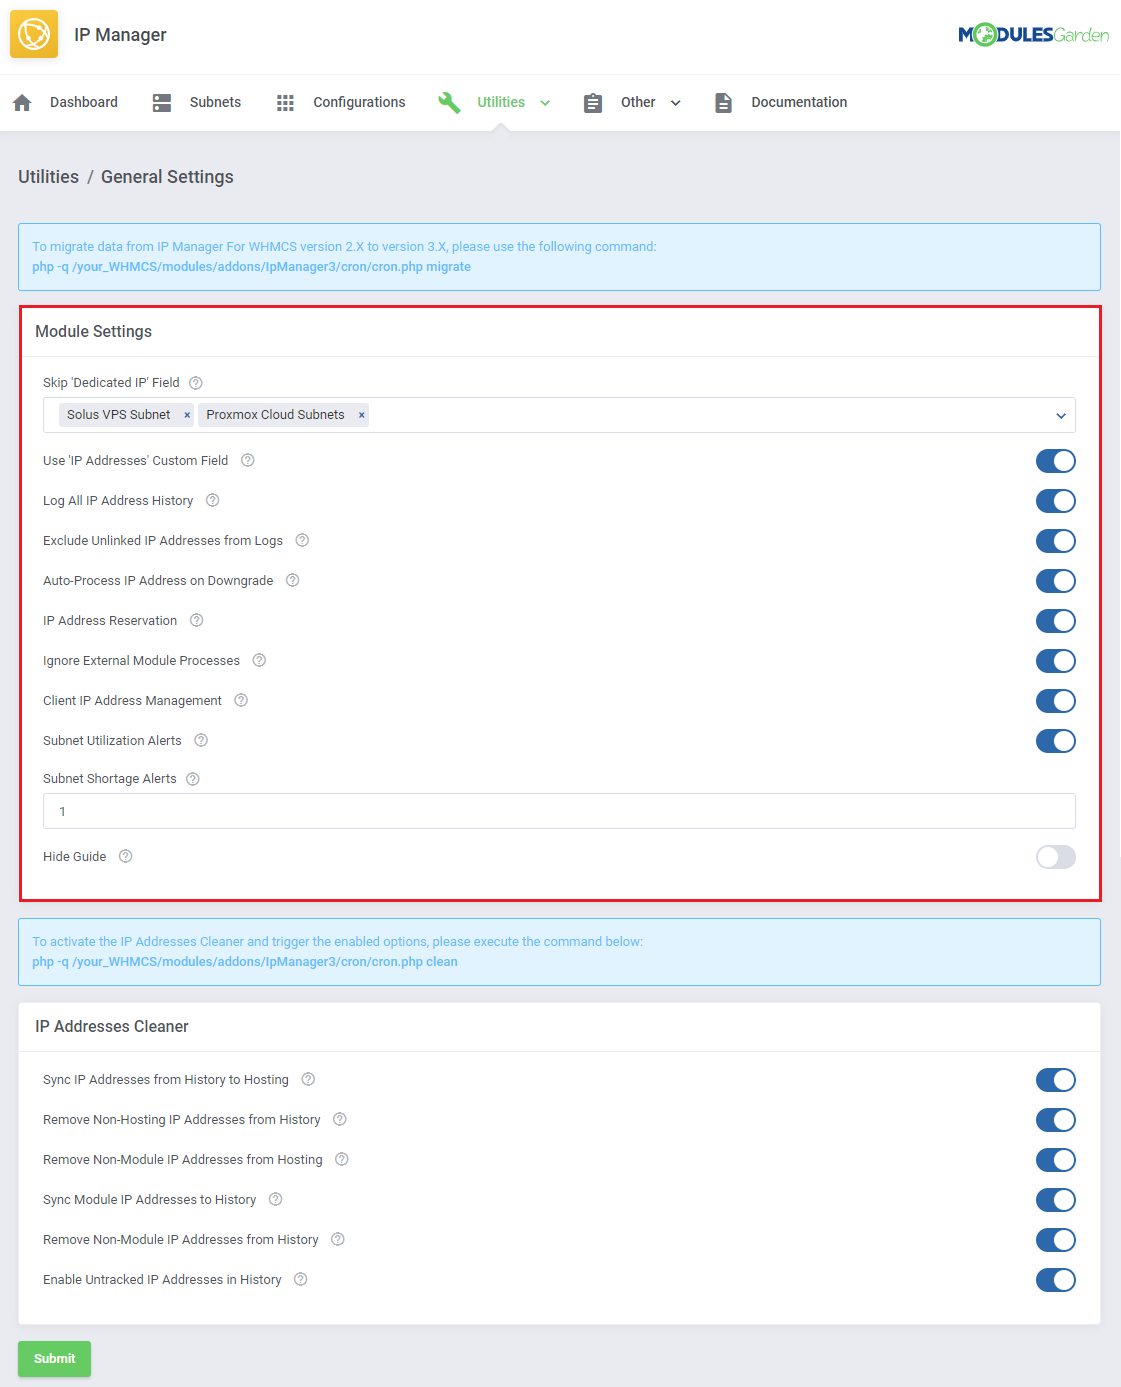
Module Settings
The settings of the module that can be configured are as follows:
- Omit "Dedicated IP" Field for: - The configurations you include in the field will not have the 'Dedicated IP' field present in the Client Area, instead assigned IP addresses or custom fields will be displayed.
- Switch to 'IP Addresses' Custom Field - Additional IP addresses can be stored in either the 'IP Addresses' custom field or 'Assigned IPs' field.
- Record All IP Addresses in History - When enabled, relations will be saved even in case of a server provisioning failure.
- Exclude Non-existent Entries from Logs - IP addresses without products or users will not be displayed in the 'Logs'.
- Handle IP Address During Downgrades - Automatically process the IP address when downgrading the configurable option.
- IP Address Reservation - If this option is enabled, the IP reservation rules will be used.
- IP Address Processing by Integration Module - The module ignores error messages from an external server and continues the action.
- IP Addresses Management in Client Area - Allows the clients to manage their assigned IP addresses in the Client Area.
- Subnet IP Address Shortage Notification - Enable to receive email notifications when a subnet is about to run out of available IP addresses.
- Exceeded Percentage Notifications - Email notifications will be sent after a subnet exceeds the percentage of available IP addresses defined here.
After making any changes in those settings, press 'Save Settings'.
|
|
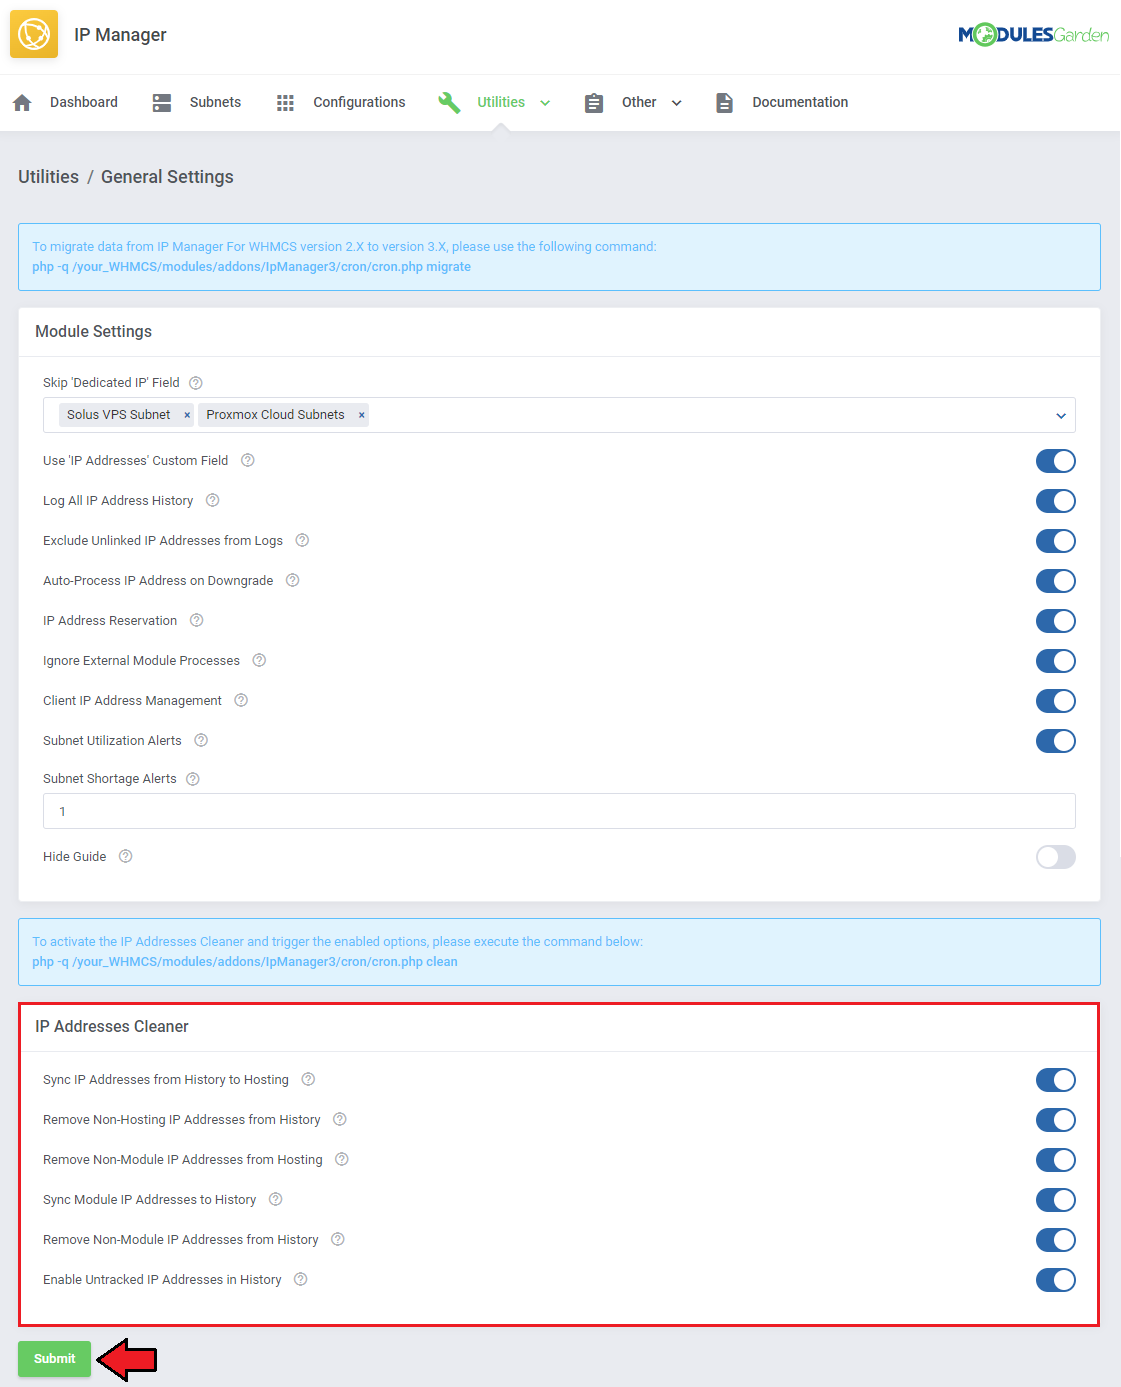
IP Addresses Cleaner
IP Addresses Cleaner allows you to restore/remove IP addresses from WHMCS/IP Manager/both depending on chosen settings.
- Add IP Addresses to Hosting- IP addresses are added to hosting if a relation exists.
- Remove Non-existent IP Addresses (Hosting) from History- IP address relations are removed if an IP address is not assigned to any hosting.
- Remove Non-existent IP Addresses from Hosting - If an IP address does not exist in any subnet, it is removed from hosting.
- Add Module IP Addresses to History- Create IP address' relation if it does not already exist.
- Remove Non-existent IP Addresses from History - If the IP address does not exist in any subnet, it is removed from relations.
- Enable Non-existent in History IP Addresses - Set the IP address as unassigned if its relation does not exist.
After making changes in those settings, press 'Save Settings'.
Otherwise, settings will not be saved and the cleaner will run using the old configuration.
|
|
'IP Addresses Cleaner' allows you to automatically find and fix broken IP address assignments.
For example, when you manually remove a product with IP addresses assigned or remove an IP subnet.
To start IP Addresses Cleaner, and trigger the selected options, execute the following command:
php -q /yourWHMCS/modules/addons/IpManager3/cron/cron.php clean
|
Export
You can export your subnets with IP addresses to CSV, XML, and JSON files.
To export, go to the 'Export' tab, and choose the subnet to export and output format.
Now you can generate and download the file.
Note: Your 'storage' folder located in 'your_whmcs/modules/addons/ipmanager2' should have chmod set to 755.
|
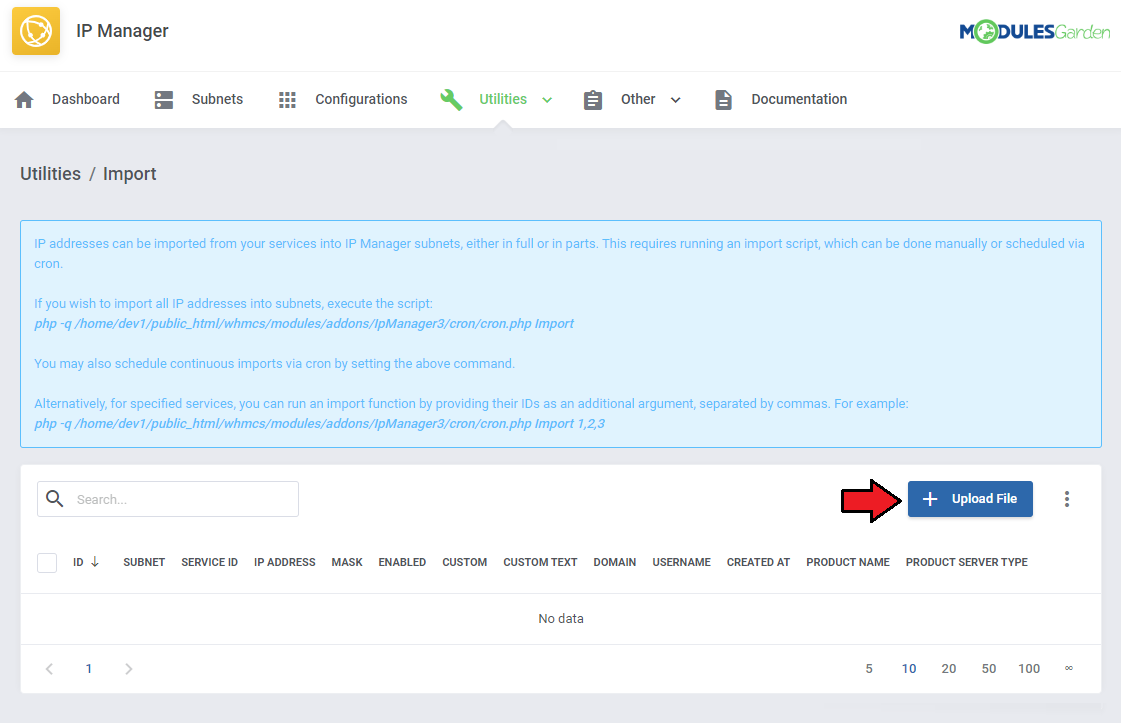
Import
In the 'Import' tab you can find tools to synchronize IP addresses from your WHMCS as well as import them from a file.
Synchronization
Synchronization will confirm relations in your system with relations in IP Manager subnets.
- If the IP address is used by a product, but is marked as unassigned inside of IP Manager subnet - the record inside of a subnet will be updated.
- If the IP address is used by a product, but does not exist in any IP Manager subnet - a new subnet will be created.
Here is the script that can be used to synchronize the IP addresses:
php -q /yourWHMCS/modules/addons/IpManager3/cron/cron.php Import
Running the script will import all IP addresses into subnets.
If you wish, you can synchronize only specified services by putting their IDs separated by a coma as an argument.
php -q /yourWHMCS/modules/addons/IpManager3/cron/cron.php Import 1,2,3
Moreover, you can keep the synchronization running continuously by setting up a cron.
File Upload
To import IP addresses from a file, click on the 'Upload File' button, include the file and 'Confirm'.
The file has to be of either .csv; .xml or .json format.
|
|
Third Party Integration
In this tab you can set up 3rd party integrations which allow you to manage IP addresses through our module in your WHMCS and synchronize changes on 3rd party servers.
Note 1: Some of these integration submodules require free IP subnets (cPanel) or IP addresses (Plesk) on servers to be set up.
Note 2: IP Manager can integrate multiple IP addresses with a single product.
|
Activation of all integration modules looks similar, there is only a difference in cPanel and cPanel Extended integration submodules.
Start by pressing the 'Status' toggle button next to the module you want to activate and press the 'Edit' button.
|
Assign configurations that will use the integration.
If the configurations you assigned feature the 'Subnet' assignment type, you can choose if all or only the first IP address should be automatically assigned.
If you only included configurations with the 'IP Addresses' assignment type, you can ignore this option, it will not affect anything.
|
cPanel and cPanel Extended additionally allow you to choose the method of the integration.
- Creates a DNS zone for each IP address assigned to a product.
- The first IP address assigned to a product is set up as a site-dedicated IP address.
|
| You can easily check the number of configurations assigned to each 3rd party integration.
|
Integration With Proxmox VE VPS/Cloud VPS For WHMCS
Integration with Proxmox VE VPS For WHMCS and Proxmox VE Cloud VPS For WHMCS is the only one to be set up both on the side of IP Manager For WHMCS and the integrated module.
Note: This integration works for LXC and KVM virtualization types.
The process of establishing the integration for Proxmox VE VPS For WHMCS module consists of 3 steps:
1. Create the subnet of IP addresses that will be used for the product.
2. Create the configuration and assign a previously created subnet to it. No additional action is required after this step.
Important: Assigning anything other than the subnet to the configuration in IP Manager For WHMCS may bring unexpected results in your WHMCS environment.
3. When Proxmox starts creating a virtual machine, it retrieves the assigned IP address to the service and assigns it directly to the virtual machine.
In the case of Proxmox VE Cloud VPS For WHMCS module, the IP addresses assigned to the service will be assigned to virtual machines in the order they were created on the server,
i.e. the first VM to retrieve the IP addresses is the one whose creation process ends first.
|
Integration With SolusVM Extended VPS For WHMCS
Integration with SolusVM Extended VPS For WHMCS is a more complex process.
IP Manager For WHMCS cannot inject the first IP address to VPS, due to the way SolusVM API works.
After the creation of a VPS, IP Manager is able to add additional IP addresses.
Therefore, if you use this integration, we advise setting up IP Manager synchronization as a cron job.
|
Creation of Integration Submodule
You can create your own integration, all you need is knowledge of the PHP programming language.
1. First, create a new folder in 'your_whmcs/modules/addons/IpManager3/app/Modules/ '.
|
2. Create a new .php file inside the new catalog and start editing it.
Note: File name has to end with 'Integration', for example, 'NewSubmoduleIntegration.php'.
|

|
3. Paste in the following code:
<?php

namespace ModulesGarden\IpManager3\App\Modules\IntegrationCustom;


use ModulesGarden\IpManager3\App\Services\ModulesService\IntegrationModule;
use function ModulesGarden\IpManager3\App\Modules\logModuleCall;

class Integration extends IntegrationModule
{
    public function getName(): string
    {
        return 'Custom Integration';
    }

    public function getDescription(): string
    {
        return 'Custom integration Module description.';
    }

    public function getModuleType(): string
    {
        return 'Custom';
    }

    public function showConfiguration(): string
    {
        return '';
    }

    public function setIPAddress($ip, $service, $server, $pool, $iteration)
    {
    }

    public function unsetIPAddress($ip, $service = null, $server = null)
    {
    }


}
- The class name should be the same as the file name.
- 'getName' defines the submodule name visible in IP Manager.
- 'getDescription' defines the submodule description displayed in IP Manager.
|
| 4. Include your integration code in the rest of the structure
|
| 5. You can see your newly added integration in the 'Third Party Integration' section of the 'Utilities'.
|
IP Addresses Reservation
You can automate the process of IP address assignment by creating rules that will then be executed while assigning IP addresses from a subnet to clients or services.
'IP Addresses Reservation' rules can be configured under the 'Utilities' section.
Use the rules consciously because they will be then taken into consideration while assigning all IP addresses from all subnets in the module.
Click on the 'Create Rule' button to formulate a new rule.
|
You need to follow the formulas described in the guide while personalizing your assignment process.
To add a new rule, type in the required value in the 'Rule' field and describe it in the 'Rule Name' field.
To illustrate:
If you enter n in the 'Rule' field, then the first IP address from a subnet will always be excluded. It will be reserved and it will not be assigned to any client or service.
|
You can add more that one rule. If you do it thoughtfully, you will have much less work later on while creating new subnets because
customized rules will substitute the need to fill out the 'Excluded IP Addresses' area.
|
Default Custom Fields - Subnets
In this section, you are allowed to add and configure custom fields that will be assigned to subnets by default.
Press the 'Add Default Custom Fields - Subnets' button to begin.
|
| All you need to do is enter the name of your custom field, and its value and save changes.
|
| You can create a lot of such custom fields and edit/remove them when the need arises.
|
Default Custom Fields - IP Addresses
The 'Default Custom Fields - IP Addresses' section allows you to add default custom fields per IP address within the selected subnet.
Press the 'Add Default Custom Field - IP Addresses' button to begin.
|
Select a subnet and the single IP addresses to which you wish to have the field assigned. You may point single subnet or select all existing subnets.
Then, type in the custom field name and value.
|
You can create a lot of such custom fields and then edit/remove them as needed.
Note: Keep in mind that if a custom field is assigned to multiple subnets, then the action conducted on a custom field in a single subnet is triggered on all the other subnets.
|
Customizing language files is now extremely easy with the "Translations" tool that is now available directly in the addon.
Its user-friendly design makes managing various language file tweaks a smooth and efficient process.
Prepare translations for the original English files with this handy built-in tool. For specific instructions on how to use this tool please refer to its dedicated article, you will find it here.
|
Logs
The 'Logs' page stores the history of actions ordered on each of the IP addresses.
Use the action buttons to see details or delete each log entry. Multiple logs can be deleted at once by utilizing the mass selection function.
|
| Furthermore, the logs feature additional actions. Changing the logs' settings, exporting the logs to a '.csv' file, and a way to delete specific log types.
|
| In the settings you can specify which log types should be recorded, and whether they should be deleted automatically after a specific time.
|
| While exporting you will pick a time frame and the log types to export.
|
| Here you can decide which log types to delete, you can also specify how old the logs have to be to qualify for deletion. Leave the first field empty to delete all logs.
|
Dashboard
The 'Dashboard' conveys the most important information as it happens, so there is no need to check any specific module sections during the day-to-day operations.
The 'Latest Assigned IP Addresses' widget displays the most recently assigned IP addresses along with the related product, client, and date.
|
The 'Latest Logs' widget shows the most recent log entries including the id, related item, log message, log type, and date.
You can manage the logs through actions and mass actions without the need of going into the 'Logs' tab.
|
IP Address Management in Products
Underneath, you will find practical usage of the module. Check how the IP addresses can be managed per product on both the admin and the client sides.
Check what option the module offers for product admin and end-users.
|
Admin Area
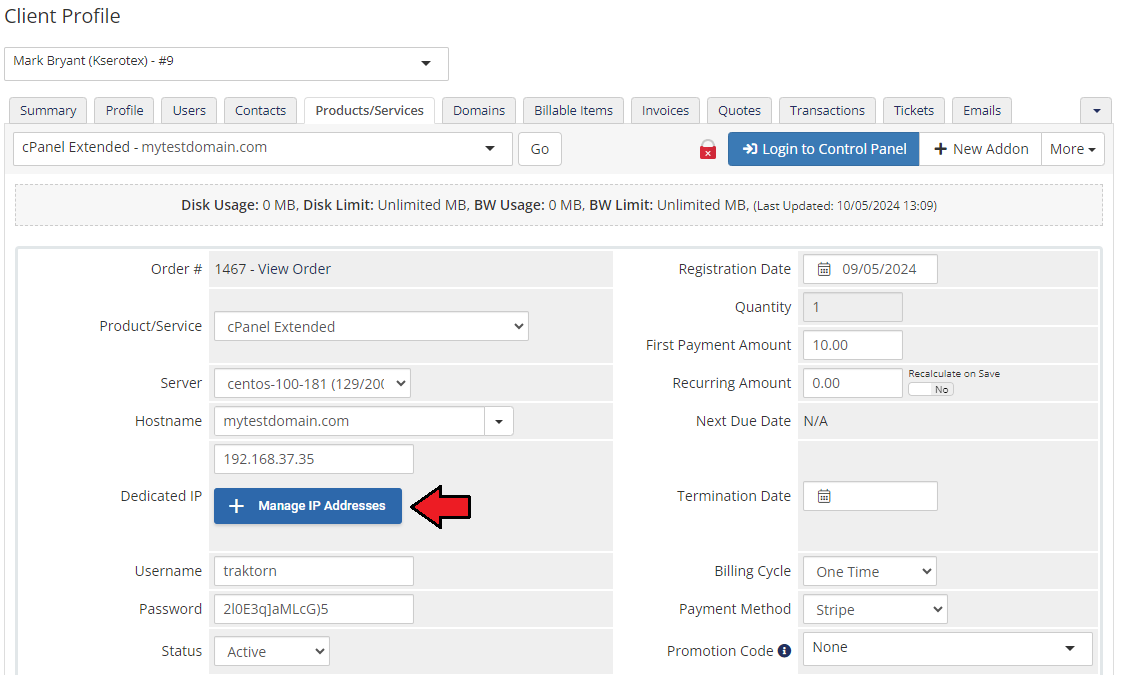
In the 'Products/Services' tab located in your client's profile view in the admin area you can manually assign and unassign IP addresses from the chosen products.
To start, select one of the products ordered by your client and press 'Manage IP Addresses' next to the 'Dedicated IP' field.
|
|
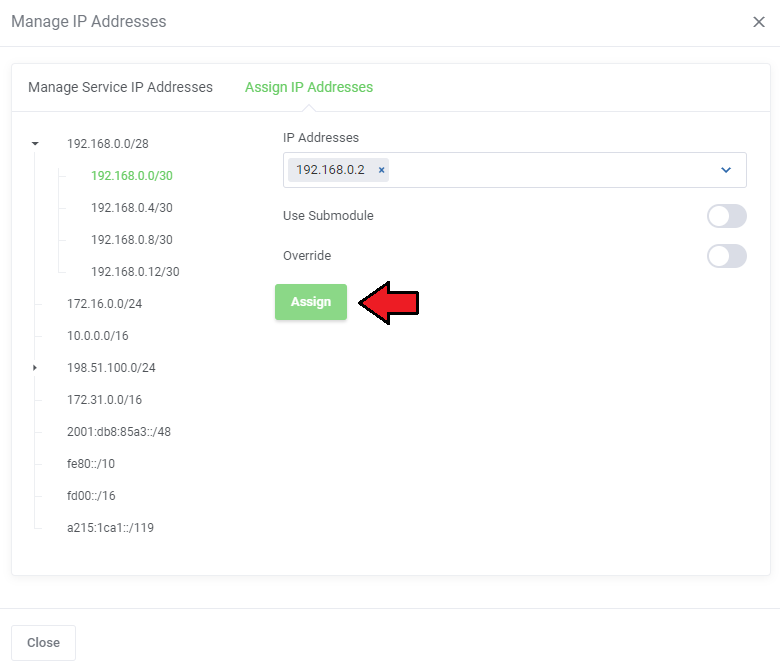
A new window will pop up, allowing you to manage the assignment of IP addresses.
Click on 'Assign IP Addresses' first. Select one of your IP pools from the tree view. In the window to the right, you can select IP addresses from the chosen pool and assign them to your client's product.
Please note that only free and not yet assigned IP addresses will be available for selection from the dropdown menu.
If any other IP addresses are already assigned to that product, you can replace them by toggling 'Override' .
Otherwise, the newly selected IP addresses will be added to those already assigned.
Additionally, toggle the 'Use Submodule' option if you want the 3rd party integration to be used. Please note, however, that this option requires the current list of assigned IP addresses to be overwritten.
This is to ensure that the synchronization works properly. If you decide to leave this option disabled, the newly added IP addresses will be assigned only in WHMCS itself.
|
|
You can see assigned IP addresses in the 'Manage Service IP Addresses' tab.
3rd party submodule integration status is also displayed for each assigned IP address.
Additionally, you can ' Unassign' any IP address from WHMCS, but it will not unassign this address automatically from the submodule. After its removal, it will also return to the IP subnet pool.
If you want to unassign an IP address from both WHMCS and 3rd party integration submodule, press the 'Use Integration' button.
Note: If you need a bit more advanced management of a single assignment of IP addresses, go to the 'Subnets' section of the IP Manager addon.
|
Client Area
Your clients can view and manage their IP addresses and subnets thanks to the installed IP Manager For WHMCS module, as long as the responsible setting is enabled in the 'General Settings' .
To remove any IP address or subnet from a product, simply press the 'Unassign' button.
|
Your client can also order a new IP address by pressing the 'Buy IP Address' button.
Your client will be moved to an order form containing previously configured addons.
Note: You have to create and assign product addons to the product in configurations first, as described here.
|
| As soon as the addon activates, new IP address is granted.
|
Add IP Addresses via Addon
Setting up an addon allows your client to add an IP address to their product using integration.
Go to 'System Settings' → 'Products/Services' → 'Product Addons' and press 'Add New Addon' .
|
Afterwards, enter the addon name, and addon description and price.
Select the applicable products.
Confirm through pressing the 'Save Changes' button.
|
Now, go to 'Addons' → 'IP Manager' → 'Configurations' and edit configuration created before or create a new one.
Navigate to the 'Addons' tab, add the previously created addon as a configuration relation and define the number of IP addresses.
Afterward, click the 'Confirm' button. If you enabled integration for the client area, your client should be able to order new IP addresses.
|
Tips
| 1. If your client orders a product that is combined with two configurations (e.g. by product type and configurable option), IP Manager will add IP addresses from both configurations.
|
| 2. If you have used IPv6 block before the update to IP Manager 2.2.0, all of them will be migrated to corresponding subnets. Note that the migration is done automatically for you.
|
| 3. IP Manager For WHMCS requires GMP or BCMath installed on your server.
|
4. If API returns the 'Unknown network interface' error when adding a new IP address for Plesk 12 Integration, then you need to modify the new_configuration.json file located in your_whmcs/modules/addons/ipmanager3/app/modules/api/Plesk/.
Firstly, change the name of the file from new_configuration.json to configuration.json. Next, open the file and provide the proper name for the interface.
To make sure that you provided the appropriate interface name, log in to your Plesk panel, proceed to the 'Tools & Settings -> IP Addresses' section, and check the interface name.
|
Update Instructions
An essential guidance through the process of updating the module is offered here.
Ensure successful completion of the module update by carefully following each step, thereby preventing data loss or any unforeseen issues.
Additionally, you will find a current list of supplementary actions necessary for a smooth update process there.
|
Important: If you are updating the module to version 3.0.0, you must deactivate the current addon module and delete its files before performing the update.
This will ensure all potential conflicts are avoided. Data migration during the beta is not yet supported.
|
Upgrade Guide
Seeking a solution that offers greater flexibility, customization tailored to your precise needs, and unrestricted availability?
There is an option that not only proves to be cost-effective in the long run but also includes prioritized support services, making it a truly valuable investment.
Opt for the Open Source version of your IP Manager For WHMCS module to unlock these benefits.
Simply click on either the Get Source Code or Upgrade To Lifetime button found on the product's page in our client area to complete the one-step upgrade process, with a dedicated discount already applied.
Follow a comprehensive guide covering the transition process, the advantages it brings, and step-by-step instructions on what to do next after the order has been successfully finalized.
|
Common Problems
| 1. In case of connection problems, please check whether your SELinux or firewall does not block ports.
|
| 2. If you see an empty box when moving to 'Addon' → 'IP Manager', remove the content of the 'template_c' folder.
|
3. If you export a file and it is empty, check your 'Storage' folder chmod, it should be set to 755. Folder is located in 'your_whmcs/modules/addons/ipmanager3' .
If you still have that problem, set chmod 777.
|
| 4. For integration with SolusVM Extended For WHMCS, one additional IP address is always assigned to the Solus virtual machine through the IP Manager For WHMCS module, exceeding the quantity specified in the SolusVM product configuration.
|


