DirectAdmin Extended For WHMCS
From ModulesGarden Wiki
(Difference between revisions)
|
|
| Line 166: |
Line 166: |
| | |} | | |} |
| | {| | | {| |
| − | |style="padding: 0px 0px 0px 30px;"|✔ Integrated With <u>Advanced Billing For WHMCS</u> - Server Resource Usage Billing [https://www.modulesgarden.com/products/whmcs/advanced-billing (read more)] | + | |style="padding: 0px 0px 0px 30px;"|✔ Integrated With <u>Advanced Billing For WHMCS</u> - Actual Server Resource Usage Billing [https://www.modulesgarden.com/products/whmcs/advanced-billing (read more)] |
| | |} | | |} |
| | {| | | {| |
Revision as of 10:09, 1 March 2018
DirectAdmin Extended For WHMCS will bring the automation into the provisioning and management of web hosting accounts in your WHMCS.
The module will allow your clients to remotely handle FTP accounts, create backups, install SSL certificates as well as set up various applications with the inbuilt installers.
|
| ✔ Create/Suspend/Unsuspend/Terminate Account
|
| ✔ Change Package And Password Of Account
|
| ✔ Log In To Each DirectAdmin Account On Click
|
| ✔ Enable Automatic Suspension Of Accounts Per Product - Upon Reaching Bandwidth Limit
|
| ✔ Configure Client Area Features Per Product
|
| ✔ Configure Resource Limits Per Product
|
| ✔ Define FTP Backups End-Points Per Product
|
| ✔ Define Backup Directory Paths Per Product
|
| ✔ Choose And Configure Application Auto Installer To Use Per Product - Softaculous Or Installatron
|
| ✔ View All DirectAdmin Extended Products In One Place
|
| ✔ Remote Access And Management Of:
|
| ✔ Applications And Their Backups
|
| ✔ View Account Resource Usage
|
| ✔ Change Account Password
|
- Application Auto Installer Features:
| ✔ Auto Install Chosen Application After Account Creation
|
| ✔ Auto Install Application Chosen By Client During Order - With Configurable Options
|
| ✔ Allow Custom Settings Of Auto Installed Application - With Custom Fields
|
| ✔ Install New Applications With Softaculous And Installatron
|
| ✔ View And Manage Installed Applications
|
| ✔ Backup Installed Applications
|
| ✔ View And Manage Created Backups
|
| ✔ Restore Applications From Backups
|
| ✔ Delete Applications Along With Their Backups
|
| ✔ Utilizes Ajax Loaded Pages - Similar To Those From cPanel
|
| ✔ Integrated With Advanced Billing For WHMCS - Actual Server Resource Usage Billing (read more)
|
| ✔ Integrated With Server Allocator For WHMCS - Automatic Assignment Of Specified Servers To Products (read more)
|
| ✔ Supports PHP 5.4 Up To PHP 7
|
| ✔ Supports WHMCS Template Five and Six
|
| ✔ Supports WHMCS V6 and V7
|
Installation and Configuration
This tutorial will focus on how to successfully install and manage DirectAdmin Extended For WHMCS.
We will guide you step by step through the whole installation process.
|
Installation
| 1. Log in to our client area and download the module.
|
2. In the downloaded file you will find two packages that support different PHP versions.
As presented on the screen below, the first one is dedicated to PHP 7, while the second one is aimed at PHP 5.4 up to PHP 5.6.
It does not apply to open source versions.
Note: You can check current PHP version in your WHMCS. To do so proceed to 'Utilities' → 'System' → 'PHP Info'.
|
3. Extract the downloaded file and choose the one with the right PHP version. Upload and extract the PHP file into the main WHMCS directory.
The content of PHP version files should look like this.
|
4. When you install DirectAdmin Extended For WHMCS for the first time you have to rename 'license_RENAME.php' file.
File is located in 'modules/servers/directadminExtended/license_RENAME.php'. Rename it from 'license_RENAME.php' to 'license.php'.
|
5. In order to configure your license key you have to edit a previously renamed 'license.php' file.
Enter your license key between quotation marks as presented on the following screen. You can find your license key in our client area → 'My Products'.
|
Addon Activation
6. Now, you have to activate the module in your WHMCS system.
Log in to your WHMCS admin area. Click 'Setup' then choose 'Addon Modules'.
Afterwards, find 'DirectAdmin Extended Cenetr' and press 'Activate' button.
|
7. In the next step you need to permit access to this module.
To do so, click on 'Configure' button, select required administrator groups and press 'Save Changes'.
|
8. Well done! You have just successfully installed DirectAdmin Extended For WHMCS!
Now, in your WHMCS system press 'Addons' then press 'DirectAdmin Extended'. You will see a following screen.
Let's proceed to configuration of your freshly installed module.
|
Server Configuration
9. Now, we will show you how to configure a new server.
To do so, log into your WHMCS and go to 'Setup' → 'Products/Services' → 'Servers'.
Once you are there, press 'Add New Server'.
|
10. Next, enter your server name, IP address, username and password. Choose 'DirectadminExtended' from a dropdown menu and press 'Save Changes'.
In this section, you can also provide other server details like nameservers or the maximum number of accounts.
|
11. After you configure your server correctly, you will see the following screen.
At this point, you need to create a new group for your server. For that purpose, press 'Create New Group'.
|
| 12. Enter the name, click on your previously created server, press 'Add' and then 'Save Changes'.
|
Product Configuration
13. In order to create and configure the product, click on 'Setup' → 'Products/Services' → 'Products/Services'.
If you do not have a product group, click on 'Create a New Group'. If you do, simply move to the step 14.
|
| 14. Enter the product group name and press 'Save Changes'.
|
15. When you have a product group, you can create your product and assign it to DirectAdmin Extended. If you already have a product, jump to the step 16.
To create a product, click on 'Create a New Product'.
|
| 16. Afterwards, choose your product type and product group from dropdown menus, enter your product name and press 'Continue'.
|
17. Then, you need to move to the 'Module Settings' section and choose both 'DirectadminExtended' and your previously created server group from dropdown menus.
Choose a preconfigured 'Package' you want to use and 'Reseller IP' if required. If you want to setup your own configuration, move to the next step.
You can also activate the feature to automatically suspend accounts when the bandwidth limit is reached. Simply tick 'Suspend at Limit'.
Don't forget to press 'Save Changes' in the end.
|
18. If you would like to setup your own configuration, choose 'Custom' from the 'Package' dropdown.
A list of customizable options will appear. Configure them at your own discretion or generate Configurable Options instead.
Also, you can generate custom fields if you wish to use the product with Autoinstalled Apps.
|
Addon Configuration
19. Go to 'Addon Modules' → 'DirectAdmin Extended'.
The dashboard is located there containing precise data on available products and servers:
- see the number of active/suspended/terminated products
- check the number of active accounts
- log into panel
- upgrade your DirectAdmin products
- press 'Documentation' tab to be moved to this very site!
|
| 20. Proceed to the 'Features' section, find the product you are interested in and press the 'Configuration' button next to it.
|
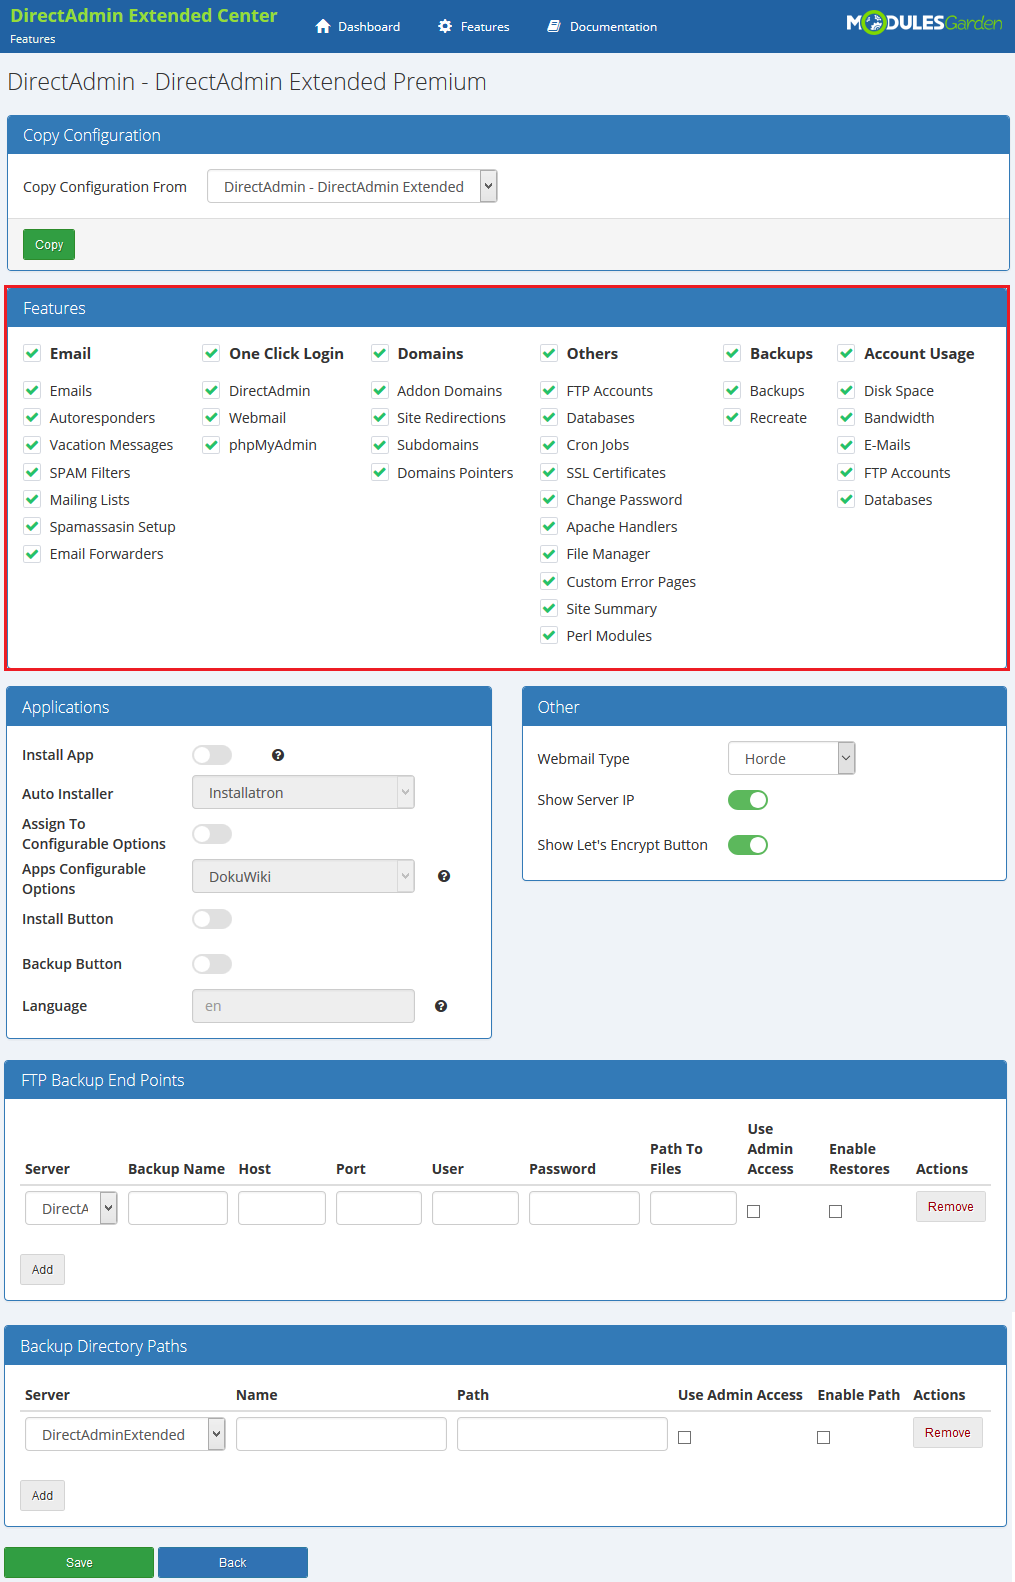
21. You should see boxes dedicated to 'Features', 'Applications', 'Other', 'FTP Backup End Points' and 'Backup Directory Paths'.
If you have already configured another product, you may copy its configuration now. Find one more box 'Copy Configuration From' and choose the product from a dropdown menu.
To let you better explore the entire process, we will set the configuration from the beginning instead of using the one of other product.
Select the features you would like to activate for your customers.
|
|
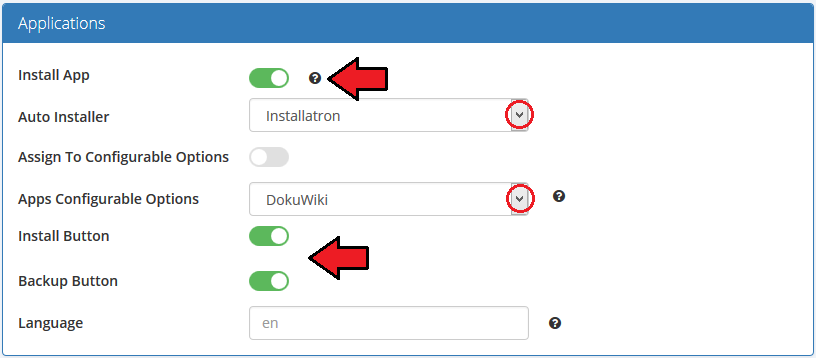
22. Choose whether to activate 'Install Applications' option.
In case you wish to enable this feature, you will have to select 'Auto Installer' from a dropdown menu. After, activate 'Install Button' and 'Backup Button'.
You can also choose a desired language of the applications by typing in its two-letter code into the 'Language' field. A complete list of language codes can be found here.
If the field is left blank, a default value, which is 'en' (english) will be used.
Note: You can also create a configurable option with app to be installed, you can find the relevant instruction here.
|
23. Finally, select the 'Webmail' button redirection from the 'Other' and choose 'Show Server IP' address.
Do not forget to 'Save' changes once the product configuration is ready!
|
| If the 'Show Server IP' address option is chosen, it will be visible in the client area for customers.
|
| If the 'Show Let's Encrypt Button' switch is selected, your customers will see it under the SSL Certificates menu.
|
24. (Optional) You can define the FTP backup path under 'FTP Backups End Points'.
Simply fill out the form with 'Backup Name', 'Host', 'Port', 'User', 'Password' and 'Path to Files'.
Afterwards, save it by pressing the 'Save' button.
|
| 25. (Optional) Now, under the Backup Directory Path, enter the backup path which can be found in your DirectAdmin server → 'Admin Backup/Transfer' → 'Local' textbox.
|
26. That's all, you have just correctly created and customized a new product, now you can check the results.
This is what your customers should see in your client area.
|
27. From now on, all your clients who will order a previously created product, will be able to manage their DirectAdmin accounts via your WHMCS system.
Below you can see the view of the ordered product's summary in the admin area. Available actions:
- Log In To Control Panel
- Use the module commands: 'Create', 'Suspend', 'Unsuspend', 'Terminate' the product; 'Change Package' and 'Change Password'
|
Management
DirectAdmin Extended allows your customers to manage their DirectAdmin accounts directly in your WHMCS client area.
This short guide will present you the possibilities of our addon module.
|
Your Account
In the below sections, you will find basic tools used to manage your DirectAdmin account shown and described.
Analyze them carefully to enjoy full and easy management.
|
Install Applications
Manage your applications straight from your WHMCS client area. Install new applications, create backups if needed and delete unused apps.
Read more about applications here.
|
FTP Accounts
| Manage FTP accounts in the easiest possible way. Type in your login, generate a new password and select the directory.
Handle the accounts to be able to access your website files through an FTP protocol.
|
Databases
| Owing to the MySQL management, you can create and delete databases.
|
You can also add users to particular databases. Remember that you should always use the secure password generator while creating a user.
Use action buttons to delete needless users or change their password.
|
File Manager
Manage files and folders of your DirectAdmin account. Upload files, create the folder to categorize the files, compress, extract, etc.
View the list of files with specific data on them: name, file size, last modification date and given permissions.
|
Subdomains
Create subdomains for your website sections. All you need to do is choosing the domain from the list of available domains and typing in thesubdomain name.
Once created, you can modify or remove the subdomain if needed.
|
Addon Domains
Add and manage your addon domains. Enter a new domain name, specify bandwidth and disc space, select options you may need:
- 'Secure SSL'
- 'CGI Access'
- 'PHP Access'
Note! Make sure the Addon Domains feature has been enabled for your account before using it!
|
Backups
This tab allows you to backup your DirectAdmin user account.
You can select what exactly you want to backup. Mark checkboxes next to the setting you would like to make the backup of.
Afterwards, press 'Backup' button to order it.
|
Our module allows you to restore your backups, you can do it by pressing the 'Restore' button next to the backup.
To delete backup, simply press an adequate icon.
|
Site Summary
Proceed to the 'Site Summary' section in order to check and analyze precise statistics.
Control usage level for each setting here.
|
Perl Modules
| Move to the next section, which is 'Perl Modules'. All Perl based modules installed on your server are listed there.
|
E-Mail Management
| Email management section includes all tools related to emails. Go through them to learn more.
|
Emails
| Create/edit/delete email accounts that are associated with your domains.
|
Email Forwarders
| In addition to managing email accounts, you are allowed to create and delete email forwarders as well.
|
SPAM Filters
SPAM Filters give you the possibility to define the following SPAM settings:
- block email addresses
- block email domains
- block emails with a chosen word
- block emails larger than the specified number of kilobytes
- define the action for blocked emails
- adult filter
|
Autoresponders
This page enables you to set up autoresponders to mailboxes from these DirectAdmin accounts.
Autoresponder replies to each message received by the mailbox.
|
Vacation Messages
The goal of Vacation Messages is similar to the one of Autoresponders shown above.
The only difference is that the vacation message replies only to the first email received per email address.
|
Mailing Lists
On this page, you can configure your mailing lists. Create a new mailing list by providing its name.
Underneath, you can find a list of your mailing lists. Use action buttons to delete a list, view its details and alter settings.
|
| Modify the mailing list in the 'Settings' section.
|
| When you 'View' the list, you will be moved to the section where subscribers can be added to the list.
|
Spamassasin Setup
On this page, you can configure your Spamassasin.
You can set up:
- Action performed on spam emails
- Threshold
- Define separete actions for spam emails of the above defined threshold
- Define whether to change the spam email subject or leave it intact
- Choose how spam should be delivered
- Specify blacklisted email addresses
- Specify whitelisted email addresses
|
Advanced Features
| Advanced tools are used to configure sophisticated settings of your account.
|
Domain Pointers
In the 'Domain Pointers' section you can manage your aliases and pointers.
You can have access to the content of one domain from another one!
|
Site Redirections
| Easy access to site redirections is very advantageous. Within a few seconds, you can redirect the page to another.
|
Cron Jobs
Cron Jobs Management allows you to easily add and remove your cron jobs.
Choose the cron's specific timing and type in the command to be executed.
|
SSL Certificates
This feature relocates completely the management of your private keys, CSR keys and SSL certificates into your WHMCS client area.
Thanks to it, you can conveniently manage all the aspects of your SSL certificates without the necessity to log in to your DirectAdmin account.
In addition, your customers can benefit from generating free certificates provided by 'Let's Encrypt' . Assuming that this option was previously enabled in the Addon Configuration
|
Apache Handlers
| Under the 'Apache Handlers' page, you can define custom handlers for chosen file extensions or specific files. You can read more about Apache Handlers here.
|
Custom Error Pages
Defining custom apache error pages is easy with 'Error Pages'.
You can define HTML code of error pages displayed during 401, 403, 404 and 500 errors.
|
Install Applications
Install Applications is a very interesting and time-saving feature of DirectAdmin Extended For WHMCS module. In merely seconds, you can install your favorite applications without even accessing DirectAdmin!
Firstly, you need to enable one of the two auto-installation managers. To do so, go to 'Addons' → 'DirectAdmin Extended Center' → 'Features'.
Press the 'Configure' button next to the product your are interested in. Then, find the 'Applications ' box.
Enable the 'Install App' checkbox, select the autoinstaller from a dropdown menu (you can choose 'Installatron' or 'Softaculous' ).
You can also choose a desired language of the application by entering value into the 'Language' field. Complete list of language codes can be found here.
If the field is left blank, the default value 'en' (English) will be used.
Finish the process by enabling 'Install Button' and 'Backup Button'. Do not forget to save the changes.
|
|
| To see the list of available applications, simply click on 'Install Applications!' , then on 'Install New' button as shown on the following screen.
|
| Then, you will see an extensive menu of application categories. For presentation purposes we will install 'webtrees' located in the 'Miscellaneous' section.
|
| Let's enter 'Miscellaneous' category and press the chosen application name.
|
Now, you can enter necessary installation details and press 'Install Application' when ready.
Leave empty fields to be handled automatically by the installler itself.
|
| If the installation process has been successful your newly installed application will appear on the list of installed ones.
|
Management of Autoinstalled Apps
To set up DirectAdmin Extended product with the autoinstalled app, follow these steps:
In the beginning, go to 'Product/Services', find your product connected with DirectAdmin Extended and enter 'Module Settings' tab.
Press 'Generate Custom Fields' to automatically create the required fields.
|

|
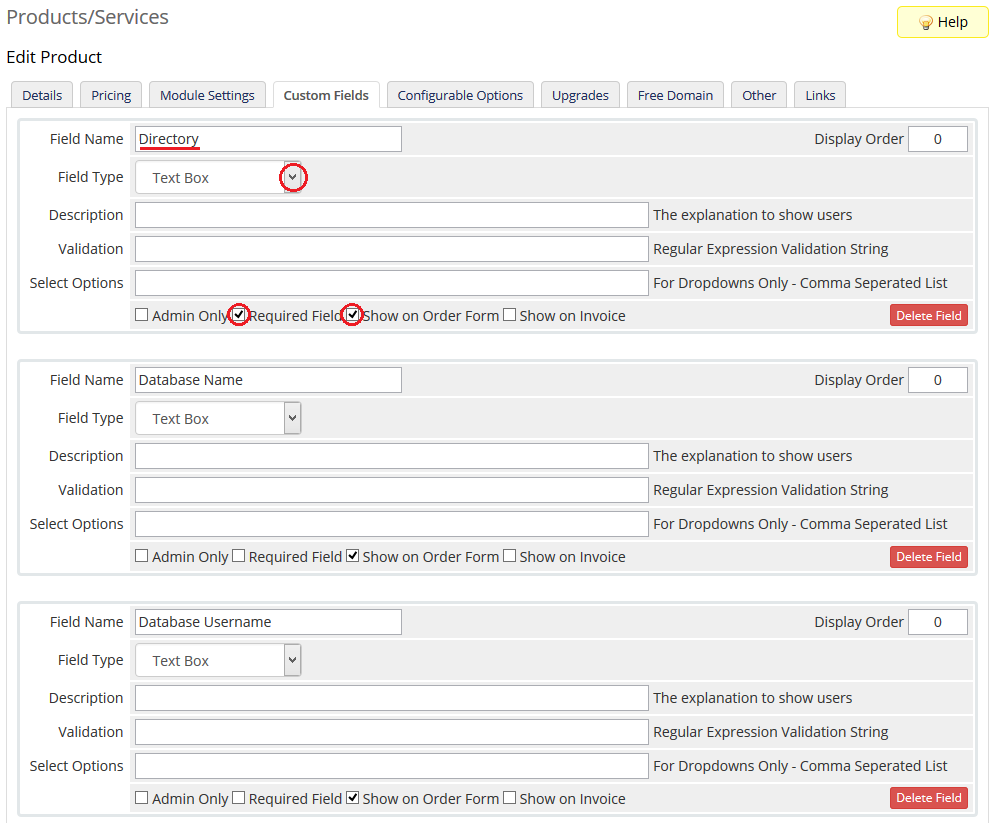
You can also create these fields manually by going to 'Custom Fields' tab. You will need to add 8 custom fields.
These are: 'Directory', 'Database Name', 'Database Username', 'Database Password', 'Table Prefix', 'Site Name', 'Site Description' and 'Language'.
Remember to set the field type as 'Text Box', tick 'Required Field ' and 'Show on Order Form'. Everything is shown on the screen below.
Note 1: 'Site Description' is needed only for Softaculous autoinstaller.
Note 2: 'Database Name', 'Database Username','Database Password' and 'Table Prefix' fields do not need to be filled upon ordering product by a client.
If they are not filled, the database will be automatically generated.
Note 3: For the Installatron autoinstaller use 'Site Title' in place of 'Site Name'.
|
|
Afterwards, go to 'Addons' → 'DirectAdmin Extended Center' → 'Features' → 'Configuration'.
Enable 'Install App' in the Applications section. Select the auto installer and app to install from dropdown menus. Confirm by pressing the 'Save' button.
|
Once you add all the custom fields, they will appear while placing an order.
Voila! Now your customers can personalize each application without the necessity of installing it later.
|
Assignment of Configurable Options To Application Autoinstall
With the help of this functionality, you can let your clients decide which application they would like to install on their new DirectAdmin account.
While placing the order your customer chooses the application and along with account creation this very application will be installed on the account.
There is nothing else you need to do. The application will be instantly ready to use!
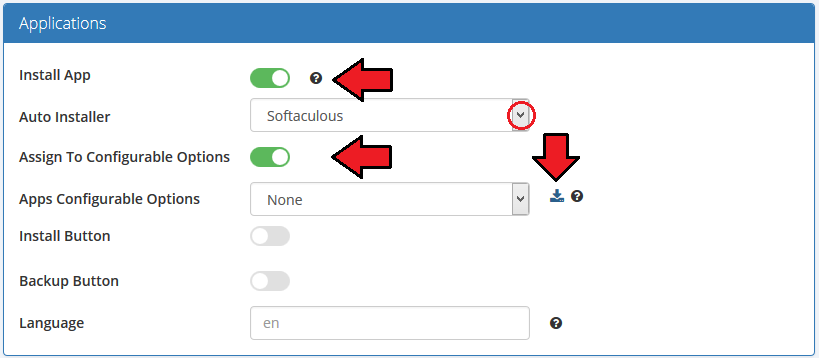
To set up this feature, go to 'DirectAdmin Extended Functions', press 'Install Apps', tick 'Install App', 'Assign To Configurable Options' and choose 'Auto Installer'.
Save these settings by pressing 'Save Changes' and click on a floppy disk icon to download the list of apps.
|
|
These are the names of values that you can enter in configurable options' fields that we will configure in the next step.
For example, if you would like to set up '4images' in your application list, you will need to enter the value '4images 1.7.11'.
1. If you make a mistake with the application name, the autoinstall feature will not work.
2. If you do not enter the version number, the autoinstall will install the latest version of the application.
Now, when you know what values should be entered in configurable options for particular applications, we can proceed.
|
| Go to your WHMCS → 'Setup' → 'Products/Services' → 'Configurable Options' and press 'Create a New Group'.
|
| Enter 'Group Name' of your choice, select the product you want to assign configurable options to, then press 'Save Changes'.
|
| Now, click on 'Add New Configurable Option'.
|
This moment is very important. As an 'Option Name', you have to type in 'Installation App'. Otherwise, the entire functionality will not work.
You can set up as many applications as you want. To do so, enter the name of the value e.g. '4images' and press 'Save Changes'.
Repeat this as many times as you need and do not forget to set the 'Option Type' to 'Dropdown'.
|
As you can see on the following screen, we decided to offer our customers 5 applications.
When you finish adding applications, press 'Save Changes' and 'Close Window'.
|
Afterwards, go to 'DirectAdmin Extended', enable 'Assign To Configurable Options' and choose 'Applications' from a dropdown menu.
Please note that you can have more configurable options groups. Press 'Save Changes' and that's it. You have just successfully assigned configurable options to application autoinstallation.
Let's check out what your customers are going to see in their client area while placing the order.
|
| As you can see a dropdown menu with our previously set up applications has shown up.
|
Backups Management For Apps
| You can also create a backup of your application. It is very easy! To do so, click 'Create Backup'.
|
After a few seconds, you should see the 'Success' message as a confirmation of the performed operation.
To manage your backups, simply press 'Backups'.
|
| You can quickly view, delete or restore your existing backups.
|
Log In To DirectAdmin
| With a single click on the 'Log In To DirectAdmin' button, you can log in to your DirectAdmin without the necessity to enter login details.
|
Log In To Webmail
| You can easily log in to your webmail by clicking 'Log In To Webmail'. You will be redirected to that site on the run.
|
Log In To phpMyAdmin
| In order to enter phpMyAdmin, press 'phpMyAdmin' button as shown on the following screen.
|
Management of Resource Usage
| In the product overview tab, you can find your product's current resource usage and limits assigned to the product.
|
Management of Existing Products
You can easily use DirectAdmin Extended module with your already configured DirectAdmin products.
To do so, change the type of servers and module names of products from 'Directadmin' to 'DirectadminExtended' .
Additional information about how to correctly configure your servers and products can be found in points 8-16 in the 'Installation and Configuration' section.
|
Management of Billing
When you combine DirectAdmin Extended For WHMCS with Advanced Billing For WHMCS, you will be able to set up additional billing options.
The module allows you to charge your customers basing on the actual server resource usage.
|
| With Advanced Billing module, you can also show your customers the current usage of server resources and their cost.
|
Tips
1. Keep in mind that user packages and reseller packages are two different things.
When you configure a typical product for your customers in the WHMCS, you would usually need to enter one of your user packages, not the reseller packages.
|
2. To manage SSL certificates, your customers require the owned IP address.
Otherwise, the module will return the following error: 'You can manage SSL certificates when you own the IP you are using. Info for admins: Assign an owned IP'.
|
| To add the owned IP address, log in to your DirectAdmin admin area, go to the 'IP Management' section, add the IP and assign it to the admin.
|
Afterwards, manage the user for whom you want to add the IP address.
Set IP to your previously created IP address, save changes and make sure that this IP will be the current IP address of your customer.
|
If you add more IP addresses with free status in your DirectAdmin, you can quickly assign those IP addresses to your customers in WHMCS.
For this purpose, simply type the IP in the 'Dedicated IP' field, press 'Enter' on your keyboard and update the product package by clicking on the 'Change Package' button.
|
| 3. As this module supports templates system, any changes made in the module's template files will be saved after the upgrade process.
|
Update Instructions
Essential guidance through the process of updating the module is offered here.
Keep in mind there is a quick and easy option in our client area that will let you upgrade the license of your module to an open source version at any time - and at a lower price!
To take advantage of it, simply use the License Upgrade button located on the product's page and a discounted invoice will be generated automatically.
|
Common Problems
| 1. When you have problems with connection, check whether your SELinux or firewall does not block ports.
|
| 2. If you have problems with connection make sure that port 2222 is open.
|
3. If you run into an ionCube encoder problem (wrong version) after the installation, please open a support ticket.
We will provide you with a different version of the module encrypted with the older version of ionCube.
|
4. You cannot change DirectAdmin port to other than 2222, due to WHMCS DirectAdmin module limitation.
DirectAdmin Extended For WHMCS rely on default WHMCS DirectAdmin module.
|
| 5. DirectAdmin Extended For WHMCS module functions only on the administrator account.
|


