R1Soft Backups For WHMCS
(→Installation and Configuration) |
(→Installation and Configuration) |
||
| Line 117: | Line 117: | ||
|} | |} | ||
{| | {| | ||
| − | |style="padding: 0px 0px 15px 15px;"|'''3. When you install R1Soft Backups for the first time you have to rename '' 'license_RENAME.php' '' file.'''<br /> | + | |style="padding: 0px 0px 15px 15px;"|'''3. When you install R1Soft Backups for the first time you have to rename '' 'license_RENAME.php' '' file.'''<br/> |
| − | File is located in '' 'modules/servers/R1SoftBackups/license_RENAME.php' '' | + | File is located in '' 'modules/servers/R1SoftBackups/license_RENAME.php'.'' Rename it from '' 'license_RENAME.php' '' to '' 'license.php'.'' |
|} | |} | ||
{| | {| | ||
| Line 134: | Line 134: | ||
==Configuration of Server== | ==Configuration of Server== | ||
{| | {| | ||
| − | |style="padding: 10px 0px 15px 15px;"|'''5. Now, we will show you how to configure a new product.'''<br /> | + | |style="padding: 10px 0px 15px 15px;"|'''5. Now, we will show you how to configure a new product.'''<br/> |
| − | Go to '' 'Setup' '' → '' 'Products/Services' '' → '' 'Servers' '' and press '' 'Add New Server' '' | + | Go to '' 'Setup' '' → '' 'Products/Services' '' → '' 'Servers' '' and press '' 'Add New Server'.'' |
|} | |} | ||
{| | {| | ||
| Line 141: | Line 141: | ||
|} | |} | ||
{| | {| | ||
| − | |style="padding: 0px 0px 15px 15px;"|'''6. Next, enter your server name, IP address/hostname, username, password and admin tenant ID.'''<br /> | + | |style="padding: 0px 0px 15px 15px;"|'''6. Next, enter your server name, IP address/hostname, username, password and admin tenant ID.'''<br/> |
| − | Choose '' 'R1SoftBackups' '' from a dropdown menu and press '' 'Save Changes' '' | + | Choose '' 'R1SoftBackups' '' from a dropdown menu and press '' 'Save Changes'.''''' |
|} | |} | ||
{| | {| | ||
| Line 148: | Line 148: | ||
|} | |} | ||
{| | {| | ||
| − | |style="padding: 0px 0px 20px 15px;"|'''7. It is time to create a server group. To do so, click on '' 'Create Server Group' '' | + | |style="padding: 0px 0px 20px 15px;"|'''7. It is time to create a server group. To do so, click on '' 'Create Server Group'.''''' |
|} | |} | ||
{| | {| | ||
| Line 154: | Line 154: | ||
|} | |} | ||
{| | {| | ||
| − | |style="padding: 0px 0px 20px 15px;"|'''8. Enter name, click on your previously created server, press '' 'Add' '' and afterwards '' 'Save Changes' '' | + | |style="padding: 0px 0px 20px 15px;"|'''8. Enter name, click on your previously created server, press '' 'Add' '' and afterwards '' 'Save Changes'.''''' |
|} | |} | ||
{| | {| | ||
| Line 162: | Line 162: | ||
==Configuration of Product== | ==Configuration of Product== | ||
{| | {| | ||
| − | |style="padding: 10px 0px 15px 15px;"|'''9. In order to create and configure a product, go to '' 'Setup' '' → '' 'Products/Services' '' → '' 'Products/Services' '' | + | |style="padding: 10px 0px 15px 15px;"|'''9. In order to create and configure a product, go to '' 'Setup' '' → '' 'Products/Services' '' → '' 'Products/Services'.'''''<br/> |
| − | Click on '' 'Create a New Group' '' | + | Click on '' 'Create a New Group'.'' |
|} | |} | ||
{| | {| | ||
| Line 169: | Line 169: | ||
|} | |} | ||
{| | {| | ||
| − | |style="padding: 0px 0px 20px 15px;"|'''10. Enter product group name and press '' 'Save Changes' '' | + | |style="padding: 0px 0px 20px 15px;"|'''10. Enter product group name and press '' 'Save Changes'.''''' |
|} | |} | ||
{| | {| | ||
| Line 175: | Line 175: | ||
|} | |} | ||
{| | {| | ||
| − | |style="padding: 0px 0px 15px 15px;"|'''11. When you have a product group, you can create your product.'''<br /> | + | |style="padding: 0px 0px 15px 15px;"|'''11. When you have a product group, you can create your product.'''<br/> |
| − | To create a product click on '' 'Create a New Product' '' | + | To create a product click on '' 'Create a New Product'.'' |
|} | |} | ||
{| | {| | ||
| Line 182: | Line 182: | ||
|} | |} | ||
{| | {| | ||
| − | |style="padding: 0px 0px 20px 15px;"|'''12. Afterwards, choose your product group and type from dropdown menus, enter your product name and press '' 'Continue' '' | + | |style="padding: 0px 0px 20px 15px;"|'''12. Afterwards, choose your product group and type from dropdown menus, enter your product name and press '' 'Continue'.''''' |
|} | |} | ||
{| | {| | ||
| Line 188: | Line 188: | ||
|} | |} | ||
{| | {| | ||
| − | |style="padding: 0px 0px 15px 15px;"|'''13. Now, go to '' 'Module Settings' '' section, choose both '' 'R1softbackups' '' and your previously created server group from dropdown menus.'''<br /> | + | |style="padding: 0px 0px 15px 15px;"|'''13. Now, go to '' 'Module Settings' '' section, choose both '' 'R1softbackups' '' and your previously created server group from dropdown menus.'''<br/> |
Save changes. | Save changes. | ||
|} | |} | ||
| Line 195: | Line 195: | ||
|} | |} | ||
{| | {| | ||
| − | |style="padding: 0px 0px 15px 15px;"|'''14. Proceed to setting up module's options: '''<br /> | + | |style="padding: 0px 0px 15px 15px;"|'''14. Proceed to setting up module's options: '''<br/> |
Use '' 'Generate' '' buttons to automatically generate custom fields and configurable options for the product. | Use '' 'Generate' '' buttons to automatically generate custom fields and configurable options for the product. | ||
Allow options according to your needs: | Allow options according to your needs: | ||
Revision as of 11:29, 9 September 2016
Contents |
About R1Soft Backups For WHMCS
| R1Soft Backups For WHMCS will let you sell R1Soft Server Backup Manager accounts through your system. You will be able to create packages with various sets of limits and privileges depending on the needs of your clients. |
- Admin Area Features:
| ✔ Create/Terminate Account |
| ✔ Suspend/Unsuspend User |
| ✔ Change Package |
| ✔ Change Password |
| ✔ View Server Details |
- Client Area Features:
| ✔ View Server Details |
| ✔ View And Manage Account Credentials |
| ✔ Log In To Control Panel |
- Package Settings:
| ✔ Is Power-User |
| ✔ Agent Limit |
| ✔ Soft Quota |
| ✔ Hard Quota |
| ✔ Quota Type |
| ✔ Replication Frequency Limit |
| ✔ MySQL Addon Limit |
| ✔ Archive Point Limit |
| ✔ Recovery Point Limit |
| ✔ Allow Archiving |
| ✔ Allow Agents |
- Configurable Options:
| ✔ Agent Limit |
| ✔ MySQL Addon Limit |
| ✔ Size - Previously Divided Into 'Soft Quota' And 'Hard Quota' |
| ✔ Replication Frequency Limit |
- General Info:
| ✔ Configurable Options Support |
| ✔ Multi-Language Support |
| ✔ Supports WHMCS Templates Five and Six |
| ✔ Supports WHMCS V5 and V6 |
Installation and Configuration
| This tutorial will show you how to successfully install and configure R1Soft Backups For WHMCS. We will guide you step by step through the whole installation and configuration process. |
Installation
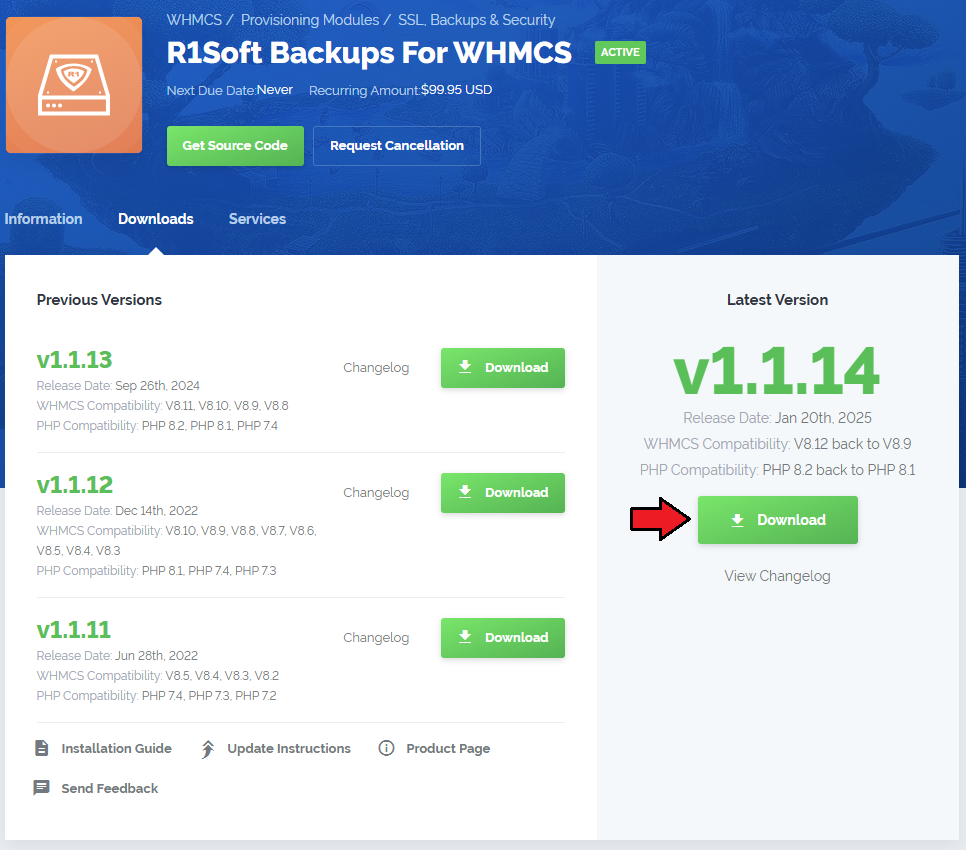
| 1. Log in to your client area and download R1Soft Backups For WHMCS. |
|
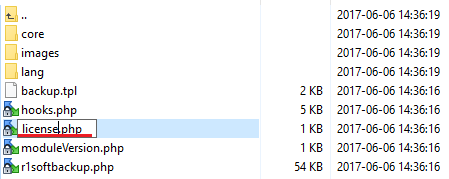
| 2. Upload and extract the module into the main WHMCS directory. Files in your WHMCS directory should look like on the following screen. |

|
| 3. When you install R1Soft Backups for the first time you have to rename 'license_RENAME.php' file. File is located in 'modules/servers/R1SoftBackups/license_RENAME.php'. Rename it from 'license_RENAME.php' to 'license.php'. |
|
| 4. In order to configure your license key, you have to edit a previously renamed 'license.php' file. Enter your license key between quotation marks as presented on the following screen. |

|
Configuration of Server
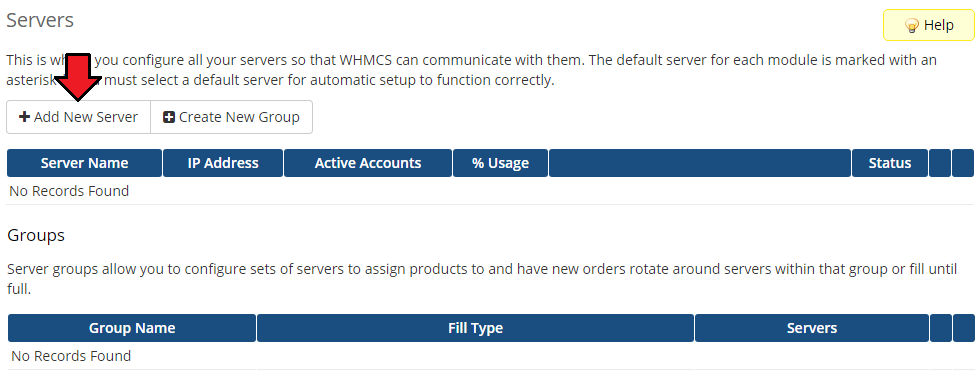
| 5. Now, we will show you how to configure a new product. Go to 'Setup' → 'Products/Services' → 'Servers' and press 'Add New Server'. |
|
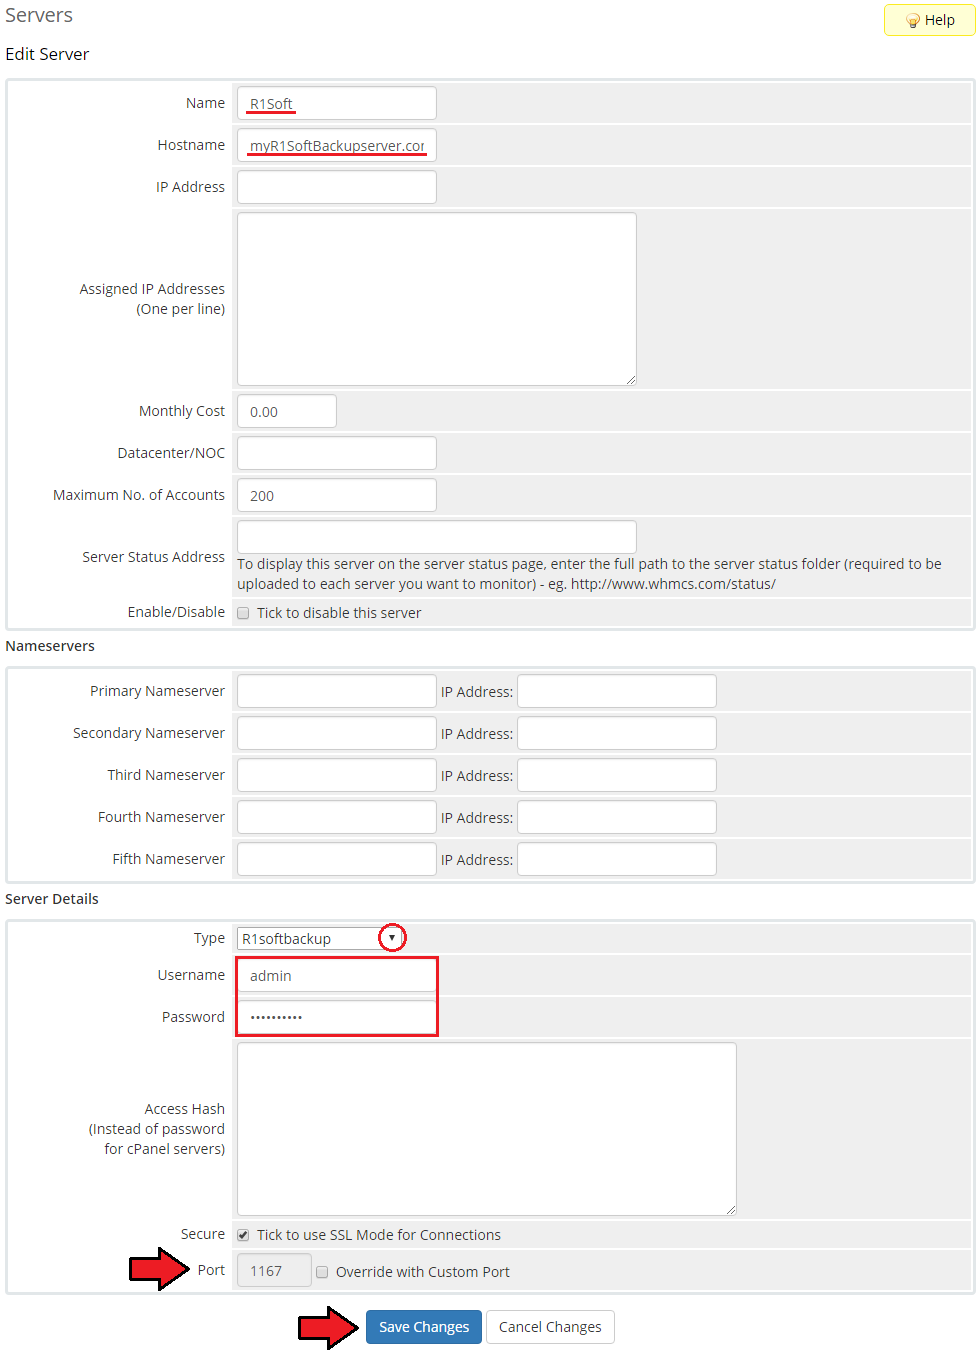
| 6. Next, enter your server name, IP address/hostname, username, password and admin tenant ID. Choose 'R1SoftBackups' from a dropdown menu and press 'Save Changes'. |
|
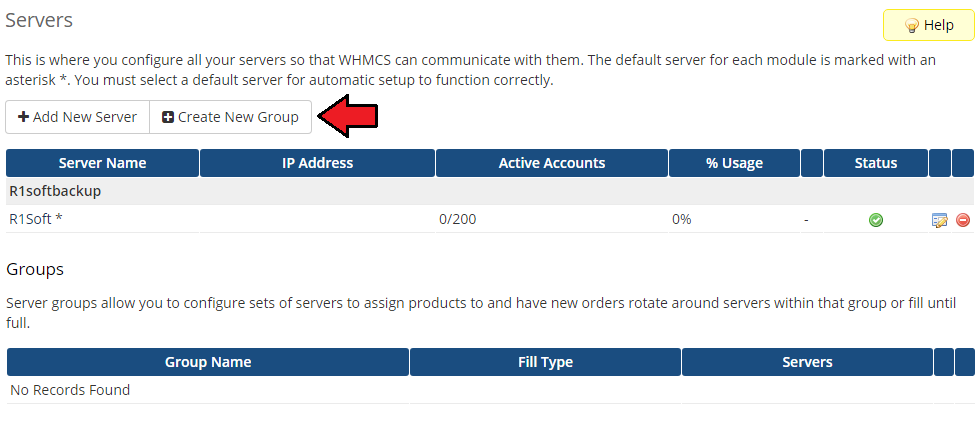
| 7. It is time to create a server group. To do so, click on 'Create Server Group'. |
|
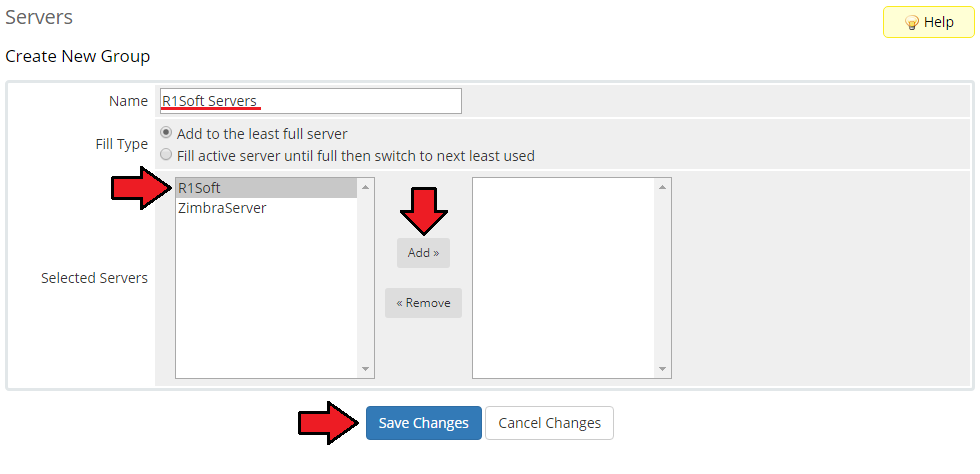
| 8. Enter name, click on your previously created server, press 'Add' and afterwards 'Save Changes'. |
|
Configuration of Product
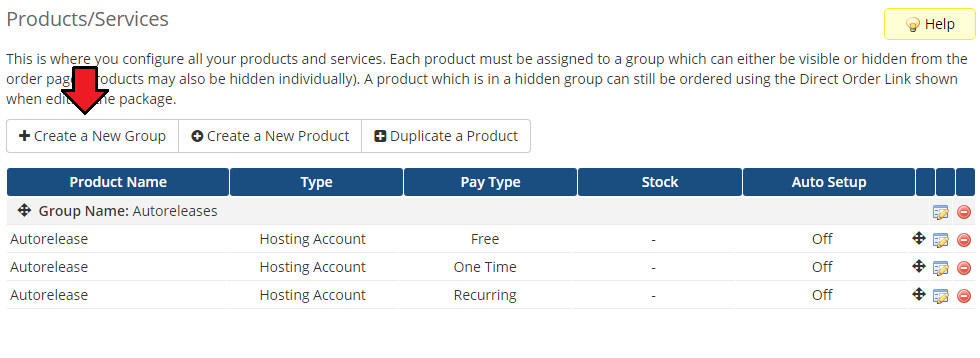
| 9. In order to create and configure a product, go to 'Setup' → 'Products/Services' → 'Products/Services'. Click on 'Create a New Group'. |
|
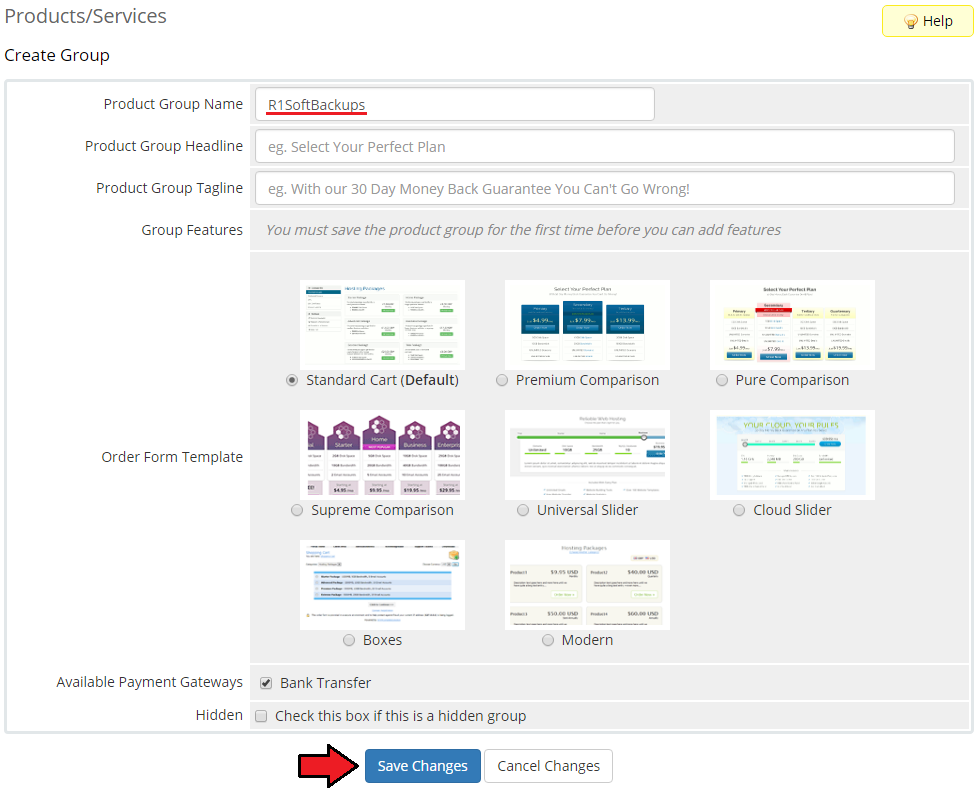
| 10. Enter product group name and press 'Save Changes'. |
|
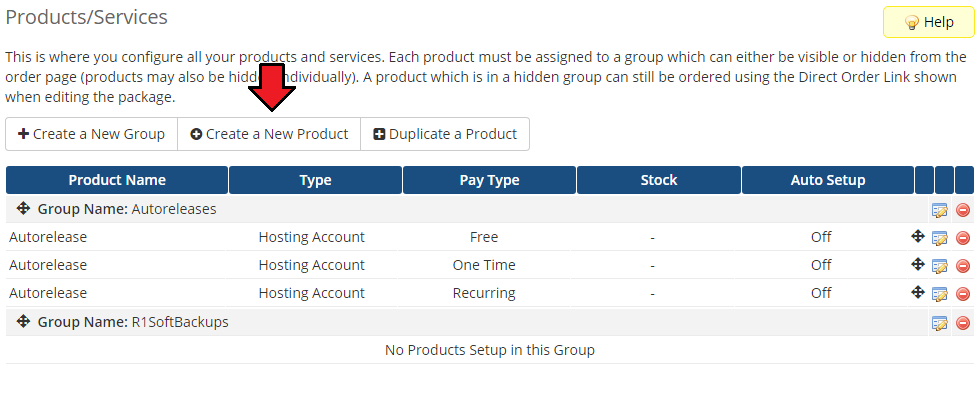
| 11. When you have a product group, you can create your product. To create a product click on 'Create a New Product'. |
|
| 12. Afterwards, choose your product group and type from dropdown menus, enter your product name and press 'Continue'. |

|
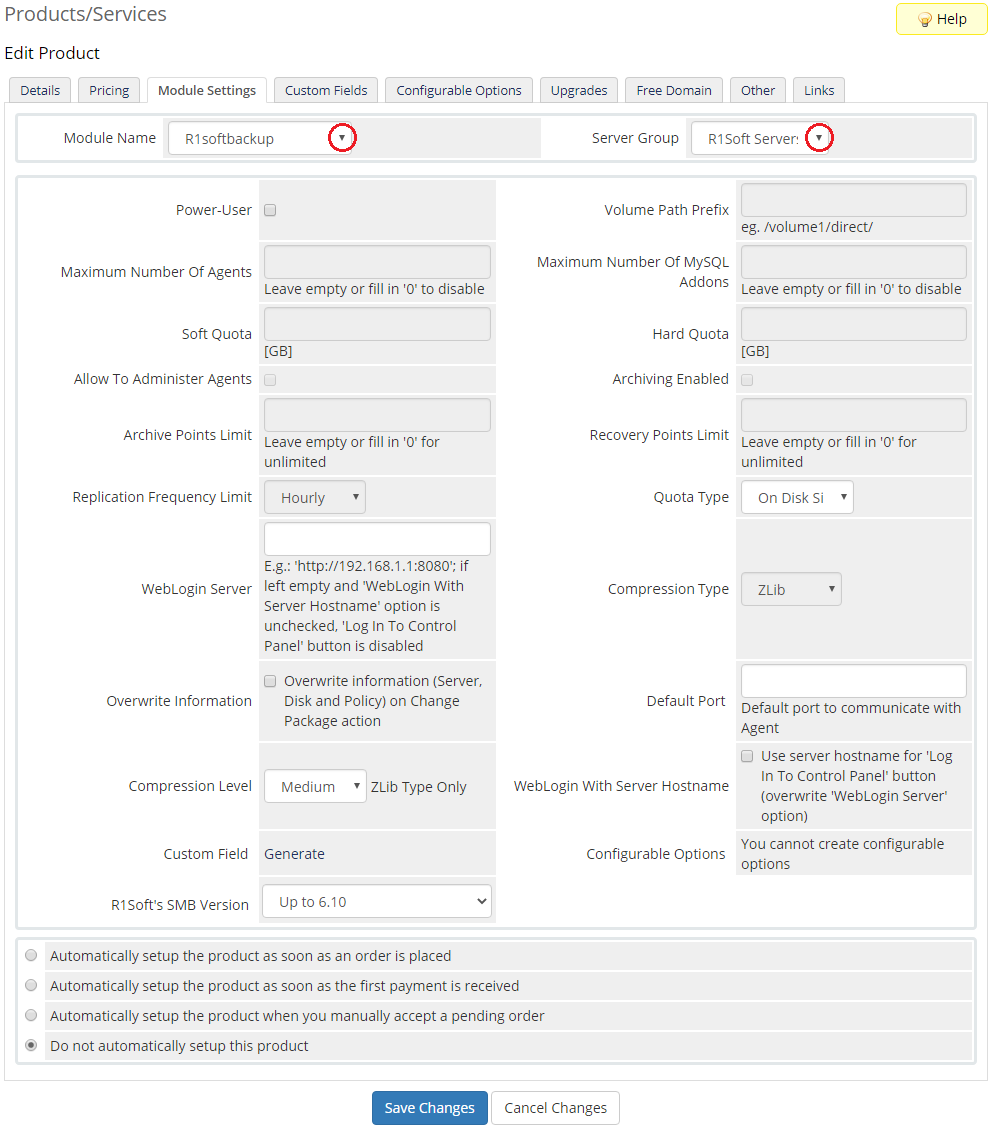
| 13. Now, go to 'Module Settings' section, choose both 'R1softbackups' and your previously created server group from dropdown menus. Save changes. |
|
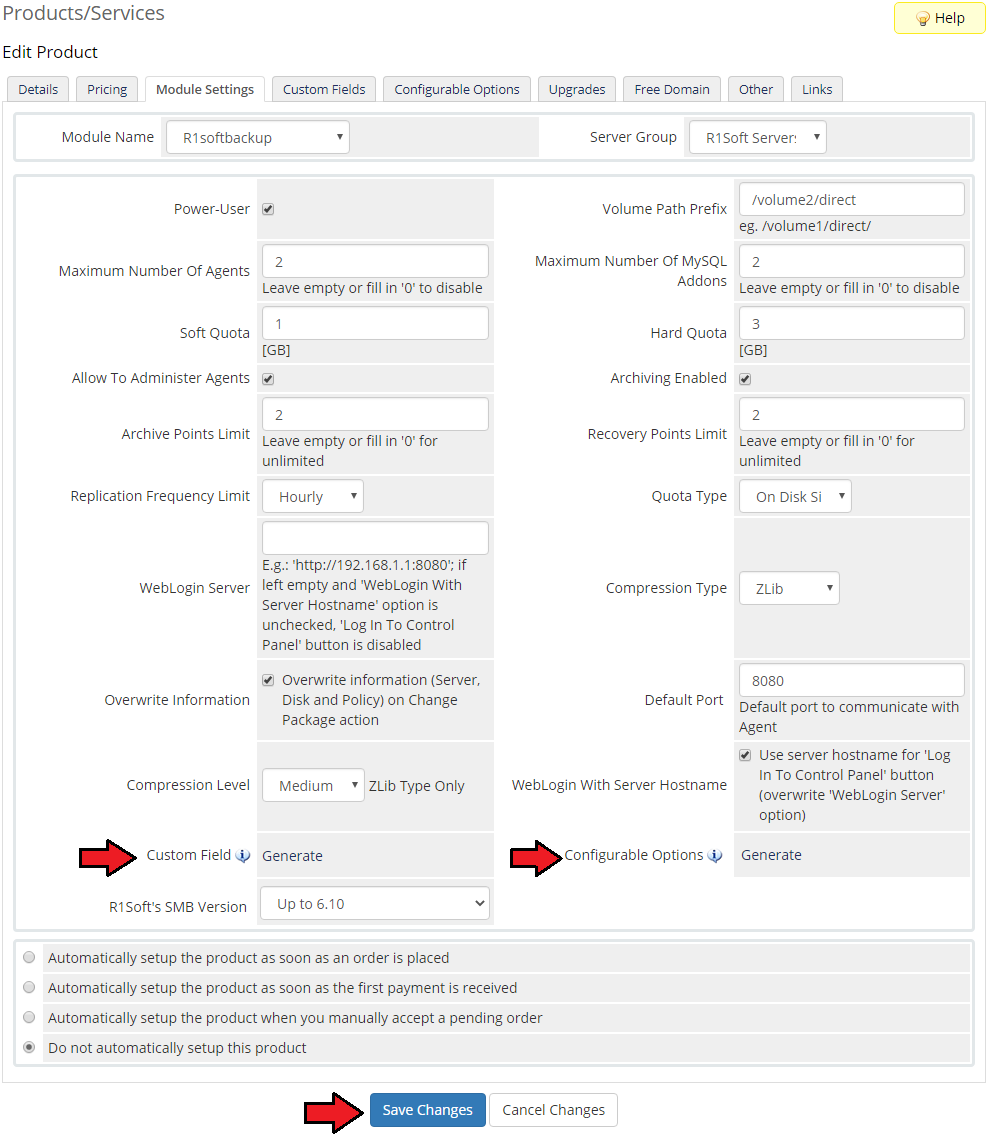
| 14. Proceed to setting up module's options: Use 'Generate' buttons to automatically generate custom fields and configurable options for the product. Allow options according to your needs:
Remember to save changes in the end. You may come back and alter the settings whenever needed. |
|
Management
| R1Soft Backups For WHMCS allows you to administer an outside backups management server directly from your WHMCS. |
Ordering
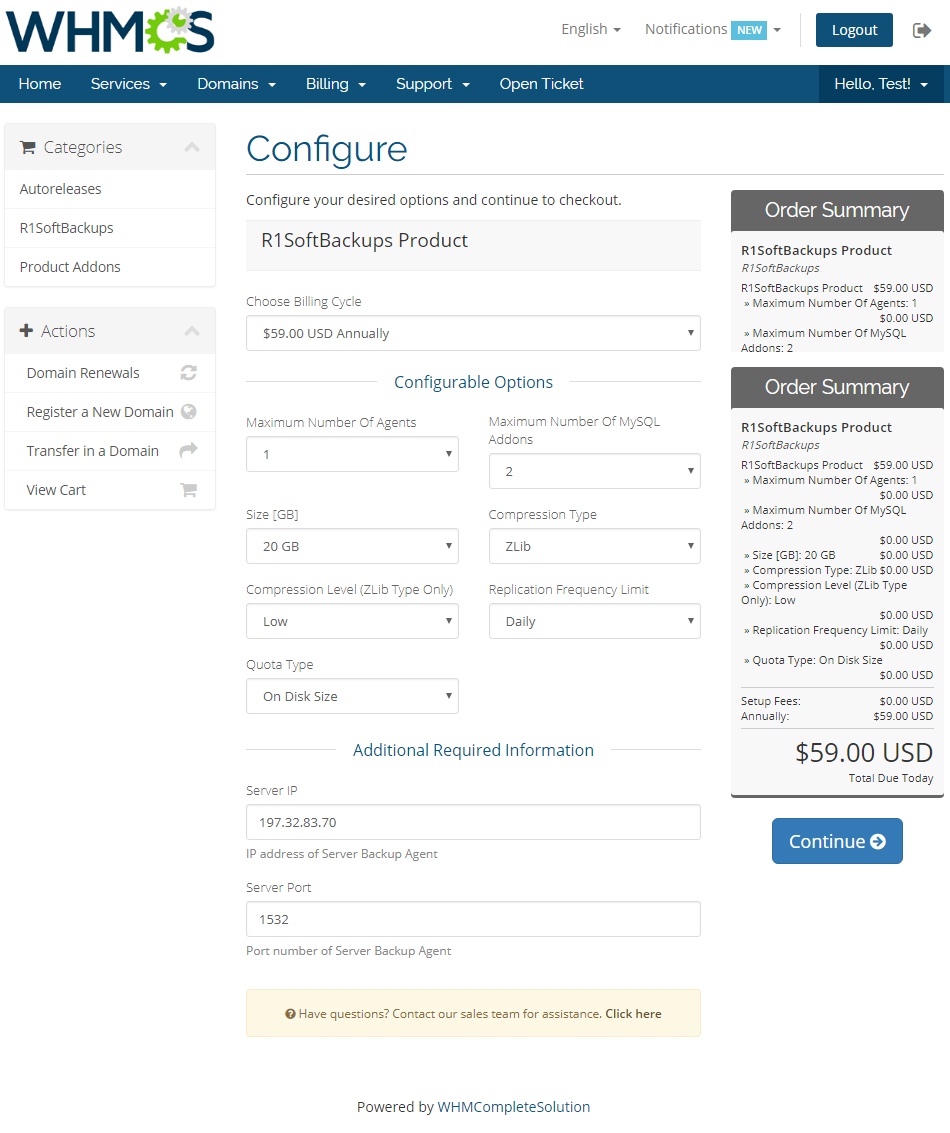
| R1Soft Backups For WHMCS is ordered by Clients as any other product. However, there is one thing to pay attention to. While completing the order for the product, a client needs to fill in Additional Required Information, which is:
Additionally, depending on configurable option, client can define account limits. |
|
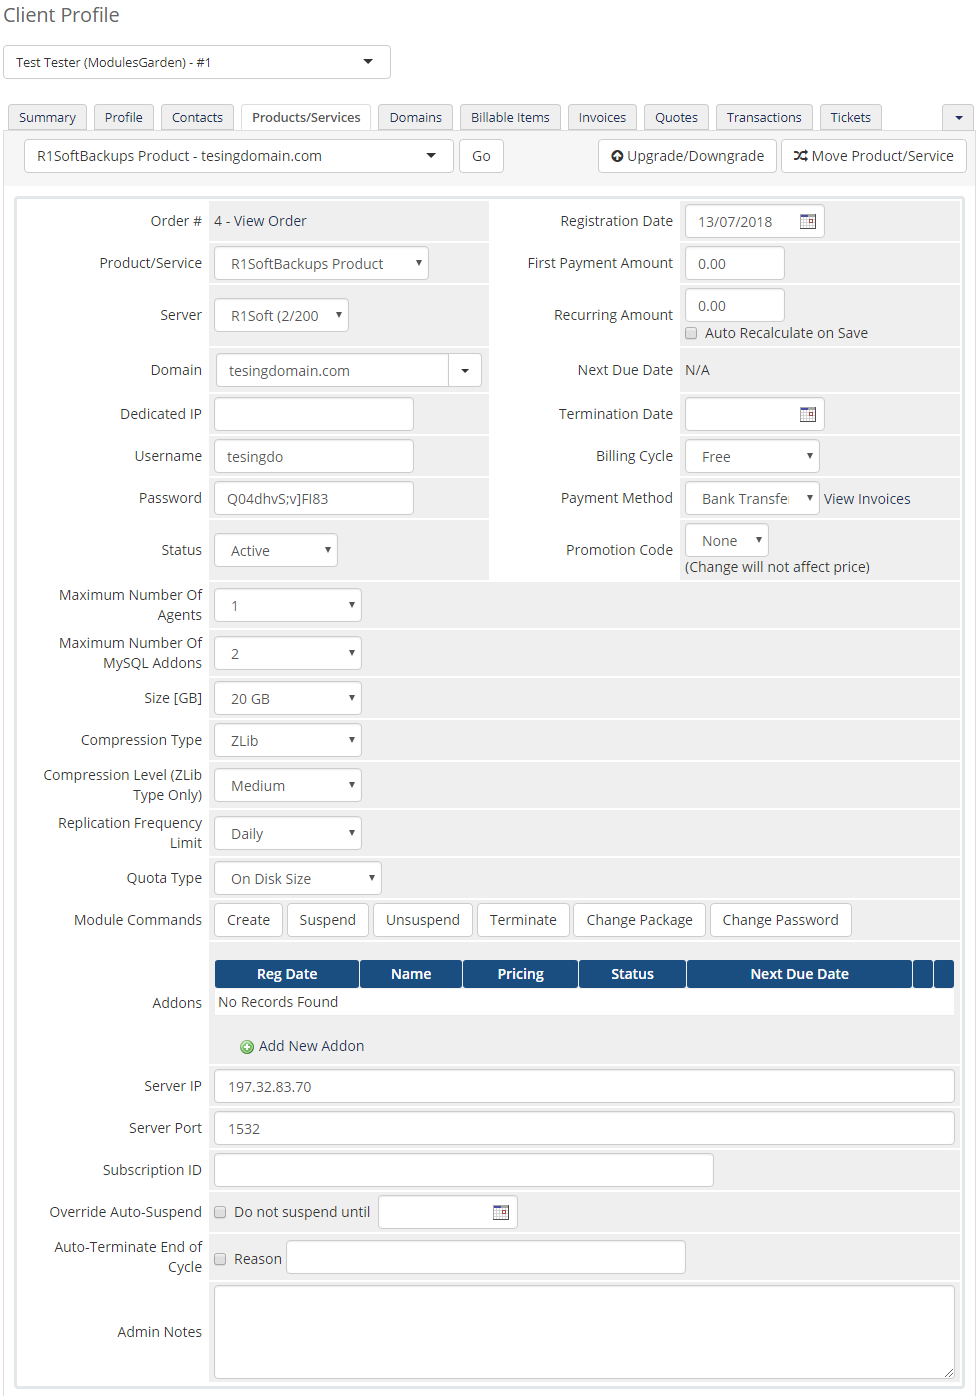
| From the admin area you can order actions such as: 'Create,' 'Suspend,' 'Unsuspend,' 'Terminate,' 'Change Package' and 'Change Password' . |
|
Client Area
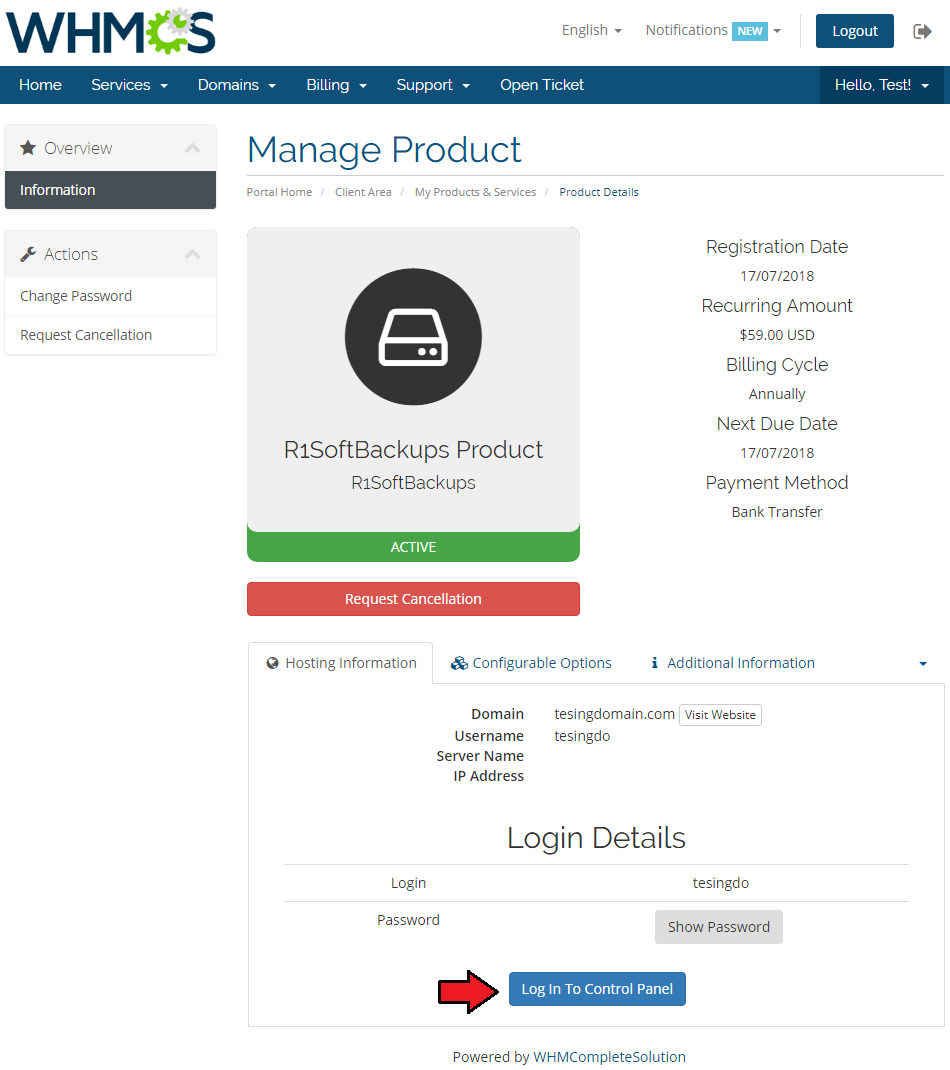
| Your client can log in to the outside R1Soft account from your WHMCS client area. Provided WebLink to the server has been entered in Module Settings (look at point 14 for more information). |
|
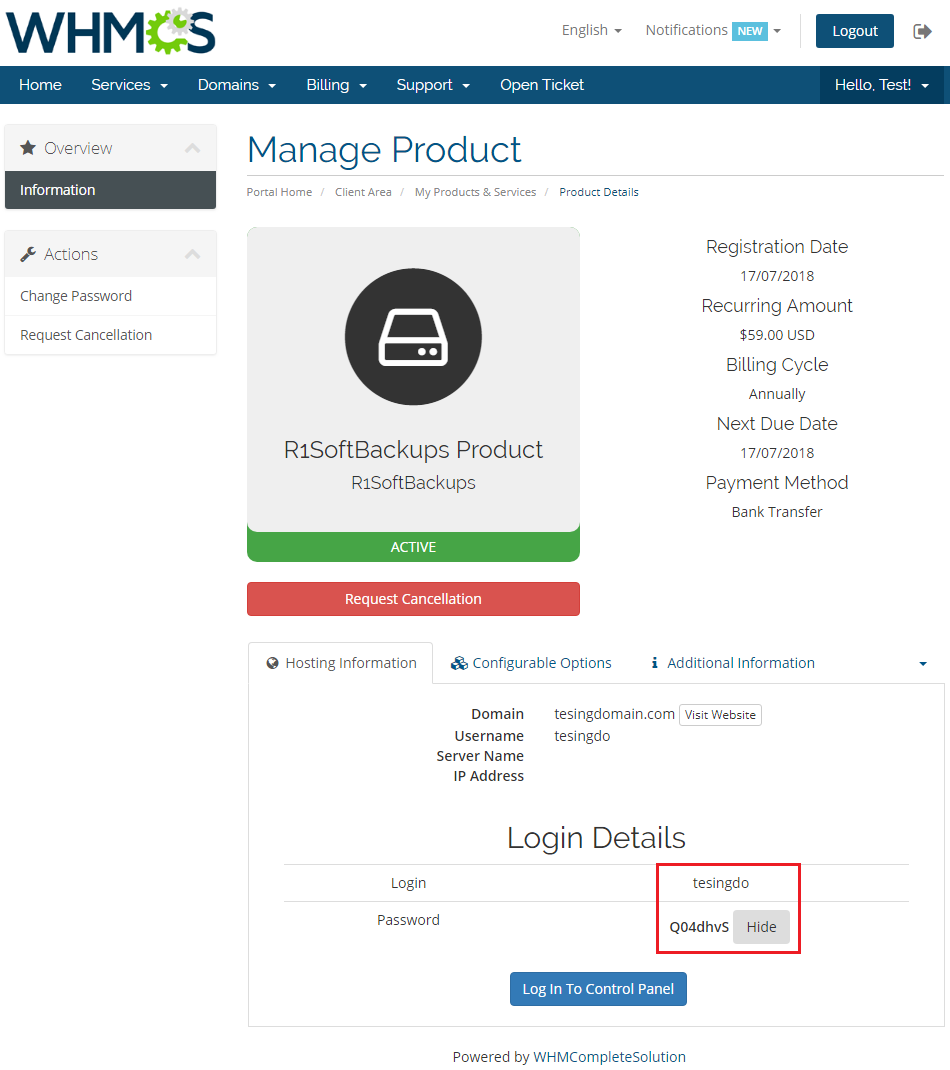
| Another option available from your client area is 'Login Details' . View your R1Soft server login and show/hide password. |
|
Tips
Common Problems
| 1. When you have problems with connection, check whether your SELinux or firewall does not block ports. |