Hosting Quota Notifications 1.X For WHMCS
(Blanked the page) |
|||
| Line 1: | Line 1: | ||
| + | <meta name="keywords" content="websitepanel extended for whmcs, websitepanel extended configuration, whmcs websitepanel extended management, whmcs websitepanel extended installation, whmcs websitepanel extended common problems, about whmcs websitepanel extended, whmcs websitepanel extended documentation, whmcs websitepanel extended faq, whmcs websitepanel extended help, whmcs websitepanel extended guide, whmcs websitepanel extended wiki, whmcs websitepanel extended tutorial, whmcs websitepanel extended tips, whmcs websitepanel extended wiki"></meta> | ||
| + | <meta name="description" content="ModulesGarden Wiki Contains All The Information You Need About The WebsitePanel Extended For WHMCS Module."></meta> | ||
| + | =About [http://www.modulesgarden.com/products/whmcs/websitepanel_extended/features WebsitePanel Extended For WHMCS]= | ||
| + | {| | ||
| + | |style="padding: 10px 0px 10px 0px;"|'''WebsitePanel Extended For WHMCS''' automates provisioning and management of WebsitePanel accounts through your system.<br /> | ||
| + | The module enables your customers to order and manage their web hosting accounts straight in your WHMCS client area. | ||
| + | |} | ||
| + | <!-- fixed --> | ||
| + | *'''Admin Area Features:''' | ||
| + | {| | ||
| + | |style="padding: 10px 0px 0px 30px;"|✔ Create/Suspend/Unsuspend/Terminate Account | ||
| + | |} | ||
| + | {| | ||
| + | |style="padding: 0px 0px 0px 30px;"|✔ Change Package And Password Of Account | ||
| + | |} | ||
| + | {| | ||
| + | |style="padding: 0px 0px 0px 30px;"|✔ Log In To Each WebsitePanel Account On Click | ||
| + | |} | ||
| + | {| | ||
| + | |style="padding: 0px 0px 0px 30px;"|✔ Configure Client Area Features Per Product | ||
| + | |} | ||
| + | {| | ||
| + | |style="padding: 0px 0px 0px 30px;"|✔ Define Hosting Plan To Limit Resource Per Product | ||
| + | |} | ||
| + | {| | ||
| + | |style="padding: 0px 0px 0px 30px;"|✔ View All WebsitePanel And WebsitePanel Extended Products And Servers In One Place | ||
| + | |} | ||
| + | {| | ||
| + | |style="padding: 0px 0px 10px 30px;"|✔ Run API Connection Test | ||
| + | |} | ||
| + | *'''Client Area Features:''' | ||
| + | {| | ||
| + | |style="padding: 10px 0px 0px 30px;"|✔ Remote Access And Management Of: | ||
| + | |} | ||
| + | {| | ||
| + | |style="padding: 0px 0px 0px 45px;"|✔ DNS Management - Requires DNS Manager For WHMCS | ||
| + | |} | ||
| + | {| | ||
| + | |style="padding: 0px 0px 0px 45px;"|✔ DNS Records | ||
| + | |} | ||
| + | {| | ||
| + | |style="padding: 0px 0px 0px 45px;"|✔ File Manager | ||
| + | |} | ||
| + | {| | ||
| + | |style="padding: 0px 0px 0px 45px;"|✔ FTP Accounts | ||
| + | |} | ||
| + | {| | ||
| + | |style="padding: 0px 0px 0px 45px;"|✔ Web Sites | ||
| + | |} | ||
| + | {| | ||
| + | |style="padding: 0px 0px 0px 45px;"|✔ Email Accounts | ||
| + | |} | ||
| + | {| | ||
| + | |style="padding: 0px 0px 0px 45px;"|✔ Email Aliases | ||
| + | |} | ||
| + | {| | ||
| + | |style="padding: 0px 0px 0px 45px;"|✔ Email Domains | ||
| + | |} | ||
| + | {| | ||
| + | |style="padding: 0px 0px 0px 45px;"|✔ Email Groups | ||
| + | |} | ||
| + | {| | ||
| + | |style="padding: 0px 0px 0px 45px;"|✔ Email Lists | ||
| + | |} | ||
| + | {| | ||
| + | |style="padding: 0px 0px 0px 30px;"|✔ One Click Login To WebsitePanel | ||
| + | |} | ||
| + | {| | ||
| + | |style="padding: 0px 0px 10px 30px;"|✔ Change Account Password | ||
| + | |} | ||
| + | *'''General Info:''' | ||
| + | {| | ||
| + | |style="padding: 10px 0px 0px 30px;"|✔ Integrated With <u>DNS Manager For WHMCS</u> - Manage DNS & rDNS Records [http://www.modulesgarden.com/products/whmcs/dns_manager/features (read more)] | ||
| + | |} | ||
| + | {| | ||
| + | |style="padding: 0px 0px 0px 30px;"|✔ Multi-Language Support | ||
| + | |} | ||
| + | {| | ||
| + | |style="padding: 0px 0px 0px 30px;"|✔ Supports WHMCS Templates Five and Six | ||
| + | |} | ||
| + | {| | ||
| + | |style="padding: 0px 0px 30px 30px;"|✔ Supports WHMCS V6 and Later | ||
| + | |} | ||
| + | |||
| + | =Installation and Configuration= | ||
| + | {| | ||
| + | |style="padding: 10px 0px 30px 0px;"|'''This tutorial will show you how to successfully install and configure WebsitePanel Extended For WHMCS.''' <br /> | ||
| + | We will guide you step by step through the whole installation and configuration process. | ||
| + | |} | ||
| + | ==Installation== | ||
| + | {| | ||
| + | |style="padding: 10px 0px 15px 15px;"|'''1. Log in to your client area and download WebsitePanel Extended For WHMCS.'''<br /> | ||
| + | '''Important:''' Before the installation of WebsitePanel Extended For WHMCS, install latest version of WebsitePanel For WHMCS. | ||
| + | |} | ||
| + | {| | ||
| + | |style="padding: 0px 0px 20px 25px;"|[[File:WPE_1.png]] | ||
| + | |} | ||
| + | {| | ||
| + | |style="padding: 0px 0px 20px 15px;"|'''2. Upload and extract the module into the main WHMCS directory.''' | ||
| + | |} | ||
| + | {| | ||
| + | |style="padding: 0px 0px 20px 25px;"|[[File:WPE_2.png]] | ||
| + | |} | ||
| + | {| | ||
| + | |style="padding: 0px 0px 15px 15px;"|'''3. When you install WebsitePanel Extended for the first time you have to rename '' 'license_RENAME.php' '' file.'''<br /> | ||
| + | File is located in '' 'modules/servers/websitepanelextended/license_RENAME.php' ''. Rename it from '' 'license_RENAME.php' '' to '' 'license.php' ''. | ||
| + | |} | ||
| + | {| | ||
| + | |style="padding: 0px 0px 20px 25px;"|[[File:WPE_3.png]] | ||
| + | |} | ||
| + | {| | ||
| + | |style="padding: 0px 0px 15px 15px;"|'''4. In order to configure your license key, you have to edit a previously renamed '' 'license.php' '' file.'''<br /> | ||
| + | Enter your license key between quotation marks as presented on the following screen.<br /> | ||
| + | You can find your license key at your client area → '' 'My Products' ''. | ||
| + | |} | ||
| + | {| | ||
| + | |style="padding: 0px 0px 30px 25px;"|[[File:WPE_4.png]] | ||
| + | |} | ||
| + | |||
| + | ==Configuration of Server== | ||
| + | {| | ||
| + | |style="padding: 10px 0px 15px 15px;"|'''5. Now, we will show you how to configure a new product.'''<br /> | ||
| + | Go to '' 'Setup' '' → '' 'Products/Services' '' → '' 'Servers' '' and press '' 'Add New Server' ''. | ||
| + | |} | ||
| + | {| | ||
| + | |style="padding: 0px 0px 20px 25px;"|[[File:WPE_5.png]] | ||
| + | |} | ||
| + | {| | ||
| + | |style="padding: 0px 0px 15px 15px;"|'''6. Next, enter your server name, IP address/hostname, API username and password.'''<br /> | ||
| + | Choose '' 'Websitepanelextended' '' from a dropdown menu and press '' 'Save Changes' ''.''' | ||
| + | |} | ||
| + | {| | ||
| + | |style="padding: 0px 0px 20px 25px;"|[[File:WPE_6.png]] | ||
| + | |} | ||
| + | {| | ||
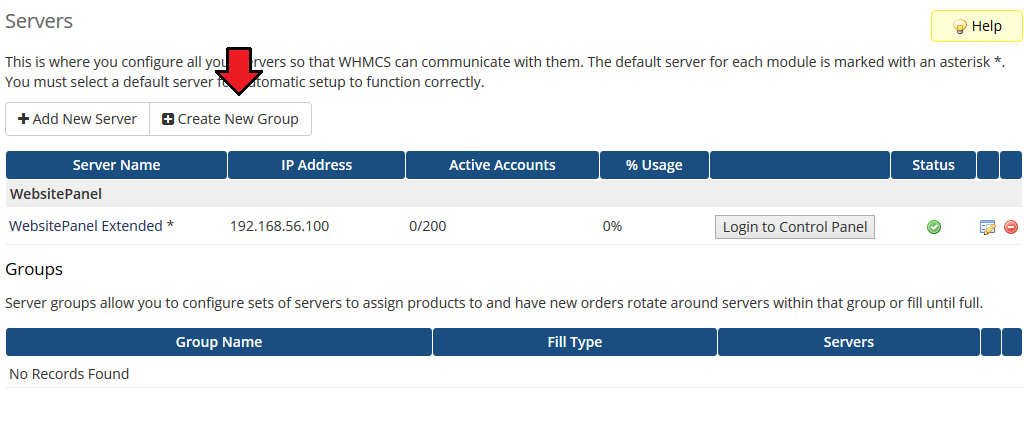
| + | |style="padding: 0px 0px 20px 15px;"|'''7. It is time to create a server group. To do so, click on '' 'Create Server Group' ''.''' | ||
| + | |} | ||
| + | {| | ||
| + | |style="padding: 0px 0px 20px 25px;"|[[File:WPE_8.png]] | ||
| + | |} | ||
| + | {| | ||
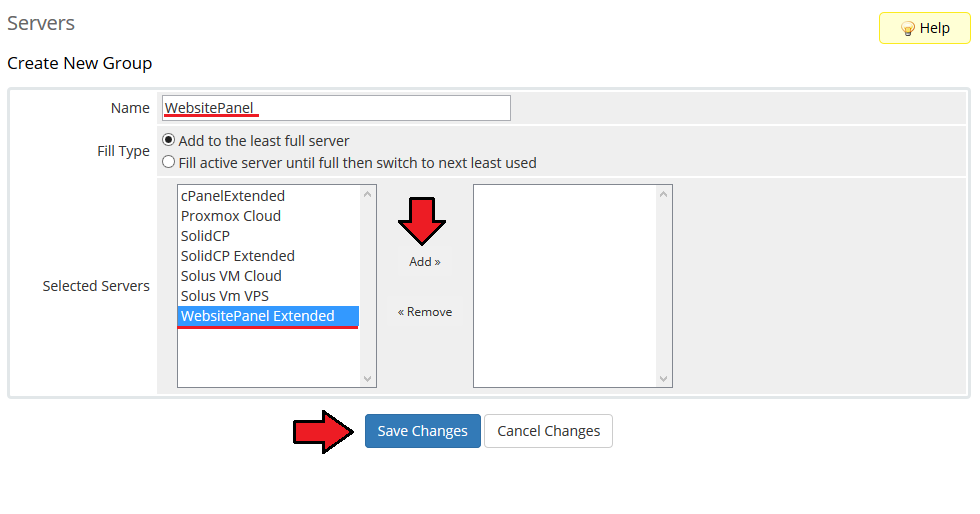
| + | |style="padding: 0px 0px 20px 15px;"|'''8. Enter name, click on your previously created server, press '' 'Add' '' and afterwards '' 'Save Changes' ''.''' | ||
| + | |} | ||
| + | {| | ||
| + | |style="padding: 0px 0px 30px 25px;"|[[File:WPE_9.png]] | ||
| + | |} | ||
| + | ==Configuration of Product== | ||
| + | {| | ||
| + | |style="padding: 10px 0px 15px 15px;"|'''9. In order to create and configure a product, go to '' 'Setup' '' → '' 'Products/Services' '' → '' 'Products/Services' ''.'''<br /> | ||
| + | Click on '' 'Create a New Group' ''. | ||
| + | |} | ||
| + | {| | ||
| + | |style="padding: 0px 0px 20px 25px;"|[[File:WPE_10.png]] | ||
| + | |} | ||
| + | {| | ||
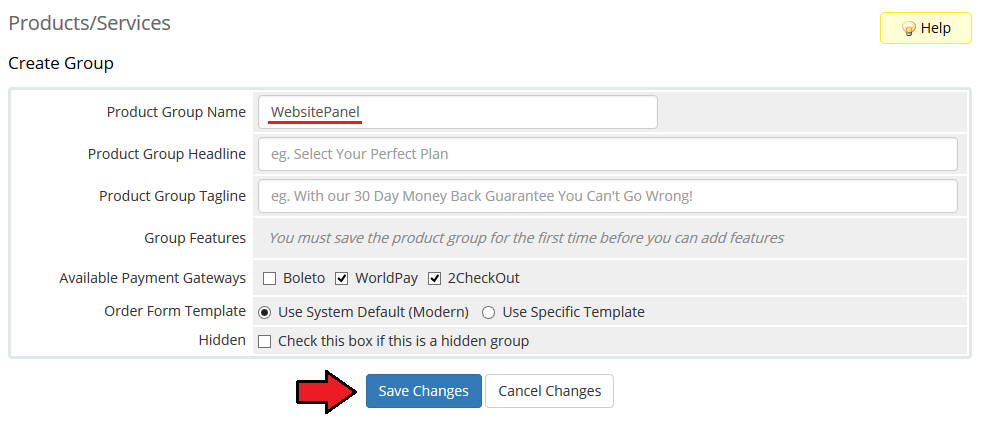
| + | |style="padding: 0px 0px 20px 15px;"|'''10. Enter product group name and press '' 'Save Changes' ''.''' | ||
| + | |} | ||
| + | {| | ||
| + | |style="padding: 0px 0px 20px 25px;"|[[File:WPE_11.png]] | ||
| + | |} | ||
| + | {| | ||
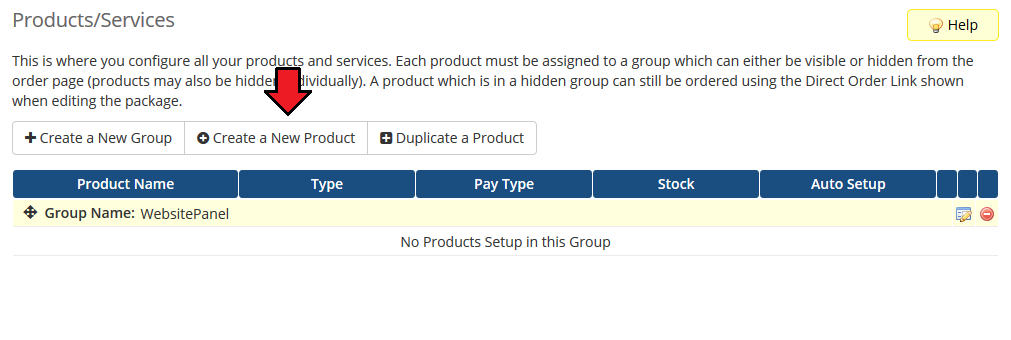
| + | |style="padding: 0px 0px 15px 15px;"|'''11. When you have a product group, you can create your product.'''<br /> | ||
| + | To create a product click on '' 'Create a New Product' ''. | ||
| + | |} | ||
| + | {| | ||
| + | |style="padding: 0px 0px 20px 25px;"|[[File:WPE_12.png]] | ||
| + | |} | ||
| + | {| | ||
| + | |style="padding: 0px 0px 20px 15px;"|'''12. Afterwards, choose your product group and type from dropdown menus, enter your product name and press '' 'Continue' ''.''' | ||
| + | |} | ||
| + | {| | ||
| + | |style="padding: 0px 0px 20px 25px;"|[[File:WPE_13.png]] | ||
| + | |} | ||
| + | {| | ||
| + | |style="padding: 0px 0px 20px 15px;"|'''13. Now, go to the '' 'Module Settings' '' section, choose both '' 'Websitepanelextended' '' and your previously created server group from dropdown menus.''' | ||
| + | |} | ||
| + | {| | ||
| + | |style="padding: 0px 0px 20px 25px;"|[[File:WPE_14.png]] | ||
| + | |} | ||
| + | {| | ||
| + | |style="padding: 0px 0px 15px 15px;"|'''14. Fill in '' 'Parent Space ID' '', '' 'Plan ID' '', '' 'Enterprise Server Port' '' and '' 'Portal URL' '' fields.'''<br /> | ||
| + | Additionally, check '' 'Create Mail Account' '', '' 'Create Temporary Domain' '', '' 'Create Website' '', '' 'Create FTP Account' '', '' 'Count Bandwidth / Diskspace' '' and '' 'Create DNS Zone' ''.<br /> | ||
| + | Confirm through pressing '' 'Save Changes' ''. | ||
| + | |} | ||
| + | {| | ||
| + | |style="padding: 0px 0px 30px 25px;"|[[File:WPE_15.png]] | ||
| + | |} | ||
| + | ==Configuration Of Addon== | ||
| + | {| | ||
| + | |style="padding: 10px 0px 20px 15px;"|'''15. Now, proceed to '' 'Setup' '' → '' 'Module Addon' '' and press '' 'Activate' '' next to '' 'WebsitePanel Extended' ''.''' | ||
| + | |} | ||
| + | {| | ||
| + | |style="padding: 0px 0px 20px 25px;"|[[File:WPE_16.png]] | ||
| + | |} | ||
| + | {| | ||
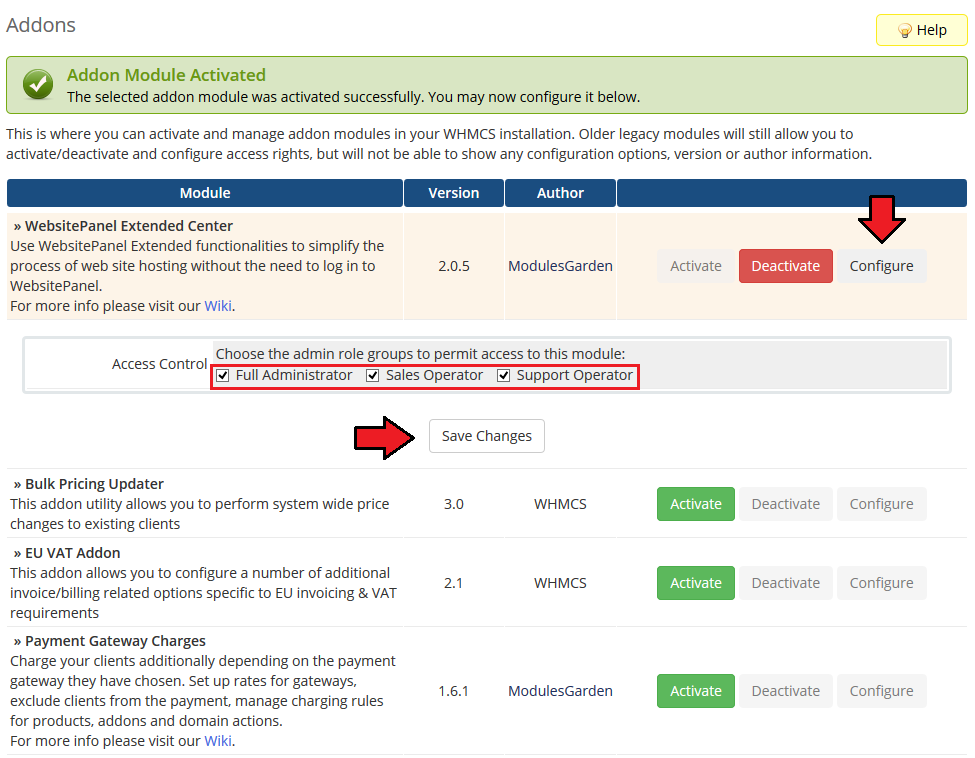
| + | |style="padding: 0px 0px 20px 15px;"|'''16. Press '' 'Configure' '', define access to the module and press '' 'Save Changes' ''.''' | ||
| + | |} | ||
| + | {| | ||
| + | |style="padding: 0px 0px 20px 25px;"|[[File:WPE_16_1.png]] | ||
| + | |} | ||
| + | {| | ||
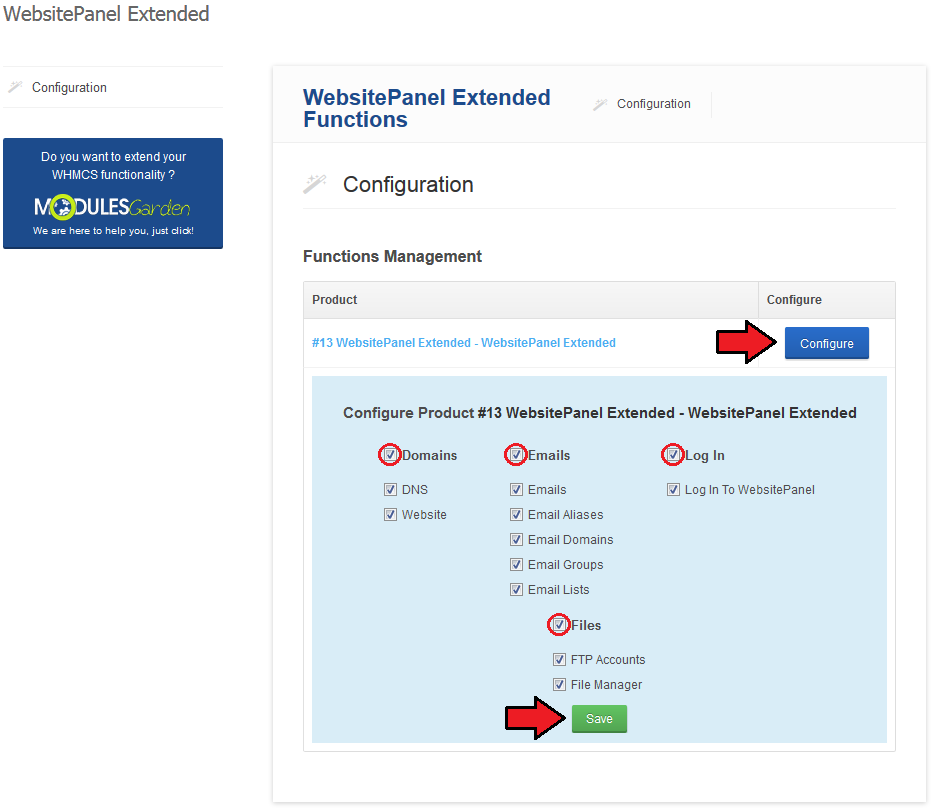
| + | |style="padding: 0px 0px 15px 15px;"|'''17. Now, proceed to the '' 'Addons' '' → '' 'WebsitePanel Extended' ''.'''<br /> | ||
| + | Press '' 'Configure' '' next to the previously created product and define which features will be available from your WHMCS client area.<br /> | ||
| + | Mark checkbox next to the feature in order to enable them. Press '' 'Save Changes' '' to confirm those settings. | ||
| + | |} | ||
| + | {| | ||
| + | |style="padding: 0px 0px 30px 25px;"|[[File:WPE_16_2.png]] | ||
| + | |} | ||
| + | |||
| + | =Management= | ||
| + | {| | ||
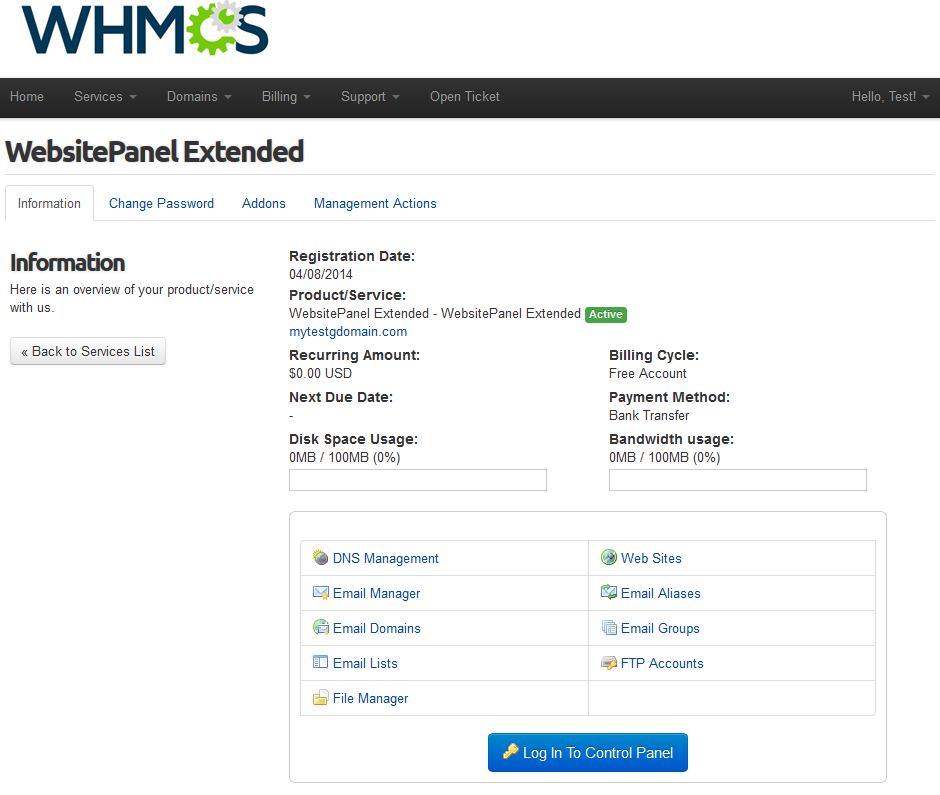
| + | |style="padding: 10px 0px 15px 15px;"|''' WebsitePanel Extended For WHMCS allows you to offer WebsitePanel for your clients.'''<br /> | ||
| + | In addition, your client can manage their WebsitePanel from their WHMCS client area. | ||
| + | |} | ||
| + | {| | ||
| + | |style="padding: 0px 0px 30px 25px;"|[[File:WPE_17.png]] | ||
| + | |} | ||
| + | ==Admin Area== | ||
| + | {| | ||
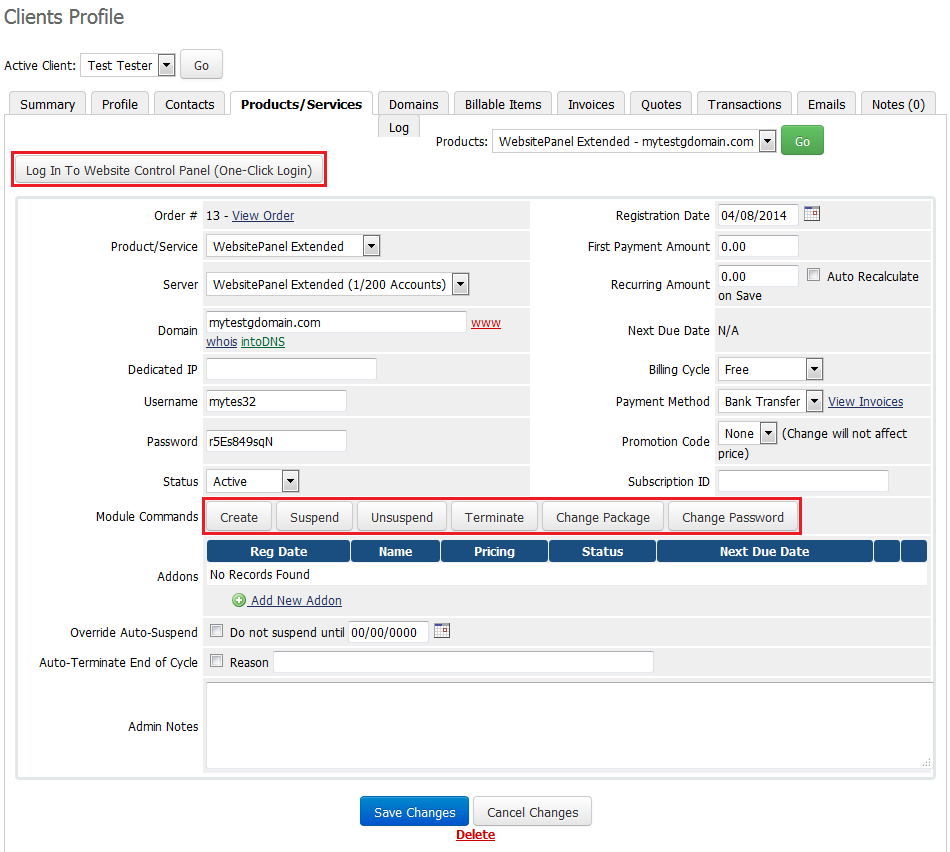
| + | |style="padding: 10px 0px 15px 15px;"|In the admin area you can easily suspend/unsuspend service, create/terminate it and change its password.<br /> | ||
| + | Additionally, you can change its package and log into WebsitePanel with one click. | ||
| + | |} | ||
| + | {| | ||
| + | |style="padding: 0px 0px 30px 25px;"|[[File:WPE_18.png]] | ||
| + | |} | ||
| + | ==Client Area== | ||
| + | {| | ||
| + | |style="padding: 10px 0px 15px 15px;"|Let's proceed to the client area. We will show you the possibilities of our module.<br /> | ||
| + | As you can see on the following screen, besides management from the client area, module allows your client to log into WebsitePanel through one click. | ||
| + | |} | ||
| + | {| | ||
| + | |style="padding: 0px 0px 20px 25px;"|[[File:WPE_19.png]] | ||
| + | |} | ||
| + | {| | ||
| + | |style="padding: 0px 0px 20px 15px;"|They can also easily change password at the '' 'Change Password' '' page. | ||
| + | |} | ||
| + | {| | ||
| + | |style="padding: 0px 0px 30px 25px;"|[[File:WPE_19_1.png]] | ||
| + | |} | ||
| + | ===DNS Management=== | ||
| + | {| | ||
| + | |style="padding: 10px 0px 15px 15px;"|'' 'DNS Management' '' page allows your clients to view the list of DNS zones as well as quickly enable/disable them.<br /> | ||
| + | Additionally, they can edit DNS zones, press '' 'Edit' '' to proceed. | ||
| + | |} | ||
| + | {| | ||
| + | |style="padding: 0px 0px 20px 25px;"|[[File:WPE_20.png]] | ||
| + | |} | ||
| + | {| | ||
| + | |style="padding: 0px 0px 15px 15px;"|As you can see, the list of current DNS records is shown.<br /> | ||
| + | To alter any of them, modify desired value and press '' 'Update' '' button. | ||
| + | |} | ||
| + | {| | ||
| + | |style="padding: 0px 0px 20px 25px;"|[[File:WPE_21.png]] | ||
| + | |} | ||
| + | {| | ||
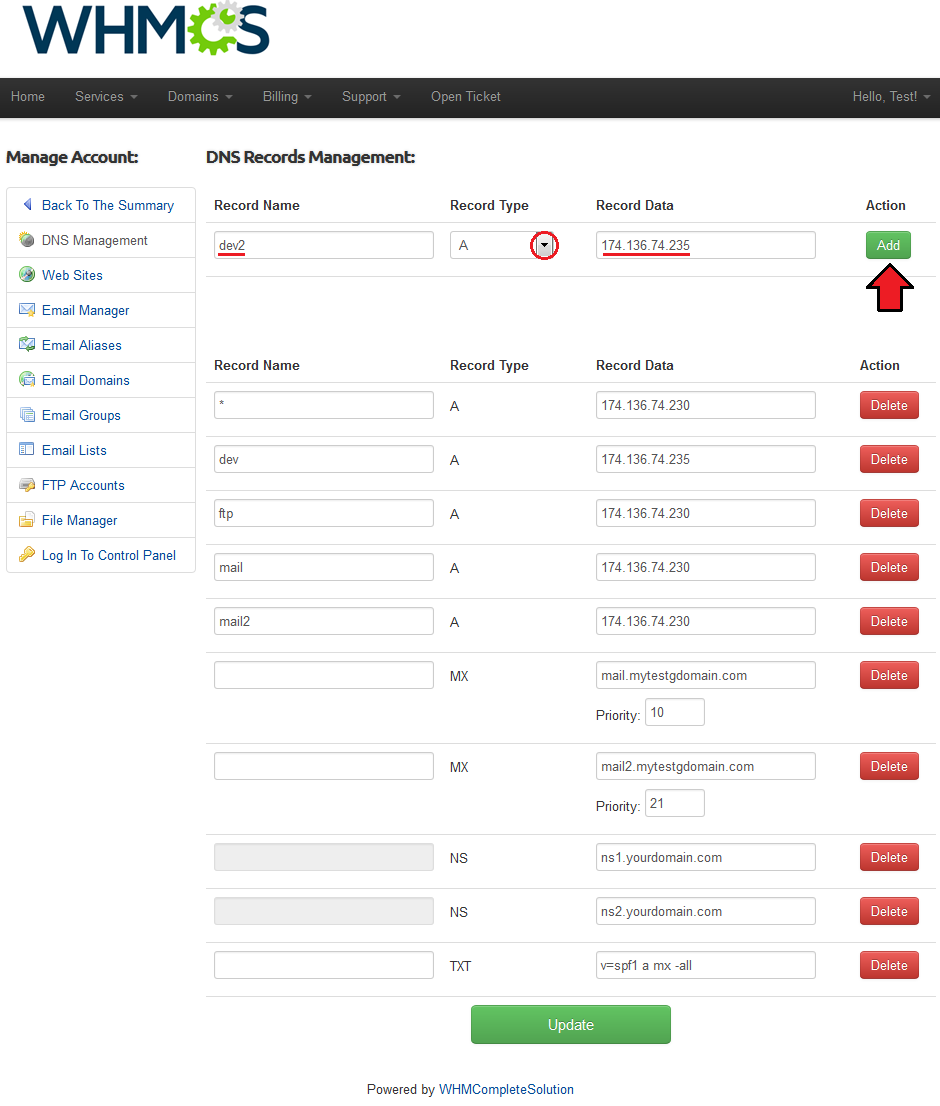
| + | |style="padding: 0px 0px 20px 15px;"|To add a new record, fill in its details and press '' 'Add' '' as shown on the following screen. | ||
| + | |} | ||
| + | {| | ||
| + | |style="padding: 0px 0px 30px 25px;"|[[File:WPE_22.png]] | ||
| + | |} | ||
| + | |||
| + | ===Web Sites=== | ||
| + | {| | ||
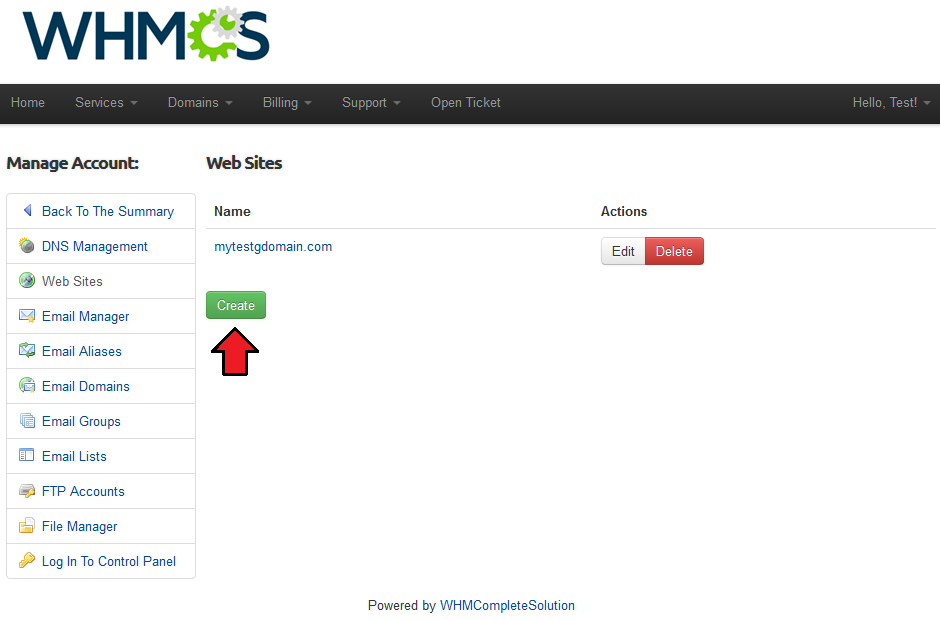
| + | |style="padding: 10px 0px 15px 15px;"|Your clients can also manage theirs sites and add subdomains to them at the '' 'Web Sites' '' page.<br /> | ||
| + | To add subdomain, press '' 'Create' ''. | ||
| + | |} | ||
| + | {| | ||
| + | |style="padding: 0px 0px 20px 25px;"|[[File:WPE_22_1.png]] | ||
| + | |} | ||
| + | {| | ||
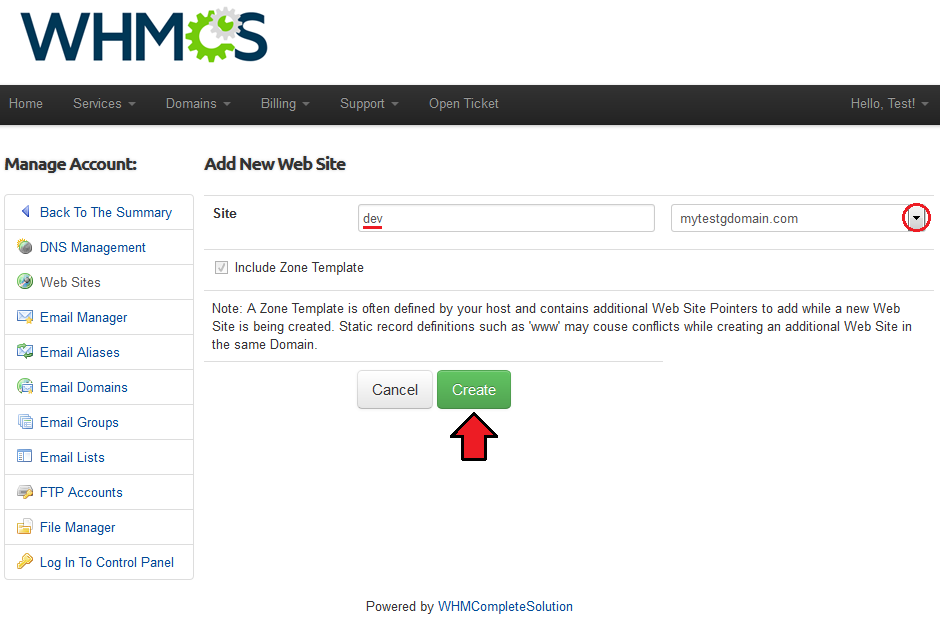
| + | |style="padding: 0px 0px 20px 15px;"|Afterwards, fill in subdomain name and select domain to create it on. | ||
| + | |} | ||
| + | {| | ||
| + | |style="padding: 0px 0px 30px 25px;"|[[File:WPE_22_2.png]] | ||
| + | |} | ||
| + | |||
| + | ===Email Manager=== | ||
| + | {| | ||
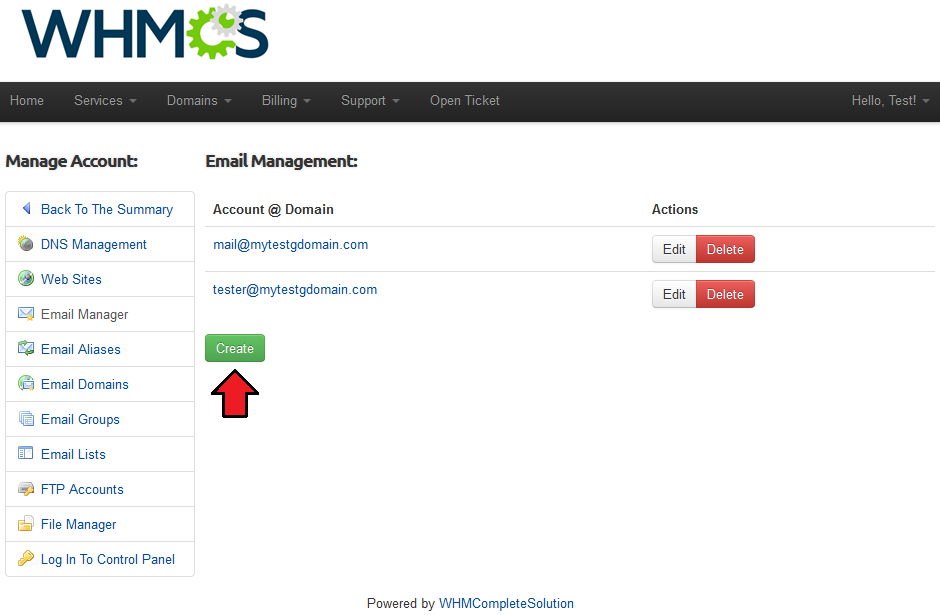
| + | |style="padding: 10px 0px 15px 15px;"|In the '' 'Email Manager' '' page your clients are able to easily add, modify and remove mailboxes.<br /> | ||
| + | To add a new mailbox, press '' 'Create' ''. | ||
| + | |} | ||
| + | {| | ||
| + | |style="padding: 0px 0px 20px 25px;"|[[File:WPE_23.png]] | ||
| + | |} | ||
| + | {| | ||
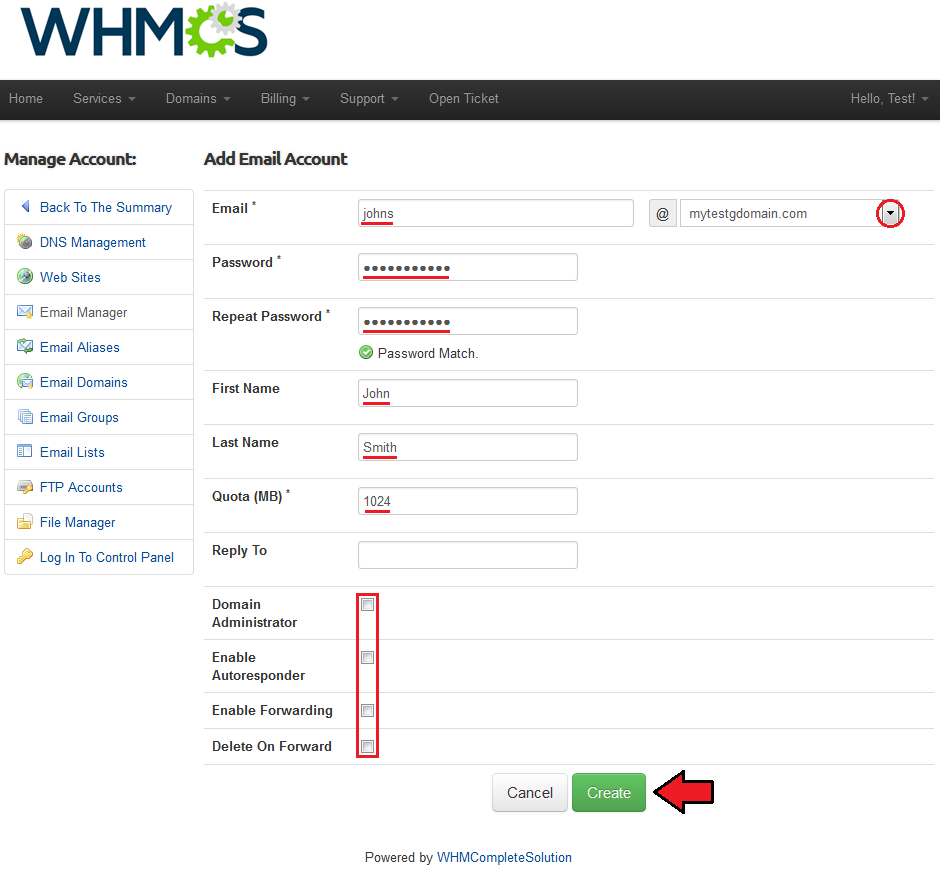
| + | |style="padding: 0px 0px 15px 15px;"|Now, select domain for the new mailbox, fill in email address, password, owner name and email quota.<br /> | ||
| + | Additionally, you can set up the mailbox settings through using checkboxes marked on the following screen.<br /> | ||
| + | Press '' 'Create' '' to save this mailbox. | ||
| + | |} | ||
| + | {| | ||
| + | |style="padding: 0px 0px 30px 25px;"|[[File:WPE_24.png]] | ||
| + | |} | ||
| + | |||
| + | ===Email Aliases=== | ||
| + | {| | ||
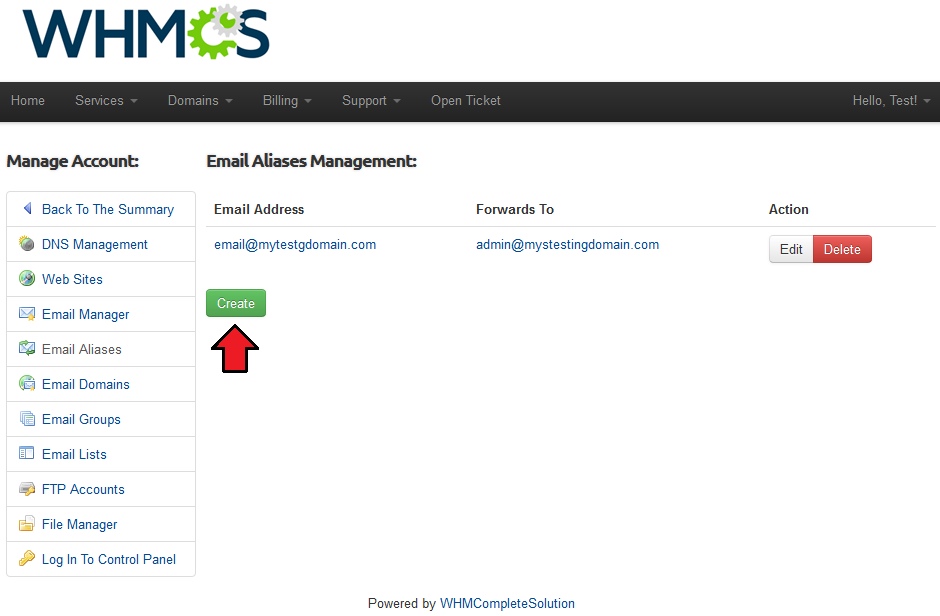
| + | |style="padding: 10px 0px 15px 15px;"|'' 'Email Manager' '' page allows your clients to set up email aliases.<br /> | ||
| + | Create one, start by press '' 'Create' '' button. | ||
| + | |} | ||
| + | {| | ||
| + | |style="padding: 0px 0px 20px 25px;"|[[File:WPE_25.png]] | ||
| + | |} | ||
| + | {| | ||
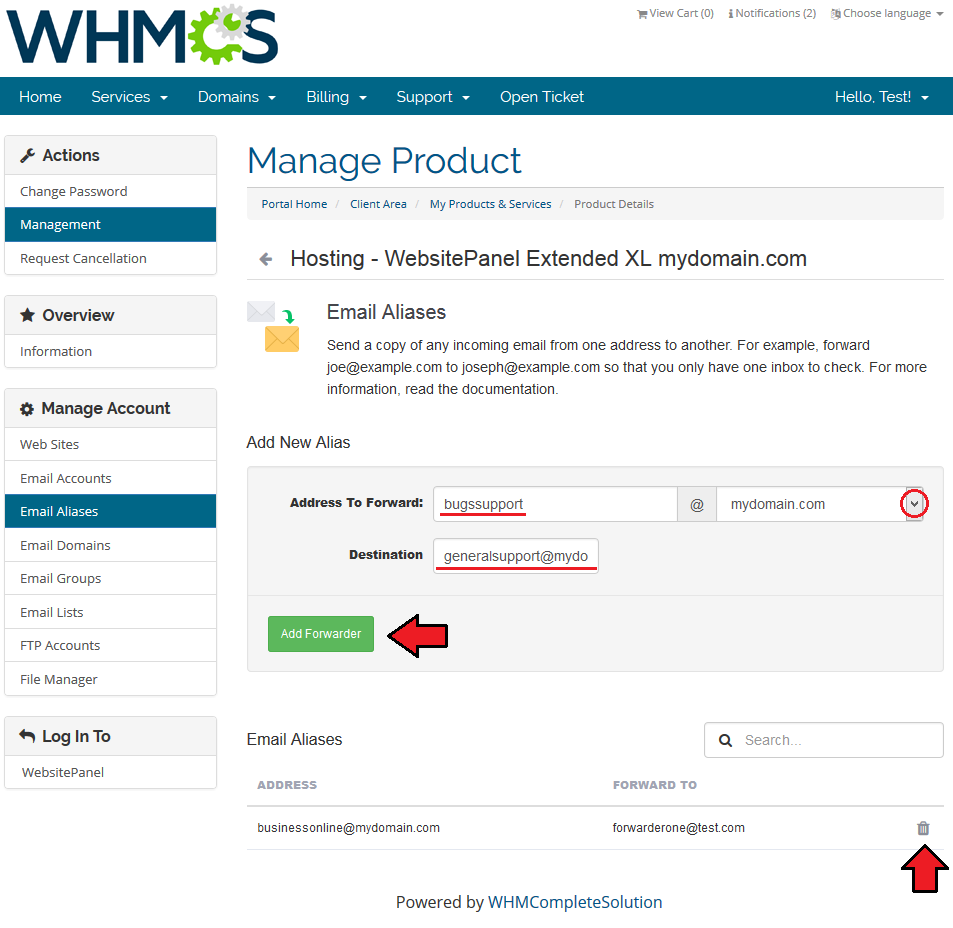
| + | |style="padding: 0px 0px 15px 15px;"|Now, fill in the address of one of your mailboxes and choose its domain.<br /> | ||
| + | Fill in the full list of email addresses to forward to and press '' 'Create' ''. | ||
| + | |} | ||
| + | {| | ||
| + | |style="padding: 0px 0px 30px 25px;"|[[File:WPE_26.png]] | ||
| + | |} | ||
| + | ===Email Domains=== | ||
| + | {| | ||
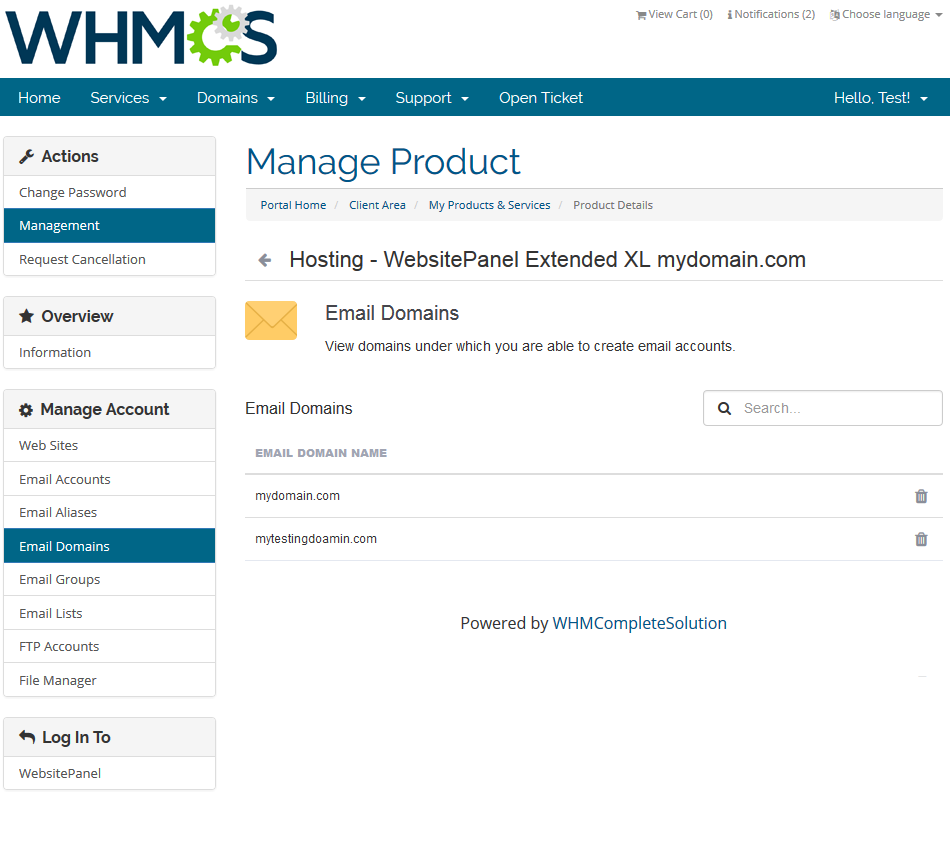
| + | |style="padding: 10px 0px 15px 15px;"|Our module allows even to view and remove email domains by your clients.<br /> | ||
| + | |} | ||
| + | {| | ||
| + | |style="padding: 0px 0px 30px 25px;"|[[File:WPE_27.png]] | ||
| + | |} | ||
| + | |||
| + | ===Email Groups=== | ||
| + | {| | ||
| + | |style="padding: 10px 0px 20px 15px;"|Proceed to '' 'Email Groups' '' page and press '' 'Create' '' to add a new email group. | ||
| + | |} | ||
| + | {| | ||
| + | |style="padding: 0px 0px 20px 25px;"|[[File:WPE_29.png]] | ||
| + | |} | ||
| + | {| | ||
| + | |style="padding: 0px 0px 15px 15px;"|Now, provide an email address which will be used as an email resender.<br /> | ||
| + | Additionally, fill in the list of email addresses which should receive email and press '' 'Create' ''. | ||
| + | |} | ||
| + | {| | ||
| + | |style="padding: 0px 0px 30px 25px;"|[[File:WPE_30.png]] | ||
| + | |} | ||
| + | |||
| + | ===Email List=== | ||
| + | {| | ||
| + | |style="padding: 10px 0px 15px 15px;"|In the '' 'Email Groups' '' page your client can add mailing lists.<br /> | ||
| + | Press '' 'Create' '' to add a new mailing list. | ||
| + | |} | ||
| + | {| | ||
| + | |style="padding: 0px 0px 20px 25px;"|[[File:WPE_31.png]] | ||
| + | |} | ||
| + | {| | ||
| + | |style="padding: 0px 0px 15px 15px;"|Now, fill in the mailing list of email address, its description and choose list moderator.<br /> | ||
| + | Additionally, you can set up password for mailing list by filling in password and checking '' 'Require Password' ''.<br /> | ||
| + | You can also define who can send emails through this list by selecting desired option from the '' 'Who Can Post' '' dropdown menu. | ||
| + | |} | ||
| + | {| | ||
| + | |style="padding: 0px 0px 20px 25px;"|[[File:WPE_32.png]] | ||
| + | |} | ||
| + | |||
| + | {| | ||
| + | |style="padding: 0px 0px 15px 15px;"|If you wish to add prefix to messages from this list, fill in a desired prefix into '' 'Subject Prefix' '' and mark '' 'Require Subject Prefix' ''.<br /> | ||
| + | Next, provide message size limit and fill in the list of email addresses into '' 'Mailing List Members' ''.<br /> | ||
| + | Finish through selecting additional options and pressing '' 'Create' ''. | ||
| + | |} | ||
| + | {| | ||
| + | |style="padding: 0px 0px 30px 25px;"|[[File:WPE_33.png]] | ||
| + | |} | ||
| + | |||
| + | ===FTP Accounts=== | ||
| + | {| | ||
| + | |style="padding: 10px 0px 15px 15px;"|All of the FTP accounts bounded to your client WebsitePanel Extended For WHMCS product are listed in the '' 'FTP Accounts' '' page.<br /> | ||
| + | You can easily add a new FTP account, press '' 'Create' '' to proceed. | ||
| + | |} | ||
| + | {| | ||
| + | |style="padding: 0px 0px 20px 25px;"|[[File:WPE_34.png]] | ||
| + | |} | ||
| + | {| | ||
| + | |style="padding: 0px 0px 15px 15px;"|Now, fill in FTP account username, password and its home folder.<br /> | ||
| + | Define account rights and press '' 'Create' ''.<br /> | ||
| + | Account will be immediately created. | ||
| + | |} | ||
| + | {| | ||
| + | |style="padding: 0px 0px 30px 25px;"|[[File:WPE_35.png]] | ||
| + | |} | ||
| + | |||
| + | ===File Manager=== | ||
| + | {| | ||
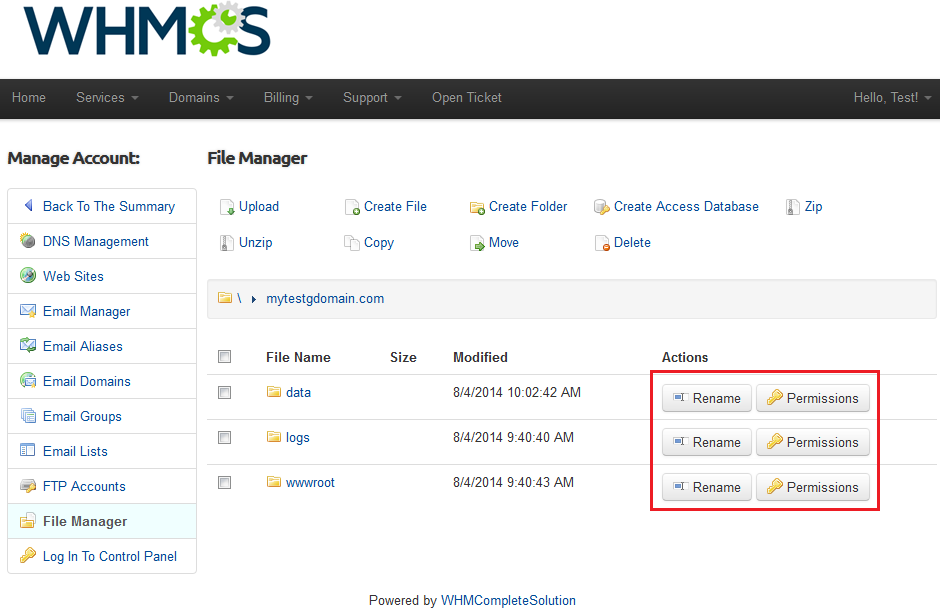
| + | |style="padding: 10px 0px 15px 15px;"|Your clients can access and modify directories related to their WebsitePanel Extended For WHMCS products in the '' 'File Manager' '' page.<br /> | ||
| + | As you can see, they can use a wide variety of commands marked on the following screen. | ||
| + | |} | ||
| + | {| | ||
| + | |style="padding: 0px 0px 20px 25px;"|[[File:WPE_36.png]] | ||
| + | |} | ||
| + | {| | ||
| + | |style="padding: 0px 0px 20px 15px;"|Clients can also view the content of all folders inside of their home directories, set up permissions to folders and files and calculate disk space. | ||
| + | |} | ||
| + | {| | ||
| + | |style="padding: 0px 0px 30px 25px;"|[[File:WPE_37.png]] | ||
| + | |} | ||
| + | ==Configuration Possibilities== | ||
| + | {| | ||
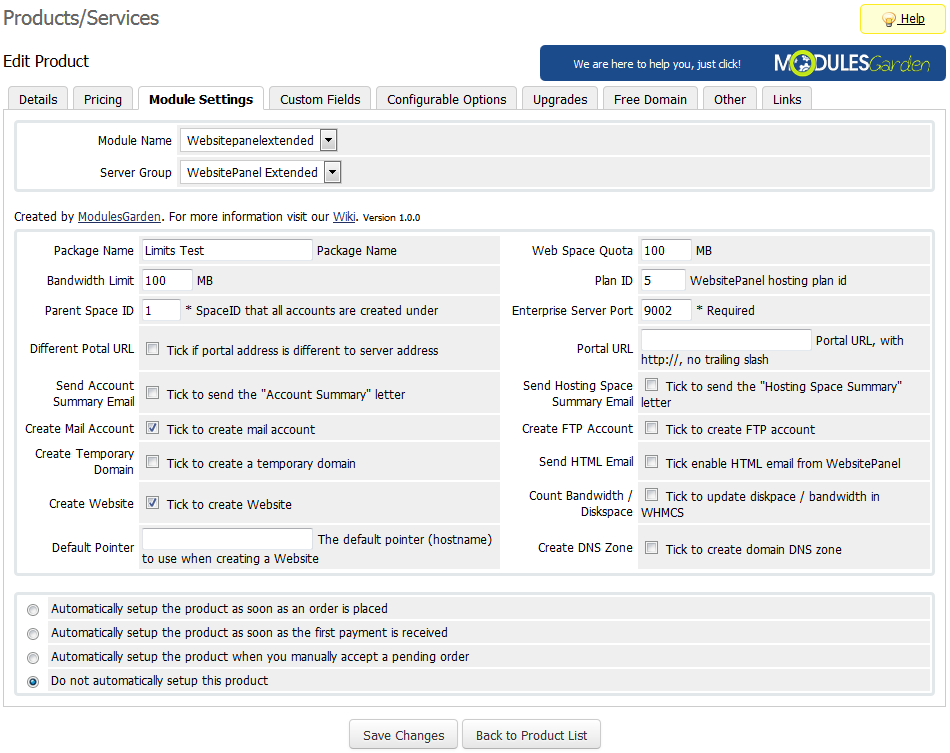
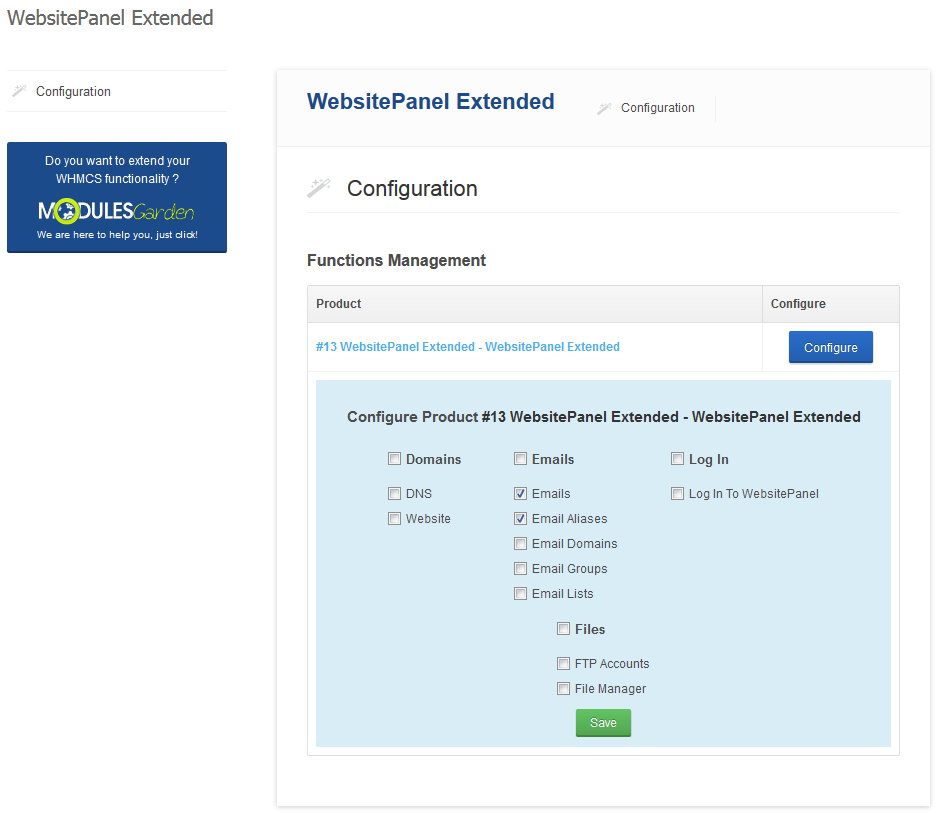
| + | |style="padding: 10px 0px 15px 15px;"|Our module allows you to offer a wide variety of products using WebsitePanel, like product with only email accounts or only access to '' 'File Manager' '' & FTP accounts.<br /> | ||
| + | All of that can be done owing to configuration of product → '' 'Module Settings' '' and defining client area features in the WebsitePanel Extended addon.<br /> | ||
| + | Sample configuration of product offering only email accounts is shown on the screens below. | ||
| + | |} | ||
| + | {| | ||
| + | |style="padding: 0px 0px 20px 25px;"|[[File:WPE_38.png]] | ||
| + | |} | ||
| + | |||
| + | {| | ||
| + | |style="padding: 0px 0px 30px 25px;"|[[File:WPE_39.png]] | ||
| + | |} | ||
| + | |||
| + | =Tips= | ||
| + | {| | ||
| + | |style="padding: 10px 0px 30px 15px;"| | ||
| + | |} | ||
| + | =Common Problems= | ||
| + | {| | ||
| + | |style="padding: 10px 0px 10px 15px;"|'''1. When you have problems with connection, check whether your SELinux or firewall does not block ports.''' | ||
| + | |} | ||
| + | {| | ||
| + | |style="padding: 0px 0px 30px 15px;"|2. If you encounter any problem related to our module, make sure to install latest version of WebsitePanel For WHMCS. | ||
| + | |} | ||
Revision as of 07:58, 25 August 2016
Contents |
About WebsitePanel Extended For WHMCS
| WebsitePanel Extended For WHMCS automates provisioning and management of WebsitePanel accounts through your system. The module enables your customers to order and manage their web hosting accounts straight in your WHMCS client area. |
- Admin Area Features:
| ✔ Create/Suspend/Unsuspend/Terminate Account |
| ✔ Change Package And Password Of Account |
| ✔ Log In To Each WebsitePanel Account On Click |
| ✔ Configure Client Area Features Per Product |
| ✔ Define Hosting Plan To Limit Resource Per Product |
| ✔ View All WebsitePanel And WebsitePanel Extended Products And Servers In One Place |
| ✔ Run API Connection Test |
- Client Area Features:
| ✔ Remote Access And Management Of: |
| ✔ DNS Management - Requires DNS Manager For WHMCS |
| ✔ DNS Records |
| ✔ File Manager |
| ✔ FTP Accounts |
| ✔ Web Sites |
| ✔ Email Accounts |
| ✔ Email Aliases |
| ✔ Email Domains |
| ✔ Email Groups |
| ✔ Email Lists |
| ✔ One Click Login To WebsitePanel |
| ✔ Change Account Password |
- General Info:
| ✔ Integrated With DNS Manager For WHMCS - Manage DNS & rDNS Records (read more) |
| ✔ Multi-Language Support |
| ✔ Supports WHMCS Templates Five and Six |
| ✔ Supports WHMCS V6 and Later |
Installation and Configuration
| This tutorial will show you how to successfully install and configure WebsitePanel Extended For WHMCS. We will guide you step by step through the whole installation and configuration process. |
Installation
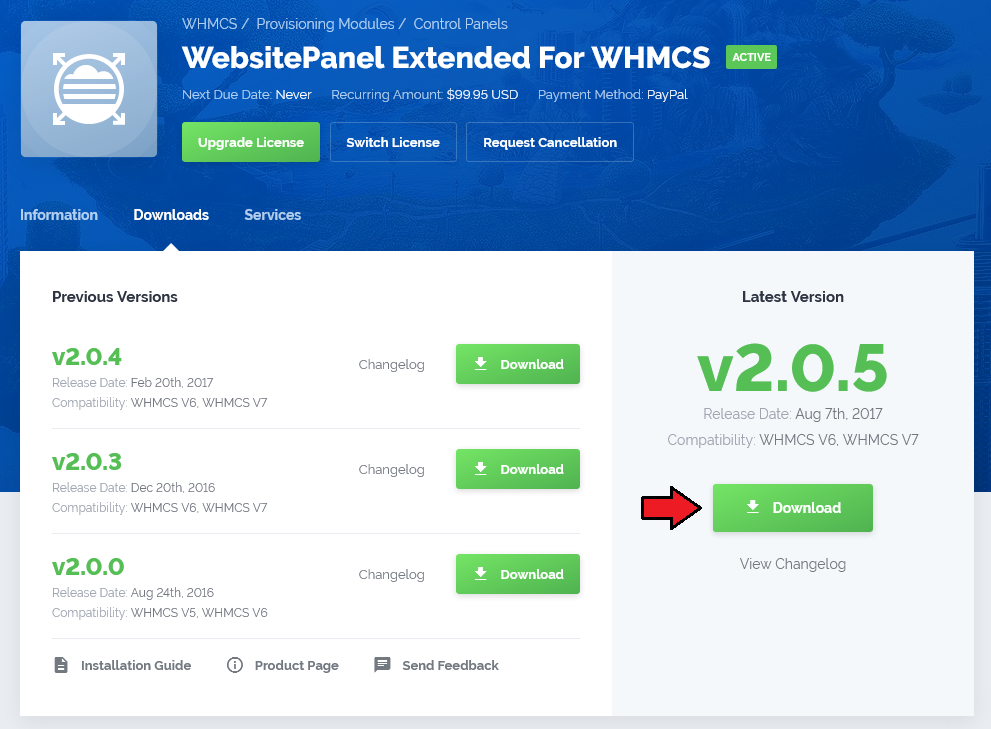
| 1. Log in to your client area and download WebsitePanel Extended For WHMCS. Important: Before the installation of WebsitePanel Extended For WHMCS, install latest version of WebsitePanel For WHMCS. |
|
| 2. Upload and extract the module into the main WHMCS directory. |

|
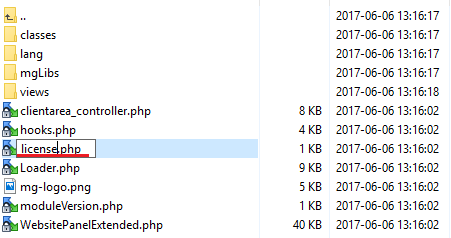
| 3. When you install WebsitePanel Extended for the first time you have to rename 'license_RENAME.php' file. File is located in 'modules/servers/websitepanelextended/license_RENAME.php' . Rename it from 'license_RENAME.php' to 'license.php' . |
|
| 4. In order to configure your license key, you have to edit a previously renamed 'license.php' file. Enter your license key between quotation marks as presented on the following screen. |

|
Configuration of Server
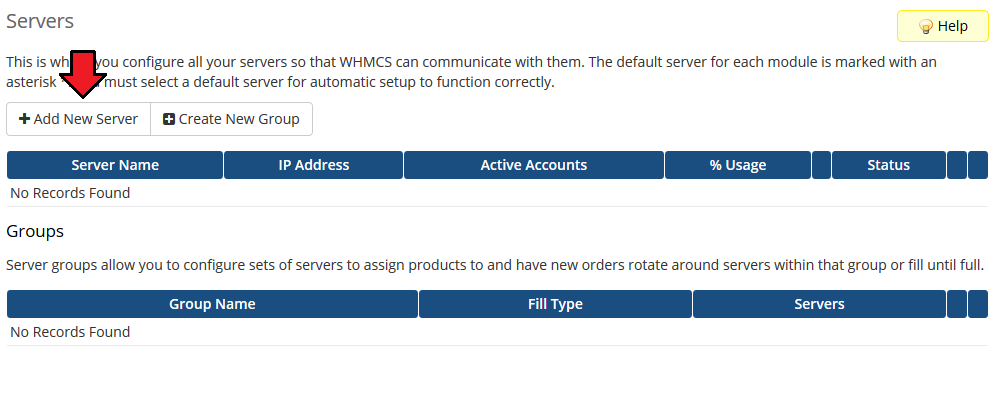
| 5. Now, we will show you how to configure a new product. Go to 'Setup' → 'Products/Services' → 'Servers' and press 'Add New Server' . |
|
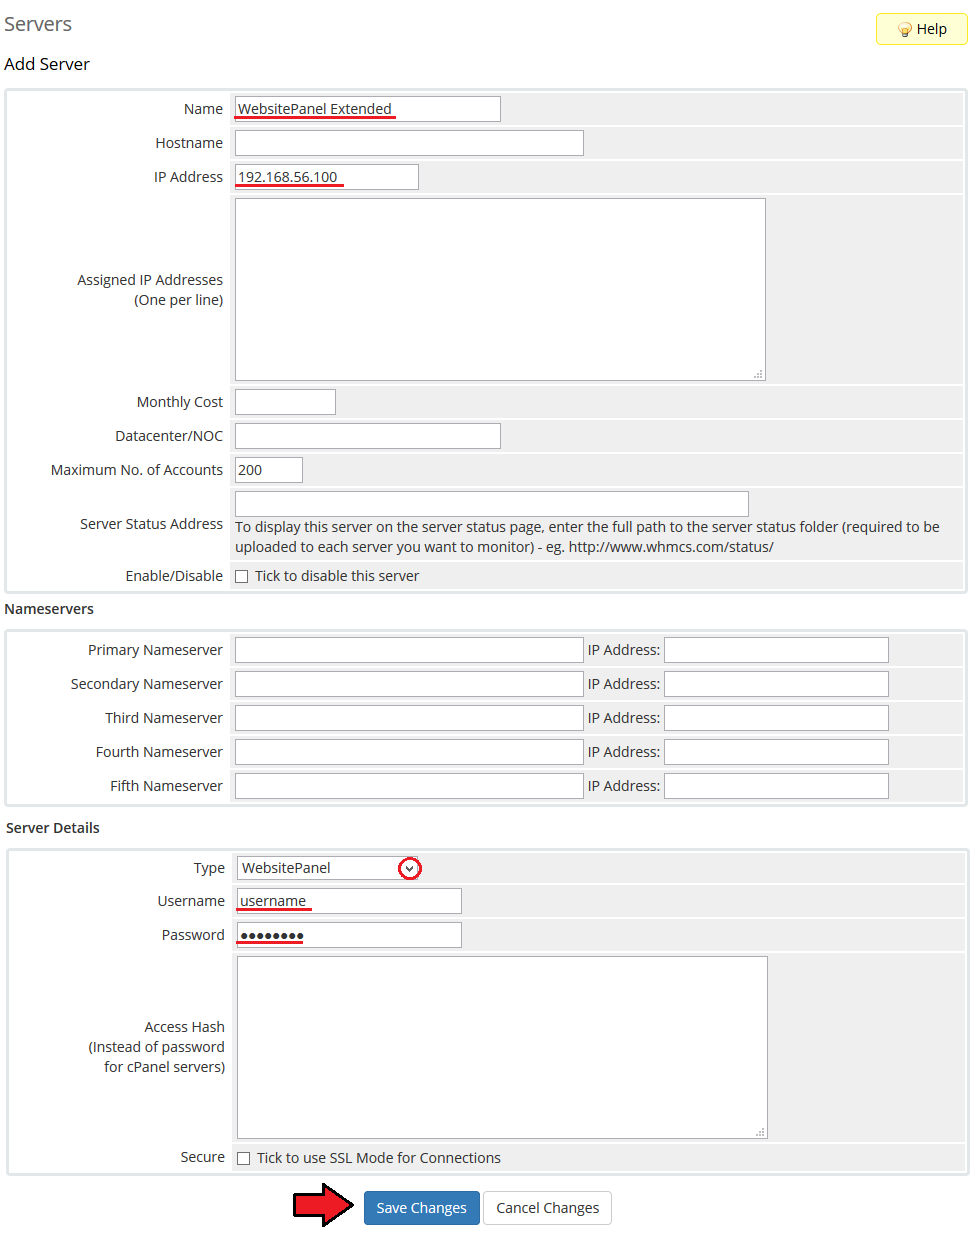
| 6. Next, enter your server name, IP address/hostname, API username and password. Choose 'Websitepanelextended' from a dropdown menu and press 'Save Changes' . |
|
| 7. It is time to create a server group. To do so, click on 'Create Server Group' . |
|
| 8. Enter name, click on your previously created server, press 'Add' and afterwards 'Save Changes' . |
|
Configuration of Product
| 9. In order to create and configure a product, go to 'Setup' → 'Products/Services' → 'Products/Services' . Click on 'Create a New Group' . |

|
| 10. Enter product group name and press 'Save Changes' . |
|
| 11. When you have a product group, you can create your product. To create a product click on 'Create a New Product' . |
|
| 12. Afterwards, choose your product group and type from dropdown menus, enter your product name and press 'Continue' . |
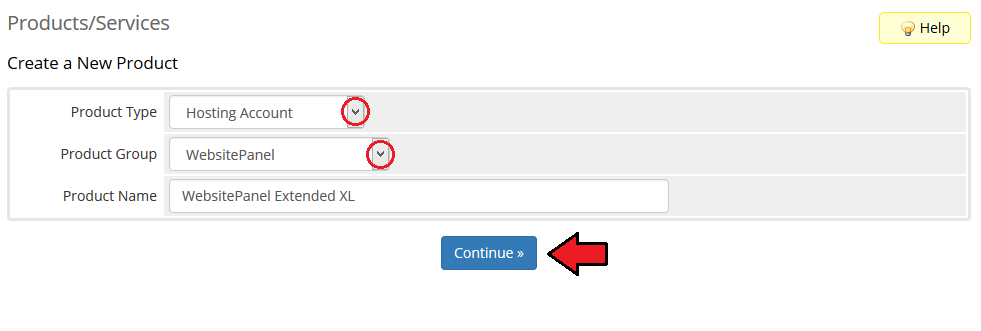
|
| 13. Now, go to the 'Module Settings' section, choose both 'Websitepanelextended' and your previously created server group from dropdown menus. |
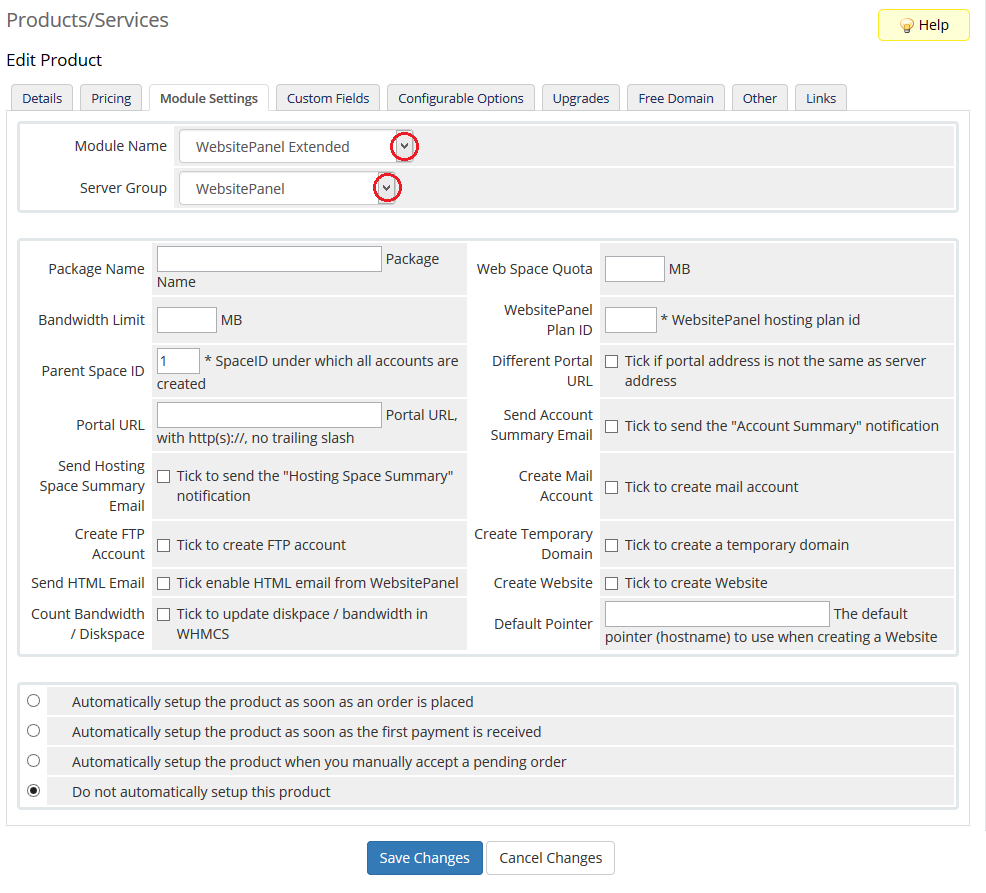
|
| 14. Fill in 'Parent Space ID' , 'Plan ID' , 'Enterprise Server Port' and 'Portal URL' fields. Additionally, check 'Create Mail Account' , 'Create Temporary Domain' , 'Create Website' , 'Create FTP Account' , 'Count Bandwidth / Diskspace' and 'Create DNS Zone' . |
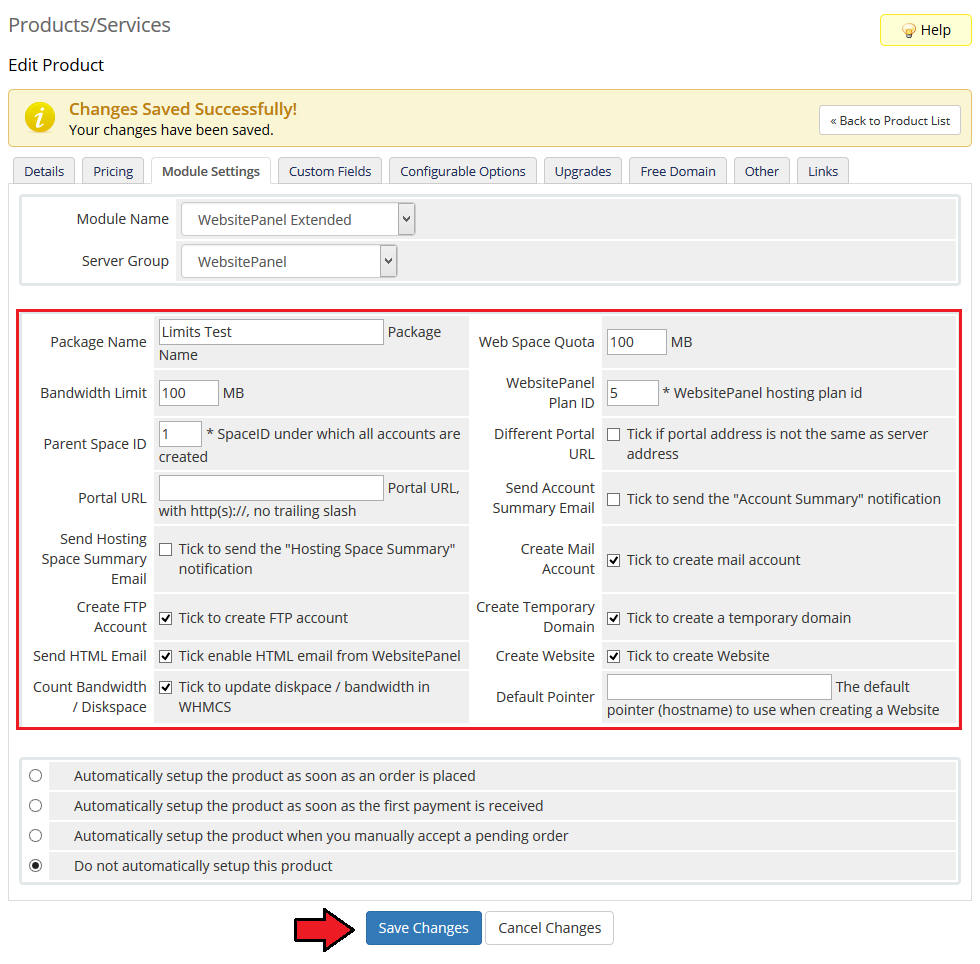
|
Configuration Of Addon
| 15. Now, proceed to 'Setup' → 'Module Addon' and press 'Activate' next to 'WebsitePanel Extended' . |
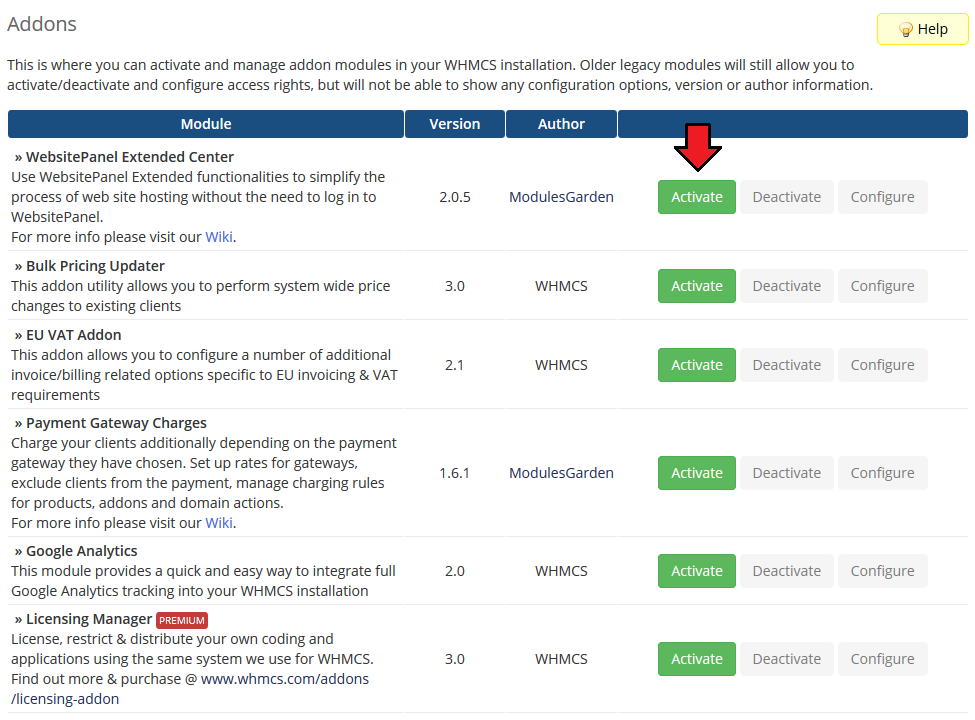
|
| 16. Press 'Configure' , define access to the module and press 'Save Changes' . |
|
| 17. Now, proceed to the 'Addons' → 'WebsitePanel Extended' . Press 'Configure' next to the previously created product and define which features will be available from your WHMCS client area. |
|
Management
| WebsitePanel Extended For WHMCS allows you to offer WebsitePanel for your clients. In addition, your client can manage their WebsitePanel from their WHMCS client area. |
|
Admin Area
| In the admin area you can easily suspend/unsuspend service, create/terminate it and change its password. Additionally, you can change its package and log into WebsitePanel with one click. |
|
Client Area
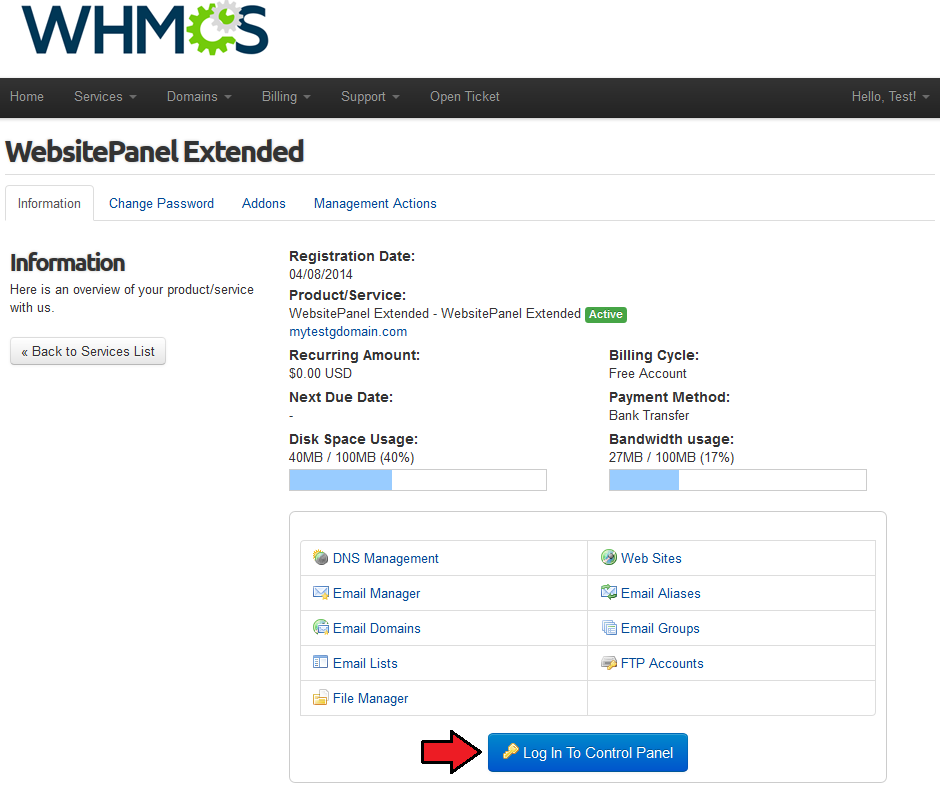
| Let's proceed to the client area. We will show you the possibilities of our module. As you can see on the following screen, besides management from the client area, module allows your client to log into WebsitePanel through one click. |
|
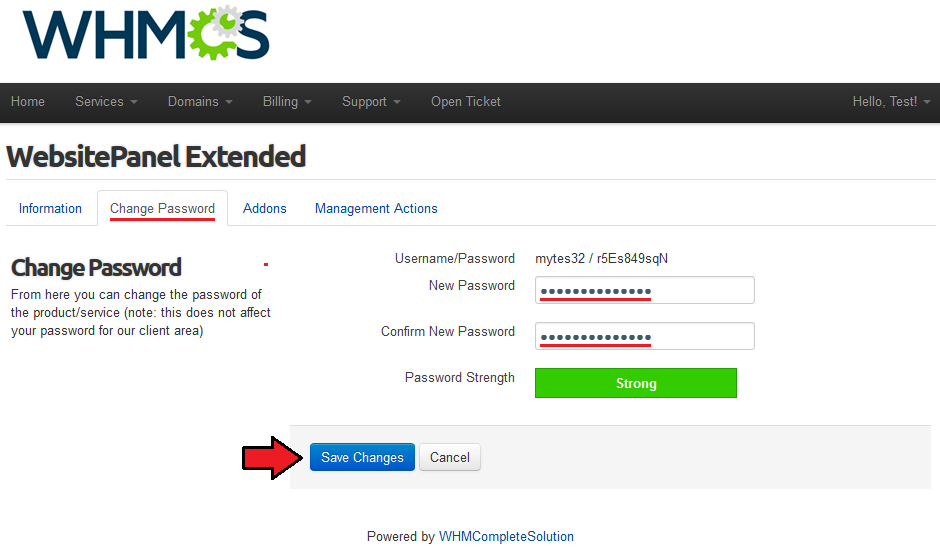
| They can also easily change password at the 'Change Password' page. |
|
DNS Management
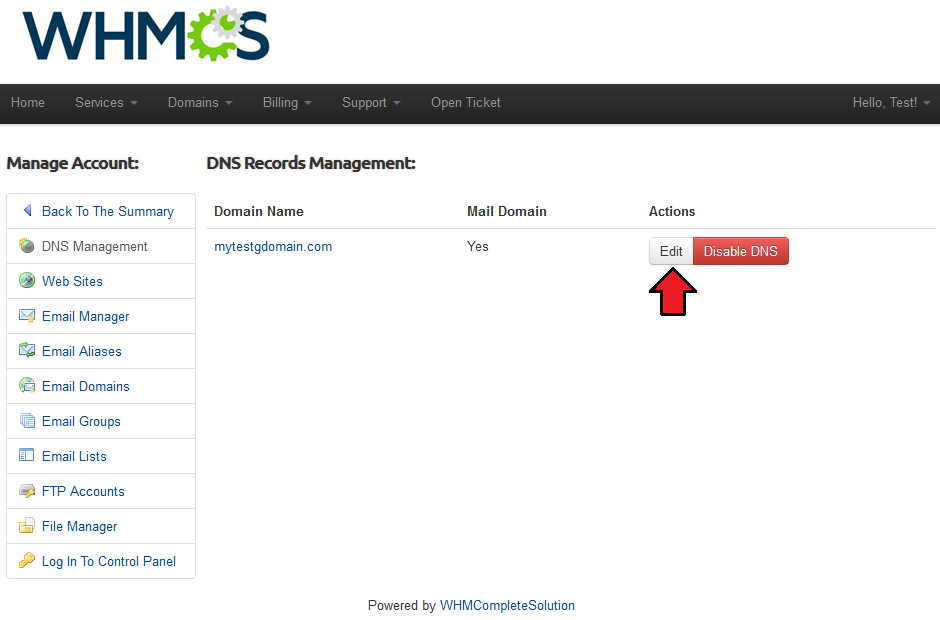
| 'DNS Management' page allows your clients to view the list of DNS zones as well as quickly enable/disable them. Additionally, they can edit DNS zones, press 'Edit' to proceed. |
|
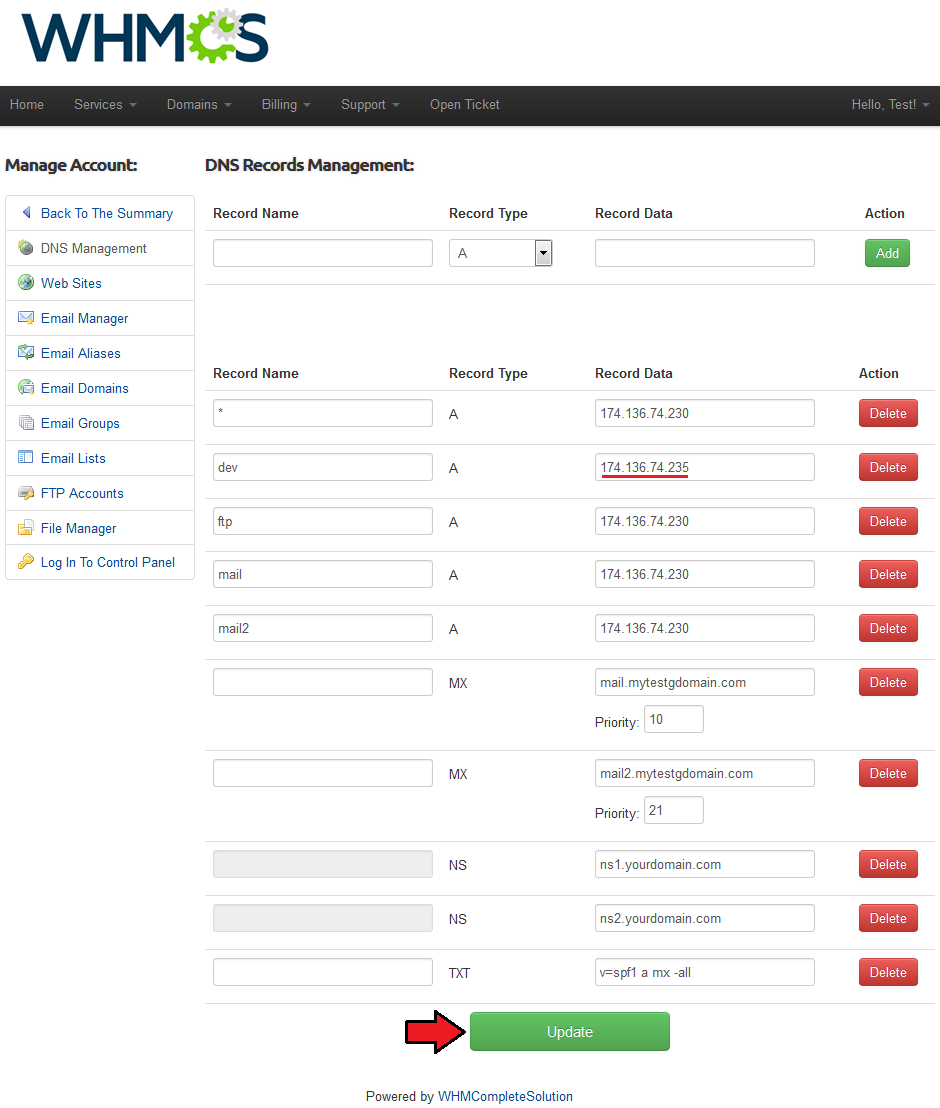
| As you can see, the list of current DNS records is shown. To alter any of them, modify desired value and press 'Update' button. |
|
| To add a new record, fill in its details and press 'Add' as shown on the following screen. |
|
Web Sites
| Your clients can also manage theirs sites and add subdomains to them at the 'Web Sites' page. To add subdomain, press 'Create' . |
|
| Afterwards, fill in subdomain name and select domain to create it on. |
|
Email Manager
| In the 'Email Manager' page your clients are able to easily add, modify and remove mailboxes. To add a new mailbox, press 'Create' . |
|
| Now, select domain for the new mailbox, fill in email address, password, owner name and email quota. Additionally, you can set up the mailbox settings through using checkboxes marked on the following screen. |
|
Email Aliases
| 'Email Manager' page allows your clients to set up email aliases. Create one, start by press 'Create' button. |
|
| Now, fill in the address of one of your mailboxes and choose its domain. Fill in the full list of email addresses to forward to and press 'Create' . |
|
Email Domains
| Our module allows even to view and remove email domains by your clients. |
|
Email Groups
| Proceed to 'Email Groups' page and press 'Create' to add a new email group. |
|
| Now, provide an email address which will be used as an email resender. Additionally, fill in the list of email addresses which should receive email and press 'Create' . |
|
Email List
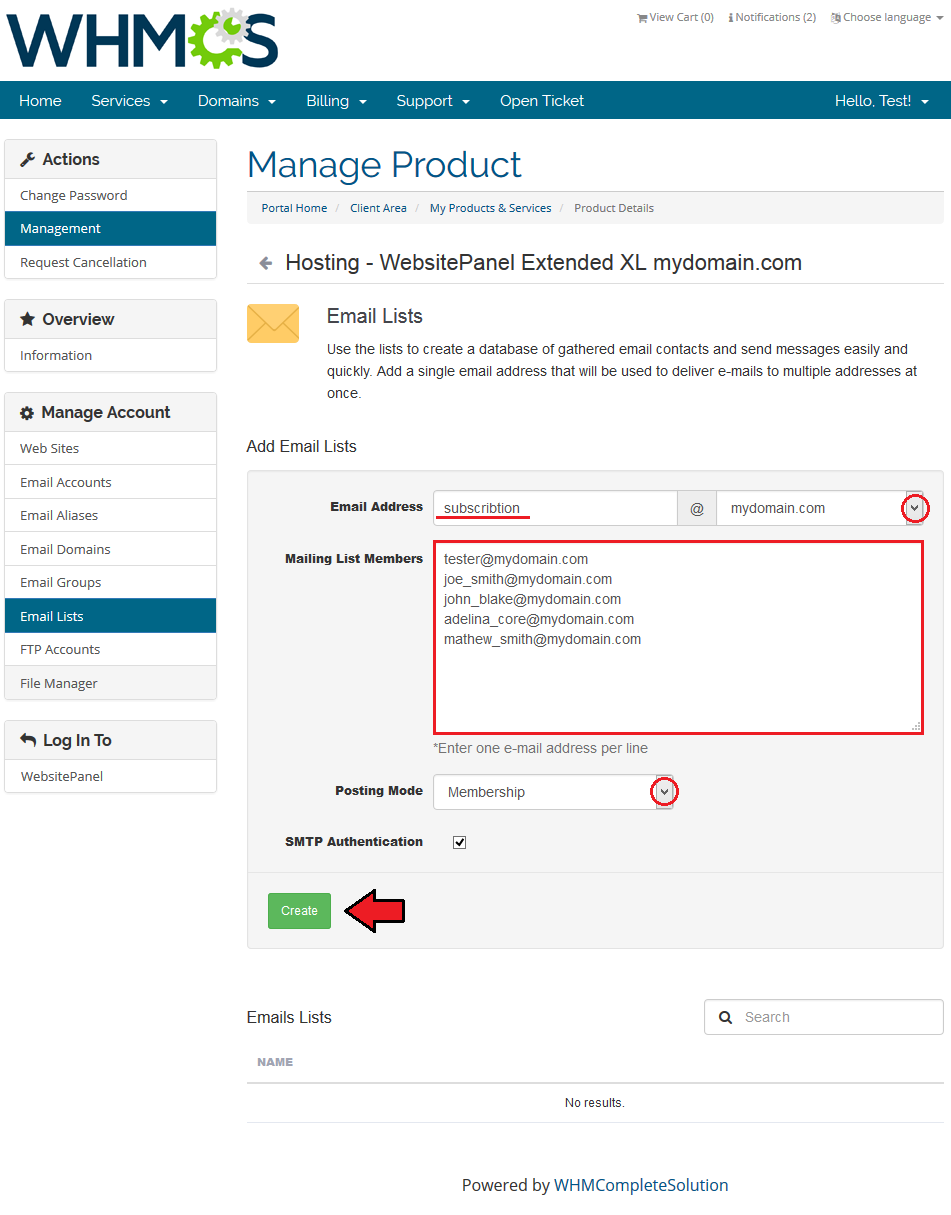
| In the 'Email Groups' page your client can add mailing lists. Press 'Create' to add a new mailing list. |
|
| Now, fill in the mailing list of email address, its description and choose list moderator. Additionally, you can set up password for mailing list by filling in password and checking 'Require Password' . |
|
| If you wish to add prefix to messages from this list, fill in a desired prefix into 'Subject Prefix' and mark 'Require Subject Prefix' . Next, provide message size limit and fill in the list of email addresses into 'Mailing List Members' . |
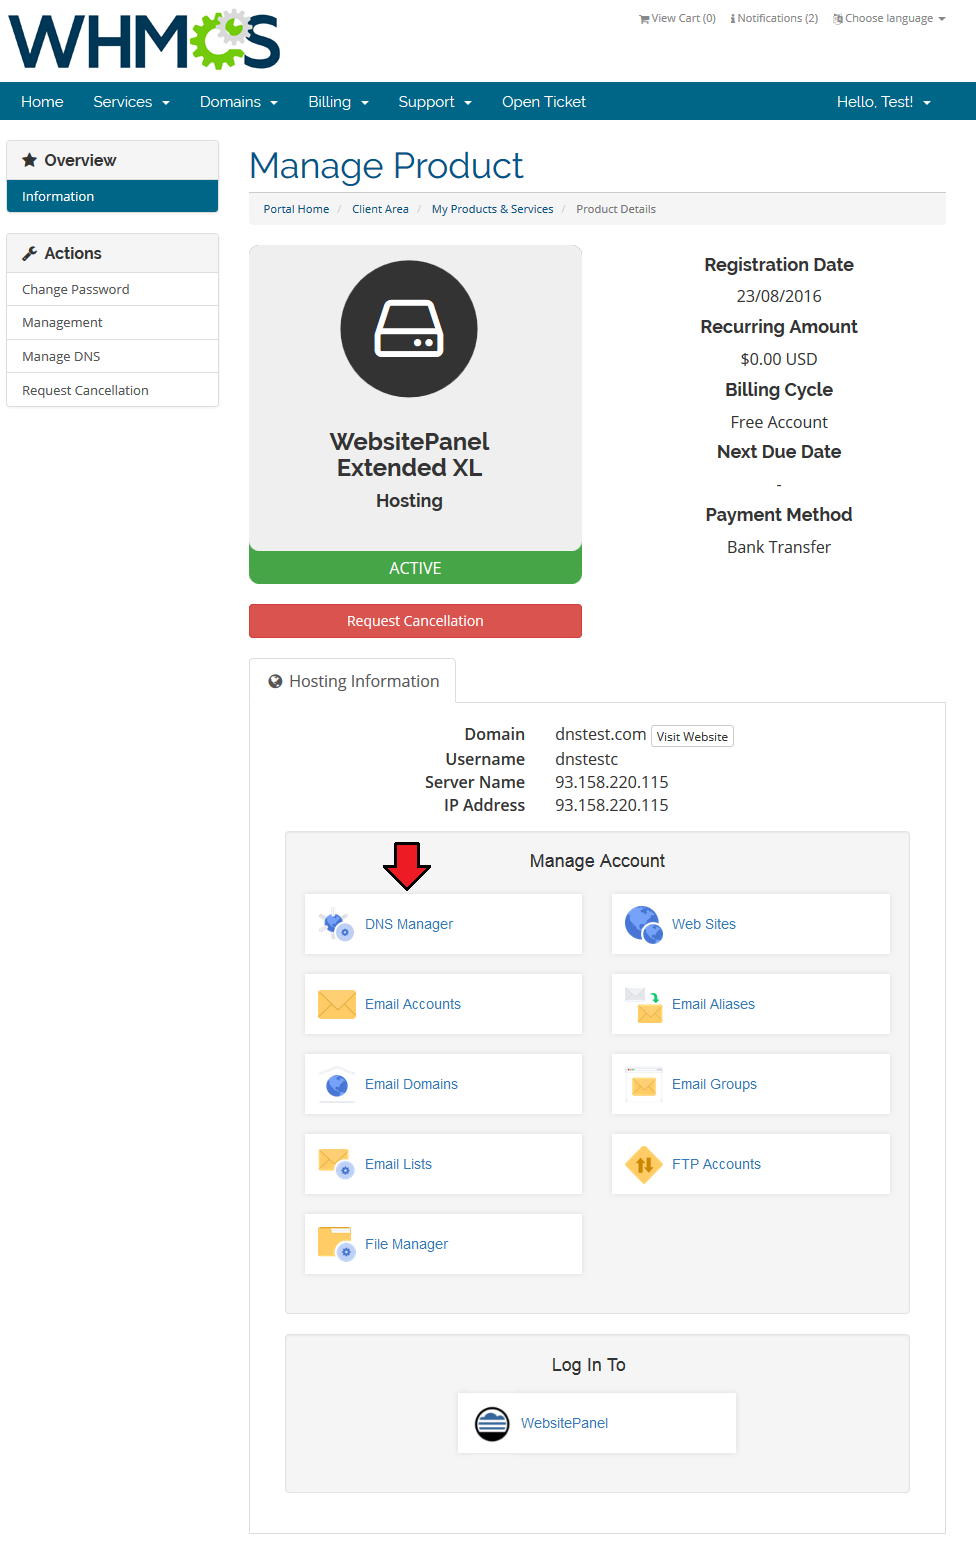
|
FTP Accounts
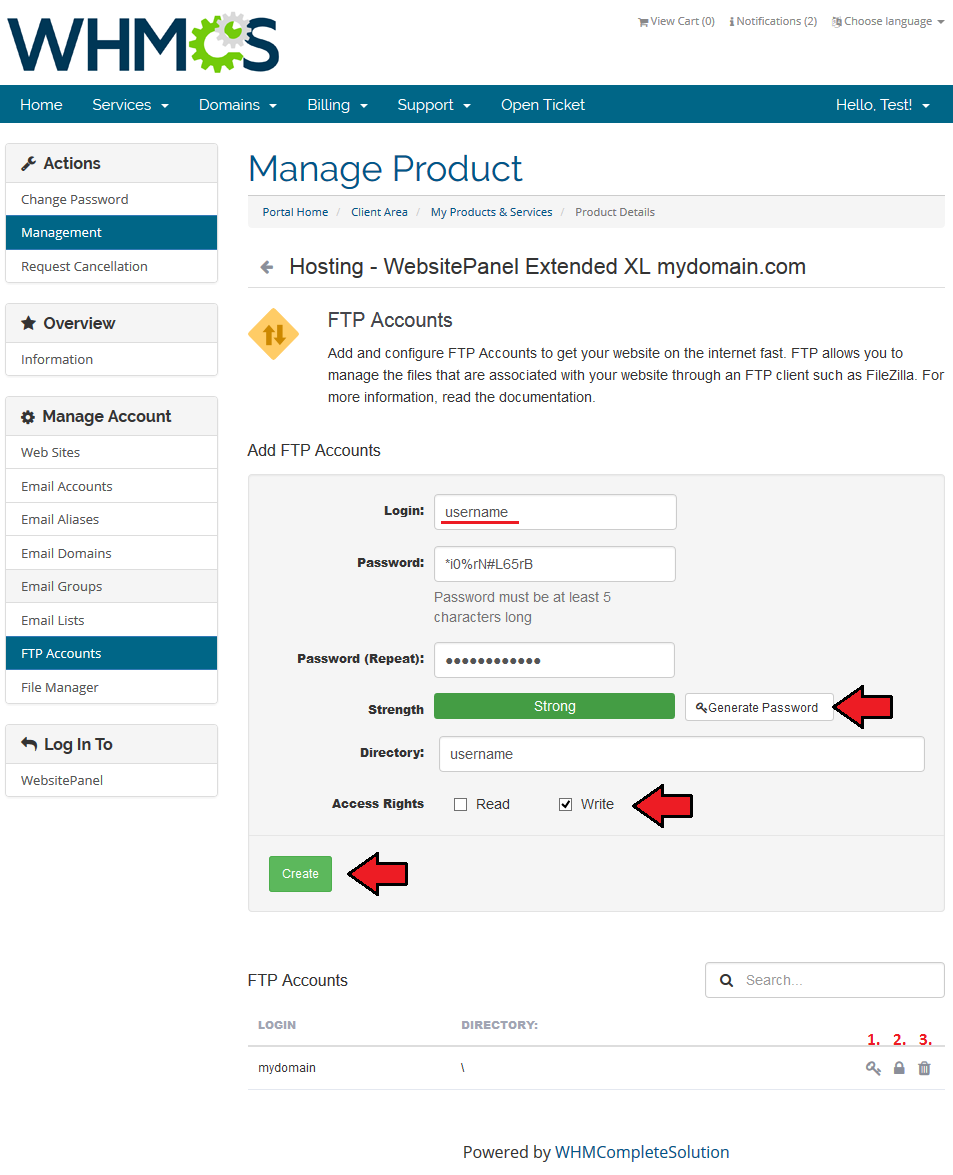
| All of the FTP accounts bounded to your client WebsitePanel Extended For WHMCS product are listed in the 'FTP Accounts' page. You can easily add a new FTP account, press 'Create' to proceed. |
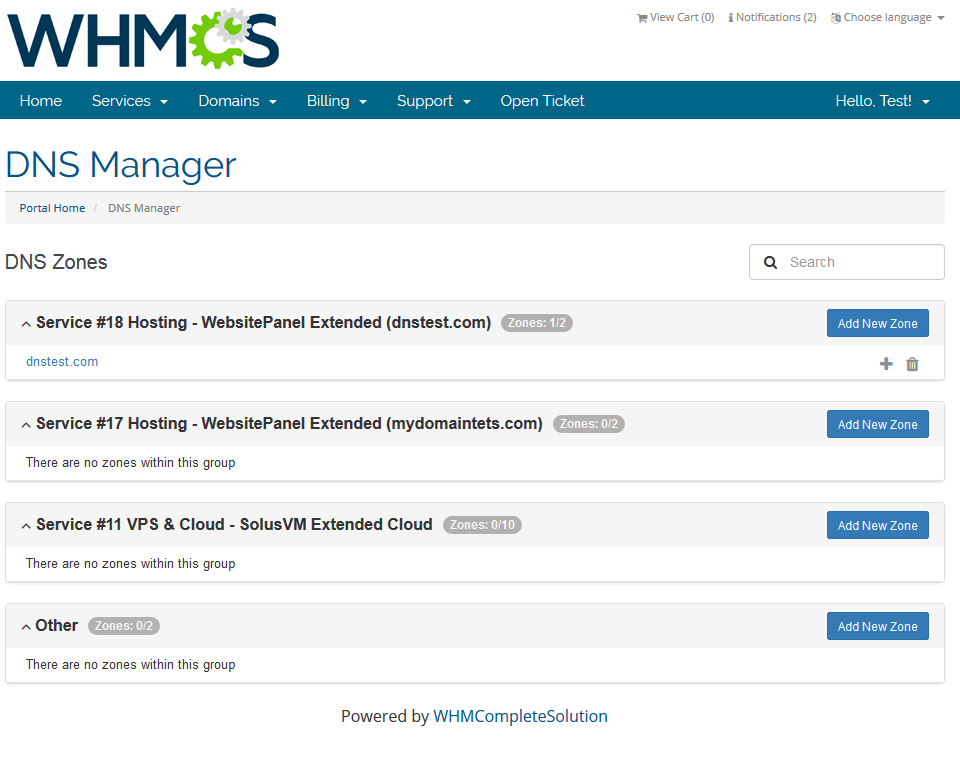
|
| Now, fill in FTP account username, password and its home folder. Define account rights and press 'Create' . |
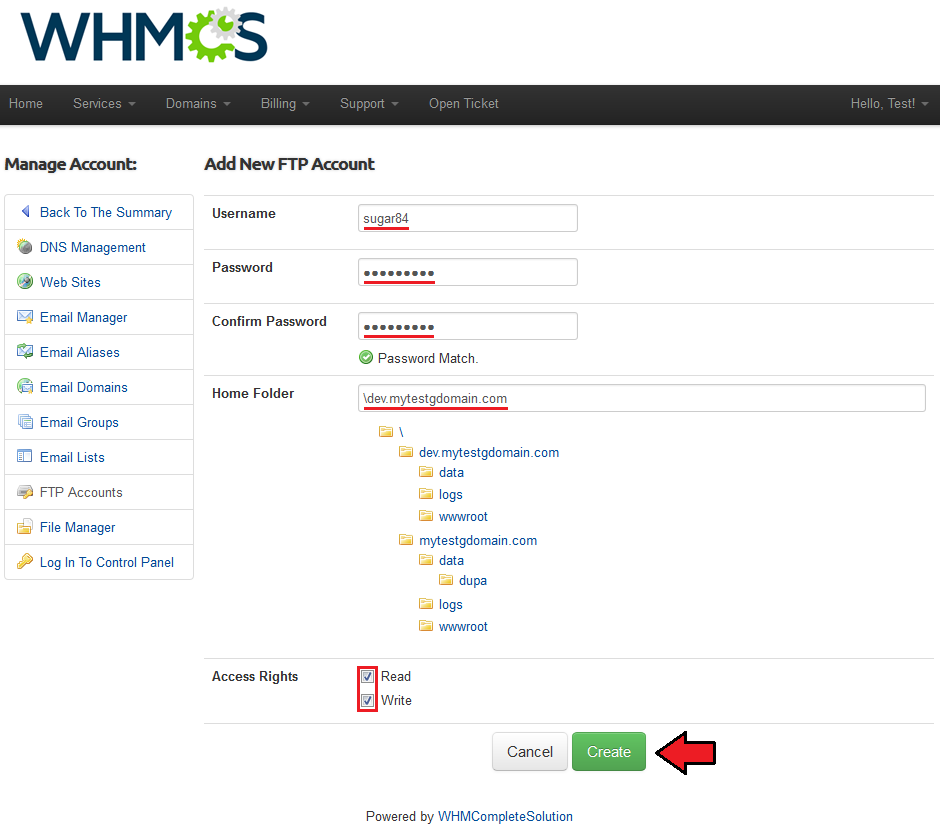
|
File Manager
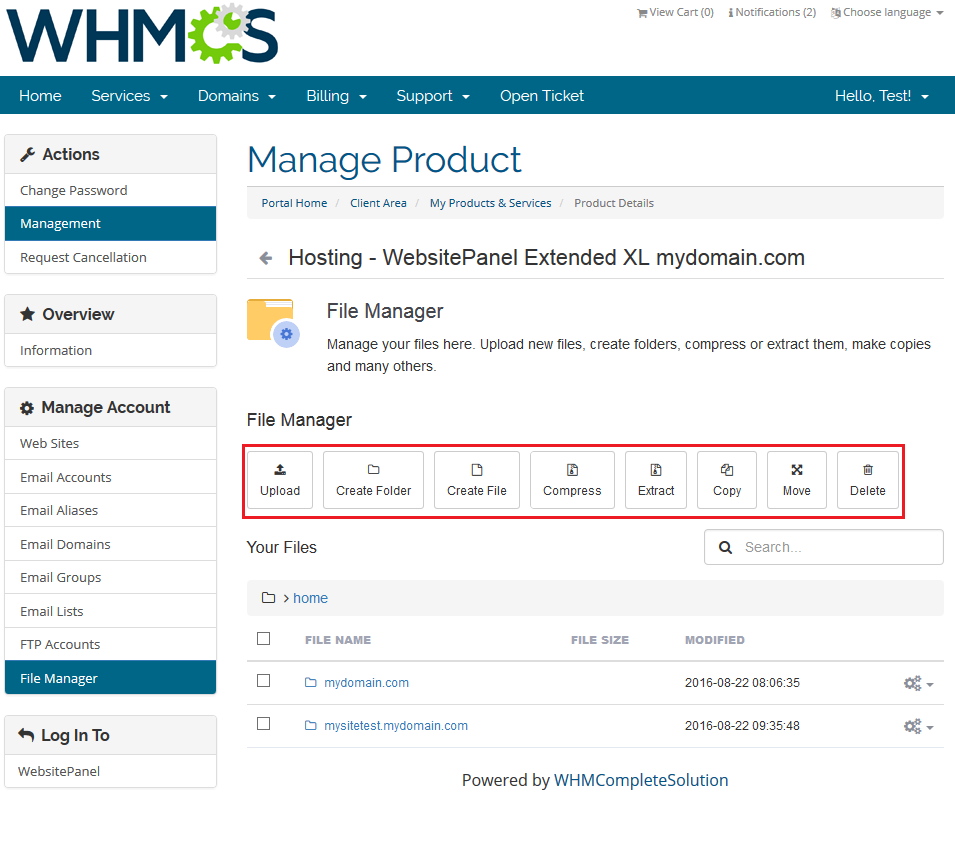
| Your clients can access and modify directories related to their WebsitePanel Extended For WHMCS products in the 'File Manager' page. As you can see, they can use a wide variety of commands marked on the following screen. |
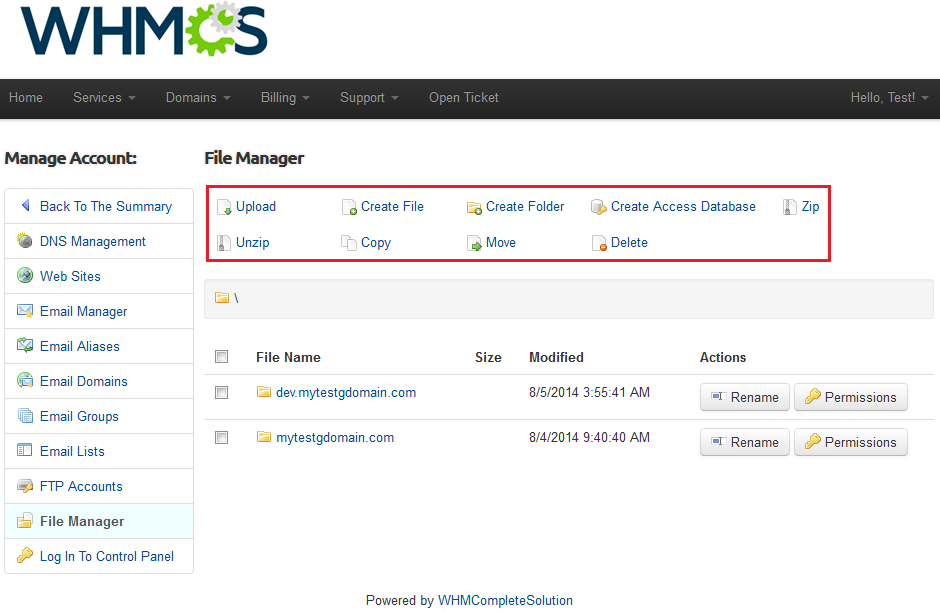
|
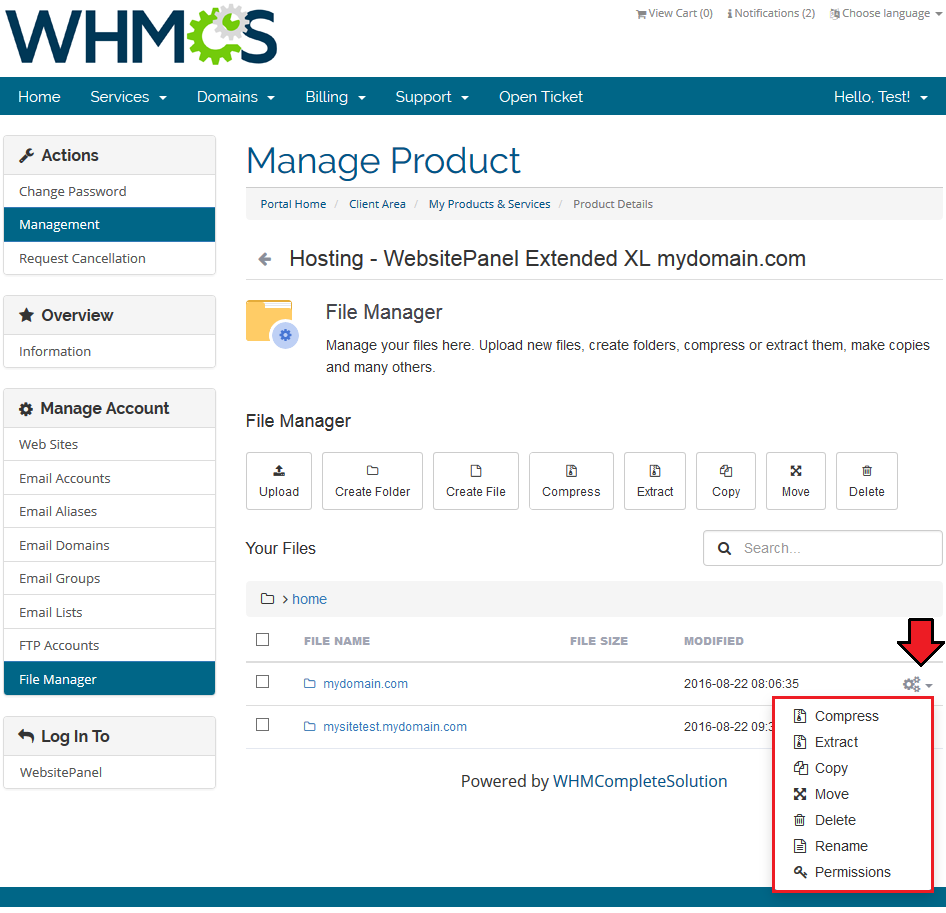
| Clients can also view the content of all folders inside of their home directories, set up permissions to folders and files and calculate disk space. |
|
Configuration Possibilities
| Our module allows you to offer a wide variety of products using WebsitePanel, like product with only email accounts or only access to 'File Manager' & FTP accounts. All of that can be done owing to configuration of product → 'Module Settings' and defining client area features in the WebsitePanel Extended addon. |
|
|
Tips
Common Problems
| 1. When you have problems with connection, check whether your SELinux or firewall does not block ports. |
| 2. If you encounter any problem related to our module, make sure to install latest version of WebsitePanel For WHMCS. |