WithoutDNS For WHMCS
From ModulesGarden Wiki
(Difference between revisions)
|
|
| Line 286: |
Line 286: |
| | ==Websites== | | ==Websites== |
| | {| | | {| |
| − | |style="padding: 10px 0px 15px 15px;"|The '''Sites''' section in the admin area provides an overview of all access links (sites) generated by clients using the WithoutDNS addon. <br/>This list includes all the fields visible in the client area, with the addition of client-specific information. | + | |style="padding: 10px 0px 15px 15px;"|The '''Sites''' section in the admin area displays all temporary sites created by clients.<br/> |
| − | * '''Client''' – Displays the name and company (if applicable) of the client who created the site. | + | This list includes all fields visible to clients, along with additional administrative details: |
| − | * '''Related Item''' – Indicates which of the client's products the site is associated with. | + | * '''Client''' – Displays the username of the client who created the site. |
| − | * '''Domain/URL''' - | + | * '''Related Item''' – Product or service associated with the temporary site |
| − | * '''IP Address''' - | + | * '''Domain/URL''' - The domain linked to the temporary URL. |
| − | * '''Temporary URL''' – The generated access link, valid for a limited time (highlighted in blue for visibility). | + | * '''IP Address''' - Server IP assigned to the site. |
| − | * '''Expires At''' – Indicates when the temporary URL will expire. | + | * '''Temporary URL''' – A access link, valid for a limited time. |
| − | Site temporary URLs are cleared autoamtically (with WHCMS cron, you do not need to set it up separatelly).
| + | * '''Expires At''' – Time when the temporary URL will expire. |
| | |} | | |} |
| | {| | | {| |
Revision as of 13:39, 15 April 2025
WithoutDNS For WHMCS addon module integrates teh fucntionality of WithoutDNS paltform in to yor WHMCS. Simplify the testing and migration porocess.
Provide a temporary URL that directs your domain to a specified server IP address through one of our proxy servers.
This approach allows you to view and test your website on the new server without modifying your local hosts file.
|
| ✔ Allow Client To Generate Temporary Website URLs, Making Them Accessible Even When DNS Is Not Yet Configured
|
| ✔ Use WithoutDNS Free Plan With No Need Of Account Creation:
|
| ✔ All Generated URLs Will Be Temporarily Valid For 15 Minutes
|
| ✔ URLs Will Be Branded With The WithoutDNS Service
|
| ✔ Limited To 3 URLs Per Day Shared Across All Clients
|
| ✔ Use WithoutDNS Paid Pro Plans To Access All Functionalities And Get Rid Of Free Limits
|
| ✔ Provide Optional API Configuration:
|
| ✔ Setup Addon Module Configuration:
|
| ✔ Select Menu Location In Client Area:
|
| ✔ Clients With Active Products
|
| ✔ Clients With Specific Products
|
| ✔ Generated URL Limit Type:
|
| ✔ Set URL Expiration Time In Hours
|
| ✔ View Temporary Website URLs:
|
| ✔ View Related Client And Item
|
| ✔ View Domain/URL And IP Address
|
| ✔ View/Copy Temporary URL
|
| ✔ View/Manage Module Logs
|
| ✔ Access WithoutDNS Management Account
|
| ✔ Create Temporary Website URLs:
|
| ✔ Provide URL For Already Owned Service
|
| ✔ Provide Target Server IP Address
|
| ✔ View Website Original URL/Domain
|
| ✔ View Website IP Address
|
| ✔ View Website Temporary URL
|
| ✔ View Temporary URL Expiration Date
|
| ✔ Delete Website Temporary URL
|
| ✔ Supports PHP 8.3 Back To PHP 8.1
|
| ✔ Supports WHMCS Themes "Twenty-One" And "Lagom WHMCS Client Theme"
|
| ✔ Supports WHMCS V8.12 Back To WHMCS V8.9
|
| ✔ Requires ionCube Loader V14 Or Later
|
Installation and Synchronization
We have prepared a short but comprehensive tutorial that will show you how to successfully install WithoutDNS For WHMCS module and synchronize your WHMCS with WithoiutDNS platform.
Although the process is extremely easy and intuitive, go over the below guide to assure it is fast, smooth and trouble-free.
|
Install The Addon
| 1. First of all, you need the package, therefore log in to our client area and download the module.
|
2. Open the FTP Client, log into the server with WHMCS installed. Then, open the main catalogue and upload the folder with files you have extracted previously.
The content of your package should look like on the below screen:
|
Activate The Addon
3. Now, you have to activate the addon module in your WHMCS system.
Please log in to your WHMCS admin area. Once there, navigate to the 'System Settings' section and select 'Addon Modules'.
Find 'MetricsCube Connector' on the list of addons and click the 'Activate' button.
|
4. After the module has been activated, you will need to enable access to your Admin Role.
To do that, click on 'Configure', select the admin roles that should have access to the module, and save changes.
|
| Your module has just been successfully installed and activated!
|
Sign Up With WithoutDNS Account
| It is possible to connect your WHMCS to WithoutDNS account directly from the addon interfcae. Simply, press the Manage Account button in the addon menu.
|
| You will be redirected to the WithoutDNS login page. Log in with your existing account, or if you're a new user, choose a plan that suits your needs and sign up.
|
| Once logged in, navigate to the API Configuration section, which you can find in the dropdown menu under your account name in the top-right corner.
|
| Click the "Generate Token" button to create a new API token.
|
| Copy the generated API token and store it securely. You’ll need it shortly to complete the connection setup in WHMCS.
|
| Return to the WHMCS admin area to complete the addon configuration and establish a connection between your WHMCS and your WithoutDNS account if needed.
|
WithoutDNS Addon Management
| As soon as the...........
|
API Configuration
Integrating the API is optional, but without it, certain limitations will apply:
- Links generated without the API will only remain active for 15 minutes.
- URLs will include WithoutDNS branding.
- A daily limit of 3 links applies, and this quota is shared across all clients.
To gain unrestricted access and additional features, you will need to enter your generated API credentials as described in the previous steps.
If you do not have an API key yet, you can get a plan here.
|
Paste the API token you generated during the setup process into the API Token field. This is required to authenticate your WHMCS system with the WithoutDNS API.
Click "Test Connection" to confirm that the API token is working. If the connection is successful, save your changes.
|
Once connected, the Temporary Domain field will appear. Select one of the available proxy domains linked to your account.
Choose between an EU or US-based domain, which will be used for generating temporary URLs.
|
| That is all, you may now use the module without rstrictions.
|
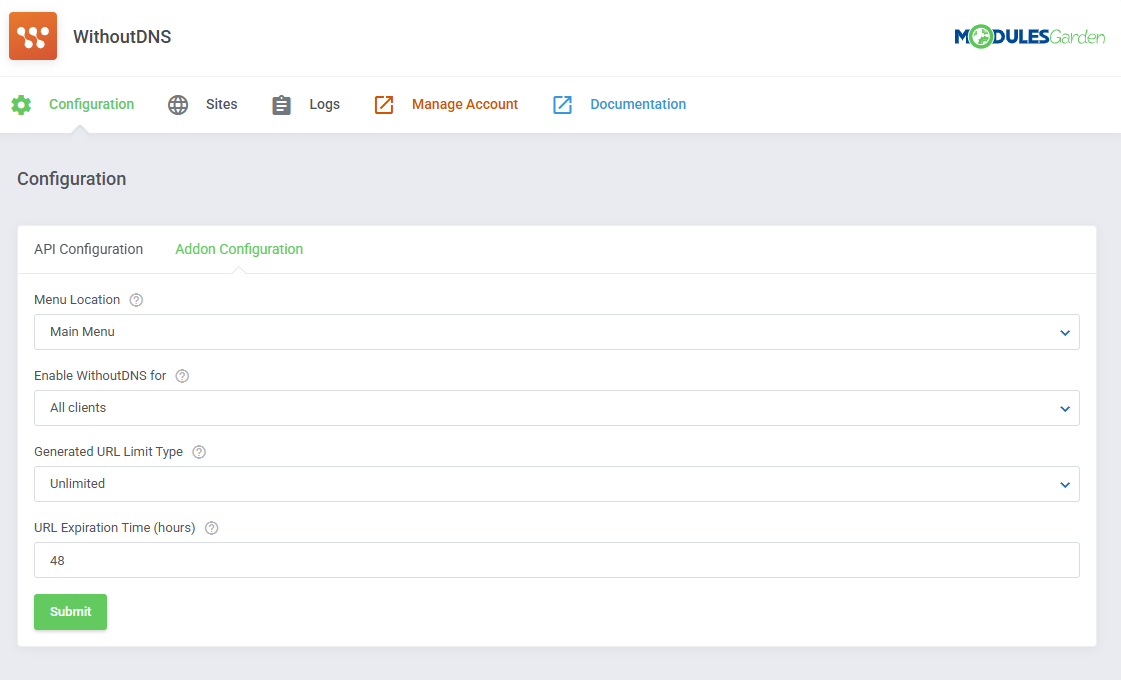
Addon Configuration
Use the settings below to customize how the WithoutDNS addon behaves within your WHMCS installation:
- Menu Location - Choose where the Site Previes button will appear in the client area navigation:
- Main Menu - Appears as a new menu item after "Open Ticket" (default).
- Services - Displays under "My Services" section.
- Domains - Displays under "My Domains" section.
- Enable WithoutDNS for - Define which clients are granted access to the addon functionality:
- All Clients - Enabled for every client (default).
- Clients with an active product - Only available to clients with at least one active service.
- Clienst with specific products - Only available to clients with selected products defined in the Required Products dropdown.
- Generated URL Limit Type - Set how limits on URL generation should be enforced:
- Unlimited - No restrictions on how many URLs a client can generate (default).
- Limit Per Client - Each client is given an individual limit.
- Limit per product - The limit is applied based on the specific product(s) the client owns.
- URL Expiration Time (hours) - Defines how long generated URLs remain active. Default is 48 hours, but this can be customized.
Once your configuration is complete, click Submit to save your settings.
|
|
Websites
The Sites section in the admin area displays all temporary sites created by clients.
This list includes all fields visible to clients, along with additional administrative details:
- Client – Displays the username of the client who created the site.
- Related Item – Product or service associated with the temporary site
- Domain/URL - The domain linked to the temporary URL.
- IP Address - Server IP assigned to the site.
- Temporary URL – A access link, valid for a limited time.
- Expires At – Time when the temporary URL will expire.
|
Logs
Client Area
The Site Previews is located in one of theree possible places, depending on the addon configuration, this can be:
- Main Menu – Displays as a new top-level item after "Open Ticket" (default, as spresented on teh screen below).
- Services – Listed under the "My Services" section.
- Domains – Listed within the "My Domains" section.
Depending on this setup find the button and press to open the withoutDNS panel.
|
This section allows you to create temporary access links to your websites, which work even if DNS settings haven't been finalized.
It's particularly helpful for previewing sites during development, testing after migrations, or sharing early-stage versions with clients.
Press Creater Site button to generate a new temporary link.
|
Enter:
- Site URL/Domain - Use full URL o rjust the domain name.
- Service - Choose a service from th elist to retrieve its ip address. If a dedicated IP is assigned to the service, it will be automatically used.
Press Confirm to complete the action.
|
Newly generated temporrary URL will appear on the list. There you will find :
- Client – Displays the name and company (if applicable) of the client who created the site.
- IP Address – Indicates which of the client's products the site is associated with.
- Temporary URL – The generated access link, valid for a limited time - use copy icon for eaasy sharing
- Expires At – Indicates when the temporary URL will expire.
- Actions – Option to manually delete the URL (free URLs cannot be delted, they expire after 15 minutes and are sutoamaically cleared; delete action is applicable to paid plans only)
|
Tips
Update Instructions
An essential guidance through the process of updating the module is offered here.
Ensure successful completion of the module update by carefully following each step, thereby preventing data loss or any unforeseen issues.
Additionally, you will find a current list of supplementary actions necessary for a smooth update process there.
|
Common Problems
| 1. When you encounter problems with connection, check whether your SELinux or firewall does not block ports.
|


