Google Workspace For WHMCS
From ModulesGarden Wiki
(Difference between revisions)
|
|
| Line 35: |
Line 35: |
| | {| | | {| |
| | |style="padding: 0px 0px 0px 30px;"|✔ Set Default Company Name | | |style="padding: 0px 0px 0px 30px;"|✔ Set Default Company Name |
| | + | |} |
| | + | {| |
| | + | |style="padding: 0px 0px 0px 30px;"|✔ Enable Password Visibility |
| | |} | | |} |
| | {| | | {| |
| Line 85: |
Line 88: |
| | |} | | |} |
| | {| | | {| |
| − | |style="padding: 0px 0px 0px 30px;"|✔ Supports PHP 8.2 Back To PHP 7.4 | + | |style="padding: 0px 0px 0px 30px;"|✔ Supports PHP 8.2 Back To PHP 8.1 |
| | |} | | |} |
| | {| | | {| |
| Line 91: |
Line 94: |
| | |} | | |} |
| | {| | | {| |
| − | |style="padding: 0px 0px 0px 30px;"|✔ Supports WHMCS V8.11 Back To WHMCS V8.8 | + | |style="padding: 0px 0px 0px 30px;"|✔ Supports WHMCS V8.12 Back To WHMCS V8.9 |
| | |} | | |} |
| | {| | | {| |
Revision as of 15:19, 12 February 2025
Google Workspace For WHMCS will enable all Authorized Resellers of Google Workspace services to provision and manage Google accounts in their very own WHMCS system.
Authenticate through OAuth 2.0, create flexible products and let your clients order ready Google services directly from your website.
|
| ✔ Create/Suspend/Unsuspend/Terminate Account
|
| ✔ Choose Action On Termination
|
| ✔ Automatically Create Administrator Account
|
| ✔ Set Administrator Mailbox Name
|
| ✔ Set Default Company Name
|
| ✔ Enable Password Visibility
|
| ✔ Set Configurable Options Per Product:
|
| ✔ Log In To Control Panel
|
- Supported Google Services:
| ✔ Google Workspace Business Starter
|
| ✔ Google Workspace Business Standard
|
| ✔ Google Workspace Business Plus
|
| ✔ Google Workspace Enterprise Essentials
|
| ✔ Google Workspace Enterprise Standard
|
| ✔ Google Workspace Essentials
|
| ✔ Requires Google Cloud Partner Program / Reseller Account
|
| ✔ Authentication And API Calls Utilize OAuth 2.0
|
| ✔ Supports PHP 8.2 Back To PHP 8.1
|
| ✔ Supports WHMCS Themes "Six" And "Twenty-One"
|
| ✔ Supports WHMCS V8.12 Back To WHMCS V8.9
|
| ✔ Requires ionCube Loader V13 Or Later
|
Installation and Authentication
This tutorial will show you how to successfully install and authenticate Google Workspace For WHMCS.
We will guide you step by step through the whole installation and authentication process.
|
| 1. Log in to our client area and download the module.
|
2. In the downloaded file you might find one or two packages that support different PHP versions.
In the most recent versions of the module, you will find only one package that supports PHP 7.2 and later.
|
Previous updates of the module may contain two packages dedicated to various PHP versions.
The first one that supports PHP 5.6 up to PHP 7.1, and the second one addressed to PHP 7.2 up to PHP 7.4.
Note: Keep in mind that PHP versions 5.6 up to 7.1 are no longer officially supported and their security issues are not fixed or released any more. Find more info here.
|
| Note: You can check the current PHP version in your WHMCS. To do so, proceed to 'Utilities' → 'System' → 'PHP Info'.
|
3. Extract the package and upload its content into the main WHMCS directory.
The content of the package to upload should look like this.
|
4. When you install Google Workspace For WHMCS for the first time, you have to rename the 'license_RENAME.php' file.
The file is located in 'modules/servers/gSuite/license_RENAME.php'. Rename it from 'license_RENAME.php' to 'license.php'.
|
5. In order to configure your license key you have to edit the previously renamed 'license.php' file.
Enter your license key between the quotation marks as presented on the following screen. You can find your license key in our client area → 'My Products'.
|
API Configuration
| 7. After you have logged in, create a new project.
|
8. To proceed, go to 'Enable APIs and Services' tab.
Find 'Google Workspace Reseller API' among the applications.
|
| 9. Now, you have to enable 'Google Workspace Reseller API' as shown on the following screen.
|
| 10. Next, search for the 'Admin SDK API' the same way you did it in step 9.
|
| 11. Enable 'Admin SDK API.'
|
12. Finally, open the 'Explore and enable API' section, the API & Services page should open. Go to 'OAuth consent screen' under the 'Credentials' section.
Afterward, enter the mail address and application name that will be visible during your requests.
Here is a list of scopes required by the module to work properly:
- admin.directory.user
- apps.order
- apps.order.readonly
- userinfo.profile
Save changes through pressing the 'Save' button.
|
| 13. Then, switch to the 'Credentials' tab and add new credentials .
|
14. After you have done that, tick 'Web application'.
Next, enter your website URL into the 'Authorized JavaScript origins' field and correct path to 'oauth_callback.php' into the 'Authorized redirect URI' field.
Confirm changes through pressing 'Create'.
|
| 15. Well done! Now that you have filled in all the necessary details, you can proceed to authenticate Google Apps.
|
Product Configuration
16. In order to create and configure a product, go to 'Setup' → 'Products/Services' → 'Products/Services'.
Click on 'Create a New Group'.
|
| 17. Enter your product group name and press 'Save Changes'.
|
18. Now, create a new product for your GoogleApps.
To do so, first click on 'Create a New Product'.
|
| 19. Choose the desired product type and product group from the dropdown menus and enter a new name of your products. Press 'Continue'.
|
20. Go to 'Module Settings' of your product and choose 'G Suite' from the 'Module Name' dropdown menu.
After choosing the module, make sure to click on the 'Save Changes' button.
|
21. Enter your previously obtained 'Client ID' as well as 'Client Secret' and make sure that 'Callback URL' is correct.
Then, press 'Grant access with Google account'.
|
| 22. If the data you entered is correct, you will be redirected to the page with permission request. Press the 'Allow access' button.
|
23. That is it. You will be now redirected to your WHMCS and you will see the following screen.
|
24. Now, let us move to 'Custom Fields'. Fields with 'GoogleApps Domain', 'GoogleApps PurchaseOrderID', 'GoogleApps Alternate Email', 'Mailbox Name', 'GSuiteSubscriptionId', 'Client Postcode' and 'GSuiteDealCode' variables are added automatically.
Note: Since 1.3.0 module version you are free to adjust the 'friendly' name part after |, but remember not to change the first part, which is a variable.
|
Configuration and Management
| Configuration and management of Google Workspace For WHMCS is very intuitive. Read the below sections to see how easy it is.
|
Basic Configuration
Let us begin the process of module configuration by choosing Default Product SKU ID. To start with, simply pick one of the available Google services.
A list of the currently supported addons can be found here.
|
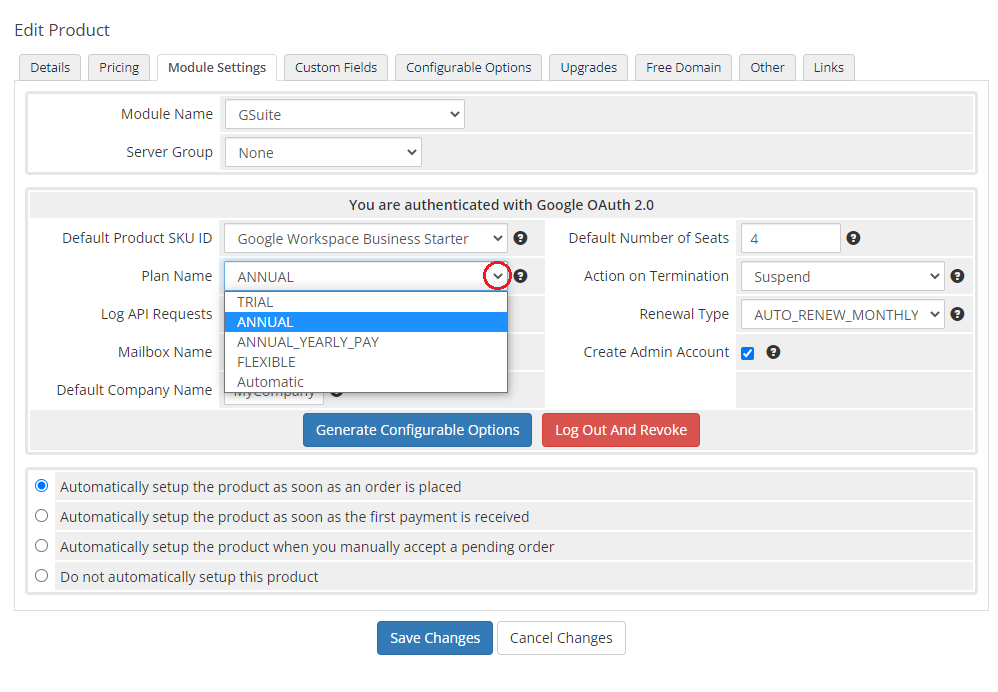
Plan Name allows you to select the method of payment. You can choose between:
- ANNUAL - the annual commitment plan with monthly payments
- ANNUAL_YEARLY_PAY - the annual commitment plan with yearly payments
- FLEXIBLE - monthly billing for the number of user accounts used in a particular month
- TRIAL - the 30-day free trial plan
Note: Since the 1.1.5 version of Google Workspace For WHMCS module, the ANNUAL plan is equivalent to ANNUAL_MONTHLY_PAY in G Suite API.
|
|
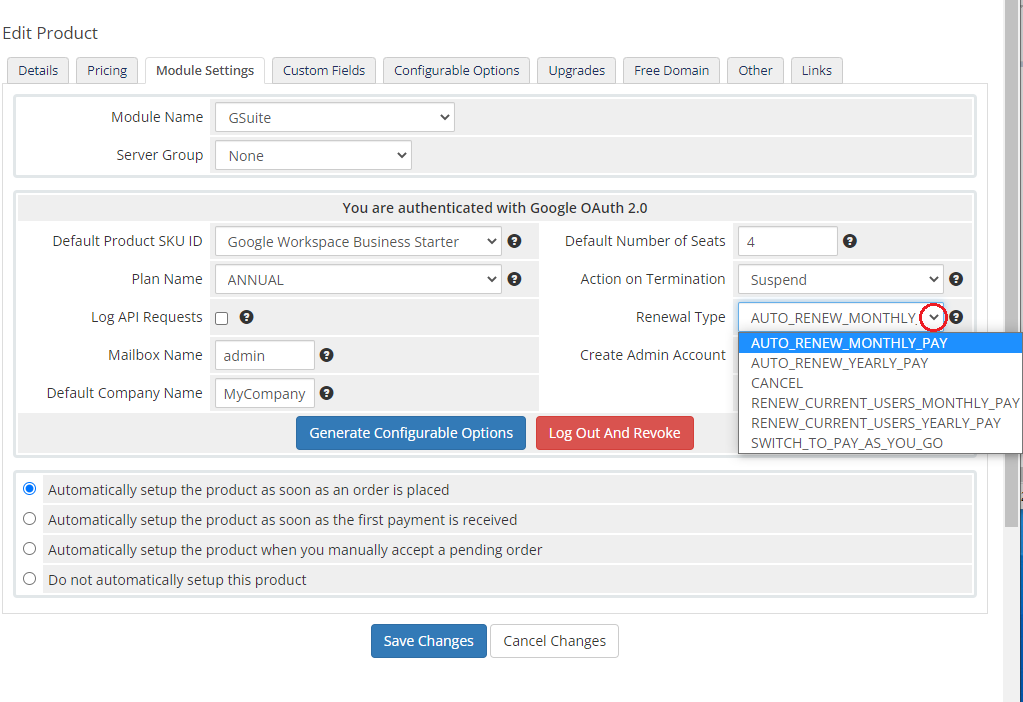
Rennewal Type - choose the method of renewing your plan when the current subscription expires. The available options are:
- AUTO_RENEW_MONTHLY_PAY - at the end of the interval of annual commitment plan, automatically renew the subscription plan with monthly payments and with the same number of user licenses
- AUTO_RENEW_YEARLY_PAY - at the end of the interval of annual commitment plan, automatically renew the subscription plan with yearly payments and the same number of user licenses
- CANCEL - at the end of the interval of annual commitment plan, suspend the customer's account
- RENEW_CURRENT_USERS_MONTHLY_PAY - at the end of the interval of annual commitment plan, renew the subscription plan with monthly payments but use the total number of current active user licenses
- RENEW_CURRENT_USERS_YEARLY_PAY - at the end of the interval of annual commitment plan, renew the subscription plan with yearly payments but use the total number of current active user licenses
- SWITCH_TO_PAY_AS_YOU_GO - at the end of the interval of annual commitment plan, change the annual commitment plan to a flexible plan
|
|
Action On Terminate - here you can decide whether you want to suspend or cancel customer services upon the termination.
Important!: Please remember that once you choose the 'Cancel' option, the subscription will be deleted immediately. It does not apply to the G Suite subscription.
|
| Create Admin Account & Mailbox Name - select this option to automatically create an administrator account with a given username for the G Suite domain.
|
Configurable Options
In order to automatically generate configurable options, simply press the button marked on the screen.
|
In your WHMCS system press 'Setup' → 'Products/Services' → 'Configurable Options'.
Find the 'GoogleApps' options on the list.
|
| Here you can manage and alter added configurable options.
|
| Provide values for your new option and enter the desired price. Press 'Save Changes'.
|
In the 'Module Settings' tab of your product you can fill out the fields for ' Default Product SKU ID' and 'Default Number of Seats.
Remember however that these values will be used only if configurable options are NOT generated.
|
From now on you can easily and quickly change value of your product. Remember that you can add more configurable options for other values.
|
Admin Area
Let us check your new product on the product page in admin area. It should look like on the screen below.
|
Client Area
| This is how the module will be displayed in the client area. Google Workspace For WHMCS also allows your customers to quickly access Google account services.
|
Update of Existing Customers
You can link existing customer accounts by filling in the Custom Fields: 'GoogleApps Domain' and 'GoogleApps PurchaseOrderID'.
After your customers order a new subscription, they should insert their primary Google account domain name in the 'GoogleApps Domain' field.
Then, the new subscription will be added to that account.
If you want to manually create an order for an existing subscription, in addition to the above steps, you need to find 'Purchase Order ID' (usually on the invoice).
Copy the ID and paste it to the 'GoogleApps PurchaseOrderID ' field.
Afterward, do not run the create command but just press the 'Save Changes' button. You can also change the status to 'Active'.
|
Tips
1. The module requires a G Suite Reseller account. To check the current status of your Google Reseller account, navigate to the following site: Google Cloud Partner Portal.
There, you can verify the status and request partner authorization if necessary.
|
| 2. Avoid using localhost and Raw IP during the authorization.
|
| 3. Callback URL is fetched from your WHMCS System URL. You can set it in the 'General Settings' of your system.
|
| 5. If you want to better understand the concept of G Suite Reseller API and our module, visit this page
|
6. Some API actions such as 'suspend' may be subject to additional restrictions or have different results depending on the selected plan or the number of days elapsed.
You can learn more about them here.
|
7. If you want to set different prices for seats depending on the plan, the only way to do that is to create separate products.
More info about setting prices can be found here.
|
Update Instructions
An essential guidance through the process of updating the module is offered here.
Ensure successful completion of the module update by carefully following each step, thereby preventing data loss or any unforeseen issues.
Additionally, you will find a current list of supplementary actions necessary for a smooth update process there.
|
Upgrade Guide
Seeking a solution that offers greater flexibility, customization tailored to your precise needs, and unrestricted availability?
There is an option that not only proves to be cost-effective in the long run but also includes prioritized support services, making it a truly valuable investment.
Opt for the Open Source version of your Google Workspace For WHMCS module to unlock these benefits.
Simply click on either the Get Source Code or Upgrade To Lifetime button found on the product's page in our client area to complete the one-step upgrade process, with a dedicated discount already applied.
Follow a comprehensive guide covering the transition process, the advantages it brings, and step-by-step instructions on what to do next after the order has been successfully finalized.
|
Common Problems
| 1. When you have problems with connection, check whether your SELinux or firewall does not block ports.
|
2. It is possible to receive such an error while authenticating our module:
Error: redirect_uri_mismatch
If such a case, make sure that URLs provided in your Google account and your WHMCS system are the same.
Keep in mind that addresses with the prefix 'www' vary from addresses without this prefix.
|
3. In case you encounter an error similar to the one below, you most probably disabled the output buffering in the PHP configuration.
Notice: ob_clean(): failed to delete buffer.
To solve the problem, please set the 'output_buffering' value to 'On' in the php.ini file.
|
4. Due Dates in WHMCS and the Google platform might be out of sync if not set up manually after import, causing the service to appear as active in WHMCS, but suspended on Google's side.
Solution: Try delaying the suspension by a specific number of days after the billing cycle ends, giving clients a grace period.
- Adjust the 'Suspend Days' value under 'System Settings' → 'Automation Settings' → 'Automatic Module Functions'.
- Set the 'Renewal Type' of the product to any status other than 'Cancel', as this will cause the account to be suspended as soon as the billing cycle in Google Workspace ends.
|


