DNS Manager For WHMCS
From ModulesGarden Wiki
(Difference between revisions)
| Line 77: | Line 77: | ||
|} | |} | ||
{| | {| | ||
| − | |style="padding: 0px 0px 20px 15px;"|[[File:Step1DNS.png]] | + | |style="padding: 0px 0px 20px 15px; border: 3px solid #0B3363;"|[[File:Step1DNS.png]] |
|} | |} | ||
{| | {| | ||
| Line 86: | Line 86: | ||
|} | |} | ||
{| | {| | ||
| − | |style="padding: 0px 0px 20px 15px;"|[[File:Step2DNS.png]] | + | |style="padding: 0px 0px 20px 15px; border: 3px solid #0B3363;"|[[File:Step2DNS.png]] |
|} | |} | ||
{| | {| | ||
| Line 98: | Line 98: | ||
|} | |} | ||
{| | {| | ||
| − | |style="padding: 0px 0px 0px 15px;"|[[File:Step3DNS.png]] | + | |style="padding: 0px 0px 0px 15px; border: 3px solid #0B3363;"|[[File:Step3DNS.png]] |
|} | |} | ||
{| | {| | ||
| Line 110: | Line 110: | ||
|} | |} | ||
{| | {| | ||
| − | |style="padding: 0px 0px 25px 15px;"|[[File:Step4DNS.png]] | + | |style="padding: 0px 0px 25px 15px; border: 3px solid #0B3363;"|[[File:Step4DNS.png]] |
|} | |} | ||
{| | {| | ||
| Line 116: | Line 116: | ||
|} | |} | ||
{| | {| | ||
| − | |style="padding: 0px 0px 15px 15px;"|[[File:Step5DNS.png]] | + | |style="padding: 0px 0px 15px 15px; border: 3px solid #0B3363;"|[[File:Step5DNS.png]] |
|} | |} | ||
{| | {| | ||
| Line 125: | Line 125: | ||
|} | |} | ||
{| | {| | ||
| − | |style="padding: 0px 0px 20px 15px;"|[[File:Step6DNS.png]] | + | |style="padding: 0px 0px 20px 15px; border: 3px solid #0B3363;"|[[File:Step6DNS.png]] |
|} | |} | ||
{| | {| | ||
| Line 137: | Line 137: | ||
|} | |} | ||
{| | {| | ||
| − | |style="padding: 0px 0px 20px 15px;"|[[File:Step7DNS.png]] | + | |style="padding: 0px 0px 20px 15px; border: 3px solid #0B3363;"|[[File:Step7DNS.png]] |
|} | |} | ||
{| | {| | ||
| Line 146: | Line 146: | ||
|} | |} | ||
{| | {| | ||
| − | |style="padding: 0px 0px 20px 15px;"|[[File:Step8DNS.png]] | + | |style="padding: 0px 0px 20px 15px; border: 3px solid #0B3363;"|[[File:Step8DNS.png]] |
|} | |} | ||
{| | {| | ||
| Line 164: | Line 164: | ||
|} | |} | ||
{| | {| | ||
| − | |style="padding: 0px 0px 20px 15px;"|[[File:Step9DNS.png]] | + | |style="padding: 0px 0px 20px 15px; border: 3px solid #0B3363;"|[[File:Step9DNS.png]] |
|} | |} | ||
{| | {| | ||
| Line 173: | Line 173: | ||
|} | |} | ||
{| | {| | ||
| − | |style="padding: 0px 0px 30px 15px;"|[[File:Step10DNS.png]] | + | |style="padding: 0px 0px 30px 15px; border: 3px solid #0B3363;"|[[File:Step10DNS.png]] |
|} | |} | ||
=Configuration= | =Configuration= | ||
| Line 193: | Line 193: | ||
|} | |} | ||
{| | {| | ||
| − | |style="padding: 0px 0px 20px 15px;"|[[File:DNS1.png]] | + | |style="padding: 0px 0px 20px 15px; border: 3px solid #0B3363;"|[[File:DNS1.png]] |
|} | |} | ||
{| | {| | ||
| Line 199: | Line 199: | ||
|} | |} | ||
{| | {| | ||
| − | |style="padding: 0px 0px 30px 15px;"|[[File:DNS2.png]] | + | |style="padding: 0px 0px 30px 15px; border: 3px solid #0B3363;"|[[File:DNS2.png]] |
|} | |} | ||
==Configuration of processing== | ==Configuration of processing== | ||
| Line 206: | Line 206: | ||
|} | |} | ||
{| | {| | ||
| − | |style="padding: 0px 0px 20px 15px;"|[[File:DNS3.png]] | + | |style="padding: 0px 0px 20px 15px; border: 3px solid #0B3363;"|[[File:DNS3.png]] |
|} | |} | ||
{| | {| | ||
| Line 221: | Line 221: | ||
|} | |} | ||
{| | {| | ||
| − | |style="padding: 0px 0px 25px 15px;"|[[File:DNS4.png]] | + | |style="padding: 0px 0px 25px 15px; border: 3px solid #0B3363;"|[[File:DNS4.png]] |
|} | |} | ||
{| | {| | ||
| Line 230: | Line 230: | ||
|} | |} | ||
{| | {| | ||
| − | |style="padding: 0px 0px 20px 15px;"|[[File:DNS5.png]] | + | |style="padding: 0px 0px 20px 15px; border: 3px solid #0B3363;"|[[File:DNS5.png]] |
|} | |} | ||
{| | {| | ||
| Line 242: | Line 242: | ||
|} | |} | ||
{| | {| | ||
| − | |style="padding: 0px 0px 30px 15px;"|[[File:DNS6.png]] | + | |style="padding: 0px 0px 30px 15px; border: 3px solid #0B3363;"|[[File:DNS6.png]] |
|} | |} | ||
==Managing DNS zones in clientarea== | ==Managing DNS zones in clientarea== | ||
| Line 255: | Line 255: | ||
|} | |} | ||
{| | {| | ||
| − | |style="padding: 0px 0px 20px 15px;"|[[File:DNS11.png]] | + | |style="padding: 0px 0px 20px 15px; border: 3px solid #0B3363;"|[[File:DNS11.png]] |
|} | |} | ||
{| | {| | ||
| Line 261: | Line 261: | ||
|} | |} | ||
{| | {| | ||
| − | |style="padding: 0px 0px 20px 15px;"|[[File:DNS12.png]] | + | |style="padding: 0px 0px 20px 15px; border: 3px solid #0B3363;"|[[File:DNS12.png]] |
|} | |} | ||
{| | {| | ||
| Line 270: | Line 270: | ||
|} | |} | ||
{| | {| | ||
| − | |style="padding: 0px 0px 20px 15px;"|[[File:DNS13.png]] | + | |style="padding: 0px 0px 20px 15px; border: 3px solid #0B3363;"|[[File:DNS13.png]] |
|} | |} | ||
{| | {| | ||
| Line 276: | Line 276: | ||
|} | |} | ||
{| | {| | ||
| − | |style="padding: 0px 0px 20px 15px;"|[[File:DNS14.png]] | + | |style="padding: 0px 0px 20px 15px; border: 3px solid #0B3363;"|[[File:DNS14.png]] |
|} | |} | ||
==Adding default records== | ==Adding default records== | ||
| Line 283: | Line 283: | ||
|} | |} | ||
{| | {| | ||
| − | |style="padding: 0px 0px 20px 15px;"|[[File:DNS7.png]] | + | |style="padding: 0px 0px 20px 15px; border: 3px solid #0B3363;"|[[File:DNS7.png]] |
|} | |} | ||
{| | {| | ||
| Line 289: | Line 289: | ||
|} | |} | ||
{| | {| | ||
| − | |style="padding: 0px 0px 20px 15px;"|[[File:DNS9.png]] | + | |style="padding: 0px 0px 20px 15px; border: 3px solid #0B3363;"|[[File:DNS9.png]] |
|} | |} | ||
{| | {| | ||
| Line 298: | Line 298: | ||
|} | |} | ||
{| | {| | ||
| − | |style="padding: 0px 0px 20px 15px;"|[[File:DNS15.png]] | + | |style="padding: 0px 0px 20px 15px; border: 3px solid #0B3363;"|[[File:DNS15.png]] |
|} | |} | ||
{| | {| | ||
| Line 304: | Line 304: | ||
|} | |} | ||
{| | {| | ||
| − | |style="padding: 0px 0px 30px 15px;"|[[File:DNS16.png]] | + | |style="padding: 0px 0px 30px 15px; border: 3px solid #0B3363;"|[[File:DNS16.png]] |
|} | |} | ||
==Managing Reverse DNS== | ==Managing Reverse DNS== | ||
| Line 311: | Line 311: | ||
|} | |} | ||
{| | {| | ||
| − | |style="padding: 0px 0px 20px 15px;"|[[File:DNS22.png]] | + | |style="padding: 0px 0px 20px 15px; border: 3px solid #0B3363;"|[[File:DNS22.png]] |
|} | |} | ||
{| | {| | ||
| Line 317: | Line 317: | ||
|} | |} | ||
{| | {| | ||
| − | |style="padding: 0px 0px 20px 15px;"|[[File:DNS10.png]] | + | |style="padding: 0px 0px 20px 15px; border: 3px solid #0B3363;"|[[File:DNS10.png]] |
|} | |} | ||
{| | {| | ||
| Line 323: | Line 323: | ||
|} | |} | ||
{| | {| | ||
| − | |style="padding: 0px 0px 20px 15px;"|[[File:DNS17.png]] | + | |style="padding: 0px 0px 20px 15px; border: 3px solid #0B3363;"|[[File:DNS17.png]] |
|} | |} | ||
{| | {| | ||
| Line 329: | Line 329: | ||
|} | |} | ||
{| | {| | ||
| − | |style="padding: 0px 0px 20px 15px;"|[[File:DNS18.png]] | + | |style="padding: 0px 0px 20px 15px; border: 3px solid #0B3363;"|[[File:DNS18.png]] |
|} | |} | ||
{| | {| | ||
| Line 335: | Line 335: | ||
|} | |} | ||
{| | {| | ||
| − | |style="padding: 0px 0px 30px 15px;"|[[File:DNS19.png]] | + | |style="padding: 0px 0px 30px 15px; border: 3px solid #0B3363;"|[[File:DNS19.png]] |
|} | |} | ||
==Managing zones list== | ==Managing zones list== | ||
| Line 345: | Line 345: | ||
|} | |} | ||
{| | {| | ||
| − | |style="padding: 0px 0px 20px 15px;"|[[File:DNS20.png]] | + | |style="padding: 0px 0px 20px 15px; border: 3px solid #0B3363;"|[[File:DNS20.png]] |
|} | |} | ||
{| | {| | ||
Revision as of 14:10, 1 June 2012
Contents |
About DNS Manager For WHMCS
| ModulesGarden's DNS Manager for WHMCS is full featured addon module that allows your customers to manage the DNS zones. Owing to great choice of submodules and unprecedented functionality, the DNS Manager for WHMCS easily adapts to your specific needs. |
| ✔ cPanel |
| ✔ 4PSA |
| ✔ Zonomi |
| ✔ Opensrs |
| ✔ Rackspace |
| ✔ DNS.com |
| ✔ SimpleDNS |
| ✔ DirectAdmin |
| ✔ Add/Delete Zones |
| ✔ Add/Edit/Delete Zone Records |
| ✔ TWO CLIENT AREA TEMPLATES: 'One Page' and 'Subpages' |
| ✔ Allow Users To Create Zones |
| ✔ Providing DNS Management Only Together With The Order Of Specific Domain/Product/Addon |
| ✔ Default Records Configuration |
| ✔ NameServers Configuration |
| ✔ Zones List Management in Admin Area |
| ✔ Reverse DNS |
| ✔ MULTILANGUAGE |
| ✔ WHMCS V4 and V5 Compatibility |
Installation
| In this short tutorial we will show you how to successfully install DNS Manager For WHMCS. We will guide you step by step through the whole installation process. |
| 1. Login to your clientarea and download DNS Manager. |
| File:Step1DNS.png |
| 2. Upload and extract the module into the main whmcs directory. |
| Files in your whmcs directory should look like this. |
| File:Step2DNS.png |
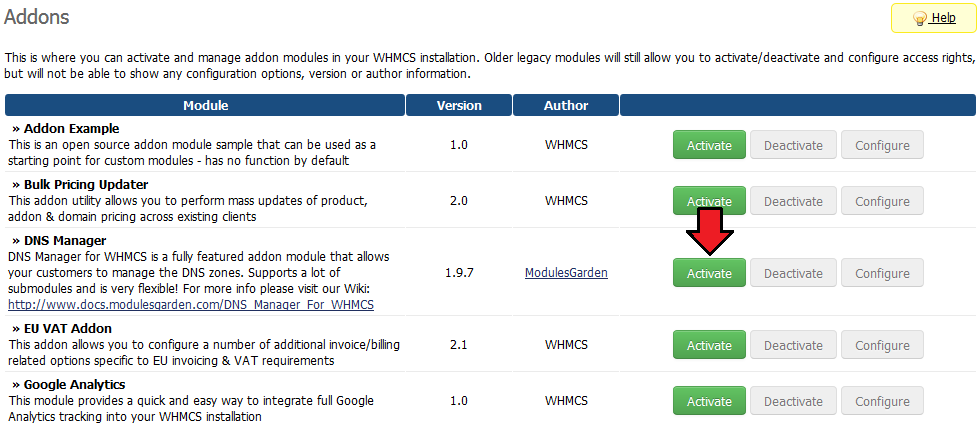
| 3. Now you have to activate the module in your WHMCS system. |
| Login to your WHMCS admin area. Click 'Setup' then choose 'Addon Modules' . |
| Afterwards find 'DNS Manager' and press Activate button. |
| File:Step3DNS.png |
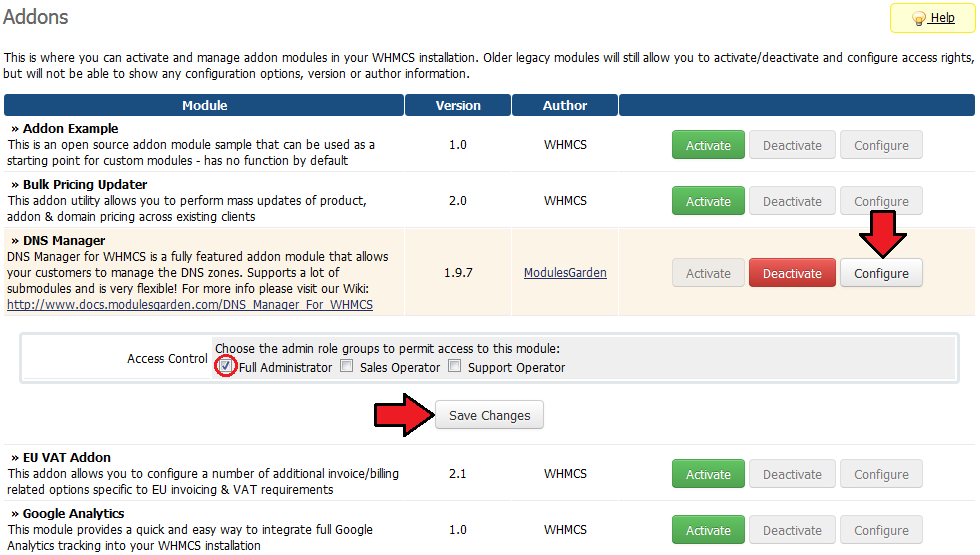
| 4. In next step you need to permit access to this module. |
| To do so click 'Addons' in main WHMCS menu. |
| Find DNS Manager and press Manage button as shown on the screen below. |
| File:Step4DNS.png |
| 5. Now choose 'Full Administrator' and press 'Save Changes' . |
| File:Step5DNS.png |
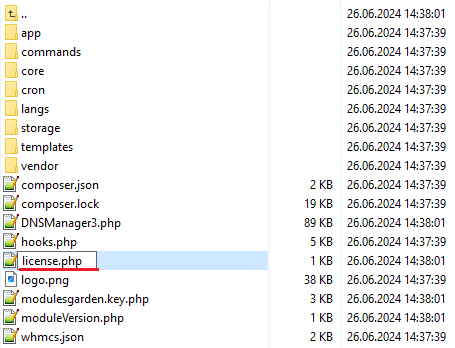
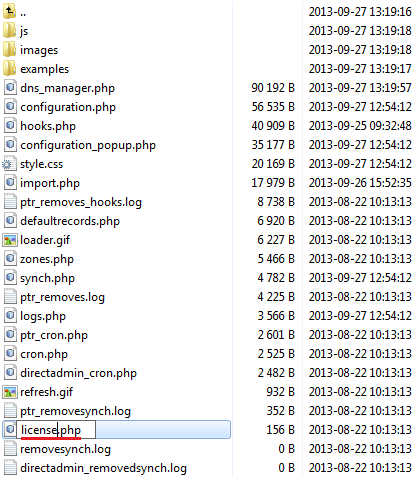
| 6. When you install DNS Manager for the first time you have to rename 'license_RENAME.php' file. |
| File is located at modules/addons/dns_manager/license_RENAME.php. Rename it from 'license_RENAME.php' to 'license.php' . |
| File:Step6DNS.png |
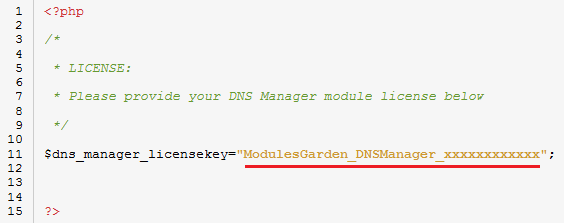
| 7. In order to configure your license key you have to edit a previously renamed 'license.php' file. |
| File is located at modules/addons/dns_manager/license.php. Enter your licence key between quotation marks as presented on the following screen. |
| You can find your license key at your clientarea -> 'My Products'. |
| File:Step7DNS.png |
| 8. After correct configuration of your license key, you have to configure 'clientareahome.tpl' file located in your currently used templates directory. |
| The screen below shows how you should properly configure 'clientareahome.tpl' file. |
| File:Step8DNS.png |
| For the purposes of presentation we will edit file in default template. Its localization is 'whmcs/templates/default/clientareahome.tpl' . |
| Here you can download 'clientareahome.tpl' file to see how this file should look like after proper configuring. |
| 8*. If you are using WHMCS v4, you have to rename (ex. dns_hooks.php) and copy 'modules/addons/dns_manager/hooks.php' to the 'includes/hooks/' directory. |
| 9. Good job! You have just successfully installed DNS Manager For WHMCS! Now in your WHMCS system press 'Addons' then press 'DNS Manager' . |
| You should see a following screen. |
| File:Step9DNS.png |
| To provide a DNS management in clientarea simply use this adress 'your_whmcs_url/clientarea.php?managedns' . Replace 'your_whmcs_url' with adress of your whmcs directory. |
| After you type the correct address you will see a screen as shown below. That's the proof that the entire installation process was successfully completed. |
| File:Step10DNS.png |
Configuration
Connection and basic configuration
| At the beginning let's connect DNS Manager with your module. We will show you this process by connecting with cPanel. |
| In your WHMCS click on 'Addons' then choose 'DNS Manager' . Go to 'Configuration -> Connection' section. |
| Choose Cpanel from a dropdown menu. Enter your username, user password, Hostname/IP and press 'Test Connection' . |
| After the appearance of the green sentence 'Connect Succuessful' you can press 'Save' . |
| Here you can also allow to create DNS zones when already in cPanel as account. |
| File:DNS1.png |
| Now press 'Name Servers' and enter the nameservers that will be visible for your customers in their clientarea. |

|
Configuration of processing
| In configuration section press 'Processing' . You will see a following screen. |
|
| There are several configuration options. We will present you each one of them. |
| You can allow DNS zones to create automatically with certain domains, products or products addons. You can also enable Reverse DNS here. |
| Beneath 'Automatically create zones:' mark for example 'With Product Addons' and select previously created addon/s. We chose 'Great Addon' . |
| That's it, press Save button. From now on DNS zones will be automatically created with product addon 'Great Addon' . |
|
| You can allow your customers to create their own DNS zones from clientarea for free. For this purpose tick 'Allow to create own zones' -> 'Free for all registered customers' and press 'Save' . |
| Afterwards all your registered clients will be allowed to create their own DNS zones regardless of registered domains or chosen products. |
|
| There is also an option to allow your customers to create their own DNS zones with for example certain product. |
| Tick 'Allow to create own zones' -> 'WithProducts' and select previously created product/s. We chose 'DNS Management Product' . |
| That's all, press Save button. Afterwards your customers will be allowed to create their own DNS zones only together with the order of this product. |
|
Managing DNS zones in clientarea
| Adding new DNS zone is very simple. First you need to provide a DNS management in clientarea. |
| For that purpose simply use this adress 'your_whmcs_url/clientarea.php?managedns' and replace 'your_whmcs_url' with adress of your whmcs directory. |
| Afterwards press 'Add Zone' |
| File:DNS11.png |
| In next step enter your zone name, IP adress and press 'Add Zone' . |
| File:DNS12.png |
| If the operation was successful, you will see a following screen. |
| In order to check your new DNS zone details press Edit button. |
| File:DNS13.png |
| You will see a screen similar to the one shown below. Here you can view and edit your zone's details. |
| File:DNS14.png |
Adding default records
| DNS Manager allows you to add your own default records to each DNS zone. In order to add new default record press 'Default Records' and 'Add New Record' . |
|
| Afterwards choose your record type from a dropdown menu, enter adress, proper TTL, value and press 'Save Changes' . |

|
| Now we will create new DNS zone to present you our new default record. Press the Edit button next to our new DNS zone. |
| Keep in mind that new default records will be added only to DNS zones created after adding a new record. Operation will not affect the already existing DNS zones. |
| File:DNS15.png |
| On the following screen you see can new default record successfully added to our DNS zone. |
| File:DNS16.png |
Managing Reverse DNS
| In order to enable Reverse DNS log in to your WHMCS. Press 'Addons' -> 'DNS Manager' -> 'Processing' and tick 'Enable Reverse DNS' . |
| File:DNS22.png |
| Now in your clientarea: 'your_whmcs_url/clientarea.php?managedns' click on 'Manage Reverse DNS' . |
| File:DNS10.png |
| Next, press Add button. |
| File:DNS17.png |
| Afterwards enter zone name, IP adress, value and press Add button once again. |
| File:DNS18.png |
| Your DNS zone and record have been successfully created. Now you can also edit your DNS zones. |
| File:DNS19.png |
Managing zones list
| List Zones allows you to monitor and manage your DNS zones. You can synchronize, create or delete zones from here. |
| Let's for example synchronize one of our DNS zones with the WHMCS system. For that purpose simply press 'Synchronize' . |
| File:DNS20.png |
| As you can see synchronization was successful and our zone exists. |
| File:DNS21.png |
Tips
| 1. To provide a DNS management in clientarea simply use this adress 'your_whmcs_url/clientarea.php?managedns' . Replace 'your_whmcs_url' with adress of your whmcs directory. |