Proxmox Mail Gateway For WHMCS
(→Server Configuration) |
(→Configuration of Product) |
||
| Line 130: | Line 130: | ||
|} | |} | ||
{| | {| | ||
| − | |style="padding: 0px 0px 20px 25px;"|[[File: | + | |style="padding: 0px 0px 20px 25px;"|[[File:PMG_11.png]] |
|} | |} | ||
{| | {| | ||
| Line 136: | Line 136: | ||
|} | |} | ||
{| | {| | ||
| − | |style="padding: 0px 0px 20px 25px;"|[[File: | + | |style="padding: 0px 0px 20px 25px;"|[[File:PMG_12.png]] |
|} | |} | ||
{| | {| | ||
| Line 143: | Line 143: | ||
|} | |} | ||
{| | {| | ||
| − | |style="padding: 0px 0px 20px 25px;"|[[File: | + | |style="padding: 0px 0px 20px 25px;"|[[File:PMG_13.png]] |
|} | |} | ||
{| | {| | ||
| − | |style="padding: 0px 0px | + | |style="padding: 0px 0px 20px 15px;"|'''13. Afterward, choose your product type, enter your product name, choose module and the product group from the dropdown menus. Press '' 'Continue'. '' ''' |
|} | |} | ||
{| | {| | ||
| − | |style="padding: 0px 0px 20px 25px;"|[[File: | + | |style="padding: 0px 0px 20px 25px;"|[[File:PMG_14.png]] |
|} | |} | ||
{| | {| | ||
| Line 156: | Line 156: | ||
|} | |} | ||
{| | {| | ||
| − | |style="padding: 0px 0px 20px 25px;"|[[File: | + | |style="padding: 0px 0px 20px 25px;"|[[File:PMG_15.png]] |
|} | |} | ||
{| | {| | ||
| − | |style="padding: 0px 0px | + | |style="padding: 0px 0px 20px 15px;"|'''15. Now, let's start configuring the product settings.''' |
|} | |} | ||
{| | {| | ||
| − | |style="padding: 0px 0px 20px 25px;"|[[File: | + | |style="padding: 0px 0px 20px 25px;"|[[File:PMG_16.png]] |
|} | |} | ||
{| | {| | ||
| − | |style="padding: 0px 0px | + | |style="padding: 0px 0px 20px 15px;"|The only option is :D |
|} | |} | ||
{| | {| | ||
| − | |style="padding: 0px 0px 30px 25px;"|[[File: | + | |style="padding: 0px 0px 30px 25px;"|[[File:PMG_17.png]] |
|} | |} | ||
Revision as of 12:45, 7 February 2022
Contents |
About Proxmox Mail Gateway For WHMCS
| Proxmox Mail Gateway For WHMCS allows |
- Admin Area Features:
| ✔ |
| ✔ |
| ✔ |
| ✔ |
| ✔ |
- Client Area Features:
| ✔ |
| ✔ |
- General Info:
| ✔ |
| ✔ |
| ✔ |
| ✔ |
| ✔ |
| ✔ Supports WHMCS V8.0 And Later |
| ✔ Easy Module Upgrade To Open Source Version |
Installation and Configuration
| This tutorial will show you how to successfully install and configure Payment Gateway Allocator For WHMCS. We will guide you step by step through the whole installation and configuration process. |
Installation
| 1. Log in to our client area and download the module. |
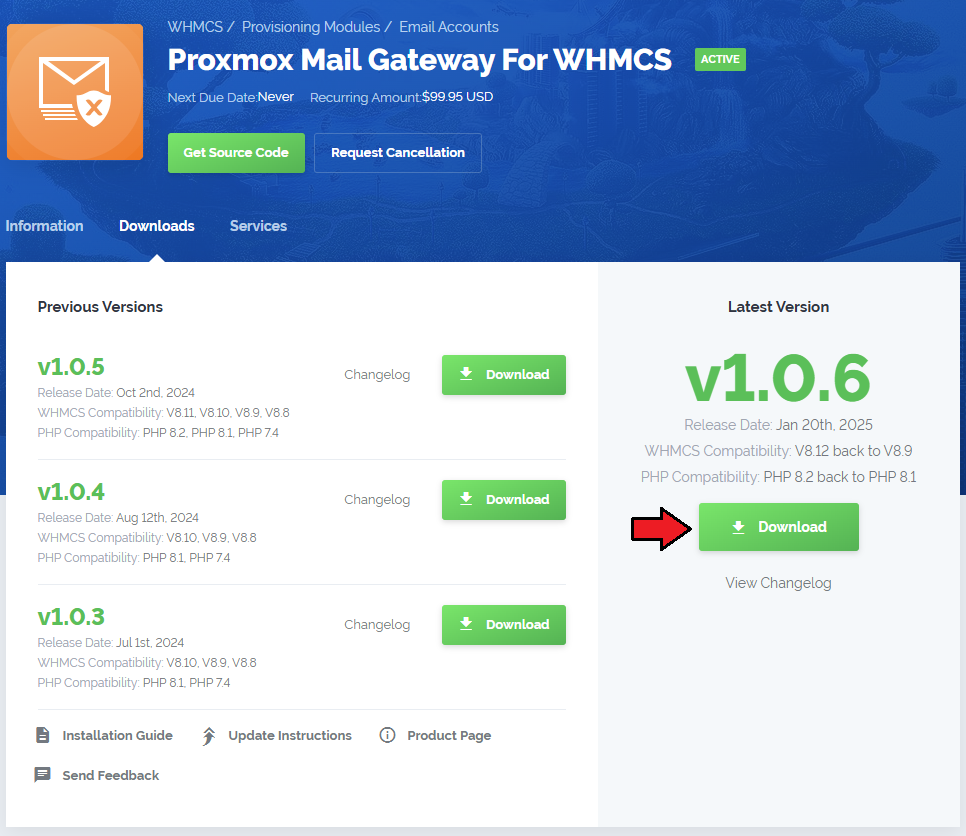
|
| 2. Upload and extract the extension into the main WHMCS directory. Extracted files in your WHMCS directory should look like this: |
| 3. When you install Proxmox Mail Gateway For WHMCS for the first time, you have to rename the 'license_RENAME.php' file. The file is located in '/yourWHMCS/modules/servers/ProxmoxMailGateway/license_RENAME.php'. Rename it from 'license_RENAME.php' to 'license.php'. |
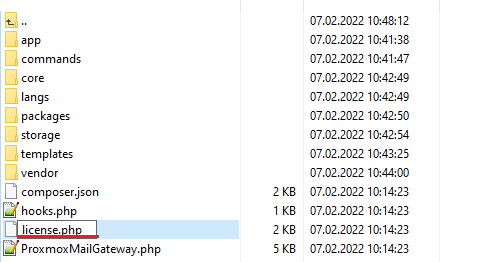
|
| 4. In order to configure your license key, you have to edit the previously renamed 'license.php' file. Enter your license key between the quotation marks as presented on the following screen. |

|
| 5. Now, set up the 'storage' folder as recursively writable. This folder is available at '/yourWHMCS/modules/servers/ProxmoxMailGateway/'. |
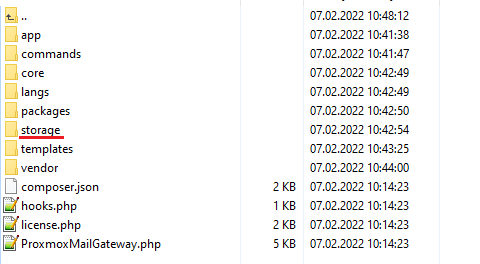
|
Server Configuration
| 10. Now, we will show you how to configure a new server. To do so, log into your WHMCS and go to 'System Settings' → 'Servers'. |
|
| 11. Next, enter your server name, hostnae and IP address, username and password. Choose 'ProxmoxMailGateway' from a dropdown menu and press 'Save Changes'. |
|
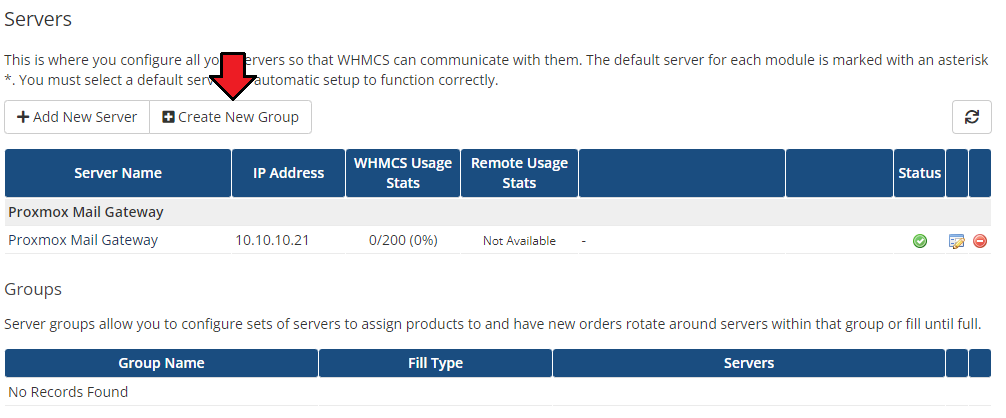
| 12. After you configure your server correctly, you will see the following screen. At this point, you need to create a new group for your server. For that purpose, press 'Create New Group'. |

|
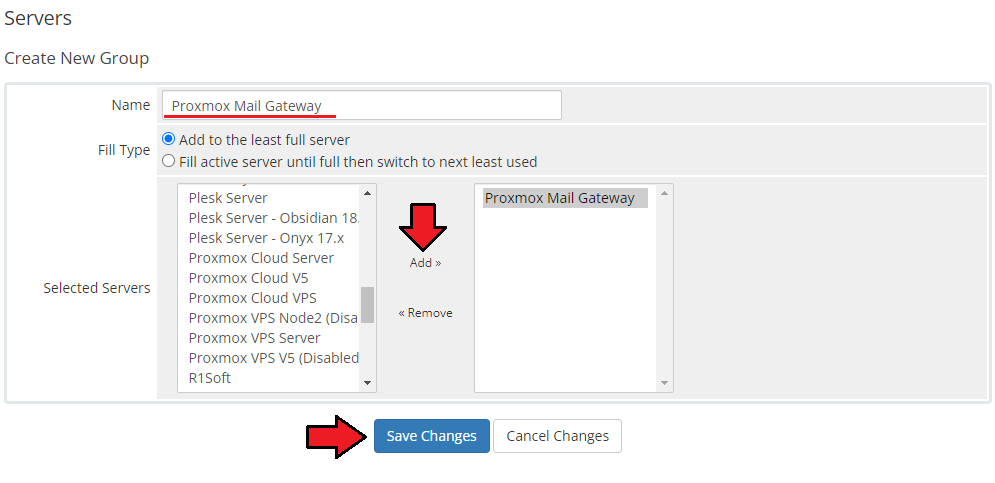
| 13. Enter the name, click on your previously created server, press 'Add' and then 'Save Changes'. |
|
Configuration of Product
| 10. In order to create and configure a product, go to 'System Settings' → 'Products/Services' → 'Products/Services'. Click on 'Create a New Group'. |

|
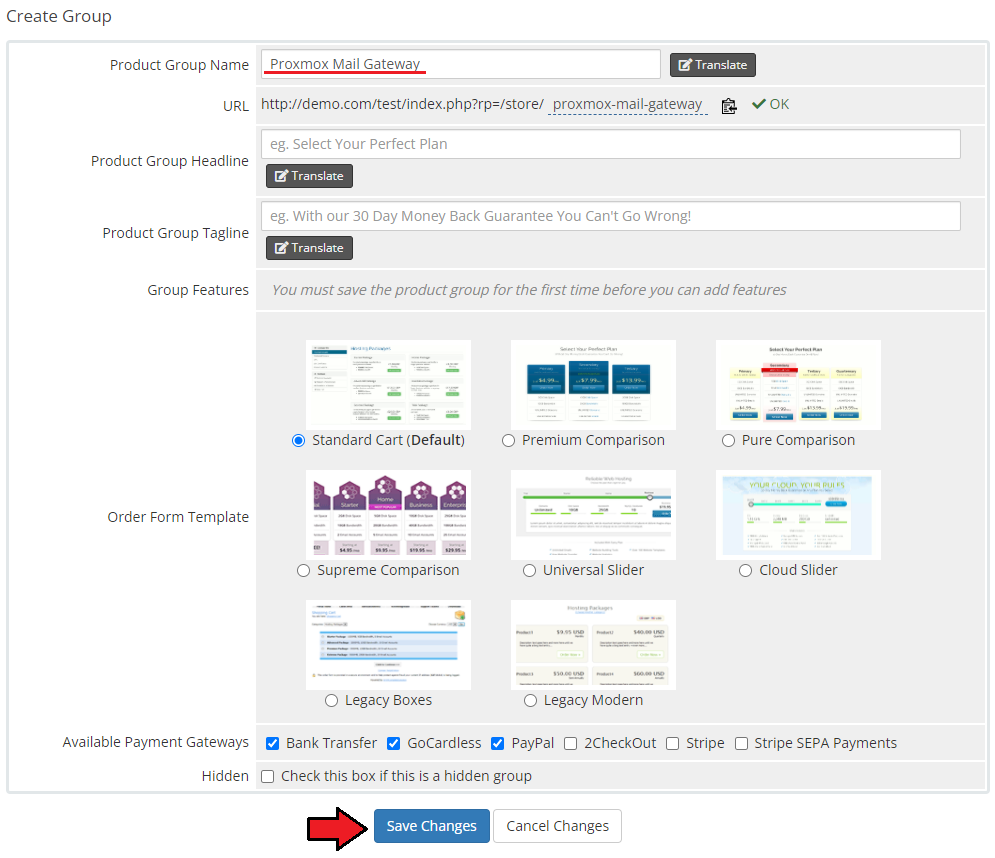
| 11. Enter your product group name and press 'Save Changes'. |

|
| 12. Once you have a product group, you can create a new product. To do so, first click on 'Create a New Product'. |
|
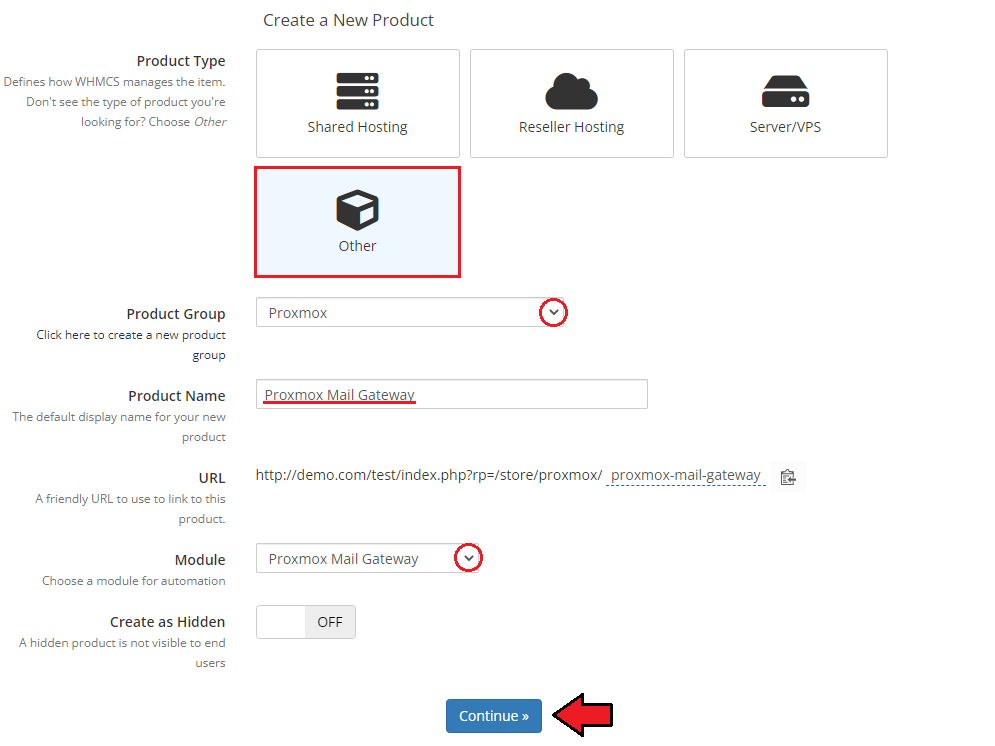
| 13. Afterward, choose your product type, enter your product name, choose module and the product group from the dropdown menus. Press 'Continue'. |
|
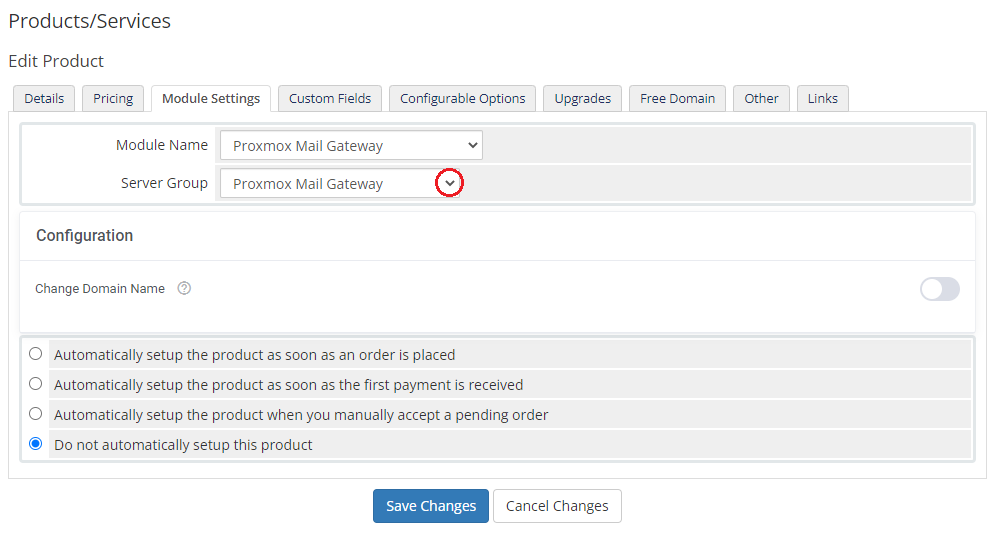
| 14. Now, go to the 'Module Settings' section, choose your previously created server group from the dropdown menu. If you did not set the proper permissions, you will be asked to do it now. |
|
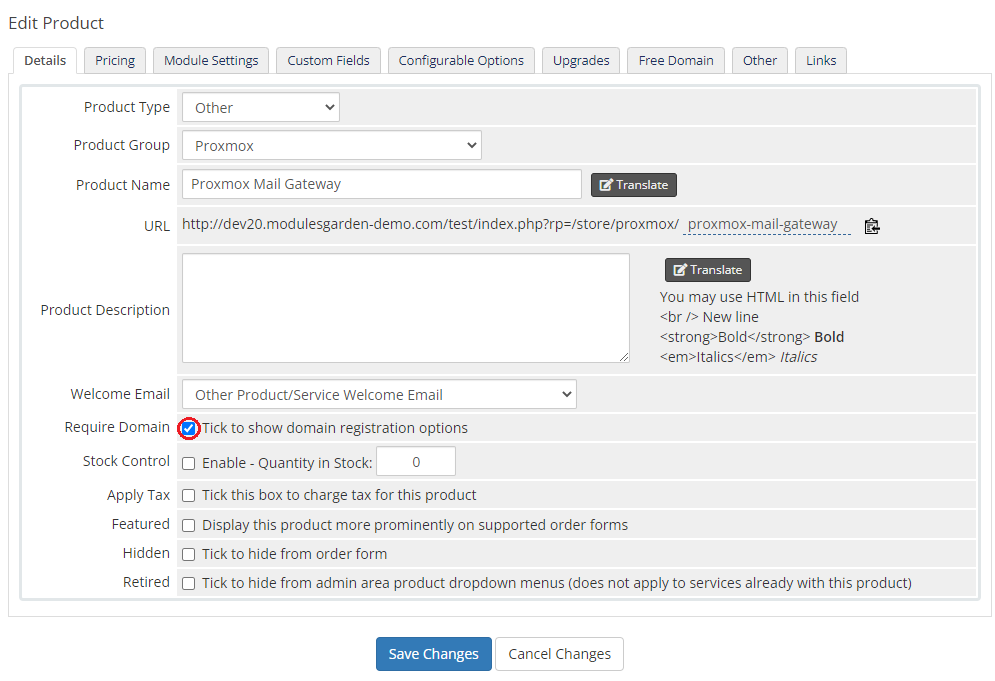
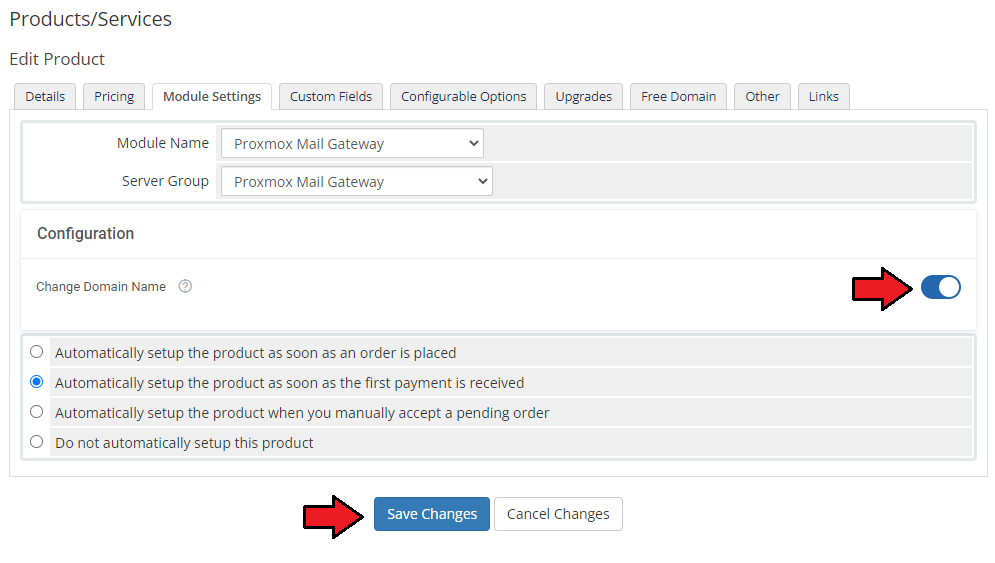
| 15. Now, let's start configuring the product settings. |
|
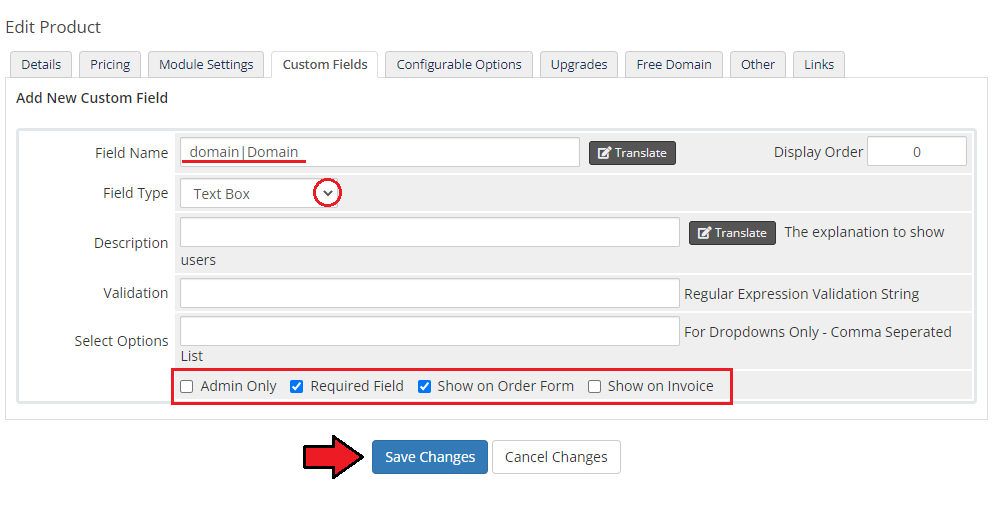
| The only option is :D |
|
Management
| In this section we will show you the possibilities |
Settings
| At th |

|
| In |
| File:PMG 9 1.png |
| File:PMG 9 2.png |
Tips
| 1. |
Update Instructions
| Essential guidance through the process of updating the module is offered here. Keep in mind there is a quick and easy option in our client area that will let you upgrade the license of your module to an open source version at any time - and at a lower price! |
Common Problems
| 1. When you have problems with connection, check whether your SELinux or firewall does not block ports. |