Cloud Billing For WHMCS
From ModulesGarden Wiki
(Difference between revisions)
|
|
| Line 163: |
Line 163: |
| | |} | | |} |
| | {| | | {| |
| − | |style="padding: 0px 0px 0px 30px;"|✔ Set Billing Data Colletcing Cron Frequency Per Day | + | |style="padding: 0px 0px 0px 30px;"|✔ Set Billing Data Collecting Cron Frequency Per Day |
| | |} | | |} |
| | {| | | {| |
Revision as of 16:09, 1 March 2021
| Cloud Billing For WHMCS is a sophisticated module that consists of:
|
| ✔ Google Cloud Billing For WHMCS
|
| ✔ Azure Billing For WHMCS (coming soon)
|
| ✔ Microsoft CSP Billing For WHMCS (coming soon)
|
Cloud Billing For WHMCS offers you a powerful billing model management of Google Cloud and Amazon Web Services to broaden your target audience.
The module allows you to gather all the services in one place, connect to the external platforms in two different ways - with the use of your account or your customer account.
Except for setting percentage billing margin for WHMCS products per service, you are given the possibility to generate detailed reports on billing management, earnings, resource usage per service, and much more.
|
| ✔ Efficiently Bill Customers For Management Of:
|
| ✔ Amazon Web Services (AWS)
|
| ✔ Earn From Your Percentage Margins Based On User Services
|
| ✔ Connect With Compute Services Using:
|
| ✔ Own Account With All Services Of Your Customers
|
| ✔ With Customers' Accounts To Keep Their Management Separate
|
| ✔ Keep Customers Up To Date With Their Current And Upcoming Costs
|
| ✔ Access Insightful Expenses, Earnings And Resources Usage Graphs
|
| ✔ View Dashboard Summaries:
|
| ✔ Invoices And Earnings Per Last Week/Month/Quarter/Year
|
| ✔ Most Profitable Clients
|
| ✔ Paid API Requests Usage
|
| ✔ Create Pricing Groups With Multiple Pricing Margins Per Services
|
| ✔ Assign WHMCS Products To Selected Pricing Groups
|
| ✔ Select Billing Method For Product:
|
| ✔ On WHMCS Invoice Generation
|
| ✔ Create And Manage Service Relations Between:
|
| ✔ Clients And Their WHMCS Products
|
| ✔ Default - Billing Services Based On Assigned Tag Names On Your AWS Account
|
| ✔ Organization - Bill Services Based On Provided Organization ID On Your AWS Account
|
| ✔ Custom Details - Bill All Services From Individual Customer AWS Account
|
| ✔ Label - Bill Resources Containing Provided Labels
|
| ✔ Project - Bill All Resources In Particular Account
|
| ✔ Total Paid And Charged Amount Per Client
|
| ✔ Current Usage With Cost And Charged Amount Per Service
|
| ✔ Changes Per Service Graph
|
| ✔ Generated Invoices Per Service
|
| ✔ View Created Invoices Per Client
|
| ✔ Provide Multiple API Credentials:
|
| ✔ To Your Individual Customers Accounts
|
| ✔ Run API Connection Test
|
| ✔ View Service Details, Usage And Charges From Client's Products/Services Tab
|
| ✔ Access Your License Information With Selected Plan Based On Current Income
|
| ✔ Set Billing Data Collecting Cron Frequency Per Day
|
| ✔ Toggle Debug Mode For API Request Logging
|
| ✔ View Current Usage Per Service
|
| ✔ View Charges Per Service Graph:
|
| ✔ Supports All Offered AWS And Google Cloud Services
|
| ✔ Supports Multiple AWS And Google Cloud Accounts
|
| ✔ Supports PHP 7.1 Up To PHP 7.4
|
| ✔ Supports WHMCS Themes "Six" And "Twenty-One"
|
| ✔ Supports WHMCS V7.9 And Later
|
| ✔ Amazon Web Services Account
|
Installation and Configuration
This tutorial will show you how to successfully install and configure Cloud Billing For WHMCS smoothly.
We will guide you step by step through the whole process.
|
Installation
| 1. Log in to our client area and download the module.
|
2. Upload and extract the extension into the main WHMCS directory.
Extracted files in your WHMCS directory should look like this:
|
3. When you install Cloud Billing For WHMCS for the first time, you have to rename the 'license_RENAME.php' file.
The file is located in 'modules/addons/CloudBilling/license_RENAME.php'. Rename it from 'license_RENAME.php' to 'license.php'.
|
4. In order to configure your license key, you have to edit the previously renamed 'license.php' file.
Enter your license key between quotation marks as presented on the following screen. You can find your license key in our client area → 'My Products'.
|
5. In the next step, set up the 'storage' folder as recursively writable.
This folder is available at 'your_whmcs/modules/addons/CloudBilling/' .
|
Activating Addon Module
6. Now, you have to activate the module in your WHMCS system.
Log in to your WHMCS admin area. Go to 'System Settings' → 'Addon Modules'. Afterward, find 'Cloud Billing' and press the 'Activate' button.
|
7. In the next step, you need to grant access to this module.
To do so, click on the 'Configure' button, go to the 'Access Control' area and check the required admin role groups. Press 'Save Changes'.
|
| 8. Good job! You have just successfully installed Cloud Billing For WHMCS! Now in your WHMCS press 'Addons' and then 'Cloud Billing'.
|
AWS Billing For WHMCS
9. In order to continue the configuration process. At first, proceed to the 'API Credentials' section as presented on the screen.
|
To complete the previous step and connect to the platform properly, you need to generate your AWS access details.
Underneath, you will find detailed instructions on where to find this information.
|
| 11. There, move to the 'Access Keys (access key ID and secret access key)' section.
|
| 12. If you do not have any active keys yet, then press the 'Create New Access Key' button to generate a new set of details.
|
13. A modal with Access Key ID and Secret Access Key will appear, so copy this information and keep it safe. You may also download a suitable file with these details.
Note: This is the only place where you can find the corresponding secret key later. It will not be visible next to the Key ID in the panel.
|
| 14. Now, come back the 'API Credentials' section and press the 'Add Credentials' button. In the new pop-up window, provide a name, API Key, API Secret.
|
| In the new pop-up window, provide a name, API Key, API Secret. Press 'Add' when ready.
|
| 15. To check if the entered data is correct, click on the 'Test Connection' button.
|
Google Cloud Billing For WHMCS
| Before you can go on, you must configure your google service account appropriately and then generate your Google Cloud access details. You will need them to create connection between the module and the Google Cloud server.
|
Billing Export
| Underneath, you will find instructions on how to export billing data and create datasets. This step is obligatory and without proper configuration here the module will not work correctly.
9. At first, proceed to 'Billing' → 'Billing Export' section of your project. There under 'Daily Cost Detail' press 'Edit Settings'.
|
10. Now create a BigQuery dataset.
This step is crucial for the whole module managemnt. Billing datasets are generated now, they will be assigned to services in the module to allow their billing.
|
| Enter the dataset ID and select localisation (the same for the project and the dataset).
|
| A new table with billing data should appear in the Explorer in a while.
|
API Credentials
11. Next, you will have to create your personal login credentials.
You will need them to successfuly connect the Cloud Billing module with the platform.
Move to 'APIs & Service' → 'Credentials'. There press '+ Create Credentials' → 'Service Account'.
|
| 12. Provide the serivce account details and press 'Create'. You will be automatically moved to the next step.
|
13.Grant the service account access to the project, add two roles:
- BigQuery Job User
- BigQuery Resource Viewer
If you need you may grant users access to the service account, however, this step is not required. Press 'Done' when everything is ready.
|
| 14. Next, open the service accunt details by pressing the icon. You will have to add a new JSON key to the just generated credentials.
|
| 15. When you have the service account detils open, find 'Add Key' at the page bottom. Select 'Create new key'.
|
16. Select the key type - 'JSON' and creat it. A JSON format file will be immediatelly saved on your disk.
Keep it save as there is no way to download it again. You will need it in a moment.
|
| Underneath you may see how an exemplary content of a JSON file may look like.
|
| 17. Move to your 'WHMCS' → 'Addons' → 'Cloud Billing'. There open the 'API Credentials' section and add new credentials.
|
18. Select credentials type - in our case, that will be 'Google Cloud' and type in your custom name for this entry.
In the 'JSON File Content' field paste the input of the file that you have just saved, make sure you are pasting the exact content of that file, otherwise, the connection will fail.
|
| 19. New Credentials appear on the list, test the connection to make sure everything is working as expected.
|
Management
Pricing Groups
| In this section, you can easily create new pricing groups. To do so, please click on the button as shown below.
|
Here, you will be asked to provide a group name and set up the default pricing margin.
Note: The default pricing margin means the percentage that will be added to the invoice.
If you do not define the margin for a particular product, then the module will use the margin which is given in the 'Others' field.
Example: If the Amazon's charge is 10$ and we set up 20% margin, the client will receive an invoice for 12$.
|
| If you wish to add more payable services, click on the 'Add Billing Service' button to add a new one.
|
| Next, you can choose the services that will be payable.
Note: Please remember that if you do not select any service type from the drop-down list, the pricing margin that you enter will be automatically assigned to the 'Other' service type.
|
| Pricing groups may be easily edited. If you wish to delete any of your pricing groups, firstly, make sure that the particular pricing group is not used anywhere. Otherwise, you will not be able to delete it.
|
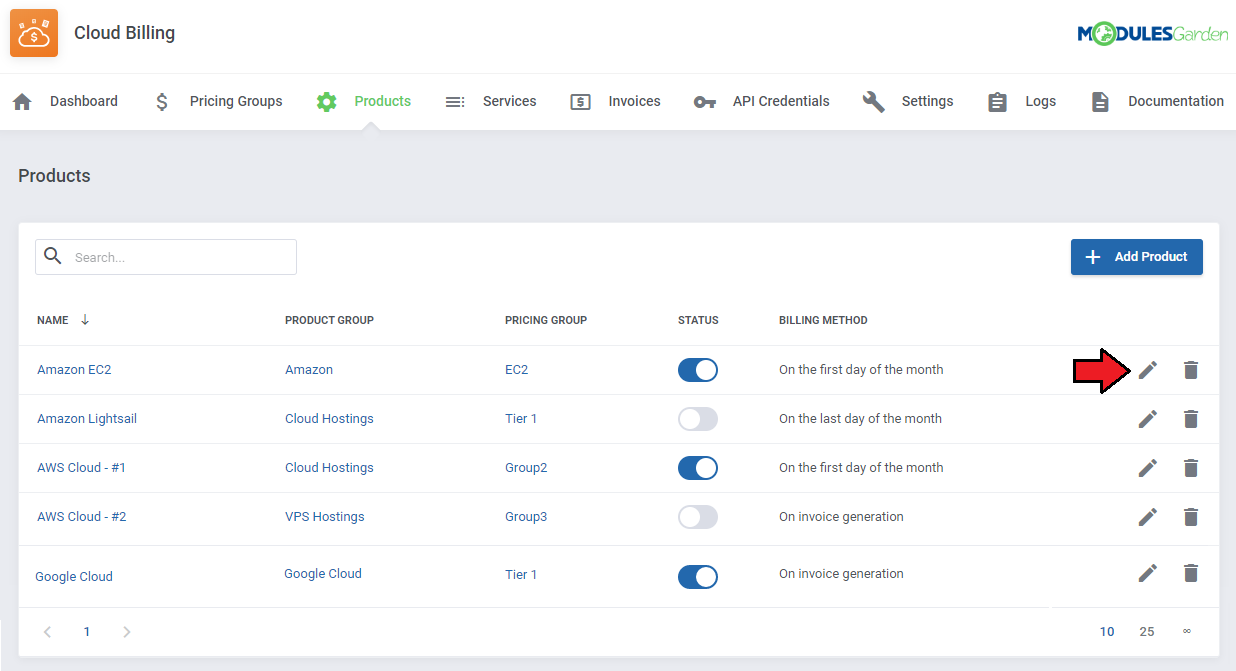
Products
| The 'Products' section grants you a possibility to add a new product and assign a pricing group to it. Moreover, you can select one of three available billing methods which will be allotted to the newly created product.
|
| This image presents what the summary of your products should look like:
|
| If you wish to disable a particular product, just click the following button:
Note: Please remember that a disabled product may be activated again anytime.
|
| If you need to introduce some changes to your product, then click on the 'Edit' button. If some products are no longer necessary, then 'Delete' them.
|
|
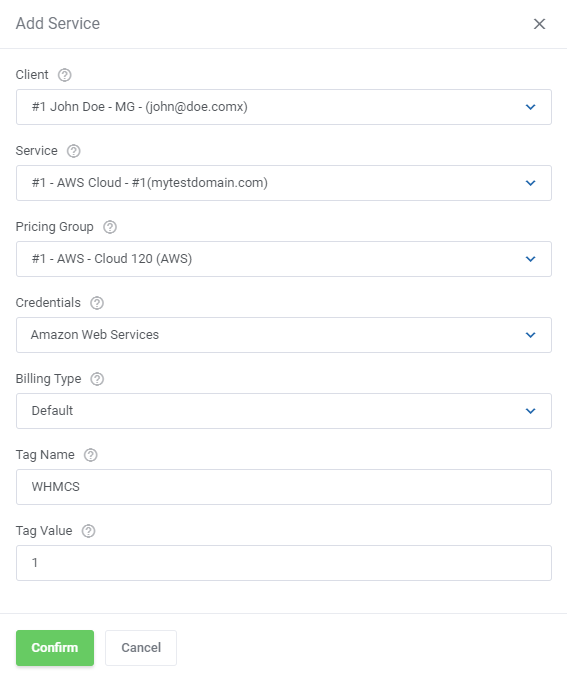
Services
| Under this tab, new services can be added. To do so, click the 'Add Service' button.
|
In the newly opened window, you will be asked to complete the following information:
|
Amazon type services:
- 'Client' - select one of your clients,
- 'Service' - choose one service which was ordered by your client,
- 'Pricing Group' - decide which of the previously created pricing groups should be allotted to this service,
- 'Credentials' - if you created more than one credentials then you can define which one will be assigned to this service,
- 'Billing Type' - determines the way of searching the resources that your clients will be billed for, there are three options available:
- 'Default' – all resources containing a tag name provided by you will be billed,
For instance, when you enter ‘WHMCS’ in the 'Tag Name' field, this entry with the value of the service will be automatically searched for in a dedicated platform
- 'Organization' – all resources in a particular company will be billed, type in the organization ID then
- 'Custom details' – all resources in a particular account will be billed. The module connects to AWS and sums everything that is available there,
- 'Organization ID' - enter the ID if you have selected 'Organization' in the 'Billing Type' selection
- 'Tag Name' – if you wish your services to be filtered according to the particular tag name.
Make sure the used tag has been activated under 'AWS Billing Dashboard' → 'Cost Allocation Tags'.
Important: The tag name entered in the Cloud Billing module must be exactly the same as the tag name provided in the EC2 [1] or Lightsail [2] products module settings, whether it is a default 'WHMCS' or a custom one.
|
|
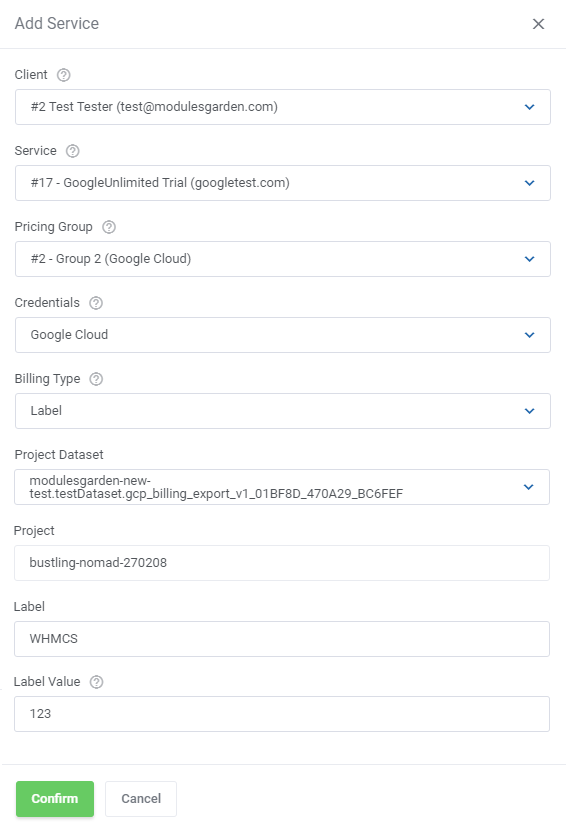
Google Cloud type services:
- 'Client' - select one of your clients,
- 'Service' - choose one service which was ordered by your client,
- 'Pricing Group' - decide which of the previously created pricing groups should be allotted to this service,
- 'Credentials' - if you created more than one credentials then you can define which one will be assigned to this service,
- 'Billing Type' - determines the way of searching the resources that your clients will be billed for, there are three options available:
- 'Label' – all resources containing labels provided by you will be billed,
For instance, when you enter ‘WHMCS’ in the 'Label' field, this entry with the value of the service will be automatically searched for in a dedicated platform
- 'Project (Custom details)' – all resources in a particular account will be billed. The module connects to Google Cloud and sums everything that is available there,
- 'Project Dataset' - Choose from available the dataset that will be assigned to this service
- 'Project' - Enter the project ID name, instance that will be assigned to this service must belong to this project
- 'Label' – if you wish your services to be filtered according to the particular label
Important: The label entered in the Cloud Billing module must be exactly the same as the label manually created in the virtual machine details on the Google Cloud Platform.
Remember to add an appropriate ID number to the label in the Google Cloud Platform when creating it. You will find it in the last position of the service details URL, e.g.: 'http://your_whmcs/test/admin/....id=7'
For example:
Label: WHMCS (module)
Label: WHMCS 7 (Google Cloud platform)
|
|
Here you can check what the newly added service looks like:
|
If you wish to check more details, press the following button.
|
Now, you will be redirected to a new subpage.
|
Please remember that there is a difference between 'Cost' and 'Charge Amount' in the 'Current Usage' section.
- 'Cost' refers to the amount that is billed by Amazon.
- 'Charge Amount' is the amount that your client will be billed.
|
If any values for usage have been counted, there will be a possibility to create invoices. To generate an invoice, simply press the icon as shown in the picture:
|
Settings
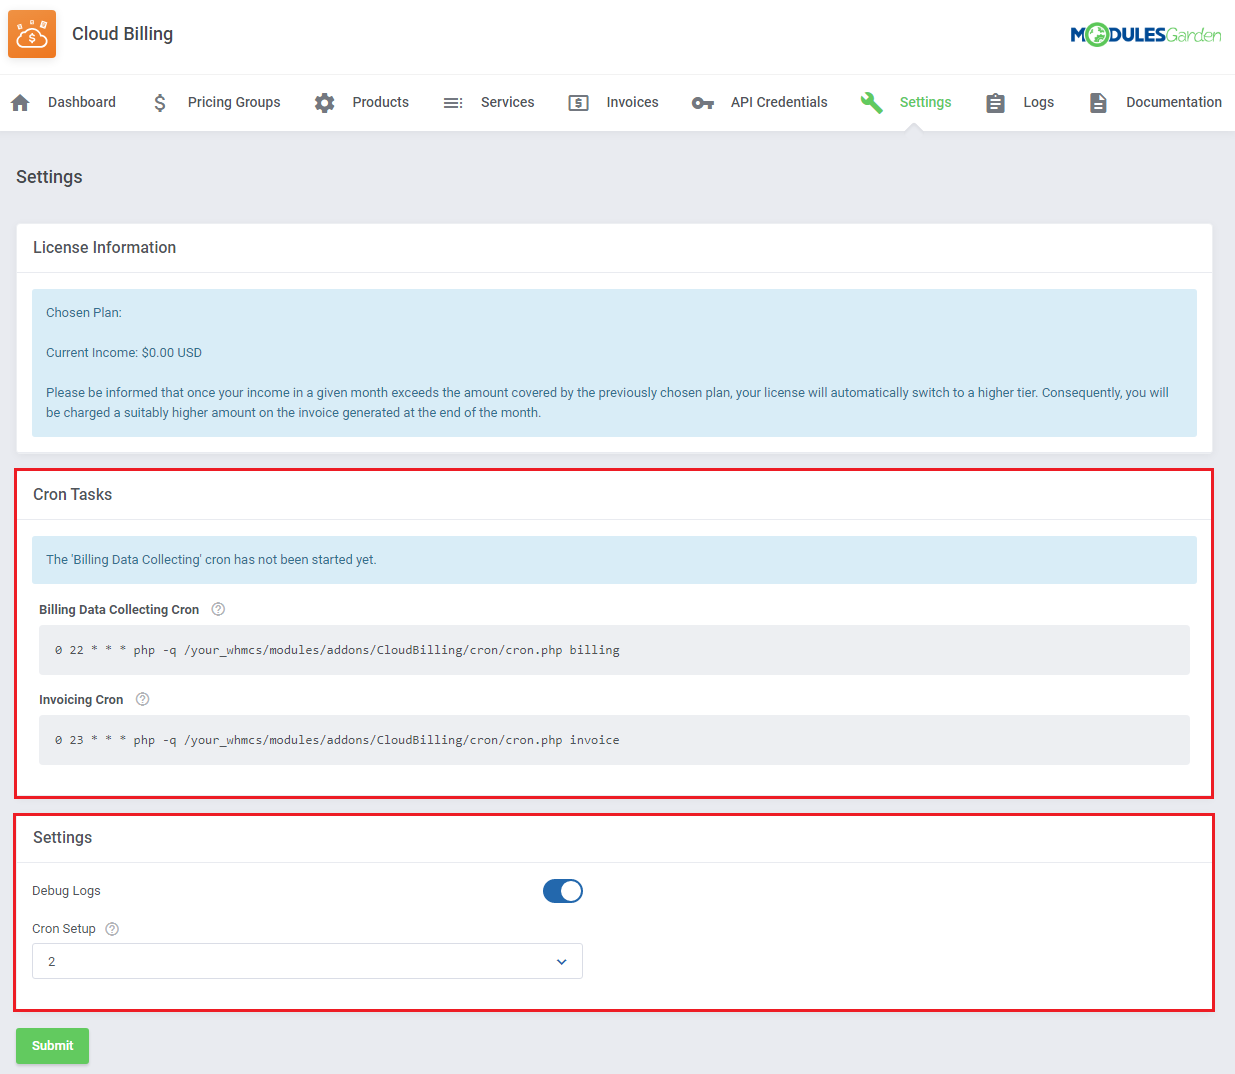
| In order to collect the data properly, the following cron tasks may be needed.
Note: Please remember that the following picture is only a suggestion how to set up cron and of course it can be modified by you.
Keep in mind that each cron should be used once a day because Amazon charges for every API request.
Note: It is possible to collect your 'Billing Data' from the preferred period of time. To do so, add date range --from --to at the end of your cron command as shown in the following example:
php -q /your_whmcs/modules/addons/CloudBilling/cron/cron.php billing --from 2020-01-05 --to 2020-01-10
Once you enter this command, you will receive the 'Billing Data' from 05.01.2020 to 10.01.2020.
To obtain precise information, we highly recommend performing the 'Billing Data Collecting' cron at 22:00 UTC time and the 'Invoicing' cron at 23:00 UTC time.
You may also define the 'Cron Setup' by providing one of the following values: 1, 2, 3, 4, 6, 8 that can be selected from the dropdown menu.
These are the factors of 24. As an example, if you choose '4' then the cron task will be run 4 times within 24 hours (about every 6 hours).
|
|
Dashboard
| It is possible to count the number of your API requests as well as their cost. This option is located at the bottom of the ‘Dashboard’ section.
|
Invoices
All generated invoices are gathered in the 'Invoices' tab.
Here you can check the most essential information of a particular invoice such as 'ID' , 'Client' , 'Status' , 'Amount' and the creation date. The search box allows you to filter invoices of a particular client.
|
In order to check the details of a specific invoice, please click the info button as presented below:
|
| Next, you will be redirected to the details of the selected invoice.
|
Logs
The 'Logs' section stores the history of all actions performed in the module.
If you wish to filter the history by one of these options: 'ID' , 'Service ID' , 'Message' , 'Type' , 'Date' , simply click on the preferred one.
|
There is a possibility to delete the selected item from the 'Logs' section by pressing the following icon.
|
Documentation
| Once you click on the 'Documentation' section, you will be redirected to the website you are currently reading.
|
Admin Area
| Cloud Billing For WHMCS allows you to monitor and manage your customer services from the admin area of your WHMCS system.
This includes supervision of such features as:
- Module commands to allow easy and quick management of the service,
- Service details
- Current Usage
- Charges per Service
- Resources Costs
- Service Invoices
|
Client Area
In the client area, proceed to 'My Products&Services' → 'Product Details' .
Here, you can check the 'Current Usage' as well as 'Charges per Service' which can be modified according to your preferences.
|
Once clicked on the edit icon, a new pop-up will show up.
|
| Here, you can select a type of your service and choose a time frame for a graph from these available ones: 'Current Month' , 'Last Month' , 'Last Quarter' , 'This Year' .
|
Update Instructions
| An essential guidance through the process of updating the module is offered here.
|
Common Problems
| 1. When you have problems with connection, check whether your SELinux or firewall does not block ports.
|
|


