Hosting Quota Notifications 1.X For WHMCS
(Blanked the page) |
|||
| Line 1: | Line 1: | ||
| + | <meta name="keywords" content="EasyDCIM for whmcs, EasyDCIM configuration, whmcs EasyDCIM management, whmcs EasyDCIM installation, whmcs EasyDCIM common problems, about whmcs EasyDCIM, whmcs EasyDCIM documentation, whmcs EasyDCIM faq, whmcs EasyDCIM help, whmcs EasyDCIM guide, whmcs EasyDCIM wiki, whmcs EasyDCIM tutorial, whmcs EasyDCIM tips, whmcs EasyDCIM wiki"></meta> | ||
| + | <meta name="description" content="ModulesGarden Wiki Contains All The Information You Need About The EasyDCIM For WHMCS Module."></meta> | ||
| + | =About [http://www.modulesgarden.com/products/whmcs/easydcim/features EasyDCIM For WHMCS]= | ||
| + | {| | ||
| + | |style="padding: 10px 0px 10px 0px;"|'''EasyDCIM For WHMCS''' will allow you to move provisioning and management of bare metal servers directly to your WHMCS.<br /> | ||
| + | Module will let your clients overview and manage their servers directly from your client area. They will be able to e.g. reboot servers, manage rDNS records or view bandwidth graphs.<br /> | ||
| + | You will be also allowed to monitor, assign and manage all your EasyDCIM regardless of whether they are already ordered by your WHMCS customers or not. | ||
| + | |} | ||
| + | <!-- fixed --> | ||
| + | *'''Client Area Features:''' | ||
| + | {| | ||
| + | |style="padding: 10px 0px 0px 30px;"|✔ Power On/Off Server | ||
| + | |} | ||
| + | {| | ||
| + | |style="padding: 0px 0px 0px 30px;"|✔ Assign SoftLayer Server To Hosting | ||
| + | |} | ||
| + | {| | ||
| + | |style="padding: 0px 0px 10px 30px;"|✔ Assign Hosting To Unassigned SoftLayer Server | ||
| + | |} | ||
| + | *'''General Info:''' | ||
| + | {| | ||
| + | |style="padding: 10px 0px 0px 30px;"|✔ Supports Bare Metal Servers | ||
| + | |} | ||
| + | {| | ||
| + | |style="padding: 0px 0px 0px 30px;"|✔ Multi-Language Support | ||
| + | |} | ||
| + | {| | ||
| + | |style="padding: 0px 0px 0px 30px;"|✔ Supports PHP 5.3 Up To PHP 7 | ||
| + | |} | ||
| + | {| | ||
| + | |style="padding: 0px 0px 0px 30px;"|✔ Supports WHMCS Templates Five and Six | ||
| + | |} | ||
| + | {| | ||
| + | |style="padding: 0px 0px 30px 30px;"|✔ Supports WHMCS V6 and V7 | ||
| + | |} | ||
| + | |||
| + | =Installation and Configuration= | ||
| + | {| | ||
| + | |style="padding: 10px 0px 30px 15px;"|'''This tutorial will show you how to successfully install and configure EasyDCIM For WHMCS.''' <br /> | ||
| + | We will guide you step by step through the whole installation and configuration process. | ||
| + | |} | ||
| + | ==Installation== | ||
| + | {| | ||
| + | |style="padding: 10px 0px 20px 15px;"|'''1. Log in to your client area and download EasyDCIM For WHMCS.''' | ||
| + | |} | ||
| + | {| | ||
| + | |style="padding: 0px 0px 20px 25px;"|[[File:ED_1.png]] | ||
| + | |} | ||
| + | {| | ||
| + | |style="padding: 0px 0px 15px 15px;"|'''2. Upload and extract the module into the main WHMCS directory.'''<br /> | ||
| + | Files in your WHMCS directory should look like these. | ||
| + | |} | ||
| + | {| | ||
| + | |style="padding: 0px 0px 20px 25px;"|[[File:ED_2.png]] | ||
| + | |} | ||
| + | |||
| + | ==Configuration of Product== | ||
| + | {| | ||
| + | |style="padding: 10px 0px 20px 15px;"|'''3. Proceed to '' 'Setup' '' → '' 'Products/Services' '' → '' 'Products/Services' '' and press '' 'Create a New Group'. ''''' | ||
| + | |} | ||
| + | {| | ||
| + | |style="padding: 0px 0px 20px 25px;"|[[File:ED_5.png]] | ||
| + | |} | ||
| + | {| | ||
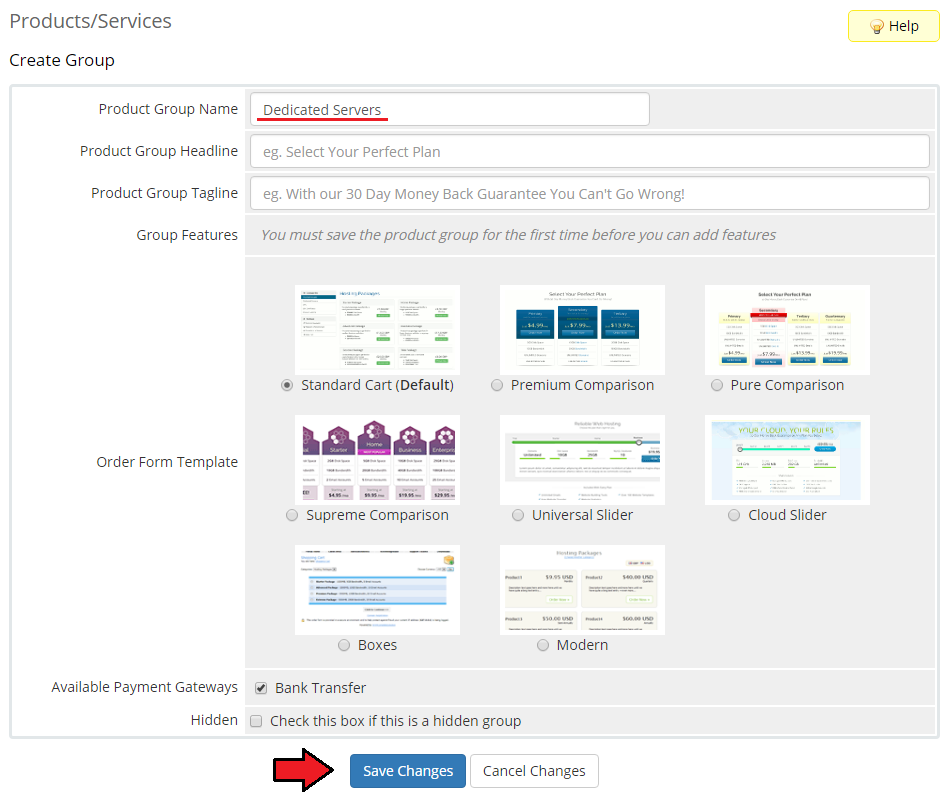
| + | |style="padding: 0px 0px 20px 15px;"|'''6. Enter product group name and press '' 'Save Changes'. ''''' | ||
| + | |} | ||
| + | {| | ||
| + | |style="padding: 0px 0px 20px 25px;"|[[File:ED_6.png]] | ||
| + | |} | ||
| + | {| | ||
| + | |style="padding: 0px 0px 15px 15px;"|'''7. When you have a product group, you can create your product.'''<br /> | ||
| + | To do so, click on '' 'Create a New Product'. '' | ||
| + | |} | ||
| + | {| | ||
| + | |style="padding: 0px 0px 20px 25px;"|[[File:ED_7.png]] | ||
| + | |} | ||
| + | {| | ||
| + | |style="padding: 0px 0px 20px 15px;"|'''8. Fill in product name, select previously created product group and press '' 'Continue'. ''''' | ||
| + | |} | ||
| + | {| | ||
| + | |style="padding: 0px 0px 20px 25px;"|[[File:ED_8.png]] | ||
| + | |} | ||
| + | {| | ||
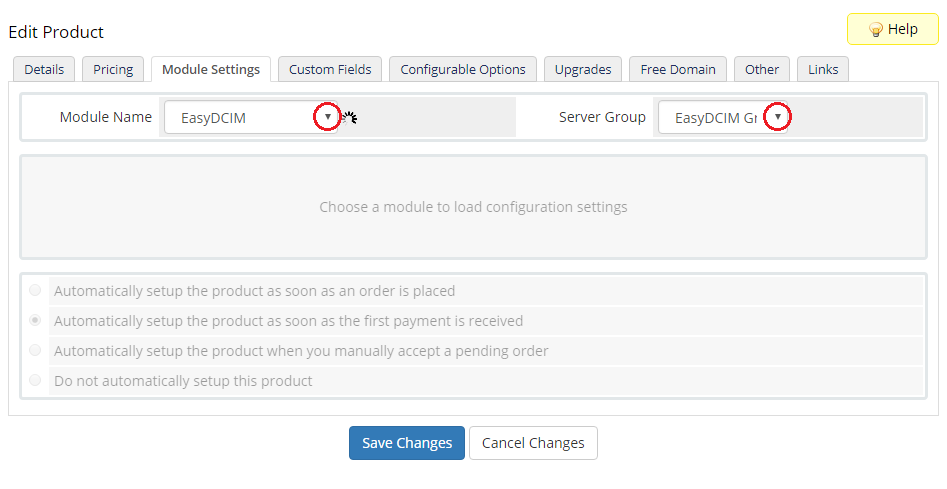
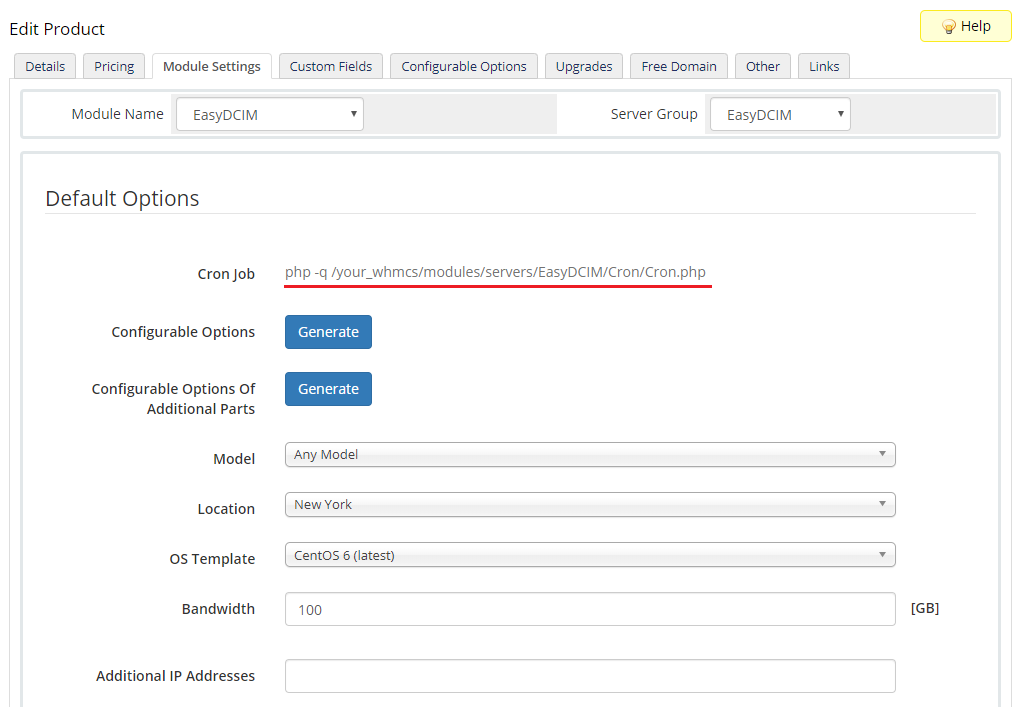
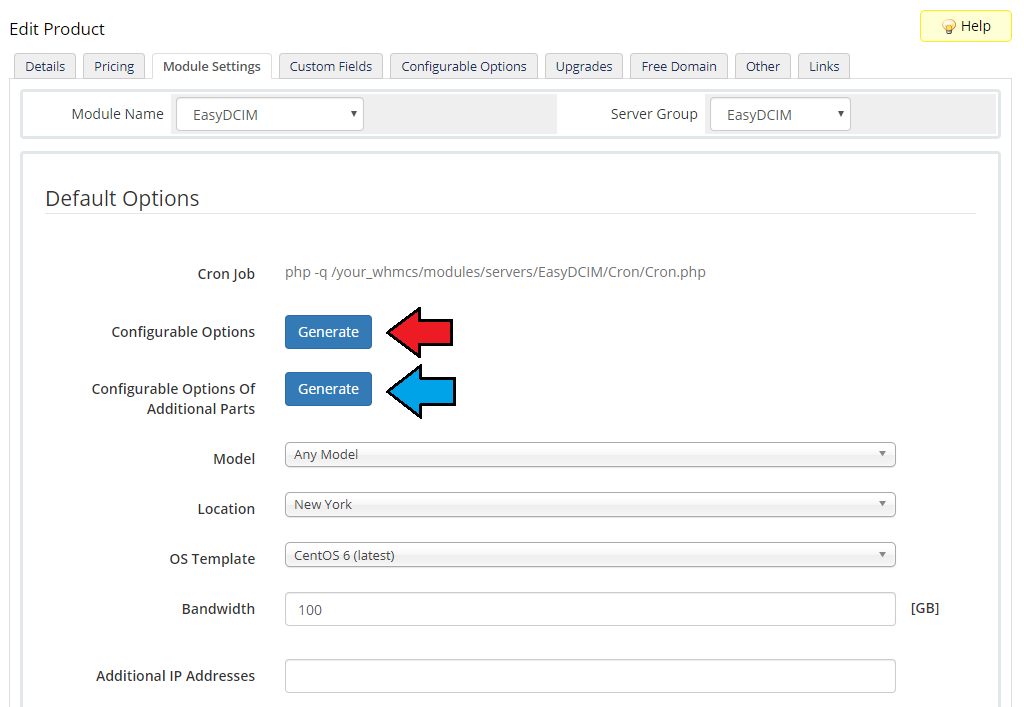
| + | |style="padding: 0px 0px 15px 15px;"|'''9. Go to '' 'Module Settings' '' tab, choose '' 'SoftLayer' '' from '' 'Module Name' '' dropdown menu and fill in the fields with your SoftLayer API access details.'''<br /> | ||
| + | Additionally, you can enable features available in the client area.<br /> | ||
| + | These features are: bandwidth graphs, rDNS management, reboot management and power management.<br /> | ||
| + | Press '' 'Save Changes' '' as soon as you have finished.<br /> | ||
| + | ''Note: You should use API access details of main user (which can be recognized by '' 'SL''' prefix in the username) otherwise servers status will not be displayed correctly.'' | ||
| + | |} | ||
| + | {| | ||
| + | |style="padding: 0px 0px 30px 25px;"|[[File:ED_9.png]] | ||
| + | |} | ||
| + | |||
| + | ==Configuration of Addon== | ||
| + | {| | ||
| + | |style="padding: 10px 0px 15px 15px;"|'''10. Now you have to activate the module in your WHMCS system.'''<br /> | ||
| + | Log in to your WHMCS admin area. Go to the '' 'Setup' '' → '' 'Addon Modules'. '' Afterwards, find '' 'SoftLayer Control Panel' '' and press '' 'Activate' '' button. | ||
| + | |} | ||
| + | {| | ||
| + | |style="padding: 0px 0px 20px 25px;"|[[File:ED_10.png]] | ||
| + | |} | ||
| + | {| | ||
| + | |style="padding: 0px 0px 15px 15px;"|'''11. In the next step you need to permit access to this module.'''<br /> | ||
| + | To do so click on '' 'Configure' '' button, tick '' 'Access Control' '' near desired admin role groups and press '' 'Save Changes'. '' | ||
| + | |} | ||
| + | {| | ||
| + | |style="padding: 0px 0px 20px 25px;"|[[File:ED_11.png]] | ||
| + | |} | ||
| + | {| | ||
| + | |style="padding: 0px 0px 15px 15px;"|'''12. It is time to configure addon API connection.'''<br /> | ||
| + | Go to '' 'Addons' '' → '' 'SoftLayer Control Panel' '' → '' 'Configure'. ''<br /> | ||
| + | Now, choose previously created EasyDCIM product and press '' 'Save' '' to load API access details from it. | ||
| + | |} | ||
| + | {| | ||
| + | |style="padding: 0px 0px 20px 25px;"|[[File:ED_12.png]] | ||
| + | |} | ||
| + | {| | ||
| + | |style="padding: 0px 0px 30px 15px;"|'''12. You have just successfully installed EasyDCIM For WHMCS!''' | ||
| + | |} | ||
| + | |||
| + | =Management= | ||
| + | {| | ||
| + | |style="padding: 10px 0px 30px 15px;"|'''At this section we will show you possibilities of EasyDCIM For WHMCS.'''<br /> | ||
| + | Our module allows you to offer EasyDCIM via your WHMCS system.<br /> | ||
| + | In addition to that, you can easily manage your servers owing to SoftLayer Control Panel addon. | ||
| + | |} | ||
| + | ==Workflow - From Order To Created Server== | ||
| + | {| | ||
| + | |style="padding: 10px 0px 15px 15px;"|Now, we will show you what steps need to be taken to prepare server to be used by a client.<br /> | ||
| + | 1. Client orders EasyDCIM from your WHMCS client area. | ||
| + | |} | ||
| + | {| | ||
| + | |style="padding: 0px 0px 20px 25px;"|[[File:ED_13.png]] | ||
| + | |} | ||
| + | {| | ||
| + | |style="padding: 0px 0px 20px 15px;"|2. You will receive an email with server creation request. | ||
| + | |} | ||
| + | {| | ||
| + | |style="padding: 0px 0px 20px 25px;"|[[File:ED_14.png]] | ||
| + | |} | ||
| + | {| | ||
| + | |style="padding: 0px 0px 20px 15px;"|3. Log in to your SoftLayer panel. | ||
| + | |} | ||
| + | {| | ||
| + | |style="padding: 0px 0px 15px 15px;"|4. Create user account (or use the existing one if an account for specified client already exists).<br /> | ||
| + | Remember to set up sufficient account permissions to use all of the client area features of EasyDCIM For WHMCS module. | ||
| + | |} | ||
| + | {| | ||
| + | |style="padding: 0px 0px 20px 15px;"|5. Assign client to machine. | ||
| + | |} | ||
| + | {| | ||
| + | |style="padding: 0px 0px 20px 15px;"|6. Save client username and API key. | ||
| + | |} | ||
| + | {| | ||
| + | |style="padding: 0px 0px 15px 15px;"|7. Go back to your WHMCS admin area and proceed to the '' 'SoftLayer Control Panel' '' → '' 'Ordered Devices' '' → '' 'All'. ''<br /> | ||
| + | Press '' 'Assign Server' '' as shown on the following screen. | ||
| + | |} | ||
| + | {| | ||
| + | |style="padding: 0px 0px 20px 25px;"|[[File:ED_15.png]] | ||
| + | |} | ||
| + | {| | ||
| + | |style="padding: 0px 0px 15px 15px;"|8. Provide here primary IP address of server and previously created user API access details.<br /> | ||
| + | Confirm assignment through pressing '' 'Save' '' button.<br /> | ||
| + | ''Note 1: Primary IP address of server can be found in '' 'SoftLayer Control Panel' '' → '' 'SoftLayer Devices' '' 26 '' 'Unassigned'. '' ''<br /> | ||
| + | ''Note 2: User API access details can be found in SoflLayer panel → '' 'Account' '' → '' 'Users'. '''' | ||
| + | |} | ||
| + | {| | ||
| + | |style="padding: 0px 0px 20px 25px;"|[[File:ED_16.png]] | ||
| + | |} | ||
| + | {| | ||
| + | |style="padding: 0px 0px 20px 15px;"|If you assigned server to user correctly, a you should see something similar to the following screen in the client are. | ||
| + | |} | ||
| + | {| | ||
| + | |style="padding: 0px 0px 30px 25px;"|[[File:ED_16_1.png]] | ||
| + | |} | ||
| + | |||
| + | ==Admin Area== | ||
| + | {| | ||
| + | |style="padding: 10px 0px 15px 15px;"|As soon as you set up server for client, you can request various actions and server details from WHMCS admin area.<br /> | ||
| + | '' 'Suspend' ''/'' 'Unsuspend' '' actions change status of user account at the SoftLayer server.<br /> | ||
| + | '' 'Create' ''/'' 'Terminate' ''/'' 'Change Package' '' actions send an email to admin with specific requests. | ||
| + | |} | ||
| + | {| | ||
| + | |style="padding: 0px 0px 20px 25px;"|[[File:ED_17.png]] | ||
| + | |} | ||
| + | {| | ||
| + | |style="padding: 0px 0px 20px 15px;"|Our module allows you to check server power status (1), do commands like: default/soft/hard reboot (2) and even power it on/off (3). | ||
| + | |} | ||
| + | {| | ||
| + | |style="padding: 0px 0px 20px 25px;"|[[File:ED_17_1.png]] | ||
| + | |} | ||
| + | {| | ||
| + | |style="padding: 0px 0px 15px 15px;"|With our module, you are able to view server details.<br /> | ||
| + | Simply, press '' 'Show Server Details' ''. | ||
| + | |} | ||
| + | {| | ||
| + | |style="padding: 0px 0px 20px 25px;"|[[File:ED_18.png]] | ||
| + | |} | ||
| + | {| | ||
| + | |style="padding: 0px 0px 20px 15px;"|As you can see on the following screen, under server details you can find various details about server assigned to your client. | ||
| + | |} | ||
| + | {| | ||
| + | |style="padding: 0px 0px 20px 25px;"|[[File:ED_19.png]] | ||
| + | |} | ||
| + | {| | ||
| + | |style="padding: 0px 0px 20px 15px;"|You can also access server bandwidth graphs through pressing '' 'Show Bandwidth Graph'. '' | ||
| + | |} | ||
| + | {| | ||
| + | |style="padding: 0px 0px 20px 25px;"|[[File:ED_20.png]] | ||
| + | |} | ||
| + | {| | ||
| + | |style="padding: 0px 0px 20px 15px;"|Both, private and public network bandwidth graphs can be accessed that way. | ||
| + | |} | ||
| + | {| | ||
| + | |style="padding: 0px 0px 30px 25px;"|[[File:ED_21.png]] | ||
| + | |} | ||
| + | |||
| + | ==Client Area== | ||
| + | {| | ||
| + | |style="padding: 10px 0px 15px 15px;"|In the client area of module your customer can view all details concerning his server as well as bandwidth graphs.<br /> | ||
| + | They can even manage rDNS records, of course if you only give them such permission.<br /> | ||
| + | Your clients can view server power status (4), switch their servers on/off (5) and order various types of reboot (6-8). | ||
| + | |} | ||
| + | {| | ||
| + | |style="padding: 0px 0px 20px 25px;"|[[File:ED_22.png]] | ||
| + | |} | ||
| + | {| | ||
| + | |style="padding: 0px 0px 20px 15px;"|Let's look at '' 'Server Details' ''(1) to you. As you can see, your clients can find here complete server specification. | ||
| + | |} | ||
| + | {| | ||
| + | |style="padding: 0px 0px 20px 25px;"|[[File:ED_23.png]] | ||
| + | |} | ||
| + | {| | ||
| + | |style="padding: 0px 0px 20px 15px;"|Your clients can view bandwidth of public and private networks in the '' 'Bandwidth Graphs' '' (2). | ||
| + | |} | ||
| + | {| | ||
| + | |style="padding: 0px 0px 20px 25px;"|[[File:ED_24.png]] | ||
| + | |} | ||
| + | {| | ||
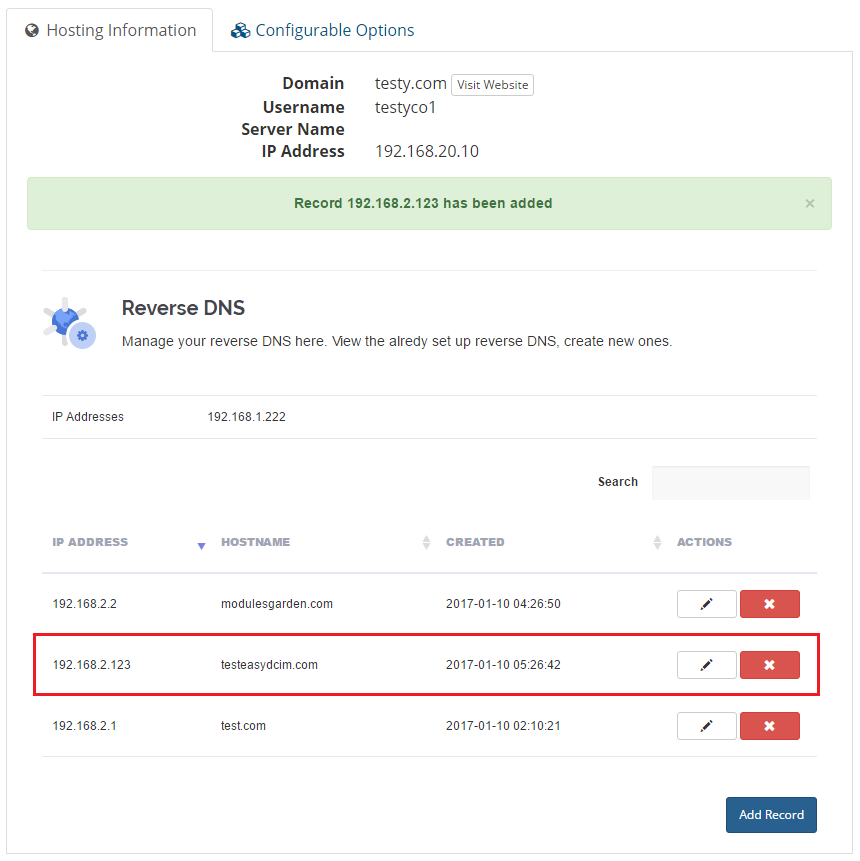
| + | |style="padding: 0px 0px 20px 15px;"|'' 'rDNS Management' '' (3) page allows your customers to easily update and remove existing rDNS records. | ||
| + | |} | ||
| + | {| | ||
| + | |style="padding: 0px 0px 20px 25px;"|[[File:ED_25.png]] | ||
| + | |} | ||
| + | {| | ||
| + | |style="padding: 0px 0px 15px 15px;"|Our module also allows your clients to add new rDNS records.<br /> | ||
| + | Adding a new rDNS record includes choosing rDNS IP address, providing TTL and hostname and pressing '' 'Add'. '' | ||
| + | |} | ||
| + | {| | ||
| + | |style="padding: 0px 0px 30px 25px;"|[[File:ED_26.png]] | ||
| + | |} | ||
| + | ==EasyDCIM Addon== | ||
| + | {| | ||
| + | |style="padding: 10px 0px 30px 15px;"|In '' 'EasyDCIM' '' addon you can view the list of all orders of SoftLayer product and the list of available dedicated servers.<br/> | ||
| + | Let's proceed to further possibilities of our addon. | ||
| + | |} | ||
| + | ===SoftLayer Product Orders=== | ||
| + | {| | ||
| + | |style="padding: 10px 0px 15px 15px;"|'' 'Ordered Services' '' tab allows you to view the list of all ordered EasyDCIM products.<br/> | ||
| + | Orders are sorted by their status, each tab contains orders with different statuses.<br/> | ||
| + | In addition, you can view basic details of each order, such as client who made it, hosting id or assigned server. | ||
| + | |} | ||
| + | {| | ||
| + | |style="padding: 0px 0px 20px 25px;"|[[File:ED_27.png]] | ||
| + | |} | ||
| + | {| | ||
| + | |style="padding: 0px 0px 15px 15px;"|From here you can also easily assign server to hosting or change assigned server if hosting already have one assigned.<br /> | ||
| + | Server assignment is shown at the [[#Workflow_-_From_Order_To_Created_Server|'''Workflow''']] section.<br /> | ||
| + | Let's see how to easily remove assigned server.<br /> | ||
| + | For that purpose press '' 'Change Assignment' '' button. | ||
| + | |} | ||
| + | {| | ||
| + | |style="padding: 0px 0px 20px 25px;"|[[File:ED_28.png]] | ||
| + | |} | ||
| + | {| | ||
| + | |style="padding: 0px 0px 20px 15px;"|Afterwards, press '' 'Remove Assignment' '' button. | ||
| + | |} | ||
| + | {| | ||
| + | |style="padding: 0px 0px 30px 25px;"|[[File:ED_29.png]] | ||
| + | |} | ||
| + | |||
| + | ===SoftLayer Devices=== | ||
| + | {| | ||
| + | |style="padding: 10px 0px 20px 15px;"|In order to view list of your EasyDCIM proceed to '' 'SoftLayer Devices' '' → '' 'All'. '' | ||
| + | |} | ||
| + | {| | ||
| + | |style="padding: 0px 0px 20px 25px;"|[[File:ED_30.png]] | ||
| + | |} | ||
| + | {| | ||
| + | |style="padding: 0px 0px 15px 15px;"|List of all unassigned EasyDCIM can be accessed under '' 'SoftLayer Devices' '' → '' 'Unassigned'. ''<br /> | ||
| + | From here you can even assign server to hosting through pressing '' 'Assign To Hosting''' button. | ||
| + | |} | ||
| + | {| | ||
| + | |style="padding: 0px 0px 20px 25px;"|[[File:ED_31.png]] | ||
| + | |} | ||
| + | {| | ||
| + | |style="padding: 0px 0px 20px 15px;"|Afterwards, choose hosting you wish to assign server to, fill API access details of SoftLayer user created for your customer and press '' 'Save'. '' | ||
| + | |} | ||
| + | {| | ||
| + | |style="padding: 0px 0px 30px 25px;"|[[File:ED_32.png]] | ||
| + | |} | ||
| + | |||
| + | =Tips= | ||
| + | {| | ||
| + | |style="padding: 10px 0px 5px 15px;"|1. We advice to create one SoftLayer user per each order.<br /> | ||
| + | Currently, suspending SoftLayer hosting suspends SoftLayer user bounded to it. | ||
| + | |} | ||
| + | {| | ||
| + | |style="padding: 0px 0px 5px 15px;"|2. If a reboot command has been issued successfully in the past 20 minutes, another remote management command will not be allowed.<br /> | ||
| + | This is to avoid any type of server failures. | ||
| + | |} | ||
| + | {| | ||
| + | |style="padding: 0px 0px 30px 15px;"|3. If you want to disable displaying of API access details form in your template there is two things you need to do.<br /> | ||
| + | 1. Check '' 'Hide API Access Details' '' checkbox at your SoftLayer product → '' 'Module Settings' ''.<br /> | ||
| + | 2. Modify your template → '' 'clientareaproductdetails.tpl' '' as shown below: | ||
| + | {if $username} | ||
| + | //code responsible for displaying form with API access details | ||
| + | {/if} | ||
| + | ''Note: Portal template already has such solution in its clientareaproductdetails.tpl file, so you can view how it's implemented.'' | ||
| + | |} | ||
| + | |||
| + | =Common Problems= | ||
| + | {| | ||
| + | |style="padding: 10px 0px 30px 15px;"|'''1. When you have problems with connection, check whether your SELinux or firewall does not block ports.''' | ||
| + | |} | ||
Revision as of 08:24, 3 November 2016
Contents |
About EasyDCIM For WHMCS
| EasyDCIM For WHMCS will allow you to move provisioning and management of bare metal servers directly to your WHMCS. Module will let your clients overview and manage their servers directly from your client area. They will be able to e.g. reboot servers, manage rDNS records or view bandwidth graphs. |
- Client Area Features:
| ✔ Power On/Off Server |
| ✔ Assign SoftLayer Server To Hosting |
| ✔ Assign Hosting To Unassigned SoftLayer Server |
- General Info:
| ✔ Supports Bare Metal Servers |
| ✔ Multi-Language Support |
| ✔ Supports PHP 5.3 Up To PHP 7 |
| ✔ Supports WHMCS Templates Five and Six |
| ✔ Supports WHMCS V6 and V7 |
Installation and Configuration
| This tutorial will show you how to successfully install and configure EasyDCIM For WHMCS. We will guide you step by step through the whole installation and configuration process. |
Installation
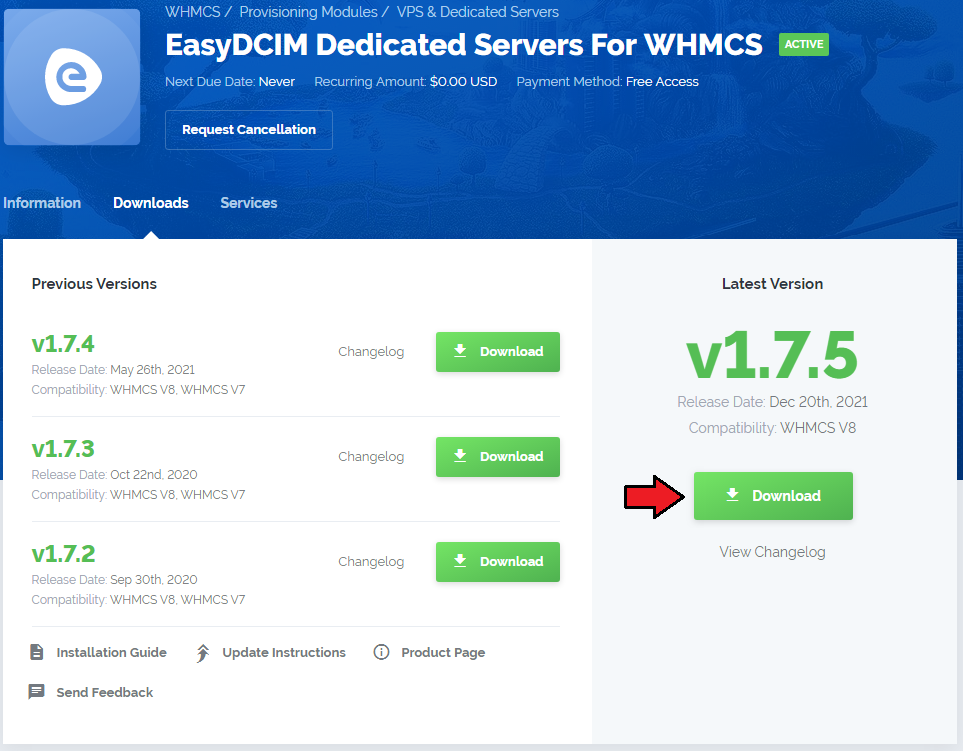
| 1. Log in to your client area and download EasyDCIM For WHMCS. |
|
| 2. Upload and extract the module into the main WHMCS directory. Files in your WHMCS directory should look like these. |

|
Configuration of Product
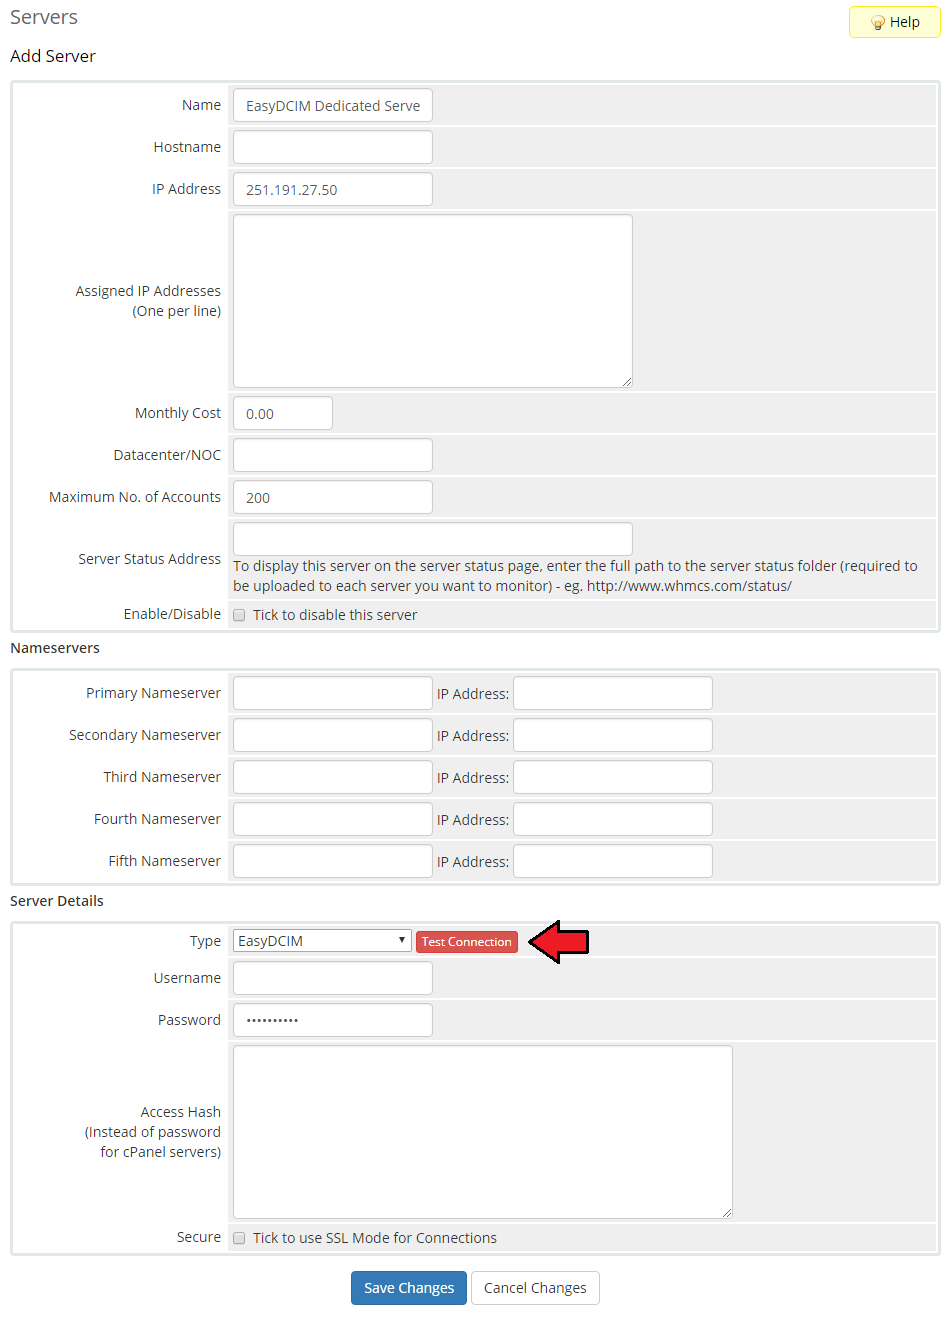
| 3. Proceed to 'Setup' → 'Products/Services' → 'Products/Services' and press 'Create a New Group'. |
|
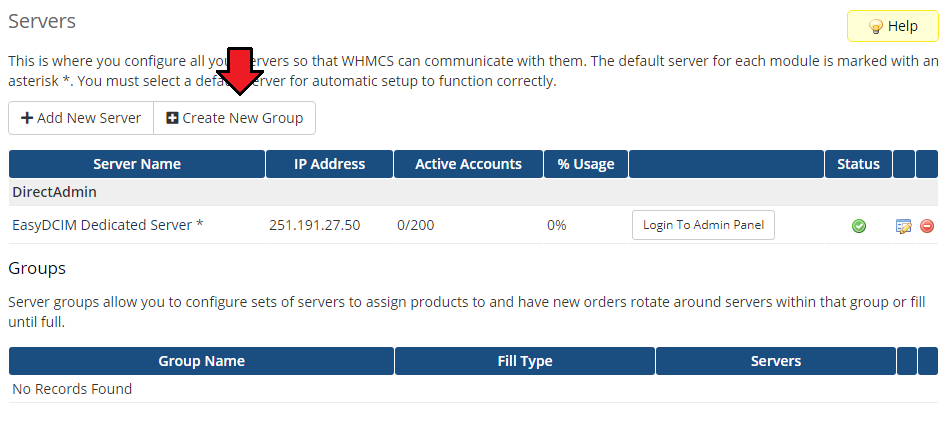
| 6. Enter product group name and press 'Save Changes'. |
|
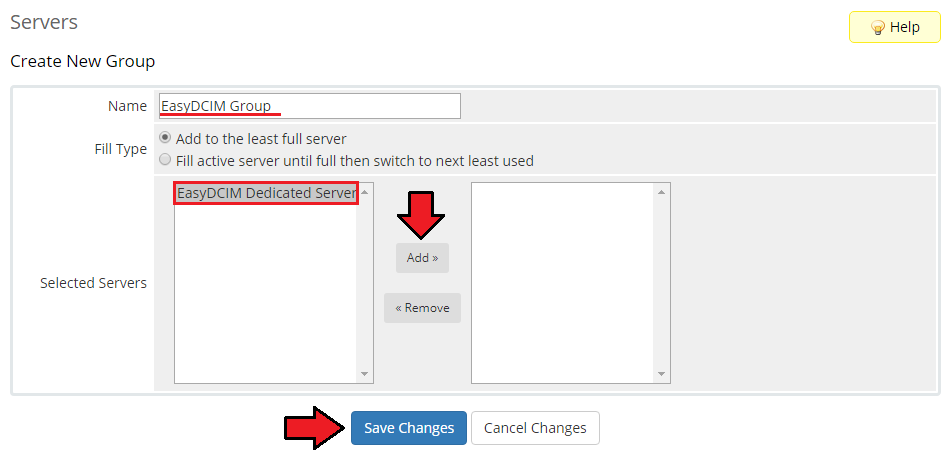
| 7. When you have a product group, you can create your product. To do so, click on 'Create a New Product'. |
|
| 8. Fill in product name, select previously created product group and press 'Continue'. |

|
| 9. Go to 'Module Settings' tab, choose 'SoftLayer' from 'Module Name' dropdown menu and fill in the fields with your SoftLayer API access details. Additionally, you can enable features available in the client area. |
|
Configuration of Addon
| 10. Now you have to activate the module in your WHMCS system. Log in to your WHMCS admin area. Go to the 'Setup' → 'Addon Modules'. Afterwards, find 'SoftLayer Control Panel' and press 'Activate' button. |

|
| 11. In the next step you need to permit access to this module. To do so click on 'Configure' button, tick 'Access Control' near desired admin role groups and press 'Save Changes'. |

|
| 12. It is time to configure addon API connection. Go to 'Addons' → 'SoftLayer Control Panel' → 'Configure'. |
|
| 12. You have just successfully installed EasyDCIM For WHMCS! |
Management
| At this section we will show you possibilities of EasyDCIM For WHMCS. Our module allows you to offer EasyDCIM via your WHMCS system. |
Workflow - From Order To Created Server
| Now, we will show you what steps need to be taken to prepare server to be used by a client. 1. Client orders EasyDCIM from your WHMCS client area. |
|
| 2. You will receive an email with server creation request. |

|
| 3. Log in to your SoftLayer panel. |
| 4. Create user account (or use the existing one if an account for specified client already exists). Remember to set up sufficient account permissions to use all of the client area features of EasyDCIM For WHMCS module. |
| 5. Assign client to machine. |
| 6. Save client username and API key. |
| 7. Go back to your WHMCS admin area and proceed to the 'SoftLayer Control Panel' → 'Ordered Devices' → 'All'. Press 'Assign Server' as shown on the following screen. |
|
| 8. Provide here primary IP address of server and previously created user API access details. Confirm assignment through pressing 'Save' button. |
|
| If you assigned server to user correctly, a you should see something similar to the following screen in the client are. |
| File:ED 16 1.png |
Admin Area
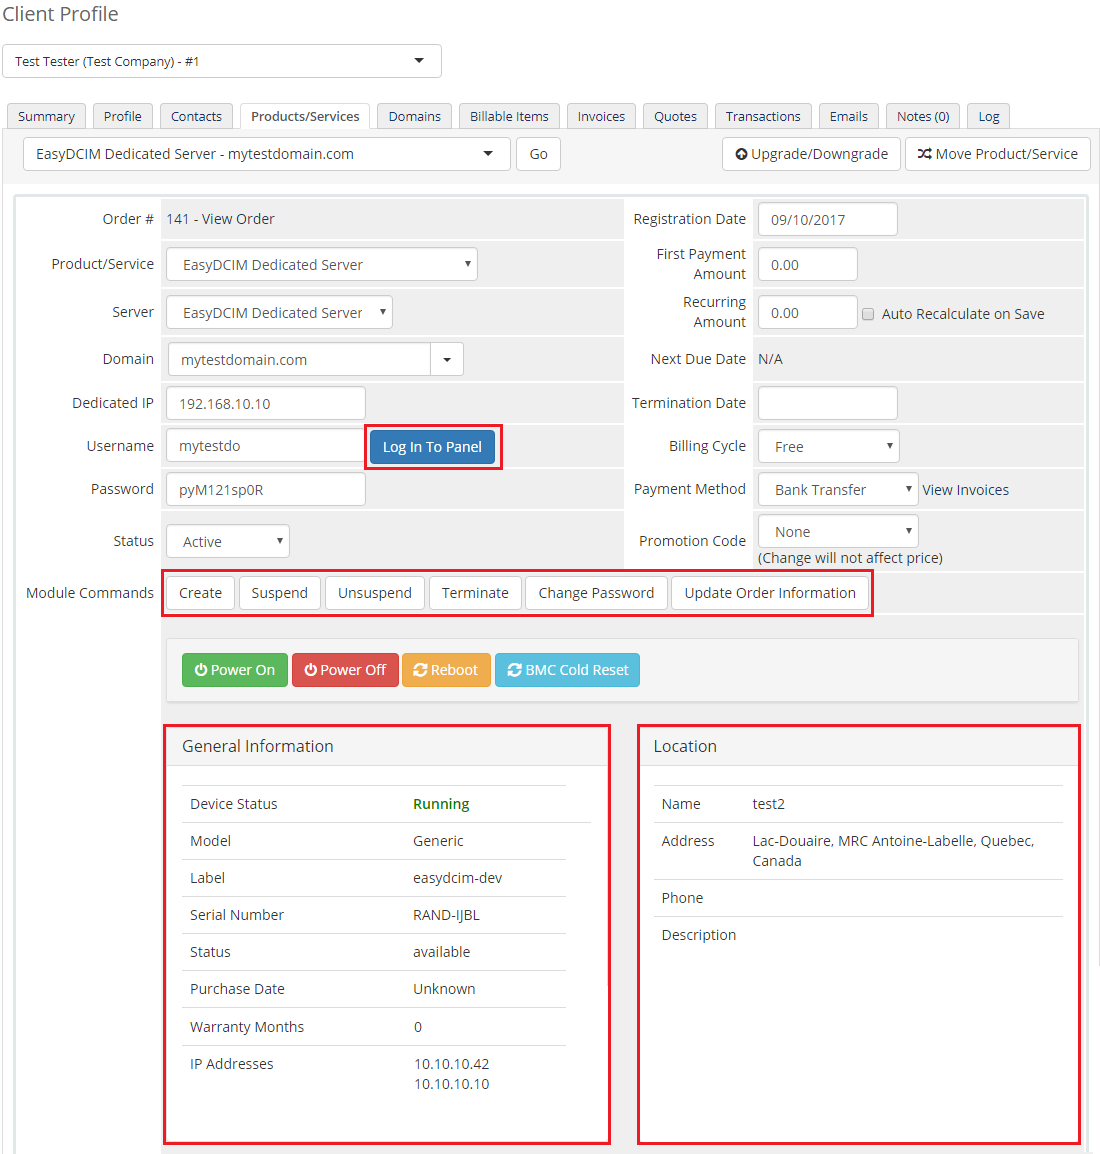
| As soon as you set up server for client, you can request various actions and server details from WHMCS admin area. 'Suspend' / 'Unsuspend' actions change status of user account at the SoftLayer server. |
|
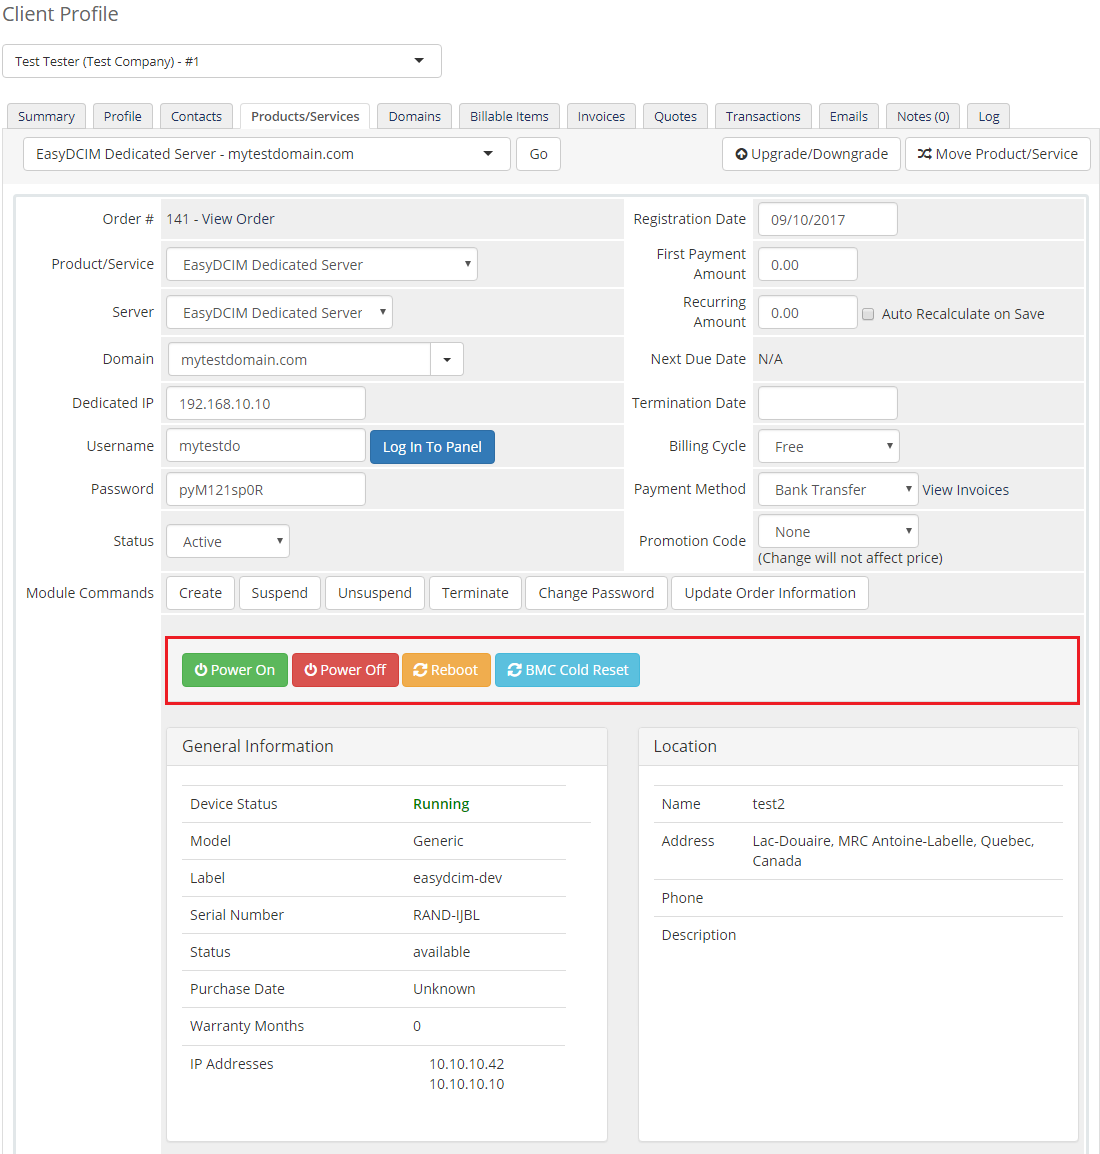
| Our module allows you to check server power status (1), do commands like: default/soft/hard reboot (2) and even power it on/off (3). |
| File:ED 17 1.png |
| With our module, you are able to view server details. Simply, press 'Show Server Details' . |
|
| As you can see on the following screen, under server details you can find various details about server assigned to your client. |
|
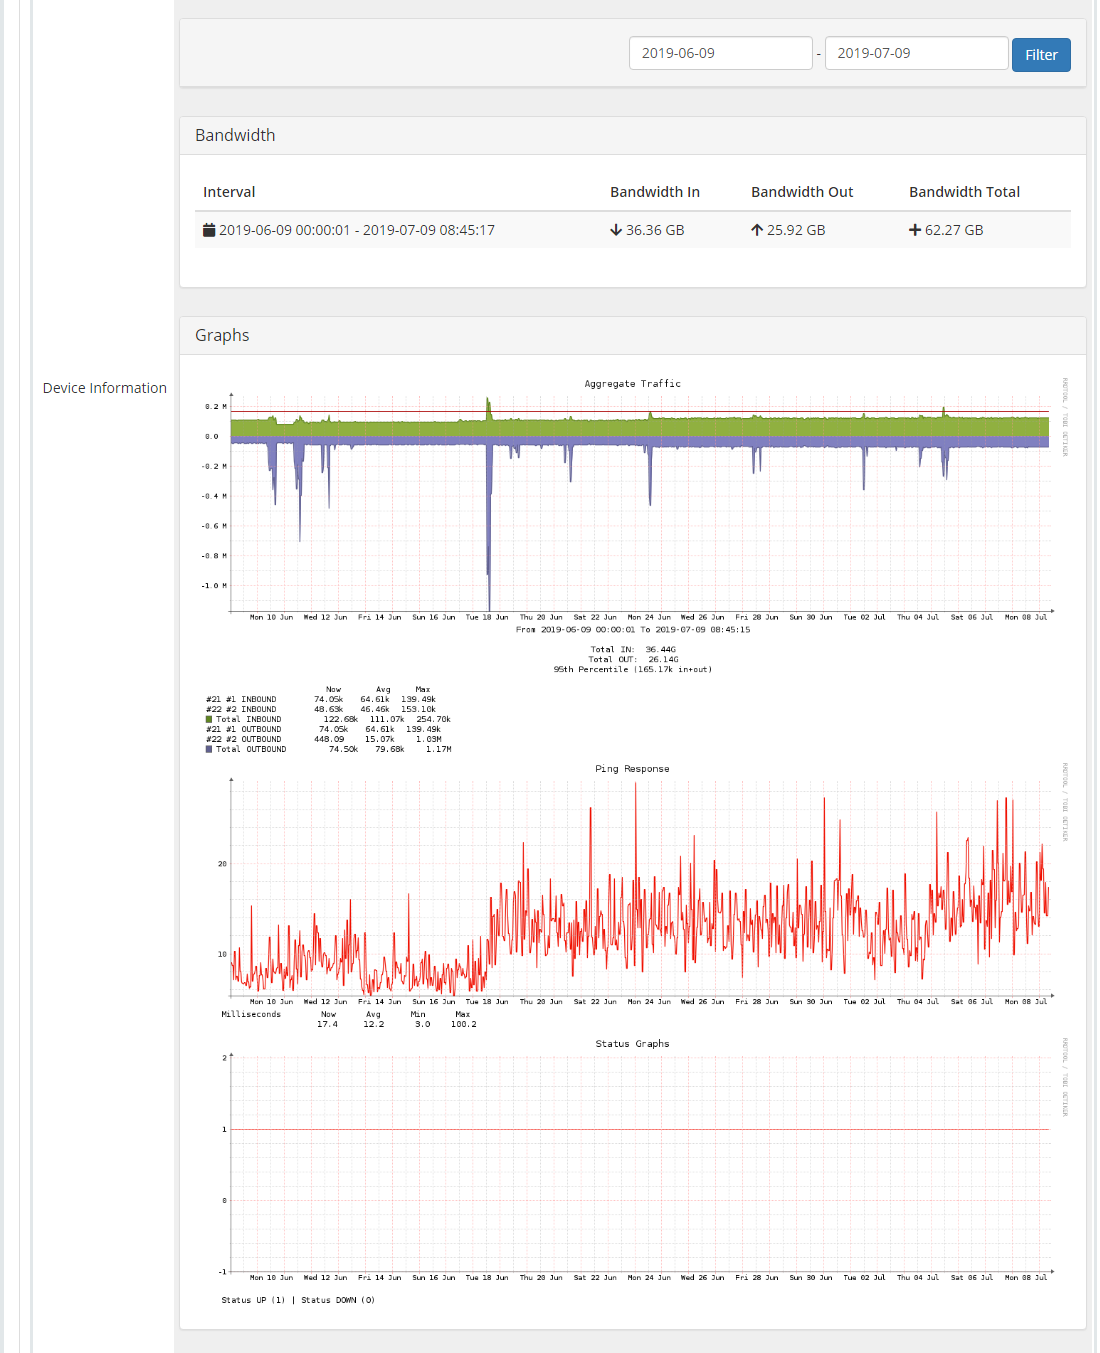
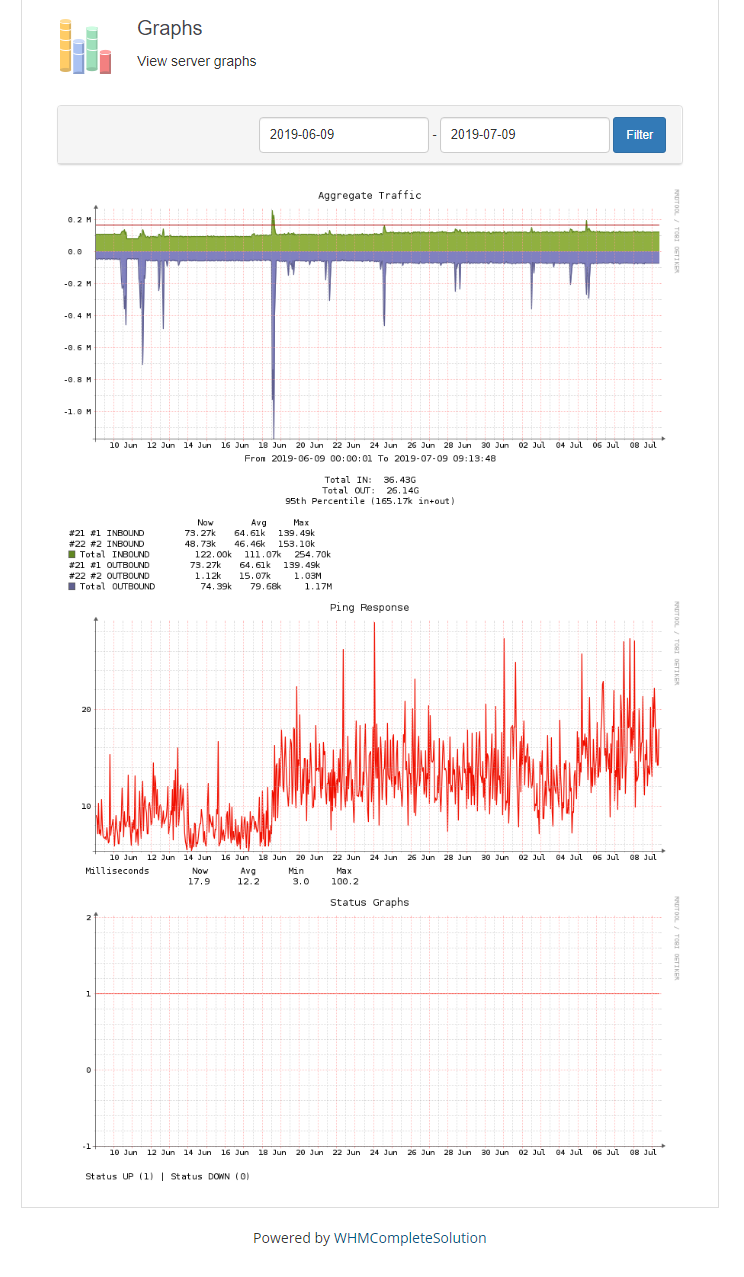
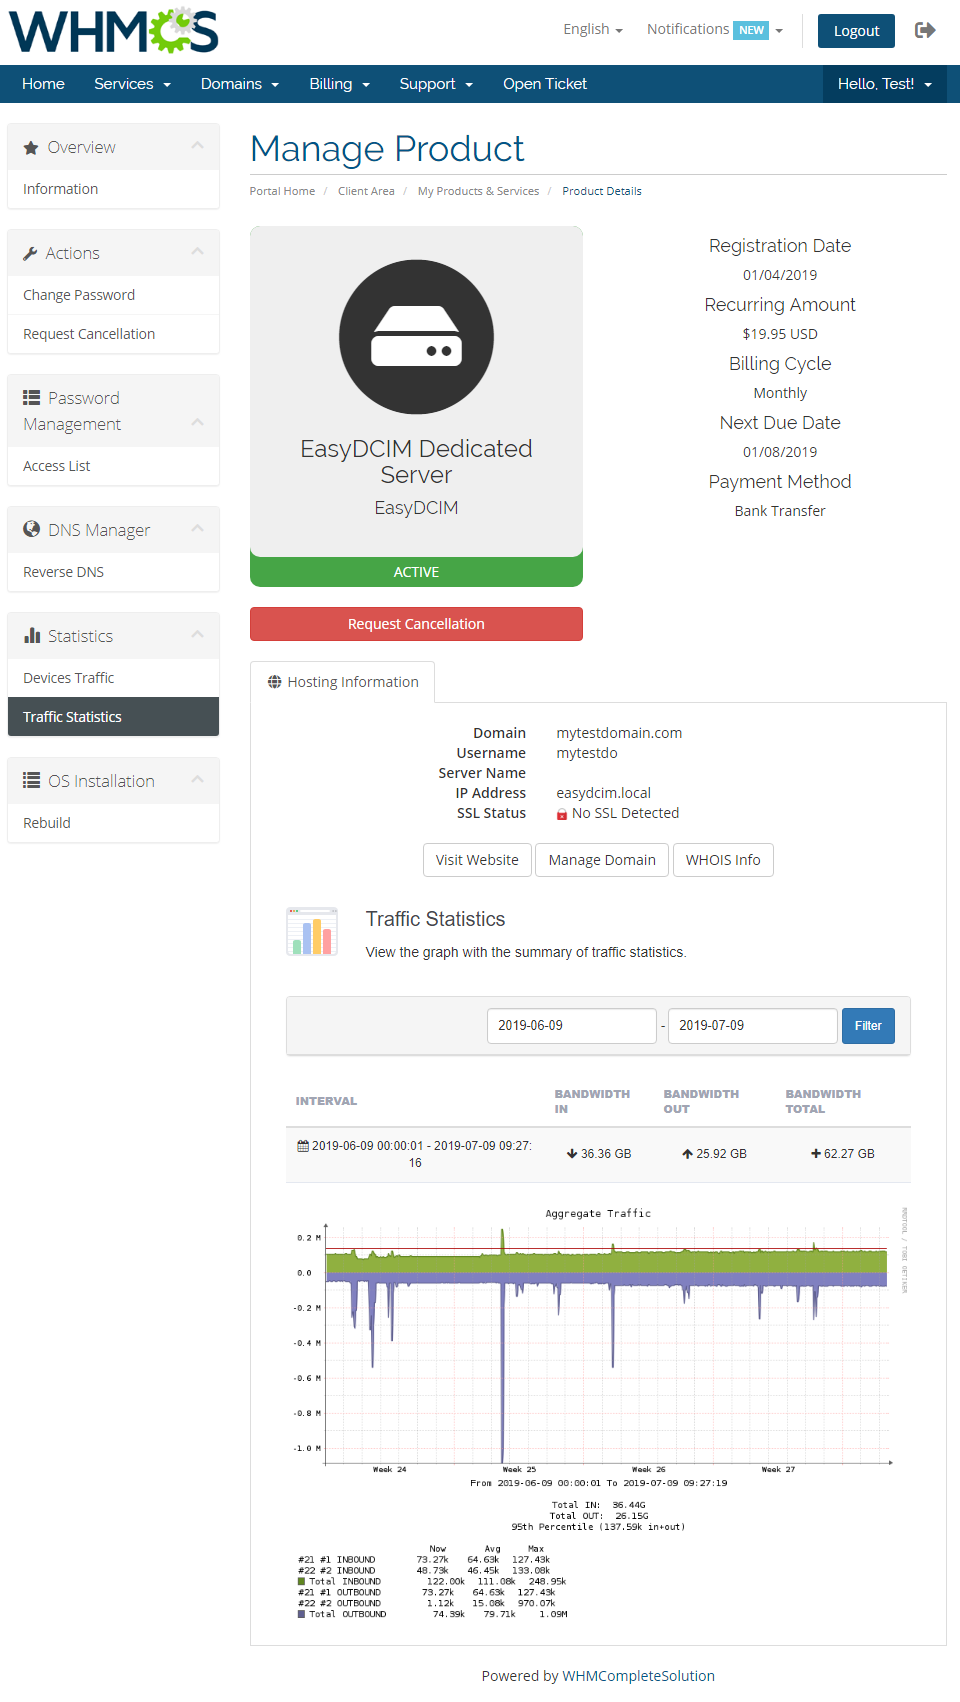
| You can also access server bandwidth graphs through pressing 'Show Bandwidth Graph'. |
|
| Both, private and public network bandwidth graphs can be accessed that way. |
|
Client Area
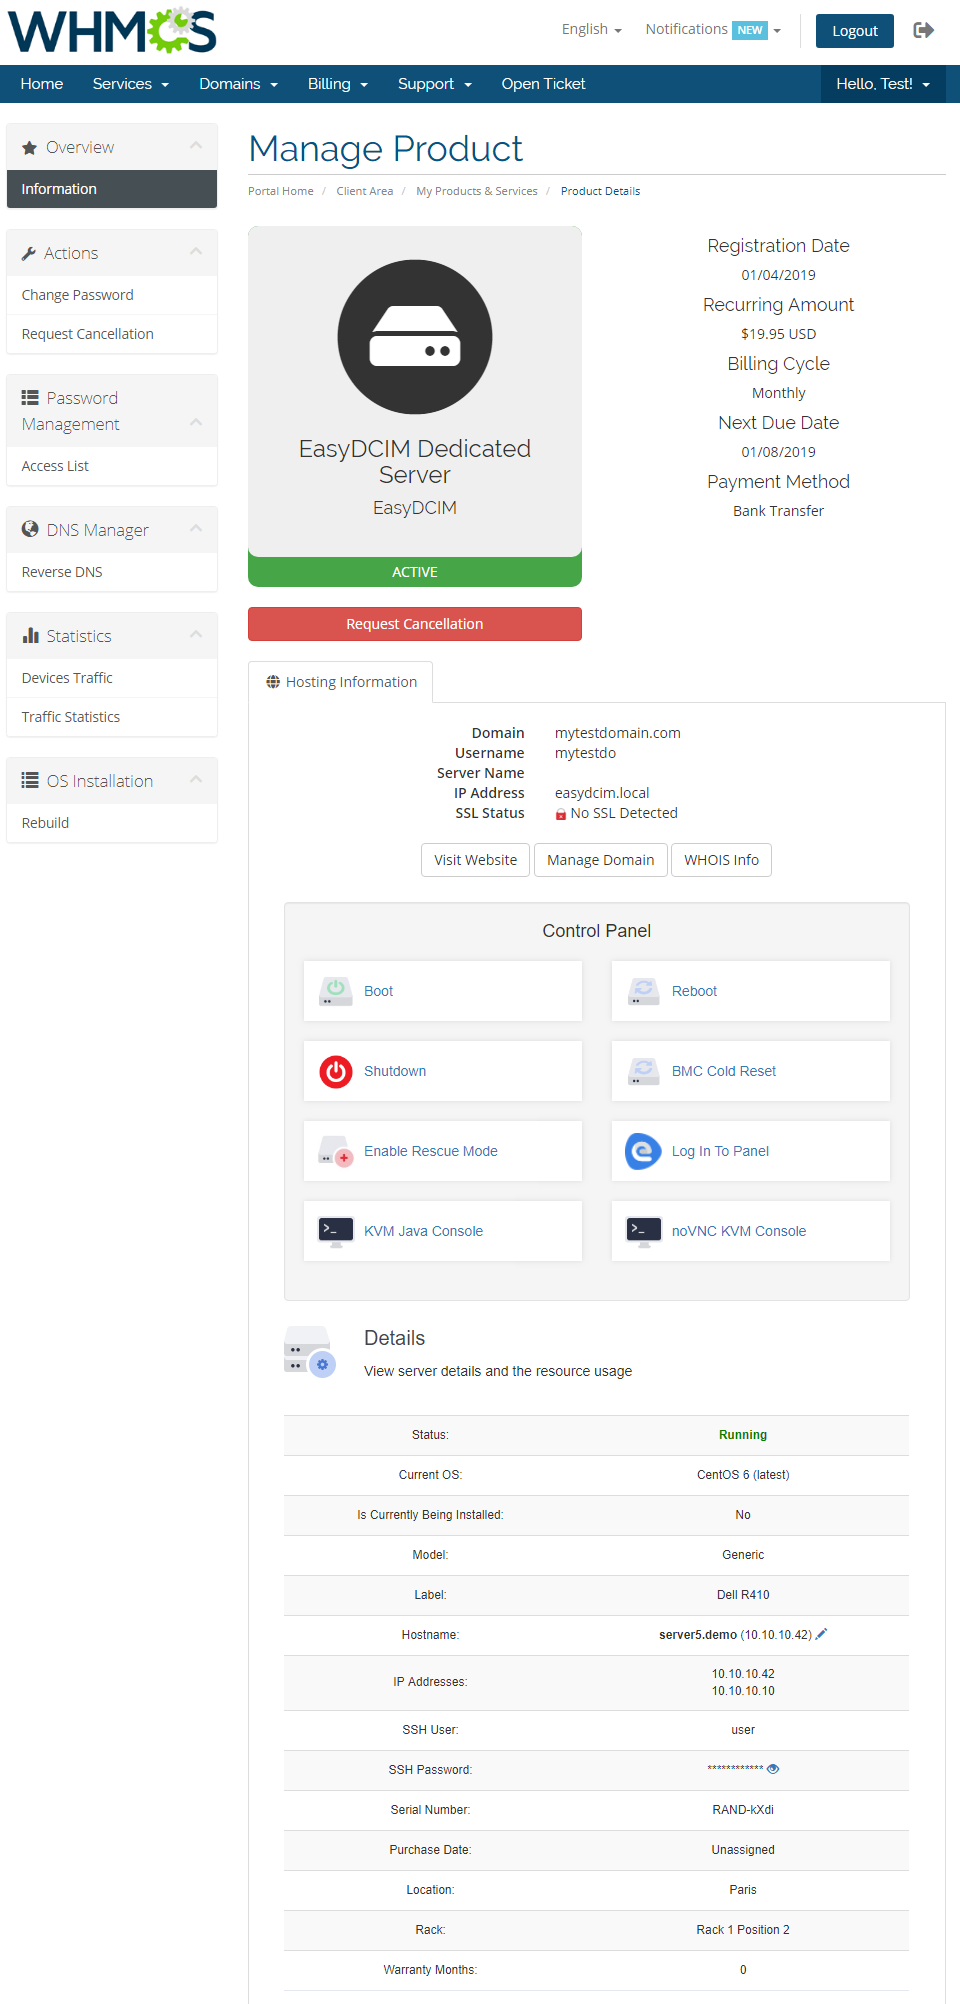
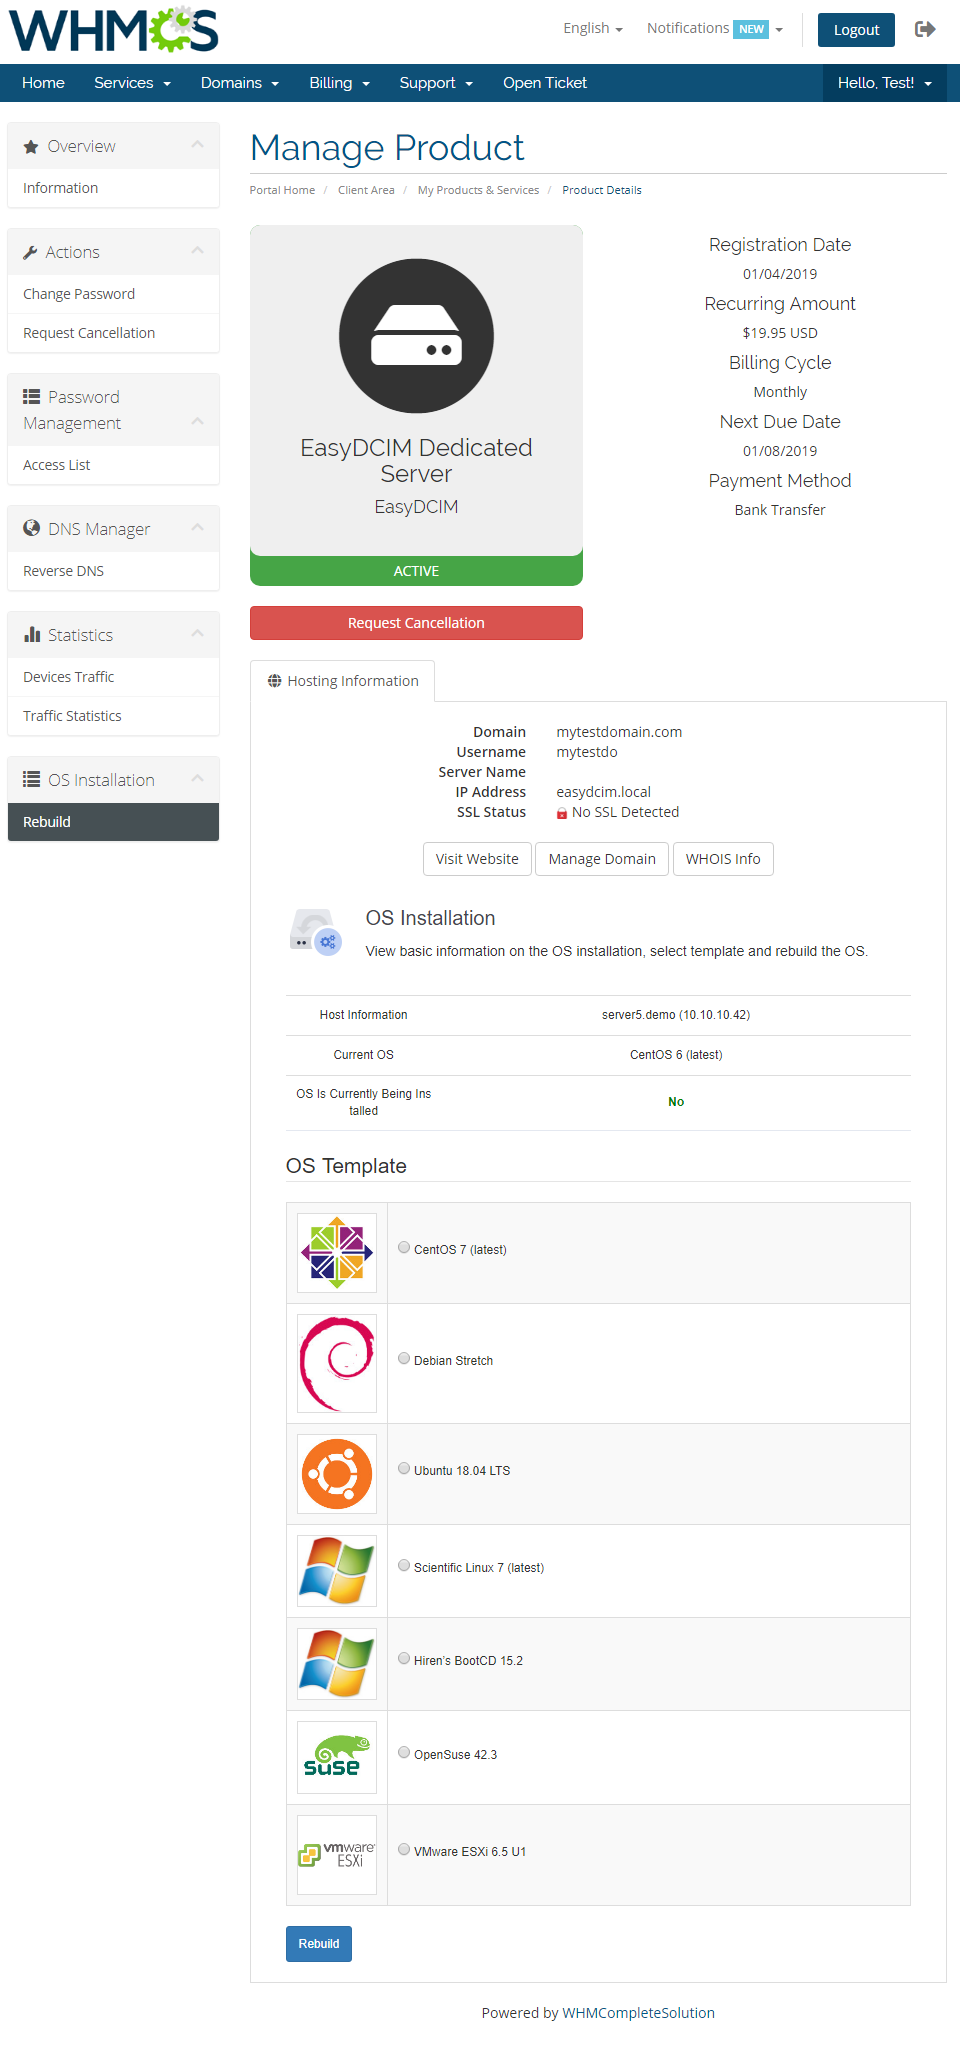
| In the client area of module your customer can view all details concerning his server as well as bandwidth graphs. They can even manage rDNS records, of course if you only give them such permission. |
|
| Let's look at 'Server Details' (1) to you. As you can see, your clients can find here complete server specification. |
|
| Your clients can view bandwidth of public and private networks in the 'Bandwidth Graphs' (2). |

|
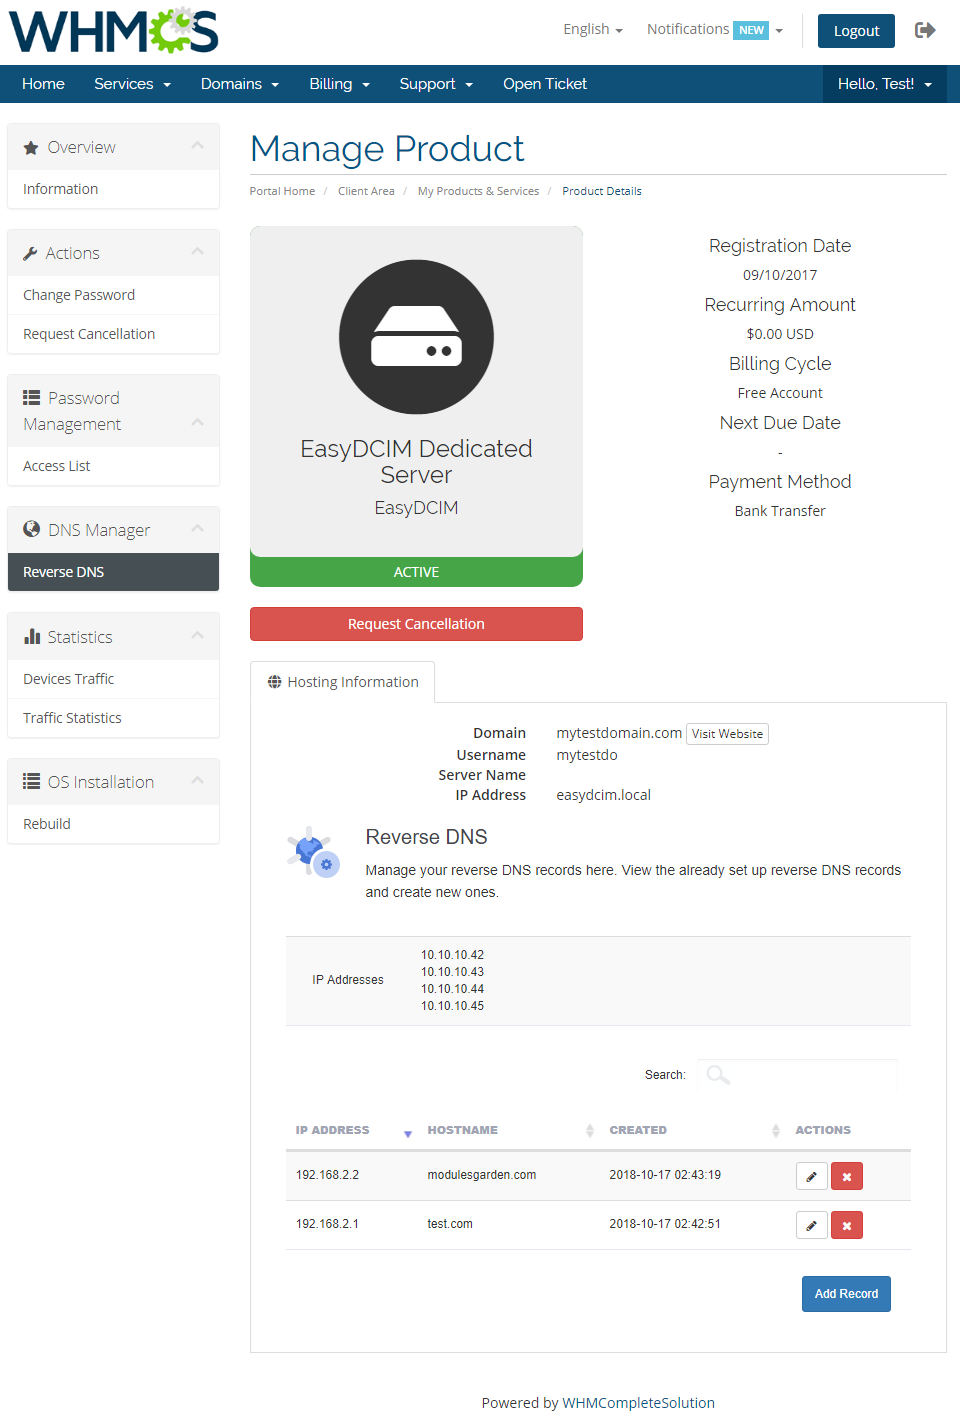
| 'rDNS Management' (3) page allows your customers to easily update and remove existing rDNS records. |
|
| Our module also allows your clients to add new rDNS records. Adding a new rDNS record includes choosing rDNS IP address, providing TTL and hostname and pressing 'Add'. |
|
EasyDCIM Addon
| In 'EasyDCIM' addon you can view the list of all orders of SoftLayer product and the list of available dedicated servers. Let's proceed to further possibilities of our addon. |
SoftLayer Product Orders
| 'Ordered Services' tab allows you to view the list of all ordered EasyDCIM products. Orders are sorted by their status, each tab contains orders with different statuses. |
|
| From here you can also easily assign server to hosting or change assigned server if hosting already have one assigned. Server assignment is shown at the Workflow section. |

|
| Afterwards, press 'Remove Assignment' button. |
| File:ED 29.png |
SoftLayer Devices
| In order to view list of your EasyDCIM proceed to 'SoftLayer Devices' → 'All'. |
| File:ED 30.png |
| List of all unassigned EasyDCIM can be accessed under 'SoftLayer Devices' → 'Unassigned'. From here you can even assign server to hosting through pressing 'Assign To Hosting' button. |
| File:ED 31.png |
| Afterwards, choose hosting you wish to assign server to, fill API access details of SoftLayer user created for your customer and press 'Save'. |
| File:ED 32.png |
Tips
| 1. We advice to create one SoftLayer user per each order. Currently, suspending SoftLayer hosting suspends SoftLayer user bounded to it. |
| 2. If a reboot command has been issued successfully in the past 20 minutes, another remote management command will not be allowed. This is to avoid any type of server failures. |
| 3. If you want to disable displaying of API access details form in your template there is two things you need to do. 1. Check 'Hide API Access Details' checkbox at your SoftLayer product → 'Module Settings' . {if $username}
//code responsible for displaying form with API access details
{/if}
Note: Portal template already has such solution in its clientareaproductdetails.tpl file, so you can view how it's implemented. |
Common Problems
| 1. When you have problems with connection, check whether your SELinux or firewall does not block ports. |