CRM For WHMCS
(→Basic Configuration) |
(→Basic Configuration) |
||
| Line 84: | Line 84: | ||
==Basic Configuration== | ==Basic Configuration== | ||
{| | {| | ||
| − | |style="padding: 10px 0px 15px 15px;"|'''8. | + | |style="padding: 10px 0px 15px 15px;"|'''8. Now, you have to set up cron job. Cron job can be found at CRM addon → '' 'Settings' '' → '' 'Cron'.'' '''<br /> |
| − | + | We advice to set up the cron as often as you wish to send email notifications. | |
|} | |} | ||
{| | {| | ||
| − | |style="padding: 0px 0px 20px 25px;"|[[File: | + | |style="padding: 0px 0px 20px 25px;"|[[File:CRM_8.png]] |
|} | |} | ||
{| | {| | ||
Revision as of 12:37, 24 November 2014
Contents |
About CRM For WHMCS
| CRM For WHMCS is a module |
- Addon Module Features:
| ✔ |
| ✔ |
| ✔ |
- General Info:
| ✔ Multi-Language Support |
| ✔ Supports WHMCS V5 and Later |
Installation & Configuration
| This tutorial will show you how to successfully install and configure CRM For WHMCS. We will guide you step by step through the whole installation and configuration process. |
Installation
| 1. Log in to your client area and download CRM For WHMCS. |
| File:CRM 1.png |
| 2. Upload and extract the module into the main WHMCS directory. Files in your WHMCS directory should look like on the following screen. |
| File:CRM 2.png |
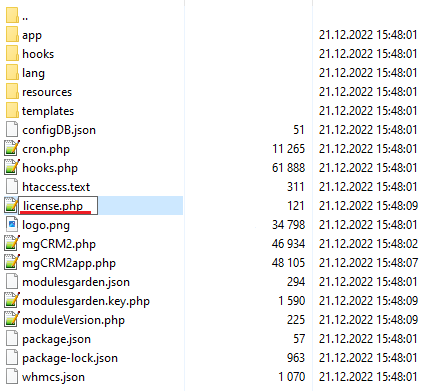
| 3. When you install CRM for the first time you have to rename 'license_RENAME.php' file. File is located in 'modules/addons/mgCRM/license_RENAME.php' . Rename it from 'license_RENAME.php' to 'license.php' . |

|
| 4. In order to configure your license key, you have to edit the previously renamed 'license.php' file . Enter your license key between quotation marks as presented on the following screen. You can find your license key in your client area → 'My Products' . |

|
| 5. Additionally, set up 'uploads' folder as writable. Folder is located in 'your_whmcs/modules/addons/mgCRM/' . |
| File:CRM 5.png |
Activate The Addon
| 6. Now you have to activate the module in your WHMCS system. Log in to your WHMCS admin area. Go to 'Setup' → 'Addon Modules' . Afterwards, find 'CRM' and press 'Activate' button. |
| File:CRM 6.png |
| 7. In the next step you need to permit access to this module. To do so, click on 'Configure' button, tick 'Full Administrator' and press 'Save Changes' . |
| File:CRM 7.png |
Basic Configuration
| 8. Now, you have to set up cron job. Cron job can be found at CRM addon → 'Settings' → 'Cron'. We advice to set up the cron as often as you wish to send email notifications. |
| File:CRM 8.png |
| 9. You have just successfully installed CRM For WHMCS! You can access your module at 'Addons' → 'CRM' . |
| File:CRM 9.png |
Configuration and Management
| CRM For WHMCS is a module which allows you to quickly display clients' details across the WHMCS.
Additionally, you can easily configure access to the clients' information depending on the admin role. |
Configuration
| In 'Configuration' page you can manage tooltip configurations and add new ones. Each configuration can have multiple admin roles assigned while one admin role can be assigned to only single configuration only. |
| File:CRM 8.png |
Tips
Common Problems
| 1. When you have problems with connection, check whether your SELinux or firewall does not block ports. |