OX WHMCS Module
(→About OX WHMCS Module) |
(→Installation and Configuration) |
||
| (12 intermediate revisions by one user not shown) | |||
| Line 2: | Line 2: | ||
<meta name="description" content="ModulesGarden Wiki Contains All The Information You Need About The OX WHMCS Module."></meta> | <meta name="description" content="ModulesGarden Wiki Contains All The Information You Need About The OX WHMCS Module."></meta> | ||
| − | =About | + | =About OX WHMCS Module= |
{| | {| | ||
| − | |style="padding: 10px 0px 10px 0px;"|'''OX WHMCS Module''' has been developed to allow quick and easy management of the OX account directly from the WHMCS client area. <br/> Establish connection between your WHMCS and Open-Xchange to get access to email accounts, aliases, forwarders and many more. <br/> | + | |style="padding: 10px 0px 10px 0px;"|'''OX WHMCS Module''' has been developed to allow quick and easy management of the OX account directly from the WHMCS client area. <br/> Establish the connection between your WHMCS and Open-Xchange to get access to email accounts, aliases, forwarders and many more. <br/> |
| − | Use the addon module to master the theme branding on your account directly | + | Use the addon module to master the theme branding on your account directly in the panel. |
|} | |} | ||
| Line 22: | Line 22: | ||
|} | |} | ||
{| | {| | ||
| − | |style="padding: 0px 0px 10px 30px;"|✔ To register on OX Cloud please click '''[https:// | + | |style="padding: 0px 0px 10px 30px;"|✔ To register on OX Cloud please click '''[https://www.open-xchange.com/about-ox/contact-us/mail-productivity/ HERE]''' |
|} | |} | ||
| Line 165: | Line 165: | ||
|} | |} | ||
{| | {| | ||
| − | |style="padding: 0px 0px 0px 30px;"|✔ Supports PHP | + | |style="padding: 0px 0px 0px 30px;"|✔ Supports PHP 8.1 Back To PHP 7.4 |
|} | |} | ||
{| | {| | ||
| Line 171: | Line 171: | ||
|} | |} | ||
{| | {| | ||
| − | |style="padding: 0px 0px 30px 30px;"|✔ Supports WHMCS V8. | + | |style="padding: 0px 0px 30px 30px;"|✔ Supports WHMCS V8.4 And Later |
|} | |} | ||
=Installation and Configuration= | =Installation and Configuration= | ||
{| | {| | ||
| − | |style="padding: 10px 0px 30px 15px;"|'''The below tutorial will show you how to | + | |style="padding: 10px 0px 30px 15px;"|'''The below tutorial will show you how to install and configure OX WHMCS Module successfully.'''<br /> |
We will guide you step by step through the whole installation process. | We will guide you step by step through the whole installation process. | ||
|} | |} | ||
| Line 197: | Line 197: | ||
|style="padding: 10px 0px 15px 15px;"|'''3. Now you have to activate the module in your WHMCS system.'''<br /> | |style="padding: 10px 0px 15px 15px;"|'''3. Now you have to activate the module in your WHMCS system.'''<br /> | ||
Log in to your WHMCS admin area. Move to the '' 'System Settings' '' and find '' 'Addon Modules'. ''<br/> | Log in to your WHMCS admin area. Move to the '' 'System Settings' '' and find '' 'Addon Modules'. ''<br/> | ||
| − | Afterwards, find '' 'OX WHMCS Module' '' and press the '' 'Activate' '' button. | + | Afterwards, find the '' 'OX WHMCS Module' '' and press the '' 'Activate' '' button. |
|} | |} | ||
{| | {| | ||
| Line 210: | Line 210: | ||
|} | |} | ||
{| | {| | ||
| − | |style="padding: 0px 0px 30px 15px;"|'''5. OX WHMCS Module has been successfully installed!'''<br /> | + | |style="padding: 0px 0px 30px 15px;"|'''5.The OX WHMCS Module has been successfully installed!'''<br /> |
Access the addon under '' 'Addons' '' → '' 'OX WHMCS Module'. '' | Access the addon under '' 'Addons' '' → '' 'OX WHMCS Module'. '' | ||
|} | |} | ||
| Line 217: | Line 217: | ||
{| | {| | ||
|style="padding: 10px 0px 15px 15px;"|'''6. In order to establish a successful connection, you will need to set up the server first.<br/> | |style="padding: 10px 0px 15px 15px;"|'''6. In order to establish a successful connection, you will need to set up the server first.<br/> | ||
| − | Log in to your WHMCS, proceed to '' 'System Settings' '' → '' 'Products/Services' '' → '' 'Servers'. '' ''' <br/> | + | Log in to your WHMCS account, proceed to '' 'System Settings' '' → '' 'Products/Services' '' → '' 'Servers'. '' ''' <br/> |
There, press '' 'Add New Server'. '' | There, press '' 'Add New Server'. '' | ||
|} | |} | ||
| Line 230: | Line 230: | ||
'''''Important:''''' <br/> | '''''Important:''''' <br/> | ||
* You will need to know which of the OX Cloud data centers you are using for mailbox provisioning. Depending on data center you should use one of the following addresses: | * You will need to know which of the OX Cloud data centers you are using for mailbox provisioning. Depending on data center you should use one of the following addresses: | ||
| − | ** '' | + | ** ''eu.appsuite.cloud'' - For EU |
| − | ** '' | + | ** ''us.appsuite.cloud'' - For US |
| + | ** ''asia.appsuite.cloud'' - For Asia | ||
* Formats such as 'HTTPS' or 'HTTP' are not allowed in the "Hostname" field | * Formats such as 'HTTPS' or 'HTTP' are not allowed in the "Hostname" field | ||
* You will need a ''Username'' and ''Password'' which you receive from the provisioning mail.<br/> If you do not have one then please contact the [https://www.open-xchange.com/about-ox/contact-us/mail-productivity OX Cloud team]. | * You will need a ''Username'' and ''Password'' which you receive from the provisioning mail.<br/> If you do not have one then please contact the [https://www.open-xchange.com/about-ox/contact-us/mail-productivity OX Cloud team]. | ||
| Line 262: | Line 263: | ||
{| | {| | ||
|style="padding: 10px 0px 15px 15px;"|'''10. In order to create and configure your desired ''Products and Services'', proceed to '' 'System Settings' '' → '' 'Products/Services'. '''''<br /> | |style="padding: 10px 0px 15px 15px;"|'''10. In order to create and configure your desired ''Products and Services'', proceed to '' 'System Settings' '' → '' 'Products/Services'. '''''<br /> | ||
| − | Start | + | Start by creating a new, dedicated group by pressing the '' 'Create a New Group' '' button. |
|} | |} | ||
{| | {| | ||
| Line 281: | Line 282: | ||
|} | |} | ||
{| | {| | ||
| − | |style="padding: 0px 0px 15px 15px;"|'''13. Afterwards, choose your product type and product group from dropdown menu, enter the product name and select '' 'OX WHMCS Module' '' module.'''<br/> You may '' 'Continue' '' to the next step now.<br/> | + | |style="padding: 0px 0px 15px 15px;"|'''13. Afterwards, choose your product type and product group from the dropdown menu, enter the product name and select the '' 'OX WHMCS Module' '' module.'''<br/> You may '' 'Continue' '' to the next step now.<br/> |
'''''Note:''' You may select "Shared Hosting" or "Other" type of the product.'' | '''''Note:''' You may select "Shared Hosting" or "Other" type of the product.'' | ||
|} | |} | ||
| Line 289: | Line 290: | ||
{| | {| | ||
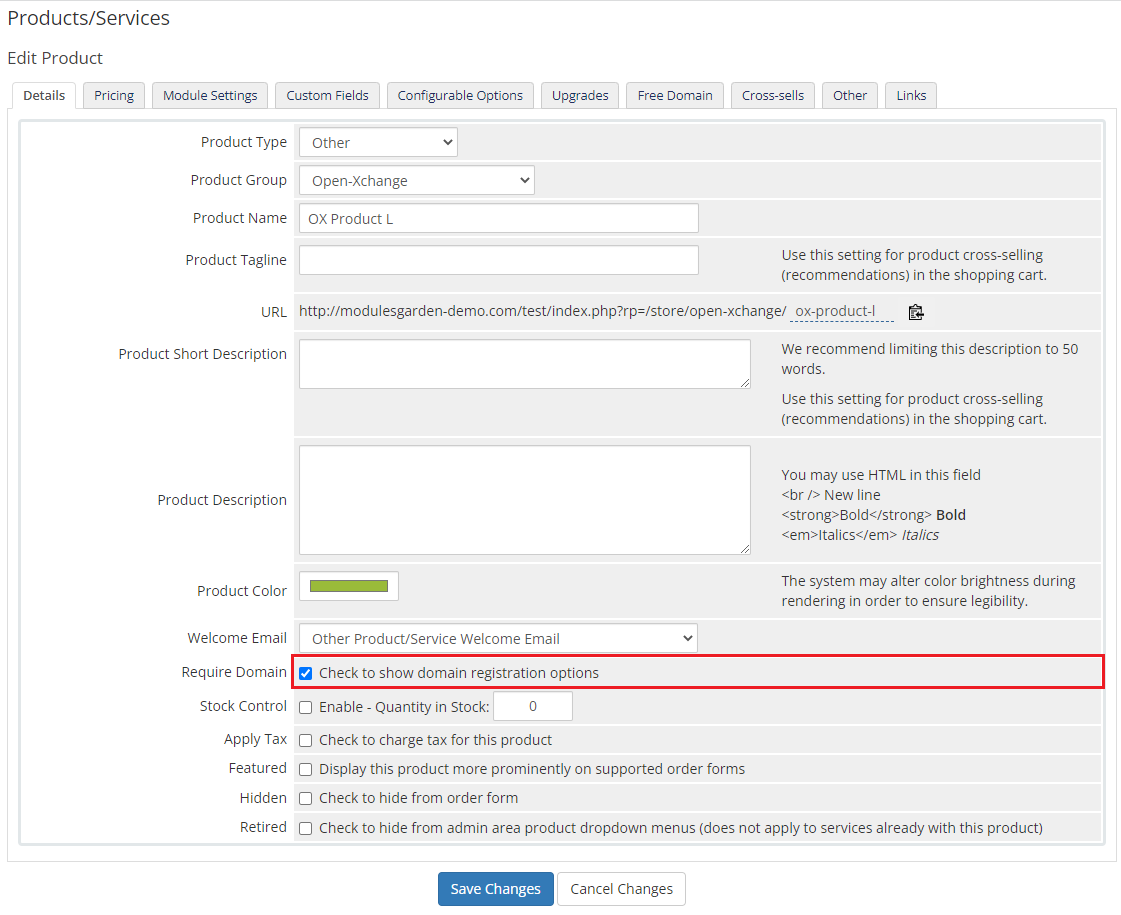
|style="padding: 0px 0px 15px 15px;"|'''14. In the product details make sure to mark the '' 'Require Domain' '' option.<br/> | |style="padding: 0px 0px 15px 15px;"|'''14. In the product details make sure to mark the '' 'Require Domain' '' option.<br/> | ||
| − | + | By marking the '' 'Require Domain' '' option, customers will have the options to: | |
*register a new domain | *register a new domain | ||
*transfer an existing domain from another registrar | *transfer an existing domain from another registrar | ||
| Line 298: | Line 299: | ||
|} | |} | ||
{| | {| | ||
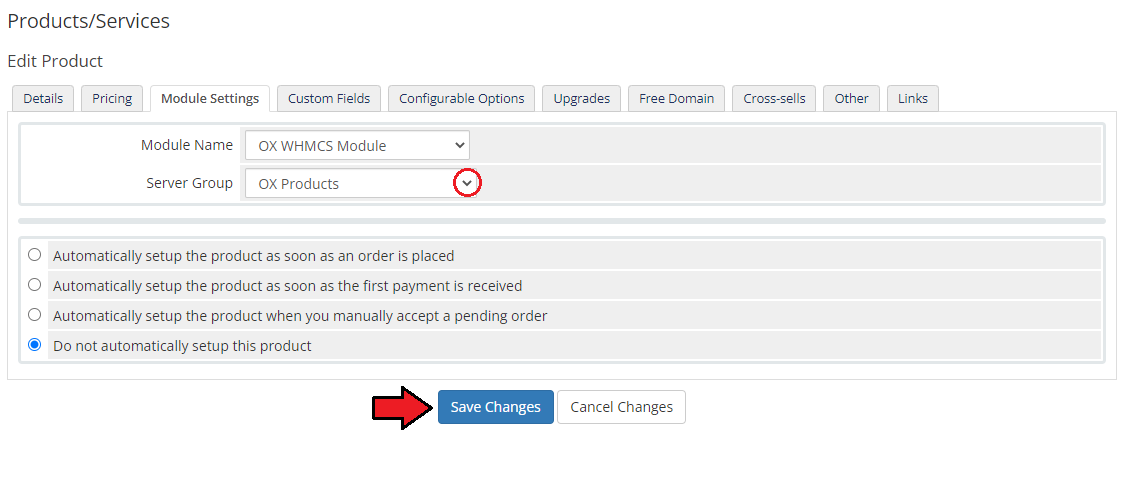
| − | |style="padding: 0px 0px 20px 15px;"|'''15. Now, go to the '' 'Module Settings' '' section, choose both '' 'OX WHMCS Module' '' and your previously created server group from the dropdown menus. ''' | + | |style="padding: 0px 0px 20px 15px;"|'''15. Now, go to the '' 'Module Settings' '' section, and choose both '' 'OX WHMCS Module' '' and your previously created server group from the dropdown menus, then click save changes.''' |
|} | |} | ||
{| | {| | ||
| Line 304: | Line 305: | ||
|} | |} | ||
{| | {| | ||
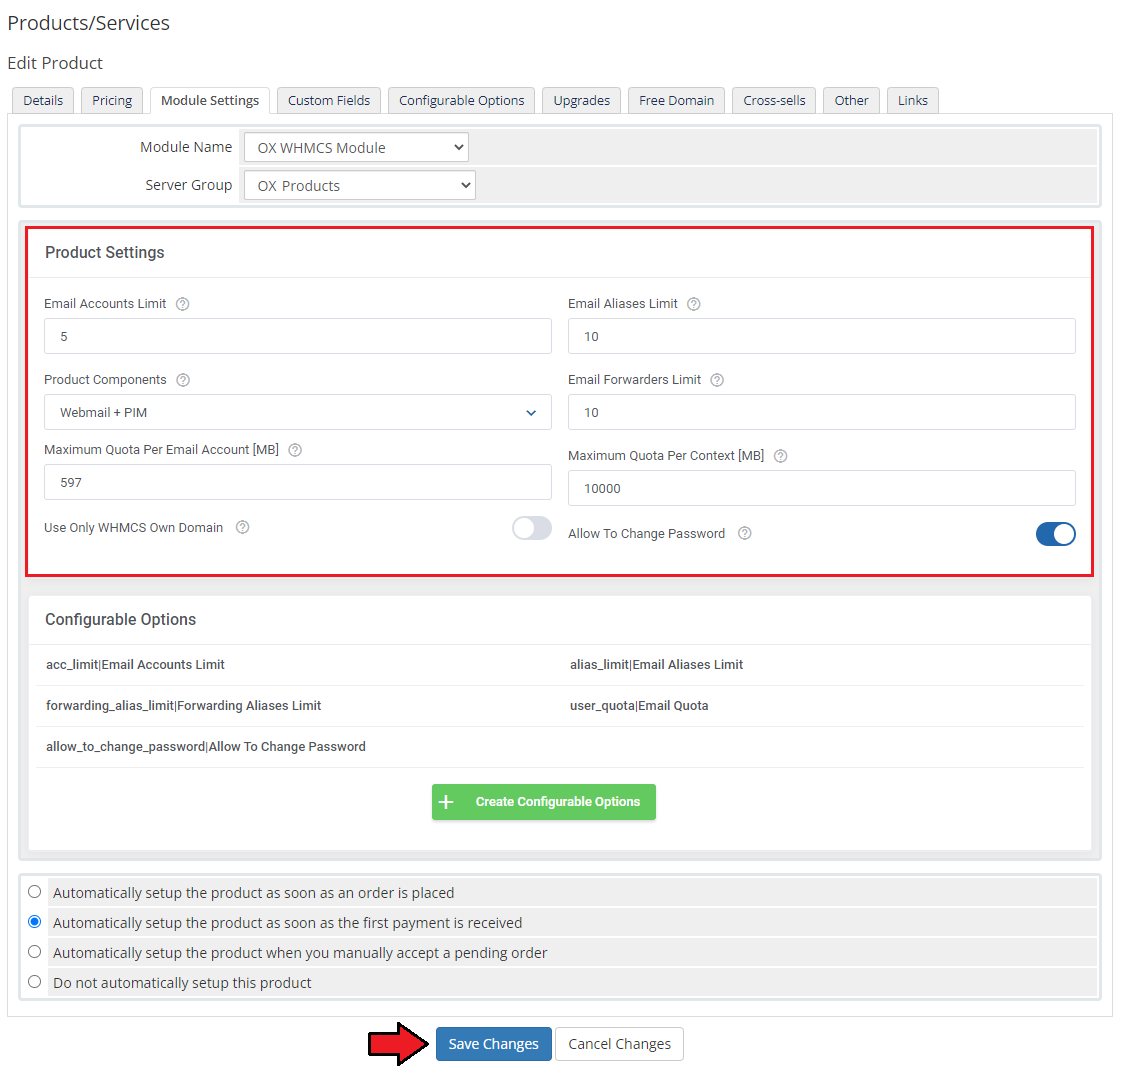
| − | |style="padding: 0px 0px 15px 15px;"|'''16. | + | |style="padding: 0px 0px 15px 15px;"|'''16. After you saved the changes, in this section you can define the limit settings per product.''' |
* '''Email Accounts Limit''' - the maximum allowed number of email accounts per context is 500 | * '''Email Accounts Limit''' - the maximum allowed number of email accounts per context is 500 | ||
| Line 313: | Line 314: | ||
* '''Product Components''' - choose the product that you want to provision to clients: | * '''Product Components''' - choose the product that you want to provision to clients: | ||
| − | ** | + | ** Mail Essential ''(OX Mail, OX Calender, OX Tasks, OX Portal, OX Address Book)'' |
| − | ** | + | ** Mail Essential + Productivity Add-on ''(additionally includes 'OX Drive', 'OX Text', 'OX Spreadsheet', 'OX Presentation' and Email Undelete)'' |
| − | ** | + | ** Mail Essential + Security Add-on ''(additionally includes email and file encryption, 'Safe Unsubscribe', 'Time-of-click anti-phishing')'' |
| − | ** | + | ** Mail Essential + Productivity Add-on + Security Add-on |
| − | * '''Maximum Quota Per Email Account [MB]''' - set the maximum quota for single email account [MB] | + | * '''Maximum Quota Per Email Account [MB]''' - set the maximum quota for a single email account [MB] |
* '''Maximum Quota Per Context [MB]''' - a context can be described as a container for users usually getting operated by a single end-user company having its users and their mail accounts located under this specific context.<br/>The maximum quota value cannot be lower than 10 000 MB (10 GB) | * '''Maximum Quota Per Context [MB]''' - a context can be described as a container for users usually getting operated by a single end-user company having its users and their mail accounts located under this specific context.<br/>The maximum quota value cannot be lower than 10 000 MB (10 GB) | ||
| − | * '''Use Only WHMCS Own Domain''' - only users | + | * '''Use Only WHMCS Own Domain''' - only users with an active domain on WHMCS will be able to manage this product |
* '''Allow To Change Password''' - when executing the "Create" and "Change Package" functions, the user will be allowed to change the password in the created context.<br/> This action is performed on the '' 'context/user' '' level. | * '''Allow To Change Password''' - when executing the "Create" and "Change Package" functions, the user will be allowed to change the password in the created context.<br/> This action is performed on the '' 'context/user' '' level. | ||
| Line 329: | Line 330: | ||
|style="padding: 0px 0px 20px 25px;"|[[File:OX_15.png]] | |style="padding: 0px 0px 20px 25px;"|[[File:OX_15.png]] | ||
|} | |} | ||
| + | ===Freemium Model=== | ||
{| | {| | ||
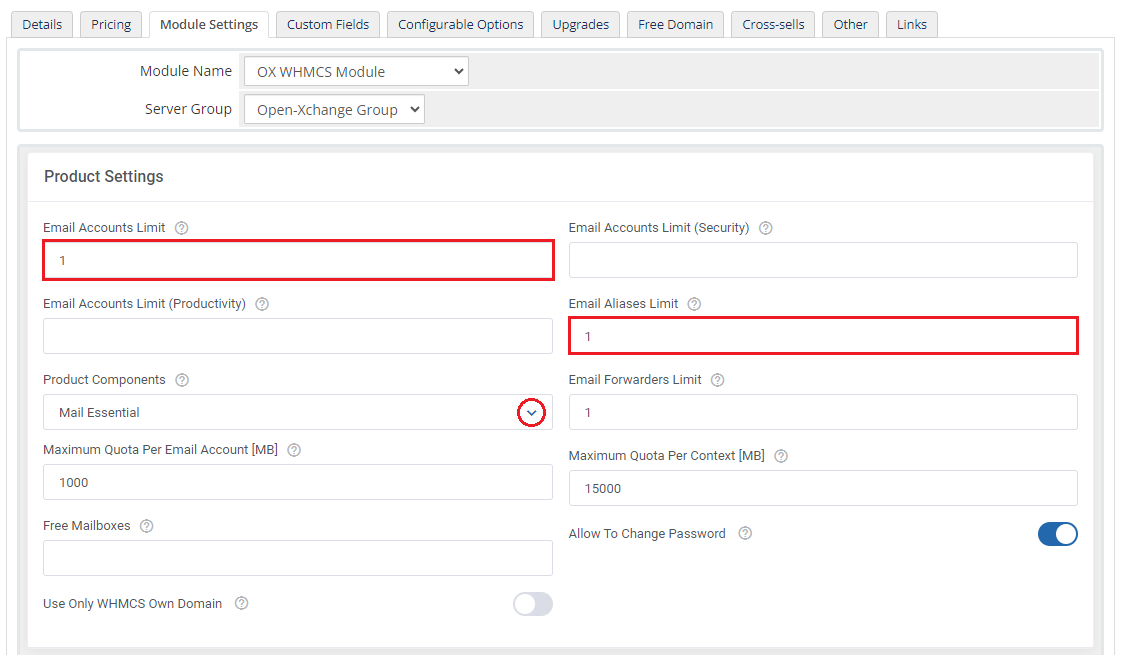
| − | |style="padding: 0px 0px 15px 15px;"|'''17. Additionally, you can replace the module static limits with | + | |style="padding: 10px 0px 15px 15px;"|1. Create a free product first. In the module settings tab, choose the "OpenXchange" module. Please remember that the configurable options should not be generated for the free product.<br/> Please see the exemplary module configuration in the screenshot below: |
| − | Press '' 'Create Configurable Options' '' to generate default set of configurable options, these can be: | + | |} |
| + | {| | ||
| + | |style="padding: 0px 0px 20px 25px;"|[[File:OX_14_1.png]] | ||
| + | |} | ||
| + | {| | ||
| + | |style="padding: 0px 0px 15px 15px;"|2. Then, create the second product which will be the paid one. In the configuration of the paid product, in the module settings tab' fill in the new field called "Free Mailboxes".<br/> In this field, provide the number of the free fields you have set in the configuration of the free product ''(the product described in point 1).''<br/> In this example, the product is configured to allow the user to have only one free account, that is why it is typed "1" in the "Free Mailboxes" field.<br/> This field is very important and it should be filled only in the case of the "Freemium model" products. Please see the exemplary product configuration in the screenshot below: | ||
| + | |} | ||
| + | {| | ||
| + | |style="padding: 0px 0px 20px 25px;"|[[File:OX_14_2.png]] | ||
| + | |} | ||
| + | {| | ||
| + | |style="padding: 0px 0px 15px 15px;"|3. While still in the paid product configuration in the "Module Settings" tab, create the configurable options.<br/> | ||
| + | Please remember to create the configurable options for each email account type ("Essential", "Productivity", "Security"): | ||
| + | |} | ||
| + | {| | ||
| + | |style="padding: 0px 0px 20px 25px;"|[[File:OX_14_3.png]] | ||
| + | |} | ||
| + | {| | ||
| + | |style="padding: 0px 0px 15px 15px;"|4. When you have created all the configurable options, please go back to the free product ''(from point 1)'' configuration page, and go to the "Upgrades" tab.<br/> On the "Packages Upgrades" field, please choose the product you have created and configured in points 2 and 3.<br/> The user also should not be able to buy this product directly: | ||
| + | |} | ||
| + | {| | ||
| + | |style="padding: 0px 0px 20px 25px;"|[[File:OX_14_4.png]] | ||
| + | |} | ||
| + | {| | ||
| + | |style="padding: 0px 0px 15px 15px;"|5. After the user buys the free product, a new context will be created for them.<br/> In this scenario, the user will be able to create only one account (in exactly the same way he was able to do this before this modification). | ||
| + | |} | ||
| + | {| | ||
| + | |style="padding: 0px 0px 20px 25px;"|[[File:OX_14_5.png]] | ||
| + | |} | ||
| + | {| | ||
| + | |style="padding: 0px 0px 20px 15px;"|6. If the user wants to buy more accounts ''("Essential", "Productivity" and "Security" types)'', they will need to upgrade the product to the paid one first: | ||
| + | |} | ||
| + | {| | ||
| + | |style="padding: 0px 0px 20px 25px;"|[[File:OX_14_6.png]] | ||
| + | |} | ||
| + | {| | ||
| + | |style="padding: 0px 0px 20px 25px;"|[[File:OX_14_7.png]] | ||
| + | |} | ||
| + | {| | ||
| + | |style="padding: 0px 0px 20px 15px;"|7. When the product is updated the user will be able to see the "Upgrade/Downgrade Options" button: | ||
| + | |} | ||
| + | {| | ||
| + | |style="padding: 0px 0px 20px 25px;"|[[File:OX_14_8.png]] | ||
| + | |} | ||
| + | {| | ||
| + | |style="padding: 0px 0px 20px 15px;"|8. When the user clicks this button, he will be able to buy more email accounts for each type: | ||
| + | |} | ||
| + | {| | ||
| + | |style="padding: 0px 0px 20px 25px;"|[[File:OX_14_9.png]] | ||
| + | |} | ||
| + | {| | ||
| + | |style="padding: 0px 0px 20px 15px;"|9. When he will pay the invoice, the limits will be upgraded. Then he will be able to create a new account.<br/> To choose the type of account there is a drop-down field called "Email Type": | ||
| + | |} | ||
| + | {| | ||
| + | |style="padding: 0px 0px 20px 25px;"|[[File:OX_14_10.png]] | ||
| + | |} | ||
| + | {| | ||
| + | |style="padding: 0px 0px 15px 15px;"|10. For the "Freemium" model functionality, there is a column in the "Email Accounts" table, called "Email Type". | ||
| + | |} | ||
| + | {| | ||
| + | |style="padding: 0px 0px 30px 25px;"|[[File:OX_14_11.png]] | ||
| + | |} | ||
| + | |||
| + | ==Additional Configuration== | ||
| + | {| | ||
| + | |style="padding: 10px 0px 15px 15px;"|'''17. Additionally, you can replace the module's static limits with dynamic ones in the form of configurable options.'''<br /> | ||
| + | Press '' 'Create Configurable Options' '' to generate a default set of configurable options, these can be: | ||
* acc_limit|Email Accounts Limit ''(allows user to increase Email Account Limit without product upgrade)'' | * acc_limit|Email Accounts Limit ''(allows user to increase Email Account Limit without product upgrade)'' | ||
* alias_limit|Email Aliases Limit ''(allows user to increase Limit of Aliases without product upgrade)'' | * alias_limit|Email Aliases Limit ''(allows user to increase Limit of Aliases without product upgrade)'' | ||
* forwarding_alias_limit|Forwarding Aliases Limit ''(allows user to increase Limit of Forwarding Aliases with product upgrade)'' | * forwarding_alias_limit|Forwarding Aliases Limit ''(allows user to increase Limit of Forwarding Aliases with product upgrade)'' | ||
| − | * allow_to_change_password|Allow To Change Password ''(allows user to change password)''<br/> | + | * allow_to_change_password|Allow To Change Password '' (allows user to change password within the Webmail UI - recommended)''<br/> |
| − | More about management of configurable options can be found [https://www.docs.modulesgarden.com/General#How_To_Use_Configurable_Options here]. | + | More about the management of configurable options can be found [https://www.docs.modulesgarden.com/General#How_To_Use_Configurable_Options here]. |
|} | |} | ||
{| | {| | ||
| Line 347: | Line 415: | ||
|} | |} | ||
{| | {| | ||
| − | |style="padding: 0px 0px 20px 15px;"|'''18. After saving the product configuration, please make sure | + | |style="padding: 0px 0px 20px 15px;"|'''18. After saving the product configuration, please make sure that the module generated custom fields have been successfully created.'''<br/> |
Do this by clicking the "Custom Fields" tab and check for: | Do this by clicking the "Custom Fields" tab and check for: | ||
* '''context_id|Context ID''' as your first Field Name | * '''context_id|Context ID''' as your first Field Name | ||
| Line 356: | Line 424: | ||
|} | |} | ||
{| | {| | ||
| − | |style="padding: 0px 0px 15px 15px;"|'''19. That's all, you have just successfully created and customized a new product, now you can check the results.'''<br/> Do this by visiting the client area and looking into '' 'My Products and Services' '' and then clicking on one of your users to observe his/her product/service information.<br/> | + | |style="padding: 0px 0px 15px 15px;"|'''19. That's all, you have just successfully created and customized a new product, and now you can check the results.'''<br/> Do this by visiting the client area and looking into '' 'My Products and Services' '' and then clicking on one of your users to observe his/her product/service information.<br/> |
This is what your customers should see in your client area. | This is what your customers should see in your client area. | ||
|} | |} | ||
| Line 371: | Line 439: | ||
==OX WHMCS Module Configuration== | ==OX WHMCS Module Configuration== | ||
{| | {| | ||
| − | |style="padding: 10px 0px 15px 15px;"|Before you start your actual work with OX WHMCS Module, move again to 'Addons' → 'OX WHMCS Module'.<br/> The addon allows | + | |style="padding: 10px 0px 15px 15px;"|Before you start your actual work with OX WHMCS Module, move again to 'Addons' → 'OX WHMCS Module'.<br/> The addon allows easy and comfortable access to the Contexts list and the OX panel cloud settings.<br/> |
The first section is dedicated to created contexts. There you will find a list of all provisioned contexts and verified domains, status, context ID and name.<br/> This information may be required if you connect to the OX Support Team: | The first section is dedicated to created contexts. There you will find a list of all provisioned contexts and verified domains, status, context ID and name.<br/> This information may be required if you connect to the OX Support Team: | ||
| Line 385: | Line 453: | ||
|} | |} | ||
{| | {| | ||
| − | |style="padding: 0px 0px 20px 15px;"|The next section, which is '' 'Cloud Settings','' is dedicated to the configuration and branding of | + | |style="padding: 0px 0px 20px 15px;"|The next section, which is '' 'Cloud Settings','' is dedicated to the configuration and branding of the Webmail UI.<br/> |
Take a look at the available settings. | Take a look at the available settings. | ||
|} | |} | ||
| Line 401: | Line 469: | ||
|} | |} | ||
{| | {| | ||
| − | |style="padding: 0px 0px | + | |style="padding: 0px 0px 20px 25px;"|[[File:OX_21.png]] |
| + | |} | ||
| + | {| | ||
| + | |style="padding: 0px 0px 20px 25px;"|[[File:OX_21_1.png]] | ||
|} | |} | ||
{| | {| | ||
| Line 408: | Line 479: | ||
|} | |} | ||
{| | {| | ||
| − | |style="padding: 0px 0px 30px 25px;"|[[File: | + | |style="padding: 0px 0px 20px 25px;"|[[File:OX_21_2.png]] |
| + | |} | ||
| + | {| | ||
| + | |style="padding: 0px 0px 30px 25px;"|[[File:OX_21_3.png]] | ||
|} | |} | ||
| Line 414: | Line 488: | ||
{| | {| | ||
|style="padding: 10px 0px 30px 15px;"|'''OX WHMCS Module allows your customers to manage their Open-Xchange contexts directly in your WHMCS client area. | |style="padding: 10px 0px 30px 15px;"|'''OX WHMCS Module allows your customers to manage their Open-Xchange contexts directly in your WHMCS client area. | ||
| − | Read through the next chapters which illustrate all the possibilities of our | + | Read through the next chapters which illustrate all the possibilities of our add-on module. |
|} | |} | ||
==Admin Area== | ==Admin Area== | ||
{| | {| | ||
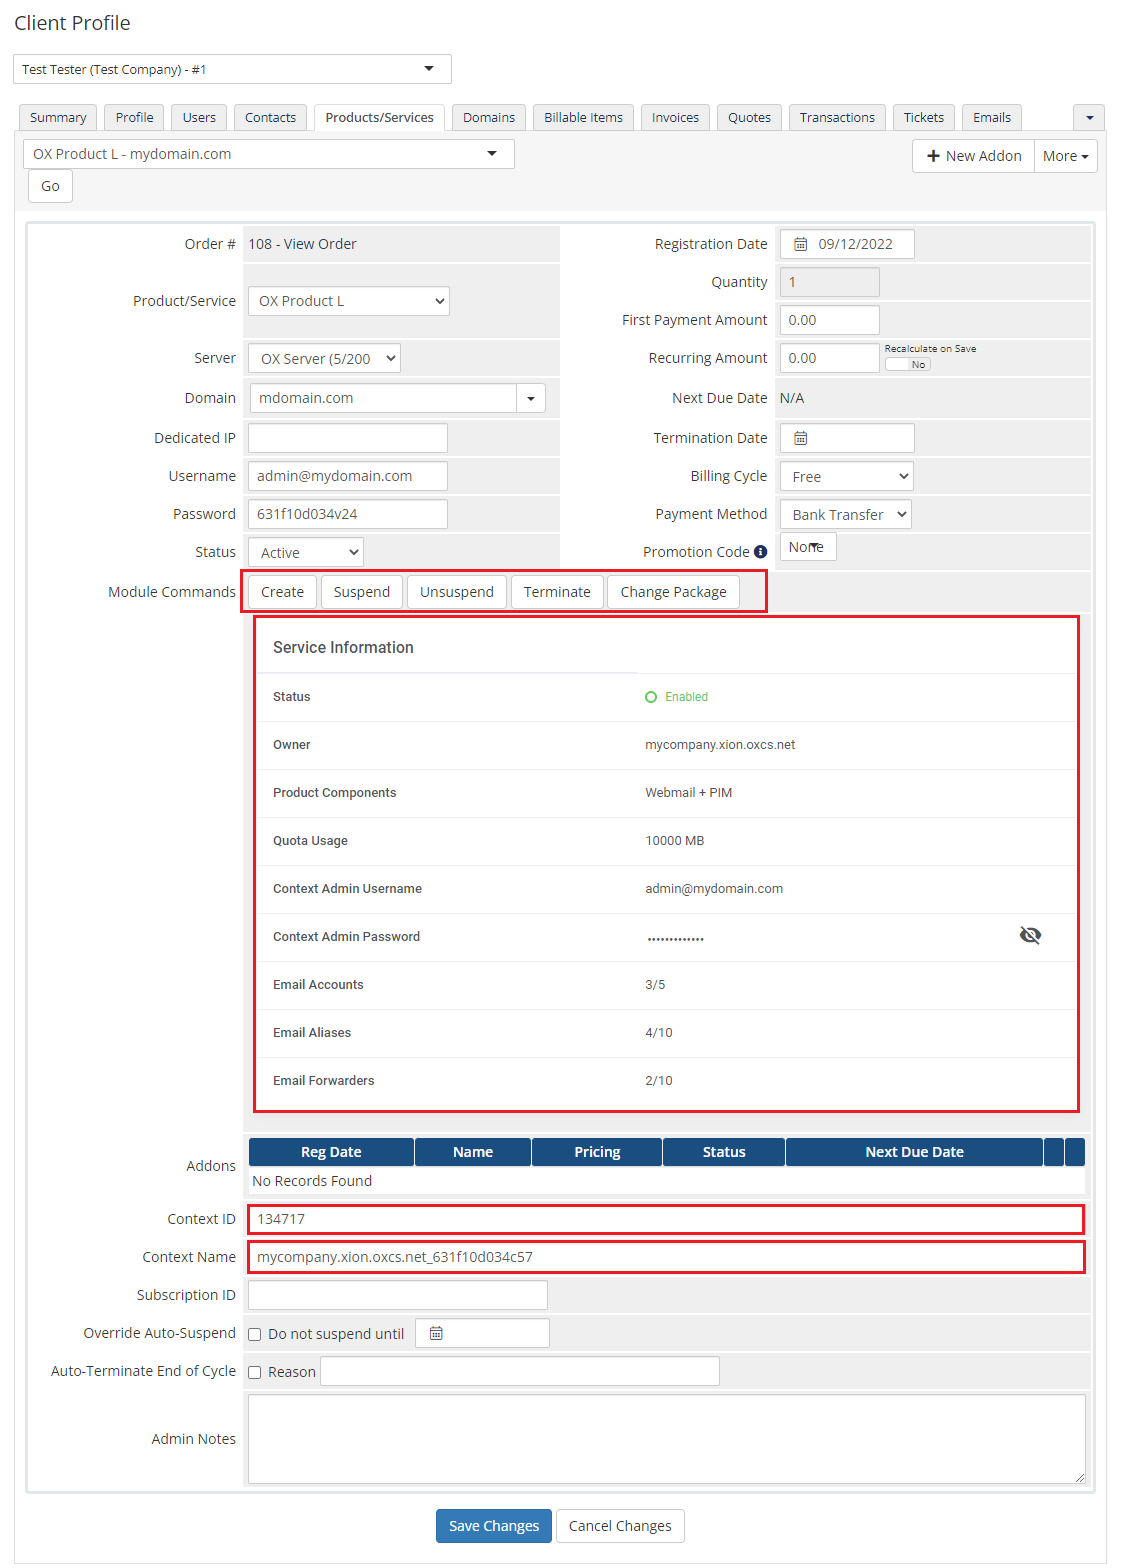
|style="padding: 10px 0px 15px 15px;"|'''From now on, all your clients who ordered a previously created product will be able to manage their OX accounts via your WHMCS system.'''<br/> | |style="padding: 10px 0px 15px 15px;"|'''From now on, all your clients who ordered a previously created product will be able to manage their OX accounts via your WHMCS system.'''<br/> | ||
| − | After running | + | After running the '' 'Create'' ' action on the product, the context and context admin are automatically created, you can check the context details in the '' 'Service Information' '' table.<br/> The username and password of the service are the context admin credentials, you can log into the panel with these credentials.<br/> |
| − | The username and password of the service are the context admin credentials, you can log into the panel with these credentials.<br/> | + | |
| − | The screen below presents a summary view of the ordered product in admin area. Among the available actions you will find: | + | The screen below presents a summary view of the ordered product in the admin area. Among the available actions you will find: |
* Module Commands: '' 'Create', 'Suspend'/'Unsuspend', 'Terminate' '' the product and '' 'Change Package' '' action | * Module Commands: '' 'Create', 'Suspend'/'Unsuspend', 'Terminate' '' the product and '' 'Change Package' '' action | ||
| − | * Change configurable options values - available options depend on configuration in '' 'Module Settings' '' | + | * Change configurable options values - available options depend on the configuration in '' 'Module Settings' '' |
* Service Information | * Service Information | ||
* Context ID | * Context ID | ||
| Line 435: | Line 508: | ||
==Client Area== | ==Client Area== | ||
{| | {| | ||
| − | |style="padding: 10px 0px 15px 15px;"|In the section below, you will find descriptions | + | |style="padding: 10px 0px 15px 15px;"|In the section below, you will find descriptions of the basic tools used to manage your OX account.<br/> |
Analyze them carefully to enjoy extensive and straightforward management capabilities. | Analyze them carefully to enjoy extensive and straightforward management capabilities. | ||
|} | |} | ||
| Line 470: | Line 543: | ||
{| | {| | ||
|style="padding: 0px 0px 15px 15px;"|Press '' 'Create Account' '' to create a new one.<br/> Fill out the fields to provide any details on the account owner.<br/> | |style="padding: 0px 0px 15px 15px;"|Press '' 'Create Account' '' to create a new one.<br/> Fill out the fields to provide any details on the account owner.<br/> | ||
| − | '''''Note:''' The provided 'Quota' field must be lower | + | '''''Note:''' The provided 'Quota' field must be lower than the setup limit. If the limit has been reached, the client will not be able to create an account.'' |
|} | |} | ||
{| | {| | ||
| Line 476: | Line 549: | ||
|} | |} | ||
{| | {| | ||
| − | |style="padding: 0px 0px 20px 15px;"|As you can see, the just created account is now visible on the list of all email accounts. <br/> Use marked buttons to either delete a single account or change its settings. | + | |style="padding: 0px 0px 20px 15px;"|As you can see, the just-created account is now visible on the list of all email accounts. <br/> Use marked buttons to either delete a single account or change its settings. |
|} | |} | ||
{| | {| | ||
| Line 482: | Line 555: | ||
|} | |} | ||
{| | {| | ||
| − | |style="padding: 0px 0px 15px 15px;"|Apart changing all the basic data of the selected account, including the password, you may change its status here.<br/> Just toggle the adequate switcher to enable or disable the email account. | + | |style="padding: 0px 0px 15px 15px;"|Apart from changing all the basic data of the selected account, including the password, you may change its status here.<br/> Just toggle the adequate switcher to enable or disable ''(suspend)'' the email account. |
|} | |} | ||
{| | {| | ||
| Line 518: | Line 591: | ||
|} | |} | ||
{| | {| | ||
| − | |style="padding: 0px 0px 15px 15px;"| A full list of existing email forwarders is now available | + | |style="padding: 0px 0px 15px 15px;"| A full list of existing email forwarders is now available for preview.<br/> You may add more forwarders, yet, once the limit is reached, you will have to delete some to be allowed to add new ones. |
|} | |} | ||
{| | {| | ||
| Line 538: | Line 611: | ||
====MX Records==== | ====MX Records==== | ||
{| | {| | ||
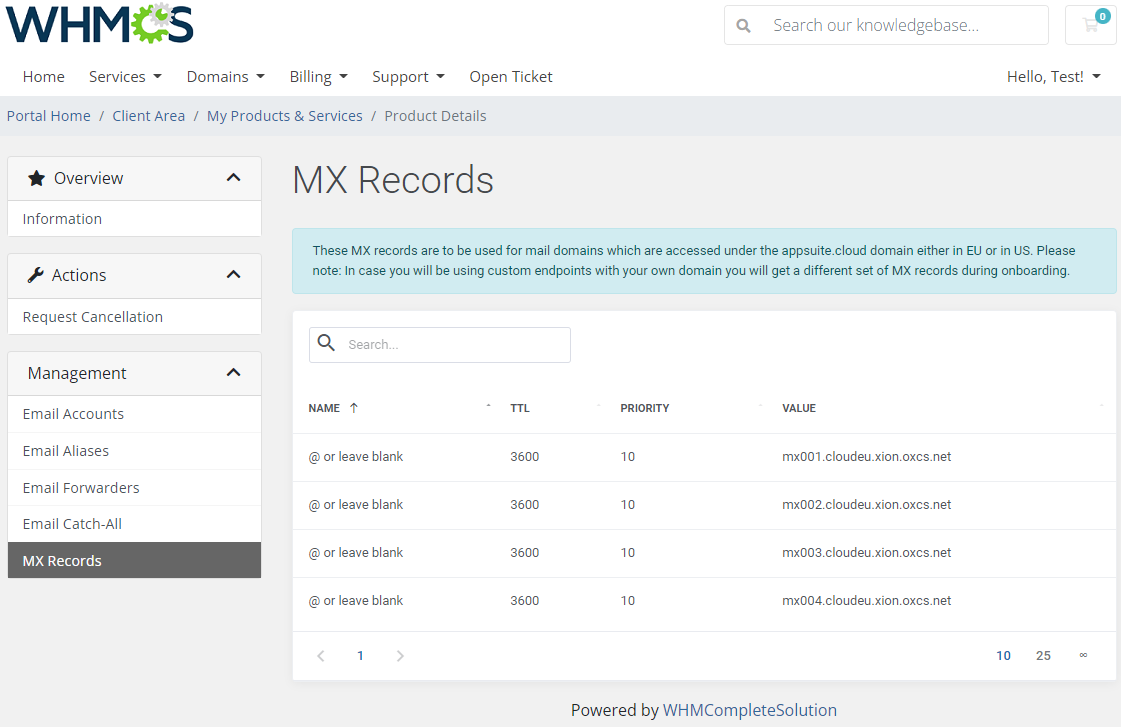
| − | |style="padding: 10px 0px 15px 15px;"|The below MX records can be used for mail domains | + | |style="padding: 10px 0px 15px 15px;"|The below MX records can be used for mail domains that are accessed under the ''appsuite.cloud'' domain either in the EU, US or in Asia. <br/> |
'''''Important:''' In the case custom endpoints are used with your own domain, you will get a different set of MX records during onboarding.'' | '''''Important:''' In the case custom endpoints are used with your own domain, you will get a different set of MX records during onboarding.'' | ||
|} | |} | ||
Latest revision as of 15:03, 8 January 2024
Contents |
[edit] About OX WHMCS Module
| OX WHMCS Module has been developed to allow quick and easy management of the OX account directly from the WHMCS client area. Establish the connection between your WHMCS and Open-Xchange to get access to email accounts, aliases, forwarders and many more. Use the addon module to master the theme branding on your account directly in the panel. |
- Important: Before using our WHMCS module
| ✔ To be able to use the OX WHMCS Module, you MUST have an OX Cloud account! |
| ✔ The OX WHMCS Module lets you provision and manage OX Cloud email accounts. |
| ✔ BEFORE you can do this, you need to be registered on OX Cloud, so that we can give you access to the OX Cloud servers. |
| ✔ Without this your OX WHMCS Module will not be able to connect to OX Cloud and will not work! |
| ✔ To register on OX Cloud please click HERE |
- Admin Area Features:
| ✔ Create/Suspend/Unsuspend/Terminate Context |
| ✔ Change Package |
| ✔ View Service Information: |
| ✔ Status |
| ✔ Owner |
| ✔ Module Access |
| ✔ Maximum Context Quota |
| ✔ Context Username And Password |
| ✔ Number And Limits Of: |
| ✔ Email Accounts |
| ✔ Email Aliases |
| ✔ Email Forwarders |
| ✔ Configure Product: |
| ✔ Set Limit Of Email Accounts Per Context |
| ✔ Set Limit Of Email Aliases Per Context |
| ✔ Set Limit Of Email Forwarders Per Context |
| ✔ Select Module Access |
| ✔ Define Maximum Quota Per Email Account [MB] |
| ✔ Define Maximum Quota Per Context [MB] |
| ✔ Toggle Using WHMCS Own Domain Only |
| ✔ Allow Users To Change Password |
- Client Area Features:
| ✔ View Service Information: |
| ✔ Status |
| ✔ Owner |
| ✔ Module Access |
| ✔ Maximum Context Quota |
| ✔ Context Username And Password |
| ✔ Number And Limits Of: |
| ✔ Email Accounts |
| ✔ Email Aliases |
| ✔ Email Forwarders |
| ✔ Access And Management Of: |
| ✔ Email Accounts |
| ✔ Email Aliases |
| ✔ Email Forwarders |
| ✔ Email Catch-All |
| ✔ View MX Records For Mail Domains |
- Configurable Options:
| ✔ Email Accounts Limit |
| ✔ Email Aliases Limit |
| ✔ Email Forwarders Limit |
| ✔ Email Quota |
| ✔ Allow To Change Password |
- General Info:
| ✔ Configurable Options Support |
| ✔ Multi-Language Support |
| ✔ Supports PHP 8.1 Back To PHP 7.4 |
| ✔ Supports WHMCS Themes "Six" And "Twenty-One" |
| ✔ Supports WHMCS V8.4 And Later |
[edit] Installation and Configuration
| The below tutorial will show you how to install and configure OX WHMCS Module successfully. We will guide you step by step through the whole installation process. |
[edit] Installation
| 1. Log in to our client area and download the module. |
|
| 2. Upload and extract the files into the main WHMCS directory. Files in your WHMCS directory should look like on the following screen. |
[edit] Activation of Addon
| 3. Now you have to activate the module in your WHMCS system. Log in to your WHMCS admin area. Move to the 'System Settings' and find 'Addon Modules'. |

|
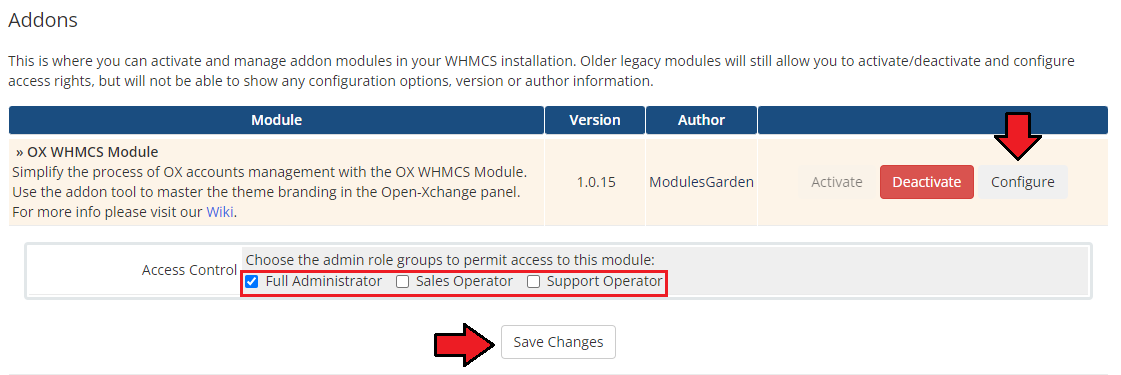
| 4. In the next step you need to permit access to this module. To do so, click on the 'Configure' button, tick the desired admin roles and press 'Save Changes'. |
|
| 5.The OX WHMCS Module has been successfully installed! Access the addon under 'Addons' → 'OX WHMCS Module'. |
[edit] Server Configuration
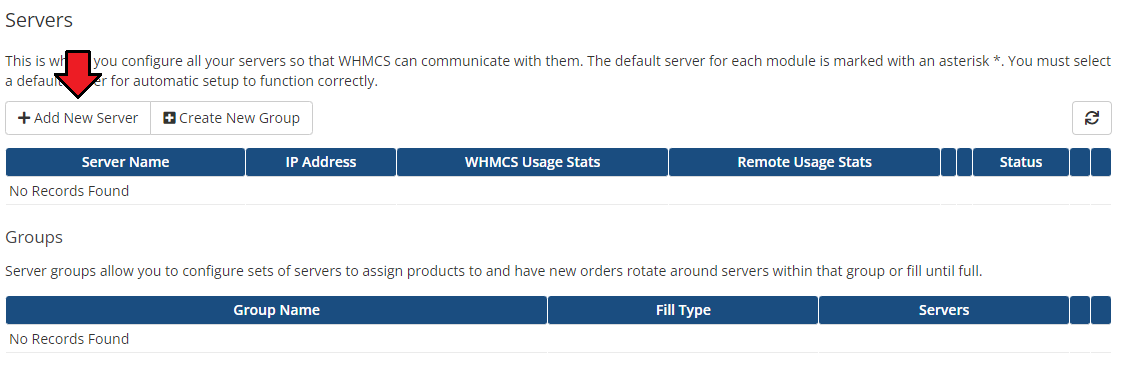
| 6. In order to establish a successful connection, you will need to set up the server first. Log in to your WHMCS account, proceed to 'System Settings' → 'Products/Services' → 'Servers'. |
|
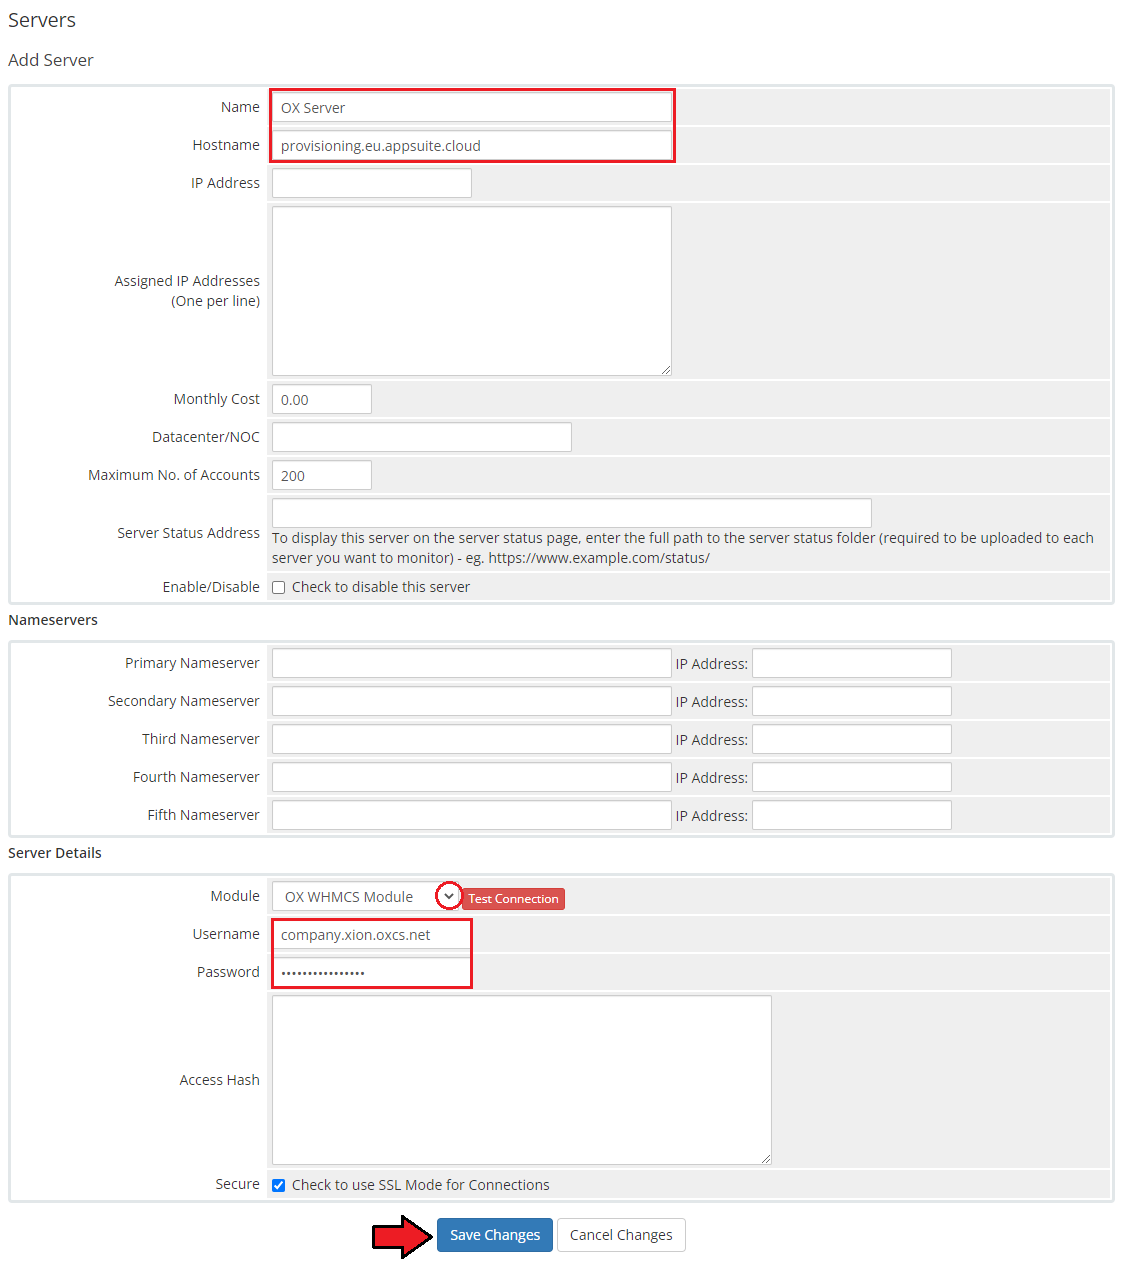
| 7. Next, enter your newly created server name and the Open-Xchange server hostname (server URL). Choose 'OX WHMCS Module' from the 'Module' dropdown menu and type in your username and password. Important:
|
|
If the connection cannot be established, please ensure that:
Note: If you use multiple servers, all their IP addresses have to be white-listed. |
| 8. After you configure your server correctly, you will see the following screen. Now you need to create a new group for your server. For that purpose press 'Create New Group'. |
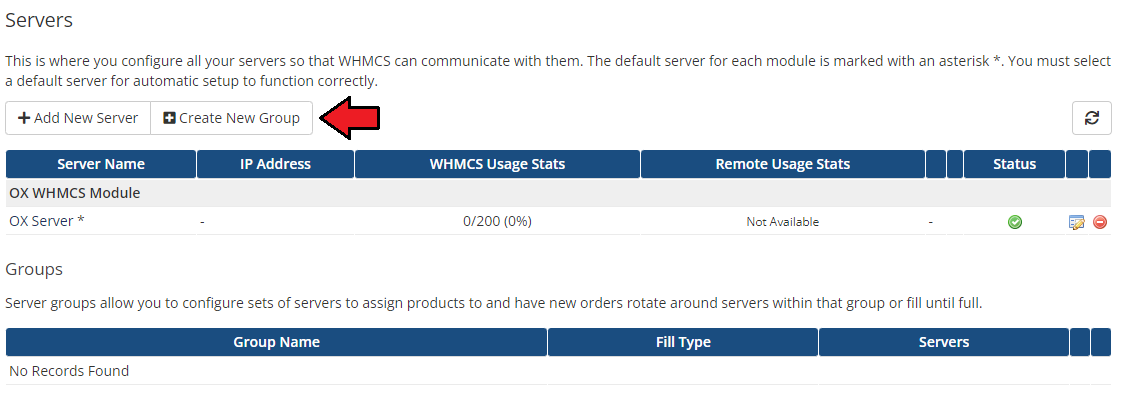
|
| 9. Enter your desired 'Group Name', click on your previously created server, press 'Add' then 'Save Changes'. |
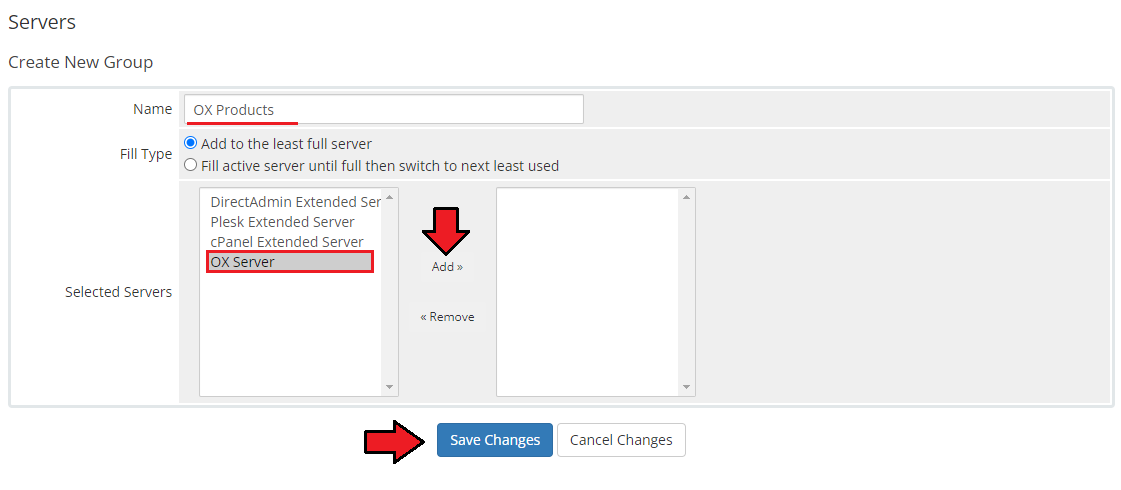
|
[edit] Product Configuration
| 10. In order to create and configure your desired Products and Services, proceed to 'System Settings' → 'Products/Services'. Start by creating a new, dedicated group by pressing the 'Create a New Group' button. |

|
| 11. Next, enter your new product group name and press the 'Save Changes' button. |
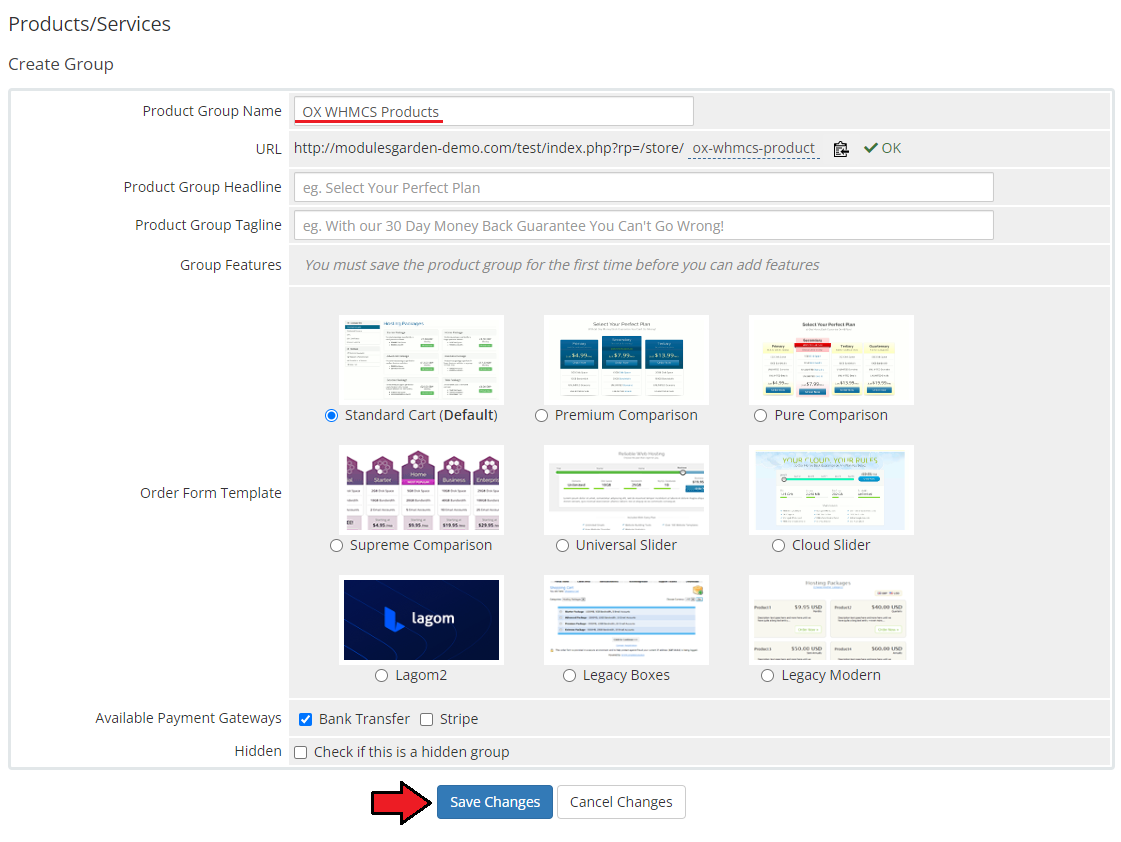
|
| 12. You can create your product now and assign it to the previously created product group. Click on 'Create a New Product'. |

|
| 13. Afterwards, choose your product type and product group from the dropdown menu, enter the product name and select the 'OX WHMCS Module' module. You may 'Continue' to the next step now. Note: You may select "Shared Hosting" or "Other" type of the product. |
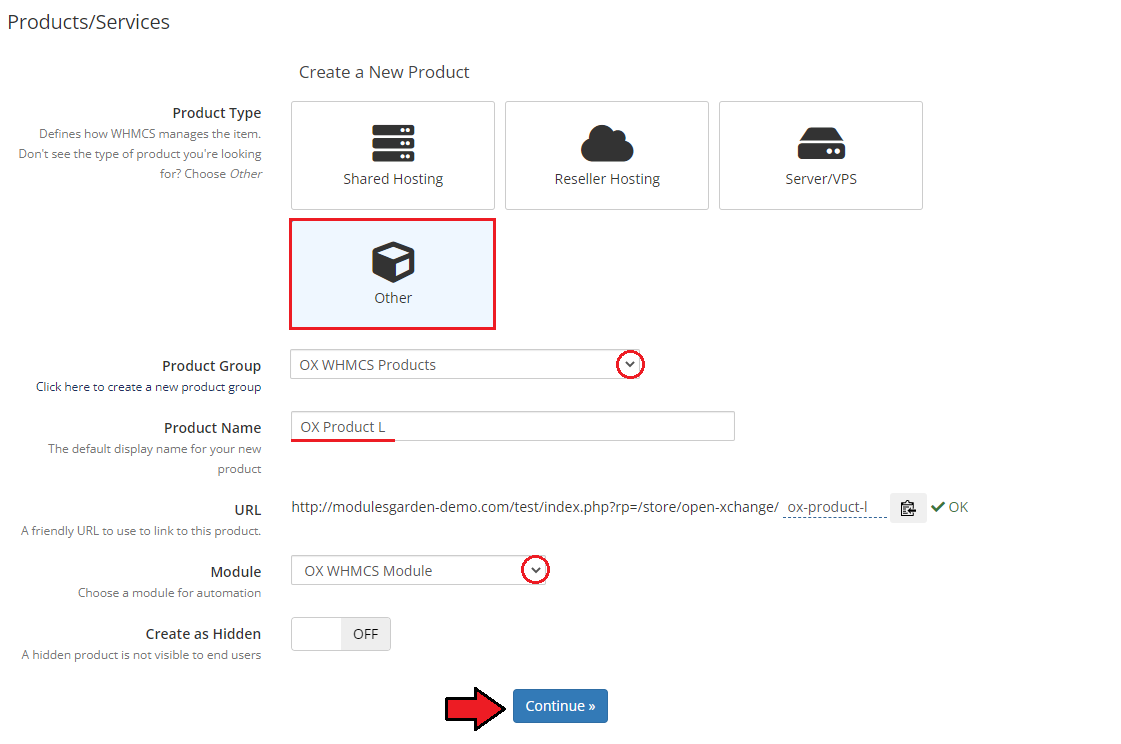
|
| 14. In the product details make sure to mark the 'Require Domain' option. By marking the 'Require Domain' option, customers will have the options to:
|
|
| 15. Now, go to the 'Module Settings' section, and choose both 'OX WHMCS Module' and your previously created server group from the dropdown menus, then click save changes. |
|
16. After you saved the changes, in this section you can define the limit settings per product.
|
|
[edit] Freemium Model
| 1. Create a free product first. In the module settings tab, choose the "OpenXchange" module. Please remember that the configurable options should not be generated for the free product. Please see the exemplary module configuration in the screenshot below: |
|
| 2. Then, create the second product which will be the paid one. In the configuration of the paid product, in the module settings tab' fill in the new field called "Free Mailboxes". In this field, provide the number of the free fields you have set in the configuration of the free product (the product described in point 1). In this example, the product is configured to allow the user to have only one free account, that is why it is typed "1" in the "Free Mailboxes" field. This field is very important and it should be filled only in the case of the "Freemium model" products. Please see the exemplary product configuration in the screenshot below: |
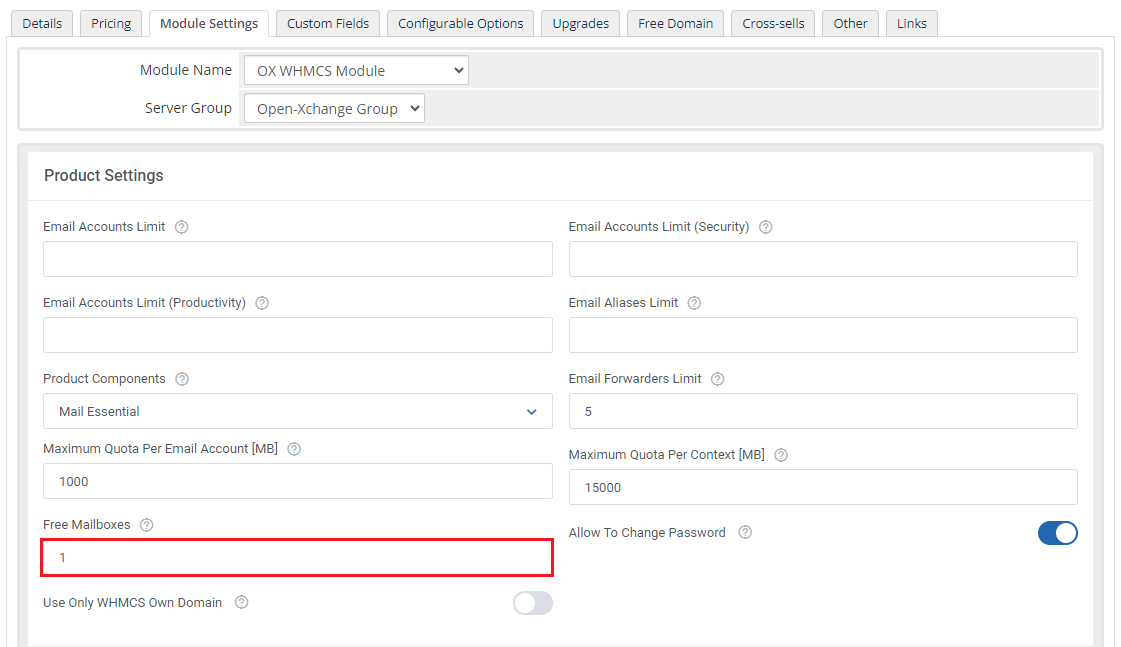
|
| 3. While still in the paid product configuration in the "Module Settings" tab, create the configurable options. Please remember to create the configurable options for each email account type ("Essential", "Productivity", "Security"): |
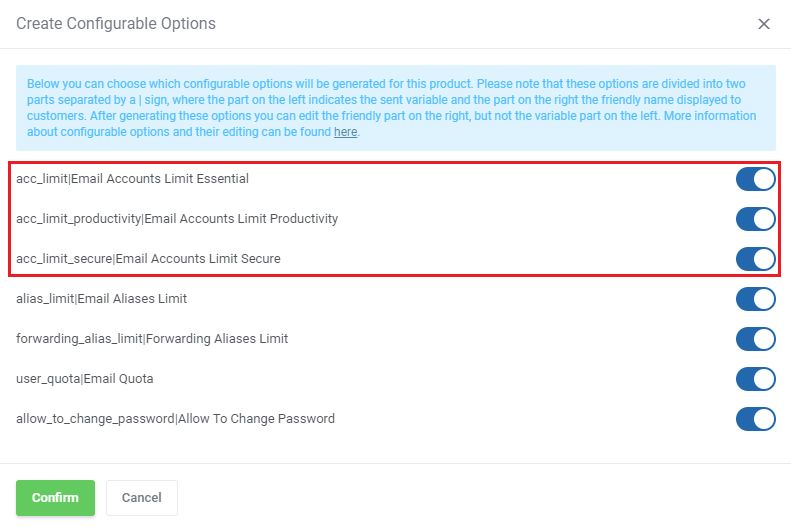
|
| 4. When you have created all the configurable options, please go back to the free product (from point 1) configuration page, and go to the "Upgrades" tab. On the "Packages Upgrades" field, please choose the product you have created and configured in points 2 and 3. The user also should not be able to buy this product directly: |
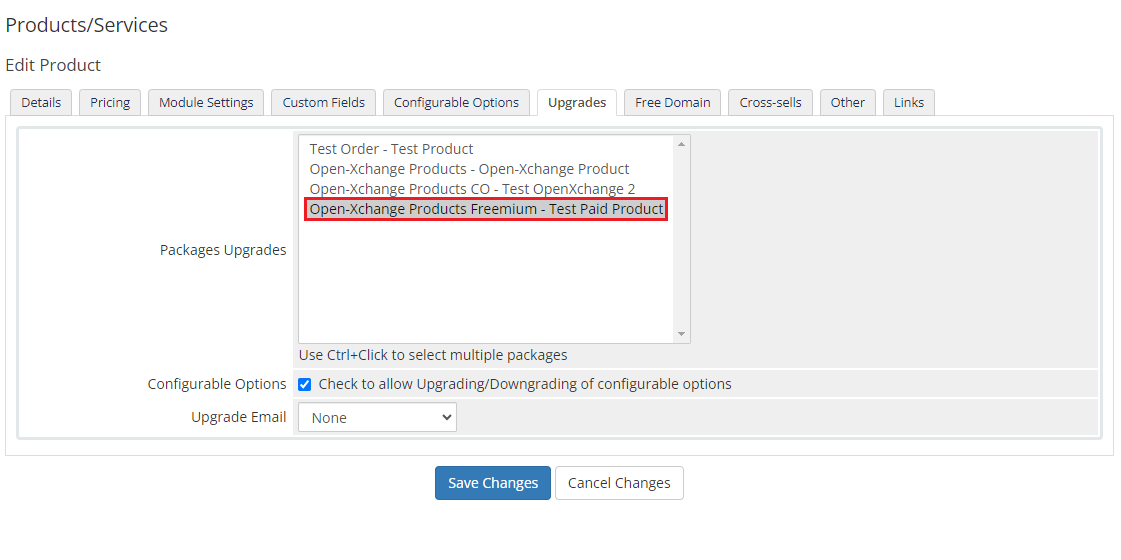
|
| 5. After the user buys the free product, a new context will be created for them. In this scenario, the user will be able to create only one account (in exactly the same way he was able to do this before this modification). |
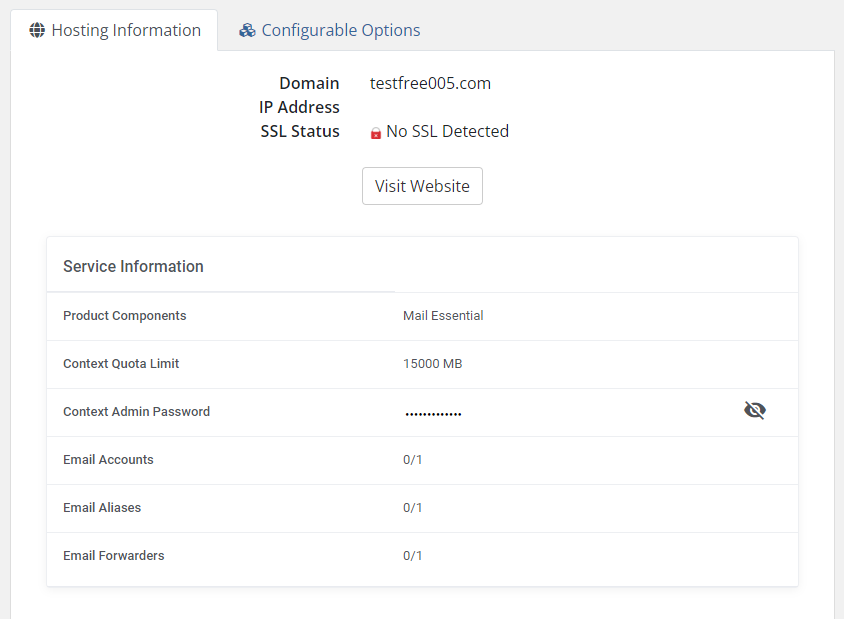
|
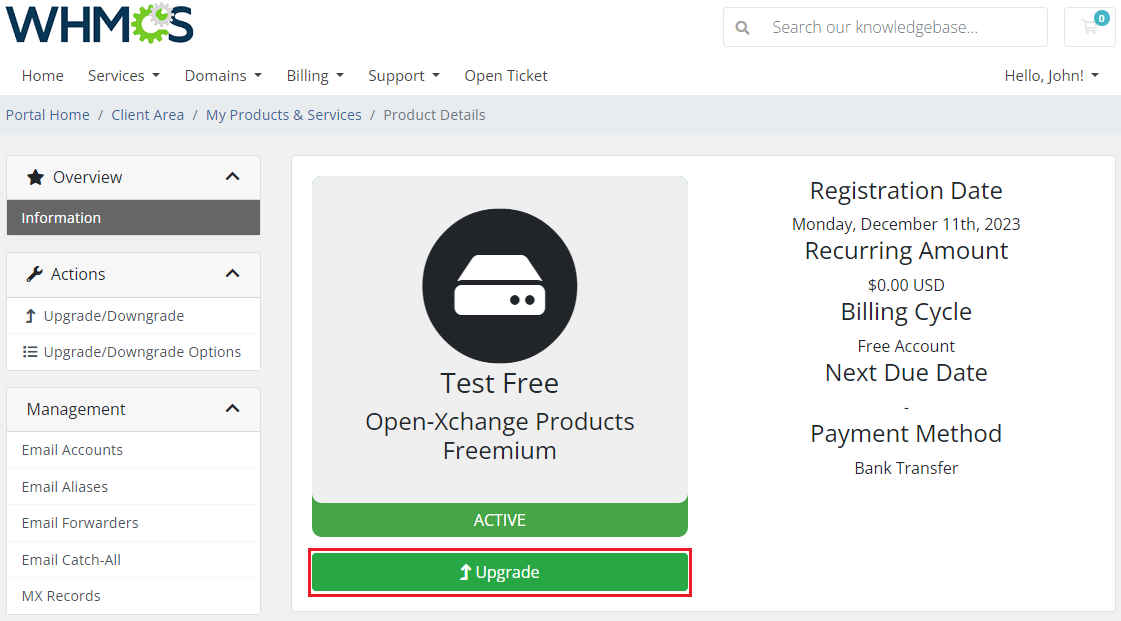
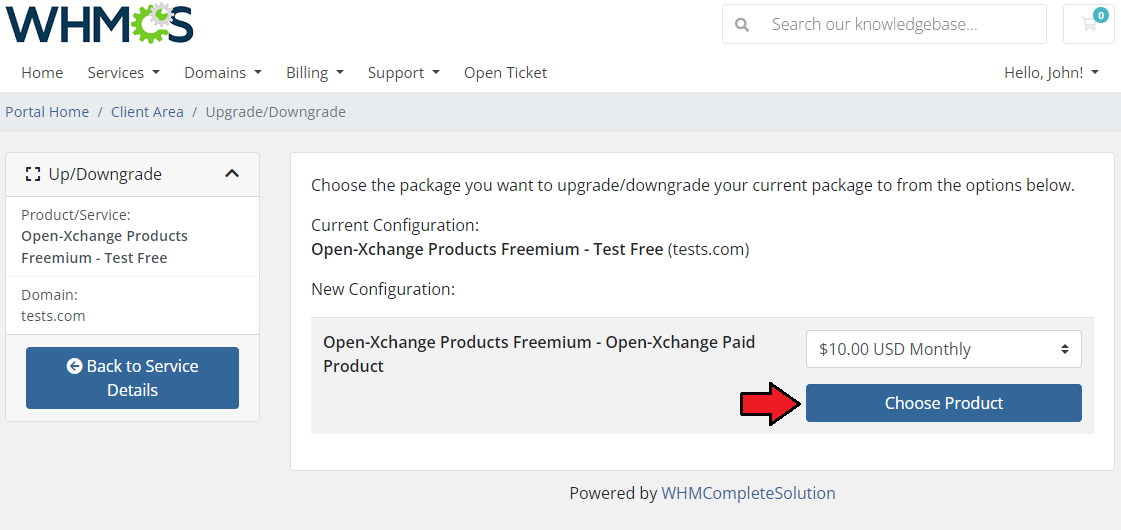
| 6. If the user wants to buy more accounts ("Essential", "Productivity" and "Security" types), they will need to upgrade the product to the paid one first: |
|
|
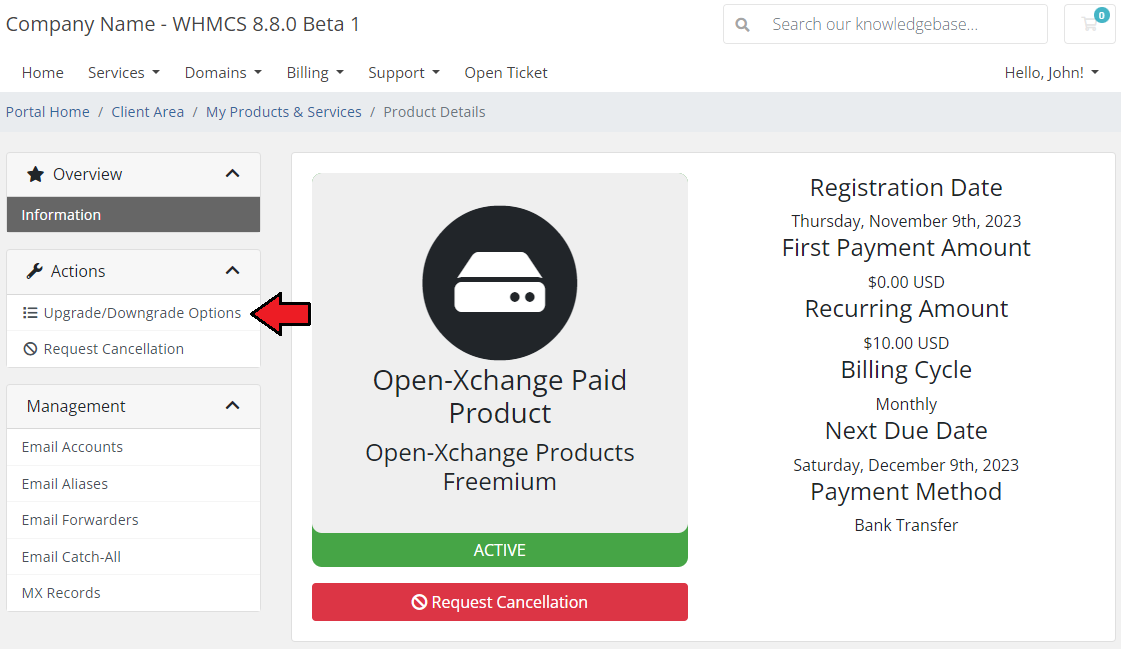
| 7. When the product is updated the user will be able to see the "Upgrade/Downgrade Options" button: |
|
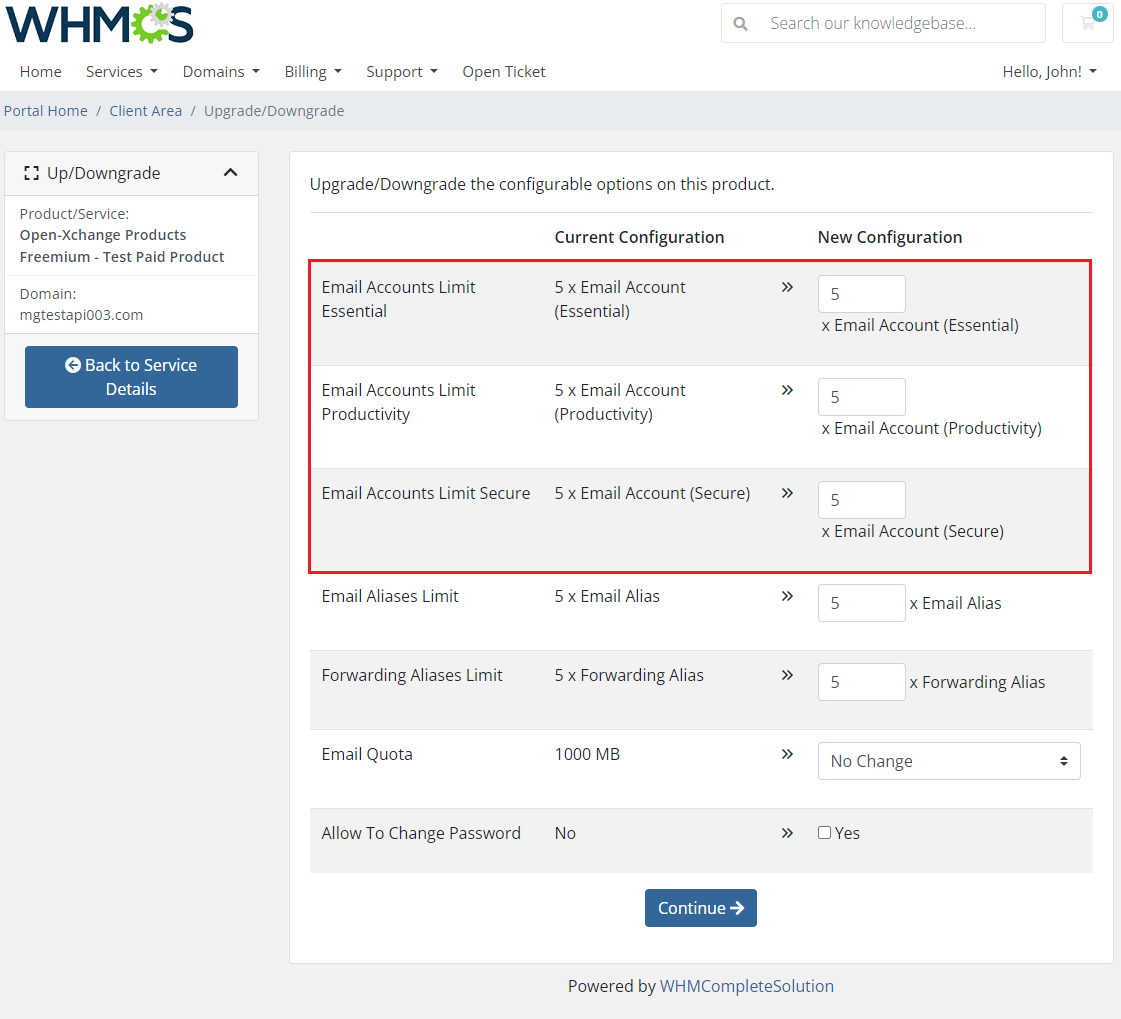
| 8. When the user clicks this button, he will be able to buy more email accounts for each type: |
|
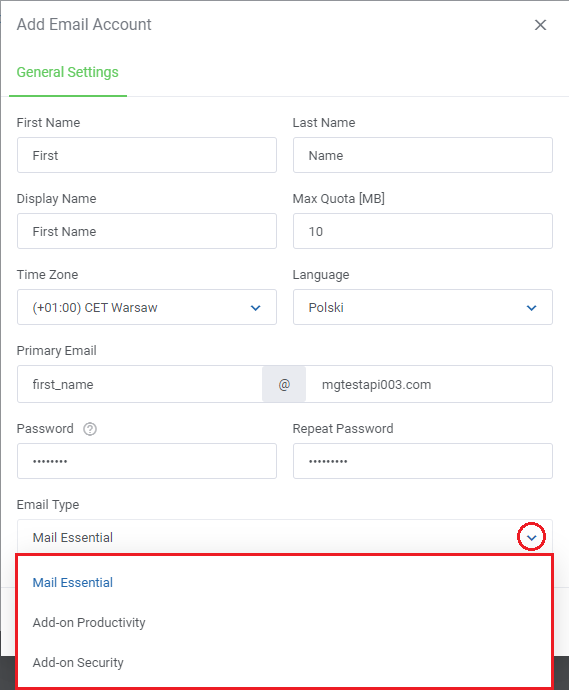
| 9. When he will pay the invoice, the limits will be upgraded. Then he will be able to create a new account. To choose the type of account there is a drop-down field called "Email Type": |
|
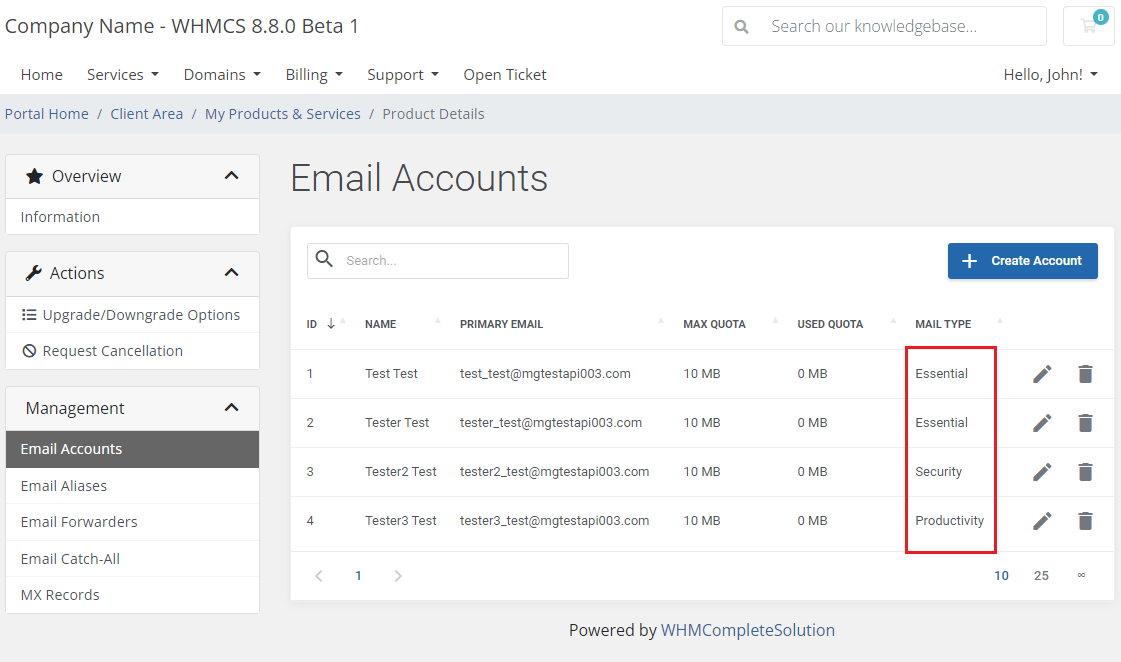
| 10. For the "Freemium" model functionality, there is a column in the "Email Accounts" table, called "Email Type". |
|
[edit] Additional Configuration
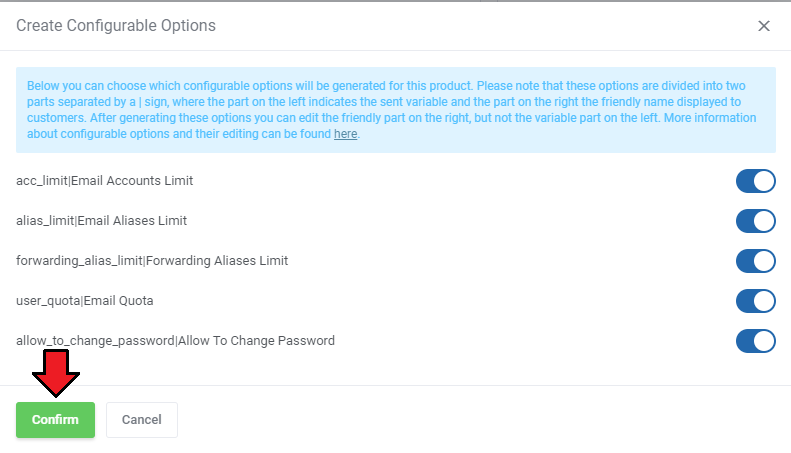
| 17. Additionally, you can replace the module's static limits with dynamic ones in the form of configurable options. Press 'Create Configurable Options' to generate a default set of configurable options, these can be:
More about the management of configurable options can be found here. |

|
|
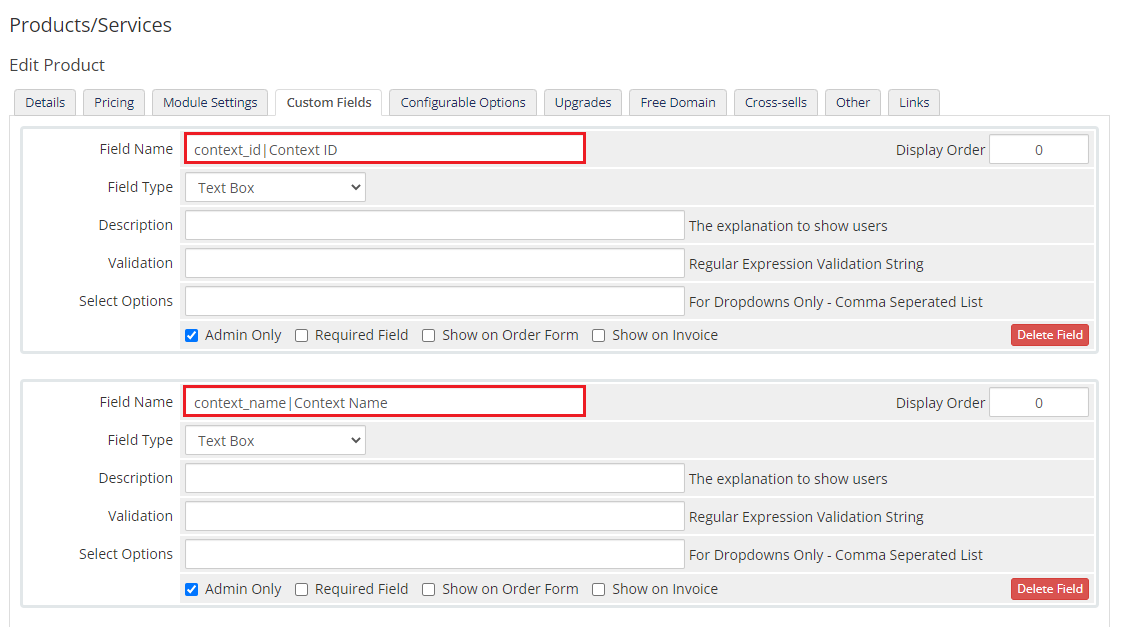
| 18. After saving the product configuration, please make sure that the module generated custom fields have been successfully created. Do this by clicking the "Custom Fields" tab and check for:
|
|
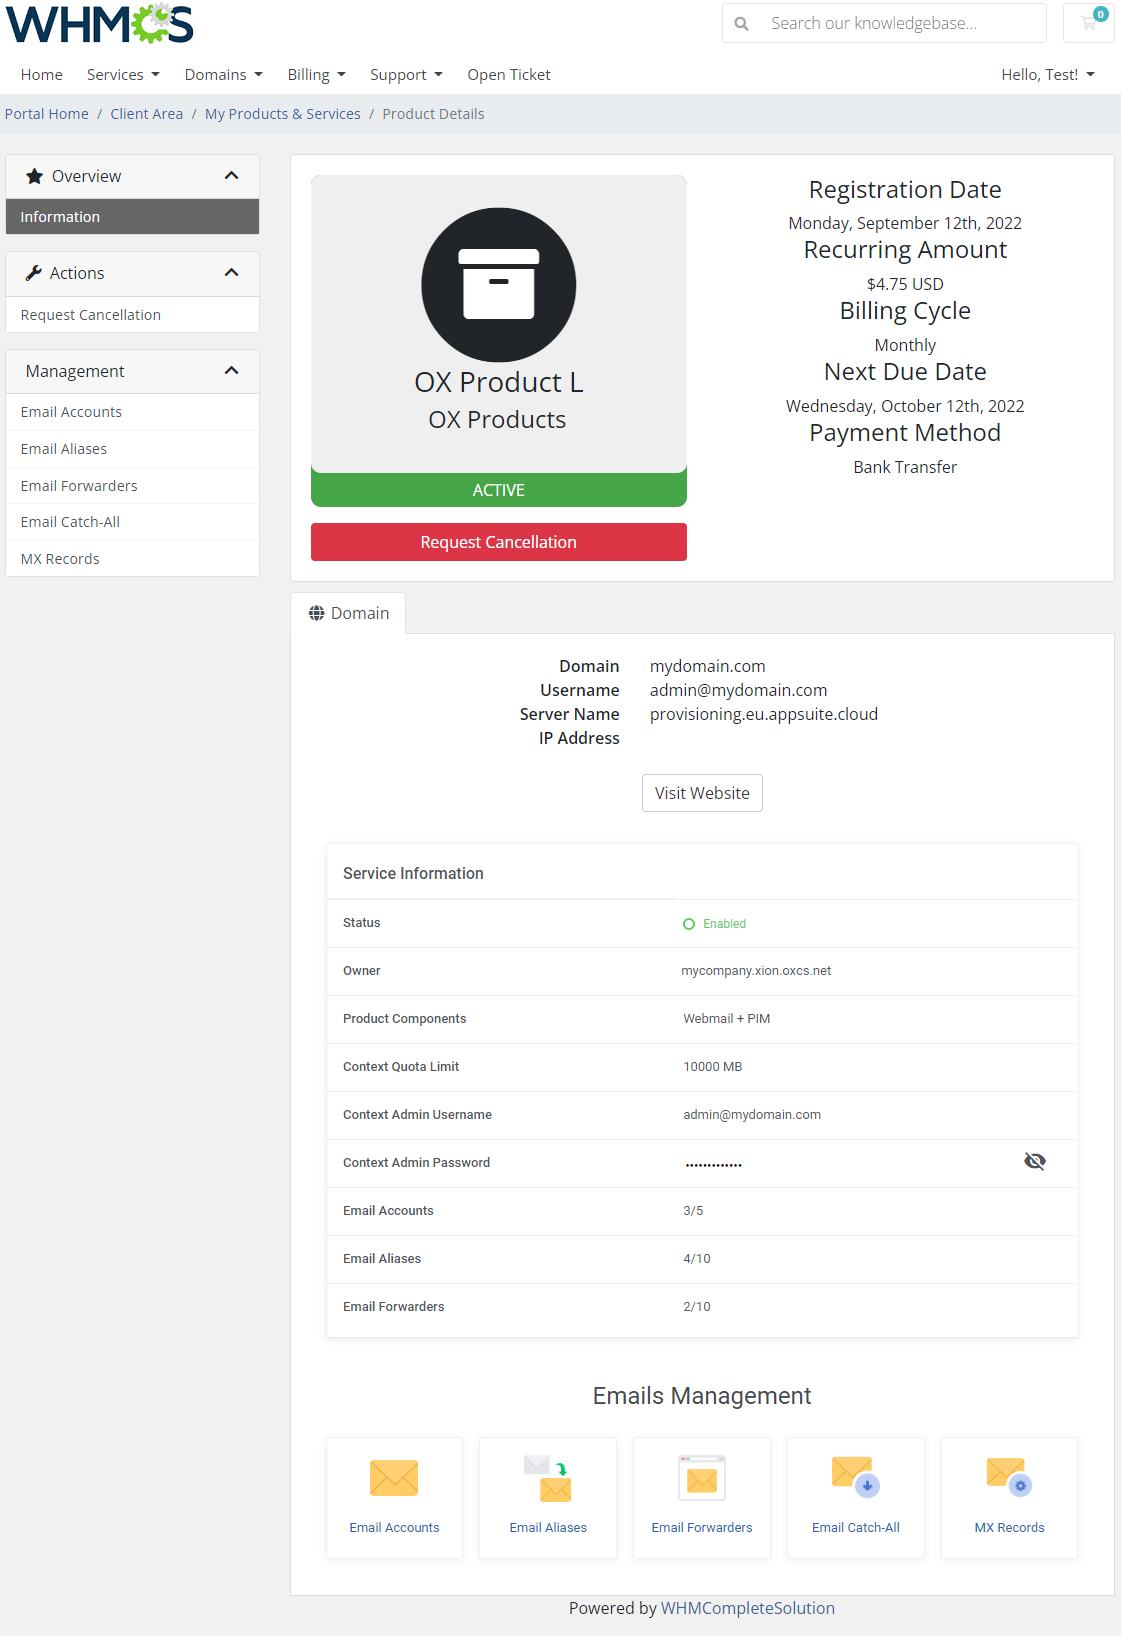
| 19. That's all, you have just successfully created and customized a new product, and now you can check the results. Do this by visiting the client area and looking into 'My Products and Services' and then clicking on one of your users to observe his/her product/service information. This is what your customers should see in your client area. |
|
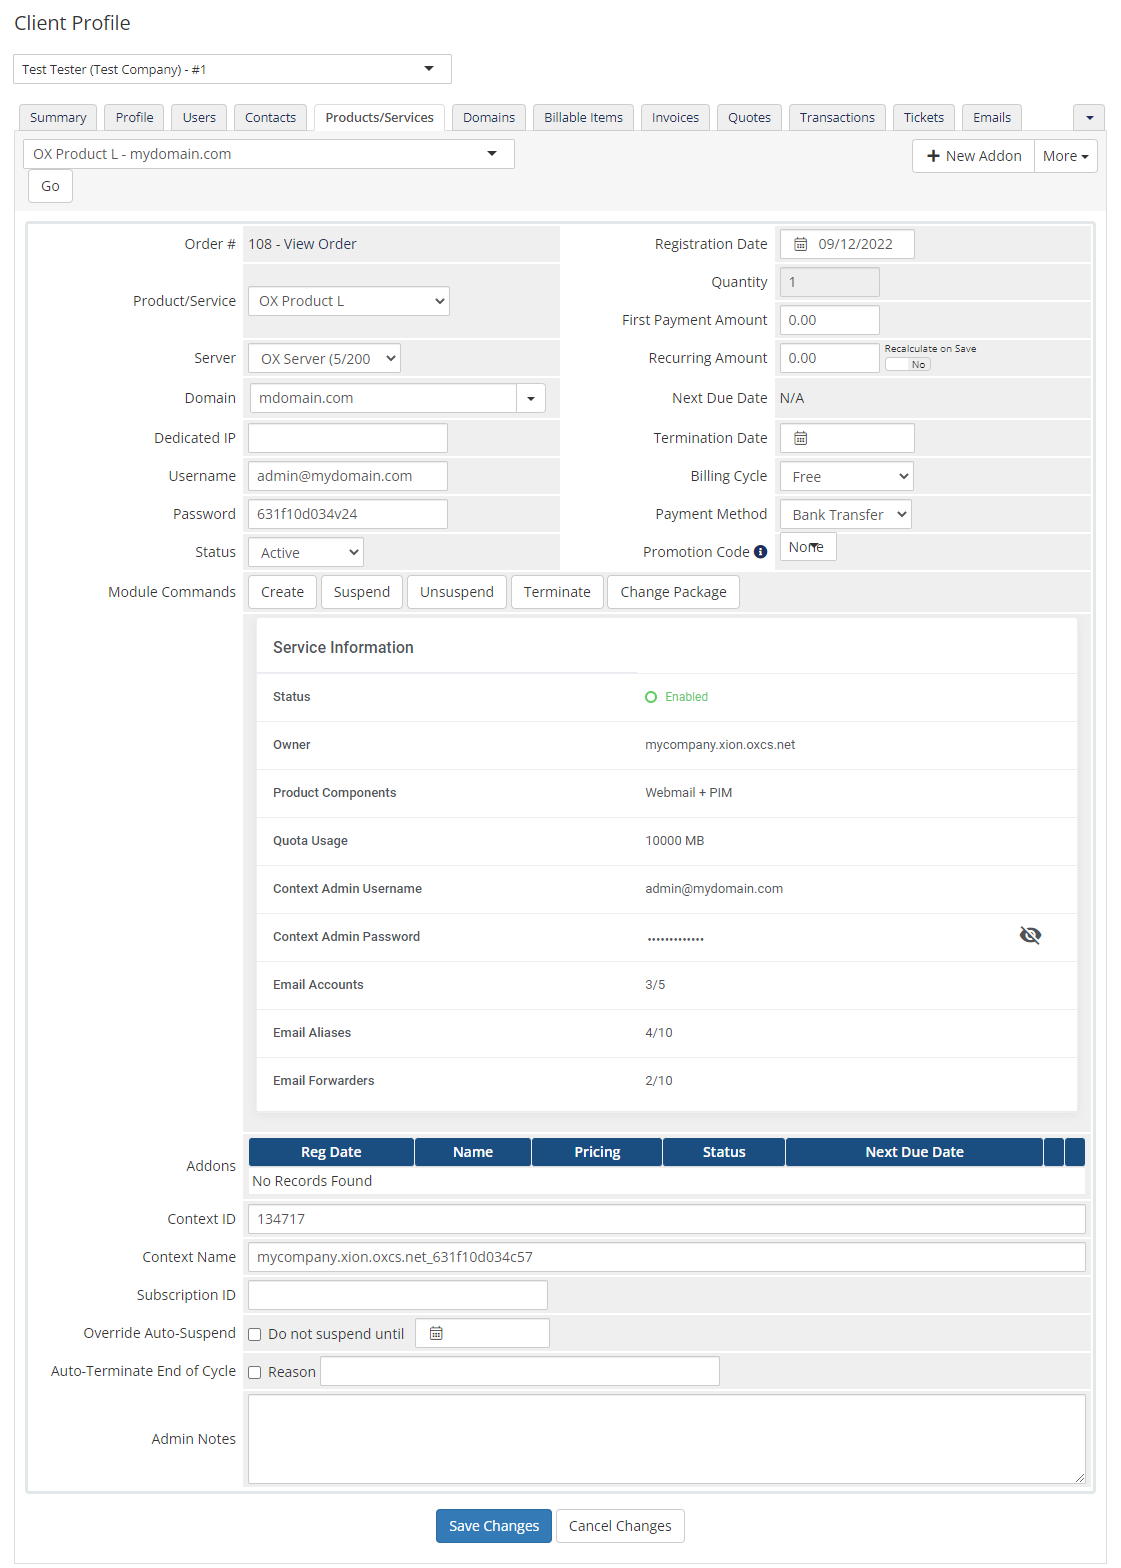
| Here is the view of a properly created and configured product from the administrator site. |
|
[edit] OX WHMCS Module Configuration
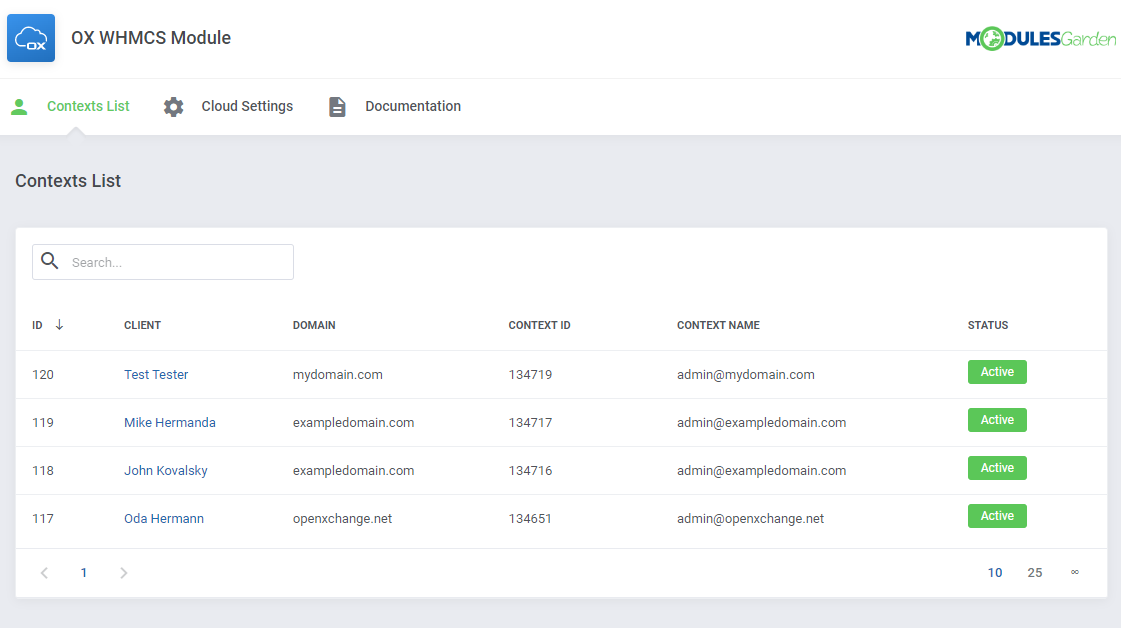
| Before you start your actual work with OX WHMCS Module, move again to 'Addons' → 'OX WHMCS Module'. The addon allows easy and comfortable access to the Contexts list and the OX panel cloud settings. The first section is dedicated to created contexts. There you will find a list of all provisioned contexts and verified domains, status, context ID and name.
|
|
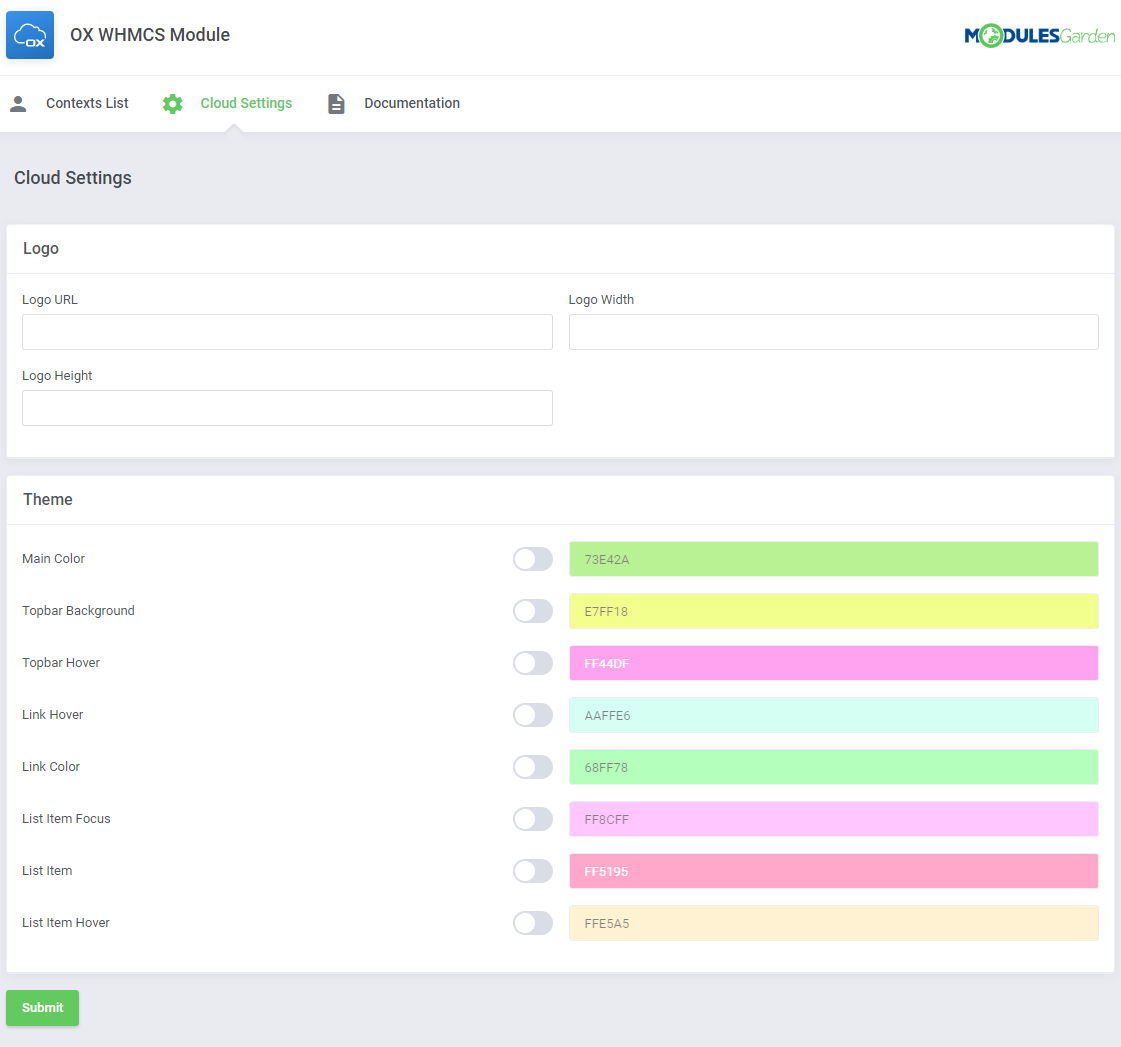
| The next section, which is 'Cloud Settings', is dedicated to the configuration and branding of the Webmail UI. Take a look at the available settings. |
|
| You may provide a link to a logo image, specify its width and height to adjust its perfect display in the OX panel. |

|
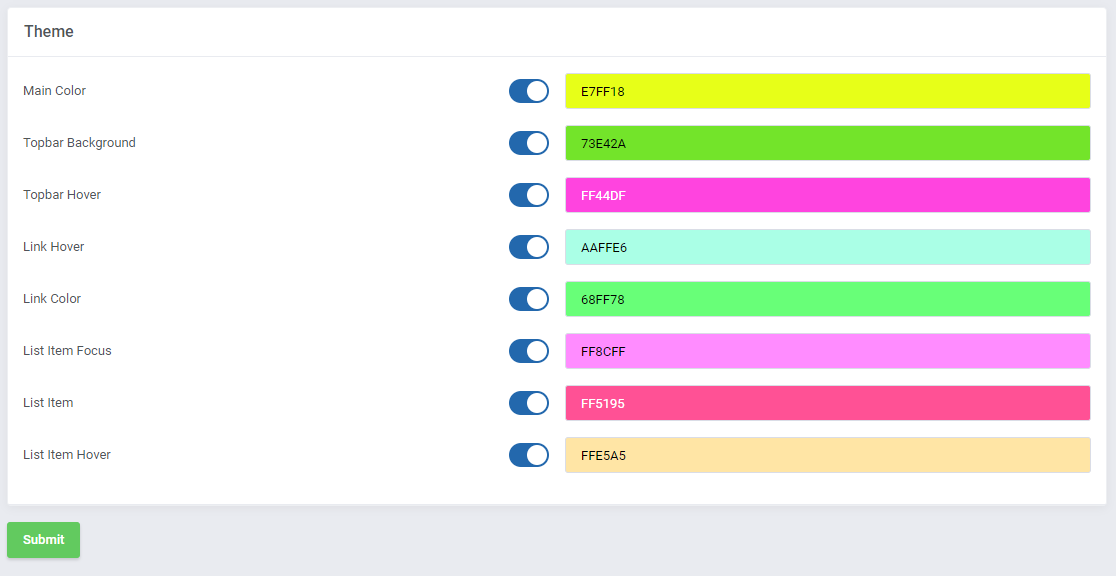
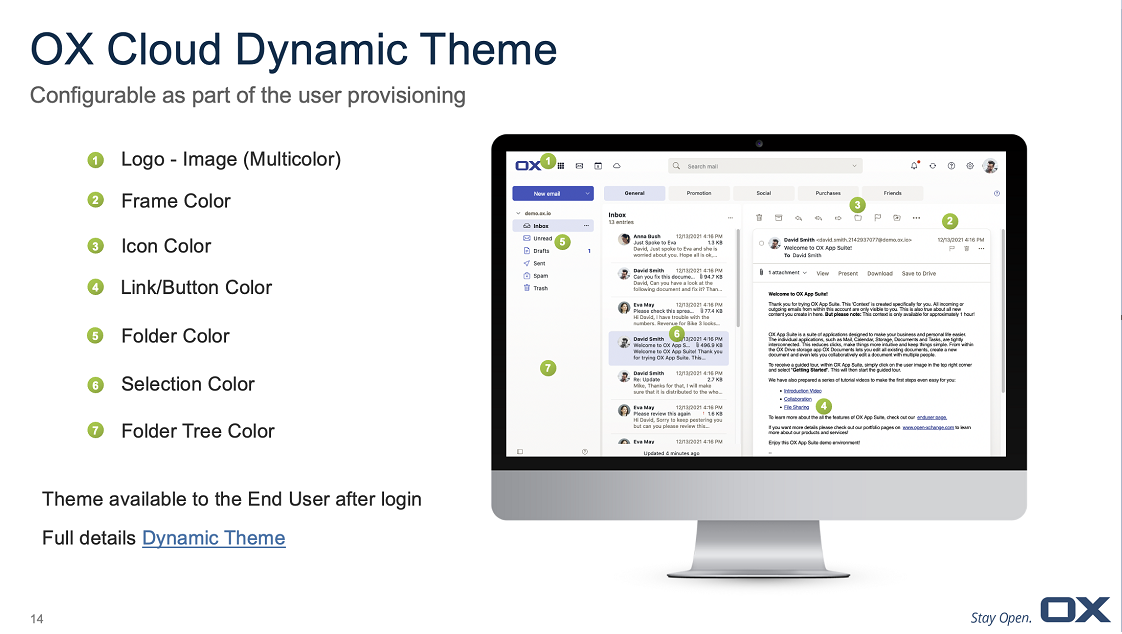
| Under 'Theme' you will find 8 options related to the main, topbar, link and list items coloring. Choose the colors of your preference from the palette and enable the theme items customization. |
|
|
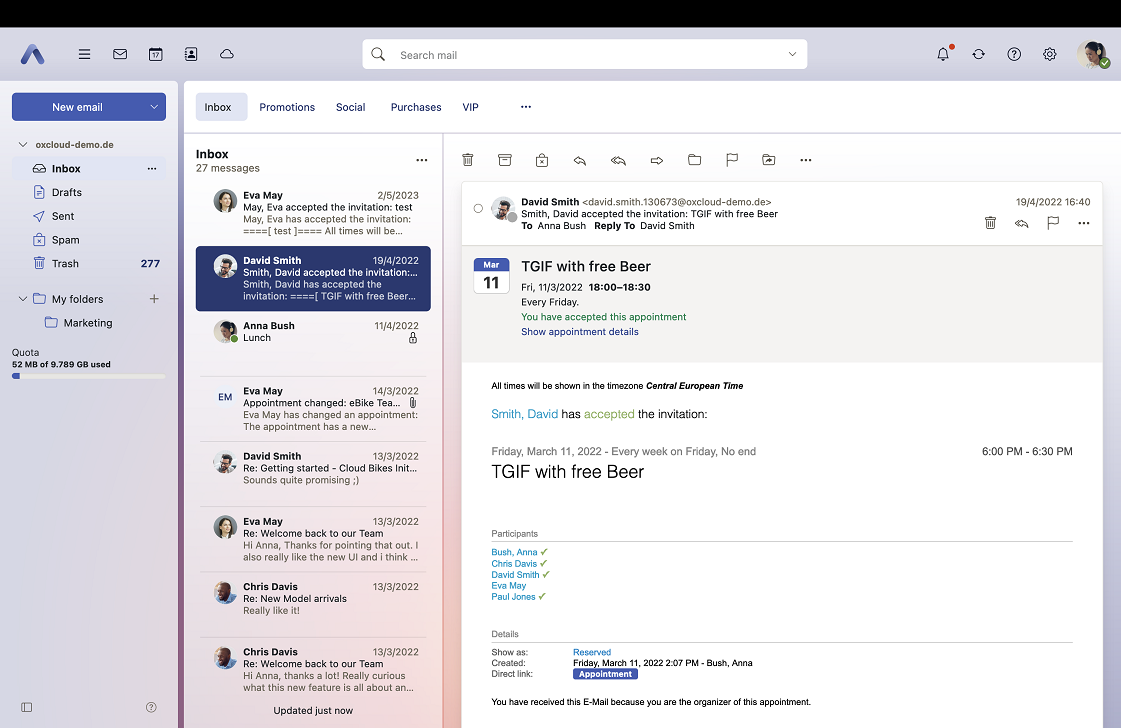
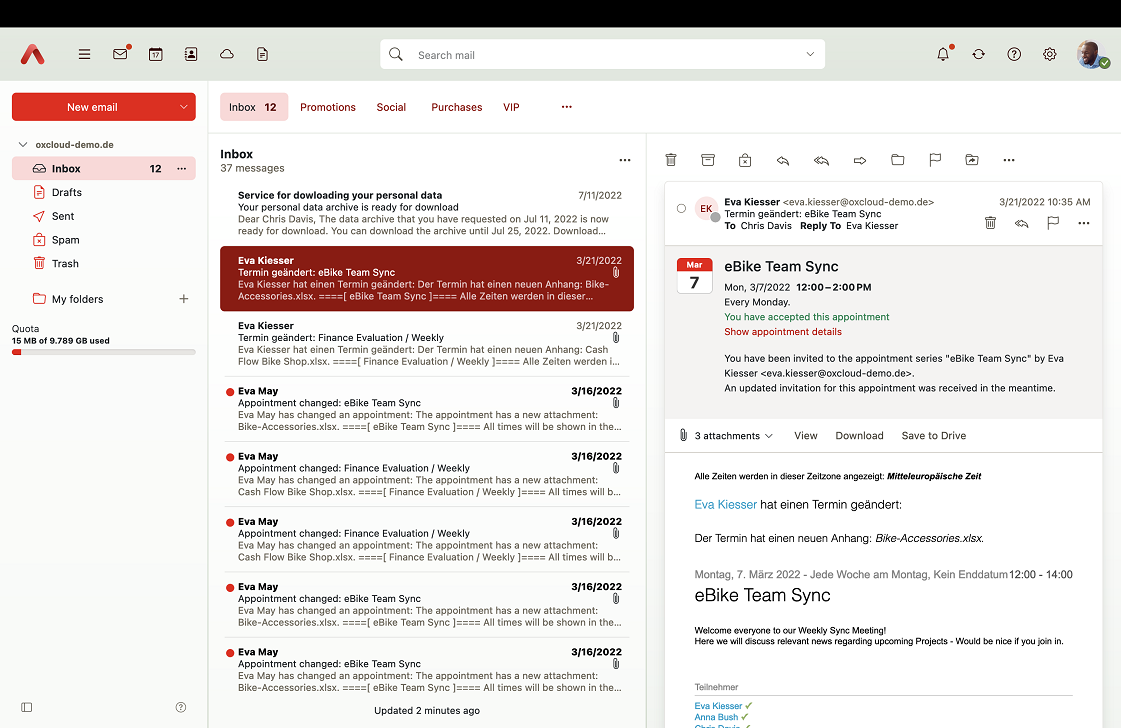
| When you have a ready configuration, make sure to save the changes. Now, you can create a new context and check in the OX panel if your design has been applied accurately. Important: The changes made in the addon are not constant! |
|
|
[edit] Management
| OX WHMCS Module allows your customers to manage their Open-Xchange contexts directly in your WHMCS client area.
Read through the next chapters which illustrate all the possibilities of our add-on module. |
[edit] Admin Area
| From now on, all your clients who ordered a previously created product will be able to manage their OX accounts via your WHMCS system. After running the 'Create ' action on the product, the context and context admin are automatically created, you can check the context details in the 'Service Information' table. The screen below presents a summary view of the ordered product in the admin area. Among the available actions you will find:
|
|
[edit] Client Area
| In the section below, you will find descriptions of the basic tools used to manage your OX account. Analyze them carefully to enjoy extensive and straightforward management capabilities. |
[edit] Ordering Process
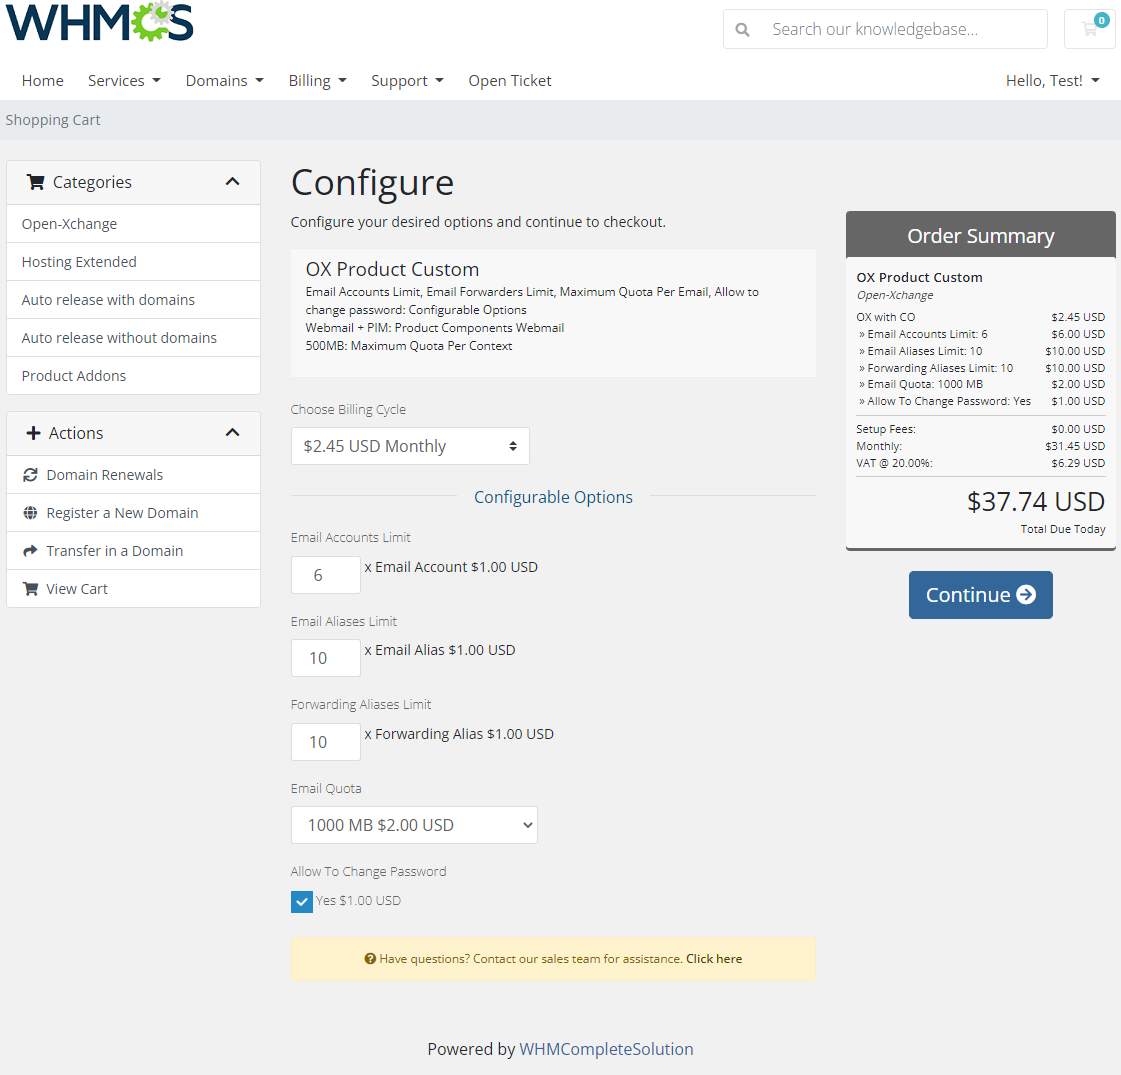
| The order page view of a product with the configurable options generated: |
|
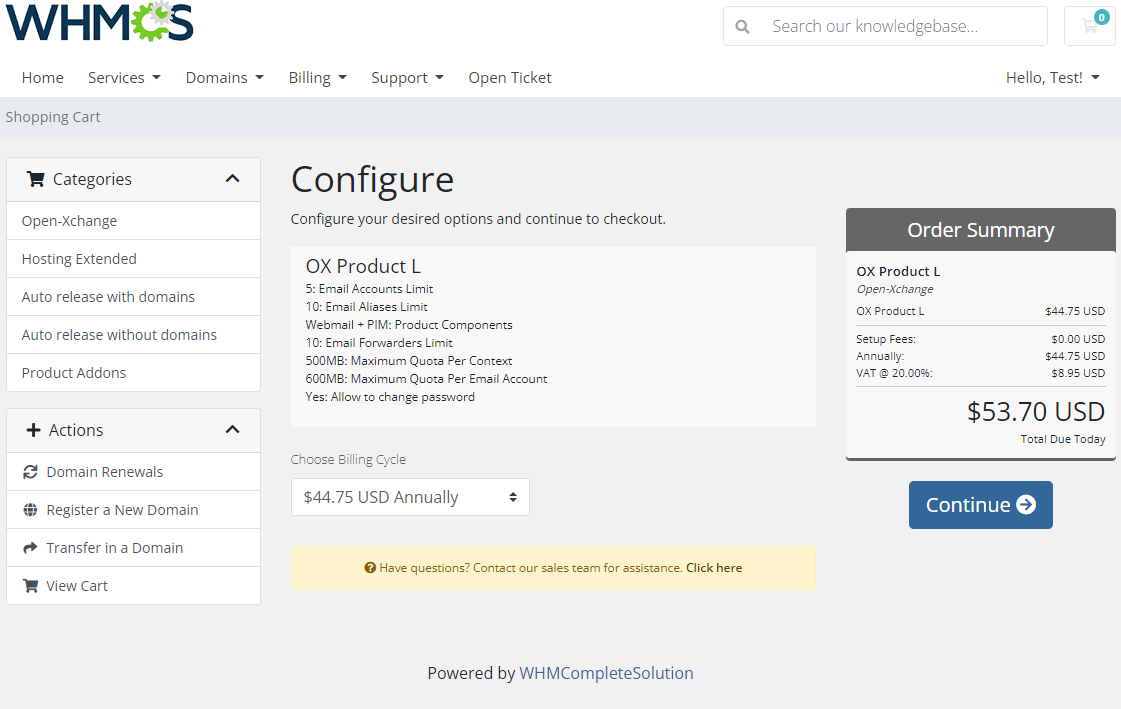
| The order page view of a product with static limits setup: |
|
[edit] Mailbox Management
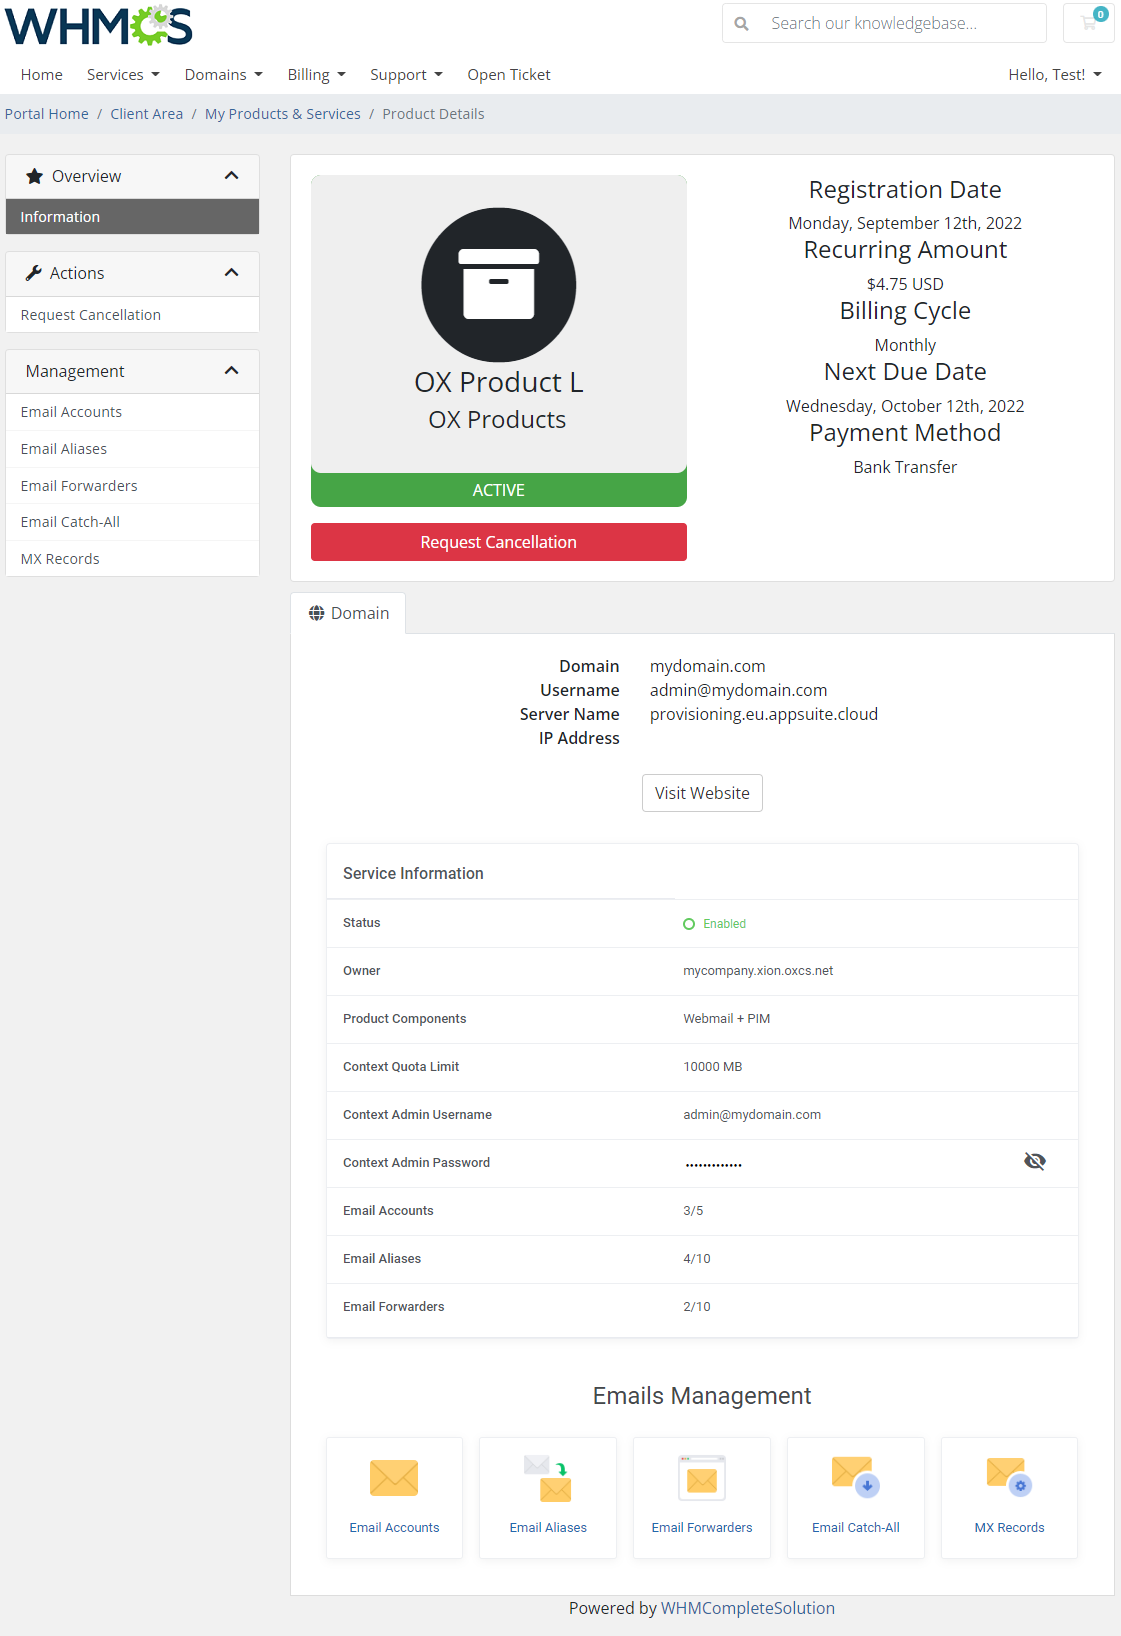
| OX WHMCS Module allows your customers to manage their OX email accounts from your WHMCS client area. This is what its management page looks like in the client area. Move to the below sections to learn more details. |
|
[edit] Email Accounts
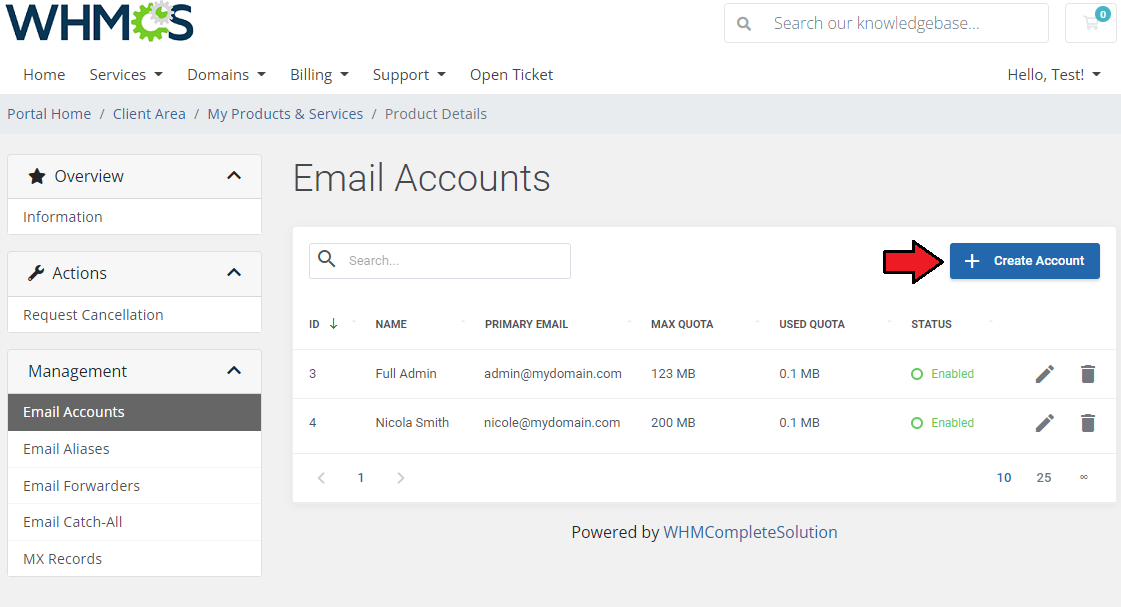
| The 'Email Accounts' section enables full management of accounts associated with your domain. You may edit the existing accounts with a wide range of options and create new ones within defined limits. |
|
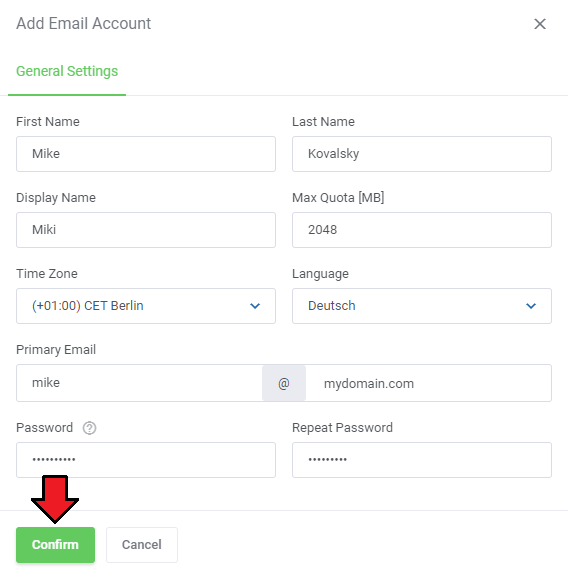
| Press 'Create Account' to create a new one. Fill out the fields to provide any details on the account owner. Note: The provided 'Quota' field must be lower than the setup limit. If the limit has been reached, the client will not be able to create an account. |
|
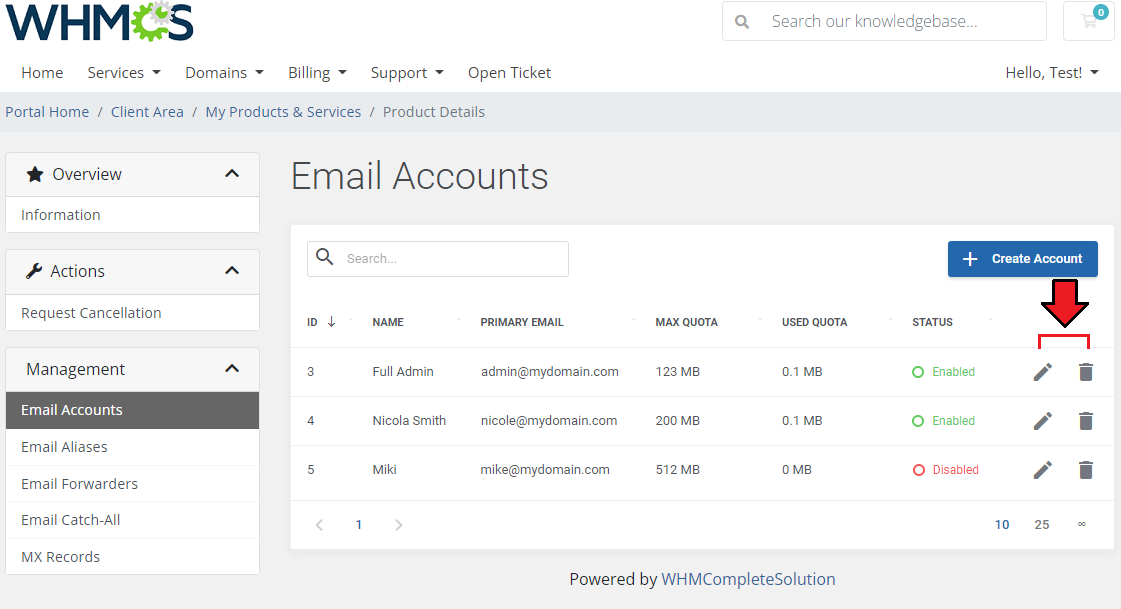
| As you can see, the just-created account is now visible on the list of all email accounts. Use marked buttons to either delete a single account or change its settings. |
|
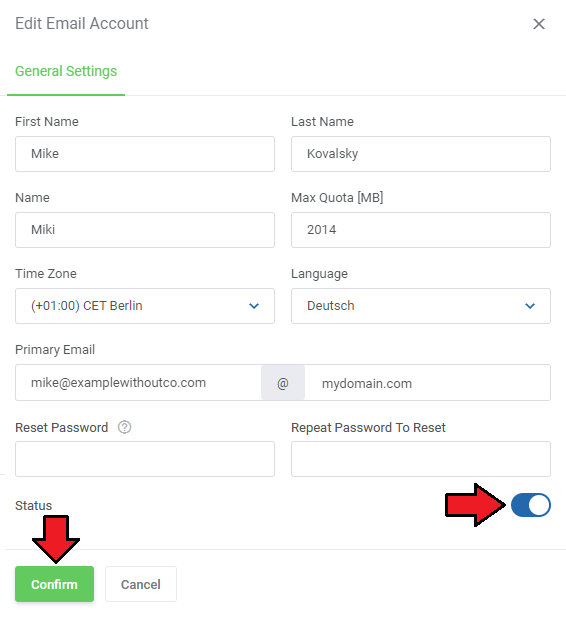
| Apart from changing all the basic data of the selected account, including the password, you may change its status here. Just toggle the adequate switcher to enable or disable (suspend) the email account. |
|
[edit] Email Aliases
| 'Email Aliases' enable you to create and use additional addresses for the same e-mail account. Note: Email aliases are created within the same email domain. |
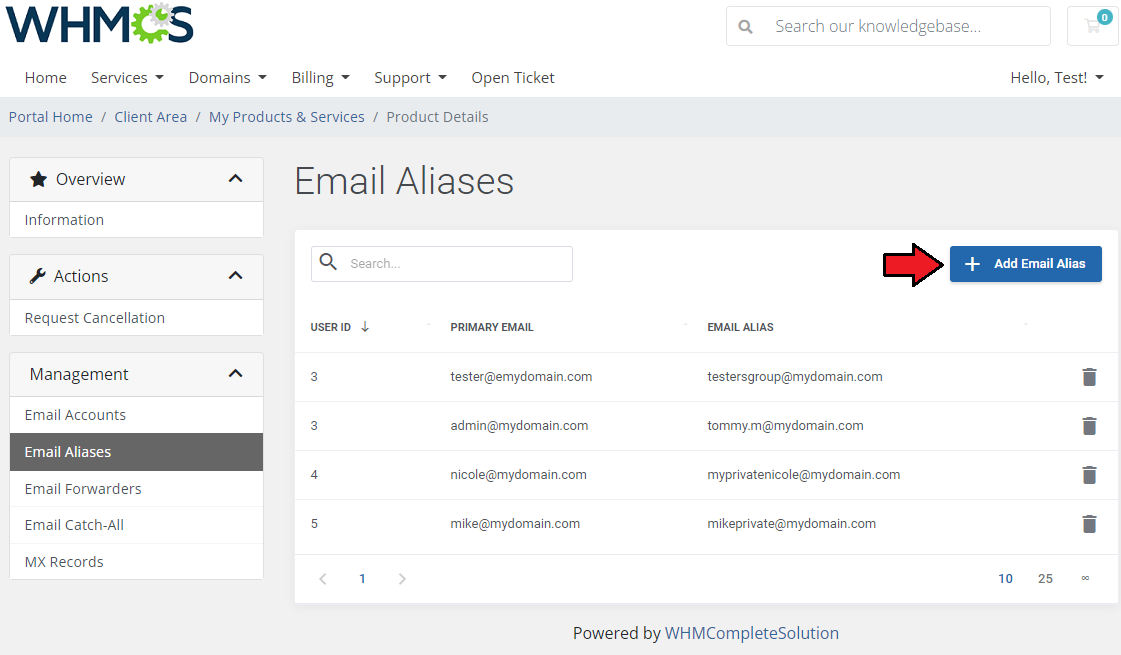
|
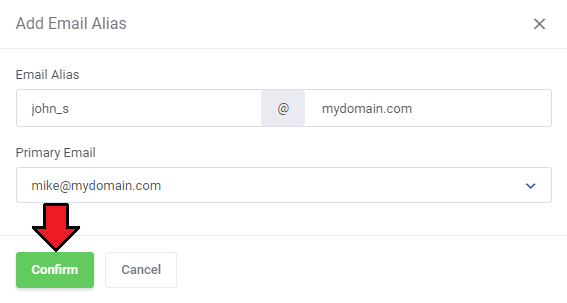
|
| Any alias can be quickly removed by pressing the trashcan icon next to the address of the Email Alias |
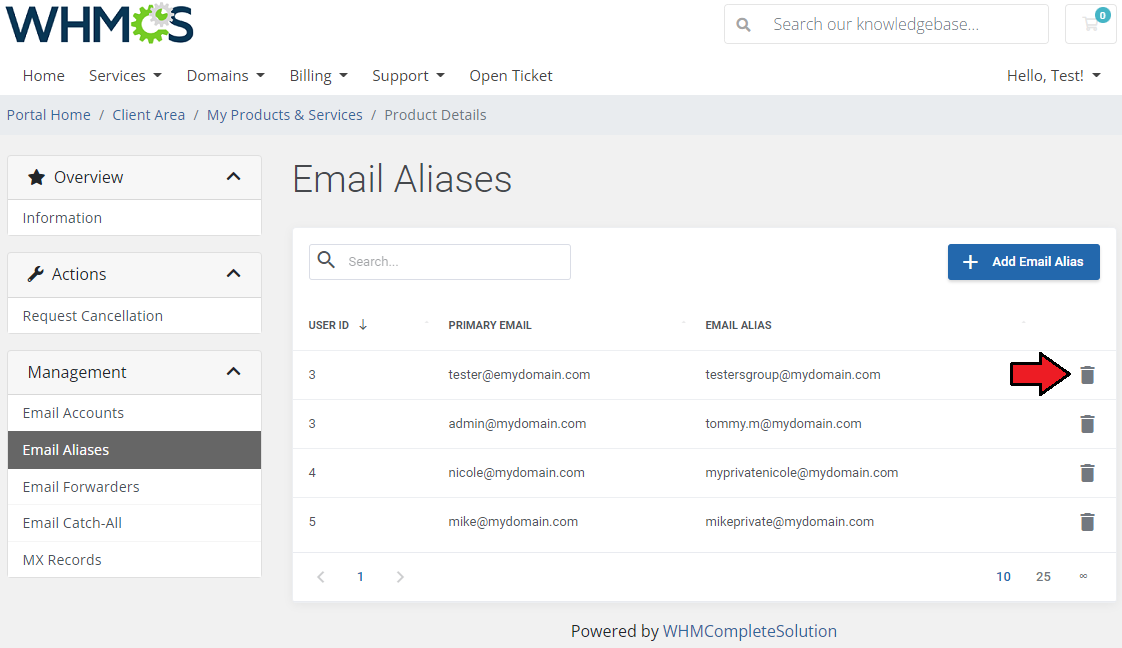
|
[edit] Email Forwarders
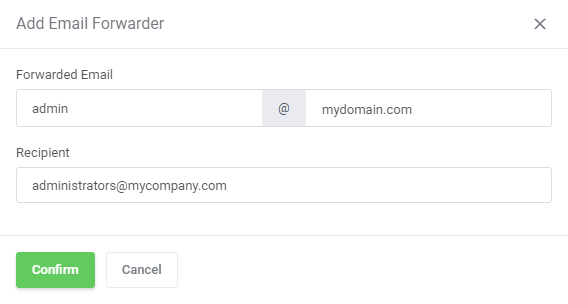
| In this section you can set up email forwarders and choose from several destination options to adjust mail forwarding perfectly to your needs. Press the 'Create Forwarder' button, specify the forwarded email and define the destination emails. |
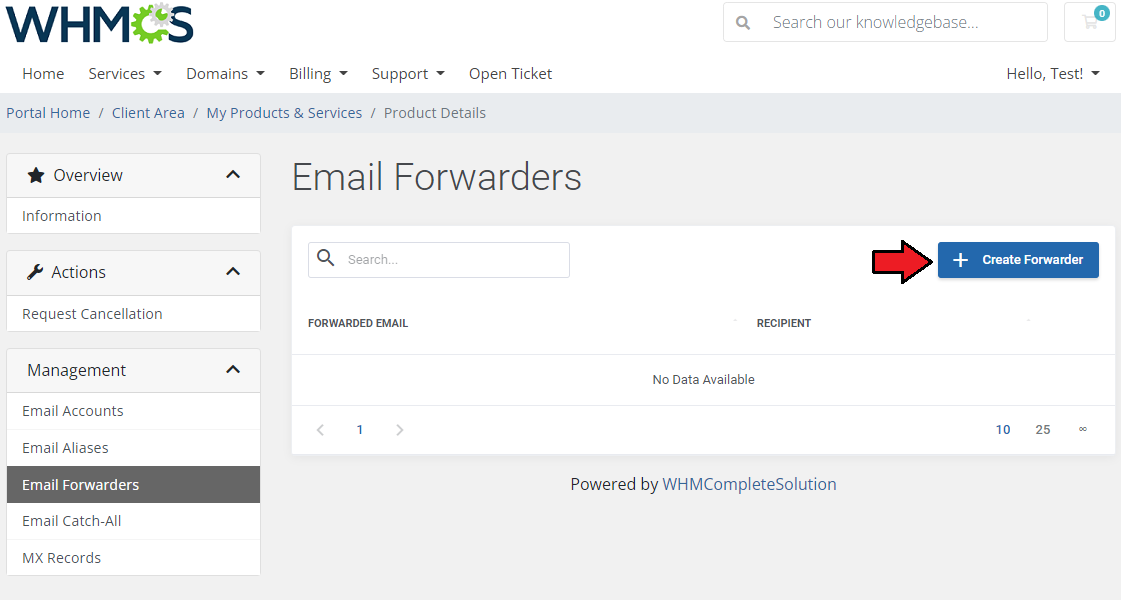
|
|
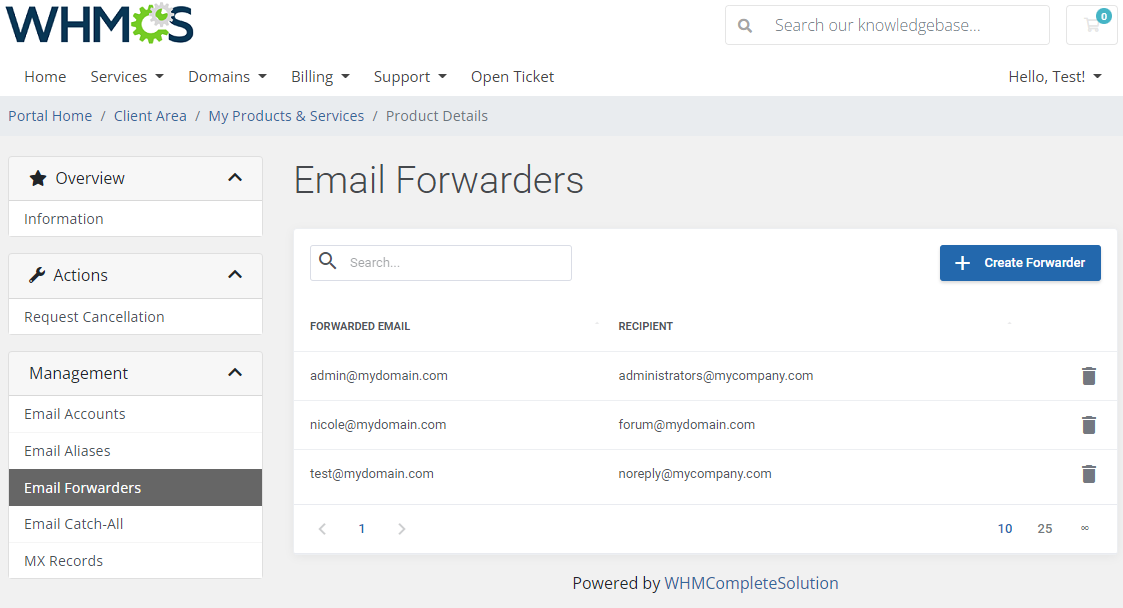
| A full list of existing email forwarders is now available for preview. You may add more forwarders, yet, once the limit is reached, you will have to delete some to be allowed to add new ones. |
|
[edit] Email Catch-All
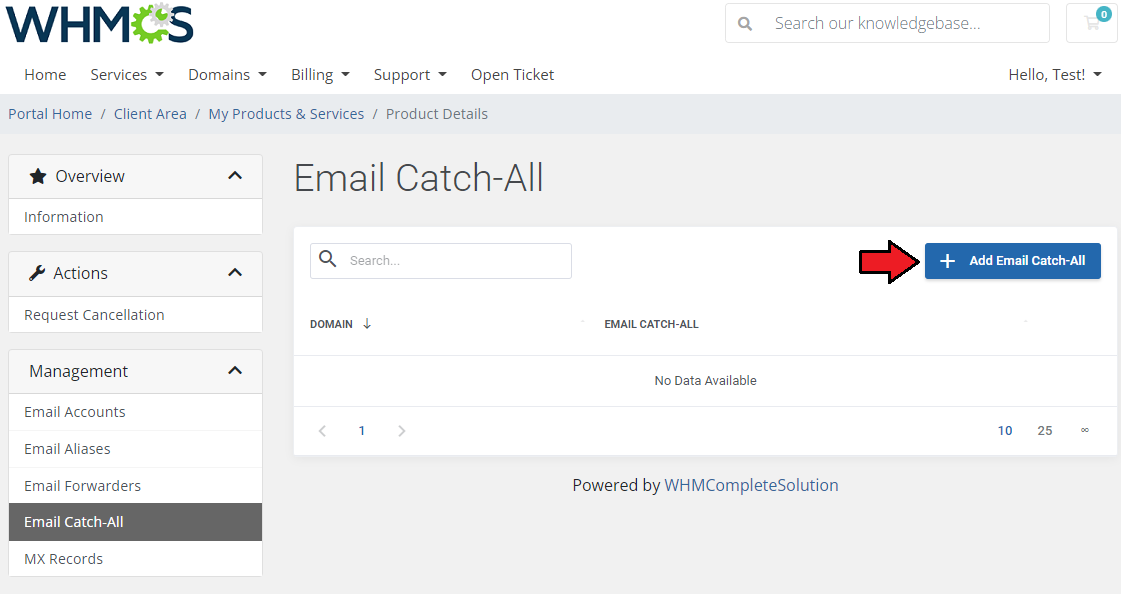
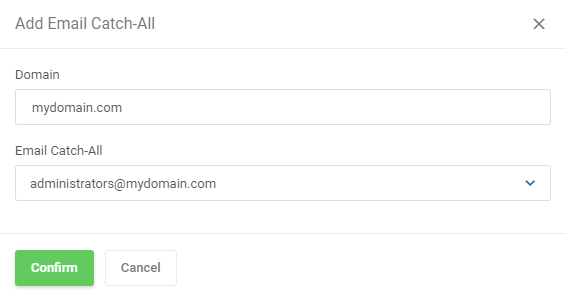
| Email Catch-All is a feature that allows you to forward emails that are sent to the non-existent email address of your domain name. Once you add an email catch-all, you may delete it using the action buttons. |
|
|
[edit] MX Records
| The below MX records can be used for mail domains that are accessed under the appsuite.cloud domain either in the EU, US or in Asia. Important: In the case custom endpoints are used with your own domain, you will get a different set of MX records during onboarding. |
|
[edit] Tips
| 1. The module supports the multilanguage functionality, which means that you can change the language of the addon at: 'yourWHMCS/modules/addons/OXWHMCSModule/lang/english.php' and in the module provisioning part: 'yourWHMCS/modules/servers/OXWHMCSModule/lang/english.php' If you want to add a new language translation, please add, for example: "deutsch.php" files in the above language directories. |
[edit] Common Problems
| 1. When you have problems with connection, check whether your SELinux or firewall does not block ports. |