Hosting Quota Notifications 1.X For WHMCS
(→Extension Configuration) |
m (Gregor moved page Hosting Quota Notifications For WHMCS 1.X to Hosting Quota Notifications 1.X For WHMCS without leaving a redirect) |
||
| (154 intermediate revisions by 4 users not shown) | |||
| Line 1: | Line 1: | ||
| − | <meta name="keywords" content=" | + | <meta name="keywords" content="hosting quota notifications for whmcs, hosting quota notifications configuration, whmcs hosting quota notifications management, whmcs hosting quota notifications installation, whmcs hosting quota notifications common problems, about whmcs hosting quota notifications, whmcs hosting quota notifications documentation, whmcs hosting quota notifications faq, whmcs hosting quota notifications help, whmcs hosting quota notifications guide, whmcs hosting quota notifications wiki, whmcs hosting quota notifications tutorial, whmcs hosting quota notifications tips, whmcs hosting quota notifications wiki"></meta> |
| − | <meta name="description" content="ModulesGarden Wiki Contains All The Information You Need About The | + | <meta name="description" content="ModulesGarden Wiki Contains All The Information You Need About The Hosting Quota Notifications For WHMCS Module."></meta> |
| − | =About [https://www.modulesgarden.com/products/whmcs/ | + | =About [https://www.modulesgarden.com/products/whmcs/hosting-quota-notifications Hosting Quota Notifications For WHMCS]= |
{| | {| | ||
| − | |style="padding: 10px 0px 10px 0px;"|''' | + | |style="padding: 10px 0px 10px 0px;"|'''Hosting Quota Notifications For WHMCS''' allows you to send automatic notifications to your clients whenever they exceed previously set bandwidth or disk usage. |
| + | Notifications can be sent in two ways: upon exceeding given resource tier or after exceeding given resource limit in a specified time period.<br /> | ||
| + | You can also define email templates and view details of each sent notification owing to logs. | ||
|} | |} | ||
| − | <!-- | + | <!--a comment maybe? --> |
*'''Admin Area Features:''' | *'''Admin Area Features:''' | ||
{| | {| | ||
| − | |style="padding: 10px 0px 0px 30px;"|✔ | + | |style="padding: 10px 0px 0px 30px;"|✔ Automatically Notify Your Clients Upon Exceeding Defined Limits Of Bandwidth And Disk Usage |
|} | |} | ||
{| | {| | ||
| − | |style="padding: 0px 0px 0px 30px;"|✔ | + | |style="padding: 0px 0px 0px 30px;"|✔ Configure Notification Groups |
|} | |} | ||
{| | {| | ||
| − | |style="padding: 0px 0px 0px 30px;"|✔ | + | |style="padding: 0px 0px 0px 30px;"|✔ Choose Between Two Types Of Group Counting: |
|} | |} | ||
{| | {| | ||
| − | |style="padding: 0px 0px 0px | + | |style="padding: 0px 0px 0px 45px;"|✔ Tiered - Define Tiers Of Usage |
|} | |} | ||
{| | {| | ||
| − | |style="padding: 0px 0px 0px | + | |style="padding: 0px 0px 0px 45px;"|✔ Fixed - Define Usage Grow Over Time |
|} | |} | ||
{| | {| | ||
| − | |style="padding: 0px 0px 0px 30px;"|✔ | + | |style="padding: 0px 0px 0px 30px;"|✔ Assign Multiple Products To Single Notification Group |
|} | |} | ||
{| | {| | ||
| − | |style="padding: 0px 0px 0px 30px;"|✔ | + | |style="padding: 0px 0px 0px 30px;"|✔ Assign Email Templates Per Notification Group |
|} | |} | ||
{| | {| | ||
| − | |style="padding: 0px 0px 0px 30px;"|✔ | + | |style="padding: 0px 0px 0px 30px;"|✔ Enable/Disable Notification Groups |
|} | |} | ||
{| | {| | ||
| − | + | |style="padding: 0px 0px 10px 30px;"|✔ View Logs Of Sent Notifications | |
| − | + | ||
| − | + | ||
| − | + | ||
| − | + | ||
| − | + | ||
| − | |style="padding: 0px 0px 10px | + | |
| − | + | ||
| − | + | ||
| − | + | ||
| − | + | ||
| − | + | ||
| − | + | ||
| − | + | ||
| − | + | ||
| − | + | ||
| − | + | ||
| − | + | ||
| − | + | ||
| − | + | ||
| − | + | ||
| − | + | ||
| − | + | ||
| − | + | ||
| − | + | ||
| − | + | ||
|} | |} | ||
*'''General Info:''' | *'''General Info:''' | ||
{| | {| | ||
| − | |style="padding: 10px | + | |style="padding: 10px 0px 0px 30px;"|✔ Multi-Language Support |
| − | + | ||
| − | + | ||
| − | + | ||
| − | + | ||
| − | + | ||
| − | + | ||
|} | |} | ||
{| | {| | ||
| − | |style="padding: 0px 0px 0px 30px;"|✔ Supports | + | |style="padding: 0px 0px 0px 30px;"|✔ Supports PHP 5.6 Up To PHP 7.2 |
|} | |} | ||
{| | {| | ||
| − | |style="padding: 0px 0px 30px 30px;"|✔ Supports WHMCS | + | |style="padding: 0px 0px 30px 30px;"|✔ Supports WHMCS V7 |
|} | |} | ||
| − | =Installation | + | =Installation= |
{| | {| | ||
| − | |style="padding: 10px 0px | + | |style="padding: 10px 0px 30px 15px;"|'''This tutorial will show you how to successfully install and configure Hosting Quota Notifications For WHMCS.''' <br /> |
We will guide you step by step through the whole installation and configuration process. | We will guide you step by step through the whole installation and configuration process. | ||
|} | |} | ||
| + | ==Installation== | ||
{| | {| | ||
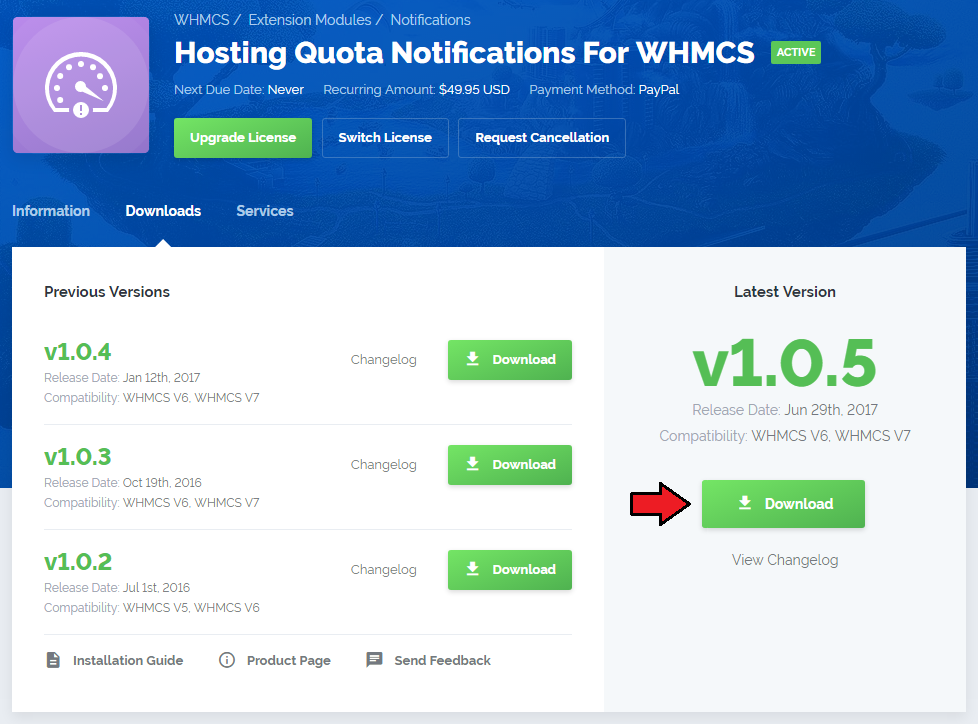
| − | |style="padding: | + | |style="padding: 10px 0px 20px 15px;"|'''1. Log in to our client area and download the module.''' |
|} | |} | ||
{| | {| | ||
| − | |style="padding: 0px 0px 20px 25px;"|[[File: | + | |style="padding: 0px 0px 20px 25px;"|[[File:HQN_1.png]] |
|} | |} | ||
{| | {| | ||
| − | |style="padding: 0px 0px 10px 15px;"|'''2. In the downloaded file you will find two packages that support different PHP versions.'''<br/>As | + | |style="padding: 0px 0px 10px 15px;"|'''2. In the downloaded file you will find two packages that support different PHP versions.'''<br/>As presented on the screen below, the first one is dedicated to PHP 5.6 up to PHP 7.0, while the second one is aimed at PHP 7.1 up to PHP 7.2.<br/>It does not apply to open source versions.<br/> |
| − | '' '''Note''': You can check current PHP version in your WHMCS. To do so, | + | '' '''Note''': You can check the current PHP version in your WHMCS. To do so, proceed to ''' 'Utilities' › 'System' › 'PHP Info'.''' |
|} | |} | ||
{| | {| | ||
| − | |style="padding: 0px 0px | + | |style="padding: 0px 0px 20px 25px;"|[[File:PHP56_72.png]] |
|} | |} | ||
{| | {| | ||
| − | |style="padding: 0px 0px 15px 15px;"|'''3. Extract the downloaded file and choose the one with | + | |style="padding: 0px 0px 15px 15px;"|'''3. Extract the downloaded file and choose the one with the right PHP version. Upload and extract the PHP file into the main WHMCS directory.'''<br /> |
| − | + | The content of PHP version files should look like this. | |
|} | |} | ||
{| | {| | ||
| − | |style="padding: 0px 0px | + | |style="padding: 0px 0px 20px 25px;"|[[File:drfere.png]] |
|} | |} | ||
| − | |||
| − | |||
{| | {| | ||
| − | |style="padding: | + | |style="padding: 0px 0px 15px 15px;"|'''4. When you install Hosting Quota Notifications For WHMCS for the first time you have to rename '' 'license_RENAME.php' '' file.'''<br /> |
| − | + | File is located in '' 'modules/addons/hosting_quota_notifications/license_RENAME.php' '' . Rename it from '' 'license_RENAME.php' '' to '' 'license.php' '' . | |
| − | '' | + | |
|} | |} | ||
{| | {| | ||
| − | |style="padding: 0px 0px 20px 25px;"|[[File: | + | |style="padding: 0px 0px 20px 25px;"|[[File:HQN_3.png]] |
|} | |} | ||
{| | {| | ||
| − | |style="padding: 0px 0px 15px 15px;"|'''5. | + | |style="padding: 0px 0px 15px 15px;"|'''5. In order to configure your license key, you have to edit a previously renamed '' 'license.php' '' file.'''<br /> |
| − | + | Enter your license key between quotation marks as presented on the following screen. You can find your license key in our client area'' → 'My Products' ''. | |
|} | |} | ||
{| | {| | ||
| − | + | |style="padding: 0px 0px 30px 25px;"|[[File:HQN_4.png]] | |
| − | + | ||
| − | + | ||
| − | + | ||
| − | + | ||
| − | + | ||
| − | |style="padding: 0px 0px 30px 25px;"|[[File: | + | |
|} | |} | ||
| − | == | + | ==Configuration of Addon== |
{| | {| | ||
| − | |style="padding: 10px 0px 15px 15px;"|''' | + | |style="padding: 10px 0px 15px 15px;"|'''6. Now you have to activate the module in your WHMCS system.'''<br /> |
| − | Log in to your WHMCS admin area | + | Log in to your WHMCS admin area. Go to '' 'Setup' '' → '' 'Addon Modules' ''. Afterwards, find '' 'Hosting Quota Notifications' '' and press '' 'Activate' '' button. |
| − | + | ||
|} | |} | ||
{| | {| | ||
| − | |style="padding: 0px 0px 20px 25px;"|[[File: | + | |style="padding: 0px 0px 20px 25px;"|[[File:HQN_5.png]] |
|} | |} | ||
{| | {| | ||
| − | |style="padding: 0px 0px 15px 15px;"|''' | + | |style="padding: 0px 0px 15px 15px;"|'''7. In the next step you need to permit access to this module.'''<br /> |
| − | + | To do so click on '' 'Configure' '' button, tick '' 'Access Control' '' near required admin role groups and press '' 'Save Changes' ''. | |
|} | |} | ||
{| | {| | ||
| − | |style="padding: 0px 0px | + | |style="padding: 0px 0px 30px 25px;"|[[File:HQN_6.png]] |
| − | + | ||
| − | + | ||
| − | + | ||
| − | + | ||
| − | + | ||
| − | + | ||
| − | + | ||
| − | + | ||
| − | + | ||
|} | |} | ||
| − | |||
| − | |||
| − | |||
| − | |||
| − | |||
| − | |||
| − | |||
| − | |||
| − | |||
| − | |||
| − | |||
| − | |||
| − | |||
| − | |||
| − | |||
| − | |||
| − | |||
| − | |||
| − | |||
| − | |||
| − | |||
| − | |||
| − | |||
| − | |||
| − | |||
| − | |||
| − | |||
| − | |||
| − | |||
| − | |||
| − | |||
| − | |||
| − | |||
| − | |||
| − | |||
| − | |||
| − | |||
| − | |||
| − | |||
| − | |||
| − | |||
| − | |||
| − | |||
| − | |||
| − | |||
| − | |||
| − | |||
| − | |||
| − | |||
| − | |||
| − | |||
| − | |||
| − | |||
| − | |||
| − | |||
| − | |||
| − | |||
| − | |||
| − | |||
| − | |||
| − | |||
| − | |||
| − | |||
| − | |||
| − | |||
| − | |||
| − | |||
| − | |||
| − | |||
| − | |||
| − | |||
| − | |||
| − | |||
| − | |||
| − | |||
{| | {| | ||
| − | |style="padding: 0px 0px 15px 15px;"|''' | + | |style="padding: 0px 0px 15px 15px;"|'''8. You have just successfully installed Hosting Quota Notifications For WHMCS!'''<br /> |
| − | + | You can access your module in '' 'Addons' '' → '' 'Hosting Quota Notifications' ''. | |
| − | + | ||
| − | + | ||
| − | + | ||
| − | + | ||
| − | + | ||
| − | + | ||
| − | + | ||
|} | |} | ||
{| | {| | ||
| − | |style="padding: 0px 0px 30px 25px;"|[[File: | + | |style="padding: 0px 0px 30px 25px;"|[[File:HQN_7.png]] |
|} | |} | ||
| − | = | + | =Configuration and Management= |
{| | {| | ||
| − | |style="padding: 10px 0px | + | |style="padding: 10px 0px 30px 15px;"|'''In this section we will show you how to properly set up and use Hosting Quota Notifications For WHMCS.''' |
| − | + | ||
|} | |} | ||
| + | ==Configuration== | ||
{| | {| | ||
| − | |style="padding: 0px | + | |style="padding: 10px 0px 15px 15px;"|In '' 'Configuration' '' page you can find the list of configured notification groups.<br /> |
| + | You can enable/disable any of them, as well as alter or completely remove them.<br /> | ||
| + | Press '' 'Create New Group' '' to proceed. | ||
|} | |} | ||
{| | {| | ||
| − | |style="padding: 0px 0px | + | |style="padding: 0px 0px 20px 25px;"|[[File:HQN_9.png]] |
| − | + | ||
|} | |} | ||
{| | {| | ||
| − | |style="padding: 0px 0px | + | |style="padding: 0px 0px 15px 15px;"|Now, you can define all products related to this configuration and email template which will be used to notify your clients.<br /> |
| + | You can choose between two types of resource usage counting:<br /> | ||
| + | *Fixed - define amount of resources over specific time period. If client usage growth has exceeded the given limit in specified time, a notification will be sent. | ||
| + | *Tiered - defines amount of resources. If client exceeds given limit, a notification will be sent. | ||
|} | |} | ||
{| | {| | ||
| − | |style="padding: 0px 0px | + | |style="padding: 0px 0px 20px 25px;"|[[File:HQN_10.png]] |
| − | + | ||
|} | |} | ||
{| | {| | ||
| − | |style="padding: 0px 0px | + | |style="padding: 0px 0px 15px 15px;"|For example, shown below module uses fixed counting type.<br /> |
| + | As you can see, we have defined limits for both bandwidth and disk.<br /> | ||
| + | Settings shown below result in sending notification to client upon: | ||
| + | *bandwidth usage growth by 5GB during 21 days. | ||
| + | *disk usage growth by 100GB over period of 14 days. | ||
|} | |} | ||
{| | {| | ||
| − | |style="padding: 0px 0px | + | |style="padding: 0px 0px 30px 25px;"|[[File:HQN_11.png]] |
| − | + | ||
| − | + | ||
|} | |} | ||
| + | ==Logs== | ||
{| | {| | ||
| − | |style="padding: 0px | + | |style="padding: 10px 0px 15px 15px;"|Under '' 'Logs' '' page you can view information about sent notifications. |
|} | |} | ||
{| | {| | ||
| − | |style="padding: 0px 0px | + | |style="padding: 0px 0px 30px 25px;"|[[File:HQN_12.png]] |
|} | |} | ||
| + | ==Notifications== | ||
{| | {| | ||
| − | |style="padding: 0px | + | |style="padding: 10px 0px 15px 15px;"|You can create as many notifications as you wish.<br /> |
| + | The only requirement is their type being set to '' 'Product/Service' ''.<br /> | ||
| + | Additionally, you can use {if} statement, as shown below: | ||
| + | {if $bw_over} Your bandwidth usage is over {$bw_over}MB{if $bw_current} (current: {$bw_current}MB){/if}.{/if} | ||
| + | {if $disk_over}Your disks usage is over {$disk_over}MB{if $disk_current} (current: {$disk_current}MB){/if}.{/if} | ||
| + | It will allow you to use this email template for bandwidth and disk notifications at the same time. | ||
|} | |} | ||
{| | {| | ||
| − | + | |style="padding: 0px 0px 30px 25px;"|[[File:HQN_13.png]] | |
| − | + | ||
| − | + | ||
| − | + | ||
| − | + | ||
| − | + | ||
| − | + | ||
| − | + | ||
| − | + | ||
| − | + | ||
| − | + | ||
| − | + | ||
| − | + | ||
| − | + | ||
| − | + | ||
| − | + | ||
| − | + | ||
| − | + | ||
| − | + | ||
| − | + | ||
| − | + | ||
| − | + | ||
| − | + | ||
| − | + | ||
| − | + | ||
| − | + | ||
| − | + | ||
| − | + | ||
| − | + | ||
| − | + | ||
| − | + | ||
| − | + | ||
| − | + | ||
| − | + | ||
| − | + | ||
| − | + | ||
| − | |style="padding: 0px 0px 30px 25px;"|[[File: | + | |
|} | |} | ||
| − | = | + | =Tips= |
{| | {| | ||
| − | |style="padding: 10px 0px 15px | + | |style="padding: 10px 0px 30px 15px;"| |
| − | + | ||
| − | + | ||
| − | + | ||
| − | + | ||
| − | + | ||
| − | + | ||
| − | + | ||
| − | + | ||
| − | + | ||
| − | + | ||
| − | + | ||
|} | |} | ||
| − | = | + | =Update Instructions= |
{| | {| | ||
| − | |style="padding: 10px 0px | + | |style="padding: 10px 0px 30px 15px;"|Essential guidance through the process of updating the module is offered '''[https://www.docs.modulesgarden.com/How_To_Update_WHMCS_Module here]'''.<br/><br/> |
| − | + | Keep in mind there is a quick and easy option in our client area that will let you upgrade the license of your module to an open source version at any time - and at a lower price!<br/> | |
| − | + | To take advantage of it, simply use the '''License Upgrade''' button located on the product's page and a discounted invoice will be generated automatically.<br/> | |
|} | |} | ||
| − | |||
| − | |||
| − | |||
| − | |||
| − | |||
| − | |||
| − | |||
| − | |||
| − | |||
| − | |||
| − | |||
| − | |||
| − | |||
| − | |||
| − | |||
| − | |||
| − | |||
| − | |||
| − | |||
| − | |||
| − | |||
| − | |||
| − | |||
| − | |||
| − | |||
| − | |||
| − | |||
| − | |||
| − | |||
| − | |||
| − | |||
| − | |||
| − | |||
| − | |||
| − | |||
| − | |||
| − | |||
| − | |||
| − | |||
| − | |||
| − | |||
| − | |||
| − | |||
| − | |||
| − | |||
| − | |||
| − | |||
| − | |||
| − | |||
| − | |||
| − | |||
| − | |||
| − | |||
| − | |||
| − | |||
| − | |||
| − | |||
| − | |||
| − | |||
| − | |||
| − | |||
| − | |||
| − | |||
| − | |||
| − | |||
| − | |||
| − | |||
| − | |||
| − | |||
| − | |||
| − | |||
| − | |||
| − | |||
| − | |||
| − | |||
| − | |||
| − | |||
| − | |||
| − | |||
| − | |||
| − | |||
| − | |||
| − | |||
| − | |||
| − | |||
| − | |||
| − | |||
| − | |||
| − | |||
| − | |||
| − | |||
| − | |||
| − | |||
| − | |||
| − | |||
| − | |||
| − | |||
| − | |||
| − | |||
| − | |||
=Common Problems= | =Common Problems= | ||
{| | {| | ||
| − | |style="padding: 10px 0px | + | |style="padding: 10px 0px 30px 15px;"|'''1. When you have problems with connection, check whether your SELinux or firewall does not block ports.''' |
| − | + | ||
| − | + | ||
| − | + | ||
|} | |} | ||
Latest revision as of 11:02, 13 September 2018
Contents |
[edit] About Hosting Quota Notifications For WHMCS
| Hosting Quota Notifications For WHMCS allows you to send automatic notifications to your clients whenever they exceed previously set bandwidth or disk usage.
Notifications can be sent in two ways: upon exceeding given resource tier or after exceeding given resource limit in a specified time period. |
- Admin Area Features:
| ✔ Automatically Notify Your Clients Upon Exceeding Defined Limits Of Bandwidth And Disk Usage |
| ✔ Configure Notification Groups |
| ✔ Choose Between Two Types Of Group Counting: |
| ✔ Tiered - Define Tiers Of Usage |
| ✔ Fixed - Define Usage Grow Over Time |
| ✔ Assign Multiple Products To Single Notification Group |
| ✔ Assign Email Templates Per Notification Group |
| ✔ Enable/Disable Notification Groups |
| ✔ View Logs Of Sent Notifications |
- General Info:
| ✔ Multi-Language Support |
| ✔ Supports PHP 5.6 Up To PHP 7.2 |
| ✔ Supports WHMCS V7 |
[edit] Installation
| This tutorial will show you how to successfully install and configure Hosting Quota Notifications For WHMCS. We will guide you step by step through the whole installation and configuration process. |
[edit] Installation
| 1. Log in to our client area and download the module. |
|
| 2. In the downloaded file you will find two packages that support different PHP versions. As presented on the screen below, the first one is dedicated to PHP 5.6 up to PHP 7.0, while the second one is aimed at PHP 7.1 up to PHP 7.2. It does not apply to open source versions. Note: You can check the current PHP version in your WHMCS. To do so, proceed to 'Utilities' › 'System' › 'PHP Info'. |

|
| 3. Extract the downloaded file and choose the one with the right PHP version. Upload and extract the PHP file into the main WHMCS directory. The content of PHP version files should look like this. |
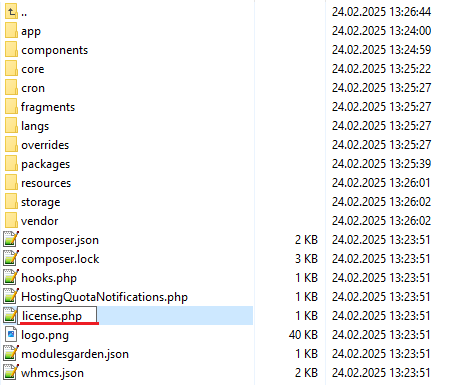
| 4. When you install Hosting Quota Notifications For WHMCS for the first time you have to rename 'license_RENAME.php' file. File is located in 'modules/addons/hosting_quota_notifications/license_RENAME.php' . Rename it from 'license_RENAME.php' to 'license.php' . |
|
| 5. In order to configure your license key, you have to edit a previously renamed 'license.php' file. Enter your license key between quotation marks as presented on the following screen. You can find your license key in our client area → 'My Products' . |

|
[edit] Configuration of Addon
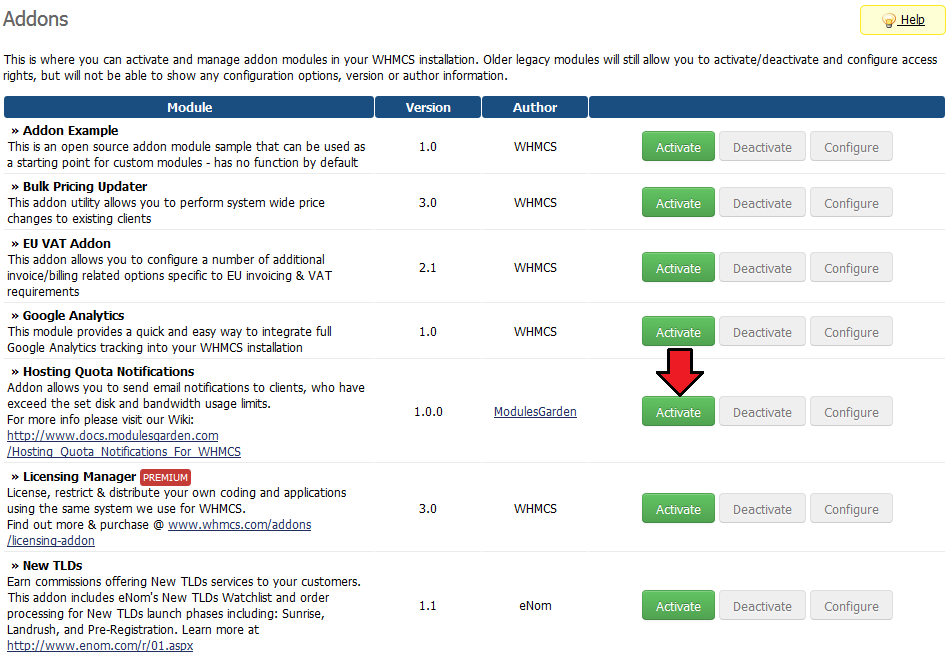
| 6. Now you have to activate the module in your WHMCS system. Log in to your WHMCS admin area. Go to 'Setup' → 'Addon Modules' . Afterwards, find 'Hosting Quota Notifications' and press 'Activate' button. |
|
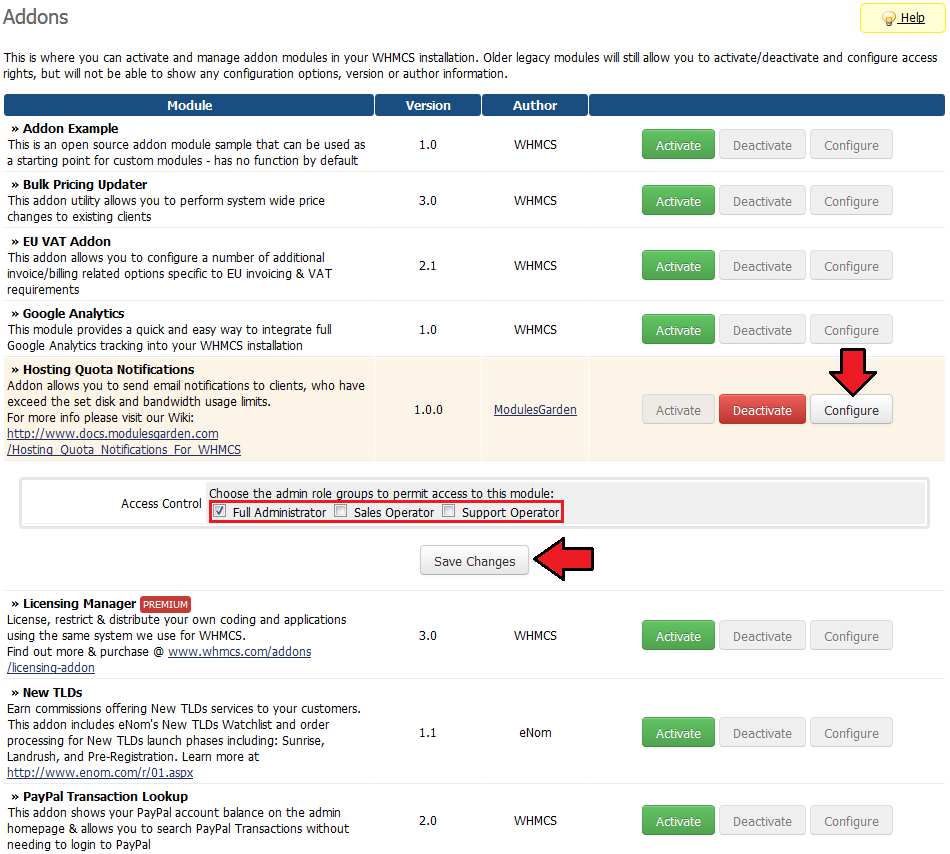
| 7. In the next step you need to permit access to this module. To do so click on 'Configure' button, tick 'Access Control' near required admin role groups and press 'Save Changes' . |
|
| 8. You have just successfully installed Hosting Quota Notifications For WHMCS! You can access your module in 'Addons' → 'Hosting Quota Notifications' . |

|
[edit] Configuration and Management
| In this section we will show you how to properly set up and use Hosting Quota Notifications For WHMCS. |
[edit] Configuration
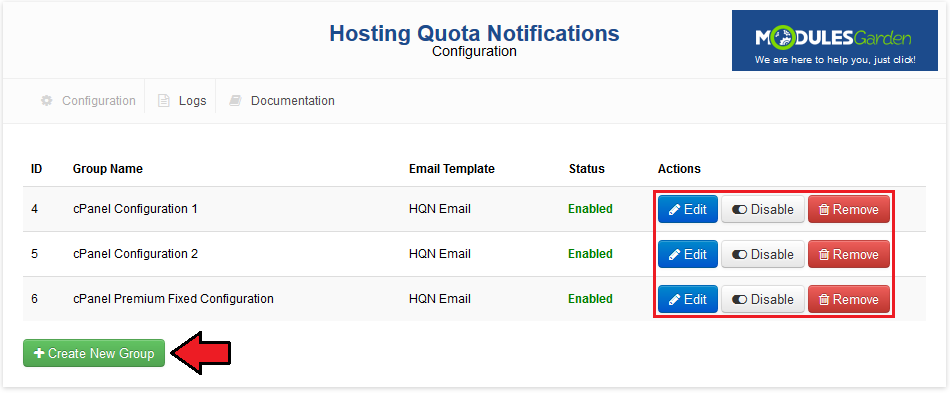
| In 'Configuration' page you can find the list of configured notification groups. You can enable/disable any of them, as well as alter or completely remove them. |
|
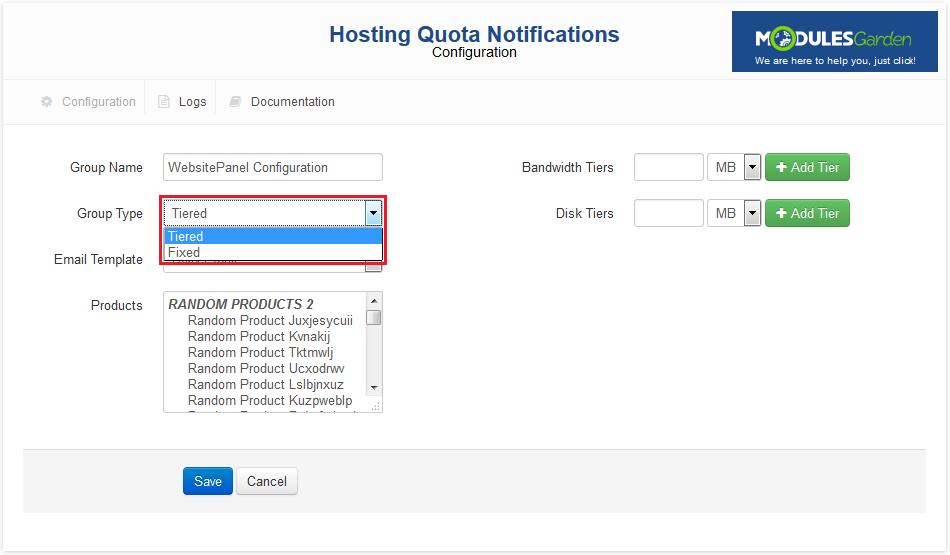
| Now, you can define all products related to this configuration and email template which will be used to notify your clients. You can choose between two types of resource usage counting:
|
|
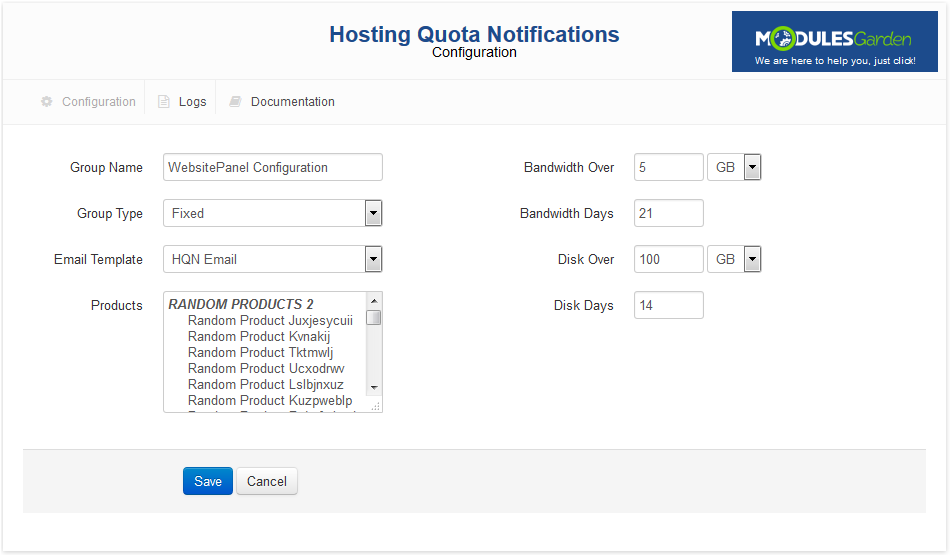
| For example, shown below module uses fixed counting type. As you can see, we have defined limits for both bandwidth and disk.
|
|
[edit] Logs
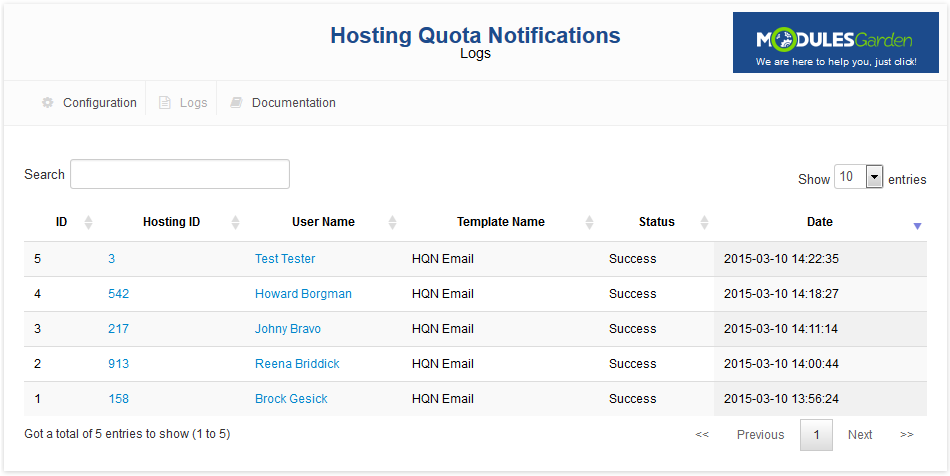
| Under 'Logs' page you can view information about sent notifications. |
|
[edit] Notifications
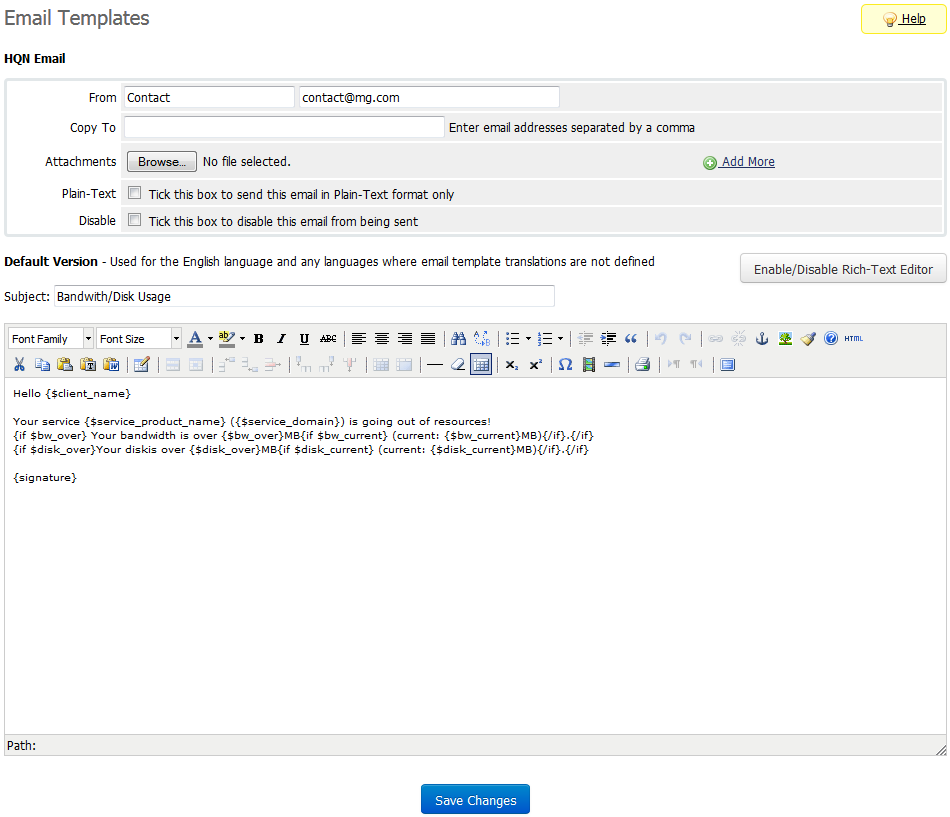
| You can create as many notifications as you wish. The only requirement is their type being set to 'Product/Service' . {if $bw_over} Your bandwidth usage is over {$bw_over}MB{if $bw_current} (current: {$bw_current}MB){/if}.{/if}
{if $disk_over}Your disks usage is over {$disk_over}MB{if $disk_current} (current: {$disk_current}MB){/if}.{/if}
It will allow you to use this email template for bandwidth and disk notifications at the same time. |
|
[edit] Tips
[edit] Update Instructions
| Essential guidance through the process of updating the module is offered here. Keep in mind there is a quick and easy option in our client area that will let you upgrade the license of your module to an open source version at any time - and at a lower price! |
[edit] Common Problems
| 1. When you have problems with connection, check whether your SELinux or firewall does not block ports. |