Rackspace Email Extended For WHMCS
(→Installation) |
|||
| (70 intermediate revisions by 8 users not shown) | |||
| Line 2: | Line 2: | ||
<meta name="description" content="ModulesGarden Wiki Contains All The Information You Need About The Rackspace Email Extended For WHMCS Module."></meta> | <meta name="description" content="ModulesGarden Wiki Contains All The Information You Need About The Rackspace Email Extended For WHMCS Module."></meta> | ||
| − | =About [ | + | <p style="border: 1px solid #6f0000; padding: 8px 14px; display: inline-block; font-size: 16px; color: #6f0000;"><strong>Rackspace Email Extended For WHMCS</strong> has reached <strong>End of Support (EOS)</strong> and is no longer actively maintained. The module remains available for purchase, including the Open Source version and License Upgrade at a <strong>discounted price</strong>. Current license subscriptions continue and stay valid for future renewals.</p> |
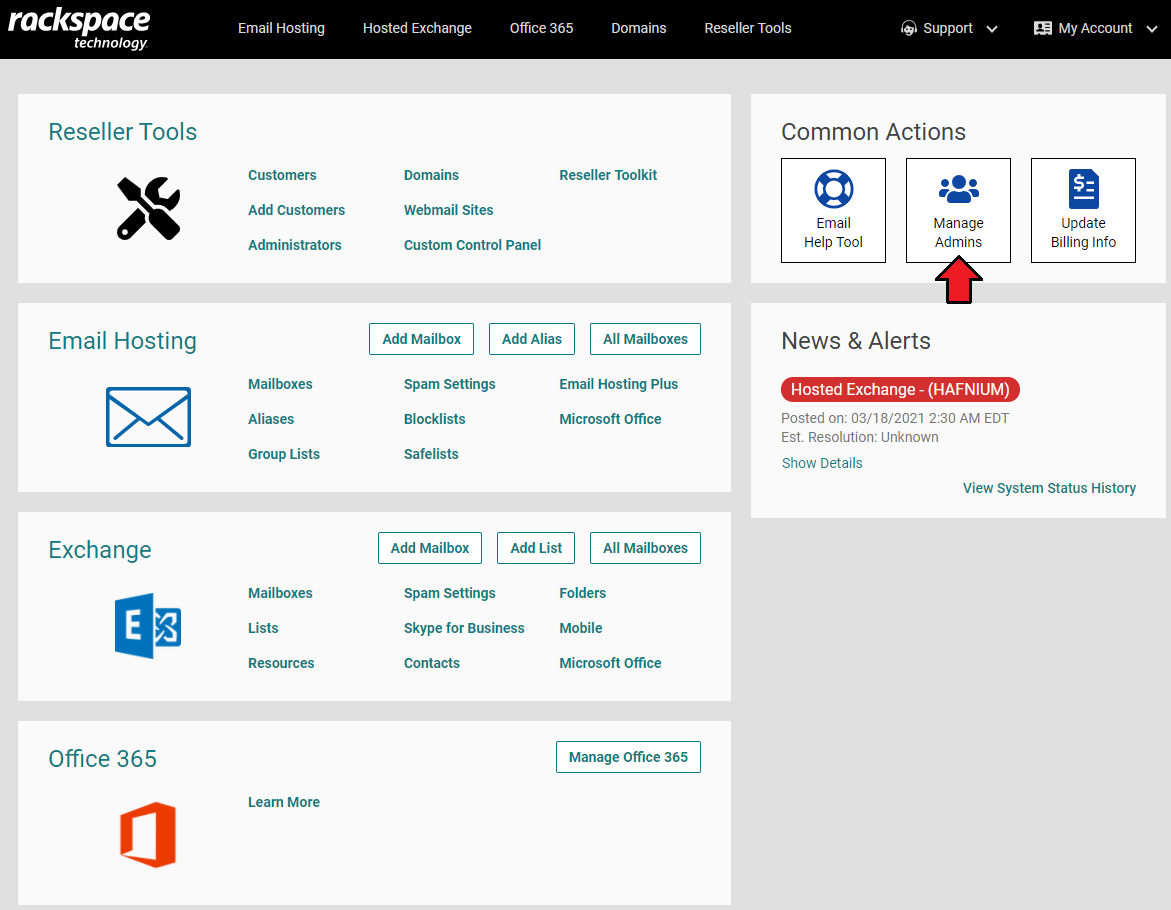
| + | |||
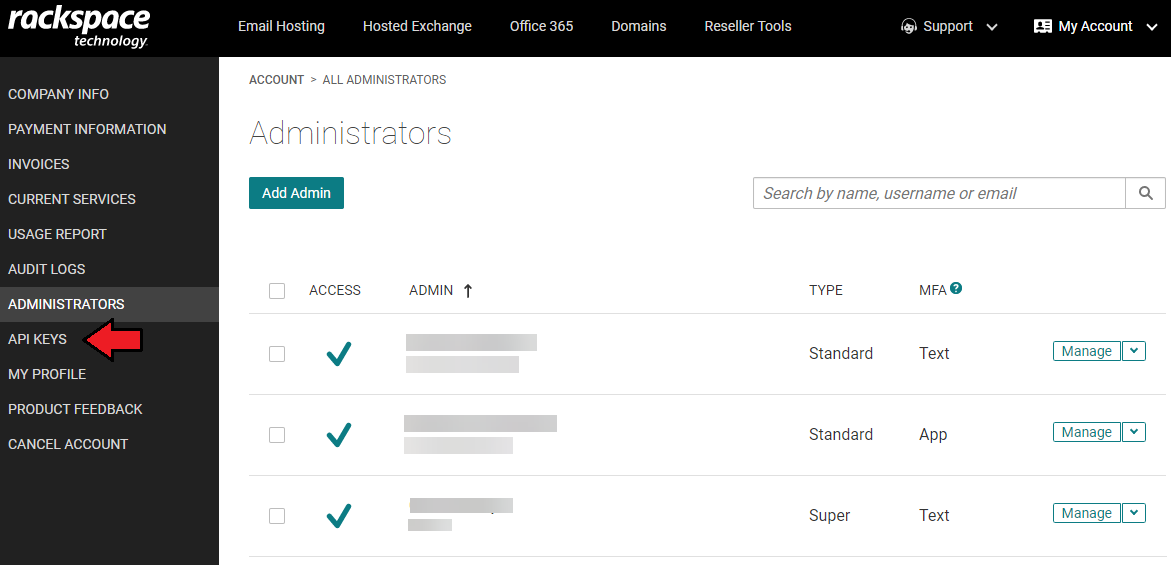
| + | =About [https://www.modulesgarden.com/products/whmcs/rackspace-email-extended Rackspace Email Extended For WHMCS]= | ||
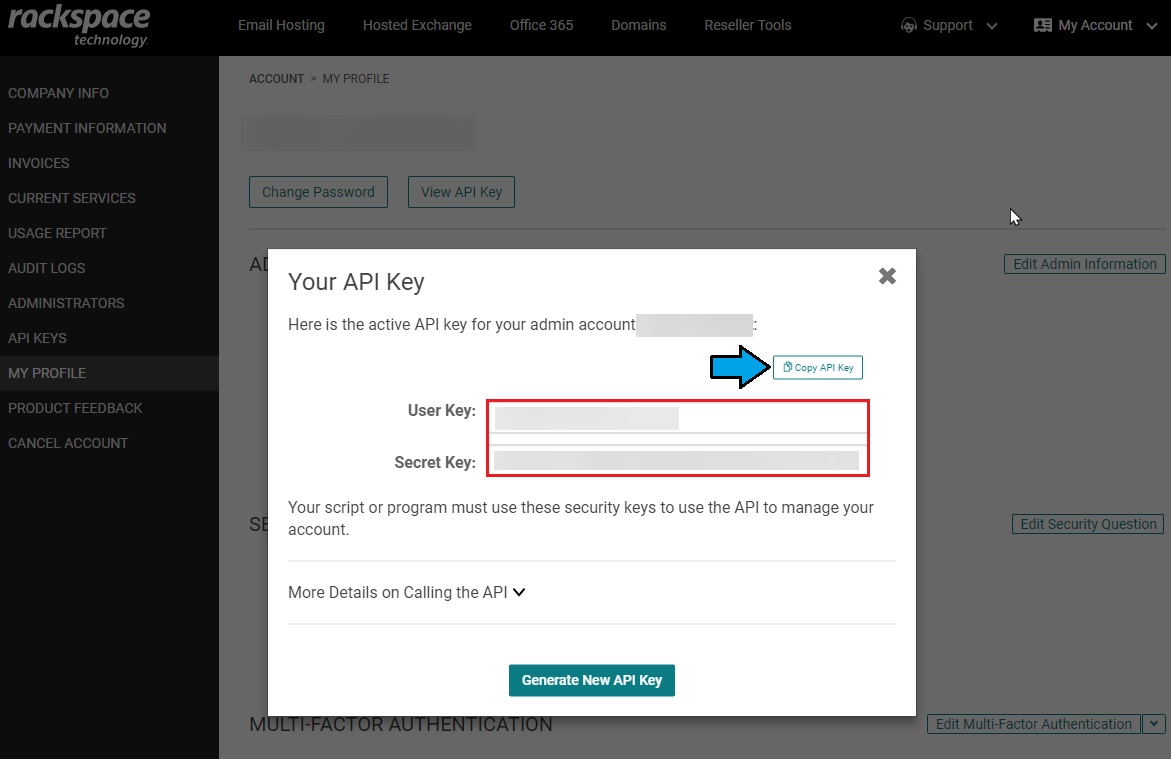
{| | {| | ||
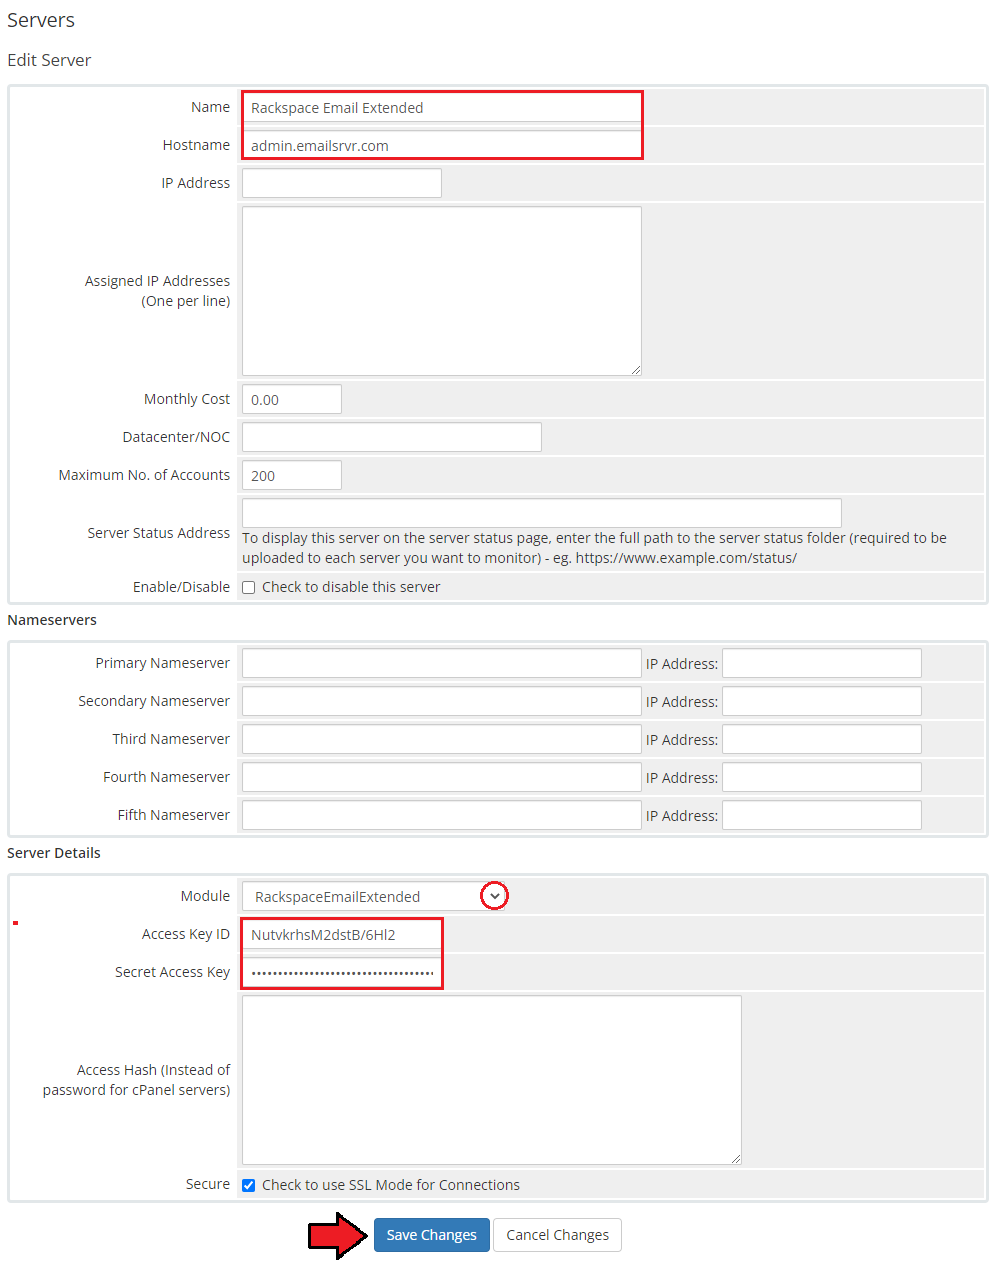
|style="padding: 10px 0px 10px 0px;"|'''Rackspace Email Extended for WHMCS''' is a fully featured addon module that allows you to resell and manage email accounts entirely from your WHMCS system!<br /> | |style="padding: 10px 0px 10px 0px;"|'''Rackspace Email Extended for WHMCS''' is a fully featured addon module that allows you to resell and manage email accounts entirely from your WHMCS system!<br /> | ||
| Line 12: | Line 14: | ||
*'''Admin Area Features:''' | *'''Admin Area Features:''' | ||
{| | {| | ||
| − | |style="padding: 10px 0px 0px 30px;"|✔ Create | + | |style="padding: 10px 0px 0px 30px;"|✔ Create/Terminate Account |
|} | |} | ||
{| | {| | ||
| − | |style="padding: 0px 0px 0px 30px;"|✔ Change Package And | + | |style="padding: 0px 0px 0px 30px;"|✔ Change Package And Account Password |
|} | |} | ||
{| | {| | ||
| Line 75: | Line 77: | ||
|} | |} | ||
{| | {| | ||
| − | |style="padding: 0px 0px | + | |style="padding: 0px 0px 0px 30px;"|✔ Exchange Extra Storage |
|} | |} | ||
| + | {| | ||
| + | |style="padding: 0px 0px 10px 30px;"|✔ Email Archiving | ||
| + | |} | ||
| + | |||
*'''General Info:''' | *'''General Info:''' | ||
{| | {| | ||
| − | |style="padding: 10px 0px 0px 30px;"|✔ Integrated With | + | |style="padding: 10px 0px 0px 30px;"|✔ Integrated With [https://www.modulesgarden.com/products/whmcs/advanced-billing#features Advanced Billing For WHMCS] - Actual Server Resource Usage Billing |
| + | |} | ||
| + | {| | ||
| + | |style="padding: 0px 0px 0px 30px;"|✔ Integrated With [https://www.modulesgarden.com/products/whmcs/server-allocator Server Allocator For WHMCS] - Automatic Assignment Of Most Suitable Servers To Products | ||
|} | |} | ||
{| | {| | ||
| Line 85: | Line 94: | ||
|} | |} | ||
{| | {| | ||
| − | |style="padding: 0px 0px 0px 30px;"|✔ Supports | + | |style="padding: 0px 0px 0px 30px;"|✔ Supports PHP 8.2 Back To PHP 7.4 |
|} | |} | ||
{| | {| | ||
| − | |style="padding: 0px 0px 30px 30px;"|✔ Supports WHMCS | + | |style="padding: 0px 0px 0px 30px;"|✔ Supports WHMCS Themes "Six" And "Twenty-One" |
| + | |} | ||
| + | {| | ||
| + | |style="padding: 0px 0px 0px 30px;"|✔ Supports WHMCS V8.11 Back To WHMCS V8.6 | ||
| + | |} | ||
| + | {| | ||
| + | |style="padding: 0px 0px 0px 30px;"|✔ Requires ionCube Loader V12 Or Later | ||
| + | |} | ||
| + | {| | ||
| + | |style="padding: 0px 0px 30px 30px;"|✔ Easy [https://www.docs.modulesgarden.com/How_To_Upgrade_WHMCS_Module Module Upgrade] To [https://www.modulesgarden.com/products/whmcs/rackspace-email-extended#open-source-version Open Source Version] | ||
|} | |} | ||
=Installation and Configuration= | =Installation and Configuration= | ||
| + | |||
| + | <p style="border: 1px solid #6f0000; padding: 8px 14px; display: inline-block; font-size: 16px; color: #6f0000;"><strong>Rackspace Email Extended For WHMCS</strong> has reached <strong>End of Support (EOS)</strong> and is no longer actively maintained. The module remains available for purchase, including the Open Source version and License Upgrade at a <strong>discounted price</strong>. Current license subscriptions continue and stay valid for future renewals.</p> | ||
| + | |||
{| | {| | ||
| − | |style="padding: 10px 0px 30px 0px;"|'''In this tutorial we will show you how to successfully install and set up Rackspace Email Extended For WHMCS.'''<br /> | + | |style="padding: 10px 0px 30px 0px;"|'''In this tutorial we will show you how to successfully install and set up [https://www.modulesgarden.com/products/whmcs/rackspace-email-extended Rackspace Email Extended For WHMCS.]'''<br /> |
We will guide you step by step through the whole installation process. | We will guide you step by step through the whole installation process. | ||
|} | |} | ||
==Installation== | ==Installation== | ||
{| | {| | ||
| − | |style="padding: 10px 0px 20px 15px;"|'''1. Log in to | + | |style="padding: 10px 0px 20px 15px;"|'''1. Log in to our client area and download the module.''' |
|} | |} | ||
{| | {| | ||
| Line 104: | Line 125: | ||
|} | |} | ||
{| | {| | ||
| − | |style="padding: 0px 0px | + | |style="padding: 0px 0px 10px 15px;"|'''2. In the downloaded file you might find one or two packages that support different PHP versions.'''<br/> |
| − | + | In the most recent versions of the module, you will find only one package that supports PHP 7.1 and later.<br/> <!-- If you need a package for the previous versions of PHP, please [https://www.modulesgarden.com/support/ticket/general-support contact our support]. --> | |
|} | |} | ||
{| | {| | ||
| − | |style="padding: 0px 0px 20px 25px;"|[[File: | + | |style="padding: 0px 0px 20px 25px;"|[[File:PHP71_74.png]] |
|} | |} | ||
{| | {| | ||
| − | |style="padding: 0px 0px 15px 15px;"|'''3. When you install Rackspace Email Extended for the first time you have to rename '' 'license_RENAME.php' '' file.'''<br /> | + | |style="padding: 0px 0px 15px 15px;"|'''Previous updates of the module may contain two packages dedicated to various PHP versions.'''<br/> |
| + | The first one that supports PHP 5.6 up to PHP 7.0, and the second one addressed to PHP 7.1 up to PHP 7.3.<br/> | ||
| + | '''''Note:''' Keep in mind that PHP versions 5.6 up to 7.0 are no longer officially supported and their security issues are not fixed or released any more. Find more info [http://php.net/supported-versions.php here].'' | ||
| + | |} | ||
| + | {| | ||
| + | |style="padding: 0px 0px 20px 25px;"|[[File:PHP56_73.png]] | ||
| + | |} | ||
| + | {| | ||
| + | |style="padding: 0px 0px 10px 15px;"|<!-- '' '''Important''': This situation does not affect [https://www.modulesgarden.com/products/whmcs/rackspace-email-extended#open-source-version '''the open source version'''] of this module which can be applied to any PHP from version 5.6 and later.''<br/>'' --> '''Note''': You can check the current PHP version in your WHMCS. To do so, proceed to ''' 'Utilities' → 'System' → 'PHP Info'.''' | ||
| + | |} | ||
| + | {| | ||
| + | |style="padding: 0px 0px 15px 15px;"|'''3. Extract the package and upload its content into the main WHMCS directory. | ||
| + | The content of the package to upload should look like this. | ||
| + | |} | ||
| + | {| | ||
| + | |style="padding: 0px 0px 20px 25px;"|[[File:dstfret.png]] | ||
| + | |} | ||
| + | {| | ||
| + | |style="padding: 0px 0px 15px 15px;"|'''4. When you install Rackspace Email Extended For WHMCS for the first time you have to rename '' 'license_RENAME.php' '' file.'''<br /> | ||
File is located in '' 'modules/servers/rackspaceEmailExtended/license_RENAME.php'. '' Rename it from '' 'license_RENAME.php' '' to '' 'license.php'. '' | File is located in '' 'modules/servers/rackspaceEmailExtended/license_RENAME.php'. '' Rename it from '' 'license_RENAME.php' '' to '' 'license.php'. '' | ||
|} | |} | ||
| Line 118: | Line 157: | ||
|} | |} | ||
{| | {| | ||
| − | |style="padding: 0px 0px 15px 15px;"|''' | + | |style="padding: 0px 0px 15px 15px;"|'''5. In order to configure your license key you have to edit a previously renamed '' 'license.php' '' file.'''<br /> |
| − | Enter your license key between quotation marks as presented on the following screen. You can find your license key in | + | Enter your license key between quotation marks as presented on the following screen. You can find your license key in our client area → '' 'My Products'. '' |
|} | |} | ||
{| | {| | ||
| Line 127: | Line 166: | ||
==Server Configuration== | ==Server Configuration== | ||
{| | {| | ||
| − | |style="padding: 0px 0px 15px 15px;"|''' | + | |style="padding: 0px 0px 15px 15px;"|'''6. Set up a new server and a product.'''<br /> |
| − | To do so, log in to your WHMCS. | + | To do so, log in to your WHMCS. Move to '' 'Setup' '' → '' 'Products/Services' '' → '' 'Servers'. ''<br /> |
| − | Afterwards, press '' 'Add New Server' '' | + | Afterwards, press '' 'Add New Server'. '' |
|} | |} | ||
{| | {| | ||
| Line 135: | Line 174: | ||
|} | |} | ||
{| | {| | ||
| − | |style="padding: 0px 0px 15px 15px;"|''' | + | |style="padding: 0px 0px 15px 15px;"|'''7. To proceed, you will need to obtain your Rackspace API keys. To do so, log in to your reseller '' 'Rackspace Account'.'' '''<br/>Find '' 'Manage Admins' '' in the Common Actions box on the top right corner. You will be moved to the '' 'Administartors' '' setion. |
| − | + | |} | |
| − | '' | + | {| |
| − | '' | + | |style="padding: 0px 0px 20px 25px;"|[[File:REE2_6.png]] |
| + | |} | ||
| + | {| | ||
| + | |style="padding: 0px 0px 20px 15px;"|'''8. When you are on the ' ''Administrators' '' page, click the '' 'API KEYS'.'' You will find it on the left, in navigation menu. | ||
|} | |} | ||
{| | {| | ||
| − | |style="padding: 0px 0px 20px 25px;"|[[File: | + | |style="padding: 0px 0px 20px 25px;"|[[File:REE2_7.png]] |
|} | |} | ||
{| | {| | ||
| − | |style="padding: 0px 0px 20px 15px;"|''' | + | |style="padding: 0px 0px 20px 15px;"|'''9. A popup with '' 'Your API Key' '' will appear. Copy your '' 'User' '' and '' 'Seccret Keys','' you will need them in the next part of the module configuration. |
|} | |} | ||
{| | {| | ||
| − | |style="padding: 0px 0px 20px 25px;"|[[File: | + | |style="padding: 0px 0px 20px 25px;"|[[File:REE2_8.png]] |
|} | |} | ||
{| | {| | ||
| − | |style="padding: 0px 0px 15px 15px;"|''' | + | |style="padding: 0px 0px 15px 15px;"|'''10. Enter your server name and choose '' 'RackspaceEmailExtended' '' from a '' 'Type' '' dropdown menu.<br /> |
| − | + | Paste the previously copied'' 'User Key' '' and '' 'Secret Key' '' into '' 'Username' '' and '' 'Password' '' fields.<br /> | |
| + | Enter the '' 'Hostname' '' address to your Webmail server - it is required for the '' 'Login to Webmail' '' function in the client area.<br /> | ||
Afterwards, press '' 'Save Changes'.'' | Afterwards, press '' 'Save Changes'.'' | ||
|} | |} | ||
| Line 158: | Line 201: | ||
|} | |} | ||
{| | {| | ||
| − | |style="padding: 0px 0px 15px 15px;"|''' | + | |style="padding: 0px 0px 15px 15px;"|'''11. After you configure your server correctly, you will see a following screen.'''<br /> |
Now, you need to create a new group for your server. For that purpose press '' 'Create New Group'.'' | Now, you need to create a new group for your server. For that purpose press '' 'Create New Group'.'' | ||
|} | |} | ||
| Line 165: | Line 208: | ||
|} | |} | ||
{| | {| | ||
| − | |style="padding: 0px 0px 20px 15px;"|''' | + | |style="padding: 0px 0px 20px 15px;"|'''12. Enter name, click on your previously created server, press '' 'Add' '' then press '' 'Save Changes'. ''''' |
|} | |} | ||
{| | {| | ||
| Line 173: | Line 216: | ||
==Product Configuration== | ==Product Configuration== | ||
{| | {| | ||
| − | |style="padding: 10px 0px 15px 15px;"|''' | + | |style="padding: 10px 0px 15px 15px;"|'''12. In order to create and configure product, move to '' 'Setup' '' → '' 'Products/Services' '' → '' 'Products/Services'. '''''<br /> |
| − | If you do not have a product group, | + | If you do not have a product group, '' 'Create a New Group'. '' If you do, simply go to step 13. |
|} | |} | ||
{| | {| | ||
| Line 180: | Line 223: | ||
|} | |} | ||
{| | {| | ||
| − | |style="padding: 0px 0px 20px 15px;"|''' | + | |style="padding: 0px 0px 20px 15px;"|'''13. Enter product group name and press '' 'Save Changes'. ''''' |
|} | |} | ||
{| | {| | ||
| Line 186: | Line 229: | ||
|} | |} | ||
{| | {| | ||
| − | |style="padding: 0px 0px 15px 15px;"|''' | + | |style="padding: 0px 0px 15px 15px;"|'''14. When you have a product group, you can create your product and assign it to Rackspace Email Extended. If you already have a product, go to step 15.'''<br /> |
To create a product click on '' 'Create a New Product'.'' | To create a product click on '' 'Create a New Product'.'' | ||
|} | |} | ||
| Line 193: | Line 236: | ||
|} | |} | ||
{| | {| | ||
| − | |style="padding: 0px 0px 20px 15px;"|''' | + | |style="padding: 0px 0px 20px 15px;"|'''15. Afterwards, choose your product type and product group from dropdown menus, enter your product name and press '' 'Continue'. ''''' |
|} | |} | ||
{| | {| | ||
| Line 199: | Line 242: | ||
|} | |} | ||
{| | {| | ||
| − | |style="padding: 0px 0px 15px 15px;"|''' | + | |style="padding: 0px 0px 15px 15px;"|'''16. Now, go to '' 'Module Settings' '' section, choose both '' 'RackspaceEmailExtended' '' and your previously created server group from dropdown menus.'''<br /> |
| − | Decide which of the service types | + | Decide which of the service types you would like to use and choose it from a dropdown menu.<br /> |
Afterwards, enter desired values in configuration fields and press '' 'Save Changes'.''<br /> | Afterwards, enter desired values in configuration fields and press '' 'Save Changes'.''<br /> | ||
| − | Please note that values | + | Please note that values do not need to be constant. You can use configurable options to adjust the values.<br /> |
| − | + | Obtain more information about configurable options [https://www.docs.modulesgarden.com/Rackspace_Email_Extended_For_WHMCS#Configuration_of_Orders here]. | |
|} | |} | ||
{| | {| | ||
| Line 209: | Line 252: | ||
|} | |} | ||
{| | {| | ||
| − | |style="padding: 0px 0px 15px 15px;"|''' | + | |style="padding: 0px 0px 15px 15px;"|'''17. In the last step you need to create a new client custom field.'''<br /> |
| − | To do so, proceed to '' ' | + | To do so, proceed to '' 'System Settings' '' → '' 'Custom Fields/Custom Client Fields'.''<br /> |
| − | Fill in '' 'EmailCustomerID' '' into field name, tick '' 'Admin Only'' ' and press '' 'Save Changes' '' | + | Fill in '' 'EmailCustomerID' '' into field name, tick '' 'Admin Only'' ' and press '' 'Save Changes'. '' |
|} | |} | ||
{| | {| | ||
| − | |style="padding: 0px 0px 20px 25px;"|[[File: | + | |style="padding: 0px 0px 20px 25px;"|[[File:REE_15_1.png]] |
|} | |} | ||
{| | {| | ||
| − | |style="padding: 0px 0px 15px 15px;"|''' | + | |style="padding: 0px 0px 15px 15px;"|'''18. Important! Our module does not automatically download '' 'EmailCustomerID' '' for the proper Rackspace customer.'''<br /> |
To prevent duplicating accounts on Rackspace side you have to manually fill in '' 'EmailCustomerID' '' with appropriate value before running '' 'Create' '' function.<br /> | To prevent duplicating accounts on Rackspace side you have to manually fill in '' 'EmailCustomerID' '' with appropriate value before running '' 'Create' '' function.<br /> | ||
| − | You can find more about it [ | + | You can find more about it [https://www.docs.modulesgarden.com/Rackspace_Email_Extended_For_WHMCS#Management_of_Existing_Account here]. |
| + | |} | ||
| + | {| | ||
| + | |style="padding: 0px 0px 30px 25px;"|[[File:REE_37.png]] | ||
|} | |} | ||
{| | {| | ||
|style="padding: 0px 0px 15px 15px;"|'''Good job! You have just correctly set up your first product with Rackspace Email.'''<br /> | |style="padding: 0px 0px 15px 15px;"|'''Good job! You have just correctly set up your first product with Rackspace Email.'''<br /> | ||
| − | + | Product after a successful activation presents similarly to the one presented on the screen below. | |
|} | |} | ||
{| | {| | ||
| − | |style="padding: 0px 0px 30px | + | |style="padding: 0px 0px 30px 25px;"|[[File:REE_16_1.png]] |
|} | |} | ||
=Management= | =Management= | ||
{| | {| | ||
| − | |style="padding: 10px 0px 30px 15px;"| | + | |style="padding: 10px 0px 30px 15px;"|'''In the following sections we will try to present all the possibilities of Rackspace Email Extended For WHMCS features.''' |
|} | |} | ||
==Configuration of Orders== | ==Configuration of Orders== | ||
| Line 237: | Line 283: | ||
|style="padding: 10px 0px 15px 15px;"|Rackspace Email Extended For WHMCS allows you to offer a product tailored to customers needs. Let's create such an order. | |style="padding: 10px 0px 15px 15px;"|Rackspace Email Extended For WHMCS allows you to offer a product tailored to customers needs. Let's create such an order. | ||
For this purpose you need to create at least one configurable option. In this guide we will create a few more to present you the possibilities of our module.<br /> | For this purpose you need to create at least one configurable option. In this guide we will create a few more to present you the possibilities of our module.<br /> | ||
| − | '''If you are not | + | '''If you are not familiar with configurable options yet, you can read more about them [https://www.docs.modulesgarden.com/General#How_To_Use_Configurable_Options here]'''<br /> |
| − | These are configurable options fields created by us, connected with our | + | These are configurable options fields created by us, connected with our Rackspace Email Extended product. |
|} | |} | ||
{| | {| | ||
| Line 244: | Line 290: | ||
|} | |} | ||
{| | {| | ||
| − | |style="padding: 0px 0px 15px 15px;"| | + | |style="padding: 0px 0px 15px 15px;"|Proceed to your product '' 'Module Settings' '' tab now.<br /> |
| − | + | Here, you need to fill in the marked fields with desired configurable option names as shown on the screen below.<br /> | |
| − | Afterwards, press '' 'Save Changes' '' | + | Afterwards, press '' 'Save Changes'. '' |
|} | |} | ||
{| | {| | ||
| Line 253: | Line 299: | ||
{| | {| | ||
|style="padding: 0px 0px 15px 15px;"|If you fill out '' 'Module Settings' '' with correct names, during order made from the admin area, you should see similar screen to the one below.<br /> | |style="padding: 0px 0px 15px 15px;"|If you fill out '' 'Module Settings' '' with correct names, during order made from the admin area, you should see similar screen to the one below.<br /> | ||
| − | Otherwise, ensure that configurable option names are filled correctly. | + | Otherwise, ensure that configurable option names are filled out correctly. |
|} | |} | ||
{| | {| | ||
| Line 259: | Line 305: | ||
|} | |} | ||
{| | {| | ||
| − | |style="padding: 0px 0px 15px 15px;"| | + | |style="padding: 0px 0px 15px 15px;"|Let's see how it looks like from the perspective of your customers.<br /> |
As you can see, owing to configurable options, they are now able to define mailbox size, amount of mailboxes, extra storage and many other options.<br /> | As you can see, owing to configurable options, they are now able to define mailbox size, amount of mailboxes, extra storage and many other options.<br /> | ||
| − | This makes each order perfectly | + | This makes each order perfectly suited to your customers needs. |
|} | |} | ||
{| | {| | ||
| Line 269: | Line 315: | ||
==Client Area== | ==Client Area== | ||
{| | {| | ||
| − | |style="padding: 10px 0px 20px 15px;"| | + | |style="padding: 10px 0px 20px 15px;"|Read through the below sections to see how Rackspace Email Extended For WHMCS is designed to work in the client area. |
|} | |} | ||
{| | {| | ||
| Line 276: | Line 322: | ||
===Email Hosting=== | ===Email Hosting=== | ||
{| | {| | ||
| − | |style="padding: 10px 0px 20px 15px;"| | + | |style="padding: 10px 0px 20px 15px;"|Email Hosting is an internet hosting service that manages electronic messages through an email server. |
|} | |} | ||
====Mailboxes==== | ====Mailboxes==== | ||
{| | {| | ||
| − | |style="padding: 10px 0px 20px 15px;"| | + | |style="padding: 10px 0px 20px 15px;"|Let's start with some basic functionality of the module, that is the mailboxes management. |
|} | |} | ||
{| | {| | ||
| Line 286: | Line 332: | ||
|} | |} | ||
{| | {| | ||
| − | |style="padding: 0px 0px 20px 15px;"| | + | |style="padding: 0px 0px 20px 15px;"|Creating a mailbox is quick and easy.<br /> |
| − | The first step is filling out '' 'General' '' form, | + | The first step is filling out '' 'General' '' form, where you can define user details, password and mailbox size. |
|} | |} | ||
{| | {| | ||
| Line 293: | Line 339: | ||
|} | |} | ||
{| | {| | ||
| − | |style="padding: 0px 0px 20px 15px;"| | + | |style="padding: 0px 0px 20px 15px;"|Proceed to '' 'Contact Info' '' tab and fill it out with its user contact information. |
|} | |} | ||
{| | {| | ||
|style="padding: 0px 0px 30px 25px;"|[[File:REE_24.png]] | |style="padding: 0px 0px 30px 25px;"|[[File:REE_24.png]] | ||
|} | |} | ||
| + | |||
====Spam==== | ====Spam==== | ||
{| | {| | ||
| − | |style="padding: 10px 0px 20px 15px;"| | + | |style="padding: 10px 0px 20px 15px;"|Spam filtering page allows you to set your preferences, edit blacklists and safelists. |
|} | |} | ||
{| | {| | ||
| Line 307: | Line 354: | ||
====Aliases==== | ====Aliases==== | ||
{| | {| | ||
| − | |style="padding: 10px 0px 15px 15px;"| | + | |style="padding: 10px 0px 15px 15px;"|With our module you can create aliases and assign chosen mailboxes to them.<br /> |
| − | To do so, press '' 'Add Alias' '' | + | To do so, press '' 'Add Alias', '' add email from '' 'Members inside this Domain' '' and press '' 'Save'.'' ''' |
|} | |} | ||
{| | {| | ||
| Line 314: | Line 361: | ||
|} | |} | ||
{| | {| | ||
| − | |style="padding: 0px 0px 20px 15px;"| | + | |style="padding: 0px 0px 20px 15px;"|On the list of aliases you can find information about the amount of mailboxes in each alias. |
|} | |} | ||
{| | {| | ||
| Line 322: | Line 369: | ||
====Mobile Sync==== | ====Mobile Sync==== | ||
{| | {| | ||
| − | |style="padding: 10px 0px 20px 15px;"| | + | |style="padding: 10px 0px 20px 15px;"|Mobile Sync allows your customers to synchronize their emails, calendars and contacts with their iPhones, Androids or Windows Mobile devices. |
|} | |} | ||
{| | {| | ||
| Line 329: | Line 376: | ||
====Storage Notification==== | ====Storage Notification==== | ||
{| | {| | ||
| − | |style="padding: 10px 0px 20px 15px;"| | + | |style="padding: 10px 0px 20px 15px;"|This page allows you to set up notifications sent to your customers when mailbox reaches certain amount of capacity. |
|} | |} | ||
{| | {| | ||
| Line 337: | Line 384: | ||
===Microsoft Exchange=== | ===Microsoft Exchange=== | ||
{| | {| | ||
| − | |style="padding: 10px 0px 30px 15px;"| | + | |style="padding: 10px 0px 30px 15px;"|Exchange Hosting is a server system, whereby software enables sending and receiving email messages and other types of interactive communications.<br /> |
It enables sharing of business critical information online or through enabled wireless devices.<br /> | It enables sharing of business critical information online or through enabled wireless devices.<br /> | ||
Let's see how our addon can help you manage your Microsoft Exchange services. | Let's see how our addon can help you manage your Microsoft Exchange services. | ||
| Line 343: | Line 390: | ||
====Mailboxes==== | ====Mailboxes==== | ||
{| | {| | ||
| − | |style="padding: 10px 0px 20px 15px;"| | + | |style="padding: 10px 0px 20px 15px;"|As in Email Hosting you can create new email accounts and manage them. |
|} | |} | ||
{| | {| | ||
| Line 353: | Line 400: | ||
====Spam==== | ====Spam==== | ||
{| | {| | ||
| − | |style="padding: 10px 0px 20px 15px;"| | + | |style="padding: 10px 0px 20px 15px;"|Again, similarly to Email Hosting, you can manage your spam here. |
|} | |} | ||
{| | {| | ||
|style="padding: 0px 0px 30px 25px;"|[[File:REE_32.png]] | |style="padding: 0px 0px 30px 25px;"|[[File:REE_32.png]] | ||
|} | |} | ||
| + | |||
====Contacts==== | ====Contacts==== | ||
{| | {| | ||
| − | |style="padding: 10px 0px 20px 15px;"| | + | |style="padding: 10px 0px 20px 15px;"|Within a few seconds you can add a new contact and manage existing ones. |
|} | |} | ||
{| | {| | ||
| Line 366: | Line 414: | ||
|} | |} | ||
{| | {| | ||
| − | |style="padding: 0px 0px 20px 15px;"| | + | |style="padding: 0px 0px 20px 15px;"|In order to add a new contact press '' 'Add Contact' '' and fill out a form shown on the following screen. |
|} | |} | ||
{| | {| | ||
| Line 374: | Line 422: | ||
==Management of Billing== | ==Management of Billing== | ||
{| | {| | ||
| − | |style="padding: 10px 0px 15px 15px;"|When you combine Rackspace Email Extended For WHMCS with [ | + | |style="padding: 10px 0px 15px 15px;"|When you combine Rackspace Email Extended For WHMCS with [https://www.docs.modulesgarden.com/Advanced_Billing_For_WHMCS Advanced Billing For WHMCS], you will be able to set up additional billing options.<br /> |
Module allows you to charge your customers based on the server resources used by them. | Module allows you to charge your customers based on the server resources used by them. | ||
|} | |} | ||
| Line 389: | Line 437: | ||
==Management of Existing Account== | ==Management of Existing Account== | ||
{| | {| | ||
| − | |style="padding: 10px 0px 15px 15px;"| | + | |style="padding: 10px 0px 15px 15px;"|You can easily use Rackspace Email For WHMCS module with your already created rackspace account.<br /> |
| − | + | Instructions below explain how to set it up:<br /> | |
| − | 1. Follow [ | + | 1. Follow [https://www.docs.modulesgarden.com/Rackspace_Email_Extended_For_WHMCS#Installation Installation] instructions.<br /> |
| − | '''Remember | + | '''Remember not to click 'Create' button during the entire process. That would unnecessarily create a new rackspace email account.'''<br /> |
| − | 2. | + | 2. Log in to your Rackspace Email server.<br /> |
| − | 3. Look for '' 'Acct#' '' values, | + | 3. Look for '' 'Acct#' '' values, these are your clients IDs. |
|} | |} | ||
{| | {| | ||
| Line 400: | Line 448: | ||
|} | |} | ||
{| | {| | ||
| − | |style="padding: 0px 0px 20px 15px;"|4. Copy '' '#Acct' '' to field marked on the screen below. | + | |style="padding: 0px 0px 20px 15px;"|4. Copy '' '#Acct' '' to the field marked on the screen below. |
|} | |} | ||
{| | {| | ||
| Line 408: | Line 456: | ||
==Upgrading Product== | ==Upgrading Product== | ||
{| | {| | ||
| − | |style="padding: 10px 0px 15px 15px;"| | + | |style="padding: 10px 0px 15px 15px;"|You can offer an upgrade from ''Rackspace Email'' to ''Rackspace Email Extended''.<br /> |
To set it up correctly, proceed to '' 'Setup' '' → '' 'Product/Services' '' → '' 'Product/Services' '' and edit your Rackspace Email product.<br /> | To set it up correctly, proceed to '' 'Setup' '' → '' 'Product/Services' '' → '' 'Product/Services' '' and edit your Rackspace Email product.<br /> | ||
Now, proceed to '' 'Upgrades' '' tab and choose a previously configured '' 'Rackspace Email Extended' '' product (in our case it was '' 'Email Accounts - Email Advanced' '').<br /> | Now, proceed to '' 'Upgrades' '' tab and choose a previously configured '' 'Rackspace Email Extended' '' product (in our case it was '' 'Email Accounts - Email Advanced' '').<br /> | ||
| Line 418: | Line 466: | ||
|} | |} | ||
{| | {| | ||
| − | |style="padding: 0px 0px 15px 15px;"| | + | |style="padding: 0px 0px 15px 15px;"|Let's upgrade a test product from Rackspace Email to Rackspace Email Extended.<br /> |
To do so, go to the client area and proceed to the Rackspace Email product.<br /> | To do so, go to the client area and proceed to the Rackspace Email product.<br /> | ||
| − | Choose '' 'Upgrade/Downgrade' '' from '' 'Management Actions' '' | + | Choose '' 'Upgrade/Downgrade' '' from '' 'Management Actions'. '' |
|} | |} | ||
{| | {| | ||
| Line 426: | Line 474: | ||
|} | |} | ||
{| | {| | ||
| − | |style="padding: 0px 0px 15px 15px;"| | + | |style="padding: 0px 0px 15px 15px;"|You should see a screen similar to the one shown below.<br /> |
Choose a billing cycle for your Rackspace Email Extended product and press '' 'Choose Product'.'' | Choose a billing cycle for your Rackspace Email Extended product and press '' 'Choose Product'.'' | ||
|} | |} | ||
| Line 433: | Line 481: | ||
|} | |} | ||
{| | {| | ||
| − | |style="padding: 0px 0px 20px 15px;"| | + | |style="padding: 0px 0px 20px 15px;"|That's it. Choose the payment method, press '' 'Click to Continue' '' button and voila! |
|} | |} | ||
{| | {| | ||
| Line 441: | Line 489: | ||
=Tips= | =Tips= | ||
{| | {| | ||
| − | |style="padding: 10px 0px | + | |style="padding: 10px 0px 0px 15px;"|1. You need to be registered in Rackspace as a reseller, only then Rackspace Email Extended For WHMCS will work properly.<br /> |
| + | :If you have a regular account in Rackspace, Rackspace Email Extended For WHMCS will not work. | ||
|} | |} | ||
| + | {| | ||
| + | |style="padding: 10px 0px 30px 15px;"|2. Please note that although action '' 'Suspend' '' is available in Module Commands, the action itself is not supported by Rackspace API.<br/> | ||
| + | :It is not possible to call this action currently. | ||
| + | |} | ||
| + | |||
| + | =Update Instructions= | ||
| + | {| | ||
| + | |style="padding: 10px 0px 30px 15px;"|An essential guidance through the process of updating the module is offered '''[https://www.docs.modulesgarden.com/How_To_Update_WHMCS_Module here]'''.<br/> | ||
| + | Ensure successful completion of the module update by carefully following each step, thereby preventing data loss or any unforeseen issues.<br/> Additionally, you will find a current list of supplementary actions necessary for a smooth update process there. | ||
| + | |} | ||
| + | =Upgrade Guide= | ||
| + | {| | ||
| + | |style="padding: 10px 0px 30px 15px;"|Seeking a solution that offers greater flexibility, customization tailored to your precise needs, and unrestricted availability?<br/> There is an option that not only proves to be cost-effective in the long run but also includes prioritized support services, making it a truly valuable investment.<br/> | ||
| + | |||
| + | Opt for the [https://www.modulesgarden.com/products/whmcs/rackspace-email-extended#open-source-version Open Source version] of your Rackspace Email Extended For WHMCS module to unlock these benefits.<br/> Simply click on either the '''Get Source Code''' or '''Upgrade To Lifetime''' button found on the product's page in our client area to complete the one-step upgrade process, with a '''dedicated discount''' already applied.<br/> | ||
| + | |||
| + | Follow a [https://www.docs.modulesgarden.com/How_To_Upgrade_WHMCS_Module comprehensive guide] covering the transition process, the advantages it brings, and step-by-step instructions on what to do next after the order has been successfully finalized. | ||
| + | |} | ||
| + | |||
=Common Problems= | =Common Problems= | ||
{| | {| | ||
| Line 448: | Line 516: | ||
|} | |} | ||
{| | {| | ||
| − | |style="padding: 0px 0px 20px 15px;"| | + | |style="padding: 0px 0px 20px 15px;"|2. If any undesired numbers appear in your client area, like the ones shown on the following screen, you can easily remove them. |
|} | |} | ||
{| | {| | ||
| Line 464: | Line 532: | ||
|} | |} | ||
{| | {| | ||
| − | |style="padding: 0px 0px | + | |style="padding: 0px 0px 20px 15px;"|3. If customer rackspace accounts are duplicated go to step 17 of '' 'Installation'. '' You will find there a solution. |
| + | |} | ||
| + | {| | ||
| + | |style="padding: 0px 0px 30px 15px;"|4. If, after clicking on '' 'Login to Webmail' '', there is no correct redirection, make sure that the hostname address to your Webmail server is correctly entered in the WHMCS server configuration. | ||
|} | |} | ||
Latest revision as of 15:10, 31 January 2025
Rackspace Email Extended For WHMCS has reached End of Support (EOS) and is no longer actively maintained. The module remains available for purchase, including the Open Source version and License Upgrade at a discounted price. Current license subscriptions continue and stay valid for future renewals.
Contents |
[edit] About Rackspace Email Extended For WHMCS
| Rackspace Email Extended for WHMCS is a fully featured addon module that allows you to resell and manage email accounts entirely from your WHMCS system! Owing to our product, your customers will be able to conveniently manage all aspects of Rackspace email accounts like e.g. mailboxes, aliases or mobile sync. |
- Admin Area Features:
| ✔ Create/Terminate Account |
| ✔ Change Package And Account Password |
| ✔ Define Service Type Per Product |
| ✔ Configure Resource Limits Per Product |
- Client Area Features:
| ✔ Email Hosting - Remote Access And Management Of: |
| ✔ Mailboxes |
| ✔ Spam |
| ✔ Aliases |
| ✔ Mobile Sync |
| ✔ Storage Notification |
| ✔ Microsoft Exchange - Remote Access And Management Of: |
| ✔ Mailboxes |
| ✔ Spam |
| ✔ Contacts |
- Available Configurable Options
| ✔ Max Mailboxes |
| ✔ Mailbox Size |
| ✔ Extra Storage |
| ✔ Active Sync Licenses |
| ✔ BlackBerry Licenses |
| ✔ Exchange Max Mailboxes |
| ✔ Exchange Extra Storage |
| ✔ Email Archiving |
- General Info:
| ✔ Integrated With Advanced Billing For WHMCS - Actual Server Resource Usage Billing |
| ✔ Integrated With Server Allocator For WHMCS - Automatic Assignment Of Most Suitable Servers To Products |
| ✔ Multi-Language Support |
| ✔ Supports PHP 8.2 Back To PHP 7.4 |
| ✔ Supports WHMCS Themes "Six" And "Twenty-One" |
| ✔ Supports WHMCS V8.11 Back To WHMCS V8.6 |
| ✔ Requires ionCube Loader V12 Or Later |
| ✔ Easy Module Upgrade To Open Source Version |
[edit] Installation and Configuration
Rackspace Email Extended For WHMCS has reached End of Support (EOS) and is no longer actively maintained. The module remains available for purchase, including the Open Source version and License Upgrade at a discounted price. Current license subscriptions continue and stay valid for future renewals.
| In this tutorial we will show you how to successfully install and set up Rackspace Email Extended For WHMCS. We will guide you step by step through the whole installation process. |
[edit] Installation
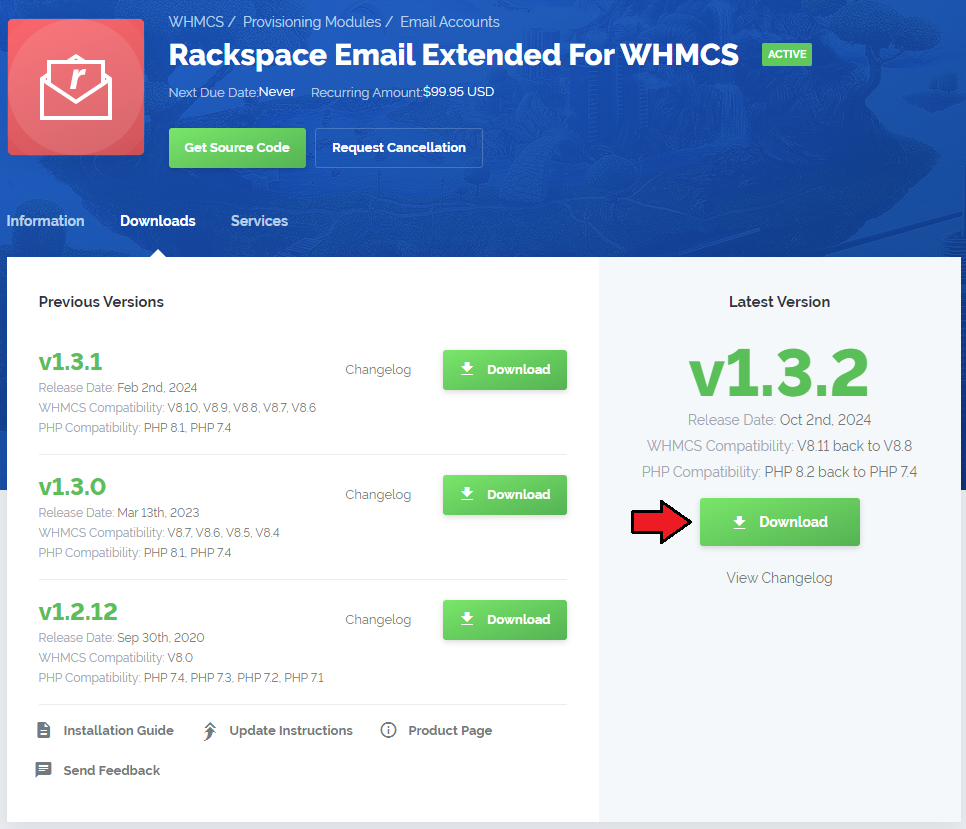
| 1. Log in to our client area and download the module. |
|
| 2. In the downloaded file you might find one or two packages that support different PHP versions. In the most recent versions of the module, you will find only one package that supports PHP 7.1 and later. |
| Previous updates of the module may contain two packages dedicated to various PHP versions. The first one that supports PHP 5.6 up to PHP 7.0, and the second one addressed to PHP 7.1 up to PHP 7.3. |

|
| Note: You can check the current PHP version in your WHMCS. To do so, proceed to 'Utilities' → 'System' → 'PHP Info'. |
| 3. Extract the package and upload its content into the main WHMCS directory.
The content of the package to upload should look like this. |
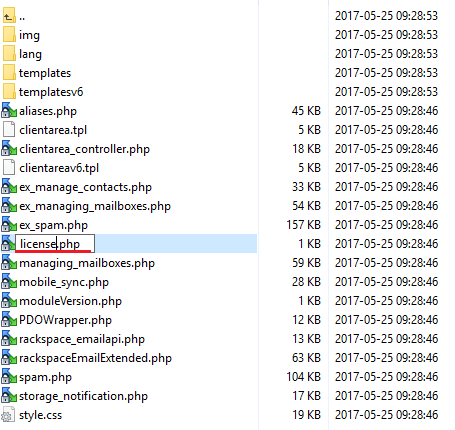
| 4. When you install Rackspace Email Extended For WHMCS for the first time you have to rename 'license_RENAME.php' file. File is located in 'modules/servers/rackspaceEmailExtended/license_RENAME.php'. Rename it from 'license_RENAME.php' to 'license.php'. |
|
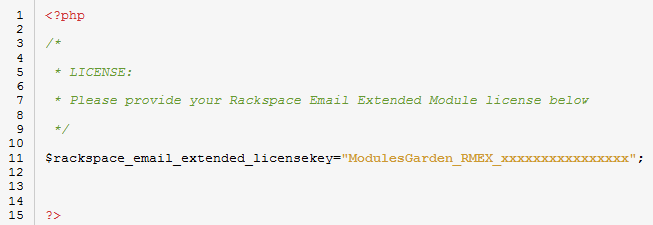
| 5. In order to configure your license key you have to edit a previously renamed 'license.php' file. Enter your license key between quotation marks as presented on the following screen. You can find your license key in our client area → 'My Products'. |
|
[edit] Server Configuration
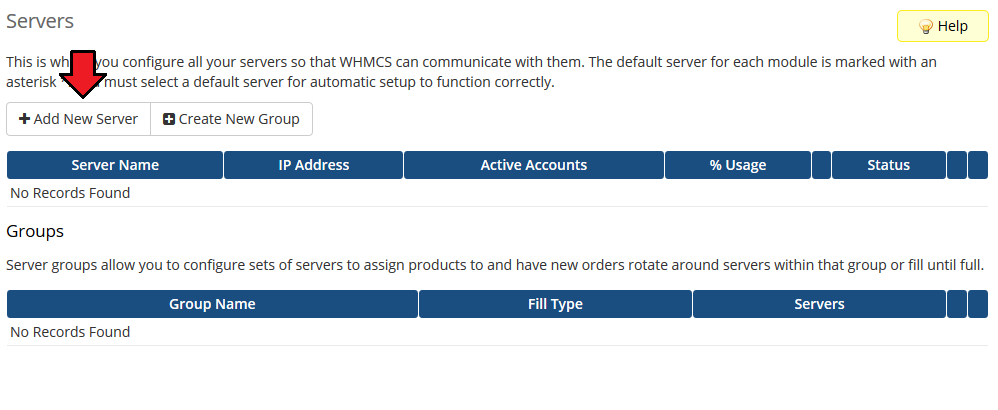
| 6. Set up a new server and a product. To do so, log in to your WHMCS. Move to 'Setup' → 'Products/Services' → 'Servers'. |
|
| 7. To proceed, you will need to obtain your Rackspace API keys. To do so, log in to your reseller 'Rackspace Account'. Find 'Manage Admins' in the Common Actions box on the top right corner. You will be moved to the 'Administartors' setion. |
|
| 8. When you are on the ' Administrators' page, click the 'API KEYS'. You will find it on the left, in navigation menu. |
|
| 9. A popup with 'Your API Key' will appear. Copy your 'User' and 'Seccret Keys', you will need them in the next part of the module configuration. |
|
| 10. Enter your server name and choose 'RackspaceEmailExtended' from a 'Type' dropdown menu. Paste the previously copied 'User Key' and 'Secret Key' into 'Username' and 'Password' fields. |
|
| 11. After you configure your server correctly, you will see a following screen. Now, you need to create a new group for your server. For that purpose press 'Create New Group'. |
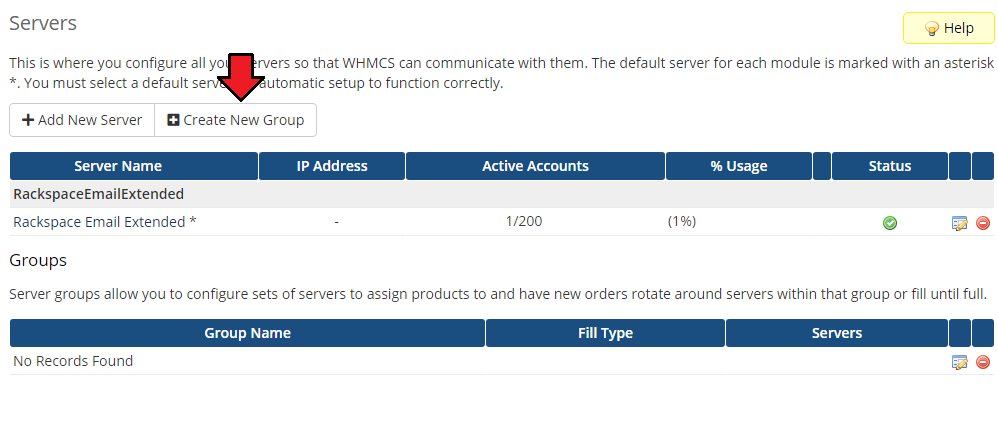
|
| 12. Enter name, click on your previously created server, press 'Add' then press 'Save Changes'. |
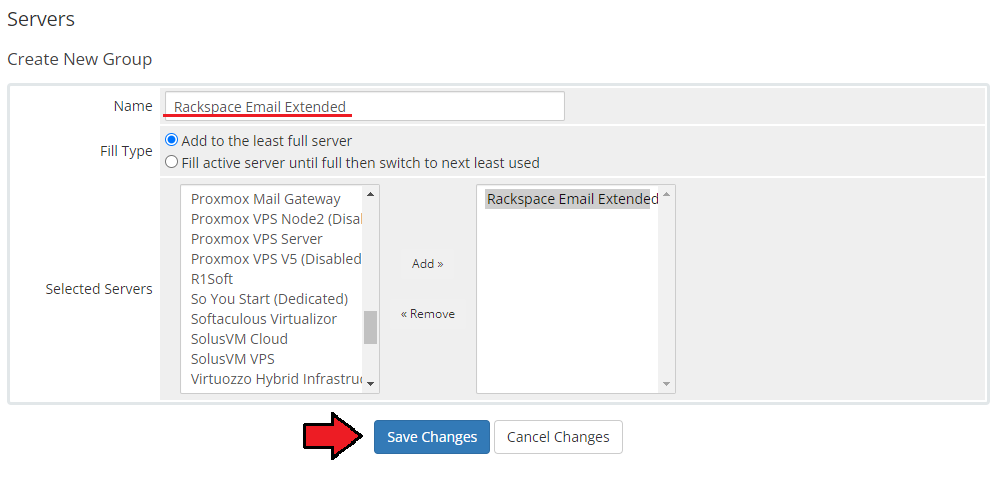
|
[edit] Product Configuration
| 12. In order to create and configure product, move to 'Setup' → 'Products/Services' → 'Products/Services'. If you do not have a product group, 'Create a New Group'. If you do, simply go to step 13. |

|
| 13. Enter product group name and press 'Save Changes'. |
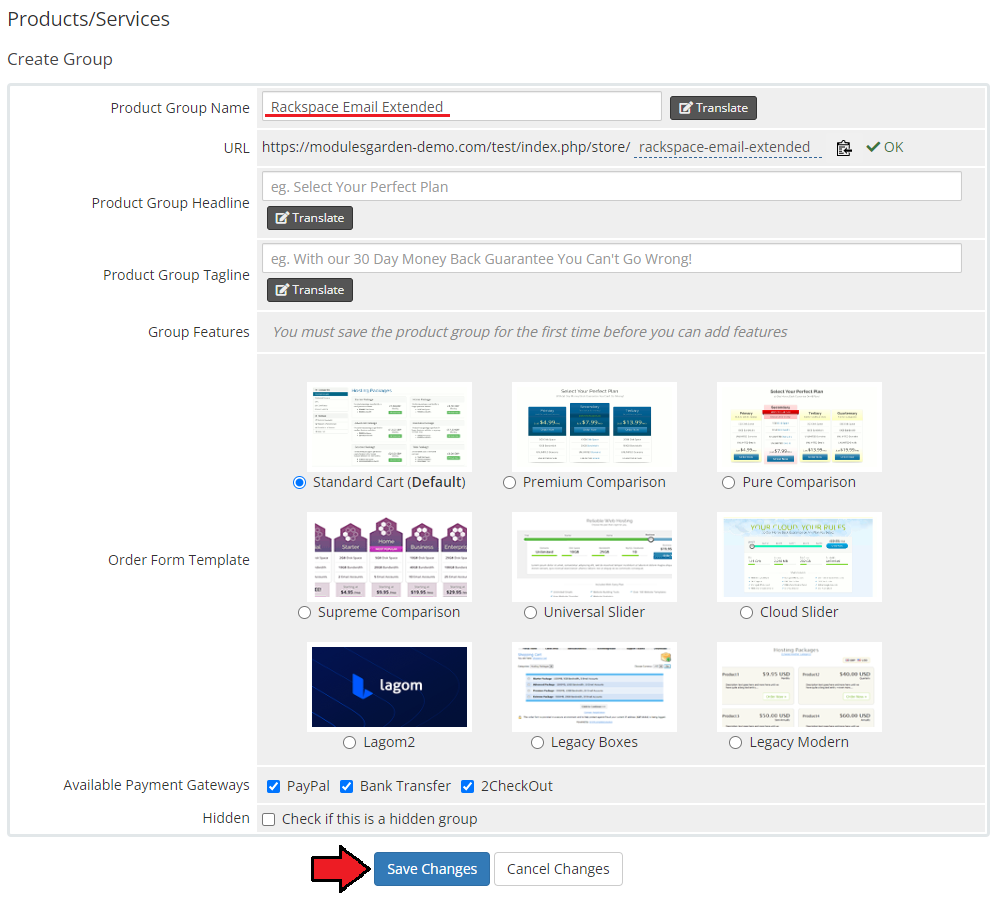
|
| 14. When you have a product group, you can create your product and assign it to Rackspace Email Extended. If you already have a product, go to step 15. To create a product click on 'Create a New Product'. |

|
| 15. Afterwards, choose your product type and product group from dropdown menus, enter your product name and press 'Continue'. |
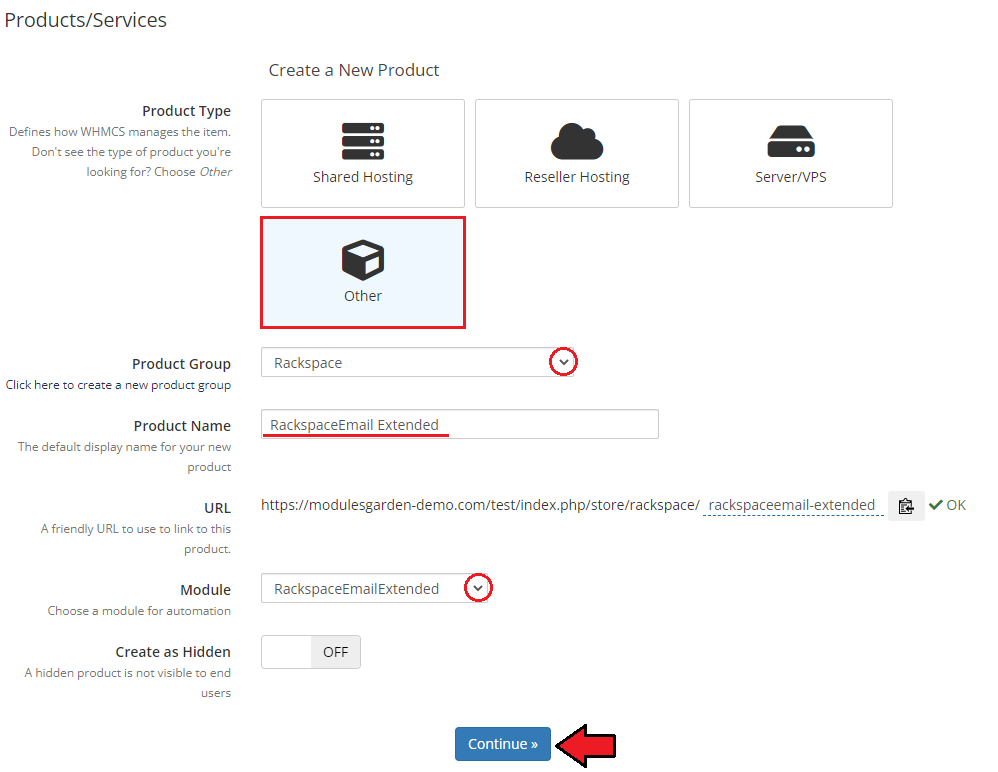
|
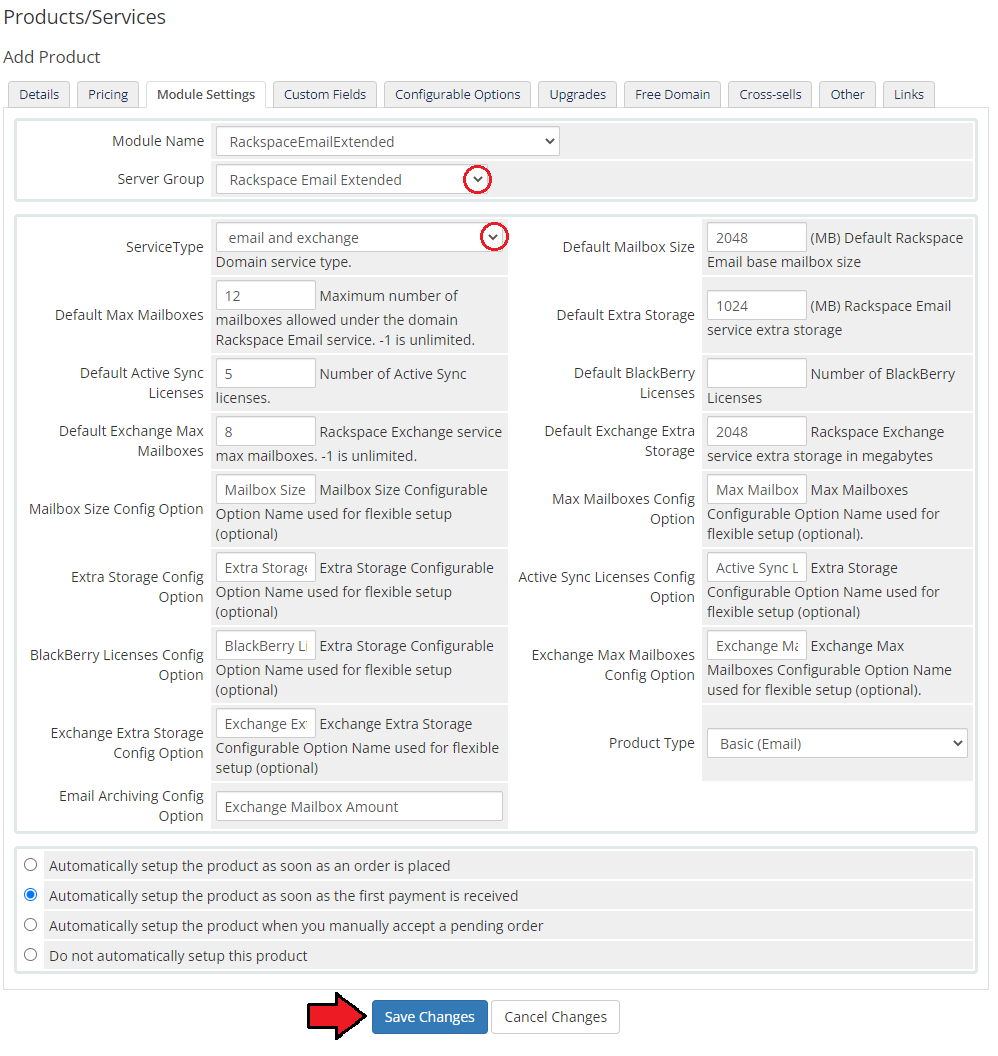
| 16. Now, go to 'Module Settings' section, choose both 'RackspaceEmailExtended' and your previously created server group from dropdown menus. Decide which of the service types you would like to use and choose it from a dropdown menu. |
|
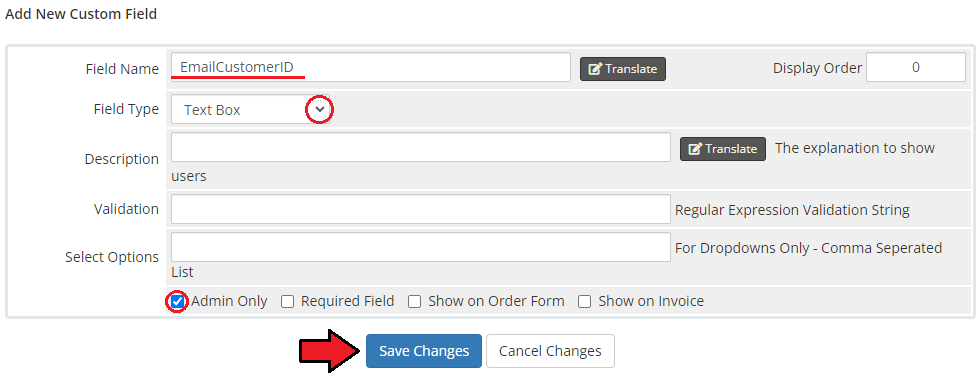
| 17. In the last step you need to create a new client custom field. To do so, proceed to 'System Settings' → 'Custom Fields/Custom Client Fields'. |
|
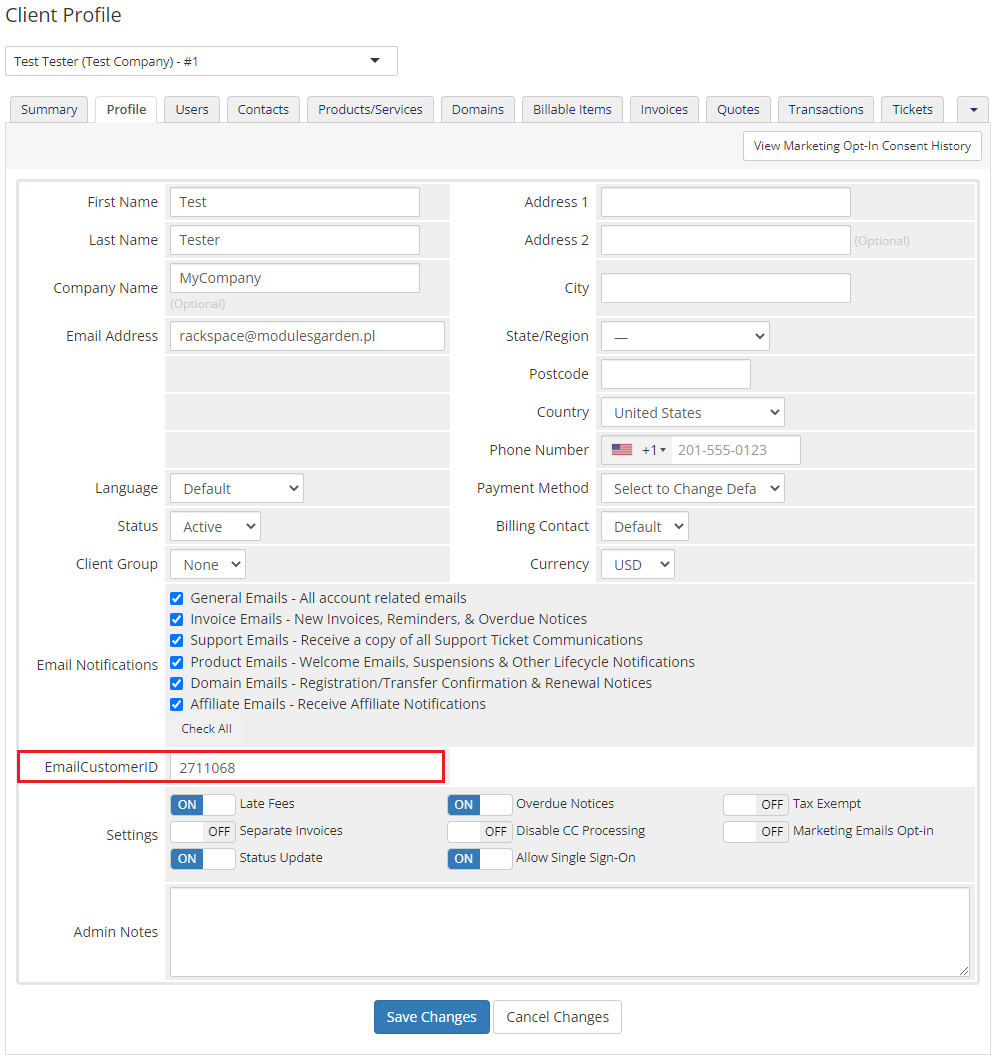
| 18. Important! Our module does not automatically download 'EmailCustomerID' for the proper Rackspace customer. To prevent duplicating accounts on Rackspace side you have to manually fill in 'EmailCustomerID' with appropriate value before running 'Create' function. |
|
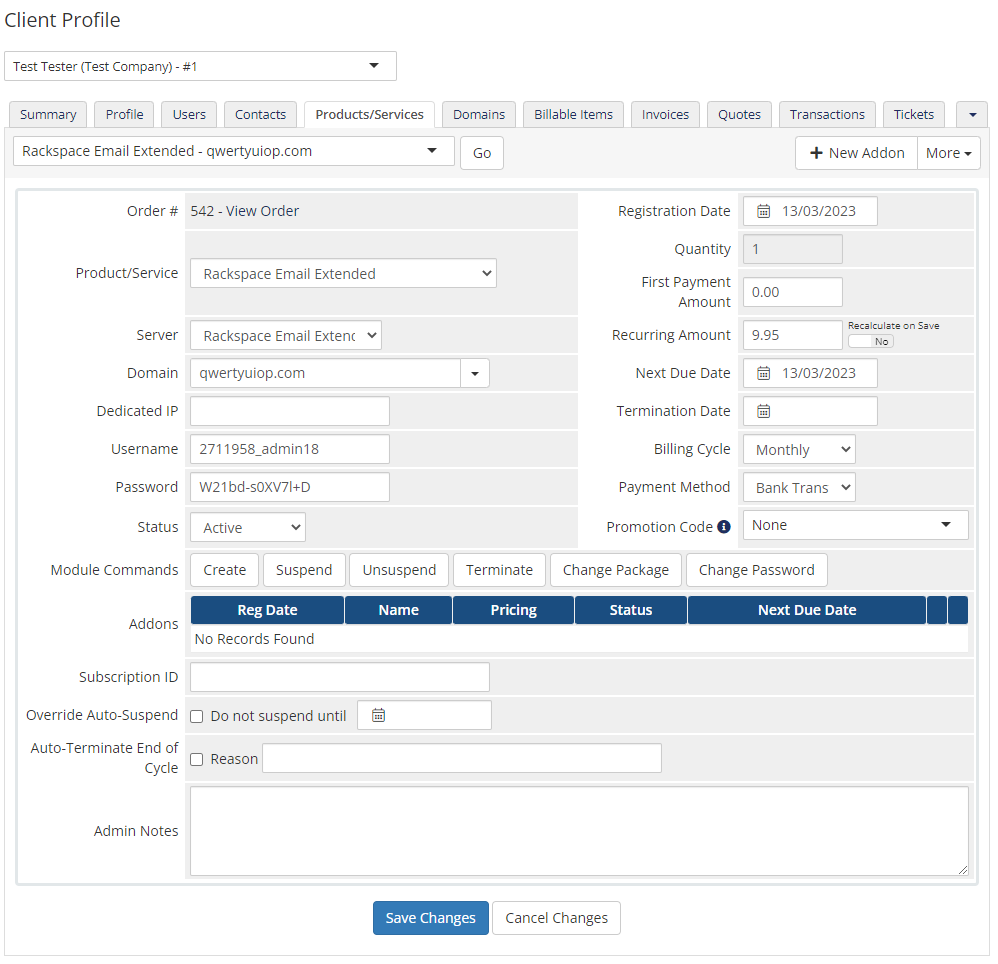
| Good job! You have just correctly set up your first product with Rackspace Email. Product after a successful activation presents similarly to the one presented on the screen below. |
|
[edit] Management
| In the following sections we will try to present all the possibilities of Rackspace Email Extended For WHMCS features. |
[edit] Configuration of Orders
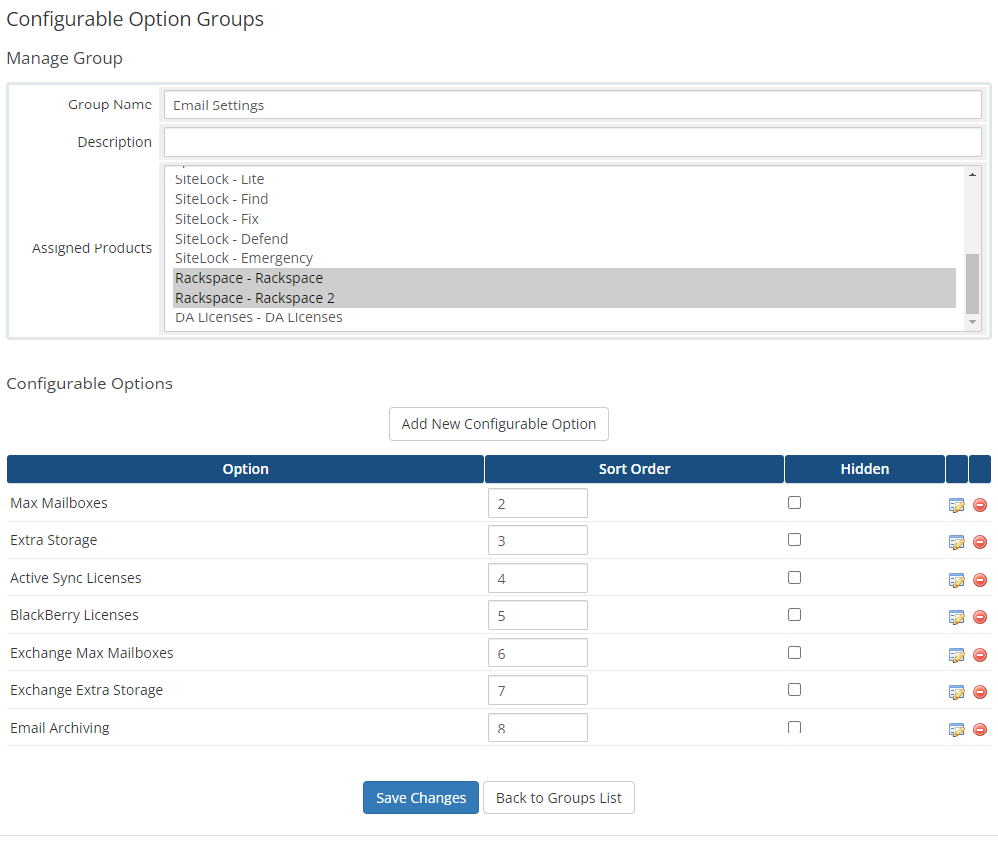
| Rackspace Email Extended For WHMCS allows you to offer a product tailored to customers needs. Let's create such an order.
For this purpose you need to create at least one configurable option. In this guide we will create a few more to present you the possibilities of our module. |
|
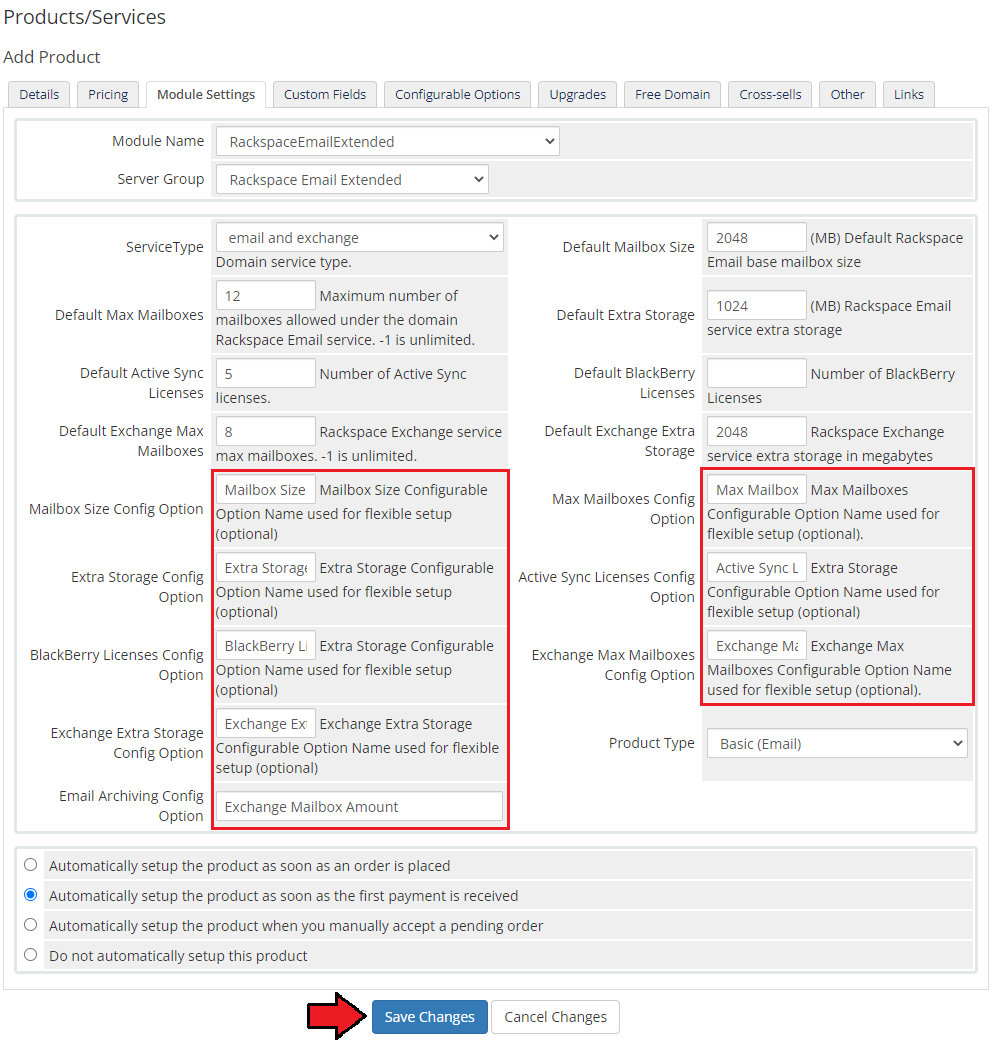
| Proceed to your product 'Module Settings' tab now. Here, you need to fill in the marked fields with desired configurable option names as shown on the screen below. |
|
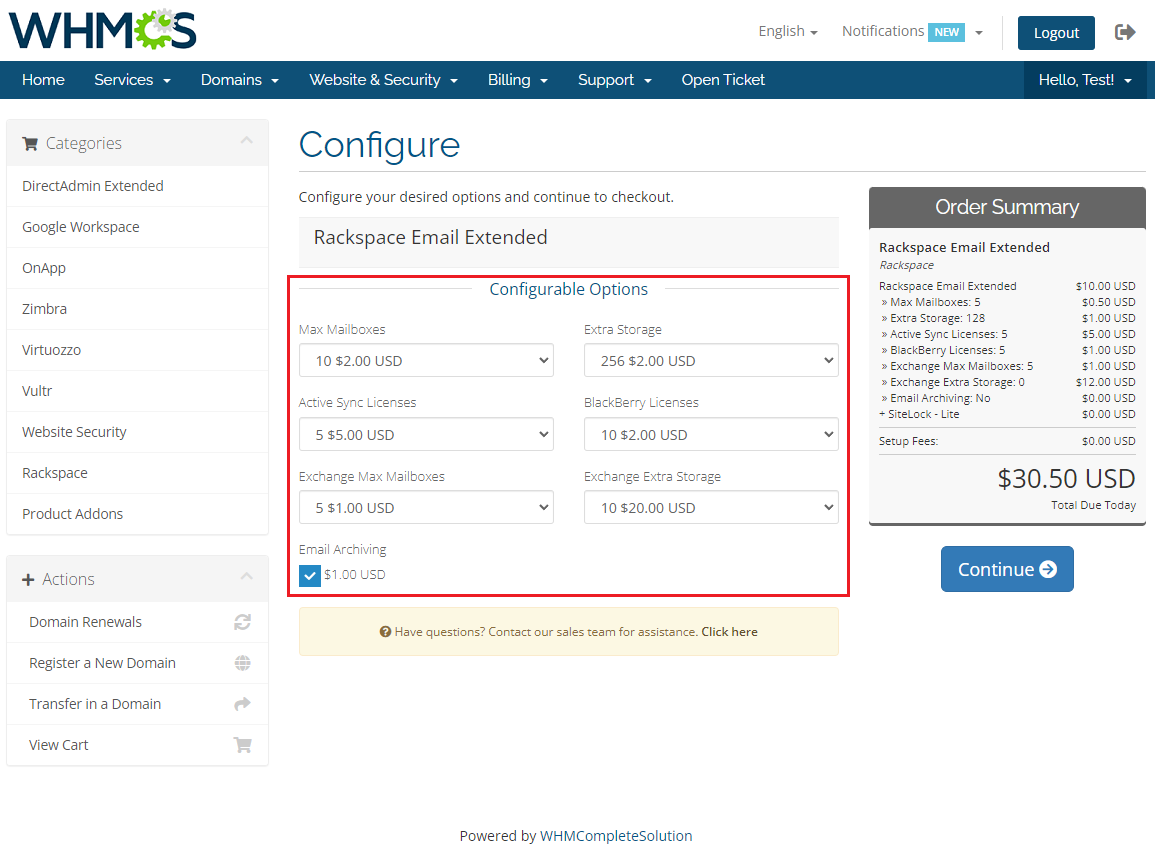
| If you fill out 'Module Settings' with correct names, during order made from the admin area, you should see similar screen to the one below. Otherwise, ensure that configurable option names are filled out correctly. |
|
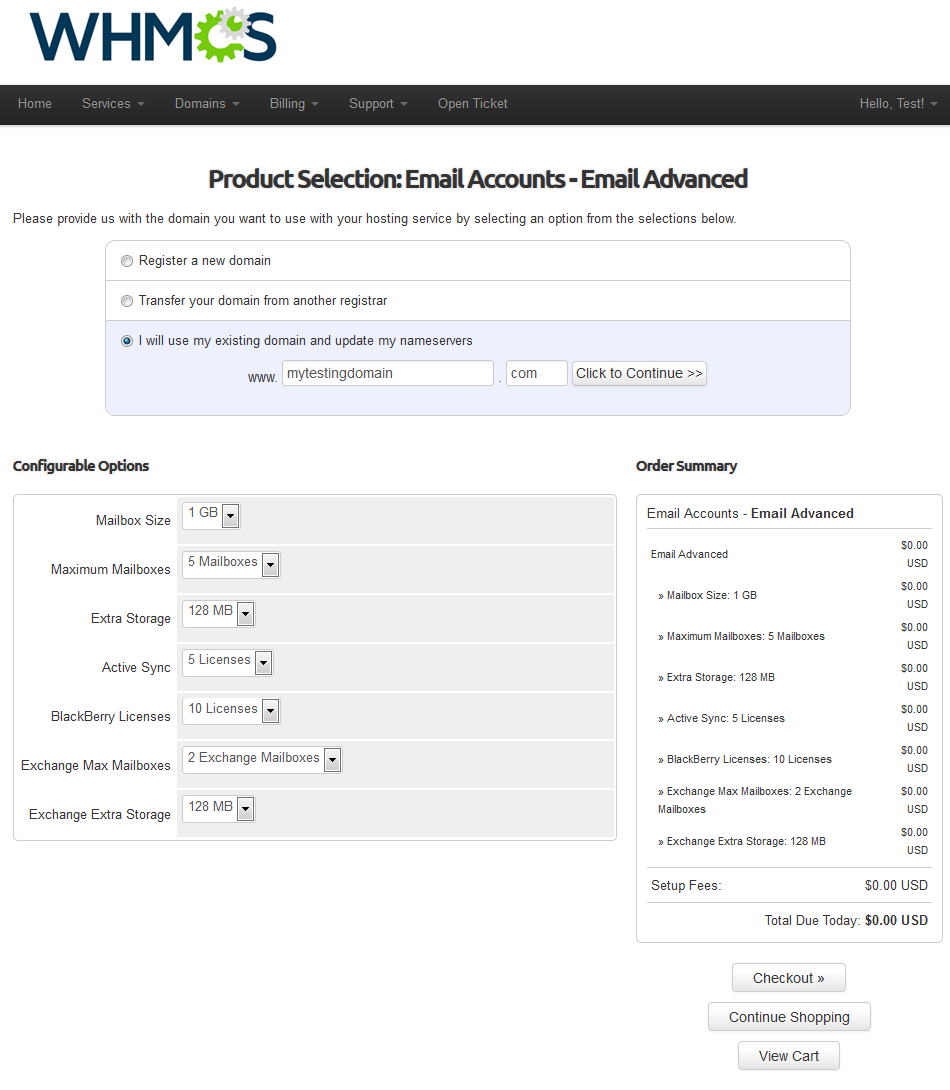
| Let's see how it looks like from the perspective of your customers. As you can see, owing to configurable options, they are now able to define mailbox size, amount of mailboxes, extra storage and many other options. |
|
[edit] Client Area
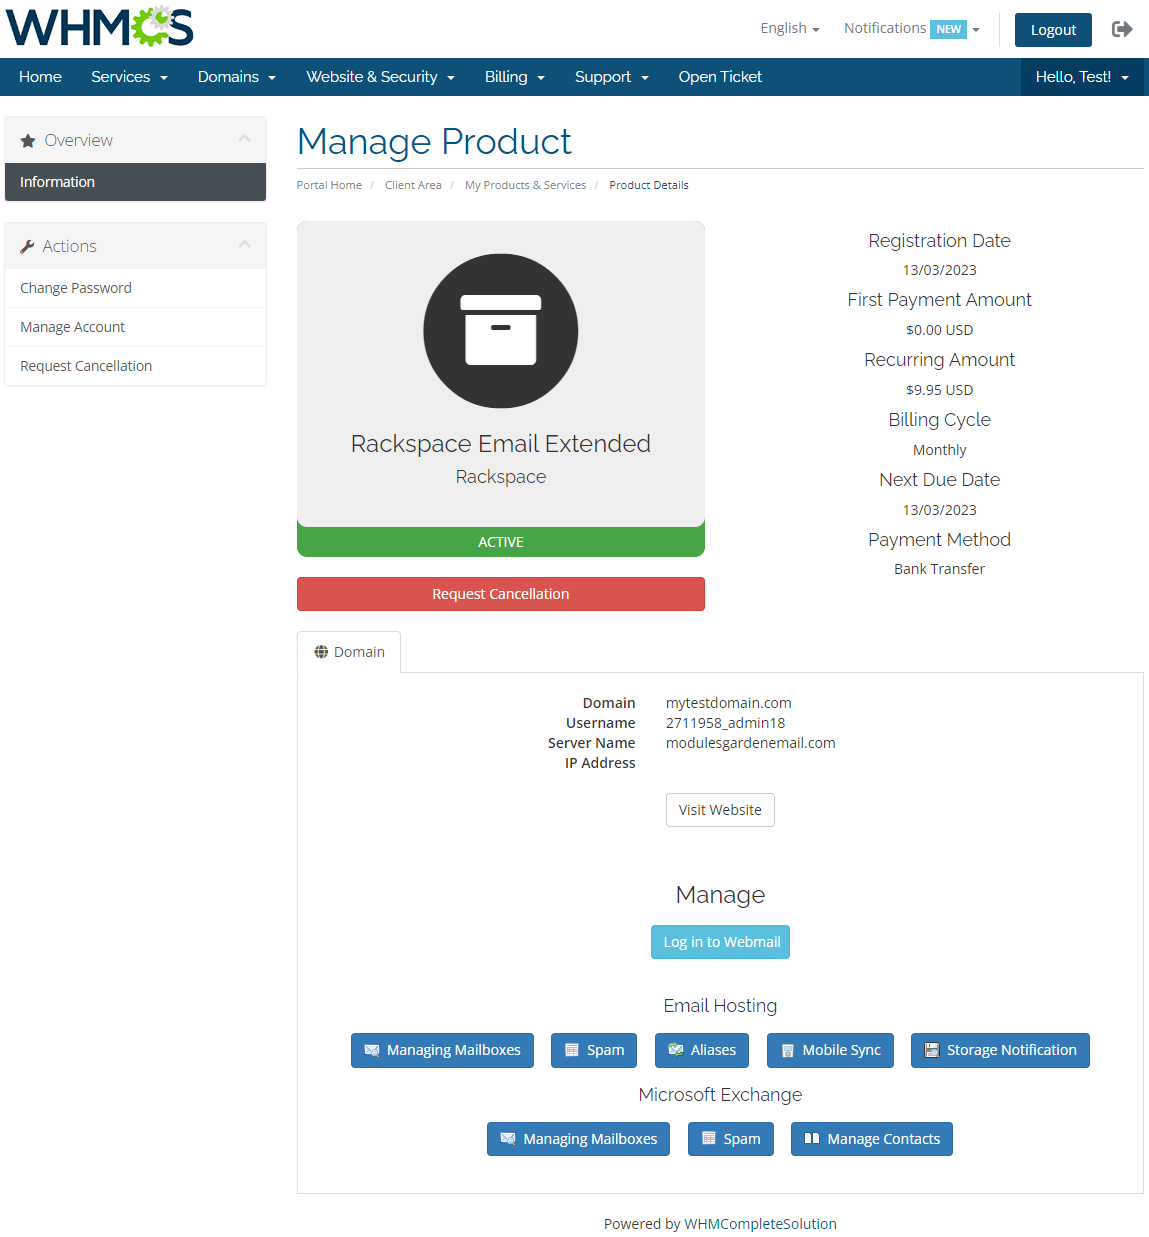
| Read through the below sections to see how Rackspace Email Extended For WHMCS is designed to work in the client area. |
|
[edit] Email Hosting
| Email Hosting is an internet hosting service that manages electronic messages through an email server. |
[edit] Mailboxes
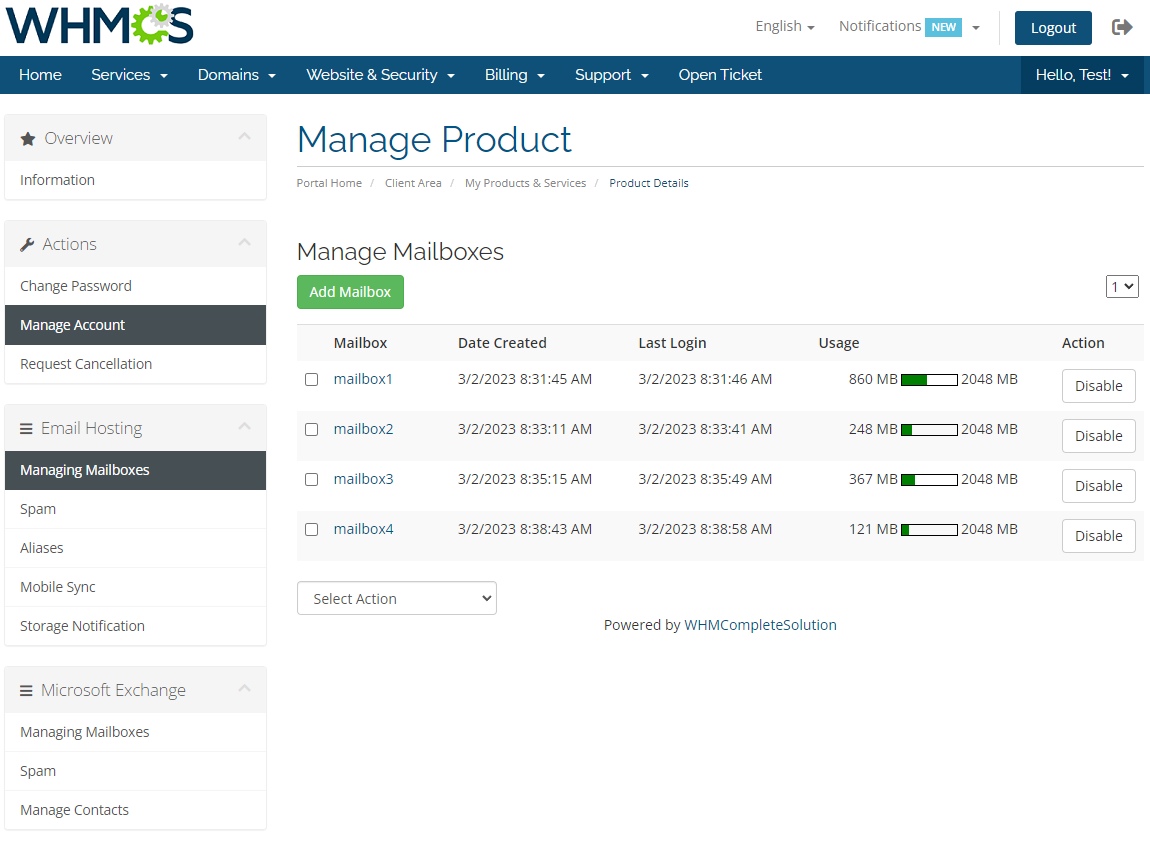
| Let's start with some basic functionality of the module, that is the mailboxes management. |
|
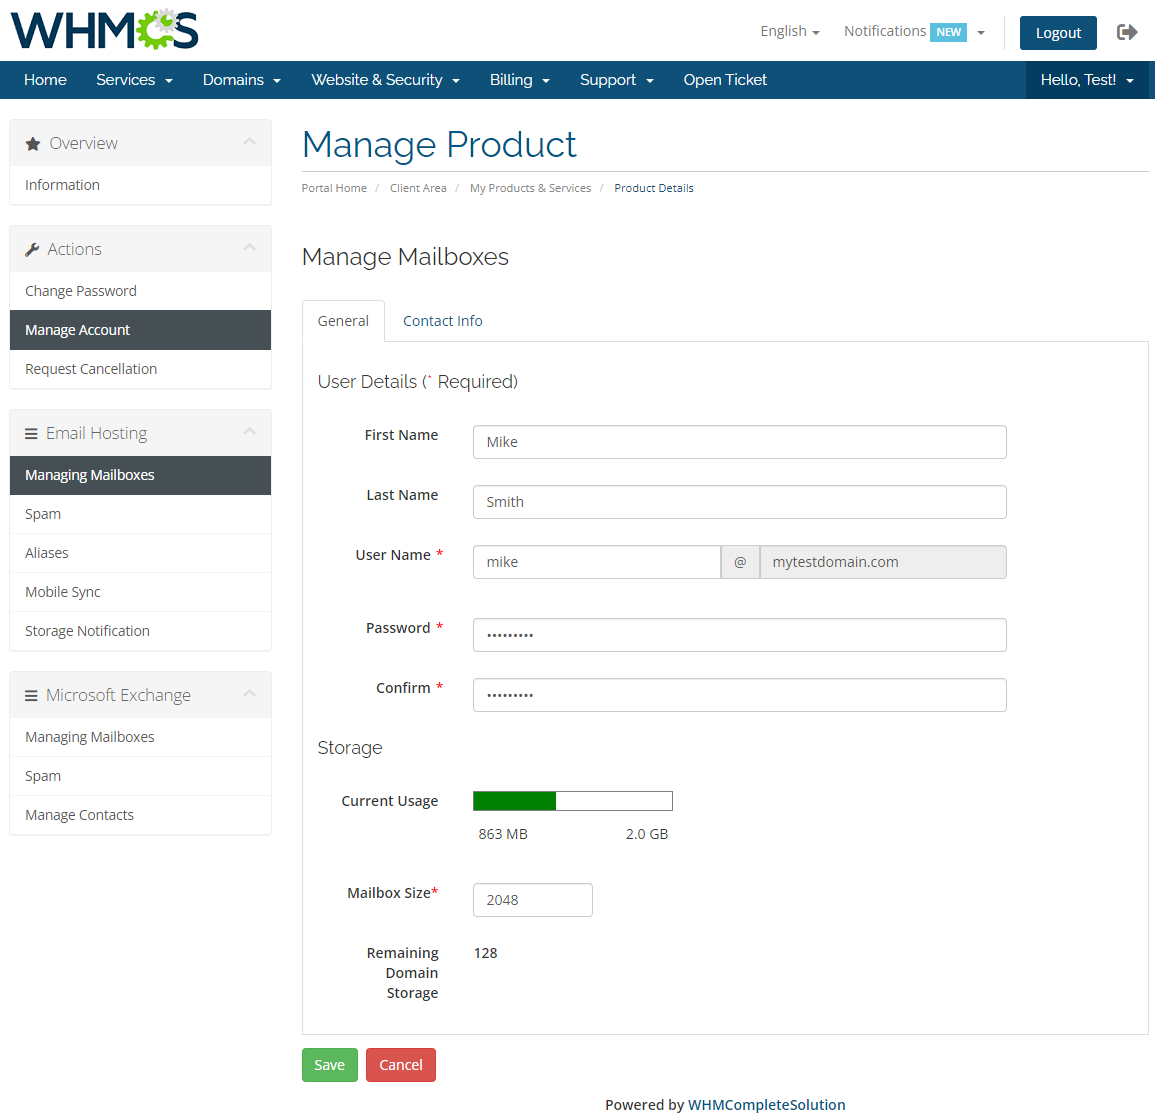
| Creating a mailbox is quick and easy. The first step is filling out 'General' form, where you can define user details, password and mailbox size. |
|
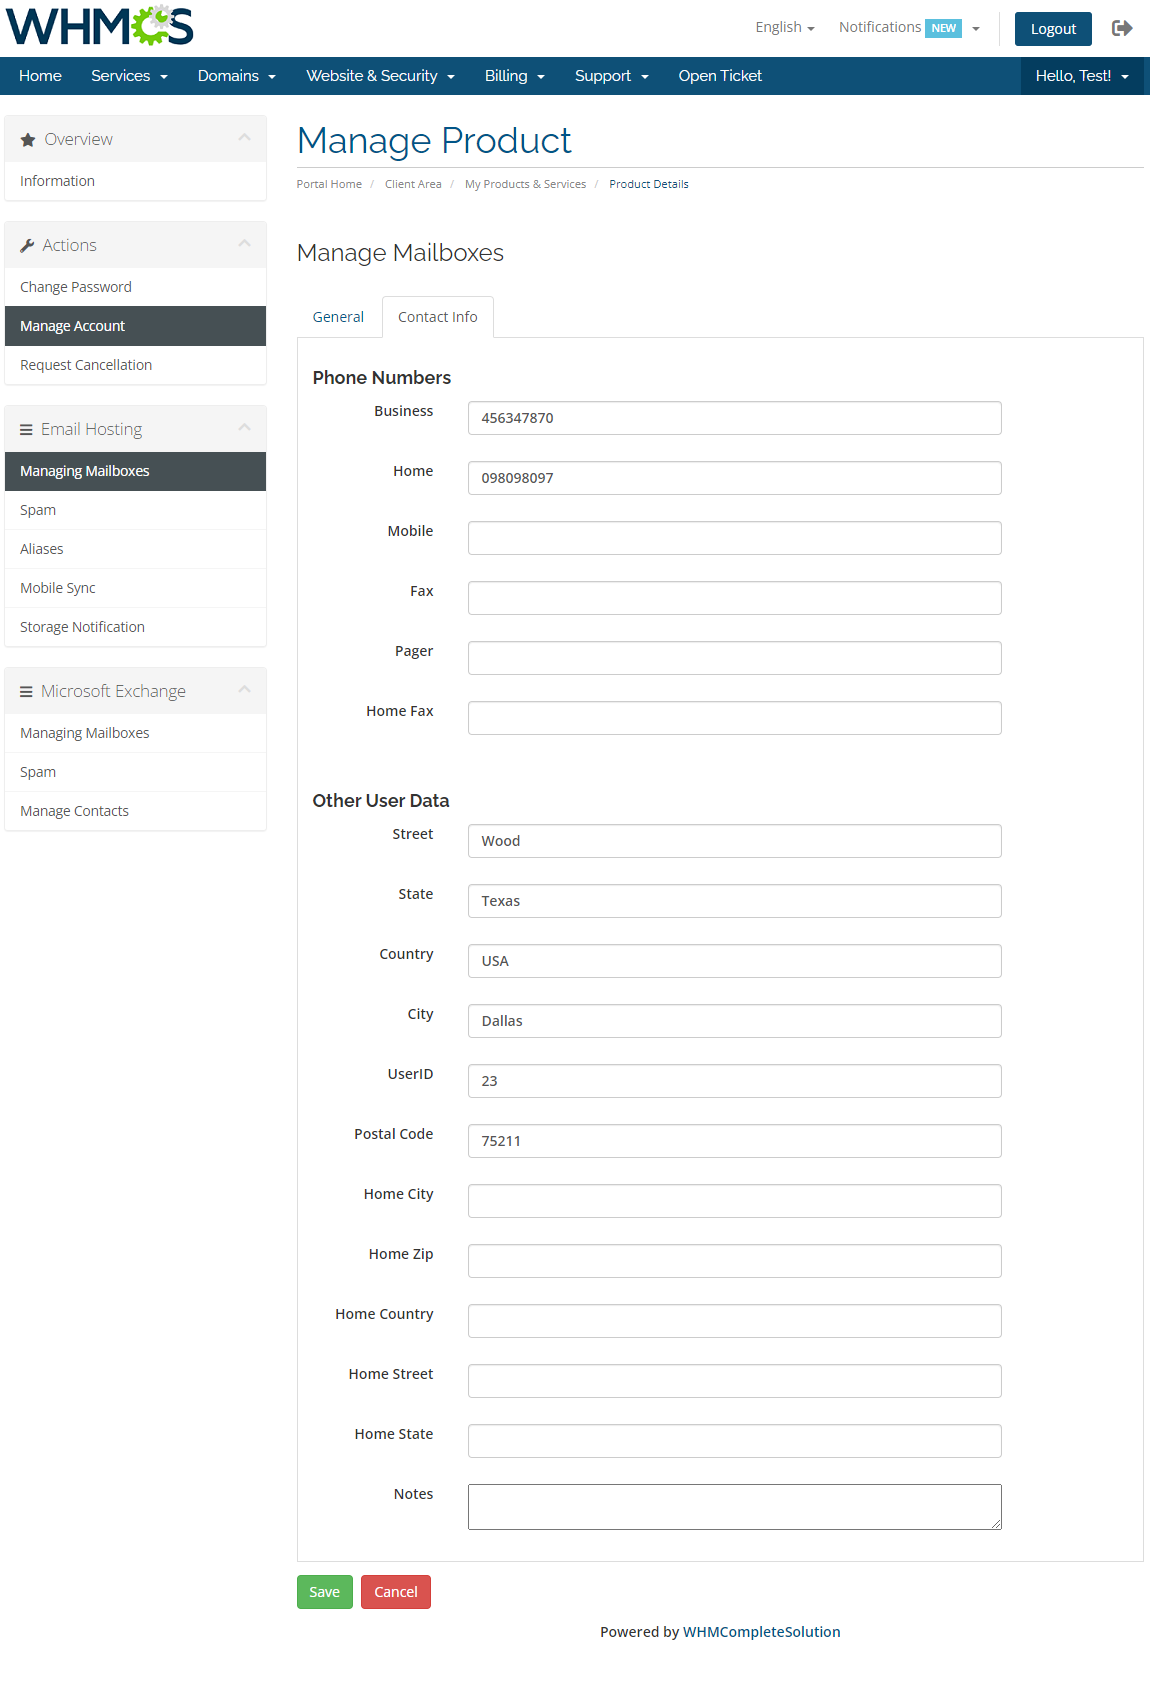
| Proceed to 'Contact Info' tab and fill it out with its user contact information. |
|
[edit] Spam
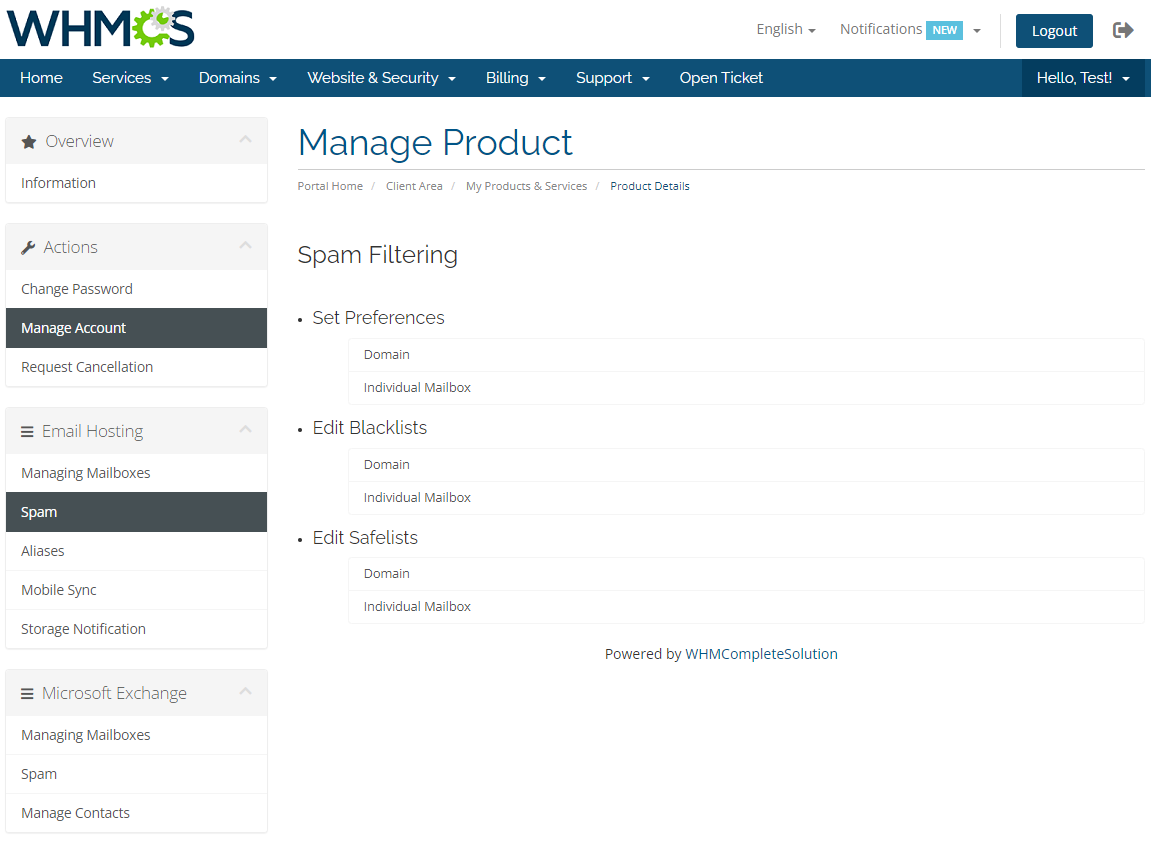
| Spam filtering page allows you to set your preferences, edit blacklists and safelists. |
|
[edit] Aliases
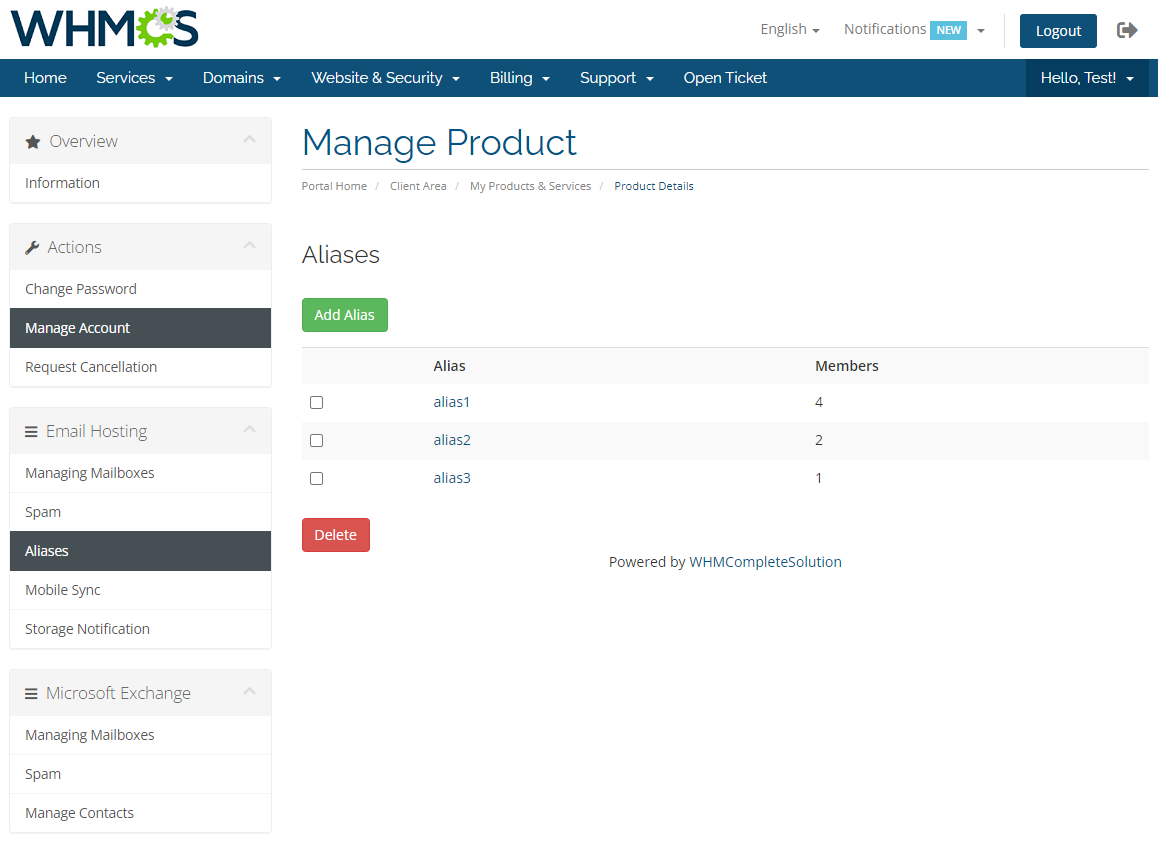
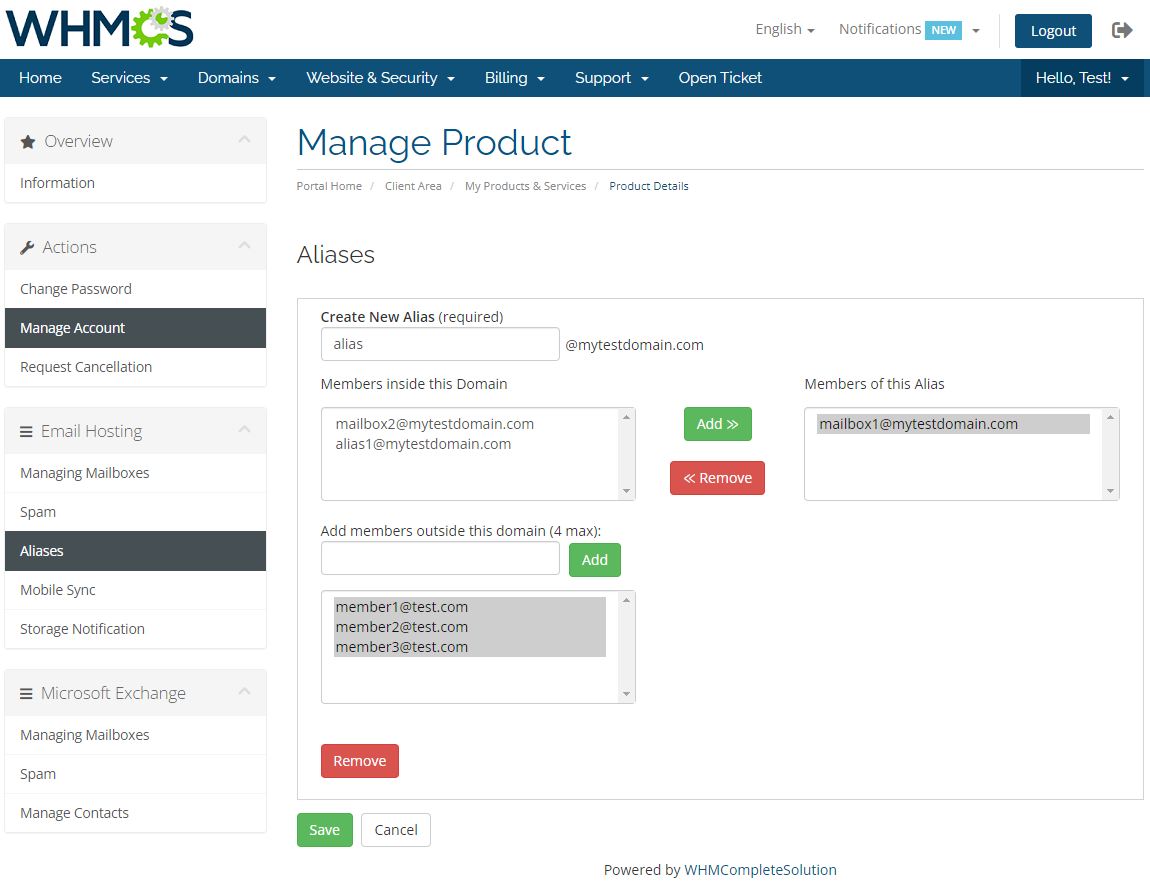
| With our module you can create aliases and assign chosen mailboxes to them. To do so, press 'Add Alias', add email from 'Members inside this Domain' and press 'Save'. |
|
| On the list of aliases you can find information about the amount of mailboxes in each alias. |
|
[edit] Mobile Sync
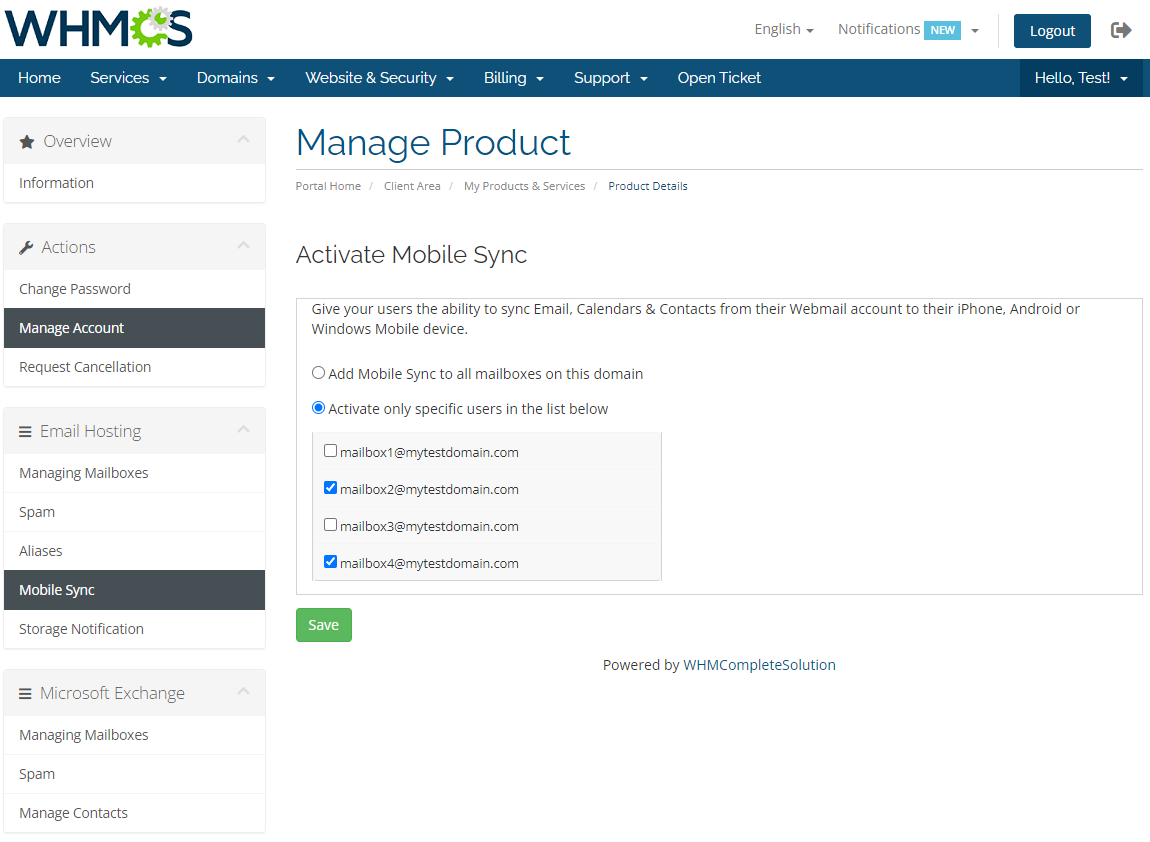
| Mobile Sync allows your customers to synchronize their emails, calendars and contacts with their iPhones, Androids or Windows Mobile devices. |
|
[edit] Storage Notification
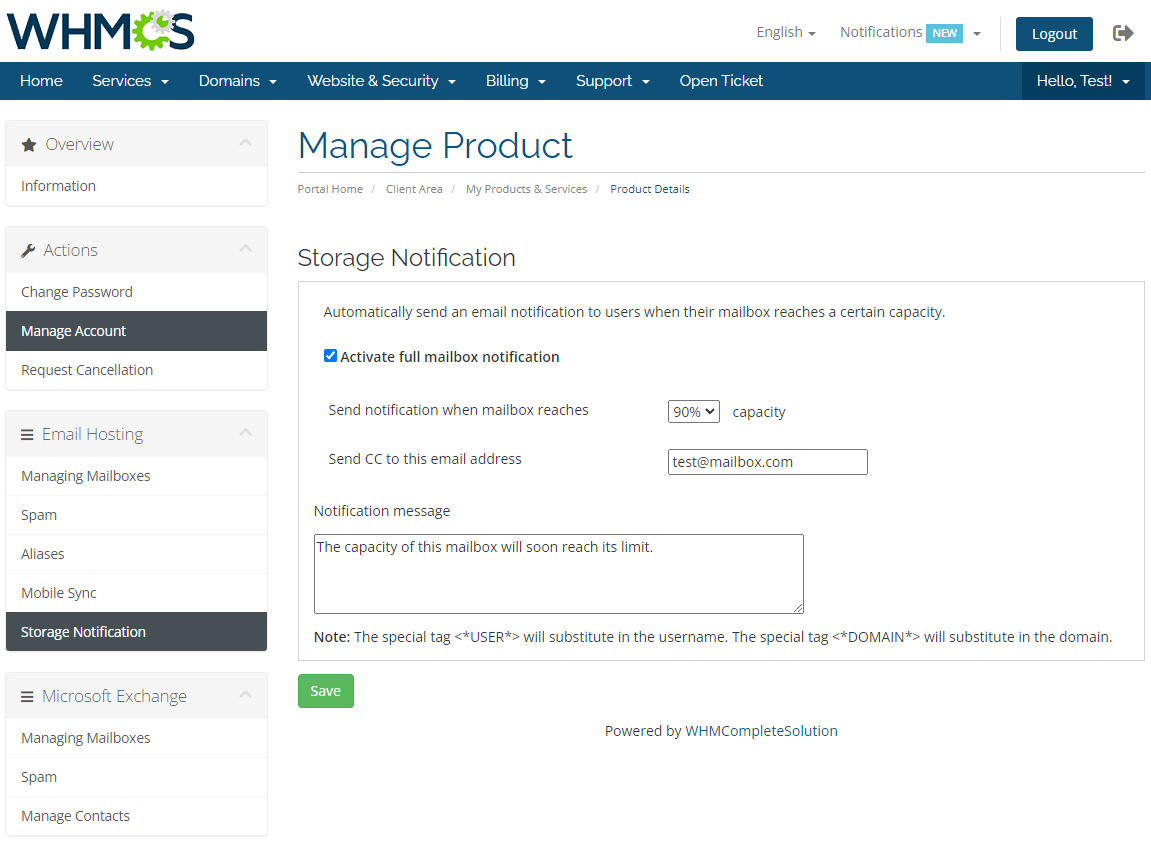
| This page allows you to set up notifications sent to your customers when mailbox reaches certain amount of capacity. |
|
[edit] Microsoft Exchange
| Exchange Hosting is a server system, whereby software enables sending and receiving email messages and other types of interactive communications. It enables sharing of business critical information online or through enabled wireless devices. |
[edit] Mailboxes
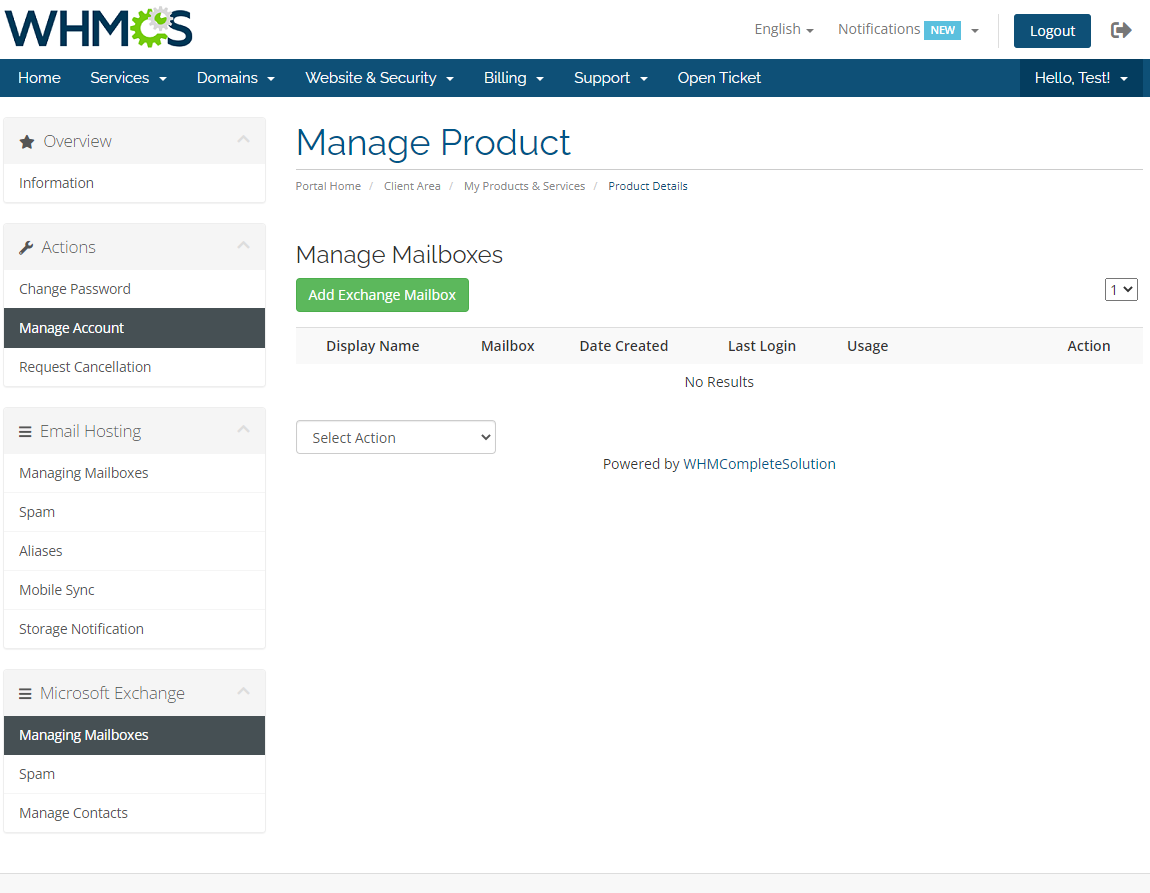
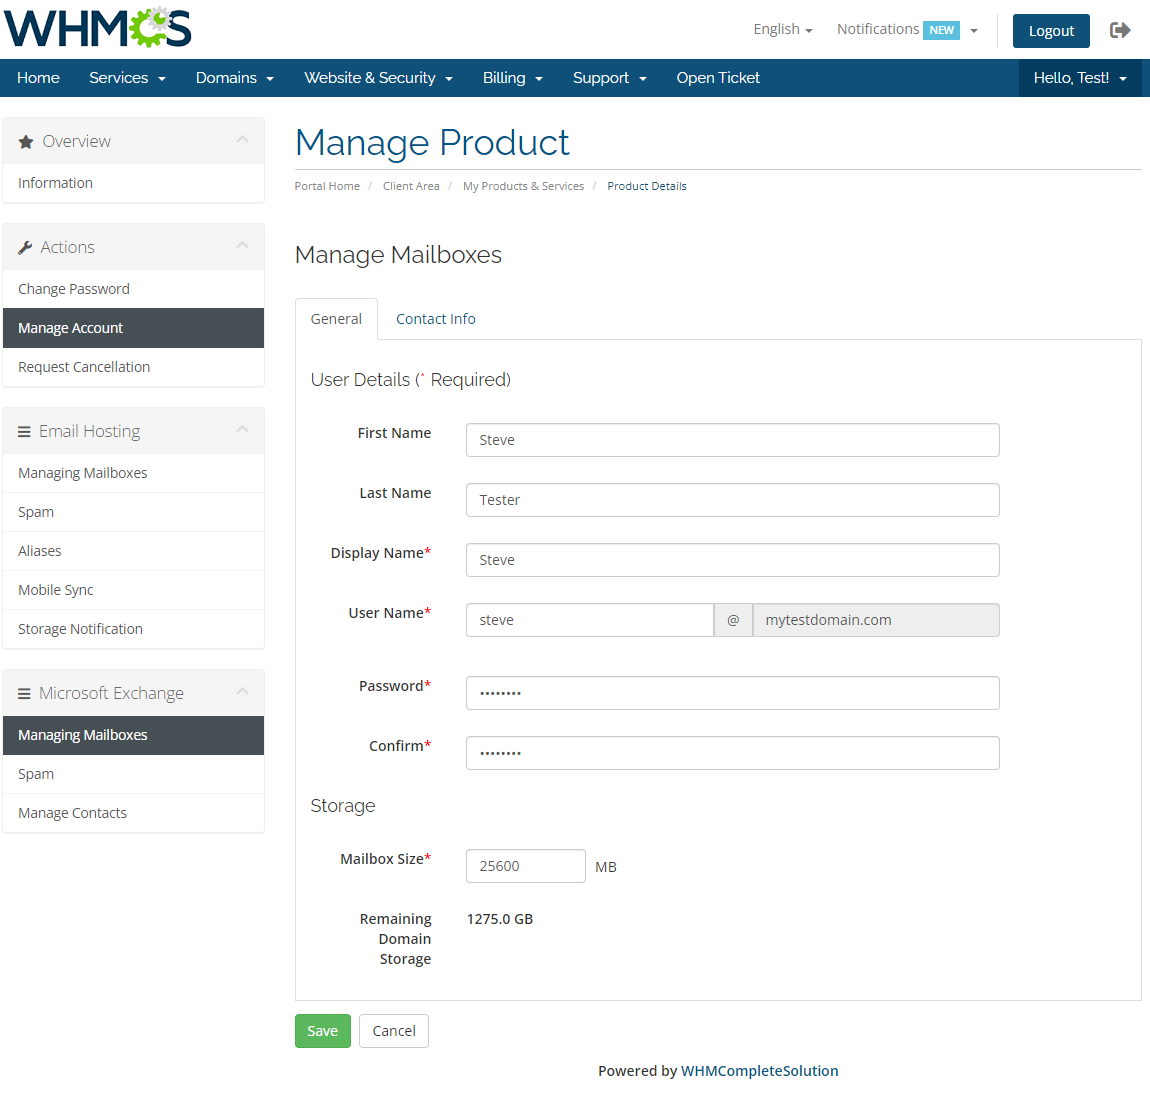
| As in Email Hosting you can create new email accounts and manage them. |
|
|
[edit] Spam
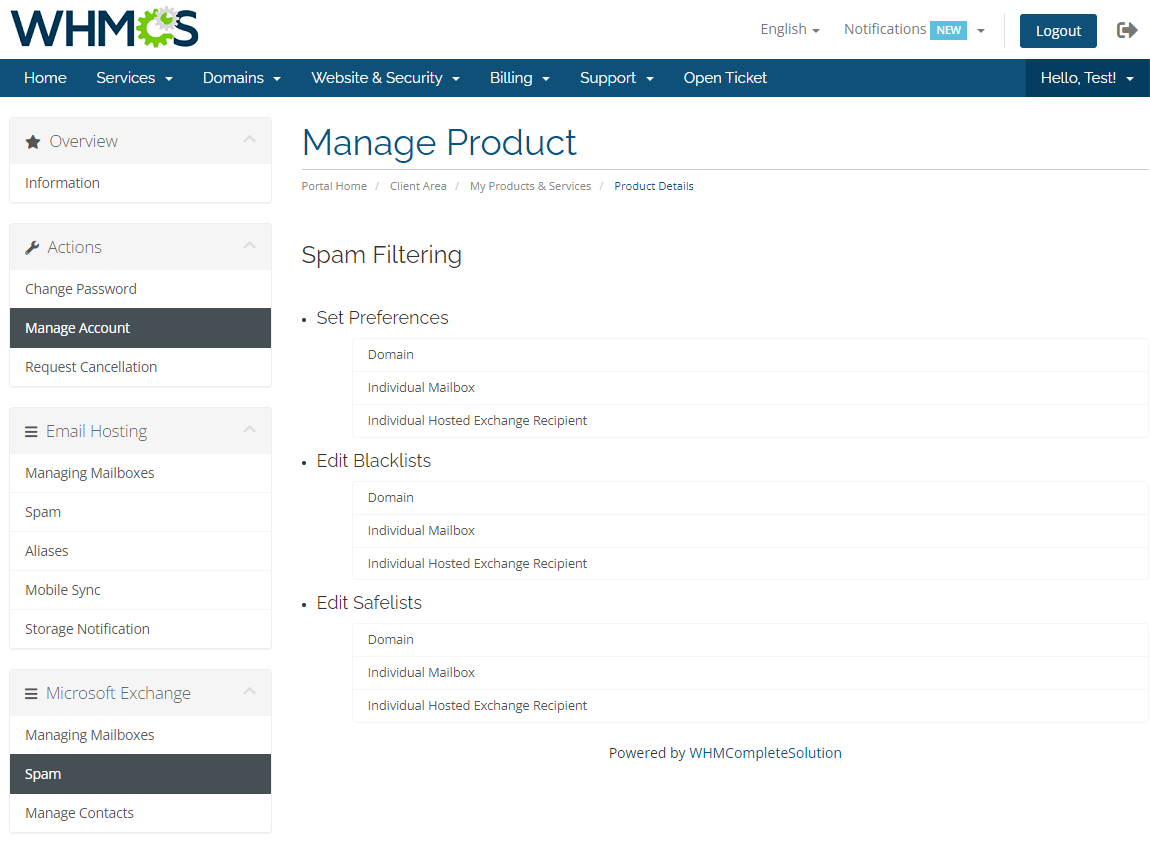
| Again, similarly to Email Hosting, you can manage your spam here. |
|
[edit] Contacts
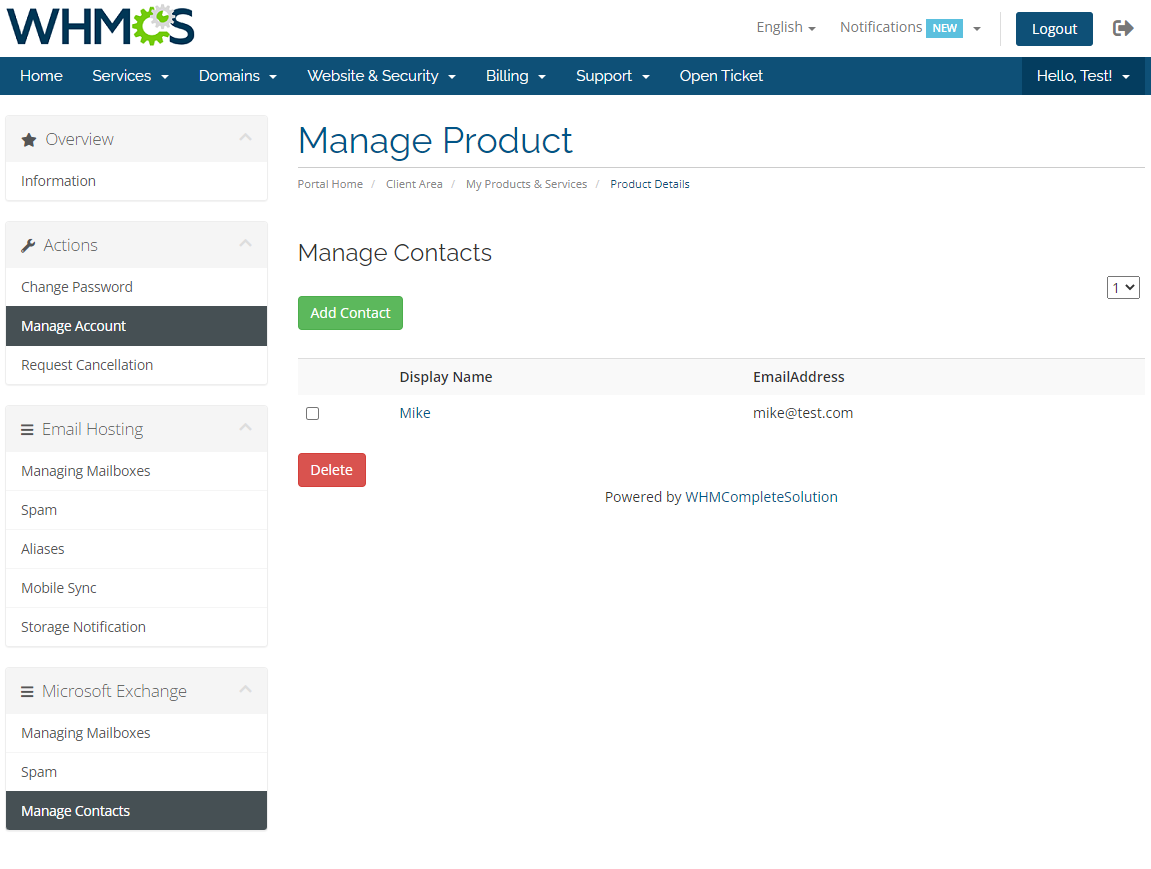
| Within a few seconds you can add a new contact and manage existing ones. |
|
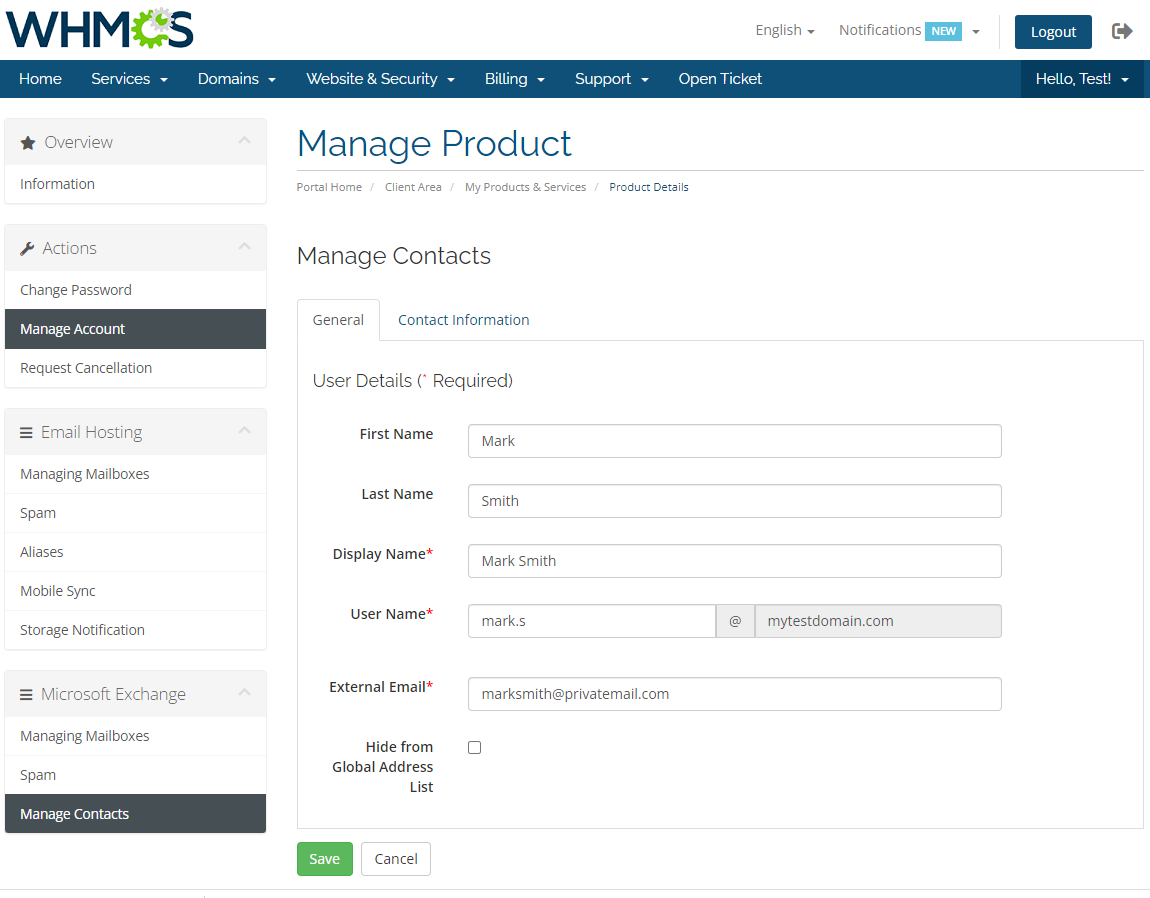
| In order to add a new contact press 'Add Contact' and fill out a form shown on the following screen. |
|
[edit] Management of Billing
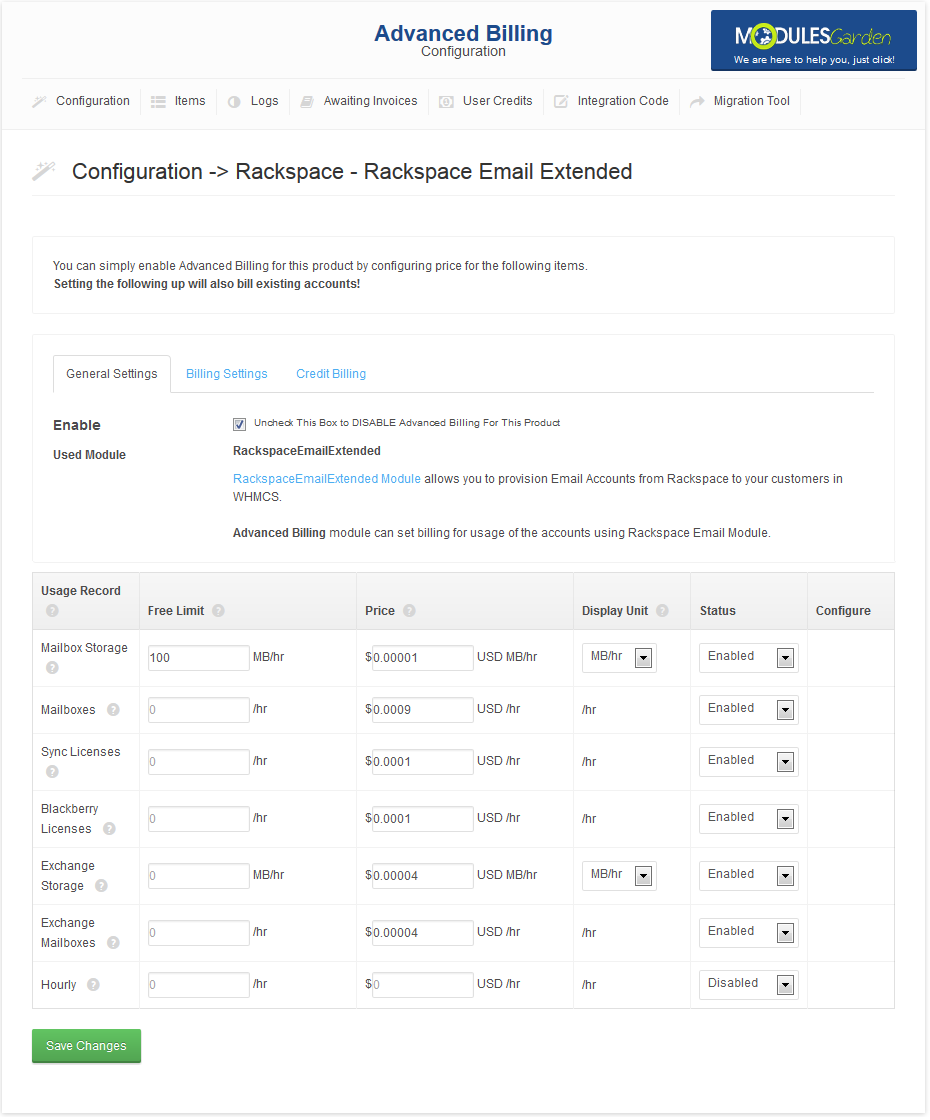
| When you combine Rackspace Email Extended For WHMCS with Advanced Billing For WHMCS, you will be able to set up additional billing options. Module allows you to charge your customers based on the server resources used by them. |
|
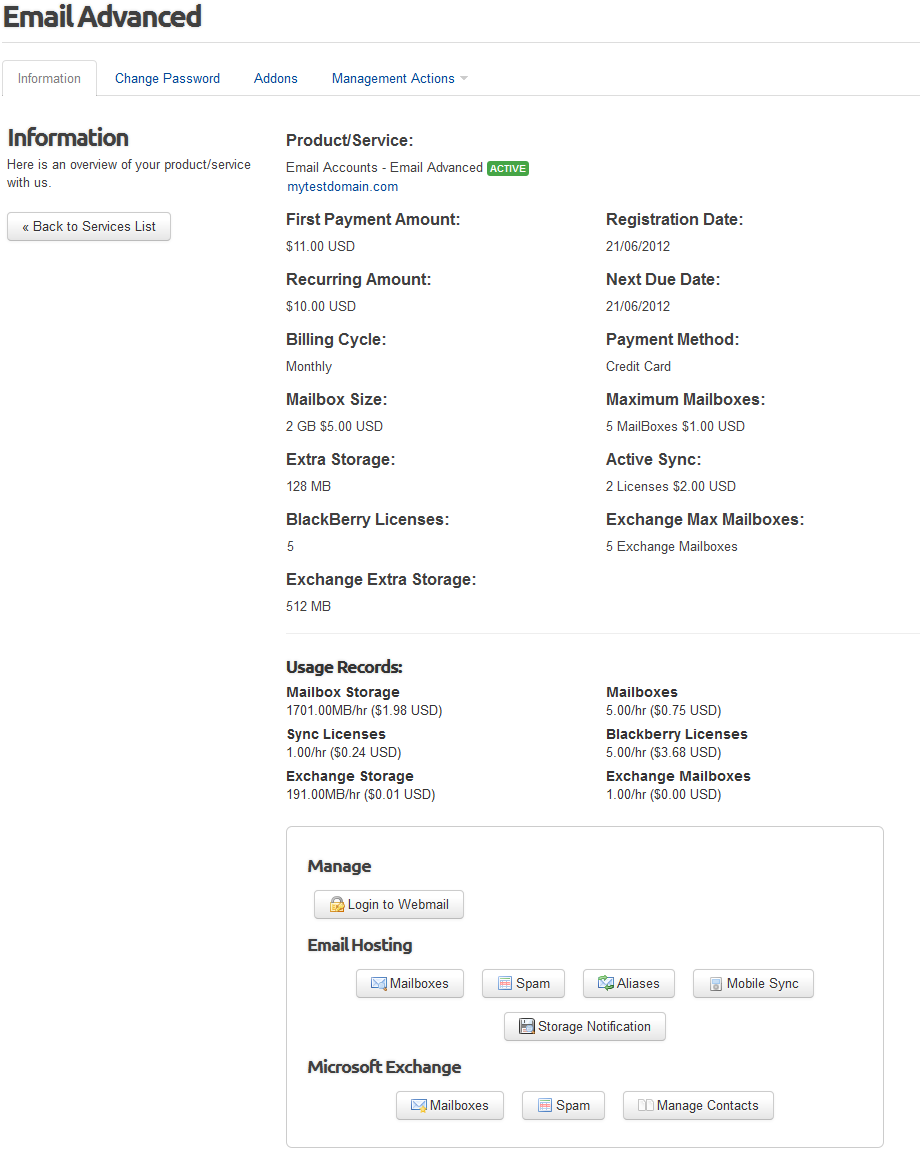
| With Advanced Billing module, you can also display your customers the current server resource usage and their cost. |
|
[edit] Management of Existing Account
| You can easily use Rackspace Email For WHMCS module with your already created rackspace account. Instructions below explain how to set it up: |
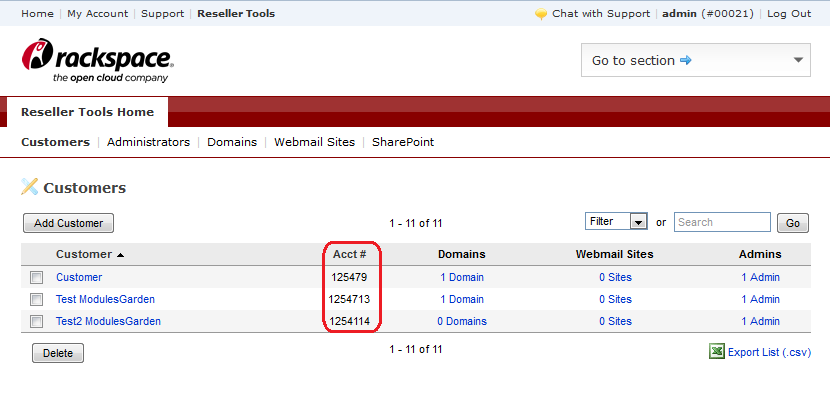
|
| 4. Copy '#Acct' to the field marked on the screen below. |

|
[edit] Upgrading Product
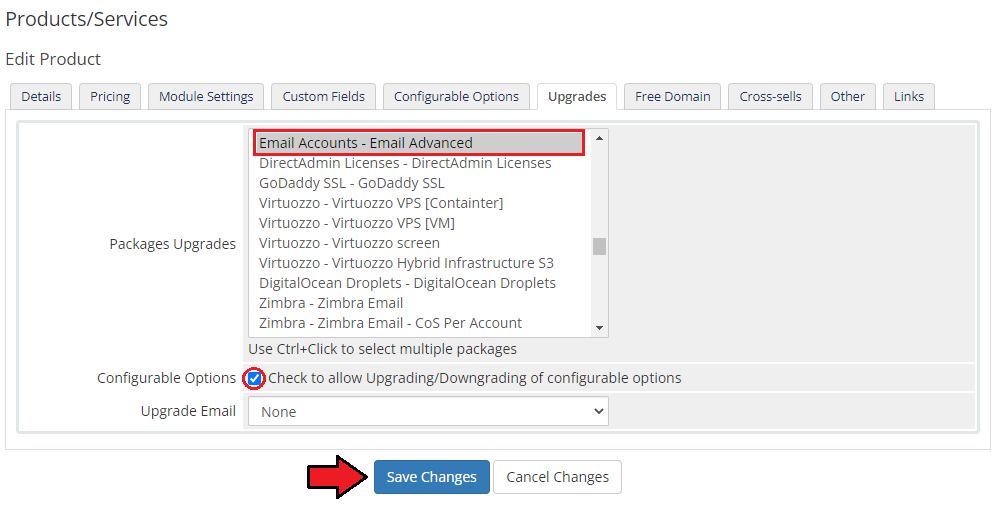
| You can offer an upgrade from Rackspace Email to Rackspace Email Extended. To set it up correctly, proceed to 'Setup' → 'Product/Services' → 'Product/Services' and edit your Rackspace Email product. |
|
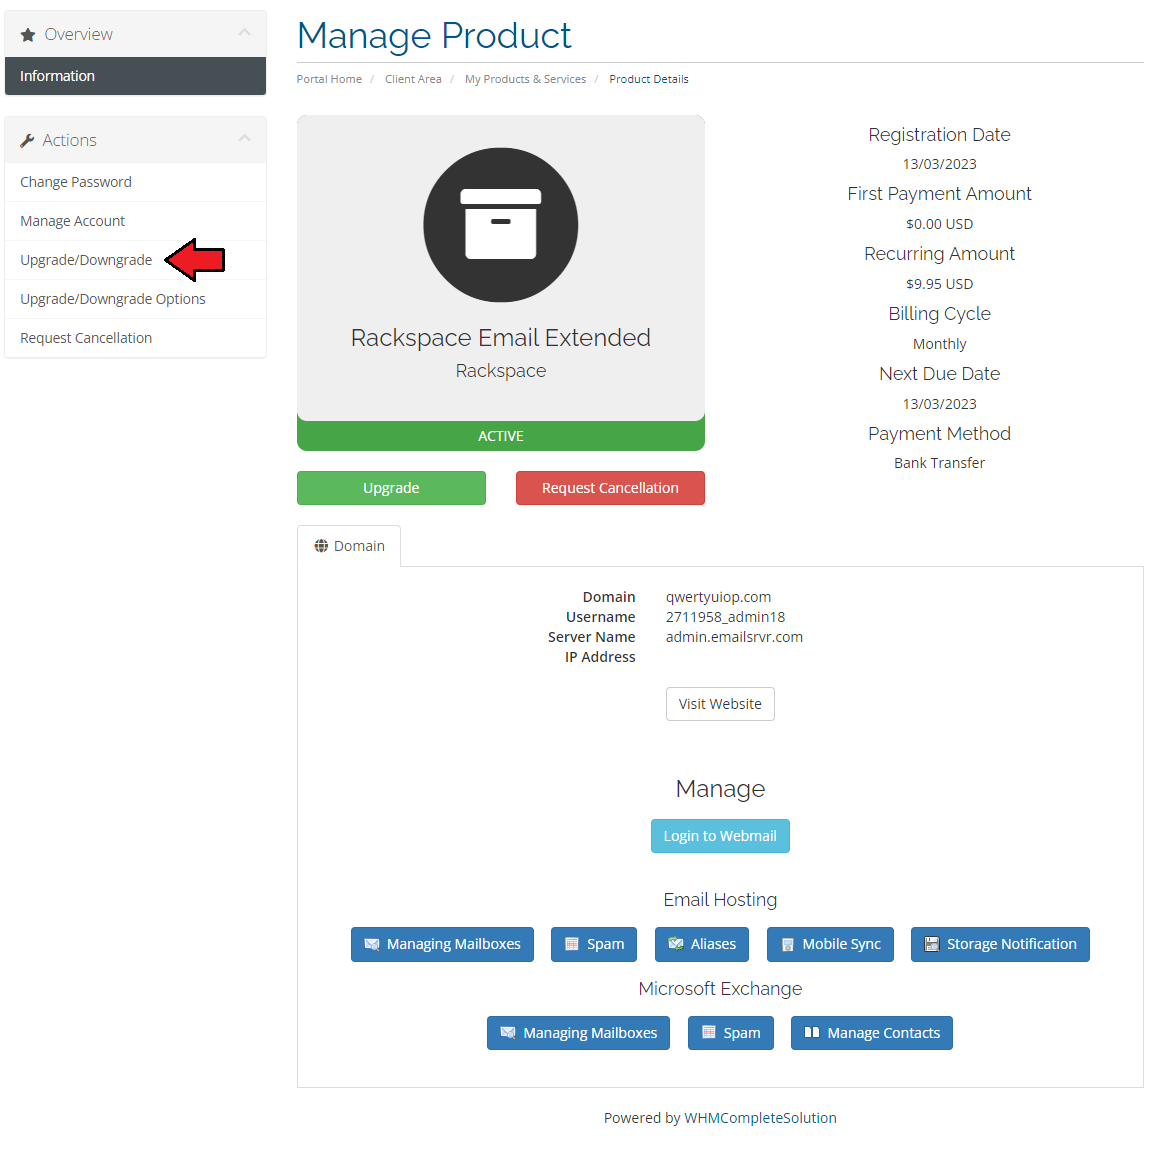
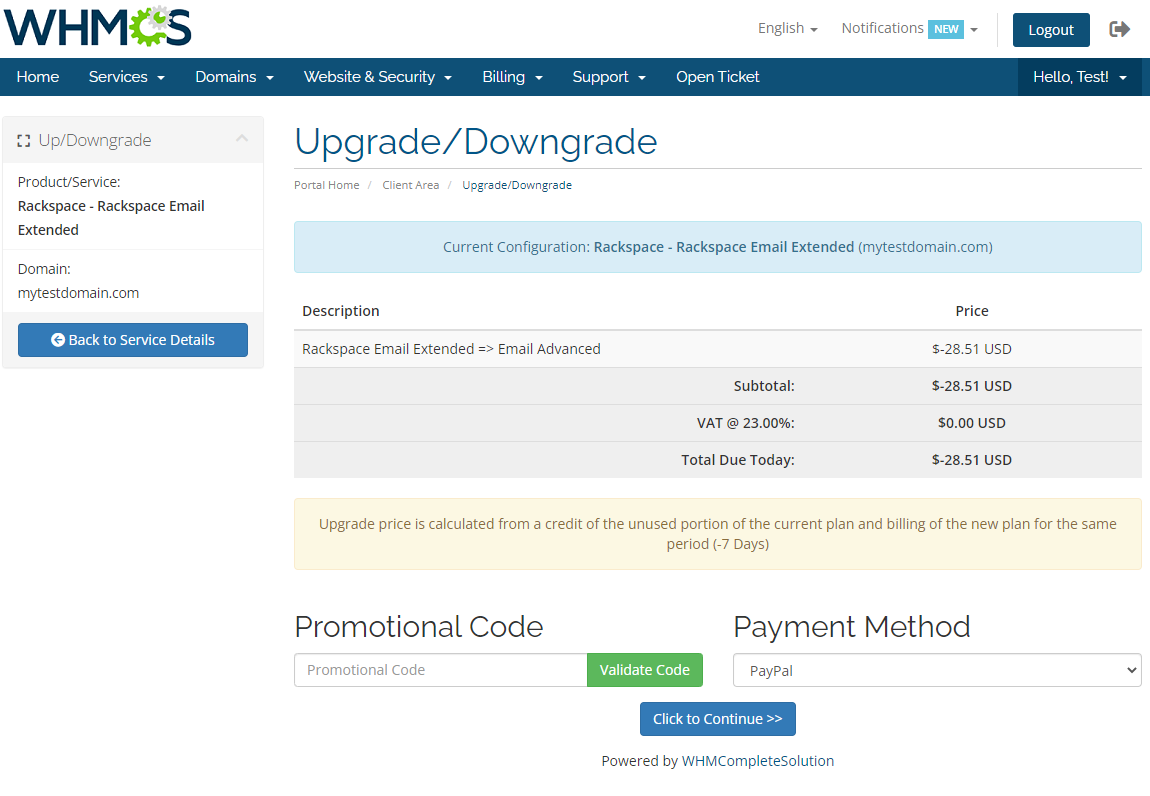
| Let's upgrade a test product from Rackspace Email to Rackspace Email Extended. To do so, go to the client area and proceed to the Rackspace Email product. |
|
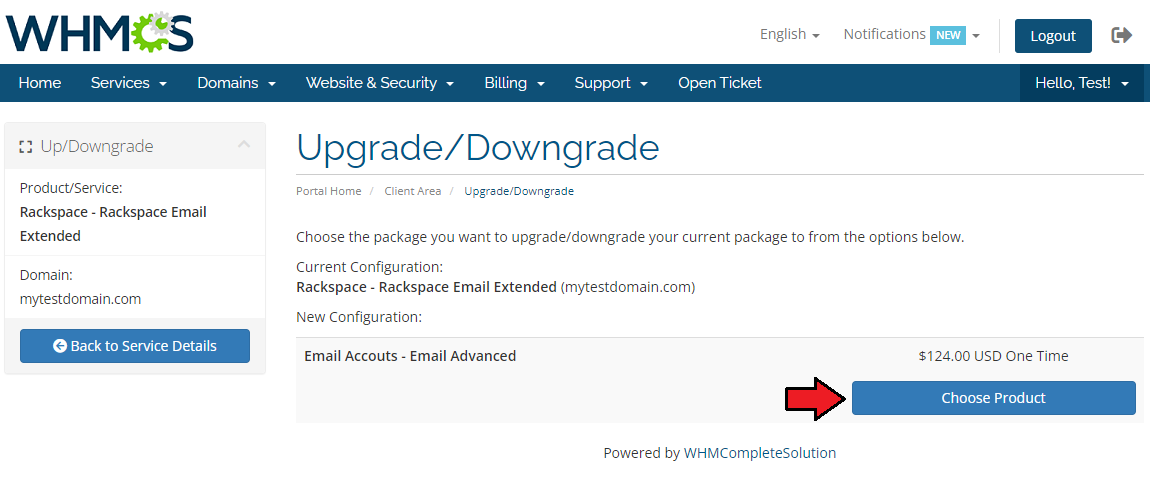
| You should see a screen similar to the one shown below. Choose a billing cycle for your Rackspace Email Extended product and press 'Choose Product'. |
|
| That's it. Choose the payment method, press 'Click to Continue' button and voila! |
|
[edit] Tips
1. You need to be registered in Rackspace as a reseller, only then Rackspace Email Extended For WHMCS will work properly.
|
2. Please note that although action 'Suspend' is available in Module Commands, the action itself is not supported by Rackspace API.
|
[edit] Update Instructions
| An essential guidance through the process of updating the module is offered here. Ensure successful completion of the module update by carefully following each step, thereby preventing data loss or any unforeseen issues. |
[edit] Upgrade Guide
| Seeking a solution that offers greater flexibility, customization tailored to your precise needs, and unrestricted availability? There is an option that not only proves to be cost-effective in the long run but also includes prioritized support services, making it a truly valuable investment. Opt for the Open Source version of your Rackspace Email Extended For WHMCS module to unlock these benefits. Follow a comprehensive guide covering the transition process, the advantages it brings, and step-by-step instructions on what to do next after the order has been successfully finalized. |
[edit] Common Problems
| 1. When you have problems with connection, check whether your SELinux or firewall does not block ports. |
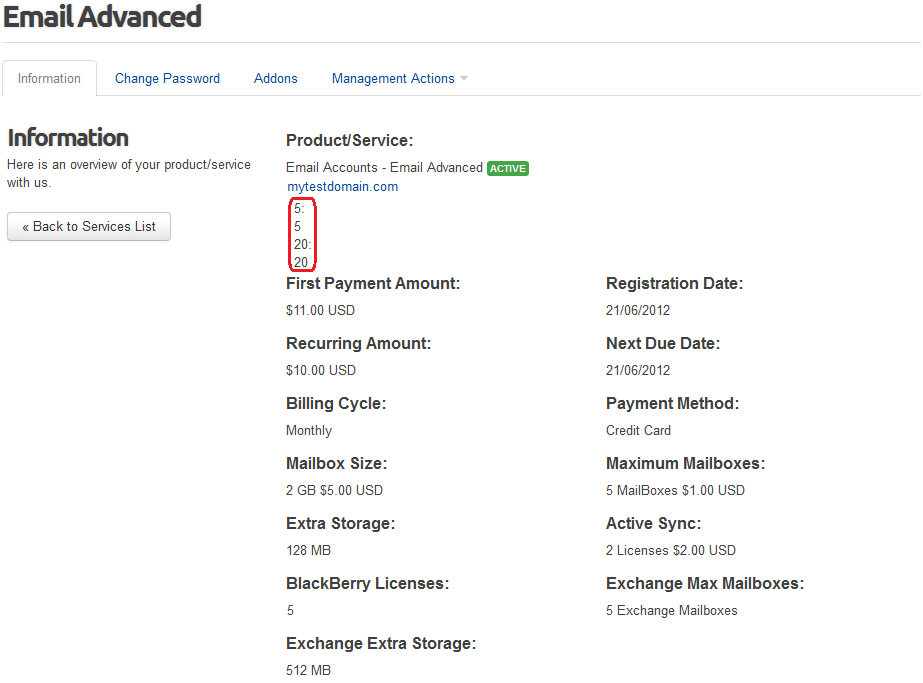
| 2. If any undesired numbers appear in your client area, like the ones shown on the following screen, you can easily remove them. |
|
To do so, edit 'your_whmcs/templates/your_template/clientareaproductdetails.tpl' . Find and delete the following code:
{foreach from=$configurableoptions item=configoption}
<p><h4>{$configoption.optionname}:</h4> {if $configoption.optiontype eq 3}{if $configoption.selectedqty}{$LANG.yes}
{else}{$LANG.no}{/if}
{elseif $configoption.optiontype eq 4}{$configoption.selectedqty} x {$configoption.selectedoption}
{else}{$configoption.selectedoption}{/if}</p>
{/foreach}
Keep in mind that code may slightly differ from the one shown above. |
| 3. If customer rackspace accounts are duplicated go to step 17 of 'Installation'. You will find there a solution. |
| 4. If, after clicking on 'Login to Webmail' , there is no correct redirection, make sure that the hostname address to your Webmail server is correctly entered in the WHMCS server configuration. |