MikroTik WireGuard VPN For WHMCS
From ModulesGarden Wiki
(Difference between revisions)
|
|
| Line 408: |
Line 408: |
| | * public key | | * public key |
| | * peer state | | * peer state |
| − | * last handshake
| |
| | * received and transmitted traffic | | * received and transmitted traffic |
| | + | * last handshake |
| | * related WHMCS service, when available | | * related WHMCS service, when available |
| | |} | | |} |
Revision as of 12:25, 31 July 2026
This documentation is still being prepared. Please allow us a little more time to polish and publish the complete article.
Thank you for your patience!
MikroTik WireGuard VPN For WHMCS enables automated provisioning and management of WireGuard VPN services on MikroTik routers.
The module handles the complete VPN service lifecycle, including peer creation, bandwidth enforcement, suspension, unsuspension, termination, configuration delivery, and usage-based billing.
Clients can access their connection details, scan a configuration QR code, download a ready-to-use configuration file, and review traffic statistics in the client area, while administrators can monitor configured routers, inspect live WireGuard peers, and review traffic usage from one central addon module.
|
| ✔ Automate Complete WireGuard VPN Service Provisioning
|
| ✔ Manage VPN Accounts On MikroTik Routers Through WHMCS
|
| ✔ Control Bandwidth And Track Traffic Usage
|
| ✔ Provide Clients With Ready-To-Use VPN Configurations
|
| ✔ Support Usage-Based Billing For Transferred Traffic
|
| ✔ Create, Suspend, Unsuspend And Terminate VPN Accounts
|
| ✔ Change Service Packages
|
| ✔ View Peer And Connection Details
|
| ✔ Download VPN Configuration Files
|
| ✔ View Daily And Monthly Traffic Statistics
|
| ✔ Select MikroTik Server And WireGuard Interface
|
| ✔ Define Peer Comment Prefix
|
| ✔ Configure Allowed IP Addresses And DNS Servers
|
| ✔ Define Upload And Download Speed Limits
|
| ✔ Enable Traffic Statistics
|
| ✔ Configure Traffic Data Retention Period
|
| ✔ Define Setup Guide And WireGuard Client Download URLs
|
| ✔ Enable Usage-Based Metric Billing
|
| ✔ View Dashboard With Server, Account And Service Summaries
|
| ✔ View General Traffic Overview Graph
|
| ✔ Manage Multiple MikroTik Servers
|
| ✔ View All WireGuard VPN Accounts And Peers
|
| ✔ Preview Peer State, Interface, Last Handshake And Traffic Usage
|
| ✔ View Connection Details And Configuration
|
| ✔ Control Staff Access Level To Specific Resources With ACL
|
| ✔ Customize Module Language Files With "Translations" Tool
|
| ✔ Review Module Activity And Error Logs
|
| ✔ View VPN Account And Connection Status
|
| ✔ View Connection Details And Assigned Tunnel IP Address
|
| ✔ Check Applied Bandwidth Limits
|
| ✔ Preview WireGuard Configuration
|
| ✔ Scan Configuration QR Code
|
| ✔ Download Ready-To-Use .conf File
|
| ✔ View Daily And Monthly Traffic Statistics
|
| ✔ Download WireGuard Client
|
| ✔ Supports MikroTik RouterOS 7.20 And Later
|
| ✔ Supports Multiple MikroTik Routers
|
| ✔ Multi-Language Support With Custom Translations Tool
|
| ✔ Supports PHP 8.3 Back To PHP 8.2
|
| ✔ Supports WHMCS Themes "Six", "Twenty-One", "Nexus" And "Lagom WHMCS Client Theme"
|
| ✔ Requires ionCube Loader V14 Or Later
|
Installation and Configuration
|
This tutorial will show you how to successfully install and configure MikroTik WireGuard VPN For WHMCS.
We will guide you step by step through the installation process, MikroTik server connection, product configuration, metric billing setup, addon module management, and client area features.
|
Installation
| 1. Log in to our client area and download the module.
|
2. Extract the module package into the main WHMCS directory.
The files should be uploaded into the corresponding WHMCS folders.
|
3. When you install MikroTik WireGuard VPN For WHMCS for the first time you have to rename 'license_RENAME.php' file.
The file is located in 'modules/addons/MikroikWireGuardVpn For WHMCS/license_RENAME.php'. Rename it from 'license_RENAME.php' to 'license.php'.
|
4. In order to configure your license key, you have to edit the previously renamed 'license.php' file.
Enter your license key between quotation marks as presented on the following screen. You can find your license key in our client area → 'My Products'.
|
5. Log in to your WHMCS admin area and navigate to System Settings → Addon Modules.
- Find MikroTik WireGuard VPN on the list and click Activate.
- Set access permissions for the required administrator roles and save the changes.
The addon module can now be opened through Addons → MikroTik WireGuard VPN.
|
MikroTik Router Preparation
|
Before connecting the router to WHMCS, make sure that:
- MikroTik RouterOS 7.20 or later is installed.
- A WireGuard interface has been created on the router.
- The RouterOS REST API is available.
- The API user has permissions sufficient to manage WireGuard peers, addresses, queues, and traffic data required by the module.
- The selected HTTP or HTTPS service and port are accessible from the WHMCS server.
- When a secure connection is used, HTTPS and a valid router certificate are configured correctly.
Important: Restrict API access to trusted IP addresses whenever possible and use HTTPS for production environments.
The module communicates with the router exclusively through the MikroTik RouterOS REST API. Legacy API and Winbox access are not required.
|
Server Configuration
6. Navigate to System Settings → Servers and click Add New Server.
The module uses the standard WHMCS server infrastructure. Choose MikroTik WireGuard VPN from the Module dropdown menu and provide the router connection details.
|
|
Configure the following fields:
- Name – enter a descriptive server name.
- Hostname – provide the router hostname or IP address.
- Username – enter the RouterOS API username.
- Password – enter the password assigned to the API user.
- Port – provide the port used by the RouterOS REST API. The default HTTPS port is 443.
- Secure – enable to connect through HTTPS; leave disabled only when an HTTP connection is intentionally used.
|
7. Use Test Connection to verify the provided credentials and connection settings.
If the test is successful, save the server configuration.
|
8. Create or select a server group and assign the configured MikroTik server to it.
The server group can later be selected in the product's module settings. Add multiple routers when you want to distribute VPN services across a larger infrastructure.
|
Product Configuration
7. Navigate to System Settings → Products/Services and create a new product or edit an existing one.
Open the Module Settings tab and select MikroTik WireGuard VPN as the module.
|
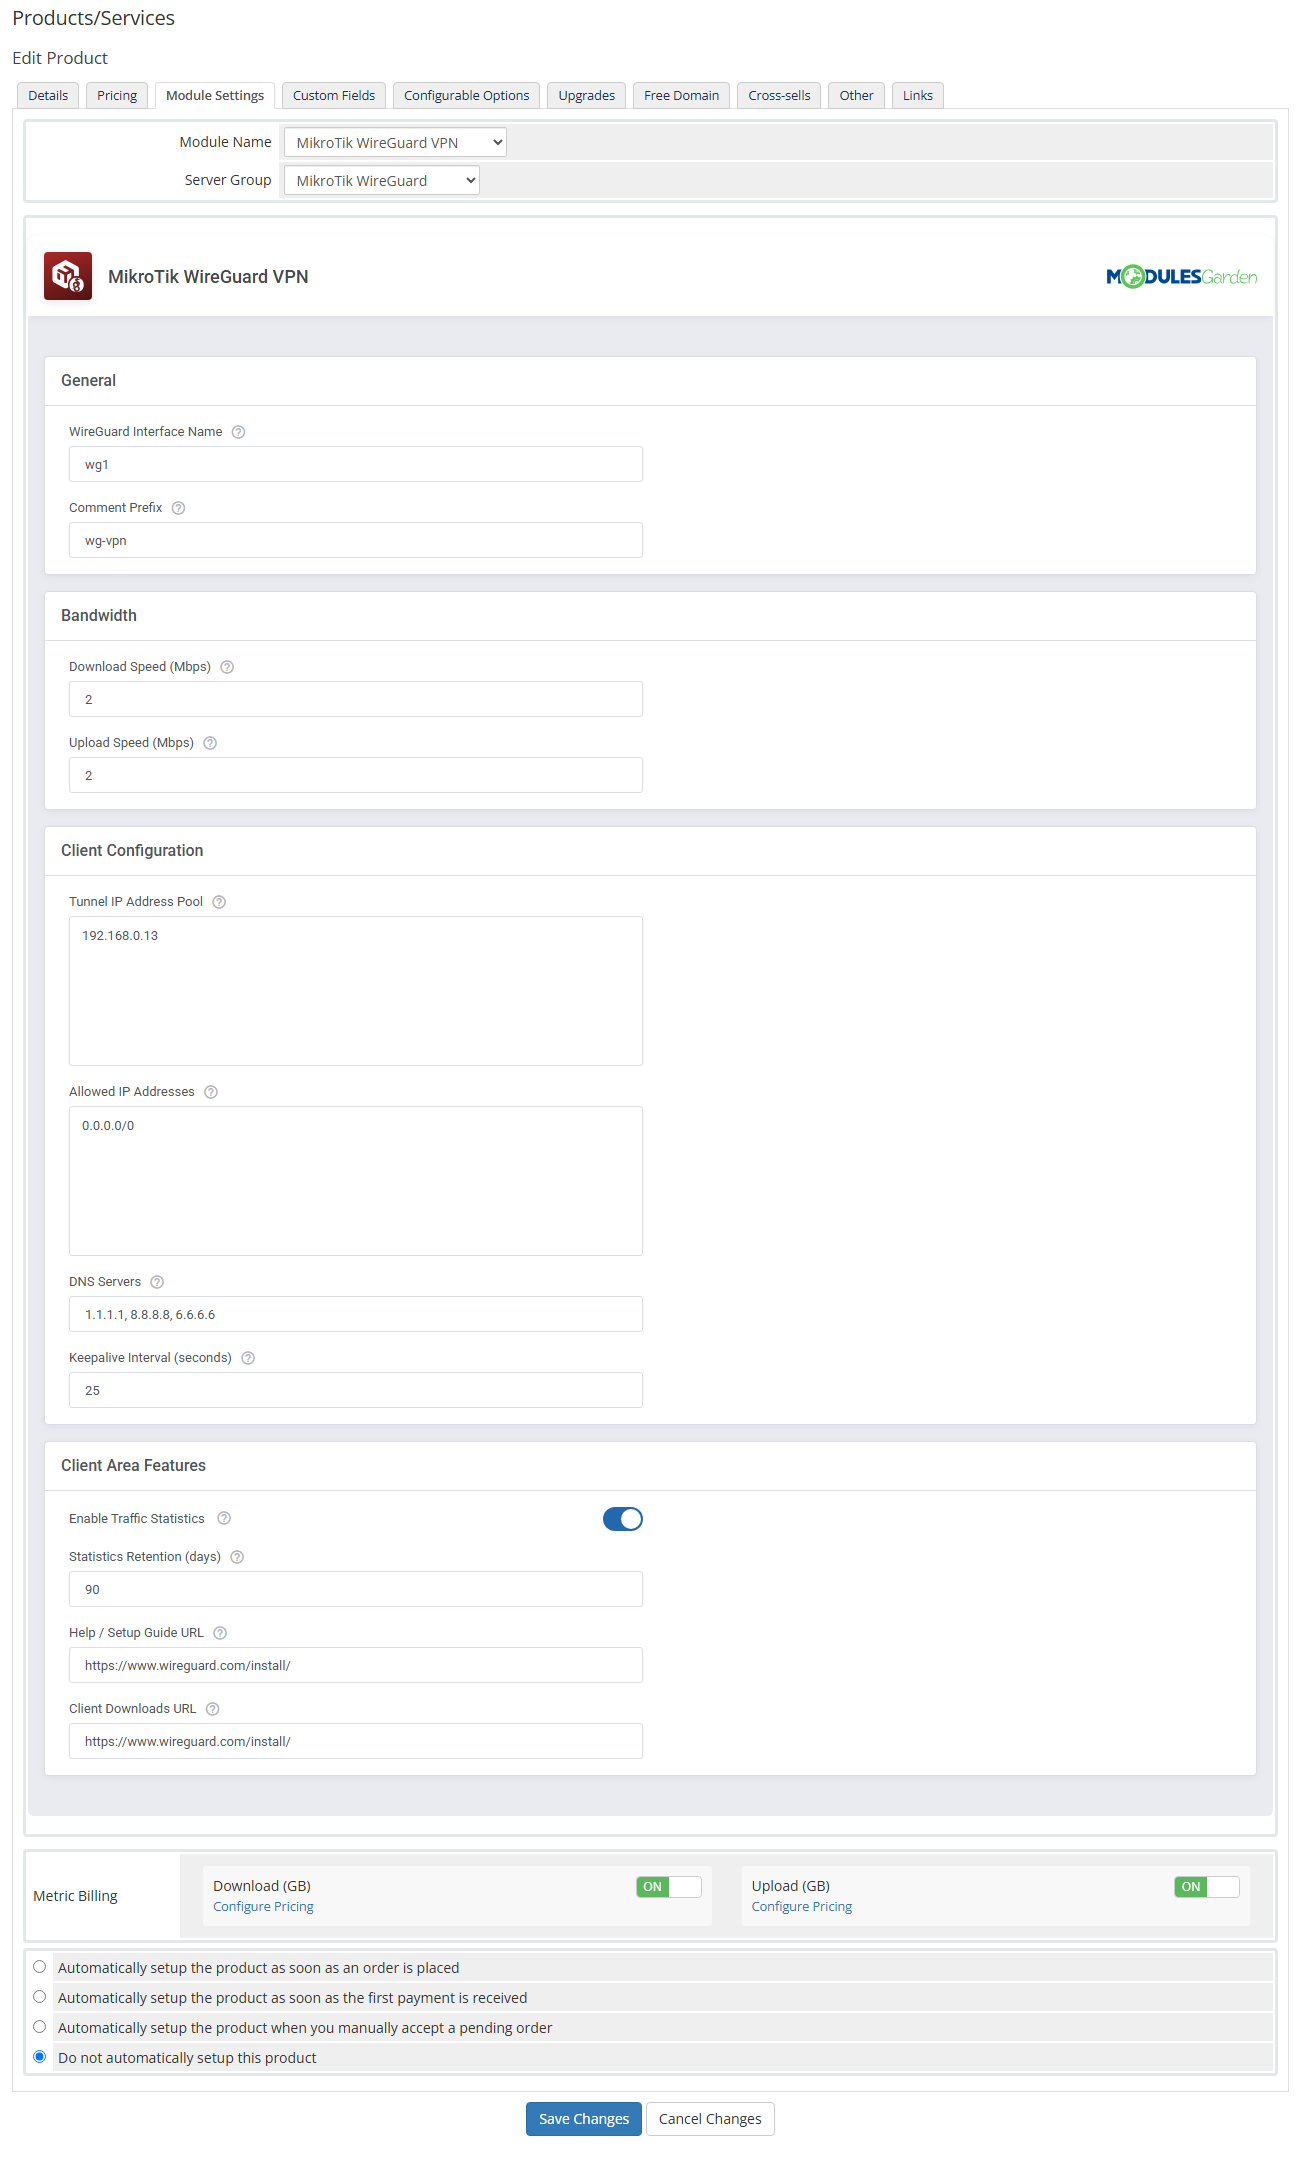
| 8. Configure the VPN service parameters.
|
|
|
The available settings include:
- Server Group – select the group containing the MikroTik router that will host the VPN peer.
- General
- WireGuard Interface – enter the WireGuard interface used for the service.
- Comment Prefix – define the prefix added to comments identifying module-created peers.
- Bandwidth
- Upload Speed Limit – define the maximum upload speed assigned to the service.
- Download Speed Limit – define the maximum download speed assigned to the service.
- Client Configuration
- Tunnel IP Address Pool - assign tunnel IP addresses individually or define an IP address range. Separate the first and last address in the range with a hyphen, for example: 192.168.0.3-192.168.0.14
- Allowed IP Addresses – specify the addresses or networks routed through the VPN tunnel.
- DNS Servers – define the DNS servers included in the client configuration.
- Keepalive Interval (seconds) – set the keepalive interval in seconds.
- Client Area Features
- Enable Traffic Statistics – enable traffic data collection and presentation.
- Statistics Retention (days) – define how long collected traffic records should be stored.
- Help / Setup Guide URL – provide a link to your VPN setup instructions.
- Client Downloads URL – provide a link clients can use to download the WireGuard application.
|
9. Select the preferred provisioning method and save the product settings.
Depending on the selected WHMCS option, the VPN account may be created automatically after the first payment, immediately after order placement, or manually by an administrator.
|
Usage-Based Metric Billing
|
The Metric Billing section allows you to control which traffic metrics are billed through the native WHMCS metric billing system.
Use the switch next to each metric to enable or disable billing. When enabled, the metric usage is reported to WHMCS and included in usage-based billing. Disabled metrics are not billed.
Select Configure Pricing below each metric to define the included traffic allowance and the price charged for each additional gigabyte. Download and upload pricing can be configured independently for every available billing cycle.
|
Management
Addon Module
|
The addon module provides a centralized overview of MikroTik servers, WireGuard accounts, traffic, and module activity.
Navigate to Addons → MikroTik WireGuard VPN to open it.
|
Dashboard
The Dashboard opens with a configuration guide covering the main setup steps: adding a MikroTik server, configuring a product, inspecting live peers, and accessing the documentation.
The statistics widgets show the numbers of configured servers, active services, suspended services, and provisioned VPN accounts. The Traffic Overview (Last 30 Days, GB) graph presents the total recorded traffic.
|
Servers
The Servers page lists MikroTik routers configured in WHMCS.
For each entry, you can review its name, hostname, connection port, connection scheme, number of assigned services, and current status.
Note: Router connection settings are managed in WHMCS System Settings → Servers. The addon page provides a centralized overview of the configured servers.
|
Accounts
The Accounts page lists the WireGuard peers currently available on the selected MikroTik router, including peers not created by the module.
Use search and filters to locate a specific peer or narrow the list by its current state.
|
|
For each peer, the list may include:
- peer comment
- WireGuard interface
- allowed address
- public key
- peer state
- received and transmitted traffic
- last handshake
- related WHMCS service, when available
|
| Open a linked account to review its peer details, assigned tunnel address, connection information, and WireGuard configuration.
|
The 'Logs' section is where the module logs are stored. You can filter the module logs by type with the 'Show' buttons.
For precise details on Logs, please refer to our dedicated documentation article, which you may find here.
|
Customizing language files is now extremely easy with the "Translations" tool that is now available directly in the addon.
Its user-friendly design makes managing various language file tweaks a smooth and efficient process.
Prepare translations for the original English files with this handy built-in tool. For specific instructions on how to use this tool please refer to its dedicated article, you will find it here.
Tip: Custom translations created with this tool are preserved separately from the original language files, making them easier to maintain during module updates.
|
Ensure secure and tailored access to your module with the "Access Control" tool available in ModulesGarden addons.
This feature allows you to assign permissions, define resource access for administrators, and track activities with detailed logs.
Customize access settings to fit your team’s structure and maintain transparency with ease. For comprehensive guidance, refer to the tool's dedicated article.
|
Admin Area
|
Open a client's product or service in the WHMCS admin area to manage the related WireGuard VPN account.
|
The service view displays whether the peer exists and is enabled, along with its assigned tunnel IP address, server endpoint, last handshake, traffic counters, and applied bandwidth limits.
Administrators can also perform the standard module commands:
- Create
- Suspend
- Unsuspend
- Terminate
- Change Package
|
Use the available management actions to preview the WireGuard configuration, download the .conf file, reset the VPN interface, and review traffic statistics.
Resetting the VPN interface disables and re-enables the WireGuard peer to force a new handshake. The assigned keys, tunnel IP address, and configuration remain unchanged.
|
Traffic Statistics
The traffic statistics view presents received and transmitted data for the selected service.
Switch between daily and monthly views to analyze usage over the required period. The metric statistics panel also shows the current download and upload totals and allows administrators to refresh the counters directly from the router.
|
VPN Configuration
The configuration view contains the complete connection parameters required by the WireGuard client, including the client interface settings and the remote peer details.
Administrators can preview the generated configuration or download it as a ready-to-use .conf file.
|
Client Area
|
The client area gives customers direct access to their WireGuard VPN service and the resources required to configure a connection.
|
VPN Dashboard
The main service page displays the live peer state, assigned tunnel IP address, server endpoint, last handshake, received and transmitted traffic, and applied upload and download limits.
Depending on the product configuration, clients can also open the setup guide and download the WireGuard application.
|
|
Available client actions include:
- previewing the WireGuard configuration
- scanning the configuration QR code
- downloading the ready-to-use .conf file
- resetting the VPN interface
- opening the setup guide
- downloading the WireGuard client
|
Configuration And QR Code
Clients can preview the complete WireGuard configuration, including the client interface and remote peer parameters, and scan the generated QR code to quickly import the tunnel into a compatible WireGuard application.
The same configuration can be downloaded as a ready-to-import .conf file.
Important: The WireGuard configuration contains sensitive connection data. Clients should store it securely and should not share it with unauthorized persons.
|
Traffic Statistics
The Traffic Statistics section allows clients to review the amount of uploaded and downloaded data.
Statistics can be displayed in daily or monthly intervals.
|
Reset VPN Interface
Use Reset VPN Interface to disable and re-enable the WireGuard peer and force a new handshake.
The action does not change the assigned keys, tunnel IP address, or configuration. The client must confirm it before it is performed.
|
Cron Jobs
|
The module uses the standard WHMCS automation cron for traffic collection, metric usage reporting, and data maintenance.
Make sure that the main WHMCS automation cron is configured and running according to the official WHMCS documentation.
|
Tips
| 1. Use HTTPS and restrict RouterOS API access to the IP address of your WHMCS server.
|
| 2. Configure separate MikroTik server groups when you want to distribute products between different routers or locations.
|
| 3. Make sure the tunnel IP address pools assigned to different routers do not overlap unless your network design explicitly requires it.
|
| 4. Enable traffic statistics only when the related RouterOS permissions and the WHMCS cron are configured correctly.
|
| 5. Configure both module metric reporting and WHMCS metric pricing before offering usage-based billing to clients.
|
Update Instructions
|
An essential guidance through the module update process can be found here.
Important: Before updating the module, create a backup of the WHMCS files and database. Review the module changelog for version-specific requirements and migration notes.
|
Common Problems
| 1. The connection test fails.
|
- Verify the router hostname or IP address and REST API port.
- Make sure the selected HTTP or HTTPS service is enabled and reachable from the WHMCS server.
- Confirm the API username, password, and assigned RouterOS permissions.
- If Secure is enabled, verify the router certificate and HTTPS configuration.
|
| 2. A VPN peer cannot be created.
|
- Make sure the selected WireGuard interface exists on the target router.
- Check whether the configured tunnel IP address pool contains an available address.
- Review the module logs for the exact RouterOS API response.
- Verify that the API user can manage the resources required by the module.
|
| 3. Traffic statistics are not displayed.
|
- Confirm that traffic statistics are enabled in the product's module settings.
- Make sure the WHMCS metric billing cron is running correctly.
- Allow the module enough time to collect the first traffic records.
- Use Refresh Now on the service page to read the current counters from the router on demand.
- Review the module logs for traffic collection errors.
|
| 4. Usage-based charges are not generated.
|
- Enable usage-based metric billing in the product's module settings.
- Configure pricing for the Download (GB) and Upload (GB) metrics in WHMCS.
- Confirm that traffic usage is being collected and reported.
- Verify that the WHMCS automation cron is running.
|


