Product Linker For WHMCS
From ModulesGarden Wiki
(Difference between revisions)
|
|
| Line 257: |
Line 257: |
| | |style="padding: 0px 0px 30px 25px;"|[[File:PL3_13.png]] | | |style="padding: 0px 0px 30px 25px;"|[[File:PL3_13.png]] |
| | |} | | |} |
| − |
| |
| | <!-- | | <!-- |
| | ==[https://www.docs.modulesgarden.com/Queue Queue]== | | ==[https://www.docs.modulesgarden.com/Queue Queue]== |
Revision as of 10:16, 29 April 2025
Article update is ongoing on this page, watch out for broken links, unclear descriptions and images!
We are sorry for the inconvenience caused.
Product Linker For WHMCS enables you to establish dynamic connections between products, addons, and configurable options.
This facilitates bundled purchases for customers, supported by flexible discounts.
The module also provides an intuitive interface for viewing, filtering, and managing existing product associations, giving you full control over the active connections used by your clients.
|
| ✔ Handle Dependencies Between Module Actions:
|
| ✔ Each Create/Terminate/Suspend/Unsuspend Action Performed On Main Product Triggers Such Action On Child Products
|
| ✔ Copy Configurable Options From Parent To Child Product
|
| ✔ Define Relations Between Chosen Products And:
|
| ✔ Define If Product Addon Price Should Be Switched With Linked Product Price
|
| ✔ Copy Custom Fields Between Configured Relations
|
| ✔ Assign Custom Promo Codes To Relations:
|
| ✔ Select Discount Priority
|
| ✔ Define Minimum Discount Amount
|
| ✔ View, Filter And Delete Existing Connections Between Linked Products
|
| ✔ Enable Related Products Notices In Client Cart
|
| ✔ View Product Upgrades/Downgrades Tasks Queue
|
| ✔ Customize Module Language Files With "Translations" Tool
|
| ✔ Purchase Multiple Products, Addons And Configurable Options By Ordering Just One
|
| ✔ View Linked Product Added To Order After Relation Is Triggered
|
| ✔ Multi-Language Support With Custom Translations Tool
|
| ✔ Supports PHP 8.2 Back To PHP 8.1
|
| ✔ Supports WHMCS Themes "Six" And "Twenty-One"
|
| ✔ Supports WHMCS V8.12 Back To WHMCS V8.9
|
| ✔ Requires ionCube Loader V14 Or Later
|
Installation
This tutorial will show you how to successfully install Product Linker For WHMCS.
We will guide you step by step through the whole installation and configuration process.
|
| 1. Log in to our client area and download the module.
|
| 3. Extract the package and upload its content into the main WHMCS directory.
The content of the package to upload should look like this.
|
4. When you install Product Linker For WHMCS for the first time you have to rename 'license_RENAME.php' file.
The file is located in 'modules/addons/ProductLinker/license_RENAME.php'. Rename it from 'license_RENAME.php' to 'license.php'.
|
5. In order to configure your license key, you have to edit the previously renamed 'license.php' file.'
Enter your license key between quotation marks as presented on the following screen. You can find your license key in our client area → 'My Products'.
|
6. Now you have to activate the module in your WHMCS system.
Log in to your WHMCS admin area. Go to 'System Settings' → 'Addon Modules'. Afterward, find 'Product Linker' and press the 'Activate' button.
|
7. In the next step, you need to permit access to this module.
To do so, click on the 'Configure' button, select administrator groups that should have access to this addon and press 'Save Changes'.
|
8. Optionally, set up a cron job, that automatically terminates linked products when the main product is upgraded/downgraded.
5-minute interval is recommended, the cron can be run as often as every minute, but at the cost of increased WHMCS server load.
php -q /your_WHMCS/modules/addons/ProductLinker/cron/cron.php queue
|
9. You have just successfully installed Product Linker For WHMCS!
You can access your module at 'Addons' → 'Product Linker'.
|
Configuration and Management
Product Linker For WHMCS allows to sell bundles of products through ordering one product with specific product addons and configurable options.
It also automatically forwards basic commands from the main product to all child products.
You can define the relationship between products through a product add-on or configurable option.
|
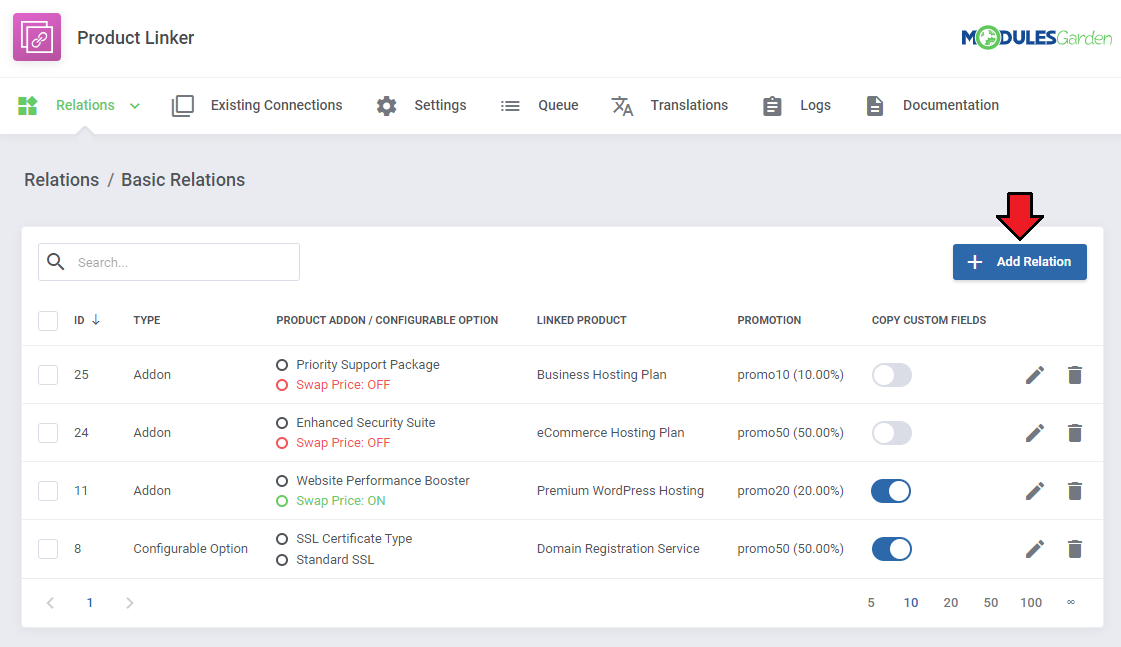
Basic Relations
At the 'Basic Relations' tab you can define links between products through product addons and configurable options.
They will be triggered once your client makes an order for a product with the product addon/configurable option chosen at the relation.
Additionally, you can define a discount added to the order by triggering the relation.
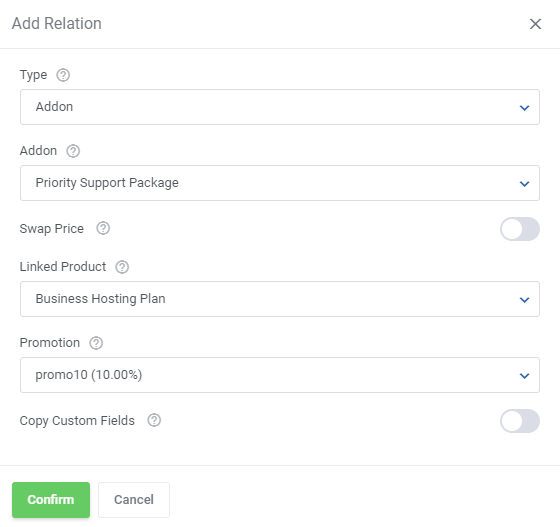
To add a new relation, go to 'Relations' → 'Basic Relations' and click on 'Add Relation'.
|
|
To set up a relation:
- Type - Choose a relation type from the 'Type' dropdown menu, selecting either a relation triggered by a product addon or a configurable option.
- Addon/Configurable Option - Select a product addon or configurable option that will trigger the relation.
- Swap Price - If you select the 'Addon' type, you can also enable the 'Swap Price' option, which will overwrite the price of the linked product with the addon price.
- Configurable Option Value - if you choose the 'Configurable Option' relation type, you must also select a specific configurable option.
- Linked Product - select a child product that will be linked after the relation is triggered. This product should be set to 'hidden' and 'free'.
- Promotion - optionally, choose a discount that will be added to the order.
Note: Keep in mind that only one discount can be assigned to an order, and you can manage discount assignments on the 'Settings' page.
- Copy Custom Fields - decide if you want Custom Fields copied from the main product to the linked product.
Note: The Custom Fields are copied from the main product, not from the addon.
|
|
| Added relations can be edited or deleted by using the relative action buttons.
|
Product Relations
At the 'Product Relations' tab you can set up a relation linking one product with another.
To create a new configuration simply click on the 'Add Relation' button.
|
Provide the following information to create the relation:
- Main Product - choose a product from the 'Main Product' dropdown menu to trigger the relation.
- Linked Product - select a product from the 'Linked Product' dropdown menu that will be added when the relation is triggered. This product should be set to 'hidden' and 'free'.
- Promotion - optionally, assign a promotion.
- Configurable Option Groups - select configurable options to transfer values for.
Note: Configurable option copying can only be enabled if the configurable option is assigned to both the parent and child products.
- Copy Custom Fields - decide if you want Custom Fields copied from the main product to the linked product.
|
| Created product relations can be edited or deleted by clicking on the respective action buttons.
|
Existing Connections
'Existing Connections' tab allows you to view the list of all products ordered by your clients for which relations exist.
You can find all the information about a relation, like the main product, linked product, their owner, or domain used by both products.
If a need arises, you can also delete a connection and optionally terminate the linked product.
Note: Keep in mind that 'Suspend', 'Unsuspend' and 'Terminate' actions performed on the Main Product will be reflected on the Linked Product.
|
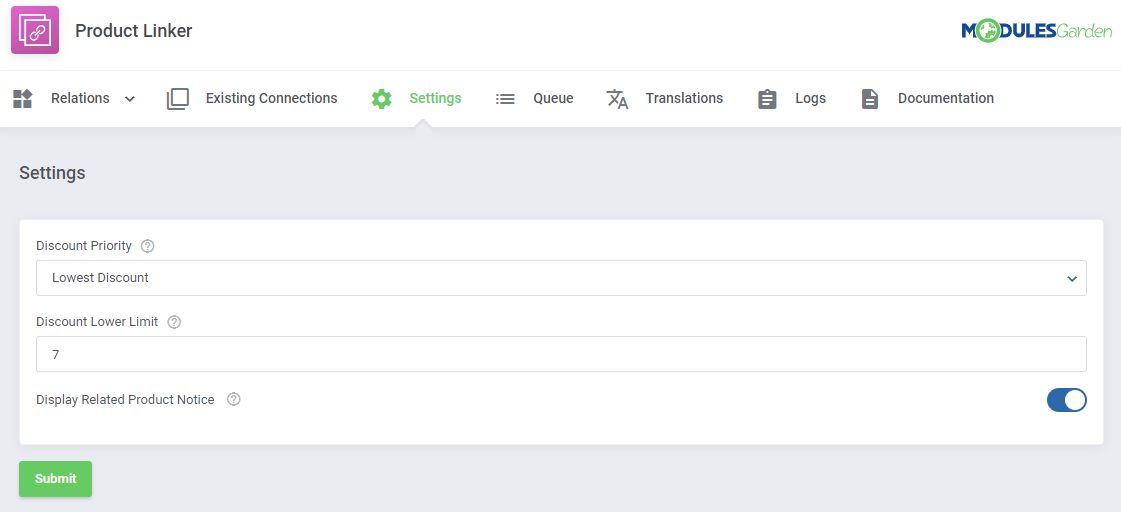
Settings
Due to the assignment of promotions to the relation, a situation may occur where multiple promotions will be assigned to one order.
WHMCS does not support such a situation, therefore only one promotion has to be chosen.
- Highest Discount - the promotion giving the highest discount to your clients will be chosen in the order form.
- Lowest Discount - the promotion giving the lowest discount to your clients will be chosen in the order form.
- Minimum Reduction Amount - if the 'Lowest Discount' is selected, provide the lowest reduction value (order subtotal * promotion rate) that can be used.
If the promotion value is below the limit, a higher discount will be applied until the provided amount is met or exceeded.
- Display Product Info - information about the linked product will be visible on the order form when this option is enabled.
Minimum Reduction Amount Example:
 Client's order qualifies for 3 discounts: 20%, 50% and 80%
 We have set the Discount Priority to 'Lowest Discount'
 The Minimum Reduction Amount is set to '10'

 The order subtotal is '36.39'
 The reduction is calculated:
 36.39 * 20% = 7.28
 36.39 * 50% = 18.20
 36.39 * 80% = 29.11

 Since the calculation with the lowest discount did not exceed the 'Minimum Reduction Amount', the next discount (50%) is applied as it does exceed the minimum.
|
|
Queue
The 'Queue' section is designed to handle product upgrades and downgrades for products that have a relation established.
The cron will automatically create tasks to terminate linked products after upgrade/downgrade of the main product.
If you allow your clients to upgrade/downgrade products that you have created relations for, it is recommended to run a dedicated cron job every 5 minutes:
php -q /your_WHMCS/modules/addons/ProductLinker/cron/cron.php queue
The table below the cron job information will allow you to see the status of each task, see its details, run it manually, or delete it.
|
| You can delete multiple tasks at once by using the mass action function.
|
| Additional actions include the auto prune system and the ability to hide the cron information.
|
Customizing language files is now extremely easy with the "Translations" tool that is now available directly in the addon.
Its user-friendly design makes managing various language file tweaks a smooth and efficient process.
Prepare translations for the original English files with this handy built-in tool. For specific instructions on how to use this tool please refer to its dedicated article, you will find it here.
|
Logs
The 'Logs' provides access to all activity records generated by the module. It serves as a central hub for monitoring and troubleshooting module behavior.
You can easily filter the displayed logs by category using the 'Show' buttons, allowing you to focus on specific types of events or actions.
For a more detailed breakdown of log types, usage scenarios, and filtering capabilities, please refer to our dedicated documentation article.
|
Client Area
When the client orders a product with a relation created for it, the relation will be displayed on the order form, provided the option is enabled in the addon's settings.
If included in the relations, promotions will be applied based on the settings.
|
Use Cases
This section provides scenarios that demonstrate common use cases, along with detailed explanations of how the module’s features can be utilized in real-world situations.
Review the following examples to understand better how the module can be applied in practice.
|
Basic Relation: Proxmox VE VPS & Cloud and cPanel Manage2
In these steps, we will show you how to link Proxmox VE VPS & Cloud with cPanel Manage2 through a product addon.
You can also link them using configurable options if you would prefer.
1. First create the product addon which will trigger the relation.
Go to 'System Settings' → 'Products/Services' → 'Products Addons' and press 'Add New Addon'.
|
| 2. Name your addon, there is no need to select a module since the addon will only be used to trigger the relation for the cPanel Manage2 product to be added.
|
| 3. Make sure you check the 'Show on Order' checkbox under 'Details'.
|
| 4. It is advised to set up the same billing cycle as in the main product. The price of the addon will effectively be the price of the linked product.
|
5. Finally, select the main product which the addon will be available for, in this case, it is 'Proxmox VE VPS & Cloud - VPS KVM'.
Next, press 'Save Changes'.
|
| 6. Now, create a relation at your 'Product Linker' → 'Relations' → 'Basic Relations'.
|
Configure the relation:
- Type - select 'Addon' for this example.
- Addon - select your newly created addon.
- Swap Price - Leave this option disabled.
- Linked Product - Select the product that will be added when the relation is triggered.
It should be set to hidden and free. You have indirectly set its price at the product addon configuration.
- Promotion - include a promotion, if you would like, you can add new promotions under 'System Settings' → 'Payments' → 'Promotions'.
- Copy Custom Fields - Leave disabled unless you want to copy custom fields from the main product to the linked product.
|
| To check if the relation works as it should, place an order from the admin area for the main product with the product addon triggering the relation.
|
| The linked product will be added to the order along with the main product.
|
Product Relation: Proxmox VE VPS & Cloud and Plesk Key Administrator
In these steps, we will show you how to link independent Proxmox VE VPS & Cloud and Plesk Key Administrator products.
The linked product will always be added when the main product is ordered.
|
| Create a relation at your 'Product Linker' → 'Relations' → 'Product Relations'.
|
Configure the relation:
- Main Product - select the main product which will trigger the relation on its own.
- Linked Product - Select the product that will be added when the relation is triggered.
It should be set to hidden and free. You can indirectly set its price by balancing the main product price and the promotion.
- Promotion - include a promotion, if you would like, you can add new promotions under 'System Settings' → 'Payments' → 'Promotions'.
- Copy Custom Fields - Leave disabled unless you want to copy custom fields from the main product to the linked product.
|
| To check if the relation works as it should, place an order from the admin area for the main product with the product addon triggering the relation.
|
| The linked product will be added to the order along with the main product.
|
Tips
| 1. If your client orders a product with settings triggering two relations with the same product, only one product will be created.
|
2. If your client orders a product configurable options upgrade/downgrade, the old linked product bound by a previous configurable option will stay active.
You need to remove the link between the old linked product and the main product in the addon and terminate the old linked product manually.
|
| 3. If a child product is at the same time a parent product in the other relation, changes made on its parent will be also commanded on its child.
|
| 4. Keep in mind that the second product, linked by the module, is never visible in the cart. It is automatically added once the first one is ordered.
|
Update Instructions
An essential guidance through the process of updating the module is offered here.
Ensure successful completion of the module update by carefully following each step, thereby preventing data loss or any unforeseen issues.
Additionally, you will find a current list of supplementary actions necessary for a smooth update process there.
|
1. Data migration to version 2.0.0 is handled automatically upon module activation.
- Download the latest version of the module from our client area.
- Remove the old module's files from the WHMCS root directory.
Note: The module folder name has been changed from 'productlinker' to 'ProductLinker'. Ensure that the old 'productlinker' folder is deleted completely.
- Upload and extract the new files into your WHMCS root directory.
- Activate the 'Product Linker' addon module.
|
Upgrade Guide
Seeking a solution that offers greater flexibility, customization tailored to your precise needs, and unrestricted availability?
There is an option that not only proves to be cost-effective in the long run but also includes prioritized support services, making it a truly valuable investment.
Opt for the Open Source version of your Product Linker For WHMCS module to unlock these benefits.
Simply click on either the Get Source Code or Upgrade To Lifetime button found on the product's page in our client area to complete the one-step upgrade process, with a dedicated discount already applied.
Follow a comprehensive guide covering the transition process, the advantages it brings, and step-by-step instructions on what to do next after the order has been successfully finalized.
|
Common Problems
| 1. When you have problems with connection, check whether your SELinux or firewall does not block ports.
|
2. We do not recommend using Product Linker For WHMCS with the following modules:
- Product Free Trial Manager For WHMCS
- Resellers Center For WHMCS
Integration between these modules is hampered due to specific features of each one of them and their individual workflow.
We are continually working on eliminating these limitations wherever possible.
|


