WithoutDNS For WHMCS
From ModulesGarden Wiki
(Difference between revisions)
|
|
| Line 215: |
Line 215: |
| | {| | | {| |
| | |style="padding: 0px 0px 20px 15px;"|Enter: | | |style="padding: 0px 0px 20px 15px;"|Enter: |
| − | - Site URL/Domain - Use full URL o rjust the domain name.
| + | * Site URL/Domain - Use full URL o rjust the domain name. |
| − | - Service - Choose a service from th elist to retrieve its ip address. If a dedicated IP is assigned to the service, it will be automatically used.
| + | * Service - Choose a service from th elist to retrieve its ip address. If a dedicated IP is assigned to the service, it will be automatically used.<br/> |
| | Press Confirm to complete the action. | | Press Confirm to complete the action. |
| | |} | | |} |
Revision as of 13:18, 14 April 2025
- Synchronization Benefits:
| ✔ Access 91 Powerful Business Reports
|
| ✔ Secure Synchronization With No Personal Data Stored
|
| ✔ Supports PHP 8.2 Back To PHP 7.3
|
| ✔ Supports WHMCS V8.12 Back To WHMCS V7.2
|
- Exclusive Promo Code From ModulesGarden:
| ✔ Save 25% For 3 Months On The MetricsCube Platform With Coupon: WHMCS25%_MC
|
Installation and Synchronization
We have prepared a short but comprehensive tutorial that will show you how to successfully install MetricsCube Business Analytics For WHMCS module and synchronize your WHMCS with MetricsCube.
Although the process is extremely easy and intuitive, go over the below guide to assure it is fast, smooth and trouble-free.
|
Install The Addon
| 1. First of all, you need the package, therefore log in to our client area and download the module.
|
2. Open the FTP Client, log into the server with WHMCS installed. Then, open the main catalogue and upload the folder with files you have extracted previously.
The content of your package should look like on the below screen:
|
Activate The Addon
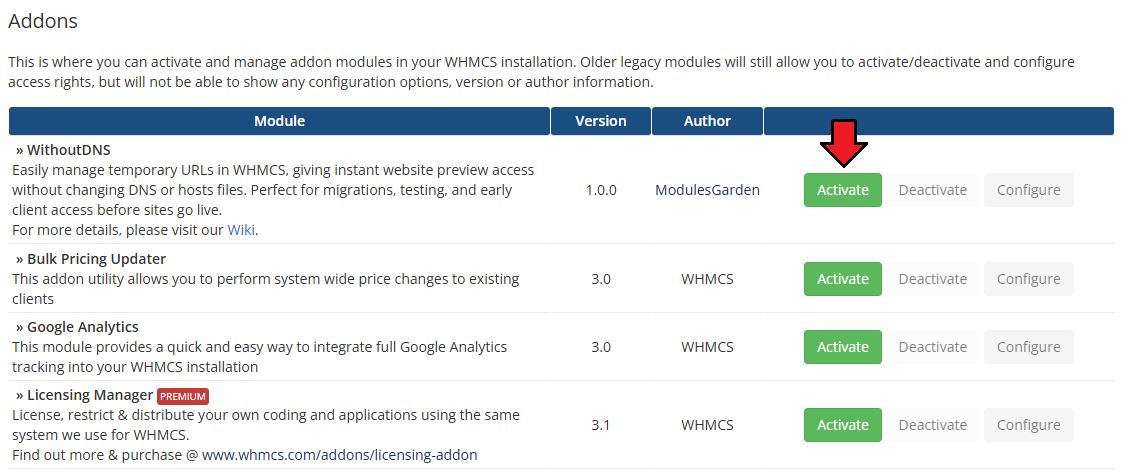
3. Now, you have to activate the addon module in your WHMCS system.
Please log in to your WHMCS admin area. Once there, navigate to the 'System Settings' section and select 'Addon Modules'.
Find 'MetricsCube Connector' on the list of addons and click the 'Activate' button.
|
4. After the module has been activated, you will need to enable access to your Admin Role.
To do that, click on 'Configure', select the admin roles that should have access to the module, and save changes.
|
| Your module has just been successfully installed and activated!
|
Sign Up And Synchronize With WithoutDNS
| You've nailed it! There is nothing to stop you now from using all MetricsCube tools and boosting the productivity of your business processes!
|
WithoutDNS Addon Management
| As soon as the...........
|
Addon Configuration
Use the settings below to customize how the WithoutDNS addon behaves within your WHMCS installation:
- Menu Location - Choose where the WithoutDNS addon will appear in the client area navigation:
- Main Menu - Displays as a new top-level item after "Open Ticket" (default).
- Services - LListed under the "My Services" section.
- Domains - Listed within the "My Domains" section.
- Enable WithoutDNS for - Define which clients are granted access to the addon:
- All Clienst - Available to every client in the system (default).
- Clients with an active product - Only accessible to clients with at least one active service.
- Clienst with specific products - Access is granted only to clients who own products selected in the "Required Products" dropdown list.
- Generated URL Limit Type - Specify how URL generation limits should be enforced:
- unlimited - no restrictions on the number of generated URLs (default setting)
- Limit Per Client - restrict th enumber of URLs each client can generate
- Limit per product - restrict th enumber of URLs based on the specific product owned by the client
- URL Expiration Time (hours) - Specifies the default lifespan of generated URLs in hours (default 48h) with the option for customization as needed.
|
|
API Configuration
Using the API is not required, but skipping it will impose certain limitations::
- Links generated without the API will only remain active for 15 minutes.
- These links will display the WithoutDNS branding.
- A daily limit of 3 links applies, and this quota is shared across all clients.
TTo gain unrestricted access and additional features, you’ll need to enter your API credentials.
If you don’t have an API key yet, you can get a plan here.
|
- API Token - Enter the API token obtained during the earlier setup steps. This token is required to authenticate your WHMCS installation with the WithoutDNS API.
- Temporary Domain - Select one of the available proxy domains associated with your WithoutDNS account. This domain will be used to generate temporary access links.
|
Websites
The Sites section in the admin area provides an overview of all access links (sites) generated by clients using the WithoutDNS addon.
This list includes all the fields visible in the client area, with the addition of client-specific information.
- Client – Displays the name and company (if applicable) of the client who created the site.
- Product/Service – Indicates which of the client's products the site is associated with.
- Temporary URL – The generated access link, valid for a limited time (highlighted in blue for visibility).
- Created At – Timestamp showing when the link was generated.
- Expires At – Indicates when the temporary URL will expire.
- Actions – Options to manually delete or regenerate the URL.
|
Logs
| The MetricsCube Connector For WHMCS addon module allows to download Connector Logs. Press the button as shown on the screen to fetch logs.
|
In case there are any issues and fetching logs is hampered, you will need to create or modify the log file in a required directory.
The correct path will be generated automatically and may be copied from the error notification that will appear on your screen. Please set the privileges as defined in the notifications.
When ready, patiently wait until the next synchronization.
|
Manage Account
| It is possible to connect your WHMCS to MetricsCube with another account from one addon. Simply, press the second button on the addon dashboard.
|
This very moment you will see a warning notification on the consequences of such action.
Connecting with another account will reset your current configuration and your WHMCS will be no longer synchronized with your existing MetricsCube account.
You will have to go through the process from the beginning.
|
Client Area
The Site Previews is located in one of theree possible places, depending on the addon configuration, this can be:
- Main Menu – Displays as a new top-level item after "Open Ticket" (default).
- Services – Listed under the "My Services" section.
- Domains – Listed within the "My Domains" section.
Dependin gon this setup find the button and press to open the withoutDNS panel.
|
This section allows you to create temporary access links to your websites, which work even if DNS settings haven't been finalized.
It's particularly helpful for previewing sites during development, testing after migrations, or sharing early-stage versions with clients.
Press Creater Site button to generate a new temporary link.
|
Enter:
- Site URL/Domain - Use full URL o rjust the domain name.
- Service - Choose a service from th elist to retrieve its ip address. If a dedicated IP is assigned to the service, it will be automatically used.
Press Confirm to complete the action.
|
| NEwly generated temporrary URL will appear on the list. Ther wouy will find :
Client – Displays the name and company (if applicable) of the client who created the site.
Product/Service – Indicates which of the client's products the site is associated with.
Temporary URL – The generated access link, valid for a limited time - use copy icon for eaasy sharing
Created At – Timestamp showing when the link was generated.
Expires At – Indicates when the temporary URL will expire.
Actions – Options to manually delete or regenerate the URL.
|
WithoutDNS Platform
Here it is! Ready, complex and so much detailed analysis of your business.
Quickly sign in to your account and start the exploration.
|
Most of all, accurate and flexible reports that will help you look deep into your company's performance.
Browse, change the periods and search for anything you might only need.
|
Tips
1. Take a look at our YouTube channel! You will find there short videos presenting three different methods of installing your MetricsCube Connector For WHMCS.
Stay tuned as other videos are coming soon!
|
2. Step into the MetricsCube Blog where you will find the latest Release Notes together with thought-provoking Business Guides.
Get the gist of the web hosting industry, let yourself be guided across the various reports types and finally reach for practical advice on how to boost your business development.
|
Update Instructions
An essential guidance through the process of updating the module is offered here.
Ensure successful completion of the module update by carefully following each step, thereby preventing data loss or any unforeseen issues.
Additionally, you will find a current list of supplementary actions necessary for a smooth update process there.
|
Common Problems
| 1. When you encounter problems with connection, check whether your SELinux or firewall does not block ports.
|
| 2. If you encounter any issues with redirection to WHMCS via buttons like View in WHMCS in the MetricsCube pop-up, please ensure the Administration Panel URL' in MetricsCube → My Application settings is accurately configured.
|


