WithoutDNS For WHMCS
| Line 3: | Line 3: | ||
=About [https://www.modulesgarden.com/products/whmcs/withoutdns WithoutDNS For WHMCS]= | =About [https://www.modulesgarden.com/products/whmcs/withoutdns WithoutDNS For WHMCS]= | ||
| + | <!-- fixed --> | ||
| + | |||
| + | *'''Synchronization Benefits:''' | ||
{| | {| | ||
| − | |style="padding: 10px 0px | + | |style="padding: 10px 0px 0px 30px;"|✔ Access 91 Powerful Business Reports |
|} | |} | ||
| − | + | ||
| − | *''' | + | *'''General Features:''' |
{| | {| | ||
| − | |style="padding: 10px 0px 0px 30px;"|✔ | + | |style="padding: 10px 0px 0px 30px;"|✔ Secure Synchronization With No Personal Data Stored |
|} | |} | ||
{| | {| | ||
| − | |style="padding: 0px 0px 0px 30px;"|✔ | + | |style="padding: 0px 0px 0px 30px;"|✔ Fully GDPR Compliant |
|} | |} | ||
{| | {| | ||
| − | |style="padding: 0px 0px 0px | + | |style="padding: 0px 0px 0px 30px;"|✔ Supports PHP 8.2 Back To PHP 7.3 |
| + | |} | ||
| + | {| | ||
| + | |style="padding: 0px 0px 10px 30px;"|✔ Supports WHMCS V8.12 Back To WHMCS V7.2 | ||
|} | |} | ||
| − | + | *'''Exclusive Promo Code From ModulesGarden:''' | |
{| | {| | ||
| − | |style="padding: 10px 0px | + | |style="padding: 10px 0px 30px 30px;"|✔ '''Save 25%''' For '''3 Months''' On The MetricsCube Platform With Coupon: '''WHMCS25%_MC''' |
| − | + | ||
|} | |} | ||
| + | |||
| + | =Installation and Synchronization= | ||
{| | {| | ||
| − | |style="padding: 0px | + | |style="padding: 10px 0px 15px 15px;"|'''We have prepared a short but comprehensive tutorial that will show you how to successfully install [https://www.modulesgarden.com/products/whmcs/metricscube-business-analytics MetricsCube Business Analytics For WHMCS] module and synchronize your WHMCS with MetricsCube.'''<br/> |
| + | Although the process is extremely easy and intuitive, go over the below guide to assure it is fast, smooth and trouble-free. | ||
|} | |} | ||
| + | ==Install The Addon== | ||
{| | {| | ||
| − | |style="padding: | + | |style="padding: 10px 0px 20px 15px;"|'''1. First of all, you need the package, therefore log in to our client area and download the module.''' |
|} | |} | ||
| − | |||
{| | {| | ||
| − | |style="padding: 0px 0px 20px | + | |style="padding: 0px 0px 20px 25px;"|[[File:MCC1.png]] |
|} | |} | ||
{| | {| | ||
| − | |style="padding: 0px 0px | + | |style="padding: 0px 0px 15px 15px;"|'''2. Open the FTP Client, log into the server with WHMCS installed. Then, open the main catalogue and upload the folder with files you have extracted previously.'''<br /> |
| + | The content of your package should look like on the below screen: | ||
|} | |} | ||
| − | |||
{| | {| | ||
| − | |style="padding: 0px 0px | + | |style="padding: 0px 0px 30px 25px;"|[[File:MCC1_1.png]] |
| − | + | ||
|} | |} | ||
| + | |||
| + | ==Activate The Addon== | ||
{| | {| | ||
| − | |style="padding: 0px | + | |style="padding: 10px 0px 15px 15px;"|'''3. Now, you have to activate the addon module in your WHMCS system.'''<br/> |
| + | Please log in to your WHMCS admin area. Once there, navigate to the '' 'System Settings' '' section and select '' 'Addon Modules'.'' <br/> | ||
| + | Find 'MetricsCube Connector' on the list of addons and click the '' 'Activate' '' button. | ||
|} | |} | ||
{| | {| | ||
| − | |style="padding: 0px 0px | + | |style="padding: 0px 0px 20px 25px;"|[[File:MCC2.png]] |
| − | + | ||
|} | |} | ||
{| | {| | ||
| − | |style="padding: 0px 0px | + | |style="padding: 0px 0px 15px 15px;"|'''4. After the module has been activated, you will need to enable access to your Admin Role.'''<br/> |
| + | To do that, click on '' 'Configure','' select the admin roles that should have access to the module, and save changes. | ||
|} | |} | ||
{| | {| | ||
| − | |style="padding: 0px 0px | + | |style="padding: 0px 0px 20px 25px;"|[[File:MCC2_1.png]] |
| − | + | ||
|} | |} | ||
{| | {| | ||
| − | |style="padding: 0px 0px | + | |style="padding: 0px 0px 30px 15px;"|'''Your module has just been successfully installed and activated!''' |
|} | |} | ||
| + | |||
| + | ==Sign Up And Synchronize With MetricsCube== | ||
{| | {| | ||
| − | |style="padding: 0px | + | |style="padding: 10px 0px 20px 15px;"|Now, move to [https://www.metricscube.io metricscube.io] to learn more about MetricsCube, create a new account and activate your free 14-day trial of the platform or use a [https://dashboard.metricscube.io/sign-up direct link] to the sign up page. |
| − | + | ||
|} | |} | ||
{| | {| | ||
| − | |style="padding: 0px 0px 20px 25px;"|[[File: | + | |style="padding: 0px 0px 20px 25px;"|[[File:MCC3.png]] |
|} | |} | ||
{| | {| | ||
| − | |style="padding: 0px 0px 15px 15px;"| | + | |style="padding: 0px 0px 15px 15px;"|Enter your email address and a strong password. Remember to read and then agree to the Privacy Policy before signing up!<br/> |
| − | + | There are no other steps required to create an account, you may continue right after. | |
|} | |} | ||
{| | {| | ||
| − | |style="padding: 0px 0px 20px 25px;"|[[File: | + | |style="padding: 0px 0px 20px 25px;"|[[File:MCC4.png]] |
|} | |} | ||
{| | {| | ||
| − | |style="padding: 0px 0px 15px 15px;"| | + | |style="padding: 0px 0px 15px 15px;"|On pressing the Sign Up button you will be automatically moved to the MetricsCube Wizard.<br/> |
| − | + | '' 'Step 1' '' - select the platform you are going to synchronize with MetricsCube - in our case that will be 'WHMCS'. | |
|} | |} | ||
{| | {| | ||
| − | |style="padding: 0px 0px 20px 25px;"|[[File: | + | |style="padding: 0px 0px 20px 25px;"|[[File:MCC5.png]] |
|} | |} | ||
{| | {| | ||
| − | |style="padding: 0px 0px 15px 15px;"|''' | + | |style="padding: 0px 0px 15px 15px;"|In '' 'Step 2' '' you will be asked to select the installation method. <br/> |
| − | + | Go for method 3, ''' 'WHMCS Module - Already Installed ', ''' as you have just installed the addon module. | |
|} | |} | ||
{| | {| | ||
| − | |style="padding: 0px 0px | + | |style="padding: 0px 0px 20px 25px;"|[[File:MCC6.png]] |
|} | |} | ||
| − | |||
| − | |||
{| | {| | ||
| − | |style="padding: | + | |style="padding: 0px 0px 15px 15px;"|When moved to '' 'Step 3' '' you will see an activation code presented on your screen.<br/> |
| − | + | Copy it, use the copy icon next to it and keep it safe as you will need it in further steps of synchronization. | |
|} | |} | ||
| − | |||
| − | |||
{| | {| | ||
| − | |style="padding: | + | |style="padding: 0px 0px 20px 25px;"|[[File:MCC7.png]] |
| − | + | ||
|} | |} | ||
{| | {| | ||
| − | |style="padding: 0px 0px | + | |style="padding: 0px 0px 15px 15px;"|Go back to your WHMCS addon now. Link the MetricsCube platform and your WHMCS by pasting the copied activation code into the Application ID field located in the module.<br/> |
| + | Press the '' 'Synchronize' '' button. | ||
|} | |} | ||
{| | {| | ||
| − | |style="padding: 0px 0px 20px 25px;"|[[File: | + | |style="padding: 0px 0px 20px 25px;"|[[File:MCC8.png]] |
|} | |} | ||
{| | {| | ||
| − | |style="padding: 0px 0px 20px 15px;"|The | + | |style="padding: 0px 0px 20px 15px;"|The last step of installation has just begun! Wait until MetricsCube wizard has finished synchronizing data between your WHMCS system and the platform. |
|} | |} | ||
{| | {| | ||
| − | |style="padding: 0px 0px 20px 25px;"|[[File: | + | |style="padding: 0px 0px 20px 25px;"|[[File:MCC8_1.png]] |
|} | |} | ||
{| | {| | ||
| − | |style="padding: 0px 0px | + | |style="padding: 0px 0px 20px 15px;"|The moment the synchronization is complete you will be informed about that in your addon with a short note. Have a break now and wait until the reports are finally ready. |
|} | |} | ||
{| | {| | ||
| − | |style="padding: 0px 0px | + | |style="padding: 0px 0px 20px 25px;"|[[File:MCC9.png]] |
| + | |} | ||
| + | {| | ||
| + | |style="padding: 0px 0px 30px 15px;"|You've nailed it! There is nothing to stop you now from using all MetricsCube tools and boosting the productivity of your business processes! | ||
|} | |} | ||
| − | = | + | =MetricsCube Connector Addon Management= |
{| | {| | ||
| − | |style="padding: 10px 0px | + | |style="padding: 10px 0px 30px 15px;"|As soon as the connection is established successfully, you will get relevant information, such as the current connection status and the time of the last synchronization.<br/> |
| − | + | The buttons allowing you to download the logs or link a different account can also be found on this page.<br/> Furthermore, you are offered several extra features to enhance your WHMCS with data straight from the MetricsCube platform. <br/> All these features will be explained in the following sections. | |
| − | + | ||
| − | + | ||
| − | + | ||
|} | |} | ||
| + | |||
| + | ==Process== | ||
{| | {| | ||
| − | |style="padding: 0px | + | |style="padding: 10px 0px 5px 15px;"|When synchronizing your WHMCS with MetricsCube platform for the first time, data download is divided into two parts:<br/> |
| + | * The first and usually quite fast synchronization fetches data from the last year of the WHMCS usage to analyze them and generate reports. | ||
| + | * As a background process there are data from the previous four years fetched and synchronized; this process is run once only. | ||
|} | |} | ||
{| | {| | ||
| − | |style="padding: 0px 0px | + | |style="padding: 0px 0px 20px 15px;"|In your addon you may control the current status of synchronization and details on when it was run for the last time. |
| − | + | ||
| − | + | ||
|} | |} | ||
{| | {| | ||
| − | |style="padding: 0px 0px | + | |style="padding: 0px 0px 30px 25px;"|[[File:MCC11.png]] |
|} | |} | ||
| + | |||
| + | ==Data Synchronization== | ||
{| | {| | ||
| − | |style="padding: 0px | + | |style="padding: 10px 0px 15px 15px;"|By default, once the synchronization of your WHMCS is completed, the personal data of your clients are not processed to MetricsCube.<br/> Therefore, some features offered by MetricsCube can be unavailable.<br/> |
| + | |||
| + | If you would like to benefit fully from the possibilities provided by MetricsCube, you can grant access to personal data.<br/> To do so, simply click on the '' 'Configure' '' button in the '' 'Data Synchronization' ''tab. | ||
|} | |} | ||
{| | {| | ||
| − | |style="padding: 0px 0px 20px 25px;"|[[File: | + | |style="padding: 0px 0px 20px 25px;"|[[File:MCC20.png]] |
|} | |} | ||
{| | {| | ||
| − | |style="padding: 0px 0px | + | |style="padding: 0px 0px 15px 15px;"|Once a new popup window opens, you will notice a possibility to tick additional configuration options. There are: |
| + | * '''General Data''' - stands for general data sharing required by MetricsCube to provide core services such as reporting, therefore this option is switched on by default. | ||
| + | * '''Live Data Synchronization''' - only if selected, data on recent activities in your system, such as users online, income or news feed, will be gathered and displayed in the Live Dashboard section.<br/>'' '''Note:''' Keep in mind that both slow connection with API and actions overload may noticeably slow down the application.'' | ||
| + | * '''Detailed User Data''' - this option allows you to transfer to MetricsCube additional data about your clients such as first name, last name, company name, email address, web hosting and domains assigned to them. <br/>[https://www.docs.modulesgarden.com/images/0/07/MCC22.png Here] you can check an exemplary report along with the personal data of clients.<br/>If this option is disabled, the client’s WHMCS will encrypt sensitive personal information and convey it in coded form.<br/>[https://www.docs.modulesgarden.com/images/b/b1/MCC23.png Here] you can find the previous example of the report without the consent to process the data.<br/>If this option is enabled, the generated reports will be more detailed and straightforward.<br/> '' '''Note:''' Please keep in mind that all data sent to MetricsCube is safely encrypted using the strong algorithm SHA-256.'' | ||
| + | * '''User Tracking''' - this option permits you to monitor the activity of your clients on the basis of logs generated through WHMCS. <br/> For instance, you can check when and which websites were browsed by your customers or verify if your clients have already read the answer for a ticket. <br/> '' '''Note:''' Please remember that this functionality is currently during the development '''and is not available yet.''' <br/>If you tick this option right now, you may be sure that once this functionality is completed, you will be granted access to it instantly.'' | ||
| + | |||
| + | '''Important:''' Please, be aware that the data update in MetricsCube, once you opt in or opt out for additional data synchronization, may take '''up to 24h'''. | ||
|} | |} | ||
{| | {| | ||
| − | |style="padding: 0px 0px | + | |style="padding: 0px 0px 30px 25px;"|[[File:MCC21.png]] |
|} | |} | ||
| + | <!-- do wywalenia ale potem | ||
{| | {| | ||
| − | |style="padding: 0px 0px | + | |style="padding: 0px 0px 30px 25px;"|[[File:MCC22.png]] |
|} | |} | ||
{| | {| | ||
| − | |style="padding: 0px 0px | + | |style="padding: 0px 0px 30px 25px;"|[[File:MCC23.png]] |
|} | |} | ||
| + | --> | ||
| + | |||
| + | <!-- | ||
| + | ==Webhooks Synchronization Method== | ||
{| | {| | ||
| − | |style="padding: 0px | + | |style="padding: 10px 0px 15px 15px;"|After the first successful synchronization between the two platforms, your data will be downloaded to analyze and update the reports automatically and regularly '''once per 24 hours'''. <br/> |
| + | '' 'Webhooks' '' is a default synchronization method that MetricsCube Connector For WHMCS works with.<br/> | ||
| + | The process starts with the MetricsCube server that makes a connection to your WHMCS.<br/> | ||
| + | Once the synchronization is initiated, the MetricsCube Connector For WHMCS module transfers the data via our API. | ||
|} | |} | ||
{| | {| | ||
| − | |style="padding: 0px 0px 30px 25px;"|[[File: | + | |style="padding: 0px 0px 30px 25px;"|[[File:MCC12.png]] |
|} | |} | ||
| − | === | + | ===Cron=== |
{| | {| | ||
| − | |style="padding: 10px 0px | + | |style="padding: 10px 0px 20px 15px;"|As another option, you can take advantage of the '' 'Cron' '' synchronization method once you have established the connection to your WHMCS.<br/> |
| + | |||
| + | In order to proceed, all you need to do is select '' 'Cron' '' from a drop-down menu that will be displayed after you click the arrow located next to the currently applied method.<br/>Now you can copy and paste the generated command to set up your crontab.<br/> | ||
| + | Afterward, the MetricsCube will no longer attempt to connect your WHMCS using the '' 'Webhooks' '' method, because it will automatically detect that the cron script has been executed. | ||
|} | |} | ||
{| | {| | ||
| − | |style="padding: 0px 0px | + | |style="padding: 0px 0px 30px 25px;"|[[File:MCC13.png]] |
|} | |} | ||
| − | + | --> | |
| − | + | ||
| − | + | ||
| − | + | ==Logs== | |
| − | + | {| | |
| − | + | |style="padding: 10px 0px 20px 15px;"|The MetricsCube Connector For WHMCS addon module allows to download Connector Logs. Press the button as shown on the screen to fetch logs. | |
| − | + | ||
| − | + | ||
| − | + | ||
| − | + | ||
| − | + | ||
| − | + | ||
| − | + | ||
| − | + | ||
| − | + | ||
| − | + | ||
|} | |} | ||
{| | {| | ||
| − | |style="padding: 0px 0px 20px 25px;"|[[File: | + | |style="padding: 0px 0px 20px 25px;"|[[File:MCC14.png]] |
|} | |} | ||
{| | {| | ||
| − | |style="padding: 0px 0px 15px 15px;"|The | + | |style="padding: 0px 0px 15px 15px;"|In case there are any issues and fetching logs is hampered, you will need to create or modify the log file in a required directory. <br/> |
| − | + | The correct path will be generated automatically and may be copied from the error notification that will appear on your screen. Please set the privileges as defined in the notifications. <br/> | |
| + | When ready, patiently wait until the next synchronization. | ||
|} | |} | ||
{| | {| | ||
| − | |style="padding: 0px 0px 30px 25px;"|[[File: | + | |style="padding: 0px 0px 30px 25px;"|[[File:MCC15.png]] |
|} | |} | ||
| − | == | + | ==Connect New Account== |
{| | {| | ||
| − | |style="padding: 10px 0px | + | |style="padding: 10px 0px 20px 15px;"|It is possible to connect your WHMCS to MetricsCube with another account from one addon. Simply, press the second button on the addon dashboard. |
| − | + | ||
| − | + | ||
|} | |} | ||
{| | {| | ||
| − | |style="padding: 0px 0px 20px 25px;"|[[File: | + | |style="padding: 0px 0px 20px 25px;"|[[File:MCC16.png]] |
|} | |} | ||
{| | {| | ||
| − | |style="padding: 0px 0px 15px 15px;"| | + | |style="padding: 0px 0px 15px 15px;"|This very moment you will see a warning notification on the consequences of such action.<br/> |
| − | + | Connecting with another account will reset your current configuration and your WHMCS will be no longer synchronized with your existing MetricsCube account.<br/> | |
| − | + | You will have to go through the process from the beginning. | |
| − | + | ||
| − | + | ||
| − | + | ||
| − | + | ||
| − | + | ||
| − | + | ||
| − | + | ||
| − | + | ||
| − | + | ||
| − | + | ||
| − | + | ||
| − | + | ||
|} | |} | ||
{| | {| | ||
| − | |style="padding: 0px 0px 30px 25px;"|[[File: | + | |style="padding: 0px 0px 30px 25px;"|[[File:MCC17.png]] |
|} | |} | ||
| − | + | ==Enhanced WHMCS Experience== | |
| − | == | + | |
{| | {| | ||
| − | |style="padding: 10px 0px | + | |style="padding: 10px 0px 15px 15px;"|Grant the MetricsCube Connector addon access to additional features, enabling it to retrieve data from your MetricsCube application and seamlessly present it within your WHMCS admin area.<br/> This will result in an elevated experience with your WHMCS platform. |
|} | |} | ||
{| | {| | ||
| − | |style="padding: 0px 0px 20px 25px;"|[[File: | + | |style="padding: 0px 0px 20px 25px;"|[[File:MCC24_0.png]] |
|} | |} | ||
{| | {| | ||
| − | |style="padding: 0px 0px | + | |style="padding: 0px 0px 20px 15px;"|Mark the features to take advantage of your MetricsCube data on specific pages directly in your WHMCS. |
| − | + | ||
|} | |} | ||
{| | {| | ||
| − | |style="padding: 0px 0px | + | |style="padding: 0px 0px 20px 25px;"|[[File:MCC24_1.png]] |
|} | |} | ||
| − | |||
| − | |||
| − | |||
{| | {| | ||
| − | |style="padding: | + | |style="padding: 0px 0px 20px 15px;"| |
| + | * '''User Data Widget Popup''' - appears upon hovering over the client's name within the entirety of the admin area. | ||
|} | |} | ||
{| | {| | ||
| − | |style="padding: 0px 0px | + | |style="padding: 0px 0px 20px 25px;"|[[File:MCC24_2.png]] |
| − | + | ||
|} | |} | ||
{| | {| | ||
| − | |style="padding: 0px 0px 20px 25px;"|[[File: | + | |style="padding: 0px 0px 20px 15px;"| |
| + | * '''User Tags in Clients List''' - preview the tags assigned to the client; hover over the tags to reveal a popup displaying additional details. | ||
| + | |} | ||
| + | {| | ||
| + | |style="padding: 0px 0px 20px 25px;"|[[File:MCC24_3.png]] | ||
|} | |} | ||
{| | {| | ||
|style="padding: 0px 0px 20px 15px;"| | |style="padding: 0px 0px 20px 15px;"| | ||
| − | * | + | * '''Quick Statistics Widget''' - MetricsCube Analytics widget featuring essential data is showcased on the WHMCS dashboard, and it can be managed just like any other active widget. |
|} | |} | ||
{| | {| | ||
| − | |style="padding: 0px 0px 20px 25px;"|[[File: | + | |style="padding: 0px 0px 20px 25px;"|[[File:MCC32.png]] |
|} | |} | ||
{| | {| | ||
|style="padding: 0px 0px 20px 15px;"| | |style="padding: 0px 0px 20px 15px;"| | ||
| − | * | + | * '''User Data Widget in Client Profile''' - a dedicated widget for individual clients, providing the same data as the 'User Data Popup,' now integrated into the profile page. |
|} | |} | ||
{| | {| | ||
| − | |style="padding: 0px 0px 20px 25px;"|[[File: | + | |style="padding: 0px 0px 20px 25px;"|[[File:MCC28.png]] |
|} | |} | ||
{| | {| | ||
| − | |style="padding: 0px 0px 20px 15px;"| | + | |style="padding: 0px 0px 20px 15px;"| |
| + | * '''User Data Widget in Service Details''' - provides a concise overview of the service balance. | ||
|} | |} | ||
{| | {| | ||
| − | |style="padding: 0px 0px 20px 25px;"|[[File: | + | |style="padding: 0px 0px 20px 25px;"|[[File:MCC29.png]] |
|} | |} | ||
{| | {| | ||
| − | |style="padding: 0px 0px 20px 15px;"| | + | |style="padding: 0px 0px 20px 15px;"| |
| + | * '''User Data Widget in Domain Details''' - offers a brief summary of the domain balance. | ||
|} | |} | ||
{| | {| | ||
| − | |style="padding: 0px 0px 20px 25px;"|[[File: | + | |style="padding: 0px 0px 20px 25px;"|[[File:MCC30.png]] |
|} | |} | ||
{| | {| | ||
| − | |style="padding: 0px 0px | + | |style="padding: 0px 0px 20px 15px;"| |
| − | + | * '''MetricsCube Link in Main Menu''' - press and you will be redirected to the MetricsCube login page. | |
|} | |} | ||
{| | {| | ||
| − | |style="padding: 0px 0px | + | |style="padding: 0px 0px 30px 25px;"|[[File:MCC31.png]] |
|} | |} | ||
| + | |||
| + | |||
| + | ===Admin Roles Permissions=== | ||
{| | {| | ||
| − | |style="padding: | + | |style="padding: 10px 0px 15px 15px;"|MetricsCube enhances the usability of your WHMCS admin dashboard by offering essential insights and rapidly providing critical information about your business's performance, clients, and services.<br/> Proceed now to the detailed configuration to upgrade your WHMCS experience with instant data from your MetricsCube. |
| − | + | ||
|} | |} | ||
{| | {| | ||
| − | |style="padding: 0px 0px | + | |style="padding: 0px 0px 20px 25px;"|[[File:MCC24.png]] |
|} | |} | ||
| − | |||
| − | |||
{| | {| | ||
| − | |style="padding: | + | |style="padding: 0px 0px 15px 15px;"|Define the settings for every administrator role individually to perfectly customize the displayed widgets and adjust the content to the admin role and needs.<br/> |
| + | Click on the '' 'Permissions' '' to open the list of available sections to enable. Note that the same options are available for every administrator role. <br/> Press the '' 'On/Off '' to select/uncheck all options at once. Remember to save the changes when the enhanced WHMCS configuration is ready. | ||
|} | |} | ||
{| | {| | ||
| − | |style="padding: 0px 0px 20px 25px;"|[[File: | + | |style="padding: 0px 0px 20px 25px;"|[[File:MCC25.png]] |
|} | |} | ||
{| | {| | ||
| − | |style="padding: 0px 0px | + | |style="padding: 0px 0px 15px 15px;"| |
| + | * '''Client Profile Popup''' | ||
| + | ** Personal Information | ||
| + | ** Income | ||
| + | ** Services | ||
| + | ** Tickets History | ||
| + | ** User Activity | ||
|} | |} | ||
{| | {| | ||
| − | |style="padding: 0px 0px | + | |style="padding: 0px 0px 20px 25px;"|[[File:MCC25_1.png]] |
|} | |} | ||
{| | {| | ||
| − | |style="padding: 0px 0px | + | |style="padding: 0px 0px 15px 15px;"| |
| + | * '''Tags''' | ||
| + | ** Create New Tags | ||
| + | ** Manage Client Tags | ||
|} | |} | ||
{| | {| | ||
| − | |style="padding: 0px 0px | + | |style="padding: 0px 0px 20px 25px;"|[[File:MCC26.png]] |
| − | + | ||
| − | + | ||
| − | + | ||
| − | + | ||
|} | |} | ||
{| | {| | ||
| − | |style="padding: 0px 0px 20px 25px;"|[[File: | + | |style="padding: 0px 0px 20px 25px;"|[[File:MCC26_1.png]] |
|} | |} | ||
{| | {| | ||
| − | |style="padding: 0px 0px 15px 15px;"| | + | |style="padding: 0px 0px 15px 15px;"| |
| + | * '''Comments''' | ||
| + | ** Add Comments | ||
| + | ** Remove Comments | ||
|} | |} | ||
{| | {| | ||
| − | |style="padding: 0px 0px 20px 25px;"|[[File: | + | |style="padding: 0px 0px 20px 25px;"|[[File:MCC27.png]] |
|} | |} | ||
{| | {| | ||
| − | |style="padding: 0px 0px | + | |style="padding: 0px 0px 30px 25px;"|[[File:MCC27_1.png]] |
|} | |} | ||
| + | |||
| + | =MetricsCube Platform= | ||
{| | {| | ||
| − | |style="padding: 0px | + | |style="padding: 10px 0px 15px 15px;"|Here it is! Ready, complex and so much detailed analysis of your business.<br/> |
| + | Quickly [https://dashboard.metricscube.io/sign-in sign in] to your account and start the exploration. | ||
|} | |} | ||
{| | {| | ||
| − | |style="padding: 0px 0px 20px | + | |style="padding: 0px 0px 20px 25px;"|[[File:MCC17_1.png]] |
|} | |} | ||
{| | {| | ||
| − | |style="padding: 0px 0px | + | |style="padding: 0px 0px 15px 15px;"| Most of all, accurate and flexible reports that will help you look deep into your company's performance.<br/> |
| + | Browse, change the periods and search for anything you might only need. | ||
|} | |} | ||
| − | |||
| − | |||
{| | {| | ||
| − | |style="padding: | + | |style="padding: 0px 0px 20px 25px;"|[[File:MCC18.png]] |
| + | |} | ||
| + | {| | ||
| + | |style="padding: 0px 0px 30px 25px;"|[[File:MCC19.png]] | ||
|} | |} | ||
=Tips= | =Tips= | ||
{| | {| | ||
| − | |style="padding: 10px 0px | + | |style="padding: 10px 0px 10px 15px;"|1. Take a look at our [https://www.youtube.com/@MetricsCube YouTube] channel! You will find there short videos presenting three different methods of installing your MetricsCube Connector For WHMCS.<br/> |
| + | Stay tuned as other videos are coming soon! | ||
| + | |} | ||
| + | {| | ||
| + | |style="padding: 0px 0px 30px 15px;"|2. Step into the MetricsCube [https://www.metricscube.io/blog Blog] where you will find the latest Release Notes together with thought-provoking Business Guides.<br/> | ||
| + | Get the gist of the web hosting industry, let yourself be guided across the various reports types and finally reach for practical advice on how to boost your business development. | ||
|} | |} | ||
| Line 358: | Line 383: | ||
=Common Problems= | =Common Problems= | ||
{| | {| | ||
| − | |style="padding: 10px 0px 10px 15px;"|'''1. | + | |style="padding: 10px 0px 10px 15px;"|'''1. When you encounter problems with connection, check whether your SELinux or firewall does not block ports.''' |
|} | |} | ||
| + | {| | ||
| + | |style="padding: 0px 0px 30px 15px;"|2. If you encounter any issues with redirection to WHMCS via buttons like '''View in WHMCS''' in the MetricsCube pop-up, please ensure the '''Administration Panel URL'''' in '''MetricsCube → My Application''' settings is accurately configured. | ||
Revision as of 11:08, 3 April 2025
Contents |
About WithoutDNS For WHMCS
- Synchronization Benefits:
| ✔ Access 91 Powerful Business Reports |
- General Features:
| ✔ Secure Synchronization With No Personal Data Stored |
| ✔ Fully GDPR Compliant |
| ✔ Supports PHP 8.2 Back To PHP 7.3 |
| ✔ Supports WHMCS V8.12 Back To WHMCS V7.2 |
- Exclusive Promo Code From ModulesGarden:
| ✔ Save 25% For 3 Months On The MetricsCube Platform With Coupon: WHMCS25%_MC |
Installation and Synchronization
| We have prepared a short but comprehensive tutorial that will show you how to successfully install MetricsCube Business Analytics For WHMCS module and synchronize your WHMCS with MetricsCube. Although the process is extremely easy and intuitive, go over the below guide to assure it is fast, smooth and trouble-free. |
Install The Addon
| 1. First of all, you need the package, therefore log in to our client area and download the module. |

|
| 2. Open the FTP Client, log into the server with WHMCS installed. Then, open the main catalogue and upload the folder with files you have extracted previously. The content of your package should look like on the below screen: |
Activate The Addon
| 3. Now, you have to activate the addon module in your WHMCS system. Please log in to your WHMCS admin area. Once there, navigate to the 'System Settings' section and select 'Addon Modules'. |

|
| 4. After the module has been activated, you will need to enable access to your Admin Role. To do that, click on 'Configure', select the admin roles that should have access to the module, and save changes. |

|
| Your module has just been successfully installed and activated! |
Sign Up And Synchronize With MetricsCube
| Now, move to metricscube.io to learn more about MetricsCube, create a new account and activate your free 14-day trial of the platform or use a direct link to the sign up page. |

|
| Enter your email address and a strong password. Remember to read and then agree to the Privacy Policy before signing up! There are no other steps required to create an account, you may continue right after. |

|
| On pressing the Sign Up button you will be automatically moved to the MetricsCube Wizard. 'Step 1' - select the platform you are going to synchronize with MetricsCube - in our case that will be 'WHMCS'. |

|
| In 'Step 2' you will be asked to select the installation method. Go for method 3, 'WHMCS Module - Already Installed ', as you have just installed the addon module. |

|
| When moved to 'Step 3' you will see an activation code presented on your screen. Copy it, use the copy icon next to it and keep it safe as you will need it in further steps of synchronization. |

|
| Go back to your WHMCS addon now. Link the MetricsCube platform and your WHMCS by pasting the copied activation code into the Application ID field located in the module. Press the 'Synchronize' button. |

|
| The last step of installation has just begun! Wait until MetricsCube wizard has finished synchronizing data between your WHMCS system and the platform. |

|
| The moment the synchronization is complete you will be informed about that in your addon with a short note. Have a break now and wait until the reports are finally ready. |

|
| You've nailed it! There is nothing to stop you now from using all MetricsCube tools and boosting the productivity of your business processes! |
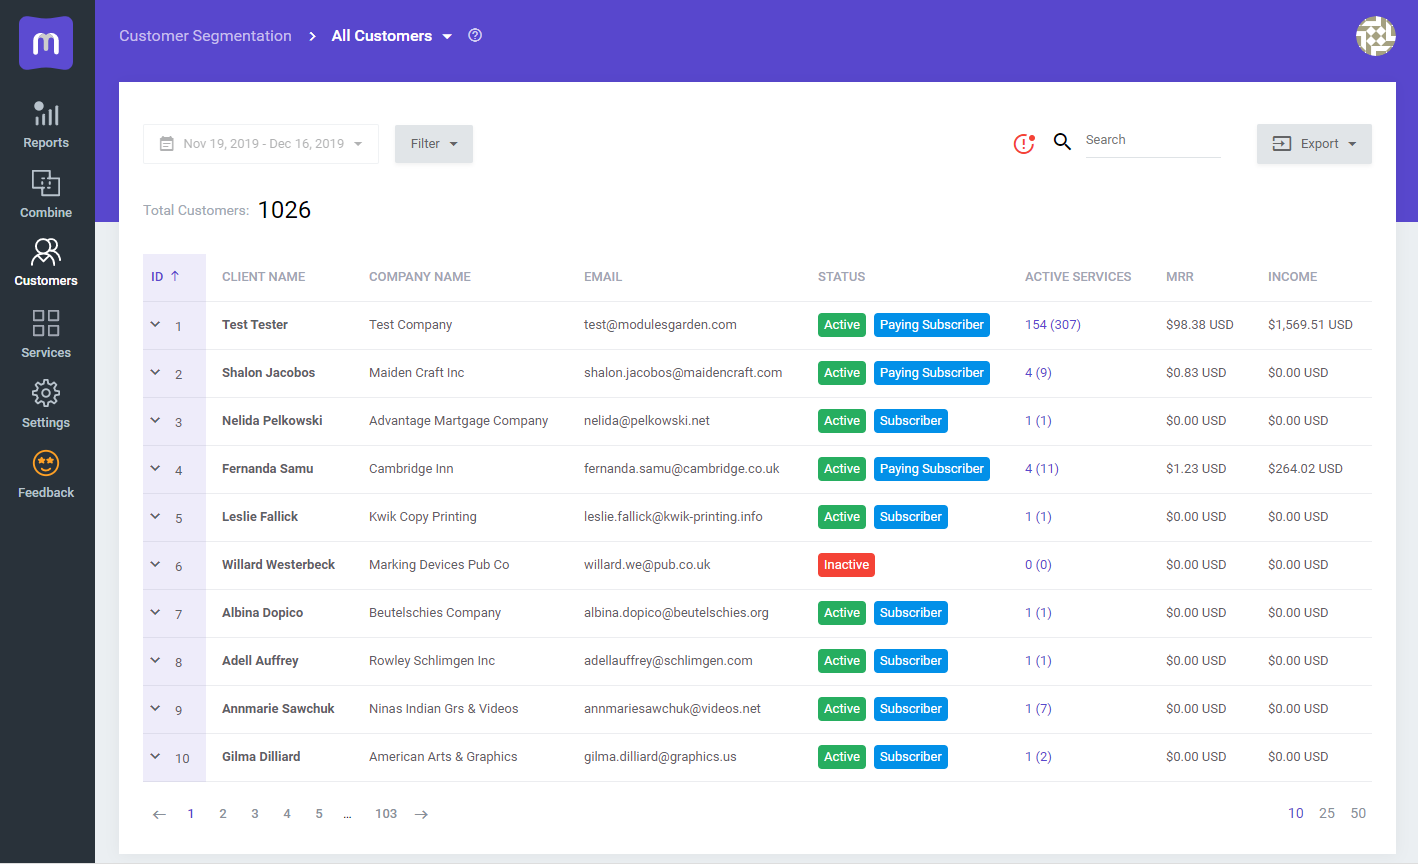
MetricsCube Connector Addon Management
| As soon as the connection is established successfully, you will get relevant information, such as the current connection status and the time of the last synchronization. The buttons allowing you to download the logs or link a different account can also be found on this page. |
Process
When synchronizing your WHMCS with MetricsCube platform for the first time, data download is divided into two parts:
|
| In your addon you may control the current status of synchronization and details on when it was run for the last time. |

|
Data Synchronization
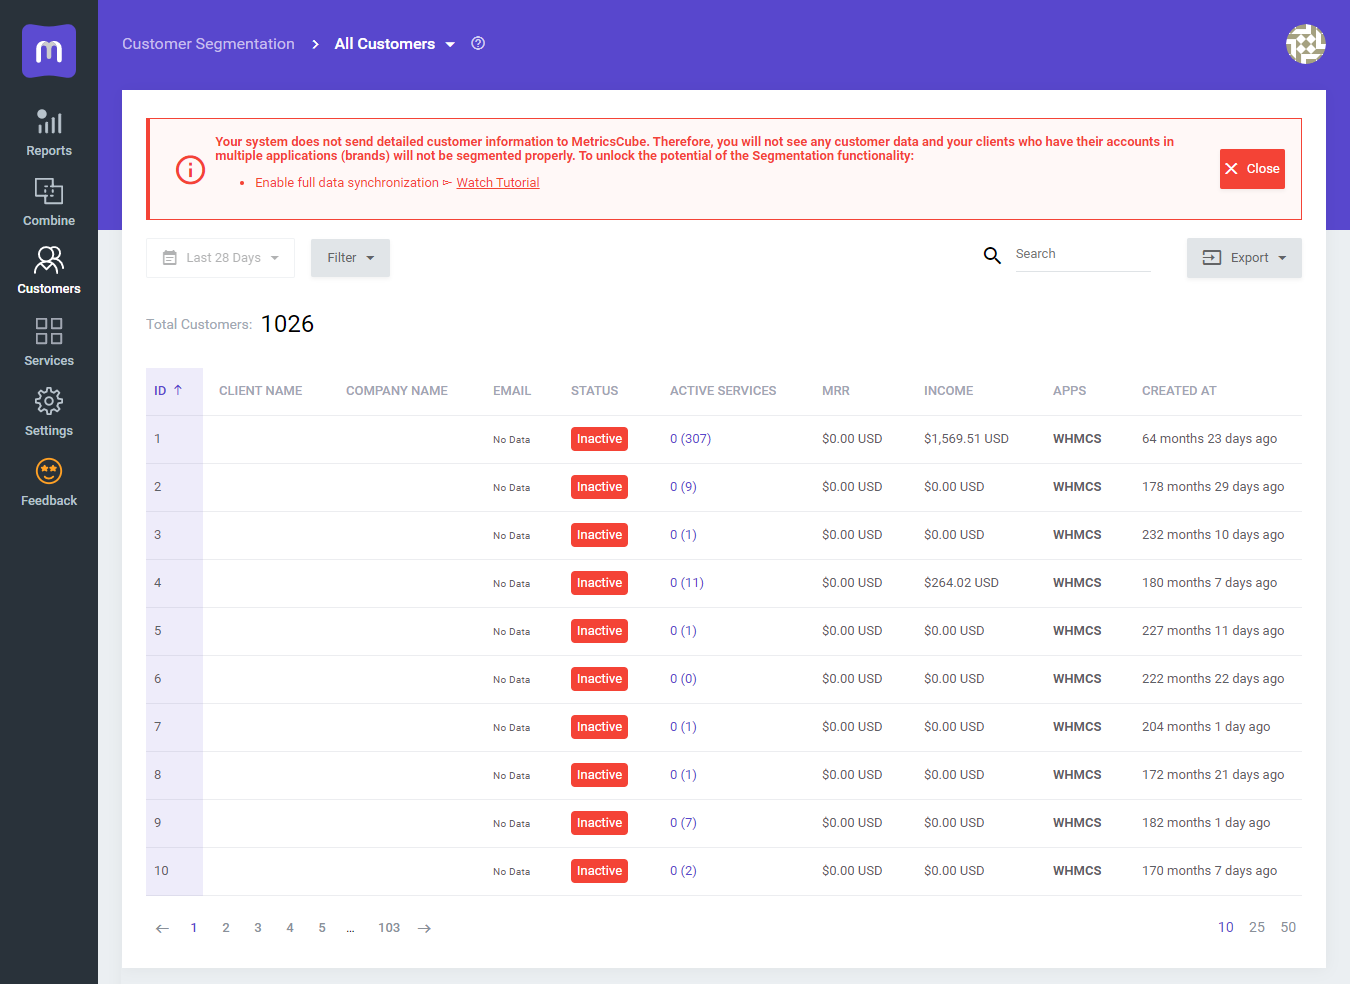
| By default, once the synchronization of your WHMCS is completed, the personal data of your clients are not processed to MetricsCube. Therefore, some features offered by MetricsCube can be unavailable. If you would like to benefit fully from the possibilities provided by MetricsCube, you can grant access to personal data. |

|
Once a new popup window opens, you will notice a possibility to tick additional configuration options. There are:
Important: Please, be aware that the data update in MetricsCube, once you opt in or opt out for additional data synchronization, may take up to 24h. |

|
Logs
| The MetricsCube Connector For WHMCS addon module allows to download Connector Logs. Press the button as shown on the screen to fetch logs. |

|
| In case there are any issues and fetching logs is hampered, you will need to create or modify the log file in a required directory. The correct path will be generated automatically and may be copied from the error notification that will appear on your screen. Please set the privileges as defined in the notifications. |

|
Connect New Account
| It is possible to connect your WHMCS to MetricsCube with another account from one addon. Simply, press the second button on the addon dashboard. |

|
| This very moment you will see a warning notification on the consequences of such action. Connecting with another account will reset your current configuration and your WHMCS will be no longer synchronized with your existing MetricsCube account. |

|
Enhanced WHMCS Experience
| Grant the MetricsCube Connector addon access to additional features, enabling it to retrieve data from your MetricsCube application and seamlessly present it within your WHMCS admin area. This will result in an elevated experience with your WHMCS platform. |

|
| Mark the features to take advantage of your MetricsCube data on specific pages directly in your WHMCS. |

|
|

|
|

|
|

|
|

|
|

|
|

|
|

|
Admin Roles Permissions
| MetricsCube enhances the usability of your WHMCS admin dashboard by offering essential insights and rapidly providing critical information about your business's performance, clients, and services. Proceed now to the detailed configuration to upgrade your WHMCS experience with instant data from your MetricsCube. |

|
| Define the settings for every administrator role individually to perfectly customize the displayed widgets and adjust the content to the admin role and needs. Click on the 'Permissions' to open the list of available sections to enable. Note that the same options are available for every administrator role. |

|
|

|
|

|

|
|

|

|
MetricsCube Platform
| Here it is! Ready, complex and so much detailed analysis of your business. Quickly sign in to your account and start the exploration. |

|
| Most of all, accurate and flexible reports that will help you look deep into your company's performance. Browse, change the periods and search for anything you might only need. |

|

|
Tips
| 1. Take a look at our YouTube channel! You will find there short videos presenting three different methods of installing your MetricsCube Connector For WHMCS. Stay tuned as other videos are coming soon! |
| 2. Step into the MetricsCube Blog where you will find the latest Release Notes together with thought-provoking Business Guides. Get the gist of the web hosting industry, let yourself be guided across the various reports types and finally reach for practical advice on how to boost your business development. |
Update Instructions
| An essential guidance through the process of updating the module is offered here. Ensure successful completion of the module update by carefully following each step, thereby preventing data loss or any unforeseen issues. |
Common Problems
| 1. When you encounter problems with connection, check whether your SELinux or firewall does not block ports. |
| 2. If you encounter any issues with redirection to WHMCS via buttons like View in WHMCS in the MetricsCube pop-up, please ensure the Administration Panel URL' in MetricsCube → My Application settings is accurately configured. |