Proxmox Mail Gateway For WHMCS
(→Server Configuration) |
(→Configuration of Product) |
||
| Line 147: | Line 147: | ||
|} | |} | ||
{| | {| | ||
| − | |style="padding: 0px 0px 20px 15px;"|'''13. Afterward, choose your product type, enter your product name, choose module and the product group from the dropdown menus. Press '' 'Continue'. '' ''' | + | |style="padding: 0px 0px 20px 15px;"|'''13. Afterward, choose your product type, enter your product name, choose module and the product group from the dropdown menus. Press '' 'Continue'. '' ''' |
|} | |} | ||
{| | {| | ||
| Line 153: | Line 153: | ||
|} | |} | ||
{| | {| | ||
| − | |style="padding: 0px 0px 15px 15px;"|'''14. | + | |style="padding: 0px 0px 15px 15px;"|'''14. At this moment, in the product '' 'Details','' you may also check the '' 'Require Domain' '' option as a domain must be a required step in the product order.'''<br/> Alternatively, you may add an adequate custom field to let the clients enter the relay domain ''(see step 17''). |
| − | + | ||
|} | |} | ||
{| | {| | ||
| Line 160: | Line 159: | ||
|} | |} | ||
{| | {| | ||
| − | |style="padding: 0px 0px | + | |style="padding: 0px 0px 15px 15px;"|'''15. Now, go to the '' 'Module Settings' '' section, choose your previously created server group from the dropdown menu.'''<br /> |
| + | If you did not set the proper permissions, you will be asked to do it now. | ||
|} | |} | ||
{| | {| | ||
| Line 166: | Line 166: | ||
|} | |} | ||
{| | {| | ||
| − | |style="padding: 0px 0px | + | |style="padding: 0px 0px 20px 15px;"|'''16. Now, let's start configuring the product settings. Choose whether you wish to allow your clients to change the domain name or not.'''<br/> Toggle the '' 'Change Domain Name' '' option and save the changes. |
|} | |} | ||
{| | {| | ||
|style="padding: 0px 0px 20px 25px;"|[[File:PMG_16.png]] | |style="padding: 0px 0px 20px 25px;"|[[File:PMG_16.png]] | ||
| + | |} | ||
| + | {| | ||
| + | |style="padding: 0px 0px 15px 15px;"|'''17. In case you did not mark the '' 'Require Domain' '' option in the product '' 'Details' '' move to the '' 'Custom Fields' '' tab and create a 'domain|Domain' custom field.''' <br/> Do not forget to mark it as a '' 'Required Field' '' and '' 'Show On Order Form'.'' Only then your clients will be able to successfully order and use this security tool for their relay domains. | ||
| + | |} | ||
| + | {| | ||
| + | |style="padding: 0px 0px 20px 25px;"|[[File:PMG_17.png]] | ||
|} | |} | ||
{| | {| | ||
Revision as of 13:10, 8 February 2022
Contents |
About Proxmox Mail Gateway For WHMCS
| Proxmox Mail Gateway For WHMCS is a tool allows to deliver Proxmox Mail Gateway security solution to protect clients mail servers against threats |
- Admin Area Features:
| ✔ |
| ✔ |
| ✔ |
| ✔ |
| ✔ |
- Client Area Features:
| ✔ |
| ✔ |
- General Info:
| ✔ |
| ✔ |
| ✔ |
| ✔ |
| ✔ |
| ✔ Supports WHMCS V8.0 And Later |
| ✔ Easy Module Upgrade To Open Source Version |
Installation and Configuration
| This tutorial will show you how to successfully install and configure Proxmox Mail Gateway For WHMCS. We will guide you step by step through the whole installation and configuration process. |
Installation
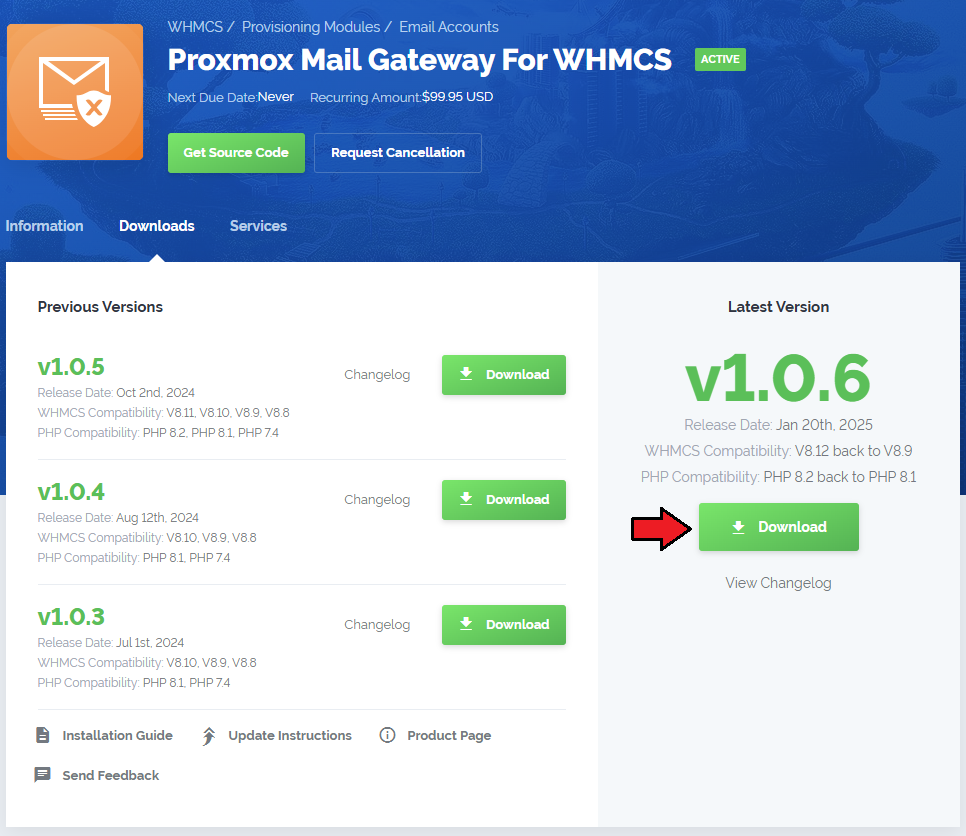
| 1. Log in to our client area and download the module. |
|
| 2. Upload and extract the extension into the main WHMCS directory. Extracted files in your WHMCS directory should look like this: |
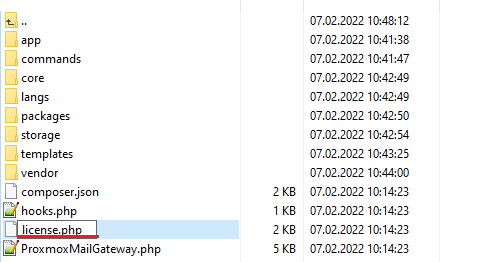
| 3. When you install Proxmox Mail Gateway For WHMCS for the first time, you have to rename the 'license_RENAME.php' file. The file is located in '/yourWHMCS/modules/servers/ProxmoxMailGateway/license_RENAME.php'. Rename it from 'license_RENAME.php' to 'license.php'. |
|
| 4. In order to configure your license key, you have to edit the previously renamed 'license.php' file. Enter your license key between the quotation marks as presented on the following screen. |

|
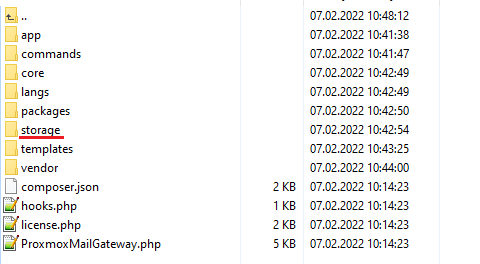
| 5. Now, set up the 'storage' folder as recursively writable. This folder is available at '/yourWHMCS/modules/servers/ProxmoxMailGateway/'. |
|
Server Configuration
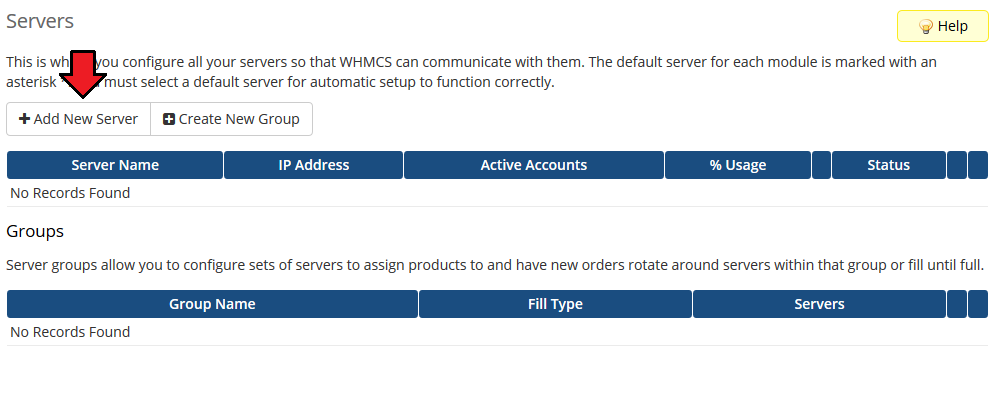
| 10. Now, we will show you how to configure a new server. To do so, log into your WHMCS and go to 'System Settings' → 'Servers'. |
|
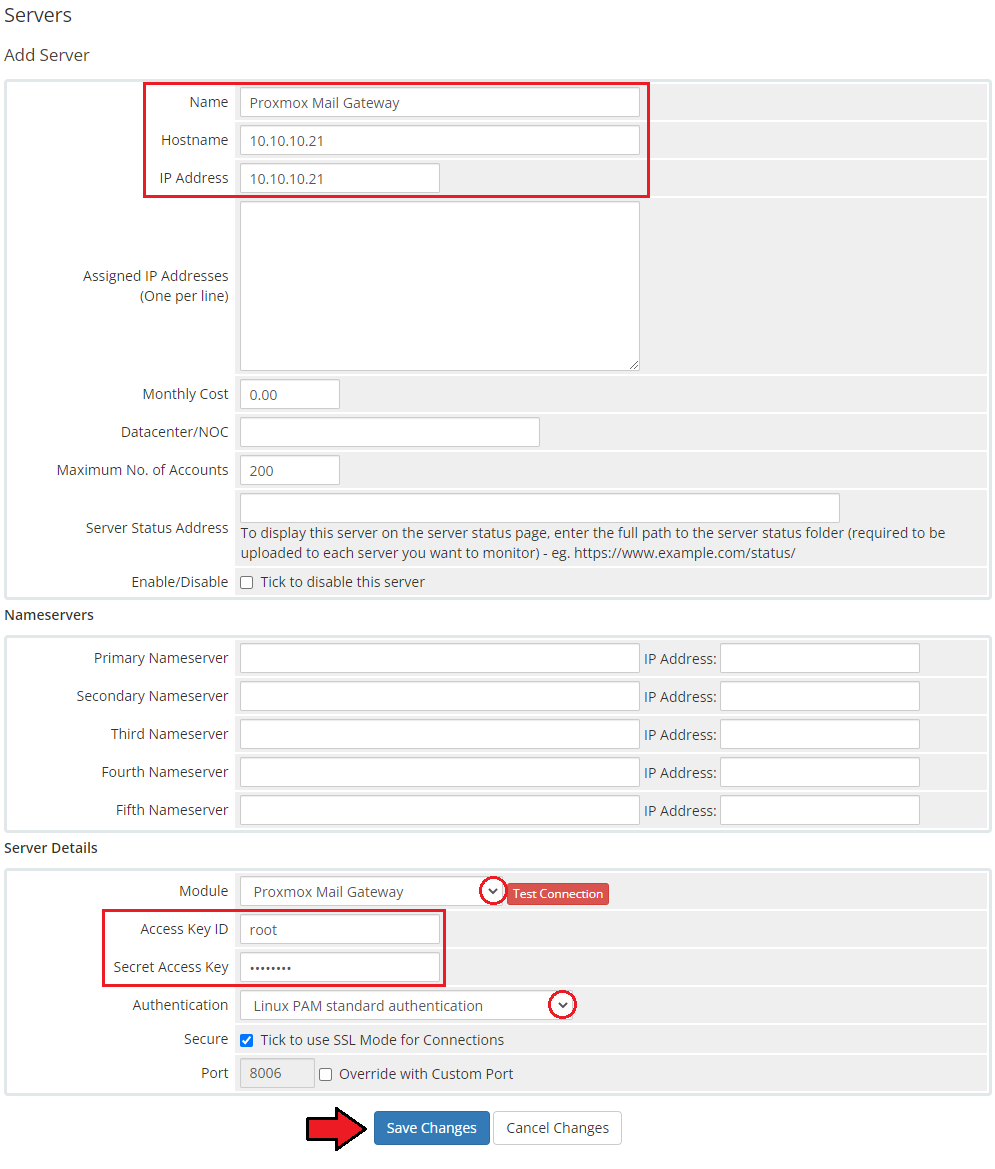
| 11. Next, enter your server name, hostname and IP address, username and password. Choose 'ProxmoxMailGateway' from a dropdown menu. If you want to provide data for a Linux user account in 'Authentication' select 'Linux PAM standard authentication' , and for ProxmoxMailGateway user select 'Proxmox Mail Gateway authentication server'. |
|
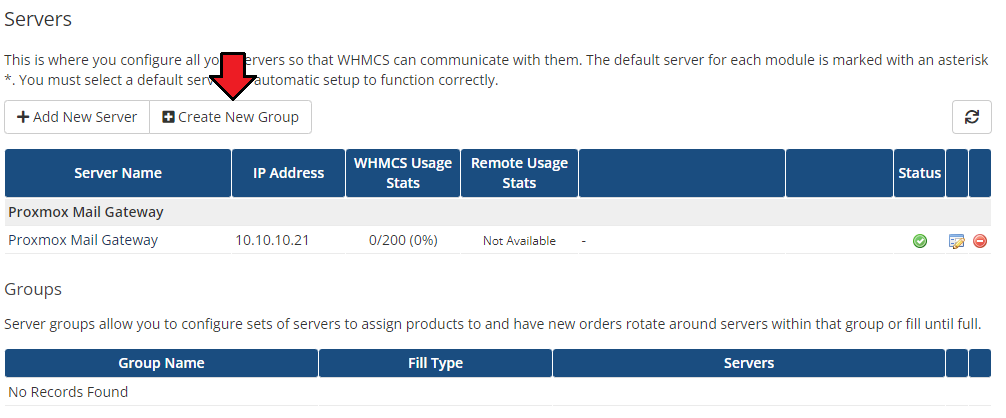
| 12. After you configure your server correctly, you will see the following screen. At this point, you need to create a new group for your server. For that purpose, press 'Create New Group'. |
|
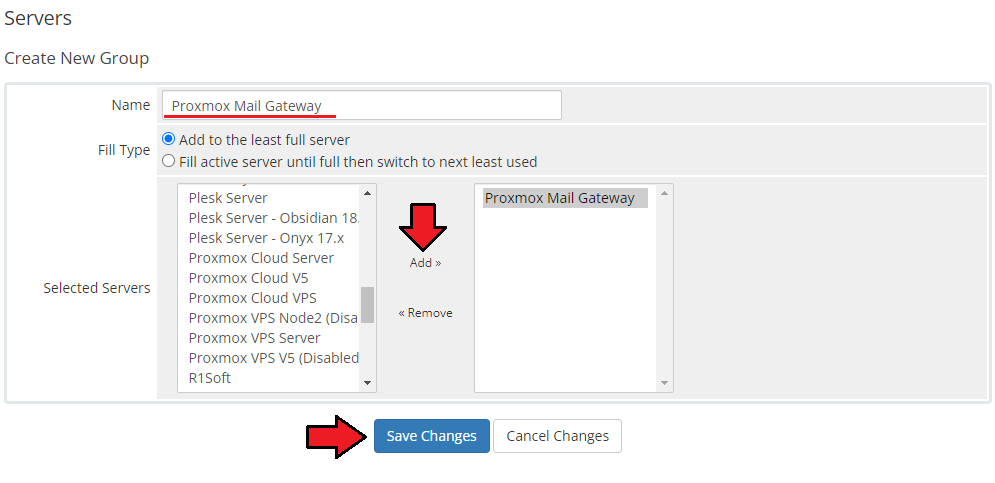
| 13. Enter the name, click on your previously created server, press 'Add' and then 'Save Changes'. |
|
Configuration of Product
| 10. In order to create and configure a product, go to 'System Settings' → 'Products/Services' → 'Products/Services'. Click on 'Create a New Group'. |

|
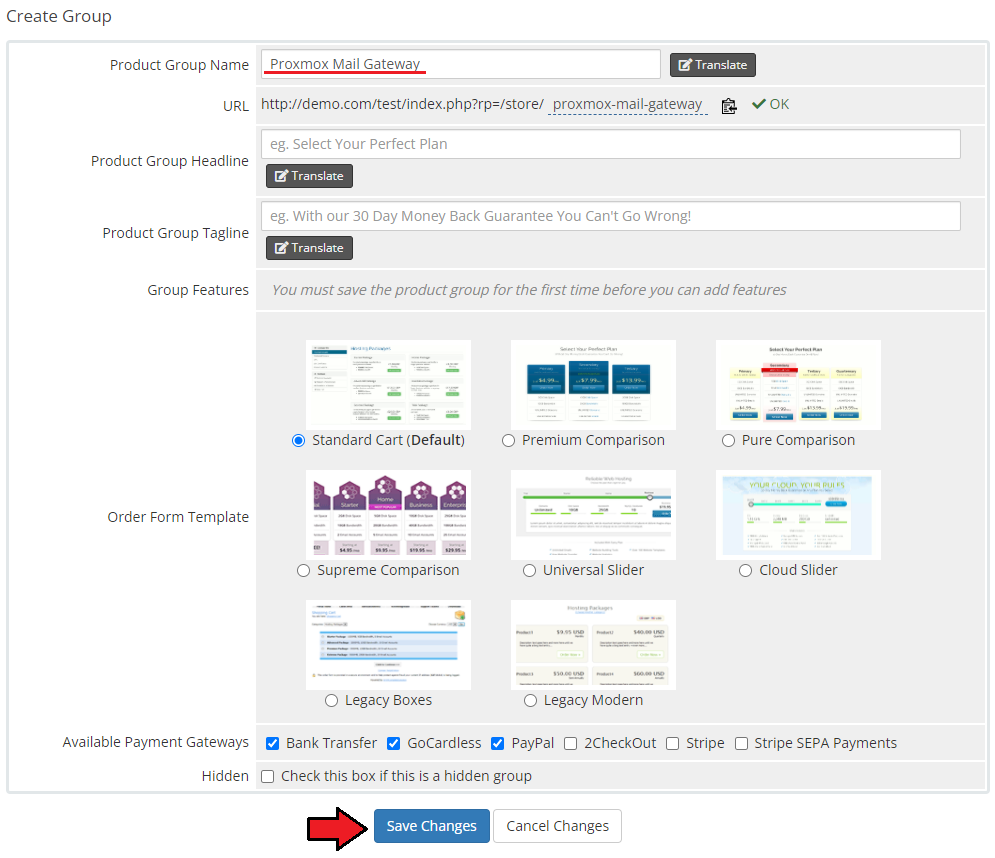
| 11. Enter your product group name and press 'Save Changes'. |
|
| 12. Once you have a product group, you can create a new product. To do so, first click on 'Create a New Product'. |

|
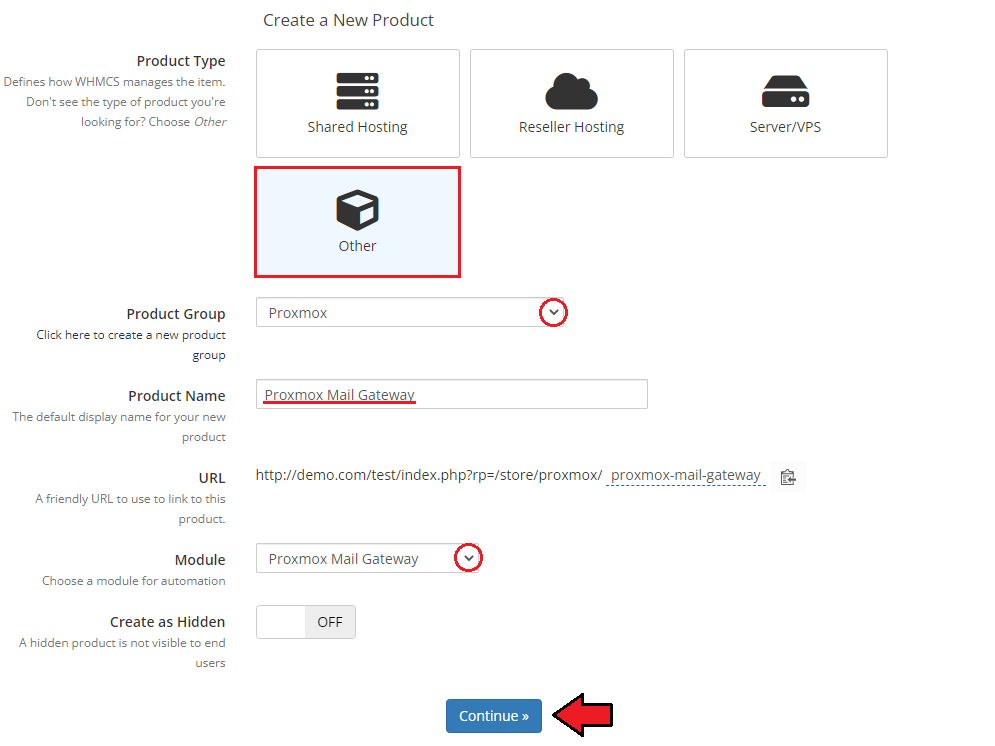
| 13. Afterward, choose your product type, enter your product name, choose module and the product group from the dropdown menus. Press 'Continue'. |
|
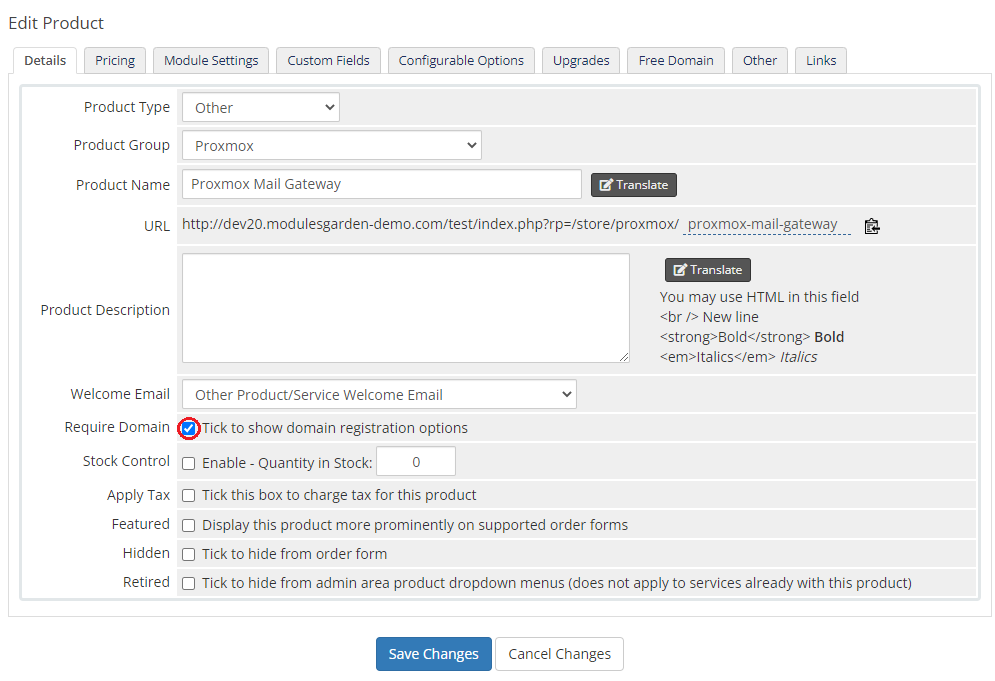
| 14. At this moment, in the product 'Details', you may also check the 'Require Domain' option as a domain must be a required step in the product order. Alternatively, you may add an adequate custom field to let the clients enter the relay domain (see step 17). |
|
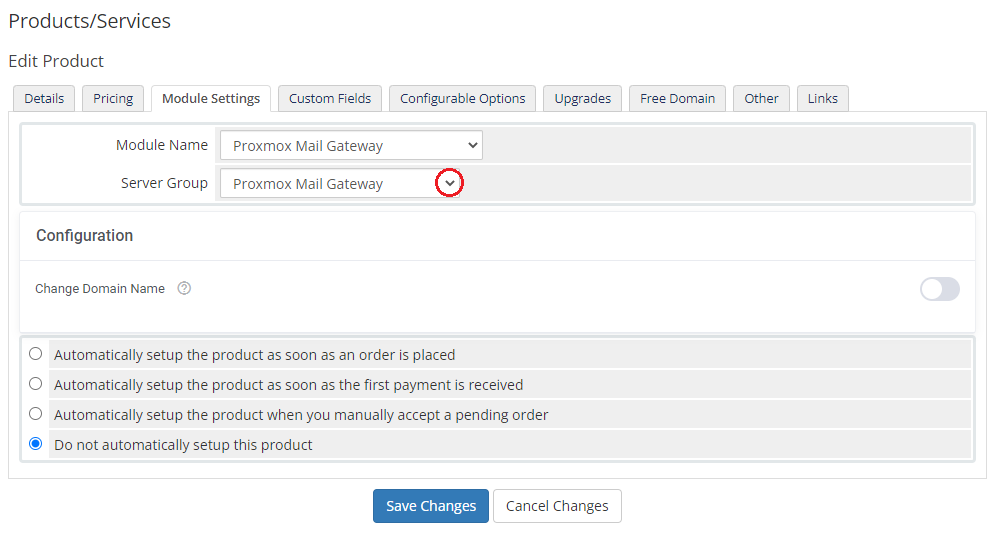
| 15. Now, go to the 'Module Settings' section, choose your previously created server group from the dropdown menu. If you did not set the proper permissions, you will be asked to do it now. |
|
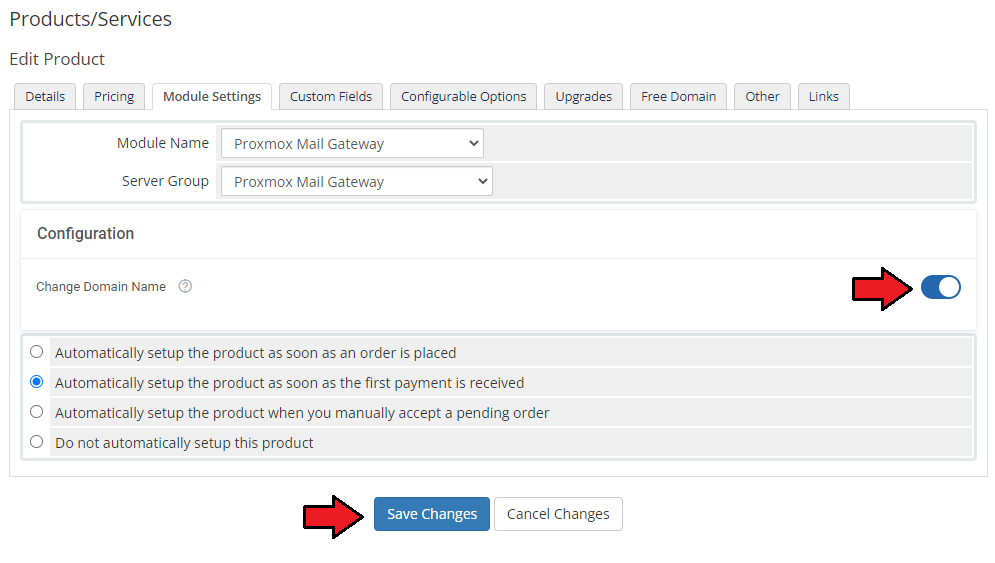
| 16. Now, let's start configuring the product settings. Choose whether you wish to allow your clients to change the domain name or not. Toggle the 'Change Domain Name' option and save the changes. |
|
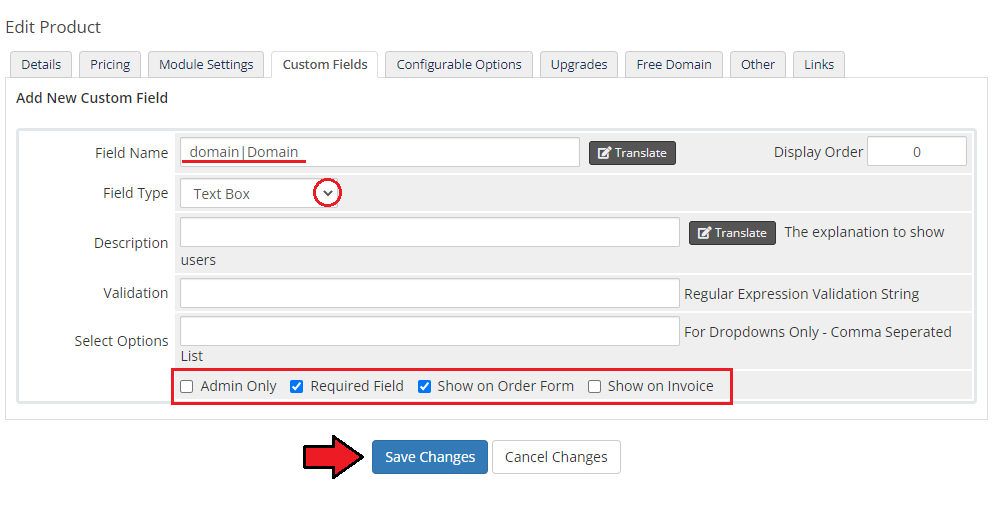
| 17. In case you did not mark the 'Require Domain' option in the product 'Details' move to the 'Custom Fields' tab and create a 'domain|Domain' custom field. Do not forget to mark it as a 'Required Field' and 'Show On Order Form'. Only then your clients will be able to successfully order and use this security tool for their relay domains. |
|
| That is all. Your product is now ready to use. |
Management
| In this section we will show you the possibilities Go through the below descriptions to become familiarized with all the options the Proxmox Mail Gateway solution can offer you. |
Admin Area
| Proxmox Mail Gateway For WHMCS allows you to monitor your service configuration details from the admin area of your WHMCS system. This includes supervision of such features like:
Basic module commands that can be executed on the service:
|
| File:PMG 19.png |
Ordering
| Ordering the service for rely domain, use the domain when placing the order. |
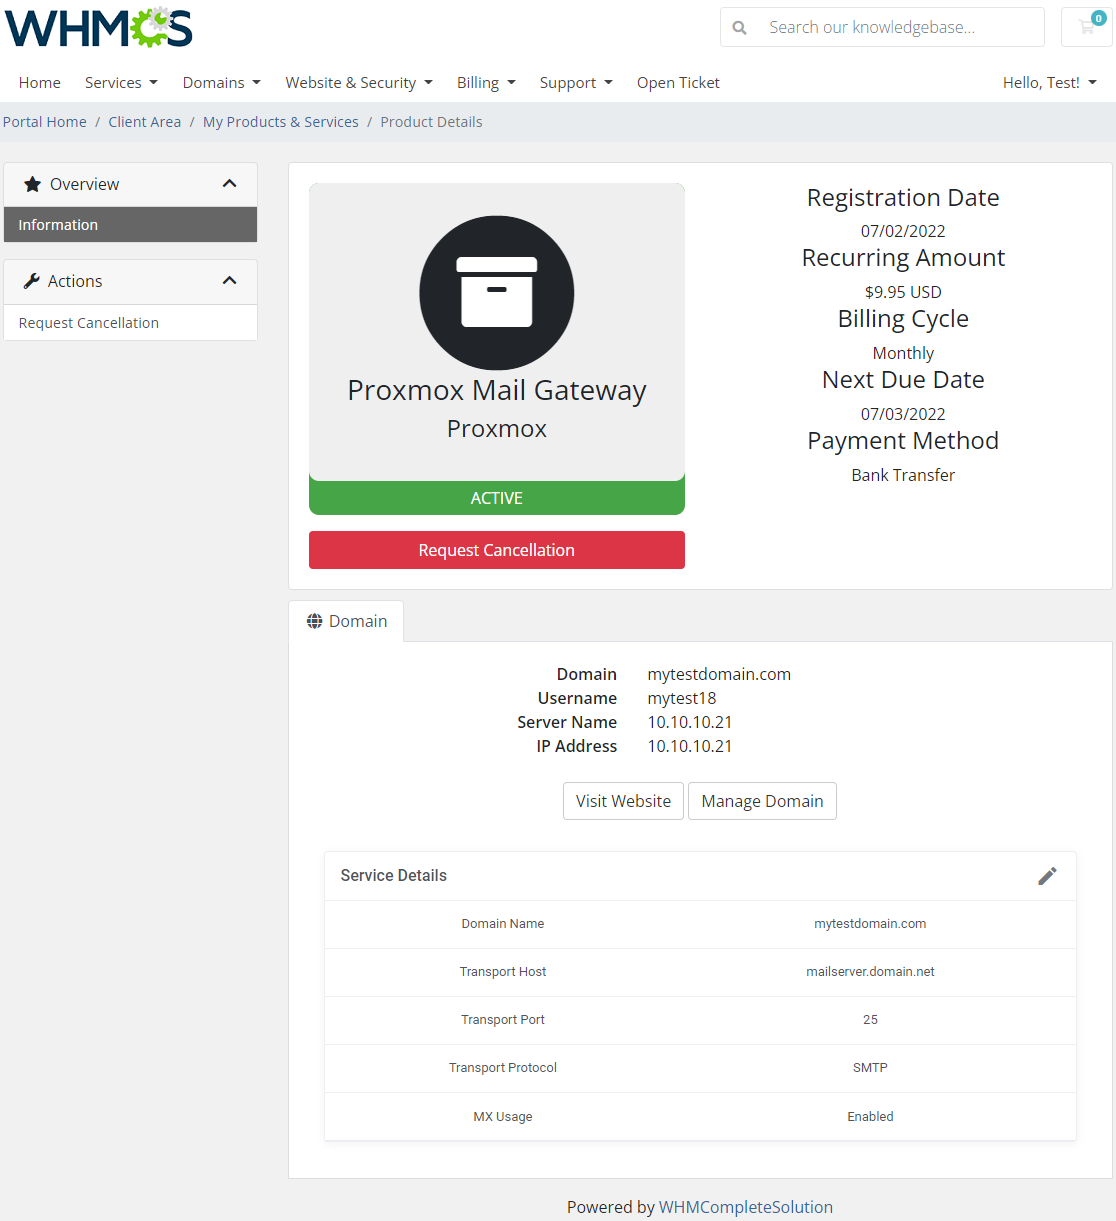
|
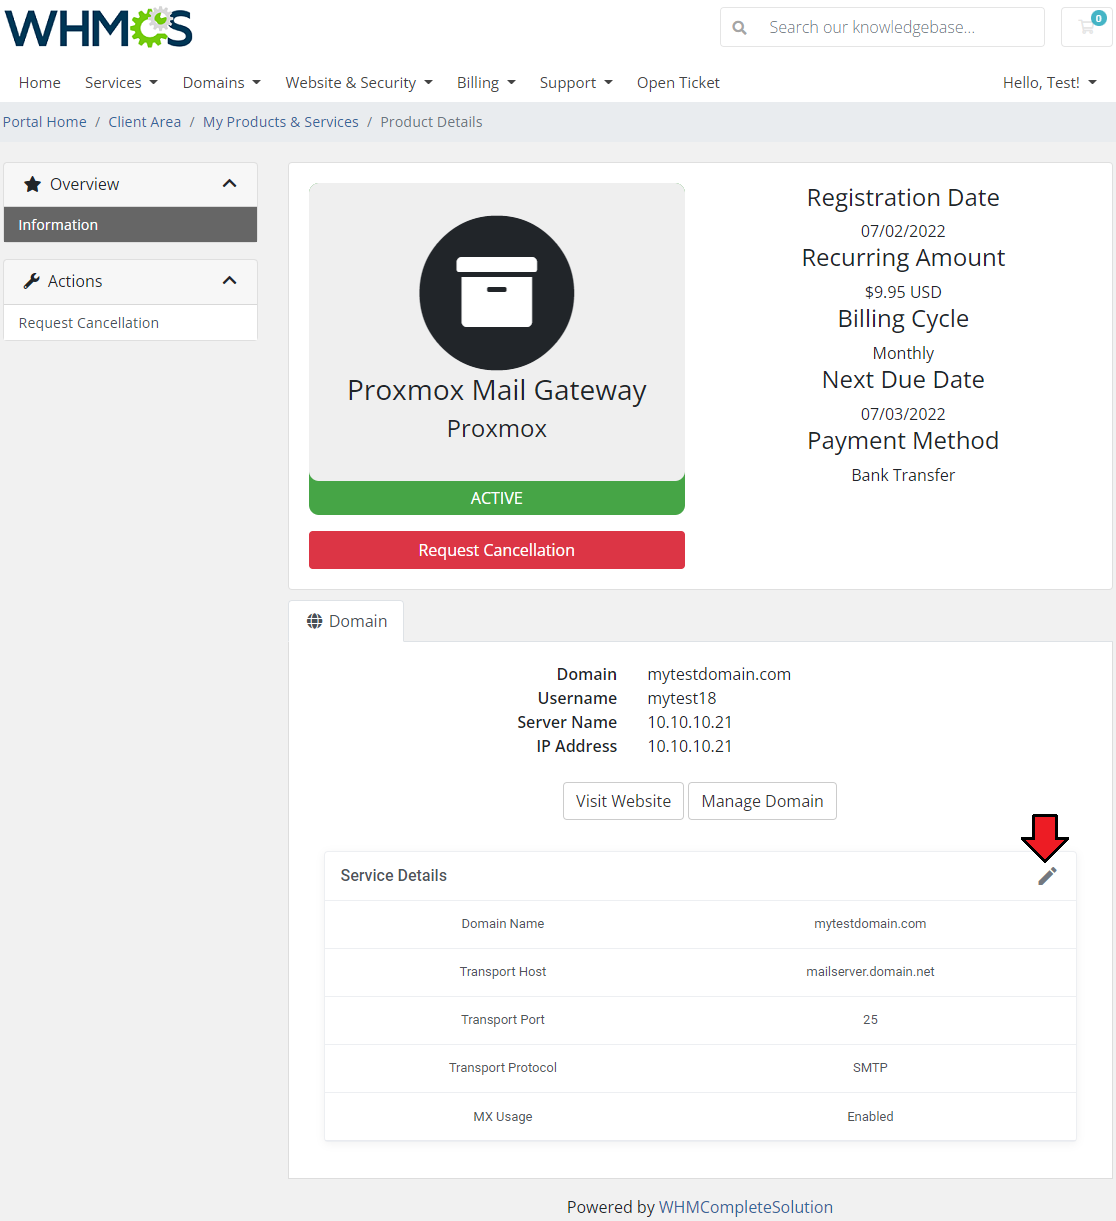
| The relay domain may also be provided in the form of a custom field to be filled in depending on the product configuration. |
|
Client Area
| This is how the service will be displayed in the client area. Proxmox Mail Gateway For WHMCS assures protection to your clients' mail servers against threats. |

|
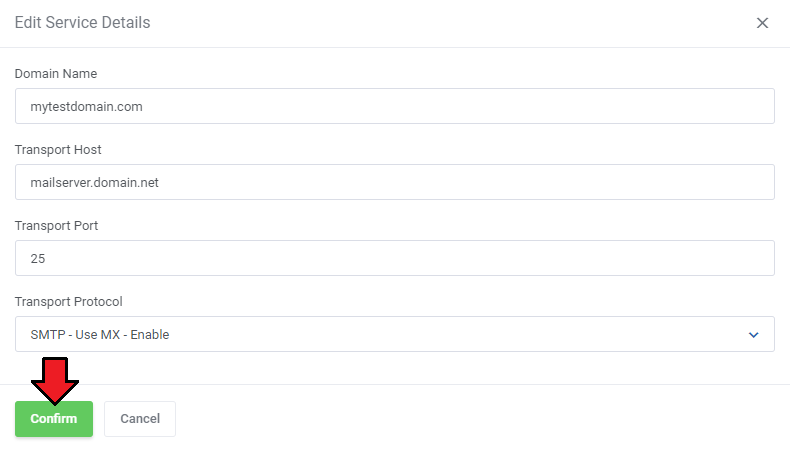
| Edit the service details (if allowed by the admin). Press the edit icon. |
|
| Confirm the changes when ready. |
| File:PMG 24.png |
Tips
| 1. |
Update Instructions
| Essential guidance through the process of updating the module is offered here. Keep in mind there is a quick and easy option in our client area that will let you upgrade the license of your module to an open source version at any time - and at a lower price! |
Common Problems
| 1. When you have problems with connection, check whether your SELinux or firewall does not block ports. |