Advanced Billing For WHMCS
(→Credit Billing) |
|||
| Line 1: | Line 1: | ||
| − | |||
| − | |||
<meta name="keywords" content="advanced billing for whmcs, advanced billing configuration, advanced billing management, advanced billing installation, advanced billing guide, modulesgarden advanced billing, advanced billing wiki, advanced billing tutorial, advanced billing tips, whmcs billing module wiki, advanced billing common problems, about advanced billing, advanced billing documentation, advanced billing faq, advanced billing help"></meta> | <meta name="keywords" content="advanced billing for whmcs, advanced billing configuration, advanced billing management, advanced billing installation, advanced billing guide, modulesgarden advanced billing, advanced billing wiki, advanced billing tutorial, advanced billing tips, whmcs billing module wiki, advanced billing common problems, about advanced billing, advanced billing documentation, advanced billing faq, advanced billing help"></meta> | ||
<meta name="description" content="ModulesGarden Wiki Contains All The Information You Need About The Advanced Billing For WHMCS Module."></meta> | <meta name="description" content="ModulesGarden Wiki Contains All The Information You Need About The Advanced Billing For WHMCS Module."></meta> | ||
| Line 6: | Line 4: | ||
=About [https://www.modulesgarden.com/products/whmcs/advanced-billing Advanced Billing For WHMCS]= | =About [https://www.modulesgarden.com/products/whmcs/advanced-billing Advanced Billing For WHMCS]= | ||
{| | {| | ||
| − | |style="padding: 10px 0px 10px 0px;"|'''Advanced Billing For WHMCS''' allows you to set up additional billing | + | |style="padding: 10px 0px 10px 0px;"|'''Advanced Billing For WHMCS''' allows you to set up additional billing models for your products based on the actual usage of bandwidth, CPU and other server resources.<br /> |
| − | + | You will be empowered to charge your clients on the grounds of the resources they used. The module also offers hourly billing, ticket billing, credit billing and recurring billing.<br /> | |
| − | + | In addition, it will automatically generate invoices in the preferred way and at freely adjusted time intervals, then send them to your customers.<br /> | |
| + | Advanced Billing For WHMCS is integrated with many popular modules, including cPanel and SolusVM, as well as ModulesGarden products. | ||
|} | |} | ||
<!--Comment--> | <!--Comment--> | ||
| Line 44: | Line 43: | ||
*''''Recurring Billing' Extension Features:''' | *''''Recurring Billing' Extension Features:''' | ||
{| | {| | ||
| − | |style="padding: 10px 0px 0px 30px;"|✔ Bill On Account | + | |style="padding: 10px 0px 0px 30px;"|✔ Bill On Account Termination |
|} | |} | ||
{| | {| | ||
| Line 56: | Line 55: | ||
|} | |} | ||
{| | {| | ||
| − | |style="padding: 0px 0px 0px 30px;"|✔ Automatically Generate | + | |style="padding: 0px 0px 0px 30px;"|✔ Define Minimum Billing Amount |
| + | |} | ||
| + | {| | ||
| + | |style="padding: 0px 0px 0px 30px;"|✔ Automatically Generate Invoice | ||
|} | |} | ||
{| | {| | ||
| Line 62: | Line 64: | ||
|} | |} | ||
{| | {| | ||
| − | |style="padding: 0px 0px | + | |style="padding: 0px 0px 0px 30px;"|✔ Automatically Apply Credits |
| + | |} | ||
| + | {| | ||
| + | |style="padding: 0px 0px 0px 30px;"|✔ Display Advanced Billing Cycle Info | ||
| + | |} | ||
| + | {| | ||
| + | |style="padding: 0px 0px 10px 30px;"|✔ Apply Discounts To Client Groups | ||
|} | |} | ||
*''''Credit Billing' Extension Features:''' | *''''Credit Billing' Extension Features:''' | ||
| Line 69: | Line 77: | ||
|} | |} | ||
{| | {| | ||
| − | |style="padding: 0px 0px 0px 30px;"|✔ Define | + | |style="padding: 0px 0px 0px 30px;"|✔ Define Minimum Amount Of Credits To Charge |
|} | |} | ||
{| | {| | ||
| Line 75: | Line 83: | ||
|} | |} | ||
{| | {| | ||
| − | |style="padding: 0px 0px 0px 30px;"|✔ Automatically Suspend Account When Client Is Out Of Credits | + | |style="padding: 0px 0px 0px 30px;"|✔ Automatically Suspend Account When Client Is Out Of Credits - With Override Support |
|} | |} | ||
{| | {| | ||
| Line 119: | Line 127: | ||
|} | |} | ||
{| | {| | ||
| − | |style="padding: 0px 0px 10px 30px;"|✔ Flush Archived Data | + | |style="padding: 0px 0px 10px 30px;"|✔ Flush Archived Data Immediately Or After A Defined Number Of Days |
|} | |} | ||
*'''Available Extensions:''' | *'''Available Extensions:''' | ||
| Line 196: | Line 204: | ||
{| | {| | ||
|style="padding: 0px 0px 10px 15px;"|'''2. In the downloaded file you will find two packages that support different PHP versions.'''<br/>As presented on the screen below, the first one is dedicated to PHP 7, while the second one is aimed at PHP 5.4 up to PHP 5.6.<br/>It does not apply to open source versions.<br/> | |style="padding: 0px 0px 10px 15px;"|'''2. In the downloaded file you will find two packages that support different PHP versions.'''<br/>As presented on the screen below, the first one is dedicated to PHP 7, while the second one is aimed at PHP 5.4 up to PHP 5.6.<br/>It does not apply to open source versions.<br/> | ||
| − | '' '''Note''': You can check current PHP version in your WHMCS. To do so proceed to ''' 'Utilities' → 'System' → 'PHP Info'.''' | + | '' '''Note''': You can check the current PHP version in your WHMCS. To do so, proceed to ''' 'Utilities' → 'System' → 'PHP Info'.''' |
|} | |} | ||
{| | {| | ||
| Line 210: | Line 218: | ||
{| | {| | ||
|style="padding: 0px 0px 15px 15px;"|'''4. Now you have to activate the module in your WHMCS system.'''<br /> | |style="padding: 0px 0px 15px 15px;"|'''4. Now you have to activate the module in your WHMCS system.'''<br /> | ||
| − | Log in to your WHMCS admin area. Click '' 'Setup' '' then choose '' 'Addon Modules'. ''<br /> | + | Log in to your WHMCS admin area. Click '' 'Setup' '', then choose '' 'Addon Modules'. ''<br /> |
| − | Afterwards find '' 'Advanced Billing' '' and press '' 'Activate' '' button. | + | Afterwards, find '' 'Advanced Billing' '' and press '' 'Activate' '' button. |
|} | |} | ||
{| | {| | ||
| Line 217: | Line 225: | ||
|} | |} | ||
{| | {| | ||
| − | |style="padding: 0px 0px 15px 15px;"|'''5. In the next step you need to configure your module | + | |style="padding: 0px 0px 15px 15px;"|'''5. In the next step you need to configure your module. To do so, press '' 'Configure' '' button.<br/> |
Select database driver for usage records: | Select database driver for usage records: | ||
*WHMCS Database | *WHMCS Database | ||
*External MongoDB Database<br/> | *External MongoDB Database<br/> | ||
| − | + | If you choose MongoDB, you will additionally have to provide: | |
*Hostname | *Hostname | ||
*Database Name | *Database Name | ||
*Username | *Username | ||
*Password<br/> | *Password<br/> | ||
| − | Choose desired admin roles groups to grant access to the module and '' 'Save Changes'. '' | + | Choose the desired admin roles groups to grant access to the module and '' 'Save Changes'. '' |
|}''' | |}''' | ||
{| | {| | ||
| Line 232: | Line 240: | ||
|} | |} | ||
{| | {| | ||
| − | |style="padding: 0px 0px 15px 15px;"|'''6. Now, proceed to [[#Extensions|Extensions]] section to find more about configuring license. | + | |style="padding: 0px 0px 15px 15px;"|'''6. Now, proceed to the [[#Extensions|Extensions]] section to find more about configuring the license. |
|} | |} | ||
{| | {| | ||
| − | |style="padding: 0px 0px 20px 15px;"|'''7. The last step is setting up a cron job | + | |style="padding: 0px 0px 20px 15px;"|'''7. The last step is setting up a cron job. You can find it following the path: WHMCS → '' 'Addons' '' → '' 'Advanced Billing' '' → '' 'Configuration' '' page. ''' |
|} | |} | ||
{| | {| | ||
| Line 241: | Line 249: | ||
|} | |} | ||
{| | {| | ||
| − | |style="padding: 0px 0px 15px 15px;"|'''Well done, you have just successfully installed Advanced Billing For WHMCS! ''' | + | |style="padding: 0px 0px 15px 15px;"|'''Well done, you have just successfully installed your Advanced Billing For WHMCS! ''' |
|} | |} | ||
{| | {| | ||
| − | |style="padding: 0px 0px 30px 15px;"|'''If you | + | |style="padding: 0px 0px 30px 15px;"|'''If you used the previous version of Advanced Billing For WHMCS and you would like to migrate the data to the current version,<br/> |
| − | please see | + | please see the [[#How To Update|How To Update]] section and follow the instructions listed there. |
|} | |} | ||
=Configuration and Management= | =Configuration and Management= | ||
{| | {| | ||
| − | |style="padding: 10px 0px 15px 15px;"|Now let | + | |style="padding: 10px 0px 15px 15px;"|Now, let us learn more about the functionalities of the module. We will show you the possibilities of our product, using cPanel Extended For WHMCS as an example.<br /> |
| − | Please note that billing features are different in | + | Please note that the billing features are different in both modules, but the core functionality of Advanced Billing remains the same.<br /> |
| − | + | First, choose your module from the'' 'Enable Advanced Billing For' '' dropdown menu as shown on the screen below.<br /> | |
| − | For | + | For demonstration we have chosen '' 'cPanel Premium' '' with the cPanel Extended module. |
|} | |} | ||
{| | {| | ||
| Line 260: | Line 268: | ||
==Core== | ==Core== | ||
{| | {| | ||
| − | |style="padding: 10px 0px 30px 15px;"|Our module core has been designed in a way to allow | + | |style="padding: 10px 0px 30px 15px;"|Our module core has been designed in such a way so as to allow the collection of records and invoices management.<br /> |
| − | Any extra features are handled by extensions | + | Any extra features are handled by extensions which can be easily enabled/disabled, and are always configured per product. |
|} | |} | ||
===Product List=== | ===Product List=== | ||
{| | {| | ||
| − | |style="padding: 10px 0px 15px 15px;"|On the | + | |style="padding: 10px 0px 15px 15px;"|On the Products List you can find all products which have Advanced Billing enabled.<br/> |
| − | If the product's submodule is not supported, '' 'default' '' mode will be used instead | + | If the product's submodule is not supported, the '' 'default' '' mode will be used instead. It enables you to bill your client only for an hourly usage of the product.<br /> |
| − | + | Apart from the products and their submodules, the Products List contains also the following options: | |
| − | * | + | *Control the status of your product billing, enable/disable Advanced Billing for a product |
| − | * | + | *Manage cron frequency |
| − | * | + | *Use action buttons: |
**Pricing | **Pricing | ||
**Settings | **Settings | ||
| Line 280: | Line 288: | ||
====Settings==== | ====Settings==== | ||
{| | {| | ||
| − | |style="padding: 10px 0px 15px 15px;"| | + | |style="padding: 10px 0px 15px 15px;"|Clicking on the '' 'Settings' '' button will allow you to see the '' Module Settings'' only for cPanel/cPanel Extended modules and other enabled extensions. We will discuss them later on.<br /> |
|} | |} | ||
{| | {| | ||
| Line 286: | Line 294: | ||
|} | |} | ||
{| | {| | ||
| − | |style="padding: 0px 0px 15px 15px;"|Here you can set Application Manager (Softaculous/Installatron) and cPanel theme.<br /> | + | |style="padding: 0px 0px 15px 15px;"|Here you can set both Application Manager (Softaculous/Installatron) and cPanel theme.<br /> |
Simply enter a theme name as shown on the screen below. | Simply enter a theme name as shown on the screen below. | ||
|} | |} | ||
| Line 295: | Line 303: | ||
====Used Resource Pricing==== | ====Used Resource Pricing==== | ||
{| | {| | ||
| − | |style="padding: 10px 0px 15px 15px;"| | + | |style="padding: 10px 0px 15px 15px;"|Moving to the '' 'Pricing' '' section will allow you to set up billing for a specific server resource usage like bandwidth.<br /> |
|} | |} | ||
{| | {| | ||
| Line 302: | Line 310: | ||
{| | {| | ||
|style="padding: 0px 0px 15px 15px;"|Manage each usage record by setting up its: | |style="padding: 0px 0px 15px 15px;"|Manage each usage record by setting up its: | ||
| − | *'''Free Limit''' - | + | *'''Free Limit''' - used to set the amount of usage records for which a customer will not be charged.<br /> |
| − | In our | + | In our case, as you can see on the screen below, a customer will not be charged for 1GB (1024MB) bandwidth.<br /> |
| − | *'''Price''' - defines how much your client will have to pay for specific resource. Note that we provide two types of charging: units per hour and units used since the last cron run.<br /> | + | *'''Price''' - defines how much your client will have to pay for a specific resource. Note that we provide two types of charging: units per hour and units used since the last cron run.<br /> |
| − | For example, | + | For example, users pay for a quantity of subdomains each hour, but when the traffic is generated, bandwidth used since the last cron run will have to be paid once only.<br /> |
| − | *'''Display Unit''' - | + | *'''Display Unit''' - defines the manner in which the record usage will be displayed. It does not affect free limit and pricing - they are calculated in a basic unit.<br /> |
| − | If you select '' 'GB' '', free limit will be still 1024 MB, and price will be MB/hr, '''not''' GB/hr.<br /> | + | If you select the '' 'GB' '' option, free limit will be still 1024 MB, and the price will be MB/hr, '''not''' GB/hr.<br /> |
*'''Status''' - allows you to enable/disable billing for this resource.<br /> | *'''Status''' - allows you to enable/disable billing for this resource.<br /> | ||
| − | To proceed, choose your usage records, units, | + | To proceed, choose your usage records, units, statuses, set up the prices and free limits. Afterwards, press '' 'Save'. '' |
|} | |} | ||
{| | {| | ||
| Line 315: | Line 323: | ||
|} | |} | ||
{| | {| | ||
| − | |style="padding: 0px 0px 30px 15px;"|As you | + | |style="padding: 0px 0px 30px 15px;"|As you probably noticed, there is also a '' 'Configure' '' column to the right.<br /> |
| − | It allows you to set up different free limits and pricing depending on resource origin.<br /> | + | It allows you to set up different free limits and pricing depending on the resource origin.<br /> |
Currently, only '' 'Viruozzo' '' and '' 'Openstack VPS' '' submodules support this feature. | Currently, only '' 'Viruozzo' '' and '' 'Openstack VPS' '' submodules support this feature. | ||
|} | |} | ||
| Line 322: | Line 330: | ||
===Items=== | ===Items=== | ||
{| | {| | ||
| − | |style="padding: 10px 0px 15px 15px;"|To view counted usage, go to '' 'Items' '' tab.<br /> | + | |style="padding: 10px 0px 15px 15px;"|To view the counted resource usage, go to the '' 'Items' '' tab.<br /> |
| − | Each cron run will create an item for each customer | + | Each cron run will create an item for each customer (if it does not exist at the moment) and add new records to the existing ones.<br /> |
| − | In | + | In this way you can see the resource usage of the current server for the last billing period.<br /> |
| − | Automatic generation of invoices is based precisely on previously created items.<br /> | + | Automatic generation of invoices is based precisely on the previously created items.<br /> |
| − | To view more details click on '' 'View Details' '' as shown on the following screen.<br /> | + | To view more details, click on '' 'View Details' '' as shown on the following screen.<br /> |
| − | You can also easily remove billing for specific hosting. To do so, press '' 'Delete Records' '' in '' 'Actions' '' column. | + | You can also easily remove billing for a specific hosting. To do so, press '' 'Delete Records' '' in the '' 'Actions' '' column. |
|} | |} | ||
{| | {| | ||
| Line 333: | Line 341: | ||
|} | |} | ||
{| | {| | ||
| − | |style="padding: 0px 0px 20px 15px;"| | + | |style="padding: 0px 0px 20px 15px;"| This section will show you some more detailed information on Bandwidth, Storage, Domains and other enabled records.<br/> |
| − | See the price and usage, last cron run date and total records summary.<br/> | + | See the price and usage, the last cron run date and the total records summary.<br/> |
Press '' 'Delete' '' button to remove entries. | Press '' 'Delete' '' button to remove entries. | ||
|} | |} | ||
| Line 343: | Line 351: | ||
===Invoices=== | ===Invoices=== | ||
{| | {| | ||
| − | |style="padding: 10px 0px 15px 15px;"| | + | |style="padding: 10px 0px 15px 15px;"|In the '' 'Invoices' '' section you can manage all of your awaiting invoices. They can be generated both automatically and manually.<br /> |
On the screen below you can see a previously generated invoice for our cPanel Extended account.<br /> | On the screen below you can see a previously generated invoice for our cPanel Extended account.<br /> | ||
| − | To view detailed information about particular invoice press '' 'Show Details' '' button. | + | To view more detailed information about a particular invoice, press '' 'Show Details' '' button. |
|} | |} | ||
{| | {| | ||
| Line 351: | Line 359: | ||
|} | |} | ||
{| | {| | ||
| − | |style="padding: 0px 0px 15px 15px;"| | + | |style="padding: 0px 0px 15px 15px;"|Here you can verify and modify your awaiting invoices. To avoid any risks, you should double check that all your invoices have been generated correctly.<br /> |
|} | |} | ||
{| | {| | ||
| Line 357: | Line 365: | ||
|} | |} | ||
{| | {| | ||
| − | |style="padding: 0px 0px 15px 15px;"| | + | |style="padding: 0px 0px 15px 15px;"|Now, let us manually generate a sample invoice for your customer.<br /> |
| − | For this purpose simply click on '' 'Generate' '' next to | + | For this purpose, simply click on '' 'Generate' '' next to the chosen invoice. |
|} | |} | ||
{| | {| | ||
| Line 364: | Line 372: | ||
|} | |} | ||
{| | {| | ||
| − | |style="padding: 0px 0px 30px 15px;"|After changing product's package, invoice | + | |style="padding: 0px 0px 30px 15px;"|After changing the product's package, the invoice will be automatically generated for an old package. |
|} | |} | ||
===Settings=== | ===Settings=== | ||
{| | {| | ||
| − | |style="padding: 10px 0px 30px 15px;"| | + | |style="padding: 10px 0px 30px 15px;"|In the '' 'Settings' '' tab you can find pages such as '' 'Logs', 'Integration' '' and '' 'Extensions'. '' |
|} | |} | ||
====Integration Code==== | ====Integration Code==== | ||
{| | {| | ||
| − | |style="padding: 10px 0px 15px 15px;"|'' 'Integration' '' page contains codes required to integrate Advanced Billing For WHMCS with your client area.<br /> | + | |style="padding: 10px 0px 15px 15px;"|The '' 'Integration' '' page contains codes required to integrate Advanced Billing For WHMCS with your client area.<br /> |
| − | The first | + | The first code allows you to display product pricing while placing an order. <br /><br /> |
| + | '' '''Note:''' The integration code path may vary depending on the order template you are using.'' | ||
|} | |} | ||
{| | {| | ||
| Line 381: | Line 390: | ||
|} | |} | ||
{| | {| | ||
| − | |style="padding: 0px 0px 15px 15px;"|If the code has been | + | |style="padding: 0px 0px 15px 15px;"|If the code has been typed in correctly, the sample order should look like this: |
|} | |} | ||
{| | {| | ||
| Line 387: | Line 396: | ||
|} | |} | ||
{| | {| | ||
| − | |style="padding: 0px 0px 15px 15px;"|The second code is responsible for | + | |style="padding: 0px 0px 15px 15px;"|The second code is responsible for displaying usage records in the client area. <br /> |
| − | ''Note: To display usage records in the client area, you need to enable ' | + | '' '''Note:''' To display usage records in the client area, you need to enable '[https://www.docs.modulesgarden.com/Advanced_Billing_For_WHMCS#Usage_Records Usage Records]' extension for the product.''<br/> |
Remember that there are separate codes for WHMCS V5 and V6. Insert codes accordingly to your system version. | Remember that there are separate codes for WHMCS V5 and V6. Insert codes accordingly to your system version. | ||
|} | |} | ||
| Line 395: | Line 404: | ||
|} | |} | ||
{| | {| | ||
| − | |style="padding: 0px 0px 20px 15px;"|If the code has been | + | |style="padding: 0px 0px 20px 15px;"|If the code has been typed in correctly, the sample resource usage should display like this: |
|} | |} | ||
{| | {| | ||
|style="padding: 0px 0px 30px 25px;"|[[File:AB_23.png]] | |style="padding: 0px 0px 30px 25px;"|[[File:AB_23.png]] | ||
|} | |} | ||
| + | |||
====Items Archive==== | ====Items Archive==== | ||
{| | {| | ||
| − | |style="padding: 10px 0px 15px 15px;"|On this page you can find information regarding archived usage records. Once a client | + | |style="padding: 10px 0px 15px 15px;"|On this page, you can find information regarding the archived usage records. Once a client has paid for the used resources, the usage history will be automatically moved to the archive. |
| − | There is a number of archived items | + | There is a number of archived items along with the space they take up on the disk. |
|} | |} | ||
{| | {| | ||
| Line 409: | Line 419: | ||
|} | |} | ||
{| | {| | ||
| − | |style="padding: 0px 0px 20px 15px;"|Use '' 'Flush' '' option to clear the archive and remove all stored | + | |style="padding: 0px 0px 20px 15px;"|Use the '' 'Flush' '' option to clear the archive and remove all stored data. You can also set the time interval to indicate the number of days after which the archive will be cleaned automatically. |
|} | |} | ||
{| | {| | ||
| Line 417: | Line 427: | ||
====Logs==== | ====Logs==== | ||
{| | {| | ||
| − | |style="padding: 10px 0px 15px 15px;"| | + | |style="padding: 10px 0px 15px 15px;"|On the '' 'Logs' '' page you will find information about the module's activity.<br/> |
| − | You can view logs in | + | You can view logs in the form of a '' 'Database' '' or a '' 'File' ''. You can select it in the place marked on the screen below. |
|} | |} | ||
{| | {| | ||
| Line 424: | Line 434: | ||
|} | |} | ||
{| | {| | ||
| − | |style="padding: 0px 0px 20px 15px;"| | + | |style="padding: 0px 0px 20px 15px;"|Here you will see different types of logs including informative logs, error logs and critical logs.<br /> |
| − | New log files are created every day to help you find information you are | + | New log files are created every day to help you always find the information you are interested in.<br/> |
|} | |} | ||
{| | {| | ||
| Line 434: | Line 444: | ||
{| | {| | ||
|style="padding: 10px 0px 15px 15px;"|In this section we will describe each extension step by step.<br /> | |style="padding: 10px 0px 15px 15px;"|In this section we will describe each extension step by step.<br /> | ||
| − | '''Important:''' Only four of them are included in Advanced Billing For WHMCS | + | '''Important:''' Only four of them are included in Advanced Billing For WHMCS. You can enable each one of them after moving to the '' 'Settings' → 'Extensions' '' section.<br/> You can see all four extensions on the screen below. The rest of the extensions listed there can be obtained separately.<br /> |
| − | + | The four default extensions in Advanced Billing For WHMCS include '' 'Recurring Billing', 'Usage Records', 'Credit Billing' '' and '' 'Graphs.' ''<br /> | |
| − | Each extension | + | '' '''Note:''' Do not mistake Recurring Billing extension for Advanced Billing with [https://www.modulesgarden.com/products/whmcs/recurring-billing-extended Recurring Billing Extended For WHMCS] module.<br/><br/> |
| − | To start using an extension, you need to activate it | + | Each extension can be configured per product, thus allowing you to use different sets of extensions according to your needs.<br /> |
| − | Afterwards, '' 'enable' '' the extension you wish to use, new options will appear in Advanced Billing For WHMCS. | + | To start using an extension, you need to first activate it. To do that, go to '' 'Settings' '' → '' 'Extensions' '' page.<br /> |
| + | Afterwards, '' 'enable' '' the extension you wish to use, and new options will appear in Advanced Billing For WHMCS. | ||
|} | |} | ||
{| | {| | ||
| Line 444: | Line 455: | ||
|} | |} | ||
{| | {| | ||
| − | |style="padding: 0px 0px 15px 15px;"|If you skip steps 3-4 | + | |style="padding: 0px 0px 15px 15px;"|If you skip the steps 3-4 from the installation instruction, you have to configure the license for each of the 4 base extensions.<br /> |
Note that each of them uses Advanced Billing license key.<br /> | Note that each of them uses Advanced Billing license key.<br /> | ||
| − | Press '' 'Configure', '' paste your license and confirm changes. | + | Press '' 'Configure', '' paste your license key and confirm changes. |
|} | |} | ||
{| | {| | ||
| Line 454: | Line 465: | ||
===Credit Billing=== | ===Credit Billing=== | ||
{| | {| | ||
| − | |style="padding: 10px 0px 15px 15px;"|'' 'Credit Billing' '' extension allows you to charge for a product from client credit balance.<br/> | + | |style="padding: 10px 0px 15px 15px;"|'' 'Credit Billing' '' extension allows you to charge your clients for a product from the client credit balance.<br/> |
| − | To | + | To enable this option for a single product, click on '' 'Settings' '' button next to the chosen product. If the extension is enabled, a new tab will appear. |
|} | |} | ||
{| | {| | ||
| Line 463: | Line 474: | ||
|style="padding: 0px 0px 30px 15px;"| | |style="padding: 0px 0px 30px 15px;"| | ||
*'''Enable Credit Billing''' - this option enables/disables credit billing for this module (if credit billing is enabled, standard billing will be turned off).<br /> | *'''Enable Credit Billing''' - this option enables/disables credit billing for this module (if credit billing is enabled, standard billing will be turned off).<br /> | ||
| − | *'''Create Invoices Each''' - this option defines how often invoice will be generated for this product (30 days is a default value).<br /> | + | *'''Create Invoices Each''' - this option defines how often an invoice will be generated for this product (30 days is a default value).<br /> |
| − | *'''Minimum Credit''' - minimum amount that will be charged from client account credit balance.<br /> | + | *'''Minimum Credit''' - minimum amount that will be charged from the client account credit balance.<br /> |
| − | *'''Low Credit Notification''' - if this value is higher than credits on client account, email to your client about low credit amount will be sent.<br /> | + | *'''Low Credit Notification''' - if this value is higher than credits on the client's account, an email to your client about low credit amount will be sent.<br /> |
*'''Email Interval''' - defines how often low credit notification email will be sent.<br /> | *'''Email Interval''' - defines how often low credit notification email will be sent.<br /> | ||
| − | *'''Autosuspend''' - when credit balance reaches 0, product ordered by client is automatically suspended and invoice | + | *'''Autosuspend''' - when credit balance reaches 0, the product ordered by the client is automatically suspended and an invoice reminding of the lacking amount will be generated.<br />'' '''Note:''' This function also takes account of the '[https://docs.whmcs.com/Products_Management#Overide_Auto_Suspension 'Override Auto-Suspend'] feature.'' |
| − | *'''Due Date''' - the number of days when your customers have to pay the invoice.<br /> | + | *'''Due Date''' - the number of days when your customers have to pay for the invoice.<br /> |
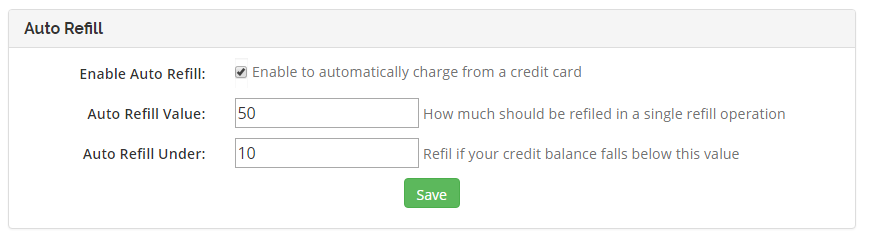
| + | *'''Credit Autorefill''' - if enabled, client's credit balance may be refilled from his credit card each time it became empty.<br /> | ||
| + | *'''Gateway''' - gateway used to charge client's credit card if autorefill is enabled.<br /> | ||
| + | *'''Minimum Amount''' - minimum amount to charge from client's CC.<br /> | ||
| + | *'''Maximum Amount''' - maximum amount to charge from client's CC.<br />'' '''Note:''' Clients can [https://www.docs.modulesgarden.com/images/b/b1/AB_27_2.png define] if they wish to use autorefill functionality as well as choose amount to refill in a single run.'' | ||
|} | |} | ||
{| | {| | ||
| Line 474: | Line 489: | ||
|} | |} | ||
{| | {| | ||
| − | |style="padding: 0px 0px 30px 15px;"|When '' 'Autosuspend' '' is | + | |style="padding: 0px 0px 30px 15px;"|When the option '' 'Autosuspend' '' is enabled and your client's credit balance reaches 0, the client's product will be suspended. Additionally, an invoice reminding of the lacking amount will be generated.<br /> |
| − | If it is | + | If it is disabled and the credit balance reaches 0, the client's product will not be suspended and invoice will be generated according to the number of days set in the '' 'Create Invoices Each' '' field. |
|} | |} | ||
====Credits==== | ====Credits==== | ||
{| | {| | ||
| − | |style="padding: 10px 0px 15px 15px;"|All information related to credit payment for hosting can be found in '' 'Credits' '' tab that will appear in your menu when enabled.<br/> | + | |style="padding: 10px 0px 15px 15px;"|All information related to the credit payment for hosting can be found in the '' 'Credits' '' tab that will appear in your menu when enabled.<br/> |
As you can see, there are two columns with credits.<br /> | As you can see, there are two columns with credits.<br /> | ||
| − | The first one, '' 'Internal Credit' '' contains credits which were not used for payment, but are reserved for it. It was created to increase accuracy of credit billing.<br /> | + | The first one, '' 'Internal Credit' '' contains credits which were not used for payment, but are reserved for it. It was created to increase the accuracy of credit billing.<br /> |
| − | The second column, '' 'Already Paid For Hosting' '' contains summary credit payment for hosting.<br /> | + | The second column, '' 'Already Paid For Hosting' '' contains a summary of the credit payment for hosting.<br /> |
| − | You can order refund of any hosting | + | You can order a refund of any hosting by pressing '' 'Refund' '' button next to the hosting service. The client will receive a sum of '' 'Internal Credit' '' and '' 'Already Paid For Hosting' '' rounded down to 0.01. |
|} | |} | ||
{| | {| | ||
| Line 491: | Line 506: | ||
===Recurring Billing=== | ===Recurring Billing=== | ||
{| | {| | ||
| − | |style="padding: 10px 0px 15px 15px;"|This extension allows you to set up recurring billing for product.<br /> | + | |style="padding: 10px 0px 15px 15px;"|This extension allows you to set up recurring billing for your product.<br /> |
| − | *'''Enable Recurring Billing''' - check to enable this billing type (remember that Recurring Billing and Credit Billing cannot be both enabled | + | *'''Enable Recurring Billing''' - check to enable this billing type (remember that Recurring Billing and Credit Billing cannot be both enabled at the same time)<br /> |
| − | *'''Bill on Termination''' - when account connected with your module is terminated, invoice for account will be generated.<br /> | + | *'''Bill on Termination''' - when the account connected with your module is terminated, an invoice for the account will be generated.<br /> |
*'''Billing Type''' - enables you to choose how to bill your client.<br /> | *'''Billing Type''' - enables you to choose how to bill your client.<br /> | ||
| − | **'''Bill on Invoice Generation''' - | + | **'''Bill on Invoice Generation''' - customers will receive an invoice at the same time as the invoice for their hosting account.<br /> |
| − | **'''Bill On Specific Day''' - | + | **'''Bill On Specific Day''' - generates invoices each month on the day specified in the '''Billing Type Value'''.<br /> |
| − | **'''Bill Each X Days''' - as | + | **'''Bill Each X Days''' - as the very name suggests, generates an invoice each X days where X is the number specified in the '''Billing Type Value''' field.<br /> |
*'''Due Date''' - the number of days in which your customers will have to pay the invoice.<br /> | *'''Due Date''' - the number of days in which your customers will have to pay the invoice.<br /> | ||
| − | *'''Autogenerate Invoice''' - | + | *'''Autogenerate Invoice''' - if enabled, automatically sends the previously generated invoices directly to your customers.<br /> |
| − | *'''Auto Apply Credits''' - automatically applies any available credits when invoice is created | + | *'''Auto Apply Credits''' - automatically applies any available credits when an invoice is created. Works only if the '' 'Autogenerate Invoice' '' opiton is enabled. |
| + | *'''Advanced Billing Cycle Info''' - if enabled the billing cycle information in client area product view will be replaced to '' '[https://www.docs.modulesgarden.com/images/d/df/AB_29_2.png Hourly Billing]' ''. | ||
| + | *'''Apply Group Discount''' - enable if you want to apply the discount to the invoice set in the [https://docs.whmcs.com/Client_Groups client group]. | ||
| + | |||
|} | |} | ||
{| | {| | ||
| Line 510: | Line 528: | ||
{| | {| | ||
|style="padding: 10px 0px 15px 15px;"|This extension displays usage records and usage records history in the client area products page.<br /> | |style="padding: 10px 0px 15px 15px;"|This extension displays usage records and usage records history in the client area products page.<br /> | ||
| − | To use it | + | To use it, you need to of course first enable it, and then place an integration code.<br /> |
| − | This extension | + | This extension can be configured per product. To do so, proceed to the product configuration in Advanced Billing.<br /> |
| − | As you can see, new tab is available | + | As you can see, a new tab is available. |
| − | *'''Enable''' - enables usage records | + | *'''Enable''' - enables the display of usage records for that product in the client area. |
| − | *'''Display Summary From''' - defines period from which usage records will be counted. | + | *'''Display Summary From''' - defines the period from which usage records will be counted. |
| − | *'''Usage Records Precision''' - | + | *'''Usage Records Precision''' - the number of decimal digits indicating the precision of usage records. |
*'''Records History''' - displays history of usage records. | *'''Records History''' - displays history of usage records. | ||
*'''Usage Records Per Page''' - defines how many usage records should be displayed per page. | *'''Usage Records Per Page''' - defines how many usage records should be displayed per page. | ||
| Line 528: | Line 546: | ||
|style="padding: 0px 0px 30px 25px;"|[[File:AB_23.png]] | |style="padding: 0px 0px 30px 25px;"|[[File:AB_23.png]] | ||
|} | |} | ||
| + | |||
===Graphs=== | ===Graphs=== | ||
{| | {| | ||
| − | |style="padding: 10px 0px 20px 15px;"|Enable '' 'Graphs' '' extension to | + | |style="padding: 10px 0px 20px 15px;"|Enable the '' 'Graphs' '' extension to gain access to the graphical display of usage records for every configured service in your Advanced Billing module. |
|} | |} | ||
{| | {| | ||
| Line 536: | Line 555: | ||
|} | |} | ||
{| | {| | ||
| − | |style="padding: 0px 0px 20px 15px;"|When enabled, a new entry | + | |style="padding: 0px 0px 20px 15px;"|When enabled, a new entry in your navigation menu appears → '' 'Graphs'. '' |
|} | |} | ||
{| | {| | ||
| Line 542: | Line 561: | ||
|} | |} | ||
{| | {| | ||
| − | |style="padding: 0px 0px 15px 15px;"|Please note that before proceeding, you must also enable '' 'Graphs' '' extension for the product. To do so move to '' 'Configuration' → 'Products List' → 'Settings' → 'Graphs'. ''<br/> | + | |style="padding: 0px 0px 15px 15px;"|Please note that before proceeding, you must also enable the '' 'Graphs' '' extension for the product. To do so, move to '' 'Configuration' → 'Products List' → 'Settings' → 'Graphs'. ''<br/> Enable the extension and save the changes. |
|} | |} | ||
{| | {| | ||
| Line 548: | Line 567: | ||
|} | |} | ||
{| | {| | ||
| − | |style="padding: 0px 0px 15px 15px;"| | + | |style="padding: 0px 0px 15px 15px;"|In the '' 'Graphs' ''section you will find an extended list of all services in your system.<br/> Press '' 'Show Graph' '' button and you will be moved to the generated line chart. |
|} | |} | ||
{| | {| | ||
| Line 554: | Line 573: | ||
|} | |} | ||
{| | {| | ||
| − | |style="padding: 0px 0px 15px 15px;"|You will immediately see a line chart generated for default resource usage and time period.<br/> You may change the requirements at any time to see a customized version of the graph with data that you actually need and | + | |style="padding: 0px 0px 15px 15px;"|You will immediately see a line chart generated for a default resource usage and time period.<br/> You may change the requirements at any time to see a customized version of the graph with data that you actually need, and the time period you desire.<br/> Use options located to the left of the graph to personalize the chart statistics. |
|} | |} | ||
{| | {| | ||
| Line 560: | Line 579: | ||
|} | |} | ||
{| | {| | ||
| − | |style="padding: 0px 0px 15px 15px;"|Line charts | + | |style="padding: 0px 0px 15px 15px;"|Line charts can be displayed not only by administrators in their panel but the clients as well.<br/> Find '' 'Resource Usage Chart' '' in the product's details to preview the generated graph.<br/>Clients, just like admins in admin area may specify the time range and select resources which they wish to see in the graphical mode. |
|} | |} | ||
{| | {| | ||
|style="padding: 0px 0px 30px 25px;"|[[File:AB_46.png]] | |style="padding: 0px 0px 30px 25px;"|[[File:AB_46.png]] | ||
|} | |} | ||
| − | ===[ | + | |
| + | ===[https://www.modulesgarden.com/products/whmcs/product-auto-upgrade Product Auto Upgrade (Sold Separately)]=== | ||
{| | {| | ||
| − | |style="padding: 10px 0px 15px 15px;"|'''Product Auto Upgrade For WHMCS''' extension is automatic upgrade/downgrade of a product according to its usage.<br/> | + | |style="padding: 10px 0px 15px 15px;"|'''Product Auto Upgrade For WHMCS''' extension is an automatic upgrade/downgrade of a product according to its usage.<br/> |
It will allow you to set rules related to the server resource usage according to which the module will resize your products and their configurable options.<br/> | It will allow you to set rules related to the server resource usage according to which the module will resize your products and their configurable options.<br/> | ||
| − | You will | + | You will also be able to let your clients decide if they want their products to be modified as well as enable them to set the rules on their own.<br/> |
For more information about Product Auto Upgrade For WHMCS, visit its [http://www.docs.modulesgarden.com/Product_Auto_Upgrade_For_WHMCS Wiki]. | For more information about Product Auto Upgrade For WHMCS, visit its [http://www.docs.modulesgarden.com/Product_Auto_Upgrade_For_WHMCS Wiki]. | ||
|} | |} | ||
| Line 589: | Line 609: | ||
==Hourly Billing== | ==Hourly Billing== | ||
{| | {| | ||
| − | |style="padding: 10px 0px 15px 15px;"|Hourly billing allows you to charge your customers for each hour of use of the product (hourly billing calculations are | + | |style="padding: 10px 0px 15px 15px;"|Hourly billing allows you to charge your customers for each hour of use of the product (hourly billing calculations are based on the '' 'Registration Date' '' product).<br /> |
You can enable hourly billing for any product type.<br /> | You can enable hourly billing for any product type.<br /> | ||
| − | Regardless of whether it is a server, web hosting account or other, | + | Regardless of whether it is a server, web hosting account or other type, customers will be billed for each hour of using the product. |
|} | |} | ||
{| | {| | ||
| Line 618: | Line 638: | ||
===Two Weeks Billing=== | ===Two Weeks Billing=== | ||
{| | {| | ||
| − | |style="padding: 10px 0px 15px 15px;"|In order to set up | + | |style="padding: 10px 0px 15px 15px;"|In order to set up the invoice generation for resource usage every 2 weeks, follow these steps:<br /> |
1. Go to '' 'Addons' '' → '' 'Advanced Billing' '' and select your product from '' 'Enable Advanced Billing For:' '' | 1. Go to '' 'Addons' '' → '' 'Advanced Billing' '' and select your product from '' 'Enable Advanced Billing For:' '' | ||
|} | |} | ||
| Line 625: | Line 645: | ||
|} | |} | ||
{| | {| | ||
| − | |style="padding: 0px 0px 15px 15px;"|2. Go to '' 'Products List' → (your product's) 'Settings' → 'Recurring Billing' '', enable the extension together with '' 'Bill on Termination' '' option.<br /> | + | |style="padding: 0px 0px 15px 15px;"|2. Go to '' 'Products List' → (your product's) 'Settings' → 'Recurring Billing' '', enable the extension together with the '' 'Bill on Termination' '' option.<br /> |
| − | Additionally, choose '' 'Bill Every X Days' '' from '' 'Billing Type' '' dropdown menu | + | Additionally, choose '' 'Bill Every X Days' '' from the '' 'Billing Type' '' dropdown menu. Enter '' '14' '' into the '' 'Billing Type Value' '' textbox and set '' 'Due Date' '' to '' '7' '' days.<br/> |
| − | Afterwards, press '' 'Save' '' the changes. | + | Afterwards, press '' 'Save' '' to save the changes. |
|} | |} | ||
{| | {| | ||
| Line 639: | Line 659: | ||
|} | |} | ||
{| | {| | ||
| − | |style="padding: 0px 0px 15px 15px;"| | + | |style="padding: 0px 0px 15px 15px;"|Congratulations, you have just successfully configured your billing options!<br /> |
| − | + | Your Advanced Billing main page should look like the screen below.<br/> | |
| − | Note that you | + | Note that you can also change Cron Frequency per product here. |
|} | |} | ||
{| | {| | ||
| Line 647: | Line 667: | ||
|} | |} | ||
| − | === | + | ===$20 Billing=== |
{| | {| | ||
| − | |style="padding: 10px 0px 15px 15px;"|To bill your client as | + | |style="padding: 10px 0px 15px 15px;"|To bill your client as frequently as possible, follow these steps:<br /> |
1.Go to '' 'Addons' '' → '' 'Advanced Billing' '' and select your product from '' 'Enable Advanced Billing For:' '' | 1.Go to '' 'Addons' '' → '' 'Advanced Billing' '' and select your product from '' 'Enable Advanced Billing For:' '' | ||
|} | |} | ||
| Line 658: | Line 678: | ||
|style="padding: 0px 0px 15px 15px;"|2. Go to '' 'Products List' → (your product's) 'Settings' → 'Credit Billing' '' and press '' 'Enable'. ''<br /> | |style="padding: 0px 0px 15px 15px;"|2. Go to '' 'Products List' → (your product's) 'Settings' → 'Credit Billing' '' and press '' 'Enable'. ''<br /> | ||
Afterwards, enter '' '1' '' into '' 'Create Invoices Each', '20' '' into '' 'Minimum Credit' '' and '' '50' '' into '' 'Low Credit Notification'. ''<br /> | Afterwards, enter '' '1' '' into '' 'Create Invoices Each', '20' '' into '' 'Minimum Credit' '' and '' '50' '' into '' 'Low Credit Notification'. ''<br /> | ||
| − | With these settings your client will be billed from credit balance as soon as the payment for resource usage has reached | + | With these settings your client will be billed from credit balance as soon as the payment for resource usage has reached $20.<br /> |
| − | They will also receive an email if their credit balance falls below | + | They will also receive an email if their credit balance falls below $50. |
|} | |} | ||
{| | {| | ||
| Line 671: | Line 691: | ||
|} | |} | ||
{| | {| | ||
| − | |style="padding: 0px 0px 15px 15px;"| | + | |style="padding: 0px 0px 15px 15px;"|Congratulations, you have just successfully configured your billing options!<br /> |
| − | + | Your Advanced Billing main page should look like the screen below.<br/> | |
| − | Note that you | + | Note that you can also change '' 'Cron Frequency' '' per product here.<br/> |
|} | |} | ||
{| | {| | ||
| Line 684: | Line 704: | ||
1. Copy new files to a correct directory in your WHCMS.<br/> | 1. Copy new files to a correct directory in your WHCMS.<br/> | ||
2. Proceed to '' 'Setup' → 'Addon Moduels', '' find '' 'Advanced Billing' '' on the list, press '' 'Configure' '' to select a proper database you wish to use.<br/> | 2. Proceed to '' 'Setup' → 'Addon Moduels', '' find '' 'Advanced Billing' '' on the list, press '' 'Configure' '' to select a proper database you wish to use.<br/> | ||
| − | 3. Move to the addon: '' 'Addons' → 'Advanced Billing' '' and run the | + | 3. Move to the addon: '' 'Addons' → 'Advanced Billing' '' and run the following script: |
/your_whmcs/modules/addons/AdvancedBilling/migrationScript.php | /your_whmcs/modules/addons/AdvancedBilling/migrationScript.php | ||
| − | If you '''already own Advanced Billing v3.x''' and | + | If you '''already own Advanced Billing v3.x''' and would like to switch to a newer version, just overwrite the files as you would do during a regular update. |
|} | |} | ||
| Line 695: | Line 715: | ||
{| | {| | ||
|style="padding: 10px 0px 5px 15px;"|1. Deactivation of the module removes products' configuration, usage records and awaiting invoices.<br /> | |style="padding: 10px 0px 5px 15px;"|1. Deactivation of the module removes products' configuration, usage records and awaiting invoices.<br /> | ||
| − | In order to update the module, simply follow | + | In order to update the module, simply follow the instructions in '' 'How To Update' '' . |
|} | |} | ||
{| | {| | ||
| Line 722: | Line 742: | ||
|} | |} | ||
{| | {| | ||
| − | |style="padding: 0px 0px | + | |style="padding: 0px 0px 10px 15px;"|2. You have problems with finding the specified line in clientareaproductdetails.tpl.<br /> |
''Cause 1:'' You are using Classic or Portal template.<br /> | ''Cause 1:'' You are using Classic or Portal template.<br /> | ||
| − | ''Solution 1:'' | + | ''Solution 1:'' If this is the case, place the required code after this line: |
<nowiki><div align="center">{$moduleclientarea}</div></nowiki><br /> | <nowiki><div align="center">{$moduleclientarea}</div></nowiki><br /> | ||
| − | ''Cause 2:'' You are using | + | ''Cause 2:'' You are using extensively customized template.<br /> |
''Solution 2:'' Create a ticket and one of our specialists will help you set up the module. | ''Solution 2:'' Create a ticket and one of our specialists will help you set up the module. | ||
| + | |} | ||
| + | {| | ||
| + | |style="padding: 0px 0px 30px 15px;"|3. If your cron has encountered an error and cannot start again, please check the cron folder in the '' 'yourWHMCS/modules/addons/AdvancedBilling/cron' '' path.<br /> | ||
| + | If there is a '' 'pid.php' '' file, delete it and try to execute the cron again. If there is still an error occur, check the details in the [https://www.docs.modulesgarden.com/Advanced_Billing_For_WHMCS#Logs logs]. | ||
|} | |} | ||
Revision as of 15:42, 18 October 2017
Contents |
About Advanced Billing For WHMCS
| Advanced Billing For WHMCS allows you to set up additional billing models for your products based on the actual usage of bandwidth, CPU and other server resources. You will be empowered to charge your clients on the grounds of the resources they used. The module also offers hourly billing, ticket billing, credit billing and recurring billing. |
- Core Features:
| ✔ Hourly Billing For Any WHMCS Module |
| ✔ Ticket Billing |
| ✔ Configure Billing Per Product |
| ✔ Manage Extensions And Configure Them Per Product |
| ✔ View Current List Of Billable Items For Next Invoices |
| ✔ View Resources Usage History Of Any Item |
| ✔ Manage Awaiting Invoices And Convert Them To Invoices |
| ✔ Define Time Period Between Resource Usage Checks |
| ✔ Define Whether To Store Logs In Files Or In Database |
| ✔ View Logs |
- 'Recurring Billing' Extension Features:
| ✔ Bill On Account Termination |
| ✔ Bill When Invoice Is Generated For Hosting |
| ✔ Bill Each X Day Of Month |
| ✔ Bill Each X Days |
| ✔ Define Minimum Billing Amount |
| ✔ Automatically Generate Invoice |
| ✔ Define Invoice Payment Due Date |
| ✔ Automatically Apply Credits |
| ✔ Display Advanced Billing Cycle Info |
| ✔ Apply Discounts To Client Groups |
- 'Credit Billing' Extension Features:
| ✔ Generate Invoice Each X Days |
| ✔ Define Minimum Amount Of Credits To Charge |
| ✔ Send Email When Client's Credit Balance Falls Below Defined Credit Amount |
| ✔ Automatically Suspend Account When Client Is Out Of Credits - With Override Support |
| ✔ Define Invoice Payment Due Date |
| ✔ List Summary Credit Billing Charges Of Any Hosting |
| ✔ Refund Credit Payment To Client |
| ✔ Automatically Refill Client's Credit Balance Using Their Credit Card |
| ✔ Client Can Enable/Disable Auto Refilling And Define A Single Refill Amount |
- 'Resource Usage' Extension Features:
| ✔ Define Period For Counted Resource Usage |
| ✔ Define Resource Usage Counting Precision |
| ✔ Show History Of Resource Usage |
| ✔ Define Amount Of Usage Records Displayed Per Page |
- 'Graphs' Extension Features:
| ✔ View Graphs In Admin And Client Area |
| ✔ Generate Time Graphs Of Chosen Resource Usage |
| ✔ Show Data For Selected Time Period |
| ✔ View Disk Storage Used To Archive Data |
| ✔ Flush Archived Data Immediately Or After A Defined Number Of Days |
- Available Extensions:
| ✔ Product Auto Upgrade - Live Upgrade/Downgrade Of Products Depending On The Used Resources |
| ✔ Proxmox Cloud Autoscaling - Scale Proxmox Servers Within Defined Limits On The Fly |
- Supported Modules:
| ✔ cPanel & cPanel Extended Integration: Hourly, Bandwidth, Storage, Databases, Addon Domains, Subdomains, Parked Domains, Domain Forwarders, FTP Accounts, Installed Applications, Email Accounts |
| ✔ DirectAdmin & DirectAdmin Extended Integration: Hourly, Bandwidth, Storage, Subdomains, Domain Pointers, FTP Accounts, MySQL Databases, Virtual Domains, Mailing Lists, POP Accounts, Email Forwarders, Email Autoresponders |
| ✔ OpenStack VPS Integration: Hourly, VCPU Cores, Memory Usage, CPU Utilization, Incoming Bandwidth, Outgoing Bandwidth, Disk Root Used, Disk I/O Read, Disk I/O Write, Floating IP, Fixed IP, Backups Number |
| ✔ Plesk & Plesk Extended Integration: Hourly, Subdomains, Disk Space, Email Boxes, Sites, Redirects, Mail Groups, Autoresponders, Mailing Lists, Users, Databases, Webapps, Traffic |
| ✔ Proxmox Cloud Integration: Disk Usage, Disk Size, Bandwidth IN, Bandwidth OUT, Memory Usage, Memory Size, Backups, CPU Number, CPU Usage |
| ✔ Proxmox VPS Integration: Hourly, Disk Usage, Bandwidth IN, Bandwidth OUT, Memory Usage, Backups Usage, CPU Number, CPU Usage |
| ✔ Rackspace Email Extended Integration: Hourly, Mailbox Storage, Mailboxes, Sync Licenses, Blackberry Licenses, Exchange Storage, Exchange Mailboxes |
| ✔ SolusVM & SolusVM Extended VPS Integration: Hourly, Disk Usage, Memory Usage (except KVM virtualization), Bandwidth Used |
| ✔ SolusVM Extended Cloud Integration: Available Disk Size, Disk Usage, Available Bandwidth, Available Memory, Cores, IP Addresses, Disk Usage, Memory Usage (except KVM virtualization), Bandwidth Used |
| ✔ Virtuozzo VPS Integration: Templates, CPU Usage, Memory, Bandwidth IN, Bandwidth OUT, Disk Used, Backups Usage |
| ✔ Zimbra Email Integration: Hourly, Mailboxes, Aliases, Storage |
- General Info:
| ✔ Store Usage Records In WHMCS Or External MongoDB Database |
| ✔ Count Usage Of All Accounts Assigned To Reseller - cPanel, cPanel Extended, DirectAdmin & DirectAdmin Extended |
| ✔ Multi-Language Support |
| ✔ Supports PHP 5.4 Up To PHP 7 |
| ✔ Supports WHMCS Templates Five and Six |
| ✔ Supports WHMCS V6 and V7 |
Installation
| In this tutorial we will show you how to successfully install and manage Advanced Billing For WHMCS. We will guide you step by step through the whole installation and configuration process. |
| 1. Log in to your client area and download the module. |

|
| 2. In the downloaded file you will find two packages that support different PHP versions. As presented on the screen below, the first one is dedicated to PHP 7, while the second one is aimed at PHP 5.4 up to PHP 5.6. It does not apply to open source versions. Note: You can check the current PHP version in your WHMCS. To do so, proceed to 'Utilities' → 'System' → 'PHP Info'. |

|
| 3. Extract the downloaded file and choose the one with the right PHP version. Upload and extract the PHP file into the main WHMCS directory. The content of PHP version files should look like this. |
| 4. Now you have to activate the module in your WHMCS system. Log in to your WHMCS admin area. Click 'Setup' , then choose 'Addon Modules'. |

|
| 5. In the next step you need to configure your module. To do so, press 'Configure' button. Select database driver for usage records:
If you choose MongoDB, you will additionally have to provide:
Choose the desired admin roles groups to grant access to the module and 'Save Changes'. |

|
| 6. Now, proceed to the Extensions section to find more about configuring the license. |
| 7. The last step is setting up a cron job. You can find it following the path: WHMCS → 'Addons' → 'Advanced Billing' → 'Configuration' page. |

|
| Well done, you have just successfully installed your Advanced Billing For WHMCS! |
| If you used the previous version of Advanced Billing For WHMCS and you would like to migrate the data to the current version, please see the How To Update section and follow the instructions listed there. |
Configuration and Management
| Now, let us learn more about the functionalities of the module. We will show you the possibilities of our product, using cPanel Extended For WHMCS as an example. Please note that the billing features are different in both modules, but the core functionality of Advanced Billing remains the same. |

|
Core
| Our module core has been designed in such a way so as to allow the collection of records and invoices management. Any extra features are handled by extensions which can be easily enabled/disabled, and are always configured per product. |
Product List
| On the Products List you can find all products which have Advanced Billing enabled. If the product's submodule is not supported, the 'default' mode will be used instead. It enables you to bill your client only for an hourly usage of the product.
|

|
Settings
| Clicking on the 'Settings' button will allow you to see the Module Settings only for cPanel/cPanel Extended modules and other enabled extensions. We will discuss them later on. |

|
| Here you can set both Application Manager (Softaculous/Installatron) and cPanel theme. Simply enter a theme name as shown on the screen below. |

|
Used Resource Pricing
| Moving to the 'Pricing' section will allow you to set up billing for a specific server resource usage like bandwidth. |

|
Manage each usage record by setting up its:
In our case, as you can see on the screen below, a customer will not be charged for 1GB (1024MB) bandwidth.
For example, users pay for a quantity of subdomains each hour, but when the traffic is generated, bandwidth used since the last cron run will have to be paid once only.
If you select the 'GB' option, free limit will be still 1024 MB, and the price will be MB/hr, not GB/hr.
To proceed, choose your usage records, units, statuses, set up the prices and free limits. Afterwards, press 'Save'. |

|
| As you probably noticed, there is also a 'Configure' column to the right. It allows you to set up different free limits and pricing depending on the resource origin. |
Items
| To view the counted resource usage, go to the 'Items' tab. Each cron run will create an item for each customer (if it does not exist at the moment) and add new records to the existing ones. |

|
| This section will show you some more detailed information on Bandwidth, Storage, Domains and other enabled records. See the price and usage, the last cron run date and the total records summary. |

|
Invoices
| In the 'Invoices' section you can manage all of your awaiting invoices. They can be generated both automatically and manually. On the screen below you can see a previously generated invoice for our cPanel Extended account. |

|
| Here you can verify and modify your awaiting invoices. To avoid any risks, you should double check that all your invoices have been generated correctly. |

|
| Now, let us manually generate a sample invoice for your customer. For this purpose, simply click on 'Generate' next to the chosen invoice. |

|
| After changing the product's package, the invoice will be automatically generated for an old package. |
Settings
| In the 'Settings' tab you can find pages such as 'Logs', 'Integration' and 'Extensions'. |
Integration Code
| The 'Integration' page contains codes required to integrate Advanced Billing For WHMCS with your client area. The first code allows you to display product pricing while placing an order. |

|
| If the code has been typed in correctly, the sample order should look like this: |

|
| The second code is responsible for displaying usage records in the client area. Note: To display usage records in the client area, you need to enable 'Usage Records' extension for the product. |

|
| If the code has been typed in correctly, the sample resource usage should display like this: |

|
Items Archive
| On this page, you can find information regarding the archived usage records. Once a client has paid for the used resources, the usage history will be automatically moved to the archive.
There is a number of archived items along with the space they take up on the disk. |

|
| Use the 'Flush' option to clear the archive and remove all stored data. You can also set the time interval to indicate the number of days after which the archive will be cleaned automatically. |

|
Logs
| On the 'Logs' page you will find information about the module's activity. You can view logs in the form of a 'Database' or a 'File' . You can select it in the place marked on the screen below. |

|
| Here you will see different types of logs including informative logs, error logs and critical logs. New log files are created every day to help you always find the information you are interested in. |

|
Extensions
| In this section we will describe each extension step by step. Important: Only four of them are included in Advanced Billing For WHMCS. You can enable each one of them after moving to the 'Settings' → 'Extensions' section. |

|
| If you skip the steps 3-4 from the installation instruction, you have to configure the license for each of the 4 base extensions. Note that each of them uses Advanced Billing license key. |

|
Credit Billing
| 'Credit Billing' extension allows you to charge your clients for a product from the client credit balance. To enable this option for a single product, click on 'Settings' button next to the chosen product. If the extension is enabled, a new tab will appear. |

|
|

|
| When the option 'Autosuspend' is enabled and your client's credit balance reaches 0, the client's product will be suspended. Additionally, an invoice reminding of the lacking amount will be generated. If it is disabled and the credit balance reaches 0, the client's product will not be suspended and invoice will be generated according to the number of days set in the 'Create Invoices Each' field. |
Credits
| All information related to the credit payment for hosting can be found in the 'Credits' tab that will appear in your menu when enabled. As you can see, there are two columns with credits. |

|
Recurring Billing
This extension allows you to set up recurring billing for your product.
|

|
Usage Records
| This extension displays usage records and usage records history in the client area products page. To use it, you need to of course first enable it, and then place an integration code.
|

|
| On the following screen you can see a sample of usage records and usage records history in the client area. |
|
|
Graphs
| Enable the 'Graphs' extension to gain access to the graphical display of usage records for every configured service in your Advanced Billing module. |

|
| When enabled, a new entry in your navigation menu appears → 'Graphs'. |

|
| Please note that before proceeding, you must also enable the 'Graphs' extension for the product. To do so, move to 'Configuration' → 'Products List' → 'Settings' → 'Graphs'. Enable the extension and save the changes. |

|
| In the 'Graphs' section you will find an extended list of all services in your system. Press 'Show Graph' button and you will be moved to the generated line chart. |

|
| You will immediately see a line chart generated for a default resource usage and time period. You may change the requirements at any time to see a customized version of the graph with data that you actually need, and the time period you desire. Use options located to the left of the graph to personalize the chart statistics. |

|
| Line charts can be displayed not only by administrators in their panel but the clients as well. Find 'Resource Usage Chart' in the product's details to preview the generated graph. Clients, just like admins in admin area may specify the time range and select resources which they wish to see in the graphical mode. |

|
Product Auto Upgrade (Sold Separately)
| Product Auto Upgrade For WHMCS extension is an automatic upgrade/downgrade of a product according to its usage. It will allow you to set rules related to the server resource usage according to which the module will resize your products and their configurable options. |

|
Proxmox Cloud Autoscaling (Sold Separately)
| Proxmox Cloud Autoscaling For WHMCS enables automatic alterations of servers provisioned by Proxmox Cloud For WHMCS depending on their load. The module will allow you to set out rules on VPS resources according to which servers will be modified through resizing or cloning. |

|
Hourly Billing
| Hourly billing allows you to charge your customers for each hour of use of the product (hourly billing calculations are based on the 'Registration Date' product). You can enable hourly billing for any product type. |

|
Ticket Billing
| Ticket billing works exactly as it sounds. When enabled, it bills your customers for each opened ticket. Remember that you must have a product with Ticket Billing submodule assigned to it. |

|
| As in the case of hourly billing, you can enable ticket billing for any product type. |

|
Sample Configuration
| In this section we will show you two samples of configuration of Advanced Billing. |
Two Weeks Billing
| In order to set up the invoice generation for resource usage every 2 weeks, follow these steps: 1. Go to 'Addons' → 'Advanced Billing' and select your product from 'Enable Advanced Billing For:' |

|
| 2. Go to 'Products List' → (your product's) 'Settings' → 'Recurring Billing' , enable the extension together with the 'Bill on Termination' option. Additionally, choose 'Bill Every X Days' from the 'Billing Type' dropdown menu. Enter '14' into the 'Billing Type Value' textbox and set 'Due Date' to '7' days. |

|
| 3. Remember to enter your pricing settings. |

|
| Congratulations, you have just successfully configured your billing options! Your Advanced Billing main page should look like the screen below. |

|
$20 Billing
| To bill your client as frequently as possible, follow these steps: 1.Go to 'Addons' → 'Advanced Billing' and select your product from 'Enable Advanced Billing For:' |
|
|
| 2. Go to 'Products List' → (your product's) 'Settings' → 'Credit Billing' and press 'Enable'. Afterwards, enter '1' into 'Create Invoices Each', '20' into 'Minimum Credit' and '50' into 'Low Credit Notification'. |

|
| 3. Remember to set up your pricing. |

|
| Congratulations, you have just successfully configured your billing options! Your Advanced Billing main page should look like the screen below. |

|
How To Update
| If you switch from Advanced Billing v2.x to v3.x, data from your previous version of the module must be migrated to the latest one. To do so, simply follow the basic steps below: 1. Copy new files to a correct directory in your WHCMS. /your_whmcs/modules/addons/AdvancedBilling/migrationScript.php
|
Tips
| 1. Deactivation of the module removes products' configuration, usage records and awaiting invoices. In order to update the module, simply follow the instructions in 'How To Update' . |
| 2. 'Installed Applications' usage record supports both Softaculous and Installatron. |
| 3. You can set up as many products as you want. |
| 4. If your client uses currency that is not WHMCS base currency (for example, WHMCS base currency is €, while client uses $):
An invoice for such client will be generated in the chosen currency, while usage record and calculation in Advanced Billing will use base currency. |
Common Problems
| 1. When you have problems with connection, check whether your SELinux or firewall does not block ports. |
| 2. You have problems with finding the specified line in clientareaproductdetails.tpl. Cause 1: You are using Classic or Portal template. <div align="center">{$moduleclientarea}</div>
Cause 2: You are using extensively customized template. |
| 3. If your cron has encountered an error and cannot start again, please check the cron folder in the 'yourWHMCS/modules/addons/AdvancedBilling/cron' path. If there is a 'pid.php' file, delete it and try to execute the cron again. If there is still an error occur, check the details in the logs. |