How To Update WHMCS Module
From ModulesGarden Wiki
(Difference between revisions)
| Line 1: | Line 1: | ||
<meta name="keywords" content=""></meta> | <meta name="keywords" content=""></meta> | ||
<meta name="description" content=""></meta> | <meta name="description" content=""></meta> | ||
| − | |||
=How To Update Provisioning Modules For WHMCS V5.2.2= | =How To Update Provisioning Modules For WHMCS V5.2.2= | ||
| Line 41: | Line 40: | ||
|} | |} | ||
{| | {| | ||
| − | |style="padding: 10px 0px 10px 15px;"|1. | + | |style="padding: 10px 0px 10px 15px;"|1. Backup your current module/modules files. |
|} | |} | ||
{| | {| | ||
| − | |style="padding: 0px 0px 10px 15px;"|2. | + | |style="padding: 0px 0px 10px 15px;"|2. Download the latest module version from your clientarea. |
|} | |} | ||
{| | {| | ||
| − | |style="padding: 0px 0px | + | |style="padding: 0px 0px 10px 15px;"|3. Upload all the module files into your main WHMCS directory. |
| + | |} | ||
| + | {| | ||
| + | |style="padding: 0px 0px 20px 15px;"|4. Update server/servers type through choosing new module name e.g. '' 'CpanelExtended' '' from a dropdown menu. | ||
|} | |} | ||
{| | {| | ||
| Line 53: | Line 55: | ||
|} | |} | ||
{| | {| | ||
| − | |style="padding: 0px 0px 20px 15px;"| | + | |style="padding: 0px 0px 20px 15px;"|5. Update product/products module settings through choosing new module name e.g. '' 'CpanelExtended' '' from a dropdown menu. |
|} | |} | ||
{| | {| | ||
| Line 59: | Line 61: | ||
|} | |} | ||
{| | {| | ||
| − | |style="padding: 0px 0px 30px 15px;"| | + | |style="padding: 0px 0px 30px 15px;"|6. Remove old module files from your system. '''(Optionally)''' |
|} | |} | ||
| Line 67: | Line 69: | ||
|} | |} | ||
{| | {| | ||
| − | |style="padding: 10px 0px 10px 15px;"|1. Download the latest module version from your clientarea. | + | |style="padding: 10px 0px 10px 15px;"|1. Backup your current module/modules files. |
| + | |} | ||
| + | {| | ||
| + | |style="padding: 0px 0px 10px 15px;"|2. Download the latest module version from your clientarea. | ||
|} | |} | ||
{| | {| | ||
| − | |style="padding: 0px 0px 10px 15px;"| | + | |style="padding: 0px 0px 10px 15px;"|3. Upload all the module files into your main WHMCS directory. |
|} | |} | ||
{| | {| | ||
| − | |style="padding: 0px 0px 20px 15px;"| | + | |style="padding: 0px 0px 20px 15px;"|4. Update registrar settings through choosing registrar module '' 'WwdGoDaddy' '' from a dropdown menu. Then enter your Go Daddy API User login and password. |
|} | |} | ||
{| | {| | ||
| Line 79: | Line 84: | ||
|} | |} | ||
{| | {| | ||
| − | |style="padding: 0px 0px 20px 15px;"| | + | |style="padding: 0px 0px 20px 15px;"|5. Update domain pricing through choosing '' 'WwdGoDaddy' '' from an 'Auto Registration' '' dropdown menu. |
|} | |} | ||
{| | {| | ||
| Line 85: | Line 90: | ||
|} | |} | ||
{| | {| | ||
| − | |style="padding: 0px 0px 30px 15px;"| | + | |style="padding: 0px 0px 30px 15px;"|6. Remove old module files from your system. '''(Optionally)''' |
|} | |} | ||
Revision as of 11:08, 19 March 2013
How To Update Provisioning Modules For WHMCS V5.2.2
| If you downloaded our provisioning module/modules before 19.03.2013 and updated your WHMCS to V5.2.2, you need to also update module/modules. If you downloaded our provisioning module/modules first time on 19.03.2013 or later, you don't need to update anything. |
| ✔ cPanel Extended For WHMCS |
| ✔ DirectAdmin Extended For WHMCS |
| ✔ Plesk Extended For WHMCS |
| ✔ Rackspace Email For WHMCS |
| ✔ Rackspace Email Extended For WHMCS |
| ✔ Zimbra Email For WHMCS |
| ✔ cPanel Manage2 For WHMCS |
| ✔ Google Apps For WHMCS |
| ✔ WWD GoDaddy Domaind For WHMCS (more details in the next section below) |
| Follow these instructions: |
| 1. Backup your current module/modules files. |
| 2. Download the latest module version from your clientarea. |
| 3. Upload all the module files into your main WHMCS directory. |
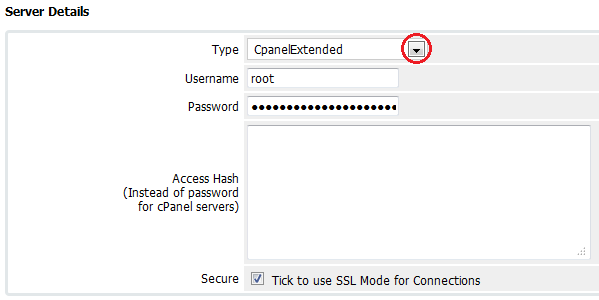
| 4. Update server/servers type through choosing new module name e.g. 'CpanelExtended' from a dropdown menu. |

|
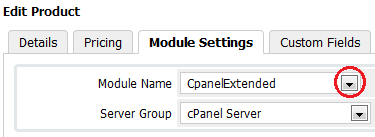
| 5. Update product/products module settings through choosing new module name e.g. 'CpanelExtended' from a dropdown menu. |

|
| 6. Remove old module files from your system. (Optionally) |
WWD GoDaddy Domains For WHMCS Update
| Follow these instructions: |
| 1. Backup your current module/modules files. |
| 2. Download the latest module version from your clientarea. |
| 3. Upload all the module files into your main WHMCS directory. |
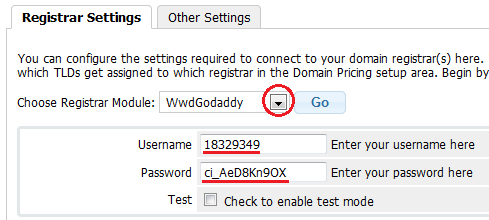
| 4. Update registrar settings through choosing registrar module 'WwdGoDaddy' from a dropdown menu. Then enter your Go Daddy API User login and password. |

|
| 5. Update domain pricing through choosing 'WwdGoDaddy' from an 'Auto Registration' dropdown menu. |

|
| 6. Remove old module files from your system. (Optionally) |