SMS Center For WHMCS
| Line 7: | Line 7: | ||
=About [http://www.modulesgarden.com/products/whmcs/sms_center/features SMS Center For WHMCS]= | =About [http://www.modulesgarden.com/products/whmcs/sms_center/features SMS Center For WHMCS]= | ||
{| | {| | ||
| − | |style="padding: 10px 0px 5px 0px;"|'''SMS Center For WHMCS''' is a module created to send text messages to your clients and administrators each time email notification is sent through WHMCS.<br /> | + | |style="padding: 10px 0px 5px 0px;"|'''SMS Center For WHMCS''' is a module created to send text messages to your clients and administrators each time an email notification is sent through WHMCS.<br /> |
| − | You will be able to choose from | + | You will be able to choose from seven different SMS gateways, define SMS templates in various languages and manage text messages in queues.<br /> |
The module will allow you to enable SMS codes as a part of two-factor authentication while logging in to your system.<br /> | The module will allow you to enable SMS codes as a part of two-factor authentication while logging in to your system.<br /> | ||
You will also get the access to SMS messages logs in order to verify the status of each sent text message.<br /> | You will also get the access to SMS messages logs in order to verify the status of each sent text message.<br /> | ||
| Line 111: | Line 111: | ||
{| | {| | ||
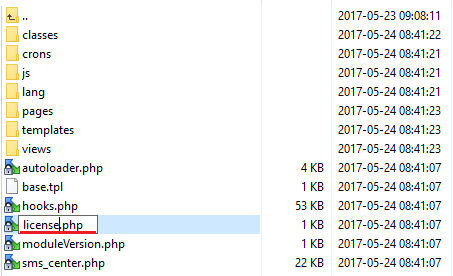
|style="padding: 0px 0px 15px 15px;"|'''3. When you install SMS Center For WHMCS for the first time you have to rename '' 'license_RENAME.php' '' file.'''<br /> | |style="padding: 0px 0px 15px 15px;"|'''3. When you install SMS Center For WHMCS for the first time you have to rename '' 'license_RENAME.php' '' file.'''<br /> | ||
| − | File is located in '' 'modules/addons/sms_center/license_RENAME.php'.'' Rename it from '' 'license_RENAME.php' '' to '' 'license.php' '' | + | File is located in '' 'modules/addons/sms_center/license_RENAME.php'.'' Rename it from '' 'license_RENAME.php' '' to '' 'license.php'. '' |
|} | |} | ||
{| | {| | ||
| Line 117: | Line 117: | ||
|} | |} | ||
{| | {| | ||
| − | |style="padding: 0px 0px 15px 15px;"|'''4. In order to configure your license key, you have to edit the previously renamed '' 'license.php' file '' | + | |style="padding: 0px 0px 15px 15px;"|'''4. In order to configure your license key, you have to edit the previously renamed '' 'license.php' file. '' '''<br /> |
| − | Enter your license key between quotation marks as presented on the following screen. You can find your license key in your client area → '' 'My Products' '' | + | Enter your license key between quotation marks as presented on the following screen. You can find your license key in your client area → '' 'My Products'. '' |
|} | |} | ||
{| | {| | ||
| Line 126: | Line 126: | ||
{| | {| | ||
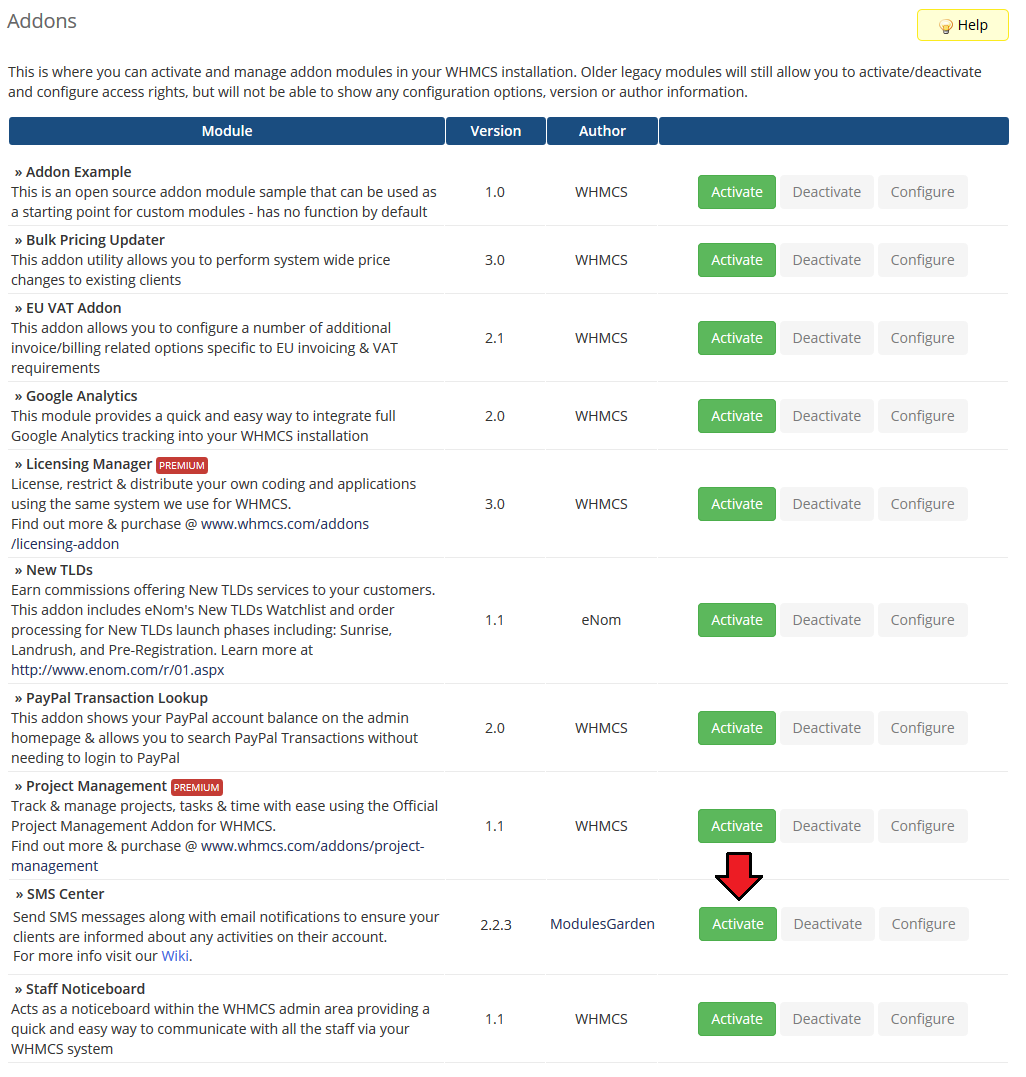
|style="padding: 10px 0px 15px 15px;"|'''5. Now, you have to activate the module in your WHMCS system.'''<br /> | |style="padding: 10px 0px 15px 15px;"|'''5. Now, you have to activate the module in your WHMCS system.'''<br /> | ||
| − | Log in to your WHMCS admin area and proceed to '' 'Setup' '' → '' 'Addon Modules' '' | + | Log in to your WHMCS admin area and proceed to '' 'Setup' '' → '' 'Addon Modules'. ''<br /> |
Afterwards, find '' 'SMS Center' '' and press '' 'Activate' '' button. | Afterwards, find '' 'SMS Center' '' and press '' 'Activate' '' button. | ||
|} | |} | ||
| Line 135: | Line 135: | ||
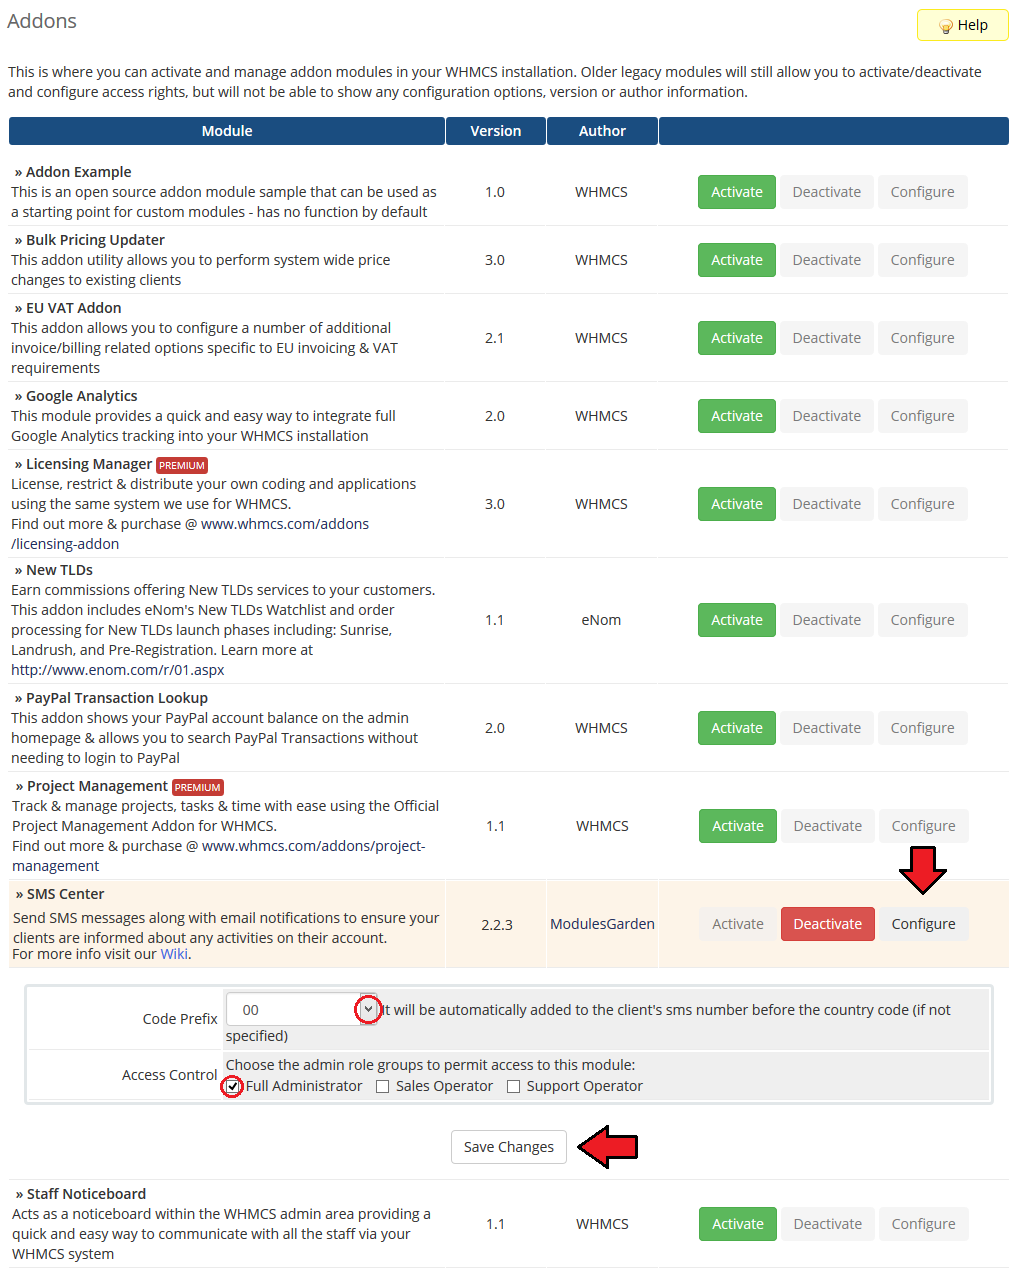
|style="padding: 0px 0px 15px 15px;"|'''6. In the next step you need to permit access to this module.'''<br /> | |style="padding: 0px 0px 15px 15px;"|'''6. In the next step you need to permit access to this module.'''<br /> | ||
To do so, click on '' 'Configure' '' button, tick checkboxes to assign desired admin roles.<br /> | To do so, click on '' 'Configure' '' button, tick checkboxes to assign desired admin roles.<br /> | ||
| − | Choose a country code prefix that will be automatically added to the client's SMS number if it has not been specified. Press '' 'Save Changes' '' | + | Choose a country code prefix that will be automatically added to the client's SMS number if it has not been specified. Press '' 'Save Changes'. '' |
|} | |} | ||
{| | {| | ||
| Line 141: | Line 141: | ||
|} | |} | ||
{| | {| | ||
| − | |style="padding: 0px 0px 20px 15px;"|'''7. Now, proceed to the addon → '' 'Integration Code' '' and follow integration instructions.''' | + | |style="padding: 0px 0px 20px 15px;"|'''7. Now, proceed to the addon → '' 'Integration Code' '' and follow integration instructions.'''<br/> |
| + | Remember that integration depends on the WHMCS version and template that you are using. If your system used is WHMCS V6.x.x and template: '' 'Six', '' there is no need for you to do any integration. <br/> | ||
| + | However, if you are working with WHMCS V6.x.x template '' 'Five' '' or WHMCS V5 then you must insert the code snippets as it is explained on the screen below. | ||
|} | |} | ||
{| | {| | ||
| Line 147: | Line 149: | ||
|} | |} | ||
{| | {| | ||
| − | |style="padding: 0px 0px | + | |style="padding: 0px 0px 10px 15px;"|'''8. The last thing you need to still do is setting up a cron job. It is advised to set the cron job with a 1 or 2 minutes interval.'''<br/> |
| + | /your_whmcs_dir/modules/addons/sms_center/crons/cron.php | ||
| + | Remember to replace ''your_whmcs_dir'' with a correct directory of your system. | ||
| + | |} | ||
| + | {| | ||
| + | |style="padding: 0px 0px 30px 15px;"|'''9. You have just successfully installed SMS Center For WHMCS!''' | ||
|} | |} | ||
| Line 156: | Line 163: | ||
==Configuration== | ==Configuration== | ||
{| | {| | ||
| − | |style="padding: 10px 0px 30px 15px;"|Under '' 'Configuration' '' tab you will find '' 'Submodules' '' and '' ' | + | |style="padding: 10px 0px 30px 15px;"|Under '' 'Configuration' '' tab you will find '' 'Submodules', 'Administrators' '' and '' 'General Settings' '' sections. Configure each of them to allow full usage of SMS Center For WHMCS module.<br /> Press the first one '' 'Submodules' '' to configure and check connection with SMS gateways. |
|} | |} | ||
===Submodules Configuration=== | ===Submodules Configuration=== | ||
{| | {| | ||
| − | |style="padding: 10px 0px 20px 15px;"|Find here all possible gateways that can be used in our module. Follow the below instructions to configure them. | + | |style="padding: 10px 0px 20px 15px;"|Find here all possible gateways that can be used in our module. Follow the below instructions to configure them.<br/> |
| − | + | Press '' 'Configure' '' next to a gateway you wish to use. | |
| − | + | ||
| − | + | ||
|} | |} | ||
{| | {| | ||
| Line 188: | Line 193: | ||
|style="padding: 0px 0px 30px 25px;"|[[File:SMSC_12.png]] | |style="padding: 0px 0px 30px 25px;"|[[File:SMSC_12.png]] | ||
|} | |} | ||
| + | |||
===Administrators Configuration=== | ===Administrators Configuration=== | ||
{| | {| | ||
| − | |style="padding: 10px 0px 20px 15px;"|This section contains a list of all staff administrators. You have the possibility here to decide | + | |style="padding: 10px 0px 20px 15px;"|This section contains a list of all staff administrators. You have the possibility here to decide who of them will receive SMS notifications and which notifications exactly. <br />Follow the steps described below to configure staff notifications properly. |
|} | |} | ||
{| | {| | ||
| Line 199: | Line 205: | ||
|} | |} | ||
{|<br /> | {|<br /> | ||
| − | |style="padding: 0px 0px 15px 15px;"|In order to enable | + | |style="padding: 0px 0px 15px 15px;"|In order to enable SMS notifications for administrators individually, firstly set configuration for them. <br /> |
1. Fill in the administrator's phone number, where text messages with notifications will be sent.<br /> | 1. Fill in the administrator's phone number, where text messages with notifications will be sent.<br /> | ||
2. Choose which of the available admin messages shall be sent to that administrator.<br /> | 2. Choose which of the available admin messages shall be sent to that administrator.<br /> | ||
| Line 214: | Line 220: | ||
|style="padding: 0px 0px 30px 25px;"|[[File:SMSC_24.png]] | |style="padding: 0px 0px 30px 25px;"|[[File:SMSC_24.png]] | ||
|} | |} | ||
| + | |||
| + | ===General Settings=== | ||
| + | {| | ||
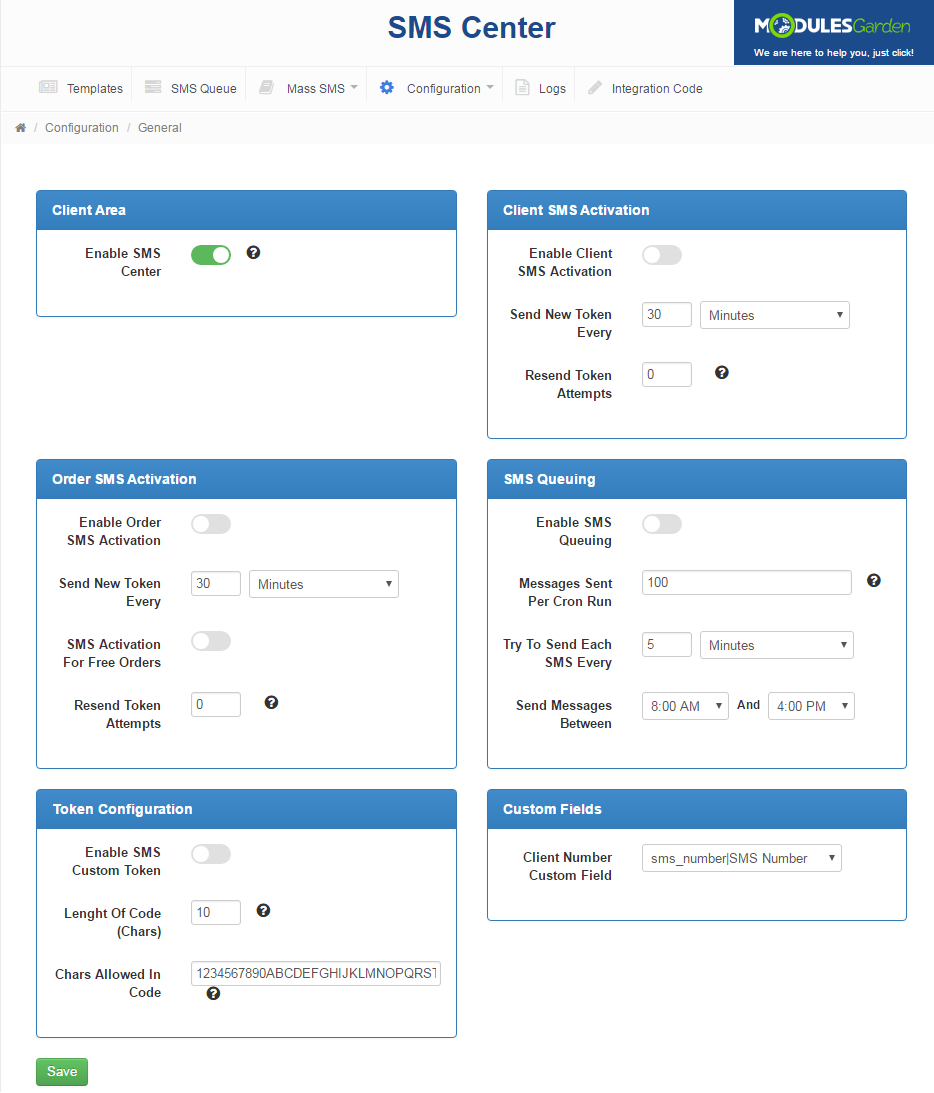
| + | |style="padding: 10px 0px 20px 15px;"|General settings section includes specific SMS configuration possibilities.<br/> | ||
| + | Configure those you wish to activate and '' 'Save' '' the changes once ready! | ||
| + | |} | ||
| + | {| | ||
| + | |style="padding: 0px 0px 30px 25px;"|[[File:SMSC_24_1.png]] | ||
| + | |} | ||
| + | ====Order SMS Activation==== | ||
| + | {| | ||
| + | |style="padding: 10px 0px 20px 15px;"|Enable '' 'Order SMS Activation' '' to allow activating orders once placed. Once an order is placed a Client will receive a text message with a token,<br/> which must be then used to finish the order.<br/> | ||
| + | ''Note, this option does not support orders upgrades!'' | ||
| + | |} | ||
| + | {| | ||
| + | |style="padding: 0px 0px 30px 25px;"|[[File:SMSC_24_2.png]] | ||
| + | |} | ||
| + | |||
| + | ====SMS Queuing==== | ||
| + | {| | ||
| + | |style="padding: 10px 0px 20px 15px;"|Enable this option to allow text messages queues. Declare time intervals between attempts to send text messages and the number of messages <br/> that can be sent in one attempt. Finally, choose time period when text messages can be sent to clients. | ||
| + | |} | ||
| + | {| | ||
| + | |style="padding: 0px 0px 30px 25px;"|[[File:SMSC_24_3.png]] | ||
| + | |} | ||
| + | |||
| + | ====Client SMS Activation==== | ||
| + | {| | ||
| + | |style="padding: 10px 0px 20px 15px;"|Enable '' 'Client SMS Activation' '' and every newly activated client will receive a token, which must be used to end up the activation process.<br/> | ||
| + | Declare time intervals for sending tokens here. | ||
| + | |} | ||
| + | {| | ||
| + | |style="padding: 0px 0px 30px 25px;"|[[File:SMSC_24_4.png]] | ||
| + | |} | ||
| + | |||
==Management== | ==Management== | ||
===Templates=== | ===Templates=== | ||
| Line 219: | Line 260: | ||
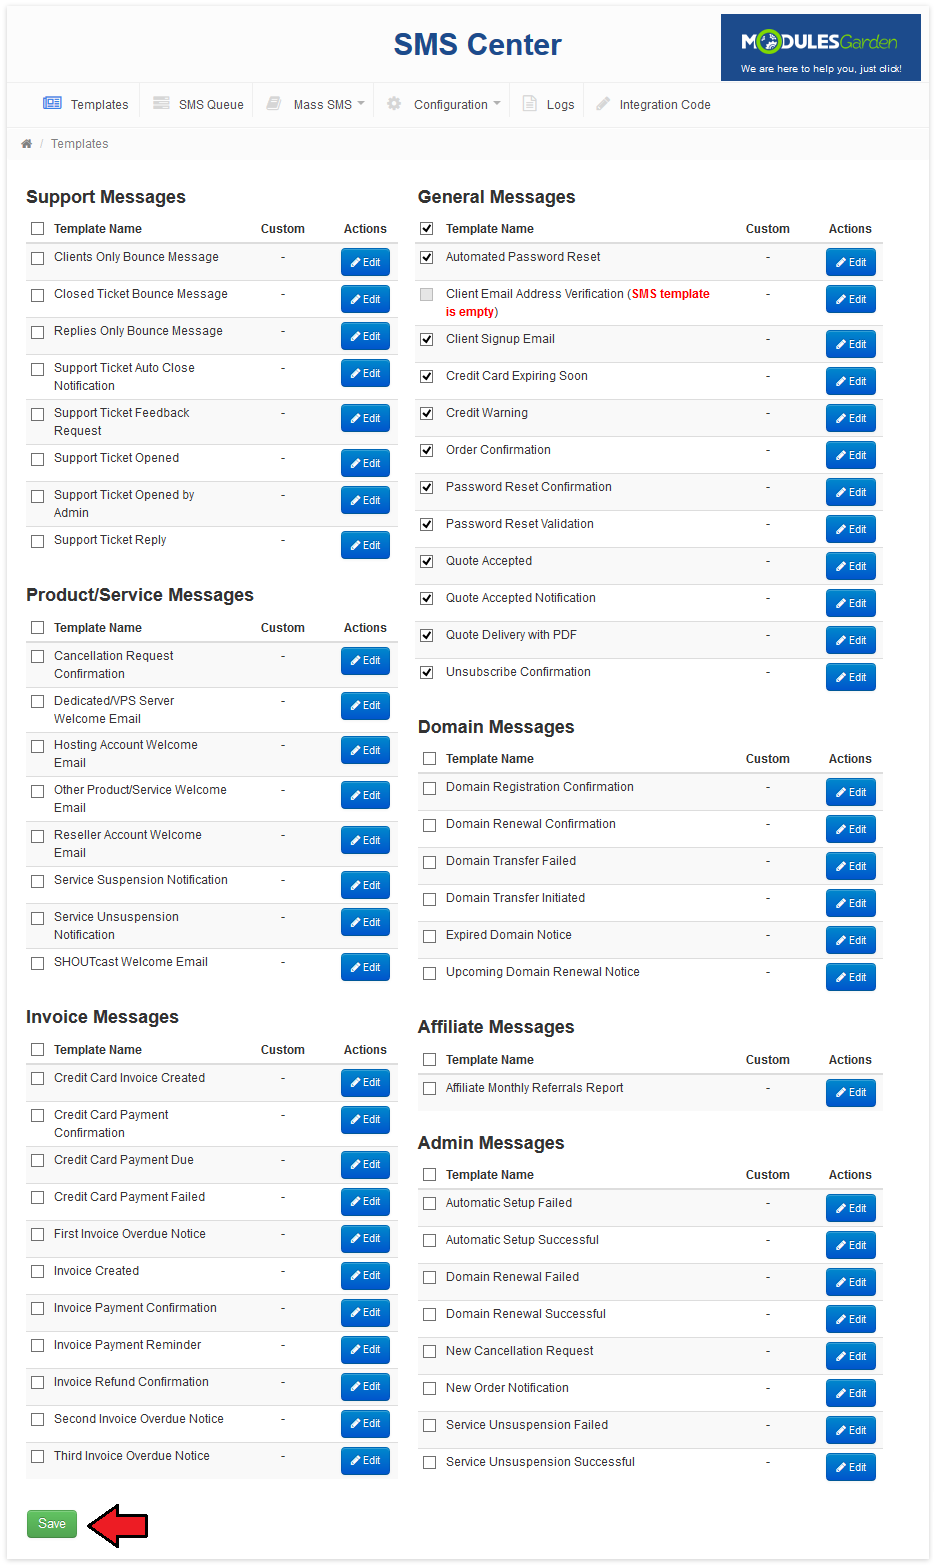
|style="padding: 10px 0px 15px 15px;"|'' 'Templates' '' tab contains the list of message templates.<br /> | |style="padding: 10px 0px 15px 15px;"|'' 'Templates' '' tab contains the list of message templates.<br /> | ||
Each email template in your system has its text message counterpart.<br /> | Each email template in your system has its text message counterpart.<br /> | ||
| − | Any of these messages can be enabled/disabled through marking/unmarking checkbox next to them and pressing '' 'Save' '' | + | Any of these messages can be enabled/disabled through marking/unmarking checkbox next to them and pressing '' 'Save'. '' |
|} | |} | ||
{| | {| | ||
| Line 253: | Line 294: | ||
|style="padding: 0px 0px 30px 25px;"|[[File:SMSC_16.png]] | |style="padding: 0px 0px 30px 25px;"|[[File:SMSC_16.png]] | ||
|} | |} | ||
| + | ===SMS Queue=== | ||
| + | {| | ||
| + | |style="padding: 10px 0px 15px 15px;"|In this section you will find a list of all text messages waiting for a cron run to be sent. Specific details of the cron, number of messages that can be sent in one attempt are specified in '' 'General Settings' '' section.<br/> If SMS Queues are enabled every single message before being sent is placed on this list. With every cron run a previously set up number of messages is sent.<br/> If message sending fails (because the number is incorrect, there are problems with gate, no funds etc.) such SMS stays on the list for the next attempt.<br/> After three failed attempts its status is changed to '' 'Aborted'. '' <br/> | ||
| + | |} | ||
| + | {| | ||
| + | |style="padding: 0px 0px 15px 15px;"|Actions:<br/> | ||
| + | 1. Send - send message manually.<br/> | ||
| + | 2. Reload - use when status has changed to '' 'Aborted' '' to bring it back to the queue.<br/> | ||
| + | 3. Delete - remove message form the list. | ||
| + | |} | ||
| + | {| | ||
| + | |style="padding: 0px 0px 20px 25px;"|[[File:SMSC_16_1.png]] | ||
| + | |} | ||
| + | |||
===Logs=== | ===Logs=== | ||
{| | {| | ||
| Line 265: | Line 320: | ||
{| | {| | ||
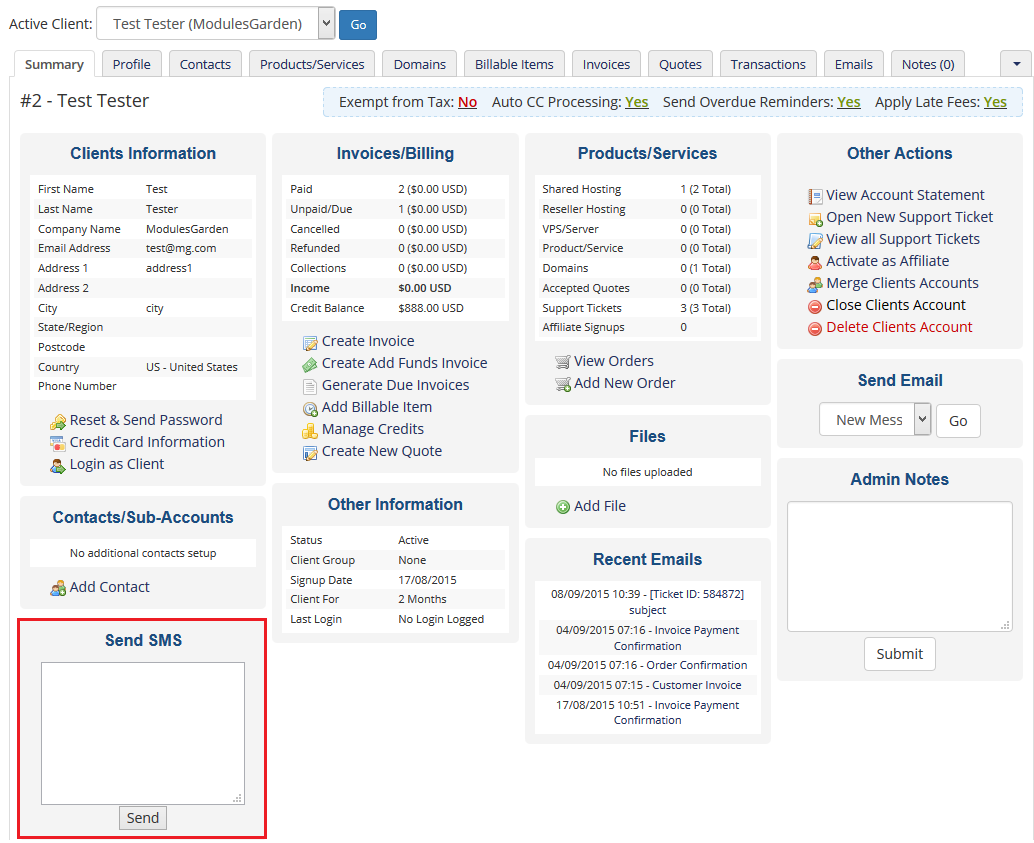
|style="padding: 0px 0px 15px 15px;"|From the clients' summary page you can send text messages to clients using only a simple box.<br /> | |style="padding: 0px 0px 15px 15px;"|From the clients' summary page you can send text messages to clients using only a simple box.<br /> | ||
| − | Type in the message text into the text field like on the screen below and press '' 'Send | + | Type in the message text into the text field like on the screen below and press '' 'Send'. '' |
|} | |} | ||
{| | {| | ||
|style="padding: 0px 0px 30px 25px;"|[[File:SMSC_25.png]] | |style="padding: 0px 0px 30px 25px;"|[[File:SMSC_25.png]] | ||
|} | |} | ||
| + | |||
==Client Area== | ==Client Area== | ||
{| | {| | ||
| Line 288: | Line 344: | ||
{| | {| | ||
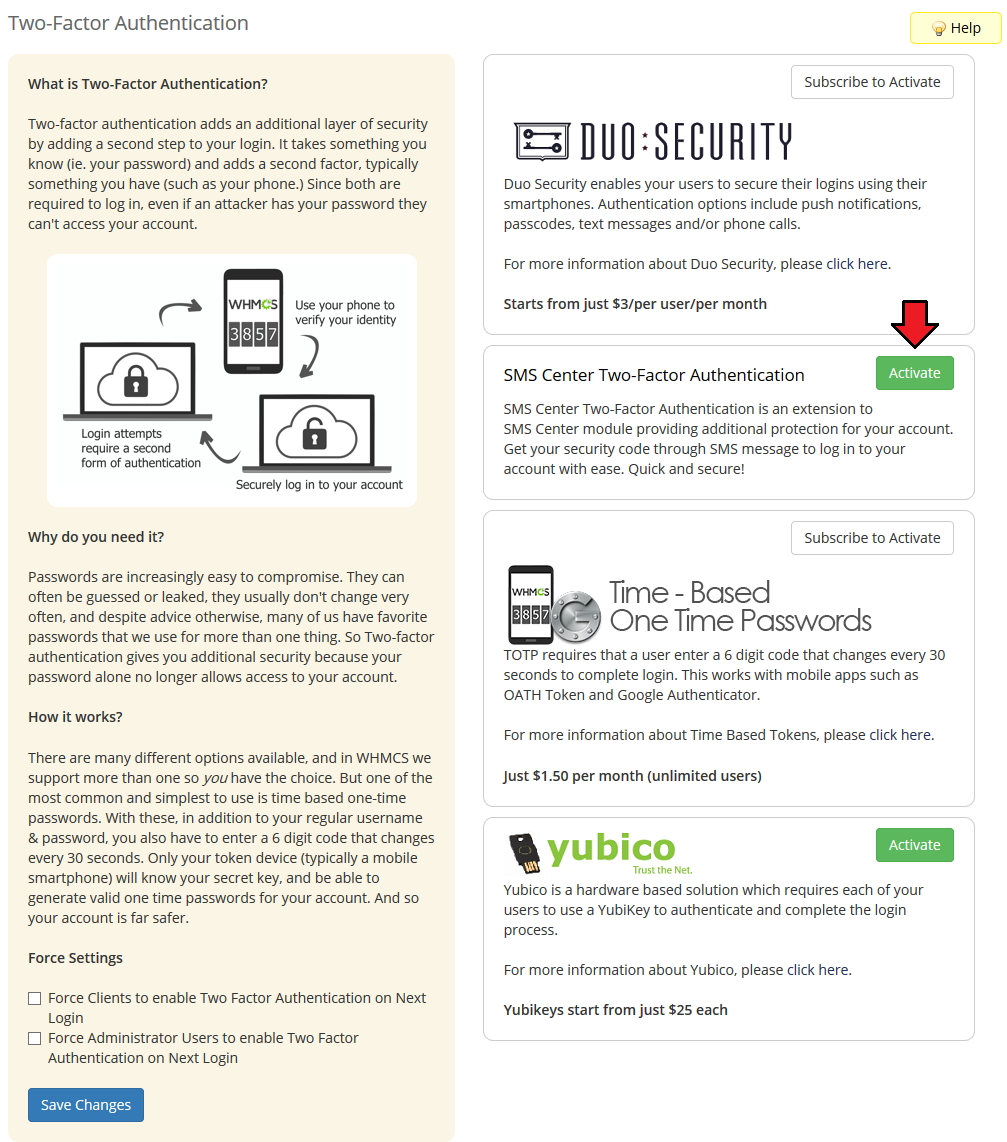
|style="padding: 0px 0px 15px 15px;"|'''SMS center For WHMCS consists of two parts, the actual SMS Center addon and the authentication addon.'''<br /> Two-Factor Authentication adds an extra layer of protection to logins. Once enabled and configured by a client or an admin,<br /> each time they sign in they will be asked to enter both username and password as well as a second factor such as a security code.<br /> | |style="padding: 0px 0px 15px 15px;"|'''SMS center For WHMCS consists of two parts, the actual SMS Center addon and the authentication addon.'''<br /> Two-Factor Authentication adds an extra layer of protection to logins. Once enabled and configured by a client or an admin,<br /> each time they sign in they will be asked to enter both username and password as well as a second factor such as a security code.<br /> | ||
| − | In order to activate it proceed to '' 'Setup' '' → '' 'Staff Management' '' → '' 'Two-Factor Authentication' '' | + | In order to activate it proceed to '' 'Setup' '' → '' 'Staff Management' '' → '' 'Two-Factor Authentication'. ''<br /> |
Afterwards, find '' 'SMS Center Two-Factor Authentication,' '' and press '' 'Activate' '' button. | Afterwards, find '' 'SMS Center Two-Factor Authentication,' '' and press '' 'Activate' '' button. | ||
|} | |} | ||
| Line 297: | Line 353: | ||
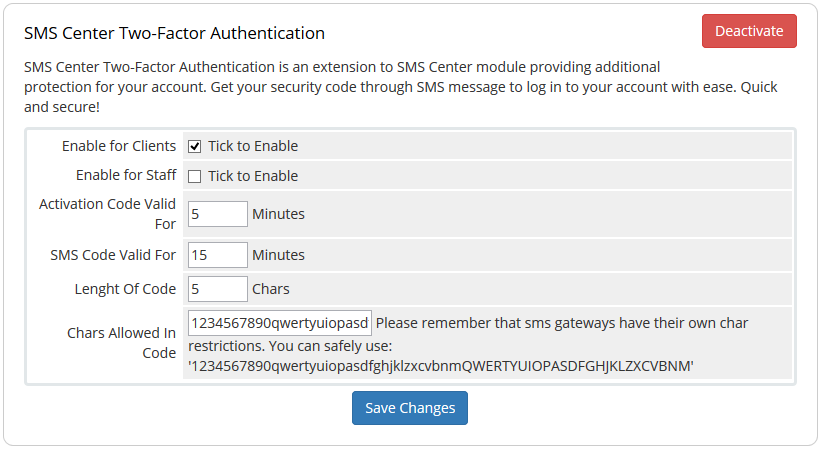
|style="padding: 0px 0px 15px 15px;"|'''In the next step you need to configure the addon settings. '''<br /> | |style="padding: 0px 0px 15px 15px;"|'''In the next step you need to configure the addon settings. '''<br /> | ||
To do so, fill out the data: | To do so, fill out the data: | ||
| − | *Enable for Clients - choose this option if you wish all clients to authenticate while logging in their account | + | *Enable for Clients - choose this option if you wish all clients to authenticate while logging in their account. |
| − | *Enable for Staff - choose this option if you wish all administrators to authenticate while logging in their account | + | *Enable for Staff - choose this option if you wish all administrators to authenticate while logging in their account. |
*Activation Code Valid For - decide how long a received code shall be valid, in minutes. Used once before the first login. | *Activation Code Valid For - decide how long a received code shall be valid, in minutes. Used once before the first login. | ||
*SMS Code Valid For - decide how long a received via SMS code shall be valid, in minutes. Used every time to log in after the first authentication. | *SMS Code Valid For - decide how long a received via SMS code shall be valid, in minutes. Used every time to log in after the first authentication. | ||
| Line 310: | Line 366: | ||
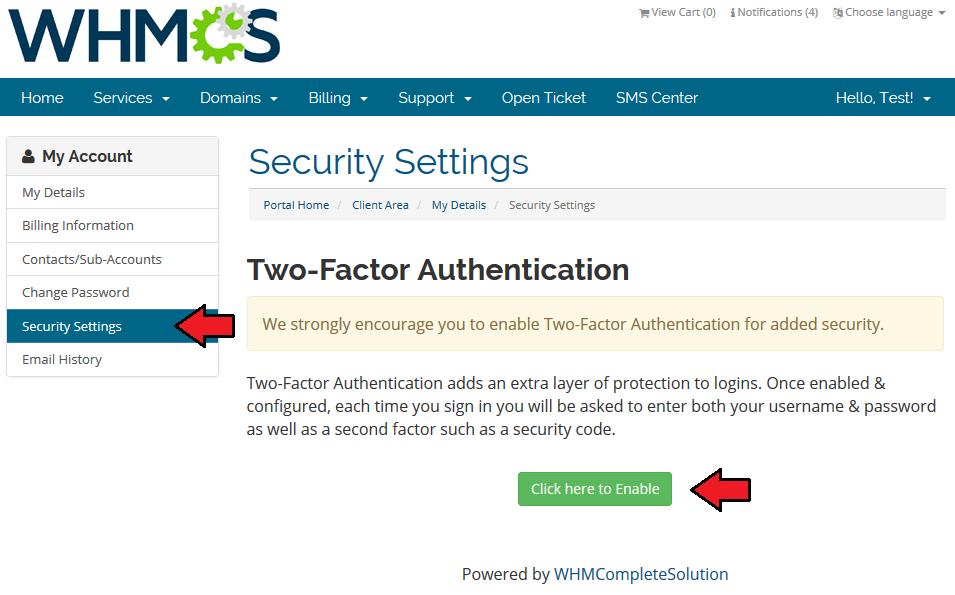
|style="padding: 10px 0px 15px 15px;"|If you have activated '' 'SMS Two-Factor Authentication' '' addon, your clients will be allowed now to decide if they wish to use such security opportunity. <br /> | |style="padding: 10px 0px 15px 15px;"|If you have activated '' 'SMS Two-Factor Authentication' '' addon, your clients will be allowed now to decide if they wish to use such security opportunity. <br /> | ||
Here is how to enable such functionality: <br /> | Here is how to enable such functionality: <br /> | ||
| − | 1. Login to your client area, proceed to '' 'Account Details' '' → '' 'Security Settings | + | 1. Login to your client area, proceed to '' 'Account Details' '' → '' 'Security Settings'. '' There is a button, which once pressed enables two factors authentication configuration for the client. |
|} | |} | ||
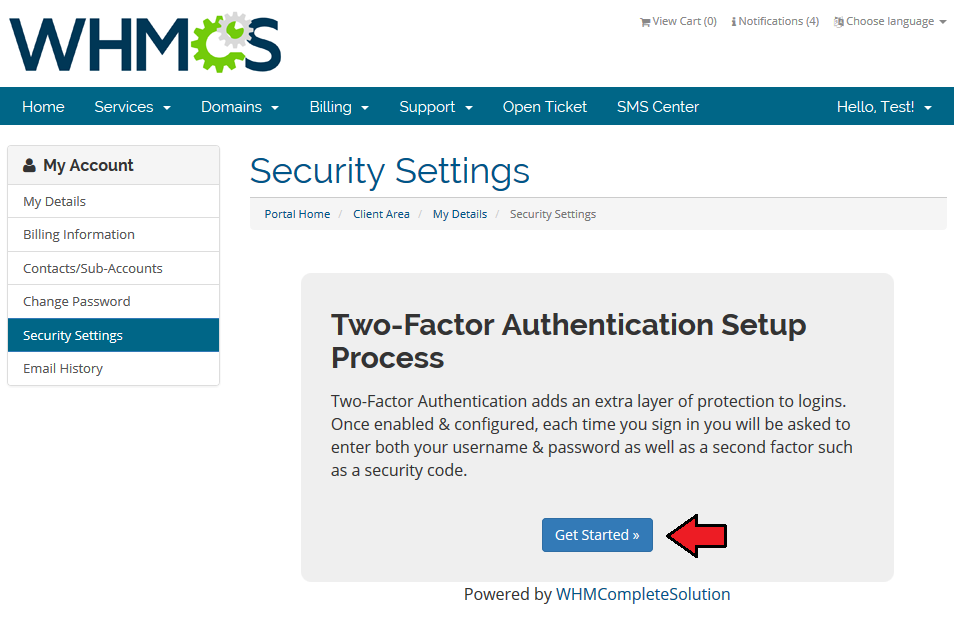
{| | {| | ||
| Line 322: | Line 378: | ||
|} | |} | ||
{| | {| | ||
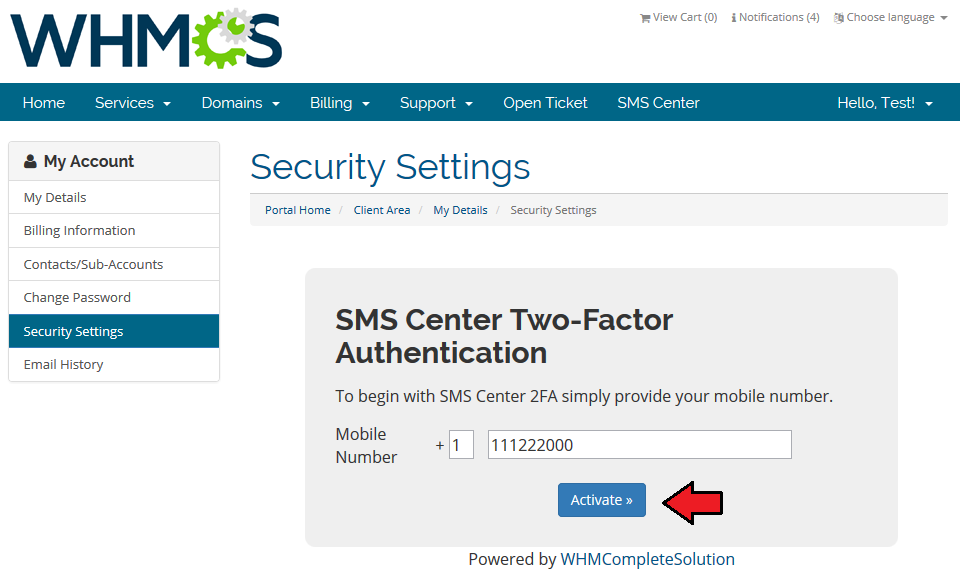
| − | |style="padding: 0px 0px 15px 15px;"|3. Provide phone number to proceed with SMS Two-Factors Authentication. Press '' 'Activate | + | |style="padding: 0px 0px 15px 15px;"|3. Provide phone number to proceed with SMS Two-Factors Authentication. Press '' 'Activate'. ''<br /> |
''This step will be skipped if the client entered a valid SMS number in the profile before!'' | ''This step will be skipped if the client entered a valid SMS number in the profile before!'' | ||
|} | |} | ||
| Line 329: | Line 385: | ||
|} | |} | ||
{| | {| | ||
| − | |style="padding: 0px 0px 20px 15px;"|4. A client should receive now an authentication code via SMS | + | |style="padding: 0px 0px 20px 15px;"|4. A client should receive now an authentication code via SMS. <br /> Type in the code in the field and press '' 'Activate.' ''<br /> ''Remember that the code is valid only temporarily, according to the addon settings!'' |
|} | |} | ||
{| | {| | ||
| Line 346: | Line 402: | ||
|style="padding: 0px 0px 30px 25px;"|[[File:SMSC_31.png]] | |style="padding: 0px 0px 30px 25px;"|[[File:SMSC_31.png]] | ||
|} | |} | ||
| − | === | + | |
| + | ===Administrators=== | ||
{| | {| | ||
|style="padding: 10px 0px 15px 15px;"|If '' 'SMS Two-Factor Authentication' '' addon has been activated and enabled for staff, as an administrator you can decide if you wish to use such security opportunity. <br /> | |style="padding: 10px 0px 15px 15px;"|If '' 'SMS Two-Factor Authentication' '' addon has been activated and enabled for staff, as an administrator you can decide if you wish to use such security opportunity. <br /> | ||
| Line 362: | Line 419: | ||
|} | |} | ||
{| | {| | ||
| − | |style="padding: 0px 0px | + | |style="padding: 0px 0px 20px 15px;"|4. You will receive now an authentication code via SMS.<br /> Type in the code in the field and press '' 'Activate.' ''<br /> ''Remember that the code is valid only temporarily, according to the addon settings!'' |
| − | '' | + | |
|} | |} | ||
{| | {| | ||
| Line 369: | Line 425: | ||
|} | |} | ||
{| | {| | ||
| − | |style="padding: 0px 0px 20px | + | |style="padding: 0px 0px 20px 25px;"|[[File:SMSC_35.png]] |
|} | |} | ||
{| | {| | ||
| − | |style="padding: 0px 0px 20px | + | |style="padding: 0px 0px 20px 15px;"|5. The second factor is now required to log in. Wait for the SMS with verification code and enter it in the field. Press '' 'Login.' '' <br />If you have any problems with receiving/entering the verification code, you can use your backup code. <br /> ''Remember to note and keep your new backup code in a secure place!'' |
|} | |} | ||
{| | {| | ||
| − | |style="padding: 0px 0px 30px | + | |style="padding: 0px 0px 30px 25px;"|[[File:SMSC_35_1.png]] |
|} | |} | ||
| + | |||
=Additional Information= | =Additional Information= | ||
{| | {| | ||
Revision as of 09:33, 7 October 2015
Article update is ongoing on this page, watch out for broken links and unclear descriptions!
We are sorry for the inconvenience caused.
Contents |
About SMS Center For WHMCS
| SMS Center For WHMCS is a module created to send text messages to your clients and administrators each time an email notification is sent through WHMCS. You will be able to choose from seven different SMS gateways, define SMS templates in various languages and manage text messages in queues. |
- Admin Area Features:
| ✔ Notify Both Your Clients And Administrators via SMS Message |
| ✔ Define SMS Template Counterpart For Each Email Template |
| ✔ Enable/Disable SMS Gateways |
| ✔ Enable/Disable SMS Templates |
| ✔ Enable/Disable Administrator Notifications Per Admin |
| ✔ Define Notifications To Receive Per Administrator |
| ✔ Define Default SMS Template Version For Each Language |
| ✔ Send SMS From Client Summary Page |
| ✔ Check Connection With SMS Gateways |
| ✔ Merge Fields Support |
| ✔ Characters Counter - Trace Length Of Your Messages |
| ✔ Adjust Format Number To International Automatically |
| ✔ Logs |
- Client Area Features:
| ✔ Define SMS Notifications To Receive |
- Supported Gateways:
| ✔ BoxisSMS |
| ✔ Clickatell |
| ✔ SMSEagle |
| ✔ SMSGlobal |
- General Info:
| ✔ Two-Factor Authentication Submodule - Use Second Layer Of Security |
| ✔ Integrated With Clients Profiler For WHMCS - Send SMS From Any WHMCS Place (read more) |
| ✔ Module API - Integrate Other SMS Gateways |
| ✔ Multi-Language Support |
| ✔ Supports WHMCS Templates Five and Six |
| ✔ Supports WHMCS V5 and V6 |
Installation
| This tutorial will show you how to successfully install and configure SMS Center For WHMCS. We will guide you step by step through the whole installation and configuration process. |
Installation
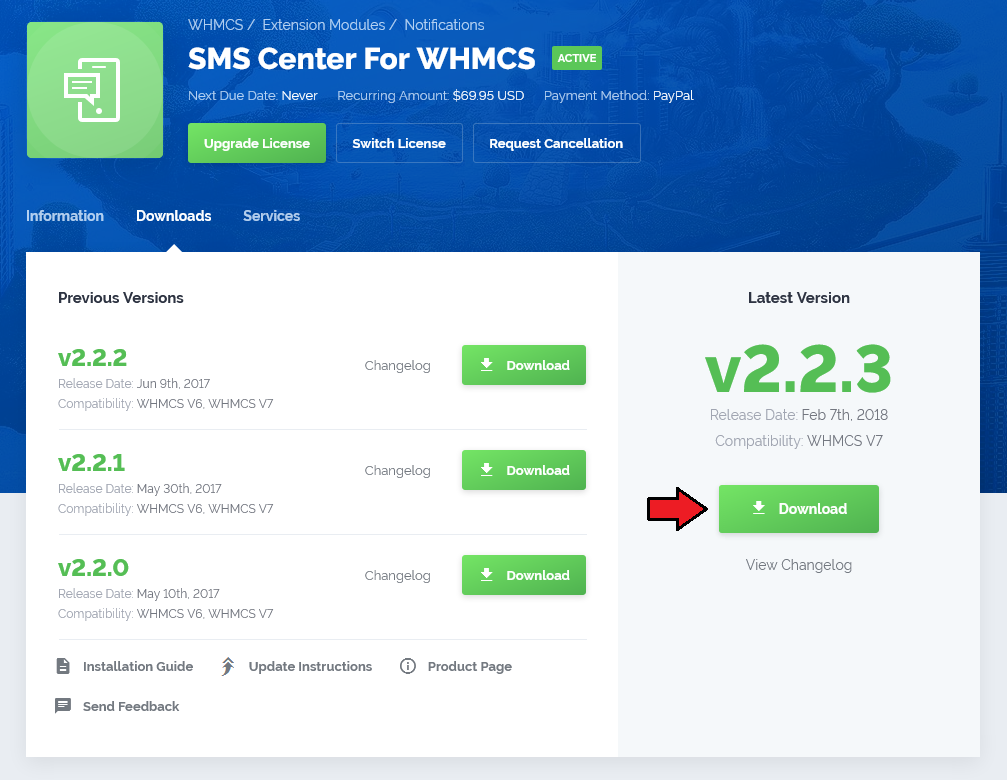
| 1. Log in to your client area and download SMS Center For WHMCS. |
|
| 2. Upload and extract the module into the main WHMCS directory. Files in your WHMCS directory should look like on the following screen. |

|
| 3. When you install SMS Center For WHMCS for the first time you have to rename 'license_RENAME.php' file. File is located in 'modules/addons/sms_center/license_RENAME.php'. Rename it from 'license_RENAME.php' to 'license.php'. |
|
| 4. In order to configure your license key, you have to edit the previously renamed 'license.php' file. Enter your license key between quotation marks as presented on the following screen. You can find your license key in your client area → 'My Products'. |

|
Activate The Addon
| 5. Now, you have to activate the module in your WHMCS system. Log in to your WHMCS admin area and proceed to 'Setup' → 'Addon Modules'. |
|
| 6. In the next step you need to permit access to this module. To do so, click on 'Configure' button, tick checkboxes to assign desired admin roles. |
|
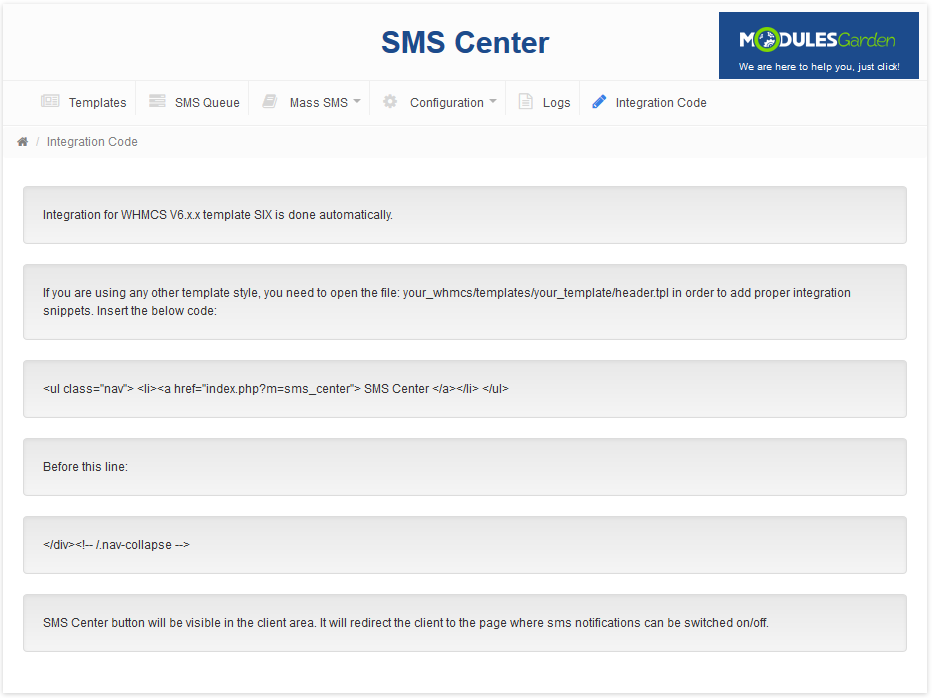
| 7. Now, proceed to the addon → 'Integration Code' and follow integration instructions. Remember that integration depends on the WHMCS version and template that you are using. If your system used is WHMCS V6.x.x and template: 'Six', there is no need for you to do any integration. |
|
8. The last thing you need to still do is setting up a cron job. It is advised to set the cron job with a 1 or 2 minutes interval./your_whmcs_dir/modules/addons/sms_center/crons/cron.php Remember to replace your_whmcs_dir with a correct directory of your system. |
| 9. You have just successfully installed SMS Center For WHMCS! |
Configuration and Management
| SMS Center For WHMCS is a module which allows you to send predefined text messages to your clients the same way emails are sent. |
Configuration
| Under 'Configuration' tab you will find 'Submodules', 'Administrators' and 'General Settings' sections. Configure each of them to allow full usage of SMS Center For WHMCS module. Press the first one 'Submodules' to configure and check connection with SMS gateways. |
Submodules Configuration
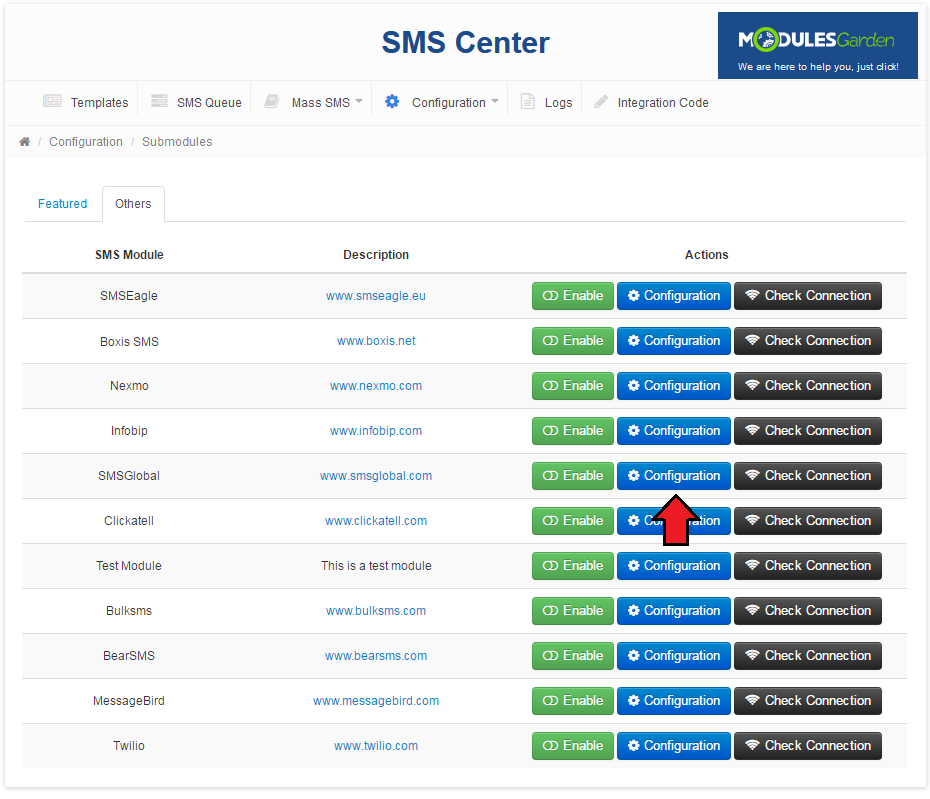
| Find here all possible gateways that can be used in our module. Follow the below instructions to configure them. Press 'Configure' next to a gateway you wish to use. |
|
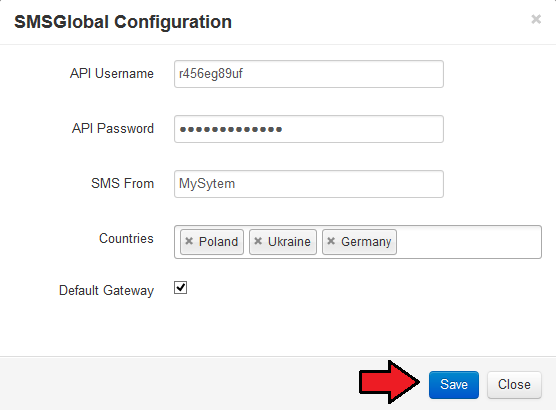
| Configuration of each gateway may vary depending on its requirements. As an example we will configure SMSEagle gateway. |
|
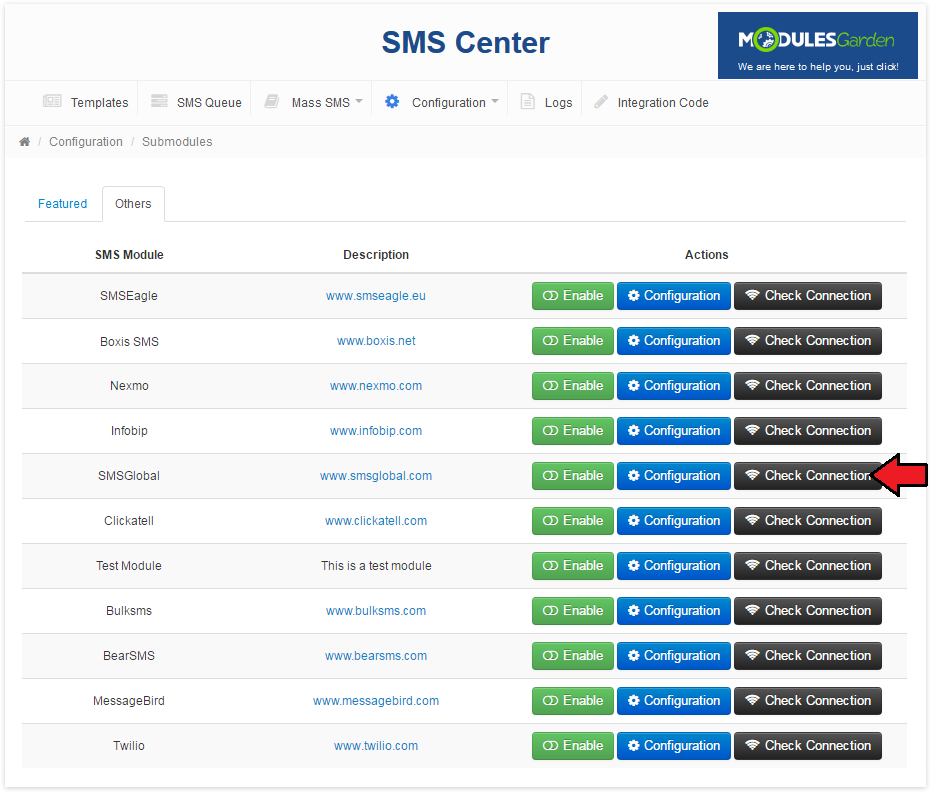
| You can check whether configuration is correct through pressing 'Check Connection'. |
|
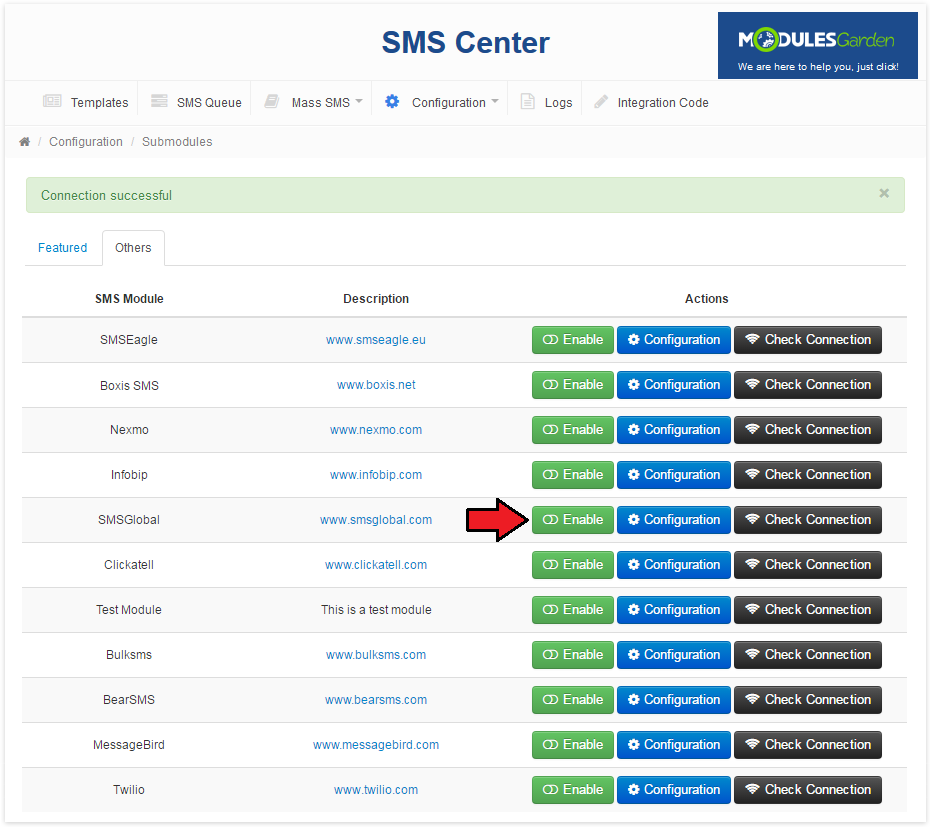
| If connection is successful, we can proceed. Activate the gateway, press 'Enable' next to it. |
|
Administrators Configuration
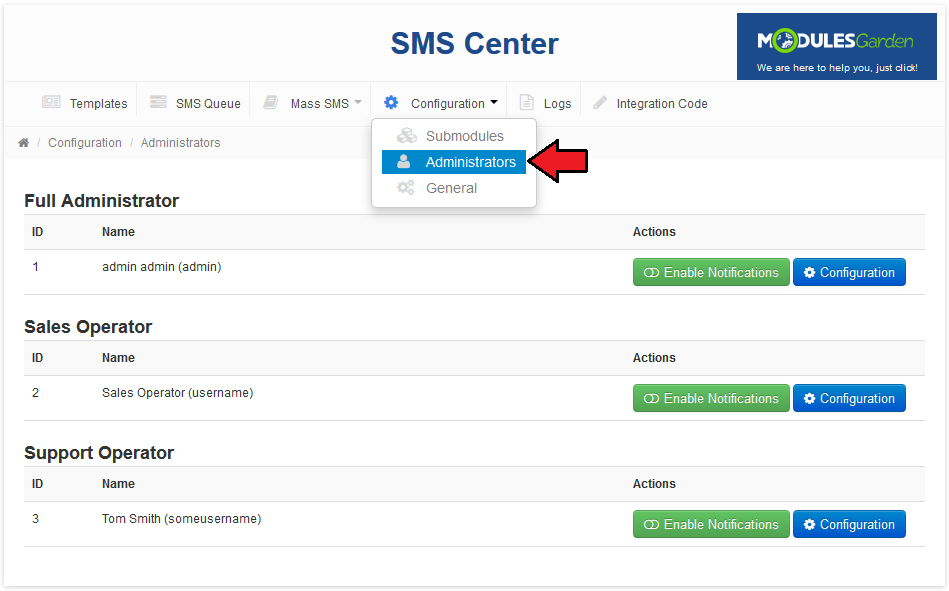
| This section contains a list of all staff administrators. You have the possibility here to decide who of them will receive SMS notifications and which notifications exactly. Follow the steps described below to configure staff notifications properly. |
| Press 'Administrators' under 'Configuration' tab. |
|
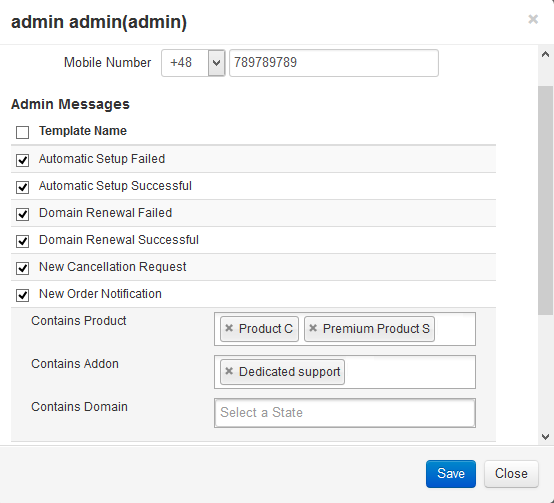
| In order to enable SMS notifications for administrators individually, firstly set configuration for them. 1. Fill in the administrator's phone number, where text messages with notifications will be sent. |
|
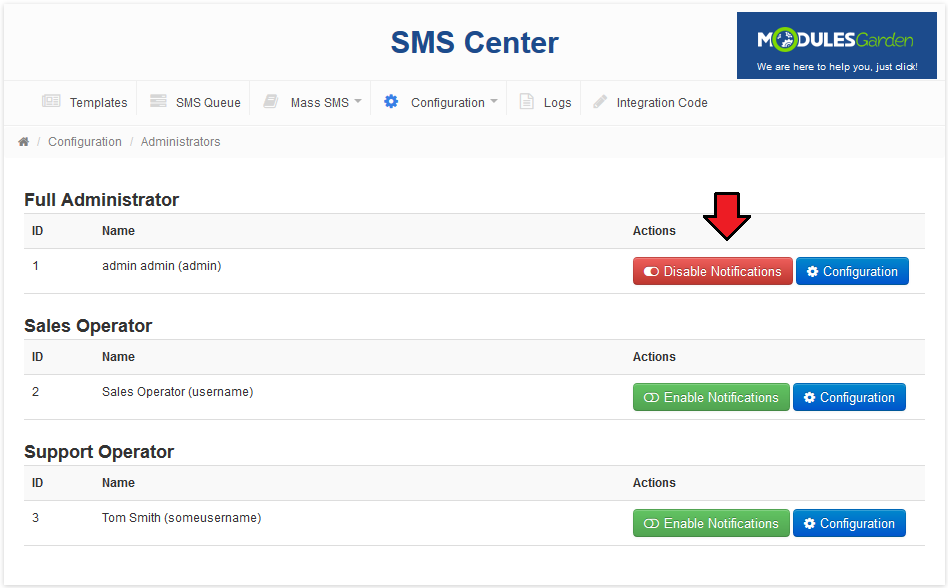
| Press 'Enable Notifications.' Repeat these steps for every administrator you wish to receive admin notifications. |
|
General Settings
| General settings section includes specific SMS configuration possibilities. Configure those you wish to activate and 'Save' the changes once ready! |
|
Order SMS Activation
| Enable 'Order SMS Activation' to allow activating orders once placed. Once an order is placed a Client will receive a text message with a token, which must be then used to finish the order. Note, this option does not support orders upgrades! |

|
SMS Queuing
| Enable this option to allow text messages queues. Declare time intervals between attempts to send text messages and the number of messages that can be sent in one attempt. Finally, choose time period when text messages can be sent to clients. |

|
Client SMS Activation
| Enable 'Client SMS Activation' and every newly activated client will receive a token, which must be used to end up the activation process. Declare time intervals for sending tokens here. |

|
Management
Templates
| 'Templates' tab contains the list of message templates. Each email template in your system has its text message counterpart. |
|
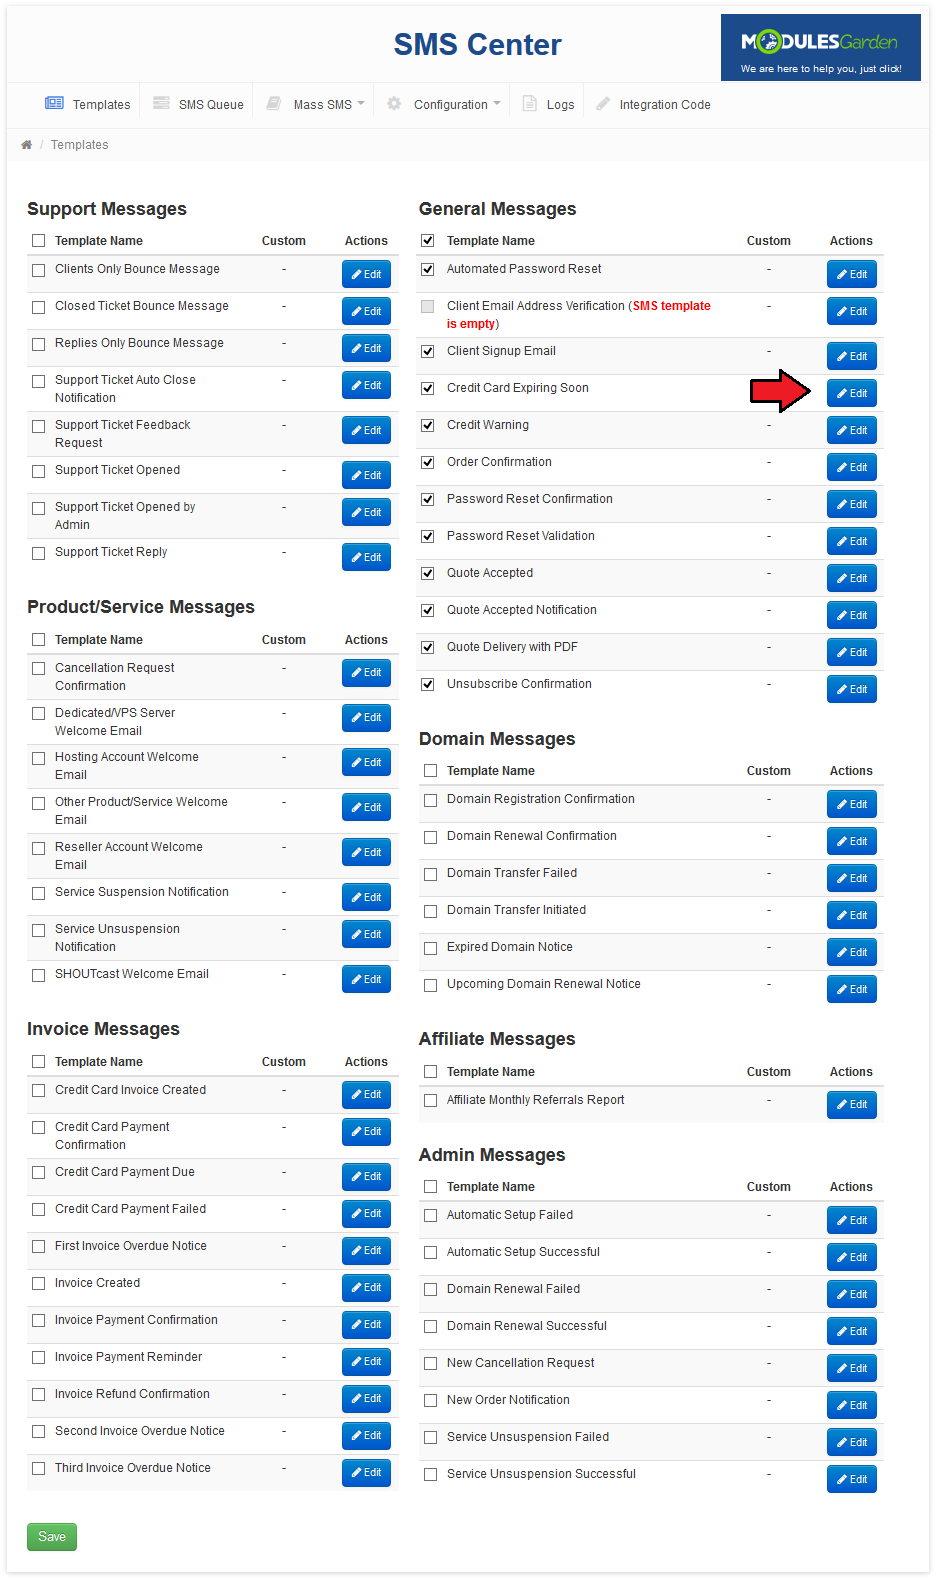
| Module comes with default message templates, but you can edit each of them. Press 'Edit' to do so. |
|
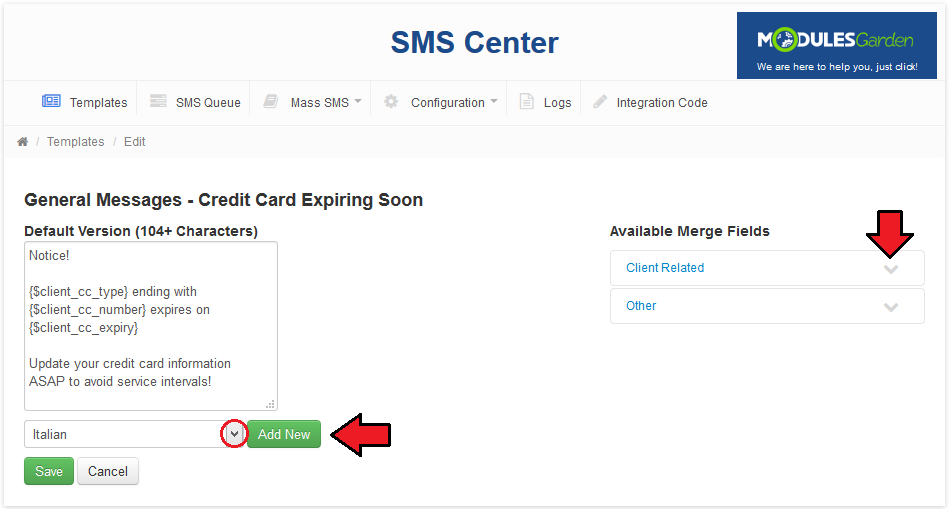
| The first field is a default message of the template. Our module allows you to define messages for selected languages. In order to prepare a message in an additional language, select desired language from a dropdown menu and press 'Add' as shown on the following screen. |
|
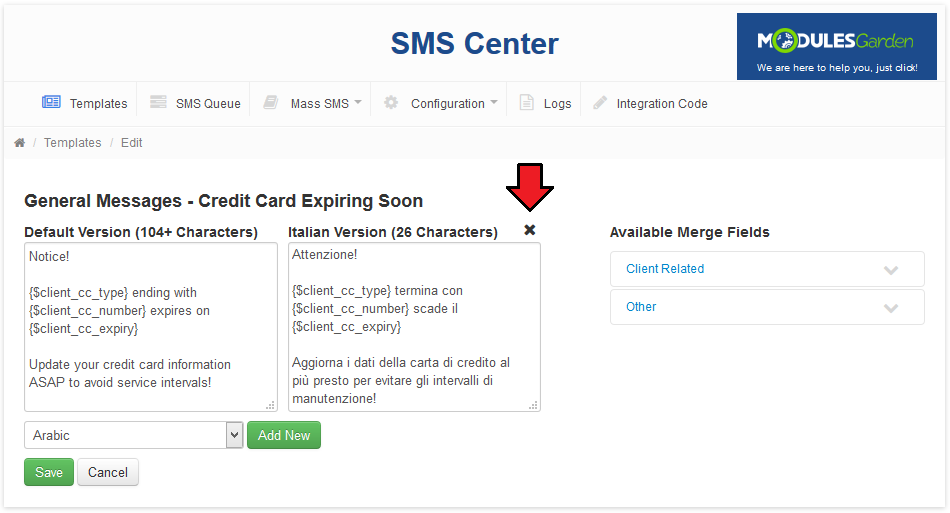
| As you can see on the screen below, a new field for chosen language appeared. You can remove any additional language through pressing 'x' icon next to it. |
|
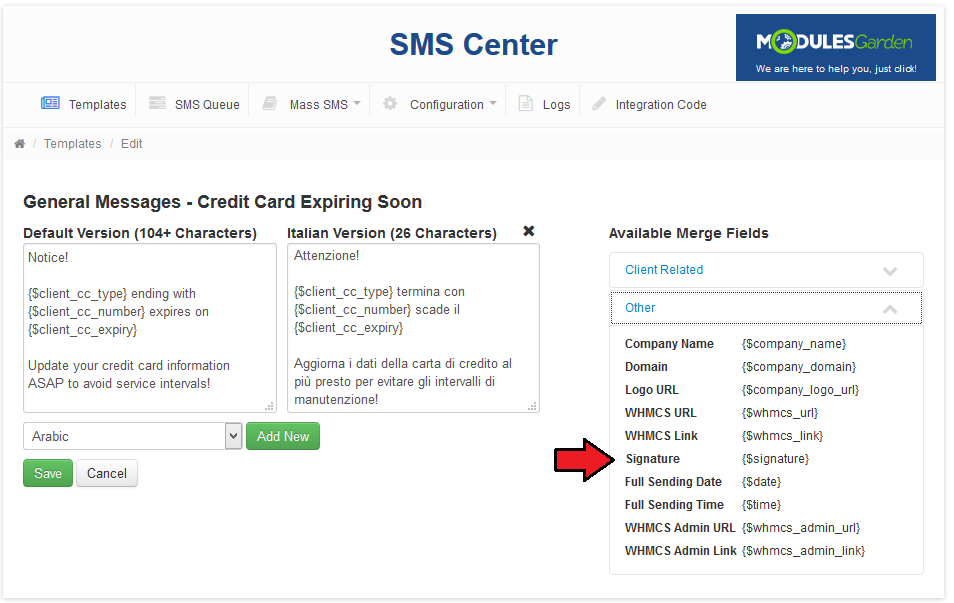
| Module template supports merge fields which can be easily injected into messages. Simply, click on the wanted merge field, it will be injected into currently edited version of the message. |
|
SMS Queue
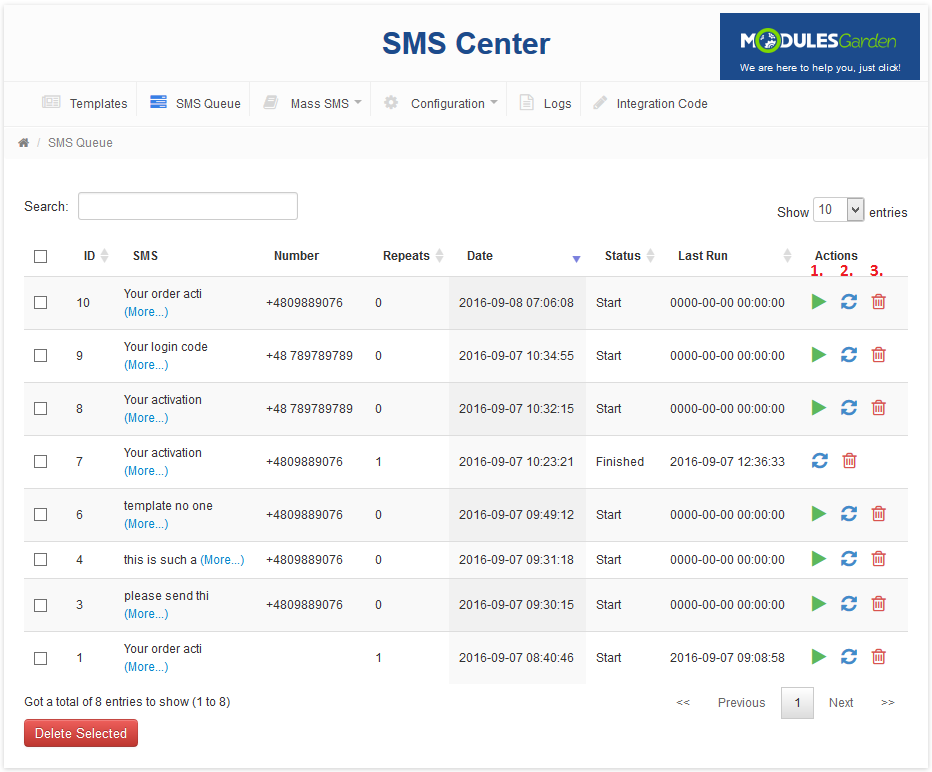
| In this section you will find a list of all text messages waiting for a cron run to be sent. Specific details of the cron, number of messages that can be sent in one attempt are specified in 'General Settings' section. If SMS Queues are enabled every single message before being sent is placed on this list. With every cron run a previously set up number of messages is sent. If message sending fails (because the number is incorrect, there are problems with gate, no funds etc.) such SMS stays on the list for the next attempt. After three failed attempts its status is changed to 'Aborted'. |
| Actions: 1. Send - send message manually. |
|
Logs
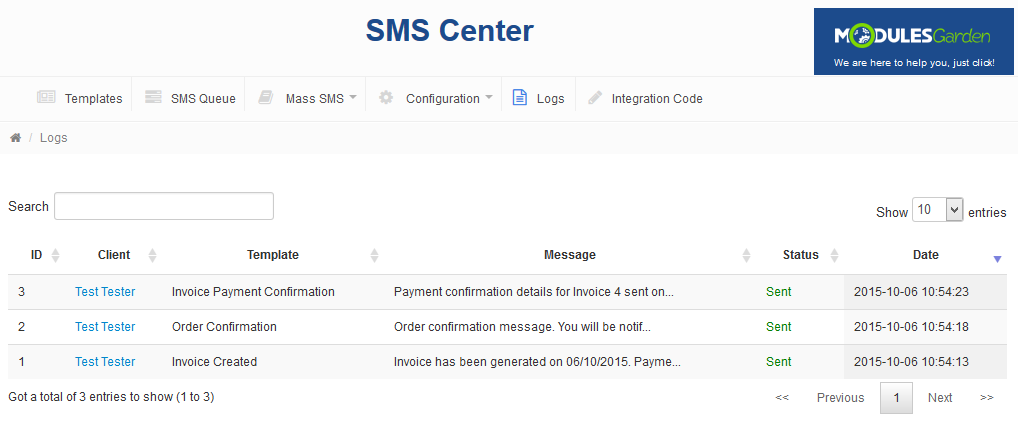
| Messages sent to your clients are logged under 'Logs' tab. As you can see on the following screen, here you can find detailed information about each message sent automatically to a client after certain actions. |
|
Client's Summary Page
| From the clients' summary page you can send text messages to clients using only a simple box. Type in the message text into the text field like on the screen below and press 'Send'. |
|
Client Area
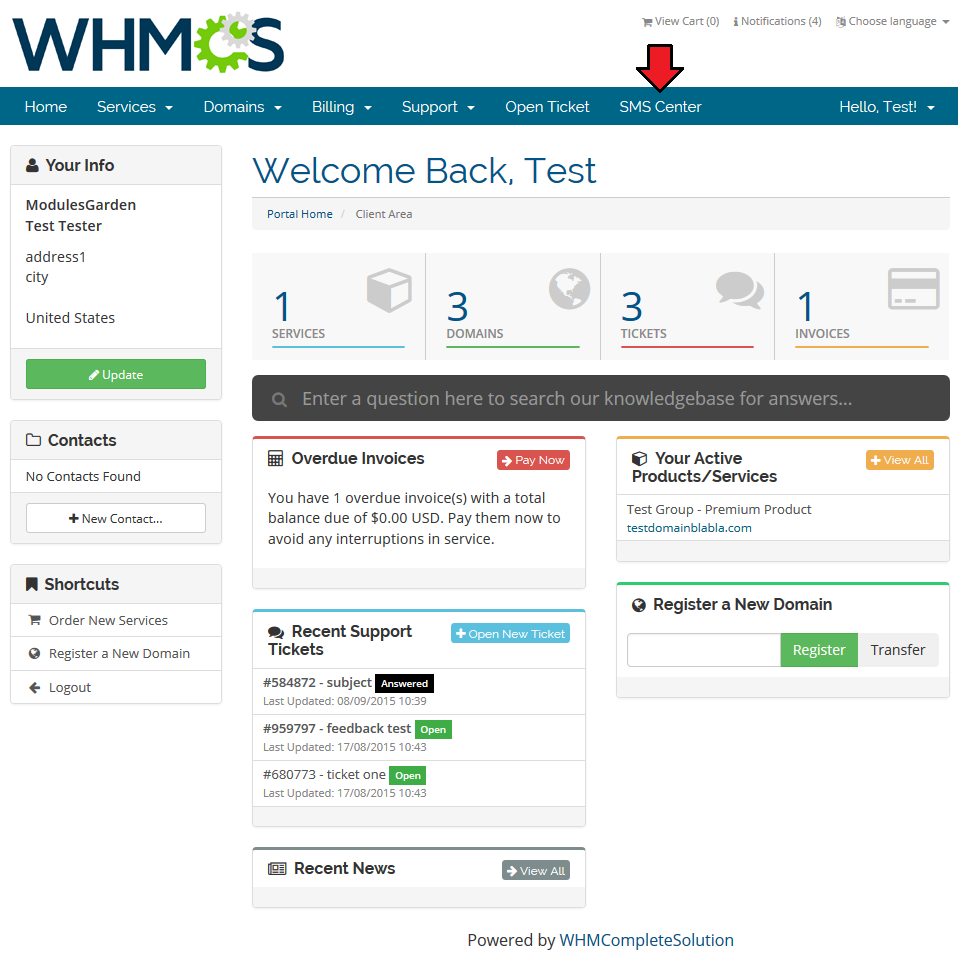
| After placing integration code, a new position appears in the client area navigation menu. Through pressing it your client will be moved to configuration of SMS notification. |
|
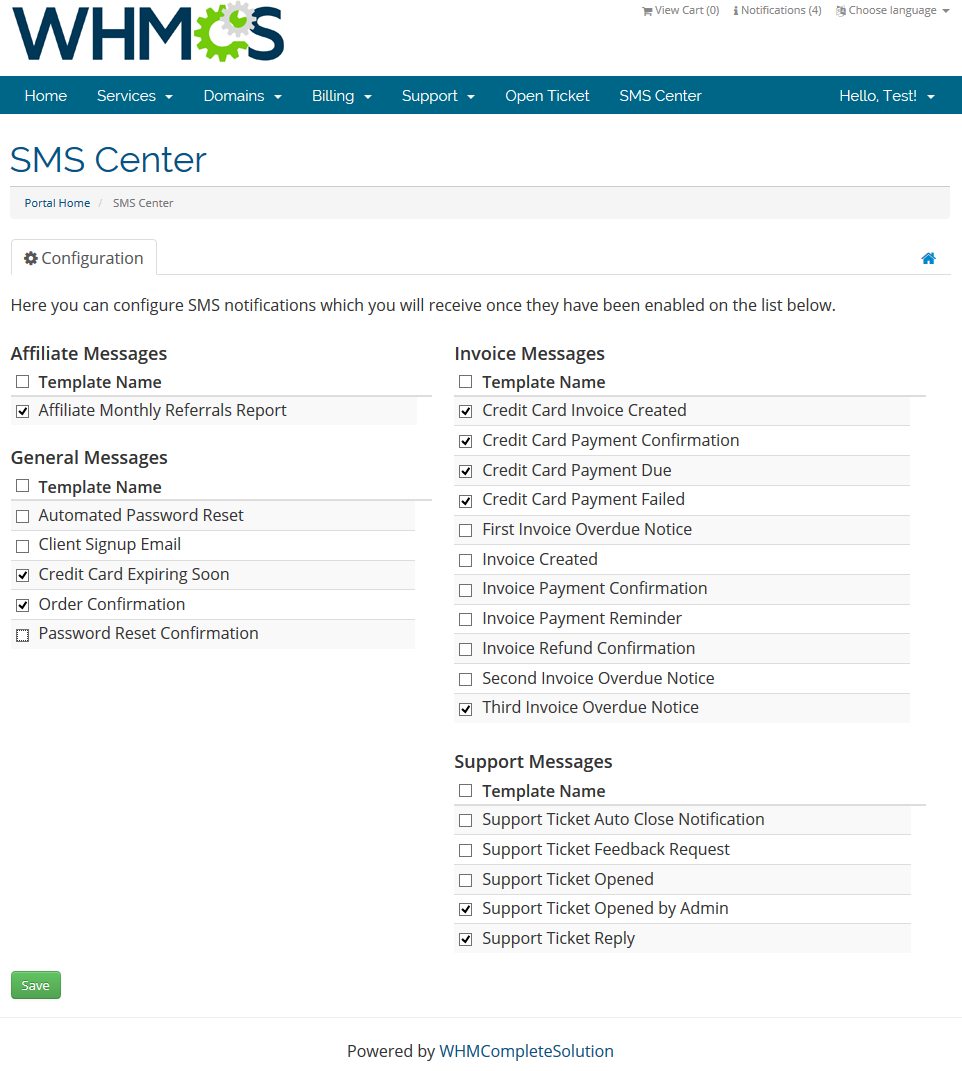
| In this place your client can choose which notifications to receive. Note! Provide SMS Number in the client's profile. Otherwise SMS Notifications will be unavailable for that client. |
|
SMS Center Two-Factor Authentication
| SMS center For WHMCS consists of two parts, the actual SMS Center addon and the authentication addon. Two-Factor Authentication adds an extra layer of protection to logins. Once enabled and configured by a client or an admin, each time they sign in they will be asked to enter both username and password as well as a second factor such as a security code. In order to activate it proceed to 'Setup' → 'Staff Management' → 'Two-Factor Authentication'. |
|
| In the next step you need to configure the addon settings. To do so, fill out the data:
|
|
Security Settings
Clients
| If you have activated 'SMS Two-Factor Authentication' addon, your clients will be allowed now to decide if they wish to use such security opportunity. Here is how to enable such functionality: |
|
| 2. Press 'Get Started' button to proceed with the process. |
|
| 3. Provide phone number to proceed with SMS Two-Factors Authentication. Press 'Activate'. This step will be skipped if the client entered a valid SMS number in the profile before! |
|
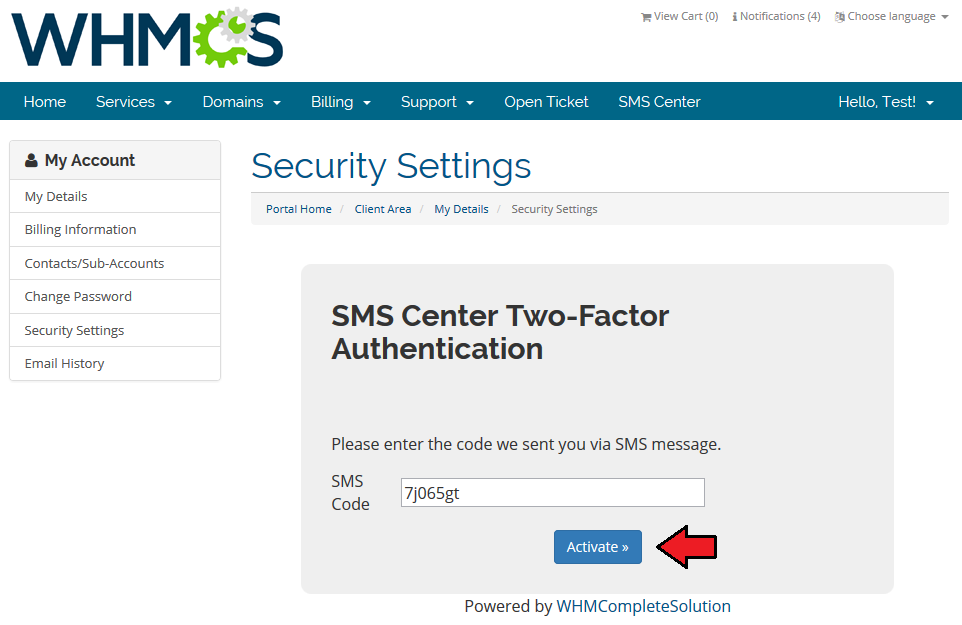
| 4. A client should receive now an authentication code via SMS. Type in the code in the field and press 'Activate.' Remember that the code is valid only temporarily, according to the addon settings! |
|
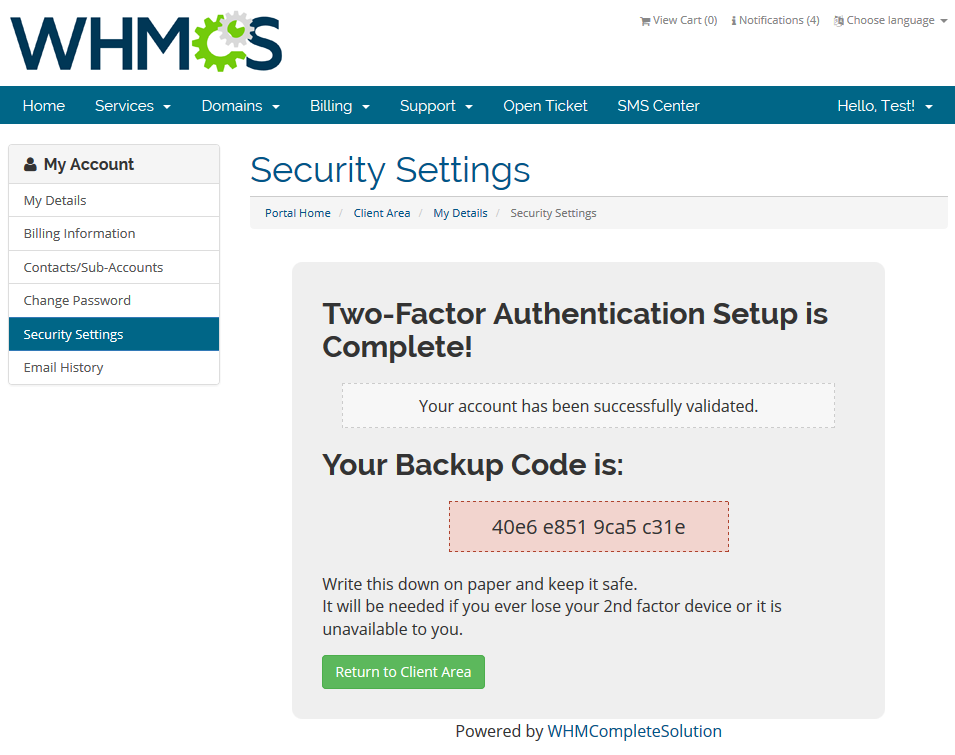
| 5. Two-Factor Authentication is now complete. |
|
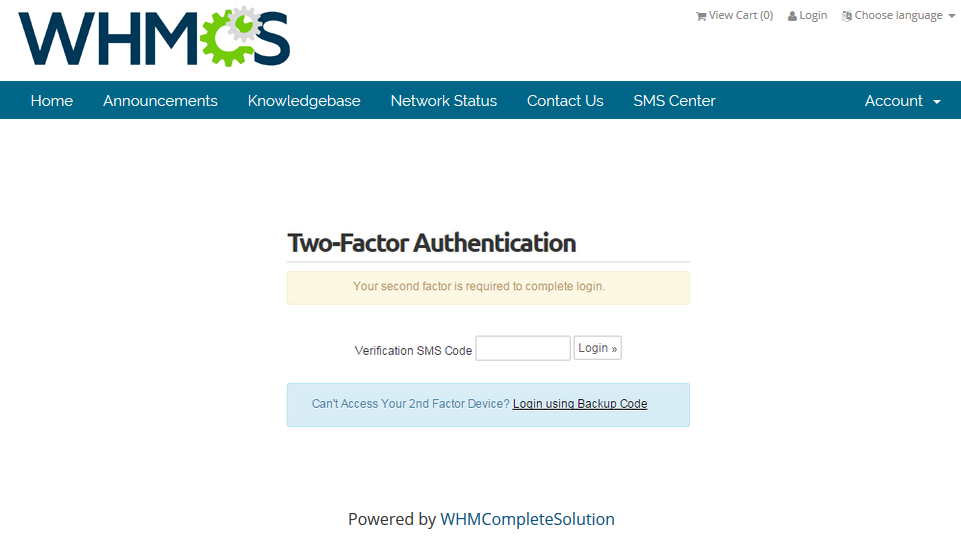
| 6. The second factor is now required to log in. Wait for the SMS with verification code and enter it in the field. Press 'Login.' If you have any problems with receiving/entering the verification code, you can use your backup code. Remember to note and keep your new backup code in a secure place! |
|
Administrators
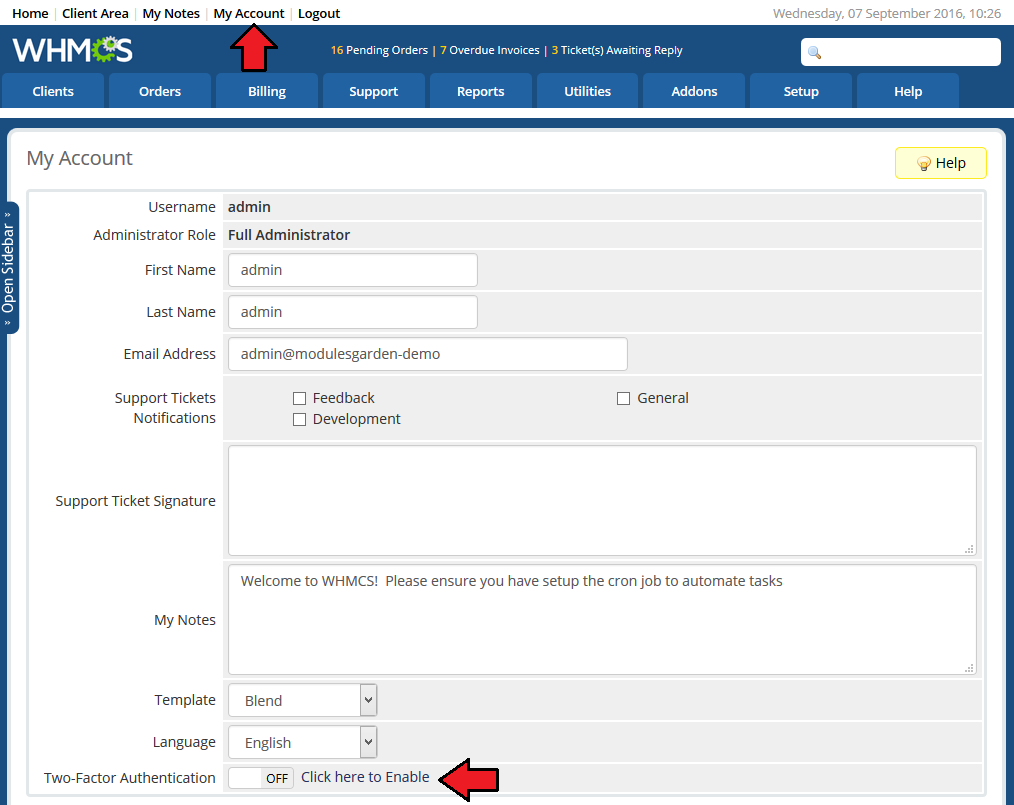
| If 'SMS Two-Factor Authentication' addon has been activated and enabled for staff, as an administrator you can decide if you wish to use such security opportunity. Here is how to enable such functionality: |
|
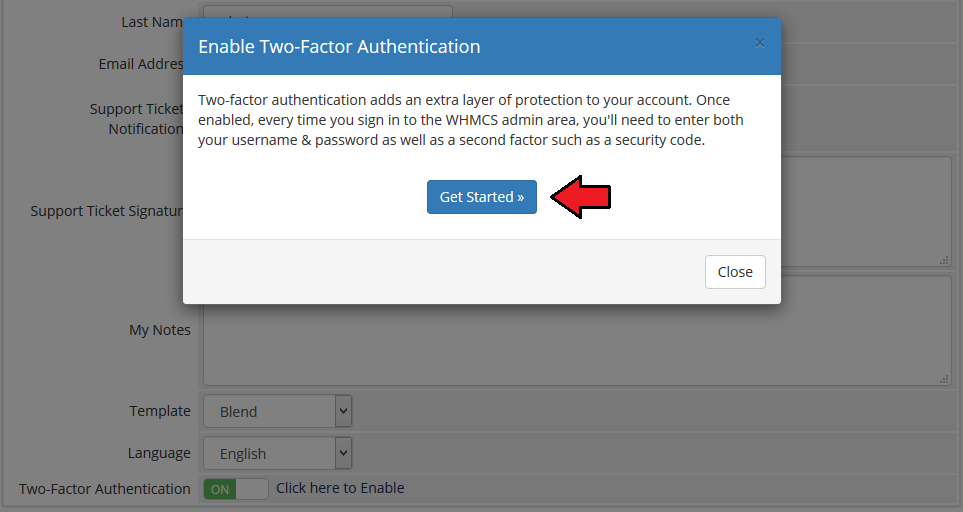
| 2. Press 'Get Started' button to proceed with the process. |
|
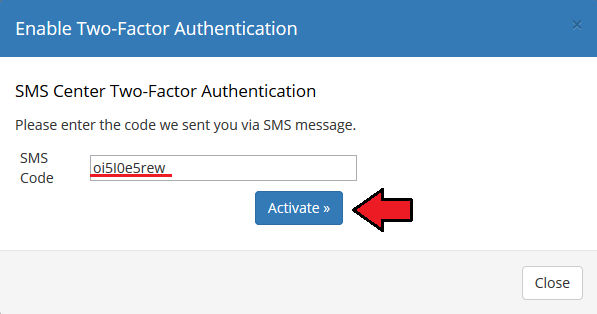
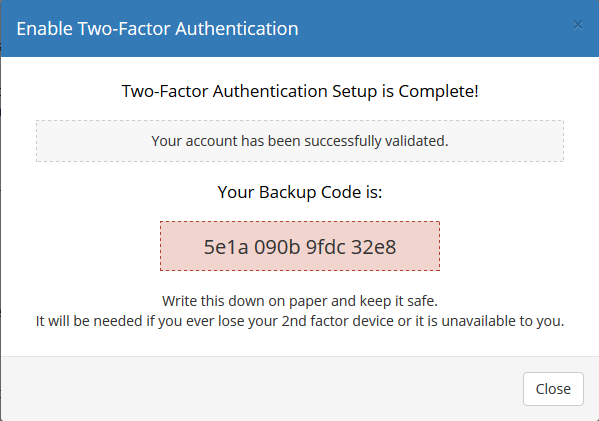
| 4. You will receive now an authentication code via SMS. Type in the code in the field and press 'Activate.' Remember that the code is valid only temporarily, according to the addon settings! |
|
|
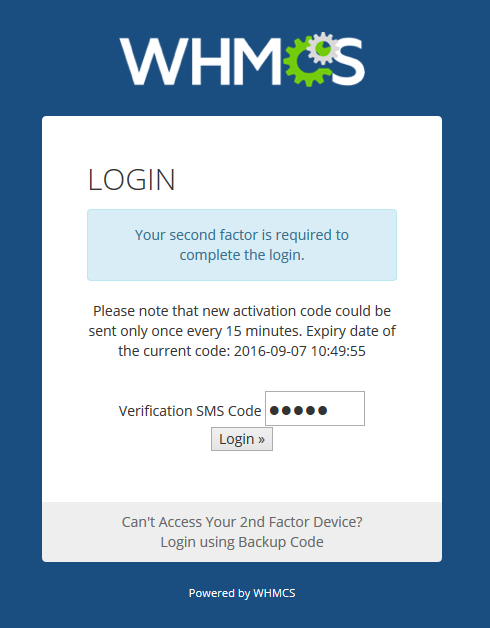
| 5. The second factor is now required to log in. Wait for the SMS with verification code and enter it in the field. Press 'Login.' If you have any problems with receiving/entering the verification code, you can use your backup code. Remember to note and keep your new backup code in a secure place! |
|
Additional Information
|
Tips
Common Problems
| 1. When you have problems with connection, check whether your SELinux or firewall does not block ports. |