How To Update WHMCS Module
(→Basic Update) |
(→How To Update WHMCS Module) |
||
| Line 4: | Line 4: | ||
=How To Update WHMCS Module= | =How To Update WHMCS Module= | ||
{| | {| | ||
| − | |style="padding: 10px 0px 15px 15px;"|This article will help you go through the process of updating | + | |style="padding: 10px 0px 15px 15px;"|This article will help you go through the process of updating a WHMCS module.<br /> |
Proceed with steps shown below to complete a basic update.<br /> | Proceed with steps shown below to complete a basic update.<br /> | ||
We will also list additional steps which may be needed. | We will also list additional steps which may be needed. | ||
| Line 10: | Line 10: | ||
==Basic Update== | ==Basic Update== | ||
{| | {| | ||
| − | |style="padding: 10px 0px 20px 15px;"|'''1. | + | |style="padding: 10px 0px 20px 15px;"|'''1. In the beginning, please make a backup of your server.''' |
|} | |} | ||
{| | {| | ||
| Line 21: | Line 21: | ||
|} | |} | ||
{| | {| | ||
| − | |style="padding: 0px 0px 20px 15px;"|4. Remove all files of old module version (except license.php file). | + | |style="padding: 0px 0px 20px 15px;"|4. Remove all files of the old module version (except license.php file). |
|} | |} | ||
{| | {| | ||
| − | |style="padding: 0px 0px 20px 15px;"|5. Upload and extract files to your WHMCS root directory. | + | |style="padding: 0px 0px 20px 15px;"|5. Upload and extract the files to your WHMCS root directory. They will overwrite the old files. |
|} | |} | ||
{| | {| | ||
|style="padding: 0px 0px 15px 15px;"|6. Proceed to the module location and remove the '' 'license.php' '' file.<br /> | |style="padding: 0px 0px 15px 15px;"|6. Proceed to the module location and remove the '' 'license.php' '' file.<br /> | ||
Now, rename '' 'license_RENAME.php' '' to '' 'license.php' '' file and edit it by providing your module license.<br /> | Now, rename '' 'license_RENAME.php' '' to '' 'license.php' '' file and edit it by providing your module license.<br /> | ||
| − | ''Note: This step is mandatory only in | + | ''Note: This step is mandatory only in some part of cases, due to changes in the packaging system.'' |
|} | |} | ||
{| | {| | ||
Revision as of 11:04, 3 August 2015
Contents |
How To Update WHMCS Module
| This article will help you go through the process of updating a WHMCS module. Proceed with steps shown below to complete a basic update. |
Basic Update
| 1. In the beginning, please make a backup of your server. |
| 2.(Addon Modules Only) Log in to your WHMCS system admin area. Go to 'Settings' → 'Addon Modules' and deactivate the module you wish to update. |
| 3. Download the latest version of a module from our website. |
| 4. Remove all files of the old module version (except license.php file). |
| 5. Upload and extract the files to your WHMCS root directory. They will overwrite the old files. |
| 6. Proceed to the module location and remove the 'license.php' file. Now, rename 'license_RENAME.php' to 'license.php' file and edit it by providing your module license. |
| 7. Remove all files from '\your_whmcs\template_c\' directory. |
| 8. (Addon Modules Only) Log in to your WHMCS system admin area. Go to 'Settings' → 'Addon Modules' and activate the recently updated module. |
Optional Actions Needed
| It may happen, that after update of module it still causes a lot of errors. If so, we advice to check the module's wiki article and check whether additional actions are needed. |
| In case of failure, return to the previous version of the module and report a problem. |
How To Update Provisioning Modules For WHMCS V5.2.2
| If you downloaded our provisioning module/modules before 19.03.2013 and updated your WHMCS to V5.2.2, you need to also update module/modules. If you downloaded our provisioning module/modules first time on 19.03.2013 or later, you don't need to update anything. |
| ✔ cPanel Extended For WHMCS |
| ✔ DirectAdmin Extended For WHMCS |
| ✔ Plesk Extended For WHMCS |
| ✔ Rackspace Email For WHMCS |
| ✔ Rackspace Email Extended For WHMCS |
| ✔ Zimbra Email For WHMCS |
| ✔ cPanel Manage2 For WHMCS |
| ✔ Google Apps For WHMCS |
| ✔ WWD GoDaddy Domaind For WHMCS (more details in the next section below) |
| Follow these instructions: |
| 1. Create backup of your WHMCS system. |
| 2. Remove old module files from your system. |
| 3. Download the latest module version from your clientarea. |
| 4. Upload all the module files into your main WHMCS directory. |
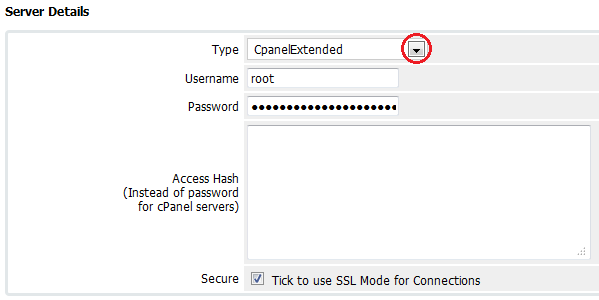
| 5. Update server/servers type through choosing new module name e.g. 'CpanelExtended' from a dropdown menu. |

|
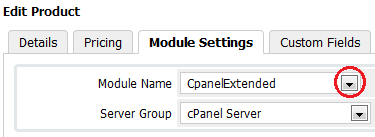
| 6. Update product/products module settings through choosing new module name e.g. 'CpanelExtended' from a dropdown menu. |

|
WWD GoDaddy Domains For WHMCS Update
| Follow these instructions: |
| 1. Create backup of your WHMCS system. |
| 2. Remove old module files from your system. |
| 3. Download the latest module version from your clientarea. |
| 4. Upload all the module files into your main WHMCS directory. |
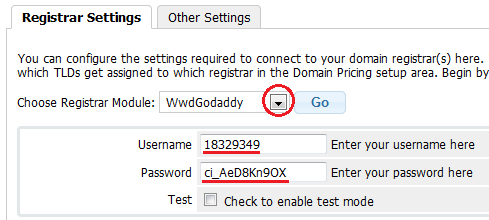
| 5. Update registrar settings through choosing registrar module 'WwdGoDaddy' from a dropdown menu. Then enter your Go Daddy API User login and password. |

|
| 6. Update domain pricing through choosing 'WwdGoDaddy' from an 'Auto Registration' dropdown menu. |

|